

DIGITAL CORDLESS
TELEPHONE
WITH INTEGRATED DIGITAL
ANSWERING DEVICE
User's Guide
Model ME5061/ME5061R
Series
Digital 1.8 GHz
MOTOROLA and the Stylized M Logo are registered in the US Patent & Trademark Office. All other product or service names are the
property of their respective owners. © Motorola, Inc. 2006.
2006
For details, please contact :
1300 889 785
Selecting the Language
Making Internal Calls
Making External Calls
Calls
Dialing
Dialing
Call
Volume
Melody (external / internal)
Default
Default
Delete
Answering Machine Operation
General
urn Answering Machine ON / OFF (preset to ON)
T
Clock Setting
Outgoing Announcement
Additional
Calls
Flash
PIN
Call
Call
Holding
Teleconference
Intercom Call Transfering
Delete Entries
35
35
35
35
36
Calls
Volume
Dialing
How to Record Your Announcement
Recording Announcement A1
(Announce Only set to OFF)
Recording Announcement A2
(Announce Only set to ON)
Remote Operation
Set "Announce Only"
On / Off (preset to OFF)
Turn Audible Message Alert On / Off
Turn Base Ringer
On / Off (preset to ON)
Set Number of Rings to Answer
Voice Prompt Language selection
Recording a Memo
Listening to Your Messages
Message Playback
Deleting Messages
Important Imformation
Quick Reference
Using the Phone
Phone Book
Handset Settings
Base Settings
Answering Machine
Warranty
Calls
37
37
37
38
39
39
39
39
39
39
40
40
41
42
42
43
43
45
46
47
48
50
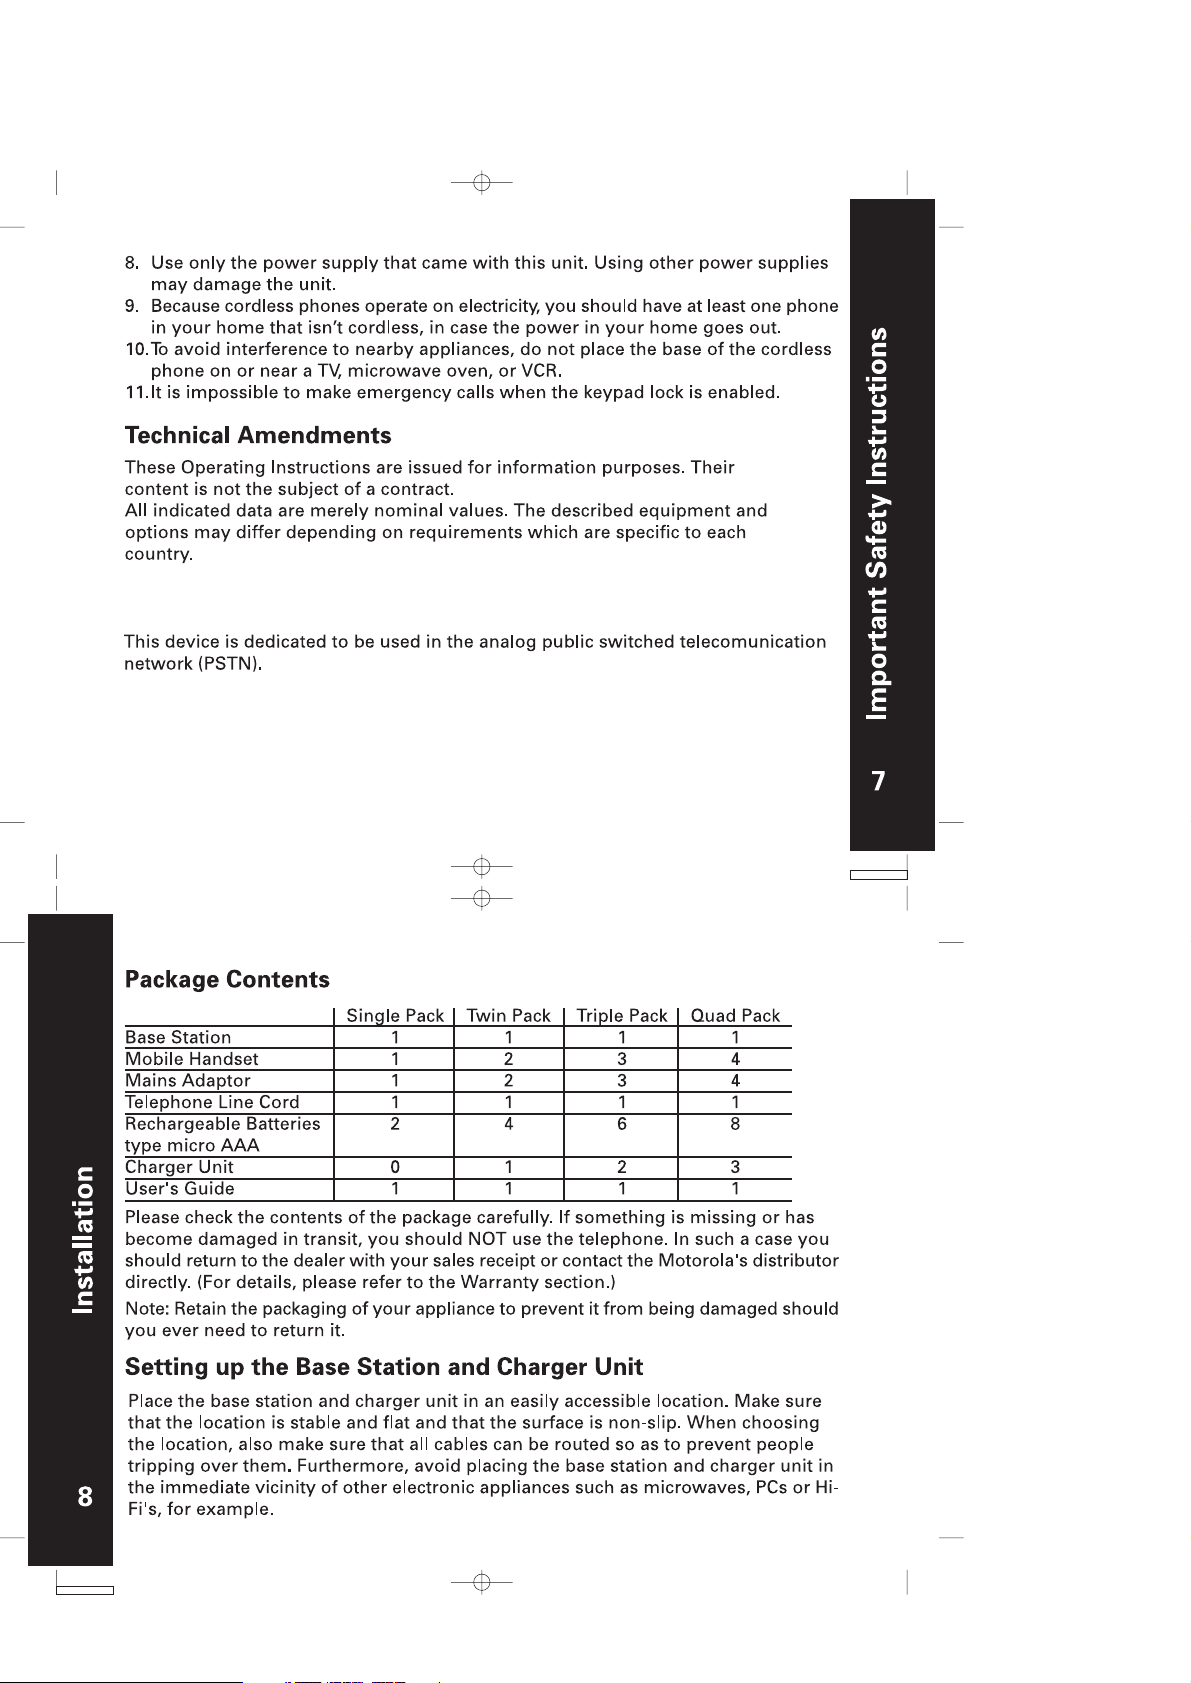
ME5061-1
ME5061R-1
ME5061-2
ME5061R-2
ME5061-3
ME5061R-3
ME5061-4
ME5061R-4

CAUTION: PLEASE DO NOT USE ALKALINE OR NONRECHAREABLE BATTERIES. IT MAY CAUSE PERMANENT
DAMAGE TO THE UNIT AND VOID THE WARRANTY.
Non rechargeable batteries can explode and cause injuries
and heavy damage on your environment.
For fully discharged batteries, the handset will power on after a 15-minute precharge.
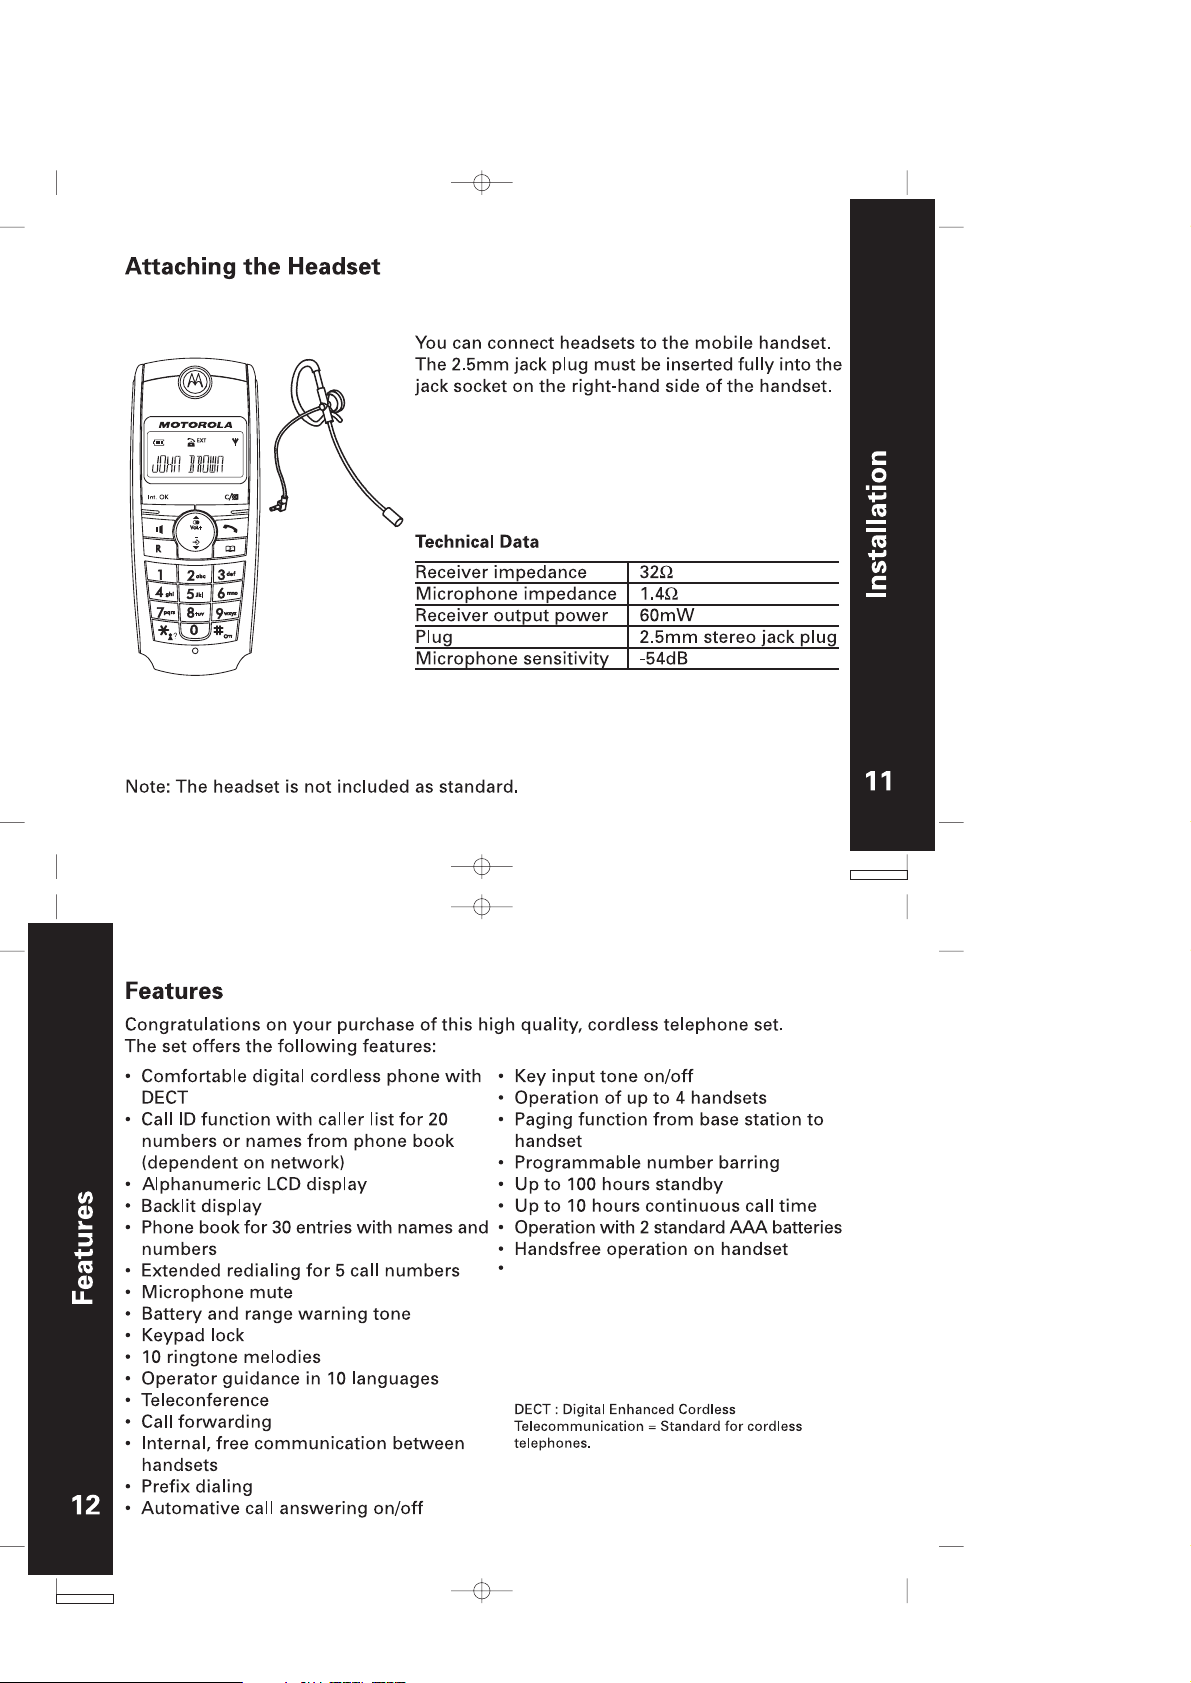
Digital Answering Machine with up to
40 minutes recording capacity, 59
messages capacity
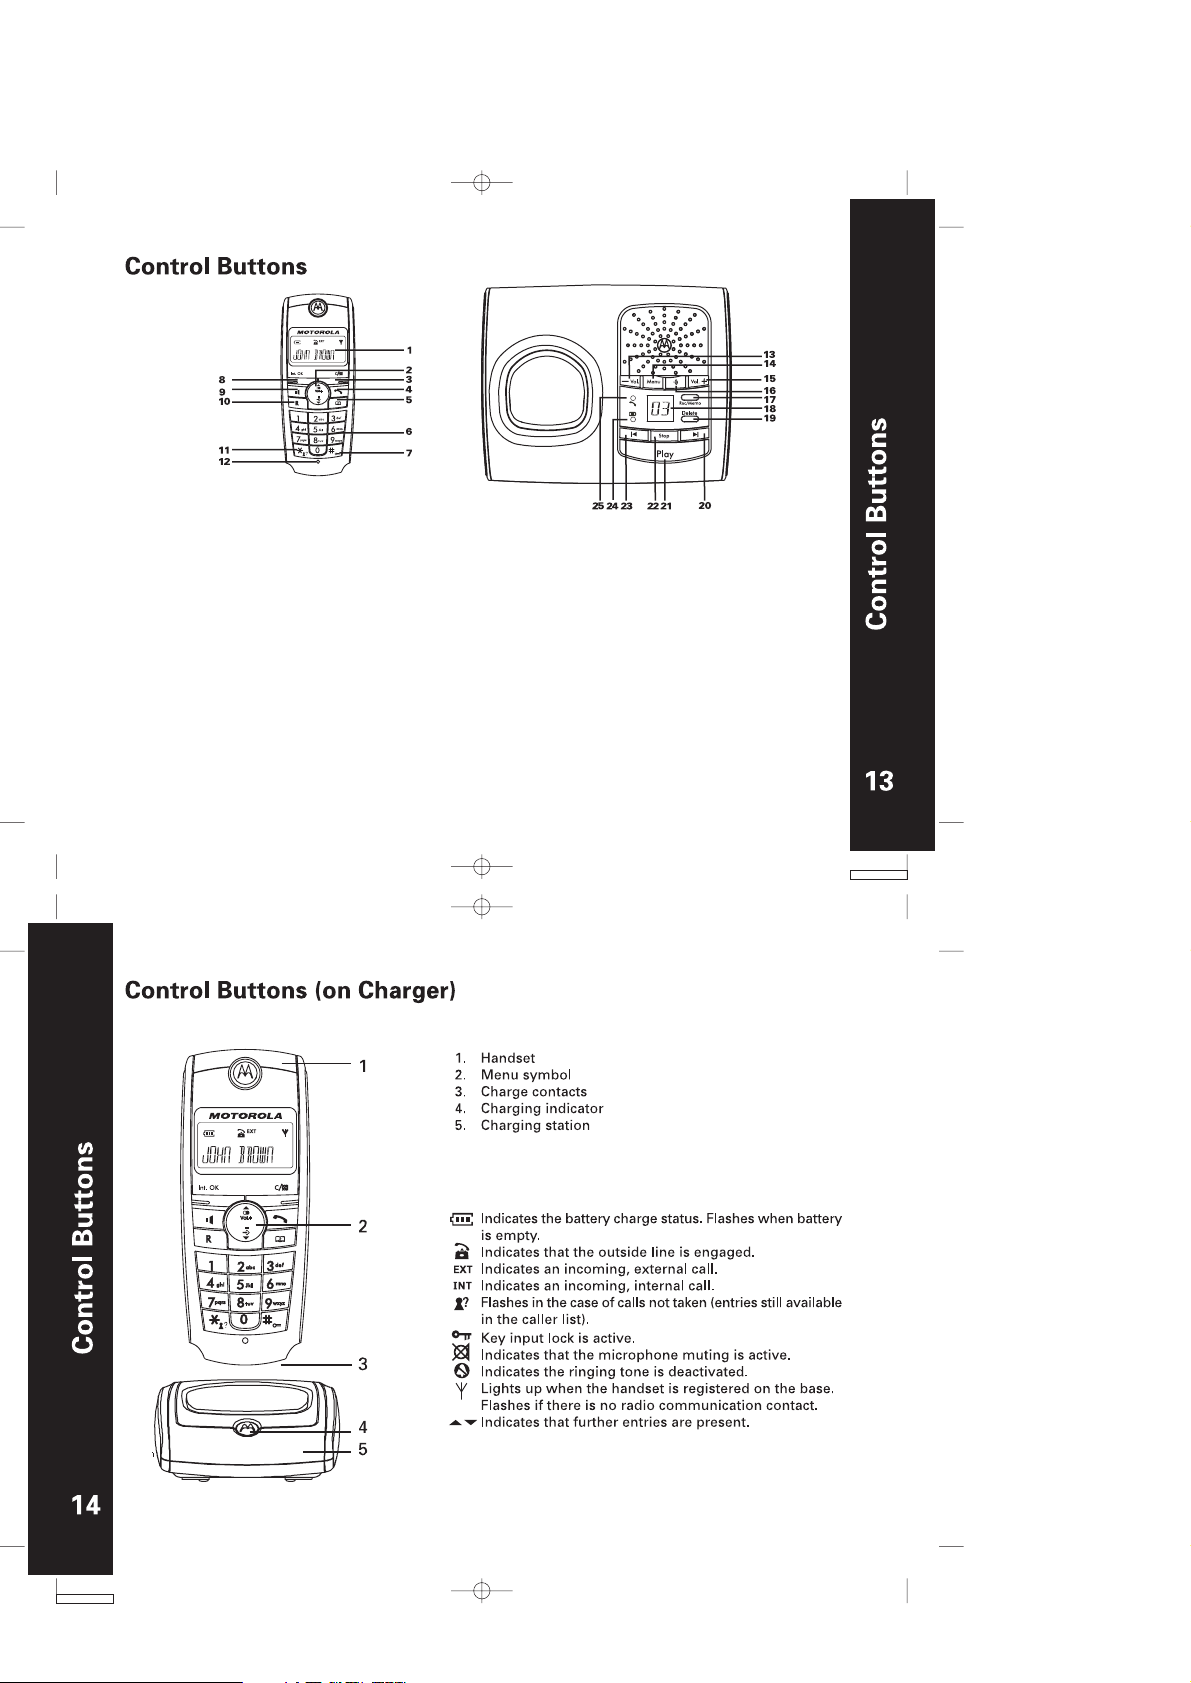
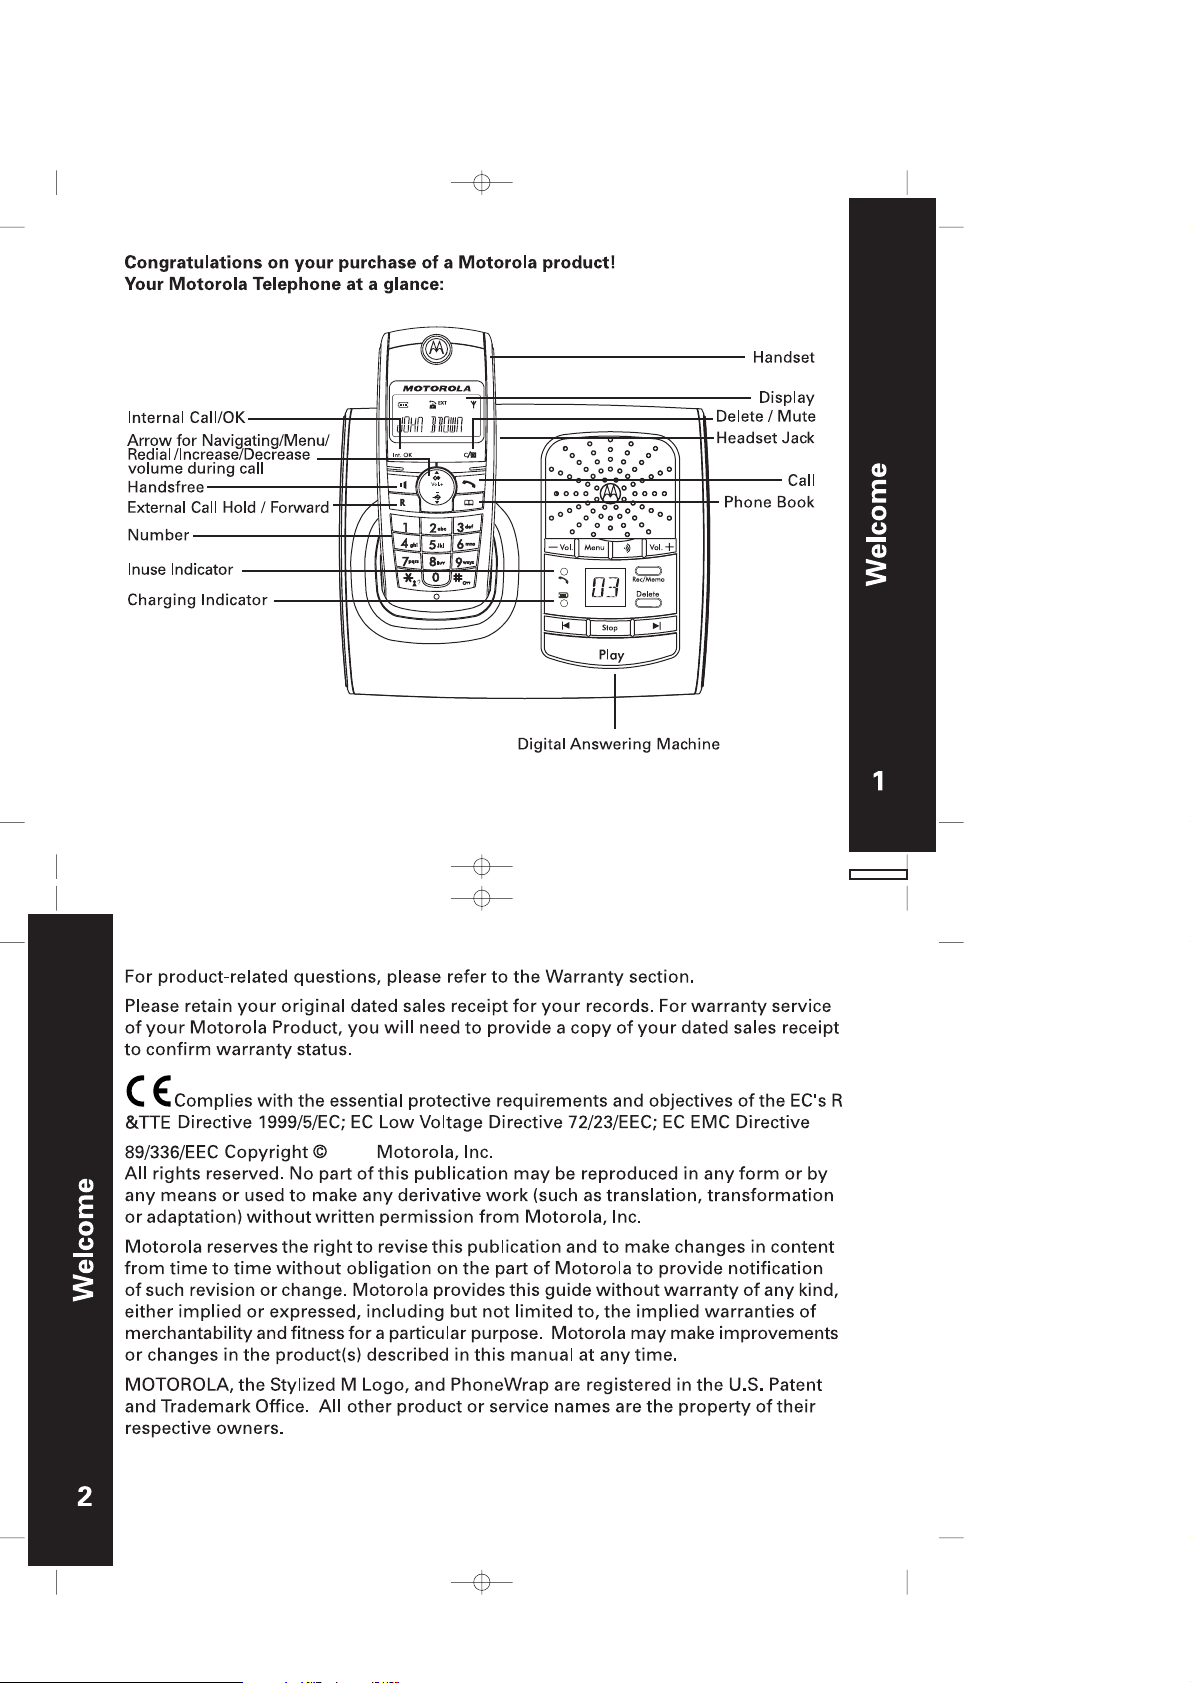
1. Display
2. Up / Down / Menu / Redial / Volume
3. Delete/Mute key
Press to delete digits or letters in the display.
During a call press to stop your caller from hearing you.
4. Talk/End call key - Press to receive, make and end calls.
5. Phone book - Press to open the phone book.
6. Keypad with alphanumeric keys
7. #/ Keypad lock key - Press to enter a hash
Press and hold to lock/unlock the keypad.
8. INT/OK key - Press to make internal calls.
Confirm menu options.
9. Handsfree (speakerphone) key
Press to hear your calls on the handset loudspeaker.
10. Hold/Transfer key - Put external callers on hold,
transfer an incoming caller to another handset.
11. Call log - Press an d hold to view the call log memory.
12. Microphone
13. Volume down (-) - Press to decrease loudspeaker volume.
14. Menu key - Press to open the answering machine menu.
15. Volume up (+) - Increase loudspeaker volume.
16. Page (Find Handset) key
Press to locate a missing handset/page all handsets registered
to the base.
17. Record/Memo key
Use to record your outgoing message or memo.
18. Mailbox indicators
Flash when new messages are stored. The display shows
the number of messages.
19. Delete key - Use to delete messages/memos.
20. Next key - During message playback,
press to skip forward to the next message.
21. Play
22. Stop - Stops message playback. Ends recording.
23. Replay/previous key
During message playback, press to replay the current message
or press twice to play the previous message.
24. Charging indicator
Illuminates when the handset is charging in the base station.
25. Call indicator
Flashes when you have incoming calls.
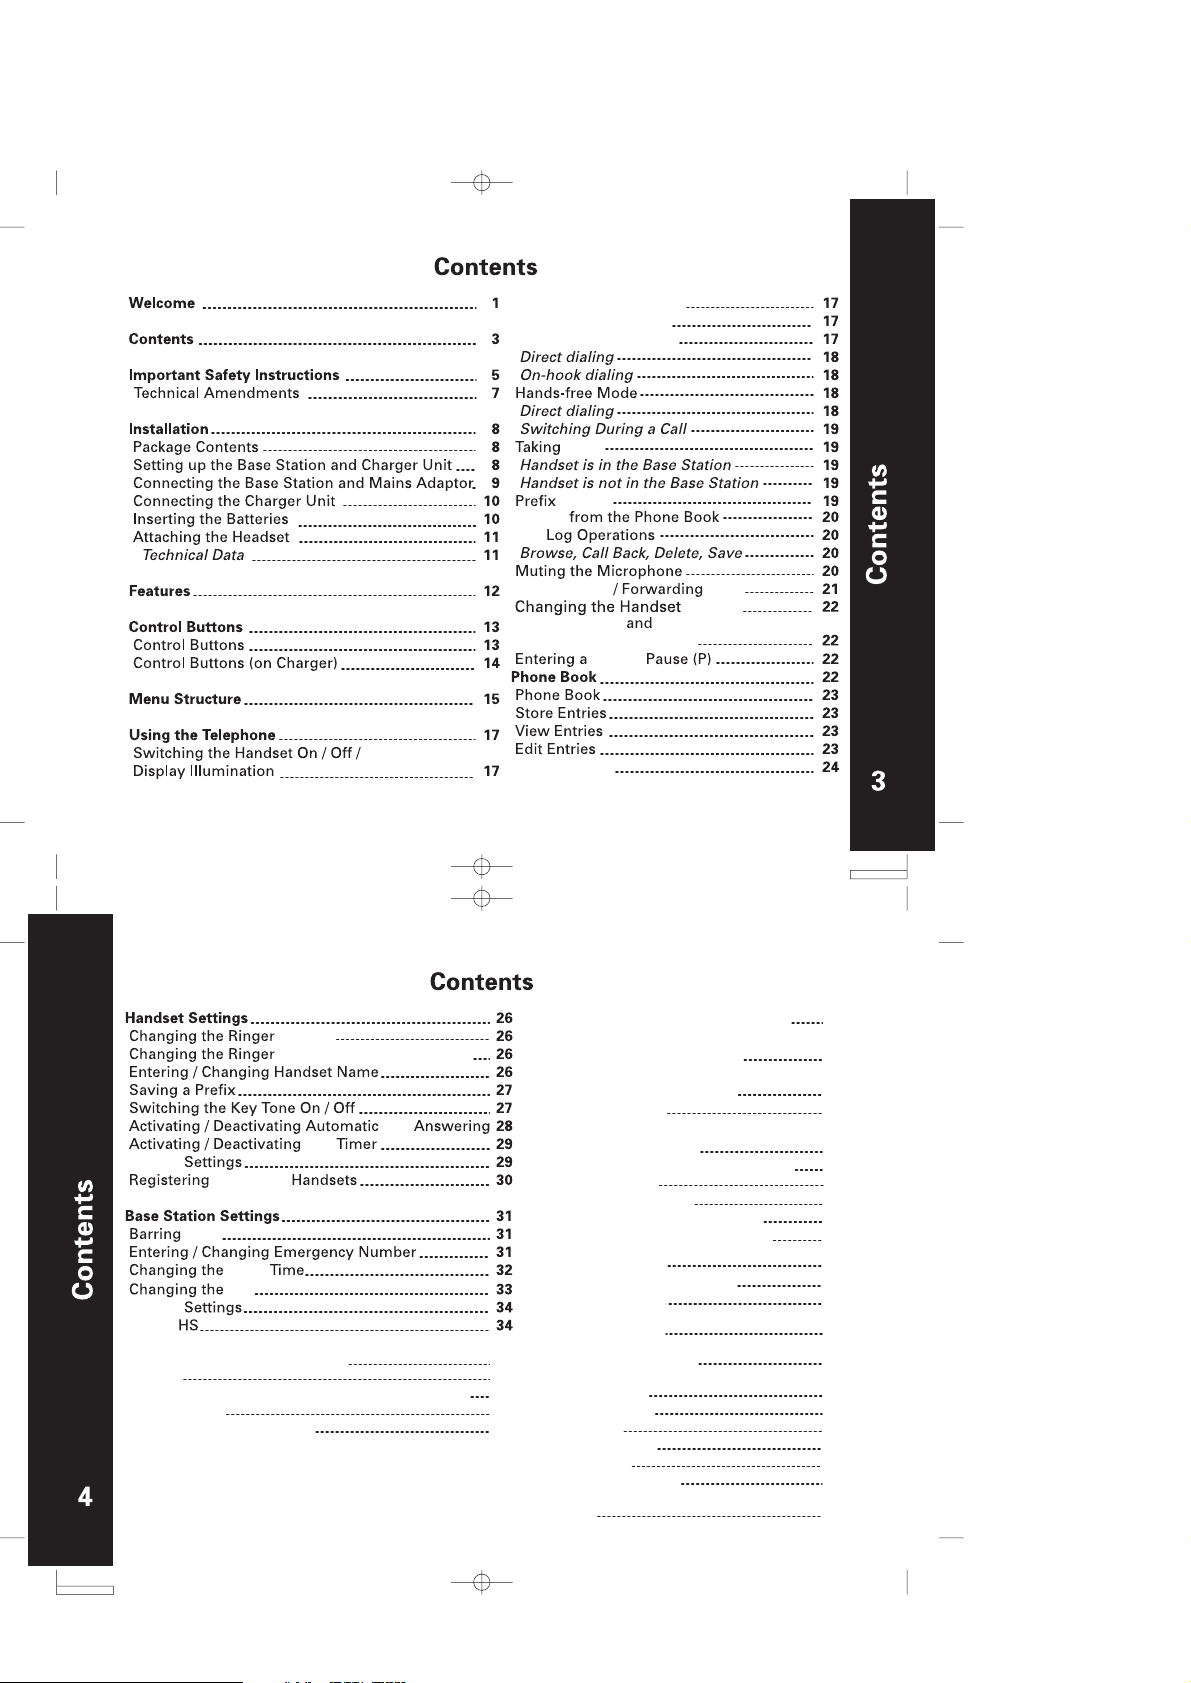
Display Icons
PORTUGUES

Note : there is no indication on the display when you are in hands-free mode.


Changing the Handset Volume
You can adjust the handset volume during a call (external or internal), the
volume level is displayed. There are 5 different volume levels.
During a call:
1. Press the or key to adjust the handset volume.


Handset Default Settings
External Ringer Melody Melody1 Prefix Number Empty
VIP Ringer Melody Melody2 Language English
Ringer Volume Level 3 Auto Answer ON
Receiver Volume Level 3 Handset Owner Name DECT
External Call Ring On/Off ON
Internal Call Ring On/Off ON
Page

DISABLE or EXTERNAL .

Base Default Settings:
E.G. PIN NO - 0000
FLASH TIME – 100ms
EMERGENCY NO - EMPTY

General
1. In the idle (standby) mode, press to program each of the following options:
Turn Answering Machine On / Off
Set the Day and Time
Record your outgoing Announcement
Set your Remote Access code
Set 'Announce Only' On / Off
Turn audible Message Alert On / Off
Set Base ringer On / Off
Set number of Rings to answer
Voice prompt language selection
Press on the base to set the options. The current setting is announced.
Once the desired option is reached and the current setting is announced, press
2.
or to change the setting.
Press to confirm your setting.
3.
At any time, press to exit setup mode.
4.
Switch Answering Machine ON/OFF (preset to ON)
When you first switch on your phone, the answering machine is in the mode.
1. Press . When you hear the announcement, press or to switch
between the On/Off setting.
Clock Setting
Follow the steps above to program the current
and then the Minute:
Da y of the w eek
ON
, then the
Hour,
Answering Machine Operation
35
First, program the Day. As you program, the display shows'd' and a number, 1 to 7,
representing the day of the week 1 represents Monday; 2 represents Tuesday, and so
on. Press when done.
Next, program the Hour. Be careful that you program pm hour if the current time is
in the afternoon or evening, or an am hour if the current time is after midnight or in
the morning. Press when done.
Next, program the Minute.You'll be programming the 'tens' column first. Your choices
are 0 through 5 , as the minutes range from 00 to 59. Press . Now, you are
programming the 'ones' column, where your choices are 0 through 9 . Press
to confirm.
Note: If the mains power to the base is lost, your answer machine will display
"St." (Set time) to remind you adjust the clock when it is switch on.
Outgoing Announcement
You can record 2 different outgoing announcements: A1 inviting your caller to leave
a message (Announce Only OFF), and A2 asking your caller to call back later (Announce
Only ON).
Outgoing Announcement A1 is played when Announce Only mode is OFF. Callers
can leave a message in this mode. Your answering machine is preset with Announce
Only set to OFF, allowing callers to leave a message.
Outgoing Announcement A2 is played when Announce Only mode is ON. Callers
Answering Machine Operation
cannot leave a message in this mode.
If you do not record your own announcements, your answering system will play a
pre-programmed message to your callers:
36

A1: "Please leave your message after the beep."
A2: "I am sorry that I am not available. Please call back later."
How to Record Y our Announcement
Recording Announcement A1 (Announce Only set to OFF)
Press until you hear 'Announcement One '
1.
Press . Y ou will hear 'Now Recording' followed by a beep. Speak
2.
toward the Base Unit. Y ou have up to 60 seconds for your announcement. Your
announcement must be at least 3 seconds in length.
Press when finished. Your recording will be played automatically. If you're
3.
not satisfied, record your announcement again.
Recording Announcement A2 (Announce Only set to ON)
Follow the same steps as recording Announcement A1. However , this time you will
hear 'Announcement T wo' since you have set Announce Only to ON.
To Review/Delete You Announcement A1/A2
1. Press until you hear ' Announcement One' (Announce Only set to
OFF) or'Announcement Two' (Announce Only set to ON).
2. Press Play, you will hear the announcement of A1 or A2 (you can only review
the latest recorded announcement).
3. During playing the announcement of A1 or A2, press Delete to delete the
current announcement and the answering machine will use the default
announcement.
Answering Machine Operation
37
Set remote access code
Your Remote Access code allows you to retrieve messages, and record memos and
announcements when you're away from your Answering Machine.
The remote access code helps prevent unauthorised people from ringing up your
answering machine and listening to your messages. The code can be any 4-digit number,
from to . The pre-set code is 0000 .
0000
1. Press until you hear "Remote access code is 0000" and the display shows Ac.
2. Press or to set the first digit between 0-9. Press to confirm.
3. Repeat Step 2 until all 4 digits have been set. The machine announces the new code.
Remote Operation
1. Call your answering machine from any touch-tone phone.
2. When you hear your outgoing announcement, enter your 4-digit Remote Access code.
3. You can now perform the following functions:
IF YOU WANT TO PRESS
Play messages in a mailbox
Repeat / Play Previous Message
Stop playback or recording
Play Next Message
Delete current message
Record a Memo
Record Announcement
Answering Machine Operation
Turn System On /Off
Play Help Menu
9999
1
4 / Press 4 T wice
5
6
7
8, then 5 to Stop
9, then 5 to Stop
0
*
38

Set 'Announce Only' On / Off (preset to OFF)
If you want callers to leave messages, Announce Only must be set to OFF .
If you do not want callers to leave messages, set Announce Only to ON.
Follow the steps in the beginning of the Setup section.
Turn Audible Message Alert On / Off
With Message Alert programmed ON , the Base unit will beep approximately every
10 seconds, alerting you to new, unplayed messages and memos. Follow the steps
in the beginning of the Setup section to program this feature.
Turn Base Ringer On / Off (preset to ON)
Your Base Ringer is independent of the Handset ringer. To program this feature, follow
the steps in the beginning of the Answering Machine section.
Set Number of Rings to Answer
Your Answering System can answer after 2-6 rings or you can choose the Toll
Saver option. The Toll saver option instructs the Answering System to answer after
4 rings only if there are new , unplayed messages; otherwise, it will answer after 6
rings. The benefit to you is if you are making a long distance call to retrieve messages,
if the Answering System does not answer after 4 rings, you can hang up. There are
no new messages, and you will save the expense of a long distance call.
To set the number of rings to answer, follow the steps in the beginning of the Setup
section.
Voice Prompt language selection
1. Press key until display "LA" (Language) to enter Voice Prompt language
selection mode.
Answering Machine Operation
39
2. After one second the display shows the language code, 1, 2 or 3 representing
the three options of English, German or French.
3. Press forward key swap language code ie "1> 2 > 3...", and unit will sound the
current new message status in the selected language type.
4. Press key or key to confirm the selected language type.
Recording a Memo
You can record a memo, either at the Base Unit or from a remote location. To record
a Memo at the Base:
Press and hold .
1.
You will hear ' Now Recording ' , followed by a beep.
2.
Speak towards the Base Unit. Press when finished. Your memo is stored
3.
like a message from an outside caller.
To record a memo from a remote location, follow instructions in the Remote Operation
section.
Note: If memory is full while recording, the answering machine will announce
"memory is full" and a beep is heard, at the same time the 7-segments LED will display
"Fu" and the message count alternatively.
Listening to Your Messages
When you have new messages, the message counter will flash, showing the number
of unplayed messages.
When you have new messages, the indicator will flash. If the Mailbox
only contains old messages, the indicator will glow steadily.
Answering Machine Operation
Recorded messages and memos are retained until you delete them.
Your Answering System has approximately 40 minutes of storage capacity (or 59
messages/memos). If its capacity is full, the system will answer after 10 rings, and
40
the caller will hear ' Memory is Full '.

Message Playback
1. Press the Play key. The prompt will tell you
how many new and old messages are stored in that Mailbox. If there are one
or more new messages, only the new messages will be played. After new
message playback is completed, you can press the Play key again to hear
all old messages.
Note: If short press the Play key, the order of playback is oldest messages first,
newest last. If long press the Play key, the order of playback is newest messages
first, oldest last.
Before each message is played, the day and time it was recorded is announced.
2. Press to replay the current message from the beginning.
Press twice to play the previously recorded message.
3. Press to skip to the next message.
4. Press STOP at any time to end playback.
Answering Machine Operation
41
Deleting Messages
To delete the message or memo currently playing, press .
To delete all old messages stored in the Mailbox:
In the idle mode, press and hold . You will hear"All old Messages are Deleted"
1.
2. All old messages will be deleted.
NOTE: New,unplayed messages cannot be deleted until you play them.
Once you deleted the message, it cannot be covered.
Important information
There is a total of 40 minutes of record time. This includes messages, memos, and
announcements.
The maximum number of messages that can be stored is 59 .
A message, memo, or announcement can be a maximum of 60 seconds.
If a call comes in while you are listening to messages, playback automatically stops.
Answering Machine Operation
42

Using the phone
Selecting the language
Making internal calls
Making external calls
Hands-free mode
Taking calls
End call
Redialing
Prefix dialing
Changing the handset volume
Dialing from the phone book
View call log entries
Call call log entries
Delete call log entries
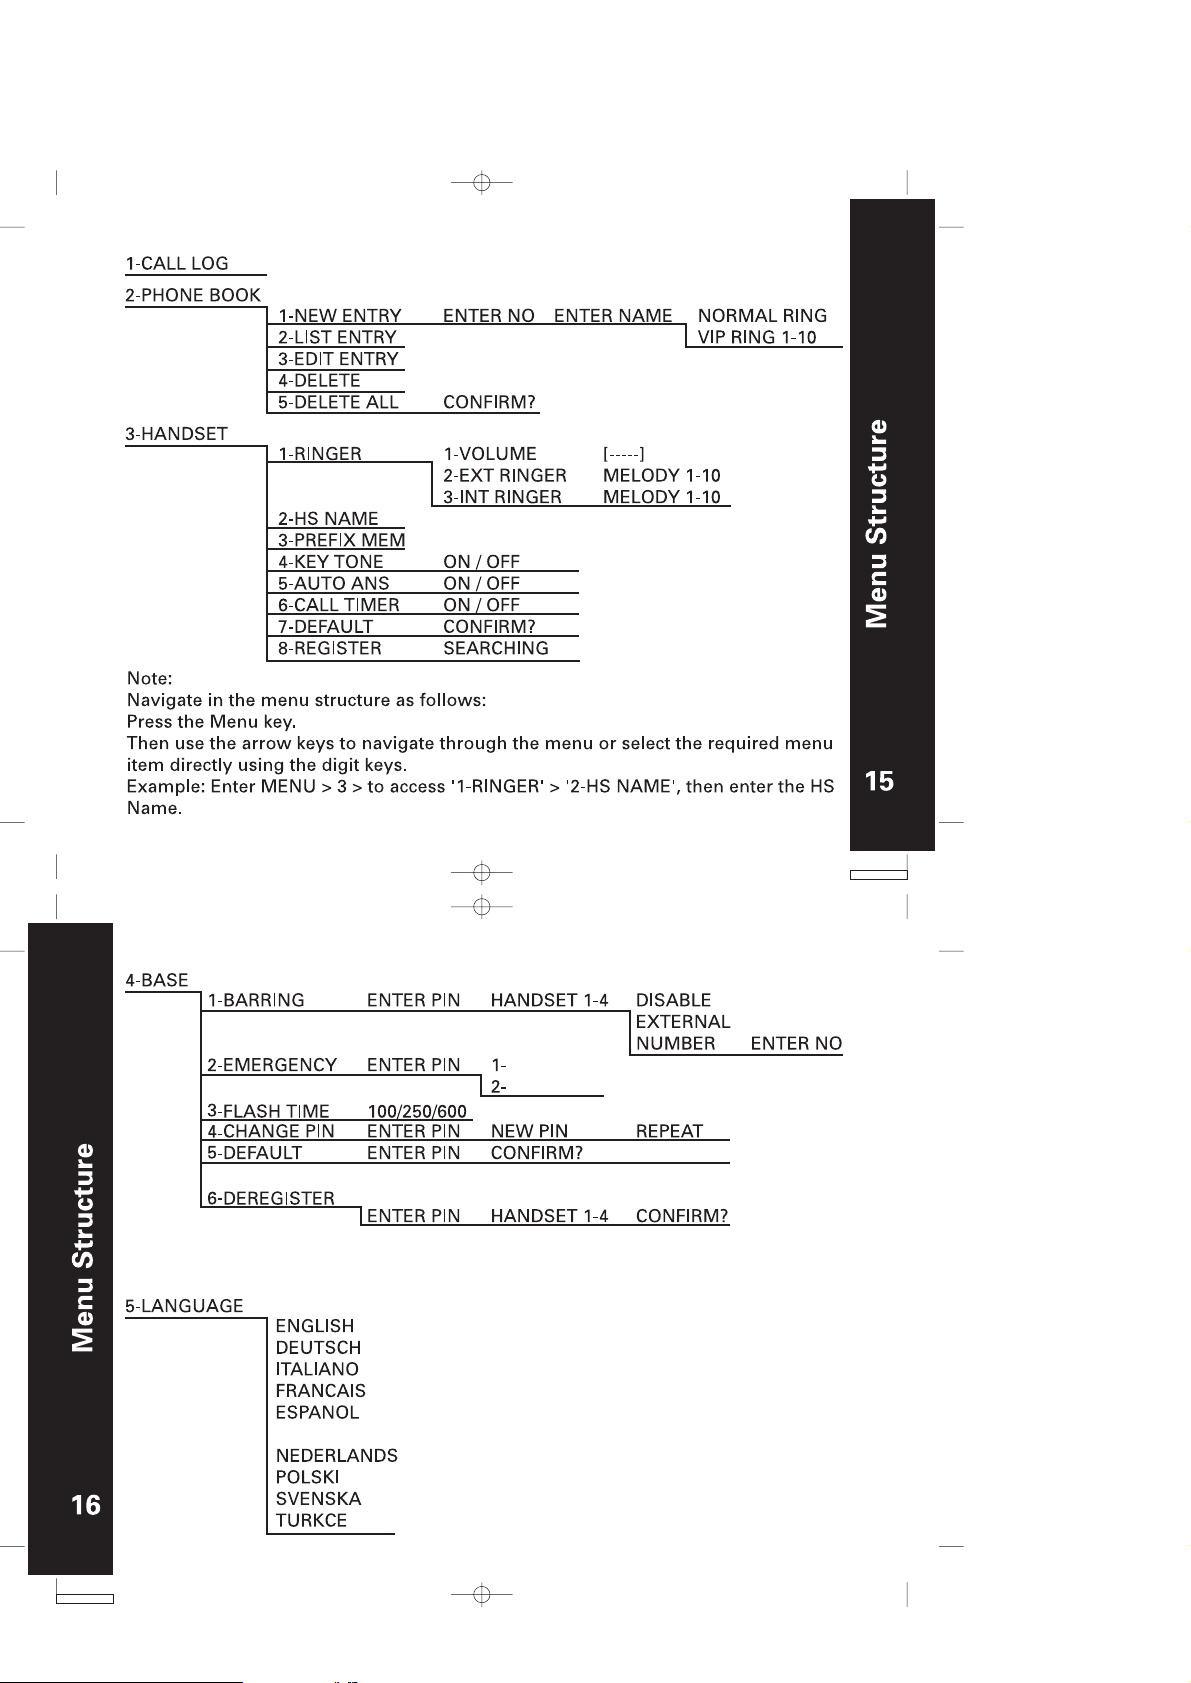
/ 5-LANGUAGE / / or / ENGLISH /
/ or /
During a call / (1-5 volume levels)
/ 1-CALL LOG / / or /
/ 1-CALL LOG / / or /
/ 1-CALL LOG / / or /
press for 2 seconds / ERASE? /
/ 1 ... 4
/ 030123... or 030123... /
/ 030123... or switch on/off during a call with
/
press for 2 seconds
/ or / or
/
or
or
add rest of number
/
or
/
Quick Reference
or
43
Delete all call log entries
Muting
Hold call, extension
Forward call, extension
Hold call and speak to
another handset.
Forward call to another
handset
Teleconference
Receiver volume
Insert dialing pause
Quick Reference
Key lock on/off
44
/ 1-CALL LOG / / or / press for 2 seconds /
or / ERASE ALL? / / CONFIRM? /
to switch on/off during a call
/ 22 /
/ 22 /
/ 1 ... 4 /
/ 1 ... 4 /
/ 1 ... 4 /
press and hold
/ or / or, during a call, or
press at relevant position during pre-dialling
press for 2 seconds

Phone Book
Store entries
Store VIP entries
List entries
Edit call numbers
Edit call numbers, VIP entries
Delete call numbers
Delete all call numbers
/ 2-PHONE BOOK / / 1-NEW ENTRY / / ENTER
NO / 030123... / / ENTER NAME / ABC... / / NORMAL
RING /
/ 2-PHONE BOOK / / 1-NEW ENTRY / / ENTER
NO / 030123... / / ENTER NAME / ABC... / / NORMAL
RING / or / VIP RING 1 - 10 /
/ 2-PHONE BOOK / / or / 2-LIST ENTRY /
/ or
/ 2-PHONE BOOK / / or / 3-EDIT ENTRY /
/ or / / 030123... / / ABC... /
/ NORMAL RING /
/ 2-PHONE BOOK / / or / 3-EDIT ENTRY /
/ or / / 030123... / / ABC... /
/ NORMAL RING / / VIP RING 1 - 10 /
/ 2-PHONE BOOK / / or / 4-DELETE /
/ or /
/ 2-PHONE BOOK / / or / 5-DELETE ALL /
/ CONFIRM? /
Quick Reference
45
Handset Settings
Ringer volume
Ringer melody, external
Ringer melody, internal
Change handset name
Save prefix number
Key tone on/off
Quick Reference
Automatic call answering
Call timer on/off
Default settings
46
Register handset
/ 3-HANDSET / / 1-RINGER / / 1-VOLUME /
/ or /
/ 3-HANDSET / / 1-RINGER / / or /
2-EXT RINGER / / or /
/ 3-HANDSET / / 1-RINGER / / or /
3-INT RINGER / / or /
/ 3-HANDSET / / or / 2-HS NAME /
/ DECT... /
/ 3-HANDSET / / or / 3-PREFIX MEM /
/ 030... /
/ 3-HANDSET / / or / 4-KEY TONE /
/ or /
/ 3-HANDSET / / or / 5-AUTO ANS /
/ or /
/ 3-HANDSET / / or / 6-CALL TIMER /
/ or /
/ 3-HANDSET / / or / 7-DEFAULT /
/ CONFIRM? /
/ 3-HANDSET / / or / 8-REGISTER /

Base Settings
Barring, off and external
Barring, number
Entering emergency
numbers
Set flash time
Changing the PIN
Default settings
De-register HS
/ 4-BASE / / 1-BARRING / / ENTER PIN / 0000 /
/ or / / or /
/ 4-BASE / / 1-BARRING / / ENTER PIN / 0000 /
/ or / / or / NUMBER /
/ ENTER NO / 321... /
/ 4-BASE / / or / 2-EMERGENCY / /
ENTER PIN / 0000 / / or / 321... /
/ 4-BASE / / or / 3-FLASH TIME / /
or /
/ 4-BASE / / or / 4- CHANGE PIN / / ENTER
PIN / 0000 / / NEW PIN / 1111 / / REPEAT /1111 /
/ 4-BASE / / or / 5-DEFAULT / /
ENTER PIN / 0000 / / CONFiRM? /
/ 4-BASE / / or / 6-DEREGISTER / / ENTER
PIN / 0000 / / or / / CONFIRM? /
Quick Reference
47
Answering Machine
Turn Answering System ON / OFF
Clock Setting
Set 'Announce Only' On / Off
(preset to OFF)
Recording Announcement A1
(Announce Only set to OFF)
Recording Announcement A2
(Announce Only set to ON)
Set your Remote Access Code
(Default: 0000)
Turn Audible Message Alert On / Off
Quick Reference
Turn Base Ringer On / Off (preset to
ON)
Set Number of Rings to Answer
Set Voice Prompt Language
48
/ Display "An" for Answering / or
/ Display "CL" for Day and time / or / to set Day/
or / to set Hour / or / to set Minute
/ Display "Ao" for Announce Only / or
/
Display "A1" for
Speak toward the Base Unit /
/
Display "A2" for
Speak toward the Base Unit /
/ Display "Ac" for Remote Access Code / or /
repeately to set each digit in the code
/ Display "AL" for Message Alert / or
/ Display "br" for Base Ringer / or
/ Display "nr" for Number of Rings selected
/ Display "LA" for Language selection
Announcement One / /
Announcement T wo / /

Record a Memo
Press and hold
'Now Recording' / Speak
towards the Base Unit /
Message Playback
Deleting Messages
Remote Operation
Play key / new messages are played / Play key to hear
all old messages
to delete the message or memo currently playing
To delete all old messages stored in a Mailbox:
In the idle mode, press & hold
Enter your 4-digit Remote Access code
when hearing your outgoing announcement, press number
keys to perform the different functions.
(please refer to the section, Remote Access)
Quick Reference
49
WARRANTY INFORMATION
Warranty
50

WARRANTY INFORMATION
Distributor guarantees to you, the original purchaser, the digital cordless telephone
and accessories which you have purchased from an authorised reseller (the
"Products"), to be in conformance with the applicable specifications current at the
time of manufacture for a term of 12 months from date of purchase of the Product(s)
(Warranty Term). You must inform Distributor of the lack of conformity to the
applicable specifications of any of the Products within a period of two (2) months
from the date on which you detect a defect in material, workmanship or lack of
conformity and in any event within a term not to exceed the W arranty Term, and must
immediately submit the Product for service to Distributor's Repair or Service Centre.
During the Warranty term, Distributor will, at its discretion and without extra charge,
as your exclusive remedy, repair or replace your Product which does not comply with
this warranty. This warranty will expire at the end of the Warranty T erm.
For details, please contact Oricom International Pty. Limited in Australia /
New Zealand on the phone number below :
Oricom 1300 889 785
HOW TO GET W ARRANTY SERVICE?
In order to be eligible to receive warranty service, you must present your receipt of
purchase or a comparable substitute proof of purchase bearing the date of purchase.
The digital cordless telephone should also clearly display the original compatible
electronic serial number. Such information is contained with the Product.
You must ensure that all and any repairs or servicing is handled at all times by a
Distributor's Service Centre in accordance with the Distributor's Service requirements.
In some cases, you may be requested to provide additional information concerning
the maintenance of the Products by Distributor's Service Centres only, therefore it is
important to keep a record of any previous repairs, and make them available if questions
arise concerning maintenance.
CONDITIONS
This warranty will not apply if the type or serial numbers on the Product has been
altered, deleted, duplicated, removed, or made illegible. Distributor reserves the right
to refuse free-of-charge warranty service if the requested documentation can not be
presented or if the information is incomplete, illegible or incompatible with the factory
records. Repair, at Distributor's option, may include reflashing of software, the
replacement of parts or boards with functionally equivalent, reconditioned or new
parts or boards. Replaced parts, accessories, batteries, or boards are warranted for
Warranty
the balance of the original warranty time period. The Warranty T erm will not be
extended. All original accessories, batteries, parts, and digital cordless telephone that
have been replaced shall become the property of Distributor.
Distributor does not warrant the installation, maintenance or service of the products,
accessories, batteries or parts.
Distributor will not be responsible in any way for problems or damage caused by any
ancillary equipment not furnished by Distributor which is attached to or used in
connection with the Products.
52
Warranty
51

When the Product is used in conjunction with ancillary or peripheral equipment not
supplied for this digital cordless telephone by Distributor, Distributor does not warrant
the operation of the Product/peripheral combination and Distributor will not honour
any warranty claim where the Product is used in such a combination and it is
determined by Distributor that there is no fault with the Product.
WHAT IS NOT COVERED BY THE WARRANTY
This warranty is not valid if the defects are due to damage, misuse, tampering, neglect
or lack of care and in case of alterations or repair car ried out by unauthorised persons.
The following are examples of defects or damage not covered by this product warranty
• Defects or damage resulting from use of the Product in other than its normal and
customary manner.
• Defects or damage from misuse, access to incompatible sources, accident or neglect.
• Defects or damage from improper testing, operation, maintenance, installation,
adjustment, unauthorised sof tware applications or any alteration or modification of
any kind.
• Breakage or damage to antennas unless caused directly by defects in material or
workmanship.
• Products disassembled or repaired other than by Distributor in such a manner as to
adversely affect performance or prevent adequate inspection and testing to verify
any warranty claim.
• Defects or damage due to range, coverage, availability, grade of service, or operation
of the cellular system by the cellular operator.
• Defects or damage due to moist, liquid or spills of food.
53
54
• All plastic surfaces and all other externally exposed parts that are scratched or
• damaged due to customer normal use.
• Products rented on a temporary basis.
• Periodic maintenance and repair or replacement of parts due to normal wear and tear.
Note: The talk-time, stand-by time and total life cycle of the rechargeable batteries for
your digital cordless telephone will depend on usage conditions and network
configurations. As a consumable product, the specifications indicate that you should
be able to obtain optimum performance for your digital cordless telephone within the
first two months from date of purchase.
The warranty for the rechargeable batteries becomes void if (i) the batteries are
charged other than by original battery chargers specified for the charging of the
battery, (ii) any of the seals on the battery are broken or show evidence of tampering,
(iii) the battery is used in equipment or service other than the digital cordless
telephone for which it is specified.
Depending on operating conditions and your usage habits, wear and tear might take
place of components including mechanical problems related to Product housing, paint,
assembly, sub-assemblies, displays and keyboards and any accessories which are not
part of the Product's in-box configuration. The rectification of faults generated through
wear and tear and the use of consumable items like batteries is considered to be your
responsibility and therefore Distributor will not provide the free Warranty repair service
for these items.

Please make and retain a note of all data you have inserted into your Product for
example names and phone numbers, before submitting your Product for a Warranty
service as such data may be deleted or erased as part of the repair or service process.
OUT OF WARRANTY REPAIRS
If you request Distributor to repair your Product any time after the Warranty term or
where this warranty does not apply due to the nature of the defect or fault, then
Distributor may in its discretion carry out such repairs subject to you paying Distributor
its fees for such a repair or it may refer you to an authorised third party to carry out
such repairs.
CONTACT US
Australia
Oricom International Pty Ltd
Locked Bag 658
South Windsor NSW 2756
Australia
Customer support
Email : support@oricom.com.au
Web : www.oricom.com.au
Fax : (02) 4574 8898
Phone : 1300 889 785
55
 Loading...