

Page 1
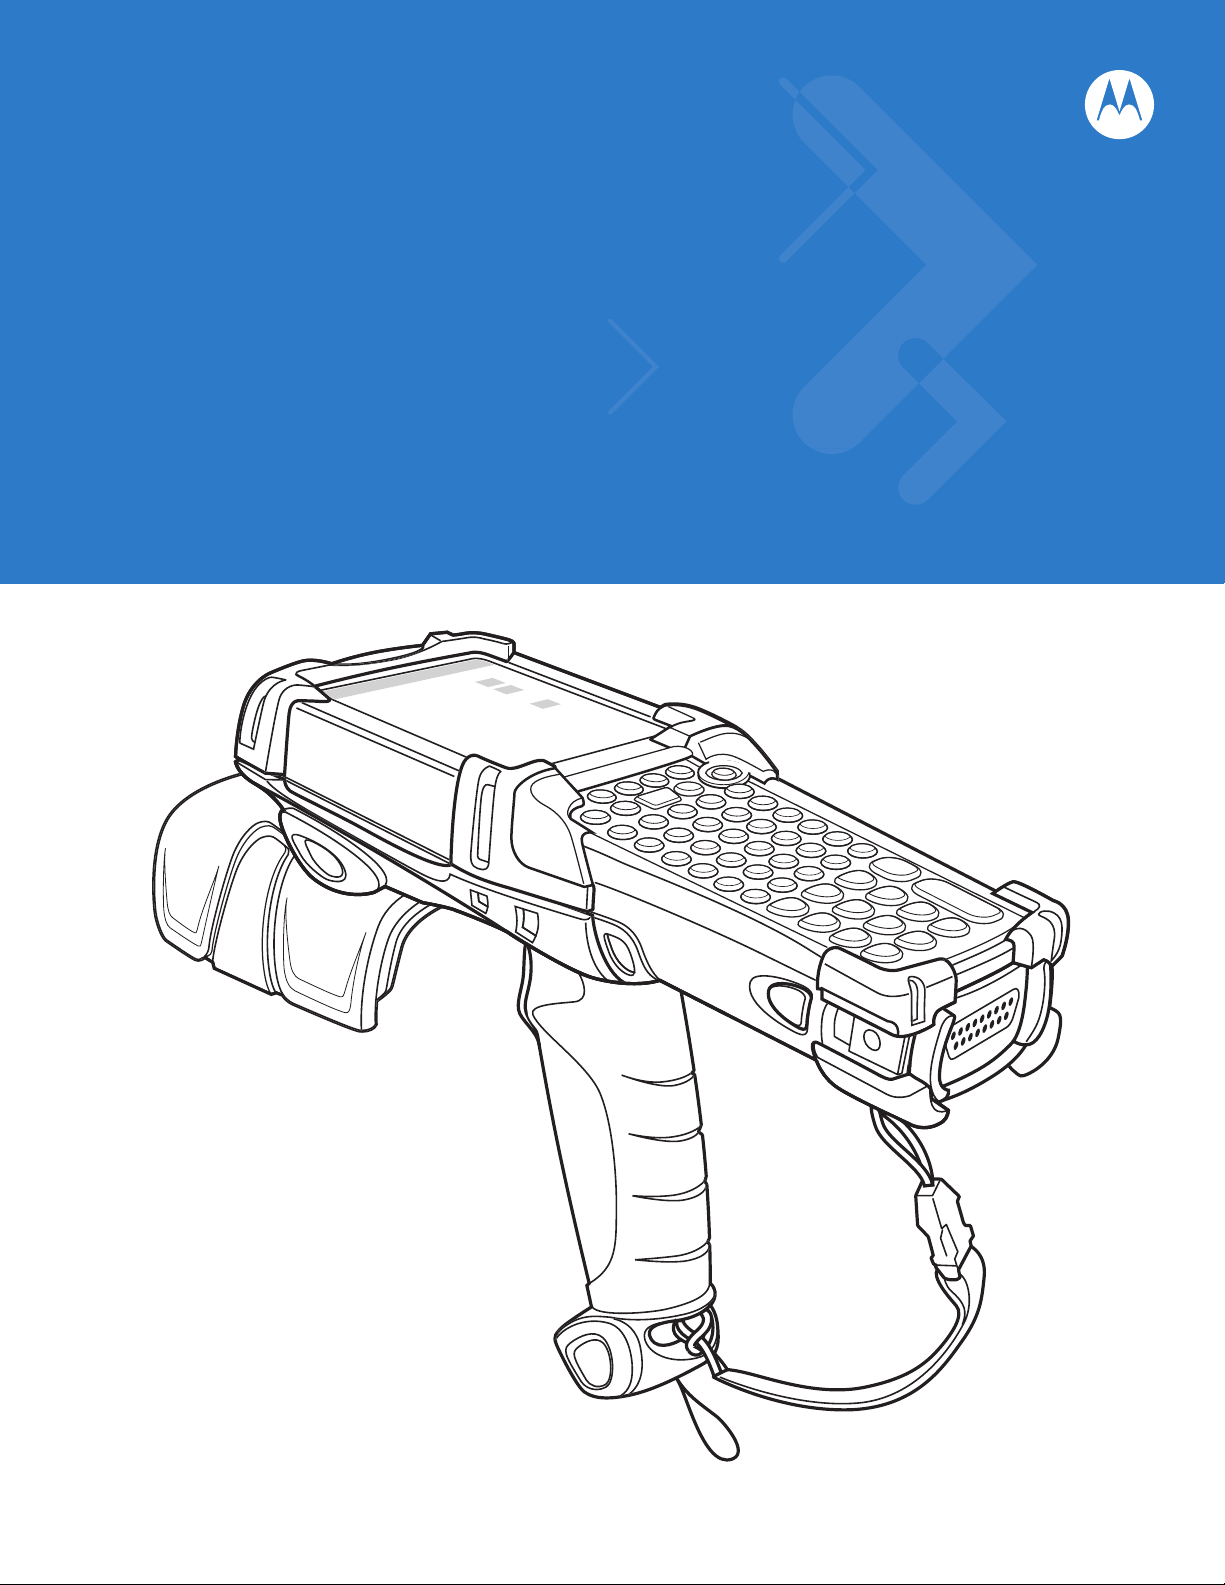
MC9090-G RFID Mobile
RFID Integrator Guide Supplement
Page 2

Page 3

MC9090-G RFID Integrator Guide Supplement
72E-89963-04
Rev A
September 2008
Page 4

ii MC9090-G RFID Integrator Guide Supplement
© 2008 by Motorola, Inc. All rights reserved.
No part of this publication may be reproduced or used in any form, or by any electrical or mechanical means,
without permission in writing from Motorola. This includes electronic or mechanical means, such as
photocopying, recording, or information storage and retrieval systems. The material in this manual is subject to
change without notice.
The software is provided strictly on an “as i s” basis. All sof twar e, including firmware, furnished to the user is on
a licensed basis. Motorola grants to the user a non-transferab le and non-exclusive license to use each
software or firmware program delivered hereunder (licensed program). Except as noted below, such license
may not be assigned, sublicensed, or otherwise transferred by the user without prior written consent of
Motorola. No right to copy a licensed program in whole or in part is granted, except as permitted unde r
copyright law. The user shall not modify, merge, or incorporate any form or portion of a licensed program with
other program material, create a derivative work from a licensed program, or use a licensed program in a
network without written permission from Motorola. The user agrees to maintain Motorola’s copyright notice on
the licensed programs delivered hereunder, and to include the same on any authorized copies it makes, in
whole or in part. The user agrees not to deco mpile, disassemble, decode, or reverse engineer any licensed
program delivered to the user or any portion thereof.
Motorola reserves the right to make changes to any software or product to improve reliability, function, or
design.
Motorola does not assume any product liability arising out of, or in connection with, the application or use of
any product, circuit, or application described herein.
No license is granted, either expressly or by implication, estoppel, or otherwise under any Motorola, Inc.,
intellectual property rights. An implied license only exists for equipment, circuits, and subsystems contained in
Motorola products.
MOTOROLA and the Stylized M Logo and Symbol and the Symbol logo are registered in the US Patent &
Trademark Office. Bluetooth is a registered trademark of Bluetooth SIG. Microsoft, Windows and ActiveSync
are either registered trademarks or trademarks of Microsoft Corporation. All other product or service names
are the property of their respective owners.
Motorola, Inc.
One Motorola Plaza
Holtsville, New York 11742-1300
http://www.motorola.com
Patents
This product is covered by one or more of the patents listed on the web site : http://www.symbol.com/patents
Page 5

Revision History
Changes to the original manual are listed below:
Change Date Description
-01 Rev A 12/2006 Initial Release
-02 Rev A 3/2008 Added Laser Scanner
-03 Rev A 5/2008 Updated Program Tag settings
-04 Rev A 9/2008 Added ETSI EN302-208 Tx-Channels Window
iii
Updated Wireless Section
Updated Applications Section
Added Duty Cycle Paramameters
Page 6

iv MC9090-G RFID Integrator Guide Supplement
Page 7

Table of Contents
Patents.................................................................................................................................................. ii
Revision History.................................................................................................................................... iii
About This Guide
Introduction........................................................................................................................................... ix
Documentation Set ......................................................................................................................... ix
Configurations....................................................................................................................................... x
Chapter Descriptions............................................................................................................................ x
Notational Conventions......................................................................................................................... xi
Related Documents and Software........................................................................................................ xi
Service Information............................................................................................................................... xii
Support Information ........................................................................................................................ xii
Chapter 1: Getting Started
Introduction .......................................................................................................................................... 1-1
MC909X Integrator Guide .............................................................................................................. 1-1
Unpacking the Mobile Computer ......................................................................................................... 1-2
Accessories ......................................................................................................................................... 1-3
Getting Started ..................................................................................................................................... 1-4
Installing and Removing the Main Battery ........................................................................................... 1-4
Installing the Main Battery .............................................................................................................. 1-4
Charging the Battery ............................................................................................................................ 1-5
Charging the Main Battery and Memory Backup Battery ............................................................... 1-5
Charging the Main Battery ............................................................................................................. 1-6
Charging Spare Batteries .................................................................................................................... 1-7
Removing the Main Battery ............................................................................................................ 1-7
Starting the Mobile Computer .............................................................................................................. 1-8
Calibrating the Screen ......................................................................................................................... 1-8
Checking Battery Status ...................................................................................................................... 1-8
Configuring the Mobile Computer ........................................................................................................ 1-9
Page 8

vi MC9090-G RFID Integrator Guide Supplement
Resetting the Mobile Computer ........................................................................................................... 1-9
Performing a Warm Boot ............................................................................................................... 1-9
Performing a Cold Boot .................................................................................................................. 1-9
Performing a Clean Boot ................................................................................................................ 1-10
Battery Management ........................................................................................................................... 1-11
Battery Saving Tips ........................................................................................................................ 1-11
Changing the Power Settings .............................................................................................................. 1-11
Changing the Display Backlight Settings ............................................................................................. 1-11
Changing the Keypad Backlight Settings ............................................................................................. 1-12
Turning the Radios Off ......................................................................................................................... 1-12
WLAN Radio on Windows Mobile 5.0 ............................................................................................ 1-12
Bluetooth and WAN Radios on Windows Mobile 5.0 ..................................................................... 1-12
Wireless Applications ........................................................................................................................... 1-13
ActiveSync ........................................................................................................................................... 1-14
Chapter 2: Accessories
Introduction .......................................................................................................................................... 2-1
Keypads ......................................................................................................................................... 2-1
Cradles ........................................................................................................................................... 2-1
Miscellaneous ................................................................................................................................ 2-2
Snap-on Modules ........................................................................................................................... 2-2
Keypad ................................................................................................................................................. 2-3
Keypad Removal ............................................................................................................................ 2-3
Multi Media Card (MMC) / Secure Device (SD) Card .......................................................................... 2-4
Chapter 3: Application Deployment for Mobile 5.0
Introduction .......................................................................................................................................... 3-1
Security ................................................................................................................................................ 3-1
Packaging ............................................................................................................................................ 3-1
Deployment .......................................................................................................................................... 3-2
XML Provisioning ................................................................................................................................. 3-2
Storage ................................................................................................................................................ 3-3
System Configuration Manager ........................................................................................................... 3-3
Rapid Deployment Client ..................................................................................................................... 3-3
AirBEAM Smart .................................................................................................................................... 3-4
Symbol Mobility Developer Kits ........................................................................................................... 3-4
Page 9

Table of Contents vii
Chapter 4: RFID Demo Application
Introduction .......................................................................................................................................... 4-1
RFIDDemo Application ........................................................................................................................ 4-2
Using RFIDDemo to Read Tags From a Remote Reader ............................................................. 4-2
Launching the RFIDDemo Application ................................................................................................. 4-3
File Menu Options .......................................................................................................................... 4-4
About .............................................................................................................................................. 4-4
Device Settings .............................................................................................................................. 4-5
Reader Device Settings: .......................................................................................................... 4-5
Tag Logging ............................................................................................................................. 4-6
Registry Settings Description ................................................................................................... 4-6
Tag Access Parameters ................................................................................................................. 4-10
Reader Tag Access Parameters Settings: ............................................................................... 4-10
Program Tag .................................................................................................................................. 4-12
Reader Program Tag Settings: ................................................................................................ 4-12
Lock Options .................................................................................................................................. 4-14
Reader Lock Option Settings: .................................................................................................. 4-14
Tag Locking ............................................................................................................................. 4-15
Read Tags ..................................................................................................................................... 4-16
Duty Cycle Paramameters ................................................................................................................... 4-18
ETSI EN 302-208 Tx-Channel Selection ............................................................................................. 4-19
RFIDFlash Utility (Radio Firmware Update Utility) ............................................................................... 4-20
Chapter 5: GeminiRFID Demo Application
Introduction .......................................................................................................................................... 5-1
Host Computer Display Setup ............................................................................................................. 5-1
Using GeminiRFID Demo to Read Tags From a Remote Reader ....................................................... 5-2
Using GeminiRFID Demo to Forward/Log Tags to Remote Device .................................................... 5-2
Launching the GeminiRFID Demo Application .................................................................................... 5-3
Reading Tags ................................................................................................................................. 5-4
Selecting Tags ............................................................................................................................... 5-5
Clearing the Display .......................................................................................................... ............. 5-5
Saving Tag Data ............................................................................................................................ 5-6
File Menu ....................................................................................................................................... 5-6
About ........................................................................................................................................ 5-7
Log ........................................................................................................................................... 5-7
Reboot ..................................................................................................................................... 5-7
Settings .................................................................................................................................... 5-8
Gen2 Operational Settings ....................................................................................................... 5-9
Exit ........................................................................................................................................... 5-9
Mode Menu .................................................................................................................................... 5-10
Inventory .................................................................................................................................. 5-10
Locate Tag ............................................................................................................................... 5-10
Program Tag ............................................................................................................................ 5-11
Page 10

viii MC9090-G RFID Integrator Guide Supplement
Chapter 6: SymbolRoam
Introduction .......................................................................................................................................... 6-1
SymbolRoam, Region Change ................................................................................... ........... .............. 6-2
Country Drop Down List ........................................................................................................ ......... 6-2
SymbolRoam Version .................................................................................................................... 6-3
Chapter 7: Maintenance & Troubleshooting
Introduction .......................................................................................................................................... 7-1
Maintaining the RFID reader ................................................................................................................ 7-1
Accessories ......................................................................................................................................... 7-2
Battery Safety Guidelines .................................................................................................................... 7-2
Troubleshooting ................................................................................................................................... 7-3
RFID Reader .................................................................................................................................. 7-3
Appendix A: Technical Specifications
Technical Specifications ...................................................................................................................... A-1
RFID Reader .................................................................................................................................. A-1
Accessory CAM and MSR Pin-Outs .................................................................................................... A-7
Index
Page 11

About This Guide
Introduction
This MC9090-G RFID Integrator Guide Supplement provides the unique set up and configuration procedures for
the MC9090-G RFID mobile computers and accessories. This guide is intended as a supplement to the MC909X
Integrator Guide, P/N: 72E-72216-xx. Procedures common to the MC909X series of pr oducts are r eferenced to the
MC909X Integrator Guide.
NOTE Screens and windows pictured in this guide are samples and may differ from actual screens.
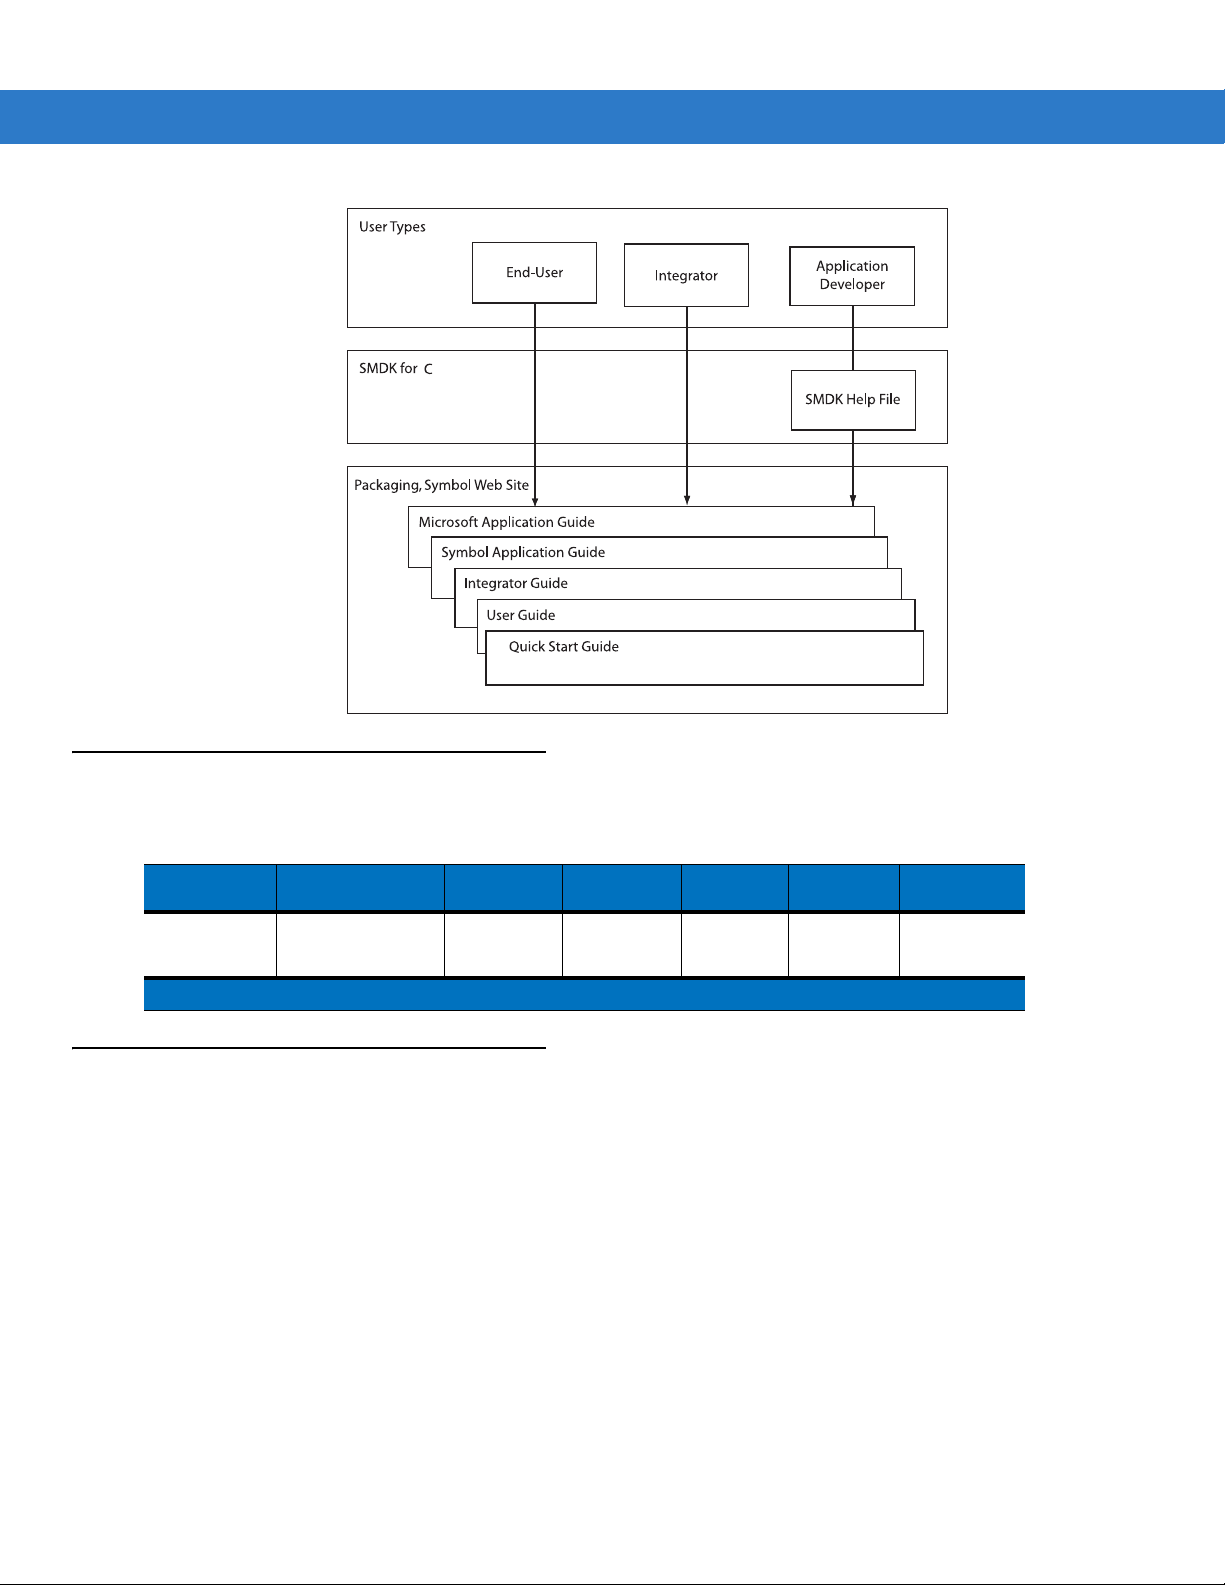
Documentation Set
The documentation set for the MC9090-G RFID reader is divided into guides that provide information for specific
user needs.
•
Microsoft Application Guide - describes how to use Microsoft developed applications.
•
Symbol Application Guide - describes how to use Motorola developed applications.
•
MC909X User Guide - describes how to use the MC909X mobile computers.
•
MC9090-G RFID User Guide Supplement - describes how to use the MC9090-G RFID mobile computer.
•
MC909X Integrator Guide - describes how to set up the MC909X mobile computers and the accessories.
•
MC9090-G RFID Integrator Guide Supplement - describes how to set up the MC9090-G RFID mobile
computer and the accessories.
•
SMDK Help File - provides API information for writing applications.
Page 12
x MC9090-G RFID Integrator Guide Supplement
Configurations
This guide covers the following configurations:
Configuration Radios Display Memory
MC9090-G
RFID
WLAN: 802.11a/b/g
WPAN: Bluetooth
Chapter Descriptions
Topics covered in this guide are as follows:
•
Chapter 1, Getting Started, provides information on charging the RFID reader battery and resetting.
•
Chapter 2, Accessories, describes the accessories available for the RFID reader and how to set up power
connections and battery charging capabilities, where applicable.
•
Chapter 3, Application Deployment for Mobile 5.0, describes features available in Windows Mobile 5.0.
•
Chapter 4, RFID Demo Application, descries how application developers can use the RFID Demo a
application.
•
Chapter 5, GeminiRFID Demo Application, descries how application developers can use the Gemini RFID
Sample application.
•
Chapter 6, SymbolRoam, descries how to us e the SymbolRoam application to change operating regions.
•
Chapter 7, Maintenance & Troubleshooting, includes instructions on cleaning and storing the RFID reader,
and provides troubleshooting solutions for potential problems during RFID reader operation.
•
Chapter A, Technical Specifications, includes the technical specifications for the RFID reader
Color 64 MB RAM
128 MB
Flash
Data
Capture
Laser Scan
Imager
RFID
Operating
System
Windows
Mobile 5.0
Keypad
53-key RFID
Page 13

Notational Conventions
The following conventions are used in this document:
•
“RFID Reader”, “reader” or “mobile computer” refers to the Motorola MC9090-G RFID reader.
•
Italics are used to highlight the following:
• Chapters and sections in this guide
• Related documents
•
Bold text is used to highlight the following:
• Dialog box, window and screen names
• Drop-down list and list box names
• Check box and radio button names
• Icons on a screen
• Key names on a keypad
• Button names on a screen.
•
Bullets (•) indicate:
• Action items
• Lists of alternatives
• Lists of required steps that are not nece ssarily sequential.
About This Guide xi
•
Sequential lists (e.g., those that describe step-by-s te p pr oc ed ur e s) ap pe a r as nu m be re d lists.
Related Documents and Software
The following documents provide more information about the MC9090-G RFID reader.
•
MC9090-G RFID Quick Start Guide, p/n 72-89960-xx
•
MC9090-G RFID Windows® Mobile® 5.0 Regulatory Guide, p/n 72-89961-xx
•
MC9090-G RFID User Guide Supplement, p/n 72E-79962-xx
•
MC909X User Guide, p/n 72E-72215-xx
•
MC909X Integrator Guide, p/n 72E-72216-xx
•
Symbol Application Guide for Symbol Devices, p/n 72E-68901-xx
•
Microsoft Applications for Mobile and WinCE 5.0 User Guide, p/n 72E-78456-xx
•
Symbol Mobility Developer Kit (SMDK) Help File, p/n 72E-38880-03
•
Symbol Mobility Developer Kit for .NET, available at: http://support.symbol.com
•
Symbol Mobility Developer Kit for C, available at: http://support.symbol.com
•
ActiveSync software, available at: http://www.microsoft.com.
For the latest version of this guide and all guides, go to: http://support.symbol.com.
Page 14

xii MC9090-G RFID Integrator Guide Supplement
Service Information
If an equipment problem occurs, contact the appropriate regional Support Center for contact information. Before
calling, locate the model number and serial number.
Call the Support Center from a phone near the scanning equipment so that the service person can try to talk
through the problem. If the equipment is found to be working properly and the problem is symbol readability, the
Support Center will request samples of bar codes for analysis at our plant.
If the problem cannot be solved over the phone, the equipment may need to be returned for servicing. If that is
necessary, specific directions will be provided.
NOTE Motorola is not responsible for any damages incurred during shipment if the approved shipping container
is not used. Shipping the units improperly can possibly void the warranty.
Support Information
For service information, warranty information or technical assistance contact or call the Support Center. Contact
information is provided on the Motorola contact web site go to: http://www.support.symbol.com
.
If the Motorola product was purchased from a Motorola Business Partner, contact that Business Partner for
service.
Page 15

Chapter 1 Getting Started
Introduction
This chapter lists the accessories for the MC9090-G RFID mobile computer and explains how to install and charge
the batteries, replace the strap and start the mobile computer for the first time.
NOTE This MC9090-G RFID Integrator Guide Supplement is intended as a supplement to the MC909X
Integrator Guide, P/N: 72E-72216-xx. Procedures common to the MC909X series of products are
referenced to the MC909X Integrator Gu i de .
MC909X Integrator Guide
The MC909X Integrator Guide, P/N: 72E-72216-xx provides the following support information applicable to the
MC9090-G RFID mobile computer:
•
Accessories; describes the accessories available for the mobile computers and how to set up power
connections and battery charging capabilities, where applicable.
•
ActiveSync; provides instructions on installing ActiveSync and setting up a partnership between the mobile
computer and a host computer.
•
Wireless Applications; provides instructions using an d configuring the mobile computer on a wireless
network.
•
Wireless Applications; describes how to configure the WLAN wireless connection.
•
Rapid Deployment Client; explains how to use the Rapid Deployment Client to facilitate software
downloads to the mobile computer from a Mobility Services Platform (MSP) Console FTP server.
•
AirBEAM Client; explains how to set up the mobile computer to synchronize with a server using the
AirBEAM® Client and AirBEAM Staging applications.
•
Application Deployment for Windows Mobile; provides instructions for installing the SMDK for C and
SMDK for .NET on the host computer.and downloading software and files to the mobile computer.
•
Maintenance & Troubleshooting; includes instructions on cleaning and storing the mobile computer, and
provides troubleshooting solutions for potential problems during mobile computer operation.
Page 16

1 - 2 MC9090-G RFID Integrator Guide Supplement
Unpacking the Mobile Computer
Carefully remove all protective material from around the mobile computer and save the shipping cont ainer for later
storage and shipping.
Verify that all equip ment listed below was received:
•
Mobile computer
•
Lithium-ion battery
•
Strap, attached to the mobile computer
•
Stylus, in the stylus silo
•
Regulatory Guide
•
Quick Start Guide (poster)
Inspect the equipment for damage. If any equipment is missing or damaged, conta ct the Symbol Technologies
Support Center immediately. See page xii for contact information.
Scan Button
Keypad
Handstrap
Indicator LED Bar Touch Screen
Microphone (Windows
Mobile 5.0 only)
Headphone Jack
(Windows Mobile
5.0 only)
Power Button
Trigger
Figure 1-1
MC9090-G RFID Mobile Computer
Page 17

Accessories
Table 1-1 lists the accessories available for the MC9090-G RFID.
Getting Started 1 - 3
Table 1-1
Cable Adapter Module
(CAM)
Four Slot Charge Only
Cradle
Four Slot Ethernet Cradle Charges the mobile computer main battery and synchronizes the mobile
Four Slot Spare Battery
Charger
Magnetic Stripe Reader
(MSR)
Modem Module Enables data communication between the mobile computer and a host
MC9090-G RFID Accessories
Accessory Description
Snap-on required to connect the following cables to the mobile computer.
•
AC line cord (country-specific) and power supply, charges the mobile
computer.
•
Auto charge cable, charges the mobile computer using a vehicle’s
cigarette lighter.
•
DEX cable, connects the mobile computer to a vending machine.
•
Serial cable, adds serial communication capabilities.
•
USB cable, adds USB communication capabilities.
•
Printer cable, adds printer communication capabilities.
Charges the mobile computer main battery.
computer with a host computer through an Ethernet connection.
Charges up to four mobile computer spare batteries.
Snaps on to the mobile computer and adds magstripe read capabilities.
computer, remotely through the phone lines, and synchronizes information
between the mobile computer and a host computer.
Multimedia Card (MMC) Provides secondary non-volatile storage.
Single Slot Serial/USB
Cradle
Software Symbol Mobility Developer Kits available at: http://support.symbol.com.
Spare lithium-ion battery Replacement battery.
Stylus Performs pen functions.
Universal Battery Charger
Adapter
Wall Mounting Bracket and
Shelf Slide
Charges the mobile computer main battery and a spare battery. It also
synchronizes the mobile computer with a host computer through either a serial
or a USB connection.
Adapts the UBC for use with the Series 9000 batteries.
Use for wall mounting applications.
Page 18

1 - 4 MC9090-G RFID Integrator Guide Supplement
Getting Started
In order to start using the mobile computer for the first time:
•
Install the main battery
•
Charge the main battery and backup battery
•
Start the mobile computer
•
Configure the mobile computer
The main battery can be charged before or after it is installed. Use one of the sp a re ba ttery cha rgers to char ge the
main battery (out of the mobile computer), or one of the cradles to charge the main battery installed in the mobile
computer.
Installing and Removing the Main Battery
Installing the Main Battery
Before using the mobile computer, install a lithium-ion battery by sliding the battery into the mobile computer as
shown in Figure 1-2.
NOTE Ensure the battery is fully inserted. Two audible clicks can be heard as the battery is fully inserted. A
partially inserted battery may result in unintentional data loss.
When a battery is fully inserted in a mobile computer for the first time, upon the mobile computer’s first power up,
the device boots and powers on automatically.
Figure 1-2
Installing the Main Battery
Page 19

Charging the Battery
Charging the Main Battery and Memory Backup Battery
Before using the mobile computer for the first time, charge the main battery until the amber charge indicator light
remains lit (see Table 1-2 on page 1-6 for charge status indications). Charge time is less than four hours. The
mobile computer can be charged using a cradle, the CAM with a charging cable, or the MSR with the appropriate
power supply.
The mobile computer is equipped with a memory backup battery which automatically charges from the
fully-charged main battery. When the mobile computer is used for the first time, the backup battery requires
approximately 15 hours to fully charge. This is also true any time the backup battery is discha rged, which occurs
when the main battery is removed for several hours. The backup battery retains data in memory for at least 30
minutes when the mobile computer's main battery is removed. When the mobile computer reaches a very low
battery state, the combination of main battery and backup battery retains data in memory for at least 72 hours.
NOTE Do not remove the main battery within the first 15 hours of use. If the main battery is removed before the backup battery
is fully charged, data may be lost.
Use the following to charge batteries:
Getting Started 1 - 5
•
Cradles: The mobile computer slips into the cradles for charging the battery in the mobile computer (and
spare batteries, where applicable).
- Single Slot Serial/USB Cradle.
- Four Slot Ethernet Cradle and Four Slot Charge Only Cradles.
•
Accessories: The mobile computer’s snap-on accessories provide charging capability, when used with one of
the accessory charging cables.
- CAM
- MSR.
•
Chargers: The mobile computer’s spare battery charging accessories are used to charge batteries that are
removed from the mobile computer.
- Single Slot Serial/USB Cradle
- Four Slot Spare Battery Charger
- Universal Battery Charger (UBC).
NOTE To achieve the best battery life in mobile computers with multiple radios, turn off the radios that are not
being used. This can be accomplished via the SetDevicePower() API (refer to the SMDK Help File for
Symbol Mobile Computers) or via the Control Panel application (tap Start > 9000 Demo > Ctl Panel
icon).
Page 20
1 - 6 MC9090-G RFID Integrator Guide Supplement
Charging the Main Battery
Charge the main battery in the mobile computer usin g a cra d le, the CAM with a ch ar gin g cable , or the M SR w ith
the appropriate power supply.
1. Ensure the accessory used to charge the main battery is connected to the appropriate power source (see
Chapter 2, Accessories for setup information).
2. Insert the mobile computer into a cradle or attach the appropriate snap-on module.
3. The mobile computer starts to charge au tomatically. The amber charge LED, in the Indicator LED Bar, lights to
show the charge status. See Table 1-2 for charging indications.
The main battery usually fully charges in less than four hours.
Table 1-2
Off Mobile computer not in cradle or the mobile computer is not attached to the CAM or
Fast Blinking Amber Error in charging; check placement of the mobile computer.
Slow Blinking Amber Mobile computer is charging.
Solid Amber Charging complete.
Mobile Computer LED Charge Indicators
LED Indication
MSR. Mobile computer not placed correctly. Charger is not powered.
Page 21

Charging Spare Batteries
Use the following three accessories to charge spare batteries:
•
Single Slot Serial/USB Cradle
•
Four Slot Spare Battery Charger
•
UBC Adapter.
To charge a spare battery:
1. Ensure the accessory used to charge the spare battery is connected to the appropriate power sou rc e (se e
Chapter 2, Accessories for setup information).
2. Insert the spare battery into the accessory’s spare battery charg ing slot with the charging cont acts facing down
(over the charging pins) and gently press down on the battery to ensure proper contact.
3. The battery starts to charge automatically. The amber charge LED on the accessory lights to show the charge
status. See Chapter 2, Accessories for charging indications for th e accessory.
The battery usually fully charges in less than four hours.
Getting Started 1 - 7
Removing the Main Battery
To remove the main battery:
1. Prior to removing the battery, press the red Power button to place the mobile computer in the suspend mode.
2. Simultaneously press both primary battery releases. The battery partially ejects from the mobile computer.
3. Pause 3-4 seconds while the mobile computer performs battery removal shutdown.
4. Press the secondary battery release, on top of the battery, and slide the battery out of the mobile computer.
Primary Battery Releases
Secondary Battery
Release
Figure 1-3
Removing the Main Battery
Page 22

1 - 8 MC9090-G RFID Integrator Guide Supplement
Starting the Mobile Computer
Press the red Power button to turn on the mobile computer. If the mobile computer does not power on, perform a
cold boot. See Performing a Cold Boot on page 1-9.
NOTE When a battery is fully inserted in a mobile computer for the first time, upon the first power up, the device
boots and powers on automatically.
When the mobile computer is powered on for the first time, it initializes its system. The Symbol splash screen
(Figure 1-4) appears for a short period of time.
Figure 1-4
Symbol Splash Window
Calibrating the Screen
To calibrate the screen so the cursor on the touch screen aligns with the tip of the stylus:
1. Using the stylus carefully press and briefly hold the tip of stylus on the center of each t arget that appea rs on the
screen.
NOTE To re-calibrate the screen at anytime, press the blue FUNC and ESC keys on the mobile computer to
launch the calibration screen application.
2. Repeat as the target moves around the screen or press ESC to cancel.
Checking Battery Status
To check whether the main battery or backup battery in the mobile computer is charged, tap Start - Settings System Tab - Power icon to display the Battery Status window.
To save battery power, set the mobile computer to turn off after a specified number of minutes.
Page 23

Configuring the Mobile Computer
•
To customize the mobile computer settings, refer to the Microsoft Applications for Symbol Devices User
Guide.
•
To set up ActiveSync to synchronize the mobile computer with the host computer, see the MC90 9X Integrator
, P/N: 72E-72216-xx.
Guide
•
To configure the mobile computer for WLAN network, see the MC909X Integrator Guide, P/N: 72E-72216-xx.
•
To configure the mobile computer using the Rapid Deployment Client, see the MC909X Integrator Guide, P/N:
72E-72216-xx
•
To set up AirBEAM to synchronize the mobile computer with the host server, see the MC90 9X Integrator
Guide
•
To install develo pm e nt so ftware on the de ve lopm en t PC, se e Chapter 3, Application Deployment for Mobile
5.0 and see the MC909X Integrator G uide
.
, P/N: 72E-72216-xx.
Resetting the Mobile Computer
Getting Started 1 - 9
, P/N: 72E-72216-xx.
If the mobile computer stops responding to input, reset it. There are two reset functions, warm boot and cold boot.
A warm boot restarts the mobile computer by closing all running programs.
A cold boot also restarts th e mobile computer, but erases all stored records and entries in RAM. Data saved in flash
memory or a memory card is not lost. In addition it returns formats, preferences and other settings to the factory
default settings.
Perform a warm boot first. This rest art s the mobile computer an d saves all stored records and entries. If the mobile
computer still does not respond, perform a cold boot.
Performing a Warm Boot
Hold down the Power button for approximately five seconds. As soon as the mobile computer starts to perform a
warm boot release the Power button.
Performing a Cold Boot
A cold boot restarts the mobile computer and er ases all user stor ed records and entries that are not saved in flash
memory (Application and Platform folders) or a memo ry card. Never pe rfor m a cold boo t unless a warm boo t d oes
not solve the problem.
CAUTION Do not hold down any key, button or the trigger, other than the Power button during a reset.
Performing a cold boot restores formats, preferences and other settings to the default settings.
NOTE Any data previously synchronized with a computer can be restored during the next ActiveSync operation.
Page 24

1 - 10 MC9090-G RFID Integrator Guide Supplement
Perform a Cold Boot:
1. Press the primary battery release on the mobile computer to partially eject the battery from the mobile
computer.
2. On an MC9090-G, while the battery is partially released, simultaneously press and release the trigger and the
Power button.
3. Push the battery to fully re-insert it in the mobile computer. One au dible click can be heard as the battery is fully
inserted.
4. The mobile computer initializes.
Performing a Clean Boot
CAUTION A clean boot shoul d only be performed by an authorized system administrator.
The mobile computer must be connected to AC power during a clean boot. Removing AC power from the
mobile computer during a clean boot may render the mobile computer inoperable.
A clean boot resets the mobile computer to the fa ctory default setting s. All dat a is th e Application folder is retained.
The Clean Boot Package file must be downloaded from the Symbol Support Central and installed on the mobile
computer before performing a clean boot.
To perform a clean boot:
1. Download the Clean Boot Package from the Symbol Support Central. Follow the instructions included in the
package for installing the package onto the mobile computer.
2. Press the primary battery release on the mobile computer to partially eject the battery from the mobile
computer.
3. While the battery is partially released, simultaneously press and release the trigger and the Power button.
NOTE After the battery is inserted, the trigger or left scan button must be pressed within two seconds.
4. Push the battery to fully insert it in the mobile computer. One audible click can be heard as the battery is fully
inserted.
5. Press and hold the trigger.
6. Connect the mobile computer to AC power using the CAM or inse rt the mobile co mputer into a powered cradle.
7. The mobile computer updates and then re-boots.
8. The calibration screen appears.
Page 25

Battery Management
Battery Saving Tips
•
Leave the mobile computer connected to AC power at all times when not in use.
•
Set the mobile computer to turn off after a short period of non-use.
•
Set the display and keyboard backlight to turn off after a short period of non-use.
•
Turn off all wireless radio activity when not in use.
•
Power off the mobile computer when charging to charge at a faster rate.
Changing the Power Settings
To set the mobile computer to turn off after a short period of non-use:
1. On devices with Windows Mobile 5.0, tap Start > Settings > System tab > Power icon > Advanced tab.
Getting Started 1 - 11
2. Select the On battery power: Turn off device if not used for: check box and select a value from the drop-down list
box.
3. Tap OK.
Changing the Display Backlight Settings
To change the display backlight settings in order to conserve more battery power:
1. On devices with Windows Mobile 5.0, tap Start > Settings > System tab > Backlight icon > Battery Power tab.
2. Select the On battery power: Disable backlight if not used for: check box and select a value from the drop-down
list box.
3. Tap th e Brightness tab.
4. Tap th e Dis able backlight check box to completely turn off the display backlight.
5. Use the slider to set the brightness of the backlight. Set it to a low value to save battery power.
6. Tap OK.
Page 26

1 - 12 MC9090-G RFID Integrator Guide Supplement
Changing the Keypad Backlight Settings
To chang e th e key pad backlig ht sett ing s in or de r to cons er ve mor e battery power:
1. On devices with Windows Mobile 5.0, tap Start > Settings > System tab > Keylight icon > Battery Power tab.
2. Select the On battery power: Disable keylight if not used for: check box and select a value from the drop-down
list box.
3. Tap th e Advanced tab.
4. Tap th e Dis able keylight check box to completely turn off the display backlight.
5. Tap OK.
Turning the Radios Off
WLAN Radio on Windows Mobile 5.0
To turn off the WLAN radio tap the Signal Strength icon and select Disable Radio. A red X appears across the icon
indicating that the radio is disabled (off).
To turn the radio back on, tap the
indicating that the radio is enabled (on).
The MC909X Integrator Guide, P/N: 72E-72216-xx provides the wireless applications support information
applicable to the MC9090-G RFID mobile computer.
Signal Strength icon and select Enable Radio. The red X disappears from the icon
Bluetooth and WAN Radios on Windows Mobile 5.0
NOTE The Flight Mode feature only turns off the WAN and Bluetooth radios. The WLAN radio must be turned off
separately.
To turn off the Bluetooth and WAN radios:
Tap the
Turn On Flight Mode.
To turn off the Bluetooth and WAN radios, tap the
Antenna/Signal icon (on WAN devices) and select Turn On Flight Mode.
The MC909X User Guide, P/N: 72E-72215-xx provides the Bluetooth support information applicable to the
MC9090-G RFID mobile computer.
Connectivity icon (on non-WAN devices) or the Antenna/Signal icon (on WAN devices) and sele ct
Connectivity icon (on non-WAN devices) or the
Page 27
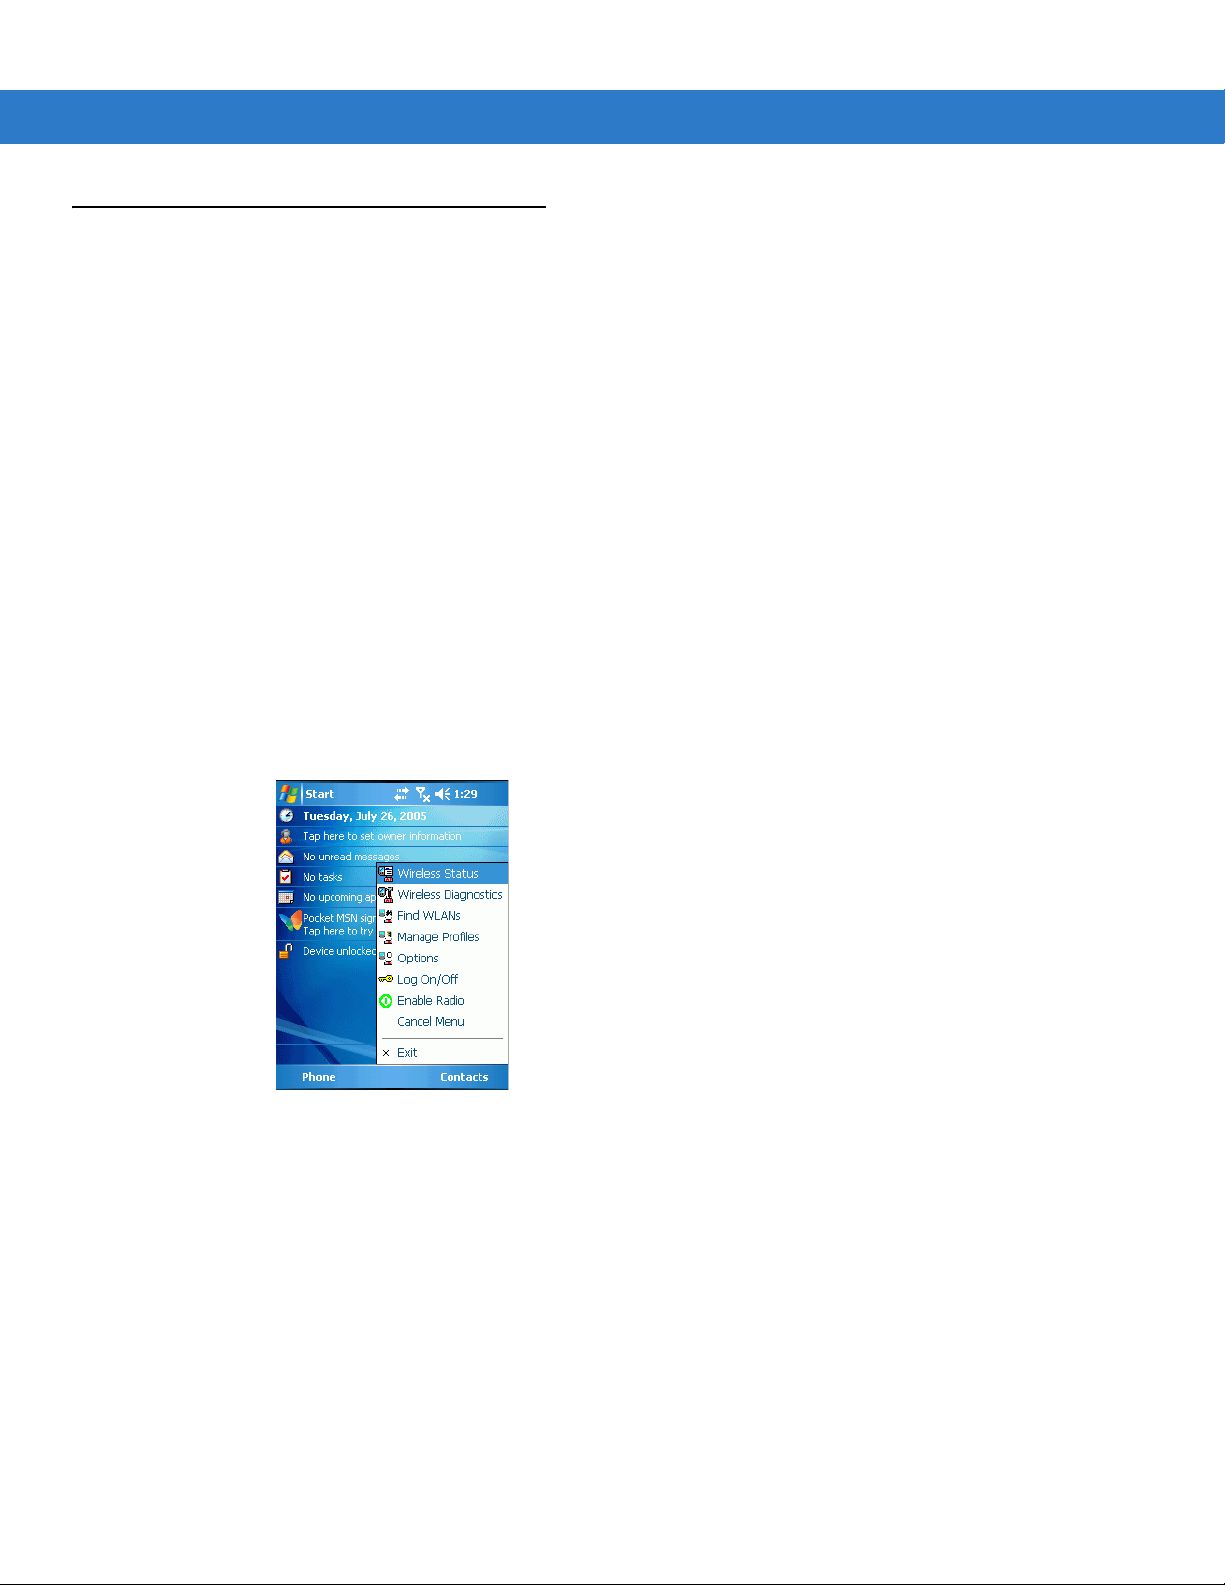
Wireless Applications
Wireless Local Area Networks (WLANs) allow mobile computers to communicate wirelessly and send captured
data to a host device in real time. Before using the mobile computer on a WLAN, the facility must be set up with the
required hardware to run the wireless LAN and the mobile computer must be configured. Refer to the
documentation provided with the access points (APs) for instructions on setting up the hardware.
To configure the mobile computer, a set of wireless applications provide the tools to configure and test the wireless
radio in the mobile computer. The
applications:
•
Wireless Status
•
Wireless Diagnostics
•
Find WLANs
•
Manage Profiles
•
Options
•
Enable/Disable Radio
Getting Started 1 - 13
Wireless Application menu on the task tray provides the following wireless
•
Log On/Off
Tap th e
The MC909X Integrator Guide, P/N: 72E-72216-xx provides the wireless applications support information
applicable to the MC9090-G RFID mobile computer.
Signal Strength icon to display the Wireless Applications menu.
Figure 1-5
Wireless Applications Menu
Page 28

1 - 14 MC9090-G RFID Integrator Guide Supplement
ActiveSync
To communicate with various host devices, install Microsoft ActiveSync (version 4.1 or higher) on the host
computer. Use ActiveSync to synchronize information on the mobile computer with information on the host
computer. Changes made on the mobile computer or host computer appear in both places after synchronization.
ActiveSync software:
•
Allows working with mobile computer-compatible host applications on the host computer. ActiveSync
replicates data from the mobile computer so the host application can view, enter, and modify data on the
mobile computer.
•
Synchronizes files between the mobile computer and host computer, converting the files to the correct
format.
•
Backs up the data stored on the mobile computer. Synchronization is a one-step procedure that ensures the
data is always safe and up-to-date.
•
Copies (rather than synchronizes) files between the mobile computer and host computer.
•
Controls when synchronization occurs by selecting a synchronization mode, e.g., set to synchronize
continually while the mobile computer is connected to the host computer, or set to only synchronize on
command.
•
Selects the types of information to synchronize and control how much data is synchronized.
The MC909X Integrator Guide, P/N: 72E-72216-xx provides the ActiveSync support information applicable to the
MC9090-G RFID mobile computer.
Page 29

Chapter 2 Accessories
Introduction
The series 9000 accessories provide a wide variety of product support capabilities. Accessories include cradles,
keypads, Magnetic Stripe Reader (MSR) and Cable Adapter Module (CAM) snap-on, four slot spare battery
charger, head phone, Multimedia Card (MMC), Secur e Device (SD) card, Universal Battery Charger (UBC) adapter ,
wall mounting bracket and shelf slide.
Keypads
The mobile computer has interchangeable modular keyp ads. However, only the 53-Key RFID keypad can be used
with the MC9090-G RFID mobile computer. The modular keypad can be changed in the field as necessary. The
MC909X Integrator Guide, P/N: 72E-72216-xx provides the keypad support information applicable to the
MC9090-G RFID mobile computer:
•
53-key RFID keypad
Cradles
The MC909X Integrator Guide, P/N: 72E-72216-xx provides the cradle support information applicab le to the
MC9090-G RFID mobile computer:
•
Single Slot Serial/USB cradle charges the mobile computer main battery and a spare battery. It also
synchronizes the mobile computer with a host computer through either a serial or a USB connection.
•
Four Slot Charge Only cradle charges the mobile computer main battery.
•
Four Slot Ethernet cradle charges the mobile computer main battery and synchronizes the mobile computer
with a host computer through an Ethernet connection.
Page 30

2 - 2 MC9090-G RFID Integrator Guide Supplement
Miscellaneous
The MC909X Integrator Guide, P/N: 72E-72216-xx provides the miscellaneous support information applicable to
the MC9090-G RFID mobile computer:
•
Four Slot Spare Battery Charger charges up to four mobile computer spare batteries.
•
Headphone can be used in noisy environments.
•
Modem Module enables data communication between the mobile computer and a host computer, remotely
through the phone lines, and synchronizes information betwee n the mobile computer and a host computer.
•
Multimedia Card (MMC) provides secondary non-volatile storage. (An SD card may also be used.)
•
UBC adapter adapts the UBC for use with the MC9000 batteries.
•
Wall Mounting Bracket and Shelf Slide can be used for wall mounting applications.
Snap-on Modules
The MC909X Integrator Guide, P/N: 72E-72216-xx provides the sna p-on mo dule suppor t in forma ti on ap plicable to
the MC9090-G RFID mobile computer:
•
MSR connects on to the mobile computer and adds magstripe read capabilities.
•
CAM connects on to the mobile computer and is used to connect cables to the mo bile computer.
Both of the snap-on modules use the cables listed below:
•
AC line cord (country-specific) and power supply, charges the mobile computer.
•
Auto charge cable, charges the mobile computer using a vehicle cigarette lighter.
•
DEX cable, connects the mobile computer to a vending machine.
•
Serial cable, adds serial communication capabilities.
•
USB cable, adds USB communication capabilities.
•
Printer cable, adds printer communication capabilities.
Page 31

Keypad
The mobile computer has a modular keypad. The modular keyp ad can be removed in the field as necessary.
Keypad removal is required to replace the MMC card.
Keypad Removal
1. Press the Power button to suspend the mobile computer.
2. Remove the two keypad screws. Slide the keypad down and lift up.
Getting Started 2 - 3
CAUTION Do not remove the keypad while the mobile computer is on and do not operate the mobile computer
with the keypad detached. Follow proper Electro-Static Discharge (ESD) precautions to avoid
damaging the MMC and SD card. Proper ESD precautions include, but are not limited to, working on
an ESD mat and ensuring that the operator is properly grounded.
MC909X keypads are not interchangeable with MC9090-G RFID keypad.
Screws
Keypad
Figure 2-1
Removing the Keypad
CAUTION Do not apply more than 4 in-lbs of torque when tightening the keypad screws.
3. Replace the keypad and re-attach using the two screws.
Multi Media Card Holder
Page 32

2 - 4 MC9090-G RFID Integrator Guide Supplement
Figure 2-2
4. Perform a cold boot (see Performing a Cold Boot on page 1-9).
Installing the Keypad
Multi Media Card (MMC) / Secure Device (SD) Card
The MMC provides secondary non-volatile storage. T he MMC is located under the keyp ad (see Figure 2-1 o n page
2-3).
NOTE SD cards are inter-operable with MMC cards and can also be used in MC9090-G RFID mobile
computers.
CAUTION Do not remove the keypad while the mobile computer is on and do not operate the mobile computer
with the keypad detached. Follow proper ESD precautions to avoid damaging the MMC/SD. Proper
ESD precautions include, but are not limited to, working on an ESD mat and ensuring that the
operator is properly grounded.
To insert the MMC/SD card:
1. Press the Power button to suspend the mobile computer.
2. Remove the two keypad screws and slide the keypad down and lift off (see Figure 2-1 on page 2-3).
3. Lift the MMC/SD retaining door.
4. Position the MMC/SD card, with the contacts down, into the MMC/SD holder. The MMC/SD card corner notch
fits into the holder only one way.
5. Snap the retaining door closed.
Page 33

MMC/SD
MMC/SD Retaining Door
Getting Started 2 - 5
Figure 2-3
Inserting the MMC/SD
CAUTION Do not apply more than 4 in-lbs of torque when tightening the keypad screws.
6. Replace the keypad and re-attach using the two screws (see Figure 2-2 on page 2-4).
Page 34

2 - 6 MC9090-G RFID Integrator Guide Supplement
Page 35

Chapter 3 Application Deployment for Mobile 5.0
Introduction
This chapter describes features available in Windows Mobile 5.0 including new security features, how to package
applications, and procedures for deploying applications onto the mobile computer. The MC909X Integrator Guide,
P/N: 72E-72216-xx provides the detailed information on these topics.
Security
The mobile computers implement a set of security policies that determine whether an application is allowed to run
and, if allowed, with what level of trust. The security configuration of the device must be available to develop an
application, as well as the ability to sign an application with the appropriate certificate to allow the application to run
(and to run with the needed level of trust). The MC909X Integrator Guide, P/N: 72E-72216- xx provides the security
support information applicable to the MC9090-G RFID mobile computer. Information on the following topics is
provided:
•
•
•
•
Packaging
Packaging combines an application executable files into a single file, called a package. This makes it easier to
deploy and install an application to the mobile computer. Package new a pplications and upda tes, such as new DLL
files, as CAB files, then deploy them to Windows Mobile 5.0 devices. Refer to the Microsoft Windows Mobile 5.0
Help file for information on CAB files.
Application Security
Digital Signatures
Device Management Security
Remote API Security
Page 36

3 - 2 MC9090-G RFID Integrator Guide Supplement
Deployment
To install applications onto the mobile computer, developers package the application and all required files into a
CAB file, then load the file onto the mobile computer using one of the following options:
•
Microsoft ActiveSync 4.1 or greater
•
Storage Card
•
AirBEAM
•
Image Update (for updating the operating system).
Refer to the Microsoft Windows Mobile 5.0 Help file for information on CAB files.
The MC909X Integrator Guide, P/N: 72E-72216-xx provides the deployment support information applicable to the
MC9090-G RFID mobile computer. Information on the following topics is provided:
•
Installation Using ActiveSync
•
Installation Using Storage Card
•
Installation Using AirBEAM
•
Image Update
•
Creating a Splash Screen
XML Provisioning
To configure the settings on a mobile computer XML provisioning should be used. To install an XML provisioning
file on the mobile computer, create a Cabinet Provisioning File (CPF) file. A CPF file is similar to a CAB file and
contains just one file: _setup.xml. Like a CAB file, the CPF extension is associated with WCELoad.EXE. Opening a
CPF extracts the XML code and uses it to provision and configure the mobile computer. The user receives an
e-mail notification indicating success or failure.
XML Provisioning provides the ability to configure various features of the mobile computer (i.e., registry and file
system). However, some settings require security privileges. To change registry settings via a CPF file, certain
privileges (roles) are required. Some registry keys require only an Authenticated User, while other registry keys
require a Manager. Refer to the Windows Mobile 5.0 Help file, Metabase Settings for Registry Configuration
Service Provider section, for the default role settings in Windows Mobile 5.0.
For those registry settings that require the Manager role, the CPF file must be signed with a privileged certificate
installed on the device. Refer to the Microsoft Windows Mobile 5.0 Help file and the Windows Mobile 5.0 SDK for
instructions and sample test certificates.
The MC909X Integrator Guide, P/N: 72E-72216-xx provides the XML Provisioning support information applicable
to the MC9090-G RFID mobile computer. Information on the following topics is provided:
•
Creating an XML Provisioning File
•
XML Provisioning vs. RegMerge and CopyFiles
Page 37

Storage
The MC909X Integrator Guide, P/N: 72E-72216-xx provides the support information applicable to the MC9090- G
RFID mobile computer for the three types of file Windows Mobile 5.0 file storage. Information on the following
topics is provided:
•
Random Access Memory (RAM)
•
Persistent Storage
•
Application folder.
System Configuration Manager
The System Configuration Manager (SCM) is a utility that runs on the development computer and is used to create
configuration files. These files, when deployed to an mobile computer, set configuration p arameters for that device.
The configurable options for a mobile computer are defined in an XML file that is available on the Symbol OSS for
that mobile computer. SCM is also available on Symbol OSS.
Application Deployment for Mobile 5.0 3 - 3
SCM eliminates the potential user errors that occur when manually editing registry settings. The MC909X
Integrator Guide, P/N: 72E-72216-xx provides the SCM support information applicable to the MC909 0-G RFID
mobile computer. Information on the following topics is provided:
•
File Types
•
User Interface
•
File Deployment
Rapid Deployment Client
The Rapid Deployment (RD) Client facilitates software downloads to a mobile computer from a Mobility Services
Platform (MSP) Console FTP server. The MSP Console is a web-based interface to the wireless infrastructure
monitoring and management tools provided by the MSP Lite or MSP Enterprise server.
When software packages are transferred to the FTP server, the mobile computer on the wireless netwo rk can
download them. The location of software packages are encoded in RD bar codes. When the mobile computer
scans a bar code(s), the software package(s) is downloaded from the FTP server to the mobile computer. Multiple
mobile computers can scan a single RD bar code. The MC909X Integrator Guide, P/N: 72E- 72216-xx provides the
RD support information applicable to the MC9090-G RFID mobile computer. Information on the following topics is
provided:
•
Rapid Deployment Window
•
Scanning RD Bar Codes
Page 38

3 - 4 MC9090-G RFID Integrator Guide Supplement
AirBEAM Smart
The AirBEAM Smart product allows specially designed software packages to be transferred between a host server
and Symbol wireless handheld devices. Before transfer, AirBEAM Smart checks and compares package versions,
so that only updated packages are loaded.
AirBEAM Smart resides on radio-equipped clien t de vice s and allows them to re qu e st, down load , an d install
software, as well as to upload files and status data. A single communications session performs both file download
and upload. The ability to transfer software over a radio network can greatly reduce the logistical efforts of client
software management. The MC909X Integrator Guide, P/N: 72E-72216-xx provides the AirBEAM Smart support
information applicable to the MC9090-G RFID mobile computer. Information on the following topics is provided:
•
AirBEAM Package Builder
•
AirBEAM Smart Client
•
Synchronizing with the Server
•
AirBEAM Staging
Symbol Mobility Developer Kits
The Symbol Mobility Developer Kit (SMDK) family of products supports developing applications that take
advantage of the capture, move and manage capabilities of the mobile computers. Go to the Symbol OSS to
download the appropriate developer kit.
Page 39

Chapter 4 RFID Demo Application
Introduction
Application developers can use the RFIDDemo Application on page 4-2 for an overview of how the application
works and to assist in application development.
NOTE The screens and windows are provided for illustration purposes only and may differ from actual screens.
The applications described may not be available on (or applicable to) all devices.
Procedures are not device specific and are intended to provide a functional overview.
The RFIDDemo application is provided for the purpose of demonstration and are not designed for
production environments.
The reader has the capability to program, erase and write; Gen2 tags. The current RFIDDemo application
only provides an example for programming tags.
The RFIDDemo is not provided with source code. However, a sample, named RFID sample, is provided
in the SMDK for C.
Page 40

4 - 2 MC9090-G RFID Integrator Guide Supplement
RFIDDemo Application
The RFIDDemo application is provided as a demo application to be used by developers in developing customized
production applications. The application is viewed on a host computer using a remote viewing application (not
provided). The RFIDDemo application is provided for the purpose of demonstration and is intended to be used
as-is.
Gen2 tags can be read, programmed, erased, written locked and killed. Each tag contains the EPC number (64 or
96 bits), CRC and kill code. In addition, data can be collected by decoding in-range EPC Gen2 RFID tags.
NOTE The reader is optimized to read only Gen 2 tags and the default setting on the RFIDDemo application are
set to read and write only Gen2 tags.
The reader has the capability to read, program, erase, write lock and kill; Gen2 tags. The current
RFIDDemo application only provides an example for programming tags.
When the read command is initiated, the reader interrogates all of the RFID tags within the radio frequency (RF)
field of view. The reader captur es data fr om each ne w tag foun d and adds it to the list box in the main Tags window.
When the read command is stopped, the reader stops interrogating tags.
Perform the following procedures to setup and use the RFIDDemo application:
•
Setup the local host computer display.
Setup a host computer to view the MC9090-G RFID menus.
•
Setup the LAN host.
The LAN host computer must be setup to receive the tag data.
•
Setup the wireless connection.
See the MC909X Integrator Guide
connection.
•
Launch the RFIDDemo application.
, P/N: 72E-72216-xx for information on setting up the wireless
Using RFIDDemo to Read Tags From a Remote Reader
The RFIDDemo can reside on many CE4.2/CE5.0 and Mobile based devices including Motorola's RD5000,
MC90xx readers, WIN CE based VRCs, and XR Series products.
On devices that have integrated RFID reading, the RFIDDemo automatically finds and connects to the integrated
RFID reader. These readers include RD5000, MC90xx, and XR Series.
On devices that do not have an integrated RFID reading capability, the RFIDDemo must be configured to connect
to the remote RFID reader using the reader IP address and port number 3000.
The settings screen is described in Device Settings on page 4-5.
Page 41

Launching the RFIDDemo Application
From the Main Window double-tap the RFIDDemo application icon to start the RFIDDemo application. It also
displays battery status and the air protocols supported by the device.
When the RFIDDemo application is launched, the RFIDDemo Load window displays. It displays version of RFID
API, reader firmware, the air protocols an d the RFID demo application.
RFID Demo Application 4 - 3
Figure 4-1
Tap th e File button to select the file menu options. See File Menu Options on page 4-4 for more information.
Tap th e Settings button to modify the RFIDDemo application settings. See Device Settings on page 4-5 for
detailed settings information.
Tap th e Start Reading button to initiate the tag read. See Read Tags on page 4-16 for detailed information.
Tap the Remove SR button to remove the select record from the list. See Tag Access Parameters on p age 4-10 for
detailed information.
RFIDDemo Load Window
Page 42

4 - 4 MC9090-G RFID Integrator Guide Supplement
File Menu Options
The RFIDDemo File Menu Options include:
•
About
•
Device Settings
•
Tag Access Parameters
•
Program Tag
•
Exit
Figure 4-2
File Menu Options Window
About
The About window displays the demo application version information
Figure 4-3
About Window
Page 43
RFID Demo Application 4 - 5
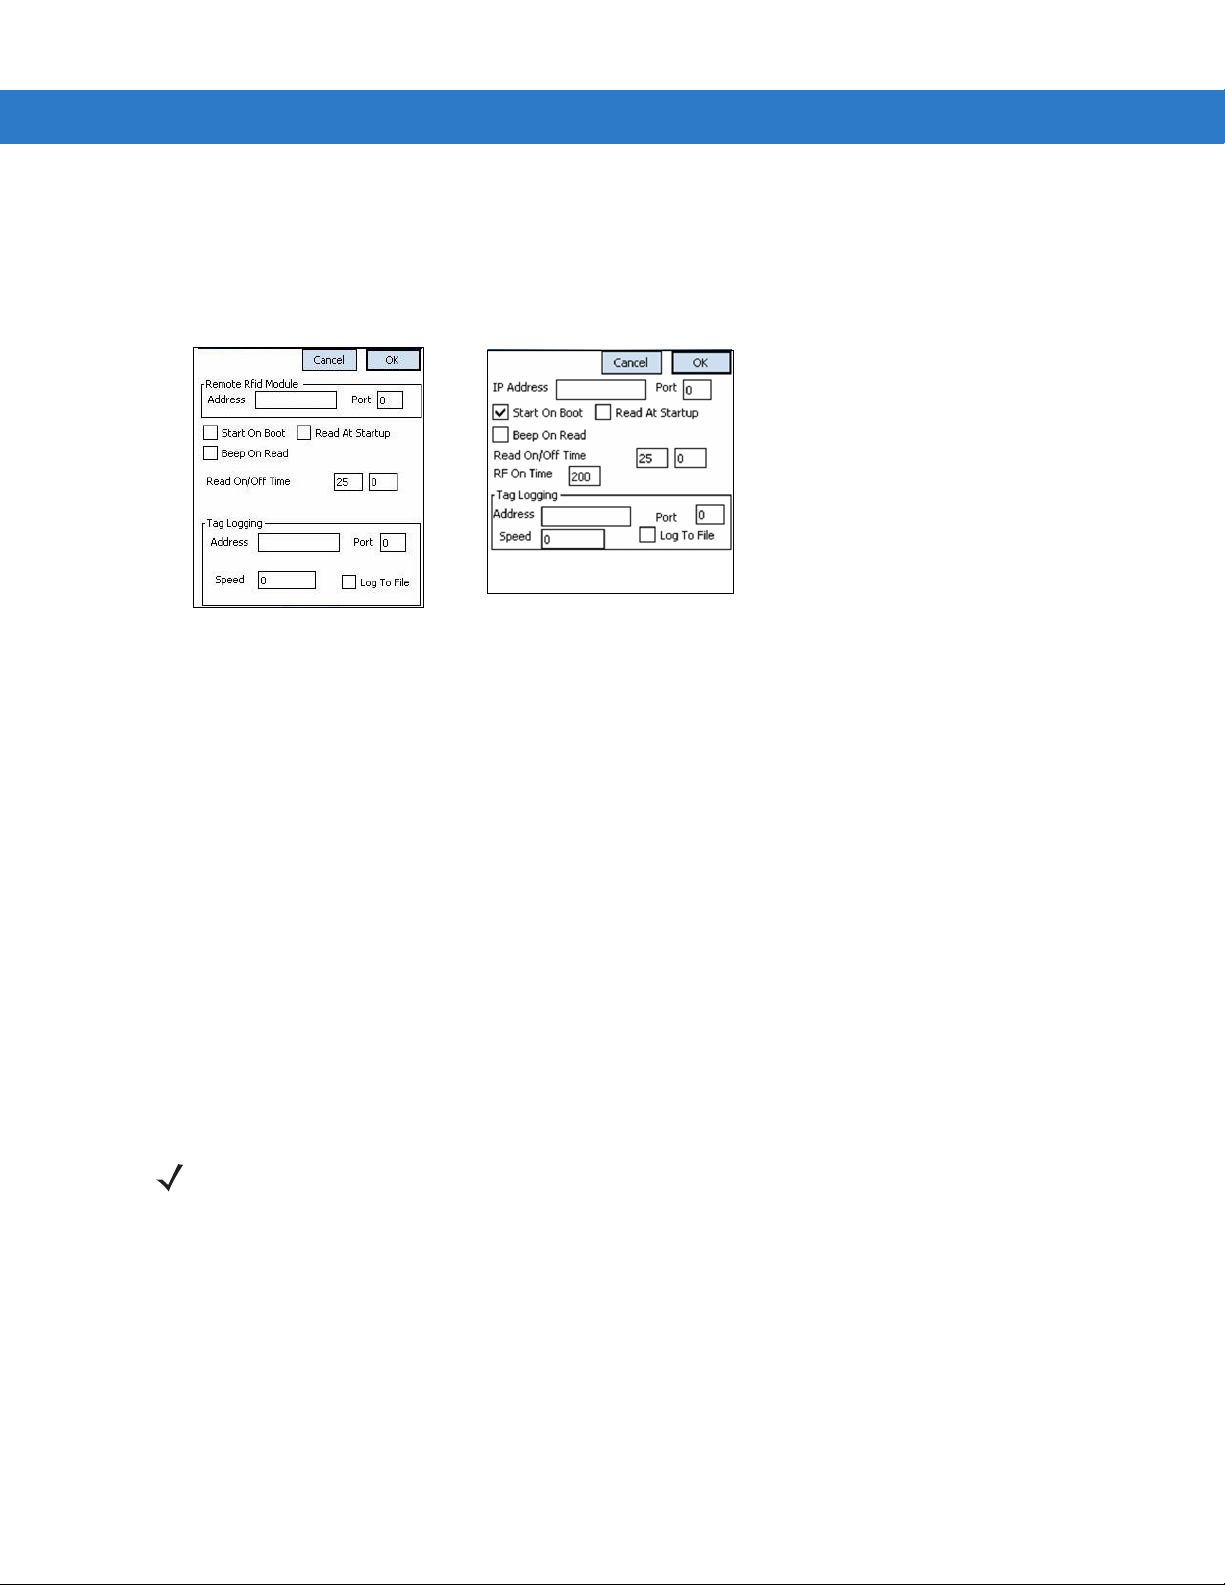
Device Settings
The RFIDDemo behavior is configurable. Tap on Settings from the RFIDDemo Load Window on page 4-3 or from
File->Device Settings, RFID- Settings window appears. These settings are persistent and will be restored on a
device cold boot (see Performing a Cold Boot on page 1-9). Once the settings have been modified, exit and
relaunch application to enable new settings.
Standard Settings Window EU Settings Window
Figure 4-4
Settings Window
Reader Device Settings:
•
IP Address:
By default, the demo attempts to find a reader o n the local COM port s. If th e RFIDDemo ap plication needs to
find a reader at a specific IP Address, enter the address in the text box. It can be an IP address by name, or
number (i.e. 192.168.1.1, or www.deviceaddress.com).
•
Port:
If the IP address is configured, configure the port as well. The default port setting is 3000.
•
Start On Boot:
Check to launch the RFIDDemo application on a warm or cold boot. When used with Read At Startup, the
application will start on boot and read.
•
Read At Startup:
Check this box to have the application start reading as soon as the application is launched.
•
Beep On Read:
Check this box to have the device beep on every tag read.
•
Read On Time / OffTime:
When reading starts, it will read for On Time (in seconds), then pause reading for Off Time (in seconds).
NOTE The RF On Time setting is available only on the EU configuration. It is used to comply with the EU
regulatory specifications. Per the EU standards, duty cycle is set to 10%.
•
RF On Time represents the RF power continuously on time, before the unit is shut down in order to meet
duty cycle limit.
Range: 1 - 255; Units = 5 milliseconds.
The minimum On time is 5 msec and max On time is 1275 msec.
Page 44

4 - 6 MC9090-G RFID Integrator Guide Supplement
Tag Logging
If Tag Logg in g is con fig ur ed , all tags will be for wa rded to the serial port, or to an IP address/port.
•
Address:
This can be an IP address, or COM port. If it is a COMPOR T, enter "COM1:", etc… (a Bluetooth COM port
can be configured here as well).
•
Port:
The IP Port number or the COMPORT (i.e. if Address is COM1:, put 1 here).
•
Speed:
This is only used for the COM port. Can be up to 115200.
•
Log To File:
Check this box to save all logging to a file. If an external location is not specified the log file is saved in a file
named Taglog.txt on the reader root directory.
NOTE The comport is currently configured for 8 bits, no parity, 1 stop bit.
Registry Settings Description
The RFIDDemo registry file restore s the demo settings after a cold boot (see Performing a Cold Boot on pa ge 1-9).
If this file is edited, the settings will not be implemented until a cold boot occurs. Alternatively, on some Motorola
devices, the registry file can be launched. When this is done, a prompt appears asking the user to choose whether
to merge these settings into the registry. The next time the demo is launched, it will use the settings in this file. Do
not perform this function while the demo is running. The Gemini_RFID.exe demo also uses many of these registry
settings and can be used to registry settings. Do not launch the Gemini_RFID.exe demo while the RFIDDemo is
running. Tab le 4-1 on page 4-7 provides the RFIDDemo registry file example.
NOTE All DWORD values must be in hex notation.
Page 45

RFID Demo Application 4 - 7
Table 4-1
; *****************************************************************************************************
; RFIDDemo Registry File. This file will restore the demo settings after a cold boot.
; If you edit this file, the settings will not take affect until a cold boot occurs. Alternatively,
; on some Symbol Terminals, the registry file can be launched. When this is done, you will be
; prompted whether or not you want to merge these settings into the registry. The next time the demo is
; launched, it will use the settings in this file. (Make sure you are not running the demo when you do this!!!)
; The Gemini_RFID.exe demo also uses many of these registry settings, and in fact, can be used to registry settings
; (Also, make sure RFIDDemo is not running when launching the Gemini_RFID.exe demo.)
;
; NOTE: ALL DWORD VALUES NEED TO BE IN HEX NOTATION.
; *****************************************************************************************************
[HKEY_LOCAL_MACHINE\SOFTWARE\SYMBOL\RFIDDemo]
; If 1, then beep on all tag reads. If 0, do not beep.
"RFIDDEMO_BEEPER_ENABLED"=dword:1
; If 0, the demo will read continuously.
"RFIDEMO_AUTONOMOUS_MODE_ONTIME"=dword:0000 61A8
; If 0, the demo will read continuously. Otherwise, it will stop for this many ms.
"RFIDEMO_AUTONOMOUS_MODE_OFFTIME"=dword:000000 00
Registry File Example
; If 1, the demo will start reading automatically after finding a RFID reader.
"RFIDEMO_READ_TAGS_ON _LAUN CH"=dword:0
; If 1, the demo will start automatically upon the next warm or cold boot of the device.
"RFIDEMO_STAR T_APP_ON_BOOT"=dword:0
; Any number less than 16 is a com port number. Greater than 16 is a TCP/IP port number.
"RFIDEMO_LOGGING_PORT_NUMBER"=dword:00000000
; Com Port baud rate for logging tags. Not used for TCP/IP connections.
; Common baud rates are:(USE HEX) (9600 = hex 2580) (38400 = hex 9600) (11 5200 = hex 1C200 ).
"RFIDEMO_LOGGING_PORT_BAUDRATE"=dword:00000000
; Name of port where logging will occur. For COM ports, use COM1: COM2:, etc...
; For TCP/IP Ports, use valid IP address, i.e. 192.168.1.1 localhost www.mysitename.com...
"RFIDEMO_LOGGING_PORT_NAME"=""
"RFIDEMO_LOGGING_TO_FILE"="1"
; If this is set, then the demo will attempt to contact an RFID reader at this port. (3000 is BB8 in hex)
"RFIDDEMO_READER_IP_PORT"=dword:00000000
; RF OnTime
"RFIDDEMO_READER_RF_ONTIME"=dword:0000003C
Page 46

4 - 8 MC9090-G RFID Integrator Guide Supplement
Table 4-1
; If this is set, then the demo will attempt to contact an RFID reader at this address.
"RFIDDEMO_READER_IP_ADDRESS"=""
; Attenuation level for reading tags. 0 is full power, 255 is low power. (Use hex values 00 - FF)
"RFID_READCAP_RF_ATTENUATION"=dword:00000000
"RFID_READCAP_RF_ATTENUATION2"=dword:00000000
; Order in which to issue read commands. Antenna 0, Antenna 1, etc ...
"RFID_DEVCAP_ANTENNA_SEQUENCE"=hex:00
; Enabled types of tag to read: a 0 means disabled, 1 means enabled.
; Each byte is as follows: C0 C1 G2
"RFID_TAGCAP_ENABLED_TYP ES"=hex:00,00,00,00,01,00
; The RFIDAPI allows duty cycle control on a micro level during tag reading.
; The on time is in ms. The off time is as a percent of the total on time.
"RFID_READCAP_DUTYCYCLE_ONTIME"=dword:00000000
"RFID_READCAP_DUTYCYCLE_OFFTIME_PCNT"=dword:00000000
"RFIDDEMO_MPS_MOTION_ENABLED"=dword:00000000
"RFIDDEMO_MPS_MOTION_X_THRESHOLD"=dword:0000015E
"RFIDDEMO_MPS_MOTION_Y_THRESHOLD"=dword:0000015E
"RFIDDEMO_MPS_MOTION_Z_THRESHOLD"=dword:0000015E
"RFIDDEMO_MPS_PROX_ENABLED"=dword:00000001
"RFIDDEMO_MPS_PROX_EVENT_MASK"=dword:0000FE7F
"RFIDDEMO_MPS_PROX_POLL_TIME_MS"=dword:00000064
"RFIDDEMO_MPS_PROX_READ_THRESHOLD"=dword:00000000
"RFIDDEMO_MPS_VEL_MIN_DET_X_THRESHOLD"=dword:00000014
"RFIDDEMO_MPS_VEL_MIN_DET_Y_THRESHOLD"=dword:00000014
"RFIDDEMO_MPS_VEL_MIN_DET_Z_THRESHOLD"=dword:00000014
"RFIDDEMO_MPS_VEL_MIN_START_X_THRESHOLD"=dword:000 0004 B
"RFIDDEMO_MPS_VEL_MIN_START_Y_THRESHOLD"=dword:000 0003 2
"RFIDDEMO_MPS_VEL_MIN_START_Z_THRESHOLD"=dword:000000 64
"RFIDDEMO_MPS_VEL_RECAL_X_THRESHOLD"=dword:0000012C
"RFIDDEMO_MPS_VEL_RECAL_Y_THRESHOLD"=dword:0000012C
"RFIDDEMO_MPS_VEL_RECAL_Z_THRESHOLD"=dword:00000BB8
"RFIDDEMO_MPS_VEL_MISC_X_THRESHOLD"=dword:000000FA
"RFIDDEMO_MPS_VEL_MISC_Y_THRESHOLD"=dword:000007D0
"RFIDDEMO_MPS_VEL_MISC_Z_THRESHOLD"=dword:00000005
; Word Length of the tag to be read
"RFID_READCAP_WORD_LENG TH"=dword:2
Registry File Example (Continued)
; Mem Bank of the tag to be read
"RFID_DEVCAP_MEM_BANK"=dword:1
; Word offset from where to start reading.
"RFID_DEVCAP_WORD_OFFSET"=dword:1
; Attenuation level for writing tags. 0 is full power, 255 is low power. (Use hex values 00 - FF)
"RFID_WRITECAP_RF_ATTENUATION"=dword:00000000
; Order in which to issue write commands. Antenna 0, Antenna 1, etc ...
"RFID_WRITECAP_ANTENNA_SEQUENCE"=hex:00
Page 47

RFID Demo Application 4 - 9
Table 4-1
; SL bit of the tag to be accessed
"RFID_DEVCAP_SEL"=dword:00000000
; Session to be used for tag access
"RFID_DEVCAP_SESSION"=dword:00000000
; Starting Q for tag access operation
"RFID_DEVCAP_STARTING_Q"=dword:00000006
; Target Inventory for tag access operation
"RFID_DEVCAP_TARGET_INVENTORY"=dword:000 00000
; Write options
"RFID_DEVCAP_WRITE_OPTIONS"=dword:00000001
; Action to be performed on add select record
"RFID_DEVCAP_SEL_ACTION"=dword:00000000
; Select Session to change inventory bit
"RFID_DEVCAP_SEL_TARGET"=dword:00000004
; Select index of Select record to be removed
"RFID_DEVCAP_SEL_INDEX"=dword:00000000
; Mem bank to be locked
"RFID_DEVCAP_LOCK_MEM_BANK"=dword:00000001
Registry File Example (Continued)
; Lock options
"RFID_DEVCAP_LOCK_OPTIONS"=dword:00000003
; Tag Mask Memory
"RFID_DEVCAP_TAG_MASK_MEM"=dword:00000001
; Tag Mask
"RFID_DEVCAP_TAG_MASK"=dword:0002CD10
; Tag Mask header nInit
"RFID_DEVCAP_TAG_MASK_HEADER_NINIT"=dword:00000417
; Tag Mask header StructureFormat
"RFID_DEVCAP_T AG_MA SK_HEAD ER_ST RUCTUR E_FORMAT"=dword:00000000
; Tag Mask header StructureSize
"RFID_DEVCAP_T AG_MA SK_HEAD ER_ST RUCTUR E_SIZE"=dword:00 0000A4
; EPC Mask Bit Length
"RFID_DEVCAP_EPC_MASK_BIT_LEN"=dword:00000000
; Tag Mask Bit Len
"RFID_DEVCAP_TAG_MASK_BIT_LEN"=dword:00000000
; Tag Mask Offset
"RFID_DEVCAP_TAG_MASK_OFFSET"=dword:00000010
Page 48

4 - 10 MC9090-G RFID Integrator Guide Supplement
Tag Access Parameters
The RFIDDemo behavior is configurable. Tap on Settings from the RFIDDemo Load Window on page 4-3 or from
File->Tag Access Params, RFID- Tag Access Params window appears.
Figure 4-5
Settings Window
Reader Tag Access Parameters Settings:
•
Sel:
Ignore SL: All tags can be inventoried; ignore the tag SL (select flag).
SL: Only inventory tags with SL is set.
No SL: Only inventory tags with SL flag is not SET.
•
Session:
S0: Use session S0 for inventory.
S1: Use session S1 for inventory.
S2: Use session S2 for inventory.
S3: Use session S3 for inventory.
•
Target:
A: Only inventory Tags with inventoried bit set to A for Session.
B: Only inventory Tags with inventoried bit set to B for Session.
•
Starting Q(0-15):
Sets the number of slots (=2^Q) in the first Inventory Round of the Inventory Algorithm. A larger starting Q
should be selected for a larger expected number of ta gs (Q = 4 is the recommen ded st arting po int). The RFID
engine firmware will dynamically adjust the Q value as needed.
Table 4-2
Action Matching Non-Matching
0x00 assert SL; inventoried->A deassert SL; inventoried->B
0x01 assert SL; inventoried->A do nothing
0x02 do nothing deassert SL; inventoried->B
0x03 negate SL; A->B, B->A assert SL; inventoried->A
0x04 deassert SL; inventoried->B assert SL; inventoried->A
0x05 deassert SL; inventoried->B do nothing
0x06 do nothing assert SL; inventoried->A
0x07 do nothing negate SL; A->B, B->A
Select Record Settings
Page 49

RFID Demo Application 4 - 11
•
Target
0x00: Modify Session S0 inventoried flag.
0x01: Modify Session S1 inventoried flag.
0x02: Modify Session S2 inventoried flag.
0x03: Modify Session S3 inventoried flag.
0x04: Modify SL flag.
•
Remove Select Record Index
Index of the select record to be removed from the list. This value is taken when remove select record
command is given from the main page.
•
RD PWR A0
Antenna power for read operation.
18 252
19 231
20 210
21 189
22 168
23 147
24 126
25 105
26 84
27 63
28 42
29 21
30 0
•
WR PWR A
Antenna power for write operation. Above table used for conversion.
Page 50

4 - 12 MC9090-G RFID Integrator Guide Supplement
Program Tag
Tap File->Program Tag, RFID- Program Tag window appears.
Figure 4-6
Program Tag Window
Reader Program Tag Settings:
•
Reserved: Reserved memory bank access operation
•
EPC: EPC memory bank access operation
•
TID: TID memory bank access operation
•
PC: Select the check box to display the PC field data along with Tag ID
•
User: User memory bank access operation
•
User Offset:
A16-bit word address at which to start reading/writing. Does not hold good for EPC re ad as EP C rea d always
returns contents of the complete memory bank.
•
Length: Number of 16-bit words to read.
•
Data: Tag Write data is provided.
•
Lock:
Tap
Lock
to send the lock command to the tag. If a valid (non zeros) access password is stored in the tag,
then the access password is required to lock the tag.
•
Kill:
Tap
Kill
to permanently kill the tag. To kill a tag, a valid kill code has to be stored in the tag and kill code is
required to kill the tag
•
Read:
Tap Read
stored in the tag, then password access is required to read the reserved memory bank. Other memory banks
can be read without supplying access password.
•
Write button:
Tap Write to send the write command to the tag. If the tag is locked with valid (non zeros) access password,
then password access is required to write to the tag.
•
EPC Mask:
to send the read command to the tag. If the tag is locked with valid (non zeros) access password
Page 51

RFID Demo Application 4 - 13
If bits of EPC ID are given in this field and Mask bank is selec ted as 1 i.e EPC, then sele ct record is added for
the tag with EPC ID given in the Mask field with the Select Record Settings in theTag Access Params Dialog.
NOTE
When the read tag in the list box is selected, it automatically appears in the Mask field.
•
Tag Mask:
If select record is to be added to a memory bank other than EPC, then the memory bank bits for which select
record is being added are provided here.
•
Mask bank:
Mask bankThe bank for which select record is to be added
0x01: EPC
0x02: TID
0x03: User
NOTE Select Records added remains valid if the user goes from this window to the main window. After that if the
Select record settings are changed from the "Tag Access Params", select record command is sent with
the new settings before any access command. If the user gives "Start Reading" command from the main
page before coming to the program page or tag access page, add select record command is sent with the
previous values of Action and Target and tag mask length as 0, where 0 implies all tags match.
•
Mask Offset
The Mask Offset is the memory word address used for adding select record.
Page 52

4 - 14 MC9090-G RFID Integrator Guide Supplement
Lock Options
To select Lock Options tap File->Lock Options. The RFID- Lock Options window appears.
Figure 4-7
The Lock Options provide the option of locking/unlocking all or individual memory banks. In the reserved memory
bank, access password and kill password can be locked or unlocked separately.
In lock command there are various options which can be selected in this dialog box.
Lock Options Window
Reader Lock Option Settings:
•
Lock
Tag is locked and tag access requires a valid access password.
•
Unlock
Tag is unlocked and tag access requires a valid access password. A tag locked by the Lock option can be
unlocked by this unlock command.
•
Permanent Unlock
The tag is permanently unlocked. It can never be locked again. All other access operations are possible.
•
Permanent Lock
The tag is permanently locked. It can never be unlocked again. Tag write is not possible on this tag.
Page 53

RFID Demo Application 4 - 15
Tag Locking
Tag locking is a two step process:
•
Write the tag access password (see Figure on page 4-12)
•
Lock the tag (see Figure on page 4-14)
To write the access password first enter the access password of the tag:
1. Read the tag.
2. Click on the tag, it appear in the EPC Mask field.The tag is now selected for operations.
3. Write the access password for the tag:
•
Select the Reserved memory bank as the target memory bank.
•
In the Data field write 32 bits of access password (e.g.: 22222222 in the Data field.)
•
Select User Offset as 2 (this is in words) of access password.
4. The following entries should be on the screen:
•
Reserved memory bank should be selected
•
User Offset field
•
Data field, this is the access password
•
EPC Mask field, the tag to write to
5. Click on Write.
6. Once the user has been successfully able write Access password on the tag, the tag can be locked.
To Lock the tag
1. Read the tag.
2. Click on the tag, it appear in the EPC Mask field.The tag is now selected for operations
3. Enter the access password values as programmed (in the case of this example 22222222) in the field next to
Lock.
4. Select the EPC memory bank as the target memory bank to lock the EPC ID field.
5. Select the Lock options, e.g.: EPC bank and Lock or permanently lock.
6. The following entries should be on the screen:
•
EPC memory bank should be selected
•
EPC Mask field, has the tag to write to
•
Lock, this has the Lock password
•
Lock Options have been configured
7. Click on Lock
8. Tag is now locked.
Page 54

4 - 16 MC9090-G RFID Integrator Guide Supplement
To write to a locked tag
1. Read the tag.
2. Click on the tag, it appears in EPC Mask field. The tag is now selected for operations.
3. Select the EPC memory bank as the target memory bank (since the EPC ID field is locked in this example).
4. In the Data field write the new 96 bit EPC ID.
5. Select User Offset as 2 (in words) EPC memory bank.
6. Enter the access password (in the case of this example 22222222) in the field next to Lock.
7. The following should be entered on the screen:
•
EPC memory bank is selected.
•
EPC Mask field, the tag to write to
•
Lock, this has the Lock password
•
User Offset field
•
Data field, this is the new tag ID
8. Click on Write
Read Tags
Tap the Start Reading button, the unit starts to read tags. As the t ags are read th e values are disp layed on
the RFID - Read Window .
NOTE
If the PC check box is selected
along with PC field.
(see Figure 4-6 on page 4-12)
then the tag data is displayed
Figure 4-8
RFID - Read Window
Page 55

RFID Demo Application 4 - 17
Tap th e Remove SR button and the select record is removed from the list. This command is not accepted when
read is going on. If command is given while read is in progr ess the following me ssage a ppe ars in the RFID - R ea d
Window.or the record is removed, success is displayed in the RFID - Read Window.
Figure 4-9
If no select record is found at the given index, then following error message is displayed in the RFID - Read
Window. The Index to remove select record is provided in the tag access page.
Figure 4-10
RFID - Read Window
RFID - Read Window
Page 56

4 - 18 MC9090-G RFID Integrator Guide Supplement
Duty Cycle Paramameters
NOTE
Only the Europeian versions of the MC9090-G RFID, working on specification EN300.220 have
Duty Cycle Params window . Per the ETSI regulations a r eader that operating in compliance
the
with this specification will not transmit more than 10% of the duty cycle
The Duty Cycle Interval is set to one hour. The Duty Cycle Params window displays the current duty cycle
parameter statistics that are calculated using the one hour Duty Cycle Interval.
Tap File->Duty Cycle Params, the Duty Cycle Params window appears.
.
Figure 4-11
Duty Cycle Paramameters:
•
•
•
Duty Cycle Params Window
TIME UNTIL AVAILABLE
Displays the wait (in seconds) until the reader can be used again. The value is zero when the reader is
available.
TX ON TIME
The amount of time (in seconds) the reader has transmitted within the duty cycle interval.
TX ON TIME AVAILABLE
The amount of time (in seconds) the reader can transmit before the duty cycle will be reached.
Page 57

ETSI EN 302-208 Tx-Channel Selection
The ETSI EN302-208 Tx-Channels window is only available on MC9090 EU specification EN302.208 products. A
reader operating within the specification par ameters may operate on any (or all) of the four available channels. By
default all 4 channels will be selected. To select channel(s) select the check box as shown in Figure 4-12.
Tap File->ETSI EN302-208 Tx-Channels, the ETSI EN302-208 Tx-Channels selection window appears.
RFID Demo Application 4 - 19
Figure 4-12
ETSI EN302-208 Tx-Channels Window
Page 58

4 - 20 MC9090-G RFID Integrator Guide Supplement
RFIDFlash Utility (Radio Firmware Update Utility)
The RFIDFlash utility is the radio firmware update utility, used to update the RFID radio module firmware. To
update the radio firmware, access the RFIDFlash utility; Tap Start - File Explorer to access the File Explorer
application.
.
Figure 4-13
From main Explorer window (see Figure 4-13) click Application - RFIDFLASH to access the RFIDFlash utility. The
RFIDFlash loader window appears (see Figure 4-15).
.
Figure 4-14
Main Windows
Explorer Windows
Page 59

Click Browse for Flash File and the Select Files window appears.
.
RFID Demo Application 4 - 21
Figure 4-15
Scroll to the flash file and click to select, click OK.
The Select Files window appears
.
Figure 4-16
Click Start Flash to download the flash update file.
RFIDFlash Loader Windows
RFIDFlash Loader Windows
Page 60

4 - 22 MC9090-G RFID Integrator Guide Supplement
Page 61

Chapter 5 GeminiRFID Demo Application
Introduction
Application developers can use the Launching the GeminiRFID Demo Application on page 5-3 for an overview of
how the application works and to assist in application development.
Integrators can use the MC909X Integrator Guide
product integration. Use the utilities to change and/or set the device parameters and to test applications.
NOTE The screens and windows are provided for illustration purposes only and may differ from actual screens. The
applications described may not be available on (or applicable to) all devices.
Procedures are not device specific and are intended to provide a functional overview.
The GeminiRFID Demo application is provided for the purpose of demonstration and are not designed for
production environments.
The reader has the capability to program, erase and write; Gen2 tags. The current GeminiRFID Demo
application only provides an example for programming tags.
The GeminiRFID Demo is not provided with source code. However, a sample, is provided in the SMDK for C.
Host Computer Display Setup
To view the system menus on a local PC use an application such as Microsoft’s Remote Display Control for Pocket
PC. For more information and the Remote Display Control for Pocket PC download go to
http://www.microsoft.com/downloads/ and search for Remote Display Control for Pocket PC. Downlo ad the
application and follow the provided installation and setup procedures.
After the remote display application has been installed on the host computer, set up an ActiveSync connection
between the host computer and the MC9090-G RFID reader (see the MC909X Integrator Guide
72E-72216-xx
).
, P/N: 72E-72216-xx for product settings and as an aid in the
, P/N:
Start the remote display application to access the MC9090-G RFID reader application.
Page 62

5 - 2 MC9090-G RFID Integrator Guide Supplement
Using GeminiRFID Demo to Read Tags From a Remote Reader
The GeminiRFID Demo can reside on many CE4.2/CE5. 0 and Mobile based d evices including Motor ola's MC909x
handhelds, RD5000, WIN CE based VRCs, and XR Series products.
On devices that have integrated RFID reading, the GeminiRFID Demo automatically finds and connects to the
integrated RFID reader. These readers include RD5000, MC90xx, and XR Series.
On devices that do not have an integrated RFID reading capability, the GeminiRFID Demo must be configured to
connect to the remote RFID reader using the reader IP address and port number 30 00.
The settings screen is described in Settings on page 5-8.
Using GeminiRFID Demo to Forward/Log Tags to Remote Device
By default, the GeminiRFID Demo will not display or log tags. The GeminiRFID Demo beeps each time a tag is
read however. The GeminiRFID Demo can be configured to log tags using the following mechanisms:
Log tag reads to a file.
Writes tags to TagLog.txt
Data format:
10-04-2006, 07:29:51.63646 (000141ms), [A0] 0220064806042978260000A5
Log tag reads to the screen
Log tag reads to a either a TCP/IP address/port or serial port
TCP/IP logging
Data format:
<TAG>[A0] 0220064806042978260000A5</TAG>
Buffers up to 1024 tags when no connection available
Works with sample win32 application RFIDServer.exe on port 3535
Serial port logging. (Local, or Bluetooth)
Data format:
[A0] 0220064806042978260000A5
Page 63

Launching the GeminiRFID Demo Application
To launch the GeminiRFID Demo application, tap Start - File Explorer - Application - Gemini_RFID icon. When
the GeminiRFID Demo application is launched, the main Tags window displays.
List of
unique tags
(tags read)
Menu selections
EPC data
Menu button
GeminiRFID Demo Application 5 - 3
Figure 5-1
Tap on the File->Settings menu option to modify the Gemini application settings. See Settings on page 5-8 for
detailed settings information.
Table 5-1
Icon Description
RFID - Main Tags Window
Main Tags Window and Settings Window, Icons
Launches the Locate Tag window (see
Launches the Program Tag window (see
Clears the tag list (see
Saves the complete list of tags (see
Previous and Next buttons appear on the menu when read t ags e xceed the amount of tags that can
fit in the tag list display.
Tap to display the previous page.
Tap to display the next page.
File and Mode menus (see
Clearing the Display on page 5-5
File Menu on page 5-6
Locate Tag on page 5-10
Program Tag on page 5-11
).
Saving Tag Data on page 5-6
and
Mode Menu on page 5-10
).
).
).
).
Tap to disable/enable the sound when a tag is read.
The RFID Module Power On icon (displayed next to the Speaker icon) indicates that the RFID radio
module is powered on and attempting to read tags.
Use the Attenuation Slide Bar (see
power) to 255 (low power). Drag the Attenuation Slide Bar to optimize tag reading and to minimize
interference. For closer tag use a lower setting and for further away tag use a higher setting.
Figure 5-5 on page 5-8
) to set the power range from 0 (full
Page 64

5 - 4 MC9090-G RFID Integrator Guide Supplement
Reading Tags
When the mobile computer trigger is pressed, the mobile computer interrogates all of the tags within the radio
frequency (RF) field of view. For each new tag found, the mobile computer beeps once and displays a tag icon in
the main RFID Tag window. If the same tag is found again, the mobile computer does not beep.
When the trigger is released, the mobile computer stops interrogating tags. The total number of unique tags found
displays in the Tag window.
To read tags:
1. Tap Start - File Explorer - Application - Gemini_RFID.
2. Ensure that the mobile computer is within the RF field of view.
3. Set the RFID signal power . Use the Attenuation slide bar (see Figure 5-5 on page 5-8) to set a value in a range
between 0 (full power) and 255 (low power) .
4. Press and hold the mobile computer’s trigger.
5. For each new tag found, a beep sounds one time, the Indicator LED flashes green, and a tag icon displays in
the Tag window.
Each tag is identified by class. For example, a Gen2 tag displays in the window labeled G2.
6. Release the trigger .
Page 65

GeminiRFID Demo Application 5 - 5
Selecting Tags
The Tag window can display up to 20 tags. If more than 20 tags are found, the application allows the user to page
forward and backward through the list of icons representing the tag s found.
To select a tag to view the tag data:
1. Tap Start - File Explorer - Application - Gemini_RFID icon.
2. Read a tag (see Reading Tags on page 5-4).
3. Select a tag icon in the Tag s window.
4. The data contained in the tag, along with a count of how many times the selected tag was read, displays in the Ta gs
window.
Selected
tag
Number of bits
(64 or 96) in
selected tag
Selected tag data: ID
300833B2DDD9014035050
000
Figure 5-2
RFID - Main Tags Window / Selected Tag
Clearing the Display
To clear the tag list in the mobile computer’s display, tap .
Page 66

5 - 6 MC9090-G RFID Integrator Guide Supplement
Saving Tag Data
A list of read tags can be saved on the mobile computer. The application saves the tag list to the "\My Documents"
folder and names the file RFIDTaglist.csv.
The file is a .csv format (comma separated text file). This file format can be read by MS Excel, or other applications
that support .csv. The sample file contains the following information.
Time Stamp, Tag ID, Tag Type, Read Count:
2005-04-17T15:34:53-05:00,H22EEDDAEBFCCEDEE,C1,10
2005-04-17T15:34:53-05:00,H8000800428254006,C1,10
2005-04-17T15:34:57-05:00,H8000800428254124,C1,15
The Time Stamp format is:
Year-month-dateTHour:Minute:seconds-TimezoneHourDifferential(GMT):TimezoneMinutesDifferntial
The Tag ID format is:
HTagData (H indicates the data is in hex)
The Tag Type format is:
CX, where X is the tag class. Currently the application supports Gen2, tags.
The file can not be displayed on the mobile computer (with the factory supplied software). The file is intended to be
downloaded to a host and displayed using an application that can read comma delimited fields, such as an Excel
spreadsheet.
The file contains a one line header and one line for each unique tag found. The header line contains a comma
separated list of field text descriptions. The tag lines contai n the Tag ID starting with 'H' for hex, and a number
indicating how many times the tag was read.
To save tag data:
1. Tap Start - File Explorer - Application - Gemini_RFID.
2. Read a tag(s). See Reading Tags on page 5-4.
3. Tap .
4. Tap OK to save using the default name and directory, or enter a custom name /directory and then tap OK.
File Menu
Tap the File menu on the Main Tags window to view version information about RFID, log information, reboot, adjust
settings, or exit the application.
Page 67

GeminiRFID Demo Application 5 - 7
About
Tap File - About to view the application version number, the RFID DLL version number, the RFID reader module
firmware version number, date code, and serial and port information.
Figure 5-3
RFID - About Window
Log
Tap File - Log to display the Log menu.
Figure 5-4
From the Log menu, tap:
•
Clear Log to clear logged data.
•
Log On turns on the log feature. With this feature is turned on, the display splits into two sectio ns: upp er and
lower. The lower section displays all communication to the RFID radio module, including tag data.
RFID - Log Menu
•
Log Off to turn off the log feature. Log Off is the default.
•
Log File to create and save a log file. The log file is saved in the root directory on the mobile computer to a
file named RXTXLog.txt. This file can be used to track errors reading RFID tags.
Reboot
Tap File - Reboot to issue a (warm) reboot command to the RFID radio module.
NOTE Reboot the RFID radio module only if tags are not being read.
Page 68

5 - 8 MC9090-G RFID Integrator Guide Supplement
Settings
The Settings window is used to set the number of iterations to read tags. To set the class type(s) to read (Gen2 is
on by default). The settings window is also used to set and test read/write power. Tap File - Settings to display the
Settings window.
Attenuation
values
Figure 5-5
To establish settings:
•
Enter a number in the Read Tag Outer Loop: text box to set the number of outer inventory loops (iterations to
read tags). Up to 255 loops are allowed. The default Read Tag Outer Loop setting is 5.
•
Enter a number in the Read Tag Inner Loop / Dwell text box to set the number of inner inventory loops
(iterations to read tags). Up to 255 loops are allowed. The default Read Tag Inner Loop setting is 3.
•
Select the Enable Gen2 Tag Reads (default setting is to read Gen2 tags) check box to enable the mobile
computer to read Gen2 tags.
•
In the Attenuation area:
RFID - Settings Window
NOTE Read Tag Outer Loop and Read Tag Inne r Lo o p set tings attempt to read a tag for a period of
time based on the parameters entered in these fields. For more information, refer to the SMDK
Help file
.
Attenuation
slide bars
•
Set the read strength by moving the Read attenuation slide bar to a value in a range between 0 (full read
power) and 255 (low read power/off).
•
Set the write strength by moving the Write attenuation slide bar to a value in a range between 0 (full write
power) and 255 (low write power/off).
•
Tap OK to exit Settings.
•
Tap Read Toggle to test the attenuation settings. When tapped, Read Toggle acts like the mobile
computer’s trigger and can be used to test tag read and write strength.
Page 69

GeminiRFID Demo Application 5 - 9
Gen2 Operational Settings
The Gen2 Operational Settings window is used to configure the Gen2 tag operational parameters. Tap File - Gen2
Settings to display the Gen2 Operational Settings window.
Figure 5-6
Table 5-2
Setting Parameter Description
Selection Specifies the expected selected flag setting in the target tag population.
Session Specify the session used in the communication with the target tag
Target Specify the expected inventoried flag setting in the target tag population.
Starting Sets the number of slots in the first inventory round of the inventory
Gen2 Operational Settings Window
Gen2 Operational Settings
Ignore SL Ignore the selected flag.
SL not set Select tags without the selected flag set.
SL set Select tags with the selected flag set.
population.
S0 Use session S0
S1 Use session S1
S2 Use session S2
S3 Use session S3
A Select tags with the inventoried flag set to A.
B Select tags with the inventoried flag set to B.
algorithm.
0 - 15 Set the number of slots in the first inventory round of the
inventory algorithm from 1 to 15.
Exit
Tap File - Exit to exit the GeminiRFID Demo application.
Page 70

5 - 10 MC9090-G RFID Integrator Guide Supplement
Mode Menu
Tap the Mode menu to use the Inventory method to read tags, locate a tag, program a tag, scan a bar code, or write
a tag. Mode menu options offer all of the operations available by tapping an icon on the main Tags window menu
bar.
Inventory
Tap Mode - Inventory to start reading tags using the Inventory method. Using this method, the application performs
as if the trigger is pulled. Tag read attempts continue until the Inventory menu option is tapped again.
Locate Tag
This option is used to find a specific tag.
1. Tap in the main Tags window or tap Mode - Locate Tag.
Tag ID
(Hex
string)
Figure 5-7
2. Enter a valid Tag ID in the text box below the magnifying glass:
•
An 8-byte hex string for 64 bits
•
A 12-byte hex string for 96 bits.
3. Pull the trigger to locate the tag. The mobile computer beeps when the tag is found. The faster the beep, the
RFID - Locate Tag Window
NOTE To pre-fill the text box with a valid Tag ID, select a tag in the main Tags window and tap .
64 bits
or
96 bits
closer the mobile computer is to the located tag.
Figure 5-7
4. Tap Back to Global Scroll to return to the main Tags window.
shows tag ID 80 00 80 04 23 23 84 33 was read 83 times.
Page 71

GeminiRFID Demo Application 5 - 11
Program Tag
This option can be used to program Gen2 RFID tags.
Gen2 tags can be programmed, erased, locked and killed. Each tag contains 88 or 120 bits, which includes the
EPC number (64 or 96 bits), CRC, and Kill Code. Locking, and killing tags requires a Kill Code which is 1 byte (8
bits) long. Since a tag has a very small Kill Code and can be thwarted with many lock/kill attempts, it shuts down
after a failed attempt for a extended amount of time (possibly up to 10 hours). In addi tion, dat a can be collected by
decoding in-range EPC RFID tags that beam back to the mobile computer the info rmation they contain.
NOTE For detailed information about programming tags, refer to the SMDK Help file.
To program RFID tags:
1. Tap in the main Tags window or tap Mode - Program Tag.
64 bits
Tag ID
(Hex)
or
96 bits
Status
Message test
Figure 5-8
2. Select the Class: 1 radio button to program tags.
3. In the Tag ID (Hex string) text box below Class:, enter an 8-byte (64 bits) or 12-byte (96 bits) hex string to be
RFID - Tag Programming Window
programmed into the tag. This string can contain any number from 0-9, and a letter from A-F. Each byte must
consist of 2 characters. Each byte should be separated by a space characte r.
For example, if the tag should contain 80012390AAFD3617, type 80 01 23 90 AA FD 36 17 as shown in
5-8
.
4. Set the write strength by moving the Write Att: (attenuation) slide bar to a value in a range be tween 0 (full wr ite
Figure
power) and 255 (low write power/off).
5. A password is required to lock a tag and kill a tag. In the 0x: Lock/Kill Code text box, enter a hex lock/kill
password code.
NOTE Remember the lock/kill code. Once a tag is locked, it cannot be killed without the lock/kill code.
6. Tap Program Tags. It might take more than one attempt to program the tag.
7. When a tag is successfully programmed, a status message displays in the Status Message text box.
8. Tap Read to read a newly programmed tag.
Page 72

5 - 12 MC9090-G RFID Integrator Guide Supplement
NOTE For a successful tag read, the allowable read distance from the front of the mobile computer scan exit
window to the tag is 0.2 ft - 10 ft (0.061 m to 3.1 m).
9. Tap Erase to erase an unlocked tag.
10. Tap Lock to lock a tag so that it cannot be changed. A lock/kill code is required to lock a tag. See Program T ag
on page 5-11.
11. Tap Kill to make a tag unreadable. A lock/kill code is required to kill a tag. (See Program Tag on page 5-11.)
12. Tap Back to Global Scroll to return to the main Tags window.
NOTE To successfully write data to a tag, the tag must be no less than 1 ft (.31 m) from the antenna and no
greater than 2 ft (.61 m) from the antenna.
Page 73

Chapter 6 SymbolRoam
Introduction
The SymbolRoam application is provided to allow users change operating regions.
NOTE The SymbolRoam application is not provided on the EU configuration. The EU configuration is
pre-set to comply with the EU regulatory specificatio ns.
'The SymbolRoam application is run on boot-up each time the unit is re-started.
To run the application manually, run SymbolROAM.exe from the path \Application\ROAM on the device .'
NOTE The screens and windows are provided for illustration purposes only and may differ from actual screens.
The applications described may not be available on (or applicable to) all devices.
Procedures are not device specific and are intended to provide a functional overview.
Page 74

6 - 2 MC9090-G RFID Integrator Guide Supplement
SymbolRoam, Region Change
The first time the application is run the SymbolRoam window displays. The warning WARN: Registry region
undefined displays the first time SymbolRoam is used and default region is not changed. This indicates that the
regions have not been changed from the default US/Canada.
Figure 6-1
SymbolRoam Window
Country Drop Down List
The list of selectable countries is provided on the Country Drop Down List window (see Figure 6-2). Select a
country and click on Change button to set the desired country.
Figure 6-2
Country Drop Down List Window
NOTE Applications developers can set the country setting in the registry file. Example:
[HKEY_LOCAL_MACHINE\Software\Symbol\RFID\SymbolROAM] "Region"="US/Canada"
This registry example shows country set as US/Canada.
Page 75

SymbolRoam Version
To display the SymbolRoam version, tap the Symbol logo (see Figure 6-3).
The currently installed SymbolRoam version information is displayed.
.
SymbolRoam 6 - 3
Figure 6-3
SymbolRoam Version Window
NOTE If the device is cold booted, .NET 2.0 (required to run SymbolRoam) will be re-installed.
Page 76

6 - 4 MC9090-G RFID Integrator Guide Supplement
Page 77

Chapter 7 Maintenance & Troubleshooting
Introduction
This chapter includes instructions on cleaning and storing the RFID read er, and provides troubleshooting solutions
for potential problems during RFID reader operating.
Maintaining the RFID reader
For trouble-free service, observe the following tips when u sing the RFID reader:
•
Take care not to scratch the screen of the RFID reader. When working with the RFID reader, use the supplied
stylus or plastic-tipped pens intended for use with a touch-sensitive screen. Never use a pen or pencil or
other sharp object on the surface of the RFID reader screen.
•
Although the RFID reader is water and dust resistant, it is good practice not to expose it to rain or moisture
for an extended period of time.
•
The battery must be changed in a clean dry area.
•
Protect the RFID reader from temperature extremes. Keep it away from heat sources.
•
Do not store or use the RFID reader in any location that is extremely dusty, damp or wet.
•
Use a soft cloth to clean the RFID reader. If the surface of the RFID reader becomes soiled, clean it with a
soft cloth moistened with a diluted window-cleaning solution.
NOTE This MC9090-G RFID Integrator Guide Supplement is configured to provides only the unique set up and
configuration procedures for the MC9090-G RFID mobile co mputers and accessories. The accessory
troubleshooting is provided in the MC909X Integrator Guide, P/N: 72E-72216-xx.
Page 78

7 - 2 MC9090-G RFID Integrator Guide Supplement
Accessories
The MC909X Integrator Guide, P/N: 72E-72216-xx provides the troubleshooting information applicable to the
following MC9090-G RFID mobile computer accessories:
•
Bluetooth Connection
•
Four Slot Charge Only Cradle
•
Four Slot Ethernet Cradle
•
Four Slot Spare Battery Charger
•
Single Slot Serial/USB Cradle
•
Cable Adapter Module
•
Magnetic Stripe Reader
•
Modem Module
Battery Safety Guidelines
•
The area in which the units are charged should be clear of debris and combustible materials or chemicals.
Particular care should be taken where the device is charged in a non-commercial environment.
•
Do not use incompatible batteries and chargers. For any questions about the compatibility of a battery or a
charger, contact Motorola Enterprise Mobility support. See Service Information on page i-xii for contact
information.
•
Do not crush, puncture, or place a high degree of pressure on the battery.
•
Severe impact from dropping any battery-operated device on a hard surface could cause the battery to
overheat.
•
Do not leave or store the equipment in or near areas that might get very hot, such as in a parked vehicle or
near a radiator or other heat source. Do not place battery into a micr owave oven or dryer.
•
Do not dispose of batteries in fire.
•
If battery or equipment is suspected, call Motorola Enterprise Mobility support to arrange for inspection. See
Service Information on page i-xii for contact information.
Page 79

Troubleshooting
RFID Reader
Maintenance & Troubleshooting 7 - 3
Table 7-1
RFID reader does not
turn on.
Rechargeable
lithium-ion battery did
not charge.
Cannot see characters
on display.
During data
communication, no data
was transmitted, or
transmitted data was
incomplete.
Troubleshooting the RFID reader
Problem Cause Solution
Lithium-ion battery
not charged.
Lithium-ion battery
not installed properly.
System crash. Perform a warm boot. If the RFID reader still does not turn on,
Battery failed. Replace battery. If the RFID reader still does not operate, try a
RFID reader removed
from cradle while
battery was charging.
RFID reader not
powered on.
RFID reader removed
from cradle or
unplugged from host
computer during
communication.
Charge or replace the lithium-ion battery in the RFID reader.
Ensure battery is installed properly. See
Battery on page 1-4
perform a cold boot. See
page 1-9
warm boot, then a cold boot. See
Computer on page 1-9
Insert RFID reader in cradle and begin charging. The lithium-ion
battery requires less than four hours to recharge fully.
Press the
Replace the RFID reader in the cradle, or reattach the
Synchronization cable and re-transmit.
.
Power
.
Resetting the Mobile Computer on
.
button.
Installing the Main
Resetting the Mobile
Incorrect cable
configuration.
Communication
software was
incorrectly installed or
configured.
No sound is audible. Volume setting is low
or turned off.
See the System Administrator.
Perform setup. See
Ensure that Microsoft ActiveSync 4.1 or greater is installed on
the host computer.
Unit may be a beeper only unit or incorrect Config Block is
programmed into device.
Chapter 2, Accessories
for details.
Page 80

7 - 4 MC9090-G RFID Integrator Guide Supplement
Table 7-1
Troubleshooting the RFID reader (Continued)
Problem Cause Solution
RFID reader turns itself
off.
Tapping the window
buttons or icons does
not activate the
corresponding feature.
A message appears
stating that the mobile
computer memory is
full.
RFID reader is
inactive.
The RFID reader turns off after a period of inactivity. If the RFID
reader is running on battery power, this period can be set to 30
sec., 1, 2, 3, 4, 5 or 6 minutes. If the RFID reader is running on
external power , this p eriod can be set to 1, 2, 3, 5 , 10, 1 5 and 30
minutes.
For Mobile 5.0 devices, Check the power settings by tapping
Start
>
Settings
>
System
Change the setting if a longer delay is required before the
automatic shutoff feature activates.
Battery is depleted. Replace the battery.
Battery is not inserted
properly.
LCD screen not
Insert the battery properly (see
page 1-4
).
Re-calibrate the screen.
aligned correctly.
Battery is not inserted
properly.
Too many files stored
on the RFID reader.
To o many
applications installed
on the RFID reader.
Insert the battery properly (see
page 1-4
).
Delete unused memos and records. Save these records on the
host computer.
If additional applications have been installed on the RFID reader,
remove them to recover memory.
For Windows Mobile 5.0 devices, tap
tab >
Remove Programs
For Win Mobile 5.0 devices, tap
>
Remove Programs
Select the unused program and tap
icon.
tab >
Power
icon >
Advanced
Installing the Main Battery on
Installing the Main Battery on
Start
>
Settings
icon.
Start
>
Settings
Remove.
tab.
>
System
>
Control Panel
The RFID reader does
not read a tag.
Read application is
not loaded.
Verify that the unit is loaded with a read application. See the
System Administrator.
Unreadable tag. Ensure the tag is not defective.
Distance between the
Ensure RFID reader is within proper read range.
reader and the tag is
incorrect.
RFID reader is not
programmed for the
Ensure the RFID reader is programmed to accept the tag type
being read.
tag type.
Battery is low. If the reader stops reading check the battery level. When the
battery is low, the reader shuts off.
Note: If the reader is still not reading, contact the distributor or
Motorola.
Page 81

Maintenance & Troubleshooting 7 - 5
Table 7-1
The RFID reader does
not accept scan input.
Troubleshooting the RFID reader (Continued)
Problem Cause Solution
Scanning application
is not loaded.
Unreadable bar code. Ensure the symbol is not defaced.
Distance between
exit window and bar
code is incorrect.
Mobile computer is
not programmed for
the bar code.
Mobile computer is
not programmed to
generate a beep.
Battery is low. If the scanner stops emitting a laser beam when the trigger is
Verify that the uni t is loaded with a scannin g application. See the
System Administrator.
Ensure RFID reader is within proper scanning range.
Ensure the RFID reader is programmed to accept the typ e of bar
code being scanned.
If a beep on a good decode is expected and a beep is not heard,
check that the application is set to generate a beep on good
decode.
pressed, check the battery level. When the battery is low, the
scanner shuts off before the mobile computer low battery
condition notification.
Note: If the scanner is still not reading symbols, contact the
distributor or Symbol Technologies.
Page 82

7 - 6 MC9090-G RFID Integrator Guide Supplement
Page 83

Appendix A Technical Specifications
Technical Specifications
The following tables summarize the RFID reader intended operating environment and general technical hardware
specifications.
RFID Reader
The following table summarizes the reader technical specifications.
Table A-1
Physical and Environmental Characteristics
Dimensions 9.1 in. L x 3.6 in. W x 7.6 in. H
Weight 25 oz.(includes battery, scanner and radio)
Keyboard 28-key; 43-key; 53-key
Display 3.8 in. 1/4 VGA Color
Battery Removable, rechargeable 7.2 volt Lithium Ion 2200 mAh battery pack, 15.8 watt
Performance Characteristics
CPU
Operating System Microsoft Windows Mobile 5.0 Premium Edition
Memory (RAM/ROM) Windows Mobile: 64MB/128MB
Expansion SD/MMC Card
Application Development SMDKs available through the Support Web Site
Technical Specifications
Item MC9090-G RFID
23.1 cm L x 9.1 cm H x 19.3 cm H
Terminal Emulation (5250, 3270, VT)
hours
®
XScale® Bulverde PXA270 processor at 624MHz
Intel
Page 84

A - 2 MC9090-G RFID Integrator Guide Supplement
Table A-1
Technical Specifications (Continued)
Item MC9090-G RFID
Data Capture Options Omni-directional 1D and 2D imaging engine reads symbologies and captures
grayscale images and signatures with intuitive laser aiming.
Gen2 tags
Laser Decode Capability Code 39 Code 128 Code 93
Codabar Code 11 Discrete 2 of 5
Interleaved 2 of 5 EAN-8 EAN-13
MSI UPCA UPCE
UPC/EAN supplementals Coupon Code Trioptic 39
Webcode RSS-14 RSS Limited
RSS Expanded
MC909X with Windows Mobile 5.0 and OEM Version 01.39.0001
Imaging Decode Capability Code 39 Code 128 Code 93
Codabar Code 11 Interleaved 2 of 5
Discrete 2 of 5 MSI EAN-8
EAN-13 UPCA UPCE
UPC/EAN supplementals Coupon Code Trioptic 39
Webcode TLC39 Composite AB
Composite C Micro PDF-417 PDF-417
Macro PDF-417 (Macro) Micro PDF-417 QR Code
RSS Expanded RSS Limited RSS-14
Data Matrix Maxi Code US Postnet
US Planet UK 4-state Australian 4-state
Canadian 4-state Japanese 4-state Dutch Kix
MC909X with Windows Mobile 5.0 and OEM Version 01.39.0001
User Environment
Operating Temperature -4°F to 122°F (-20°C to 50°C)
Battery Charging
32° to 104° F / 0° to 40° C ambient temperature range
Temperature
Storage Temperature -25°F to 160°F (-40°C to 70°C)
Humidity 5% to 95% non condensing
Drop Specification Multiple 6 ft.(1.8m) drops to concrete across operating temperature range
Tumble 2,000 one-meter tumbles at room temperature (4,000 hits)
Environmental Sealing IP64
ESD +/-15kVdc air discharge
+/-8kVdc direct discharge
+/-8kVdc indirect discharge
RFID
Standards Supported EPC Generation 2 UHF
Page 85

Technical Specifications A - 3
Table A-1
Nominal read range
Technical Specifications (Continued)
Item MC9090-G RFID
1
10 ft./3.04 m with the RFX6000 4x4 tag optimally oriented.
Field Half read range beam width: +/- 80 degrees (with tags optimally oriented).
Antenna Integrated, circularly polarized, 1.5 dB effective linear gain per axis (nominal);
Antenna port for future support of optional external antenna.
Frequency Range 902-928 MHz
Output power 1W conducted (1.4W EIRP with integrated antenna)
Wireless Data Communications
WLAN 802.11a/b/g
Output Power 100mW U.S. and International
Data Rate 802.11a: 54Mb per second
802.11b: 11Mb per second
802.11g: 54Mb per second
Antenna Internal
Frequency Range: 802.11a: 5 GHz; country-dependent
802.11b: 2.4 GHz; country-dependent
802.11g: 2.4 GHz; country-dependent
Bluetooth
Bluetooth
®
Version 1.2 with BTExplorer™ (manager) included
Peripherals and Accessories
Cradles Single-slot and 4-slot cradles available
Printers Supports extensive line of Symbol approved printers, cables and accessories
Charger 4-Slot universal battery charger
Other Accessories Cable Adapter Module; Magnetic Stripe Reader; Modem; Full set of holsters
In accordance with the SymbolPlus partner program
Page 86

A - 4 MC9090-G RFID Integrator Guide Supplement
Table A-1
Regulatory
Technical Specifications (Continued)
Item MC9090-G RFID
Electrical Safety Certified to UL60950-1, CSA C22.2 No. 60950-1, EN60950-1, IEC 60950-1.
WLAN and Bluetooth
®
USA — FCC Part 15.247, 15.407; Canada — RSS-210.
RF Exposure USA — FCC Part 2, FCC OET Bulletin 65 Supplement C; Canada — RSS-102.
RFID USA — FCC Part 15.247, 15.205, 15.209: Canada — RSS-210.
EMI/RFI USA — FCC Part 15; Canada — ICES 0003 Class B.
Imaging Decode Capability Code 39 Code 128 Code 93
Codabar Code 11 Interleaved 2 of 5
Discrete 2 of 5 MSI EAN-8
EAN-13 UPCA UPCE
UPC/EAN supplementals Coupon Code Trioptic 39
Webcode TLC39 Composite AB
Composite C Micro PDF-417 PDF-417
Macro PDF-417 (Macro) Micro PDF-417 QR Code
RSS Expanded RSS Limited RSS-14
Data Matrix Maxi Code US Postnet*
US Planet UK 4-state Australian 4-state
Canadian 4-state Japanese 4-state Dutch Kix
*To be supported at a later date. Go to http://software.symbol.com/ for a list of the
latest supported symbologies.
Page 87

Modem Module
Technical Specifications A - 5
Table A-2
Asynchronous character format Up to 10 bits, including data, start, stop, and parity bits
Asynchronous data rates Transmission rate fallback through 300 bps
Chipset Conexant SCM
Compatible public switched
network jacks
Dialing capability Tone and rotary pulse
Line requirements Public switched telephone network (PSTN) including international
Operating environment Altitude: up to 20,000 ft.
Operating temperature
Operating modes Asynchronous, full duplex, automatic and manual call originate
Performance Line speed up to 33,600 bps
Environmental Parameters and Technical Hardware Specifications
Item Description
RJ11
connections
Humidity: 10% to 90% non-condensing
Operating: 32
Storage: -4
HHC to modem speed (DTE speed) up to 57,600 bps
V.42bis data compression
V.42 LAPM error correction
o
to 122oF / 0o to 50oC
o
to 149oF / -20o to 65oC
Current consumption 100 mA active
<10 mA sleep
Pulse dialing rate
(except where prohibited under
TBR-21 rules)
Ringer equivalence 0.1 dBm
Stan dards & protocols Bell 103, Bell 212A, Hayes AT command set, and ITU Vs. 17, 21, 22 A
Tone detected Dial, busy, ring back, modem answer tones.
AC Adapter 9V, 2 amp regulated AC/DC adapter allows unlimited modem use. Do
10 pulses per second
Pulse dialing duty cycle: 39/61% (US) make-to-break ratio
& B, 22bis, 23, 25bis, 27 ter, 29, 32, 32bis, 42bis
Blind dialing based on time-out periods available for incompatible
tones.
NOT substitute an AC adapter; using an incorrect AC power supply
causes electrical damage to the mobile computer and voids warranty.
Page 88

A - 6 MC9090-G RFID Integrator Guide Supplement
9
Mobile Computer Pin-Outs
17
1
Figure A-1
Table A-3
PIN Number Signal Name Function
1 USB_GND USB
2 USB_D_PLUS USB
3 TXD RS232C
4 RXD RS232C
5 DCD RS232C
6 RTS RS232C
7 DSR RS232C
8 GND Ground, 2.5A max.
9 RI RS232C
10 CRADLE_DET Grounded by cradle when in cradle
Pin Locations
Pin-Outs
8
11 DTR RS232C
12 Not connected Not connected
13 POWER_IN 12V, 2.5A max
14 CTS RS232C
15 USB_5V_DET USB
16 USB_D_MINUS USB
17 EXT_PWR_OUT 3.3V @500mA
Page 89

Accessory CAM and MSR Pin-Outs
Technical Specifications A - 7
Figure A-2
Table A-4
Pin Signal
1 USB_5V_DET
2 USB_D_MINUS
3 USB_D_PLUS
4GND
5GND
6 PWR_EXT_OUT
7 CRADLE_DET*
8DSR
9DCD
10 TXD
11 CTS
CAM and MSR Serial Connector
CAM and MSR Serial Connector Pin-outs
12 DTR
13 RI
14 RTS
15 RXD
Page 90

A - 8 MC9090-G RFID Integrator Guide Supplement
Page 91

Index
A
access points . . . . . . . . . . . . . . . . . . . . . . . . . . . . . . 1-13
accessories . . . . . . . . . . . . . . . . . . . . . . . . . . . . . . . . 1-3
auto charge cable . . . . . . . . . . . . . . . . . . . . . . . . 2-2
cables . . . . . . . . . . . . . . . . . . . . . . . . . . . . . .1-3, 2-2
CAM . . . . . . . . . . . . . . . . . . . . . . . . . . . . . . .1-3, 2-2
DEX cable . . . . . . . . . . . . . . . . . . . . . . . . . . .1-3, 2-2
four slot charge only cradle . . . . . . . . . . . . . .1-3, 2-1
four slot Ethernet/USB cradle . . . . . . . . . . . .1-3, 2-1
four slot spare battery charger . . . . . . . . . . .1-3, 2-2
headset . . . . . . . . . . . . . . . . . . . . . . . . . . . . . . . . 2-2
magnetic stripe reader . . . . . . . . . . . . . . . . .1-3, 2-2
modem module . . . . . . . . . . . . . . . . . . . . . . .1-3, 2-2
multi media card . . . . . . . . . . . . . . . . . . . . . .1-3, 2-2
printer cable . . . . . . . . . . . . . . . . . . . . . . . . .1-3, 2-2
serial cradle . . . . . . . . . . . . . . . . . . . . . . . . . .1-3, 2-1
shelf slide . . . . . . . . . . . . . . . . . . . . . . . . . . .1-3, 2-2
SMDK . . . . . . . . . . . . . . . . . . . . . . . . . . . . . . . . . 1-3
spare battery . . . . . . . . . . . . . . . . . . . . . . . . . . . . 1-3
stylus . . . . . . . . . . . . . . . . . . . . . . . . . . . . . . . . . . 1-3
UBC adapter . . . . . . . . . . . . . . . . . . . . . . . . .1-3, 2-2
USB charger cable . . . . . . . . . . . . . . . . . . . .1-3, 2-2
wall mounting bracket . . . . . . . . . . . . . . . . . .1-3, 2-2
ActiveSync . . . . . . . . . . . . . . . . . . . . . . . . . . . . . . . . 1-14
deploying CAB files . . . . . . . . . . . . . . . . . . . . . . . 3-2
AirBEAM
AirBEAM Smart . . . . . . . . . . . . . . . . . . . . . . . . . . 3-4
Client . . . . . . . . . . . . . . . . . . . . . . . . . . . . . . . . . . 3-4
deploying CAB files . . . . . . . . . . . . . . . . . . . . . . . 3-2
package builder . . . . . . . . . . . . . . . . . . . . . . . . . . 3-4
staging . . . . . . . . . . . . . . . . . . . . . . . . . . . . . . . . 3-4
synchronization with server . . . . . . . . . . . . . . . . . 3-4
aligning screen . . . . . . . . . . . . . . . . . . . . . . . . . . . . . 1-8
application deployment . . . . . . . . . . . . . . . . . . . .3-1, 3-2
CAB files . . . . . . . . . . . . . . . . . . . . . . . . . . . . . . . 3-2
application packaging . . . . . . . . . . . . . . . . . . . . . . . . 3-1
application security . . . . . . . . . . . . . . . . . . . . . . . . . . 3-1
auto charge cable . . . . . . . . . . . . . . . . . . . . . . . . . . . 2-2
B
backup battery
charging . . . . . . . . . . . . . . . . . . . . . . . . . . . . . . . 1-5
battery
backup charging . . . . . . . . . . . . . . . . . . . . . . . . . 1-5
charging . . . . . . . . . . . . . . . . . . . . . . . . . . . . . . . 1-5
check status . . . . . . . . . . . . . . . . . . . . . . . . . . . . 1-8
installing . . . . . . . . . . . . . . . . . . . . . . . . . . . . . . . 1-4
removing . . . . . . . . . . . . . . . . . . . . . . . . . . . . . . . 1-7
battery charging temperature . . . . . . . . . . . . . . . . . . A-2
boot
clean . . . . . . . . . . . . . . . . . . . . . . . . . . . . . . . . . 1-10
cold . . . . . . . . . . . . . . . . . . . . . . . . . . . . . . . . 1-8, 1-9
warm . . . . . . . . . . . . . . . . . . . . . . . . . . . . . . . . . . 1-9
bullets . . . . . . . . . . . . . . . . . . . . . . . . . . . . . . . . . . . . . .xi
C
CAB files . . . . . . . . . . . . . . . . . . . . . . . . . . . . . . . 3-2, 3-3
deployment via ActiveSync . . . . . . . . . . . . . . . . . 3-2
deployment via AirBEAM . . . . . . . . . . . . . . . . . . 3-2
deployment via image update . . . . . . . . . . . . . . . 3-2
deployment via storage card . . . . . . . . . . . . . . . 3-2
Cable Adapter Module . . . . . . . . . . . . . . . . . . . .1-3, 2-2
cables . . . . . . . . . . . . . . . . . . . . . . . . . . . . . . . . . 1-3, 2-2
auto charge cable . . . . . . . . . . . . . . . . . . . . . . . . 2-2
DEX cable . . . . . . . . . . . . . . . . . . . . . . . . . . .1-3, 2-2
printer cable . . . . . . . . . . . . . . . . . . . . . . . . . 1-3, 2-2
USB charger . . . . . . . . . . . . . . . . . . . . . . . . . 1-3, 2-2
calibrating screen . . . . . . . . . . . . . . . . . . . . . . . . . . . 1-8
CAM . . . . . . . . . . . . . . . . . . . . . . . . . . . . . . . . . .1-3, 2-2
charging
spare batteries . . . . . . . . . . . . . . . . . . . . . . . . . . 1-7
Page 92

Index - 2 MC9090-G RFID Integrator Guide Supplement
charging batteries . . . . . . . . . . . . . . . . . . . . . . . . . . . 1-5
charging spare batteries . . . . . . . . . . . . . . . . . . . . . . 1-7
charging the main battery . . . . . . . . . . . . . . . . . . . . . 1-6
clean boot . . . . . . . . . . . . . . . . . . . . . . . . . . . . . . . . 1-10
cleaning RFID reader . . . . . . . . . . . . . . . . . . . . . . . . 7-1
clearing RFID tags . . . . . . . . . . . . . . . . . . . . . . . . . . . 5-5
cold boot . . . . . . . . . . . . . . . . . . . . . . . . . . . . . . .1-8, 1-9
communications . . . . . . . . . . . . . . . . . . . . . . . . . . . . 1-14
configuration . . . . . . . . . . . . . . . . . . . . . . . . . . . . . x, 1-4
conventions
notational . . . . . . . . . . . . . . . . . . . . . . . . . . . . . . . .xi
cpf file . . . . . . . . . . . . . . . . . . . . . . . . . . . . . . . . .3-2, 3-3
CPU . . . . . . . . . . . . . . . . . . . . . . . . . . . . . . . . . . . . . . A-1
cradles
four slot charge only . . . . . . . . . . . . . . . . . . .1-3, 2-1
four slot Ethernet/USB . . . . . . . . . . . . . . . . .1-3, 2-1
serial . . . . . . . . . . . . . . . . . . . . . . . . . . . . . . . . . . 1-3
serial cradle . . . . . . . . . . . . . . . . . . . . . . . . . . . . . 2-1
creating cpf file . . . . . . . . . . . . . . . . . . . . . . . . . . . . . 3-2
SCM . . . . . . . . . . . . . . . . . . . . . . . . . . . . . . . . . . 3-3
creating splash screen . . . . . . . . . . . . . . . . . . . . . . . . 3-2
D
data capture . . . . . . . . . . . . . . . . . . . . . . . . . . . . . . . . . . x
scanning . . . . . . . . . . . . . . . . . . . . . . . . . . . . . . . 3-3
deployment . . . . . . . . . . . . . . . . . . . . . . . . . . . . .3-1, 3-2
CAB files . . . . . . . . . . . . . . . . . . . . . . . . . . . . . . . 3-2
file . . . . . . . . . . . . . . . . . . . . . . . . . . . . . . . . . . . . 3-3
DEX cable . . . . . . . . . . . . . . . . . . . . . . . . . . . . . .1-3, 2-2
digital signatures . . . . . . . . . . . . . . . . . . . . . . . . . . . . 3-1
display . . . . . . . . . . . . . . . . . . . . . . . . . . . . . . . . . . . . A-1
drop specification . . . . . . . . . . . . . . . . . . . . . . . . . . . . A-2
E
I
image update
deploying CAB files . . . . . . . . . . . . . . . . . . . . . . . 3-2
information, service . . . . . . . . . . . . . . . . . . . . . . . . . . . xii
installing main battery . . . . . . . . . . . . . . . . . . . . . . . . 1-4
K
keyboard . . . . . . . . . . . . . . . . . . . . . . . . . . . . . . . . . .A-1
L
LAN . . . . . . . . . . . . . . . . . . . . . . . . . . . . . . . . . . . . . 1-13
lithium-ion battery . . . . . . . . . . . . . . . . . . . . . . . . . . . . 1-2
Local Area Networks . . . . . . . . . . . . . . . . . . . . . . . . 1-13
M
magnetic stripe reader . . . . . . . . . . . . . . . . . . . . 1-3, 2-2
main battery
charging . . . . . . . . . . . . . . . . . . . . . . . . . . . . 1-4, 1-5
installing . . . . . . . . . . . . . . . . . . . . . . . . . . . . . . . 1-4
maintenance . . . . . . . . . . . . . . . . . . . . . . . . . . . . . . . 7-1
MDM9000 . . . . . . . . . . . . . . . . . . . . . . . . . . . . . 1-3, 2-2
memory . . . . . . . . . . . . . . . . . . . . . . . . . . . . . . . . . x, A-1
MMC . . . . . . . . . . . . . . . . . . . . . . . . . . . . . . 1-3, 2-2, 2-4
mobile computer
starting . . . . . . . . . . . . . . . . . . . . . . . . . . . . . . . . . 1-8
mobile computer configuration . . . . . . . . . . . . . . . . . . 1-4
Mobility Services Platform Console . . . . . . . . . . . . . . 3-3
modem module . . . . . . . . . . . . . . . . . . . . . . . . . 1-3, 2-2
MSP . . . . . . . . . . . . . . . . . . . . . . . . . . . . . . . . . . . . . . 3-3
MSR . . . . . . . . . . . . . . . . . . . . . . . . . . . . . . . . . . 1-3, 2-2
multi media card . . . . . . . . . . . . . . . . . . . . . .1-3, 2-2, 2-4
electrical safety . . . . . . . . . . . . . . . . . . . . . . . . . . . . . A-4
electro-static discharge
ESD . . . . . . . . . . . . . . . . . . . . . . . . . . . . . . . . . . .2-3, 2-4
F
file deployment . . . . . . . . . . . . . . . . . . . . . . . . . . . . . 3-3
find WLAN . . . . . . . . . . . . . . . . . . . . . . . . . . . . . . . . 1-13
flash card . . . . . . . . . . . . . . . . . . . . . . . . . . . 1-3, 2-2, 2-4
four slot charge only . . . . . . . . . . . . . . . . . . . . . .1-3, 2-1
four slot Ethernet/USB . . . . . . . . . . . . . . . . . . . . .1-3, 2-1
four slot spare battery charger . . . . . . . . . . . . . . .1-3, 2-2
H
hard reset . . . . . . . . . . . . . . . . . . . . . . . . . 1-8, 1-9, 1-10
headset . . . . . . . . . . . . . . . . . . . . . . . . . . . . . . . . . . . 2-2
humidity . . . . . . . . . . . . . . . . . . . . . . . . . . . . . . . . . . . A-2
O
operating system . . . . . . . . . . . . . . . . . . . . . . . . . . x, A-1
operating temperature . . . . . . . . . . . . . . . . . . . . . . . . A-2
P
packaging . . . . . . . . . . . . . . . . . . . . . . . . . . . . . . . . . 3-1
parts of the mobile computer . . . . . . . . . . . . . . . . . . . 1-2
front view . . . . . . . . . . . . . . . . . . . . . . . . . . . . . . . 1-2
pin-outs
accessory . . . . . . . . . . . . . . . . . . . . . . . . . . . . . . A-7
mobile computer . . . . . . . . . . . . . . . . . . . . . . . . . A-6
printer cable . . . . . . . . . . . . . . . . . . . . . . . . . . . . 1-3, 2-2
programming an RFID tag . . . . . . . . . . . . . . . . . . . . 5-11
Page 93

Index - 3
R
radio . . . . . . . . . . . . . . . . . . . . . . . . . . . . . . . . . . . . . 1-13
radio firmware update . . . . . . . . . . . . . . . . . . . . . . . 4-20
radios . . . . . . . . . . . . . . . . . . . . . . . . . . . . . . . . . . . . . . . x
RAPI . . . . . . . . . . . . . . . . . . . . . . . . . . . . . . . . . . . . . 3-1
rapid deployment client . . . . . . . . . . . . . . . . . . . . . . . 3-3
bar codes . . . . . . . . . . . . . . . . . . . . . . . . . . . . . . 3-3
RD . . . . . . . . . . . . . . . . . . . . . . . . . . . . . . . . . . . . . . . 3-3
bar codes . . . . . . . . . . . . . . . . . . . . . . . . . . . . . . 3-3
reading RFID tags . . . . . . . . . . . . . . . . . . . . . . . . . . . 5-4
remote API . . . . . . . . . . . . . . . . . . . . . . . . . . . . . . . . . 3-1
removing main battery . . . . . . . . . . . . . . . . . . . . . . . . 1-7
reset
hard . . . . . . . . . . . . . . . . . . . . . . . . . . . 1-8, 1-9, 1-10
soft . . . . . . . . . . . . . . . . . . . . . . . . . . . . . . . . . . . 1-9
resetting . . . . . . . . . . . . . . . . . . . . . . . . . . . . . . . . . . . 1-9
RFID
about . . . . . . . . . . . . . . . . . . . . . . . . . . . . . . . . . . 5-7
clearing tags . . . . . . . . . . . . . . . . . . . . . . . . . . . . 5-5
exit . . . . . . . . . . . . . . . . . . . . . . . . . . . . . . . . . . . 5-9
file menu . . . . . . . . . . . . . . . . . . . . . . . . . . . . . . . 5-6
inventory . . . . . . . . . . . . . . . . . . . . . . . . . . . . . . 5-10
launching . . . . . . . . . . . . . . . . . . . . . . . . . . . .4-3, 5-3
locate tag . . . . . . . . . . . . . . . . . . . . . . . . . . . . . 5-10
log . . . . . . . . . . . . . . . . . . . . . . . . . . . . . . . . . . . . 5-7
mode menu . . . . . . . . . . . . . . . . . . . . . . . . . . . . 5-10
program tag . . . . . . . . . . . . . . . . . . . . . . . . . . . . 5-11
reading tags . . . . . . . . . . . . . . . . . . . . . . . . . . . . 5-4
reboot . . . . . . . . . . . . . . . . . . . . . . . . . . . . . . . . . 5-7
saving tag data . . . . . . . . . . . . . . . . . . . . . . . . . . 5-6
selecting tags . . . . . . . . . . . . . . . . . . . . . . . . . . . 5-5
settings . . . . . . . .4-4, 4-5, 4-10, 4-12, 4-14, 5-8, 5-9
S
saving RFID tag data . . . . . . . . . . . . . . . . . . . . . . . . . 5-6
scanning
RD bar codes . . . . . . . . . . . . . . . . . . . . . . . . . . . 3-3
reading RFID tags . . . . . . . . . . . . . . . . . . . . . . . . 5-4
SCM . . . . . . . . . . . . . . . . . . . . . . . . . . . . . . . . . . . . . . 3-3
file deployment . . . . . . . . . . . . . . . . . . . . . . . . . . 3-3
file types . . . . . . . . . . . . . . . . . . . . . . . . . . . . . . . 3-3
user interface . . . . . . . . . . . . . . . . . . . . . . . . . . . 3-3
XML provisioning . . . . . . . . . . . . . . . . . . . . . . . . 3-3
screen
calibration . . . . . . . . . . . . . . . . . . . . . . . . . . . . . . 1-8
Symbol splash window . . . . . . . . . . . . . . . . . . . . 1-8
SD . . . . . . . . . . . . . . . . . . . . . . . . . . . . . . . . . . . . . . . 2-4
secure device card . . . . . . . . . . . . . . . . . . . . . . . . . . 2-4
security . . . . . . . . . . . . . . . . . . . . . . . . . . . . . . . . . . . 3-1
application . . . . . . . . . . . . . . . . . . . . . . . . . . . . . . 3-1
device management . . . . . . . . . . . . . . . . . . . . . . 3-1
digital signatures . . . . . . . . . . . . . . . . . . . . . . . . . 3-1
remote API . . . . . . . . . . . . . . . . . . . . . . . . . . . . . 3-1
selecting RFID tags . . . . . . . . . . . . . . . . . . . . . . . . . . 5-5
serial cradle . . . . . . . . . . . . . . . . . . . . . . . . . . . . 1-3, 2-1
shelf slide . . . . . . . . . . . . . . . . . . . . . . . . . . . . . . 1-3, 2-2
SMDK . . . . . . . . . . . . . . . . . . . . . . . . . . . . . . xi, 1-3, 3-4
soft reset . . . . . . . . . . . . . . . . . . . . . . . . . . . . . . 1-9, 5-7
spare batteries
charging . . . . . . . . . . . . . . . . . . . . . . . . . . . . . . . . 1-7
spare battery . . . . . . . . . . . . . . . . . . . . . . . . . . . . . . . 1-3
charging . . . . . . . . . . . . . . . . . . . . . . . . . . . . . . . . 1-7
splash screen
creating . . . . . . . . . . . . . . . . . . . . . . . . . . . . . . . . 3-2
starting the mobile computer . . . . . . . . . . . . . . . 1-4, 1-8
storage . . . . . . . . . . . . . . . . . . . . . . . . . . . . . . . . . . . . 3-3
storage card
deploying CAB files . . . . . . . . . . . . . . . . . . . . . . . 3-2
storage temperature . . . . . . . . . . . . . . . . . . . . . . . . . . A-2
strap . . . . . . . . . . . . . . . . . . . . . . . . . . . . . . . . . . . . . . 1-2
stylus . . . . . . . . . . . . . . . . . . . . . . . . . . . . . . . . . 1-2, 1-3
suspend . . . . . . . . . . . . . . . . . . . . . . . . . . . . . . . . . . . 1-7
Symbol configuration manager . . . . . . . . . . . . . . . . . 3-3
file deployment . . . . . . . . . . . . . . . . . . . . . . . . . . 3-3
file types . . . . . . . . . . . . . . . . . . . . . . . . . . . . . . . 3-3
user interface . . . . . . . . . . . . . . . . . . . . . . . . . . . . 3-3
XML provisioning . . . . . . . . . . . . . . . . . . . . . . . . . 3-3
Symbol Mobility Developer Kit . . . . . . . . . . . . . . . . . . 3-4
Symbol Mobility Developer Kit for C . . . . . . . . . . . . . 1-3
synchronization . . . . . . . . . . . . . . . . . . . . . . . . . . . . 1-14
T
technical specifications, modem module . . . . . . . . . . A-5
troubleshooting . . . . . . . . . . . . . . . . . . . . . . . . . . . . . 7-3
bluetooth . . . . . . . . . . . . . . . . . . . . . . . . . . . . . . . 7-2
cable adapter module . . . . . . . . . . . . . . . . . . . . . 7-2
four slot charge cradle . . . . . . . . . . . . . . . . . . . . . 7-2
four slot ethernet cradle . . . . . . . . . . . . . . . . . . . . 7-2
four slot spare battery charger . . . . . . . . . . . . . . 7-2
magnetic stripe reader . . . . . . . . . . . . . . . . . . . . . 7-2
mobile computer . . . . . . . . . . . . . . . . . . . . . . . . . 7-2
modem module . . . . . . . . . . . . . . . . . . . . . . . . . . 7-2
single slot serial/USB cradle . . . . . . . . . . . . . . . . 7-2
U
UBC adapter . . . . . . . . . . . . . . . . . . . . . . . . . . . 1-3, 2-2
unpacking . . . . . . . . . . . . . . . . . . . . . . . . . . . . . . . . . 1-2
USB charger . . . . . . . . . . . . . . . . . . . . . . . . . . . 1-3, 2-2
W
wall mounting bracket . . . . . . . . . . . . . . . . . . . . 1-3, 2-2
warm boot . . . . . . . . . . . . . . . . . . . . . . . . . . . . . 1-9, 5-7
weight . . . . . . . . . . . . . . . . . . . . . . . . . . . . . . . . . . . . A-1
Page 94

Index - 4 MC9090-G RFID Integrator Guide Supplement
wireless applications . . . . . . . . . . . . . . . . . . . . . . . . 1-13
WLAN . . . . . . . . . . . . . . . . . . . . . . . . . . . . . . .1-12, 1-13
WLAN 802.11a/b/g . . . . . . . . . . . . . . . . . . . . . . . . . . . . x
WPAN Bluetooth . . . . . . . . . . . . . . . . . . . . . . . . . . . . . . x
X
XML provisioning . . . . . . . . . . . . . . . . . . . . . . . . . . . . 3-2
SCM . . . . . . . . . . . . . . . . . . . . . . . . . . . . . . . . . . 3-3
Page 95

Page 96

Motorola, Inc.
One Motorola Plaza
Holtsville, New York 11742, USA
1-800-927-9626
http://www.symbol.com
MOTOROLA and the Stylized M Logo and Symbol and the Symbol logo are registered in the U.S. Patent and Trademark Office.
All other product or service names are the property of their registered owners.
© Motorola, Inc. 2008
72E-89963-04 Revision A - September 2008
 Loading...