

Page 1
MC35 EDA
User Guide
Page 2

Page 3

User Guide
MC35 Enterprise Digital Assistant
Page 4

COPYRIGHT
© 2007 by Motorola, Inc. All rights reserved.
No part of this publication may be reproduced or used in any form, or by any electrical or
mechanical means, without permission in writing from Motorola. This includes electronic or
mechanical means, such as photocopying, recording, or information storage and retrieval
systems. The material in this manual is subject to change without notice.
The software is provided strictly on an "as is" basis. All software, including firmware, furnished
to the user is on a licensed basis. Motorola grants to the user a non-transferable and nonexclusive license to use each software or firmware program delivered hereunder (licensed
program). Except as noted below, such license may not be assigned, sublicensed, or otherwise
transferred by the user without prior written consent of Motorola. No right to copy a licensed
program in whole or in part is granted, except as permitted under copyright law. The user shall
not modify, merge, or incorporate any form or portion of a licensed program with other program
material, create a derivative work from a licensed program, or use a licensed program in a
network without written permission from Motorola. The user agrees to maintain Motorola’s
copyright notice on the licensed programs delivered hereunder, and to include the same on any
authorized copies it makes, in whole or in part. The user agrees not to decompile, disassemble,
decode, or reverse engineer any licensed program delivered to the user or any portion thereof.
Motorola reserves the right to make changes to any software or product to improve reliability,
function, or design.
Motorola does not assume any product liability arising out of, or in connection with, the
application or use of any product, circuit, or application described herein.
No license is granted, either expressly or by implication, estoppel, or otherwise under any
Motorola, Inc., intellectual property rights. An implied license only exists for equipment, circuits,
and subsystems contained in Motorola products.
MOTOROLA and the Stylized M Logo are registered in the US Patent & Trademark Office.
Symbol is a registered trademark of Symbol Technologies, Inc. All other product or service
names are the property of their respective owners. Bluetooth is a registered trademark of
Bluetooth SIG. Microsoft, Windows and ActiveSync are either registered trademarks or
trademarks of Microsoft Corporation. Other product names mentioned in this manual may be
trademarks or registered trademarks of their respective companies and are hereby
acknowledged.
Motorola, Inc.
One Symbol Plaza
Holtsville, New York 11742-1300
http://www.symbol.com
Page 5

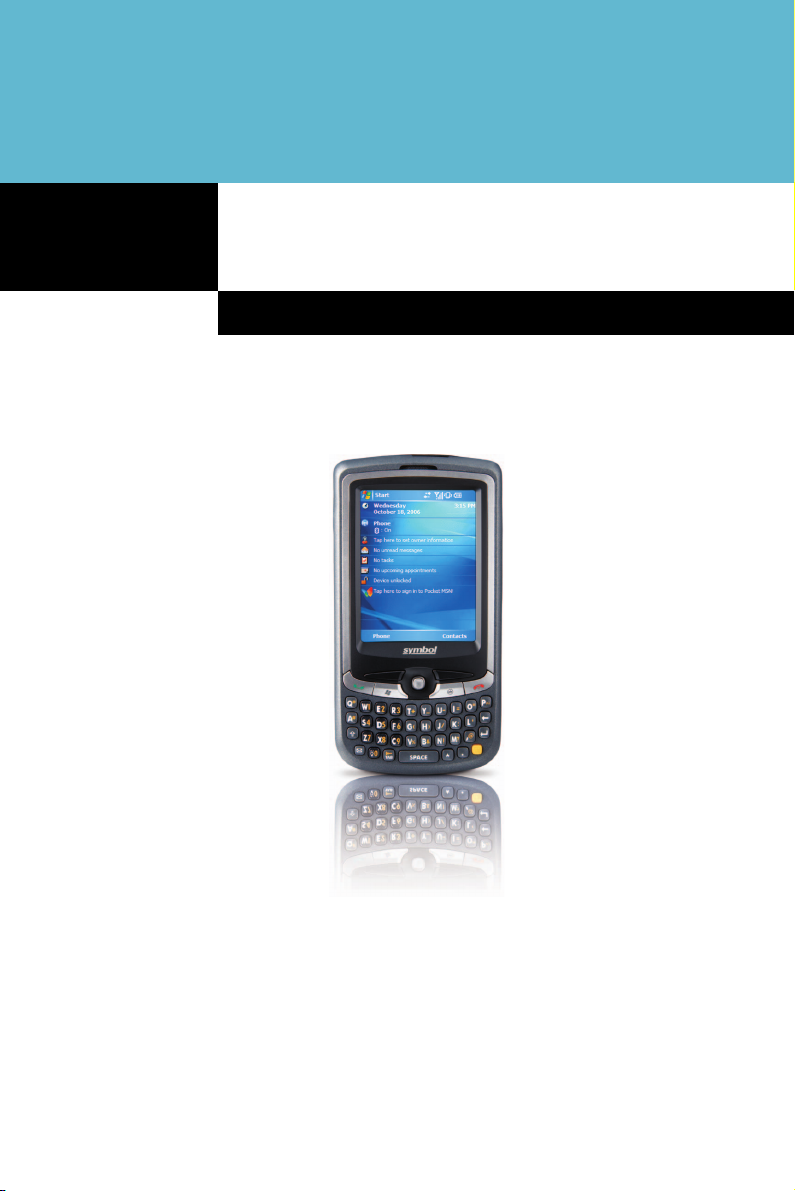
Welcome
Welcome
Thank you for making MC35 your choice for your mobile computing and communication
needs. Your new sleek MC35 is a fully integrated EDA-mobile phone device. It combines
the power of high-performance EDA applications for organizing personal and
work-related information with the connectivity function of a mobile phone. The device
also supports high-speed General Packet Radio Services (GPRS) for on-the-go Inter net
access, as well as a high quality Global Positioning System (GPS) solution to meet your
travel needs. Selected MC35 models have a built-in camera for taking pictures and bar
code data capture. All these features make your MC35 the ideal digital companion for
both work and play.
v
Page 6

Welcome
vi
Page 7

Contents
Welcome v
1 First Things First 1
2 System Tour 7
3 Entering Information 21
4 Managing Information 39
5 Wireless Communications 43
Package contents. . . . . . . . . . . . . . . . . . . . . . . . . . . . . . . . . . . . . . . . . . . . . . . . . . . . . . . 1
Preparing to use your MC35 . . . . . . . . . . . . . . . . . . . . . . . . . . . . . . . . . . . . . . . . . . . . . . 1
Installing the battery pack . . . . . . . . . . . . . . . . . . . . . . . . . . . . . . . . . . . . . . . . . . . . 1
Charging the MC35 . . . . . . . . . . . . . . . . . . . . . . . . . . . . . . . . . . . . . . . . . . . . . . . . . 2
Installing Microsoft ActiveSync . . . . . . . . . . . . . . . . . . . . . . . . . . . . . . . . . . . . . . . . 3
Starting the MC35 . . . . . . . . . . . . . . . . . . . . . . . . . . . . . . . . . . . . . . . . . . . . . . . . . . 4
Creating an ActiveSync partnership . . . . . . . . . . . . . . . . . . . . . . . . . . . . . . . . . . . . 4
Features summary. . . . . . . . . . . . . . . . . . . . . . . . . . . . . . . . . . . . . . . . . . . . . . . . . . . . . . 7
Performance . . . . . . . . . . . . . . . . . . . . . . . . . . . . . . . . . . . . . . . . . . . . . . . . . . . . . . 7
Display. . . . . . . . . . . . . . . . . . . . . . . . . . . . . . . . . . . . . . . . . . . . . . . . . . . . . . . . . . . 7
Audio . . . . . . . . . . . . . . . . . . . . . . . . . . . . . . . . . . . . . . . . . . . . . . . . . . . . . . . . . . . . 7
Mobile connectivity . . . . . . . . . . . . . . . . . . . . . . . . . . . . . . . . . . . . . . . . . . . . . . . . . 7
Hardware connectivity. . . . . . . . . . . . . . . . . . . . . . . . . . . . . . . . . . . . . . . . . . . . . . . 8
Battery pack . . . . . . . . . . . . . . . . . . . . . . . . . . . . . . . . . . . . . . . . . . . . . . . . . . . . . . 8
Design and ergonomics . . . . . . . . . . . . . . . . . . . . . . . . . . . . . . . . . . . . . . . . . . . . . 8
Accessories. . . . . . . . . . . . . . . . . . . . . . . . . . . . . . . . . . . . . . . . . . . . . . . . . . . . . . . 9
Hardware tour . . . . . . . . . . . . . . . . . . . . . . . . . . . . . . . . . . . . . . . . . . . . . . . . . . . . . . . . 10
Hardware interface. . . . . . . . . . . . . . . . . . . . . . . . . . . . . . . . . . . . . . . . . . . . . . . . . . . . . 12
Using the touch screen backlight key . . . . . . . . . . . . . . . . . . . . . . . . . . . . . . . . . . 12
Using the stylus. . . . . . . . . . . . . . . . . . . . . . . . . . . . . . . . . . . . . . . . . . . . . . . . . . . 12
Using the SD/MMC expansion slot . . . . . . . . . . . . . . . . . . . . . . . . . . . . . . . . . . . . 12
Soft buttons and keypad . . . . . . . . . . . . . . . . . . . . . . . . . . . . . . . . . . . . . . . . . . . . 14
Command interface . . . . . . . . . . . . . . . . . . . . . . . . . . . . . . . . . . . . . . . . . . . . . . . . . . . . 17
Today screen. . . . . . . . . . . . . . . . . . . . . . . . . . . . . . . . . . . . . . . . . . . . . . . . . . . . . 17
Start menu. . . . . . . . . . . . . . . . . . . . . . . . . . . . . . . . . . . . . . . . . . . . . . . . . . . . . . . 18
Navigation bar . . . . . . . . . . . . . . . . . . . . . . . . . . . . . . . . . . . . . . . . . . . . . . . . . . . . 18
Command bar . . . . . . . . . . . . . . . . . . . . . . . . . . . . . . . . . . . . . . . . . . . . . . . . . . . . 20
Pop-up menus. . . . . . . . . . . . . . . . . . . . . . . . . . . . . . . . . . . . . . . . . . . . . . . . . . . . 20
Notifications. . . . . . . . . . . . . . . . . . . . . . . . . . . . . . . . . . . . . . . . . . . . . . . . . . . . . . 20
Using the MC35 keypad. . . . . . . . . . . . . . . . . . . . . . . . . . . . . . . . . . . . . . . . . . . . . . . . . 21
Using the Input Selector. . . . . . . . . . . . . . . . . . . . . . . . . . . . . . . . . . . . . . . . . . . . . . . . . 21
Keyboard. . . . . . . . . . . . . . . . . . . . . . . . . . . . . . . . . . . . . . . . . . . . . . . . . . . . . . . . 22
Block Recognizer . . . . . . . . . . . . . . . . . . . . . . . . . . . . . . . . . . . . . . . . . . . . . . . . . 23
Letter Recognizer . . . . . . . . . . . . . . . . . . . . . . . . . . . . . . . . . . . . . . . . . . . . . . . . . 23
Transcriber. . . . . . . . . . . . . . . . . . . . . . . . . . . . . . . . . . . . . . . . . . . . . . . . . . . . . . . 24
Star Key. . . . . . . . . . . . . . . . . . . . . . . . . . . . . . . . . . . . . . . . . . . . . . . . . . . . . . . . . 25
Writing on the screen. . . . . . . . . . . . . . . . . . . . . . . . . . . . . . . . . . . . . . . . . . . . . . . . . . . 25
Drawing on the screen. . . . . . . . . . . . . . . . . . . . . . . . . . . . . . . . . . . . . . . . . . . . . . . . . . 27
Recording a message . . . . . . . . . . . . . . . . . . . . . . . . . . . . . . . . . . . . . . . . . . . . . . . . . . 28
Using My Text . . . . . . . . . . . . . . . . . . . . . . . . . . . . . . . . . . . . . . . . . . . . . . . . . . . . . . . . 29
Using ActiveSync. . . . . . . . . . . . . . . . . . . . . . . . . . . . . . . . . . . . . . . . . . . . . . . . . . . . . . 30
Synchronizing information with your computer . . . . . . . . . . . . . . . . . . . . . . . . . . . 30
Synchronizing with a server . . . . . . . . . . . . . . . . . . . . . . . . . . . . . . . . . . . . . . . . . 34
Using ActiveSync to copy files. . . . . . . . . . . . . . . . . . . . . . . . . . . . . . . . . . . . . . . . 36
Synchronization options . . . . . . . . . . . . . . . . . . . . . . . . . . . . . . . . . . . . . . . . . . . . 36
ActiveSync errors . . . . . . . . . . . . . . . . . . . . . . . . . . . . . . . . . . . . . . . . . . . . . . . . . 37
Using wireless communication. . . . . . . . . . . . . . . . . . . . . . . . . . . . . . . . . . . . . . . . . . . . 38
Opening programs . . . . . . . . . . . . . . . . . . . . . . . . . . . . . . . . . . . . . . . . . . . . . . . . . . . . . 39
Program list . . . . . . . . . . . . . . . . . . . . . . . . . . . . . . . . . . . . . . . . . . . . . . . . . . . . . . 40
Using Search . . . . . . . . . . . . . . . . . . . . . . . . . . . . . . . . . . . . . . . . . . . . . . . . . . . . . . . . . 42
Using File Explorer. . . . . . . . . . . . . . . . . . . . . . . . . . . . . . . . . . . . . . . . . . . . . . . . . . . . . 42
Wireless communication features . . . . . . . . . . . . . . . . . . . . . . . . . . . . . . . . . . . . . . . . . 43
Beam function . . . . . . . . . . . . . . . . . . . . . . . . . . . . . . . . . . . . . . . . . . . . . . . . . . . . 43
vii
Page 8

GPRS connection . . . . . . . . . . . . . . . . . . . . . . . . . . . . . . . . . . . . . . . . . . . . . . . . .49
WiFi connection . . . . . . . . . . . . . . . . . . . . . . . . . . . . . . . . . . . . . . . . . . . . . . . . . . .50
Managing wireless connections . . . . . . . . . . . . . . . . . . . . . . . . . . . . . . . . . . . . . . . . . . .56
Using Wireless Manager . . . . . . . . . . . . . . . . . . . . . . . . . . . . . . . . . . . . . . . . . . . .56
Getting connected . . . . . . . . . . . . . . . . . . . . . . . . . . . . . . . . . . . . . . . . . . . . . . . . . . . . .59
Connecting to the Internet . . . . . . . . . . . . . . . . . . . . . . . . . . . . . . . . . . . . . . . . . . .59
Connecting to your office network . . . . . . . . . . . . . . . . . . . . . . . . . . . . . . . . . . . . .60
Viewing intranet URLs . . . . . . . . . . . . . . . . . . . . . . . . . . . . . . . . . . . . . . . . . . . . . .61
Setting an e-mail server connection. . . . . . . . . . . . . . . . . . . . . . . . . . . . . . . . . . . .61
6 Using the Windows Mobile Programs 63
7 Using Phone 109
Microsoft Outlook Mobile programs . . . . . . . . . . . . . . . . . . . . . . . . . . . . . . . . . . . . . . . .63
Calendar . . . . . . . . . . . . . . . . . . . . . . . . . . . . . . . . . . . . . . . . . . . . . . . . . . . . . . . .63
Contacts . . . . . . . . . . . . . . . . . . . . . . . . . . . . . . . . . . . . . . . . . . . . . . . . . . . . . . . .66
Tasks. . . . . . . . . . . . . . . . . . . . . . . . . . . . . . . . . . . . . . . . . . . . . . . . . . . . . . . . . . .70
Notes. . . . . . . . . . . . . . . . . . . . . . . . . . . . . . . . . . . . . . . . . . . . . . . . . . . . . . . . . . .72
Messaging. . . . . . . . . . . . . . . . . . . . . . . . . . . . . . . . . . . . . . . . . . . . . . . . . . . . . . .74
Microsoft Office Mobile programs. . . . . . . . . . . . . . . . . . . . . . . . . . . . . . . . . . . . . . . . . .78
Word Mobile . . . . . . . . . . . . . . . . . . . . . . . . . . . . . . . . . . . . . . . . . . . . . . . . . . . . .78
Excel Mobile . . . . . . . . . . . . . . . . . . . . . . . . . . . . . . . . . . . . . . . . . . . . . . . . . . . . .81
PowerPoint Mobile . . . . . . . . . . . . . . . . . . . . . . . . . . . . . . . . . . . . . . . . . . . . . . . .83
Windows Media Player . . . . . . . . . . . . . . . . . . . . . . . . . . . . . . . . . . . . . . . . . . . . . . . . .86
Copying files to your device . . . . . . . . . . . . . . . . . . . . . . . . . . . . . . . . . . . . . . . . . .86
The library . . . . . . . . . . . . . . . . . . . . . . . . . . . . . . . . . . . . . . . . . . . . . . . . . . . . . . .87
The playlist. . . . . . . . . . . . . . . . . . . . . . . . . . . . . . . . . . . . . . . . . . . . . . . . . . . . . . .87
File Playback . . . . . . . . . . . . . . . . . . . . . . . . . . . . . . . . . . . . . . . . . . . . . . . . . . . . .91
Customizing the Player . . . . . . . . . . . . . . . . . . . . . . . . . . . . . . . . . . . . . . . . . . . . .92
Internet Explorer Mobile . . . . . . . . . . . . . . . . . . . . . . . . . . . . . . . . . . . . . . . . . . . . . . . .96
Pocket MSN . . . . . . . . . . . . . . . . . . . . . . . . . . . . . . . . . . . . . . . . . . . . . . . . . . . . . . . . . .99
MSN Hotmail. . . . . . . . . . . . . . . . . . . . . . . . . . . . . . . . . . . . . . . . . . . . . . . . . . . .101
MSN Messenger . . . . . . . . . . . . . . . . . . . . . . . . . . . . . . . . . . . . . . . . . . . . . . . . .103
Phone setup . . . . . . . . . . . . . . . . . . . . . . . . . . . . . . . . . . . . . . . . . . . . . . . . . . . . . . . . .109
Installing the SIM card . . . . . . . . . . . . . . . . . . . . . . . . . . . . . . . . . . . . . . . . . . . . .109
Entering your PIN. . . . . . . . . . . . . . . . . . . . . . . . . . . . . . . . . . . . . . . . . . . . . . . . .111
Dialer screen . . . . . . . . . . . . . . . . . . . . . . . . . . . . . . . . . . . . . . . . . . . . . . . . . . . . . . . .112
Dialer buttons. . . . . . . . . . . . . . . . . . . . . . . . . . . . . . . . . . . . . . . . . . . . . . . . . . . .112
Phone status icons. . . . . . . . . . . . . . . . . . . . . . . . . . . . . . . . . . . . . . . . . . . . . . . .113
Phone operation . . . . . . . . . . . . . . . . . . . . . . . . . . . . . . . . . . . . . . . . . . . . . . . . . . . . . .113
Turning the phone function on and off . . . . . . . . . . . . . . . . . . . . . . . . . . . . . . . . .113
Erasing number input. . . . . . . . . . . . . . . . . . . . . . . . . . . . . . . . . . . . . . . . . . . . . .115
Answering a call. . . . . . . . . . . . . . . . . . . . . . . . . . . . . . . . . . . . . . . . . . . . . . . . . .116
Rejecting a call. . . . . . . . . . . . . . . . . . . . . . . . . . . . . . . . . . . . . . . . . . . . . . . . . . .116
Ending a call . . . . . . . . . . . . . . . . . . . . . . . . . . . . . . . . . . . . . . . . . . . . . . . . . . . .116
Adjusting the phone volume. . . . . . . . . . . . . . . . . . . . . . . . . . . . . . . . . . . . . . . . .116
Using the speakerphone . . . . . . . . . . . . . . . . . . . . . . . . . . . . . . . . . . . . . . . . . . .116
Muting a call. . . . . . . . . . . . . . . . . . . . . . . . . . . . . . . . . . . . . . . . . . . . . . . . . . . . .117
Making phone calls . . . . . . . . . . . . . . . . . . . . . . . . . . . . . . . . . . . . . . . . . . . . . . .117
Phone features . . . . . . . . . . . . . . . . . . . . . . . . . . . . . . . . . . . . . . . . . . . . . . . . . . . . . . .121
Call notification and identification. . . . . . . . . . . . . . . . . . . . . . . . . . . . . . . . . . . . .122
Call hold . . . . . . . . . . . . . . . . . . . . . . . . . . . . . . . . . . . . . . . . . . . . . . . . . . . . . . . .122
Conference call . . . . . . . . . . . . . . . . . . . . . . . . . . . . . . . . . . . . . . . . . . . . . . . . . .123
Call notes . . . . . . . . . . . . . . . . . . . . . . . . . . . . . . . . . . . . . . . . . . . . . . . . . . . . . . .123
Text messaging service . . . . . . . . . . . . . . . . . . . . . . . . . . . . . . . . . . . . . . . . . . . .125
Voice mail. . . . . . . . . . . . . . . . . . . . . . . . . . . . . . . . . . . . . . . . . . . . . . . . . . . . . . .128
Contacts integration. . . . . . . . . . . . . . . . . . . . . . . . . . . . . . . . . . . . . . . . . . . . . . .129
Call History . . . . . . . . . . . . . . . . . . . . . . . . . . . . . . . . . . . . . . . . . . . . . . . . . . . . .131
Phone profiles. . . . . . . . . . . . . . . . . . . . . . . . . . . . . . . . . . . . . . . . . . . . . . . . . . . . . . . .134
Phone preferences . . . . . . . . . . . . . . . . . . . . . . . . . . . . . . . . . . . . . . . . . . . . . . . . . . . .136
Phone tab. . . . . . . . . . . . . . . . . . . . . . . . . . . . . . . . . . . . . . . . . . . . . . . . . . . . . . .136
Services tab . . . . . . . . . . . . . . . . . . . . . . . . . . . . . . . . . . . . . . . . . . . . . . . . . . . . .138
Network tab . . . . . . . . . . . . . . . . . . . . . . . . . . . . . . . . . . . . . . . . . . . . . . . . . . . . .142
Band tab. . . . . . . . . . . . . . . . . . . . . . . . . . . . . . . . . . . . . . . . . . . . . . . . . . . . . . . .143
viii
Page 9

8 Using MC35 Companion Programs 145
9 Customizing your MC35 193
10 User Support 209
Phone management programs . . . . . . . . . . . . . . . . . . . . . . . . . . . . . . . . . . . . . . . . . . 145
SIM Manager. . . . . . . . . . . . . . . . . . . . . . . . . . . . . . . . . . . . . . . . . . . . . . . . . . . . 145
SIM Toolkit. . . . . . . . . . . . . . . . . . . . . . . . . . . . . . . . . . . . . . . . . . . . . . . . . . . . . . 147
Wireless communication programs . . . . . . . . . . . . . . . . . . . . . . . . . . . . . . . . . . . . . . . 148
Internet Sharing. . . . . . . . . . . . . . . . . . . . . . . . . . . . . . . . . . . . . . . . . . . . . . . . . . 148
Push to Talk. . . . . . . . . . . . . . . . . . . . . . . . . . . . . . . . . . . . . . . . . . . . . . . . . . . . . 149
GPRS Setting . . . . . . . . . . . . . . . . . . . . . . . . . . . . . . . . . . . . . . . . . . . . . . . . . . . 157
Terminal Services Client . . . . . . . . . . . . . . . . . . . . . . . . . . . . . . . . . . . . . . . . . . . 158
Express GPS Connect . . . . . . . . . . . . . . . . . . . . . . . . . . . . . . . . . . . . . . . . . . . . 160
Media-related programs. . . . . . . . . . . . . . . . . . . . . . . . . . . . . . . . . . . . . . . . . . . . . . . . 164
Pictures & Videos . . . . . . . . . . . . . . . . . . . . . . . . . . . . . . . . . . . . . . . . . . . . . . . . 164
Camera . . . . . . . . . . . . . . . . . . . . . . . . . . . . . . . . . . . . . . . . . . . . . . . . . . . . . . . . 173
CamWedge . . . . . . . . . . . . . . . . . . . . . . . . . . . . . . . . . . . . . . . . . . . . . . . . . . . . . 178
Product download-related programs . . . . . . . . . . . . . . . . . . . . . . . . . . . . . . . . . . . . . . 181
AirBEAM Smart . . . . . . . . . . . . . . . . . . . . . . . . . . . . . . . . . . . . . . . . . . . . . . . . . . 181
Rapid Deployment Client. . . . . . . . . . . . . . . . . . . . . . . . . . . . . . . . . . . . . . . . . . . 190
Download Agent . . . . . . . . . . . . . . . . . . . . . . . . . . . . . . . . . . . . . . . . . . . . . . . . . 192
Adjusting system preferences . . . . . . . . . . . . . . . . . . . . . . . . . . . . . . . . . . . . . . . . . . . 193
Personal tab . . . . . . . . . . . . . . . . . . . . . . . . . . . . . . . . . . . . . . . . . . . . . . . . . . . . 193
System tab . . . . . . . . . . . . . . . . . . . . . . . . . . . . . . . . . . . . . . . . . . . . . . . . . . . . . 198
Connections tab . . . . . . . . . . . . . . . . . . . . . . . . . . . . . . . . . . . . . . . . . . . . . . . . . 203
Program management . . . . . . . . . . . . . . . . . . . . . . . . . . . . . . . . . . . . . . . . . . . . . . . . . 206
Adding programs to your device . . . . . . . . . . . . . . . . . . . . . . . . . . . . . . . . . . . . . 206
Removing programs . . . . . . . . . . . . . . . . . . . . . . . . . . . . . . . . . . . . . . . . . . . . . . 208
Customer support . . . . . . . . . . . . . . . . . . . . . . . . . . . . . . . . . . . . . . . . . . . . . . . . . . . . 209
Protecting your MC35 . . . . . . . . . . . . . . . . . . . . . . . . . . . . . . . . . . . . . . . . . . . . . . . . . 210
Using system locks . . . . . . . . . . . . . . . . . . . . . . . . . . . . . . . . . . . . . . . . . . . . . . . 210
Creating backup files. . . . . . . . . . . . . . . . . . . . . . . . . . . . . . . . . . . . . . . . . . . . . . 211
Troubleshooting . . . . . . . . . . . . . . . . . . . . . . . . . . . . . . . . . . . . . . . . . . . . . . . . . . . . . . 213
Troubleshooting reminders . . . . . . . . . . . . . . . . . . . . . . . . . . . . . . . . . . . . . . . . . 213
Troubleshooting procedures . . . . . . . . . . . . . . . . . . . . . . . . . . . . . . . . . . . . . . . . 213
Recalibrating the screen . . . . . . . . . . . . . . . . . . . . . . . . . . . . . . . . . . . . . . . . . . . 217
Resetting your MC35. . . . . . . . . . . . . . . . . . . . . . . . . . . . . . . . . . . . . . . . . . . . . . 218
Battery pack information . . . . . . . . . . . . . . . . . . . . . . . . . . . . . . . . . . . . . . . . . . . 219
Index 221
ix
Page 10

x
Page 11

1 First Things First
• Package contents
• Preparing to use your MC35
Package contents
Your MC35 comes packed in a cardboard box. Carefully unpack the box and remove the
contents. If any of the following items are missing or damaged, contact your dealer
immediately.
• MC35 Enterprise Digital Assistant
• Stylus
• Standard life battery
• AC adapter (with four region-specific clip plugs)
• USB sync cable
• MC35 Quick Start Guide
• MC35 Regulatory Guide
Preparing to use your MC35
Perform the following easy setup tasks to begin using your device:
1 Install the battery pack.
2 Charge your device.
3 Install ActiveSync 4.2 or higher on your computer.
4 Start the MC35.
5 Create an ActiveSync partnership between your device and your computer.
1 First Things First
Package contents
Installing the battery pack
Your MC35 uses a high-density removable and rechargeable 1370 mAh lithium polymer/
standard life battery. See “Battery problem” on page 213 for more information on how to
conserve power consumption to make your battery last longer.
NOTE: An optional 2740 mAh extended life battery is available.
WARNING! There is a risk of fire and burns if the battery is handled improperly. DO
NOT disassemble, crush, puncture, short external contacts, or dispose the battery in fire
or water. DO NOT attempt to open or service the battery. Dispose of used batteries
according to local recycling guidelines in your area.
1
Page 12
1 First Things First
Preparing to use your MC35
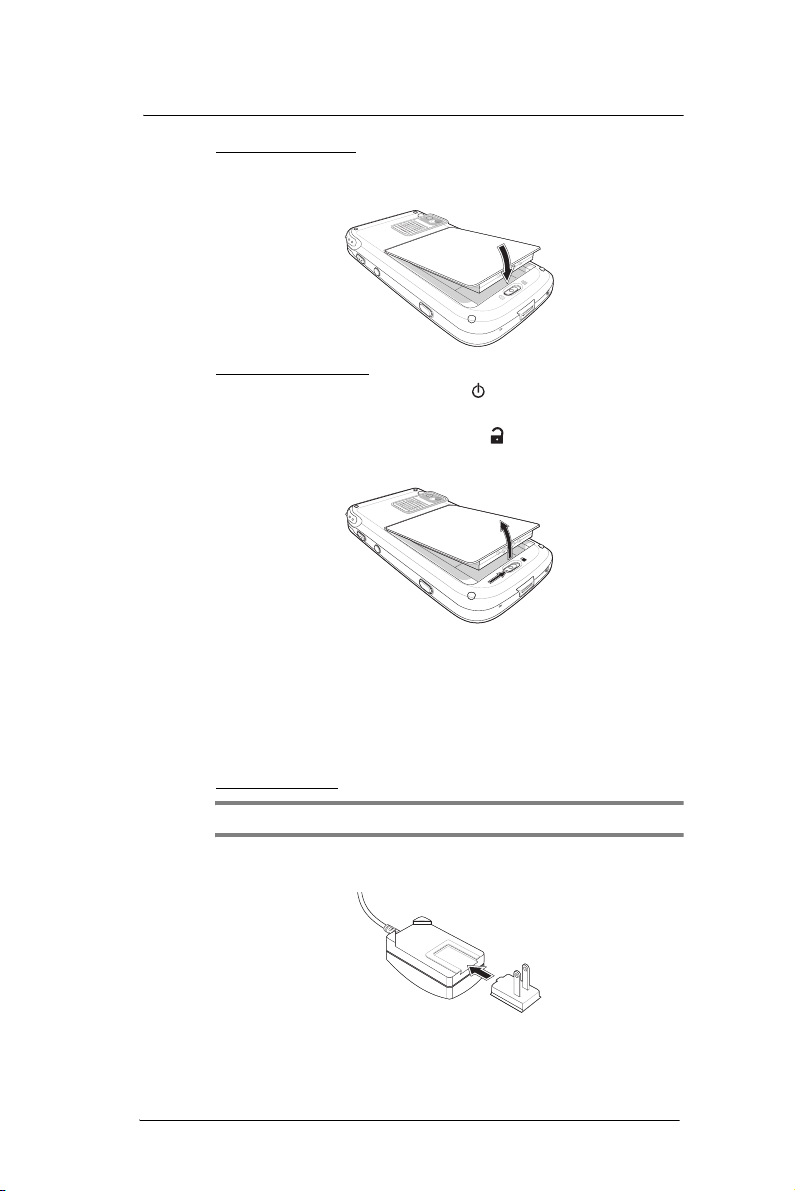
To install the battery pack:
Align the tabs on the battery pack with the grooves on the rear side of the device, and
then insert the battery pack in place. The battery pack locks to the chassis with an
audible click.
To uninstall the battery pack:
1 If the device is on, press the Power button to turn off the device.
Wait for five seconds to allow the device to completely power off.
2 Slide the battery latch toward the unlock icon to release the battery pack from
the chassis (1).
3 Completely detach the battery pack from the device (2).
Charging the MC35
Initial charging of a standard life battery takes about four hours. The extended life battery
type requires at least eight hours. After the initial charging, charge your device everyday
to restore the battery to full capacity. Charge your device using the AC adapter cable, see
instructions below.
While waiting for the initial charging to complete, install Microsoft® ActiveSync® 4.2 or
higher on your computer to prepare for the initial syn chronization procedure. Refer to the
next section for instructions.
To charge your device:
2
1
NOTE: Use the clip plug applicable in your country.
1 Slide the replaceable clip plug into the AC adapter until it locks into place with an
audible click.
2
Page 13
1 First Things First
Preparing to use your MC35
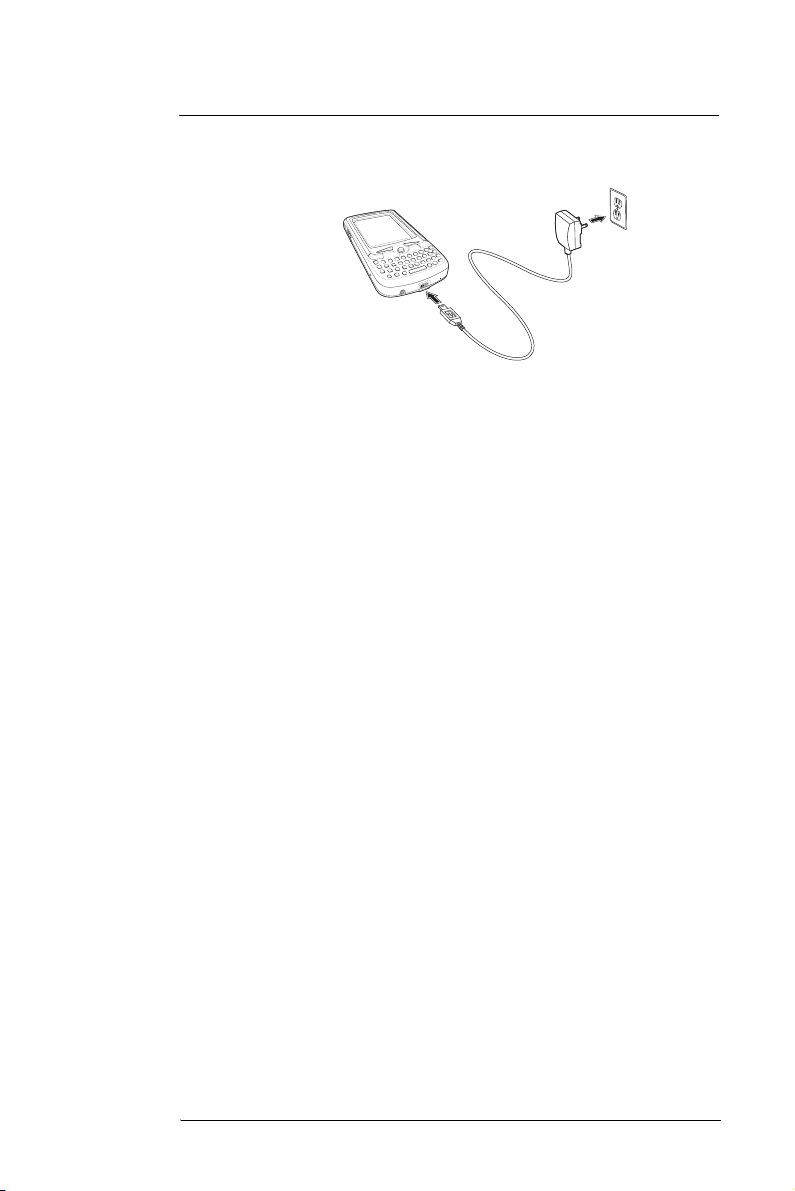
2 Plug the AC adapter cable into the mini USB connector on bottom of the device.
3 Connect the AC adapter cable into an electrical outlet.
The LED indicator on the right side of the touch screen lights up orange to signify
that AC connection is made.
If the battery level becomes low in the course of normal use, a status icon appears
on the device screen indicating low or depleted battery status (see "Status icons" on
page 18 for more information). In both cases, perform an ActiveSync operation to
back up your data, and then recharge your device as soon as possible.
If the battery level reaches low status, the device enters sleep mode; if the battery
level reaches very low status, the device enters deep sleep mode. In this case, you
have about 72 hours to recharge your device after which you risk losing all data on
your device’s internal memory.
Installing Microsoft ActiveSync
ActiveSync is already installed on your MC35; you only need to install it on your
computer.
System installation requirements
• Supported operating systems:
• Windows 2000 Service Pack 4
• Windows Server® 2003 Service Pack 1
• Windows Server 2003 Service Pack 1 for Itanium-based Systems
• Windows Server 2003, Standard x64 Edition
• Windows XP® Media Center Edition
• Windows XP Professional x64 Edition
• Windows XP Service Pack 1
• Windows XP Service Pack 2
• Windows XP Tablet PC Edition
• Microsoft Outlook® 2000, Microsoft Outlook XP, or Microsoft Outlook® 2003
(recommended) messaging and collaboration clients required for Microsoft Outlook
Office Mobile synchronization
• Microsoft Office 2000, Microsoft Office XP or Microsoft Office 2003 for Microsoft
Office Mobile® synchronization
• Microsoft Internet Explorer 6.0 or later for Internet Explorer Mobile favorites
synchronization
• Microsoft Systems Management Server 2.0
• Hard disk drive with 7 MB of available hard disk space (actual requirements may
vary based on selected features and user’s current system configuration)
• USB port, Bluetooth, or infrared connection
3
Page 14
1 First Things First
Preparing to use your MC35
To install Microsoft ActiveSync on your computer:
1 Close all open programs, including those that run at startup, and disable any
virus-scanning software.
2 Download the ActiveSync setup software from the Microsoft ActiveSync Download
page at http://www.microsoft.com.
3 On the download prompt, click Open.
4 Follow all on-screen instructions to complete installation.
To confirm you've successfully installed ActiveSync, open ActiveSync, then click
Help > About Microsoft ActiveSync.
For detailed information about using ActiveSync on your computer, start ActiveSync
on your computer, click Help > Microsoft ActiveSync Help.
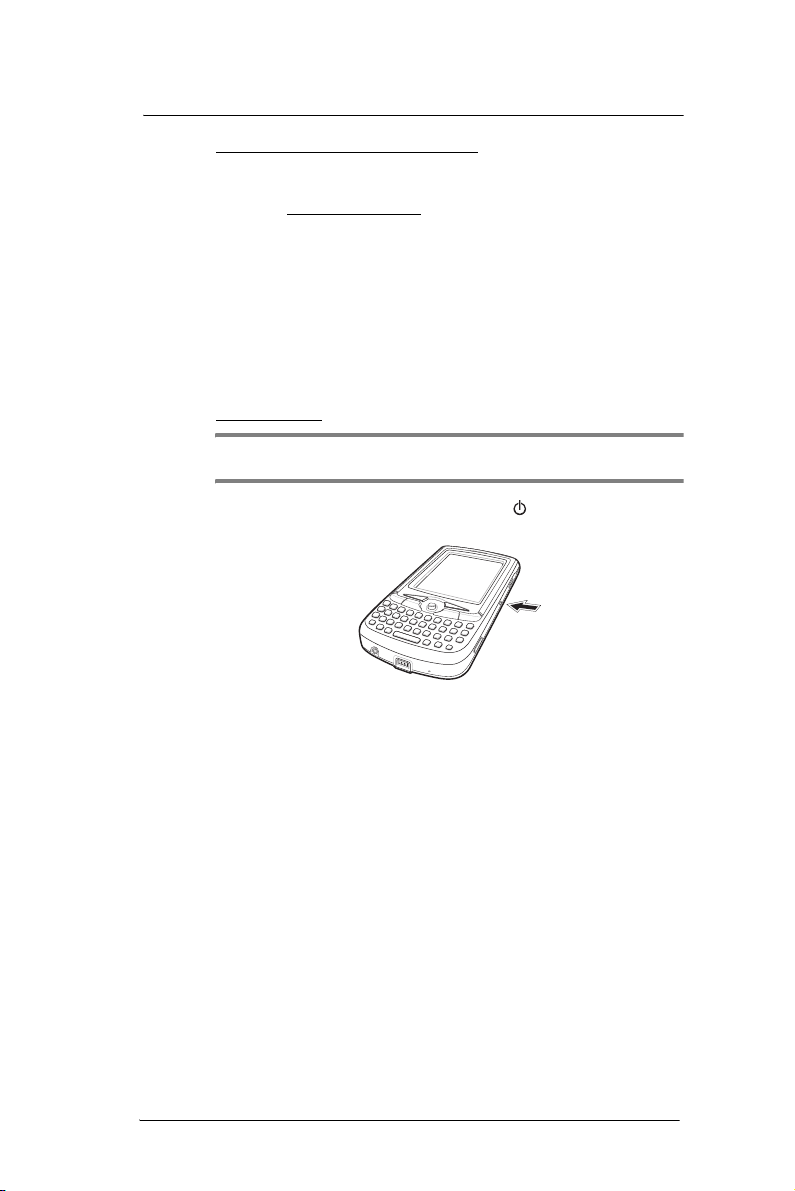
Starting the MC35
After you have initially charged your device, the device is ready for use. You can now
start your device where you will calibrate the display, learn basic stylus usage, and set up
the system date and time.
To start your MC35:
NOTE: After pressing the power button, wait four seconds for the device to power on
before pressing the power button again.
1 Turn on your device by pressi ng the Power button located on the right side of
the touch screen.
2 Follow the on-screen Welcome Screen Wizard instructions.
3 After the device setup, create an ActiveSync partnership to synchronize information
between your computer and/or server and your MC35.
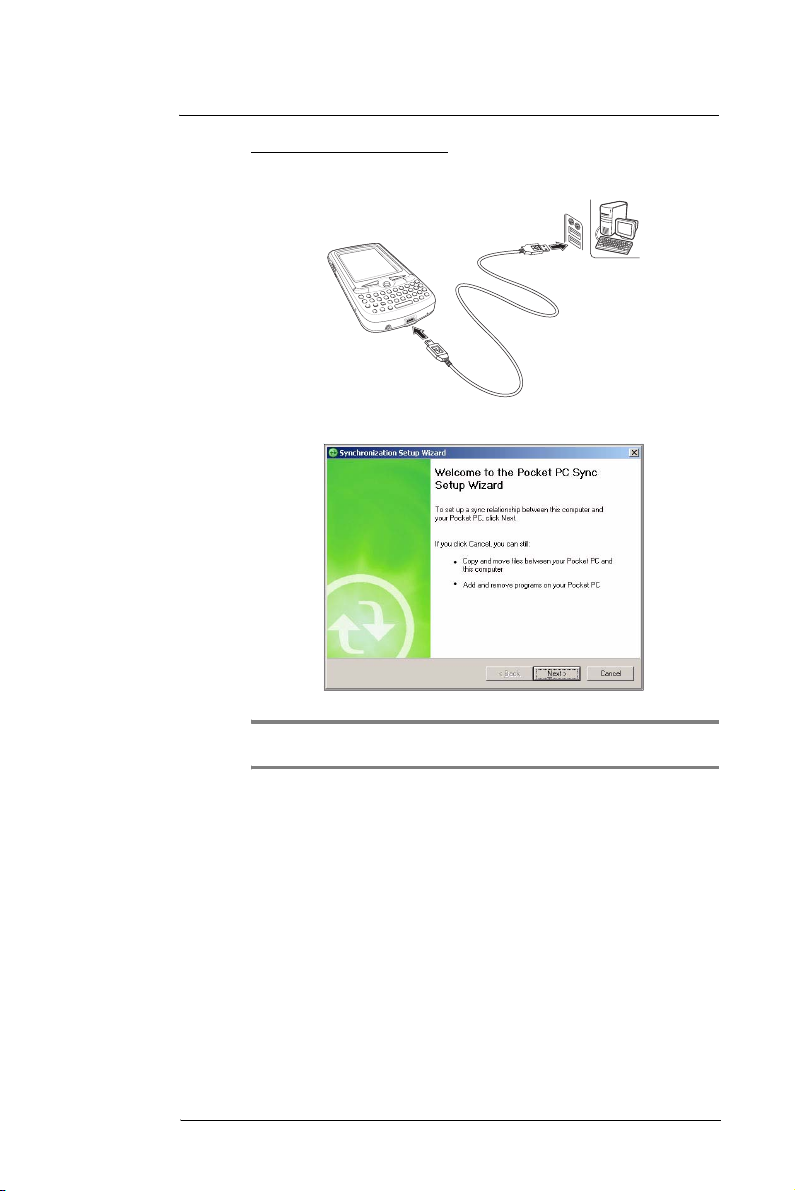
Creating an ActiveSync partnership
After installing ActiveSync on your computer and completing the device setup, you can
now set up a partnership between your MC35 (first time connecti on only) and your
computer and/or a server with the help of the New Partnership setup wizard. This wizard
will help you:
• Set up a partnership so you can synchronize information between your
device and your computer
• Customize your synchronization settings
4
Page 15
1 First Things First
Preparing to use your MC35
To create an ActiveSync partnership:
1 Connect the USB sync cable into the connector on the bottom of your device, then
plug the USB sync cable into a USB port on your computer.
The Synchronization Setup Wizard automatically starts on your computer screen.
NOTE: If the wizard does not automatically appear, launch ActiveSync on your
computer by clicking on its icon from Start > Programs.
2 Follow the on-screen instructions.
To prevent synchronization problems, select the “Synchronize directly with a server
running Microsoft Exchange Server...” option only if you are certain that your
company is running Microsoft Exchange Server with Exchange ActiveSync and you
know the server address and logon credentials. For more information, contact your
corporate network administrator or service provider.
By default, ActiveSync only synchronize information for Contacts, Calendar,
Messaging (Outlook E-Mail), Tasks, and Favorites (for Internet Explorer Mobile). If
you decide to synchronize other files, for example, Word documents, ActiveSync
need to convert these files. Converted files may not contain all information found in
original file.
5
Page 16
1 First Things First
Preparing to use your MC35
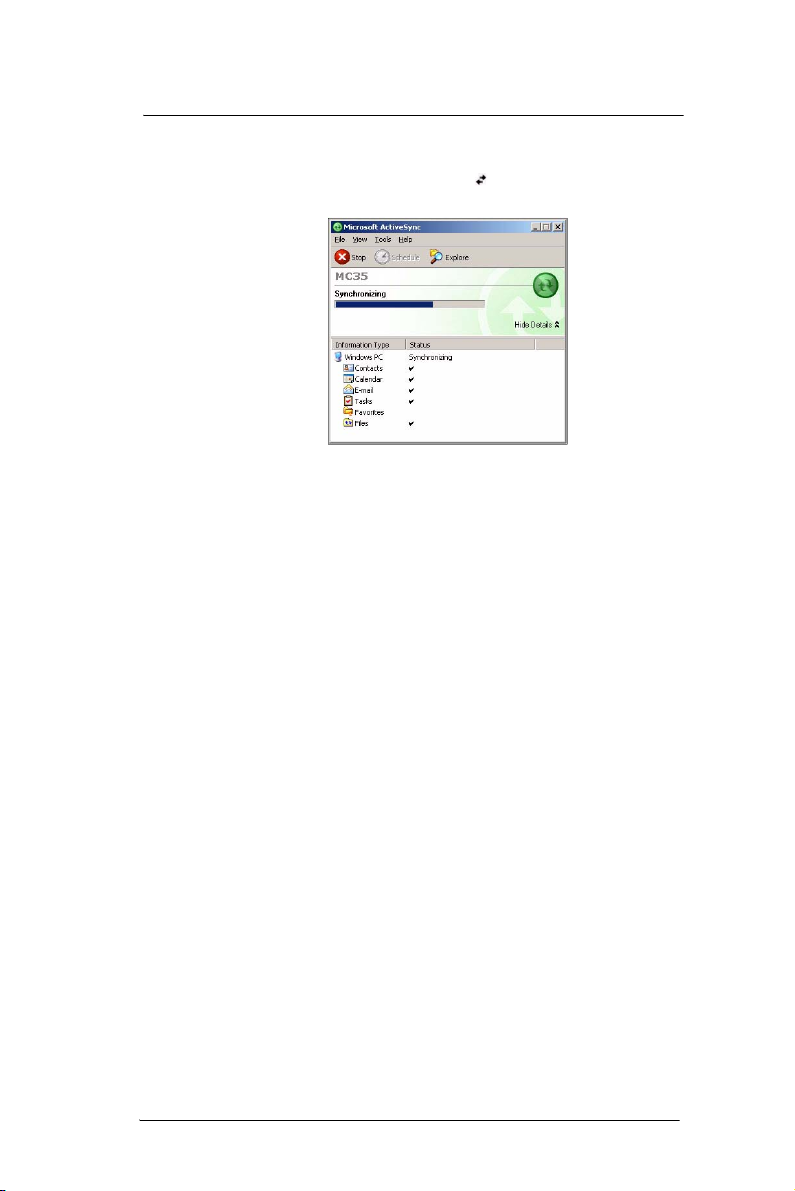
3 Click Finish to close the wizard and start the initial synchronization.
During the synchronization process, the ActiveSync window appears on your
computer, while the Data connectivity icon appears on your device’s navigation
bar.
After the initial synchronization, the information types you’ve selected for
synchronization are copied to your device. Disconnect your device from your
computer and you're ready to go!
The next time you connect your device, your computer recognizes it automatically.
You don’t need to set up the partnership again. You can initiate synchronization from
your device anytime via several connection options—via USB sync cable, infrared,
or Bluetooth connections. For more information on these connection options and
other ActiveSync configur ation settings, see “Using ActiveSync” on page 30.
6
Page 17

2 System Tour
• Features summary
• System tour
• Hardware interface
• Command interface
Features summary
Listed below are the MC35 key features and specifications.
Performance
• Intel® PXA270 processor with speed of up to 416 MHz
• Integrated Intel XScaleTM Technology
• System memory:
• 64 MB SDRAM for application storage
• 128 MB Flash ROM
• Microsoft Windows MobileTM 5.0 software
• Microsoft ActiveSync technology for data synchronization
• Express GPS Connect for Assisted Global Positioning System (AGPS) function
• Available configuration models
Model Part number
• WAN/PAN/GPS
• WAN/PAN/GPS/Camera
• WAN/PAN/LAN/GPS
• WAN/PAN/LAN/GPS/Camera
Features summary
• MC35-B-0
• MC35-C-0
• MC35-L-0
• MC35-CL-0
2 System Tour
Display
• 2.8" transreflective Thin Film Transistor Liquid Crystal Display (TFT LCD)
• Quarter Video Graphics Array (QVGA) resolution
• 65 K color depth support
• Hardware and software backlight controls
• Microsoft ClearType technology for clearer, crisper font display
Audio
• Embedded AC '97 CODEC with CD-quality stereo output
• Built-in industry-standard 2.5-mm earphone jack
• Built-in speaker and microphone
• Separate volume control for system sounds and phone function
• Playback support for both Windows Media and MIDI sound files for personalizing
ring tones and sound notifications
Mobile connectivity
• Phone function
• Quad-band GSM broadband function (850/900/1800/1900 MHz)
• Customizable ring tones and ringer options
• Hardware and software launch options
7
Page 18

2 System Tour
Features summary
• Wireless connectivity
• IrDA standard Infrared (IR) sensor for short-range file exchange
• Bluetooth for personal area network (PAN) connection
• High-speed GPRS for mobile Internet access via GSM network
• Optional WiFi (IEEE 802.11b/g) hardware for wireless local area network
Hardware connectivity
• Mini USB B connector
• SD/MMC expansion slot
• 2.5-mm earphone jack (four-wire)
• Optional 2.0 megapixel micro/macro dual focus digital camera
Battery pack
• Removable and rechargeable 1370 mAh standard life or 2740 mAh
extended life battery pack
• Charging time from empty to full capacity:
• Standard life battery: four hours
• Extended life battery: eight hours
• Operation time (in hours)
• Talktime
• Standby
• MP3 playback
• WMV playback time
• Internet browsing time (WLAN)
• GPS usage
Conditions:
• MP3 playback time measured with the backlight off.
• WMV playback time measured with the backlight on and phone off.
(WLAN) connection
Standard life battery
(default)
4
150
12
8
4
8
Extended life battery
(optional)
8
300
24
16
8
16
NOTE: Length of battery operation depends on power consumption which in turn is
based on system resources use. For example, constantly using the backlight or using
power-demanding applications shortens the length of battery operation.
Design and ergonomics
• Stylish and sleek design
• Dimensions
• Length: 127 mm (5 inches)
• Width: 66 mm (2.6 inches)
• Depth: 19 mm (0.51 inches)
• Weight (approximately, with battery pack): 179 g (6.3 oz.)
8
Page 19

2 System Tour
Features summary
• User-friendly navigation features
• Joystick for one-hand operation
• Volume button for system volume control
• Push To Talk button for voice recordings and PTT calls. This button is
only available for PTT when PTT service is provided by your carrier.
Contact your mobile phone service provider about feature availability.
The PTT button can also be set to launch another program. Tap Start >
Settings > Personal > Buttons to customize this button
• Camera/Bar Code switch for enabling camera or data capture mode
• Camera button for launching the Pictures & Videos program
Accessories
• Vehicle kit (includes the auto mounting kit, auto charger and hands-free handset)
• Leather case
• USB charge/sync cable
• Travel charger
• Hands-free headset (earbuds)
• Protective boot
• Stylus 3-pack
• Standard life battery
• Extended life battery
9
Page 20
2 System Tour
Hardware tour
Hardware tour
This section is a descriptive tour of the MC35 hardware interface.
1
2
11
10
3
4
5
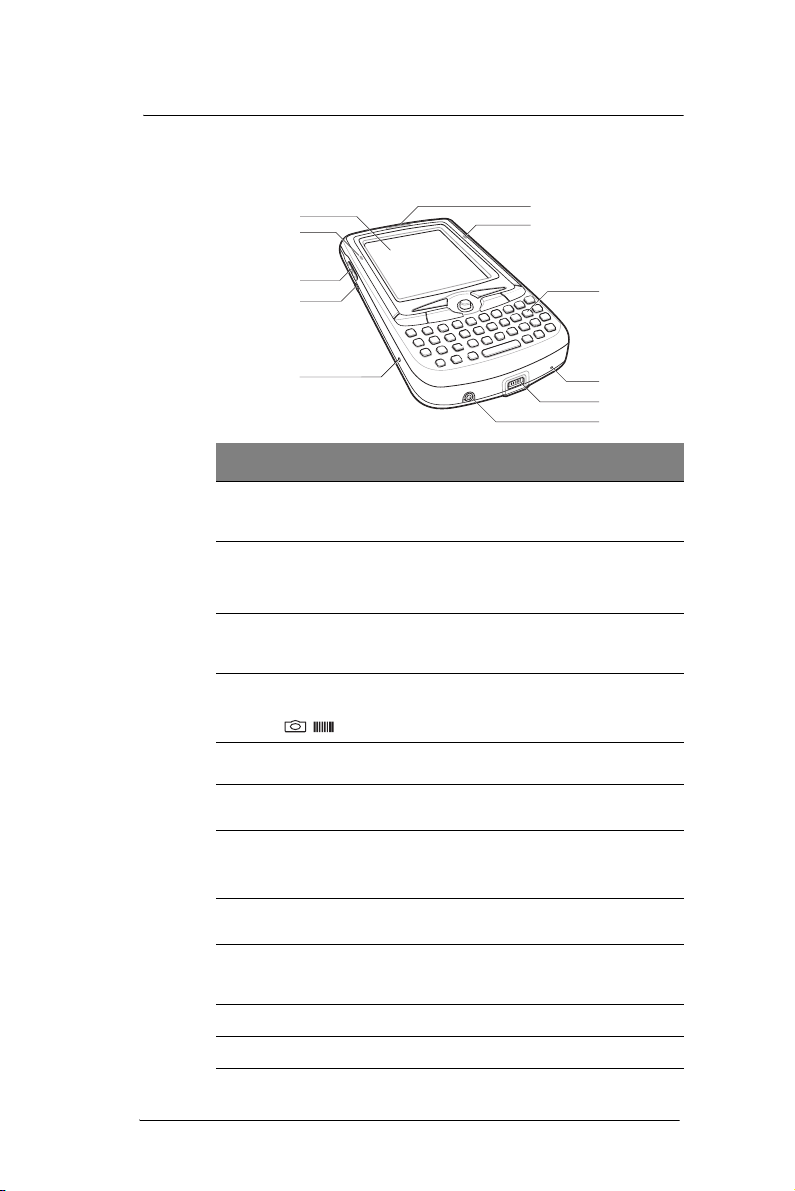
No. Component Description
1 LCD touch
screen
2 GSM status/
notification LED
3 Volume up/down
button (system
volume only)
4 Camera/Bar
Code switch
5 Reset button Press the tip of the stylus into the button to reset
6 Earphone jack Connects to an audio line-out device such as
7 Connector • For ActiveSync operation - accepts the USB
8 Microphone Inputs audio into your device during phone calls or
9 Keypad Key in alphanumeric characters. It also supports
10 Charging LED Lights up orange during battery charging.
11 Phone speaker Listen to a phone call from here.
Displays the applications and data stored on your
device. It is touch-sensitive and responds to the
stylus or your finger.
• Fast flashing green - indicates GSM activity.
• Solid green - indicates voice call in progress.
• Flashing red - indicates system alarms or
reminders.
Press the top key to increase volume, press the
bottom key to decrease volume.
Toggles the camera lens mode from bar code
data capture to camera mode (for device
configurations with camera function only).
your device.
earphones or headphones.
sync cable, which in turn connects to a
computer’s USB port.
• For recharging - accepts the AC adapter cable.
when recording voice notes.
special keys for launching phone/messaging
functions, as well as for backlight control.
9
8
7
6
10
Page 21
2 System Tour
Hardware tour
12
13
22
14
15
21
20
16
17
No. Component Description
12 Main battery Removable and rechargeable battery pack.
13 System speaker Listen to multimedia files here. When the
14 Camera lens
(optional)
15 Camera flash
(optional)
16 IR port Uses infrared technology to transmit and receive
17 SD/MMC
expansion slot
18 Stylus To use the stylus, remove it from its holder and hold
19 Push To Talk
button
20 Power button Press to toggle the device on/off.
speakerphone is active, sounds are emitted here.
Take pictures or captures bar code data.
Provides illumination when taking pictures in low
light conditions.
data from other IR-enabled devices.
Supports SD/MMC/SDIO storage cards allowing you
to expand the device memory capacity.
Install add-on applications or use files stored in it for
use with internal applications. You can also use it to
back up data from your device.
it the same way you hold a pen or pencil.
Press this button to:
• Create voice recordings – See “Recording a
message” on page 28 for more information.
• Initiate Push to Talk calls – See “Push to Talk”
on page 149 for more information.
Note: This button can be set to launch another
program. Tap Start > Settings > Personal >
Buttons to customize this button.
Note: Wait four seconds after pressing the power
button to allow the device to power on/off before
pressing the power button again.
19
18
11
Page 22

2 System Tour
Hardware interface
No. Component Description
21 Camera button Press to launch the Pictures & Videos program and
22 Battery release
latch
Hardware interface
This section explains basic hardware procedures and describes the MC35 keypad and
function buttons.
Using the touch screen backlight key
Under some lighting conditions, viewing information on the LCD touch screen may be
difficult. If this is the case, activate the backlight by tapping the screen or by pressing the
Backlight key (not applicable when viewing the Today screen, the Dialer pad will instead
be displayed).
Using the stylus
On your device, the stylus replaces the mouse.
• Tap - Touch the screen once with the stylus to open items and select options.
• Drag - Hold the stylus on the screen and drag across the screen to select text and
images. Drag in a list to select multiple items.
• Tap and hold - Tap and hold the stylus on an item to see a list of actions available
for that item. In the pop-up menu that appears, tap the action you want to perform.
take pictures or capture ba r code data.
Note: In MC35 configuration models with no camera
function, this button can be set to launch another
program. Tap Start > Settings > Personal >
Buttons to customize this button.
Unlocks the battery pack from the chassis.
Using the SD/MMC expansion slot
Your device has an expansion slot compatible with a range of SD and MMC storage
cards, which are primarily used to back up or transfer files and data. The slot also
supports SDIO cards for added connectivity options.
To insert a storage card:
NOTE: This device comes with a protective plastic card in the card slot. Remove the
plastic card from the slot before trying to insert a storage card.
1 Hold your device securely, then lift the rubber cover from the SD/MMC expansion
slot .
1
12
Page 23
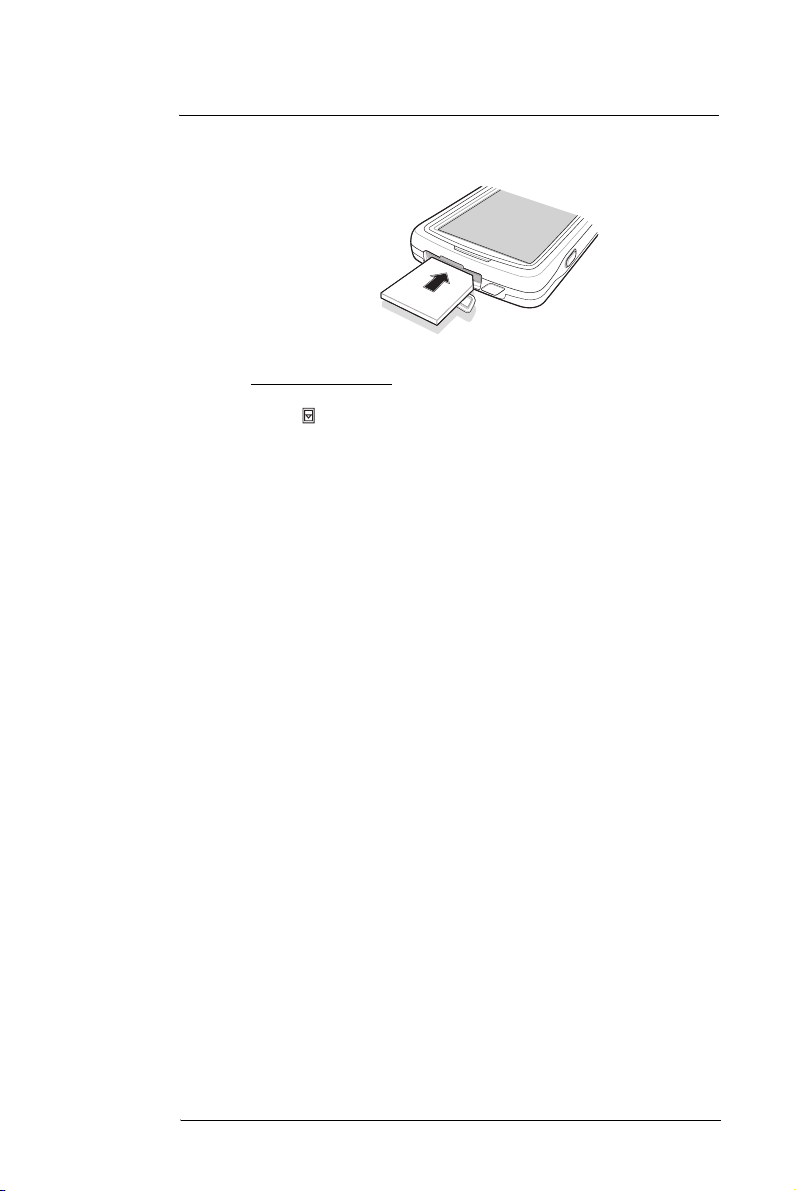
2 System Tour
Hardware interface
2 Slide the SD/MMC card into the slot and push in until it locks into place.
The card is secure when it is not protruding from the base.
2
3 Insert the rubber cover back into place.
To remove a storage card:
1 Hold your device securely, then lift the rubber cover from the SD/MMC expansion
slot .
2 Push against the top of the card, as if you were pushing it further into the slot, letting
the card spring out. An audible system sound indicates that the card has been
released.
3 Gently remove the card from the slot.
4 Close the rubber cover.
13
Page 24
2 System Tour
Hardware interface
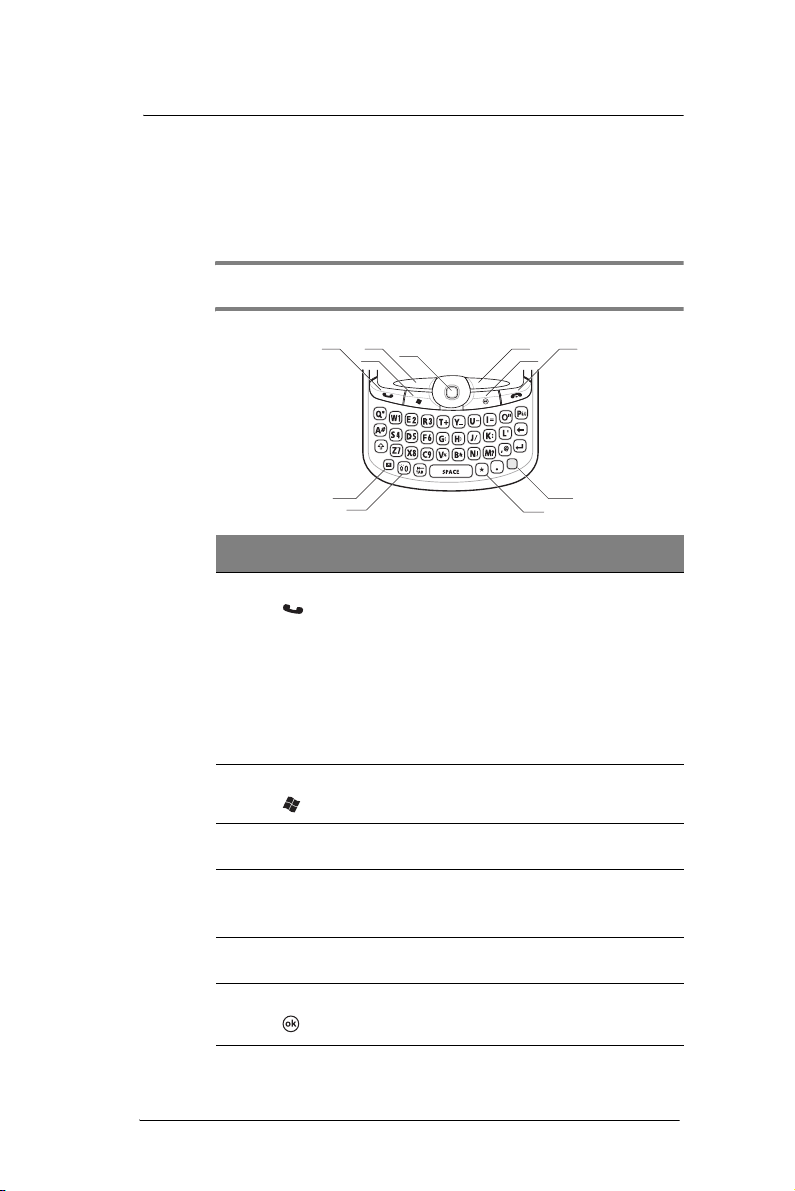
Soft buttons and keypad
The MC35 keypad has alphanumeric keys that produce the 26-character alphabet (A-Z,
both lowercase and uppercase), numbers (0-9), and assorted special characters. The
keypad is color-coded to indicate when the modifier key is pressed to produce a
particular character or action. In addition to alphanumeric keys, the keypad also has soft
buttons and special keys to launch particular applications, control the screen backlight,
and display the on-screen keyboard.
NOTE: The keypad illuminates when a key is pressed and stays lit for approximately
five seconds.
1
3
4
2
11
10
7
5
6
8
9
No. Component Description
1 Send button • When there’s an incoming call, press to accept
the call.
• During an ongoing call, press and hold to toggle
on/off the speakerphone mode.
• From Speed Dial, press to call the currently
selected number.
• From Call History, press to call the currently
selected log item.
• In Messaging, press to send a composed e-mail/
text message or display options for a received
e-mail/text message.
• Change between an active call and call that is on
hold.
2 Start button Press to display the Start menu.
3 Left soft button Press to perform the function indicated on the lower
4 Joystick • Press the center of the joystick to access menu
5 Right soft button Press to perform the function indicated on the lower
6 OK button Press to close the active program and display the
left corner of the display.
options and confirm your selection.
• Move the joystick in a left, right, up or down
direction to navigate through the menu options.
right corner of the display.
Today screen.
14
Page 25

2 System Tour
Hardware interface
No. Component Description
7 End button • When there’s an incoming call, press to reject
8 Orange key Use this key to enable the secondary keypad
9 Star key Press this key to display the on-screen keyboard.
10 Backlight/0 key • Press this key to adjust the touch screen
11 Messaging
key
the call.
• During an ongoing call, press to end the call.
• When manually dialing a number, press to
delete the number input.
• Press and hold for at least five seconds to toggle
the Wireless connections on/off. See “Managing
wireless connections” on page 56 for more
information.
characters/functions.
• To type a special character, press the Orange
key and secondary character key. To illustrate,
pressing the Orange key, then J will allow you to
type a slash (/).
• Press the Orange key twice to lock the keypad in
secondary character/action mode. Press the
Orange key again to revert to the default keypad
mode (alphabetic, lower-case).
• Press and hold the Orange key while entering
characters or actions.
backlight.
• Press the Orange key, then this key to type the
zero ‘0’ character.
• In the Today screen, press this key to display the
Dialer pad.
Press this key to launch the Messaging program.
See “Messaging” on page 74 for more information.
15
Page 26

2 System Tour
Hardware interface
Secondary keypad input mode
Key Default
Qq Q *
Ww W 1
Ee E 2
Rr R 3
Tt T +
Yy Y _
Uu U -
Ii I =
Oo O “
Pp P áü
Aa A #
Ss S 4
Dd D 5
Ff F 6
Gg G (
Hh H )
Jj J /
Kk K :
Ll L ‘
Zz Z 7
Xx X 8
Cc C 9
Vv V %
Bb B &
Nn N !
Mm M ?
,, , @
Brightness Brightness Brightness 0
Note: The following keys only have one action: Backspace, Shift, Enter, Messaging,
Tab, Space, and Star.
input
Keystroke combination
Shift or CAPS + Key Orange + Key
16
Page 27
Command interface
This section explains the MC35 command interface.
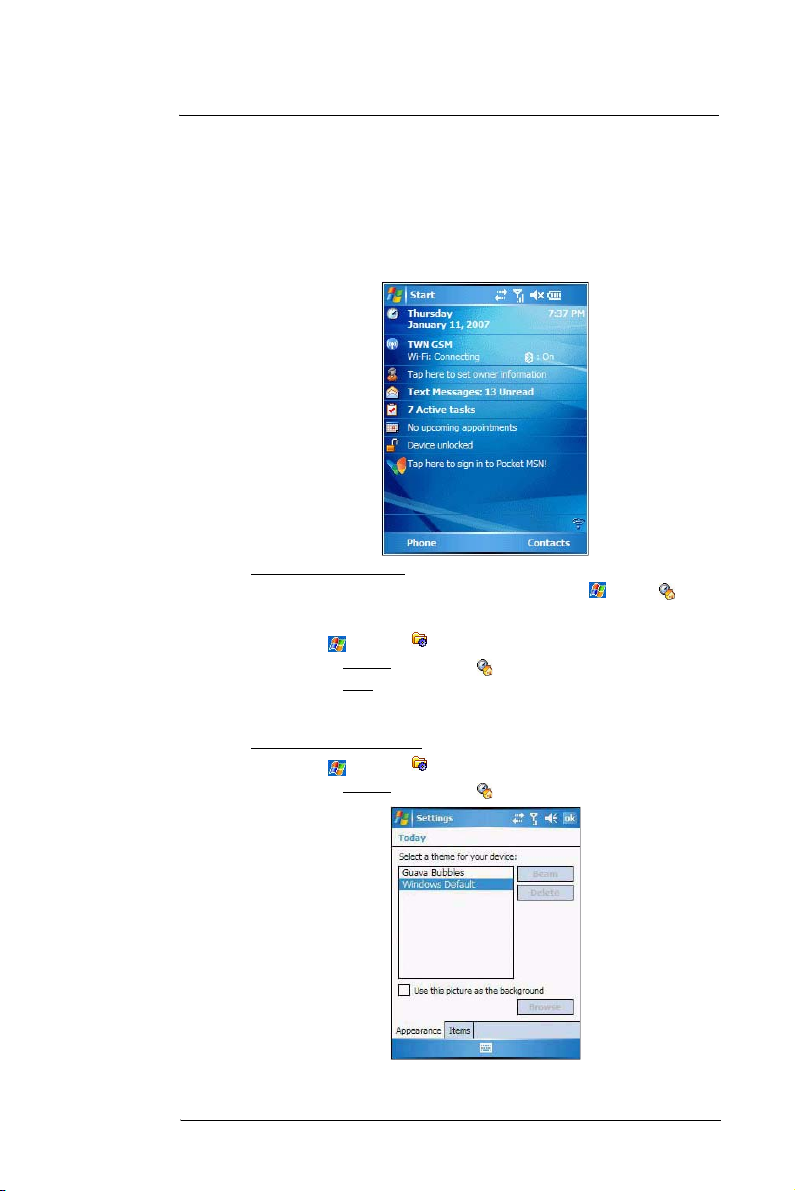
Today screen
When you turn on your device for the first time each day (or after a preset period of
inactivity), you'll see the Today screen. This screen provides an at-a glance view of the
day’s important reminders and status.
To display the Today screen:
• When viewing another screen, press the OK button or tap > Today .
• You can also define a preset period of inactivity after which the Today screen is
displayed. Follow the steps below.
1 Tap > Settings .
2 On the Personal tab, tap Today .
3 On the Items tab, select the “Today timeout“ option.
4 Tap the pick list beside the check box to set the period of inactivity.
5 Tap ok.
To customize the Today screen:
1 Tap > Settings .
2 On the Personal tab, tap Today .
2 System Tour
Command interface
17
Page 28
2 System Tour
Command interface
3 On the Appearance tab, tap the “Use this picture as background” check box.
4 Tap Browse to select a picture from the pictures stored in your device.
5 Tap ok.
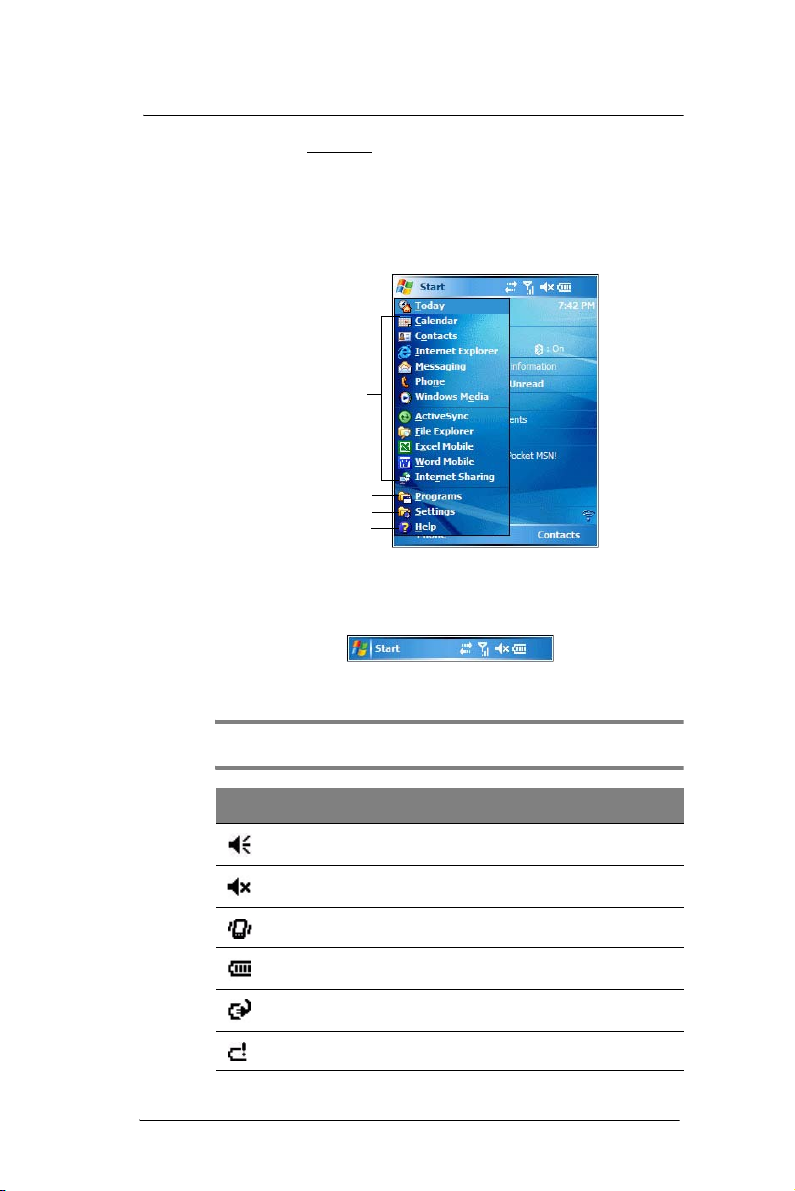
Start menu
The Start menu displays a list of active programs, as well as options to view the
Programs, Settings, and Help screens.
Tap a program icon to open it.
Tap to see more programs.
Tap to customize your device.
Tap to launch the online Help.
Navigation bar
The navigation bar is located on the top of the screen. It shows the status icons for the
battery, volume, and data connectivity. Notifications icons for system alarms and
reminders are also displayed here.
Status icons
The table below describes some of the status icons you may see on the navigation bar.
NOTE: See “Phone status icons” on page 113 for more information on the status icons
related to the phone function.
Icon Description
Speaker on
Speaker off
Vibrate mode
Battery level
Battery charging
Battery is low
18
Page 29
Command interface
Icon Description
Battery power completely depleted
Notification1 that one or more instant messages were received
Notification that one or more e-mail/text messages were received
Pending alarm
Data call in progress
Synchronization error
• No data connection. Tap to activate the device’s Phone, WiFi,
Bluetooth, or cellular data wireless connection (GPRS).
• Device is not synchronized with a computer
• Data connection is active
• Phone and wireless features, such as WiFi, Bluetooth, or GPRS; on
your device are turned on.
• Device is synchronized with a computer
Roaming
GPRS network is available
GPRS data connection is active
2 System Tour
GPRS signal status
1xRTT (single carrier radio transmission technology) data service is
available
EVDO (Evolution Data Optimized) high speed data service is available
Transmit or receive data on 1xRTT connection
Transmit or receive data on EVDO connection
WiFi on
WiFi data call
Bluetooth
Bluetooth audio
1 If more notification icons need to be displayed than there is room to display them, the
Notification icon appears on the command bar. Tap Notification to view all notification
icons.
19
Page 30
2 System Tour
Command interface
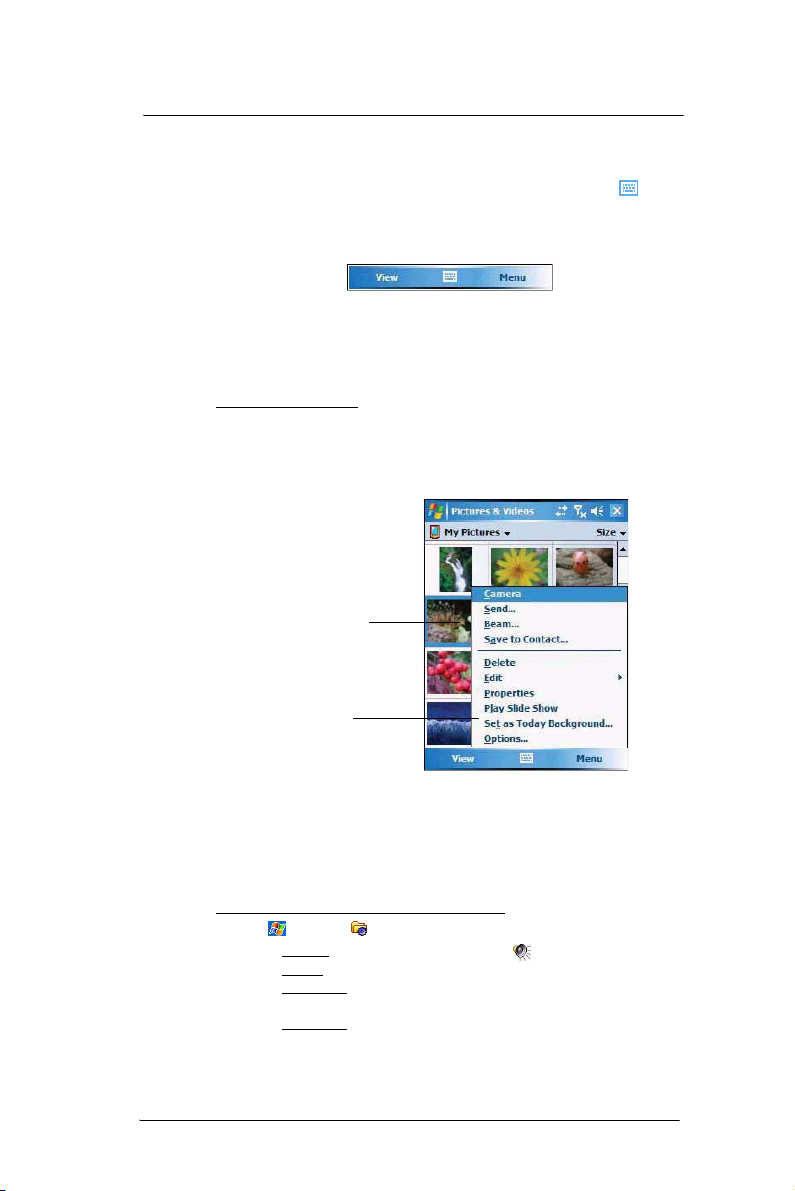
Command bar
Use the command bar at the bottom of the screen to perform tasks in programs. The
command bar includes menu names, buttons, and the Input Selector button .
• To create a new item in the current program, tap New.
• To view a notification or an image file received on your device, tap View.
• To see the name of a button, tap and hold the stylus on the button. Drag the
stylus off the button so that the command is not carried out.
Pop-up menus
With pop-up menus, you can quickly choose an action for an item. For example, you can
use the pop-up menu in the contact list to quickly delete a conta ct, make a copy of a
contact, or send an e-mail message to a contact. The actions in the pop-up menus vary
from program to program.
To display a pop-up menu:
1 Tap and hold the stylus on the item that you want to perform the action on.
2 When the menu appears, lift the stylus then:
• Tap the action you want to perform.
• Tap anywhere outside the menu to close the menu without performing
an action.
Tap and hold the selected item
to display a pop-up menu.
Lift the stylus and tap
the option you want.
Notifications
Your device reminds you in a variety of ways when you have something to do or receive a
message. For example, if you've set up an appointment in Calendar, a task with a due
date in Tasks, or an alarm in Clock, you'll be notified in any of the following ways:
• A message box appears on the screen.
• A sound, which you can specify, is played.
To choose reminder types and sounds for your device:
1 Tap > Settings .
2 On the Personal tab, tap Sounds & Notifications .
3 On the Sounds tab, select the kind of events you want to be notified of.
4 On the Notifications tab, select the manner of notification you prefer for each event.
5Tap ok.
6 On the Notifications tab, select the manner of notification you prefer for each event.
20
Page 31

3 Entering Information
• Using the MC35 keypad
• Using the Input Selector
• Writing on the screen
• Drawing on the screen
• Creating a recording
• Using My Text
• Using ActiveSync
• Using wireless communication
Using the MC35 keypad
The MC35 keypad has alphanumeric keys that produce the 26-character alphabet (A-Z,
both lowercase and uppercase), numbers (0-9), and assorted special characters. In
addition to alphanumeric keys, the keypad also has function buttons and special keys
that perform specific action. See “Soft buttons and keypad” on page 14 for more
information.
Using the Input Selector
Use Input Selector to enter typed text in any program where text entry is possible. You
can either tap the keys on an on-screen keyboard or by use any of the handwriting
recognition options.
To show or hide the Input Selector:
• Tap the Input Selector arrow, then select an input option.
3 Entering Information
Using the MC35 keypad
Word Completion
When you use the Input Selector, your device anticipates the word you are typing or
writing and displays it above the Input Selector arrow. When you tap the displayed
word, it is inserted into your text at the insertion point. The more you use your device, the
more words it learns to anticipate.
21
Page 32

3 Entering Information
Using the Input Selector
To define the Word Completion settings:
1 Tap > Settings .
2 On the Personal tab, tap Input .
3 On the Word Completion tab, define the word suggestion settings.
4Tap ok.
Keyboard
The soft keyboard allows you to “type” information just like in a regular keyboard by
tapping the on-screen keys.
To use the soft keyboard:
1 Tap the Input Selector arrow, then select Keyboard; or you can press the Star
key on the MC35 keypad.
2 On the soft keyboard that is displayed, tap the keys with your stylus.
TIP: To make the keys larger, tap the Input Selector arrow, and then Options. In
the Input method list, select Keyboard, and then tap Large Keys.
22
Page 33

3 Entering Information
Using the Input Selector
Block Recognizer
With Block Recognizer, you use a single stroke to write letters, numbers, symbols, and
punctuation, which are then converted into typed text.
To use Block Recognizer:
1 Tap the Input Selector arrow, then select Block Recognizer.
2 Write characters, numbers, and symbols in the designated writing area.
• Enter letters by writing in the abc (left) area of the box
• Enter numbers by writing in the 123 (right) area of the box.
• Enter symbols and punctuation by tapping in either area of the box and
then writing the desired character.
TIP: For help with writing characters with Block Recognizer, tap the question mark
near the writing area.
Letter Recognizer
With Letter Recognizer, you can write individual letters, numbers, and punctuation and
have them converted into typed text.
To use Letter Recognizer:
1 Tap the Input Selector arrow, then select Letter Recognizer.
23
Page 34

3 Entering Information
Using the Input Selector
2 Write characters, numbers, and symbols in the designated writing area.
• Enter capital letters by writing in the ABC (left) area of the box.
• Enter lower case letters by writing in the abc (middle) area of the box.
• Enter numbers by writing in the 123 (right) area of the box.
• Enter punctuation and symbols by tapping in either area of the box and
then writing the desired character.
TIP: For help with writing characters with Letter Recognizer, tap the question mark
near the writing area.
Transcriber
Transcriber allows you to write anywhere on the screen using the stylus just as you would
on paper. It recognizes cursive or printed handwriting, or a combination of both.
To use Transcriber:
1 Tap the Input Selector arrow, then select Transcriber.
2 Write anywhere on the screen.
3 Pause and let transcriber change the written characters to typed text.
To learn how to write a letter in Transcriber:
1 Tap the letter shape icon on the toolbar.
2 In the screen that appears, select the letter you want to learn about, then tap one of
the examples.
24
Page 35

3 Entering Information
Writing on the screen
To punctuate in Transcriber:
1 Tap the keyboard icon on the toolbar.
2 Tap the punctuation mark you need.
TIP: For specific instructions on using the Transcriber, tap the question mark on the
toolbar.
Star Key
Use the Star Key option to enter special symbols not available on the regular soft
keyboard, such as ¿ and £.
To enter special symbols:
1 Tap the Input Selector arrow, then select Star Key.
2 On the soft keyboard that is displayed, tap the special symbol keys with your stylus.
Writing on the screen
In Notes, you can use your stylus to write directly on the screen. Write the way you do on
paper. You can edit and format what you've written and convert the information to text at
a later time.
To write on the screen:
• Tap Menu > Draw.
This action displays lines on the screen to help you write.
25
Page 36

3 Entering Information
Writing on the screen
To select and edit written text:
If you want to edit or format written text, you must select it first.
1 Tap and hold the stylus next to the text you wan t to select until the insertion point
appears.
2 Without lifting, drag the stylus across the text you want to select.
If you accidentally write on the screen, tap Menu > Undo Ink, and try again.
-or-
Tap the text to deselect it.
3 You can cut, copy, and paste written text in the same way you work with typed text:
(a) Tap and hold the selected words.
(b) Tap an editing command on the pop-up menu.
To convert writing to text:
• Tap Menu > Tools > Recognize.
If you want to convert only certain words, select them before tapping Recognize on
the Tools menu (or tap and hold the selected word, then tap Recognize on the
pop-up menu). If a word is not recognized, it is left as writing.
Select the text you want to convert, then
tap Recognize on the pop-up menu.
If the conversion is incorrect, you can select different words from a list of
alternates or return to the original writing. To do so:
(a) Tap and hold the incorrect word (tap one word at a time).
(b) In the pop-up menu, tap Alternates.
A menu with a list of alternate words appear.
26
The writing is turned into text.
Page 37

(c) Perform one of the following:
• Tap the word you want to use.
• Tap the writing at the top of the menu to return to the original writing.
Conversion reminders
• Hyphenated and foreign words that use special characters such as accents and
some punctuation cannot be converted.
• If you add writing to a word to change it (such as changing a "3" to an "8") after you
attempt to recognize the word, the writing you add is not included if you attempt to
recognize the writing again.
Tips for getting good recognition
• Write neatly.
• Write on the lines. Write the cross of the "t" and apostrophes below the top line so
that they are not confused with the word above. Write periods and commas above
the line.
• For better recognition, try increasing the zoom level to 300% using the Tools menu.
• Write the letters of a word closely and leave big gaps between words so that your
device can easily tell where words begin and end.
Drawing on the screen
In Notes, you can draw on the screen in the same way that you write on the screen. The
difference between writing and drawing on the screen is how you select items and how
they can be edited. For example, selected drawings can be resized, while writing cannot.
To create a drawing:
1 Draw a triangle on the screen.
A drawing box appears.
2 Subsequent strokes in or touching the drawing box become part of the drawing.
Drawings that do not cross three ruled lines are treated as writing.
3 Entering Information
Drawing on the screen
The drawing box indicates the
boundaries of the drawing.
You may want to change the zoom level so that it is easier to work on or view your
drawing. Tap Menu > Zoom and select a zoom level.
To select a drawing:
If you want to edit or format a drawing, you must select it first.
• Tap and hold the stylus on the drawing until the selection handle appears.
• To select multiple drawings, tap and hold the stylus on the drawing, then drag to
select the drawings you want.
To edit a drawing:
1 Tap and hold the selected drawing.
2 Tap an editing command on the pop-up menu, or tap Menu > Edit.
27
Page 38

3 Entering Information
Recording a message
Recording a message
In any program where you can write or draw on the screen, you can also quickly capture
thoughts, reminders, and phone number s by recording a message.
• In Calendar, Tasks, and Contacts, you can include a recording in an item.
• In Notes, you can either create a stand-alone recording, include a recording in a
written note, or set a voice recording as your ring tone.
• In Phone, you can create a recording during a call.
• In Messaging, you can attach a recording to an e-mail message.
To create a recording in Notes:
1 Tap > Programs > Notes .
If you want to include the recording in a note, open the note first.
2Tap Menu > View Recording Toolbar.
3 Position your device's built-in microphone near your mouth or other source of
sound.
You can also use the microphone in the stereo headset/single earbud headset
bundled with your device to create a recording.
4 On the Recording toolbar, tap .
5 Tap to stop recording.
The new recording appears in the note list or as an embedded icon.
To play a recording:
• Tap it in the list or tap its icon in the Notes.
28
Page 39

To set a voice recording as ringtone:
• Tap and hold a voice recording in Notes, then select Set As Ringtone on
the pop-up menu.
Using My Text
When using Messaging or MSN Messenger, use My Text to quickly insert preset
messages into the text entry area.
To insert a My Text message:
1 Tap Menu > My Text, then tap a message.
3 Entering Information
Using My Text
2Tap ok.
29
Page 40

3 Entering Information
Using ActiveSync
Using ActiveSync
Use Microsoft ActiveSync to synchronize information between your MC35 and your
computer and/or a server so you always have the most up-to-date information wherever
you are.
Use ActiveSync to:
• Keep Microsoft Outlook Mobile data up-to-date by synchronizing your device with
the Microsoft Outlook data on, including Outlook contacts’ pictures, on your
computer.
NOTE: Microsoft Outlook XP or Microsoft Outlook 2003 is required for synchronization
of Outlook contacts' pictures.
• Open and edit your Microsoft Office Mobile files in your device and synchronize it
back to your computer. Files are automatically converted to the correct format.
• Access and configure Microsoft Windows Media Player music, including album art,
and video files on your computer.
IMPORTANT: Windows Media Player files can only be synchronized via ActiveSync
USB connection.
• Synchronize Internet Explorer Mobile favorites on your computer.
Displays detailed
connection status
Displays connection
Tap to connect
and synchronize.
status
Synchronizing information with your computer
ActiveSync supports the following connection options between your device and your
computer:
• USB connection – using the USB sync cable. This connection is established
when you created your device’s ActiveSync partnership with your computer.
IMPORTANT: Using an external USB hub when establishing an ActiveSync
connection may result to have some connection instabilities such as drops in the
connection, or an unresponsive computer. For more information about this issue, see
article 817900, "USB port may stop working after removing or inserting USB device" in
the Microsoft Knowledge Base at http://support.microsoft.com.
• Infrared connection – This connection is only applicable if your computer has an
infrared port. This method is ideal for quickly switching between multiple devices
since there are no cables or adapters to change.
• Bluetooth connection – This connection is only applicable if your computer is
equipped with a Bluetooth adapter or access point.
30
Page 41

3 Entering Information
Using ActiveSync
NOTE: To synchronize remotely with your computer, it must be turned on.
To set up a USB ActiveSync connection:
1 Perform the steps below on your computer.
(a) Open ActiveSync .
(b) Click File > Connection Settings.
(c) Select the “Allow USB connections“ option.
(d) Click OK.
2 Perform the steps below on your device.
(a) Tap > Programs > ActiveSync .
(b) Tap Menu > Connections.
(c) Select the “Synchronize all PCs using this connection” option.
(d) Sel ect USB.
(e) Tap ok.
3 Connect your device to your computer using the USB sync cable.
Synchronization is automatically initiated.
To set up an infrared ActiveSync connection:
1 Perform the steps below on your computer.
(a) Configure the infrared port on your computer.
Refer to your computer’s user documentation for instructions.
(b) Once your computer’s IR port is ready, open ActiveSync .
(c) Click File > Connection Settings.
(d) On the “Allow connections to one of the following” drop-down list, select
Infrared Port (IR).
(e) Click OK.
2 Perform the steps below on your device.
31
Page 42
3 Entering Information
Using ActiveSync
(a) Align the IR port of your device with that on your computer so that they
are unobstructed and within close range.
(b) Tap > Programs > ActiveSync .
(c) Tap Menu > Connect via IR.
Synchronization is automatically initiated. Wait for synchronization to
To set up a Bluetooth ActiveSync connection:
Before setting up a Bluetooth ActiveSync connection, configure the Bluetooth function of
your device. See “Bluetooth connection” on page 45 for more information.
IMPORTANT: For additional security, disable network bridging on the computer
(specifically, bridging to a Remote NDIS adapter) before connecting to the computer to
pass though to the Internet or a network. For more information on network bridging, see
Windows Help on your computer.
NOTE: The instructions below are for computers that support the Windows XP SP2 or
later version operating system.
complete before you move your device.
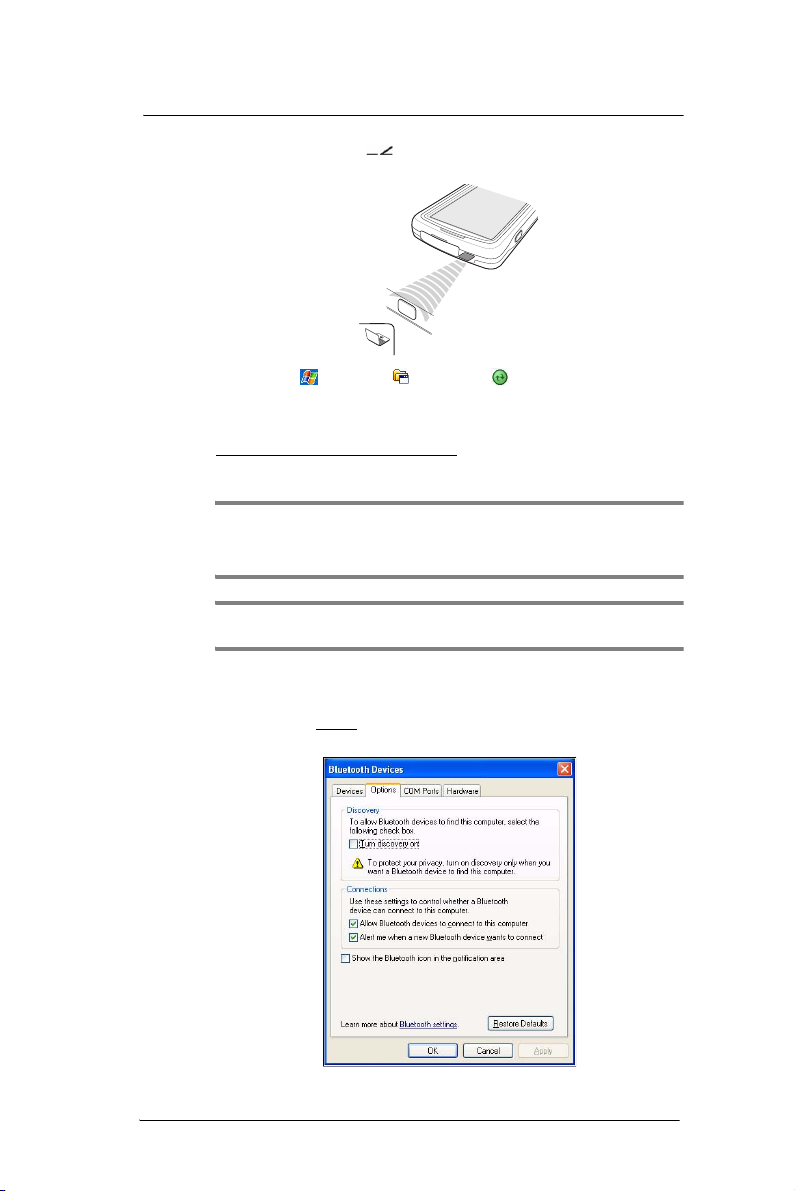
1 Perform the steps below on your computer.
(a) Click Start > Setting s > Control Panel.
(b) Double-click Bluetooth Devices.
(c) On the Options tab, select the check box for the “Turn discovery on” and
“Allow Bluetooth devices to connect to this computer” options.
32
Page 43

3 Entering Information
Using ActiveSync
(d) On the COM Ports tab, click Add.
(e) Select the “Incoming (device initiates the connection)” option, then click OK.
(f) Note the number of the COM port that was added. The COM port number
must be no higher than 20.
(g) Click OK.
(h) Open ActiveSync .
(i) Click File > Connection Settings.
(j) On the “Allow connections to one of the following” drop-down list, select the
2 Ensure that the Bluetooth is turned on your computer and discoverable and within
3 Make MC35 discoverable to your PC.
COM port with the number you noted in step f.
close range.
(a) Tap > Settings > Connections tab> Bluetooth .
(b) On the Mode tab, select the check box for the “Turn on Bluetooth” and “Make
this device visible to other devices” check box.
(c) Tap ok.
33
Page 44

3 Entering Information
Using ActiveSync
4 Perform the steps below on your device.
(a) Tap > Programs > ActiveSync .
(b) Tap Menu > Connect via Bluetooth.
Synchronization is automatically initiated. The PC to USB status icon
appears on the lower right corner of the Today screen.
If an Authentication is required, the Enter Passcode screen appears, type an
alphanumeric passkey (PIN code), then tap Next; enter the same passkey on
the other device.
The passkey is recommended for enhanced security. Your passkey must be
between 1 to 16 alphanumeric characters.
If you do not want to use a passkey, tap Next.
Synchronizing with a server
The option to synchronize your device with a server is available when you first create a
partnership. Note that this option only synchronizes information for Contacts, Calendar,
Messaging (Outlook E-mail), and Tasks.
After your first full synchronization with Microsoft Exchange server, you can schedule
automatic synchronization between your device and the server every time an item arrives
or is changed in the Microsoft Exchange server.
Enable server synchronization only if you are certain that your company is running
Microsoft Exchange Server with Exchange ActiveSync. Before you can begin to
synchronize information with a ser ver, you need to request the following information,
either from your servi ce provider or from your corp orate network administrator:
• Your user name and password in your corporate network
• The name of the Microsoft Exchange server
To set up synchronization with a Microsoft Exchange server:
1 Tap > Programs > ActiveSync .
34
Page 45

3 Entering Information
Using ActiveSync
2Tap Menu > Add Server Source.
3 In the “Server address” box, enter the name of the Microsoft Exchange server to
which you want to connect.
Select the “This server requires an encrypted (SSL) connection” option if it is
applicable to your corporate network.
4Tap Next.
5 Enter your user name, passwor d, and domain name.
If you intend to enable automatic synchronization, select the “Save password”
option.
6Tap Advanced.
Define the rules for resolving conflicts if items change on both your device and on
the server.
7Tap Next.
8 Select the check box opposite the types of information that you want to synchronize
with the server.
9 Define the synchronization settings for each information type by tapping the type of
information, then tap Settings.
10 Tap Finish.
To set up automatic synchronization with a server:
1 Tap > Programs > ActiveSync .
2Tap Menu > Schedule.
3 Perform one or both of the following:
• Under Peak times, select the “When new items arrive” option.
It is more cost-efficient to synchronize on a regular schedule when mail
volume is high, instead of when new items arrive.
• Under Off-peak times, select the “When new items arrive” option.
This can be more cost-efficient than synchronizing on a regular schedule when
mail volume is low.
4 To set the days and hours that makes up your peak and off-peak times, click
Change Times.
5Tap ok.
NOTE: Some devices or versions of Microsoft Exchange Server may also require
you to specify a device address to use this feature.
35
Page 46

3 Entering Information
Using ActiveSync
To stop synchronizing with a server:
You can stop synchronizing an information type with a server, and instead synchronize it
with your computer.
1 Tap > Programs > ActiveSync .
2Tap Menu > Options.
3 Deselect the check box opposite the types of Information that you no longer want to
synchronize with the server.
4Tap ok.
Using ActiveSync to copy files
You can use ActiveSync to exchange information from your device to your computer and
vice versa. Changes you make to the information on one location do not affect the
information on the other one. If you want to automatically update information on both
your device and computer, synchronize the information instead.
You can copy two types of information to your device: files and Pocket Access Windows
CE Store information.
The procedure below only applies to copying files. Refer to the ActiveSync Help on your
computer for instructions on how to copy Pocket Access Windows CE Store information.
To copy files:
1 Connect your device to your computer.
2 In ActiveSync on your computer, click Explore.
Windows Explorer opens the Mobile Device window for your device.
3 Locate the file that you want to copy on your device or computer.
4 Perform one of the following:
• To copy the file to your device, right-click the file and click Copy. Place
the cursor in the desired folder for your device, right-click, then click
Paste.
• To copy the file to your computer, right-click the file and click Copy.
Place the cursor in the desired folder for your computer, right-click, then
click Paste.
Synchronization options
Users have the option to customize both the type and volume of information to be
synchronized, as well the schedule synchronization should occur.
Remote synchronization schedule
You can control when remote synchronization occurs by selecting a synchronization
schedule.
36
Page 47
3 Entering Information
Using ActiveSync
NOTE: When you are in roaming mode, you can synchronize manually to reduce
roaming charges, or you can use the mobile schedule you’ve set.
NOTE: When your device is connected to your computer via the USB sync cable,
synchronization occurs automatically—changes made on the computer or device is
duplicated immediately.
To set up a wireless synchronization schedule:
1 Tap > Programs > ActiveSync .
2Tap Menu > Schedule.
3 Perform one or both of the following:
• Under Peak times, select a shorter interval when you are working or
when e-mail volume is high.
• Under Off-peak times, select a longer interval or the “As items arrive”
option.
• Enabling the “Use above settings when roaming” option is more
consumptive in terms of battery power and roaming cost compare to
manual synchronization.
4Tap ok.
Synchronization type and volume
By default, ActiveSync only synchronize information for Contacts, Calendar, Messaging
(Outlook E-Mail), Tasks, and Favorites (for Internet Explorer Mobile). You can select
which information types are synchronized. You can also control how much information is
synchronized. To illustrate, when synchronizing Calendar, you can set ActiveSync to
synchronize appointments within a certain date range and for specific categories only.
For example business appointments from the past two weeks only.
To control the volume of information synchronized, see the ‘Synchronizing ...” section
“Using the Windows Mobile Programs” on page 63.
NOTE: ActiveSync does not suppor t synchronizing subfolders in Calendar and
Contacts.
To select the type of information to synchronize:
IMPORTANT: If you decide to synchronize files, for example Word documents,
ActiveSync needs to convert these files. Converted files may not contain all information
found in original file.
1 Connect your device to your computer.
2 Click Tools > Options.
3 Select the information type that you want to synchronize.
4 If available, click Settings, and then select the options you want.
5 Repeat steps 2 and 3 for each information type.
ActiveSync errors
Whenever ActiveSync cannot successfully synchronize information, it displays an Error
link on the ActiveSync window on your device. Tap the link to display more information
about the error that occurred.
Some types of errors can interfere with automatic synchronization. If you suspect that a
scheduled automatic synchronization has not occurred, you should try to manually
synchronize your information. Successfully completing manual synchronization resets
automatic synchronization.
37
Page 48

3 Entering Information
Using wireless communication
Using wireless communication
You can use any of the wireless communication options listed below to download
information to your MC35. For more information on using these options, See “5 Wireless
Communications” on page 43 for more information.
• IR port for short-range file exchange
• Bluetooth for PAN connection
• High-speed GPRS for mobile Internet access
• Optional WiFi (IEEE 802.11b/g) for WLAN connection
38
Page 49

4 Managing Information
• Opening programs
• Using Search
• Using File Explorer
Opening programs
Your MC35 supports a variety of EDA and wireless communication programs to help you
manage both personal and work-related information.
To open a program:
• Tap a program name from the menu.
You can select which programs are displayed on the menu. See “To add a
program to the Start menu program using Settings” on page 207 for more
information.
NOTE: Some programs have abbreviated labels for check boxes and drop-down lists.
To see the full spelling of an abbreviated label, tap and hold the stylus on the label.
Drag the stylus off the label so that the command is not carried out.
• Tap > Programs , then tap program icon.
4 Managing Information
Opening programs
39
Page 50

4 Managing Information
Opening programs
Program list
The following table contains a list of programs installed on your device.
NOTE: To get detailed information on using any of the applications listed in this
section, open the program, tap > Help .
Icon Program Usage
Calculator Perform basic arithmetic computations.
Device management programs
ActiveSync Synchronize information between your device and
File Explorer Manage the files stored on your device, as well as
Search Locate specific files stored on your device, as well
Microsoft Outlook Mobile programs
Calendar Keep track of your appointments and create
Contacts Keep track of your friends and colleagues.
Messaging Send and receive text and e-mail messages.
your computer and/or server.
those in a storage card.
as those in a storage card.
meeting requests.
Notes Create handwritten or typed notes, drawings, and
Tasks Keep track of your tasks.
Microsoft Office Mobile programs
Excel Mobile Create new workbooks or view and edit Excel
PowerPoint
Mobile
Word Mobile Create new documents or view and edit Word
Other Microsoft Windows Mobile programs
Internet
Explorer
Mobile
MSN®
Messenger
Pocket MSN Subscribe to popular MSN services.
40
voice recordings.
workbooks created on your computer.
View slide show presentations.
documents created on your computer.
Browse Internet and intranet sites, and download
programs and files to your device.
Send and receive instant messages with your MSN
Messenger contacts.
Page 51

4 Managing Information
Icon Program Usage
Windows Media
Player Mobile
Phone-related programs
Phone Send and receive local and international calls and
SIM Manager View the contents of your SIM card and transfer it to
SIM Toolkit Access the mobile content and data services, such
Wireless communication programs
Express GPS
Connect
GPRS
Settings
Internet
Sharing
Push to Talk Conduct walkie-talkie style conversations using a
Terminal
Services Client
Media-related programs
CamWedge Enable bar code data capture.
Play stored or streaming digital audio and video
files.
text messages.
your contacts list.
as news, weather, banking, and traveling
information; offered by the mobile phone service
provider.
Use Assisted Global Positioning System (AGPS)
technology for you travel/navigation activities.
Configure the device’s GPRS settings.
Configure your device as a modem for connecting to
the Internet via a USB or Bluetooth personal area
network (PAN) connection.
mobile phone connection.
Log onto a Windows NT server type PC that is
running the Terminal Services software and use all
of the programs that are available on that PC from
your device.
Opening programs
Pictures &
Videos
Download-related programs
AirBEAM Smart Allows specially designed software packages to be
Download
Agent
Rapid
Deployment
Client
Take pictures and video.
transferred between a host server and your MC35.
Manage the download and installation of add-on
programs.
Facilitates software downloads from a Mobility
Services Platform Console FTP server to your
device.
41
Page 52

4 Managing Information
Using Search
Using Search
The Search function helps you locate a particular file quickly.
1 Tap > Programs > Search .
2 Enter the file name of the file you’re searching, then select a data type.
3Tap Search.
Using File Explorer
Use File Explorer to locate files on your device and to organize these files into folders.
• Tap > Programs > File Explorer .
Tap here to select a
sort criterion for the
list.
Tap and hold a blank
area to display the New
Folder command.
Tap here to display a
pop-up menu.
42
Page 53

5 Wireless Communications
Wireless communication features
5 Wireless Communications
• Wireless communication features
• Managing wireless connections
• Getting connected
Wireless communication features
You can use your MC35 to exchange information with other mobile devices and connect
to your computer, a network, or the Internet. You have the following connection options:
• Use the infrared sensor or the Bluetooth function to exchange files from another
IR- or Bluetooth-enabled device.
• Use a GPRS or WiFi connection to send and receive e-mail messages by using
Messaging; and view Web or WAP pages by using Internet Explorer Mobile.
Contact your mobile phone service provider to have your WAP or GPRS connection
activated.
Beam function
In a Microsoft Windows Mobile program (except Messaging), and Picture & Videos, you
can exchange files using either infrared or Bluetooth.
TIP: You can also beam files (not folders) from the File Explorer screen. To do, tap
and hold the item you want to send, then tap Beam File from the pop-up menu.
First activate the beam function before exchanging files with another IR- or Bluetoothenabled device.
To activate the Beam function:
1 Tap > Settings .
2 On the Connections tab, tap Beam .
3 Tap “Receive all incoming beams” check box.
4Tap ok.
43
Page 54

5 Wireless Communications
Wireless communication features
Infrared connection
Using infrared, you can enable sh ort-range file exchange between your MC35 and
another IR-enabled device.
Exchanging files using IR connection
Ensure that the IR function on both your MC35 and on other device you want to
exchange files with are enabled.
To send files via IR connection:
1 Switch to the program where you created the item you want to send and locate the
item in the list.
2 Align the IR port of your device with that of the IR-enabled device so that they
are unobstructed and within a close range.
3 Tap and hold the item, then tap Beam [type of item] on the pop-up menu.
4 Tap the device that you want to send the file to.
44
Page 55

5 Wireless Communications
Wireless communication features
To receive files via IR connection:
1 Align the IR port of your device with that of the IR-enabled device so that they
are unobstructed and within a close range.
2 Have the owner of the other IR-enabled device send the file to you.
3 On the Receiving Data callout, tap Yes.
Bluetooth connection
Your device allows you to connect to any Bluetooth-enabled device in your personal area
network (PAN). Once connected you can perform the following:
• Send and receive files to another Bluetooth-enabled device.
• Transfer an outgoing call to a Bluetooth-enabled headset. See “To make a
call from a Bluetooth-enabled headset” on page 120 for more information.
• Print files to a Bluetooth-enabled printer.
Additional software is required on your device to enable you to print files to a
Bluetooth-enabled printer. Contact your local dealer for more information.
• Once connected to another Bluetooth-enabled device or computer, you can locate
and use any of the services available on the device.
Activating the Bluetooth function
You have two options to activate your MC35’s Bluetooth connection—using the Wireless
Manager or the Bluetooth option under the Settings > Connections preferences. Once
activated, connection is indicated as On in the Wireless Manager section of the
Today screen.
To activate Bluetooth via the Wireless Manager:
See “To activate Bluetooth via the Wireless Manager” on page 57 for more information.
To activate Bluetooth using the Settings option:
1 Tap > Settings .
2 On the Connections tab, tap Bluetooth .
45
Page 56

5 Wireless Communications
Wireless communication features
3 On the Mode tab, select all the check boxes.
4 Tap ok.
NOTE: Deactivate the Bluetooth feature when you do not plan to use it for an
extended time.
Creating a Bluetooth partnership
You need to create a partnership with another Bluetooth-enabled device to be able to
exchange information with it.
To create a Bluetooth partnership:
1 Ensure that your MC35 and the other Bluetooth-enabled device(s) are turned on,
visible, and within close ran ge of each other.
2 Perform either of the following.
• On the Wireless Manager screen, tap Menu > Bluetooth Settings.
• Tap > Settings > Connections tab> Bluetooth .
3 On the Devices tab, tap Add new device.
46
Page 57

5 Wireless Communications
Wireless communication features
Your device searches for Bluetooth-enabled devices on your personal area network
(PAN) and displays them in the device list.
4 Tap the name of the device in the list, then tap Next.
If you want to use a passcode, type an alphanumeric passkey, then tap Next; enter
the same passkey on the other device.
The passkey is recommended for enhanced security. Your passkey must be
between 1 to 16 alphanumeric characters.
If you do not want to use a passkey, tap Next.
5 On the Partnership Settings screen, perform the following:
(a) Type in a meaningful device name on the Display Name box to identify the
device later.
(b) Select the type of services you want to enable for this Bluetooth partnership.
6Tap Finish.
47
Page 58

5 Wireless Communications
Wireless communication features
7 On the Bluetooth screen, tap the COM Ports tab, then perform one of the following:
• To connect to a device, tap New Outgoing Port.
• To allow other devices to connect to the MC35, tap New Incoming
8 Select the device you want to add, then tap Next.
9 Select a numbered COM port from the list.
10 Select “Secure Connection” option to designate the COM port for Bluetooth
11 Tap Finish, then tap ok.
Exchanging files using Bluetooth
IMPORTANT: Ensure that the two devices have Bluetooth turned on, discoverable,
and within close range.
Port.
partnership.
To send files via Bluetooth:
1 Switch to the program where you created the item you want to send and locate the
item in the list.
2 Tap and hold the item, then tap Beam [type of item] on the pop-up menu.
3 Tap the device that you want to send the file to.
48
Page 59

5 Wireless Communications
Wireless communication features
To receive files via Bluetooth:
1 Have the owner of the other Bluetooth-enable device send the file to you.
2 On the Bluetooth callout, tap Yes.
GPRS connection
General Packet Radio Service (GPRS) is a packet-switched technology that allows
transmission of data between mobile phones and the Internet over a GSM network. It
supports an “always on” capability which uses the GSM network only during data
transmission. This means users only pay for the amount of downloaded information
rather than the duration of the network connection.
The communication software for creating a GPRS connection is already installed on your
device. Your service provider will provide software needed to install other services, such
as paging and fax services.
Once you’ve established a GPRS connection, you can:
• Use Messaging to send and receive e-mail messages.
• Use Internet Explorer Mobile to access Web or WAP pages
• Use Windows Media Player 10 Mobile for Pocket PC to listen to streaming media
• Use MSN Messenger to conduct IM sessions with your friends and colleagues.
Configuring your GPRS connection
NOTE: GPRS Settings application is not available on all configurations.
You have two options to configure your GPRS connection—using the GPRS Settings
or the Connections option under the Settings > Connections preferences.
To manually configure GPRS connection using GPRS Settings:
See “To configure GPRS connection using GPRS settings” on page 157 for more
information.
To manually configure GPRS connection using Settings:
See “To connect to the Internet” on page 59 for more information.
For more information on configuring your device’s GPRS setting, contact your mobile
phone service provider.
49
Page 60

5 Wireless Communications
Wireless communication features
Connecting to the GPRS network
NOTE: When downloading large files through GPRS data connection, incoming phone
calls are not received. Phone calls are directed to voicemail.
A GPRS connection is required to connect to a GPRS network. To create a GPRS
connection, the GPRS features on your GSM account must be enabled and activated on
your SIM card. You may be required to configure your GPRS connection and
authenticate GPRS to connect to the GPRS network. Obtain the user name and
password from your mobile phone service provider.
To connect to GPRS network:
1 On the navigation bar, tap the Data connectivity icon .
2 Tap Connect GPRS.
The Connecting call drop-down box displays. The GPRS data connection active
icon appears on the navigation bar and changes to and to once a GPRS
connection is established.
To end a GPRS connection:
Perform one of the following:
• On the navigation bar, tap the Data connectivity icon , then tap Cancel
on the Connectivity drop-down box.
• On the Today screen, tap Wireless Manager > Menu > Disconnect
Cellular Data.
WiFi connection
Your MC35 supports an optional WiFi hardware (IEEE 802.11b/g) you can use to scan
for existing wireless local area network (WLAN) access points or hot spots. WLAN
access points or hot spots can be found in homes and office or public areas such as
inside airports, restaurants, coffee shops, hotels, or other public areas. Just like in a
GPRS connection, a WiFi access allows you to connect to a computer, access the
Internet, and send/ receive e-mail and files.
NOTE: WiFi access in some areas may require a separate purchase of a service
contract with a wireless service provider. Check with a WiFi service provider in your
area for more information.
Activating a WiFi connection
You have several options to activate your MC35’s WiFi connection—from the Today
screen, using the Wireless Manager or the WiFi Card Setting icon; or the WiFi option
under the Settings > Connections preferences. Once activated, WiFi connection is
indicated as On in the Wireless Manager section of the Today screen.
To activate WiFi connection via the Wireless Manager:
See “To activate WiFi connection via the Wireless Manager” on page 57 for more
information.
To activate WiFi connection using the WiFi Card Setting icon:
1 On the Today screen, tap the WiFi Card Setting icon , located on the lower
right corner of the screen.
50
Page 61
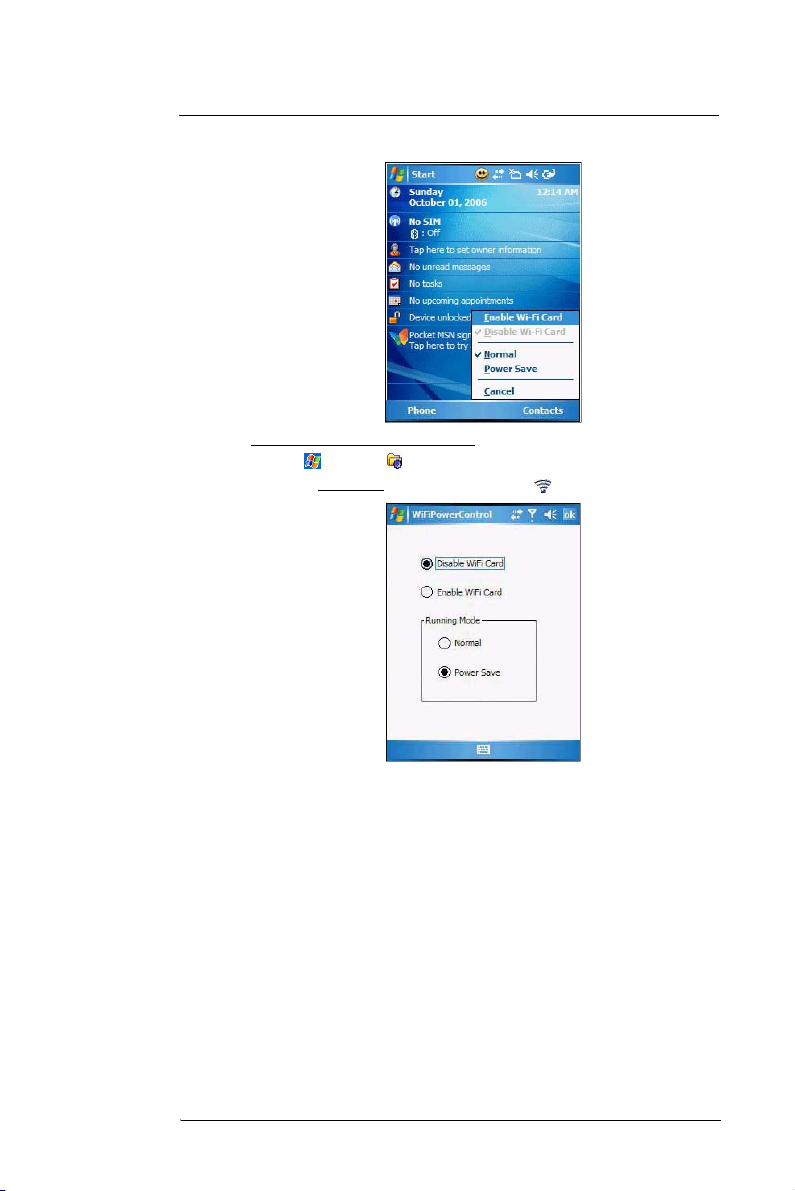
5 Wireless Communications
Wireless communication features
2 Select Enable Wi-Fi Card.
To activate WiFi using the Settings option:
1 Tap > Settings .
2 On the Connections tab, tap WiFi Card Setting .
3 Select Enable WiFi Card, then select a running mode.
4Tap ok.
51
Page 62

5 Wireless Communications
Wireless communication features
Your device will automatically detect the WLAN access points available in your area
and display them on the notification prompt.
5 Select the network you want to connect to.
6 Tap ok.
Setting up a wireless network connection
After activating WiFi connection, you can proceed to the wireless network setup. A
wireless network can be automatically detected or be manually added by entering the
related network settings. Before performing the procedure in this section, determine if
authentication information is needed.
Check the following before setting up a wireless network connection for your device.
• Make sure that the Internet Protocol (TCP/IP) is installed on your computer.
• Make sure the network system and remote access server in your workplace
supports TCP/IP protocol
• Make sure you have remote access account. Ask your network administrator for
assistance on setting up a wireless connection.
To set up a wireless network connection:
1 Tap > Settings .
2 On the Connections tab, tap WiFi .
TIP: Alternatively, from the Today screen, you can tap Wireless Manager > Menu >
WiFi Settings.
52
Page 63

5 Wireless Communications
Wireless communication features
3On the Wireless tab, perform one of the following:
• If your preferred network is not listed, tap Add New. See “To add a wireless
network “ on page 54 for more information.
• Tap an available wireless network. Previously configured networks are
already listed. To change network settings, tap a network and follow the
on-screen instructions.
4 In the Networks to access drop-down list, select the type of network you wish to
connect to. Options include:
• All available
• Only access points
• Only computer-to-computer
5Tap ok.
To configure a network adapter:
1 On the WiFi screen, tap the Network Adapters tab.
2 Make your desired changes to the available adapters on the list.
3Tap ok.
53
Page 64

5 Wireless Communications
Wireless communication features
To connect to a wireless network:
1 Tap > Settings .
2 On the Connections tab, tap WiFi .
3On the Wireless tab, tap an available wireless network.
4 On the command bar, tap Connect.
If a wireless network is detected, a similar screen appears, tap Connect on the
command bar.
To add a wireless network:
If your preferred wireless network is not automatically detected, you can add the network
provided you know the wireless networ k settings. Contact your networ k administrator for
wireless network settings applicable to your network.
1 Open the Configure Wireless Networks screen by performing one of the following:
• Tap > Wireless Manager > Menu > WiFi Settings.
• Tap > Settings > Connections tab > WiFi .
2On the Wireless tab, tap Add New.
3 Enter the Network name, then choose whether the wireless network connects to
The Internet or Work network.
4 If you want to connect to another wireless device (Ad-hoc mode), select the “This is
a device-to-device (ad-hoc) connection” option.
54
Page 65

5 Wireless Communications
Wireless communication features
5Tap Next.
6 In the Authentication drop-down list, select the authentication method.
7 In the Data Encryption drop-down list, select an encryption method.
8 Tap “The key is automatically provided” check box or enter the network key.
NOTE: Obtain network security settings from the network administrator.
9Tap Next.
10 Tap the “Use IEEE 802.1x network access control” check box.
11 In the EAP type drop-down list, select an appropriate EAP method.
12 Tap Finish.
55
Page 66
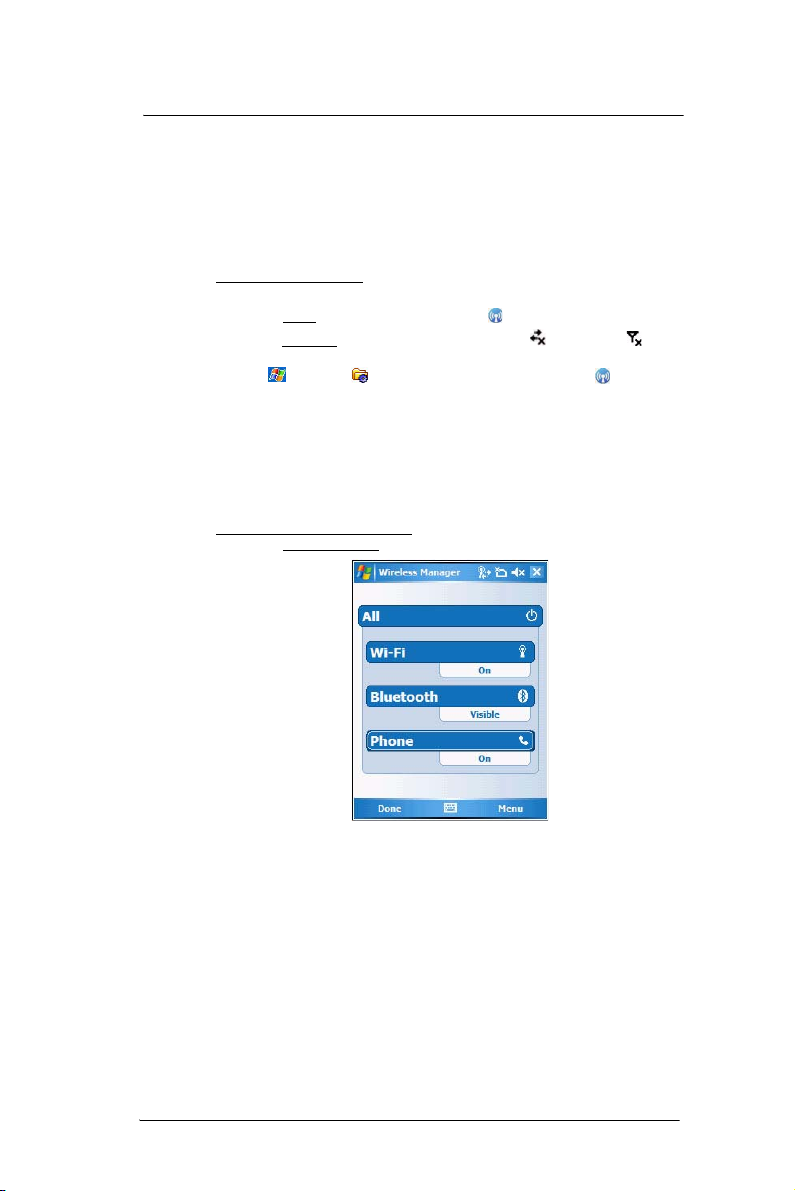
5 Wireless Communications
Managing wireless connections
Managing wireless connections
Using Wireless Manager
The Wireless Manager provides easy management to the wireless features on your
device. This program complements your device’s integrated wireless card enabling you
to turn the wireless features on and off and allows for centralized management of the
WiFi, Bluetooth, and Phone settings.
To open Wireless Manager:
Perform one of the following:
• On the Today screen, tap Wireless Manager .
• On the navigation bar, tap the Data connectivity icon or signal icon ,
then from the Connectivity drop-down box, tap Wireless Manager.
• Tap > Settings > Connections tab > Wireless Manager .
Activating wireless features
You can use Wireless Manager to turn the following wireless features on and off— one at
a time or all at the same time.
• WiFi
• Bluetooth
• Phone
• Cellular Data GPRS connection
To turn multiple wireless features on:
• On the Wireless Manager screen, tap All > Done.
56
Page 67

5 Wireless Communications
Managing wireless connections
To activate Bluetooth via the Wireless Manager:
1 On the Today screen, tap Wireless Manager .
Tap to launch the
Wireless Manager.
2 On the Wireless Manager screen, tap Bluetooth.
3Tap Done.
To activate WiFi connection via the Wireless Manager:
1 On the Today screen, tap Wireless Manager .
2Tap WiFi > Done.
To activate Phone via the Wireless Manager:
1 On the Today screen, tap Wireless Manager .
2Tap Phone > Done.
To disconnect cellular data GPRS connection via the Wireless Manager:
1 On the Today screen, tap Wireless Manager .
57
Page 68

5 Wireless Communications
Managing wireless connections
2 Tap Menu > Disconnect Cellular Data.
Configuring the multiple wireless settings
Using Wireless Manager, you can set Phone, Bluetooth, and WiFi settings.
To configure the Phone settings:
1 On the Wireless Manager screen, tap Menu.
2Select Phone Settings.
The Phone Settings screen has four tabs—Phone, Services, Network, and
Band. See “Phone preferences” on page 136 for the configuration options
available for each tab.
To configure the Bluetooth settings:
See “Bluetooth connection” on page 45 for more information.
To configure the WiFi settings:
See “WiFi connection” on page 50 for more information.
For information on configuring the Bluetooth settings, Phone settings, or
WiFi settings, tap Help .
58
Page 69

Getting connected
After configuring your device’s wireless settings you can now define the network settings
you’ll be using to access the Internet, connect to your office network, and view intranet
URLs.
For help information on performing the following procedures, tap Help from the
screen you’re having difficulty with.
Once you’ve establish these network settings; use Internet Explorer Mobile to view
Internet and intranet sites. See “Internet Explorer Mobile” on page 96 for more
information.
Connecting to the Internet
You can connect to the Internet by using a modem or wireless connection. Before you
perform the procedure below, obtain the following information from your Internet service
provider (ISP) or wireless service provider.
• ISP server phone number or access point
• User name and password
To connect to the Internet:
1 Tap > Settings .
2 On the Connections tab, tap Connections .
3 On the Tasks tab, tap Add a new modem connection from either My ISP.
5 Wireless Communications
Getting connected
4 Enter a name for the connection (e.g. Internet).
5 In the Select a modem list, select your modem type.
If you will be using a mobile phone netw ork, select Cellular Line.
If you will be using GPRS, select Cellular Line (GPRS).
6Tap Next.
7 Enter the access point name provided by your mobile service provider.
8Tap Next.
9 If required, enter the user name, password, and domain name.
If the mobile phone service provider specified the IP addresses of your DNS
servers, tap Advanced > Servers tab. Select Use specific server address, enter
the DNS addresses, then tap ok.
10 Tap Finish.
The connection is automatically started when you begin using a program that uses
an Internet connection.
To manually start the connection, perform one of the following:
• Repeat steps 1 and 2, then on the Tasks tab, tap Manage existing
connections under My ISP. Tap and hold a connection name, then
select Connect from the pop-up menu.
• Perform the “To connect to a wireless network” procedure on page 54.
59
Page 70

5 Wireless Communications
Getting connected
Flight Mode
Flight Mode allows you to turn off all the active wireless connections for safe use on an
airplane.
To turn off wireless connections:
1 Press and hold the End button for five seconds.
2Select Yes when the Turn On Flight Mode notification appears. All active wireless
connections are turned off.
When you want to turn the wireless connections back on, press and hold the End
button for five seconds. Select Yes when the Turn Off Flight Mode notification
appears. The device remembers which wireless connections were active prior to
entering Flight Mode and only turns on those wireless connections.
Connecting to your office network
You can connect to your office network by using a modem, virtual private network (VPN),
or wireless connection. Before you perform the procedure below, obtain the following
information from your network administrator or your wireless service provider.
• For a modem connection:
• ISP server phone number or access point
• User name and password
• For a VPN connection:
• User name, password, and domain name
• TCP/IP settings
• VPN server host name or IP address
• ISP server phone number or access point
If you will be using a modem or a VPN connection, perform the procedure in this section.
If you will be using a wireless connection, perform the “To connect to a wireless network”
procedure on page 54.
To connect to your office network:
1 Tap > Settings .
2 On the Connections tab, tap Connections .
3 Under My Work Network on the Tasks tab; select the kind of work connection you
will be using.
4 Enter the required information for the selected work connection.
5 Tap Finish.
The connection is automatically started when you use Internet Explorer Mobile to
connect to your work network. Begin using a program that uses an Internet
connection. To manually start the connection, perform one of the following:
60
Page 71

5 Wireless Communications
Getting connected
(a) Repeat steps 1 and 2, then on the Tasks tab, tap Set up my proxy server
under My Work Network.
(b) On the Modem or VPN tab, tap and hold a connection name, then select
Connect from the pop-up menu.
Viewing intranet URLs
If you’ll be connecting to intranet sites that have periods in their URLs (e.g.
intranet.corporatename.com), you must add them the to Work URL Exceptions list.
Otherwise, Internet Explorer Mobile will search for them in the Internet rather than the
company’s intranet.
To add an intranet URL:
1 Tap > Settings .
2 On the Connections tab, tap Connections .
3 On the Advanced tab, tap Exceptions.
4Tap Add New URL.
5 Enter the intranet URL.
TIP: If you use URLs that share the same root company name, you can add them as
group by entering *.corporatename.com.
6Tap Finish.
Setting an e-mail server connection
You can set up a connection to an e-mai l server so that you can send and receive e-mail
messages on your device. You can use multiple e-mail accounts to receive your
messages. For each e-mail account you intend to use, first set up and name the e-mail
service. If you use the same service to connect to different mailboxes, set up and name
each mailbox connection.
There are two types of e-mail account that can be managed using your device.
• Microsoft Outlook
Using Microsoft Outlook, your Inbox is updated each time you sync with your
computer or corporate e-mail server.
• POP3/IMAP4
This includes e-mail service from providers. These e-mail accounts can be
managed remotely using a wireless connection.
61
Page 72

5 Wireless Communications
Getting connected
To set up an e-mail account:
For an explanation on any of the setup screens, tap > Help .
1 Tap > Messaging .
2 Tap Menu > Tools > New Account.
3 Select the e-mail type from the drop-down list, then tap Next.
If you have selected an Outlook E-mail account, messages on the Microsoft Outlook
Inbox folder on your computer will synchronize to your device’s Outlook E-mail
Inbox during the next time you perform an ActiveSync synchronization.
NOTE: The first time that you synchronize Outlook e-mail with your device, any
existing Outlook e-mail items on your device are deleted and replaced by items
synchronized from your computer.
4 If you have selected POP3 or an IMAP e-mail account, follow the succeeding steps.
5 Enter your e-mail address, then tap Next.
This will initiate auto-configuration which attempts to connect your device to your
e-mail server and automatically download the necessary e-mail connection settings.
If auto-configuration is successful you can begin sending/receiving e-mails. If
unsuccessful you will need to manually enter the settings.
6 Once auto-configuration is finished, tap Next, then Finish, or you can select
Options to configure additional e-mail settings.
If auto-configuration is not successful, contact your ISP or network administrator for
the following information and enter them manually:
• User name and password
• Domain name
• Account type and name
• Incoming and outgoing e-mail server
62
Page 73

6 Using the Windows Mobile Programs
Microsoft Outlook Mobile programs
6 Using the Windows
Mobile Programs
• Microsoft Outlook Mobile programs
• Microsoft Office Mobile programs
• Windows Media Player 10 Mobile for Pocket PC
• Internet Explorer Mobile
• Pocket MSN
Microsoft Outlook Mobile programs
Microsoft Outlook Mobile includes Calendar, Contacts, Inbox, Notes, Tasks, and
Messaging. You can use these programs individually or in tandem with each other. For
example, e-mail addresses stored in Contacts can be used in Messaging.
You can use ActiveSync to synchronize your Outlook Mobile data with the Microsoft
Outlook information on your computer or to a Microsoft Exchange server.
See ”Using ActiveSync” on page 30 for more information.
Calendar
Calendar enables you to conveniently manage your schedules and appointments or any
other activities associated with a time and date. You can schedule appointments,
including meetings and other events. Checking your appointments is easy using one of
several views—Agenda, Day, Week, Month, and Year.
To open Calendar:
• Tap > Calendar .
Calendar opens to today’s schedule.
Tap to go to
current date.
Tap to display or edit the
appointment details.
Switch display views by tapping the view option on the lower left corner of
the command bar.
NOTE: You can customize the Calendar display, such as changing the first day of the
week, by tapping Menu > Options.
63
Page 74

6 Using the Windows Mobile Programs
Microsoft Outlook Mobile programs
Scheduling an appointment
1 If you are in Day or Week view, tap the desired date and time for the appointment.
2Tap Menu > New Appointment.
Tap to select a date.
3 Using the soft keyboard, enter the appointment details.
To select a field, tap it.
Hide the soft keyboard to see all available fields.
4 To add notes, tap the Notes tab.
5 After completing the appointment details, tap ok.
If you select “Remind me” in an appointment, your device notifies you
according to the options set in the Settings > Personal > Sounds &
Notifications option.
Viewing an appointment
You can view an appointment schedule in all views except for Year and Agenda view.
• To see the details of an appointment, tap the appointment.
• To see a pop-up menu of available actions for an appointment, tap and hold the
appointment.
• In Year view, the time of appointments are indicated by symbols. An upward
triangle means a morning appointment; a downward triangle means an afternoon
appointment. A solid square indicates an appointment that overlaps the noon day
border.
Finding an appointment
• Tap > Programs > Search , enter the appointment name, select
Calendar for the type, then tap Search.
Tap to choose from a
predefined text.
Tap to choose previously
entered location.
Tap to select a time.
Notes is a good place
for maps, directions,
or meeting reminders.
64
Page 75

6 Using the Windows Mobile Programs
Microsoft Outlook Mobile programs
Beaming an appointment
You can send an appointment to another IR- or Bluetooth-enabled device by beaming it.
1 If you intend to send the appointment:
• Via IR: Ensure that the two devices have IR turned on, then align the IR port
of your device with that of the other device so that they are unobstructed
and within close range.
• Via Bluetooth: Ensure that the two devices have Bluetooth turned on,
discoverable, and within close range.
2 In Agenda, Day or Month view, tap and hold the appointment.
3Select Beam Appointment on the pop-up menu.
4 Tap the device that you want to send the appointment to.
Using the Calendar summary screen
When you tap an appointment in Agenda or Day view, a summary screen is displayed. To
change the appointment, tap Edit.
Creating a meeting request
You can use Calendar to set up meetings with users of Outlook or Pocket Outlook. The
meeting request is created automatically and is sent when you synchronize Messaging
or when you connect to your e-mail server. Indicate how you want meeting requests sent
by tapping Menu > Options.
To schedule a meeting:
1 Create an appointment.
2 In the appointment details, hide the input panel, then tap Attendees.
3 Select the check box before the e-mail address of the contacts you want to send a
meeting request to.
4Tap ok twice—once to return to the appointment details page and another to save
the appointment.
The meeting request is created automatically and placed in the Outbox folder.
5Tap ok.
Synchronizing calendar items
• Calendar items created on your device are copied to your computer and/or
on a Microsoft Exchange server during synchronization, and vice versa. By
default, Calendar items from the last two weeks are synchronized.
• Similarly, Calendar items that are deleted from your device are deleted from
your computer and/or server during synchronization, and vice versa.
65
Page 76

6 Using the Windows Mobile Programs
Microsoft Outlook Mobile programs
• To save storage space on your device, synchronize appointments within a
convenient date range. Perform the following:
(a) Connect your device to your computer.
(b) In ActiveSync on your computer, if the details pane is not open, click Show
Details.
(c) Double-click Calendar, then select an interval in “Synchronize only the past”.
Contacts
Contacts maintains a list of your friends’ and colleagues’ contact information.
To open Contacts:
Perform one of the following:
• On the Today screen, press the right soft button or tap Contacts .
• Tap > Contacts .
Contacts opens to the contact list. To change the way contact information is
displayed in the list, tap Menu > Options.
Tap one of the letter blocks to
display only contact names
starting with such letters.
Enter the name of
the contact you’re
searching for.
Tap to create a
new contact.
To create a contact:
1 Tap New.
Tap a field to enter
contact information.
Scroll to see more
fields.
Notes is a good
place for additional
contact information.
2 Using the soft keyboard, enter a name and other contact information.
To select a field, tap it.
Hide the soft keyboard to see all available fields.
3 To add notes, tap the Notes tab.
66
Page 77

6 Using the Windows Mobile Programs
Microsoft Outlook Mobile programs
4 After completing the contact details, tap ok.
To find a contact:
There are several ways to find a contact.
• Using the MC35 keypad, press the starting letter of the contact name
• Tap one of the letter blocks displayed across the top of the contact list.
• Use the Smart Lookup function by entering the first few letters of the contact you’re
looking for in the search box under the navigation bar. To show all contacts again,
clear text from the box or tap the button to the right of the box.
• Tap > Programs > Search , enter the contact name, select Contacts
for the type, then tap Search.
Using the Contacts summary screen
When you tap a contact in the contact list (or select it using the joystick), a summary
screen displays. This is referred to as a contact card. To change the contact information,
tap Menu > Edit.
Calling a contact
You can make a call to a contact using either the contact list or the contact card.
To make a call from the contact list:
• Using commands in the pop-up menu.
(a) Tap and hold a contact to display a pop-up menu of actions.
Tap any call options
to make a call.
(b) Tap any of the Call options to make a call.
67
Page 78

6 Using the Windows Mobile Programs
Microsoft Outlook Mobile programs
• Using the contact list abbreviation
(a) Tap the letter in the right column next to the contact you want to call. The
contact’s summary screen appears.
(b) Tap which number to call or send e-mail/text messages.
The letter that appears opposite a contact entry corresponds to a particular
contact information. These are as follows:
• e – E-mail address
• e2 – Second e-mail address
• e3 – Third e-mail address
• h – Home phone number
• h2 – Second home phone number
• m – Mobile phone number
• pgr – Pager phone number
• sms – SMS address
• w – Work phone number
• w2 – Second work phone number
• web – Web page
• Using the hardware buttons
(a) Move the joystick up or down to scroll through the contact list and select the
contact you want to call.
(b) Press the Send button twice—once to launch Phone and another to
make the call. The call will be made to that contact’s priority number.
To make a call from a contact card:
• Tap any of the listed phone numbers.
• Move the joystick up or down to scroll through the listed numbers and select
one, then press the joystick or Send button to make the call.
Sending a message to a contact
You can send an e-mail or text message to a contact either from the contact list or from a
contact card.
To send a message from the contact list:
1 Tap and hold a contact to display a pop-up menu of actions.
- or -
Move the joystick up or down to scroll through the list and select a contact, then
press the joystick to display a pop-up menu of actions.
68
Page 79

6 Using the Windows Mobile Programs
Microsoft Outlook Mobile programs
2Tap Send E-mail or Send Text Message.
- or -
Move the joystick up or down to select either Send option, then press the joystick to
enable it.
Messaging opens to a new message screen with the “To” box automatically filled
out with the selected contact’s e-mail address/SMS number.
3 Proceed to composing the message.
To send a message from a contact card:
1 Tap any of the listed e-mail/text addresses.
- or -
Move the joystick up or down to scroll through the listed e-mail/text addresses and
select one, then press the joystick.
Messaging opens to a new message screen with the “To” box automatically filled
out with the selected contact’s e-mail/text address.
2 Proceed to composing the message.
Beaming a contact card
You can send a contact card to another IR- or Bluetooth-enabled device either from the
contact list or from a contact card screen.
To beam a contact card from the contact list:
1 If you intend to send the contact card:
• Via IR: Ensure that the two devices have IR turned on, then align the IR port
of your device with that of the other device so that they are unobstructed
and within close range.
• Via Bluetooth: Ensure that the two devices have Bluetooth turned on,
discoverable, and within close range.
2 Tap and hold a contact to display a pop-up menu of actions.
- or -
Move the joystick up or down to scroll through the list and select a contact, then
press the joystick to display a pop-up menu of actions.
3Tap Send Contact > Beam.
4 Tap the device that you want to send the contact card to.
To beam an open contact card:
1 Perform step 1 of the previous section.
2Tap Menu > Send Contact > Beam.
3 Tap the device that you want to send the contact card to.
Synchronizing contacts
• Contacts created on your device are copied to your computer or on a Microsoft
Exchange server during synchronization, and vice versa. By default, all of your
contacts are synchronized.
• Similarly, contacts that are deleted from your device are deleted from your
computer and/or server during synchronization, and vice versa.
69
Page 80

6 Using the Windows Mobile Programs
Microsoft Outlook Mobile programs
Tasks
Use Tasks to keep track of what you have to do and prioritize them based on their
importance and urgency.
To open Tasks:
• Tap > Programs > Tasks .
Tasks opens to the task list. To change the way task information is displayed
in the list, tap Menu > Options.
Indicates high priority.
Tap to set the selected
task as Active or
Complete.
To create a task:
1 Tap Menu > New Task.
Tap a field to enter
task information.
Tap to create a short
to-do task.
Tap and hold to display a
pop-up menu of actions.
Tap to choose
predefined subjects.
Scroll to see more
fields.
Notes is a good place
for additional task
information.
2 Using the soft keyboard, enter the task details.
To select a field, tap it.
Hide the soft keyboard to see all available fields.
3 To add notes, tap the Notes tab.
4 After completing the task details, tap ok.
Managing tasks
By default all created task items appear as one long list and are named based on their
subject line. To keep your tasks organized and allow quick searching you can choose to:
• Filter tasks based on their category or completion status. Tap Menu > Filter, then
select a filter option.
70
Page 81
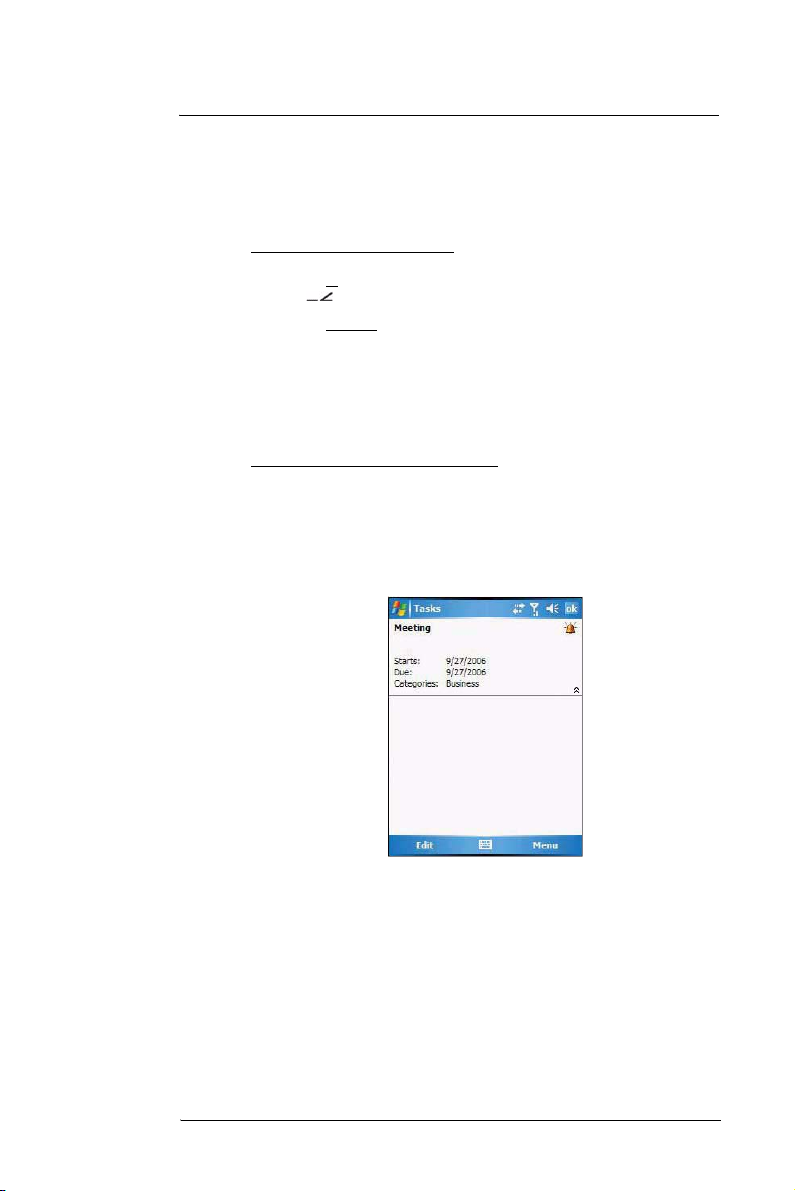
6 Using the Windows Mobile Programs
Microsoft Outlook Mobile programs
• Sort tasks based on their completion status, priority level, subject, start date, or due
date. Tap Menu > Sort By, then select a sort criteria.
Beaming a task item
You can send a task item to another IR- or Bluetooth-enabled device either from the task
list or from a task summary screen.
To beam a task item from the task list:
1 If you intend to send the task item:
• Via IR: Ensure that the two devices have IR turned on, then align the IR port
of your device with that of the other device so that they are unobstructed
and within close range.
• Via Bluetooth: Ensure that the two devices have Bluetooth turned on,
discoverable, and within close range.
2 Tap and hold a task item to display a pop-up menu of actions.
- or -
Move the joystick up or down to scroll through the list and select a task item, then
press the joystick to display a pop-up menu of actions.
3Tap Beam Task.
4 Tap the device that you want to send the task item to.
To beam a task item from its summary screen:
1 Perform step 1 of the previous section.
2Tap Menu > Beam.
3 Tap the device that you want to send the task item to.
Using the Tasks summary screen
When you tap a task in the task list, a summary screen displays. To change the task, tap
Edit.
Synchronizing tasks
• Task synchronization is, by default, automatically selected in ActiveSync.
• Tasks can only be synchronized with your computer; they cannot be synchronized
with a server.
• Tasks created on your device are copied to your computer during synchronization,
and vice versa. By default, only incomplete tasks are synchronized.
• Similarly, tasks that are deleted from your device are deleted from your computer
during synchronization, and vice versa.
71
Page 82

6 Using the Windows Mobile Programs
Microsoft Outlook Mobile programs
Notes
Quickly capture thoughts, reminders, ideas, drawings, and phone numbers with Notes.
You can create a written note or a recording. You can also include a recording in a note.
If a note is open when you create the recording, it is included in the note as an icon. If the
note list displays, it is created as a stand-alone recording. The option to create notes is
integrated in other Outlook Mobile programs.
To open Notes:
• Tap > Notes .
Notes opens to the note list.
Tap and hold to display a
pop-up menu of actions.
Tap to create a
new item.
To create a note:
1 Tap New.
2 Compose the note by using any of the Input Selector options, by writing/drawing on
the screen, or by creating a recording.
Tap to change the
sort order of the list.
3 Once you’ve completed the note, tap ok.
Managing notes
By default all created notes appear as one long list and are named chronologically
(i.e., Note1, Note2, etc.). To keep your notes organized you can choose to:
• Move or copy notes to system default folders, or you can create new folders to fit
your preferences. This helps you filter your notes and locate them quickly. Select
the appropriate command from the pop-up menu or tap Menu.
72
Page 83

6 Using the Windows Mobile Programs
Microsoft Outlook Mobile programs
• Rename notes to identify them in a more meaningful manner. Select the
appropriate command from the pop-up menu or tap Menu.
• Sort notes based on name, date, size, or type to make searching easier. Tap the
Sort By pick list on the upper right corner of the note list, then select a sort criteria.
Sending a note
You can send a note by beaming it to another person’s IR- or Bluetooth-enabled device,
or you can send it via e-mail.
NOTE: You must first set up an e-mail account on your device before you can send a
note by e-mail. See ”Setting an e-mail server connection” on page 61 for more
information.
To beam a note from the note list:
1 If you intend to send the note:
• Via IR: Ensure that the two devices have IR turned on, then align the IR port
of your device with that of the other device so that they are unobstructed
and within close range.
• Via Bluetooth: Ensure that the two devices have Bluetooth turned on,
discoverable, and within close range.
2 Tap and hold a note to display a pop-up menu of actions.
- or -
Move the joystick up or down to scroll through the list and select a note, then press
the joystick to display a pop-up menu of actions.
3Tap Beam File.
4 Tap the device that you want to send the note to.
To beam an open note:
1 Perform step 1 of the previous section.
2Tap Menu > Tools > Beam.
3 Tap the device that you want to send the note to.
To send a note via e-mail from the task list:
1 Tap and hold a note to display a pop-up menu of actions.
- or -
Move the joystick up or down to scroll through the list and select a note, then press
the joystick to display a pop-up menu of actions.
2Tap Send.
A new message screen displays with the selected note shown as an attachment
(*.pwi).
3 Proceed to completing the e-mail message.
To send an open note via e-mail:
1 Tap Menu > Tools > Send.
A new message screen displays with the selected note shown as an attachment
(*.pwi).
2 Proceed to completing the e-mail message.
Synchronizing notes
• Notes synchronization is, by default, automatically selected in ActiveSync.
• Notes can only be synchronized with your computer; they cannot be synchronized
with a server.
• Notes created on your device are copied to your computer during synchronization,
and vice versa.
• Similarly, notes that are deleted from your device are deleted from your computer
during synchronization, and vice versa.
• Handwritten text or drawings will appear as pictures in your computer.
73
Page 84

6 Using the Windows Mobile Programs
Microsoft Outlook Mobile programs
Messaging
Use Messaging to manage and organize both your e-mail and text (SMS) messages.
See ”Setting an e-mail server connection” on page 61 for more information on how to set
up an e-mail server connection. For instructions on how to use a text messaging service,
see “Text messaging service” on page 125.
With Messaging, you can:
• Synchronize Outlook E-mail messages Microsoft Outlook on your computer or with
a Microsoft Exchange server.
• Send and receive e-mail messages by connecting directly to an e-mail server
through an Internet service provider (ISP) or a network.
• Send and receive text messages through your mobile service subscription.
Messaging supports 8 bits data with class 0, 1, 2, 3, as well as USDD (Unstructured
Supplementary Service Data).
To open Messaging:
• Tap > Messaging .
Tap to toggle display from
folder list to message list.
Tap to create a new
e-mail or text message.
Tap to select a sort order
for the messages.
To send and receive e-mail messages:
• Tap Menu > Send /Receive.
Using the message list
The messages you receive display in the message list. By default, the most recently
received messages display first in the list.
Tap to select the sort
Tap and hold a message
to display a pop-up menu
of actions.
order for messages.
74
Page 85

6 Using the Windows Mobile Programs
Microsoft Outlook Mobile programs
When you receive a message, tap it to open. Unread messages are displayed in bold
text.
Creating an e-mail/text message
Whether you want to send an e-mail or text message, you do so by changing the Account
option. To do so, tap Menu > Go To > Text Messages or Outlook E-mail.
The following procedures explain how to compose an e-mail message. For procedures
on how to compose a text message, see page 12 7.
To compose an e-mail message:
1 In the message list, tap New.
2 Enter the e-mail address of your intended recipients in the “To” box. You can do this
in different ways.
• Manually enter the address using any of the Input Selector options.
• Type the first few letters of an e-mail address that is stored in Contacts, then
tap any of the available e-mail addresses. The auto-suggest feature suggests
e-mail addresses as you type so that you find them more quickly.
• Tap Menu > Add Recipient to display the contact list, then tap a contact from
the list.
Make sure multiple e-mail addresses within the same field is separated with a
semicolon.
3 Compose your e-mail message.
Outlook E-Mail supports the following e-mail options.
• To enter a preset or frequently used messages, tap Menu > My Text, then
select a message.
• Use the Menu > Insert command to attach a picture, voice note, or any file as
e-mail attachments.
When attaching a voice note, the Recording toolbar appears for you to create
the voice note (file format: .wav); or you can select a previously created voice
note (file format: .pwi).
Outlook Mobile now supports attachment of Office Mobile files (Word, Excel,
and PowerPoint).
• Use the Menu > Spell Check command to search your message for common
spelling errors.
• Use the Menu > Message Options command to set the priority level,
security, and language options.
75
Page 86

6 Using the Windows Mobile Programs
Microsoft Outlook Mobile programs
4Tap Send when you've finished the message.
If you are working offline, the message is moved to the Outbox folder and sent the
next time you’re online.
To keep sent items:
By default, sent e-mail messages are not saved on your device to help conser ve
memory. If you prefer to keep copies of sent e-mail messages, follow the procedure
below:
1 In the message list, tap Menu > Tools > Options.
2 On the Message tab, then select the “Keep copies of sent items in the Sent folder”
option.
3Tap ok.
4 If you are using an Outlook E-mail or a IMAP4 account, select the Sent Items folder
for synchronization.
For more information on e-mail synchronization options, see “To configure
ActiveSync e-mail synchronization settings” on page 77.
Creating a message signature
You can personalize your e-mail and text messages by appending a signature to it. The
signature support of your device allows you to create different signatures for your e-mail
and SMS account. This feature also eliminates the need to re-type a closing for every
message.
To create a signature:
1 In the message list, tap Menu > Tools > Options.
2 On the Accounts tab, tap Signatures.
3 Tap the pick list to select which account to create a signature for.
76
Page 87

6 Using the Windows Mobile Programs
Microsoft Outlook Mobile programs
4 Select the “Use signature with this account” option.
5 You can use the signature for new messages only, or you can select the “Use
signature when replying and forwarding” option to append it to all outgoing
messages.
6 Enter a signature in the box.
7Tap ok.
Managing messages and folders
By default, messages are displayed in one of five folders for each service you have
created—Deleted Items, Drafts, Inbox, Outbox, and Sent Items.
• The behavior of the Deleted and Sent Items folders depends on the options
you have chosen. To set these options, in the message list:
(a) Tap Menu > Tools > Options.
(b) On the Message tab, select your options.
• If you want to organize messages into subfolders, tap Menu > Tools >
Manage Folders to create new folders.
• To move a message to another folder, in the message list, tap and hold the
message, then tap Move on the pop-up menu.
Downloading messages
The manner in which messages are downloaded in your device depends on the type
account you have.
• E-mail messages in an Outlook E-mail account can be downloaded during
ActiveSync synchronization.
• E-mail messages in an e-mail account provided by your ISP, or that you access
using a virtual private network (VPN) server can be downloaded from a remote
email server.
• Text messages are automatically received by your device when the phone function
is turned on. When the phone function is disabled, messages are held by your
mobile phone service provider until the next time you turn the phone function on.
Synchronizing Outlook e-mail messages
Outlook e-mail messages can be synchronized as part of the general ActiveSync
synchronization process.
During ActiveSync synchronization:
• Only the first 500 bytes (or characters, including spaces) of each new message
sent to you within the last three days.
• Messages are copied from the Outlook Inbox folder on your computer, or from a
Microsoft Exchange server, to the Outlook E-mail Inbox folder on your device.
• The messages on your device and on your computer are linked. When you delete a
message on your device, it is also deleted from your computer the next time you
synchronize, and vice versa.
To set up ActiveSync e-mail synchronization:
1 Open Acti veSync on your computer.
2 Click Tools > Options.
3 In the Mobile Device list under the Desktop area, select the “E-mail” option.
4 Click OK.
To configure ActiveSync e-mail synchronization settings:
1 Connect your device to your computer.
2 On ActiveSync on your computer, make sure the details pane is open. If it’s not,
click Show Details.
3 Double-click E-Mail.
4 Select the e-mail synchronization options you prefer.
• If you receive long messages often and want to synchronize them in full, select
a larger size in the “Limit e-mail size to” list.
• If you want to synchronize more past messages, increase the interval in the
“Include the previous” box.
77
Page 88

6 Using the Windows Mobile Programs
Microsoft Office Mobile programs
• If you want to include email attachments, select the “Include file attachments”
option. To limit the size of synchronized attachments, select the “Only if
smaller than” option and enter a size limit. Attachments larger than this limit
will not be synchronized with your device.
• If you want to synchronize folders other than Inbox, click Select Folders, then
select the subfolders that you want to synchronize.
The Deleted Items folder synchronizes only one direction, from the device to
the computer. Items in the Deleted Items folder on your computer will not
appear on your device.
5 Click OK twice.
Synchronizing POP3/IMAP4 e-mail messages
POP3/IMAP4 e-mail messages are downloaded using an e-mail server connection.
During e-mail server synchronization:
• New e-mail messages are downloaded to that account’s Inbox folder.
• E-mail messages in that account’s Outbox folder are sent.
• E-mail messages that have been deleted in the e-mail server are removed from
your device’s Inbox folder.
• If you are using a POP3 account and you move e-mail messages to a folder you
created, the link is broken between the messages on your device and their copies
on the e-mail server. The next time you connect, the e-mail server sees that the
messages are missing from the de vice’s Inbox and delete them from the server.
This prevents you from having duplicate copies of a message, but it also means
that you will no longer have access to messages that you move to folders created
from anywhere except your device.
• If you are using an IMAP4 account, the folders you create and the e-mail messages
you move are mirrored on the server. Therefore, messages are available to you
anytime you connect to your e-mail server, whether it is from your device or from
your computer. This synchronization of folders occurs whenever you connect to
your mail server, create new folders or rename/delete folders when connected.
To synchronize POP3/IMAP4 e-mail messages:
1 On the message list on your device, tap Menu > Go To, then select the e-mail
account you want to use.
2Tap Menu > Send/Receive.
Microsoft Office Mobile programs
Microsoft Office Mobile includes the mobile versions of the popular Word, Excel, and
PowerPoint programs. With these mobile programs, you maintain a productive work
schedule even while on-the-go.
Word Mobile
Use Word Mobile to:
• Create and edit documents and templates and save them as .doc, .rtf, .txt,
and .dot files.
• Edit Word documents and templates created on your computer. You can
also open and edit Pocket Word (*.psw ) documents.
• Synchronize documents and templates between your device and your
computer.
78
Page 89

6 Using the Windows Mobile Programs
Microsoft Office Mobile programs
To open Word Mobile:
• Tap > Programs > Word Mobile .
The Word Mobile document list displays.
Using the Word Mobile document list
The Word Mobile document list is the default screen when you open Word Mobile. Every
time you tap ok in an open document, this list displays.
• Tap a file in the document list to open it. You can open only one document at
a time.
• To delete, make copies of, and send files, tap and hold a file in the list, then select
the appropriate action on the pop-up menu.
Creating a Word Mobile document
Word Mobile has built-in templates for creating a new document, meeting notes, memo,
phone memo, and to do list.
To change the default template:
1 On the document list, tap Menu > Options.
2 Select another template from the “Default template” pick list.
3Tap ok.
To create a new document:
1 On the document list, tap New.
A new document appears based on the default template.
2 Enter the information using any of the Input Selector options.
3 Format texts by using the Word Mobile toolbar.
This toolbar provides basic formatting options, such as font style, paragraph
alignment, and bullet options. You can show and hide this toolbar by tapping View >
Toolbar.
4Tap ok.
This will close the newly created document and automatically name the file after the
first several words in the document. The new document is placed in the Word
Mobile document list.
- or -
79
Page 90

6 Using the Windows Mobile Programs
Microsoft Office Mobile programs
Tap Menu > File > Save As to customize the save settings.
Tap to view the toolbar,
change Zoom options,
and enable text wrapping.
Tips for working in Word Mobile
• If you're opening a Word document created on a computer, select Wrap to
Window on the View menu so that you can see the entire document.
• You can change the zoom magnification by tapping View > Zoom, then
select the percentage you want. Select a higher percentage to enter text and
a lower one to see more of your document.
Sending a Word Mobile document
You can send a Word Mobile document by beaming it to another person’s IR- or
Bluetooth-enabled device or send it as an attachment via e-mail.
To beam a document:
1 If you intend to send the document:
• Via IR: Ensure that the two devices have IR turned on, then align the IR port
of your device with that of the other device so that they are unobstructed
and within close range.
• Via Bluetooth: Ensure that the two devices have Bluetooth turned on,
discoverable, and within close range.
2 From the Word document list, select the item you want to beam.
3Tap Menu > Beam File.
4 Tap the device that you want to send the file to.
To send a document via e-mail from the document list:
Tap to return to the
document list
(changes are saved
automatically).
Tap and hold
anywhere in the
document to display
a pop-up menu of
actions.
NOTE: Make sure that your device is properly setup to send and receive mail. See
”Getting connected” on page 59 for more information.
1 From the Word document list, select the item you want to send.
2Tap Menu > Send.
A new message screen displays with the selected file shown as an attachment.
3 Proceed to completing the e-mail message.
4Tap Send.
To send an open document via e-mail:
1 Tap Menu > File > Send.
A new message screen displays with the file shown as an attachment.
2 Proceed to completing the e-mail message.
80
Page 91

6 Using the Windows Mobile Programs
Microsoft Office Mobile programs
Synchronizing Word documents
You can synchronize Word documents created on your computer with your device. Note
the following reminders when selecting this option.
• Word Mobile does not support synchronization of password-protected files. You
must first remove the password protection in Word on your computer if you want to
view the document on the device.
• ActiveSync need to convert your computer document files before synchronizing it
with your device. Converted files may not contain all information found in original
file. For more information, on the Word Mobile document list, tap > Help ,
then locate the Unsupported features in Word Mobile link.
To synchronize Word documents:
1 Connect your device to your computer.
2 Click Tools > Options.
3 Select the “Files” option.
This will create the <device name> My Documents folder on your computer’s
desktop.
4 Place all the Word documents you want to synchronize with your device in this
folder.
5 Initiate synchronization.
The documents you placed on the <device name> My Documents folder are copied
to your device.
Excel Mobile
Use Excel Mobile to:
• Create, view, and edit workbooks and save them as .xls and .xlt files.
• Edit Excel workbooks and templates created on your computer.
• Create, view, and edit charts/graphs and save them in a separate worksheet
or embed them as objects in the source worksheet.
• Synchronize Excel workbooks and templates between your device and your
computer.
To open Excel Mobile:
• Tap > Programs > Excel Mobile .
The Excel Mobile workbook list displays.
81
Page 92

6 Using the Windows Mobile Programs
Microsoft Office Mobile programs
Using the Excel Mobile workbook list
The Excel Mobile workbook list is the default screen when you open Excel Mobile. Every
time you tap ok in an open workbook, this list displays.
• Tap a file in the workbook list to open it. You can open only one workbook at
a time.
• To delete, make copies of, and send files, tap and hold a file in the list, then select
the appropriate action on the pop-up menu.
Creating an Excel Mobile workbook
Word Mobile has built-in templates for creating a blank workbook and a vehicle mileage
log.
To change the default template:
1 On the workbook list, tap Menu > Options.
2 Select another template from the “Template for new workbook” drop-down list.
3Tap ok.
To create a new workbook:
1 On the workbook list, tap New.
A new workbook appears based on the on default template.
2 Perform any of the following.
• Tap a cell, enter the information (values, text, formula), then tap Enter.
If you’re entering a formula, enter the equal sign (=) first.
Tap Help for more information on how to perform more advanced
workbook tasks.
• Use the Excel toolbar. It has tools for working with formulas, functions,
and charts; as well as options for sorting and filtering data. You can
show and hide this toolbar by tapping View > Toolbar.
• A new workbook by default has only three worksheets. To add more
worksheets, tap Menu > Format > Modify Sheets > Insert.
3Tap ok.
This will close the newly created workbook and automatically name the file as
Book#. The new document is placed in the Excel Mobile workbook list.
- or -
Tap Menu > File > Save As to customize the save settings.
Tap to return to the workbook list (changes are
saved automatically).
Status bar
Tap to create a
charts or graph.
Toobar
Tips for working in Excel Mobile
Note the following when working in large worksheets.
• View in full-screen mode to see as much of your worksheet as possible.
• Tap View > Full Screen.
• To exit full screen mode, tap View, then deselect Full Screen.
82
Page 93

6 Using the Windows Mobile Programs
Microsoft Office Mobile programs
• Show and hide screen elements.
• Tap View, then tap the elements you want to show or hide.
• You might want to freeze the top and left-most panes in a worksheet to keep row
and column labels visible as you scroll through a sheet.
(a) Select the cell where you want to freeze panes.
(b) Tap View > Freeze Panes.
• Split panes to view different areas of a large worksheet.
(a) Tap View > Split.
(b) Drag the split bar to where you want it.
To remove the split, tap View > Remove Split.
• Show and hide rows and columns.
• To hide a row or column:
(a) Select a cell in the row or column you want to hide.
(b) Tap Menu > Format > Row or Column > Hide.
• To display a hidden row or column:
(a) Select the cells which span the hidden row or column.
(b) Tap Menu > Format > Row or Column > Unhide.
Sending an Excel Mobile workbook
You can send an Excel Mobile workbook by beaming it to another person’s IR- or
Bluetooth-enabled device, or you can send it as an e-mail attachment. You can do any of
these in the same manner as you do with a Word Mobile document. See “Synchronizing
Word documents” on page 81 for more information.
Synchronizing Excel workbooks
You can synchronize Excel workbook created on your computer with your device. You
can do this in the same manner as you do with Word documents. See “Synchronizing
Word documents” on page 81 for more information.
PowerPoint Mobile
Use PowerPoint Mobile to view slide show presentations. You can download slide show
presentations from a storage card, company network, inter net, e-mail attachment or
obtained by synchronizing with your personal computer.
To open PowerPoint Mobile:
• Tap > Programs > PowerPoint Mobile .
Getting slide shows onto your device
You can download PowerPoint files from a memory card or the Web to your computer,
then synchronize them with your device. To do so, you need to activate your device (you
only need to activate it once), then set up synchronization for files in ActiveSync.
To get slide show presentation onto your device:
1 Open ActiveSync on your computer.
2 Use Windows Explorer on your computer to locate the PowerPoint Mobile folder
and the Pocket_PC My Documents folder.
3 Use ActiveSync to download the files from your computer to your device as
described in the Read Me file in the PowerPoint Mobile folder.
Using PowerPoint Mobile
PowerPoint Mobile contains a list of files stored on your device. The file list is the default
screen when you open PowerPoint Mobile.
To open a PowerPoint presentation:
1 Tap > Programs > PowerPoint Mobile .
83
Page 94

6 Using the Windows Mobile Programs
Microsoft Office Mobile programs
2 Tap the slide show you want to view.
3 Tap the current slide to advance to the next slide.
To stop a slide show presentation:
In a PowerPoint Mobile presentation, tap and hold , then tap End Show.
84
Page 95

6 Using the Windows Mobile Programs
Microsoft Office Mobile programs
To change the slide show presentation:
1 In a PowerPoint Mobile presentation, tap and hold , then tap Show Options.
2 Tap the Orientation tab, then select the orientation.
To navigate between slides:
1 In a PowerPoint Mobile presentation, tap and hold the , then tap
Go to Slide.
2 Tap the slide you want to view.
Setting the slide show playback options
You can change the PowerPoint presentation settings to turn off animation, prevent slide
show transitions from playing, or set time interval between each slide.
To set the slide show playback options:
1 In a PowerPoint Mobile presentation, tap and hold the , then tap
Show Options.
2 Tap the Playback tab; select the Override playback options for all files check box.
3 Perform any of the following:
• Select the “Show without animation” option to turn off builds and other
animations.
• Select the “Show without slide transition” option to prevent slide
transitions from playing.
• Select the “Use slide timings, if present” option to use the timings
recorded with each slide in a presentation.
• Select the -“Loop continuously” option to automatically advance to the
first slide after the last slide in a presentation.
4Tap ok.
Sending a PowerPoint file
You can send a PowerPoint file to another person either by e-mail or by beaming it to that
person’s IR- or Bluetooth-enabled d evice.
NOTE: You must first set up an e-mail account on your device before you can send a
PowerPoint file by e-mail. See “To set up an e-mail account” on page 62 for more
information.
To send a PowerPoint file by beaming:
1 In the PowerPoint document list, tap and hold the document.
2Tap Beam File on the pop-up menu.
3 Perform one of the following:
• Select a Bluetooth-enabled device, then tap the Tap to send link.
• Align the IR port of your device with that of the other IR-enabled
device so that they are unobstructed and within close range, then select
the IR-enabled device and tap the Tap to send link.
To send a PowerPoint file by e-mail:
1 In the PowerPoint document list, tap and hold the document.
2Tap Send via E-mail on the pop-up menu.
A new message screen in Inbox displays with the selected note shown as an
attachment (*.pwi).
3 Proceed to completing the e-mail message.
85
Page 96

6 Using the Windows Mobile Programs
Windows Media Player
Windows Media Player
Enjoy your favorite music and movies on the road, online or offline, with the new
Windows Media Player 10 Mobile for Pocket PC. The Player provides you with the
highest quality audio and video experience for your mobile entertainment and it works
seamlessly with Windows Media Player 10 on your Windows XP-based computer.
Copying files to your device
Use the Sync feature in Windows Media Player 10 on your computer to copy your digital
media files to your device. Using the Player, instead of simply copying files using the
Explore button in ActiveSync, ensures that licenses are copied with protected files.
1 In Windows Media Player on your computer, click the Library tab (you must first
connect your device to your computer).
2 In the Playlist pane, click the playlist, category, or other item that you want to copy.
3 On the top right side of the screen, click Now Playing List, then select Sync List.
4 Drag the items from middle portion of the screen to the Sync List pane to add them
to the list of items to be synchronized.
5 Click Start Sync at the bottom right corner of the screen.
Windows Media Player verifies that there is sufficient storage space on your device
to copy the selected files. If there is sufficient space, the files are converted (if
necessary) and copied. If the device has insufficient storage space, May not fit
appears next to the selected items in the Sync List pane.
NOTE: To facilitate faster copying of audio files to your device, it is recommended that
you configure Windows Media Player 10 on your computer to automatically determine
the quality level settings applicable to your MC35 EDA. See the Windows Media Player
Help on your computer for more information.
To open Windows Media Player 10 Mobile for Pocket PC:
• Tap > Windows Media .
The Player displays the last open screen from your previous session.
86
Page 97

6 Using the Windows Mobile Programs
Windows Media Player
The library
The library contains links to your playlists and audio or video files. You can sort content
by criteria such as artist name, album title or genre. By default, Windows Media Player 10
Mobile automatically searches your device for compatible digital media files and adds
them to the My Device library. Similarly, when you insert a storage card into your device,
Windows Media Player 10 Mobile automatically detects the files and adds them to the
Storage Card library.
To update the library:
If the Player does not detect new files that you copy to your device, you can manually
update the library.
1 Tap > Windows Media .
2Tap Menu > Update Library.
3 Wait for files to be added, then tap Done.
The playlist
A playlist is a customized list of digital media files that you want to watch or listen to.
Using a playlist lets you group various digital media files together and specify the order
you want the files to play in. You can also use playlists to copy files to your computer.
You can create a playlist based on:
• Source - For example, tracks from various CDs of your favorite artist or
streaming media from an online music site.
• Personal preferences - For example, a playlist of tracks belonging to your
favored music genre or video clips from your funny movie collection.
• Mood or activities - For example, a playlist of tracks you want to listen while
travelling or during your R&R periods.
The Player has two default playlists:
• Local Content - Consists of all compatible audio and video files stored on
your device and/or storage card.
• Web Favorites - Consists of your favorite streaming media files. This playlist
is empty until you add items to it.
87
Page 98

6 Using the Windows Mobile Programs
Windows Media Player
To add items to the Now Playing playlist:
1 On the Library screen, tap Menu > Library.
2 Select a library in the Library pick list (for example a storage card).
TIP: If the Player does not detect new files that you copied to your device, you can
manually update the library by tapping Menu > Update Library. After the files have
been added, tap Done.
3 Select a category, then tap and hold the item that you want to add in the Now
Playing folder.
4Tap Menu > Queue Up.
5Tap Menu > Now Playing.
6 On the Now Playing screen, tap to switch to the Library screen and find items
to add to the Now Playing playlist.
NOTE: To quickly add a group of files to the Now Playing playlist, tap and hold an item
in the library (such as an album name, artist name or genre), then tap Queue Up.
88
Page 99

6 Using the Windows Mobile Programs
Windows Media Player
To edit the Now Playing playlist:
1 On the Player screen, tap Now Playing.
- or -
Tap Menu > Library > Now Playing, then the playlist you want to edit.
2 Perform any of the following:
• Tap to move the selected item up in the playlist. You can also tap
and drag an item to move it up in the playlist.
• Tap to move the selected item down in the playlist. You can also
tap and drag an item to move it down in the playlist.
• Tap to display the Library screen and add items to the Now Playing
playlist.
• Tap to delete the selected item from the playlist.
• Tap to view track properties of the selected item.
To delete an item in the Now Playing playlist:
1 On the Playback screen, tap Now Playing.
2 Tap and hold the item you want to delete, then tap Remove from Playlist from the
pop-up menu.
- or -
Tap an item you want to delete, then tap Menu > Remove from Playlist.
89
Page 100
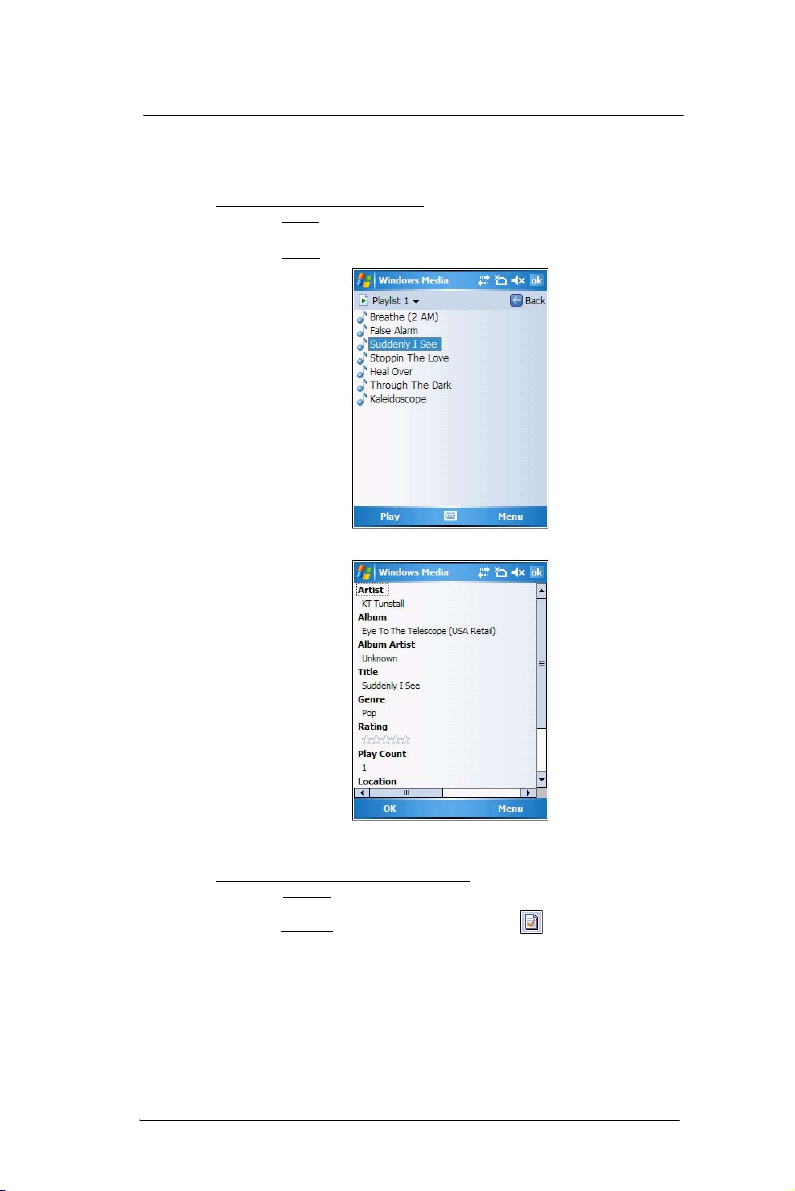
6 Using the Windows Mobile Programs
Windows Media Player
Viewing track properties
You can check the file properties of a track for your reference. You can do this either in a
playlist screen or in the Player screen.
To view track properties from a playlist:
1 On the Library screen, tap My Playlists.
2 Tap a playlist category.
3 On the Playlist screen, tap or play a file.
4Tap Menu > Properties.
5 Tap the scroll bar to view more fields.
6Tap ok.
To view track properties from the Player screen:
• On the Playback screen, tap Menu > Properties.
- or -
On the Playback screen, tap Now Playing, then tap .
Tap the scroll bar to view more fields.
90
 Loading...