

Page 1
MA580 Series User Guide
Digital 5.8GHz
Page 2

i
Page 3
Welcome
Congratulations on your purchase of a Motorola
product! Your Motorola expansion handset at
a glance:
Welcome
Page 4

For a copy of a large-print version of this
guide (U.S. Only), or for product-related
questions, please contact:
1-800-353-2729 U.S.A.
Welcome
Product registration is an important step toward
enjoying your new Motorola product. Registering helps
us facilitate warranty service, and permits us to contact
you should your Motorola product require an update or
other service. Registration is not required for warranty
coverage.
To register your product online, visit:
www.motorola.com/warranty/cordless
Note: Product registration is not available in Canada.
1-888-390-6456 TTY (Text Telephone)
Or visit us online: www.motorola.com/cordless
1-800-461-4575 Canada
Please retain your original dated sales receipt for your
records. For warranty service of your Motorola Product,
you will need to provide a copy of your dated sales
receipt to confirm warranty status.
Copyright © 2004 Motorola, Inc.
All rights reserved. No part of this publication may be
reproduced in any form or by any means or used to
make any derivative work (such as translation,
transformation or adaptation) without written permission
from Motorola, Inc.
Motorola reserves the right to revise this publication and
to make changes in content from time to time without
obligation on the part of Motorola to provide notification
of such revision or change. Motorola provides this
guide without warranty of any kind, either implied or
expressed, including but not limited to, the implied
warranties of merchantability and fitness for a particular
ii
Page 5

purpose. Motorola may make improvements or
changes in the product(s) described in this manual at
any time.
MOTOROLA, the Stylized M Logo, and Pho neWrap are
registered in the U.S. Patent and Trademark Office. All
other product or service names are the property of their
respective owners.
Welcome
iii
Page 6

Welcome
iv
Page 7

Table of Contents
Welcome . . . . . . . . . . . . . . . . . . . . . . . . . . . . . . . . . . . . . i
Important Safety Instructions . . . . . . . . . . . . . . . . . . .vii
FCC and Interference Information. . . . . . . . . . . . . . . . xi
Getting Started . . . . . . . . . . . . . . . . . . . . . . . . . . . . . . . .1
Battery Safety Instructions . . . . . . . . . . . . . . . . . . . . . .1
Charging the Battery . . . . . . . . . . . . . . . . . . . . . . . . . .1
Setting Up the Handset . . . . . . . . . . . . . . . . . . . . . . . .3
Setting Up the Base . . . . . . . . . . . . . . . . . . . . . . . . . . .5
Installation. . . . . . . . . . . . . . . . . . . . . . . . . . . . . . . . . . . .9
Installing the Phone on a Desk . . . . . . . . . . . . . . . . . . .9
Installing the Phone on the Wall . . . . . . . . . . . . . . . . .10
Installing or Removing the Belt Clip . . . . . . . . . . . . . . 11
Using the Telephone. . . . . . . . . . . . . . . . . . . . . . . . . . .13
Making a Call . . . . . . . . . . . . . . . . . . . . . . . . . . . . . . .13
Answering a Call . . . . . . . . . . . . . . . . . . . . . . . . . . . .13
Adjusting the Volume . . . . . . . . . . . . . . . . . . . . . . . . .14
Ending a Call . . . . . . . . . . . . . . . . . . . . . . . . . . . . . . .14
Redialing a Number . . . . . . . . . . . . . . . . . . . . . . . . . .14
If You Hear Interference on the Line . . . . . . . . . . . . .14
Finding a Lost Handset . . . . . . . . . . . . . . . . . . . . . . .15
Saving a Number in Memory . . . . . . . . . . . . . . . . . . .16
Dialing a Number from Memory . . . . . . . . . . . . . . . . .17
Using Automated Dialing . . . . . . . . . . . . . . . . . . . . . .17
Deleting Numbers from Memory . . . . . . . . . . . . . . . .18
Using Caller ID . . . . . . . . . . . . . . . . . . . . . . . . . . . . . .18
Dialing a Number from the Caller ID List . . . . . . . .18
Deleting Numbers from the Caller ID List . . . . . . . .19
Saving a Caller ID Number in Memory . . . . . . . . . .19
Contents
v
Page 8

Storing and Calling Emergency Numbers . . . . . . . 20
Using the Intercom . . . . . . . . . . . . . . . . . . . . . . . . . . 20
Conference Calling . . . . . . . . . . . . . . . . . . . . . . . . . . 21
Transfering a Call . . . . . . . . . . . . . . . . . . . . . . . . . . . 21
Using the Answering Machine . . . . . . . . . . . . . . . . . . 23
Turning the Answerin g Mach in e On or Off . . . . . . . 23
Setting the Day and Time . . . . . . . . . . . . . . . . . . . . 23
Setting the Number of Rings . . . . . . . . . . . . . . . . . 24
Setting Up Your Outgoing Message . . . . . . . . . . . . 25
Recording a Memo . . . . . . . . . . . . . . . . . . . . . . . . . 25
Contents
Checking Messages from the Base Station . . . . . . 26
Checking Messages from a Handset . . . . . . . . . . . 26
Checking Messages Remotely . . . . . . . . . . . . . . . 26
Deleting Messages . . . . . . . . . . . . . . . . . . . . . . . . 27
Screening Calls . . . . . . . . . . . . . . . . . . . . . . . . . . . 27
Motorola Limited Warranty . . . . . . . . . . . . . . . . . . . . . 29
vi
Page 9

Important Safety Instructions
Follow these safety precautions when using your
cordless phone to reduce the risk of fire, electric shock
and injury to persons or property:
1. Keep all slits and openings of the phone unblocked.
Do not set the phone on a heating register or over a
radiator. Ensure that proper ventilation is provided
at the installation site.
2. Do not use while wet or while standing in water.
3. Do not use this product near water (for example,
near a bath tub, kitchen sink, or swimming pool).
4. Do not allow anything to rest on the power cord.
Place the power cord so that it will not be walked
on.
5. Never insert objects of any kind into the product
slits as that may result in fire or shock.
6. Unplug this product from the wall outlet before
cleaning. Do not use liquid cleaners or aerosol
cleaners. Use a damp cloth for cleaning.
7. Do not disassemble this product. If service or repair
work is required, contact the Motorola address
found in the back of this user’s guide.
8. Do not overload wall outlets and extension cords.
9. Avoid using during an electrical storm. Use a surge
protector to protect the equipment.
10. Do not use this cordless phone to report a gas leak,
especially if you are in the vicinity of the gas line.
Caution:
or larger UL Listed or CSA Certified Telecommunication
Line Cord.
To reduce the risk of fire, use only No. 26 AWG
Safety Info
vii
Page 10

Unplug this cordless phone immediately from
an outlet if:
• The power cord or plug is damaged or fra yed .
• Liquid has been spilled into the product.
• The product has been exposed to rain or wate r. Do not
retrieve the handset or base until after you have unplugged
the power and phone from the wall. Then retrie ve the unit by
unplugged cords.
• The product has been drop ped o r the c abi net h as be en
damaged.
• The product exhibits a d istinc t chan ge in pe rforman ce.
Installation Guidelines
1. Read and understand all instructions and save
them for future reference.
2. Follow all warnings and instructions marked on the
product.
3. Do not install this product near a bath tub, sink or
Safety Info
shower.
4. Operate this phone using only the power source
that is indicated on the marking label. If you are
unsure of the power supply to your home, consult
with your dealer or local power company.
5. Do not place this product on an unstable cart, st and
or table. This product may fall, causing serious
damage to the product.
6. Adjust only those controls that are covered by the
operating instructions. Improper adjustment of other
controls may result in damage and will often require
extensive work to restore the product to normal
operation.
7. Clean this product with a soft, damp cloth. Do not
use chemicals or cleaning agents to clean this
phone.
viii
Page 11

8. Use only the power supply that came with this unit.
Using other power supplies may damage the unit.
9. Because cordless phones operate on electricity,
you should have at least one phone in your home
that isn’t cordless, in case the power in your home
goes out.
10. To avoid interference to nearby appliances, do not
place the base of the cordless phone on or near a
TV, microwave oven, or VCR.
Caution:
exposure guidelines, place the base unit at least 20 cm
from nearby persons.
To maintain compliance with the FCC’s RF
Safety Info
ix
Page 12

Safety Info
x
Page 13

FCC and Interference Information
This equipment complies with Parts 15 and 68 of the
FCC rules and the requirements adopted by the
Administrative Council for Terminal Attachments
(ACTA).
A plug and jack used to connect this equipment to the
premises wiring and telephone network must comply
with applicable FCC Part 68 rules and requirements
adopted by the ACTA. A compliant telephone cord and
modular plug is provided with this product. It is designed
to be connected to a compatible modular jack that is
also compliant. See installation instructions for details.
Notification of Local Telephone Company
On the bottom of this equipment is a label that contains,
among other information, a product identifier in the form
US:AAAEQ##TXXXX. Y ou must, upon request, provide
this information to your telephone company.
The digits represented by ## in the product identifier
indicate the Ringer Equivalency Number (REN) for this
equipment. The REN is useful in determining the
number of devices you may connect to your telephone
line and still have all of these devices ring when your
telephone number is called. In most (but not all) areas,
the sum of the RENs of all devices connected to one line
should not exceed 5. To be certain of the number of
devices you may connect to your line as determined by
the REN, contact your local telephone company.
Note: This equipment may not be used on coin service
provided by the telephone company .
FCC Info
xi
Page 14

Connection to party line service is subject to state tarif fs.
Contact the state public utility commission, public
service commission or corporation commission for
information.
If your home has specially wired alarm equipment
connected to the telephone line, ensure the installation
of this cordless phone does not disable your alarm
equipment. If you have questions about what will
disable alarm equipment, consult your telephone
company or a qualified installer .
Notice must be given to the telephone company upon
permanent disconnection of your telephone from your
line. The FCC requires that you connect your cordless
telephone to the nationwide telephone network through
a modular telephone jack (USOC RJ1 1C/RJ11W or
RJ14C/RJ14W).
Rights of the Telephone Company
Should your equipment cause trouble on your line which
may harm the telephone network, the telephone
company shall, where practicable, notify you that
temporary discontinuance of service may be required.
Where prior notice is not practical and the
circumstances warrant such action, the telephone
FCC Info
company may temporarily disconnect service
immediately . In case of such temporary discontinuance,
the telephone company must:
• Promptly notify you of such temporary
discontinuance
• Afford you the opportunity to correct the situation
xii
Page 15

• Inform you of your right to bring a complaint to the
Commission pursuant to procedures set forth in
Subpart E of Part 68, FCC Rules and Regulations.
The telephone company may make changes in its
facilities, equipment, operations, or procedures that
could affect the operation of the equipment. If this
happens, the telephone company will provide advance
notice in order for you to make necessary modifications
to maintain uninterrupted service.
Interference Information
This device complies with Part 15 of the FCC Rules.
Operation is subject to the following two conditions:
• This device may not cause harmful interference.
• This device must accept any interference received,
including interference that may cause undesired
operation.
This equipment has been tested and found to comply
with the limits for a Class B digital device, pursuant to
Part 15 of the FCC Rules. These limits are designed to
provide reasonable protection against harmful
interference in a residential installation.
This equipment generates, uses, and can radiate radio
frequency energy and, if not installed and used in
accordance with the instructions, may cause harmful
interference to radio communications. However, there is
no guarantee that interference will not occur in a
particular installation.
FCC Info
xiii
Page 16

If this equipment does cause harmful interference to
radio or television reception, which can be determined
by turning the equipment on and off, the user is
encouraged to try to correct the interference with one or
more of the following measures:
• Reorient or relocate the receiving antenna (that is,
the antenna for the radio or television that is
"receiving" the interference).
• Re orient or relocate and incr ease the separation
between the telecommunications equipment and
the receiving antenna.
• Connect the telecommunications equipment into
an outlet on a circuit different from that to which
the receiving antenna is connected.
If these measures do not eliminate the interference,
please consult your dealer or an experienced radio/
television technician for additional suggestions. Also,
the Federal Communications Commission has prepared
a helpful booklet, "How to Identify and Resolve Radio/
TV Interference Problems." This booklet is available
from the U.S. Government Printing Office, W ashington,
D.C. 20402. Please specify stock number
004-000-00345-4 when ordering copies.
The FCC requires this product to be serviced only by
Motorola or its authorized service agents.
FCC Info
CAUTION / WARN ING: Changes or modifications not
expressly approved by Motorola could void not only the
user's authority to operate the equipment, but also the
limited warranty.
xiv
Page 17

Hearing Aid Compatibility
This telephone system meets the FCC standards for
hearing aid compatibility .
FCC Info
xv
Page 18

FCC Info
xvi
Page 19

Getting Started
Before you can use your cordless phone to make or
answer calls, you must charge the battery and
complete the initial setup. This section provides the
step-by-step instructions you will need.
Battery Safety Instructions
•
Do not burn, disassemble, mutilate, or puncture the
battery . The battery contains toxic materials that could
be released, resulting in injury.
•
Caution:
the battery with an incorrect battery type. Use only the
battery that came with your phone or an authorized
replacement recommended by the manufacturer.
•
Keep batteries out of the reach of children.
•
Remove batteries if storing over 30 days.
•
Do not dispose of batteries in fire, which could result
in explosion.
•
The rechargeable batteries that power this
product must be disposed of properly and may
need to be recycled. Refer to your battery’s
label for battery type. Contact your local
recycling center for proper disposal methods.
There is a risk of explosion if you replace
Charging the Battery
1 Remove the battery door.
2 Insert the battery into the battery compartment.
Getting Started
1
Page 20

3 Plug the battery connector into the receptacle in
the battery compartment and replace the
battery door.
4 Plug the power cord into the back of the base and
into an outlet.
5 Rest the handset in the base so the charging
LED lights.
Getting Started
2
Page 21

6 For the initial charge, charge the battery for
at least 16 hours.
Attention:
Do not plug the phone cord into the phone jack until the
battery is fully charged.
Setting Up the Handset
1 Press flash.
2 Set the language:
English
\
] French
^ Spanish
3 Press flash.
4 If you live in an area with 7-digit dialing and you
subscribe to caller ID service with your phone
company:
Enter your 3-digit area code and press
If you live in an area with 10-digit dialing (3-digit area
code + 7-digit phone number), or if you do not
subscribe to caller ID service with your phone company:
flash
.
Getting Started
3
Page 22

Press
flash
to go to the next prompt (do not enter your
area code).
5 Set the ring sound. Each sound plays as you
select it.
\ Ring tone 1 (soft ring)
] Ring tone 2 (loud ring)
^ Musical
6 Press flash.
7 Set touch tone or pulse operation. It is
recommended that you always choose touch
tone dialing unless it is not available in your area.
\ touch tone
] pulse
8 Press flash.
Note: If you select pulse, you can still use touch
tone menu systems. To activate touch tone
temporarily for one call, press * before you dial.
Caution:
physiological effects of Radio Frequency (RF)
electromagnetic fields have not been evaluated by UL. If
you are concerned with the risk of RF exposure, you may
want to limit the duration of your calls and position the
antenna as far away from your body as is practical.
Getting Started
4
The long-term characteristics or the possible
Page 23

Setting Up the Base
1 Press flash.
2 Set the language by scrolling to the appropriate
selection:
ENG = English
FRA = French (
ESP = Spanish (
3 Press flash.
4 If you live in an area with 7-digit dialing and you
subscribe to caller ID service with your phone
company:
Enter your 3-digit area code and press
If you live in an area with 10-digit dialing (3-digit area
code + 7-digit phone number), or if you do not
subscribe to caller ID service with your phone company:
Press
flash
area code).
5 Set the ring sound. Each sound plays as you
select it.
\
Ring tone 1
]
Ring tone 2
^
Musical
6 Press flash.
7 Set touch tone or pulse operation. It is
recommended that you always choose touch
tone dialing unless it is not available in your area.
\
touch tone
Français
Español
)
)
flash
.
to go to the next prompt (do not enter your
Getting Started
5
Page 24

]
pulse
8 Press flash.
Note: If you select pulse, you can still use touch
tone menu systems. To activate touch tone
temporarily for one call, press * before you dial.
9 Set the ring level:
\
high
]
low
^
off
10 Press flash.
11 Set the security code by entering your 3-digit
security number. This number can be used to
access your answering machine remotely.
12 Press flash.
13 Set the day of the week by scrolling to the
appropriate day.
14 Press flash.
15 Set the time by entering the time of day and
selecting either AM or PM.
16 Press flash.
17 Set the contra st of th e LCD disp la y:
\
light
]
medium
^
dark
Getting Started
6
Page 25

18 Press flash.
19 Set the language of the base voice prompts by
scrolling to the appropriate selection:
ENG = English
FRA = French (
Français
)
Getting Started
7
Page 26

Getting Started
8
Page 27

Installation
Once your MA580 is fully charged and ready for use,
you can install it on a desktop or mounted to a wall. This
section provides the step-by-step instructions you will
need to install the phone.
Installing the Phone on a Desk
Once the battery is fully charged, plug the phone cord
into the back of the phone and then into the phone jack
on the wall.
Installation
9
Page 28

Installing the Phone on the Wall
The wall mount works best with a wall mount bracket,
which is available at most electronic stores.
Installation
1
Insert the 6 tabs on the wall mount into the 6 slots on
the bottom of the base, ensuring it snaps snuggly into
place.
Insert the
small tabs
into the base...
...then pivot
the wallmount
until the tabs on the
side lock in place.
2
Plug the power cord into the back of the base and into
an electrical outlet.
3
Plug one end of the telephone line cord into the jack on
the back of the base. Route the cord through the slot in
the wall mount and then plug the other end into the
phone jack on the wall.
4
Route the cord through the slot in the wall mount and
then plug the other end into the phone jack on the wall.
10
Page 29

5
Tuck any extra cord into the back of the wall mount.
6
Line up the tabs on the wall mount bracket with the
holes on the back of the wall mount. Snap the wall
mount firmly into place.
Installing or Removing the Belt Clip
To attach the belt clip to the handset, insert the tabs of
the clip into the slots on the back of the handset.
Installation
To remove the belt clip, gently release the tabs
of the clip.
11
Page 30

Installation
12
Page 31

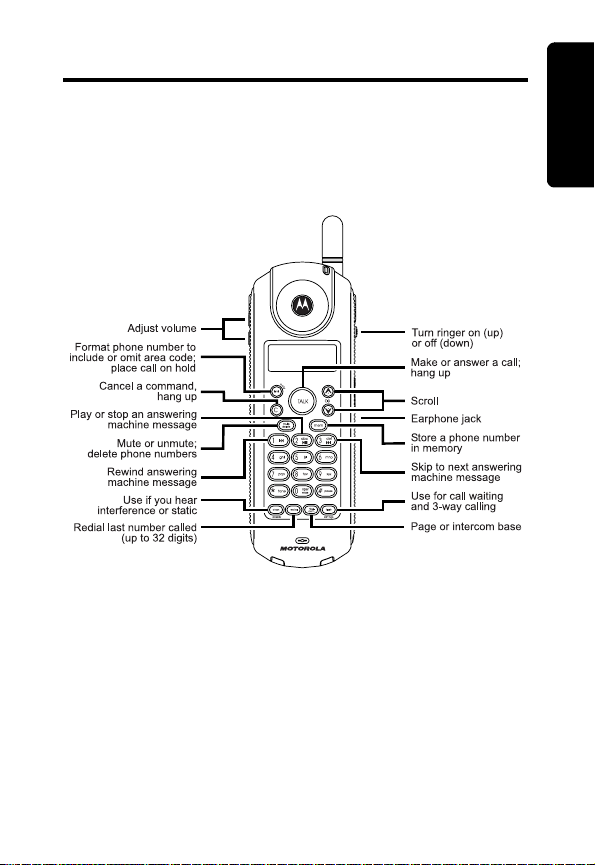
Using the Telephone
Y our Motor ola MA580 at a glance:
Making a Call
Press
Talk
. When you hear the dial tone, dial the
number.
Answering a Call
Press
Talk
.
Telephone
13
Using the
Page 32

Adjusting the Volume
Ending a Call
Press
Talk
or place the handset in the answering
machine.
Redialing a Number
Y ou r phone remembers the last num ber you dialed,
even if the call did not connect (for example, if the
number was busy). To redial the last called number:
1
Press
Talk
.
2
Press
Redial
.
If You Hear Interference on the Line
If you hear other calls, static, or noise on the line, or if
Using the
Telephone
the signal is weak, press
channel without interference.
Chan
until you get on a clear
14
Page 33

Finding a Lost Handset
1
Press
page/intercom
2
Follow the sound to locate the handset.
Note: No need to hurry, the handset will not stop
beeping for about two minutes.
3
Press
page/intercom
handset) to stop the beeping. page/intercom
on the answering machine.
again (or press
Talk
on the
Telephone
Using the
15
Page 34

Saving a Number in Me mory
Memory dialing makes it easy to dial phone numbers
you call frequently . You can store 10 phone num bers
in memory . Each ph one number can have up to
24 digits.
1
Make sure the unit is not in use. If you hear a d ial
tone, press
2
Press
3
Press any number key (Ñ through É) to store
the phone number in that memory location.
4
Press
5
Enter the name you want to store. The following
table shows how many times to press each
button on the handset to enter letters and special
characters.
Using the
Telephone
6
Press
7
Enter the phone number you want to store.
Talk to turn it off.
Mem
.
Mem
.
Button
space -
1
2
3
4
5
6
7
8
9
Mem
.
Number of Presses
1 2 3 4
*
ABC(
DEF )
GH I $
JKL‘
MNO ;
PQRS
TUV?
WXYZ
,
16
Page 35

To insert a pause in the number (for example, if you
have to dial 9 for a dial tone), press
#
twice (a P
appears in the number).
To store the last number you dialed, press
Redial
instead of entering a phone number.
8
Press
Mem
.
Dialing a Number from Me mory
1
Press
Talk
.
2
Press
Mem
.
3
Press the number key (Ñ through É) to select
the memory location of the phone number you
want to call.
Using Automated Dialing
Y ou can retreive numer ic information (like a PIN or
credit card number) from the phonebook during a
phone call. This feature is useful when using
automated response system.
For example, if you frequently access your bank
account information over the phone, you can store
your account number and PIN in the phonebook, and
then access them during the call instead of entering
them manually each time.
1
Press
Talk
.
2
Press
Mem
.
3
Press the number key (Ñ through É) to select
the memory location of the phone number you
want to call.
For example, if you stored your bank’s number in
location 1, your account number in location 2, and your
Telephone
Using the
17
Page 36

PIN in location 3, you would press the following keys to
access your account information:
â
Mem
\
Mem
]
Mem
^
Deleting Numbers from Memory
1
Press
Mem
.
2
Using ò and ú, scroll to the number you want to
delete.
3
Press
mute
.
4
When Delete Entry? is displayed, press
Mute
to delete the number, or c to cancel the
delete and keep the number in memory.
Using Caller ID
When you receive a call, the handset display shows one
of the following messages:
•
NEW: You received a new call that has not been
reviewed.
•
No Data: No caller ID information was sent from your
phone service provider.
Your phone can hold up to 40 caller ID entries. To
scroll through the list of calls, press ò or ú.
Using the
Telephone
Dialing a Number from the Caller ID List
1
Make sure the unit is not in use. If you hear a d ial
tone, press
2
Using ò and ú, scroll to the number you want to
dial.
Talk to turn it off.
18
Page 37

3
To change from 7-digit dialing to 10-digit dialing
or long distance format, press
frmt
until the
desired format is displayed (7, 10, or 11).
4
Press
Talk
.
Deleting Numbers from the Caller ID List
To delete an individual number:
1
Using ò and ú, scroll to the call you want to
delete.
2
Press
Mute
.
3
When Delete Call ID? is displayed, press
Mute
to delete the number, or C to cancel the
delete and keep the number in the caller ID list.
To delete all numbers:
1
Press ò or ú to display a number in the caller ID
list.
2
Press and hold
Mute
until Delete All?
is displayed.
3
Press
Mute
to delete all caller ID numbers, or c to
cancel the delete and keep the numbers in the
caller ID list.
Saving a Caller ID Number in Memory
1
Using ò and ú, scroll to the number you want to
store.
2
Press
Mem
.
3
Press any number key (Ñ through É) to store
the number in that memory location.
4
If there is already a number in that memory
Mem
location, press
to replace the old number
Telephone
Using the
19
Page 38

with the new number. If the memory location was
empty, this step is not needed.
To call a number stored in memory, see page 17.
Storing and Calling Emergency Numbers
When storing an emergency number ( such as 911)
into memory or making a test call to an emergency
number stored in memory, remain on the line and
briefly explain to the dispatcher the reason for the
call. Only do this, if necessary, in of f-peak hours such
as early morning or late evening.
Using the Intercom
Y ou can use the intercom fea ture to talk be tween the
handset and the base.
From either the handset or the base, press page/
intercom. If the base is being paged, the
in use/page indi cator blinks. If the handset is be ing
paged, the indicator on the top of the hand set blinks.
Pressing page/intercom during a phone call places
the call on hold until the unit is returned to Talk mode.
T o accept the p age, press page/intercom. T o decline
the page, press Talk or C.
Using the
To quit intercom mode and return to st andby, press
Telephone
page/intercom again.
20
Page 39

Conference Calling
Both the handset and the base can participate in a
call at the same time.
To connect to a call in progress press Talk. A short
connection beep will alert the user that another
person has joined the call.
To disconnect from a conference call, press Talk.
Transfering a Call
To transfer a call in progress, press page/intercom.
The call is placed on hold and the other unit is paged.
When the page is answered, pressing Hold begins a
conference between the base, handset, and caller.
Press Talk to complete the transfer.
Telephone
Using the
21
Page 40

Using the
22
Telephone
Page 41

Using the Answering Machine
The answering machine stores up to 15 minutes of
messages and/or memos. Y o u can listen to your
messages from the base station, from the handset,
or remotely.
The answering machine at a glance:
Turning the Answering Machine On or Off
To turn the answering machine on or of f, press the
On/Off button on the base. Answer On or
Answer Off is displayed accordingly .
Answering
Machine
Setting the Day and Time
If you did not set the day and time of the answering
machine during the initial setup (see “Setting Up the
Base”), you can do so from the base.
1
Press and hold
current day. After you release
answering machine repeats the day and time.
day/check
until you hear the
day/check
, the
23
Page 42

2
Press and hold
hour
until you hear the current
hour.
After you release
hour
, the answering machine
repeats the day and time.
3
Press and hold
minute. After you release
min
until you hear the current
min
, the answering
machine repeats the day and time.
Note:
When you first press
machine announces the minutes in 1-minute
increments, then increases the rate to 5-minute
increments.
min
, the answering
Setting the Number of Rings
Use the slide switch on the back of the answering
machine to adjust how many times the phone will ring
before the answering machine picks up the call. You
can chose 3 rings, 5 rings, or “Toll Saver.”
Toll Saver sets the answering machine to pick up the
call after 3 rings when new messages are presen t, or
after 5 rings when there are no new messages.
Using this feature, if you call long distance to check
your messages and the phone does not pick up after
the third ring, you can hang up and avoid the toll
charge because no new messages are waiting.
Machine
Answering
24
Page 43

Setting Up Your Outgoing Message
Y ou can record a personal outgoing message (OGM)
that plays when you receive a call but cannot answer .
If you do not record a personal message, a
prerecorded greeting will play .
1
Press and hold
annce
. The answering machine
beeps and the message Announcement is
recording is displayed on the base.
2
Record the message you want callers to hear.
Speak clearly and at least 12 inches away from
the microphone.
3
Release
annce
. The message replays.
To return to the default announcement, briefly press
annce
. As your recorded message plays, press
delete
to delete it.
To hear your announcement at any time, briefly
annce
press
.
Recording a Memo
The voice memo feature lets you leave a message for
yourself on the answering machine.
1
Press and hold
memo
. The answering machine
beeps.
2
While still holding down
memo
, record your
message. Speak clearly and at least 12 inches
away from the microphone.
3
Release
The answering machine saves the memo as a
message, then beeps.
memo
when you are finished recording.
Machine
Answering
25
Page 44

Checking Messages from the Base Station
Press
Press
Press
Press
i
g
h
delete
to play and stop messages
to skip forward
to skip backward
to delete message
Checking Messages from a Handset
1
Press chan.
2
Scroll to and select the function you want. The
functions are:
Press 2 to play/stop messages
Press 3 to skip forwards
Press 1 to skip backwards
Press 4 to turn the answering
machine on/off
Press 7 to repeat the menu
Press 0 to delete the message
Checking Messages Remotely
Machine
If you have a touch-tone phone, you can access your
Answering
messages remotely .
1
Call your home.
2
When the answering machine picks up the call,
press
A synthesized voice prompts you with
and then enter your security ID number.
*
instructions.
26
Page 45

3
To skip the voice prompts and operate the base
station directly , press the appropr iate number key
on the phone. The functions are:
Press 2 to play/stop messages
Press 3 to skip forwards
Press 1 to skip backwards
Press 4 to turn the answering
machine on/off
Press 7 to repeat the menu
Press 0 to delete the message
Deleting Messages
Press
delete
while listening to the message.
T o erase all messages on the answering machine, press
and hold
beeps and erases all messages.
erase
for 2 seconds. The answering machine
Screening Calls
Y ou can listen to a message while the caller is leaving
the message on your answering machine.
1
While the caller is leaving the message, press
chan
on the handset.
2
To interrupt the message and talk to the caller,
Talk
press
.
To stop screening the call and allow the caller to leave
a message, press
C
.
Answering
Machine
27
Page 46

Answering
28
Machine
Page 47

Motoro la Limited Warranty
Motorola Limited Warranty
for Consumer Products, Accessories, and Software
Purchased in the United States or Canada
What Does this Warranty Cover?
Subject to the exclusions contained below, Motorola, Inc.
warrants its cordless telephones ("Products"), Motorolabranded or certified accessories sold for use with these
Products ("Accessories"), and Motorola software contained
on CD-ROMs or other tangible media and sold for use with
these Products ("Software") to be free from defects in
materials and workmanship under normal consumer usage
for the period(s) outlined below. This limited warranty is a
consumer's exclusive remedy, and applies as follows to
new Motorola Products, Accessories and Software
purchased by consumers in the United States or Canada,
which are accompanied by this written warranty:
Products and Accessories as defined above, unless
otherwise provided for below. Length of coverage: one (1)
year from the date of purchase by the first consumer
purchaser of the product unless otherwise provided for
below.
• Decorative Accessories and Cases. Decorative
covers, bezels, PhoneWrap® covers and cases. Length
of coverage: limited lifetime warranty for the lifetime of
ownership by the first consumer purchaser of the
product.
• Monaural Headset s. Ear buds and boom headsets that
transmit mono sound through a wired connection. Length
of coverage: limited lifetime warranty for the lifetime of
ownership by the first consumer purchaser of the
product.
Warranty
29
Page 48

• Products and Accessories that are Repaired or
Replaced. Length of coverage: The balance of the
original warranty or for ninety (90) days from the date
returned to the consumer, whichever is longer.
• Software. Applies only to physical defects in the media
that embodies the copy of the software (e.g. CD-ROM,
or floppy disk). Length of coverage: ninety (90) days from
the date of purchase.
Exclusions
Normal Wear and Tear. Periodic maintenance, repair and
replacement of parts due to normal wear and tear are
excluded from coverage.
Batteries. Only batteries whose fully charged capacity falls
below 80% of their rated capacity and batteries that leak
are covered by this limited warranty.
Abuse & Misuse. Defects or damage that result from: (a)
improper operation, storage, misuse or abuse, accident or
neglect, such as physical damage (cracks, scratches, etc.)
to the surface of the product resulting from misuse; (b)
contact with liquid, water, rain, extreme humidity or heavy
perspiration, sand, dirt or the like, extreme heat, or food; (c)
use of the Products or Accessories for commercial
Warranty
purposes or subjecting the Product or Accessory to
abnormal usage or conditions; or (d) other acts which are
not the fault of Motorola, are excluded from coverage.
Use of Non-Motorola Products and Accessories.
Defects or damage that result from the use of NonMotorola branded or certified Products, Accessories,
Software or other peripheral equipment are excluded
from coverage.
Unauthorized Service or Modification. Defects or
damages resulting from service, testing, adjustment,
installation, maintenance, alteration, or modification in any
way by someone other than Motorola, or its authorized
service centers, are excluded from coverage.
Altered Products . Products or Accessories with (a) serial
numbers or date tags that have been removed, altered, or
obliterated; (b) broken seals or that show evidence of
tampering; (c) mismatched board serial numbers; or (d)
nonconforming or non-Motorola housings, or parts, are
excluded from coverage.
30
Page 49

Communication Services. Defects, damages, or the
failure of Products, Accessories or Software due to any
communication service or signal you may subscribe to or
use with the Products, Accessories or Software is excluded
from coverage.
Software Embodied in Physical Media. No warranty is
made that the software will meet your requirements or will
work in combination with any hardware or software
applications provided by third parties, that the operation of
the software products will be uninterrupted or error free, or
that all defects in the software products will be corrected.
Software NOT Embodied in Physical Media. Software
that is not embodied in physical media (e.g. software that is
downloaded from the internet), is provided "as is" and
without warranty.
Who is Covered
This warranty extends to the first end-user purchaser, only.
What will Motorola Do?
Motorola, at its option, will at no charge repair , replace or
refund the purchase price of any Products, Accessories or
Software that does not conform to this warranty. We may
use functionally equivalent reconditioned/refurbished/preowned or new Products, Accessories or parts. No data,
software or applications added to your Product, Accessory
or Software, including but not limited to personal contacts,
games and ringer tones, will be reinstalled. T o avoid losing
such data, software and applications please create a back
up prior to requesting service.
How to Get Warranty Service or Other
Information
In the USA, call: In Canada, call:
1-800-353-2729 1-800-461-4575
TTY 1-888-390-6456 TTY 1-888-390-6456
For accessories and software, please call the telephone
number designated above for the product with which they
are used. Y ou will receive instructions on how to ship the
Products, Accessories or Software, at your expense, to a
Motorola Authorized Repair Center. To obtain service, you
must include: (a) a copy of your receipt, bill of sale or other
Warranty
31
Page 50

comparable proof of purchase; (b) a written description of
the problem; (c) the name of your service provider, if
applicable; (d) the name and location of the installation
facility (if applicable) and, most importantly; (e) your
address and telephone number.
What Other Limitations Are There?
ANY IMPLIED WARRANTIES, INCLUDING WITHOUT
LIMIT ATION THE IMPLIED WARRANTIES OF
MERCHANT ABILITY AND FITNESS FOR A PAR TICULAR
PURPOSE, SHALL BE LIMITED TO THE DURATION OF
THIS LIMITED WARRANTY, OTHERWISE THE REPAIR,
REPLACEMENT, OR REFUND AS PROVIDED UNDER
THIS EXPRESS LIMITED WARRANTY IS THE
EXCLUSIVE REMEDY OF THE CONSUMER, AND IS
PROVIDED IN LIEU OF ALL OTHER WARRANTIES,
EXPRESS OF IMPLIED. IN NO EVENT SHALL
MOTOROLA BE LIABLE, WHETHER IN CONTRACT OR
TORT (INCLUDING NEGLIGENCE) FOR DAMAGES IN
EXCESS OF THE PURCHASE PRICE OF THE
PRODUCT , ACCESSORY OR SOFTW ARE, OR FOR ANY
INDIRECT, INCIDENTAL, SPECIAL OR
Warranty
CONSEQUENTIAL DAMAGES OF ANY KIND, OR LOSS
OF REVENUE OR PROFITS, LOSS OF BUSINESS,
LOSS OF INFORMA TION OR DAT A, SOFTW ARE OR
APPLICATIONS OR OTHER FINA NCIAL LOSS ARISING
OUT OF OR IN CONNECTION WITH THE ABILITY OR
INABILITY TO USE THE PRODUCTS, ACCESSORIES
OR SOFTWARE TO THE FULL EXTENT THESE
DAMAGES MA Y BE DISCLAIMED BY LA W.
Some states and jurisdictions do not allow the limitation or
exclusion of incidental or consequential damages, or
limitation on the length of an implied warranty, so the above
limitations or exclusions may not apply to you. This
warranty gives you specific legal rights, and you may also
have other rights that vary from state to state or from one
jurisdiction to another.
Laws in the United States and other countries preserve for
Motorola certain exclusive rights for copyrighted Motorola
software such as the exclusive rights to reproduce and
distribute copies of the Motorola software. Motorola
software may only be copied into, used in, and redistributed
32
Page 51

with, the Products associated with such Motorola software.
No other use, including without limitation disassembly of
such Motorola software or exercise of the exclusive rights
reserved for Motorola, is permitted.
Warranty
33
Page 52

Warranty
34
Page 53

Visit our website at:
www.motorola.com
514783-001
08/04
MGBI
 Loading...