


Motorola
iDEN
Digital Multi-Service Data-Capable Phone
®
i80s Rel 2 Phone User’s Guide
@NNTN4511A@
NNTN4511-A

www.motorola.com/iden

Table of Contents
IMPORTANT!
Read“SafetyandGeneral Information”on page169
before using your i80s phone.
Introduction .......................................................................................... 7
Driving Safety Tips .........................................................................................8
Getting Started.................................................................................... 11
i80s Phone Features ......................................................................................12
Battery...........................................................................................................13
Turning Your i80s Phone On/Off..................................................................15
Enabling Security ..........................................................................................16
Receiving Over-the-Air Programming..........................................................16
SIM Card .......................................................................................................17
Keypad Lock .................................................................................................23
Status of Your i80s Phone.............................................................................27
My Information .............................................................................................27
Using T9® Text Input ...................................................................................28
Display Essentials ............................................................................... 35
Display Screen...............................................................................................35
Status Icons....................................................................................................36
Text Display Area .........................................................................................38
Call Information Icons...................................................................................38
Menu Icon......................................................................................................38
Display Options.............................................................................................38
Navigating Menus and Lists..........................................................................39
Main Menu Options.......................................................................................40
i

Phonebook...........................................................................................43
Accessing Phonebook with an i2000, i2000plus, or GSM Phone.................44
Phonebook Entries and Speed Dial Numbers................................................44
Phonebook Icons ...........................................................................................45
Voice Names .................................................................................................45
Accessing Your Phonebook ..........................................................................45
About PhonebookEntries..............................................................................46
Viewing Phonebook Entries..........................................................................46
Sorting Phonebook Entries............................................................................47
Checking Phonebook Capacity .....................................................................48
Adding Phonebook Entries............................................................................48
Storing Numbers and Private IDs Quickly....................................................52
Editing Phonebook Entries............................................................................53
Deleting PhonebookEntries..........................................................................54
Pause Digit Entry...........................................................................................54
Plus Dialing...................................................................................................55
Digital Cellular....................................................................................57
Making Phone Calls ......................................................................................57
Emergency Calling ........................................................................................63
Receiving a Phone Call.................................................................................63
Ending a Phone Call......................................................................................63
Recent Calls...................................................................................................63
Call Timers....................................................................................................66
Hands-Free Speakerphone.............................................................................67
Mute...............................................................................................................68
Call Waiting ..................................................................................................68
Call Hold .......................................................................................................70
Three-Way Calling ........................................................................................71
Call Forwarding.............................................................................................72
Messages.............................................................................................. 77
Message Center .............................................................................................79
Using Voice Mail ..........................................................................................80
www.motorola.com/iden
ii

Using Text and Numeric Messaging .............................................................81
Using Net Alert .............................................................................................83
Using Your Phone as a Modem.....................................................................84
Mobile Originated Text Messaging...................................................85
Message Center .............................................................................................85
Text Msg Setup .............................................................................................87
Text Message Inbox......................................................................................88
Text Message Outbox....................................................................................90
Private and Group Calls .................................................................... 97
Private Calls ..................................................................................................97
Call Alerts......................................................................................................99
Group Calls..................................................................................................104
Datebook............................................................................................ 107
Datebook Icons............................................................................................108
Viewing Your Datebook .............................................................................108
About Datebook Events...............................................................................110
Adding New Events.....................................................................................111
Editing Events .............................................................................................114
Deleting Events ...........................................................................................115
Datebook Event Reminders.........................................................................115
Customizing Datebook Set Up....................................................................116
Memo .................................................................................................117
Adding a New Memo ..................................................................................117
Viewing a Memo .........................................................................................117
Editing a Memo...........................................................................................118
Deleting a Memo .........................................................................................118
Voice Record .....................................................................................119
About VoiceRecord....................................................................................119
Accessing Voice Record .............................................................................119
Recording a Voice Record ..........................................................................120
iii

Playing a Voice Record...............................................................................120
Adding to a Voice Record...........................................................................121
Labeling a Voice Record .............................................................................121
Deleting a Voice Record .............................................................................122
Locking/Unlocking a Voice Record............................................................122
Voice Record Memory................................................................................123
Java .................................................................................................... 125
Installing Java Applications ........................................................................126
Running Java Applications..........................................................................126
Downloading Java Applications..................................................................127
Java Memory ...............................................................................................127
Customizing the i80s Phone............................................................. 129
Settings Menu..............................................................................................129
Styles ...........................................................................................................145
Shortcuts ......................................................................................................150
Accessories......................................................................................... 155
Batteries.......................................................................................................156
Travel Chargers ...........................................................................................157
Carrying Solutions.......................................................................................158
Data Accessories .........................................................................................161
Other Important Information ......................................................... 167
Understanding Status Messages ..................................................................167
Safety and General Information ..................................................... 169
RF Operational Characteristics ...................................................................169
Electro Magnetic Interference/Compatibility..............................................172
Medical Devices..........................................................................................172
Operational Warnings..................................................................................174
Operational Cautions...................................................................................175
Accessory Safety Information.....................................................................177
Limited Warranty Motorola Communication Products...............................185
www.motorola.com/iden
iv

Limited WarrantyMotorola Communication Products (International) ......189
Patent and Trademark Information..............................................................193
Index .................................................................................................. 195
v

vi
www.motorola.com/iden

Introduction
Congratulations on purchasingyourMotorola iDEN i80s multi-service,
data-capable, digital, portable phone.
• Voice Activated Dialing — Your i80s phone offers state-of-the-artVoice
Activated Dialing.
• Speakerphone —You can enjoy hands-freecommunicationat thetouchof
a button. Speakerphone is especially great for conference calls.
• Phonebook— Your consolidated Phonebook holds up to 250 entries and
allows you to store multiple contactnumbers for each person, offering you
various ways to communicate with your business and personal contacts.
• SIM Card — Yourphone’sSIM cardholdsallentries stored in your
Phonebook. In addition, you have a PIN (Personal IdentificationNumber)
to keep your information safe and secure.
• Datebook— Schedule and keep trackofappointmentsusing your phone’s
Datebook feature.
• Messages — The Message Center allows you to manage and access your
Voice Mail, Text Messagesand NetAlerts all from the same inbox.
• Private and GroupCalls — You can use your phone as a two-way radio
to communicate directly with business and personalcontacts in your iDEN
service area.
• Fax and Data Transfer — for circuit data faxes and file transfers. See
“Using Your Phone as a Modem” on page 84.
TM
• J2ME
many Java programs.Download Java applications directly from the
Internet, or try one of the pre-loaded applications.
• Customization — Use the Settings, Styles, and Shortcuts featuresto
customize your i80s phone to meet your individual needs.
For more informationontheseandotherfeatures of the i80s phone, reviewthis
User’s Guide. There is a Table of Contents in the front of the guide and an Index
in the back of the guide to assist you in finding the specific information you
want.
NOTE: Some features of your i80s phone are available only in the iDEN
NOTE:This guide describes the features of the i80s phone as they
— With the JavaTMapplications feature, you can choose fromthe
service area, and are indicated as such in this guide.
were set up by Motorola. However, your carrier or your
organization may have changed or added features. For more
information, check with your carrier or your organization.
Your i80s phone offers:
7

Driving Safety Tips
“Safety is your most important call!”
Your Motorola wireless telephone gives you the powerful ability to
communicate by voice — almost anywhere, anytime, wherever wireless phone
serviceis available and safe conditions allow. But an important responsibility
accompanies that benefitsof wireless phones, one that every user must uphold.
Whendrivingacar, driving is yourfirst responsibility. Ifyoufind it necessary to
use yourwireless phone whilebehind the wheel of a car,practicegoodcommon
sense and remember the following tips:
1. Get to know your Motorola wireless phone and its features such as speed
dial and redial.Ifavailable, these features help you to place your call without taking your attention off the road.
2. When available, use a hands-freedevice. If possible,add an additional
layer of convenience to your wireless phone with one of the many Motorola Original hands-freeaccessoriesavailable today.
3. Positionyourwireless phone withineasyreach. Be able to access your
wireless phone without removing your eyes from the road. If you receive
an incoming call at an inconvenient time, if possible, let your voice mail
answer it for you.
4. Let the person you are speaking with know you are driving; if necessary,
suspend the callin heavy traffic or hazardousweather conditions. Rain,
sleet,snow, ice, and even heavy trafficcan be hazardous.
5. If youreceive an incoming callat an inconvenient timedo not take notesor
look up phone numbers whiledriving. Jotting down a “to do” list or going
through your address book takes attention away from your primary responsibility — driving safely.
6. Dialsensibly andassessthe traffic;if possible, placecalls whenyouare not
moving or before pulling into traffic. Try to plan calls when your car will
be stationary. If you need to make a call while moving, dial only a few
numbers,check the road and your mirrors, then continue.
7. Do not engage in stressful or emotional conversations that may be distracting. Make people you are talkingwith aware you are driving and suspend
conversations which have the potential to divert your attention away from
the road.
8. Use your wirelessphone to call for help. Dial 9-1-1orotherlocal emergency numberin the case of fire, traffic accident or medical emergencies.
1
www.motorola.com/iden
8

Driving Safety Tips
9. Use your wirelessphone to help others in emergencies. If you see an auto
accident, crime in progress or other serious emergency where lives are in
danger,call 9-1-1 or other local emergency number, as you would want
others to do for you.
10. Call roadside assistanceora special non-emergency wireless assistance
number when necessary. If you see a broken-down vehicle posingno serioushazard,abrokentrafficsignal,aminortrafficaccidentwherenoone
appearsinjured, oravehicle youknowto be stolen,call roadside assistance
or other specialnon-emergency wireless number.
1
1. Whereverwireless phone service is available.
9

10
www.motorola.com/iden

Getting Started
This section includes:
i80s Phone Features Page 12
Battery Page 13
Turning Your i80s PhoneOn/Off Page15
Enabling Security Page 15
ReceivingOver-the-Air Programming Page 16
SIM Card Page 17
Keypad Lock Page 23
Statusof Your i80s Phone Page 27
My Information Page 27
Using T9® Text Input Page 28
11

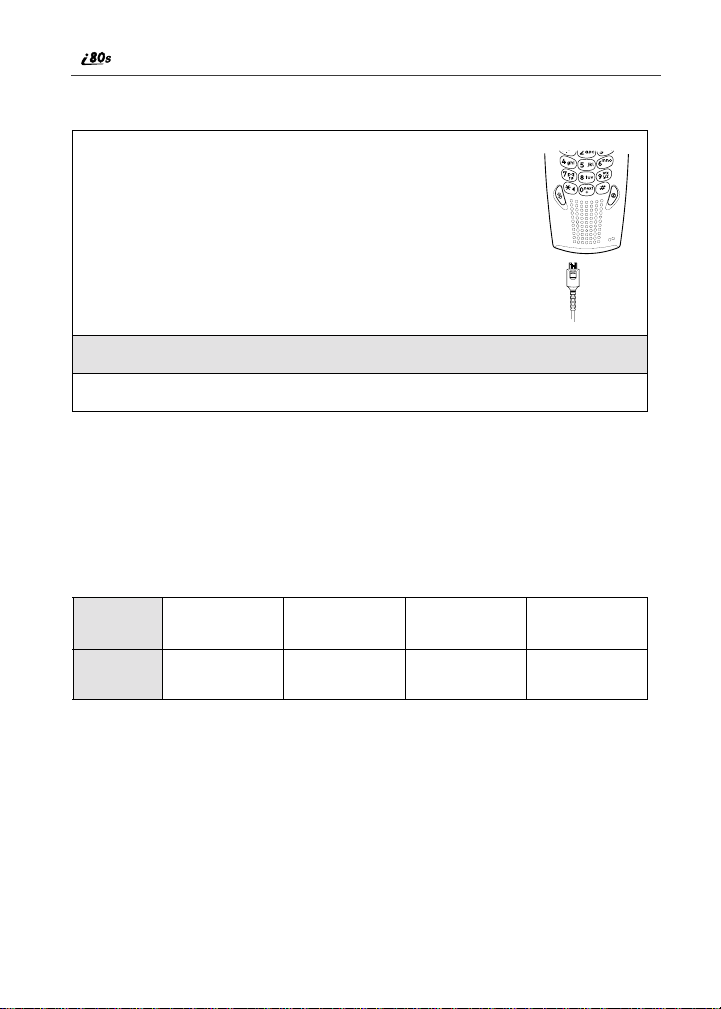
i80s Phone Features
Lanyard Hook
Antenna
Earpiece
VolumeControl Buttons
Push-To-Talk Button (PTT)
Battery
Headset Jack
SIDE VIEW
TOP VIEW
4-WayNavigation Key
OptionKey
Photosensor
End/Home Key
Punctuation Key
Back Key/PauseDialing
SpeakerKey
Next Word Key/International
Plus Dialing
StatusLight
Accessory Connector
FRONT VIEW
NOTE: Throughout the User’s Guide, the option keys
represented by
A
.
BOTTOM VIEW
andDwill be
C
Display
Option Key
Menu K ey
Send Key
AlphaNumeric
Keypad
Power On/Off
Microphone
12
www.motorola.com/iden

Battery
Battery
Your i80s phone comes with a Lithium Ion battery. After attachingthebattery,
you must charge it before youuse it for the first time.See “ChargingLithium
Ion Batteries” on page 156 for the charging times for your phone’s battery. The
firsttimeyou chargeyour phone’s battery, charge for 30 minutes morethanthe
time shownon page 156. Aftertheinitial charging, the battery canbechargedin
thetimeshownonpage156.
Attaching the Battery
1
Holding the phone face down,insert the battery into the phone in a
forward and downward motion. A securing click will be heard.
Detaching the Battery
1
Ensure the phone is poweredoffbefore attemptingto detach the battery.
2
Press the battery release button and slide the battery away from the
antenna.
3
Remove the battery by pushingthe battery toward the antenna and
liftingit out of the phone.
13
Charging the Battery
1
With your phone’s keypad facing up, plug thecharger’s
accessory connector intotheleftside of the accessory
connectoron the bottom of the phone.
In Process
2
If the charger has folding electricalprongs, flip open the prongs.
3
Plug the charger into an electricaloutlet.
NOTE: Your phone’s screenbacklight will remainlit while the battery ischarging.
Battery Charging Status
The batterystrength indicator icon found on your phone’sdisplay screenshows
the chargeamount remaininginthe battery. Refer to the following tables.
When Using P hone
Icon
Display
Battery
Strength
NOTE: A short, chirp-like sound indicates a low battery.This indicates that you have
approximately five minutes of talk time remaining.
abcd
Low
Battery
11% - 40% 41% - 70% Fully Charged
(90% -100%)
www.motorola.com/iden
14
When Charging Battery
A
Turning Your i80s Phone On/Off
Icon
Display
Battery
Strength
NOTE: During the charging process, the battery icon will be flashing. In addition,
when the battery is fully charged, the battery icon will show a fully charged
battery.
efgh
1flashingbar 1flashingbar,
Low
Battery
1 continuous bar
31% - 60% 61% - 90% FullyCharged
1 flashing bar,
2 continuous bars
3 continuous bars
(90% -100%)
Turning Your i80s Phone On/Off
To power the phone on:
1
For optimal signalstrength, extend the antenna.
2
Press and hold p near the bottom of the phone until the status light
glows red and a tone briefly sounds.
3
Whenthe Enter SIM PIN Code screen displays, enteryourSIM PIN.
(For more information see “SIM Card Personal Identification Number
(PIN)” on page 17.)
NOTE: The default SIM card PIN is 0000. It is recommended that you change
your PIN to prevent fraudulent use ofthe SIM card (see “Changing
the PIN” on page 19).
4
Press B under OK.
As your phone connects to the network,
youwillseeawelcomemessageanda
connecting message. Whenthe Ready
screen appears on the display, you are
readytouseyouri80s phone!
15
To power the phone off:
1
Press and hold p near the bottomofthe phone untilyouseethe message
Powering Off.
2
Push down the antenna.
Enabling Security
To utilize browserfunctionality from your service provider, you must enable
securitythefirst time you power on your phone or within 20 days of first
activation of your phone.
1
When you power on your phone for the
first time, after the Ready screen appears,
you will be prompted to select OK to
update your browser info.
NOTE: If you press B under LATER, you
will be prompted to enable security
each time you power on your phone
until youpress
recommended that you do not
choose LATER.
2
Press A under OK.
3
You are prompted to enable security.Press B under YES. A series of
screens display. If you subscribe to your service provider plan, your
home page displays.
B under OK. It is
a
4
Press s to return to the Ready screen.
Receiving Over-the-Air Programming
If you havebeen set up to receive over-the-air programming (OARSS), you will
receive your Private ID and Talkgroup lists for Private Call use, your Personal
TelephoneNumber via a Net Alert message.
In order to receive your programming, you must enablesecurity (“Enabling
Security” on page 16). Within 24 hours of enabling security, you will receive a
Net Alert messagecontaining your lists.
www.motorola.com/iden
16

SIM Card
To accept your phone programming:
1
Youwill receive a NetAlert withthe messageNewBrowserMes sage ReceiveProgramming Info.
2
Press B under GOTO.
3
You are promptedto accept changes to your phone’s lists. Press B
under OK.
4
A confirmation screen displays. PressB under OK.
5
You are prompted again to accept changes to your phone's lists. Press
B under OK.
6
A confirmation screen displays. PressB under OK.
7
Press r to return to the idle screen.
SIM Card
Your phonecomes with a built-inlevel of security protectionthrough the use of
the SIM (Subscriber Identity Module) card. The SIM card stores all your
Phonebookinformation. Sincethis information is storedontheSIM card, not in
your phone itself,you can remove the information by removing the SIM card.
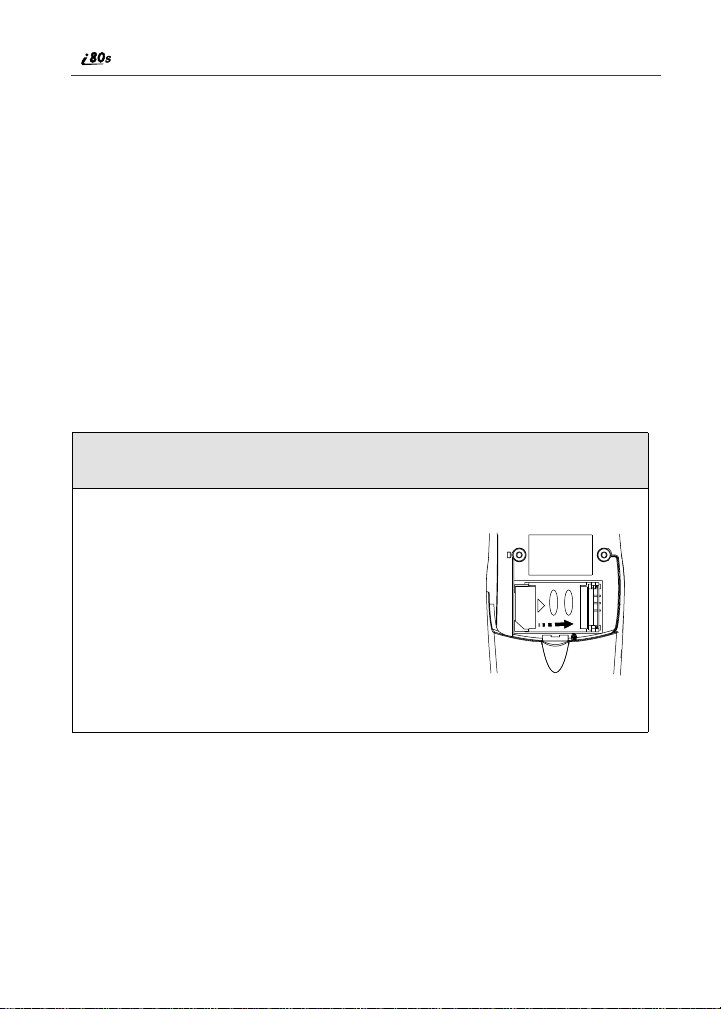
The SIM card is located in the SIM Card Holder on the back of the phone,
underneath thebattery. Youcan verify thatthe SIM card isinplace by removing
the batteryand viewing the SIM card through the SIM card cover.
See “Inserting/Removing the SIM Card” on page22forinformationonlocating
the SIM card. If there is no SIM card in your phone, notify your sales
representative.
NOTE: Except for makingemergency calls, your phone will not function without the
SIM card.
SIM Card Personal Iden t ification Number (PIN)
To prevent unauthorized use of your phone, your SIM card is protected by a
PIN. Each time the phone is powered on, you must enter your PIN. You can
change or disableyour PIN if desired.
NOTE: Disabling yourPIN enablesanyone to useyour phone.If you disableyour PIN,
you must still keep the SIM card in the phone to make calls.
17
Entering the PIN
Depending on your service provider, your phone
may or may not require you to enter a SIM PIN
whenyou firstuseyourphone.
If your phone is set to require you to entera PIN,
your default SIM card PIN is: 0000. It is
recommended that you change your PIN to
preventfraudulent use of the SIM card (see
“Changing the PIN” on page 19).
P
IMPORTANT: Incorrectly entering your PIN three times causes the SIM card to be
NOTE: Please check with your service provider regarding the amount of times that
1
2
If you enter an incorrect PIN, the message SIM PIN incorrect Try again
appearson your phone’sscreen. After three consecutive incorrect attempts,the
SIM cardisblocked. The phonedoesnotallow you to attempttoenter your PIN
again, even afterpowering the phone off and back on. If this happens,see
“Unblocking the PIN” on page 20.
blocked. To unblock your SIM card, you must contact y our service
provider. For more inform ation, s ee “Unbloc king the PIN” on page 20.
you can incorrectly enter the SIM PIN.
From the Enter SIM PIN screen, enteryourfour- to eight-digit PIN.
An asterisk appears for each character entered.
NOTE: Other than emergency dialing, you will be unable to use any of the
phone functions,including receiving phone calls, untilyou enter the
PIN.
Press B under OK.
18
www.motorola.com/iden

Changing the PIN
C
1
From the Ready screen, pressm and
then press R to scroll to Settings.
B
2
Press B under SELECT. The Settings screen displays.
3
Press R to scroll to Security.PressB
under SELECT to access the Security
screen.
4
At the Security screen, press R to scroll to New Passwords.PressB
under SELECT to access the New Passwordsscreen.
SIM Card
5
At the NewPasswords screen, pressR to scroll to SIM PIN and press
B under SELECT.
6
At the Enter Old SIM PIN Code screen, enter the current SIM PIN
and press B under OK.
NOTE: The default SIM is 0000.
7
At the Enter New SIM PIN Code screen, enterthenew 4- to 8-digit
SIM PIN and press B under OK.
8
At the Re-enterNe w SIM PIN Code screen, re-enter the new SIM PIN
to confirm, and press B under OK.
19

Unblockingthe PIN
If you forget your PIN and unsuccessfullyenterit three times, access to your
phone will be blocked.
NOTE: Before you begin, obtain the PIN Unblocking Key (PUK)code from your
service provider, then readand understand the PIN unblocking sequence.
When entering the key press sequence, each key press must occur within 5
seconds of the prior key pr ess.
IMPORTANT: If you unsuccessfully enter the PUK code ten times, the SIM card is
To unblock the PIN:
1
2
3
4
5
Disabling/Enabling the PIN R equirem ent
When the PIN requirement is enabled,you are
prompted to enteryourPIN each time you turn
on your phone. Until a valid PIN is entered,you
can use thephone only to make emergencycalls.
After the PIN is accepted, the phone registers on
the network and the Ready screen displays.
WhenthePIN requirementis disabled,the phone
can be used without entering a PIN.
permanently blocked and must be replaced. If this happens, all data will
be lost. You will get a message to contact your service provider. If the
SIM card is blocked, the i80s phone only allowsoutgoing Emergency
calls.
Press **05e.
Enter the PUK code.
Press e.
Enter a new 4- to 8-digit SIM PIN and press e.
Re-enter your SIM PIN and presse.
If you entered the codes properly, the SIM Unlockedscreen displays.
P
IMPORTANT: If you disable the PINrequirement, you removeprotection of personal
20
dataon your SIM card. Anyone canthen useyour phoneand accessyour
personal data.
www.motorola.com/iden

1
From the Ready screen, pressm and
then press R to scroll to Settings.
B
2
Press B under SELECT. The Settings screen displays.
3
Press R to scroll to Security.PressB
under SELECT to access the Security
screen.
C
4
At the Security screen, pressR to scroll to SIM PIN.PressB under
SELECT to access the SIM PIN screen.
SIM Card
5
Press R to scroll to On or Off. On enables the SIM PIN requirement;
Off disables the SIM PIN requirement.PressB under SELECT.
6
At the Verify SIM PIN Code screen, enter the currentSIM PINand
press B under OK.
21
Inserting/Removing the SIM Card
IMPORTANT: If you remove yourS IM card and insert anotherSIM card into your
phone, the following information is erased when you use the phone with
the new SIMcard:
• Datebook Notifications • Call Filtering settings in Styles
• Recent Calls List • Net Alert Notifications
• Voice Records • Information stored in Memo
• Voice Names for
Phonebookentries and
Shortcuts
• Personalized settings
• Browser Bookmarks
IMPORTANT: Do not touch the gold-colored areasof the SIM card. To avoid loss or
1
damage, do not remove your SIM card from yourphone unless
absolutely necessary.
With phone powered off,remove the battery cover. See “Detachingthe
Battery” on page 13.
2
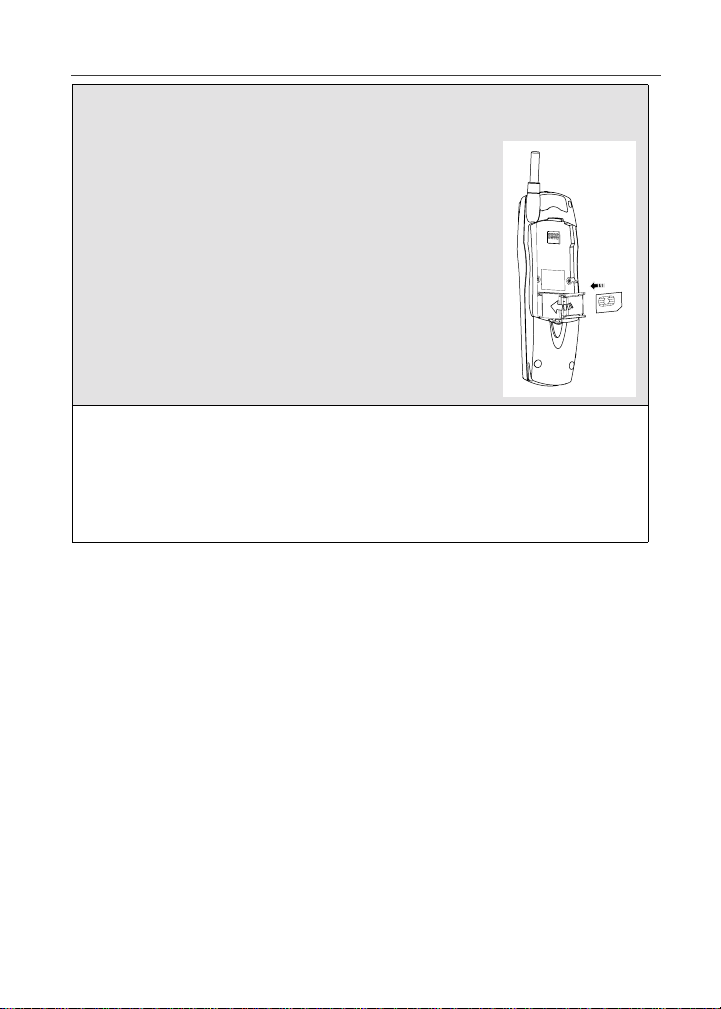
With the back of the phoneexposed and facing
up, locate the SIM cover and gently push it to
the right. Lift the coverup.
www.motorola.com/iden
22
Keypad Lock
3
To insert the SIM card, very carefully place it in its holder with the gold
contactsidefacing down.
To closethe SIM cardcover, pushi t down and slide
forward.
4
To removethe SIM card,slide theSIMcard cover backand lift up (asin
step 2). Very carefully lift the SIMout ofitsholder. Do not touch the
gold-coloredareas of the SIM card.
NOTE: Protect the SIM card as you would any delicate object. When the SIM
card isnot in the phone, you should store it in something protective,
such as a mailing envelope.
Keypad Lock
The i80s phoneincludes a KeypadLock featurethat enables youtoquickly lock
the phone’s keypad to avoid inadvertently pressing keys or placing calls.
Once Keypad Lock is activated, you can only perform the following tasks:
• Turn yourphoneonand off
• Unlock the keypad
• Receive incoming calls, messages, and alerts.
NOTE: Emergency calls cannot be placed while Keypad Lock is activated.
Beforelocking yourphone’skeypad, you may wanttoreadthis entire sectionto
learnhowtorespondtoincomingcalls,messages,andalerts.
23
Activating Keypad Lock
From the Ready screen,press m*.The
message KeypadLocked displayson your
phone.
D
Wheneverakeyis pressed while in Keypad Lock mode,the unlock instructions
display briefly.
Receiving Incoming Calls
When you receive an incoming phone call (see “Receiving a Phone Call” on
page 63), KeypadLock is temporarily disabled.
1
Press B under YES or press e to answer the call. When you end the
call, the Recent Calls list appears. Press
reactivate Keypad Lock and returntothe Ready screen.
Or,
A underNOorpresss to send the call to Voice Mail and
Press
reactivate Keypad Lock.
s or press A under EXIT to
24
www.motorola.com/iden

Keypad Lock
Receiving Private Calls
When you receive an incoming Private call, Talkgroup call, or call alert (see
“Private Calls” on page 97), Keypad Lock is temporarily disabled.
1
Press and holdthe Push-To-Talk (PTT) buttonon the side of the phone.
Begin talking after the phone emitsa chirping sound. Release the PTT
buttonto listen.
2
When you end the call, the Recent Calls list appears.Press e or press
A under EXIT to reactivate Keypad Lock and returntotheReady
screen.
Receiving New Voice Mail
When you receive new Voice Mails (see “Using Voice Mail” on page 80),
Keypad Lock is temporarily disabled.
1
WhenNe w Voice Mail Message displays, press A under EXIT to
returnto theReady screen andreactivateKeypad Lock.
Or,
Press B under CALL to access VoiceMail.
2
Once you have finished, press s to exit VoiceMail. The Recent Calls
list displays. Press s to reactivate Keypad Lock and return to the
Ready screen.
25

Receiving New Text Messag es
When you receive new Text Messages (see “Using Text and Numeric
Messaging” on page 81), KeypadLock is temporarily disabled.
1
WhenNew Text Message displays, press A under EXIT to returnto
the Ready screen and reactivate Keypad Lock.
Or,
Press B under READ to read the message. Press B under SAVE or
DELETE. Once you have finished,press s or press A under EXIT to
reactivateKeypadLockreturntotheReady screen.
Receiving New Net Alerts
When you receive a new Net Alert, Keypad Lock is temporarily disabled.
1
When New Browser Message displays, press A under EXIT to return
to the Ready screen and reactivate Keypad Lock.
Or,
Press B under GOTO. Pr ess A under View. Press A under OK or
Reply. Once you have finished, press s or press A under EXIT to
reactivate Keypad Lock return to the Ready screen.
26
www.motorola.com/iden
Status of Your i80s Phone
Deactivating Keypad Lock
From the Ready screen, press m*.
The message Keypad Unlocked
displaysbriefly.
E
Status of Your i80s Pho ne
Your i80s phone has a status light that displays at the top of the phone. The
statuslighti ndicates the status of your connection.
Status Light
Indicator
Flashing Red Signing on to the network. Please wait.
Solid Red No service or out of coveragearea.
Flashing
Green
Solid Green In use
My Information
You can select My Info from the main menu to displayor editthefollowing:
• Name — enter your name in this field.
• PrivateID — your Private ID is displayed in this field.Your Private ID is
the number that others use to contact you using Private calls.
i80s Phone Status
Inservice/Readytouse.
.
27
• Phone Numbers of Lines1 and 2 — your phone’s numbers aredisplayedin
these fields. You can edit the phone numbers displayed on the My
Information screen, but this does not change your phone numbers.
• Carrier IP — this field display’s your phone’s carrier assigned IP address.
• IP Addresses — these fieldsdisplay the IP addresses you use to access the
Internetwith your phone.
• CircuitDataNumber (Ckt) — your circuit data numberis in this field.
Viewing/Editing My Information
1
From the Ready screen, pressm.
2
Press S to scroll to My Info.PressB under SELECT. The My
Information screen displays.
3
Use S to scroll through the fields.
4
Toedit the displayed information, press B under CHANGE. Edit
information as desired, and press B under OK to save the changes.
To return to the Ready screen, press A under EXIT.
Using T9®Text Input
Your i80s phone has embedded software, calledT9®Text Input,that makes
typing on a phone keypad much like typingon a computer keyboard; it
eliminates the traditional “multi-tap” method of text entry. As you type, you
pressonly one keyperletter. T9 Text Input matchesyour keystrokes to wordsin
its linguistic database of approximately 60,000 words and proper names. You
may also store additional words you frequently use in your own user database,
which is incorporated into the T9 database.
T9 Text Input is available when you are typing information into your
Phonebook and Datebook.
28
www.motorola.com/iden

Using T9® Text Input
T9 TextInputEntry Modes
Four text entry modes are availablein T9 Text Input: Alpha, Word, Symbols,
and Numeric. When you are using T9 Text Input, an icon in the top right corner
of your phone’s display screen (next to the battery strength indicatoricon)
indicates the T9 Text Input entry mode you are using:
Icon T9 Entry Mode
w Alpha Standard “multi-tap” keypad
# Word Entering words and
! Symbols Entering punctuation and
, Numeric Entering keypad numbers.
When you are using Phonebook or Datebook, you select your text entrymode
from a menu availablewhenever the phone is displayinga screenthat requires
you to enter text (for example, the Name screen or Title screen).
To choose a text entry mode:
1
From any screen thatrequires text input,press m to access the Entry
Method menu.
A check mark appears next to the currenttextentry mode. When you
access a Phonebook or Datebook screen that requires text input, the
default text entry mode is Alpha.
2
Press S to scroll to the T9 Text Input text entry modeyou want to use.
Name
Used For...
text entry.
punctuation with one keypress per character.
symbols such as “@” or “?”.
3
Press B under SELECT.
The phone returns to the text entry screen. The text entry mode you
selectedisnow active.
29

Using Alpha Mode
To enter text while in Alpha text entry mode to enter letters, numbers, and
symbols:
• Press any button on the alphanumeric keypadto entertheletters, numbers,
and symbols on that key.
• TypealetterthenpressQ to activate Caps Lock or typea letter then press
R to deactivate Caps Lock.
• Pause briefly to leave the currently displayedcharacter in place and move
on to the next place in the text entry field.
• Press P to create a space in the text entry field.
• Press A under DELETE to deleteone character. Press and hold A under
DELETE to delete an entireentry.
Using Word Mode
In Word mode, T9 Text Input analyzestheletters on the keypad buttonyou
press and arranges them to create words.As you type, T9 Text Input matches
your keystrokes to words in its database and will display the most commonly
used matching word.
Special Key Functions
Some of your phone’s keys assume different functions while in T9 Text Input
Word mode .
Backspace and Erase
Press A under DELETE once to backspace or to erase a single character.Press
and hold A under DELETE to erase the entire text entry field.
Space
Press R once to accept a word and insert a space when entering text.
Next Word in Database
Press 0 to display more words in the database that matchthe keystroke
sequence you entered.
www.motorola.com/iden
30

Using T9® Text Input
Shift and Caps Lock
Press # to make the next letter typed uppercase (Shift), to make all subsequent
letters types uppercase (Caps Lock), or to go back to lowercase letters.
These icons appear in the top row of your display screen:
• $ for Shift to uppercase
• x for Caps Lock
When neither of these icons appear, letters typedarelowercase.
NOTE: T9 Text Input automatically makes the first letter of a sentence uppercase.
Punctuation
In Word mode, T9 Text Input uses Smart Punctuation to quickly apply basic
rules of grammar to insert the correct punctuation within a word and at the end
of a sentence.
Press 1 to insert punctuation. One of eight basic punctuation symbolswillbe
inserted(.,-’ @:?;).
Press 0 to changetheinserted punctuation symbol to another of the eightbasic
punctuation symbols.
Press R to accept the punctuationand continue typing.
NOTE: Additional punctuation symbolsare available in Symbols mode.
EnteringaWord
To enter a word using Word mode:
1
Choose Word as your text entry mode.
31

2
Type a word by using one key-press per desired letter.
For example, to type “test” press 8378.
NOTE: The displayed word may change as you type it. Do not try to correct
the word as yougo. Type to the end of the word before editing.
3
If the word that appearsisnotthedesired word, press 0 to change the
word on the display to the next most likely word in the database.
Repeat until the desired word appears.
If the desired worddoesnotappear,you can add it to the database of
words usingtheinstructionsin “Adding Words to the User Database”
on page 32.
Adding Words to the User Database
To add words to the T9 database:
1
Change from Word text entry mode to Alpha text entry mode.
2
Type the word using Alpha text entry mode.
3
Return to Word text entry mode.
4
Press R to add a space.
The word you typed in Alpha text entry mode is now in the database.
NOTE: You cannot store alphanumericcombinations, such as Y2K.
Choosing a Language
To change the language of the T9 Text Input database:
1
From any screen thatr equires text input, pressm to access the Entry
Method menu.
2
Press S to scroll to Languages.
www.motorola.com/iden
32

Using T9® Text Input
3
Press B under SELECT.
4
Press S to scroll to the language you want T9 Text Input to use.
5
Press B under SELECT.
Using Numeric Mode
To use Numeric text entry mode, chooseNumeric as your text entry mode and
press the number buttonsonyourkeypad to enter numbers.
Using Symbols Mode
To use Symbols text entry mode:
1
Choose Symbols as your text entry mode.
A row of 32 symbols appears along the bottom of your phone’sdisplay
screen,justabove the display option and menu icon. (Press T to view
the completerow.)
2
Press T to highlight the symbol you want to enter into the text entry
field.
3
Press B under SELECT to enter the symbol.
33

34
www.motorola.com/iden

Display Essentials
Your i80s phone’s display screen tellsyou what you need to know as you use
your phone.
This section includes:
DisplayScreen Page 35
Status Icons Page 36
Text Display Area Page 38
Call Information Icons Page 38
Menu Icons Page 38
Display Options Page 38
NavigatingMenus and Lists Page 39
Main Menu Options Page 40
Display Screen
Any time your phone is powered on, the displayscreen providesyou with
information and options.
The Ready Screen
The Ready screen displays any time the
phone is poweredon, but not engagedin
some activity.
The Ready screen consist of elements
commontomanyofthescreensyour
phone displays:
• statusicons
• text displayarea
• menu icon
\
Status
Status
Status
icon
icon
icon
rows
rows
rows
Text
Text
Text
display
display
display
area
area
area
Menu
Menu
Menu
icon
icon
icon
Display
Display
Display
options
options
options
35

• displayoptions
USER TIP: You can always access the Ready screen by pressing e.
Status Icons
Statusicons provide you with information about your phone and its functions.
These icons are context sensitive; meaning, the icons that appear depend on the
task you are performing.
Statusicons appear inthetwo rows at thetopof the displayscreen. Some appear
at all times.Others appear onlywhen your phone is engaged in certain activities
or when you have activated certain features.
Icon Indicates...
36
abcd
efgd
opqr
s
01
GHI
JKL
c Phone In Use — phone is connected on an
h PrivateIn Use — number beingcalled is a
% Talkgroup In Use — phone is active on a
BatteryStrength icons — remaining
battery charge. More bars on the battery
indicate a greater charge. See thetable on
page 14 for detailed information about the
meaning of each battery strength icon.
Signal Strengthicons — strength of the
network signal.Morebarsnexttothe
antenna indicate a stronger signal.
Active Line icons — currently active
phone line;0 indicatesLine 1 isactive;1
indicates Line 2 is active.
Call Forward icons — phone is set to
forward calls. See “Call Forwarding” on
page 72 for more information.
active call.
Private ID.
talkgroup call.
www.motorola.com/iden

Status Icons
Y Packet Data Ready — phone is ready to
Z Packet Data Activity — phone is
] Mobile IP — phone is ready to access the
{ Secure Data — phone is accessingthe
. TextMessage— you have one or more
y Voice Mail — you have one or more Voi ce
B
u
-[\* Ring/Vibe icons — you have customized
w#,!
$x
receive data through a data cable.
transmitting data.
Internet.
Internetusinga secure connection.
Text Messages or Net Alert messages.
Mailmessages.
Fax Mail — you have one or more Fax
Mailmessages.
Speaker Off — phone’s speakerisoff.
the way in which the phone is set to notify
you when you receivecalls and other types
of messages. See “Ring Style and
Notification Type” on page 131 for more
information.
T9 Text Input icons — youareusingT9
Text Input to enter text. See “Using T9®
Text Input” on page 28 for more
information.
`
The icon of the main menu feature currently in use always appears in the top left
of the status icon rows. For a list of the main menu icons, see “Main Menu
Options” on page 40.
TTY— your phone supports TTY devices
and communications
37

Text Display Area
The text displayareashows menu options, messages, names, phone numbers,
and other information.
Call In formation Icons
Each of the following iconsappearon the left side of the text displayarea of the
screen, providing you with information aboutyour phones line or lines.
Icon Indicates...
D In Call - phone is in an active call.
E Incoming Call - phone is receiving an
X Outgoing Call - phone is placing an
z On Hold - phone has a call on hold.
? End Call - phone has ended the active call.
incoming all (not active).
outgoing (not active).
Menu I con
This menu icon m appears on any screen from which a menu can be accessed.
To access a menu, press the menu key on your keypad. This key has the menu
icon printed on it.
Menus are contextsensitive. The menu thatappears depends on the screen you
access it from and the items on the menu apply to the task you are currently
performing.
Pressing
m or Q from the Ready screen accesses the main menu.
Display Options
Two displayoptions appear at the bottom ofmostscreens. Theseoptions enable
you to perform a wide variety of actions, including changing, saving and
viewing information,running programs,and canceling previousactions. You
activate a display option by pressing the
www.motorola.com/iden
38
A below it.

Navigating Menus and Lists
The Ready screen display options provide quick access to two main menu
features. By default, the Phonebook (PHBK)andMessages(MESG)display
optionsappear on the Ready screen. You can control which display options
appearon the Ready screenusing thephone’s Personalize feature in the Settings
menu (see “Changing Ready Screen Options” on page 136).
The display optionsonscreens other than the Ready screen cannot be
customized.
Navigating Menus and Lists
The i80s phone is menu driven. By navigating menus, you access submenus
which lead to all ofthe functionsand features thatare built into yourphone. Use
the menus to store calls,manage your Phonebook and Datebook, change your
phone settings, browse the Internet, and more.
Some features include lists of names, numbers,or other information.Theselist
items can be accessedthesame way menu options are.
To access the items in a menu or list, scroll through using the four-way
navigation key near the center of your keypad. Scroll downby pressing the
lower portion of the navigation key R. Scroll up by pressingtheupperportion
of the navigation key Q. Holding down the appropriate part of the navigation
key speeds up scrolling. If you continue scrolling after you have reached the
bottom or top of a menu or list, you “wrap-around” to the opposite end.
If more items appear in a menu or list than can be displayed in the text area, a
down arrow or up arrow appears in the left side of the screen indicating that
more options may be accessedbyscrolling up or down.
Down arrow Up arrow
B
S
39

Main Menu Options
By default, the main menu options appear in the order determined by your
service provider. You can change the order in which they appear by using the
Personalize feature (see “Reordering Main Menu” on page 136)
NOTE:The Net option may not be available for all customers. Contact
your service provider for availability.
To access the main menu, press m or Q from the Ready screen:
Menu Item Use to ...
7 Net Browse the Web.
F Java Run pre-installed and download custom
m Settings Customizeyourphone:Ring/Vibe, In Call
( VoiceRecord Record personal messagesor the incoming
b Phonebook Storeandretrieve a listof stored entriesfor
R Messages Receive, store, access and manageVoice
; Call Forward Settingsforforwarding callsinvarious
= Datebook Schedule and organize events, by the day
O Memo Input and store numbersto access later.
Java applications on your phone.
Setup, Security, Personalize, Initial Setup,
PhoneSetup, Voice Volume,and Talkgroup
Settings.
portion ofphone callsto play backat a later
time.
calling,editing, viewing, and deleting.
Mail, Fax Mail, Text Messages, and Net
Alerts.
situations.
or the month,such as appointments and
meetings.
www.motorola.com/iden
40

Main Menu Options
z Call Timers Displaythe durationof phone calls,private
j RecentCalls Accessa list ofthelast 20 sent, received, or
n Shortcuts Associatea menu optionwitha number on
U My Info Viewthe name, PrivateI D, phone numbers
v Styles Create or edit a group of settingsandsave
: Call Alert Storereceived call alerts to respond to at
To choose the highlighted Main Menu selection, press B under SELECT. To
exittheMainMenu and return tothe Ready screen, press A under EXIT or
s.
press
or group calls,circuit data use, and
Kilobytessentand received.
missedcalls. Calls can be made from this
list.
the alphanumeric keypad for quick and
easy access.
for lines 1 and 2, IP address, and circuit
data number of your phone.
them as one for use in different
environments.
your convenience.
41

42
www.motorola.com/iden

Phonebook
The Phonebook allows you to store up to 250 frequently used names and
numbers.
When youstore information in yourPhonebook, it is savedon your SIM card. If
you move your SIM card to another SIM-based phone, you can access
information in your Phonebook from that phone.
NOTE: If you use a different SIM card inyour phone, some information stored inthe
phone willbe lost. See “Inserting/Removing the SIM Card” on page 22.
This section includes:
AccessingPhonebook with an i2000, i2000plus, or
GSM Phone
Phonebook Entries and Speed Dial Numbers Page44
Phonebook Icons Page 45
Voice Na mes Page 45
AccessingYour Phonebook Page 45
About Phonebook Entries Page 46
Viewing PhonebookEntries Page 46
Sorting Phonebook Entries Page 47
Adding Phonebook Entries Page 48
Storing Numbers and Private IDs Quickly Page 52
Deleting Phonebook Entries Page 54
Pause Digit Entry Page 54
Plus Dialing Page 55
Page 44
43

Accessing Phonebook with an i2000, i2000plus , or GSM Phone
If you plan to use the information stored in your Phonebook with an i2000,
i2000plus, or any other GSM phone, you must purchaseCompanionPro. Go to
www.motorola.com\iden or your service provider’swebsiteformore
information.
You can use CompanionProto make the Phonebook information saved to your
i80s phone’s SIM card accessible in this type of phone.
Phonebook Entries and Speed Dial Numbers
Your Phonebook canstore multiple numbersto a singlename. For example, you
can enter someone’s name into your Phonebook once andthenassign that
person’s home, office, mobilephone,andfaxnumbers to the name. Youcan
storeuptosevenphonenumbers,aPrivateID,aTalkgroupID,andanIP
address.
Each number storedinyourPhonebook is automatically assigneda Speed Dial
number thatcorresponds to its location in your Phonebook.Each phone number
uses one Speed Dial location, even if it is assigned to the same name as other
phone numbers.The phone number stored in location 1 is assigned Speed Dial
number 1, thephone number stored inlocation 2 is assigned Speed Dial number
2, and so forth, to location250.
NOTE: Private ID numbers and Talkgroup numbers do not have associated Speed
Dial numbers.
44
www.motorola.com/iden

Phonebook Icons
Phonebook Icons
Icons that appear to the right of entries in your Phonebook convey information
about those entries.
When you enter a phone number in your Phonebook, you can designatethe
phone number’stypeusinganyof the following icons:
W Mobile b Pager
h Private ID K Fax
+ Work
Q Main Z Other
L Home n Talkgroup
For more informationonentering numbers into your Phonebook, see “Adding
Phonebook Entries” on page 48.
The “picker” arrows efappearing around the number type icon indicates
multiplephonenumbers stored under one name:
The Voice Name icon p appearing to the left of one of the phone number type
icons indicates that a voice name is associatedwiththePhonebook entry:
|
IP Address
Voice Names
A voice name is an audio recording you make by speakinginto your i80s phone
that you assign to a number in your Phonebook. You can then dialthe number
by speaking the words you recorded into the phone. See step 6 of “Adding
Phonebook Entries” on page 48 for more information on creating a voice name.
Accessing Your Phonebook
If PHBK is one of your display options:
From the Readyscreen, press A under PHBK.
45

If PHBK is not one of your displayoptions:
1
From the Ready screen, press m.
2
Press R to scroll to Phonebook.
3
Press B under SELECT.
USER TIP:You can also access the Phonebook by pressing m while
This brings you to the Phonebook screen. From thisscreen, you can view, sort,
add, edit, and delete Phonebook entries, check Phonebook capacity, or make
calls.
your phone is on a phone call or private call.
About Phonebook Entries
Each Phonebook entry may contain the following information:
• The name associated with the entry. Typically, this is the name of the
person whosenumber you are storing in the Phonebook.
• The type of number to be stored: Mobile, Private, Work, Main, Home,
Pager, Fax, Other, or Talkgroup. If you don’t choose a type, the number is
assignedtypeMobile, unless a Mobile number has alreadybeen assigned
to the name.
• The number to be stored. Every Phonebook entry must contain a phone
number. This number may be any type of phone number,Private ID, or
Talkgroupnumber.
• A Speed Dial number. You may accept the defaultSpeed Dial number or
assign a different one.
• A voice name audio recording for voice-activated dialing.
Viewing Phonebook Entries
Names with more than one numberassigned to them appear with ef
surrounding the icon to the right of the name. For example, if you had stored a
home and work number for Joe Smith, the entry for Joe Smith’s home phone
number would looklike this:
Joe Smith eLf
Whenthenameishighlighted,pressT to scroll to the iconsrepresenting each
of the numbers assigned to that name.
www.motorola.com/iden
46

Sorting Phonebook Entries
To view any of the phone numbers assigned to a name:
1
From the Phonebook screen, press S to scroll to the name associated
with the phone numberyou want to see.
2
Press T to view the icons representingthephonenumbers assigned to
that name.
3
When the icon representing the number you want to view is displayed,
press B under VIEW.
If there is a Private ID or a Talkgroup number stored for the person,
press m.ThenpressR to scroll to View and pressB under SELECT.
4
Press S to view the other numbers stored for thisname.
Sorting Phonebook Entries
You can sort your Phonebook entries by:
• Name — thenameyouenteredfortheentry.
• Speed No. — the Speed Dial location of the entry.
NOTE: Private and groupcalls cannot be made from the Phonebook when sorted by
Speed Diallocation.
To sort your Phonebook list:
1
From the Main Screenscreen, press m
and scroll down R to view the
PhonebookMenu screen.
2
Press R to scroll to Sort By.
3
Press B under SELECT.
}
47

4
Press R to scroll to the desired sorting method: Name or Speed #.
5
Press B under SELECT.
Checking Phonebook Capacity
Your Phonebookcanstore up to 250 separate numbers. To see how many
entriesare stored in your Phonebook:
1
From the Phonebook screen, press m to view the PhonebookMenu
screen.
2
Press R to scroll to Capacity.
3
Press B under SELECT.
The Capacity screen shows how many storagespaces in you
Phonebook are in use and how many are empty.
Adding Phonebook Entries
Using the following instructions, you will enter the information in the order the
items appearon the Phonebook Entry Details screen. However, you can enter
this information in any order by pressing S to scroll through the items on the
Entry Details screen.
YoucanleaveanyitemblankorunchangedbypressingS to scroll pastit on
the Entry Detailsscreen. A number and type are required for a valid
Phonebook entry.
After you have entered a phone number and any other information you wish to
include, you can press A under DONE to save the Phonebook entry.
To cancela Phonebook entry atanytime, presss to return to the Readyscreen.
48
www.motorola.com/iden

To add a Phonebook entry:
1
Access the Entry Detailsscreen:
From the Main Screen screen, press m.
Then press R to scroll to Phonebook.
Press B under SELECT. To add a [New
Entry],pressB under SELECT.
Adding Phonebook Entries
Or,
From the Phonebook screen, pressm.
Then press R to scroll to New and press B under SELECT.
2
If you want to assign a name to your
Phonebook entry:
With the Name fieldhighlighted,press B
under CHANGE.
From the Namescreen, enter the name
using the alphanumeric keypad.
See “Using T9® Text Input” on page 28
for information about entering text into this field.
When you are finished, press B under OK.
The Entry Details screen returns with the Type field highlighted.
3
If you want to assign a number type to
your Phonebook entry:
With the Type fieldhighlighted, pressB
under CHANGE.
From the Type Editor screen, press R to
scroll to the type of number you want to
assign to the Phonebookentry.
Press B under SELECT.
H
I
J
The Entry Details screen returns with the # field highlighted.
49

4
Assign a number to your Phonebook
entry:
With the # field highlighted, press B
under CHANGE.
Type the number using the alphanumeric
keypad. For phone numbers, use the
10-digit format.
To delete a digit, press A under DELETE.
See “Pause Digit Entry” on page 54 and “Plus Dialing” on page 55 for
information on using these features when storingphonenumbers in
your Phonebook.
NOTE: The number can be up to 20 characters long.
When you are finished, press B under OK.
The Entry Details screen returns with the Speed # field highlighted.
5
The default Speed Dialnumber assigned
to the Phonebook entry is displayed in the
Speed # field. This is always the next
available Speed Dial location.
If you want to assign the phone number to
a differentSpeed Dial location:
With the Speed # field highlighted, press
B under CHANGE.
K
L
Press A under DELETE to delete the
current Speed Dial number.
Type the new Speed Dial number using the alphanumeric keypad.
When you are finished, press B under OK.
www.motorola.com/iden
50

Adding Phonebook Entries
U
6
If you want to assign a voice name to the
number:
With the Voice Name field highlighted,
press B under RECORD.
Asdirectedby the screen prompts,say and
repeat the name you want to assignto the
number. Speak clearly into the
microphone.
An ) icon appears in the Voice Name fieldindicating that the voice
name has been recorded.
USER TIP:For best results, record in a quiet environment.
7
If you want to store more numbers to the
name associated with this Phonebook
entry:
Press R to scroll to Type and then press
B under SELECT.
AnewType field appears forthe additional
number.
Enter the information for the additionalnumber using step 3 through
step 7.
NOTE: Each namein your Phonebookmay have upto seven phone numbers, one
Private ID, one Talkgroup number, and one IP address associated with it.
M
8
Whenyouhave enteredall the information
you wanted in this Phonebook entry, press
A under DONE.
N
51

Storing Numbers a nd Private IDs Qu ickly
Your phone gives you two ways to store numbers quickly: from the Ready
screen and fromthe RecentCallslist.
To store a number from the Ready screen:
1
From the Ready screen, use the alphanumeric keypad to enter the
number you want to store.
2
Press m to access the Dialing Menu screen.
3
With Store Numberhighlighted, pressC under SELECT.
This displays the Store To screen.
4
To store to a new entry, press C under SELECT. The Entry Details
screen willdisplay with the number entered in the field.
Or,
S
Tostoretoanexistingentry,press
Phonebook. Or press the first letter of the entry to jump to the entry.
Once the desired entry is highlighted, press C under SELECT. The
Phonebook information for that entrydisplays with the number entered
in the # field.
5
From the Entry Details screen, pressSto scrollto thefirst Type
field.
To store a number from the Recent Calls list:
to scroll the list of names in your
1
From the Recent Calls screen, pressRto scroll to the 10-digit
telephonenumber you want to store.
2
Press C under STORE. This displays the Store To screen with[New
Entry] highlighted.
www.motorola.com/iden
52

Editing Phonebook Entries
3
To storea new entry,press C under SELECT. The EntryDetails screen
displayswith the number entered in the # field and the Type field
highlighted.
Or,
Tostoretoanexistingentry,press
Phonebook. Or press the first letter of the entry to jump to the entry.
Once the desired entry is highlighted, press C under SELECT. The
Phonebook information for that entrydisplays with the number entered
in the # field and the Type field highlighted.
4
Press C underCHANGE. PressRto scrolltothetype of number you
want to assign to the Phonebook entry. Press C under SELECT.
5
If you want to addmore information to the Phonebook entry, followthe
applicable instructions in “Adding Phonebook Entries” on page 48.
6
Press C under DONE.
To store a Private ID from the Recent Callslist:
1
PressRto scroll to the Private ID number you want to store. Note:
The Store option for Private ID numbers(e.g., 123*123*1234), will not
displayananoptionkey.
2
With the Private ID highlighted, press m to access the Rec.Calls
Menu. PressRto scroll to Store. Press C under SELECT. This
displays the StoreToscreen with [New Entry] highlighted.
Followsteps 3-6in" To store a numberfrom the Recent Callslist" (listedonthe
previouspage).
S
to scroll the list of names in your
Editing Phonebook Entries
1
From the Phonebook screen, press R to scroll to the entry you want to
edit.
2
Press m to view the Phonebook Menu.
53

3
Press R to scroll to Edit.
4
Press B under SELECT. The Entry Details screen displays.
5
Followthe applicable instructions in “Adding Phonebook Entries” on
page 48 to edit the various fields.
Deleti ng Phonebook Entries
1
From the Phonebook screen, press R to scroll to the entry you want to
delete.
2
Press m to view the Phonebook Menu.
3
Press R to scroll to Delete Contact or Delete Number.
Delete Contact deletes the name and all numbersassociatedwiththat
name.
Delete Number deletes the number associated with the icon thati s
currently displayedin the Phonebooklist for the name. The name and
all the other numbers will remain.
4
Press B under SELECT. A warning screendisplays requiring you to
confirm the deletion.
Pause Digit Entry
Whenstoring a number, you canprogram your phonesothat it will not only dial
a number but also pause before entering another seriesof numbers such as a
personal identification number (PIN)or password. This feature is particularly
usefulforaccessing automated servicessuch as voice mail and banking systems
from your i80s phone.
Example:Let’s say you have a company voice mail account thatyou frequently
check while traveling. To access that account you must do the following:
• Dial your work number
• Press # while the voice mail greeting is being played
• Enter your PIN to accessyourmessages
54
www.motorola.com/iden

Plus Dialing
You can program your phone to enter all of the above information for you. All
you have to do is separate each entry with a pause. If youwereto program your
phone to automatically input the above information, the stored data would look
likethis17035551234P#P1234.Inthis example,the first elevendigits represent
the number that mustbe dialedtoaccessyour voice mail.The P represents a 3
second pause. The # interrupts your greeting. The second P represents another3
second pause. The last four digits represent your PIN.
You can use this feature not only to enter PINs and passwords but also to have
the phone automatically select menu options (i.e., press 1 to hear messages).
To create a three-second pause, followthe steps below:
Pressandhold * for twoseconds.Thepause symbol(P)will appear on
the display screen.
You can enter up to 20 charactersi n a single entry,stored or dialed.
NOTE: If you use a system that will not let youe nter an option untilthe automated
message has played in its entirety, you can program your phone to pause for
more than 3 seconds. For example, performing the above step twice will
program twopauses and cause your phone to wait 6 seconds before entering
the next set of numbers.
Plus Dialing
This feature enables you to place an internationalcallfrommostcountries —
without entering the local international access code. Use Plus Dialingforall
Phonebook entries if you plan to travel outside the United States. Begin by
following the instructions for “Adding Phonebook Entries” on page 48. Before
you type the phone number to be stored:
1
Press and hold 0 for two seconds. A “0” appears, then changes to a
“+”.
NOTE: The network translates the “+” into the appropriate international access
code needed to place the call.
2
Enter the countrycode, city code, or area code, and phone number.
3
Follow the rest of the instructionsfor“Adding Phonebook Entries” on
page 48.
55

56
www.motorola.com/iden
Digital Cellular
The i80s phone enables you to make and receive domestic and international
phone calls,makeemergency calls, and be notified of a missed call.
This section includes:
Making Phone Calls Page 57
Emergency Calling Page 63
Receiving a Phone Call Page 63
Ending a Phone Call Page 63
Recent Calls Page63
Call Timers Page 68
Hands-FreeSpeakerPhone Page 67
Mute Page 68
Call Waiting Page 68
Call Hold Page 70
Three-Way Calling Page 71
Call Forwarding Page 72
Making Phone Calls
Your i80s phone provides the following features for makingphonecalls:
• Direct Dial
• Phonebook
• RecentCalls
• Speed Dial
• Turbo Dial
• Voice-Activated Dialing
®
57

• Last Number Redial
• TTY—your phone supports TTY devices and communications.
Using Direct Dial
1
From the Readyscreen, use the keypad to enter the 10-digit phone
number you want to call.
2
Press e to place the call.
3
Press s to end the call.
NOTE: See “Plus Dialing” on page5 5 for information on makinginternational calls.
If you make a mistake:
• To clear one digit, press A under DELETE.
• To clear all digits, press and hold A under DELETE.
• To cancel, press s.
Making Calls from the Phonebook
After you have entered phone numbers into your Phonebook,you can use these
numbers to make phone calls.For information on entering numbers into your
Phonebook, see “Adding Phonebook Entries”on page 48.
58
www.motorola.com/iden

Making Phone Calls
To make calls from the Phonebook:
1
From the Ready screen, if PHBK is one of your display options, press
A under PHBK.
Or,
From the Readyscreen, press m,thenpressR to scroll to
Phonebook.PressB under SELECT.
2
Press R to scroll through the names in your Phonebook.
Or,
Use the alphanumeric keypad to enter the first letterof the name and
press R to scroll through thenames beginning with that letter.
Stop when the name of the person you want to call is highlighted.
3
If more than one number is stored for the person you want to call, ef
appearsaround the icon to the right of the person’sname.
Press T to scroll throught he icons representing thenumbers stored for
that person.
Or,
Press B under VIEW to view all the numbers stored for this person.
Then press R to scroll to the number you want to call.
Or,
If there is a Private ID or a Talkgroup number stored for this person,
press m. When the Phonebook Menu appears, press S to scroll to
View and press B under SELECT. Then press R to scroll to the
number you want to call.
For more information on assigning multiplenumbers to one person,see
“Adding PhonebookEntries” on page 48.
4
Press e to place the call.
5
Press s to end the call.
59

Making Calls from the Recent Calls List
Your phone stores the numbers of the last 20 calls you received or sent in the
RecentCalls list.
1
From the Ready screen, press R to access the Recent Calls screen.
Press B under SELECT.
2
Press S to scroll throughthe list of receivedor sent recent calls until
you reach the desired call.
3
To view additionalinformation about the call:
Press B under VIEW.
Or,
Press m to access the Rec. Calls Menu.ThenpressR to scroll to
View and press B under SELECT.
4
Press e to place the call.
5
Press s to end the call.
Using Speed Dial
Each phonenumber stored in your Phonebook is assigned a SpeedDialnumber.
You can use the Speed Dial number to quickly place a call.
1
From the Ready screen, enter the Speed Dial number assignedtothe
phone numberyou want to call.
2
Press #.
3
Press e to place the call.
4
Press s to end the call.
60
www.motorola.com/iden

Making Phone Calls
Using Turbo Dial
Turbo Dial allows you to call the numbers in yourPhonebook associated with
Speed Dial numbers1 through9 by pressing and holding the corresponding
numerickeyonthekeypad.
Press and hold a number key (1 through 9).
NOTE: Turbo Dial cannot be accessed while the browser is active, nor while Keypad
Lock or SIM Lock is active.
Making Calls Using Voice-Activated Dialing
If you have recorded a voice name for a phone number in your Phonebook(see
“Voice Names” on page 45), you can use this voice name to call the number.
USER TIP: If you have difficulty making phone calls using a voice name, try assigning
1
2
3
a longer voice name to thenumber. For example, if the voice name “Joe”
fails to place a call to Joe Smith’s number, try assigning the voicename
“Joe Smith” to the number.
From the Readyscreen, pressand hold t near the bottomofyourphone
until the Say Name Now screen appears.
Speaking into the microphone, say the voice name assigned to the
phone numberyou want to call.
Your phone will play the name back to you. The call will automatically
be placed.
Last Number Redial
Press and hold e to redial the last number you called.
Making TTY Calls
NOTE: This feature maynot be offered by your service provider.
You can use your phone to make calls using a TTY device.
61

When you make TTY call, the call begins in the
TTY modeyoulast selected. You canc hange the
TTY mode during a call. For more information
on choosing a TTY mode, see “Setting TTY
Mode” on page 142.
To make a call using a TTY device:
Q
1
Connectone end of a 2.5mmcable into thejack on the phone.(Tol ocate
the jack,seepage12.)Connect the other end of the cord into your TTY
device.
2
Enter the phone number you wish to call and press e.
Placing International Phone Calls
When making an international call, you can either enter the international access
code directly(011intheUnited States) or use Plus Dialing.
You can make international calls from your Phonebook if you have stored the
numbers with Plus Dialing. See “Adding Phonebook Entries” on page 48 and
“Plus Dialing” on page 55 for more information.
NOTE: Your service default is “International Calls Restricted.” Therefore, you must
call Customer Care to obtain international dialing access.
To make an international call using PlusDialing:
1
Press and hold 0 for two seconds. A “0” appears, then changes to a
“+”.
NOTE: The network translates the “+” into the appropriate international access
code needed to place the call.
2
Enter the countrycode, city code, or area code, and phone number.
3
Press e to place the call.
4
Press s to end the call.
www.motorola.com/iden
62

Emergency Calling
Emergency Calling
Your phone supports emergency calling. Emergencycallscan be made even
when the SIM card is blocked or not in the phone.
To place a call in an emergency, dial 911e. You will be connected to the
nearest emergency dispatch center. If you are on an active call,you mustend it
beforecalling 911.
NOTE: If you have enabledthe Keypad Lock feature, you must unlock the phone’s
keypad before any calls can be made, including 911 emergency calls.
Receiving a Phone Call
Incoming calls are indicated by a ring, vibration or backlight
illumination. Press e or any key on the keypad or press B under YES
to answer the call.
USER TIP: You can turn down the ringer volumeby pressing the volume buttons on
the side ofyour phone while the phoneis ringing. Turningthe volume
down tothe end will turn on theVibrate All feature.
Ending a Phone Call
Press s to hang up.
Recent Calls
The RecentCalls feature storesthe numbers of the20 most recentcalls you have
made and received,including private and group calls. You can access Recent
Calls to:
• view your recent calls
• store numbers to the Phonebook
• deleterecent calls
• call numbers on the Recent Callslist
NOTE: The Recent Calls list displays briefly after you end a call.
Recent Calls Icons
If thenumber of the recentcall is stored in yourPhonebook, thename associated
with the phone number appears on the Recent Calls list.
63

For privatecalls, group calls, and numbers stored in your Phonebook, an icon
appearstothe right of the name ornumber and to the rightofthetype indicating
the Phonebook type of the number used in the call. See “Phonebook Icons” on
page 45 for more informationabout Phonebook types.
For phone calls, an icon appears to the left of the name or number indicating the
type of call:
• N indicates an incoming call
• a indicates an outgoing call
• V indicates a missedcall.(Missed calls appear on your Recent Calls list
only if you have Caller ID.)
For private calls, aniconappears to theleft of the nameor number indicatingthe
type of call:
• h indicatesa Private Call
• n indicates a Group Call
Viewing Recent Calls
To view your Recent Calls list:
1
From the Ready screen, press R to access the Recent Calls screen.
Press B under SELECT.
2
Press S to scroll the list ofrecent calls.
Getting Detailed Information About Recent Calls
To get more information about a recent call:
1
From the Recent Calls screen, press S to scrollto thecall you want
more information on.
2
Press B under VIEW.
Or,
Press m to access the Rec. Calls Menu.ThenpressR to scroll to
View and press B under SELECT.
www.motorola.com/iden
64

Recent Calls
The screen that appears displays information such as the name associated with
the number of the recentcall, the number, the date,time,andduration of the
call.
Storing a Recent Call Number to the Phonebook
To store a number from the Recent Calls list to the Phonebook:
1
From the Recent Calls screen, press S to scrollto thenumber you
want to store.
2
Press B under STORE. Press B under SELECT.
This displays the Store Toscreen with [NewEntry] highlighted.
3
If you want to add more information to the Phonebook entry, follow
applicable the instructions in “Adding Phonebook Entries” on page 48.
Calling From the Recent Calls List
See “Making Calls from the Recent Calls List” on page 60.
Deleting Recent Calls
To delete a recent call:
1
From the Recent Calls screen, pressS to scroll to the call you want to
delete.
2
Press m to access the Rec. Calls Menu.
3
Press R to scroll to Delete.
4
Press B under SELECT.
5
Press A under YES to confirm the deletion.
65

To delete allcalls on the Recent Calls list:
1
From the Recent Calls screen, press m to access the Rec. Calls
Menu.
2
Press R to scroll to Delete All.
3
Press B under SELECT.
4
Press A under YES to confirm the deletion.
Accessing Voice Record From Recent Calls
YoucanaccesstheVoice Recordsfeature from RecentCalls and useit to record
spoken messages that you can listentolater.
1
From the Recent Calls screen, press m to access the Rec. Calls
Menu.
2
Press S to scroll to Voice Records.
3
Press B under SELECT.
For more informationabout Voice Record, see “Voice Record” on page 119.
Call Time rs
Call Timers measure the duration of your phone calls, Private or Group calls,
and circuitdatause,aswellas the numberof Kilobytes sent and receivedby
your phone.
The Call Time rs menu displays the following options:
• Last Call — displays the duration of your most recent phone call.
• PhoneReset— keepsa running total of yourphone call minutes, untilyou
reset it.
• Phone Lifetime — displays the total minutes of all your phone calls.
• Prvt/Grp Reset — keeps a running total of all of your Private and Group
call minutes, until you reset it.
66
www.motorola.com/iden

Hands-Free Speakerphone
• Prvt/GrpLifetime— displaysthetotalminutes of all your Private and
Groups calls.
• CircuitReset — keeps a running total of all of your circuit data use, until
you reset it.
• Circuit Lifetime — displays the total minutes of all of your circuitdata
use.
• Kbytes Reset — keeps a runningtotal of the numberof Kilobytes sentand
receivedby your phone, until you reset it.
To view the Call Tim ers menu:
1
From the Ready screen, press m.
2
Press R to scroll to Call Timers.
3
Press B under SELECT.
To view or reset a Call Timers option:
1
From the Call Timersm enu, press S to scroll to the Call Timers
option youwant to view or reset.
2
Press B under SELECT.
3
If the feature does not include an option to reset or you do not wish to
reset the option,press A under DONE when you are finished viewing.
To reset a feature,press B under RESET. When the confirmation
screen appears, press A under YES to confirm the reset.
NOTE: The values displayedby Call Timers are estimates only.
Hands-Free Speakerphone
This featureprovides the convenience of a hands-free solution,allowing you to
hold impromptu meetingsand place safer phone calls. The speakerphone option
(SPKR) is available whenever you are on an active phone.
NOTE: During speakerphone operation, you may either speak or listen, but you
cannot do both at the sametime.
67

To turn the speakerphone on:
While on an active call, press B under SPEAKER.
While speakerphone is on, Spkrphone On appears in the text display area.
To turn the speakerphone off:
Press B under SPEAKER.
Mute
Use the Mute feature to listento incoming audio without allowing sound from
your phone’s microphone to be transmitted over the phone line.
To turn mute on:
Press B under MUTE.
While mute is on, UNMUTE appears as a display option.
To turn mute off:
Press B under UNMUTE.
Call Waiting
Call Waiting allows youto receive a second call while you are talking on the
phone. You can switchbetween calls so you never have to miss a call. By
default, Call Waiting is always on unless you turn it off for a specific call.
www.motorola.com/iden
68

Call Waiting
If you’re on a call and you receive a second call,
you will:
• Hear a tone; and
• See a message on your display informing
you of another incoming call.
e
Accepting Calls
Press B under YES. The first call is placed on hold.
Switching Between Calls
When you acceptasecond call whileyou aretalking on the phone,yourdisplay
shows thename ornumberof each call.Aniconappears to theleft of eachname
or number indicating that the call is on hold z or active D.
Press B under SWITCH to switch
between calls.
[
Declining Calls
Press A under NO. If you subscribe to Voice Mail, the call will be
forwarded to your Voice Mail box.
Ending the Active Call
s.
Press
69

Turning Off Call Waiting
If you do not want to be interrupted during a call,you can turn Call Waiting off
prior to making/receivinga call.
1
From the Ready screen, press m.PressR to scroll to Settings,and
press B under SELECT.
2
Press R to scroll to In Call Setup and press B under SELECT.
3
Press R to scroll to Call Waiting and press B under CHANGE.
4
Press R to scroll to Off and press B under SELECT.
Call Waiting is now disabled for the next call. It will automatically reset
to On when you hang up.
Call Hold
When you are on an active call, you can place the call on hold and make a
second call.
To place an active call on hold:
1
Press m to access the Calls Menu.
2
Press R to scroll to Hold.
3
Press B under SELECT.
4
If you have not placed a second call, you can resume this callby
pressing B under RESUME.
To place a second call while the first call is on hold:
1
Enter the second phone numberyou want to call. Or select the number
from your Phonebook by pressing
2
Press e to place the second call.
www.motorola.com/iden
m and selecting Phonebook.
70

Three-Way Calling
To toggle between the two calls:
Press B under SWITCH.
To end the active call:
Press s. The call on hold becomes active.
Three-Way Calling
Using Three-Way Calling, you can combine two ongoing phone callsintoone
conversation. While on an active call,youcan makea second callandcombine
the two calls. When you placeor receivea phone call, the 3-WAY option
appearsin the bottom right-hand corner of the display screen.
To make a three-way call:
1
Place or receive a phone call.
2
While on the call, press m to access the Call Menu.
3
Press R to scroll to 3Way.
4
Press B under SELECT. The first call will be placed on hold.
5
Enter the second phone numberyou want to call and press e to place
the secondcall.
Or, access the number from your Phonebook:
m andthenpressR to scroll to Phonebook.
Press
B under SELECT.
Press
To place the call, see “Making Calls from the Phonebook” on page 58.
6
After you reach the second individual,pressm.
71

7
Press S to scroll to 3Way.
8
Press B under SELECT. Both calls will appear on your display.
Call Forwarding
CallForwarding forwards callsto the numberyoudesignate.The following Call
Forwarding options are available:
• Off — No calls are forwarded.
• All Calls — When this option is turned on, all calls will be sent
automatically to a number you specify.
• Detailed — Choosing thisoption enables you to forward calls you missed
to different numbers, ortoVoice Mail, depending onwhy you missed each
call:
• Busy — your phone is engaged in other activities.
• No Answer — you do not answer.Thephone will ring 4 times before
forwarding the call.
• Unreachable — your phone is out of coverage or powered off.
You can forward Line 1 and Line 2 independently.
When your phone is set to forward all calls, one of the following icons appears
on the top row of your display screen to indicatethecall forwarding option you
have chosen:
Icon Indicates...
72
G Line1i s active;calls fromLine 1 arebeing
forwarded.
H Line1i s active;calls fromLine 2 arebeing
forwarded.
I Line 1 is active; calls from Line 1 and Line
2 are being forwarded.
J Line2i s active;calls fromLine 1 arebeing
forwarded.
www.motorola.com/iden

Call Forwarding
W
K Line 2 isactive; calls from Line2 are being
L Line 2 is active; calls from Line 1 and Line
NOTE: Call Forwarding must be set to Detailed with the Voice Mail access number to
receive Voice Mail messages. This is the default setting.
TurningOnCallForwarding
1
Press m then press R to scroll to Call Forward.
2
Press B under SELECT.
3
At the Call Forward screen, the Forward
field is highlighted. PressB under
CHANGE.
4
Press S to scroll to All Calls.
forwarded.
2 are being forwarded.
5
Press B under SELECT.
6
Press R to scroll to the To field and press B under CHANGE.
73

7
To activate a call forwarding number:
If you have never used Call Forwarding before, the Forward screen
appears. To entera call forwarding number, type the number on your
phone’skeypadorpressB under SEARCH t o select from numbers
stored in your phone.Press B under OK.
Or,
If you have used Call Forwarding before, the call forwarding number
youlastusedisdisplayed.PressB under CHANGE to access the
Forward screen.
To forward your calls to this number, press B under OK.
To forward your callsto a different number, press and hold A under
DELETE to erase the displayednumber.Type the new number on your
phone’skeypadorpressB under SEARCH t o selectfrom numbers
stored in your phone.Press B under OK.
Your calls will now be forwarded to the number that you selected.
Turning Off Call Forwarding
1
Press m then press R to scroll to Call Forward.
2
Press B under SELECT.
The Call Forward screen displayswith the Forward field highlighted.
74
www.motorola.com/iden

Call Forwarding
3
Press R to scroll to the To field and press B under CHANGE.
4
Press S to scroll to Off and press B
under SELECT.
NOTE: You canuse the Detailed setting to forward calls to other numbers if desired.
However, it is recommended that you leave Detailed set to the Voice Mail
access number and use the All Calls setting if you wish to forward your calls
to anothernumber.
SettingCallForwardingtoVoiceMail
In mostcases, turning off Call Forwarding restores yourability to receiveVoice
Mail messageswhenyou are unavailable (see“Turning Off Call Forwarding”
on page 74). If you have completed those steps but are still not able to receive
Voice Mail messages, you can reset Call Forwarding to Voice Mail.
For you to receive Voice Mail messages, Call Forwardingmust be set to
Detailed with your Voice Mail access number:
1
Press m then press R to scroll to Call Forward.
2
Press B under SELECT.
The Call Forward screen displayswith the Forward field set to
Detailed.
3
Press R to scroll to the If Busy field and press B under CHANGE.
4
The call forwarding number you last used is displayed. Press B under
CHANGE. If this is your Voice Mail access number (the first six digits
of your 10-digit phonenumberfollowed by 6245), go to step 7.
5
Press and hold A under DELETE to erase the displayed number.
75

6
Enter your Voice Mail access number.
Your Voice Mail accessnumber is the first six digits of your 10-digit
phone number, followed by 6245. (For example 7035556245.)
7
Press B under OK.
8
Repeat step 3 through step7 for the If No Answer field and the If
Unreachable field.
9
When finished, press A under EXIT.
NOTE: You canuse the Detailed setting to forward calls to other numbers if desired.
However, it is recommended that you leave Detailed set to the Voice Mail
access number and use the All Calls setting if you wish to forward your calls
to anothernumber.
76
www.motorola.com/iden

Messages
The main topics covered in this section are listed below:
MessageAlerts Page 77
MessageCenter Page 79
Using Voice Mail Page 80
Using Text and Numeric Messaging Page 81
Using Net Alert Page 83
Using Your Phone as a Modem Page 84
NOTE: If your service provider supports mobile originated text messaging,
see “Mobile Originated Text Messaging” on page 85. Your Message
Center will look slightly different than the one described in this
section.
Receiving Messages
Your phone alertswhen you receive a new VoiceMail message, Text and
Numericmessage, or Net Alert message.
Message Alerts
If you are not on a call when you receive a message, yourphone sounds an alert
tone every 30 seconds untilyoudismiss the alert.
If you are on a call whenyou receive a message, your phonemay sound analert
toneduringthe call or after you end thecall, depending on yourphone’ssettings
(see “In Call Setup” on page 134).
77

Your phone screendisplays message alerts as follows:
Message Type Display
Voice Mail
f
Text Messages
i
Net Alert
]
These messagealert screens appear if the new messageis the onlymessage you
have.
www.motorola.com/iden
78

Message Center
Dismissing Alerts
When you dismiss a messagealert, the message alertdisplay disappears from
the screen and your phone stops sounding alert tones, but the messageisnot
deleted.You can access themessage throughthe MessageCenter.See“Message
Center” on page 79 for more information.
Message Center
The Message Center enables you to access all messaging services through one
screen.
To access the MessageCenter:
If MESG is one of your display options:
From the Readyscreen, press B under MESG.
If MESG is not one of your display options:
1
From the Ready screen, press m.
2
Press R to scroll to Messages.
3
Press B under SELECT.
The Message Centerscreen displaysthenumber of messages you have in each
message service — Voice Mail (Voice Mail), Text Msgs (Text and Numeric
Messages), and Net Alert (Net Alert).
To access any message service:
1
From the Message Centerscreen, press R to scrollto the message
serviceyou want to access.
2
Press B under the display option on the right. This option varies
depending on the message service selected.
79

Using Voice Mail
Transferring Calls to Voice Mail
Press B under NO while your phone is ringing to transferincoming
calls directly to Voice Mail.
Accessing New M essages
When you receive a message, you can:
Listening to a Mess age Immediately
Press B under CALL to log into your Carrier’s Voice Mail System.
Calling displays as you are connected to the network.
Listening to a Mess age Later
Press B under EXIT.The
remind you that you have a stored Voice Mail message.
• NewVoice MailMessagewilldisplayonthescreen.
• Yourphone will alertyou every 30s econds until youpress B under CALL
or A under EXIT. (Ifyou are on a call, your phone will alertyou once
during the call.)
y icon will appear on the Ready screen to
www.motorola.com/iden
80

Using Text and Numeric Messaging
Accessing All Messages
1
From the Message Centerscreen (see “Message Center” on page 79),
press S to scrolldown to Text Msgs. The number of new messages
and the total number of messages are displayed.
2
Press C under SELECT. The TextMsg Inbox screenappears.
3
Press S to scroll to the message you want to read and press C under
READ.
4
If the message fills more than one screen, use S to scroll through the
rest of the message.
5
Press C under SAVE to save the message.
Or,
Press C under DELETE to delete the message.
Using Text and Numeric Messaging
NOTE: If your service provider supports mobile originated text messaging, see
“Mobile Originated Text Messaging” on page 85.
With Text and Numeric Messaging, your phone will:
• Allow numeric messages up to 20 characters in length and text(alpha)
messagesupto160charactersinlength.
• Accept your messages even if you are unavailable,if your phoneis turned
off,or if you are busy on another call.
• Alertyouofa new text or numericmessage,evenifyou are on anothercall.
• Store a message if you are making a Private or Group call and deliver it
upon completion ofthe call.
• Store the message if you are outside of the coverage areaand deliver it as
soon as you are back in a coverage area.
• Attemptcontinuous delivery of messages until successful,forup to 7 days.
• Refer to text and numeric messages as Text Messages.
• Stamp the message with the time and date the message was left.
• Storeupto16messagesatatime,thatwillremainuntilyoudeletethem.
NOTE: “Mail Waiting, MemoryFull” displays when 16 message registers are full.
(Messages must be erased before you can receive others.)
81

• Allow for “Auto Call Back” of a phone number that is included within a
message,by pressinge. Ifthe message contains two phonenumbers, Auto
Call Back will dial the last number.
Accessing New M essages
When you receive a message, you can view it immediately or later:
View a Message Immediately
1
Press B under READ. The message displays.
2
If the message fills more than one screen, use S to scroll through the
rest of the message.
3
Press A under SAVE to save the message.
Or,
Press B under DELETE to delete the message.
Viewing a Message Later
Press A under EXIT. The
Ready screen to remind you that you have a stored message.
. icon will appearon the second lineofthe
Viewing Stored Mes s ages
1
In the Message Center screen, press S to scrolldownto Text Msgs.
The number of new messages and the total number of messages are
displayed.
2
Press B under SELECT. The TextMsg Inbox screenappears.
3
Press S to scroll to the message you want toreadand press B under
READ.
4
If the message fills more than one screen, use S to scroll through the
rest of the message.
www.motorola.com/iden
82

5
Press A under SAVE to save the message.
Or,
Press B under DELETE to delete the message.
Accessing All Messages
1
From the Message Centerscreen (see “Message Center” on page 79),
press S to scrolldown to Text Msgs. The number of new messages
and the total number of messages are displayed.
2
Press C under SELECT. The TextMsg Inbox screenappears.
3
Press S to scroll to the message you want toreadand press C under
READ.
4
If the message fills more than one screen, use S to scroll through the
rest of the message.
5
Press C under SAVE to save the message.
Or,
Press C under DELETE to delete the message.
Using Net Alert
Using Net Alert
With Net Alert, you can send text and numeric messages in any of three ways:
• from your i80s phone
• from a web site provided by your service provider
• from any email application
When you receive a new message:
• Words willdisplay on yourphone’sdisplay screen indicating thatyou have
a Net Alert message. (The exactwords displayed are determined by your
serviceprovider.)
• Your phone will alert you every 30 seconds until you dismiss the alert.
83

If you choose to exit the screen and view the message later, the . icon will
appear on the second line of the Ready screen to remind you that you have a
stored message.
You can view new or stored Net Alert messages at any time by accessingthe
Message Center. For more information, see “Message Center” on page 79.
Using Your Phone as a Modem
NOTE: Some features may be network dependent or subscription only, and may not
be available in all areas. Contact your service provider for more information.
You can use your i80s phone as a modem for data transfer from your laptop,
handheld device, or desktop computer. This is particularly useful when thereis
no wired phone line (wall jack) available.
You simply attacha datacable(available separately) to your phone and your
computer. From that point, your phone is your modem. This allows you to send
or receive time-critical information such as email, a field service report, or files.
In addition, you can also send or receive faxes.
This type of wireless connection uses one of two types of data connection:
circuit-switched data and packet data.
• Circuit-switched dataistypicallyused for sending and receiving faxes and
for transferring large files.
• Packetdata is used for small filetransfers such as email.
To use theseservices, youmustinstall the iDEN WirelessData Services
software (availableseparately). For more information on setting up your
computer and your i80s phone for Packet and Circuit Data calls, see the
Wireless Data Services User’s Guide and contact your carrier.
TTY Users
You can use your phone and computer in TTY mode. Your computer
screen and keyboard replace the standard TTY device. For more
information, please see the Wireless Data Services User’s Guide.
www.motorola.com/iden
84

Mobile Originated Text
Messaging
Mobile originated text messaging allows you to communicate with other
messagecable devices to send and receive brief text messages. Received
messages appear on your phone display or in your text message inbox.
NOTE:This is a network suppositions dependent feature. Please
consult with your service provider for availability.
This documentincludes:
MessageCenter Page 85
Message Icons Page 87
Text Msg Setup Page 87
Text Message Inbox Page 88
Quick Notes Page 89
Text Message Outbox Page 90
DraftsFolder Page 94
Memory Storage and the Memory Meter Page 95
Message Center
The Message Center enables you to access all messaging services through one
screen. To access the Message Center:
If MESG is one of your display options:
From the idle screen, press C under MESG.
85

If MESG is not one of your display options:
1
From the idle screen, press q.
2
Press R to scroll to Messages.
3
Press C under SELECT.
The Message Centerscreen displaysthenumber of messages you have in each
message service:
• Voice Ma il
• Text Inbox (Text and Numeric Messages)
• Net Alert — Consult your Service Provider for availability.
• Quick Notes — user-customizable list of canned messages.
• Text Outbox — contains messages which the phone has sent or is tryingto
send.
• DraftsFolder — contains messages which the user has composed,but not
sent.
• Fax Mail — Consult your Service Provider for availability.
NOTE:The Message Center will not display the number of Quick Notes
messages that are stored.
NOTE:Drafts Folder will only appear at the Message Center if there is
at least oned raft message.
To access any message service:
1
From the Message Centerscreen, press R to scroll to the message
serviceyou want to access.
2
Press C under the display option on the right. This option varies
depending on the message service selected.
www.motorola.com/iden
86

Text Msg Set up
Message Icons
The followingiconsappears dependingon the type of message.
Icon Description
Message Sent and Confirmed
Message Sent Attempted (if this
doesn’t change to theMessage Sent
Confirmed icon, resend the message
again).
Message Forwarded
Message not Received by Addressee
Message Received by Addressee
Message Locked
Message Send Failed
Message Re-sent
Text Msg Setup
Before you begin sending and receiving messages, you must set up your
signature, service center number and expiration information in the Text M sg
Setup Form.
Accessing TextMsg Setup
1
From the Message Centerscreen, press S to scroll to Text Inbox,
then press q to access the Msg Ctr Menu screen.
2
In the Msg Center Menu screen, the Text Msg Setup field will be
highlighted. Press C under SELECT.
87

3
In the Text Msg Setup screen, Signature is highlighted.PressC under
CHNGE.
Type in your name (up to 11 characters)which will be your signature.
Press C under OK.
NOTE:Each time you create a message, you will have to add the
signature.
4
From the Text Msg Setup screen,the Srvc Cntr No field will be
highlighted. Press C under CHNGE.
NOTE:You must use the “+” dialing code andcountry code as part
of the service center number. If the service center numberis
not preceded by a “+” sign and country code, the message
will not be sent successfully.The network will return an error
message to the phone.
Enter the phone numberfor the MessagingService. If you do not know
the number, contact your ServiceProvider.
5
After you have entered the phone number, press C under OK.
6
From the Text Msg Setup screen,the Expire After field will
highlighted.
NOTE:ThemessagewillonlybekeptbytheSMSCenterforthe
givenperiod untilthe addressee is reachable. Once the
given period expires, the message will be discarded by the
SMS Center.
If you want to change this setting, press C under CHNGE.
7
In the Expire After screen, press N or press C under --> to change
the selection.
Press C under DONE when you are finished.
8
You willbe takenbackto the Text Msg Setup screen.PressC under
BACK to save the settings.
Text Message Inbox
The Text Message Inboxallows you to access, manage and create messages.
www.motorola.com/iden
88

Text Message Inbox
NOTE:The Inbox memory space can hold 14 messages with a
maximum length of 160 characters for each message.
Receiving a Text M essage
When you receive a new message,your phone displaysNewM essage and gives
an alert.
NOTE:You mustset up the textmessage inbox beforeyou can receive
text messages. See“Text Msg Setup” on page 87.
Press C underREAD to open the message(or your text message inbox
if there are multiple messages).
Reading a Message
1
From the Message Centerscreen, press S to scroll to Text Inbox.
Press C under SELECT.
2
In the Text Message Inbox, [Create Msg] is highlighted. Press R to
scrollto message that you want to read. Press C under READ.
3
Once you read the message,you have the choice of saving or deleting
the message.
Or,
Toseemorechoices,pressq to access the Inbox Menu screen.
4
In the Inbox Menu screen, press R to scroll to your desired choice.
Press C under SELECT. Follow the prompts for that particular
selection.
Quick Notes
Quick Notes are short, pre-written textmessages that you can create, edit, and
send quickly.TheQuickNotes list contains canned textmessages that you can
use to send messages or replies.Y ou can store up to 20 Quick Notes. Each
canned text can have a maximum of 30 characters.
89

Accessing Quick Notes
1
From the Message Centerscreen, press S to scroll to Qui ck Notes.
Press C under SELECT.
2
In the Quick Notes screen, [New QuickNote]is highlighted. Press C
under CREATE.
3
Type the note that you want to store as a Quick Note. Press C under
STORE.
Or,
Press C under BROWSE to accessthe Qui ck Notes screen. Thereisa
list of pre-installed notes. Press R to scroll to the desired choice. Press
C under SELECT.
Then press C under STORE. A confirmationscreen appears. The
Quick Note screen returnswiththe recently stored quick note
highlighted.
4
Press q to access the Quick Notes Menu screen. Send is
highlighted. Press R to scroll to the desired action. Press C under
SELECT.
Text Message Outbox
The Text Message Outboxallowsyouto view and manageoutgoing messages.
The Outbox items are numbered, with the largest numberon top being the most
recent item sent and the first item is the [Create Msg].Youcan:
• Create a text message
• Send a message
• Manage an outbox
NOTE:The Outbox and Drafts Folder share the same memory space
and a maximumof 20 messages can be held. If you have
reached the maximum, it will be necessary to delete old
messages before sending out new messages.
90
www.motorola.com/iden

Text Message Out box
Creating Text Mess ages
1
From the Message Centerscreen, press S to scroll to Text Outbox.
Press C under SELECT.
2
In the Text Outbox, [Create Msg] is highlighted. Press C under
CREATE.
3
With the To field highlighted, press C under CHNGE t o access the To
screen.
Type the number of the person that you are sending the message to.
Or,
Press C under BROWSE to access the Search menu.
Youwillhave the choice to select RecentCalls, Phonebookor Memo to
obtain an existing number.
Modify the phone numberentryasdesired then press C under OK
when finished.
The New Message screenreturns withthe Msg field highlighted.
4
With the Msg field highlighted, press C under CHNGE to access the
Msg screen.
Type the message usingthe alphanumeric keypad. See “Using T9 Text
Input” on page 29 for information about entering text into this field.
Or,
Press C under BROWSE to access the Quick Notesscreen. Press R
to scroll to thedesired messagetype, then press C under SELECT.
If you want to insert your signature, press q to access the Entry
Method screen. Press R to scroll to Add Signature.PressC under
SELECT.
When you are finished, press C under OK.
The New Message screenreturns withthe Report fieldhighlighted.
91

5
With the Report fieldhighlighted,press C under CHNGE if you want
to change the selection. Press R to scroll to YES. Press C under
SELECT. The New Message screen returns with the Send As field
highlighted.
Or,
With the Report field highlighted, press P to scroll to select YES.
Press R to scroll to Send As field.
This submits a requestto confirm delivery of your message.
6
You can specifythe type of message that you want to send. The default
is Text.Toassignadifferentmessagetype:
With the Send As field highlighted, press P to scrollto thedesired
message type.
Press q to access the New Msg Menu screen.
The New Msg Menu screen returns with the Send field highlighted.
7
Press C under SELECT, if you are ready to send the message.
Or,
Press R to scroll to Save as Draft,thenpressC under SELECT. The
draft willbe saved.
Or,
Press R to scroll to Delete,thenpressC under SELECT. A transient
screen appears.
Press C under YES to delete the message. You will be returned to the
Text Msg Outbox screen.
Or,
Press C under NO. Youwill be returned to the New Message screen.
www.motorola.com/iden
92

Text Message Out box
Sending a Mess age
1
From theNew Msg Menu screen,with theSend fieldhighlighted,press
C under SELECT.
Or,
Press s to send the message. A confirmation screen appears.Press C
under YES to send the message.
2
The message will be sent.
Managing the Outbox
The Text Message Outboxalsoallows you to manage your messages. You can
resend a messagethat has been previously sent, lock, or deletemessages.
Resending a Message
1
From the Text Msg Outbox screen,pressR to scroll the message that
you would like to resend, pressq to go to the Outbox Menu screen.
2
The Outbox Menu screenappears. Press R toscrollto Re-send.Press
C under SELECT.
3
A confirmation screen appears. Press C under YES to confirm. The
messagewill be sent.
Locking messages from the Outbox Screen
1
From the Text Msg Outbox screen, highlight the message that you
wouldliketolock,pressq to go to the Outbox Menu screen.
2
The OutboxMenuscreen appears. PressR toscrolltoLock.PressC
under SELECT. A confirmation screen appears.
93

Deleting messages from the Outbox Screen and Read Screens
1
From the Text Msg Outbox screen, highlight the message that you
would like to delete, press q to go to the Outbox Menu screen.
2
The OutboxMenuscreen appears with Deletehighlighted.Press R to
scrollto Delete the message or scroll to Delete All if you want to delete
all your messages.
Press C under SELECT.
NOTE:Deleting all messages will only remove those messages that
are not locked. You must first unlock the message before
you can remove it.
3
A confirmation screens appears.
Press C under YES to delete the message.
Or,
Press C under NO. Youwill be returned to the Text Outbox screen.
Drafts Folder
The Drafts Foldercontains messages which were created,but not sent either
because you wishto send the messageat another time or the message is
incomplete.
NOTE:Drafts Folder will only appear at the Message Center if there is
at least oned raft message.
NOTE:The Outbox and Drafts Folder share the same memory space
and a maximumof 20 messages can be held. If you have
reached the maximum, it will be necessary to delete old
messages before sending out new messages.
Accessing the Drafts Folder
1
From the Message Centerscreen, press S to scroll to Drafts
Folder.Press C under SELECT.
www.motorola.com/iden
94

Text Message Out box
2
In the Drafts Folder screen, [Create Msg] is highlighted.Press C
under CREATE.
3
Follow step 3 through step 6 for “CreatingTextMessages” on page 91.
4
Press R to scroll to Save as Draft.PressC under SELECT. A
confirmation screen willappear stating the messagehasbeenstored.
5
Press s to return to the idle screen.
Editing the Drafts Folder
1
From the Drafts Folder screen, press R to scrollto thedraft that you
want to edit. Press q to access the DraftsMenuscreen. The Change
field is highlighted.
2
If you want to change the draft, press C under SELECT. Press S to
scrollto the field thatyou want to change and follow the prompts or
followstep3throughstep6for“Creating Text Messages” on page 91.
3
Press q to access the New Msg Menu screen.
The New Msg Menu screen returns with the Send field highlighted.
Press S to scroll to the desired choice.
Memory Storage and the Memory M eter
Your phone has a specificamount of memory storage and there is a limit on the
amount of messagesthatit can store.You can checkto see how much memory
your phone has in both the Text Inbox and Text Outbox.
The Inbox memory space can hold 14 messages with a maximum length of
70-160 characters (depending on language) for each message. The Outbox and
DraftsFolder sharethesame memory space andamaximum of20messages can
be held.
NOTE:When the SIM card is removedand a new SIM card is inserted,
the messages and Quick Notes will be erased to protect the
privacy of the user.
95

Accessing the Memory Meter from Text Inbox
1
From the Message Centerscreen, press R to scroll to Text Inbox.
Press q to access the Msg Center Menu screen.
2
Press S to scroll to Memory Meter.PressC under SELECT.
3
In the Inbox Memory Meterscreen, you will see how much memory is
available.
4
Press C underBACKtogobacktotheMessage Center screen.
Accessing the Memory Meter from Text Outbox
1
From the Message Centerscreen, press R to scroll to Text Outbox.
Press q to access the Msg Center Menu screen.
2
Press S to scroll to Memory Meter.PressC under SELECT.
3
In the Outbox/Drafts Meter screen, you willseehow much memory is
available.
4
Press C underBACKtogobacktotheMessage Center screen.
96
www.motorola.com/iden

Private and Group Calls
The main topics covered in this section are listed below:
Private Calls Page 97
Call Alerts Page 99
Group Calls Page 104
Private Calls
There are several ways to reach an individual using Private calls:
• Enter the person’s Private ID from the keypad.
• Select the person’sPrivate ID from the numbers in your Phonebook.
• Select the person’sPrivate ID from the numbers in your Recent Calls list.
• Use voice-activated dialing.
Whether you dial the person’s Private IDdirectlyoruse a numberstoredinyour
Phonebookor Recent Callslist, you musthave the individual’s PrivateID to use
Private calls. To learn how to store names and numbers, see “Phonebook” on
page 43.
USER TIP: To find out your own Private ID number, see “My Information” on page 27.
Making a Private Cal l from the Keypad
1
Enter the Private ID of the person you are trying to call.
2
Press and hold the PTT button on the side of the phone. Begin talking
after the phone emits a chirping sound.
3
Releasethe PTT button to listen.
97

Making a Private Call from the Phonebook
If you have stored a person’s Private ID in your Phonebook, you can use your
Phonebook to make a Privatecallt o that person:
1
From the Ready screen, press m.
2
Press R to scroll to the Phonebook.PressB under SELECT.
3
From the Phonebook screen, press S to scroll through thenames until
the desiredname is highlighted.
4
Press and hold the PTT button on the side of the phone. Begin talking
after the phone emits a chirping sound.
5
Releasethe PTT button to listen.
Making a Private Call from the Recent Call L ist
1
From the Ready screen, press m.
2
Press R to scroll to the Recent Calls.PressB under SELECT.
3
From theRecentCalls screen, press S to scroll through thenames and
numbersuntil the desired nameor Private ID is highlighted. (If the
Privateicon h appears to the right of the number, the numberis a
Private ID.)
4
Press and hold the PTT button on the side of the phone. Begin talking
after the phone emits a chirping sound.
5
Releasethe PTT button to listen.
For more information on the Recent Calls list, see “Recent Calls” on page 63.
Making Private Calls Using Voice-Activated Dialing
If you have recorded a voice name for a Private ID in your Phonebook,see
“Voice Names” on page 45, you can use this voice name to call the number.
www.motorola.com/iden
98
 Loading...