

Page 1

Digital Multi-service Data-capable Phone
@NNTN5759A@
NNTN5759A
Motorola
iDEN
i710 Phone User’s Guide
Page 2

Page 3

IMPORTANT NOTICE: PLEASE READ
PRIOR TO USING YOUR PHONE
The SIM cardprovided in this kit isintended for use with
the phone provided in this package.
Loss of certain features will resu lt when using a SIM
card from one of the following models: i30sx, i35s,
i50sx, i55sr, i58sr, i60c, i80s, i85s, i88s, i90c, i95cl
series, and the i2000 series.
For more information on SIM c ard compatibility, go to
www.motorola.com/iden/support.
Defects or damage to your Motorola phone t hat res ult
from the use of non -Motorola branded or certified
Accessories, including but not limited to replacement
housings and or oth er peripheral accessories, are
excluded from warranty coverage. Please refer to the
text of Motorola's Limited One Year warranty located in
this user’s guide for complete details.
Page 4

Page 5

Contents
Getting Started........................................... 1
Locating Your SIM Card....................................3
Battery...............................................................3
Activating Service..............................................6
Powering On and Off.........................................6
Enabling Over-the-Air Security..........................7
Phone Programming .........................................7
Finding Your Phone Number.............................7
Phone Basics ....................................................8
SIM Card Security...........................................12
Accessories.....................................................15
For More Information.......................................15
Making Calls............................................. 16
Phone Calls.....................................................16
Private Calls ....................................................16
Receiving Calls................................................16
Ways to Enter Calls.........................................17
Missed Phone Calls.........................................20
Using Speakerphone.......................................20
Using Mute......................................................20
Making Emergency Phone Calls .....................20
Call Alerts..................................................22
Sending Call Alerts..........................................22
Receiving Call Alerts.......................................22
Using the Call Alert Queue..............................22
Recent Calls..............................................24
Viewing Recent Calls ......................................24
Storing Recent Calls to Contacts ....................24
Deleting Recent Calls......................................25
Contacts ....................................................26
Viewing Contacts ............................................27
Creating Entries ..............................................28
Storing Numbers Faster ..................................29
Editing Entries .................................................30
Deleting Entries...............................................30
Checking Capacity ..........................................30
Creating Pauses and Waits.............................30
International Numbers.....................................31
Accessing Contacts with GSM Phones...........31
i
Page 6

Call Forwarding........................................ 33
Forwarding All Calls ........................................33
Turning Off Call Forwarding ............................34
Forwarding Missed Calls.................................34
Viewing Call Forwarding Settings....................35
Advanced Calling Features..................... 36
Call Waiting .....................................................36
Switching Between Calls.................................36
Putting a Call on Hold......................................37
Calling 2 People..............................................37
Creating Pauses and Waits While Dialing.......38
Making International Calls...............................38
Setting One Touch PTT...................................38
Setting Flip Actions..........................................39
Group Calls .....................................................39
Call Timers......................................................40
Using Your Phone as a Modem ......................41
Making TTY Calls............................................42
ii
Memo .........................................................45
Ring Tones................................................46
Setting Your Phone to Vibrate.........................46
Ring and Vibrate .............................................47
Assigning Ring Tones to Contacts..................47
Viewing Ring Tone Assignments ....................47
Downloading More Ring Tones.......................47
Managing Memory ..........................................48
Deleting Custom Ring Tones ..........................48
Entering Text ............................................49
Using Alpha Mode...........................................49
Using Word Mode ...........................................49
Special Function Keys.....................................50
Using Numeric Mode.......................................51
Using Symbols Mode ......................................51
Messages..................................................52
Message Notifications .....................................52
Message Center..............................................53
Voice Mail Messages................................54
Receiving a Message......................................54
Page 7

Accessing Voice Mail from
the Message Center ...................................54
Sending Unanswered Calls to Voice Mail .......54
MOSMS Messages . .................................. 55
Setting Up........................................................55
Receiving a Message......................................55
Reading from the Message Center .................56
Creating and Sending Messages ....................56
Sorting Messages............................................59
Managing Memory...........................................59
Datebook ..................................................60
Viewing Datebook ...........................................60
Creating Events...............................................61
Editing Events .................................................63
Deleting Events ...............................................63
Receiving Reminders ......................................64
Making Calls From Datebook..........................64
Customizing Datebook Setup..........................65
Java Applications.................................... 66
Installing Applications......................................66
Running Applications.......................................66
Suspending Applications.................................66
Resuming Applications....................................67
Ending Applications.........................................67
Downloading Applications...............................67
Deleting Applications.......................................67
Managing Memory ..........................................68
Shortcuts on the Main Menu ...........................68
Java Applications and GPS Enabled ..............69
GPS Enabled.............................................72
IMPORTANT: Things to Keep in Mind ............72
Making an Emergency Call .............................73
Viewing Your Approximate Location ...............74
Enhancing GPS Performance.........................75
Updating Satellite Almanac Data ....................77
Setting Privacy Options...................................78
Using GPS with Map Software........................79
Voice Records ..........................................81
Creating Voice Records ..................................81
Playing Voice Records ....................................81
Labeling Voice Records ..................................81
Deleting Voice Records...................................82
iii
Page 8

Locking Voice Records....................................82
Managing Memory...........................................82
Editing a Shortcut............................................97
Deleting Shortcuts...........................................97
Customizing Your Phone........................ 84
Setting the Volume..........................................84
Setting Your Phone to Vibrate.........................84
Changing the Look of Your Phone ..................84
Temporarily Turning Off Calls .........................86
Using Settings .................................................86
Profiles ..................................................... 91
Viewing Profiles...............................................91
Switching Profiles............................................91
How Changing Settings Affects Profiles..........91
Temporary Profiles..........................................92
Creating Profiles..............................................93
Editing Profiles ................................................93
Deleting Profiles ..............................................93
Setting Call Filtering ........................................94
Shortcuts.................................................. 96
Creating a Shortcut .........................................96
Using a Shortcut..............................................96
iv
Using a Headset .......................................98
Attaching a Headset........................................98
Using a Remote PTT Button ...........................98
Understanding Status Messages............99
Safety and General Information ............101
RF Operational Characteristics.....................101
Portable Radio Product Operation and EME
Exposure...................................................101
Electro Magnetic Interference/Compatibility..104
Medical Devices ............................................104
Operational Warnings ...................................105
Operational Cautions ....................................106
Accessory Safety Information .......................107
Page 9

MOTOROLA LIMITED WARRANTY ...... 109
Limited Warranty
Motorola Communication Products
(International) ..................................... 113
Patent and Trademark Information ...... 117
Index ....................................................... 118
Driving Safety Tips ................................ 123
v
Page 10

DECLARATION OF CONFORMITY
Per FCC CFR 47 Part 2 Section 2.1077(a)
Responsible Party Name: Motorola, Inc.
Address: 8000 West Sunrise Boulevard
Plantation, FL 33322 USA
Phone Number: 1 (800) 453-0920
Hereby declares that the product:
Product Name: i710
Model Number: H45XAN6RR4AN
Conforms to the following regulations:
FCC Part 15, subpart B, section 15.107(a),
15.107(d) and section 15.109(a)
Class B Digital Device
As a personal computer peripheral, this device
complies with Part 15 of the FCC Rules. Operation
is subject to the following two conditions: (1) this
device may not cause harmful interference, and (2)
this device must accept any interference received,
including interference that may causeundesired
operation.
vi
Note: This equipment has been tested and
found to comply with the limits for a Class
B digitaldevice,pursuantto part 15 ofthe
FCC Rules. These limits are designed to
provide reasonable protection against
harmful interferencein a residential
installation. This equipment generates,
uses and can radiate radio frequency
energy and, if not installed and used in
accordance with the instructions, may
causeharmfulinterferencet o radio
communications. However, there is no
guarantee that interference will not occur
in a particular installation.
If this equipment does cause harmful
interference to radio or television reception,
which can be determined by turning the
equipmentoff and on, the user is
encouraged to try to correct the interference
by one or more of the following measures:
• Reorient or relocate the receiving
antenna.
• Increase the separationbetween the
equipment and receiver.
• Connect the equipment into an outlet on
a circuit different from that towhich the
receiver is connected.
• Consult the dealer or an experienced
radio/TV technician for help.
Page 11

Getting Started
volume
controls
antenna
Push-To-T alk
(PTTTM) button
TM
audio jack
accessory connector
speaker
(in back)
microphone
light sensor
1
Page 12

Getting Started
p Power button.
Navigation key — press the arrows to
scrollthroughmenus andlists.
O OK key — selects highlighted item;
answerscalls.
m Menu key — accessescontext-sensitive
menus.
A Optionkey — selects the option
appearing above it on the display.
s Send key — placesphonecalls.
e End key — ends phone calls; returnsto
idlescreen.
2
t Acts like s when the flipis closed; turns
speaker on; used with voice names and
voice records.
. Acts like e when the flip is closed;
accesses recent calls; sends incoming
callsto voice mail.
To start using your i710 phone:
• Make sure your SIM card is in place.
• Chargethe battery.
• Activate your service.
• Enable over-the-air security if you are prompted
to.
Page 13

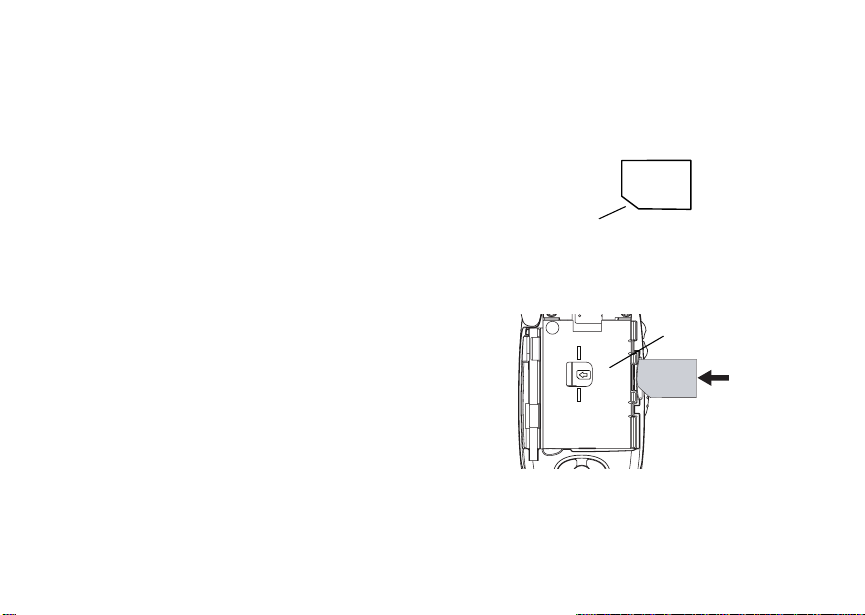
Locating Your SIM Card
Locating Your SIM Card
Your SIM (SubscriberIdentity Module)card is a
small piece of plastic located in the S IM card
holderin the back of your phone, underneath the
battery.
SIM card
If your SIM card is not in the SIM card holder, it
may be in the box your phone came in, attached to
a piece ofplasticaboutthe size of a credit card. If
this is the case, carefully detach your SIM card
from the surrounding plastic and insert it as
described in “InsertingYourSIM Card” on page 14.
If there is no SIM card in your phone or the box,
contactyour service provider.
Battery
Removing the Battery Door
1 Make sure the phone is powered off. See
“Powering On and Off” on page 6.
2 Slidethe releasebuttonbackuntil it releasesthe
battery door.
speaker
3
Page 14
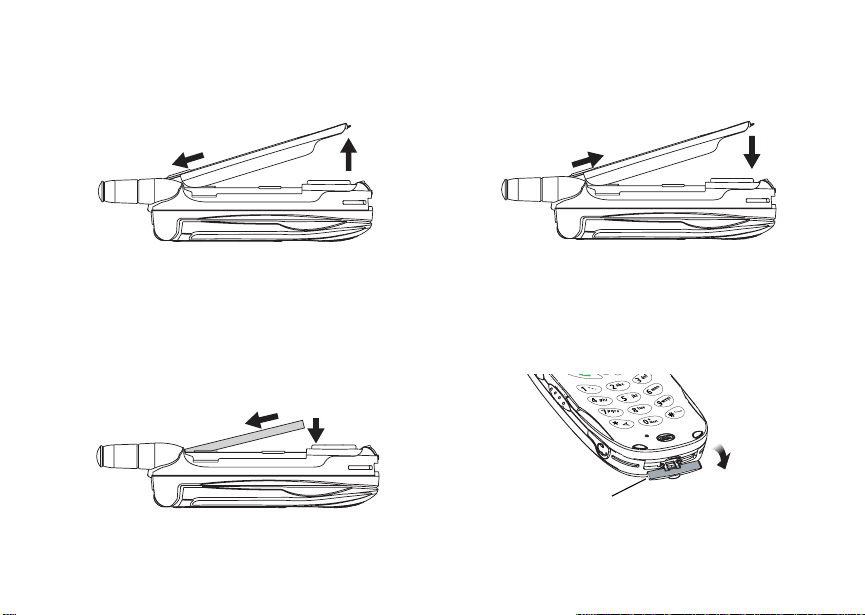
Getting Started
3 Allow the battery door to pop up, slide it forward,
and remove it from theback of your phone.
Inserting the Battery
Your phone comes with a Standard Lithium Ion
Battery.
1 Remove the battery door.
2 Insert the top of thebatteryintothe batteryarea.
Pressthe bottom of the battery to secure it.
4
3 Replace the battery door and pressitgentlyuntil
you hear a click.
Charging the Battery
Your phone comes with a standard travel charger.
1 Plug the chargerinto an electricaloutlet.
2 Open the connector cover.
connector
cover
Page 15
Battery
3 Plug the other end of the charger into the
accessory connector.
Charging Times
See your battery and charger to determinethe
appropriate charging time.
Battery Charger
Rapid Mid-Rate
Slim 2hours 3hours
High
Performance
For best results, charge the batteries within the
temperature range of 50°F to 104°F (10°C to
40°C).
2hours 4hours
Prolonged charging is notrecommended.
Removing the Battery
1 With the phone powered off, remove the battery
door.
2 Remove the battery by pushing the battery
toward the antenna and lifting it out.
Battery Use and Maintenance
• TheMotorolaiDEN Approved Lithium Ion
chargers provide optimum performance. Other
chargers may not fully charge the iDEN Lithium
Ion batteryor may yield a reduced number of
lifetime charge cycles.
• Extreme temperatures degrade battery
performance.Do not store the battery where
temperatures exceed 140°F (60°C) or fall below
4°F (-20°C).
5
Page 16
Getting Started
• Lithium Ion batteries have a self discharge rate
and withoutuse, lose about 1% oftheircharge
per day.
• Thebattery capacityisdegradedif thebattery is
storedfor long periodswhile fullycharged.If
long term storage is required,store at half
capacity.
Activating Service
The first time you poweron yourphone, you must
be in your local calling area. This activates your
service.
Powering On and Off
The first time you poweryourphone on, a screen
may appear asking you to update your browser
information. This means you must enable security.
To power your phone on:
1 Open the flip.
2 Press p.
To power your phone off:
1 Open the flip.
2 Pressand hold p.
6
When You Power On For the First Time
If the Enter SIM PIN Code screenappears,enter
your SIM PIN. See“ Entering the PIN” on page12.
Press A under Ok.
When you receive your phone, the SIM PIN is
0000. Change your PIN to prevent fraudulentuse
of the SIM card (see “Changing the PIN” on page
12).
As your phone connects to thenetwork, you will
see a welcome message and a connecting
message. When the idle screen appears, the
phone is ready to use.
Page 17

Enabling Over-the-Air Security
Enabling Over-the-Air
Security
If you are set up to receive over-the-air
programming from your serviceprovider, you must
enable security the first time you poweron your
phone or within 20 daysof first activationof your
phone:
1 When you power onyour phone for the first time,
afterthe idle screen appears, you will be
prompted to select Ok to update your browser
information.
Note: If you press A under Later, you will be
prompted to enable security each time
you power on yourphone until you press
A under Ok.
2 Press A under Ok.
3 You are prompted to enable security. Press A
under Yes. A series of screens appears. If you
subscribe to your serviceprovider’s plan, your
home page appears.
4 Press e to return to the idle screen.
Phone Programming
Within24 hours of enabling security, you may
receive an alert notification containing your Private
ID and Talkgroup lists for Private calls.
To accept programming:
1 When you receive an alert notification saying
New Browser Message - Receive
Programming Info,pressO or press A under
Goto.
2 You are prompted to accept changes to your
lists. Press O or press A under Ok.
3 If you are prompted again to accept changes to
your lists, press O or press A under Ok.
4 A confirmation screen displays. Press O or
press A under Ok.
5 Press e to return to the idle screen.
Finding Your Phone Number
My Info lets you viewyour phone number, Private
ID, and other phone information:
1 Press m to access the main menu.
2 Scroll to My Info.
3 Press O.
4 Scrollto seeyourinformation:
•Name— Enter your name. See “Entering
Text”onpage49.
•Line1and Line 2 —yourphonenumbers for
phonelines 1 a nd 2. Each is filledin when you
receive your first call on thatline.
7
Page 18
Getting Started
•Private— Your Private ID is the number that
others use to contact you using Private calls.
ItisfilledinwhenyoureceiveyourfirstPrivate
call.
•GroupID— the number of the Talkgroup you
have joined.
• Carrier IP — the IP address assigned to your
serviceprovider.Itisfilledinwhenyou
register for packet data services.
• IP1 Address andIP2 Address —theIP
addresses you use to accesstheInternetwith
your phone.
•Ckt— Your circuit data number is the number
youuseifyouwanttouseyourphoneto
transfer circuit data. See “Using Your Phone
as a Modem”on page 41. You receivethis
number from your service provider.
Note: The context-sensitivemenuunderMy Info
contains information that may beused by
your service provider if there is a problem
withyour phone.
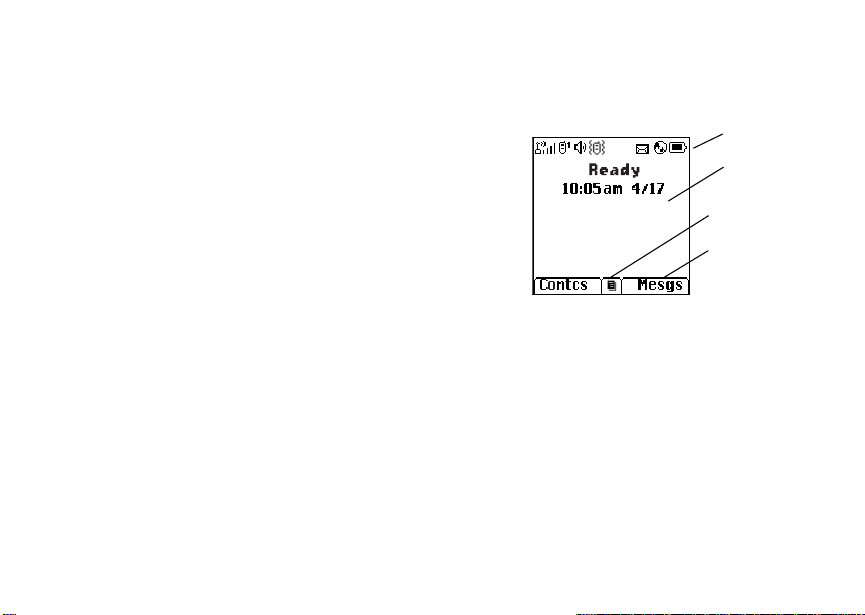
Phone Basics
Any time your phone is powered on, the display
provides you with information and options.
8
The external displayshows a shortened version of
the internal display. To see more information, open
the flip.
status icons
text area
menu icon
display options
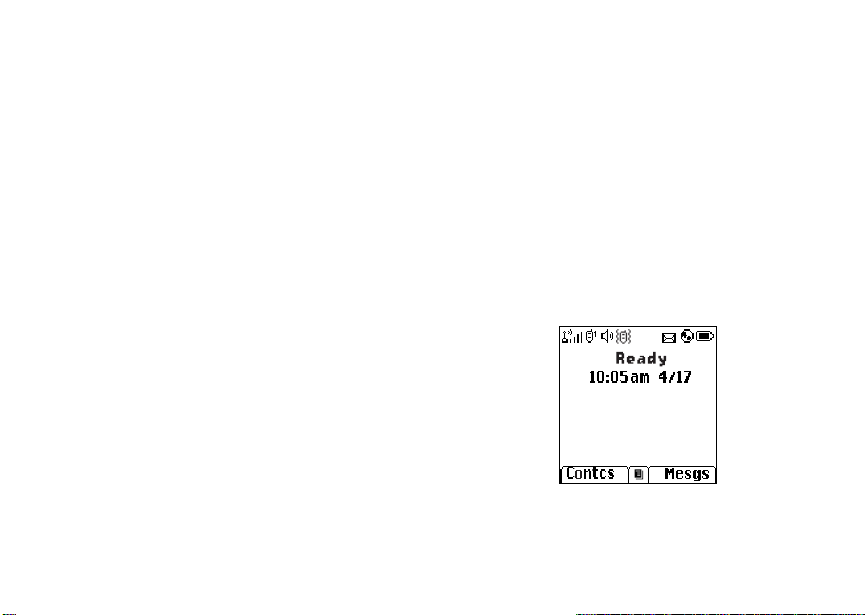
The screen shown is theidle screen.T he text that
appearson your idle screen depends on your
serviceprovider. The idle screen appears when
your phone is on,but not engaged in any activity.
Text Ar ea
This area displays menus, messages, names,
phone numbers, and other information.
Page 19

Phone Basics
Display Options
Two display options appear at the bottom of most
screens. You select a display option by pressing
theoptionkeybelowit.
Menus and Lists
Your phone’sfeatures are arrangedin menus,
submenus,and lists.
To access the items in a menu or list,scroll using
the navigation key at the top of yourkeypad.This
key lets you scroll up, down,left,or right.Holding
down the appropriatepart of the navigationkey
speeds up scrolling.
In this guide,this symbol> tells you to select a
menu or list item. For example, Settings >
Security means:
1 Scroll to Settings on the main menu.
2 Press O to see the Settings screen.
3 Scroll to Security.
4 Press O to see the Security screen.
Quick Access to Main Menu Items
Each arrow in the navigation key and O can be
used to access a main menu item from the idle
screen.Each of these keysis assignedto a main
menu item when you receive your phone. To
assign different main menu items, see “Personalize
Features” on page 88.
OK Key
Pressing O:
• Selects the highlightedmenuitem or list item
• Sets options
• Confirms actions
• Places and answer calls
Menu Key
Many features provide context-sensitive menus
that let you access related features and actions.
Thisicon S appears any timea context-sensitive
menu is available.Press m to access the menu.
9
Page 20

Getting Started
Main Menu
All your phone’sfeaturescan be accessedthrough
themainmenu.Youcansetthemainmenuto
appearas a listor as large icons.
Browser Browse the Web.
a
Java Apps Java applications on your
q
Settings Customize your phone.
b
Ring Tones Assign ring tones and turn
m
VoiceRecord Record and play audio
c
My Info View personal phone
j
GPS Find your approximate
l
Contacts View,store,editcontacts.
d
10
phone.See page 66.
Seepage84.
ringer off. See page 46.
messages. See page81.
information, including
phonenumberand Private
ID. See page 7.
geographicallocation.See
page 72.
Seepage26.
Messages Access messages.See
e
Call Forward Set call forwarding
f
Datebook Schedule appointments.
o
Memo Store a number to access
g
Call Timers Phone usage information.
h
Recent Calls Lists recent calls. See
i
Shortcuts Create shortcuts to
s
Profiles Groups of settings you
p
Call Alert Lists call alerts. See
k
page 52.
options.S ee page 33.
Seepage60.
later.Seepage45.
Seepage40.
page 24.
screens.See page 96.
applytogether. See
page 91.
page 22.
Page 21

Phone Basics
Status Icons
Status icons appear at the top of the display. Some
appearat all times. Others appear only when your
phone is engaged in certain activities or when you
have activated certain features.
abcd
efgd
opqr
s
A
B
C
12
GJ
HK
Battery Strength — Afuller battery
indicates a greater charge.
Signal Strength —More barsnext
to the antennaindicate astronger
signal.
Phone In Use — Your phone is
activeon a phonecall.
PrivateIn Use — Your phone is
active on a Private call.
TalkgroupIn Use—Yourphone is
activeon a groupcall.
Active Phone Line —1indicates
phoneline1 is ready to make calls;
2 indicates phone line 2 is ready to
make calls.
Call Forward — Your phone is set
to forward calls.See page 33.
IL
u Q RM
wxT
yz
DE
U
YZ
N O
t
Ringer Off — Your phone is set not
to ring. See page 46.
Messages — You have one or
more messages.See page 52.
Internet — You are ready to
browse the internet.
Airplane Mode — Your phone is
set to airplane mode. See page 86.
Packet Data — You are readyto
transfer packet data or are
transferring packet data. See
page 41.
TTY — Youare ready to use your
phonetomakecallsusinga
teletypewriter device. See page 42.
Roaming — You are using your
phone outsideyour carrier's
network.
11
Page 22

Getting Started
SIM Card Security
Your SIM card protects your personal information.
The SIM card stores all yourContacts information.
Since this information is stored on your SIM card,
not in your phone, you can remove the information
by removing your SIM card.
Note: Except for making emergency calls, your
phone will not function withoutt he SIM
card.
To prevent unauthorized use ofyour phone,your
SIM cardmay be protectedby a PIN that you enter
each time the phone is powered on. You can
change the PIN or turnoff the requirement that it
be entered.
Entering the PIN
You may be requiredto enter a SIM PINwhenyou
firstuse your phone.
When you receive your phone, the SIM PIN is
0000. Change your PIN to prevent fraudulent use
of the SIM card.
12
Important: Ify ou enter your PINincorrectly3 times,
1 When the Enter SIM PIN Code screen appears,
enter your SIM PIN. An asterisk appears for
each character entered.
2 Press A under Ok.
your SIM card is blocked. To unblock
your SIM card, you must contact your
service provider. See “Unblocking the
PIN” on page 13.
Changing the PIN
1 From the main menu, select Settings >
Security > Change Password > SIM PIN.
2 At the Enter Old SIM PIN screen, enter the
current SIM PIN.
3 Press A under Ok.
4 At the Enter New SIM PIN screen, enter the
new 4- to 8-digit SIM PIN.
5 Press A under Ok.
6 At the Re-enter New SIM PIN screen, re-enter
the new SIM PIN to confirm.
7 Press A under Ok.
Page 23

SIM Card Security
Turning the PIN Requirement On and Off
When the SIM PIN requirement is on, you are
prompted to enteryour PIN each time youturn on
your phone.
Note: If a SIM PIN is required, your phone will
not function until the SIM PIN is entered,
exceptfor making emergencycalls.
When the PIN requirement is off, your phone can
be used without enteringa PIN.
Important: When the SIM PIN requirement is off,
the personal data on your SIM card is
not protected. Anyone can use your
phone and access your personal data.
1 From the main menu, select Settings >
Security > SIM PIN.
2 Select On or Off.
3 Enter the current SIM PIN.
4 Press A under Ok.
Unblocking the PIN
If you enter your PIN incorrectly3 times, your SIM
card is blocked. To unblock your SIM card, you
must contact your service provider to get a PIN
Unblock Code (PUK).
Important: If you unsuccessfully enter the PUK
code 10 times, your SIM card is
permanently blocked and must be
replaced. If this happens, all data is
lost. You will get a message to contact
your service provider. Except for
making emergency calls, your phone
will not function with a blocked SIM
card.
To unblock the PIN:
1 Press *#m1.
2 At your service provider representative’s
request, provide the information needed to give
youaPUKcode.
3 Select Unblock PIN.
4 Enter the PUK code.
5 Enter a new 4- to 8-digit SIM PIN.
6 Re-enter your SIM PIN.
If you entered the codes properly, SIM Unlocked
appearson the display.
13
Page 24
Getting Started
Inserting and Rem oving Your SIM Card
Important: Do not touch the gold-colored areas of
Switching SIM Cards
Moving your SIM card from one phone to another
moves all your Contacts information, but erases
otherinformation.If you remove your SIM cardand
useit with anotherphone,or use anotherSIM card
with your phone, the following information is
erased:
• The recent calls list
• Call forwarding settings
• Net alerts
• MOSMSdrafts, outbox messages,and
customized quick notes
• InformationstoredinMemo
• 3 most recent GPS Enabled locations
• Voice records
• Voice names
• Datebook events
• Options set using the Personalize menu
14
your SIM card.
Inserting Your SIM Card
1 With your phone powered off, remove the
battery door and battery.
2 Hold your SIM card as shown.
cut corner
3 Carefully slide your SIM card into yourphone
until it lines up with the marks above and below
the SIM card holder.
SIM card
holder
Page 25
Accessories
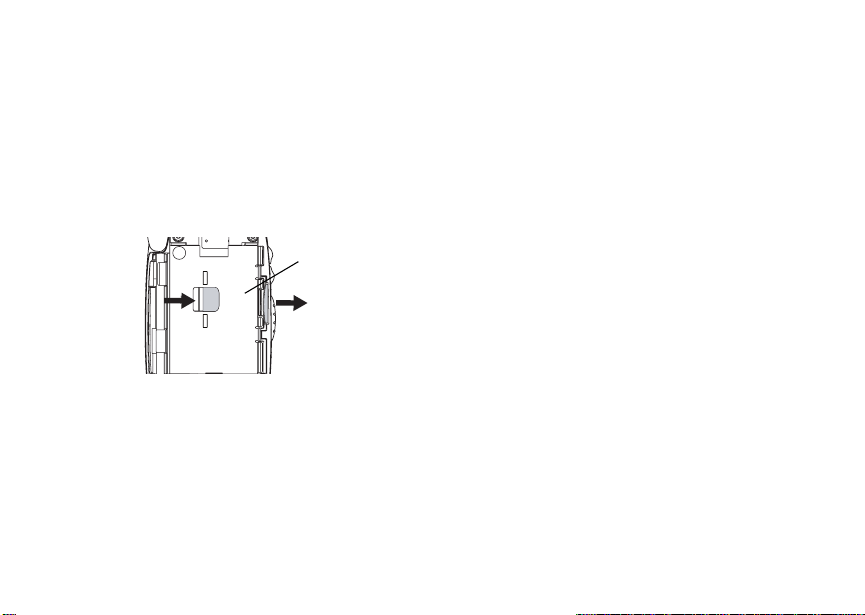
Removing Your SIM Card
Important: Toavoid loss or damage, donot remove
your SIM card from your phone unless
absolutely necessary.
1 With your phone powered off, remove the
battery door and battery.
2 While holding the tab down, slide your SIM card
out of the SIM card holder.
SIM card
holder
Note: Protect your SIM card as you would any
delicate object. Store it carefully.
Accessories
To order accessories, log on to our Website at
www.motorola.com/store/iden or con tact y ou r
Motorola Authorized Retailer.
For More Information
If you havequestions about your i710 phone,
contact your sales representative or your service
provider.
15
Page 26

Making Calls
Your i710 phone makes two types of calls: digital
cellular phone calls and Private calls. With Private
calls,you use your phoneas a long-range,digital
walkie-talkie.
Phone Calls
1 Enter the number you want to call.
2 To place the call:
Press s. -or-
If you entered the number from the idle screen,
press O.
3 To end the call:
Press e. -or-
Closethe flip.
To end a callby closingthe flip, you must have the
Flip to End feature turned on (see “Setting Flip
Actions” on page 39).
Private Calls
1 Enter the Private ID you want to call.
2 Pressand hold the PTT button on the side of
your phone. Begin talking after your phone emits
a chirpingsound.
16
3 Release the PTT button to listen.
Tip: To let someone know you want to talk to
himorheronaPrivatecall,sendacall
alert.See “Call Alerts”on page 22.
Receiving Calls
Phone Calls
When you receive a phone call, your phone rings,
vibrates, or lights up its backlight.
Answering
If the flip is closed, press t. -or-
Open the flip. -or-
Press s. -or-
Press O. -or-
Press A under Yes. -or-
Pressany number key.
To answer acall by opening the flip, you must have
theFliptoAnsfeatureturnedon(see“SettingFlip
Actions” on page 39). To answer a call by pressing
any number key, you musthave the Any Key Ans
feature turned on (see“Phone Calls Features” on
page 87).
Page 27

Ways to Enter Calls
SendingtoVoiceMail
If the flip is closed, press .. -or-
Press e. -or-
Press A under No.
Ending
If the flip is closed, press .. -or-
Press e. -or-
Closethe flip.
Private Calls
When you receivea Private call, your phoneemits
a chirping sound or vibrates.
1 Waitfor the caller to finish speaking.
2 Pressand hold the PTT button on the side of
your phone. Begin talking after your phone emits
a chirpingsound.
3 Release the PTT button to listen.
Ways to Enter Calls
• Usethe numbers on thekeypad
• Select the number from the recent calls list
• Select the number from Contacts
• Select a numberstoredin Datebook
• Redial the lastphonenumbercalled
• Sayavoicenameintoyourphone
• Use Speed Dial or Turbo Dial
• UseOneTouchPTTtomakeaPrivatecall
• Use a TTY device — see “Making TTY Calls” on
page 42
®
From the Keypad
To enter the number you want to call, press the
numbers on the keypad.
Ifyoumakeamistake:
• Toclear a digit, press A under De lete.
• Toclear all digits,press and hold A under
Delete.
• To insert or delete a digit anywhere in the string
of digits you have entered, scroll left or right.
• To canc el, press e.
From the Recent Calls List
The recent calls list stores the last 20 callsyou
made or received.
1 From the main menu, select Recent Calls.
2 Scrollto the name ornumber you want to call.
17
Page 28

Making Calls
From Contacts
If you have numbers stored in Contacts, you can
use these numbers to makecalls. For information
on entering numbersinto Contacts, see “Creating
Entries” on page 28.
1 From the main menu, select Contacts.
2 Scrollto the name ornumber you want to call.
Tip: To find Contactsentriesfaster,use the
keypad to enter the first letter of the name.
3 Placethe call now. -or-
Scrollleftor rightto displaythe Contactstype for
the number you want to call.
IfyouaremakingaPrivatecall,yourphoneplaces
the call to thePrivate ID stored in the Contacts
entry, even if the Private icon is not displayed.
Ifyouaremakingaphonecall:
• Your phone places the call to the phone number
assignedto the Contactstypedisplayed.
• If the Contacts type displayed is not a phone
number, your phone places the call to the phone
number stored in the Contacts entry.
18
• If the Contactstypedisplayed is not a phone
number and you have more than one phone
numberstored in the Contactsentry,your phone
prompts you to selectthe phone number you
wantto place the callto.
From Datebook
If you havenumbers stored as partof events in
Datebook, you can use these numbers to make
calls.For information on storing events in
Datebook, see “D atebook”on page 60.
1 From the main menu, select Datebook.
2 Select the day of the event containing the
numberyou want to call.
3 Highlight or select the event containing the
numberyou want to call.
For details,see “Making Calls From Datebook” on
page 64.
Redialing the Last Number
Pressandhold s to placea callto thelastphone
number you called.
Page 29

Using a Voice Name
If you have created a voice name in Contacts for
the number you want to call, say the voice name
into your phone to enter the number. See page 27
for information on voice names.
You can usea voice name to entera number with
theflipopenorclosed.
1 If the flip is open, press and hold t until a
prompt appears telling you to say the voice
name. -or-
If the flip is closed,press andholdt until a
tone sounds.
2 Speaking into the microphone,say the voice
name assignedto the number you want to call.
Your phone plays the name back to you.
If you aremaking a phone call,the call is placed
automatically.
Tip: To stop a phone call from being completed,
press . if the flip is closed or presse.
IfyouaremakingaPrivatecall,pressandholdthe
PTTbuttontoplacethecall.
Ways to Enter Calls
Using Speed Dial and Turbo Dial
Each phone number stored in Contacts is assigned
a Speed Dial number which you can use to call that
number.
Speed Dial
1 From the idle screen, use the keypad to enter
the SpeedDialnumberassigned to thephone
numberyou want to call.
2 Press #.
3 Press s.
Turbo Dial
From the idle screen, press and hold the Speed
Dialnumber (1 through9) assignedtothephone
numberyou want to call.
®
Using One Touch PTT
One Touch PTT sets your phone to call the most
recentPrivateID on therecentcallslist, or a
Private ID you choose, every time you press the
PTT button. See “Setting One Touch PTT” on page
38.
19
Page 30

Making Calls
Missed Phone Calls
Whenyoumissa call,thisicon V andthenumber
of phone calls you have missed appear briefly.
Ifyouwanttodismissthemissedcallmessage,
press A under Back. -or-
If you want to view the missed call on the recent
calls list, press A under View.
Using Speakerphone
Turningo n speakerphonemakes incoming sound
come out of the phone’s speaker instead of the
earpiece.S peakerphoneisavailablewheneveryou
areonanactivephonecall.
With the Flip Open
To turn speakerphoneon or off:
Press A under Spkr. -or-
Press t.
With the Flip Closed
When you are ona call with theflip closed,
speakerphone is always on.
Opening the flip turns speakerphone off.
20
Using Mute
Muting callslets you listen to incoming sound
withouttransmittingsound. Mute isavailable
whenever you are on an active call.
To turn mute on:
Press A under Mute.
Whilemuteison,Unmute appears as a display
option.
To turn mute off:
Press A under Unmute.
Making Emergency Phone Calls
Your phone supportsemergency calling.
Emergency phone calls can be made even when
your SIM card isblockedor not in your phone.
Dial 911 to be connected to an emergency
responsecenter. If youare on anactive call,you
must end it before calling 911.
When you make an emergency call, your phone’s
GPS Enabled featurecan help emergencyservice
personnel find you, if you are in a locationwhere
yourphone's GPS antennahasestablisheda clear
view of the opensky and your local emergency
Page 31

response center has the equipment to process
locationinformation. See “GPS Enabled”on page
72, and particularly “IMPORTANT: Things to Keep
inMind”onpage72and“MakinganEmergency
Call” on page 73, for more information on the
limitations of this feature. Because of the
limitationsof this feature,alwaysprovide your best
knowledge of yourlocation to the emergency
response center when you make an emergency
call.
Important: Emergency calls cannot be placed while
Important: If you have not registered on the
the keypad is locked.
network, emergencycalls cannot be
placed while your SIM card is in your
phone.
Making Emergency Phone Calls
21
Page 32

Call Alerts
Sending a call alert lets the recipient know you
want to talk to him or her on a Private call.
When you send a call alert, the recipient’s phone
emits a series of beeps, or vibrates, and displays
your name or Private ID.
The recipientcan:
• Answer— begina Private call with thesender
• Queue — store the call alert to the call alert
queue, which is a list of call alerts
• Clear —dismissand deletet he call alert
Sending Call Alerts
1 Enterthe PrivateID you want to sendto, as you
wouldwhenmakingaPrivatecall.
2 Press A under Alert. Ready to Alert appears
on the display.
3 Pressthe PTT button until Alert Successful
appears on the display.
Note: If the alert is not successful, this may
meanthepersonyouaretryingtoreachis
on a call or has the phone turned off.
22
Receiving Call Alerts
When you receive a call alert, you must answer,
queue,or clear it. You cannot receive phone calls
or Private calls until you do.
To answer a callalert:
PressthePTTbuttontomakeaPrivatecallto
the sender.
To queue a callalert:
Press A under Queue.
To clear a callalert:
Press O. -or-
Press A under Clear. -or-
If the flip is closed, press ..
Note: The recent calls list also stores call alerts
you have received. They appear as
Private calls. Call alerts remainin your
recentcallslist until you delete them or
until they reach the endof the list.
Using the Call Alert Queue
When you queue a callalert,it remainsin the call
alertqueue until you make a Private call to the
senderordeleteit.
Page 33

Using the Call Alert Q ueue
Viewing Call Alerts
1 From the main menu, select Call Alert.
2 Scroll through the list.
Viewing Date and Time
To view the date and time a callalert was received:
1 From the main menu, select Call Alert.
2 Select the call alert you want information on.
Responding to Call Alerts in the Queue
After you queue a call alert, you can respond to it
by making a Private call to the sender or sending a
call alert to the sender.
Making a Private Call to the Sender
1 From the main menu, select Call Alert.
2 Scrolltothecallalertyouwanttorespondto.
3 PressthePTTbuttontobeginthecall.
This removes the call alert from the queue.
Sending a Call Alert to the Sender
1 From the main menu, select Call Alert.
2 Scrolltothecallalertyouwanttorespondto.
3 Press A under Alert. Ready to Alert appears
on the display.
4 Pressthe PTT button until Alert Successful
appears on the display.
Deleting Call Alerts
To delete a call alert from the queue:
1 From the call alert queue, scroll to the call alert
you want to delete.
2 Press m.
3 Select Delete.
4 Press O or press A under Yes to confirm.
To delete all call alerts from the queue:
1 From the call alert queue, press m.
2 From the call alert menu, select Delete All.
3 Press O or press A under Yes to confirm.
Sorting Call Alerts
Tip: Youmusthaveatleastonecallalertinthe
queue to access this feature.
To sort call alerts by the order they were received:
1 From the main menu, select Call Alert.
2 Press m.
3 Select Sort By.
4 Select First on Top or Last on Top.
23
Page 34

Recent Calls
The recent calls list stores the numbers of the 20
most recent calls you have made and received.
If the number of a recent call is stored in Contacts,
the name associatedwith the number appears on
the recent calls list.
An icon appears beside the name or number
indicating the Contacts type of the number used in
thecall.See“Contacts”onpage26.
For phone calls, an icon appears to theleft of the
name or numbergivingmoreinformationabout the
call:
A call you made.
X
A call you received.
W
A missed call. Missed calls appear on the
V
recent calls list only if you have Caller ID.
Note: The recent calls list also stores call alerts
you have received.They appearas
Private calls. Call alerts remainin your
recentcallslistuntilyou delete them or
untiltheyreach the end of the list.
24
Viewing Recent Calls
1 From the main menu, select Recent Calls.
2 Scroll through the list.
To get more informationon a recentcall:
From the recent calls list, select the call you
wantinformationon.
This displays information such as the name
associatedwiththecall,the number,the date,
time,and duration of the call.
Storing Recent Calls to Contacts
1 From the recent calls list, scroll to the number
you want t o store.
2 Press A under Store. -or-
If Store is not one of your options: Press m.
Select Store.
Tip: If Store is not onthismenu, the number is
already stored in Contacts.
3 Tostoret he number as a newentry,select[New
Contact]. -or-
To store the number to an existingentry,select
the entry.
Page 35

4 With the Contacts type field highlighted, scroll
left or right to display the Contacts type you want
to assign the number. For information on
Contacts types, see page 26.
5 If you want toadd more information to theentry,
follow the applicable instructions in “Creating
Entries” on page 28.
6 Press A under Done.
Deleting Recent Calls
To deletea call:
1 From the recent calls list, scroll to the call you
wantto delete.
2 Press A under Delete. -or-
If Delete is not one of your options: Press m.
Select Delete.
3 Press O or press A under Yes to confirm.
To delete all calls:
1 From the recent calls list, press m.
2 Select Delete All.
3 Press O or press A under Yes to confirm.
Deleting Recent Calls
25
Page 36

Contacts
Contacts stores up to 600 numbers or addresses.
Each Contactsentrycan store several numbersor
addresses.
InformationstoredinContactsissavedonyour
SIM card.
A Contacts entry contains:
• A name — A name is required if you are storing
more than one number or address to theentry;
otherwise, it is optional. Typically, this is the
name ofthe person whose contact information is
stored in the entry.
• Aringtone—Youcanassignaringtoneto
eachentry.Thisis the sound your phone makes
when you receive phone calls or call alerts from
any of the numbers stored in the entry.
26
• A Contacts type — Each number or address
storedmust be assigned a Contacts type:
Mobile phone number
A
Private Private ID
B
Work1 phone number
C
Work2 phone number
D
Home phone number
E
Email email address
F
Fax phone number
G
Pager phone number
H
Talkgroup Talkgroup number
I
IP IP address
J
Other phone number
K
• A number or address — Each Contacts entry
must contain a numberor address.Thismay be
any type of phone number, Private ID, Talkgroup
number,email address,or IP address.
Page 37

Viewing Contacts
Note: You can storenumbers up to 64 digits
long, but every 20 digits must be
separated by a pause or wait. See
“Creating Pauses and Waits” on page 30.
• A Speed Dial number — When you store a
phone number, it is assigned a Speed Dial
number.You can accept the default Speed Dial
numberor change it.
• Avoicename — Ifyou create a voicenamefora
number,you can then dial that number bysaying
the voice name into yourphone. This icon
appears to the left of the Contacts type icon if a
voice name is assigned.
P
Viewing Contacts
To access Contacts:
From the main menu, select Contacts. -or-
Ifyouareonacall:Pressm.SelectContacts.
To view entries:
1 From the Contacts list, scroll to the entry you
wantto view.
2 If an entry has more than one number or
addressstored,
icon.Scrollleftor right to view the icon for each
numberstoredin the entry.
3 Press O to view the entry.
<> surrounds the Contacts type
4 Scrollto view the other numbers and addresses
storedfor the entry.
Tip: Toview more entries,continue scrolling.
Searching for a Name
To search for a name in Contacts:
1 From the Contacts list, press A under Search.
-or-
If Search is notone of your options: Pressm.
Select Search.
2 Enter the name you want to see. See “Entering
Text”onpage49.
3 Press O.
Your phone finds the name you entered or the
nearestmatch.
Showing Only Private IDs and Talkgroups
To set Contacts to show only entries that contain
Private IDs andTalkgroup entries:
1 From the Contacts list, press m.
2 Select Filter.
3 Set this option to Show Prvt/Grp.
27
Page 38

Contacts
To set Contacts to show allentries:
1 From the Contacts list, press m.
2 Select Filter.
3 Set this option to Show All.
Creating Entries
A number or address and a Contacts type are
required for allContacts entries. Otherinformation
is optional.You may enter the informationin any
order by scrolling through the entry details.
After you have entered the number or address,
Contacts type,andany other informationyouwant,
you can press A under Done to savethe entry to
Contacts.
To cancel a Contacts entry at any time press, e
to return to the idle screen.
To create a Contacts entry:
1 To access the entry detailsscreen:
Select Contacts > [New Contact]. -or-
From the Contacts list,press m. Select New.
2 Ifyouwanttoassignanametotheentry:
Select Name.
Enterthe name. See “Entering Text” on page
49. When you are finished,pressO.
28
Tip: PressA under Browse to select a name
alreadyin Contacts.
3 Ifyouwanttoassignaringtonetothename:
Select Ringer.
Selecttheringtoneyouwanttoassign.
4 ToassignaContactstypetothenumberor
addressbeingstored:
Select the Contacts type field.
Select the Contacts type you want toassign.
5 To store anumber or address:
Select the # field (or ID for an email address, or
IP for an IP address).
Enterthe number or address. For phone
numbers, use the10-digit format. For email
addresses, see “Entering Text” on page 49.
Tip: PressA under Browse to select a number
or address from Contacts, the recent calls
list, or Memo.
When you are finished, press O.
6 Ifyouwanttoassignmoreoptionstothe
number,select [Options]. See “Assigning
Options” on page 29.
Page 39

Storing Numbers Faster
7 If you wantto add more numbers or addresses
to the entry:
Scrollpast the information you already entered.
Enter the additional information for the entry
using step 2 through step 6. You must assign a
name to the entry, if you have not already.
8 Press A under Done.
Assigning Options
1 Ifyouhavenotalready,select[Options].
2 The default Speed Dial number assigned to a
phonenumber is displayedin the Speed # field.
This is always the next available S peed Dial
location.
Ifyouwanttoassignthephonenumbertoa
different Speed Dial location:
With the Speed # field highlighted, press O.
Press A under Deleteto delete the current
Speed Dial number.
Enter the new Speed Dial number using the
keypad.
When you are finished, press O.
3 Ifyouwanttocreateavoicenameforaphone
number,select Voice Name.
As directed by the screen prompts, say and
repeatthe name you want t o assign to the
number.Speak clearlyinto the microphone.
4 When you are finished, press A underBack.
Storing Numbers Faster
To store numbers to Contacts from the recent calls
list, see “Storing Recent Calls to Contacts” on page
24.
To store numbers to Contacts from Memo, see
“Memo” on page 45.
To store numbers to Contactsfrom the idle screen:
1 Use the keypadto enter thenumberyouwantto
store.
2 Press m.
3 Select Store Number.
4 Tostoret he number as a newentry,select [New
Contact]. -or-
To store the number to an existingentry,select
the entry.
5 With the Contacts type field highlighted, scroll
leftor right to displaythe Contactstype you want
to assign the number.
29
Page 40

Contacts
6 If you want toadd more information to theentry,
follow the applicable instructions in “Creating
Entries” on page 28.
7 Press A under Done.
Editing Entries
1 From the Contacts list, scroll to the entry you
wantto edit.
2 Press A under Edit. -or-
If Edit isnot one of youroptions: Press m.
Select Edit.
The entry details screen displays.
3 Follow the applicable instructions in “Creating
Entries” on page28 to edit thevariousfields.
Deleting E ntries
Delete an Entry
1 From the Contacts list, scroll to the entry you
wantto delete.
2 Press m.
3 To deletethe entire entry, select Delete
Contact.
4 Press O or press A under Yes to confirm.
30
Delete a Number or Address
1 From the Contacts list, scroll to the entry that
contains the number or address you want to
delete.
2 Scrollleft or rightto displaythe Contactstype for
the number you want to delete.
3 Press m.
4 Select Delete Number.
5 Press O or press A under Yes to confirm.
Note: If an entry contains only one number or
address, deleting the number or address
deletes the entry.
Checking Capacity
To see howmany numbersare stored in Contacts:
1 From the Contacts list, press m.
2 Select Capacity.
Creating Pauses and Waits
When storing a number, you can program your
phoneto pause or waitbetween digits while
dialing. A pause makes your phone pause for 3
seconds beforedialing further. A wait makes your
phone wait for your responsebefore dialing further.
Page 41

International Numbers
This featureis useful when using voice mail or
otherautomatedphone systemsthat requireyouto
dial a phone number and then enter an access
number.
To program a pause:
Pressand hold * until the letter P appears.
The P represents a 3-second pause.
If you store 17035551235P1234, when you select
this number and make a call,yourphone dials the
first 11 digits, pauses for 3 seconds, then dials the
last 4 digits.
If you want a pause longer than 3 seconds, press
and hold * morethan once. Each P representsa
3-second pause.
To program a w ait:
Pressand hold * until the letter W appears.
The W means your phone waits before dialing
further.
If you store 17035551235W1234,when you select
this number and make a call,yourphone dials the
first11 digits and then w aits. A message appears
askingif you want to sendthe rest of thedigits.
Press A under Yes to dial the last 4 digits.
Tip: Youcan create pausesand waitswhile
dialing a numberfrom the keypad. See
“Creating Pauses and Waits While Dialing”
on page 38.
International Numbers
Note: This feature may not be offeredby your
service provider.
When storinga number that you plan to use for
international calls, use Plus Dialing:
1 Pressand hold 0 for two seconds. A “0”
appears, then changes to a “+”.
Note: The network translates the “+” into the
appropriate international access code
needed to place the call.
2 Enter the country code, city code or areacode,
and phone number.
For information about making international calls,
see “Making International Calls” on page 38.
Accessing Contacts with GSM Phones
Ifyouplantousetheinformationstoredin
Contacts with an i2000, i2000plus, or any other
GSM phone, download iDEN Phonebook Manager.
31
Page 42

Contacts
Go to idenphones.motorola.com/iden/supportfor
more information.
You can use iDEN PhonebookManager to make
the Contacts information saved to your i710
phone’s SIM cardaccessible in this type of phone.
32
Page 43

Call Forwarding
Call forwarding sends calls to the phone numbers
you specify. You can forward all calls to one
numberor forward missedcallsto different
numbers depending on the reason you missed the
call.
You can forward phone lines 1 and 2
independently.
Forwarding All Calls
When you set yourphoneto forward all calls, an
icon appears in the top row of the display:
Phone line1 is active; calls to phone line 1
G
are being forwarded.
Phone line1 is active; calls to phone line 2
I
are being forwarded.
Phone line1 is active; calls to phone lines 1
H
and 2 are being forwarded.
Phone line2 is active; calls to phone line 1
J
are being forwarded.
Phone line2 is active; calls to phone line 2
L
are being forwarded.
Phone line2 is active; calls to phone lines 1
K
and 2 are being forwarded.
To forward all calls:
1 From the main menu, select Call Forward >
Forward > All Calls.
2 Select To.
If you specified a forwarding numberfor all calls
before, this number displays.
To forward calls to this number, press A under
Back.
To delete this number, press O,thenpressand
hold A under Delete.
3 To enter the number you want to forward calls to:
Enterthe number using your keypad. -or-
Press A under Search. Select Contacts,
Recent Calls,orMemo.Select the number you
wantto enter.
4 Press O.
All your calls are now forwarded to the number you
specified.
33
Page 44

Call Forwarding
Turning Off Call Forwarding
If you don’t want all your calls forwarded,turn the
feature off:
1 From the main menu, select Call Forward > To.
2 Set this option to Off.
All your calls are nowsentto your phone.
Calls you miss are forwardedaccording to the
optionsset for missed calls. By default,missed
calls are forwarded to voice mail.
Note: To receivevoicemailmessages,youmust
firstset up avoice mail account with your
service provider.
Forwarding Missed Calls
You canspecifya forwardingnumber for eachtype
of missed call:
•IfBusy— Yourphoneisona callor transferring
data.
•IfNoAnswer— You do not answer on the first
4rings.
• If Unreachable — Your phone is out of
coverage or powered off.
34
Note: If you want a type of missed call sent to
voicemail,thecallforwardingnumberfor
that type of missed call must be your
voice mail access number.
Toforwardmissedcalls:
1 From the main menu, select Call Forward >
Forward > Detailed.
2 Select If Busy tospecify a forwarding number
for calls received when your phone is busy.
3 If you specified a forwarding number for this type
of call before, this number displays.
To forward calls to this number, press A under
Back andgotostep6.-or-
To delete this number, press O,thenpressand
hold A under Delete.
4 To enter the number you wantto forwardthis
type of call to:
Enterthe number using your keypad. -or-
Press A under Search. Select Contacts,
Recent Calls,orMemo.Select the number you
wantto enter.
5 Press O.
6 Repeatstep 2 through step 5 for If No Answer
and If Unreachable.
7 When you are finished, press A underBack.
Page 45

Viewing Call Forwarding Settings
1 From the main menu, select Call Forward >
Forward > All Calls.
2 With To highlighted, press A under Status.
Viewing Call Forwarding Settings
35
Page 46

Advanced Calling Features
Call Waiting
Call Waiting lets you receive asecond call while on
an active call. Call Waiting is always available,
unlessyou turn it offfor a specific call.
Ifyouareonacallandreceiveasecondcall,your
phoneemits a tone anddisplays a messagesaying
youarereceivingasecondcall.
To acceptthe second call andputtheactive call on
hold:
Press A under Yes.
To accept the second call andend the active call:
1 Press e.
Yourphone rings with the second call.
2 Answerthe second call.
To decline the second call:
Press A under No.Ifyousubscribetovoice
mail,the call is forwardedto yourvoicemailbox,
unless you set Call Forward for If Busy to a
different number.
36
Turn Off Call Waiting
To turn off Call Waiting during a call:
1 Press m.
2 Select In Call Setup > Call Waiting.
3 Set this option to Off.
Tip: To turn Call Waiting back on while still on
the call, set this option to On .
To turn off Call Waiting for the next callyou make
or receive:
1 From the main menu, select Settings > Phone
Calls > Call Waiting.
2 Set this option to Off.
Call Waiting is turned back on when you end the
call.
Switching Between Calls
Any time you haveone call active and one call on
hold, to make the call on hold active and put the
active call on hold:
Press A under Switch. -or-
If Switch is not one of your options: Press m.
Select Switch.
Page 47

Putting a Call on Hold
Putting a Call on H old
1 Whileonanactivecall,pressm.
2 Select Hold.
If you wantto make the callactive again, press A
under Resume.
Calling 2 People
Putting a Call on Hold, Making a Second Call
1 Placeor receive a phone call.
2 While the call isactive,press m.
3 Select 2nd Call. This puts the call on hold.
4 Enter the second phone number you want to
call.
Tip: For quick ways to enter the number, press
m.
5 Press s to place the call.
To end thesecondcall and make the call on hold
active again:
Press e.
Tomakethecallonholdactiveandputtheactive
call on hold:
Press A under Switch.
Making a 3-Way Call
1 Placeor receive a phonecall.
2 While the call is active, press m.
3 Select 3Way. This puts the call on hold.
4 Enter the second phone number you want to
call.
Tip: For quick ways to enter the number, press
m.
5 Press s to place the call.
6 Press A under Join.
All 3 people in the call can speak to and hear each
other.
Merging 2 Calls into a 3-Way Call
You can combine 2 phone calls into a 3-way call
any time you havea call on holdand a callactive:
1 Press m.
2 Select Join.
All 3 people in the call can speak to and hear each
other.
37
Page 48

Advanced Calling Features
Creating Pauses and Waits While Dialing
You can enter a pause or wait while dialing a
number.For more information on pauses and
waits, see “Creating Pauses and Waits” on page
30.
To create a pause while dialing a phonenumber:
1 From the keypad, enter the digits you want to
occur before the pause.
2 Press m.
3 Select Insert Pause.
4 Enter the digits you want to occurafter the
pause.
To create a wait while dialing a phone number:
1 From the keypad, enter the digits you want to
occurbeforethe wait.
2 Press m.
3 Select Insert Wait.
4 Enter the digits you want to occurafter the wait.
38
Making International Calls
Note: This feature may not be offeredby your
service provider.
Plus Dialinglets you place an international call to
most countries without entering the local
international access code.
1 Pressand hold 0 for two seconds. A “0”
appears, then changes to a “+”.
Note: The network translates the “+” into the
appropriate international access code
needed to place the call.
2 Enter the country code, city code or areacode,
and phone number.
Setting One Touch PTT
One Touch PTT sets your phone to call the most
recentPrivateID on therecentcallslist, or a
Private ID you choose, every time you press the
PTT button.
To setyourphone to callthemost recentPrivate ID
on the recent calls list:
1 From the main menu, select Settings > 2-Way
Radio > OneTouch PTT.
2 Set this option to Last Call.
Page 49

Setting Flip Actions
To set your phone to call a Private ID you choose:
1 From the main menu, select Settings > 2-Way
Radio > OneTouch PTT > AssignedNumber.
2 To enter the Private ID you wantyour phone to
call every time you press the PTT button:
Enterthe number using your keypad. -or-
Press A under Search. Select Contacts,
Recent Calls,orMemo.Select the number you
wantto enter.
Tip: If you are entering a Talkgroup number,
enter# before the number.
3 Press O.
To turn off One TouchPTT:
1 From the main menu, select Settings > 2-Way
Radio > OneTouch PTT.
2 Set this option to Off.
Setting Flip Actions
For Answering Calls
To set your phone to answer calls when you open
the flip:
1 From the main menu, select Settings > Phone
Calls > Flip Activation > Flip to Ans.
2 Set this option to On.
To set your phone not to answer calls when you
open the flip:
Set Flip to Ans to Off in step 2.
For Ending Calls
To set your phone to end calls when you close the
flip:
1 From the main menu, select Settings > Phone
Calls > Flip Activation > Flip to End.
2 Set this option to On.
To set yourphonenot to endcallswhenyou close
the flip:
Set Flip to End to Off in step 2.
Note: Ifyouareusingyourphonewitha
headset, and you have the Flip to End
option set to On, closing your flip sends
incoming sound to the headset and does
not end the call.
Group Calls
A group call is similar to a Private call, but ismade
to all members of a Talkgroup at once.
Before you can makeor receive group calls, a
Talkgroupmustbe established.After theTalkgroup
is established, you must join the Talkgroup.
39
Page 50

Advanced Calling Features
Joining a Talkgroup
Your sales representative or your service provider
establishes Talkgroups for you and assignseach
Talkgroup a Talkgroup number.You can choose a
name foreachofyourTalkgroupswhen you create
entries for them in Contacts.
To receive group calls made toany of these
Talkgroups, you must join theTalkgroup.
1 Press A under Contcs. -or-
From the main menu, scroll to Contacts and
press O.
2 Scroll to the Talkgroup you want to join.
3 Press A under Join.
Note: You can only monitor one Talkgroup at a
time.
Making Group Calls
1 Press #. Then enter the Talkgroup number
using the keypad. -or-
Choose the Talkgroup name from Contacts or
recent calls list.
2 Proceed as ifmakinga Private call.
40
Receiving Group Calls
To answer a groupcall:
Proceed as if answering a Private call. Only one
person at a time may speak on a group call.
ThePrivate ID or nameof theperson who is
speaking will appear on the display below the
Talkgroup number.
TurningoffGroupCalls
To set your phone to prevent you from hearing
group calls to your Talkgroup:
1 From the main menu, select Settings > 2-Way
Radio > TkgrpSilent.
2 Set this option On.
To set your phone to let you hear group calls to
your Talkgroup:
Set Tkgrp Silent to Off in step2.
Call Timers
Call timers measure the durationof your phone
calls, Private or group calls, and circuit data use,
as well as thenumber of Kilobytessent and
receivedby your phone:
•LastCall— displays the durationof your most
recent phone call.
Page 51

Using Your Phone as a Modem
• Phone Reset — keeps a running total of your
phone call minutes, until you reset it.
• Phone Lifetime — displays the total minutesof
all your phone calls.
• Prvt/Grp Reset — keeps a running totalofallof
your Private and group call minutes, until you
reset it.
• Prvt/Grp Lifetime — displaysthe total minutes
of all your P rivate and group calls.
• Circuit Reset — keeps a running total of all of
your circuit data use, until you reset it.
• Circuit Lifetime — displaysthe totalminutesof
all of your circuit data use.
• Kbytes Reset — keeps a running total of the
numberof Kilobytessent and received by your
phone, until you reset it.
To view or reseta timer:
1 From the main menu, select Call Timers.
2 Selectthefeatureyouwanttovieworreset.
3 To view a feature without resetting: Press O
when you are finished viewing. -or-
To reset a feature:P ress A under Reset.Press
O orpressA under Yes to confirm.
Note: The values displayedby Call Timers
should not be used for billing. Call timers
are estimates only.
Using Your Phone as a Modem
Note: This feature may not be offeredby your
service provider.
To use your phoneas a modem with a laptop,
handheld device, or desktop computer:
1 Open the connector cover.
connector
cover
2 Withthe phone’sdisplay facing up, insert a data
cable’s connector into the accessory connector,
41
Page 52

Advanced Calling Features
until you hear a click.
3 Insertthe dataplugintothedataport of theother
device.
When used as a modem, your phone has these
data transfer modes:
• Circuit data — used for sending and receiving
faxes and for transferring large files
• Packet data — used for small file transfers such
as email
42
To use these services, you mustinstall the iDEN
Wireless Data Servi ces software (available
separately). For more informationon setting up
your computerand your i710 phoneforpacketand
circuitdata calls, refer to the WirelessData
Services User’s Guide or contact your service
provider.
Making TTY Calls
Note: This feature may not be offeredby your
service provider.
To use your phone to make phone calls using a
teletypewriter (TTY) device:
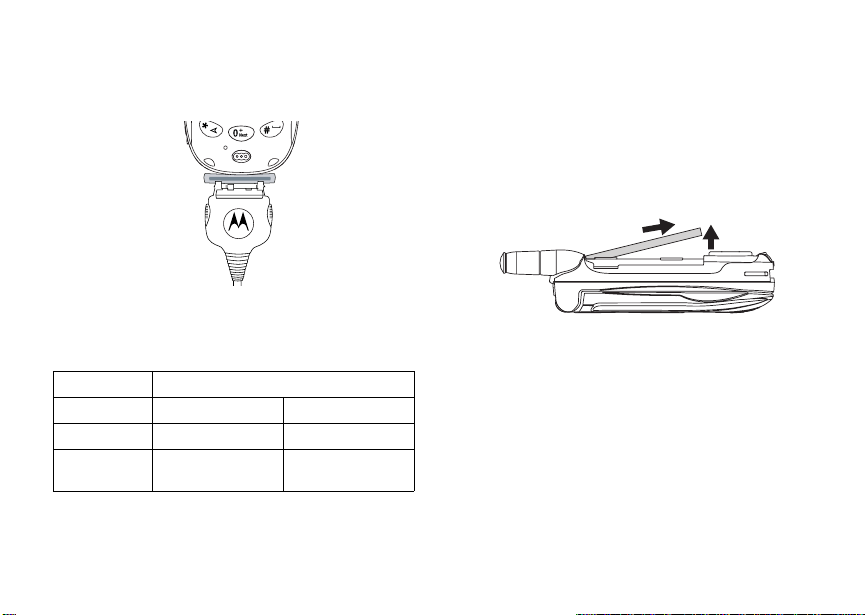
1 Connectone end of a 2.5mm cable into the
audio jack on your phone. Connect the other
endofthecabletoyourTTYdevice.
2 Make sure that your phone’s TTY feature is on
and select the TTY mode you want to use.
3 Use your phone to enter phone numbers and
make calls.
When you make a TTYcall, these icons appear on
the phone’s display:
Phone call is active.
N
Phone call is on hold.
O
Page 53

Making TTY Calls
TTY device features such as Turbo-Code,
High-Speed, and Interruption are not supported by
your phone. These featuresmustbe turned off or
disabled to use your TTY device with yourphone.
TurningOntheTTYFeature
Your phone’s TTY feature must be on if you want
to make TTY calls, set theTTY mode, or change
the TTY baud rate. T o makesure the TTY feature
is on:
From the main menu, select Settings > Phone
Calls > TTY > Use TTY. This field must sayOn.
Choosing a Mode
Your phone supportsthese TTY modes:
• TTY — You type and readtexton your TTY
device.
•VCO(Voice-Carry-Over) — You speak into your
phone and read text replies on yourTTY device.
• HCO (Hearing -Carry-Over) — You type text on
your TTY device and listen to voice replies on
your phone speaker.
To change mode while not in a call:
1 From the main menu, select Settings > Phone
Calls > TTY > Type.
2 Select the TTY mode you want.
When you make a TTY call, the call begins in the
TTY mode you last selected.
To change mode during a callusing yourphone:
1 Press m.
2 Select In Call Setup > TTY > Type.
3 Selectthemodeyouwant.
To change mode during a call using your TTY
device,issueone of the following commands:
• “VCOplease” —to select VCO mode
• “HCO please” — to select HCO mode
• “HCOoff please”— to turnoffHCO mode
Important: When youare using HCO, the sound
coming from your phone speaker may
be uncomfortably loud. Use caution
when putting the phone to your ear.
(For information on setting the volume
of your phone speaker,see “Setting the
Volume” on page 84.)
Changing the TTY Baud Rate
By default, your phone’sTTY baud rate is set to
45.45,the baud rate requiredfor TTY calls within
the U.S. To make calls outside the U.S., set your
TTYbaudrateto50.0.
43
Page 54

Advanced Calling Features
To change the TTY baud rate:
1 From the main menu, select Settings > Phone
Calls > TTY > Baud.
2 Selectthebaudrateforyourlocation.
44
Page 55

Memo
Memoletsyoustoreanumber,makeacalltothat
number, and save it to Contacts.
To create a memo:
1 From the main menu, select Memo.
2 Enter the number using your keypad.
3 Press O.
Toviewthememolater:
1 From the main menu, select Memo.
To deletethe memo:
1 From the main menu, select Memo.
2 Pressand hold A under Delete.
3 Press O.
To edit the memo:
1 From the main menu, select Memo.
2 Enter the new number.
3 Press O.
To make a call to thememo number:
1 From the main menu, select Memo.
2 To make a phone call, press s. -or-
To make a Private call, press the PTT button.
To store the memonumberto Contacts:
1 From the main menu, select Memo.
2 Press m.
3 Select Store to Cntcs.
4 To storethe numberasa new entry, select[New
Contact]. -or-
To store the number to an existingentry,select
the entry.
5 With the Contacts type field highlighted, scroll
leftor right to displaythe Contactstype you want
to assign the number.
6 If you want toadd more information to theentry,
follow the applicable instructions in “Creating
Entries” on page 28.
7 Press A under Done.
45
Page 56

Ring Tones
To set theringtone your phone makes when you
receivephonecalls, message notifications, or call
alerts:
1 From the main menu, select Ring Tones.
2 Make sure Vibrate All is set to Off.
3 Scrollthroughthe listof ringtonesand selectthe
one you want to assign. Vibrate sets your phone
to vibrate insteadof making a sound;Silent sets
your phone to neither vibrate nor make a sound.
Tip: Highlighting a ring tone lets you hear it.
4 Selectthe featuresyou want to assign the ring
tone to.
5 When you are finished, press A underDone.
Note: This icon
setyour phonetoneithervibratenormake
a sound for phone calls.
Setting Your Phone to Vibrate
You can set yourphoneto vibrate insteadof
makinga sound when youreceive all phone calls,
Private calls, group calls, messages notifications,
and call alerts.
1 From the main menu, select Ring Tones >
Vibrate All.
46
M appears on the display if you
2 Set this option to On.
Tip: Pressingthe volume controlsto turndown
the volume as faras possiblesetsVibrate
All to On.
To set your phone to vibrate instead of making a
sound for some features but not others:
1 From the main menu, select Ring Tones.
2 Make sure Vibrate All is set to Off.
3 Select Vibrate fromthelist of ring tones.
4 Select the featuresyou want to setto make no
sound.
5 When you are finished, press A underDone.
Note: To set ring options for Private calls and
groupcalls,see “Setting YourPhoneto
Vibrate” on page 84.
These icons indicate how the ringer is set.
Q The phone always vibrates instead of making
a sound.
The phone vibratesinstead of makinga
R
sound for phone calls.
GroupcallsandPrivatecallsareheard
u
through the earpiece, not the speaker.
These icons may appear at the same time.
Page 57

Ring and Vibrate
Ring and Vibrate
To set your phone to ring and vibrate when you
receivephonecallsor call alerts:
1 From the main menu, select Ring Tones.
2 Make sure Vibrate All is set toOff.
3 Scroll through the list of ring tones and highlight
theoneyouwanttoassign.
4 Press m.
5 Select Assign w/Vibe.
6 Selectthe featuresyou want to set to ring and
vibrate.
7 When you are finished, press A underDone.
Thisicon
S appears on the display.
Assigning Ring Tones to Contacts
You can set theringtone your phonemakes when
you receive phone calls or call alerts from
someone you have stored in Contacts.
1 From the main menu, select Ring Tones.
2 Make sure Vibrate All is set toOff.
3 Scrollthroughthe listof ringtonesand selectthe
one you want to assign.
4 Select AContact.
5 SelecttheContactsentryyou want to assign the
ring tone to.
Viewing Ring Tone Assignments
1 From the main menu, select Ring Tones.
2 Make sure Vibrate All is set to Off.
3 Highlight any ring tone.
4 Press m.
5 Select Overview.
6 Scrollto view ring tones assignedto features
and Contact entries.
Downloading More Ring Tones
If you want to use other ring tones, you can
download them into yourphone fora fee. Go to
www.motorola.com/idenupdate for a selection of
custom ring tones and downloading instructions.
Note: Ring tones purchased from this web site
may be downloaded only once. If you
delete a ringtone from your phone, you
must purchase it again to download it
again.
47
Page 58

Ring Tones
Managing Memory
To view the amountof memory availablefor
custom ring tones:
1 From the main menu, select Ring Tones.
2 Make sure Vibrate All is set toOff.
3 Highlight any ring tone.
4 Press m.
5 Select Memory Usage.
Deleting custom ring tones frees memory.
Note: Ring tones are stored in your phone using
the same memory space used to store
messages, voice records, Java
applications, and wallpaper images.
Deleting some of these other items frees
memoryfor ring t ones.
Deleting Custom Ring Tones
To delete a custom ring tone:
1 From the main menu, select Ring Tones.
2 Make sure Vibrate All is set toOff.
3 Scrollt o the ring tone you want to delete.
4 Press m.
5 Select Delete.
6 Press A under Yes to confirm.
48
Page 59

Entering Text
You can enter text into your phone using the
traditional methodof pressing a key several times
for each character, or by pressing a key once for
each letter while words likely to be the one you
want are chosen from a database. You can also
enter symbols and numbers into a text field.
In screens that require you to enter text, you see
the followingicons. These icons tell you which text
input mode you are using:
Alpha — Press a keyseveral times foreach
l
character.
Word — Press a key once for each letter
j
while words likely to be the one you want are
chosenf rom a database.
Symbols — Enter punctuation and other
i
symbols.
Numeric — Enter numbers.
k
When you access a screen that requires you to
entertext, you start in themode last used.
To choose a textinputmode:
1 At a screen that requiresyou toenter text, press
m.
2 Select the text input mode you want to use. A
checkmark appears next to the current mode.
Using Alpha Mode
• Press any key on the keypadtoentertheletters,
numbers,andsymbolson thatkey.For example,
to enter the letter Y, press 9 three times.
• Typealetterthenscrolluptomakethatletter
uppercase, or type a letter then scroll down to
make that letter lowercase.
• See “Special Function Keys” on page 50 for
more information on adding spaces,
capitalization, and punctuation.
Using Word Mode
In Word mode, T9Text Input analyzesthe letters
on thekeypadbuttonyoupressand arrangesthem
to create words. As you type, T9 T ext Input
matches your keystrokes to words in its database
and displays the most commonly used matching
word. You can add yo u own words to this
database.
Entering a Word
1 Select Word as your textinputmode.
49
Page 60

Entering Text
2 Type a wordby pressing one key for each letter.
For example, to type “test” press 837
8.
The displayed word may change as you type it.
Do not try to correct the word as you go. Type to
the end of the word before editing.
3 If the word that appears is not the desired word,
press 0 to change the word on the display to
the next most likely word in the database.
Repeatuntil thedesired word appears.
If the desiredworddoesnotappear, you can add it
to the database.
Adding Words to the Database
1 Select Alpha as your text input mode.
2 Type the word using Alpha mode.
3 Select Word as your textinputmode.
4 Press #.
ThewordyoutypedinAlphatextentrymodeis
now in thedatabase.
Note: You cannot store alphanumeric
combinations,suchas Y2K.
50
Choosing a Langu age
To change the languageof the database:
1 At a screen that requiresyou toentertext, press
m.
2 Select Languages.
3 Selectthe language you want foryourdatabase.
Special Function Keys
Some of the phone’s keys assume different
functions while in Alpha or Wordmode.
Spaces
Press # for a space.
Capitalization
When you press and hold the # key, itactsas a
3-way toggle. Press and hold # to make the next
letter typed uppercase (shift), to make all
subsequent letters typed uppercase (caps lock), or
to go back to lowercase letters.
These iconsappearin the top rowof your display:
m or X
n or W
Shift is on.
Caps lock is on.
Page 61

When neither of these icons appear, letters typed
are lowercase.Scrolling up after typing aletter
makes that letter uppercase.
Note: Your phone automatically makes the first
letterof a sentence uppercase.
Punctuation
Press 1 or 0 to insert punctuation. Continue to
press the key to view the list of symbols available
through that key. Pause to select the symbol you
want.
Note: Additionalpunctuationsymbols are
available in Symbols mode.
Using Numeric Mode
1 Select Numeric as your text input mode.
2 Pressthe number buttons on your keypad to
enter numbers.
Using Symbols Mode
1 SelectSymbolsas your text input mode.
A row of symbols appears along the bottom of
the phone’s display. Scroll right to view the
complete row.
2 Press O to select the highlighted symbol.
Using Num eri c Mode
51
Page 62

Messages
You can receive the following types of messages
on your phone:
• Voice mail messages
• Short Message Service (SMS) text messages
• Depending on your serviceprovider,you may
havethe option to receive fax mail andNet
alerts.
You have 2 ways to access the messages you
receive:
• Respond to the message notification that
appears when the message is received.
• Dismissthe message notification and access
the message later throughthe message center.
You can listen to or view thesemessages, delete
them, or continue to store them inthe message
center.
Message Notifications
When you receive a message, your phone notifies
youwithtextonthedisplayandanotificationtone
or vibration.You can access the message or
dismiss the notification.
52
If you dismiss the notification, the message is not
deleted.It can be accessed through the message
center.
If you arenot on a phonecall when you receive a
message, your phone sounds a notification tone
every 30 seconds until you access themessage,
you dismiss the notification, or the alert time-out
expires.
Setting Notification Options
To control whether your phone sounds message
notificationtoneswhileyou are on phone calls:
1 From the main menu, select Settings > Phone
Calls > Notifications.
2 Select the option you want:
• Receive All — Tones sound during calls for
all types of messages.
•MsgMailOnly— Tones sound during calls
for SMS messages;tones for all other types
of messages are held until you end calls.
• DelayAll — Tones for all types of messages
are held until you endcalls.
Tip: Tosetnotificationoptions during a call:
Press m. Select In Call Setup >
Notifications.
Page 63

Message Center
The message center managesyour messages.
All your messages are stored in the message
center.The message center shows how many
messages you have of each type.
To access your messages through the message
center:
1 From the main menu, select Messages.
2 Scrolltothetypeofmessageyouwantto
access.
3 Press O or press A under the display option on
the left.
MessageCenter
53
Page 64

Voice Mail Messages
Note: To receivevoicemailmessages,youmust
firstset up avoice mail account with your
service provider.
Receiving a Message
When you receive a voice mail message, New
Voice Mail Messageappears on the display.
To call your service provider’s voice mail system
and listen to the message:
Press A under Call.
To dismiss the message notification:
If the flip is closed, press .. -or-
If the flip is open, press O or press A under
Back, or close the flip.
If the caller leaves a message, this icon
appearson the display, reminding you thatyou
have a newmessage.
Accessing Voice Mail from the Message Center
From the main menu, select Messages > Voice
Mail.
54
y
Sending Una nswered Calls to Voice Mail
To send a phone call to voice mail instead of
answering it:
If the flip is closed, press .. -or-
Press e. -or-
Press A under No.
Page 65

MOSMS Messages
Note: This feature may not beoffered by your
service provider.
If your serviceprovideroffersMOSMS, your phone
sends SMS messages using MOSMS and receives
SMS messages from other phones that are using
MOSMS.
Setting Up
Before you begin using MOSMS, youmay need to
set up your signature, service center number, and
expiration information:
1 From the main menu, select Messages.
2 Scroll to Text Inbox.
3 Press m.
4 Select Text Msg Setup.
5 Select Signature.
Enteryour signature. It may be up to 11
characters long. See “Entering Text” on page
49. When you are finished,pressO.
6 Select Srvc Cntr No.
Enterthe phone number of your service center.
If you do not know this number, contact your
service provider.
When you are finished, press O.
7 Select Expire After.
This is the amount of time messages you send
are savedat the service centeriftheycannotbe
delivered.Afterthis period,they are discarded.
Scrollt o select the number of daysyou want
your messagesto be saved.
When you are finished, press O.
8 Select Auto Clean Up. Set this option to On if
you want your phone to delete sentmessages.
If you set Au to Clean Up to On,selectClean
Up After to set the number of days after which
sent messages are deleted or the number of
messages to be kept.
9 Press A under Done to save the information
you entered.
Receiving a Message
To view the message:
Press A under Read.
To dismiss the message notification:
Press A under Exit.
55
Page 66

MOSMS Messages
If your phone is poweredoff when you receivea
text message, your phone notifies you the next
time you power it on. If you are out of your
coveragearea,your phone alertsyou when you
return to your coverage area.
Tip: While reading a text and numeric message
that contains a phone number, you can
press s tocall that number.
Reading from the Message Center
1 From the main menu, select Messages> Text
Inbox.
2 Selectthemessageyouwanttoread.-or-
Pressthe number of themessage you wantto
read.
3 If the message fills more than one screen, scroll
to read it.
Tip: Scrolling through one message lets you
view the next message.
4 To save the message, press A under Ok . -or-
To reply to the message, press A under Reply.
-or-
To see allother choices, includingforwarding
and deleting the message, callingthe sender,or
56
storing the sender’s number in Contacts, press
m.
Creating and Sending Messages
1 From the main menu, select Messages>
[Create Message]. -or-
Select [Create Message] from Text Inbox, Text
Outbox, or Drafts. -or-
Highlight Quick Notes and press A under
Compose.
Tip: This option is available from many
context-sensitive menus in the message
center.
2 To address the message:
Use the keypad to enter thephone number of
the person you want to send the message to.
-or-
Press A under Browse.SelectContacts,
Recent Calls,orMemo. Select the number you
wantto enter.
When you are finished, press O.
3 Enter the text of the message. See “Entering
Text”onpage49.-or-
Page 67

Creating and Sending Messages
To use a quick note: Press A under Browse.
Scroll to the quick note you want. For more
informationonquicknotes,see“UsingQuick
Notes”.
When you are finished, press O.
4 If you want to send the message, press O or
press A under Send. -or-
To delete the message withoutsending it, press
A under Cancel. -or-
If you want to request confirmation of delivery,
save the message as a draft, or set the sending
method, press m. Select the option you want.
Beginning Messages Fromthe Recent Calls List
1 From the recent calls list, scrollto the name you
wantto send a messageto.
2 If the entry has morethan one phone number
stored, view the phone number you want to send
the message to.
3 Press m.
4 Select Compose SMS. The message is
automatically addressed to the phone number
you chose.
5 Follow step 3 through step 4 of “Creating and
Sending Messages” on page 56.
Beginning Messages From the Idle Screen
1 Using the keypad, enter the number you want to
sendamessageto.
2 Press m.
3 Select Compose SMS. The messageis
automaticallyaddressed to the phonenumber
you chose.
4 Follow step 3 through step 4 of “Creating and
SendingMessages” on page 56.
Using Quick Notes
Quick notes are short, pre-written text messages
that you can create, edit, and send. You can store
up to 20 quick notes.A quick note may be up to 30
characters long.
To create a quicknote:
1 Fromthemainmenu,select Messages > Quick
Notes > [New Note].
2 Press O or pressA under Create. Entertext.
See “Entering Text” on page 49. -or-
To choose from pre-installed notes, select the
note you want.
Tip: For more options,including sendingthe
quick note, press m.
57
Page 68

MOSMS Messages
Using Drafts
When you savea message as a draft, it is saved in
the drafts folder.
To edit a draft:
1 From the main menu, select Messages>
Drafts.
2 Selectthedraftyouwanttoedit.
3 To edit the fields you want to change, follow
step 2 through step 4 in “Creatingand Sending
Messages” on page 56.
Resendin g Messages
To resend a message:
1 From the main menu, select Messages> Text
Outbox.
2 Scrollto the message you want to resend. -or-
Pressthe number of themessage you wantto
resend.
3 Press s. -or-
Press m. Select Resend.
58
Deleting Sent Messages
To delete a sentmessage:
1 From the main menu, select Messages> Text
Outbox.
2 Scrollto the message you want to delete.
3 Press A under Delete.
4 Press A under Yes to confirm.
To delete all unlocked sent messages:
1 From the main menu, select Messages> Text
Outbox.
2 Press m.
3 Select Delete All.
4 Press A under Yes to confirm.
Locking and Unlocking Sent Messages
When you lock a message, it cannot be deleted
until you unlock it.
Lockinga Message
1 From the main menu, select Messages> Text
Outbox.
2 Scrollto the message you wantto lock or
unlock.
3 Press m.
Page 69

Sorting Messages
4 Select Lock.
Unlocking a Message
1 From the main menu, select Messages> Text
Outbox.
2 Scrollto the message you wantto lock or
unlock.
3 Press A under Unlock.
Sorting Messages
You can sort messages in your inbox by sender,
time and date, and status. You can sort messages
in your outbox by recipient,timeand date, and
status.
1 From the main menu, select Messages> Text
Inbox or Messages > TextOutbox.
2 Highlight any messages.
3 Press m.
4 Select Sort and Order.
5 Select Sort By to specify the sorting method.
6 Select Order By to specify the sorting order.
Managing Memory
Your text inbox, outbox,and drafts folderhave a
set amount of memory available for storing
messages.
The textinboxholds20 messages. If the text inbox
is full, you cannot receive messages until you
deletesome.
The outboxand draftsfolder share memory space.
Togetherthey can hold 30 messages.If theoutbox
and drafts foldermemory is full, you cannot send
messages or save draftsuntil you delete some.
To view the amountof memoryavailable in your
text inbox:
1 From the main menu, select Messages> Text
Inbox.
2 Press A under Memory.
To view the amountof memoryavailable in your
outbox and drafts folder:
1 From the main menu, select Messages> Text
Outbox or Messages > Drafts.
2 Press A under Memory.
59
Page 70

Datebook
Datebook stores up to 250 events. You can store
events over a 13 month period — 12 months after
and 1 month before the current date.
A Datebook event contains:
• A subject — A name you assign to the event.
You can also enter a phone number, Private ID,
or Talkgroup number here. After the event is
stored, you cancallthisnumberfrom Datebook
or when you get a reminder of this event.
• A location — The location of the event. You can
alsoentera phone number,Private ID, or
Talkgroup number here. After the event is
stored, you cancallthisnumberfrom Datebook
or when you get a reminder of this event.
• A start time — The start time automatically
assigned to an event is the beginningof theday.
Youcanchangethestarttime, or assignno start
time, before storing the event.
• A duration— the length of time t he event lasts
• A date — The date automatically assigned to an
eventis the date that washighlightedor
selected when youbegancreating the event.
You can change this date before storing the
event.
60
• A repeat — lets you storethe eventas a
recurring event.
• A reminder — If an event has a start time, you
can set Datebook to remind you that the event is
goingtostart.
• a ring tone for thereminder
• a profilethat your phoneis switchedt o while the
event is occurring
• a Java application that startswhen the event
starts
Only the subject and date are required.
Viewing Datebook
To access Datebook:
From the main menu, select Datebook.
You can view Datebook by the day, by the week, or
by the month. You can also view the detailsof any
event.
In day view, brief information about each event for
that day appears.
In week view, events appear as markers
corresponding to their times.
In month view, days with events appear with a
markerin the corner.
Page 71

Creating Events
To view an event:
1 Select the day the event occurs.
2 Select the event.
To change the current view:
1 WhileviewingDatebook, press m.
2 Select the view you want.
Navigating Datebook
To scroll through Datebook:
Scrollleft and right using the navigationkey.-or-
In week view andmonthview, press* or #.
Toseemoreindayview:
Scrollup and down using the navigationkey.
To highlighta day in month view:
Enterthe date using the keypad.
To go to today’s date:
1 WhileviewingDatebook, press m.
2 Select Go To Today.
To go to any date in Datebook:
1 WhileviewingDatebook, press m.
2 Select Go To Date.
3 Selectthedateyouwant.
Creating Events
EveryDatebook event must have a subjectand be
storedto a date.Other information is optional.
You may enter the information in any order by
scrolling through the event details.
After you have entered the information you want,
you can press A under Done to store the event to
Datebook.
If you decide you don’t want tostoretheevent:
Press A under Cancel.
To create a Datebook event:
1 While viewing datebook, press A under New.
-orIn day view, select [New Event].
2 To assign a subject to the event:
Select Subject.
Enter the name. See “Entering Text” on page
49. -or-
Press A under Browse to choose from common
event names. -or-
Enter a phone number, Private ID, orTalkgroup
number. After the event is stored, you can call
this number.
61
Page 72

Datebook
When you are finished, press O.
3 Ifyouwanttoassignalocationtotheevent:
Select Location.
Enter the location. See “Entering Text” on page
49. -or-
Enter a phone number, Private ID, orTalkgroup
number. After the event is stored, you can call
this number.
When you are finished, press O.
4 The start time automatically assigned to an
event is the beginning of the day. If you want to
change the start time or assign no start time:
Select Start.
Enter the start time you want. -or-
Press A under No Timeto assignno start time.
5 Ifyouwanttoassignadurationtotheevent:
Select Duration.
Selectthe duration you want. -or-
Select Custom to enter a duration.
6 The date automatically assignedto an event is
the date that was highlighted or selected when
you began creatingthe event. To change the
date of the event:
62
Select Date.
Enter the date you want.
7 If you want to make the event a recurring event:
Select Repeat.
Selectthe repeat cycle you want.
If the event occurs more than once a week:
Select Multiple Day. Select the days you want.
Press A under Done.
Select the date you want this event to stop
recurring.
8 If you want to create a reminder for this event:
Select Reminder.
Select the reminder time you want. -or-
Select Custom to enter a reminder time.
Note: If an event has no start time, you can not
create a reminder for it.
9 If you have entered all the informationyou want
for this event, press A under Done. -or-
Ifyouwanttoassignaringtone,aprofile,ora
Javaapplication to the event, see “Assigning
More Options”.
Page 73

Editing Events
Assigning More Options
To assign more options before storing an event:
1 If you have createda reminderfor the event and
wantto set thering tone for that reminder:
Select Ring Tone.
Selectthe ring tone youwantfromthe ring tones
stored in your phone.
2 If you want to assign a profile that your phone is
switched to while the eventis occurring:
Select Profile.
Select the profile you want from the profiles
stored in your phone.
Yourphoneswitches to this profile when the
event starts and switches back to the previous
profile when the event ends.
3 IfyouwanttoassignaJavaapplicationtostart
when the event starts:
Select App.
Select the application you want from the Java
applicationsstoredin your phone.
If you created a reminder for this event, your
phonepromptsyoutostarttheJavaapplication
when you get the reminder.
Editing Events
To change the details of an event:
1 Select the day the event occurs.
2 Scrollto theevent.
3 Press A under Edit.
4 Follow the applicable instructions in “Creating
Events”onpage61toeditthevariousfields.
To copy an event to another date:
1 Select the day the event occurs.
2 Select the event.
3 Press m.
4 Select Copy.
5 Press A under Yes to confirm.
6 Enter the date you want.
7 Press O.
8 If you want to change more information, follow
the applicable instructions in “Creating Events”
on page 61 toeditthe various fields.
Deleting Events
1 Select the day the event occurs.
2 Select the event.
3 Press m.
4 Select Delete.
63
Page 74

Datebook
5 If the event is not a recurring event, press O or
press A under Yes to confirm.-or-
If the event is a recurring event:
Select This Event Onlyto delete only the event
selected in step 2.
Select Repeat Event to delete all occurrences
of the event.
Receiving Reminders
If you created a reminder for a Datebookevent,
whenthe remindertime occurs,your phonenotifies
you with text onthe display and a reminder tone.
To view more details about the event:
Open the flip. -or-
Press A under View.
To dismiss the reminder:
If the flip is closed, press .. -or-
If the flip is open, press O,pressA under
Dismiss, or close the flip.
64
For Events with Java Applications
If you assigned a Java application to start when the
eventstarts,youcan starttheapplicationwhen you
get the reminder.
1 Press m.
2 Select Launch.
For Events with Numbers to Call
Ifyoustoredaphonenumber,PrivateID,or
Talkgroup numberin the Subject orLocation field
of a Datebook event, you can call or send a call
alert to that number from the reminder for that
event.
Making Calls From D atebook
Ifyoustoredaphonenumber,PrivateID,or
Talkgroup numberin the Subject orLocation field
of a Datebook event, you can call or send a call
alertto that number from Datebook.
YoucancallthenumberstoredinSubject andthe
numberstoredin Location if one is aphone
numberand the other is a Private ID orTalkgroup
number.If both are thesametype of number, the
numberin Subject is called or sent a call alert. To
callorsendacallalerttothenumberstoredin
Location, you must delete the number stored in
Subject.
Page 75

Customizing Datebook Setup
To make a call or send a call alert:
1 Highlight or select the event containing the
numberyou want to callor send a callalertto.
2 To make a phone call:
Press s. -or-
Press m. Select Call # in Event.
To make aPrivatecall or group call:
Pressand hold the PTT button on the side of
your phone. -or-
If you did notinclude a # before the Talkgroup
you want to call: Press m. Select Talkgroup.
To send a call alert:
Press m. Select Alert # in Event.
Customizing Datebook Setup
To access Datebook set up options:
1 From the main menu, select Datebook.
2 Press m.
3 Select Setup.
You can view or change these options:
•StartView— sets Datebook to start in day view,
week view, or month view when you access
Datebook.
•DailyBegin— sets the beginning of your day.
Thisistheearliesttimeofdaydisplayedinweek
view, if you havea 12-hour day view.
• Delete After — sets the amount of time
Datebook waits to delete an event after is
occurs.
•TimeShift— letsyou shift the times of all
Datebook events. This is useful if you are
traveling to a different time zone.
• Alert Timeout — setsthe amount of time a tone
continues to sound when you receive a
message notification, call alert, or Datebook
reminder.
•Clock— controls whether the time and date
appear on the idle screen; sets time and date
format; sets year.
65
Page 76

Java Applications
Your phone arrives with Java applications loaded
and ready to install.You can download and install
more Java applications.
Note: Using Java applications may causeyour
phone to use up more battery power than
otheruses of your phone.
Installing Applications
1 From the main menu, select Java Apps.
2 Select the application or suite of applications
you want to install.
Installation messages appear as the application
installs.
3 IfyouwanttocreateashortcuttotheJava
application on the main menu: Press A under
Next.PressA under Yes.PressO.
4 Press A under Done.
Running Applications
Torunanapplicationthathasashortcutonthe
main menu:
1 From the main menu, select the application or
suite of applications you want to run.
66
2 Ifyouhaveselectedasuiteofapplications,
selecttheapplicationyouwanttorun.
To run an application that does not have a shortcut
on the main menu:
1 From the main menu, select Java Apps.
2 Select the application or suite of applications
you want to run.
3 Ifyouhaveselectedasuiteofapplications,
selecttheapplicationyouwanttorun.
Tip: If you don’thearthe soundsassociatedwith
the Java application, select Settings >
Volume and check the volumes of Java
Speaker and Java Earpiece.
Suspending Applications
When you suspendan application, it does not stop
running. It goes to the background so that you can
run another applicationin the foreground.
To suspend an application:
Press e or close the flip.
To view your suspended applications:
From the Java menu, select Suspended Apps.
You can have up to 3 applications running at one
time — 1 running in the foreground and 2 in the
background.
Page 77

Resuming Applications
Resuming Applications
You can resume a suspendedapplication at any
time. This brings it to theforeground.
1 From the Java menu, select Suspended Apps.
2 Select the application you want to resume.
Ending Applications
Toendanapplication:
1 From the main menu, select Java Apps.
2 If the applicationyou want to end ispart of a
suite of applications, select the suite.
3 Scrollt o the applicationyou want to end.
Press A under End. -or-
If End isnot one of youroptions: Press m.
Select End.
Tip: You can also end applications from the
Suspended Apps screen.
To end all applications:
1 From the main menu, select Java Apps.
2 Scroll to Suspended Apps.
3 Press m.
4 Select End All.
5 Press O or press A under Yes to confirm.
6 If you want toend all applications withoutletting
them exit, press A under EndNow.
Downloading Applications
If you want to run more Java applications, you can
download them into yourphone.
Go to www.motorola.com/idenupdate for a
selection of Java applications and downloading
instructions.
Deleting Applications
To delete an application:
1 From the main menu, select Java Apps.
2 Scrollt o the applicationyou want to delete.
3 Press m.
4 Select Deinstall.
5 Press O or press A under Yes to confirm.
6 When your phone has finished deleting the
application, press A under Done.
To delete all Java applications:
1 From the main menu, select Java Apps.
2 Scroll to Java System.
3 Press m.
4 Select Delete All.
67
Page 78

Java Applications
5 Press O or press A under Yes to confirm.
Managing Memory
To view the amountof memory availablefor Java
applications:
1 From the main menu, select Java Apps > Java
System.
2 Press A under Next.
3 To see more memory information, press A
under Next again.
Deleting Java applicationsfreesmemory.
Note: Java application data is stored in your
phone using the same memory space
used to store messages,voicerecords,
ring tones, and wallpaper images.
Deleting some of these other items frees
memory for Java applications.
Shortcuts on the Main Menu
When you install an application, you can create a
shortcut to the application on the mainmenu.
68
Tocreateashortcuttoanapplicationthatis
alreadyinstalled:
1 From the main menu, select Settings >
Personalize > Menu Options > Add/Remove
Apps. -or-
From the main menu: Press m. Select Main
Menu Setup > Add/Remove Apps.
2 Scrollto viewthelistof Java applications. Any
application that has a shortcut on the main menu
hasacheckmarknexttoit.
3 Scrollto the applicationyou wantto create a
shortcut for.
4 Press O.
5 Press A under Done.
Toremoveashortcut:
1 From the main menu, select Settings >
Personalize > Menu Options > Add/Remove
Apps. -or-
From the main menu: Press m. Select Main
Menu Setup > Add/Remove Apps.
2 Scrollto viewthelistof Java applications. Any
application that has a shortcut on the main menu
hasacheckmarknexttoit.
3 Scrollto the applicationyou wantto remove the
shortcut for.
Page 79

Java Applications and GPS Enabled
4 Press O.
5 Press A under Done.
Java Applications and GPS
Enabled
Some Java applications can make use of your
phone’s GPS featureto determinethe approximate
geographicallocation of yourphone.(See“GPS
Enabled”on page 72 for more information on the
GPS feature.) However, for privacy reasons, you
may not always want Javaapplicationsto access
the locationof your phone. Your phone protects
your privacyb y giving you the option to block all or
some Java applications from accessing the
locationof yourphone.
Setting Privacy for All Java Applications
These optionscontrol the privacy of all Java
applicationson your phone:
• Restricted — No Java or similar software
applications may access the location of your
phone. However, location information may still
be available to the phone’s owner,fleet
manager, or account administrator.
• Unrestricted — All Java applications may
accessthe locationof your phone, without
notifying you.
•ByPermission— When a Java application
attempts to access the location of yourphone,
you are prompted to give permission. However,
location information may still be available to the
phone’s owner, fleet manager, or account
administrator.
See “SettingPrivacy Options” on page 78 for
informationon choosing these options.
Granting or Denying Permission
If you choose By Permission,you must grant or
deny each Java application access to the location
of your phone when the applicationrequests
accessfor the first time. Youmay be required to
grantor deny subsequentrequests from the same
application,depending on the privacy setting you
choosefor the individualJavaapplication (see
“Setting Privacy for Each Java Application”).
When a Java applicationrequests access t o the
locationof your phone,a screenappears informing
you.
To deny this request:
1 Press A under Deny. The application does not
accessthe locationof your phone.
69
Page 80

Java Applications
2 Select the denying option you want:
• Always — If the application requests access
to the location of your phone again, the
request isdenied without notifyingyou.
• For this session — If the application
requests access to the location of your phone
again beforeyou power off your phone, the
request isdenied without notifyingyou.
•OnlyOnce— If the application requests
access to the location of your phone again,
you are prompted to grant or deny
permission.
To grant this request:
1 Press A underGrant. The application accesses
your phone’s location.
2 Selectthe granting option you want:
• Always — If the application requests access
to the location of your phone again, the
request is granted without notifying you.
• For this session — If the application
requests access to the location of your phone
again beforeyou power off your phone, the
request is granted without notifying you.
•OnlyOnce— If the application requests
access to the location of your phone again,
you are prompted to grant or deny
permission.
70
Setting Privacy for Each Java Application
After a given Java application requestsaccessto
the locationof your phone for thefirsttime,you
have the opportunity to setthe GPS privacy option
for that Java application.
1 From the main menu, select Java Apps.
2 Scrollt o the applicationor suite of applications
youwanttosettheprivacyoptionfor.
If the application has requested access to the
location of yourphone,this icon
when you highlight theapplication.
3 Press m.
4 Select Permissions.
5 Select the privacy option you want for this
application:
•Always— The application always has
permission to access the location of your
phone, without notifying you.
•Ask— When the application requestsaccess
tothelocationofyourphone,youare
prompted to grant or deny permission (see
“Granting or Denying Permission” on page
69).
S appears
Page 81

• Never — Whenthe application requests
accessto the locationof your phone, the
request isdenied without notifyingyou.
Java Applications and GPS Enabled
71
Page 82

GPS Enabled
Your phone’sGPS Enabled feature uses
information from Global Positioning System (GPS)
satellites orbiting the Earth to determine the
approximate geographical location of yourphone,
expressed as latitudeand longitude. The
availabilityand accuracyof this location
information (and the amount of t ime t hat it takest o
calculateit)will varydependingontheenvironment
in which you are using the GPS feature. For
example, GPS location fixes are often difficult to
obtainindoors, in covered locations, between high
buildings,or in othersituationswhereyou have not
established a clear broad view of thesky. SEE:
“IMPORTANT: Things to Keep in Mind”.
When you make a 911 emergency call, the GPS
feature of your phone can help emergency
personnel locate you if yourphone has adequate
accessto GPS satellitesignals and your
emergencyresponsecenterisequipped toprocess
such information.
You can also use theGPS featureto view your
approximate location. Locationinformation
appearson the phone’s display.
72
Java applications loaded on your phone can also
request your location. If your phone is connected to
a laptop computer or similar device, software
runningon that device can request your location.
To protect your privacy,you can control whether
these requests are granted.
IMPORTANT: Things to Keep in Mind
If you are using the GPS feature of your phone
while driving, please give full attention to driving
and to the road.
Whereadequatesignalsfrommultiplesatellites
are not available (usually because your GPS
antenna cannot establish a view of a wide area of
open sky), the GPS feature of your phone WILL
NOT WORK. Such situations include but are
not limited to:
• In underground locations
• Inside of buildings, trains, or other covered
vehicles
• Under any other metal or concrete roof or
structure
• Between tall buildings or under dense
tree-cover
• Near a powerful radio or television tower
Page 83

Making an Emergency Call
• When your GPS antenna is covered (for
example, by your hand or other object) or
facing the ground
• In temperature extremes outside the
operating limits of your phone
Walking or driving very slowly may also
substantially reduce GPS performance.
Even where location informationcan be
calculated in such situations, it maytake much
longer to do so, and your location estimate may
not be as accurate. Therefore, in any 911 call,
always reportthe location to theemergency
response center if you can and if you cannot,
remain on your phone for as long as the
emergency response center instructs you.
Even where adequate signals from multiple
satellites are available, your GPS feature will
only provide an approximate location, often
within 150 feet (45 meters) but sometimes
much further from your actual location. Advice
on how to improveGPS performance is
provided in “Enhancing GPS Performance” on
page 75.
While the GPS feature of yourphonecan be a
valuable navigational aid, it does not replace the
need for careful navigating and goodjudgment.
Never rely solely on one device for navigation.
Rememberthatthe accuracy of the location
informationand the time needed to obtain it will
vary dependingon circumstances,particularly the
ability to receive signals from adequate numbers of
satellites.
On emergency calls, your phone uses assistance
information fromthe phone networkto improvethe
speed and accuracy of your phone’s location
calculation: if such assistance information
becomes unavailable, it may reduce the speed and
accuracyof the location calculation.
The satellites used by the GPS feature of your
phone are controlled by the U.S. government and
aresubject to changesimplementedin accordance
with the Departmentof Defense GPS user policy
and the Federal Radionavigation Plan. These
changesmay affect the performance of the GPS
feature of your phone.
Making an Emergency Call
Dial 911 to be connected to an emergency
responsecenter. If youare on anactive call,you
must end it before calling 911.
When you make an emergency 911 call, the GPS
feature of your phone begins to seek information to
calculate your approximate location. It will take
the GPS feature of your phone some time to
determine your approximate location. Even
where your phone has good access to sufficient
73
Page 84

GPS Enabled
GPS satellitesignals and network assist data, it
may take 30 seconds or more to determine the
approximate location. This time will increase where
thereis reduced access to satellite signals. When
your approximate location is determined, it is made
available to theappropriateemergencyr esponse
center.
In some cases, your local 911 emergency
response center may not be equipped to
receive GPS location information. For this
reason, and because the GPS location information
reported is only approximateor may not be
available in your location(see “IMPORTANT:
Thingsto Keep in Mind”on page 72), always
report your locationto the911 operator you
speak to when making an emergency call, if able,
just asyou would when using a phone without GPS
capabilities.
Note: If youare concerned about whether your
local911 emergencyresponse center is
equipped to receive GPS location
information, contact your local authorities.
In general, if your phone has access to signals
from more GPS satellites, your location will be
determined faster and more accurately than if your
phone has access to signals from fewer GPS
satellites.
74
If your phone doesnot have adequate access to
GPS satellites signals, the location of the nearest
cell tower in contact with your phone is
automatically made available to the emergency
responsecenter,if the center has the capabilityto
receive such information.
See“EnhancingGPSPerformance”on page 75 for
information on how to help your phone determine
your location.
Viewing Your Approximate Location
1 From the main menu, select GPS > Position.
2 Scrollto view the entirescreen.
This displays the following information about the
last time your location was calculated:
• Thetime (as Greenwich Mean Time)and date
that the location was last calculated
• The approximate location, expressed as latitude
and longitude
• Theestimated accuracy of thecalculated
location.Thisestimate ofaccuracyis only a very
roughestimate and mayvary substantiallyfrom
the actual accuracy of the approximate location
informationreported.
Page 85

Enhancing GPS Performance
• The number of satellites used to calculate the
location. In general, more satellites make for
better accuracy.
To calculate your location again:
Press A under Rfrsh.
It may takeyour phoneseveral minutes to
complete the process of determining your location.
During this time, a message usually appearson
your phone’sdisplaysayingyour phone is
scanning for satellites.Fortips on getting the best
locationcalculation,see “Enhancing GPS
Performance”.
The Position screen displays the updated
information.
To cancel a location calculation before it is
completed:
Press A underCancel to return to the Position
screen. -or-
Press e to return to the idle screen.
Each time approximate location of your phone is
calculated, the latest locationinformationis stored
in your phone and remains there even when your
phone is powered off. You will see this information
thenexttimeyouviewthePosition screen.
If you received a phone call or alertwhile
attemptingtodetermineyourlocation,the Position
screenwill disappear, but your phone will continue
attempting to determine its location. If it is
successful, the new location information will be
displayed the nexttime you view the Position
screen.
Enhancing GPS Performance
Sometimes the GPS feature of your phone may be
unable to complete a location calculation
successfully. If this happens when you are making
an emergency call, the location of the nearest cell
tower in contact with yourphone is made available
to the appropriate emergency response center if
the center has the capability to receive such
information. If this happens when you a re trying to
view your location on the phone’s display,you will
see a message indicatingthatyour phone cannot
accesssatellites.
75
Page 86

GPS Enabled
To improve accuracy and increase your chances of
a successful calculation, do the followingwhile
your phone is determining your approximate
location:
• Stay in the open. The GPS feature works best
wherethereis nothing betweenyourphone and
a large amount of opensky. If possible,go
outside, away from tall buildings and foliage.
While performance in a building is improved by
movingclosertowindows,glasswithcertainsun
shielding films may block satellite signals.
• Extend your phone antenna.
76
• Hold your phone to enhance reception. Signals
from GPS satellites are transmitted to your GPS
antenna, which is in your phone antenna. Hold
your phone away from your body, giving the
antenna clear access to satellite signals. Do not
covertheantennaareawithyourfingersor
anything else.
GPS antenna
Page 87

Updating Satellite Almanac Data
• Standstill. If possible, standstilluntil your phone
is finished determining your location. Moving
your phone at a walking pace while your phone
is calculating your approximatelocationmay
substantially decrease GPS performance.
• Ina car.Whenusing the GPSEnabledfeaturein
a car, position your phone so that the GPS
antenna has good access to GPS signals
through the car’s windows. Typically, the GPS
antenna has best access to GPS signals in a car
when placed near a window.
Note: Although movingyour phone at a walking
pacedecreases GPS performance,
moving it at the speed of a moving car
does not.
• Stay in network coverage.Depending on who
your se rvice provider is, the ne twork will provide
your phone with information that helps
determine your location more quickly and
accurately.
Updating Satellite Almanac
Data
Anotherway to keep the GPSfeatureof your
phone workingwell is to keep your satellite
almanacdata up to date.
The United States government maintains an
almanacof data aboutwhereGPSsatellitesareas
they orbitthe Earth.Thisinformationisavailableto
your phone.Keepingyour satellite almanac up to
date helps your phone determineyour location
more quickly.
The almanac containsinformationaboutthe
location of satellites, their operational status, and
other satellite information. Keeping this information
updatedenhances the performance of your GPS
feature. In most cases, your phone will be able to
get a fixin strong satellite signal conditions with
outdated almanac data, but itmay take longer.
Note: When you make an emergency call, your
phone does not rely upon the almanac to
determine your location.
If your satellite almanac data is out of date, your
phone may prompt you to updateit. Follow the
instructions that appear on the phone’s display.
Youmaybeaskedtogotoawebsiteorcalla
customer care number.
77
Page 88

GPS Enabled
Setting Privacy Options
Yourphone’s GPS privacyoptions control whether
Java applications on your phoneor othersoftware
applicationsmay view the locationof your
phone.You may setyour phone to one of these
GPS privacy options.
Note: Privacyoptions do not apply to the
transmission of location information
during emergency 911 calls.
To set your GPS privacy options:
1 From the main menu, select GPS > Privacy.
2 If your GPS PIN security feature is enabled,
enter your GPS PIN. (See “Setting the GPS PIN
Security Feature” for more information.)
3 Select the privacy option you want:
• Restricted — No Java or similar software
applicationsmay view the locationof your
phone.However, locationinformationmay still
be available to the phone’s owner, fleet
manager, or account administrator.
• Unrestricted — All applications may view the
locationof yourphone, without notifying you.
78
•ByPermission—Whenanapplication
attempts to view the location of your phone,
youwillbepromptedtogivepermission.
However,locationinformationmay still be
availabletothephone’sowner,fleet manager,
or account administrator.
Setting the GPS PIN Security Feature
To prevent your GPS privacy settings from being
alteredwithout your knowledge,your GPS privacy
optioncan be protectedby a PIN.
When you receive your phone, the GPSsecurity
feature is turnedoff,so you do not have to entera
GPS PIN to access your GPS privacy options. If
you turn this feature on, youwillbe required to
entera GPS PIN to access your GPSprivacy
options.
To turn the GPSEnabledsecurity feature on or off:
1 From the main menu, select Settings >
Security > GPS PIN.
2 Select On or Off.
3 Enter the current GPS PIN.
Note: When you receive your phone, your GPS
PIN is 0000.
4 Press A under Ok.
Page 89

Using GPS with Map Software
To change your GPS PIN:
1 From the main menu, select Settings >
Security > Change Password > GPS PIN.
2 Enter the current GPS PIN.
Note: When you receive your phone, your GPS
PIN is 0000.
3 Press A under Ok.
4 Enter the new 4- to 8-digit GPS PIN.
5 Press A under Ok.
6 Enter the new 4- to 8-digit GPS PIN to confirm.
7 Press A under Ok.
Using GPS with Map Software
You can use the GPS feature of yourphone to
provideapproximatelocationdata to a laptop
computer or similar device that is running
interactivemap software such as that made by
DeLorme or Microsoft. This way, if your phone has
good access to GPSsignals, your approximate
positionon a map can be made available as you
travel in a vehicle.
To do this,connect your phone toyour laptop(or
otherdevice) with a data cable and set your phone
to transmit data (see “Getting Started” on page 80).
Your phone then provides your approximate
locationto the devicerunningthe map software,
whichdisplays yourlocation on a map. Your phone
provides an updated location every second and the
map software displays your changing locationon
its map.
See“EnhancingGPSPerformance”on page 75 for
more details on obtaining good location
information.
Note: Because your phone is continuously
determining your location, using the GPS
feature of yourphone with map software
uses the phone’s battery power quickly.
Software Compatibility
Your phone sends location information to your
laptopor other device using the standard National
MarineElectronics Association (NMEA) format.
Your phone supportsoutputmessages in
NMEA-0183 format and supports the following
NMEA-0183 sentences: GGA, GLL, GSA, GSV,
RMC, and VTG.
Themapsoftwarerunningonyourlaptoporother
device must support NMEA 3.0.
79
Page 90

GPS Enabled
Getting Started
To connect your phone to your laptop or other
device:
1 Open the connector cover.
connector
cover
2 Withthe phone’sdisplay facing up, insert a data
cable’s connector into the accessory connector,
until you hear a click.
80
3 InsertthedataplugintotheCOMportofyour
laptop or other device.
Make sure no other application is usingthe COM
port selected.
Make sure the COM port settings of yourlaptopor
otherdeviceare set to the following:
• Bits per second: 4800
• Data bits: 8
• Parity: None
• Stop bits: 1
• Flow control: Hardware
To set your phone to send location information to
your laptopor other device:
1 From the main menu, select GPS > Interface.
2 Set NMEA OUT to On.
Your phone is now sending location data to your
laptopor other device.
To stop your phone from sending location data to
your laptopor other device:
Set NMEA OUT to Off.
Each time you power your phone on, NMEA OUT
is automatically set to Off.
Page 91

Voice Records
A voice record is a recording you makewith your
phone and can play back. You canrecord notes to
yourselfor phonecalls.
Your phone can store up to20 voice records.
Creating Voice Records
Torecordanotetoyourself:
1 From the main menu, select VoiceRecord >
[New VoiceRec].
2 Say the message you wantto record into the
microphone.
Tip: To stop recordingbeforeyou are finished,
press A under Pause. To start recording
again,pressA under Resume.Tostop
recording and discard the voice r ecord at
any time, press A under Cancel.
3 When you are finished recording,press O.
Toaddtotheendofvoicerecord:
1 From the main menu, select VoiceRecord.
2 Scroll to the voice record you want to add to.
3 Press m.
4 Select Add To.
5 When you are finished recording,press O.
To record a phonecall:
1 Whileonanactivecall,pressm.
2 Select Record.
3 When you are finished recording, press O.
Note: Recordingof phone calls is subject to
applicable laws regarding privacy and
recording of phone conversations.
Playing Voice Records
1 From the main menu, select VoiceRecord.
2 Selectthevoicerecordyouwanttoplay.
3 Tostop thevoicerecord while it is playing,press
O.
Tip: Tofast forward,scroll right.Torewind, scroll
left. To pause or resume, press any number
key.
Labeling Voice Records
When you create a voice record, it islabeled with
the time and date it wasrecorded. You canthen
rename it with a custom label.
1 From the main menu, select VoiceRecord.
2 Scroll to the voice record you want to label.
3 Press A under Label.
81
Page 92

Voice Records
4 Enter the label you want to assign. See
“Entering Text” on page 49.
5 Press O.
Deleting Voice Records
To delete a voice record:
1 From the main menu, select VoiceRecord.
2 Scrollto the unlocked voice record you want to
delete.
3 Press m.
4 Select Delete.
5 Press O or A under Yes to confirm.
To delete all voice records:
1 From the main menu, select VoiceRecord.
2 Scroll to any voice record.
3 Press m.
4 Select Delete All.
5 Press O or A under Yes to confirm.
Locking Voice Records
When you lock a voice record,it cannotbe deleted
until you unlock it.
1 From the main menu, select VoiceRecord.
82
2 Scroll to the voice record you want to lock or
unlock.
3 Press m.
4 Select Lock to lock the message. -or-
Select Unlock to unlock the message.
Whenavoicerecord is locked,this icon
next to it.
R appears
Managing Memory
To view the amountof memory availablefor voice
records:
1 From the main menu, select VoiceRecord.
2 With [New VoiceRec] highlighted,pressA
under Memory. -or-
With any voice record highlighted, press m.
Select Memory.
To free more memory by deleting all unlocked
voice records:
1 From the voice records memory screen, press
A under Delete.
2 Press O or A under Yes to confirm.
Page 93

Note: Voice records are stored in your phone
using the same memory space used to
storemessages, Java application data,
ring tones, and wallpaper images.
Deleting some of these other items frees
memoryfor voice records.
Managing Memory
83
Page 94

Customizing Your Phone
Setting the Volume
Of the Earpiece and Speaker
1 Fromthe mainmenu,selectSettings > Volume.
2 Scroll to Earpieceto set the earpiece volume.
-orScroll to Speaker to set the speaker volume.
3 To s et the volu me:
Scrollleft orright. -or-
Pressthe volume controls.
Of the Ringer
Pressthe volume controls.
Setting Your Phone to Vibrate
To set your phone to vibrate instead of making a
sound when you receive phone calls, Private calls,
group calls,messagenotifications, and call alerts,
see “Setting Your Phone to Vibrate”on page 46.
84
To set your phone to vibrate instead of making a
sound when you receive Private calls and group
calls,even if you wantyour phone to r ing f or other
features:
1 From the main menu, select Settings > 2-Way
Radio > Alert Type.
Tip: If Alert Type does not appear: From the
main menu, selectRing Tones.Makesure
Vibrate All is set to Off. Repeat step 1.
2 Select Vibrate to set your phone to vibrate.
Tip: SelectSilent in step 2 toset your phone to
neither vibrate nor make a sound.
Changing the Look of Your Phone
Wallpaper
A wallpaper is an image that appears on theidle
screen.
Choosing a Wallpaper
1 From the main menu, select Settings >
Display/Info > Wallpaper > Wallpaper.
2 Select the wallpaper you want.
Tip: If youwant to see whatt he wallpaperlooks
like, press A under View.
Page 95

Changing the Look of Your Phone
Setting Wallpaper to Change Automatically
Note: This feature may not beoffered by your
service provider.
1 From the main menu, select Settings >
Display/Info > Wallpaper > Auto Cycle.
2 Select how often you want the wallpaper to
change.
Any of thewallpapersin your phone may appear
on your idle screen.
Setting Text Size
To set thesizeof the text on the display:
1 From the main menu, select Settings >
Display/Info > Text Size.
2 Select the option you want:
• Zoom — 11 characters per line
• Standard — 14 characters per line
• Compressed — 18 characters per line
To set your phone to briefly display very large
digitswhen you enter numbers at theidle screen:
1 From the main menu, select Settings >
Display/Info > Large Dialing.
2 Set this option to Large Digits.
Setting Contrast
To set the contrast of the display:
1 From the main menu, select Settings >
Display/Info > Contrast.
2 Scroll left or right to set the contrast.
Setting the Menu View
YoucansettheitemsonyourmainmenuandJava
applicationsmenu to appear as large icons or a
list:
1 From the main menu, select Settings >
Display/Info > Menu View. -orFrom the main menu: Press m. Select Main
Menu Setup > Menu View.
2 To choose a list, selectListView. -or-
To choose large icons, select Icon View.
Setting the Backlight
A backlightlightsthedisplay andkeypadwhenyou
make or receive a call, open or close the flip, or
press keys or buttons.
To control how long thebacklight stays on:
1 From the main menu, select Settings >
Display/Info > Backlight > Backlight.
85
Page 96

Customizing Your Phone
2 Selectthe number of seconds you want the
backlight to stay on. -or-
Select Off if you never want thebacklight on.
To set thekeypadbacklight to light up only in low
light conditions:
1 From the main menu, select Settings >
Display/Info > Backlight > Sensor.
2 Set this option to On.
Temporarily Turning Off Calls
Sometimes you maywant to haveyour phoneon,
but turn off its ability to make and receive calls,
such as when you are on an airplane.
To set your phone so that it cannot make or receive
phonecalls,Private calls,or group calls;or transfer
data:
1 From the main menu, select Settings >
Advanced > AirplaneMode.
2 Set this option to On.
This icon
To restore your phone’s ability to do all these
things:
Set this option to Off.
86
U appears.
Using Settings
Settings contains many submenus that let you
customizeyour phone.
For information on applying groups of settings to
your phone together, see “Profiles”on page 91.
Display/Info Features
The Display/Info menu controls how the keypad
and display appear:
• Wallpaper — changes the wallpaperthat
appears on the idle screen.
•Palette— changes the color scheme of the
display.
•TextSize— setssize of text on the display.
• Home Icons — controls whether main menu
iconsappear onthe idle screen.
• Backlight — controlsbacklight illumination.
•Clock— controls whether the time and date
appear on the idle screen; sets time and date
format; sets year.
•MenuView— controls whethertheitemson
your main menu and Java applications menu
appear as large icons or a list.
• Large Dialing — sets large digits to appear on
the idle screen when you enter a number.
Page 97

Using Settings
•Contrast— sets the contrast of the display.
• Language — sets the language that your phone
displays.
Phone Calls Features
The Phone Calls menu controls how your phone
handles phone calls:
•SetLine— sets phone line 1 or phone line 2 as
the active line for outgoing calls.
•AnyKeyAns— If this feature is on, you can
answer calls by pressing any key on the keypad.
•AutoRedial— setsyour phonet o automatically
redialcalls you make when the system is busy.
•CallWaiting— See “Call Waiting” on page 36.
• Auto Ans — sets your phone to automatically
answer an incoming call after a specified
numberof rings. When this feature is on, the
phone answers by connecting you to the caller;
it does not send the call to voice mail, unless
you are out of coverage or on the line.
• Flip Activation — See “Setting Flip Actions”on
page 39.
• Minute Beep — causes a beepto sound every
minuteof an active call.
• Call Duration — causes theduration of acallto
appear on the display when the call ends.
•TTY—See“MakingTTYCalls”onpage42.
• Notifications — See“MessageNotifications”on
page 52.
•JavaAppControl— If you have installed a
Javaapplication that answersphone calls,this
setting lets you turn that application on.
2-Way Radio Features
The 2-Way Radio menucontrols how your phone
handles Private calls and group calls:
• Tkgrp Silent — controls whether you hear
groupcalls to your Talkgroup.See“GroupCalls”
on page 39.
•TkgrpArea— lets you define your Talkgroup
area.
• One Touch PTT — See “Setting One Touch
PTT”on page 38.
•AlertType— controls how your phone notifies
you when you receive Private calls and group
calls.
87
Page 98

Customizing Your Phone
Personalize Features
The Personalize menu makes main menu items
easierto access.
• Menu Options — Reorder Menu lets you
changetheorder of the items on the main menu
by grabbing and moving them; Add/Remove
Apps letsyoucreateashortcuttoaJava
application on the main menu.
•UpKey— sets the main menu item you access
when you scroll up fromtheidle screen.
•DownKey— sets the main menu item you
access when you scroll down f rom the idle
screen.
• LeftKey— sets the main menu item you access
when you scroll left from the idle screen.
•RightKey— sets the mainmenu item you
access when you scroll right from the idle
screen.
• Center Key — sets the main menu item you
access when you press O from the idle screen.
• Left Sftkey— sets the mainmenu item you
access when you press the left option key from
the idle screen.
• Right Sftkey — sets themainmenu item you
accesswhenyou press the right optionkey from
the idle screen.
88
•PowerUp— setsthe main menu item you see
when you power on yourphone.To set the idle
screen to be the first thing you see when you
power on your phone, select Default Ready.
Volume Features
The Volume menu sets the volume of sounds your
phone makes:
•Line1— sets ringer volume for phone line 1.
•Line2— sets ringer volume for phone line 2.
• Messages — sets the volume ofmessage
notificationsand Datebookreminders.
• Earpiece — sets the volume of sound coming
outoftheearpiece.
• Speaker — sets the volume of sound coming
outofthespeaker.
•Keypad— sets the volume of sound associated
withpressingkeys and buttons.
• Java Earpiece — setsthevolume of sound
associated with Java applicationscoming out of
the earpiece.
• Java Speaker —sets the volume of sound
associated with Java applicationscoming out of
the speaker.
•Data— sets the volume of sounds that notify
you that youare receiving a circuit data call.
Page 99

Using Settings
Security Features
The Security menu lets you turn security features
on and off and changepasswords:
• Phone Lock — turns on a feature that locks
your phone, either immediately or automatically
aftera set period of inactivity.A n unlockcodeis
required to enable this feature,to unlock the
phone, and to set a new unlock code. Contact
your serviceprovider for your default unlock
code.
•KeypadLock— locks the phone’s keypad,
either immediately or automatically after a set
period of inactivity.
•SIMPIN— enables and disables your phone’s
SIM PIN security feature. See “Turning the PIN
Requirement On and Off” on page13.
•GPSPIN— enables and disablesyourphone’s
GPS PIN security feature. See “Setting the GPS
PIN Security Feature” on page 78.
• Change Passwords — changes your phone
unlockcode,security code, SIMPIN, and GPS
PIN.
Advanced Features
The Advanced menu contains advanced and rarely
used Settings features.
• Alert Timeout — setsthe amount of time a tone
continues to sound when you receive a
message notification, call alert, or Datebook
reminder.
• Headset/Spkr — sets headset option. See
“Usinga Headset” on page 98.
• Connectivity — Network ID sets the phone’s
network IDs and theirroamingoptionsunderthe
direction of your service provider; Master Reset
lets your service provider reset your service in
the event of a security or provisioningproblem.
• Reset Defaults — Reset Settings returns all
settings to their original defaults; Reset All
returns all settings to their original defaults and
erases all stored lists. Use only under the
direction of your service provider.
• ReturntoHome—controlshowlong therecent
callslist displays after calls.
• Airplane Mode — preventsyour phone from
makingor receivingphone calls,Private calls,or
group calls; or transferring data.
• Phone Only — prevents your phone from
makingor receiving Private calls or group calls,
or transferring data.
89
Page 100

Customizing Your Phone
Note: This feature may not beoffered by your
service provider.
•BaudRate— sets the baud rate at which your
phone communicates with a laptop computer,
PC, or similar device.
90
 Loading...