

Page 1

Digital Multi-service Data-capable Phone
i315 Phone User’s Guide
@NNTN5504A@
NNTN5504A
Motorola
iDEN
Page 2

Page 3

IMPORTANT NOTICE: PLEASE READ
PRIOR TO USING YOUR PHONE
The SIM card provided in this kit is intended for use with
the phone provided in this package.
Loss of certain features will result when using a S IM
card from one of the following models: i30sx, i35s,
i50sx, i55sr, i58sr, i60 c, i80s, i85s, i88s, i90c, i95cl
series, and the i2000 series.
For more information on SIM card compatibility, go to
www.motorola.com/iden/support.
Defects or damage to your Motorola phone that result
from the use of non-Motorola branded or certified
Accessories, i nc luding but not limited to replacement
housings and or other peripheral accessories, are
excluded f rom warranty c ov erage. Please refer to the
text of Motorola's Limited One Year warranty located in
this user’s guide for complete details.
Page 4

Page 5

Contents
Getting Started........................................... 1
Locating Your SIM Card....................................3
Activating Service..............................................6
Powering On and Off.........................................6
Enabling Over-the-Air Security..........................6
Phone Programming .........................................7
Finding Your Phone Number.............................7
Phone Basics ....................................................8
SIM Card Security...........................................11
Locking the Keypad.........................................14
Games.............................................................15
Accessories.....................................................15
For More Information.......................................15
Making Calls............................................. 16
Phone Calls.....................................................16
Private Calls....................................................16
Receiving Calls................................................16
Call Icons.........................................................17
Ways to Enter Calls.........................................17
Using Speakerphone.......................................19
Using Mute ......................................................20
Making Emergency Phone Calls.....................20
MOTOtalk
Channels and Codes.......................................22
Private MOTOtalk Calls...................................24
Making Emergency Calls in MOTOtalk ...........25
Setup Options .................................................25
TM ..........................................................21
Call Alerts..................................................27
Sending Call Alerts..........................................27
Receiving Call Alerts.......................................27
Using the Call Alert Queue..............................27
Recent Calls..............................................29
Storing Recent Calls to Contacts ....................29
Deleting Recent Calls......................................30
Contacts ....................................................31
Viewing Contacts ............................................32
Creating Entries ..............................................33
Storing Numbers Faster ..................................34
Editing Entries.................................................35
i
Page 6

Deleting Entries...............................................35
Checking Capacity ..........................................36
Creating Pauses and Waits.............................36
International Numbers .....................................36
Accessing Contacts with GSM Phones...........37
Call Forwarding........................................ 38
Forwarding All Calls ........................................38
Turning Off Call Forwarding ............................39
Forwarding Missed Calls .................................39
Viewing Call Forwarding Settings....................40
Memo .........................................................49
Ring Tones................................................50
Setting Your Phone to Vibrate.........................50
Turning Ring Tones Off...................................50
Ring and Vibrate .............................................51
Assigning Ring Tones to Contacts..................52
Viewing Ring Tone Assignments ....................52
Downloading More Ring Tones.......................52
Managing Memory ..........................................52
Deleting Custom Ring Tones ..........................53
Advanced Calling Features..................... 41
Call Waiting.....................................................41
Call Hold..........................................................42
3-Way Calling..................................................42
Creating Pauses and Waits While Dialing.......43
Making International Calls...............................43
Setting One Touch PTT
Group Calls .....................................................44
Call Timers ......................................................45
Using Your Phone as a Modem ......................46
ii
® ......................................... 43
Entering Text ............................................54
Using Alpha Mode...........................................54
Using Word Mode ...........................................54
Special Function Keys.....................................55
Using Numeric Mode.......................................56
Using Symbols Mode ......................................56
Messages..................................................57
Message Notifications.....................................57
Message Center..............................................58
Page 7

Voice Mail Messages............................... 59
Receiving a Message......................................59
Accessing Voice Mail from
the Message Center ...................................59
Sending Unanswered Calls to VoiceMail .......59
MOSMS Messages...................................60
Setting Up........................................................60
Receiving a Message......................................60
Reading from the Message Center .................61
Creating and Sending Messages ....................61
Managing Memory...........................................65
GPS Enabled ............................................ 66
IMPORTANT: Things to Keep in Mind ............66
Making an Emergency Call .............................67
Viewing Your Approximate Location ...............68
Enhancing GPS Performance.........................69
Updating Satellite Almanac Data.....................71
Setting Privacy Options...................................71
Using GPS with Map Software........................72
Voice Records.......................................... 75
Creating Voice Records ..................................75
Playing Voice Records ....................................75
Labeling Voice Records ..................................76
Deleting Voice Records...................................76
Locking Voice Records ...................................76
Managing Memory ..........................................76
Customizing Your Phone.........................78
Setting the Volume..........................................78
Setting Your Phone to Not Ring ......................78
Seeing the Display Better................................79
Using Settings.................................................79
Using a Headset .......................................82
Attaching a Headset........................................82
Using a Remote PTT Button ...........................82
Understanding Status Messages............83
Safety and General Information ..............85
RF Operational Characteristics.......................85
Portable Radio Product Operation and EME
Exposure.....................................................85
Electro Magnetic Interference/Compatibility....88
Medical Devices..............................................88
iii
Page 8

Operational Warnings......................................89
Operational Cautions.......................................90
Accessory Safety Information..........................91
MOTOROLA LIMITED WARRANTY ........ 93
Limited Warranty
Motorola Communication Products
(International)....................................... 97
Patent and Trademark Information...... 101
Index ....................................................... 102
Driving Safety Tips................................ 107
iv
Page 9

DECLARATION OF CONFORMITY
Per FCC CFR 47 Part 2 Section 2.1077(a)
Responsible Party Name: Motorola, Inc.
Address: 8000 West Sunrise Boulevard
Plantation, FL 33322 USA
Phone Number: 1 (800) 453-0920
Hereby declares that the product:
Product Name: i315
Model Number: H69XAH6RR1AN
Conforms to the following regulations:
FCC Part 15, subpart B, section 15.107(a),
15.107(d) and section15.109(a)
Class B Di gital Device
As a personalcomputerperipheral, this device
complies with Part 15 of the FCC Rules. Operation
is subject to the following two conditions: (1) this
device may not cause harmful interference, and (2)
this device must accept any interference received,
including interference that may cause undesired
operation.
Note: This equipment has beentestedand
found to comply with the limits for a Class
B digitaldevice, pursuant to part 15 of the
FCC Rules. These limits are designed to
provide reasonable protection against
harmful interferencein a residential
installation. This equipment generates,
uses and can radiate radio frequency
energy and, if not installed and used in
accordance with the instructions, may
causeharmfulinterferencet o radio
communications. However, there is no
guarantee that interference will not occur
in a particular installation.
If this equipment does cause harmful
interference to radio or television reception,
which can be determined by turning the
equipmentoff and on, the user is
encouraged to try to correct the interference
by one or more of the following measures:
• Reorient or relocate the receiving
antenna.
• Increase the separation between the
equipment and receiver.
• Connect the equipment into an outlet on
a circuit differentfrom that to which the
receiver is connected.
• Consult the dealeror an experienced
radio/TV technician for help.
v
Page 10

Page 11
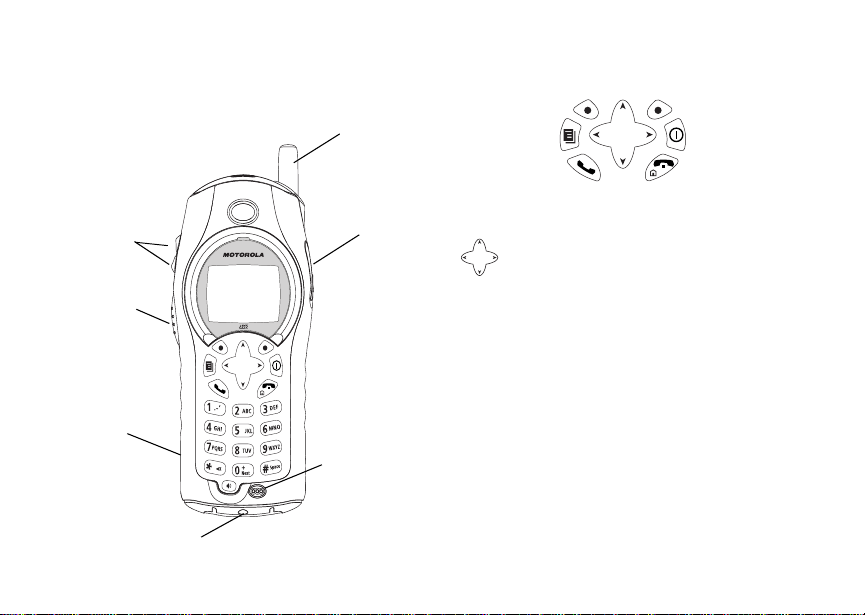
Getting Started
antenna
volume
controls
Push-To-Talk
(PTT) button
speaker
(in back)
accessory connector
audio jack
microphone
p Power button.
Navigation key — press the arrows to
scroll through menus and lists.
m Menu key — accesses context-sensitive
menus.
A Optionkey—selectstheoption
appearing above it on the display.
s Send key — places phone calls.
e End key — ends phone calls; returns to
idle screen;in browser mode, returns to
Net main menu.
1
Page 12

Getting Started
To start using your i315 phone:
• Makesure your SIM card is in place.
• Charge the battery.
• Activate your service.
• Enable over-the-air security.
Removing the Battery Door
1 Make sure the phone is powered off.
2 Slide the release button forwarduntil it releases
the battery door.
2
Note: If the release button does not slide
forward to release the battery door,rotate
the circular piece in the center of the
releasebuttontounlockit.
3 Remove the battery door from the back of your
phone.
Page 13
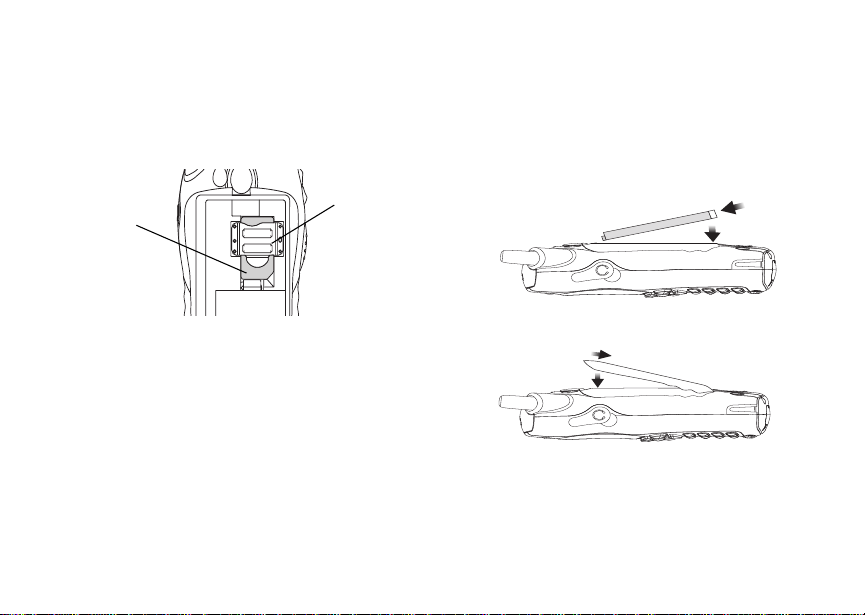
Locating Your SIM Card
Locating Your SIM Card
Your SIM (SubscriberIdentity Module) card is a
small piece of plastic located in the SIM card
holderin the backof your phone, underneath the
battery.
SIM card
SIM card
If your SIM card is not in the SIM card holder, it
may be in the box your phone came in, attached to
a piece of white plastic about the size of a credit
card. If this is the case, carefully detach your SIM
card from the surrounding plastic and insert it as
described in “Inserting Your SIM Card”on page 13.
If there is no SIM card in your phone or the box,
contactyour service provider.
holder
Battery
Inserting the Battery
1 Remove the battery door.
2 Insertthe top of the batteryinto the batteryarea.
Press the bottom of the battery to secure it.
3 Replacethe batterydoorandpress it gentlyuntil
you hear a click.
3
Page 14
Getting Started
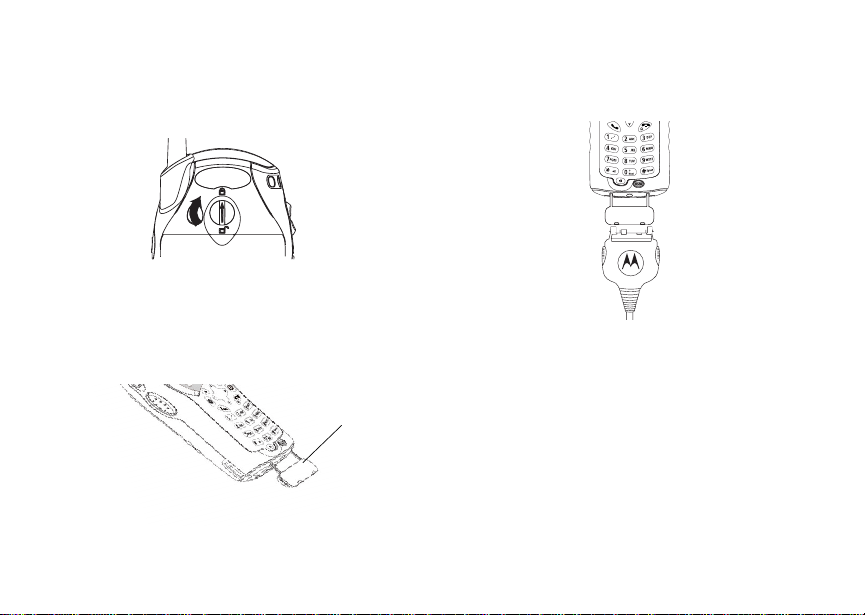
4 If you want to ensure the battery door does not
accidentally come off, rotate the circular piece in
the center of the release button to lock it.
Charging the Battery
Your phone comes with a standard travel charger.
1 Plug the charger into an electrical outlet.
2 Open the connector cover.
connector
cover
4
3 Plug the otherend of t he chargerinto the
accessory connector.
DeviceAttached appears on the display.
Tip: To remove the charger from the accessory
connector: Press the buttons on the sides
of the plug.Pull the plug straight out.
4 When charging the battery for the first time,
charge for 30 minutes longer than the time
shown in “Charging Times”.
Page 15
Locating Your SIM Card
Charging Times
See your battery and chargerto determine the
appropriate charging time.
Battery Charger
Rapid Mid-Rate
High
Performance
Extra
Capacity*
Maximum
Capacity*
For best results, charge the batteries within the
temperature range of 50°F to 104°F (10°C to
40°C).
Prolonged charging is not recommended.
* It is recommended that you use the Maximum
Capacity or Extra Capacity batterywhen you are
usingthe MOTOtalk feature.
2hours 4hours
2.5 hours 6 hours
3.5 hours 7.5 hours
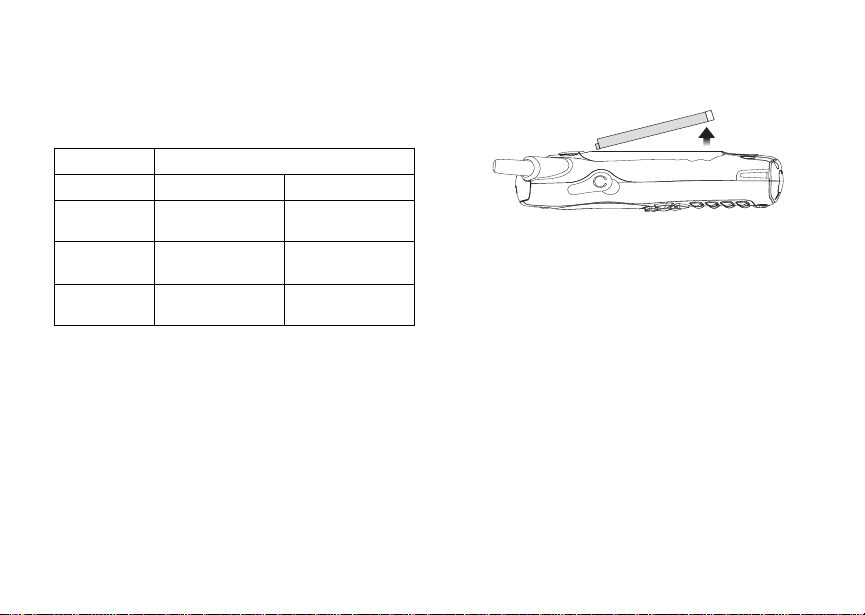
Removing the Battery
1 With the phonepoweredoff,removethe battery
door.
2 Remove the battery by pushing the battery
toward the antenna and lifting it out.
Battery Use and Maintenance
• TheMotorola iDEN Approved Lithium Ion
chargers provide optimum performance. Other
chargers may not fully charge the iDEN Lithium
Ion batteryor may yield a reducednumberof
lifetime charge cycles.
• Extreme temperatures degrade battery
performance.Do not storethe battery where
temperatures exceed 140°F (60°C) or fall below
4°F (-20°C).
• Lithium Ion batteries have a self discharge rate
and withoutuse, lose about 1% of theircharge
per day.
• The battery capacity is degraded if the battery is
storedfor long periods while fully charged. If
long term storage is required, store at half
capacity.
5
Page 16

Getting Started
Activating Service
The first time you power on your phone, you must
be in your local calling area. This activates your
service.
Powering On and Off
To power your phoneon:
Press p.
To power your phoneoff:
Pressand hold p.
When You Power On for the First Time
The first time you power your phone on, a screen
may appear asking you to update your browser
information. This means you must enable security.
If the Enter SIM PIN Code screen appears,enter
your SIM PIN. See “Entering the PIN” on page 11.
Press A under Ok .
When you receive your phone,t he SIM PIN is
0000. Change your PIN to prevent fraudulent use
of the SIM card (see “Changing the PIN” on page
11).
6
As your phone connectsto the network, you will
see a connecting message. When the idle screen
appears,the phone is ready to use.
s
Contcs
S
d1
Enabling Over-the-Air Security
If you are set up to receive over-the-air
programmingfrom your service provider, you must
enable security thefirst time you power on your
phone or within 20 days of first activationof your
phone:
1 When you power on your phone for the first time,
aftert he idle screen appears, you will be
prompted to select Ok to update your browser
information.
Note: If you press A under Later,youwillbe
prompted to enable security each time
you power on your phone until you press
A under Ok.
Page 17

Phone Programming
2 Press A under Ok.
3 You are prompted to enable security. Press A
under Yes. A series of screens appears. If you
subscribe to your service provider’s plan, your
home page appears.
4 Press e to return to the idle screen.
Phone Programming
Within 24 hours of enabling security, you will
receive a Net alert containing your Private ID and
Talkgroup lists for Private calls.
To accept programming:
1 When you receivea Net alert saying New
Browser Message - Receive Programmi ng
Info,pressA under Goto.
2 You are prompted to accept changes to your
lists. Press A under Ok.
3 If you are prompted again to accept changes to
your lists, press A under Ok.
4 A confirmation screendisplays.Press A under
Ok.
5 Press e to return to the idle screen.
Finding Your Phone Number
My Info lets you view your phone number,Private
ID, and other phone information:
1 Press m to access the main menu.
2 Scroll to My Info.
3 Press A under Select.
4 Scroll to see your information:
•Name— Enter your name. See “Entering
Text”onpage54.
•Line1and Line 2 — yourphonenumbersfor
phone lines 1 and 2. Theseare filled in when
you receive your firstPrivatecall after
enabling over-the-airsecurity on your phone.
•Private— Your Private ID is the number that
othersuse to contactyou using PrivateID
calls.It is filled in when you receive your first
Private call.
•GroupID— the number of the Talkgroup you
have joined.
• Carrier IP — the IP address assigned to your
serviceprovider.Itisfilledinwhenyou
register for packet data services.
• IP1 Address and IP2 Address —theIP
addresses you use to access the Internetwith
your phone.
7
Page 18
Getting Started
•Ckt— Your circuit data number is the number
youuseifyouwanttouseyourphoneto
transfer circuit data. See “Using Your Phone
as a Modem” on page 46. You receivethis
number from your service provider.
Note: The context-sensitive menuunderMy Info
contains information that may be used by
your service provider if there is a problem
withyour phone.
Phone Basics
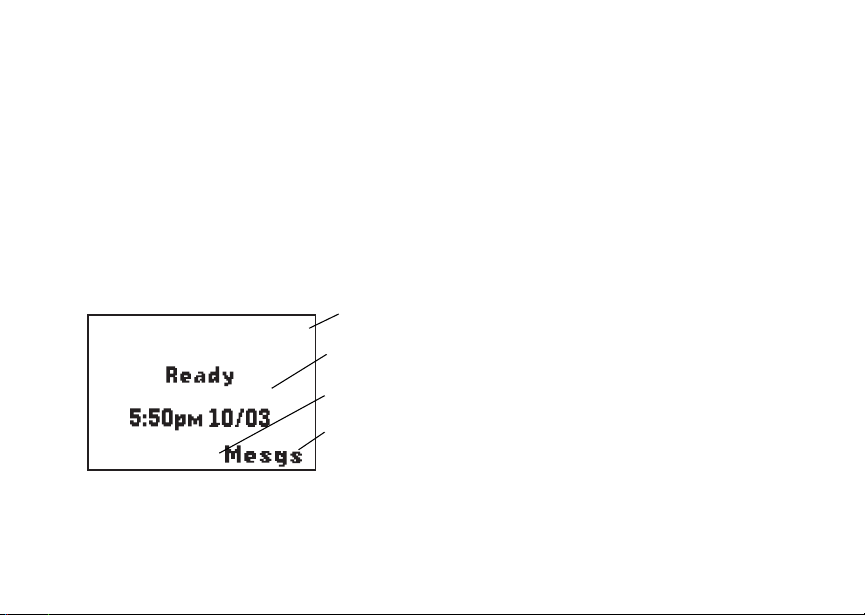
Any time your phone is powered on, the display
provides you with information and options.
s
Contcs
8
S
status icons
d1
text area
menu icon
display options
The screen shown above is the idle screen. The
text that appears on your idle screen depends on
your service provider. The idle screen a ppears
when your phone i s on, but not engaged in any
activity.
Text Area
This area displays menus, messages, names,
phone numbers, and other information.
Display Options
Two display optionsappearat the bottomof most
screens. You select a display option by pressing
theoptionkeybelowit.
Menus and Lists
Your phone’s featuresare arrangedin menus,
submenus, and lists.
Toaccesstheitemsinamenuorlist,scrollusing
the navigation key at the top of your keypad. This
key lets you scroll up, down, left, or right. Holding
down the appropriatepartof the navigation key
speeds up scrolling.
In this guide, this symbol > tells you to select a
menu or list item. For example, Settings >
Securitymeans:
1 Scroll to Settings on the main menu.
Page 19

Phone Basics
2 Press A under Select to see the Settings
screen.
3 Scroll to Security.
4 Press A under Select to see the Security
screen.
Menu Key
Many features provide context-sensitive menus
that let you access related features and actions.
This S icon appears any time a context-sensitive
menu is available. Press m to access the menu.
Main Menu
All your phone’sfeaturescan be accessed through
the main menu. Whenyou are using a feature, the
icon for that feature appears in the upper left
cornerof the display.
a Browser Browse the Web.
b Settings Customize your phone.
c VoiceRecord* *Thisisan optionalfeature.
d Contacts View,store,editcontacts.
Seepage78.
Recordand play audio
messages. See page 75.
Seepage31.
e Messages Access messages. See
f Call Forward Setcallforwardingoptions.
g Memo Store a number to access
h Call Timers Phoneusage information.
i Recent Calls Lists recent calls. See
j My Info Viewpersonalphone
Games Access games. See
G
k Call Alert Lists call alerts. See
l GPS Find your approximate
m Ring Tones Assign ring tones and turn
page 57.
Seepage38.
later.Seepage49.
Seepage45.
page 29.
information,including
phone number and Private
ID. See page 7.
“Games” on page 15.
page 27.
geographical location. See
page 66.
ringeroff. See page 50.
9
Page 20

Getting Started
m MOTOtalk/MT
Options
Launch/Exit MOTOtalk
Access MOTOtalk Setup
and Help. See page 21.
Status Icons
Status icons appear in the two rows at the top of
the display. Some appear at all times. Others
appearonlywhenyourphone is engagedin certain
activities or when you have activated certain
features.
abcd
efgd
opqr
s
A Phone In Use — Your phone is
B Private InUse — Yourphoneis
C Talkgroup In Use —Your
10
Battery Strength — More bars
on the battery indicate a greater
charge.
Signal Strength — More bars
next to the antenna indicate a
stronger signal.
active on a phone call.
active on a Private call.
phone is active on a group call.
12 Active Phone Line —1
m MOTOtalk — Your phone is set
GHI
JKL
uvMR Ringer Off — Your phone is set
wy x
D Internet — You are ready to
YZ Packet Data — You are ready
P Roaming — You are using your
indicates phone line 1 is ready
tomake calls; 2 indicatesphone
line 2 is ready to make calls.
to MOTOtalk mode.
Call Forward — Your phone is
set to forward calls. See “Call
Forwarding”on page 38.
not to ring. S ee “Turning Ring
TonesOff”onpage50.
Messages — You have one or
more messages.See
“Messages” on page 57.
browsethe internet.
to transfer packetdata or are
transferringpacket data.See
“Using Your Phone as a
Modem”on page 46.
phone outside your carrier's
network.
Page 21

SIM Card Security
SIM Card Security
Your SIM card protects yourpersonali nformation.
The SIM card stores all your Contactsinformation.
Since this information is stored on your SIM card,
not in yourphone,you can remove the information
by removing your SIM card.
Note: Except for making emergency calls, your
phone will not function withoutthe SIM
card.
To prevent unauthorized use of your phone,your
SIM card is protected by a PIN that you entereach
timethe phoneis poweredon. You canchange the
PIN or turn off the requirement that it be entered.
Entering the PIN
You may be requiredto entera SIM PIN when you
firstuse your phone.
When you receive your phone,t he SIM PIN is
0000. Change your PIN to prevent fraudulent use
of the SIM card.
Important: If you enter your PIN incorrectly3 times,
1 When the Enter SIM PIN Code screen appears,
enter your SIM PIN. An asterisk appears for
each character entered.
2 Press A under Ok.
your SIM card is blocked. To unblock
your SIM card, you must contact your
service provider. See “Unblocking the
PIN”.
Changing the PIN
1 From the main menu, select Settings >
Security > Change Password > SIM PIN.
2 At the Enter Old SIM PIN Code screen, enter
the current SIM PIN.
3 Press A under Ok.
4 At the Enter New SIM PIN Code screen, enter
the new 4- to 8-digit SIM PIN.
5 Press A under Ok.
6 At the Re-enter New SIM PIN Code screen,
re-enter the new SIM PIN to confirm.
7 Press A under Ok.
11
Page 22

Getting Started
Turning the PIN Requirement On and Off
When the SIM PIN requirement is on, you are
prompted to enter your PIN each time you turn on
your phone.
Note: If a SIM PIN is required, your phone will
not function until the SIM PIN is entered,
exceptfor making emergency calls.
When the PIN requirement is off, your phone can
be used without enteringa PIN.
Important: When the SIM PIN requirement is off,
the personal data on your SIM card is
not protected. Anyone can use your
phone and access your personal data.
1 From the main menu, select Settings >
Security > SIM PIN.
2 Select On or Off.
3 Enter the current SIM PIN.
4 Press A under Ok.
Unblocking the PIN
If you enter your PIN incorrectly 3 times, your SIM
card is blocked. To unblock your SIM card, you
must contact your service provider to get a PIN
Unblock Code (PUK).
12
Important: If you unsuccessfully enter the PUK
code 10 times, your SIM card is
permanently blocked and must be
replaced. If this happens, all data is
lost. You will get a message to contact
your service provider. Except for
making emergency calls, your phone
will not function with a blocked SIM
card.
To unblock the PIN:
1 Press *#m1.
2 At your service provider representative’s
request, provide the informationneededto give
youaPUKcode.
3 Select Unblock PIN.
4 Enter the PUK code.
5 Enter a new 4- to 8-digit SIM PIN.
6 Re-enter your SIM PIN.
If you entered the codes properly, SIM Unlocked
appearson the display.
Page 23
SIM Card Security
Inserting and Removing Your SIM Card
Important: Do not touch the gold-colored areas of
Switching SIM Cards
Moving your SIM card from one phoneto another
moves all your Contacts information, but erases
otherinformation. If you remove your SIM card and
useit with another phone,or use anotherSIM card
with your phone, the following information is
erased:
• The recent calls list
• Call forwarding settings
• Net alerts
• Mobile originatedtext messages,drafts, and
quicknotes
• InformationstoredinMemo
• 3 most recent GPS Enabled locations
• V oice records*
• Voice names*
* This is an optionalfeature. Contact your service
provider about its availabilty of purchase.
your SIM card.
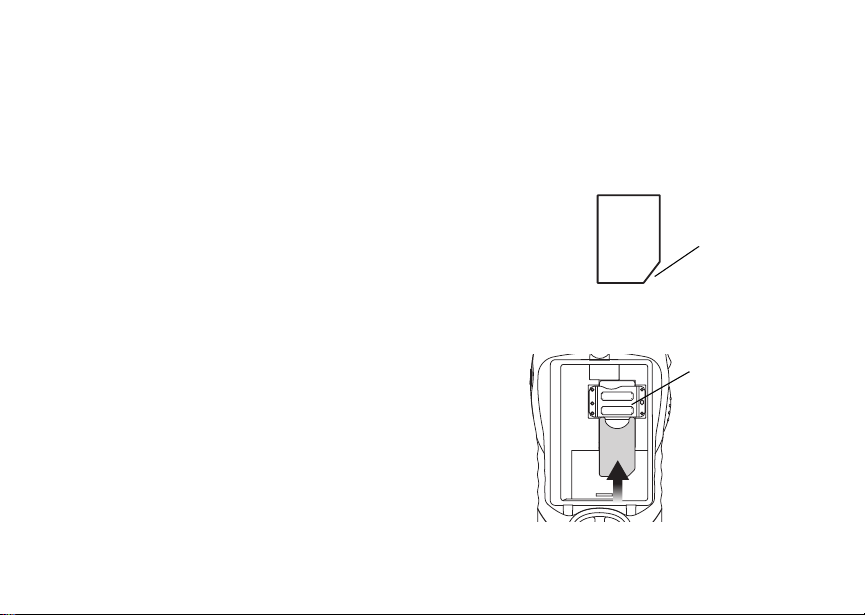
Inserting Your SIM Card
With your phone powered off, remove t he battery
door and battery. See “Removing the Battery”on
page 5.
1 Hold your SIM card as shown. Do not touch the
gold-colored area.
cut corner
2 Carefullyslide your SIM card intoyour phone,
until it lies flat in the SIM card holder.
SIM card
holder
13
Page 24
Getting Started
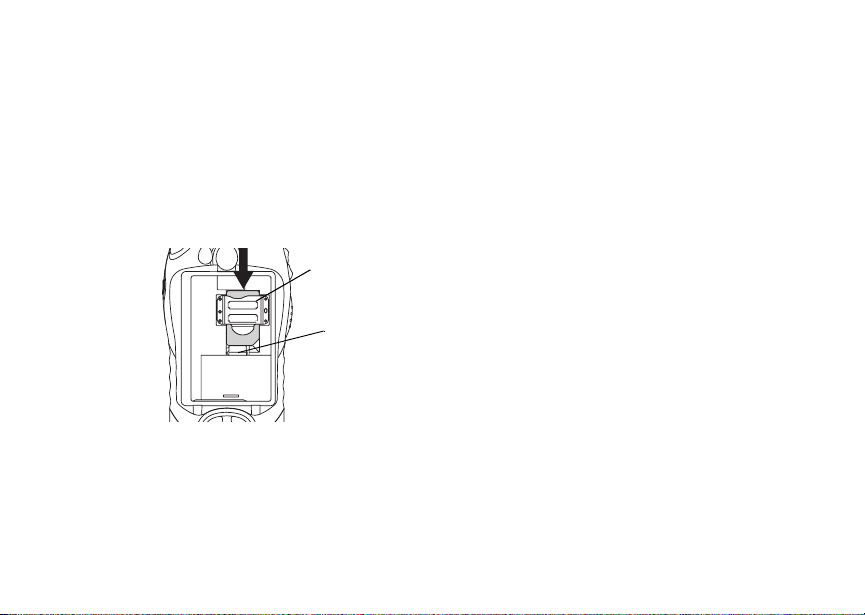
Removing Your SIM Card
Important: To avoid loss or damage, do not remove
your SIM card from your phone unless
absolutely necessary.
1 With your phone powered off, remove the
battery door and battery.
2 While holding the tab down, slide your SIM card
out of the SIM card holder.
SIM card
holder
tab
Note: Protect your SIM card as you would any
delicate object. Store it carefully.
14
Locking the Keypad
Locking the phone’s keypad prevents its buttons
from being pressed. When the keypadis locked,
you can only:
• Power the phone on and off
• Unlock the keypad
• Respond to incoming calls, messages, and
alerts
Important: Emergency calls cannot be placed while
To lock the keypad:
1 From the idle screen, press m.
2 Press *.
If you press a key while the keypad is locked,
instructions for unlocking the keypad display
briefly.
To unlock the keypad:
1 From the idle screen, press m.
2 Press *.
Whilethekeypadislocked,youcanrespondto
incomingcalls,messages,and alerts just as you
do when the keypad is not locked. When finished,
press e to return to the idle screen. The keypad
remains locked.
the keypad is locked.
Page 25

Games
Games
Your phone comes with pre-installed games.
Note: Dependingon your serviceprovider, you
may or may not have all the games listed
below in your phone.
To access Games:
1 From the main menu, select Games.
2 Scrollto the desiredgame.
3 Press A under Select.
Blackjack
Basedonthecardgame,bethefirsttoreach21,
or the closest to it, without going over.
Othello
Choose a color, either black or white, and enclose
your opponent'ssquares in betweenyours. Once
there are no more available moves, the player with
the most squares on the board wins.
Mindblaster
Figureout the correctsequenceof the icons to
solvethe puzzle on each level.
Accessories
To order accessories,log on to our Web site at
www.motorola.com/store/iden or contact your
Motorola Authorized Retailer.
For More Information
If you have questionsabout your i315 phone,
contact your sales representative or your service
provider.
15
Page 26

Making Calls
Your i315 phone makes two types of calls: digital
cellular phone callsand Private calls. With Private
calls,you use your phone as a long-range, digital
walkie-talkie.
Phone Calls
1 Enter the number you want to call.
2 Press s to place the call.
3 Press e to end the call.
Private Calls
1 Enter the Private ID you want to call.
2 Press and holdthe PTT button on the side of
your phone. Begin talking after your phone emits
a chirpingsound.
3 Releasethe PTT button to listen.
Tip: To let someone know you want to talk to
him or her on a Privatecall,send a call
alert.See “Call Alerts”on page27.
16
Receiving Calls
Phone Calls
When you receive a phone call, your phone rings,
vibrates, or lights up its backlight.
Answering
Press s. -or-
Press A under Yes. -or-
Pressany number key.
To answer a call b y pressing any number key, you
must have the Any Key Ans feature turnedon (see
“Phone Calls Features” on page 79).
SendingtoVoiceMail
Press e. -or-
Press A under No.
Ending
Press e.
Private Calls
When you receive a Private call, your phoneemits
a chirping sound or vibrates.
Answering
1 Waitfor the caller to finish speaking.
Page 27

Call Icons
2 Press and holdthe PTT button on the side of
your phone. Begin talking after your phone emits
a chirpingsound.
3 Releasethe PTT button to listen.
Call Icons
When you make a call,call icons appear in the text
area of the phone’s display.
X Placing a phone call.
W Receiving a phone call.
Y Phonecall is active.
Z Phone call is on hold.
U Phonecall ended.
When you miss a call, this icon appears in the text
area:
V Youmissedaphonecall.
Ways to Enter Calls
To enter the number you want to call, youcan:
• Usethe numbers on the keypad
• Select the number from the recent calls list
• Select the numberfrom Contacts
• Redial the last phone number called
• Sayavoicenameintoyourphone
• Use Speed Dial or Turbo Dial
• UseOneTouchPTTtomakeaPrivatecall
• Use a TTY device — see “Group Calls” on page
44
®
From the Keypad
To enter the number you want to call, press the
numbers on the keypad.
Ifyoumakeamistake:
• To clear a digit, press A under Delete.
• To clear all digits, press and hold A under
Delete.
• To insert or delete a digit anywhere in the string
of digits you have entered, scroll left or right.
• To cancel, press e.
From the Recent Calls List
The recent calls list stores the last 20 calls you
made or received.
17
Page 28

Making Calls
To select a numberfrom the recent calls list as the
numberyou want to call:
1 From the idle screen, scroll down. -or-
From the main menu,selectRecentCalls.
2 Scrollto the name or number you want to call.
From Contacts
If you have numbers stored in Contacts, you can
use these numbers to make calls. For information
on entering numbers into Contacts, see “Creating
Entries” on page 33.
Calling from the Contacts List
1 From the main menu, select Contacts.
2 Scrollto the name or number you want to call.
Tip: To find Contacts entries faster, use the
keypad to enter the first letter of the name.
3 Place the call now.-or-
Scrollleftor rightto displaythe Contactstype for
the number you wantto call.
IfyouaremakingaPrivatecall,yourphoneplaces
the call to the Private ID stored in the Contact s
entry, even if the Private icon is not displayed.
Ifyouaremakingaphonecall:
18
• Your phone places the call to the phone number
assigned to the Contacts type displayed.
• If the Contactstype displayed is not a phone
number, yourphoneplaces the call to thephone
number stored in the Contacts entry.
• If the Contactstype displayed is not a phone
number and you have more than one phone
numberstored in the Contactsentry, yourphone
prompts you to select the phone number you
wantto place the call to.
Calling from a Contacts Entry
1 From the main menu, select Contacts.
2 Scrollto the name or number you want to call.
3 Press A under View. -or-
If View is not one of your options: Press m.
Select View.
4 Place the call now.-or-
Scroll to view more numbers. When you place
the call, it is made to the number displayed.
Redialing th e Last Number
Press and hold s to place a call to the last phone
number you called.
Page 29

Using Speakerphone
Using a Voice Name
Note: This is an optional feature.Contact your
service provider about its availability for
purchase.
If you have created a voice name in Contacts for
the number you want to call, you can say the voice
name into your phone to enter the number. See
page 32 for more information about voice names.
To use a voice name:
1 Press m.
2 Select Voice Recog.
3 Speaking into the microphone, say the voice
name assignedto the number you want to call.
Your phone plays the name back to you.
If you are making a phone call, the call is placed
automatically.
Tip: To stop a phone callfrom being completed,
press e.
IfyouaremakingaPrivatecall,pressandholdthe
PTTbuttontoplacethecall.
Using Speed Dial and Turbo Dial
Each phone number stored in Contacts is assigned
a Speed Dial number which you can use to enter
that number.
®
Speed Dial
1 From the idle screen, use the keypad to enter
the SpeedDial number assigned to the phone
numberyou want to call.
2 Press #.
3 Press s.
Turbo Dial
From the idle screen, press and hold the Speed
Dial number (1 through 9) assigned to the phone
number you want to call.
Using One Touch PTT
One Touch PTT sets your phone to call the most
recentPrivateID on the recentcalls list, or a
Private ID you choose, every time you press the
PTT button. See “Setting One Touch PTT®” on
page 43.
®
Using Speakerphone
Note: This is an optional feature.Contact your
service provider about its availability for
purchase.
Turning on speakerphone makes incoming sound
come out of the phone’s speaker instead of the
earpiece.Speakerphoneisavailable whenever you
areonanactivephonecall.
19
Page 30

Making Calls
To turn speakerphoneon or off:
Press under A under Spkr. -or-
Press t.
Using Mute
Muting calls lets you listen to incoming sound
withouttransmittingsound.Mute is available
whenever you are on an active call.
To turn mute on:
Press A under Mute.
Whilemuteison,Unmute appears as a display
option.
To turn mute off:
Press A under Unmute.
Making Emergency Phone Calls
Your phone supports emergency calling.
Emergency phone calls can be made even when
your SIM card is blocked or not in your phone.
Dial 911 to be connected to an emergency
responsecenter. If you are on an active call, you
must end it before calling 911.
20
When you make an emergency call, your phone’s
GPS Enabled featurecan help emergency service
personnel find you,if you are in a location where
yourphone's GPS antennahas established a clear
view of the open sky and your local emergency
responsecenterhas the equipment to process
locationinformation. See “GPS Enabled” on page
66, and particularly“IMPORTANT: Thingsto Keep
inMind”onpage66and“MakinganEmergency
Call” on page 67, for more information on the
limitations of this feature. Because of the
limitationsof this feature, always provideyour best
knowledge of your location to the emergency
responsecenterwhen you make an emergency
call.
Important: Emergency phone calls cannot be
Important: If you have not registered on the
placed while the keypad is locked.
network, emergencycalls cannot be
placed while your SIM card is in your
phone.
Page 31

MOTOtalk
MOTOtalk allows direct two-way phone-to-phone
communicationsbetweent wo or more phones
equipped for MOTOtalk.You can make and
receive MOTOtalk calls even when network service
is not available. You can talk to anyoneon your
code and channel within your range.
MOTOtalk allows you to:
• Usecode or private mode operation
• Useupto10channels
• Communicate with standalone MOTOtalk radios
Note: MOTOtalk is not compatible with older
Family Radio Services products.
The followingfeatures and main menu items will
notbeavailablewhileinMOTOtalk:
• On-network p hone cal ls
• On-network Private calls
• Data transmission
• Incoming message notification
• Musical ring tones
• GPS
• Call forwarding
• Messages
TM
• Call Timers
• Callalerts
• V oice records
Using MOTOtalk
To set your phone to MOTOtalk:
1 From the main menu, scroll to MOTOtalk and
press A under Select.
2 Select Go to MOTOtalk.
Switching to MOTOtalk Please Wait displays.
After a few seconds, the MOTOtalk idle screen
appears.MT Ready appears on the first line of the
display. The code you are set to appears on the
secondline of the display.The channel you are set
to appears on the third line of the display.
Note: When switching from the network to
MOTOtalk, the last channel and code that
wereset appear on the MOTOtalk idle
screen.
While in MOTOtalk,thisicon m appears on t he
display, indicatingthat there is no network signal
and MOTOtalkis active.
21
Page 32

MOTOtalk
TM
Exiting MOTOtalk
To set your phone to network mode when
MOTOtalk is active:
1 From the MOTOtalk idle screen, press m.
2 Scroll to MT Options and press A under
Select.
3 Select Exit MOTOtalk.
SwitchingtoNetworkPleaseWaitdisplays. After
a few seconds, the network idle screen appears.
Talk Range
Phonesused in MOTOtalk mode should be a
minimum of 6 feet apart to maximizeperformance
and improve transmission range.
Channels and Codes
Your phone has 10 channels and 15 codes.
Channels are dividedinto sets of frequencies that
allowyou to make and receiveMOTOtalk calls.
Other partiesmay also be talking on the same
channel.
Codes help minimize interference from unwanted
messagesandotherdisturbanceswhenyou are on
the same channel as others.
22
To have a conversation, all partiesmust be on the
same channel and code. For private MOTOtalk
calls,the person you are calling must be in
MOTOtalk and set to the same channel to receive
your call.
Note: When making a codecall,all parties that
are on your code and channelcan hear
your conversation.
To set a channel:
1 From the MOTOtalk idle screen,press A under
Edit.
2 Scroll to Channe l.
3 Press A under Edit.
4 Select a channel.
5 When you are finished, press A under Back to
return to the MOTOtalk idle screen.
To set a code:
1 From the MOTOtalk idle screen,press A under
Edit.
2 Scroll to Code.
3 Press A under Edit.
4 Select a code.
5 When you are finished, press A under Back to
return to the MOTOtalk idle screen.
Page 33

Channels and Codes
Making and Receivi ng Code Calls in MOTOtalk
TomakeacodecallinMOTOtalk:
1 Press and holdthe PTT button. MT Transmit
appears on the first line of display. Begin
speaking after your phone emits the MOTOtalk
tone.
2 Releasethe PTT button to listen.
The tone emitted from your phonewhen using
MOTOtalk is 4 beeps and sounds different from the
standard tone heard with on-networkPrivate and
group calls.
If you receivean error message:
• There may be no parties on your channel or
code.
• You are out of range.
Whenyou receivea codecall using MOTOtalk,MT
Receive appears on the first line of the display.
Receive All
You can set your phone to receive MOTOtalk
transmissionsfrom any phonethat is set to the
same channel, regardless of the code (1-15),by
settingt he code to Receive All. When you receive
transmissionswith the codeset to Receive All,the
display changes from Receive All to the code on
which the transmission was received.
Tip: Youcanreplytoanincomingcallwithin6
seconds afterhearingthe short ending
beep by pressing the PTT button.
Note: You cannot initiate a code call when the
code is set to Receive All. If you press
the PTT button with the code set to
Receive All , you will receive an error
message.
To set the codeto Receive All:
1 From the MOTOtalk idle screen,press A under
Edit.
2 Scroll to Code.
3 Press A under Edit.
4 Select Receive All.
5 When you are finished, press A under Back to
return to the MOTOtalk idle screen.
23
Page 34

MOTOtalk
TM
Private MOTOtalk Calls
You can have a private conversation with another
personusing MOTOtalk. When on a private
MOTOtalk call, no other parties can hear your
conversation.In order to make a privateMOTOtalk
Call, you must use the valid 10-digit Personal
Telephone Number (PTN) of the person you are
calling. The person you are callingmust be in
MOTOtalk and set to the same channel to receive
your call.
If you receivean error message:
• YoumaynotbeusingavalidPTN.
• The person that you are trying to reach may not
be in MOTOtalk.
• Thepersonthatyouaretryingtoreachissetto
a differentchannel or is outof range.
Private Only
To limit MOTOtalk to private conversation only, set
yourcodeto Private Only. In this mode, code calls
will be ignored and only private calls can be made
or received.
Note: YouwillberequiredtoenteravalidPTN
before pressing the PTT button.
24
To set the codeto Private Only:
1 From the MOTOtalk idle screen, press A under
Edit.
2 Scroll to Code.
3 Press A under Edit.
4 Select Pvt Only.
Making a private MOTOtalk Call
1 Enter the10-digit PTN of thepersonyou w ant to
call on your channel. -or-
ScrolltoanumberornameinContacts. -or-
Scroll to a number in the recent calls list.
2 Press and holdthe PTT button. Beginspeaking
after your phone emits the MOTOtalk tone.
3 Release the PTT button to listen.
The number or name of the person you are calling
will appear in the first line of the display.
Receiving a private MOTOtalk Call
The number or name of the person who initiated
the call will appear in the firstline of the display.
Note: You can reply within 6 seconds simply by
pressing the PTT button.
Page 35

Making Emergency Calls in MOTOtalk
Ending a private MOTOtalk Call
A private MOTOtalk call will end if there is no
communication for 6 seconds.
Note: AprivateMOTOtalkcallmaybe
interruptedduringthe6secondidletime
by another code call or private call.
The displaywillreturn to the MOTOtalk idle screen.
Making Emergency Calls in
MOTOtalk
Emergency phone calls can still be made even
when you are not connected to network service.
Dial 911 to be connected to an emergency
responsecenter.IfyouareonanactiveMOTOtalk
call, you must end it beforecalling 911.
Setup Options
MOTOtalk setup options are available in the MT
OptionsscreeninbothnetworkandMOTOtalk
modes.
To access Setup Options in network:
1 From the main menu, select MOTOtalk.
2 Select Setup.
To access Setup Optionsin MOTOtalk:
1 From the main menu, select MT Options.
2 Select Setup.
You can set your phone to:
• Launch directly into MOTOtalk when you select
MOTOtalk from the main menu.
• Notifyyouperiodicallywithatonethatyouarein
MOTOtalk.
Using Direct Launch
To set your phone to launch MOTOtalk when you
select MOTOtalk from the main menu:
1 From the Setup screen,scrollto Direct Launch
and press A under Change.
2 Select On.
Note: If Direct Launch is set to On,youwillnot
see MT Options when you select
MOTOtalk from the main menu. In order
to have accessto your setup options,
Direct Launch must beset to Off.Oryou
can access setup options while in
MOTOtalk by pressing m and selecting
MT Options.
25
Page 36

MOTOtalk
TM
To turn offDirect Launch:
1 From the Setup screen,scrollto Direct Launch
and press A under Change.
2 Select Off.
Your phone now displaysMT Options when you
select MOTOtalk from the main menu.
Using State Tone
To set your phone to notify you with a tone that you
areinMOTOtalk:
1 From the Setup screen,scroll to State Tone and
press A under Change.
2 Select the time frame during which you want to
be notified that you are in MOTOtalk.
For example, if you select 1 hour, you will be
notified every hour that you are in MOTOtalk.
To turn off State Tone:
3 From the Setup screen,scroll to State Tone and
press A under Change.
4 Select Off.
26
Page 37

Call Alerts
Sending a call alert lets the recipient know you
want to talk to him or her on a Private call.
When you send a call alert, the recipient’s phone
emits a seriesof beeps, or vibrates,and displays
your name or Private ID.
The recipientcan:
• Answer — begin a Privatecall with the sender
• Queue — store the call alert to the call alert
queue, which is a list of call alerts
• Clear — dismiss and delete the call alert
Sending Call Alerts
1 Enter the Private ID you want to send to, as you
wouldwhenmakingaPrivatecall.
2 Press A under Alert. Ready to Alert appears
on the display.
3 Press the PTTbuttonuntil Alert Successful
appears on the display.
Note: If the alert is not successful, this may
meanthepersonyouaretryingtoreachis
on a call or has the phoneturned off.
Receiving Call Alerts
When you receive a call alert, you must answer,
queue,or clear it. You cannot receive phone calls
or Private calls until you do.
To answer a call alert, press the PTT button to
make a Private call to the sender.
To queue a call alert, press A under Queue.
To clear a call alert, press A under Clear.
Note: The recent calls list also stores call alerts
you have received. They appear as
Private calls. Call alerts remain in your
recentcalls list until you deletethem or
until theyreach the endof the list.
Using the Call Alert Queue
When you queuea call alert, it remainsin the call
alertqueue until you makea Private call to the
senderordeleteit.
Viewing Call Alerts
1 From the main menu, select Call Alert.
2 Scroll through the list.
27
Page 38

Call Alerts
Viewing Date and Time
To view the date and time a call alertwas received:
1 From the main menu, select Call Alert.
2 Scrollto the call alert you want information on.
3 Press m.
4 Select View.
Responding to Call Alerts in the Queue
After you queue a call alert, you can respond to it
by making a Private call to the sender or sending a
call alert to the sender.
Making a Private Call to the Sender
1 From the main menu, select Call Alert.
2 Scrolltothecallalertyouwanttorespondto.
3 PressthePTTbuttontobeginthecall.
This removes the call alert from the queue.
Sending a Call Alert to the Sender
1 From the main menu, select Call Alert.
2 Scrolltothecallalertyouwanttorespondto.
3 Press A under Alert. Ready to Alert appears
on the display.
4 Press the PTTbuttonuntil Alert Successful
appears on the display.
28
Deleting Call Alerts
To delete a call alert from the queue:
1 From the call alert queue, scroll to the call alert
you want to delete.
2 Press m.
3 Select Delete.
4 Press A under Yes to confirm.
To delete all callalertsfrom the queue:
1 From the call alert queue, press m.
2 From the call alert menu, select Delete All.
3 Press A under Yes to confirm.
Sorting Call Alerts
Tip: Youmusthaveatleastonecallalertinthe
queue to access this feature.
To sort callalertsby theorder they were received:
1 From the main menu, select Call Alert.
2 Press m.
3 Select Sort By.
4 Scroll to First on Top or Last on Top.
5 Press A under Select.
Page 39

Recent Calls
The recent calls list stores the numbersof the 20
most recent calls you have made and received.
To view the recent calls list:
1 From the idle screen, press the down arrow on
the navigation key. -or-
From the main menu,selectRecentCalls.
2 Scroll through the list.
If the number of a recent call is stored in Contacts,
the name associated with the numberappearson
the recent calls list.
An icon appears beside the name or number
indicating the Contacts type of the number used in
thecall.See“Contacts”onpage31.
For phone calls, an icon appears to the left of the
name or number givingmoreinformationaboutthe
call:
X A call you made.
W A call you received.
V A missed call. Missed calls appear on the
recentcallslistonlyifyouhaveCallerID.
Note: The recent calls list also stores call alerts
you have received. They appear as
Private calls. Call alerts remain in your
recentcalls list until you deletethem or
until theyreach the endof the list.
To get more information on a recentcall:
1 From the recent calls list, scroll to the call you
wantinformationon.
2 Press A under View. -or-
If View is not one of your options: Press m.
Select View.
This displays information such as the name
associatedwiththe call,the number, the date,
time,and duration of the call.
Storing Recent Calls to Contacts
1 From the recent calls list, scroll to the number
you want to store.
2 Press A under Store. -or-
If Store is not one of your options: Press m.
Select Store.
Tip: If Store is not on this menu, the number is
already stored in Contacts.
29
Page 40

Recent Calls
3 Tostore the number as a new entry,select [New
Contact]. -or-
To store the number to an existing entry, select
the entry.
4 With the Contacts type field highlighted, scroll
left or right to display the Contacts type you want
to assign to the number.For information on
Contacts types, see page 31.
5 If you want to add more information to the entry,
follow the applicable instructions in “Creating
Entries” on page 33.
6 Press A under Done.
Deleting Recent Calls
To deletea call:
1 From the recent calls list, scroll to the call you
wantto delete.
2 Press m.
3 Select Delete.
4 Press A under Yes to confirm.
To delete all calls:
1 From the recent calls list, press m.
2 Select Delete All.
3 Press A under Yes to confirm.
30
Page 41

Contacts
Contacts stores up to 600 numbers or addresses.
Each Contactsentry can store severalnumbers or
addresses.
InformationstoredinContactsissavedonyour
SIM card.
A Contacts entry contains:
• A name — A name is required if you are storing
more than one number or addressto the e ntry;
otherwise, it is optional. Typically, this is the
name of the person whose contact information is
stored in the entry.
• Aringtone—Youcanassignaringtoneto
eachentry. Thisis the soundyour phonemakes
when you receive phone calls or call alerts from
any of the numbers stored in the entry.
• A Contacts type — Eachnumberor address
storedmust be assigned a Contacts type:
A Mobile phone number
B Private PrivateID
C Work1 phone number
D Work2 phone number
E Home phone number
F Email email address
G Fax phone number
H Pager phone number
T Talkgroup Talkgroup number
J IP IP address
K Other phone number
• A number or address — Each Contacts entry
must containa number or address.T his may be
any type of phone number,Private ID, Talkgroup
number, email address,or IP address.
Note: You can store numbers up to 64 digits
long, but every 20 digits must be
separated by a pause or wait. See
“Creating Pauses and Waits” on page 36.
31
Page 42

Contacts
• A Speed Dial number — When you store a
phone number, it is assigned a Speed Dial
number. You can accept the default Speed Dial
numberor change it.
• Avoice name — Ifyoucreatea voice name for a
number,you can then dial that number by saying
the voice name into your phone. This icon
appears
a voice name is assigned.
Note: This is an optional feature.Contact your
P to the left of the Contacts type icon if
service provider about its availability for
purchase.
Viewing Contacts
To access Contacts:
Press A under Contcs. -or-
From the main menu,selectContacts. -or-
Ifyouareonacall:Pressm. Select Contacts.
To view entries:
1 From the Contacts list, scroll to the entry you
wantto view.
2 If an entry has more than one number or
address stored, <> surrounds the Contacts type
icon.S croll left or right to view the icon for each
numberstoredin the entry.
32
3 Whentheiconforthenumberoraddressyou
want to view is displayed, press A under View.
-or-
If View is not one of your options: Press m.
Select View.
4 Scrollto view the other numbers and addresses
storedfor the entry.
Tip: To view more entries, continue scrolling.
Searching for a Name
To search for a name in Contacts:
1 From the Contacts list, press m.
2 Select Search.
3 Enter the name you want to see. See “Entering
Text”onpage54.
4 Press A under Ok.
Your phone finds the name you entered or the
nearestmatch.
Showing Only Private IDs and Talkgroups
To set Contactsto show onlyentriesthatcontain
Private IDs and Talkgroups:
1 From the Contacts list, press m.
2 Select Filter.
Page 43

Creating Entries
3 With Prvt/Grp highlighted, press A under
Select.
To set Contactsto show all entries:
1 From the Contacts list, press m.
2 Select Filter.
3 With Show All highlighted, press A under
Select.
Creating En tries
A number or address and a Contacts type are
required for all Contacts entries.Otherinformation
is optional.You may enter the informationin any
order by scrolling through the entry details.
After you have enteredthe number or address,
Contacts type,andany otherinformation youwant,
you can press A under Done to save the entry to
Contacts.
To cancel a Contacts entry at any time press, e to
return to the idle screen.
Tip: In some fields that require you to enter
information, you can begin entering the
information from the keypad instead of
pressingA under Change.
To create a Contacts entry:
1 To access the entry details screen:
Select Contacts> [New Contact]. -or-
From the Contacts list, press m.ScrolltoNew.
Press A under Select.
2 Ifyouwanttoassignanametotheentry:
With the Name fieldhighlighted, pressA under
Change.
Enter the name. See “Entering Text” on page
54. When you are finished,press A underOk.
3 Ifyouwanttoassignaringtonetothename:
With the Ringer field highlighted, press A
under Change.
Scrollto the ring tone you want to assign. Press
A under Select.
4 ToassignaContactstypetothenumberor
addressbeingstored:
With the Contacts type field highlighted, press
A under Change.
Scroll to the Contacts type you want to assign.
Press A under Select.
5 To store a number or address:
With the # field highlighted (or ID for an email
address, or IP for an IP address), press A
under Change.
33
Page 44

Contacts
Enter the number or address.For phone
numbers, use the 10-digitformat. For email
addresses, see “Entering Text” on page 54.
Tip: Press A under Browse to select a number
or address from Contacts, the recent calls
list,or Memo.
When you are finished,press A under Ok.
6 Ifyouwanttoassignmoreoptionstothe
number, press A under Change withthe
[Options] field highlighted. See “Assigning
Options”.
7 If you want to add more numbersor addresses
to the entry:
Scrollpast the information you already entered.
Enter the additional information for the entry
usingstep2throughstep6.Youmustassigna
name to the entry, if you have not already.
8 Press A under Done.
Assigning Options
1 If you have not already, press A under Change
with t he [Options] field highlighted.
2 The default Speed Dial number assigned to a
phonenumber is displayed in the Speed # field.
This is always the next available S peed Dial
location.
34
Ifyouwanttoassignthephonenumbertoa
different Speed Dial location:
With the Speed # field highlighted, press A
under Change.
Pressand hold A under Delete to delete the
current Speed Dial number.
Enter the new Speed Dial number using the
keypad.
When you are finished,press A under Ok.
3 Ifyouwanttocreateavoicenameforaphone
number,scroll to Voice Name and press A
under Record.
As directed by the screen prompts, say and
repeatthe name you want to assign to the
number.Speak clearly into the microphone.
4 When you are finished, press A under Back.
Storing Numbers Faster
To store numbers to Contacts from the recent calls
list, see “Storing Recent Calls to Contacts” on page
29.
To store numbersto Contactsf rom Memo, see
“Memo”on page 49.
Page 45

Editing Entries
To store numbersto Contacts f rom the idle screen:
1 Use the keypad to enter thenumber you wantto
store.
2 Press m.
3 Select StoreNumber.
4 Tostore the number as a new entry,select [New
Contact]. -or-
To store the number to an existing entry, select
the entry.
5 With the Contacts type field highlighted, scroll
left or right to display the Contacts type you want
to assignto the number.
6 If you want to add more information to the entry,
follow the applicable instructions in “Creating
Entries” on page 33.
7 Press A under Done.
Editing Entries
1 From the Contacts list, scroll to the entry you
wantto edit.
2 Press m.
3 Select Edit. The entry details screen displays.
4 Follow the applicable instructions in “Creating
Entries” on page 33 to edit the various fields.
Deleting Entries
Delete an Entry
1 From the Contacts list, scroll to the entry you
wantto delete.
2 Press m.
3 To delete the entiree ntry,scrollto Delete
Contact.
4 Press A under Select.
5 Press A under Yes to confirm.
Delete a Number or Address
1 From the Contacts list, scroll to the entry that
contains the number or address you want to
delete.
2 Scrollleft or right to displaythe Contactstype for
the number you wantto delete.
3 Press m.
4 Scroll to Delete Number.
5 Press A under Select.
6 Press A under Yes to confirm.
Note: If an entry contains only one number or
address, deleting the number or address
deletes the entry.
35
Page 46

Contacts
Checking Capacity
To see how many numbers are stored in Contact s:
1 From the Contacts list, press m.
2 Select Capacity.
Creating Pauses and Waits
When storing a number,you can program your
phone to pause or wait between digits while
dialing. A pause makes your phone pause for 3
seconds beforedialingfurther. A wait makes your
phone wait for your response before dialing further.
This featureis useful when using voice mail or
otherautomatedphonesystemsthat requireyou to
dial a phone number and then enteran access
number.
To program a pause:
Pressand hold * until the letter P appears.
The P represents a 3-second pause.
If you store 17035551235P1234,when you select
this number and make a call,your phone dials the
first 11 digits, pauses for 3 seconds, then dials the
last 4 digits.
If you want a pause longer than 3 seconds, press
and hold * more than once.E ach P representsa
3-second pause.
36
To program a wait:
Pressand hold * until theletter W appears.
The W means your phone waits before d ialing
further.
If you store 17035551235W1234,when you select
this number and make a call,your phone dials the
first 11 digits and then waits. A message appears
askingif you want to send the rest of the digits.
Press A under Yes to dial the last 4 digits.
Tip: You can create pauses and waits while
dialing a number from the keypad. See
“Creating Pauses and Waits While Dialing”
on page 43.
International Numbers
Note: This feature may not be offered by your
service provider.
When storing a number that you plan to use for
international calls, use Plus Dialing:
1 Press and hold0 for two seconds. A “0”
appears, then changes to a “+”.
Note: The network translates the “+” into the
appropriate international access code
needed to place the call.
2 Enter the country code,city code or area code,
and phone number.
Page 47

For information about making international calls,
see “Making International Calls” on page 43.
Accessing Contacts with GSM Phones
Ifyouplantousetheinformationstoredin
Contacts with an i2000, i2000plus, or any other
GSM phone, download iDEN Phonebook Manager.
Go to idenphones.motorola.com/iden/support for
more information.
You can use iDEN Phonebook Managerto make
the Contacts information saved to your i315
phone’s SIM card accessible in this type of phone.
Accessing Contacts with GSM Phones
37
Page 48

Call Forwarding
Call forwarding sends calls to the phone numbers
you specify. You can forward all calls to one
numberor forward missed calls to different
numbers depending on the reason you missed the
call.
You can forward phone lines 1 and 2
independently.
Forwarding All Calls
When you set your phone to forward all calls, an
icon appears in the top row of the display:
G Phone line 1 is active; calls to phone line 1
are being forwarded.
H Phone line 1 is active; calls to phone line 2
are being forwarded.
I Phone line 1 is active; calls to phone lines 1
and 2 are being forwarded.
J Phone line 2 is active; calls to phone line 1
are being forwarded.
K Phone line 2 is active; calls to phone line 2
are being forwarded.
38
L Phone line 2 is active; calls to phone lines 1
and 2 are being forwarded.
To forward all calls:
1 From the main menu, select Call Forward.
2 Press A under Change.
3 Select All Calls.
4 Scroll to To.
5 Press A under Change.
6 If youspecified a forwardingnumber for all calls
before, this number displays.
To forward calls to this number, press A under
Back. -or-
To delete this number, press A under Change,
then press and hold A under Delete.
To enter the number you want to forward calls
to:
Enterthe number using your keypad.-or-
Press A under Search. Select Contacts,
Recent Calls,orMemo. Selectthe number you
wantto enter.
7 Press A under Ok.
All your calls are now forwarded to the number you
specified.
Page 49

Turning Off Call Forwarding
Tip: In some fields, you can select an option by
scrolling left or right instead of pressing A
under Change.
Turning Off Call Forwarding
If you don’t want all your calls forwarded, turn the
feature off:
1 From the main menu, select Call Forward.
2 Press A under Change.
3 Select All Calls.
4 Scroll to To.
5 Press A under Change.
6 Scroll to Off.
7 Press A under Select.
All your callsare now sent to your phone.
Calls you miss are forwardedaccording to the
optionsset for missed calls. By default, missed
calls are forwarded to voice mail.
Forwarding Missed Calls
You canspecifya forwardingnumberfor each type
of missed call:
•IfBusy—Your phoneis on a callor transferring
data.
•IfNoAnswer— You do not answer on the first
4rings.
• If Unreachable — Your phone is out of
coverage or powered off.
Note: If you want a type of missed call sent to
voicemail,thecallforwardingnumberfor
that type of missed call must be your
voice mail access number..
Toforwardmissedcalls:
1 From the main menu, select Call Forward.
2 Press A under Change.
3 Select Detailed.
4 Scroll to If Busy to specifya forwarding number
for calls received when your phone is busy.
5 Press A under Change.
6 If you specified a forwarding number for this type
of call before, this number displays.
To forward calls to this number, press A under
Back andgotostep9.-or-
To delete this number, press A under Change,
then press and holdA under Delete.
7 To enter the number you want to forward this
type of call to:
Enterthe number using your keypad.-or-
39
Page 50

Call Forwarding
Press A under Search. Select Contacts,
Recent Calls,orMemo. Selectthe number you
wantto enter.
8 Press A under Ok.
9 Repeat step 4 through step 8 for If No Answer
and If Unreachable.
When you are finished, press A under Back.
Viewing Call Forwarding Settings
1 From the main menu, select Call Forward.
2 Press A under Change.
3 Select All Calls.
4 Scroll to To.
5 Press m.
6 Select RetrieveStatus.
40
Page 51

Advanced Calling Features
Call Waiting
Call Waiting lets you receive a second call while on
an active call. Call Waiting is always available,
unlessyou turn it off for a specific call.
Ifyouareonacallandreceiveasecondcall,your
phoneemits a tone and displaysa messagesaying
youarereceivingasecondcall.
To acceptthe second call and put the activecall on
hold:
Press A under Yes.
To accept the second call and end the active call:
1 Press e.
Yourphone rings with the secondcall.
2 Answer the secondcall.
To decline the secondcall:
Press A under No. If you subscribe to voice
mail,the call is forwardedto yourvoicemail box,
unless you set Call Forward for If Busy to a
different number.
Switching Between Calls
When you accept a second call, the displayshows
the name or number of each call, with an icon
indicating which call is active:
Y Phone call is active.
Z Phone call is on hold.
Tomakethecallonholdactiveandputtheactive
call on hold:
Press A under Switch.
Turn Off Call Waiting
To turn offCall Waiting during a call:
1 Press m.
2 Select In Call Setup > Call Waiting.
3 Press A under Change.
4 Scroll to Off.
Tip: To turn Call Waiting back on while still on
the call:Scroll to On.
5 Press A under Select.
41
Page 52

Advanced Calling Features
To turn off Call Waiting for the next call you make
or receive:
1 From the main menu, select Settings > Phone
Calls > Call Waiting.
2 Press A under Change.
3 Scroll to Off.
4 Press A under Select.
CallWaitingisturnedbackonwhenyouendthe
call.
Call Hold
Call Hold lets you put an active call on hold and
makeasecondcall.
To put a callon hold:
1 Whileonanactivecall,pressm.
2 Scroll to Hold.
3 Press A under Select.
4 If you want to make the call activeagain,press
A under Resum.
Tomakeasecondcallwhileacallisonhold:
1 Enter the number you want to call.
Tip: To enterthe number from Contacts: Press
m. Select Contacts.
2 Press s to place the call.
42
To end the second calland make the call on hold
active again:
Press e.
Tomakethecallonholdactiveandputtheactive
call on hold:
Press A under Switch.
3-Way Calling
Note: This feature may not be offered by your
service provider.
3-waycallinglets you combine 2 phone calls into
one. All 3 people in the call can speak to and hear
each other.
Tomakea3-waycall:
1 Place or receivea phonecall.
2 While the call is active, press A under 3-Way.
This puts the call on hold.
3 Enter the second phone number you want to
call.
Tip: To enter the number from Contacts: Press
m.SelectContacts.
4 Press s to place the call.
5 While the second call is active, press m.
6 Scroll to 3Way.
Page 53

Creating Pauses and Waits While Dialing
7 Press A under Select.
Both calls are now active and appear on the
display.
Creating Pauses and Waits
While Dialing
You can enter a pause or wait while dialing a
number.For more informationon pauses and
waits, see “Creating Pauses and Waits” on page
36.
To create a pause while dialing a phone number:
1 From the keypad, enter the digits you want to
occur before the pause.
2 Press m.
3 Select Insert Pause.
4 Enter the digits you want to occurafter the
pause.
To create a wait while dialing a phone number:
1 From the keypad, enter the digits you want to
occurbeforethe wait.
2 Press m.
3 Select Insert Wait.
4 Enter the digits you want to occurafter the wait.
Making International Calls
Note: This feature may not be offered by your
service provider.
Plus Dialinglets you place an international call to
most countries without entering the local
international access code.
1 Press and hold0 for two seconds. A “0”
appears, then changes to a “+”.
Note: The network translates the “+” into the
appropriate international access code
needed to place the call.
2 Enter the country code,city code or area code,
and phone number.
Setting One Touch PTT
One Touch PTT sets your phone to call the most
recentPrivateID on the recentcalls list, or a
Private ID you choose, every time you press the
PTT button.
To setyourphone to callthemostrecentPrivateID
on the recentcallslist:
1 From the main menu, select Settings > 2-Way
Radio > One TouchPTT.
2 Scroll to Last Call.
3 Press A under Select.
®
43
Page 54

Advanced Calling Features
To set your phone to call a Private ID you choose:
1 From the main menu, select Settings > 2-Way
Radio > One Touch PTT > AssignedNumber.
2 To enter the PrivateID you want your phone to
call every time you press the PTT button:
Enterthe number using your keypad.-or-
Press A under Search. Select Contacts,
Recent Calls,orMemo. Selectthe number you
wantto enter.
Tip: If you are entering a Talkgroup number,
enter# before the number.
3 Press A under Ok.
To turn off One TouchP TT:
1 From the main menu, select Settings > 2-Way
Radio > One Touch PTT.
2 Scroll to Off.
3 Press A under Select.
Group Calls
A group callis similar to a Private call, but is made
to all members of a Talkgroup at once. A Talkgroup
is a predetermined group of your service provider’s
customers.
44
Joining a Talkgroup
Before you can make or receivegroupcalls,a
Talkgroupmustbe established. After theTalkgroup
is established, you must join the Talkgroup.
Joining a Talkgroup
Your sales representative or your service provider
establishes Talkgroups for you and assigns each
Talkgroup a Talkgroup number. You can choose a
name for eachof yourTalkgroupswhenyou create
entries for them in Contacts.
To receive group calls made to any of these
Talkgroups, you mustjoin the Talkgroup.
1 Press A under Contcs. -or-
From the main menu,selectContacts.
2 Scrollto the Talkgroup you wantto join.
3 Press A under Join.
Note: You can only monitor one Talkgroupat a
time.
Making Group Calls
1 Press #. Then enter the Talkgroup number
using the keypad. -or-
Choose the Talkgroup name from Contacts or
recent calls list.
Page 55

Call Timers
2 Proceedas if makinga Private call.
Receiving Group Calls
To answer a group call:
Proceed as if answering a Private call. Only one
person at a time may speak on a group call.
ThePrivate ID or name of the personwho is
speaking will appear on the display below the
Talkgroup number.
Making Group Calls
1 Press #. Then enter the Talkgroup number
using the keypad. -or-
Choose the Talkgroup name from Contacts or
recent calls list.
2 Proceedas if makinga Private call.
Receiving Group Calls
To answer a group call:
Proceed as if answering a Private call. Only one
person at a time may speak on a group call.
ThePrivate ID or name of the personwho is
speaking will appear on the display below the
Talkgroup number.
TurningoffGroupCalls
To control whether you hear group calls to your
Talkgroup:
1 From the main menu, select Settings > 2-Way
Radio > Tkgrp Silent.
2 Press A under Change.
3 Scroll to On if you don’t want to hear group calls
to your Talkgroup. -or-
Scroll to Off if you want to hear group calls to
your Talkgroup.
4 Press A under Select.
Call Timers
Call timers measure the duration of your phone
calls, Private or group calls, and circuit data use,
as well as the number of Kilobytessent and
receivedby your phone:
•LastCall— displays the durationof your most
recent phone call.
• Phone Reset — keepsa running total of your
phone call minutes, until you reset it.
• Phone Lifetime — displaysthe total minutesof
all your phone calls.
45
Page 56

Advanced Calling Features
• Prvt/Grp Reset — keepsa running total of all of
your Private and group call minutes, until you
reset it.
• Prvt/Grp Lifetime — displays the total minutes
of all your Privateand group calls.
• Circuit Reset — keeps a running total of all of
your circuit data use, until you reset it.
• Circuit Lifetime — displaysthe total minutesof
all of your circuit data use.
• Kbytes Reset — keepsa running total of the
numberof Kilobytessent and r eceived by your
phone, until you reset it.
To view or reset a timer:
1 From the main menu, select Call Timers.
2 Selectthefeatureyouwanttovieworreset.
3 To view a feature without resetting: Press A
under Done when you are finishedviewing. -or-
To reset a feature: Press A underReset.Press
A under Yes to confirm.
Note: The values displayed by Call Timers
should not be used for billing. Call timers
are estimates only.
46
Using Your Phone as a Modem
Note: This feature may not be offered by your
service provider.
To use your phone as a modemwith a laptop,
handheld device, or desktopcomputer:
1 Open the connector cover.
connector
cover
Page 57

Using Your Phone as a Modem
2 With the phone’s displayfacingup, insert a data
cable’s connector into the accessory connector,
until you hear a click.
3 InsertthedataplugintotheCOMportofthe
other device.
When used as a modem,your phone has these
data transfer modes:
• Circuit data — used for sending and receiving
faxes and for transferring large files
• Packet data — used for small file transferssuch
as email
To use these services,you must install theiDEN
Wireless Data Services software (available
separately). MakingTTY Calls
Note: This feature may not be offered by your
service provider.
To use your phone to make phone calls using a
teletypewriter (TTY) device:
1 Connect one end of a 2.5mm cable into the
audio jack on your phone. Connect the other
endofthecabletoyourTTYdevice.
2 Make sure that your phone’s TTY feature is on
and select the TTY mode you want to use.
3 Use your phoneto enter phone numbers and
make calls.
When you make a TTY call, these icons appear on
the phone’s display:
N Phone call is active.
O Phone call is on hold.
TTY device features such as Turbo-Code,
High-Speed, and Interruption are not supported by
your phone. These features must be turnedoff or
disabled to use your TTY device with your phone.
Turning On the TTY Feature
Your phone’s TTY feature must be on if you want
to make TTY calls, set the TTY mode,or change
the TTY baudrate. To make sure the TTY feature
is on:
From the main menu,selectSettings > Phone
Calls > TTY . This fieldmust say On.
47
Page 58

Advanced Calling Features
Choosing a Mode
Your phone supports these TTY modes:
• TTY — Youtype and read text on your TTY
device.
•VCO(Voice-Carry-Over) — You speak into your
phone and read t ext replieson your TTY device.
• HCO (Hearing-Carry-Over) — You type text on
your TTY device and listen to voice replies on
your phone speaker.
To change mode while not in a call:
1 From the main menu, select Settings > Phone
Calls > TTY > Type.
2 Press A under Change.
3 Scrollto the TTY mode you want.
4 Press A under Select.
When you make a TTY call, the call begins in the
TTY mode you last selected.
To change mode duringa callusing your phone:
1 Press m.
2 Select in Call Setup > TTY > Type.
3 Selectthemodeyouwant.
To change mode during a call using your TTY
device,issue one of the following commands:
48
• “VCOplease” — to select VCO mode
• “HCO please” — to select HCO mode
• “HCOoff please” — to turn off HCO mode
Important: Whenyou areusing HCO,the sound
coming from your phone speaker may
be uncomfortablyloud. Use caution
when putting the phone to your ear.
(For information on setting the volume
of your phone speaker, see “Setting the
Volume” on page 78.)
Changing the TTY Baud Rate
By default, your phone’s TTY baud rate is set to
45.45,the baud rate required for T TY callswithin
the U.S. To make calls outside the U.S., set your
TTYbaudrateto50.0.
To change the TTY baud rate:
1 From the main menu, select Settings > Phone
Calls > TTY > Baud.
2 Press A under Change
3 Scrollto the baud rate for your location.
4 Press A under Select.
Page 59

Memo
Memoletsyoustoreanumber,makeacalltothat
number, and save it to Contacts.
To create a memo:
1 From the main menu, select Memo.
2 Enter the number using your keypad.
3 Press A under Store.
Toviewthememolater:
1 From the main menu, select Memo.
To deletethe memo:
1 From the main menu, select Memo.
2 Press and holdA under Delete.
3 Press A under Store.
To edit the memo:
1 From the main menu, select Memo.
2 Enter the new number.
3 Press A under Store.
To make a callto the memo number:
1 From the main menu, select Memo.
2 To make a phone call, press s. -or-
To make a Private call, press the PTT button.
To store the memo number to Contacts:
1 From the main menu, select Memo.
2 Press m.
3 Press A under Select.
4 To store the number as a newentry, select[New
Contact]. -or-
To store the number to an existing entry, select
the entry.
5 With the Contactstype field highlighted,scroll
leftor right to displaythe Contactstype you want
to assign to the number.
6 If you want to add more information to the entry,
follow the applicable instructions in “Creating
Entries” on page 33.
7 Press A under Done.
49
Page 60

Ring Tones
To set the ring tone your phone makes when you
receivephone calls,messagenotifications, or call
alerts:
1 From the main menu, select Ring Tones.
2 Make sure VibeAll or SilentAll is set to Off.
3 Scrollthroughthe list of ringtonesand selectthe
one you want to assign. Vibrate sets your phone
to vibrateinsteadof makinga sound;Silent sets
your phone to neither vibrate nor make a sound.
Tip: Highlighting a ring tone lets you hear it.
4 Press A under Assign.
5 Scrolltothefeatureyouwanttoassignthering
tone to.
6 Press A under Select.
Tip: A checkmark next to a feature means the
currentring tonehas been assignedto it. To
remove the assignment: Scroll to the
feature. Press A under Select.
7 To assign the ring tone to other features,repeat
step 5 through step 6.
8 When you are finished, press A under Done.
Note: This icon M appears on the display if
you set your phoneto neither vibrate nor
make a sound for phone calls.
50
Setting Your Phone to Vibrate
If your phoneincludesa vibrate feature, you can
set your phone to vibrate when you receive phone
calls, Private calls and group calls, messages
notifications, or call alerts.
Note: This is an optional feature.Contact your
service provider about its availability for
purchase.
TurningRingTonesOff
You can set your phone to make no sound when
you receive phone calls, Private calls and group
calls,messagesnotifications, or call alerts.
These icons indicate how the ringer is sett.
v The phone always vibrates instead of making
a sound.
R The phonevibrates instead of making a
sound for phone calls.
M The phone never vibrates nor makes a
sound;or, the phoneneithervibrates nor
makes a sound for phone calls.
u Prvt/Grp speaker set to off.
These icons may appear at the same time.
Page 61

Ring and Vibrate
Never Ring
1 From the main menu, select Ring Tones >
SilentAll.
2 Scrollleft or right to set SilentAll to On.
Always Vibrate Instead of Ringing
If your phoneincludesa vibratefeature:
1 From the main menu, select Ring Tones >
VibeAll.
2 Scrollleft or right to set VibeAll to On.
Tip: Pressingthe volume controlsto turn down
the volume as far as possible setsVibeAll
to On.
Do Not Ring for Some Features
To set individual ring options for phone calls,
messages notifications, or call alerts:
1 From the main menu, select Ring Tones.
2 Make sure VibeAll or SilentAll is set to Off.
3 Scroll through the list of ring tones to Silent. -or-
If your phone includes the vibrate feature, scroll
through the list of ring tones to Vibrate.
4 Press A under Assign.
5 Scrollto the featureyou want to setto make no
sound.
6 Press A under Select.
7 To assign Vibrate or Silentto another feature,
repeatstep 5 through step 6.
8 When you are finished, press A under Done.
Note: To set ring options for Private calls and
groupcalls,see “SettingYour Phone to
Not Ring” on page 78.
Ring and Vibrate
To set your phone to ring and vibrate when you
receive phone calls or call alerts:
1 From the main menu, select Ring Tones.
2 Make sure VibeAll is set to Off.
3 Scrollthroughthe list of ring tonesandselectthe
one you wantto assign.
4 Press m.
5 Select Assign w/Vibe.
6 Select the feature you want to set to ring and
vibrate.
7 When you are finished, press A under Done.
Thisicon S appears on the display.
51
Page 62

Ring Tones
Assigning Ring Tones to Contacts
You can set the ring tone your phone makes when
you receive phone calls or call alerts from
someone you have stored in Contacts.
1 From the main menu, select Ring Tones.
2 Make sure VibeAll or SilentAll is set to Off.
3 Scroll through the list of ring tones to the one
you want to assign. Highlighting a ring tone lets
you hear it.
4 Press A under Assign.
5 Select AContact.
6 Scroll to t he Contacts entry you want to assign
theringtoneto.
7 Press A under Select.
Viewing Ring Tone Assignments
1 From the main menu, select Ring Tones.
2 Make sure VibeAll or SilentAll is set to Off.
3 Highlight any ring tone.
4 Press m.
5 Select Overview.
52
6 Scroll to view ring tones assigned to features
and Contact entries.
Downloading More Ring Tones
Note: This feature may not be offered by your
service provider.
If you want to use other ring tones, you can
download them intoyour phone for a f ee. Go to
www.motorola.com/idenupdate for a selection of
custom ring tones and downloading instructions.
Note: Ring tones may be downloaded only
once.If you deletea ring tone from your
phone, you must purchase it to download
it again.
Managing Memory
To view the amount of memory availablefor
custom ring tones:
1 From the main menu, select Ring Tones.
2 Make sure VibeAll or SilentAll is set to Off.
3 Highlight any ring tone.
4 Press m.
5 Select Memory Usage.
Deleting custom ring tones frees memory.
Page 63

Note: Ring tones are stored in your phone using
the same memory spaceused to store
voicerecords. Deleting voice records
frees memory space for ring tones.
Deleting Custom Ring Tones
To delete a custom ring tone:
1 From the main menu, select Ring Tones.
2 Make sure VibeAll or SilentAll is set to Off.
3 Scrollto the ring tone you want to delete.
4 Press m.
5 Select Delete.
6 Press A under Yes to confirm.
Deleting Custom Ring Tones
53
Page 64

Entering Text
You can entertext into your phoneusing the
traditional methodof pressing a key several times
for each character, or by pressing a key once for
each letter while words likely to be the one you
want are chosen from a database. You can also
enter symbols and numbers into a text field.
In screens that require you to enter text, you see
the following icons near the top right corner. These
icons tell you which text input mode you are using:
Alpha — Press a key several times for each
l
character.
Word— Press a key once for each letter
j
whilewords likely to be the one you want are
chosenfrom a database.
Symbols — Enter punctuation and other
i
symbols.
Numeric — Enter numbers.
k
When you accessa screen t hat requires you to
entertext, you start in Alpha mode.
To choose a text input mode:
1 At a screenthat requires you to enter text, press
m.
54
2 A checkmark appears next to the current text
input mode. Scroll to the text input mode you
wantto use.
3 Press A under Select.
Using Alpha Mode
• Press any key on thekeypadto enter the letters,
numbers,andsymbolson thatkey.Forexample,
to enter the letter Y, press 9 three times.
• Typealetterthenscrolluptomakethatletter
uppercase, or type a letter then scroll down to
make that letter lowercase.
• See “Special Function Keys” on page 55 for
more information on adding spaces,
capitalization, and punctuation.
Using Word Mode
In Word mode, T9 T ext Input analyzes the letters
on thekeypadbuttonyoupressand arrangesthem
to create words. As you type, T9 T ext Input
matches your keystrokes to words in its database
and displays the most commonly used matching
word. You can add y ou own words to this
database.
Entering a Word
1 Select Word as your text input mode.
Page 65

Special Function Keys
2 Typea word by pressing one key for each letter.
For example, to type “test” press 837
8.
The displayed word may change as you type it.
Do not try to correct the word as you go. Type to
the end of the word before editing.
3 If the word that appears is not the desired word,
press 0 to changethe word on the display to
the next most likely word in the database.
Repeatuntil the desired word appears.
If the desired worddoes not appear,you can add it
to the database.
Adding Words to the Database
1 Select Alpha as your text input mode.
2 Type the word using Alpha mode.
3 Select Word as your text input mode.
4 Press #.
ThewordyoutypedinAlphatextentrymodeis
now in the database.
Note: You cannot store alphanumeric
combinations,suchas Y2K.
Choosing a Language
To change the language of the database:
1 At a screenthat requires you to entertext, press
m.
2 Select Languages.
3 Scrollto the languageyou want for your
database.
4 Press A under Select.
Special Function Keys
Some of the phone’s keys assume different
functions while in Alpha or Wordmode.
Spaces
Press # for a space.
Capitalization
When you press and hold #,itactsasa3-way
toggle.Pressand hold # to make the next letter
typed uppercase(shift), to make all subsequent
letters t yped uppercase (caps lock), or to go back
to lowercase letters.
55
Page 66

Entering Text
These icons appear in t he top row of your display:
Shift is on.
m
Caps lock is on.
n
When neither of theseicons appear,letters typed
are lowercase.
Note: Your phone automatically makes the first
letterof a sentenceuppercase.
Punctuation
Press 1 or 0 to insert punctuation. Continue to
press the key to view the list of symbols available
through that key. Pause to select the symbol you
want.
Note: Additionalpunctuationsymbols are
available in Symbols mode.
Using Numeric Mode
1 Select Numeric as your text input mode.
2 Press the numberbuttonson your keypad to
enter numbers.
56
Using Symbols Mode
1 Select Symbols as your text input mode.
A row of symbols appears along the bottomof
your phone’s display. Scroll right to view the
complete row.
2 Scrollleft or right to choose the symbolyou want
to enter.
3 Press A under Select.
Page 67

Messages
You can receivethe following typesof messages
on your phone:
• V oice mail messages
• Short Message Service (SMS) text messages
• Depending on your service provider, you may
havethe option to receive fax mail andNet
alerts.
You have 2 ways to access the messagesyou
receive:
• Respond to the message notification that
appears when the message is received.
• Dismiss the message notification and access
the message later through the message center.
You can listento or view these messages, delete
them, or continue to storethem in the message
center.
Message Notifications
When you receive a message, your phone notifies
youwithtextonthedisplayandanotificationtone
or vibration. You can access the message or
dismiss the notification.
If you dismiss the notification, the message is not
deleted.It can be accessedthrought he message
center.
If you are not on a phone call when you receive a
message, your phone sounds a notification tone
every 30 seconds untilyou access the message,
dismissthe notification, or the alert time-out
expires.
Setting Notification Options
To control whether your phone sounds message
notification tones while you are on phone calls:
1 From the main menu, select Settings > Phone
Calls > Notifications.
2 Choose the option you want:
• Receive All — Tones sound during calls for
all types of messages.
•MsgMailOnly— Tones sound duringcalls
for SMS messages; tones for all other types
of messages are helduntilyou end calls.
• Delay All — Tones for all types of messages
are held until you end calls.
3 Press A under Select.
Tip: Toset notification options duringa call:
Press m. SelectIn Call Setup >
Notifications.
57
Page 68

Messages
Message Center
The message center manages your messages.
All your messages are stored in the message
center.The message center shows how many
messages you have of each type.
To access your messagesthrough the message
center:
1 Press A under Mesgs. -or-
From the main menu,selectMessages.
2 Scrolltothetypeofmessageyouwantto
access.
3 Press A under the display option on the left.
58
Page 69

Voice Mail Messages
Note: To receivevoice mailmessages,youmust
firstset up a voice mail account with your
service provider.
Receiving a Message
When you receive a voice mail message, New
Voice Mail Message appearson the display.
To call your service provider’s voice mail system
and listen to the message:
Press A under Call.
To dismiss the message notification:
Press A under Back.Thisicon
on the display, remindingyou that you have a
new message.
Accessing Voice Mail from the Message Center
1 From the main menu, select Messages > Voice
Mail.
2 Press A under Call to call your service
provider’s voice mail system.
y appears
Sending Unanswered Calls to Voice Mail
To send a phone call to voice mail instead of
answering it:
Press e. -or-
Press A under No.
If the caller leavesa message, this icon
appearson the display, remindingyou that you
have a new message.
y
59
Page 70

MOSMS Messages
Note: This feature may not be offered by your
service provider.
If your serviceprovideroffersMOSMS, your phone
sends SMS messages using MOSMS and receives
SMS messages from other phonesthat are using
MOSMS.
Setting Up
Before you begin using MOSMS, you may need to
set up your signature, service center number, and
expiration information:
1 From the main menu, select Messages.
2 Scroll to Text Inbox.
3 Press m.
4 Select Text Msg Setup.
5 With the Signature field highlighted, press A
under Change.
Enteryour signature. It may be up to 11
characters long. See “Entering Text” on page
54. When you are finished,press A underOk.
6 With the Srvc Cntr No field highlighted, press
A under Change.
60
Enterthe phone number of your service center.
If you do not know this number, contact your
service provider.
When you are finished,press A under Ok.
7 With the Expire After fieldhighlighted,press A
under Change.
This is the amount of time messages you send
are saved if they cannot be delivered. After this
period, they are discarded.
Scrollor press A under Q to change field.
When you are finished,press A under Done.
8 Press A under Back to save the information
you entered.
Receiving a Message
When you receive a text message, New Text
Message appearson the display.
To view the message:
1 Press A under Read.
2 Ifthemessagefillsmorethanonescreen,scroll
to read it.
3 To keep the message, scroll to the end of the
message and press A under Save. -or-
Page 71

Reading from the Message Center
To delete the message, scroll to the end of the
message and press A under Delete.
To dismiss the message notification:
Press A under Exit.Thisiconw appears on
the display, reminding you that you have a new
message.
If your phoneis powered off when you receive a
text message, your phone notifies you the next
time you power it on. If you are out of your
coveragearea,your phone alerts you when you
return to your coverage area.
Tip: While reading a text and numeric message
that contains a phone number, you can
press s to call that number.
Reading from the Message
Center
1 From the main menu, select Message > Text
Inbox.
2 Scroll to the message you want to read.
3 Press A under Read.
4 If the message fills more than one screen, scroll
to read it.
5 Tokeep the message, press A under Save. -or-
To delete the message, scroll to the end of the
message and press A under Delete.
Tip: To see more choices, including replying to
the message, pressm .
Creating and Sending Messages
1 From the main menu, select Messages > Text
Inbox>[CreateMsg]. -or-
From the main menu,selectMessages> Text
Outbox > [CreateMsg].
2 Press A under Create.
3 To address the message:
Use the keypadto enter the phone number of
the person you want to send the message to.
-orPress A under Browse. Select Contacts,
Recent Calls,orMemo. Enter the number from
Contacts, the recent callslist,or Memo, as you
wouldwhenmakingacall.
When you are finished,press A under Ok.
4 Enter the t ext of the message. See “Entering
Text”onpage54.-or-
To use a quick note: Press A under Browse.
Scrollto the quick note you want. Press A
61
Page 72

MOSMS Messages
under Select. For more information on quick
notes,see “Using Quick Notes” on page 63.
If you want to add your signature: Press m.
Select Add Signature.
When you are finished,press A under Ok.
5 If you want to send the message, press A
under Yes. -or-
If you want to request confirmation of delivery,
specify the type of message you want to send,
save the message as a draft, or delete the
message without sending it, press A under No.
6 If you want to request confirmation of delivery:
With the Report field highlighted, press A
under Change. Select Yes.
7 Ifyouwanttospecifythetypeofmessageyou
want t o send:
With the Send As field highlighted, press A
under Change. Scroll to the message type you
want. Press A under Select.
8 To send the message: Press s.PressA under
Yes. -or-
To save the message as a draft without sending
it: Press m.ScrolltoSave As Draft.PressA
under Select. -or-
62
To deletet he messagewithout sendingit: Press
m.ScrolltoDelete.PressA under Select.
Tip: In some fields, you can select an option by
scrolling left or right instead of pressing A
underChange.
Beginning Messages From t heRecent Calls List
1 From the recentcallslist, scroll to the name you
wantto send a message to.
2 If the entry has more than one phonenumber
stored, viewthe phonenumberyou want to send
the message to.
3 Press m.
4 Select Compose SMS. The message is
automaticallyaddressed to t he phone number
you chose.
5 Followstep4throughstep8of“Creatingand
SendingMessages” on page 61.
Beginning Messages From the Idle Screen
1 Using the keypad, enter the number you want to
sendamessageto.
2 Press m.
Page 73

Creating and Sending Messages
3 Select Compose SMS. The message is
automatically addressed to the phone number
you chose.
4 Follow step 4 through step 8 of “Creating and
Sending Messages” on page 61.
Using Quick Notes
Quick notes are short, pre-written textmessages
that you can create, edit, and send. You can store
up to 20 quick notes.A quicknote may be up to 30
characters long.
To create a quick note:
1 From the main menu, selectMessages > Quick
Notes > [New Quick Note].
2 Press A under Create.
Enter text. See “Entering Text” on page 54. -or-
To choose from pre-installed notes:Press A
under Browse. Scroll to the note you want.
Press A under Select.
3 Press A under Store.
Tip: For more options, includingsendingt he
quick note, press m.
Using Drafts
When you save a message as a draft,it is saved in
thedraftsfolder.Youmusthaveadraftsavedto
have a drafts folder.
To edit a draft:
1 Fromthe main menu,select Messages > Drafts
Folder.
2 Press A under Change.
3 To edit the fields you want to change, follow
step3throughstep8in“CreatingandSending
Messages” on page 61.
If you have a draft saved, you can createmore
drafts in the drafts folder:
1 Fromthe main menu,select Messages > Drafts
Folder > [Create Msg].
2 Press A under Create.
3 Followstep3throughstep7in“Creatingand
SendingMessages” on page 61.
4 Scroll to Save As Draft.
Using the Outbox
Messages you have sent are stored in the outbox.
63
Page 74

MOSMS Messages
These icons appear next to messagesin the
outbox:
5 Sent and confirmed.
9 Send attempted.
0 Forwarded.
4 Received by addressee.
6 Notreceived by addressee.
8 Send failed.
7 Re-sent.
R Locked.
Resending Messages
To resend a message:
1 From the main menu, select Messages > Text
Outbox.
2 Scrollto the messageyou want to resend.
3 Press m.
4 Select Re-send.
5 Press A under Yes to confirm.
64
Deleting Sent Messages
To delete a sent message:
1 From the main menu, select Messages > Text
Outbox.
2 Scroll to the message you want to delete.
3 Press m.
4 Select Delete.
5 Press A under Yes to confirm.
To delete all unlocked sentmessages:
1 From the main menu, select Messages > Text
Outbox.
2 Press m.
3 Select Delete All.
4 Press A under Yes to confirm.
Locking Sent Mess ages
When you lock a message, it cannot be deleted
until you unlock it.
1 From the main menu, select Messages > Text
Outbox.
2 Scroll to the message you want to lock or
unlock.
3 Press m.
4 Scroll to Lock to lock the message. -or-
Page 75

Managing Memory
Scroll to Unlock to unlock the message.
5 Press A under Select.
Managing Memory
Your text inbox, outbox, and drafts folder have a
set amount of memory available for storing
messages.
The text inboxholds20 messages. If the text inbox
is full, you cannotreceivemessages until you
deletesome.
The outbox and drafts folder share memory space.
Together they can hold 30 messages. If the outbox
and drafts folder memory is full,you cannot send
messages or save draftsuntil you delete some.
To view the amount of memory available in your
text inbox:
1 From the main menu, select Messages > Text
Inbox.
2 Press m.
3 Select Memory Meter.
To view the amount of memory available in your
outbox and drafts folder:
1 From the main menu, select Messages > Text
Outbox.
2 Press m.
3 Select Memory Meter.
65
Page 76

GPS Enabled
Your phone’s GPS Enabled feature uses
information from Global Positioning System (GPS)
satellites orbiting the Earth to determine the
approximate geographical locationof your phone,
expressed as latitudeand longitude. The
availabilityand accuracyof this location
information (and the amount of time that it takes to
calculateit)will varydepending on theenvironment
in which you are using the GPS feature. For
example, GPS location fixes are often difficult to
obtainindoors,in covered locations, between high
buildings,or in other situations whereyou have not
established a clearbroad view of the sky. SEE:
“IMPORTANT: Things to Keep in Mind”.
When you make a 911 emergency call, the GPS
feature of your phone can help emergency
personnel locate you if your phonehas adequate
accessto GPS satellite signals and your
emergency responsecenter isequippedtoprocess
such information.
You can also use the GPS feature to view your
approximate location. Location information
appearson the phone’s display.
66
If your phoneis connectedt o a laptopcomputer or
similar device, software running on that device can
requestyour location. To protectyour privacy,you
can control whether these requests are granted.
IMPORTANT: Things to Keep in Mind
If you are using the GPS feature of your phone
while driving, please give full attention to driving
and to the road.
Whereadequatesignalsfrom multiple satellites
are not available (usually because your GPS
antenna cannot establish a view of a wide area of
open sky), the GPS feature of your phone WILL
NOT WORK. Such situations include but are
not limited to:
• In underground locations
• Inside of buildings, trains, or other covered
vehicles
• Under any other metal or concrete roof or
structure
• Between tall buildings or under dense
tree-cover
• Near a powerful radio or television tower
Page 77

Making an Emergency Call
• When your GPS antenna is covered (for
example, by your hand or other object) or
facing the ground
• In temperature extremes outside the
operating limits of your phone
Walking or driving very slowly may also
substantially reduce GPS performance.
Even where location information can be
calculated in such situations,it may take much
longer to do so, and your location estimate may
not be as accurate. Therefore, in any 911 call,
always reportthe location to the emergency
response center if you can and if you cannot,
remain on your phone for as long as the
emergency response center instructs you.
Even where adequate signals from multiple
satellites are available, your GPS feature will
only provide an approximate location, often
within 150 feet (45 meters) but sometimes
much further from your actual location. Advice
on how to improve GPS performance is
provided in “Enhancing GPS Performance” on
page 69.
While the GPS feature of your phone can be a
valuable navigational aid, it does not replace the
need for careful navigating and good judgment.
Never rely solely on one device for navigation.
Remembert hat the accuracy of t he location
informat ion and the timeneededt o obtainit will
vary dependingon circumstances, particularly the
ability to receive signals from adequate numbers of
satellites.
On emergency calls, your phone uses assistance
information from the phone network to improve the
speed and accuracy of your phone’slocation
calculation: if such assistanceinformation
becomes unavailable, it may reduce the speed and
accuracyof the location calculation.
The satellitesused by the GPS feature of your
phone are controlled by the U.S. government and
aresubject to changesimplementedin accordance
with the Department of Defense GPS user policy
and the Federal Radionavigation Plan. These
changesmay affect the performanceof the GPS
feature of your phone.
Making an Emergency Call
Dial 911 to be connected to an emergency
responsecenter. If you are on an active call, you
must end it before calling 911.
When you make an emergency 911 call, the GPS
feature of your phone begins to seek information to
calculate your approximate location. It will take
the GPS feature of your phone some time to
determine your approximate location. Even
where your phone has good access to sufficient
67
Page 78

GPS Enabled
GPS satellitesignalsand network assist data, it
may take 30 seconds or more to determine the
approximate location. This time will increase where
thereis reduced access to satellite signals. When
your approximate location is determined, it is made
available to the appropriateemergency response
center.
In some cases, your local 911 emergency
response center may not be equipped to
receive GPS location information. For this
reason, and because the GPS location information
reported is only approximate or may not be
available in your location(see “IMPORTANT:
Thingst o Keep in Mind” on page 66), always
report your locationto the 911 operatoryou
speak to when making an emergency call, if able,
just as you would when using a phone without GPS
capabilities.
Note: If you are concerned about whether your
local911 emergency response center is
equipped to receive GPS location
information, contact your local authorities.
In general, if your phone has access to signals
from more GPS satellites, your location will be
determined faster and more accurately than if your
phone has access to signals from fewer GPS
satellites.
68
If your phone does not have adequate access to
GPS satellitessignals, the location of the nearest
cell tower in contact with your phone is
automatically made available to the emergency
responsecenter, if the centerhas the capabilityto
receive such information.
See“Enhancing GPS Performance” on page 69
for information on how to help your phone
determine your location.
Viewing Your Approximate Location
1 From the main menu, select GPS > Position.
2 Scroll to view the entirescreen.
This displays the following information about the
last time your location was calculated:
• Thetime (as Greenwich Mean Time) and date
that the location was last calculated.
• The approximate location, expressed as latitude
and longitude.
• Thee stimated accuracy of the calculated
location . Thisestimateofaccuracyis only a very
roughestimate and may vary substantially from
the actual accuracy of the approximate location
informationreported.
Page 79

Enhancing GPS Performance
• The number of satellites used to calculate the
location. In general, more satellites make for
better accuracy.
To calculate your location again:
Press A under Rfrsh.
It may take your phoneseveral minutes to
complete the process of determining your location.
During this time, a message usuallyappearson
your phone’s displaysaying your phone is
scanning for satellites. For t ips on getting the best
locationcalculation, see “Enhancing GPS
Performance”.
The Position screen displays the updated
information.
To cancel a locationcalculat ion beforeit is
completed:
Press A under Cancel to return to the Position
screen. -or-
Press e to return to the idle screen.
Each time approximate location of your phone is
calculated, the latest location information is stored
in your phone and remains there even when your
phone is powered off. You will see this information
thenexttimeyouviewthePosition screen.
If you received a phone call or alert while
attemptingt o determineyour location,the Position
screenwill disappear, but yourphone willcontinue
attempting to determine its location. If it is
successful, the new location information will be
displayed the next time you view the Position
screen.
Enhancing GPS Performance
Sometimes the GPS feature of your phone may be
unable to complete a location calculation
successfully. If this happens when you are making
an emergency call, the location of the nearest cell
tower in contact with your phone is made available
to the appropriate emergency response center if
the center has the capability to receive such
information. If this happens whenyou are tryingto
view your location on the phone’s display,you will
see a message indicating that your phone cannot
accesssatellites.
To improve accuracy and increase your chances of
a successful calculation, do the following while
your phone is determining your approximate
location:
69
Page 80

GPS Enabled
• S tay in the open. The GPS feature works best
wherethereis nothing between your phone and
a large amount of open sky. If possible,go
outside, away from tall buildings and foliage.
While performance in a building is improved by
movingcloserto windows, glasswith certainsun
shielding films may block satellite signals.
• Hold your phone to enhance reception. Signals
from GPS satellites are transmitted to your GPS
antenna, whichis insidethe back of your phone,
opposite the earpiece, above the label with your
service provider’s name on it. Hold your phone
away from your body, giving the antenna clear
access to satellite signals. Do not cover the
antennaarea with your fingers or anything else.
GPS antenna area
70
• Stand still.If possible,standstilluntil your phone
is finished determining your location. Moving
your phone at a walking pace while your phone
is calculating your approximate locationmay
substantially decrease GPS performance.
• Ina car. Whenusingthe GPS Enabledfeature in
a car, positionyour phone so thatthe GPS
antennahas good access to GPS signals
through the car’s windows. Typically, the GPS
antenna has best access to GPS signals in a car
when placed near a window.
Note: Although movingyour phone at a walking
pace decreases GPS performance,
movingit at the speed of a movingcar
does not.
• Stay in network coverage.Depending on who
your service provider is, the network will provide
your phone with information that helps
determine your location more quickly and
accurately.
Page 81

Updating Satellite Almanac Data
Updating Satellite Almanac
Data
Anotherway to keepthe GPS f eature of your
phone workingwell is to keep your satellite
almanac data up to date.
The United States government maintains an
almanac of data about where GPS satellitesare as
they orbit the Earth. This information is available to
your phone. Keeping your satellite almanac up to
date helps your phone determine your location
more quickly.
The almanac containsinformation about the
location of satellites, their operational status, and
other satellite information. Keeping this information
updatedenhances the performanceof your GPS
feature. In most cases, your phone will be able to
get a fix in strongsatellite signal conditions with
outdated almanac data, but it may take longer.
Note: When you make an emergency call, your
phone does not rely upon the almanac to
determine your location.
If your satellite almanac data is out of date, your
phone may prompt you to update it. Followthe
instructions that appear on the phone’s display.
Youmaybeaskedtogotoawebsiteorcalla
customer care number.
Setting Privacy Options
Yourphone’sGPS privacyoptionscontrolwhether
softwareapplicationsmay viewthe location of your
phone.You may set your phoneto one of these
GPS privacy options:
• Restricted — No software applications may
view the locationof your phone.However,
location information may still be available to the
phone’s owner, fleet manager, or account
administrator.
• Unrestricted — All applications may view the
location of your phone, without notifying you.
•ByPermission— When an application
attempts to view the location of your phone,you
willbe prompted to give permission. However,
location information may still be available to the
phone’s owner, fleet manager, or account
administrator.
Note: Privacy optionsdo not apply to the
transmission of location information
during emergency 911 calls.
71
Page 82

GPS Enabled
To set your GPS privacy options:
1 From the main menu, select GPS > Privacy.
2 If your GPS PIN security feature is enabled,
enter your GPS PIN. (See “Setting the GPS PIN
Security Feature” for more information.)
3 Scroll to the privacy setting you want.
4 Press A under Select.
Setting the GPS PIN Security Feature
To prevent your GPS privacysettings from being
alteredwithout your knowledge, your GPS privacy
optioncanbeprotectedbyaPIN.
When you receive your phone,t he GPS security
featureisturnedoff,soyoudonothavetoentera
GPS PIN to access your GPS privacy options. If
you turn thisfeature on, you willbe required to
entera GPS PIN to accessyour GPS p rivacy
options.
To turn the GPS Enabled security feature on or off:
1 From the main menu, select Settings >
Security > GPS PIN.
2 Scroll to On or Off.
3 Press A under Select.
4 Enter the current GPS PIN.
Note: When you receive your phone, your GPS
PIN is 0000.
72
5 Press A under Ok.
To change your GPS PIN:
1 From the main menu, select Settings >
Security > Change Password > GPS PIN.
2 Enter the current GPS PIN.
Note: When you receive your phone, your GPS
PIN is 0000.
3 Press A under Ok.
4 Enter the new 4- to 8-digit GPS PIN.
5 Press A under Ok.
6 Enter the new 4- to 8-digit GPS PIN to confirm.
7 Press A under Ok.
Using GPS with Map Software
You can use the GPS feature of your phone to
provideapproximate locationdata to a laptop
computer or similar device that is running
interactivemap software such as that made by
DeLorme or Microsoft. This way, if your phone has
good access to GPS signals, your approximate
positionon a map can b e made available as you
travel in a vehicle.
To do this, connect your phone to your laptop (or
otherdevice) with a data cable and set your phone
to transmitdata(see“GettingStarted”on page73).
Your phone then provides your approximate
Page 83

Using GPS with Map Software
locationto the device running the map software,
whichdisplaysyourlocationon a map. Your phone
provides an updated location every second and the
map softwaredisplays your changinglocation on
its map.
See “Enhancing GPS Performance” on page 69
for more details on obtaining good location
information.
Note: Because your phone is continuously
determining your location, using the GPS
feature of your phone with map software
uses the phone’s battery power quickly.
Software Compatibility
Your phone sends location information to your
laptop or other device using thestandard National
MarineElectronics Association (NMEA) format.
Your phone supports output messagesin
NMEA-0183 format andsupportsthe following
NMEA-0183 sentences: GGA, GLL, GSA, GSV,
RMC, and VTG.
The map software running on your laptop or other
device must support NMEA 3.0.
Getting Started
To connect your phone to your laptop or other
device:
1 Open the connector cover.
connector
cover
2 With the phone’s display facing up, insert the
data cable’s connector into the accessory
connector, until you hear a click.
73
Page 84

GPS Enabled
3 InsertthedataplugintotheCOMportofyour
laptop or other device.
Make sure no other application is using the COM
port selected.
Make sure the COM portsettings of your laptop or
otherdeviceare set to the following:
• Bits per second:4800
• Data bits: 8
• Parity:None
• S top bits: 1
• Flow control: Hardware
74
To set your phone to send location information to
your laptop or other device:
1 From the main menu, select GPS > Interface.
2 With NMEA OUT highlighted, press A under
Change.
3 Scroll to On.
4 Press A under Select. Your phone is now
sending location data to your laptop or other
device.
To stop your phone from sending location data to
your laptop or other device:
Set NMEA OUT to Off.
Each time you power your phone on, NMEA OUT
is automatically set to Off.
Page 85

Voice Records
Note: This is an optional feature.Contact your
service provider about its availability for
purchase.
A voicerecordis a recording you make with your
phone and can play back. You canrecord notes to
yourselfor phone calls.
Your phone can store up to 20 voice records.
Creating Voice Records
Torecordanotetoyourself:
1 From the main menu, select VoiceRecord.
2 With [New VoiceRec] highlighted, press A
under Record.
3 Say the message you want to record into the
microphone.
Tip: To stop recording before you are finished,
press m, then selectPause.Tostart
recording again, press A under Resume.
To stop recording and discard the voice
recordat any time,press A under Cancel.
4 When you are finished recording, press A
under Stop.
To add to the end of voice record:
1 From the main menu, select VoiceRecord.
2 Scroll to the voice record you want to add to.
3 Press m.
4 Select Add To.
5 When you are finished recording, press A
under Stop.
To record a phone call:
1 Whileonanactivecall,pressm.
2 Select Record.
3 When you are finished recording, press A
under Stop.
Note: Recordingof phone calls is subject to
applicable laws regarding privacy and
recording of phone conversations.
Playing Voice Records
1 From the main menu, select VoiceRecord.
2 Scroll to the voice record you want to play.
3 Press A under Play .
4 To stop the voice record whileit is playing,press
A under Back.
Tip: Tofast forward,scroll right.Torewind, scroll
left. T opause or resume, press any number
key.
75
Page 86

Voice Records
Labeling Voice Records
When you createa voice record, it is labeled with
the time and date it was recorded. You can then
rename it with a custom label.
1 From the main menu, select VoiceRecord.
2 Scroll to the voice record you want to label.
3 Press m. Select Label.
4 Enter the label you want to assign. See
“Entering Text” on page 54.
5 Press A under Ok.
Deleting Voice Records
To delete a voice record:
1 From the main menu, select VoiceRecord.
2 Scroll to t he unlockedvoice record you want to
delete.
3 Press m.
4 Select Delete.
5 Press A under Yes to confirm.
To delete all voice records:
1 From the main menu, select VoiceRecord.
2 Scroll to any voice record.
3 Press m.
4 Select Delete All.
76
5 Press A under Yes to confirm.
Locking Voice Records
When you lock a message, it cannot be deleted
until you unlock it.
1 From the main menu, select VoiceRecord.
2 Scroll to the message you want to lock or
unlock.
3 Press m.
4 Scroll to Lock to lock the message. -or-
Scroll to Unlock to unlock the message.
When a voice record is locked,this icon
appearsnext to it.
Managing Memory
To view the amount of memory availablefor voice
records:
1 From the main menu, select VoiceRecord.
2 With [New VoiceRec] highlighted,press m.
Select Memory. -or-
With any voice recordhighlighted, pressm.
Select Memory.
Page 87

To free more memory by deleting all unlocked
voice records:
1 From the voice records memory screen, press
A under Delete.
2 Press A under Yes to confirm.
Note: Voice records are stored in your phone
using the same memory space used to
storemessages,Java application data,
and ring tones. Deleting some of these
other items frees memory for voice
records.
Managing Memory
77
Page 88

Customizing Your Phone
Setting the Volume
To set the volume of the sound coming from the
phone’s earpiece or speaker:
1 From the main menu, select Settings > Volume.
2 Scroll to Earpieceto set the earpiece volume.
-orScroll to Speakerto set the speakervolume.
3 Press A under Change.
4 To select the volume:
Scrollleft or right.-or-
Pressthe volume controls.
5 Press A under Ok.
To set the volume of the phone’s ring:
Pressthe volume controls.
For another way to set the volume of the phone’s
ring,or the volumeof many other sounds your
phone makes:
1 From the main menu, select Settings > Volume.
2 Scrollto the optionyou want andmake the
change. Choose Line 1 or Line 2 to set the
78
volumeof the phone’s ring when you geta call
on that line.
See “Volume Features”on page 80.
Setting Your Phone to Not Ring
To set your phone to make no sound when you
receivephone calls,Privatecalls,group calls,
messagenotifications,and call alerts,see “Setting
YourPhonetoVibrate”onpage50.
To set your phone to vibrate instead of making a
sound when you receivePrivate callsand group
calls,even if you want your phone to ring for other
features:
1 From the main menu, select Settings > 2-Way
Radio > Alert Type.
Tip: If Alert Type does not appear:From the
main menu, select Ring Tones.Makesure
Vibrate All or SilentAll is set to Off.
Repeat step 1.
2 Press A under Change.
3 Scroll to Vibrate.
4 Press A under Select.
Note: This is an optional feature.Contact your
service provider about its availability for
purchase.
Page 89

Seeing the Display Better
If your phonedoes not include a vibrate feature,
you can still set your phone to make no sound.
Scroll to Silent in step 3.
Seeing the Display Better
To set the contrast of the display:
1 From the main menu, select Settings >
Display/Info > Contrast.
2 Press A under Change.
3 Scrollleft or r ight to set the contrast.
4 Press A under Ok.
Using Settings
Settings contains many submenus that let you
customizeyour phone.
Display/Info Features
The Display/Info menu controls how the keypad
and display appear:
• Backlight — controlshow long the backlight
stays on after you make or receive a call.
•Clock— controls whether the time and date
appears on the idle screen, sets the format of
the time and date, and sets the year.
•Contrast— setst he contrast on the display.
See “Seeingthe Display Better”.
• Language — sets the language that your phone
displays.
Phone Calls Features
The Phone Calls menu controls how your phone
handles p hone calls:
• Set Line — sets phone line 1 or phone line 2 as
the active line for outgoing calls.
•AnyKeyAns— If this feature is on, you can
answer calls by pressing any number key on the
keypad.
•AutoRedial—setsyour phoneto automatically
redialcalls you make when the system is busy.
•CallWaiting— See “Call Waiting” on page 41.
• Auto Ans — setsyour phone to automatically
answer an incoming call after a specified
number of rings. When this feature is on, the
phone answers by connecting you to the caller;
it does not send the call to voice mail, unless
you are out of coverage or on the line.
•MinuteBeep— causes a beep to sound every
minuteof an active call.
•CallDuration— causesthe durationof a callto
appear on the phone’s display when the call
ends.
79
Page 90

Customizing Your Phone
• TTY — lets you use your phone with a TTY
device. See “To use these services, you must
installthe iDEN Wireless Data Services software
(available separately). Making TTY Calls” on
page 47.
• Notifications — See“MessageNotifications”on
page 57.
2-Way Radio Features
The 2-Way Radio menucontrols how your phone
handles Private calls and group calls:
• Tkgrp Silent — controls whether you hear
group calls to your Talkgroup. See “Receiving
GroupTMCalls” on page 45.
•TkgrpArea— lets you define your Talkgroup
area.
• One Touch PTT — See “Setting One Touch
PTT®” on page 43.
•AlertType— controlshow your phone notifies
you when you receive Private calls and group
calls. See “Setting Your Phone to Not Ring” on
page 78.
Volume Features
The Volume menu sets the volume of soundsyour
phone makes:
•Line1— sets ring volume for phone line 1.
80
•Line2— sets ring volume for phone line 2.
• Messages — sets thevolume of message
notifications.
• Earpiece — sets the volume of sound coming
outoftheearpiece.
• Speaker— sets the volume of sound coming
outofthespeaker.
•Keypad—sets the volume of sound associated
withpressingkeys and buttons.
•Data— sets the volume of soundsthat notify
you that you are receiving a circuit data call.
Security Features
The Security menu lets you turn security features
on and off and change passwords:
• Phone Lock — turns on a feature that locks
your phone, either immediately or automatically
aftera set period of inactivity. An unlock code is
required to enable this feature, to unlock the
phone, and to set a new unlock code. Contact
your service provider for your default unlock
code.
•KeypadLock— locksthe phone’s keypad,
either immediately or automatically after a set
period of inactivity. See “Locking the Keypad” on
page 14 for more information on locking and
unlocking the keypad.
Page 91

Using Settings
•SIMPIN— enablesand disablesyour phone’s
SIM PIN security feature. See “Turning the PIN
Requirement On and Off”on page 12.
•GPSPIN— enablesand disablesyour phone’s
GPS PIN security feature. See “Setting the GPS
PIN Security Feature” on page 72.
• Change Passwords — changes your phone
unlockcode, securitycode, SIM PIN, and GPS
PIN.
Advanced Features
The Advanced menu contains advanced and rarely
used Settings f eatures.
• Alert Timeout — controlsthe amount of time a
tone continues to sound when you receivea
message notificationor call alert.
• Headset/Spker — sets headset option. See
“Using a Headset” on page 82.
• Connectivity — Network ID sets the phone’s
network IDs and their roamingoptions under the
direction of your service provider; Master Reset
lets your service provider reset your servicein
the event of a security or provisioning problem.
• Reset Defaults — Reset Settings returns all
settings to their original defaults; Reset All
returns all settingsto theiroriginal defaults and
erases all stored lists. Use only under the
direction of your service provider.
• ReturntoHome— controls how longthe recent
callslist displays after calls.
• Phone Only — prevents your phone from
makingor receiving Private calls or group calls.
Note: Check with your service provider for
availability of this feature.
•BaudRate— sets the baud rate at which your
phone communicates with a laptop computer,
PC, or similar device.
81
Page 92

Using a Headset
Ifyouuseaheadsetorsimilardevicewithyour
phone,you can set your phone to send incoming
sound to t he headset only, or to the headsetand
the speaker at the same time:
1 From the main menu, select Settings >
Advanced > Headset/Spkr.
2 Press A under Change.
3 Scroll to HdsetOnly to send incomingsound to
the headset only. -or-
Select Hdset&Spkr to send incoming sound to
the headsetand ring tonesto the speaker.
4 Press A under Select.
Note: When using a headset, the PTT button on
your phone works the same way as when
you are not using a headset. Sounds
associated with Private calls and group
callsare heard through the headset.
Attaching a Headset
1 Lift the audiojack cover.
2 Insert the headset connector firmly into the
audio jack. You may have to rotate the headset
connector until it fits securely into the audio jack.
82
Using a Remote PTT Button
If you are using a headset or other accessorywith
a remote PTT button, you can use the remotePTT
button for phone calls and Private calls.
For phone calls, use the remote PTT buttonto
answer calls, switch between calls, and end calls.
HoldtheremotePTTbuttonforlessthan2
seconds to answer calls and switch between calls.
Hold the remote PTT button for more than 2
seconds to end calls.
For Private calls, use the remote PTT button as
you would the PTT button on your phone.
Page 93

Understanding Status Messages
You may receive status messages under certain
conditions. Before contactingCustomerCare,note
the message, numericcode, and the conditions
under which it appeared. The following table lists
and describes the status messages.
StatusMessages Message Description
Number Not in
Service
User Not Available
User Not
Authorized
Please Try Later
Service Restricted
Service Not
Available
The number that you entered is not
valid.
The phone that you called is either
busy,out of coverage, orturned off.
Please try again later.
The person that you called has not
purchased this service.
This service is temporarily not
available. Please try again later.
This service was restricted by your
service provider, o r thisservicewas
not purchased.
Youare either out of coverage or
having problems with provisioning.
StatusMessages Message Description
System Busy
Please Try Again
Self Check Error +
Number Code
Self Check Fail +
Number Code
PIN Blocked
Call Your P rovider
Insert SIM
Check SIM Card
Wrong PIN
The system is experiencing heavy
traffic. Please try again later.
An error occurred. Please try again.
A fault was detected with your
phone. If this error recurs, note the
error code and contact Customer
Care.
An operational fault was detected
with your phone. Note the numeric
code, turn your phone off, and
contact Customer Care.
The incorrect PIN was entered 3
consecutive times. Youwill be
unable to place or receive calls on
your phone. Contact Customer
Care to have them obtain the PIN
Unblocking Key (PUK) code.
Your SIM card is not being
detected. Please check to ensure
that you have inserted the SIM card
correctly into your phone.
Please check your SIM card to
make sure it has been inserted
properly.
Youhave entered an incorrect PIN
number.
83
Page 94

Understanding Status Messages
StatusMessages Message Description
Enter SIM PIN
Enter Unlock Code
New Browser
Message Memory
Full!
Scanning for
Satellites
Unable to Locate
Sats
Technical Error
84
Please enter your 4- to 8- digit SIM
PIN code.
Auto Phone Lock is activated.
Enter you unlock code.
Warns of low memory for Net
Alerts.
Searching for GPS satellites.
Could not find GPS satellites.
A problem occurredin your phone’s
GPS circuitry. If this error occurs,
contact Customer Care
Page 95

Safety and General Information
IMPORTANT INFORMATION ON SAFE AND
EFFICIENT OPERATION.
READ THIS INFORMATION BEFORE USING
YOUR INTEGRATED MULTI-SERVICE
PORTABLE RADIO.
RF Operational Characteristics
Your radio product containsa radio frequency
transmitter to convey the information you wish to
send as well as occasional automatic signals used
to sustain connection to the wireless network, and
a receiver which enables you to receive
communication and connection information from
the network.
Portable Radio Produc t Operation and EME Exposure
Your Motorola radio product is designed to comply
with the followingnational and international
standards and guidelines regarding exposure of
human beings to radio frequency electromagnetic
energy(EME):
• United States Federal Communications
Commission, Code of Federal Regulations; 47
CFR part 2 sub-part J.
• American National Standards Institute (ANSI) /
Institute of Electrical and Electronics Engineers
(IEEE). C95. 1-1992.
• Instituteof Electricaland Electronics Engineers
(IEEE). C95. 1-1999 Edition.
• International Commissionon Non-Ionizing
Radiation Protection (ICNIRP) 1998.
• Ministry of Health (Canada). Safety Code 6.
Limits of Human Exposure to Radiofrequency
Electromagnetic Fields in the Frequency Range
from 3 kHz to 300 GHz, 1999.
• Australian Communications Authority
Radiocommunications (Electromagnetic
Radiation - Human Exposure)Standard 2003.
• ANATEL,Brasil Regulatory Authority,Resolution
256 (April11,2001) “additionalrequirements for
SMR, cellular and PCS product certification.”
To assure optimal radio product performance
and make sure human exposure to radio
frequency electromagnetic energy is within the
guidelines set forth in the above standards,
always adhere to the following procedures:
85
Page 96

Safety and General Information
Phone Operation
When placing or receiving a phone call, hold your
radio product as you would a wireline telephone.
Speak directly into the microphone.
Two-way radio operation
When using your radio productas a
traditional two-way radio, hold the
radio product in a vertical position
with the microphone one to two
inches (2.5 to 5 cm) away from the lips.
Body-worn operation
To maintain compliance with FCC RF exposure
guidelines, if you wear a radioproducton your
body when transmitting, always place the radio
product in a Motorola approved clip, holder,
holster, case or body harness for this product.
Use of non-Motorola-approvedaccessoriesmay
exceedFCC RF exposure guidelines. If you do
not use a Motorola approved body-worn
accessory and are not using the radio product
in the intended use positions along side the
head in the phone modeor in front of the face
in the two-way radio mode, then ensure the
antenna and the radio product are kept the
following minimum distances from the body
when transmitting
86
• Phone or Two-way radio mode: one inch (2.5
cm)
• Data operation usingany datafeaturewith or
without an accessory cable: one inch (2.5
cm)
Antenna Care
Use only the supplied or an approved
replacement antenna.Unauthorizedantennas,
modifications,or attachmentscould damagethe
radio product and may violate FCC regulations.
DO NOT hold the antenna when the radio
product is “IN USE”. Holding the antenna affects
call quality and may cause the radio product to
operateat a higherpower level than needed.
Approved Accessories
For a list of approved Motorola accessoriescall
1-800-453-0920, or visit our website at
www.motorola.com/iden.
Page 97

Portable Radio ProductOperation and EME Exposure
ALL MODELS WITH FCC ID AZ489FT5832 MEET THE
GOVERNMENT’S REQUIREMENTS FOR EXPOSURE
TO RADIO WAVES.
Your wireless phone is a radio transmitter and receiver. It
is designed and manufactured not to exceed the emission
limits for exposure to radiofrequency (RF) energy set by
the Federal Communications Commission of the U.S.
Government. These limits are part of comprehensive
guidelines and establish permitted levels of RF energy for
the general population. The guidelines are based on
standards that were developed by independent scientific
organizations through periodic and thorough evaluation of
scientific studies. The standards include a substantial
safety margin designed to assure the safety of all persons,
regardless of age and health.
The exposure standard for wireless mobile phones
employs a unit of measurement known as the Specific
Absorption Rate, or SAR. The SAR limit set by the FCC is
1
1.6W/kg.
operating positions reviewed by the FCC with the phone
transmitting at its highest certified power level in all tested
frequency bands. Although the SAR is determined at the
highest certified power level, the actual SAR level of the
phone while operating can be well below the maximum
value. Thisis because the phone is designed to operate at
multiple power levels so as to use only the power required
to reach the network. In general, the closer you are to a
wireless base station antenna, the lower the power output.
Before a phone model is available for sale to the public, it
must be tested and certified to the FCC that is does not
exceed the limit established by the government-adopted
requirement for safe exposure. The tests are performed in
positions and locations (e.g., at the ear and worn on the
Tests for SAR are conducted using standard
body) as required by the FCC for each model. The highest
SAR value for this model phone when tested for use at the
ear is 1.45 W/kg and when tested on the body, as
described in this user guide, is 1.26 W/kg during packet
data transmission. (Body-worn measurements differ
among phone models, depending upon available
accessories and FCC requirements.)
While there may be differences between the SAR levels of
various phones and at various positions, they all meet the
government requirement for safe exposure.
The FCC has granted an Equipment Authorization for this
model phone with all reported SAR levels evaluated as in
compliance with the FCC RF exposure guidelines. SAR
information on this model phone is on file with the FCC
and can be found under the Display Grant section of
http://www.fcc.gov/oet/fccid after searching on FCC ID
AZ489FT5832.
Additional information on Specific Absorption Rates (SAR)
can be found on the Cellular Telecommunications Industry
Association (CTIA) web-site at http://www.wow-com.com.
1
In the United States and Canada, the SAR limit for
mobile phones used by the public is 1.6 watts/kg (W/kg)
averaged over one gram of tissue. The standard
incorporates a substantial margin of safety to give
additional protectionfor the public and to account for any
variations in measurements.
2
The SAR information reported to the FCC includes the
FCC-acceptedMotorola testingprotocol,assessment
procedure, and measurement uncertainty range for this
product.
2
87
Page 98

Safety and General Information
Electro Magnetic Interference/Compatibility
Note: Nearly every electronic device is
susceptible to electromagnetic
interference (EMI) if inadequately
shielded, designed or otherwise
configured for electromagnetic
compatibility.
Facilities
To avoid electromagnetic interference and/or
compatibility conflicts, turn off your radio product in
any facilitywhereposted notices instruct you to do
so. Hospitalsor health care facilities may be using
equipment that is sensitiveto external RF energy.
Aircraft
When instructedto do so, turn off your radio
product when on board an aircraft. Any use of a
radio product must be in accordance with
applicable regulations per airline crew instructions.
88
Medical Devices
Pacemakers
The Advanced MedicalTechnology Association
(AdvaMed) recommends that a minimum
separation of 6 inches (15 cm) be maintained
betweena handheld wireless radio product and a
pacemaker. These recommendations are
consistent with those of the U.S. Food and Drug
Administration.
Persons with pacemakers should:
• ALWAYS keep the radio product more than 6
inches (15 cm) from their pacemaker when the
radio product is turned ON.
• Not carry the radio product in a breast pocket.
• Use the ear opposite the pacemaker to minimize
the potential for interference.
• Turn the radio product OFF immediately if you
haveany reason to suspectthat interference is
takingplace.
Hearing Aids
Some digital wirelessr adio products may interfere
with some hearing aids. In the event of such
interference, you may want to consult your hearing
aid manufacturer to discuss alternatives.
Page 99

Operational Warnings
Other Medical Devices
If you use any otherpersonalmedical device,
consultthe manufacturer of your device to
determine if it is adequately shieldedfrom RF
energy.Your physicianmay be able to assistyou
in obtainingthis information.
Use W hile Driving
Checkthe lawsand regulations on the use of radio
products in the area where you drive.Alwaysobey
them.
When usingthe radio productwhiledriving, please:
• Give full attention to driving and to the road
• Use hands-free operation, if available.
• Pull off the road and park before making or
answering a call if driving conditions so require.
.
Operational Warnings
For Vehicles with an Air Bag
Do not place a portable radio product in the area
over the air bag or in the air bag deployment area.
Air bags inflate with great force.If a portable radio
isplacedin the air bag deploymentareaandthe air
bag inflates, the radio product may be propelled
with great force and cause serious injury to
occupants of the vehicle.
Potentially Explosive Atmospheres
Turn off your radio productprior to entering any
area with a potentially explosive atmosphere,
unless it is a radio product type especially qualified
for use in such areas as “Intrinsically S afe” (for
example, Factory Mutual, CSA, or UL approved).
Do not remove,install, or chargebatteries in such
areas.Sparksin a potentially explosive
atmosphere can cause an explosion or fire
resulting in bodily injury or evendeath.
Note:The areas with potentially explosive
atmospheres referred to above include
fueling areas such as below deckso n
boats, fuel or chemicaltransfer or
storage facilities, areas where the air
contains chemicals or particles, such
!!
89
Page 100

Safety and General Information
as grain, dust or metal powders, and
any other area where you would
normally be advised to turn off your
vehicle engine. Areas with potentially
explosive atmospheres are often but
not always posted.
Blasting Caps and Area s
To avoid possible interference with blasting
operations, turn off your radio product when you
are near electrical blasting caps, in a blasting area,
or in areas posted:“Turnoff two-way radio”. Obey
all signs and instructions.
Operational Cautions
Batteries
All batteriescan cause property damage and/or
bodilyinjury,such as burnsif a conductivematerial
such as jewelry, keys, or beaded chains touches
exposedterminals. The conductive materialmay
complete an electrical circuit (short circuit) and
become quite hot. Exercise care in handling any
chargedbattery, particularlywhenplacingit inside
a pocket, purse, or other container with metal
objects.To reduce the riskof injury, batteries
should not be exposedto fire, disassembled, or
crushed.
90
!
Cleaning and Drying Considerations
Using a leather carrycase may help protectthe
surfacesand help prevent liquids(e.g., rain) from
entering into the interior of the radio product. This
productis not waterproof, and exposing the unit to
liquids may result in permanentdamageto the unit.
If your radio product interior gets wet, then do not
trytoacceleratedryingwiththeuseofanovenora
dryeras thiswill damage the radio product and
void the warranty. Instead,do the following:
1 Immediately power off the radio product.
2 Remove Battery and SIM card (if so equipped)
from radio product.
3 Shake excess liquid from radio product.
4 Place the radio product and battery in an area
that is at room temperature and has good air
flow.
5 Let the radio product, battery, and SIM card dry
for 72 hours before reconnecting the battery
and/or powering on the radio product.
If the radio product does not work after following
the steps listed above, contact your dealer for
servicing information.
 Loading...