

Page 1

Digital Multi-service Data-capable Phone
@NNTN5720A@
NNTN5720A
Nextel
iDEN
i710 Phone User’s Guide
Page 2

Page 3

Contents
Getting Started........................................... 1
Removing the Battery Door...............................3
Locating Your SIM Card....................................3
Battery...............................................................4
Powering On and Off.........................................6
Activating Service..............................................6
Enabling Security ..............................................6
Phone Programming .........................................7
Finding Your Phone Number and Direct
Nextel
Nextel Worldwide
Customizing Features .......................................8
Phone Basics ....................................................9
SIM Card Security ...........................................12
Locking the Keypad.........................................16
Accessories.....................................................17
Wireless Local Number Portability: Bringing
Nextel
®
Connect
Your PhoneNumberFrom Another
Carrier.........................................................17
Number ........................................7
®
Voice Mail.............................................8
®
Customer Care...................................18
®
Service ...............................8
Making Calls .............................................20
Phone Calls.....................................................20
Direct Connect
Receiving Calls ...............................................21
Ways to Enter Calls.........................................22
Missed Phone Calls ........................................24
Using Speakerphone.......................................24
Using Mute......................................................25
Making Emergency Phone Calls.....................25
®
Calls .....................................20
Call Alerts..................................................27
Sending Call Alerts..........................................27
Receiving Call Alerts.......................................27
Using the Call Alert Queue..............................27
Recent Calls..............................................29
Viewing Recent Calls ......................................29
Storing Recent Calls to Contacts ....................29
Deleting Recent Calls......................................30
Entering Text ............................................31
Using Alpha Mode...........................................31
Using Word Mode ...........................................31
i
Page 4

Special Function Keys.....................................32
Using Numeric Mode.......................................33
Using Symbols Mode ......................................33
Contacts ................................................... 34
Viewing Contacts.............................................35
Creating Entries...............................................36
Storing Numbers Faster ..................................37
Editing Entries .................................................38
Deleting Entries...............................................38
Checking Capacity ..........................................38
Creating Pauses and Waits.............................38
International Numbers.....................................39
Memo ........................................................ 40
Call Forwarding........................................ 41
Forwarding All Calls ........................................41
Turning Off Call Forwarding............................42
Forwarding Missed Calls.................................42
Viewing Call Forwarding Settings....................43
ii
Advanced Calling Features .....................44
Call Waiting.....................................................44
Switching Between Calls.................................44
Putting a Call on Hold .....................................45
Calling 2 People ..............................................45
Creating Pauses and Waits While Dialing.......46
Making International Calls...............................46
Setting One Touch Direct Connect
Setting Flip Actions .........................................47
Group Connect
TM
Calls...................................48
®.................... 46
Call Timers......................................................49
Using Your Phone as a Modem ......................50
Making TTY Calls............................................51
Special Dialing Codes.....................................52
Nextel®Phone Services ...........................54
Caller ID ..........................................................54
Per-Call Blocking.............................................54
Per-Line Blocking ............................................54
Alternate Line Service .....................................54
Call Restrictions ..............................................55
®
Nextel
411.....................................................55
Page 5

Ring Tones ...............................................56
Setting Your Phone to Vibrate.........................56
Ring and Vibrate..............................................57
Assigning Ring Tones to Contacts ..................57
Viewing Ring Tone Assignments.....................57
Downloading More Ring Tones.......................57
Managing Memory...........................................58
Deleting Custom Ring Tones ..........................58
Nextel®Voice Mail....................................63
Setting Up Your Voice Mail Box ......................63
Playing Messages ...........................................63
Changing Your Password ...............................64
Recording Your Name.....................................64
Recording Your Active Greeting......................65
Advanced Voice Mail Features .......................65
®
Nextel
Voice Mail Tree ..................................70
Message Center....................................... 59
Accessing the Message Center.......................59
Message Center Options.................................59
Receiving Messages................................ 60
Message Notifications .....................................60
Message Center..............................................60
Voice Mail Messages............................... 62
Receiving a Message......................................62
Accessing Voice Mail from
the Message Center ...................................62
Sending Unanswered Calls to VoiceMail.......62
SMS and Two-Way Messages .................71
SMS Messages...............................................71
Two-Way Messages and Net Alerts................72
Nextel Online®Services...........................75
NOL Services..................................................75
Accessing NOL Services From Your Phone...75
Voice Records ..........................................77
Creating Voice Records ..................................77
Playing Voice Records....................................77
Labeling Voice Records ..................................77
Deleting Voice Records...................................78
Locking Voice Records ...................................78
iii
Page 6

Managing Memory...........................................78
Java Applications.................................... 80
Installing Applications......................................80
Running Applications.......................................80
Suspending Applications.................................80
Resuming Applications....................................81
Ending Applications.........................................81
Downloading Applications...............................81
Deleting Applications.......................................81
Managing Memory...........................................82
Shortcuts on the Main Menu ...........................82
Java Applications and GPS Enabled...............83
GPS Enabled ............................................ 86
IMPORTANT: Things to Keep in Mind ............86
Making an Emergency Call .............................87
Viewing Your Approximate Location ...............88
Enhancing GPS Performance .........................89
Updating Satellite Almanac Data.....................91
Setting Privacy Options...................................92
Using GPS with Map Software........................93
iv
Datebook...................................................95
Viewing Datebook ...........................................95
Creating Events...............................................96
Editing Events .................................................98
Deleting Events...............................................99
Receiving Reminders ......................................99
Making Calls From Datebook........................100
Customizing Datebook Setup........................100
Customizing Your Phone.......................102
Setting the Volume........................................102
Setting Your Phone to Vibrate.......................102
Changing the Look of Your Phone ................102
Temporarily Turning Off Calls .......................104
Using Settings ...............................................104
Profiles ....................................................109
Viewing Profiles.............................................109
Switching Profiles..........................................109
How Changing Settings Affects Profiles........109
Temporary Profiles........................................110
Creating Profiles............................................111
Editing Profiles ..............................................111
Page 7

Deleting Profiles ............................................111
Setting Call Filtering ......................................112
Shortcuts................................................ 113
Creating a Shortcut .......................................113
Using a Shortcut............................................113
Editing a Shortcut ..........................................114
Deleting Shortcuts.........................................114
Using a Headset..................................... 115
Attaching a Headset......................................115
UsingaRemotePTT
TM
Button .....................115
Nextel®Customer Care ......................... 116
Domestic Customer Care..............................116
Nextel Worldwide
®
Customer Care...............117
Understanding Status Messages.........118
®
Nextel
Terms and
Conditions of Service ........................ 120
Safety and General Information ............142
RF Operational Characteristics .....................142
Portable Radio Product Operation and EME
Exposure...................................................142
Electro Magnetic Interference/Compatibility..145
Medical Devices ............................................145
Operational Warnings ...................................146
Operational Cautions ....................................147
Accessory Safety Information .......................148
MOTOROLA LIMITED WARRANTY.......150
Limited Warranty
Motorola Communication Products
(International)......................................154
Patent and Trademark Information.......158
Index ........................................................159
v
Page 8

DECLARATION OF CONFORMITY
Per FCC CFR 47 Part 2 Section 2.1077(a)
Responsible Party Name: Motorola, Inc.
Address: 8000 West Sunrise Boulevard
Plantation, FL 33322 USA
Phone Number: 1 (800) 453-0920
Hereby declares that the product:
Product Name: i710
Model Number: H45XAN6RR4AN
Conforms to the following regulations:
FCC Part 15, subpart B, section 15.107(a),
15.107(d) and section 15.109(a)
Class B Digital Device
As a personalcomputer peripheral, this device
complies with Part 15 of the FCC Rules. Operation
is subject to the following two conditions: (1) this
device may not cause harmful interference, and (2)
this device must accept any interferencereceived,
including interference that may cause undesired
operation.
vi
Note: This equipment has beentested and
found to comply with the limits for a Class
B digital device, pursuantto part15 of the
FCC Rules. These limits are designed to
provide reasonable protection against
harmful interferencein a residential
installation. This equipment generates,
uses and can radiate radio frequency
energy and, if not installed and used in
accordance with the instructions, may
causeharmfulinterference to radio
communications. However, there is no
guarantee that interference will not occur
in a particular installation.
If this equipment does cause harmful
interference to radio or television reception,
which can be determined by turning the
equipmentoff and on, the user is
encouraged to try to correct the interference
by one or more of the following measures:
• Reorient or relocate the receiving
antenna.
• Increasethe separationbetween the
equipment and receiver.
• Connect the equipment into an outlet on
a circuitdifferent from that to which the
receiver is connected.
• Consult the dealer or an experienced
radio/TV technician for help.
Page 9
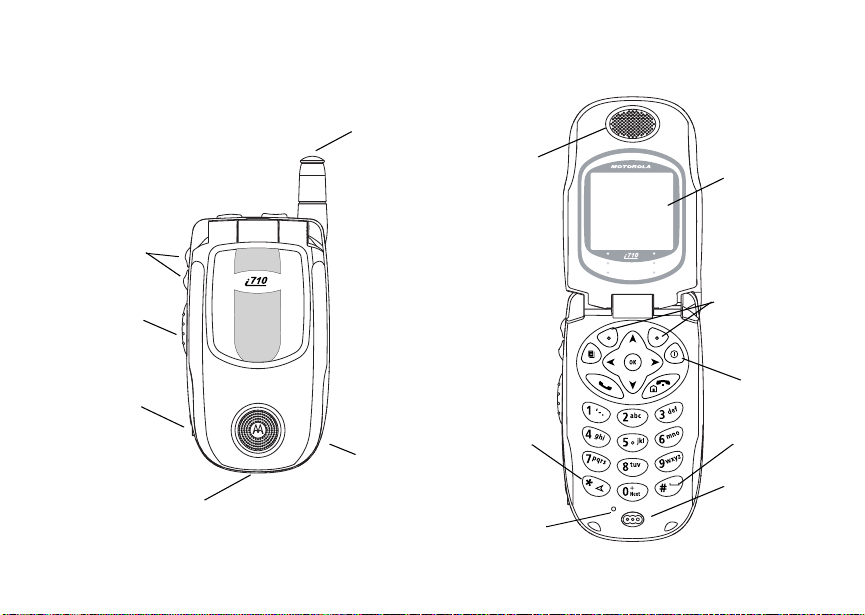
Getting Started
volume
controls
antenna
earpiece
display
screen
PUSH TO TALK
(PTTTM) button
audio jack
accessory connector
TM
speaker
(in back)
backkey
light sensor
option keys
power
button
space key
microphone
1
Page 10
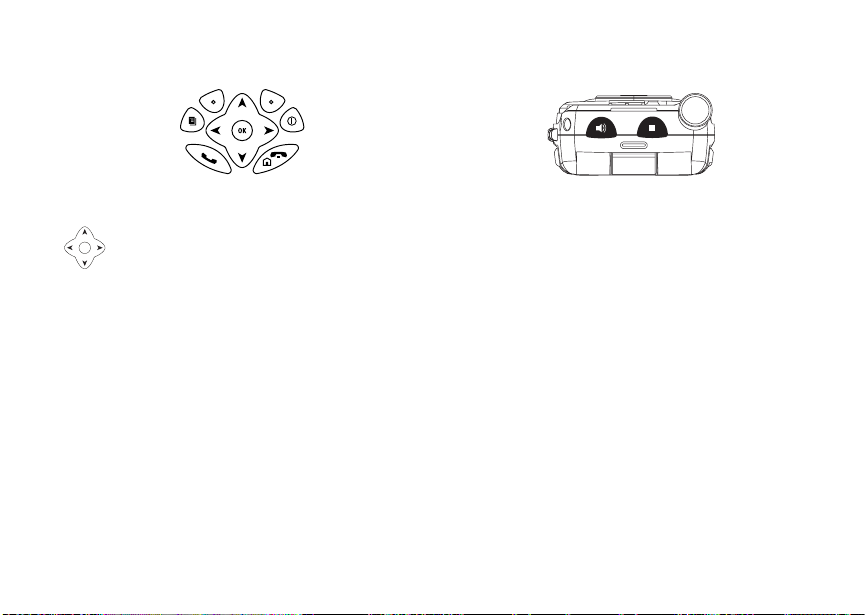
Getting Started
p Power button.
Navigation key — press the arrows to
scrollthroughmenus andlists.
O OK key — selects highlighted item;
answerscalls.
m Menu key — accesses context-sensitive
menus.
A Optionkey — selects the option
appearing aboveit on the display.
Note: Throughoutthis User’s Guide,
theoptionkeyswillbe
representedby A.
s Send key — places phone calls.
e End key — ends phone calls; returns to
idle screen; in browser mode, returnst o
Net main menu.
2
t Acts like s whentheflipisclosed;turns
Direct Connect®/ Group Connect
speaker on and off; used with voice
TM
namesand voice records.
. Acts like e when the flip is closed.
To start using your i710 phone:
• Make sure your SIM card is in place.
• Charge the battery.
• Activate your service.
• Enable security.
Page 11
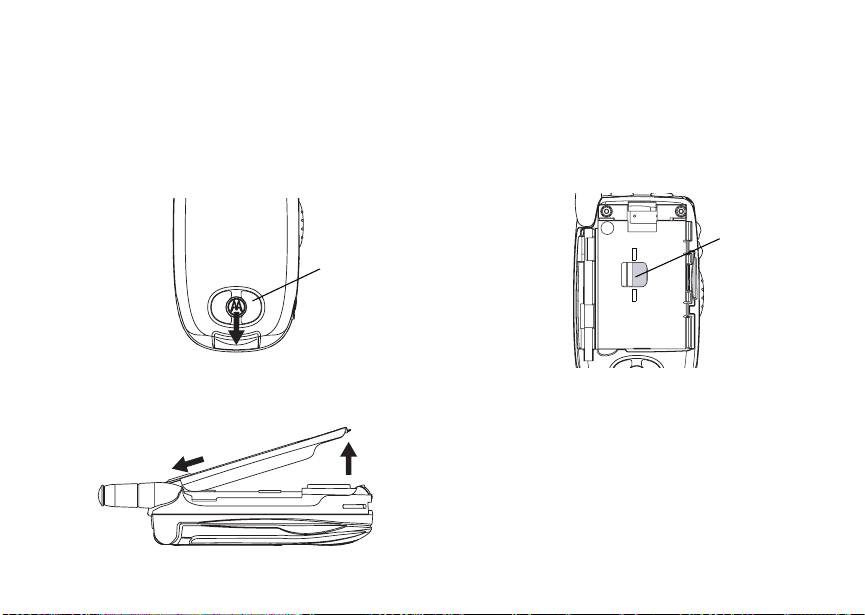
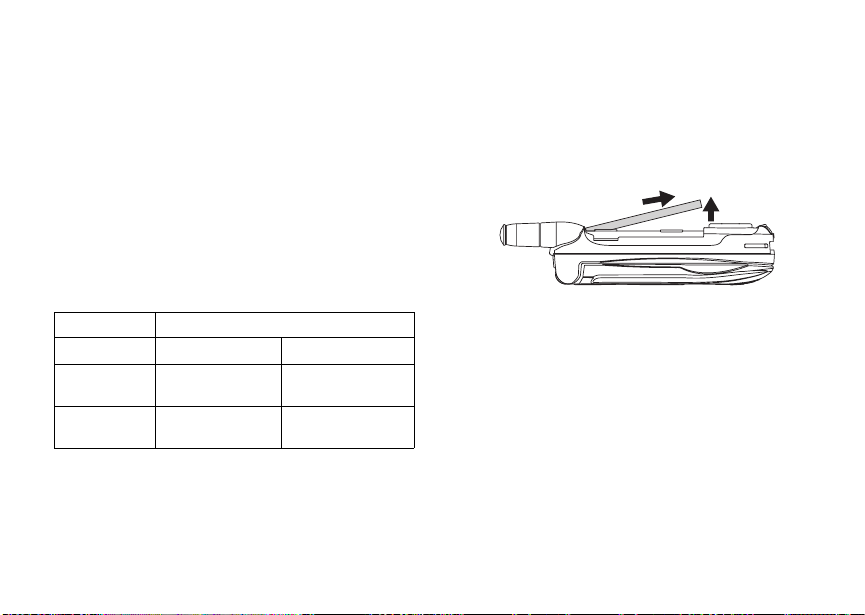
Removing the Battery Door
Removing the Battery Door
1 Make sure the phone is powered off. See
“Powering On and Off” on page 6.
2 Slidethe release buttonbackuntilit releasesthe
battery door.
speaker
3 Allow the battery door to pop up, slide it forward,
and remove it from the back of your phone.
Locating Your SIM Card
Your SIM (Subscriber Identity Module) card is a
small piece of plastic located in the SIM card
holderin the back of your phone, underneath the
battery.
SIM card
If there is no SIM card in your phone, contact
NextelCustomer Care at 1-800-639-6111.
3
Page 12
Getting Started
Battery
Inserting the Battery
Your phone comes with a Standard Lithium Ion
Battery.
1 Remove the battery door.
2 Insertthe top ofthe batteryinto the batteryarea.
Pressthe bottomof the battery to secure it.
3 Replace the batterydoor and press it gentlyuntil
you hear a click.
4
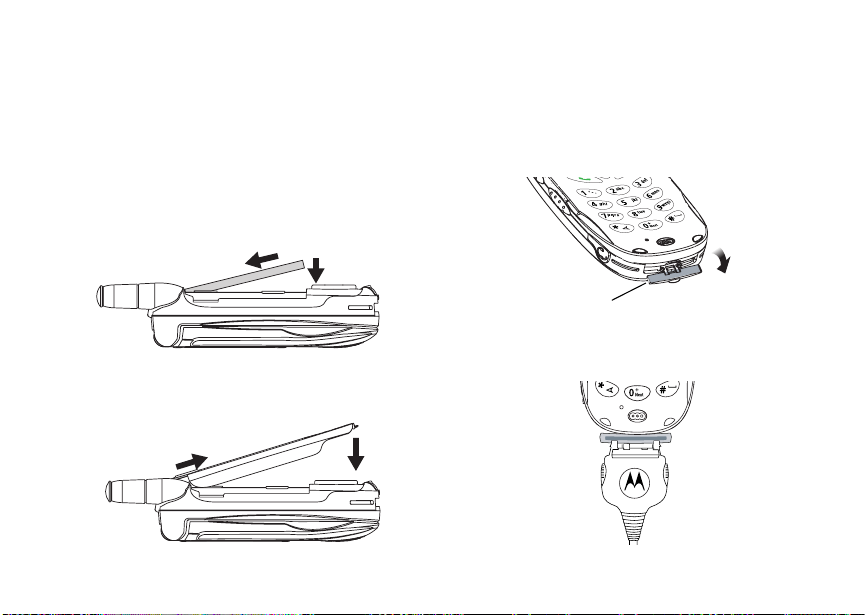
Charging the Battery
Your phone comes with a standard travel charger.
1 Plug the charger into an electrical outlet.
2 Open the connector cover.
connector
cover
3 Plug the otherend of t he charger into the
accessory connector.
Page 13
Battery
ChargerAttached appears on the display.
Tip: To remove the charger from the accessory
connector: Press the buttonson the sides
of the plug. Pull the plug straightout.
4 If you have purchased optional batteries or
chargers, see “Charging Times”.
Charging Times
Check your battery and charger type against the
below grid t o determine appropriate charging
times.
Recommendedchargingtimes:
Battery Charger
Rapid Standard
Slim Lithium
Ion
Standard
Lithium Ion
For best results, charge the batteries within the
temperature range of 50°F to 104°F (10°C to
40°C).
Prolonged charging is not recommended.
2hours 3hours
2hours 4hours
Removing the Battery
1 With the phone powered off, remove the battery
door.
2 Remove the battery by pushing the battery
toward the antenna and lifting it out.
Battery Us e and Maintenance
• The Motorola iDEN ApprovedLithium Ion
chargers provide optimum performance. Other
chargers may not fully charge the iDEN Lithium
Ion battery or may yield a reduced number of
lifetime chargecycles.
• Extreme temperatures degrade battery
performance.Do not storethe battery where
temperatures exceed 140°F (60°C) or fall below
4°F (-20°C).
• Lithium Ion batteries have a self discharge rate
and without use, lose about 1% of theircharge
per day.
5
Page 14
Getting Started
• The batterycapacityis degraded if the battery is
storedfor long periodswhile fully charged.If
long term storage is required, store at half
capacity.
Powering On and Off
To power your phone on:
1 Open the flip.
2 Press p.
As your phone connects to the network, you will
see a connecting message. When the idle screen
appears,the phone is ready to use.
6
To power your phone off:
1 Open the flip.
2 Pressand holdp.
Activating Service
The first time you power on your phone, your
service is activated.
A screen then appears prompting you to select Ok
to update your browser information.This screen
will only appear during initial activation. See
“Enabling Security”.
Enabling Security
You must enable security the first time you power
on yourphone or within20 days of firstactivationof
your phone.
1 Press A under Ok.
Note: If you press A under Later, the idle
screen will appear. The next time you
select Net from the main menu, you will
bepromptedto enablesecuritybeforeyou
can use Nextel Online services.
2 You are prompted to enable security. Press A
under Yes. A series of screens and then the
default homepage displays.
3 Press e to return to the idle screen.
Page 15

Phone Programming
Phone Programming
Within 24 hours of enabling security, you will
receive an alert notification containing your
Personal Telephone Number (PTN), Nextel
Customer Care number, DirectConnect number,
and Talkgroup lists for Group Connectcalls.
1 When you receive an alert notification saying
New Browser Message - Receive
Programming Info,pressA under Goto.
2 You are prompted to accept changes to your
lists. Press A under Ok.
3 You are prompted again to accept changes to
your lists. Press A under Ok.
4 A confirmationscreen displays. Press A under
Ok.
5 Press e to return to the idle screen.
Finding Your Phone Number
and Direct Connect
My Info lets you view your phone number, Direct
Connectnumber,and otherphone information.
1 Press m to access the main menu.
2 Scroll to My Info.
3 Press O.
®
Number
4 Scroll to see your information:
•Name— Enter your name. See “Entering
Text”onpage31.
•Line1and Line 2 — your phone numbers for
phone lines 1 and 2. These are filled in when
you receive your alert notification after
enabling security on your phone.
• Direct Connect — Your Direct Connect
number is the number that others use to
contact you using Direct Connect
is filledin whenyou receiveyour alert
notification afterenabling security on your
phone. T o view your Direct Connect number,
scroll to Direct Connect and press O.
•GroupID— the number of the Talkgroup you
have joined.
• Carrier IP — the IP address assigned to
Nextel. It is filled in when you register for
packetdata services. Toview your Carrier IP
address,scrollto Carrier IP and press O.
• IP1 Address and IP2 Address —theIP
addresses assigned to you for using the
Internet with your phone.To view your IP
addresses, scrollto theIP address you want
to view and press O.
®
service. It
7
Page 16

Getting Started
•Ckt—Your circuit data number is the number
youuseifyouwanttouseyourphoneto
transfer circuit data. See “Using Your Phone
as a Modem” on page 50.Youreceive this
number from Nextel.
Note: If you request equipment related
transactions on your account, Nextel
Customer Care may require you to
provide specific information about your
phone. By pressing m anytime while in
My I nfo, a context-sensitive menu will
appear that includes your phone's service
status, unit information, and phone
identification numbers including IMEI, SIM
ID, and Serial Number (SN). Please be
prepared to supply the representative with
this information when requesting these
types of transactions.
Nextel®Voice Mail
You must set up your voice mail box before you
canretrievemessages.See“SettingUpYour
VoiceMailBox”onpage63.
8
Nextel Worldwide®Service
You can use your phone to make calls
internationally in select cities using other iDEN
networksby calling NextelCustomerCare to
activate international dialing on your account.
Countries in which you can use your phone include
Argentina, Brazil, Canada, Philippines, Singapore,
Israel, Mexico and Peru*.
* Credit approval may be required. Other conditions may apply.
®
Customizing Features
You can control many features of your phone,
including the size of thetext on the display, the way
youaccessmainmenuitems,andthevolumeof
incoming sound, rings, and other tones. See
“Customizing Your Phone” on page 102.
Page 17
Phone Basics
Phone Basics
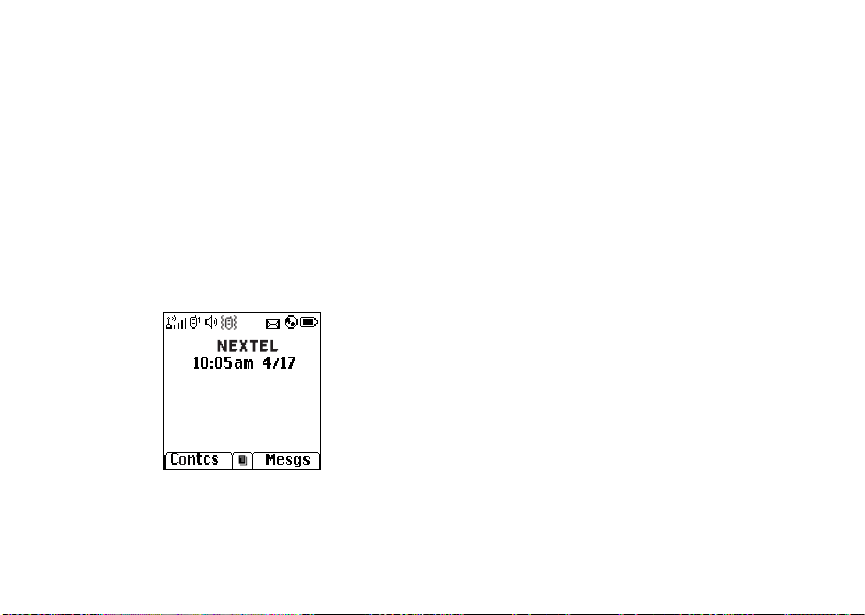
Any time your phone is powered on, the display
provides you with information and options.
The screen shown above is the idle screen. The
idle screen appears when your phone is on, but not
engaged in any activity.
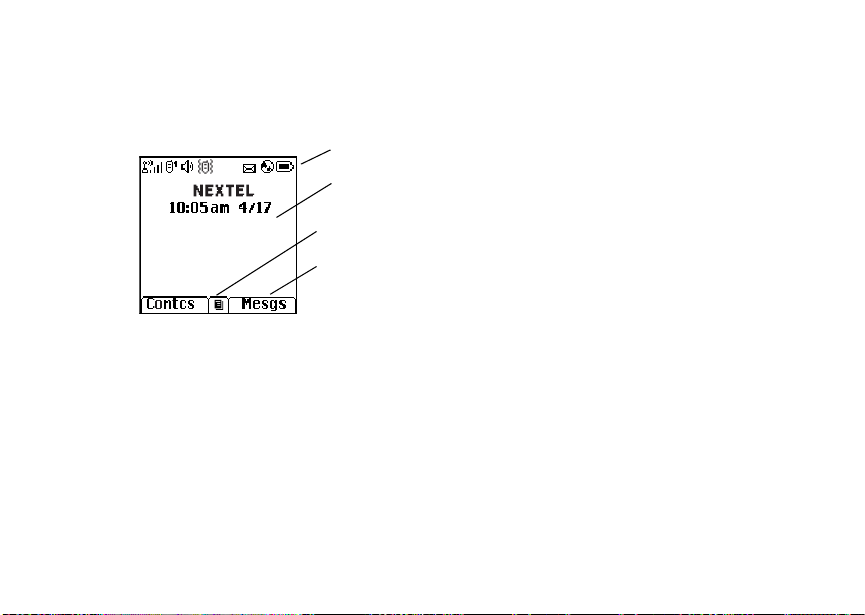
Text Area
This area displaysmenus, messages, names,
phone numbers, and other information.
Display Options
Two display options appear at the bottom of most
screens. You select a display option by pressing
theoptionkeybelowit.
status icons
text area
menu icon
display options
Menus and Lists
Your phone’s features are arrangedin menus,
submenus, and lists.
Toaccesstheitemsinamenuorlist,scrollusing
the navigationkey at the top of your keypad. T his
key lets you scroll up, down, left, or right. Holding
down the appropriate partof the navigationkey
speeds up scrolling.
In this guide,this symbol > tells you to select a
menu or list item. For example, Settings >
Securitymeans:
1 Scroll to Settings on the main menu.
2 Press O to see the Settings screen.
3 Scroll to Security.
4 Press O to see the Security screen.
Quick Access to Main Men u Items
Each arrow in the navigation key and O can be
used to access a main menu item from the idle
screen.Each of these keys is assigned to a main
menu item when you receive your phone. To
assign different main menu items, see “Personalize
Features” on page 106.
9
Page 18

Getting Started
OK Key
Pressing O:
• Selects the highlightedmenu item or list item
• Sets options
• Confirms actions
• Placesand answercalls
• From the idle screen, accesses ring tones list.
This is the defaultsetting. You can assign a
different main menu item to O.
Menu Key
Many features provide context-sensitive menus
that let you access related features and actions.
Thisicon
menu is available.Press m to access the menu.
10
S appears any time a context-sensitive
Main Menu
All your phone’s featurescan be accessedthrough
the main menu. You can set t he main menu to
appearas a list or as large icons (see “S etting the
Menu View” on page 103).
Net Access to Nextel Online
a
Java Apps Java applications on your
q
Settings Customize your phone.
b
RingTones Assign ring tones and turn
m
VoiceRecord Record and playaudio
c
My Info View personal phone
j
services. See page 75.
phone. See page 80.
See page 102.
ringer off. See page 56.
messages. See page 77.
information, including
phone number and Direct
Connectnumber.See
page 7.
Page 19

Phone Basics
n Downloads Providesa catalogof ring
GPS Find your approximate
l
Contacts Create, view, store,edit
d
Messages Access messages.See
e
Call Forward Setcallforwarding options.
f
Datebook Schedule appointments.
o
Memo Store a number to access
g
Call Timers Phone usage information.
h
Recent Calls Lists recent calls. See
i
tones, wallpaper, games
and Java applications that
you can download directly
to your phone. Items in this
catalogchange frequently,
so check regularly for fresh
content. See page 57.
geographical location. See
page 86.
contacts. See page 34.
page 59.
Seepage41.
Seepage95.
later.Seepage40.
Seepage49.
page 29.
Shortcuts Createshortcutsto
s
Profiles Groupsof settings you
p
Call Alert Lists call alerts. See
k
screens.See page 113.
applytogether. See
page 109.
page 27.
Status Icons
Statusiconsappear at the top of thedisplay.Some
appearat all times. Others appearonly whenyour
phone is engagedin certainactivities or when you
have activated certain features.
abcd
efgd
opqr
s
A
B
Battery Strength — A fuller battery
indicates a greater charge.
Signal Strength — More bars next
to the antenna indicate a stronger
signal.
Phone In Use — Your phone is
active on a phone call.
Direct ConnectIn Use —Your
phone is active on a DirectConnect
call.
11
Page 20

Getting Started
C
12
GL
IJ
HK
Q RM
u
wxT
yz
ljik
mXnW
12
TalkgroupIn Use — Your phone is
active on a Group Connect call.
Active Phone Line —1indicates
phoneline1isreadytomakecalls;
2 indicates phoneline 2 is ready to
make calls.
Call Forward — Your phone is set
to forward calls. See “Call
Forwarding” on page 41.
Ringer Off — Your phone isset not
to ring. See “Setting Your Phone to
Vibrate” on page 56.
Speaker Off — Sets Direct Connect
and Group Connect sound to come
through the earpiece rather than
through the speaker.
Messages — You have one or
more messages. See page 59.
T9 Text Input— You are using T9
Text Input to entertext. See
“EnteringText”on page 31.
DE
U
YZ
N O
Internet — You are readyto
browse the internet or are browsing
theinternetusingasecure
connectio n.
Airplane Mode — Your phone is
set to Airplane Mode. See
“Temporarily Turning Off Calls” on
page 104.
Packet Data — You are ready to
transfer packet data or are
transferring packet data. See “Using
Your Phone as a Modem”on page
50.
TTY — You are ready to use your
phonetomakecallsusinga
teletypewriter device. See “Making
TTY Calls” on page 51.
SIM Card Security
Your SIM card stores all your Contacts and
protects your personalinformation. Since this
information is storedon your SIM card, not in your
phone,you can remove the i nformationby
removing your SIM card.
Page 21

SIM Card Security
Note: Except for making emergency calls, your
phone will not function withoutthe SIM
card.
To prevent unauthorized use of your phone, your
SIM card is protected by a PIN that you enter each
timethe phone is poweredon.You canchangethe
PIN or turn off the requirement t hat it be entered.
Turning the PIN Requirement On and Off
When the SIM PIN r equirementis off, your phone
canbeusedwithoutenteringaPIN.
Important: When the SIM PIN requirement is off,
When the SIM PIN requirement is on, you are
prompted to enter your PIN each time you power
on your phone.
Note: If a SIM PIN is required, your phone will
1 From the main menu, selectSettings >
Security > SIM PIN.
2 Select On or Off.
3 Enter the current SIM PIN.
the personal data on your SIM card is
not protected. Anyone can use your
phone and access your personal data.
not function until the SIM PIN is entered,
exceptfor making emergency calls.
Note: The defaultSIMPINis 0000.Changeyour
PIN to prevent fraudulentuse of the SIM
card (see “Changing the PIN”).
4 Press A under Ok.
Entering the PIN
1 When the Enter SIM PIN Code screenappears
afteryou power on your phone, enter your SIM
PIN.
2 Press A under Ok.
The message SIM Unlocked displays.
Important: Ify ou enteryour PIN incorrectly 3 times,
your SIM card is blocked. To unblock
your SIM card, you must contactNextel
Customer Care. See “Unblocking the
PIN” on page 14.
Changing the PIN
Note: The SIM PIN requirement must be turned
on in order to access this feature.
1 From the main menu, selectSettings >
Security > Change Password > SIM PIN.
2 At the Enter Old SIM PIN screen, enter the
current SIM PIN.
3 Press A under Ok.
13
Page 22

Getting Started
4 At the Enter New SIM PIN screen, enter the
new 4- to 8-digitSIM PIN.
5 Press A under Ok.
6 At the Re-enter New SIM PIN screen,re-enter
the new SIM PIN to confirm.
7 Press A under Ok.
Changed: SIM PIN displays.
Unblocking the PIN
If you enter your PIN incorrectly 3 times,your SIM
card is blocked. To unblock your SIM card, you
must contact Nextel Customer Care to get a PIN
Unblock Code (PUK).
Important: If you unsuccessfully enter the PUK
To unblock the PIN:
1 Press *#m1.
2 At your Nextel Customer Care representative’s
request, provide theinformation neededto give
youaPUKcode.
14
code 10 times, your SIM card is
permanently blocked and must be
replaced. If this happens, all data is
lost. You will get a message to contact
Nextel Customer Care. Except for
making emergency calls, your phone
will not function with a blocked SIM
card.
3 Select Unblock PIN.
4 Enter the PUK code.
5 Entera new 4- to 8-digit SIM PIN.
6 Re-enter your SIM PIN.
Note: These steps must be performed in quick
succession.
If you entered the codes properly, SIM Unlocked
appearson the display.
Inserting and Removing Your SIM Card
Important: Do not touch the gold-coloredareas of
The SIM card is designed for optimal Contacts
storageand feature use. For Nextel SIM card
compatibility information, visit
www.nextel.com/sim.
If you remove your SIM card and use it with
anotherphone, or use another SIM card with your
phone,the following information is erased:
• The recent calls list
• Call forwarding settings
• Net alerts
• InformationstoredinMemo
• 3 most recent GPS Enabled locations
your SIM card.
Page 23
SIM Card Security
• Voice records
• Voice names
• Datebook events
• Options set using the Personalize menu
Note: In some cases, Contacts may not be
accessible if you move your SIM card to
another phone. Contacts entries created
with your i710 phone are not r eadable by
an older iDEN SIM-based phone.
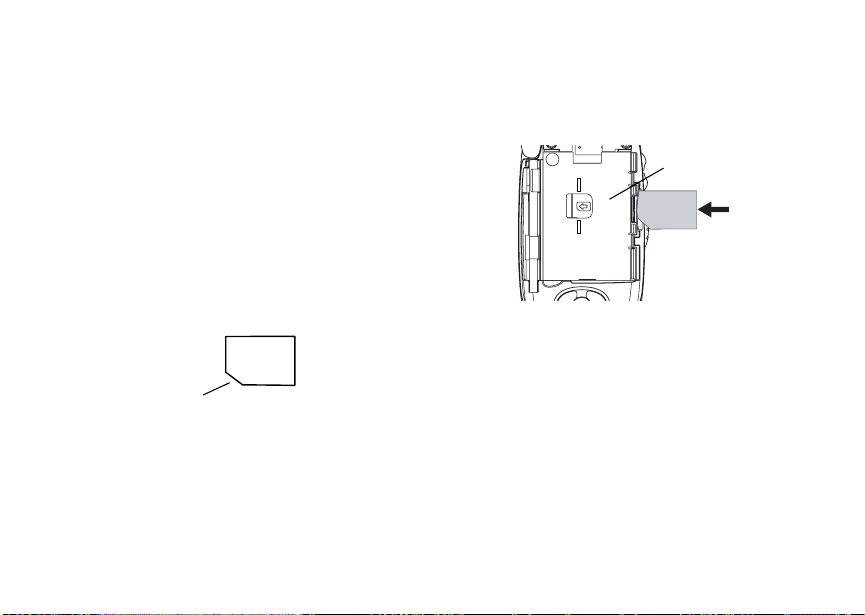
Inserting Your SIM Card
1 With your phone powered off, remove the
battery door and battery.
2 Hold your SIM card as shown.
cut corner
3 Carefully slide your SIM card into your phone
until it lines up with the marks above and below
the SIM card holder.
SIM c ard
holder
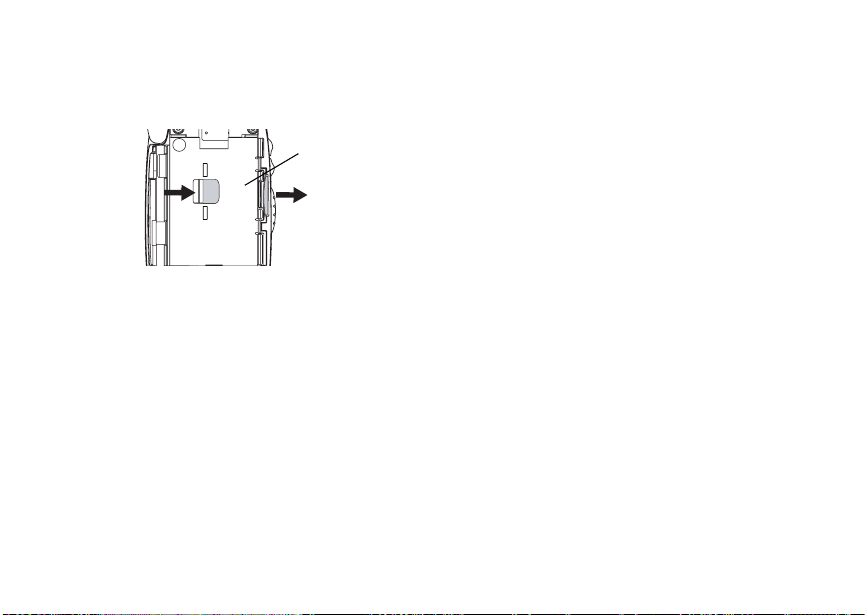
Removing Your SIM Card
Important: Toavoid loss or damage, do not remove
your SIM card from your phone unless
absolutely necessary.
1 With your phone powered off, remove the
battery door and battery.
15
Page 24
Getting Started
2 While holding the tab down, slide your SIM card
out of the SIM card holder.
SIM c ard
holder
Locking the Keypad
Lockingthe phone’s keypad prevents its buttons
from being pressed. When the keypad is locked,
you can only:
• Powerthe phone on and off
• Unlock the keypad
• Respond to incoming calls, messages, and
alerts
Important: Emergency calls cannot be placed while
To lock the keypad:
1 From the idle screen, press m.
2 Press *.
16
the keypad is locked.
If you press a key while the keypad is locked,
instructions for unlocking the keypad display
briefly.
To unlock the keypad:
1 From the idle screen, press m.
2 Press *.
Whilethekeypadislocked,youcanrespondto
incomingcalls, messages, and alerts just as you
do when the keypad is not locked. When finished,
press e to return to the idle screen. The keypad
remains locked.
You also have the option of setting your phone to
automaticallylock the keypad if therehas been no
activity for a specified time.
1 From the main menu, selectSettings >
Security > Keypad Lock.
2 To lock the keypad immediately, select Lock
Now. You will be given the option to press m
and * to lock and unlockthe keypad.
3 To set a specific time for the keypad to lock if
therehas been no activity,selectAuto Lock and
then select a time.
The keypad can be set to lock in 5, 10, 15 or 20
minutesif the keypad is not touched during the
specified time.To turn the auto lock off, repeat
step 3 and select Off.
Page 25

Accessories
Accessories
Your phone comes with a StandardLithium Ion
Battery and a standard travel charger.
Variousaccessoriesare available for use withyour
i710 phone, including cases, vehiclepower
charger, data cables, Hands-Freeaccessories and
more.
To order additionalaccessories,go to
www.nextel.com or call 1-800-Nextel6. You can
also contact your Nextel Authorized Sales
Representative or stop by any Nextel-owned Retail
Store.For information on Nextel retail store
locations, go to www.nextel.com.
Wireless Local Number Portability: Bringing Your Phone Number From Another Carrier
If you are bringingyour phonenumber from
anothercarrier, your new phone will be activeas
soon as you receive it. Nextel will provideyou with
a temporary phone number so that you can begin
using your phone immediately. Once the number
you have brought to Nextel is activated, your
temporary phone number will be deactivated and
service with your previous carrier will be cancelled
automatically.You will receive a text message on
your Nextel phone letting you know that activation
is complete. Simply turn your phone off and back
on againto complete activation.
Here is additional information you need to be
aware of until the number you have broughtto
Nextel is active on the Nextel network:
Nextel®Voice Mail
We suggest you set up your voice mail box after
the number you brought to Nextelis active on your
Nextel phone and your temporary phone number is
deactivat ed. If you set up your voice mail box prior
to this, all messages and all settings (including
your greeting and password) will be lost when the
numberyou have brought to Nextel becomes
active.
Text Messaging
Duringthe activationprocess, it is possiblethattext
messages may not be properlyrouted to your
Nextelphone.
911 Calls
Nextel continues to make efforts to ensure that all
911 calls are minimallyimpactedby thisprocess.If
you make a call to 911 fromyour temporary phone
numberand the call fails, the 911 emergency
17
Page 26

Getting Started
responsecenter will not be able to callyou back on
your Nextel phone if in the meantime your Nextel
phonehas been programmedwith yourpermanent
phone number. As with any wireless 911 call, if
your call is disconnected before location and
details have been provided, be sure to call 911
again and advise that you were disconnected.
Go to www.nextel.com/wlnp for more details.
Nextel®Customer Care
Nextel Customer Care: 1-800-639-6111 or dial 611
fromyour i710 phone.
NextelWorldwide Customer Care:
+1-360-662-5202 (toll-free from your i710 phone).
18
Page 27

i710 Phone Menu Tree
Net
Java Apps
Java Applications (if any)
Deinstall
Permissions
License Info
Java System
Reset System
Delete All
Settings
Display/Info
Phone Calls
DC/GC Options
Personalize
Volume
Security
Advanced
Ring Tones
Vibrate All
Available Ring Tones
Vibrate
Silent
Assign To
Assign w/vibe
Overview
Memory Usage
Delete
VoiceRecord
[New VoiceRec]
VoiceRecords (if any)
Label
New
Lock/Unlock
Add To
Memory
Delete
Delete All
My Info
Name
Line 1
Line 2
Direct Connect
Group ID
Carrier IP
IP1 Address
IP2 Address
CKT
Service Status
Unit Info
IMEI/SIM ID/SN
Register Log
Downloads
GPS
Position
Privacy
Interface
Contacts
[New Contact]
Search
New
Capacity
Filter
Call Setup
Contacts (if any)
Edit
New
Search
Delete Contact
Delete Number
Capacity
Filter
Call Setup
Messages
Voice Mail
Net Alert
SMS
Memory
Delete All
Call Forward
All Calls
-
-
-
Detailed
To
Status
If Busy
If No Answer
If Unreachable
Status
Datebook
[New Event]
Go To Today
Go To Date
Week View
Month View
Setup
Events (if any)
Edit
New
Go To Today
Go To Date
Week View
Month View
Setup
Delete
Copy
Call # in Event
Alert # in Event
Talkgroup
Memo
Store to Cntcs
Cancel
Delete
Call Timers
Last Call
Phone Reset
Phone Lifetime
DC/GC Reset
DC/GC Lifetime
Circuit Reset
Circuit Lifetime
Kbytes Reset
Recent Calls
Recent Calls (if any)
Store
Delete
Delete All
Call Alert Queue
Call Setup
Shortcuts
[New Entry]
Shortcuts (if any)
Edit
New
Reorder
Delete
Delete All
Profiles
[New Profile]
Profiles (if any)
View
Edit
New
Delete
Delete All
Setup
Call Alert
Call Alerts (if any)
Store
Delete
Delete All
Sort By
Recent Calls
19
Page 28

Making Calls
Your i710 phone makes two types of calls: digital
cellular phone calls and Direct Connect calls. With
Direct Connect calls, you use your phone as a
long-range, digitalwalkie-talkie.
Phone Calls
1 Enter the number you want to call.
2 To place the call:
Press s. -or-
If you entered the number from the idle screen,
press O.
3 To end the call:
Press e. -or-
Closethe flip.
To end a call by closing the flip, you must have the
Flip to End feature turned on (see “Setting Flip
Actions” on page 47).
Direct Connect®Calls
Nextel offers the following Direct Connect services:
• Direct Connect — allo ws walkie-talkie calling
within your local coveragearea.
20
• Nationwide Direct Connect — allows
walkie-talkiecallingtoNextelusersfrom
anywhere on the Nextel National Network (U.S.)
to anywhere on the National Network.
• International Direct Connect — allows
walkie-talkiecallingtoandfromselectcountries.
• Group Connect — allows walkie-talkie calling to
up to 25 Nextel customers simultaneously (see
“GroupConnect
See www.nextel.com for more details on these
Direct Connect services. Pricing for each of t hese
servicesis basedon your service contract .
1 Enter the Direct Connect number you want to
call.
2 Pressand holdthe PTT button on the side of
your phone. Begin talking after your phone emits
a chirping sound.
3 Release the PTT button to listen.
Tip: To let someone know you want to talk to
him or her on a Direct Connect call, send a
call alert. See “Call Alerts” on page 27.
TM
Calls”on page48).
Dialing Direct Connect®Numbers
Every Direct Connect number has 3 parts — an
area ID, a network ID, and a member ID — withan
asterisk betweeneach of theseparts.For example:
999*999*9999.
Page 29

Receiving Calls
When you place a Direct Connectcall, you must
enter the whole Direct Connect number including
the asterisks.
Tip: When you store a DirectConnectnumber in
Contacts it is good practice to include the
wholeDirect Connect number includingthe
asterisks in case you travelwith your
phone,or anotherDirect Connect user
whom you are trying to reach travels with
theirphone, outside of your network.
Receiving Calls
Phone Calls
When you receivea phone call,your phone rings,
vibrates, or lights up its backlight.
Answering
If the flip is closed, press t. -or-
Open the flip.-or-
Press s. -or-
Press O. -or-
Press A under Yes. -or-
Pressany numberkey.
To answer a call by opening the flip, you must have
theFliptoAnsfeatureturnedon(see“SettingFlip
Actions” on page 47). To answer a call by pressing
any number key, you must have the Any Key Ans
feature turnedon (see “P hone CallsFeatures” on
page 105).
SendingtoVoiceMail
If the flip is closed, press .. -or-
Press e. -or-
Press A under No.
Ending
If the flip is closed, press .. -or-
Press e. -or-
Closethe flip.
Direct Connect®Calls
When you receive a Direct Connect call, your
phone emits a chirping sound or vibrates.
1 Waitf or the caller to finish speaking.
2 Pressand holdthe PTT button on the side of
your phone. Begin talking after your phone emits
a chirping sound.
3 Release the PTT button to listen.
21
Page 30

Making Calls
Ways to Enter Calls
• Use the numbers on the keypad
• Select the number from the recent calls list
• Select the numberfrom Contacts
• Select a number stored in Datebook
• Redialthe last phone numbercalled
• Say a voice name into your phone
• Use Speed Dial or Turbo Dial
• Use One Touch Direct Connect to make a Direct
Connectcall
• Use a TTY device — see “Making TTY Calls” on
page 51
From the Keypad
To enter the numberyou want to call, pressthe
numbers on the keypad.
Ifyoumakeamistake:
• To clear a digit,press A under Delete.
• To clear all digits, press and hold A under
Delete.
• To insert or delete a digit anywhere in the string
of digits you have entered, scroll left or right.
• To c an cel, p ress e.
22
®
From the Recent Calls List
The recent calls list stores the last 20 calls you
made or received.
1 From the main menu, selectRecent Calls.
2 Scrollt o the name or number you wantto call.
From Contacts
If you have numbersstored in Contacts,you can
use these numbersto make calls. For information
on entering numbersinto Contacts, see “Creating
Entries” on page 36.
1 From the main menu, selectContacts.
2 Scrollt o the name or number you wantto call.
Tip: To find Contacts entries faster,use the
keypad to enter the first letter of the name.
3 Placethe call now. -or-
Scrollleft or rightto displaythe Contactstype f or
the number you want to call.
Ifyou are making a DirectConnect call,yourphone
placesthe call to the DirectConnectnumberstored
in the Contacts entry, even if the Direct Connect
icon is not displayed.
Ifyouaremakingaphonecall:
• Your phone places the call to the phone number
assigned to the Contacts type displayed.
Page 31

Ways to Enter Calls
• If the Contacts type displayed is not a phone
number, your phone places the call to the phone
number stored in the Contacts entry.
• If the Contacts type displayed is not a phone
number and you have more than one phone
numberstored in the Contactsentry, your phone
prompts you to select the phone number you
wantto place the call to.
From Datebook
If you have numbersstored as part of events in
Datebook, you can use these numbers to make
calls. For information on storing events in
Datebook, see “Datebook” on page 95.
1 From the main menu, selectDatebook.
2 Select the day of the event containing the
numberyou want to call.
3 Highlight or select the event containing the
numberyou want to call.
For details, see “Making Calls From Datebook” on
page 100.
Redialing the Last Number
Pressandhold s to placea callto the last phone
number you called.
Using a Voice Name
IfyouhavecreatedavoicenameinContactsfor
the number you want to call, say the voice name
intoyourphonetoenterthenumber.Seepage35
for informationon voice names.
You can use a voice nameto enter a number with
theflipopenorclosed.
1 If the flip is open, press and hold t until a
prompt appears telling you to say the voice
name. -or-
If the flip is closed, press and hold t until a
tone sounds.
2 Speaking into the microphone, say the voice
name assigned to the number you want to call.
Your phone plays the name back to you.
If you are making a phone call, the call is placed
automatically.
Tip: To stop a phone call from being completed,
press. if the flip is closed or press e.
If you are making a DirectConnectcall, pr ess and
holdthePTTbuttontoplacethecall.
23
Page 32

Making Calls
Using Speed Dial and Turbo Dial
Each phone number stored in Contacts is assigned
a Speed Dial number which you can use to call that
number.
Speed Dial
1 From the idle screen, use the keypad to enter
the Speed Dial numberassigned to the phone
numberyou want to call.
2 Press #.
3 Press s.
Turbo Dial
From the idle screen, press and hold the Speed
Dialnumber(1 through 9) assigned to thephone
numberyou want to call.
Using One Touch Direct Connect
One Touch Direct Connect sets your phone to call
the most recent Direct Connect numberon the
recentcalls list, or a DirectConnectnumber you
choose,every time you press the PTT button. See
“SettingOne Touch Direct Connect
24
®
®
®
” on page46.
Missed Phone Calls
Whenyou miss a call, this icon V andthenumber
of phone calls you have missedappear briefly.
Ifyouwanttodismissthemissedcallmessage,
press A under Back. -or-
If you want to view the missed call on the recent
calls list, press A under View.
Using Speakerphone
Turning on speakerphone makes incoming sound
come out of the phone’sspeakerinstead of the
earpiece. Speakerphoneis availablewheneveryou
areonanactivephonecall.
With the Flip Open
To t urn speakerphone on or off:
Press A under Spkr. -or-
Press t.
With the Flip Closed
When you are on a call with the flip closed,
speakerphone is always on.
Opening the flip turns speakerphone off.
Page 33

Using Mute
Using Mute
Muting calls lets you listen to incoming sound
withouttransmitting sound. Mute is available
whenever you are on an active call.
To turn muteon:
Press A under Mute.
Whilemuteison,Unmute appearsas a display
option.
To turn muteoff:
Press A under Unmute.
Making Emergency Phone Calls
Your phone supports emergency calling.
Emergency phone calls can be made even when
your SIM card is blocked or not in your phone.
Dial 911 to be connected to an emergency
responsecenter. If you are on an active call,you
must end it before calling 911.
When you make an emergency call, your phone’s
GPS Enabled f eature can help emergency service
personnel find you, if you are in a locationwhere
yourphone'sGPS antennahas established a clear
view of the open sky and your local emergency
responsecenterhas the equipment to process
locationinformation. See “GPS Enabled” on page
86, and particularly “IMPORTANT:Things to Keep
in Mind” on page 86 and “Making an Emergency
Call” on page 87, for more informationon the
limitations of this feature. Because of the
limitationsof thisfeature,always provide your best
knowledge of your locationto the emergency
responsecenterwhen you make an emergency
call.
Important: Emergency calls cannot be placed while
Important: If you have not registered on the
the keypad is locked.
network, emergency calls cannot be
placed while your SIM card is in your
phone.
25
Page 34

Making Calls
Important: If you are bringing your phone number
26
to Nextel from your previous carrier,
you may receive a temporary telephone
number while your Nextel phone is
being programmed with your
permanent phone number. If you make
a call to 911 and the call fails, the 911
emergency response center will not be
able to call you back on your Nextel
phone if in the meantime, your Nextel
phone has been programmed with your
permanenttelephone number.If the call
is disconnected before location and
details have been provided, call 911
again and advise that you were
disconnected.
Page 35

Call Alerts
Sending a call alert lets the recipient know you
want to talk to him or her on a Direct Connect call.
When you send a call alert, the recipient’s phone
emits a series of beeps, or vibrates, and displays
your name or Direct Connect number.
The recipient can:
• Answer — begin a Direct Connect call with the
sender
• Queue — store the call alert to the call alert
queue, which is a list of call alerts
• Clear — dismiss and delete the call alert
Sending Call Alerts
1 Enter the Direct Connect number you want to
send to, as you would when making a Direct
Connectcall.
2 Press A under Alert. Ready to Alert appears
on the display.
3 Pressthe PTT button untilAlert Successful
appears on the display.
Note: If the alert is not successful, this may
meanthepersonyouaretryingtoreachis
on a call or has the phone turned off.
Receiving Call Alerts
When you receive a call alert, you must answer,
queue,or clear it. You cannot receivephone calls
or Direct Connectcalls until you do.
To answer a call alert:
Pressthe PTT button to make a Direct Connect
call to the sender.
To queue a call alert:
Press A under Queue.
To clear a call alert:
Press O. -or-
Press A under Clear. -or-
If the flip is closed, press ..
Note: The recent calls list also stores call alerts
youhave received.Theyappearas Direct
Connectcalls.Call alerts remain in your
recentcalls list until you delete them or
until they reach the endof the list.
Using the Call Alert Queue
When you queue a call alert, it remainsin the call
alert queue until you make a Direct Connect call to
the sender or delete it.
27
Page 36

Call Alerts
Viewing Call Alerts
1 From the main menu, selectCall Alert.
2 Scroll through the list.
Viewing Date and Time
To view the date and time a call alert was received:
1 From the main menu, selectCall Alert.
2 Select the call alert you want information on.
Responding to Call Alerts in the Queue
After you queue a call alert, you can respond to it
by makinga DirectConnect call to the sender or
sending a call alert to the sender.
Making a Direct Connect Call to the Sender
1 From the main menu, selectCall Alert.
2 Scrolltothecallalertyouwanttorespondto.
3 PressthePTTbuttontobeginthecall.
This removes the call alert from the queue.
Sending a Call Alert to the Sender
1 From the main menu, selectCall Alert.
2 Scrolltothecallalertyouwanttorespondto.
3 Press A under Alert. Ready to Alert appears
on the display.
28
4 Pressthe PTTbutton until Alert Successful
appears on the display.
Deleting Call Alerts
To delete a call alert from the queue:
1 From the call alert queue, scroll to the call alert
you want to delete.
2 Press m.
3 Select Delete.
4 Press O or press A under Yes to confirm.
To delete all call alertsfrom the queue:
1 From the call alert queue, press m.
2 From the call alert menu,select Delete All.
3 Press O or press A under Yes to confirm.
Sorting Call Alerts
Tip: Youmusthaveatleastonecallalertinthe
queue to access this feature.
To sort call alertsby the order they were received:
1 From the main menu, selectCall Alert.
2 Press m.
3 Select Sort By.
4 Select First on Top or Last on Top.
Page 37

Recent Calls
The recent callslist stores the numbers of the 20
most recent callsyou have made and received.
If the number of a recent call is stored in Contacts,
the name associated with the number appears on
the recent callslist.
An icon appears beside the name or number
indicating the Contacts type of the number used in
thecall.See“Contacts”onpage34.
For phone calls, an icon appearsto the left of the
name or numbergivingmoreinformation about the
call:
A call you made.
X
A call you received.
W
A missed call. Missed calls appear on the
V
recent calls list only if you have Caller ID.
Note: The recent calls list also stores call alerts
youhave received.Theyappearas Direct
Connectcalls.Call alerts remain in your
recentcalls list until you deletethem or
untilthey reach the end of the list.
Viewing Recent Calls
1 From the main menu, selectRecent Calls.
2 Scroll through the list.
To get more information on a recent call:
From the recent calls list, select the call you
wantinformation on.
This displays information such as the name
associatedwiththe call,the number,the date,
time,and duration of the call.
Storing Recent Calls to Contacts
1 From the recent calls list, scroll to the number
you want to store.
2 Press A under Store. -or-
If Store is not one of your options: Press m.
Select Store.
Tip: If Store is not on this menu, the number is
already stored in Contacts.
3 To storethe number as a newentry, select [New
Contact]. -or-
To store the number to an existingentry, select
the entry.
29
Page 38

Recent Calls
4 With the Contacts type field highlighted, scroll
left or right to display the Contacts type you want
to assign the number. For information on
Contacts types, see page 34.
5 If you want to add more informationto the entry,
follow the applicable instructions in “Creating
Entries” on page 36.
6 Press A under Done.
Deleting Recent Calls
To delete a call:
1 From the recent calls list, scroll to the call you
wantto delete.
2 Press A under Delete.-or-
If Delete is not one of your options: Press m.
Select Delete.
3 Press O or press A under Yes to confirm.
To delete all calls:
1 From the recent calls list, press m.
2 Select Delete All.
3 Press O or press A under Yes to confirm.
30
Page 39

Entering Text
You can enter text into your phone using the
traditionalmethod of pressing a key severaltimes
for each character, or by pressing a key once for
each letter while words likely to be the one you
want are chosen from a database. You can also
enter symbols and numbers into a text field.
In screens that require you to enter text, you see
the followingicons. These icons tell you which text
input mode you are using:
Alpha — Press a key several timesfor each
l
character.
Word — Press a key once for each letter
j
while words likely to be the one you want are
chosenfrom a database.
Symbols — Enter punctuation and other
i
symbols.
Numeric — Enter numbers.
k
When you access a screen that requires you to
entertext, you start in the mode last used.
To choose a text input mode:
1 At a screenthat requiresyou to enter text, press
m.
2 Select the text input mode you want to use. A
checkmark appears next to the current mode.
Using Alpha Mode
• Pressany key on the keypad to enterthe letters,
numbers, and symbolsonthatkey.For example,
to enter the letter Y,press 9 three times.
• Typealetterthenscrolluptomakethatletter
uppercase, or type a letter then scroll down to
make that letter lowercase.
• See “Special Function Keys” on page 32 for
more information on adding spaces,
capitalization, and punctuation.
Using Word Mode
In W ord mode, T9 Text Input analyzes the letters
on the keypad buttonyoupressand arrangesthem
to create words. As you type, T 9 Text Input
matches your keystrokes to words in its database
and displays the most commonly used matching
word. You can add you own words to this
database.
Entering a Word
1 SelectWord as your text i nput mode.
31
Page 40

Entering Text
2 Type a word by pressing one key for each letter.
For example, to type “test” press 837
8.
The displayed word may change as you type it.
Do not try to correct the word as you go. Type to
the end of the word before editing.
3 If the word that appears is not the desired word,
press 0 to change the word on the display to
the next most likely word in the database.
Repeatuntil the desiredword appears.
If the desiredworddoes not appear, you can add it
to the database.
Adding Words to the Database
1 Select Alpha as your text input mode.
2 Type the word using Alpha mode.
3 SelectWord as your text input mode.
4 Press #.
ThewordyoutypedinAlphatextentrymodeis
now in the database.
Note: You cannot store alphanumeric
combinations,such as Y2K.
32
Choosing a Language
To change the language of the database:
1 At a screenthat requiresyou to enter text, press
m.
2 Select Languages.
3 Selectt he languageyou want for yourdatabase.
Special Function Keys
Some of the phone’s keys assume different
functions while in Alpha or Word mode.
Spaces
Press # for a space.
Capitalization
When you press and hold the # key, it acts as a
3-way toggle. Press and hold # to make the next
letter typed uppercase (shift), to make all
subsequent letters typed uppercase (caps lock), or
to go back to lowercase letters.
These icons appear in the top row of your display:
m or X
n or W
Shift is on.
Caps lock is on.
Page 41

When neither of these iconsappear, letters typed
are lowercase. Scrollingup after typing a letter
makes that letter uppercase.
Note: Your phone automatically makes the first
letterof a sentenceuppercase.
Punctuation
Press 1 or 0 to insert punctuation. Continue to
press the key to view the list of symbols available
through that key. Pause to select the symbol you
want.
Note: Additionalpunctuation symbols are
available in Symbols mode.
Using Numeric Mode
1 Select Numeric as your text input mode.
2 Pressthe numberbuttonson your keypadto
enter numbers.
Using Symbols Mode
1 SelectSymbols as your text input mode.
A row of symbols appears along the bottom of
the phone’s display. Scroll right to view the
complete row.
2 Press O to select the highlighted symbol.
Using Numeric Mode
33
Page 42

Contacts
Contacts stores up to 600 numbers or addresses.
Each Contacts entry can store severalnumbers or
addresses.
InformationstoredinContactsissavedonyour
SIM card.
A Contacts entry contains:
• A name — A name is required if you are storing
more than one numberor address to the entry;
otherwise, it is optional. Typically, this is the
name of the person whose contact information is
stored in the entry.
• Aringtone—Youcanassignaringtoneto
eachentry. This is the sound your phonemakes
when you receivephone calls or callalerts from
any of the numbersstored in the entry.
34
• A Contacts type — Each numberor address
storedmust be assigned a Contacts type:
Mobile phone number
A
DC Direct Connect number
B
Work1 phone number
C
Work2 phone number
D
Home phone number
E
Email email address
F
Fax phone number
G
Pager phone number
H
Talkgroup Talkgroup number
I
IP IP address
J
Other phone number
K
• A number or address — Each Contacts entry
must contain a number or address.This may be
any type of phone number, Direct Connect
number, Talkgroup number, email address, or IP
address.
Page 43

Viewing Contacts
Note: Youcan store numbers up to 64 digits
long, but every 20 digits must be
separated by a pause or wait. See
“Creating Pauses and Waits” on page 38.
• A Speed Dial number — When you store a
phone number, it is assigned a Speed Dial
number. Youcan acceptthe defaultSpeed Dial
numberor change it.
• A voice name — If you createa voice name for a
number,you can then dial that number by saying
the voice name into your phone. This icon
appears to the left of the Contacts type icon if a
voice name is assigned.
P
Viewing Contacts
To access Contacts:
From the main menu, selectContacts. -or-
Ifyouareonacall:Pressm.SelectContacts.
To view entries:
1 From the Contacts list, scroll to the entry you
wantto view.
2 If an entry has more than one number or
addressstored,
icon.Scroll left or right to view the icon for each
numberstored in the entry.
3 Press O to view the entry.
<> surrounds the Contacts type
4 Scrollto view the other numbers and addresses
storedfor the entry.
Tip: To view more entries,continuescrolling.
Searching for a Name
To search for a name in Contacts:
1 From the Contacts list, pressA under Search.
-or-
If Search is not one of your options:Press m.
Select Search.
2 Enter the name you want to see. See “Entering
Text”onpage31.
3 Press O.
Your phone finds the name you entered or the
nearestmatch.
Showing Only Direct Connect
®
Numbers and Talkgroups
To set Contacts to show only entries thatcontain
Direct Connect numbers and Talkgroup entries:
1 From the Contacts list, press m.
2 Select Filter.
3 Set this option to Show DC.
35
Page 44

Contacts
To set Contacts to show all entries:
1 From the Contacts list, press m.
2 Select Filter.
3 Set this option to Show All.
Creating Entries
A number or address and a Contacts type are
required for all Contactsentries.Other information
is optional. You may enter the information in any
order by scrolling through the entry details.
After you have entered the number or address,
Contacts type, and any otherinformationyou want,
you can press A under Done to savethe entry to
Contacts.
To cancel a Contacts entry at any time press, e
to return to the idle screen.
To create a Contacts entry:
1 To access the entry details screen:
Select Contacts> [New Contact]. -or-
From the Contactslist,press m. Select New.
2 Ifyouwanttoassignanametotheentry:
Select Name.
Enterthe name. See “Entering Text”on page
31. When you are finished,press O.
36
Tip: Press A under Bro w se to select a name
alreadyin Contacts.
3 Ifyouwanttoassignaringtonetothename:
Select Ringer.
Selecttheringtoneyouwanttoassign.
4 ToassignaContactstypetothenumberor
addressbeingstored:
Select the Contactstype field.
Select the Contactstype you want to assign.
5 To store a number or address:
Select the # field (or ID for an email address,or
IP for an IP address).
Enterthe numberor address.For phone
numbers, use the 10-digitformat. For email
addresse s, see “EnteringText” on page 31.
Tip: Press A under Bro w se to select a number
or address from Contacts, the recent calls
list, or Memo.
When you are finished, press O.
6 Ifyouwanttoassignmoreoptionstothe
number, select [Options]. See “Assigning
Options” on page 37.
Page 45

Storing Numbers Faster
7 If you want to add more numbers or addresses
to the entry:
Scrollpast the information you already entered.
Enter the additional information for the entry
using step 2 through step 6. You must assign a
name to the entry, if you have not already.
8 Press A under Done.
Assigning Options
1 Ifyouhavenotalready,select[Options].
2 The default Speed Dial number assigned to a
phonenumberis displayed in the Speed # field.
This is always the next available Speed Dial
location.
Ifyouwanttoassignthephonenumbertoa
differentSpeed Dial location:
With the Speed # fieldhighlighted, press O.
Press A under Delete to delete the current
Speed Dial number.
Enter the new Speed Dial number using the
keypad.
When you are finished, press O.
3 Ifyouwanttocreateavoicenameforaphone
number, select Voice Name.
As directed by the screen prompts, say and
repeatthe name you want to assign to the
number.Speak clearlyinto the microphone.
4 When you are finished, press A under Back.
Storing Numbers Faster
To store numbers to Contacts from the recent calls
list, see “Storing Recent Calls to Contacts” on page
29.
To store numbers to Contactsfrom Memo, see
“Memo” on page 40.
To store numbers to Contactsfrom t he idle screen:
1 Use the keypad to enter the numberyou want to
store.
2 Press m.
3 Select Store Number.
4 To storethe number as a newentry,select [New
Contact]. -or-
To store the number to an existingentry, select
the entry.
5 With the Contacts type field highlighted, scroll
leftor righttodisplaytheContacts type you want
to assign the number.
37
Page 46

Contacts
6 If you want to add more informationto the entry,
follow the applicable instructions in “Creating
Entries” on page 36.
7 Press A under Done.
Editing Entries
1 From the Contacts list, scroll to the entry you
wantto edit.
2 Press A under Edit. -or-
If Edit is not one of your options: Pressm.
Select Edit.
The entry details screen displays.
3 Follow the applicable instructions in “Creating
Entries” on page 36 to edit the various fields.
Deleting Entries
Delete an Entry
1 From the Contacts list, scroll to the entry you
wantto delete.
2 Press m.
3 To delete the entire entry, select Delete
Contact.
4 Press O or press A under Yes to confirm.
38
Delete a Number or Address
1 From the Contacts list, scroll to the entry that
contains the number or address you want to
delete.
2 Scrollleft or rightto displaythe Contactstype for
the number you want to delete.
3 Press m.
4 Select Delete Number.
5 Press O or press A under Yes to confirm.
Note: If an entry contains only one number or
address, deleting the number or address
deletes the entry.
Checking Capacity
To see how many numbersare storedin Contacts:
1 From the Contacts list, press m.
2 Select Capacity.
Creating Pauses and Waits
When storing a number, you can programyour
phoneto pause or wait between digitswhile
dialing. A pause makes your phone pause for 3
seconds before dialing further. A wait makes your
phone wait for your response before dialing further.
Page 47

International Numbers
This feature is useful when using voice mail or
otherautomatedphonesystems that requireyouto
dial a phone numberand then enter an access
number.
To program a pause:
Pressand hold * until the letter P appears.
The P represents a 3-second pause.
If you store 17035551235P1234, when you select
this number and make a call,your phonedials the
first 11 digits, pauses for 3 seconds, then dials the
last 4 digits.
If you want a pause longer than 3 seconds, press
and hold * more than once.Each P representsa
3-second pause.
To program a w ait:
Pressand hold * until the letter W appears.
The W means your phone waitsbefore dialing
further.
If you store 17035551235W1234, when you select
this number and make a call,your phonedials the
first11 digits and then waits. A messageappears
askingif you want to send the rest of the digits.
Press A under Yes to dial the last 4 digits.
Tip: You can create pauses and waitswhile
dialing a number from the keypad. See
“Creating Pauses and Waits While Dialing”
on page46.
International Numbers
When storing a number that you plan to use for
international calls, use Plus Dialing:
1 Pressand hold0 for two seconds. A “0”
appears, then changes to a “+”.
Note: The network translates the “+” into the
appropriate international access code
needed to place the call.
2 Enterthe countrycode, city code or area code,
and phone number.
For information about making international calls,
see “Making International Calls” on page 46.
39
Page 48

Memo
Memoletsyoustoreanumber,makeacalltothat
number, and save it to Contacts.
To create a memo:
1 From the main menu, selectMemo.
2 Enterthe numberusing your keypad.
3 Press O.
Toviewthememolater:
1 From the main menu, selectMemo.
To delete the memo:
1 From the main menu, selectMemo.
2 Pressand holdA under Delete.
3 Press O.
To edit the memo:
1 From the main menu, selectMemo.
2 Enterthe new number.
3 Press O.
To make a call to the memo number:
1 From the main menu, selectMemo.
2 To make a phone call,press s. -or-
To make a Direct Connect call, press the PTT
button.
40
To store the memo number to Contacts:
1 From the main menu, selectMemo.
2 Press m.
3 Select Storeto Cntcs.
4 To store the numberas a new entry,select [New
Contact]. -or-
To store the number to an existingentry, select
the entry.
5 With the Contacts type field highlighted, scroll
leftor righttodisplaytheContacts type you want
to assign the number.
6 If you want to add more informationto the entry,
follow the applicable instructions in “Creating
Entries” on page 36.
7 Press A under Done.
Page 49

Call Forwarding
Call forwarding sends calls to the phone numbers
you specify. You can forward all calls to one
numberor forwardmissedcalls to different
numbers depending on the reason you missed the
call.
You can forward phone lines 1 and 2
independently.
Forwarding All Calls
When you set your phone to forwardall calls, an
icon appears in the top row of the display:
Phone line 1 is active; calls to phoneline 1
G
are being forwarded.
Phone line 1 is active; calls to phoneline 2
I
are being forwarded.
Phone line 1 is active; calls to phonelines 1
H
and 2 are being forwarded.
Phone line 2 is active; calls to phoneline 1
J
are being forwarded.
Phone line 2 is active; calls to phoneline 2
L
are being forwarded.
Phone line 2 is active; calls to phonelines 1
K
and 2 are being forwarded.
To forward all calls:
1 From the main menu, selectCall Forward >
Forward > All Calls.
2 Select To.
If you specified a forwarding number for all calls
before, this number displays.
To forward calls to this number, press A under
Back.
To delete this number, press O,thenpressand
hold A under Delete.
3 To enter the number you want to forward calls to:
Enterthe numberusing your keypad. -or-
Press A under Search. Select Contacts ,
Recent Calls,orMemo.Select the number you
wantto enter.
4 Press O.
All your calls are now forwarded to the number you
specified.
41
Page 50

Call Forwarding
Turning Off Call Forwarding
If you don’t want all your calls forwarded, turn the
feature off:
1 From the main menu, selectCall Forward > To.
2 Set this option to Off.
All yourcalls are now sent to your phone.
Calls you miss are forwardedaccording to the
optionsset for missed calls. By default, missed
calls are forwarded to voice m ail.
Forwarding Missed Calls
You can specify a forwardingnumberfor each type
of missed call:
•IfBusy— Yourphone is on a callor transferring
data.
•IfNoAnswer—You do not answer on the first
4rings.
• If Unreachable — Your phone is out of
coverage or powered off.
42
Note: If you want a type of missed call sent to
voicemail,thecallforwardingnumberfor
that type of missed call must be your
voicemail access number.In mostcases,
your voice mail access number is your
area code + first3 digitsof your PTN +
MAIL (6245). To verify your voice mail
access number, contact NextelCustomer
Care.
Toforwardmissedcalls:
1 From the main menu, selectCall Forward >
Forward > Detailed.
2 Select If Busy to specifya forwardingnumber
for calls received when your phone is busy.
3 If you specified a forwarding number for this type
of call before, this number displays.
To forward calls to this number, press A under
Back andgotostep6.-or-
To delete this number, press O,thenpressand
hold A under Delete.
4 To enter the numberyou want to forward this
type of call to:
Enterthe numberusing your keypad. -or-
Press A under Search. Select Contacts ,
Recent Calls,orMemo.Select the number you
wantto enter.
Page 51

5 Press O.
6 Repeatstep 2 through step5 for If No Answer
and If Unreachable.
7 When you are finished, press A under Back.
Viewing Call Forwarding Settings
1 From the main menu, selectCall Forward >
Forward > All Calls.
2 With To highlighted, press A under Status.
Viewing Call Forwarding Settings
43
Page 52

Advanced Calling Features
Call Waiting
Call Waiting lets you receive a second call while on
an active call. Call Waiting is always available,
unlessyou turn it off for a specific call.
Ifyouareonacallandreceiveasecondcall,your
phoneemits atoneand displaysa messagesaying
youarereceivingasecondcall.
To acceptthe second call and put theactivecallon
hold:
Press A under Yes.
To accept the second call and end the activecall:
1 Press e.
Yourphone rings with the second call.
2 Answerthe secondcall.
To decline the second call:
Press A under No.Ifyousubscribetovoice
mail,the callis forwardedto your voice mail box,
unless you set Call Forward for If Busy to a
different number.
44
Turn Off Call Waiting
To turn off Call Waiting during a call:
1 Press m.
2 Select In Call Setup > Call Waiting.
3 Set this option to Off.
Tip: To turn Call Waiting back on while still on
the call, set this option to On.
To t urn off Call Waiting for the next call you make
or receive:
1 From the main menu, selectSettings > Phone
Calls > Call Waiting.
2 Set this option to Off.
Call Waiting is turned back on when you end the
call.
Switching Between Calls
Any time you have one call activeand one call on
hold, to make the call on hold active and put the
active call on hold:
Press A under Switch. -or-
If Switch is not one of your options: Press m.
Select Switch.
Page 53

Putting a Call on Hold
Putting a Call on Hold
1 Whileonanactivecall,pressm.
2 Select Hold.
If you want to make the call activeagain, press A
under Resume.
Calling 2 People
Putting a Call on Hold, Making a Second Call
1 Placeor receivea phone call.
2 Whilethe call i s active, press m.
3 Select 2nd Call. This puts the call on hold.
4 Enter the second phone number you want to
call.
Tip: For quick ways to enter the number, press
m.
5 Press s to place the call.
To end the second call and make the call on hold
active again:
Press e.
Tomakethecallonholdactiveandputtheactive
call on hold:
Press A under Switch.
Making a 3-Way Call
1 Placeor receive a phone call.
2 While the call is active, press m.
3 Select 3Way. This puts the call on hold.
4 Enter the second phone number you want to
call.
Tip: For quick ways to enter the number, press
m.
5 Press s to place the call.
6 Press A under Join.
All 3 people in the call can speak to and hear each
other.
Merging 2 Calls into a 3-Way Call
You can combine 2 phone calls into a 3-waycall
any time you have a call on hold and a call a ctive:
1 Press m.
2 Select Join.
All 3 people in the call can speak to and hear each
other.
45
Page 54

Advanced Calling Features
Creating Pauses and Waits While D ialing
You can enter a pause or wait while dialing a
number.For more information on pauses and
waits, see “Creating Pauses and Waits” on page
38.
To create a pause while dialinga phone number:
1 From the keypad, enter the digits you want to
occur before the pause.
2 Press m.
3 Select Insert Pause.
4 Enterthe digits you want to occur after the
pause.
To create a wait while dialing a phone number:
1 From the keypad, enter the digits you want to
occurbefore the wait.
2 Press m.
3 Select Insert Wait.
4 Enterthe digits you want to occur after the wait.
Making International Calls
Your service default is “International Calls
Restricted.”Contact Nextel Customer Care to
obtain international dialing access.
46
Calls placed between the United States and
Canadado not require an international access
code.
Plus Dialing lets you place an internationalcall to
most countries without entering the local
international access code.
1 Pressand hold0 for two seconds. A “0”
appears, then changes to a “+”.
Note: The network translates the “+” into the
appropriate international access code
needed to place the call.
2 Enterthe countrycode, city code or area code,
and phone number.
Setting One Touch Direct
Connect
One Touch Direct Connect sets your phone to call
the most recent Direct Connect number on the
recentcalls list, or a DirectConnect number you
choose,every time you press the PTT button.
To set your phone to call the most recent Direct
Connectnumber on the recent calls list:
1 From the main menu, selectSettings > DC/GC
Options > One Touch DC.
2 Set this option to Last Call.
®
Page 55

Setting Flip Actions
To set your phone to call a Direct Connect number
you choose:
1 From the main menu, selectSettings > DC/GC
Options > One Touch DC > Assigned
Number.
2 To enter t he Direct Connect number you want
yourphone to call every timeyou press the PTT
button:
Enterthe numberusing your keypad. -or-
Press A under Search. Select Contacts ,
Recent Calls,orMemo.Select the number you
wantto enter.
Tip: If you are entering a Talkgroup number,
enter# before the number.
3 Press O.
To t urn off One TouchDirect Connect:
1 From the main menu, selectSettings > DC/GC
Options > One Touch DC.
2 Set this option to Off.
Setting Flip Actions
For Answering Calls
To set your phone to answer calls when you open
the flip:
1 From the main menu, selectSettings > Phone
Calls > Flip Activation> Flip to Ans.
2 Set this option to On.
To set your phone not to answer calls when you
open the flip:
Set Flip to Ans to Off in step 2.
For Ending Calls
To set your phone to end calls when you close the
flip:
1 From the main menu, selectSettings > Phone
Calls > Flip Activation> Flip to End.
2 Set this option to On.
To set your phone not to end calls when you close
the flip:
Set Flip to End to Off in step 2.
47
Page 56

Advanced Calling Features
Note: If you are using your phone with a
headset, and you have the Flip to End
option set to On, closingyour flip sends
incoming sound to the headset and does
not end the call.
Group ConnectTMCalls
A Group Connectcall is similar to a Direct Connect
call, but is made to all members of a Talkgroup at
once. A Talkgroupis a predeterminedgroup of up
to 25 Nextelcustomers.
Before you can makeor receive Group Connect
calls,a Talkgroupmust be established.A fter the
Talkgroup is established, you must join the
Talkgroup.
Joining a Talkgroup
When you enable security, you receive a list of
Talkgroups that have been set up for you if you
subscribe to this service.The Talkgroup list is
saved to Contacts.
To receive Group Connect calls made to any of
these Talkgroups,you must join theTalkgroup.
1 Press A under Contcs. -or-
From the main menu, scrollto Contacts and
press O.
48
2 Scroll to the Talkgroupyou wantto join.
3 Press A under Join.
Note: Youwill now be able to receiveGroup
Connectcommunicat ions from this
Talkgrouponly. You can only monitor one
Talkgroup at a t ime.
Setting Up More Talkgroups
YoucansetupmoreTalkgroupsin3ways:
• Using Group Connect Management* on
MyNextel at www.nextel.com
* You must be an account administrator to use Group Connect
Management.
• Contacting your Nextel Sales Representative at
the time of activation
• Using Wireless Manager to create, manage, and
delete Talkgroups
When you create your Talkgroups, you can select
your own Talkgroupnumbers.
YoucanjoinanewTalkgroupbypressing# and
entering the numberusing the keypad.T hen press
A under Join.
Making Group ConnectTMCalls
1 Press #. Then enter the T alkgroup number
using the keypad. -or-
Page 57

Call Timers
Choose the Talkgroup name from Contacts or
recent calls list.
2 Proceed as if making a DirectConnectcall.
Receiving Group ConnectTMCalls
To answer a Group Connect call:
Proceed as if answering a Direct Connect call.
Only one person at a time may speak on a
Group Connect call.
The Direct Connect numberor name of the
person who is speaking will appearon the
display below the Talkgroup number.
TurningoffGroupConnectTMCalls
To set your phone to prevent you from hearing
Group Connect calls to your Talkgroup:
1 From the main menu, selectSettings > DC/GC
Options > Tkgrp Silent.
2 Set this option On.
To set your phone to let you hear Group Connect
calls to your Talkgroup:
Set Tkgrp Silent to Off in step 2.
Call Timers
Call timers measure the duration of your phone
calls,Direct Connect or Group Connectcalls, and
circuitdata use, as wellas the number of Kilobytes
sent and received by your phone:
•LastCall— displaysthe duration of your most
recent phone call.
• Phone Reset — keeps a running totalof your
phone call minutes, until you reset it.
• Phone Lifetime — displays the total minutes of
all your phone calls.
• DC/GC Reset — keeps a running total of all of
your Direct Connect and Group Connect call
minutes, until you reset it.
• DC/GC Lifetime — displaysthe total minutes of
all your DirectConnectand Group Connect
calls.
• Circuit Reset — keeps a running total of all of
your circuit data use, until you reset it.
• Circuit Lifetime — displays the total minutes of
all of your circuit data use.
• Kbytes Reset — keeps a running totalof the
numberof Kilobytes sent and receivedby your
phone, until you reset it.
49
Page 58

Advanced Calling Features
To view or reset a timer:
1 From the main menu, selectCall Timers.
2 Selectthefeatureyouwanttovieworreset.
3 To view a featurewithout resetting: Press O
when you are finished viewing. -or-
To reset a feature: Press A under Reset.Press
O or pressA under Yes to confirm.
Note: The values displayed by Call Timers
should not be used for billing. Call timers
are estimates only.
Using Your Phone as a Modem
To use your phone as a modem witha laptop,
handheld device,or desktopcomputer:
1 Open the connector cover.
connector
cover
50
2 Withthe phone’s display facing up, insert a data
cable’s connector into the accessory connector,
until you hear a click.
3 Insert the data plug into the data port of the other
device.
When used as a modem,your phonehas these
data transfer modes:
• Circuitdata — used for sending and receiving
faxes and for transferring large files
• Packet data — used for small file transfers such
as email
To use these services,you must install the iDEN
Wireless Data Services software (available
separately) and subscribeto a Nextel Wireless
Web access plan.For more informationon setting
Page 59

Making TTY Calls
up your computer and your i710 phone for packet
and circuit data calls, go to www.n extel.com and
click on Nextel Online/ Wireless Web Access
under the Services tab.
Making TTY Calls
To use your phone to make phone calls using a
teletypewriter (TTY) device:
1 Connectone end of a 2.5mm cableinto the
audio jack on your phone. Connect the other
endofthecabletoyourTTYdevice.
2 Make sure that your phone’sTTY featureis on
and select the TTY mode you want to use.
3 Use your phone to enter phone numbers and
make calls.
When you make a TTY call, these icons appear on
the phone’s display:
Phone call is active.
N
Phone call is on hold.
O
TTY device features such as Turbo-Code,
High-Speed, and Interruption are not supported by
your phone. These featuresmust be turnedoff or
disabled to use your TTY devicewith your phone.
Turning On the TTY Feature
Your phone’s TTY feature must be on if you want
to make TTY calls, set the TTY mode, or change
the TTY baud rate.To make sure the TTY feature
is on:
From the main menu, selectSettings > Phone
Calls > TTY > Use TTY. This field must say On.
Choosing a Mode
Your phone supportsthese TTY modes:
•TTY— You type and read text on your TTY
device.
•VCO(Voice-Carry-Over) — You speak into your
phone and read text replies on your T TY device.
• HCO (Hearing-Carry-Over) — You type text on
your TTY device and listen to voice replies on
your phone speaker.
To change mode while not in a call:
1 From the main menu, selectSettings > Phone
Calls > TTY > Type.
2 Selectthe TTY mode you want.
When you make a TTY call, the call begins in the
TTY mode you last selected.
51
Page 60

Advanced Calling Features
To change mode duringa call using your phone:
1 Press m.
2 Select In Call Setup > TTY > Type.
3 Selectthemodeyouwant.
To change mode during a call using your TTY
device,issue one of the following commands:
• “VCO please” — t o select VCO mode
• “HCO please” — to s elect HCO mode
• “HCO off please”— to turn off HCO mode
Important: When you are using HCO, the sound
coming from your phone speaker may
be uncomfortably loud. Use caution
when putting the phone to your ear.
(For information on setting the volume
of your phone speaker, see “Setting the
Volume” on page 102.)
Changing the TTY Baud Rate
By default, your phone’s TTY baud rate is set to
45.45,the baud rate required for TTY callswithin
the U.S. To make calls outside the U.S., set your
TTY baud rate to 50.0.
To change the TTY baud rate:
1 From the main menu, selectSettings > Phone
Calls > TTY > Baud.
52
2 Selectthebaudrateforyourlocation.
Special Dialing Codes
Non-Emergency Numbers
Nextel supports many “non-emergency”numbers
(such as #77, 311,...) provided by local and state
governments. These numbersare used to report
non-emergencyincidents. If the situation includes
imminent danger or loss of life, you should dial
911.
Telecommunications Relay Service
Nextel supports servicesfor communicating with
speechand/or hearing impaired individuals.You
can dial 711 to reach a local Telecommunications
Relay Center. You will then be connectedto your
destinationnumber.Relay service works through a
Communications Assistantwho reads messages
typed into a TDD/TTY deviceby a speechor
hearingimpairedindividual to you. The
Communications Assistantthentypes your spoken
messages to t he hearing or speech impaired
individual. Telecommunications Relay Serviceis
available 24 hours a day, seven days a week, and
every call is strictly confidential.
Page 61

Note: Using 711to reachTelecommunications
RelayService may not be available in all
areas.
Special Dialing Codes
53
Page 62

Nextel®Phone Services
Contact Nextel Customer Care to obtain these
services or for additional information:
Note: Some servicesare not available outside
of the continental United States.
Caller ID
Your phone can automatically display the phone
numberor name (if the 10-digit phone number is
stored in your Contacts) of the person calling
(unless blocked by the caller), enabling you to
decidewhetherto take the call or forwardit tovoice
mail.
Caller ID information is not available on all calls.
Per-Call Blocking
You can block delivery of your phone number to
otherCaller ID units for a single phone call:
Press *67before dialing the call.
YourNextelphone numbercannotbe blockedfrom
callsmade to 911, 800, 855, 866, 877, 888, or
othertoll- free phone numbers.
54
Per-Line Blocking
You can permanently block delivery of your phone
numberon every call you make.
To show your number on a per-call basis:
Press *82before dialing the call.
Alternate Line Service
You can have two different phone numberson the
same phone. With Alternate Line Service, you can:
• Setup differentbillingaddressesfor each phone
line.
• Use different ringer styles so that you can tell
which line is receiving the call.
• Forward incoming calls to the primary and
alternate line to different phone numbers.
To set the activeline:
1 From the main menu, selectSettings > Phone
Calls > Set Line.
2 Selectthephonelineyouwanttobetheactive
line.
When calls made to the line that is not active are
set to be forwarded to the active line, these calls
are sent to voice mail withoutringing. See “Call
Forwarding” on page 41.
Page 63

Call Restrictions
You can prevent your phone from making or
receiving longdistance,incoming, and outgoing
(except911) calls.
Nextel®411
You can call Nextel411 within the continental
UnitedStates and Hawaii.Services include white
and yellow page listings, drivingdirections,
restaurant reservations, movie listings and
showtimes, and local event information.
Call Restrictions
55
Page 64

Ring Tones
To set the ring tone your phone makes when you
receivephone calls, message notifications, or call
alerts:
1 From the main menu, selectRing Tones.
2 Make sure Vibrate All is set to Off.
3 Scrollthroughthe listof ringtonesand selectthe
one you want to assign. Vibrate setsyour phone
to vibrateinstead of makinga sound; Silent sets
your phone to neither vibrate nor make a sound.
Tip: Highlighting a ring tone lets you hear it.
4 Selectthe features you want to assignthe ring
tone to.
5 When you are finished, press A under Done.
Note: This icon
setyourphone to neithervibratenor make
a sound for phone calls.
Setting Your Phone to Vibrate
You can set your phone to vibrate insteadof
makinga sound when you receive all phone calls,
Direct Connect calls, Group Connectcalls,
messages notifications, and call alerts.
1 From the main menu, selectRing Tones >
Vibrate All.
56
M appears on the display if you
2 Set this option to On.
Tip: P ressing the volume controlsto t urn down
the volume as far as possible sets Vibrate
All to On.
To set your phone to vibrate instead of making a
sound for some features but not others:
1 From the main menu, selectRing Tones.
2 Make sure Vibrate All is set to Off.
3 Select Vibrate from the list of ring tones.
4 Selectthe features you want to set to make no
sound.
5 When you are finished, press A under Done.
Note: To set ring options for Direct Connect calls
and Group C onnect calls, see “Setting
Your Phone to Vibrate”on page 102.
These icons indicate how the ringer is set.
Q The phone always vibrates instead of making
a sound.
The phone vibrates instead of makinga
R
sound for phone calls.
Group Connect calls and Direct Connect
u
calls are heard through the earpiece, not the
speaker.
These icons may appear at the same time.
Page 65

Ring and Vibrate
Ring and Vibrate
To set your phone to ring and vibrate when you
receivephone calls or callalerts:
1 From the main menu, selectRing Tones.
2 Make sure Vibrate All is set to Off.
3 Scroll through the list of ring tones and highlight
theoneyouwanttoassign.
4 Press m.
5 Select Assign w/Vibe.
6 Selectthe features you want to set to ring and
vibrate.
7 When you are finished, press A under Done.
Thisicon
S appears on the display.
Assigning Ring Ton es to Contacts
You can set the ring tone your phonemakes when
you receive phone calls or call alerts from
someone you have stored in Contacts.
1 From the main menu, selectRing Tones.
2 Make sure Vibrate All is set to Off.
3 Scrollthroughthe listof ringtonesand selectthe
one you want to assign.
4 Select AContact.
5 SelecttheContacts entry you want to assignthe
ring tone to.
Viewing Ring Tone Assignments
1 From the main menu, selectRing Tones.
2 Make sure Vibrate All is set to Off.
3 Highlight any ring tone.
4 Press m.
5 Select Overview.
6 Scrollto view ring tones assigned to features
and Contact entries.
Downloading M ore Ring Tones
If you want to use otherring tones, you can
download them into your phone for a fee. Check
the Downloads menu optionon your phone for a
catalog of additional items available for purchase
and download directly from your phone.
You can also go to www.nextel.com/downloads for
a wide selection of available ring tones and
downloading instructions.
57
Page 66

Ring Tones
Note: Ring tones may be downloaded only
once.Ifyoudeletearingtonefromyour
phone, you must purchase it again to
download it again.
Managing Memory
To view the amount of memory available for
custom ring tones:
1 From the main menu, selectRing Tones.
2 Make sure Vibrate All is set to Off.
3 Highlight any ring tone.
4 Press m.
5 Select Memory Usage.
Deleting custom ring tones frees memory.
Note: Ring tones are stored in your phone using
the same memory space used to store
messages, voice records, Java
applications, and wallpaper images.
Deleting some of these other items frees
memoryfor ring t ones.
Deleting Custom Ring Tones
To delete a custom ring tone:
1 From the main menu, selectRing Tones.
2 Make sure Vibrate All is set to Off.
58
3 Scrollt o the ring tone you wantto delete.
4 Press m.
5 Select Delete.
6 Press A under Yes to confirm.
Page 67

Message Center
The message centermanagesyour messages.
When you receive the following types of
messages, you can access them through the
messagecenter:
• Voice mail messages
• Two-Way messages
• Short Message Service (SMS) messages
You can listen to or view these messages, delete
them, or continueto storethem in the message
center.
Accessing the Message Center
From the main menu, selectMessages.
Message Center Options
•VoiceMail— access voice mail messages you
have received.
•NetAlert— access Two-Way messages you
have received.
•SMS— access SMS messages you have
received.
59
Page 68

Receiving Messages
When you receive a voice mail message, Short
Message Service (SMS) message, or Net alert,
you have 2 ways to access the message:
• Respond to the message notification that
appears when the message is received.
• Dismiss the message notification and access
the message later throughthe message center.
Message Notifications
When you receive a message, your phone notifies
youwithtextonthedisplayandanotificationtone
or vibration. You can access the message or
dismiss the notification.
If you dismiss the notification, the message is not
deleted.It can be accessed through the message
center.
If you are not on a phone call when you receive a
message, your phone sounds a notification tone
every 30 seconds until you access the message,
you dismiss the notification, or the alert time-out
expires.
60
Setting Notification Options
To control whether your phone sounds message
notification tones while you are on phone calls:
1 From the main menu, selectSettings > Phone
Calls > Notifications.
2 Select the option you want:
• ReceiveA ll — Tones sound during calls for
all types of messages.
•MsgMailOnly— Tones sound during calls
for SMS messages; tones for all other types
of messages are held until you end calls.
• DelayAll — Tones for all types of messages
are held until you end calls.
Note: Delay All is the default setting.
Tip: Toset notification options duringa call:
Press m. Select In Call Setup >
Notifications.
Message Center
All your messages are stored in the message
center.The messagecenter shows how many
messages you have of each type.
To access your messages through the message
center:
1 From the main menu, selectMessages.
Page 69

2 Scrolltothetypeofmessageyouwantto
access.
3 Press O or press A under the display option on
the left.
Note: In order for you to access voice mail for
the first time you must access it by dialing
into your voice mail box using your PTN. If
thereis alreadya message in your voice
mail box, then you can access your voice
mail through the messagecenter.
MessageCenter
61
Page 70

Voice Mail Messages
Receiving a Message
When you receive a voice mail message, New
Voice Mail Message appearson the display.
To call Nextel’s voice mail system and listen to the
message:
Press A under Call.
To dismiss the message notification:
If the flip is closed, press .. -or-
If the flip is open, press O or press A under
Back, or close the flip.
If the caller leaves a message,this icon
appearson the display, remindingyou that you
have a new message.
Accessing Voice Mail from the Message Center
From the main menu, select Messages > Voice
Mail.
62
y
Sending Unanswered Calls to Voice Mail
To send a phone call to voice mail instead of
answering it:
If the flip is closed, press .. -or-
Press e. -or-
Press A under No.
Page 71

Nextel®Voice Mail
Note: Toreceivevoicemailmessages, you must
first set up your voice mail box.
Note: If you are bringing your phone number
from another carrier, we suggest you set
up your voice mail box afterthe number
you brought to Nextel is active on your
Nextelphone and your temporary phone
numberis deactivated. If you set up your
voicemail b ox prior to this, all messages
and all settings (including your greeting
and password) will be lost when the
number you have brought to Nextel
becomes active.
Setting Up Your Voice Mail Box
Using your i710 phone,dial your 10-digit Nextel
Personal Telephone Number (PTN).For example:
7035557777. Follow the system instructions to
createa new 4- to 7-digit password, record your
name, and record a greeting. When the system
says, “Thank you for using Nextel Voice Mail,” your
mailbox is set up.
If you are calling from a phone other than your
i710, dial your 10-digit Nextel PTN. When you hear
the greeting, press the star key to access your
voice mail box. The system will prompt you to enter
your password. Enter the last seven digits of your
NextelPTN. For example: 5557777. This is your
temporary password.
Youareinthemainvoicemailmenuwhenyou
hear the optionslistedbelow.
• To play your messages, press 1. (This option
plays only if you have new or saved messages.)
• To record a message, press 2.
• To change your greeting, press 3.
• To access your personal options, press 4.
If you press * while you are in a sub-menu,you
will go to the previous menu. If you press **,
youwillgotothemainvoicemailmenu.Fromthe
main voice mail menu, press # to exit voice mail.
At any time, you may end the call by pressinge.
Playing Messages
When you receive a new voice mail message,you
caneitherlistentoitimmediatelybypressingA
under Call, or later by pressing A under Back.
These are options available while you are listening
to your messages:
63
Page 72

Nextel®Voice Mail
• Backup — press 1.
• Rewindto beginning of message— press
11.
• Pauseorcontinuethecurrentmessage— press
2.
• Fast forward — press 3.
• Fast forward to end of message — press 33.
• Play the date and time stamp — press 55.
These options are available while a message is
playing or afterit has played:
• Forward the message to another subscriber —
press 6.
• Deletethe message— press 7.
• Reply to a message — press 8.
• Save the message — press 9.
• Skip to the next message — press #.
Messages that are not saved or deleted remain in
your mailbox as new messages. All messages are
automaticallydeletedafter 30 days.
To retrieve deleted messages,press *3.This
option only applies to the current voice mail
session. If you end the call, the messages will be
permanently deleted.
64
Important: After exiting the voice mail session, you
cannot recover deleted messages.
Changing Your Password
1 From the main voicemail menu, press 4 to
access personal options.
2 Press 4 to access personal preferences.
3 Press 1 to modify password.
4 Enter your new password. It must be 4 to 7 digits
long.
Note: It is important that you choose a number
that is easy for you to remember, but hard
for someone else to guess. Passwords
usingallthesamedigits,forexample
4,4,4,4 or a sequential series of digits,
1,2,3,4, will not be accepted.
5 Press ** to return to the main menu.
Note: If you forget your password, contact
Nextel Customer Care.
Recording Your Name
When you send, reply to, or copy a message, your
name response precedes the message. To record
or re-record your name at any time:
1 From the main voicemail menu, press 4 to
access personal options.
Page 73

Recording Your Active Greeting
2 Press 4 to access personal preferences.
3 Press 3 to access the record your name
option.
4 Press 2 to record your name.
5 Press ** to return to the main menu.
Recording Your Active Greeting
You may want to include one or all of the following
options in your greeting so that callers will know
they are available.
• Press 1 to send a numericmessage.
• Press 2 to send an operator-assisted message.
(Thisoptionis available only if you are a
subscriber of Operator Assisted Messaging.
Contact Nextel CustomerCare for more
information.)
• Press # to skip the greeting and record a
message immediately.
To record or alter your greeting at any time:
1 From the main voice mail menu, press 3 to
changeyour greeting.
2 Press 1 to play, press 2 to record or
re-record,or press 7 to delete your active
greeting.
3 Recordyour greeting and press # when you
have finished.
4 Press ** to return to the main menu.
Advanced Voice Mail Features
Multiple Greetings
You can create up to five different greetings and
designate whichgreetingwill be your active
greeting at any given time. The greeting that was
recorded during your initial voice mail box setup is
greeting 1. This is your default active greeting.
To record additional greetings:
1 From the main voicemail menu, press 3 to
access the greetings menu.
2 Press 4 to modify greetings.
3 Enter the greeting number you wish to create or
modify.
4 Press 2 to record a greeting.
5 Recordyour greeting and press # when you
have finished.
6 Press ** to return to the main menu.
To select your active greeting:
1 From the main voicemail menu, press 3 to
access the greetings menu.
2 Press 3 to selectanothergreeting to be active.
65
Page 74

Nextel®Voice Mail
3 Enter the number of the greeting that you would
like to be active. The system will confirmyour
active greeting number.
4 Press 1 to playyour activegreeting.
5 Press ** to return to the main menu.
Greetings Schedule
You can choose to have your greetings
automatically activated based on a pre-determined
time schedule. By activatingthe Greeting
Schedule, Greetings1, 2, and 3 will automatically
play accordingto the timeschedule listed below.
Greeting 1 Evenings and
Weekends
Greeting 2 Weekday
Mornings
Greeting 3 Weekday
Afternoons
5:00 pm – 7:59 am,
Monday– Friday
24-hours, Saturday
and Sunday
8:00 am – 11:59 am
Monday– Friday
Noon–4:59pm
Monday– Friday
To activate t he greeting schedule:
1 From the main voice mail menu, press 3 to
access the greetingsmenu.
2 Press 9 to activate your greeting schedule.
3 Press ** to return to the main menu.
66
Note: The greeting schedule, when on, will
override any other greeting that you may
set as active. If a greeting is not recorded,
asystemstandardgreetingwillbeplayed.
Automatic Playback
By default, the playback mode of your voice mail
service is set to normal. This feature automatically
playsand saves new messages when you log in.
To activate automatic playback:
1 From the main voicemail menu, press 4 to
access personal options.
2 Press 4 to access personal preferences.
3 Press 2 to access playback preferences.
4 Press 2 to switch between automatic and
normal playback.
5 Press ** to return to the main menu. Changingthe Playback Order of Messages
Youcanselecttheorderinwhichyouwant
unheardmessages to be played. You may listen to
the last received message first, or you may listen to
the first receivedmessagefirst.To select the order
in which new messages should be played:
1 From the main voicemail menu, press 4 to
access personal options.
2 Press 4 to access personal preferences.
Page 75

Advanced Voice Mail Features
3 Press 2 to access playback preferences.
4 Press 1 to switchbetweenthe playback
orders.
5 Press ** to return to the main menu.
Recording, Forwarding, and Replying to
Messages
These functionsallow you to record and send,
reply to, or forward a message to an assigned
destination address or group list number. If you
record a complete or partial message, but do not
send it, Nextel Voice Mail servicewill referto this
messageas an “in preparation” message.
To record and send a message:
1 From the main voice mail menu, press 2 to
record a message.
2 Recordyour message and press # to end the
message.
3 Press 9 at the promptto indicatethatyou want
to send the messageor press 5 for delivery
options.
4 Enterthe mailbox numberand/or group list
number(s). (A mailbox number is the 10-digit
NextelPTN of a Nextelcustomer. The Nextel
customer must be in your local calling area. The
name of the recipient plays if it is recorded.)
5 Press # to send.
6 Press ** to return to the main menu.
Note: You can only send messages using this
method to Nextel customers in your home
market.
Delivery Options
After you have created a message, you can assign
the message to a category before you send it.
Belowis a list of the options that can be applied to
a message:
•Urgent— Recipientwill hear this message
before other messages.
•Private— Recipientcannot copy the message
to another mailbox or phone number.
• Notification of Non-Delivery — You will be
notified if the recipient has not listened to your
message by a certain date and time.
•FutureDelivery—Youcan specify a t ime and
date (up to three months in advance) for the
messagetobedelivered.
Note: All dates must have digitsin the MM/DD
format( 2 digits for the monthand 2 digits
for the date). For example,January2nd
would be 0102.
Important: Once a message has been sent for
future delivery, it cannot be retrieved or
deleted.
67
Page 76

Nextel®Voice Mail
To set a special delivery option:
1 After recording your message, but before
sending it, press 5 for delivery options.
2 Press the number that corresponds with the
desired delivery option:
• Press 1 for urgent.
• Press 2 for private.
• Press 3 for notification of non-delivery.At
prompt, specify time and date.
• Press 4 for future delivery of messages.At
prompt, specify time and date.
• Press 9 to send the message immediately.
3 The list of options will be presented again.
Select an additional option or press 9 to send
the message.
4 Enterthe destination mailbox or group list
number of the recipient(s).
5 Press # to send.
6 Press ** to return to the main menu.
68
Working With Group Lists
This feature enables you to create a list and assign
it a unique name. Then, you can add mailbox
numbers,group lists, or individuals. Once you
createalistyoucansendavoicemessageto
everyoneon the list by entering the group list
number.Youcanhaveupto40grouplists.Each
listcanholdupto50addresses.
To set up a group list:
1 From the main voicemail menu, press 4 to
access personal options.
2 Press 2 to access your Group Lists.
3 Press 2 to create a Group List.
4 Enterthe 1- or 2-digit group list number and
press #.
5 Recorda name for the list and press #.
6 Selectgroup members by mailbox number,
grouplist, or name.
7 Press # to saveall entriesadded to the list.
8 Press ** to return to the main menu.
To modify a group list:
1 From the main voicemail menu, press 4 to
access personal options.
2 Press 2 to access group lists.
Page 77

Advanced Voice Mail Features
3 Press 4 to modify a group list. Enter the
number of the group list you want to modify.
4 Press 1 to add a new recipient.
5 Press # to save your changes.
6 Press ** to return to the main menu.
Deleting a group list:
1 From the main voice mail menu, press 4 to
access personal options.
2 Press 2 to access grouplists.
3 Press 3 to delete a group list.
4 Enterthe numberof the group list you want to
delete.The system will play the name of the
group list.
5 Press # to delete the list.
6 Press ** to return to the main menu.
Message Forwarding
Note: You can only forward messages to Nextel
customers in your home market.
This feature allows you to program your phone to
automaticallyforwardincoming messages to
another mailbox. Thereare two typesof
forwarding: notified and silent. Notified forwarding
promptsthe caller that the message will be
forwarded. Silent forwardingdoes not prompt the
callerthat the message will be forwarded.
To modify forwarding options:
1 From the main voicemail menu, press 4 to
access personal options.
2 Press 5 to modify forwardingoptions.
3 Select the applicable option below:
• To createa forwarding number, press 2.
• If you have already created a forwarding
number, press 2 to modify the number.
• To enable or disable message forwarding,
press3.
• To change the forwarding type, press2.
4 Press ** to return to the main menu.
69
Page 78

Nextel®Voice Mail
Nextel®Voice Mail Tree
Main Menu
Play
1
Messages
Record
2
Messages
Change
3
Greetings
Personal
4
Options
Retrieve
* 3
Deleted Msgs
Unheard
1 1
Messages
Nextel
0 0
Customer
Care
Global
Commands
Previous
*
Menu
Main
* *
Menu
Undelete
* 3
Messages
Additional
0
Info (Help)
70
2
4
5
Personal
Options
Access
Group Lists
Personal
Preferences
Forwarding
Options
Personal
Preferences
Change
1
Password
Playback
2
Preferences
Name
3
4
1
2
3
5
7
8
9
8
Change
Greetings
Play Active
Greeting
Record Active
Greeting
Select Active
Greeting
Edit
Greetings
Skip Toggle
Delete Active
Greeting
Review
Schedule
Activate
Schedule
1
1 1
2
3
3 3
5 5
6
7
8
9
#
Play
Messages
Backup
Replay
Message
Pause/
Continue
Fast Forward
Forward to
End
Play Date
and Time
Forward
Message
Delete
Message
Reply to
Message
Save
Message
New Message/
Keep as New
Page 79

SMS and Two-Way Messages
SMS Messages
ShortMessage Service (SMS)messagesareshort
text messages, also called text and numeric
messages. You can send SMS messages through
any email account or on www.nextel.com.
Your phone receives SMS messages sent to its
SMS address, but does not send SMS messages.
Your phone's SMS address is your
PTN@page.nextel.com.
If your phone is powered off when you receive a
message, your phone notifies you the next time
you power it on. If you are out of your coverage
area,your phonealerts you when you return to
your coverage area.
Yourphoneattemptsto deliverthesemessages for
up to 7 days.
Receiving a Message
When you receive a text and numericmessage,
New Text Message appears on the display.
To view the message:
1 Press A under Read.
2 Ifthemessagefillsmorethanonescreen,scroll
to read it.
3 To keep the message, press O. -or-
To delete the message, scroll to the end of the
message, t hen press A under Delete.
To dismiss the message notification:
If the flip is closed, press .. -or-
If the flip is open, press A under Back or close
the flip.
This icon
you that you have a new message.
w appears on the display, reminding
Reading from the Message Center
1 From the main menu, selectMessages> SMS.
2 Selectthemessageyouwanttoread.
3 Ifthemessagefillsmorethanonescreen,scroll
to read it.
4 To keep the message, press O. -or-
To delete the message, scroll to the end of the
message, t hen press A under Delete
71
Page 80

SMS and Two-Way Messages
Calling and Storing Numbers
If an SMS message you receive contains a phone
number,you can call that number by pressing s
whileviewing the message.
If an SMS message you receive contains a phone
number,Direct Connect number, or Talkgroup ID,
you can call or send a call alert to that number,or
store that number to Contacts. Press m while
viewing the message to access theseoptions.
To call the number, select Call Back.
To send a call alert, select Alert,thenpressthe
PTT button.
To store the numberto Contacts, selectStore
Number.
Two-Way Messages and Net Alerts
Two-Way messages can be sent and received
throughany email accountand on
www.nextel.com. Your phone sends and receives
Two-Waymessagesthrough Nextel Online
services.
Yourphone's Two-WayMessagingaddressis your
PTN@messaging.nextel.com.
72
When you receive a Two-Way message, your
phone notifiesyou witha Net alert. Each Net alert
lets you view the Two-Way message associated
with it.
Netalertsappearin the message center. Two-Way
messages appearin the Nextel Online services
browser.
Receiving a Message
When you receive a Two-Way message, a Net
alertnotification appearson the display.
To view the message:
Press A under Goto.
This lets you read the message through Nextel
Online services.
To dismiss the Net alert notification:
If the flip is closed, press .. -or-
If the flip is open, press A under Back or close
the flip.
This icon
you that you have a new message.
w appears on the display, reminding
Page 81

Two-Way Messages and Net Alerts
Accessing Two-Way Messages
From Nextel Online Services
1 From the main menu, selectNet > Text
Messaging > Read Messages > Message
Inbox.
2 Selectthemessageyouwanttoview.
From the Message Center
1 From the main menu, selectMessages> Net
Alert.
2 Press O.
This takes you to your Message Inbox and lets
you read messages through Nextel Online
services.
3 Selectthemessageyouwanttoview.
Deleting Net Alerts
When you delete a Net alert, the Two-Way
message is not deleted, but it is no longer
accessible through t he message center. Y ou can
still access the message throughNextel Online
services.
1 From the main menu, selectMessages.
2 With Net Alert highlighted, press O.
3 Press A under Delete
4 Press A under Yes to confirm.
Sending Two-Way Messages
TosendaTwo-Waymessagefromyourphone:
1 From the main menu, selectNet > Text
Messagin g > Send Message.
2 Ifyouaresendingthemessagetoanew
address, select New Address. -or-
Ifyouaresendingthemessagetoanaddress
you already sent a message to, select Sent
Address.
To send a message to a new address:
1 Enterthe phone numberor email address of the
person you are sending the message to.
Note: Use the right option key to switch between
text entry modes.
2 Press A under Ok.
3 Select Compose New to compose and send a
new message. -or-
Select Sent to send a previouslysent message.
Scrollto t he sent messageyou wantto send and
press A under Ok.
4 Press A under Send.
73
Page 82

SMS and Two-Way Messages
To send a message to a sent address:
1 Scrollto the phonenumber or emailaddressyou
wanttosendthe messageto andpressA under
Ok.
2 Select Compose New to compose and send a
new message. -or-
Select Sent to send a previouslysent message.
Scrolltothesentmessageyouwanttosendand
press A under Ok.
3 Press A under Send.
74
Page 83

Nextel Online®Services
You can use your phone’s Net feature to access a
suite of wirelessdata product s known as Nextel
Online (NOL) services. Services include Two-Way
Messaging, Web and Premium Web, Address
Book, Mobile Email, and wirelessaccess to AOL
Instant MessengerTM.
With the exception of the Two-WayMessaging
Expressservice,Nextel Online* services require
the activation of a Nextel Online service plan. To
order, call 1-800-NEXTEL6or contact your Nextel
salesrepresentative.
* Nextel Online is available in the continental U.S., Canada,
Mexico, Brazil, Argentina, and Peru. Nextel Online usage outside
of the continental U.S. may incur additional charges. See
www.nextel.com for details.
NOL Services
• Two-WayMessaging — Discretely send and
receive text messages via your Nextel phone,
any email address, or www.nextel.com with
Two-Way Messaging. For customers who
purchased a Free Incoming plan, there is a
nominal charge for each message sent and
received. Or, customers have the option of
subscribing to a Two-Way Messaging Premier
package f or enhanced functionality and
unlimited messaging.
• Web — access the wireless Internet from your
Nextelphone.
• Premium Web — access any site on the
wireless Internet, conduct topic and keyword
searches, bookmark sites and applications, and
®
customize your phone's browser menu.
• Address Book — program your Contacts from
the Internet.
• MobileEmail — access and send email f rom
your Nextel phone.
®
• AOL
InstantMessengerTM—sendandreceive
instant messages in real–timethrougha
handset-based interface.
Accessing NOL Services From Your Phone
You must first enable security on your phone to
receiveNOL services. See “EnablingSecurity” on
page 6.
1 Press m to access the main menu and select
Net.
Your NOL home page displays.
2 Choosethe serviceyou want to access.
To access your Two-Way Messaging Service:
75
Page 84

Nextel Online®Services
Select the Text Messaging application from the
Net menu.
To access the Web:
Select Web Sites,Downloads, Marketplace,or
Search
To access Address Book:
Select Business Tools > Address Book
To access Mobile Email:
Select Email and More > Mobile Email
®
To access AOL
InstantMessengerTM:
Select Email and More > AIM
Note: Many screens will require you to enter
text.Forinformationonenteringtext,see
“Entering Text” on page 31.
Navigation Keys
•Home—Presse to return to your home
page.
Tip: Press e twice to return to your phone's
idlescreen.
•Back—Press* to return to a previous
screen.
76
Tip: While navigating through Nextel Online
screens, a number may appear to the left of
the application or topic you want to access.
Press the corresponding number on the
keypad for quickeraccess to that
application or topic.
When transmitting highlypersonalor sensitive
data, such as a creditcard number, this icon
E
appears,indicating that the data is encrypted
duringtransmission.
Note: You may be asked to (re)enable security
asNextel adds new servicesor upon your
return to the U.S. after traveling.
Quick Start Guides for NOL services can be
accessed on www.nextel.com under the Customer
Support tab by clicking on Guides &
Tutorials/Services. NOL Demos can be accessed
on www.nextel.com under the Services tab by
clickingon NextelOnline/Web Services Demo.
Page 85

Voice Records
A voice record is a recording you make with your
phone and can play back. You can recordnotes to
yourselfor phonecalls.
Your phone can storeup to 20 voice records.
Creating Voice Records
Torecordanotetoyourself:
1 From the main menu, selectVoiceRecord >
[New V oiceRec].
2 Say the message you want to recordinto the
microphone.
Tip: Tostop recordingbefore you are finished,
press A under Pause. To start recording
again,press A under Resume.Tostop
recording and discard the voice recordat
any time, press A under Cancel.
3 When you are finishedrecording, press O.
Toaddtotheendofvoicerecord:
1 From the main menu, selectVoiceRecord.
2 Scroll to the voice record you want to add to.
3 Press m.
4 Select Add To.
5 When you are finishedrecording, press O.
To r ecord a phone call:
1 Whileonanactivecall,pressm.
2 Select Record.
3 When you are finished recording, press O.
Note: Recording of phone calls is subject to
applicable laws regarding privacy and
recording of phone conversations.
Playing Voice R ecords
1 From the main menu, selectVoiceRecord.
2 Selectthevoicerecordyouwanttoplay.
3 To stop the voicerecord whileit is playing, press
O.
Tip: Tofastforward,scroll right. Torewind, scroll
left. To pause or resume, press any number
key.
Labeling Voice Records
When you create a voice record,it is labeled with
the time and date it was recorded. You can then
rename it with a custom label.
1 From the main menu, selectVoiceRecord.
2 Scroll to the voice record you want to label.
3 Press A under Label.
77
Page 86

Voice Records
4 Enter the label you want to assign. See
“Entering Text” on page 31.
5 Press O.
Deleting Voice Records
To delete a voice record:
1 From the main menu, selectVoiceRecord.
2 Scrollto t he unlocked voice recordyou want to
delete.
3 Press m.
4 Select Delete.
5 Press O or A under Yes to confirm.
To delete all voice records:
1 From the main menu, selectVoiceRecord.
2 Scroll to any voice record.
3 Press m.
4 Select Delete All.
5 Press O or A under Yes to confirm.
Locking Voice Records
When you locka voice record,it cannotbe deleted
until you unlockit.
1 From the main menu, selectVoiceRecord.
78
2 Scroll to the voice record you want to lock or
unlock.
3 Press m.
4 Select Lock to lock the message. -or-
Select Unlock to unlock the message.
Whena voice record is locked, this icon
next to it.
R appears
Managing Memory
To view the amount of memory available for voice
records:
1 From the main menu, selectVoiceRecord.
2 With [New VoiceRec] highlighted, press A
under Memory. -or-
With any voice record highlighted, press m.
Select Memory.
To f ree more memory by deleting all unlocked
voice records:
1 From the voice records memoryscreen, press
A under Delete.
2 Press O or A under Yes to confirm.
Page 87

Note: Voice records are stored in your phone
using the same memory space used to
storemessages,Java application data,
ring tones, and wallpaper images.
Deleting some of these other items frees
memoryfor voice records.
Managing Memory
79
Page 88

Java Applications
Your phone arriveswith Java applicationsloaded
and ready to install. You can download and install
more Java applications.
To downloadand installmoreJavaapplications, go
to the Downloads menu option on your phone or
visit www.nextel.com/downloads
Note: Using Java applications may cause your
phone to use up more battery power than
otheruses of your phone.
Installing Applications
1 From the main menu, selectJava Apps.
2 Select the application or suite of applications
you want to install.
Installation messages appearas the application
installs.
3 IfyouwanttocreateashortcuttotheJava
application on the main menu: Press A under
Next.PressA under Yes.PressO.
4 Press A under Done.
80
Running Applications
To r un an application thathas a shortcut on the
main menu:
1 From the main menu, select the application or
suiteof applicationsyou want to run.
2 Ifyouhaveselectedasuiteofapplications,
selecttheapplicationyouwanttorun.
To run an application that does not have a shortcut
on the main menu:
1 From the main menu, selectJava Apps.
2 Select the application or suite of applications
you want to run.
3 Ifyouhaveselectedasuiteofapplications,
selecttheapplicationyouwanttorun.
Tip: If you don’thearthe soundsassociatedwith
the Java application, select Settings >
Volume and check the volumes of Java
Speaker and Java Earpiece.
Suspending Applications
When you suspendan application,it does not stop
running. It goes to the background so that you can
run another applicationin the foreground.
To suspend an application:
Press e or close the flip.
Page 89

Resuming Applications
To view your suspendedapplications:
From the Java menu, select Suspended Apps.
You can have up to 3 applications running at one
time — 1 running in the foreground and 2 in the
background.
Resuming Applications
You can resume a suspended application at any
time. This bringsit to the foreground.
1 From the Java menu, select Suspended Apps.
2 Select the application you want to resume.
Ending Applications
Toendanapplication:
1 From the main menu, selectJava Apps.
2 If the application you want to end is part of a
suite of applications, select the suite.
3 Scrollt o the applicationyou want to end.
Press A under End. -or-
If End is not one of your options: Press m.
Select End.
Tip: Youcan also end applications from the
Suspended Apps screen.
To end all applications:
1 From the main menu, selectJava Apps.
2 Scroll to Suspended Apps.
3 Press m.
4 Select End All.
5 Press O or press A under Yes to confirm.
6 If you want to end all applicationswithoutletting
them exit, press A under EndNow.
Downloading Applications
If you want to run more Java applications, you can
download them into your phone.
Check the Downloads menu option on your phone
for a catalog of items available for purchase and
download.
You can also go to www.nextel.com/downloads for
a selection of Java applications and downloading
instructions.
Deleting Applications
To delete an application:
1 From the main menu, selectJava Apps.
2 Scrollto the application you want to delete.
3 Press m.
81
Page 90

Java Applications
4 Select Deinstall.
5 Press O or press A under Yes to confirm.
6 When your phone has finished deleting the
application, press A under Done.
To delete all Java applications:
1 From the main menu, selectJava Apps.
2 Scroll to Java System.
3 Press m.
4 Select Delete All.
5 Press O or press A under Yes to confirm.
Managing Memory
To view the amount of memory available for Java
applications:
1 From the main menu, selectJava Apps > Java
System.
2 Press A under Next.
3 To see more memoryinformation, press A
under Next again.
Deleting Java applications freesmemory.
82
Note: Java application data is storedin your
phone using the same memory space
used to store messages, voice records,
ring tones, and wallpaper images.
Deleting some of these other items frees
memory for Java applications.
Shortcuts on the Main Menu
When you install an application, you can createa
shortcutto the application on the main menu.
Tocreateashortcuttoanapplicationthatis
alreadyinstalled:
1 From the main menu, selectSettings >
Personalize > Menu Options > Add/Remove
Apps. -or-
From the main menu: Press m. Select Main
Menu Setup > Add/Remove Apps.
2 Scroll to view the list of Java applications. Any
application that has a shortcut on the main menu
hasacheckmarknexttoit.
3 Scrollt o the application you want to create a
shortcut for.
4 Press O.
5 Press A under Done.
Page 91

Java Applications and GPS Enabled
To remove a shortcut:
1 From the main menu, selectSettings >
Personalize > Menu Options > Add/Remove
Apps. -or-
From the main menu: Press m. Select Main
Menu Setup > Add/Remove Apps.
2 Scrollt o view the list of Java applications. Any
application that has a shortcut on the main menu
hasacheckmarknexttoit.
3 Scrollt o the application you want to remove the
shortcut for.
4 Press O.
5 Press A under Done.
Java Applications and GPS
Enabled
Some Javaapplications can make use of your
phone’s GPS featureto determinethe approximate
geographical locationof your phone. (See “GPS
Enabled”on page 86 for more informationon the
GPS feature.) Ho wev er, for privacy reasons, you
may not always want Java applications to access
the location of your phone.Your phone protects
your privacyby giving you the option to block all or
some Java applications from accessing the
locationof your phone.
Setting Privacy for All Java Applications
These options control the privacyof all Java
applicationson your phone:
• Restricted — No Java or similar software
applications may access the location of your
phone. However, location information may still
be available to the phone’s owner,fleet
manager,or account administrator.
• Unrestricted — All Java applications may
accessthe location of your phone, without
notifying you.
•ByPermission— When a Java application
attempts to access the location of your phone,
you are prompted to give permission. However,
location information may still be available to the
phone’s owner, fleet manager, or account
administrator.
See “Setting Privacy Options” on page 92 for
informat ion on choosing these options.
83
Page 92

Java Applications
Granting or Denying Permissio n
If you choose By Permission, you must grant or
deny each Java application access to the location
of your phone when the application requests
access for the first time. You may be required to
grantor deny subsequentrequestsfrom the same
application,depending on the privacy setting you
choose for the individual Java application (see
“Setting Privacy for Each Java Application”).
When a Java application requests accessto the
locationof yourphone,a screen appearsinforming
you.
To deny this request:
1 Press A under Deny. The application does not
access the location of your phone.
2 Select the denying option you want:
• Always — If the applicationrequestsaccess
to the location of your phone again, the
request is denied withoutnotifying you.
• For this session — If the application
requests access to the location of your phone
again before you power off your phone,the
request is denied withoutnotifying you.
•OnlyOnce— If the application requests
access to the location of your phone again,
you are prompted to grant or deny
permission.
84
To grant this request:
1 Press A underGrant. The application accesses
your phone’s location.
2 Selectthegrantingoptionyouwant:
•Always— If the application requestsaccess
to the locationof your phone again,the
request is granted withoutnotifying you.
• For this session — If the application
requests access to the location of your phone
again before you power off your phone,the
request is granted withoutnotifying you.
•OnlyOnce— If the applicationrequests
access to the location of your phone again,
you are prompted to grant or deny
permission.
Setting Privacy for Each Java Application
After a given Javaapplication requests access to
the location of your phone for the firsttime, you
have the opportunity to set the GPS privacy option
for that Java application.
1 From the main menu, selectJava Apps.
2 Scrollt o the applicationor suite of applications
youwanttosettheprivacyoptionfor.
Page 93

If the application has requested accessto the
location of your phone, this icon
when you highlight the application.
S appears
3 Press m.
4 Select Permissions.
5 Select the privacy option you want for this
application:
• Always — The application always has
permission to access the location of your
phone,withoutnotifyingyou.
•Ask—When the application requestsaccess
to the location of your phone, you are
prompted to grant or deny permission (see
“Grantingor DenyingPermission” on page
84).
• Never— When the application requests
accessto the location of your phone,the
request is denied withoutnotifying you.
Java Applications and GPS Enabled
85
Page 94

GPS Enabled
Your phone’s GPS Enabled feature uses
information from Global Positioning System (GPS)
satellites orbiting the Earth to determine the
approximate geographical location of your phone,
expressed as latitude and longitude. The
availability and accuracy of this location
informat ion (and the amount of time that it takes to
calculateit)willvarydepending on the environment
in which you are using the GPS feature. For
example, GPS location fixes are often difficult to
obtainindoors,in coveredlocations, between high
buildings,or in othersituationswhere you havenot
established a clear broad view of the sky. SEE:
“IMPORTANT: Things to Keep in Mind”.
When you make a 911 emergency call, the GPS
feature of your phone can help emergency
personnel locate you if your phone has adequate
accessto GPS satellite signals and your
emergency responsecenterisequippedtoprocess
such information.
You can also use the GPS featureto view your
approximate location.Locationinformat ion
appearson the phone’s display.
86
Java applications loaded on your phone can also
request your location. If your phone is connected to
a laptopcomputeror similar device,software
runningon that device can request your location.
To protect your privacy, you can control whether
these requestsare granted.
IMPORTANT: Things t o Keep in Mind
If you are using the GPS feature of your phone
while driving, please give full attention to driving
and to the road.
Whereadequatesignals frommultiple satellites
are not available (usually because your GPS
antenna cannot establish a view of a wide area of
open sky), the GPS feature of your phone WILL
NOT WORK. Such situations include but are
not limitedto:
• In underground locations
• Inside of buildings, trains, or other covered
vehicles
• Under any other metal or concrete roof or
structure
• Between tall buildings or under dense
tree-cover
• Near a powerful radio or television tower
Page 95

Making an Emergency Call
• Whenyour GPS antenna is covered (for
example, by your hand or other object) or
facing the groun d
• In temperature extremes outside the
operating limits of your phone
Walking or driving very slowly may also
substantially reduce GPS performance.
Even where location information can be
calculated in such situations, it may take much
longer to do so, and your location estimate may
not be as accurate.Therefore, in any 911 call,
always report the location to the emergency
response center if you can and if you cannot,
remain on your phone for as long as the
emergency response center instructs you.
Even where adequate signals from multiple
satellites are available, your GPS feature will
only provide an approximate location, often
within 150 feet (45 meters) but sometimes
much further from your actual location. Advice
on h ow to improve GPS performance is
provided in “Enhancing GPS Performance” on
page 89.
While the GPS feature of your phone can be a
valuable navigational aid, it does not replace the
need for carefulnavigating and good judgment.
Never rely solely on one device for navigation.
Rememberthat the accuracy of the location
information and the time neededto obtainit will
vary dependingon circumstances, particularly the
ability to receive signals from adequate numbers of
satellites.
On emergency calls, your phone uses assistance
informat ion from the phone networkto improvethe
speed and accuracyof your phone’s location
calculation: if such assistanceinformation
becomes unavailable, it may reduce the speed and
accuracyof the location calculation.
The satellitesused by the GPS feature of your
phone are controlled by the U.S. government and
aresubjectto changesimplementedin accordance
with the Department of Defense GPS user policy
and the Federal Radionavigation Plan. These
changesmay affectthe performance of the GPS
feature of your phone.
Making an Emergency Call
Dial 911 to be connected to an emergency
responsecenter. If you are on an active call,you
must end it before calling 911.
When you make an emergency 911 call, the GPS
feature of your phone begins to seek information to
calculate your approximate location. It will take
the GPS feature of your phone some time to
determine your approximate location. Even
where your phone has good access to sufficient
87
Page 96

GPS Enabled
GPS satellite signals and network assist data, it
may take 30 seconds or more to determine the
approximate location. This time will increase where
thereis reducedaccess to satellitesignals. When
your approximate location is determined, it is made
available to the appropriate emergency r esponse
center.
In some cases, your local 911 emergency
response center may not be equipped to
receive GPS location information. For this
reason, and because the GPS location information
reported is only approximate or may not be
available in your location(see “IMPORTANT:
Thingsto Keep in Mind” on page 86), always
report yourlocation to the 911 operator you
speak to when making an emergency call, if able,
just as you would when using a phone without GPS
capabilities.
Note: If you are concerned aboutwhetheryour
local911emergency response center is
equipped to receive GPS location
information, contact your local authorities.
In general, if your phone has access to signals
from more GPS satellites, your location will be
determined faster and more accurately than if your
phone has access to signals from fewer GPS
satellites.
88
If your phone does not have adequate access to
GPS satellitessignals, the location of the nearest
cell tower in contact with your phone is
automatically made availableto the emergency
responsecenter, if the centerhas the capabilityto
receive such information.
See“Enhancing GPS Performance” on page 89 for
informat ion on how to help your phone determine
your location.
Viewing Your Approximate Location
1 From the main menu, selectGPS > Position.
2 Scrollto view the entire screen.
This displays the following information about the
last time your location was calculated:
• The time (as Greenwich MeanTime)and date
that the location was last calculated
• The approximate location, expressed as latitude
and longitude
• The estimated accuracy of the calculated
location. This estimateofaccuracyis only a very
roughestimateand may vary substantiallyfrom
the actual accuracy of the approximate location
informationreported.
Page 97

Enhancing GPS Performance
• The number of satellites used to calculate the
location. In general, more satellites make for
better accuracy.
To calculate your location again:
Press A under Rfrsh.
It may take your phoneseveral minutes to
complete the process of determining your location.
During this time,a message usually appears o n
your phone’s display saying your phone is
scanning for satellites.For t ips on gettingthe best
locationcalculation,see “ E nhancing GPS
Performance”.
The Position screen displays the updated
information.
To cancel a location calculat ion before it is
completed:
Press A under Cancel to return to the Position
screen. -or-
Press e to return to the idle screen.
Each time approximate location of your phone is
calculated, the latestlocationinformation is stored
in your phone and remains there even when your
phone is poweredoff. You will see this information
thenexttimeyouviewthePosition screen.
If you received a phone call or alert while
attemptingtodetermineyour location,the Position
screenwill disappear,but yourphone will continue
attempting to determine its location. If it is
successful, the new location information will be
displayed the next time you view the Position
screen.
Enhancing GPS Performance
Sometimes the GPS feature of your phone may be
unable to complete a location calculation
successfully. If this happens when you are making
an emergency call,the location of the nearest cell
tower in contactwith your phone is made available
to the appropriate emergency response center if
the center has the capability to receive such
informat ion. If this happens when you are trying to
view your locationon the phone’s display,you will
see a message indicating that your phone cannot
accesssatellites.
89
Page 98

GPS Enabled
To improve accuracy and increase your chances of
a successful calculation,do the followingwhile
your phone is determining your approximate
location:
• Stay in the open. The GPS feature works best
wherethere is nothing between your phone and
a largeamount of open sky. If possible,go
outside, away from tall buildings and foliage.
While performance in a building is improved by
movingcloserto windows,glasswithcertainsun
shielding films may block satellite signals.
• Extendyour phone antenna.
90
• Hold your phone to enhance reception. Signals
from GPS satellites are transmitted to your GPS
antenna, which is in your phone antenna. Hold
your phone away from your body, giving the
antenna clear access to satellite signals. Do not
covertheantennaareawithyourfingersor
anything else.
GPS antenna
Page 99

Updating Satellite Almanac Data
• Stand still.If possible,stand still until your phone
is finished determining your location. Moving
your phone at a walking pace while your phone
is calculatingyour approximate locationmay
substantially decrease GPS performance.
• Ina car.When usingthe GPS Enabled featurein
a car, position your phone so that the GPS
antenna has good access to GPS signals
through the car’s windows. Typically, the GPS
antenna has best access to GPS signals in a car
when placed near a window.
Note: Although moving your phone at a walking
pacedecreasesGPS performance,
moving it at the speed of a moving car
does not.
• Stay in network coverage. Depending on who
your service provider is, the network will provide
your phone with information that helps
determine your location more quickly and
accurately.
Updating Satellite Almanac
Data
Anotherway to keep the GPS feature of your
phone working well is to keep your satellite
almanacdata up to date.
The United States government maintains an
almanacof data about where GPS satellitesare as
they orbitthe Earth. This informationis availableto
your phone. Keeping your satellite almanacup to
date helps your phone determine your location
more quickly.
The almanac contains informationabout the
location of satellites, their operational status, and
other satellite information. Keeping this information
updatedenhancesthe performance of your GPS
feature. In most cases, your phone will be able to
get a fixin strongsatellitesignal conditions with
outdated almanacdata, but it may t ake longer.
Note: When you make an emergency call, your
phone does not rely upon the almanac to
determine your location.
If your satellitealmanac data is out of date, your
phone may promptyou to updateit. Followthe
instructions that appear on the phone’s display.
Youmaybeaskedtogotoawebsiteorcalla
customer care number.
91
Page 100

GPS Enabled
Setting Privacy Options
Yourphone’sGPS privacy options control whether
Java applications on your phone or other software
applicationsmay view the locationof your
phone.Yo u may set your phone to one of these
GPS privacyoptions.
Note: Privacy options do not apply to the
transmission of location information
during emergency 911 calls.
To set your GPS privacy options:
1 From the main menu, selectGPS > Privacy.
2 If your GPS PIN security feature is enabled,
enter your GPS PIN. (See “Setting the GPS PIN
Security Feature” for more information.)
3 Select the privacy option you want:
• Restricted — No Java or similar software
applicationsmay view the locationof your
phone.However, locationinformation may still
be available to the phone’s owner, fleet
manager, or account administrator.
• Unrestricted — All applications may view the
locationof your phone, without notifyingyou.
92
•ByPermission—Whenanapplication
attempts to view the location of your phone,
youwillbepromptedtogivepermission.
However, locationinformation may still be
availableto the phone’sowner,fleetmanager,
or account administrator.
Setting the GPS PIN Security Feature
To prevent your GPS privacysettingsfrom being
alteredwithoutyour knowledge, your GPS privacy
optioncan be protected by a PIN.
When you receive your phone,the GPS security
feature is turnedoff, so you do not have to enter a
GPS PIN to access your GPS privacy options. If
you turn this feature on, you will be required to
entera GPS PIN to access your GPS privacy
options.
To turn the GPS E nabled security feature on or off:
1 From the main menu, selectSettings >
Security > GPS PIN.
2 Select On or Off.
3 Enter the current GPS PIN.
Note: When you receive your phone, your GPS
PIN is 0000.
4 Press A under Ok.
 Loading...