

Page 1
Quick Start Guide
HMWL1010
Wireless Camera
Page 2

Wireless Camera Quick Start Guide
Regulatory Information
FCC ID NUMBER: OU4-XWC700
INSTRUCTION TO THE USERS (IF DEVICE DOES NOT CONTAIN A DIGITAL DEVICE)
The user is cautioned that changes or modifications not expressly approved by the p arty responsi ble for compliance could void the user's authority to operate this
equipment.
INSTRUCTION TO THE USER (IF DEVICE CONTAINS A DIGITAL DEVICE)
This device complies with part 15 of the FCC Rules. Operation is subject to the fo llowing two c onditio ns: (1) This device may not ca use harmfu l inter ference, and
(2) this device must accept any interference received, including interference that may cause undesired operation.
Note: This equipment has been tested and found to comply with the limits for a Class B digital device, pursuant to part 15 of the FCC Rules. These limits are
designed to provide reasonable protection against harmful interf erence in a residential installation. This equipment generates, uses and can radiate radio
frequency energy and, if not installed and used in accordance with the instructions, may cause harmful interference to radio communications. However, there is
no guarantee that interference will not occur in a particular installation. If this equipment does cause harmful interference to radio or television reception, which
can be determined by turning the equipment off and on, the user is encouraged to try to correct the interference by one or more of the following measures:
• Reorient or relocate the receiving antenna.
• Increase the separation between the equipment and receiver.
• Connect the equipment into an outlet on a circuit different from that to which the receiver is connected.
• Consult the dealer or an experienced radio/TV technician for help.
This device must be installed and used in strict accordance with the manufacturer’s instructions as described in the user documentation that comes with the
product.
The term "IC:" before the certification/registration number only signifies that t he Industry Canada technical specifications were met.
Limited Warranty
Wireless Camera
Motorola, Inc., Broadband Communications Sector (" Motorola")
Limited Warranty. Motorola warrants to you, the original end user customer, that (A) the Product, excluding Software, will be materially free from defects in
materials and workmanship under normal use, and (B) with respect to Software, (i) the media on which the Software is provided will be free from defects in
material and workmanship under normal use, and (ii) the Software will perform materiall y as described in its documentation. This Limited Warranty to yo u, the
original end user customer, continues (A) for Software and the media upon which it is provided, for a period of ninety (90) days from the date of purchase from
Motorola or an authorized Motorola reseller , and (B) for the Product (e xcluding So f tware), for a period of one (1) ye ar from the da te of purcha se f rom Motoro la or
from an authorized Motorola reseller. To take advantage of this Limited W arranty or to obt ain tech nical support, you must call the Motoro la toll-free phone number
(below). Motorola’s sole and exclusive obligation under this Limited Warranty for retail sales shall be to repair or replace any Product or Software that does not
meet this Limited Warranty. All warranty claims must be made within the applicable Warranty Period.
General Information. The warranties described in this Section shall not apply: (i) to any Product subjected to accident, misuse, neglect, alteration, Acts of God,
improper handling, improper transport, improper storage, improper use or application, improper installation, improper testing or unauthorized repair; or (ii) to
cosmetic problems or defects which result from normal wear and tear under ordinary use, and do not affect the performance or use of the Product. Motorola’s
warranties apply only to a Product that is manufactured by Motorola and identified by Motorola owned trademark, trade name or product identification logos
affixed to the Product. Motorola does not warrant to you, the end user, or to anyone else that the Software will perfor m error free or without bugs. MOTOROLA IS
NOT RESPONSIBLE FOR, AND PROVIDES “AS IS” ANY SOFTWARE SUPPLI ED BY 3RD PARTIES. EXCEP T AS EXPRESSLY STATED IN THIS SECTION
(“WARRANTY INFORMATION”), THERE ARE NO WARRANTIES OF ANY KIND RELATING TO THE PRODUCT, EXPRESS, IMPLIED OR STATUTORY,
INCLUDING BUT NOT LIMITED TO IMPLIED WARRANTIES OF MERCHANTABILITY, FITNESS FOR A PAR TICULAR PURPOSE, OR THE WARRANTY
AGAINST INFRINGEMENT PROVIDED IN THE UNIFORM COMMERCIAL CODE. Some states do not allow for the exclusion of implied warranties, so the
above exclusion may not apply to you.
What additional provisions should I be aware of? Because it is impossible for Motorola to know the purposes for which you acquired this Product or t he uses to
which you will put this Product, you assume full responsibility for the selection of the Product for its installation and use. While every reasonable effort has been
made to insure that you will receive a Product that you can use and enjoy, Motorola does not warrant that the functions of the Product will meet your
requirements or that the operation of the Product will be uninterrupted or error-free. MOTOROLA IS NOT RESPONSIBLE FOR PROBLEMS OR DAMAGE
CAUSED BY THE INTERACTION OF THE PRODUCT WITH ANY OTHER SOFTWARE OR HARDWARE. ALL WARRANTIES ARE VOID IF THE PRODUCT
IS OPENED, ALTERED, AND/OR DAMAGE D.
THESE ARE YOUR SOLE AND EXCLUSIVE REMEDIES for any and all claims that you may have arising out of or in connection with this P roduct, whether
made or suffered by you or another person and whether based in contract or tort.
THIS PRODUCT IS INTENDED ONLY FOR USE TO FACILIT ATE HOME MONITORING AND CONTROL AND IS NOT INTENDED TO BE A SUBSTITUTE
FOR A HOME SECURITY SYSTEM. MOTOROLA HEREBY DISCLAIMS ANY LIABILITY WHA T SOEVER THAT MAY ARISE FROM THE USE OR INABILITY
TO USE THIS PRODUCT AS A HOME SECURITY SYSTEM. IN NO EVENT SHALL MOTOROLA BE LIABLE TO YOU OR ANY OTHER PARTY FOR ANY
DIRECT, INDIRECT, GENERAL, SPECIAL, INCIDENTAL, CONSEQUENTIAL, EXEMPLARY OR OTHER DAMAGES ARISING OUT OF THE USE OR
INABILITY TO USE THE PRODUCT (INCLUDING, WITHOUT LIMITATION, DAMAGES FOR INJURY, LOSS OF PROPERTY, BUSINESS PROFITS,
BUSINESS INTERRUPTION, LOSS OF INFORMATION OR ANY OTHER PECUNIARY LOSS), OR FROM ANY BREACH OF WARRANTY, EVEN IF
MOTOROLA HAS BEEN ADVISED OF THE POSSIBILITY OF SUCH DAMAGES. IN NO CASE SHALL MOTOROLA’S LIABILITY EXCEED THE AMOUNT
YOU PAID FOR THE PRODUCT.
THIS PRODUCT EMPLOYS WIRELESS TECHNOLOGY AND, IN SOME CASES, MAY FACILITATE TRANSMISSION OF DATA OR VIDEO OVER THE
INTERNET IN CONNECTION WITH ITS USE. THE CUSTOMER SHOULD UNDERSTAND THAT ALL WIRELESS TRANSMISSIONS MAY BE SUBJECT TO
INTERCEPTION AND THAT DATA TRANSMISSION OVER THE INTERNET CANNOT BE GUARANTEED TO BE 100% SECURE. AS A RESULT,
MOTOROLA CANNOT ENSURE OR WARRANT THE SECURITY OF ANY VIDEO OR DATA TRANSMITTED BY OR THROUGH THIS PRODUCT,
WHETHER OR NOT TRANSMITTED VIA THE INTERNET, AND THE CUSTOMER USES SUCH PRODUCT AT HIS OR HER OWN RISK.
These matters are governed by the laws of the Commonwealth of Pennsylvania, without regard to conflict of laws principles and excluding the provisions of the
United Nations Convention on Contracts for the International Sale of Goods.
Please call the Motorola toll-free number, 1-877-466-8646, for technical support or warranty service.
Page i
Page 3

Quick Start Guide Wireless Camera
Battery Life
For your Motorola Home Monitoring & Control System devices that require batteries, use high quality, non-corrosive batteries designed for use in electronic
equipment. Battery life is one year with normal usage. Do not use Rechargeable batteries in any Motorola Home Monito ring & Control System device.
Registration
Register your product by accessing this website:
http://broadbandregistration.motorola.com
Copyright © 2004 by Motorola, Inc.
All rights reserved. No part of this publication may be reproduced in any form or by an y means or used to make any derivative work (such as translation,
transformation or adaptation) without written permission from Motorola, Inc.
Motorola reserves the right to revise this publication and to make changes in content from time to time without obligation on the part of Motorola to provide
notification of such revision or change. Motorola provides this guide without warranty of any kind, either implied or expressed, including, but not limited to, the
implied warranties of merchantability and fitness for a particular purpose. Motorola may make improvements or changes in the product(s) described in this
manual at any time.
MOTOROLA and the Stylized M Logo are registered in the US Patent & Trademark Office. All other
owners. © Motorola, Inc. 2004.
product or service names are the property of their respective
Page ii
Page 4
Wireless Camera Quick Start Guide
Introduction
Congratulations on your purchase of the Motorola Wireless Camera. Your camera uses a high-resolution color video camera, a built-in heat-activated motion detector, and an audio microphone. These
features enable you to secure an area, regardless of day or night, rain or shine. This Quick St art Guide
describes how to set up and troubleshoot your Wireless Camera.
Controlling Your Camera
Using your computer and the Gateway, you locally manage your home environment with the Motorola
Home Monitoring & Control System. When configured, the system can notify you of any new events
by sending an e-mail when your Wireless Camera detects an event. An event is defined as movement
in the field of view of the camera heat sensor.
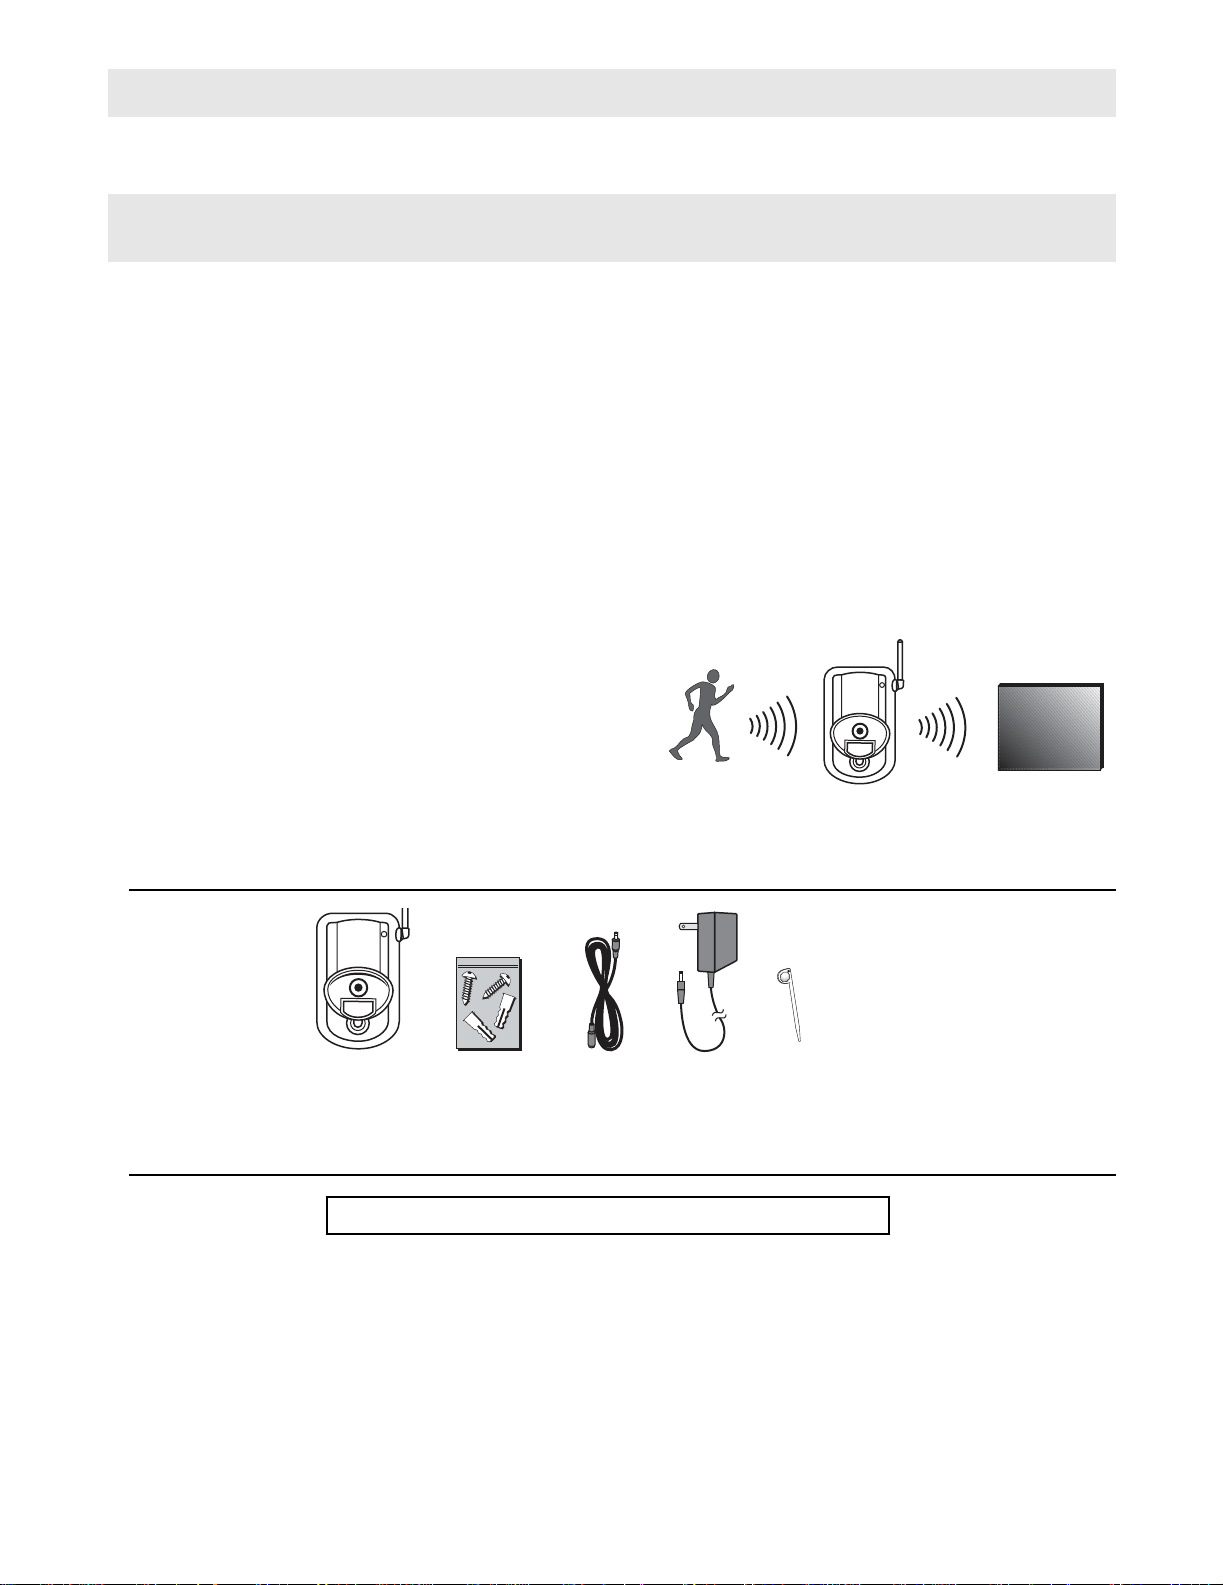
How It Works
The Wireless Camera surveys the area up to 12 -14 ft.
(3.5 - 4 m) at a viewing angle of 80 degrees. If armed,
heat-motion triggers the camera and turns it on automatically and begins transmitting the image. The camera then communicates the video wirelessly back to
the Gateway, which in turn feeds your computer. This
enables you to watch the video to determine the event
that triggered it.
Controller
Package Contents
Wireless
Camera
Hardware
Mounting Kit
Camera AC
Extension
Cord
9V Power
Adapter
Discovery
Tool
Installation Overview
The Gateway must be installed before activating your camera!
Installing your camera is a simple two-step process.
1 Register your camera with your Gateway using a process called discovery. You must use AC
power and not batteries for the intial discovery process. Refer to your Gateway documentation
for instructions on how to discover your Wireless Camera.
2 Mount the camera.
Note: Batteries can be used after discovery but are discouraged as they only provide approximately 2 hours of
coverage. Instead, use the power adapter to ensure smooth camera operation.
Page 1
Page 5

Quick Start Guide Wireless Camera
)
Installation Hints
The Motorola Wireless Camera is constructed of UV resistant ABS plastic.
Please consider the following points when mounting the camera:
• The camera must be aimed so that it does not dire ctly face the sun or any bright light; otherwise,
this may cause damage to the camera.
• Avoid viewing areas where half of the area is in bright sunlight and the other half is dark. All types
of cameras have difficulty seeing wide variations of light.
• If installing the Wireless Camera outside, it should be shielded from the elements, such as
underneath a porch. Do not install the camera where it is subjected directly to the elements.
• Typically, the camera's wireless reception is good up to 60-80 feet depending on the number of
obstacles. These can include metal framing, thick walls, and other wireless devices operating at
2.4 GHz. It is recommended that different positions as well as varying antenna adjustments be
tried.
Installing Your Camera
Your camera can either be mounted on a wall or just sit on a level surface.
Wall Mount Your Wireless Camera
Make sure the power adapter cord is long enough to reach your mounting location. Also, be sure the AC outlet
cannot be switched on and off with a wall-switch.
Warning, when mounting near a window, drilling too close to the glass could break the glass and possibly cause
it to shatter. The window extends deeper into the frame than can be seen; therefore, ensure your screw is
beyond the glass before drilling.
1 The Wireless Camera can use a separate wall mount bracket allowing you to easily remove the
camera from the wall mount bracket and move it to your table stand, if desired.
2 Using the holes on the drilling template found later in this guide,
mark the position of the holes to be drilled. For drywall or other
composite surfaces, use a 7/32" drill bit. Drill a hole for each of the
mounting screws and insert a plastic wall anchor into each hole.
For other solid surfaces use a 1/16" drill bit. Drill a pilot hole for
each of the mounting screws.
1.6 mm (1/16 inch
maximum
Page 2
Page 6

Wireless Camera Quick Start Guide
3 Using the screws provided, secure the camera to the wall. When mounting the screws to the wall,
leave 1/16" (1.6 mm) space between the screw head and the wall. Using the mounting holes,
slide the camera down on to the screws until it is firmly seated.
Discovery
Button
4 Position the camera to view the desired area and plug in the power supply. Please keep in mind
that the field of view is 80 degrees and motion sensor distance works up to 12 -14 ft. (3.5 - 4 m).
5 Make slight adjustments to the camera-viewing angle by tilting and panning the camera head by
hand.
6 It is recommended that the antenna be set vertically.
Power Insert
Mounting
Holes
Tabletop Mount Your Wireless Camera
The camera can be placed on any level surface.
1 Plug the power supply into camera and then to the wall.
2 Make adjustments to the camera viewing angle by tilting and panning the ca mera head with your
hand.
3 Adjust the antenna as needed. It is recommended that the antenna stay at a 90-degree angle to
the base of the camera for the best wireless reception.
Page 3
Page 7

Quick Start Guide Wireless Camera
Troubleshooting
Problem Solution
Camera will not register
with the Gateway
No camera picture • Ensure the camera is powered.
Poor picture quality • Ensure that you are using the proper power supply.
Motion events are not
triggered
• Ensure the camera is powered.
• Ensure that the Gateway is powered and online.
• Ensure you are pressing the Discovery button .
• Reposition the camera closer to the Gateway.
• Ensure that the Gateway is powered and online.
• Ensure you have the proper camera selected.
• Reposition the camera closer to the Gateway.
• Reposition the antenna.
• Make sure proper camera quality settings are configured when viewing.
• Make sure your camera viewing area has proper lighting.
• Try another location.
• Adjust the camera antenna.
• Select other operating channels on other 2.4 GHz devices
• Ensure the camera is not positioned behind glass. The motion sensor is
triggered by changes in heat. Any material such as glass that "insulates”
keeps the camera from detecting heat changes (movement).
• Ensure the camera head is positioned properly.
Audio problems • Make sure your volume is turned up when playing back the video clip.
• Make sure the sound is within the microphone range (6-10 feet).
• Does the computer have a sound card and are the speakers activated
and loud enough?
FAQ
The Gateway does not recognize the camera during discovery mode?
Make sure your Gateway indicates discovery mode and that the camera is using the proper power supply (9
volt). Press the Discovery button found inside of the battery compartment. If this continues to fail, you will need
to try another location for the camera. You may also try a hard reset by holding down the Discovery button while
powering up the camera. After resetting the camera, please try to discover the camera again.
How far away can the camera see?
Depending on the lighting conditions and the size of the object(s), you can view objects up to 200 feet (60 m)
away with a viewing angle of 80 degrees. The motion sensor is capable of detecting objects up to 12 -14 ft. (3.5
- 4 m) with a field of view of 80 degrees.
How sensitive is the camera's microphone?
The microphone picks up normal conversation 6 to 10 feet away.
Page 4
Page 8

Wireless Camera Quick Start Guide
Features and Specifications
• PIR motion detection
• LED in camera illuminates when activity occurs
• Microphone captures audio
• 80 degree field of view for motion and camera lens
• Weather resistant
• Auto Brightness, Auto Contrast, Auto White-Balance
• All hardware for either wall or ceiling mounting included
• AC or battery operation (batteries not included)
Integrated Lens:
4.3 mm, F1.8 fixed focus
Focus range: 2 feet to Infinity Resolution: 360 horizontal TV lines
Signal/Noise Ratio: 48 dB High-Speed Electronic Shutter 1/6 0 - 1/15000 sec
Image Sensor 1/3” CMOS Current Consumption: approximately 40mA
Typical Range Outdoors:
250 feet (76 m)
Minimum Illumination: 5 lux Frequency Range 2.41-2.47 GHz
Overall Size: 3.25"W x 7.3"H x 4.5"D (8.3 cm W x 18.5 cm H x 11.4 cm D)
Motion and camera lens:
80 degree field of view
Typical Range Indoors:
60 feet (18 m)
Page 5
Page 9

Quick Start Guide Wireless Camera
Wall Mounting Drilling Template
Mounting tools: Screwdriver, electric drill or awl. On hard surfaces, pre-drill ½ inch deep pilot holes
with a drill bit slightly smaller than the camera mounting screws before securing the camera to the surface. When mounting a camera on soft surfaces like sheetrock, use an awl to punch holes in the ma terial slightly smaller than the plastic anchors included in the hardware mounting kit.
The illustrations are drawn to a one-to-one scale which means they provide the exact dimensions required to
mount the unit.
Drill Holes In
These Positions
Page 6
Page 10

Visit our website at:
http://www.motorola.com/homemonitoring
516955-001
7/04
MGBI
 Loading...