

Page 1

SHAWDIRECT SATELLITE TV
HDDSR 605 & HDPVR 630 User Guide
Page 2

A. PREFACE
© 2010 Shaw Satellite G.P.
All trademarks and copyrights are the property of their respective owners.
Version 1.9 – Drumheller 12.1
Last Updated: July 14, 2010
Created & Maintained by: Shaw Direct Product Development
ii
Page 3

B. TABLE OF CONTENTS
A. PREFACE ................................................................................. II
B. TABLE OF CONTENTS ............................................................. III
C. HOW TO READ THIS MANUAL .................................................. IV
1. THE BASICS ............................................................................ 1
CONNECTIONS AND VIDEO SETTINGS ............................................ 1
1A.
CURRENT VERSION .................................................................. 3
1B.
ACTIVATING YOUR RECEIVER ...................................................... 3
1C.
USING YOUR REMOTE CONTROL ................................................. 3
1D.
INTERACTIVE MENU BAR ........................................................... 5
1E.
2. FINDING WHAT YOU WANT, WHEN YOU WANT .......................... 8
THE GUIDE ............................................................................ 8
2A.
SEARCH TOOLS ..................................................................... 11
2B.
INFO PAGES ......................................................................... 12
2C.
THE PROGRAM OPTIONS MENU ................................................ 13
2D.
THE UPCOMING AIR DATES SCREEN .......................................... 14
2E.
MUSIC SEARCH ..................................................................... 14
2F.
3. CUSTOMIZE YOUR VIEWING EXPERIENCE .............................. 16
PARENTAL CONTROLS............................................................. 16
3A.
FAVOURITES ......................................................................... 19
3B.
GUIDE SETTINGS ................................................................... 20
3C.
4. HDDSR 605: SMART REMINDER TECHNOLOGY ....................... 22
SETTING REMINDERS ............................................................. 22
4A.
VIEWING REMINDERS ............................................................. 23
4B.
MANAGING REMINDERS .......................................................... 23
4C.
USING AUTO-TUNES .............................................................. 24
4D.
5. HDPVR 630: SMART PVR TECHNOLOGY ................................. 25
5A.
SETTING RECORDING EVENTS .................................................. 25
CUSTOMIZING YOUR RECORDING EVENT OPTIONS ........................ 26
5B.
VIEWING UPCOMING RECORDINGS ............................................ 28
5C.
RECORDING SYMBOLS ........................................................... 28
5D.
DUAL RECORDINGS ............................................................... 29
5E.
MANUAL TIMERS .................................................................. 29
5F.
6. THE PVR LIST ....................................................................... 30
PLAYING BACK YOUR RECORDED PROGRAMS .............................. 30
6A.
PLAYBACK CONTROLS ............................................................ 32
6B.
7. CONTROLLING LIVE TV WITH LIVE-OFF-DISK (LOD) ................ 34
8. OTHER MENUS ..................................................................... 35
INTERACTIVE APPLICATIONS .................................................... 35
8A.
RECEIVER MAIL .................................................................... 35
8B.
CALLER ID LOG .................................................................... 35
8C.
9. RECEIVER OPTIONS .............................................................. 36
“1. FAVORITE LISTS” ............................................................ 36
9A.
“2. PARENTAL CONTROLS” ..................................................... 36
9B.
“3. PURCHASE HISTORY” ....................................................... 36
9C.
“4. SYSTEM SETTINGS” ......................................................... 36
9D.
“5. PVR SETTINGS” .............................................................. 39
9E.
“6. (OMITTED)” .................................................................... 39
9F.
“7. GUIDE SETTINGS” ........................................................... 39
9G.
“8. MENU BAR” .................................................................. 39
9H.
10. FREQUENTLY ASKED QUESTIONS ................................... 40
iii
Page 4
C. HOW TO READ THIS MANUAL
iv
Page 5

1. THE BASICS
1A. CONNECTIONS AND VIDEO SETTINGS
When installing your HDDSR, 1 direct coax line is required to connect to your satellite dish or
multiswitch. If you have an HDPVR, 2 direct coax lines are required. The HDPVR will have
limited functionality if only 1 line is connected. If you would like us to take care of the
installation, call Customer Service – we’re here 24/7 to discuss available options and help you
book an appointment.
If you are unsure of how to connect your satellite receiver to your TV or home theatre system,
please refer to the corresponding product manual or the directions that came with your satellite
receiver.
CABLE TYPES
Note that the following cable types must be used to provide high definition (HD) picture:
• COMPONENT: Look for 3 connectors on each end, coloured Green, Blue, and Red. This
cable does not carry sound.
• DVI-TO-HDMI: This cable allows you to connect a DVI-only device to an HDMI-only device.
This cable does not carry sound.
• HDMI: This cable carries both video and sound. It has a single identical connector on
both ends.
The following cable types will provide Dolby 5.1 Surround Sound when connected to a capable
home theatre receiver:
• OPTICAL: This thin cable has a small square connector at each end.
• HDMI: If supported by your home theatre receiver, you can use a single HDMI cable to
connect your receiver to your home theatre system, and another HDMI cable to connect
the home theatre system to the TV. Both video and sound are carried in the cable.
For the best television experience, it is recommended that you connect your HD receiver with one
of the above video and audio connections.
1
Page 6
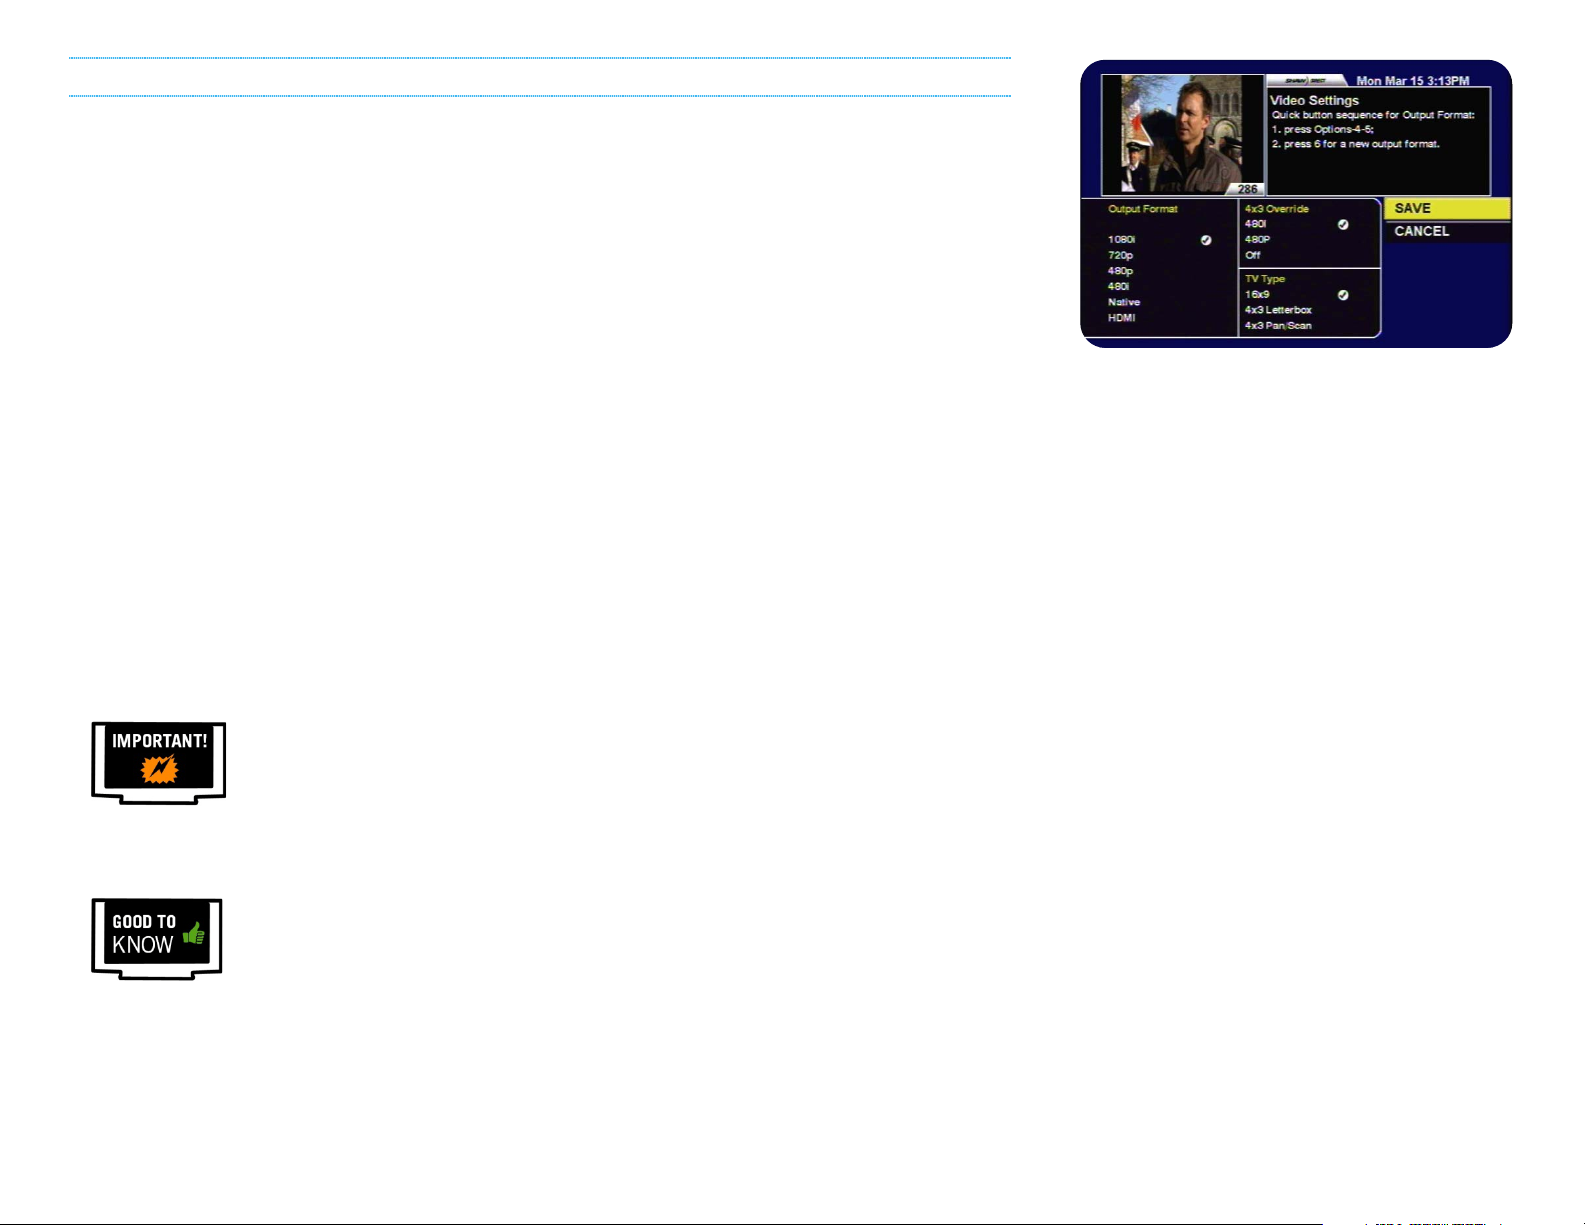
VIDEO SETTINGS
After connecting your satellite receiver, taking a moment to optimize your video settings will
ensure the best viewing experience. Press OPTIONS on your remote control, then enter the
numbers 4, 5. The following Video Settings options will be available:
• OUTPUT FORMAT: This determines the primary resolution that is used to send video to your
TV. On most HDTVs, 1080i is optimal. For SDTVs, use 480i.
• 4X3 OVERRIDE: Turning this on will “override” the primary output format when tuned to
standard definition stations. Turning on the override allows most TVs to automatically
stretch SD content to fill the whole screen. If you’d prefer to control this yourself using
the ASPECT button, leave it Off.
• TV TYPE: This option specifies what type of TV you have. Widescreen TVs are 16x9 (such
as most HDTVs); traditional square TVs (such as most SDTVs) are 4x3. Select whichever
is applicable to you.
On a regular HDTV, recommended settings are 1080i, 480i, and 16x9 and will normally result in
standard definition channels automatically “stretched” by your TV to fit the screen.
On an SDTV, recommended settings are 480i, Off, and 4x3 Letterbox.
Select “SAVE” and press ENTER after changing the settings and EXIT to return to live TV.
If you select an output format that is not supported by your TV, video may be
lost. If this occurs, press EXIT, OPTIONS, 4, 5, and then 6 repeatedly until
video returns. The selected output format will be displayed on the Front Panel
of the receiver with each change.
You can use the ASPECT or B button while watching any program or recording
to Stretch (“str”) or Zoom (“zoo”) the picture. You can return the aspect to
Normal (“nor”) when the program has finished. The current aspect mode is
shown on the front panel of your receiver each time you press the button.
2
Page 7
1B. CURRENT VERSION
Pressing OPTIONS, 4, 7 will display the System Status menu. Line H shows the version of your
receiver software, listed as “Current Version”. This manual applies to Current Version 00.12.
Individual menus, options, or functionality may be slightly different depending on your Current
Version. If you have questions about whether your receiver has the most recent version, please
inquire with the Shaw Direct agent when you activate your receiver.
1C. ACTIVATING YOUR RECEIVER
Once connected, your receiver must be activated on your Shaw Direct account in order to access
programming and function properly. You can reach Shaw Direct customer service anytime at
1-888-554-7827 to activate your receiver.
1D. USING YOUR REMOTE CONTROL
For a full list of all buttons and their function, refer to the manual that came with your remote or
the Welcome Guide that came with your receiver. Throughout this manual, refer to the green
table on the right side of the page to know which buttons access a particular functionality.
NAVIGATING THE ONSCREEN MENUS
The following keys will allow you to navigate through the menus on your Shaw Direct HD receiver:
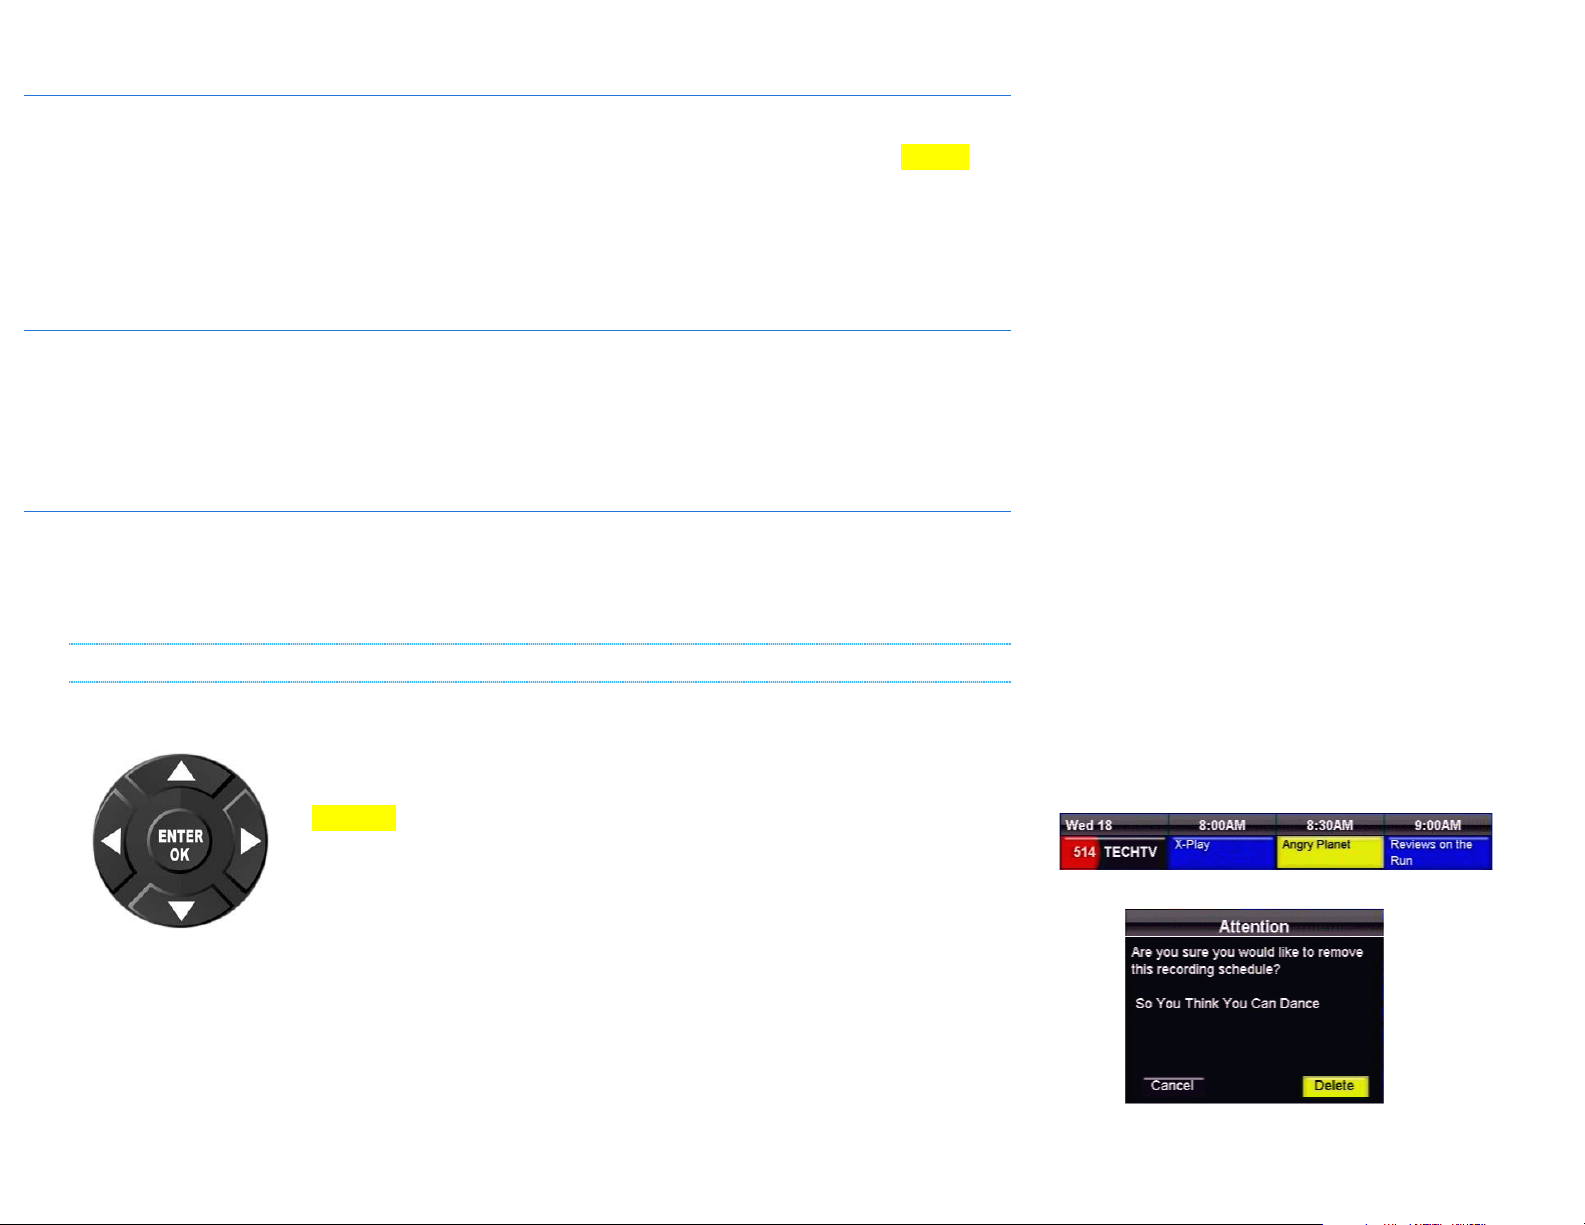
The DIRECTIONAL ARROW keys allow you to move up, down, left, and
right through the onscreen menus. Your current selection is always shown
in YELLOW.
The ENTER or OK button will “select” the item in yellow and display
available options or confirm the current selection. For example:
1. Pressing ENTER will display the Program Options menu for Angry Planet.
2. Pressing ENTER will confirm deletion of the recording schedule.
3
1
2
Page 8
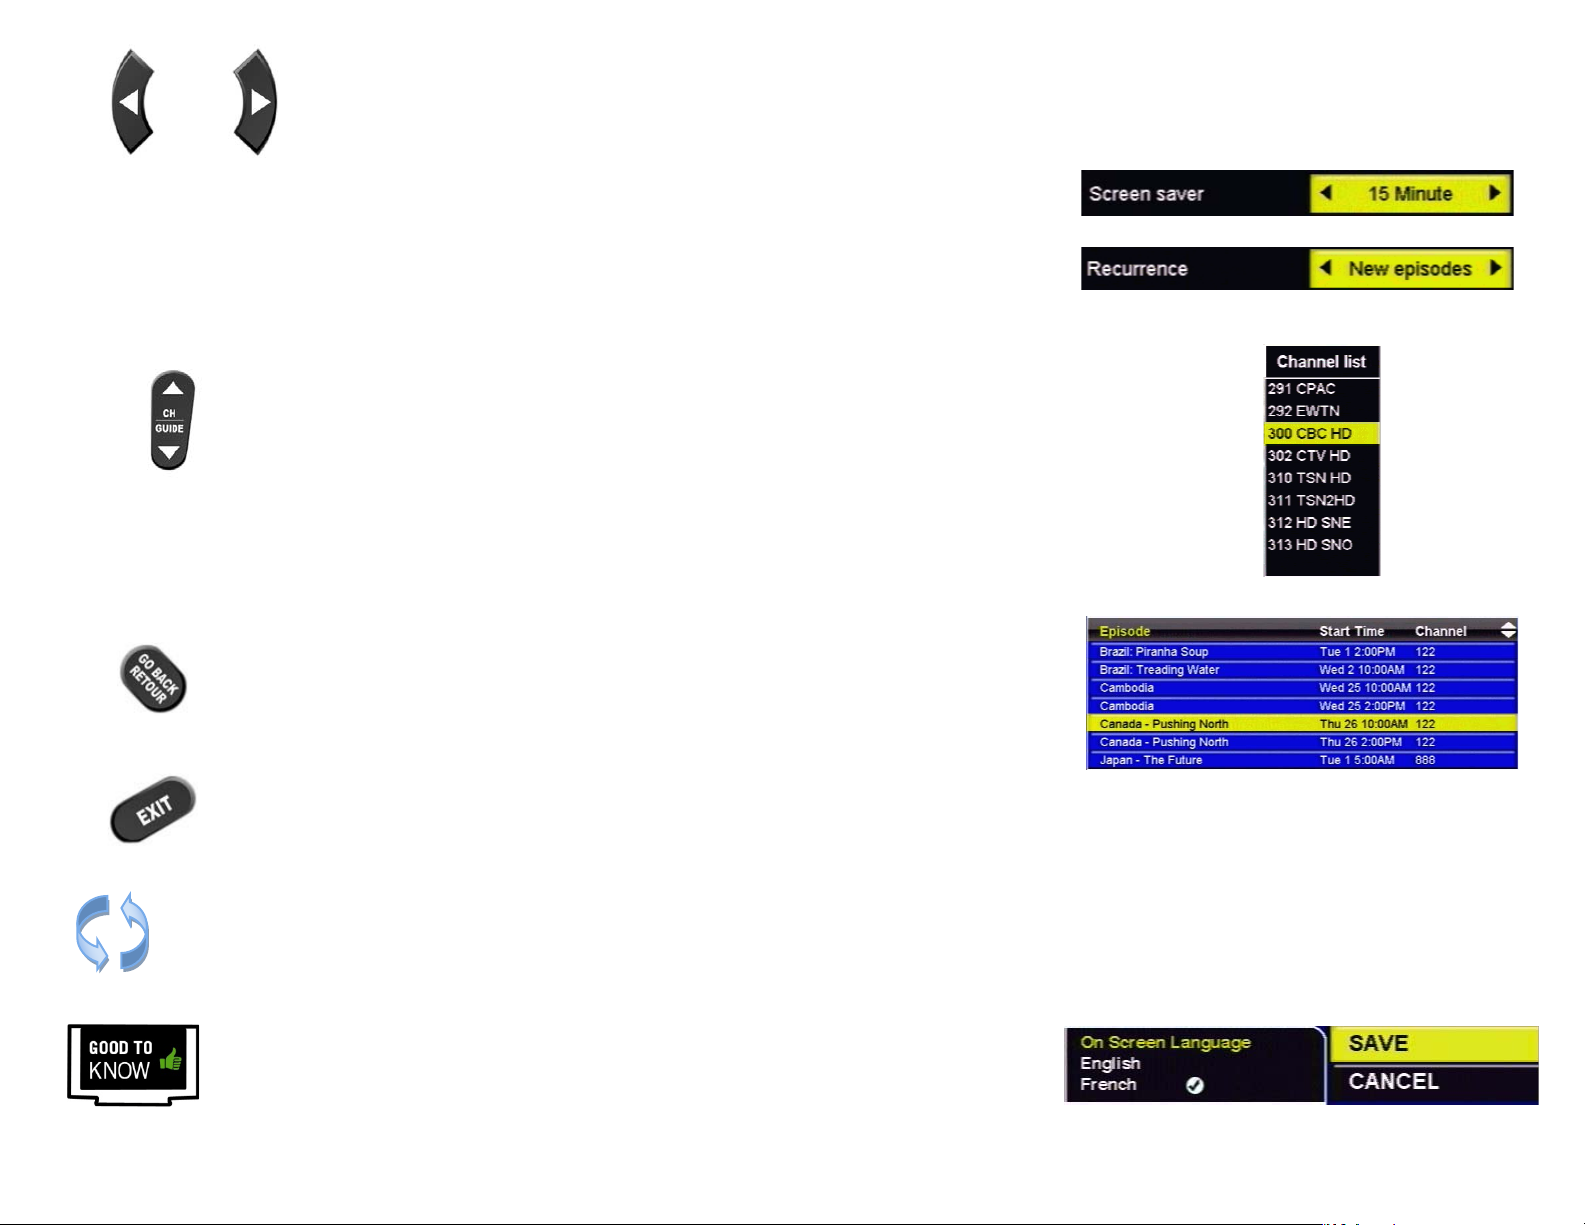
The LEFT and RIGHT arrow keys also allow you to change options for the
selected item in applicable menus, as indicated by the “a d” symbols on
screen. For example:
3. Pressing the LEFT arrow key will change the Screen Saver delay to 14 Minute, pressing the
3
RIGHT arrow key will change the Screen Saver delay to 16 Minute.
4. Pressing the LEFT or RIGHT arrow keys will toggle between New episodes and All episodes.
4
The CHw and CHs keys (or CH+ and CH-, depending on your remote) allow you
to move through lists one page at a time. For example:
5. Pressing CH
w will page up and show channels 283-290, pressing CHs
will page down and show channels 314-321.
6. Pressing CH
w will page up and show episodes starting with A, pressing CHs will page down
and show episodes from K onwards.
The GO BACK key will save your changes and return to the previous menu.*
The EXIT key will save your changes in the current menu and exit all the way back
to live TV.* Note that if you have made changes in intermediate menus, these
may be lost by using EXIT instead of GO BACK.
All menus are “circular”, and will continue from the beginning when you reach the end
of the menu.
5
6
*Within the “System Settings” menus, you must select “SAVE” to save your
changes. Pressing GO BACK or EXIT will discard any changes you have made.
4
Page 9

1E. INTERACTIVE MENU BAR
The menu bar is your portal to all the great features available on your Shaw Direct HD receiver.
Many tools and menus found here can also be accessed directly by using the appropriate key on
your remote control.
The menu bar can be accessed in any of the following ways:
• Pressing either the MENU or INTERACTIVE button on your remote
control
• Pressing the A button on your remote control
• Pressing the OPTIONS button on the remote control and selecting
“8. Menu Bar”
The menu bar will always appear at the bottom of your screen and will exit you from any active
menus. Use the LEFT and RIGHT arrow keys to view available options and the ENTER button to
access that menu option or submenu.
A complete listing of all menu selections on the HDPVR and HDDSR receivers is contained on
the next pages.
-
5
Page 10
Guide
Recordings
Music
Recordings
Options
Manual Timers
Title Search
Interests
Music
Interactive
Mail
Call Log
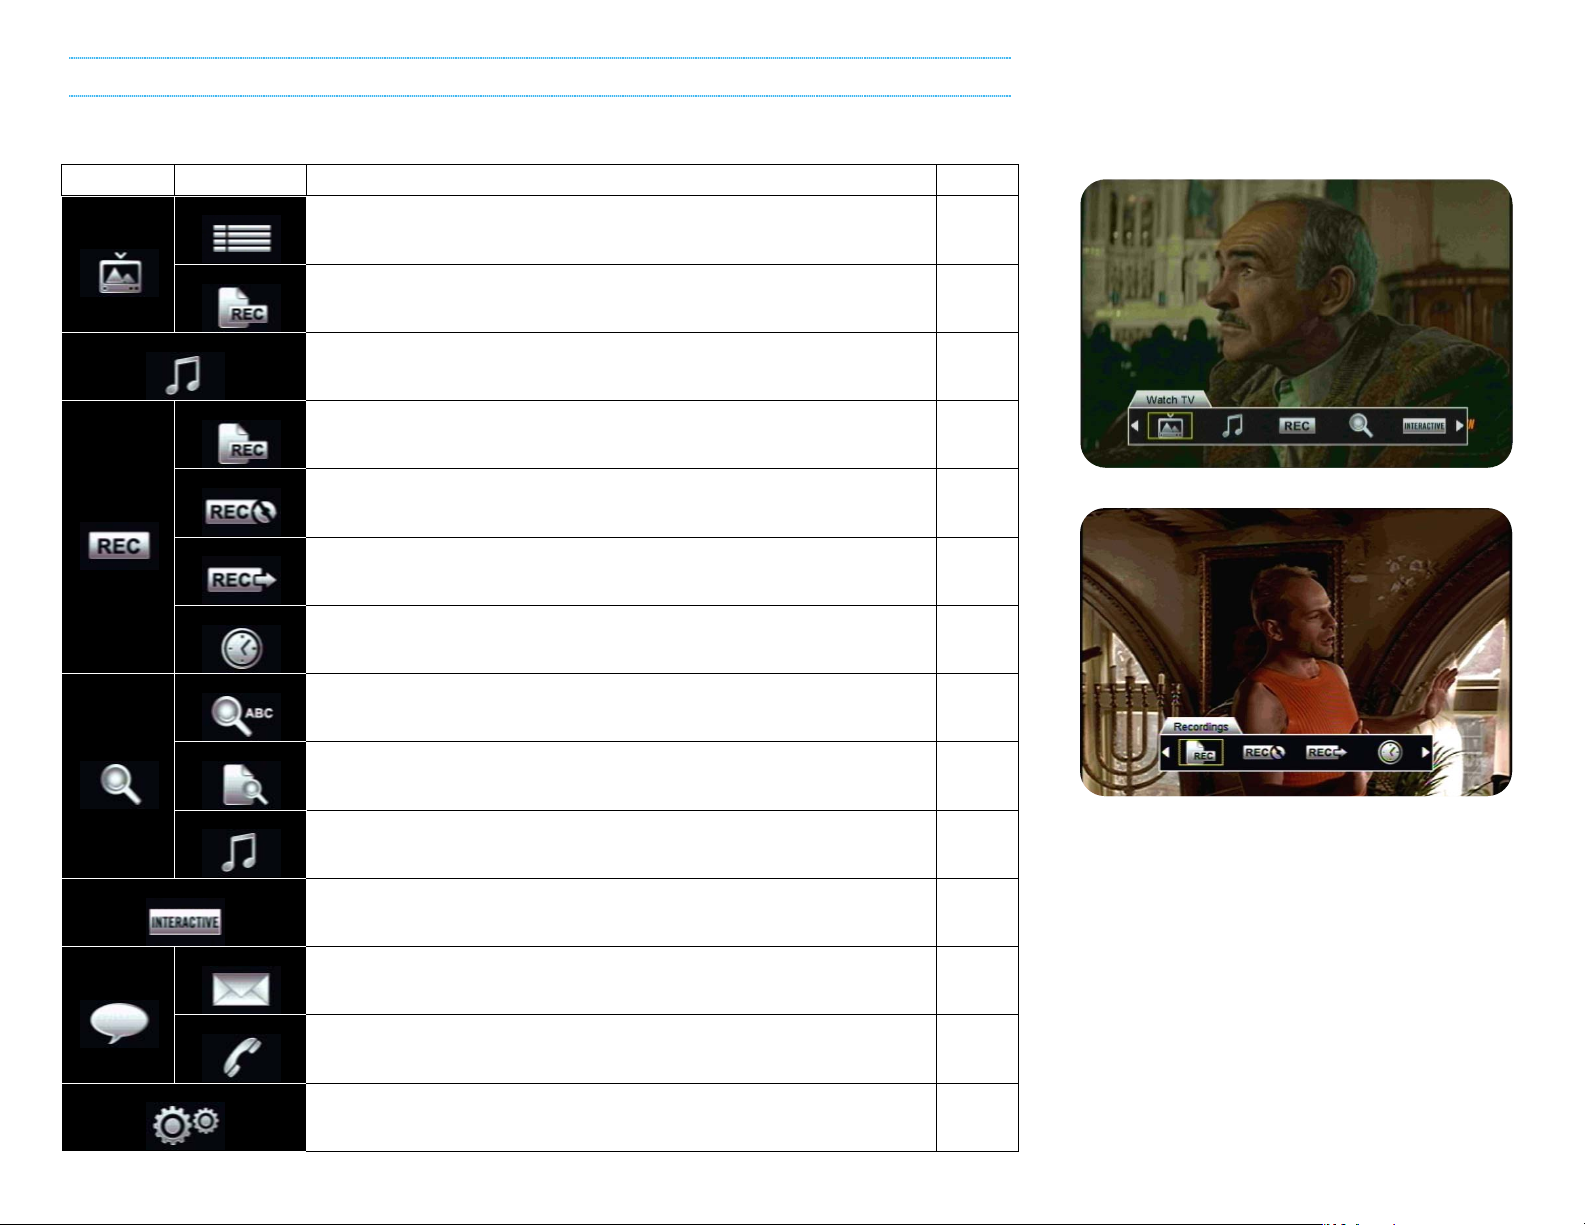
HDPVR MENU BAR
The following menu bar selections are available on the HDPVR receiver:
MENU BAR SUB MENU DETAILS PAGE
Watch TV
PVR
Search
Upcoming
Access the Guide, where you can browse up to 14 days of
programming information.
Access the PVR List, where you can watch a previouslyrecorded program.
Allows you to search for commercial free digital music stations
by genre, or radio stations by city.
Access the PVR List, where you can watch a previouslyrecorded program.
The PVR Options menu allows you to customize your recording
preferences for each show you have scheduled to record.
In PVR Upcoming, you can view a list of all upcoming
programs which are scheduled to record.
Manual Timers can be used to record programs manually by
timeslot, rather than by program.
Find programs or movies by title.
Search for something to watch or record by genre.
Allows you to search for commercial free digital music stations
by genre, or radio stations by city.
8
30
14
30
26
28
29
11
11
14
Messages
Settings Menu
Launch the Shaw Direct Interactive Weather Application
Read mail messages from Shaw Direct
Check out your Caller ID log
Access the main receiver Options Menu.
35
35
35
36
6
Page 11
Guide
Music
Options
Upcoming
Title Search
Music
Interactive
Mail
Call Log
Settings Menu
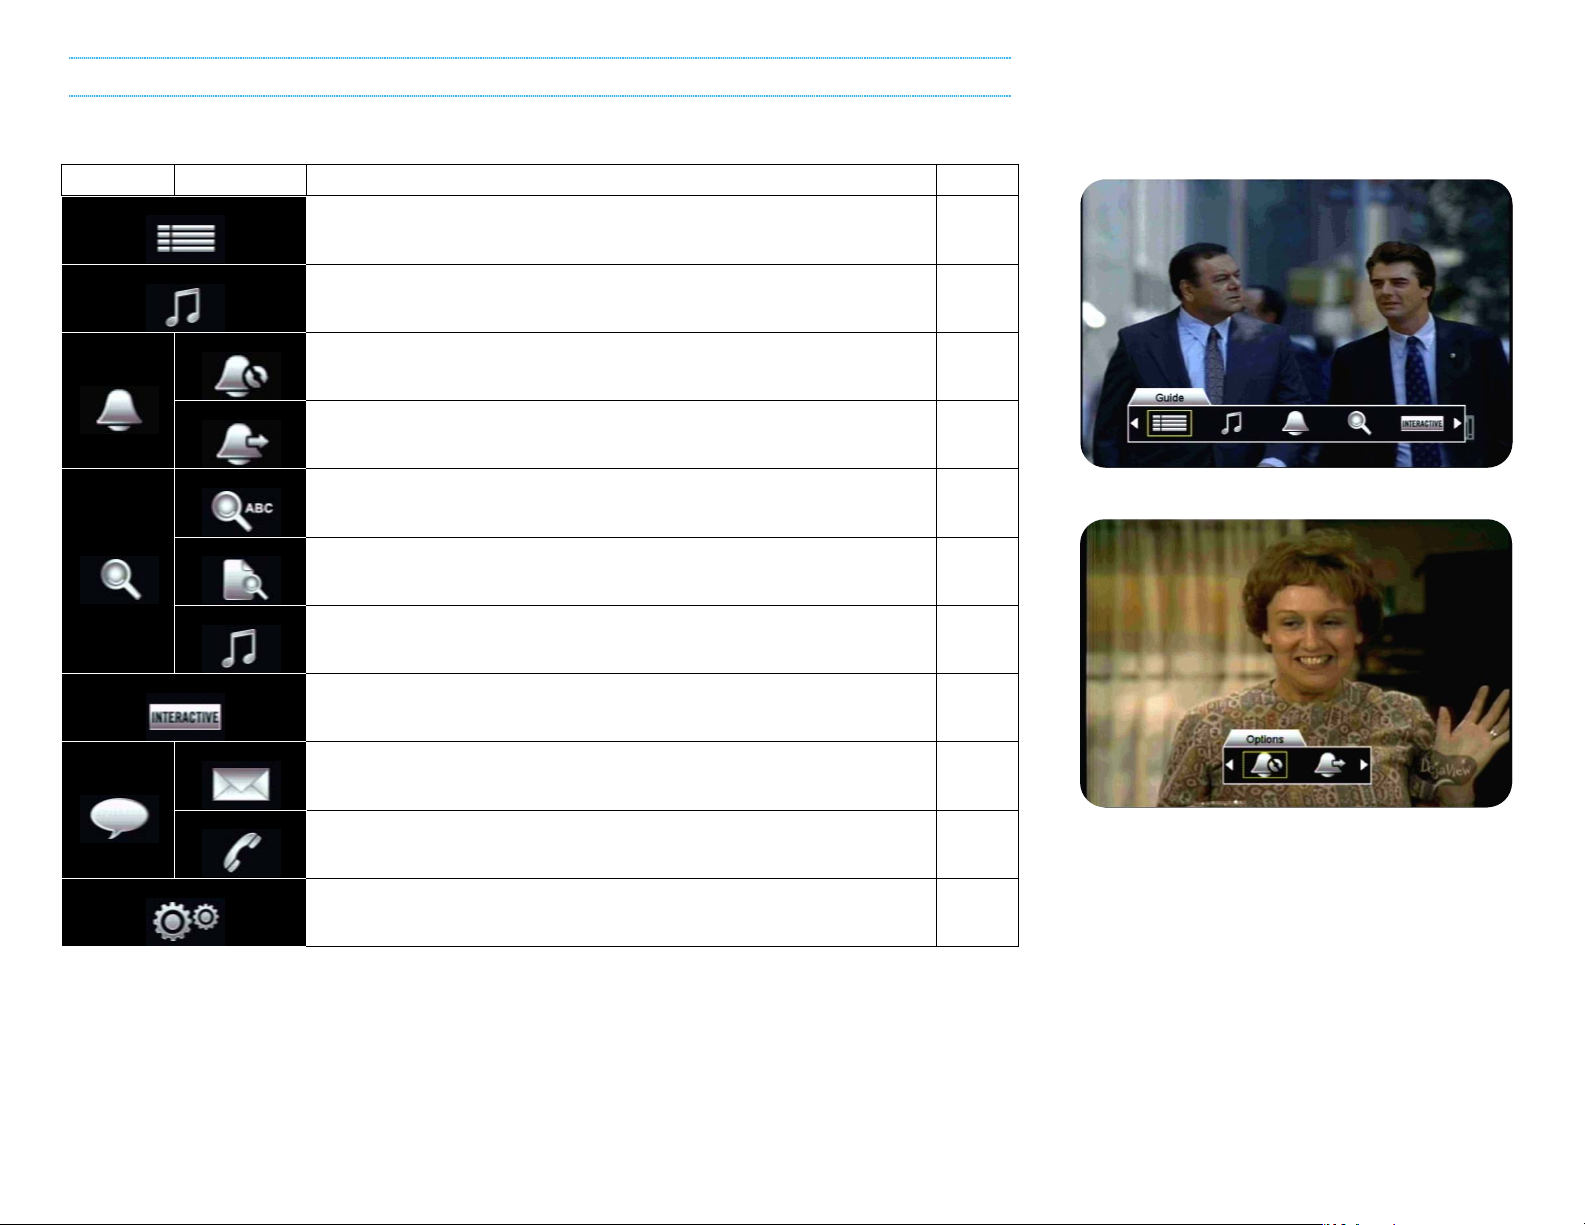
HDDSR MENU BAR
The following menu bar selections are available on the HDDSR receiver:
MENU BAR SUB MENU DETAILS PAGE
Reminders
Search
Messages
Access the Guide, where you can browse up to 14 days of
programming information.
8
Allows you to search for commercial free digital music stations
by genre, or radio stations by city.
14
The Reminders Options menu allows you to customize your
reminder preferences for each show you have scheduled.
In Upcoming Reminders, you can view a list of all upcoming
programs which have reminders or auto-tunes set.
Find programs or movies by title.
Interests
Search for something to watch by genre.
23
23
11
11
Allows you to search for commercial free digital music stations
by genre, or radio stations by city.
Launch the Shaw Direct Interactive Weather Application
Read mail messages from Shaw Direct
14
35
35
Check out your Caller ID log
Access the main receiver Options Menu.
35
36
7
Page 12
2. FINDING WHAT YOU WANT, WHEN YOU WANT
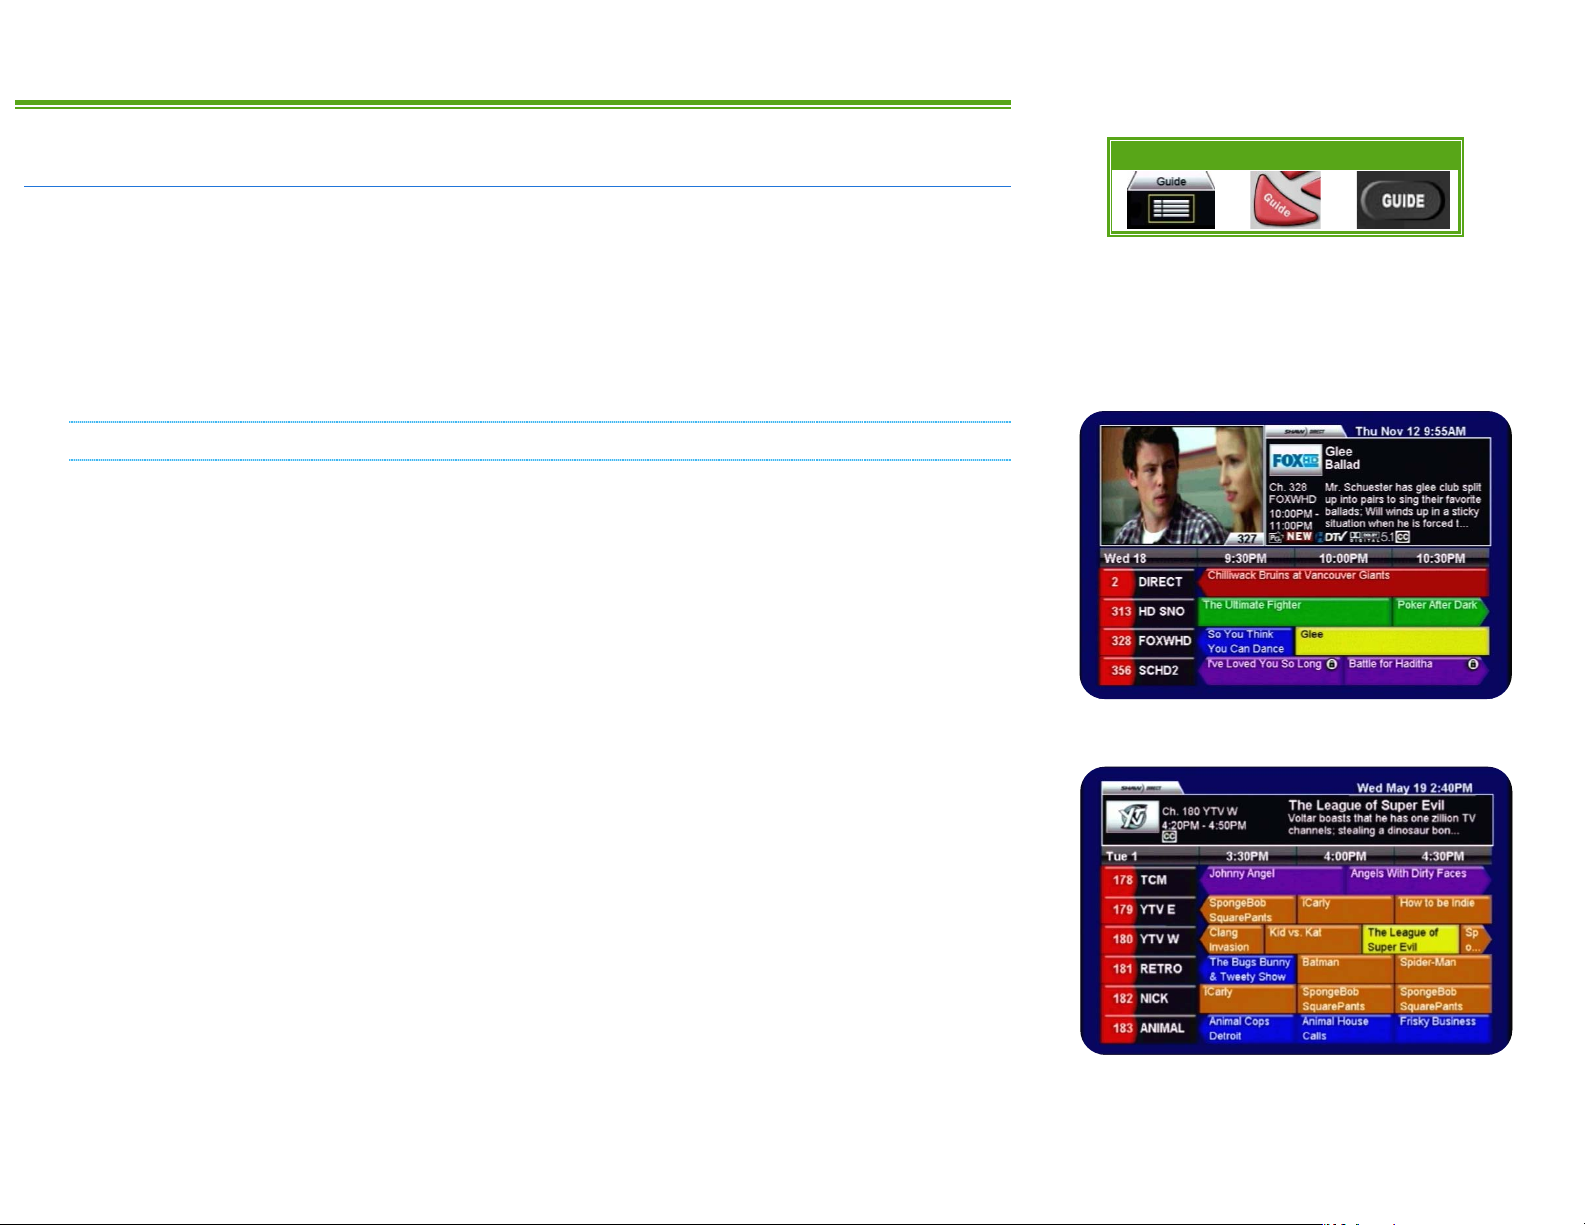
2A. THE GUIDE
One of the greatest features of your Shaw Direct digital satellite TV is the onscreen interactive
program Guide. With the Guide, you can instantly see what’s airing right now and into the
future, on every channel you subscribe to!
When accessed, the Guide will appear with the channel you’re watching highlighted. You can
browse the onscreen Guide while watching your favourite show in the corner of the screen, or you
can press GUIDE on the remote again to change to the full-screen Guide.
NAVIGATING THE GUIDE
awsd Use the DIRECTIONAL ARROW keys to move up, down, left, or right through the listings.
Pressing ENTER on a program which is currently airing will tune to that program; pressing
ENTER on a program which is not currently airing will bring up the Program Options menu.
CHw/ s You can move an entire page at a time (4 channels in the regular guide, 6 channels in
the full-screen guide) by using CHw and CHs.
5 6 Use REWIND and FAST FORWARD to move backwards or forward in the listings 6 hours at
a time.
Menu Bar 5XX Remote 6XX Remote
9 0 The SKIP BACK and SKIP AHEAD buttons skip 24 hours at a time, for example from
8:00pm Monday to 8:00pm Tuesday.
2 1 Pressing PAUSE or PLAY while in the Guide will always take you back in the listings to the
channel and program you’re currently watching. If you’re watching a recording, it will take you to
the channel the receiver is currently tuned to in the background.
Press EXIT or GO BACK to leave the Guide and return to whatever you were watching.
8
Page 13

UNDERSTANDING THE GUIDE
All listings in the Guide and Search Results are colour-coded to help you find what you’re looking
for faster. When you select a program, broadcasting symbols help you understand more about it,
such as the parental rating, whether it is presented in high definition, or if it is a new episode.
9
Page 14

COLOUR CODING
BLUE
GREEN
PURPLE
ORANGE
AQUA
RED
GREY
YELLOW
GENERAL PROGRAMMING: Includes network series, specials, news, and other
regularly airing programs
SPORTS: Includes most sports-related programs such as sports talk, live sporting
events and replays, and sports-related series programming
MOVIES: Includes films and most documentaries
KIDS AND FAMILY: Most programming intended for young children and family
viewing
PAY-PER-VIEW: PPV movies, sports, and events available for purchase
SHAW DIRECT CHANNELS: Information and promotional channels, and the Shaw
Direct TV network
UNSUBSCRIBED: Channels not included in your Shaw Direct programming package
appear in grey. These channels can be hidden from your Guide, as described on
page 20.
CURRENT SELECTION: The program or menu item currently selected is always shown
in yellow.
BROADCAST SYMBOLS
The following symbols are used to tell you about each program:
Program Attributes Television Ratings Movie Ratings
Broadcast in High
Definition
Broadcast with Dolby
5.1 Surround Sound
Episode airing for the
first time
Available with Closed
Captions
Available with
Descriptive Video
Program is Subject to
Blackout
®
Children
Children over 8 years
General
Parental Guidance
Over 14 years
Adults
General
Parental Guidance
Adult 14+
Adult 18+
Restricted
Adults Only
All program information is provided by the broadcaster.
10
Page 15

2B. SEARCH TOOLS
With over 400 channels and two weeks of programming information, sometimes it can be
difficult to find what you’re looking for using the Guide. By using the Search Tools built into
your receiver, you can easily find programs by title, time, or genre.
TITLE SEARCH
Title Search allows you to input the name of the show or movie you’re looking for. Matching
results will be displayed on the right side of the screen, where you can tune into the program,
see upcoming air dates, set up a recording or reminder, or get information about the show.
After selecting “Title Search” from the Menu Bar, use the DIRECTIONAL ARROWS and ENTER
button to type letters into the Search tool. Results will begin to narrow as soon as the first letter
is entered. Once you see what you’re looking for, use the RIGHT ARROW to select the list, and
the UP or DOWN keys to select the program. Pressing ENTER will give you the Program Options
menu on the HDPVR, and the Upcoming Air Dates screen on the HDDSR.
Note: You cannot input accented characters into Title Search. Simply enter part of the title
which does not contain any accented characters (for example, “journal” in “téléjournal”) and
Search will find the program.
Menu Bar 5XX Remote 6XX Remote
N/A N/A
INTERESTS SEARCH
Interests Search is useful when you’re not looking for a specific show, don’t know the title of the
show you’re looking for, or just want to find a particular genre to watch or record. Similar to Title
Search, as you select the time, category, and genre you are looking for, results will narrow or
expand on the right side of the screen.
After selecting “Interests” from the Menu Bar, use the UP and DOWN keys to select the time you
would like to search in. Examples include “anytime”, “up next”, or “this week”. Then, use the
RIGHT ARROW to select the middle column where you can pick a broad category using the UP
and DOWN keys. A variety of choices are available here, including “Movies”, “Sports”,
“Children”, and “HD”. Use the RIGHT ARROW again to select the third column, which will show
the available genres, such as “Action”, “Musical Comedy”, “Nature”, or “Talk”. Once the genre
you’re looking for has loaded, use the RIGHT ARROW to select the list, and the UP or DOWN
keys to browse through the available programs. Pressing ENTER will give you the Program
Options menu on the HDPVR, and the Upcoming Air Dates screen on the HDDSR.
11
Menu Bar 5XX Remote 6XX Remote
N/A
Page 16

Any series Recording Events created from the top-level search results (before
selecting “view upcoming air dates”) will default to record on all channels,
unless changed in the PVR Options menu. See section 5 for more details on
Recording Events.
2C. INFO PAGES
Expanded Information for most programs is available by pressing the INFO button on the remote
control, or selecting “Show more information” from the Program Options menu. Use the LEFT
and RIGHT arrow keys to move between the available pages and GO BACK to return to the
location you started from.
REGULAR PROGRAMMING
If available, the following information will be shown for regular programming. Note that not all
broadcasters send the same amount of information, so it is normal for certain programs to have
more or less information than others.
All pages show the channel name, logo, and number the program airs/aired on; the date and time
it airs/aired; the program attributes and parental rating; and the program name and episode title.
The following information appears on each page:
• DESCRIPTION: A description of the program is provided on this page.
• CAST (HDPVR ONLY): This page shows the main cast members featured in this program.
• MORE INFO: This page shows the original airdate of the program; specific parental
advisories such as “violence” or “strong language”; and genres which apply to the
program.
Menu Bar 5XX Remote 6XX Remote
N/A
12
Page 17

MOVIES AND DOCUMENTARIES
If available, the following information will be shown for movies and documentaries, including
those airing on PPV. Note that not all broadcasters send the same amount of information, so it is
normal for certain movies to have more or less information than others.
All pages show the channel name, logo, and number the movie airs/aired on; the date and time it
airs/aired; star rating from 0.5 to 4 stars; the program attributes and parental rating; and the
movie title. The following information appears on each page:
• DESCRIPTION: A description of the movie is provided on this page, followed by the main
cast members.
• CAST (HDPVR ONLY): This page shows the cast members featured in this title.
• MORE INFO: This page shows the year the movie was released; specific parental advisories
such as “language” or “graphic violence”; and genres which apply to the program.
2D. THE PROGRAM OPTIONS MENU
The Program Options menu is your gateway to many of the great program-related features
contained in your Shaw Direct receiver, including setting recordings or reminders and viewing
upcoming air dates.
While in the Guide, Info Pages, Upcoming Air Dates screen, or Search results, press the ENTER
key on the desired program to view the Program Options menu. If the program is currently airing,
pressing ENTER will tune to it. In this case, press INFO and then ENTER to access the menu.
REGULAR PROGRAMMING
For regular programming the following Program Options may be available:
• TUNE TO THIS CHANNEL: Change to this channel, regardless of what is currently airing.
• RECORD NEW EPISODES (HDPVR) or SET A REMINDER FOR NEW EPISODES: Sets a recurring
Recording or Reminder Event
• RECORD ALL EPISODES (HDPVR) or SET A REMINDER FOR ALL EPISODES: Sets a recurring
Recording or Reminder Event
• RECORD THIS PROGRAM (HDPVR) or SET A REMINDER FOR THIS PROGRAM: Sets a one-time
Recording or Reminder Event
• AUTOMATICALLY TUNE TO THIS AIRING: Sets an Auto-tune event for this episode
• VIEW UPCOMING AIR DATES: View the Upcoming Air Dates screen for this program
• SHOW MORE INFORMATION: View the Info Pages for this episode
13
Page 18

MOVIES AND DOCUMENTARIES
For films, the following Program Options may be available:
• TUNE TO THIS CHANNEL: Change to this channel, regardless of what is currently airing.
• RECORD THIS PROGRAM (HDPVR) or SET A REMINDER FOR THIS PROGRAM: Sets a one-time
Recording or Reminder Event
• AUTOMATICALLY TUNE TO THIS AIRING: Sets an Auto-tune event for this airing
• VIEW UPCOMING AIR DATES: View the Upcoming Air Dates screen for this movie
• SHOW MORE INFORMATION: View the Info Pages for this movie
Full details on Reminder Events can be found in section 4. Full details on Recording Events can
be found in section 5.
2E. THE UPCOMING AIR DATES SCREEN
The Upcoming Air Dates screen gives a convenient listing of all known upcoming air dates of the
selected program or movie, on all available channels. You can press ENTER on any entry to view
the Program Options menu, or use the LEFT or RIGHT arrow keys to sort alphabetically by
Episode, or chronologically by Start Time. Press GO BACK to return to the location you started
from.
Any series Recording Events created from the Upcoming Air Dates screen will
record on the currently selected channel only, unless changed in the PVR
Options menu. See section 5 for more details on Recording Events.
2F. MUSIC SEARCH
Shaw Direct carries 40 commercial-free Galaxie digital music stations and over 50 radio stations
from all over North America. The Music Search tool allows you to easily find whatever you’re in
the mood for.
After selecting “Music” from the Menu Bar, use the UP or DOWN arrow keys to choose between
commercial free “Music” stations, or regular “Radio” stations.
Menu Bar 5XX Remote 6XX Remote
N/A N/A
14
Page 19

MUSIC
After selecting Music, use the RIGHT ARROW to select the genre column, where you can use the
UP and DOWN keys to select a genre such as “Classical”, “Jazz”, or “Rock”. Corresponding
stations appear on the right side of the screen, much like the other Search tools. Use the RIGHT
ARROW again to select the results column and the UP and DOWN to select the station you want
to listen to. Pressing ENTER will tune directly to the selected station.
By default, when tuned to a commercial-free music stations the track information will be
displayed for each song. The receiver screensaver will activate over this information after the
specified activation period. Both of these settings can be changed in the Guide Settings menu,
as described in section 3C.
RADIO STATIONS
If you have selected Radio in the first column, use the RIGHT ARROW to select the city column,
where you can use the UP and DOWN keys to select a city. Corresponding radio stations will
appear on the right side of the screen. When you see the station you want, use the RIGHT
ARROW to get to the results column and the UP and DOWN keys to select the station you want
to listen to. Pressing ENTER will tune directly to the selected station.
Radio stations do not have track information available.
If you have a favourite music or radio station, you can always enter the 3-digit
channel number listed on the right side of the screen to tune directly without
using the Music Search tool.
It is not possible to record content from the Music or Radio stations. Live-off-disk functionality
(as explained on page 34) is also unavailable while tuned to a Music or Radio channel.
15
Page 20

3. CUSTOMIZE YOUR VIEWING EXPERIENCE
3A. PARENTAL CONTROLS
Parental Control options allow you to keep locked content from being accessed or viewed without
the 4-digit parental password being entered. When activated, Parental Controls apply uniformly
across the entire system, preventing access via the Guide, Search results, direct channel entry,
LOD playback, and the PVR List. If you are activated for instant Pay Per View, the password will
also have to be entered to make a PPV purchase.
SETTING PARENTAL CONTROLS
You can access the Parental Controls menu by selecting “2. Parental Controls” from the Options
Menu, or by pressing LOCKS on your remote control. If Parental Controls are currently disabled,
you will be prompted to create a 4 digit numeric password.
The following Parental Control options are available:
Menu Bar 5XX Remote 6XX Remote
• ENABLE LOCKS [ENABLED, DISABLED]: Allows you to turn all locks on (“enabled”) or off
(“disabled”). When locks are disabled, all settings (with the exception of the password)
are retained and will be saved for the next time you enable locks.
• TV RATING [C8+, G, PG, 14+, 18+, NO LOCKS]: Allows you to select the lowest rating you want
to lock access to. For example, by setting TV Rating to “14+”, all TV programs rated 14+
and 18+ will be locked. Choices available correspond to the Television Ratings listed on
page 10.
• MOVIE RATING [PG, 14+, 18A, RESTRICTED, ADULT, NO LOCKS]: Allows you to select the lowest
rating you want to lock access to. For example, by setting Movie Rating to “18A”, all
movies rated 18A, Restricted and Adult will be locked. Choices available correspond to
the Movie Ratings listed on page 10.
• LOCKED CHANNELS [SHOW, HIDE]: Allows you to show or hide locked channels from the
Guide. Locked channels can still be tuned directly by entering the applicable channel
number, but will always require a password to view.
16
Page 21

• LOCKED PROGRAMS [SHOW, HIDE]: Allows you to hide the titles of programs which exceed
your TV and Movie Ratings from appearing. When set to “Hide”, all locked content will
appear as “Parentally Locked”.
Note: Only rating locks will prevent the titles of locked programs from appearing in
Search results.
• CHANNEL LOCKS [EDIT…]: Allows you to lock all content airing on specific channels from
being viewed without the parental password. Select from the available channels in the
left column, and press ENTER to move them into the right “Locked” column. Select a
channel from the right column and press ENTER to unlock it. Press GO BACK to save
your list of locked channels.
• CHANGE PASSWORD [EDIT…]: Use this option to change your previously set parental
password. It is highly recommended you choose a unique password and change it often.
• UNRATED PROGRAMS [UNLOCKED, LOCKED]: Some programs, such as the nightly news,
sporting events, and other specially categorized programs do not include parental ratings.
By setting Unrated Programs to “locked”, any program without a parental rating will
require the password to view or access.
Locked content is indicated throughout the system with the closed “lock” icon.
USING PARENTAL CONTROLS
For maximum security, you may be prompted for your parental password up to three times while
attempting to unlock a program. First, you will need to enter your password to view the program
title and/or unlock the Program Options menu. Second, you will need to enter your password to
actually view the channel and unlock the picture and sound. Third, you will need to enter the
password again if you use PAUSE or SKIP BACK to enter the LOD buffer and watch the program
off the hard drive rather than live.
Programs which exceed one or more Parental Control setting will also be locked in the PVR or
Reminder Options and PVR or Reminder Upcoming menus and will require the password to view
or modify.
17
Page 22

The following Parental Control features provide further security against unauthorized viewing:
• WHEN THE PROGRAM CHANGES: If ratings-based locks are enabled, each time a new program
starts which meets or exceeds current rating locks, the parental password must be reentered. For example, “Schindler's List” is a historical drama rated R for violence and
language. You unlock this program for your teenager. It is followed on the same channel
by “American Pie”, which is rated R for strong sexuality and crude dialogue. You will
need to re-enter the parental password in order to unlock American Pie and allow it to be
viewed.
• WITH NO GUIDE DATA: If Guide data has been cleared by a power outage or reset and
Parental Controls are “Enabled”, the parental password will be required to tune to any
channel until Guide data has reloaded. In most cases, Guide data should return within
15 minutes.
• INCORRECT PASSWORD: If an incorrect password has been entered five consecutive times,
the system will go into lockdown and deny access to all locked content (including the
entire Parental Controls menu) for 60 minutes. If you have forgotten your password, you
must call Shaw Direct customer service to have it reset.
If you are prompted for your parental password to tune to a channel or view the next program and
do not wish to unlock that channel or program, simply press LAST on the remote control to return
to the last channel you were viewing. You can also press GUIDE or PVR to find something else to
watch.
If you have unlocked a program or channel and wish to re-enable all locks,
simply power the receiver off and then back on. All programs and channels
will be re-locked based on the current Parental Control settings.
18
Page 23

3B. FAVOURITES
By setting up a Favourites List, you can customize the Guide by only displaying the channels in
your list. If you’re finding yourself spending too much time paging through the Guide when you
only watch a few channels, this can be a great timesaver. You can set multiple Favourites Lists,
so everyone in your household can have their own list.
CREATING A FAVOURITES LIST
To get started, press the FAVOURITES or FAV button on your remote control, or select “1.
Favorite Lists” from the Options menu. Select “Create new favourites list” and use the ARROW
KEYS and ENTER to input a name for your list. Press GO BACK to save your list and move to the
next step.
Next, use the UP and DOWN arrow keys or CH+ and CH- to select the channels you want in your
list. Pressing ENTER on each channel will move it to the right column, adding it to the current
favourites list.
If you want to remove a channel from your list, select it in the right column and press ENTER to
move it back to the list of available channels.
When you are satisfied with your list, press GO BACK on the remote control to save it. You will
notice that your list is now active in the “List name” option. Press EXIT to return to regular
viewing. When you press GUIDE, you will notice that your list is now active, as indicated below
the video window.
Menu Bar 5XX Remote 6XX Remote
EDITING A FAVOURITES LIST
From the Favourites List menu, you can use the LEFT or RIGHT arrow keys to select the “List
name” you want to edit. Select “Edit favourites list” and press ENTER to view and change the
channels in the list. Press GO BACK to save your changes.
You can also delete the current list by selecting “Delete favourites list” and pressing ENTER.
You will be asked to confirm your selection, select “Delete” and press ENTER to permanently
delete the list.
19
Page 24

RETURNING TO ALL CHANNELS OR CHANGING THE FAVOURITES LIST
To display all channels in the Guide again, change the “List name” option to “All channels”.
From within the Guide, you can also press OPTIONS on the remote control and use the LEFT or
RIGHT arrow keys to change “Channel list” to “All channels”. Press GO BACK to save your
changes. You can also activate a different favourites list this way.
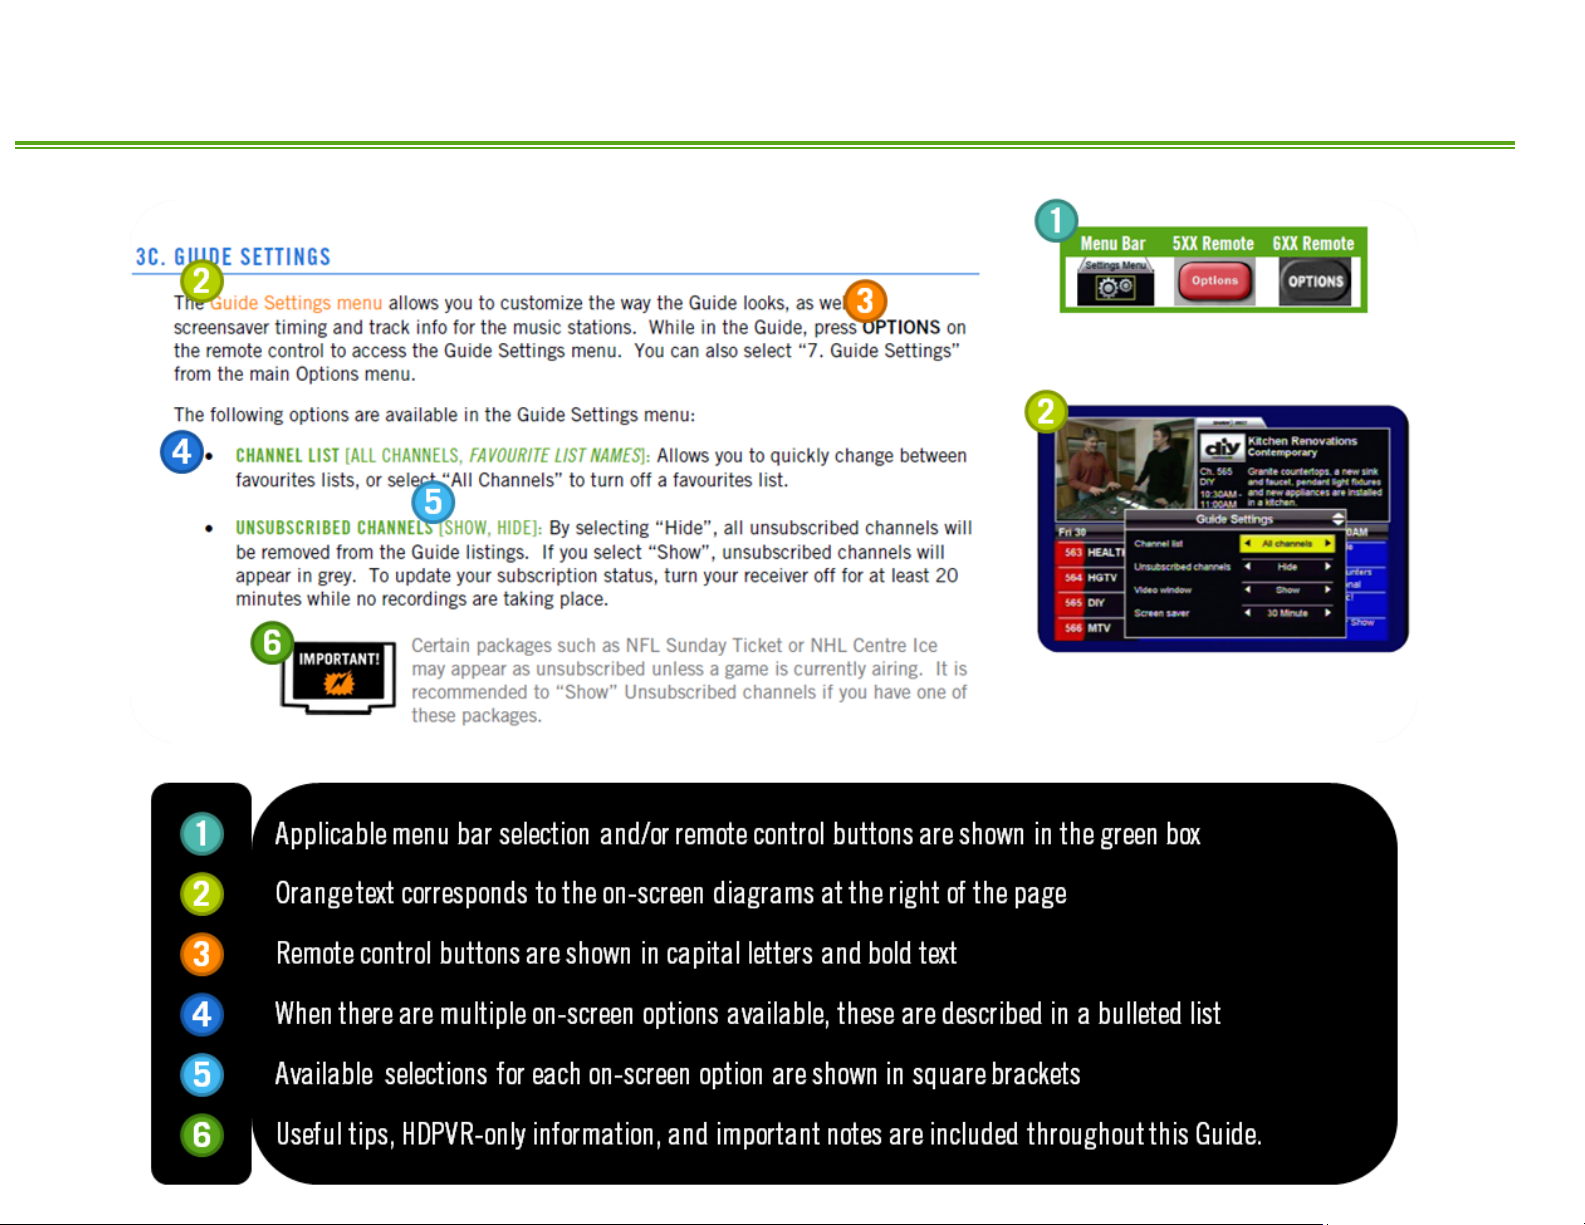
3C. GUIDE SETTINGS
The Guide Settings menu allows you to customize the way the Guide looks, as well as
screensaver timing and track info for the music stations. While in the Guide, press OPTIONS on
the remote control to access the Guide Settings menu. You can also select “7. Guide Settings”
from the main Options menu.
The following options are available in the Guide Settings menu:
• CHANNEL LIST [ALL CHANNELS, FAVOURITE LIST NAMES]: Allows you to quickly change between
favourites lists, or select “All Channels” to disable the favourites lists.
• UNSUBSCRIBED CHANNELS [SHOW, HIDE]: By selecting “Hide”, unsubscribed channels will be
removed from the Guide listings. If you select “Show”, unsubscribed channels will
appear in grey.
• VIDEO WINDOW [SHOW, HIDE]: Sets the default view when accessing the Guide. If set to
“Show”, 4 channels at a time will be displayed, along with video from the current
program. If set to “Hide”, 6 channels at a time will be displayed. Pressing GUIDE while
in the Guide will always toggle temporarily between these two options.
Menu Bar 5XX Remote 6XX Remote
20
Page 25

• SCREEN SAVER [OFF, 1-30 MINUTE]: Determines how long a static image must remain on the
screen before the screensaver is activated. If the screensaver activates, simply press
ENTER on the remote to remove it. Your location in the menus or options will always be
retained.
• TRACK INFORMATION [SHOW, HIDE]: Allows you to enable (“show”) or disable (“hide”) the
track information from appearing when tuned to a commercial-free digital music station.
The screensaver will also initialize after the specified number of minutes when tuned to a
music station.
21
Page 26

4. HDDSR 605: SMART REMINDER TECHNOLOGY
The same technology used on the Shaw Direct HDPVR to automatically record and manage all
your favourite programs is also available on the HDDSR to “remind” you whenever certain
programs are airing. When a program you’ve set a reminder for is about to start, you’ll see a
“warning sign” in the top right corner of the screen. Just press ENTER and you’ll see a list of all
upcoming “reminded” programs, all in one convenient menu!
4A. SETTING REMINDERS
Reminders are always set from the Program Options menu. As described earlier, you can access
this menu from the Guide, Search Results, Info Pages, or Upcoming Air Dates screen.
Reminders always apply to the currently selected channel only. You can set
multiple reminders for the same program to cover more channels if needed.
From within the Program Options menu, the following selections will set a Reminder:
• SET A REMINDER FOR NEW EPISODES: Each time a first-run episode of the selected program
airs on the selected channel, you will receive a reminder. This is a recurring reminder.
• SET A REMINDER FOR ALL EPISODES: Each time any episode of the selected program airs on
the selected channel, you will receive a reminder. This is a recurring reminder.
• SET A REMINDER FOR THIS PROGRAM: When this specific episode or movie airs, you will
receive a reminder. To set a reminder for a future airing of the program or movie, use the
“View upcoming air dates” option to select the episode or airing you wish to set a
reminder for. This is a one-time reminder.
You can set as many overlapping reminders as you want. “Reminded” programs are
indicated with a black bell symbol.
22
Page 27

4B. VIEWING REMINDERS
Two minutes prior to a “reminded” program starting, you will see a “warning sign”
appear in the top right corner of your TV screen. Press ENTER to view the list of
upcoming reminders, or any other key to remove the warning sign.
From within the list of upcoming reminders, you can view the program information for each
upcoming program. Pressing ENTER on a program will immediately tune you to that channel,
pressing INFO will display the Info Pages for the program.
UPCOMING REMINDERS
If you missed the warning sign, or just want to know about your upcoming reminders, select
“Upcoming” from the “Reminders” section on the Menu Bar. If you would like to delete or
change an upcoming reminder, use the Reminders Options menu.
4C. MANAGING REMINDERS
The Reminders Options menu can be accessed by selecting “Options” from the “Reminders”
section on the Menu Bar. By selecting a program listed here you can view the Edit Reminder
Event menu, where the following options are available:
• VIEW UPCOMING AIR DATES: View all upcoming air dates on all channels for the selected
program. You can setup one-time reminders or additional recurring reminders from this
menu.
• DELETE REMINDER EVENT: This will delete the reminder. You will not receive any future
reminders for the selected program on the selected channel.
• RECURRENCE: You can toggle between “New episodes” and “All episodes” with this
option.
When you are satisfied with your changes, press GO BACK or EXIT on the remote control. The
receiver will take a few moments to save the new reminder priorities, during which time you will
not be able to access any onscreen menus.
Menu Bar 5XX Remote 6XX Remote
N/A N/A
Menu Bar 5XX Remote 6XX Remote
N/A N/A
Within the Reminders Options menu, recurring reminders are distinguished from one-time
reminders with an “R” on the reminder symbol.
23
Page 28

4D. USING AUTO-TUNES
Auto-tunes are similar to Reminders, but with a few key differences. First, an Auto-tune will
actually force the receiver to the auto-tuned program when it starts. This can be useful if you are
recording programs with an external device. Second, unlike Reminders you cannot set multiple
Auto-tunes for the same start time. Third, all Auto-tunes are one-time events. You cannot set
recurring Auto-tunes.
Auto-tunes are set and managed in the same way as Reminders. Auto-tuned programs are
indicated with a white clock symbol.
24
Page 29

5. HDPVR 630: SMART PVR TECHNOLOGY
Smart PVR technology will completely change the way you watch TV. By setting up series
Recording Events, your HDPVR will automatically find and record all your favourite shows. Once
recorded, they’re instantly available to you with the press of a button – whenever you want!
5A. SETTING RECORDING EVENTS
Recording Events are easily set from the Program Options menu. As described earlier, you can
access this menu from the Guide, Search Results, Info Pages, or Upcoming Air Dates screen.
From within the Program Options menu, the following selections can be used to set a Recording
Event:
• RECORD NEW EPISODES: Each time a first-run episode of the selected program airs, it will
be automatically recorded. This creates a recurring Recording Event.
• RECORD ALL EPISODES: Each time any episode of the selected program airs, it will be
automatically recorded. This creates a recurring Recording Event.
• RECORD THIS PROGRAM: When this specific episode or movie airs, it will be recorded at this
time. This creates a one-time Recording Event and will take priority over any existing
Recording Events for that time.
If you set a Recording Event from any screen where a channel number is listed with your
selection (such as the Guide or Upcoming Air Dates screen), the Recording Event will default to
record on the selected channel only.
If you set a Recording Event from a screen where no channel number is listed (such as the
Search Results screen), the Recording Event will default to record on all channels.
From within the Guide, you can quickly set a one-time recording event by
pressing the RECORD button on the desired program. One-time recording events
take priority over any existing Recording Events for that time.
It is highly recommended that you
always customize and confirm all
Recording Event Options after setting
any new Recording Event.
25
Page 30

5B. CUSTOMIZING YOUR RECORDING EVENT OPTIONS
By customizing your Recording Events, you can ensure that exactly what you want gets recorded
every time. A variety of options – from automatically starting early or ending late, to only
recording on HD channels, to only keeping a few episodes – are available to optimize your
experience.
After you have set up at least one Recording Event, you can access the PVR Options menu to
make necessary adjustments. Select “Options” from the “PVR” section of the Menu Bar. All
Recording Events, including both one-time and recurring will appear in this list.
Recurring Recording Events are distinguished from one-time Recording Events with an
“R” on the record symbol.
From the list of Recording Events, select one and press ENTER to view the Edit Recording Event
menu. The following options are available:
• CHANGE PRIORITY: The HDPVR relies on priorities to determine which programs get
recorded in the event of a conflict. Your HDPVR can record two programs at once, so if
three or more recordings overlap, only the two with the highest priority will be recorded.
For Example:
o “The Biggest Loser” airs from 8:00-10:00pm. It has priority 1 in your PVR
Options.
o “V” airs from 8:00-9:01pm. It has priority 3 in your PVR Options.
o “NCIS: Los Angeles” airs from 9:00-10:00pm. It has priority 7 in your PVR
Options.
“NCIS: Los Angeles” will not be recorded because at 9:00pm, both tuners will still be in
use recording the other two programs. If you move “NCIS: Los Angeles” to priority 2, “V”
will not be recorded because there will not be two free tuners for the entire duration of
the program.
• VIEW UPCOMING AIR DATES: Selecting this option displays the upcoming air dates screen for
the program. You can select a different airing to record if you anticipate a conflict or
want to record off a specific channel this one time only.
• DELETE RECORDING EVENT: This option will delete the recording event. No further
recordings will take place for this program, however all existing recordings in the PVR List
will be retained.
Menu Bar 5XX Remote 6XX Remote
N/A N/A
26
Page 31

• RECURRENCE* [NEW EPISODES, ALL EPISODES]: You can toggle between recording “New
episodes” (those airing for the first time) and “All episodes” (including reruns) with this
option.
Your PVR keeps track of each episode it records and will only knowingly record
the same episode once in the duration specified by “PVR History” setting. See
page 39 to find out how to change this setting.
• CHANNELS* [X ONLY, ALL CHANNELS, HD ONLY, SD ONLY]: This setting tells the PVR where to
look for the selected program. Setting it to “All channels” provides the most flexibility
and will almost always ensure the program is recorded, but can occasionally cause
multiple airings of the same episode to be recorded if the broadcaster has not sent
correct program info. Refer to section 10 to find out more about this situation.
• START EARLY [OFF, 1-90 MINUTE]: Turning this option on will force the PVR to begin
recording the program the specified number of minutes before it is scheduled to begin.
• END LATE [OFF, 1-90 MINUTE]: Turning this option on will force the PVR to end recording the
program the specified number of minutes after it is scheduled to end. This can be useful
for live sporting events or to ensure you always see next week’s preview at the end of an
episode.
“Start Early” and “End Late” settings are ignored when there are dual
scheduled recordings taking place before or after the selected program.
• KEEP* [ALL EPISODES, 1-14 EPISODES]: This option determines how many episodes can be
stored on the hard drive before the oldest episode is automatically deleted.
• KEEP UNTIL [SPACE IS NEEDED, FOREVER]: By selecting “Forever”, new recordings made from
this Recording Event will be automatically Protected in the PVR List and can only be
deleted by you. If you leave the recording on the default “space is needed”, the
recording is Unprotected and can be deleted by your HDPVR when the hard drive is full
and space is needed for new recordings. See page 31 to find out more about PVR SelfManagement.
* “Recurrence”, “Channels”, and “Keep” do not apply to one-time recordings such as movies or
single episodes.
27
Page 32

Recording in
Denotes an episode which is currently being recorded. You can
Not Scheduled
Indicates an episode which does not meet your recording event
5C. VIEWING UPCOMING RECORDINGS
You can easily review all upcoming recordings in the PVR Upcoming menu. To access this
menu, select “Upcoming” from the “PVR” section of the Menu Bar.
From this menu, you can ensure that all expected programs will be recorded and change or
cancel specific episodes scheduled to be recorded. If you select a specific episode scheduled to
be recorded and press ENTER, you will be presented with the following Event Options:
• DO NOT RECORD THIS EPISODE or STOP THIS RECORDING: Selecting this option will cancel the
recording of this episode at the current time, or stop an in-progress recording. The partial
recording will still be available in the PVR List.
• VIEW UPCOMING AIR DATES: This will access the Upcoming Air Dates screen, where you can
also cancel the recording of this episode and select a different airing to be recorded.
• SHOW MORE INFORMATION: Select “Show more information” to view the Info pages for the
episode scheduled to be recorded.
5D. RECORDING SYMBOLS
Menu Bar 5XX Remote 6XX Remote
N/A N/A
Throughout the Guide, Search Results, PVR Upcoming and Upcoming Air Dates screens, a
variety of recording symbols are used to keep you informed of the status of your Recording
Events. Their meaning is as follows:
Recording
Scheduled
progress
Duplicate Episode
Recording Conflict
Denotes an episode which meets your recording event criteria and is
currently scheduled to be recorded.
watch it from the beginning in your PVR List.
Indicates an episode which meets your recording event criteria but
is not scheduled to be recorded because it is a duplicate episode
which has already been recorded or is already scheduled to be
recorded at a different time.
Denotes an episode which meets your recording event criteria but
cannot be recorded due to a conflict. You can use the Upcoming
Air Dates screen to try to find a different airing to record, or PVR
Upcoming to cancel one of the conflicting events. You can also
raise the priority of the conflicted program in PVR Options.
criteria. It will not be recorded.
28
Page 33

5E. DUAL RECORDINGS
With two tuners, your HDPVR can record up to two programs at once. If you are watching TV and
dual scheduled recordings are about to begin, you will see a “warning sign” (as
pictured at left) appear in the top right corner of the screen. Press ENTER on the
remote control to view the warning, or any other key to remove it.
If you press ENTER, you will be able to allow or deny one of the recordings from taking place. If
you select “Allow”, the receiver will tune away to the specified program when it begins in order
to record it. If you select “Deny”, you will be asked to confirm that you are stopping the
recording from occurring.
You can always use the PVR Upcoming menu to cancel or reschedule an upcoming recording to
ensure you have a tuner free for Live TV.
DUAL RECORDINGS IN PROGRESS
If you attempt to change channels while two programs are currently being recorded, you will
receive a warning message explaining that this is not possible. You can select “Cancel” to
continue watching the current program, or select “PVR List”, which will allow you to:
• Watch a previously recorded program
• Watch either of the in-progress recordings from the beginning
• Stop either recording to free up a tuner to watch Live TV.
When one of the recordings finishes, you will be able to change channels again.
5F. MANUAL TIMERS
A manual timer can be created by selecting “Manual Timers” from the Menu Bar. Manual
Timers record the specified channel for the specified duration, but do not capture any program
information such as title, description, or parental rating. If Parental Controls are “enabled”, all
manual timers will be locked and require the password to view or edit.
If you would like to record a program which may run long, such a live sporting event, it is
recommended to use the “End Late” setting in PVR Options for the desired program.
29
Page 34

6. THE PVR LIST
6A. PLAYING BACK YOUR RECORDED PROGRAMS
Once recorded, your programs are all available in one convenient location – the PVR List. Press
PVR or DVR List on your remote control, or select “Recordings” from the Menu Bar.
Within the PVR List, use the UP or DOWN arrow keys to select the program you want to watch.
Press ENTER to see the Recording Options menu, where the following options are available:
• WATCH THIS RECORDING: Selecting this option will start playback of the selected program.
If you have already watched part of this recording, you will be given the option to
“Resume playback” from where you last stopped, or “Restart playback” from the
beginning of the recording.
• PROTECT THIS RECORDING: Pressing ENTER will protect this recording from being
automatically deleted if the hard drive is full. The only way to remove this program from
your PVR once it is protected is to manually delete it. Recurring recordings set to “Keep
Until: Forever” will automatically be protected.
Menu Bar 5XX Remote 6XX Remote
• DELETE THIS RECORDING: This will delete the selected program from the PVR List. You will
be asked to confirm your selection.
• SHOW MORE INFORMATION: Select “Show more information” to view the Info pages for the
episode. You can also press INFO on the remote control to view this information.
30
Page 35

SORTING THE PVR LIST
You can use the LEFT or RIGHT arrow keys to sort recordings in your PVR List. The current sort
criteria is highlighted in yellow.
• DATE AND TIME: All recordings are sorted chronologically. The newest recordings appear at
the top of the list.
• PROGRAM NAME (ALPHABETICAL): All recordings are sorted alphabetically, with “A” at the
top.
• PROGRAM NAME (GROUPED): Episodes are grouped by program name. Selecting a grouping
will display all episodes available in that group. If only 1 episode is available, the
Recording Options menu will be displayed.
PVR SELF MANAGEMENT
With Smart Technology, your PVR is self-managing. When the hard drive gets full, the oldest
unprotected recordings will be automatically deleted to ensure there is always room for your new
scheduled recordings. If you manually protect a recording, or have the corresponding Recording
Event set to “Keep Until: Forever”, the recording will never be automatically deleted, and
can only be deleted by you. These recordings are indicated with the “hand” symbol.
31
Page 36

6B. PLAYBACK CONTROLS
After selecting “Watch this recording”, you can control playback just like a DVD by using the
playback keys on the remote control:
2 Pressing PAUSE will pause playback at the current position. Press PAUSE or PLAY to resume
playback.
5 6 Use REWIND and FAST FORWARD to move backwards or forward through the recording.
There are three fast forward and rewind speeds available, press the button again to move to the
next speed.
You can play back your recordings in slow motion by pressing PAUSE and
then REWIND or FAST FORWARD. There are 2 slow motion speeds
available, press the button again to move to the next speed.
1 Pressing PLAY will always resume playback when paused or if you are rewinding or fast
forwarding. Pressing PLAY while the recording is playing back will display the playback bar, so
you can see where you are in the recording.
If you want to jump to a specific point in the recording, Absolute Jump
allows you to do just that. Use the number keys to enter the point you want
to jump to, and then press PLAY to move to that location. For example,
pressing 4, 5, PLAY will move you to 45:00 in the program!
9 0 The SKIP BACK and SKIP AHEAD buttons skip 10 seconds back and 30 seconds ahead.
These durations can be customized by pressing OPTIONS, 4, 8, 1.
For ultimate control, use the Absolute Skip feature. Press a number on the
remote control, immediately followed by SKIP BACK or SKIP AHEAD to
move that number of minutes in the recording. For example, pressing 2,
SKIP AHEAD will advance you 2 minutes, perfect for bypassing unwanted
sections in your programs.
Use the ENTER button to bring up the Info Banner for the current program. The current date
and time, as well as information for the program you are watching will be displayed.
32
Page 37

watched yet.
YELLOW
UNDERSTANDING THE PLAYBACK BAR
The Playback Bar is like a map of your recording, telling you exactly where you are and where you
can go at any given time. The following diagram explains what each part of the playback bar
means:
shows parts of
a program
which were
recorded and
have already
GREEN shows parts
of a program which
were recorded but
have not been
RED shows parts of a
program which were not
recorded.
It also shows parts which
have not been recorded
yet if the program is
currently in progress.
Your current
position
The current
playback status
The length of
the program
For recordings that are currently in progress, you will see the red space at the right gradually turn
to green as more and more of the program is recorded.
If you rewind or skip backwards into a part that has already been viewed, it will turn green again.
You can press ENTER at any time while playing back a recording to view the Info Banner for the
Program.
33
Page 38

7. CONTROLLING LIVE TV WITH LIVE-OFF-DISK (LOD)
Almost immediately after you tune to a channel, your HDPVR automatically begins recording it in
the background to a special part of the hard drive called the LOD buffer. In the same way that
you can control a recorded program, you can control live TV!
Note: You cannot fast forward past the current “live” position of a program.
The LOD buffer is cleared each time you change channels. Subject to
available space on the hard drive, if you remain on one channel for a
prolonged period of time the LOD buffer will retain the current program and
previous program, regardless of length.
If you decide part way through that you would like to permanently record the program you are
currently watching, just press the RECORD button on the remote control and confirm the
recording. All parts available in the LOD buffer will be copied to the PVR List and the remainder
of the program will be recorded.
If you have tuned into a program part way through, or changed channels after tuning in, the
entire program will not be available to copy to the PVR List, as indicated by the red gaps in the
playback bar. You can use the “View upcoming air dates” option to find a future airing of this
program and schedule a future recording if desired.
If a program is currently being recorded to the PVR List (as indicated by the symbol in the
Guide), you can change channels as many times as you want and the remainder of the program
will still be recorded.
34
Page 39

Menu Bar
5XX Remote
6XX Remote
Menu Bar
5XX Remote
6XX Remote
8. OTHER MENUS
8A. INTERACTIVE APPLICATIONS
Interactive applications, such as Shaw Direct Weather are available by selecting “Interactive”
from the menu bar.
Other applications may be available by selecting the applicable channel from the Guide. Check
out
www.shawdirect.ca for the latest information on current applications.
While in an interactive application, press the EXIT or LAST CH key on your remote control to exit
and return to the last channel you were viewing.
N/A N/A
8B. RECEIVER MAIL
Shaw Direct uses receiver mail to occationally send short messages on free previews, promotions,
or account information. You can access your receiver mailbox by selecting “Mail” from the
Messages section of the Menu Bar.
When a message is received, the envelope icon on the front of your receiver will illuminate. After
you read the message, it will turn off.
8C. CALLER ID LOG
If you have connected your receiver to your residential telephone line and subscribe to Caller ID
through your local phone company, incoming calls will appear onscreen in real time. You can
access a log of your recent incoming calls by selecting “Call Log” from the Messages section of
the Menu Bar. If you prefer, you can disable Caller ID by accessing OPTIONS, 4, 1.
N/A N/A
Menu Bar 5XX Remote 6XX Remote
N/A N/A
35
 Loading...