

Page 1
User Guide
Page 2

© 2020 Motorola Mobility LLC. All rights reserved.
MOTOROLA, the stylized M logo, MOTO, and the MOTO family of marks are trademarks or registered trademarks
of Motorola Trademark Holdings, LLC. LENOVO is a trademark of Lenovo. Google, Android, Google Play and
other marks are trademarks of Google LLC. microSD Logo is a trademark of SD-3C, LLC. Manufactured with Dolby
technologies under license from Dolby Laboratories. Dolby, Dolby Audio, and the double-D symbol are trademarks
of Dolby Laboratories. All other product or service names are the property of their respective owners.
Certain features, services and applications are network dependent and may not be available in all areas; additional
terms, conditions and/or charges may apply. Contact your service provider for details.
All features, functionality, and other product specifications, as well as the information contained in this help content,
are based upon the latest available information and believed to be accurate at the time of release. Motorola
reserves the right to change or modify any information or specifications without notice or obligation.
Some images in help content are examples only.
You can also read this help on your phone at Settings > Help.
Page 3

Moto G Power iii
Contents
Set up phone 1
Hardware diagram 1
Insert and remove SIM and SD cards 2
Add or remove accounts 4
Set up voicemail 5
Set up email 5
Make it yours 6
Accessibility settings 8
Visual assistance 8
Hearing assistance 10
Dexterity assistance 11
Use accessibility shortcuts 12
Learn the basics 14
About your home screen 14
About your lock screen 14
New to Android? 16
If this is your first smartphone 16
If you had an iPhone 17
About your Google account 18
Status bar icons 19
Phone terms you should know 23
Get around 25
Learn gestures 25
Use the stylus 26
Move between apps and screens 26
Use quick settings 27
Wake or put screen to sleep 29
Adjust volume 29
Frequently used tools 31
Turn flashlight on and off 31
Take screenshots 31
Use voice commands 32
Get turn-by-turn directions 33
Use Time and Weather widget 33
Manage time spent on your phone 35
Work with text 38
Use onscreen keyboard 38
Cut, copy, paste text 39
Use voice typing 40
Fill in forms automatically 40
Page 4

Moto G Power iv
Personalize your phone 41
Home screen 41
Change wallpaper 41
Customize your Favorites tray 41
Add widgets, shortcuts, or folders 41
Remove widgets, shortcuts, or folders 44
Remake your home screen with launchers 44
Lock screen 45
Use a screen saver 45
Add message to lock screen 45
Sounds 47
Set ringtones 47
Avoid interruptions with Do Not Disturb 48
Stop phone from speaking 51
Other sound settings 52
Silence power on sound 52
Turn off charging sounds 52
Apps 53
About your apps 53
Use two apps at once 57
View notifications 58
About the Moto app and settings 60
Manage your apps 61
Install or update apps 61
Manage or delete apps 63
Protect against harmful apps 65
Pin your screen 65
Search and web browser 67
Search the web 67
Search your phone 69
Browse websites 70
Text messaging 72
About text and multimedia messages 72
Read, send, manage text messages 72
Add attachments 74
Save attachments from text message 75
Turn group messaging on or off 75
Change default messaging app 76
Control notifications for text messages 76
Change text message reply to incoming calls 76
Page 5

Moto G Power v
Get text messages on your computer 77
Email 78
Read, send, manage emails 78
View email attachments 79
Preview inboxes from home screen 80
Add email signature 80
Control email notifications 80
Calendar app 81
About the calendar 81
Find calendar events 81
Create and manage events 82
Control notifications for calendar events 82
Clock app 84
Set alarms 84
Use timer or stopwatch 84
Set date and time 86
Photos app 87
Share photos and videos 87
Upload photos and videos 87
Calls, contacts, voicemail 89
Phone calls 89
Answer calls 89
Make calls 90
During a call 91
Make video calls 92
Make conference calls 93
Block calls and texts 93
Turn on call waiting 94
View and delete call history 95
Contacts 97
Add contacts 97
Edit or delete contacts 98
Star your favorite contacts 99
Sort contacts 99
Share contacts 100
Voicemail 102
Use voicemail 102
Send all calls from contact to voicemail 103
Music 104
Listen to music 104
Page 6

Moto G Power vi
Transfer music files 105
Connect a MIDI device 106
Battery 107
Charge phone 107
Extend battery life 107
Use Battery Saver mode 108
Storage 110
About storage options 110
Manage phone storage 110
Manage SD card 111
Find downloaded files 112
Recover recently deleted files 113
Upload music to cloud 113
Upload photos and videos 114
Scan documents and make copies 114
Network and internet 116
Connect to Wi‑Fi networks 116
Use Airplane mode 117
Control data usage 117
Share your internet connection 119
Connect to VPNs 121
Connected devices 122
Connect with Bluetooth™ 122
Connect with Wi-Fi Direct 123
Cast screen or media to TV 124
Transfer files between phone and computer (USB) 125
Print from your phone 126
About wireless sharing 127
Other settings 130
Apps & notifications 130
Change app settings 130
Choose how apps notify you 131
Turn emergency alerts off/on 133
Display 135
Stop automatic rotation 135
Choose color mode 135
Adjust screen colors at night 135
Adjust screen brightness 136
Change font and display size 136
Change theme 136
Change screen timeout 137
Page 7

Moto G Power vii
See Peek Display notifications 137
Location 139
Use location services 139
Security 140
About security 140
Protect against harmful apps 141
Be ready to find a lost phone 141
Lock and unlock phone 142
Set screen lock 142
Unlock with trusted devices 143
Unlock at trusted places 144
Keep phone unlocked while it's on you 145
Use fingerprint security 145
Lock SIM card 147
Accounts 149
Add or remove accounts 149
Sync accounts and apps 150
Manage information in your Google account 151
System 152
Languages & input 152
Customize the keyboard 152
Use multiple languages 153
Gestures 155
Change System navigation 155
Turn flashlight on and off 155
Twist phone to open camera 155
Shrink screen for one-handed use 156
Adjust screenshot settings 156
Back up phone 156
Users and guests 158
Share your phone 158
Add, modify, remove users 159
Add or delete guest 160
About phone 161
Set up emergency information 161
Record your IMEI number 161
Find legal and product information 161
Fix a problem 162
Hardware issues 162
Page 8

Moto G Power viii
Phone is slow or unstable 162
Phone feels warm or hot 162
Phone won't turn on 163
Phone restarts or crashes 163
Screen is frozen or won't respond 164
SD card problems 164
Call and SIM issues 167
Problems making/receiving calls 167
Problems during calls 168
Battery issues 171
Charging problems 171
Battery drains too fast 171
Bluetooth, Wi-Fi, USB issues 172
Bluetooth problems 172
Wi-Fi problems 174
Can't transfer files or connect to computer 175
Account and sign-in issues 176
Forgot unlock code 176
Can't sign in to Google 176
Account sync issues 176
App issues 178
App or widget problems 178
Messaging problems 179
Camera problems 180
Maintenance procedures 183
Update Android software 183
Reset Wi-Fi, cellular data, and Bluetooth 183
Reset phone 184
Get more help 185
Page 9
Set up phone 1
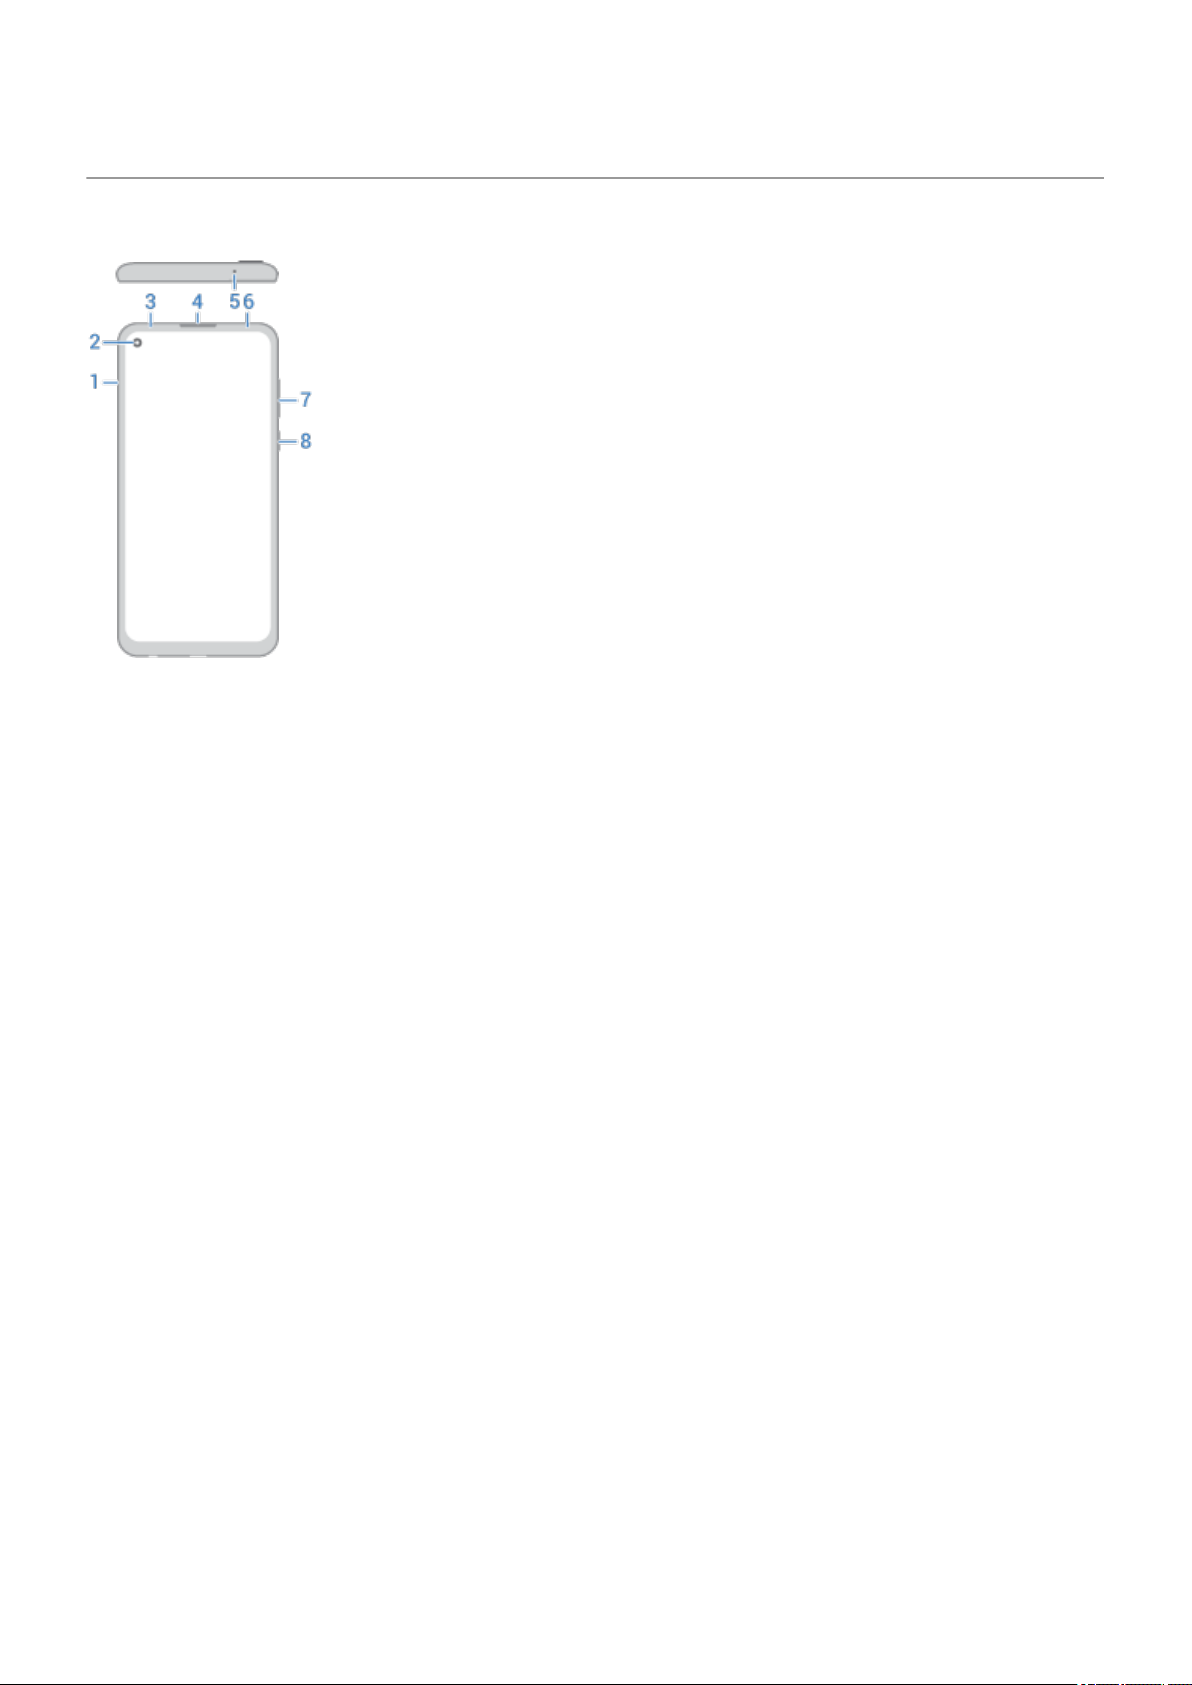
Hardware diagram
1. Tray for SIM and SD card
2. Front camera (To learn more, read help in the Camera app.)
3. Proximity sensor
4. Earpiece
5. Microphone
6. Ambient light sensor
7. Volume up/down button
8. Power button
Page 10
Set up phone
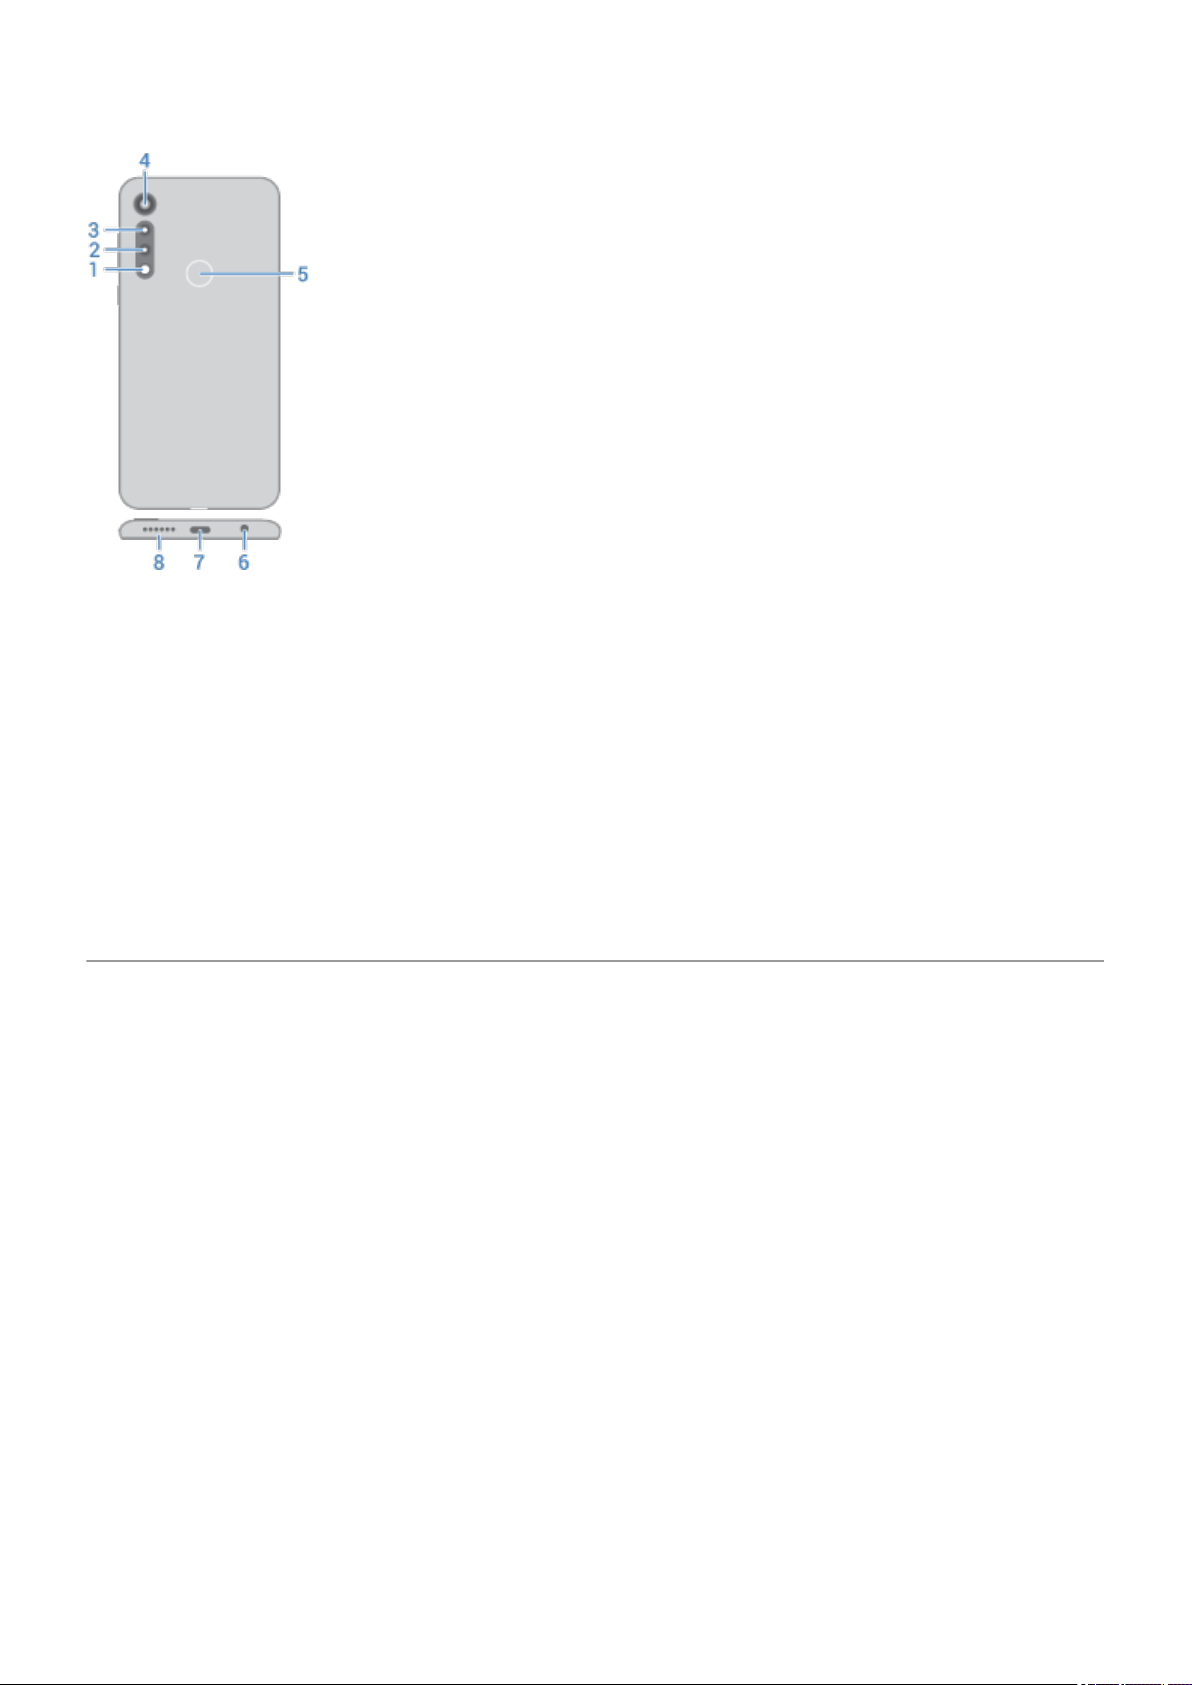
1. Flash
2. Macro camera (To learn more, read help in Camera app.)
2
3. Main camera
4. Ultra-wide camera
5. Fingerprint sensor
6. Headset jack
7. USB-C port for charging, transferring files, sharing connection with tethered devices.
8. Speaker
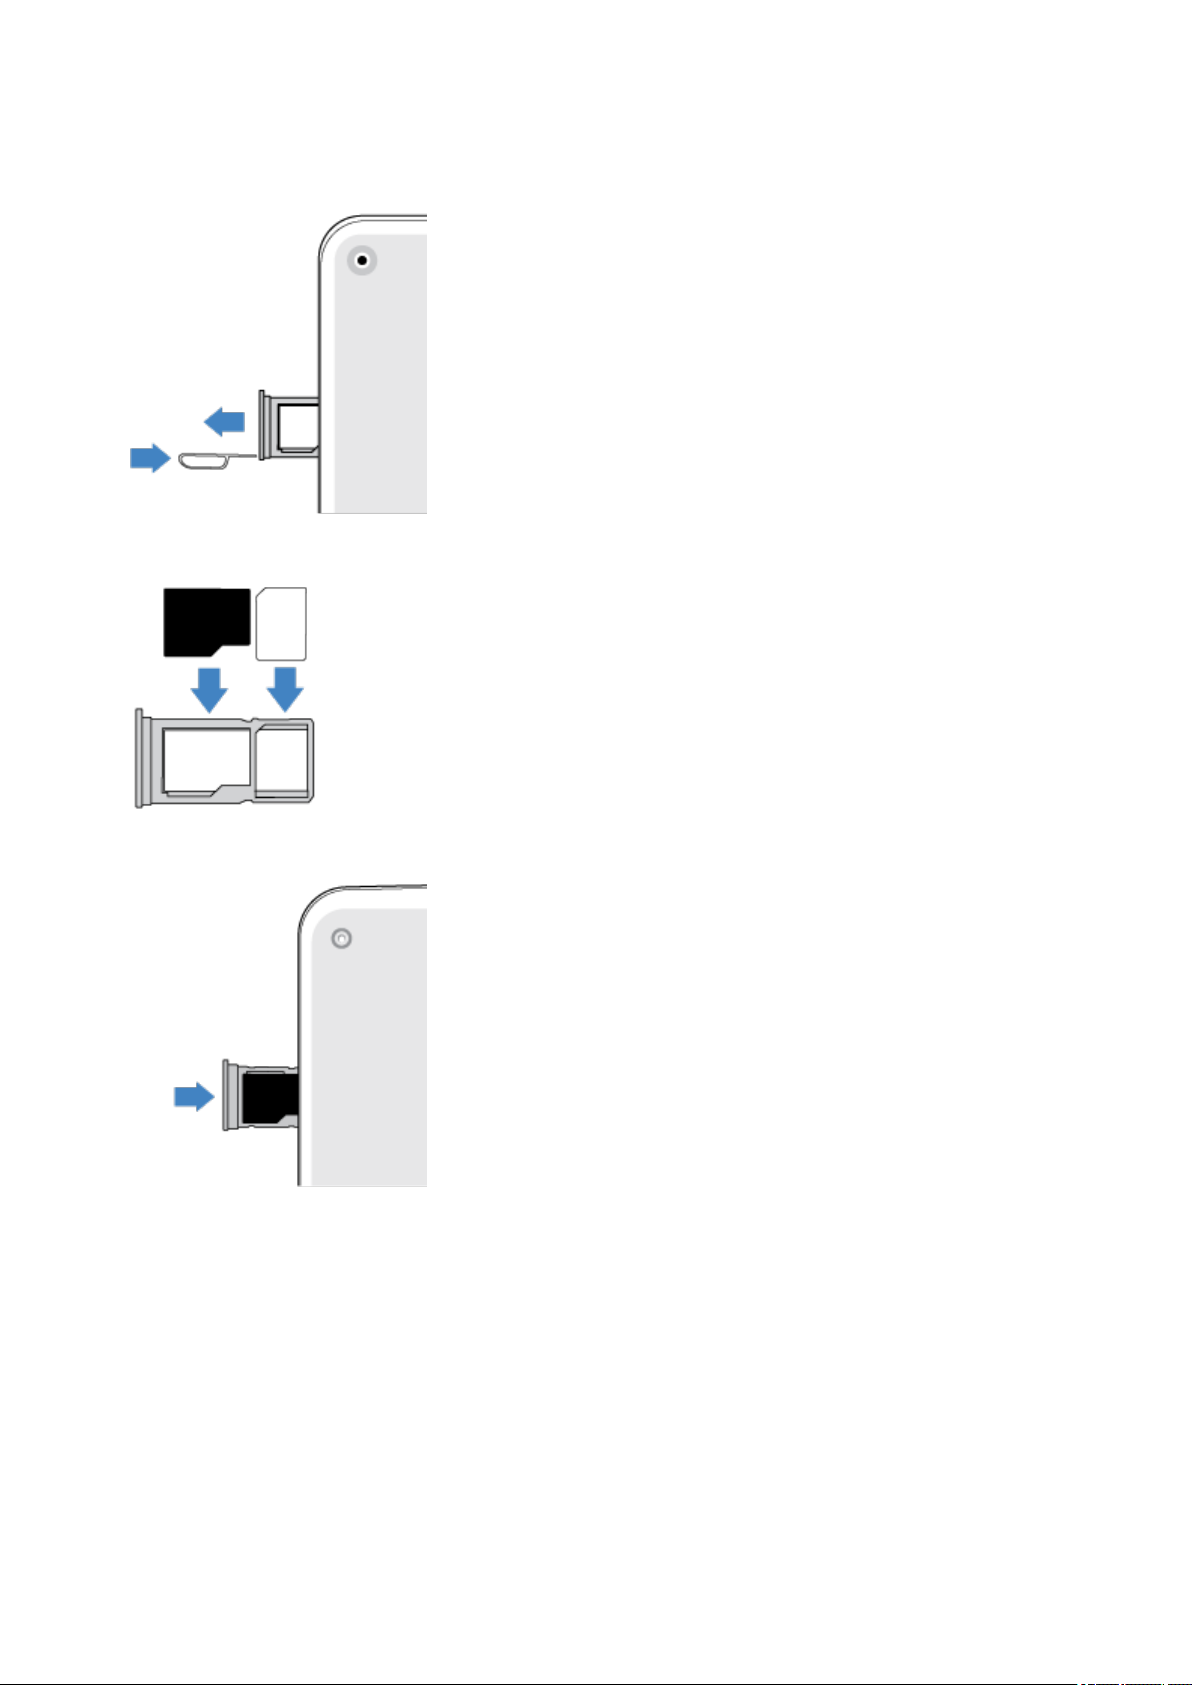
Insert and remove SIM and SD cards
About the SD card
Your phone supports a microSD card up to 512 GB.
A Class 2, 4, or 6 card is sufficient.
Your phone uses the card as portable storage for media files: photos, videos, and music. Because it's portable, you
can easily swap the card and its content between devices. After you insert the card, be sure to update settings
within media apps (like camera, music, and podcast apps), so they use the card to store content you create or
download.
You can't store apps on the SD card because it is portable storage.
Replace SIM or SD card
1. If you are removing an SD card, unmount it first (Settings > Storage).
Page 11
Set up phone
2. Insert the tool into the hole in the tray and gently push to pop it out.
3. Insert or remove the cards as needed.
3
4. Push the tray back into the phone.
Fix a problem
If you’re having problems, try these troubleshooting steps:
SIM card
•
SD card
•
Page 12
Set up phone
Add or remove accounts
Add Google account
When you set up your phone, you were prompted to add a Google account. If you skipped this, be sure to set one
up now so you can download apps from Play Store, get a customized information feed, and take full advantage of
the Calendar, Gmail, and other apps included with your Google account.
To add a Google account:
1. Go to Settings.
2. Touch Accounts > Add account.
3. Touch Google and follow the onscreen instructions to add an existing account or to create a new one.
4. Once the account is added, Calendar, Contacts, and other account features and apps are updated with
information from that account. You can review and change what syncs with your phone for that account.
4
Tip: Keep your apps up-to-date. To see if newer versions of the apps associated with your Google account are
available, open the Play Store app and touch > My apps & games.
Add email or app account
Accounts are automatically added when you:
Set up corporate email
•
Set up personal email for non-Gmail addresses
•
Install apps that require a username/password to log in, such as messaging, shopping, or streaming content
•
To review these accounts or add another:
1. Go to Settings.
2. Touch Accounts > Add account.
3. Touch the type of account to add and follow the onscreen instructions.
If you don't see the type of account you want to add, install the related app from Play Store, then sign into your
account through the app.
4. Once the account is added, account-related features and apps are updated with information from that account.
To review and change what syncs with your phone, touch the account type, then account name.
Remove account
If you remove an account, information you synced will be removed from your phone, but it is not deleted from your
account.
To remove an account:
1. Go to Settings > Accounts.
2. Touch the account name.
3. Touch Remove account.
Page 13

Set up phone
Tip: If you have trouble removing a corporate account, go to Settings > Security > Advanced > Device
admin apps and turn off the app for the account, then try to remove it again.
Set up voicemail
Set voicemail password
Contact your carrier for help setting or recovering your password/PIN for voicemail.
Set mailbox greeting
Your carrier provides and manages your voicemail.
To set your greeting:
1.
Touch > .
5
2.
Touch & hold to dial into your mailbox.
3. Follow your carrier’s system prompts. If your voicemail is not set up, contact your carrier for instructions.
Change voicemail options
1.
Touch > > Settings.
(If you don't see , swipe down on the screen.)
2. Touch Voicemail.
3. Touch Advanced Settings.
4. Change any of the options:
To change voicemail service from your provider to another voicemail service or app, touch Service.
•
To change the number dialed to access voicemail, touch Setup.
•
Set up email
Set up personal email
You can add multiple email accounts of the following types:
Gmail
•
Personal email from other providers (IMAP/POP)
•
If you added a Google account on your phone:
When you open the Gmail app for the first time, you'll see your email for that account. You're already set up.
•
•
To set up additional accounts, open Gmail, touch your profile icon , then touch Add another account.
Page 14

Set up phone
If you didn’t add a Google account to your phone and want to set up email for an IMAP/POP provider (an address
that's not Gmail):
1. Open the Gmail app.
2. Follow the onscreen instructions to enter your email address, password, and account options.
If you have problems setting up the account, read Google's help for Gmail.
Set up corporate email
If you use Microsoft Office Outlook on your work computer, your phone can synchronize emails, calendar events,
and contacts with the Microsoft Exchange server. Before you start, you'll need the following information from your
company's IT department:
Email address
•
Email password
•
Domain name
•
Username
•
6
Server name
•
Security type/SSL settings
•
Client certificate requirement
•
To set up corporate email:
1. Open the Gmail app.
2. Do one of the following:
If this is your first time opening the Gmail app, touch Add another email address.
•
•
If you have been using Gmail with another account, touch your profile icon , then touch Add another
account.
3. Touch Exchange and Office 365.
4. Follow the onscreen instructions to enter your email address, password, and other information from your
company's IT department.
Switch account views
In the Gmail app, touch your profile icon , then select an account.
To open each inbox with one touch from your home screen, add task shortcuts:
1.
Touch & hold .
2.
Drag for each account to a blank space on your home screen.
Make it yours
Now that you're up and running (battery charged, contacts imported, accounts added), it's time for fun:
Set the wallpaper.
•
Page 15

Set up phone 7
Assign ringtones or photos to friends you call.
•
Find some games.
•
Play some music.
•
Start taking and sharing those selfies.
•
To protect your phone, be sure to:
Set up a screen lock.
•
Set up fingerprint security to unlock your screen safely and quickly with a touch.
•
In case you ever lose your phone, set up Find My Device and record your IMEI number.
•
You'll probably also want to:
Set up your Bluetooth and Wi-Fi connections.
•
If you use multiple languages, set them up so they appear on your keyboard.
•
Set your schedule for Do Not Disturb, to automatically silence your phone when you don't want to be
•
interrupted.
Find your phone number
1. Go to Settings.
2. Touch About phone > Phone number.
Page 16
Set up phone : Accessibility settings
Visual assistance
Adjust colors if you’re color blind
1. Go to Settings > Accessibility.
2.
Touch Color correction and turn Use color correction on .
3. Touch Correction mode and choose an option.
How you see colors Option to choose
It’s difficult to tell violet from blue. Yellow and green appear redder. Deuteranomaly (red-green)
Colors aren’t bright. Red, orange, and yellow appear greener. Protanomaly (red-green)
8
It’s difficult to tell yellow and red from pink. Blue appears greener. Tritanomaly (blue-yellow)
Color correction is an experimental feature and might not work correctly everywhere on your phone.
Use magnification gestures and icon
You can magnify the screen by triple tapping it or by touching by the navigation buttons.
To enable these gestures and add the icon:
1. Go to Settings > Accessibility > Magnification.
2. Adjust settings as needed:
•
To use gestures to zoom in and out, touch Magnify with triple-tap and turn it on .
•
To add if you're using 3-button navigation, touch Magnify with shortcut and turn it on .
Then, use these gestures:
•
To zoom in/out, touch or triple-tap the screen, then touch the area of the screen to magnify.
•
To zoom temporarily, touch , then touch & hold anywhere on the screen. Drag to move around the screen,
then lift your finger to zoom out.
To scroll while zoomed in, swipe the screen up or down with one finger.
•
To move the screen around, drag it with two fingers.
•
To adjust the zoom, pinch fingers together or apart.
•
You can't zoom in on the keyboard or the buttons.
Tip: You can also adjust font and display size.
Page 17

Set up phone : Accessibility settings
Turn touch sounds on/off
1. Go to Settings > Sound > Advanced.
2. Do any of the following:
To hear a tone when you dial a number, turn on Dial pad tones.
•
To hear a click when you lock or unlock the screen, turn on Screen locking sounds.
•
To hear a click when you touch something on the screen, turn on Touch sounds.
•
To feel a vibration when you type on the keyboard, turn on Touch vibration.
•
If you don't want any of these sounds, just turn them off .
Hear notification sounds
You can assign a ringtone for notifications from specific apps.
You can also control sounds used to notify you of other events:
9
1. Go to Settings > Sound > Advanced.
2. To hear when your phone begins charging and reaches a full charge, turn Charging sounds and vibration on
.
Use TalkBack to read screens
Hear descriptions of everything you touch.
Enable TalkBack
1. Go to Settings > Accessibility.
2.
Touch TalkBack and turn Use service on .
3. Touch Settings and set the options you want.
When TalkBack is on
Touch an item. Your phone speaks the name.
•
Start typing. Your phone speaks each number or letter.
•
Drag status bar down. Your phone speaks all of the notifications.
•
Open a message, file, or book. Your phone reads the text out loud.
•
Change readout volume
•
Press a Volume button to open volume settings, then use the slider to adjust the level.
Or, during voice readout, repeatedly press a Volume button.
•
Stop readout
To pause or resume readout, press & hold both the Volume Up and Down buttons at the same time for three
seconds, until you hear confirmation that TalkBack is on or off. You can change the accessibility feature associated
with this shortcut.
Or, turn TalkBack off:
Page 18
Set up phone : Accessibility settings
1. Go to Settings > Accessibility.
2.
Touch TalkBack and turn Use service off .
More assistance
You can also:
Use voice commands
•
Dictate text instead of typing
•
Hearing assistance
Turn on video captions
1. Go to Settings > Accessibility.
10
2.
Touch Caption preferences and turn Use captions on .
3. Specify options (language, text size, and style) for closed captioning.
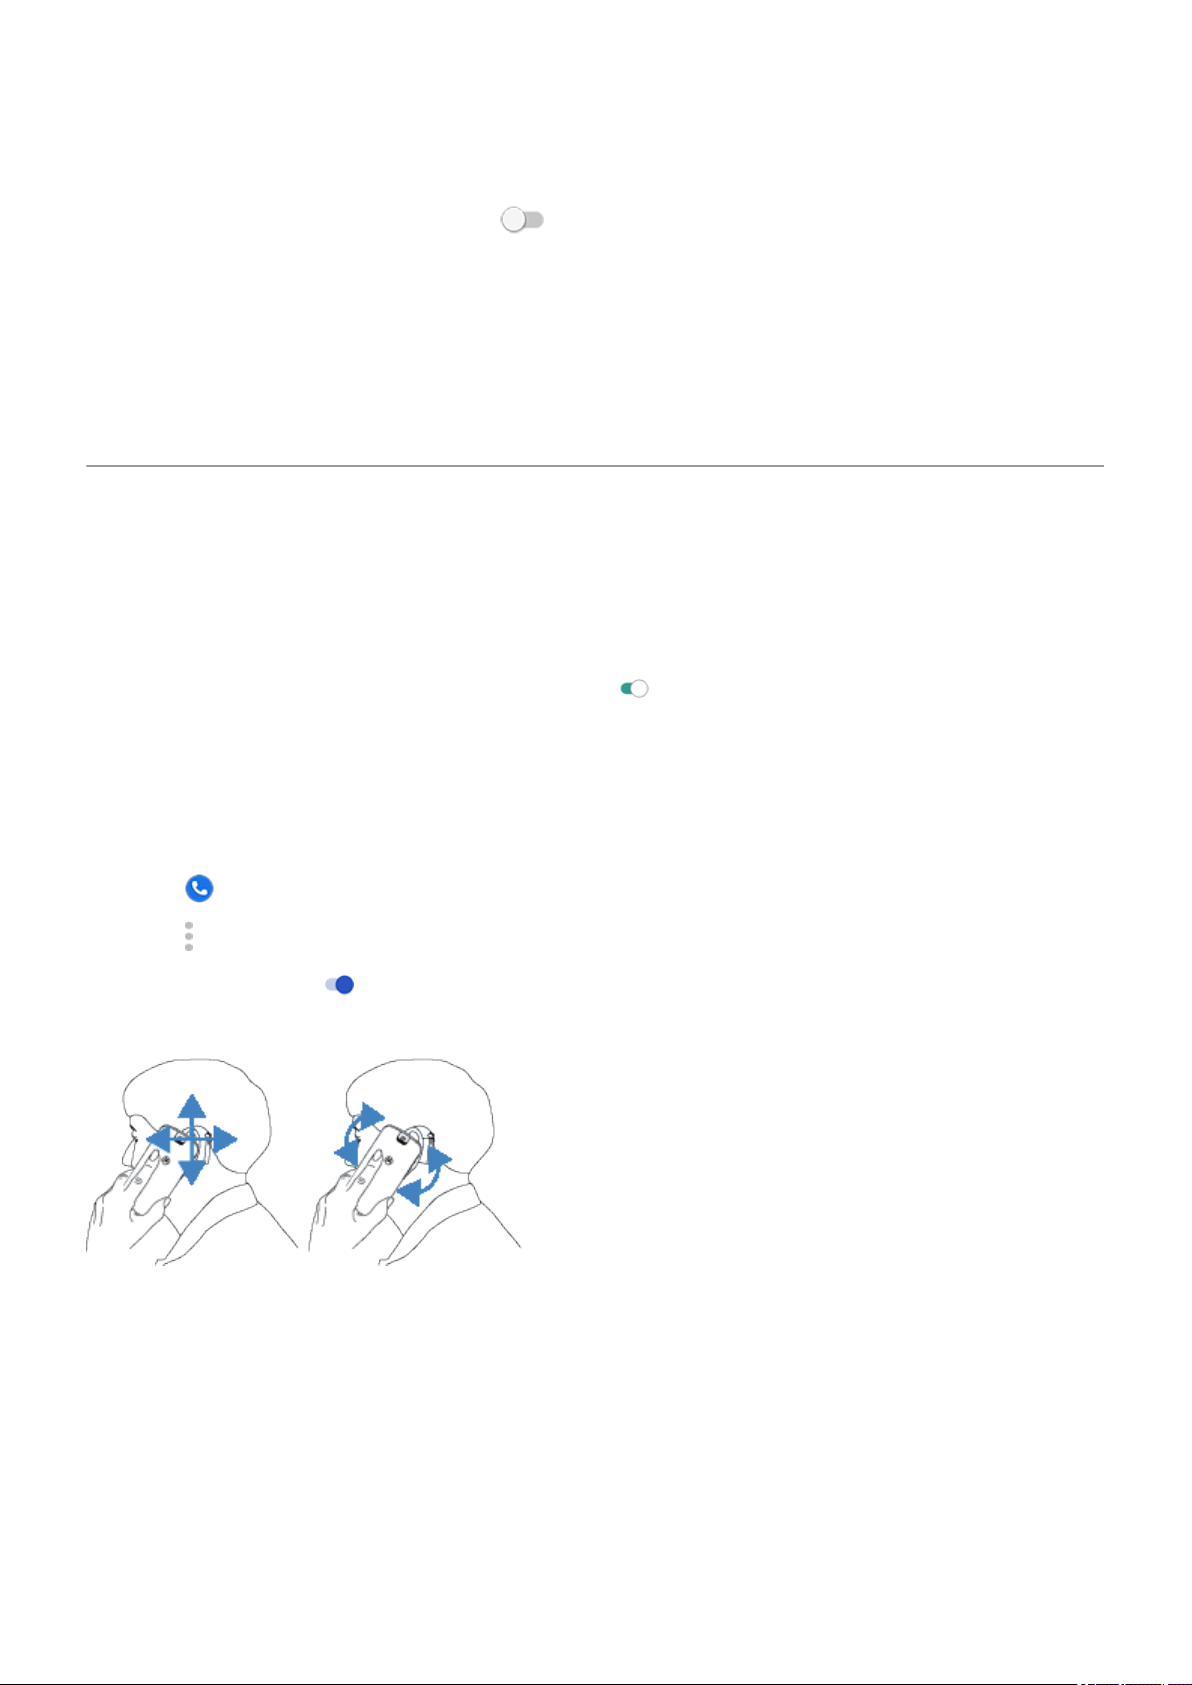
Use hearing aids
To improve compatibility with hearing aids and reduce sound feedback:
1.
Touch .
2.
Touch > Settings > Accessibility.
3.
Turn Hearing aids on .
During a call, hold the phone to your ear, then rotate or move it to get the best position for speaking and listening.
Use real-time text (RTT) during calls
Not all carriers support this feature.
Real-time text (RTT) lets you use text to communicate during a phone call. Your phone sends text as you type and
the recipient can read your message while you write.
RTT:
Uses call minutes, just like a voice call
•
Doesn't require additional accessories
•
Page 19
Set up phone : Accessibility settings
To turn RTT on:
1.
Touch .
2.
Touch > Settings > Accessibility.
3.
Touch Real Time Text (RTT) Call and turn it on .
Once it’s on, you can make or receive RTT calls.
To make a call with RTT:
1.
Touch .
2. Call the number.
While the phone rings, the other person's screen displays an RTT indicator.
3. After the other person answers, enter a message in the text field.
The text that you enter is visible to the other person as you type.
4.
During a call, you can touch to mute the call, turn on the speaker, return to the keypad, or add a call.
11
5.
To end the call, touch .
Set up TTY device
Not all carriers support this feature.
For text-based communication, you can use text messaging and email.
If you prefer to connect to a TTY device:
1.
Touch .
2.
Touch > Settings > Accessibility > TTY mode.
3. Select a mode:
TTY Full: Type and read text on your TTY device.
•
TTY HCO: Type text on your TTY and listen to voice replies on your phone.
•
TTY VCO: Speak into your phone and read text replies on your TTY.
•
4. Connect your phone and TTY with the audio cord that came with your TTY.
Dexterity assistance
External switch or keyboard
If you’re unable to use a touchscreen, Switch Access lets you control the phone using external switches or
keyboard keys to select items, scroll, enter text, and more.
To use Switch Access, you must have one of the following:
An external switch. USB or Bluetooth switch devices send keystroke signals to your phone.
•
Page 20

Set up phone : Accessibility settings
An external keyboard. Standard USB or Bluetooth keyboards can work as switch devices by assigning one
•
or more keys to actions.
Connect the external device to your phone using the manufacturer’s instructions. Learn more about connecting
with Bluetooth.
Set up Switch Access
1. Go to Settings > Accessibility.
2. Touch Switch Access.
3.
Turn Use service on .
4. Follow onscreen instructions to select:
Number of switches
•
Scanning options
•
Switch assignments
•
To adjust Switch Access later:
12
1. Go to Settings > Accessibility.
2. Touch Switch Access > Settings.
3. Adjust options.
Use Switch Access
To start scanning and highlighting items on the screen, press the assigned switch or key.
•
To select a highlighted item, press the assigned switch or key, then press the switch or key assigned to select
•
options.
Change time to take action
If you need more time to respond to a notification or messages that are visible only temporarily, you can adjust the
time before they disappear:
1. Go to Settings > Accessibility.
2. Touch Time to take action.
3. Choose your preferred timeout.
Note: Not all apps support this setting.
Use accessibility shortcuts
Use accessibility menu
Get quick access to an accessibility menu that gives you better control of your phone.
To turn it on:
Page 21

Set up phone : Accessibility settings
1. Go to Settings > Accessibility.
2. Touch Accessibility Menu.
3.
Turn Use service on .
Tip: To increase the size of the buttons on this menu, touch Settings, then turn Large buttons on .
If you're using gesture navigation:
1. Use two fingers to swipe up from the bottom of the screen.
If you've set other accessibility tools to use this gesture, swipe up with two fingers and hold to switch between
tools.
2. Choose an option from the menu.
If you're using 3-button navigation:
1.
At the bottom of the screen, touch .
If you've set other accessibility tools to use this icon, touch & hold it to switch between tools.
13
2. Choose an option from the menu.
Press Volume buttons for accessibility services
You can press the Volume buttons to turn an accessibility feature of your choice (TalkBack, Switch Access) on or
off.
To enable the shortcut:
1. Go to Settings > Accessibility.
2. Touch Volume key shortcut.
3.
Turn Use service on .
4. To change the accessibility feature associated with the shortcut, touch Shortcut service.
5.
To use the Volume buttons from the lock screen, turn Allow from lock screen on .
To use the shortcut:
Press and hold the Volume Up and Down buttons at the same time for three seconds.
You'll hear confirmation that the feature has been turned on or off.
Page 22
Learn the basics
About your home screen
You see the home screen when you turn on and unlock your phone or touch .
You can add more pages to the right as needed. To add a page, drag an app shortcut or widget to the edge of an
existing page and place it on the new page.
Swipe right or left to move between pages.
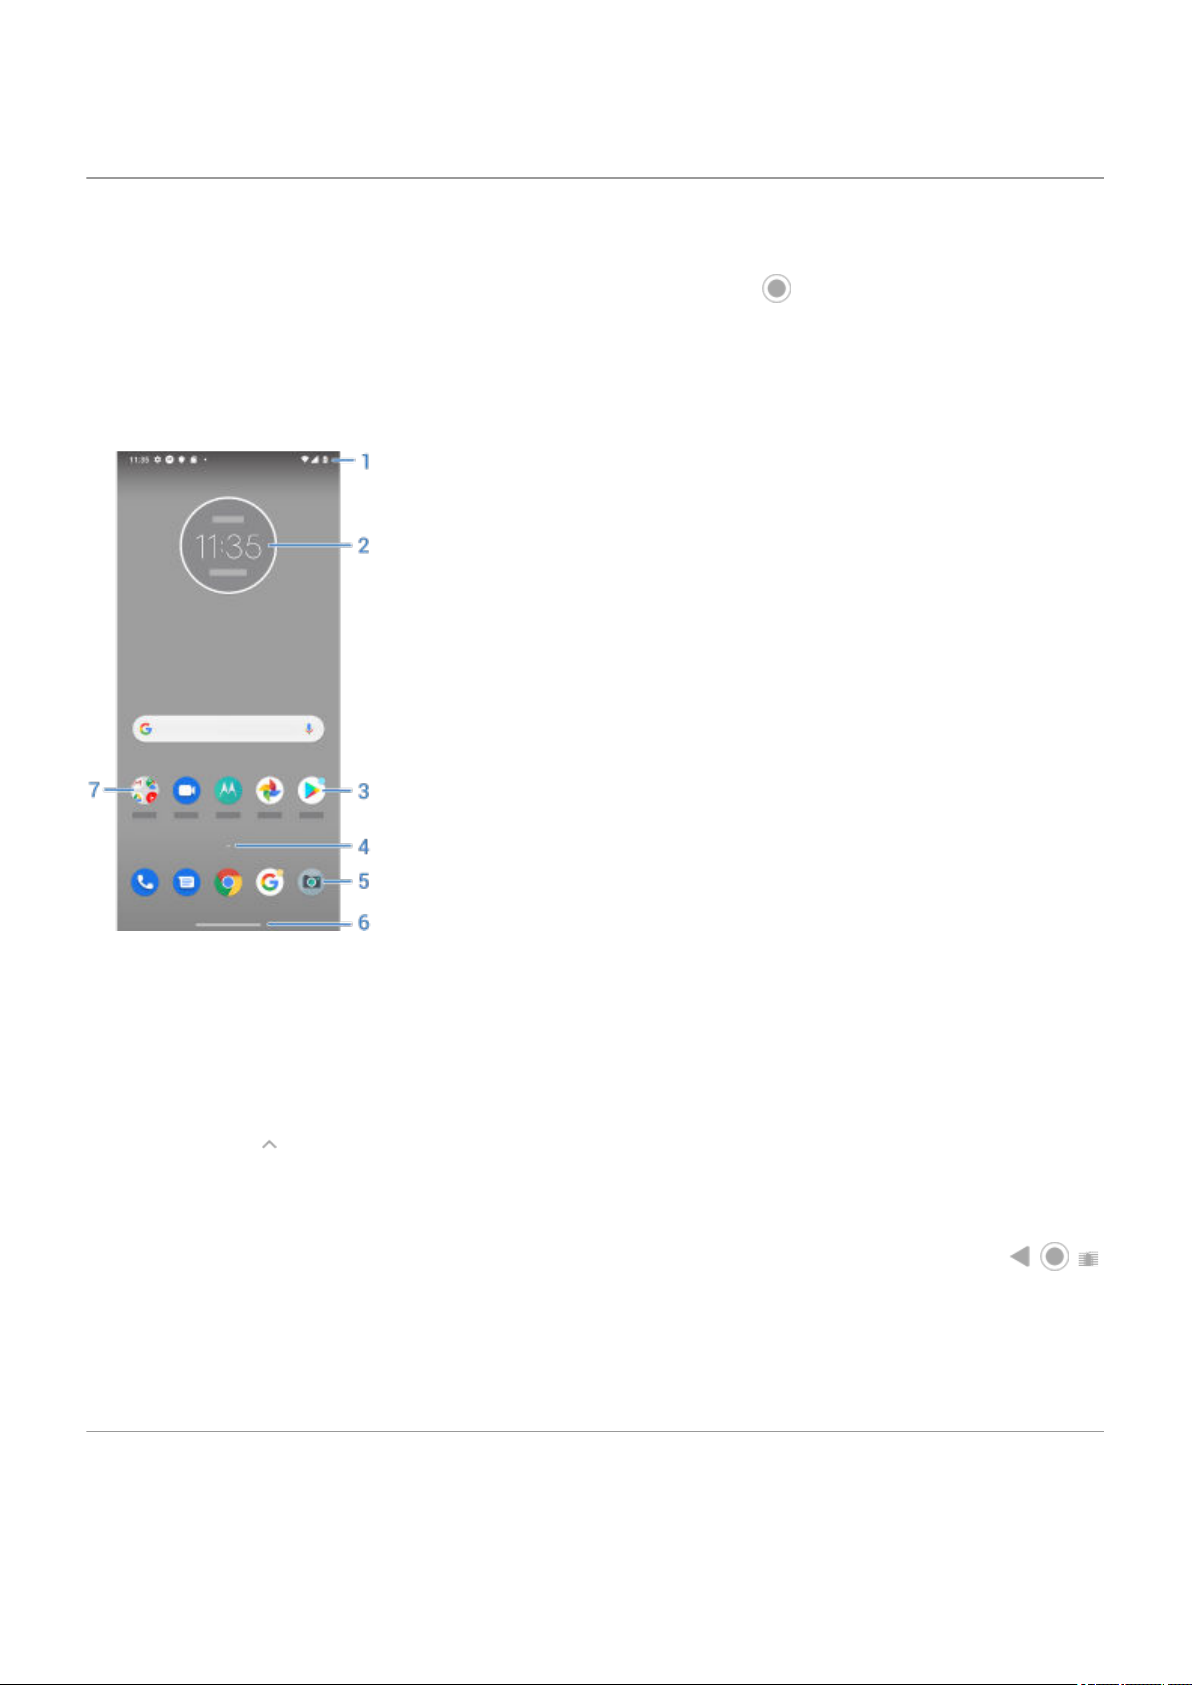
Here are the parts of your home screen:
14
1. Status bar: Displays the time and icons that tell you about your phone's battery and network connections.
Swipe down to see your notifications and quick settings.
2. Widget: You can add widgets to your home screen for quick access to information or frequent tasks.
3. Shortcut: You can add shortcuts to open apps or web pages you use frequently.
4.
App list: Swipe up from the bottom of the screen to see the list of all your apps.
5. Favorites tray: Provides one touch access to your most-used apps from any home screen page. You can
customize which apps appear here.
6.
Navigation bar: Use gestures to move between apps and screens. You can replace the bar with the
navigation icons instead.
7. Folder: Add folders to organize app shortcuts.
If you want an entirely new look and feel for your home screen, you can use a different launcher. For a less drastic
renovation, just change the wallpaper.
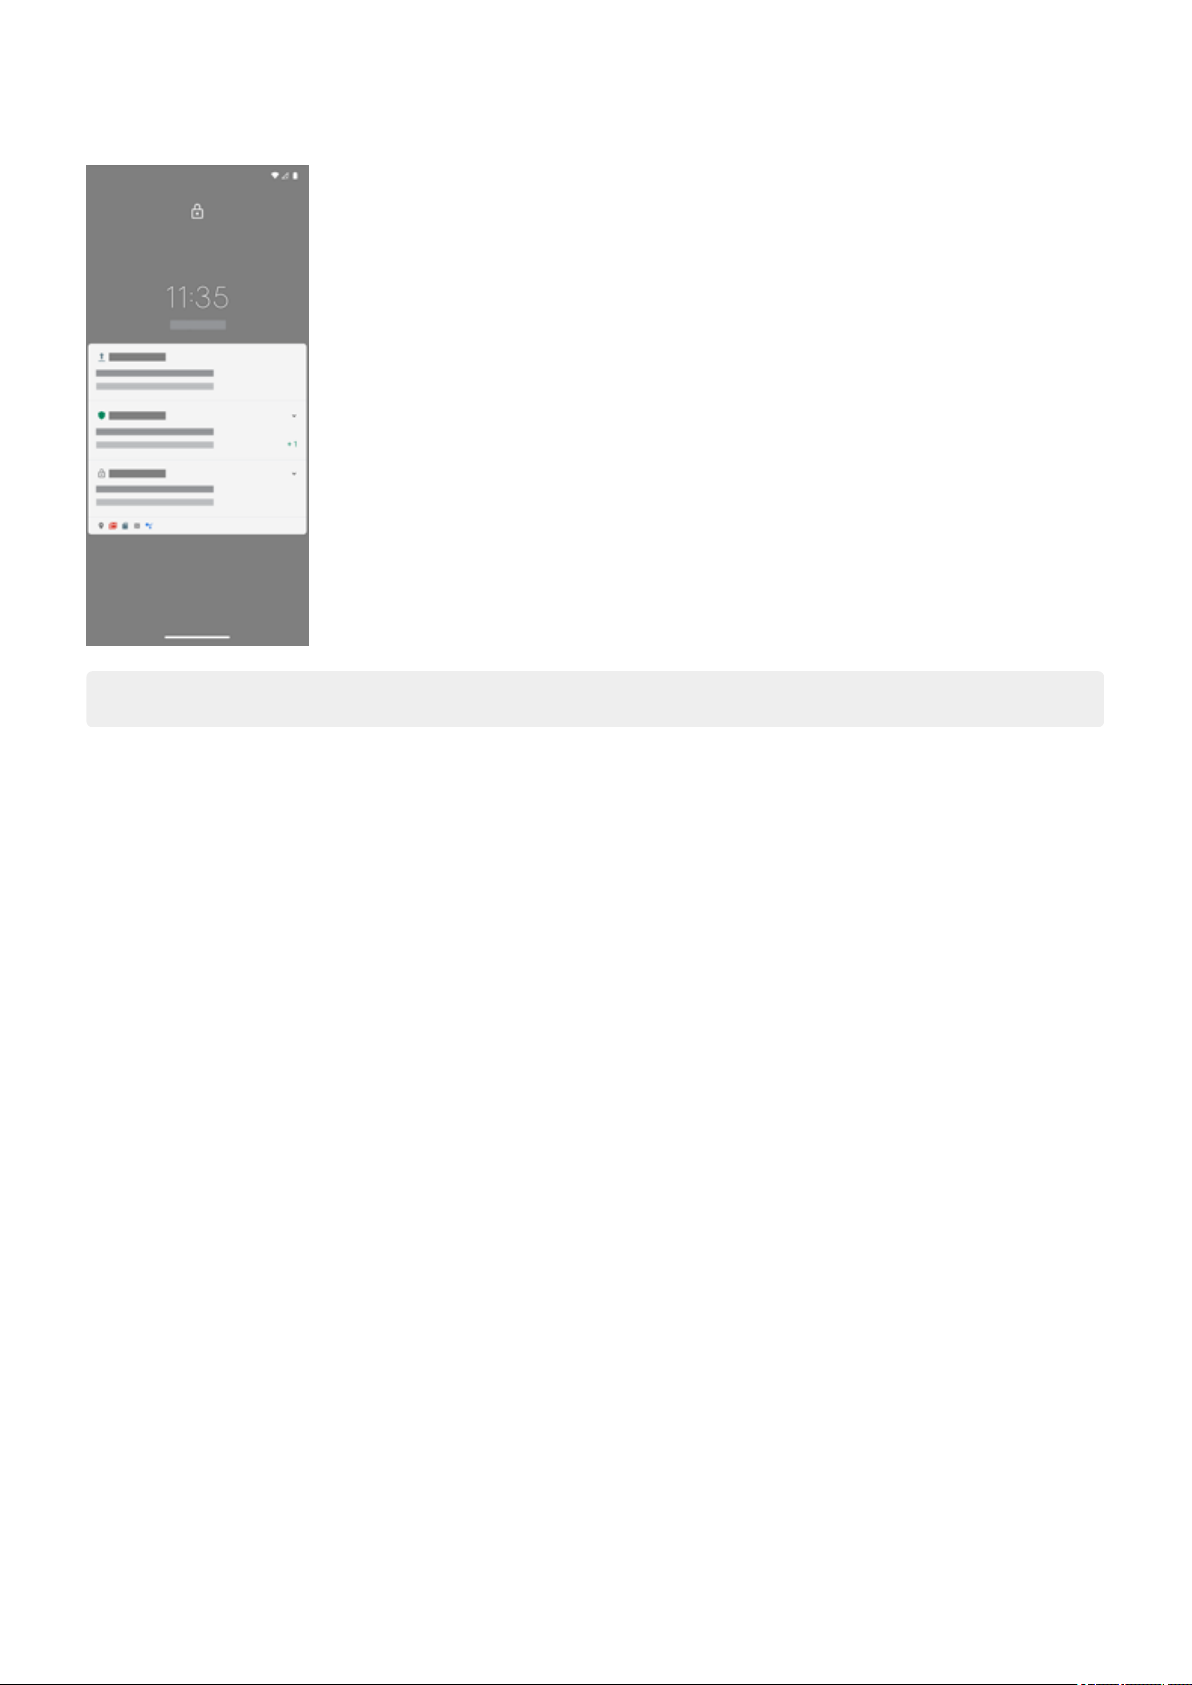
About your lock screen
The lock screen appears when you're using a screen lock and you turn on or wake your phone.
Page 23
Learn the basics 15
Tip: If you're using Peek Display, you'll see those notifications before you get to your lock screen.
From the lock screen, you can:
View and respond to notifications. Double touch one to open it.
•
Open your quick settings. Swipe down from top of screen.
•
Start a voice search. Swipe up diagonally from either bottom corner.
•
Go into Lockdown. Temporarily turn off notifications and fingerprint unlocking.
•
You can customize your lock screen to:
Control which notifications, if any, appear.
•
Add your name or a short message.
•
Page 24

Learn the basics : New to Android?
If this is your first smartphone
Learn the basics
To get around your phone, here are the key concepts.
•
You can choose how you move between apps and screens: gestures or icons.
In addition to touching the screen to select items, you can use other gestures, such as pinch to zoom.
•
The icons at the top of your home screen tell you important stuff at a glance, like your phone’s battery level
•
and network connection, and whether you’ve missed a call.
Your phone and apps send you notifications for things like new messages, calendar events, and upcoming
•
alarms. You’ll find notifications in several places, and can do a lot with them.
To learn about these common tasks, touch one below:
Answer a call.
•
16
Make a call.
•
Set an alarm.
•
Turn the flashlight on/off.
•
Listen to music.
•
Get apps
Your phone comes with many fun and useful apps, but you can really unlock its power by installing apps that suit
your lifestyle. Go to Play Store to explore free and paid apps that help you be more productive, organized,
informed, in touch, and entertained.
Protect your phone
You carry your phone around with you, and accidents happen; phones get lost sometimes. So set up some security
and prevent heartache if you and your phone become separated.
Set up a screen lock. This is your first line of defense in keeping your sensitive information safe. Prefer numbers,
shapes, words? Set up a PIN, pattern, or password required to unlock your phone. Learn how.
A screen lock doesn't prevent you from immediately answering a call or accessing your camera.
Display your owner info. On your lock screen, you can discreetly display a “please return” message with some of
your contact info so that, if your phone is lost, someone can to return it to you. Learn how.
Enable lost phone features. For peace of mind, check out Find My Device, in case you ever need to remotely
locate and lock or erase your phone.
Personalize your phone
While changing your wallpaper is probably your first customization, don't stop there. Be sure to explore your
Settings to set ringtones, font sizes, data usage preferences, keyboard preferences, and much more. It's a great
way to learn many of your phone's capabilities while customizing it to suit your needs.
Page 25
Learn the basics : New to Android?
In most apps you can touch or for app-specific settings. Be sure to see what options are available to you
there, too.
17
Manage cellular data
Understand your data usage. Keep an eye on your data usage and learn how to make the most of it. See which
apps use large amounts of data and adjust their settings. If your phone is using too much data, you can also stop
accounts from auto-syncing.
Use Wi-Fi to conserve cellular data. When you connect to a Wi-Fi network, your data will use that network
connection instead of your carrier's network, saving your cellular data for when you need it. Learn how to connect
to Wi-Fi networks.
Useful to know
Find phone info. To find your phone number, device name, and other information, go to Settings > About phone.
Tell your phone what to do. Use your phone hands-free with voice commands. Tell it to navigate you, and listen
to it speak the directions to you as you drive--it'll even reroute you if you've gone off course. Tell it to set alarms,
find information on the web, make calls.
Never miss a photo opportunity. Automatically open the camera right from your lock screen. Just twist your
phone twice. You can automatically back up your photos and videos with your Google account or with other photo
sharing apps available from Play Store.
Store your stuff. You have several storage options. Store apps and content on your phone. For more storage
space, use an SD card for photos, videos, and music. You can open stored items in associated apps, like Photos to
see your photos and videos. For even more storage space, plus the ability to access your media and files from any
internet-connected device (phone, computer, tablet), use cloud storage. Your Google account includes free cloud
storage on Drive, which has its own app and is also available from the menu throughout other apps.
Wi-Fi hotspot. You can use your phone as a Wi-Fi hotspot to share your internet connection with your other
devices that need internet access (for example, a laptop or tablet).
Reboot phone. In the unlikely event that your phone becomes unresponsive, frozen, shows a blank or black
screen, or doesn't respond to the Power button, you can reboot it. Press and hold the Power button for 7 - 10
seconds. The phone will restart normally.
Certain features, services, and applications are network or carrier dependent and may not be available in all areas.
If you had an iPhone
Welcome to Android! Here are some differences between your old iPhone and your new phone.
Your assistant: You've retired Siri. Now, find info and get things done with Google Assistant. Just set up “OK,
Google”. Then ask for info or help with everyday tasks.
Apps:
Goodbye Apple App Store, hello Google Play Store. Play Store is now your default app store. Apps aren't
•
compatible between iPhone and Android. However, many developers make iPhone and Android versions of
their apps; if the app stores your data online, then you can switch with little effort. Just download the Android
version from Play Store and log in.
Continue listening to podcasts. You can listen with the YT Music app. Or, there are lots of podcast apps on
•
Play Store - search for “podcast” in Play Store and download one of your choice.
Install apps remotely. On a computer, visit play.google.com. Browse apps on the bigger screen and then install
•
them on your phone from your computer.
Page 26

Learn the basics : New to Android?
Your home screen:
On your old iPhone, your home screen was far left. Now, you start with one home screen and can add more
•
pages to the right as needed.
Your old phone showed all apps on your home screen. With your new phone, you can put shortcuts to your
•
most important apps on your home screen for easy access. Or, find your full list by swiping up from your
favorites tray. This frees up room on your home screen for widgets, making your new home much more lively.
In addition to apps, Android has widgets that stream information to you. For example, widgets can provide
•
weather updates or upcoming calendar events.
Like your old iPhone, you'll see notifications at the top of the screen, which you can swipe down to review. But
•
on your new phone, you can swipe them left or right to dismiss them.
Quick access to settings: On your old iPhone, to adjust settings you opened a Settings app. You can still do that.
But now you've also got quick settings. Swipe down from the top of the screen for easy access to toggles for
airplane mode, Wi-Fi, and other frequently-used settings.
In the cloud: Your Google account is your key to cloud storage with Google. If you migrated your contacts to your
phone, then you can see them from any device or computer by logging into Gmail. Your Google account includes
apps like Calendar and Drive that let you work well with others. And it has apps that let you play too - access your
photos, videos, music from any device when you log in with your Google account. Use YT Music to upload your
iTunes library.
18
About your Google account
Benefits of your account
When you set up your phone, you added a Google account. If you haven't had a Google account before, this is
more than just a password you set up for your phone.
A Google account lets you organize and access your personal information and files from any computer or mobile
device:
Synchronize everything. Never lose your contacts. Associate them with your Google account if you create
•
them on your phone, and view them from Gmail on any computer or by signing into your Google account on
any phone. Create emails or calendar events on your phone and view them on any computer. Access your
browser bookmarks from any device.
Store in the cloud. Upload your photos, videos, and music to the cloud; get to all of it without taking up space
•
on your phone.
Keep your stuff secure. Your account password secures it all and lets you access it from anywhere.
•
Maintaining your account
Other than remembering your password, you don’t need to do much maintenance on your Google account - just
enjoy the benefits of your secure, synchronized information. However, you can:
Control how frequently your phone syncs your information.
•
Review and manage the information Google collects from you, such as search and browsing history.
•
Learn about Google apps
Many Google apps, like Gmail, Chrome, Photos, and Maps are preloaded on your phone. To learn about and
download additional Google apps, read Google’s information.
Page 27
Learn the basics : New to Android? 19
Can't sign in to Google account
If you’re having problems signing in to your account, read Google's support information.
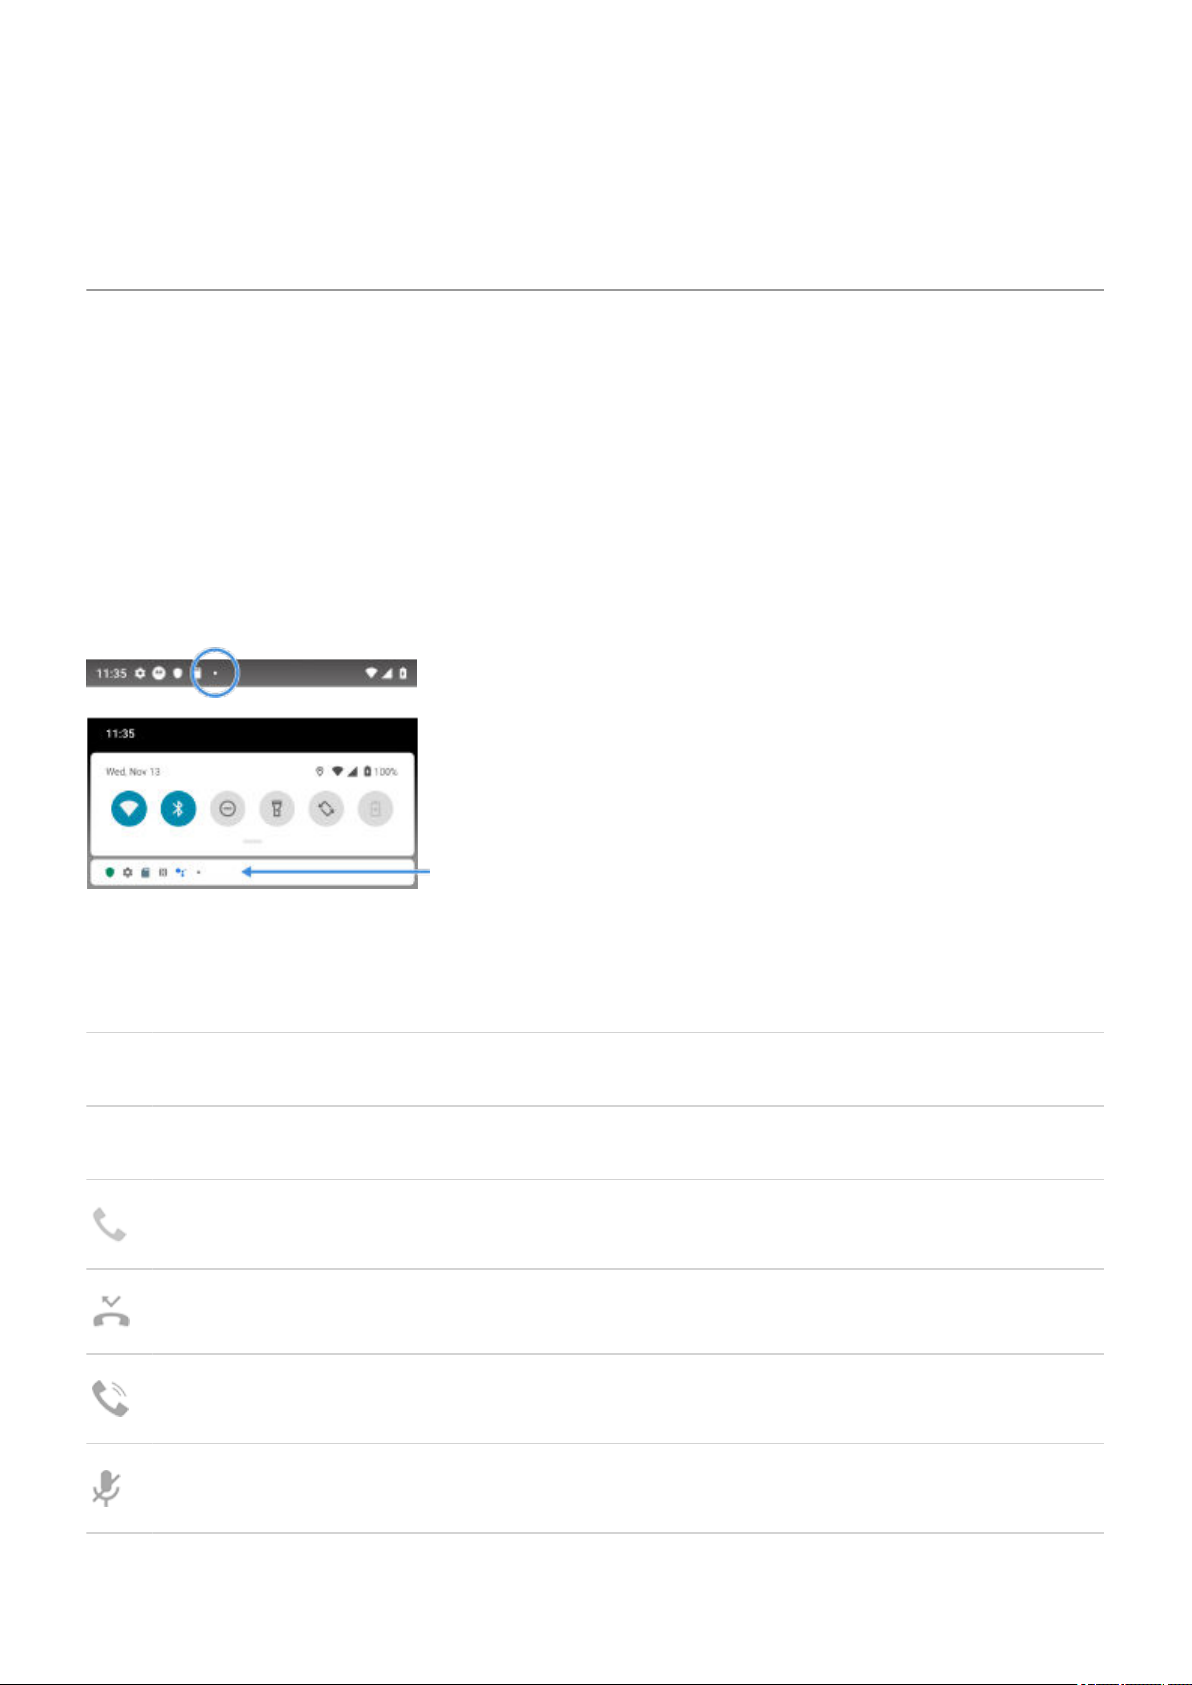
Status bar icons
About status icons
The status bar at the top of the home screen contains icons that help you monitor your phone.
On the left, icons tell you about apps, such as new messages or downloads. If you don't know what one of
•
these icons means, swipe the status bar down for details.
On the right, icons tell you about your phone's battery level and network connections.
•
A dot means there are more icons to view. Drag down from the top of the screen to see all icons.
What status icons mean
These are the icons from apps that came on your phone and the phone status icons.
Icon Meaning
CALLS
Active call.
Missed call.
Speakerphone on.
Microphone muted.
Page 28
Learn the basics : New to Android? 20
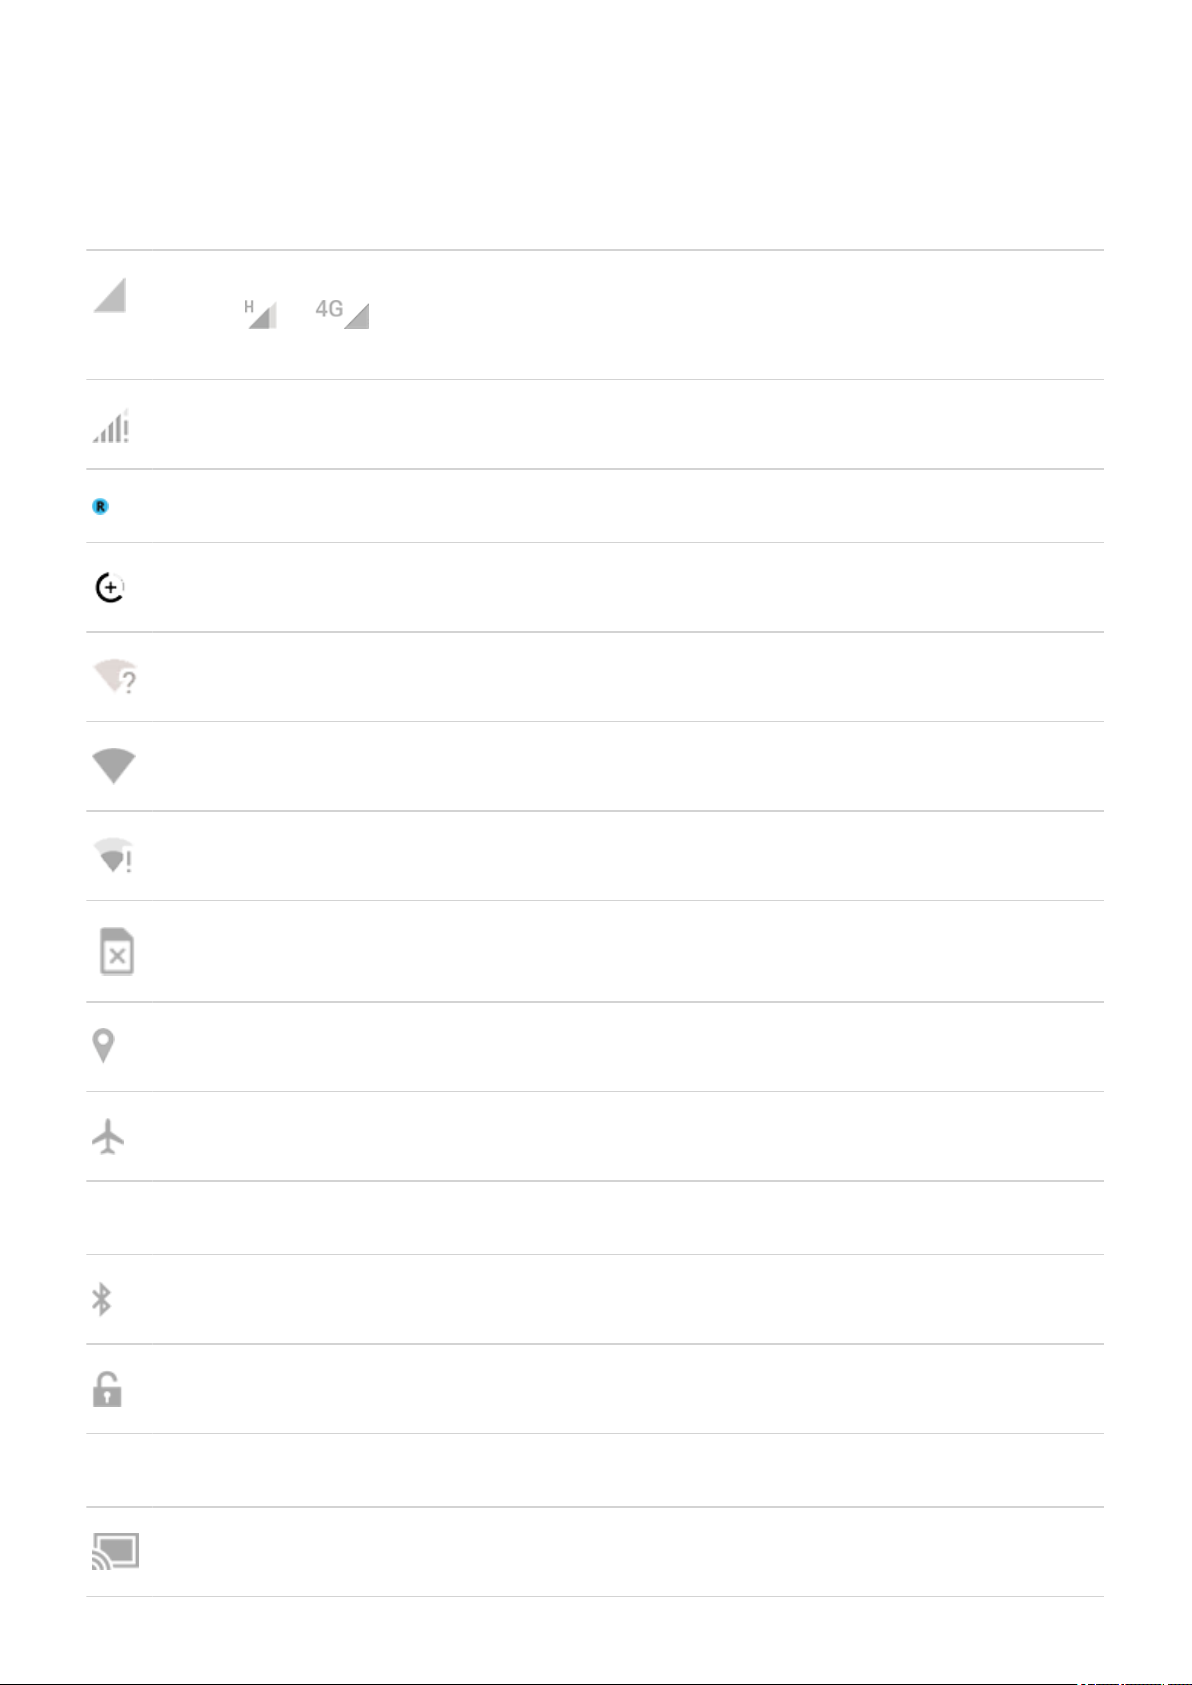
NETWORK
Connected to cellular/mobile network (full signal). Speed of your network connection is also shown. For
example, or . Possible speeds, from slowest to fastest, are 1X, 2G, 3G, H, H+, 4G. Available
speeds depend on your carrier and your location.
Poor connection to cellular/mobile network.
Connected to different cellular/mobile network (roaming).
Data Saver is on, preventing apps from using background data.
Wi‑Fi network within range.
Connected to Wi‑Fi network.
Poor connection to Wi‑Fi network.
No SIM card.
Location services are in use.
Airplane mode on.
CONNECTIVITY
Bluetooth connected.
Trusted device connected.
Your phone is a Wi‑Fi hotspot. Devices can connect to share your data connection.
Wireless display or adaptor connected.
Page 29
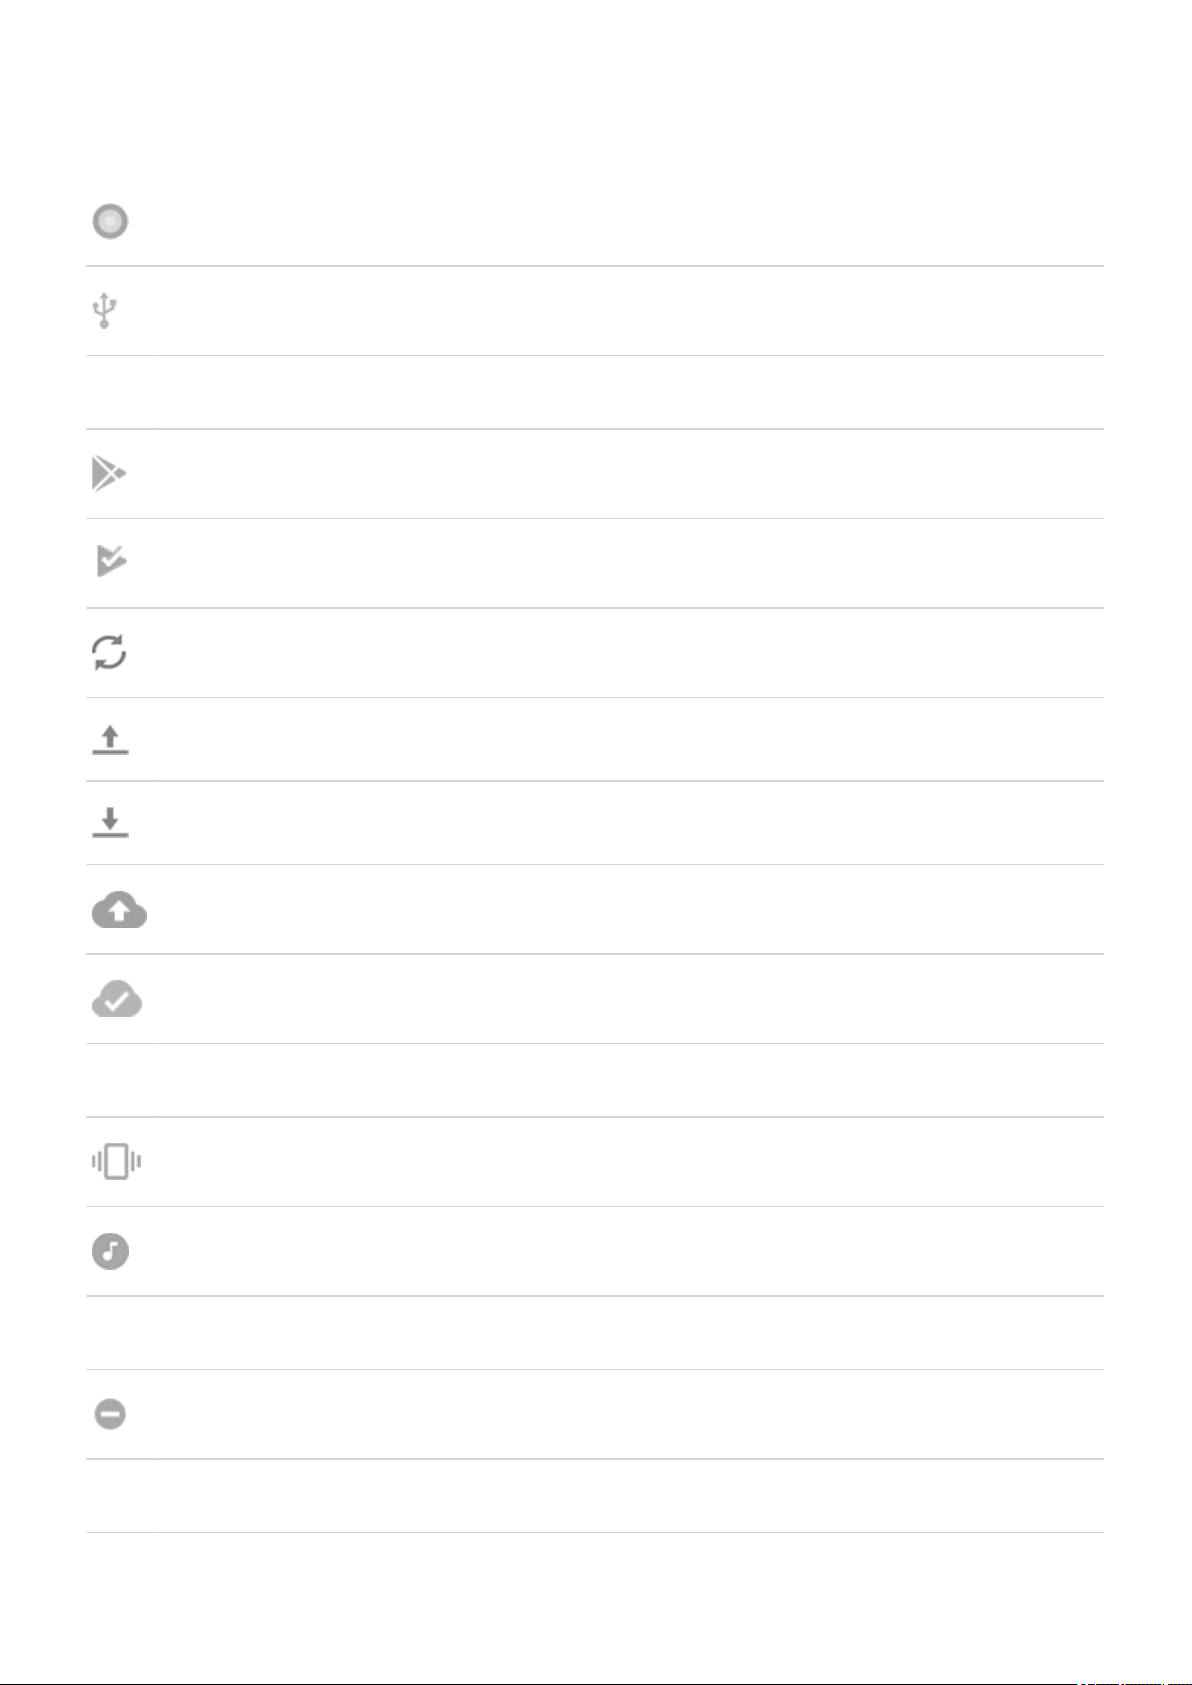
Learn the basics : New to Android? 21
Connected by USB cable.
USB tethering enabled.
SYNC AND UPDATES
App updates are available for download from Play Store.
App successfully installed from Play Store.
Email and calendar sync in progress.
Upload complete.
Download complete.
Google backup in progress.
Google backup complete.
SOUND
Vibrate.
Song playing.
DO NOT DISTURB
Do Not Disturb is on.
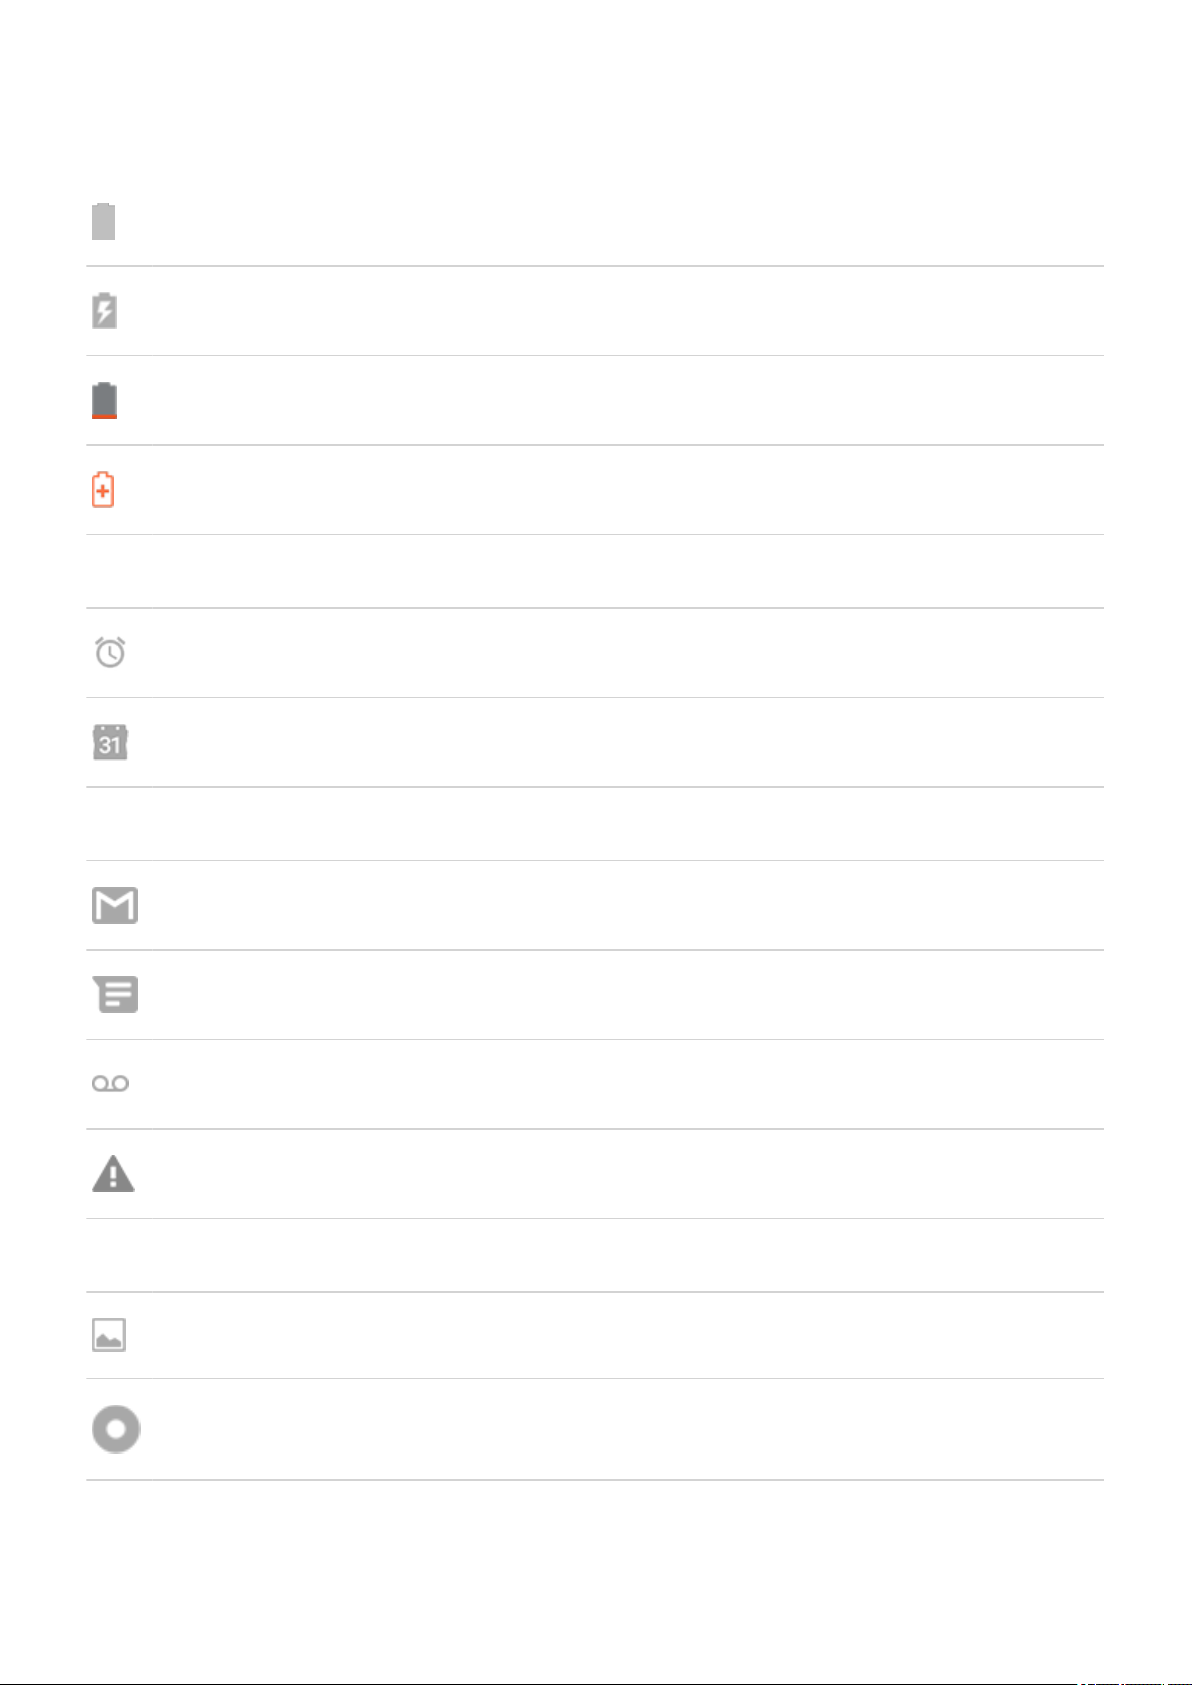
BATTERY
Page 30
Learn the basics : New to Android?
Battery fully charged.
Battery charging.
Battery low.
Phone is in Battery Saver mode.
ALARM AND CALENDAR
Alarm set.
22
Upcoming calendar event.
EMAIL AND MESSAGING
New Gmail message.
New text message.
New voicemail.
Important alert.
OTHER ICONS
Screenshot is available.
Focus mode is on.
Apps that you download might show other icons to alert you about their status.
Certain features, services, and applications are network or carrier dependent and may not be available in all areas.
Page 31

Learn the basics : New to Android?
23
Phone terms you should know
Airplane mode
A mode allowing access to a device’s non-wireless functions (e.g., music, games, etc.), while disabling its wireless
radio functions that are banned on airplanes during flight.
app
Software that you can download for added functionality, such as games, email apps, bar code scanners and more.
Some apps are already on your phone, and more can be downloaded from your phone's app store.
Bluetooth™
A short-range wireless technology you can use to connect a device to other nearby Bluetooth-capable devices and
accessories, such as headsets, speakers, printers, etc. Use Bluetooth to make handsfree calls on a headset or in
your car, listen to music on wireless speakers, use a wireless mouse or keyboard, or print a document in another
room. Set up Bluetooth.
cellular network or mobile network
A network of radio-transmitting towers. You make calls on your phone using radio waves sent between the phone
and the network towers. You also send data and access the Internet on this network. Carriers use different
technologies to handle these radio transmissions (GSM, CDMA, Edge, 3G, 4G, LTE, HSPA, iDEN).
data
Information sent or received from your phone other than calls and text messages. You may use data when you
access the internet, check your email, play games, use apps and more. Background tasks, such as syncing or
location services, may also use data.
data usage
The amount of data your phone uploads or downloads over a network in a given period. Your phone uses your
carrier's cellular network or over a Wi-Fi network. Depending on your plan with your carrier, you may be charged
additional fees when your data usage exceeds your plan's monthly limits.
GPS
Global Positioning System. A global satellite-based system for determining precise locations on Earth.With GPS,
your phone becomes your navigator when you're driving and your concierge when you're looking for a nearby
meal, movie, or cup of coffee.
mobile hotspot
A device or app that lets you share your mobile data connection with multiple devices via Wi‑Fi. You can connect
different devices to your hotspot, including notebooks, netbooks, MP3 players, cameras, Smartphones, and
portable gaming systems. The number of devices that can connect at one time depends on your carrier and
connection speed.
notification
An alert from your phone or an app on your phone. Your phone displays icons in the status bar to notify you of new
messages, calendar events and alarms. Icons can also indicate ongoing status, such as connection to a Wi‑Fi
network.
Play Store
Google's store where you can download apps, books, movies, and music. Choose from an assortment of free
books or apps; purchase from an even larger selection.
SD card
Secure Digital (SD) card. A small, high-capacity removable memory card used in small, portable devices such as
mobile phones, tablets, and digital cameras.
short cut
An icon you can add to your home screen that lets you quickly open an app. Create short cuts for apps you use
frequently.
Page 32

Learn the basics : New to Android? 24
SIM card
Subscriber Identity Module (SIM) card. A card that securely stores information your carrier uses to authenticate
your phone on the cellular network.
software update
An update to your phone's operating system that typically includes new features and fixes reported problems. The
update is wirelessly downloaded to your phone at no additional cost to you.
status bar
Thin bar at the top of your home screen that displays the time and icons that tell you about your phone's battery
and network connections. Apps display icons in the status bar to alert you of events, such as new messages.
sync
The process of sharing the same information across multiple devices and websites. Contacts, calendars and email
are often synced through cloud services, so you can enter information on one device and access it through
another.
widget
An element you can add to your home screen that gives you quick access to information or frequent tasks. For
example, widgets can provide weather updates, upcoming calendar events. Many are preinstalled on your phone.
Apps you download may also include widgets.
Wi‑Fi
A short-range wireless technology that provides a high-speed internet connection to wireless data devices. Many
locations offer Wi-Fi connections, including airports, hotels, restaurants and more. Using a Wi-Fi connection
instead of your cellular network can help reduce your cellular data usage. Some public Wi-Fi connections may not
be secure. You should only connect to those you trust and use some form of internet security on your devices. Set
up Wi-Fi.
Certain features, services, and applications are network or carrier dependent and may not be available in all areas.
Page 33

Learn the basics : Get around
Learn gestures
Gesture Description
25
Touch
Touch & hold
Drag
Swipe
Press with one finger and lift.
Result: Open something (app or email) or choose something (checkbox, icon). It’s like clicking a
mouse on a computer.
Press and wait before lifting one finger.
Result: Select something (app icon, text on a page) and see possible actions.
Try it: Touch & hold text on this page to see the copy feature.
Touch & hold an item and then, without lifting, slide your finger until you reach the target position.
Result: Move elements on the screen; for example, change a toggle from ON to OFF.
Try it: Drag an app shortcut or widget from one spot on your home screen to another.
Quickly move one finger across the screen, without pausing when you first touch (so you don’t
drag instead).
Result: Switch between home screens or between tabs in an app. Or, move quickly through a list.
Try it: Open the Phone app and swipe left/right to switch between tabs.
Pinch out to
zoom
Pinch in to
zoom
More gestures: You can also swipe different directions to move between apps and screens.
Put two fingers on the screen and then drag them apart.
Result: Zoom in to see larger version of photos and maps. Or, open expandable notifications.
Try it: Open a photo and pinch out to zoom in on an area.
Tip: If you have visual impairments, you can enable additional magnification gestures.
Put two fingers on the screen, far apart, and then drag them together.
Result: Zoom out to see smaller version of photos or maps. Or, close expandable notifications.
Page 34

Learn the basics : Get around
26
Use the stylus
Move between apps and screens
Choose how to get around
You can change the kind of navigation you use to move between apps and screens: Settings > System >
Gestures > System navigation.
Use gesture navigation
Use these gestures to move between screens and apps if you chose Gesture navigation and see at the
bottom of your home screen.
Action Gesture to use
Switch between apps At the very bottom of the screen, swipe left or right.
See all recent apps Drag up from the bottom, hold, then let go.
See all apps Swipe up from the bottom of the home screen.
Go back Swipe towards the middle from the left or right edge of any screen.
Go home Swipe up from the bottom of any screen.
Open Google Assistant Swipe diagonally from either lower corner of the screen.
Use 3-button navigation
Use these icons to move between screens and apps if you chose 3-button navigation.
takes you back one screen.
returns you to the home screen from any app.
lets you switch between recent apps.
Tip: For visual assistance, you can add to open the Accessibility Menu or magnify what's on the screen.
Page 35

Learn the basics : Get around 27
Use quick settings
Open quick settings
Settings you adjust frequently, like Wi-Fi and Bluetooth, are “quick settings”, easy to get to from any screen.
To see your first few quick settings, swipe down once from the top of your screen.
To see all quick settings, swipe down again.
Adjust quick settings
Do one of the following:
•
Touch an icon to toggle the setting on or off .
Touch & hold an icon to adjust related settings.
•
Icon Setting
Wi-Fi
Bluetooth
Do Not Disturb
Flashlight
Page 36

Learn the basics : Get around
Moto Audio
Auto-rotate
Battery Saver
Mobile data
28
Airplane mode
Screen Cast
Data Saver. Appears after you turn on Data Saver the first time.
Night Light. Appears after you turn on Night Light the first time.
Wi-Fi hotspot. Appears after you turn on hotspot the first time.
You can also slide to adjust screen brightness.
Page 37

Learn the basics : Get around
Open all settings
To open the full list of all settings, do one of the following:
•
Open quick settings and touch .
•
Or, open the Settings app.
Tip: You can search the Settings app to find what you need quickly. Just touch at the top of the app and
type your search term.
Customize quick settings
You can rearrange quick settings, putting your most used at the top. You can also add or remove them.
1. Open quick settings.
2.
Touch .
29
3. Drag to add, remove, or rearrange.
To return quick settings to its original state, touch > Reset.
Tip: You can also change the background color to be light or dark.
Wake or put screen to sleep
To save battery power, your screen automatically goes to sleep if you haven't used it for a while. You can adjust the
amount of time before your screen should sleep.
To wake sleeping screen:
Press the Power button. If you've set up a screen lock, you need to unlock it.
•
If you've added your fingerprint to the phone, touch the sensor to wake and unlock your phone.
•
Your screen automatically wakes when you have an incoming call.
•
To put screen to sleep:
Briefly press the Power button. When you set down your phone, it's good habit to do this. You save a bit of
•
battery and keep it secure with the screen lock.
To keep your screen off and phone quiet when you don't want interruptions, like at night, use Do Not Disturb
•
settings.
Adjust volume
Use Volume buttons
In-call audio. When you’re on a call, the Volume buttons control the volume of the other person.
Page 38

Learn the basics : Get around
Media. When you’re not on a call, the Volume buttons control media volume during playback or before you listen.
Phone ringtone, notification sounds, and alarms. To adjust these volumes, press a Volume button and then use
this shortcut on your home screen:
1.
Touch to toggle the phone ringtone and notification sounds between on , silent , and vibration only .
2. Slide to adjust media volume.
3. Touch to mute media volume.
4. Touch to access all volume controls (call, ring, alarm).
30
Silence with Power & Volume buttons
To silence a ringing phone, press either the Power button or the Volume down button.
To switch to vibrate at any time, press & hold the Power & Volume up buttons until you feel a vibration and see
.
If you want to customize Power & Volume up so that it silences the phone instead of vibrating:
1. Go to Settings > System > Gestures.
2. Touch Prevent ringing > Mute.
Tip: Use Do Not Disturb to silence all calls, messages, events, and reminders. Turn it on from quick settings, or
schedule it to turn on automatically during certain times or during calendar events.
Pick up to silence
You can simply pick up your phone to silence incoming calls and alarms, and to turn vibration on.
To enable this gesture:
1. Go to Settings > Sound > Advanced.
Or, open the Moto app and touch > Moto Actions.
2.
Touch Pick up to silence and turn it on .
3. If you want this gesture to silence calls but not alarms (or vice versa), touch Settings and turn the appropriate
option off .
Page 39

Learn the basics : Frequently used tools
Turn flashlight on and off
To turn your flashlight on or off:
1. Open quick settings.
2.
Touch or .
Or, make a chopping motion to turn the flashlight on or off.
If the camera opens instead of turning on the flashlight, be sure to use a chop gesture, not a twist gesture.
To control the chop gesture:
1. Go to Settings > System > Gestures.
Or, open the Moto app and touch > Moto Actions.
2. Touch Fast flashlight and turn it on or off.
31
Take screenshots
Take a screenshot
1. Do one of the following:
Touch & hold three fingers on the screen. (If this doesn't work, turn Three finger screenshot on.)
•
Press & hold the Power button, then touch Screenshot.
•
Press & hold Power and Volume Down simultaneously until the screen is captured.
•
2.
To scroll and capture more content, touch .
To stop scrolling before the end of the page, touch STOP.
Page 40

Learn the basics : Frequently used tools
3. Do any of the following:
•
To crop the screenshot, touch .
•
To edit the screenshot, touch . Then, touch to draw on it, or touch to highlight it.
•
To share it, touch .
4. Touch Save.
Or, touch Discard to delete it.
Find screenshots later
Open the Photos app and touch > Device folders > Screenshots.
Use voice commands
32
Train launch phrase
1. Open the Google app, then touch More > Settings > Voice > Voice Match.
2. Turn on Access with Voice Match and follow the onscreen instructions to record your voice.
3. If you want voice commands to access your email, calendar, or contacts when your phone is locked, turn Lock
screen personal results on .
Speak a command
Not all languages support voice commands.
Tell your phone to call people, get directions, send messages, set alarms. The possibilities are enormous.
1. From the home screen or when you've started a search, say “OK, Google.”
2. When the phone responds, say the command (for example, “Call Elise” or “Set alarm for 7 AM tomorrow”).
Tip: To see a list of commands, say “Help.”
3.
Some commands cause your phone to speak a response to you. To stop the phone from speaking, touch .
You can use voice commands from the Peek Display screen, if you turn Google Assistant on in settings. Learn
more.
Fix a problem
If your phone isn't recognizing “OK, Google” commands:
1. Open the Google app.
2. Touch More > Settings > Voice > Voice Match.
3. Touch Voice Match > Retrain voice model.
Page 41

Learn the basics : Frequently used tools
33
Get turn-by-turn directions
Navigation and battery life
Navigation is one of the most power-intensive apps, so keep your phone plugged into a high-quality car charger,
especially if you're streaming music and/or using Bluetooth (also power-intensive features).
Use Directions widget
1. Before you hit the road, add a Maps Directions widget to your home screen, and you'll have directions to any
destination you choose.
2. When you're ready to roll, just touch the widget, and your phone will talk you through the directions.
Tip: Combine your Directions widgets into a folder on your home screen.
Get directions to home or work
Get directions from anywhere to your home or work addresses with one touch by setting up a task shortcut for the
Maps app:
1.
Touch & hold .
2.
Drag to a blank space on your home screen.
3. If you haven't set your home or work address yet in Maps, touch the shortcut and follow the onscreen
instructions to add it.
When you're ready to roll, just touch the shortcut, and your phone will talk you through the directions.
Use voice commands to get directions
Tell your phone to provide directions to a destination:
1. Say your launch phrase.
2. Say “Navigate to [destination].”
Use Time and Weather widget
Add widget to home screen
Put a clock on your home screen and get quick access to alarms, your calendar, and the weather.
Page 42

Learn the basics : Frequently used tools
1. Touch & hold the home screen.
2. Touch Widgets.
3. Touch & hold the Time and Weather widget, then drag it to a home screen page.
Set or delete alarms
1. Touch the time.
2. Do one of the following:
•
To use an existing alarm, switch it on . Touch to view or edit its ringtone.
34
•
To add a new alarm, touch and set the time and ringtone.
•
To delete an alarm, touch next to it, then touch .
3.
To control general alarm settings, like alarm volume and snooze duration, touch > Settings.
When an alarm is set, shows in the status bar.
Manage cities for weather forecasts
The Time and Weather widget displays current temperature for your location or for a city you specify.
To display the temperature for your current location:
1. Do one of the following:
Touch Add cities.
•
•
Or, touch the current temperature, then touch > .
2. Turn Current location on.
Tip: To switch between Fahrenheit and Celsius, touch Temperature unit.
To see a forecast, touch the current temperature on the widget.
To add a city:
1. Do one of the following:
If you haven't added locations yet, touch Add cities.
•
•
Or, touch the current temperature, then touch .
2. Touch Add new location.
3.
Enter a city name or ZIP code, then touch .
Page 43

Learn the basics : Frequently used tools
4. Touch the city to add.
Tip: To switch between forecasts for multiple cities, touch the temperature, then swipe left or right.
To remove a city:
1. Touch the temperature.
2.
Touch > Settings.
3.
Touch next to the city's name.
View your calendar
Touch the current date to open your calendar, where you can view or add upcoming events.
Manage time spent on your phone
35
Understand your habits
1. Go to Settings > Digital Wellbeing & parental controls.
2. If this is your first time using this feature, touch Show your data.
3. Review the chart to see:
Time you spent using phone today
•
Which apps you’ve had on screen and for how long
•
How often you unlocked the phone today
•
How many notifications you’ve gotten
•
4. For more information, touch a label on the chart. For example, to see your screen time for the week, touch
today’s usage time.
Tip: To find Digital Wellbeing & parental controls as an app, turn on Show icon in the app list.
Limit daily screen time
For individual apps, you can set a timer that limits the amount you use the app daily.
Tip: To manage your child's screen time, use parental controls.
To set an app timer:
1. Go to Settings > Digital Wellbeing & parental controls > Dashboard.
Or, Settings > Apps & notifications > Screen time.
2.
Next to the app you want to limit, touch .
3. Set the total time that you can use the app per day.
Page 44

Learn the basics : Frequently used tools
When you reach your time limit in an app:
The app closes.
•
Its icon dims and no longer opens the app.
•
The app timer resets at midnight. To use the app before midnight, go back to the timer in Settings and extend its
time or delete the timer.
Pause distracting apps to focus
Use Focus mode to pause selected apps for fewer distractions.
1. Go to Settings > Digital Wellbeing & parental controls > Focus mode.
2. Choose which apps you want to pause.
3. Do one of the following:
To turn it on, touch Turn on now.
•
To have it turn on automatically, touch Set a schedule, then select days of the week and start/end times.
•
36
When Focus mode is on:
•
You'll see in the status bar.
You won’t be able to use the selected apps and won’t get notifications from them.
•
Tip: To add Focus mode to quick settings, open quick settings, touch , then drag the tile where you want
it.
To turn Focus mode off:
•
Open quick settings and touch .
Or, on the notification, touch Turn off now. (To turn it off temporarily, touch Take a break.)
•
To remove the schedule:
1. Do one of the following:
•
Open quick settings, then touch & hold .
Go to Settings > Digital Wellbeing & parental controls > Focus mode.
•
2.
Next to Schedule, touch .
Tip: To mute sounds, stop vibration, and block notifications for all calls and notifications, use Do Not Disturb.
Make it easier to put your phone away at bedtime
You can schedule changes to get ready for sleep.
1. Go to Settings > Digital Wellbeing & parental controls > Wind Down.
2. Turn on Use Wind Down.
3. Adjust start and end times if needed.
Page 45

Learn the basics : Frequently used tools 37
4. Set what your phone should do during this scheduled time:
Remove screen colors (turn on Grayscale).
•
Silence your phone (turn on Do Not Disturb).
•
Use parental controls
You can:
Control your child’s access to devices and apps
•
Control location settings and view the location of your child’s supervised device
•
Set daily usage limits, monitor app usage, and remotely lock supervised devices
•
Set filters and controls on what your child can browse, purchase, or download using Chrome, Google Search,
•
Play Store, and YouTube
You’ll need to set up parental controls on your and your child's devices.
To set up parental controls on this phone:
1. Go to Settings > Digital Wellbeing & parental controls.
2. Touch Set up parental controls.
3. Follow onscreen instructions to set up the phone for child or adult usage.
4. To set up parental controls on the other device, refer to the help for that device.
To learn more, read Google's help.
Page 46

Learn the basics : Work with text
Use onscreen keyboard
Open, close, resize keyboard
To open the keyboard, just touch an area where you can enter text or numbers.
To close the keyboard so you can see other parts of the screen, touch .
To make the keyboard larger, turn your phone horizontally. If your screen doesn’t rotate, check your auto-rotate
setting.
Tip: If you installed other keyboards, you'll see next to the navigation buttons when you're typing. To
switch to a different keyboard, touch .
Type special characters
38
Touch & hold a key to see related special characters. For example:
Touch & hold . to see other punctuation marks.
•
Touch & hold e to see é and 3.
•
Tip: To insert a period followed by a space, touch the spacebar twice quickly.
Capitalize letters
To type in ALL CAPS, touch twice, quickly, so you see . Touch it once more to turn ALL CAPS off.
To change capitalization of a word you've already typed:
1. Select the word.
2.
Touch until you see the capitalization you want: first letter only, ALL CAPS, or lowercase.
Use glide typing
You have two options for entering text: type one letter at a time (multi-touch typing) or slide your finger through all
the letters in a word using one continuous motion (glide typing). Start typing either way and switch whenever you
like.
When you're using glide typing, you can:
Type a word. Drag your finger over the letters in the word.
•
•
Delete words. Drag left slowly from to select a word or string of words, then lift your finger to delete.
Enter apostrophes in common words. Drag through the letters and the apostrophe is automatically inserted.
•
Add a space. There's no need to use the space bar. Just lift your finger and start the next word.
•
You can disable glide typing.
Page 47

Learn the basics : Work with text
Get suggestions
Use suggestions to type faster.
When you're typing, you'll see a list of suggested next words above the keys:
Touch a word in the list to insert it in your text.
•
•
If you don’t like a suggested word, touch & hold it, then drag it to .
You can limit or turn suggestions off.
Spell check and auto correct
Misspelled words are automatically corrected as you type:
•
To undo a correction, touch .
To prevent that word from being auto-corrected again, add it to your dictionary by touching the word in the list
•
of suggestions above the keys.
39
If auto-correction is turned off, you can still check spelling:
1. After you're done typing, review your text; misspelled words (and words not in your dictionary) are underlined.
2. Touch an underlined word:
If the word is spelled correctly, touch it in the suggestion bar.
•
If the word is misspelled, select the correct word in the suggestion bar or type the correction.
•
Type in multiple languages
If you have added multiple languages as a system language in your phone settings, keyboards and text suggestion
are available for those languages:
When using a keyboard language other than your primary system language, available keyboard languages are
•
shown on the spacebar.
•
To toggle between languages, touch .
•
To see a list of available keyboards, touch & hold or the spacebar.
You can add keyboards for other languages.
Cut, copy, paste text
You can select and copy text from web pages and messages.
1. To select text, touch & hold a word.
2. Touch Copy, Cut, Share, Select all or:
•
Select more text. Drag the sliders .
Get information about selected text. Touch Web Search.
•
•
Translate selected text. Touch > Translate. (If you don't see this option, install the Google Translate
app.)
Page 48

Learn the basics : Work with text
3. To paste text, touch to insert at the cursor or select a block of text to replace. Then touch Paste.
Tips:
In some apps, you need to double-tap a word to select it (instead of touching & holding it).
•
When you use Copy, the text is copied to the clipboard in your phone's memory, overwriting previous text
•
in the clipboard. If you want to save and manage everything you copy into the clipboard, search for
“clipboard manager” in Play Store to select and download an app.
Use voice typing
Enable keyboard mic for dictation
If you don't see on your keyboard:
1.
On the keyboard, touch or > .
40
2.
Touch Voice typing and turn Use voice typing on .
Dictate text
1. Touch a text field to show the onscreen keyboard.
2.
Touch on the onscreen keyboard.
3. Speak what you want to type:
Speak naturally but clearly. There's no need to shout or hold the phone close to your mouth.
•
To include punctuation, say “comma,” “period,” “question mark,” or “exclamation point.”
•
•
To pause or restart, touch .
•
To delete a word, touch .
Fill in forms automatically
Don’t retype your personal information again and again. Save it securely, then with just one touch, fill in passwords,
addresses, credit cards, and other information saved to your Google account.
To set it up:
1. Go to Settings > Privacy > Advanced > Autofill service from Google.
Or, Settings > System > Languages & input > Advanced > Autofill service > .
2. Touch CONTINUE.
3. Touch categories to review and edit personal information, addresses, credit cards, and passwords.
Page 49

Personalize your phone : Home screen
Change wallpaper
You can change the background image on your home screen or lock screen.
Tip: If your battery is low, temporarily change animated wallpaper to a static image to save power.
1. Open the Wallpapers app.
2. Do one of the following:
To set a single wallpaper, select a photo or wallpaper.
•
To see a new wallpaper each day, open a category and touch Daily wallpaper > Continue.
•
3. Touch Set wallpaper.
4. Select whether you want to use the wallpaper on your home screen, lock screen, or both.
41
Customize your Favorites tray
The Favorites tray at the bottom of the home screen gives you one-touch access to your most-used applications. You can customize these app shortcuts.
To change the app shortcuts:
1. Touch & hold one of the app shortcuts, then drag it up and drop it on Remove.
2. Swipe up from the bottom of the home screen to open your app list.
3. Touch & hold the app you want. When the new shortcut appears, drag it to the empty spot in your tray.
Tip: You can also use folders in your Favorites tray.
Add widgets, shortcuts, or folders
Add widgets
Widgets stream information, giving some of an app’s functionality without opening the app. For example, the
Calendar widget shows your daily agenda and gives you one-touch access to your full calendar.
To add a widget:
1. Touch & hold the home screen.
2. Touch Widgets.
Widgets are listed under their related apps.
Page 50

Personalize your phone : Home screen 42
3. Touch & hold a widget to add it.
You can make some widgets larger to view more content:
1. Touch & hold the widget until it's highlighted.
2. Release it to see an outline.
3. Drag a corner or side to resize.
Add app shortcuts
1. Swipe up from the bottom of the home screen to open your app list.
2. Touch & hold the app you want.
3. Drag the app to an empty spot on your home screen. Or, drag it to the edge of the screen and drop it onto a
new home screen panel.
Add task shortcuts
Many apps icons include shortcuts to common tasks, so you don’t have to open and navigate the app.
1. Touch & hold an app icon to see available task shortcuts.
2. Do one of the following:
To perform the task, touch it.
•
•
To create a shortcut for that task, drag to an empty space on your homescreen.
Here are examples of task shortcuts for various apps. Not all apps include task shortcuts.
App Task shortcuts
Compose new email
Gmail
Maps
YouTube
•
Open to specific account
•
Navigate to Work
•
Navigate to Home
•
Search
•
Chrome
Subscriptions
•
Trending
•
New incognito tab
•
New tab
•
Page 51

Personalize your phone : Home screen
New reminder
Calendar
Messages
Clock
Settings
•
New event
•
Open most recent conversation
•
New conversation
•
Start screen saver
•
Start stopwatch
•
Create new timer
•
Create new alarm
•
Battery
•
Data usage
•
43
Wi-Fi
•
Add web page shortcuts
1. Open the Chrome app.
2. Navigate to the web page.
3.
Touch > Add to Home screen.
4. Edit the name if desired.
5. Touch ADD.
6. Do one of the following:
Touch & hold the icon to drag it where you want on the home screen.
•
Touch Add automatically.
•
Add folders
Folders organize your shortcuts.
1. Touch & hold an app shortcut on your home screen.
2. Drag it onto another to group them together, then release when a circle forms around them:
Then you can:
Page 52

Personalize your phone : Home screen
Add more apps. Drag app icons onto the circle from your home screen or app tray.
•
Use an app in the folder. Open the folder and touch the app's icon.
•
Name the folder. Open the folder, then touch its name and type a new name.
•
Remove an app from the folder. Open the folder and drag the app icon onto the home screen, or drag it up
•
and drop it on Remove.
Delete the folder. Touch & hold the folder, then drag it to Remove.
•
Remove widgets, shortcuts, or folders
To remove widgets or shortcuts from your home screen:
1. Touch & hold it until it vibrates.
2. Drag it to Remove.
To select a totally new user interface for your home screen, download a different launcher.
44
Remake your home screen with launchers
Get different launcher
Totally changing the look and feel of your home screen is easy to do. Just select and download a new launcher
app. Switch back to the standard look and feel at any time. Launchers frequently include new sets of wallpapers,
new gestures for interacting with your phone, and customizable elements for your home screen.
1. Search for “launcher” in Play Store.
2. Read through the choices and download the one (or more) that you want.
3. To start using it, open the app or follow the onscreen instructions after downloading it.
Switch between launchers
1. Go to Settings > Apps & notifications.
2. Touch Default apps > Home app.
Or, touch Advanced > Default apps > Home app.
3. Select the launcher you want to use.
4.
To adjust its settings, touch .
Delete launchers
You can only delete launchers that you installed.
Touch & hold the launcher's app icon, then touch > Uninstall.
Page 53

Personalize your phone : Lock screen
Use a screen saver
Set up screen saver
While your phone is idle on a dock or charger, turn it into a desk clock, a photo frame to show off your pics, or
more.
1. Go to Settings > Display > Advanced.
2. Touch Screen saver.
3. Do any of the following:
To change screen savers, touch Current screen saver, then select one. To set options for that screen
•
saver, touch .
To preview your selection, touch Start now. Touch the screen anywhere (unlock if necessary) to return to
•
settings.
To adjust when the screen saver starts (while docked, charging, or either), touch When to start.
•
45
Start screen saver
The screen saver automatically starts when you connect your phone to a dock or charger and the screen goes to
sleep.
To exit the screen saver and return to your home or lock screen:
Press the Power button.
•
Or, if you're using fingerprint security, touch the sensor.
•
To manually start your screen saver any time, go to Settings > Display > Advanced > Screen saver and touch
Start now.
Turn off screen saver
To prevent the screen saver from starting automatically:
1. Go to Settings > Display > Advanced.
2. Touch Screen saver > When to start > Never.
Add screen savers
Search for “Screen saver” in Play Store for apps that give you more.
After you install an app, you can select the new ones in Settings > Display > Advanced > Screen saver.
Add message to lock screen
To add your name or a short message to your lock screen for anyone who finds your phone:
1. Go to Settings > Display > Advanced > Lock screen display.
2. Touch Lock screen message.
Page 54

Personalize your phone : Lock screen 46
3. Type the text to display and touch Save.
Tip: Don't put your mobile number as your contact info unless you can access your voicemail from another
device.
Page 55

Personalize your phone : Sounds
Set ringtones
Change default call ringtone
1. Go to Settings > Sound.
2. Touch Advanced > Phone ringtone.
3. Do one of the following:
Select a ringtone from the list.
•
•
To use a song as the ringtone, touch Add ringtone at the bottom of the list. Then touch > Audio and
select the song stored on your phone.
For silence, touch None at the top of the list.
•
Vibrate phone for calls
47
You can set the phone to vibrate when it rings for calls.
To extend battery life, turn vibrate off.
1. Go to Settings > Sound.
2.
Turn Vibrate for calls on or off .
Set call ringtone for a contact
You can choose a unique ringtone for calls from specific people so you'll know instantly who's calling.
1.
Open the Contacts app.
2. Touch the contact's name.
3.
Touch > Set ringtone.
4. Do one of the following:
Select a ringtone from the list.
•
•
To use a song as the ringtone, touch Add ringtone at the bottom of the list. Then touch > Audio and
select the song stored on your phone.
For silence, touch None at the top of the list.
•
Set ringtone for app notifications
You can set a default sound for notifications from apps including messaging and email. You can also set a unique
ringtone for notifications from specific apps. Learn how.
Tip: To change your alarm sound, open the Clock app and touch . Then touch .
Page 56

Personalize your phone : Sounds
Get more ringtones
Although your phone comes with lots of ringtones, you can get more:
Search for “ringtones” in Play Store and install an app that provide ringtones.
•
Search for “ringtone maker” in Play Store and install an app that lets you create custom ringtones. Open the
•
app and use it to select entire songs or portions of songs.
If you have songs that are .mp3 files stored on your computer, connect your phone and computer with a USB
•
cable, then copy the song to your phone.
Fix a problem
If you’re not hearing your ringtones, look for in your status bar, which means you're in Do Not Disturb mode.
Open quick settings and touch to turn Do Not Disturb off.
Avoid interruptions with Do Not Disturb
48
Turn Do Not Disturb on or off manually
When you're busy, use Do Not Disturb to mute sounds, stop vibration, and block notifications.
Turn it on
1.
Open quick settings and touch .
You'll see in the status bar when Do Not Disturb is on.
2.
To change how long it stays on, in quick settings, touch & hold , touch Default duration, and then choose
one:
To keep it on indefinitely, touch Until you turn off.
•
To select a duration, touch For 1 hour, then touch + or - to adjust the time.
•
To choose each time you turn Do Not Disturb on, touch Ask every time.
•
Turn it off
Open quick settings and touch .
If it's turning itself on again, but you don't want it to:
Make sure you're not silencing on a schedule or during calendar events.
•
If you're using Wind Down, touch Settings > Digital Wellbeing & parental controls > Wind Down and turn
•
Do Not Disturb off .
Set overall behavior
Sound and vibration
When Do Not Disturb is on, sound and vibration are muted. Alarms and media aren't muted by default, but you can
mute them too.
Page 57

Personalize your phone : Sounds
To adjust settings for alarms, media, and touch sounds:
1. Go to Settings > Sound > Do Not Disturb.
2. Touch See all exceptions.
3.
For each category, select whether sound and vibration is muted or not .
Notifications
When Do Not Disturb is on, you won’t see or hear notifications by default. You can change settings to:
Allow visual notifications but no sound
•
Allow or prevent the screen from turning on or waking
•
Show or hide notification dots, status bar icons, pop-up notifications
•
Show or hide notifications from the notification list
•
To change how Do Not Disturb handles notifications:
1. Go to Settings > Sound > Do Not Disturb.
49
2. Touch Restrict notifications.
3. Do one of the following:
To block sound from notifications but still see them on your screen, select No sound from notifications.
•
To block all visual notifications, select No visuals or sound from notifications.
•
To block or allow selected visual notifications, select Custom and turn features on or off.
•
If Do Not Disturb is off and you expect but aren't getting notifications from an app, check your settings for the app's
notifications.
Allow exceptions
When Do Not Disturb is on, incoming calls, messages, and calendar events or reminders are muted. You can allow
exceptions.
Calls
1. Go to Settings > Sound > Do Not Disturb.
2. Touch Calls > Allow calls.
3. Choose whether to allow calls from:
Anyone
•
Contacts only
•
Starred (favorite) contacts only
•
None
•
4. To let calls through from repeat callers (the same person calling a second time within 15 minutes), turn Allow
repeat callers on .
Text messages
1. Go to Settings > Sound > Do Not Disturb.
Page 58

Personalize your phone : Sounds
2. Touch SMS, MMS, and messaging apps > Allow messages.
3. Choose whether to allow messages from:
Anyone
•
Contacts only
•
Starred (favorite) contacts only
•
None
•
Calendar events and reminders
1. Go to Settings > Sound > Do Not Disturb.
2. Touch See all exceptions.
3.
Turn Allow reminders and Allow events on .
Silence on schedule
You can create a schedule for when your phone should automatically switch into and out of Do Not Disturb mode.
50
1.
Open quick settings, then touch & hold .
2. Touch Schedules.
3. Use rules to set the schedule:
To use an existing rule, touch its name, like Sleeping. Turn Use rule on and adjust times or settings as
•
needed.
To create a new rule, touch Add more. Touch Time, then enter a name and touch OK. Specify its days,
•
start and end times, and level of silence.
To stop your phone from automatically silencing:
1. Go to Settings > Sound.
2. Touch Do Not Disturb > Schedules.
3. Do any of the following:
To use the schedule later, uncheck it to turn it off.
•
•
To delete a schedule, touch > .
•
To delete multiple schedules, touch > Delete schedules.
Silence during calendar events
Your phone can automatically switch into and out of Do Not Disturb mode for all scheduled events in calendars that
you specify.
1.
Open quick settings, then touch & hold .
2. Touch Schedules.
3. Do one of the following:
To use an existing one, turn it on.
•
To create a new one, touch Add more. Touch Event, then enter a name and touch OK.
•
Page 59

Personalize your phone : Sounds 51
4. Adjust options to select the calendar to use and your reply status.
To stop your phone from automatically silencing:
1. Go to Settings > Sound.
2. Touch Do Not Disturb > Schedules.
3. Do any of the following:
To use the schedule later, uncheck it to turn it off.
•
•
To delete a schedule, touch > .
•
To delete multiple schedules, touch > Delete schedules.
Stop phone from speaking
Some voice commands (like “What's up?” and “What is the current weather?”) cause your phone to speak in
response.
To stop the phone from speaking temporarily, touch .
To prevent your phone from speaking:
1. Open the Google app.
2. Touch More > Settings.
3. Touch Voice.
4. Select an option for Spoken results.
Page 60

Personalize your phone : Sounds : Other sound settings 52
Silence power on sound
If you don’t want your phone to make a sound when it powers up:
1. Go to Settings > Sound > Advanced.
2.
Turn Power on sounds off .
You can't adjust the volume level for this sound.
Turn off charging sounds
If you don’t want your phone to make a sound when it comes in contact with a charger:
1. Go to Settings > Sound > Advanced.
2. Turn off Charging sounds and vibration.
Page 61

Apps 53
About your apps
Open an app
Swipe up from the bottom of your home screen, then touch the app to open.
Preloaded apps
The following apps are preloaded on your phone. Don’t want some? Delete or disable them.
Icon App Description
Assistant Use your voice to control your phone.
Calculator Make some quick calculations.
Calendar Keep track of your upcoming events, get automatic reminders on your phone, and
coordinate with others by sharing calendars.
Camera Capture photos or videos. To learn more, read help in Camera app.
Chrome Browse the web. Access your browser bookmarks from any device, and sync tabs
with your computer or Android devices.
Clock Set alarms. Use a timer or stopwatch.
Contacts Organize and connect with your contacts. Assign ringtones to people.
Page 62

Apps 54
Docs Create, edit, and collaborate with others on documents.
Drive Store and synchronize your files on Google's cloud, then access them anywhere
you have an internet connection. Create and share spreadsheets, documents, and
presentations. Scan documents and share or print them.
Duo Make video call with your friends across Android and iOS.
Facebook Connect with friends, family, and communities. Share updates and media. Find
information on events, entertainment, and businesses.
Files Browse and manage files and folders stored on your device or SD card.
FM Radio Listen to FM radio stations. (Available in Play Store if not preloaded.) To learn
more, open the app and touch > Help.
Gmail Compose, send, view, or search your email from your phone or computer.
Google Search the web, see your updates, and adjust Google settings, including privacy.
Google One Get expanded storage, Google support, and other member benefits with a paid
subscription.
Google Pay Pay with your phone in-store or online, and send cash using this secure digital
wallet.
Home Set up and control your Google Home and Chromecast devices, and other home
products like lights, cameras, and thermostats.
Page 63

Apps 55
Keep Notes Create and share notes, lists, and reminders.
Maps Find your destination, explore locations.
Messages Send and receive text messages.
Moto Select available gestures for phone shortcuts and control notifications.
Moto Audio Get premium, adjustable audio for movies, music, games, and voice.
News See headlines, weather, and information on your favorite topics and locations.
Phone Make calls.
Photos Manage photos and upload them automatically to your private album.
Play Movies & TV Get movies and TV shows for instant viewing from Play Store.
Play Store Get apps for your phone, as well as books, magazines, music, and movies and
access them from your computer or any Android device.
Podcasts Find the latest episodes of your favorite podcasts, browse popular and trending
podcasts, or discover new podcasts based on your listening history and
preferences.
Page 64

Apps
56
Settings Customize your phone settings.
Sheets Create, edit, and collaborate with others on spreadsheets.
Slides Create, edit, collaborate with others, and play presentations.
Wallpapers Change your wallpaper, get new ones, or automatically show a new one every day.
YouTube Find, view, and upload videos to the web.
YT Music Stream your favorite albums, singles, and live performances, and get
recommendations for new music.
Get more apps
Don’t see what you need? Download more apps.
Tip: Swipe up and touch Search apps. Type the missing app's name to go to Play Store where you can
install with one touch.
Get help for an app
1. Open the app.
2.
Touch or .
3. Look for Help or Settings > Help.
Switch between recent apps
1.
Touch to see your recently used apps.
Or, if you're using the navigation bar, drag up from the bottom of the home screen, hold, then let go.
Page 65

Apps
2. Do any of the following:
Touch any app screen to return to it.
•
Swipe left or right to see more apps.
•
Swipe an app up to remove it from the list.
•
To clear the list, swipe all the way right and touch Clear all.
•
Tips:
•
Touch twice to switch between your two most recently used apps. (If you're using the navigation bar,
swipe left or right.)
Use two apps at once with split screen.
•
Close apps
To get out of an app, touch to return to your home screen. Or, swipe up if you're using the
navigation bar.
57
You don't need to close apps. Android manages the memory and battery that apps use, so you don't need to worry
about leaving apps open.
To remove apps from your recently used list:
1. Drag up from the bottom of the home screen, hold, then let go.
2. Do one of the following:
To remove one app, swipe up to remove it from the list.
•
To remove all apps, swipe right to the end of the list and touch Clear all.
•
Tips for using apps
You can change the background color of your app list to be light or dark.
•
See how long you use each app and set app timers to improve your digital wellbeing.
•
You can print from many apps.
•
Copy and paste text between apps with the clipboard.
•
To organize apps into groups on your home screen, use folders.
•
•
Want to turn the flashlight on or off? Use quick settings ( or ). No app required.
If you’re having problems with an app, try these troubleshooting steps.
•
Use two apps at once
Use split screen view
1. Open the first app.
Page 66

Apps
2. Drag up from the bottom of the home screen, hold, then release.
3.
In the recent list, touch the app's icon, at the top of the app's preview, to see and .
Be sure to touch the app's icon instead of the preview, which opens the app.
4.
Touch Split screen.
5. Select the second app to use.
58
Exit split screen view
Drag the black divider all the way up or down.
Use Picture-in-picture
With some apps, you can watch video in a small, movable frame while you do other things. Use it when navigating
with Google Maps, too.
1.
When you’re playing a video or navigating with Maps, touch .
The video (or navigation) shrinks.
2. You can drag the video (or navigation) anywhere on the screen.
To return it to full size, touch it twice.
•
•
To close it, drag it to the bottom of the screen. Or, touch it, then touch .
•
To turn off Picture-in-picture for the app in use, touch it, then touch and turn Allow picture-in-picture
off .
To see all apps that support Picture-in-picture:
1. Go to Settings > Apps & notifications.
2. Touch Advanced > Special app access > Picture-in-picture.
3.
To turn off Picture-in-picture for an app, touch it and turn Allow picture-in-picture off .
View notifications
Find your notifications
Notifications alert you about things like new messages, calendar events, and alarms.
You see notifications:
On your lock screen
•
Page 67

Apps
When you swipe the status bar down on any screen
•
When you touch & hold an app icon that shows a notification dot
•
59
If you receive multiple notifications from an app, they're bundled together. Swipe down to view more details.
Some important notifications pop up briefly over your current app so that you can take action. For example, a
notification for an incoming call might appear while you're watching a video, so that you can answer or dismiss the
call.
What you can do with notifications
Respond from a notification. Many notifications include actions at the bottom that let you complete common
•
tasks without opening the full app. If you have several notifications, these actions are hidden. When you see
, touch it to reveal actions.
Open the app that sent the notification Swipe down from the top of the screen and touch the notification to
•
open the app. From your lock screen, touch the notification twice and enter your PIN, pattern, or password to
unlock your screen and open the app.
•
Snooze a notification. Swipe left or right slowly. Then touch and select a duration to snooze notifications.
To snooze notifications, first turn on snoozing.
Dismiss a notification. Swipe it sideways.
•
Clear all notifications. Swipe to the end of your notifications and touch Clear all. Some notifications, like
•
voicemails, require an action and cannot be dismissed.
Customize your notifications
Use Do Not Disturb to silence all notifications when you don’t want interruptions.
Touch & hold a notification to customize that app's notifications. Then you can:
Stop all notifications from that app.
•
Change the app's notifications to be Silent instead of Alerting.
•
Page 68

Apps 60
About the Moto app and settings
Moto Actions
Use gestures as shortcuts for common tasks:
Use three fingers to take a screenshot.
•
Twist your wrist twice quickly to open the camera from any screen.
•
Use the Volume buttons to switch tracks when listening to music.
•
Make a chopping motion to turn the flashlight on or off.
•
Swipe to shrink screen for one-handed use.
•
Set your phone face down on a surface to start Do Not Disturb mode.
•
Pick up your ringing phone to silence it and switch to vibrate.
•
Moto Display
See what's going on while your screen sleeps. Notification icons quietly appear and disappear on the screen,
giving you a peek at notifications while using very little power.
Keep your screen on while you’re looking at it with Attentive Display.
Page 69

Apps : Manage your apps
61
Install or update apps
Get apps from Google Play Store
Need a voice recorder, notepad, or compass? You can download more apps, in addition to the apps preloaded on
your phone.
To download apps:
1. Open the Play Store app.
2. Browse by category or search.
3. Touch an item to see a description, read reviews, and download it.
You'll see in the status bar when the app has downloaded and installed successfully.
Tips:
•
To view Play Store apps you've installed on this phone, touch > My apps & games. Touch LIBRARY
to see apps you've installed on other devices using the same Google account.
•
To prevent accidental or unwanted purchases, touch > Settings > Require authentication for
purchases.
Get apps from other sources
Before downloading, do some research: check the app's rating and read lots of comments.
To download apps:
1. Open the Chrome app and go to the appropriate site to download the app.
If you see a warning, touch OK to continue.
You'll see in the status bar when the download completes.
2. Touch the download notification to install the app. Or, open the Files app to install it later.
3. When installing the app, be sure to review what information the app will access. If you don’t want the app to
access this information, cancel the installation. For example, if you're installing an app that makes a shopping
list, the app should not require access to your contacts.
Update Play Store apps automatically
Updating your apps gives you the latest features and improves security and stability. For best performance, apps
are set to update automatically.
If an app changes the information it wants to access on your phone, you will receive a notification to update the
app manually and will be required to review and accept the new permissions.
To control when your apps are automatically updated:
1. Open the Play Store app.
2.
Touch > Settings.
Page 70

Apps : Manage your apps
3. Touch Auto-update apps.
4. Select whether apps should:
Auto-update over any network
•
Auto-update only over Wi-Fi - save data charges on your cellular plan
•
Update Play Store apps manually
1. Open the Play Store app.
2.
Touch > My apps & games.
3. On the UPDATES tab, touch Update all, or to update a specific app, touch Update next to its name.
4. Read the summary of what changed, then swipe down to review any changes to permission details, what
information on your phone the app can access. If you agree, touch Update.
Turn off Play Store auto-updates
To stop a specific app from updating automatically:
62
1. Open the Play Store app.
2.
Touch > My apps & games.
3. Touch the INSTALLED tab, then touch the app's name.
4.
Touch and turn off Enable auto update.
To stop all apps from updating automatically:
1. Open the Play Store app.
2.
Touch > Settings.
3. Touch Auto-update apps > Don't auto-update apps.
Restore Play Store apps
If you uninstall an app you got from Play Store, you can reinstall it anytime. Have apps you use infrequently, such
as a flight tracker? Delete them and easily reinstall when needed.
1. Open the Play Store app.
2.
Touch > My apps & games.
3. Touch the LIBRARY tab for a list of every app you’ve downloaded.
4. Next to the app name, touch INSTALL.
5.
If you have multiple Google accounts, touch and next to your account touch . Select the other account
and repeat the process to restore apps downloaded in that account.
Page 71

Apps : Manage your apps
Manage or delete apps
Organize apps
To organize apps into groups on your home screen, use folders.
Control app permissions
The first time you use an app, and sometimes when you install or update it, you are asked to grant the app
permission to access certain data and phone features. You can adjust these permissions any time.
To adjust permissions by app:
1.
Touch & hold the app icon, then touch .
2. Touch Permissions.
3. Turn each permission on or off as needed.
63
Tip: To see how the app uses each permission, touch > All permissions.
You can also review each feature and adjust which apps have permission.
Use safe mode
Issues such as apps crashing, unexpected reboots, or fast battery drain could be caused by a third-party app. Use
safe mode to start your phone with only the original software and apps. If the issues go away in safe mode, the
problem is probably from a third-party app you downloaded.
To reboot in safe mode:
1. Press & hold the Power button.
2. Touch & hold Power off. Then touch OK to restart in safe mode.
When it restarts, you'll see Safe mode across the bottom of the home screen and widgets will be disabled.
3. Use your phone and see if the problem has gone away. Remember, you won’t be able to use any downloaded
apps.
If the problem goes away:
1. To exit safe mode, restart your phone.
2. One by one, uninstall recently downloaded apps. After each removal, restart your phone. See whether
removing that app solved the problem.
3. Once you delete the problematic app, you can restore the other apps you removed during testing.
If the problem doesn't go away: Try these troubleshooting steps for phone performance issues.
Clear app's cache or data
Clearing the cache and data can free up phone memory, improve performance, and fix some problems with apps
and web pages.
1.
Touch & hold the app icon, then touch .
Page 72

Apps : Manage your apps
2. Do one of the following:
To free up space by removing temporary files, touch Storage & cache > Clear cache. Over time, the
•
cache builds up again, so repeat if a problem occurs.
If problems still occur, then delete all data saved in the app by touching Storage & cache > Clear
•
storage. Be careful - there’s no way to undo this.
Force stop apps
Force stop an app only if it seems to be causing a problem. To completely shut down an app, including any
background services:
1.
Touch & hold the app icon, then touch .
2. Touch Force stop.
Delete apps you installed
You can delete (uninstall) apps that you downloaded. For many preloaded apps, you can disable but not delete
them.
64
1. Touch & hold the app's icon.
2. Do one of the following:
•
Drag the icon up and drop it on . This removes the app and frees storage space.
•
If you don't see a delete option, touch & hold the app icon, then touch > Disable.
Delete apps installed by others
If you are the owner of the phone and share it with users or guests, you can uninstall apps they installed. Although
their apps don’t appear in your app tray or on your home screen, they do reduce available storage space.
1. Go to Settings > Apps & notifications > See all ### apps.
Apps installed by others show the message Not installed for this user.
2. Touch the app name.
3.
Touch > Uninstall for all users.
Back up to Google
You can automatically back up the following items to your Google account:
Apps and app data
•
Call history
•
Contacts
•
Phone settings (including Wi-Fi passwords and permissions)
•
Photos and videos (synced to your Google Photos library, not to Google Drive)
•
•
SMS text messages (if using Messages)
Not all apps back up data automatically. Check with the app developer.
Page 73

Apps : Manage your apps
To automatically back up to Google Drive:
1. Go to Settings > System.
2. Touch Backup.
3.
Turn Back up to Google Drive on .
4. If you have multiple Google accounts, touch Account to select an account.
5. Follow the onscreen instructions.
To back up other files that aren't automatically backed up, like attachments or downloads:
1.
Open the Drive app.
2. Touch +.
3. Touch Upload, then choose the files or folder to upload.
Protect against harmful apps
65
Scan phone for harmful apps
Play Protect helps keep your phone secure by automatically scanning your phone to check for potentially harmful
apps.
If Play Protect finds a potentially harmful app, it stops the app from running and warns you so you can uninstall it.
To see the results or to rescan:
1. Open the Play Store app.
2.
Touch > My apps & games.
3. Do any of the following:
•
To see the results of latest scan, on the UPDATES, look at the message next to .
•
To rescan your phone, touch .
If your phone seems slow
If you’ve scanned your phone to confirm there aren’t any potentially harmful apps but your phone seems slow, try
these troubleshooting steps.
Pin your screen
Turn on screen pinning
Use screen pinning to keep the current screen or app in view until you unpin it. For example, you can pin a game
and your child cannot navigate anywhere else on your phone.
You can set up a pattern, PIN, or password required to unpin the screen.
1. Go to Settings > Security > Advanced > Screen pinning.
Page 74

Apps : Manage your apps 66
2. Turn screen pinning on.
3. By default, you must always enter your pattern, PIN, or password when unpinning a screen. If you don't want
this security before accessing your other phone screens, turn this option off.
Pin a screen
1. Make sure you've turned on screen pinning.
2. Open an app and go to the screen you want to pin.
3.
Touch .
4. Touch the icon of what you want to pin.
5.
Touch .
Unpin a screen
1.
Touch & hold and at the same time.
2. If you required a pattern, PIN, or password when you turned on pinning, enter it to unlock the phone.
Page 75

Apps : Search and web browser
Search the web
Search with the widget
To type your search term:
1. Touch the Search widget.
2. Start typing a search term.
As you type, suggested terms appear.
3. Touch a suggestion to search for it.
Search from anywhere
67
You don't have to leave your current app to search for the info you need. Use Google Assistant from any screen to
get search results and options for your next action.
To search:
1. Say “OK, Google” or “Hey, Google”. (Be sure you've set up the launch phrase.)
Or swipe diagonally from either lower corner of the screen.
2. Tell the assistant what you're looking for. For example, search for a local restaurant by saying “Find [restaurant
name].”
3. Below the search result, touch options for related actions: make a call, get directions, read reviews, and more.
For more help with Google Assistant, read Google's support information.
Get info about your surroundings
Get information about and interact with your surroundings. Just open the Camera app and use Google
Lens to:
Search for information about objects around you: products for purchase, landmarks and buildings, plants
•
and animals, books and visual art
Scan barcodes and QR codes: Search for related information, open a website to purchase a product
•
Digitize real-world text: Copy text to paste in another app, translate text, save business card information to
•
Contacts, create calendar events from dates on event posters or billboards
To use Google Lens:
1.
Open the Camera app.
2.
On the viewfinder, touch .
3. Frame the item you want to learn about, then touch it on the screen.
For text, touch it to select it, and use to select more.
Page 76

Apps : Search and web browser
4. In the list of results:
Touch a selection to see the search result or take the suggested action.
•
•
To look for other results, touch . For example, switch to text results or shopping results.
•
To narrow the search, touch to crop the image for closer detail.
To learn more, read Google's help.
Search from Gboard
When you're typing with the onscreen keyboard:
1.
Touch above the keys.
2. Start typing a term in the search bar.
3. Touch a result to share its link, or touch one of the additional suggested searches for more information.
If you don't see on your keyboard:
68
1. Go to Settings > System > Languages & input > Virtual keyboard.
2. Touch Gboard > Search.
3.
Turn Show "Search and more" button on .
Search for nearby phone numbers
To find and call a nearby business:
1.
Open the Phone app.
2.
Touch .
3. Say or type the name of place to call, or a search term about the place (for example, “restaurant”).
You’ll see a list of nearby search results.
4. Touch the place to dial its number.
If it doesn't work:
Make sure Location is enabled.
•
•
Touch > > Settings and turn Nearby places on.
Delete Google search history
Read Google's help for instructions.
Use search engine other than Google
To use a search engine other than Google:
1. Search for “search engine” in Play Store and install one of the apps.
2. Open that app to search.
Page 77

Apps : Search and web browser
3. Optionally:
Delete the Google search widget from your home screen. If you can’t delete it, use a different launcher for
•
your home screen that doesn’t include the widget.
Install a browser to replace Chrome and make it your default browser.
•
Turn off Google’s collection of your information.
•
Search your phone
Search contents of your phone
1. Touch the Search widget.
2. Enter a search term.
69
3.
On the search results page, under , swipe left and change ALL to PERSONAL.
If you're not seeing results:
1. Open the Google app.
2. Touch More > Settings.
3. Touch General > Personal results.
4. Make sure that everything you want to include in your searches is checked.
Find an app
1. Swipe up from the bottom of the home screen to open your app list.
2.
Touch Search apps.
3. Type the app's name.
4. If the app is on your phone, touch its icon to open it.
If the app isn't on your phone, touch SEARCH FOR MORE APPS to go to Play Store and install with one
touch.
Find your phone number
1. Go to Settings.
2. Touch About phone > Phone number.
Find photos, videos, files
To find photos or videos on your phone, use the Photos app.
To find downloaded files, use the Files app.
Page 78

Apps : Search and web browser
Browse websites
Visit and bookmark websites
Your phone connects to your carrier's cellular network or to a Wi‑Fi network to access the internet. To save data
charges on your cellular plan, use a Wi‑Fi connection.
1.
Open the Chrome app.
2. Go to a site by touching the bar at the top and typing the address.
3. On a web page:
•
To bookmark it, touch > .
Or, touch > Add to Home screen to put a shortcut on your home screen.
•
To search for text on that page, touch > Find in page.
70
To open a link, touch it.
•
To see options for opening a link in a new tab and copying or sharing a link, touch & hold the link.
•
•
To print the page, touch > Share > Print. Be sure you set up your print service.
4.
To return to the previous page touch .
To learn more about browsing or managing bookmarks, open Chrome and touch > Help & Feedback.
Open and switch browser tabs
In the Chrome app:
•
To switch tabs, touch the switcher icon .
•
To open a new tab, touch touch the switcher icon , then touch .
Clear browsing history
1.
Open the Chrome app.
2.
Touch > History.
3. Touch CLEAR BROWSING DATA.
You can also review and delete your search history.
Change default browser
You can download other browsers from Play Store. After you've installed one, you can make it your default
browser.
1. Go to Settings > Apps & notifications.
Page 79

Apps : Search and web browser 71
2. Touch Default apps > Browser app.
Or, touch Advanced > Default apps > Browser app.
3. Touch the app to use.
Page 80

Apps : Text messaging
72
About text and multimedia messages
Text messages - SMS
SMS (Short Message Service) messages contain text only. One text message can contain 160 characters; when
you near the limit, a counter appears. If you type more, your message is sent in a series of SMS messages.
You can send one SMS message to multiple people, and replies are delivered in separate, not group, conversation
threads (unless you and your recipients have group messaging enabled).
SMS messages are included in most carriers' text messaging plans and do not use cellular data.
Multimedia messages - MMS
MMS (Multimedia Messaging Service) messages can include unlimited text plus a photo, picture slideshow, video,
or sound file.
You can send one MMS message to multiple people using group messaging, containing text only or text and
media, and replies are delivered in group conversation threads to each person in the group.
MMS messages use cellular data and require a cellular data plan or pay-per-use payment.
Group messaging
Group messaging lets multiple people carry on a group conversation. All replies from recipients are delivered to all
recipients, in a group conversation thread.
Though you send one message to multiple recipients, you are charged for each message received. Group
messaging:
Converts multiple-recipient SMS messages to MMS for all who can receive them
•
Is available for MMS messages only
•
Note: Recipients who cannot receive MMS messages receive SMS instead and, if media is attached, a link to
download it over Wi-Fi (when offered by carrier). Replies are to the sender only, in an individual conversation.
If you don’t want to receive replies in group conversations, you can turn off group messaging in the Messages app.
Read, send, manage text messages
Read and reply to a text message
When you receive a text message with the Messages app, you'll see in the status bar.
1.
Swipe the status bar down and touch .
Page 81

Apps : Text messaging
2. Do any of the following:
•
To respond to the message, enter your response in the text box and touch .
If the message is from an unassigned number, create a contact to associate a name with that number.
•
To open an attached photo, slideshow, or any type of attachment, touch it.
•
•
To save an attachment, touch & hold it, then touch .
•
To find a message, touch at the top of your message list and enter search terms.
Tips:
If you don't want multi-recipient SMS messages converted to MMS and want replies sent in separate
•
conversations (threads) to you only, turn off group messaging.
To protect your privacy, you can hide sensitive content for lock screen notifications.
•
Send text message
73
1.
Open the Messages app.
2.
Touch .
3. Enter recipients, then type the message.
4. Optionally:
•
To add an attachment, touch or .
•
To add a smiley or other icons, touch on the onscreen keyboard.
5.
Touch .
Tips for sending messages:
•
To text your best friend with one touch from your home screen, add a task shortcut. Touch & hold and drag
to your home screen.
•
To change the text message reply to incoming calls, open the Phone app and touch > Settings > Quick
responses.
Request text delivery reports
See whether recipients receive your messages by requesting delivery reports.
1.
Open the Messages app.
2.
Touch > Settings.
3. Touch Advanced and turn on Get SMS delivery reports.
Manage draft texts
When you begin composing a text message reply or a new message with recipients, it is saved in your message
list as a draft until you send or delete it.
Page 82

Apps : Text messaging
1. Open the message list and touch the conversation marked Draft.
2. Do one:
•
Finish composing the message and touch .
Delete the characters in the text field to delete the draft.
•
Forward a text message
1.
Open the Messages app.
2. Open the conversation.
3. Touch & hold the message.
4.
Touch > Forward.
Copy text from a message
1.
Open the Messages app.
74
2. Open the conversation.
3. Touch & hold the message.
4.
Touch .
You can now paste it elsewhere, like in an email you're composing.
Delete or archive texts
When you delete a message, you also delete any attached photos or videos. If you want the attachments, be sure
to save them before deleting the message.
•
To delete a single message, open the conversation (thread) and touch & hold the message, then touch .
•
To delete or archive all messages in a conversation, touch & hold the conversation, then touch to delete or
to archive.
•
To delete or archive multiple conversations, touch & hold each conversation, then touch or .
•
To see archived messages, touch > Archived.
Add attachments
Attach files to text message
You can attach saved pictures and videos, or take one right from your message that has an optimized, reduced file
size.
1.
Open the Messages app.
2. Compose a reply or a new message.
Page 83

Apps : Text messaging
3. Do one of the following:
•
Touch to attach a photo or video or capture a new one. Touch to expand the viewfinder to
fullscreen, where you can switch to a selfie camera or capture a video.
•
Touch for other types of attachments (emoji, GIF, your location, a recording).
4.
Touch .
To learn more, touch > Help & Feedback in the Messages app.
Send contact as text message
1.
Open the Messages app.
2. Open your conversation with that person.
3. Touch their name at the top of the conversation.
4.
Touch > Share.
75
5. Touch the recipient's name, or touch Messages to start a new message.
6.
Touch .
Fix a problem
If you're having trouble attaching files, check that:
Cellular data is turned on.
•
Your data plan supports MMS (multimedia messages).
•
Save attachments from text message
If you received an attachment to a text message, you can save it on your phone. In the message, just touch & hold
the attachment, then touch to save it.
To view the saved attachment:
•
For photos or videos, open the Photos app and touch > Device folders > Messages.
For other attachments, open the Files app.
•
If you do not save a photo or video from a message, it is kept within the message only. So, if you delete the
message, you also delete the attachment. (You can try to recover recently deleted messages.)
Turn group messaging on or off
Group messaging allows conversation participants to reply to all recipients in a single thread. If you do not want
multi-recipient SMS messages converted to MMS and want replies sent in separate threads only to you, turn off
group messaging.
This feature is not available in all countries.
Page 84

Apps : Text messaging
To adjust the group messaging setting:
1.
In the Messages app, touch > Settings > Advanced.
2. Touch Group messaging and select an option.
Change default messaging app
You can download additional messaging apps from Play Store. After you've installed one, you can make it your
default messaging app.
To select a different app to send and receive text (SMS) and multimedia (MMS) messages:
1. Go to Settings > Apps & notifications.
2. Touch Default apps > SMS app.
Or, touch Advanced > Default apps > SMS app.
3. Touch the app to use.
76
Control notifications for text messages
If you use the Messages app:
1.
Open the Messages app.
2.
Touch > Settings.
3. Touch Notifications and turn notifications on or off, change the sound, and add or remove vibration.
If you use a different messaging app:
1. Touch & hold the app's icon.
2.
Touch App info > Notifications.
3. Make changes.
Tip: In your phone settings, you can prevent interruptions by restricting text message notifications during hours
you specify or from specific people.
Change text message reply to incoming calls
When your phone rings, you can drag towards to see a list of quick responses you can send by text
message instead of answering the call.
To edit these quick responses:
1.
Touch .
2.
Touch > Settings.
3. Touch Quick responses.
Page 85

Apps : Text messaging
4. Touch one of the responses to edit it.
Get text messages on your computer
Set up Messages for web
If you use the Messages app on your phone, you can see and send text messages on your computer.
Pair your computer and the Messages app on your phone by scanning a QR code:
The QR code is unique to that computer.
•
You can set up multiple computers, getting individual QR codes, but only one is active at a time.
•
To set up a computer:
1. Be sure your phone and computer are connected to the internet.
2.
On your phone, open the Messages app and touch > Messages for web.
77
3. On your computer, go to https://messages.android.com. To remember this computer and stay signed in to
Messages, turn the slider on .
4. Follow onscreen instructions to scan the QR code on the web page with your phone.
Once paired, you'll see your latest conversations in your computer's browser.
See and send messages
When you have unread messages, you'll see a red notification and number of unread messages in the browser tab
on your computer.
To send messages from your computer, your phone must be on and connected to the internet.
Usual carrier fees for sending text messages from your phone also apply to messages sent from your computer.
Sign out of Messages for web
If you don’t use Messages on a paired computer for 14 days, you’re automatically signed out from that computer
for security reasons.
If you're using a shared or public computer, sign out when you're done.
To sign out from your phone:
1.
Open the Messages app.
2.
Touch > Messages for web.
3. Do one of the following:
•
Touch next to an individual computer to sign out of it.
Touch Sign out of all computers.
•
To sign out from the computer, at the top of the message list, click .
Page 86

Apps : Email
78
Read, send, manage emails
Read email
If you've set up email, you’ll start receiving emails after your account syncs with your phone. When you receive an
email notification, you'll see in the status bar.
1. To open email from a notification, swipe the status bar down and touch the notification:
A single email notification opens the message directly.
•
A multiple email notification opens the email list; touch an email to open it.
•
If you dismiss the notification and want to view the email later, open the Gmail app.
2. Do any of the following:
•
To view other folders, touch from your email list.
Attachments appear at the end of the email. You can view or save them.
•
You can print emails from your phone.
•
Reply to or forward an email
1.
Touch to reply to the sender. Or, swipe to the end of the email and touch to reply to all recipients or
to forward.
2. Enter your message.
3.
To copy someone on the email, in the To field, touch .
4.
Touch .
Send new email
1.
Open the Gmail app and touch .
2. Enter the recipient and your message.
3.
To copy someone on the email, in the To field, touch .
4.
Touch .
Add attachment to email
1.
In the email you're composing, touch > Attach file.
2. Browse to the file, and touch it to add it to the email. The attachment appears at the bottom of the email.
Find emails
When you open the Gmail app, you see your Inbox.
Page 87

Apps : Email
To view sent email, drafts, recently deleted email, and other categories, touch .
To search for emails, at the top of your email list enter terms, like the topic or the sender's name.
Delete emails
To delete an open email, touch .
To delete multiple emails, go to your email list, touch & hold each message to delete, then touch .
To delete large quantities of email, sign into your email account on your computer, and see your email provider's
help for more information.
Tips:
To delete attachments that you saved from emails, use the Files app.
•
You can also remove email accounts from your phone.
•
79
Learn more
For more help with Gmail, read Google's support information.
For help managing email from other providers, sign into your email account on your computer and look for the
provider's instructions.
View email attachments
View attachments
Attachments appear at the end of an email.
To view or play the attachment, touch it.
If you see a message that you can't open the attachment type, most file types have a free viewer that you can use.
In Play Store, search for the file type, then select and download an app.
Save attachments from email
In the email, touch to download and save it on your phone, or touch to save it in Drive.
To view attachments later, open the Files app (go to Download) or the Drive app.
Delete attachments saved from email
1. Open the Files app.
2. Touch Browse > Downloads.
3. Do one of the following:
To select one item, touch & hold it.
•
To select multiple items, touch & hold the first one, then touch the others.
•
Page 88

Apps : Email
4.
Touch .
Prevent previews of attachments
Attached photos or videos appear as thumbnails, showing a preview.
To see a generic thumbnail instead of a preview thumbnail until you open the file:
1. Open the Gmail app.
2.
Touch > Settings, then touch the account name.
3. Touch Images > Ask before displaying external images.
Preview inboxes from home screen
To preview your inboxes, open emails, or quickly start a new email, add the Gmail widget to your home screen.
With the widget, you can:
80
Open a message. Touch the message.
•
•
Compose a message. Touch .
View more messages. Scroll down the list.
•
Open the app. Touch the folder name at the top of the widget.
•
Add email signature
To add a signature automatically to the end of emails you send:
1. Open the Gmail app.
2.
Touch > Settings.
3. Select the account.
4. Touch Mobile Signature and edit the text you want to appear at the end of every email.
Control email notifications
You can control whether you see notifications when you receive an email.
1.
Touch & hold .
2.
Touch > Notifications.
3. Adjust notification settings.
Tip: To automatically silence notifications during hours you specify, use Do Not Disturb.
Page 89

Apps : Calendar app
81
About the calendar
Keep track of upcoming events and get automatic reminders on your phone with your calendar. Google calendars
let you save all your events in one place, which is secure, synced, and accessible from any web-enabled device or
computer when you've signed in to your account.
You can:
Review existing events.
•
Create new events.
•
Control notifications for events.
•
Your calendar can automatically create new events based on your incoming Gmail messages. For example, if you
make restaurant reservations or book a flight, these events will show up automatically on your calendar; you don't
have to add them.
If you created multiple calendars within your Google account, or if you have multiple Google accounts on your
phone, you can control which events are synced with your phone.
Find calendar events
Open calendar events
You'll see in the status bar to alert you of upcoming events. Just swipe the status bar down and touch the
notification to see the event details in your calendar.
To see your list of upcoming events, open the Calendar app.
Tip: For an overview of your upcoming events from your home screen, add a Calendar widget.
Get around the calendar
To glance at the month view:
1. Touch the month's name.
2. Touch a date to jump to it and see its events.
To change the view:
1.
In your calendar, touch .
2. Touch Schedule, Day, 3 Day, Week or Month. This view remains the default until you change it.
From these views, you can:
•
Read or edit event details. Touch the event to open it and touch to edit it.
•
Add new events. Touch .
•
Search your calendar. Touch > Search.
Page 90
Apps : Calendar app
82
Create and manage events
Create calendar events
As you're creating an event, you'll see suggestions for the event titles, locations, people, and more. In some cases,
these suggestions are personalized based on information associated with your Google account and your
previously created events.
1.
Open the Calendar app and touch > Event.
2. Touch the account name to associate the event with the calendar you want.
3. Enter the start time and other details.
4. If you want a reminder sent to your status bar, touch Add another notification and select how long before the
event you want a reminder.
5. Touch Save.
Edit or delete calendar events
1. Touch an event to open it.
2. Do any of the following:
•
To edit it, touch .
•
To delete it, touch > Delete.
Control which events are shown
To temporarily hide calendar events for a Google account you don't need to see all the time:
1.
Open the Calendar app and touch .
2. Beneath the account name, touch Events. If you have multiple calendars for that account, touch the name of
each calendar to hide its events.
Tip: When you hide events, the calendar still syncs with your Google account. To prevent that account's
calendar from automatically syncing, from the home screen go to Settings > Accounts.
To exclude automatically-generated events created from Gmail (for events such as flight bookings and restaurant
reservations):
1.
Touch > Settings > Events from Gmail.
2. Under the name of the account, turn off Events from Gmail.
To learn more, open Calendar and touch > Help & Feedback.
Control notifications for calendar events
1.
Touch & hold the app icon.
Page 91

Apps : Calendar app 83
2.
Touch > Notifications.
3. Adjust notification settings.
If you have assigned a ringtone for the notification but you silence your phone, your phone won't play the ringtone.
Tip: To automatically silence notifications during hours you specify, use Do Not Disturb.
Page 92

Apps : Clock app
Set alarms
Set alarm by touch
1. Open the Clock app.
2.
Touch .
3. Do one of the following:
•
To create a new alarm, touch .
To use an existing alarm, switch it on.
•
•
To adjust an alarm's sound, schedule or label, touch .
4.
To control general alarm settings, like alarm volume and snooze duration, touch > Settings.
84
Set alarm by voice
1.
If you've set up Voice Match, say “OK, Google”. Or, touch on the Google Search widget.
2. When prompted to speak, say your command. For example: “Set alarm for 7:45 p.m., label, switch the
laundry” or “Wake me up at 7 a.m. tomorrow.”
Your phone sets the alarm and provides a confirmation.
When an alarm is set
You'll see in the status bar and on your lock screen.
To adjust it, open quick settings and touch the alarm time.
Delete an alarm
1. Open the Clock app.
2.
Touch
3.
Touch > .
Use timer or stopwatch
Use timers
You can set multiple countdown timers with labels to keep track:
1.
In the Clock app, touch for the Timer tab.
Page 93

Apps : Clock app
2. Enter the time to count down.
3.
Touch .
4. Do any of the following:
•
To pause the countdown, touch .
To add a label to the timer, touch Label (helpful when using multiple timers).
•
To add a minute to the countdown, touch + 1:00.
•
•
To reset the counter to the original time, touch > Reset.
To add a timer, touch Add timer.
•
To delete a timer, touch Delete.
•
•
To change the timer's sound, touch > Settings > Timer sound.
If you leave this app, quickly return to it by swiping the status bar down with one finger to see the timer
•
notification and remaining time. To open the timer, touch the notification.
85
Tip: If you use timers frequently, create a task shortcut. Touch & hold , then drag Create new timer to your
home screen.
Use a stopwatch
Record your time and share your results.
1.
In the Clock app, touch for the Stopwatch tab.
2.
Touch .
3. Do any of the following:
•
To pause the stopwatch, touch .
To record laps (or multiple durations) while the stopwatch is running, touch Lap.
•
•
To reset the counter to zero, touch > Reset.
•
To share your times with others or send them to yourself, touch > Share.
If you leave this app, quickly return to it by swiping the status bar down with one finger and touching a
•
control. To open the stopwatch, touch the notification.
Tip: If you use stopwatches frequently, create a task shortcut. Touch & hold , then drag Start stopwatch to
your home screen.
Page 94

Apps : Clock app
Set date and time
Change time format
1. Go to Settings > System > Date & time.
2. To change how times are displayed:
•
To use military time such as 13:00, turn Use 24-hour format on .
•
To use 12-hour format such as 1:00 PM, turn Use 24-hour format off .
Set date and time automatically
1. Go to Settings > System > Date & time.
2. Turn on Use network-provided time and Use network-provided time zone.
86
Your phone automatically syncs with the local time (using the mobile network). The local time is used for alarms
and is displayed on the lock screen and other displays.
Set date and time manually
1. Go to Settings > System > Date & time.
2. Turn off Use network-provided time.
3. To make corrections, touch Date and Time.
Switch time zones
1. Go to Settings > Date & time.
2. Turn off Use network-provided time zone.
3. Touch Time zone. Then choose a regional time zone (which is applied to the current time).
Show multiple time zones
You can view multiple time zones in the Clock app, so you can coordinate plans with friends and co-workers in
other cities, or stay in touch with family back home when you’re traveling.
1.
Open the Clock app and touch .
2.
To add time zones, touch , then select cities in the time zone you want to view.
Show home time zone
When traveling, you can view your home time zone in the Clock app.
1.
Open the Clock app and touch .
2.
Touch > Settings > Automatic home clock.
3. Touch Home time zone, then select your home time zone.
Page 95

Apps : Photos app
Share photos and videos
You can wirelessly share one, multiple, or all items from any Photos view, sending them as email or message
attachments, uploading to the cloud, or using device-to-device connections like Bluetooth.
In addition to sharing wirelessly, you can transfer photos to your computer with a USB connection. You can also
move photos from internal memory to SD card.
To share wirelessly:
1. Open the Photos app.
2. Navigate to the thumbnail of the item you want to share.
3. Select the item to share:
To select one item, touch & hold its thumbnail.
•
To select multiple items, touch & hold the first thumbnail, then touch the others to select them.
•
87
Tip: To clear all selections, touch .
4.
Touch and select the way you want to share.
Upload photos and videos
Back up automatically
1. Open the Photos app.
2.
Touch > Settings > Back up & sync.
3.
Turn Back up & sync on .
4. Adjust settings as needed:
To choose high quality or original size for uploads, touch Upload size.
•
To back up items in your Download, Screenshots, and third-party app folders, touch Back up device
•
folders.
To back up items over your cellular network, turn Photos and Videos on.
•
•
To allow syncing when your cellular service is roaming, turn Roaming on .
Back up manually
1. Open the Photos app.
2. Open the photo or video.
3.
On the photo or video, touch .
Page 96

Apps : Photos app 88
View your backed up photos and videos
From your phone, open the Photos app.
From your computer, sign in to photos.google.com.
More help
To learn more, read Google's help.
Page 97

Calls, contacts, voicemail : Phone calls
89
Answer calls
Answer incoming call
When you receive a phone call, the Incoming call screen shows the caller ID. If you miss a call, you'll see in
the status bar.
To answer an incoming call:
On the Incoming call screen, touch Answer.
•
•
On the lock screen, swipe up to answer a voice call, or swipe the caller's icon/picture up to answer a video
call.
During a call, you can use the keypad to enter numbers or codes, use speakerphone or a paired Bluetooth device,
and add other people to the call. Learn more.
Tip: You can save a recent call as a contact.
Auto answer on headset
You can set your phone to automatically answer calls after 2, 5, or 10 seconds when you're using a headset (wired
or Bluetooth).
1.
Touch .
2.
Touch > Settings.
3. Touch Calls.
4. Touch Auto answer on headset and select a duration.
Dismiss incoming call
If you don’t want to talk to the caller, you can:
Divert the call to voicemail. On the Incoming call screen, touch Dismiss. Or, on the lock screen, press the
•
Power button. You can also automatically divert all calls from a specified number to voicemail.
•
Respond with a text message. On the lock screen, swipe up. You can customize these default
messages.
Block all calls from that number.
•
Control ringtones and notifications
You can:
Quickly silence the ringer. Press Volume Down on the side of the phone.
•
Silence ringtones during hours you specify. Use Do Not Disturb.
•
Choose a unique ringtone for specific people. You'll know instantly who's calling.
•
Get notified of incoming calls when you're on a call. Set up call waiting.
•
Page 98

Calls, contacts, voicemail : Phone calls 90
Set the number of rings before sending a call to voicemail. Dial into voicemail, then follow your carrier’s
•
prompts to change this setting.
Fix a problem
If your phone isn't ringing for incoming calls, look for in your status bar. Open quick settings and touch to
turn Do Not Disturb off. Your phone will ring for incoming calls. Check your settings to make sure your phone is
screening calls at the appropriate times.
If you’re having other problems, try these troubleshooting steps.
Make calls
Make a call
1.
Touch .
2.
Touch and enter a number.
3.
If you enter a wrong number, touch .
4.
Touch to call the number.
5.
To hang up, touch .
Other ways to make calls
You can place calls from:
•
The Phone app
•
The Contacts app
Other apps that show contact information. Wherever you see a phone number, you can usually touch it to dial.
•
In the Phone app, you can place calls in several ways.
To Do this
Dial a number
Touch , enter a number and touch . If you enter a wrong number, touch .
Dial by voice
Call by name
Touch and say a name or number. (If you don't see , swipe down to close the dialer.)
Or, skip the Phone app entirely and say a voice command.
Start typing the name in the search box. You'll see a list of matches. Just touch one to call.
(If you don't see , swipe down to close the dialer.)
Page 99

Calls, contacts, voicemail : Phone calls
Or, to see your contact list, touch . Swipe through and touch the person to call.
91
Call a favorite
Call nearby place
Return call
Tips:
To call frequent numbers with one touch from your home screen, add a Direct dial widget.
•
You can save a recent call as a contact.
•
Touch the tab.
Touch and say or type the name, then touch the search result to place the call. Learn more.
Touch , then touch next to the number.
Change default calling app
You can download additional calling apps from Play Store. After you've installed one, you can make it your default
calling app.
1. Go to Settings > Apps & notifications.
2. Touch Default apps > Phone app.
Or, touch Advanced > Default apps > Phone app.
3. Touch the app to use.
Fix a problem
To change your caller ID information seen by people receiving your calls, contact your carrier.
If you’re having other problems, try these troubleshooting steps.
During a call
Adjust sound during call
While listening, you can:
Adjust the volume. Use the Volume button on the side of the phone.
•
•
Use speaker. Touch .
•
Use a paired Bluetooth device. Touch to use or stop using the device.
•
Mute your microphone. Touch . You can hear the caller but they can’t hear you.
Page 100

Calls, contacts, voicemail : Phone calls
92
Enter a number
Touch on the call screen to use the numeric keypad.
Use other apps
When you hold your phone to your ear, the screen goes dark to avoid accidental touches. To wake it up, move it
away from your ear or press the Power button.
To hide the call and use other apps, touch .
To return to the call, swipe the status bar down and touch Ongoing call.
Answer call waiting
If call waiting is active and a new call comes in, you can answer it. Touch Hold and Answer Voice. The first call is
put on hold.
To switch between calls, touch .
To merge the calls, touch .
End the call
Touch on the call screen.
Or, swipe down from the top of any other screen to view the call notification and touch Hang up.
Make video calls
Make video call with Duo app
Duo lets you video call anyone in your contact list who also uses Duo. Android users can get it from Play Store,
and iPhone users can download it from the iTunes App Store. The video calls are secure and can’t be seen by
others.
To get started, open the Duo app and follow the onscreen instructions to set it up.
For more information, touch > Help & Feedback.
Get an app to make video calls
There are many video calling apps to choose from on Play Store (like WhatsApp, Skype, and more).
1. Open the Play Store app.
2. Search for “video calls”.
3. Download the app you want to use.
 Loading...