

Page 1

Professional Radio
GM360
User Guide
68P64110B89
Issue: July 2000
Page 2

13
14
15
6
5
4
3
15
12
11
10
9
2
1
8
7
Page 3

CONTENTS
RadioOverview .................... 3
RadioControls...................... 3
ProgrammableButtons ............... 3
KeypadKeys....................... 7
KeypadLock/Unlock ................. 7
MenuKeys.........................8
MenuNavigationChart ...............9
LCDDisplayandIcons............... 10
AudioSignalTones................. 11
LEDIndicators..................... 12
GettingStarted.................... 13
TurningtheRadioOn-Off............. 13
RadioOnMessage ................. 13
Adjusting the Radio’s Volume . . . . . . . . . 13
SelectingaRadioChannel............ 14
MemoryChannel................... 15
SendingaCall..................... 15
ReceivingaCall.................... 16
CancellingaCall................... 16
EndingaCall...................... 16
RadioCalls........................17
SelectiveCalls......................17
MakingaSelectiveCall...............17
ReceivingaSelectiveCall.............17
ContactList........................18
KeypadEdit........................19
MissedCalls .......................20
StatusCalls........................23
MakingaStatusCall...............23
ReceivingaStatusCall............24
EmergencyCalls....................25
DTMF.............................26
Features..........................31
VoiceStorage......................31
VoiceRecorder...................31
EmergencyMessage..............34
PublicAddressMode.................35
CarRadioMute.....................36
Utilities . . . . . . . . . . . . . ..............37
Scan .............................39
CallForward .......................42
Talkaround.........................43
ExternalAlarm......................44
LoneWorker.......................45
CONTENTS
1
English
Page 4

PowerLevel....................... 46
Companding....................... 47
Backlight.......................... 48
Brightness ........................ 49
OptionBoard...................... 50
VoiceOperatedTransmit(VOX).......51
Stun/Unstun....................... 52
CONTENTS
RadioInformation ................. 53
SafetyInformation................. 55
SafeandEfficientOperation.......... 55
Exposure to Radio Frequency Energy. . . 55
Electromagnetic Interference/
Compatibility....................... 56
OperationalWarnings ............... 56
Potentially Explosive Atmospheres. . . 56
Blasting Caps and Areas. . . . . . . . . . . 56
Radio Operation and EME Exposure. . . . 57
Mobile Antenna Installation . . . . . . . . . . . 57
ControlStationOperation.............57
GeneralRadioCare................. 58
Computer Software Copyright
The products described in this manualmay includecopyrighted computer
programmesstored in semiconductormemories or other media. Laws in the
United States of America and other countries preserve for Motorola Europe
and Motorola Inc. certain exclusive rights for copyrighted computer
programmes,including the right to copy or reproduce in any form the
copyrightedcomputer programme. Accordingly,any copyrighted computer
programmescontained in the products described in this manual may not be
copied or reproduced in any manner without the express written permission of
the holders of the rights. Furthermore, the purchase of these products shall not
be deemed to grant either directly or byimplication, estoppel, or otherwise,any
licence under the copyrights, patents, or patent applications of the holders of
the rights, except for the normal non-exclusiveroyalty free licence to use that
arises by operation of the law in the sale of the product.
English
2
Page 5

RADIO OVERVIEW
This user guide covers the operation of the
GM360 Professional Mobile Radio.
Please read pages 55 to 58 before using this radio.
RADIO CONTROLS
The numbers below refer to the illustrations on
the inside front cover.
1. On-Off / Volume Knob
Used to turn the radio on or off, and to adjust
the radio’s volume.
2. LED Indicators
Indicateschannel, scan, and monitor status, as
well as receipt of a selective call.
3. LCD Display (1 Line)
4. Menu Exit/Escape Button
5. Channel Selector/Menu Navigation
Up/Down y or z
Used for channel scrolling. When in menu
mode, used for menu navigation.
6. Menu Enter/Select Button c
7. Mic Jack
x
9. Programmable Button 2 h
10. Edit Buttons Left/Right v or w
11. Programmable Button 3 i
12. Programmable Button 4 j
MICROPHONE CONTROLS
(Keypad Microphone)
Hold the microphone 2.5 to 5 cm (1-2 inches)
from your mouth, and speak clearly into it.
13. Keypad
14. Programmable Keys
15. Push-to-talk (PTT)
Press and hold down this button to talk;
release it to listen.
{}|
PROGRAMMABLE BUTTONS
Severalof your radio buttons can be
programmed (by Customer Programming
Software CPS) to activate the radio features.
The following tab leshows the featuresthat can
be assigned to theP1-P4 buttonsand the AB C
buttons.P1-P4 are exchangeablefor customised
icon buttons to match programming.
RADIO OVERVIEW
8. Programmable Button 1
g
3
English
Page 6

Feature Description
Monitor allows user to select between signalling squelch,
carrier squelch and unsquelch,and to suspend scan when
Monitor/Cancel
landed on a channelin scanmode.
Cancel allows user to cancel current incoming or outgoing
call.
RADIO OVERVIEW
English
Radio Call To make an individual or groupselective call.
Missed Call List
Contact List Allows user direct access into Contact List menu feature.
Status List
Channel
Scan On/Off
4
Allows user directaccess into the Missed Call List menu
feature.
Allows user direct access into Status List menu
feature.
Allows user direct access into the Channel mode. The up/
down keys (5) are set to increment/decrement the channel
number.
To toggle between start and stop of the scan
operation.
Page 7

Feature Description
To delete a nuisance (unwanted) channel when scanning,
Nuisance
Delete/Cancel
(Voice Storage)
Nuisance Delete
with exception of priority channel, last channel in scan list
and home channel.
Cancel, deletes messages being played back from the
Voice Storage feature.
To delete a nuisance (unwanted) channel when scanning,
with exception of priority channel, last channel in scan list
and home channel.
RADIO OVERVIEW
Cancel
(Voice Storage)
Power Level
Talkaround On/Off
Emergency
Lone Worker
Cancel, deletes messages being played back from the
Voice Storage feature.
To toggle the radio’s transmit power level between High
and Low.
To talk directly with another radio without going through a
system or despatcher.
Activates emergency alar m sequence. A pre- recorded
message (using the voice storage feature) may be s ent to
enable the user’s location or status to be determined.
Toidentify user as a lone worker.Radio enters emergency
sequence unless user responds, when prompted, by
pressing any radio button.
5
English
Page 8

Feature Description
RADIO OVERVIEW
Call Forward
Companding On/Off
Option Board
On/Off
Keypad Lock
On/Off
DTMF
External Alarm To toggle the External Alarm feature on and off.
Memory Channel Allows user direct channel access on single button press.
Backlight To toggle the display backlight on and off.
Record/Play-back
(Voice Recorder)
To transfercalls automatically to another radio ifuser is
unable to take the call.
Totoggle between compression/expansion of audio signal
and normal audio signal.
Allows user to toggle the option board betweenon andoff.
Allows user to lock/unlock menu keys and keypad keys.
To place the keypad microphone into permanentDTMF
live dial mode.
To record/play-back incoming calls, emergency
message or memo usingvoice recorder feature.
English
6
Page 9

KEYPAD KEYS
(Keypad Microphone)
123
456
789
*0#
{}|
These keys are used when dialling a phone number,
making a radio call, or for numeric channel
selection.
KEYPAD LOCK/UNLOCK
On your radio there is a keypad lock feature which
allows you to lock the keypad keys and menu keys
to eliminate accidental key presses.
Press the keypad lock button to lockthe keys, the
displayicon L will be lit and the display will show:
Lock Keypad
After 2 seconds the radioreturns to the IDLE
STATE.
Press the keypad lock button again to unlock the
keyswhentheiconwillbeextinguishedandthe
display will show:
Unlock Keypad
The radio will then return to the IDLE STATE.
Keypad Unlock may be performed during a call, to
allow menu access to the contactlist, status list and
scan on/off features.
RADIO OVERVIEW
7
English
Page 10

MENU KEYS
xc
Exit
Up
y
Menu/
Select
Right Key w
Used as Morekey to provide additional information.
Left Key v
Used as a destructive backspace key when editing.
vw
Left
RADIO OVERVIEW
Menu/Select Key c
Used to enter the Menu Mode. When youare inthe
MenuMode,thiskeyisalsousedtomakemenu
selections.
Note: When the radio is in the IDLE STATE,
pressing any of the cx
menu keys causes the radio to enter the
Menu mode.
Exit Key x
Used to move up to the next higher Menu level.
When the top level menu is selected, this key is
used to exit the Menu Mode.
Up /Down Key
Used to scroll when in Menu Mode.
Increment/decrementchannel number orscroll
address/status list, whichever is definedas IDLE
STATE.
English
8
z
Down
y / z
Right
vw
Page 11

MENU NAVIGATION CHART
(Refer to Menu Navigation guidelines—
lower,left-hand corner of this page)
RADIO OVERVIEW
c
+e
Missed
Calls
select/
entry
Contact
List
select/
enter ID
Status
select/
enter Status
Number
Menu Navigation
c to enter Menu Mode.
+ or e to scroll through the list.
c to select Menu item.
x to return to previous menu level
Channel
select/
enter
Channel
Number
Emergency
Msg.
select/
record/
play/
delete
Voice
Storage
+e
Voice
Recorder
select/
record/
play/
delete
+ or e to scroll through
sub-list.
c to select sub-menu item.
Utilities
+e
Call Forward
DTMF
Backlight
Brightness
Scan
Talkaround
External Alarm
Lone Worker
Option Board
Companding
Power Level
Information
+e
SW Version
CP Version
SW Part No.
CP Part No.
9
Radio
English
Page 12

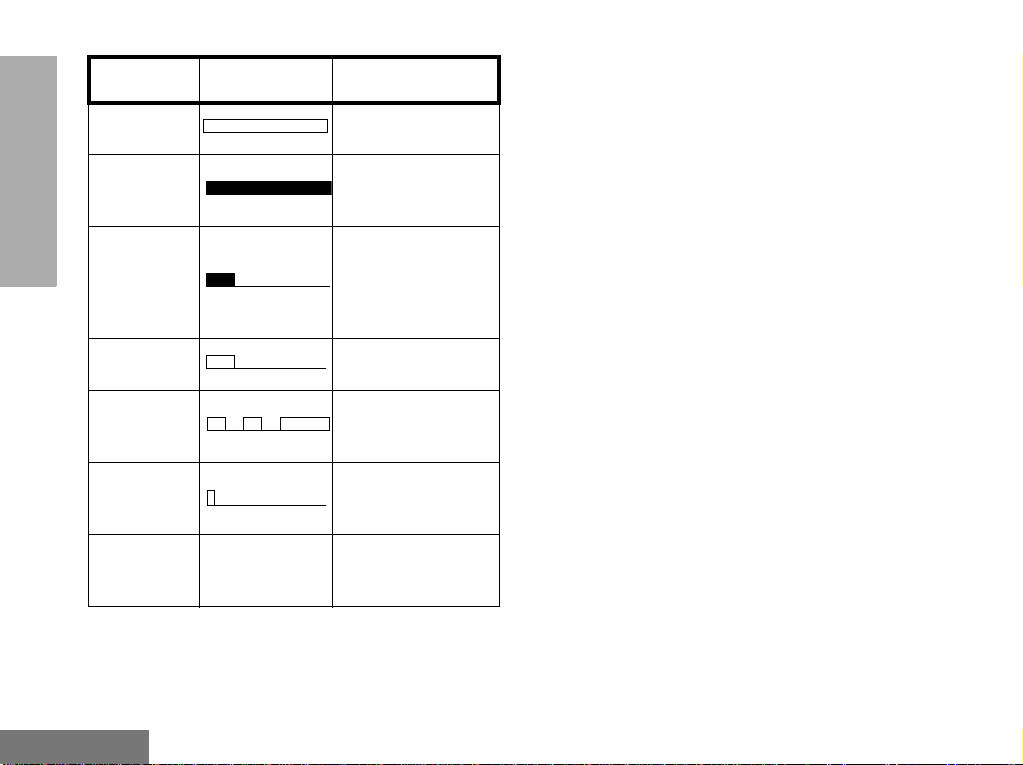
LCD DISPLAY AND ICONS
CHAN
RADIO OVERVIEW
Displays channel, menu, and radio status
information. The top screen row shows radio
status indicator symbols, explained in the table
below:
Symbol Name and Description
XPAND™ Indicator
A
B
C
Indicates that your radio has the
companding feature activated.
Power Level Indicator
“L” lights when your radio is configured to
transmit in Low Power.“H” lights when your
radio is co nfigured to transmit in High Power.
Monitor Indicator
On indicates carrier squelch.
Off indicates signalling squelch.
Symbol Name and Description
Voice Recorder Indicator
Indicates that there are stored messages or
F
memos in the voice recorder.
Scan Indicator
H
L
N
D
Q
J
K
Note: At extremely low temperatures, you may experi-
Indicates that you are scanning. The dot is lit
during priority scan mode.
Keypad L o ck I ndi cato r
On indicates that the keypad and menu keys
are locked. Off indicates unlocked.
Option Board Indicator
Indicates that an option board is activated.
DTMF Indicator
Indicates DTMF is enabled.
Missed Call Indicator
On indicates call in list.
Off indicates no calls in list.
Flashing, indicates new call in list.
Talkaround Indicator
Indicates talkaround enabled.
External Alarm Indicator
Indicates external alarm enabled.
ence a slight delay in displaying new information.
This is normal and does not affect the f unction of
your radio.
English
10
Page 13

AUDIO SIGNAL TONES
High pitched tone Low pitched tone
Tone Signal Description
Power up OK Radio self-test OK.
Power up Fail Radio self-test fail.
Button/
Keypad Error
Engaged
Call Failed Call failed t o connect.
Force Monitor
Button
Feature
Enable
Button
Feature
Disable
Group Call
Button/keypad key/
menu key press not
permitted.
Channel busy or not
permitted to transmit.
Radio must monitor
channel before transmission permitted.
Any option button
pressed to enable a
feature.
Any option button
pressed to disable a
feature.
Radio receives a
Group Call.
Tone Signal Description
Individual Call
Call
Reminder
TOT Pre-Alert
Monitor Alert
VoiceStorage
VoiceStorage
VoiceStorage
Scan Star t
Scan Stop
Priority Call
Decode
Priority
Channel
Radio receives an
Individual Call.
Reminder of
unanswered call.
Warns of expiry of
time out timer.
Alerts to change of
squelch.
VoiceStorageRecording.
VoiceStorageWarning.
VoiceStorageFull.
Radio starts
scanning.
Radio stops
scanning.
Radio detects a
priority call.
Radio landed on the
priority channel.
RADIO OVERVIEW
11
English
Page 14
RADIO OVERVIEW
Tone Signal Description
Lone Worker
Hardware
Error
Cancel
Message
Channel Free
Beep
Incoming
Emergency
Alert
Keypad
Acknowledge
Ringtones
English/French/
General
Reminds lone worker
to respond.
Hardware error, tone
continues until valid
operation.
Previous message or
message currently
being played from
VoiceStorage has
been deleted.
Indicates current
channel is free.
Indicates an
emergency situation.
Confidence tone
when any key
pressed.
Incoming calls (high
tones), outgoing calls
(low tones).
LED INDICATORS
Green: Successful power up.
Green Flashing: Radio scanning.
Red: Radio transmitting.
Red Flashing: Channel busy - when
receiving.
Yellow: Radio called or Monitor (lower priority).
Yellow Flashing: Radio call reminder alert.
English
12
Page 15

GETTING STARTED
TURNING THE RADIO ON OR OFF
ON OFF
Push the On/Off/
Volume Control knob
until you hear a click.
ADJUSTING THE VOLUME
Turn the On/Off/Volume Control knob clockwise to
increase the volume, or counterclockwise to
decrease the volume.
Push the On/Off/
Volume Control knob
until you hear a click and
the display clears.
RADIO ON MESSAGE
At power up the radio will display a message
customised by your dealer, e.g.:
Radio On
After this text has been displayed, the radio
performs a self testroutine. On completion of a
successful self testthe radio will display:
Channel
This may be a number or an alias and will be the
current channel. Alternatively, if required the radio
may display a message customised by your dealer,
e.g.
Ready
Note: If your radio fails the self test routine consult
your dealer.
GETTING STARTED
13
English
Page 16

Selecting a Radio Channel
Yourradio offers up to 255 channels, howeversome
may not be programmed. Check with your dealer for
more information.
Before selecting a channel ensure your radio is in
channel mode.
Note: The keypad microphone and Up/Down keys
GETTING STARTED
IDLE states are programmable and may be set
to channel mode.
There are two ways to enter channelmode:
Method 1
Press the Channel Modedirect access button, if
programmedby your dealer.
Method 2
1 c to enter Menu Mode
2 + or e until:
Channel
3 c to select
4 Displayshowse.g.:
Chan: 05
Note: After a short period of inactivity the radio
returns to the IDLE STATE.
Once in channel mode, there are two ways to select
a channel:
Method 1
1
+ or e until:
Channel Number
or
Alias
Note: If the + or e is pressed and held, the radio
will fast scroll through the a v ai l ab lechannels.
2 c to confirm your selection.
(If channel list is entered via the menu.)
Display shows:
Selected
(for 2 seconds)
Method 2 (Keypad Microphone only)
1 Enter the desired
channel number from
the ke ypad, e.g. 05:
CH: 05
2 c to confirm your selection.
Display shows:
Selected
(for 2 seconds)
Note: The keypad microphone can’t be used to enter
the channel number during a call or whilst the
radioisina scan.
English
14
Page 17

Memory Channel
Up to two programmable buttons can be
programmed as memory channel buttons
which allow you quick access to frequently
used channels. The buttons may be preprogrammed by your dealer or programmable
by y ourself .
If pre-programmed by your dealer, a short
press of the button will take you to the
assigned channel.
Toprogram a Memory Channel buttonyourself,
select the desired channel in the normal way
and press and hold the button for 2 seconds.
The button is then programmed to the selected
channel; a short press on the button will take
you to that channel.
Note: The programming is retained when you turn off
the radio.
Sending a Call
1. Select the desired radio channel.
2. Pressthe PTT button and speak clearly into the
microphone.Your mouth should be 2.5 to 5 cm
away from the microphone.
3. When transmitting, the red indicator will light
continuously.
4. Release the PTT button to listen.
Your radio may be configured for ‘Transmit Inhibit’
under certain conditions (e.g. when the channel is in
use by others) in which case, the channel busy tone
will sound when youpress thePTT or call buttonto
indicate that transmission is inhibited.
When the channel is free, the Channel Free beep
will sound, and you can make a call.
If your radio is equippedwith a transmit time out
timer (TOT),a warning tone will
sound a few seconds before the transmission is cut
off. Yourradio may be programmed to inhibit
retransmission within a preset time.
GETTING STARTED
15
English
Page 18

Receiving a Call
1. Turn your radio on and adjust the volume level.
2. Switch to the desired radio channel.
3. If, at any time, a call is received you will hear
the call at the volume level you have set.
Note:The system may have a limited call time and
GETTING STARTED
the call may be terminated automatically if this
call time is exceeded.
Cancelling a Call
At any time while setting up a call it may be cancelled
by pressing the Monitor/Call Cancel button, or
replacing the microphone in its holder (referred to as
going “on hook”) .
The call timer canalso cancel a call.
Ending a Call
A call should always be ended by pressing theMonitor/
Call Cancel b utton, or replacing the microphone in its
holder.
English
16
Page 19

RADIO CALLS
SELECTIVE CALLS
Making a Selective Call
You can make a selective call to a particular radio,
known as an individual call, or a group of radios,
known as a group call.
You can make calls by using the Contact List,the
Missed Calls List or Manual Dialling (utilising the
keypadmicrophone).
Receiving a Selective Call
When you receivea selectivecall, you will hear
either,
an individual call alert tone ,
or a group call alert tone .
The LED Indicator will light (yellow) and the
display will show the alias (name) or number
(address) of the calling radio
e.g.
To answer the call:
1. Press the PTT button or Call button.
2. The call will terminate automatically when
the conversation has ended or press the
Monitor button.
RADIO CALLS
Display shows:
Addr: 234
17
English
Page 20

CONTACT LIST
When the radio is in the IDLE state or during a call,
the contact list may be used to give access to up to
255 preprogrammed numbers accessed via the
menu.
Depending on the way your radio is programmed,
the radio will display either the alpha alias (name) or
RADIO CALLS
thenumbertobedialled.
There are two ways to enter the ContactList:
Method 1
Press the Contact List direct access button, if
programmedby your dealer.
Method 2
1
c to enter Menu Mode.
2
+ or e until:
3
c to select
Contact List
Once in the Contact List, there are two ways to
choose the desired address:
Method 1
+ or e until:
f
Method 2 (Manual Dialling-keypad microphone only)
Enterthe desired address
from the
keypad,e.g. 0574:
Alpha Alias
Number
ADDR: 0574
English
18
Page 21

Once the desired address is displayed,there are
two methods to selectthe address:
Method 1
c to confirm your selection.
Keypad Edit
(Keypad Microphone)
If the radio is displaying a Contact Listnumber, a
Keypad Dialled number or a Status number, the last
digit may be deleted by:
RADIO CALLS
Display shows:
(for 2 seconds)
Method 2
Press the PTT button or Call1-4 to select address
and make the call.
Call 1-4 are pre-programmed call buttons.
Note: During a call you may enter the contact list
as described above and make another call to
a third party, or initiate a new call. In either
case the call may be a voiceor status call.
Selected
For Aliases, eg:
1 d or f Once
(to select number)
2 d Again
(to delete last digit)
For Numbers, eg:
3 d Once
(to delete last digit)
4 Enter new numbers
5 PTT button to make radio call.
Note: The edited number is not saved at the end of
the call in the contact list, but is saved in the
last number redial.
Jack
1234567
123456
1234567
123456
12345699
19
English
Page 22

MISSED CALLS
To view the calls in the list via the menu
:
If a callremains unanswered, the call willbe
stored by the radio, provided that MissedCalls
has been prog r amm edinto yourradio.
Up to ten calls can be stored. If the same radio
calls more than once, only the most recent call
is stored. When ten calls have been stored by
RADIO CALLS
the radio, depending on the radio
programming, the eleventh call received may
overwrite the first or not be stored by the radio.
Whenanewcallhasbeenstoredbytheradio,
the Missed Call icon Q will flash and the
display will show the alias (name) or number
(address) of the last calling radio
234
e.g:
When the Missed Calls list has been read and
any missed calls retained, the Missed Call icon
will be illuminated.
The Missed Call List can be entered directly by
pressing the Missed Call button (if
programmed) when the radio is in the IDLE
STATE or via the menu.
If using the Missed Call button, follow the
procedures from step 3 below.
1
c to enter Menu Mode.
2 Display shows:
3
c to select
4 + or e to
scroll list:
5
c to confirm your
selection.
6 Display shows:
(for 2 seconds)
Note: In the Missed Calls list some alpha alias/
numbers may contain a suffix S, which
indicates a status message associated with
the call.
Missed Calls
Addr: Alias
Selected
English
20
Page 23

Example: You can call back to any number in the Missed
Call list by:
1 Display shows
If the displays shows S there is a status message
associated with the call.
Reception S
1
+ or e until
desired number is
displayed:
Addr: Alias
RADIO CALLS
f
f
f
again
again
Displays message e.g.
On Break
Displays status number
e.g.
Status 04
Display shows
Reception S
2 PTT button or
3 After the call is set-up, press PTT button and
talk with your mouth 2.5-5 cm from
microphone.Release PTT to listen.
4 The call will ter minate automatically when the
conversation has ended or press the
Monitor/Cancel button.
c or # to make the call.
21
English
Page 24

On a successful call set- up, the entry is
automatically deleted from the stack together
with any associated status message.
Unanswered calls may be deleted from the
Missed Call list at any time by :
On deletion of the last message in the Missed
Calls list, theradio will exit the menu andreturn
to the IDLE STATE.
ToexittheMissedCallList:
1
c to enter Menu Mode.
RADIO CALLS
2
Display shows:
3
c to select
4 + or e to
select entry in list:
5
x to request deletion.
6 Display shows:
7
c to confirm deletion.
8 Display shows
momentarily, then
returns to the Missed
Calls list:
English
22
Missed Calls
Addr: Alias
Delete?
Deleted
Addr: Alias
/
1 xx
to exit Missed Call List.
Displayshowse.g.:
Note: The calls in the list are not deleted when the
radio is turned off.
Ready
Page 25

STATUS CALLS
A status is a code fortransmitting prearranged
messages, e.g. status “05” may indicate
“Return to Base”. The prearranged messages
and associated code digits are contained in a
Status List which contains up to 255 entries.
This list is used for both incoming calls, when
the status of the calling radio is displayed, and
outgoing calls, when your status is sent either
to a requesting radio or to other radios.
Making a Status Call
When the radio is in the IDLE state or during a
call, the status list may be used to select a
status message to reply to a calling radio or
send your status to another radio.
There are two ways to enter the Status List:
Method 1
Press the Status List direct access button, if
programmedby your dealer.
Method 2
1
c to enter Menu Mode.
3
c to select
Once in the Status List, there aretwo ways to
choose the desired status:
Method 1
+ or e until:
Message Alias
(e.g On Break)
f
Number
(e.g. 04)
Method 2 (Manual Dialling-keypad microphone only)
Enter the desired status
from the
keypad,e.g. 04:
(digitrange00to999)
Stat: 04
RADIO CALLS
2
+ or e until:
Status
23
English
Page 26

Once the desired statusis displayed, there are two
methods to select the status:
Method 1
c to confirm your selection.
Display shows:
(for 2 seconds)
RADIO CALLS
Method 2
Press the PTT button or Call 1-4 toselect and make
the call. Call 1-4 are pre-programmed call buttons.
Note: During a call you may enter the status list as
described above and make another status
call to a third party or initiate a new status
call.
To send status message to another radio, select
radio Alias/ID from Contact List via menu and send
as detailed.
Selected
Receiving a Status Call
Your radio receives a Status Call when:
1 Individual Call alert
sounds
2 Display shows:
Stat: On Break
or
Stat: 04
alternating with
Alias/Number
Where Status message “04” / “On Break” is
example status message. Note that status
number (04) only willbe displayed if associated
message is not programmed into your radio.
Alias/Number is the name or number of the
calling radio.
English
24
Page 27

EMERGENCY CALL
Your radio can be programmed to give you a
one-button quick access to call a particular
radio or centre (predefined by your dealer) in
emergency situations. This is the Emergency
Call.
When you make an Emergency call, your radio
goes into an Emergency state, which can be
programmed to:
• continually receive speech,
• the radio can receive and transmit.
1. Press the Emergency button to initiate an
Emergency call.
2. Emergency can be stopped by:
• Switching the radio Off and On again.
•Areset message is received by your
radio.
• The emergency time duration is
reached.
Note: The emergency time duration and reset
messageare programmed into your radio by
your dealer.
Youmay pre-record a message (for example to
confirm your location or status), which is sent
automatically when the emergency call is
activated. Refer to Voice Storage to use this
feature.
Should you receive an Emergency call the
incoming emergency alert tone
will sound.
RADIO CALLS
25
English
Page 28

DTMF
(Keypad Microphone only)
To initiate a DTMF call with Automatic
Telephone Interconnect Call
DTMF means Dual Tone Multi Frequency and is
used when the radio is required to operate in a radio
system with an interface to telephone systems.
There are two methodsof accessing DTMF Live
Dial Mode:
RADIO CALLS
Automatic/Manual
To do this, your radio must send a telephone
interconnect to a stationthat connects you to a
phone line. After you have finished your call,the
radio sends a cleardown call (if programmed)to
shutdown the connection to the phone line.
Sending the Telephone Interconnect Call
Your radio can be programmed to send the
interconnect call in one of the following ways:
• automatically - when a call button
(Call 1 - 4 or PTT) has been programmed with
the interconnect call, or a contact list entry has
been programmed for D TMF access.
• manually - whenyou dial the code using
the keypad microphone.
If in doubt, please contact your dealer or network
manager for further information.
1 Press dedicated Call Button (Call 1-4 or PTT),
you will hear a tone sequence.
Display icon lit:
2 Wait for call to be set up when you will hear a
dial tone.
Display shows:
3 Enter desired phone number on the keypad
microphone, taking care not to press the PTT.
Note: Each DTMF digitis transmitted instantly.
Display shows
entered digits:
4 Once the radio has connected to the called
number, you can begin the conversation.Even
though this is a phone call, your conversation
mimics a radio call, that meansthat both
parties speak in turn, i.e. press the PTT to talk,
release to listen.
D
Enter Digits
8116
English
26
Page 29

5 Toend the call press the Monitor Button or
change channel when the cleardown call is
sentautomaticallyfrom yourradio to shutdown
the phone line.
To initiate a DTMF call with Manually
Dialled Telephone Interconnect Call
1 Enter the interconnect call from the keypad
microphone, you will hear a tone sequence.
Displayshowse.g.
2 Press dedicated Call Button (PTT or Call 1-4)
122
Display shows
entered digits:
5 Once the radio has connected to the called
number, you can begin the conversation.Even
though this is a phone call, your conversation
mimics a radio call, that meansthat both
parties speak in turn, i.e. press the PTT to talk,
release to listen.
6 Toend the call press the Monitor Button or
change channel when the cleardown call is
sentautomaticallyfrom yourradio to shutdown
the phone line.
8116
RADIO CALLS
Display icon lit:
3 Wait for call to be set up when you will hear a
dial tone.
Display shows:
4 Enter desired phone number, taking care not
to press the PTT.
Note: Each DTMF digitis transmitted instantly.
D
Enter Digits
Note: The radio star ts a programmable timer the
moment both parties stop transmitting
(talking). If the time-out timer expires, the
radio will end the phone call.
27
English
Page 30

Permanent DTMF Mode
Using the DTMF Button
Press the pre-programmed DTMF button once, to
put the keypad microphone into permanent DTMF
live dial mode. Press the DTMF button again to
disablethe DTMF live dial. The radio then returns to
theIDLESTATEandselectcallscanbemade.
Alternatively, use the DTMF menu option to enable
RADIO CALLS
or disable permanent DTMF Mode.
Note: Permanent DTMF mode is not available in
scan or during a call.
1. Pressthe DTMF button to switchon permanent
DTMF Mode when the feature enablealert will
sound, the display icon
will show
Press the DTMF button again to switch off
2.
permanent DTMF Mode w hen the feature
disable alert will sound, the display icon
extinguished andthe display will show
:
DTMF Mode On
DTMF Mode Off
D is lit and the display
D is
:
English
28
Page 31

Using the Menu
1 EnsureradioisinIDLESTATE.
2
c to enter Menu Mode.
3
+ or e until:
4
c to select
5
+ or e until:
6
c to select
Utilities
DTMF Mode
RADIO CALLS
Display shows
current status e.g. :
7
+ or e until:
8
c to select:
Display shows:
(for 2 seconds)
9
Radio exits menu
mode and display
shows e.g.:
Off
On
On
Selected
Chan: 05
29
English
Page 32

To initiate a DTMF call in permanent live
dial
1 Enter the interconnect call from the keypad
microphone, you will hear a tone sequence.
5 Toend the call press the Monitor Button or
change channel when the cleardown call is
sentautomaticallyfrom yourradio to shutdown
the phone line.
Displayshowse.g.
RADIO CALLS
2 Wait for call to be set up when you will hear a
dial tone.
Display shows:
3 Enter desired phone number, taking care not
to press the PTT.
Note: Each DTMF digitis transmitted instantly.
Display shows
entered digits:
4 Once the radio has connected to the called
number, you can begin the conversation.Even
though this is a phone call, your conversation
mimics a radio call,that meansthat bothparties speak in turn, i.e. press the PTT to talk,
release to listen.
English
30
122
Enter Digits
8116
Page 33

FEATURES
VOICE STORAGE
Voice storage allows you to perform various
voice related tasks which include voice
recorder and an emergency message feature.
8
x to remain in Emergency Message
Feature
9 Press and hold the Record/Playback button,
the Voice Storage Recording alert sounds
momentarily.
.
FEATURES
Voice Rec order
You can record and playback incoming calls or
make a memo usingthe v oicerecorder feature,
which allows up to 2 minutes of recording.
To record an incoming call:
1
c to enter Menu Mode.
2
+ or e until:
3
c to select
4
+ or e until:
5
c to select
6 Display shows:
7
c to delete emergency message pre-
recorded in Emergency Message feature
Voice Storage
Recorder
Del Msgs?
/
.
10 Recordthecallorpartofthecall.
11 The Voice Storage Warning alert sounds
when the memory is nearly full.
12 The VoiceStorage Full aler t soundswhen the
memory is fulland recording ceases.
13 Release the Record/Playback button at any
time to stoprecording.
14 Subsequent messages can be stored by
repeating steps 9 to 13.
31
English
Page 34

To record a memo:
1 EnsureradioisinIDLESTATE.
10 The VoiceStorage Full aler t soundswhen the
memory is fulland recording ceases.
2
c to enter Menu Mode.
3
+ or e until:
Voice Storage
FEATURES
4
c to select
5
+ or e until:
6
c to select
7 Press and hold the Record/Playback button,
the Voice Storage Recording alert sounds
momentarily.
You will see:
8 Speak clearly into the radio microphone to
record your memo.
9 The VoiceStorage Warning alert sounds
when the memory is nearly full.
You will see:
Recorder
Recording
Storage Low
You will see:
11 Release the Record/Playback button at any
time to stoprecording.
12 Subsequent messages can be stored by
repeating steps 7 to 11.
Storage Full
English
32
Page 35

To playback a recorded call or memo:
1 EnsureradioisinIDLESTATE
2 Press the Record/Playbackbuttonto playback
the first recorded call or memo.
You will see:
3 Press the Record/Playback button again to
skip to the next message to be played back.
Playing
To delete a recorded call or memo:
1 Playback message as describedin above
procedure.
2 Press the Cancel button to delete the
message currently being played back.
FEATURES
33
English
Page 36

Emergency Message
You can pre-record an emergency message to
be sent automatically when the emergency call
feature is activated. This message may
contain, for example, your location or status
whichmayproveusefultotherecipient,
FEATURES
especially if, in the emergency situation, you
are unable to talk.
To pre-record an emergency message:
9
x to remain in Voice Recorder
feature
.
10 Press and hold the Record/Playback button,
the VoiceStorage Recording alert sounds
momentarily.
Youwill see:
11 Speak clearly into the radio microphone to
record your message.
Recording
1 EnsureradioisinIDLESTATE.
2
c to enter Menu Mode.
3
+ or e until:
4
c to select
5
+ or e until:
6
c to select
7 Display shows:
8
c to delete all messages recorded in
English
Voice Recorder feature
34
.
Voice Storage
Emergency Msg
Del Msgs?
/
12 The Voice Storage Warning alert sounds
when the memory is nearly full.
Youwill see:
13 The Voice Storage Full alert sounds when the
memory is full and recording ceases.
Youwill see:
14 Release the Record/Playback button atany
time to stop recording.
15 Press the Record/Playback button to playback
the emergency message.
Youwill see:
16 You can change the message at any time by
repeating the above procedure.
Storage Low
Storage Full
Playing
Page 37

PUBLIC ADDRESS MODE
To access the PublicAddress system:
The Public Address mode allows you to use
your radio audio as a public address system.
You can use your radio microphone as normal
and the audio is routed through the radio to an
external loudspeaker fitted to your vehicle.
A switch, external to your radio, switches the
audio from your radio to the external
loudspeaker.
This feature is programmed and fitted by your
dealer.
1 Turn external switch to the PA position.
Display shows:
2 Press microphone PTT and talk.
3 To exit PA mode, turn external switch to the
RADIO position.
Note 1: WhileinPAmodeyoucanstillhearincom-
ingradiocallsaslongasyoudo not press the PTT.
Note 2: YoumustexitPAmodeinordertoanswer
or make radio calls.
Public Address
FEATURES
35
English
Page 38

CAR RADIO MUTE
The Car Radio Mute feature automatically
mutes your in-car audio entertainment system
to allow you to hear incoming calls or to stop
audio interference when you are making a call.
This feature may be programmed into your
FEATURES
radio by your dealer.
English
36
Page 39

UTILITIES
The utilities described below are programmed
into your radio by your dealer and are
accessible either via a programmable buttonor
via the menu.
UTILITIES
37
English
Page 40

DTMF
DTMF means Dual Tone Multi Frequency and
is used when the radio is required to operate in
a radio system with an interface to telephone
systems.
You ca n switch On or Off Permanent DTMF
UTILITIES
Mode by using a pre-programmed DTMF
button or via the menu, please refer to page
26.
Note: Youmustbeusingakeypadmicrophoneto
perform DTMFcalls.
English
38
Page 41

SCAN
Using the Scan Button
You can monitor several channels in order to
receive any call that is transmitted on any of
these channels. Sixteen different channels can
be programmed into each scan list. Each
channel can share the same scan list or have
different scan lists assigned to them.
Once the radio’s scan operation is activated
and the radio detects a call coming through a
channel in its scan list, it switches to that
channel for you to receive the call.
STARTING OR STOPPING SCAN
Youcan start or stop a scan operation byusing
a pre-programmed Scan buttonor via the
menu, either when the radio is in theIDLE
STATEorwheninacall.
Press the Scan button to start scanning. The
1.
scan start alert tone will sound
and the display icon G lit .
2. Press the Scan button again to stop scanning.
Thescanstopalerttone will
sound and the display icon
extinguished
.
G is
UTILITIES
39
English
Page 42

Using the Menu The scan start alert tone will sound, the display
icon G will be lit and the LED indicator will
1 EnsureradioisinIDLESTATE,orinacall.
2
c to enter Menu Mode.
3
+ or e until:
Utilities
UTILITIES
4
c to select
5
+ or e until:
6
c to select
Display shows
current status e.g. :
Scan
Off
blink green during a scan operation. When a
call on a channel is detected the LED will stop
blinking and the channel number will be
displayed.
PRIORITY CHANNEL
A scan list may contain a priority channel. This
means that a particular channel (for example, a
commonly used channel) may be checked
more frequently than other channels in the list
during a scan operation. Priority channels are
programmed into your radio scan lists by your
dealer, however when a priority channel is
7
+ or e until:
8
c to select
Display shows:
(for 2 seconds)
On
Selected
included in a scan list, the scan icon changes
from G to H.
TALKBACK
If the programmable Talkbac koption isset, you
can respond toany calls received during the
9
Radio exits menu
mode and display
shows e.g.:
Chan: 05
scan operation by press ingthe PTT button
beforethe program medhang-time ends. Check
with your dealer for detail s .
English
40
Page 43

DELETING A NUISANCE CHANNEL
If a channelcontinually generates unwan tedcalls/
noise (a “nuisance”channel), y oucan temporarily
removeit from the scanlist byperforming a
Nuisance Channel Delete operation:
1. While the radio is on the Nuisance Channel, press and hold the Nuisance Delete
button until you hear the scan start alert
tone.
2. Release the Nuisance Delete button.
Note:You cannot perform a Nuisance Channel Delete
on a priority channel or if there is only one
remainingchannelinthescanlist.
ADDING A DELETED NUISANCE CHANNEL BACK INTO THE SCAN LIST
Using the Scan Button
1. Press the Scan button to stop scanning.
The scan stop alert tone will sound.
2. Press the Scan button again to re-start
scanning. The scan start alert tone will
sound, and thescan list will contain all
programmed channels.
Using the Menu
1. Follow the instructions for selecting Scan
On/Off via the menu
2. Select Scan Off. Your radio will stop scan-
ning, the scan stop alert tone will sound,
the display icon G andthe LEDindicator
will be extinguished.
3. Select Scan On. Your radio will re-start
scanning, the scan start alert tone will
sound, the display icon G will be lit , the
LED indicator will blink green and the scan
list will contain all programmed channels.
UTILITIES
41
English
Page 44

CALL FORWARD
Using the Menu
You can call forward calls to your radio to
another radio if you are unable to take calls or
are away from your radio.
You ca n switch On or Off Call Forward by
using a pre-programmed Call Forward button
UTILITIES
or via the menu.
Using the Call Forward Button
Press the Call Forward button to switch on
1.
Call Forward, when the feature enable alert
will sound and the display will show:
Forwarded On
2.
Press the Call Forward button again to switch
off Call Forward when the feature disablealer t
will sound and the display will show
Forwarded Off
1 EnsureradioisinIDLESTATE.
2
c to enter Menu Mode.
3
+ or e until:
4
c to select
5
+ or e until:
6
c to select
Display shows
current status e.g. :
7
+ or e until:
8
:
c to select
Display shows:
(for 2 seconds)
9
Radio exits menu and returns to IDLE STATE
Utilities
Call Forward
Off
On
Selected
English
42
Page 45

TALKAROUND
Using the Menu
Inyour communications network, youmaybe using
asystemto cover a larger areathanis possible with
your radio.However ,you can communicatewith
another radio within yourradio’s range without
going through thesystem byusing theTalkaround
feature.This is especially useful when thesystemis
down.
You ca n switch On or Off Talkaround by using
a pre-programmed Talkaround button or via
the menu.
Using the Talkaround Button
Press the Talkaround button to switch on
1.
Talkaroundwhen the feature enable alert will
sound,the displayicon
will show:
Talkaround On
Press the Talkaround button again to switch
2.
off Talkaround when the feature disable alert
will sound, the display icon
and the display will show:
Talkaround Off
J is lit and the display
J is extinguished
1 EnsureradioisinIDLESTATE.
2
c to enter Menu Mode.
3
+ or e until:
4
c to select
5
+ or e until:
6
c to select
Display shows
current status e.g. :
7
+ or e until:
8
c to select
Display shows:
(for 2 seconds)
9
Radio exits menu
mode and display
shows e.g.:
Utilities
Talkaround
Off
On
Selected
Chan: 05
UTILITIES
43
English
Page 46

EXTERNAL ALARM
Using the Menu
The external alarm feature activates the
vehicle horn and/or lights to inform you of an
incoming call when you are away from your
vehicle.
You ca n switch On or Off External Alarm by
UTILITIES
using a pre-programmed External Alarm
button or via the menu.
When the alarm is activ atedit can be cancelledby:
1. Answeringthe call.
2. The external alarm timer times out.
Using the External Alarm Button
Press the External Alarm button to switch
1.
External Alarm on, when the feature enable
alert will sound, the display icon
the display will show
Ext Alarm On
2.
Press the External Alarm button again to
switch
External Alarm off, when the feature
disable aler t will sound, the display icon
extinguished and the display will show:
Ext Alarm Off
:
K is lit and
K is
1 EnsureradioisinIDLESTATE.
2
c to enter Menu Mode.
3
+ or e until:
4
c to select
5
+ or e until:
6
c to select
Display shows
current status e.g. :
7
+ or e until:
8
c to select
Display shows:
(for 2 seconds)
9
Radio exits menu
mode and display
shows e.g.:
Utilities
External Alarm
Off
On
Selected
Chan: 05
English
44
Page 47

LONE WORKER
Using the Menu
The Lone Worker feature enables you to work
alone with added safety.
You ca n switch On or Off Lone Worker by
using a pre-programmed Lone Worker button
or via the menu.
Using the Lone Worker Button
1. Press the Lone Worker button to switch Lone
Worker on, when the feature enable alert will
sound and the display will show:
Lone Wkr On
• If you have not pressed any buttons within a programmedtime,youwillberemindedthatLone
Worker is switched on bya high pitched alert
tone (Lone Worker Reminder) being sounded.
•Pressany button to respond and cancel the
alert, if you do not the radio will enter the
Emergency state.
2. Press the Lone Worker button again to switch
LoneWorkeroff,when thefeaturedisablealert
will sound and the display will show:
Lone Wkr Off
3. Youmay also switch off Lone Worker by chang-
ing the channel or switching radio off and on
again.
1 EnsureradioisinIDLESTATE.
2
c to enter Menu Mode.
3
+ or e until:
4
c to select
5
+ or e until:
6
c to select
Display shows
current status e.g. :
7
+ or e until:
8
c to select
Display shows:
(for 2 seconds)
9
Radio exits menu
mode and display
shows e.g.:
Utilities
Lone Worker
Off
On
Selected
Chan: 05
UTILITIES
45
English
Page 48

POWER LEVEL
Using the Menu
You can transmit your calls at different transmit
power lev els. A higher level means youcan
reach a radio that is farther away. Alowerpower
level reduces the possibility of interference.Use
thehighpowersettingonlywhennecessary.
UTILITIES
You can switch between high and low power
levels by using a pre-programmed Power
Level button or via the menu.
Using the Power Level Button
Press the Power Level button to switch to high
1.
power when the feature enable alert will
sound, the display icon H is lit and the display
will show:
High Power
2.
Press the Power Level button again to switch
to low power when the feature disable alert
will sound, the display icon L is lit and the dis-
play will show:
Low Power
1 EnsureradioisinIDLESTATE.
2
c to enter Menu Mode.
3
+ or e until:
4
c to select
5
+ or e until:
6
c to select
Display shows
current status e.g. :
7
+ or e until:
8
c to select
Display shows:
(for 2 seconds)
9
Radio exits menu
mode and display
shows e.g.:
Utilities
Power Level
Low
High
Selected
Chan: 05
English
46
Page 49

COMPANDING
Using the Menu
Companding is a collective term to define
compressing the audio signal on transmission
and expanding the audio signal on reception.
The overall effect is to reduce noise in the
received signal, giving you crisper, clearer
audio clarity.Companding should only be used
when other radios in your system have the
same companding feature available.
You ca n switch On or Off Companding by
using a pre-programmed Companding button
or via the menu.
Using the Companding Button
Press the Companding button to switch Com-
1.
panding on, when the feature enable aler t will
sound, the display icon A is lit and the
display will show
Press the Companding button again to switch
2.
Compandingoff,when the feature disable alert
will sound, the display icon A extinguished
and the display will show:
:
Companding On
Companding Off
1 EnsureradioisinIDLESTATE.
2
c to enter Menu Mode.
3
+ or e until:
4
c to select
5
+ or e until:
6
c to select
Display shows
current status e.g. :
7
+ or e until:
8
c to select
Display shows:
(for 2 seconds)
9
Radio exits menu
mode and display
shows e.g.:
Utilities
Companding
Off
On
Selected
Chan: 05
UTILITIES
47
English
Page 50

BACKLIGHT
Using the Menu
Backlight illuminates the radio display and
menu navigation keys.
Your radio can be programmed to have the
backlight permanently on, permanently off or a
timed period, when anynew information being
UTILITIES
displayed causes thebacklight to remain on for
10 seconds.
You ca n switch On or Off the Backlight by
using a pre-programmed Backlight button or
via the menu.
Using the Backlight Button
Press the Backlight button to switch
1.
Backlighton, when the featureenable alert will
sound and the display will show
Backlight Tmd Backlight On
Press the Backlight button again to switch
2.
Backlight off, when the feature disable alert
will sound and the display will show
Backlight Off
or
:
1 EnsureradioisinIDLESTATE.
2
c to enter Menu Mode.
3
+ or e until:
4
c to select
5
+ or e until:
6
c to select
Display shows
current status e.g. :
7
+ or e until:
8
c to select e.g.:
Display shows:
:
(for 2 seconds)
9
Radio exits menu
mode and display
shows e.g.:
Utilities
Backlight
Off
On
or
Timed
Timed
Selected
Chan: 05
English
48
Page 51

BRIGHTNESS
Using the Menu
This feature allows you to alter the brightness
of the radio display and menu keys to suit
conditions.
You can only alter the brightness feature via
the menu.
1 Ensure radio is in IDLE STATE and Backlight
is set to On.
2
c to enter Menu Mode.
3
+ or e until:
4
c to select
5
+ or e until:
6
c to select
7
+ or e to alter brightness to one of
nine lev els.
8
c to select required level.
Display shows:
(for 2 seconds)
9
Radio exits menu
mode and display
shows e.g.:
Utilities
Brightness
Selected
Chan: 05
UTILITIES
49
English
Page 52

OPTION BOARD
Using the Menu
Your radio is capable of being fitted with an
option board. Each board will extend the
capability of your radio byadding anew feature
such as voice storage, voice scrambler or
trunking. See your dealer for the availability
UTILITIES
and suitability of the various option boards.
You ca n switch On or Off theOptionBoardby
using a pre-programmed Option Board button
or via the menu.
Using the Option Board Button
Press the Option Board button to switch the
1.
OptionBoard on, when the featureenablealert
will sound, the optionboard icon N is lit and
the display will show
Option Brd On
Press the Option Board button again to switch
2.
the Option Board off, when the feature disable
alert will sound, the option board icon N
extinguished and the display will show:
Option Brd Off
:
1 EnsureradioisinIDLESTATE.
2
c to enter Menu Mode.
3
+ or e until:
4
c to select
5
+ or e until:
6
c to select
Display shows
current status e.g. :
7
+ or e until:
8
c to select
Display shows:
(for 2 seconds)
9
Radio exits menu
mode and display
shows e.g.:
Utilities
Option Board
Off
On
Selected
Chan: 05
English
50
Page 53

VOICE OPERATED TRANSMIT (VOX)
When the VOX accessory is connected, your
radio may be used with hands-free operation.
The V OX feature intelligently senses
background noise, so that it adapts
automatically to the noise level in the
environment in which you are working.
To start the VOX feature:
1. Ensure that the VOXaccessory is
connected to the rear accessory connector of the radio.
2. Switch the radio to a VOX channel.
You can disable the VOX feature by pressing
the PTT button on the hand held microphone.
This allows you to use the hand held
microphoneas normal.
To re-enable the VOX feature:
1. Change channel away from and back to
the VOX channel.
UTILITIES
51
English
Page 54

STUN/UNSTUN
For added security and to avoid abuse of the
radio system in which you operate, a feature
known as Stun/Unstun is included in your
radio.
This feature can only be activated by your
UTILITIES
system manager or administrator.
For example, if y ourradio is stolen and is being
used illegally, your system administrator can
send a signal which will stun the radio making
it incapable of being used. This feature is also
useful if the system is being abused by a user
who is not complying with the correct
communications protocol.
The radio can only be unstunned, i.e. returned
to operational use, by an unstun signal sent
from the system administrator or returning the
radio for reprogramming.
English
52
Page 55

RADIO INFORMATION
To access Radio Information
RADIO INFORMATION
To enable you and your dealer/system
administrator to establish, quickly, the software
and radio parameters programmed into your
radio, a feature known as Radio Information
can be accessed via the menu.
On selection of Radio Information, your radio
display will indicate:
• Software (SW)version
• Codeplug (CP) version
• Software (SW) part number
• Codeplug (CP) part number
1 EnsureradioisinIDLESTATE.
2
c to enter Menu Mode.
3
+ or e until:
4
c to select
5
+ or e until:
6
c to select e.g.:
Display shows e.g. :
7
x to return to
previous menu level:
Radio Info
SW Version
or
CP Version
or
SW Part No
or
CP Part No
SW Version
D02.00.01
SW Version
53
English
Page 56

RADIO INFORMATION
8
+ or e for
further selections
following steps
6 and 7:
9
xxto exit
menu mode , display
shows e.g.:
SW Version
or
CP Version
or
SW Part No
or
CP Part No
Chan: 05
English
54
Page 57

SAFETY INFORMATION
Safe and Efficient Operation of Motorola
Two-Way Radios
This section provides information and instructions for
the safe and efficient operation ofMotorola Mobile
Two-Wa yRadios.
For information regarding radio use in hazardous
areas, please refer to the Factory Mutual (FM)
approval manual supplement or Instruction Card
which is included withradio models that offer this
capability.
Exposure To Radio Frequency Energy
National and International Standards and
Guidelines
Your Motorola Two-W a yRadio, which generates and
radiates radio frequency (RF) electromagnetic energy
(EME) is designed to comply with the following National
and International Standardsand Guidelines regarding
exposure of human beings to radio frequency
electromagnetic energy:
• Federal Communications Commission Report and
Order No. FCC 96-326 (August 1996)
• American National Standards Institute
(C95.1 - 1992)
• National Council on RadiationProtection and
Measurements (NCRP - 1986)
• International Commission on Non-Ionizing Radiation Protection (ICNRP - 1986)
• European Committee for Electrotechnical
Standardisation (CENELEC)
• ENV. 50166-1
1995 E
• ENV. 50166-2
1995 E
• Proceedings of
SC211/8 1996
To assure optimal radio performance and that
humanexposureto radio frequency electromagnetic
energyis within theguidelines set forth in the above
standards, always adhere to the following
procedures:
Human Exposure to Electromagnetic Fields LowFrequency (0Hz to 10kHz)
HumanExposuretoElectromagnetic Fields High Frequency (10kHz to 300GHz)
Safety Considerations for
HumanExposuretoE.M.F.s
from Mobile Telecommunications Equipment (M.T.E.) in
the Frequency Range
30MHz - 6 GHz (E.M.F. Electromagnetic Fields)
SAFETY
55
English
Page 58

Electromag neticInterference/Compat ibili ty
Note: Nearly every electronic device is
SAFETY
To avoid electromagnetic interference and/or
compatibility conflicts, turn off your radio in any
facility where postednotices instruct you to do so.
Hospitals or health care facilities may be using
equipment that is sensitive to external RF energy.
When instructed to do so, turn off your radio when
on board anaircraft. Any use of a radio must be in
accordance with airline regulations or crew
instructions.
susceptible to electromagnetic interference
(EMI) if inadequately shielded, designed or
otherwise configured for electromagnetic
compatibility.
Operational Warnings
Vehic lesWith an Air Bag
Do not place communicationsequipment in the area
overan air bag or in the air bag deployment area. Air
bags inflate with great force. If communications
equipment is placed in the air bag deployment area
and the air bag inflates, it may be propelled with
W A R N I N G
!
!
great forceand cause seriousinjury to occupants of
the vehicle.
Potentially Explosive Atmospheres
Turn off your two-way radio when you are in any
area with a potentially explosive atmosphere.
Sparks in a potentially explosive atmosphere can
causean explosionor fire resultingin bodily injury or
evendeath.
Blasting Caps and Areas
To avoid possible interference with blasting
operations, turn off your radio when you are near
electrical blasting caps, in a blasting area, or in
areas posted: “Turn o ff two-way radio.” Obey all
signs and instructions.
Note:
The areas with potentially explosive atmospheres
referred to above include fueling areas such as:
below decks on boats; fuel or chemical transfer or
storage facilities; areas where the air contains
chemicals or particles, such as grain, dust or metal
powders; and any other areawhere you would
normally be advised to turn off your vehicle engine.
Areas with potentially explosive atmospheres are
often but not always posted.
English
56
Page 59

Mobile Radi o Operation and EME Exposure
Mobile Antenna Installation
To assure optimal radio performance and that
humanexposure to radio frequency electromagnetic
energy is within the guidelinesreferenced earlier in
this document, transmit only when peopleinside
and outside the vehicle are at least the minimum
distance away from a properly installed, externally
mounted antenna.
Table1 liststhe minimum distance for several
differentranges of radiatedpower.
Table 1: Radiated P ower and Distance
Radiated Power of
Vehicle-installed
Mobile Two-way Radio
7 to 15 Watts 30.5 cm(1 Foot)
16 to 50 Watts 61 cm (2 Feet)
More than 50 Watts 91.5 cm (3 Feet)
MinimumDistance
FromTransmitting
Antenna
Install the vehicle antenna external to the vehicle
and in accordance with:
• The requirements of the antenna manufacturer/
supplier
• Instructions in the Radio Installation Manual
Control Station Operation
When radio equipment is used to operate as a
control station, it is important that the antenna
be installed outside the building and away from
places where people may be in close proximity.
Refer to Table 1 for rated power and minimum
distant values for transmitting antennas.
SAFETY
57
English
Page 60

General Radio Care
• The use of chemicals such as
detergents, alcohol, aerosol
sprays, and/or petroleum
products may be har mful to and damage the
SAFETY
radio housing.
• Avoid physical abuse of the radio.
• Clean the radio exterior using a cloth moistened
with clean water and a mild dishwashing liquid.
• The use of non-approved radio accessories may
damage the radio and invalidate warranty.
!
C a u t i o n
English
58
 Loading...