

Page 1

Technical
Information
MOTOROLA G24 KJAVA
USER ’S GUIDE
ENGLISH
FEBRUARY 15, 2008
6802981C50-C
Page 2

REVISION HISTORY
Revision Date Purpose
A May 15, 2007 Initial release
B June 21, 2007 Updated due to software updates
C Febr ua ry 15, 2008 Appendix E added (IP Director) due to software updates. Additional minor
updates.
ii 6802981C50-C
Page 3

G24 KJAVA
User’s Guide
CONTENTS
REVISION HISTORY........................................................................................................................................................ii
CHAPTER 1 - PREFACE
1.1 PURPOSE ......................................................................................................................................................................1
1.2 INTENDED AUDIENCE..............................................................................................................................................1
1.3 DISCLAIMER ...............................................................................................................................................................1
1.4 ABBREVIATIONS, ACRONYMS AND DEFINITIONS ...........................................................................................2
1.5 TRADEMARKS ............................................................................................................................................................3
1.6 APPLICABLE DOCUMENTATION............................................................................................................................3
1.7 PROBLEM REPORTING INSTRUCTIONS................................................................................................................3
1.8 HOW THIS GUIDE IS ORGANIZED..........................................................................................................................3
CHAPTER 2 - PRODUCT OVERVIEW
2.1 INTRODUCTION.......................................................................................................................................................... 5
2.2 PRODUCT ADVANTAGES.........................................................................................................................................7
2.3 TYPICAL USE CASE...................................................................................................................................................7
CHAPTER 3 - GENERAL SETUP
3.1 EVALUATION BOARD...............................................................................................................................................9
3.1.1 Antenna Installation...................................................................................................................................... 10
3.1.2 Power Supply Installation.............................................................................................................................10
3.1.3 G24 EVB Placement.....................................................................................................................................11
3.1.4 Start Operation..............................................................................................................................................11
3.2 SOFTWARE CONFIGURATION ..............................................................................................................................11
3.2.1 Software Version..........................................................................................................................................11
3.2.2 Available Memory........................................................................................................................................11
3.2.3 USB PC Driver.............................................................................................................................................12
3.2.4 Default RS232 Configuration.......................................................................................................................12
3.2.5 Query System Information ...........................................................................................................................12
3.2.6 MIDlet Downloading....................................................................................................................................12
3.2.7 Reflashing G24 Software..............................................................................................................................13
3.2.8 G24-J HMI....................................................................................................................................................13
February 2008
© Motorola Inc., 2007 6802981C50-C
Page 4

CHAPTER 4 - KJAVA ARCHITECTURE
4.1 GENERAL................................................................................................................................................................... 15
4.2 FUNCTIONAL DESCRIPTION................................................................................................................................. 16
4.2.1 Switching between MIDlet Manager and JTool Manager without GPIO Pin Toggling .............................17
4.3 MIDlet MANAGER .................................................................................................................................................... 17
4.4 JTool MANAGER.......................................................................................................................................................18
4.5 OEM MODES ............................................................................................................................................................. 19
4.6 MIDlet SECURITY.....................................................................................................................................................20
CHAPTER 5 - DEVELOPMENT AND MAINTENANCE
5.1 GENERAL................................................................................................................................................................... 21
5.2 JTool COMMANDS.................................................................................................................................................... 21
5.3 KDWP ......................................................................................................................................................................... 23
5.3.1 Activation Procedure.................................................................................................................................... 23
CHAPTER 6 - JAVA API
6.1 KJAVA CONTENT .................................................................................................................................................... 25
6.2 PACKAGES OVERVIEW.......................................................................................................................................... 26
6.2.1 Access Package............................................................................................................................................ 26
6.2.2 Network Package ......................................................................................................................................... 26
6.2.3 OSC Package................................................................................................................................................ 27
6.2.4 WebSession Package....................................................................................................................................33
6.2.5 HAPI Package.............................................................................................................................................. 34
6.2.6 Call Package................................................................................................................................................. 37
6.2.7 I2C Package .................................................................................................................................................38
6.2.8 IPD Package.................................................................................................................................................39
6.3 STANDARD CLASSES DEVIATIONS.................................................................................................................... 41
6.3.1 Comm Connections......................................................................................................................................41
6.3.2 Server Socket Connection........................................................................................ .................................... 41
6.3.3 Message Connection....................................................................................................................................43
6.3.4 File Connection............................................................................................................................................ 43
6.3.5 Location API................................................................................................................................................ 43
APPENDIX A - GPIO LINES
APPENDIX B - DEFAULT MIDlet FEATURES
B.1 SUPPLY OF ALL AVAILABLE UNIT INFORMATION.......................................................................................49
B.2 FAULT REPORT ....................................................................................................................................................... 49
B.3 CQA TESTING ROUTINES HANDLER.................................................................................................................. 50
B.4 OTA PROVISIONING...............................................................................................................................................50
B.5 GPRS INDICATOR.................................................................................................................................................... 50
B.6 SMS UPDATES / REQUESTS LISTENER .............................................................................................................. 51
B.6.1 Message Format .......................................................................................................................................... 51
B.6.2 Messages Types........................................................................................................................................... 51
iv 6802981C50-C
Page 5

APPENDIX C - GPIO INTERRUPT LATENCY
C.1 INTRODUCTION ...................................................................................................................................................... 57
C.2 MULTITHREADING BACKGROUND ...................................................................................................................57
C.3 HOW TO ACHIVE MINIMAL LATENCY..............................................................................................................57
C.4 CODE EXAMPLE...................................................................................................................................................... 58
APPENDIX D - MIDlet SIGNING
D.1 GENERAL.................................................................................................................................................................. 59
D.2 GENERIC SIGNING..................................................................................................................................................59
D.3 BOUND SIGNING..................................................................................................................................................... 59
APPENDIX E - IP DIRECTOR
E.1 USING THE IPD FEATURE ........................................... .......................................................................................... 61
E.2 IPD CONFIGURATION ........................................................ .................................................................................... 61
E.3 IPD ACTIVATION................................................ .....................................................................................................61
E.4 IPD DEACTIVATION ....................................... ........................................................................................................ 62
E.5 OTA (OVER THE AIR) OVER SERIAL PPP LINK................................................................................................ 63
6802981C50-C v
Page 6

vi 6802981C50-C
Page 7

1. CHAPTER 1 - PREFACE
1.1 PURPOSE
This guide gives an overview of the G24 KJAVA product and its capabilities.
1.2 INTENDED AUDIENCE
This guide is intended for G24 KJAVA customers, developers and support groups.
1.3 DISCLAIMER
Motorola reserves the right to make changes without notice to any of the products or services described herein. "Typical" parameters, which may be provided in Motorola Data sheets and/or specifications can and do vary in different applications and actual
performance may vary. Customer's technical experts will validate all "Typicals" for each customer application.
Motorola makes no warranty in regard to the products or services contained herein. Implied warranties, including without limitation, the implied warranties of merchantability and fitness for a particular purpose, are given only if specifically required by
applicable law. Otherwise, they are specifically excluded.
No warranty is made as to coverage, availability, or grade of service provided by the products or services, whether through a
service provider or otherwise.
No warranty is made that the software will meet your requirements or will work in combination with any hardware or application software products provided by third parties, that the operation of the software products will be uninterrupted or error free,
or that all defects in the software products will be corrected.
In no event shall Motorola be liable, whether in contract or tort (including negligence), for any d a mages resulti ng from use of
a product or service described herein, or for any indirect, incidental, special or consequential damages of any kind, or loss of
revenue or profits, loss of business, loss of information or data, or other financial loss arisi ng out of or in connection with the
ability or inability to use the Products, to the full extent these damages may be disclaimed by law.
Some states and other jurisdictions do not allow the exclusion or limitation of incidental or consequential damages, or limitation
on the length of an implied warranty, therefore the above limitations or exclusions may not apply to you.
This warranty gives you specific legal rights, and you may also have other rights, which vary from jurisdiction to jurisdiction.
Motorola products or services are not designed, intended, or authorized for use as components in systems intended for surgical
implant into the body, or other applications intended to support or sustain life, or for any other application in which the failure
of the Motorola product or service could create a situation where personal injury or death may occur.
Should the buyer purchase or use Motorola products or services for any such unintended or unauthorized application, the buyer
shall release, indemnify and hold Motorola and its officers, employees, subsidiaries, affiliates, and distributors harmless against
all claims, costs, damages, and expenses, and reasonable attorney fees arising out of, directly or indirectly, any claim of personal
injury or death associated with such unintended or unauthorized use, even if such claim alleges that Motorola was negligent
regarding the designing or manufacturing of the product or service.
Motorola recommends that if you are not the author or creator of the graphics, video, or sound, you obtain sufficient license
rights, including the rights under all patents, trademarks, trade names, copyrights, and other third party proprietary rights.
6802981C50-C 1
Page 8

CHAPTER 1 - PREFACE
1.4 ABBREVIATIONS, ACRONYMS AND DEFINITIONS
Abbreviation Full Name
AMS Application Management Software
APN Access Point Name
Autoupdate A user settable feature that synchronizes the local clock with the time received from the network
CPHS Common PCN Handset Specification
CSD Circuit Switch Data
DM Default MIDlet
DNS Domain Name Server
EVB EValuation Board
Flash 1. G24 software
2. The process of replacing the G24 software
Flex G24 configuration file, allows product flexibility
GCF Generic Connection Framework
GIDx Group Identifier level x
GPIO General Purpose Input Output
GPS Global Positioning System
HAPI Hardware Application Program Interface
HMI Human Machine Interface. G24 with display and keypad support
ICCID Integrated Circuit Card ID
IDE Integrated Development Environment
IMEI International Mobile Equipment Identity
JAD Java Application Descriptor
JAR Java Archive
JAL Java Application Loader
JPDA Java Platform Debugger Architecture
KDWP KVM Debug Wire Protocol
Kjava Kilobyte Java
KMgr pin KJAVA Manager GPIO pin
KVM Kilobyte VM. Java VM for limited systems such as embedded ones
Local Clock The unit's clock. This clock may be synchronized with the network or set by the user with the OSC
class methods
M2M Machine to Machine
MIDlet An application that conforms to the MIDP standard.
MIDP Mobile Information Device Profile
MO Mobile Originated
Motorola MD Motorola Mobile Devices Business
MT Mobile Terminated
2 6802981C50-C
Page 9
Abbreviation Full Name
NITZ Network Identity and Time Zone
NMEA National Marine Electronics Association
NVM Non Volatile Memory
OEM Original Equipment Manufacturer
OSC OEM System Control
OTA Over The Air
OTA Provisioning The process by which the carrier configures the device
PC Personal Computer
PCN Personal Communication Network
PKI Public Key Infrastructure
RTC Real Time Clock
TBD To Be Defined
SA Ship Acceptance
SCL Serial CLock line of I2C bus
SDA Serial DAta line of I2C bus
UART Universal Asynchronous Receiver/Transmitter
UM User MIDlet
URL Uniform Resource Locator
USSD Unstructured Supplementary Service Data
Web Session Holds Internet conne ction settings, also known as Internet Settings.
WS Web Session
CHAPTER 1 - PREFACE
1.5 TRADEMARKS
MOTOROLA and the Stylized M Logo are registered in the U.S. Patent and Trademark Office. All other product or service
names are the property of their respective owners.
1.6 APPLICABLE DOCUMENTATION
[1] Motorola G24 Developer's Guide, Module Hardware Description, at G24-J MOTODEV Web Page
[2] Motorola G24 Developer's Guide, Developer's Kit, at G24-J MOTODEV Web Page
[3] Motorola G24 Developer’s Guide, AT Commands reference manual, at G24-J MOTODEV Web Page
[4] G24-J MOTODEV Web Page
[5] Motorola G24-J HMI Display Integration Guide, G24-J MOTODEV Web Page
1.7 PROBLEM REPORTING INSTRUCTIONS
Problems or corrections to this guide should be reported to G24 customer care by mail: M2MCare@motorola.com
1.8 HOW THIS GUIDE IS ORGANIZED
This guide contains the following chapters:
• Chapter 1 - Preface
6802981C50-C 3
Page 10

CHAPTER 1 - PREFACE
• Chapter 2 - Product Overview
• Chapter 3 - Development Environment Setup
• Chapter 4 - Java Architecture
• Chapter 5 - Development and Maintenance
• Chapter 6 - Java API
• Appendix A - GPIO Lines
• Appendix B - Default MIDlet Features
• Appendix C - GPIO Interrupt Latency
• Appendix D - MIDlet Signing
• Appendix E - IP Director
4 6802981C50-C
Page 11

2. CHAPTER 2 - PRODUCT
OVERVIEW
2.1 INTRODUCTION
G24 is a GSM/GPRS/EDGE OEM module. It is similar to a condensed cellular phone core, which can be integrated into a
communication system to enable the transfer of voice or data information over a cellular network. For a detailed description of
the G24 cellular engine refer to reference
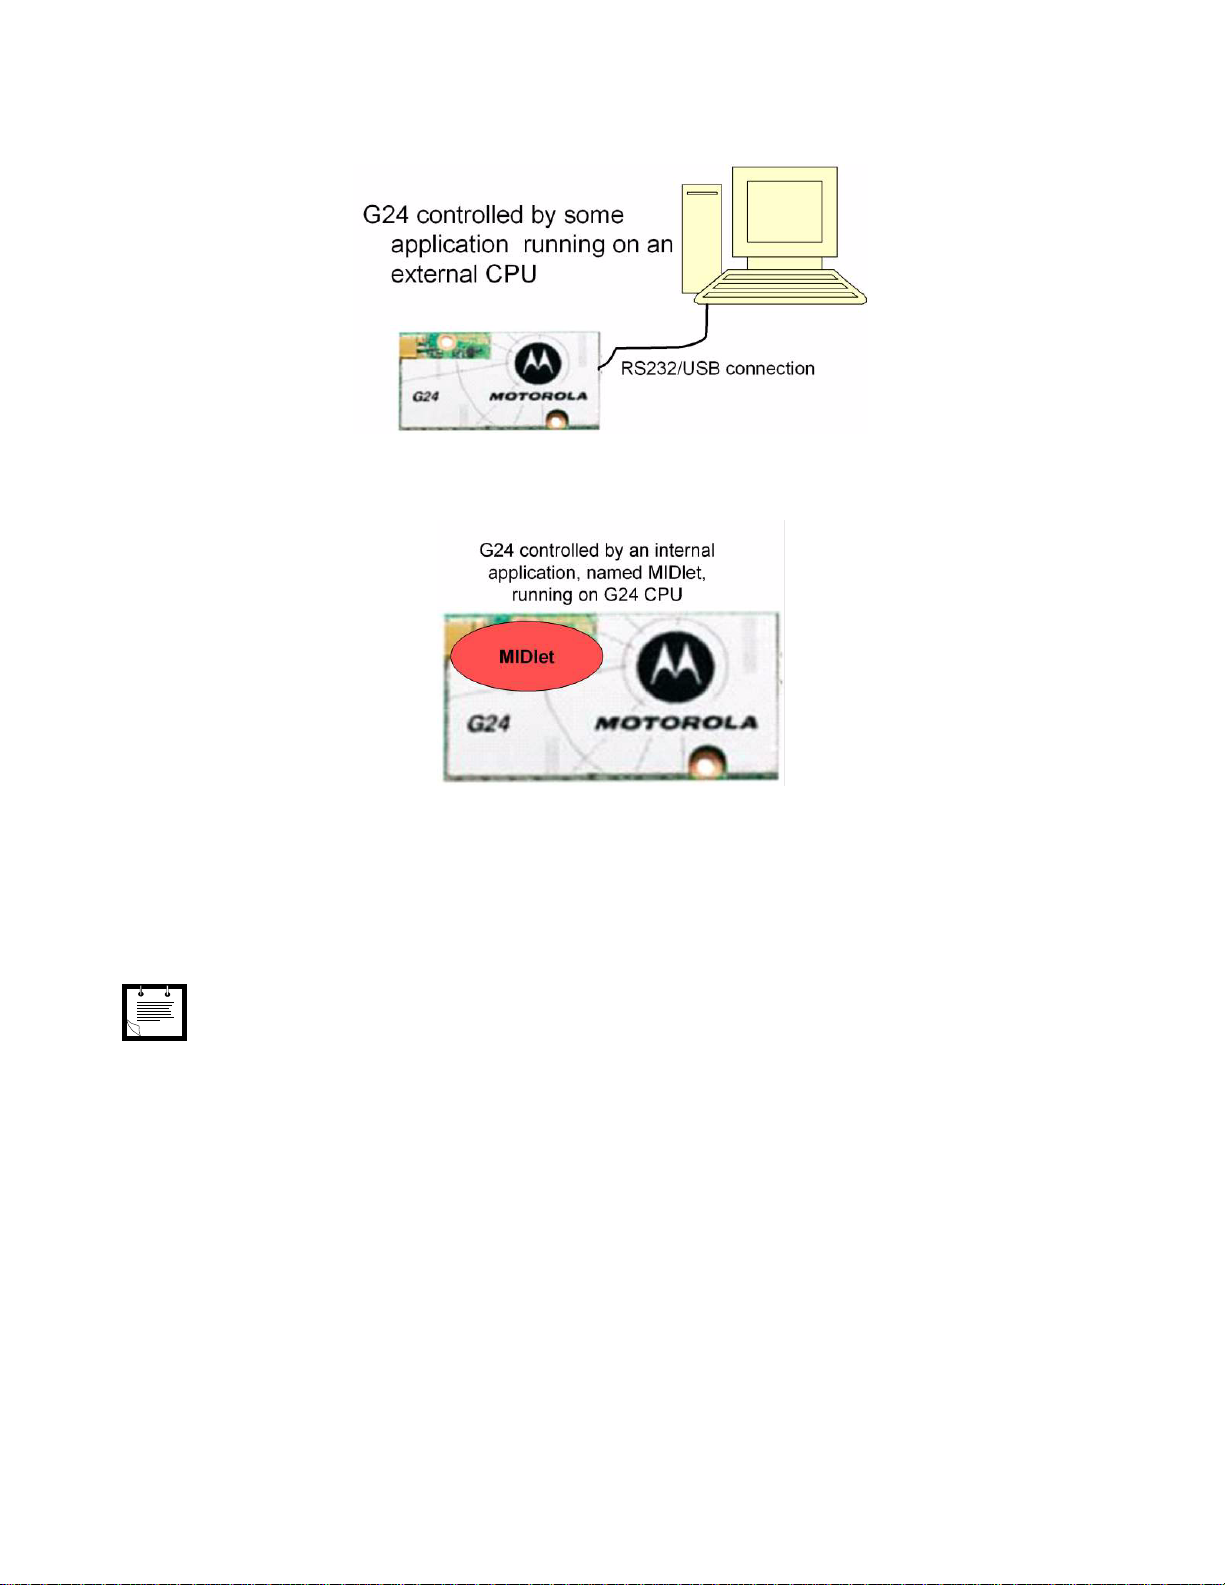
This OEM module which once was controlled by an external CPU is now enhanced to be controlled by the customer’s java
MIDlet applications running on G24's CPU. This new module name is OEM KJAVA.
The main Java differences between a mobile handset and G24 KJAVA engines are shown in Table 1:
Handset G24
[1].
Table 1: G24 Java Compared to a Handset
Java is not the main feature. Java controls all activities.
Activation via Menu by the user. Activated automatically upon power-up.
MIDlet is for entertainment (Games, Calculators, …). MIDlet is a stand alone controller.
G24 KJAVA allows the customer MIDlet to control the following major features:
• Circuit Switched calls (data and voice)
• IP Network connections
• SMS/MMS
• GSM/GPRS Network status
• Serial connectivity
• SIM card
• NVM Data base (Phone book, File System, Record management)
• HW interfaces: A2D and GPIO
• Power (Low power mode, Airplane mode, Real Time Clock)
• MIDlet upgrade
6802981C50-C 5
Page 12
CHAPTER 2 - PRODUCT OVERVIEW
Note
Figure 1 and Figure 2 present the differences between basic module architecture and the KJAVA one:.
Figure 1. G24 - Basic Module Architecture
Figure 2. G24 - KJAVA Architecture
Two G24 hardware configurations are available:
• OEM - display and keypad are disabled
• HMI - display and keypad are enabled
These two configurations look identical and can be identified by the model name printed on the units.
In order to facilitate G24’s integration with external systems, an evaluation board (EVB) should be u sed. The EVB consist of
the following features:
• 70 pin connector for G24 placement
• SIM card interface
• Antenna
• DC power supply
• USB and RS232 interfaces
• Digital and analog audio interfaces
• Switches, jumpers and LEDs for miscellaneous controls and indications
For a detailed description of the EVB, see “EVALUATION BOARD” and reference [2].
A handset, display and keypad can be attached to the EVB. Such an EVB configuration requires the use of an HMI G24 unit.
6 6802981C50-C
Page 13

CHAPTER 2 - PRODUCT OVERVIEW
2.2 PRODUCT ADVANTAGES
1. Cheaper & Simpler - No External CPU (the traditional controller).
• Java MIDlet controls G24 functionality by running on its own CPU ("On target"), instead of using external control ler
CPU executing AT commands.
• Smaller PCB.
2. Friendly & Flexible - Java Language has rich verity of standard cellular APIs.
3. Easy maintenance - Over The Air (OTA) customer MIDlet application upgrade.
4. Provides full Java solution New Motorola proprietary API - dedicated for the M2M market segment.
5. Partial mode - AT command mode running si mu ltaneously with Java mode.
Example: Developers can use the G24 as a GPRS/EDGE module to connect to the internet via external TCP/IP stack (i.e.
connect it to a standard computer dialer), on the other hand, in parallel, a Java MIDlet can be run.
2.3 TYPICAL USE CASE
A typical M2M use case can be described as follows:
G24 integrated within a vending machine, when the machine is out of products it toggles a G24 I/O pin which notifies the MIDlet
(via G24 proprietary API). The MIDlet uses a standard SMS protocol (JSR 120) to notify a control center about this event.
6802981C50-C 7
Page 14

CHAPTER 2 - PRODUCT OVERVIEW
8 6802981C50-C
Page 15

3. CHAPTER 3 - GENERAL SETUP
3.1 EVALUATION BOARD
Figure 3 shows a G24 unit, display and SIM card mounted on the evaluation board (EVB) and other major EVB components.
Table 2 gives a description of the components.
Figure 3. Evaluation Board - Major Components
Table 2: Evaluation Board Description
No.
1. J210 Wall adapter supply connector
2. S200 Main power supply switch
3. D200 Main power supply indication LED
6802981C50-C 9
Reference
Designator
Description
Page 16

CHAPTER 3 - GENERAL SETUP
Note
Table 2: Evaluation Board Description (Continued)
No.
4. J380 USB Mini-B Connector
5. J300 RS232-1 Connector
6. J330 RS232-2 Connector
7. J350 RS232-3 Data Logger Connector
8. J430 Speaker Connector
9. J460 Microphone Connector
10. J440 Headset Connector
11. J480 Alert speaker Connector
12. - Keypad and Display
13. - G24
14. J100 SIM card Tray
15. S170 General switches for testing
16. S160 General switches for A2D
17. S110, D701 G24 On/Off push-button and indication LED
Reference
Designator
Description
18. M1 Antenna
19. - Antenna Cable
20. P2 On board antenna connector
21. J122 CLI Display
3.1.1 Antenna Installation
The numbers in parenthesis refer to the numbers shown in Figure 3.
1. Connect the supplied antenna stub to the EVB antenna base (18).
2. Connect the supplied antenna cable to the EVB SMA antenna connector (20).
3.1.2 Power Supply Installation
1. The supplied wall adapter includes a North-American type electrical plug, with optional adapter for European wall sockets. Connect the supplied wall adapter (1), or connect the power supply via the DC supply jacks.
10 6802981C50-C
Page 17

CHAPTER 3 - GENERAL SETUP
Note
Note
• When using a DC supply, set its voltage level to 3.6V-4.2V, and its current limiting to 2.5A.
• Use the power supply source selection jumper (P204 and P2 03) to activate either of the power supply sources.
• Verify that P200, P201 jumpers are placed.
3.1.3 G24 EVB Placement
1. Position the G24 unit over its connector and align with the supporting spacers.
2. Use the supplied screws to fasten the G24 to the board spacers.
3. Connect the antenna cable to the G24 MMCX connector.
3.1.4 Start Operation
1. Turn-on the main power switch S200 (2), and verify that indication led D200 (3) is on. Led D701 (10) will turn-on briefly.
2. Turn on G24 by pressing the On/Off push-button switch (17) for a period of 1-2 seconds. Led D701 (17) will turn on permanently.
3. G24 is now ready.
Turning on the ignition switch (IGN1 - S100) causes the unit to turn on automatically whenever the main power
switch S200 (2) is turned on, skipping the On/Off push-button switch (17) press.
3.2 SOFTWARE CONFIGURATION
G24 KJAVA has several GSM models available:
• Dual Band Europe
• Dual Band USA
• Quad Band
• Quad Edge
3.2.1 Software Version
User should use the following versions and up:
G24: G24_G_0C.11.B2R.
DM: DM_20_11_07.hs - version 2.2.3
3.2.2 Available Memory
Flash: 10 MB - Jar file and all data saved by MIDlet (RMS, File System).
RAM: 1.8 MB - Heap size.
6802981C50-C 11
Page 18

CHAPTER 3 - GENERAL SETUP
Note
3.2.3 USB PC Driver
USB PC driver can be found in:
http://developer.motorola.com/docstools/USB_Drivers/Handset_USB_Driver/
3.2.4 Default RS232 Configuration
Baud rate 19200bps, 8 data bits, 1 stop bit, no parity bit, Flow Control = HW (Auto CTS/RTS)
3.2.5 Query System Information
There are two ways to query for system information. The first one is by using DM default outputs upon its startup. Some of its
outputs are:
• Software version
• Flex version
• DM version
The second way is by using OSC AP I via user own MIDlet. This can be done by using: OSC.getProperty method.
3.2.6 MIDlet Downloading
3.2.6.1 Serial (UART2)
Downloading a MIDlet via serial communications can be done using two different applications.
The first is a multipurpose tool developed alongside the G24, called "Jadpur".
The second is a Motorola Java loader application tool called "MIDway".
Both tools are available in MOTODEV website [4].
Jadpur Setup Stages:
Jadpur requires MS .NET framework installed on your PC.
1. Connect G24 UART2 to PC COM via RS232 cable.
2. Switch the KMgr pin to JTool mode.
3. Run Jadpur, use the Ports button to select the desired COM port, and from "File"->Settings -> Communication menu option
to configure the COM port baudrate to 19200 bps.In the Settings menu, check-mark the "One Click Download" option.
4. Use "File">"Open JAD" menu item to select the JAD file for download. JAD file properties will be displayed in the upper
right corner window frame.
5. Click the Download button, located in the bottom toolbar, to send the oemdownload command and send JAD file.
6. MIDlet download and installation process reports are sent to terminal window, ending with "MIDlet installation
completed".
MIDway Setup Stages:
1. Connect G24 UART2 to PC COM via RS232 cable.
2. Run MIDway and from "File"->Settings menu-> "Communication Settings" configure to 19200 bps. In the "AT command"
box enter "OEMdownload" and click OK.
12 6802981C50-C
Page 19

CHAPTER 3 - GENERAL SETUP
Note
3. Switch the KMgr pin to JTool mode.
4. Select "File"->"Send AT command" menu item to send the download command to the device.
5. Select "File">"Open JAD" menu item to select JAD file.
6. Select "File">"Send JAD" menu item to send the JAD file (JAR file will be sent automatically).
Using "AT command" box and “Debug Log” Tab in MIDway imitates the traditional terminal use. It is possible to work
separately - sending JTool commands through external terminal and limiting the MIDway to handle the down load
process only.
3.2.6.2 Over the Air
Provides the ability to download and install content over a wireless network.
MIDlets stored on a web server can be downloaded to the unit in two ways:
1. Using the OT ADownload API from a UM.
2. Triggering an OTA download from the DM.
3.2.6.3 Common Errors
1. Attributes common to JAR manifest and JAD are not identical.
2. The MIDlet-JAR-Size attribute field does not contain the correct JAR size in bytes.
3. Wrong JAD attributes:
MIDlet-Name must be "UserMIDlet" (case sensitive).
MicroEdition-Configuration should be CLDC-1.1.
MicroEdition-Profile must be MIDP-2.0.
4. Untrusted MIDlet trying to replace trusted MIDlet (resolution: trusted MIDlet must be deleted first).
Refer to "Motorola MIDway User's Guide" in the SDK documentation for additional information.
3.2.7 Reflashing G24 Software
G24 enables its own software upgrade. Upgrades can be done via:
1. USB with RSD tool.
2. UART1 with PCLoader tool ("OEMreflash" command must be issued via UART2 before using PCLoader).
For the above tools installation and user guides, contact customer care:
M2MCare@motorola.com
3.2.8 G24-J HMI
See reference document [5], G24-J HMI Display Integration Guide.
6802981C50-C 13
Page 20

CHAPTER 3 - GENERAL SETUP
14 6802981C50-C
Page 21

4. CHAPTER 4 - KJAVA
Note
ARCHITECTURE
4.1 GENERAL
The G24 KJAVA product runs one of the following two types of MIDlets:
User MIDlet (UM)
The UM is the customer's MIDlet which controls the G24 to its needs. The UM is the core concept within the G24 Java module.
It lets the customers to run their own code on the G24's CPU. UM is expected to run "forever".
MIDlet-Name attribute (in JAD file) must be "UserMIDlet" (case sensitive) and is verified during MIDlet installation
(Any other name will cause the MIDlet to be rejected).
Default MIDlet (DM)
The DM is a MIDlet provided by the manufacturer. It is a backup MIDlet which enables basic control in case UM has failed or
is absent (e.g. out of the factory). It also enables the customers to broadcast a command for a fresh UM download to all of their
newly scattered units
“APPENDIX B - DEFAULT MIDlet FEATURES” describes all the DM's supported features.
6802981C50-C 15
Page 22
CHAPTER 4 - KJAVA ARCHITECTURE
Note
G24 start
procedure
MIDlet
Manager
JTOOL
Manager
K
J
A
V
A
M
a
n
a
g
e
r
G
P
I
O
p
i
n
=
O
n
K
J
A
V
A
M
a
n
a
g
e
r
G
P
I
O
p
i
n
=
O
ff
KJAVA Manager
GPIO pin = On/Off
MIDlet OTA
Manager
T
r
i
g
g
e
r
f
o
r
M
I
D
l
e
t
u
p
d
a
t
e
M
I
D
l
e
t
d
o
w
n
l
o
a
d
c
o
m
p
l
e
t
e
/
f
a
i
l
e
d
In charge of the G24
MIDlet (G24 MIDlet
controls the G24
functionality)
Supported Tools
1. SW upgrade
2. KDWP enable or
disable
3. Module configuration
(debug logs, set baud
rate, …)
4. MIDlet update
(download)
OTA update triggred
by the MIDlet
4.2 FUNCTIONAL DESCRIPTION
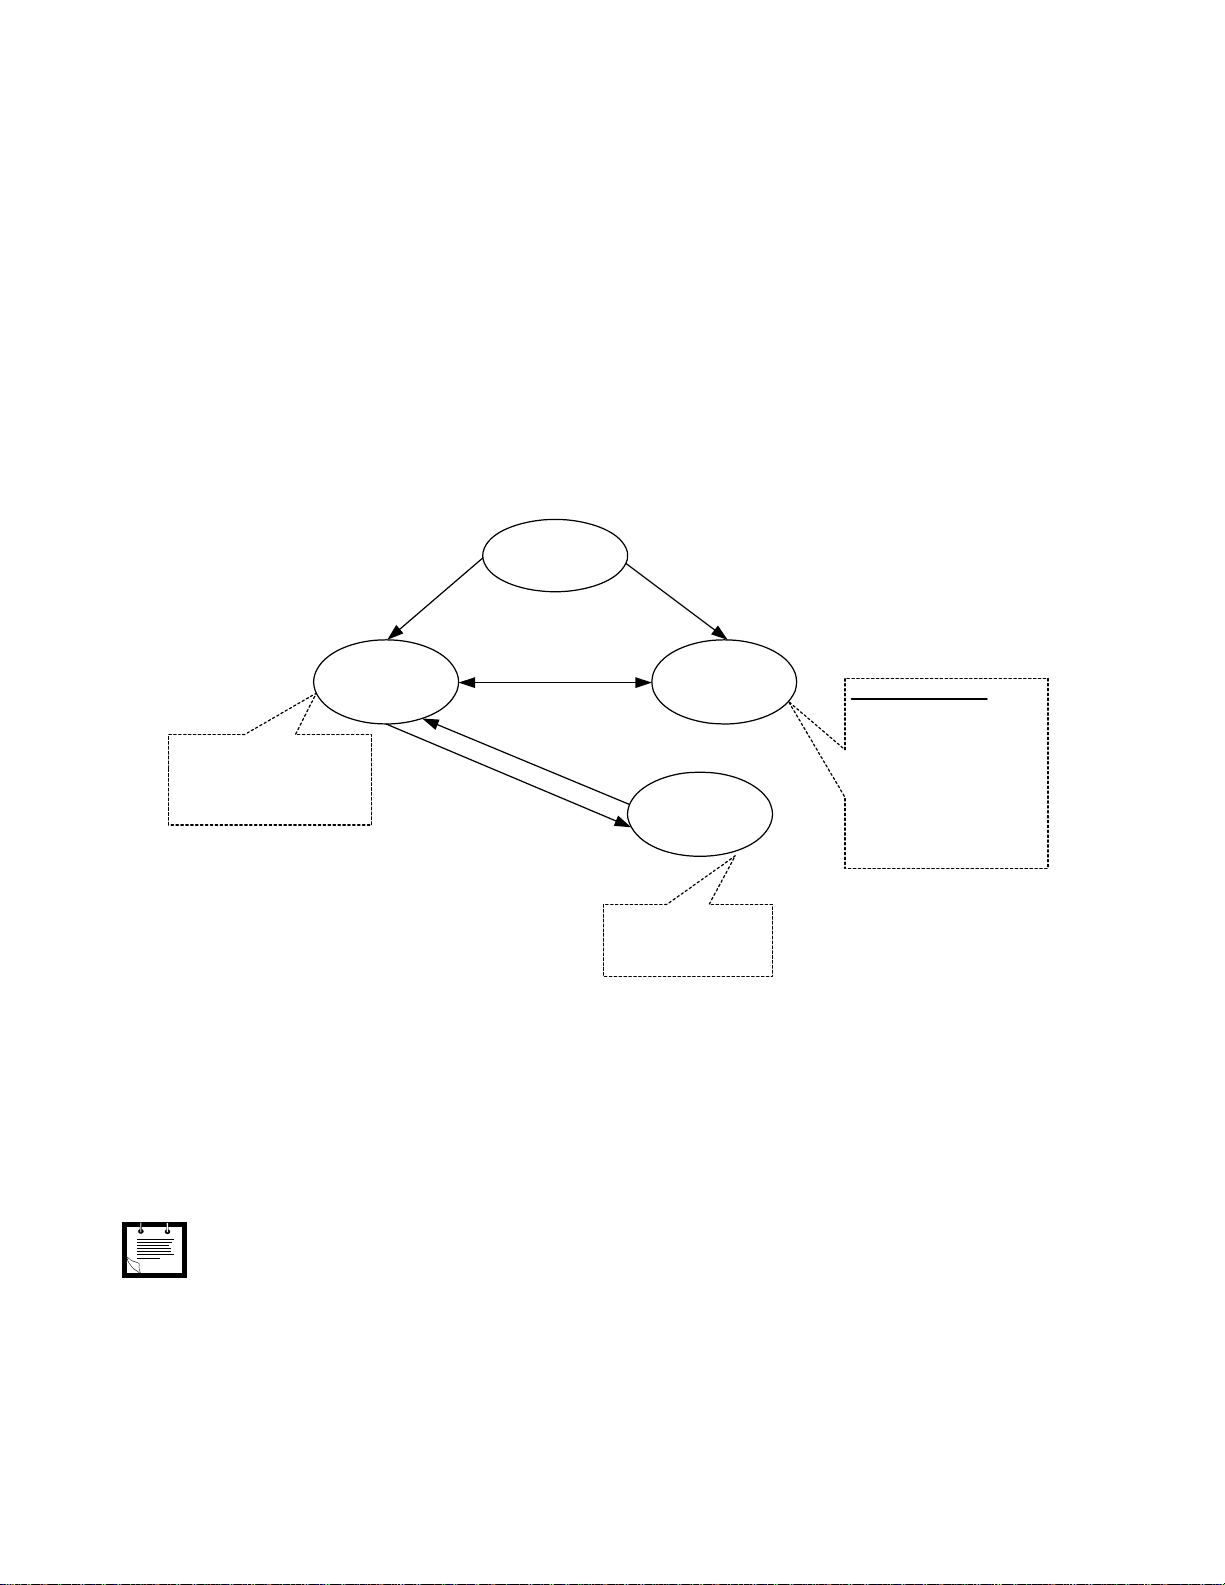
G24 KJAVA module has three entities:
• MIDlet Manager - Manages and executes the MIDlet.
• JTool Manager - Manages G24 maintenance
•JAL
• G24 SW reflash
• KDWP activation
• Module configuration
• OTA download Manager - Over The Air MIDlet download procedure
The handshake between these three entities, controlling the G24, is shown in Figure 4. These three entities are mutually exclusive, i.e. upon starting one of these entities the already running one will be stopped.
A GPIO pin ("KMgr pin") selects between MIDlet Manager and JTool Manager entities.
Pin status and selection is defined as follows:
• OFF (low HW signal) - JTool Manager.
• ON (high HW signal) - MIDlet Manager.
16 6802981C50-C
Figure 4. G24 KJAVA Architecture
Line must be pulled to ON if not connected through a switch.
Page 23

CHAPTER 4 - KJAVA ARCHITECTURE
Note
KMgr assigned pin depends on the hardware configuration (OEM or HMI) as described in Table 3.
Table 3: KMgr Pin
G24 HW Type
OEM 42 GPIO8 S120, GPIO8 reference
HMI 16 WKUPI_N/GPIO16 S100 WKUPI_N
Pin Number in 70 Pin
Connector
GPIO Pin Name EVB Switch
Also refer to “APPENDIX A - GPIO LINES” and reference [2].
4.2.1 Switching between MIDlet Manager and JTool Manager without GPIO Pin Toggling
Switching between MIDlet Manager and JTool Manager can also be done using dedicated commands.
To switch from MIDlet Manager to JTool Manager - send the command "MMgr2JToolSwitch" over UART2 serial interface;
G24 will send back 'JTOOL READY'.
The necessary pre-conditions for successful operation of the command are:
• MIDlet Manager is active
• KMgr pin is ON (in MIDlet Manger state)
• UART2 is not used by a MIDlet, KDWP or any other agent
If these pre-conditions are not met, the command will be ignored.
To switch from JTool Manager to MIDlet Manager, issue the command "JT2MM" in terminal.
The necessary pre-conditions for successful operation of the command are:
• JTool Manager is active
• KMgr pin is ON (in MIDlet Manger state)
If these pre-conditions are not met, the command will fail with JTool Error.
This option is present mainly for easier production process. It allows scripts to download a MIDlet without the need
to manually toggle the KMgr pin back and forth.
4.3 MIDlet MANAGER
The MIDlet Manager manages and executes the MIDlet. It is activated when KMgr pin is ON.
MIDlet Manager executes UM if it exists and valid, otherwise it executes the DM. In case DM is invalid too, MIDlet Manager
will move to "Fault" state (reports can be observed via AMS logs mechanism) - waiting for MIDlet upgrade via JTool
commands.
When MIDlet exits by invalid operations, it is marked with "Invalidity flag".
• DM - Flag is effective to the current session and will be cleared upon reset.
• UM - Flag is effective until UM upgrade (replacement).
6802981C50-C 17
Page 24

CHAPTER 4 - KJAVA ARCHITECTURE
Note
Is GPIO ON?
Yes
Start procedure
No
Is UM Valid?
No
Is DM Valid?
Store Fault Info
Run UM
Yes
Run DM
Yes
No
Crashed MIDlet Recovery
JTOOL
Manager
Steady Fault
State
Check Exit
Type
Faulty
Mark UM/DM
as invalid
OTA
GPIO OFF
notification
GPIO ON
notification
Figure 5 demonstrates the MIDlet Manager f low :
Figure 5. MIDlet Manager Flow
• Switching to JTool mode, OT A download and Shutdown (reset, watchdog expired, panic, …) are considered valid
exit operations.
• Both UM and DM "invalidity flag" can be cleared using the JTool command: "OEMconfig_clearFlag", see Table 5.
• Run fault information can be accessed via OSC.getProp erty("oem.lastfault.running") method.
4.4 JTool MANAGER
JTool Manager enables users to communicate with the G24 KJAVA module via RS232 over UART2 using a set of predefined
commands (refer to
JTool Manager functionality:
“Default RS232 Configuration”).
1. Downloading a MIDlet via Jadpur or MIDway.
2. Reflashing of G24 software.
3. KDWP activation.
4. Module configuration.
18 6802981C50-C
Page 25

Default RS232 configuration:
Note
Baud Rate = Default baud rate (value 19200 bps);
Data Bits = 8 bit;
Parity = NONE;
Stop Bits = ONE STOP BIT;
Flow Control = HW (Auto CTS/RTS)
See “JTool COMMANDS” section for more details
4.5 OEM MODES
The G24 unit has three functional modes (OEM modes):
1. Java - Only MIDlet controls the unit.
2. Partial Java - The unit is controlled by MIDlet and a limited set of AT commands.
3. AT - Only AT commands control the unit (KJAVA module is disabled).
OEM modes can be controlled by the OSC class.
For OEM mode settings see Table 4.
CHAPTER 4 - KJAVA ARCHITECTURE
Table 4: OEM mode settings
OEM Mode API Connectivity availability
JAVA OSC.setProperty("oem.mode", "java_mode") KJAVA controls: UART1, UART2, USB
Partial JAVA 1 OSC.setProperty("oem.mode","partial_java_mode_1") KJAVA controls: UART2
AT Commands via: UART1, USB
Partial JAVA 2 OSC.setProperty("oem.mode","partial_java_mode_2") KJAVA controls: UART2, USB
AT Commands via: UART1
Partial JAVA 3 OSC.setProperty("oem.mode","partial_java_mode_3") KJAVA controls: UART1, UART2
AT Commands via: USB
AT Mode OSC.setProperty("oem.mode", "AT_mode") AT Commands via: UART1, UART2, USB
In order to read the OEM mode use - OSC.getProperty("oem.mode").
Mode switching between AT mode and JAVA mode without Java APIs:
• JTool command - "OEMconfig_java2at" for AT mode.
• AT command - "AT+MJAVA=0" for JAVA mode.
• Upon changing the OEM mode, G24 performs power cycle.
• Use AT+MJAVA? Command to query current OEM mode.
Partial Java Mode
In this mode, KJAVA is available in pa rallel with the AT commands as in Table 4.
The main purpose of this mode is to allow External GPRS call while KJAVA is active; however more commands are available.
6802981C50-C 19
Page 26

CHAPTER 4 - KJAVA ARCHITECTURE
Note
When developing in such mutual environment it is important to avoid addressing the same platform resource. In such cases
inconsistencies and failures may occur.
The main problematic components are blocked to AT commands in this mode and are listed in the following lists.
There are two types of commands. "Type 1" consists of permanently blocked commands and "Type 2" consists of configurable
blocked commands (can be reconfigured to be unblocked). Configuration is done on the entire list and by Motorola only.
Type 1
CHLD, CHUP, CR, A, D (except for D*99), DL, H, CACM, CAMM, CAOC, CPAS, CPUC, CSNS, CTFR1, MCST,
MIPCALL, MIOD, MIOC, MMAD
Type 2
CFUN, CCLK, ATS24, CPBS, CPBR, CPBF, CPBW, MCSN, MDSI, CSVM, MPDPM, CPIN,CPWD, CLCK, EMPC, COPS,
CLIP, CLIR, CUSD, CCWA, COLP, CALM, CLVL, CMUT, CRSL, CRTT, MADIGITAL, MAFEAT, MAMUT, MAPATH,
MAVOL, MMICG, MPCMC, VTD, VTS, S94, S96, CNMA, CNMI, CSCB, MCSAT
4.6 MIDlet SECURITY
This paragraph describes the MIDP 2.0 Security Model for the Motorola G24 KJAVA product.
Two types of MIDlets can be downloaded into the G24: “Untrusted” (Unsigned) or “Trusted” (Signed).
Security modes:
MIDlet may run in one of two security modes:
• Normal mode (Trusted domain) - Full access is granted to all APIs
• Safe mode (Untrusted domain) - Limited access to API.
Any access to a protected API will be blocked and an exception will be thrown (java.lang.SecurityException).
Mode is determined according to MIDlet JAD during the download process. Signed MIDlet will run at Normal mode, Unsigned
will run in Safe mode.
G24 uses x.509 PKI for signing and verifying trusted MIDlets.
The JAD file of a signed MIDlet contains additional attributes:
• MIDlet-JAR-RSA-SHA1
• MIDlet-Permissions
• MIDlet-Certificate-1-1
The protected APIs are:
• javax.microedition.io.HttpConnection
• javax.microedition.io.HttpsConnection
• javax.microedition.io.DatagramConnection
• javax.microedition.io.SocketConnection
• javax.microedition.io.SecureConnection
• javax.microedition.io.ServerSocketConnection
• javax.wireless.messaging.*
• com.motorola.oem.OTADownload
• com.motorola.oem.call.*
Download process will fail in case of signature error.
See “APPENDIX D - MIDlet SIGNING” for additional information.
20 6802981C50-C
Page 27

5. CHAPTER 5 - DEVELOPMENT
AND MAINTENANCE
5.1 GENERAL
The following log types are available:
•AMS logs - Issued by unit components (AMS, KVM, and Native Code)
• MIDlet logs - Issued by running MIDlet (stdout)
5.2 JTool COMMANDS
JTool commands enable external communication to G24 KJAVA module over serial connection (See “JTool MANAGER”
section for more information).
When switching to JTool, running MIDlet is stopped.
A command line consists of JTool command string and a carriage return (commands are not case sensitive):
<Command><CR>
G24 KJAVA module echoes the input to the terminal.
The G24 KJAVA JTool commands are listed in Table 5:
Table 5: JTool Commands
Subject JTool commands Action Notes
JTool JT Returns "JTool OK" when alive and
listening.
Download OEMdownload Prepares the unit for downloading a
MIDlet.
Reflash OEMreflash Switch to boot mode - ready for
reflash.
KDWP OEMkdwpON Sets KDWP flag 'ON'. KDWP flag is checked when
OEMkdwpOFF Sets KDWP flag 'OFF' (future use).
Only for UART1 with
PCLoader tool
running a MIDlet. If it is 'on'
then the MIDlet will run in
debug mode.
6802981C50-C 21
Page 28

CHAPTER 5 - DEVELOPMENT AND MAINTENANCE
Table 5: JTool Commands (Continued)
Subject JTool commands Action Notes
UART's Baud
Rate
Log Routing OEMconfig_LogRead Read log routing X values:
Log OEMconfig_LogEnable:X Enable Logs X values:
OEMconfig_BaudRead:X Read baud rate for serial X X values:
OEMconfig_BaudDefaultSet:X,Y Set default baud rate Y for UART X
OEMconfig_BaudDefaultRestore:X Restore default baud rate for UART
X
OEMconfig_BaudSet:X,Y Set baud rate Y for UART X
for the current session.
OEMconfig_LogSet:X,Y Route to serial X log type Y
OEMconfig_LogDisable:X Disable Logs
'1' - UART1
'2' - UART2
Y ranges:
9600, 19200, 38400, 57600,
115200
Note: When JTOOL is activated UART2 is se t to "Default
baud rate".
'0' - USB
'1' - UART1
'2' - UART2
Logs are routed to UART2 by
default.
Only one log type to one port
Y values:
'0' - AMS
'1' - STDOUT
'0' - AMS
'1' - STDOUT
Note: Disabling "AMS logs"
will cause them to be routed to
platform data logger.
Trace OEMconfig_TraceEnable:X Enable Trace X values:
OEMconfig_TraceDisable:X Disable Trace
OEMconfig_TraceEnableAll Enable All Traces
OEMconfig_TraceDisableAll Disable All Traces
OEMconfig_TraceRead Outputs all available traces with their
number and current status
Java to AT
Mode
Clear invalidity
flag
Delete MIDlet OEMconfig_delete:UM Delete UM
OEMconfig_java2at Change OEM mode from Java mode
to full AT mode
OEMconfig_clearFlag:UM Clear UM invalidity flag (for debug
purposes)
OEMconfig_clearFlag:DM Clear DM invalidity flag (for debug
purposes)
1-n, when n is the number of
available traces types.
Note: Traces are subcategories
of AMS logs.
Note: Unit will reset before the
change takes place.
For switching back to Java:
AT+ MJAVA=0
See “CHAPTER 4 - KJAVA
ARCHITECTURE” for additional information.
22 6802981C50-C
Page 29

CHAPTER 5 - DEVELOPMENT AND MAINTENANCE
Note
Note
5.3 KDWP
KDWP is used for MIDlet "on target" debugging. Its "Debug agent" (PC application) communicates with the target’s KVM over
RS232 (A serial connection must be set between G24 UART2 and PC COM). Only UART2 can be used, therefore Serial Logs
should be routed to UART1, USB or disabled.
IDE application must be JPDA (Java Platform Debugger Architecture) compliant to be able to attach to "Debug agent". Known
JPDA compliant IDEs are: NetBeans, Eclipse and JBuilder.
All KDWP relevant files (including detailed activati on procedure) can be found in the related bundle located in MOTODEV
website, see reference
• MIDlet must be compiled with debug information.
• After restart KDWP is off.
[4].
5.3.1 Activation Procedure
1. Switch to JTool.
2. Enable KDWP on unit (“OEMkdwpon” command).
3. Set UART2's baud rate to 115200.
4. Switch to MIDlet Manager.
5. Execute the following command on a PC (in KDWP folder):
java -jar kdp.jar -v 9 -r serial: <com_port_number> -l <debugger_port_number> -cp <classes>
• com_port_number - port number on PC
• debugger_port_number - port to be used by IDE debugger
• classes - semicolon separated files with classes to debug including MIDlet's JAR file.
MIDlet JAR file must be in KDWP folder.
Example:
java -jar kdp.jar -v 9 -r serial: 1 -l 1234 -cp WSupdata.jar
6. Start IDE and set breakpoints as needed.
7. Attach debugger to IDE.
Note that IDE should attach to the same port number as in <debugger_port_number>.
8. In order to quit KDWP G24 should be restarted (restarting will take ~30 seconds).
6802981C50-C 23
Page 30

CHAPTER 5 - DEVELOPMENT AND MAINTENANCE
24 6802981C50-C
Page 31

6.1 KJAVA CONTENT
The APIs available in G24 KJAVA product are listed in Table 6.
Table 6: Motorola API Matrix
G24 APIs Description JSR’s API Type
CLDC 1.1 Infrastructure 139
MIDP 2.0 UI, RMS, Connections, Basic Audio
COMM Connection Logical serial port connection
WMA 1.1/2.0 SMS, MMS 120,205
6. CHAPTER 6 - JAVA API
118
Standard
MMAPI 1.1 Audio record play, video playback 135
PIM Contacts Access 75
File Connection File system access 75
Location Request and get location result 179
Access SIM card services access N/A
HAPI GPIO and A2D control N/A
Network Manage network features N/A
OSC OEM system control services N/A
Websession Manage websession services N/A
Call Handle MO and MT call operations N/A
I2C Manage I2C communication N/A
IPD Utilize the IP Director feature N/A
Motorola Proprietary
6802981C50-C 25
Page 32

CHAPTER 6 - JAVA API
Note
6.2 PACKAGES OVERVIEW
For detailed package usage information refer to Javadoc.
6.2.1 Access Package
Package name: com.motorola.oem.access
The Access package provides these SIM card services:
1. SIM card status: indication and query.
2. SIM PIN1:
• Lock utility - enable/disable and query status
• Unlock
• Change Code
• Enabling/ Disabling Lock utility will take effect after next power cycle.
• Unlocking is valid until next power cycle.
• Code change can be done only when Lock util ity is enabled and SIM PIN1 is unlocked.
• 3 times wrong PIN1 entry will cause SIM to be blocked.
3. Get MSISDN phone numbers.
4. Get SIM card files data (IMSI, GID1, GID2, CPHS, ICCID, and Preferred Languages).
6.2.2 Network Package
Package name: com.motorola.oem.network
The Network package provides these network (GSM/GPRS) features:
1. Network related indications and query:
• Signal strength (RSSI and BER)
• Cell information
• Registration status
2. Operator selection.
3. Query of available networks.
4. Edit the preferred operators list.
5. Network Clock (NITZ) - format "yyyy/mm/dd,hh:mm:ss+timezone " (time zone is presented in units of quarter hour).
Availability depends on network operator. See
6. Supplementary services (SS):
• Calling line ID (CLI) presentation
• Calling line ID (CLI) restriction
USSD - Unstructured reports are supported - String representing the network indication or confirmation.
“OSC Package”.
Some network indication response require user's action (example: password for barring).
For each transaction response a required-action code will be attached.
Possible action codes:
• Further user action required - session continues, the MIDlet should follow with a new MO transaction.
• No action needed - session is closed.
26 6802981C50-C
Page 33

CHAPTER 6 - JAVA API
Some indications, sent by the network are Network Initiated messages.
USSD service restrictions:
• Network query operations (including a second USSD transaction) will be restricted when USSD transaction is taking place
• USSD transaction will be restricted when Network query operations are taking place.
• USSD String length will be at most 200 characters
• Sending an Empty string will result in session termination.
• The option to cancel a session after starting a transaction is not supported.
For more details refer to - G24-J Java Doc.
6.2.3 OSC Package
Package name: com.motorola.oem.osc
The OSC class provides:
• “get” and “set” methods to access system properties
• Enable sleep mode
•SW Reset
•Power down
• Get Power-up reason
• Real time clock mechanism
• Measurements indication and query:
• Battery level
• G24 internal temperature
• Antenna
• Air plane mode - RF disable
• MIDlet Watchdog
The DisplayConfig class provides:
• FPGA & Display configuration
6.2.3.1 OSC System Properties
The OSC system properties are listed in Table 7.
Table 7: OSC System Properties
Property name Description Possible values
oem.lastfault.running UM/DM Last run fault information. NA NA Get
oem.lastfault.panic Last panic information. NA NA Get
oem.lastfault.ota Last OTA fault information. NA NA Get
oem.lastfault.reportaddressX Report destination address (X: 1 to 3) Refer to “APPENDIX B -
DEF AULT MIDlet FEA-
TURES”
oem.logs.ams.available
oem.logs.stdout.available
AMS logs
Standard output logs
ON, OFF ON Set, get
Default
value
NA Set, get
6802981C50-C 27
Available
for get/set
method
Page 34

CHAPTER 6 - JAVA API
Note
Table 7: OSC System Properties (Continued)
Property name Description Possible values
oem.logs.ams.route
oem.logs.stdout.route
oem.mode Java or AT operation mode See Table 4 NA Set, Get
oem.dm.smslistener DM SMS Listener ON, OFF ON Set, Get
oem.dm.updateurl Update URL for download the dm NA NA Set, Get
oem.audio.digital Audio to be used: digital or analog ON, OFF ON Set, Get
oem.hw.module Hardware configuration OEM, HMI NA Get
oem.hw.imei Product IMEI NA NA Get
oem.version.software Software version NA NA Get
oem.version.flex Flex Version NA NA Get
oem.version.dm DM version number NA NA Get
oem.version.um UM version number NA NA Get
oem.kmgrpin.timesample Kmgr pin time sample.
Serial port for log USB, UART1, UART2 UART2 Set, get
"disable"->0ms "level1" >0.5ms
Valid for the next power cycle.
See “Sleep Mode” for more details.
"level2" ->5 ms
"level3" -> 10 ms
"level4" ->20 ms
Default
value
"level1" Set, Get
Available
for get/set
method
6.2.3.2 Sleep Mode
G24 will enter sleep mode once it is enabled and idle state is reached (no I/O interrupts and RF activities).
Unit current consumption while in sleep mode is 3.5mA @ DRX9.
• USB device connected to G24 will prevent unit from entering sleep mode.
• If data (Serial Logs or Comm Connection) is not being read by external device (remains in UART1 or UART2
buffers) G24 will not enter Sleep Mode.
• To reduce power consumption to minimum, Kmgr pin time sample (polling) should be reduced respectively. Use
setProperty("oem.kmgrpin.timesample",XXX).
6.2.3.3 Airplane Mode
When "Airplane" mode is turned on, all transmit and receive RF circuits are disabled and Network related classes will throw an
exception, if accessed:
• SocketConnection
• UDPDatagramConnection
• SocketServerConnection
• HTTPConnection
After power cycle, G24 restarts in normal mode, i.e. RF operations are enabled, even if in the previous session they were closed.
6.2.3.4 Real Time Clock (RTC) Mechanism
The RTC mechanism consists of two parts:
28 6802981C50-C
Page 35

CHAPTER 6 - JAVA API
1. "Time and Date" - contains current date and time synchronized with Network time.
2. "Alarm" - contains some pre-installed date and time.
The RTC mechanism operates in all of the G24 KJAVA operating modes (Off, Idle, Sleep) as long as the power supplied is
above the minimum operating level, see reference
[1]. If the power supply is physically disconnected from th e G24, th e RTC
timer resets and all the time, date and alarm settings are lost. On the next G24 power-up the time and date will revert to a default
value.
The currently default is "00:00:00 01-Feb-07" (This value may be changed in further versions).
Time and Date
The OSC class provides the ability for the UM to accept or to decline Network NITZ update.
There are two ways to set "Time and Date" to be available:
• By auto update - if network supports NITZ and UM enables this feature.
• Direct set - if UM disables auto update and manually set Time and Date.
After power cut "time and date" will be reset and not be available until next set.
If network does not support Network NITZ update it is recommended not to enable auto update.
Alarm
Enable the user to set a time for an Alarm event to occur. This event will take place when "Time and Date" becomes equal to
Alarm's setting time.
This feature can be used to automatically switch the module ON at a pre-defined time (can be used to save battery power).
6802981C50-C 29
Page 36

CHAPTER 6 - JAVA API
6.2.3.5 Measurements
The G24 KJAVA module supports measurements of antenna presence, battery level and temperature.
Battery
All available range of battery voltage - from 3200 mV to 4200 mV is broken on pre-defined levels according to the table below:
Level Battery Voltage
5
4
3
2
1
0
3700 - 4200
3500-3700
3400-3500
3350-3400
3300-3350
3200 - 3300 (Low battery)
Notification will be sent if average value of battery voltage crosses to new range.
30 6802981C50-C
Page 37

CHAPTER 6 - JAVA API
Temperature
Temperature measurement is mapped from 0-255 A2D units to Celsius.
The actual temperature level (in degrees Celsius) can be derived from table or graphical representation (see Table 8 or Figure 6).
Table 8: A/D Value to Temperature Conversion
Temperature
(°C)
-30 229 4 114 38 43
-29 226 5 111 39 41
-28 223 6 108 40 40
-27 219 7 105 41 39
-26 216 8 102 42 38
-25 213 9 100 43 37
-24 210 10 97 44 36
-23 206 11 94 45 34
-22 203 12 92 46 33
-21 199 13 89 47 32
-20 196 14 87 48 31
-19 192 15 84 49 31
-18 189 16 82 50 30
-17 185 17 79 51 29
-16 182 18 77 52 28
-15 178 19 75 53 27
-14 175 20 73 54 26
-13 171 21 71 55 26
-12 168 22 69 56 25
-11 164 23 67 57 24
-10 160 24 65 58 23
-9 157 25 63 59 23
-8 153 26 61 60 22
-7 150 27 59 61 21
-6 146 28 57 62 21
-5 143 29 56 63 20
-4 140 30 54 64 20
-3 136 31 52 65 19
-2 133 32 51 66 19
-1 130 33 49 67 18
0 127 34 48 68 18
1 123 35 47 69 17
2 120 36 45 70 17
3 117 37 44
A2D
units
Temperature
(°C)
A2D
units
Temperature
(°C)
A2D
units
6802981C50-C 31
Page 38

CHAPTER 6 - JAVA API
Note
A temperature level approximation can be obtained using the following 5th order polynomial formula:
Temp [C] = A5* ADCp5 + A4* ADCp4 + A3* ADCp3 +A2* ADCp2 +A1* ADCp1 +A0
A5 = -1.3e-09, A4=8.91591e-07, A3=-0.00024, A2=0.032894, A1=-2.56084, A0=103.2997
• ADCpN means ADC value powered by N
• XeY means X*(10 powered by Y)
Figure 6. Actual Temperature Level (in degrees Celsius)
6.2.3.6 Antenna Presence
Antenna presence measurement reports whether antenna is attached or not.
6.2.3.7 MIDlet Watchdog
The watchdog is a guard that keeps the system alive, and will restart the G24 when a MIDlet lockup is detected.
Once it is activated platform initiates a timer. Timer expiry is considered a MIDlet lockup.
UM should kick the watchdog timer in order to reset it.
Once it is activated platform send events every 10 seconds that can be caught by OSCWdogListener interface implementer. This
will allow the MIDlet to kick the watchdog timer (by calling KickMIDletWatchdog ) without maintain its own Timer mecha
nism.
The watchdog default state is not active.
32 6802981C50-C
-
Page 39

CHAPTER 6 - JAVA API
6.2.4 WebSession Package
Package name: com.motorola.oem.websession
Web Session is a collection of parameters which configure and manage the Internet connection (GPRS, MMS).
There are 2 types of web sessions used by Java platform for network (GPRS) connection. It is the user responsibility to set these
parameters which are operator's specific:
Java Session - used for all javax.microedition.io (MIDP2.0), with addition of OTADownload APIs.
Mms Session - used for MMS send/receive (including emails).
Prov Session - used for session parameters provisioned by a browser message
FOTA Session - used for over-the-air update of the G24-J firmware. This session must be initialized by the UM on power up.
6.2.4.1 OTADownload
The OTADownload class enables the UM to update itself over the air (JAD and JAR).
OTADownload is using "Java Session" parameters by default.
In order to enable the OTA download, UM should provide a URL to the requested MIDlet suite along with all OTA websession
parameters. Once the download process started, "there is no return" and the running MIDlet will be closed.
MIDlet downloading and installing is fully automatic. In case of a successful dow nload and install, the new MIDlet will start
automatically. In case of a failure, previous MIDlet will be launched again (if it's the DM a report will be send to all saved report
addresses).
OTADownload uses HTTP 1.1 and WAP 2.0 protocols.
6.2.4.2 WebSessionManager
The WebSessionManager class manages Web Sessions entries addition, deletion, update and setting the "current" G24 Web
Session.
Session provisioning-
Web session's OTA Provisioning is the process, by which the carrier configures a web session.
The user may "listen" to a "browser settings received" event, indicating the arrival of a new "browser settings" (sent by the
carrier). In case web session update is accepted by the MIDlet, the "Prov Session" web session entry is overridden with the
newly received settings.
The "browser settings" message may contain an optional parameter which indicates the security mechanism used. If the parameter is not present, no security is used. If the parameter is present it must take one of the values: AUTH_METHOD_NETWPIN,
AUTH_METHOD_USERNETWPIN, AUTH_METHOD_USERPIN, and AUTH_METHOD_USERPINMAC.
The following table describes the 3 predefined (reserved) web session entries:
Web Session Name Web Session Name Web Session Index
Java Session "Java Session" SESSION_INDEX_JAVA
Mms Session "Mms Session" SESSION_INDEX_MMS
Prov Session "Prov Session" SESSION_INDEX_PROV
6802981C50-C 33
Page 40

CHAPTER 6 - JAVA API
Note
Prov Session is read only.
See Table 9 for Web Session Parameters.
Table 9: Web Session Parameters
Web
Session
Parameter
Access
Name W e b session
Home Page URL
Gateway IP 1/2 Gateway IP null
Port 1/2 Port number 8080 (HTTP)
Domain 1/2
Service Type 1/2 Service Type
DNS 1/2 DNS URL
Sub
Parameters
Parameter
Description
name
for the connection
Possible Values Default Value
Any name, except for the reserved session names.
9201 (WAP)
wap, wap_connectionless
wap_secure,
wap_secure_connectionless
http
http_secure
Note: For MIDP2 connections use
http and http_secure only .
Port 1: 8080
Port 2: 9201
HTTP
DNS 2 DNS URL
Time Out Connection
timeout
CSD 1/2 Phone Num-
ber
User Name
Password
Speed
Line type
GPRS APN
User Name
Password
CSD session 1
and 2 configu
ration
GPRS session
access parame
ters
In minutes:
1, 2, 5, 10, 15
Speed Baud rates available:
-
2400, 4800, 9600,14400
Line type available: Modem, Isdn
-
6.2.5 HAPI Package
Package name: com.motorola.oem.hapi
The G24 KJAVA product supports two hardware-controlling APIs:
• GPIO API
• A2D API
15
Speed: 14400
Line type: Modem
null
34 6802981C50-C
Page 41

CHAPTER 6 - JAVA API
Note
Set GPIO co u nter
Notify java V M
Is counter expiry?
YES
NO
Java
Midlet
platform
Counter++
6.2.5.1 GPIO API
The GPIO API is responsible for configuring and handling the I/O pins.
The API allows direct access to GPIO lines for:
• Read pin status
• Write to pin
• Interrupt or counter (enable/disable)
Several GPIO lines support two configuration modes:
1. Interrupt - Receive notifications on edge-triggered, according to pre-defined notification and debounce type.
Available GPIOs: 1, 14, 15, 16
2. Counter - Receive notifications on counter expiry according to pre-defined notification type, counter type and counter
expiry value.
Available GPIOs: 14, 15
Working in counter mode enable system to receive interrupts in high frequency. Notifications to user about counter expiry
occurrence will arrive only when reaching pre-defined number of interrupts - counter expiry value. See
Figure 7 for GPIO
counter mechanism.
Figure 7. GPIO Counter Mechanism
Interrupt and Counter performance:
1. Interrupt latency - notification to UM.
• Idle - 10 ms.
• While HTTP download session - 15 ms.
• While UDP download session - 20ms.
For both HTTP and UDP, thread yielding must occur. See “APPENDIX C - GPIO INTERRUPT LATENCY” for more
information.
2. Counter frequency:
• Idle - 2 KHz.
• While HTTP download session - 500 Hz.
For additional GPIO information refer to “APPENDIX A - GPIO LINES”.
6802981C50-C 35
Page 42

CHAPTER 6 - JAVA API
Note
GPIO Classes
1. GpioInput - GPIO configuration as input, interrupt or counter.
Actions: read status, enable/disable interrupt/counter
2. GpioOutput - GPIO configuration as output.
Actions: write
3. GpioInterruptConfig - is container of interrupt GPIO.
Configuration: notification type, debounce type, and notifications listener.
Default configuration values:
a. Debounce: 40ms (Normal).
b. Notifications: both edges.
Gpio interrupt performance are detailed in “APPENDIX C - GPIO INTERRUPT LATENCY”.
4. GpioCounterConfig - is container of counter GPIO.
Configuration: notification type, counter type, counter expiry, and no tifications listener.
Default configuration values:
a. Debounce: disabled (Can not be changed).
b. Notifications: both edges.
c. Counter: cyclical.
d. Counter expiry: 50 pulses.
5. GpioCounter - Service methods for GPIO counter.
Actions: Read and reset counter.
6.2.5.2 A2D API
A2D API is responsible for configuring and handling the 3 external A2D converters, pins: 37, 43 and 47.
Converter values are between 0 to 255 unit ranges, representing 0-2.3 Volt.
Automatic notifications:
1. Periodical - cyclically with pre-defined period.
2. Threshold - notification upon Voltage (see Figure 8):
a. Below the "low limi t range".
b. Above the "high limit range".
36 6802981C50-C
Page 43

A2D automatic notification default state is OFF.
High limit range
Low limit range
THRESHOLD_HIGH_LIMIT_HIGH
THRESHOLD_HIGH_LIMIT_LOW
THRESHOLD_LOW_LIMIT_HIGH
THRESHOLD_LOW_LIMIT_LOW
new value
new value
Figure 8. Threshold's Conditions for Auto Notification by Threshold Mode
CHAPTER 6 - JAVA API
G24 performance:
1. Periodical notification - Every 4 sec. at the minimum (defined by multiples of 4 sec).
2. Due to system architecture, threshold notification may be delayed up to 4 sec.
A2D classes
1. A2dManager - Manages the access to A2D converters.
2. A2dChannel - A2D converter configuration and notification (access to A2D value, Enable/Disable notification).
3. A2dAutoPeriodConfig - A2D period notification container, default period is 4 sec.
4. A2dAutoThresholdConfig - A2D threshold notification container.
Default value for "low limit range" - 50 to 60 and "high limit range" - 190 to 200.
6.2.6 Call Package
Package name: com.motorola.oem.call
This package enables the UM to perform a single MO/MT voice or data call.
Contains: interface "DataCallConnection" and classes "Call" and "DataCallConfig".
The interface "DataCallConnection" is based on the Generic Connection Framework and extends the StreamConnection inter-
face.
The major features of the package are:
• Dial, Answer or release a call.
• Indicates call direction, number and type.
• Report call state and call exit cause.
• Configure air link parameters for the next MO data call.
• Get Radio Link Protocol parameters range to be used in air link configuration.
6802981C50-C 37
Page 44

CHAPTER 6 - JAVA API
• Several events type Voice/Data call alerts and state change events.
6.2.7 I2C Package
Package name: com.motorola.oem.i2c
I2C package provides standard GCF API to communicate with I2C driven peripherals.
I2C serial bus is available through two GPIO lines.
The following table defines mapping of I2C bus lines to GPIO lines in G24 70 pins connector.
BUS Identifier SDA SCL
BUS0 (default bus) 32 34
BUS1 32 34
I2C API utilities:
• Create connection
• Close connection
• Open new Datagram
• Connection configuration
• Provide data transfer mechanism to devices on the bus - read / write
• General call address
I2C default configuration:
After opening I2C connection, its default configuration will be:
Bus mode: Single master.
Data rate: Standard.
Device address type: 7 bits.
Register address length: 0 byte.
Start Type: start bit.
Receive start bit enabled: True.
Receive stop bit enabled: True.
I2C performance:
• Data rate -
1. I2C support standard mode - up to 100 Kbit/s.
2. G24 I2C bus effective data rate is 80 Kbit/sec.
3. Due to I2C devices characteristic of fully data rate downwards compatible, G24 will be able to commun icate w ith I2C
devices that support higher data rate such as Fast mode (up to 400 Kbit/s), or High speed (up to 3.4 Mbit/s).
• Max datagram size is limited to 1024 Bytes (datagram will be fragmented to chunks of 128 bytes).
38 6802981C50-C
Page 45

CHAPTER 6 - JAVA API
Note
I2C HW adjustment:
In order to adjust bus lines rising time to I2C specification, 4.7 KOhm pull up resisters must be connect to bus lines.
I2C restrictions:
• I2C API support only single master mode. Any attempt to set another configuration will generate exception.
• I2C API support only 7 bits device address. Any attempt to set another configuration will generate exception.
• I2C API support 0, 1 or 2 bytes register address length. Any attempt to set another configuration will generate exception.
• I2C API support only standard data rate. Any attempt to set another configuration will generate exception.
• MIDlet will be able to open only single I2C Connection for each bus ID. Any attempt to open another connection of this bus
will generate exception.
• I2C bus shares physical bus lines with GPIO API. On power up these lines are not dedicated to I2C-bus utili zing.
• In case the GPIO lines are already being used (GPIO API already holds them), I2C connection will not be opened and will
generate exception.
• Until closing connection any attempt to configure these lines to work as GPIO lines will generate GpioException.
• Max datagram size is limited to 1024 Bytes. Upon attempt to exceed this limitation, request will be ignored and IOException
will be generated.
• Max stretching time, allowed by attached device to the bus is 100 ms. If after 100 ms the attached device still holds the SCL
line, the G24 will return one of the following :
1. Device not response - in case it is the first byte transfer on the bus.
2. NACK - in case it is not the first byte transfer on the bus.
• For known issues, please refer to G24-J Customer Notes.
6.2.8 IPD Package
For detailed information regarding IPD, see “APPENDIX E - IP DIRECTOR”.
Package name: com.motorola.oem.ipd
com.motorola.oem.ipd package enables the UM to utilize the IP Director feature, to establish local socket connection over the
serial link with an external device.
A local socket is an IP based socket (over PPP), which bounds a server/client that resides in the MIDlet, to a cli ent/server that
resides in an external device connected to the serial port.
This package contains interface IpDirectorAvailabilityListener and class LocalSocketManager.
Interface IpDirectorAvailabilityListener is a listener for IP Director state change events.
This interface contains a single method onIpdStateChanged.
Class LocalSocketManager implements the local socket management.
Class methods allow access to connection parameters (IP addresses and port number), and use of the listener described above.
6.2.8.1 IPD Connection Services
When IPD is active (See “IPD ACTIVATION”), the MIDlet may connect to the external device using the external device's IP
in the following Connection interfaces/methods:
1. Standard MIDP intercfaces:
• SocketConnection,
6802981C50-C 39
Page 46

CHAPTER 6 - JAVA API
• ServerSocketConnection,
• DatagramConnection,
• UDPDatagramConnection,
• HttpConnection,
• HttpsConnection,
• SecureConnection.
40 6802981C50-C
Page 47

CHAPTER 6 - JAVA API
2. OEM proprietary methods:
com.motorola.oem.websession.OTADownload.startOTA().
That is, 'OTA' download of a new User MIDlet over a Serial link (UART/USB). See “OTA (OVER THE AIR) OVER
SERIAL PPP LINK”.
6.3 STANDARD CLASSES DEVIATIONS
6.3.1 Comm Connections
Package: javax.microedition.io.CommConnection.
Description: Handling serial connection.
Three parallel serial ports are available: UART1, UART2 and USB.
See Table 10 for Port to Serial mapping.
Table 10: Port to Serial Mapping
Port Identifier Serial
COM0 UART2
COM1 UART1
COM2 UART2
COM3 USB
6.3.2 Server Socket Connection
Package: javax.microedition.io.ServerSocketConnection.
Description: Handling listen TCP/UDP socket.
Deviation: One client per connection socket (up to 4 sockets).
Example for handling server socket connection:
public class TcpConnection extends Thread {
public SocketConnection sc = null;
public ServerSocketConnection scn = null;
public InputStream is = null;
public void run() {
//gets port number from jad file
openConnection(getAppProperty("PORT"));
byte[] ReceiveData = new byte[256];
try {
6802981C50-C 41
Page 48

CHAPTER 6 - JAVA API
} catch (IOException e) {
InputStream is = sc.openInputStream();
while (true) {
int len = is.read(ReceiveData);
if (len > -1) {
//receive data
System.out.println("Receive data - " + new String(ReceiveData) + "\n");
System.out.println("Number of bytes - " + len + "\n");
} else if (len == -1) {
//connection with client has been broken.
openConnection(getAppProperty("PORT"));
}
}
...
}
}
private void openConnection(String port) {
try {
//create ServerSocketConnection instance
scn = (ServerSocketConnection) Connector.open("socket://:" + port);
//wait for client connection.
sc = (SocketConnection) scn.acceptAndOpen();
sc.setSocketOption(SocketConnection.LINGER, 5);
} catch (IOException e) {
//cannot open connection
...
}
}
}
42 6802981C50-C
Page 49

CHAPTER 6 - JAVA API
Note
In order to open more sockets in parallel, use another TcpConnection thread.
6.3.3 Message Connection
Package: javax.wireless.messaging.
Default SMS Port API.
All regular incoming SMS (without destination and source port) will be redirected to a special, default MT port;
• Destination port - 6024
• Source port - 49153
In order to be able to get this kind of SMS, MIDlet should listen on port 6024 using JSR120.
MIDlet Messages are stored in a separate JSR120 Inbox folder (up to 26 messages).
When this folder reaches its limit then the oldest unread message in a group of existing port (xxxx) will be deleted. If no group
port messages exist the oldest unread message in the folder will be deleted.
Notification about Incoming Message
There are two main use-cases for message arrival:
1. MIDlet is running
MIDlet handles message (registered to 6024 port).
2. MIDlet is not running
SMS will be stored in the JSR120 Inbox folder. When MIDlet is launched and registers to 6024 port, then incoming SMS
will be handled it and deleted from storage.
6.3.4 File Connection
Package name: javax.microedition.io.file
G24-J team recommends saving files and creating directories in root '/c/'.
For example:
fileConnection = (FileConnection) Connector.open("file:///c/<my_file>");
6.3.5 Location API
Package name: javax.microedition.location
G24-J Location mechanism is the result of JSR179 implementation.
The Location APIs feature allows obtaining updated location information (longitude, latitude, altitude, speed, course etc.) from
a GPS device by Request or Periodical Listening.
6.3.5.1 Connection of a GPS Device to G24-J
GPS receiver may be connected to the G24-J via serial port UART1 or UART2. TX and RX lines are required for this connection. Optionally, flow control lines CTS and RTS can be connected.
6802981C50-C 43
Page 50

CHAPTER 6 - JAVA API
6.3.5.2 Initialization of a GPS Device
The GPS device should be initialized before usage, in order to wake-up in the periodical broadcasting NMEA mode. The special
commands in binary format could be sent using Comm Connection APIs. It could be @@Oi, @@OF, @@Oa, @@Oj, @@Ot,
@@Oa configuration commands for basic GPS initialization and $PMOTG commands to assign NMEA format for broadcasted
messages. These commands may be different for different GPS types.
Usage example in Java MIDlet:
// Open connection with UART2 in order to initialize GPS
CommConnectioncommConnectionUart2
=(CommConnection)Connector.open("comm:COM2;baudrate=19200;autocts=off;autorts=off",
Connector.READ_WRITE, true);
oStreamUart2 = commConnectionUart2.openOutputStream();
System.out.println("Start GPS initialialization...");
// Initilize GPS
oStreamUart2.write(CommandArray); // When CommandArray is a Byte array of a GPS specific initialization command.
oStreamUart2.flush();
// Close connection
oStreamUart2.close();
commConnectionUart2.close();
System.out.println("End GPS initialialization.");
6.3.5.3 Setting of Selected G24-J UART Communication Properties for Location Session
UART communication properties could be changed by special OSC property oem.uart.config.
Usage:
OSC.setProperty("oem.uart.config", settings string);
Setting string format:
"comm:<uart_id>;[baudrate:<baudrate_value>];[databits:<databits_value>];
[stopbits:<stopbits_value>];[parity:<parity_value>];[fc:<fc_value>]"
Parameters in square brackets are optional. If an optional parameter is omitted, the default value will be set. The following table
shows the possible parameters values:
Parameter Description Port setting Possible values Default value
Comm.. UART number. <uart_id> "com1", "com2" N/A
44 6802981C50-C
Page 51

CHAPTER 6 - JAVA API
Parameter Description Port setting Possible values Default value
baudrate UART speed. <baudrate_value> "110","150","300",
"600","1200","2400"
,4800","9600",
”14400", "19200",
"28800", "38400",
"57600", "115200",
"230500", "460800",
"921600"
databits Number of data bits
per character.
stopbits Number of stop bits
per character.
parity Parity. <parity> "odd", "even",
Fc Flow control. <fc> "hw", "sw", "none" None
<databits_value> "7", "8" 8
<stopbits_value> "1", "2" 1
"none"
Usage examples in Java MIDlet:
OSC.setProperty("oem.uart.config", "comm:com2;databits:8;stopbits:2;parity:odd;");
OSC.setProperty("oem.uart.config", "comm:com1;baudrate:4800;fc:hw;")
OSC.setProperty("oem.uart.config", "comm:com1;")
19200
None
6.3.5.4 Location Session
After previous steps, the user can open the Location session in order to obtain relevant location information.
Request Location example in Java MIDlet:
QualifiedCoordinates coordinates = null;
// Set criteria for selecting a location pr ovider:
// accurate to 500 meters horizontally
criteria = new Criteria();
criteria.setHorizontalAccuracy(500);
// open selected by OSC serial port(UART1 or UART2)
provider = LocationProvider.getInstance(criteria);
provider.getLocation(timeout);
// display location results
coordinates = location.getQualifiedCoordinates();
float altitude = coordinates.getAltitude();
double latitude = coordinates.getLatitude();
double llongitude = coordinates.getLongitude();
6802981C50-C 45
Page 52

CHAPTER 6 - JAVA API
Note
Example of Periodical Listening for Location Update in Java MIDlet:
// Set criteria for selecting a location pr ovider:
// accurate to 500 meters horizontally
Criteria criteria = null;
criteria = new Criteria();
criteria.setHorizontalAccuracy(500);
// open selected by OSC serial port (UART1 or UART2)
provider = LocationProvider.getInstance(criteria);
// Define Location listener with 4 seconds Location data update
provider.setLocationListener(this, 4, -1, -1);
...
// Listener method
public void locationUpdated(LocationProvider provider, Location location)
{
QualifiedCoordinates coordinates = null;
// display location results
coordinates = location.getQualifiedCoordinates();
float altitude = coordinates.getAltitude();
double latitude = coordinates.getLatitude();
double llongitude = coordinates.getLongitude();
}
Orientation and ProximityListener classes of JSR179 are not implemented in G24 Location API.
46 6802981C50-C
Page 53

7. APPENDIX A - GPIO LINES
Note
Pin assignment details for G24 KJAVA module GPIO lines are listed in the following tables.
1. GPIO 1-8 can be accessed via EVB switch S120.
2. Pin dedicated for Java Tool is marked yellow.
3. GPIO13 must not be grounded at power up.
4. If GPIO direction is input and line is not connected, its state will be defined according Initial value.
5. If GPIO direction is output, "Floating" state is not available. Initial state d epends on initial configuration. This
configuration can be controlled by Java GPIO API.
Y=Yes; N=No.
I = Input; O = Output; I/O = Input/Output.
Table 11: Java Module GPIO Lines, OEM Units
70
Pin
Conn.
Pin
No.
G24
Signal
Java
Signal
Internal
resistor
(Pull
Up)
Initial
Value
Direction
Default
Direction
Interrupt Counter
28 GPIO1 GPIO1 100k 1 I/O I Y N
30 GPIO2 GPIO2 100k 1 I/O I N N
32 GPIO3 GPIO3 22k 1 I/O I N N
34 GPIO4 GPIO4 22k 1 I/O I N N
36 GPIO5 GPIO5 22k 1 I/O I N N
38 GPIO6 GPIO6 22k 1 I/O I N N
40 GPIO7 GPIO7 22k 1 I/O I N N
42 GPIO8 GPIO8 22k 1 I/O I N N
41 ANT_DET GPIO9 0 O O N N
49 GPRS GPIO10 0 O O N N
26 WKUPO_N GPIO11 22k 1 O O N N
Input
23 RI_N GPIO12 100k 1 I/O I N N
13 DSR_N GPIO13 100k 1 I/O I N N
19 DTR_N GPIO14 100k 1 I/O I Y Y
6802981C50-C 47
Page 54

APPENDIX A - GPIO LINES
Table 11: Java Module GPIO Lines, OEM Units (Continued)
70
Pin
Conn.
Pin
No.
G24
Signal
Java
Signal
Internal
resistor
(Pull
Up)
Initial
Value
Direction
Default
Direction
Interrupt Counter
Input
17 DCD_N GPIO15 100k 1 I/O O Y Y
16 WKUPI_N
GPIO16 22k 1 I/O I Y N
(EVB S100)
Table 12: Java Module GPIO Lines, HMI Units
70
Pin
Conn.
Pin
No.
G24
Signal
Java
Signal
Internal
resistor
(Pull
Up)
Initial
Value
Direction
Default
Direction
Interrupt Counter
26 WKUPO_N GPIO11 22k 1 O O N N
23 RI_N GPIO12 100k 1 I/O I N N
13 DSR_N GPIO13 100k 1 I/O I N N
19 DTR_N GPIO14 100k 1 I/O I N N
Input
17 DCD_N GPIO15 100k 1 I/O O N N
16 WKUPI_N
GPIO16 22k 1 I/O I N N
(EVB S100)
48 6802981C50-C
Page 55

8. APPENDIX B - DEFAULT MIDlet
FEATURES
B.1 SUPPLY OF ALL AVAILABLE UNIT INFORMATION
DM outputs all available unit information to the standard output. If it's an HMI unit, information is printed to the screen as well.
Output information includes:
•DM Version
• Earliest required software version for present DM
• Software version
• Flex version
• Product description
• OEM mode
•IMEI
•MSISDN
• Unit Time and Date
•UM version
• Fault report address
• Last OTA status
•OTA fault data
• MIDlet run fault data
• DM SMS listener status
B.2 FAULT REPORT
DM manages the fault report mechanism. There are two types of faults:
• Run fault - In case there was a critical error in UM or DM run-time (uncaught exception, VM error, etc.).
• OTA fault - In case an OTA download process has failed.
When DM loads, a fault report is sent automatically (in case fault information is available). In addition, the DM can be triggered
to send a fault report using an SMS request.
6802981C50-C 49
Page 56

APPENDIX B - DEFAULT MIDlet FEATURES
Note
Note
Note
The following table shows report types:
Report
Type
File file file A text file containing a detailed report in
SMS sms://<phone number> sms://972541234567 An SMS message is sent to the phone num-
E-Mail email://<email address> email:// name@company.com An E-Mail message is sent to the address,
HTTP/HTTPS http://<web server address>
All report addresses can be configured through SMS to DM and through OSC API.
Report Address Report Address Example Description
XML format is saved in the file system under
"file:///c/mobile/kjava/" folder. Three fault
reports may be saved, named
"fault_report<n>.xml", where
"fault_report1.xml" is the most recent and
"fault_report3.xml" is the least recent. Only
one fault report may be saved every session
to prevent the same report from being written
twice.
ber, containing the IMEI of the unit, and what
fault information is available.
containing a detailed report in XML format.
http://www.example.com An HTTP post request is sent to the address,
https://<web server address>
in which the post variable "fault_report" contains a detailed report in XML format.
B.3 CQA TESTING ROUTINES HANDLER
DM handles the CQA tests as part of the manufacturing process. DM implements several capabilities such as MT voice call and
serial port communication, which are tested in the factory.
This feature is enabled only in case there is no UM installed on the unit.
B.4 OTA PROVISIONING
DM handles OTA provisioning through WAP push messages (browser messages).
B.5 GPRS INDICATOR
DM "outputs" GPRS registration status to GPIO 11 - LOW represents registered, HIGH represents unregistered.
This feature is enabled only in case there is no UM installed on the unit.
50 6802981C50-C
Page 57

APPENDIX B - DEFAULT MIDlet FEATURES
B.6 SMS UPDATES / REQUESTS LISTENER
The DM starts an SMS listener which allows updates and requests to be sent to the unit. The SMS sent to this listener must meet
a specific format.
Upon initialization, the DM reads the OSC property "oem.dm.smslistener", if set to "on", which i s the default value, it starts
listening to SMS messages. To turn off the listener set the property to "off". Using these messages, updates and requests can be
sent to the unit.
B.6.1 Message Format
The SMS has to be sent to port 16001. The message is constructed from fields and values. The field and value are separated by
a colon, and the fields are separated by an LF (line feed, "\n") sign or a CR (carriage return, "\r") sign. LF and CR are treated as
the same character.
Example:
action:value
field1:value
field2:value
field3:value
Additional notes:
• Every message must contain an "action" field which defines the update or request type.
• The order of the fields has no importance.
• If there is more than one occurrence of a field, the last occurrence will be used.
• The field strings and value strings are not case-sensitive.
• All field strings and value strings are trimmed.
B.6.2 Messages Types
Supported messages:
• Java/Mms Session Update
• OTA Download Triggering
• Fault Report Addresses Update
• Fault Report Triggering
•Ping
B.6.2.1 Java/MMS Session Update
This message updates the "Java Session" or "Mms Session" web sessions.
Additional notes:
• The only difference between the two is the action field.
• If the message contains a field with an invalid value, the message is dismissed.
• To set a field to its default value, don't include the field in the message.
• The update replaces the full Web Session, not specific fields. Old values are not saved.
6802981C50-C 51
Page 58

APPENDIX B - DEFAULT MIDlet FEATURES
Message fields are given in the table below:
Description Field String Vali d Val ues Notes
Action to be performed (Update "Java
Session" or "Mms Session" web sessions)
Homepage homepage This field is used as a default
Service Type 1 service1 •wap
Proxy 1 proxy1
Port 1 port1 Default value is 8080
Domain 1 domain1
Service Type 2 Service2 •wap
Proxy 2 proxy2
action • java session
• mms session
• wap connectionless
•wap secure
• wap secure connectionless
•http
•http secure
• wap connectionless
•wap secure
• wap secure connectionless
•http
•http secure
This field defines the message
type.
This is a mandatory field.
OTA download URL.
Default value is http
Port 2 port2 Default value is 9201
Domain 2 domain2
DNS 1 dns1
DNS 2 dns2
Timeout (minutes) timeout •1
•2
•5
•10
•15
CSD No. 1 csd1
CSD No. 1 User Name csduser1
CSD No. 1 Password csdpass1
Speed (Bps) 1 speed1 • 2400
• 4800
• 9600
• 14400
Line T ype 1 line1 • modem
•isdn
CSD No. 2 csd2
Default value is 15
Default value is 14400
Default value is modem
52 6802981C50-C
Page 59

Description Field String Vali d Val ues Notes
CSD No. 2 User Name csduser2
CSD No. 2 Password csdpass2
Speed (Bps) 2 speed2 • 2400
• 4800
• 9600
• 14400
APPENDIX B - DEFAULT MIDlet FEATURES
Line T ype 2 line2 • modem
•isdn
GPRS APN apn
GPRS User Name gprsuser
GPRS Password gprspass
Default value is modem
Example: Update the Java Session
action:java session
homepage:http://www.domain.com/directory/midlet.jad
service1:wap
service2:wap
csd1:+972540000000
port1:9201
port2:9201
apn:internet
B.6.2.2 OTA (Over the Air) Download Trigger
This message triggers an OTA download of a new MIDlet to the unit. If the message does not specify a JAD file URL, the
homepage parameter of the "Java Session" web session will be used as a URL.
Message fields are given in the table below:
Description Field String Valid Values Notes
Action to be performed: OTA download
trigger
JAD File URL url
action
ota
This field defines the message
type.
This is a mandatory field.
Example 1: Download, install and run the MIDlet found at the homepage of the “Java Session” web session
action:ota
Example 2: Download, install and run the MIDlet found at http://www.domain.com/directory/midlet.jad
action:ota
url:http://www.domain.com/directory/midlet.jad
6802981C50-C 53
Page 60

APPENDIX B - DEFAULT MIDlet FEATURES
B.6.2.3 Fault Report Addresses Update
This message updates the fault report addresses of the unit.
Message fields are given in the table below:
Description Field String Valid Values Notes
Action to be performed: Update fault
report address
Report Address 1 address1 Must be a valid address
Report Address 2 address2 Must be a valid address
Report Address 3 address3 Must be a valid address
action
report address
This field defines the message
type.
This is a mandatory field.
Example 1: Update fault report address 1 to email://name@company.com.
action:report address
address1:email://name@company.com
Example 2: Update fault report address 1 to email://name@company.com, fault report address 2 to
email://anothername@anothercompany.com and don't use fault report address 3
action:report address
address1:email://name@company.com
address2:email://anothername@anothercompany.com
address3:
B.6.2.4 Request for Fault Report
This message commands the unit to report the fault information to its defined addresses. The report happens automatically when
the DM loads if there is fault information available.
Message fields are given in the table below:
Description Field String Valid Values Notes
Action to be performed: Report fault
information
action
fault report
This field defines the message
type.
This is a mandatory field.
Example: Report the fault information to the defined addresses.
action:fault report
B.6.2.5 Ping
This message is used to verify if the unit is working. When the DM receives this message, it returns a message to the sender
containing the text "Ping (Motorola Wireless Modules)".
54 6802981C50-C
Page 61

Message fields are given in the table below:
Description Field String Valid Values Notes
APPENDIX B - DEFAULT MIDlet FEATURES
Action to be performed: Ping the unit action
Example: Ping the unit.
action:ping
fping
This field defines the message
type.
This is a mandatory field.
6802981C50-C 55
Page 62

APPENDIX B - DEFAULT MIDlet FEATURES
56 6802981C50-C
Page 63

7. APPENDIX C - GPIO INTERRUPT
LATENCY
C.1 INTRODUCTION
In order to achieve minimal average interrupt latency (HW I/O to Java) one should understand JVM limitation, and how to
manipulate code accordingly.
Java VM provides limited RT abilities. Programming in a multithreading environment while trying to ensure strict RT scheduling, is an impossible mission. As a result, working in such an environment will cause interrupt latency to be inconsistent,
specially when parallel threads consume large amount of VM resource (i.e. +UDP or HTTP connection).
C.2 MULTITHREADING BACKGROUND
A basic understanding of how to use threads is the key to writing effective J2ME applications. Some import ant issues about
multithreaded environments are listed below:
1. Scheduling
Thread scheduling is a complicated affair over which the application has little control. The KVM scheduler allocates byte
code slot for current running thread (classical OS uses run time slot). It impossible to ensure fix run time for a fixed num
ber of bytes code slot.
2. Priority
The only real influence the application has over thread scheduling is via the thread's priority level: higher-priority threads
execute more often than those with lower priority (default thread priority is NORAML PRIORITY).
A thread keeps running until:
• It yields by calling the yield method
• The scheduler selects new thread to run
3. Garbage collection
Has higher priority then any other user thread, therefore will always have precedence over user thread.
This behavior may cause inconsistent interrupt performance.
C.3 HOW TO ACHIVE MINIMAL LATENCY
Limited control over JVM scheduling mechanism can be achieved using Thread class:
• Thread.setPriority(priority level) -
This method enables user to adjust, in runtime, the current thread priority (range is from MIN_PRIORITY to
MAX_PRIORITY).
• Thread.yield() -
This method enforces current thread to give up the CPU resource.
In order to create minimal average interrupt latency, one should set interrupt thread (Nat iveExtEventThread) priority to the
maximum level, other threads to the lower one and limit those threads execution time by using yield function (if not used, inter
rupt thread can be delayed for a significant amount of time: 40-50 milliseconds).
-
-
6802981C50-C 57
Page 64

APPENDIX C - GPIO INTERRUPT LATENCY
C.4 CODE EXAMPLE
The following code example demonstrates the use of the above sections:
public class myMidlet extends MIDlet implements GpioInterruptListener{
void startApp(){
// Define gpio 15 as input and enable interrupts on it.
GpioInput gpioInput = new GpioInput(15);
GpioInterruptConfig gpioInterruptConfig = new GpioInterruptCo nfig(this);
gpioInterruptConfig.enableDebounce(false);
gpioInterruptConfig.setNotificationType(GpioInterruptConfig.NOTIFICATION_TYPE_LOW_TO_HIGH);
gpioInput.enableInterrupt(gpioInterruptConfig);
// Start the HTTPConnection thread.
HTTPConnection myHttp = new HTTPConnecti on("http:// www. domain. com");
myHttp.start();
}
…
public void onInterrupt(int gpioNum, boolean val) {
// Set onInterrupt thread priority to MAX pr iority.
Thread.currentThread().setPriority(Thread.MAX_PRIORITY);
}
// HTTPConnection is used to demonstrate VM resource consuming thread.
protected class HTTPConnection extends Thread{
private String url ;
private HttpConnection conn;
private InputStream iStream;
public HTTPConnection(String Url){
// Set HTTP connection thread priority to MIN priority.
this.setPriority(this.MIN_PRIORITY);
this.url = Url;
}
public void run(){
conn = (HttpConnection)Connector.open(ur l, Co nnector.R EAD, tr ue);
iStream = conn.openInputStream();
while(true){
iStream.read();
// HTTPConnection thread yield the CPU after each reading.
this.yield();
}
}
}
}
58 6802981C50-C
Page 65

5. APPENDIX D - MIDlet SIGNING
D.1 GENERAL
There are two types of MIDlet signing:
• Generic signing
• Bound signing
D.2 GENERIC SIGNING
Generically signed MIDlet can be downloaded to all G24 units. Once a MIDlet is tested and ready for deployment to production,
it will be generically signed.
Only the manufacturer (Motorola Wireless Modules) can generically sign a MIDlet.
To request a generic signature, refer to M2MCare@motorola.com.
D.3 BOUND SIGNING
Bound signed MIDlet can be downloaded to a specific G24 unit. In development phase, in order to download a trusted MIDlet
to a G24 unit, it should be "bound signed".
All the tools and documentation for establishing "bound signing" procedure are l ocated in the "BoundSignBundle.zip" file,
located at
The document "Signing a MIDlet with a BOUND Certificate (External Release)" details all the necessary steps to receive a
"bound certificate".
The above procedure allows signing a MIDlet using a special certificate, called "bound certificate". Such a certificate is tied to
the UID of the G24 unit.
Below is a summary of all the steps necessary for the developer to follow, in order to establish a "bound signing" procedure:
1. Download the "BoundSignBundle.zip" file.
2. Set up the digital signing environment by performing steps 2.2.1, 2.2.2, 2.2.3 and 2.2.4 from the "Signing a MIDlet with a
3. Create a Certificate Signing Request and collect UIDs by performing steps 10, 11, 12 from chapter 2.2.5 of the above docu-
4. Fill in all the "G24_Bound_Cert_Request_Form_182-1.doc" will all the UIDs collected in the previous step (maximum 10
http://developer.motorola.com/products/embeddeddevices/g24.
BOUND Certificate (External Release)" document.
ment.
UIDs per request).
5. Send the "example.csr" file created in step 2 and the "G24_Bound_Cert_Req uest_Form_182-1.doc" created in step 4 to
M2MCare@motorola.com. You will receive from Motorola a bound certificate within a few days.
6802981C50-C 59
Page 66

APPENDIX D - MIDlet SIGNING
6. Upon receiving the "Bound Certificate" (.crt) file from Motorola, you should create a directory for G24 in the following
location: C:\BOUND_Certificate\cert\G24.
7. Place the "Bound Certificate" (.crt) file at the following location:
C:\BOUND_Certificate\cert\G24
It is important to preserve the above path since an automatic tool relays on it.
8. Open a command window and run the "BoundSign.bat" batch file as follows:
BoundSign.bat UserMIDlet 182-1.X
Where:
- "UserMIDlet" is the name of your midlet (without the jad or jar suffix).
- "182-1.X" is the certificate file name you received from Motorola without the crt suffix.
The "BoundSign.bat" batch file performs all the steps listed in chapter 2.2.6 of
"Signing a MIDlet with a BOUND Certificate (External Release)" document.
60 6802981C50-C
Page 67

4. APPENDIX E - IP DIRECTOR
Note
E.1 USING THE IPD FEATURE
The external device will trigger the IPD state changes via a serial connectivity. There are two applicable java modes for the IPD:
1. Partial java mode 2.
2. Partial java mode 3.
See OSC.setProperty("oem.mode", <mode-string>)
E.2 IPD CONFIGURATION
Configurable parameters are:
1. UM fixed IP - the MIDlet will be assigned a fixed IP by the IPD.
2. UM fixed Port - the MIDlet will be able to listen on a fixed Port Id which is recognized by the IPD (for server mode only).
3. External device fixed IP - the external device will be assigned a fixed IP by the IPD
The default configuration is:
1. UM fixed IP - 192.168.1.1.
2. UM fixed Port - 5001.
3. External device fixed IP - 192.168.1.2.
Reconfiguring of the IP addresses and port number can be done by using AT+MIAU command (see G24 AT Commands Reference Manual).
E.3 IPD ACTIVATION
The External device will generally have to establish a PPP link over serial, in order to activate the IPD. This can be done in one
of two ways:
1. With GPRS
Issue ATD*99# command and establish PPP link (GPRS dialup). In this case the cellular network will assign an IP
address (IP4 in the figure below) to the external device. External device may communicate with outside world Internet
and the UM using the same PPP link.
Although IP4 is different from IP2, the IPD handles MIDlet IP packets destined to IP2 and redirects them to IP4.
6802981C50-C 61
Page 68

APPENDIX E - IP DIRECTOR
Note
2. Without GPRS
Issue AT+MDLC command and establish PPP link. In this case the IPD will assign the fixed (A T+MIAU configured) preset IP (IP2 in the figure below), to the External device. The external device may communicate with UM sockets, but not
with the Internet.
For testing purposes only, ATD*98# command will establish same PPP link with Windows dialer.
In both cases, the MIDlet is notified of the IPD new state by the IpDirectorAvailabilityListener.
While IPD is active, the External device may access any open MIDlet socket by using the UM fixed IP (IP1 in the figure below)
as DA.
Figure 9. IPD Active
E.4 IPD DEACTIVATION
One of the following actions will deactivate the IPD:
1. External device terminated PPP by sending LCP-Terminate message.
2. External device dropped DTR line.
62 6802981C50-C
Page 69

APPENDIX E - IP DIRECTOR
Note
This will drop the PPP link in both cases (with and w/o GPRS) and will restore serial to AT command mode. The MIDlet is
notified of the IPD new state by the IpDirectorAvailabilityListener. From this point on, the External device <--> MIDlet IP
connection (local socket service) is unavailable.
Figure 10. IPD Inactive
E.5 OTA (OVER THE AIR) OVER SERIAL PPP LINK
Generally, OTA process is done using WAP2.0 or HTTP1.1 prot ocols. HTTP is the recommended one. The external device
processor should comply with MIDP2.0 specification section 2.1.10 in order to succeed with the OTA download.
Please be aware that startOTA(String MIDletURL) method usually uses the Java Session as Web Session settings.
The only Web Session obligation here is that proxy server's parameters 'proxy1' and 'proxy2' should remain empty
during OTA over Serial process. The recommendation is to create one dedicated Web Session record for OTA over
Serial without proxy settings and with a dummy APN value in it. Then use index = addWebSession(newWS) right
before startOTA(index) call.
6802981C50-C 63
Page 70

APPENDIX E - IP DIRECTOR
64 6802981C50-C
Page 71

Page 72

@6802981C50@
6802981C50-C
MOTOROLA and the Stylized M Logo are registered in the US Patent & Trademark Office.
All other product or service names are the property of their respective owners.
©Copyright 2007 Motorola, Inc.
Java™ Technology and/or J2ME™ : Java and all other Java–based marks are trademarks or registered
trademarks of Sun Microsystems, Inc. in the U.S. and other countries.
UNIX® : UNIX is a registered trademark of The Open Group in the United States and other countries.
 Loading...