

Page 1
A
UIDE
G
S
’
SER
U
™
™
Page 2

CONTENTS
INTRODUCTION . . . . . . . . . . . . . . . . . . . . . . . . . .1
EXCITING FLEX TECHNOLOGY . . . . . . . . . . . . . . 1
EFFECTIVE USE OF YOUR PAGER . . . . . . . . . . . . 1
ABOUT THIS USER’S GUIDE . . . . . . . . . . . . . . . . . 2
OPERATING YOUR PAGER . . . . . . . . . . . . . . . . . . 2
CONTROLS . . . . . . . . . . . . . . . . . . . . . . . . . . . . . . 3
INDICATOR SYMBOLS . . . . . . . . . . . . . . . . . . . . . 3
TURNING YOUR PAGER ON AND OFF . . . . . . . . . 4
TURNING THE LIGHT ON AND OFF . . . . . . . . . . .5
SETTING THE TIME AND DATE . . . . . . . . . . . . . . . 5
SETTING THE INCOMING MESSAGE ALERT . . . .7
SETTING THE PLEASING ALERTS . . . . . . . . . . . . 7
RECEIVING AND READING MESSAGES . . . . . . . . 8
PROTECTING AND UNPROTECTING YOUR
MESSAGES . . . . . . . . . . . . . . . . . . . . . . . . . . . . . 10
ERASING MESSAGES . . . . . . . . . . . . . . . . . . . . . 11
SETTING THE ALARM . . . . . . . . . . . . . . . . . . . . . 11
AUTOMATIC ON/OFF . . . . . . . . . . . . . . . . . . . . .13
FEATURES . . . . . . . . . . . . . . . . . . . . . . . . . . . . . .14
BATTERY INFORMATION . . . . . . . . . . . . . . . . . . 15
CARE AND MAINTENANCE . . . . . . . . . . . . . . . . . 17
CLEANING YOUR PAGER . . . . . . . . . . . . . . . . . . 17
PATENT INFORMATION . . . . . . . . . . . . . . . . . . .17
PAGE
ii
Page 3

INTRODUCTION
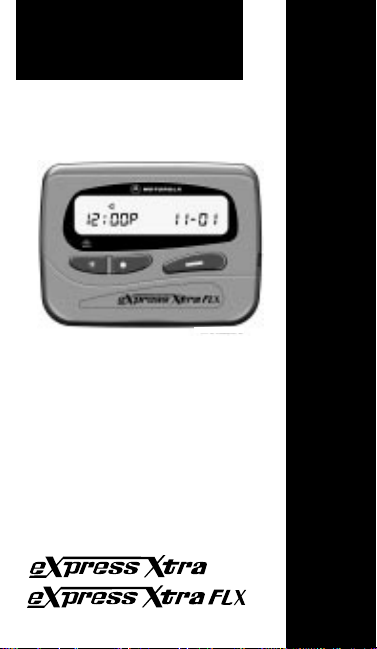
Congratulations on your purchase of a Motorola
Express Xtra™ or Express Xtra FLX™ pager. Your
new pager allows you to receive numeric messages
instantly and affordably. The Express Xtra or
Express Xtra FLX pager provides many enhanced
features and can be a vital part of your personal and
business life management. The compact pager incorporates the most advanced electronic, microminiaturization and wireless technologies.
EXCITING FLEX TECHNOLOGY
If your pager incorporates the latest in paging technology - FLEX TECHNOLOGY - you can enjoy many
benefits. FLEX technology extends battery life up to
four times longer than ordinary pagers, saving you
time and money. As a Motorola FLEX pager user,
you can feel more confident in receiving your pages
because FLEX technology improves the ability to receive pages. FLEX technology has been developed
by Motorola, the leader in paging innovation and
quality.
EFFECTIVE USE OF YOUR PAGER
Your pager can help you keep in contact with everyone important to you . . . your children, child care providers, business office, family, and friends. Be sure
your children’s school, physician, family, and friends
have your pager number so you can be contacted
when necessary.
If you have a cellular phone, give your pager number
instead of your cellular number. Then you can decide
who to call back on your cellular phone without paying for incoming cellular calls.
e
1
Page 4
ABOUT THIS USER’S GUIDE
This user’s guide explains how to operate your pager
and provides suggestions for first-time as well as experienced pager users.
Please note: If you have used a BRAVO
an Ultra Express™ or an Ultra Express FLX™ pager,
®
Express,
the Express Xtra and Express Xtra FLX pagers have
enhanced operation. Review this user’s guide to get
the most from your pager. Keep this guide handy for
quick reference.
OPERATING YOUR PAGER
Your pager receives pages only when it is turned on.
2
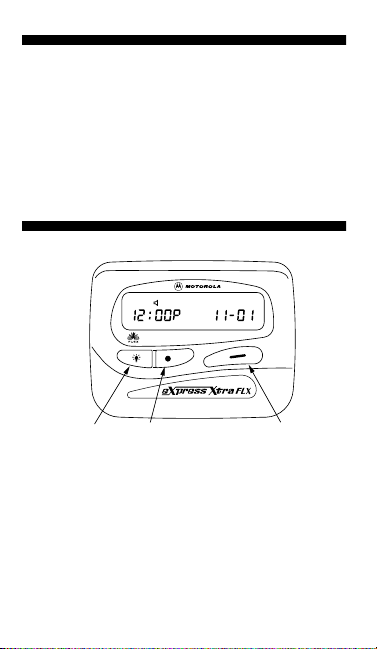
LIGHT/RESET
BUTTON
MODE
BUTTON
e
READ/SELECT
BUTTON
AIPB-962502-O
Page 5

CONTROLS
The Read/Select button ] is used to turn the pager on, display messages and select pager functions.
The Mode button \ is used to scan pager modes.
The Light/Reset button
pager’s LCD backlight, and return the pager to the
standby mode.
INDICATOR SYMBOLS
E
Audible mode
D
Vibrate or no alert (silent) mode
QR
Message indicator (flashes)
I
Message continuation
K
Duplicate message
F
Protected message
J
Pager alarm activated
A
Automatic turn on/off activated
G
Out of range
H
Low-battery
is used to turn on the
[
e
3
Page 6

TURNING YOUR PAGER ON AND OFF
Press ] to turn your pager on. An alert indicator
(E
or D
) indicates the pager is on and ready to re-
ceive messages.
When the pager is on and no activity is taking place,
the standby screen is displayed. The standby screen
displays the time and date, the alert mode, and other
pager indications such as the unread message indicator and the auto on/off indicator.
D
11:28a 11-03
Example of the standby screen (pager on)
➊
To turn your pager off, press and release \ until
pager off ?
➋
Press ].
The time of day and the date are displayed even
when the pager is turned off.
is displayed.
11:28a 11-03
Example of the standby screen (pager off)
4
e
Page 7

TURNING THE LIGHT ON AND OFF
➊
Press [ at any time to turn the light on.
➋
Press [ again to turn the light off and return to
the standby screen.
SETTING THE TIME AND DATE
Setting the Time:
➊
Press and release \ until
played.
➋
Press ]. The hour digits begin to flash. Press
and release \ to set the hour digits.
set time ?
D
11:28a
Example of set-time screen
➌
Press ]. The first digit of the minutes flashes.
Press and release \
minutes.
➍
Press ]
es. Press and release \ to set the second digit
of the minutes.
. The second digit of the minutes flash-
to set the first digit of the
is dis-
e
5
Page 8

Note: If your pager was previously set for 24-hour
time format, step 5 is omitted.
]
➎
Press
Press and release \ to select a or p.
➏
Pres
. The A.M./P.M. indicator flashes.
s ]
. The 12/24-hour indicator flashes.
Press and release \ to select 12- or 24-hour
time format.
Note: If ] is pressed after step 6, your pager returns to the time-setting function.
➐
Allow the pager to automatically return to the
standby screen, or press
[ twice to return to the
standby screen.
Setting the Date:
➊ Press and release
\ until set date ? is dis-
played.
➋ Press ]. The month digits flashes.
➌ Press and release
➍ Press
]. The da y digits flashes.
➎ Press and release
Note: If
] is pressed after step 5, your pager re-
\ to set the month digits .
\ to set the da y digits .
turns to the date-setting function.
➏ Allow the pager to automatically return to the
standby screen, or press
[ twice to return to the
standby screen.
6
e
Page 9

SETTING THE INCOMING MESSAGE ALERT
You can set your pager to alert with a vibrating alert
(vibration with no alert tone), an audio alert (audible
with pleasing alert), a chirp alert (short beep alert), or
no alert (completely silent).
➊ Press and release
played.
\ until set alert ? is dis-
➋ Press ].
➌ Press and release
?
, audio ?, chirp ?, or no alert ? is displayed.
➍ To change the alert mode, press
\ until y our choice of vibrate
] while your
choice is displayed.
Note: If Audio is selected, your pager automatically
goes into the Set Pleasing Alert mode.
SETTING THE PLEASING ALERTS
You can set your pager to alert with one of seven
pleasing alerts.
➊ Press and release
played.
\ until set alert ? is dis-
➋ Press ].
➌ Press and release
➍ Press
].
➎ Press and release
\ until audio ? is displayed.
\ until your choice of Alert 1,
Alert 2, Alert 3, Alert 4, Alert 5, Alert 6, or Alert 7 is
displayed. The pager gives a sample of each alert
while scrolling through the pleasing alerts menu.
➏ Press ] to activate your selection and return to
the standby screen.
e 7
Page 10

RECEIVING AND READING MESSAGES
When a message is received, the pager alerts (vibration, audible, or chirp) for eight seconds, unless the
pager is set to No Alert. A flashing message indicator
(for example
ner of the standby screen lets you know how many
QR, QS, etc.) in the upper left-hand cor-
messages you have received.
➊ Press any button to stop the alert.
] to displa y the message . The message
➋ Press
number is displayed in the upper left-hand corner
of the message screen.
] again to display the second screen of
➌ Press
the message.
➍ Allow the pager to automatically return to the
standby screen, or press
[ twice to return to the
standby screen.
A I in the upper right-hand corner of the message
screen indicates the message is continued on an additional screen. The next screen is automatically displayed, or you can press
screen. The last screen of the message displays the
] to display the next
time the message was received.
8 e
Page 11

QR D B
555-1234
Example of a message screen
with message continuation indicator
If messages are left unread, the pager gives a reminder alert every two minutes, unless the pager is
set to No Alert. The number of unread messages
flashes in the upper left-hand corner of the standby
screen (for example,
Note: You need to read all messages for the pager to
reset the unread message counter.
QR, QS, QT).
e 9
Page 12

PROTECTING AND UNPROTECTING YOUR MESSAGES
You can protect up to ten messages so they are not
erased or replaced by new messages.
To protect a message:
➊ While the message is displayed, press and re-
\ until protect ? is displayed.
lease
➋ Press
].
When reading a protected message,
in the upper portion of the screen.
To unprotect a message:
➊ While the message is displayed, press and re-
\ until unprotect ? is displayed.
lease
➋ Press
]. The F symbol is no longer displayed.
D F
QR
F is displayed
555-1234
Example of a protected message
10 e
Page 13

ERASING MESSAGES
Erasing Individual Messages:
➊ While the message is displayed, press and re-
\ until erase ? is displayed.
lease
➋ Press
]. All remaining messages are mo ved to
the next available message slot.
Erasing All Messages:
➊ Press and release \ until erase all ? is dis-
played.
➋ Press ]. All read and unprotected messages
are erased from memory.
SETTING THE ALARM
You can set your pager’s alarm to alert at a certain
time of day.
To enable the alarm:
➊ Press and release
played.
\ until set alarm ? is dis-
➋ Press ]. The on/off indicator flashes.
➌ Press and release \ until your choice of on (au-
dible alarm alert) or
➍ Press
].
vib (vibrate alarm alert).
e 11
Page 14

Follow the time-setting instructions on page 5 to set
the time for the alarm to occur.
When the alarm is enabled,
standby screen, even if the pager is turned off.
D J
J is displayed on the
11:28p 11-01
Example of standby screen with alarm enabled
To disable the alarm:
➊ Press and release
played.
➋ Press ].
➌ Press and release \ until off is displayed.
➍ Allow the pager to automatically return to the
standby screen, or press [ twice to return to the
standby screen.
\ until set alarm ? is dis-
12 e
Page 15

AUTOMATIC ON/OFF
You can set your pager to turn on or turn off at a selected time of day.
To enable automatic on/off:
➊ Press and release
played.
➋ Press ].
When the automatic on/off feature is enabled,
displayed on the standby screen, even when the
pager is turned off.
B
\ until pager auto ? is dis-
A is
11:28p 11-01
Example of standby screen with automatic on/off enabled
To set the on/off times:
➊ Press and release
played.
➋ Press ].
Follow the time-setting instructions page 5 to set the
on and off times.
To disable automatic on/off:
➊ Press and release
played.
➋ Press ].
The pager automatically returns to the standby
screen and A is removed from the display.
\ until set auto ? is dis-
\ until pgr manual ? is dis-
e 13
Page 16

FEATURES
Time of Day/Month and Day: The time of day and
the month and day are displayed even when the pager is off.
Pleasing Alerts: Your pager can alert you of new
messages with one of seven pleasing musical
sounds.
Message Protect: Up to ten messages can be protected so they are not erased.
Automatic Reset: Pager alerts automatically stop,
even if you do not press any of the pager’s buttons.
Reminder Chirp: The pager chirps or vibrates every
two minutes until you read all unread messages, unless the pager is set to No Alert.
Low-Battery Indicator: When the battery level is
low, the low-battery symbol H is displayed in the upper portion of the screen and the pager gives a twosecond alert. Replace the battery within five days after the first appearance of the low-battery symbol.
Timestamp: The time of day a message was received is displayed on the last screen of the message.
Message Erase: Messages which are no longer
needed, can be erased to free up space for new
messages. Messages can be erased individually, or
all read unprotected (unlocked) messages can be
erased at once.
Duplicate Message Indicator: If a message is received that is exactly the same as a message already in memory, K is displayed in the upper portion of the screen while reading the message. The original message is updated with the timestamp of the newest message.
14 e
Page 17

Out of Range: With this option enabled, G is dis- played in the upper portion of the screen when your pager is located outside of your paging coverage area. G is no longer displayed when you return to your coverage area.
Memory Capacity: The pager can store up to twenty
20-character messages, or a total of 400 characters.
Memory Retention: All messages remain in memory
even when the pager is turned off. Note: Messages
are not retained when changing the battery, however, the pager alert settings are retained.
Backlight: In low-light conditions, the pager’s backlight makes the screen easy to read.
Personal Alarm: The personal alarm can be set to
alert you of a certain time, and operates even when
the pager is turned off.
Automatic On/Off: Your pager can be set to turn on or turn off at a selected time of day.
BATTERY INFORMATION
The Express Xtra and Express Xtra FLX pagers operate with one AAA-size alkaline battery.
Note: To retain pager alert settings, turn the pager off
before removing the old battery. Messages are not
retained when replacing the battery.
➊ T urn your pager off .
➋ To remove the old battery, slide the battery door
lock towards the top of the pager to unlock the bat-
tery door.
e 15
Page 18

➌ While pressing on the battery door, slide the door
until the ribs on the battery door and the ribs on
the back cover are aligned. Lift the battery door to
free it from the housing.
➍ Align the new battery so the positive (+) and nega-
tive (–) markings match the direction of the polarity
diagram in the battery compartment, and insert
the battery.
➎ To replace the battery door, align the grooves on
the battery door with the grooves on the back cover.
➏ Slide the battery door lock toward the bottom of
the pager to lock the battery door.
Battery
Door
Lock
Ribs
Slide to open
AIPB-962701-O
16 e
Page 19

CARE AND MAINTENANCE
The Express Xtra and Express Xtra FLX pagers are
durable, reliable, and can provide years of dependable service; however, it is a precision electronic
product. Water and moisture, excessive heat, and
extreme shock may damage the pager. Do not expose your pager to these conditions.
If service is required, Motorola’s Service Organization, staffed with specially trained technicians, offers
conveniently located repair and maintenance facilities throughout the world. Please contact your paging service provider or a Motorola sales office for
more information.
CLEANING YOUR PAGER
To clean smudges and grime from the exterior of
your pager, use a soft, non-abrasive cloth moistened
in a mild soap and water solution. Use a second cloth
moistened in clean water to wipe the surface clean.
Do not immerse in water. Do not use alcohol or other
cleaning solutions.
PATENT INFORMATION
This Motorola product is manufactured under one or
more Motorola U.S. patents. These patent numbers
are listed inside the housing of this product. Other
U.S. patents for this product are pending.
FUNCTIONALITY AND USE OF YOUR PAGER
For questions pertaining to the functions and use of
your pager, please call 1-800-548-9954. For questions pertaining to your paging service, contact your
paging service provider.
e 17
Page 20

t, Motorola, Express Xtra, Express Xtra FLX, E,
Bravo Express, Ultra Express, and Ultra Express FLX
are trademarks or registered trademarks of Motorola, Inc.
© 1996 by Motorola, Inc. All Rights Reserved.
1500 Gateway Blvd., Boynton Beach, FL 33426-8292
Paging Products Group
Printed in U.S.A. 10/96
@6881027B85@
6881027B85-O
e
 Loading...