

Page 1
r
p
DSR 550 Satellite Receiver
Download Installation Manual
To Be Used with Initial Production Units ONLY
Note: Screen content displayed in this manual will vary. This
depicts a beta version of the firmware, and does not represent
the final look and feel of the product.
22 October 2003
Proprietary Information
All information contained in this document is confidential and proprietary to Motorola, Inc. Broadband Communications Sector. No license, expressed or implied,
under any patent, copyright or trade secret right is granted or implied by the conveyance of this document. No part of this document may be reproduced, transmitted,
transcribed, stored in a retrieval system, translated into any language or computer language, in any form or by any means, electronic, mechanical, magnetic, optical,
chemical, manual, or otherwise without the prior written permission of Motorola, Inc. Broadband Communications Sector. (See Document Security Standard,
320190-000 for details.)
MOTOROLA, the Stylized M Logo and all other trademarks indicated as such herein are trademarks of Motorola, Inc. ® Reg. U.S. Pat. & Tm. Off. All othe
roduct or service names are the property of their respective owners.
Copyright © 2000-2003 Motorola, Inc. All rights reserved.
Page 2
This Motorola document is intended to assist an installer on installation, download, and activation process for
the DSR550 satellite receiver set-top box (STB).
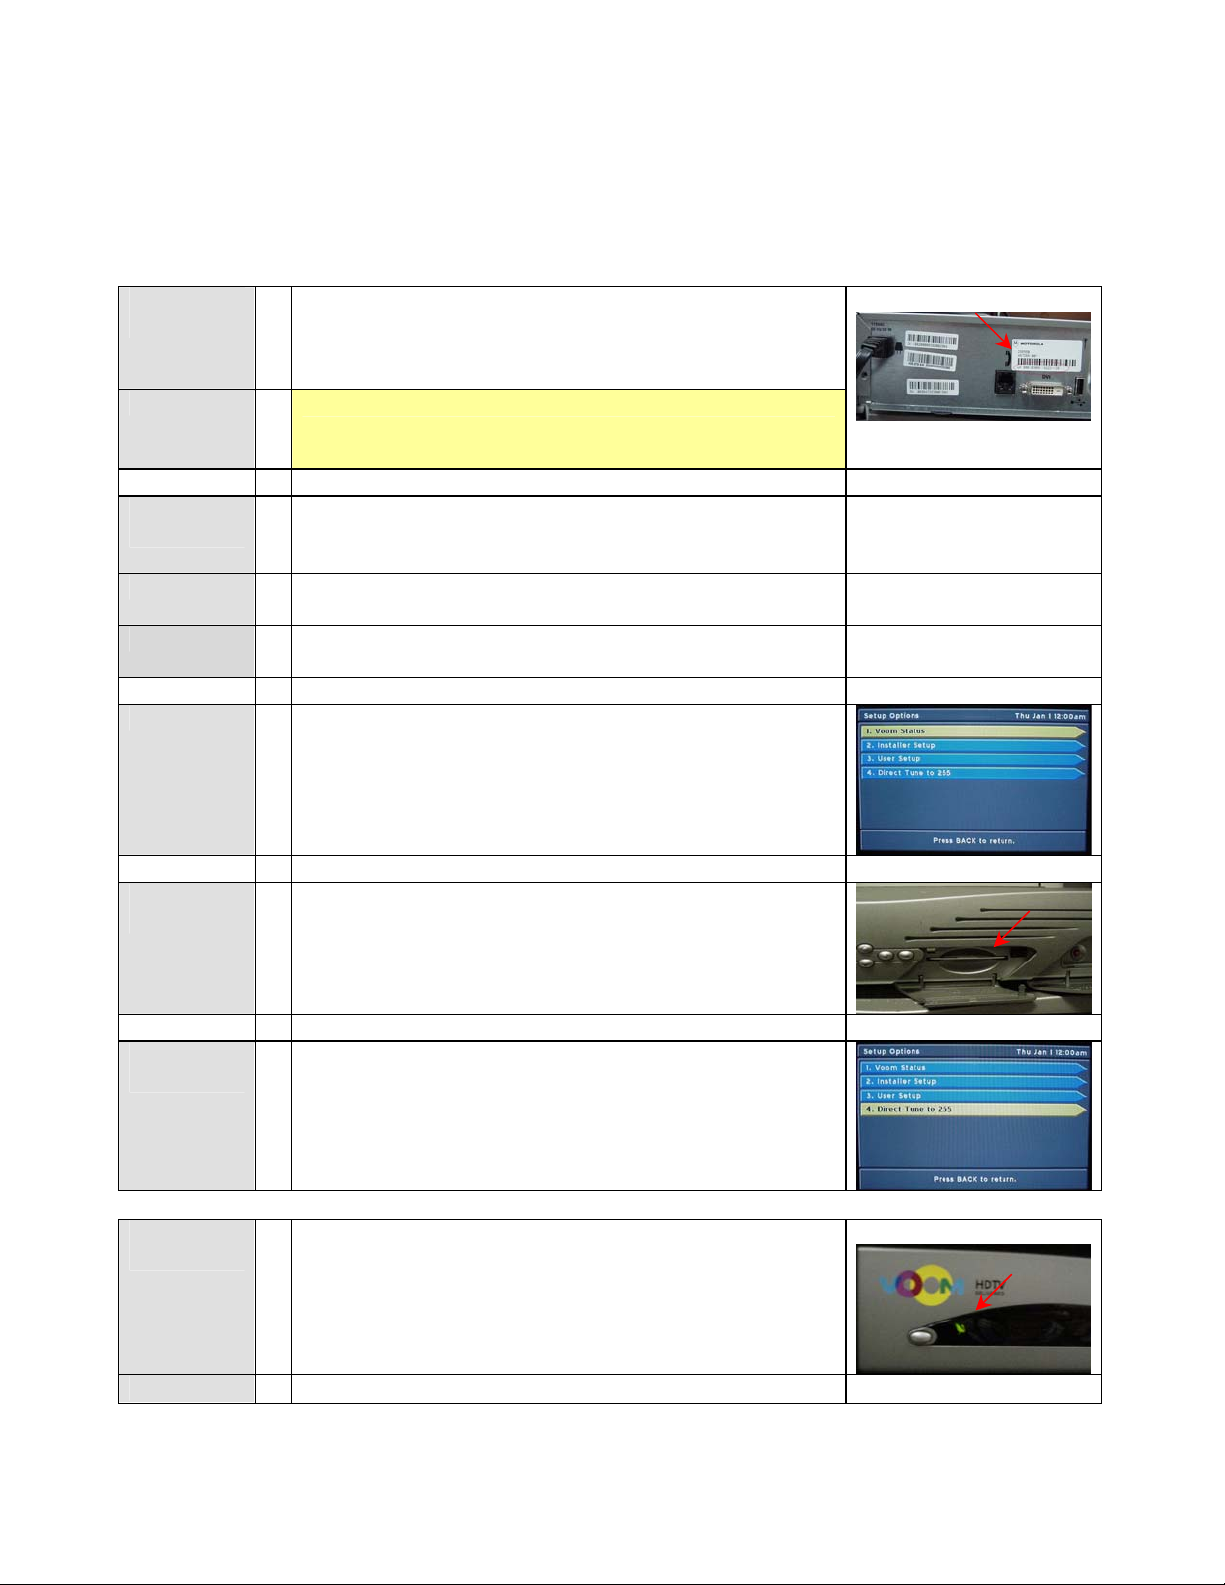
Record STB
unit address
Please record the STB unit address (UA) located on the
label on the rear panel of the STB. It is in the format:
000-XXXXX-XXXXX-XXX. This is required for
authorization later in the process.
9
U/A: 000 - __________ - __________ - ______
Initial
Assumptions
Outdoor electronics are installed and peaked at the Rainbow
1 satellite. Antenna and diplexor are properly wired to
STB.
STB is wired to television via RCA or remod outputs for
installation process only.
HD Component connections should be wired for Final
Configuration.
Plug in STB
The STB will require less than 1 minute to fully power up.
When the power up is completed, a Setup Options screen
will appear.
Verify
Smartcard
Open up the smartcard front panel on the STB to verify that
the smartcard is in place. If no smartcard is present, please
notify Installs, Inc. of missing smartcard. A missing
smartcard will prevent video from being viewed.
Tune
Satellite
From the Setup Options screen menu, use the remote
control unit (RCU) to select option 4. Direct Tune to 255.
Verify DCII
Signal
Wait about 1 minute. A green satellite dish icon will appear
on the STB front panel display. This indicates that you
have acquired the correct Rainbow 1 signal are ready to
receive authorization. If the icon remains red, it indicates a
problem with antenna dish pointing angle, or the wiring
between the antenna electronics and the STB.
If the green satellite dish icon does not appear, you can
2
P
1
P
AAGGEE
OOFF
1
44
Page 3

verify that your signal strength is at an acceptable level by
b
pressing option 2. Installer Setup, then option 1. Tune
Satellite Signal.
View Status
Screen
The Signal Level Number should be about 30. The signal
strength meter bar should be green as well. Press the back
key on the RCU to get back to the Setup Options screen.
The STB is now ready to be authorized. Please pull up the
following screen to monitor the authorization process.
Note: If you have already received trips on a prior
installation, the receiver may go directly to cycling the
‘Light Pipes’ in the Download Operation step. If so, go to
the Download Operation step.
Select Option 2. Installer Setup.
Selection Option 2. Reportback.
The following menu will appear. The Trip Count field
should be zero (0). After authorization (see step below),
this field will increment indicating successful authorization.
Getting
Activated
Call the VoOm Call Center: (866) 522-8666 and tell the
ICOMs operator that you wish to have a Cablevision VoOm
unit activated. Provide the VoOm account number from
your workorder. The VoOm account number is the only
information you should provide to the VoOm CSR to look
up the customer. Ask them to authorize and have a
“refresh” (instant trip) sent to the unit. Provide the
serial number to the operator, and request that they send
multiple trips. Keep the operator on the phone until the
next step is completed.
If the Trip Counter field does not increment, and the TV
After a few seconds, the Trip Count field will increment,
the TV screen will go black, and the STB front panel amber
“light pipes” will begin to cycle/flash.
does not go black, the STB has not received the
authorization messages. Verify the correct unit address has
een recorded by looking at the rear panel label again.
Verify that the operator has used that exact U/A when
creating and authorizing the unit. Ask the operator if they
have authorized the unit with the correct tiers and channel
map.
3
Page 4

Download
Operation
VoOm!
After the front panel amber “light pipes” have been blinking
for about 1 minute, pull the plug and power cycle the STB.
The “Download In Progress” screen will automatically
appear on the channel ¾ or the Composite Input on the TV.
The download screen is not visible on the Component Input
on the TV. The row that starts with DL: shows how far
along the download is. The last number in that row will
count down to zero (0) as the download files are received.
The download should take less than 20 minutes to complete.
There is a timer in the top right corner that should continue
to move. If the timer stops, wait a few minutes. If the timer
does not start to move again, call for assistance.
After the download is complete, the TV screen will go
black, and the STB front panel amber “light pipes” will
begin to cycle/flash.
Wait about 2 minutes for this operation to complete.
Note: Download files are delivered over the satellite in a
carousel manner. If the STB misses a file due to bad
weather, poor dish alignment, or some other anomaly, the
unit will have to wait until another pass of that file is
delivered over the satellite.
After 2 minutes, the unit should automatically reboot, and
you should be watching TV! If after 3 minutes, the “light
pipes” are still flashing, pull the plug to reboot the STB.
Congratulations, download and initial activation is
complete! The STB video outputs may now be connected to
any of the standard definition or high definition TV or home
theatre video components in the homeowners system. The
video mode button may have to be pressed to match the
output mode of the viewing device. Once this is set, it
should not have to be set again. The lightbars (from top to
bottom) indicate the following video modes: 1080i,
720p,480p, 480i).
4
 Loading...