

Page 1

DSR205
User Guide
Page 2

This use r guide is for use with DSR205 Digital Satellit e Receivers
Publicati on #516581-001
Rev A
All Rights Reserved
General Instrument Corporation doi ng business as the
Broadband Communications Sector of Motorola, Inc. (Motorol a BCS)
6450 Sequence Dr .
San Diego, California 92121
Internet: http/ /www.mot.com
Copyright © 2004 Motorola, Inc.
All rights reserved. No part of this publication may be reproduced in an y form or by any
means or used to make any derivative wor k (such as translation, tr ansforma tion or
adaptation) without written permission from Motorola, Inc.
Motorola reserves the right to revise this publication and to make cha nges in content from
time to tim e w ithout obligation on the pa rt of Motorola to provide notification of such
revision or change. Motor ola provides this guide without warranty of any kind, either
implied or expressed, including but not limited to, the implied warranties of
merchant ability and fitness for a particular purpose. Motorola may make improvements
or change s in the product (s) described in this manual at any time.
Page 3
IMPORTANT SAFETY
INSTRUCTIONS
WARNING: "DANGER OF EXPLOSION IF BATTERY IS INCORRECTLY REPLACED.
REPLACE ONLY WITH THE SAME OR EQUIVALENT TYPE." To reduce the risk of fire or
electric shock, do not expose this unit to rain or moisture. Do not open the unit. Refer servicing to
qualified personnel only.
CAUTION: TO PREVENT ELECTRIC SHOCK, MATCH WIDE BLADE OF PLUG TO
WIDE SLOT, FULLY INSERT. To prevent electric shock, do not use this (polarized) plug with an
extension cord receptacle or other outlet unless the blades can be fully inserted to prevent blade exposure.
Ligh t ning Flash Icon. The lightning flash with arrowhead symbol within an
equilateral triangle is intended to alert the user to the presence of un-insulated “dangerous
voltage” within the product’s housing that may be strong enough to constitute a risk of
electric shock to persons.
Exclamation Point Icon. The exclamation point within an equilateral triangle is
intended to alert the user to the presence of important operating and maintenance (servicing)
instructions in the literature accompanying the appliance.
This digital apparatus does not exceed the Class A/Class B (whichever is applicable) limits
for rad io noise emissions from digital apparatus as set out in the Radio Interference
Regulations of the Canadia n D epartment of Communi cations .
Read, Follow and Keep Inst ructions. Before you operate the unit, read and
follow all of the safety and operating instructions. Keep the safety and operating instructions
for fut u re re ferenc e .
Heed W arning. Pay attention to all warnings on the equipment and in the operating
instructions.
Cleaning. Do not use liquid cleaners or aerosol cleaner s. Use a damp cloth to clean the
outside of the unit. Do not open the unit for cleaning or any other reason.
Power Cord Protection. Place po wer suppl y cords so that they are not walked on or
pinched by items placed on or against them. Pay particular attention to the cords where they
join the plug, near convenience receptacles, and where they exit from the equipment.
Power Sources/Grounding. Operate the equipment from the type of power source
indicated on the marking label. This product has a polarized alternating-current line plug as a
safety feature. This plug fits into the power outlet only one way. If the plug does not fit,
contact your electrician to replace your obsolete outlet. Do not try to change the plu g o r d efeat
its safety purpose.
Ventilation. Do not block or cover the slots and openings of the unit. They provide
ventilation and protect it from overheating. Never place the unit on carpeting, which it may
block ventilation through the bottom slots. Never place the unit near a source of heat or in a
built-in installation rack unless there is proper ventilation. Do not place near heat sources such
as radiators, sto ves, or other produc ts (including amplifiers) that produc e heat.
DSR205 User Guide i
Page 4
Safety
Do Not Operate near Water. Do not use this product near water, for ex amp l e, near a
bath tub, wash bowl, kitchen si nk, swimm ing pool, l a undry tub, in a wet bas e ment, or in
similar situations.
Objects or L iquid in the Unit. Never push any objec t into this unit through any of
its openings because they may touch dangerous voltage points or short out the parts. This could
cause a fire or any electrical shock. Do not spill liquid of any kind on the unit.
Laser Light. Use or controls or adjustments or performance of procedures othe r than those
specified may result in hazardous radiation exposure. A void direct eye exposure. Keep out of
reach of children. The laser light emitted from this device should not be directed towards
people, under any circumstances.
Overloading. Do not overload power outlets or extension cords. This can result in a risk of
fire or electrical shock.
Damage Re quiring Service. Unplug this equipment from the power source, and
contact a qualified service provider if any of the following situations occurs:
- If the power supply cord or plug is damag e d.
- If liquid or objects have fallen into the unit.
- If the unit became wet from rain or water.
- If the unit was dropped or damaged.
- If the unit’s performance changes .
Service. Do not try to service this pr o du c t you rself. If you op e n or re mo ve th e co ver, you
may be ex posed to dangerous voltage or other haz ards and may void the unit’ s warranty.
Contact a qualified service provider for all service.
Mounting and Placement. Do not place this product on an unstable surface such as a
cart, stand, tripod, bracket, or table. It may fall, causing serious injury to a child, adult, or to the
unit itself. To mount the unit, follow the manufacturer’s instructions, and use a mounting
accessory recommended by the manufacturer. Do not place this product direct ly on wood or
simulated wood surfaces because these surfaces may be damaged.
Power Lines. Do not locate the satellite antenna system near overhead power lines,
electrical light or power circuits, or where it can fall into power lines or circuits. When
installing a satellite antenna system, avoid dangerous contact with power lines or circuits.
Outdoor Antenna Grounding. To provide some protection against voltage surges,
lightning, and built-up static charges, make sure that the satellite antenna is properly grounded.
Outdoor Cable Protection. Protect all outdoor connections from m oisture. D ur ing
installation, treat all o f the cable connectors on your LNB with coax seal, even if the connecti on
is installed under a weatherproof cover. Intern al heating can draw moisture or condensati on
into the covering of the unit and affect its operation. Do not use silicone seal because it has
a tendency to form air pockets.
Replacement Parts. If your re c eiver requires repairs, contact yo ur e quipment provider,
who will be able to assist you.
Safety Check. After the unit is serviced or repaired, ask the service tech nician to perform
safety checks to find out if the unit is in proper operating condition.
ii
Page 5
IMPORTANT SAFETY INSTRUCTIONS
Lightning. To pro tect the product from damage caused by ligh tning and power line surge s,
unplug it f rom the wall outlet and disconne c t it from t he antenna or cable system befor e a
lightning storm or if the unit will be left unattended or unused for a long period of time. Once a
storm passes, reconnect all antenna cables to the correct connectors. If you live in an area that
has many lightning storms, buy polariz ed surge protect ors and surge protectors for the power
line, telephone line, and RF cable to protect your system from damage. Never attempt to
connect or disconnect any wire s during a thunderst orm or lightning sto rm.
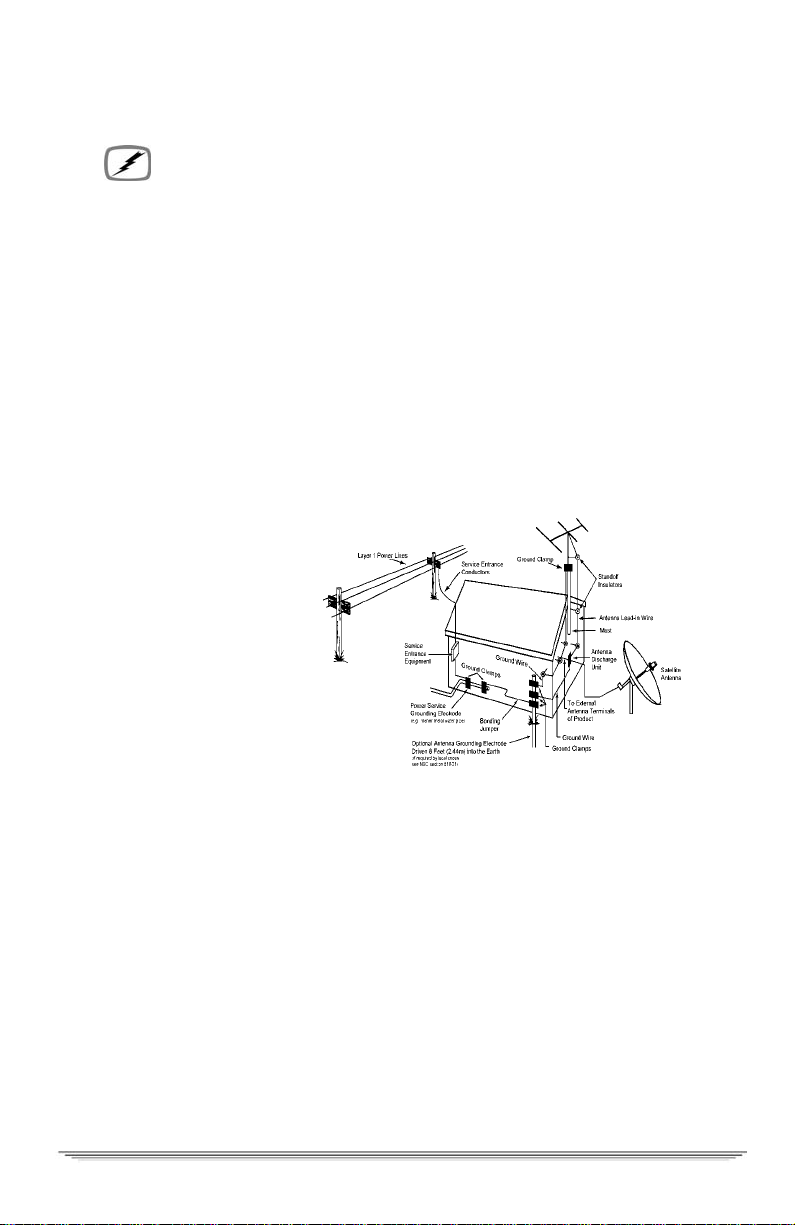
Note to the syste m installer:
The purpose of this reminder is to call your attention to Article 820-40 of the NEC that provides
guidelines for proper grounding and, in particular, specifi es that the cable ground shall be connected to the
grounding system of the building, as close to the point of cable entry as practical. The illustration is an
example of antenna grounding according to the National Electrical Code Section 810, "Radio and
Television Equipment." Chec k your loca l building a nd electr ical codes f or other r e stricti ons on antenna
grounding.
1. For the ground wire, use No. 10 AWG (5.3mm2) copper, No. 8 AWG (8.4mm2) aluminum, No. 17
AWG (1.0mm2) copper-clad steel or bronze wire, or larger.
2. Secure the antenna lead-in
wire an d ground wires to the
house with stand-off
insulators spaced 4 ft.
(1.22mm) to 6 ft. (1.83m m)
apart.
3. Mount the antenna di scharge
unit as close as possible to
the place where the lead-in
enters the house.
4. Use a jumper wire that is no
smaller than No. 6 AWG
(13.3mm2) copper, or the
equiv alent, whe n using a
separate antenna groundi ng
electrode. See NEC Section
810-21(1).
5. In areas that are heavily prone to lightning storms install a lightning rod mounted to the top of the
antenn a on t he back s ide . Ins ta ll a grou nd strap (2 AWG, or larger , of cop per wir e) fro m the l igh tni ng
rod to the rest of the antenna ground system.
6. Sec tion 810 of the National Elect r ical Code, ANSI/NFPA No. 70-1984, prov ides infor mation about
the following items:
- Proper grounding of the mast and supporting struc ture.
- Grounding of the lead-in wire to the antenna discharge unit.
- Size of grounding conductors.
- Location of antenna-discharge un it.
- Con ne c ti o n t o gr ou nding elec tro de s.
- Requir e ment for the groundin g electro de .
DSR205 User Guide iii
Page 6

Safety
Programming Copyright Notice
Use of thi s device may violate S ection 605 of the Com m unications Act of 1934, as amended, if that use
consist s of the unauthorized interception and divulge nce of radio communications for one’ s own benefit
where there is no entitlement to its receipt.
Changes or modifications to this device not expressly approved by the party responsible for compliance
with FCC regulations (the manufacturer) could void the user’s authority to operate the equipment .
Resale of signals received from broadcast satellites is explicitly regulated. In any use or application
involving resale or distribution, the user should verify compliance with current laws, regulations, and
approved procedures for use. Where required, local and federal licensing or franchise author i zat i on is the
sole responsibility of the user.
Export of this device requires a valid export license issued by the U.S. Department of Commerce.
FCC Compliance
This equipment has been tested and found to comply with the limits for a Class B digital device, pursuant
to Part 15 of the FCC Rules. These limits are designed to provide reasonable protection against harmful
interference in a residential installation. This equipment generates , uses, and can radiate radio frequen cy
energy and, if not installed and used in accordance with the instructions, may cause harmful interference
to radio communications. However, there is no guarantee that interference will not occur in a particular
installation.
FCC Part 68
This equipment complies with Part 68 of the FCC rules . Located on the equipment is a l abel that contains,
among other information, the FCC registration number and Ringer Equivalence Number (REN). If
requested, this information must be provided to the telephone company.
The REN is used to determine the quantity of devices which may be connected to the telephone line.
Excessive REN’s on the telephone line may result in the devices not ringing in response to an incoming
call. In most, but not all areas, the sum of the REN’s should not exceed five (5.0). T o be certain of the
number of devices that may be connected to the line, as determined by the total REN’s contact the
telephone company to determine the maximum REN for the calling area.
This equipment cannot be u sed on the telephone company-prov i ded coin service. Connection to party line
service is subject to state tariffs.
If this equipment causes harm to the telephone network, the telephone company will notify you in
advance that temporary discontinuance of service may be required. If advance notice isn’t pr act ical , the
telephone company will notify you as soon as possible. Also you will be advised of your right to file a
complaint with the FCC if you believe it is necessary.
If trouble is experienced with this equipment, please contact:
Star Choice Communications, Inc.
1-888-554-STAR
If the trouble is causing harm to the telephone network, the telephone company may request you to
remove the equipment from the network until the problem is resolved.
This equipment uses the following USOC jacks: RJ11C
iv
Page 7

IMPORTANT SAFETY INSTRUCTIONS
It is recommended that the customer install an AC surge arrester in the AC outlet to which this device is
connected. This is to avoid damaging the equipment caused by local lightening str i kes and other electrical
surges.
This equipment is Hearing-Aid Compatible (HAC).
User Instruct i ons
If this equipment does cause interference to radio or television reception, which can be determined by
turning the equipment off and then on, the user is encouraged to try to correct the interference by one or
more of the following measures:
- Reorient or relocate the receiving antenna.
- Increase the distance between the equipment and receiver.
- Connect the equipment into a different outlet so that the equipment and receiver are on
different branch circuits.
- Consult the dealer or an experienced radio/TV technician for help.
Changes or modifications not expressly approved by Motorola could void the user’s right to operate the
equipment and/or the equipment warranty.
DSR205 User Guide v
Page 8

Safety
Copyright © 2004 Motorola, Inc.
MOTOROLA, the Stylized M Logo, TVPass and DigiCipher are registered in the US Patent & Trademark
Office. All other product or service names are the property of their respective owners. C ertain third party
trademarks are used throughout this manual for explanatory purposes only. The depiction of any third
party trademark in typed form, or graphical form, in this manual should not be taken to imply any
relationship, sponsorship, endorsement,license between Motorola, Inc. and the owner of such third party
trademark, or any other affiliation. Such trademarks, and graphical representations thereto, include NBC,
Bravo, History Channel, CBS, WGN, Lifetime, A&E, HGTV , ESPN, Fox, ESPN2, CNN, Discovery, PBS,
CMT, Playboy, TMN, “National Geographic: On Assignment”, “Blind Faith”, “Art and Racing”,
“Defiance”, “Doug”, “Hey Arnold!”, “Ace Ventura”, “Fatal Affair”, “Bravo!”, “Authors”, “The
Avengers”, “Interiors”, “House”, “Build”, “ESPN Now”, “Rodeo”, “Automovilismo”, “American
Muscle”, “CNN/Sports Illustrated Sports News”, “The Sixth Sense”, “Discovery Kids”, “Discovery
Science”, Discovery Health” and are the property of their respective owners. Further, any other third
party trademarks not listed herein are the property of their respective owners. © Motorola, Inc. 2004
Covered under one or more U.S. patents: 4613901, 4634808, 4712238, 4792973, 4823399, 4864615,
490885 9, 4933898, 4975951, 5068724 , 5081680, 5083293, 5091782, 5093720, 5111 504, 544664,
521629 5, 5216374, 5216503, 5345408 , 5376968, 5398237, 5406228, 5485577, 5517250, 5530400,
553742 0, 5565922, 5566089, 5580203 , 5598415 and patents pending.
ATTENTION
®
This consume r unit is intende d for the decoding of DigiCipher
II television
signals for consumer use. Possession of this device does not enable or entitle the
possess or to receive DigiCipher II television signals. Contact program provi ders
to obtain appropriate authorization.
WARNING
The unautho rized modifi cation of any decoder and the sale and use of any su ch
decoder i s prohibited b y law. Any such modification or alteration of this product
or any unauthorized reception of television program m ing could subject the user
and/or seller and/or party modifying the decoder to fines, imprisonment and civil
damages.
vi
Page 9

Table of Contents
IMPORTANT SAFETY INSTRUCTIONS... ................. ......... ..........i
Note to the system installer: ....................................................................... iii
User Instructions ...........................................................................................v
Equipment Attachment Limitations .............................................................v
Installation ...................................................................................1
Connecting the Satellite Dish, Receiver, and TV .........................................1
Front Panel Key Descriptions .......................................................................2
Back Panel Connections ...............................................................................2
Using the Menus ...........................................................................................3
Choosing the M enu Language .......... .......... ................. ................. .......... ......3
Acquiring a Signal ........................................................................................4
Authorizing Your Receiver ..........................................................................4
Completing the Rece iver Connections to
Your Entertainment System .........................................................................5
Connections to Audio/Video Monitor ..........................................................5
Connections to Audio/Video Monitor and VCR ..........................................5
Additi o na l Fea tu re s ............. ... ... ............. .............. .............. .............. ............6
Viewing and La nguage Settings .......... .......... ................. ................. .............7
Audio Settings ..............................................................................................7
Installation Settings ......................................................................................7
System S ta tu s . ... .............. ........................ .............. .............. .............. ............ 8
Autho ri za ti on Sc re e ns ....................... .............. .............. ............. .............. ....8
Using Your Remote...... ........................ ................ ................. ......9
Key Functions .............................................................................................10
Programming the Remote Control ..............................................................12
If Your Four-Digit Code is not in the Tables (Scanning) ...........................13
Programming the Master Power Feature ....................................................13
Verifying Your TV, DVD, VCR and AUX Mode Codes ..........................14
Volume Control Crossover .........................................................................14
If You Have More Than One Satellite Receiver ........................................14
Replacing the Remote Control Batteries ....................................................15
"Remote Energy Saver" ..............................................................................15
Watching TV...... ................. ....................... ................. ................23
How to Sel ec t Me nu Options . ... ............. .............. .............. .............. .......... 2 3
Banners ............. ........... .............. ............. ........... .............. .............. ............. 24
Interac t iv e Pr o gr am Guide (IPG ) .............. .............. ......................... ..........25
How to Dis p la y th e Gu id e ...... .............. ............. .............. .............. .............25
DSR205 User Guide vii
Page 10

TOC
Interests and Favorites ................................................................................28
Options.......................................................................................31
How to Dis p la y an d Use th e O p tio n s M e nu . .............. ......................... .......3 1
Openi ng Y ou r Ma il .............. .............. .............. .............. ............. .............. ..32
Settin g Fa v o rit e C h an n el s . ... ... .............. ......................... ............. .............. ..34
Settin g Pa r en ta l Con t ro ls & Passwords ..... ... ... .............. ............. .............. ..35
Settin g T ime rs ............. ... .. .............. .............. .............. .............. ............. .....3 8
List Pur cha ses ... .............. ............. .............. .............. .............. .............. ....... 4 2
Change System Settings .............................................................................43
Installation Settings ....................................................................................45
System S ta tu s . ... .............. ........................ .............. .............. .............. .......... 4 5
Specifications............................................................................47
Input . ...... ..... ... ...... ..... ...... .. ...... ..... ...... ... ..... ...... ..... ... ...... ..... ...... .. ...... ..... .....47
Video .......................................................................................................... 47
Remodulator Output ...................................................................................48
Audio .. .............. ................ ................. ............................ ........................... ..48
Warranty & Service...................... ................. ................. ...........49
viii
Page 11

1
Installation
Connecting the Satellite Dish, Rece ive r, and TV
Complete the following steps, and make sure that the satellite receiver is not
plugged into a power source before you connect any cables to the receiver:
• Connect the cable from the satellite dish to the satellite terminal on the satellite
receive r's back panel . Conn ect the sup plie d thr ee- wire (r ed, yell ow, and whi te)
cable from the TV terminal on the satellite receiver's back panel to TV IN (or
coaxial cable to VHF IN) te rm inal on your TV.
• On th e back panel of the satellite receiver, set the CH3 CH4 switch which is
located just above the TV terminal— to the same channel that you set on your
TV for us e w ith your VCR .
• T urn on the TV and tune it to cha nnel 3 or 4 to match th e pos itio n of the sw itc h
on the back panel of the satellite receiver.
• Pl ug the satellite receiver power cord into a standard powe r outlet. Wait one
minute, and th en press the P O WER k ey on the left side of the satellite
receive r's front pane l.
321
DSR205 User Guide 1
Page 12
1
Front Panel Key Descriptions
1. POWER. Press this key to turn the receiv er power on/of f and to watch pr o-
grams in SAT mode.
2. REMOTE . A n indicator dot blinks each t ime you press a key on the remote
control.
3. SIGNAL . An indicator lights up when a satellite signal is present. Green
indicates a good signal. Red indicates no signal.
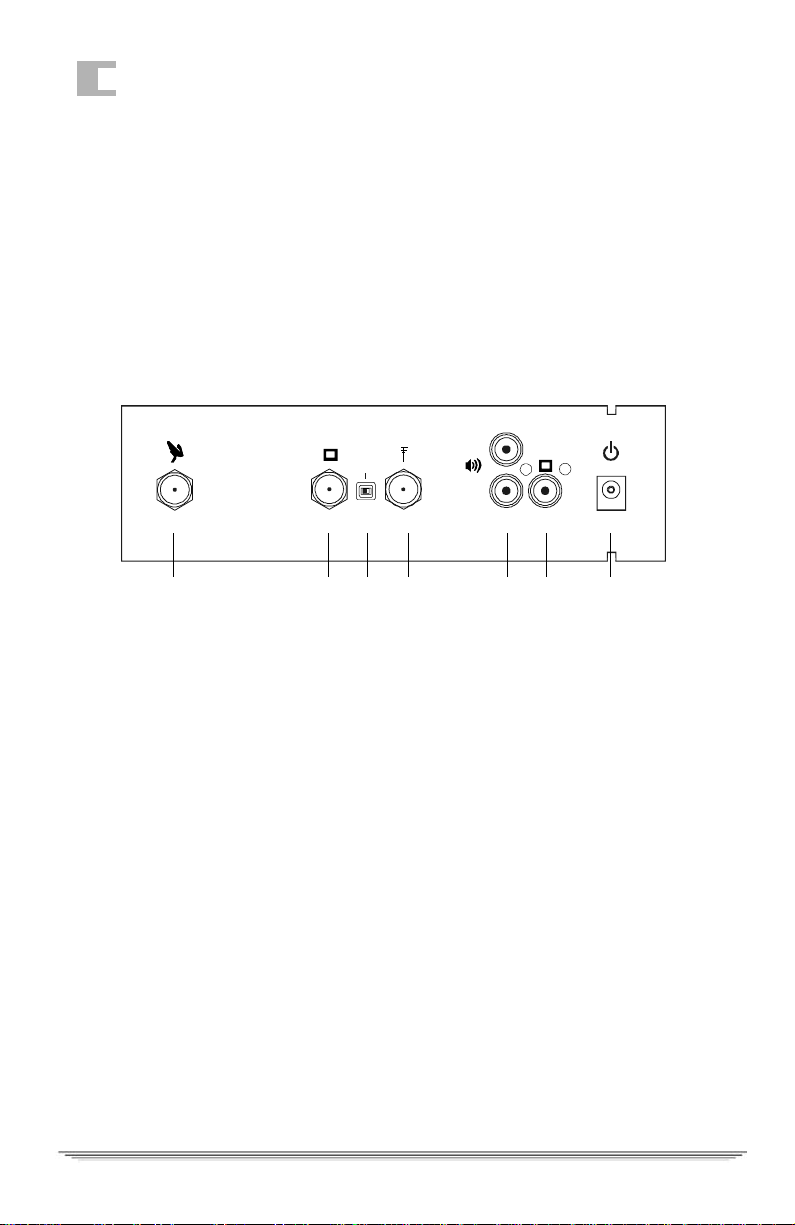
Back Panel Connections
AUDIO
L
VIDEO
+ +
R
+12V DC
SAT IN
OUT
Chan
4 3
ANT
IN
TV
2 3 4 5 6 71
1. SATELLITE IN. T his terminal receives LNB input.
2. ANTENNA IN. This is an off-a ir antenna term i na l .
3. CH3 CH4. This switch determines the channe l (3 or 4) to which you set your
TV to receive satellite broadcasts. The setting shoul d be the same as the TV
setting for use with your VCR (usually channel 3).
4. OUT TO TV. This supplies the VHF signal to your TV.
5. AUDIO OUT (R L). Thes e ar e au dio output s, whic h may be us ed to conn ect t o
your TV or VCR. Volume levels are not adjustable.
6. TO VCR. This video output jack may be connected to your VCR input
connections for VCR taping.
7. POWER. This is the power block input.
2
Page 13

Installation
Using the Menus
You will be ma king various
adjustments to your r eceiver
using the keys on the remote
control. Press Options on the
remote control. The Change
System Settings option
provides access to menus that
allow you to adjust the
operation of your system.
•Press the
keys to highlight
56
the option you wish to
select. The n press the ENTER key to select it.
• If the options are num bered, simply press the num ber key for an option.
34
keys or the
Choosing the Menu Language
T o make sure that the menus
are displayed in the
appropri ate language for
you, complete the following
steps:
• Whil e your receiver is
turned on, aim the
remote co n trol at the
receive r and press the
OPTIONS key. The
Options menu will
appear.
• From the Options menu,
select option 6 (Change Sys tem Settings), and the System Set tings menu will
appear.
• Select option 1 (Change Viewing and Langua ge Settings), and the V iewing &
Language Settings menu will appear.
• Opt ion 3 shows you the la nguage options available for the menus. Press the
keys on the re m ote to select your language.
56
• Onc e you have chosen a language, pr ess the GO BACK key until you return to
the Option s m enu or press the EXI T key to exit and return to watchin g
programs.
DSR205 User Guide 3
Page 14

1
Acquiring a Signal
Complete th e following st eps to help you acquire a signal:
• Usi ng the numbe r ke ys o n the r emot e co ntrol , tune to th e auth ori zat ion c hann el
(refer to the information supplied with your system). You should see a banner
with the channel number at the top of the scr een.
• Press the OPTIONS key on the remote control. The Options m enu will appear.
• From the Options menu, select option 6 (Change System Settings), and the
System Settin gs m enu will appear.
• Select option 3 (Change Install ation Settings), and on th e Installation Settings
menu select option 1 (Tune in Satellite Signal).
• Loo k at the value in the box l abelled Si gnal. If it is less than 10, make s ure that
all connections between the satellite dish LNBF and the satellite receiver are
correct. If the signal strength rem ains below 10, contact your service provider
for assi stance.
• Using the number keys on the remote control, enter the Provider ID supplied
by your service provid er (refer to the information supplie d w ith your syste m).
You can u se the
• If the satellite dish is pointed at the correct satellite, the large field in the center
of the screen wil l t urn gre en a nd di splay the mess age "Corre ct si gnal fo und ". If
you do no t se e thi s m es sa g e w it hin 5 to 10 minut es , th e sa te llite dish may be
pointed at the incorrect satellite. Cont act your service provider for assistance.
key on t he remote control to back up and make corrections.
3
Authorizing Your Receiver
• Press the EXIT key on
the remo te co ntrol . Th en
press the number keys
for the authorization
channel.
• Press the OPTIONS key
on the remote control.
The Options menu will
appear.
• From the Options menu,
select option 6 (Change
System Settings), and
the System S etting s
menu will appear.
4
Page 15

Installation
• Se lect option 4 (Check System Status), and the Syst em S tatus menu w ill
appear. Line A show s your Unit ID number.
• Telephone the company that provid es your programming subscription, and ask
to authorize your unit.
• When your receiver has received the authorization message the Trip Counter
on the Installation Settings menu will advance.
Completing the Receiver Connectio ns to
Your Entertainment System
You will ne ed to make changes to connect your VCR.
• Con nect the top/left TV terminal on the back pan el of the receiver to the IN
terminal on the VCR. If you had al ready connected this cable t o your TV you
must disconnect and connect it to your VCR.
• Connect the OUT terminal(s) on the VCR to the VHF IN term inal(s) on the
TV.
Connections to Audio/Video Monitor
Complete the following steps if you only plan to connect the satellit e receiver to
an audio/video monitor:
• Using standard RCA-type audio/video cables, connect the top/left TV
(VIDEO output) terminal on the rear panel of the rece iver to the video input
terminal on the monitor (or TV using the baseband inputs) .
• Using standard RCA-type audio/video cables, connect the tw o bottom/left
speaker ( R and L) ter mina ls on the ba ck p ane l of th e re ceive r t o th e audi o in put
terminals on the monitor (or TV using the baseband inputs).
Connections to Audio/Video Monitor and VCR
Complete the following steps if you plan to connect the satellite receiver to an
audio/video monitor and VCR:
• Using standard RCA-type audio/video cables, connect the top/right TV
(VIDEO output) terminal on the rear panel of the rece iver to the video input
terminal on the VCR.
• Using standard RCA-type audio/video cables, connect the tw o bottom/right
Speaker icon (R and L) terminals on the rear panel of the receiver to the audio
input terminals on the VCR.
• Using standard RCA-type audio/video cables, connect the au dio and video
DSR205 User Guide 5
Page 16

1
V
inputs on the audio/vide o m onitor (or TV using baseband audio/video inputs)
to the outputs on the VCR.
L
AUDIO
IN
CR
VIDEO
+12V DC
+
+
R
Power
Supply
SAT IN
Chan
4 3
ANT
Coax ial
OUT
TV
TV
Additional Features
After you complete the
installation procedures, you
may wish to use the on-screen
menus to make additional
adjustments to th e satellite
receive r's operation.
Options. The Options me nu
provides access to all of the onscreen menus. It appea rs when
you press the OPTIONS key o n
the remo te control.
Change System Sett ings. The
Change System Settings menu provides access to menus that allow you to adjust
the opera tion of your system.
6
Page 17

Installation
Viewing and Language Settings
Channel Information. The Channel Info rm ation option allows you to tu rn the
header (top of screen) and banner (bottom of screen) On or Off. The default
setting is On.
Subtitles. The Subtitles option allows you to select the language for subtitles (if
availab le for t he p arti cul ar pr ogr am) o r ke ep them turne d of f . The d ef aul t set ti ng is
None.
Language. The Language option allows you to select the language of the onscreen menus and audio for your programs. The default setting is Eng lish.
TV Viewing. The TV Viewing op tion allows you to select the size of the viewing
area. Select the Standard option if your TV screen is a typical scree n w ith a 4:3
ratio of wid th t o heig ht . Sele ct W ide if you r TV sc re en is a w ide scr een w ith a 1 6:9
ratio (as in HDTV’ s or digital TV’s). The default set ting is Sta ndard.
Audio Settings
If you are in SAT mode (digital) broadcast, two options ap pear on the Audio
Settings menu.
Audio Connections. Select o ption 1 ( A udio Connections), and you will be able to
select either TV or HiFi (the default is TV). Sele ct TV if the receiver’s AUDIO
OUT port is conn ected to your TV. Select HiFi if it is connected to your stereo
system.
Satellite Audio. Select opti on 2 and then selec t M ono, Stere o, or Surround.
Installation Settings
Tune in Satellite Signal. This op tion allows you to see the stre ngth of the signa l
your anten na is receivi ng.
Set Remote Control Address. This option allows you to control up to four
receive rs in a centralized area, with one or more remote controls . Each receiver
require s a separate add ress. The defa ult address is 0000.
On the front panel of your receiver press the Menu button to bring up the Menu
screen.
• Choose Options.
• Choose option 6 (Change System Settings).
• Choose option 3 (Installation Settings).
DSR205 User Guide 7
Page 18
1
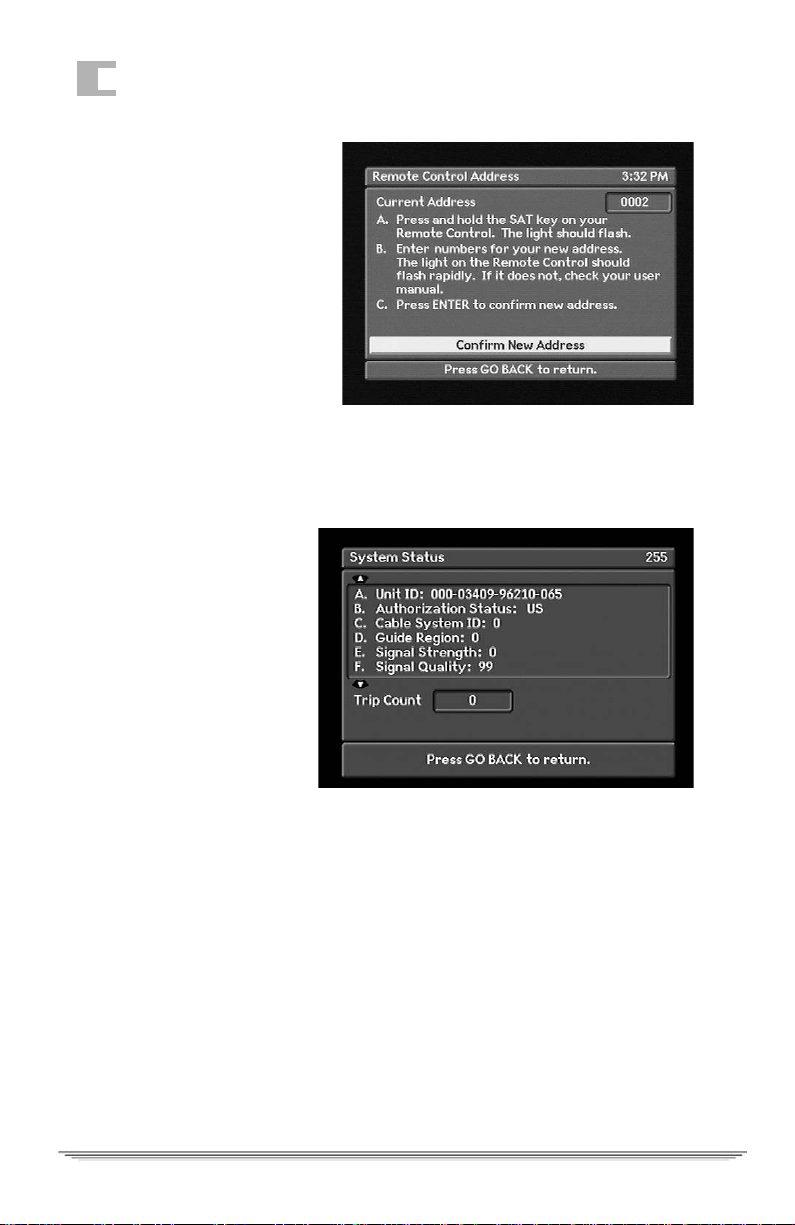
• On th e Installat ion Settings
menu, choose op t i on 2 (Set
Remote Control Address).
Now follow the instructio ns
on the Remote Control
Address scr een.
• If you have four rec eivers,
you will ha ve to change the
addresses on three of them:
they will have address of
0000, 0001, 0002, and
0003.
To program your remote control for each recei ver, hol d dow n the SAT key on th e
remote cont rol until the light flas hes. Once the li ght begins to flash enter the
desired address.
System Status
This is a view -only screen
that displays information
about the status of the
receiver.
Trip Counter. Trip Counter
displays the number of
message updates from your
serv ice provi de r.
Authorization Screens
Sometimes when you tune to a program, an Authorization screen will appear. It
will fad e to bla ck af ter a short time, it will reappear wh e n:
• The channel or pro gram is locked out because of your parental contro l setting,
which requi res you to enter a password. (If you have not se t a password, just
press the ENTER key. )
• The receiv e r is not authoriz ed .
• A subscription is requ ired to receive the p rogram.
• The re is a program blackout in your area.
• The re is a technic al problem.
8
Page 19

Using Your Remote
All around the world, people just like you are enjoying
entertaining, educational, and informational programming
with a Motorola digital satellite receiver . In addition to
offering outstanding picture an d sound quality, your
receiver comes with a remote con trol that can be
programmed to operate your receiver, TV and auxiliary
equipment.
A Word About Modes. To enable the remote control to
operate you r r ec eiver, your TV, and your VCR, i t may ha ve
as many as five main modes of operation: SAT mode, TV
mode, DVD mode, VCR mode and AUX mode. This
means that when you press the SAT, TV, DVD, VCR or
AUX keys on the remote control, you enable it to control
each of these devic es, one at a time. Naturally, some of the
remote cont rol keys have more than one function,
depending upon which mode you are using at the time.
Keep this i n mi nd as you read the descriptions for each
remote co ntrol ke y. Also keep in mind that some SAT
functions are available only within SAT mode. Among
these spe cia l funct i ons are acces s to the men us th rou gh th e
OPTI ONS ke y, use of t he In ter acti ve Pr ogram Gu ide (IPG)
through t he GUIDE key, and the abilit y to select a satelli te
by using the SAT key.
2
DSR205 User Guide 9
Page 20

2
Key Functions
Power. To turn the component on or off.
SAT(mode). To change the remot e to SAT mode so it can control the receiver for
viewing satellite and cable TV signals as well as th e OPTIONS menu .
TV(mode). To change the remote to TV m ode so it can cont rol the TV.
VCR(mode). To change the remote to VCR mode to control the VCR.
DVD(mode). To change the remote to DVD mode to control the DVD.
AUX(mode). To change the remote to AUX mode to control auxiliary
components.
Source. To control the input source to your satellite receiver, your TV, your VCR
or your auxiliary components.
- In SAT mode, it shifts between s atellite or cable and antenna i nput.
- In TV mode, it shifts between auxiliary antenna and video sources.
- In VCR mode, it shi fts between TV input and VCR input.
- In DVD mode, it shifts between TV input and DVD input.
- In AUX mode, it allows input from auxiliary components.
PPV. To displa y th e current Pa y- P er- View selections.
Options. To exit any menu and display the Options menu.
Interests. To exit any menu and display the Interests menu. Press it again to
remove the Interests m enu and return to watching a pr ogram.
Browse. To view program infor m ation for chan nels and times ot her than the
current channel and time while continuing to v iew a program. Press GO BACK to
return t o w atching a progr am. Press ENTER to go to the progr am located in the
Browse banner.
Future. To display a program banner for what’s on in the future while you are
watching a program.
Guide. T o display the Interactive Pr ogram Guide ( IPG). Press it again to retur n to
program view ing.
Go Back. To return to the previous menu.
Enter. For convenience, there are tw o EN TER keys. If you ar e using a menu,
press EN TER to sele ct a hig hlighted option. In SAT mode press ENTER to t une in
the channe l whose numbers you have already pressed.
Arrow Keys. T o highlight selections from menu scr eens. Also used in the Browse
banner to navigate betwee n listings.
10
Page 21

Using Y our Remote
Exit. To exit any me nu an d w atch a program or to dis play a program information
if you are already watchi ng a program.
Last Ch. To return to the last channel viewed.
Info. To displa y detailed information about the current program or a hig h lighted
program in the Guide. Press it again to turn the information off.
Vol. To rai se or lower the volume level.
Mute. To mute the TV sound.
Chan. If you are using a menu, press to change channels without removing the
menu. If you ar e using the Guide , press to move one page up or down.
Number Keys. These keys operate in di fferent way s, depending up on w hich
mode you are in :
- While usi ng the menus, press these key s to select a numbered option.
- If you are watching a program, press these keys and ENTER to change
channe ls . If th e ch annel has thre e nu m be rs , it wil l tu ne in immediately
after you ent er the thir d numb er. Gener ally s pea king, ca ble TV channe ls
(analog) are numbered 1-99, and satellite TV channels are assigned
numbers 100 and above.
VCR Keys. The re mote control has separat e keys that oper ate the VCR’s play
( ), stop ( ), pause ( ), fast-for w ard ( ), rewind ( ), and
record fun ctio ns. Pre ss an d hold the recor d ( ) but to n the n press pl ay ( )
to perform the record function.
Help. To display the help
screens. Press it again to turn off
the help screens and re turn to
watching a program. If you
occasionally forget what an icon
(symbol) means or how to use
one of the satellite receiver
features, j ust pres s t he HEL P key
to display the Hel p messages.
Press the ENTER key to display
each successive Help screen.
Some screens provide exp lanations that help you to use receiver fea tures.
If you forget what cert ain keys or icons m ean, just look them up by displaying this
screen.
DSR205 User Guide 11
Page 22

2
Progra mming the R e mote Contr o l
The remote control is set at the factory to control all of the satellite receiver
functions, but to use it to operate your TV, DVD, VCR and auxiliary components
as well, you mus t "pro gra m" it for the bran d you own. Fol low thes e ins truc ti ons to
program the remote to control your TV, DVD, VCR and auxiliary (AUX)
components.
Follow these instructions to program the remote to control your TV.
1. Turn on the desired component for programming.
2. Use the table that appears later in this secti on to find the manuf acturer bra nd.
3. After the manufacturer’s brand name is a four-di git code number (or several
four-digit codes).
4. Press and hold the appropriate mode key on the remote control for at least
three seconds—until the light on your remote flashes.
5. When the light flashes, key in the first of the four-digit codes (listed in the
table) f or you r com ponent us in g the n umber ke ys on the re mote co ntrol . Make
sure to do th is acc u ra te ly an d w it ho u t a lo n g de la y.
6. If the remote control "accep ts" the code, you w ill see seve ral rapid fla shes of
the light. If it does not flash, repeat steps 4 , and 5. After the remo te contro l
accept s the code, press the POWER key on t he remote control to make sure
the remot e control is ab le to turn your component off. This mean s it is
functioning properly.
7. If your component does not respond to the remote con trol POWER key, even
though it has "accepted" the manufac turer’s co de, repeat st eps 4 and 5 using
the second four-digit code from the table. If this does not work, try the third
code, etc., until the r emote control accepts the code and your component
responds to the remote control POWER key.
NOTE: Some cable box brands are also programmable using these instructions.
Check the table that appea rs later in this section for applicable cable box brands
and codes . You will press the TV key to progra m your cable box. Your remote can
only accep t a TV or cable box code for this programming step.
12
Page 23

Using Y our Remote
If Your Four-Digit Code is not in the Tables (Scanning)
If you try to program your rem ote control using the four-digit codes, and the
remote control does not work correctly, you may be able to find a code that works
by using the "scanning" process.
1. Turn on the TV.
2. Press the TV key for at least three seconds—until the LED blinks.
3. The following steps explain how t o "scan" through the TV codes stor ed in
your remot e control using the
v
keys are dep ressed.
- While poi nting the remot e control at you r TV, press the
upward to the next code. (Use the
- If the transmitted code is the correct one, your TV will turn off,
responding as if its POWER key were pressed.
- If your TV does not respond, depress the
When your TV turns on or off as a result of the transmitted code, you
will know that you have found the correct code.
- When you have found the corre ct code (power to your TV is toggled on
or off), press the ENTE R key. This will store the man ufacturer’s code.
The LED will then flash rapidly several times and turn off.
NOTE: If you r TV i s no t li sted i n t he tab le s and/ or the codes for you r bra nd ar e n ot
accepted by the remote, you will need to use the remote ori ginally ma nufactured
for your unit.
v
keys. (The LED will not be lit while the
5
key to scan
6
key to re turn to the previous code.)
5
key to try the next code.
Programming the Master Power Feature
If you wish to control the power on/off function of you r receiver and TVwith a
single pres s of the PO WER ke y on yo ur rem ote c ont rol, you can en able the remo te
control’s Mas ter Power feature by foll ow ing these steps:
• Press the SAT key on the remo te contro l for at least three seconds—until the
light on the key blinks.
• Press the POWER key on the remote. The light will remain on steady. Press the
power key a second time, and the light on the remote will blink on and off
briefly, whic h in d ic at es tha t the remote ha s ac ce p te d th e Ma st er Power
command.
• If you wish to cancel the Master Power feature, just repea t the steps out lined
above.
DSR205 User Guide 13
Page 24

2
Verifying Your TV, DVD, VCR and AUX Mode Codes
You can ver ify th e ac cep ted pro gra mming code s fo r ea ch mode by fo llowi ng th es e
steps.
1. Press the TV key for at least three seconds—until the LED blinks.
2. Press the "INFO" key.
3. The LED will blink, indicating the code of your TV in the follo w ing
sequenc e. For example, if your TV code is for a Tandy br and TV (code 1005)
the blink pattern will be:
- Pause>long blink "1;"
- Pause>short blink "0;"
- Pause>short blink "0;"
- Pause>long blink, long blink, long blink, long blink, long blink "5."
A zero in the code will alw ays be represented by a short blink.
Volume Control Crossover
Your re m ote control unit is programmed from the facto ry to contr ol the volume of
your television set when you are using the remote control in the TV mode. T he
AUX mode can also be programmed to control the audio from the TV or Audio
device. To program your rem ote control f or this funct ion:
• Enter the programming mode using the AUX mode key .
• While the AUX mode key is flashing, press and releas e the AUX mode or TV
mode key (depending on which device you want remote volume and mut e
control).
• The AUX mode key will light as you pres s and release the programming mode
key, flash three times rapidly and extinguish.
• The remote control will now control the volume of the SAT device when in the
AUX mode.
If You Have More Than One Satellite Receiver
If you have more than one receiver, you m ay want to prevent the remote controls
from aff ecting the other receiver s. To prevent this kind of interference, yo u mu st
"pair" each remote cont rol with one receiver. In order to do this, you will have to
assign a ne w "address" to each pair of rem ote controls and recei v ers so that each
pair functions independently of the others.
14
Page 25

Using Y our Remote
Using the re m ote control press the Menu button to bring up the M enu screen on
the receiver monitor (TV).
• Choose Options, choose Change Sys tem Settings.
• Choose Installation Settings.
• On the Installat ion Settings m enu, choose Set Remote Control A ddress. Now
follow the instructions on the Remote Control Address screen.
• If you have multiple receivers, you will have to change the address on each of
them. Choose from following addresses: 00 00, 0001, 0002, or 0003.
To program your remote control for each receiv er, hold down the
remote cont rol until the light flas hes. Once the li ght begins to flash enter the
desired address.
SAT key on the
Replacing the Remote Control Batteries
When the rem o te control batterie s are worn out (discharged), the remote will stop
working. Replace the batteries as soon as possible to retain your programmed
codes. Once you remove the batteries from the compartment, you must replace
them within two hours to retain your programmable features. The remote control
for this unit may be powered by two AA batterie s. Use only high qu ality , noncorrosive b att eri es de si gned fo r us e in elect ron ic equi pme nt.
both batt eries at the same time. To replace the bat teries:
- Remove the cover by press ing down the back panel indentation and
remov ing the panel off the remote control.
- Positi o n each battery i n the battery compartment so that the flat base (-)
is agai nst the spring and so that t he raised contact (+) is against the
terminal. Make sure the batt eries are securely se ated. Replace the cover.
Remember to replace
"Remote Energy Saver"
If you mispl ace your remote (i.e., it i s stuck in your couch), and a key is
inadvertently pr essed, the remote will automatically tur n itself off after three
minutes.
DSR205 User Guide 15
Page 26

2
TV Codes
ABI . . . . . . . . . . . . . . . . . . . . . . . . . . . . . 1064
AOC. . . . . . 1005,1006,1019,1020,1023,1024
. . . . . . . . . . . . . . . . . . . .1120,1140,1163,1173
Accent . . . . . . . . . . . . . . . . . . . . . . . . . . .1065
Admiral . . . . . . . . . . . . 1 003,1018,1034,1041
. . . . . . . . . . . . . . . 1069,1090,1125,1129,1176
Adyson. . . . . . . . . . . . . . . . . . . . . . . . . . .1073
Aiko . . . . . . . . . . . . . . . . . . . . . . . . . . . . .1024
Aiwa. . . . . . . . . . . . . . . . . . . . . . . . . . . . .1090
Akai . . . . . . 1000,1032,1070,1074,1075,1077
. . . . . . 1081,1083,1085,1094,1095,1097,1100
. . . . . . .1101,1103,1105,1106,1107,1108,1111
. . . . . . .1115,1116,1124,1127,1128,1133,1135
. . . . . . 1136,1137,1138,1139,1149,1163,1172
Alaron . . . . . . . . . . . . . . . . . . . . . . . . . . .1034
Alba . . . . . . . . . . . . . . . . . . . . . . . . . . . . .1142
Amark . . . . . . . . . . . . . . . . . . 1120,1224,1225
Amstrad . . . . . . . . . . . . . . . . . . . . . 1033,1132
Anam . . . . . .1005,1009,1021,1041,1120,1121
Anam National. . . . . . . . . . . . . . . . . . . . .1211
Apex. . . . . . . . . . . . . . . . . . . . . . . . . . . . .1159
Archer . . . . . . . . . . . . . . . . . . . . . . . . . . . 1120
Audiovox. . . . . . . . . . . .1024,1041,1120,1170
BPL . . . . . . . . . . . . . . . . . . . . . . . . . . . . . 1144
Bang & Olufson. . . . . . . . . . . . . . . . . . . . 1154
Bell & Howell . . . . . . . 1 018,1034,1090,1129
Broksonic. . . . . . . . . . . .1005,1010,1172,1173
. . . . . . . . . . . . . . . . . . . . . . . . . . . . .1174,1176
CXC. . . . . . . . . . . . . . . . . . . . . . . . . . . . .1041
Candle . . . . 1005,1006,1022,1023,1025,1163
Capehart. . . . . . . . . . . . . . . . . . . . . . . . . .1019
Carver . . . . . . . . . . . . . . . . . . . . . . . . . . .1151
Centurion. . . . . . . . . . . . . . . . 1028,1192,1194
Citizen . . . . 1005,1006,1010,1016,1018,1022
. . . . . . 1023,1024,1025,1026,1163,1172,1224
Concerto. . . . . . . . . . . . . . . . .1005,1010,1023
Contec . . . . . . . . .1041,1054,1091,1181,1227
Corando . . . . . . . . . . . . . . . . . . . . . . . . . .1224
Coronado . . . . . . . . . . . . . . . . . . . . . . . . .1225
Craig . . . . . . . . . . . . . . . . . . .1 021,1041,1203
Crown . . . . . . . . . . . . . . . . . . . . . . 1026,1041
Curtis Mathes. . . .1006,1016,1018,1023,1026
. . . . . . . . . . .1041,1059,1090,1125,1131,1151
. . . . . . . . . . . . . . .1163,1172,1192,1194,1224,
Daewoo . . . 1005,1023,1024,1026,1029,1030
. . . . . . 1032,1130,1146,1170,1171,1172,1224
Daytron . . . . . . . . 1024,1026,1192,1194,1224
Denon. . . . . . . . . . . . . . . . . . . . . . . . . . . .1169
Dimensia . . . . . . . . . . . . . . . . . . . . . . . . .1125
Dixi . . . . . . . . . . . . . . . . . . . . . . . . .1120,1146
Dumont . . . . . . . . . . . . . . . . . . . . . . . . . .1001
Emerson. . . . . . . . 1017,1023,1026,1028,1033
. . . . . . . . . . . . . . . 1034,1035,1037,1038,1039
. . . . . . . . . . .1041,1090,1122,1132,1141,1143
. . . . . . . . . . . 1160,1163,1171,1172,1176,1181
. . . . . . . . . . . . . . . 1203,1222,1224,1225,1227
Envision. . . . . . . . . . . . . . . . . . . . . . . . . . 1163
Fisher. . . . . . . . . . . . . . . . . . . 1042,1090,1099
Fujitsu . . . . . . . . . . . . . . . . . . . . . . . . . . . 1034
Funai . . . . . . . . . . . . . . .1024,1034,1041,1132
Futuretech . . . . . . . . . . . . . . . . . . . . . . . . 1041
General Electric. . . . . . .1003,1008,1009,1023
. . . . . . . . . . .1043,1044,1125,1130,1134,1143
. . . . . . 1163,1165,1170,1172,1182,1207,1211
Goldstar. . . . . . . . 1005,1023,1026,1028,1045
. . . . . . . . . . .1046,1088,1120,1146,1163,1168
. . . . . . . . . . . . . . . 1172,1173,1194,1224,1225
Gradiente. . . . . . . . . . . . . . . . . . . . . . . . . 1060
Granada. . . . . . . . . . . . . . . . . . . . . . . . . . 1146
Grundig . . . . . . . . . . . . . . . . . . . . . . . . . . 1162
Hallmark . . . . . . . . . . . . . . . . . . . . .1023,1172
Hinari. . . . . . . . . . . . . . . . . . . . . . . .1034,1146
Hitachi. . . . . . . . . 1005,1018,1023,1024,1026
. . . . . . . . . . .1044,1048,1049,1050,1051,1052
. . . . . . . . . . .1053,1054,1055,1126,1169,1172
. . . . . . . . . . .1177,1183,1194,1210,1224,1225
Infinity. . . . . . . . . . . . . . . . . . 1010,1066,1151
JBL . . . . . . . . . . . . . . . . . . . . 1010,1066,1151
JC Penney . . . . . . 1003,1005,1006,1014,1016
. . . . . . . . . . .1026,1043,1044,1096,1125,1131
. . . . . . . . . . . 1134,1149,1163,1165,1172,1194
. . . . . . . . . . . . . . . . . . . . . . . . . . . . .1207,1224
JVC . . . . . . .1057,1058,1059,1060,1061,1185
Jensen . . . . . . . . . . . . . . . . . . . . . . . . . . . 1056
KEC. . . . . . . . . . . . . . . . . . . . . . . . . . . . . 1041
KMC . . . . . . . . . . . . . . . . . . . . . . . .1224,1225
KTV. . 1026,1039,1041,1163,1172,1224,1225
Kenwood . . . . . . . . . . . . . . . . . . . . .1006,1163
Kloss . . . . . . . . . . . . . . . . . . . 1022,1110,1175
LXI . . 1003,1010,1066,1090,1117,1125,1129
. . . . . . .1131,1132,1134,1151,1172,1173,1194
Lloytron. . . . . . . . . . . . . . . . . . . . . . . . . . 1224
Lodgenet . . . . . . . . . . . . . . . . . . . . . . . . . 1018
Loewe . . . . . . . . . . . . . . . . . . . . . . . 1146,1186
Logik . . . . . . . . . . . . . . . . . . . . . . . . . . . . 1018
Luxman . . . . . . . . . . . . . . . . . . . . . . . . . . 1023
MGA . . . . . .1004,1005,1006,1023,1034,1071
. . . . . . . . . . .1072,1149,1163,1172,1192,1194
MTC . 1005,1006,1010,1016,1023,1024,1163
Magnasonic . . . . . 1024,1034,1129,1131,1151
Magnavox . .1000,100 6, 1 008 , 10 10 , 10 17,1020
. .1024,1025,1027, 102 8,1034,1066,1067, 106 8
16
Page 27

Using Y our Remote
TV Codes (continued)
Majestic . . . . . . . . . . . . . . . . . . . . . . . . . .1018
Marantz . . . . . . . .1006,1010,1066,1068,1072
. . . . . . . . . . .1088,1146,1149,1151,1163,1172
Matsui . . . . . . . . . . . . . . . . . . 1032,1109,1146
Memorex . . . . . . . . . . . 1018,1032,1034,1072
. . . . . . . . . . . . . . . . . . . . . . . . 1090,1149,1172
Midland . . . . . . . . . . . . . . . . .1001,1003,1165
Mitsubishi . . . . . .1004,1005,1023,1034,1070
. . . . . . . . . . .1071,1072,1122,1123,1129,1149
. . . . . . . . . . . . . . . 1172,1173,1188,1192,1194
Multitech . . . . . . . . . . . . . . . . . . . . . . . . .1041
NAD. . . . . . . . . . . 1002,1117,1131,1166,1172
NEC . . . . . . . . . . . 1005,1006,1007,1009,1023
. . . . . . . . . . .1028,1036,1090,1141,1149,1163
. . . . . . 1172,1173,1191,1192,1193,1194,1195
National . . . . . . . . . . . . . . . . . 1008,1011,1145
. . . . . . . . . . . . . . . . . . . .1151,1190,1196,1211
Nikkai . . . . . . . . . . . . . . . . . . 1113,1118,1146
Onwa . . . . . . . . . . . . . . . . . . . . . . . . . . . . 1041
Optimus . . . . . . . . . . . . . . . . . 1012,1090,1166
Optonica. . . . . . . . . . . . . . . . . . . . . .1129,1141
Orion . . . . . . . . . . . . . . .1037,1146,1176,1212
Osume . . . . . . . . . . . . . . . . . . . . . . . . . . .1091
Panasonic. . . . . . .1008,1009,1010,1011,1012
. . . . . . . . . . .1040,1066,1147,1151,1153,1165
. . . . . . . . . . . . . . . . . . . .1196,1197,1198,1211
Philco. . . . . . . .1005,1006,1 009,1010,1 024
. . . . 1025,1067,1068 ,1110,1149,1151,1163
. . . . . . . . 1169,1172,1175,1176,1224,1225
Pioneer. . . . 1002,1008,1031,1048,1051,1076
. . . . . . . . . . . . .1131,1166,1199,1202,1204
Portland . . . 1005,1024,1026,1172,1224,1225
Proscan. . . . . . . . . . . . . . . . . . 1125,1152,1172
Proton. . . . . . . . . .1006,1013,1019,1023,1026
. . . . . . . . . . . . . . . . . . . . . . . . 1120,1172,1224
Pulsar . . . . . . . . . . . . . . . . . . . . . 1001,1024
Quasar . . . . . . .1008,1009,1012,1165,1 211
RCA. . . . . . 1003,1005,1008,1009,1014,1028
. . . . . . . . . . 1047,1048,1063,1078,1079,1080
. . . . . . . . . . .1082,1084,1086,1087,1125,1130
. . . . . . . . 1134,1149,1168,1172,1182,1210
Radio Shack. . . . .1003,1026,1041,1072,1090
. . . . . . . . .1112,1141,1172,1173,1194,1224
Realistic . . . .1035,1041,1090,1112,1141,1163
. . . . . . . . . . . . . . . . . . . .1172,1194,1222,1224
Runco. . . . . . . . . . . . . . . . . . . . . . . 1001,1163
SSS. . . . . . . . . . . . . . . . . . . . . . . . . 1005,1041
Saba . . . . . . . . . . . . . . . . . . . . . . . . . . . . .1051
Saisho. . . . . . . . . . . . . . . . . . . 1032,1033,1109
Sampo . . . . .1006,1019,1156,1163,1192,1194
Samsung . . .1005,1006,1016,1023,1026,1032
. . 1088,1112,1146,1155,1157,1158,1163,1167
. . . . . . 1172,1173,1192,1194,1205,1224,1225
Sansui . . . . . . . . . . . . . . . . . . . . . . . . . . . 1176
Sanyo. . . . . . . . . . 1041,1042,1089,1090,1091
. . . . . . . . . . . . . . . . . . . .1092,1109,1184,1194
Scott. . . . . . . . . . . 1026,1034,1037,1041,1093
. . . . . . . . . . . . . . . 1172,1173,1192,1194,1224
Sears . . . . . . . . . . 1003,1010,1016,1023,1034
. . . . . . 1042,1090,1096,1098,1099,1102,1104
. . . . . . .1117,1125,1131,1132,1134,1151,1172
. . . . . . . . . . . . . . . . . . . .1184,1194,1224,1225
Sharp . 1026,1091,1129,1141,1200,1224,1225
Signature . . . . . . . . . . . . . . . . 10 18,1129,1151
Sony. . . . . . . . . . . . . . . . . . . . . . . . .1000,1189
Sounde sign . . . . . 10 23,1025, 1034,1041,1172
Spectricon . . . . . . . . . . . . . . . . . . . . . . . . 1120
Starlite . . . . . . . . . . . . . . . . . . . . . . . . . . . 1041
Supra . . . . . . . . . . . . . . . . . . . . . . . .1022,1023
Sylvania . . . .1006,1010,1024,1025,1066,1068
. . . . . . . . . . . 1110,1112,1132,1151,1163,1172
. . . . . . . . . . . . . . . . . . . .1173,1175,1192,1194
Symphonic. . . . . . . . . . . . . . . 1041,1132,1179
TMK . . . . . . . . . . . . . . . . . . . 1005,1023,1172
TNCi . . . . . . . . . . . . . . . . . . . . . . . . . . . . 1015
Tandy. . . . . . . . . . . . . . . . . . . 1112,1113,1129
Tatung . . . . . . . . . . . . . . . . . . 1009,1146,1211
Technics. . . . . . . . . . . . . . . . . 1008,1012,1165
Techwood . . . . . . . . . . . . . . . . . . . .1023,1165
Teknika . . . .1004,1005,1016,1018,1022,1023
. . . . . . 1024,1025,1026,1034,1041,1072,1114
. . . . . . . . . . . . . . . . . . . .1149,1151,1224,1225
Telerent . . . . . . . . . . . . . . . . . . . . . .1018,1224
Teletech . . . . . . . . . . . . . . . . . . . . . . . . . . 1032
Thomson . . . . . . . . . . . . . . . . . . . . . . . . . 1051
Toshiba . . . .1016,1017,1090,1096,1117,1118
. . . . . . . . . . . . . . . 1129,1131,1180,1201,1206
Totevision . . . . . . . . . . . . . . . . . . . .1026,1224
Universal. . . . . . . . . . . . . . . . 1043,1044,1207
Vector Research . . . . . . . . . . . . . . . .1006,1163
Victor. . . . . . . . . . . . . . . . . . . . . . . .1057,1060
Video Concepts . . . . . . . . . . . . . . . . . . . . 1070
Vidtech . . . . . . . . 1005,1023,1169,1172,1173
Viking . . . . . . . . . . . . . . . . . . . . . . . . . . . 1022
Wards. 1005,1006,1008,1018,1023,1034,1043
. . . . . . 1044,1067,1068,1119,1125,1141,1151
. . 116 3,1172,1173,1182,1 192,1194,1207,1224
Westinghouse. . . . . . . . .1037,1041,1090,1130
. . . . . . . . . . . . . . . . . . . . . . . . 1170,1171,1190
Yamaha . . . .1005,1006,1163,Yorx,1192,1194
Zenith . . . . . . . . . 1001,1018,1024,1169,1178
Zonda. . . . . . . . . . . . . . . . . . . . . . . . . . . . 1120
DSR205 User Guide 17
Page 28

2
DVD Players
Aiwa . . . . . . . . . . . . . . . . . . . . . . . . . . . . . . .3179
Akai . . . . . . . . . . . . . . . . . . . . . . . . . . . . . . . .3163
Apex . . . . . . . . . . . . . . . . . . . . . . . . . . . . . . .3004
Apex Digital . . . . . . . . . . . . . . . . . . . . . . . . .3001
Cinevision . . . . . . . . . . . . . . . . . . . . . . . . . . .3223
Denon . . . . . . . 3006,3222, 3223,3224,3239,3241
Emerson . . . . . . . . . . . . . . . . . . . . . . . . . . . . .3002
Ferguson . . . . . . . . . . . . . . . . . . . . . . . . . . . .3205
Fisher . . . . . . . . . . . . . . . . . . . . . . . . . . 3189,3236
Funai . . . . . . . . . . . . . . . . . . . . . . . . . . . . . . .3225
General Electric. . . . . . . . . . . . . . . . . . . . . . .3205
Goldstar . . . . . . . . . . . . . . . . . . . .3221,3233,3247
Harman Kardon . . . . . . . . . . . . . . . . . . .30043005
Hitachi . . . . . . . . . . . . . . . . . . . . . . . . . .31813226
JVC . . . . . . . . . . . . . . . . . . . . . . .3006,3117,3250
KLH. . . . . . . . . . . . . . . . . . . . . . . . . . . . . . . .3187
Kenwood . . . . . . . . . . . . . . . . . . .3007,3227,3 253
LG . . . . . . . . . . . . . . . . . . . . . . . . . . . . . . . . .3008
Magnav ox . . . . . . . . .3002,3228,3229,3230,3 231
Marantz . . . . . . . . . . . . . . . . . . . . . . . . 3009,3231
Memorex . . . . . . . . . . . . . . . . . . . . . . . . . . . .3010
Mitsubishi . . . . . . . . . . . . . 3228,3230,3232,3234
NAD . . . . . . . . . . . . . . . . . . . . . .3005,3012,3228
Nakamichi . . . . . . . . . . . . . . . . . . . . . . . . . . .3013
Nordmende . . . . . . . . . . . . . . . . . . . . . . . . . .3205
VCR Recorders
ASA . . . . . . . . . . . . . . . . . . . . . . . . . . . 2065,2134
Admiral . . . . . . . . . . . . . . . . . . . . . . . . 2085,2178
Aiwa. . . . . . . . . . . . . . . . . . . . . . .2056,2088,2202
Akai . . . . .2008,2013,2014,20 15,2016,2018,2019
. . . . . . . . . . . . . . . . . . . . . . . . . . .2020,2068,2086
Alba . . . . . . . . . . . . . . . . . . . . . . . . . . . . . . . .2046
American High. . . . . . . . . . . . . . . . . . . 2054,2158
Amstrad . . . . . . . . . . . . . . . . . . . . . . . . . . . . .2088
Audio Dynamics . . . . . . . . 2013,2030,2046,2086
Audiovox . . . . . . . . . . . . . . . . . . . . . . . . . . . .2056
Bell & Howell . . . . . . . . . . . . . . .2049,2175,2177
Broksonic. . . . . . . . . . . . . . 2005,2008,2059,2148
Bush . . . . . . . . . . . . . . . . . . . . . . . . . . . . . . . .2089
CCE . . . . . . . . . . . . . . . . . . . . . . . . . . . . . . . .2176
Candle . . . . . . . 2042,2046,2056,2080,2092,2149
Canon. . . . . . . . . . . . . . . . . 2042,2054,2154,2158
Capehart . . . . . . . . . . . . . . . . . . . . . . . . . . . . .2046
Carver . . . . . . . . . . . . . . . . . . . . . . . . . 2065,2136
Cineral . . . . . . . . . . . . . . . . . . . . . . . . . . . . . .2176
Citizen . . . . . . . . . . . .2034,2046,2056,2091,2092
Craig . . . . . . . . . . . . . . . . . 2044,2056,2082,2091
Curtis Mathes. . 2034,2051,2054,2088,2092,2105
. . . . . . . . . . . . . . . . . .2114,2139,2149,2154,2158
DBX. . . . . . . . . . . . . . . . . . 2013,2030,2046,2086
Daewoo . . . . . . . . . . .2034,2046,2049,2150,2176
Daytron . . . . . . . . . . . . . . . . . . . . . . . . . . . . .2046
Denon. . . . . . . . . . . . . . . . . . . . . . . . . . . . . . .2173
Dimensia . . . . . . . . . . . . . . . . . . . . . . . . . . . .2105
Dual . . . . . . . . . . . . . . . . . . . . . . . . . . . . . . . .2086
Dumont . . . . . . . . . . . . . . . . . . . . . . . . . . . . .2049
Dynatech . . . . . . . . . . . . . . . . . . .2034,2088,2161
Electrohome. . . . . . . . . . . . . . . . . . . . . 2056,2068
Onkyo . . . . . . . . . . . . . . . . . . . . .3003,3014,3230
Panasonic. . . . . . . . . .3003,3015,3 016,3188,3235
. . . . . . . . . . . . . . . . . . . . . . 3236,3239,3240,3241
Philips . . .3002,3009,3011,3017,3229,3230,3231
Pioneer. . . . . . . . . . . . . . . . 3018,3188,3228,3244
Proceed . . . . . . . . . . . . . . . . . . . . . . . . . . . . .3007
Proscan . . . . . . . . . . . . . . . . . . . . . . . . 3019,3205
Quasar . . . . . . . . . . . . . . . . . . . . . . . . . . . . . .3236
RCA. . . . . . . . . . . . . . . . . . . . . . . 3001,3205,3245
Radio Shack. . . . . . . . . . . . . . . . . . . . . . . . . .3225
Runco . . . . . . . . . . . . . . . . . . . . . . . . . . . . . .3207
Saba . . . . . . . . . . . . . . . . . . . . . . . . . . . . . . . .3205
Samsung . . . . . . . . . .3000,3020,3208,3209,3230
Sanyo. . . . . . . . . . . . . . . . . . . . . . . . . . . . . . .3189
Sharp . . . . . . . . . . . . . . . . . . . . . .3021,3197,3253
Sherwood. . . . . . . . . . . . . . . . . . . . . . . . . . . .3246
Sony. . . . . . . . . . . . . .3000,3215,3216,3217,3220
Sylvania. . . . . . . . . . . . . . . . . . . . . . . . . . . . .3002
Technics. . . . . . . . . . . . . . . 3235,3236,3240,3241
Theta Digital . . . . . . . . . . . . . . . . . . . . . . . . .3229
Thomson . . . . . . . . . . . . . . . . . . . 3022,3201,3205
Toshiba . . . . . . . . . . . . . . . 3023,3228,3230,3253
Yamaha . . . . . . 3024,3 214,3239,3241,3254,325 5
Zenith . . . . . . . . . . . .3203,3221,3230, 3233,3247
Emerson. . . . . . 2005,2 006,2008,2009,2010,201 1
. . . . . . . . .2012,2034,2056,2059,2068,2070,2088
. . . . 2090,2132,2148,2 150,2169,2176,2190,219 2
Finlandia . . . . . . . . . . . . . . . . . . . . . . . . . . . .2049
Finlux. . . . . . . . . . . . . . . . . 2049,2065,2088,2134
Fisher. . . . . . . . 2048,2049, 2081,2082,2084,2175
Fuji. . . . . . . . . . . . . . . . . . . . . . . . . . . . 2054,2158
Funai . . . . . . . . . . . . . . . . . . . . . . . . . . . . . . .2088
General Electri c. . . . .2025,2033,2050,2051,2052
. . . . . . . . .2054,2091,210 5,2133,2 139,2149,2154
. . . . . . . . . . . . . . . . . .2158,2167,2174,2178,2194
Go V ideo . . . . . 2057,205 8,2091,2164,2165,2 186
Goldstar. . . . . . . . . . .2030,20 33,2056, 2092,2102
Goodmans . . . . . . . . . . . . . . . . . .2085,2089,2161
Gradiente . . . . . . . . . . . . . . . . . . .2061,2062,2088
Granada . . . . . . . . . . . . . . . . . . . . . . . . 2049,2081
Grundig . . . . . . . . . . . . . . . . . . . . . . . . 2065,2134
HQ . . . . . . . . . . . . . . . . . . . . . . . . . . . . . . . . .2034
Harman Kardon. . . . . . . . . 2030,2065,2069,2136
Hinari. . . . . . . . . . . . . . . . . . . . . . . . . . . . . . .2089
Hitachi . . . . . . . 2013,2037,2038,2040,2086,2088
. . . . . . . . . . . . . . . . . . . . . . 2094,2095,2139,2173
ITT. . . . . . . . . . . . . . . . . . . . . . . . . . . . 2018,2086
JC Penne y . . . . 2030,2046,2050,2052,2054,205 6
. . . . 2080,2081,2091,2092,2094,2114,2139,2149
. . . . . . . . . . . . . . . . . . . . . .,2154,2158,2173,2175
JVC . . . . 2030,2046,2061,2062,2063,2064,2081,
. . . . . . . . . . . . . . . . . .2086,2092,2123,2158,2168
Jensen . . . . . . . . . . . . . . . . . . . . . . . . . 2013,2086
Kenwood . . . . . 2046,2062,2081,2086,2088,2092
Kodak . . . . . . . . . . . . . . . . . . . . . . . . . 2056,2158
LXI . . . . . . . . . . . . . .2034,2056,2088,2173,2175
Lloyd . . . . . . . . . . . . . . . . . . . . . . . . . . . . . . .2088
18
Page 29

VCR Recorders (continued)
Logik . . . . . . . . . . . . . . . . . . . . . . . . . . . . . . .2089
Luxor . . . . . . . . . . . . . . . . . . . . . . . . . . . . . . .2018
MEI . . . . . . . . . . . . . . . . . . . . . . . . . . . 2054,2158
MGA . . . . . . . . . . . . . . . . . 2067,2068,2070,2169
MTC . . . . . . . . . . . . . . . . . . . . . .2080,2088,2091
Magnav ox . . . . 2027,2033,2034,2050,2054, 2065
. . . . . . . . .2076,2085,2088,2111,2130,2134,2136
. . . . . . . . . . . . . . . . . .2137,2138,2139,2158,2159
Magnin. . . . . . . . . . . . . . . . . . . . . . . . . . . . . .2091
Marantz . .2030,2046,2054,2065,2081,2085,2092
2102. . . . . . . . . 2134,2136,2139,2158,2159,2161
Marta . . . . . . . . . . . . . . . . . . . . . . . . . . . . . . .2056
Matsui . . . . . . . . . . . . . . . . . . . . . . . . . . . . . .2088
Matsushita2054,2114,2137,2138,2139,2154,2158
Memorex .203 3,2049,2054,2056,2066,2081,2082
. . . . . . . . .2085,2088,2091 ,2114, 2158,2161,2178
Minolta . . . . . . . . . . . . . . . . . . . . . . . . 2094,2173
Mitsubishi . . . . 2062, 2067,2068,2069,2070,2 071
. . . . . . . . . . . . . . . . . .2124,2125,2140,2169,2178
Motorola . . . . . . . . . . . . . . . . . . .2054,2158,2178
Multitech . . . . . . . . . .2088,2089,2091,2154,2174
NAD . . . . . . . . . . . . . . . . . . . . . . . . . . 2073,2153
NEC. . . . . . . . . 2013,2030,2031,2032,2046,2049
. . . . 2062,2081,2086, 2092,2102,2128,2158,2 160
National . . . . . . . . . . . . . . . . . . . . . . . . . . . . .2054
Nokia . . . . . . . . . . . . . . . . . . . . . . . . . . . . . . .2176
Olympus . . . . . . . . . . . . . . . . . . . . . . . 2054,2158
Optimus. .2049,205 6,2088, 2091,2114,2154,2178
Optonica . . . . . . . . . . . . . . . . . . .2085,2130,2161
Orion . . . . . . . . . . . . . . . . . . . . . .2005,2006,2021
Panasonic.2023,2034,2054,2078,2098,2114,2129
. . . . 2137,2138,2139, 2149,2154,2158,2170,2 171
Pentax . . . . . . . . . . . . . . . . 2037,2092,2094,2173
Philco. . . . . . . . 2054,2076 ,2088,2111,2134,2 137
. . . . . . . . . . . . . . . . . .2138,2139,2154,2158,2176
Philips . . .2034,2054,2065,2085,2088,2134,2136
. . . . . . . . . . . . . 2138,2139,2154,2155, 2158,2161
Pioneer . . . 2046,2062,2073,2074,2075,2076,2111
Portland . . . . . . . . . . . . . . . . . . . . . . . . . . . . .2046
Proscan . .2034,2065,2105,2136,2138,2154,2173
Pulsar . . . . . . . . . . . . . . . . . . . . . .2033,2088,2154
Quartz . . . . . . . . . . . . . . . . . . . . . . . . . . . . . .2081
Quasar . . . . . . . 2054,2078,2114,2129, 2137,2139
. . . . . . . . . . . . . . . . . . . . . . . . . . .2149,2158,2170
RCA20032025202720282034 2037205120542065
2088. . .2091 209421052136213821392147 2154
2158 . . . . . . . . . . . . . . . . . . . . . . . .217321782194
Using Y our Remote
Radio Shack. 20542056206820812082 20842085
2088. . . . . . . . . . . 209121142130 215421612172
Realistic20492054205620802081 208220842085
2088. . . 20912130 213 921492154215821612175
2178. . . . . . . . . . . . . . . . . . . . . . . . . . . . . . . . . . . .
SBR. . . . . . . . . . . . . . . . . . . . . . . .206521342155
STS . . . . . . . . . . . . . . . . . . . . . . . . . . . . . . . .2173
Saisho . . . . . . . . . . . . . . . . . . . . . . . . . .20062009
Salora. . . . . . . . . . . . . . . . . . . . . . . . . . .20672081
Samsung20152034207920802088 209121652174
2186. . . . . . . . . . . . . . . . . . . . . . . . . . . . . . . . . . . .
Sanky. . . . . . . . . . . . . . . . . . . . . . . . . . . . . . .2178
Sansui . . . . . . . . . 20132032204620622 08 6 2088
Sanyo. . 20442048204920812082 208320842175
2176. . . . . . . . . . . . . . . . . . . . . . . . . . . . . . . .2177
Schneider. . . . . . . . . . . . . . . . . . . . . . . . . . . .2089
Scott20082009203420592067 2070209 02 16 921 74
Sears . . 20342048204920542056 208120822084
2088. . . . . . . . . . . . . . . . . . . 20942158 21732175
Semp . . . . . . . . . . . . . . . . . . . . . . . . . . .20342080
Sentra. . . . . . . . . . . . . . . . . . . . . . . . . . . . . . . 2046
Sharp . . . . . . . . . . . . . . .20682085213021612178
Signature . . . . . . . . . . . . . . . . . . . . . . . . 20852088
Sony. . . . . . . . . . . . . . . .20002001200220542158
Soundesign . . . . . . . . . . . . . . . . . . . . . . . . . . 2088
Sylvania 20502054206520672070 207620882 111
2134. . . . . . . 21362137 21392154215821592169
Symphonic. . . . . . . . . . . . . . . . . . . . . . . . . . .2088
TMK . . . . . . . . . . . . . . . . . . . . . . .200620912190
Tandy. . 20492068208120822084 208520882161
Tashiko . . . . . . . . . . . . . . . . . . . . . . . . . . . . .2088
Tatung . . . . . . . . . . . . . . . . . . . . . . . . . .20132086
Teac . . . . . . . . . . . . . . . . . . . . . . . .201320862088
Technics. . . . . . . . . . . . .20542114213821542158
Teknika . . . . . . . . . . . . .2054205620 8720 882158
Toshiba 20342035206720702084 208620902169
Totevisi on . . . . . . . . . . . . . . . . . . .205620802091
Unitech . . . . . . . . . . . . . . . . . . . . . . . . .20802091
Vector . . . . . . . . . . . . . . . . . . . . . . . . . . . . . .2034
Vector Research. . . . . . . . . . .2030204620672092
Victor. . . . . . . . . . . . . . . . . . . . . . . . . . . . . . . 2062
Vi deo Concepts . . 203020342046206 82088 2092
Videosonic. . . . . . . . . . . . . . . . . . . . . . . . . . .2091
Wards. . 20272033205420652068 208020822085
2088. . . 20892090 209 121302136215821612173
2178. . . . . . . . . . . . . . . . . . . . . . . . . . . . . . . . . . . .
XR-1000 . . . . . . . . . . . . . . . . . . . . . . . . . . . .2158
Yamaha 20132030204620812086 208820922175
Zenith . . . . . . . . . . . . . . . . . . . . . .203320622088
DSR205 User Guide 19
Page 30

2
Cable Boxes
AT&T . . . . . . . . . . . . . . . . . . . . . . . . . . . . . . 6238
Americast . . . . . . . . . . . . . . . . . . . . . . . . . . . 6128
Cablevision . . . . . . . . . . . . . . . . . . . . . 6103,6104
Eagle . . . . . . . . . . . . . . . . . . . . . . . . . . . . . . 6006
Eastern . . . . . . . . . . . . . . . . . . . . 6007,6015,6017
General Instrument . . . . . . . . . . 6055,6235,6236
. . . . . . . . . . . . . . . . . . . . . . 6238,6241,6242,6243
Hamlin . . . . . . . . . . . . . . . . . . . . 6088,6089,6090
Hitachi . . . . . . . . . . . . . . . . . . . . . . . . . . . . . 6053
Hyundai . . . . . . . . . . . . . . . . . . . . . . . . . . . . 6127
Jerrold . . . . . . . . . . . 6050,6053,6055,6120,6163
. . . . 6190,6235,6236,6237,6238,6241,6242,6243
Lodgenet . . . . . . . . . . . . . . . . . . . . . . . . . . . 6200
Macom . . . . . . . . . . . . . . . . . . . . . . . . . . . . . 6044
NSC . . . . . . . . . . . . . . . . . . . . . . . . . . . . . . . 6020
Oak. . . . . . . . . . . . . . . . . . . 6056,6057,6058,6059
Orion . . . . . . . . . . . . . . . . . . . . . . . . . . . . . . 6018
Panasonic . . . . . . . . . . . . . . 6014,6099,6249,6250
Philips . . . . . . . . . . . . . . . . . . . . . . . . . . . . . 6004
Pioneer . . . . . . . . . . . 6064,6108,6244,6245,6246
CD Players
ADC . . . . . . . . . . . . . . . . . . . . . . . . . . . . . . . 3025
Aiwa . . . . . . . . . . . . . . . . . . . . . . . . . . .3026,3027
Burmeister . . . . . . . . . . . . . . . . . . . . . . . . . . 3028
California Audio. . . . . . . . . . . . . . . . . . . . . . 3058
Carver . . . . . . . . . . . . . . . . . . . . . . . . . . . . . . 3029
DKK . . . . . . . . . . . . . . . . . . . . . . . . . . . . . . . 3033
Daewoo. . . . . . . . . . . . . . . . . . . . . . . . .3030,3031
Denon . . . . . . . . . . . . . . . . . . . . . . . . . . . . . . 3032
Fisher . . . . . . . . . . . . . . . . . . . . . . . . . . . . . . 3034
Genexxa . . . . . . . . . . . . . . . . . . . 3035,3036,3037
Harmon. . . . . . . . . . . . . . . . . . . . 3038,3039,3040
JVC. . . . . . . . . . . . . . . . . . . . . . . . . . . .3042,3043
Jensen . . . . . . . . . . . . . . . . . . . . . . . . . . . . . . 3041
Kenwood . . . . . . . . . . . . . . . . . . 3044,3045,3046
Linn . . . . . . . . . . . . . . . . . . . . . . . . . . . . . . . 3047
MTC . . . . . . . . . . . . . . . . . . . . . . . . . . . . . . . 3028
Magnavox. . . . . . . . . . . . . . . . . . . . . . . . . . . 3048
Mission . . . . . . . . . . . . . . . . . . . . . . . . . . . . . 3047
NSM . . . . . . . . . . . . . . . . . . . . . . . . . . . . . . . 3047
Pulsar . . . . . . . . . . . . . . . . . . . . . . . . . . . . . . .6065
Radio Shack . . . . . . . . . . . . . . . . . . . . . 6023,6131
Regal . . . . . . . . . . . . . . . . . . . . . . . . . . 6089,6090
Regency . . . . . . . . . . . . . . . . . . . . . . . . 6007,6017
SL-Marx . . . . . . . . . . . . . . . . . . . . . . . . . . . .6007
Samsung . . . . . . . . . . . . . . . . . . . . . . . . 6006,665
Scientific Atlanta6066,6067,6069,6070,6239,6240
Signal. . . . . . . . . . . . . . . . . . . . . . . . . . . . . . .6006
Signature . . . . . . . . . . . . . . . . . . . . . . . . . . . .6053
SkyCable . . . . . . . . . . . . . . . . . . . . . . . . . . . .6129
Sprucer. . . . . . . . . . . . . . . . . . . . . . . . . 6014,6249
Starcom . . . . . . . . . . . . . . . . . . . . . . . . 6055,6235
Stargate . . . . . . . . . . . . . . . 6007,6022,6065,6063
Sylvania . . . . . . . . . . . . . . . . . . . . . . . . . . . . .6072
Texscan . . . . . . . . . . . . . . . . . . . . . . . . . . . . .6072
Tocom . . . . . . . . . . . . . . . . . . . . .6241,6242,6243
Videoway. . . . . . . . . . . . . . . . . . . . . . . . . . . .6248
Viewstar. . . . . . . . . . . . . . . . . . . . . . . . . . . . .6020
Visionetics . . . . . . . . . . . . . . . . . . . . . . . . . . .6106
Zenith. . . . . . . . . . . . . . . . . . . . . . . . . . 6247,6248
Nakamichi . . . . . . . . . . . . . . . . . . . . . . . . . . 3049
Nikko . . . . . . . . . . . . . . . . . . . . . . . . . .3036,3050
Onkyo. . . . . . . . . . . . . . . . . . . . . . . . . .3051,3052
Optimus . . . . . . . . . . . . . . . . . . . . . . . . . . . . 3053
Panasonic . . . . . . . . . . . . . . . . . . 3054,3055,3056
Polk Audio. . . . . . . . . . . . . . . . . . . . . . . . . . 3057
QED . . . . . . . . . . . . . . . . . . . . . . . . . . . . . . . 3047
Quasar . . . . . . . . . . . . . . . . . . . . . . . . . . . . . 3058
RCA . . . . . . . . . . . . . . . . . . . . . . . . . . . . . . . 3059
SAE . . . . . . . . . . . . . . . . . . . . . . . . . . . . . . . 3047
Sansui. . . . . . . . . . . . . . . . . . . . . . . . . . . . . . 3060
Sears . . . . . . . . . . . . . . . . . . . . . . . . . . . . . . . 3061
Sharp . . . . . . . . . . . . . . . . . . . . . . . . . . . . . . 3062
Sony . . . . . . . . . . . . . . . . . . . . . . . . . . . . . . . 3063
Tascam . . . . . . . . . . . . . . . . . . . . . . . . . . . . . 3028
Teac . . . . . . . . . . . . . . . . . . . . . . . . . . . 3064,3065
Victor . . . . . . . . . . . . . . . . . . . . . . . . . . . . . . 3066
Yamaha. . . . . . . . . . . . . . . . . . . . 3067,3068,3069
Satellite Receivers
4DTV . . . . . . . . . . . . . . . . . . . . . . . . . . . . . . 0000
General Instrument . . . . . . .0000,0001,0002,0003
. . . . . . . . . . . . . . . . . . . . . .0004,0005,0006,0007
Motorola . . . . . . . . . . . . . . .0000,0001,0002,0003
. . . . . . . . . . . . . . . . . . . . . .0004,0005,0006,0007
Next Level . . . . . . . . . . . . . . . . . . . . . . . . . . 0000
Star Choice . . . . . . . . . . . . . . . . . . . . . . . . . . 0000
20
Page 31

Amplifiers
Using Y our Remote
Adcom . . . . . . . . . . . . . . . . . . . . 4024,4032,4042
Admiral . . . . . . . . . . . . . . . . . . . . . . . . 4101,4185
Aiwa. . . . . . . . . . . . . 4020,4033,4102,4103,4104
. . . . . . . . . . . . . . . . . 4149,4150,4151,4152,4173
Akai . . . . . . . . . . . . . . . . . . 4075,4119,4153,4207
AMC . . . . . . . . . . . . . . . . . . . . . . . . . . 4040,4208
Anam . . . . . . . . . . . . . . . . . . . . . . . . . . . . . . 4065
Audio Alchemy . . . . . . . . . . . . . . . . . . . . . . 4154
Audio Design. . . . . . . . . . . . . . . . . . . . . . . . 4054
Audio Matrix . . . . . . . . . . . . . . . . . . . . . . . . 4209
Audio Source. . . . . . . . . . . . . . . . . . . . . . . . 4155
B & K. . . . . . . . . . . . . . . . . . . . . . . . . . . . . . 4010
B&K. . . . . . . . . . . . . . . . . . . . . . . . . . . . . . . 4026
Bose . . . . . . . . . . . . . . . . . . . . . . . . . . . 4020,4211
Carver. . . 4022,402,54083,4091,4093,4094,4147
Casio . . . . . . . . . . . . . . . . . . . . . . . . . . 4021,4170
Cinema Sound . . . . . . . . . . . . . . . . . . . . . . . 4036
Citation. . . . . . . . . . . . . . . . . . . . . . . . . 4052,4212
Clarion . . . . . . . . . . . . . . . . . . . . . . . . . . . . . 4059
Curtis Mathes. . . . . . . . . . . . . . . . . . . . . . . . 4021
Daewoo . . . . . . . . . . . . . . . . . . . . . . . . . . . . 4105
Denon. . . . . . . . . . . . . . . . . . . . . . . . . . . . . . 3032
Denon. . . . . . . . 4036,4106,4107,4108,4109,4110
DKK. . . . . . . . . . . . . . . . . . . . . . . . . . . . . . . 3033
Emerson . . . . . . . . . . . . . . . . . . . . . . . . . . . . 4163
Fisher . . . . . . . . . . . . . . . . . . . . . . . . . . . . . . 3034
Fisher . . . . . . . . . . . . . . . . . 4083,4087,4147,4158
Garrard . . . . . . . . . . . . . . . . . . . . . . . . . 4075,4163
General Electric . . . . . . . . . . . . . . . . . . 4067,4159
Goldstar . . . . . . . . . . . . . . . . . . . . . . . . . . . . .4112
Harman Kardon . . . . .4039,4052,4113,4160,4212
Hitachi . . . . . . . . . . . . . . . . . . . . . . . . . 4077,4110
Inkel . . . . . . . . . . . . . . . . . . . . . . . . . . . . . . . 4193
JBL. . . . . . . . . . . . . . . . . . . . . . . . . . . . 4078,4161
JC Penney . . . . . . . . . . . . . . . . . 4021,4148,4170
Jensen. . . . . . . . . . . . . . . . . . . . . . . . . . 4114,4206
JVC . . . . . . . . . . . . . 4034,4041,4043,4044,4079
Kenwood 4058,4059,4083,4087,4135,4162,4214
Koss . . . . . . . . . . . . . . . . . . . . . . 4148,4163,4164
Krell . . . . . . . . . . . . . . . . . . . . . . . . . . . . . . . 4017
Lexicon . . . . . . . . . . . . . . . . . . . . . . . . . . . . 4165
Linn . . . . . . . . . . . . . . . . . . . . . . . . . . . . . . . 4008
Lloyds . . . . . . . . . . . . . . . . . . . . . . . . . . . . . 4170
Luxman . . . . . . . . . . 4069,4127,4166,4167,4168
LXI. . . . . . . . . . . . . . . . . . . . . . . 4021,4067,4169
Magnavox . . . . . . . . . . . . . 4028,4119,4170,4210
Marantz . . . . . . . . . . 4015,4074,4081,4086,4091
. . . . . . . . . . . . . . . . . 4093,4094,4099,4120,4171
McIntosh . . . . . . . . . . . . . . . . . . . . . . . 41224172
MCS. . . . . . . . . . . . . . . . . . . . . . . . . . . . . . . 4021
MCS . . . . . . . . . . . . . . . . . . . . . . . . . . . . . . .4021
Memorex . . . . . . . . . . . . . . . . . . . . . . . . . . . . 4151
Meridian . . . . . . . . . . . . . . . . . . . . . . . 4025,4095
Mitsubishi . . . . . . . . . . . . . . . . . . . . . . 4045,4082
Modulaire . . . . . . . . . . . . . . . . . . . . . . . . . . . 4170
Mondial . . . . . . . . . . . . . . . . . . . . 4029,4065,4144
NAD . . . . . . . . . . . . . . . . . . . . . . . . . . . . . . . 4099
Nakamichi . . . . . . . . . . . . . 4074,4084,4157,4217
NEC. . . . . . . . . . . . . . . . . . . . . . . . . . . . . . . .4076
Onkyo . . . . . . . . . . . .4050,4061,4070,4071,4085
. . . . . . . . . . . . . . . . . . . . . . 4096,4124,4218,4219
Optimus. . . . . . . . . . .4037,4059,4075,4175,4176
Panasonic. . . . . . . . . .4038,4080,4126,4177,4220
Parasound . . . . . . . . . . . . . . . . . . . . . . 4035,4178
Philco. . . . . . . . . . . . . . . . . . . . . . . . . . . . . . . 4179
Philips . . . . . . . . . . . . . . . . 4015,4086,4093,4181
Pioneer. . . . . . . . . . . .4023,4062,4088,4187,4221
Proton . . . . . . . . . . . . . . . . . . . . . . . . . 4182,4183
RCA. . . . . . . . . . . . . . 4053,4063,4089,4119,4129
. . . . . . . . . . . . . . . . . .4130,4131,4158,4184,4222
Realistic. . . . . . . . . . .4018,4067,4072,41 70,4185
Rotel . . . . . . . . . . . . . . . . . . . . . . 4019,4233,4234
Samsung . . . . . . . . . . . . . . . . . . . . . . . . . . . . 4189
Sansui . . .4015,4016,4063, 4074,4133,4223,4224
Sanyo. . . . . . . . . . . . . . . . . . . . . . . . . . 4083,4147
Schneider. . . . . . . . . . . . . . . . . . . . . . . . . . . .4134
Scott. . . . . . . . . . . . . . . . . . . . . . . 4031,4191,4192
Sears . . . . . . . . . . . . . . . . . . . . . . . . . . . . . . . 4021
Sharp . . . . . . . . . . . . . . . . . 4059,4106,4135,4239
Sherwood. . . . . . . . . . . . . . 4051,4073,4136,4138
. . . . . . . . . . . . . . . . . . . . . . 4193,4194,4195,4196
Sontec . . . . . . . . . . . . . . . . . . . . . . . . . . . . . .4197
Sony. . . . . . . . . . . . . . . . . . . . . . . 4000,4001,4002
. . . . . . . . . . . . . . . . . .4003,4004,4005,4006,4007
Sound Stream . . . . . . . . . . . . . . . . . . . 4027,4030
Soundesign . . . . . . . . . . . . . . . . . . . . . 4049,4140
SSI. . . . . . . . . . . . . . . . . . . . . . . . . . . . . . . . .4249
Teac . . . . .4058,4074,4075,4090,4 223,4225,4226
Technics. . . . . . . . . . . . . . . 4056,4057,4076,4080
. . . . . . . . . . . . . . . . . . . . . . 4126,4177,4199,4200
Topline. . . . . . . . . . . . . . . . . . . . . . . . . . . . . .4201
Toshiba . . . . . . . . . . . . . . . . . . . . . . . . . . . . .4100
Vector Research. . . . . . . . . . . . . . . . . . 4171,4202
Victor. . . . . . . . . . . . . . . . . . . . . . . . . . . . . . . 3066
Victor. . . . . . . . . . . . . . . . . . . . . . . . . . . . . . . 4009
Wards. . . . . . . . . . . . . . . . . . . . . . . . . . . . . . .4083
Yamaha . . . . . . . . . . . . . . . 4053,4059,4060,4145
. . . . . . . . . . . . . . . . . . . . . . 4180,4203,4204,4227
Yo rx. . . . . . . . . . . . . . . . . . . . . . . . . . . . . . . . 4170
Zenith . . . . . . . . . . . . . . . . . . . . .4205,4206,4228
DSR205 User Guide 21
Page 32

2
Combination TV/VCRs, TV/DVD
Aiwa. . . . . . . . . . . . . . . . . . . . . . . . . . . . . . . 5251
Apex. . . . . . . . . . . . . . . . . . . . . . . . . . . . . . . .5011
Audio Dynamics . . . . . . . . . . . . . . . . . . . . . 5234
Broksonic. . . . . . . . . . . . . . . . . . . . . . . . . . . 5219
Curtis Mathes. . . . . . . . . . . . . . . . . . . . 5231,5251
DBX. . . . . . . . . . . . . . . . . . . . . . . . . . . . . . . 5234
Daewoo . . . . . . . . . . . . . . . . . . . 5233,5250,5252
Electrohome. . . . . . . . . . . . . . . . . . . . . . . . . 5240
Emerson. . . . . . 5219,5223,5226,5251,5252,5253
Funai . . . . . . . . . . . . . . . . . . . . . . . . . . . . . . 5251
General Electric . . . . . . . . . . . . . 5231,5233,5248
Goldstar . . . . . . . . . . . . . . . 5223,5230,5234,5254
Harman Kardon . . . . . . . . . . . . . . . . . . . . . . 5234
Hitachi . . . . . . . . . . . . . . . . . . . . . . . . . 5231,5251
Hughes . . . . . . . . . . . . . . . . . . . . . . . . . . . . . 5024
JC Penney . . . . . . . . . . . . . 5223,5231,5232,5234
JVC . . . . . . . . . . . . . . . . . . . . . . . . . . . 5234,5235
Kenwood . . . . . . . . . . . . . . . . . . . . . . . 5234,5251
LXI. . . . . . . . . . . . . . . . . . . . . . . 5223,5251,5254
MGA . . . . . . . . . . . . . . . . . . . . . . . . . . . . . . 5240
MTC. . . . . . . . . . . . . . . . . . . . . . . . . . . . . . . 5251
Magnavox . . . . . . . . 5012,5231,5236,5237,5251
Marantz . . . . . . . . . . . . . . . . . . . . . . . . 5234,5237
Marta . . . . . . . . . . . . . . . . . . . . . . . . . . . . . . 5223
Memorex . . . . . 5223,5232,5244,5245,5248,5251
Mitsubishi . . . . . . . . . . . . . . . . . . . . . . 5239,5240
Multitech . . . . . . . . . . . . . . . . . . . . . . . . . . . 5251
NEC . . . . . . . . . . . . . . . . . . . . . . . . . . . . . . . 5234
Optimus . . . . . . . . . . . . . . . . . . . . . . . . . . . . 5232
Orion . . . . . . . . . . . . . . . . . . . . . . . . . . 5219,5226
Panasonic . . . . . . . . . . . . . . 5010,5231,5232,5255
Philco . . . . . . . . . . . . . . . . . . . . . 5236,5237,5251
Home Theater
Fujitsu . . . . . . . . . . . . . . . . . . . . . . . . . . . . . .4066
JVC . . . . . . . . . . . . . . . . . . . . . . . . . . . . . . . .4068
Pioneer. . . . . . . . . . . . . . . . . . . . . . . . . . . . . .4048
Venturer . . . . . . . . . . . . . . . . . . . . . . . . . . . . .4190
Philips . . . . . . . . . . . . . . . . 5223,5236,5237,5251
Pioneer. . . . . . . . . . . . . . . . . . . . . . . . . . . . . .5235
Proscan . . . . . . . . . . . . . . . . . . . . . . . . . . . . .5233
Pulsar . . . . . . . . . . . . . . . . . . . . . . . . . . . . . . .5248
Quasar . . . . . . . . . . . . . . . . . . . . . . . . . 5231,5232
RCA. . . . . . . . . . . . . . . . . . . . . . .5231,5233,5251
Radio Shack . . . . . . . . . . . . . . . . .5230,5232,5251
Realistic . . . . . . . . . . . . . . . . . . . . . . . . 5223,5251
Runco. . . . . . . . . . . . . . . . . . . . . . . . . . . . . . .5243
Samsu ng . . . . . 5221,5229,5233 ,5244,52 45,5246
Sansui . . . . . . . . . . . . . . . . . . . . .5219,5235,5251
Sanyo . . . . . . . . . . . . . . . . . . . . . . . . . . 5244,5245
Scott. . . . . . . . . . . . . . . . . . . . . . . . . . . . . . . .5233
Sears . . . . . . . . . . . . . . . . . . . . . . . . . . 5223,5251
Signature . . . . . . . . . . . . . . . . . . . . . . . . . . . .5251
Sony. . . . . . . . . . . . . . . . . . . . . . . . . . . . . . . .5232
Soundesign . . . . . . . . . . . . . . . . . . . . . . . . . .5251
Sylvania . . . . . . . . . . . . . . . 5050,5237,5240,5251
Symphonic . . . . . . . . . . . . . . . . . . . . . . . . . . .5251
Tandy. . . . . . . . . . . . . . . . . . . . . . . . . . . . . . .5251
Teac . . . . . . . . . . . . . . . . . . . . . . . . . . . . . . . .5251
Technics. . . . . . . . . . . . . . . . . . . . . . . . . . . . .5232
Teknika . . . . . . . . . . . . . . . . . . . . . . . . 5223,5251
Toshiba. . . . . . . . . . . . . . . . 5013,5228,5233,5240
Totevision . . . . . . . . . . . . . . . . . . . . . . . . . . .5223
Vector Research. . . . . . . . . . . . . . . . . . . . . . .5234
Victor. . . . . . . . . . . . . . . . . . . . . . . . . . . . . . .5235
Video Concepts . . . . . . . . . . . . . . . . . . 5234,5251
Wards. . . . . . . . . . . . . . . . . . . . . . . . . . . . . . .5251
Yamaha . . . . . . . . . . . . . . . . . . . . . . . . 5234,5251
Zenith. . . . . . . . 5219,5223, 5235,5248,5249,5251
22
Page 33

3
Watching TV
Once you become accustomed to the various controls and f eatures, you will spend
most of your television viewing time e njoying the programs made available
through t he satellite receiver. The features described in this section will be
available to you when the remote control is set to SAT mode— in other words,
when you have pressed the SAT key and are viewing various programs.
How to Select Menu Options
As you use the many menus, you will be asked to select various options. When
you see the wor d select, it is important that when you use the remote control, there
are two ways to select a menu option :
1. Press the
ENTER key to select it.
2. If the options are numbere d, simply press the nu m ber key for an option. You do
not have to press the ENTER key.
keys or thevkeys to highlight an option. Then press the
34
Headers
Your view ing screen displays a variety of information about the programs you are
viewing or plan to view. When yo u tune in a channel, a header appears at the top
of the scre en. It displa y s th e fo ll ow i n g in fo rmation fro m lef t to right:
• Interests—Unti l you iden ti fy your vi ewi ng i ntere st s no thing appe ars on the le ft
side of the header. After you select an interest such as Pay Per Vi ew, the name
of the interest you selected will appear on the left side of the header.
• Channel name—NBC-W, BRAVO, HISTORY, etc.
• Channel number—A num ber from 1 to 999.
• Message—An enve lope icon appears if a message is waiting for you.
• Time—The current time automatically appears on the righ t side of the header.
DSR205 User Guide 23
Page 34

3
Banners
Program banners appear at
the bottom of the scr een:
On Now b anner—When you
tune in a channe l, this ban ner
displays the current program
title, s tart and end times, a nd
rating icon. Press EXIT to
remove the banner.
Whil e you are viewin g a
channel, if you press the
FUTURE key, the Browse
Banner displays the next
program’s title, start and end times, and ra tings icon. Press EXIT to remove the
banner.
Info Banner
To obtain detailed information about th e current prog ram, press the IN FO key.
To obtain detailed progra m information about the next program on a selected
channel, press the INFO key and then press the FUTURE key or the
the On Next Banner is already displayed at the bottom of your screen, just press
the INFO key to display more detailed information ab out the next program. Press
the
key to return to the information dis play for the current program.
3
4
key. If
Browse Banner
• Press GO BACK to return to watching a program.
• Press FUTURE to go to a different day and/or time.
24
Browse is use d to view
current program information
while viewi ng a program.
Browse is also used to view
inform a tion for chann e ls and
times other than the cur rent
channel and time. Press GO
BACK to retu rn to watchin g a
program. Press ENTER to
change channels to the
progra m lo ca ted in the
Browse banner or set timers
for future programs.
Page 35

Watching TV
•Press the vkeys to scroll through the channels.
•Press the
• Press ENTER to change ch annels to t he program located i n the Browse banner.
• While in Browse, to obtain more detailed inform ation about the program
disp la yed, press t h e INF O ke y.
keys to scro ll through the next or previous program.
34
Interactive Program Guide (IPG)
The Interactive Program Guide (I PG) provides access to current and fut ure
program information while you watch TV. It displays a 90-minute block of
schedule d programs, and can be used as a starting point for purchasing IPPV
programs and settings timers.
How to Display the Guide
• Press the GUIDE key
once. (displays 6
channels at once).
• Press the GUIDE key a
second time or press the
EXIT key to return to
watching TV programs.
• Press the GO BACK key
to return to the menu last
viewe d (o r re tu r n to
watching TV).
How to Use the Guide
•Press thevkeys to display different channels.
•Press the
• Enter a particu lar channel number to display that channel at the top of the
screen.
• Press the ENTER key to tune to a current program that is highlighted. If you
press the ENTE R key on a future prog ram , a detailed program inform ation
banne r ap p ears (discu ss e d la te r in thi s section).
• Press the INFO key to display more detailed information.
• Press the CHANNEL + and – keys to page up and down through the Guide.
DSR205 User Guide 25
keys to scroll backward and forward by hal f-hour increments.
34
Page 36

3
Guide Screen
The header (top of screen) displ ays the current Interests menu setting (spor ts,
movies, etc.) on the left side and the tim e on the right. The line below the header
displays the day of the program information bein g viewed. The rest of the screen
displays the channel names and numbers on the left and the progr am names on the
right. Th e G uide screen displays 6 programs at a time.
How to Display a Future Day and Time on the Guide
You can alwa ys scroll ahead with the Guid e, but if you want to im m ediately look
at progra m offerings for another day or a specific time, you can ju mp ahead
withou t scrolling. To jump to a specif ic date and time:
• Display the Options menu (press the OPTIONS key on the remote control).
• Select option 2 (Guide & Favorit es). The Guide & Favorites menu appears.
• Select option 1 (Set a Future Day & Time for the Guide). A Choose Day menu
appears.
• Select which day of the G uide yo u woul d like to di spla y. A Choos e Ti me m enu
will appear.
• Select the time of day for the Guide programming you would like to view.
Short Cut: Press the FUTURE key after pressing GUI D E . You can go directly
to the Choose Day menu.
Press th e G U ID E ke y. The Gui de wi ll retu r n to dis playing the cu rrent day and
time. If you press the G O BA CK key, you will return to the previous screen or the
program you wer e w atching.
How to View the Guide by Interests
You can also focus the Guide display to a list of your favorite channels or to
special programming interests (such as sports or movies). To select an int erest:
26
Page 37

Watching TV
• Press the INTERESTS
key. The Interests menu
will appear.
• Highlight one of the
listed choices and pres s
the ENTER key.
• T h e G ui d e w ill appear
and display only
programs t hat pertain to
the interest (such as
sports) that you have
selected. For example, if
you have selec ted a li st of
favorite channels (Favor ites A, B, C or D ), the Guide will display only the list
of favorite channels you have selected. (Refer to the section entitled "Setting
Favorite Channels" to select the channels you want to include in your Favorites
list.)
• Future intere st programming by day and time can be viewed by pres sing the
FUTUR E ke y on th e re m o te wh il e in GUIDE.
Detailed Program Information
Press the INFO key to display a pr ogram information banner that has a detailed
description of the prog ram, ratings , purchasing information, and information
icons.
Setting a Timer for a Future Program
Using the Gui de , you can set a tim er to au toma ti call y di splay a pro gra m at a f uture
time and date. If you are viewing a programming list for a future date or time on
the Guide, press the ENTER key or t he IN FO key while a program is highlighted
to display the detailed program information bann er. Thi s banner includes a Time r
button. Select the Timer button by pr essing the ENTER key to display a Confi rm
Timer screen. Confirm the Timer by pressing the ENTER key again. You will
return t o the Guide and a Timer icon will appear in the lower right corn er of the
program ce ll . Pres s I NFO agai n or pr ess th e G O BACK key to turn of f t he d etail ed
information and return to the Guide. More information on timers is in the section
entitled, "Options: Setting Timers."
DSR205 User Guide 27
Page 38

3
Interests and Favorites
You have th e choice to scan ev ery channel when you "channel surf." But to hel p
you locate channels and shows of specific interest to you, the receiver has an
Intere sts menu that helps you to focu s your channel sur fing.
• By using the Interests
menu, you can qu ickly
locate pr ograms according
to a part icu la r them e or su rf
through four lists of
favorit e channels.
How to Display and Use
the Interests Menu
• Press the INTERESTS key
on the remote control. The
Interests menu appears.
• To select an interest (for exampl e, All Progra ms , Favorites A, B, C, D or
Network Series, News/Education , Movies, Sport s, Pay Per View, or Music/
Radio), highlight one of the se options and press the ENTER key. The Guide
will appear and display ch annels or progr am s that perta in to the interest you
selected. Remember that once you have selected one of the options (o r
interests) from the Interests menu:
A. The info rmation you see in the Guide will be limited to programming that
matches the interest you selected. If there is no programming that matches the
interest, a message will appear notifying you of this.
B. You will notice that wh ile you are watc hing a program or channel, the left
side of the header will display the int erest you selected. If there is no
programming matching the selected interest, a message will appear notifying
you of this.
• Press the INTERESTS key again to display the Interests menu and change
your sele ction.
1 All Programs. Each time you turn on the receiver, it automatically returns to
the All Programs setting. Wh en this opt ion is sel ected, you will be able to s can for
all program s while channel surfing or when you are using the Guide.
2 Favorites A, B, C, D. If you select Favori tes A, B, C or D, you will be able to
limit you r channel surfing and the Guid e information listings to channels that are
listed in the Favo rites A, B, C or D lists. If you h ave not yet m ade a list of favorite
channels, a m essage will instruct you to do so.
28
Page 39

Watching TV
3 Movies. If you select this interest, you will be ab le to ch a n ne l su rf exclusively
for movies.
4 News/Education. If you select this interest, you will be able to channel surf
exclusiv ely for news/educatio n programs.
5 Sports. If you select this interest, you will be able to cha nnel surf exclusively
for sports programs .
6 Children/Fam ily . If you select this interest, you will be able to channel surf
exclusi vely for children/fa mily progra ms.
7 Music. If you select this in terest, yo u will be able to cha nnel surf exclusively
for music programming.
8 Network Series. If you se le ct thi s in terest, you wi ll b e ab le t o channel surf
exclusiv ely for network series programs.
9 Pay-Per -View. If you select this interest, you wi ll be able to ch annel surf
exclusivel y for Pay-Per-View (PPV) programs.
DSR205 User Guide 29
Page 40

3
30
Page 41

How to Display and Use the Options Menu
The Options menu is your
doorway to a series of menu
screens th at allo w you to set u p
various features for program
viewing. There is one
procedure for displaying the
Options menu if you are using
the remo te co ntr ol, and the re is
another if you are using the
keys on the Front Panel of the
receiver.
4
Options
If you are using the remote co ntrol, press the OPTIONS key. The Options me nu
will app ea r.
If you are using the front pa nel of the rece iver, press the MENU key. When the
Menu screen appears, press the
ENTER key. The Options menu will appear.
The following list will give you a broad overview of the menu options and the
features they control.
1. Open Your Mail. This option lets you read personal, programming, or
promotional messages. Look for the envelope icon on your viewing screen.
2. Set Guide & F avorites. This option allow s you to select a future day and ti me
for viewin g IPG li stin gs. It als o all ows you to creat e a li st of fa vor ite cha nne ls that
can be used fo r selective channel surfi ng and to limit t he programs displayed on
the IPG to a par ticular gro up.
DSR205 User Guide 31
keys to hig hlight Optio ns, and then press the
v
Page 42

4
3. Set Parental C ontrol (a nd Pa ssword s). Parental Control features and
passwords allow you to control the programs, channels, and subject matter that
can be viewed with your receiver.
4. Set Timers. This option allows you to set a timer to view (or record) a program
at a future ti m e and day up to one year in advance.
5. List Purchases. This list shows the date, time, cost, and name of each
purchase d program.
6. Change System Settings. There are a variety of topics available through this
menu option including language, audio, installation and system status settings.
The Sleep T imer is also l ocated under t h is option.
Opening Your Mail
Your receiver is able to display a variety of messages that are sent to it. Some
messages will be displayed on your screen as soon as they arrive, but others are
stored in you r m ailb ox f or y ou to ret r ieve. If a mess ag e is wait i ng in you r mai lb ox,
the envelope icon will appear on your screen header while you are watc hing a
program. This feature applies to viewing i n SAT mode only.
How to Display the Mailbox Menu
• Press the OPTIONS key to display the Options Menu.
• Select option 1 (Open Your Mail). The Mailbox menu appears.
Mailbox Menu
The Mailbox menu displays
a list of numbered message
titles, each wit h a date. If you
wish to re ad the entire
contents of a message, select
the message (while the
message is highligh ted, p ress
the ENTER key), and a
message screen will ap pear
within the Ma ilbox menu.
32
Page 43

Mailb ox Message Scree n
The Message screen contains
the complete messag e. Once
you read the message and wish
to erase it, press either the
ENTER key or the GO BACK
key . A n Eras e Mes sag e prom pt
screen will appear. Some
messages will be automatically
erased af ter you read them.
Such messages will have the
following statement in the
instructions at the bottom of
the screen: "This message will
erase after being read."
Erase or Keep Message Scree n
When the Erase Message prompt screen appears within the Mailbox menu, it
allows you to select from two options.
• Select Erase Message to erase the messa ge and return to the Messag e List
menu.
• Select Keep Message to save the messag e and return to the Message List
menu.
Options
Setting a Future Day and Time for the Guide
If you want to im mediat el y look a t p rog ram o ffe ri ngs in the IPG f or anothe r da y or
a specifi c time:
• Display the Options menu (press the OPTIONS key on the remote control).
• Select option 2 (Guide & Favorit es). The Guide & F avorites menu appears.
• Select optio n 1 (Set a Future Day & T ime for th e Gu ide). A Cho ose Day menu
appears.
• Select which day of the G uide yo u woul d like to di spla y. A Choos e Ti me m enu
will appear.
• Select the time of day for the Guide programming you would like to view .
Refer to the se ction entitl ed " Guide (IPG)" fo r more informat ion.
DSR205 User Guide 33
Page 44

4
Setting Favorite Channels
With t his option, you can create a list of favorite channels usi ng the Favorit e
Channels men u. Once you create this list you wi ll be able to focus your channel
surfing and find programs more quickly.
How to Display the Favorite Channels Menu
• Display the Options
menu.
• Select Option 2 (Set
Guide & Favorites). The
Guide and Favorites
menu appears.
• Select Option 2 (Set
Favorite Channels). The
Favorite Channels menu
appears.
Favorite Channels Menu
The Favorite Chan nel s menu
allows you to assign
channels to each of four lists
(refer to the section entitled,
"Viewing In terests and
Favorites"). The Favorite
Channels menu displays
options to set Favorite
Channels A, B, C, or D.
Press the
ENTER or use the number
keys to select which Favori te
Channels lis t you would like
to modify. When yo u select one of these options the correspondi ng Favorites
screen wi ll ap p ea r, i.e. Fa vo r ites A. Each of th e F avorites menu s di sp la y s a list
showing the name of the channel and the channel number with corresponding
buttons running down the right side of the screen.
keys and press
v
34
Page 45

Options
To assign a channel to the Favorites A, B, C or D list:
•Press thevkeys to scroll thro ugh the li st of chann e ls.
•Press the
channel.
• Press the ENTER key. A check mark will appear in the box you select. Press
the ENTER key again if you wish to remove the check mark.
• Press GO BACK to return to the Favorite Channels menu.
• Repeat this process to create each Favorites list.
• Press EXIT to view programming.
keys to highlight the box to which you will ass ign the
34
Setting Parental Controls & Passwords
The Parental Control menu
enables you to set
passwords, lock out certain
channels, and lock out
certain programs bas ed on
their ra ting or specific
content. This applies to
programs which have a U.S.
conten t rating.
How to Display the
Parental Control Menu
• Display the Options menu.
• Select Option 3 (Set Parental Control). If a password has al ready been
programmed, you w ill be asked to enter your passw ord before you ca n have
access to the Parenta l C ontrol men u.
Parental Control Menu Options
1. Set Password. The Set Pas sw ord option allows you to set a parental control
password that prevents others from viewing certain channels and programs.
• From the Parental Control menu, select option 1 (Set Password). The New
Password screen appear s.
• Use the number keys to enter a password of up to 8 numbers. An asterisk (*)
will appea r each time you add a number. Press the
and change a number. When you are finished, press the ENTER key. The
Confirm Pass w ord screen appears.
• Re-enter your password numbers and press the ENTER key. The Password
DSR205 User Guide 35
key to move to th e left
3
Page 46

4
Changed sc reen appea rs , let ting you kno w tha t your pa sswo rd is now e f fe ctiv e.
Press the GO BACK ke y to re tu rn to th e Par e nt al Control me nu .
T o Set a New Password. If
you wish to change your
password i n the future, you
must first enter your current
password to gain access to the
Parental Control menu. From
the Parental Control menu ,
select option 1 (Set
Password). The New
Password screen appears. Key
in a new password, and press
the ENTER key. When the
Confirm Password screen
appears, re -e nte r the ne w pass wor d. A Pas swor d Cha nge d scree n wil l co nfir m that
your password has been cha nged.
To Clear Your Password. If you wi sh to clear your password so that no
passwords are required to purchase Pay Per View programs or view locked-out
channels or programs, you must first ent er your current pa ssword to gain access to
the Parental Control menu . From the Parental Control menu, select option 1 (Set
Password) . The New Password screen appear s. Press the ENTER key without
keying in any numbers. W hen the Confirm Password screen appears, press the
ENTER key again without keying in any numbers. A Password Changed screen
will confirm that your password has been cleared.
2. Set Channel Locks . The
Set Channel Lo cks option
allows you to lock out
specifi c channels from
viewing. Once a channel is
locked out, you must use the
parenta l control pas swo rd to
view progr ams on the l ock ed
out channel.
• Select option 2 (Set
Channel Locks). The
Channel Lock s m enu
appears. The Channel Locks menu displays a list of channel names, numbers,
and bu ttons. Pr e ss the
Select a highlighted channel (press the ENTER key) to lock it out. A lock
appears on the button . To remove a lock, s elect a cha nne l that is a lr eady lo cke d
(press the ENTER key when it is highligh ted).
• Press the GO BACK key to exit this menu. Changes are saved automatically
keys to scroll up and down the list of names.
v
36
Page 47

Options
each time you set a lock.
• When you are channel surfing , the receiver will skip locked out ch annels. If
you try to directly ente r the channel number of the locked-out channel while
channel su rfing, the fo llowing message will appea r: "This chan nel has been
locked".
3. Set General Rating Locks. The Set G ener al Rati ng L ocks op ti on al lo ws y ou to
lock out programs based on their general rating —PG, R, NC-17, X, etc. Once you
set a general rating lim it, you must use t he parental control passwo rd to view
programs with that rating or a higher rating.
• Select option 3 (S et General Rating Locks). The Gene ral Rating Lock s m enu
appears.
• If you highlight one of the rating boxes on the left side of the menu, a
description of that rating will appear.
• Select a rating to lock out progr am s m atching that rating. All h igher ratings
will also be automatically locked out. A closed lock symbol will appear. If you
select a locked rati ng, it will be unlocke d.
• Y ou may also select No Locks to perm it access.
4. Set Content Rating Locks. The Set Content Rat ing L ocks op tion allo ws y ou to
lock out digital program s based on their specific content—violence, sexual
materia l, or offensive language—regardless of their g eneral rat ing. Once you set a
content rating lock, you must use the parental control password to view programs
that pos sess t he l oc ked -out c ont ent . This app li es to pro gra ms w hich h ave a co nte nt
rating.
• Select option 4 (S et Content Rating Locks). The Content Rating Locks menu
appears.
• Listed under each category ( Violence, Sexual Material, or Language) ar e four
boxes. For example, under the Violence category are: No Locks, GV (graphic
violence), V (violenc e), and (MV) mild violence. If you highlight one of the
boxes, a full descript ion of the cate gory will appear.
• Select a rating to lock out program s w ith that rating. All higher ratings will be
automatically locked out, and a closed lock icon will appear. If you select a
locked rating, it will be unlocked.
• Y ou may also select No Locks for each category.
5. Locks. The Locks option allows you to turn off all of the channel and program
locks so that you can view all of the locked out channels and programs. If you set
any new loc k s af ter Locks is set to Off , th e Lo c k s op tion automa tically re-s e ts
itself to On. Each time you press the POWER key to turn on the receiver, the
Locks Option resets itself to On.
DSR205 User Guide 37
Page 48

4
6. Lock Channel on "No Info" in Guide. This option will allow you to lock any
program m ing that i s listed as "No Info" in the Guide.
Setting Timers
With t im ers, you can sc hedule your vie w ing up to one year in advance—wheth er
you want to sch edule one-time-only events or daily programs. Once you have set
the timer, the receiver will automatically tune to the channel when the program
begins. You can change, erase, and review th e timers whenever you wish. Make
sure to set your VCR if you wish to make a tape since the receiver will not
automatically program your VCR t o tape an event.
Sleep Timer. Sometimes
when you are watching a
program in SAT mode, you
will want to automatically
turn of f the picture and
sound becau se you plan to
fall asl eep after a certain
amount of time.
To set the sleep timer:
• Display the Options
menu (p re s s th e
OPTIONS key on the
remote control).
• Select option 6 (Ch ange System Sett ings), and the System Setting s m enu
appears.
• Select option 5 (S leep Timer) to highlight it.
•Press the
program unt il the sleep timer shuts of f the picture and sound (shown in hours
and minutes). The maximum time limit is 3 hours.
NOTE: A n y time that a sleep tim e r is set , the LOCKS opt io n re -sets itself to O n.
See "Setting Parental Controls & Passwords."
keys to set the amount of time yo u w ish to watch and hea r a
34
How to Display the Timers Menu
• Display the Options menu.
• Select Option 4 (Set Timers). the Ti m ers menu appears.
38
Page 49

Options
How to Use the Timers Menu
The Timers menu has up to
25 timer listings. Each listing
that has already been set
include s the program nam e,
the day and time it begins,
and icons for parental
controls and IPPV programs.
•Press the
scroll up and down the
listings.
• If you select a Not Used
listing, a Set Timer menu
will appear.
• If you select a li sti ng th at has a lread y bee n se t, the Chang e T i mer /Er ase T i mers
prompt screen will appear.
v
keys to
Change Timer/Er as e Timer Prompt Screen
The Cha nge Timer/E r ase
Timer prom pt s cr een h as two
options:
• If you select the Change
Timer op tion, the Set
timer menu wil l appear
so that you can change
the timer settings.
• If you select Erase Timer,
The Timers menu will
reappear, and the listing
will be ch a ng e d to Not
Used.
A clock icon ap pears on the ri ght side of the arrow-shaped box if the timer is set
but the program has not yet begun.
Maximum Number of Timers
The maximum number of timers is twenty-five (25). If all of the timers have been
used you will have to eras e an existing timer before a new timer can be set.
DSR205 User Guide 39
Page 50

4
Before a Time r Ex e cu t e s
Two minutes before a timer ex ecutes, the front panel Timer light will blink, and a
countdown s creen will appe ar. You may ei ther: (1) press the GO BACK key to
remove the countdown scr een, (2) press the ENTER key to return to the Timers
menu so that you can erase the timer, or (3) wait until t he timer executes.
How to Use the Set Timer Menu
If you selected a Not Used
listing in the Timers menu,
the Set T imer menu appe ars.
The Set Timer menu allows
you to select the frequency
for the tim e r, the da te , th e
beginning and ending times
for the program, and the
channel.
Press the
highlight the various options .
To set each option, press
either the
When you are finished setting all of the timer options, select the Confirm Timer
arrow to display the Confirm Timer menu.
3v4
34
keys to
keys or the number keys as indicated.
How to Set Each Timer Option
•Press the
frequenc y (for example, a weekly or dai ly program).
• If Daily, Weekly or Other is selected, different screens will appear.
•Press the
• Press the number keys to set the time. A timer must be at least 5 minutes long
to activate.
•Press the
3v4
34
34
keys and ENTER to display the day of the the program’s
keys to display the date.
keys, or the num ber keys to indicate the channel number.
Setting a Timer for Next Year
If you set the timer for a month and day that have already passed in the current
year , the receiv er w ill consider the setting to be for the next year on that date. For
example, if it is December and you set a timer for February, your timer will
execute in February of the com ing new year.
40
Page 51

Options
If You Press the GO BACK Key
If you press the Go BACK key from the Set Timer menu, a message scr een will
appear. It will instruct you to do either one of the following:
• Cancel your changes by pressing the ENTER key.
• Press the GO BA C K key again to return to the Set Timer menu.
How to Use the Confirm Timer Menu
The top portion of the
Confirm T imer menu
displays timer information
followed b y up to four
options (the IPPV option
does not app ear if the
program i s not a su bscri pt ion
program). Som e programs
may be schedul ed too far in
advance to immediatel y
determ ine this information.
1. Select option 1 (C onfirm Timer and Leave) to com plete your se ttings from th e
Set Ti m er m enu and to retur n to the Timers menu to complete additional settings.
Select this option only after you make sure the other options on this screen are
correct.
2. Select option 2 (Change Timer) to return to th e Set Timer menu and cha nge the
Timer option settings.
3. Opt ion 3 (Approve Purchase) al low s you to pre-pu rchase a program before
viewing time. This option only appears if your receiver is IPPV enabled. The
program’s price is not always displayed.
• Select the Yes option to pre-pu rchase the program.
• If you select the No option, the pro gram will not be pr e-purchased . The timer
will be set for the program, but you will have to purchase the program at
viewing time.
• If the program cannot be taped, a no tape icon will appear.
If you have pu rchased a program or have used parental cont rol feat ures to l ock
out channels, satellites, or program content, a Password screen will appear. You
will hav e to en te r yo u r pa s sw o rd to fin i sh set ting the timer. Refer to the se ct io n
entitled "Setting Par ental Controls and Pass words".
DSR205 User Guide 41
Page 52

4
Setting a Timer Using the Guide
To set a timer while you are usin g the Guide:
• Highlight a future program.
• Press the INFO key or the ENTER key.
• The Confirm Timer menu will appear (follow the instructions for the Confirm
Timer menu).
How to Cancel a Timer
To cancel a timer while it is
executing:
•Press the POWER key.
For repeating timers (such
as those use d for daily or
weekly programs),
pressing the POWER key
only cance ls the currently
executing event. The
timer fo r th e next
repeating event (the timer
for the next day or week)
will be re-enabled at the start of the next day.
• Erase the timer on the Timers menu. This will cancel single-event and
repeating event timers. Refer to the section entitled "Change Timer/Erase
Timer M e nu".
If New Settings Conflict with Previous Settings
If your new t ime r sett in gs c onfli ct w ith a pr evi ously set tim er (fo r ex ampl e, if bot h
are set for the same time), a mess age screen will appear. It will descri be the
conflict and ask you to do either one of the following:
• Press ENTER to replace the conflict ing (previo u sly set) timer with the new
one.
• Press GO BACK so that you can ret ain the previously s et timer and change the
settings of the current timer so that they no longer are in conflict.
List Purchases
This is a view only screen that allows you to review a l ist of pre viously purchased
IPPV programs and to verif y your account status. Refer to the section entitled
"Pay-Per-View Events" for more inf orm ation regar d ing this option.
42
Page 53

Options
Change System Settings
The System Set tings menu
provides access to menus
that allow you to adjust the
operation of your system.
Viewing and Language
Settings
The Change Viewing and
Language Settings option
allows y ou to turn off the
headers an d banners, choose
the language for subtitles and audio, and choose the size of the viewing area.
Typically, these settings are selected at the time of initial installation by your
installer.
• Press the OPTIONS key
on the remote . The
Options menu appears.
• Select option 6 (Ch ange
System Set tings ), and t he
System Settin gs m enu
appears.
• Select Option 1 (Cha nge
Viewing and Language
Settings). the Viewing
and Language Settings
menu will be displayed.
Channel Information. The Channel Informa tion option allows you to turn the
header (top of scr ee n) and ban ner (bo ttom of scr een) on or of f . Selec t the op ti on of
your choic e, On or Off. The default se tting is On.
Subtitles. The Subtitles option allows you to select the language for subtitles (if
available for the particular prog ram) or keep them turned off . Select the option of
your choic e— N one, English, Spanish, or French. The default setting is None.
Language. the Languag e option allows you to select the language of the audio for
your programs. Select the option of your choice—English, Spanish, or French.
The default setting is En g lish.
DSR205 User Guide 43
Page 54

4
TV Viewing. The TV Viewing op tion allows you to select the size of the viewing
area. Select the N ormal option if your TV screen is typical screen with 4:3 ratio of
width to height. Select Wide if your TV screen is a wide screen with a 16:9 ratio.
The defa u lt setting is Normal.
Audio Settings
To adjust the audio settings
so that they are correct for
the type of equipment
connected to your receiver,
you will be using the
onscreen menus. Typically,
these set tings are selected at
the time of initial installation
by your installer .
• Press the OPTIONS key
on the remote. The
Options menu appears.
• From the Options menu, select option 6 (Change Systems Settings), and the
System Settings menu appears.
• From the System Set tings menu, select option 2 ( C hange Audio Settings), and
an Audio Settings menu will appear.
Audio Settings Menu for Satellite Broadcasts. On t he Aud io Sett ings menu t wo
options appear:
• Select option 1 (Audio Connections), and you will be able to select either TV
or Hi Fi (the default is TV), Select TV if the receiver’s AUDIO OUT port is
connected to your TV. Select Hi Fi if it is conne cted to your stereo system.
• Select option 2 and then select Mono, Stereo, or Surround.
44
Page 55

Options
Installation Settings
Tune in Satellite Signal.
This option al lows you to see
the strength of the signal
your anten na is receivi ng.
Set Remote Control
Address. This opti on allows
you to control up to four
receive rs in a centralized
area wit h one or mor e remote
controls. Each receiver
require s a separate address.
The default address is 0000.
On the front panel of your receiver press the Menu button to bring up the Menu
screen.
• Choose Options.
• Choose option 6 (Change System Settings).
• Choose option 3 (Installation Settings).
• On the Installation Settings menu, choose option 2 (Set Rem ote Control
Address) . Now follow the instructions on the Remote Control A ddress screen.
• If you have four receivers, you will have to change the addresses on three of
them: they will have address of 0000, 0001, 00 02, and 0003.
To program your remote control for each receiver, hold down the SAT key on the
remote control until the light flashes. Once the light begins to flash enter the
desired address (0000, 0001, 0002, or 0003).
System Status
This is a vie w -only screen
that displays information
about th e status of the
receiver.
Trip Counter. Trip Counter
displays the number of
message updates from your
serv ice provi de r.
DSR205 User Guide 45
Page 56

4
46
Page 57

Input
L-Band Input
Input frequency 950 to 1550 MHz or
950 to 2150 MHz
Input impedance 75 ohm
Input level -65 dBm to -25 dBm
Return loss 8 dB minim um
Demodulator QPSK demodula tor
Antenna Input
Connector "F" type, receptacle
Input Im pedance 75 ohm
5
Specifications
Video
Composite Video
Output level 1.0 Vp-p ±10% into 75 ohm
Connector Yellow phono, marked Video out
De-emphasis 525 line CCIR Rec. 405-1
DigiCipher II (Digital) System
Frequency respo nse ±1.0 dB, 1kHz to 4.2 MHz
Differential ga in 5.0% p-p ma ximum
Differential phase 5.0 deg. p-p maximum
S/N 57 dB mini m u m
(unified weighting 100 kHz HPF, 5MHz LPF)
DSR205 User Guide 47
Page 58

5
Remodulator Output
Connector "F" type receptacl e, "Out to TV" NTSC & IEC
Impedance 75 ohm
Channel Ch. 3 or 4 (NTSC, North America)
Audio Mono
Audio
Modes Digital stereo
Fixed vol u me output, vol um e co ntr ol is from TV onl y
DigiCipher II (Digital) System
Frequency respo nse ±1.0 dB, maximum
Remote Control
Transmitter Infrared (IR)
Batter ies 2 x AA type
Range Up to a maximum of 35 ft. (IR)
Angle ±22 deg. (I R)
20 Hz to 20 kH z
Physical/Environmental
Temperat ur e 0 deg. to 40 deg. C am b i ent
Humidity 95% relative
Dimensions 6.9" W x 2.25" H x 8" D
W e ight 1.3 lbs
Power input 12V DC; 15W maximum
UL Listed
CSA Certified
48
Page 59

6
Warranty & Service
RECEIVER WARRANTY COVERAGE
Within 1-365 days fro m date of purchase.
• Call the Star Choice Customer Care Centre (1 888 554-STAR) to see if we can
help you troubleshoot th e problem on the spot.
• If it can’t b e fixed over the phone, you’ll be given a Ret urn Tracking Code #
(RTC) needed to return t h e receiver for warranty coverage.
• We’ll have a replacement delivered to you.
• Y our new receiver package will include a prepaid mailing label and
instructions for returning the defective receiver. When doing so, you must
enclose a pr oof of purcha se (i.e. sales receipt) and your RTC #.
• We must get your defe ctive recei ver within 30 days of you getting the
replace m ent. Otherwise, a char ge for the receiver will be applied to your
account.
366 days or more – not covered under warranty. Contact Star Choice for
details.
REMOTE CONTROL WA RRANTY COVERAGE
Within 1-365 Days fr om the date of purchase.
• Call the Star Choice Customer Care Centre (1 888 554-STAR) to see if we can
help you troubleshoot th e problem on the spot.
• If it can’t b e fixed over the phone, you’ll be given a Ret urn Tracking Code #
(RTC) needed to return t h e remote for warranty co verage.
• We’ll have a replacement delivered to you.
366 days or more – not covere d under warranty. Contact Star Choice
for details.
DSR205 User Guide 49
Page 60

6
RECEIVER/REMOTE CONTROL WARRANTY
ENTITLEME N T WILL NOT APPLY IN THE
FOLLOWING CASES
Improper Handling – if the unit appears to have been dropped or otherwise
damaged as a result of accident or neglect
Opened Case – if the receiver cover has been opened, tampered wit h or alter ed in
any way
Liquid Spills – includes any foreign matter found in receiver (e.g., soft drinks,
coffee, animal hair, etc.)
Lightning/Power Surge – if equipment is separately connected to a prope r surge
protector, refer to the warranty detail provided by the manufacturer of the surge
protector. Star Choice is not responsible for covering 3
warranties.
Unit Resold – if a unit has been resold from it s original owner to anoth er
consumer
rd
party extended
50
 Loading...