

Moovo MK User Manual
GENERAL SAFETY WARNINGS AND
PRECAUTIONS
CAUTION! – Incorrect installation or programming may
cause serious physical injury to those working on or
using the system. For this reason, during installation,
always strictly obser ve all local safety standards and the
instructions in this manual. If in any doubt regarding
installation, do not proceed and contact the Moovo
Technical Assistance for clarifications.
CAUTION! – Observe the following warnings:
– never make any modifications to part of the device other than those specified in this manual. Operations of this
type will lead to malfunctions. The manufacturer de clines all liability for damage caused by makeshift modifications to the product.
– during installation, ensure that parts of the product
cannot come into contact with water or other liquids.
– should this occur, disconnect the power supply immediately and contact a Moovo service centre. Use of the
product in these conditions constitutes a hazard.
– all operations requiring opening of the product protection housing must be performed with the automation
control unit disconnected from the power supply. If the
disconnect de vice is not in a visible location, affix a
notice stating: “WARNING! MAINTENANCE IN PRO GRESS”.
– The product packaging material must be disposed of in
full observance of current local legislation governing
waste disposal.
SAFETY WARNINGS AND PRECAUTIONS
• Keep this manual in a safe place to enable future product
maintenance and programming operations.
• At the end of the product lifetime, ensure that the materials
are recycled or scrapped according to current standards in
the place of use.
• For cleaning the product surfaces, use a slightly damp (not
wet) cloth. Important – Never use substances containing
alcohol, benzene, diluents or other flammable substances.
Use of these substances may damage to the devices and
cause fires or electric shocks.
• Before cleaning, to prevent persons from activating the
auto mation, release the gearmotor as described in the relative in struction manual.
PRODUCT DESCRIPTION AND
INTENDED USE
This product comprises a wall-mounted control keypad
designed for use in systems for the automation of doors,
gates, garage doors and similar, which implement a control
unit with "Bus" connection system using the protocol "BusMoovo". CAUTION! – Any other use than as specified
herein is strictly prohibited!
It is an accessory of the Moovo series, useful to enhance and
complete performance of your automation: it can be programmed to operate in two modes: traditional mode (each
key performs a specifically assigned function– factory set)
and safety mode (to activate a manoeuvre, a secret key
sequence must be entered, as set by the user). The control
keypad is a wall-mounted device, and is back-lit to improve
visibility in poor lighting. Other details are provided in the
paragraph “Technical specifications of product”.
PRELIMINARY INSTALLATION WORK
• Check that the packaging is intact before opening, and
then check the product inside.
• Before proceeding with installation, check the condition of
the product, suitability of the selected model and conditions
of the intended installation environment.
• CAUTION! – Ensure that the power supply voltage on the
terminals for the “Bus” connection of the automation control
unit corresponds to specifications for this device.
• Ensure that the selected surfaces for installation are solid
and guarantee a stable fixture.
• Ensure that the device is in a sheltered location and protected against the risk of accidental impact.
Application limits
– This product can be used exclusively with Moovo control
units, equipped with a “Bus” connection system.
PRODUCT INSTALLATION AND CONNECTION
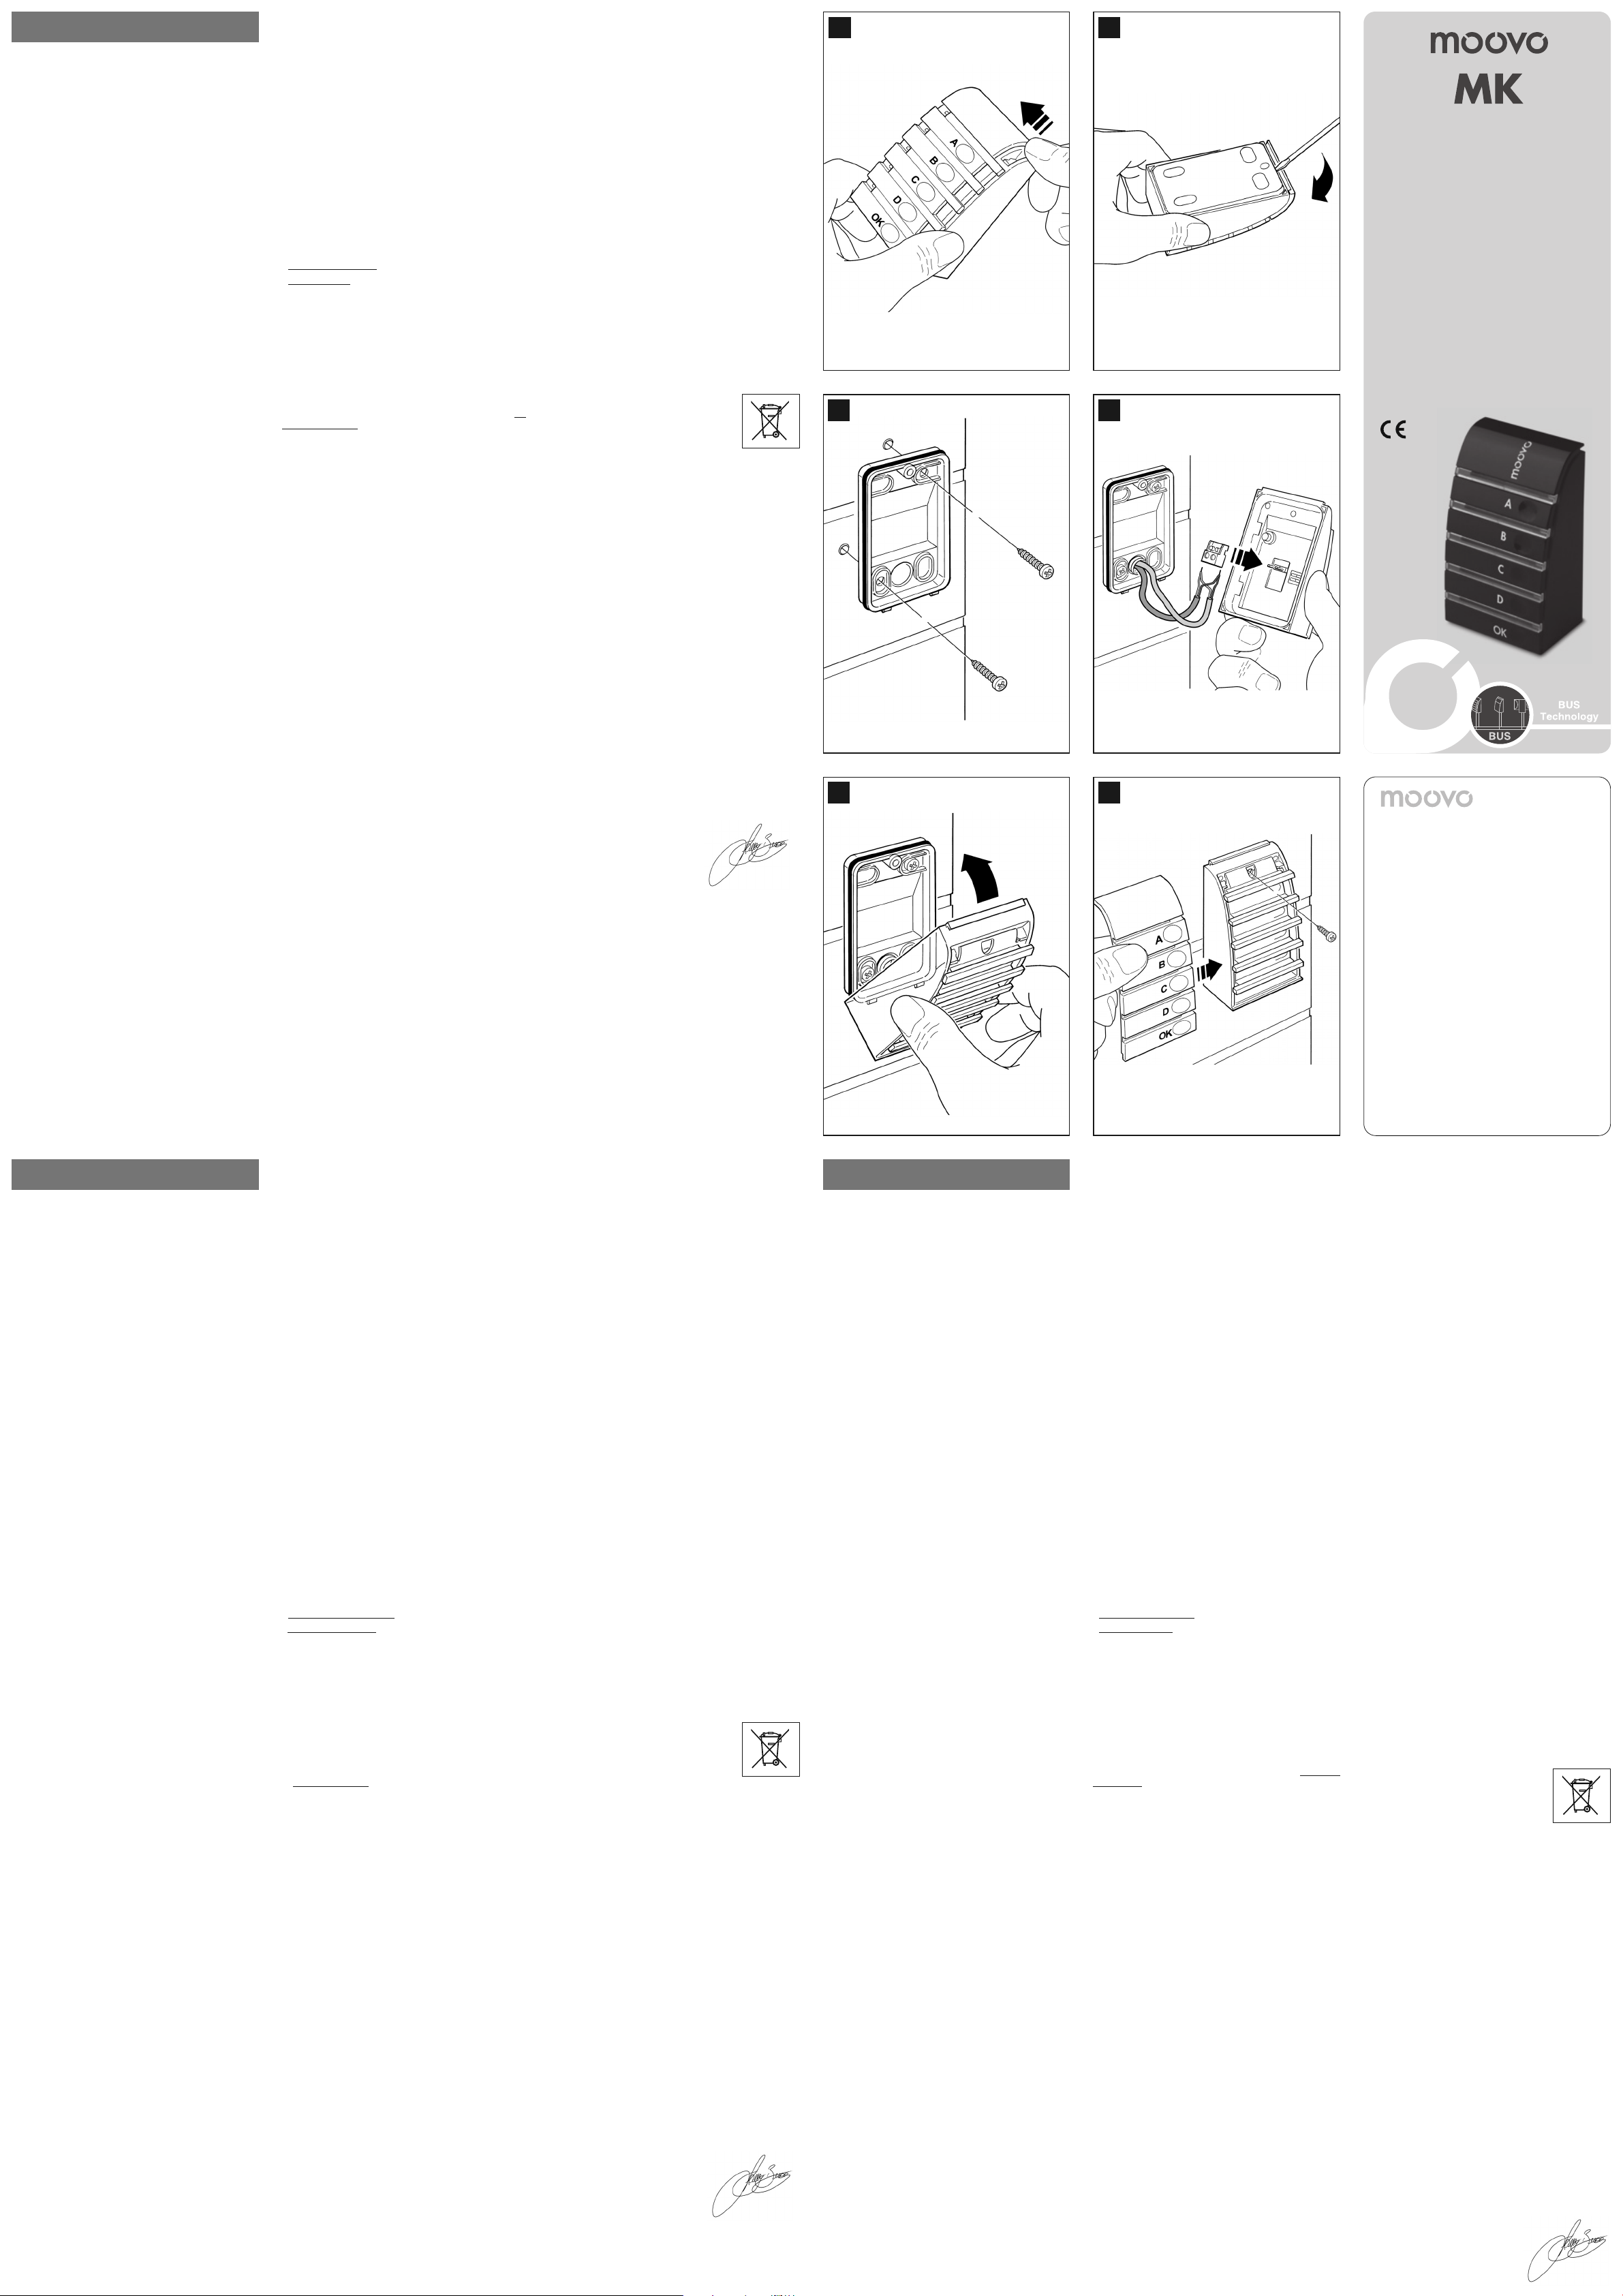
To install and connect the keypad proceed as follows:
01. Fig. 1: Remove the keypad cover by pushing down one
side as shown in the figure.
02. Fig. 2: Using a screwdriver, open and detach the base
of the keypad.
03. Fig. 3: Select the position of the keypad on the wall.
Warning - The “fixed” control devices must be visible
from the automation but positioned far from moving
parts and at a minimum height of 150 mm.
a) Drill a hole on the pre-cut section on the base for routing the connection cables.
b) Fix the keypad base to the wall with the relative
screws, routing the cables through the prepared hole.
Note – for connection of the keypad, use a cable type 2 x 0.5
mm
2
(up to a distance of 20 m) or cable type 2 x 1.0 mm2(for
distances over 20 m).
CAUTION! – Incorrect connections can cause faults or
hazards; therefore ensure that the specified connections
are strictly observed.
04. Fig. 4:
a) Connect the cable wires to the respective terminals.
b) Insert the cable connector in the male connector at
the rear of the keypad.
05. Fig. 5: Refit the cover, ensuring that the serrated section
engages with that of the keypad base.
06. Fig. 6: Fix the keypad cover to the base by means of the
screw supplied. Lastly refit the screw cover cap as
shown in the figure.
KEYPAD PROGRAMMING
The control keypad can be programmed for two alternative
operating modes:
- TRADITIONAL
mode (factory setting).
- SAFETY
mode (with use of a personal password).
TRADITIONAL MODE
In this mode each key is programmed as follows:
Key “A” = Step-by-step command
Key “B” = “Partial open” command
Key “C” = Open Command
Key “D” = Close command
Key “OK” = Stop Command
SAFETY MODE
This mode enables memorisation and therefore use of a single command only (see point 04 of the following procedure).
In this mode the keypad is enabled only on entry of a password (set by the user, from 1 to 10 letters) followed by the
key OK. This action only sends the specific command selected by the user during programming.
Programming:
01. Press and hold keys “A” and “B” simultaneously for a
few seconds, until the keypad emits a sequence of
beeps. This indicates start-up of programming
02. Using the keys enter the “PUK code” (10-letter code
printed on the badge supplied with the keypad); and
then press “OK”. If the code is correct the keypad emits
a series of beeps; if incorrect a single continuous tone is
emitted.
03. Using the keys enter the personal password (from 1 to
10-letters); and then press “OK”. The keypad emits a
series of beeps.
04. From the list below, select the command to be programmed and on the keypad press the key to be associated with the command followed by OK. The keypad
emits a series of beeps to indicate completion of programming.
Key “A” = Step-by-step* command
Key “B” = “Partial open” command
Key C = Open Command
Key D = Close command
Key OK = Stop command
* Note –The “Step-by-step” command enables the user to
individually control the manoeuvres Open - Stop - Close -
Stop ..., in this specific sequence. To activate each manoeuvre, the specific password must be entered, followed by OK.
After sending a command, to send another one shortly afterwards, press OK again without entering the password, provided that no more than 10 seconds pass between one
command and the next. This can be repeated as required,
observing the time-out of 10 seconds.
Modifying the Personal Password:
To modify you personal password, repeat the entire “Safety mode” procedure, changing the existing password at
point 03.
Procedure for re-programming the keypad in
TRADITIONAL mode
01. Press and hold keys “A” and “B” simultaneously for a
few seconds, until the keypad emits a sequence of
beeps that indicate start-up of programming.
02. Using the keys enter the “PUK code” (10-letter code
printed on the badge supplied with the keypad); and
then press “OK”. If the code is correct the keypad emits
a series of beeps; if incorrect a single continuous tone is
emitted.
03. Then press OK twice to complete programming.
TECHNICAL SPECIFICATIONS OF PRODUCT
The product MK is produced by Nice S.p.a. (TV) I. Moovo is
a commercial trademark owned by Nice S.p.a.
I Type: 5-key keypad with option of activating automation
with or without entry of password. I Technology adopted:
Possibility of entering an activation code of up to 10 digits
(over 1 million possible combinations). I Power supply
/Output: The device must be connected to Moovo Bus networks, from which it is powered and sends the output signals. I Absorbed power: 120 mW in operation; 45 mW in
stand by. I Ambient operating temperature: -20 - 50 °C.
I Use in acid, saline or potentially explosive atmospheres: No. I Assembly: Vertical wall-mounted. I Protection rating: IP 44. I Dimensions: 50 x 85h x 35 mm.
I Weight: 80 g.
PRODUCT DISPOSAL
This product is an integral part of the automation and
therefore must be disposed together with the latter.
As in installation, also at the end of product lifetime, the disassembly and scrapping operations must be performed by
qualified personnel.
This product comprises various types of materials: some
may be recycled others must be disposed of. Seek information on the recycling and disposal systems envisaged by the
local regulations in your area for this product category.
CAUTION! – some parts of the product may contain pollutant or hazardous substances which, if disposed of into the
environment, may cause serious damage to the environment
or physical health.
As indicated by the symbol alongside, disposal of this product in domestic waste is strictly prohibited.
Separate the waste into categories for disposal, according to the methods envisaged
by current legislation in your area, or return
the product to the retailer when purchasing a
new version.
CAUTION! – Local legislation may envisage serious fines in
the event of abusive disposal of this product.
CE DECLARATION OF CONFORMITY
This Declaration of Conformity contains the individual declarations
of conformity for the specified products; it was updated on the
issue date of this manual and the text herein has been drawn up
for editorial purposes. A copy of the original declaration for each
product can be requested from Nice S.p.a. (TV) I.
MK is produced by Nice S.p.a. (TV) I; MOOVO is a commercial trademark owned by Nice S.p.a.
The undersigned, Lauro Buoro, in the role of Managing Director, declares under his sole responsibility, that the product:
Manufacturer’s Name: NICE s.p.a.
Address: Via Pezza Alta 13, Z.I. Rustignè, 31046 Oderzo
(TV) Italy
Type: “MOOVO” series digital selector
Models: MK
Accessories: No accessory
Complies with the requirements of the following EC directives, as amended by Directive 93/68/EEC of the European
Council of 22 July 1993:
89/336/EEC DIRECTIVE 89/336/EEC OF THE EUROPEAN
COUNCIL of 3 May 1989 regarding the approximation of
member state legislation related to electromagnetic compatibility.
According to the following standards:
EN 61000-6-2:2005, EN 61000-6-3:2001+A11:2004
Lauro Buoro
(Managing director)
ENGLISH
AVVERTENZE E PRECAUZIONI PER LA
SICUREZZA
ATTENZIONE! – Un’installazione e una programmazione
errata possono causare gravi ferite alle persone che eseguono il lavoro e a quelle che useranno il prodotto. Per
questo motivo, durante l’installazione, è importante ri spettare le leggi e le norme sulla sicurezza, in vigore sul
territorio, e tutte le istruzioni riportate in questo manuale.
Non procedere con l’installazione se si hanno dubbi di
qualunque natura e richiedere eventuali chiarimenti al
Servizio Assistenza Moovo.
Attenzione! – Rispettare le seguenti avvertenze:
– non eseguire modifiche su nessuna parte del dispositivo, se non quelle previste nel presente manuale. Operazioni di questo tipo possono solo causare malfunzionamenti. Il costruttore declina ogni responsabilità per danni derivanti da prodotti modificati arbitrariamente.
– durante l'installazione evitare che le parti del prodotto
possano venire immerse in acqua o in altre sostanze
liquide.
– se sostanze liquide penetrano all’interno del prodotto, scollegare immediatamente l’alimentazione elettrica
e rivolgersi al Servizio Assistenza Moovo. L’utilizzo del
prodotto in tali condizioni può causare situazioni di
pericolo.
– tutte le operazioni che richiedono l’apertura del guscio
di protezione del prodotto, devono avvenire con la Centrale dell’automazione scollegata dall’alimentazione
elettrica. Se il dispositivo di sconnessione non è a vista,
apporvi un cartello con la seguente dicitura:
“ATTENZIONE! MANUTENZIONE IN CORSO”.
– Il materiale dell’imballaggio del prodotto deve essere
smaltito nel pieno rispetto della normativa in vigore sul
territorio.
AVVERTENZE E PRECAUZIONI PER L’USO
• Conservare con cura questo manuale per facilitare eventuali interventi futuri di programmazione e manutenzione del
prodotto.
• Al termine della vita del prodotto, assicurarsi che il materiale venga riciclato o smaltito secondo le norme vigenti sul
territorio.
• Per la pulizia superficiale del prodotto, utilizzare un panno
leggermente umido (non bagnato). Importante – Non utilizzare sostanze contenenti alcool, benzene, diluenti o altre so stanze infiammabili. L’uso di tali sostanze potrebbe danneggiare i dispositivi e generare incendi o scosse elettriche.
• Prima di procedere alla pulizia, per impedire che qualcuno
possa azionare inavvertitamente l'automazione, sbloccare il
motoriduttore come descritto nel proprio manuale istruzioni.
DESCRIZIONE DEL PRODOTTO E
DESTINAZIONE D’USO
Il presente prodotto è una tastiera di comando da parete
destinata all'uso in automazioni per porte, cancelli, portoni
da garage e similari, che adottano una Centrale di comando
con sistema di collegamento “Bus” con protocollo "BusMoovo". ATTENZIONE! – Qualsiasi altro uso diverso da
quello descritto è da considerarsi improprio e vietato!
È un accessorio della linea Moovo, utile per aumentare e
completare le prestazioni della propria automazione: può
essere programmata per funzionare in due modalità: modo
tradizionale (ogni tasto esegue una funzione specifica assegnata – modalità impostata in fabbrica) e modo sicurezza (per
comandare una manovra è necessario digitare una sequenza
segreta di tasti, impostata dall’utente). La tastiera è un dispositivo che si fissa a parete ed è retroilluminata per le situazioni
con scarsa luce. Altre caratteristiche sono descritte nel paragrafo “Caratteristiche tecniche del prodotto”.
VERIFICHE PRELIMINARI
ALL’INSTALLAZIONE
• Verificare l’integrità dell’imballo prima di aprirlo e del prodotto contenuto all’interno.
• Prima di procedere all’installazione, è necessario verificare
l’integrità del prodotto, l’adeguatezza del modello scelto e
l’idoneità dell’ambiente destinato all’installazione.
• ATTENZIONE! – Verificare che la tensione di alimentazione
elettrica presente sui morsetti dedicati al collegamento "Bus"
della Centrale di comando dell'automatismo, sia la stessa di
quella indicata sul presente dispositivo.
• Verificare che la superficie prescelta per l’installazione sia
solida e che possa, quindi, garantire un fissaggio stabile.
• Verificare che il dispositivo sia collocato in una posizione
protetta e al riparo da urti accidentali.
Limiti d’impiego
– Il presente prodotto può essere utilizzato esclusivamente
con le Centrali di comando Moovo, dotate di sistema di collegamento “Bus”.
INSTALLAZIONE E COLLEGAMENTO
DEL PRO DOTTO
Per installare e collegare la tastiera procedere nel modo se guente:
01. Fig. 1: Togliere il coperchio della tastiera spingendolo di
lato come mostrato nell’immagine.
02. Fig. 2: Con l’aiuto di un cacciavite, aprire e staccare il
fondo della tastiera.
03. Fig. 3: Stabilire sul muro la posizione della tastiera.
Attenzione – I dispositivi di comando di tipo “fisso”
devono essere posizionati in vista dell’automazione ma
lontano dalle sue parti mobili e ad un’altezza superiore a
150 cm.
a) Con l’aiuto di un trapano, forare sul fondo la parte
predisposta per il passaggio del cavo di collegamento.
b) Fissare il fondo della tastiera al muro con le apposite
viti, facendo passare il cavo attraverso il foro predisposto.
Nota – Per il collegamento della tastiera utilizzare un cavo del
tipo 2 x 0,5 mm
2
(per una distanza fino a 20 m) oppure un
cavo del tipo 2 x 1,0 mm
2
(per una distanza oltre i 20 m).
ATTENZIONE! – Un collegamento errato può provocare
guasti o situazioni di pericolo; quindi, rispettare scrupolosamente i collegamenti indicati.
04. Fig. 4:
a) Collegare i fili del cavo ai rispettivi morsetti.
b) Innestare il connettore del cavo sul connettore mas -
chio presente sul retro della tastiera.
05. Fig. 5: Rimettere il coperchio facendo in modo che i
dentini di quest’ultimo si incastrino in quelli del fondo
della tastiera.
06. Fig. 6: Fissare il coperchio della tastiera al fondo tramite
vite in dotazione. Infine rimettere il tappo coprivite come
indicato nell’immagine.
PROGRAMMAZIONE DELLA TASTIERA
La tastiera di comando può essere programmata alternativamente in una delle seguenti modalità:
- modalità
TRADIZIONALE (impostazione di fabbrica).
- modalità
SICUREZZA, con l'uso di una password personale.
MODALITÀ “TRADIZIONALE”
In questa modalità ciascun tasto è programmato nel modo
se guente:
tasto “A” = comando Passo-Passo
tasto “B” = comando Apertura parziale
tasto “C” = comando Apre
tasto “D” = comando Chiude
tasto “OK” = comando Stop
MODALITÀ “SICUREZZA”
Questa modalità permette di memorizzare e quindi di utilizzare un solo comando
(vedere il punto 04 della seguente pro-
cedura). La tastiera funziona unicamente digitando una pas-
sword (decisa dall'utente, da 1 a 10 lettere) seguita dal tasto
“OK”. Questa azione invia solo il comando specifico scelto
dall’utente durante la programmazione.
Programmazione:
01. Tenere premuti contemporaneamente i tasti “A” e “B”
per alcuni secondi fino a quando la tastiera emette una
sequenza di suoni (beep). Questi segnalano l’avvio della
programmazione.
02. Inserire il “codice PUK” (codice a 10 lettere presente
nella tessera fornita) usando i tasti della tastiera e premere infine il tasto “OK”. Se il codice è corretto, la tastiera emette una serie di suoni (beep); se invece è errato
verrà emesso un suono unico e continuo.
03. Inserire una password personale (da 1 a 10 lettere)
usando i tasti della tastierae e premere infine il tasto
“OK”. La tastiera emette una serie di suoni (beep).
04. Infine, scegliere nella lista in basso il comando che si
desidera programmare; quindi premere sulla tastiera il
tasto associato al comando e, di seguito, il tasto “OK”.
La tastiera emette una serie di suoni (beep) che concludono questa programmazione.
Comando Passo-Passo* = tasto A
Comando Apertura parziale = tasto B
Comando Apre = tasto C
Comando Chiude = tasto D
Comando Stop = tasto OK
* Nota – Il comando “Passo-passo” permette all’utente di
co mandare singolarmente le manovre Apre - Stop - Chiude
- Stop ..., in questo preciso ordine ciclico. Per comandare
ogni manovra è necessario digitare la propria password e di
seguito il tasto “OK”.
Alla fine dell’invio di un comando, se si desidera inviarne
un’altro in breve tempo, si può premere di nuovo il tasto
“OK”, senza digitare la propria password, purché ciò venga
fatto entro 10 secondi. Questo è possibile farlo più di una volta, rispettando il time-out di 10 secondi.
Modificare la Password personale:
Se si desidera modificare la propria password, rifare tutta la
procedura "modalità Sicurezza", cambiando al punto 03 la
password esistente.
Procedura per riprogrammare la tastiera nella mo dalità “TRADIZIONALE”
01. Tenere premuti contemporaneamente i tasti “A” e “B”
per alcuni secondi, fino a quando la tastiera emette una
sequenza di suoni (beep) che segnalano l’avvio della
programmazione.
02. Usando i tasti della tastiera inserire il “codice PUK”
(codice a 10 lettere presente nella tessera fornita con la
tastiera); infine, premere il tasto “OK”. Se il codice è corretto la tastiera emette una serie di suoni (beep); se invece è errato verrà emesso un suono unico e continuo.
03. infine, premere 2 volte il tasto “OK” per terminare la programmazione.
CARATTERISTICHE TECNICHE
DEL PRODOTTO
Il prodotto MK è prodotto da Nice S.p.a. (TV) I. Moovo è un
marchio di Nice S.p.a.
I Tipologia: Tastiera a 5 tasti con possibilità di azionare l’au-
tomazione con e senza l’inserimento di combinazione.
I Tecnologia adottata: Possibilità di inserimento di un codi-
ce di attivazione fino a 10 cifre (oltre 1 milione di possibili
combinazioni). I Alimentazione / Uscita: Il dispositivo deve
essere collegato a reti “Bus” Moovo, dalla quale preleva l’alimentazione elettrica e invia i segnali di uscita. I Potenza
assorbita: 120 mW in funzionamento; 45 mW in stand by.
I Temperatura ambientale di funzionamento: -20 ÷ 50
°C. I Utilizzo in atmosfera acida, salina o po tenzialmen-
te esplosiva: No. I Montaggio: Verticale a parete. I Grado
di protezione: IP 44. I Dimensioni: 50 x 85h x 35 mm.
I Peso: 80 g.
SMALTIMENTO DEL PRODOTTO
Questo prodotto è parte integrante dell'automazione, e
dunque, deve essere smaltito insieme con essa.
Come per le operazioni d'installazione, anche al termine della vita di questo prodotto, le operazioni di smantellamento
devono essere eseguite da personale qualificato.
Questo prodotto è costituito da vari tipi di materiali: alcuni
possono essere riciclati, altri devono essere smaltiti. Informatevi sui sistemi di riciclaggio o smaltimento previsti dai
regolamenti vigenti sul vostro territorio, per questa categoria di prodotto.
Attenzione! – alcune parti del prodotto possono contenere
sostanze inquinanti o pericolose che, se disperse nell’ambiente, potrebbero provocare effetti dannosi sull'ambiente
stesso e sulla salute umana.
Come indicato dal simbolo a lato, è vietato
gettare questo prodotto nei rifiuti domestici.
Eseguire quindi la “raccolta separata” per lo
smaltimento, secondo i me todi previsti dai
regolamenti vigenti sul vo stro territorio, op pure riconsegnare il prodotto al venditore nel
momento dell'acquisto di un nuovo prodotto equivalente.
Attenzione! – i regolamenti vigenti a livello locale possono
prevedere pesanti sanzioni in caso di smaltimento abusivo di
questo prodotto.
DICHIARAZIONE CE DI CONFORMITÁ
La presente Dichiarazione di Conformità raccoglie il contenuto
delle singole dichiarazioni di conformità dei singoli prodotti citati; è
aggiornata alla data di edizione del presente manuale ed è stata
riadattata per motivi editoriali. Copia della dichiarazione originale
per ogni prodotto può essere richiesta a Nice S.p.a. (TV) I.
MK è prodotto da NICE S.p.a. (TV) I; MOOVO è un marchio
commerciale di proprietà di Nice S.p.a.
Il sottoscritto Lauro Buoro in qualità di Amministratore Delegato, dichiara sotto la propria responsabilità che il prodotto:
Nome produttore: NICE s.p.a.
Indirizzo: Via Pezza Alta 13, Z.I. Rustignè, 31046 Oderzo
(TV) Italia
Tipo: Selettore digitale serie “MOOVO”
Modelli: MK
Accessori: Nessun accessorio
Risulta conforme a quanto previsto dalle seguenti direttive
comunitarie, così come modificate dalla Direttiva 93/68/CEE
del consiglio del 22 Luglio 1993:
89/336/CEE; DIRETTIVA 89/336/CEE DEL CONSIGLIO del 3
maggio 1989, per il riavvicinamento delle legislazioni degli
Stati membri relative alla compatibilità elettromagnetica.
Secondo le seguenti norme:
EN 61000-6-2:2005, EN 61000-6-3:2001+A11:2004
Lauro Buoro
(Amministratore Delegato)
ITALIANO
AVERTISSEMENTS ET PRÉCAUTIONS POUR
LA SÉCURITÉ
ATTENTION ! – Une installation et une programmation
incorrectes peuvent causer de graves blessures aux personnes qui effectuent le travail et à celles qui utiliseront le
produit. Pour cette raison, au cours de l’installation, il est
important de respecter les lois et les normes de sécurité
en vigueur sur le territoire, ainsi que toutes les instructions figurant dans ce guide. Ne pas effectuer l’installation si le moindre doute persiste et demander les éclaircissements nécessaires au Service après-vente Moovo.
Attention ! – Par ailleurs, respecter les consignes suivantes :
– ne pas effectuer de modifications sur des parties du
dispositif quelles qu’elles soient, en dehors de celles qui
sont décrites dans ce guide. Des opérations de ce type
ne peuvent que provoquer des problèmes de fonctionnement. Le con structeur décline toute responsabilité
pour les dommages dé rivant de produits modifiés arbitrairement.
– au cours de l’installation, éviter que les parties du produit puissent être immergées dans l’eau ou dans d’autres substances liquides.
– si des substances liquides pénètrent à l’intérieur du
produit, déconnecter immédiatement l’alimentation
électrique et s’adresser au Service après–vente Moovo.
L’utilisation du pro duit dans ces conditions peut constituer des situations de danger.
– toutes les opérations qui demandent l’ouverture du
carter de protection du produit, doivent être effectuées
avec la logique de commande déconnectée. Si le dispositif de dé connexion n’est pas visible, y accrocher un
panonceau indiquant : « ATTENTION ! MAINTENANCE
EN COURS » .
– Les matériaux de l’emballage du produit doivent être
mis au rebut dans le plein respect des normes locales en
vigueur.
RECOMMANDATIONS ET PRÉCAUTIONS
POUR L’UTILISATION
• Conserver avec soin ce guide pour faciliter les éventuelles
interventions futures de programmation et de maintenance
du produit.
• À la fin de la vie du produit, s’assurer que les matériaux
sont recyclés ou mis au rebut en respectant les normes
locales en vigueur.
• Pour le nettoyage superficiel du produit, utiliser un chiffon
légèrement humide (pas mouillé). Important – Ne pas utiliser
de substances contenant de l’alcool, du benzène, des
diluants ou autres substances inflammables. L’utilisation de
ces substances pourrait endommager les dispositifs et provoquer des incendies ou des décharges électriques.
• Avant de procéder au nettoyage, pour éviter que l’automatisme puisse être actionné par quelqu’un d’autre, débrayer
l’opérateur comme décrit dans le guide respectif.
DESCRIPTION DU PRODUIT ET APPLICATION
Le présent produit est un clavier de commande mural destiné à être utilisé dans les automatisations pour portes, portails, portes de garage et similaires, qui adoptent une logique
de commande avec système de connexion « Bus » avec protocole « Bus-Moovo ». ATTENTION ! – Toute autre utilisa-
tion que celle décrite doit être considérée comme impropre et interdite !
C’est un accessoire de la ligne Moovo, utile pour augmenter
et compléter les performances de l’automatisme installé : le
clavier peut être programmé pour fonctionner en deux
modalités : mode traditionnel (chaque touche effectue une
fonction spécifique préétablie – configuration effectuée en
usine) et mode sécurité (pour commander une manœuvre il
faut taper une combinaison secrète de touches, configurée
par l’utilisateur). Le clavier est un dispositif qui se fixe au mur
et il est rétro-éclairé pour pouvoir être utilisé y compris en cas
de lumière insuffisante. Les autres caractéristiques sont
décrites au paragraphe « Caractéristiques techniques du
produit ».
CONTRÔLES AVANT L’INSTALLATION
• Vérifier l’intégrité de l’emballage avant de l’ouvrir, et du produit à l’intérieur.
• Avant d’effectuer l’installation, il est nécessaire de vérifier
l’intégrité du produit, l’adéquation du modèle choisi et son
adaptation au lieu prévu pour son installation.
• ATTENTION ! – Vérifier que la tension d’alimentation électrique présente sur les bornes dédiées à la connexion « Bus
» de la lo gique de commande de l’automatisme est la même
que celle indiquée sur le présent dispositif.
• Vérifier que la surface choisie pour l’installation est solide et
peut donc garantir une fixation stable.
• Vérifier que le dispositif se trouve dans une position protégée, à l’abri des chocs accidentels.
Limites d’application
– Le présent produit ne peut être utilisé qu’avec les lo giques de commande Moovo, munies de système de con nexion « Bus ».
INSTALLATION ET CONNEXION DU PRODUIT
Pour installer et connecter le clavier, procéder de la façon
suivante :
01. Fig. 1: Enlever le couvercle du clavier en le poussant sur
le côté comme l’indique l’illustration.
02. Fig. 2: À l’aide d’un tournevis, ouvrir et détacher le fond
du clavier.
03. Fig. 3: Déterminer sur le mur la position du clavier.
Attention – Les dispositifs de commande de type « fixe
» doivent être positionnés de manière à voir l’automatisme mais loin de ses parties mobiles et à une hauteur
supérieure à 150 mm.
a) À l’aide d’une perceuse, percer sur le fond la partie
prévue pour le passage du câble de connexion.
b) Fixer le fond du clavier au mur avec les vis prévues à
cet effet, en faisant passer le câble dans le trou.
Note – Pour connecter le clavier, utiliser un câble du type 2 x
0,5 mm² (pour une distance jusqu’à 20 m) ou un câble du
type 2 x 1,0 mm² (pour une distance de plus de 20 m).
ATTENTION ! – Une connexion incorrecte peut provoquer des pannes ou des situations de danger ; respecter par con séquent scrupuleusement les connexions
indiquées.
04. Fig. 4:
a) Connecter les fils du câble aux bornes respectives.
b) Brancher le connecteur du câble sur le connecteur
mâle présent à l’arrière du clavier.
05. Fig. 5: Remettre le couvercle en faisant en sorte que les
dents de ce dernier s’encastrent dans les logements du
fond du clavier.
06. Fig. 6: Fixer le couvercle de la photocellule au fond avec
la vis fournie. Remettre le cache-vis en place comme
l’indique l’illustration.
PROGRAMMATION DU CLAVIER
Le clavier de commande peut être programmé en deux
modes de fonctionnement, alternatifs l’un à l’autre :
- mode
TRADITIONNEL (réglage par défaut).
- mode
SÉCURITÉ, (avec mot de passe personnel).
MODE « TRADITIONNEL »
Dans ce mode, chaque touche est programmée de la façon
suivante :
touche « A » = commande Pas à Pas
touche « B » = commande Ouverture partielle
touche « C » = Commande Ouverture
touche « D » = commande Fermeture
touche « OK » = commande Stop
MODE « SÉCURITÉ »
Ce mode permet de mémoriser et donc d’utiliser une seule
commande (voir le point 04 de la procédure qui suit). Le
clavier fonctionne uniquement en tapant un mot de passe
(choisi par l’utilisateur, de 1 à 10 lettres) suivi de la pression
de la touche « OK ». Cette action envoie uniquement la
commande spécifique choisie par l’utilisateur durant la programmation.
Programmation :
01. Maintenir enfoncées simultanément les touches « A » et
« B » pendant quelques secondes, jusqu’à ce que le clavier émet te une séquence de sons (bips). Ils signalent le
début de la programmation.
02. En utilisant les touches du clavier taper le « code PUK »
(code à 10 lettres présent sur la carte fournie avec le clavier) ; presser ensuite la touche « OK ». Si le code est
correct, le clavier émet une série de sons (bips) ; s’il est
erroné le clavier émet un son unique et continu.
03. En utilisant les touches du clavier taper un mot de passe
personnel (de 1 à 10 lettres) ; presser ensuite la touche «
OK ». Le clavier émet une série de sons (bips).
04. Choisir enfin dans la liste ci-dessous la commande que
l’on désire programmer et presser sur le clavier la
touche associée à la commande puis, ensuite, la touche
« OK ». Le clavier émet une série de sons (bips) qui
concluent cette programmation.
Commande Pas à Pas* = touche A
Commande Ouverture partielle = touche B
Commande Ouverture = touche C
Commande Fermeture = touche D
Commande Stop = touche OK
* Note – La commande « Pas à pas » permet à l’utilisateur
de commander individuellement les manœuvres Ouverture -
Stop - Fermeture - Stop …, dans cet ordre cyclique précis.
Pour commander chaque manœuvre il faut taper le mot de
passe personnel puis presser la touche « OK ».
À la fin de l’envoi d’une commande, si on souhaite en
envoyer une autre rapidement, on peut presser de nouveau
la touche « OK », sans retaper le mot de passe, à condition
d’opérer dans les 10 secondes qui suivent. On peut procéder ainsi plusieurs fois de suite, toujours en respectant le
temps maximum de 10 secondes.
Modifier le mot de passe personnel :
Si l’on souhaite modifier son mot de passe, refaire toute la
procédure « mode Sécurité », en changeant au point 03 le
mot de passe existant.
Procédure pour reprogrammer le clavier en
mode « TRADITIONNEL »
01. Maintenir enfoncées simultanément les touches « A » et
« B » pendant quelques secondes, jusqu’à ce que le clavier émette une séquence de sons (bips) qui signalent le
début de la programmation.
02. En utilisant les touches du clavier taper le « code PUK »
(code à 10 lettres présent sur la carte fournie avec le clavier) ; presser ensuite la touche « OK ». Si le code est
correct, le clavier émet une série de sons (bips) ; s’il est
erroné le clavier émet un son unique et continu.
03. Presser ensuite 2 fois la touche « OK » pour terminer la
programmation.
CARACTÉRISTIQUES TECHNIQUES
DU PRODUIT
Le produit MK est produit par Nice S.p.a. (TV) Italie. Moovo
est une marque de Nice S.p.a.
I Typologie : Clavier à 5 touches avec possibilité d’action-
ner l’automatisme avec et sans la saisie d’un code. I Tech-
nologie adoptée : Possibilité de saisie d’un code d’activation jusqu’à 10 chiffres (plus d’1 million de combinaisons).
I Alimentation / Sortie : Le dispositif doit être connecté au
réseau « Bus » Moovo, duquel il prélève l’alimentation électrique et envoie les signaux de sortie. I Puissance absor-
bée : 120 mW en fonctionnement ; 45 mW en stand by.
I Température ambiante de fonctionnement : -20 ÷ 50
°C. I Utilisation en atmosphère acide, saline ou poten-
tiellement explosive : Non. I Montage : Vertical mural.
I Indice de protection : IP 44. I imensions : 50 x 85h x 35
mm. I Poids : 80 g.
MISE AU REBUT DU PRODUIT
Ce produit est partie intégrante de l’automatisme et doit
donc être mis au rebut avec ce dernier.
Comme pour les opérations d’installation, à la fin de la durée
de vie de ce produit, les opérations de démantèlement doivent être effectuées par du personnel qualifié.
Ce produit est constitué de différents types de matériaux :
certains peuvent être recyclés,, d’autres doivent être mis au
rebut. Informez-vous sur les systèmes de recyclage ou de
mise au rebut prévus par les règlements, en vigueur dans
votre pays, pour cette catégorie de produit.
Attention ! – certains composants du produit peuvent
contenir des substances polluantes ou dangereuses qui
pourraient avoir des effets nuisibles sur l’environnement et
sur la santé des personnes s’ils étaient jetés dans la nature.
Comme l’indique le symbole ci-contre, il est interdit de jeter
ce produit avec les ordures ménagères. Par
con séquent, utiliser la méthode de la « collecte sélective » pour la mise au rebut des
composants conformément aux prescriptions des normes en vigueur dans le pays
d’utilisation ou restituer le produit au vendeur
lors de l'achat d’un nouveau produit équivalent.
Attention ! – les règlements locaux en vigueur peuvent appliquer de lourdes sanctions en cas d’élimination illicite de ce
produit.
DÉCLARATION DE CONFORMITÉ
La présente Déclaration de conformité réunit le contenu des
diverses déclarations de conformité de chaque produit cité ; elle
est mise à jour à la date d’édition du présent manuel et a été
réélaborée pour des raisons d’édition. Une copie de la déclaration
originale pour chaque produit peut être demandée à Nice S.p.a.
(TV) I.
MK est produit par NICE S.p.a. (TV) I ; MOOVO est une
marque commerciale dont Nice S.p.a. est propriétaire.
Je soussigné Lauro Buoro en qualité d’Administrateur Délégué, déclare sous mon entière responsabilité que le produit :
Nom du producteur : NICE s.p.a.
Adresse : Via Pezza Alta 13, 31046 Z.I. Rustignè, Oderzo
(TV) Italie
Type : Sélecteur numérique série « MOOVO »
Modèles : MK
Accessoires : Aucun accessoire
Résulte conforme à ce qui est prévu par les directives communautaires suivantes, modifiées par la directive 93/68/CEE
du conseil du 22 juillet 1993 :
89/336/CEE ; DIRECTIVE 89/336/CEE DU CONSEIL du 3
mai 1989, concernant l’harmonisation des législations des
États membres relatives à la compatibilité électromagnétique.
Selon les normes suivantes : EN 61000-6-2:2005,
EN 61000-6-3:2001+A11:2004
Lauro Buoro
(Administrateur Délégué)
FRANÇAIS
4
1 2
5 6
3
Moovo is a commercial trademark owned
by Nice S.p.a.
Moovo è un marchio di Nice S.p.a.
Moovo est une marque de Nice S.p.a.
Moovo es una marca de Nice S.p.a.
Moovo ist eine Handelsmarke der Firma
Nice S.p.a.
Moovo to marka firmy Nice S.p.a.
Moovo is een merk van Nice S.p.a.
Nice S.p.a.
Via Pezza Alta, 13
Z.I. Rustignè
31046 Oderzo (TV) Italia
Tel. +39 0422 20 21 09
Fax +39 0422 85 25 82
Codice: IST232.4852 - Rev. 01 del 24 - 07 - 2007
EN Installation and use instructions and
warnings
IT Istruzioni ed avvertenze per l’instal-
lazione e l’uso
FR Instructions et avertissements pour
l’installation et l’utilisation
ES Instrucciones y advertencias para la
instalación y el uso
DE Anweisungen und Hinweise für die
Installation und die Bedienung
PL Instrukcje instalacji i użytkowania i
ostrzeżenia
NL Aanwijzingen en aanbevelingen voor
installering en gebruik
Digital keypad
ADVERTENCIAS Y PRECAUCIONES DE
SEGURIDAD
¡ATENCIÓN! – Una instalación y una programación inco-
rrectas pueden provocar heridas graves a las personas
que hacen el trabajo y a aquellas que utilizarán el producto. Por dicho motivo, durante la instalación es importante observar las leyes y las normas de seguridad vi gentes locales y respetar todas las instrucciones mencionadas en este manual. No proceda con la instalación
si tuviera alguna duda, y pida aclaraciones al Servicio de
Asistencia Moovo.
¡Atención! – Respete las siguientes advertencias:
– no modifique ninguna pieza del dispositivo si no está
previsto en este manual. Ese tipo de operaciones puede
provocar desperfectos. El fabricante no se asumirá ninguna responsabilidad por daños originados por productos modificados arbitrariamente.
– durante la instalación, evite que los componentes del
producto puedan quedar sumergidos en agua o en otras
sustancias líquidas.
– si sustancias líquidas penetraran dentro del producto, desconecte inmediatamente la alimentación eléctri ca y contacte con el Servicio de Asistencia Moovo.
Utilizar el producto en dichas condiciones podría ser
muy peligroso.
– todas las operaciones en las que haya que abrir la
cubierta de protección del producto deberán hacerse
con la Central de la automatización desconectada de la
alimentación eléctrica. Si el dispositivo de desconexión
no estuviera a la vista, aplique un cartel que indique:
“¡ATENCIÓN! MANTENIMIENTO EJECUTÁNDOSE”.
– El material de embalaje del producto debe eliminarse
respetando la normativa local.
ADVERTENCIAS Y PRECAUCIONES
PARA EL USO
• Conserve con cuidado este manual para facilitar las operaciones futuras de programación y mantenimiento del producto.
• Al final de la vida útil del producto, controle el material sea
reciclado o eliminado según las normas locales vigentes.
• Utilice un paño ligeramente humedecido (no mojado) para
la limpieza superficial del producto. Importante – No utilice
sustancias que contenga alcohol, benceno, disolventes u
otras sustancias inflamables. El uso de dichas sustancias
podría averiar los dispositivos y producir incendios o sacudidas eléctricas.
• Antes de proceder con la limpieza, desbloquee el motorreductor, tal como descrito en este manual de instrucciones,
para que nadie pueda accionar inadvertidamente la automatización.
DESCRIPCIÓN DEL PRODUCTO Y USO
ADECUADO
Este producto es una botonera de mando destinada para
ser utilizada en las automatizaciones de puertas, cancelas,
puertas de garaje y similares, que incorporen una Central de
mando con sistema de conexión "Bus" con protocolo "BusMoovo". ¡ATENCIÓN! – ¡Un uso diferente de aquel des-
crito es considerado inadecuado y está prohibido!
Es un accesorio de la línea Moovo, útil para aumentar y completar las prestaciones de la automatización: puede ser programada para funcionar en dos modalidades: modo tradicional (cada botón ejecuta una función específica asignada –
modalidad configurada en fábrica) y modo seguridad (para
accionar un movimiento es necesario pulsar un secuencia
secreta de botones, configurada por el usuario). La botonera
es un dispositivo que se fija a la pared y está retroiluminada
para cuando hay poca luz. Más características están descritas en el párrafo “Características técnicas del producto”.
CONTROLES PRELIMINARES A
LA INSTALACIÓN
• Controle la integridad del embalaje antes de abrirlo y la del
producto en su interior.
• Antes de proceder con la instalación, controle que el pro ducto esté íntegro, que el modelo corresponda con el pe dido y
que sea idóneo para el entorno en el cual debe ser instalado.
• ¡ATENCIÓN! – Controle que la tensión de alimentación elé -
ctrica presente en los bornes dedicados a la conexión "Bus"
de la Central de mando de la automatización sea la misma
que aquella indicada en el dispositivo.
• Controle que la superficie escogida para la instalación sea
sólida y que pueda garantizar una fijación estable.
• Controle que el dispositivo quede colocado en una posición segura y protegida de golpes accidentales.
Límites de utilización
– Este producto puede ser utilizado exclusivamente con las
Centrales de mando Moovo, dotadas de sistema de conexión “Bus”.
INSTALACIÓN Y CONEXIÓN DEL PRODUCTO
Para instalar y conectar la botonera, proceda de la siguiente
manera:
01. Fig. 1: Quite el cubierta de la botonera empujándola del
costado como se muestra en la imagen.
02. Fig. 2: Con un destornillador, abra y separe el fondo de
la botonera.
03. Fig. 3: Determine en la pared la posición de la botonera.
Atención – Los dispositivos de mando “fijos” deben
colocarse a la vista de la automatización pero lejos de
sus partes movibles, a más de 150 mm del suelo.
a) Con un taladro, taladre en el fondo la parte destinada
para que pase el cable de conexión.
b) Fije el fondo de la botonera a la pared con los tornillos
correspondientes, pasando los cables por el agujero
respectivo.
Nota – Para la conexión del teclado, utilice un cable de tipo
2 x 0,5 mm
2
(para una distancia de hasta 20 m) o un cable
de tipo 2 x 1,0 mm
2
(para una distancia de más de 20 m).
¡ATENCIÓN! – Una conexión incorrecta podría provocar
averías o situaciones peligrosas; por consiguiente, respete escrupulosamente las conexiones indicadas.
04. Fig. 4:
a) Conecte los hilos del cable a los bornes correspon-
dientes.
b) Conecte el conector del cable en el conector macho
presente en la parte trasera de la botonera.
05. Fig. 5: Coloque la cubierta, encastrando sus dientes en
los dientes del fondo de la botonera.
06. Fig. 6: Fije la cubierta de la botonera en el fondo con el
tornillo correspondiente. Por último, coloque el tapatornillo, tal como se muestra en la imagen.
PROGRAMACIÓN DE LA BOTONERA
La botonera de mando puede ser programada en una de las
siguientes modalidades alternativas entre sí:
- modalidad
TRADICIONAL (configuración de fábrica).
- modalidad
SEGURIDAD, utilizando una contraseña personal
MODALIDAD “TRADICIONAL”
En esta modalidad cada botón está programado de la si guiente manera:
botón “A” = mando Paso a Paso
botón “B” = mando Apertura parcial
botón “C” = mando Abrir
botón “D” = mando Cerrar
botón “OK” = mando Stop
MODALIDAD “SEGURIDAD”
Esta modalidad permite memorizar y utilizar un solo mando
(véase el punto 04 del siguiente procedimiento). La botonera
funciona únicamente insertando una contraseña (elegida por
el usuario, de 1 a 10 letras), seguida del botón “OK”. Esta
acción envía sólo el mando específico predeterminado por el
usuario durante la programación.
Programación:
01. Mantenga pulsados contemporáneamente los botones
“A” y “B” durante algunos segundos hasta que la botonera emita una secuencia de tonos de aviso (beep).
Dichos tonos de aviso señalan que la programación ha
comenzado.
02. Con los botones de la botonera, inserte el “código
PUK” (código de 10 letras presente en la tarjeta sumi-
nistrada); por último, pulse el botón “OK”. Si el código
es correcto, la botonera emitirá una serie de tonos de
aviso (beep); por el contrario, si fuera incorrecto, emitirá
un único sonido continuo.
03. Con los botones de la botonera, inserte una contraseña
personal (de 1 a 10 letras); por último, pulse el botón
“OK”. La botonera emitirá una serie de tonos de aviso.
04. Por último, elija en la lista de abajo el mando que se
desea programar y pulse el botón asociado al mando en
la botonera; por último, pulse el botón “OK”. La botonera emitirá una serie de tonos de aviso (beep), indicando
el final de esta programación.
Mando Paso a Paso* = botón A
Mando Apertura parcial = botón B
Mando Abrir = botón C
Mando Cerrar = botón D
Mando Stop = botón OK
* Nota – El mando “Paso a paso” permite que el usuario
pueda accionar los movimientos de Abrir - Stop - Cerrar -
Stop ... en este orden preciso. Para accionar cualquier movimiento es necesario insertar la propia contraseña y pulsar el
botón “OK”. Al final del envío de un mando, si se deseara
enviar otro inmediatamente después, se puede pulsar de
nuevo el botón “OK”, sin insertar la contraseña, siempre y
cuando se haga antes de 10 segundos. Esto se puede hacer
varias veces, respetando el time-out de 10 segundos.
Modificar la Contraseña personal:
Si se desea modificar la contraseña personal, siga todo el
procedimiento “modalidad Seguridad”, cambiando en el
punto 03 la contraseña existente.
Procedimiento para reprogramar la botonera
en la modalidad “TRADICIONAL”
01. Mantenga pulsados contemporáneamente los botones
“A” y “B” durante algunos segundos hasta que la botonera emita una secuencia de tonos de aviso que señalan que la programación ha comenzado.
02. Con los botones de la botonera, inserte el “código PUK”
(código de 10 letras presente en la tarjeta suministrada
con la botonera); por último, pulse el botón “OK”. Si el
código es correcto, la botonera emitirá una serie de
tonos de aviso (beep); por el contrario, si fuera incorrecto, emitirá un único sonido continuo.
03. Por último, pulse 2 veces el botón “OK” para concluir la
programación.
CARACTERÍSTICAS TÉCNICAS
DEL PRODUCTO
El producto MK es fabricado por Nice S.p.a. (TV) I. Moovo
es una marca de Nice S.p.a.
I Tipo: Botonera de 5 botones con posibilidad de accionar
la automatización con y sin la inserción de combinaciones.
I Tecnología adoptada: Posibilidad de insertar un código
de activación de hasta 10 cifras (más de 1 millón de combinaciones posibles). I Alimentación / Salida: El dispositivo
puede conectarse a redes “Bus” Moovo desde las que obtiene la alimentación eléctrica y envía las señales de salida.
I Potencia absorbida: 120 mW en funcionamiento; 45 mW
en stand by. I Temperatura ambiente de funcionamiento:
-20 ÷ 50°C. I Empleo en atmósfera ácida, salobre o con
riesgo de explosión: No. I Montaje: Vertical en la pared.
I Clase de protección: IP 44. I Medidas: 50 x 85h x 35
mm. I Peso: 80 g.
ELIMINACIÓN DEL PRODUCTO
Este producto forma parte integrante de la automatización y, por consiguiente, deberá ser eliminado junto
con ésta.
Al igual que para las operaciones de instalación, también al
final de la vida útil de este producto las operaciones de desguace deben ser efectuadas por personal experto.
Este producto está formado de varios tipos de materiales:
algunos pueden reciclarse y otros deben eliminarse. Infórmese sobre los sistemas de reciclaje o de eliminación previstos
por las normativas vigentes locales para esta categoría de
producto.
¡Atención! – algunas piezas del producto pueden contener
sustancias contaminantes o peligrosas que, si se las abandonara en el medio ambiente, podrían provocar efectos perjudiciales para el mismo medio ambiente y para la salud
humana.
Tal como indicado por el símbolo de aquí al lado, está prohibido arrojar este producto a los residuos
urbanos. Realice la “recogida selectiva” para
la eliminación, según los métodos previstos
por las normativas vigentes locales, o bien
entregue el producto al vendedor cuando
compre un nuevo producto equivalente.
¡Atención! – las normas locales pueden prever sanciones
importantes en el caso de eliminación abusiva de este producto.
DECLARACIÓN DE CONFORMIDAD CE
La presente Declaración de Conformidad agrupa el contenido de
cada declaración de conformidad de cada uno de los productos
citados; está actualizada a la fecha de edición de este manual y
ha sido readaptada por motivos de impresión. Una copia de la
declaración original de cada producto puede ser solicitada a Nice
S.p.a. (TV) I.
MK es fabricado por NICE S.p.a. (TV) I; MOOVO es una marca comercial de propiedad de Nice S.p.a.
El suscrito Lauro Buoro, en su carácter de Administrador
Delegado, declara bajo su responsabilidad que el producto:
Nombre fabricante: NICE S.p.a.
Domicilio: Via Pezza Alta 13, Z.I. Rustignè, 31046 Oderzo
(TV) Italia
Tipo: Selector digital serie “MOOVO”
Modelos: MK
Accesorios: ningún accesorio
Satisface los requisitos previstos por las directivas comunitarias, modificadas por la Directiva 93/68/CEE del consejo del
22 de julio de 1993:
89/336/CEE DIRECTIVA 89/336/CEE DEL CONSEJO del 3
de mayo de 1989 para la aproximación de las legislaciones
de los Estados miembros relativas a la compatibilidad electromagnética
Según la siguientes normas:
EN 61000-6-2:2005, EN 61000-6-3:2001+A11:2004.
Lauro Buoro
(Administrador delegado)
ESPAÑOL
SICHERHEITSHINWEISE UND MAßNAHMEN
ACHTUNG! Durch eine falsche Installation und Program -
mierung können die Personen, die die Arbeiten ausführen, sowie die Benutzer des Produktes schwer verletzt
werden. Aus diesem Grund ist es wichtig, bei der Installation die örtlich gültigen Gesetze und Sicherheitsvorschriften sowie alle Anweisungen im Handbuch einzuhalten.
Führen Sie die Installation nicht aus, wenn Sie Zweifel
haben: verlangen Sie beim Moovo Kundendienst genauere Auskünfte.
Achtung! - Befolgen Sie diese Hinweise:
– Führen Sie nur die im vorliegenden Handbuch vorgesehenen Änderungen an Teilen der Vorrichtung aus. Nicht
vorgesehene Vorgänge werden nur Betriebsstörungen
verursachen. Der Hersteller übernimmt keinerlei Haftung
für Schäden, die durch willkürlich veränderte Produkte
entstanden sind.
– Teile des Produktes sollten bei der Installation nicht in
Wasser oder andere Flüssigkeit getaucht werden.
– Sollten Flüssigkeiten in das Produkt eindringen, trennen Sie die Versorgung unverzüglich ab und wenden Sie
sich an den Moovo Kundendienst. Der Gebrauch des
Produktes unter diesen Bedingungen kann Gefahren
verursachen.
– Alle Vorgänge, für die das Öffnen des Schutzgehäuses
des Produktes notwendig ist, müssen mit von der Versorgung abgeschalteter Steuerung erfolgen. Sollte die
Abschaltvorrichtung nicht sichtbar sein, bringen Sie ein
Schild mit der folgenden Schrift an:“ACHTUNG! WARTUNG IM GANG".
– Das Verpackungsmaterial des Produktes muss unter
voller Einhaltung der örtlichen Vorschriften entsorgt
werden.
HINWEISE UND VORSICHTSMAßNAHMEN
ZUM GEBRAUCH
• Bewahren Sie das vorliegende Handbuch sorgfältig auf, um
zukünftige Programmierungs- und Wartungsarbeiten am
Produkt zu erleichtern.
• Stellen Sie sicher, dass das Produkt am Ende seiner
Lebensdauer nach den örtlich gültigen Vorschriften weiterverwertet oder entsorgt wird.
• Verwenden Sie zur Oberflächenreinigung des Produktes ein
leicht feuchtes Tuch (nicht nass). Wichtig – Verwenden Sie
keine Substanzen, die Alkohol, Benzol, Verdünnungsmittel
oder sonstige entzündbare Stoffe enthalten. Solche Substanzen könnten die Vorrichtungen beschädigen und Brand
oder Stromschläge verursachen.
• Um eine unbeabsichtigte Aktivierung der Automation zu
vermeiden, entriegeln Sie den Antrieb vor der Reinigung, wie
in seinem Anleitungshandbuch beschrieben.
PRODUKTBESCHREIBUNG UND EINSATZ
Bei dem vorliegenden Produkt handelt es sich um eine Steuertastatur für die Wandmontage, die zum Gebrauch von
Automationen für Türen, Tore, Garagentore und ähnliches
dient, die eine Steuerung mit “Bus”-Verbindung und “BusMoovo”-Protokoll anwenden. ACHTUNG! – Jeder andere
Einsatz als der Beschriebene ist unsachgemäß und
untersagt!
Es handelt sich um ein Zubehör der Linie Moovo, das nützlich ist, um die Leistungen der jeweiligen Automation zu verbessern und zu vervollständigen. Es kann auf zwei Arten programmiert sein: konventioneller Modus (jede Taste führt eine
ihr zugeordnete spezifische Funktion aus – werkseitig eingestellter Modus) und Sicherheitsmodus (damit eine Bewegung
erfolgt, muss auf eine vom Benutzer eingestellte, geheime
Tastensequenz gedrückt werden). Die Tastatur ist eine Vorrichtung, die man an der Wand befestigt und für schlechte
Lichtverhältnisse mit rückseitiger Beleuchtung ausgestattet
ist. Sonstige Merkmale sind in Par. “Technische Merkmale
des Produktes” beschrieben.
ÜBERPRÜFUNGEN VOR DER INSTALLATION
• Überprüfen Sie die Verpackung auf Schäden, bevor sie
geöffnet wird, danach das Produkt darin.
• Vor Installationsbeginn muss geprüft werden, ob das Produkt unversehrt ist und das gewählte Modell und die Umgebung für die jeweilige Installation geeignet sind.
• ACHTUNG! – Prüfen Sie, dass die Versorgungsspannung
an den Klemmen für die "Bus"-Verbindung der Steuerung
des Automatismus wie jene ist, die auf der vorliegenden Vorrichtung angegeben ist.
• Prüfen, dass die für die Installation gewählte Oberfläche solide ist und daher eine stabile Befestigung garantieren kann.
• Prüfen Sie, ob die Vorrichtung in geschützter und stoßsicherer Position angebracht werden kann.
Einsatzgrenzen
– Das vorliegende Produkt kann ausschließlich mit den
Steuerungen Moovo verwendet werden, die mit “Bus”-Verbindungssystemen ausgestattet sind.
INSTALLATION UND ANSCHLUSS DES
PRODUKTES
Gehen Sie wie folgend vor, um die Steuertastatur zu installieren und anzuschließen:
01. Abb. 1: Entfernen Sie den Deckel der Tastatur, indem
seitlich geschoben wird, wie auf der Abbildung gezeigt.
02. Abb. 2: Öffnen Sie den Boden der Tastatur mit einem
Schraubenzieher und nehmen Sie ihn ab.
03. Abb. 3: Bestimmen Sie die Position der Tastatur an der
Wand. Achtung - Fest montierte Steuervorrichtungen
müssen in Sichtnähe der Automation, aber fern von
ihren Bewegungsteilen in über 150 cm Höhe angebracht sein.
a) Lochen Sie im Boden das Teil, das zum Durchführen
der Anschlusskabel bereits vorbereitet ist, mit einer
Bohrmaschine.
b) Führen Sie das Kabel durch das gebohrte Loch und
befestigen Sie den Boden der Tastatur mit seinen
Schrauben an der Wand.
Anmerkung – Die Tastatur muss mit einem Kabel vom Typ
2 x 0,5 mm
2
(für eine Entfernung bis 20 m) oder vom Typ 2
x 1,0 mm
2
(für eine Entfernung über 20 m) angeschlossen
werden.
ACHTUNG! – Ein falscher Anschluss kann Defekte und/
oder Gefahren verursachen, führen Sie daher die angegebenen Anschlüsse genauestens aus.
04. Abb. 4:
a) Die Drähte des Kabels mit den entsprechenden Klem -
men verbinden.
b) Den Verbinder des Kabels in den Male-Verbinder an
der Rückseite der Tastatur stecken.
05. Abb. 5: Den Deckel wieder anbringen, so dass sich sei-
ne Zahnung in jene des Bodens der Tastatur einspannt.
06. Abb. 6: Den Deckel der Tastatur mit der mitgelieferten
Schraube am Boden befestigen. Dann die Schraubenabdeckung wieder anbringen, wie auf der Abbildung gezeigt.
PROGRAMMIERUNG DER TASTATUR
Die Steuertastatur kann entweder auf die eine oder die andere Art programmiert werden:
- KONVENTIONELLER
Modus (werkseitige Einstellung).
- SICHERHEITSMODUS
(mit Gebrauch eines individuellen
Passworts)
“KONVENTIONELLER” MODUS
In diesem Modus ist jede Taste wie folgend programmiert:
Taste “A” = Befehl Schrittbetrieb
Taste “B” = Befehl Teilöffnung
Taste “C” = Befehl Öffnet
Taste “D” = Befehl Schließt
Taste “OK” = Befehl Stopp
“SICHERHEITSMODUS“
In diesem Modus kann nur ein Befehl gespeichert und daher
benutzt werden (siehe Punkt 04 des folgenden Verfahrens).
Die Tastatur funktioniert nur, wenn ein vom Benutzer
bestimmtes Passwort (von 1 bis 10 Buchstaben) eingetippt
wird, gefolgt von der Taste “OK”. Mit dieser Handlung wird
nur der vom Benutzer bei der Programmierung gewählte
Befehl gesendet.
Programmierung:
01. Die Tasten “A” und “B” ein paar Sekunden lang gleichzeitig gedrückt halten, bis die Tastatur eine Tönesequenz (Bieptöne) abgibt. Die Töne melden den Beginn
der Programmierung.
02. Den “PUK-Code” (der aus 10 Buchstaben bestehende
Code auf der gelieferten Karte) mit den Tasten der
Tastatur eingeben, dann auf Taste “OK” drücken. Falls
der Code korrekt ist, gibt die Tastatur eine Reihe Töne
(Bieptöne) ab; falls er falsch ist, wird ein einziger Dauerton abgegeben..
03. Ein individuelles Passwort (von 1 bis 10 Buchstaben)
mit den Tasten der Tastatur eingeben, dann auf Taste
“OK” drücken. Die Tastatur gibt eine Reihe Töne (Bieptöne) ab.
04. Dann in der Liste unten den Befehl wählen, den man
programmieren will, und an der Tastatur auf die dem
Befehl zugeordnete Taste und dann auf Taste “OK”
drücken. Die Tastatur gibt eine Reihe Töne (Bieptöne)
ab, die das Ende dieser Programmierung melden.
Befehl Schrittbetrieb* = Taste A
Befehl Teilöffnung = Taste B
Befehl Öffnet = Taste C
Befehl Schließt = Taste D
Befehl Stopp = Taste OK
* Anmerkung – Mit dem Befehl “Schrittbetrieb” kann der
Benutzer die Bewegungen Öffnet - Stopp - Schließt -
Stopp ... in dieser Reihenfolge zyklisch ausführen. Um eine
Bewegung auszuführen, muss das eigene Passwort, gefolgt
vom Drücken der Taste “OK”, eingetippt werden.
Wenn man kurz nach der Sendung eines Befehls einen weiteren senden will, kann erneut auf die Taste “OK” gedrückt
werden, ohne dass man sein Passwort erneut eintippen
muss, falls dies innerhalb von 10 Sekunden erfolgt. . Das
kann unter Einhaltung der Zeitgrenze von 10 Sekunden
mehrmals gemacht werden.
Ändern des individuellen Passwortes:
Wenn man sein Passwort ändern will, das ganze Verfahren
"Sicherheitsmodus" erneut ausführen und das existierende
Passwort in Punkt 03 ändern.
Verfahren für die Neuprogrammierung der
Tastatur im “KONVENTIONELLEN“ Modus
01. Die Tasten “A” und “B” ein paar Sekunden lang gleichzeitig gedrückt halten, bis die Tastatur eine Tönesequenz (Bieptöne) abgibt, die den Beginn der Programmierung meldet.
02. Den “PUK-Code” (der aus 10 Buchstaben bestehende
Code auf der mit der Tastatur gelieferten Karte) mit den
Tasten der Tastatur eingeben, dann auf Taste “OK” drükken. Falls der Code korrekt ist, gibt die Tastatur eine Reihe Töne (Bieptöne) ab; falls er falsch ist, wird nur ein
Dauerton abgegeben.
03. Abschließend zwei Mal auf die Taste “OK” drücken, um
die Programmierung zu beenden.
TECHNISCHE MERKMALE DES PRODUKTS
Das Produkt MK ist von Nice S.p.a. (TV) I hergestellt. Moovo
ist eine Handelsmarke der Firma Nice S.p.a.
I Typik: Tastatur mit 5 Tasten. Kann die Automation mit und
ohne Eingabe einer Kombination betätigen. I Angewendete
Technologie: Mögliche Eingabe eines Aktivierungscodes bis
zu 10 Ziffern (mehr als 1 Million mögliche Kombinationen).
I Versorgung/Ausgang: Die Vorrichtung muss an “Bus”
Moovo-Netze angeschlossen sein, denen sie die elektrische
Versorgung entnimmt und die Ausgangssignale sendet.
I Leistungsaufnahme: 120 mW in Betrieb; 45 mW in
Stand-by. I Betriebstemperatur: -20 ÷ 50 °C. I Benut-
zung in säure- und salzhaltiger oder explosionsgefährdeter Umgebung: Nein. I Montage: Vertikale Wandmonta-
ge. I Schutzart: IP 44. I Abmessungen: 50 x 85H x 35
mm. I Gewicht: 80 g
ENTSORGUNG DES PRODUKTES
Das vorliegende Produkt ist Bestandteil der Automation
und muss daher zusammen mit ihr entsorgt werden.
Wie die Installationsarbeiten muss auch die Abrüstung am
Ende der Lebensdauer dieses Produktes von Fachpersonal
ausgeführt werden. Dieses Produkt besteht aus verschiedenen Stoffen, von denen einige recycled werden können,
andere müssen hingegen entsorgt werden. Informieren Sie
sich über die Recycling- oder Entsorgungssysteme für dieses Produkt, die von den auf Ihrem Gebiet gültigen Verordnungen vorgesehen sind.
Achtung! - bestimmte Teile des Produktes können Schadstoffe oder gefährliche Substanzen enthalten, die, falls in die
Umwelt gegeben, schädliche Wirkungen auf die Umwelt und
die menschliche Gesundheit haben könnten.
Wie durch das Symbol seitlich angegeben, ist es verboten,
dieses Produkt zum Haushaltmüll zu ge ben. Daher differenziert nach den Methoden entsorgen, die
von den auf Ihrem Ge biet gültigen Verordnungen vorgesehen sind, oder das Produkt
dem Verkäufer beim Kauf eines neuen,
gleichwertigen Produktes zurückgeben.
Achtung! - die örtlichen Verordnungen können schwere Strafen im Fall einer widerrechtlichen Entsorgung dieses Produktes vorsehen.
CE-KONFORMITÄTSERKLÄRUNG
Die vorliegende Konformitätserklärung ist eine Sammlung des
Inhalts der einzelnen Konformitätserklärungen der genannten,
einzelnen Produkte, aktualisiert am Ausgabedatum des vorliegenden Handbuchs und aus Verlagsgründen angepasst. Eine Kopie
der Originalerklärung eines jeden Produktes kann bei Nice S.p.a.
(TV) I verlangt werden.
MK ist von Nice S.p.a. (TV) I hergestellt; MOOVO ist eine
Handelsmarke der Firma Nice S.p.a.
Der Unterzeichnete Lauro Buoro erklärt als Geschäftsführer
unter seiner Haftung, dass das Produkt:
Herstellername: NICE s.p.a.
Adresse: Via Pezza Alta 13, Z.I. Rustignè, 31046 Oderzo
(TV) Italien,
Typ: Digitales Codeschloss der Serie “MOOVO”
Modelle: MK
Zubehör: kein Zubehör
Mit den Vorschriften der folgenden gemeinschaftlichen Richtlinien sowie den Änderungen durch die Richtlinie 93/68/CEE
des Rates vom 22. Juli 1993 konform ist:
89/336/CEE; RICHTLINIE 89/336/CEE DES RATES vom 3.
Mai 1989 für die Annäherung der Gesetzgebung der Mitgliedstaaten bezüglich der elektromagnetischen Verträglichkeit.
Gemäß der folgenden Normen:
EN 61000-6-2:2005, EN 61000-6-3:2001+A11:2004
Lauro Buoro
(Geschäftsführer)
DEUTSCH
INSTRUKCJE I ZALECENIA DOTYCZĄCE
BEZPIECZEŃSTWA
UWAGA! – Nieprawidłowo wykonana instalacja i progra-
mowanie mogą powodować poważne zranienia osób,
które wykonują operacje jak również osób używających
urządzenie. Dlatego też podczas instalowania urządzenia
ważne jest przestrzeganie przepisów oraz instrukcji, do tyczących bezpieczeństwa, za mieszczonych w tej in strukcji. Nie przystępować do instalowania urządzenia w
przypadku wątpliwości jakiegokolwiek charakteru i zwrócić się o ewentualne wyjaśnienia do Serwisu Technicznego Moovo.
Uwaga! – Stosować się do następujących zaleceń:
– nie wprowadzać zmian do żadnej części urządzenia,
jeżeli nie są one przewidziane w tej instrukcji. Operacje
tego typu mogą jedynie powodować nieprawidłowe funkcjonowanie. Producent zrzeka się wszelkiej odpowiedzialności za szkody wynikające z samowolnego modyfikowania urządzeń.
– podczas instalowania urządzenia należy unikać zanurzania elementów urządzenia w wodzie lub w innych substancjach ciekłych.
– jeżeli substancje ciekłe dostaną się do wnętrza urządzenia należy natychmiast odłączyć zasilanie elektryczne
i zwrócić się o pomoc do Serwisu Technicznego Moovo.
Używanie urządzenia w tym stanie może stwarzać sytuacje niebezpieczne.
– wszelkie operacje, które wymagają otwarcia pokrywy
ochronnej urządzenia, powinny następować po odłączeniu Centrali automatu od zasilania elektrycznego. Jeżeli
urządzenie wyłączające jest niewidoczne z miejsca pracy
należy zawiesić tablicę z następującym napisem:
“UWAGA! KONSERWACJA W TOKU”.
– Opakowanie urządzenia musi być zlikwidowane zgodnie z odpowiednimi przepisami obowiązującymi na da nym terytorium.
INSTRUKCJE I ZALECENIA DOTYCZĄCE
OBSŁUGI
Starannie przechowywać tę instukcję w celu ułatwienia ewentualnych operacji programowania i konserwacji urządzenia.
• Po zakończeniu okresu eksploatacji urządzenia należy
upewnić się, czy materiał, z którego to urządzenie się składa
zostanie ponownie wykorzystany lub zlikwidowany zgodnie
z przepisami obowiązującymi na danym terytorium.
• Do czyszczenia urządzenia należy używać miękkiej, lekko
wilgotnej ściereczki (nie mokrej). Ważne – Nie stosować substancji zawierających alkohol, benzen, rozpuszczalniki lub
inne substancje łatwopalne. Stosowanie tych substancji może
spowodować uszkodzenie urządzenia, pożar lub porażenie
prądem elektrycznym.
• Przed przystąpieniem do czyszczenia urządzenia należy
uniemożliwić przypadkowe uruchomienie automatu i odblokować motoreduktor, jak opisano w instrukcji obsługi motoreduktora.
OPIS URZĄDZENIA I PRZEZNACZENIE
Omawiane w tej instrukcji urządzenie jest naścienną klawiaturą sterującą, przeznaczoną do użytku w automatyce do drzwi,
bram, bram garażowych i do innych podobnych zastosowań,
które wykorzystują Centralę sterującą z magistralą łączącą
“Bus” z protokołem "Bus-Moovo". UWAGA! – Każde inne
zastosowanie odmienne od opisanego w tej instrukcji jest
niewłaśiwe i zabronione!
Omawiane w tej instrukcji urządzenie należy do urządzeń z
serii Moovo, służy ono do zwiększania i uzupełniania możliwości po siadanego automatu: może być programowane do
funkcjonownia w dwóch trybach: tryb tradycyjny (każdy przycisk pełni specyficzną funkcję, która została z nim połączona
– tryb ustawiony fabrycznie) oraz tryb bezpieczny (podczas
sterowania manewru należy wpisać tajną sekwencję przycisków, ustawioną przez użytkownika). Klawiaturę należy przymocować do ściany. Jest ona podświetlana od tyłu w przypadku niedostatecznego oświetlenia otoczenia. Inne cechy
charakterystyczne klawiatury są opisane w paragrafie “Parametry techniczne urządzenia”.
WERYFIKACJE WSTĘPNE DO WYKONANIA
PRZED INSTALACJĄE
• Przed otwarciem opakowania należy sprawdzić jego stan,
a następnie sprawdzić stan urządzenia znajdującego się
wewnątrz.
• Przed przystąpieniem do instalacji należy sprawdzić stan
urządzenia, zgodność wybranego modelu oraz czy warunki
otoczenia przeznaczonego do jego instalacji są zgodne z
wymaganymi.
• UWAGA! – Sprawdzić, czy napięcie zasilania elekrycznego,
występujące na zaciskach przeznaczonych do podłączenia
magistrali "Bus" Centrali sterującej automatem jest takie same
jak napięcie podane na urządzeniu.
• Sprawdzić, czy wybrana wstępnie powierzchnia, przeznaczona do instalacji urządzenia jest trwała i może zagwarantować stabilne przymocowanie.
• Sprawdzić, czy urządzenie zostało umieszczone w położeniu za bezpieczającym je przed przypadkowymi uderzeniami.
Ograniczenia zastosowania
– Ten produkt może być używany wyłącznie z centralami sterującymi Moovo, wyposażonymi w magistralę łączącą “Bus”.
INSTALOWANE I PODŁĄCZENIE URZĄDZENIA
Aby zainstalować i podłączyć klawiaturę należy postępować
w następujący sposób:
01. Rys. 1: Zdjąć pokrywę klawiatury naciskając ją z boku,
jak po kazano na zdjęciu.
02. Rys. 2: Z pomocą śrubokrętu otworzyć i zdjąć dolną
część klawiatury.
03. Rys. 3: Ustalić położenie klawiatury na ścianie. Uwaga –
Urządzenia sterujące typu “stałe” należy umieścić w
widocznym miejscu automatyki, z dala od jej ruchomych
części i na wysokości powyżej 150 cm.
a) Z pomocą wiertarki wywiercić w dolnej części elementu otwór, przez który należy przeprowadzić kabel łączący.
b) Przykręcić dolną część klawiatury do ściany specjalnymi śrubami, przeprowadzając kabel przez przygotowany
wcześniej otwór.
Uwaga – Do podłączenia klawiatury należy zastosować przewód typu 2 x 0,5 mm
2
(na odległość do 20 m) lub przewód
typu 2 x 1,0 mm
2
(na odległość powyżej 20 m).
UWAGA! – Nieprawidłowo wykonane podłączenie może
powodować uszkodzenia lub systuacje niebezpieczne;
należy więc skrupulatnie przestrzegać zalecanych podłączeń.
04. Rys. 4:
a) Podłączyć przewody do odpowiednich zacisków.
b) Włożyć wtyczkę z przewodem do złącza męskiego
znajdującego się z tyłu klawiatury.
05. Rys. 5: Ponownie założyć pokrywę zwracając uwagę,
aby ząbki znajdujące się na niej zazębiły się z ząbkami
znajdującymi się w dolnej części klawiatury.
06. Rys. 6: Przykręcić pokrywę do dolnej części klawiatury
śrubą znajdującą się na wyposażeniu urządzenia. Wreszcie ponownie włożyć zatyczkę osłaniającą śrubę, jak
pokazano na zdjęciu.
PROGRAMOWANIE KLAWIATURY
Klawiatura sterująca może być programowana w dwóch
trybach:
- tryb
TRADYCYJNY (ustawienie fabryczne).
- tryb
BEZPIECZNY, z zastosowaniem osobistego hasła.
TRYB “TRADYCYJNY”
W tym trybie programowania każdy przycisk zostanie zaprogramowany w następujący sposób:
przycisk “A” = polecenie Krok po kroku
przycisk “B” = polecenie Otwarcie częściowe
przycisk “C” = polecenie Otwarcie
przycisk “D” = polecenie Zamknięcie
przycisk “OK” = polecenie Stop
TRYB “Bezpieczny”
Ten tryb programowania pozwala na wczytywanie i wykonywanie tylko jednego polecenia
(patrz punkt 04 opisanej niżej
procedury). Klawiatura funkcjonuje wyłącznie po wpisaniu
hasła (wybranego przez użytkownika, które zawiera od 1 do
10 liter) i następnie po wciśnięciu przycisku “OK”. Ta operacja
powoduje wysłanie tylko jednego specyficznego polecenia,
wybranego przez użytkownika podczas programowania.
Programowanie:
01. Przytrzymać wciśnięte równocześnie przyciski “A” i “B”
przez kilka sekund, dopóki klawiatura nie wykona serii
dźwięków (beep). Sygnalizują one włączenie programowania.
02. Wpisać “kod PUK” (kod 10- literowy, znajdujący się przy
dostarczonej klawiaturze) używając przycisków klawiatury, następnie wcisnąć przycisk “OK”. Jeżeli kod jest prawidłowy klawiatura wykona serię dźwięków (beep); jeżeli
natomiast kod jest nieprawidłowy zostanie wykonany
jeden ciągły dźwięk.
03. Wpisać osobiste hasło (od 1 do 10 liter), używając przy-
cisków klawiatury, następnie wcisnąć przycisk “OK”. Klawiatura wykona serię dźwięków (beep).
04. Następnie z listy wyświetlonej u dołu należy wybrać polecenie, które zamierza się zaprogramować; wcisnąć na
klawiaturze przycisk połączony z wybranym poleceniem i
następnie wcisnąć przycisk “OK”. Klawiatura wykona
serię dźwięków (beep), które zakończą programowanie.
Polecenie Krok po kroku* = przycisk A
Polecenie Otwarcie częściowe = przycisk B
Polecenie Otwarcie = przycisk C
Polecenie Zamknięcie = przycisk D
Polecenie Stop = przycisk OK
* Uwaga – Polecenie “Krok po kroku” umożliwia użytkowniko-
wi sterowanie pojedynczymi manewrami Otwarcie - Stop -
Zamknięcie - Stop ..., dokładnie w tej cyklicznej kolejności.
Aby zarządzić każdy z manewrów należy wpisać własne hasło
i następnie wcisnąć przycisk “OK”. Po zakończeniu wysyłania
polecenia, jeżeli w krótkim czasie zamierza się wysłać następne polecenie, można ponownie wcisnąć przycisk “OK”, bez
wpisywania hasła, pod warunkiem, że operacja zostanie
wykonana w ciągu 10 sekund. Można ją wykonać kilka razy,
przestrzegając 10- sekundowego limitu przerw.
Zmiana osobistego hasła:
Jeżeli zamierza się zmienić osobiste hasło należy ponownie
wykonać całą procedurę "tryb Bezpieczny", zmieniając w
punkcie 03 istniejące hasło.
Procedura umożliwiająca ponowne programowanie klawiatury w trybie “TRADYCYJNYM”
01. Przytrzymać wciśnięte równocześnie przyciski “A” i “B”
przez kilka sekund, dopóki klawiatura nie wykona
sekwencji dźwięków (beep), które sygnalizują włączenie programowania.
02. Wykorzystując przyciski klawiatury wpisać “kod PUK”
(kod 10- literowy, znajdujący się przy dostarczonej klawiaturze); następnie wcisnąć przycisk “OK”. Jeżeli wpisany kod jest prawidłowy klawiatura wykona serię dźwięków (beep); jeżeli natomiast kod jest nieprawidłowy
zostanie wykonany jeden ciągły dźwięk.
03. teraz wcisnąć 2 razy przycisk “OK”, aby zakończyć pro-
gramowanie.
DANE TECHNICZNE PRODUKTU
MK został wyprodukowany przez Nice S.p.a. (TV) I. Moovo
jest znakiem firmowym Nice S.p.a.
I Typ: Klawiatura 5-cio przyciskowa, z możliwością włącze-
nia automatu po wprowadzeniu kombinacji lub też bez jej
wprowadzania. I Zastosowana technologia: Możliwość
wprowadzenia kodu aktywacji do 10 cyfr (ponad milion możliwych kombinacji). I Zasilanie / Wyj cie: Urządzenie musi
być podłączone do sieci “Bus” Moovo, z której pobiera zasilanie elektryczne i do której wysyła sygnały wyjściowe. I Moc
pobierana: 120 mW podczas funkcjonowania; 45 mW w stanie stand by. I Temperatura funkcjonowania: -20 ÷ 50 °C.
I Stosowanie w atmosferze kwaśnej, słonej lub potencjalnie wybuchowej: Nie. I Montaż: Naścienny w pozycji
pionowej. I Stopień zabezpieczenia: IP 44. I Wymiary: 50
x 85w x 35 mm. I Waga: 80 g.
LIKWIDACJA PRODUKTU
Ten produkt jest integralną częścią automatu, dlatego też
powinien zostać zlikwidowany razem z nim.
Zarówno w przypadku operacji instalowania jak również po
zakończeniu eksploatacji urządzenia, operacje demontażu
powinny być wykonywane przez personel wykwalifikowany.
Niniejsze urządzenie składa się z różnych rodzajów materiałów: niektóre z nich mogą być ponownie używane, inne nadają się do wyrzucenia. Zgromadzić niezbędne informacje dotyczące placówek zajmujących się recyrkulacją lub likwidacją
materiałów, zgodnie z przepisami obowiązującymi dla tej
kategorii urządzenia na Waszym terytorium.
Uwaga! - niektóre części urządzenia mogą zawierać substancje zanieczyszczające lub niebezpieczne, które jeżeli zostaną
rozrzucone w otoczeniu, mogą wywierać szkodliwy wpływ na
środowisko i zdrowie ludzkie.
Jak wskazuje symbol przedstawiony obok, zabrania się
wyrzucania urządzenia razem z odpadami
do mowymi. Należy więc przeprowadzić “se lektywną zbiórkę odpadów”, zgodnie z me todami przewidzianymi przez przepisy obowiązujące na Waszym terytorium lub oddać
urzadzenie do sprzedawcy podczas dokonywania zakupu no wego ekwiwalentnego urządzenia.
Uwaga! - lokalne przepisy mogą przewidywać wysokie kary
za nielegalną likwidację niniejszego urządzenia.
DEKLARACJA ZGODNOŚCI CE
W niniejszej Deklaracji Zgodności zgromadzone są pojedyncze
deklaracje zgodności dla pojedynczych zacytowanych wyżej urządzeń; została ona zaktualizowana w dniu wydania niniejszej
instrukcji obsługi i została dostosowana dla celów wydawniczych.
Kopia oryginalnej deklaracji zgodności dla każdego urządzenia
może być zamawiana w firmie Nice S.p.a. (TV) I.
MK został wyprodukowany przez NICE S.p.a. (TV) I; MOOVO
jest znakiem handlowym własności firmy Nice S.p.a.
Niżej podpisany Lauro Buoro, w charakterze Członka Zarządu
Spółki oświadcza na własną odpowiedzialność, że urządzenie:
Nazwa producenta: NICE s.p.a.
Adres: Via Pezza Alta 13, Z.I. Rustignè 31046 - Oderzo (TV)
Włochy
Typ: Przełącznik cyfrowy z serii “MOOVO”
Modele: MK
Akcesoria: Brak akcesoriów
Jest zgodne z założeniami następujących dyrektyw unijnych,
a co zostało zmienione przez dyrektywę 93/68/EWG Rady z
dnia 22 lipca 1993 roku:
89/336/EWG; DYREKTYWA 89/336/EWG RADY z dnia 3
maja 1989 roku, o zbliżeniu legislacyjnym krajów członkowskich dotycząca kompatybilności elektromagnetycznej.
Zgodnie z następującymi normami:
EN 61000-6-2:2005, EN 61000-6-3:2001+A11:2004
Lauro Buoro
(Członek Zarządu)
POLSKI
AANBEVELINGEN EN VOORZORGSMAATREGELEN VOOR DE VEILIGHEID
LET OP! – Een foutief uitgevoerde installatie en program-
mering kan ernstig letsel toebrengen aan de personen die
de werkzaamheden uitvoeren of aan hen die de installatie
zullen gebruiken. Daarom is het van belang dat u tijdens
de installatie de wetten en normen op het gebied van de
veiligheid, zoals die plaatselijk van kracht zijn alsook alle
aanwijzingen uit deze handleiding opvolgt. Begin niet met
de installatie indien u ook maar de minste twijfel heeft.
Vraag eventueel uitleg aan de klantenservice van Moovo.
Let op! – Neem de volgende aanbevelingen in acht:
– breng geen wijzigingen aan onderdelen aan, indien dit
niet in deze handleiding is voorzien. Dergelijke handelingen kunnen alleen maar storingen veroorzaken. De fabrikant wijst elke aansprakelijkheid voor schade tengevolge
van willekeurig gewijzigde producten van de hand.
– Zorg er tijdens de installatie voor dat delen van het producten niet in water of andere vloeistoffen terecht kunnen
komen.
– sluit onmiddellijk de elektrische stroom af indien er een
vloeistof in de automatiseringsinrichtingen terecht is
gekomen en wend u tot de klantenservice van Moovo.
Indien de automatisering in die omstandigheden wordt
gebruikt, kan dit een gevaarlijke situatie veroorzaken.
– bij elke handeling waarvoor het beveiligingscarter van
het product geopend moet worden, moet de besturingseenheid van het elektriciteitsnet losgekoppeld zijn. Indien
het niet goed te zien is, dient u een bord aan te brengen
met het opschrift: “LET OP ONDERHOUDSWERKZAAMHEDEN IN UITVOERING”.
– De afvalverwerking van het verpakkingsmateriaal van
het product moet geheel en al volgens de plaatselijk geldende regels plaatsvinden.
AANBEVELINGEN EN VOORZORGSMAATREGELEN VOOR HET GEBRUIK
• Bewaar deze handleiding zorgvuldig zodat u haar in de toekomst bij eventuele programmeer- of onderhoudswerkzaamheden van dit product kunt raadplegen.
• Vergewis u ervan dat wanneer het product aan het einde
van zijn levensduur is gekomen, dat het materiaal gerecycled
wordt of volgens de plaatselijk geldende voorschriften wordt
ontmanteld.
• Voor het schoonmaken van de buitenkant van het product
gebruikt u een enigszins vochtige (niet natte) doek. Belangrijk
– Gebruik geen stoffen die alcohol, benzeen, oplosmiddelen
of andere ontvlambare stoffen bevatten. Bij het gebruik van
deze stoffen zouden de inrichtingen beschadigd kunnen
raken en zou er zich brand of elektrische schokken kunnen
voordoen.
• Voordat u met de schoonmaakwerkzaamheden begint, dient
u, om te voorkomen dat iemand per ongeluk de automatisering in werking zou kunnen stellen, de reductiemotor te ontgrendelen zoals dat in de handleiding daarvan is beschreven.
BESCHRIJVING VAN HET PRODUCT EN
GEBRUIKSDOEL
Dit product is een toetsenpaneel voor aan de wand bestemd
voor het bedienen van automatiseringen van deuren, poorten,
garagedeuren en dergelijke, die een besturingsinstallatie
gebruiken voorzien van een aansluitsysteem “Bus” met het
protocol "Bus-Moovo". LET OP! – Elk ander gebruik dat
niet overeenkomt met wat beschreven is, dient als oneigenlijk gebruik te worden beschouwd en is dus verboden!
Het vormt een onderdeel van de lijn Moovo en is nuttig om de
prestaties van uw automatisering te vergroten en aan te vullen: het kan geprogrammeerd worden om op twee manieren
te functioneren: traditionele modus (elke toets voert een specifieke daaraan gekoppelde functie uit – in de fabriek ingestelde modus) en veiligheidsmodus (voor het aansturen van een
manoeuvre dient u een geheime reeks toetsen, welke door de
gebruiker is ingesteld, in te toetsen). Het toetsenpaneel is een
inrichting die aan de wand bevestigd wordt en die verlicht is
voor die situaties dat er weinig licht is. De andere kenmerken
worden beschreven in de paragraaf “Technische gegevens
van het product”.
CONTROLES VOOR DE INSTALLATIE
• Controleer voordat u de verpakking open maakt, of die
intact is, en het product daarin intact is.
• Voordat u gaat installeren dient u te controleren of de onderdelen van het product intact zijn, het uitgekozen model en de
voor installatie bestemde omgeving geschikt is.
• LET OP! – Controleer of de spanning van de stroomtoevoer
op de klemmetjes voor de aansluiting "Bus" van de besturingsinrichting van de automatisering gelijk is aan die welke op
deze inrichting is vermeld.
• Verifieer dat het voor de installatie gekozen vlak stevig is en
dus een stabiele bevestiging kan garanderen.
• Verifieer dat de inrichting op een veilige en tegen stoten en
botsingen beschermde plaats is aangebracht
Gebruikslimieten
– Dit product mag uitsluitend worden gebruikt met de besturingseenheden Moovo, die voorzien zijn van het Bussysteem
voor aansluitingen”.
INSTALLEREN EN AANSLUITEN VAN
HET PRODUCT
Voor het installeren en aansluiten van het toetsenpaneel dient
u als volgt te werk te gaan:
01. Afb. 1: Haal de dekplaat van het toetsenpaneel waarbij u
het zijdelings wegduwt zoals de afbeelding laat zien.
02. Afb. 2: Open met behulp van een schroevendraaier het
toetsenpaneel en haal het los van de montageplaat.
03. Afb. 3: Bepaal de plaats van het toetsenpaneel op de
muur. Let op! – De “vaste” besturingsinrichtingen moeten
zo geplaatst worden dat de automatisering van die plaats
uit kan worden gezien, maar zij moeten uit de buurt van
de bewegende delen blijven op een hoogte van meer dan
150 mm.
a) Boor met behulp van een boor, de ruimte open die
bestemd is voor het laten passeren van de aansluitkabel.
b) Zet de montageplaat van het toetsenpaneel met de
speciaal daarvoor bestemde schroeven vast op de muur,
waarbij u de kabel via de daarvoor bestemde opening
laat lopen.
N.B. – voor aansluiting van het toetsenpaneel dient u een
kabel te gebruiken 2 x 0,5 mm
2
(voor een afstand van ten
hoogste 20 m) of een kabel 2 x 1,0 mm
2
(voor een afstand van
meer dan 20 m).
LET OP! – Een verkeerd uitgevoerde aansluiting kan ernstige schade of een gevaarlijke situatie veroorzaken, voer
nauwgezet de aansluitingen uit, zoals ze zijn aangegeven.
04. Afb. 4:
a) Sluit de draden van de kabel op de desbetreffende
klemmetjes aan.
b) Steek de connector van de kabel op de stekker op de
achterzijde van het toetsenpaneel
05. Afb. 5: Zet de dekplaat weer terug en zorg ervoor dat de
tandjes daarvan vallen in die van de montageplaats van
het toetsenpaneel.
06. Afb. 6: Zet de dekplaat van het toetsenpaneel met de
meegeleverde schroef op de montageplaat vast. Zet tenslotte het afdekdopje van de schroef terug zoals dat op
de afbeelding is te zien.
PROGRAMMEREN VAN HET TOETSENPANEEL
Het toetsenpaneel voor bediening kan afwisselend in één van
de volgende modi worden geprogrammeerd:
- TRADITIONELE
modus (fabrieksinstelling).
- VEILIGHEIDS
-modus, met gebruik van een persoonlijk
wachtwoord.
TRADITIONELE MODUS
Bij deze modus wordt elke toets als volgt geprogrammeerd:
toets “A” = instructie Stap-voor-stap
toets “B” = instructie Gedeeltelijke opening
toets “C” = instructie Open
toets “D” = instructie Sluit
toets “OK” = instructie Stop
VEILIGHEIDSMODUS
Bij deze modus is het mogelijk één enkele instructie (zie punt
04 van onderstaande procedure) in het geheugen op te slaan
en dus te gebruiken. Het toetsenpaneel functioneert dus uitsluitend wanneer het wachtwoord (uitgekozen door de
gebruiker en van 1 tot 10 letters) wordt ingetoetst, gevolgd
door de toets “OK”. Alleen na deze handeling wordt de specifieke door de gebruiker tijdens de programmering gekozen
instructie verzonden.
Programmeren:
01. Houd tegelijkertijd de toetsen “A” en “B” enkele seconden
ingedrukt totdat het toetsenpaneel een reeks geluidssignalen afgeeft (beeps) die aangeven dat het programmeren is begonnen.
02. Voer met behulp van de toetsen op het toetsenpaneel de
PUK-code in (10-lettercode welke u vindt op het kaartje
dat samen met het toetsenpaneel is meegeleverd); druk
tenslotte op de toets “OK”. Als de code correct is, zal het
toetsenpaneel een serie geluidssignalen (beeps) afgeven;
als ze daarentegen fout is, zal er één enkel onafgebroken
geluid worden voortgebracht.
03. Voer met behulp van de toetsen op het toetsenpaneel
een persoonlijk wachtwoord (van 1 tot 10 letters) in en
druk tenslotte op de toets “OK”. Het toetsenpaneel zal
een reeks geluidssignalen afgeven (beeps).
04. Kies hierna in de lijst hieronder de instructie die u wilt programmeren; druk vervolgens op het toetsenpaneel op de
aan die instructie gekoppelde toets en daarna op de
toets “OK”. Het toetsenpaneel zal een reeks geluidssignalen afgeven (beeps) die aangeven dat de programmering beëindigd is.
Instructie Stap-voor-stap* = toets A
Instructie Gedeeltelijke opening = toets B
Instructie Open = toets C
Instructie Sluit = toets D
Instructie Stop = toets OK
* N.B. – Met de instructie “Stap-voor-stap” is het mogelijk de
ma noeuvres Open - Stop - Sluit - Stop ..., apart in deze pre-
cieze volgorde aan te sturen. Voor het aansturen van elke
manoeuvre is het noodzakelijk uw wachtwoord in te toetsen
en daarna op de toets “OK” te drukken. Nadat u een instructie hebt verzonden, kunt u, indien u binnen korte tijd er nog
een wilt versturen, opnieuw op de toets “OK” drukken, zonder
uw wachtwoord in te toetsen, mits dit binnen 10 seconden
gebeurt. Het is mogelijk dit meer dan één maal te doen mits
de time-out van 10 seconden in acht wordt genomen.
Wijzigen van het persoonlijke wachtwoord:
Als u uw wachtwoord wilt wijzigen dient u opnieuw de procedure "Veilige modus" uit te voeren waarbij u op punt 03 het
bestaande wachtwoord verandert.
Procedure voor het opnieuw programmeren
van het toetsenpaneel in de TRADITIONELE
modus
01. Houd tegelijkertijd de toetsen “A” en “B” enkele seconden
ingedrukt totdat het toetsenpaneel een reeks geluidssignalen afgeeft (beeps) die aangeven dat het programmeren is begonnen.
02. Voer met behulp van de toetsen op het toetsenpaneel de
PUK-code in (10-lettercode welke u vindt op het kaartje
dat samen met het toetsenpaneel is meegeleverd); druk
tenslotte op de toets “OK”. Als de code correct is, zal het
toetsenpaneel een serie geluidssignalen (beeps) afgeven;
als ze daarentegen fout is, zal er één enkel onafgebroken
geluid worden voortgebracht.
03. Druk tenslotte 2 maal op de toets “OK” om de programmering te beëindigen.
TECHNISCHE GEGEVENS VAN HET PRODUCT
Het product MK wordt vervaardigd door Nice S.p.a. (TV) I.
Moovo is een merk van Nice S.p.a.
I Typologie: Toetsenpaneel met 5 toetsen met de mogelijk-
heid de automatisering met en zonder het invoeren van de
combinatie aan te sturen. I Toegepaste technologie:
Mogelijkheid tot het invoeren van een activeringscode van ten
hoogste 10 cijfers (meer dan 1 miljoen mogelijke combinaties). I Stroomvoorziening / Uitgang: De inrichting moet
aangesloten worden op een busnet Moovo, waarvan ze de
stroom krijgt en de uitgangssignalen verzendt. I Opgeno-
men vermogen: 120 mW bij werking; 45 mW in stand by.
I Omgevingstemperatuur voor gebruik: -20 ÷ 50 °C.
I Gebruik in zure, zoute of potentieel explosieve omge-
ving: Nee. I Montage: verticaal aan de wand. I Beschermingsklasse: IP 44. I Afmetingen: 50 x 85h x 35 mm.
I Gewicht: 80 g.
AFVALVERWERKING VAN HET PRODUCT
Dit product vormt een integrerend deel van de automatisering en moet dus samen daarmee ontmanteld worden.
Wanneer de levensduur van dit product ten einde is, dienen,
zoals dit ook bij de installatiewerkzaamheden het geval is, de
ontmantelingswerkzaamheden door gekwalificeerde technici
te worden uitgevoerd. Dit product bestaat uit verschillende
soorten materialen: sommige daarvan kunnen opnieuw ge bruikt worden, terwijl andere als afval verwerkt dienen te worden. Win inlichtingen in over de methoden van hergebruik of
afvalverwerking in en houd u aan de in uw land voor dit soort
producten van kracht zijnde voorschriften.
Let op! – sommige delen van het product kunnen vervuilende
of gevaarlijke stoffen bevatten: indien die in het milieu zouden
verdwijnen, zouden ze schadelijke gevolgen
voor het milieu en de menselijke gezondheid
kunnen hebben, zoals dat door het symbool
hiernaast is aangegeven, is het verboden dit
product met het gewone huisafval weg te
gooien. Scheid uw afval voor verwerking op
een manier zoals die in de plaatselijke regelgeving is voorzien
of lever het product bij uw leverancier in, wanneer u een nieuw
gelijksoortig product koopt.
Let op! – de plaatselijke regelgeving kan in zware straffen
voorzien in geval van illegale dumping van dit product.
EG-VERKLARING VAN OVEREENSTEMMING
Deze Verklaring van overeenstemming omvat de inhoud van de
afzonderlijke verklaringen van overeenstemming van de afzonderlijk opgevoerde producten; zij is aangepast tot op de datum van
uitgifte van deze handleiding en om publicatietechnische redenen
aangepast. Een exemplaar van de originele verklaring kan voor elk
product worden opgevraagd bij Nice S.p.a. (TV) I.
MK wordt vervaardigd door NICE S.p.a. (TV) I; MOOVO is een
handelsmerk dat eigendom is van Nice S.p.a.
Ondergetekende Lauro Buoro, in diens hoedanigheid van
Gedelegeerd Bestuurder, verklaart onder zijn verantwoordelijkheid dat het product:
Naam fabrikant: NICE s.p.a.
Adres: Via Pezza Alta 13, Z.I. Rustignè, 31046 Oderzo (TV) Italië
Type: Digitale schakelaar serie “MOOVO”
Modellen: MK
Accessoires: Geen enkel accessoire
in overeenstemming met de bepalingen van de onderstaande
communautaire richtlijnen is, zoals die bij Richtlijn 93/68/ EEG
van de Raad van 22 juli 1993 gewijzigd zijn:
89/336/EEG; RICHTLIJN 89/336/EEG VAN DE RAAD van 3 mei
1989, inzake de onderlinge aanpassing van de wetgevingen van
de Lidstaten betreffende elektromagnetische compatibiliteit.
Volgens de volgende normen: EN 61000-6-2:2005,
EN 61000-6-3:2001+A11:2004
Lauro Buoro
(Gedelegeerd Bestuurder)
NEDERLANDS
 Loading...