

Page 1

manual and warranty
manuel et garantie
manual y garantía
Page 2

Important Safety Information
1. READ these instructions.
2. KEEP these instructions.
3. HEED all warnings.
4. FOLLOW all instructions.
5. DO NOT use this apparatus near water.
6. CLEAN ONLY with dry cloth.
7. DO NOT block any ventilation openings. Install in accordance
with the manufacturer’s instructions.
8. DO NOT install near any heat sources such as radiators, heat
registers, stoves, or other apparatus (including amplifiers)
that produce heat.
9. DO NOT defeat the safety purpose of the polarized plug.
A polarized plug has two blades with one wider than the other.
The wider blade is provided for your safety. If the provided plug
does not fit into your outlet, consult an electrician for replacement
of the obsolete outlet.
1
ENGLISH
Page 3

10. PROTECT the power cord from being walked on or pinched,
particularly at the plugs and the point where it exits from
the apparatus.
11. ONLY USE attachments/accessories specified by the manufacturer.
12. UNPLUG this apparatus during lightning storms or when unused
for long periods of time.
13. REFER all servicing to Monster Cable.
®
See “FORMAL WARRANTY
CLAIM” in the warranty section in the back of this manual.
14. DO NOT expose this apparatus to dripping or splashing and ensure
that no objects filled with liquids, such as vases, are placed on
the apparatus.
15. To completely disconnect this apparatus from the AC mains,
disconnect the power supply cord plug from the AC receptacle.
16. The mains plug of the power supply cord shall remain
readily operable.
2
Page 4

The exclamation point, within an equilateral triangle, is intended to alert the
user to the presence of important operating and maintenance (servicing)
instructions in the literature accompanying the product.
The lightning flash with arrowhead symbol within an equilateral triangle
is intended to alert the user to the presence of uninsulated “dangerous
voltage” within the product’s enclosure that may be of sufficient magnitude
to constitute a risk of electrical shock.
WARNING: To reduce the risk of fire or electrical shock, do not expose
this apparatus to rain or moisture.
WARNING: No naked flame sources — such as candles — should be placed
on the product.
WARNING: Batteries, battery pack or batteries installed shall not be exposed
to excessive heat such as sunshine, fire or the like.
Place the equipment near a main power supply outlet and make sure that
you can easily access the power breaker switch.
3
Page 5

WARNING: This product is intended to be operated ONLY from the AC voltages
listed on the back panel. Operation from voltages other than those indicated may
cause irreversible damage to the product and void the product’s warranty. The use
of AC plug adapters is cautioned because it can allow the product to be plugged
into voltages in which the product was not designed to operate. Use only the power
cord provided with your product. If you are unsure of the correct operational voltage,
please contact your local distributor and/or retailer.
4
Page 6

Left Speaker
Out
-2dB 0 +2dB
(L)
(R)
(L) (R)
Computer/MP3
Mini Jack In
TV/Audio In
Mixer In
High Definition
Multi-Media
Speaker Monitor
AC-IN
Normal
High BoostHigh Cut
Wireless
Module
Back view
Front 3/4 view
5
Page 7

Features and Benefits
iPod®/iPhone® dock
Just set your iPod or iPhone in the integrated dock and start listening
Advanced 6.5-inch bass driver and concave 1-inch tweeter
Delivers big bass and superior sonic accuracy
Digital power amp
For powerful, room filling sound
Active/Passive configuration
Makes setup and installation quick and easy
Remote control
Control iPod/iPhone playback
Connectivity for home and professional use
RCA, ¼-inch TRS Unbalanced and 3.5 mm mini jack inputs
Wireless port
For future use with Monster® Streamcast™ Wireless System
6
Page 8

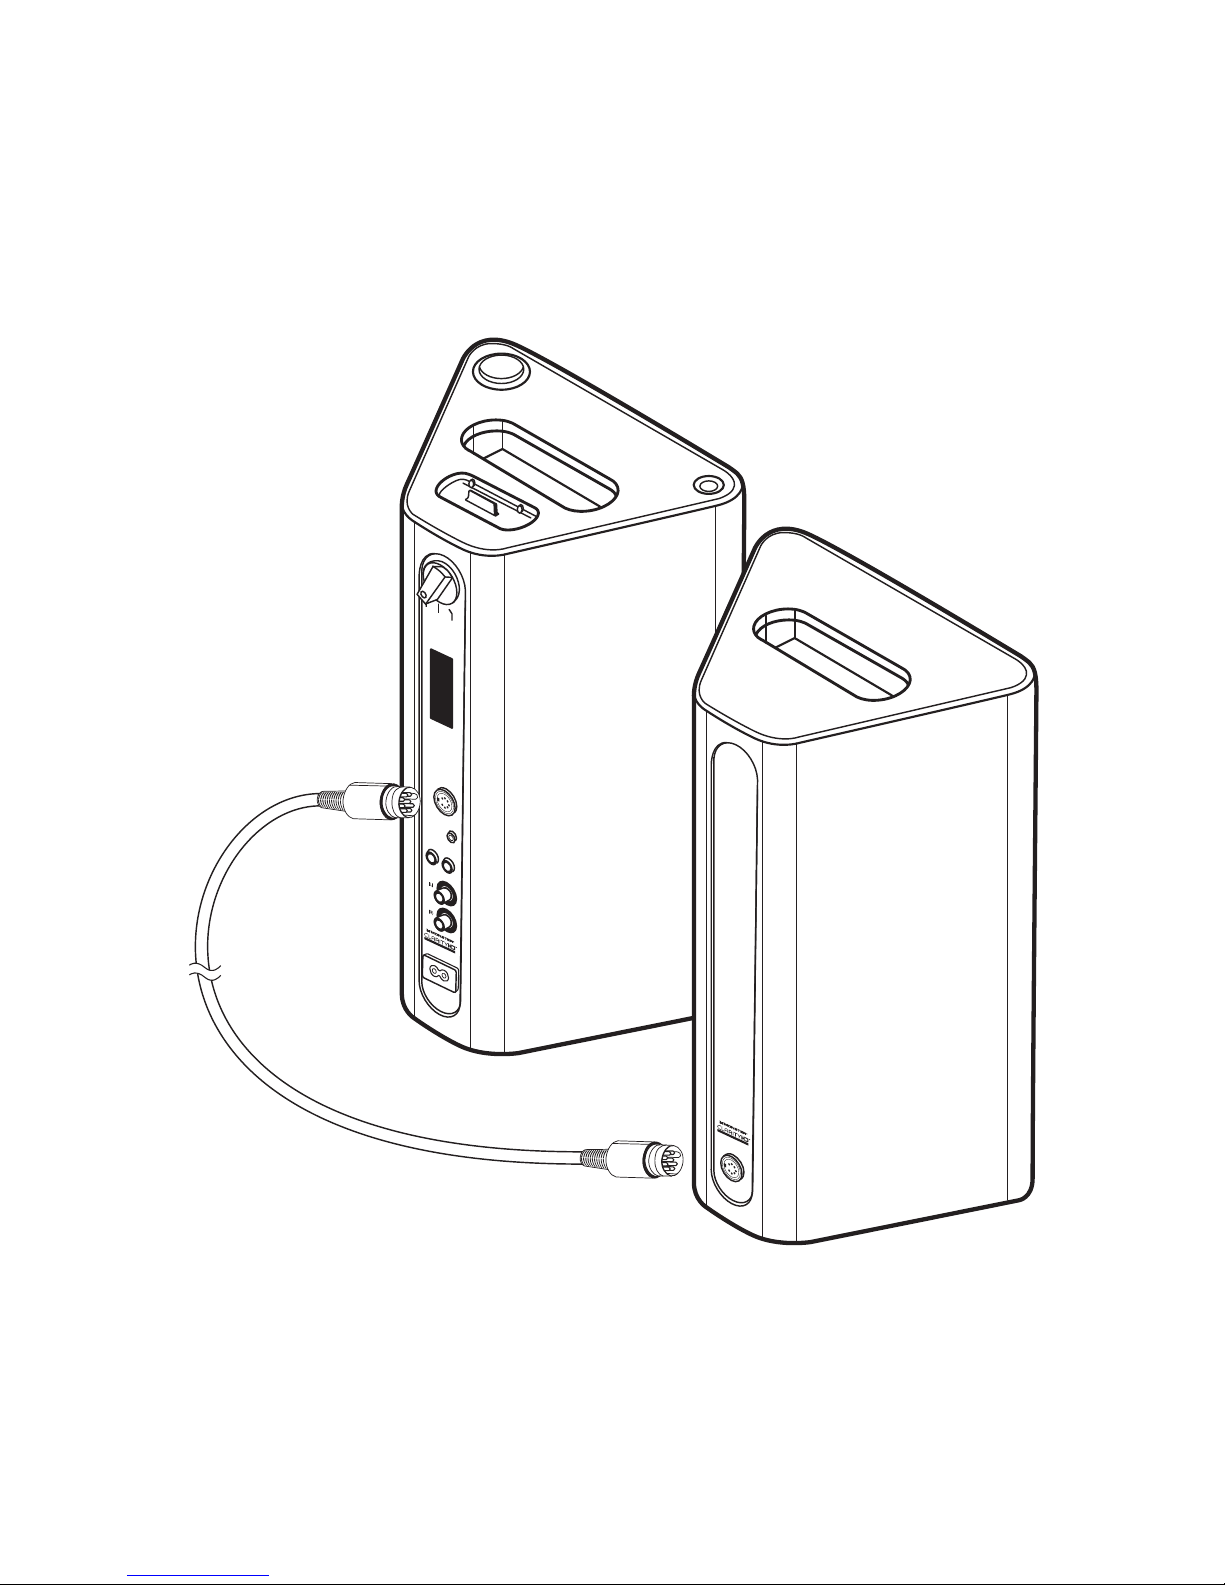
Set-up
Clarity HD™ Model One Monitors feature an active/passive configuration,
with the amp, volume control and inputs on the right (active) monitor.
The left (passive) monitor is connected to the active monitor with included
Monster® 8-pin DIN cable. No other cables need to be connected
to the passive monitor.
Connection to Passive Monitor
Make sure power is turned off. Plug one end of the included Monster® 8-pin DIN
cable into the active monitor and the other end into the passive monitor.
7
Page 9
Left
Speaker
In
-2dB 0 +2dB
Normal
High BoostHigh Cut
Wireless
Module
Left Speaker
Out
Computer/MP3
Mini Jack In
(L) (R)
V/Audio In
Mixer In
High Definition
Multi-Media
Speaker Monitor
AC-IN
High Definition
Multi-Media
Speaker Monitor
8
Page 10

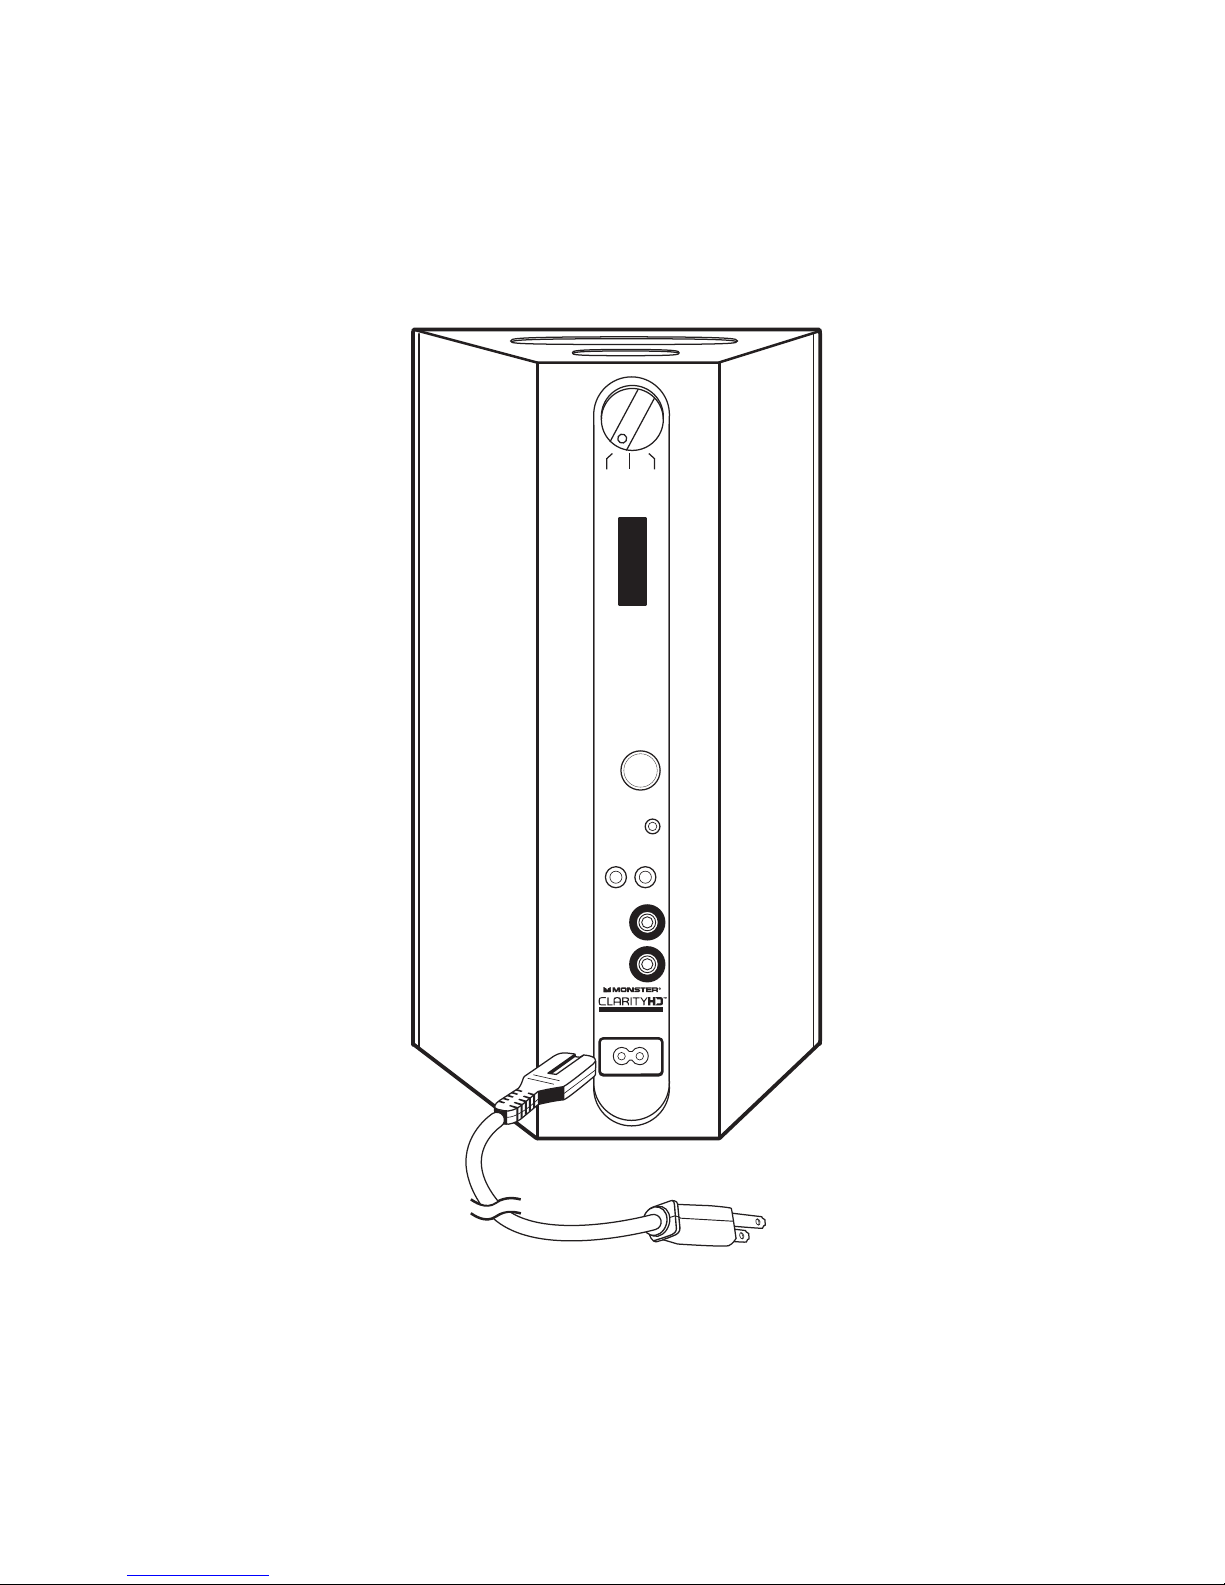
Power
Plug the AC power cord into the back of the active monitor,
as shown. Plug the two-pronged plug end into a 120-volt
power outlet.
9
Page 11
Left Speaker
Out
-2dB 0 +2dB
(L)
(R)
(L) (R)
Computer/MP3
Mini Jack In
TV/Audio In
Mixer In
High Definition
Multi-Media
Speaker Monitor
AC-IN
Normal
High BoostHigh Cut
Wireless
Module
10
Page 12

Connecting Audio Devices
Connecting iPod®/iPhone®
Clarity HD™ Model One Monitors feature a built-in dock for iPod and iPhone
for an easy, direct connection. This will also give you the ability to control
playback with the included remote control.
Using iPod/iPhone Dock Adaptors
Clarity HD Model One Monitors include multiple Dock Adaptors that fit
iPod nano® (4th and 5th generations), iPod touch® (2nd generation),
iPod classic® (80GB and 120GB/160GB), iPod with video (30GB)
and iPhone 3G and 3GS.
To install, simply push the adaptor plate that fits your model into the
iPod/iPhone dock.
5th generation (30GB),
iPod classic 80GB
and 120/160GB
iPhone 3G
and 3GS
2nd generation
4th generation
5th generation
9
15
16
17
18
iPhone
iPod and
iPod classic
iPod touch
iPod nano
iPod nano
Number for which iPod/
iPhone fits
11
Page 13

iPod/iPhone
iPod/iPhone
dock adaptor
iPod/iPhone dock
12
Page 14

NOTE: Make sure the “Shake to Shuffle” setting is turned off on your iPod®
or iPhone.® The bass response of the speaker may activate it and interfere
with playback.
NOTE: If a dock adaptor for your model of iPod or iPhone isn’t included with Clarity
HD™ Model One Monitors, you can purchase one at www.apple.com/store. Apple’s
dock adaptors do not come in black, but the Clarity HD Model One Monitor’s dock
is made to be compatible with Apple Dock Adaptors.
Docking iPod/iPhone
After installing the proper dock adaptor, set your iPod or iPhone onto the dock on
the top of Clarity HD Model One Monitors, being sure the dock port on your player
and the dock plug are aligned properly. Your player should connect easily and
remain upright in the port, with no forcing necessary.
13
Page 15

Connecting Devices using 1/8-inch (3.5 mm) mini jack input
You can connect and listen to any music player that has a standard 3.5 mm
headphone port using a mini jack to mini stereo cable (not included).
To connect, turn off the power to the monitors, plug one end of the cable into the 3.5
mm headphone output of your player and the other end into the 3.5 mm input on the
back of the active monitor. Turn on the power.
IMPORTANT: The iPod/iPhone dock will override and disable the 3.5 mm
mini jack input when an iPod or iPhone is docked. Be sure to remove your
iPhone or iPod from the dock before using the 3.5 mm input.
Connecting Devices using RCA inputs
The RCA inputs allow you to connect AV components that utilize RCA outputs,
like a CD player, using a stereo RCA cable (not included).
Stereo RCA cables are color coordinated red and white, with red for the
“right” channel and white for the “left” channel. But some color variation can
occur in the left channel plug. Monster Cable® RCA, the recommended cable,
is blue, and some manufacturers use black. However, red is consistently
used for the right channel.
14
Page 16

To connect, plug the left and right plugs on one end of the cable into their
respective RCA outputs on the back of your component. They will be color
coordinated or marked “left” and “right.” Plug the other end of the RCA
cable into their respective inputs on the back of the active monitor.
Connecting Devices using Left and Right TRS ¼-inch
(6.35 mm) Balanced Inputs
You can connect professional stereo audio equipment, like studio
or DJ gear, using a TRS ¼-inch to ¼-inch cable (not included).
To connect, plug one end of the cables into the left, then right ¼-inch outputs
on your gear and the other ends into the left and right ¼-inch inputs on the back
of the active speaker.
Always turn the power off when connecting
or disconnecting components.
Listen
Be sure a music player is securely connected, as described
in the previous section.
Turn on Clarity HD™ Model One Monitors by pushing the power button
on the left side of top surface of the active monitor or with the remote control.
Start your player.
15
Page 17
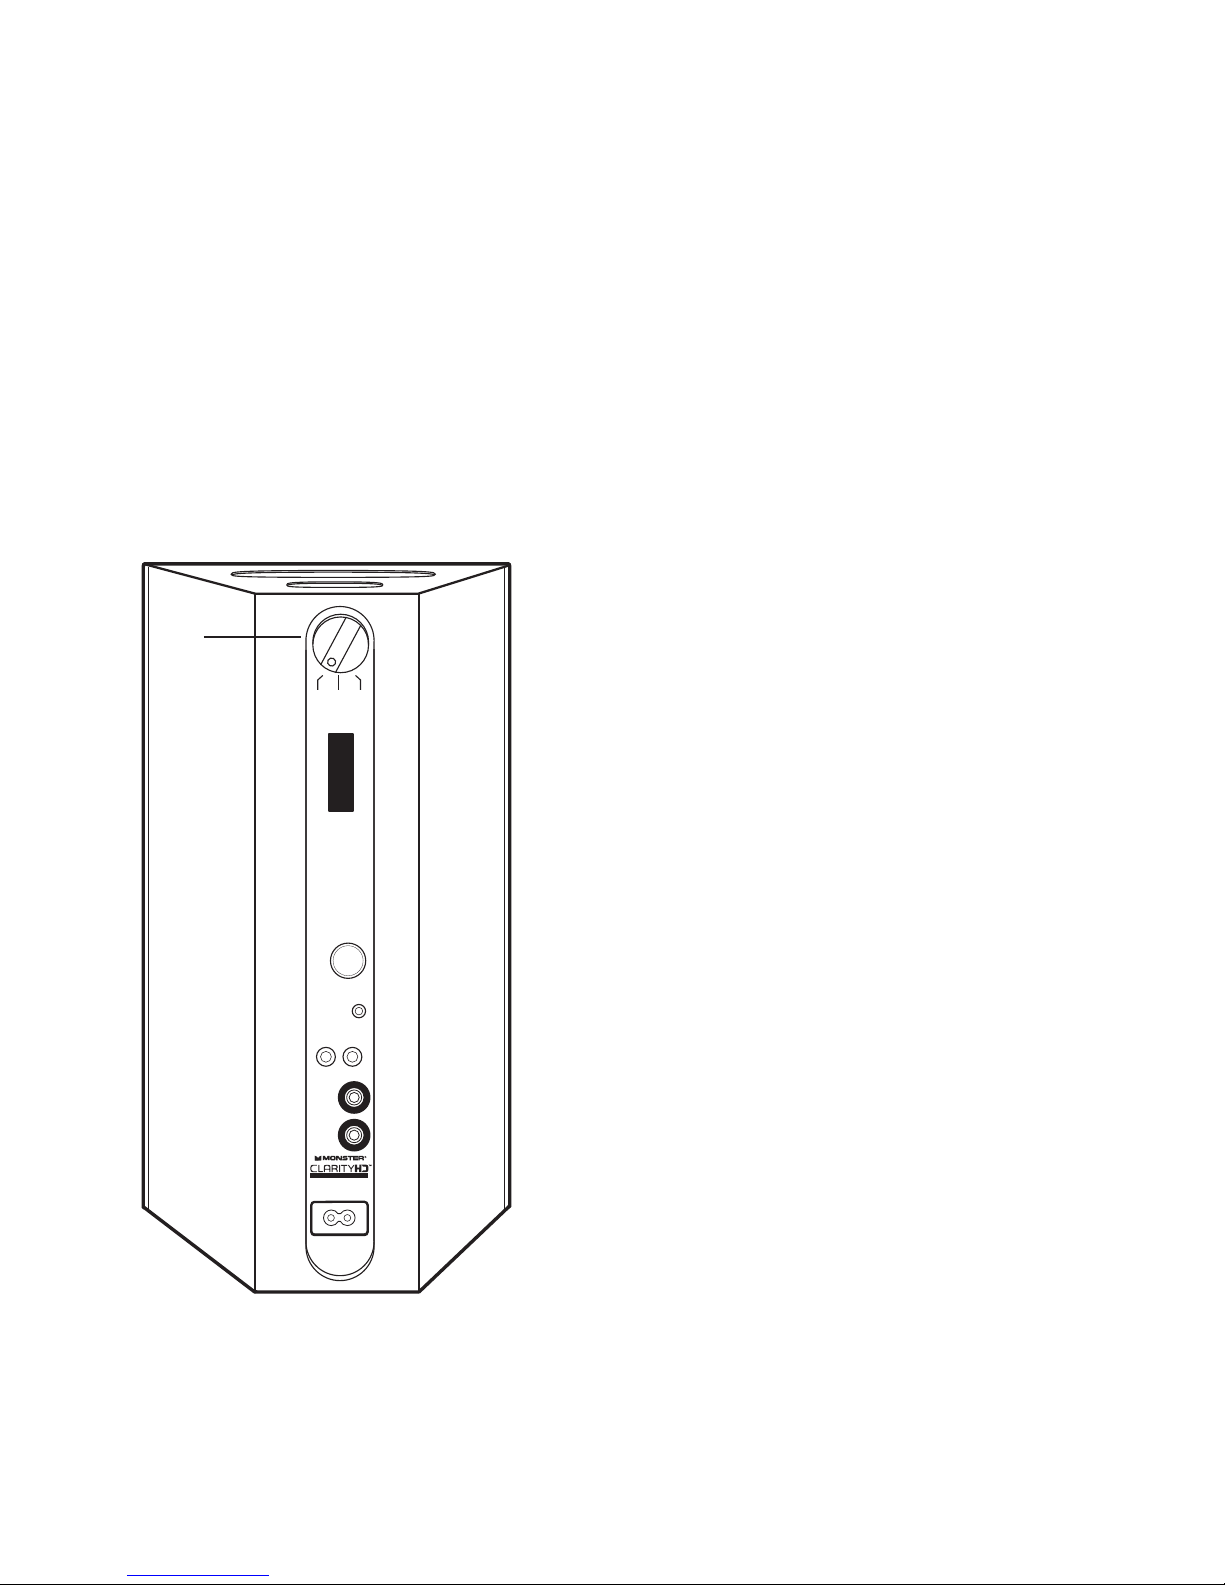
Clarity HD™ Model One Monitors feature
a High Filter for adjusting the level of the high
frequencies. This allows you to adapt the
speakers to your listening space.
Set to 0: Keeps the high frequencies at
the level they were originally set at in the
recording studio.
Set to -2dB: Lowers the level
of the high frequencies.
Set to +2dB: Increases the
level of the high frequencies.
Left Speaker
Out
-2dB 0 +2dB
(L)
(R)
(L) (R)
Computer/MP3
Mini Jack In
TV/Audio In
Mixer In
High Definition
Multi-Media
Speaker Monitor
AC-IN
Normal
High BoostHigh Cut
Wireless
Module
High
Frequency
Filter
Using High Frequency Filter
Volume
Volume can be controlled with the volume controls on the right side of the top
surface of the active monitor or with the remote control.
16
Page 18
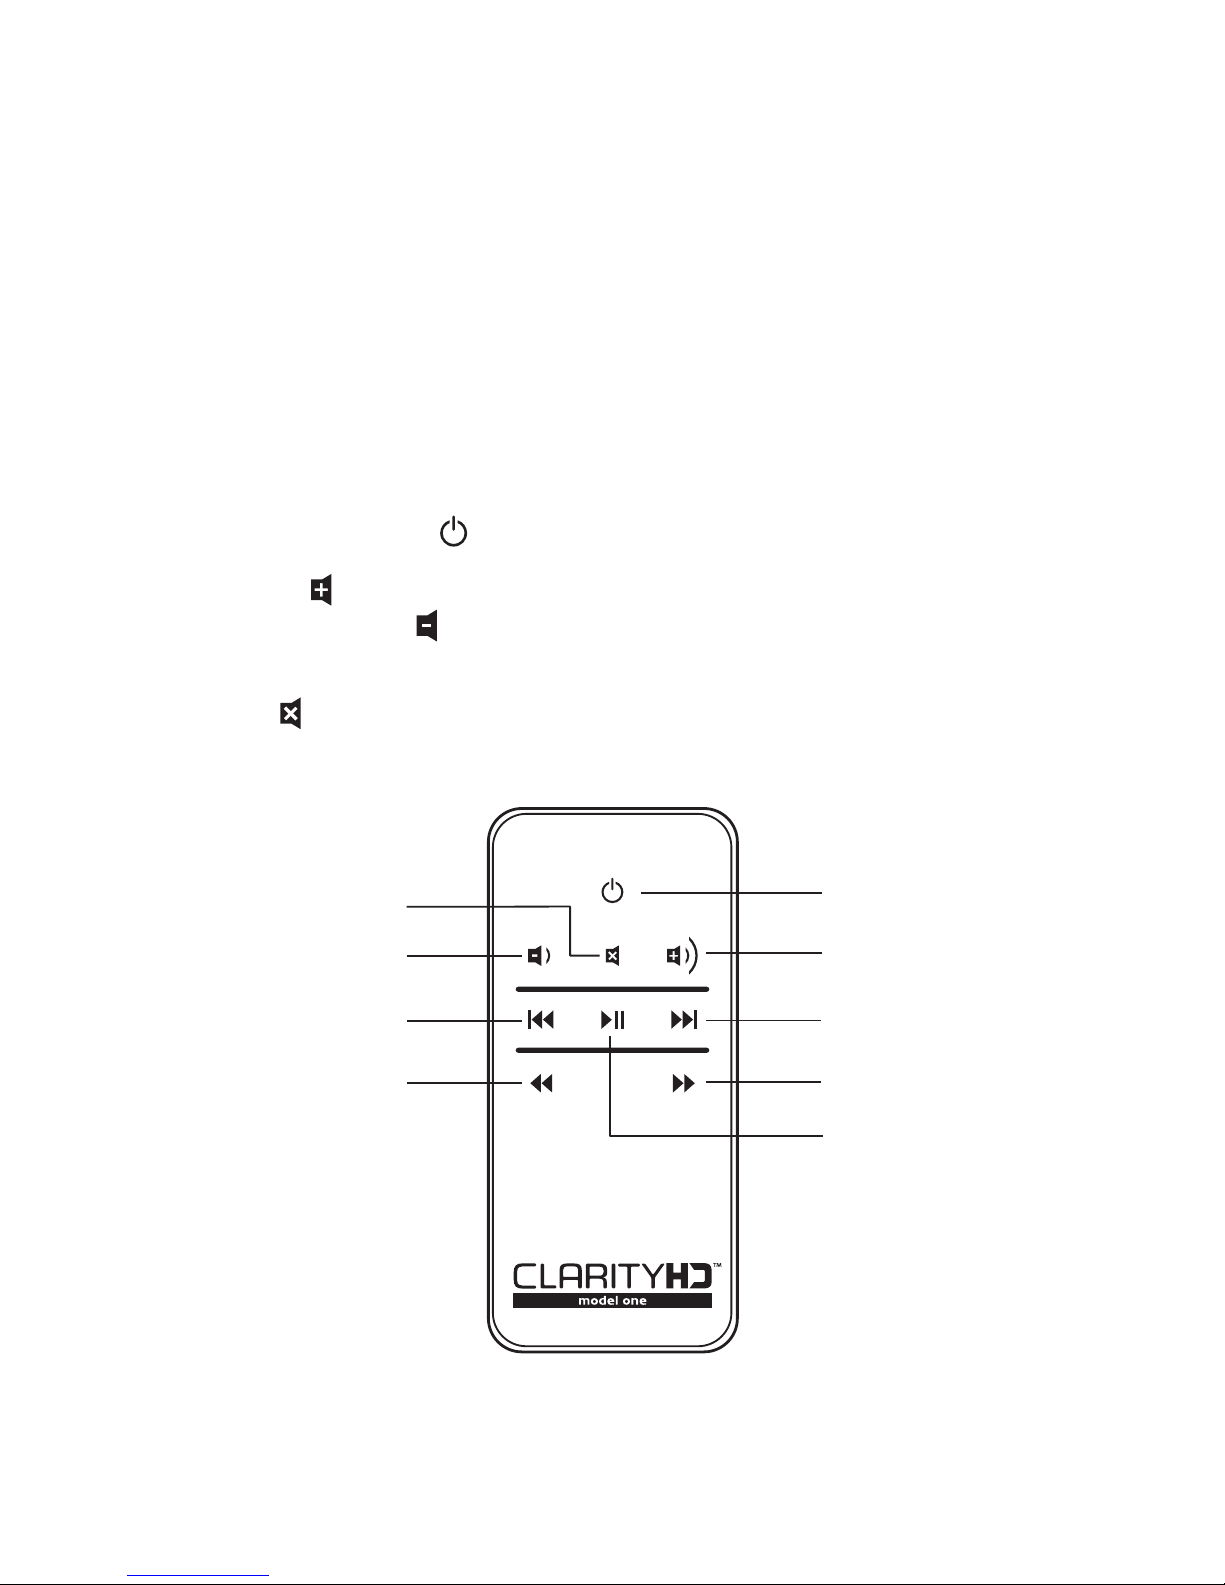
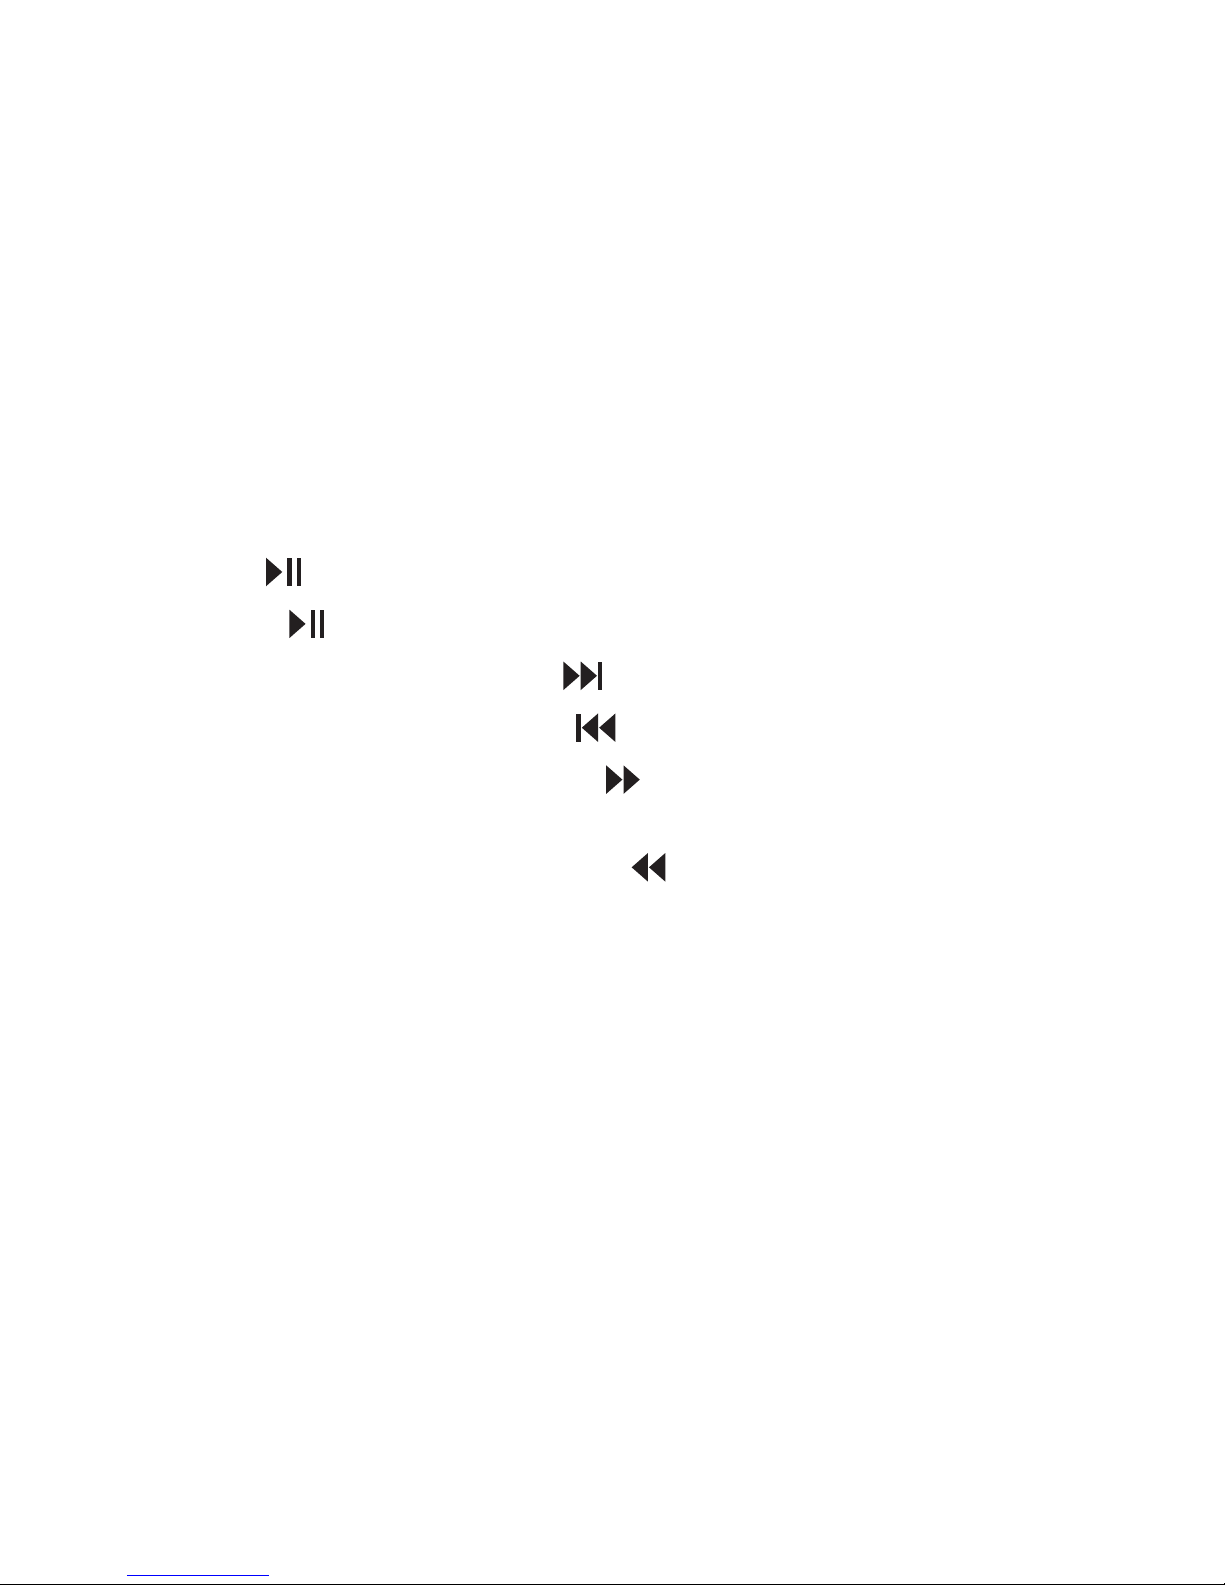
Using Remote Control to Control
Clarity HD™ Model One Monitors
Make sure the CR2025 battery used by the remote is installed correctly.
If it is old, replace it
Power on and off: Push and release.
Volume: Push and hold to increase volume. Release when desired
volume is reached. Push and hold to decrease volume.
Release when desired volume is reached.
Mute: Push and release. To resume sound, push again.
Power
Volume up
Skip forward
Scan forward
Play/pause
Skip back
Scan back
Volume down
Mute
17
Page 19
Using Remote Control to Control iPod®/iPhone
®
The included remote control can be used to control playback
of a docked iPod or iPhone. It cannot control playback
of other connected devices.
Using Remote Control for iPod or iPhone Playback
Play: Push and release.
Pause: Push and release. Push again to resume play.
Skip forward to next track: Push and release.
Skip back to previous track: Push and release.
Scan forward through a track: Push and hold.
Release to stop scanning and resume normal play.
Scan backward through a track: Push and hold.
Release to stop scanning and resume normal play.
18
Page 20

Troubleshooting
The table can help solve most operating problems with your
Clarity HD™ Model One Monitors.
First, follow these steps:
• Remove your iPod®/iPhone® from the dock completely.
• Reseat it in the dock rmly.
• Make sure your iPod/iPhone has the latest software installed.
19
Page 21

Problem What to do
I hear no
sound
coming
from my
Clarity HD
Model One
Monitors.
• Make sure you have your iPod/iPhone docked securely.
• Make sure your iPod/iPhone is turned on and music
is playing.
• Make sure you have the power cord properly
connected on the back of your Clarity HD Model One Monitors
and that it is plugged into a working AC outlet.
• Make sure you press the power button and verify
the power LED is lit.
• If you’re trying to listen to a device connected to your
Clarity HD Model One Monitors via the mini jack input and cannot
hear it, be sure to remove your iPod/iPhone from the dock.
• On the remote control, press the Play/Pause button.
• Raise the volume.
• Remove your iPod/iPhone from the dock.
Wait 5 seconds. Then reseat your iPod/iPhone.
• Reset the system. First, unplug the power cable
for 60 seconds. Next, plug it back in and push
the power button - verify the power LED is lit.
• If you are listening to a device connected via AUX IN,
make sure the device is turned on and music is playing.
Raise that device’s volume.
• Make sure the umbilical cable is connected between
the left and right monitors.
20
Page 22

Problem What to do
My Clarity
HD™
Model One
Monitors
suddenly
stopped
working and
the red LED
is flashing.
• Carefully check if the back plate of the amplier is
hot. If the monitors have been running at their highest
power output for an extended period, the amplifier may
have overheated and the protection circuitry has
shut down the monitors temporarily. Your Clarity HD Model One
Monitors provide maximum protection from amplifier
overdrive, and overheating. Switch off the monitors
and wait 30 minutes to let the back plate cool down.
Switch the power back on.
• Raise the volume to check they are operating normally.
• If the monitors are still not responding, contact
the dealer you purchased them from, or Monster.
My iPod®/
iPhone®
does not
charge up.
• Make sure you have the power cord properly
connected on the back of the unit.
• Make sure you have the power cord plugged
into a working AC outlet.
• Remove your iPod/iPhone from the dock.
Wait 5 seconds. Then reseat your iPod/iPhone.
21
Page 23

Problem What to do
My iPod®/
iPhone®
does not
respond to
the remote
control.
• Make sure there’s a clear path between the remote
and the system with no obstructions.
• Wipe the small lens on the front end of the remote
using a clean, dry cloth.
• Bright room lights or sunlight can cause interference.
Try using the remote from another location.
• Remove your iPod/iPhone from the dock.
Wait 5 seconds. Then reseat your iPod/iPhone.
• Make certain the remote battery is installed correctly.
If it is old, replace it.
The system
won’t
respond to
any controls.
• Reset the system. First, unplug the power cable for 60
seconds. Next, plug it back in.
• Contact your dealer or Monster® Customer Service.
22
Page 24

LIMITED WARRANTY FOR CONSUMERS
Monster, LLC., 7251 West Lake Mead Blvd., Las Vegas, NV 89128, USA, [PLEASE NOTE THAT MONSTER DOES NOT
ACCEPT PRODUCTS SHIPPED TO THIS ADDRESS – FOLLOW INSTRUCTIONS IN “HOW TO MAKE A CLAIM”
BELOW] (415) 840-2000 (“Monster”) extends You this Limited Warranty. Statutory or common law may provide You with
additional rights or remedies, which shall not be affected by this Limited Warranty.
DEFINITIONS
“Adequate Use” means use of the Product (i) within a home or dwelling, (ii) for private (as opposed to commercial)
purposes, (iii) in conformance with all applicable local, state or federal law, code or regulations (including without
limitation building and/or electrical codes), (iv) in accordance with manufacturer recommendations and/or instructions in
the materials and documentation that accompany the Product, and (v) if applicable, with proper electrical grounding.
“Authorized Dealer” means any distributor, reseller or retailer that (i) was duly authorized to do business in the
jurisdiction where it sold the Product to You, (ii) was permitted to sell You the Product under the laws of the jurisdiction
where You bought the Product, and (iii) sold You the Product new and in its original packaging.
“Formal Warranty Claim” means a claim made in accordance with the section “Formal Warranty Claims” herein.
“Product” means a Product (i) that is listed in the Specifications Table below, (ii) that You bought from an Authorized
Dealer new and in its original packaging, and (iii) whose serial number, if any, has not been removed, altered, or defaced.
“Product Defect” means an inadequacy of the Product that existed at the time when You received the Product from
an Authorized Dealer and that causes a failure of the Product to perform in accordance with Monster’s documentation
accompanying the Product, unless such failure has been caused completely or partly by (a) any use other than Adequate
Use, (b) transportation, neglect, misuse or abuse by anyone other than Monster’s employees; (c) alteration, tampering
or modification of the product by anyone other than a Monster employee; (d) accident (other than a malfunction that
would otherwise qualify as a Product Defect); (e) maintenance or service of the Product by anyone other than a Monster
employee; (f) exposure of the Product to heat, bright light, sun, liquids, sand or other contaminants; or (g) acts outside the
control of Monster, including without limitation acts of God, fire, storms, earthquake or flood.
“Warranty Period” means the time period during which Monster must have received Your Formal Warranty Claim.
The different Warranty Periods related to Product Defects are defined in the Specifications Table below. The Warranty
Period commences on the date when You purchased or received (whichever occurs later) the Product from an Authorized
Dealer as evidenced by the Authorized Dealer’s invoice, sales receipt or packing slip. If You do not have written proof of
the date of purchase or receipt, then the Warranty Period commences three (3) months after the date when the Product
left Monster’s or its factory as evidenced by Monster’s records. The Warranty Period ends after the time defined in the
Specifications Table has expired or after You have transferred ownership of the Product, whichever occurs earlier. Also,
You must call Monster and obtain a Return Authorization Number (as described under “How to Make a Claim”) within two
(2) months after You discover a Product Defect (or should have discovered it, if such Product Defect was obvious).
23
Page 25

“You” means the first individual person that purchased the Product in its original packaging from an Authorized Dealer.
This Limited Warranty does not apply to persons or entities that bought the Product (i) in used or unpackaged form, (ii) for
resale, lease or other commercial use, or (iii) from someone other than an Authorized Dealer.
SCOPE OF THIS LIMITED WARRANTY
PRODUCTS. If a Product contained a Product Defect when You bought it from an Authorized Dealer and Monster
receives a Formal Warranty Claim from You within two (2) months after You discover such Product Defect (or should
have discovered it, if such Product Defect was obvious) and before the end of the Warranty Period for Product Defects
applicable to the affected Product, then Monster will provide You with one of the following remedies: Monster will
(1) repair or, at Monster’s sole discretion, replace the Product, or (2) refund to You the purchase price You paid to the
Authorized Dealer for the affected Product if repair or replacement is not commercially practicable or cannot be timely
made. NOTE: MONSTER DOES NOT ASSUME ANY LIABILITY FOR ANY INCIDENTAL, CONSEQUENTIAL OR INDIRECT
DAMAGES UNDER THIS LIMITED WARRANTY.
GENERAL PROVISIONS
CHOICE OF LAW/JURISDICTION. This Limited Warranty and any disputes arising out of or in
connection with this Limited Warranty (“Disputes”) shall be governed by the laws of the State of California, USA, excluding
conflicts of law principles and excluding the Convention for the International Sale of Goods. The courts located in the State
of California, USA shall have exclusive jurisdiction over any Disputes.
OTHER RIGHTS. THIS LIMITED WARRANTY GIVES YOU SPECIFIC LEGAL RIGHTS, AND YOU MAY ALSO HAVE OTHER
RIGHTS, WHICH VARY FROM STATE TO STATE AND JURISDICTION TO JURISDICTION, AND WHICH SHALL NOT BE
AFFECTED BY THIS LIMITED WARRANTY. THIS WARRANTY EXTENDS ONLY TO YOU AND CANNOT BE TRANSFERRED OR
ASSIGNED. If any provision of this Limited Warranty is unlawful, void or unenforceable, that provision shall be deemed
severable and shall not affect any remaining provisions. In case of any inconsistency between the English and other
versions of this Limited Warranty, the English version shall prevail.
REGISTRATION. Please register Your Product at www.monstercable.com. Failure to register will not diminish Your
warranty rights.
SPECIFICATIONS TABLE
Product Model Warranty Period for Product
MSP CLY MTR-DK EF One (1) Year
MSP CLY MTR-DK AU One (1) Year
24
Page 26

FORMAL WARRANTY CLAIM
HOW TO MAKE A CLAIM. In the event damage has occurred to Products, You must follow these instructions: (1) Call
Monster within two (2) months after You discover a Product Defect (or should have discovered it, if such Product Defect
was obvious); (2) Give a detailed explanation of how the damage occurred; (3) Obtain a Return Authorization Number; (4)
Upon receipt of a claim form (which may be sent to You after You filed Your Formal Warranty Claim), fill out the claim form
entirely; (5) Return the Products, shipping prepaid by You (to be refunded if You are entitled to a remedy under the Scope
of this Limited Warranty), to Monster for verification of damage, along with a copy of Your original sales receipts and proof
of purchase (UPC label or packing slip) for such Products, the completed claim form, and printed Return Authorization
Number on the outside of the return package (the claim form will include instructions for return).
TELEPHONE NUMBERS. United States, Asia Pacific and Latin America: 1 877 800-8989 or 415-840-2000, Canada
866-348-4171, Ireland 353 65 68 69 354, Austria 0800-296-482, Belgium 0800-79201,Czech Republic 800-142471, Denmark 80882128, Finland 800-112768, France 0800-918201, Germany
0800-1819388, Greece 800-353-12008, Italy 900-982-909, Netherlands 0800-0228919, Norway 800-10906, Russia 810-80020051353, Spain 900-982-909, Sweden 020-792650, Switzerland 0800-834659,
United Kingdom 0800-0569520
FURTHER PROCEEDINGS. Monster will determine whether a Product Defect existed. Monster may, at its discretion,
direct You to obtain a repair estimate at a service center. If a repair estimate is required, You will be instructed on how to
properly submit the estimate and the resulting invoice to Monster for payment. Any fees for repairs may be negotiated by
Monster.
TIMING. If You bring a Formal Warranty Claim and fully comply with all terms and conditions of this Limited Warranty,
Monster will use its best efforts to provide You with a remedy within thirty (30) days after receipt of Your Formal Warranty
Claim (if You reside in the United States - forty-five (45) days if You reside elsewhere), unless obstacles outside Monster’s
control delay the process.
25
Page 27

“Monster,” the Monster logo, “Clarity HD,” the Clarity HD logo, the product and packaging are trademarks or registered
trademarks of Monster Cable Products, Inc. or its subsidiaries in the United States or other countries. iPhone, iPod, iPod
classic, iPod nano, iPod shuffle, and iPod touch are trademarks of Apple Inc., registered in the U.S. and other countries.
Apple is not responsible for the operation of this device or its compliance with safety and regulatory standards.
26
Page 28

Consignes de sécurité importantes
1. LISEZ ces consignes.
2. CONSERVEZ ces consignes en lieu sûr.
3. RESPECTEZ toutes les mises en gardes.
4. CONFORMEZ-VOUS à toutes les consignes.
5. N’UTILISEZ PAS ce dispositif près de l’eau.
6. NETTOYEZ l’appareil uniquement avec un chiffon sec.
7. NE BLOQUEZ PAS les orifices de ventilation. Installez l’appareil
conformément aux instructions du fabricant.
8. N’INSTALLEZ PAS cet appareil près d’une source de chaleur, comme
un radiateur, calorifère, poêle ou tout autre dispositif (incluant
les amplificateurs) qui produit de la chaleur.
9. NE CONTOURNEZ PAS le dispositif de sécurité d’une fiche polarisée.
Une fiche polarisée possède deux lames dont l’une est plus large
que l’autre. La lame plus large est conçue pour assurer votre
sécurité. Si la fiche fournie ne s’insère pas dans la prise murale,
consultez un électricien pour le remplacement de la prise désuète.
27
FRANÇAIS
Page 29

10. PROTÉGEZ le cordon d’alimentation pour éviter qu’on ne marche
dessus, ou qu’il ne soit pincé, en particulier au niveau des prises
et au point où il sort de l’appareil.
11. UTILISEZ UNIQUEMENT les accessoires spécifiés par le fabricant.
12. DÉBRANCHEZ cet appareil durant les orages électriques
ou lorsqu’il est inutilisé pendant de longues périodes.
13. POUR TOUTE RÉPARATION adressez-vous à Monster Cable.®
Pour ce faire, consultez la section « RÉCLAMATION FORMELLE
EN VERTU DE LA GARANTIE » dans la section de ce manuel
traitant de la garantie.
14. N’EXPOSEZ PAS cet appareil aux écoulements ou aux
éclaboussements d’eau. Assurez-vous qu’aucun objet rempli
de liquide, tels que les vases, ne soit placé sur l’appareil.
15. Pour entièrement déconnecter cet appareil de l’alimentation
en électricité CA, débranchez la fiche du cordon d’alimentation
de la prise murale d’électricité CA.
16. La fiche du cordon d’alimentation, qui s’insère dans la prise
murale, doit demeurer fonctionnelle en tout temps.
28
Page 30

Le point d’exclamation dans les triangles équilatéraux avertit l’utilisateur
de la présence d’importantes instructions d’utilisation et d’entretien dans
la documentation qui accompagne l’appareil.
L’éclair accompagné d’une flèche dans des triangles équilatéraux avertit
l’utilisateur de la présence d’une tension dangereuse non isolée, dans
l’enveloppe du produit, suffisante pour poser un risque de
choc électrique.
AVERTISSEMENT : Pour réduire les risques d’incendie ou de choc électrique,
n’exposez pas cet appareil à la pluie ou à l’humidité.
AVERTISSEMENT : Ne placez pas de sources de flammes nues,
comme des chandelles, sur le produit.
AVERTISSEMENT : Les piles, les bloc-piles ou les piles installées ne doivent pas
être exposées à une chaleur intense, comme la lumière du soleil, le feu et d’autres
sources de chaleur semblables.
Installez l’appareil à proximité d’une prise murale et assurez-vous que vous avez un
accès facile à l’interrupteur d’alimentation.
29
Page 31

AVERTISSEMENT : Ce produit est prévu pour un fonctionnement UNIQUEMENT
avec les tensions CA énumérées sur le panneau arrière. Le fonctionnement avec
une autre tension que celles indiquées risque d’endommager le produit de façon
irrémédiable, ce qui annule aussi la garantie. L’utilisation des adaptateurs CA est
fortement déconseillée, car un tel connecteur permet le branchement sur des
tensions pour lesquelles le produit n’a pas été conçu. N’utilisez que le cordon
d’alimentation fourni avec le produit. Si vous êtes incertain quant à la tension de
fonctionnement appropriée, veuillez communiquer avec le revendeur ou détaillant
dans votre localité.
30
Page 32

Left Speaker
Out
-2dB 0 +2dB
(L)
(R)
(L) (R)
Computer/MP3
Mini Jack In
TV/Audio In
Mixer In
High Definition
Multi-Media
Speaker Monitor
AC-IN
Normal
High BoostHigh Cut
Wireless
Module
Vue arrière
Vue avant (3/4)
31
Page 33

Caractéristiques et avantages
Socle d’accueil pour iPod®/iPhone®
Pour votre plaisir musical, il suffit de poser votre iPod
ou iPhone dans le socle intégré
Pilote évolué de 6,5 po pour les sons graves et
haut-parleur concave de 1 po pour les sons aigus
Fournit des graves profonds et offre une précision
sonique supérieure
Amplificateur de puissance
Produit un son puissant qui emplit toute la pièce
Configuration active/passive
Permet une installation et une configuration rapides et aisées
Télécommande
Commande de lecture sur iPod/iPhone
Connectivité pour un usage résidentiel et commercial
Entrées RCA, TRS asymétrique de ¼ po et pour mini-fiche de 3,5 mm
Port sans fil
Prévues pour une utilisation future avec les systèmes sans
fil Streamcast™ de Monster®
32
Page 34

Installation
Les moniteurs Clarity HD™ Model One comportent une configuration active/
passive, avec les ampères, la commande de volume et les entrées étant situés sur
le moniteur de droite (moniteur actif). Le moniteur de gauche (moniteur passif) est
connecté au moniteur actif moyennant le câble DIN à 8 broches de Monster®
(câble inclus). Il est inutile de brancher d’autres câbles au moniteur passif.
Connexion au moniteur passif
Assurez-vous que le courant est coupé. Branchez une extrémité du câble
DIN à 8 broches de Monster® (câble inclus) sur le moniteur actif et l’autre
extrémité, sur le moniteur passif.
33
Page 35

Left
Speaker
In
-2dB 0 +2dB
Normal
High BoostHigh Cut
Wireless
Module
Left Speaker
Out
Computer/MP3
Mini Jack In
(L) (R)
V/Audio In
Mixer In
High Definition
Multi-Media
Speaker Monitor
AC-IN
High Definition
Multi-Media
Speaker Monitor
34
Page 36

Alimentation
Branchez le cordon d’alimentation en électricité CA sur la prise
à l’arrière du moniteur actif (voir illustration). Branchez la fiche
à deux lames dans une prise murale de 120 volts.
35
Page 37

Left Speaker
Out
-2dB 0 +2dB
(L)
(R)
(L) (R)
Computer/MP3
Mini Jack In
TV/Audio In
Mixer In
High Definition
Multi-Media
Speaker Monitor
AC-IN
Normal
High BoostHigh Cut
Wireless
Module
36
Page 38

Connexion d’appareils audio
Connexion d’un iPod®/iPhone®
Les moniteurs Clarity HD™ Model One comportent un socle d’accueil pour les iPod
et iPhone, permettant une connexion facile et directe. Ce socle vous permet aussi
de commander la lecture à l’aide de la télécommande.
Utilisation des connecteurs de socle pour iPod/iPhone
Les moniteurs Clarity HD Model One comportent de multiples connecteurs de socle
convenant aux appareils suivants : iPod nano (4e et 5e générations), iPod touch
(2e génération), iPod classic (80 Go et 120 Go/160 Go), iPod avec capacité vidéo
(30 Go), iPhone 3G et 3GS.
Pour installer un des connecteurs, insérez simplement dans le socle pour iPod/iPhone
la plaque de connecteur qui convient à votre modèle.
5e génération (30 Go),
iPod classic 80 Go
et 120/160 Go
iPhone 3G
et 3GS
2e génération
4e génération
5e génération
9
15
16
17
18
iPhone
iPod et
iPod classic
iPod touch
iPod nano
iPod nano
Numéro assorti au
iPod/iPhone concerné
37
Page 39

iPod/iPhone
Connecteur de socle
pour iPod/iPhone
Socle d’accueil pour iPod/iPhone
38
Page 40

REMARQUE : Assurez-vous que le réglage « Shake to Shuffle »
est inactivé sur votre iPod® ou iPhone.® La réponse des graves
du haut-parleur pourrait réactiver ce réglage et nuire à la lecture.
REMARQUE : Si un connecteur de socle pour le modèle de votre
iPod ou iPhone n’est pas inclus avec les moniteurs Clarity HD™ Model One, vous
pouvez vous en procurer un dans la boutique Appel en ligne à l’adresse suivante
: www.apple.com/store. Les connecteurs de socle pour les modèles d’Apple ne
se déclinent pas en noir, mais le socle du moniteur Clarity HD Model One est
compatible avec les connecteurs de socle fabriqués par Apple.
Connexion d’un iPod/iPhone
Après avoir installé le connecteur de socle qui convient, insérez votre iPod ou
iPhone dans le socle d’accueil sur le dessus des moniteurs Clarity HD™ Model One,
tout en vous assurant que le port de socle sur votre lecteur et la prise de socle sont
alignés correctement. Votre lecteur devrait se connecter facilement et demeurer en
position vertical dans le port sans que vous ayez à forcer.
39
Page 41

Connexion d’un appareil à l’aide d’une entrée pour
mini-fiche de 1/8 po (3,5 mm)
Vous pouvez effectuer des connexions à votre guise pour écouter de la musique
provenant de n’importe quel lecteur équipé d’un port pour écouteurs de 3,5 mm
à l’aide d’une mini-fiche d’un mini-câble stéréo (non inclus).
Pour établir une connexion, mettez les moniteurs hors tension, branchez une
extrémité du câble dans le port pour écouteurs de 3,5 mm de votre lecteur, et l’autre
extrémité dans le port de 3,5 mm à l’arrière du moniteur actif. Ensuite, remettez les
moniteurs sous tension.
IMPORTANT: Le socle d’accueil pour iPod/iPhone supprimera et ainsi
inactivera le port pour mini-fiche de 3,5 mm à la connexion d’un iPod ou
iPhone. Assurez-vous de retirer votre iPhone ou iPod du socle d’accueil
avant d’utiliser un port de 3,5 mm.
Connexion d’un appareil à l’aide d’une entrée RCA
Les entrées RCA vous permettent de connecter des appareils AV qui font appel à
des sorties RCA, tels qu’un lecteur CD, à l’aide d’un câble RCA stéréo (non inclus).
Les câbles RCA stéréo sont chromcodés rouge et blanc : rouge pour le canal
de droite, blanc pour le canal de gauche.Toutefois, il est possible qu’il y ait
des variations de couleur pour la prise du canal de gauche. Le câble RCA
de Monster, le câble recommandé, est bleu. Certains fabricants utilisent la
couleur noire. Le rouge est, par contre, la couleur qui est toujours utilisée
pour le canal de droite.
40
Page 42

Pour effectuer une connexion, branchez les fiches de gauche et de droite fixées
sur une extrémité du câble sur leurs sorties RCA respectives à l’arrière de votre
appareil. Ces sorties sont chromocodées ou portent la mention « gauche » et
« droite ». Branchez les fiches de l’autre extrémité du câble RCA sur leurs entrées
respectives à l’arrière du moniteur actif.
Connexion d’un appareil à l’aide d’entrées TRS symétriques
de ¼ po (6,35 mm) de gauche et de droite
Il est possible de brancher des appareils stéréo de qualité professionnelle, comme
le matériel utilisé en studio ou l’équipement d’un DJ, à l’aide d’un câble TRS ¼ po à
¼ po (non inclus).
Pour établir la connexion, branchez une extrémité des câbles sur les sorties de
gauche et de droite de ¼ po sur vos appareils et les autres extrémités sur les
entrées de gauche et de droite de ¼ po à l’arrière du moniteur actif.
Lorsque vous établissez des connexions, veillez à toujours mettre les appareils hors
tension ou débranchez-les.
Écoutez de la musique
Assurez-vous que le lecteur de musique est connecté de façon sécuritaire,
tel que décrit dans la section précédente.
Allumez les moniteurs Clarity HD™ Model One en appuyant sur la touche
d’alimentation située à gauche sur le dessus du moniteur actif ou en utilisant
la télécommande.
Démarrez votre lecteur.
41
Page 43

Les moniteurs Clarity HD™ Model One
comprennent un filtre des hautes fréquences
permettant d’ajuster le niveau des hautes
fréquences. Vous pouvez ainsi adapter les
moniteurs à votre espace d’écoute.
Réglage à 0 : Les hautes fréquences
restent au même niveau que celui paramétré
dans le studio d’enregistrement.
Réglage à -2dB : abaisse le niveau
des hautes fréquences.
Réglage à +2dB : augmente le niveau
des hautes fréquences.
Left Speaker
Out
-2dB 0 +2dB
(L)
(R)
(L) (R)
Computer/MP3
Mini Jack In
TV/Audio In
Mixer In
High Definition
Multi-Media
Speaker Monitor
AC-IN
Normal
High BoostHigh Cut
Wireless
Module
Filtre
des hautes
fréquences
Utilisation d’un filtre des hautes fréquences
Volume
Le volume peut être réglé à l’aide des commandes de volume à droite sur le dessus
du moniteur actif ou à l’aide de la télécommande.
42
Page 44

Utilisation de la télécommande pour commander
les moniteurs Clarity HD™ Model One
Assurez-vous que la pile CR2025 est correctement installée dans
la télécommande. Si la pile est vielle, remplacez-la.
Mise en marche/arrêt : Appuyez sur la touche puis relâchez-la.
Volume : Appuyez sur la touche et maintenez-la enfoncée pour augmenter
le volume. Relâchez-la une fois le volume souhaité atteint. Appuyez sur
la touche et maintenez-la enfoncée pour diminuer le volume. Relâchez-la
une fois le volume souhaité atteint.
Sourdine : Appuyez sur la touche puis relâchez-la.
Pour rétablir le son, appuyez-y de nouveau.
Alimentation
Augmentation du volume
Avancer
Balayage avant
Lecture/pause
Retour
Balayage arrière
Diminution du volume
Sourdine
43
Page 45

Utilisation de la télécommande avec
le iPod®/iPhone
®
Il est possible d’utiliser la télécommande incluse pour commander la lecture
sur un iPod ou iPhone inséré dans le socle d’accueil. Il est, toutefois, impossible
de commander la lecture de tout autre appareil branché.
Utilisation de la télécommande pour commander
la lecture sur un iPod ou iPhone
Lecture : Appuyez sur la touche puis relâchez-la.
Pause : Appuyez sur la touche puis relâchez-la.
Appuyez-y de nouveau pour redémarrer la lecture.
Passer à la piste suivante : Appuyez sur la touche puis relâchez-la.
Passer à la piste précédente : Appuyez sur la touche puis relâchez-la.
Balayer vers l’avant d’une piste : Appuyez sur la touche
et maintenez-la enfoncée. Relâchez la touche pour mettre fin au
balayage et reprendre la lecture normale.
Balayer vers l’arrière d’une piste : Appuyez sur la touche
et maintenez-la enfoncée. Relâchez la touche pour mettre fin au
balayage et reprendre la lecture normale.
44
Page 46

Dépannage
Le tableau ci-dessous permet de résoudre la plupart des problèmes
de fonctionnement de vos moniteurs Clarity HD™ Model One.
Pour commencer, veuillez suivre les étapes suivantes :
• Retirez complètement votre iPod®/iPhone® du socle d’accueil.
• Replacez-le fermement dans le socle.
• Assurez-vous que les logiciels les plus récents ont été installés
sur votre iPod/iPhone.
45
Page 47

Problème Marche à suivre
Je n’entends
pas de
son; mes
Moniteurs
Clarity HD
Model One
n’émettent
aucun son.
• Assurez-vous que votre iPod/iPhone est correctement
inséré dans le socle d’accueil.
• Assurez-vous que votre iPod/iPhone est allumé et que
la lecture de musique est en cours.
• Assurez-vous que le cordon d’alimentation est
correctement inséré à l’arrière des moniteurs Beats
Studio et qu’il est branché sur une prise de courant CA.
• Assurez-vous d’appuyer sur la touche d’alimentation
et de vérifier que le voyant DEL est allumé.
• Si vous essayez d’écouter un appareil branché sur vos
moniteurs Clarity HD Model One à l’aide d’une entrée pour mini-prise
et que vous n’entendiez rien, assurez-vous de retirer votre
iPod/iPhone du socle d’accueil.
• Appuyez sur la touche Lecture/Pause de la télécommande.
• Augmentez le volume.
• Retirez votre iPod/iPhone du socle d’accueil. Attendez 5
secondes Ensuite, replacez votre iPod/iPhone dans le socle.
• Réinitialisez le système. Commencez par débrancher
le cordon d’alimentation pendant 60 secondes. Ensuite,
rebranchez-le et appuyez sur la touche d’alimentation.
Assurez-vous que le voyant DEL est allumé.
• Si vous écoutez un appareil connecté au port ENTRÉE AUX,
assurez-vous que l’appareil est allumé et que la lecture
de musique est en cours. Augmentez le volume de
l’appareil concerné.
46
Page 48

Problème Marche à suivre
• Assurez-vous que le câble ombilical est connecté entre
les moniteurs de gauche et de droite
Mes
moniteurs
Clarity HD™
Model One
ont cessé de
fonctionner
tout à coup
et le voyant
DEL rouge
s’est mis à
clignoter.
• Vériez soigneusement si la plaque arrière de l’amplicateur
est chaude. Si les moniteurs étaient réglés sur leur puissance
maximale pendant une période prolongée, il se peut que
l’amplificateur soit surchauffé et que les circuits de sécurité
aient désactivé les moniteurs provisoirement. Vos moniteurs
Clarity HD Model One offrent une protection maximale contre la
surcharge et la surchauffe de l’amplificateur. Éteignez les
moniteurs et attendez 30 minutes afin de laisser refroidir la
plaque arrière. Rallumez les moniteurs.
• Augmentez le volume pour vérier le fonctionnement
normale des moniteurs.
• Si les moniteurs ne réagissent toujours pas, communiquez
avec votre revendeur ou le service à la clientèle de Monster.
Mon iPod®/
iPhone®
ne se charge
pas.
• Assurez-vous que le cordon d’alimentation est correctement
connecté à l’arrière de l’appareil
• Assurez-vous que le cordon d’alimentation est branché
sur une prise CA en état de fonctionnement.
• Retirez votre iPod/iPhone du socle d’accueil. Attendez 5
secondes Ensuite, replacez votre iPod/iPhone dans le socle.
47
Page 49

Problème Marche à suivre
Mon iPod/iPhone
ne répond pas à la
télécommande.
• Assurez-vous que l’aire est claire entre la
télécommande et le système, sans aucune obstruction.
• Essuyez la petite lentille située à l’avant de la télécommande
à l’aide d’un chiffon propre et sec.
• La lumière intense de certaines pièces ou du soleil peut provoquer
des interférences. Essayez d’utiliser
la télécommande dans une autre pièce.
• Retirez votre iPod/iPhone du socle d’accueil.
Attendez 5 secondes. Ensuite, replacez votre iPod/iPhone
dans le socle.
• Assurez-vous que la pile est correctement installée dans la
télécommande. Si la pile est vieille, remplacez-la.
Le système ne
répond à aucune
commande de la
télécommande.
• Réinitialisez le système. Commencez par débrancher
le cordon d’alimentation pendant 60 secondes.
Puis, rebranchez-le.
• Communiquez avec votre revendeur ou avec le service
à la clientèle de Monster.
®
48
Page 50

GARANTIE LIMITÉE À L’INTENTION DES CONSOMMATEURS
Monster, LLC., 7251 West Lake Mead Blvd., Las Vegas, NV 89128, É.-U., [VEUILLEZ NOTER QUE MONSTER
N’ACCEPTE AUCUN PRODUIT EXPÉDIÉ À CETTE ADRESSE – SUIVEZ LES INSTRUCTIONS DE LA
SECTION « COMMENT SOUMETTRE UNE RÉCLAMATION » CI-DESSOUS] (415) 840-2000 (Monster) vous
offre cette garantie limitée. Les lois écrites ou la Common Law peuvent vous conférer des droits supplémentaires ou des
recours auxquels la présente garantie limitée ne s’applique pas.
DÉFINITIONS
« Utilisation adéquate » signifie l’utilisation du Produit (i) dans une maison d’habitation, (ii) à des fins privées (et non
pas commerciales), (iii) en conformité avec toutes les législations locales, d’État ou fédérales, codes ou règlements en
vigueur (y compris, mais ne s’y limitant pas, les codes du bâtiment et/ou des installations électriques), (iv) en conformité
avec les recommandations et/ou instructions du fabricant figurant sur les matériels et la documentation qui accompagnent
le Produit, (v) le cas échéant avec une prise de terre correcte.
« Distributeur agréé » désigne tout distributeur, revendeur ou détaillant qui (i) était dûment autorisé à faire affaire dans
la région où il vous a vendu le produit, (ii) était autorisé à vous vendre le produit selon les lois du territoire où vous avez
acheté le produit et (iii) vous a vendu le produit neuf dans son emballage d’origine.
« Réclamation formelle en vertu de la garantie » signifie toute réclamation faite conformément à la section «
Réclamations formelles en vertu de la garantie » dans le présent document.
« Produit » désigne tout produit (i) qui est énuméré dans le tableau des spécifications ci-dessous,
(ii) que vous avez acheté neuf auprès d’un distributeur autorisé et dans son emballage original et
(iii) dont le numéro de série, le cas échéant, n’a pas été enlevé, modifié ou défiguré.
« Défaut du produit » désigne une insuffisance du Produit qui existait au moment où un Revendeur autorisé vous a
remis le Produit, et qui entraîne un défaut du Produit à fonctionner en conformité avec la documentation Monster qui
accompagne le Produit, sauf si ce défaut a été provoqué en totalité ou en partie par (a) toute utilisation autre qu’une
Utilisation adéquate; (b) le transport, la négligence ou l’abus de toute personne autre que les employés de Monster; (c)
la modification du Produit par toute personne autre qu’un employé de Monster; (d) un accident (autre qu’un mauvais
fonctionnement qui serait autrement considéré comme un Défaut du produit); (e) la maintenance ou l’entretien du Produit
par qui que ce soit, à l’exception d’un employé Monster; (f) l’exposition du Produit à la chaleur, une lumière vive, le soleil,
des liquides, du sable ou autres contaminants; (g) des actes échappant à la volonté de Monster, y compris, mais de
manière non exhaustive, des catastrophes naturelles, incendies, tempêtes, des tremblements de terre ou des inondations.
« Période de garantie » signifie la période au cours de laquelle Monster doit avoir reçu votre réclamation formelle en
vertu de la garantie. Les différentes périodes de garantie liées aux défauts du produit sont définies dans le tableau des
spécifications ci-dessous. La période de garantie commence à courir le jour où vous avez acheté ou reçu (la date la plus
avancée faisant foi) le produit auprès d’un distributeur agréé, avec facture, reçu de caisse ou bordereau de marchandises
du distributeur à l’appui. Si vous n’avez aucune preuve écrite de la date d’achat ou de réception, la période de garantie
commence à courir trois (3) mois après la date à laquelle le produit a quitté l’usine de Monster, ainsi qu’il est inscrit dans
les dossiers de Monster. La période de garantie se termine après que la période définie dans le tableau des spécifications
49
Page 51

soit écoulée, ou après que vous ayez transféré la propriété du produit, le premier des deux évènements faisant foi. De plus,
vous devez appeler Monster pour obtenir un numéro d’autorisation de retour de marchandise (selon les directives à
l’article « Dépôt d’une réclamation ») dans les deux (2) mois après que vous avez découvert un défaut du produit (ou auriez
dû le découvrir, si un tel défaut était apparent).
« Vous » désigne le premier acheteur du produit dans son emballage d’origine auprès d’un revendeur autorisé. La
présente garantie limitée ne s’applique pas aux personnes ni aux entités qui ont acheté le produit (i) sous une forme
usagée ou non emballée, (ii) à des fins de revente, de location ou de tout autre usage commercial ou (iii) auprès de toute
personne autre qu’un concessionnaire autorisé.
PORTÉE DE LA PRÉSENTE GARANTIE LIMITÉE
PRODUITS. Si un produit comporte un défaut au moment de son achat chez un distributeur agréé et que Monster
reçoit une réclamation formelle en vertu de la garantie de votre part dans un délai de deux (2) mois après que vous avez
découvert un défaut du produit (ou auriez dû le découvrir, si un tel défaut était apparent), et avant la fin de la période
de garantie contre les défauts applicable au produit concerné, Monster vous dédommagera de l’une des façons suivantes :
Monster (1) réparera ou, à la seule discrétion de Monster, remplacera le produit ou (2) vous remboursera
le prix d’achat que vous avez payé au distributeur agréé pour le produit touché si une réparation ou un remplacement
n’est pas commercialement possible ou ne peut pas être faite en temps opportun. REMARQUE : MONSTER DÉCLINE
TOUTE RESPONSABILITÉ QUANT AUX DOMMAGES ACCESSOIRES OU INDIRECTS AUX TERMES DE LA PRÉSENTE
GARANTIE LIMITÉE.
CONDITIONS GÉNÉRALES
CHOIX DE LA LOI/D’UN TRIBUNAL. Cette garantie limitée et tout litige résultant de ou en relation avec cette
garantie limitée (« Litiges ») seront régis par les lois de l’État de Californie, aux États-Unis, excluant les conflits de principes
de lois et excluant la convention sur les contrats de vente internationale de marchandises. Le tribunal situé dans l’État de
Californie, aux États-Unis, devra avoir compétence exclusive sur tout litige.
AUTRES DROITS. CETTE GARANTIE LIMITÉE VOUS DONNE DES DROITS LÉGAUX SPÉCIFIQUES; VOUS POUVEZ
ÉGALEMENT AVOIR D’AUTRES DROITS, QUI VARIERONT D’UN ÉTAT À L’AUTRE ET D’UNE JURIDICTION À L’AUTRE,
ET QUI NE SERONT PAS TOUCHÉS PAR CETTE GARANTIE LIMITÉE. LA PRÉSENTE GARANTIE VOUS EST OFFERTE
EXCLUSIVEMENT ET NE PEUT ÊTRE CÉDÉE NI ASSIGNÉE. Si une disposition quelconque de la présente garantie limitée
devait contrevenir à la loi ou être nulle, non avenante et non exécutoire, ladite disposition peut être extraite de la teneur de
la présente garantie, mais elle est réputée ne pas influer sur les dispositions restantes. En cas d’inconsistances entre les
versions anglaises et les autres versions de cette garantie limitée, la version anglaise prévaut.
ENREGISTREMENT. Veuillez enregistrer votre Produit sur le site Internet www.monstercable.com. Le fait de ne pas
enregistrer votre produit ne vous enlèvera pas vos droits de garantie.
50
Page 52

TABLEAU DES SPÉCIFICATIONS
Référence du modèle Période de garantie du produit
MSP CLY MTR-DK EF Un (1) an
MSP CLY MTR-DK AU Un (1) an
RÉCLAMATION FORMELLE EN VERTU DE LA GARANTIE
COMMENT SOUMETTRE UNE RÉCLAMATION. En cas de dégâts occasionnés aux Produits, vous devez suivre ces
instructions : (1) Appelez Monster dans les deux (2) mois après que vous avez découvert un défaut du produit (ou auriez dû
le découvrir, si un tel défaut était apparent); (2) Donnez une explication détaillée des dommages encourus; (3) Obtenez un
numéro d’autorisation de retour; (4) Lors de la réception du formulaire de réclamation (qui vous sera envoyé lorsque vous
aurez rempli votre réclamation formelle sous garantie), remplissez le formulaire de réclamation entièrement;
(5) Retournez les produits, frais d’envois prépayés par vos soins (frais qui seront remboursés si vous avez droit à une
solution offerte dans le cadre de cette garantie limitée), à Monster pour la vérification des dommages, ainsi qu’en joignant
une copie de vos factures d’achat originales et preuves d’achat (code barre ou bordereau de marchandise) concernant
ces produits, le formulaire de réclamation entièrement rempli et le numéro d’autorisation de retour imprimé à l’extérieur du
paquet d’emballage (le formulaire de réclamation vous donnera les instructions détaillées concernant le procédé
de retour).
NUMÉROS DE TÉLÉPHONE. États-Unis, Asie du Pacifique et Amérique latine : 1 877 800-8989 ou 415-840-2000,
Canada 866-348-4171, Irlande 353 65 68 69 354, Autriche 0800-296-482, Belgique 0800-79201, République tchèque
800-142471, Danemark 8088-2128, Finlande 800-112768, France 0800-918201, Allemagne 0800-1819388,
Grèce 800-353-12008, Italie 900-982-909, Pays-Bas 0800-0228919, Norvège 800-10906, Russie 810-800-20051353,
Spain 900-982-909, Suède 020-792650, Suisse 0800-834659, Royaume-Uni 0800-0569520
DÉMARCHES SUIVANTES. Monster déterminera si un produit est réellement défectueux. Monster peut, à sa
discrétion, vous diriger vers un centre de service pour obtenir une estimation de réparation. Si un devis de réparation est
requis, vous recevrez les instructions concernant la soumission du devis à effectuer et comment soumettre la facture
à Monster pour que le paiement soit effectué. Tous les frais de réparation pourront faire l’objet d’une négociation avec
Monster.
DURÉE. Si vous fournissez une réclamation formelle sous garantie et vous conformez aux termes et conditions apportées
dans cette garantie limitée, Monster fera de son mieux pour vous offrir une solution dans les trente (30) jours suivant la
réception de votre réclamation formelle sous garantie (si vous résidez aux États-Unis - quarante cinq (45) jours si vous
demeurez ailleurs), à moins que des éléments hors du contrôle de Monster viennent retarder le processus.
51
Page 53

« Monster », le logo Monster, « Clarity HD », le logo Clarity HD,le produit et l’emballage sont des marques de commerce ou
des marques de commerce déposées de Monster Cable Products inc. ou ses filiales aux États-Unis ou dans d’autres pays.
iPhone, iPod, iPod classic, iPod nano, iPod shuffle, et iPod touch sont des marques de commerce de Apple inc., déposées aux
États-Unis et dans d’autres pays. Apple ne peut être tenue responsable du fonctionnement de ce dispositif ni de sa conformité
aux normes de sécurité ou à la réglementation.
52
Page 54

Información importante de seguridad
1. LEA estas instrucciones.
2. CONSERVE estas instrucciones.
3. ATIENDA todas las advertencias.
4. SIGA todas las instrucciones.
5. EVITE USAR este equipo en lugares cercanos al agua.
6. LÍMPIELO SÓLO con un trapito seco.
7. EVITE BLOQUEAR las aperturas de ventilación. Instale el equipo
conforme a las instrucciones del fabricante..
8. EVITE INSTALAR este equipo cerca de fuentes de calor tales como
radiadores, salidas de aire caliente, hornos u otros equipos
(incluidos los amplificadores) que generen calor.
9. NUNCA ELIMINE la protección que brindan los enchufes
polarizados. Los enchufes polarizados tienen dos patas planas,
una de las cuales es más ancha que la otra. La pata más ancha
brinda un mecanismo de protección. Si el enchufe provisto no
encaja directamente en su tomacorriente, acuda a un electricista
a fin de reemplazar el tomacorriente obsoleto.
53
ESPAÑOL
Page 55

10. PROTEJA el cable de alimentación de forma que nadie lo pise ni
quede aplastado ni pellizcado, en particular cerca del enchufe
y en el lugar en el que sale del aparato.
11. UTILICE SÓLO aditamentos y accesorios suministrados
por el fabricante.
12. DESENCHUFE este equipo durante las tormentas eléctricas
o cuando no lo vaya a utilizar durante mucho tiempo.
13. ACUDA a Monster Cable® para todo mantenimiento o
reparación. Consulte el aparte “RECLAMACIONES FORMALES
POR LA GARANTÍA” en la sección que habla de la garantía
más adelante en este manual.
14. El equipo NO DEBE RECIBIR goteos ni salpicaduras, por lo que
no debe colocarse sobre él ningún objeto que contenga líquidos,
como jarrones.
15. A fin de desconectar totalmente este equipo del tendido de
electricidad CA, desconecte el cable de alimentación del
equipo del tomacorriente de CA.
16. El enchufe del lado del tendido eléctrico del cable de
alimentación de electricidad debe permanecer listo
para su uso.
54
Page 56

El símbolo de un triángulo equilátero con un signo de exclamación en su
interior y que se muestra en los documentos que acompañan al producto
tiene el propósito de alertar al usuario de la presencia de instrucciones
importantes de operación y mantenimiento (servicio)
en dichos documentos.
El símbolo de un triángulo equilátero con un relámpago en su interior y
que se muestra en los documentos que acompañan al producto tiene el
propósito de alertar al usuario de que dentro del cuerpo del producto podría
haber voltajes sin aislar de la magnitud suficiente para constituir un riesgo
de descargas eléctricas.
ADVERTENCIA: Con el fin de reducir el riesgo de descargas eléctricas, evite
exponer este equipo a la lluvia o la humedad.
ADVERTENCIA: No coloque sobre el equipo ninguna fuente de llamas abiertas,
como velas por ejemplo.
ADVERTENCIA: No se debe exponer las baterías, paquetes de baterías ni baterías
internas a altas temperaturas excesivas, tales como la luz del sol directa, llamas
y similares.
Instale el equipo cerca de un tomacorriente y asegúrese de que el acceso
al interruptor del ruptor eléctrico no quede bloqueado
55
Page 57

ADVERTENCIA: Este producto fue diseñado para funcionar EXCLUSIVAMENTE con
los voltajes CA indicados en el panel trasero. Si se intenta utilizar voltajes distintos
de los indicados, podrían ocurrir daños irreversibles al producto y también la
anulación de la garantía del producto. Se advierte contra el uso de adaptadores de
enchufes de CA. Dichos adaptadores podrían permitir que el producto se enchufe
a voltajes para los cuales el producto no haya sido diseñado. Utilice solamente el
cable de alimentación de electricidad suministrado con su producto. Si tiene dudas
acerca del voltaje operacional correcto, comuníquese con su distribuidor
o vendedor local
56
Page 58

Left Speaker
Out
-2dB 0 +2dB
(L)
(R)
(L) (R)
Computer/MP3
Mini Jack In
TV/Audio In
Mixer In
High Definition
Multi-Media
Speaker Monitor
AC-IN
Normal
High BoostHigh Cut
Wireless
Module
Vista trasera
Vista delantera en 3/4
57
Page 59

Características, funciones y beneficios
Base de conexión para iPod®/iPhone®
Sólo tiene que colocar su iPod o iPhone en la base integrada
para comenzar a escuchar música
Avanzado parlante de bajos de 6,5 pulgadas y parlante cóncavo
de 1 pulgada para los agudos
Proporciona una gran respuesta de bajos y una precisión
superior del audio
Potencia digital
Para un sonido poderoso que llega a todas partes
Configuración activa/pasiva
Facilita y agiliza la configuración y la instalación
Control remoto
Para controlar la reproducción de los iPhone/iPhone
Conectividad para aplicaciones domésticas y profesionales
Entradas RCA, entradas TRS de ¼” balanceadas y entrada
de mini enchufe de 3.5 mm
Puerto inalámbrico
A ser utilizado en el futuro con el sistema inalámbrico
Monster® Streamcast™ Wireless
58
Page 60

Instalación
Los monitores Clarity HD™ Model One presentan una configuración
activa/pasiva, con el control de volumen, amperaje y entradas sobre el monitor
de la derecha (activa). El monitor izquierdo (pasivo) se conecta al activo mediante
el cable DIN de 8 pines de Monster.® No se necesita de ningún otro cable para
interconectar los monitores.
Conexión al monitor pasivo
Asegúrese de que el equipo esté apagado. Enchufe en el monitor activo un extremo
del cable DIN de 8 pines de Monster® suministrado con el equipo, y el otro extremo
en el monitor pasivo.
59
Page 61

Left
Speaker
In
-2dB 0 +2dB
Normal
High BoostHigh Cut
Wireless
Module
Left Speaker
Out
Computer/MP3
Mini Jack In
(L) (R)
V/Audio In
Mixer In
High Definition
Multi-Media
Speaker Monitor
AC-IN
High Definition
Multi-Media
Speaker Monitor
60
Page 62

Encender/Apagar
Conecte el cable de alimentación eléctrica a la parte trasera del monitor activo,
como se muestra. Conecte el enchufe de dos patas en el otro extremo del cable
a una toma de CA de 120 Voltios.
61
Page 63

Left Speaker
Out
-2dB 0 +2dB
(L)
(R)
(L) (R)
Computer/MP3
Mini Jack In
TV/Audio In
Mixer In
High Definition
Multi-Media
Speaker Monitor
AC-IN
Normal
High BoostHigh Cut
Wireless
Module
62
Page 64

Conexión de dispositivos de audio
Conexión de dispositivos iPod®/iPhone®
Los monitores Clarity HD™ Model One incorporan una base para dispositivos iPod
e iPhone, que permite una interconexión sencilla y directa. También permite
la capacidad de controlar la reproducción con el control remoto incluido.
Uso de los adaptadores de la base de conexión para iPod/iPhone
Los monitores Clarity HD Model One incluyen varios adaptadores para la base de
conexión, que se adaptan a los dispositivos iPod nano (4ª y 5ª generación), iPod touch
(2ª generación), iPod classic (80 GB y 120 GB/160 GB), iPod with video (30 GB)
e iPhone 3G y 3GS.
Para instalar el adaptador correspondiente a su modelo de iPod/iPhone, sólo tiene que
fijarlo a la base de conexión.
5ª generación (30GB),
iPod classic 80GB
y 120/160GB
iPhone 3G
y 3GS
2ª generación
4ª generación
5ª generación
9
15
16
17
18
iPhone
iPod e
iPod classic
iPod touch
iPod nano
iPod nano
Indicador del tipo de iPod/iPhone al que
corresponde el adaptador
63
Page 65

iPod/iPhone
Adaptador para la base de conexión
de dispositivos iPod/iPhone
Base de conexión para iPod/iPhone
64
Page 66

NOTA: Asegúrese de desactivar la opción “Shake to Shuffle”
en su iPod® o iPhone.® Las frecuencias bajas reproducidas por los
monitores podrían confundir a dicha función e interferir con la reproducción
de la música
NOTA: Si los monitores Clarity HD™ Model One no incluyen el adaptador que
corresponde a su modelo de iPod o iPhone, puede adquirirlo en www.apple.com/
store. Los adaptadores para la base de conexión fabricados por Apple no están
disponibles en color negro, pero la base de conexión de los monitores Clarity HD™
Model One está diseñada para que sea compatible con los adaptadores de Apple.
Conexión de dispositivos iPod/iPhone a la base
Luego de instalar el adaptador correcto, inserte su dispositivo iPod o iPhone en
la base de conexión que se encuentra en la parte superior del monitor Clarity HD
Model One activo. Asegúrese de alinear correctamente el dispositivo con
la base antes de insertarlo. La inserción en la base e interconexión debe lograrse
de manera muy sencilla, y el dispositivo permanecerá erguido sobre la base sin
necesidad de forzarlo.
Conexión de dispositivos a través de la entrada de mini
enchufe de 1/8" (3.5 mm)
Se puede conectar y escuchar a través de los monitores Clarity HD Model One
cualquier reproductor de música que cuente con un puerto de 3.5 mm para
auriculares, con el uso de un cable estéreo de mini enchufes (no se incluye).
65
Page 67

Para hacer la interconexión, enchufe un extremo del cable a la salida de 3.5 mm de
auriculares del reproductor de música y el otro extremo a la entrada de 3.5 mm en la
parte trasera del monitor activo. Encienda los monitores Clarity HD™ Model One.
IMPORTANTE: Al haber un dispositivo iPod o iPhone inserto en la base de
conexión de dispositivos iPod/iPhone, la señal proveniente del iPod/iPhone
tendrá prioridad sobre la interconexión a través de la entrada de 3.5 mm.
Asegúrese de extraer el iPod o iPhone de la base de conexión antes
de utilizar la entrada de 3.5 mm.
Conexión de dispositivos a través de las entradas RCA
Las entradas RCA permiten la conexión de componentes de AV que utilizan
salidas RCA, como los tocadiscos de CD, con el uso de un cable RCA estéreo
(no se incluye).
Los cables RCA estéreo por lo general son de colores rojo y blanco. El cable
rojo corresponde al canal derecho y el cable blanco al canal izquierdo. Pero
el cable y los enchufes correspondientes al canal izquierdo podrían ser de
un color distinto. Los cables Monster Cable® RCA, los cables recomendados,
son de colores rojo y azul. Otros fabricantes utilizan los colores rojo y negro.
No obstante, el color rojo identifica universalmente al canal derecho.
66
Page 68

Para conectar los cables RCA, conecte los enchufes izquierdo y derecho de
un extremo del cable a la salidas correspondientes del componente. La salidas
también están identificadas por colores y/o marcadas “LEFT” (canal izquierdo) y
“RIGHT (canal derecho). Conecte los enchufes al otro extremo del cable RCA
a las respectivas entradas en la parte trasera del monitor activo.
Conexión de dispositivos a través de las entradas TRS
balanceadas de ¼" (6,35 mm)
Se puede conectar equipos de audio estéreo profesionales, como equipos
de estudio o de DJ, con el uso de un cable TRS de clavijas ¼" a ¼" (no se incluye).
Para hacer la interconexión, enchufe las clavijas de los cables a las salidas
izquierda y derecha de ¼" del equipo, y las otras clavijas a las entradas izquierda
y derecha de ¼" en la parte trasera del altavoz activo.
Asegúrese de apagar los altavoces y los componentes al conectarlos
y desconectarlos.
Para escuchar
Asegúrese de que el reproductor de música esté correcta y firmemente conectado,
según lo indicado en la sección anterior.
Presione el botón de encendido al lado izquierdo de la superficie superior
del monitor Clarity HD™ Model One activo para encender los altavoces,
o utilice el control remoto.
Ponga a funcionar el reproductor de música.
67
Page 69

Los altavoces Clarity HD™ Model One
incorporan un filtro de alta frecuencia para
el ajuste del nivel de las frecuencias altas.
Dicho filtro permite adaptar los altavoces al
entorno en el que se escuchan los altavoces.
Posición "0": Mantiene sin cambios el nivel
de las frecuencias altas que fue establecido
originalmente en el estudio de grabación
Posición "-2dB": Reduce el nivel
de las frecuencias altas.
Posición "-+2dB": Aumenta el nivel de
las frecuencias altas.
Left Speaker
Out
-2dB 0 +2dB
(L)
(R)
(L) (R)
Computer/MP3
Mini Jack In
TV/Audio In
Mixer In
High Definition
Multi-Media
Speaker Monitor
AC-IN
Normal
High BoostHigh Cut
Wireless
Module
Filtro
de alta
frecuencia
Uso del filtro de alta frecuencia
Volumen
El volumen se puede controlar con los controles de volumen al lado derecho
de la superficie superior del monitor activo, o utilice el control remoto.
68
Page 70

Uso del control remoto para controlar
los altavoces Clarity HD™ Model One
Asegúrese de que la batería CR2025 del control remoto esté correctamente
instalada. Reemplace la batería si está vieja.
Encender y apagar: Presione y libere el botón.
Volumen: Presione el botón y manténgalo presionado para aumentar el volumen.
Libere el botón al llegar al volumen deseado. Presione el botón y manténgalo
presionado para reducir el volumen. Libere el botón al llegar al volumen deseado.
Silenciar: Presione y libere el botón. Presione de nuevo el botón para
volver a escuchar.
Encender/Apagar
Subir volumen
Saltar a la pista siguiente
Avanzar rápidamente
mientras escucha
Reproducir/Pausa
Saltar a la pista anterior
Retroceder rápidamente mientras
escucha
Bajar volumen
Silenciar
69
Page 71

Uso del control remoto para controlar
dispositivos iPod®/iPhone
®
El control remoto incluido con el equipo se puede utilizar para controlar
la reproducción de dispositivos iPod o iPhone conectados a la base.
No controla la reproducción de otro tipo de dispositivos.
Uso del control remoto para controlar la reproducción
de dispositivos iPod/iPhone
Reproducir música: Presione y libere el botón.
Pausa: Presione y libere el botón. Presiónelo de nuevo para reanudar
la reproducción.
Saltar a la siguiente pista: Presione y libere el botón.
Saltar a la pista anterior: Presione y libere el botón.
Avanzar rápidamente por una pista mientras escucha:
Presione y mantenga presionado el botón. Libere el botón cuando quiera
detener el avance y reanudar la reproducción normal.
Retroceder rápidamente por una pista mientras escucha:
Presione y mantenga presionado el botón. Libere el botón cuando
quiera detener el avance y reanudar la reproducción normal.
70
Page 72

Diagnóstico de problemas
La tabla a continuación puede contribuir a resolver la mayoría de los problemas que
pudieran surgir durante la operación de los altavoces Clarity HD™ Model One.
Para empezar, siga estos pasos:
• Extraiga totalmente el iPod®/iPhone® de la base de conexión.
• Vuelva a insertarlo rmemente en la base.
• Asegúrese de que el iPod / iPhone tenga instalado el software más reciente.
71
Page 73

Problema Solución
No se
escucha
audio a
través
de los
altavoces
Clarity HD
Model One.
• Asegúrese de que el iPod/iPhone esté conectado
correcta y firmemente a la base.
• Asegúrese de que el iPod/iPhone esté encendido
y tocando música.
• Asegúrese de que el cable de alimentación esté
conectado correctamente a la parte trasera del
altavoz Clarity HD Model One activo en, y que esté conectado
a un tomacorriente de CA en buenas condiciones.
• Asegúrese de presionar el botón de encendido y de
comprobar que el indicador de LED esté encendido.
• Si quiere escuchar un dispositivo conectado a los
altavoces Clarity HD Model One a través de la toma de mini
enchufe y no se escucha, asegúrese de retirar el iPod/
iPhone de la base de conexión.
• Presione el botón de Reproducción/Pausa en
el control remoto.
• Suba el volumen.
• Extraiga el iPod/iPhone de la base de conexión. Espere
5 segundos. Después vuelva a insertar el iPod/iPhone
en la base.
• Reinicie el sistema. Para ello, primero desconecte el
cable de alimentación durante 60 segundos. Después
conéctelo de nuevo y presione el botón de encendido.
Compruebe que el indicador de LED esté encendido.
72
Page 74

Problema Solución
• Si quiere escuchar un dispositivo conectado a través de
la entrada “AUX IN” (entrada auxiliar), asegúrese de
que el dispositivo esté encendido y tocando música.
Suba el volumen del dispositivo.
• Asegúrese de que el cable umbilical de interconexión
esté conectado entre los altavoces izquierdo y derecho.
Los altavoces
Clarity HD™
Model One
dejaron de
funcionar
súbitamente y
el indicador de
LED parpadea
de color rojo.
• Revise con cuidado si la placa trasera del amplicador
está caliente. Si los monitores han estado funcionando
a su máxima potencia durante un tiempo prolongado,
es posible que se haya recalentado el amplificador
y que el circuito de protección haya interrumpido
temporalmente el funcionamiento de los monitores.
Sus altavoces Clarity HD Model One incorporan mecanismos
de máxima protección contra excesos de potencia
y contra el recalentamiento. Apague los monitores y
espere 30 minutos hasta que la placa trasera se enfríe.
Vuelva a encender el equipo.
• Suba el volumen a n de comprobar que todo
funcione normalmente.
• Si los monitores continúan sin responder, comuníquese
con el concesionario que le vendió el equipo,
o con Monster.
73
Page 75

Problema Solución
El iPod®/
iPhone® no
se recarga
• Asegúrese de que el cable de alimentación esté
conectado correctamente a la parte trasera
del equipo.
• Asegúrese de que el cable de alimentación esté
enchufado en un tomacorriente de CA en
buenas condiciones.
• Extraiga el iPod/iPhone de la base de conexión. Espere
5 segundos. Después vuelva a insertar el iPod/iPhone
en la base.
74
Page 76

Problema Solución
My iPod®/
iPhone®
does not
respond to
the remote
control.
• Make sure there’s a clear path between the remote
and the system with no obstructions.
• Wipe the small lens on the front end of the remote
using a clean, dry cloth.
• Bright room lights or sunlight can cause interference.
Try using the remote from another location.
• Remove your iPod/iPhone from the dock.
Wait 5 seconds. Then reseat your iPod/iPhone.
• Make certain the remote battery is installed correctly.
If it is old, replace it.
The system
won’t
respond to
any controls.
• Reset the system. First, unplug the power cable for 60
seconds. Next, plug it back in.
• Contact your dealer or Monster® Customer Service.
75
Page 77

GARANTÍA LIMITADA PARA LOS CONSUMIDORES
Monster, LLC., 7251 West Lake Mead Blvd., Las Vegas, NV 89128, USA, [POR FAVOR OBSERVE QUE MONSTER NO
ACEPTA PRODUCTOS QUE SEAN ENVIADOS A ESTA DIRECCIÓN – SIGA LAS INSTRUCCIONES QUE SE
INDICAN ABAJO PARA “PRESENTAR UNA RECLAMACIÓN”] (415) 840-2000 (“Monster”) le amplía esta Garantía
Limitada. Las leyes estatutarias u ordinarias pueden otorgarle derechos o compensaciones adicionales que no se verán
afectados por esta Garantía Limitada.
DEFINICIONES
“Uso Adecuado” significa usar el Producto (i) dentro de una casa o vivienda (ii) para un propósito privado (en vez de
comercial), (iii) cumpliendo con todas las leyes locales, estatales o federales, código o reglamentaciones (incluyendo sin
limitación códigos eléctricos o de construcción,
(iv) cumpliendo con las recomendaciones del fabricante y/o las instrucciones en los materiales
y la documentación que acompañan al Producto, y (v) si es aplicable con una toma a tierra eléctrica apropiada.
“Distribuidor autorizado” es cualquier distribuidor, revendedor o minorista que (i) estaba debidamente autorizado
para hacer transacciones en la jurisdicción en la que le vendió el Producto, (ii) tenía la aprobación para venderle el
Producto según las leyes de la jurisdicción en la que Usted compró dicho Producto, y (iii) le vendió el Producto en calidad
de nuevo y en su empaque original.
“Reclamación formal de garantía” significa una reclamación que cumple con la sección “Reclamaciones formales
de Garantía” del documento actual.
“Producto” significa un producto (i) que aparece en la Tabla de Especificaciones que se muestra a continuación, (ii) que
usted haya comprado a un nuevo Agente Autorizado en su envasado original, y (iii) cuyo número de serie, si lo tiene, no ha
sido eliminado, alterado o desfigurado.
“Defecto de Producto” significa una inadecuación del Producto que existía en el momento en que recibió el Producto
de un Agente Autorizado y que causa un fallo del Producto para funcionar de acuerdo a la documentación de Monster
que acompaña al Producto, a menos que dicho fallo haya sido causado completamente o parcialmente por (a) cualquier
uso que no sea el adecuado, (b) transporte, negligencia, uso erróneo o incorrecto por parte de alguien que no sea
empleado de Monster; (c) alteración, falsificación o modificación del producto por alguien que no sea empleado de
Monster; (d) accidente (que no sea un funcionamiento anómalo que pudiera clasificarse como un Defecto de Producto);
( e) mantenimiento de servicio del Producto por alguien que no sea empleado de Monster; (f) exposición del producto
al calor, luz brillante, sol, líquidos, arena u otros contaminantes; o (g) actúe fuera del control de Monster, incluyendo sin
limitaciones los actos de Dios, incendio, tormentas, terremotos o inundaciones.
‘Periodo de Garantía’ significa el periodo durante el cual Monster debe haber recibido su Reclamación Formal de
Garantía. Los distintos Períodos de Garantía correspondientes a los Defectos en el Producto se definen en la Tabla de
Especificaciones que se encuentra más adelante en este documento. El Período de Garantía se inicia en la fecha en la
que Usted adquirió o recibió (la que ocurra más tarde) el Producto de un Distribuidor Autorizado, según se indique en
76
Page 78

la factura, recibo de ventas o nota de despacho del Distribuidor Autorizado. Si Usted no dispone de una prueba escrita
de la fecha de compra o de recepción, entonces el Período de Garantía se iniciará tres (3) meses después de la fecha
en la que el Producto salió de Monster o de su fábrica, según lo evidenciado en los registros de Monster. El Período de
Garantía finaliza después del lapso de tiempo definido en la Tabla de Especificaciones, o después de que Usted haya
transferido la propiedad del Producto, lo que ocurra primero. Además, Usted debe llamar a Monster y obtener un Número
de Autorización de Devolución (como se indica en “Cómo hacer una reclamación”) dentro de los dos (2) meses siguientes
a que haya descubierto un Defecto en el Producto (o que debiera haberlo descubierto si tal Defecto en el Producto
fuera evidente).
“Usted” hace referencia al primer individuo que adquirió el Producto en su embalaje original en un Distribuidor
Autorizado. Esta Garantía Limitada no se aplica a personas o entidades que hayan comprado el producto (i) usado
o sin embalaje, (ii) para la reventa, alquiler u otro uso comercial,
o (iii) a alguien que no sea un Distribuidor Autorizado.
ALCANCE DE ESTA GARANTÍA LIMITADA
PRODUCTS. Si un Producto presentaba un Defecto cuando Usted lo adquirió en un Distribuidor Autorizado y Monster
recibiera su Reclamación Formal por la Garantía dentro de los dos (2) meses siguientes a que Usted efectivamente
detectara el Defecto del Producto (o que debiera haberlo detectado si tal Defecto fuera evidente) y antes de finalizado el
Período de Garantía contra Defectos en el Producto correspondiente al artículo afectado, entonces Monster le ofrecerá
una de las siguientes compensaciones: Monster (1) reparará o, a su exclusiva discreción, reemplazará el Producto, o (2)
le devolverá el precio de compra que Usted pagó al Distribuidor Autorizado por el producto afectado si la reparación o
reemplazo no es comercialmente viable o no se puede hacer oportunamente. NOTA: MONSTER NO ASUME NINGÚN
TIPO DE RESPONSABILIDAD POR DAÑOS ACCIDENTALES, EMERGENTES O INDIRECTOS, EN VIRTUD DE ESTA
GARANTÍA LIMITADA.
DISPOSICIONES GENERALES
LEGISLACIÓN Y JURISDICCIÓN COMPETENTES. Esta garantía limitada y todo litigio que surgiese en virtud de o
en conexión con esta Garantía Limitada (“Litigios”) se regirán por las leyes del estado de California, EE. UU., excluyendo
conflictos de principios jurídicos o legales y excluyendo la Convención para la Venta Internacional de Bienes. Los
tribunales situados en el Estado de California, EE. UU. tendrán jurisdicción exclusiva sobre todo litigio.
OTHER RIGHTS. ESTA GARANTÍA LE OTORGA DERECHOS LEGALES ESPECÍFICOS Y USTED PODRÍA TENER TAMBIÉN
OTROS DERECHOS QUE VARÍAN DE UN ESTADO A OTRO Y DE UNA JURISDICCIÓN A OTRA, LOS CUALES NO SE VERÁN
AFECTADOS EN VIRTUD DE ESTA GARANTÍA LIMITADA. ESTA GARANTÍA SE EXTIENDE SÓLO A USTED Y NO PUEDE
SER TRANSFERIDA. Si alguna cláusula de esta Garantía limitada es ilegal, nula o incoercible, dicha cláusula deberá
considerarse prescindible y no afectará En todo caso de discrepancia entre la versión en inglés y otras versiones de esta
Garantía Limitada, se considerará válida a la versión en inglés.
REGISTRO. Registre su Producto en www.monstercable.com. Los derechos establecidos por la Garantía no se ven
afectados si no se registra el producto.
77
Page 79

TABLA DE ESPECIFICACIONES
Modelo del producto Período de garantía del producto
MSP CLY MTR-DK EF Un (1) Año
MSP CLY MTR-DK AU Un (1) Año
RECLAMACIÓN FORMAL POR LA GARANTÍA
CÓMO PRESENTAR UNA RECLAMACIÓN. Usted debe seguir estas instrucciones en caso de que se hayan
producido daños en el Producto: (1) llame a Monster dentro de los 2 (dos) meses a partir de que Usted descubrió el
Defecto del Producto (o debería haberlo descubierto si dicho Defecto era evidente); (2) proporcione una explicación
detallada sobre cómo se produjo el daño; (3) obtenga un número de autorización de devolución; (4) contra entrega del
formulario (que se le puede enviar a Usted luego de que haya presentado su Reclamo formal de Garantía), complete todo
el formulario de reclamo; (5) devuelva los Productos; Usted deberá pagar previamente el envío (que se le reembolsará
si tiene derecho a una compensación económica, en virtud del Alcance de esta Garantía limitada), para que Monster
constate del daño, junto con una copia de sus recibos de venta originales y una prueba de su compra (etiqueta con
UPC o código universal del producto o una nota de empaque) de tales Productos, el formulario de reclamo completo y el
número de autorización de devolución impreso en el exterior del embalaje de devolución (el formulario de reclamo incluirá
instrucciones para realizar la devolución).
NÚMEROS DE TELÉFONO. Estados Unidos, Pacífico Asiático y América Latina: 1 877 800-8989 o 415-840-20 00, Canadá 866348-4171, Irlanda 353 65 68 69 354, Austria 0800-296-482, Bélgica 0800-79201, República Checa 800-142471, Dinamarca
8088-2128, Finlandia 800-112768, Francia 0800-918201, Alemania 0800-1819388, Grecia 800-353-12008, Italia 900-982-909,
Holanda 0800-0228919, Noruega 800-10906, Rusia 810-800-20051353, España 900-982-909, Suecia 020-792650, Reino Unido
0800-0569520, Suiza 0800-834659, Reino Unido 0800-0569520
PROCEDIMIENTOS ULTERIORES. Monster determinará si existe un Defecto en el Producto. Monster puede, a su
exclusivo criterio, indicarle que obtenga un presupuesto de reparación en un centro de servicio técnico. Si se solicita
un presupuesto de reparación, se le indicará la forma de enviar correctamente dicho presupuesto y también la factura
correspondiente a Monster para su pago. Todo cargo por reparaciones podrá ser negociado por Monster.
CRONOGRAMA. Si Usted envía una Reclamación Formal por la Garantía y cumple totalmente todos los términos y
condiciones de esta Garantía Limitada, Monster hará su máximo esfuerzo para suministrarle una compensación dentro de
los treinta (30) días siguientes a la recepción de su Reclamación Formal por la Garantía (en caso de que Usted resida en
los Estados Unidos; pero si reside en otro lugar, dicho lapso será de cuarenta y cinco (45) días), a menos que el proceso se
retrase por factores fuera del control de Monster.
78
Page 80

“Monster”, el logotipo de Monster, “Clarity HD”, el logotipo de Clarity HD, el producto y su embalaje son marcas comerciales
o marcas comerciales registradas de Monster Cable Products, Inc. o de sus subsidiarias en los Estados Unidos y en otros
países. “iPhone,” “iPod,” “iPod classic,” “iPod nano,” “iPod shuffle,” e iPod touch son marcas comerciales de Apple Inc.
registradas en los Estados Unidos y en otros países. Apple no se hace responsable de la manera como se utilice este
dispositivo, ni de su conformidad con estándar alguno de seguridad ni con ninguna norma legal.
79
Page 81

Page 82

Page 83

Page 84

©2011 Monster, LLC
Monster Technology International, Ltd
rm 855433
 Loading...