

Page 1
E35 CONVECTION OVEN
SERVICE
MANUAL
E35 Turbofan Ovens
Revision 12
-1-
© Moffat Ltd, January 2010
Page 2

WARNING: ALL INSTALLATION AND SERVICE REPAIR WORK MUST BE CARRIED OUT BY
QUALIFIED PERSONS ONLY.
E35 Turbofan Ovens
Revision 12
-2-
© Moffat Ltd, January 2010
Page 3

CONTENTS
This manual is designed to take a more in depth look at the E35 convection oven for the purpose of making
the unit more understandable to service people.
There are settings explained in this manual that should never require to be adjusted, but for completeness
and those special cases where these settings are required to change, this manual gives a full explanation
as to how, and what effects will result.
SECTION PAGE NO.
1. SPECIFICATIONS .............................................................................................................................. 5
2. INSTALLATION .................................................................................................................................. 10
3. OPERATION ....................................................................................................................................... 12
3.1 Description of Controls (up to Lot No. 0817999).
3.2 Description of Controls (from Lot No. 0818001).
3.3 Explanation of Control System
4. MAINTENANCE .................................................................................................................................. 19
4.1 Cleaning
4.2 Routine Procedures
5. TROUBLE SHOOTING GUIDE........................................................................................................... 21
6. SERVICE PROCEDURES .................................................................................................................. 24
6.2 Access
6.3 Replacement
6.4 Adjustment / Calibration
7. ELECTRICAL SCHEMATICS ............................................................................................................. 47
8. ELECTRICAL WIRING DIAGRAMS................................................................................................... 54
9. ACCESSORIES / OPTIONS ............................................................................................................... 68
IMPORTANT: MAKING ALTERATIONS MAY VOID WARRANTIES AND APPROVALS.
E35 Turbofan Ovens
Revision 12
-3-
© Moffat Ltd, January 2010
Page 4

10. PARTS DIAGRAMS............................................................................................................................ 69
11.1 Oven Main Assembly.
11.2 Control Panel Assembly.
11.3 Gear Plate Assembly.
11.4 Door Assembly.
11. SERVICE CONTACTS........................................................................................................................ 92
APPENDIX A. STACKING KIT INSTRUCTIONS........................................................................................ 94
APPENDIX B. STAND MOUNTING INSTRUCTIONS ................................................................................ 97
APPENDIX C. MOTOR CONTROL AND STEAM TIMER ADJUSTMENT GUIDE .................................... 98
E35 Turbofan Ovens
Revision 12
-4-
© Moffat Ltd, January 2010
Page 5
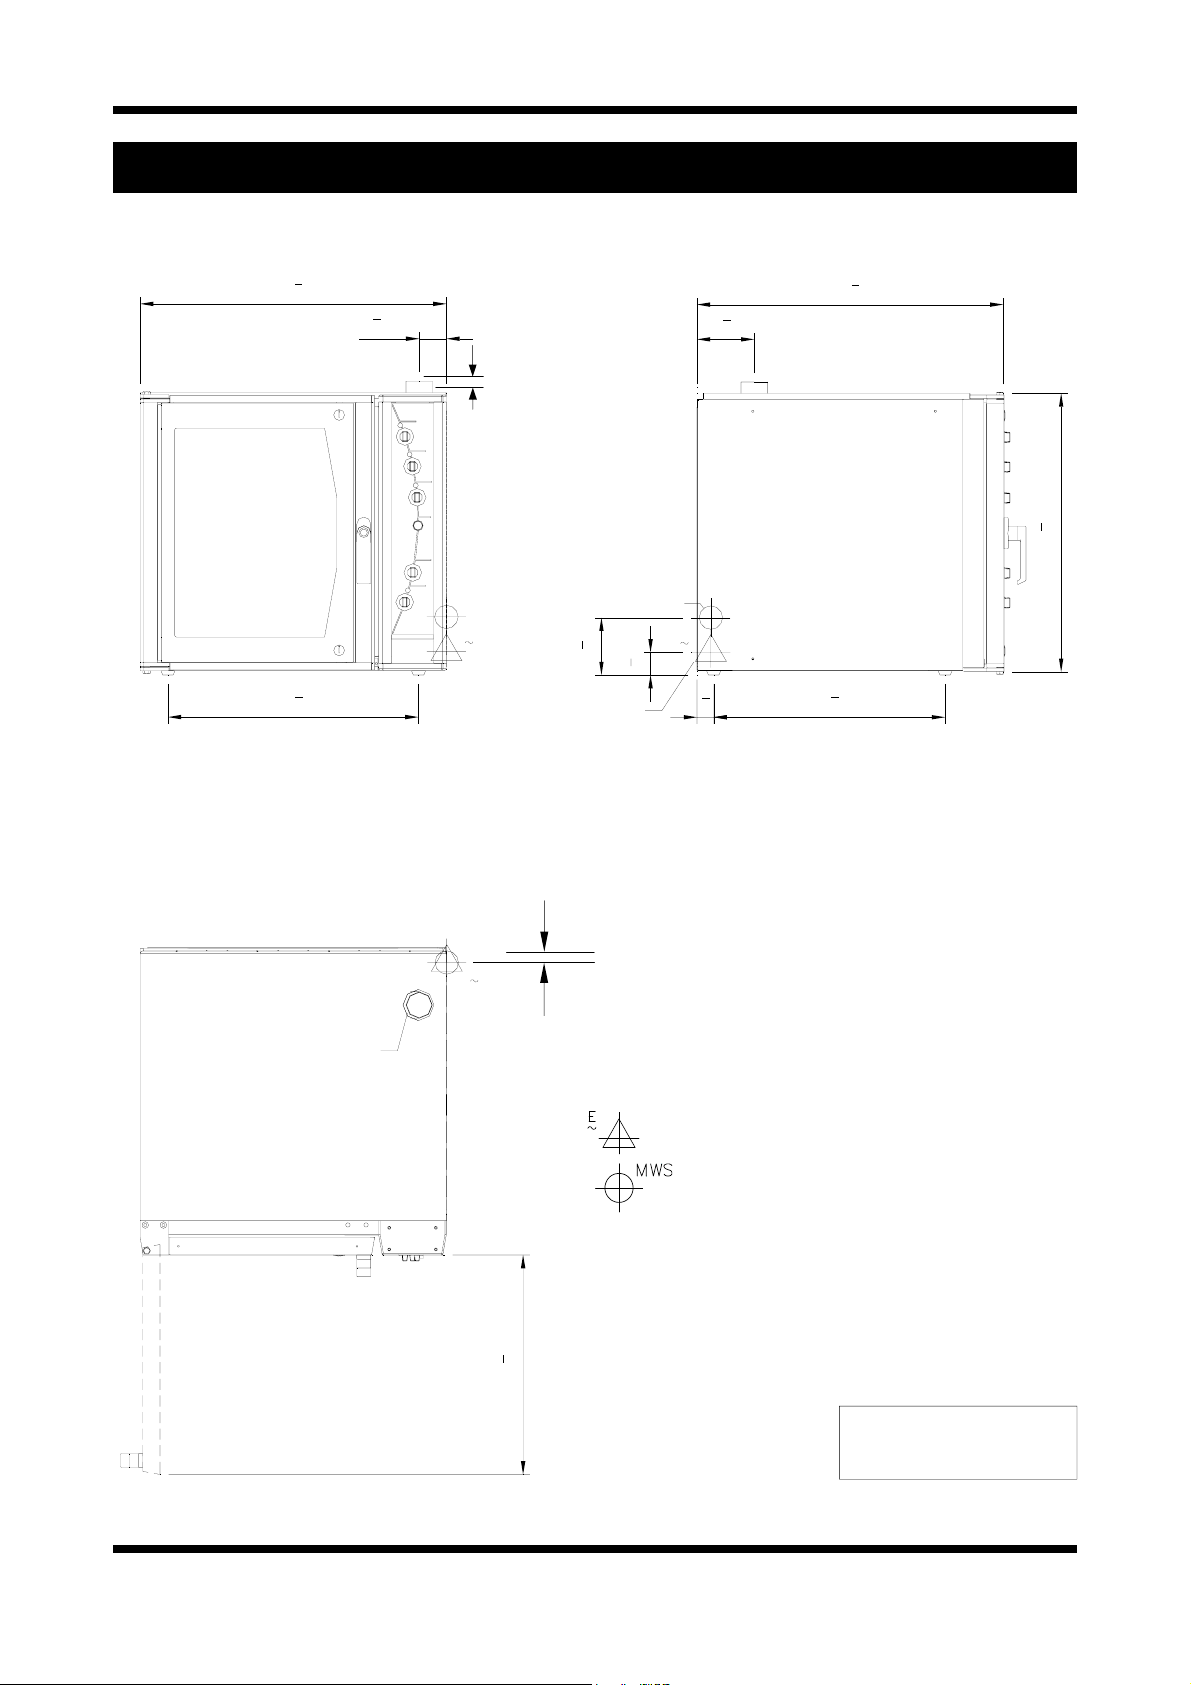
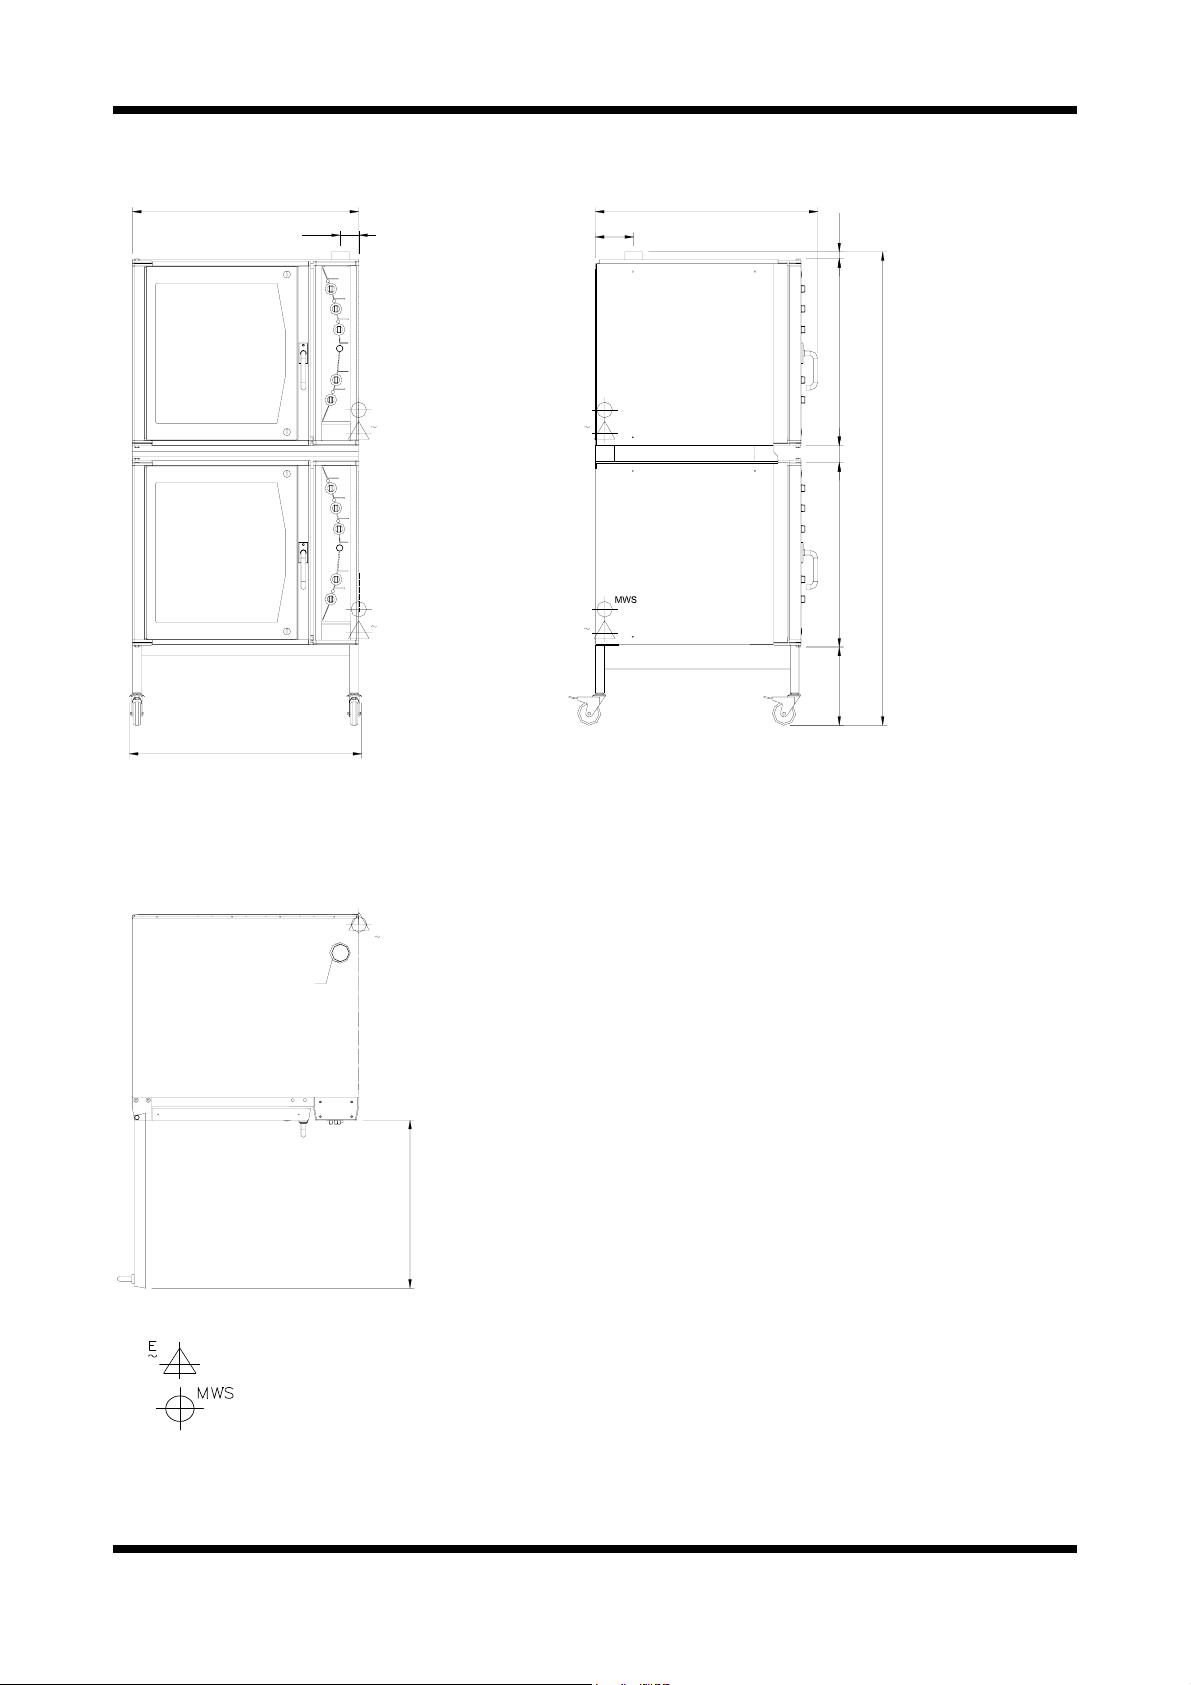
MODEL: E35-26
1. SPECIFICATIONS
FRONT
34
880
28
720
5
"
8
3
"
8
3
78
1
"
8
33
15/16”
MWS
E
3
ELECTRICAL ENTRY
WATER ENTRY
"
1
2
6
155
"
5
2
55
8
1
"
6
2
165
MWS
E
3
7
1
"
8
48
26
665
34
1
4
5
8
880
"
"
"
1
2
31
800
SIDE
VENT Ø 76 O.D.
PLAN
MWS
E
3
"
7
8
24
40
(1.6)
LEGEND
630
- Electrical connection entry point
- Water entry - 3/4” BSP hose connection
Dimensions shown in
millimetres and inches
E35 Turbofan Ovens
Revision 12
-5-
© Moffat Ltd, January 2010
Page 6
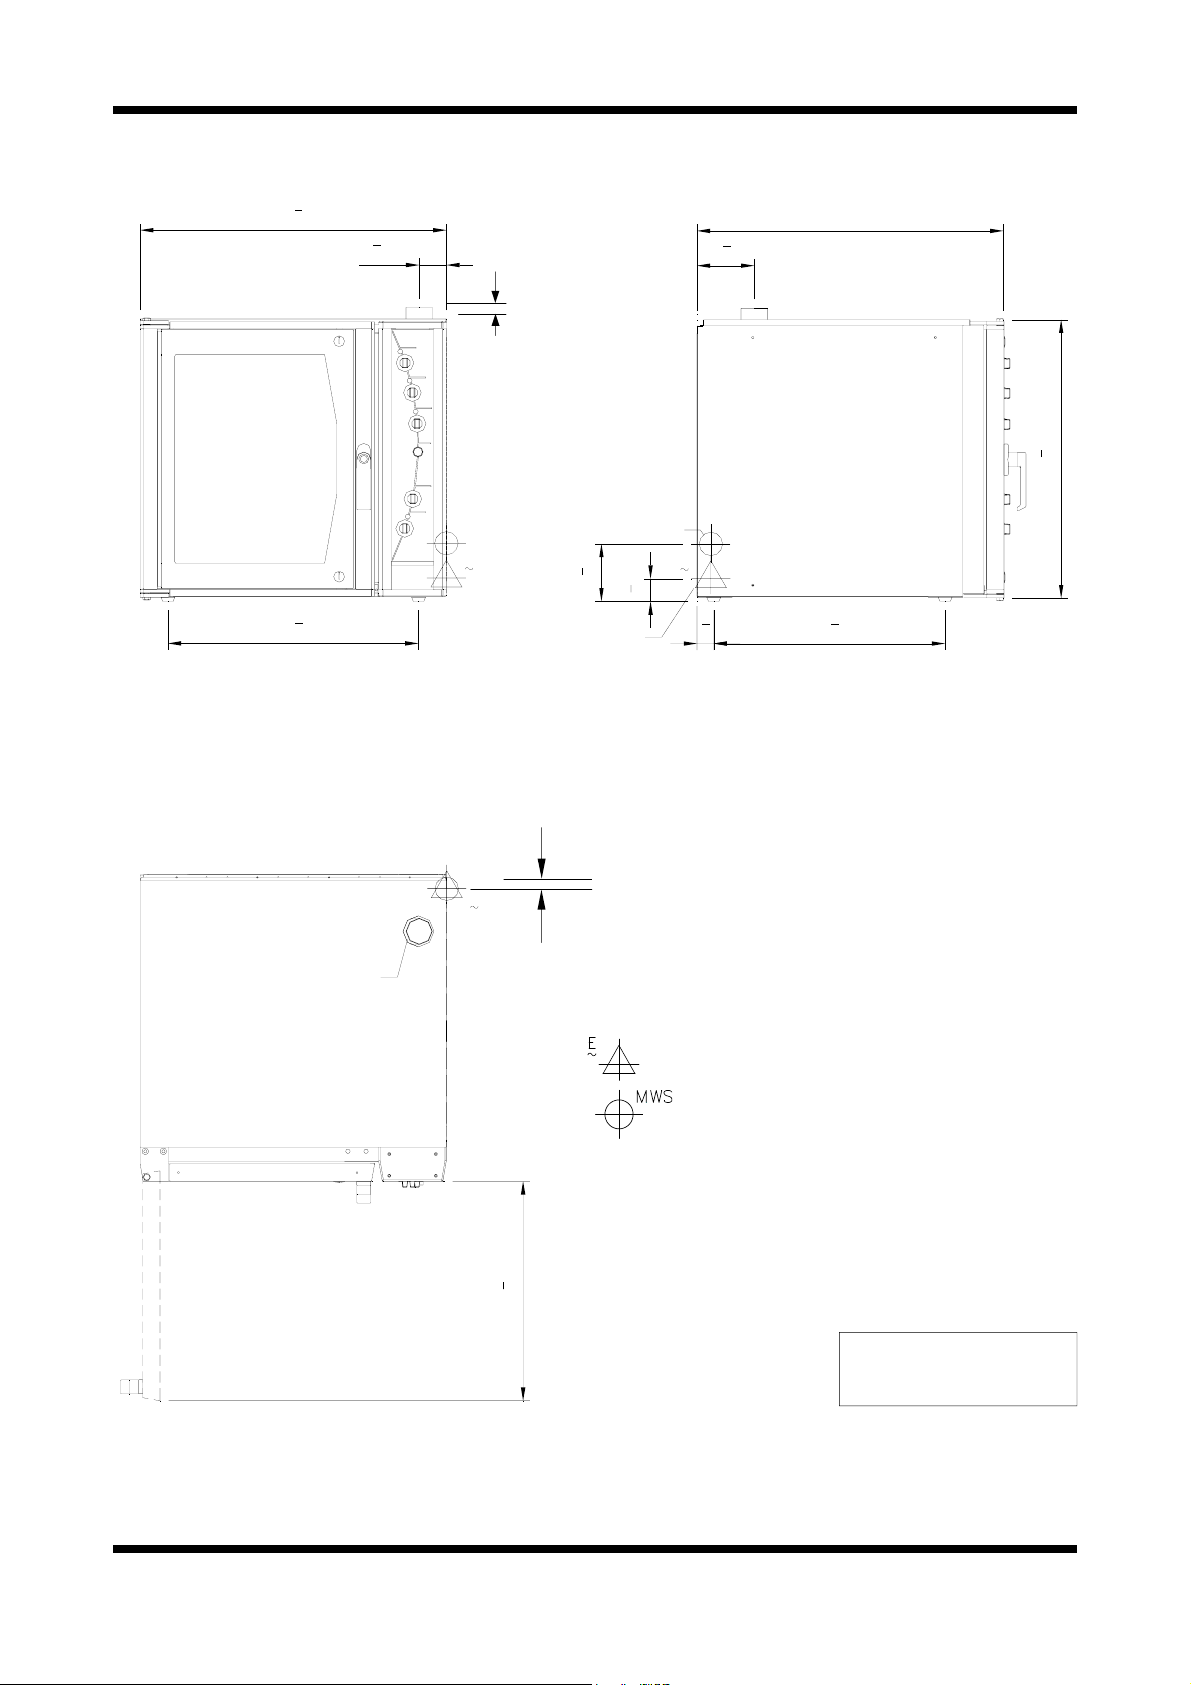
MODEL: E35-30
FRONT
34
880
28
720
5
"
8
3
"
8
3
78
1
"
8
33
15/16”
MWS
E
3
ELECTRICAL ENTRY
WATER ENTRY
"
1
2
6
155
5
"
2
55
8
1
"
6
2
165
MWS
E
3
7
1
"
8
48
26
665
38.6
34
980
1
"
4
5
"
8
"
1
2
31
800
SIDE
VENT Ø 76 O.D.
PLAN
MWS
E
3
"
7
8
24
40
(1.6)
LEGEND
630
- Electrical connection entry point
- Water entry - 3/4” BSP hose connection
Dimensions shown in
millimetres and inches
E35 Turbofan Ovens
Revision 12
-6-
© Moffat Ltd, January 2010
Page 7
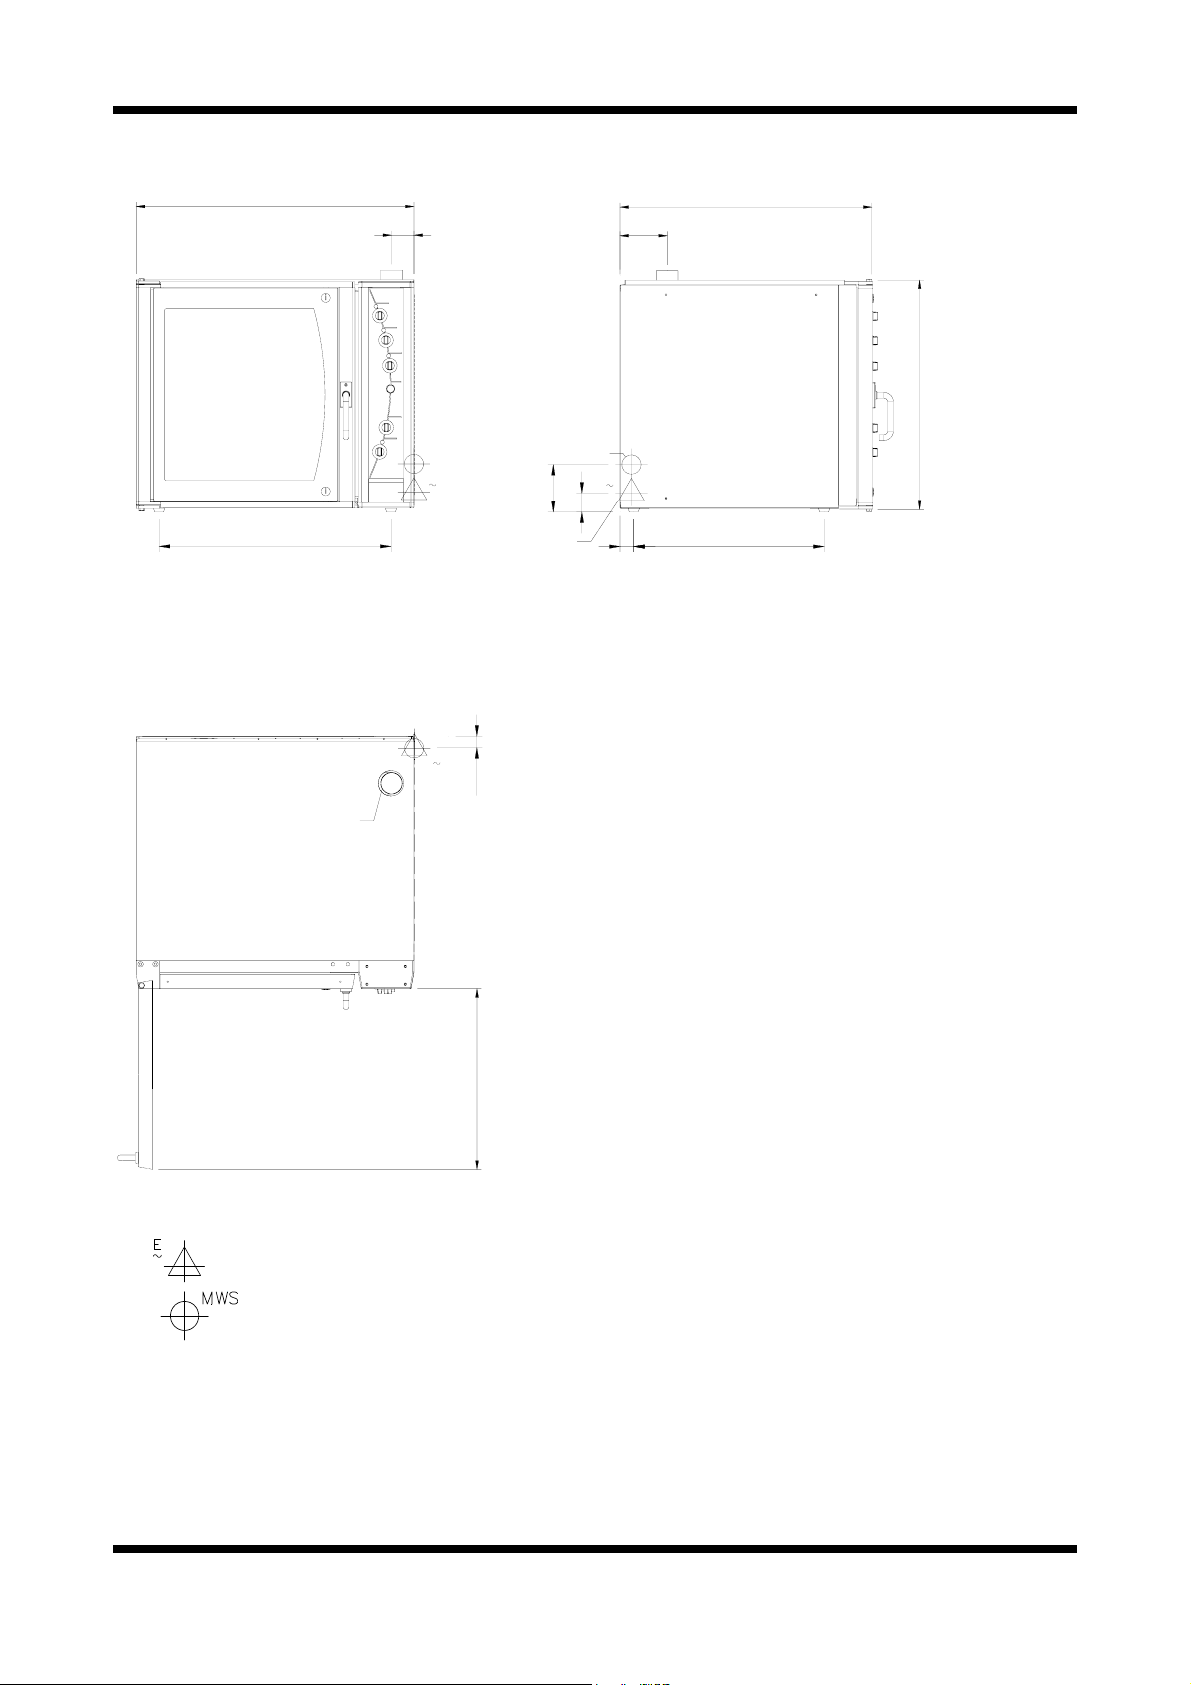
MODEL: E35GN-26
970
810
FRONT
78
MWS
E
3
MWS
E
3
WATER ENTRY
165
ELECTRICAL ENTRY
40
65
880
165
800
MWS
E
3
66548
SIDE
VENT Ø 76 O.D.
PLAN
LEGEND
- Electrical connection entry point
- Water entry - 3/4” BSP hose connection
Dimensions shown in millimetres.
Dimensions in inches shown in brackets.
630
E35 Turbofan Ovens
Revision 12
-7-
© Moffat Ltd, January 2010
Page 8
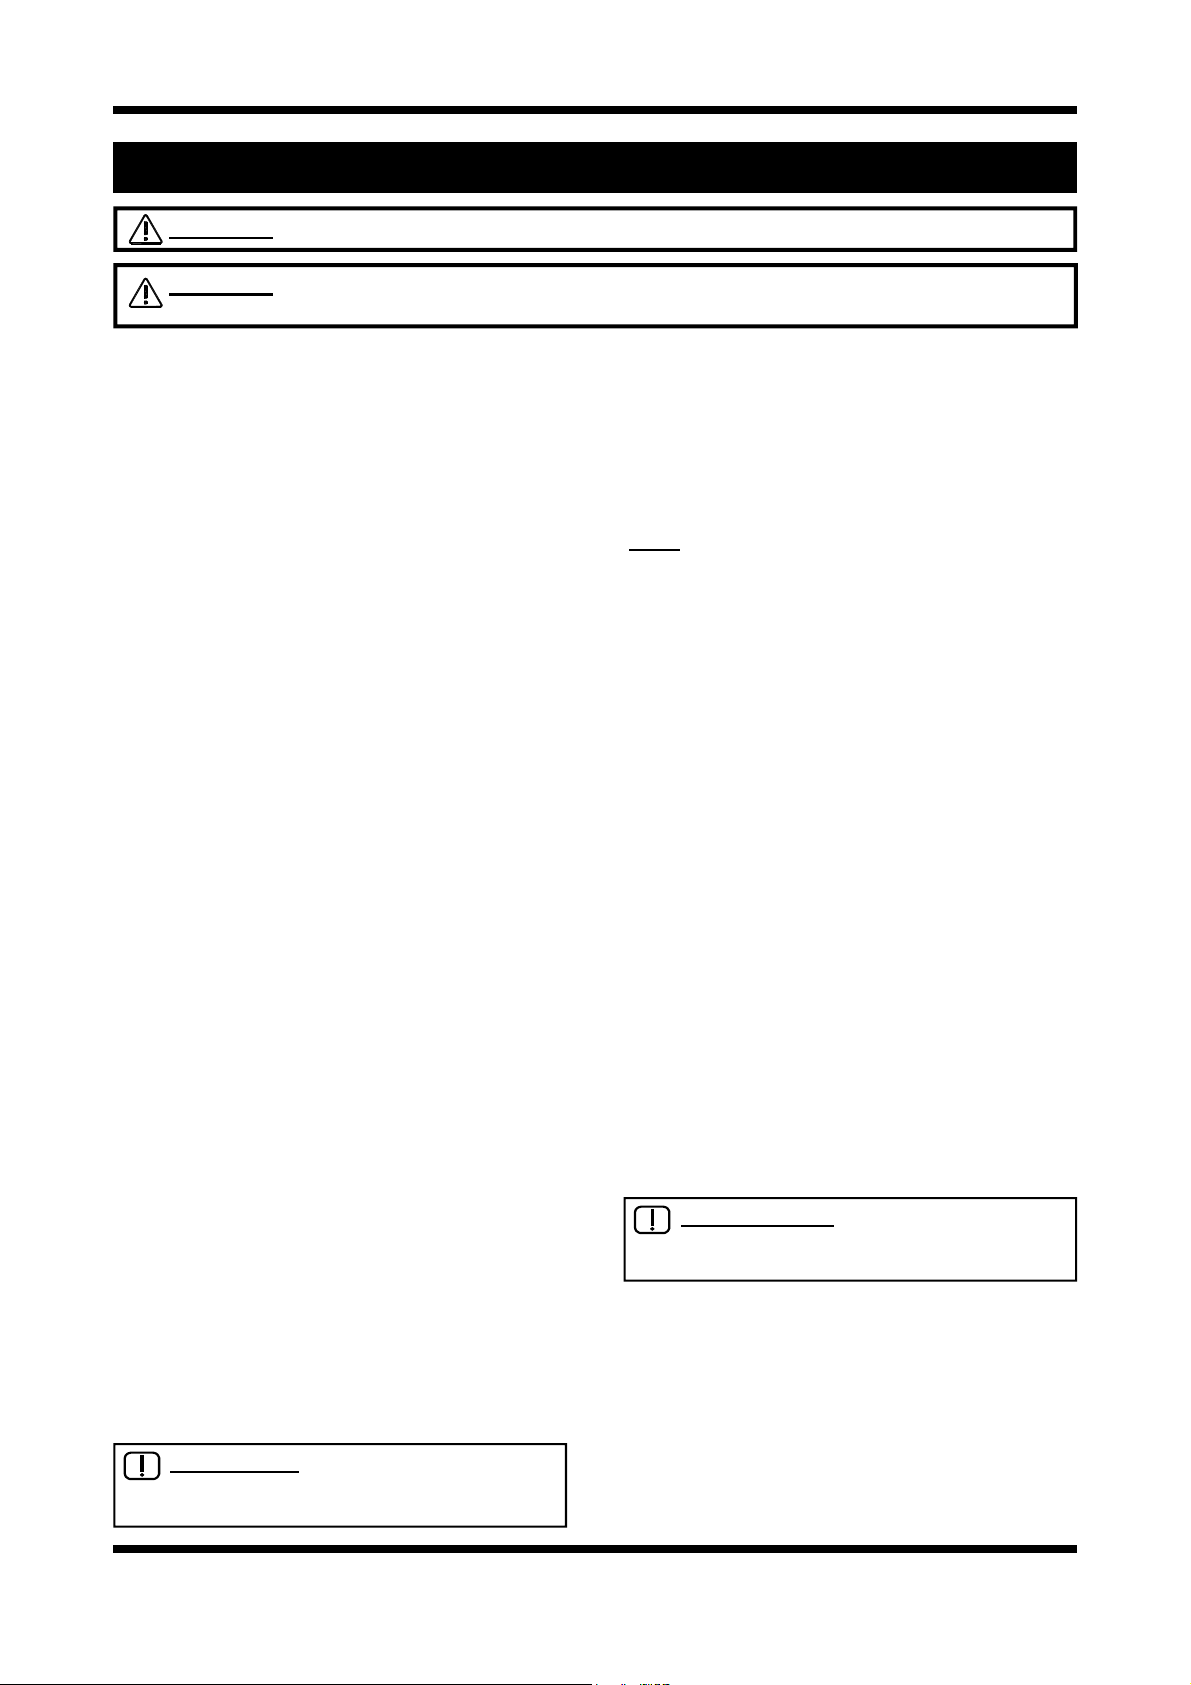
MODEL: E35GN-26 DOUBLE STACK
970
998
955
78
MWS
E
3
MWS
E
3
165
MWS
E
3
E
3
30
2030
790 80075
335
LEGEND
FRONT
MWS
E
3
VENT Ø 76 O.D.
720
PLAN
- Electrical connection entry point
- Water entry - 3/4” BSP hose connection
SIDE
Dimensions shown in millimetres.
Dimensions in inches shown in brackets.
E35 Turbofan Ovens
Revision 12
-8-
© Moffat Ltd, January 2010
Page 9

LOCATION
To ensure correct ventilation for the motor and
controls the following minimum installation
clearances are to be adhered to:
Rear 0mm / 0“.
Left-hand side 0mm / 0”.
Right-hand side 75mm / 3.0”.
OVEN INTERNAL DIMENSIONS
E35-26
Width 465mm / 18
1
/4”.
Height 685mm / 27”.
Depth 760mm / 30”.
Oven Volume 0.24m³ / 8.5ft³.
E35-30
Width 465mm / 18
1
/4”.
Height 685mm / 27”.
Depth 860mm / 34”.
Oven Volume 0.27m³ / 9.7ft³.
E35GN-26
Width 555mm / 21
4
/5”
Height 685mm / 27”
Depth 760mm / 30”
Oven Volume 0.29m³ / 10.2ft³
OVEN RACK SIZE
E35-26
Width 460mm / 18” or 405mm / 16”
(Adjustable shelf width)
Depth 660mm / 26”
E35-30
Width 460mm / 18” or 405mm / 16”
(Adjustable shelf width)
Depth 760mm / 30”
E35GN-26
Width 530mm
Depth 660mm
Standard 2/1 GN Pan or 2 x 1/1 GN Pan
OVEN RACK SPACING
6 Tray (standard) 105 mm / 4
1
/8”
8 Tray (option) 78 mm / 3“
ELECTRICAL SUPPLY SPECIFICATION
OPTIONS
208V, 60Hz, 1P+N+E, 53.7A, 11.2 kW.
220V, 50Hz, 1P+N+E, 56.8A, 12.5 kW.
220-240V, 60Hz, 1P+N+E, 52.0A, 12.5 kW.
230-240V, 50Hz, 1P+N+E, 52.0A, 12.5 kW.
208V, 60Hz, 3P+E, 31A/Ph, 11.2 kW.
220V, 50Hz, 3P+E, 33A/Ph, 12.5 kW.
220-240V, 60Hz, 3P+E, 50.7A/Ph, 12.5 kW.
220V, 60Hz, 3P+E, 32.8A/Ph, 12.5kW.
380V, 60Hz, 3P+N+E, 18.9A/Ph, 12.5kW.
380V, 50Hz, 3P+N+E, 18.9A/Ph, 12.5 kW.
400-415V, 50Hz, 3P+N+E, 17.4A/Ph, 12.5 kW.
400-415V, 50Hz, 3P+N+E, 11A/Ph, 8kW.
ELECTRICAL CONNECTION WIRE
CONDUCTOR SIZES
1P+N+E/Gnd 6AWG/10mm² Copper T75 min.
3P+E/Gnd 10AWG/6mm² Copper T75 min.
3P+N+E/Gnd 12AWG/4mm² Copper T75 min.
WATER SUPPLY CONNECTION
Max Pressure 550 kPa / 5.5 bar / 80 psi.
Min Pressure 100 kPa / 1.0 bar / 15 psi.
E35 Turbofan Ovens
Revision 12
-9-
© Moffat Ltd, January 2010
Page 10
2. INSTALLATION
WARNING: THIS APPLIANCE MUST BE GROUNDED.
WARNING: ALL INSTALLATION AND SERVICE REPAIR WORK MUST BE CARRIED OUT BY
QUALIFIED PERSONS ONLY.
It is most important that the oven is installed
correctly and that the operation is correct
before use. Installation shall comply with local
electrical, health and safety requirements.
BEFORE CONNECTION TO POWER SUPPLY
Unpack and check unit for damage and report
any damage to the carrier and dealer. Report
any deficiencies to your dealer. Fit the feet which
are packed inside the oven. Check that the available power supply is correct to that shown on the
rating plate located on the right-hand side panel.
208V, 60Hz, 1P+N+E, 53.7A, 11.2 kW
220V, 50Hz, 1P+N+E, 56.8A, 12.5 kW
220-240V, 60Hz, 1P+N+E, 52.0A, 12.5 kW
230-240V, 50Hz, 1P+N+E, 52.0A, 12.5 kW
208V, 60Hz, 3P+E, 31A/Ph, 11.2 kW
220V, 50Hz, 3P+E, 33A/Ph, 12.5 kW
220-240V, 60Hz, 3P+E, 50.7A/Ph, 12.5 kW
220V, 60HZ, 3P+E, 32.8A/Ph, 12.5kW
380V, 60Hz, 3P+N+E, 18.9A/Ph, 12.5kW
380V, 50Hz, 3P+N+E, 18.9A/Ph, 12.5 kW
400-415V, 50Hz, 3P+N+E, 17.4A/Ph, 12.5 kW
400-415V, 50Hz, 3P+N+E, 11A/Ph, 8kW
LOCATION
To ensure correct ventilation for the motor and
controls the following minimum installation clearances are to be adhered to:
Rear 0mm / 0“
Left-hand side 0mm / 0”
Right-hand side 75mm / 3.0”
Position the oven in its allocated working position.
Use a spirit level to ensure the oven is level from
side to side and front to back. (If this is not
carried out, uneven cooking could occur). The
feet/legs used with bench or floor mounting or
provided with stands are adjustable and will require adjusting in levelling the unit. It should be
positioned so the operating panel and oven
shelves are easily reachable for loading and
unloading.
Bench Mounting
For bench mounted applications the oven must
be fitted with 100mm / 4 inch feet.
Floor Mounting
For floor mounted applications the oven must be
fitted with 150mm / 6 inch legs.
Four 100mm/4 inch or 150mm / 6 inch
Note:
adjustable legs are available separately from
your E35 dealer as an optional extra.
Stand Mounting
Ovens that are to be mounted on stands do not
require feet or legs. Refer to Appendix B for
stand mounting instructions.
Avoid having heat producing equipment such as
fryers or steamers adjacent to the right-hand side
of oven.
BEFORE USE
Operate the oven for about 1 hour at 200°C
(400°F) to remove any fumes or odours which
may be present.
ELECTRICAL CONNECTION
Remove side cover panel to allow access to the
terminal block and strain relief cable clamp. The
cable can be fitted through the entry grommet
and secured from strain by tightening the fitted
strain relief bushing. Connect cable to the
terminals as marked. Refit cover panel.
IMPORTANT: FIXED WIRING
INSTALLATIONS MUST INCLUDE AN
ALL-POLE DISCONNECTION SWITCH.
Refer to specifications section for wire
connections required, and supply connection
conductor sizes.
IMPORTANT: THE OVEN VENT
LOCATED ON THE CABINET TOP MUST
NEVER BE OBSTRUCTED.
E35 Turbofan Ovens
Revision 12
-10-
© Moffat Ltd, January 2010
Page 11

WATER CONNECTION
A cold water supply should be fitted to the water
3
/4” BSP hose connection) which is located
inlet (
on the rear of the right hand side of the unit.
Alternately, a connection elbow and sealing
washer is supplied with this unit for direct
connection of a
1
/2” ID hose, which is
recommended for easy installation and service.
Connect water supply - Max inlet pressure 80psi /
550kPa.
Turn on water supply to check for leaks.
IMPORTANT: MAXIMUM INLET WATER
PRESSURE IS 550 kPa / 80 psi.
DOUBLE STACKING UNITS
When it is desired to mount an E35 Turbofan
oven on an E85 prover, a double stacking kit
must be used. Available from your dealer or
Turbofan distributor. (see Spare Parts).
When mounting one oven on top of another, a
double stacking kit is also required.
For stacking kit assembly instructions, refer to
Appendix A.
RACK WIDTH POSITIONS
The E35 models have an adjustable rack width
setting. This allows for the racking to be
configured for 405mm / 16” or 460mm / 18” wide
baking sheets / pans or racks.
Position the side racks in their innermost position
for 16” trays and in their outermost position for
18” trays.
Removal of Side Racks (as illustrated)
1) Lift the side rack off the bottom locating pins.
2) Move bottom of rack toward centre of oven.
3) Lower rack to clear top locating pins, and
remove.
Replacement of Side Racks
1) Insert rack into the oven, placing the
appropriate holes over the top locating pins.
2) Lift the side rack over the bottom locating
pins.
3) Lower rack with appropriate holes over bottom locating pins.
RATING PLATE LOCATION
The rating plate for the E35 convection oven is
located at the bottom left corner of the RH side
panel. An internal rating plate is also located
behind the RH side panel on the vertical dividing
panel behind the electrical contactors. (Units
manufactured from July 2002).
Internal Rating Plate
Figure 2.3
Rating Plate
Locating Stud
E35 Turbofan Ovens
Revision 12
Figure 2.2
-11-
© Moffat Ltd, January 2010
Page 12
3. OPERATION
NOTE: A full user’s operation manual is supplied with the product and can be used for further
referencing of installation, operation and service.
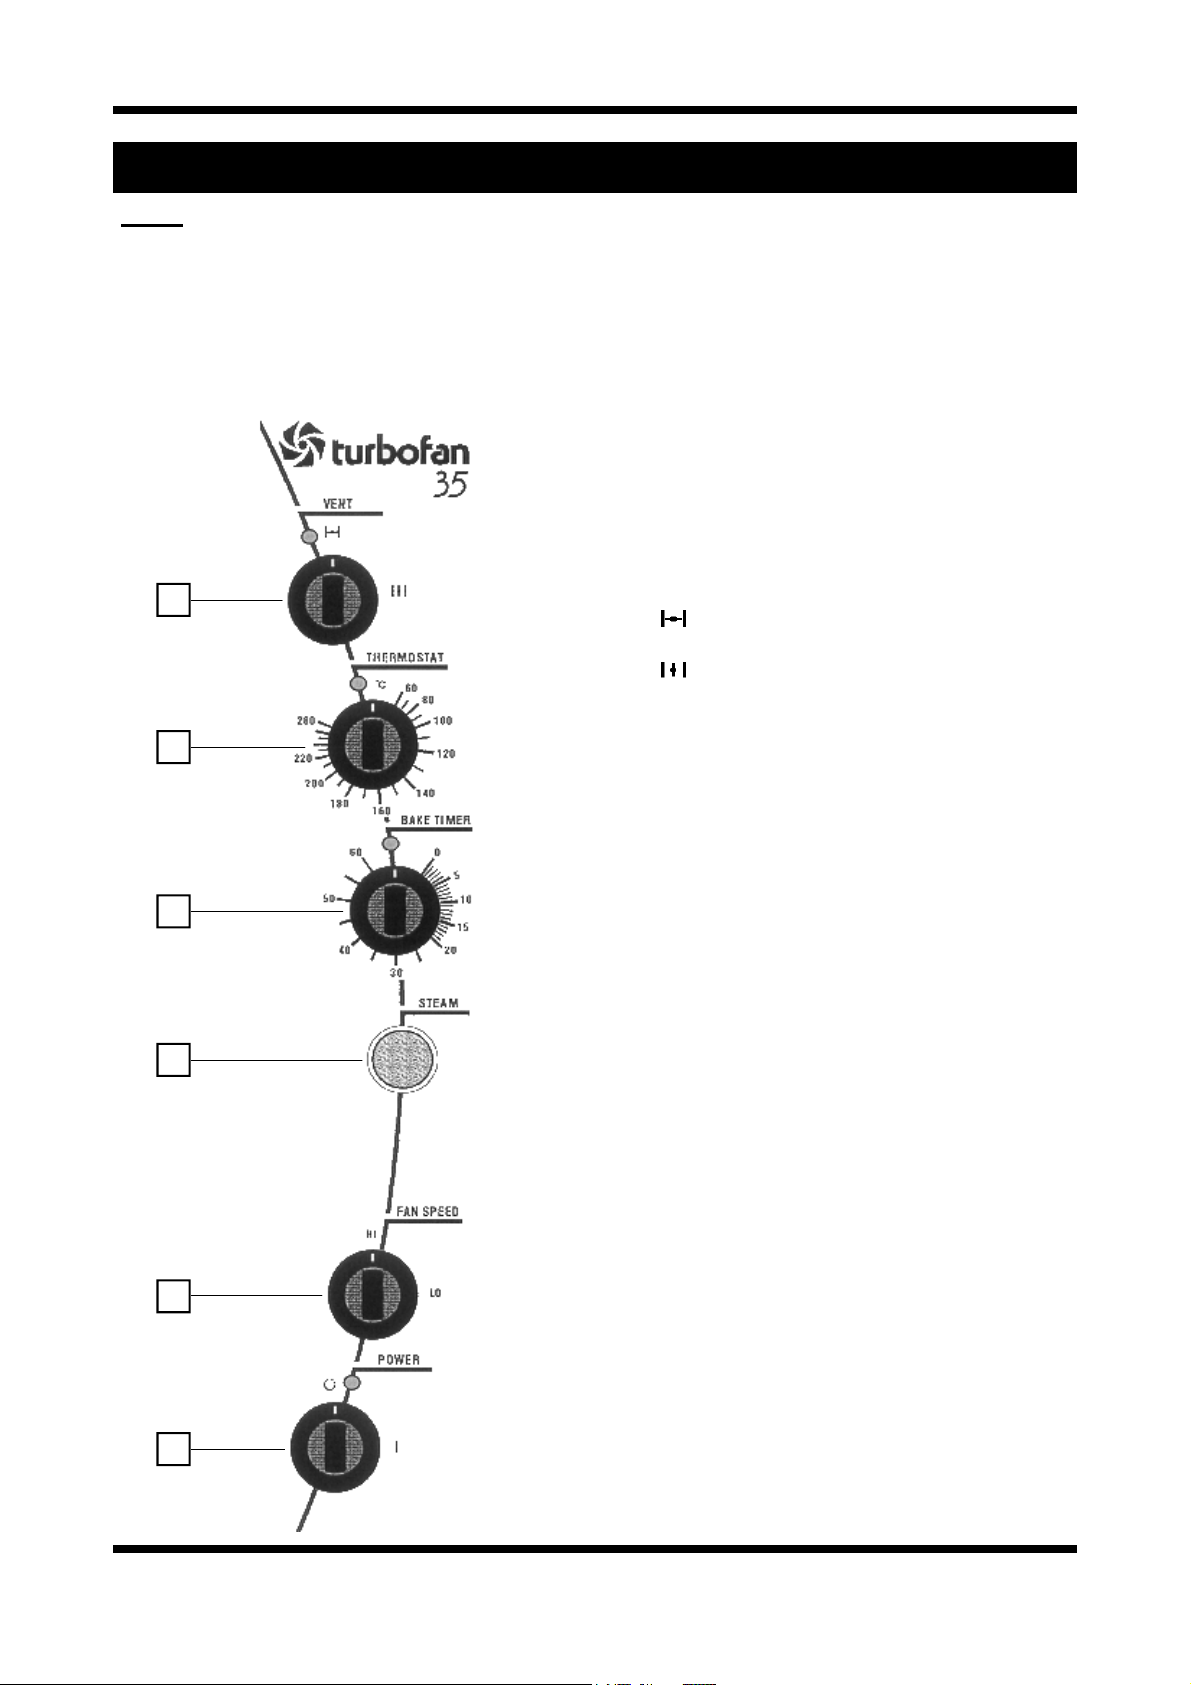
3.1 DESCRIPTION OF CONTROLS (Up to Lot No. 0817999)
1
2
3
4
5
1. VENT
Oven vent closed (incorporates over-
pressure relief when closed).
Oven vent open (light illuminates).
2. THERMOSTAT
Temperature range 60 - 280°C / 100 - 550°F.
(Light illuminates when elements are cycling ON
to maintain set temperature).
3. TIMER
1 Hour bake timer.
(Light illuminates when “time up” (0) reached, and
buzzer sounds).
4. STEAM BUTTON
Push button to activate automatic steam dose
into oven chamber.
(Light illuminates when button activated for
duration of steam cycle).
5. FAN SPEED
HI Full fan speed (Star point connection on
motor).
LO Half fan speed (Delta point connection
on motor).
6. POWER
O UNIT IS OFF
I UNIT IS ON (Light illuminates when
switched to this position).
Oven lights operate continuously.
Fan starts after 10 seconds when door
closed.
6
E35 Turbofan Ovens
Revision 12
-12-
© Moffat Ltd, January 2010
Page 13
NOTE: A full user’s operation manual is supplied with the product and can be used for further
referencing of installation, operation and service.
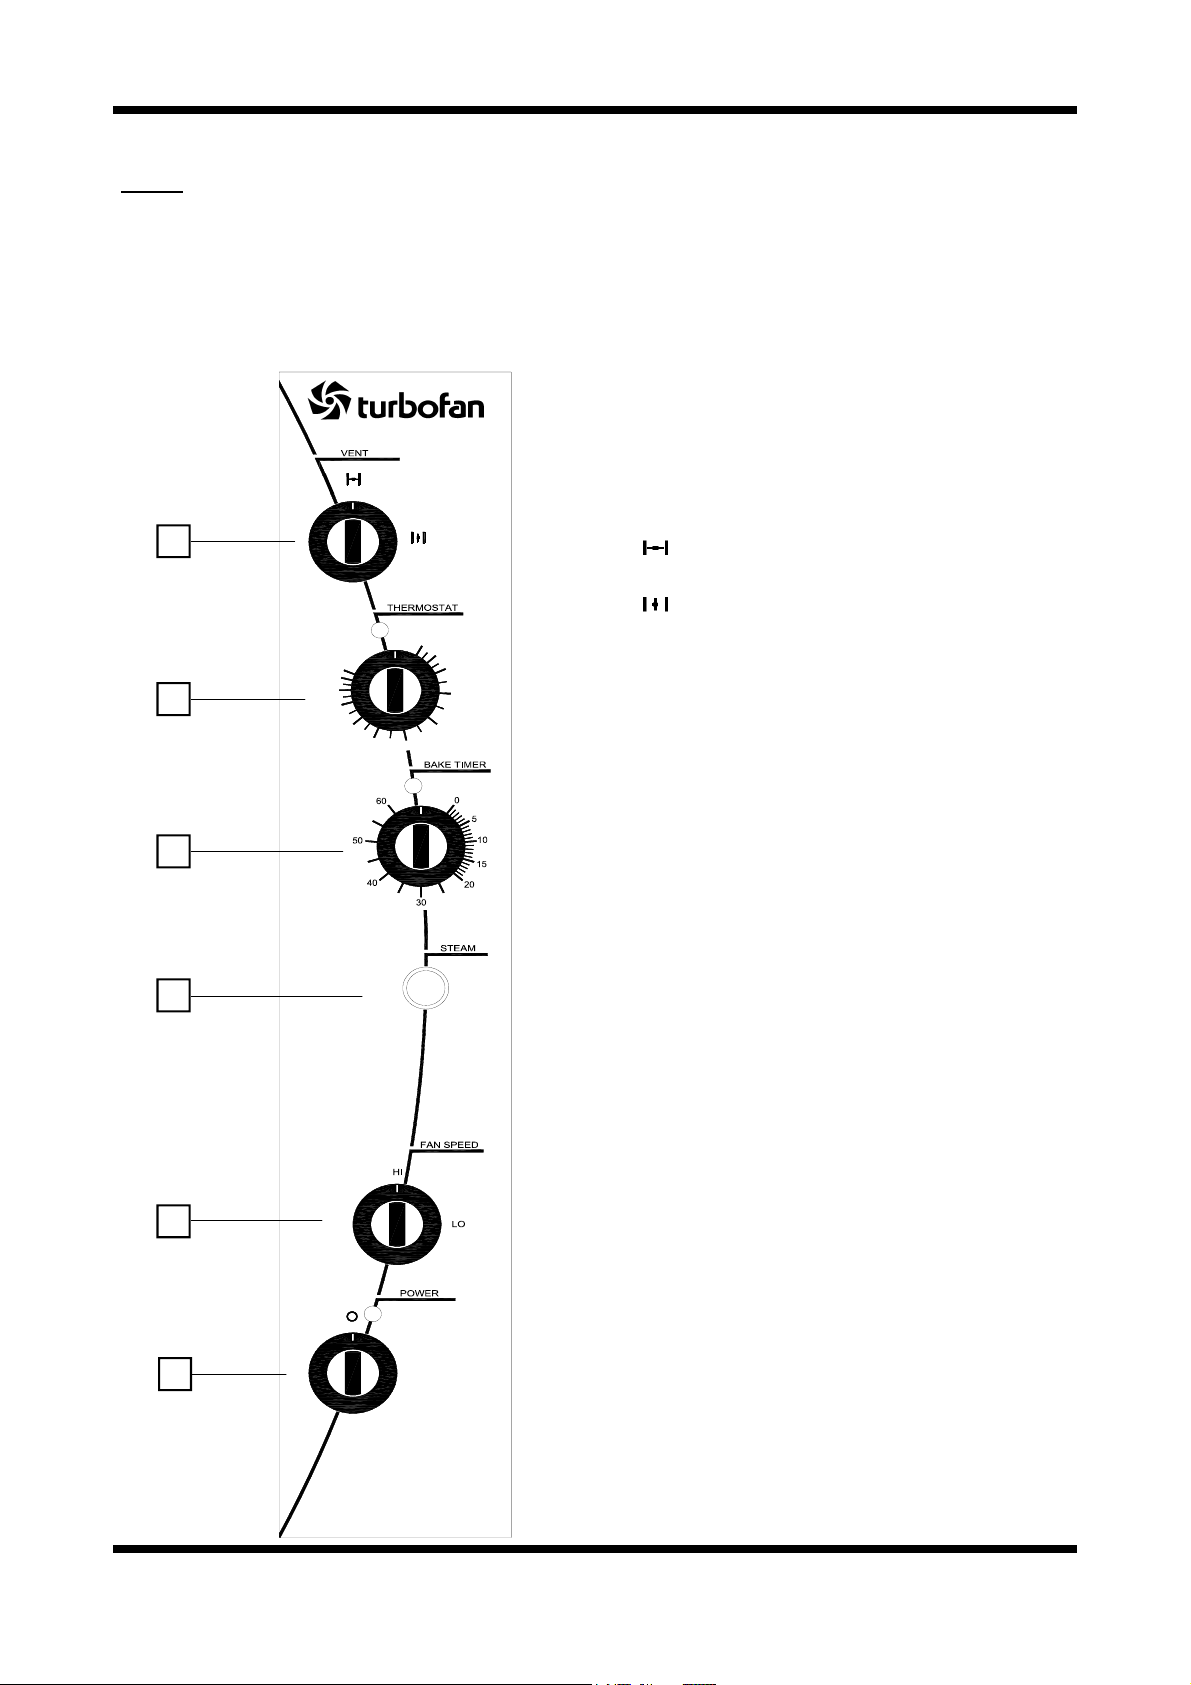
3.2 DESCRIPTION OF CONTROLS (from Lot No. 0818001)
35
1. VENT
1
2
3
4
5
6
°C
60
80
280
220
200
180
100
120
140
160
l
Oven vent closed (incorporates over-
pressure relief when closed).
Oven vent open.
2. THERMOSTAT
Temperature range 60 - 280°C / 100 - 550°F.
(Light illuminates when elements are cycling ON
to maintain set temperature).
3. TIMER
1 Hour bake timer.
(Light illuminates when “time up” (0) reached, and
buzzer sounds).
4. STEAM BUTTON
Push button to activate steam dose into oven
chamber.
NOTE: Press steam button for 10 seconds
will give you 10 seconds of steam.
5. FAN SPEED
HI Full fan speed (Star point connection on
motor).
LO Half fan speed (Delta point connection
on motor).
6. POWER
O UNIT IS OFF
I UNIT IS ON (Light illuminates when
switched to this position).
Oven lights operate continuously.
Fan starts after 10 seconds when door
closed.
E35 Turbofan Ovens
Revision 12
-13-
© Moffat Ltd, January 2010
Page 14

3.3 EXPLANATION OF CONTROL SYSTEM
The E35 Turbofan convection oven features
multi-function operator controls, and a combined
fan motor and steam control system.
A correct understanding of their operation is
required before carrying out any service or fault
repair work. The control device functions are
explained as follows:
Circuit Protection
All models are fitted with a 3 pole circuit breaker,
from which a control circuit is taken from L1
circuit breaker, and this control circuit is fitted with
a 6A circuit breaker. The 3 pole main circuit
breakers are rated 25A/pole for 3P+N+E/GND
and 1P+N+E/GND supply models, and 40A/pole
for 3P+E/GND (no neutral) models. These provide control circuit protection via the 6A circuit
breaker, and load circuit protection via the 3 pole
circuit breakers.
Additionally, the 3 pole circuit breaker is
mechanically connected to a Shunt Trip breaker,
which in the event of the oven fan motor
overheating will trip the 3 pole circuit breakers to
isolate power from the unit. The Shunt Trip is
directly connected to thermal limit switches in the
motor windings, and the supply Neutral (or L3 on
3 phase, no neutral models). A supply from the
6A control circuit breaker is connected to the
motor thermal switches. Should any of the motor
windings overheat, the thermal switches close
and supply power to the Shunt Trip, which in turn
trips (triggers) and mechanically trips the 3 pole
circuit breaker.
Accordingly, causes of circuit breakers tripping
can be ascertained with the above knowledge,
and this is covered in more detail in the Fault
Diagnosis section.
Power ‘On’ / ‘Off’
A Power switch on the control panel isolates
power to the operator controls of the oven. With
the power switch OFF all functions of the oven
are inoperable.
An integral cooling fan, behind the control panel
used to keep the electrical controls of the oven
cool, is on continuously whenever the power
supply to the oven is on. Switching the oven
control panel Power switch off will leave the
cooling fan running.
With the Power switch ON (illuminated neon
indicator), power is supplied to all operator
controls.
Oven Lamps
Up to Lot No. 0817999.
The two oven lamps (12 volt halogen) are on
whenever the Power switch is on. The oven
lamps are supplied with 12 volts from an
electronic lamp transformer fitted on the oven’s
control switchgear assembly.
From Lot No. 0818001.
The two oven lamps (208 / 240 volt halogen) are
on whenever the Power switch is on. The oven
lamps are supplied with mains voltage.
Bake Timer
The 60 minute bake timer is a mechanical timer
and can therefore be operated with the oven’s
power ON or OFF. However only with the oven’s
power switch On and the oven door closed will
the timer turn on the time-up buzzer and time-up
indicator neon on the control panel. The buzzer
and time-up indicator provide indication that the
time setting has run down to zero and at this point
will remain on continuously until the 60 minute
timer has been manually set back to the Off
(vertical) position. The 60 minute timer does not
control any other part of the oven’s operating
system as the timer is independent of the
temperature control, heating, fan, or steam
system.
Oven Vent
Up to Lot No. 0817999.
The oven vent is a manual operation by way of
the Vent knob on the control panel.
The vent knob directly rotates the vent shaft
through 90 degrees to open and close the vent.
The vent shaft passes through a rotary switch
mounted behind the control panel and this switch
is used to switch ‘On’ or ‘Off’ the vent indicating
neon. In the vent ‘Open’ position, the indicator is
illuminated. The oven vent restricts venting of the
oven when in the closed position, however the
vent flap is fitted with a spring loaded overpressure flap which relieves excess pressure
created during oven steaming. This avoids steam
pressure escaping out of door seals etc, if the
oven is steamed with the vent closed. The spring
pressure on the over-pressure vent flap ensures
that only excess steam is lost out of the vent.
From Lot No. 0818001.
The oven vent is a manual operation by way of
the Vent knob on the control panel.
The vent shaft passes through the control panel
and directly rotates the vent shaft to manually
open and close the vent. The oven vent restricts
venting of the oven when in the closed position,
E35 Turbofan Ovens
Revision 12
-14-
© Moffat Ltd, January 2010
Page 15

however the vent flap is fitted with a spring
loaded over-pressure flap which relieves excess
pressure created during oven steaming. This
avoids steam pressure escaping out of door seals
etc, if the oven is steamed with the vent closed.
The spring pressure on the over-pressure vent
flap ensures that only excess steam is lost out of
the vent.
Door Switch
The oven has a mechanical door, micro-switch
located below the oven opening, which breaks
the power supply to the oven fan and
temperature control circuits when the door is
opened. Additionally, opening the oven door will
remove power from the Bake Timer buzzer and
indicator. This allows only the oven lights to be
operational if the oven door is opened.
Thermostat Control
Heating of the oven is controlled by an
electronic thermostat control, comprising of a
potentiometer dial and knob on the control panel,
a temperature sensing probe (thermistor type) in
the oven chamber, and the thermostat control
board behind the control panel. Power to the
electronic thermostat is supplied through an
over-temperature/hi limit thermostat. Accordingly
a failure of the electronic thermostat control
causing a temperature over-run will result in the
over-temperature thermostat switching and
removing power from the heating control circuit.
The over-temperature thermostat is able to be
manually reset, however a serviceman is required
to perform this function, as removal of the R/H
service panel is required to access this safety
protection device.
The electronic thermostat when set to a
temperature will illuminate the heating neon
indicator on the control panel whenever the oven
heating elements are on. When the indicator
neon goes out, the oven is up to the set
temperature.
Heating / Elements
The electronic thermostat when requiring heating
of the oven, switches power to the heating
contactor (referred to as C1 contactor on models
prior to Lot no 0817999, and C3 on models from
Lot no 0818001).
The heating contactor closes to supply power
through to the heating elements in the oven. In
all ovens all 3 poles of the contactor are used to
supply L1, L2, and L3 phase circuits to the 3
heating elements on each side of the oven fan
motor.
On 3 Phase + Neutral supply models, all 6
elements are looped to neutral, and the 3 Phase
power to the elements is to each set of three
elements in parallel connection. Hence each of
the elements is supplied with the Phase to
Neutral voltage.
On 3 Phase supply models (no neutral), the set
of three elements each of the fan motor are
connected in Delta configuration, which each
element being supplied the Phase to Phase
voltage.
On 1 Phase + Neutral supply models, all 6
elements are looped to neutral, and the 1 Phase
power to the elements is split into three poles at
the main circuit breakers on the oven, then feed
through the three poles of the heating contactor,
from where each pole is connected to two of the
six elements in parallel. Hence each of the
elements is supplied with the Phase to Neutral
voltage.
The heating elements are rated at 2000 Watts
each, therefore providing a total of 12000 Watts
or 12kW of heating.
In some cases special heating kilowatts may be
supplied to special request, so always check
rating plate information on the unit if in doubt.
The heating contactor cycles ON / OFF as
controlled by the thermostat to maintain set oven
temperature.
Fan / Motor
The E35 Turbofan ovens use a dual speed,
bi-directional oven fan circulation system, in order
to provide even heat distribution through the
oven, and fan speed control to suit different
product types.
To provide both dual fan speed and bi-direction, a
motor of 4 pole / 8 pole configuration is used.
Fan / Motor Direction
The direction change is made by swapping two
phases to the motor through the motor
contactors. On models to Lot no 0817999 these
are referred to as C2 and C3 contactors. On
models from Lot no 0818001 these are referred to
as C1 and C2 contactors.
In one direction L1, L2, and L3 are switched
through the first motor direction contactor with the
second motor direction contactor open. In the
alternate direction, the second contactor closes
and the first contactor opens. L1 and L2 are
reversed on the second contactor connections.
The motor contactors are mechanically interlocked (interlock fitted to rear of contactors) to
prevent any switching overlap.
E35 Turbofan Ovens
Revision 12
-15-
© Moffat Ltd, January 2010
Page 16

Motor direction change is automatic, and the
duration of the direction cycle is factory set.
Additionally, a dwell period between at each
change of direction occurs to allow the motor to
restart in the opposite direction only after the
motor rotation has slowed down. This is
necessary to avoid motor overheating due to the
high current load that would be required to
change direction instantaneously.
Each direction cycle is 90 seconds long, at the
beginning of which is a preset 10 second dwell /
delay. As the dwell is at the beginning of the cycle, the fan always has a 10 second start delay
when the oven is first turned on, or when the door
is closed after opening.
Up to Lot No. 0817999.
The direction control timing is provided by three
electronic timers mounted below the motor
contactors on the electrical switchgear panel of
the oven. Timer T1 controls the direction cycle
time, timer T3 controls the dwell for one direction
and timer T5 controls the dwell for the opposite
direction.
When the door is closed and power is ON, cycle
timer T1 will switch power to dwell timer T3 for 90
seconds. Timer T3 will then switch power
through to motor direction contactor C2 after the
preset 10 second delay. The motor will then run
for the remainder of the 90 second cycle.
At the completion of the 90 second cycle, cycle
timer T1 will switch the power from T3 dwell
timer to T5 dwell timer. This dwell timer will
then switch power through to contactor C3
after the preset 10 s
econd delay, and the
motor will run in the opposite direction for
the remainder of that 90 second cycle. At the
completion of that cycle the cycle timer T1
switches power back to the other dwell timer,
and this continues until the oven door is opened,
or the power is turned off.
From Lot No. 0818001.
The direction control timing is provided by a
single Motor Direction Cam Timer mounted below
the motor speed contactors C4, C5 and C6 on the
electrical switchgear panel of the oven.
The circulation fan on the E35 oven reverses
direction every 90 seconds for a 50Hz supply
(every 75 seconds for 60Hz). Prior to a change
of direction the fan motor is switched off for 10
seconds (8½ seconds for 60Hz) to allow the
motor / fan to slow down. Cycling of the fan
motor is controlled by a continuous cam timer
with electric motor. The timer has two cams and
switches which supply power alternately to one of
two motor supply contactors, causing the motor to
alternate direction. During the fan motor slow
down periods, both cam switches are open and
power is not supplied to either of the motor supply
contactors. When the oven door is opened or the
power is switched off the cams will stop. When
the oven door is closed or the power switched
back on the cam timer will resume its cycle from
the point where it stopped.
Fan / Motor Speed
For HI speed operation the motor is run as a 4
pole motor. (1420 rpm 50Hz / 1750 rpm / 60Hz)
For LO speed operation the motor is run as an 8
pole motor. (715 rpm 50Hz/850 rpm / 60Hz)
Selection of the pole configuration for run speed
is made though the motor contactors C4, C5 and
C6.
In HI speed setting the motor contactors C4 and
C6 close, C4 switching power to the motor on the
4 pole connection leads, and C6 binding 4 of the
8 motor poles to allow motor to run as a 4 pole
motor.
In LO speed setting the motor contactor C5
closes to switch power to the motor on the 8 pole
connections leads, with contactors C4 and C6
remaining open.
Motor contactors C5 and C6 are mechanically
interlocked (interlock fitted to rear of contactors)
to prevent any switching overlap between LO and
HI speed changes.
The motor speed control is by manual operation
of the Fan Speed switch on the control panel.
This rotary switch simply supplies power to either
motor contactors C4 and C6 for HI speed, or C5
for LO speed. The contactors stay closed in the
selected setting unless the oven door is opened.
Closing the oven door allows the contactors to
switch on again.
Fan / Motor - Single Phase Models
The operation of the fan motor on single phase
E35 models is the same as other three phase
models for two speed and bi-direction operation,
except for the electrical circuit required.
On single phase models the same motor is used
as on three phase models, but with capacitors in
the motor circuit to create an artificial phase lag,
that is normally part of the three phase supply on
three phase models. Use of the three phase
motor is required to retain the bi-direction
operation.
On single phase models the L1 supply to the
motor connects to the normal L1 connection of
the motor, and the Neutral supply connects to the
normal L2 (as connected on three phase models)
connection of the motor. A capacitor is then
connected to the normal L3 (as connected on the
three phase models) connection of the motor, and
E35 Turbofan Ovens
Revision 12
-16-
© Moffat Ltd, January 2010
Page 17

this capacitor is supplied power from the L1/
Phase supply. This capacitor is referred to as the
Run capacitor as it is permanently in the circuit
during motor operation. Each motor on single
phase models has two run capacitors, one for the
LO speed operation (lower capacitance) and one
for the HI speed operation (higher capacitance).
Each Run capacitor is only used when the motor
is running at that speed setting.
Additionally a Start capacitor is also fitted on
single phase models, and is used for starting the
motor rotation at the beginning of each direction
change when in HI speed setting only. This
capacitor is switched on for approximately 7
seconds only at the beginning of each motor start
up, with a contactor C7 switching the Start
capacitor on and off, and with a timer T6
controlling the timing of the contactor C7.
Fan direction change in single phase models is
still controlled by motor contactors C2 and C3.
However unlike three phase models where C2
and C3 swap phases over to change motor start
rotation / direction, single phase models use C2
and C3 to switch the run capacitor form the L1
supply to the Neutral supply for direction change.
Control of the motor cycle timing and dwell timing
is the same as three phase models.
Motor Protection
Refer Circuit Protection at start of section.
Steam System
Up to Lot No. 0817999.
The E35 Turbofan ovens feature an automatically
timed oven chamber steaming system, that
allows operators to inject a 10 second period of
steam into the oven at any stage. The steam is
generated when a solenoid valve opens and
supplies mains water to a calibrated wide spray
angle nozzle in the oven that discharges the water as a fine spray into the oven fan. The fine
spray at a wide angle is then immediately thrown
by the fan circulation across the oven heating
elements either side of the fan. The fine spray
instantaneously turns to steam on the hot
elements, which is supported by the hot air of the
oven also turning the water droplets into steam.
The steam is initiated by depressing the Steam
switch on the control panel. When depressed the
steam switch provides power one of two Steam
timers which are preset to 10 seconds steam
cycle duration. These Steam timers are T2 and
T4.
T2 is associated with fan dwell timer T3 and is
used when steam is required during the fan
direction cycle that uses the T3 dwell timer.
T4 is associated with fan dwell timer T5 and is
used when steam is required during the fan
direction cycle that uses the T5 dwell timer.
This ensures that steam can be used in either fan
direction cycle, and additionally allows the fan to
be turned on as soon as steam is activated, even
if the fan was in a direction change dwell.
Ensuring that the fan is running when steam is
required is necessary to atomise the water
droplets by the mechanical action of the fan, and
by the fan throwing the water across the
elements.
The Steam switch on the control panel only
needs to be depressed momentarily as the
duration of the steam injection is automatically
timed by the steam timers. The Steam switch will
illuminate for the duration of the steam injection to
provide a visual confirmation of the steaming
process. The light in the steam switch is
independent of the switch contacts and is
powered by the electrical circuit to the water
solenoid valve. Therefore the switch is
illuminated for as long as the water solenoid is
open: 10 seconds.
Steam System
From Lot No. 0818001.
The E35 Turbofan ovens feature a manually
operated oven chamber steaming system, that
allows operators to inject a shot of steam into the
oven at any stage. The steam is generated when
a solenoid valve opens and supplies mains water
to a calibrated wide spray angle nozzle in the
oven that discharges the water as a fine spray
into the oven fan. The fine spray at a wide angle
is then immediately thrown by the fan circulation
across the oven heating elements either side of
the fan. The fine spray instantaneously turns to
steam on the hot elements, which is supported by
the hot air of the oven also turning the water
droplets into steam.
The steam is initiated by depressing the Steam
switch on the control panel. When depressed,
the steam switch provides power to the water
solenoid. Pressing the Steam switch for one
second will provide one second of steam,
pressing the steam switch for 5 seconds will
provide 5 seconds of steam.
The Steam switch will not illuminate as with
pre-Lot No. 0818001 Ovens.
E35 Turbofan Ovens
Revision 12
-17-
© Moffat Ltd, January 2010
Page 18

Summary of Components
Up to Lot No. 0817999.
The electrical switchgear (not user controls)
components are summarised as follows:
C1 Heating contactor
Switches elements ON / OFF.
C2 Motor direction contactor
Phases switched in line.
C3 Motor direction contactor
Phases L1 and L2 swapped on 3 phase
models.
Run capacitor swapped from L1 to
Neutral on 1 phase models.
C4 Motor speed contactor
HI speed.
C5 Motor speed contactor
LO speed.
C6 Motor speed contactor
HI speed (changes motor from 8 pole
to 4 pole).
T1 Fan cycle timer
Direction cycle.
T2 Steam timer
For T3 dwell direction.
T3 Fan dwell timer
Alternate direction (always initial
direction dwell).
T4 Steam timer
For T5 dwell direction.
T5 Fan dwell timer
Alternate direction (always 2
nd
direction
dwell).
C7 Motor start capacitor contactor.
(Single phase models only).
T6 Motor start capacitor timer
(Single phase models only).
Motor contactor interlocks fitted to C2+C3
(mounted on rear on contactors).
Motor contactor interlocks fitted to C5+C6
(mounted on rear on contactors).
Summary of Components
From Lot No. 0818001.
The electrical switchgear (not user controls)
components are summarised as follows:
C1 Motor direction contactor
Phases switched in line.
C2 Motor direction contactor
Phases L1 and L2 swapped on 3 phase
models.
Run capacitor swapped from L1 to
Neutral on 1 phase models.
C3 Heating contactor
Switches elements ON / OFF.
C4 Motor speed contactor
HI speed.
C5 Motor speed contactor
LO speed.
C6 Motor speed contactor
HI speed (changes motor from 8 pole
to 4 pole).
C7 Motor start capacitor contactor.
(Single phase models only).
T1 Motor start capacitor timer
(Single phase models only).
Motor contactor interlocks fitted to C1+C2
(mounted on rear on contactors).
Motor contactor interlocks fitted to C5+C6
(mounted on rear on contactors).
E35 Turbofan Ovens
Revision 12
-18-
© Moffat Ltd, January 2010
Page 19
4. MAINTENANCE
WARNING: ALL INSTALLATION AND SERVICE REPAIR WORK MUST BE CARRIED OUT BY
QUALIFIED PERSONS ONLY.
4.1 CLEANING
WARNING: ALWAYS TURN THE
POWER SUPPLY OFF BEFORE
CLEANING.
IMPORTANT: THIS UNIT IS NOT
WATER PROOF.
DO NOT USE A WATER JET SPRAY TO
CLEAN INTERIOR OR EXTERIOR OF THIS
UNIT.
EXTERIOR
Clean with a good quality stainless steel cleaning
compound. Harsh abrasive cleaners may damage the surface.
INTERIOR
Ensure that the oven chamber is cool. Do not use
wire brushes, steel wool or other abrasive materials. Clean the oven regularly with a good quality
oven cleaner. Take care not to damage the fan
or the tube at the right side of the oven which
controls the thermostat.
SIDE RACKS
To remove, follow instructions given in the
installation section.
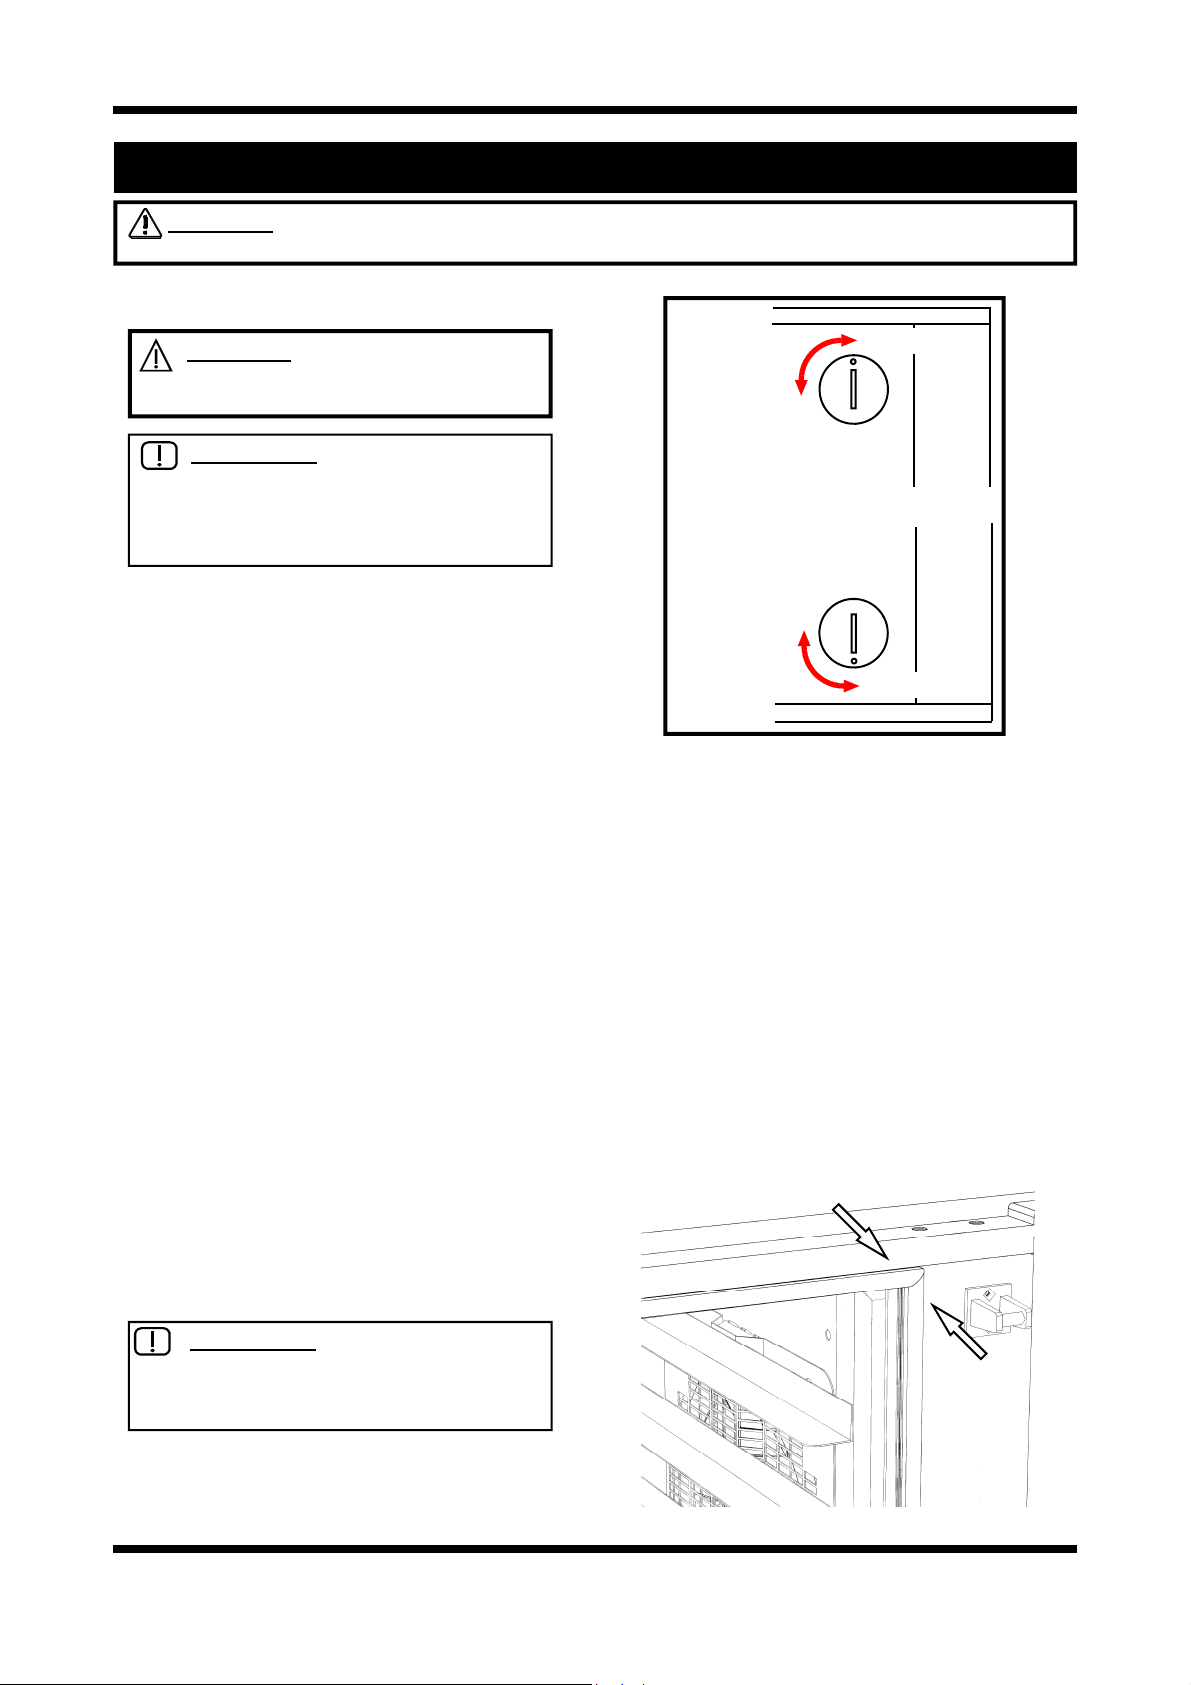
OVEN DOOR (HINGED GLASS)
Outer surfaces: Clean with conventional glass
cleaners
Inner surfaces: To clean between the inner and
outer door glasses, firstly ensure the door is
locked shut. With a screwdriver, coin, or other
suitable device,
1
/4 turn the outer glass locks to
release the outer glass and allow it to be hinged
open for cleaning access (refer to figure 4.1 for
correct procedure).
IMPORTANT: ALWAYS ENSURE
THAT THE OUTER GLASS IS HINGED
CLOSED AND LOCKED INTO
POSITION BEFORE OPENING DOOR.
TOP
LOCKED
UN-LOCKED
UN-LOCKED
LOCKED
BOTTOM
Figure 4.1
OVEN DOOR (HINGED GLASS)
Outer surfaces: Clean stainless steel with quality
stainless steel cleaner.
Inner surfaces: Clean stainless steel with
quality stainless steel cleaner.
Door glass: Clean with conventional glass
cleaners.
OVEN SEALS
To remove, pull out the seal starting at each
corner. The seal may be washed in the sink, but
take care not to cut or damage it. To replace, fit
the seal in at the corners first, then push in the
rest of the seal.
E35 Turbofan Ovens
Revision 12
-19-
Figure 4.2
© Moffat Ltd, January 2010
Page 20

4.2 ROUTINE PROCEDURES
PROCEDURE INTERVAL
DOOR SEALS Check for deterioration. 12 months
DOOR PIVOT BUSHES Check for wear. 12 months
DOOR CATCH Ensure that catch is adjusted such that the door closes
12 months
properly.
ELEMENT Check that element resistance is correct to it’s rating (refer
12 months
6.3.12).
WATER NOZZLE Check for lime build-up in water nozzle. 12 months
E35 Turbofan Ovens
Revision 12
-20-
© Moffat Ltd, January 2010
Page 21

5. TROUBLE SHOOTING
WARNING: ALL INSTALLATION AND SERVICE REPAIR WORK MUST BE CARRIED OUT BY
QUALIFIED PERSONS ONLY.
The following Troubleshooting Guide should be used to identify any incorrect oven operation. On correct
identification of the operating fault the Troubleshooting guide will make reference to the corrective action
required, or refer to the Fault Diagnosis section and / or Service section to assist in correction of the fault.
FAULT POSSIBLE CAUSE REMEDY
THE OVEN DOES NOT
OPERATE / START
The mains isolating switch on the
wall, circuit breaker or fuses are
“off” at the power board.
The power switch on the oven is
off (‘0’).
Incorrect electrical supply.
Oven circuit breaker tripped.
Power switch on unit faulty.
FAN DOESN’T OPERATE Door not closed.
(Fan only operates when the
door is closed).
Door microswitch out of
adjustment.
Door microswitch faulty.
Fan motor faulty.
Fan timers / Contactors faulty.
Turn on.
Turn switch to ‘I’ position.
Ensure electrical supply correct.
Identify fault.
Reset circuit breaker.
Replace.
(Refer service section 6.3.1).
Close door.
Adjust.
(Refer service section 6.4.1).
Replace.
(Refer service section 6.3.3).
Replace.
(Refer service section 6.3.21).
Replace.
(Refer service section 6.3.10).
STEAM LIGHT DOES NOT
ILLUMINATE
Up to Lot No. 0817999 Only.
NO STEAM
(continued next page)
E35 Turbofan Ovens
Revision 12
Blown bulb. Replace bulb.
Water not turned on.
Blocked filter in water solenoid.
Nozzle blocked.
Check valve blocked / corroded.
-21-
Turn water on at isolating valve.
Clean filter.
Remove, clean or replace.
(Refer service section 6.3.15).
Remove check valve.
(Refer service section 6.3.15).
© Moffat Ltd, January 2010
Page 22

FAULT POSSIBLE CAUSE REMEDY
NO STEAM
(continued)
Steam tube blocked.
Faulty solenoid coil.
Steam switch faulty.
Timer faulty.
Up to Lot No. 0817999.
STEAMS ONLY SOMETIMES
Steam timer faulty. Replace.
Up to Lot No. 0817999.
SLOW RECOVERY Faulty contactor.
Element(s) blown.
NO HEAT IN OVEN Faulty door microswitch.
Faulty heating contactor.
Over-temperature control tripped.
Faulty thermostat controls.
Remove, clean or replace.
Replace.
(Refer service section 6.3.16).
Replace.
(Refer service section 6.3.13).
Adjust / Replace.
(Refer service section 6.3.10).
(Refer service section 6.3.10).
Replace.
(Refer service section 6.3.10).
Replace.
(Refer service section 6.3.11).
Adjust or replace.
(Refer service section 6.3.3).
Replace.
(Refer service section 6.3.10).
Reset.
Replace.
(Refer service section 6.3.7).
OVER-TEMPERATURE
CONTROL TRIPS / OVEN OVERHEATS
Oven too hot, thermostat out of
calibration.
Over-temp out of calibration.
TIMER WILL NOT TIME DOWN Faulty timer.
NO TIME UP ALARM
INDICATION
Faulty timer.
Faulty buzzer.
NO HIGH FAN SPEED
NO LOW FAN SPEED
Fan selector switch faulty.
Fan selector switch faulty.
Replace.
(Refer service section 6.3.8).
Replace.
(Refer service section 6.3.12).
Replace.
(Refer service section 6.3.18).
Replace.
(Refer service section 6.3.18).
Replace.
(Refer service section 6.3.19).
Replace.
(Refer service section 6.3.22).
Replace.
(Refer service section 6.3.22).
E35 Turbofan Ovens
Revision 12
-22-
© Moffat Ltd, January 2010
Page 23

FAULT POSSIBLE CAUSE REMEDY
OVEN LIGHTS NOT
ILLUMINATING
Blown bulb(s).
Faulty lighting transformer.
(Up to Lot No. 0817999 Only).
NOTE:
If both light bulbs have blown then
there will be no output from the
lighting transformer.
OVEN VENT INDICATOR NOT
ILLUMINATING WHEN IN ‘OPEN’
POSITION.
Up to Lot No. 0817999.
OVER-PRESSURE VENT NOT
OPERATING DURING STEAM
CYCLE
Indicator faulty.
Switch faulty.
Vent blocked.
Over-pressure vent mechanism
restricted.
DOOR DOES NOT CLOSE Tray in way of door.
Door seal obstruction.
Door handle in wrong position.
Up to Lot No. 0817999.
Door setting incorrect.
Replace.
(Refer service section 6.3.4).
Replace.
(Refer service section 6.3.6).
Replace.
(Refer service section 6.3.2).
Replace.
(Refer service section 6.3.23).
Remove and clean blockage.
Remove and clean.
(Refer service section 6.3.24).
Correctly position tray in rack.
Correctly install door seal.
(Refer maintenance section).
Reposition door handle.
(Refer service section 6.3.28a /
6.3.29).
Adjust.
(Refer service sections 6.4.3 /
6.4.4 / 6.4.5).
DOOR SEAL LEAKS Door seal damaged.
Door seal incorrectly fitted.
Replace.
(Refer Section 4, Maintenance).
Correctly install door seal.
(Refer Section 4, Maintenance).
RACKS DO NOT FIT Incorrect pin location. Relocate on correct pin.
E35 Turbofan Ovens
Revision 12
-23-
© Moffat Ltd, January 2010
Page 24

6. SERVICE PROCEDURES
WARNING: ENSURE POWER SUPPLY IS SWITCHED OFF BEFORE SERVICING.
WARNING: ALL INSTALLATION AND SERVICE REPAIR WORK MUST BE CARRIED OUT BY
QUALIFIED PERSONS ONLY.
SECTION PAGE NO.
6.2 ACCESS.............................................................................................................................................. 26
6.2.1 Control Panel ...................................................................................................................... 26
6.2.2 Service Panel (RH Side Panel)........................................................................................... 26
6.2.3 Baffle ................................................................................................................................... 26
6.2.4 Side Panel (LH Side)........................................................................................................... 26
6.2.5a Control Panel Rear (Up to Lot No.0817099)....................................................................... 26
6.2.5b Control Panel Rear (From Lot No.0818001)....................................................................... 27
6.3 REPLACEMENT ................................................................................................................................. 28
6.3.1 Power Switch ...................................................................................................................... 28
6.3.2 Indicator Lights.................................................................................................................... 28
6.3.3 Door Microswitch................................................................................................................. 28
6.3.4 Light Bulb / Glass ................................................................................................................ 29
6.3.5 Light Fitting.......................................................................................................................... 29
6.3.6 Lighting Transformer (Up to Lot No.0817099) .................................................................... 29
6.3.7 Thermostat Dial................................................................................................................... 29
6.3.8 Thermostat Board ............................................................................................................... 30
6.3.9 Thermostat Probe ............................................................................................................... 30
6.3.10 Contactors / Timers etc ...................................................................................................... 31
6.3.11 Elements ............................................................................................................................. 31
6.3.12 Over Temp Thermostat ....................................................................................................... 31
6.3.13a Steam Switch (Up to Lot No.0817099) ............................................................................... 32
6.3.13b Steam Switch (From Lot No.0818001)................................................................................ 32
6.3.14 Spray Nozzle....................................................................................................................... 32
6.3.15 Check Valve (Up to Ser. No.261984).................................................................................. 33
6.3.16 Water Solenoid.................................................................................................................... 33
6.3.17 Cooling Fan......................................................................................................................... 33
6.3.18 Bake Timer .......................................................................................................................... 34
6.3.19a Buzzer (Up to Lot No.0817099) .......................................................................................... 34
6.3.19b Buzzer (From Lot No.0818001)........................................................................................... 34
6.3.20 Oven Fan............................................................................................................................. 34
6.3.21 Fan Motor..............................................................................................................
6.3.22 Fan Speed Selector Switch................................................................................................. 36
6.3.23 Vent Switch (Up to Lot No.0817099) .................................................................................. 36
6.3.24a Vent / ‘Over Pressure’ Vent (Up to Lot No.0817099).......................................................... 36
6.3.24b Vent / ‘Over Pressure’ Vent (From Lot No.0818001) .......................................................... 36
6.3.25 Door Outer Glass ................................................................................................................ 37
6.3.26 Door Inner Glass ................................................................................................................. 37
6.3.27a Door Catches (Up to Lot No.0817099) ............................................................................... 37
6.3.27b Door Catches (From Lot No.0818001)................................................................................ 38
6.3.28a Door Handle (Up to Lot No.0817099) ................................................................................. 38
6.3.28b Door Handle (From Lot No.0818001) ................................................................................. 38
6.3.29 Door Catch Mechanism (Up to Lot No.0817099)................................................................ 39
.............. 35
E35 Turbofan Ovens
Revision 12
-24-
© Moffat Ltd, January 2010
Page 25

6.4 ADJUSTMENT / CALIBRATION ........................................................................................................ 40
6.4.1 Door Microswitch Adjustment.............................................................................................. 40
6.4.2 60 Minute Timer Zero Position Adjustment......................................................................... 40
6.4.3a Door Setting / Adjustment (Up to Lot No.0817099) ............................................................ 40
6.4.3b Door Setting / Adjustment (From Lot No.0818001)............................................................. 40
6.4.4 Door Seal Adjustment (From Lot No.0818001)................................................................... 41
6.4.5 Door Latch Adjustment (From Lot No.0818001)................................................................. 41
6.4.6a Reversing the Door (Up to Lot No.0817099) ...................................................................... 42
6.4.6a Reversing the Door (From Lot No.0818001)....................................................................... 43
6.4.7 Fan and Steam Timer Operation / Adjustment ................................................................... 45
6.4.8 Fan / Steam Flow Chart (From Lot No.0818001)................................................................ 46
E35 Turbofan Ovens
Revision 12
-25-
© Moffat Ltd, January 2010
Page 26
6.2 ACCESS
6.2.4 SIDE PANEL (LH SIDE)
6.2.1 CONTROL PANEL
1) Remove vent knob by pulling straight off.
2) Remove screw above vent shaft.
One Screw
Pre Lot No.0818001
Post Lot No.0818001
Figure 6.2.1
3) Panel is now free to hinge at bottom, take
care not to drop panel or pull wires out.
(support panel while working with panel
open).
6.2.2 SERVICE (RH SIDE) PANEL
1) Undo the 4 screws holding panel.
1) Undo the 4 screws holding panel.
2) Remove panel.
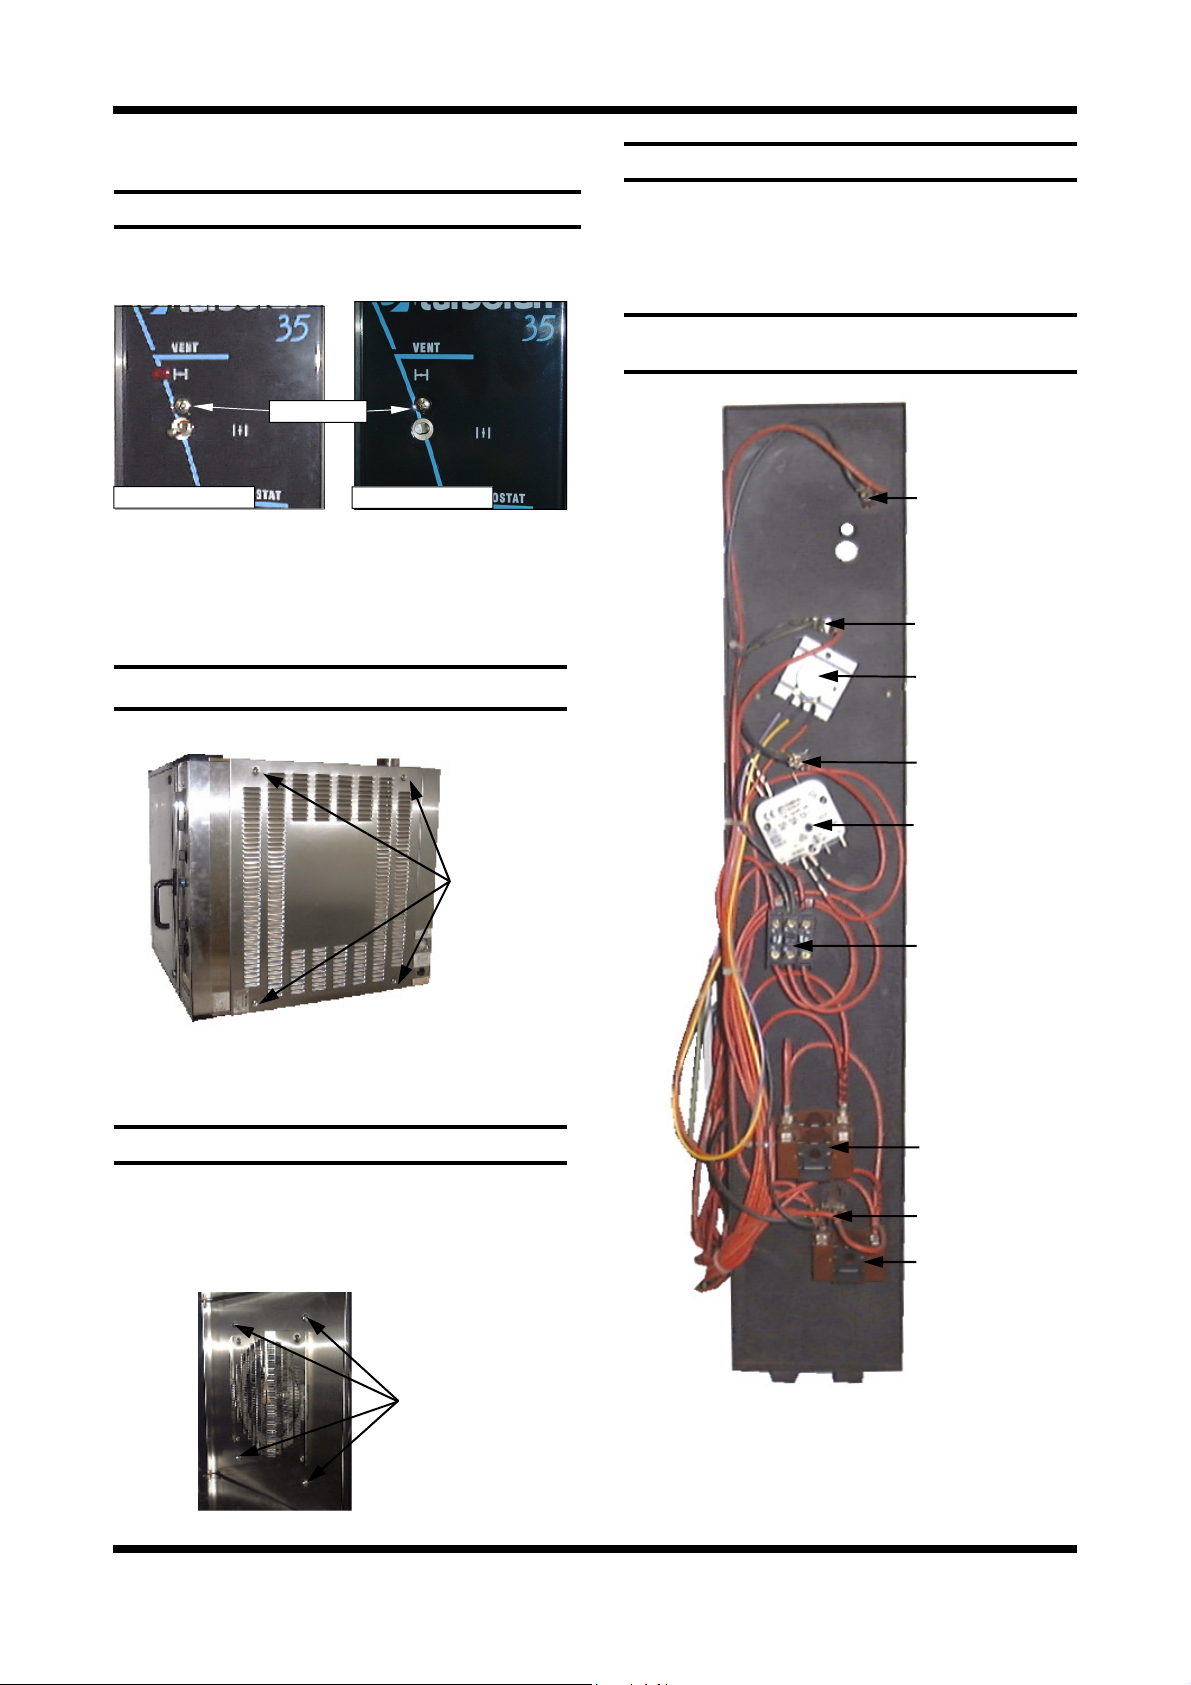
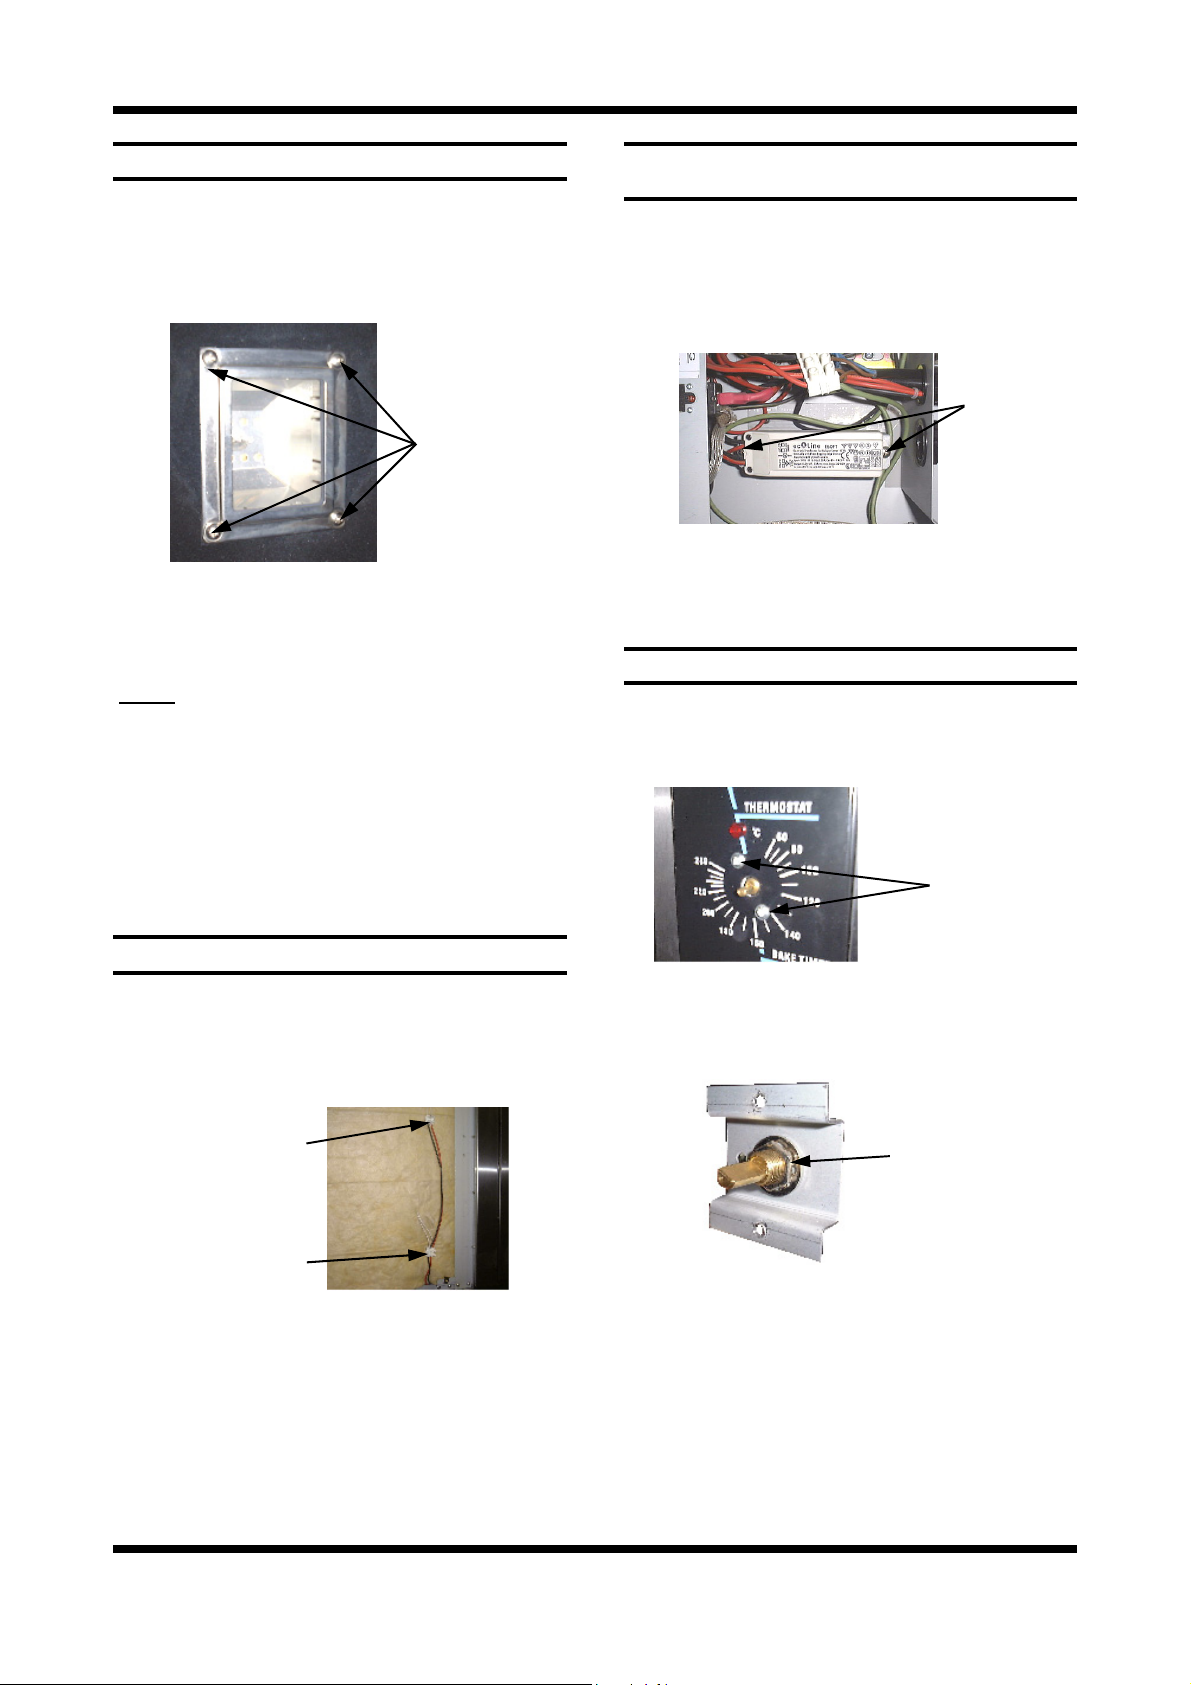
6.2.5a CONTROL PANEL—REAR
(Up to Lot No.0817099)
Vent Indicator
Heating Indicator
Thermostat
Bake Time Up
Indicator
Four Screws
Figure 6.2.2
2) Remove panel.
6.2.3 BAFFLE
1) Remove racks, trays and RH side rack.
2) Undo the 4 nuts holding the baffle.
3) Pull panel off studs, pull bottom into middle of
oven and remove panel.
Four Nuts
Bake Timer
Steam Switch
Fan Speed Selector
Switch
Power Indicator
Power Switch
Figure 6.2.5a
E35 Turbofan Ovens
Revision 12
Figure 6.2.3
-26-
© Moffat Ltd, January 2010
Page 27
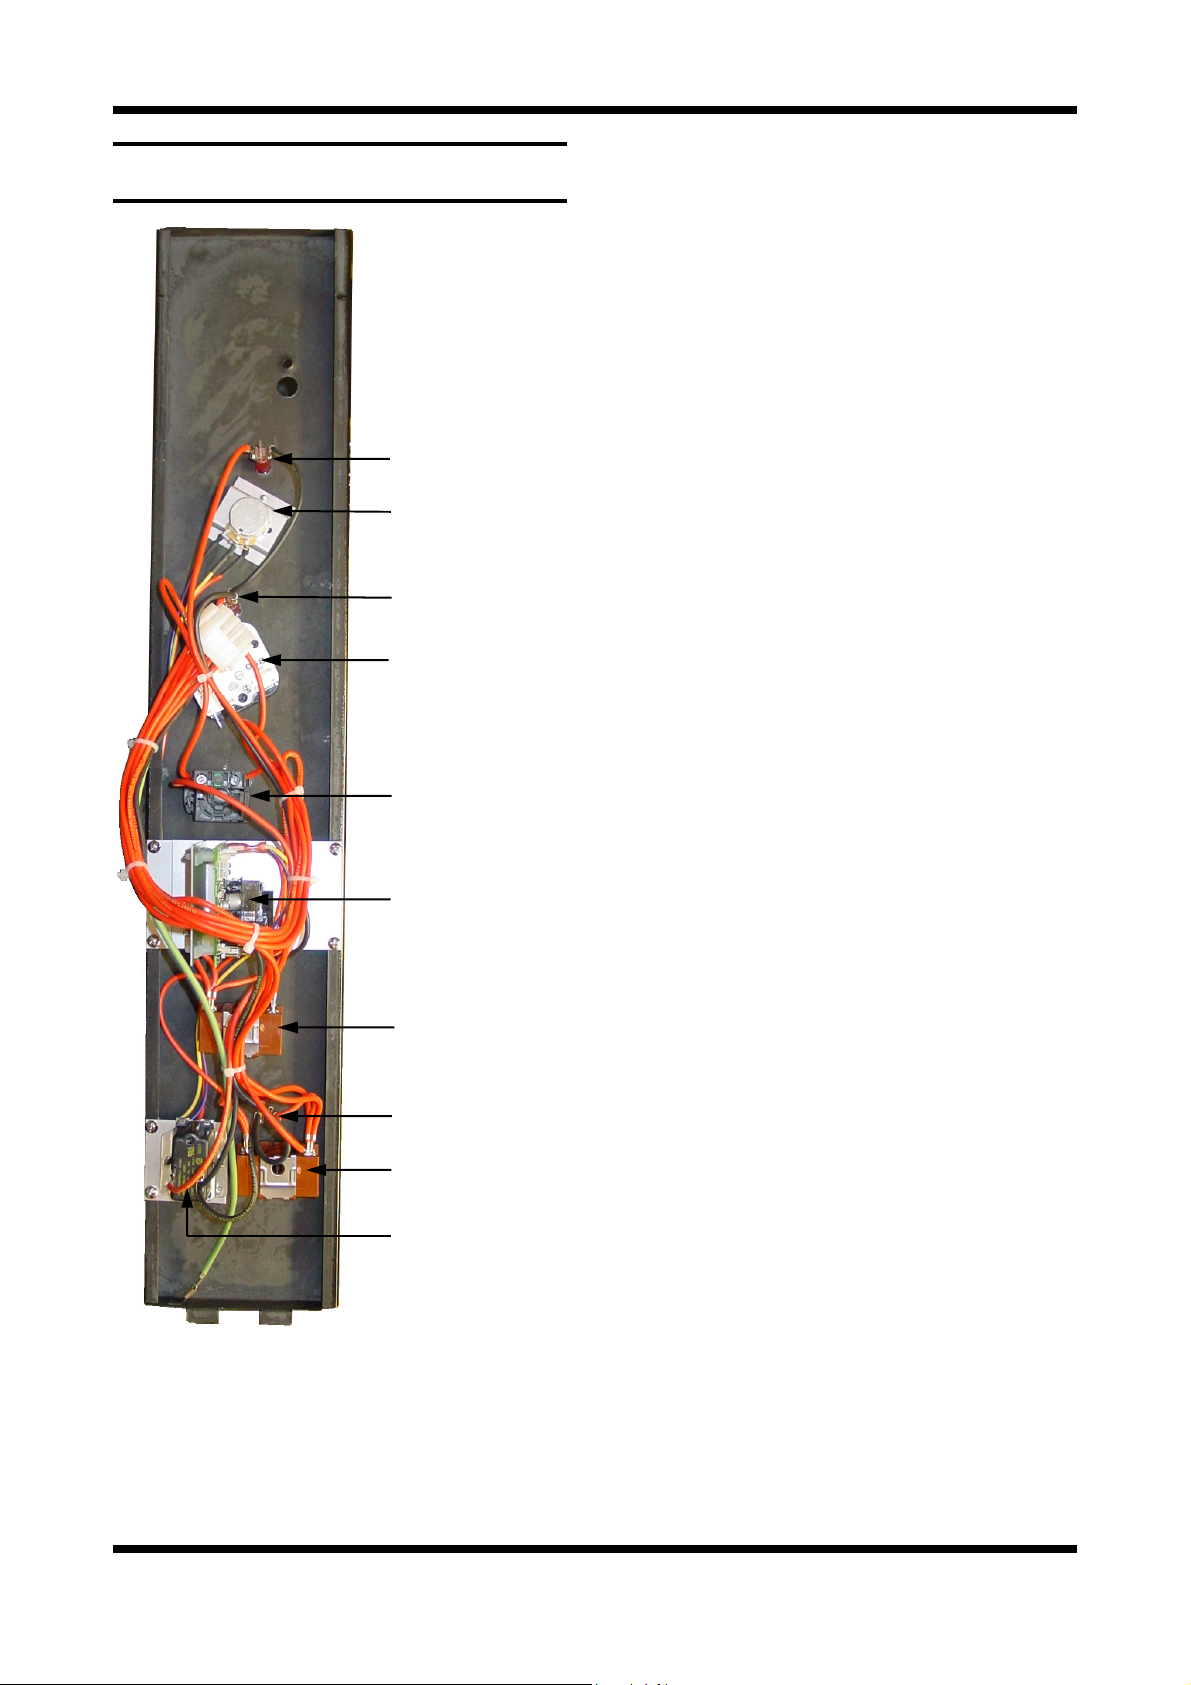
6.2.5b CONTROL PANEL—REAR
(From Lot No.0818001)
Heating Indicator
Thermostat
Bake Time Up
Indicator
Bake Timer
Figure 6.2.5b
Steam Switch
Thermostat
PC Board
Fan Speed Selector
Switch
Power Indicator
Power Switch
Time Up Buzzer
E35 Turbofan Ovens
Revision 12
-27-
© Moffat Ltd, January 2010
Page 28
6.3 REPLACEMENT
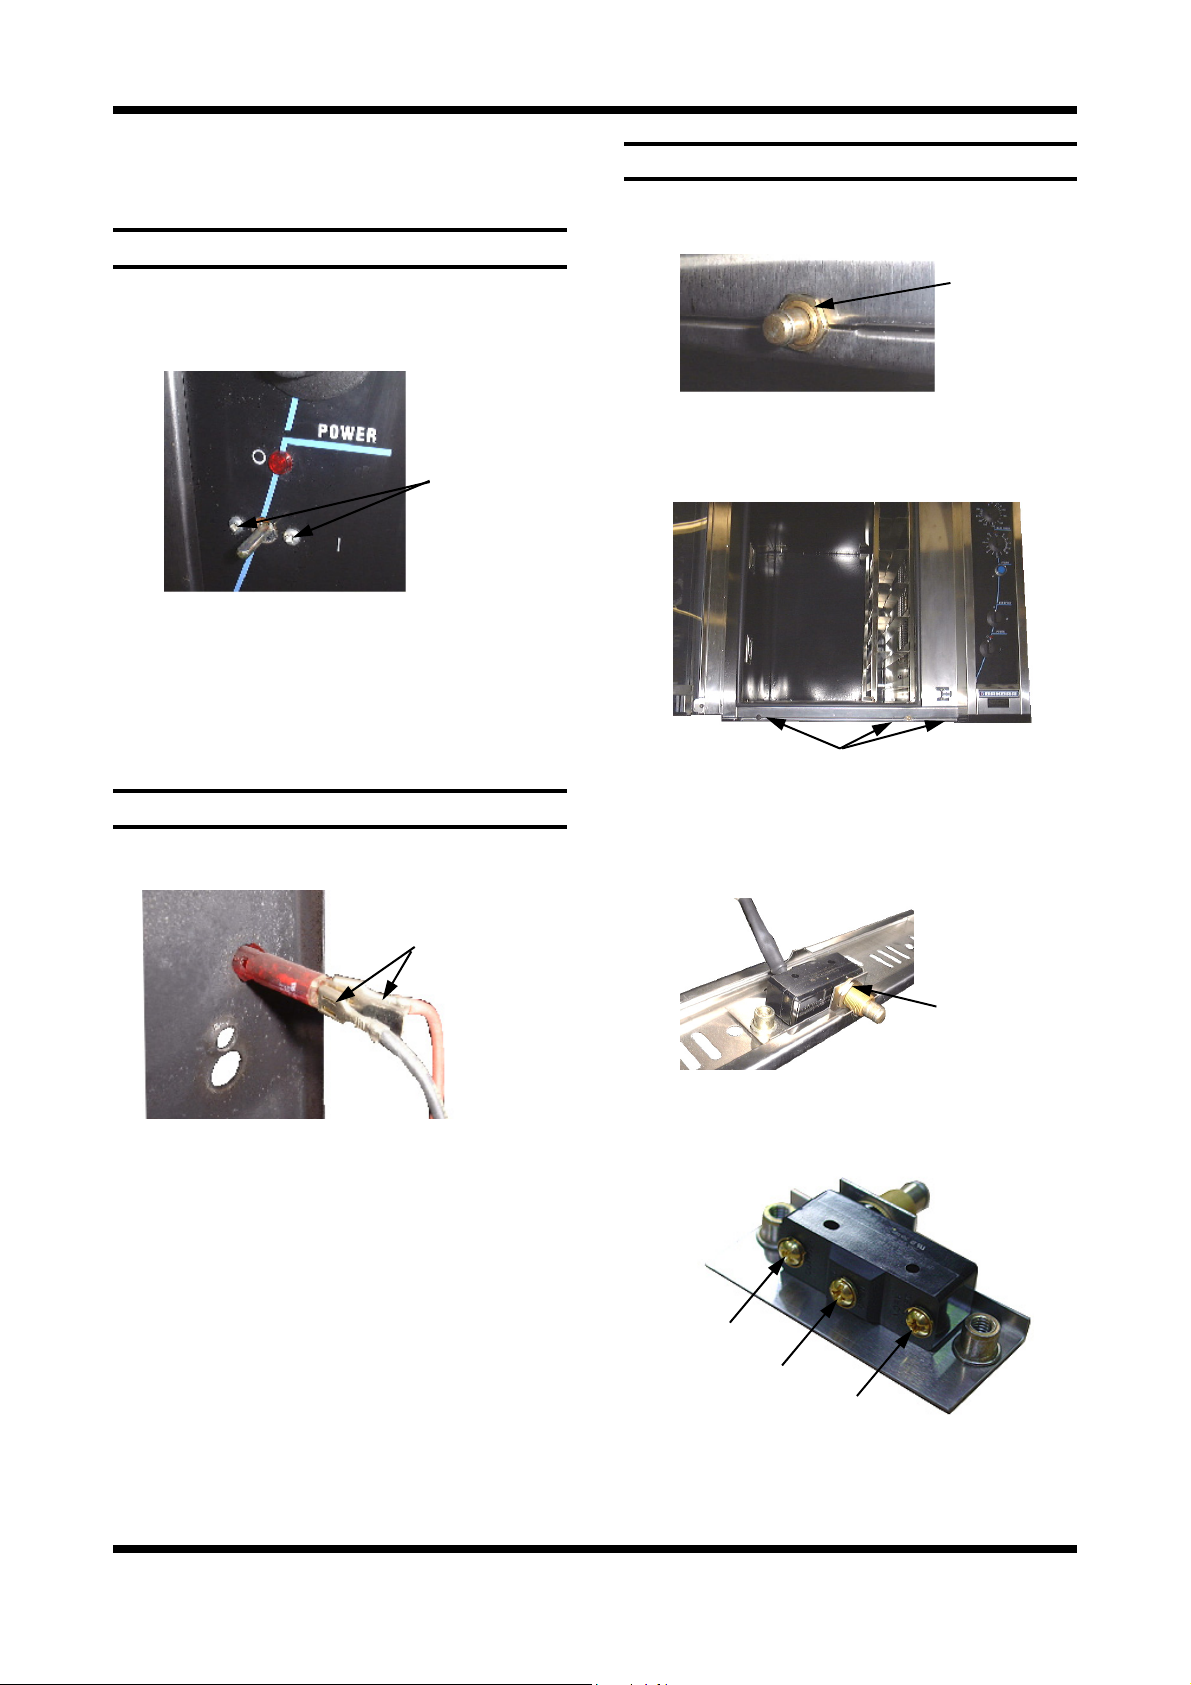
6.3.1 POWER SWITCH
1) Pull knob off front of switch.
2) Open control panel (refer 6.2.1) and undo 2
screws securing switch.
Two Screws
Figure 6.3.1
3) Transfer wires to new switch.
4) Withdraw old switch and insert new switch,
securing with screws.
6.3.3 DOOR MICROSWITCH
1) Open oven door.
2) Remove nut on front of micro-switch.
Microswitch
Nut
Figure 6.3.3a
3) Remove 3 screws holding microswitch cover
panel and drop panel down.
6.3.2 INDICATOR LIGHTS
1) With control panel open (refer 6.2.1) remove
wires from the back of the indicator light.
Indicator Wires
Figure 6.3.2
2) From back push indicator through front of
panel rotating clockwise.
3) Push new indicator in from front of panel, and
re-connect wires.
Three Screws
Figure 6.3.3b
4) Remove 2nd nut on front of micro-switch, to
free micro-switch. (Loosen / remove 2 bolts
holding micro-switch bracket as required).
2nd Microswitch
Nut
Figure 6.3.3c
5) Transfer wires to new the new switch and reassemble.
Common
E35 Turbofan Ovens
Revision 12
Normally Open
Normally Closed
(Not used)
Figure 6.3.3d
6) Adjust micro-switch (refer 6.4.1).
-28-
© Moffat Ltd, January 2010
Page 29
6.3.4 LIGHT BULB / GLASS
1) Remove LH side rack from oven.
2) Undo the four screws holding light face
surround on and remove the glass and
surround. Check the seal and replace if
necessary.
Four Screws
6.3.6 LIGHTING TRANSFORMER
(Up to Lot No.0817099)
1) With R/H service panel removed (refer 6.2.2)
transfer wires to new transformer with the aid
of a screw-driver.
2) Remove one screw and loosen the second
screw securing the transformer.
Two Screws
Figure 6.3.6
Figure 6.3.4
3) Pull bulb straight out of fitting, towards back
of oven (taking care not to break glass).
Replace bulb.
:
NOTE
The bulb is a halogen lamp, so do not touch
the glass of the bulb while pushing straight
into light fitting (use an oil free cloth or paper
towel).
4) Replace seal, glass and surround, securing
with the screws (do not over tighten).
6.3.5 LIGHT FITTING
1) Remove glass and surround (refer 6.3.4).
2) Remove LH side panel (refer 6.2.).
2) Disconnect wires at connector block (inside
LH side panel).
Top Light Connector
Block
3) Remove the old transformer and secure the
new transformer with the screws.
6.3.7 THERMOSTAT DIAL
1) Pull knob off front of thermostat.
2) Open control panel (refer 6.2.1) and undo two
screws securing thermostat bracket.
Two Screws
Figure 6.3.7a
3) Transfer wires to new thermostat.
4) Undo nut holding thermostat to bracket
Thermostat Nut
Bottom Light Connector
Block
Figure 6.3.5
3) Open fibreglass to expose lamp fitting.
4) Push in tabs at back of light fitting from
outside oven, pivot into oven and remove.
5) Re-assemble in reverse order.
E35 Turbofan Ovens
Revision 12
-29-
Figure 6.3.7b
© Moffat Ltd, January 2010
Page 30
5) Withdraw old thermostat and insert new
thermostat, securing with nut.
6) Re-assemble in reverse order.
e
P
u
g
n
r
p
a
l
r
e
O
Y
e
l
l
o
w
6.3.9 THERMOSTAT PROBE
1) Remove R/H service panel (refer 6.2.1) and
oven fan baffle (refer 6.2.3).
2) Remove bracket on steam line inside oven
cavity by undoing the two screws.
Bracket
Thermostat Dial
n
w
o
r
B
B
r
o
w
n
Thermostat Board
Figure 6.3.7c
Thermostat Dial Resistances
:
NOTE
Dial must be dis-connected from board for
testing.
O is orange wire, P is purple wire, Y is yellow
wire.
Resistance Between
Dial Position O-P P-Y O-Y
Off 900 Ω 900 Ω 0 Ω
Halfway 900 Ω 450 Ω 450 Ω
Maximum 900 Ω 0 Ω 900 Ω
6.3.8 THERMOSTAT BOARD
1) With control panel open (refer 6.2.1) transfer
wires to new board.
2) Squeeze legs together on plastic clips holding
board and extract.
3) Push new board onto clips.
Thermostat
Board
Two Screws
Figure 6.3.9
3) Undo the 2 bolts on the flange where the
probe enters the oven (inside oven).
NOTE
:
Removal of probe and its mounting plate will
require breaking of the silicone sealant.
Two Bolts
Figure 6.3.10
4) With control panel open (6.2.1) remove wires
from thermostat board (2 fine brown wires at
bottom left of board - refer figure 6.3.8).
5) Remove probe by drawing wires into oven.
6) Install the new probe in the reverse order.
:
NOTE
Ensure probe mounting plate has RTV
silicone sealant applied to sealing face to
ensure a leak proof assembly. Remove
excess sealant after tightening securing
screws.
Thermostat Probe Resistances
NOTE
:
Probe must be disconnected from board for
testing.
Pre Lot No.0818001
E35 Turbofan Ovens
Revision 12
Figure 6.3.8
Post Lot No.0818001
-30-
Temperature Resistance (kΩ)
0°C (32°F) 288
37°C (99°F) 56
100°C (212°F) 6.1
© Moffat Ltd, January 2010
Page 31

6.3.10 CONTACTORS / TIMERS Etc
6.3.12 OVER-TEMP THERMOSTAT
1) With R/H service panel removed (refer 6.2.2),
remove the din rail mounted component.
2) Install the new component onto the din rail.
3) Transfer the wires from old component to new
one.
4) On contactors C2-C3, and C5-C6, ensure that
mechanical interlock (Part Number 020769) is
fitted as illustrated below.
Allen Bradley Contactors
Pre Lot No.0818001
Interlock fitted to
rear of contactors
Figure 6.3.10a
Lovato Contactors
Post Lot No.0818001
Interlock fitted to
top of contactors
1) Remove service panel (refer 6.2.2) and baffle
(refer 6.2.3).
2) Remove bracket on steam line inside oven
cavity by undoing the 2 screws (Figure 6.3.9).
3) Undo the 2 bolts on the flange where the
probe enters the oven (inside oven).
:
NOTE
Removal of the probe and mounting plate will
require breaking of the silicone sealant.
Two Bolts
Figure 6.3.12a
4) Undo gland nut on bracket and extract the
probe from the bracket.
Figure 6.3.10b
6.3.11 ELEMENTS
1) With service panel and baffle removed (refer
6.2.2 & 6.2.3) remove the wires from the
element.
2) With the use of an
11
/16” tube spanner, undo
the nuts on the outside at the element ends.
3) Pull element into oven and remove.
:
NOTE
When replacing or refitting elements
ensure that the fibre sealing washers are
used.
Element Resistances
NOTE
:
Element must be disconnected for testing.
Resistances are given at room temperature.
208-220V 24.2 Ω
230-240V 28.8 Ω
Gland Nut
Figure 6.3.12b
5) Undo the 2 screws holding the over-temp and
remove over-temp.
Two Screws
Figure 6.3.12c
6) Transfer wires from old over-temp thermostat
to the new one.
7) Install the new over-temp and probe in the
reverse order of above.
:
NOTE
Ensure probe mounting plate has RTV
silicone sealant applied to sealing face to
ensure a leak proof assembly. Remove
excess sealant after tightening securing
screws.
E35 Turbofan Ovens
Revision 12
-31-
© Moffat Ltd, January 2010
Page 32

6.3.13a STEAM SWITCH (Up to Lot No.0817099)
1) Open control panel (refer 6.2.1).
2) Prise out or rotate the switch locking tab with
a small screwdriver, and withdraw the steam
switch assembly.
Prise out Switch
Locking Tab
Steam Switch
Note the locating tab on the side of the push
switch locates into notch in the control panel.
6) To re-assemble, when re-fitting the switch
body to the push switch in the control panel,
align the locking tab body arrow on the switch
with the arrow on the side of the push switch
body.
Figure 6.3.13a
Rotate Switch
Locking Tab
Steam Switch
Figure 6.3.13b
3) Transfer wires to new steam switch, and reassemble in reverse order.
6.3.13b STEAM SWITCH
(From Lot No.0818001)
1) Open the control panel
(refer 6.2.1).
2) Push the locking tab in
the direction of the
arrow shown on the
plug.
3) Lift off the rear of the
plug.
Figure 6.3.13c
Locating Arrows
Figure 6.3.13e
Push Switch
Locking
Ring
Switch
Body
Micro
Switch
Figure 6.3.13f
6.3.14 SPRAY NOZZLE
1) Remove the fan baffle (refer 6.2.3).
2) Unscrew the spray nozzle with
9
/16” and 5/8”
spanners.
3) Clean or replace as required, ensuring debris
free on re-assembly.
Push the Switch
Locking Tab in
direction of Arrow
4) Transfer wires to
Figure 6.3.13d
new steam switch.
5) To remove the push switch from the control
panel, unscrew the locking ring on rear of
push switch and remove from the control
panel.
E35 Turbofan Ovens
Revision 12
-32-
Spray
Nozzle
Figure 6.3.14
© Moffat Ltd, January 2010
Page 33

6.3.15 CHECK VALVE - Up To Ser. No.261984
6.3.17 COOLING FAN
NOTE: If the check valve becomes blocked or
corroded, the recommended course of action is to
remove the internal parts of the valve, as it is not
required for operation of the oven. The procedure
for this is given below.
1) Remove the spray nozzle (refer 6.3.14).
2) Remove the check valve with
1
/2” and 5/8”
spanners.
Check
Valve
Figure 6.3.15a
3) Dismantle the valve as illustrated, and discard
the ball and spring from the valve.
4) Re-assemble the valve (without the ball and
spring) and refit to the unit.
1) Remove R/H service panel (refer 6.2.2).
2) Remove the fan wires from the contactors.
Fan Wires
Figure 6.3.17a
2) Remove the 4 screws securing the fan to it’s
mounting bracket and remove fan.
NOTE:
There is a nut on each screw, hold the
nut while undoing the screw.
Screws (4)
Ball Spring
Figure 6.3.15b
6.3.16 WATER SOLENOID
1) Ensure water supply is turned off.
2) With the R/H service panel removed (refer
6.2.2) remove the wires from the solenoid.
3) Undo the compression fitting on the output
side of the solenoid (
4) Remove the hose fitting, inlet side, and
adapter (
13
/16”), outlet side.
1
/2” spanner).
5) Remove two screws (up under bracket) and
extract.
Solenoid
Wires
Figure 6.3.17b
3) Replace and re-assemble in reverse order.
4) Ensure fan and flow direction is correct sucks air out of controls and into motor cavity.
Figure 6.3.17c
Two Screws
Figure 6.3.16
6) Secure new solenoid with screws, and reassemble.
E35 Turbofan Ovens
Revision 12
-33-
© Moffat Ltd, January 2010
Page 34

6.3.18 BAKE TIMER
6.3.19b BUZZER (From Lot No.0818001)
1) Remove bake timer knob by pulling it firmly
away from control panel.
2) Open control panel (refer 6.2.1) and undo two
screws securing timer.
3) Transfer wires to new timer.
4) Withdraw old timer and insert new timer, securing with screws.
5) Replace knob.
6) Check timer switches off at ‘0’ mark. If slight
adjustment required, loosen the mounting
screws and rotate timer in direction required.
Two
Screws
Figure 6.3.18
6.3.19a BUZZER (Up to Lot No.0817099)
1) Remove R/H service panel (refer 6.2.2).
2) Remove two screws holding buzzer bracket
to panel.
1) Remove R/H service panel (refer 6.2.2).
2) Remove two screws holding buzzer bracket
to the rear of the control panel.
Two Screws
Figure 6.3.19a
3) Withdraw wires from old buzzer and transfer
connections to new buzzer.
Two Screws
Figure 6.3.19b
4) Remove old buzzer from bracket, and secure
new buzzer to bracket.
5) Secure bracket to rear of control panel.
6) Re-assemble in reverse order.
Two Screws
Figure 6.3.19a
3) Withdraw and transfer wires to new buzzer.
4) Remove old buzzer from bracket, and secure
new buzzer.
5) Reassemble in reverse order.
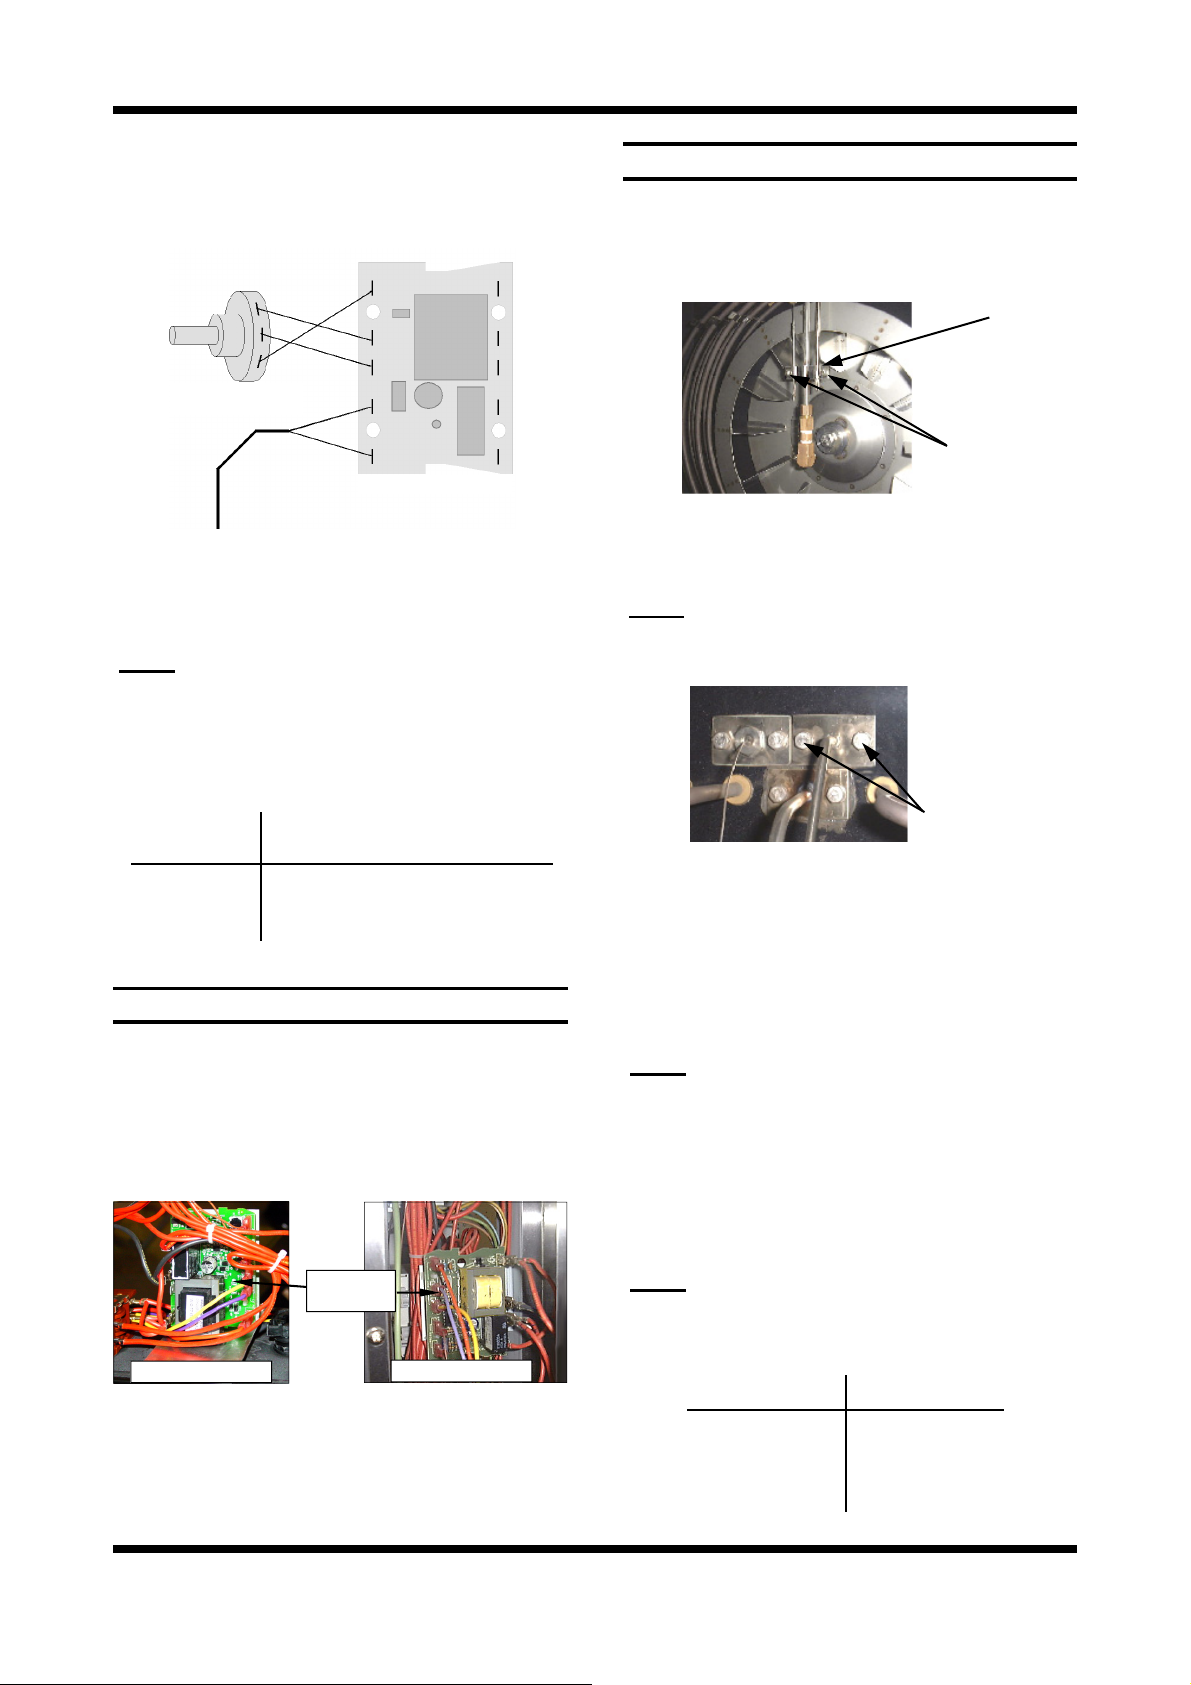
6.3.20 OVEN FAN
1) With service panel and oven fan baffle
removed (refer 6.2.2 & 6.2.3) undo the 6 bolts
holding the probes and steam line.
Six Bolts
Figure 6.3.20a
E35 Turbofan Ovens
Revision 12
-34-
© Moffat Ltd, January 2010
Page 35

2) Undo the steam line compression fitting on
the outside of the oven nearest the oven.
Steam Line
Compression
Fitting on outside
of Oven.
Figure 6.3.20b
3) Pull assembly (steam nozzle etc) into the
oven (without damaging probe lines) and
support clear of the fan.
:
NOTE
Removal of the probe and mounting plate will
require breaking of the silicone sealant.
4) Undo the bolt in the centre of the fan (use fan
blades and heat deflector to steady).
5) Use a gear puller if necessary to remove the
fan from the tapered shaft.
6) Replace and re-assemble in reverse order.
:
NOTE
Ensure probe mounting plate has RTV
silicone sealant applied to sealing face to
ensure a leak proof assembly. Remove
excess sealant after tightening securing
screws.
8) Remove the motor from the oven.
9) Pass the contactor to heat baffle panel loom,
through the grommet in the heat baffle plate
before wiring loom up to the contactor
terminals.
Motor Wiring
Loom Pre Ser.
No. 415020
Pass Motor Wiring Loom through
Grommet with Plug remaining on
the motor side of the Panel
Figure 6.3.21a
10) Ensure the connector is on the motor side of
the heat baffle plate.
11) Connect up the motor wiring loom to the
contactor terminals. (Refer to wiring diagram
below for correct wiring connections to the
contactor).
Wiring Loom Connections from Contactors to Heat Baffle
Panel (Viewed from the rear of the Connector)
6.3.21 FAN MOTOR
1) Remove R/H service panel (refer 6.2.2).
2) Remove the fan baffle (refer 6.2.3).
3) Remove the probes and steam line from
inside the oven (refer 6.3.20).
4) Undo the steam line compression fitting (refer
6.3.20).
5) Pull the assembly (steam nozzle etc) into the
oven (without damaging the probe lines)
(refer 6.3.20).
6) Remove the fan from the tapered shaft. (refer
6.3.20).
For Ovens up to Ser No. 415019.
7) Disconnect the wiring loom from the motor to
the contactors.
IMPORTANT
: Note wire colour and terminal
connections.
E35 Turbofan Ovens
Revision 12
Figure 6.3.21b
12) Fit the replacement motor and connect the
lead from the motor to the connection from
the contactors. Tie wrap up any loose cable.
For Ovens from Ser No. 415020 Onwards.
13. Unplug the wiring loom from the motor to the
connector attached to the heat baffle plate.
14. Remove the motor from the oven.
15. Fit the replacement motor and connect the
lead from the motor to the connection from
the contactors. Tie wrap up any loose cable.
NOTE:
For Ovens after Serial No. 415019, the wiring
loom from the heat baffle plate to the
contactors will not be required and can be
discarded.
-35-
© Moffat Ltd, January 2010
Page 36

6.3.22 FAN SPEED SELECTOR SWITCH
1) Pull knob off front of switch.
2) Open control panel (refer 6.2.1) and undo 2
screws securing switch.
Two Screws
Figure 6.3.22
3) Transfer wires to new switch. Pull 2nd switch
off and transfer to new switch.
4) Withdraw old switch and insert new switch,
securing with screws.
6.3.23 VENT SWITCH (Up to Lot No.0817099)
1) With the control panel removed (refer 6.2.1)
remove the four screws securing bracket and
two screws securing switch.
Bracket
Screws (4)
Switch Screws
(2)
6.3.24b VENT / ‘OVER-PRESSURE’ VENT
(From Lot No.0818001)
1) Remove the control panel (refer 6.2.1).
2) Remove racks, trays, R/H side rack and the
fan baffle (refer 6.2.3).
3) Remove the bush from the centre of the vent
shaft bracket.
4) Remove the 4 screws securing the bracket to
the oven frame.
5) Remove the bracket (twist to clear frame and
pull forward).
Vent Shaft
Bush
Bracket
Securing
Screws. 2
per Side.
Figure 6.3.24b
6) Rotate the vent shaft 180º to access the vent
flap from inside the oven. The conical spring
and allen screw should be facing into the
oven.
Figure 6.3.23
2) Remove bracket (twist to clear frame and pull
forward), and switch (pull forward).
3) Transfer wires to the new switch and
re-assemble in reverse order.
6.3.24a VENT / ‘OVER-PRESSURE’ VENT
(Up to Lot No.0817099)
1) Remove Vent Switch (refer 6.3.23) and Baffle
(refer 6.2.3).
2) Rotate vent shaft 180° such that the conical
spring is facing into the oven.
3) With 3mm Allen key remove Allen screw
holding spring and vent assembly (inside top
back RHS of oven).
4) Internal vent pressure relief and vent shaft
can now be removed and replaced.
Conical
Spring
Allen Screw
Conical
Spring
Allen Screw
Figure 6.3.24c
7) Using a 3mm Allen key, remove allen screw
holding spring and vent assembly (inside top
rear R/H side of oven).
8) Internal vent pressure relief flap and vent
shaft can now be removed and replaced.
9) When re-fitting the vent bracket to the oven
fascia, ensure that the stop screw is
positioned as shown in the figure below to
ensure correct location behind the vent
bracket.
Ensure Stop Screw
positioned as
shown when re-
fitting Vent Bracket.
E35 Turbofan Ovens
Revision 12
Figure 6.3.24a
-36-
Figure 6.3.24d
© Moffat Ltd, January 2010
Page 37

10) Refit the vent bracket to the oven and secure
to the oven frame with the 4 screws.
NOTE:
Ensure that the stop pin is correctly located
beneath and not above the vent bracket.
11) Refit the vent shaft bush over the vent shaft
and into the centre of the vent shaft bracket.
(see Figure 6.3.24b).
12) Refit and secure the control panel.
13) Refit the vent shaft control knob to the vent
shaft.
6.3.25 DOOR OUTER GLASS
6.3.26 DOOR INNER GLASS
(Up to Lot No.0817099)(Up to Lot No.0817099)
1) Open the oven door.
(Up to Lot No.0817099)
2) Remove the top door trim (two screws, one
each end of trim). Take care not to drop the
glass.
Two Screws
1) Ensure the door is locked shut
2) With a screwdriver, coin, or other suitable
device, ¼ turn the outer glass locks to
release the outer glass and allow it to be
hinged open.
Top
Locked
Unlocked
Unlocked
Locked
Bottom
Figure 6.3.25a
3) Undo the two hinges (two screws per hinge)
and remove outer glass assembly.
Two
Screws
(Up to Lot No.0817099)
Figure 6.3.26a
Two Screws
Door Glass Buffers
(From Lot No.0818001)
Figure 6.3.26b
3) Lift and remove glass assembly.
4) Should the door glass buffers (Qty 4) require
replacement, these are an interference fit into
the door frame.
5) Replace and re-assemble in reverse order.
6.3.27a DOOR CATCHES (Up to Lot No.0817099)
1) Open the oven door.
2) Undo two screws and pull catch straight out.
Figure 6.3.25b
4) Replace and re-assemble in reverse order.
E35 Turbofan Ovens
Revision 12
Two Screws
Figure 6.3.27a
3) Replace and re-assemble in reverse order.
-37-
© Moffat Ltd, January 2010
Page 38

6.3.27b DOOR CATCHES (From Lot No.0818001)
6.3.28b DOOR HANDLE (From Lot No.0818001)
1) Open the oven door to reveal the locking dog.
Locking Dog.
Neoprene Seal
Figure 6.3.27b
2) Pull back the neoprene seal to reveal the
locking screw.
Neoprene Seal
Lock Nut
Figure 6.3.27c
3) Slacken the locking screw.
4) Unscrew the locking dog and replace.
5) Refit the replacement locking dog and
neoprene seal and adjust the door locking
dog as shown in Section 6.4. ‘Adjustment /
Calibration’.
6.3.28a DOOR HANDLE (Up to Lot No.0817099)
1) Open the oven door.
2) Remove the three screw blanking caps
covering the screw locations on the inside of
the door.
Screw Blanking
Caps
Figure 6.3.28b
3) Undo the three screws and washers securing
handle, and carefully remove from the door.
4) Fit the replacement door handle and reassemble in reverse order.
NOTE
:
This door handle can be fitted onto a left
handed door, carry out the following to
change the orientation of the handle.
5) Remove the plastic cap from the top of the
door handle using a small screwdriver.
Screw Blanking
Cap
Hex HD Screw
1) Open the oven door.
2) Remove the two screw caps covering the
screws on the door handle.
3) Undo two screws securing handle, and pull
straight out.
4) Replace and re-assemble in reverse order.1)
Two
Screws
Figure 6.3.28a
E35 Turbofan Ovens
Revision 12
Figure 6.3.28c
6) Whilst holding the handle, unscrew the hex
head screw a few turns, using a 4mm allen
key, until it is possible to rotate the handle
through 180º.
7) Once the handle has been rotated, re-tighten
the hex head screw and refit the screw
blanking cap to the handle.
-38-
© Moffat Ltd, January 2010
Rotate Handle
Page 39

6.3.29 DOOR CATCH MECHANISM
(Up to Lot No.0817099)
1) Remove the outer glass (refer 6.3.25) and
door handle (refer 6.3.28a) leaving the door
open.
2) Drill out the six rivets (refer figure 6.3.29, Item
E below) on the inside of the RH Door Trim
(A) using a 3.5mm drill.
3) Remove four screws (F) on outside of RH
door trim (A).
4) Remove the door trim (rotate toward the
inside of the door).
5) Remove the four screws (J) from RH inner
door trim (B), and remove trim. (Loosen
bottom trim screw (K) if required).
6) Remove two split-pins (G) from the
connecting rod (H) on latch (C).
7) With handle in open position, push latch
mechanism (C1) away from connecting rod
(H) and remove the connecting rod.
To Remove the Latching Mechanism.
8) Remove two screws (I) securing latching
mechanism (C), and remove the latching
mechanism.
To Remove the Securing Handle Mechanism.
9) Remove two screws (L) securing handle
mechanism (D), and remove the handle
mechanism.
10) Replace and re-assemble in reverse order.
G
L
G
C
I
C1
H
D
H
C
K
B
E
J
F
J
E
F
A
Figure 6.3.29
E35 Turbofan Ovens
Revision 12
-39-
© Moffat Ltd, January 2010
Page 40

6.4 ADJUSTMENT / CALIBRATION
6.4.3a DOOR SETTING ADJUSTMENT
(Up to Lot No.0817099)
6.4.1 DOOR MICROSWITCH ADJUSTMENT
1) Open oven door.
2) Loosen nut on front of microswitch, located at
bottom right of door frame.
Microswitch
Nut
Figure 6.4.1
3) Loosen two bolts securing microswitch
bracket from underside of oven.
Two Bolts
Figure 6.4.1
1) Open oven door.
2) Loosen the two bolts securing the top door
hinge plate to the oven.
Two Bolts
Figure 6.4.3a
3) Adjust oven door position and tighten two
bolts.
4) Check door operation. Repeat steps 2 and 3
as necessary to ensure that door closes and
latches evenly.
4) Adjust microswitch position and tighten bolts.
:
NOTE
The switch should operate when door handle
approximately
1
/2 engaged (45°).
5) Repeat steps 2-5 as required, then tighten the
front nut.
6.4.2 60 MINUTE TIMER ZERO POSITION
1) Remove 60 minute timer knob by pulling it
firmly away from control panel.
2) Open control panel (refer 6.2.1). Loosen two
screws on control panel holding 60 minute
timer.
Two
Screws
Figure 6.4.2
3) The timer can now be rotated as required to
ensure that the buzzer sounds at the zero
position.
6.4.3b DOOR SETTING ADJUSTMENT
(From Lot No.0818001)
1) Open oven door.
2) Loosen the two bolts securing the door top
and bottom hinge plates to the oven.
Two Bolts
Figure 6.4.3b
3) Adjust oven door position and tighten four
bolts (2 top and 2 bottom).
4) Check the door operation. Repeat steps 2
and 3 as necessary to ensure that the door
closes and latches evenly.
E35 Turbofan Ovens
Revision 12
-40-
© Moffat Ltd, January 2010
Page 41

6.4.4 DOOR SEAL ADJUSTMENT
(From Lot No.0818001)
1) With the oven door closed and latched shut,
lightly push the top of the door in the hinge
area and tighten the top pivot pin nut.
Tighten up
Top Pivot
Pin Nut
Gently Press
against door
Figure 6.4.4
2) Repeat for the lower hinge.
6.4.5 DOOR LATCH ADJUSTMENT
(From Lot No.0818001)
6) Continue to adjust the locking dog until the
door shuts correctly.
7) Tighten up the lock nut and reposition the
neoprene seal over the lock nut.
1) Open the oven door to reveal the locking dog.
Locking Dog.
Neoprene Seal
Figure 6.4.5a
2) Pull back the neoprene seal to reveal the lock
nut.
Neoprene Seal
Lock Nut
Figure 6.4.5b
3) Slacken the lock nut.
4) Adjust the locking dog to the required
position.
5) Slam the door shut and ensure that the door
is not a loose fit when closed and that
pressure is maintained against the door seal.
E35 Turbofan Ovens
Revision 12
-41-
© Moffat Ltd, January 2010
Page 42

6.4.6a REVERSING THE DOOR
(Up to Lot No.0817099)
1) Open the oven door.
2) Undo the top and bottom door hinge pivot
pins (whilst supporting the door). Remove the
oven door.
Figure 6.4.6a
3) Undo the bolts securing the top hinge plate
and bottom hinge plate to the left hand side of
the oven door opening and remove.
Top Hinge Plate
5) Remove the microswitch nut.
Microswitch
Nut
Figure 6.4.6d
6) Undo the three screws securing the microswitch cover panel to the bottom of the oven.
Three Screws
Figure 6.4.6e
7) Undo the 2 screws securing the microswitch
mounting bracket to the cover panel, turn the
bracket around, and re-secure the microswitch (facing the other way).
Figure 6.4.6b
4) Remove the bolt catches (secured by two
screws each) from the right hand side of the
door frame, and secure to the left hand side of
the door frame.
Bolt catch (top)
Figure 6.4.6c
E35 Turbofan Ovens
Revision 12
Two Screws
Figure 6.4.6f
Figure 6.4.6g
8) Refit the cover panel to the bottom of the
oven with the microswitch at the left hand side
of the oven.
-42-
© Moffat Ltd, January 2010
Page 43

9) Fit the top and bottom hinge plates (removed
in step 2) to the right hand side of the oven
door opening. (The plates should be turned
upside-down from their position on the left
hand side of the oven).
10) Turn the door over and refit the pivot pins to
the hinge plates to secure the door to the right
hand side of the door opening.
11) Check the operation of the door microswitch
and adjust as necessary.
NOTE
:
The door handle mechanism will now operate
in the ‘Up’ direction rather than in the ‘Down’
direction.
6.4.6b REVERSING THE DOOR
(From Lot No.0818001)
1) Isolate the oven from the mains power supply.
2) Close the oven door.
3) Loosen the upper pivot pin nut (this will assist
when re-assembling door to oven).
4) Undo and remove the securing bolts securing
the top hinge bracket to the oven. Take care
to support the oven door.
8) Remove the bottom sill by removing the 3
screws securing the sill to the oven.
Three Screws
Figure 6.4.6j
9) Loosen nut on front of microswitch, located at
bottom right of door frame.
Microswitch
Nut
Figure 6.4.6k
10) Unscrew and remove the 2 bolts securing the
microswitch bracket to the bottom sill.
Two Bolts
Pivot Pin
Nut
Figure 6.4.6h
5) Lift and remove the door and top hinge plate
from the oven.
6) Loosen the lower pivot pin nut (this will assist
when re-assembling door to oven).
7) Remove the 3 bolts from the lower hinge
bracket and remove the bracket from the
oven.
Pivot Pin
Nut
Three Bolts
Two Bolts
Figure 6.4.6l
11) Remove the microswitch from the bottom sill.
12) Rotate the bottom bracket by 180º.
13) Refit the microswitch bracket in new position
at the door handle end of the door opening.
Tuck cables back
along sill edge
Figure 6.4.6m
NOTE
:
Ensure microswitch cables are tucked back
along the edge of the bottom sill.
E35 Turbofan Ovens
Revision 12
Figure 6.4.6i
-43-
© Moffat Ltd, January 2010
Page 44

14) Refit the bottom sill to the oven and fit a
blanking plug to the old microswitch position.
15) Invert the bottom pivot plate and fit loosely to
the opposite side of the door opening.
Pivot Pin
Figure 6.4.6n
23) Align the top hinge plate fitted to the door,
with the screw holes at the top of the oven
and secure the top hinge plate to the top of
the oven.
Securing Bolt
Top Hinge Plate
16) Remove the pivot pin from the lower bracket
and refit to bracket with the pivot pin upwards.
Pivot Pin
Rotated
Figure 6.4.6o
17) Invert the top pivot pin in the top mounting
bracket, and secure finger tight.
18) Change the door latch over to the opposite
side of the door. (refer to 6.3.27b for latch
removal / refitting).
19) Remove the blanking screws from the top of
the oven and transfer these to the old top
hinge position.
20) Carefully rotate the door, bottom side up.
21) Fit the top hinge plate to the door.
Figure 6.4.6q
24) Align the door with the oven and tighten the
top 2 and lower 3 securing bolts.
Door Seal Adjustment:
25) Refer to 6.4.4 for Door Seal Adjustment.
Door Latch Adjustment:
26) Refer to 6.4.5 for Door Latch Adjustment.
Microswitch Adjustment:
27) Refer to 6.4.1 for Door Microswitch
Adjustment.
Top Hinge Plate
Pivot Pin
Securing Nut
Figure 6.4.6p
22) Lift and fit the door onto the lower pivot.
E35 Turbofan Ovens
Revision 12
Pivot Pin
-44-
© Moffat Ltd, January 2010
Page 45

6.4.7 FAN & STEAM TIMER OPERATION /
ADJUSTMENT (Up to Lot No.0817099)
All the timers have a dial on the front that adjusts
the time the timer switches for when control
energised. All the timers have an LED on the
front that flashes when the timer is switched.
T1 Fan Cycle Timer
This timer switches power between the clockwise
and anti-clockwise fan direction circuits, the time
set is the duration on each fan direction.
Factory set to 1
1
/2 minute.
Refer to Appendix C for timer settings.
T2 & T4 Steam Timers (2)
These should be set the same and determine the
duration of the steam, one for clockwise fan
circuit and one for anti-clockwise fan circuit. If the
steam cycle is too long water will condense on
the product and oven chamber, and oven may
cool too much - it is usually better to have
multiple cycles than a long cycle.
Factory set to 10 seconds.
Refer to Appendix C for timer settings.
T3 & T5 Dwell Timers (2)
Once again these should be set the same, this is
the delay time between fan directions and after
steaming, when no power is applied to the fan
motor. One is for the clockwise fan circuit and
one is for the anti-clockwise fan circuit.
Factory set to 10 seconds.
Refer to Appendix C for timer settings.
Figure 6.4.7 shows the function of the timers on a
time line. The grey areas are when a timer is
switched (LED flashing) or where fan is rotating /
steam injecting. The dark lines show when the
steam button has been pressed, the first is most
common while the next two show the effect of
steaming at the beginning or end of a direction
cycle. Priority (power flow) is top to bottom on
the chart (cycle timer effects all others)
T1 Cycle timer
T2 Steam Clockwise
T4 Steam Anticlockwise
T3 Dwell Clockwise
T5 Dwell Anticlockwise
Fan rotation
Steaming
1 1/2 min 1 1/2 min 1 1/2 min 1 1/2 min 1 1/2 min 1 1/2 min 1 1/2 min
Steam injection activated
Steam injection activated
Steam injection activated
Figure 6.4.7
E35 Turbofan Ovens
Revision 12
-45-
© Moffat Ltd, January 2010
Page 46

Fan / Steam Flow Chart (Pre Lot No.0818001)
This is a guide only, for accurate representation of all connections refer to the wiring chart.
Power In
via 6A breaker
Power Switch
Anti-Clockwise
Fan Rotation
Steam
Switch
Steam Timer
T4
T5
C3
(10sec)
Dwell timer
(10sec delay)
Fan Direction
Contactor
Door Switch
Cycle timer
1min 30sec
switching time
T1
Water Solenoid
3 Phase Power
phase
change
Clockwise
Fan Rotation
Steam
Switch
Steam Timer
(10sec)
Dwell timer
(10sec delay)
Fan Direction
Contactor
T2
T3
C2
C4 & C6
Steam switch on control panel - manual activation.
Timers T4 and T2 only operate when steaming (otherwise is direct connection).
E35 Turbofan Ovens
Revision 12
Hi Speed
Contactors
Fan speed
switch selection
Motor
-46-
Low Speed
Contactor
© Moffat Ltd, January 2010
C5
Page 47

7. ELECTRICAL CIRCUIT SCHEMATIC
7.1 E35 MODELS UP TO LOT NUMBER 0817999
7.1.1 380-415V, 3P+N+E (Up to Lot No. 0817999)
E35 Turbofan Ovens
Revision 12
-47-
© Moffat Ltd, January 2010
Page 48

7.1.2 208-240V, 3P+E (up to lot number 0817999)
E35 Turbofan Ovens
Revision 12
-48-
© Moffat Ltd, January 2010
Page 49

7.1.3 208-240V, 1P+N+E (up to lot number 0817999)
E35 Turbofan Ovens
Revision 12
-49-
© Moffat Ltd, January 2010
Page 50

7.2 E35 MODELS FROM LOT NUMBER 0818001
7.2.1 380-415V, 3P+N+E (from lot number 0818001)
A113 5
21
A113 5
21
A2462
22
A2462
22
C1 C2
COOLING FAN
M
C
NO
C
NC NC NO
13
531A1
13
531A1
A113 5
13
C4 C5 C6
WATER
14
264A2
14
264A2
A2462
14
GREY
GREY
THERMAL
SWITCH
FAN MOTOR
M
BLUE
WHITE
BLACK
BROWN
YELLOW
GREEN/RED
6
3
5
7894
12
GREY
GREY
BROWN
BLUE
BLACK
GREEN/RED
YELLOW
WHITE
4
1
5
9876
32
TIMER
MOTOR
A1
A2246
HEATING
ELEMENTS
6 x 2000W
135
C3
BREAKER
6A CIRCUIT
C
BREAKER
25A CIRCUIT
RELAY
SHUNT TRIP
4321
5
L3
L2
L1
11 10
987
6
12
6
3
5
11 12
789
4
12
10
OVER TEMP
1
21435
2
3
4
5
LIGHTS
DOOR
240V 25W
SWITCH
POWER (L1)
STEAM
FAN - LOW SPEED
DOOR MICROSWITCH
DOOR MICROSWITCH
DIAL
POTENTIOMETER
HEAT
C1 - CONTACTOR MOTOR DI RECTION ANTI-CLOCKWISE ( 3 NO + 1 NC)
C2 - CONTACTOR MOTOR DI RECTION CLOCKWISE ( 3 NO + 1 NC)
C3 - CONTACTOR HEAT ING
C4 - CONTACTOR MOTOR HI SPEED (3 NO + 1 NO)
C5 - CONTACTOR MOTOR LO W SPEED (3 NO + 1 NO)
C6 - CONTACTOR MOTOR HI SPEED (3 NO + 1 NO)
CONTROL PANEL SUB ASSEMBLY
EARTH
OVEN LIGHT
HEAT OUTPUT
NEUTRAL
FAN - HIGH SPEED
POWER
2
YELLOW
PURPLE
1
4
TIMER
2
356
TIME UP
STEAM
LL
PROBE
ORANGE
12345
910876
P.C. BOARD
THERMOSTAT
1
FAN
SPEED
P1
P2
B
BUZZER
TIME UP
2
1
POWER
P1
P2
NO NC
E
SUITABLE FOR
400-415v 3Ø+N+E SUPPLY
N
380v 3Ø+N+E SUPPLY
E35 Turbofan Ovens
Revision 12
-50-
© Moffat Ltd, January 2010
Page 51

7.2.2 208-240V, 3P+E (from lot number 0818001)
E35 Turbofan Ovens
Revision 12
-51-
© Moffat Ltd, January 2010
Page 52

7.2.3 208-240V, 1P+N+E ( from lot number 0818001 to lot number 0938xxx)
E35 Turbofan Ovens
Revision 12
-52-
© Moffat Ltd, January 2010
Page 53

7.2.4 208-240V, 1P+N+E ( from lot number 0938xxx)
E35 Turbofan Ovens
Revision 12
-53-
© Moffat Ltd, January 2010
Page 54

8. ELECTRICAL WIRING DIAGRAM
8.1 E35 MODELS UP TO LOT NUMBER 0817999
8.1.1 380-415V, 3P+N+E (up to lot number 0817999)
VENT
INDICATOR
61
1
P1
24
20W20W
HALOGEN LAMP
61
HEATING
INDICATOR
2P2
56
THERMOSTAT
ORANGE
PURPLE
YELLOW
P.C. BOARD
1
2
3
4
5
10
28
54
9
8
65
7
6
53
62
56
55
THERMOSTAT
DIAL
TIME UP
INDICATOR
57
STEAM
SWITCH
27
26
1
42
4
3
40 52 40
FAN SPEED
SWITCH
30
31
26
2
3
X2
P1
P2
P1
P2
65
INDICATOR
POWER
SWITCH
25
4
66
POWER
21
71 60
HALOGEN LAMP
59
70
63
PROBE
64
60 MIN
TIMER
6
5
5857
6466
41
34X1
58
BUZZER
62
67
36
1
2
34
1
2
29
23
30
1
P1
P2
32
2
23
22
24
27
SWITCH
COM
25
DOOR
NORM
OVER TEMP
28
OPEN
E35 Turbofan Ovens
Revision 12
83
-54-
© Moffat Ltd, January 2010
Page 55

8 9
7
78
8 9
6
53
5
A1 A2
13513
C1
21446
15
18
16
19
17
20
78 77
34
12
12
315
C4 C6C5
2 6A2
4
YELLOW
WHITE
RED 60Hz
GREEN 50Hz
37
33 39 39
32
A1 15
A1 15
98
13513A1 13135 A1
C2 C3
24614A2 24614A2
11
11
11
12
13
A113 1 3 5
14
2A214 46
13
BRN
75 74
BLK
BL
76
4341
42
48
A1 15
A1 15
45
50
10
10
10
43
35
36
14 14
A1 13 513
A2 2 4614
13
13
44
38
A1 15
52
46
51
44
76
A1
73
49
BLACK
BLUE
BROWN
GREEN 50 Hz
WHITE
YELLOW
3x2kW
HEATING ELEMENTS
(RED 60 Hz)
15
16
81 81
17
82 82
8584
86
MOTOR
LEADS
FAN CIRC.
MOTOR
18 19
89
20
88 87
3x2kW
HEATING ELEMENTS
91
81 81
T1 T2 T3 T4 T5
18
A216
16
38
40
40
37
72 72 72 72
73
69
79
RELAY/
25A25A25A6
SHUNTTRIP
18 18 18 1818
4
5
1
2
3
L1L2L3
69
240v
29
59
12v
70
18 A2
16 18 A2
50
48
45
47
CIRCUT
BREAKERS
6
7
79
N
E
80
68
LIGHTING
TRANSFORMER
67
16 18 A2
4
A
21
SUPPLY T/BLOCK
16 18 A2
51
49
80
46
47
82
3
2
1
82
82
90
82
90
91
86
89
83
WATER
SOLENOID
BLACK/WHITE
BLACK/WHITE
47
C1-CONTACTOR HEATING
C2-CONTACTOR MOTOR DIRECTION ANTI-CLOCKWISE
C3-CONTACTOR MOTOR DIRECTION CLOCKWISE
C4-CONTACTOR MOTOR HI SPEED
C5-CONTACTOR MOTOR LOW SPEED
C6-CONTACTOR MOTOR HI SPEED
T1-TIMER MOTOR DIRECTION CYCLE
T2-TIMER STEAM (ANTI-CLOCKWISE)
T3-TIMER MOTOR DWELL ANTI-CLOCKWISE
T4-TIMER STEAM (CLOCKWISE)
47
T5-TIMER MOTOR DWELL CLOCKWISE
68
CONNECTION
E35 Turbofan Ovens
Revision 12
-55-
© Moffat Ltd, January 2010
Page 56

8.1.2 208-240V, 3P+E (up to lot number 0817999)
E35 Turbofan Ovens
Revision 12
-56-
© Moffat Ltd, January 2010
Page 57

E35 Turbofan Ovens
Revision 12
-57-
© Moffat Ltd, January 2010
Page 58

8.1.3 208-240V, 1P+N+E (up to lot number 0817999)
VENT
INDICATOR
61
1
P1
24
20W20W
HALOGEN LAMP
61
HEATING
INDICATOR
THERMOSTAT
DIAL
TIME UP
INDICATOR
57
71 60
HALOGEN LAMP
59
70
26
STEAM
SWITCH
27
1
42
40 52 40
4
2
3
4
X2
3
2P2
56
63
64
60 MIN
TIMER
6
5
5857
6466
41
34X1
THERMOSTAT
ORANGE
PURPLE
YELLOW
P.C. BOARD
1
2
3
4
5
10
28
54
9
8
65
7
6
53
62
56
55
PROBE
58
BUZZER
62
67
FAN SPEED
SWITCH
30
P1
P2
31
P1
P2
65
INDICATOR
POWER
SWITCH
26
25
C1-CONTACTOR HEATING
C2-CONTACTOR MOTOR DI RECTION ANTI-CLOCKWISE
C3-CONTACTOR MOTOR DIRECTION CLOCKWISE
C4-CONTACTOR MOTOR HI SPEED
C5-CONTACTOR MOTOR LOW SPEED
C6-CONTACTOR MOTOR HI SPEED
C7-CONTACTOR CAPA CITOR START
36
1
2
34
1
2
29
23
66
POWER
30
P1
P2
21
83
T1-TIMER MOTOR DIRE CTION CYCLE
T2-TIMER STEAM (ANTI-CLOCKWISE)
T3-TIMER MOTOR DWELL ANTI-CLOCKWISE
T4-TIMER STEAM (CLOCKWISE)
T5-TIMER MOTOR DWELL CLOCKWISE
T6-TIMER ON DELAY
32
1
2
23
22
24
27
SWITCH
COM
25
DOOR
NORM
OVER TEMP
28
OPEN
E35 Turbofan Ovens
Revision 12
-58-
© Moffat Ltd, January 2010
Page 59

20
3
88 87
3x2kW
HEATING ELEMENTS
81 81
7
78
6
53
8
5
A2A1
13513
C1
15
16
14624
18
19
17
20
78
34
93
96
5C4A11331
A264214
YELLOW
WHITE
RED 60Hz
GREEN 50Hz
11
11
9
10
10
92
11
94
95
96
5C513 A113
14624 A2
13
BRN
75
BLK
BL
76
52
COOLING FAN
12
C3
11
77
C6
74 73
46
51
A151331C2135A131
A261442146A242
44
76
A151331
A261442
3x2kW
45
50
10
11
43
35
36
14 14
13
13
15
FAN CIRC.
MOTOR
HEATING ELEMENTS
91
82 82
8584
86
81 81
17
16
89
18 19
323733
38
40
40
37
79 97
RELAY/
SHUNTTRIP
41
73
4
T2T1
181618 A216
72
2
CIRCUT
BREAKERS
25
A
1818
5
6
43
42 44
48
39
39
49
38
15 A 1 15A115A115A115A1
100
MOTOR
LEADS
T5T4T3
A2
48
47
25
A
18
A2
A2 16 1816 18
50
45
72
3
1
7
67
69
2
1
A21816
51
49
72
72
46
47
4
97
99
5 21 A113
C7
6 22 A224
625
AA
1818
21
79
93
98
80
82
82
T6
21
90
013114 (CRIMP CONNECTOR)
47
47
82 82
(BLACK/WHITE)
(BLACK/WHITE)
WATER
SOLENOID
BLU/BLK
12
98 99
94
BRN/RED
47
47
68
30 µf 50Hz
(35 µf 60Hz)
20 µf 50Hz
(35 µf 60Hz)
10 µf 50Hz
(12 µf 60Hz)
91
-59-
86
89
© Moffat Ltd, January 2010
CONNECTION
E
N
SUPPLY T/BLOCK
80
68
PARTITION PLATE 022296
69
240v
29
59
70
12v
LIGHTING
TRANSFORMER
L1
3
E35 Turbofan Ovens
Revision 12
Page 60

8.2 E35 MODELS FROM LOT NUMBER 0818001
8.2.1 380-415V, 3P+N+E (from lot number 0818001)
C1 - CONTACTOR MOTOR DIRECTION ANTI-CLOCKWISE ( 3 NO + 1 NC)
C2 - CONTACTOR MOTOR DIRECTION CLOCKWISE (3 NO + 1 NC)
C3 - CONTACTOR HEATING
C4 - CONTACTOR MOTOR HI SPEED (3 NO + 1 NO)
C5 - CONTACTOR MOTOR LOW SPEED (3 NO + 1 NO)
C6 - CONTACTOR MOTOR HI SPEED (3 NO + 1 NO)
CONTROL PANEL SUB ASSEMBLY
HEATING
INDICATOR
TIME UP
INDICATOR
42
44
1
42
STEAM
SWITCH
THERMOSTAT
P.C. BOARD
5
6
40
47
92
93
4
2
3
4
41
45
FAN SPEED
SWITCH
48
49
91
5
43
7
54
90
91
P1
P2
POWER
SWITCH
90
60 MIN
TIMER
6
YELLOW
PURPLE
3
2
9
8
46
92
53
POWER
INDICATOR
49
57
50
ORANGE
1
10
47
1
51
2
52
93
94
P1
1
56
P2
2
55
54
109
PROBE
THERMOSTAT
BUZZER
43
40
DIAL
44
45
MATE N LOCK PLUG 1-480708-0
VIEWED FROM REAR
51
50
11 12
10
56
9
78
55
52
6
4
5
41
53
12
3
109
94
57
25
19
26
81
30
1
2
1
2
20
11 10
12
987
4
65
32
1
MATE N LOCK CAP 1-480709-0
VIEWED FROM REAR
MATE N LOCK CAP
1-480764-0
VIEWED FROM REAR
MATE N LOCK PLUG
1-480763-0
VIEWED FROM REAR
1
2
1
2
HALOGEN LAMP
25W
HALOGEN LAMP
25W
19
20
21
22
23
24
100
75
26
76
112
23
22
21435
5
2143
28
30
27
81
110
110
111
24
21
18
112
112
110
75
76
76
27
NORM
OPEN
28
COM
111
DOOR
SWITCH
18
E35 Turbofan Ovens
Revision 12
-60-
25
25
OVER TEMP
© Moffat Ltd, January 2010
Page 61

10
10
10
10
10
FAN CIRC.
MOTOR
10
105104103
COOLING FAN
7
6
5
8
8
8
A2A1
315
13
A1
1 53 21
1 3 215 A1
C2
C1
2 4 226 A2
19
20
24
21
17
16
70
20
24
13
135
A1 1C55 13
C4
14132 46
12
70
14
15
2 64 22
9
72
3
4A2 2 6 14
C3
A2
426
14
A2A1
10
9
9
71
1111
A1
1 3 135 A1
A2
2 4 146 A2
13
GREY
10
10
10
10
GREY
73
10
BLACK
BLUE
GREEN 50Hz / RED 60 Hz
GREY
BROWN
WHITE
YELLOW
19
11
C6
3x2kW
MOTOR
MATE N LOCK CAP
1-480707-0
VIEWED FROM REAR
7
98
4
6
5
32
1
GREY
HEATING ELEMENTS
108 107
80 79
MOTOR
MATE N LOCK PLUG
1-480708-0
VIEWED FROM REAR
78
4
12
GREY
9
6
5
3
WHITE
101
78 78
106
GREY
BLACK
BLUE
BROWN
GREEN 50Hz / RED 60 Hz
YELLOW
79 80
3x2kW
HEATING ELEMENTS
NcCOMN o
16
17
BREAKERS
25
RELAY/
A
SHUNTTRIP
18 18
5
18
103
112
112
110
100
75
75
76
76
EMP
SUITABLE FOR
SUPPLY T/BLOCK
74
CONNECTION
1
2
3
400-415v 3Ø+N+E SUPPLY
380v 3Ø+N+E SUPPLY
7374
1
CIRCUT
4
6
2
A25A25A
18 18 18
7
E
N
L3
L2
L1
MOTOR
TIMER
3
4
6
18
ARROW INDICATES
OPEN SIDE OF
TERMINAL BLOCK
GREY
106
101
102
78
78
77
WATER
SOLENOID
21
CONNECTIONS FOR OPTIONAL CORDSET
EARTH
NEUTRAL
LINE 1
LINE 2
= GREEN / YELLOW
= BLUE
= BROWN
= BLACK
LINE 3 = GREY
E35 Turbofan Ovens
Revision 12
-61-
© Moffat Ltd, January 2010
Page 62

8.2.2 208-240V, 3P+E (from lot number 0818001)
C1 - CONTACTOR MOTOR DIRECTION ANTI-CLOCKWISE (3 NO + 1 NC)
C2 - CONTACTOR MOTOR DIRECTION CLOCKWISE (3 NO + 1 NC)
C3 - CONTACTOR HEATING
C4 - CONTACTOR MOTOR HI SPEED (3 NO + 1 NO)
C5 - CONTACTOR MOTOR LOW SPEED (3 NO + 1 NO)
C6 - CONTACTOR MOTOR HI SPEED (3 NO + 1 NO)
CONTROL PANEL SUB ASSEMBLY
HEATING
INDICATOR
TIME UP
INDICATOR
42
44
1
2
3
42
STEAM
SWITCH
THERMOSTAT
P.C. BOARD
5
6
41
FAN SPEED
SWITCH
90
91
90
60 MIN
4
TIMER
6
5
43
50
MATE N LOCK PLUG 1-480708-0
VIEWED FROM REAR
51
50
10
11 12
56
78
55
52
4
5
41
53
12
109
94
57
YELLOW
PURPLE
ORANGE
3
1
4
2
9
7
10
8
46
47
91
45
92
PROBE
40
THERMOSTAT
DIAL
44
45
40
24
19
20
21
19
12
11 10
9
6
3
25
7
8
9
4
65
3
2
1
26
MATE N LOCK CAP
1-480764-0
VIEWED FROM REAR
MATE N LOCK PLUG
1-480763-0
VIEWED FROM REAR
MATE N LOCK C AP 1-480709-0
VIEWED FROM REAR
22
23
24
100
75
26
76
112
30
22
21435
21435
28
30
27
81
110
20
21
E35 Turbofan Ovens
Revision 12
1
P1
48
47
P2
49
53
POWER
54
BUZZER
43
INDICATOR
POWER
SWITCH
92
49
93
57
51
2
52
93
94
1
P1
P2
56
2
55
54
109
1
2
21
HALOGEN LAMP
25W
110
111
81
30
1
2
1
2
HALOGEN LAMP
25W
111
NORM
OPEN
COM
DOOR
SWITCH
27
28
18
112
11
100
75
76
76
18
OVER TEMP
-62-
25
© Moffat Ltd, January 2010
Page 63

10
10
10
10
95
95
95
FAN CIRC.
MOTOR
10
10
103 104 105
95
95
95
COOLING FAN
7
6
24
19
20
21
5
24
8
8
8
A2
A1
135
A1
1 53 21
1 3 215 A1
2 4 226 A2
17
16
70
13
135
70
16
C1
20
C4
No
NcCOM
17
A1 1C55 13
14132 46
12
14
15
7374
2 64 22
9
72
9
3
4A2 2 6 14
C2
9
A2
71
1111
A1
A2
13
GREY
MOTOR
TIMER
C3
246
19
1 3 135 A1
C6
2 4 146 A2
10
10
10
10
10
10
11
BLACK
BLUE
BROWN
GREEN 50Hz / RED 60 Hz
73
GREY
WHITE
GREY
YELLOW
GREY
3x2kW
HEATING ELEMENTS
MOTOR
MATE N LOCK CAP
1-480707-0
VIEWED FROM REAR
7
98
4
6
5
32
1
108 107 106
MOTOR
MATE N LOCK PLUG
1-480708-0
VIEWED FROM REAR
78
4
12
5
GREY
9
6
3
WHITE
BLACK
GREEN 50Hz / RED 60 Hz
GREY
BLUE
YELLOW
101
95 95 95959595
BROWN
3x2kW
HEATING ELEMENTS
1
3
2
A25A25A
18 18 18
7
83
E
L3
L2
L1
4
6
18
GREY
106
DO NOT FIT"N" LABEL
ARROW INDICATES
OPEN SIDE OF
TERMINAL BLOCK
101
102
77
WATER
SOLENOID
21
CIRCUT
BREAKERS
25
RELAY/
A
SHUNTTRIP
18 18
4
5
1
2
SUPPLY T/BLOCK
CONNECTION
3
6
18
112
103
112
100
24
75
75
6
76
74
CONNECTIONS FOR OPTIONAL CORDSET
SUITABLE FOR
208v 3Ø+E SUPPLY
220v 3Ø+E SUPPLY
240v 3Ø+E SUPPLY
EARTH
LINE 1
LINE 2
= GREEN / YELLOW
= BROWN
= BLACK
LINE 3 = GREY
E35 Turbofan Ovens
Revision 12
-63-
© Moffat Ltd, January 2010
Page 64

8.2.3 208-240V, 1P+N+E (from lot number 0818001 to lot number 0938xxx)
T
C1 - CONTACTOR MOTOR DIRECTION ANTI-CLOCKWISE (3NO + 1NC)
C2 - CONTACTOR MOTOR DIRECTION CLOCKWISE (3NO + 1NC)
C3 - CONTACTOR HEATING
C4 - CONTACTOR MOTOR HI SPEED (3 NO + 1 NO)
C5 - CONTACTOR MOTOR LOW SPEED (3 NO + 1 NO)
C6 - CONTACTOR MOTOR HI SPEED (3 NO + 1 NO)
C7 - CONTACTOR MOTOR START CAPACITOR (2 NO + 2 NC)
T1 - TIMER MOTOR START CAPACITOR (ON DELAY)
R1 - SHUNT TRIP
CONTROL PANEL SUB ASSEMBLY
HEATING
INDICATOR
TIME UP
INDICATOR
42
44
1
3
42
STEAM
SWITCH
THERMOSTAT
P.C. BOARD
5
6
41
FAN SPEED
SWITCH
49
90
91
90
60 MIN
4
TIMER
6
5
2
43
50
YELLOW
PURPLE
ORANGE
3
1
4
2
9
7
10
8
46
47
91
45
MATE N LOCK PLUG 1-480708-0
VIEWED FROM REAR
51
50
10
11 12
56
55
41
53
9
78
52
6
45
12
3
109
94
57
19
25
92
1
P1
48
P2
51
2
52
PROBE
40
THERMOSTAT
DIAL
44
45
40
47
20
12
11 10
8
9
654
32
26
MATE N LOCK CAP
VIEWED FROM REAR
MATE N LOCK PLUG
VIEWED FROM REAR
1
2
21
7
1
23
24
MATE N LOCK CAP 1-480709-0
VIEWED FROM REAR
75
1-480764-0
1-480763-0
30
21
22
100
26
76
112
23
22
21435
5
2143
28
27
81
110
E35 Turbofan Ovens
Revision 12
53
POWER
54
BUZZER
43
INDICATOR
POWER
SWITCH
92
49
93
57
93
94
1
P1
P2
56
2
55
54
109
SUITABLE FOR
208v 60Hz 1Ø+N+E SUPPLY
220v 50Hz 1Ø+N+E SUPPLY
240v 60Hz 1Ø+N+E SUPPLY
240v 50Hz 1Ø+N+E SUPPLY
-64-
HALOGEN LAMP
25W
110
111
81
30
1
2
1
2
HALOGEN LAMP
25W
111
NORM
OPEN
COM
DOOR
SWITCH
27
28
18
OVER
25
overtemp
© Moffat Ltd, January 2010
Page 65

10
10
10
10
10
FAN CIRC.
MOTOR
10
104 105
103
24
72
16
1 3 215 A1
2 4 226 A2
9
11
13
70
36
9
74
84
13
35
A2
A1
36
15
18
35
6
5
84
84
1 53 21
C1
2 64 22
11
11
84
72
84
70
20
12
84
11
135
A1 1C55 13
C4
14132 46
84
37
33
1 R1 3R3 A1
C7
2 R2 4R4 A2
37
84
73
1
2
CIRCUT
R1T1
BREAKERS
25
A25A25A
18 18A18 18 18
4
5
6
7
84
3
4A2 2 6 14
NcCOM No
16
7
812
85
71
A2A1
17
315
13
A1
C2
C3
A2
426
14
A2A1
A2A1
10
10
10
84
19
29
32
11
11 11
1 3 135 A1
A1
C6
2 4 146 A2
A2
12
12
12
12
84
14
GREY
15
10
10
10
11
BLACK
BLUE
GREY
GREEN 50Hz / RED 60 Hz
73
WHITE
GREY
YELLOW
32
MOTOR
17
TIMER
34
3
4
6
33
34
18
GREY
MOTOR
MATE N LOCK CAP
1-480707-0
VIEWED FROM REAR
98
654
3
2
GREY
85
7
1
86
87
3x2kW
HEATING ELEMENTS
10 µf 50Hz
(12 µf 60Hz)
30 µf 50Hz
(35 µf 60Hz)
20 µf 50Hz
(35 µf 60Hz)
107108 106
80 79
MOTOR
MATE N LOCK PLUG
1-480708-0
VIEWED FROM REAR
GREY
9
78
BLACK
456
1
2
3
GREEN 50Hz / RED 60 Hz
WHITE
101
78 78
GREY
BLUE
BROWN
YELLOW
3x2kW
HEATING ELEMENTS
79 80
COOLING FAN
N
106
FIT 3-POLE
CENTRE JUMPER
ARROW INDICATES
OPEN SIDE OF
TERMINAL BLOCK
101
102
78
78
77
WATER
SOLENOID
21
103
112
100
75
76
MP
SUPPLY T/BLOCK
74
CONNECTION
E
1
2
L1
3
E35 Turbofan Ovens
Revision 12
-65-
© Moffat Ltd, January 2010
Page 66

2
8.2.4 208-240V, 1P+N+E (from lot number 0938xxx)
C1 - CONTACTOR MOTOR DIRECTION ANTI-CLOCKWISE (3NO + 1NC)
C2 - CONTACTOR MOTOR DIRECTION CLOCKWISE (3NO + 1NC)
C3 - CONTACTOR HEATING
C4 - CONTACTOR MOTOR HI SPEED (3 NO + 1 NO)
C5 - CONTACTOR MOTOR LOW SPEED (3 NO + 1 NO)
C6 - CONTACTOR MOTOR HI SPEED (3 NO + 1 NO)
C7 - CONTACTOR MOTOR START CAPACITOR (2 NO + 2 NC)
T1 - TIMER MOTOR START CAPACITOR
R1 - SHUNT TRIP
CONTROL PANEL SUB ASSEMBLY
HEATING
INDICATOR
TIME UP
INDICATOR
42
44
1
2
3
42
STEAM
SWITCH
THERMOSTAT
P.C. BOARD
5
6
41
FAN SPEED
SWITCH
48
49
92
93
4
4
45
54
90
91
5
43
7
91
P1
P2
POWER
SWITCH
6
53
90
60 MIN
TIMER
50
YELLOW
PURPLE
3
2
9
8
46
92
POWER
INDICATOR
49
57
ORANGE
1
10
47
1
51
2
52
93
94
P1
1
P2
56
2
55
54
109
PROBE
THERMOSTAT
BUZZER
43
40
DIAL
44
45
40
47
SUITABLE FOR
208v 60Hz 1Ø+N+E SUPPLY
220v 50Hz 1Ø+N+E SUPPLY
240v 60Hz 1Ø+N+E SUPPLY
240v 50Hz 1Ø+N+E SUPPLY
MATE N LOCK P LUG 1-480708-0
VIEWED FROM REAR
51
50
10
11 12
56
89
7
55
52
456
41
53
12
3
109
94
57
19
25
30
2
2
20
12
11 10
87
9
654
32
26
MATE N LOCK CAP
VIEWED FROM REAR
MATE N LOCK PLUG
VIEWED FROM REAR
1
2
1
2
81
1
1
23
1
24
MATE N LOCK CAP 1-48070 9-0
VIEWED FROM REAR
75
1-480764-0
1-480763-0
HALOGEN LAMP
25W
HALOGEN LAMP
25W
111
21
100
5
30
81
DOOR
SWITCH
24
19
20
21
22
26
76
112
23
22
21435
214
3
28
27
110
18
110
111
27
NORM
OPEN
28
COM
112
11
100
76
75
76
18
25
OVER TEMP
E35 Turbofan Ovens
Revision 12
-66-
© Moffat Ltd, January 2010
Page 67

10
10
10
FAN CIRC.
MOTOR
10
104 105
103
10
10
24
19
20
21
18
24
72
16
1 3 215 A1
2 4 226 A2
70
9
11
135
13
70
36
1 R1 3R3 A1
2 R2 4R4 A2
9
74
84
13
35
A1 A2
R1T1
36
16
15
35
6
5
12
84
84
1 53 21
C1
2 64 22
11
11
84
72
84
20
12
84
11
A1 1C55 13
C4
14132 46
84
37
33
C7
37
18
84
73
1
2
CIRCUT
BREAKERS
25
A25A25A
18 18A18 18 18
4
5
6
7
84
3
4A2 2 6 14
COM
No
Nc
16
7
8
85
71
A2A1
17
315
13
A1
C2
C3
A2
426
14
A2A1
A2A1
10
10
10
84
19
29
32
11
11 11
A1
1 3 135 A1
C6
A2
2 4 146 A2
12
12
12
12
84
14
GREY
15
10
10
10
11
BLACK
BLUE
GREY
GREEN 50Hz / RED 60 Hz
73
WHITE
GREY
YELLOW
GREY
32
MOTOR
17
TIMER
34
3
4
6
33
34
18
GREY
MOTOR
MATE N LOCK CAP
1-480707-0
VIEWED FROM REAR
7
8
9
4
65
3
21
85
86
87
3x2kW
HEATING ELEMENTS
10 µf 50Hz
(12 µf 60Hz)
(35 µf 60Hz)
20 µf 50Hz
(35 µf 60Hz)
30 µf 50Hz
107108 106
80 79
MOTOR
MATE N LOCK PLUG
1-480708-0
VIEWED FROM REAR
GREY
9
8
7
BLACK
6
45
1
23
GREEN 50Hz / RED 60 Hz
WHITE
101
78 78
GREY
BLUE
BROWN
YELLOW
3x2kW
HEATING ELEMENTS
79 80
COOLING FAN
112
100
75
76
103
112
100
75
6
E35 Turbofan Ovens
Revision 12
106
SUPPLY T/BLOCK
74
CONNECTION
E
N
1
2
L1
3
FIT 3-POLE
CENTRE JUMPER
ARROW INDICATES
OPEN SIDE OF
TERMINAL BLOCK
101
102
78
77
21
-67-
78
WATER
SOLENOID
© Moffat Ltd, January 2010
Page 68

9. ACCESSORIES
OVEN RACKS
Part numbers:
015168 E35-26
020993 E35-30
025183 E35GN-26
100 MM (FOUR INCH) LEG OPTION
Part number 021348 x 4
DOUBLE STACKING KIT
(PART No. 021236[26”] / 021237[30”] )
150 MM (SIX INCH) LEG OPTION
Part number 018724 x 4
A26 STAINLESS STEEL STAND
E35 Turbofan Ovens
Revision 12
-68-
© Moffat Ltd, January 2010
Page 69

10. PARTS DIAGRAMS
SECTION PAGE NO.
10.1 OVEN MAIN ASSEMBLY ................................................................................................................... 70
10.1.1 Main Assembly.................................................................................................................... 70
10.1.2 Front Upright Control Assembly .......................................................................................... 74
10.1.3 Water Injection Assembly.................................................................................................... 75
10.2 CONTROL PANEL ASSEMBLY......................................................................................................... 76
10.3 GEAR PLATE ASSEMBLY ................................................................................................................ 77
10.3.1 Gear Plate Assembly 3 Phase Models (to lot no 0817999)................................................ 77
10.3.2 Gear Plate Assembly 3 Phase Models (from lot no 0818001)............................................ 79
10.3.3 Gear Plate Assembly 1 Phase Models (to lot no 0817999)................................................ 81
10.3.4 Gear Plate Assembly 1 Phase Models (from lot no 0818001)............................................ 83
10.4 OVEN DOOR ASSEMBLY.................................................................................................................. 87
10.4.1 Glass Door Assembly E35-26 / E35-30 (to lot no 0817999)............................................... 87
10.4.2 Glass Door Assembly E35-26 / E35-30 (from lot no 0818001)........................................... 88
10.4.3 Glass Door Assembly E35GN-26 (to lot no 0817999) ........................................................ 89
10.4.4 Glass Door Assembly E35GN-26 (from lot no 0818001).................................................... 90
10.4.5 Stainless Steel Door Assembly E35-26 / E35-30 (to lot no 0817999) ................................ 91
E35 Turbofan Ovens
Revision 12
-69-
© Moffat Ltd, January 2010
Page 70

10.1 OVEN MAIN ASSEMBLY
10.1.1 MAIN ASSEMBLY
E35 Turbofan Ovens
Revision 12
-70-
© Moffat Ltd, January 2010
Page 71

Pos Part No. Description
1 020788 SIDE PANEL RH (E35-26 / E35GN-26 only, to Ser. No. 215839)
(Replace with 023971)
023971 SIDE PANEL RH (E35-26 / E35GN-26 only, from Ser. No. 215840)
020790 SIDE PANEL RH (E35-30 only, to Ser. No. 215839)
(Replace with 023972)
023972 SIDE PANEL RH (E35-30 only, from Ser. No. 215840)
2 020792 SERVICE ENTRY PANEL
019213 CABLE ENTRY BUSH (Not illustrated - to Ser. No. 205999)
3 020785 PANEL MOUNTING BRACKET
4 021526 WATER INLET ELBOW (Refer 10.1.3)
021527 WATER INLET WASHER
5 020745K MOTOR (380-415V 50Hz 3ø)
020885K MOTOR (220-240V 50Hz 1ø/3ø)
020886K MOTOR (208-240V 60Hz 1ø/3ø)
---------- Motor Front Bearing - SKF 6204-2Z/C3LHT23.
---------- Motor Rear Bearing - NSK 6203Z.
025751 FAN MOTOR HEAT FLINGER
6 020860 WATER SUPPLY TUBE (E35-26 / E35GN-26 only) (Refer 10.1.3)
020862 WATER SUPPLY TUBE (E35-30 only) (Refer 10.1.3)
7 020851 WATER SOLENOID (Refer 10.1.3)
8 020869 CONNECTOR - 3/8"F x 1/4" COMPRESSION (Refer 10.1.3)
9 020991 MOUNTING BRACKET (Refer 10.1.3)
10 020897 MOTOR INSULATION PLATE
11 020778 MOTOR MOUNTING PLATE
12 020797 SIDE INSULATION PANEL (E35-26 / E35GN-26 only ,Up to Lot No. 0817999)
231798 SIDE INSULATION PANEL (E35-26 / E35GN-26 only, From Lot No. 0818001)
020798 SIDE INSULATION PANEL (E35-30 only, Up to Lot No. 0817999)
231808 SIDE INSULATION PANEL (E35-30 only, From Lot No. 0818001)
13 021160 OVEN SIDE PLATE
14 090416 FIBREGLASS INSULATION 730x780x38 (E35-26 / E35GN-26 only)
090417 FIBREGLASS INSULATION 730x880x38 (E35-30 only)
15 020762 ELEMENT - 220-240V 2000W (H,N,T only)
020763 ELEMENT - 208-220V 2000W (P,X only)
022259 ELEMENT - 208-220V 1250W (8kW units only - option)
015292 SEALING WASHER
16 020896 MOTOR SHAFT SEAL
17 020898 MOTOR SEAL HOUSING
18 025396 FAN
19 020780 CHASSIS HORIZONTAL SIDE (E35-26 / E35GN-26 only)
020786 CHASSIS HORIZONTAL SIDE (E35-30 only)
20 020795 TOP COVER (E35-26 only)
020796 TOP COVER (E35-30 only)
025184 TOP COVER (E35GN-26 only)
21 022425 VENT SEAL
22 022426 VENT SEAL FLANGE PLATE
23 020781 CHASSIS HORIZONTAL (E35-26 / E35-30 only)
025169
CHASSIS HORIZONTAL (E35GN-26 only)
24 023970 CHASSIS VERTICAL REAR RH
25 020791 BACK PANEL (E35-26 / E35-30 only)
025189 BACK PANEL (E35GN-26 only)
26 020895 CABLE GUIDE BRACKET
27 020787 SIDE PANEL LH (E35-26 / E35GN-26 only)
020789 SIDE PANEL LH (E35-30 only)
28 021351 OVEN LAMP HOLDER & BULB (Up to Lot No. 0817999)
232108 OVEN LAMP HOLDER & BULB (From Lot No. 0818001)
021352 OVEN LAMP - GLASS LENS
021354 OVEN LAMP - GASKET
021350 OVEN LAMP - BULB G4/20W (Up to Lot No. 0817999)
E35 Turbofan Ovens
Revision 12
-71-
© Moffat Ltd, January 2010
Page 72

231814 OVEN LAMP BULB G9/25W (From Lot No. 0818001)
021353 OVEN LAMP -SUPPORT FRAME
29 004703 OVEN WA - ENAMELLED (E35-26 only)
004704 OVEN WA - ENAMELLED (E35-30 only)
004983 OVEN WA - ENAMELLED (E35GN-26 only)
020874 OVEN WA STAINLESS STEEL (E35-26 only)
020875 OVEN WA STAINLESS STEEL (E35-30 only)
30 020828 VENT FLAP
31 020827 VENT OVER PRESSURE PLATE
32 020819 OVER PRESSURE SPRING
33 041425 SCREW - M4 x 6 PAN POZI
34 016241 VENT HOOD
35 020824 VENT GASKET
36 020845 VENT WA
37 020821 VENT OPERATING ROD (E35-30 only Up to Lot No. 0817999)
231810 VENT OPERATING ROD (E35-30 only) From Lot No. 0818001)
020820 VENT OPERATING ROD (E35-26 / E35GN-26 only Up to Lot No. 0817999)
231809 VENT OPERATING ROD (E35-26 / E35GN-26 only From Lot No. 0818001)
38 020822 SELECTOR SWITCH (Refer 10.1.2 Up to Lot No. 0817999 Only)
39 020834 VENT SWITCH BRACKET (Refer 10.1. 2 Up to Lot No. 0817999)
231789 VENT SWITCH BRACKET (From Lot No. 0818001)
40 020761 TOP BUTT STRAP
41 020764 CONTROL HOUSING CAP
020865 SCREW CAP - BLACK
42 018768 STAND-OFF (Refer 10.1.2)
43 020882K THERMOSTAT - SOLID STATE (Refer 10.1.2)
44 020775 THERMOSTAT BOARD MOUNTING BRACKET (Refer 10.1.2)
45 011794 BUZZER (Refer 10.1.2)
46 020783 CHASSIS VERTICAL FRONT (Refer 10.1.2)
47 014032 BUZZER MOUNTING BRACKET (Refer 10.1.2)
48 019369K OVERTEMP THERMOSTAT KIT (Refer 10.1.2, 10.1.3)
013506 GLAND WASHER
013507 GLAND BUSH
013508 GLAND NUT
020887 SPLIT GLAND NUT ASSY (c/w Split nut, Seal & Washer)
020892 GLAND BUSH MOUNTING PLATE
49 ---------- CONTROL PANEL ASSEMBLY (Refer 10.2)
50 020841 FACIA WA (E35-26 / E35-30 Up to Lot No. 0817999)
232080 FACIA WA (E35-26 / E35-30 From Lot No. 0818001)
025173 FACIA WA (E35GN-26 Up to Lot No. 0817999)
232121 FACIA WA (E35GN-26 From Lot No. 0818001)
51 020774 MICROSWITCH
52 020829 MICROSWITCH MOUNTING BRACKET
53 020830 MICROSWITCH COVER PANEL (E35-26 / E35-30 Up to Lot No. 0817999)
232217 MICROSWITCH COVER PANEL (E35-26 / E35-30 From Lot No. 0818001)
025172 MICROSWITCH COVER PANEL (E35GN-26 Up to Lot No. 0817999)
232220 MICROSWITCH COVER PANEL (E35GN-26 From Lot No. 0818001)
54 020793 BASE COVER SHEET (E35-26 only)
020794 BASE COVER SHEET (E35-30 only)
025171 BASE COVER SHEET (E35GN-26 only)
55 020899 BLANKING PLATE
56 020784 OVEN SUPPORT BRACKET (E35-26 / E35-30 only)
025170 OVEN SUPPORT BRACKET (E35G
N-26 only)
57 230577 LEG PLATE
021348 LEG 100MM (Not illustrated)
230578 LEG 150MM (Not illustrated)
58 020881 FAN GUARD
59 020879 FAN BAFFLE (E35-xxx-26 only)
020880 FAN BAFFLE (E35-xxx-30 only)
60 020857 STEAM TUBE WA (Refer 10.1.3)
E35 Turbofan Ovens
Revision 12
-72-
© Moffat Ltd, January 2010
Page 73

61 020861 COMPRESSION UNION ¼" (Refer 10.1.3)
62 020883K PROBE KIT (Refer 10.1.3)
020856 GASKET
63 016794 MALE CONNECTOR (Refer 10.1.3) (From Ser. No. 261985)
020855 FEMALE CONNECTOR (Refer 10.1.3) (Up to Ser. No. 261984)
64 020852 CHECK VALVE (Up to Ser. No. 261984)
65 020853 SPRAY BODY - WHIRLJET (Refer 10.1.3)
020856 GASKET
66 020890 PROBE SECURING BRACKET (Refer 10.1.3)
67 020844 BAFFLE SPACER WA
68 020802 RACK LOCATION UPPER WA
69 020810 SIDE RACK 6 TRAY RH WA (E35-26 only)
020812 SIDE RACK 6 TRAY RH WA (E35-30 only)
025180 SIDE RACK 6 TRAY RH WA (E35GN-26 only)
023019 SIDE RACK 8 TRAY RH WA (E35-30 only)
025090 SIDE RACK 8 TRAY RH WA (E35-26 only)
025917 SIDE RACK 4 TRAY RH WA (E35-26 only)
026787 SIDE RACK 5 TRAY RH WA (E35-30 only)
026128 SIDE RACK 5 TRAY RH WA (E35-26 only)
70 015168 OVEN RACK (E35-26 only)
020993 OVEN RACK (E35-30 only)
025179 OVEN RACK (E35GN-26 only)
71 020809 SIDE RACK 6 TRAY LH WA (E35-26 only)
020811 SIDE RACK 6 TRAY LH WA (E35-30 only)
025179 SIDE RACK 6 TRAY LH WA (E35GN-26 only)
023018 SIDE RACK 8 TRAYLH WA (E35-30 only)
025089 SIDE RACK 8 TRAY LH WA (E35-26 only)
025916 SIDE RACK 4 TRAY LH WA (E35-26 only)
026786 SIDE RACK 5 TRAY LH WA (E35-30 only)
026127 SIDE RACK 5 TRAY LH WA (E35-26 only)
72 020803 RACK LOCATION LOWER WA
73 231438 DOOR SEAL (E35-26 / E35-30 only)
232119 DOOR SEAL (E35GN-26 only)
74 020754 BOLT CATCH
75 020737 HINGE MOUNTING PLATE TOP (To Ser. No. 205999)
023050 HINGE MOUNTING PLATE TOP (From Ser. No. 206000 ,Up to Lot No. 0817999)
230741 HINGE MOUNTING PLATE TOP (From Lot No. 0818001)
020876 TOP HINGE BOLT
020831 DOOR PIVOT PIN (Up to Lot. No. 0817999)
230744 DOOR PIVOT PIN (From Lot No. 0818001)
020738 HINGE BUSH (Up to Lot. No. 0817999)
76
230745 HINGE BUSH (From Lot No. 0818001)
230746 HINGE NUT (From Lot No. 0818001)
77 ---------- DOOR ASSEMBLY (Refer 10.4)
78 020750 HINGE MOUNTING PLATE BOTTOM (To Ser. No. 205999)
023051 HINGE MOUNTING PLATE BOTTOM (From Ser No 206000,Up to Lot No. 0817999)
230742 HINGE MOUNTING PLATE BOTTOM (From Lot No. 0818001)
79 ---------- GEAR PLATE (Refer 10.3)
80 021156 COOLING FAN
81 021157 COOLING FAN BRACKET
82 021158 HEAT BAFFLE (Up to Lot. No. 0817999)
231784 HEAT BAFFLE (From Lot No. 0818001)
83 021388 CAPACITOR MOUNTING BRACKET (1ø ONLY)
84 021389 CAPACITOR SHIELD (1ø ONLY)
85 021551 CAPACITOR 10uF (H AND X) (50Hz 1ø ONLY)
021553 CAPACITOR 20uF (H AND X) (50Hz 1ø ONLY)
021554 CAPACITOR 30uF (H AND X) (50Hz 1ø ONLY) To Lot No.0817999
021552 CAPACITOR 12uF (P AND T) (60Hz 1ø ONLY)
021555 CAPACITOR 35uF (P AND T) (60Hz 1ø ONLY)
For models after Lot No. 0818000, refer to Section 10.3.4 for single phase Capacitors.
E35 Turbofan Ovens
Revision 12
-73-
© Moffat Ltd, January 2010
Page 74

10.1.2 FRONT UPRIGHT CONTROL ASSEMBLY
Pos Part No. Description
38 020822 SELECTOR SWITCH (Up to Lot No. 0817999)
39 020834 VENT SWITCH BRACKET (Up to Lot No. 0817999)
231789 VENT SWITCH BRACKET (From Lot No. 0818001)
42 018768 STAND-OFF
43 020882K THERMOSTAT - SOLID STATE (Kit includes Potentiometer)
44 020775 THERMOSTAT BOARD MOUNTING BRACKET
45 011794 BUZZER
46 020783 CHASSIS VERTICAL FRONT
47 014032 BUZZER MOUNTING BRACKET (Up to Lot No. 0817999)
231797 BUZZER MOUNTING BRACKET (From Lot No. 0818001)
48 019369K OVERTEMP THERMOSTAT KIT
E35 Turbofan Ovens
Revision 12
-74-
© Moffat Ltd, January 2010
Page 75

10.1.3 WATER INJECTION ASSEMBLY
Pos Part No. Description
4 021526 WASHER INLET ELBOW (c/w Washer)
6 020860 WATER SUPPLY TUBE (E35-xxx-26 only)
020862 WATER SUPPLY TUBE (E35-xxx-30 only)
7 020851 WATER SOLENOID
8 020869 CONNECTOR -
3
/8”F x 1/4” COMPRESSION
9 020991 MOUNTING BRACKET
48 019369K OVERTEMP THERMOSTAT KIT
013506 GLAND WASHER
013507 GLAND BUSH
013508 GLAND NUT
020887 SPLIT GLAND NUT ASSY (c/w Split Nut, Seal & Washer)
020892 GLAND BUSH MOUNTING PLATE
60 020857 STEAM TUBE WA
61 020861 COMPRESSION UNION
1
/4"
62 020883K PROBE KIT
020856 GASKET
63 016794 MALE CONNECTOR (From Ser. No. 261985)
020855 FEMALE CONNECTOR (To Ser. No. 261984)
64 020852 CHECK VALVE (To Ser. No. 261984)
65 020853 SPRAY BODY - WHIRLJET
020856 GASKET
66 020890 PROBE SECURING BRACKET
E35 Turbofan Ovens
Revision 12
-75-
© Moffat Ltd, January 2010
Page 76

10.2 CONTROL PANEL ASSEMBLY
Part No. Description
1 020823 KNOB (Vent)
020848 COMPRESSION RING
2 020849 NEON INDICATOR
3 004705 CONTROL PANEL ºF (Up to Lot No. 0817999)
231812 CONTROL PANEL ºF (From Lot No. 0818001)
004706 CONTROL PANEL ºC (Up to Lot No. 0817999)
231819 CONTROL PANEL ºC (From Lot No. 0818001)
4 020976 POTENTIOMETER BRACKET
5 020985K POTENTIOMETER
6 011760 TIMER - (60 Minute)
7 020893 STEAM SWITCH ASSEMBLY (Up to Lot No 0817999)
232411 STEAM SWITCH ASSEMBLY (From Lot No 0818000)
8 020888 SELECTOR SW. (Fan Speed)
E35 Turbofan Ovens
Revision 12
-76-
Pos
© Moffat Ltd, January 2010
Page 77

10.3 GEAR PLATE ASSEMBLY
10.3.1 GEAR PLATE ASSEMBLY (3 PHASE MODELS ONLY) Up to lot number 0817999
123
4 5 6 6
5
8 8
7
5
5
5
8 8
6
9
10
11
12
13
14
E35 Turbofan Ovens
Revision 12
15 16
-77-
© Moffat Ltd, January 2010
Page 78

Pos Part No. Description
1 020891 GEAR PLATE
2 020990 DIN RAIL
3 020769 CONTACTOR INTERLOCK (C2&C3 AND C5&C6)
4 015966 HEATING CONTACTOR 50Hz
020974 HEATING CONTACTOR 50Hz (X253 ONLY)
020772 HEATING CONTACTOR 60Hz
5 020768 MOTOR CONTACTOR
6 020995 END ANCHOR
7 020863 TIMER - FAN DIRECTION (TO Ser. No. 204012)
023059 TIMER - FAN DIRECTION (FROM Ser. No. 204013)
8 020773 TIMER - FAN DWELL / STEAM DOSE (TO Ser. No. 204012)
023058 TIMER - FAN DWELL / STEAM DOSE (FROM Ser. No. 204013)
9 020770 SHUNT TRIP (VYNKIER) (50Hz to Ser. No. 230810)
021345 SHUNT TRIP (AB) (50Hz FROM Ser. No. 230811; 60Hz All)
10 020776 CIRCUIT BREAKER - 3ø 25A (VYNKIER) (To Ser. No. 230810)
021563 CIRCUIT BREAKER - 3ø 25A (AB) (From Ser. No. 230811)
020975 CIRCUIT BREAKER - 3ø 40A (AB) (263 & 253 UNITS ONLY)
11 020777 CIRCUIT BREAKER - 6A (VYNKIER) (50Hz To Ser. No. 230810)
021344 CIRCUIT BREAKER - 6A (AB) (50Hz From Ser. No. 230811; 60Hz All)
12 025715 TERMINAL BLOCK - M10 RED (From Ser. No. 261183)
020999 TERMINAL BLOCK - M6 RED (To Ser. No. 261182)
13 025714 TERMINAL BLOCK - M10 GREY (From Ser. No. 261183)
020998 TERMINAL BLOCK - M6 GREY (To Ser. No. 261182)
025716 CENTRE JUMPER - 2 POLE M10 (From Ser. No. 261183)
020996 CENTRE JUMPER - 2 POLE M6 (To Ser. No. 261182)
14 025713 TERMINAL BLOCK - M10 GREEN (From Ser. No. 261183)
020997 TERMINAL BLOCK - M6 GREEN (To Ser. No. 261182)
15 020213 LIGHTING TRANSFORMER
16 021159 TRANSFORMER BRACKET
E35 Turbofan Ovens
Revision 12
-78-
© Moffat Ltd, January 2010
Page 79

10.3.2 GEAR PLATE ASSEMBLY (3 PHASE MODELS ONLY) From lot number 0818001
E35 Turbofan Ovens
Revision 12
-79-
© Moffat Ltd, January 2010
Page 80

Pos Part No Description
1 231510 GEAR PLATE
2 020990 DIN RAIL
4 231742 CONTACTOR 11BG0601A230
5 231739 CONTACTOR LOVATO BF1810A230 (3 phase 380-415 Volts Models)
231740 CONTACTOR 11BF3200A230 (3 phase 208-240 Volt Models)
6 020995 END ANCHOR
7 231745 REVERSING STARTER KIT SMX9022
8 232466 MOTOR WIRING LOOM
9 231743 CONTACTOR INTERLOCK 11BGX5000
10 231741 CONTACTOR No. 11BG0610A230
11 231745 REVERSING STARTER KIT SMX9022
12 024567 MOTOR TIMER
14 232407 CIRCUIT BREAKER 6A
15 232408 CIRCUIT BREAKER 25A 3PH.
16 232410 SHUNT TRIP
17 231748 ON DELAY TIMER 24-240VAC
18 021229 TERMINAL MARKING TAG - E
19 021228 TERMINAL MARKING TAG - N
20 021227 TERMINAL MARKING TAG - L3
21 021226 TERMINAL MARKING TAG - L2
22 021225 TERMINAL MARKING TAG - L1
23 022297 CENTER JUMPER 2 POLE
24 231759 TERMINAL BLOCK 16mm RED
25 022296 PARTITION PLATE
26 022295 TERMINAL BLOCK 16mm GREY
27 231760 TERMINAL BLOCK 16mm GREEN
28 231511 CONNECTION BRACKET
29 232577 WIRE LOOM GEAR PLATE
E35 Turbofan Ovens
Revision 12
-80-
© Moffat Ltd, January 2010
Page 81

10.3.3 GEAR PLATE ASSEMBLY (1 PHASE MODELS ONLY) Up to lot number 0817999
123
6 5 5 4
5 5 5
8 7 7
7 7
9 10
14 14 1415
11 12
13
16 17
E35 Turbofan Ovens
Revision 12
-81-
© Moffat Ltd, January 2010
Page 82

Pos Part No. Description
1 020891 GEAR PLATE
2 020990 DIN RAIL
3 020769 CONTACTOR INTERLOCK (C2&C3 AND C5&C6)
4 020995 END ANCHOR
5 020768 MOTOR CONTACTOR
6 015966 HEATING CONTACTOR 50Hz
020772 HEATING CONTACTOR 60Hz
7 020773 TIMER - FAN DWELL / STEAM DOSE (To Ser. No. 204013)
023058 TIMER - FAN DWELL / STEAM DOSE (From Ser. No. 204014)
8 020863 TIMER - FAN DIRECTION (To Ser. No. 204013)
023059 TIMER - FAN DIRECTION (From Ser. No. 204014)
9 020770 SHUNT TRIP (VYNKIER) (50Hz To Ser. No. 230810)
021345 SHUNT TRIP (AB) (50Hz From Ser. No. 230811; 60Hz All)
10 020776 CIRC. BREAKER 3 POLE 25A (VYNKIER) (50Hz to Ser. No. 230810)
021563 CIRC. BREAKER 3 POLE 25A (AB) (50Hz From Ser. No. 230811; 60Hz All)
11 020777 CIRCUIT BREAKER - 1ø 6A (VYNKIER) (50Hz to Ser. No. 230810)
021344 CIRCUIT BREAKER - 1ø 6A (AB) (50Hz From Ser. No. 230810; 60Hz All)
12 022281 CONTACTOR (MOTOR START CAPACITOR)
13 021562 TIMER - ON DELAY 1-30 SECOND (MOTOR START CAPACITOR)
14 022295 TERMINAL BLOCK - 16mm GREY
022297 CENTRE JUMPER - 2 POLE (Not Illustrated)
15 022296 PARTITION PLATE
16 020213 LIGHTING TRANSFORMER
17 021159 TRANSFORMER BRACKET
E35 Turbofan Ovens
Revision 12
-82-
© Moffat Ltd, January 2010
Page 83

10.3.4 GEAR PLATE ASSEMBLY (1 PHASE MODELS ONLY)
from lot number 0818001 to lot number 0938xxx
E35 Turbofan Ovens
Revision 12
-83-
© Moffat Ltd, January 2010
Page 84

Pos Part No DESCRIPTION
1 231510 GEAR PLATE
2 020990 DIN RAIL
3 041045 SCREW 8x3/8" TRUSS HD PHL NP
4 231741 CONTACTOR NO 11BG0610A230
5 231739 CONTACTOR LOVATO BF1810A230
6 232551 CAPACITOR 10 mF (for 50Hz models)
232552 CAPACITOR 12 mF (for 60Hz models)
7 232554 CAPACITOR 30 mF (for 50Hz models )
232555 CAPACITOR 35 mF (for 60Hz models)
8 232553 CAPACITOR 20 mF (for 50Hz models)
232555 CAPACITOR 35 mF (for 60Hz models)
9 232466 MOTOR WIRING LOOM
10 231743 CONTACTOR INTERLOCK 11BGX5000
11 024567 MOTOR TIMER
12 041036 SCREW 3/8”X8B PAN PH NP
13 232407 CIRCUIT BREAKER 6A
14 232410 SHUNT TRIP
14 232408 CIRCUIT BREAKER 25A 3PH.
15 231748 ON DELAY TIMER 24-240VAC
16 021229 TERMINAL MARKING TAG - E
17 021228 TERMINAL MARKING TAG - N
18 021225 TERMINAL MARKING TAG - L1
19 022297 CENTER JUMPER 2 POLE
20 022527 CENTER JUMPER 3 POLE
21 020995 END ANCHOR
22 231759 TERMINAL BLOCK 16mm RED
23 022296 PARTITION PLATE
24 022295 TERMINAL BLOCK 16mm GREY
25 231760 TERMINAL BLOCK 16mm GREEN
26 231511 CONNECTION BRACKET
27 232577 WIRE LOOM GEAR PLATE
E35 Turbofan Ovens
Revision 12
-84-
© Moffat Ltd, January 2010
Page 85

10.3.5 GEAR PLATE ASSEMBLY (1 PHASE MODELS ONLY) from lot number 0938xxx
E35 Turbofan Ovens
Revision 12
-85-
© Moffat Ltd, January 2010
Page 86

Pos Part No DESCRIPTION
1 231510 GEAR PLATE
2 020990 DIN RAIL
3 041045 SCREW 8x3/8" TRUSS HD PHL NP
4 231741 CONTACTOR NO 11BG0610A230
5 231739 CONTACTOR LOVATO BF1810A230
6 232551 CAPACITOR 10 mF (for 50Hz models)
232552 CAPACITOR 12 mF (for 60Hz models)
7 232554 CAPACITOR 30 mF (for 50Hz models )
232555 CAPACITOR 35 mF (for 60Hz models)
8 232553 CAPACITOR 20 mF (for 50Hz models)
232555 CAPACITOR 35 mF (for 60Hz models)
9 232466 MOTOR WIRING LOOM
10 231743 CONTACTOR INTERLOCK 11BGX5000
11 024567 MOTOR TIMER
12 041036 SCREW 3/8”X8B PAN PH NP
13 232407 CIRCUIT BREAKER 6A
14 232410 SHUNT TRIP
14 232408 CIRCUIT BREAKER 25A 3PH.
15 231748 ON DELAY TIMER 24-240VAC
16 021229 TERMINAL MARKING TAG - E
17 021228 TERMINAL MARKING TAG - N
18 021225 TERMINAL MARKING TAG - L1
19 022297 CENTER JUMPER 2 POLE
20 022527 CENTER JUMPER 3 POLE
21 020995 END ANCHOR
22 231759 TERMINAL BLOCK 16mm RED
23 022296 PARTITION PLATE
24 022295 TERMINAL BLOCK 16mm GREY
25 231760 TERMINAL BLOCK 16mm GREEN
26 231511 CONNECTION BRACKET
27 232577 WIRE LOOM GEAR PLATE
28 231742 CONTACTOR
29 234033 CONTACTOR 2NC 11BG09T2A230
E35 Turbofan Ovens
Revision 12
-86-
© Moffat Ltd, January 2010
Page 87

10.4 OVEN DOOR ASSEMBLY
10.4.1 GLASS DOOR ASSEMBLY - E35-26 / E35-30 Up to lot number 0817999
Pos Part No. Description
1 020713K DOOR INNER GLASS (745.5mmx536mm)
022314 GLASS SEAL
022311 INNER GLASS UPGRADE KIT (Up to Ser. No. 39600) (745.5mmx536mm)
2 022308 GLASS CLAMP
3 004715 DOOR COVER TOP
4 020833 DOOR BOLT CONNECTING ROD
047308 SPLIT PIN - 32x3.2 ST/ST
5 020753 BOLTING ELEMENT
6 020752 HANDLE GEAR
7 020751K DOOR HANDLE KIT
020865 SCREW CAP - BLACK
8 022309 GLASS SPACER TRIM
9 020730 DOOR TRIM INNER RH
10 020731 DOOR TRIM OUTER RH
11 020766 LATCH ASSEMBLY
12 021154 OUTER GLASS HINGED (744mmx553mm)
090014 GLASS SEAL - 750mm (INSEAL 10 x 6mm)
13 021153 HINGE SPACER PLATE
14 004716 DOOR COVER BOTTOM
15 020725 DOOR FRAME
16 020732 DOOR TRIM INNER LH
17 020733 DOOR TRIM OUTER LH
SD7031 COMPLETE DOOR ASSEMBLY
E35 Turbofan Ovens
Revision 12
-87-
© Moffat Ltd, January 2010
Page 88

10.4.2 GLASS DOOR ASSEMBLY - E35-26 / E35-30 From lot number 0818001
Pos Part No Description
1 230725 DOOR FRAME WA E35
2 230745 HINGE BUSH
230744 HINGE PIN
230746 HINGE NUT
3 230735 DOOR TRIM LH
4 230736 DOOR TRIM RH
5 231494 HANDLE / LOCK - SLAMSHUT
231804 SINGLE STEP LOCKING DOG
231805 DUAL STEP LOCKING DOG
6 232134 DOOR OUTER GLASS ASSEMBLY(744mmx525mm)
7 232588 QUAD LATCH
8 232364 DOOR OUTER GLASS SPRING
9 231801 DOOR INNER GLASS BUFFER
10 231803 DOOR INNER GLASS E35(745.5mmx536mm)
11 231773 DOOR TRIM TOP WA
12 231774 DOOR TRIM BOTTOM WA
13 020866 DOME PLUG DIA. 12.7
232103 DOOR ASSEMBLY
E35 Turbofan Ovens
Revision 12
-88-
© Moffat Ltd, January 2010
Page 89

10.4.3 GLASS DOOR ASSEMBLY - E35GN-26 Up to lot number 0817999
Pos Part No. Description
1 025161 DOOR INNER GLASS E35GN (744mmx626mm)
022314 GLASS SEAL
2 022308 GLASS CLAMP
3 004981 DOOR COVER TOP E35GN
4 020833 DOOR BOLT CONNECTING ROD
047308 SPLIT PIN - 32x3.2 ST/ST
5 020753 BOLTING ELEMENT
6 020752 HANDLE GEAR
7 020751K DOOR HANDLE KIT
020865 SCREW CAP - BLACK
8 022309 GLASS SPACER TRIM
9 020730 DOOR TRIM INNER RH
10 020731 DOOR TRIM OUTER RH
11 020766 LATCH ASSEMBLY
12 025159 OUTER GLASS HINGED E3GN (744mmx643mm)
090014 GLASS SEAL - 750mm (INSEAL 10 x 6mm)
13 021153 HINGE SPACER PLATE
14 004982 DOOR COVER BOTTOM E3GN
15 025162 DOOR FRAME E35GN
16 020732 DOOR TRIM INNER LH
17 020733 DOOR TRIM OUTER LH
E35 Turbofan Ovens
Revision 12
-89-
© Moffat Ltd, January 2010
Page 90

10.4.4 GLASS DOOR ASSEMBLY - E35GN-26 From lot number 0818001
Pos Part No Description
1 232122 DOOR FRAME WA E35GN
2 230745 HINGE BUSH
230744 HINGE PIN
230746 HINGE NUT
3 230735 DOOR TRIM LH
4 230736 DOOR TRIM RH
5 231494 HANDLE / LOCK - SLAMSHUT
231804 SINGLE STEP LOCKING DOG
231805 DUAL STEP LOCKING DOG
6 232135 DOOR OUTER GLASS ASSEMBLY E35GN (744mmx615mm)
7 232588 QUAD LATCH
8 232364 DOOR OUTER GLASS SPRING
9 231801 DOOR INNER GLASS BUFFER
10 232123 DOOR INNER GLASS E35GN (745.5mmx626mm)
11 232125 DOOR TRIM TOP WA E35GN
12 232126 DOOR TRIM BOTTOM WA E35GN
13 020866 DOME PLUG DIA. 12.7
232118 E35GN-26 DOOR ASSEMBLY
E35 Turbofan Ovens
Revision 12
-90-
© Moffat Ltd, January 2010
Page 91

10.4.5 STAINLESS STEEL DOOR ASSEMBLY - E35-26 / E35-30 Up To lot number 0817999
7
23
6
13
5
4
3
28
2
26
1
28
8 9 1110
14
15
16
17
5
13
18
23
12
13
Pos Part No. Description
1 024103 OUTER GLASS SEAL
2 024079 DOOR OUTER PANEL WA
3 004892 DOOR FRAME WA
4 020738 HINGE BUSH
5 024098 COVER SUPPORT BRACKET
6 004893 DOOR COVER TOP
7 024099 DOOR TRIM INNER LH
8 024083 DOOR INNER PANEL WA
9 024090 GLASS MODULE(480mmx310mm)
10 024104 INNER GLASS SEAL
11 024087 GLASS CLAMP WA
12 024101 HANDLE SUPPORT
13 047100 NUTSERT 3/16”
14 020752 HANDLE GEAR RH
15 020833 DOOR BOLT CONNECTING ROD
16 047308 SPLIT PIN 32 x 3.2
17 020753 BOLTING ELEMENT
18 004894 DOOR COVER BOTTOM
19 041409 SCREW M5 x 25 MUSH SLOT
20 045410 WASHER M5 SPRING
21 044017 NUT M5 HEX
22 041045 SCREW 3/8” x 8 TRUSS
23 041436 SCREW 3/4” x 3/16 SD POZI BLACK
24 090005 SILICONE RTV CLEAR
25 090402 FIBREGLASS
26 044206 NUT SPIRE M5
27 041411 SCREW M5 x 16 PAN SLT 304 SS
28 024242 WINDOW VENT
E35 Turbofan Ovens
Revision 12
-91-
© Moffat Ltd, January 2010
Page 92

12. SERVICE CONTACTS
AUSTRALIA
VICTORIA - MOFFAT PTY LTD
HEAD OFFICE AND MAIN WAREHOUSE
740 Springvale Road Tel (03) 9518 3888
Mulgrave VIC 3171 Fax (03) 9518 3838
Spare Parts Department Free Call 1800 337 963
Fax (03) 9518 3895
NEW SOUTH WALES - MOFFAT PTY LTD
Unit 3/142 James Ruse Drive Tel (02) 8833 4111
Rosehill NSW 2142
Sydney
Spare Parts Free Call 1800 337 963
Fax (03) 8833 4133
QUEENSLAND - MOFFAT PTY LTD
30 Prosperity Place Tel (07) 3630 8600
Geebung QLD 4034
Spare Parts Free Call 1800 337 963
Fax (03) 3630 8623
WESTERN AUSTRALIA - MOFFAT PTY LTD
67 Howe Street
Osbourne Park Tel (08) 9305 8855
WA 6017
Spare Parts Free Call 1800 337 963
Fax (03) 9202 6836
NATIONAL COVERAGE FOR 24 HOUR SERVICE OR MAINTENANCE
DIAL FREE CALL 1800 622 216 (AUSTRALIA ONLY)
CANADA
SERVE CANADA
22 Ashwarren Rd Tel 416-631-0601
Downview Fax 416-631-0315
Ontario M3J1Z5
NEW ZEALAND
CHRISTCHURCH - MOFFAT LTD
16 Osborne St Tel (03) 389 1007
PO Box 10-001 Fax (03) 389 1276
Christchurch
Spare Parts Free Call 0800 MOFFAT
(0800 66 33 28)
Fax (03) 381 3616
AUCKLAND - MOFFAT LTD
4 Waipuna Road Tel (09) 574 3150
Mt Wellington Fax (09) 574 3159
Auckland
Spare Parts Free Call 0800 MOFFAT
(0800 66 33 28)
E35 Turbofan Ovens
Revision 12
-92-
© Moffat Ltd, January 2010
Page 93

UNITED KINGDOM
BLUESEAL LTD
67 Gravelly Business Park Tel 0121 327 5575
Gravelly Park Fax 0121 327 9711
Birmingham B24 8TQ
England
UNITED STATES OF AMERICA
MOFFAT INC.
3765 Champion Blvd
Winston-Salem Tel 366 661 0257
NC27115 Fax 336 661 9546
NATIONAL COVERAGE FOR SERVICE OR MAINTENANCE
DIAL FREE CALL 1800 551 8795 (USA ONLY)
E35 Turbofan Ovens
Revision 12
-93-
© Moffat Ltd, January 2010
Page 94

APPENDIX A. STACKING KIT INSTRUCTIONS
A. UNPACKING
Check kit includes correct parts and correct
quantities for the kit purchased as listed.
ITEM DESCRIPTION Qty
A Stand Frame 2
B Stand side (top) 2
C Clamp plate 4
D Screw Washer Washer E Bolting bracket 4
F Screw - 2"x
G Double stack front WA 1
H Double stack back 1
I Double stack side 2
J Screw- 1"x
K Screw L Top sheet 2
M Screw N Vent extension WA 1
Vent gasket 1
O Connection sleeve 1
P Hose clamp - 3" 2
Q RTV clear - 150g tube 1
3
/4” x 1/4” hex hd 12
1/
” spring 12
4
1/
” flat 12
4
3
/4"BSW hex black 4
3
/16" raised CSK 4
3
/4"x3/16"pozi mush 16
1
/2"x8A pozi mush 6
Figure A.1
Figure A.6
Figure A.8
A
C
F
A
B
D
B
E
C
D
E
F
Figure A.1
E35 Turbofan Ovens
Revision 12
-94-
© Moffat Ltd, January 2010
Page 95

B. STAND
1) Place one stand frame (A) on working surface
with threaded holes face up.
2) Fit both sides (C), to the stand frame with the
screws and washers (E). Ensuring the clamp
plates (D) are fitted on the upright sections
inside the sides (Figure A.2).
3) Place the other stand frame (A) on working
surface with threaded holes face up.
4) Turn the assembly (as in 1&2 above) over
onto the stand frame.
5) Secure the sides to the stand frame with the
screws and washers (E). Ensuring the clamp
plates (D) are fitted on the upright sections
inside the sides (Figure A.2).
6) Feet are already inserted into the ends of the
stand frames.
B
A
Figure A.3
7) Remove the 2 front top side panel support
brackets, 2 screws each. (Figure A.4)
E
C
F
Figure A.2
C. BOTTOM OVEN
Onto Stand
1) Remove feet from oven.
2) Oven should be place onto stand with
threaded holes in ovens foot plates lining up
with holes on stand (at ends of sides B).
3) Secure oven using screws (F). It is essential
that the Bolting Bracket (E) is correctly in
position, refer Figure A.2. Bolt up through
mounting bracket and stand into oven foot
plate.
4) Adjust stand feet to level the oven.
Remove Panels
5) Remove side panels from oven, each side
panel is held on by 4 screws.
6) Remove rear RH side corner panel (power
and water entry points), secured with 3
screws at front edge of panel. (Figure A.3)
Figure A.4
Stacking Assembly
8) Place insulation panels (L) onto oven top
(Figure A.5) fitting into the top of the oven to
cover the insulation. There are 3 screws (M)
down each side to secure the 2 panels.
L
Figure A.5
9) Assemble loosely the front (G), back (H) and
sides (I), with one screw (J) at each corner
(Figure A.6), in from the sides.
10) Place stacking assembly on top of the lower
oven and loosely attach, using 2 screws (K)
in each corner of the unit (at front and back
up from the sides).
E35 Turbofan Ovens
Revision 12
-95-
© Moffat Ltd, January 2010
Page 96

M
K
H
K
G
Figure A.6
D. TOP OVEN
Remove Panels
1) Remove side panels from oven, each side
panel is held on by 4 screws.
2) Remove rear RH side corner panel (power
and water entry points), secured with 3
screws at front edge of panel (Figure A.3).
3) Remove the 2 front bottom side panel support
brackets, 2 screws each.
E. STACKING
Stack
1) Remove legs / feet from top unit and place
onto bottom unit (on stacking assembly)
secure using 2 screws (K) in each corner of
the unit (at front and back down from the
sides).
2) Remove the RH double stack side (I).
3) Remove vent bottom plate, 4 screws from
underneath.
4) Secure vent extension (N) with 3 screws
(screw closest to oven is inaccessible), using
sealant provided (Q) to ensure sealed
connection. See Figure A.7.
5) Refit the RH double stack side (I).
6) Tighten all screws on the stacking assembly.
7) Place connection sleeve (O) over join in vent
using plenty of sealant (Q) between vent and
sleeve, and secure using hose clamps (P).
See Figure A.8.
L
J
N
I
Figure A.7
Re-assembly
8) Replace side cover support brackets (Figure
A.4) at top front of bottom unit and bottom
front of top unit, using original screws.
9) Replace rear RH panel (Figure A.3) on each
unit using original screws.
10) Replace side panels, using original screws.
Q
N
P
O
E35 Turbofan Ovens
Revision 12
-96-
Figure A.8
© Moffat Ltd, January 2010
Page 97

APPENDIX B. STAND MOUNTING INSTRUCTIONS
A. UNPACKING
Check stand includes correct parts and correct
quantities for the stand purchased as listed.
A26C has ‘Castor Stem Sockets’ in Stand
Frames, not feet.
ITEM DESCRIPTION Qty
A Stand frame front 1
(Nutserts one side only)
B Stand frame rear 1
(Nutserts both sides)
D Rack 2
E Screw E Washer E Washer F Screw - 2
3
/4"x1/4" BSW hex hd 8
1
/4" Spring 8
1
/4” Flat 8
1
/4"x3/4" hex hd 4
Castor (A26C only) 2
Castor braking (A26C only) 2
B. ASSEMBLY (diagram on reverse side)
Stand
1) Place front stand frame (A) on working
surface with threaded holes and oven
supports face up.
2) Fit both racks (D) to the stand frames (A).
Take care which holes are used to secure the
racks as inside holes in rack uprights (D) are
used for 18” (460mm) wide trays, and outside
holes are used for 16” (405mm) wide trays.
3) Turn assembly upright.
G
D
16” (405m
m) wide
trays
G
4) Fit the other stand frame (B) with screws and
washers (E).
:
NOTE
• Take care which way around the frame is.
For 26” oven have the oven supports
facing the racks, for 30” oven have the
supports (C) facing away from racks (refer
figure B.2).
• Take care which holes are used to secure
the racks, as in 2 above.
R
E
A
R
R
a
c
k
m
o
u
n
t
i
n
g
h
o
l
e
s
b
o
t
h
s
B
G
A
G
G
G
F
R
O
N
T
R
a
c
k
m
o
o
n
e
s
i
d
e
G
G
u
n
t
i
n
g
h
o
l
e
s
o
n
l
y
i
d
e
s
C
F
G
G
Figure B.2
5) A26C only. Insert castors into Stand Frames,
ensure 2 braking castors are in front frame.
(Front frame has nutserts in one face only)
Oven - Mounting on Stand
6) Remove feet from oven (if fitted).
7) Oven should be place onto stand with
threaded holes in ovens foot plates lining up
with holes in oven supports on stand.
8) Secure oven using screws (F).
9) A26 only. Adjust stand feet to level the oven.
10) A26C only. Ensure braking castors are in
front frame.
E35 Turbofan Ovens
Revision 12
18” (460mm)
wide trays
Figure B.1
D
-97-
© Moffat Ltd, January 2010
Page 98

APPENDIX C. MOTOR CONTROL AND STEAM TIMER
ADJUSTMENT GUIDE
FS Series Timers—Settings E35 Convection Oven (Figure C.1)
NOTE
: Superceded by FE Series Timers—see below.
Timer Type Function Time Adjust Setting Actual Time
T1 FSF3 Fan motor direction 0.15 1.5 minutes
T2 FSD3 Steam time 0.3 10 seconds
T3 FSD3 Fan delay 0.3 10 seconds
((Up to Lot No. 0817999 Only)
Figure C.1
T4 FSD3 Steam time 0.3 10 seconds
T5 FSD3 Fan delay 0.3 10 seconds
FE Series Timers—Settings E35 Convection Oven (Figure C.2)
NOTE
: Supercedes FS Series Timers.
FE series timers interchangeable with earlier FS series timers (above). Time scale settings as per listing
below.
Figure C.2
Timer Type Function Scale Setting Time Adjust Setting Actual Time
T1 FEF3T Fan motor direction 10 minutes 0.15 1.5 minutes
T2 FED3T Steam time 10 seconds 1.0 10 seconds
T3 FED3T Fan delay 10 seconds 1.0 10 seconds
T4 FED3T Steam time 10 seconds 1.0 10 seconds
T5 FED3T Fan delay 10 seconds 1.0 10 seconds
E35 Turbofan Ovens
Revision 12
-98-
© Moffat Ltd, January 2010
Page 99

E35 Turbofan Ovens
Revision 12
-99-
© Moffat Ltd, January 2010
 Loading...