

Page 1

INSTALLATION / OPERATION
MANUAL
E35C CONVECTION OVEN
with Recipe Controller and
Graphical Display Screen
232107-12
Page 2

MANUFACTURED BY
Moffat Limited
Christchurch
New Zealand
INTERNATIONAL CONTACTS
AUSTRALIA
Moffat Pty Limited
Web: www.moffat.com.au
E.Mail: vsales@moffat.com.au
Main Office: (tel) +61 (03) 9518 3888
(fax) +61 (03) 9518 3833
Service: (tel): 1800 622 216
Spares: (tel): 1800 337 963
Customer Service: (tel): 1800 335 315
(fax): 1800 350 281
CANADA
Serve Canada
Web: www.servecanada.com
E.Mail: info@servecanada.com
Sales: (tel): 800 551 8795 (Toll Free)
Service: (tel): 800 263 1455 (Toll Free)
NEW ZEALAND
Moffat Limited
Web: www.moffat.co.nz
E.Mail: sales@moffat.co.nz
Main Office: (tel): 0800 663328
UNITED KINGDOM
Blue Seal
Web: www.blue-seal.co.uk
E.Mail: sales@blue-seal.co.uk
Sales: (tel): +44 121 327 5575
(fax): +44 121 327 9711
Spares: (tel): +44 121 322 6640
(fax): +44 121 327 9201
Service: (tel): +44 121 322 6644
(fax): +44 121 327 6257
UNITED STATES
Moffat
Web: www.moffat.com
Sales: (tel): 800 551 8795 (Toll Free)
(tel): +1 336 661 1556
(fax): +1 336 661 9546
Service: (tel): 800 858 4477 (Toll Free)
(tel): +1 336 661 1556
(fax): +1 336 661 1660
REST OF WORLD
Moffat Limited
Web: www.moffat.co.nz
E.Mail: export@moffat.co.nz
The reproduction or copying of any part of this manual by any means whatsoever is strictly forbidden unless au thorized previously in
writing by the manufacturer.
In line with policy to continually develop and improve its products, Moffat Ltd. reserves the right to change the specifications and
design without prior notice.
© Copyright Moffat Ltd. September 2011.
Page 3

Contents List
E35C Convection Oven
Introduction ............................................................................................. 3
Specifications ........................................................................................... 4
E35C Convection Oven (Single Oven on Stand)
E35C Convection Oven (Double Stacked)
Installation............................................................................................... 6
Installation Requirements
Before Connection to Power Supply
Location
Bench Mounting
Floor Mounting
Stand Mounting
Electrical Connection
Water Connection - Optional (not required for Main Oven Operation)
Before Use
Operation Guide ....................................................................................... 8
Description of Controls
Oven Pre-Heat Settings............................................................................ 9
Setting the Oven Pre-Heat Temperature
Changing the Oven Pre-Heat Temperature
Cooking with Programmed Recipes ....................................................... 10
Cooking with Programmed Recipes (Without Shelf Timer Function)
Cooking with Programmed Recipes (Using Shelf Timer Function)
Cooking in Manual Mode ........................................................................ 18
Cooking in Manual Mode
‘With NO Shelves / Timers Selected’
‘With Timers Selected’
‘With Shelves Selected’
Other Controller Functions..................................................................... 25
Door Open
Cool Down Feature
Service Support
Page 4

Contents List
Programming Recipes ............................................................................ 26
Editing Recipes
Editing Events
Controller Configuration......................................................................... 30
Entering the Service Mode
Service Parameters
Service Parameter Flow Chart
Oven Operation - General....................................................................... 35
Door Handle
Side Racks
Removal of Side Racks
Replacement of Side Racks
Cleaning and Maintenanc e ..................................................................... 36
General
Oven Cool-Down Mode
Daily Cleaning
Weekly Cleaning
Monthly Cleaning
Periodic Maintenance (6 Monthly)
Fault Finding........................................................................................... 39
Circuit Schematic.................................................................................... 40
Competency Check Lists......................................................................... 41
Turbofan E35C Convection Oven - Operation (Implement Safe Working Procedures)
Turbofan E35C Convection Oven - Daily Cleaning (Implement Essential Hygiene and Sanitation
Procedures)
Hazard Risk Assessment ........................................................................ 44
Replacement Parts List........................................................................... 45
Page 5

Introduction
We are confident that you will be delighted with your TURBOFAN OVEN, and it will become a most valued
appliance in your commercial kitchen.
A new oven can seem very complex and confusing at first glance. To ensure you receive the utmost
benefit from your new Turbofan, there are two important things you can do.
Firstly
Please read the instruction book carefully and follow the directions given. The time taken will be well
spent.
Secondly
If you are unsure of any aspect of the installation, instructions or performance of your oven, contact your
E35 dealer promptly. In many cases a phone call could answer your question.
Date Purchased........................................................... Serial No.....................................................
Dealer.............................................................................................................................................
Service Agent..................................................................................................................................
3
Page 6
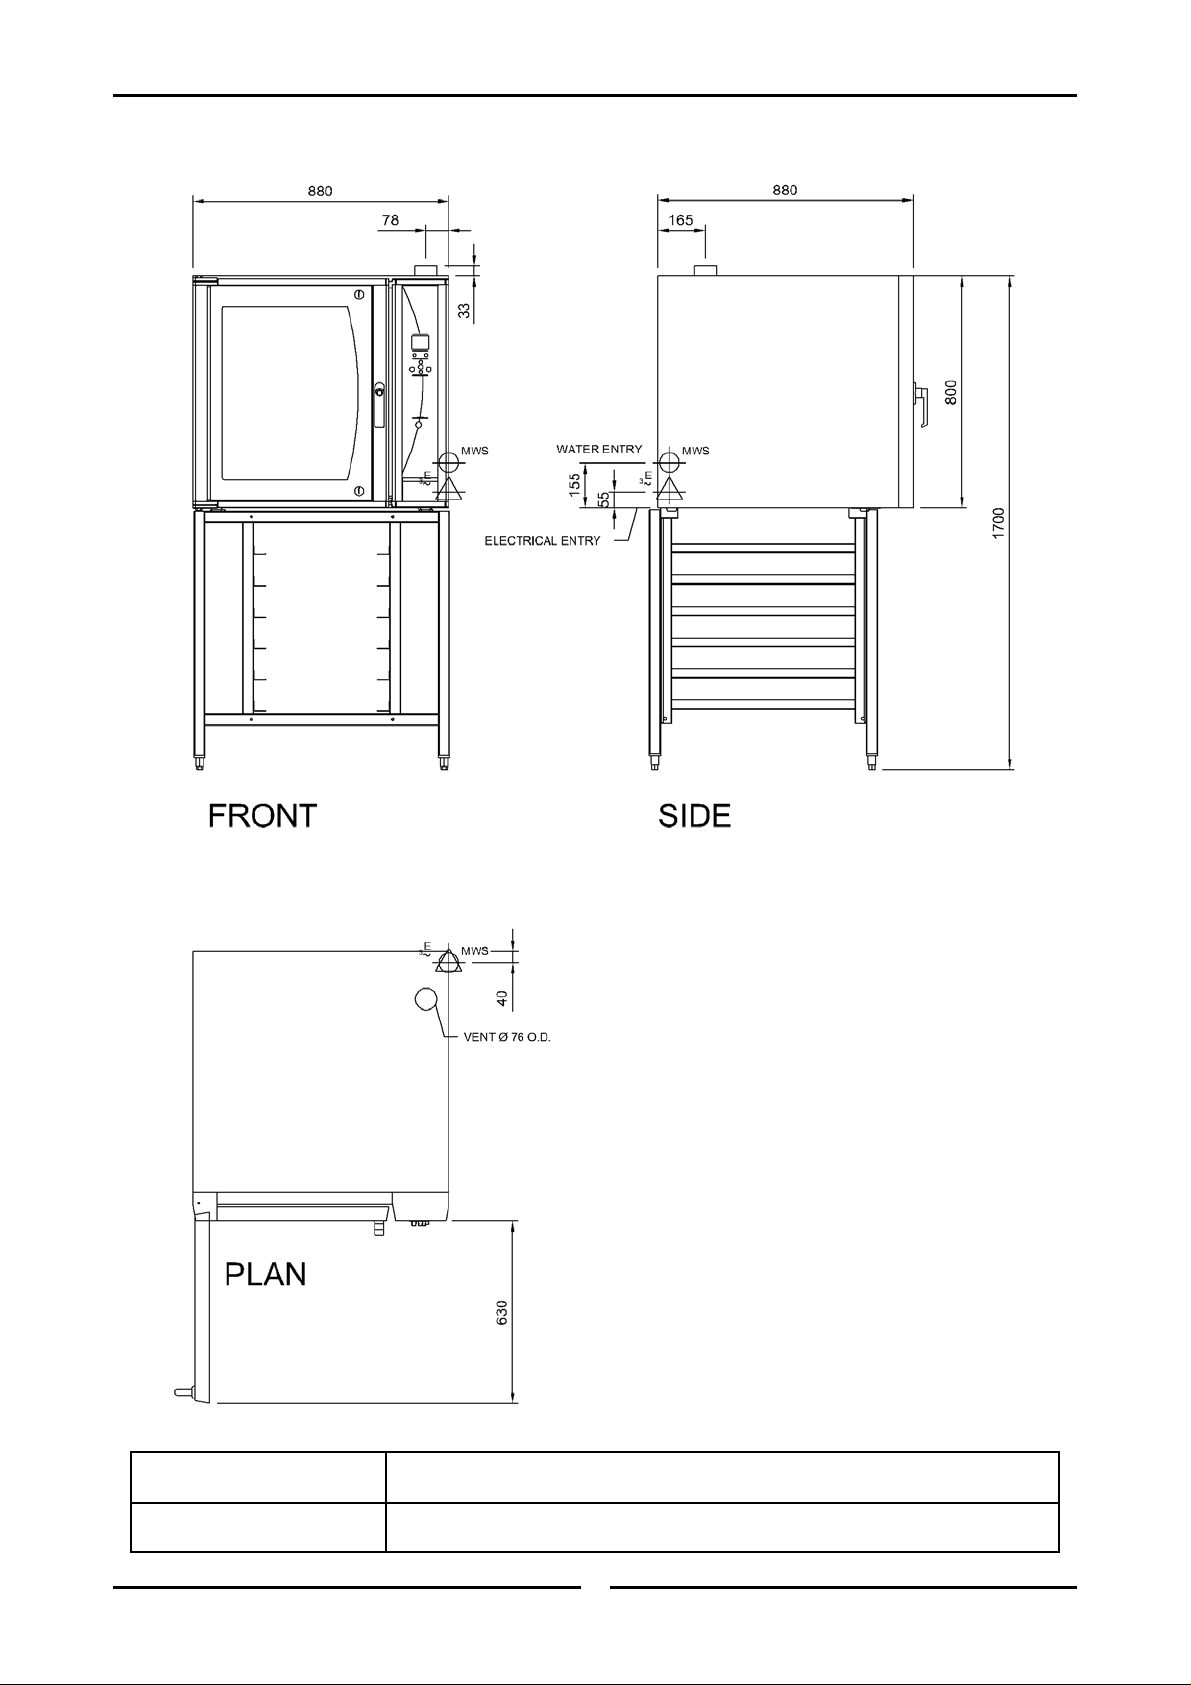
Specifications
E35C Single Oven on Stand
Electrical Connection Refer to Section 'Before Connecting to Power Supply' on Page 6.
Cold Water Connection ¾” B.S.P. or ½” ID hose (550 kPa / 80 psi maximum pressure).
4
Page 7
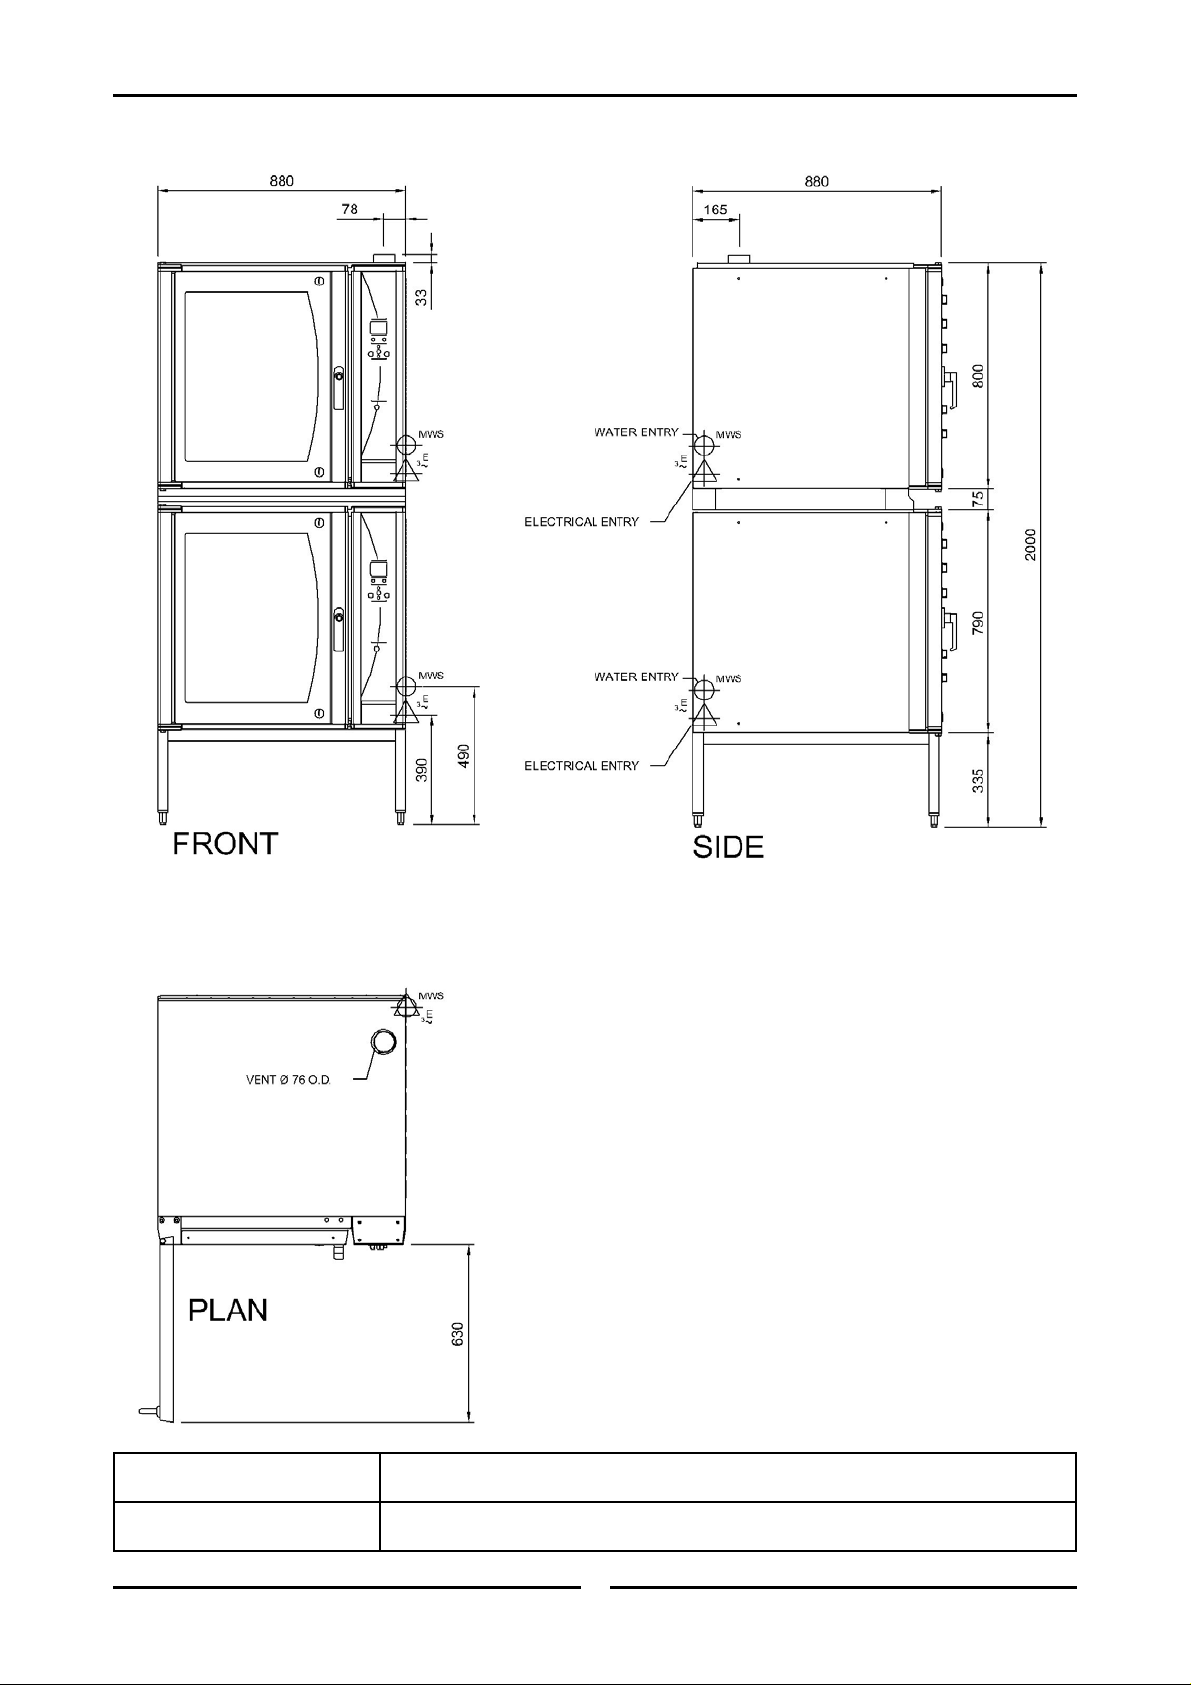
E35C Ovens - Double Stacked
Specifications
Electrical Connection Refer to Section 'Before Connecting to Power Supply' on Page 6.
Cold Water Connection ¾” B.S.P. or ½” ID hose (550 kPa / 80 psi maximum pressure).
5
Page 8
Installation
Installation Requirements
It is most important that this oven is installed correctly and that operation is correct
before use.
Installation shall comply with local electrical, health and safety requirements.
Before Connection to Power Supply
Remove all packing.
Check equipment and parts for damage. Report any damage immediately to the carrier and
distributor.
Remove protective plastic coating from the side panels.
Check that the following parts have been supplied with your oven:
3 x Oven Racks.
Water Inlet Elbow.
Washer Rubber.
Report any deficiencies to the distributor who supplied the oven.
Fit the feet to the oven.
Check that the available power supply is correct to that shown on the rating plate located on the
right-hand side panel.
Location
Model Electrical Rating
E35C-xx-453 400-415 V a.c., 50 Hz, 3P+N+E, 12.5 kW @ 415 V
E35C8-xx-453 400-415 V a.c., 50 Hz, 3P+N+E, 8.0 kW @ 415 V
To ensure correct ventilation for the motor and controls the following minimum installation
clearances are to be adhered to:
Rear 0 mm / 0”.
Left-hand side 0 mm / 0”.
Right-hand side 75 mm / 3” (Fixed installations require at least 500 mm (20”) clearance at the
right hand side for service accessibility).
Position the oven in its working position.
Use a spirit level to ensure oven is level from side to side and front to back. (If this is not carried
out, uneven cooking could occur). The feet / legs used with bench / floor mounting or provided with
stands are adjustable and will require adjusting in levelling the unit.
The unit should be positioned such that the operating panel and oven shelves are easily reachable
for loading and unloading.
Important:
THE VENT LOCATED ON THE OVEN TOP MUST NEVER BE OBSTRUCTED.
6
Page 9

Installation
Bench Mounting
For bench mounted applications the oven must be fitted with 100 mm / 4” feet.
C
AUTION
To reduce the risk of fire, the appliance is to be installed over a non-combustible surface
only. Such surface shall extend not less than 12” (300 mm) beyond the appliance on all
sides.
Floor Mounting
For floor mounted applications the oven must be fitted with 150 mm / 6” legs.
NOTE: Four 100 mm / 4” adjustable or 150 mm / 6” legs are available separately from your
E35 dealer as an optional extra.
Stand Mounting
Ovens that are to be mounted on stands do not require feet or legs. Refer to instructions for
mounting on stand in instructions supplied with separately ordered stands.
Avoid having heat producing equipment such as fryers or steamers adjacent to the right-hand side of
oven.
Electrical Connection
:
Remove side cover panel to allow access to the terminal block and strain relief cable clamp.
The cable can be fitted through the entry grommet and secured from strain by tightening the fitted
strain relief bushing.
Connect cable to the terminals as marked.
Refit the cover panel.
Important:
• FIXED WIRING INSTALLATIONS MUST INCORPORATE AN ALL-POLE DISCONNECTION SWITCH.
THIS APPLIANCE MUST BE EARTHED / GROUNDED.
Water Connection
A cold water supply should be fitted to the water inlet (¾” BSP connection) which is located near the
rear of the right hand side of the unit.
Alternately, a connection elbow and sealing washer is supplied with this unit for direct connection of
a ½” ID hose, and is recommended for easy installation and service.
Connect water supply - Max inlet pressure 80 psi / 550 kPa.
Turn on water supply to check for leaks.
Before Use
Operate the oven for about 1 hour at 400°F (200°C) to remove any fumes or odours which may be
present.
7
Page 10
Operation Guide
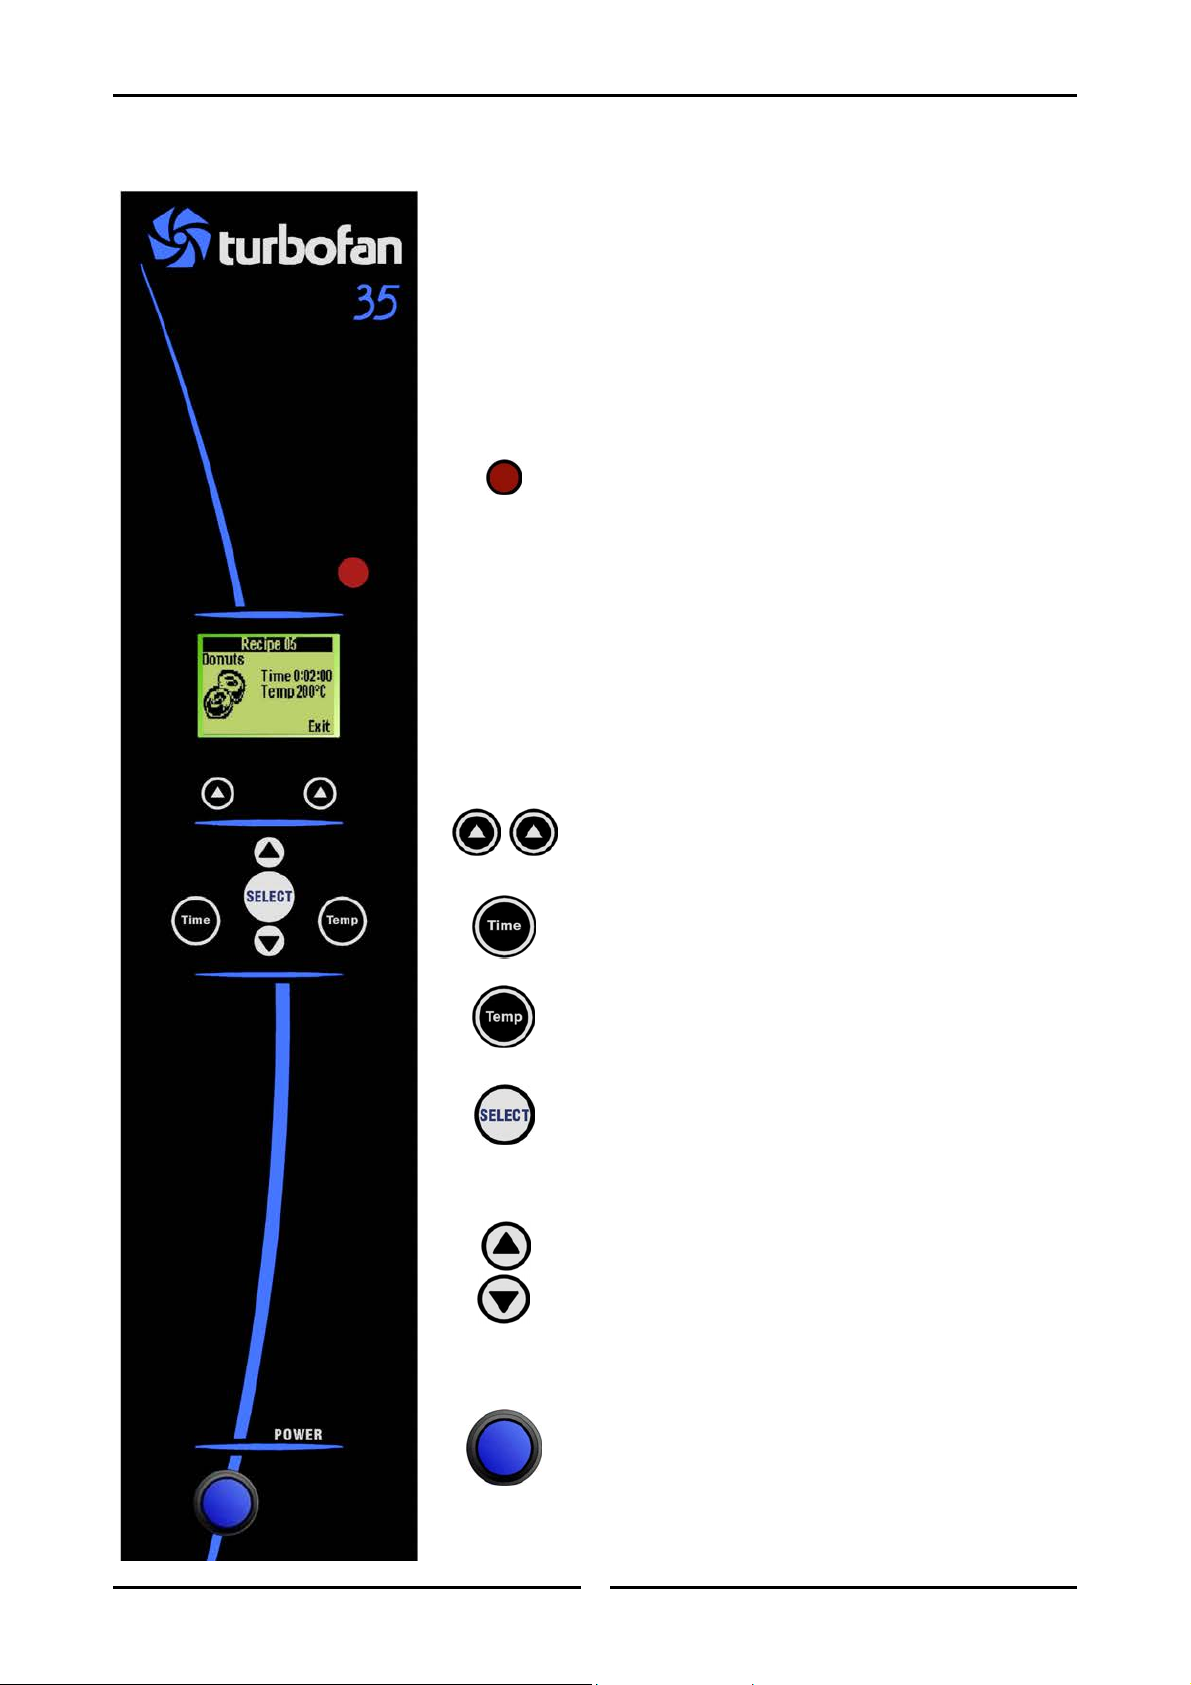
Description of Controls
KEY FEATURES
- Manual Recipe Mode.
- Program Recipes.
- Up to 5 Cooking Events (Stages) per Recipe.
- 12 Character Recipe Descriptions.
- Picture Display of Recipe Product.
IR Port
Infrared port, used with optional Palm recipe
programming software.
Display
Full graphical display, showing time / temp and recipe
information.
Function Keys (Left / Right)
Used for confirmation of screen bottom line text.
Time Key
Used for adjusting the time.
Temp Key
Used for adjusting the temperature.
Select Key
Used for confirming selection.
Select Up - Down Keys
Used for selecting programs / recipes.
Used for changing time and temperature values in
manual or programming modes.
Power
Depress to switch power 'On' or 'Off' (switch
illuminates when power is 'On').
8
Page 11
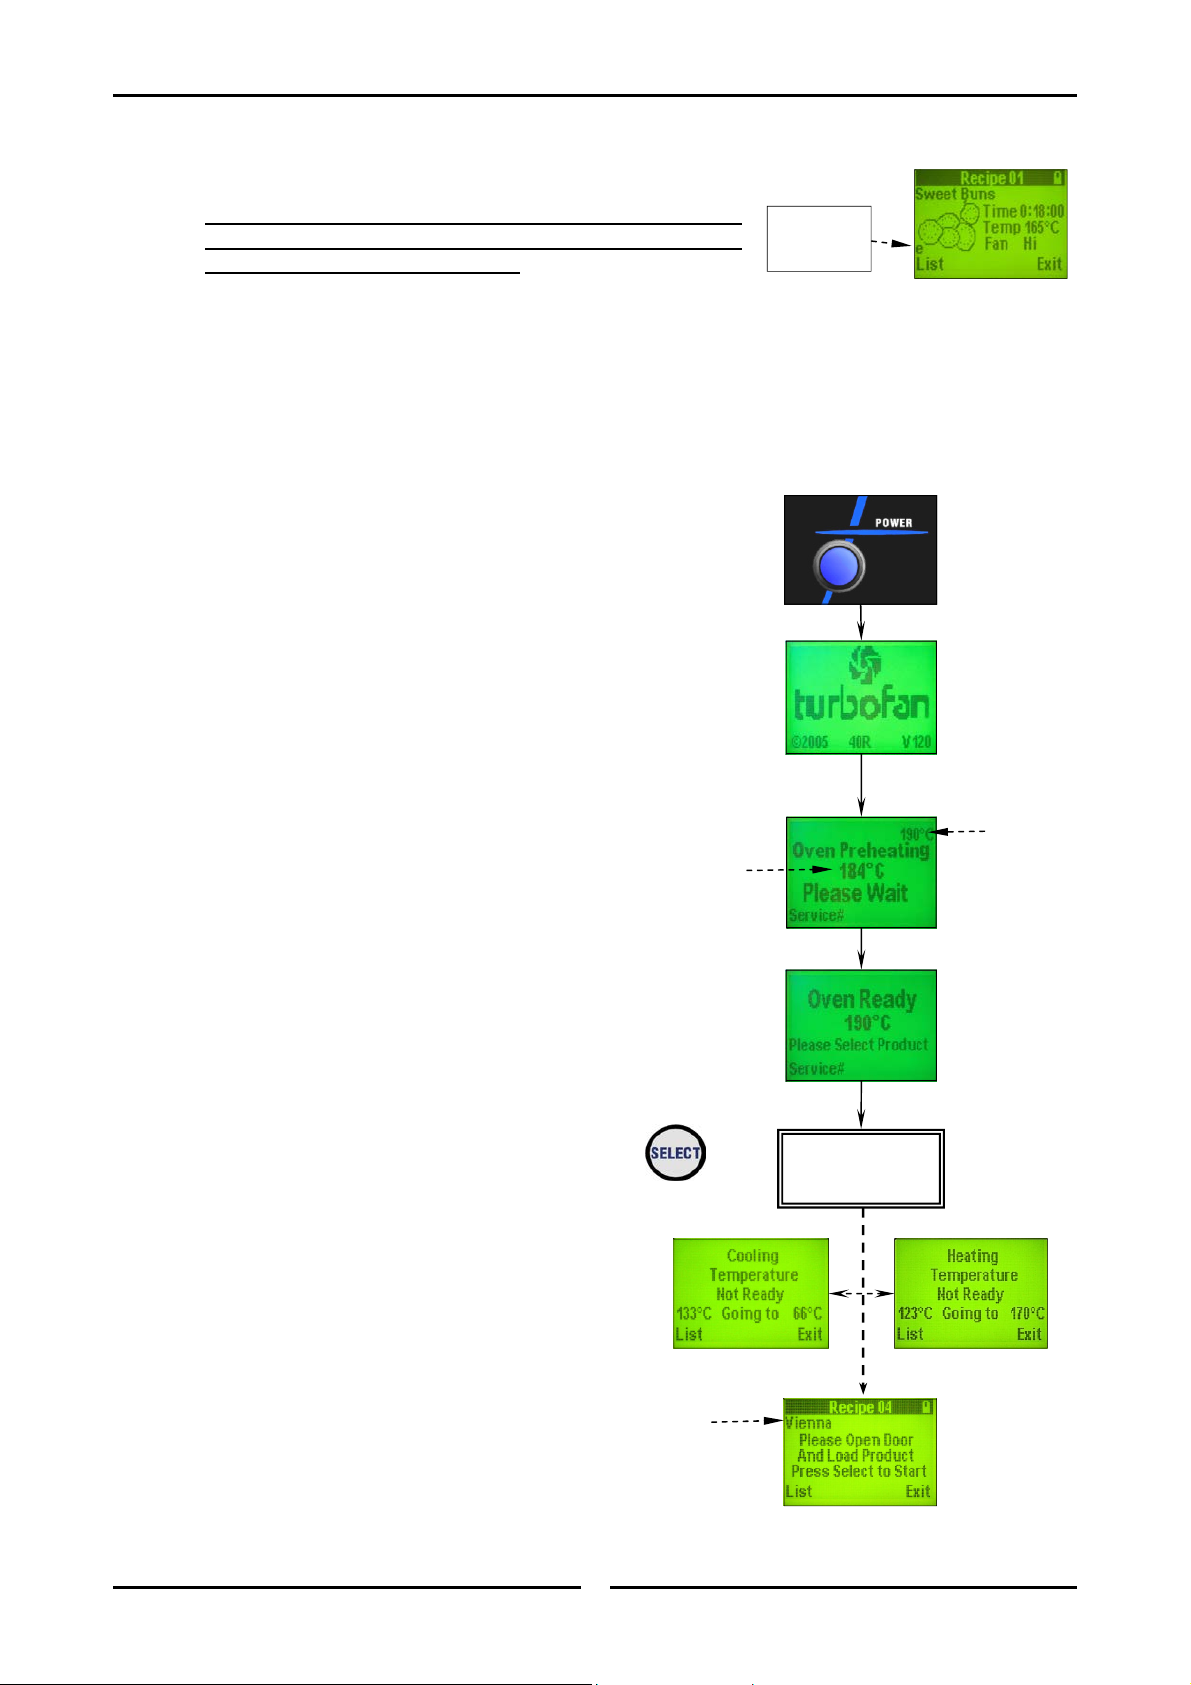
Setting the Oven Pre-Heat
Temperature
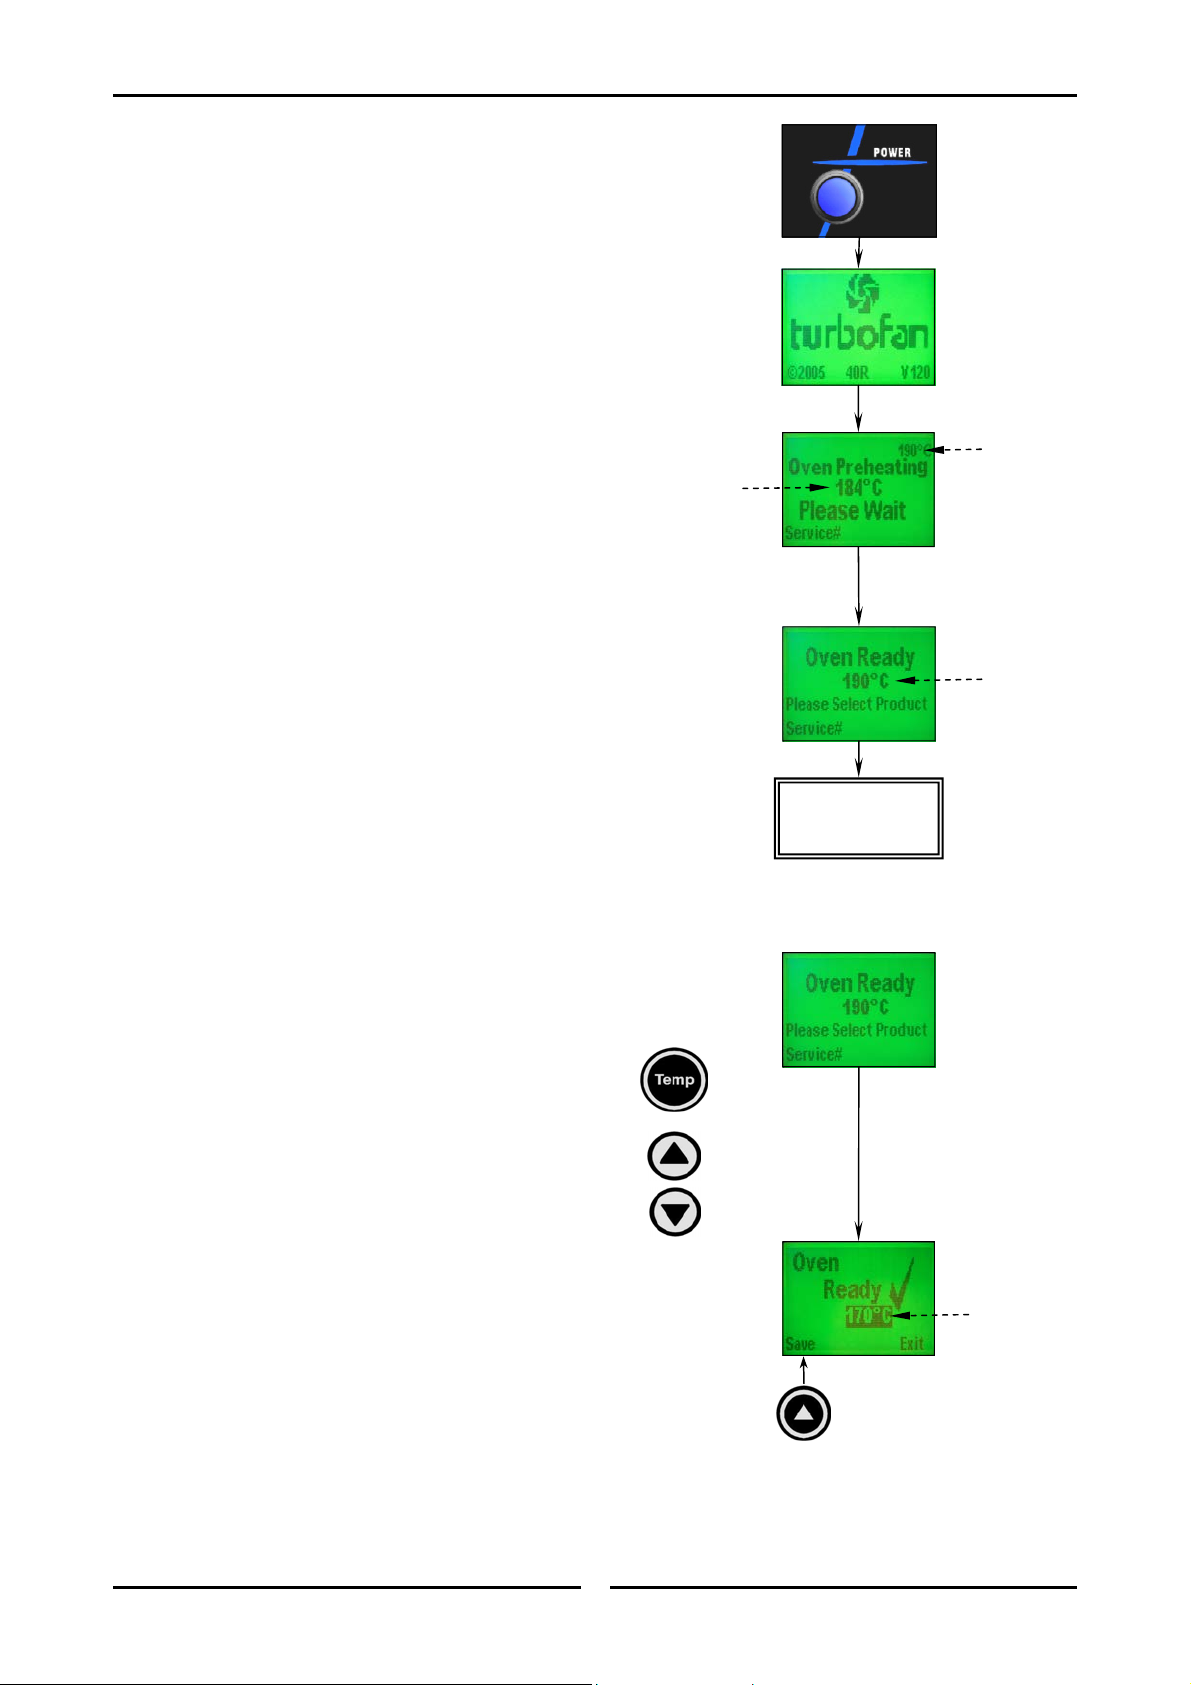
Turning the Oven ‘ON’
1. Depress the blue Power switch on the main
control panel to switch the oven ‘On’ /
‘Off’ (switch illuminates when power is ‘On’).
2. The ‘Turbofan’ start-up screen will appear for
10 seconds before being replaced by the ‘Oven
Preheating’ screen.
3. The display pre-heating screen will show Set
Temperature and Actual Temperature of
the oven.
Pre Heat and Oven Ready Mode
4. When Pre-Heat temperature is reached, an
Alarm prompt sounds and the ‘Oven Ready’
screen appears showing Pre Heat temperature.
5. Select the recipe required as shown in
‘Selecting a Recipe’ on the following pages.
Changing the Oven Pre-Heat
Temperature
Oven Pre-Heat Settings
Set Temp
Actual Temp
of Oven
Pre-Heat
Temp
Selecting Recipes
(Refer overleaf)
1. When in the ‘Oven Ready’ screen, the pre-heat
temperature of the oven can be adjusted to suit
requirements.
2. To change the pre-heat temperature, press the
‘Temp’ key.
3. Press the ‘Select Up - Down’ keys to change
the pre-heat temperature.
4. The new ‘Pre-Heat’ temperature will be
displayed on the screen.
5. Press the Save (Left function key) to save
the selected pre-heat temperature required.
New Pre-Heat
Temp
9
Page 12
Cooking with Programmed Recipes
Cooking with Programmed Recipes (Without Shelf Timer Function)
NOTE:-
To turn ‘Off’ the ‘Shelf Timer’ function, refer to the Service Parameters section,
‘Controller Configuration’, Menu 2, Item 8 ‘Num of Shelves’. The ‘Number of Shelves’
setting must be set to ‘1’ to de-activate the ‘Shelf Timer’ function.
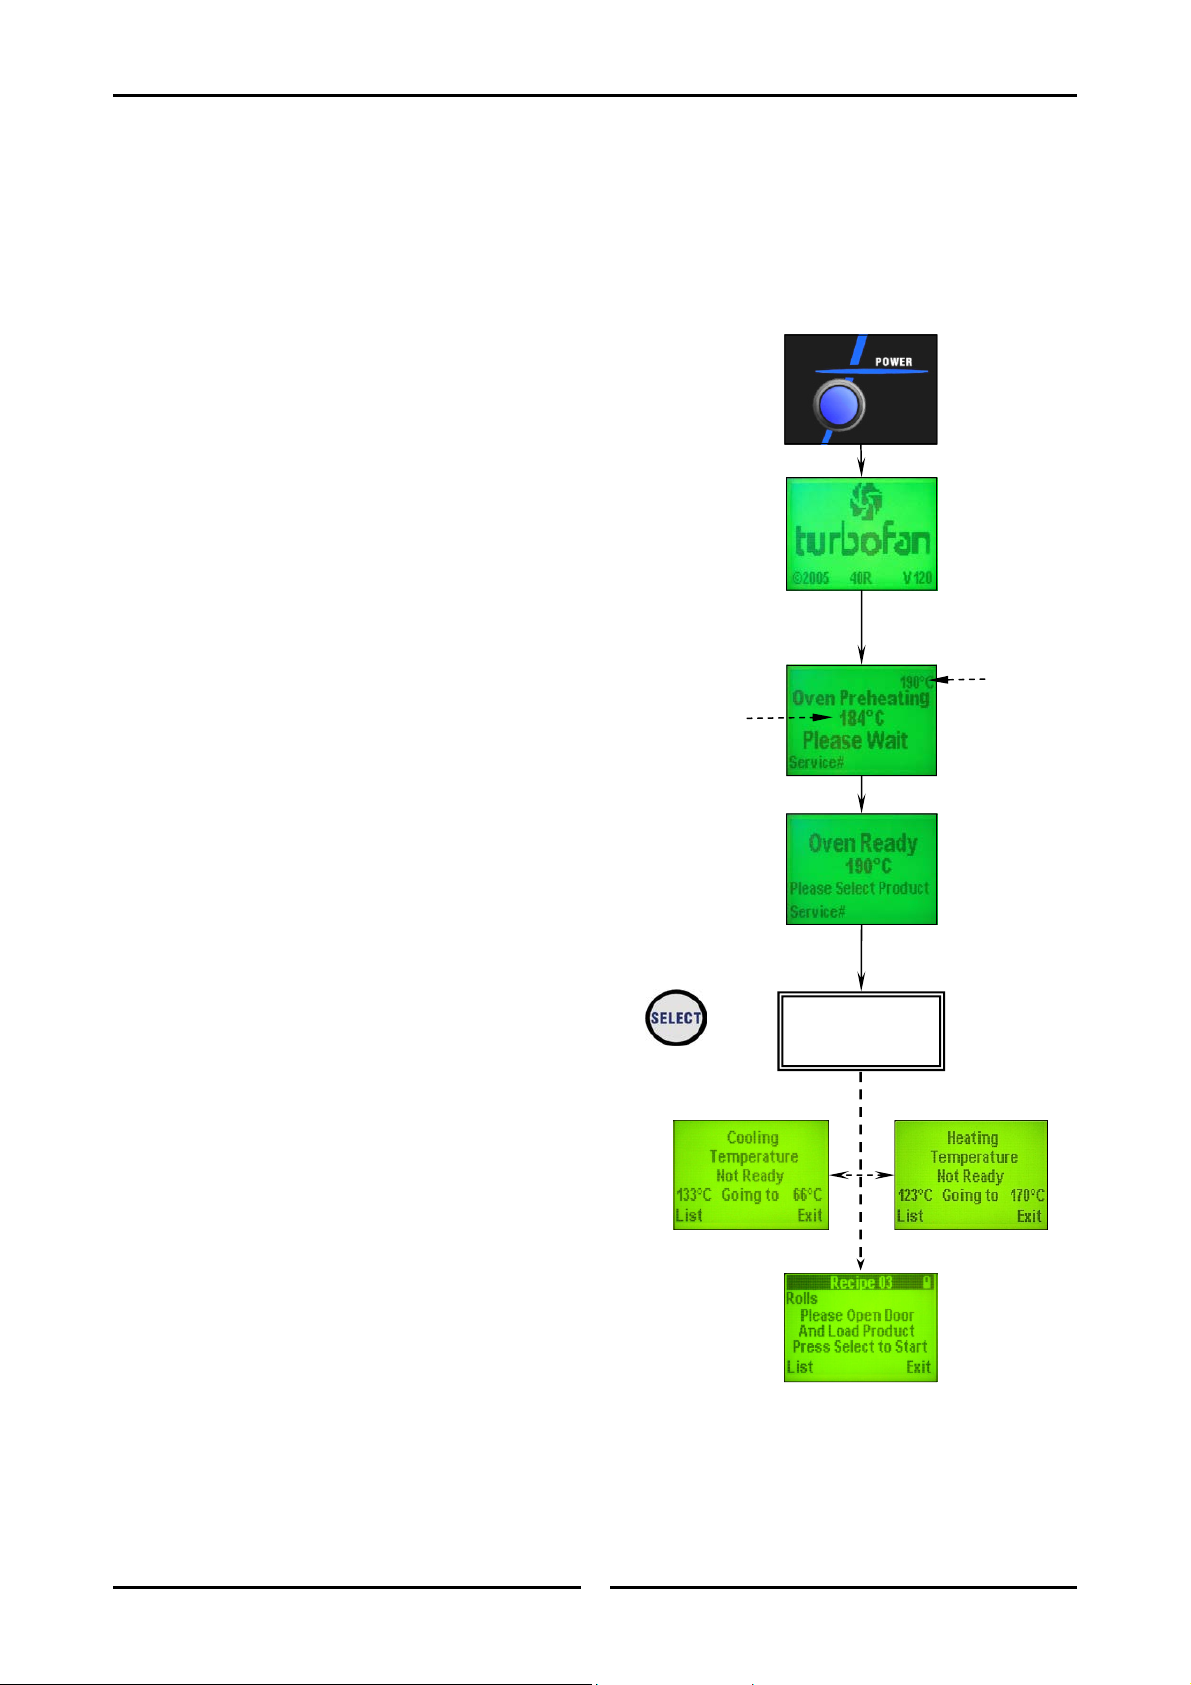
Turning Oven ON / OFF
1. Depress the blue Power switch on the main
control panel to switch the oven ‘On’ /
‘Off’ (switch illuminates when power is ‘On’).
2. The Turbofan Start Up Screen will appear for 10
seconds before being replaced by the ‘Oven
Pre-Heating’ screen. If the Pre-Heating
temperature needs to be adjusted, refer to
‘Changing the Oven Pre-Heat
Temperature’ on the previous page.
3. Pre-heat Screen will show ‘Set Temperature’
and ‘Actual Temperature’ of the oven.
4. When Pre-Heat temperature is reached, the
‘Oven Ready’ screen will show on the display.
5. Press ‘Select’ to select the recipe required as
shown in ‘Selecting a Recipe’ on the following
page.
6. The screen will show either the ‘Cooling Temp
Not Ready’ or ‘Heating Temp not Ready’
screens depending on the recipe temperature
and the temperature of the oven.
7. An alarm will sound when the oven is up to
temperature and the display will show ‘Open
Door - Load Product’.
8. Choose the recipe required from the options
shown at ‘Selecting a Recipe’, overleaf.
Actual Temp
of Oven
Selecting Recipes
(Refer overleaf)
Set Temp
10
Page 13
Cooking with Programmed Recipes
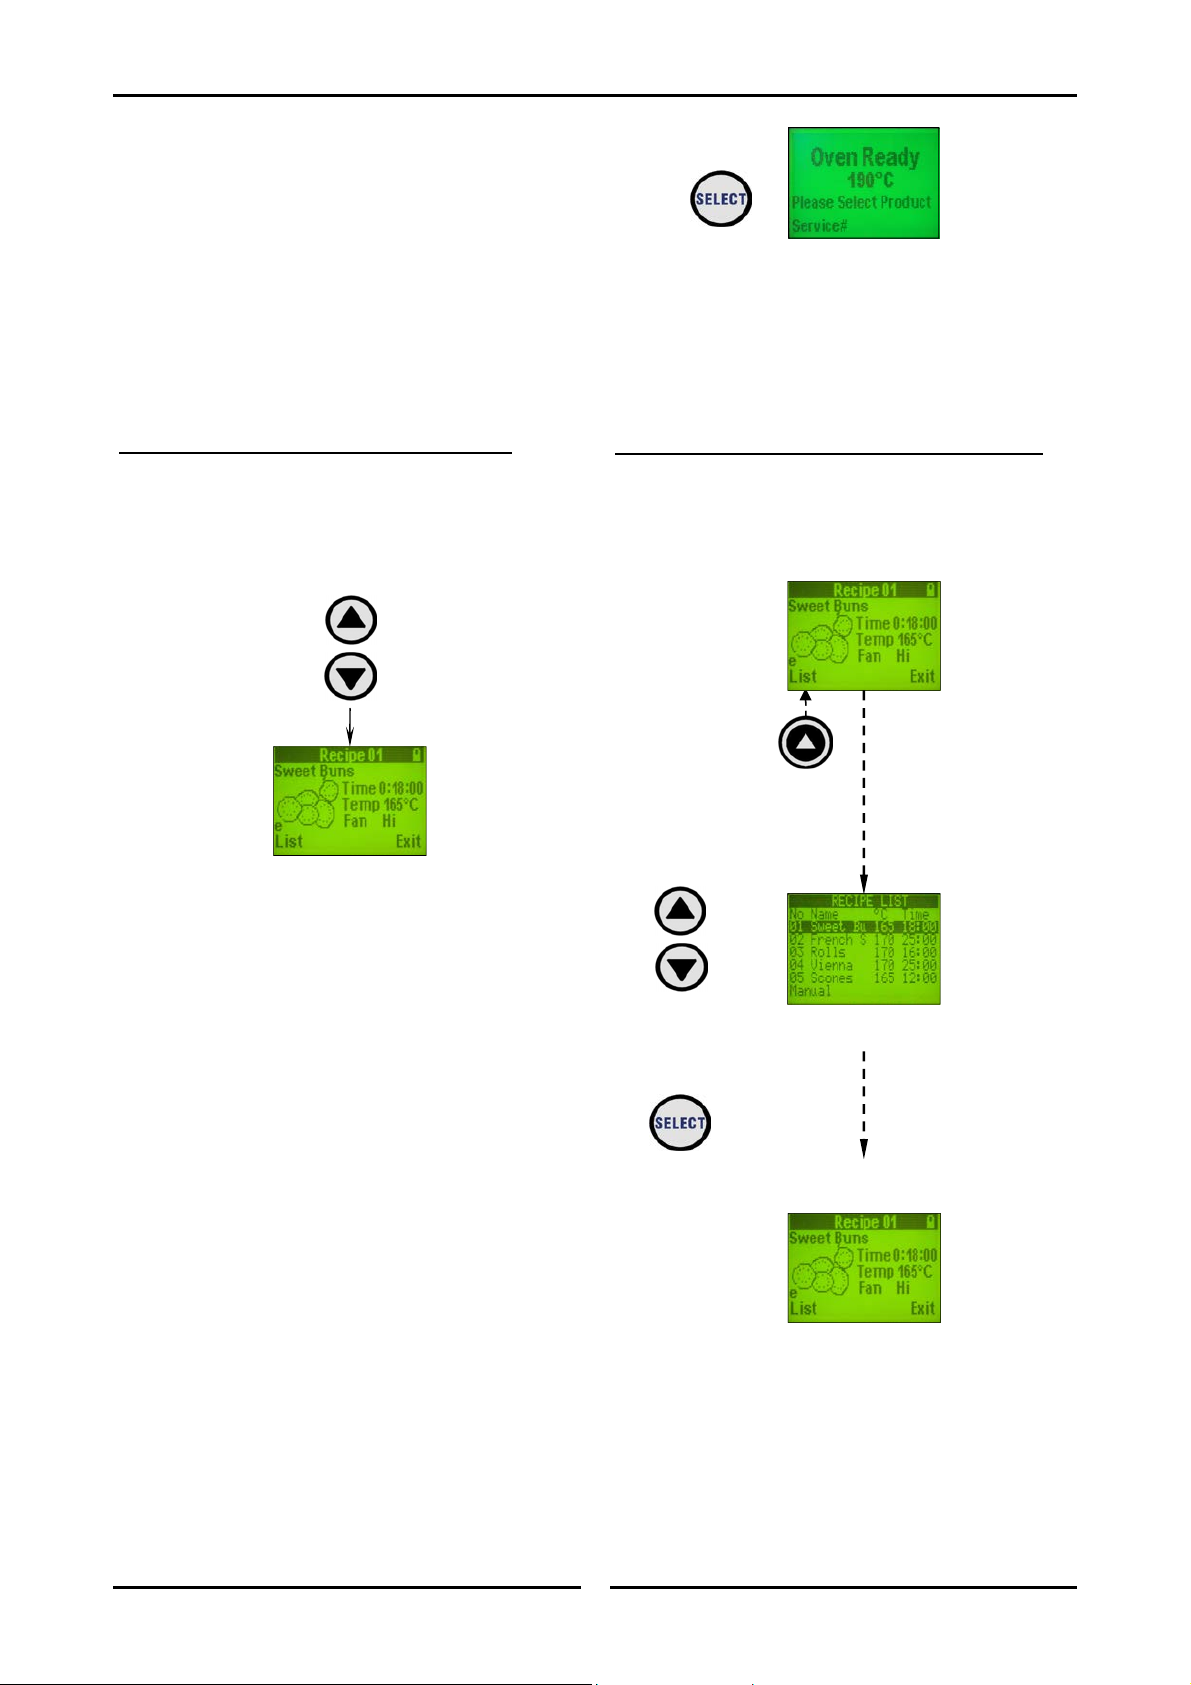
Selecting a Recipe
1. From the Oven Ready display, press the
‘Select’ key and a recipe screen will be shown
on the display.
2. The following Options are Available:-
METHOD A (Select ‘Up - Down’ Arrow Keys):
A. Press the ‘Select Up - Down’ keys to scroll
through the individual recipe selections and
select the recipe required.
B. Refer to 'Loading the Oven' on the following
page to commence the 'Cooking Cycle'.
METHOD B (Select the ‘List’ (Left Function Key):
A. Press the List (Left function key) below the
‘List’ logo will display the complete recipe list to
select the recipe required.
B. Scroll through the Recipe List shown using the
‘Select Up - Down’ keys until the desired
recipe is found.
C. Press the ‘Select’ key to select the recipe
required.
D. This recipe will be shown on the display.
E. Refer to 'Loading the Oven' on the following
page to commence the 'Cooking Cycle'.
11
Page 14
Cooking with Programmed Recipes
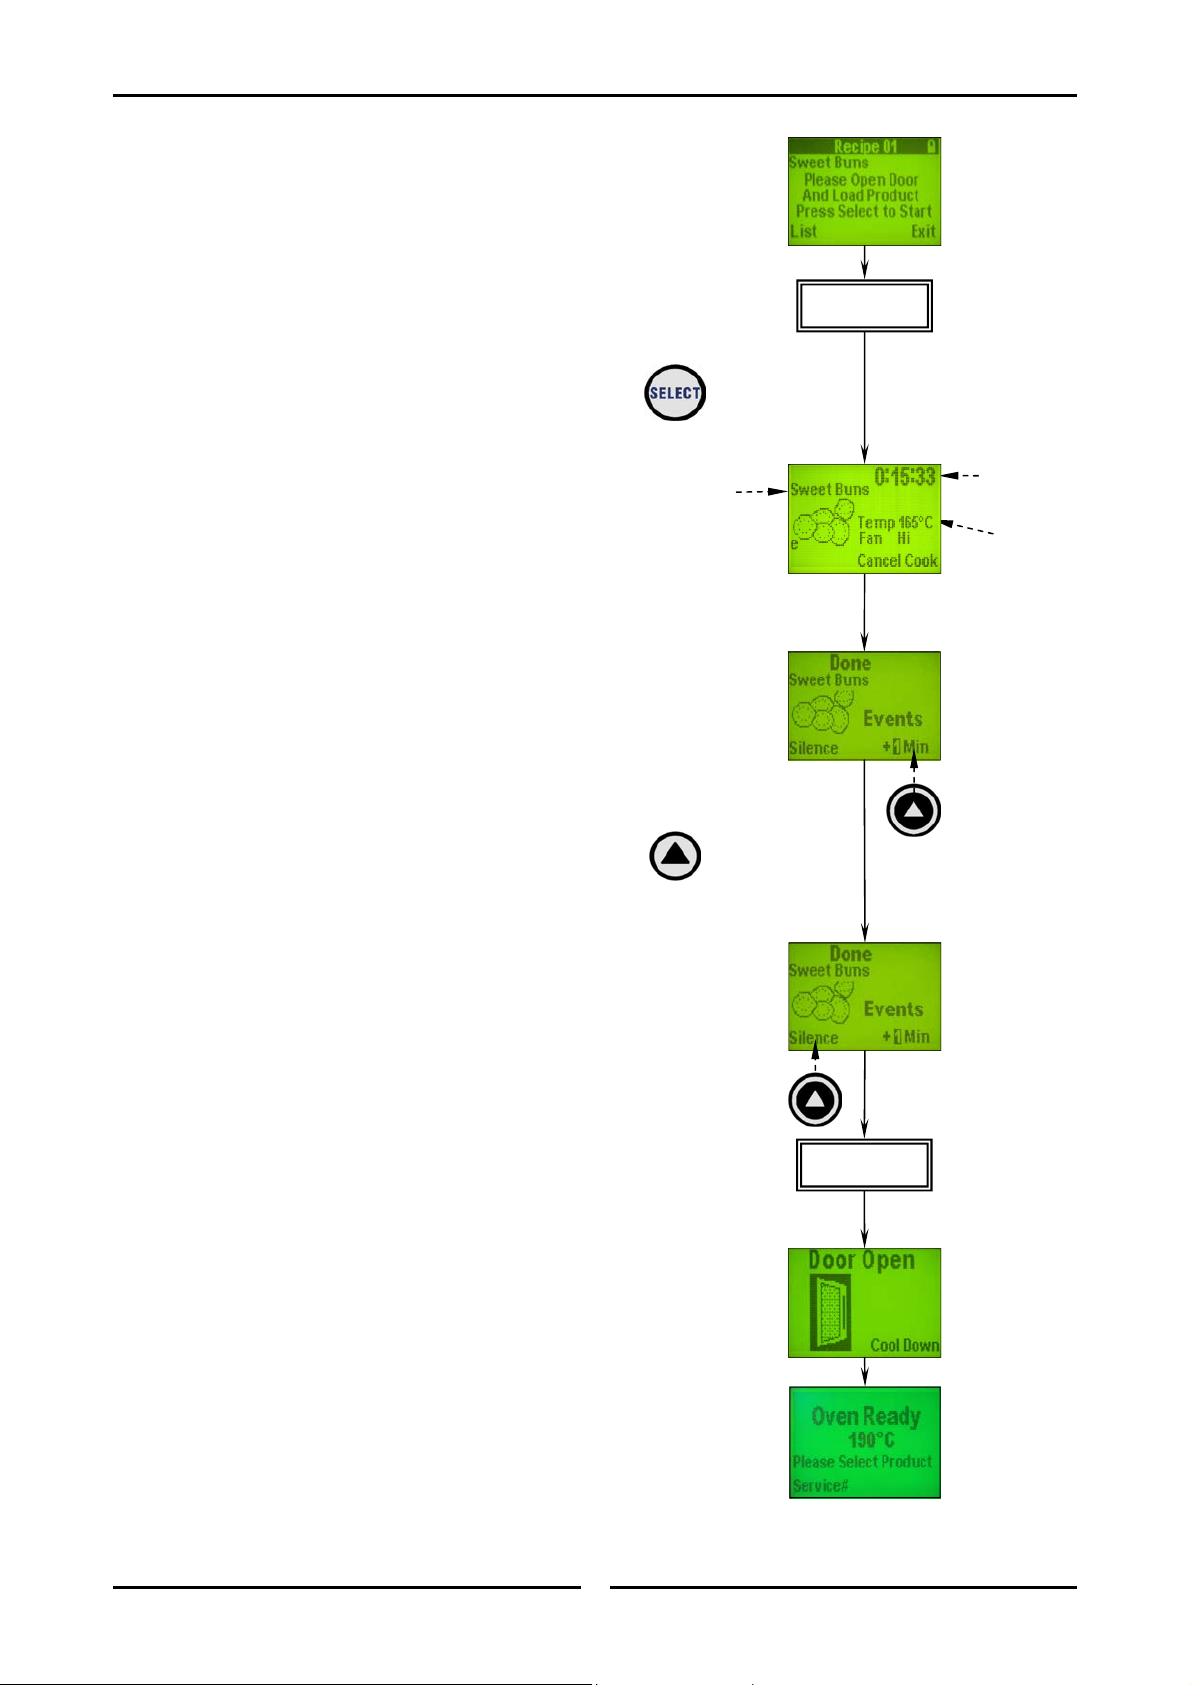
Loading the Oven
1. When the oven has reached the programmed
temperature the screen will display the
following screen and an alarm will sound.
2. Open the door and load the oven with the
product to be cooked.
3. Close the oven door and press the ‘SELECT’
key to start the cooking program.
4. The Time selection on the top right of the
display will commence counting down the cook
time.
Cooking Done
1. When cooking is completed, the 'Done' screen
will appear and a continuous alarm will sound.
2. To Increase Cooking Time by +1 Min -
If an additional minute of cooking time is
required, press the +1 Min - Right function
key.
3. To increase the cooking time by more
than 1 minute - Press the Select Up key in
increments of 1 minute.
automatically after approximately 3
seconds.
4. When cooking is completed, press the 'Silence'
- Left function key to stop the alarm.
5. Open the oven door and remove the cooked
product from the oven.
6. The display will show ‘Door Open’. Close the
oven door.
7. The display will revert to the ‘Oven Ready’
screen.
8. The oven can now be re-programmed as shown
at Loading the Oven above, to cook
additional items of the same temperature.
9. Continue cooking until all product is cooked.
Cooking will start
Recipe
Name
Open Door and
Load Oven
Time
Remaining
Set
Temperature
Open Door and
Unload Oven
12
Page 15
Cooking with Programmed Recipes
Cooking with Programmed Recipes (Using Shelf Timer Function)
NOTE:-
Recipes containing Programmed Events (shown by
an ‘e’ displayed on the screen) cannot be cooked
when using ‘Shelf Timer’ mode.
To use the ‘Shelf Timer’ mode, more than one shelf must be selected in the
Service Parameters. Refer to ‘Controller Configuration’, Menu 2, Item 8 ‘Num of
Shelves’. If ‘Number of Shelves’ is set to 1 then the ‘Shelf Timer’ function is
de-activated. Menu 1, Item 3 must be set to ‘Timer’.
Shelf timers are used to cook items that have the same cook temperatures. Shelves
can be loaded one at a time and an individual timer started for each shelf.
Turning Oven ON / OFF
1. Depress the blue Power switch on the main
control panel to switch the oven ‘On’ /
‘Off’ (switch illuminates when power is ‘On’).
2. The Turbofan Start Up Screen will appear for 10
seconds before being replaced by the ‘Oven
Pre-Heating’ screen. If the Pre-Heating
temperature needs to be adjusted, refer to
‘Changing the Oven Pre-Heat
Temperature’ on page 9.
3. Pre-heat Screen will show ‘Set Temperature’
and ‘Actual Temperature’ of the oven.
4. When the Pre-Heat temperature is reached, the
‘Oven Ready’ screen will show on the display.
5. Press ‘Select’ to select the recipe required as
shown in ‘Selecting a Recipe’ on the following
page.
6. The screen will show either the ‘Cooling Temp
Not Ready’ or ‘Heating Temp not Ready’
screens depending on the recipe
temperature and the temperature of the oven.
7. An alarm will sound when the oven is up to
temperature and the display will show the
product to be cooked and ‘Open Door - Load
Product’.
8. Choose the recipe required from the options
shown at ‘Selecting a Recipe’, overleaf.
Actual Temp
of Oven
Product to be
Cooked
‘e’ denotes
Programmed
Events.
Set Temp
Selecting Recipes
(Refer overleaf)
13
Page 16

Cooking with Programmed Recipes
Selecting a Recipe
1. From the Oven Ready display, press ‘Select’
key and a recipe screen will be shown on the
display.
2. The following Options are Available:-
METHOD A (Select ‘Up - Down’ Arrow Keys)
A. Pressing the ‘Select Up - Down’ keys and
scroll through the individual recipe selections
and select the recipe required.
:
METHOD B (Select the ‘List’ (Left Function Key):
A. Press the List (Left function key) below the
‘List’ logo will display the complete recipe list to
select the recipe required.
B. Refer to 'Loading the Oven' on the following
page to commence the 'Cooking Cycle'.
B. Scroll through the Recipe List shown using the
‘Select Up - Down’ keys until the desired
recipe is found.
C. Press the ‘Select’ key to select the recipe
required.
D. This recipe will now be shown on the display.
E. Refer to 'Loading the Oven' on the following
page to commence the 'Cooking Cycle'.
14
Page 17

Cooking with Programmed Recipes
Loading the Oven
1. When the oven is up to temperature for the
recipe selected, the display will show the screen
opposite.
2. Open the oven door and load the product into
the oven. The ‘Door Open’ logo will show in
the display.
3. Close the oven door and press the ‘Select’ key.
To Add a Timer Function
1. Press ‘Select’ to select the ‘Timer’ mode. The
display will show ‘Timer 1’.
2. Press the ‘Select Up - Down’ keys to select
the timer required.
3. Press ‘Select’ key and the timer selected will
start.
4. To alter the time of the timer selected, press
the ‘Time’ key to scroll through seconds /
minutes / hours.
5. Press the ‘Select Up - Down’ keys to change
the time.
6. Once the changes have been added, press
‘Select’ key to restart the timer selected.
Open Door and
Load Shelf
Timer 1 Time
Remaining
Minutes
Seconds
15
Page 18

Cooking with Programmed Recipes
To Add Further Timers
1. To add further timers, press ‘Select’, key
twice. ‘Timer 2’ will show on the display.
2. Load the shelf selected and close the door.
3. Press the Select Up - Down keys to select the
timer required.
4. Press ‘Select’ key, the selected timer will start.
5. To review the times remaining on all the timers
set, press ‘Review’ (Right function key) to
scroll through the timers.
6. To alter timers already programmed, refer to
Items 4 to 6 on the previous page and press
‘Select’ to restart the changed timer.
7. When scrolling through ‘Review’ mode, any
timers not running, timer number will flash and
‘Not Running’ will be shown on the display.
NOTE: Once times have been changed, the
display will always show the Timer
with the least time to completion.
Cooking Done
Open Door and
Load Shelf
1. When Timer Cooking is completed, the 'Done'
screen will appear and a continuous alarm will
sound.
2. To Increase Cooking Time by +1 Min -
If an additional minute of cooking time is
required, press the +1 Min - Right function
key.
3. To increase the cooking time by more than
1 minute - Press the Select Up key in increments of 1 minute.
matically after approximately 3 seconds.
Cooking will start auto-
4. When cooking is completed, press the 'Cancel'
- Left function key to stop the alarm and
complete the cooking cycle.
5. Open the oven door and remove the cooked
product from the oven.
6. The display will show ‘Door Open’. Close the
oven door.
Open Door and
Unload Shelf
16
Page 19

Cooking with Programmed Recipes
7. The display will show ‘Timer 1 Not Running’
and then will revert to the next timer with the
shortest time to run.
8. Repeat ‘Cooking Done’, Items 1 to 7 on the
previous page and above, for any further timers
that are in use.
9. The oven timers shown as ‘Not Running’ can
now be re-programmed as shown at Loading
the Oven on page 15, to cook additional items
of the same temperature.
10. Continue cooking until all product is cooked.
17
Page 20

Cooking in Manual Mode
Cooking in Manual Mode
1. Depress the blue Power switch on the main
control panel to switch the oven ‘On’ /
‘Off’ (switch illuminates when power is ‘On’).
2. The Turbofan Start Up Screen will appear for 10
seconds before being replaced by the ‘Oven
Pre-Heating’ screen.
3. Pre-Heat Screen will display Set Temperature
and Actual Temperature of oven.
4. When Pre-Heat temperature is reached, an
Alarm prompt sounds and the ‘Oven Ready’
screen appears showing the Pre Heat
temperature.
5. Press the ‘Select’ Key, and the ‘Recipe’ Screen
will appear.
6. Select List (Left function key), the ‘Recipe
List’ screen will display.
7. Select Manual (Left function key), the
‘Manual Cook’ screen will appear.
Set Temp
Actual Temp
of Oven
Pre Heat
Temp
18
Page 21

Enter Cook Temperature
1. Press the ‘Temp’ key to select the ‘Cook
Temperature’.
2. Adjust the temperature with the Select ‘Up Down arrow keys.
3. Press the SELECT key to enter new
temperature value.
Enter Cook Time
1. With the ‘Manual Cook’ screen showing on the
display.
2. To set the ‘Cook Time’ press the ‘Time’ key.
Adjust with the ‘Select Up - Down’ keys.
3. Press the ‘Time’ key again to move the cursor
between seconds, minutes and hours.
NOTE: The Cooking Compensation function
automatically compensates the time
when opening the door to add other
products to the oven.
4. To activate cooking compensation, from the
‘Manual Cook’ screen, select Cook Comp
(Left function key).
5. A small ‘c’ will appear in the display window
below the ‘Manual Cook’ logo.
6. Press the ‘Select’ key to save the new values.
The display will show new cook program.
7. The screen will show either the ‘Cooling Temp
Not Ready’ or ‘Heating Temp Not Ready’
screens depending on the recipe temperature
and the present temperature of the oven.
8. An alarm will sound when the oven is up to
temperature and the display will show ‘Open
Door - Load Product’.
NOTE: Select from the following, ‘With NO
Shelves / Timers Selected’ or ‘With
Timers Selected’, ‘With Shelves
Selected’ as shown on the following
pages to continue.
Cooking in Manual Mode
Cook Temp
Cook Time
Cooking Comp
Activated
19
Page 22

Cooking in Manual Mode
Cooking in Manual Mode - “with NO Shelves / Timers Selected”
NOTE:-
To cook in Manual Mode with NO Shelf or Timer function selected, Menu 2, Item 8
‘Num of Shelves’, in Service Parameters, must be set to ‘1’ to deactivate the shelf
function.
1. Open the oven door and load all shelves with
produce to be cooked.
2. Press ‘Select’ key to start the cooking mode.
3. While cooking is in progress, the screen on the
right will show on the display.
4. To cancel any cooking, press the Cancel (Left
function key).
Cooking Done
1. When cooking is completed, the screen to the
right is displayed. The alarm indicates the
product is done.
2. To Increase Cooking Time by +1 Min -
If an additional minute of cooking time is
required, press the +1 Min (Right function
key).
3. To increase the cooking time by more than
1 minute - Press the Select Up key in
increments of 1 minute.
automatically after approximately 3
seconds.
4. When cooking is completed, press the Cancel
(Left function key) to stop the alarm and
cancel the cooking program.
5. Open the oven door and remove the product
from the oven.
6. The display will show Door Open / Cool
Down.
7. Close the oven door and the display will return
to the ‘Oven Pre-Heating’ or ‘Oven Ready’
screens.
8. To continue cooking further items, return to
Item 1 at the top of this page.
Cooking will start
Open Door and
Unload Oven
Cook Time
Remaining
20
Page 23

Cooking in Manual Mode
Cooking in Manual Mode - “with Timers Selected”
NOTE:-
Recipes containing Programmed Events (shown by
an ‘e’ displayed on the screen) cannot be cooked
when using the ‘Timer’ mode.
To use the ‘Timer’ mode, more than one shelf must be selected in the Service
Parameters. ‘Controller Configuration’, Menu 2, Item 8 ‘Num of Shelves’, must be set
to the number of shelves being used. Menu 1, Item 3 must be set to ‘Shelf’. NOTE - If
‘Number of Shelves’ is set to ‘1’ then the ‘Shelf Timer’ mode is deactivated.
Shelf timers are used to cook items that have the same cook temperatures. Shelves
can be loaded one at a time and an Individual Timer started for each shelf.
1. Open the oven door and load the first shelf with
product to be cooked.
2. Press the ‘Select’ key to select one of the
timers.
3. Press the ‘Select Up - Down’ keys to select
the timer required. The timer selected will
show on the display.
4. Press ‘Select’ key to start the cooking mode for
this timer.
5. Press ‘Select’ key twice to return to ‘Timer’
mode, then continue as shown at Items 1 to
4 above to select and load any further timers.
6. When timers are activated, to review timers
during the cooking phase, press Review
(Right function key) to scroll through the
time remaining for each Timer selected.
7. When in ‘Review’ mode, timers that have not
been programmed will display the following
screen. This timer has not been programmed.
8. To cancel any cooking, select the timer
required by pressing the Review (Right
function key).
9. Press the Cancel (Left function key) to
cancel the timer option.
Timer Being
Reviewed
‘e’ denotes
Programmed
Events.
Shelf Timer
Time Remaining
to Cook
Completion
21
Page 24

Cooking in Manual Mode
Cooking Done
NOTE: The display will always revert to the
Timer with the least time left to cook
completion.
1. When cooking is completed, the screen to the
right is displayed. The alarm indicates the
product is done.
2. To Increase Cooking Time by +1 Min -
Press the +1 Min (Right function key), if an
additional minute of cooking time is required.
3. To increase the cooking time by more
than 1 minute - Press the Select Up key in
increments of 1 minute.
automatically after approximately 3
seconds.
4. When cooking is completed for that timer, press
the Cancel (Left function key) to stop the
alarm and cancel the cook program for this
timer.
5. Open the oven door and remove the product
from the oven shelf shown as ‘Done’.
6. The display will show ‘Door Open / Cool
Down’.
7. This shelf timer can now be re-programmed as
shown at Item 1 at the top of the previous
page to cook additional items of the same
temperature.
8. The display will revert to the next timer with the
least time to run. Continue cooking until all
timers are done.
Cooking will start
Open Door and
Unload Oven
22
Page 25

Cooking in Manual Mode
Cooking in Manual Mode - “with Shelves Selected”
NOTE:-
Recipes containing Programmed Events (shown by
an ‘e’ displayed on the screen) cannot be cooked
when using ‘Shelf’ mode.
To use the ‘Shelf’ mode, more than one shelf must be selected in the Service
Parameters. Refer to ‘Controller Configuration’, Menu 2, Item 8 ‘Num of Shelves’,
must be set to the number of shelves being used. Menu 1, Item 3 must be set to
‘Shelf’. NOTE - If ‘Number of Shelves’ is set to ‘1’ then the ‘Shelf Timer’ mode is
deactivated.
Shelves are used to cook items that have the same cook temperatures. Shelves can
be loaded one at a time and a cooking time set for each shelf.
1. Open the oven door and load the first shelf with
product to be cooked.
2. Press the ‘Select’ key to select one of the
shelves.
3. Press the ‘Select Up - Down’ keys to select
the shelf required.
4. The shelf selected will show on the display.
5. Press ‘Select’ key to start the cooking mode for
this shelf.
6. Press the ‘Select’ key twice to return to the
shelf mode, then continue as shown at Items 1
to 5 above to select and load any further
shelves.
7. When shelves are activated, to review the shelf
time at any time during the cooking phase,
press Review (Right function key) to scroll
through the time remaining for each Shelf
selected.
8. When in Review mode, shelves that have not
been programmed will display the following
screen. This shelf timer has not been
programmed.
9. To cancel any cooking, select the shelf required
by pressing the Review (Right function key).
10. Press the Cancel (Left function key) to
cancel the shelf option.
Shelf Being
Reviewed
‘e’ denotes
Programmed
Events.
Shelf Number
Time Remaining
to Cook
Completion
23
Page 26

Cooking in Manual Mode
Cooking Done
NOTE: The display will always revert to the
Shelf with the least time left to cook
completion.
1. When cooking is completed, the screen to the
right is displayed. The alarm indicates the
product is done.
2. To Increase Cooking Time by +1 Min -
Press the +1 Min (Right function key), if an
additional minute of cooking time is required.
3. To increase the cooking time by more
than 1 minute - Press the Select Up key in
increments of 1 minute.
automatically after approximately 3
seconds.
4. When cooking is completed for that shelf, press
the Cancel (Left function key) to stop the
alarm and cancel the cooking programme for
that shelf.
5. Open the oven and remove the product from
the oven shelf shown as ‘Done’.
6. The display will show ‘Door Open / Cool
Down’.
7. This shelf can now be re-programmed as shown
at Item 1 at the top of the previous Page,
to cook additional items of the same
temperature.
8. The controller will revert to the next shelf with
the least time to run. Continue cooking until all
shelves are done.
Cooking will start
Open Door and
Unload Oven
24
Page 27

Door Open
1. The screen on the right appears on the display
at any time the door is open.
Cool Down Feature
1. With the door open, press the Stop Cool
Down (Right function key) to turn on the
fan to cool down the oven.
2. The temperature is shown on the display screen
during cool down.
Service Support
1. When the Pre Heat or Oven Ready display is
shown, press Service # (Left function key)
to display the number to call for service help.
2. If the name and number of the service support
has not been programmed in, follow the steps
shown below to add these details to the on
screen prompt:-
To edit the name and number of the service
contact, from the For Service Call screen,
select Edit (Left function key) this will
take you to the EDIT NAME / NUMBER
screen.
Press Time or Temp to move the cursor
between Name and Number.
Press SELECT to move the cursor to the
right.
Editing Name
Other Controller Functions
Whilst in Name press Select Up - Down
keys to add name.
Press Select key to move cursor to the
right.
Editing Number
Whilst in Number press Select Up - Down
keys to add number.
Press Select key to move cursor to the
right.
3. On completion of editing, press Exit (Right
function key) to save the settings and exit to
the For Service Call screen.
4. In the For Service Call screen, press Select
key to return to the Oven Ready screen.
25
Page 28

Programming Recipes
Editing Recipes
Preset recipes can be programmed into the oven
controller. Each recipe can have up to 5 phases
with individual time and temperature settings.
The recipe may be changed when it is being
selected.
NOTE: If a recipe contains events “e”, the
time and temperature cannot be
changed in the ‘Programming
Recipes’ mode. To edit time and
temperature in ‘Events’, refer to
‘Editing Events’ on page 29.
1. From the ‘Oven Read y’ screen, press the
‘Select’ key to choose the recipe to be
changed.
2. Press the ‘Time’, ‘Temp’ and Left Function
Key to unlock the display. The ‘Unlock’
symbol will be displayed at the top right of the
display.
Edit Recipe Name:
Events Symbol
Unlock
Symbol
Recipe Name
1. With the display unlocked, press the ‘Time’ and
‘Temp’ keys to change the ‘Recipe Name’.
2. Use the Select Up - Down keys to change the
letters.
3. Use the ‘Select’ key to move across the letters.
4. Press the ‘Time’ and ‘Temp’ keys to move to
the recipe symbol.
5. Use the Select Up - Down keys to change the
symbol.
6. Press the ‘Save’ (Left function key) to save
the changes and revert back to the ‘Recipe’
screen.
Recipe Symbol
26
Page 29

Edit Recipe Time:
1. With the display unlocked, press the ‘Time’ key
to select the time to change.
2. Press the Select Up - Down keys to change
the time.
3. Press the ‘Time’ key again to move the cursor
between seconds, minutes and hours.
4. Press the ‘Select’ key to store the changes and
return to the recipe menu.
Cook Compensation – Automatically
compensates when opening the oven door to load
product into the oven.
5. Press Cook Comp (Left function key) to
enable the Cook Compensation feature whilst in
the ‘Edit Recipe Time’ mode.
NOTE: A “c” symbol will display in the
bottom left hand corner for all recipes
with Cook Compensation selected.
6. Press SELECT to store the Edit Recipe Time
and Cook Compensation setting changes.
Edit Recipe Temperature:
1. With the display unlocked, press the ‘Temp’
key to select the temperature.
2. Press the Select Up - Down keys to change
the temperature.
3. Press the ‘Temp’ key again to move the cursor
between seconds, minutes and hours.
4. Press the ‘Select’ key to store the changes.
Programming Recipes
Seconds Time
Symbol
Minutes Time
Symbol
Cook Comp
Symbol
Display
Unlocked
Temperature
Display
27
Page 30

Programming Recipes
Change Fan Settings:
1. Press the ‘Temp’ key to select the ‘Fan’ mode.
2. Press the Select Up - Down keys to select the fan
settings required, as shown below:-
Table of Fan Settings (E35 Ovens Only)
HI Fan - Fan speed Fast.
LO Fan - Fan speed Slow.
Hi H - Fan speed High when Heating.
Lo H - Fan speed Low when Heating.
Hi P - Fan speed High - Pulse to pre-set time.
(Refer ‘Edit Events’ for setting details).
Lo P - Fan speed Low - Pulse to pre-set time.
(Refer ‘Edit Events’ for setting details).
NOTE: Time settings for ‘Hi P’ and ‘Lo P’ are
programmed in the ‘Edit Events’ mode.
3. On completion of the fan settings, press the ‘Select’ key
to store the changes and return to the Recipe Menu.
28
Page 31

Programming Recipes
Editing Events
Each programmable recipe cooking period can be made up of the following:-
A straight time / temperature setting for the entire cooking period of the recipe. (Refer to ‘Edit Recipe
Time / Temperature’ on the previous pages).
Or
The cooking period can be programmed with a series of Events which will occur during the cooking
period. (Refer to the information below for details of how to program Events).
Each Event is a sequence of Time, Temperature, Steam and Fan operation which can be set as part of the
cooking process and influence the way a product is cooked.
A maximum of up to 5 Events can be programmed into each recipe.
The combination of all these Event settings added together will make up the overall cooking time for the
product being cooked.
Steam Setting
When a steam time setting is included as part of an Event, the setting relates to how many seconds of
steam will be activated at the start of the event, (i.e. If 5 seconds of steam is set for a 10 minute event,
then at the start of this event, 5 seconds of steam will be activated and then for 9 minutes 55 seconds the
product will cook at the temperature set for this event).
1. With the display unlocked in the Recipe select
screen, press both Select and Time keys
together to enter the EVENTS screen.
2. Press the ‘Time’ key to move the cursor to the
left
.
3. Press the ‘Temp’ key to move the cursor to the
right
.
4. Press the Select Up - Down arrow keys to
change the
highlighted number / time
.
5. Press the ‘Select’ key to save the highlighted
right
setting and move the cursor to the
.
6. Press Save (Left function key) to save the
programmed events and return to the Recipe
select screen.
7. Press Exit (Right function key) to e xit the
Recipe select screen without saving changes.
NOTE: If events are programmed into a
recipe, an ‘e’ will be displayed in the
recipe.
The ‘e’ denotes that
this Recipe has
Programmed Events
29
Page 32

Controller Configuration
Entering the Service Mode
To access the ‘Service Mode’, whilst in the PreHeat or Oven Ready screens, press the Time
and Right function key simultaneously for 3
seconds, Menu 1 will display.
Service Parameters
Service parameters are identified by a number,
shown on the left hand side of the display screen.
Use the ‘Select Up - Down’ keys to scroll to the
Service Mode Menu Number required.
Press the ‘Select’ key to enter the Recipe Menu
required.
Press 'Exit', 'Right' Function key to return to the
Menu Screen / Exit the Controller Configuration
Menu’s.
MENU 1
Parameter
Number
1. Set Temp Offset
Sometimes it is necessary to make a small
adjustment to the real temperature.
To carry out this function, place a digital
thermometer into the centre of the oven and
allow the oven temperature to stabilise.
The temperature display on the oven will
show the real temperature measured by the
temperature sensor without offset.
Press the ‘Select’ key to enter Item 1 ‘Set
Temp Offset’. The Offset Temp screen will
display.
Use the ‘Select Up - Down’ keys to enter
the actual difference that the digital
thermometer shows.
Press 'Save', 'Left' Function key to save the
settings and return to Menu 1.
Offset Temp Default – 005°C.
Offset
Temperature
Press the ‘Select - Down’ key to scroll to
the Item 2 - ‘Calibrate the Probes’.
30
Page 33

2. Calibrate the Probes
Press the ‘Select’ key to enter the
Parameters Screen.
Press 'Exit', 'Right' Function key to return
to the Menu Screen / Exit the Controller
Configuration Menu’s.
Used to Calibrate the Probes with the use of
a Calibration device with 1000 ohm RTD and
176°C.
The Probes are factory set and will not
require calibration.
Refer to Menu 1,
Item 1 to adjust the set temp offset.
Press the Select - Down key to scroll to
Item 3 - ‘Change to Timer / Change to
Shelf’.
3. Change to Timer / Change to Shelf
Determines whether to use ‘Timer’ or
‘Shelf’ identification on cooking screens.
Controller Configuration
Press the ‘Select’ key to change the options
from ‘Timer’ to ‘Shelf’.
Defaults to Shelf
.
NOTE: If the display shows ‘Chan ge to Shelf ’,
pressing the ‘Select’ button will
change to the ‘Shelf’ Mode. The
display will then show ‘Change to
Timer’ mode.
Press the Select - Down key to scroll to
Item 4 - ‘Change to Serial / Change to
IR’.
4. Change to Serial / Change to IR
Configures control for RS232 or IR recipe
exchange.
If ‘Change to Shelf’ is selected,
menu will show Shelf Symbol
here in Menu’s.
If ‘Change to Timer’ selected,
menu will show Timer
Symbol here in Menu’s.
Press the ‘Select’ key to change the options
from ‘Serial’ to ‘IR’.
Defaults to IR
.
Press the Select - Down key to scroll to
Item 5 - ‘Change to ºC / Change to ºF’.
31
Page 34

Controller Configuration
5. Change to ºC / Change to ºF
Temperatures can be displayed as either
Fahrenheit or Centigrade.
Press the ‘Select’ key to change the options
from ‘Timer’ to ‘Shelf’.
Defaults to Fahrenheit
Press the Select - Down key to scroll to
Item 6 - ‘Change to Lock / Change to
No Lock’..
6. Change to Lock / Change to No Lock
If all recipes require to be unlocked for
editing, the service setting can be changed
to the ‘No-Lock’ Mode.
Press the ‘Select’ key to change the options
from ‘Lock’ to ‘No Lock’.
To temporarily enable recipe editing while in
the Lock Mode, press Left function key +
Time + Temp keys simultaneously. The
locked padlock icon will be replaced with an
unlocked padlock icon in the title bar.
Recipes can be edited until the next oven
control power or until the time set at Item
10 - ‘Re-Lock Time’ is completed or until
the operator again presses Left function
key + Time + Temp keys simultaneously.
.
Recipe ‘Locked’ and
can NOT be edited.
Recipe ‘Unlocked’ and
can be edited.
Recipe editing will be disabled and a locked
padlock icon will appear in title bar. Refer to
Item 10 - ‘Re-Lock Time’.
Defaults to No Lock
.
Press 'Next', 'Left' Function key to return
to the Menu Screen / Exit the Controller
Configuration Menu’s.
MENU 2
7. Change to FAN /Change to NO FAN.
NOTE: The ‘FAN’ setting is to be used, i.e.
display shows ‘Change to No Fan’.
Press the ‘Select’ key to change the options
from ‘Change to Fan’ to ‘Change to No
Fan’.
Press the Select - Down key to scroll to
Item 8 - ‘Num of Shelves’.
32
Page 35

8. Num of Shelves
Determines the number of individual shelf
timers that can be used.
Can be set from
1 to 6. If set to 1, the shelf timers are
de-activated,
refer to ‘Cooking in Manual
Mode’ - ‘with NO Shelves / Timers
Selected
’.
Press the ‘Select’ key to change the shelf
options from ‘1’ to ‘6’.
Press the Select - Down key to scroll to
Item 9 - ‘Ld Tmp Drop’.
9. Load Temperature Drop - 150° (F)
Bypass.
Load Temperature drop from 25°F to 150°F,
in increments of 5°.
Defines allowable oven temperature drop
during oven loading (door open).
If oven temperature drop exceeds setting,
recipe will revert to the 'Heating
Temperature Not Ready' mode.
Load Temperature drop can also be by passed by setting the display to ‘Ld Tmp
Drop BP’.
Press the ‘Select’ key to scroll through the
Load Temperature drop options.
Press the Select - Down key to scroll to
Item 10 - ‘Re-Lock Time’.
Controller Configuration
From ’1’ to ’6’ Shelves can be selected. Press the
‘Select’ key to change number of shelves.
10. Re-Lock Time
Determines the duration time for the
controller to automatically return to the
‘Locked’ Mode during recipe editing. Can be
set from OFF to 60 secs in 10 second
increments.
Default Setting 10 Seconds.
Press the ‘Select’ key to scroll through the
Re-Lock Time options.
Press 'Exit', 'Right' Function key to return
to the Menu Screen / Exit the Controller
Configuration Menu’s.
NOTE: Menu 2 screen also shows the
present operating temperature of the
Controller board and the Max Board
Temp. These are not adjustable.
33
Current Board Temp.
Max Board Temp
Page 36

Controller Configuration
Service Parameter Flow Chart
MENU 1
NOTE: Factory Use Only - Do Not Change
MENU 2
Press 'Left' Function key to return to Menu 1,
OR
Press 'Right' Function key to Exit Service Mode.
34
Page 37

Oven Operation - General
Door Handle
Standard Door Catch Operation
A. To open the oven door, rotate the handle either
clockwise or anti-clockwise to the 'Open' position to
unlatch the door and pull the door open with the
door handle.
B. To close the door, push the door firmly closed and
the door will lock in the closed position. (there is no
need to turn the handle to the closed position as the
door self-latches in the closed position and the
handle will self-centre to the 'Closed' position.
Side Racks
1. The side racks can be fitted in one of two positions, in
order to take 16 or 18 inch trays.
2. To position racks for 16 inch trays, use the holes at the
rear of the rack.
3. Alternatively for 18 inch trays, use the holes nearest the
centre of the oven.
Removal of Side Racks
Open
Closed
Open
16 inch tray
locator
18 inch tray
locator
1. Lift the side rack off the bottom locating pins.
2. Move the bottom of the side rack toward the centre of the
oven.
3. Lower side rack to clear top locating pins, and remove.
Replacement of Side Racks
1. Insert rack into the oven, placing appropriate holes over
the top locating pins.
2. Lift the side rack over the bottom locating pins.
3. Lower side rack with the appropriate holes over the
bottom locating pins.
35
35
3
1
2
Page 38

Cleaning and Maintenance
General
C
AUTION
Always turn off the electrical power supply at the mains supply before
commencing oven cleaning.
This appliance is not water proof.
Do not use water jet spray to clean interior or exterior of this appliance.
Clean the oven regularly. A clean appliance looks better, will last longer and will perform better.
Carbonised grease on the oven will hinder the transfer of heat from the cooking surface to the food. This
will result in loss of cooking efficiency.
NOTE:
DO NOT use water on the oven while it is still hot as warping and cracking may occur.
Use the oven ‘Cool Down’ mode to cool the oven before commencing cleaning.
DO NOT use harsh abrasive scouring pads, abrasive detergents, strong solvents or
caustic detergents as they could corrode or damage the oven.
Ensure that any detergent or cleaning material has been completely removed after
each cleaning.
To keep your oven clean and operating at peak efficiency, follow the procedures shown below:-
Oven Cool-Down Mode
:
This Mode can be used to cool down the oven after cooking
operations have been completed and prior to cleaning, to
ensure that the oven is at an acceptable temperature before
commencing the cleaning operation.
1. Open the oven door. The following screen will be
displayed.
2. Press the Cool Down (Right function key) to turn ‘On’
the fan and cool down the oven.
3. The current temperature of the oven is shown on the right
hand side of the display screen during cool down.
4. When the correct oven temperature is reached, to stop
'Cool-Down', either close the oven door or press the
Stop Cool Down (Right function key). Cool down will
stop.
5. Press the blue Power switch on the main control panel to
switch ‘Off’ the oven (switch is illuminated when power is
‘On’).
Current Temp
of Oven.
36
Page 39

Cleaning and Maintenance
Daily Cleaning
Oven Control Panel - IMPORTANT
a. DO NOT use cleaning chemicals on control panel. Clean with damp cloth only. DO NOT apply
pressure on display screen.
b. Dry the control panel thoroughly with a dry cloth and polish with a soft dry cloth
Oven
a. Thoroughly clean the interior and exterior surfaces of the oven with a damp cloth moistened i n
hot water and a detergent solution and use a soft scrubbing brush if required.
b. Any carbon deposits within the oven should be removed using a wooden or plastic scraper tool
followed by wiping with a damp cloth to prevent accumulation of food deposits.
c. Dry the oven thoroughly with a dry cloth and polish with a soft dry cloth.
Oven Trays
a. Thoroughly clean the oven trays with a damp cloth moistened in hot water and a detergent
solution and use a soft scrubbing brush if required.
DO NOT use harsh abrasive scouring pads, abrasive detergents, strong solvents or
caustic detergents as they will damage the oven trays.
Oven Racks
a. To remove, follow instructions given in ‘Oven Operation - General’ section.
Weekly Cleaning
NOTE:
If the oven usage is very high, we recommend that the weekly cleaning procedure is
carried out on a more frequent basis.
DO NOT use water on the oven while the oven is still hot as warping may occur. Allow
the oven to cool before cleaning.
DO NOT use harsh abrasive scouring pads, abrasive detergents, strong solvents or
caustic detergents as they will damage the oven and oven seals.
Ensure that protective gloves are worn during the cleaning process.
Exterior
a. Clean with a good quality stainless steel cleaning compound. Harsh abrasive cleaners may
damage the surface.
Stainless Steel Surfaces
a. Clean the exterior surfaces of the oven with a damp cloth moistened with a mild detergent
solution, or a soft bristled brush.
b. Baked on deposits or discolouration may require a good quality stainless steel cleaner. Always
apply cleaner when the appliance is cold and rub in the direction of the grain.
c. Dry all components thoroughly with a dry cloth and polish with a soft dry cloth.
Oven Interior
a. Ensure that the oven chamber is cool. Do not use wire brushes, steel wool or other abrasive
materials to clean the oven interior.
b. Remove the oven racks and the fan baffle and clean any build up of grease from the oven
interior with a mild anti bacterial detergent and hot water solution using a soft bristled brush.
c. Take care not to damage the fan or the tube at the right side of the oven which controls the
thermostat.
d. Dry the oven thoroughly with a soft dry cloth.
37
Page 40

Cleaning and Maintenance
Oven Side Racks
a. Remove the RH and LH Side Racks by lifting the side racks off the bottom locating pins.
b. Move the bottom of the rack toward the centre of the oven.
c. Lower rack to clear top locating pins, and remove from the oven.
d. Clean the side racks with a mild anti bacterial detergent and hot water solution using a soft
bristled brush.
e. Dry the side racks thoroughly with a soft dry cloth before re-fitting.
f. Refit the side racks by inserting the racks into the oven, placing the appropriate holes over the
top locating pins.
g. Lift the side rack over the bottom locating pins.
h. Lower rack with appropriate holes over bottom locating pins.
Fan Baffle
a. To remove th e fan baffle, firstly remove the RH side rack as shown above
b. Undo the 4 screws (anti-clockwise) at the top and bottom of the baffle plate.
c. Remove the fan baffle from the right hand side of the oven.
d. Clean fan baffle with mild anti bacterial detergent, hot water solution and a soft bristled brush.
e. Dry the fan baffle thor oughly with a soft dry cloth before re-fitting.
f. Refit the fan baffle in reverse order and tighten the 4 securing screws to secure the fan baffle.
g. Refit the RH side rack as shown above.
Oven Door Cleaning
a. The oven door and glass can be cleaned with a mild anti bacterial
detergent and hot water solution using a damp cloth.
b. Dry the oven door thoroughly with a soft dry cloth.
c.
OUTER SURFACES: Clean door glass with a conventional glass cleaner.
INNER SURFACES: To clean between the inner and outer door glasses,
firstly ensure the door is locked shut. With a screwdriver, coin, or other
suitable device,
1
/4 turn the outer glass locks to release the outer glass
and allow it to be hinged open for cleaning access.
IMPORTANT: Always ensure outer glass is hinged closed and locked into position
before opening door.
Oven Seals
a. To remove, pull out the seal starting at each corner.
b. Check the seals for wear and damage and replace if damaged or worn.
c. Seals may be washed in a sink, take care not to cut or damage them.
d. Dry the oven seals thoroughly with a soft dry cloth before re-fitting.
e. To replace, fit the seal into the corners first, then push in rest of seal.
Monthly Cleaning
Top
Unlocked
Unlocked
Bottom
Locked
Locked
Oven Seals
a. Check the oven seals for wear and damage and replace if damaged or worn.
b. Clean the oven regularly with a good quality domestic oven cleaner.
Periodic Maintenance (6 Monthly)
1. To achieve the best results cleaning must be regular and thorough and all controls and mechanical parts
checked and adjusted periodically by a competent serviceman.
2. If any small faults occur, have them checked promptly. Don't wait until a complete breakdown occurs.
It is recommended that the appliance is serviced every 6 months.
38
Page 41

Fault Finding
C
AUTION
This appliance is;
For professional use and is to be used by qualified persons only.
Only authorised service persons are to carry out installation, and servicing
operations.
Components having adjustments protected (e.g. paint sealed) by the
manufacturer should not be adjusted by the user / operator.
This section provides an easy reference guide to the more common problems that may occur during the
operation of your equipment. The fault finding guide in this section is intended to help you correct, or at
least accurately diagnose problems with your equipment.
Although this section covers the most common problems reported, you may encounter a problem not
covered in this section. In such instances, please contact your local authorised service agent who will
make every effort to help you identify and resolve the problem. Please note that the service agent will
require the following information:-
Model Code and Serial Number of the appliance. (Both can be found on the Rating
Plate located on the appliance.
:
Fault Possible Cause Remedy
The oven does not operate /
start.
The mains isolating switch on the
wall, circuit breaker or fuses are
'Off' at the power board.
The power switch on the oven is
'Off'.
Overtemp safety thermostat
tripped.
Turn 'On'.
Depress switch. Switch will
illuminate.
Reset (Button located at bottom
RH side of RH side panel). If fault
re-occurs call for service.
Oven light illuminating but fan not
working and oven not heating.
Oven door not closed properly.
Door switch or door catch broken.
Close oven door properly.
Call for service.
Bake timer does not time down. Bake timer not set correctly. For settings less than 10 minutes,
first set to greater setting then turn
back to desired setting.
Oven light not illuminating. Blown bulb. Replace bulb.
No water injection / steam. Water not turned 'On'. Turn water 'On' at water supply.
39
Page 42

Circuit Schematic
380V, 3P+N+E
400-415V, 3P+N+E
40
Page 43

Competency Check Lists
Guide Sheets for Staff Training
The pages in the following section of this manual should be copied and used when training staff to operate
the E35C convection oven. It is suggested that the competency assessment checklists be completed,
signed, and a copy kept in the personnel files for future reference.
Supervisors to Ensure
Competency check lists are copied and completed as part of the training of staff.
Correct training of staff to the required competency expectations.
The verification section of the competency check list is signed off.
A copy of the completed and signed competency check list is placed in personnel records as evidence
of operator competence.
41
Page 44

Competency Check Lists
Turbofan E35C Convection Oven - Operation
Element
:
Implement Safe Work Procedures
Assessment Criteria
“Can the operator”
Identify the purpose and use of:
Warning signs.
Safety features.
Related to the Turbofan E35C Convection Oven?
Identify:
Machine-related health and safety risks of this equipment?
Emergency procedures to be used with this equipment?
Operate this equipment correctly in normal and emergency situations?
Identify:
OH&S reporting procedures related to hazard reporting for this machine?
Comments:
To gain competency in the use of the Turbofan E35C Convection Oven, the assessor must be satisfied
that the operator has consistently applied the knowledge and skills in all of the above elements.
— Use this form to train staff, and place a copy in personnel files.
SUGGESTION
This form should be signed off only when the assessor is satisfied that the employee / trainee
is competent to carry out all of the tasks described above.
Applicant’s signature
Assessor’s signature
Date / /
Date / /
42
Page 45

Competency Check Lists
Turbofan E35C Convection Oven - Daily Cleaning
Element
:
Implement essential hygiene and sanitation procedures
Assessment Criteria
“Can the operator”
Maintain sound personal hygiene at all times when working with the Turbofan E35C
Convection Oven?
Use appropriate protective and work clothing while working with the Turbofan E35C
Convection Oven?
Identify:
Product handling requirements during production process?
Critical points in the process where contamination can be introduced?
Why it is important to monitor hygiene and sanitation performance?
The effect of poorly maintained equipment on the control of contamination and spoilage?
Company policies and procedures regarding hygiene and sanitation?
Actual and potential contamination and spoilage hazards?
Solutions to rectify contamination and spoilage problems?
Use work practices and methods that reduce the risk of product contamination?
Remove contamination where appropriate in accordance with:
Workplace hygiene and sanitation procedures?
Procedures specific to the Turbofan E35C Convection Oven?
Comments:
To gain competency in the use of the Turbofan E35C Convection Oven, the assessor must be satisfied
that the operator has consistently applied the knowledge and skills in all of the above elements.
This form should be signed off only when the assessor is satisfied that the employee / trainee
is competent to carry out all of the tasks described above.
Applicant’s signature
Assessor’s signature
Date / /
Date / /
43
— Use this form to train staff, and place a copy in personnel files.
SUGGESTION
Page 46

Hazard Risk Assessment
The following risk assessment covers the reasonably foreseeable hazards to health and safety arising from
the Turbofan E35C Convection Oven and from systems of work associated with this machine.
Hazard Identified Existing Controls Consequences Likelihood Risk Rating
Cleaning the machine with
buckets of water or hoses is
extremely dangerous and may
lead to electrocution.
The machine must be cleaned
with a damp cloth only.
Electrical isolation switch
should be fully accessible to
the operator.
Recommend no more than 1.5
metres above the floor.
Service panels should not be
removed whilst the machine is
in operation.
The machine must not be
operated with any service
access panel removed.
The machine should never be
connected to alternative
power source other than that
which has been designed for
that machine by the store
designer.
Safe work cleaning practices
included in training manual
local workplace rules and
management.
Site supervision, inspection
and training as detailed in
this manual.
Dependent on store electrical
policy.
Machine designed to be
accessed by authorised
service technicians only.
Warning signs clearly evident.
Site supervision, inspection
and training as detailed in
this manual.
Direct connection to
switchboard only.
Catastrophic Rare High
Major injuries Rare High
Major injuries Unlikely High
Moderate injuries Rare Moderate
Exterior front surfaces and
interior surfaces can get
extremely hot - burn hazard.
Steam blow back burns from
opening door during oven
operation.
Glass viewing windows
become extremely hot.
Risk Rating Extreme Risk. Immediate action required.
High Risk. Senior management attention required.
Moderate Risk. Management responsibility must be specified.
Low Risk. Manage by routine procedures.
Warning signs.
Workplace standard operation
procedures.
Standard baking procedures
indicate how and when steam
is to be used.
Warning signs.
Workplace standard operation
procedures.
Minor injuries. Unlikely Low
Moderate injuries Unlikely Moderate
Minor injuries Unlikely Low
Owners and Operators Please Note:
The risk ratings and control measures as outlined in this manual must be incorporated into your safety
management systems and procedures. Ensure effective risk control by reinforcing these procedures with
staff. For example: never clean any electrical equipment with buckets of water or pressurised hoses.
44
Page 47

Replacement Parts List
Control Panel
026475 Oven Controller (100 Re cipe).
B26053 Control Panel.
026018 Overlay E35C.
B25926 Controller Cover Panel.
026506 Oven Control Relay Board.
026507 Oven Control Keypad.
232371 Operator Switch.
232394 Switch Contact 2N/O+Lamp.
025997 Temperature Probe PT1000.
025787 Transformer - 12Vac.
Electrical Gear
231739 Heating Contactor.
231742 Motor Contactor (3NO + 1NC).
231746 Suppressor (Heating Contactor).
231747 Suppressor ( Motor Contactors).
231743 Contactor Interlock.
232410 Shunt Trip.
232408 Circuit Breaker 3ø 25A.
232407 Circuit Breaker 1ø 6A.
232108 Lamp Hold er Complete (G9 Halogen).
231814 Light Bulb G9. 25W 230V - (G9 Halogen).
021352 Oven Lamp Glass.
021354 Lamp Gasket.
025400 Over Tem perature Thermostat.
021156 Cooling Fan.
024567 Motor Timer.
020774 Microswitch.
Motor & Elements
Replacement Parts List
020745K Motor Kit - 380 - 414V.
025396 Fan.
020896 Motor Shaft Seal.
020762 Elemen t - 230 - 240V, 2000W, - (E3 5 Standard Models).
022259 Elemen t - 230 - 240V, 1250W, - (E3 5C8, 8kW Models Only).
Steam System
020851 Water Sol enoid Valve.
020853 Spra y Adaptor Body.
020819 Vent O ver Pressure Spring.
020824 Vent Gasket.
021526 Water Inlet Elbow.
021527 Washer Rubber.
45
Page 48

Replacement Parts List
Replacement Parts List (continued)
Door
231438 Door Seal.
231804 Sin gle Step Locking Do g.
231803 Door Inner Glass.
232364 Door Glass Outer Spring .
231801 Door Inner Glass Buffer.
230745 Hinge Bush.
230741 Hinge Mounting Plate Top.
230742 Hinge Mounting Plate Bottom.
231494 Door Handle.
232134 Door O uter Glass Assembly.
Racks
020809 Side Rack L / Hand WA (E35-26 ”).
020810 Side Rack R / Hand WA (E35-26”).
020811 Side Rack L / Hand WA (E35-30 ”).
020812 Side Rack R / Hand WA (E35-30”).
015168 Oven Rack (E35-26”).
020993 Oven Rack (E35-30”).
Optional Extras
025916 Rack Run ner 4 Tray LH WA (E35-26”).
025917 Rack Run ner 4 Tray RH WA (E35-26”).
026127 Rack Run ner 5 Tray LH WA (E35-26”).
026128 Rack Run ner 5 Tray RH WA (E35-26”).
025089 Rack Run ner 8 Tray LH WA (E35-26”).
025090 Rack Run ner 8 Tray RH WA (E35-26”).
023118 Side Rack L / Hand WA 8 Tray (E35- 30”).
023119 Side Rack R / Hand WA 8 Tray (E35-30”).
026590 Rack Run ner 4 Tray L / Hand WA (E 35-30”).
026591 Rack Run ner 4 Tray R / Hand WA (E35-30 ”).
021236 Double Stack Kit (E35- 26”).
021237 Double Stack Kit (E35- 30”).
021348 Adj ustable Legs 4”.
230578 Leg Assy 150 mm ST/ST.
46
Page 49

 Loading...