

Page 1
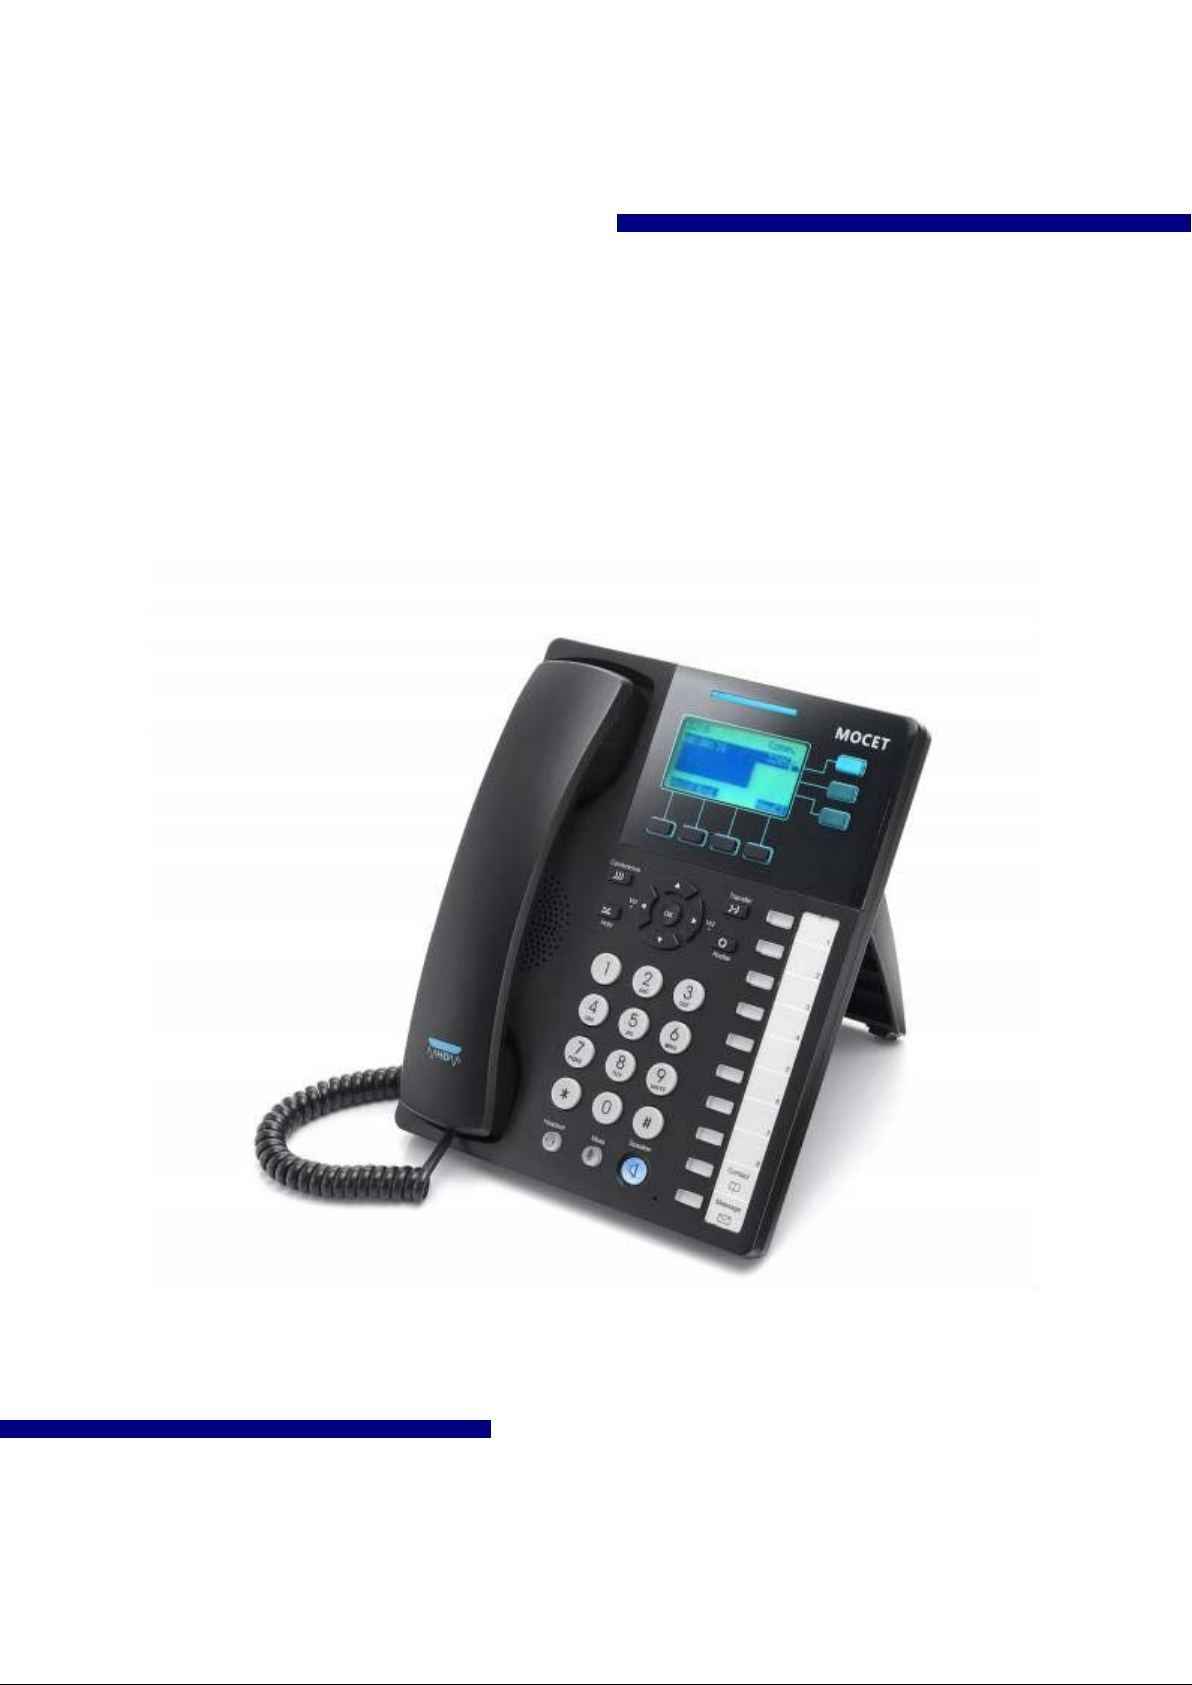
M22
User Manual
Copyright © 2015, All Rights Reserved.
1
Ver: R02 D/C: 101-0618
Page 2

M22 USER MANUAL
Environment
The phone you have purchased, as well as any used batteries must not be disposed of with
household waste. You should return these to your distributor if they are to replaced or dispose of
them in an approved recycling center.
FCC Statement
This equipment generates, uses and can radiate radio frequency energy and, if not installed and
used in accordance with the instructions in this guide, may cause interference to radio
communications. This equipment as been tested and found to comply with the limits for a Class B
computing device pursuant to Subpart J of Part 15 of FCC rules, which are designed to provide
reasonable protection against radio interference when operated in a commercial environment.
Operation of this equipment in a residential area is likely to cause interference, in which case the
user, at his own expense, will be required to take whatever measures are necessary to correct the
interface.
CE Declaration of Conformity
This equipment complies with the requirements relating to electromagnetic compatibility, EN55022
class B for ITE and EN 50082-1. This meets the essential protection requirements of the European
Council Directive 89/336/EEC on the approximation of the laws of the Member States relating to
electromagnetic compatibility.
Copyright Notice
All rights reserved. No part of this publication may be reproduced, tr ansmitted, tr anscribed,
stored in retrieval system or translated in to any language or computer language, in any
form or by any means, electronic, mechanical, magnetic, optical, chemical, manual, or
otherwise, without the prior written permission of Company.
Company reserves the right to revise the publication and make changes from time to time in
the contents hereof without obligation of this company to not ify person of such revision or
changes. The material contained herein is supplied without representation or warranty of
any kind. The Company therefore assumes no responsibility and shall have no liability of
any kind arising from the supply or use of this document or the material contained herein.
Trademarks
Windows NT/2000/XP/7™ and Internet Explorer™ are registered tradem arks of Microsoft
Corporation. All other company, brand and product names, like Netscape Navigator™ are
trademarks or registered trademarks of their respective owners.
2
Page 3

M22 USER MANUAL
WARNING!
1. Read these installation instructions carefully before connecting the IP phone to its power.
2. To reduce the risk of electric shock, do not remove the cover from the IP phone or attempt to
dismantle it. Opening or removing covers may expose you to dangerous voltage levels.
Equally, incorrect reassembly could cause electric shock on re-use of the appliance.
3. Do not expose the IP Phone to Fire, direct sunlight or excessive heat.
4. Do not expose the IP Phone to rain or moisture and do not allow it to come into contact with
water.
5. Do not install the IP phone in an environment likely to present a THREAT OF IMPACT.
6. You may clean the IP phone using a fine damp cloth. Never use solvents (such as
trichloroethylene or acetone), which may damage the phone’s plastic surface and LCD
screen. Never spray the phone with any cleaning product whatsoever.
7. Take care not to scratch the LCD screen.
8. The IP phone is designed to work in temperatures from 5
o
C to 40oC.
9. The IP phone must be installed at least 1 meter from radio frequency equipment, such as
TVs, radios, hi-fi or video equipment (which radiate electromagnetic fields).
10. Do not connect the LAN/PC port to any network other than an Ethernet network.
11. Do not attempt to upgrade your IP phone in an unstable power environment. This could
cause unexpected issues.
12. Do not work on the system or connect or disconnect cables during lightning storms.
13. Children don't recognize the risks of electrical appliances. Therefore use or keep the phone
only under supervision of adults or out of the reach from children.
14. No repair can be performed by the end user, if you experience trouble with this equipment,
for repair or warranty information, please contact your supplier.
Electrical Powering:
The M22 can be powered with PoE Switch or power adaptor in the package, the power
adaptor must be 5V/2A. Any damage caused to the M22 as a result of using unsupported
power adaptors will NOT be covered by the manufacturer’s warranty.
COMPANY disclaims all responsibility in the event of use that does not comply with the
present instructions.
Product Disposal Warning:
Ultimate disposal of this product, accessories, packing, especially the batteries should be
handled carefully for recycle and nature protection in accordance with national laws and
regulations.
3
Page 4

M22 USER MANUAL
Contents
Contents ............................................................................................................................. 4
Getting Started ................................................................................................................... 7
Overview of the M22 .......................................................................................................... 9
The Front-View of the M22 ........................................................................................... 9
The LED Indication ..................................................................................................... 14
The LCD Indication ..................................................................................................... 16
The Connectors of the M22 ........................................................................................ 24
General Operations ......................................................................................................... 26
Introduction ................................................................................................................. 26
Calls .................................................................................................................... 26
Register to IG7600 .............................................................................................. 26
Caller ID & User ID .............................................................................................. 26
Using Multiple Calls ............................................................................................. 26
Basic Call Features ..................................................................................................... 29
Making a Call ....................................................................................................... 29
Ending a call ........................................................................................................ 29
Holding a call ....................................................................................................... 29
Resuming a call ................................................................................................... 29
Receiving a Call ................................................................................................... 30
Mute the Microphone ........................................................................................... 30
Adjust the Voice Volume During a Conversation ................................................. 30
Advanced Call Operations .............................................................................................. 31
Redialing a Number ............................................................................................. 31
3-Way Conference Call ........................................................................................ 31
Call Transfer (Blind Transfer) ............................................................................... 32
Call Transfer (Attended Transfer) ........................................................................ 32
Call Transfer (Semi-Attended Transfer) ............................................................... 32
Voice Mail ............................................................................................................ 32
ODP Call .............................................................................................................. 33
Call Log ...................................................................................................................... 34
Dialed Calls ......................................................................................................... 34
Missed Calls ........................................................................................................ 34
Answered Calls .................................................................................................... 35
Call Setting ................................................................................................................. 37
DND Setting......................................................................................................... 37
Auto Answer ........................................................................................................ 38
4
Page 5

M22 USER MANUAL
Call Waiting ......................................................................................................... 39
Call Forward ........................................................................................................ 40
Call Blocking (Add, Edit, or Delete a Number) ..................................................... 41
SIP Server ........................................................................................................... 41
Phone Number .................................................................................................... 43
Display Name ...................................................................................................... 45
Authentication ...................................................................................................... 45
DTMF Type .......................................................................................................... 47
RFC2833 Payload ............................................................................................... 47
Volume Setting ........................................................................................................... 49
Ring Volume ........................................................................................................ 49
Handset Speaker ................................................................................................. 50
Hands-free Speaker ............................................................................................ 50
Headset Speaker ................................................................................................. 51
Information .................................................................................................................. 52
View Information about the M22 .......................................................................... 52
Backlight ..................................................................................................................... 53
Backlight .............................................................................................................. 53
Contrast ...................................................................................................................... 54
Contrast ............................................................................................................... 54
Phonebook ................................................................................................................. 55
Add Contacts ....................................................................................................... 55
Edit Contacts ....................................................................................................... 56
Delete a Number ................................................................................................. 56
Hotline Setting ............................................................................................................ 58
Hotline Number .................................................................................................... 59
Hotline Timeout .................................................................................................... 59
Speed Dialing ............................................................................................................. 61
Speed Dialing (Clr or Edit a Number) .................................................................. 61
Dial a Speed Dialing Number .............................................................................. 62
Admin Setting ............................................................................................................. 63
Admin/User Name, Password .............................................................................. 63
Dynamic IP Address (DHCP) ............................................................................... 65
Static IP Address ................................................................................................. 65
Dial Timeout ........................................................................................................ 66
Ping ..................................................................................................................... 67
Reset to Default ................................................................................................... 68
Reboot ........................................................................................................................ 70
Reboot ................................................................................................................. 70
Web Configuration ........................................................................................................... 71
5
Page 6

M22 USER MANUAL
Login page .................................................................................................................. 71
Configuration Pages ................................................................................................... 73
Information Page ................................................................................................. 73
Network Page ...................................................................................................... 74
Phone Page ......................................................................................................... 76
SW Upgrade Page ............................................................................................... 81
SIP Page ............................................................................................................. 83
System Page ....................................................................................................... 88
EDM .................................................................................................................... 90
Phonebook .......................................................................................................... 91
Features & Specifications ............................................................................................... 93
Troubleshooting ............................................................................................................... 95
Glossary ........................................................................................................................... 96
Acronyms .................................................................................................................... 96
Terminology ................................................................................................................ 97
6
Page 7
M22 USER MANUAL
Getting Started
You can customize your IP phone by adjusting the settings including display contrast, ring
type, device volume adjustment, call settings, and add, edit or delete contacts in the
phonebooks of the M22 using the on-screen menus, butt ons and nav igat ion keys.
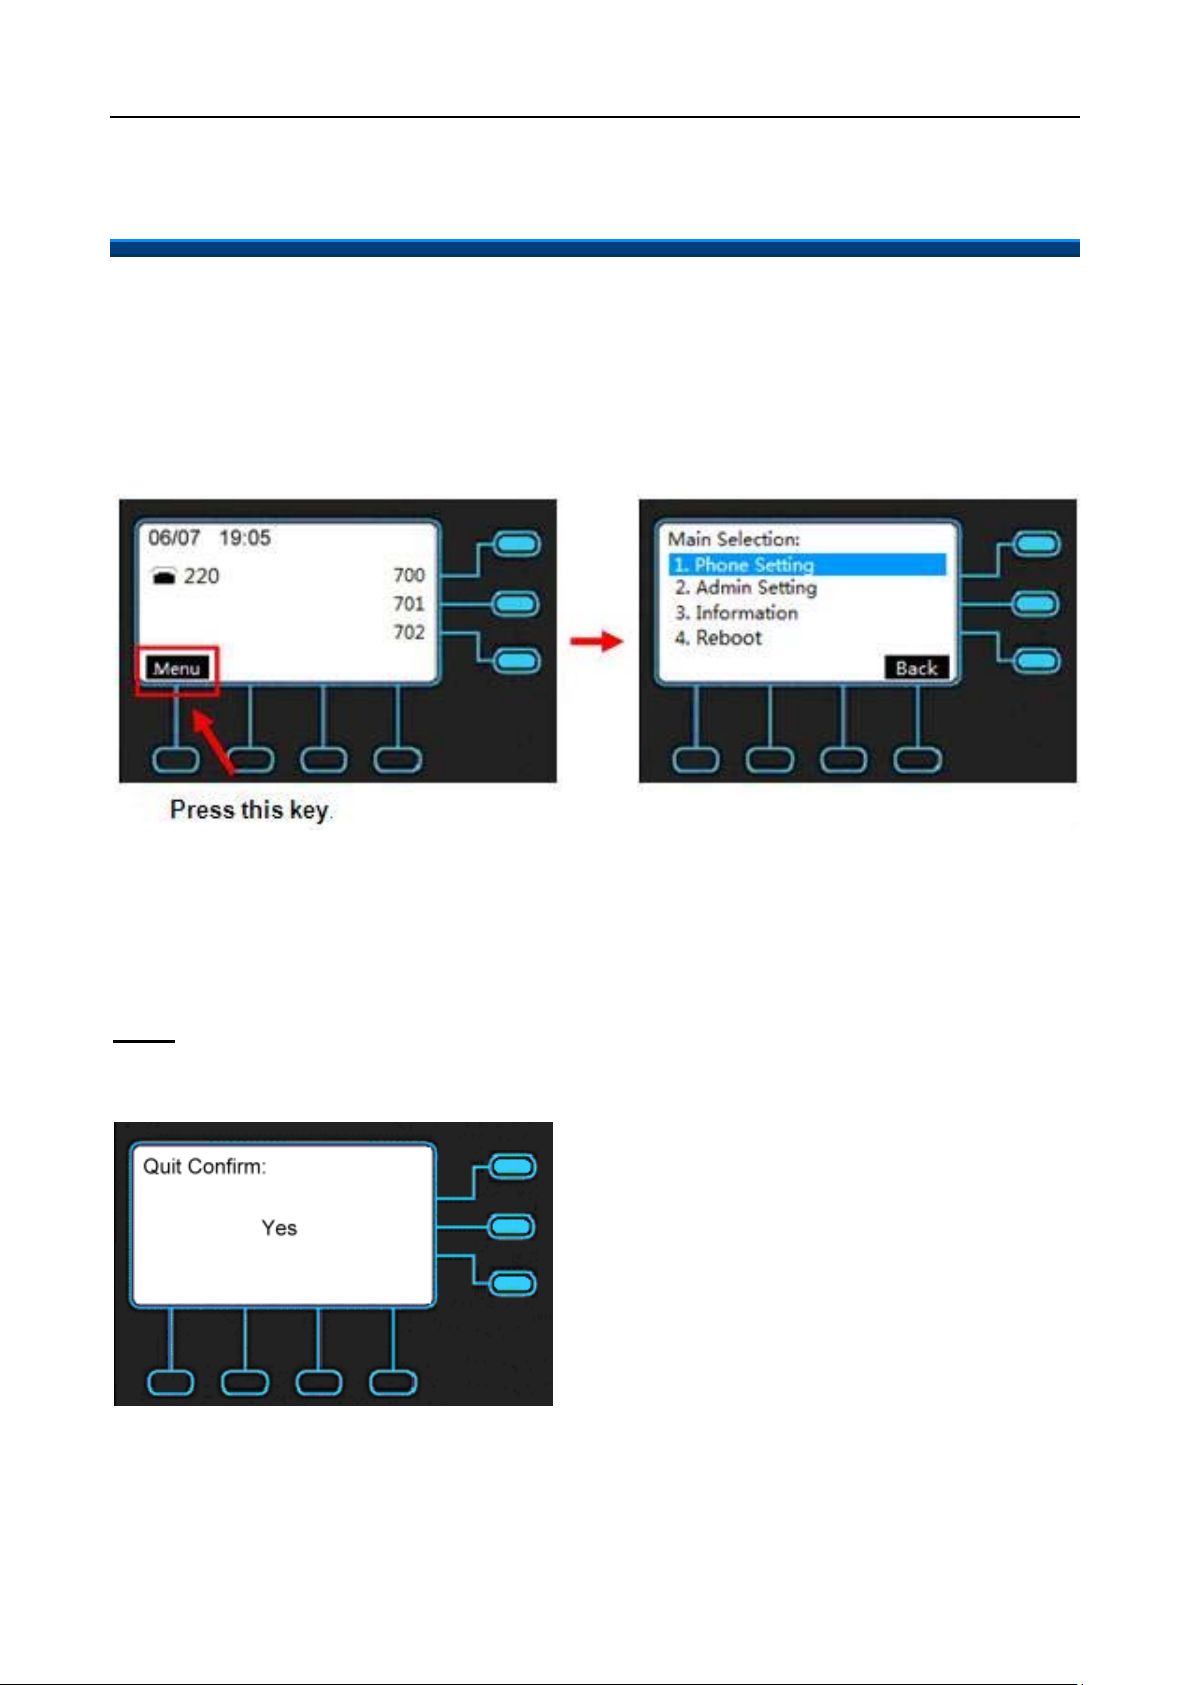
To configure your IP Phone from the menu, you can press Menu soft-key under the LCD
screen.
You can navigate through the menu with t he navigation keys. The following sections will
describe how you can setup your IP Phone through this menu. If you require additional
information or assistance with your new phone, contact your system administrator.
Note: changes to the phone settings will only become active after you exit from the menu
and confirm the changes. The LCD will show the following screen to let you confirm your
changes and exit the menu.
If you press Navigation OK, phone will save the settings.
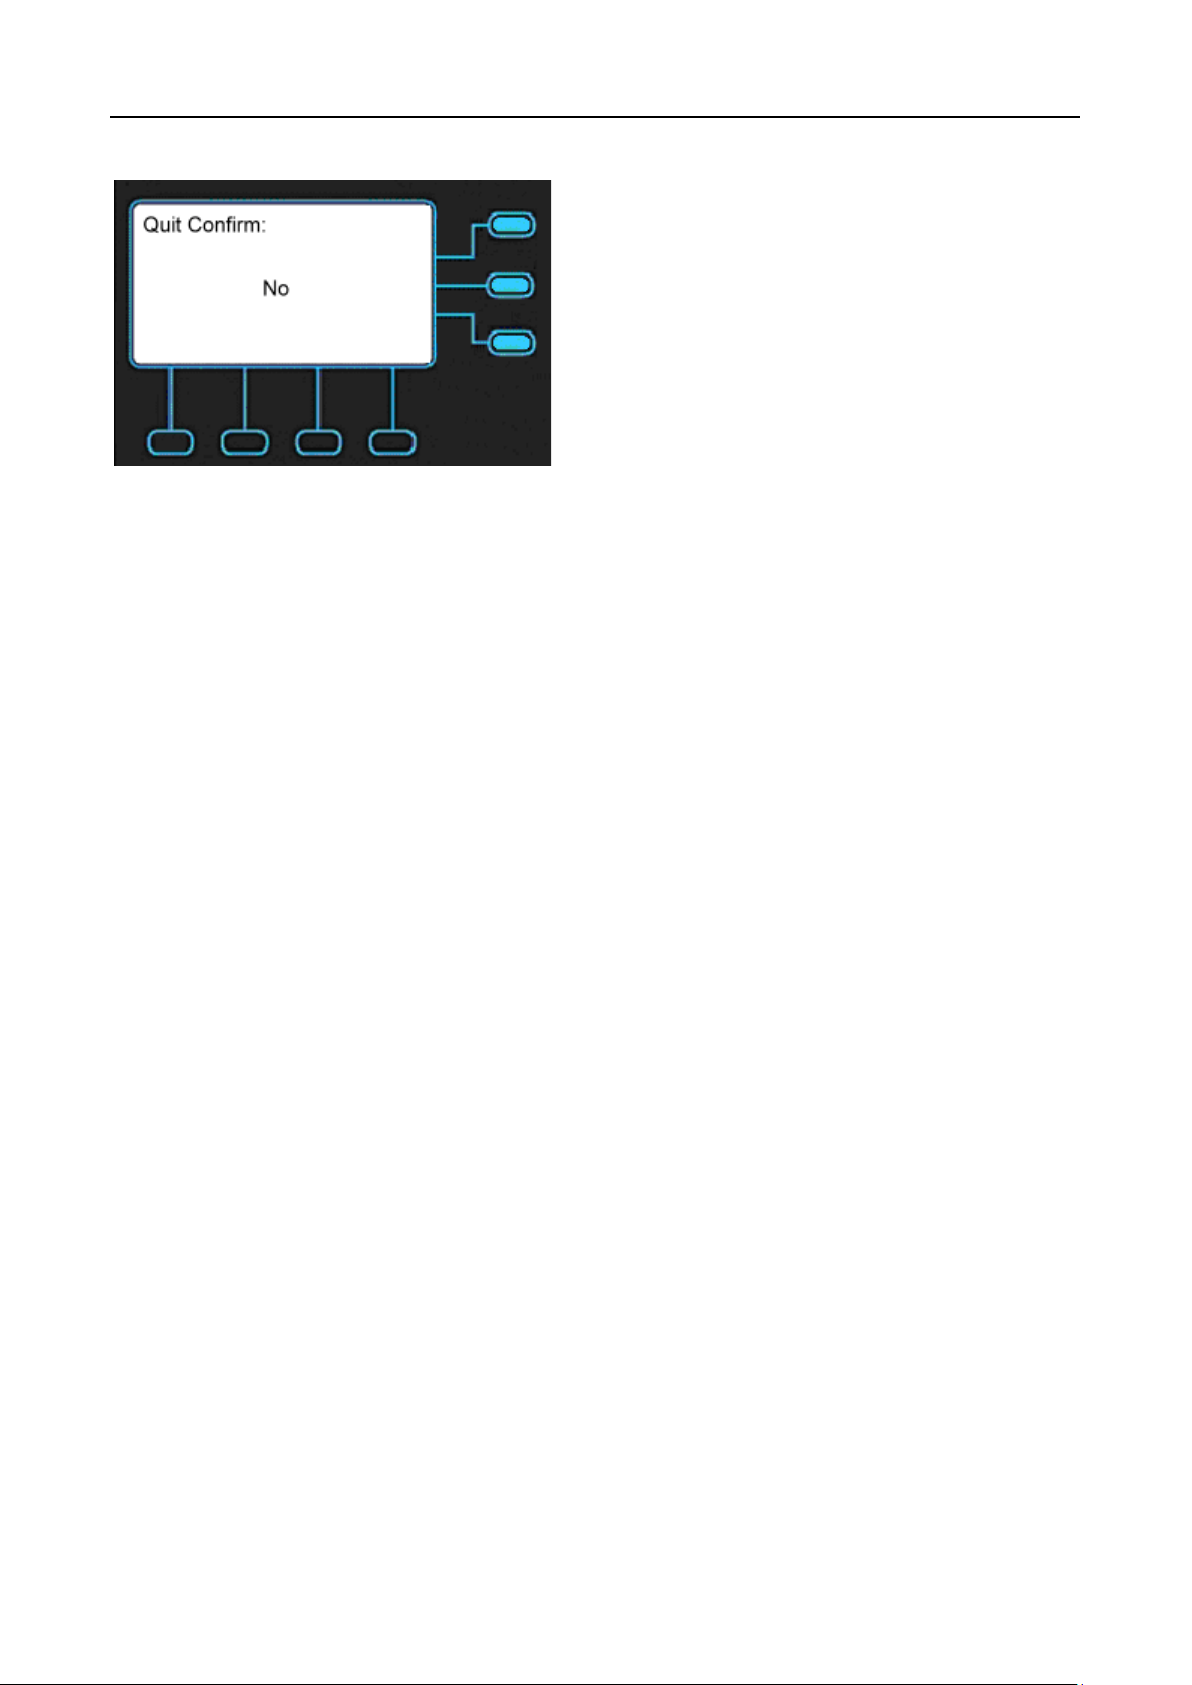
If you press Navigation Up and Down, phone will change the screen to the following
7
Page 8
M22 USER MANUAL
screen:
If choose No, phone will not save the settings. You will exit the screen and could
continue to configure your phone.
8
Page 9
M22 USER MANUAL
Overview of the M22
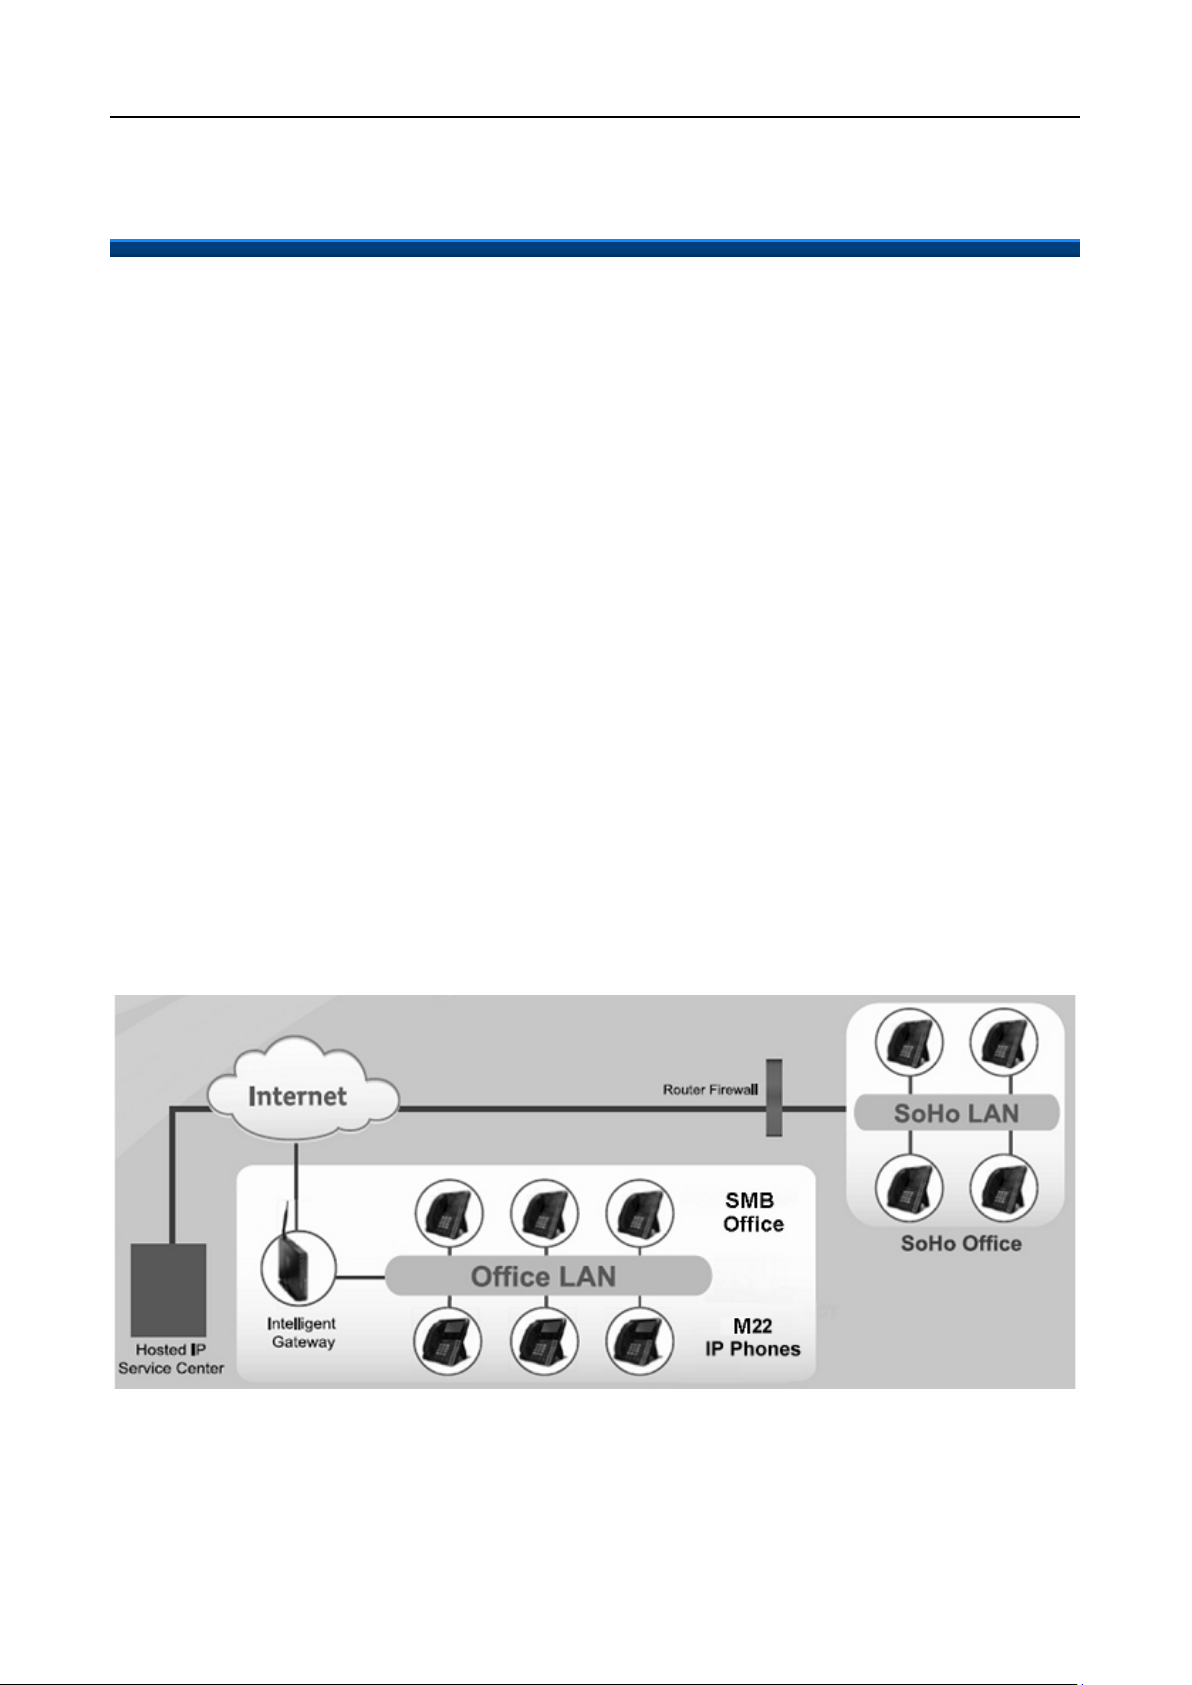
The M22 Professional IP phone is an easy-to-use high quality desk phone with many
advanced features. Utilizing a next generation capacitive touch sensitivity panel design, the
M22 supports up to four simultaneous lines and can be positioned in multiple tilt angles and
has a wall mount option, and has a built-in t wo port 10/100 Ethernet switch with automatic
support for power over Ethernet (PoE). The M22 has 8 programmable buttons and can be
configured through the simple built in menus displayed on the blue backlit LCD or from the
phone’s web user interface. The M22 can be automatically provisioned from a local or
Internet based on IG servers.
The M22 IP Phone supports many advanced features including 5-way on-phone
conferencing, can transfer and receive calls using industry-standard SIP protocols, and can
provide built-in music-on-hold (MoH) over IP network. Therefore, the M22 can be deployed
and used anywhere there is a suitable local area network (LAN) with Internet access and a
local or remotely hosted SIP server. Since it is a stand-alone and “always-on” device, it
does not require connection to a computer for it to work.
In addition, the M22 has a large LCD display to show all calls in progress at once and
supports HD audio through the use of the G.722 wideband codec, has a dedicated
external headset port, and an Extended Dial Module port. These functions make the M22 a
more powerful and flexible IP phone to meet the demands of a busy professional user.
The Front-View of the M22
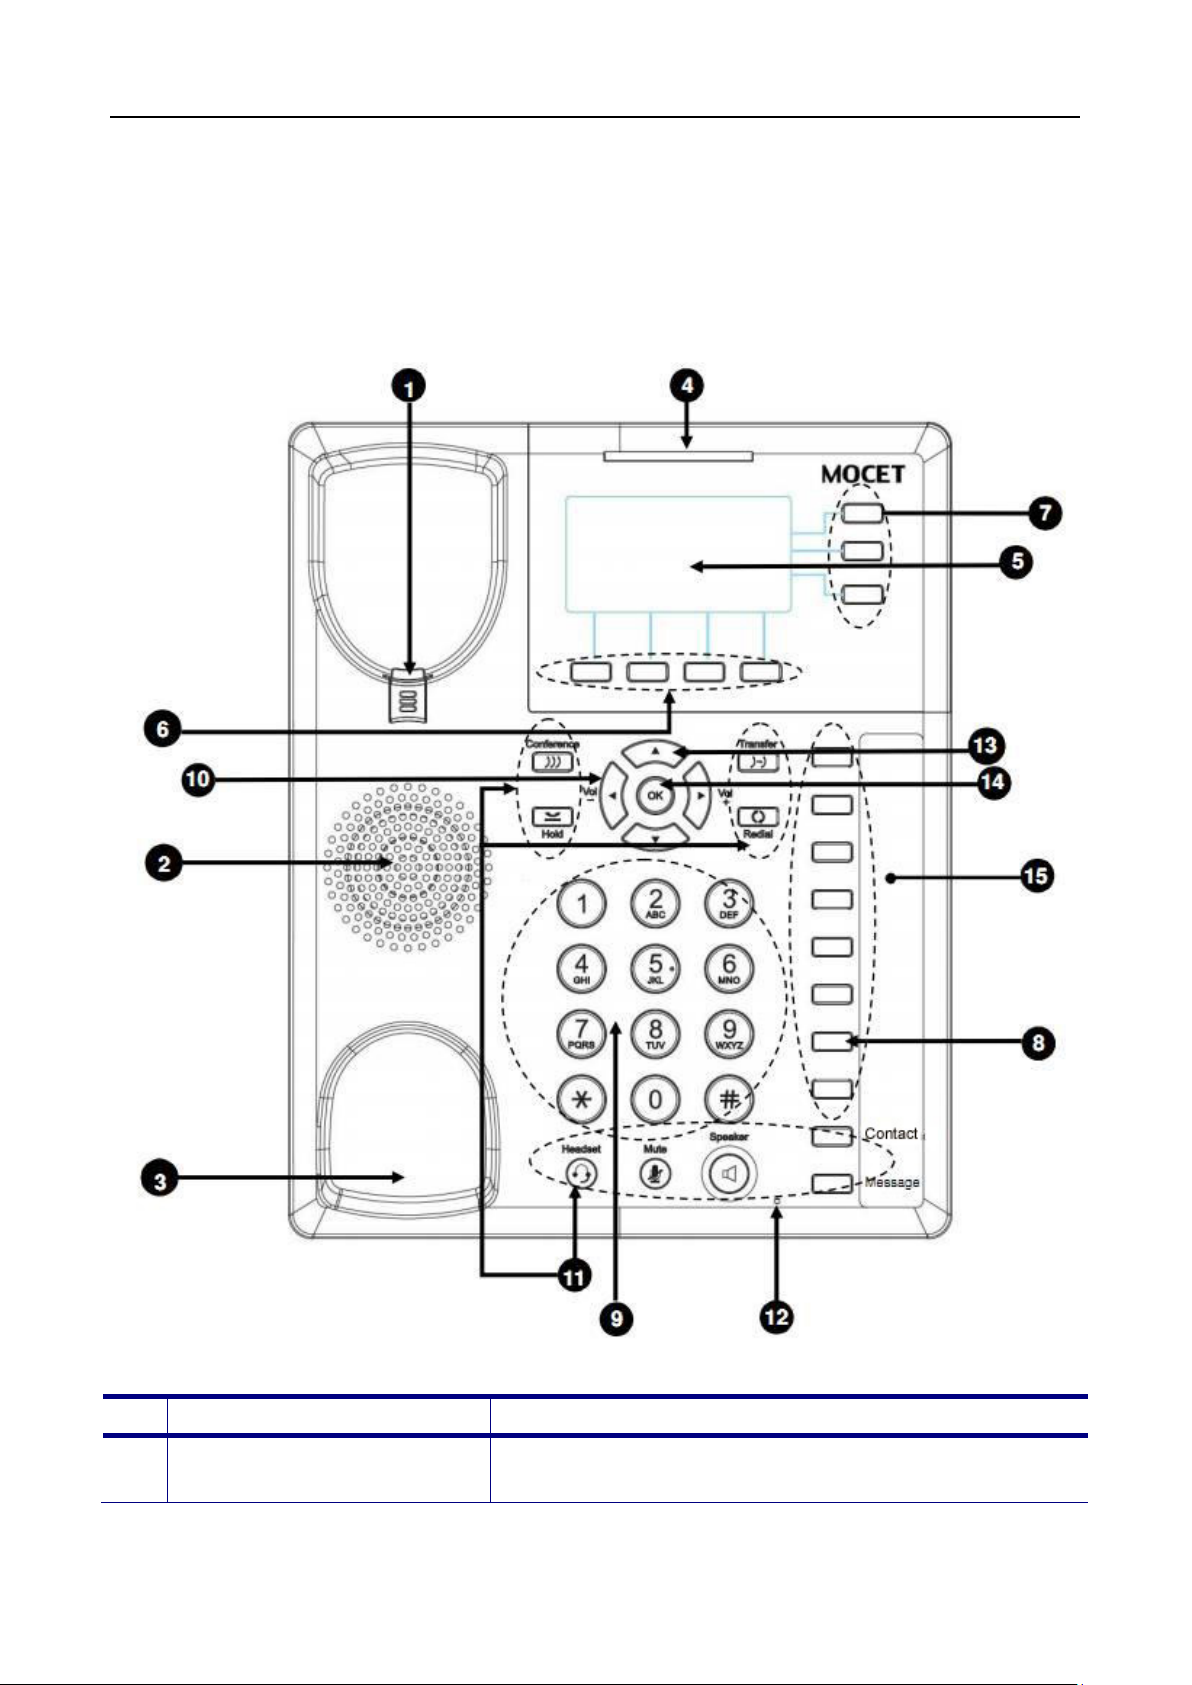
The M22 Standard IP Phone comes with a blue backlit L CD display, capacitive touch keys,
including 4 soft keys, 3 line keys, and 5 navigator keys, as well as a traditional keypad, 8
9
Page 10
M22 USER MANUAL
No
Part Name
Description of function
The hanger can be pulled; it is reversed for
programmable keys and 9 function keys. In the box, a handset, cur ly handset cord and a
power adaptor supplied. It can be installed and placed on the desktop or mounted on the
wall. The wall mount accessory is available separately. The figure below illustrates the front
view of the M22 IP Phone. With the point numbers, you can find its name and a simple
description of specified part in the following table.
1
Hanger
wall-mount installation.
10
Page 11
M22 USER MANUAL
2
For ring and hands-free talking.
Under the cradle, a hook switch is used for handset
while on a call will end the call.
The message LED. Steady blue means the phone is
The LCD screen is used for displaying phone’s
settings, phone number, call status and so forth.
Soft keys displayed on the LCD are used for item
are context-sensitive.
Line keys can be used for indicating busy lamp field
indicate its status.
Programmable keys can be used for indicating busy
associated with each key to indicate its status.
Numeric keypad
The Volume Control key is used to set the loudness
volume adjustment purpose when idle.
This headset key is used to activate or deactivate the
Speaker
3
4
5
6
7
8
Hook switch &
Handset
bottom cradle
Message LED
LCD Display
Soft keys
Line keys
Programmable keys
hang-on and hang-off detection.
The handset bottom cradle is for the placement of
handset; placing the handset on the bottom cradle
booting or upgrading.
selection or control. The various soft key functions
depend on the current activity on the phone as they
(BLF) status of other phones, speed dial phone
numbers, or for activating features of a service or
IP-PBX. A blue LED is associated with each key to
lamp field (BLF) status of other phones, speed dial
phone numbers, or for activating features of a service
or IP-PBX. A green LED and a red LED are
9
[1], [2], …, [9], [*], [0], [#]: The numeric keypad for
dialing numbers.
of the ringer, handset, headset and
speakerphone functions. While the phone is in idle
10
Volume Control Keys
state, the ringer is adjustable, and it will play ring
tone with current volume level. While in a call, the
handset, headset or speaker volume is adjustable.
[Note]: The left and right arrow keys can be used for
11
external headset. The headset icon will show to
indicate active status.
Headset key
11
Page 12
M22 USER MANUAL
The MUTE key is used to activate or deactivate the
Speaker Phone key
The SPKR key is used to activate or deactivate the
The Redial key dials the last dialed number
The Hold key is used to place the active call on hold.
The Transfer key is used to transfer a call to another
The Conference key is used to place multiple calls on
The Message key is used to access the Voice Mail
The Contact key is used to enter into the Phonebook
The Hands-free MIC.
Navigator Control Keys
The Navigation Control Keys are used for navigating
The OK button is used to confirm and save a setting
MUTE key
microphones on the M22. The mute icon will show or
not to indicate whether the phone is muted or not.
Hands-free feature. A blue LED is used to indicate
whether the speakerphone is active or not.
Redial key
Hold key
Transfer key
Conference key
Message key
Contact key
automatically.
IP phone.
the phone into a conference on the phone.
System for message retrieval.
menu to call, add, edit or delete a contact in a
selected phonebook.
12
Hands-free MIC
the menus on the phone; menu items are displayed
13
on the LCD screen.
on the phone or to dial a phone number.
14
Navigator OK Key
12
Page 13

M22 USER MANUAL
The programmable key plate label is plastic. For best
phones are available from DESI (see,
http://labels.desi.com)
15
Programmable key plate
label
results, we recommend using a fine permanent
marker (such as Sharpie brand) to write on it. It can
be cleaned with industrial alcohol.
Note: Custom templates and programming software
for
13
Page 14

M22 USER MANUAL
LED
Color
Status
Description
Extension: relative phone is idle.
in idle.
Trunk: relative trunk line is held (for local
Mailbox: relative virtual number
has new voicemail.
Trunk: relative trunk line is busy (for local
Live Record: feature is active.
Blinking
Fast
Trunk: relative trunk line has an incoming
call (not for local phone).
Trunk: relative trunk line is held (not for
Call Park: relative park number is in use.
Extension: relative phone is busy.
local phone).
Extension: relative phone is idle.
in idle.
Blinking
Fast
Trunk: relative trunk line has an incoming
call.
Blinking
Slow
Trunk: relative trunk line is held.
Call Park: relative park number is in use.
The LED Indication
Off Idle or no new message.
MESSAGE LED
Programmable LED
Blue
Green/Red
Green
Blinking
Slow
Steady
Off
Blinking
Fast
Blinking
Slow
New voice message(s) indication.
Phone is booting or upgrading.
Trunk: relative trunk line is idle.
Call Park: relative park number is idle.
Feature Key: feature is inactive.
Do Not Disturb: feature is inactive.
Live Record: feature is inactive.
Virtual Mailbox: relative virtual number is
Trunk: relative trunk line has an incoming
call (for local phone).
phone).
Virtual
Programmable
Keys LED
(besides LCD)
Red
Blue
Steady
Blinking
Slow
Steady
Off
phone).
Do Not Disturb: feature is active.
local phone).
Trunk: relative trunk line is busy (not for
Trunk: relative trunk line is idle.
Call Park: relative park number is idle.
Feature Key: feature is inactive.
Do Not Disturb: feature is inactive.
Live Record: feature is inactive.
Virtual Mailbox: relative virtual number is
14
Page 15

M22 USER MANUAL
Virtual Mailbox: relative virtual number
has new voicemail.
Extension: relative phone is busy.
Live Record: feature is active.
Speakerphone LED Blue
Steady
Off
Steady
Trunk: relative trunk line is busy.
Do Not Disturb: feature is active.
Speakerphone is not in use.
On-hook dialing or hands-free mode.
15
Page 16

M22 USER MANUAL
The LCD Indication
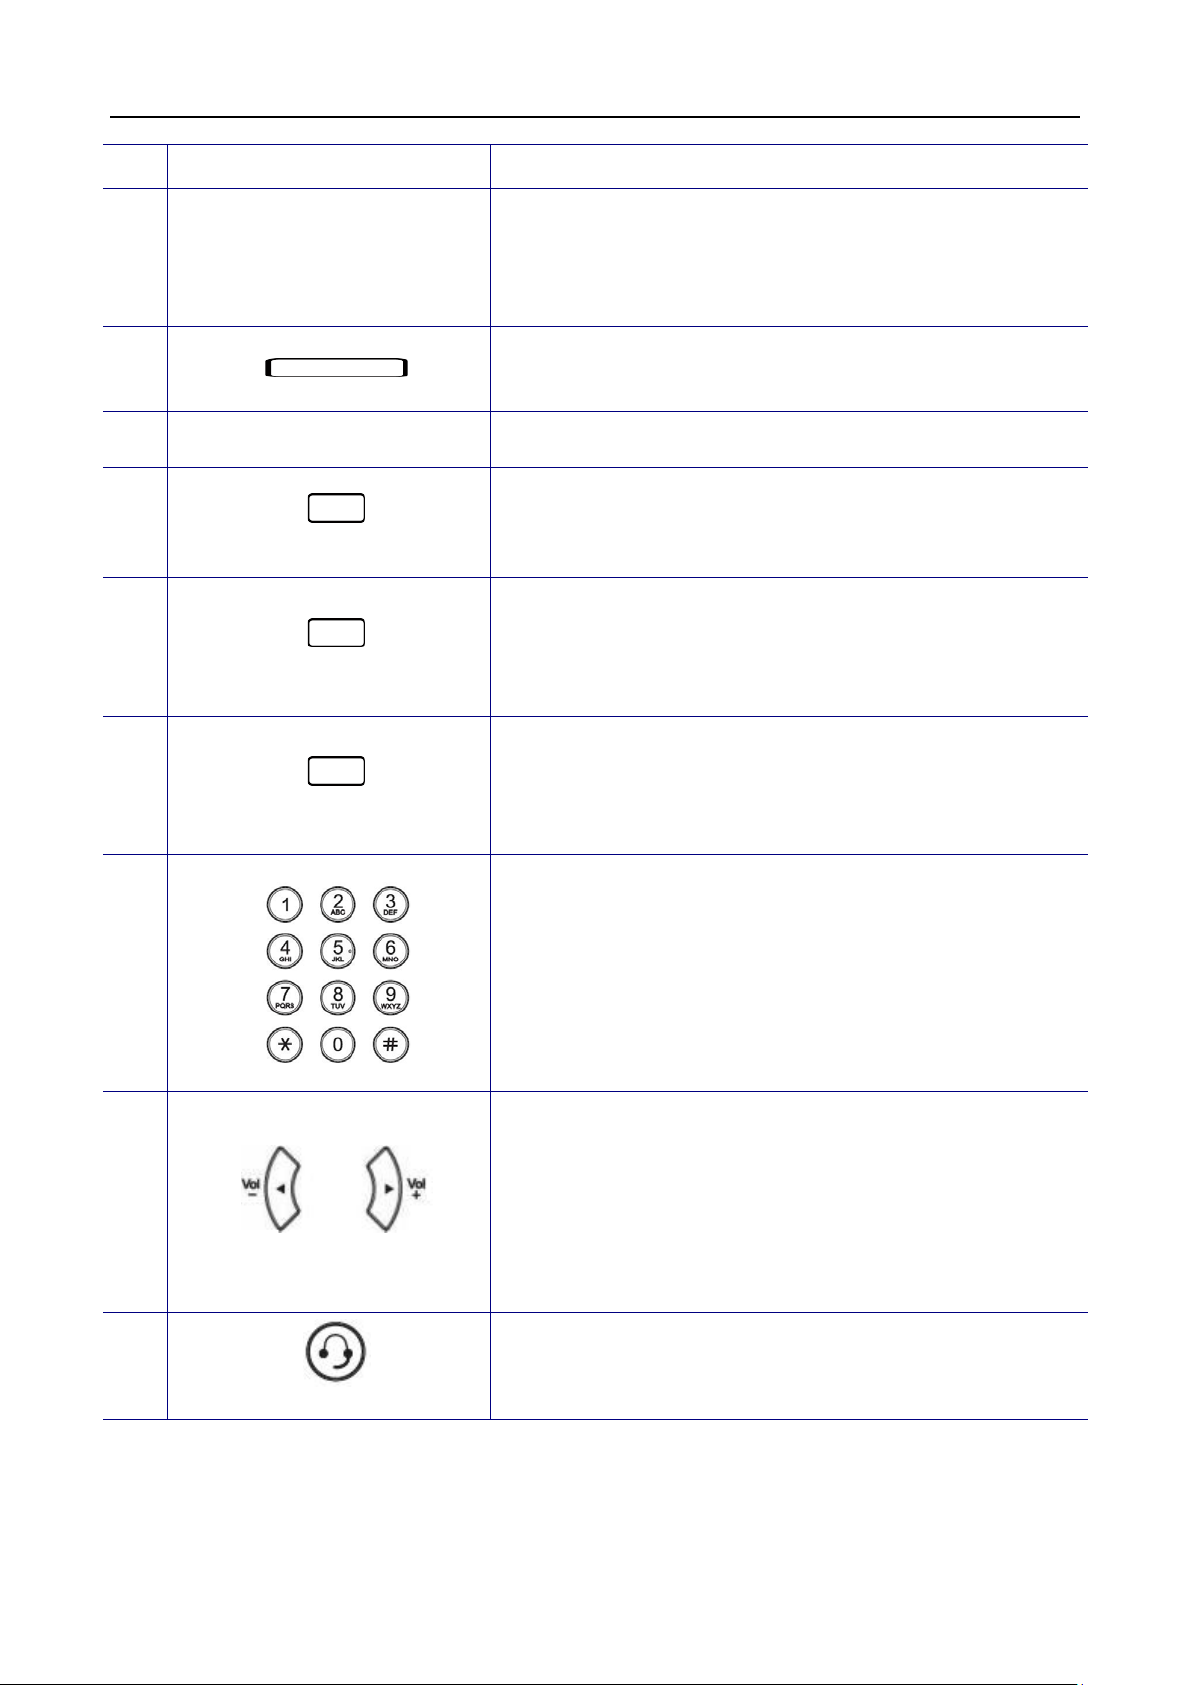
The following figure shows a standard format of LCD screen. There are 4 soft keys
associated with the operation of LCD display. For different menu or status, the display
format will be changed accordingly.
Menu: The M22 supports 4 functions for selection.
Phone Setting
Admin Setting
Information
Reboot
Date and Time: If M22 is registered to the IG7600 successfully, the M22 will sync the
correct time to server according to user’s time zone setting. If not, it shows the elapsed time
since last boot.
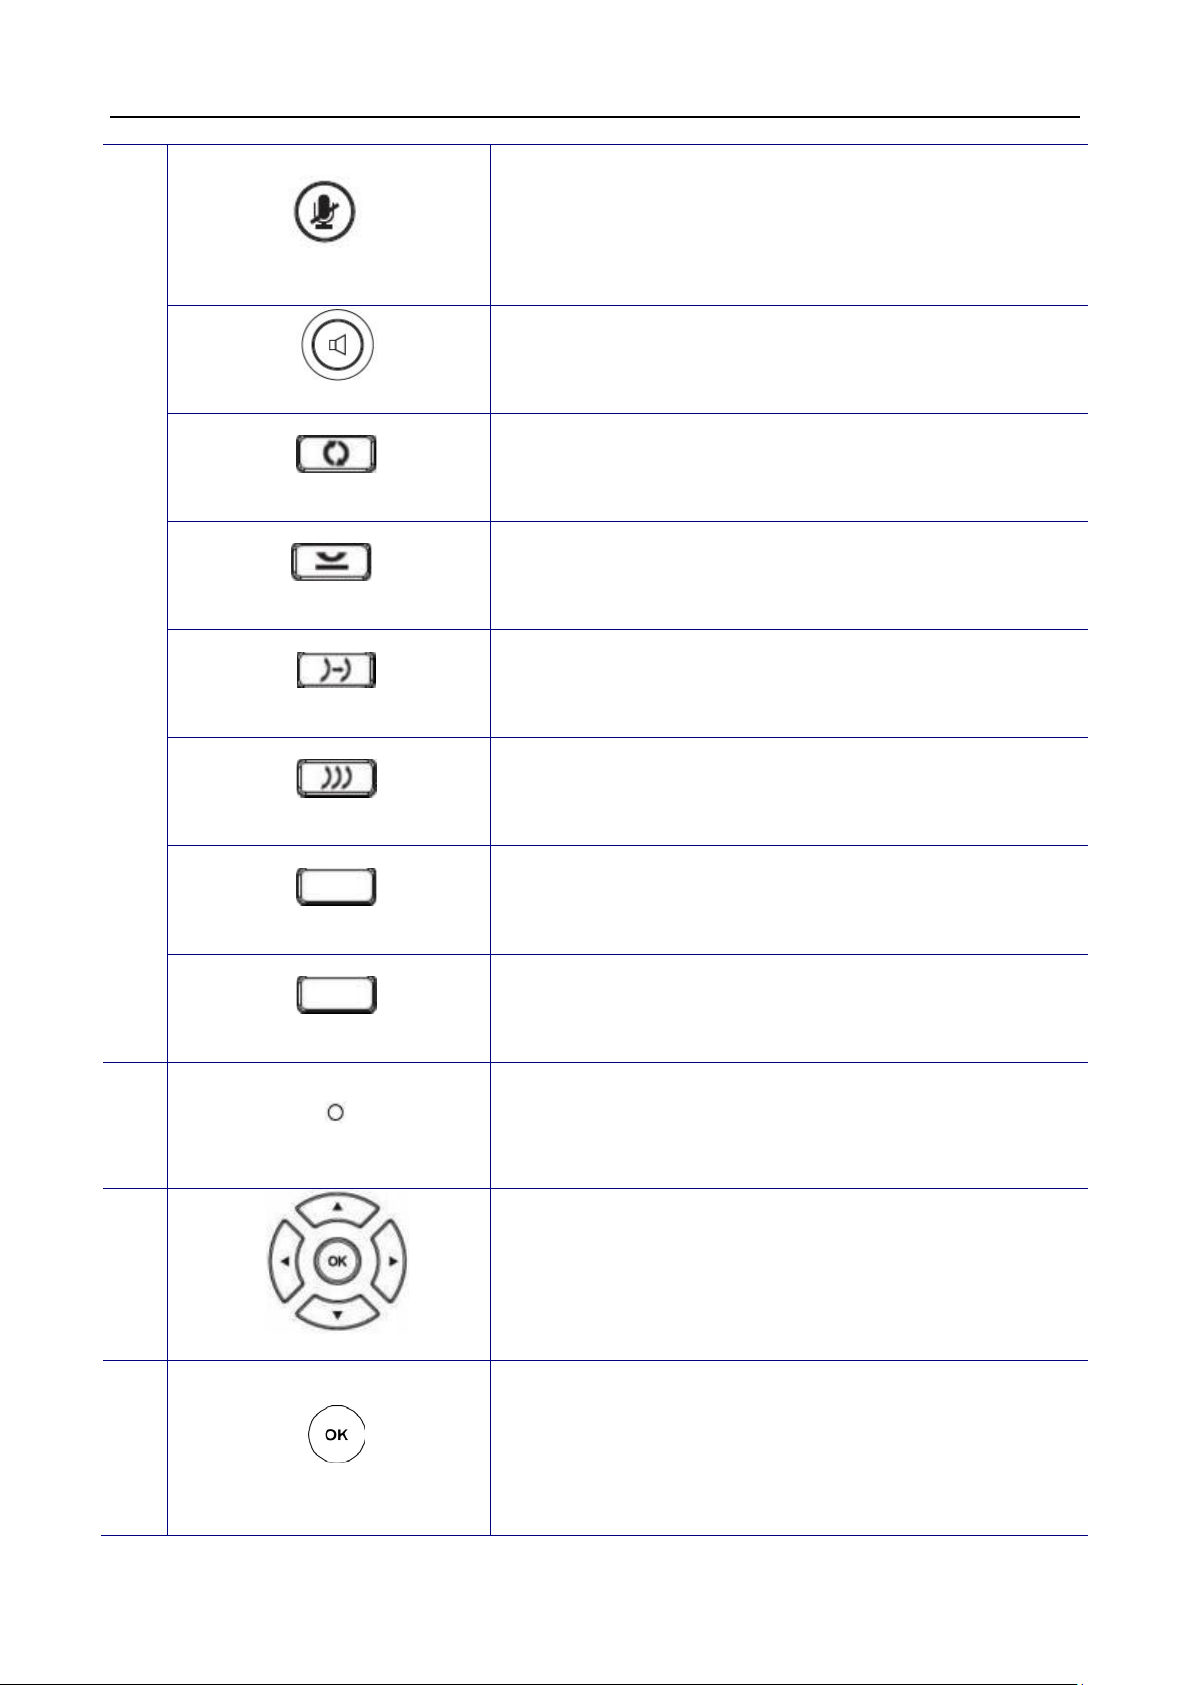
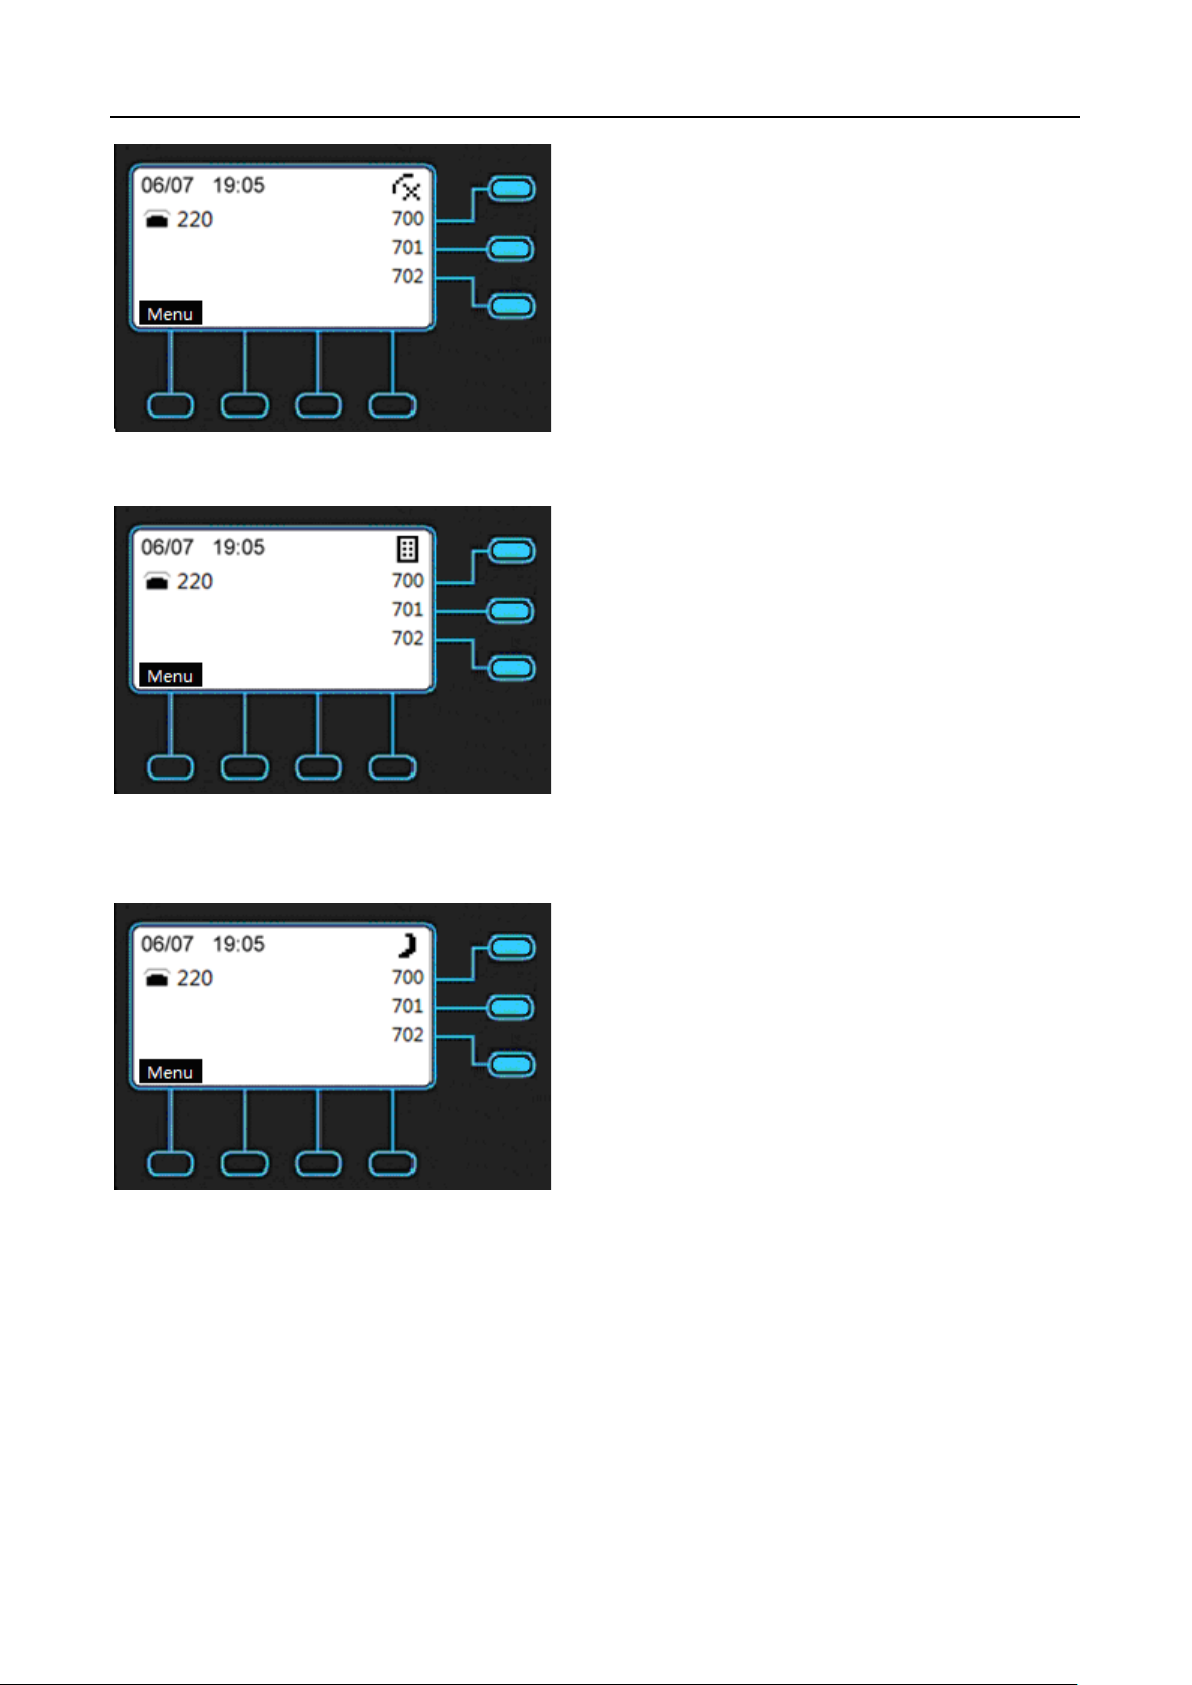
DND Indication: If DND (Do Not Disturb) function is enabled, the phone will show as below
on LCD.
16
Page 17
M22 USER MANUAL
EDM Indication: If EDM device is plug in, the phone will show as below on LCD.
Night Mode Indication: If service mode on IG server is night mode, the phone will show as
below on LCD.
Call Forward Indication: If the phone is in always call forward status, the phone will show
as below on LCD.
17
Page 18
M22 USER MANUAL
NOTE: Busy/No Answer/DND/Forking call forward will not show the forward icon on LCD.
Message Indication: If voice message is notified by IG server the phone will show the
number of message for relative line and the MESSAGE LED will bl ink ing slowly.
Disconnection Indication: If the cable is unplugged, the phone will show as below on
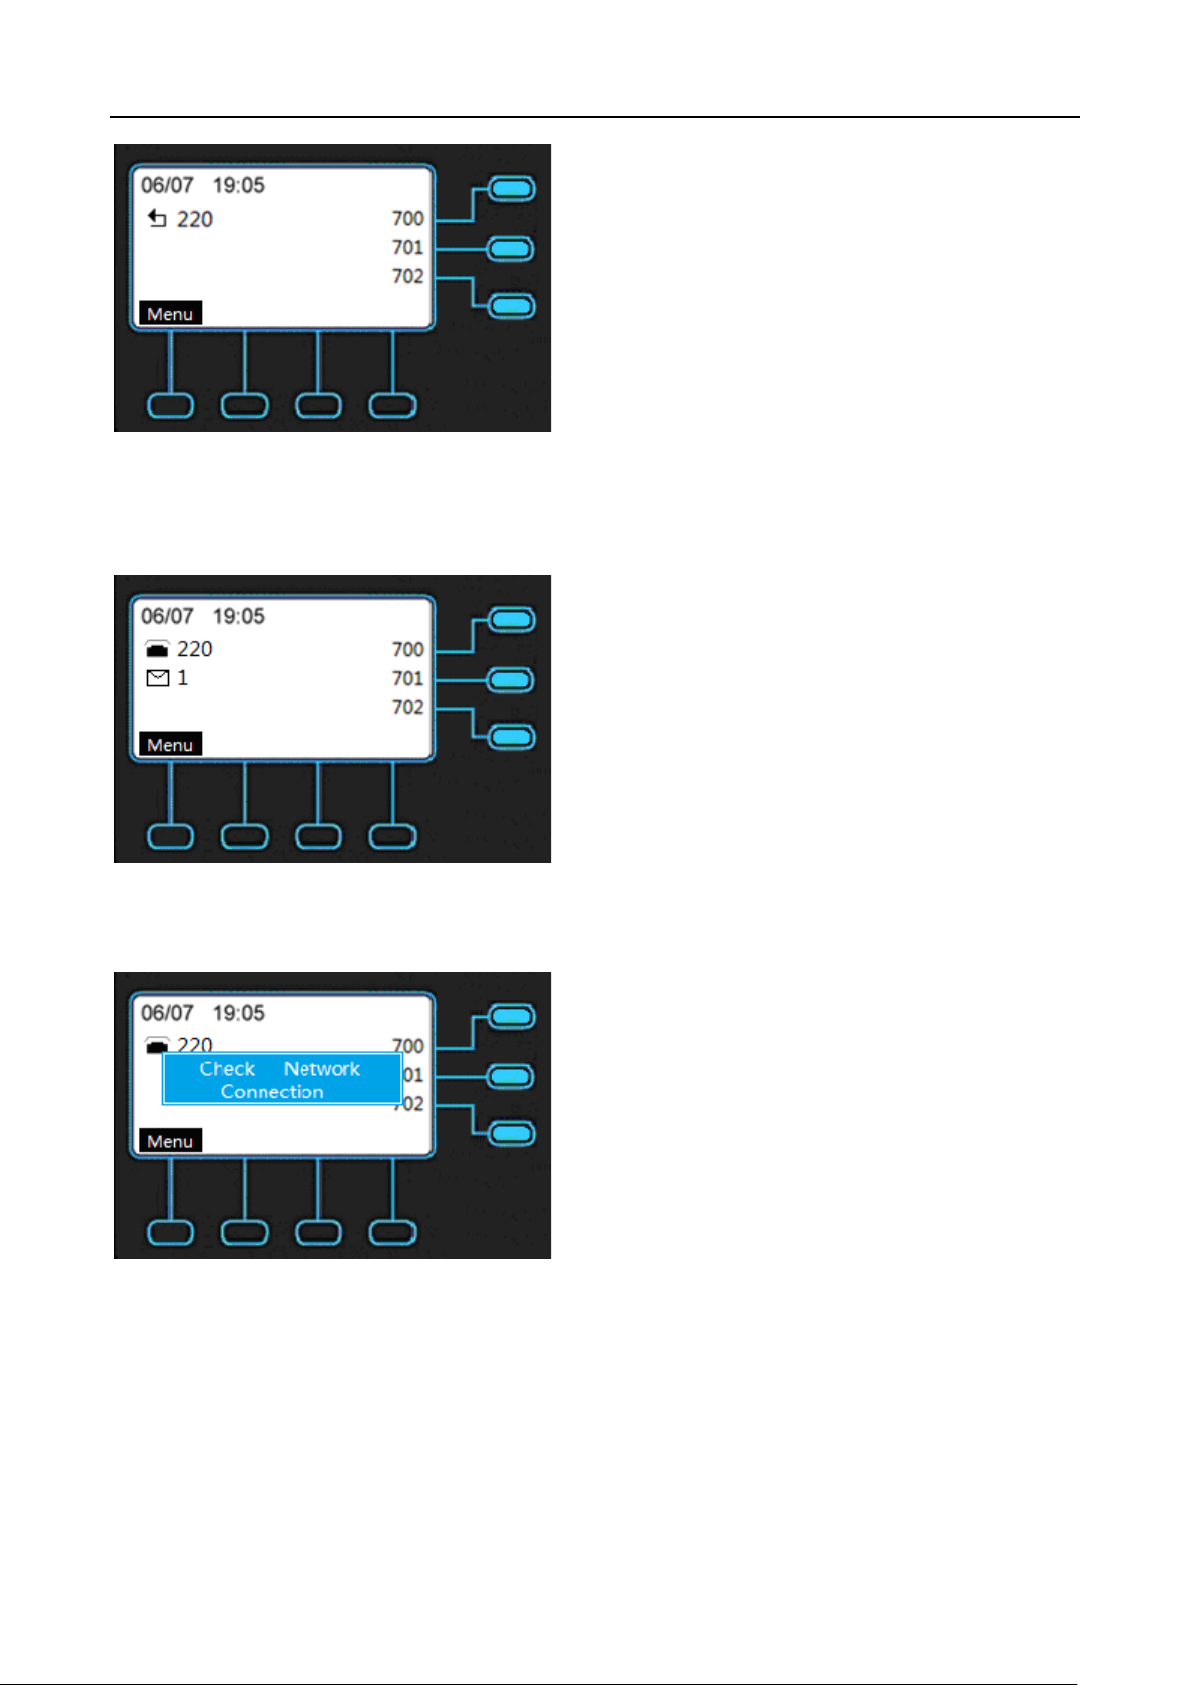
LCD.
IP Conflict Indication: If the phone is in IP conflict status, the phone will show as below on
LCD.
18
Page 19
M22 USER MANUAL
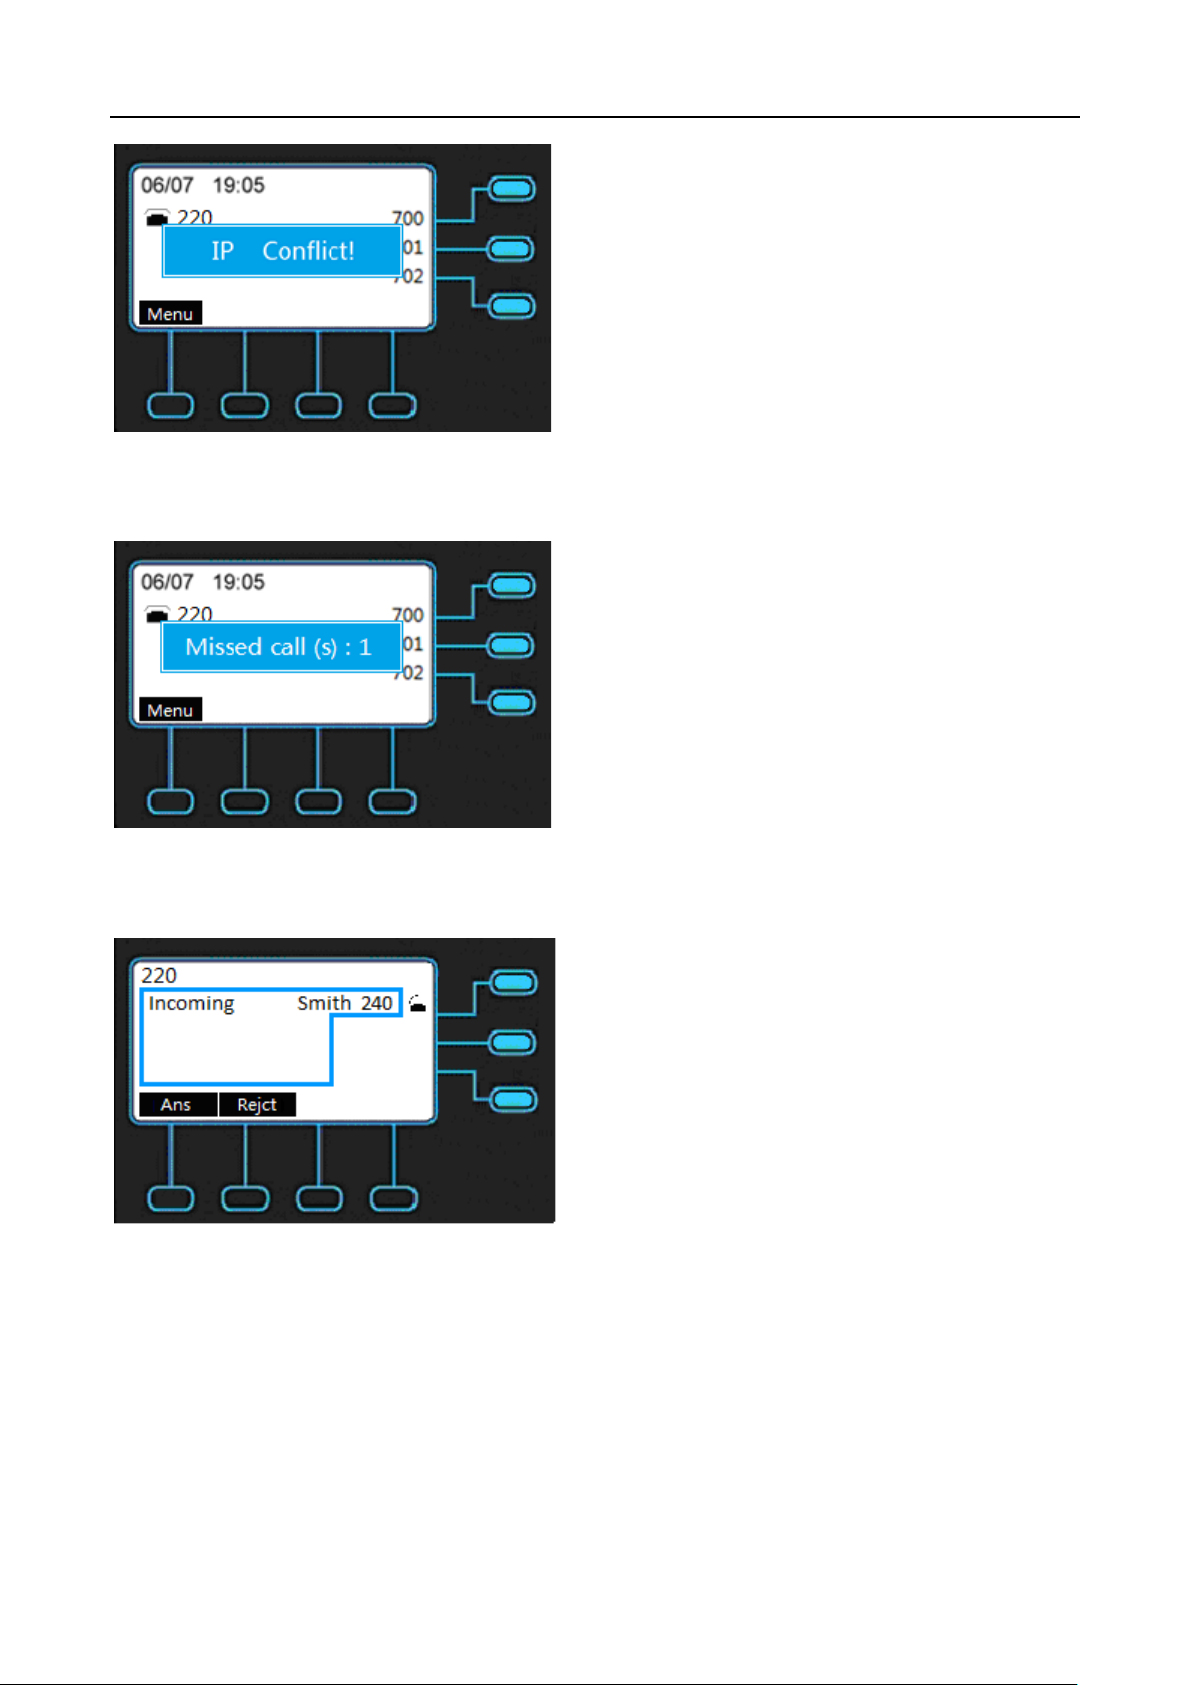
Missed Call Indication: If you have a missed call, the phone will show pop-up window on
LCD.
Incoming Call Indication: If the phone ringing, the caller ID of incoming call will show o n
LCD.
NOTE: If phone is setting as operator, there will be no Rejct on LCD.
Outgoing Call Indication: If you dial the phone to another user, the phone number will
show on LCD.
19
Page 20
M22 USER MANUAL
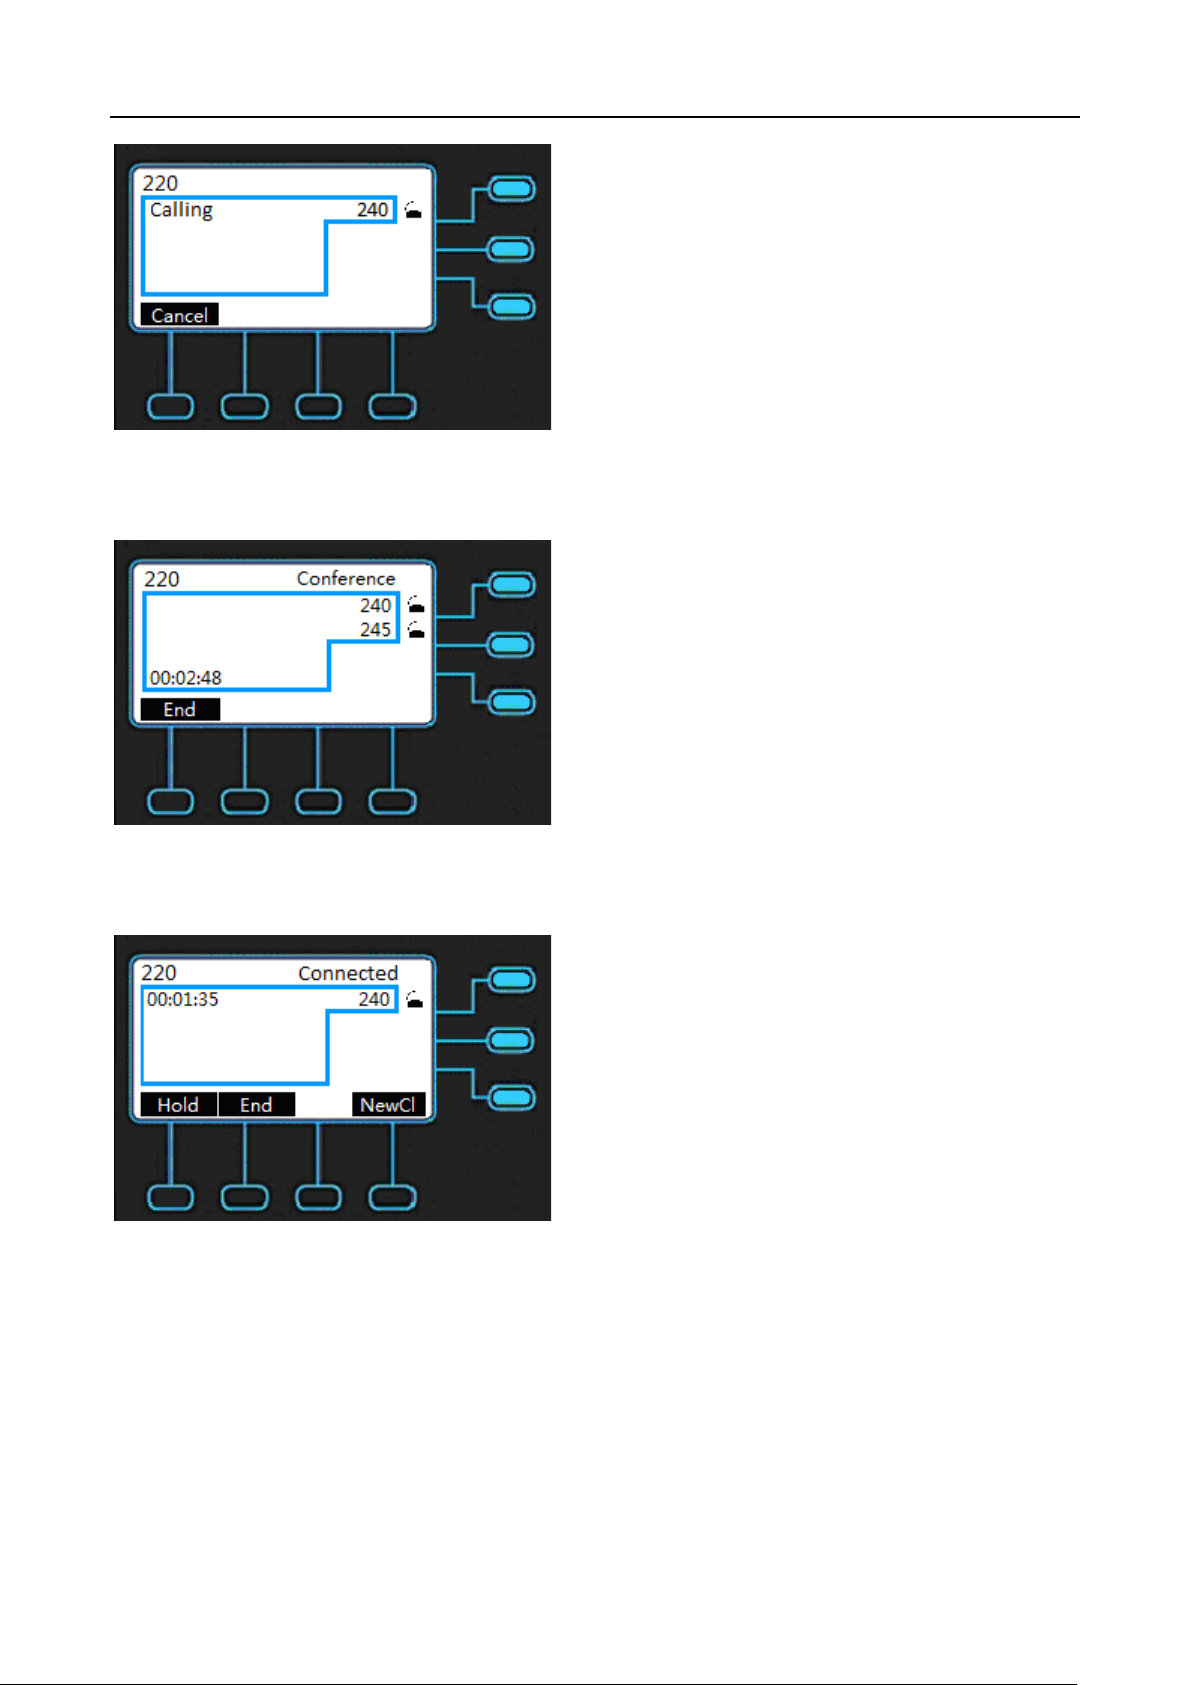
Conference Indication: If the call is in conference status, the caller ID of other users will
show on LCD.
Talk Indication: If the phone is in talk status, the caller ID of other users and the talk time
will show on LCD.
NOTE: If it is paging call, it will auto answer the call, and there will be Ans End on LCD
before press Ans.
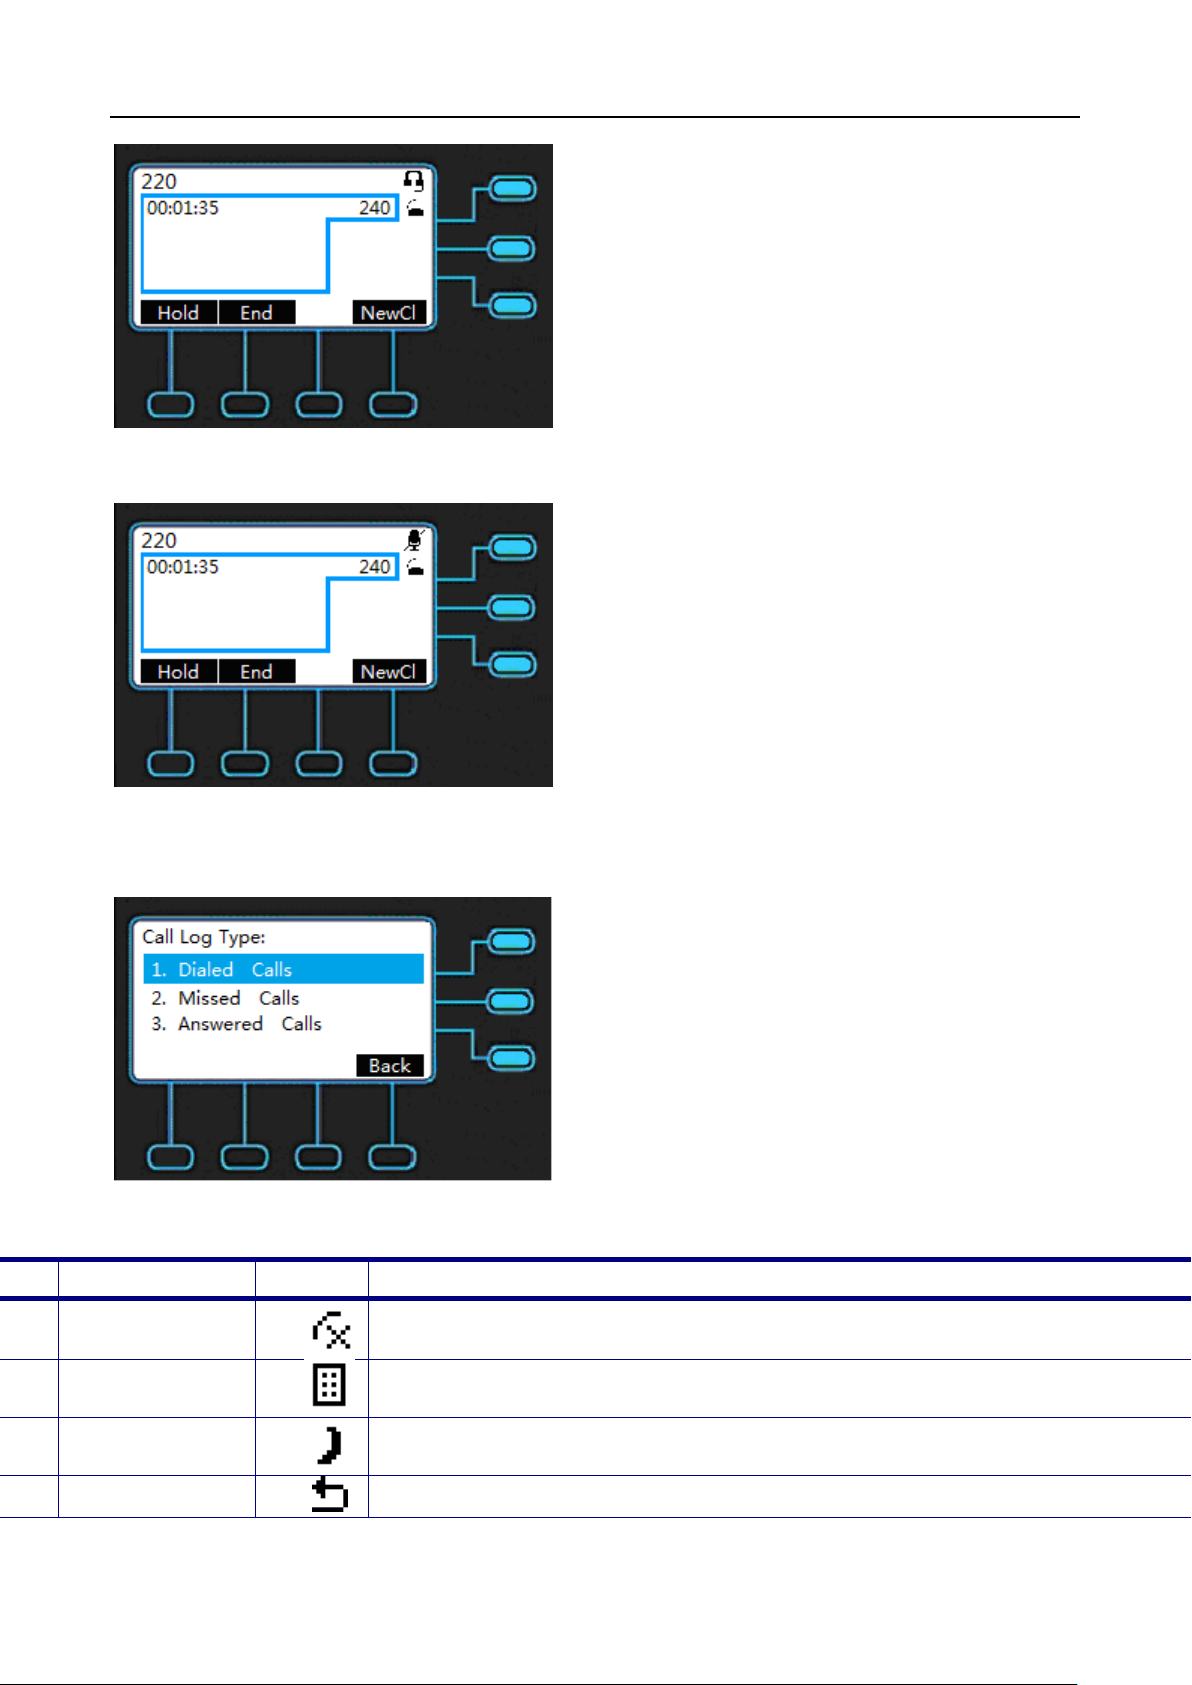
Hold Indication: If the phone is in hold status, the phone will show “Hold” as below on
LCD.
20
Page 21
M22 USER MANUAL
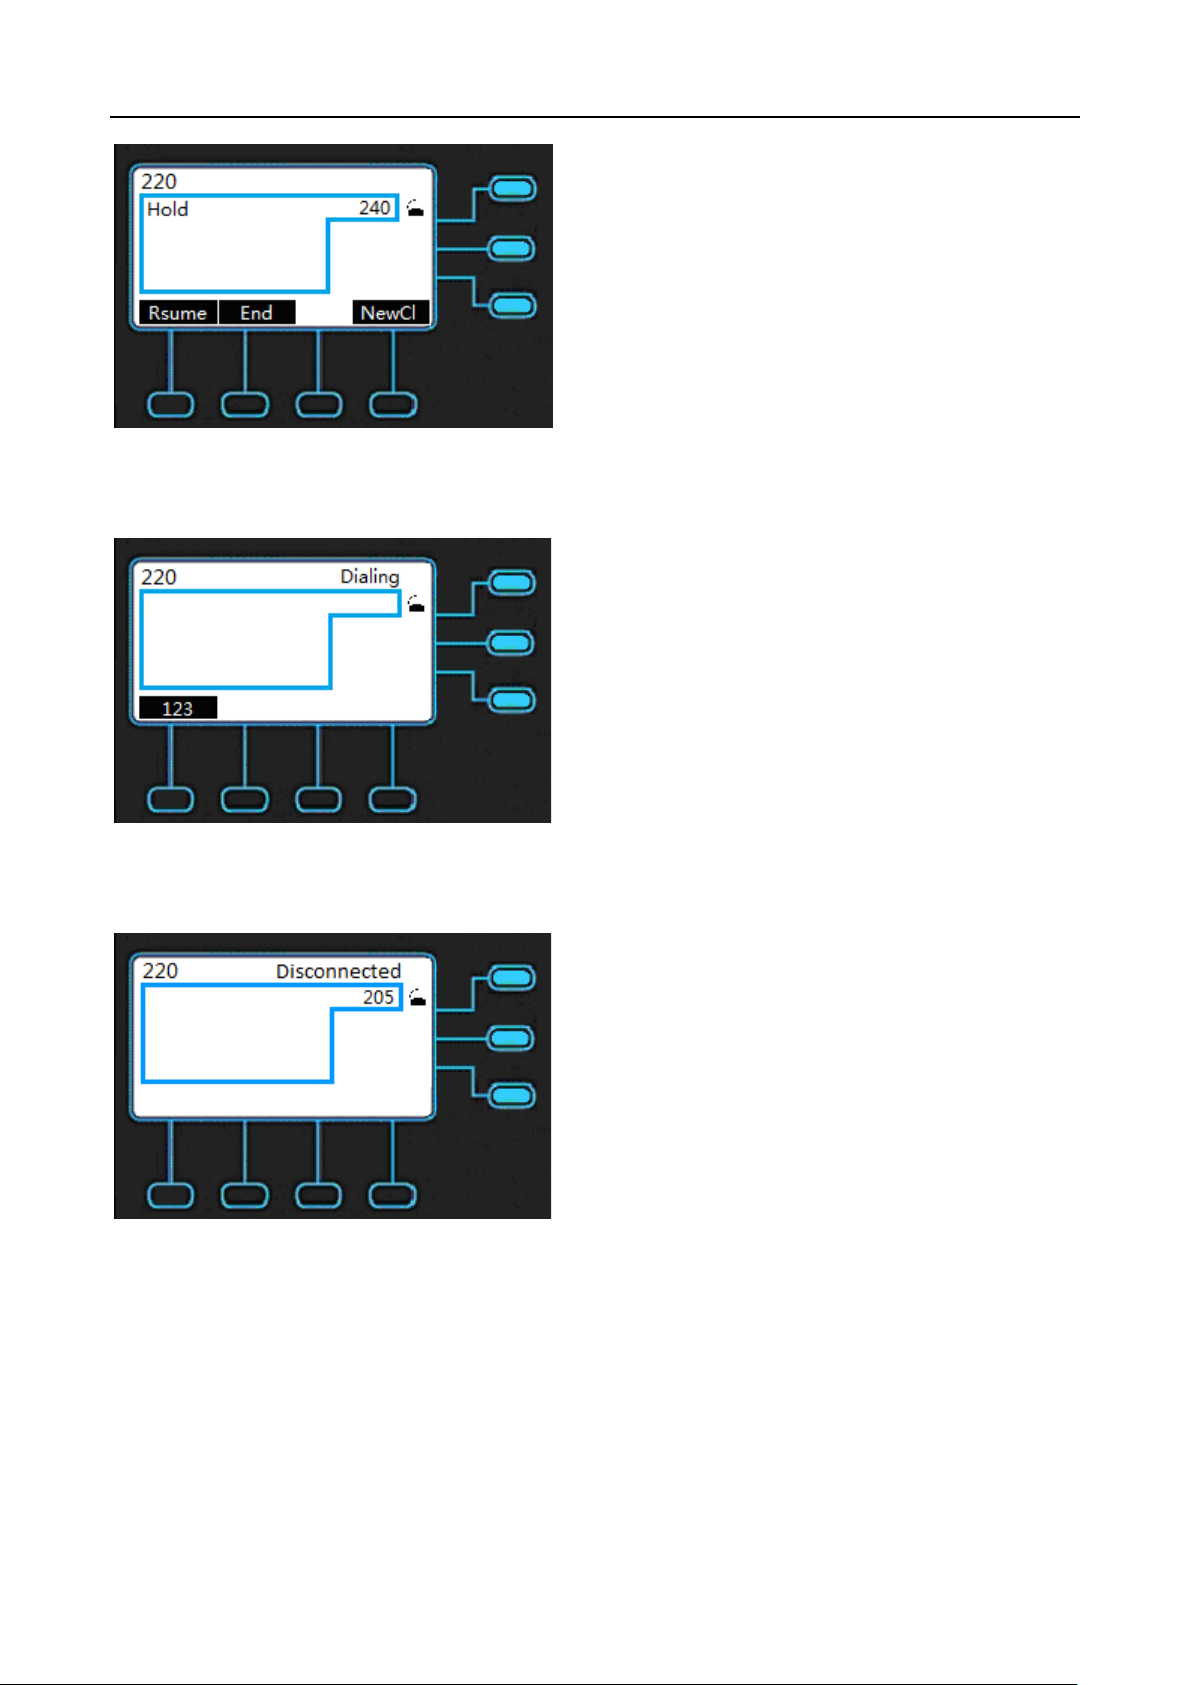
Off Hook Indication: If the phone is in off hook status, the phone will show as below on
LCD.
Dial Wrong Number Indication: If the phone dial wrong number, the phone will show as
below on LCD.
Headset Indication: If the phone is using headset device, the phone will show as below on
LCD.
21
Page 22
M22 USER MANUAL
No
Name
Icon
Description of function
4
Always call forward feature is enabled.
Mute Indication: If the phone is in mute status, the phone will show as below on LCD.
1
Call Log Indication: If using navigation key and pressing Navigation Up, the Call Log
Type will show as below on LCD.
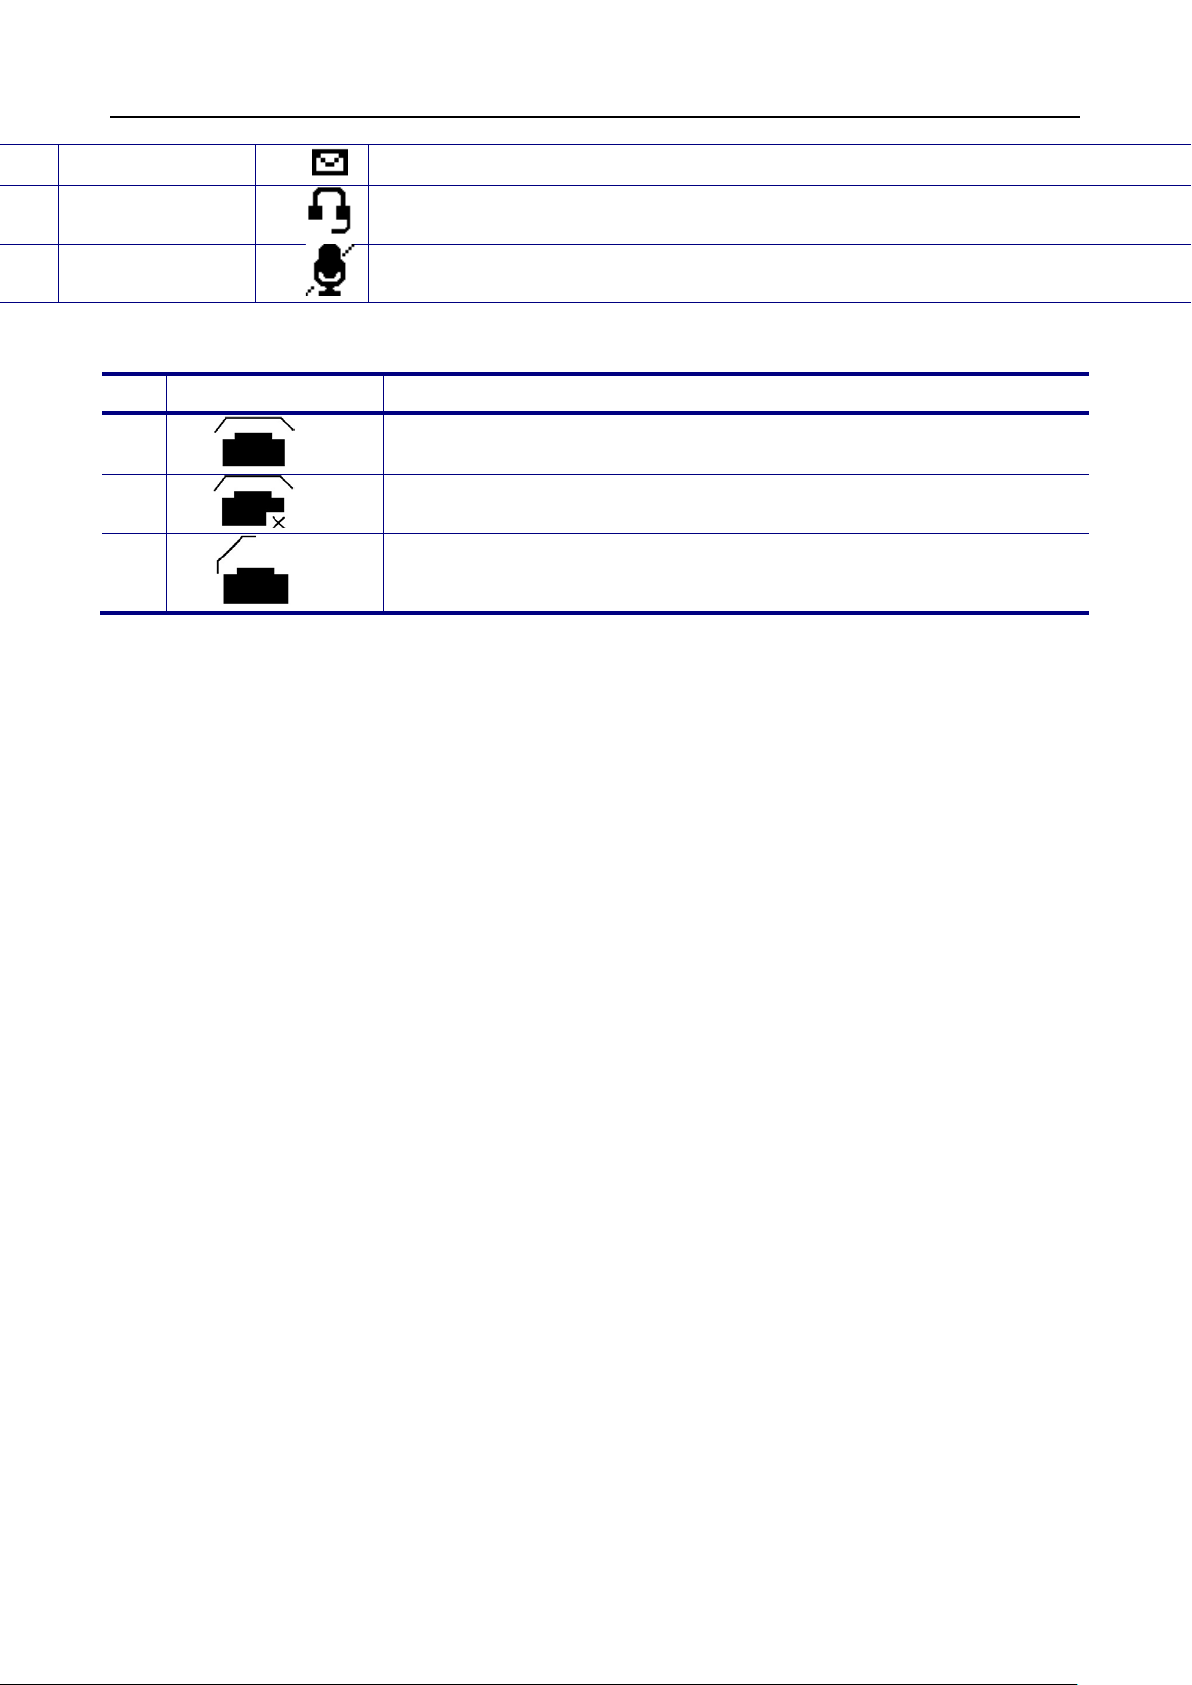
Icons Indication:
DND
DND feature is enabled.
2
3
EDM
Night Mode
Call Forward
There’s EDM device plug in.
Current service mode is night mode.
22
Page 23
M22 USER MANUAL
5
There’s unread voicemail message from server.
No
Line Status Icon
Description of function
Voicemail
6
7
Headset
Mute
Line Status Indication:
1
2
3
Current call is using headset device.
Current call is in mute.
The line is registered to the SIP server or service.
The line is not registered to the SIP server or service.
The line is registered to the SIP server or service and is in use.
23
Page 24
M22 USER MANUAL
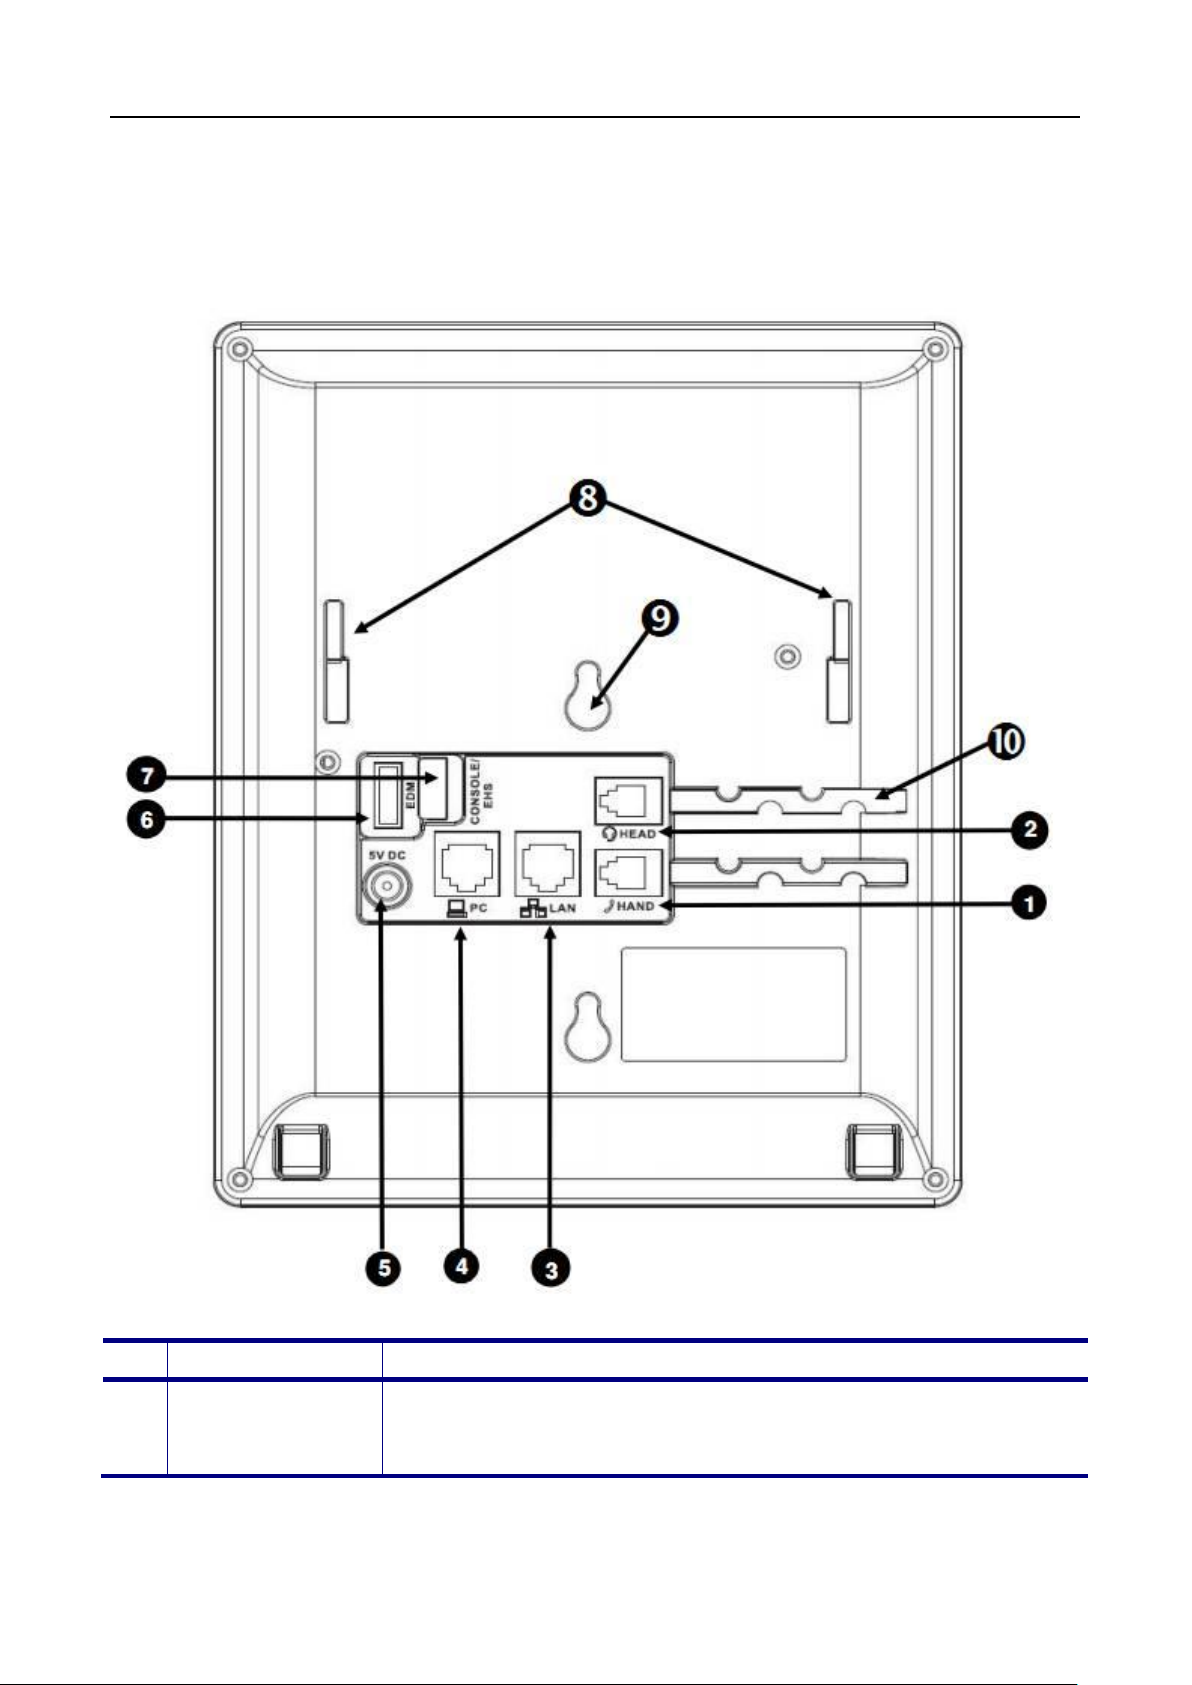
No
Part Name
Description of function
RJ-9 Jack for connecting handset cord.
The Connectors of the M22
Their locations are shown in the figure below:
The back side view and the connectors of the M22 are as follows:
1
Handset
Connector
24
Page 25

M22 USER MANUAL
RJ-9 Jack for connecting headset cord.
RJ-45 Jack 100/10Mbps Ethernet port for connecting to the
Ethernet (PoE) if the LAN switch provides it.
RJ-45 Jack 100/10Mbps Ethernet port for connecting to a
If a power source from adaptor is required, please order the
SATA interface for attaching the Extended Dial (EDM)
information.
1. Console port for engineering maintaince purpose. or
will be done by software.
These 2 slots are used for snapping the stand.
These 2 holes are reserved for wall-mount support
The wires of Handset and Headset can be routed and run in the
2
3
4
5
6
7
Headset
Connector
LAN Port
PC Port
Power Jack
EDM Port
Console/EHS
Port
local area network (LAN). This port can support power over
computer.
M22 power adapter separately from MOCET.
accessory. Up to two EDM units can be supported on the M22.
Please refer to EDM Quick Installation Guide for more
2. EHS Port (Electrical Hook Switch) con ne c ts to IP-EHS for
Wireless Headset support. This can be connected to
general DHSG I/F(eg. Jabra) or APD-80 I/F of Plantronics. The
default is set to EHS. And switching between Console and EHS
8
9
10
Stand Slots
Hang Holes
Wire Route
Ditch
ditches.
25
Page 26

M22 USER MANUAL
General Operations
Introduction
To operate the M22, you need to know some conventions that we will mention in this
manual. In the following descriptions, we will introduce some terminologies for your
understanding.
Calls
A “Call” in this guide represents how many simultaneous connecti ons can be made to a
single phone number. M22 has only one line based on IG server, which can support up to
four calls simultaneously. This allows the user to place one caller on hold and talk to the
other person in another call on the same Line. Therefore, the M22 phone is said to support
multiple call appearances.
Register to IG7600
The M22 supports Plug-n-Play function to register and get configured automatically when it
is connected to IG7600’s LAN/WAN port (with same subnet as IG7600). It also supports
manual configuration if it is a remote phone (need to obtain the account information from
system administrator).
Refer to Configuration through Menus or Configuration through Web for detail inform at ion
of how to configure the phone to register to IG7600.
Caller ID & User ID
When you receive a call, the caller's phone number is shown on the screen, if the caller
hasn’t chosen to hide his number and if the network supports the Caller ID feature. The IP
Phone can display both the Caller ID (CLID) and the Caller Name (CNAM) of the caller if it
is available. Not all services and servers support CLID and CNAM. For more information
about this topic, please contact your service provider or system administrator.
Using Multiple Calls
Each line of service in the M22 can support up to four calls simultaneously. It allows you to
place one caller on hold and talk to the other person in another call on the same line.
26
Page 27
M22 USER MANUAL
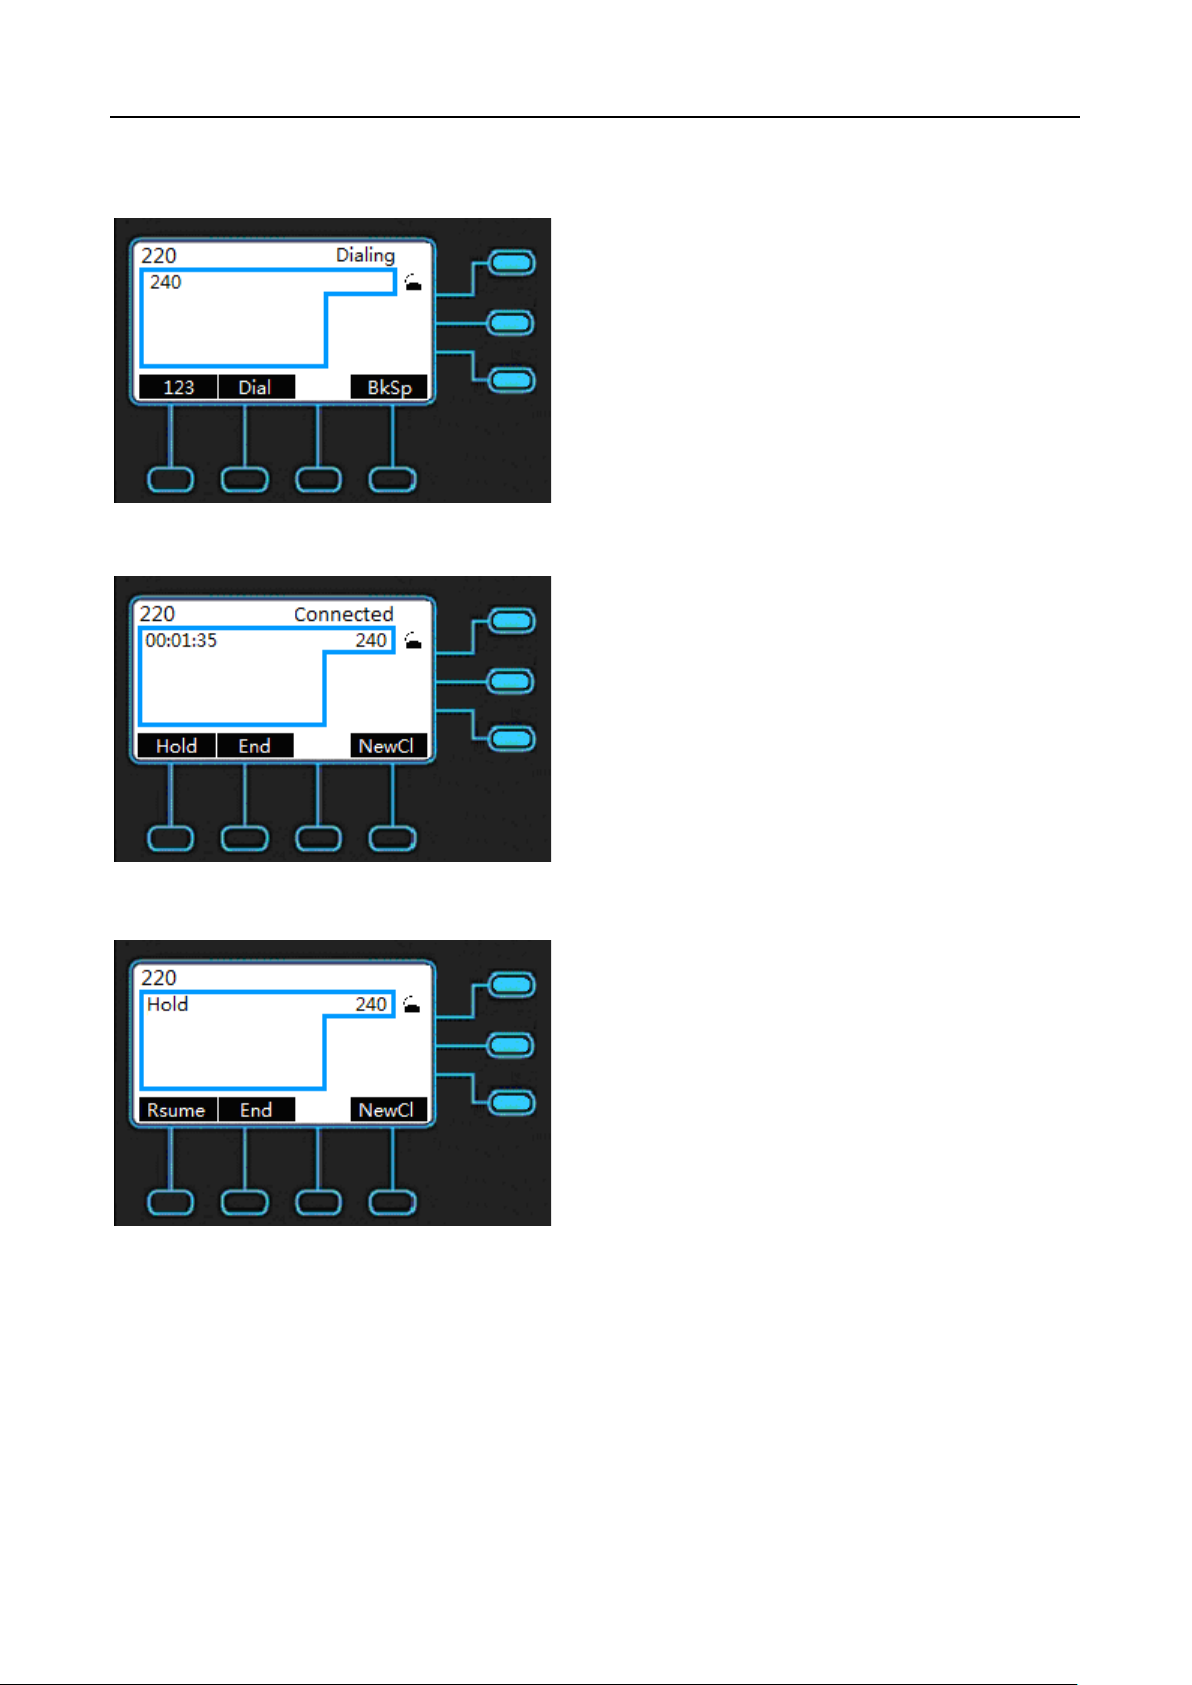
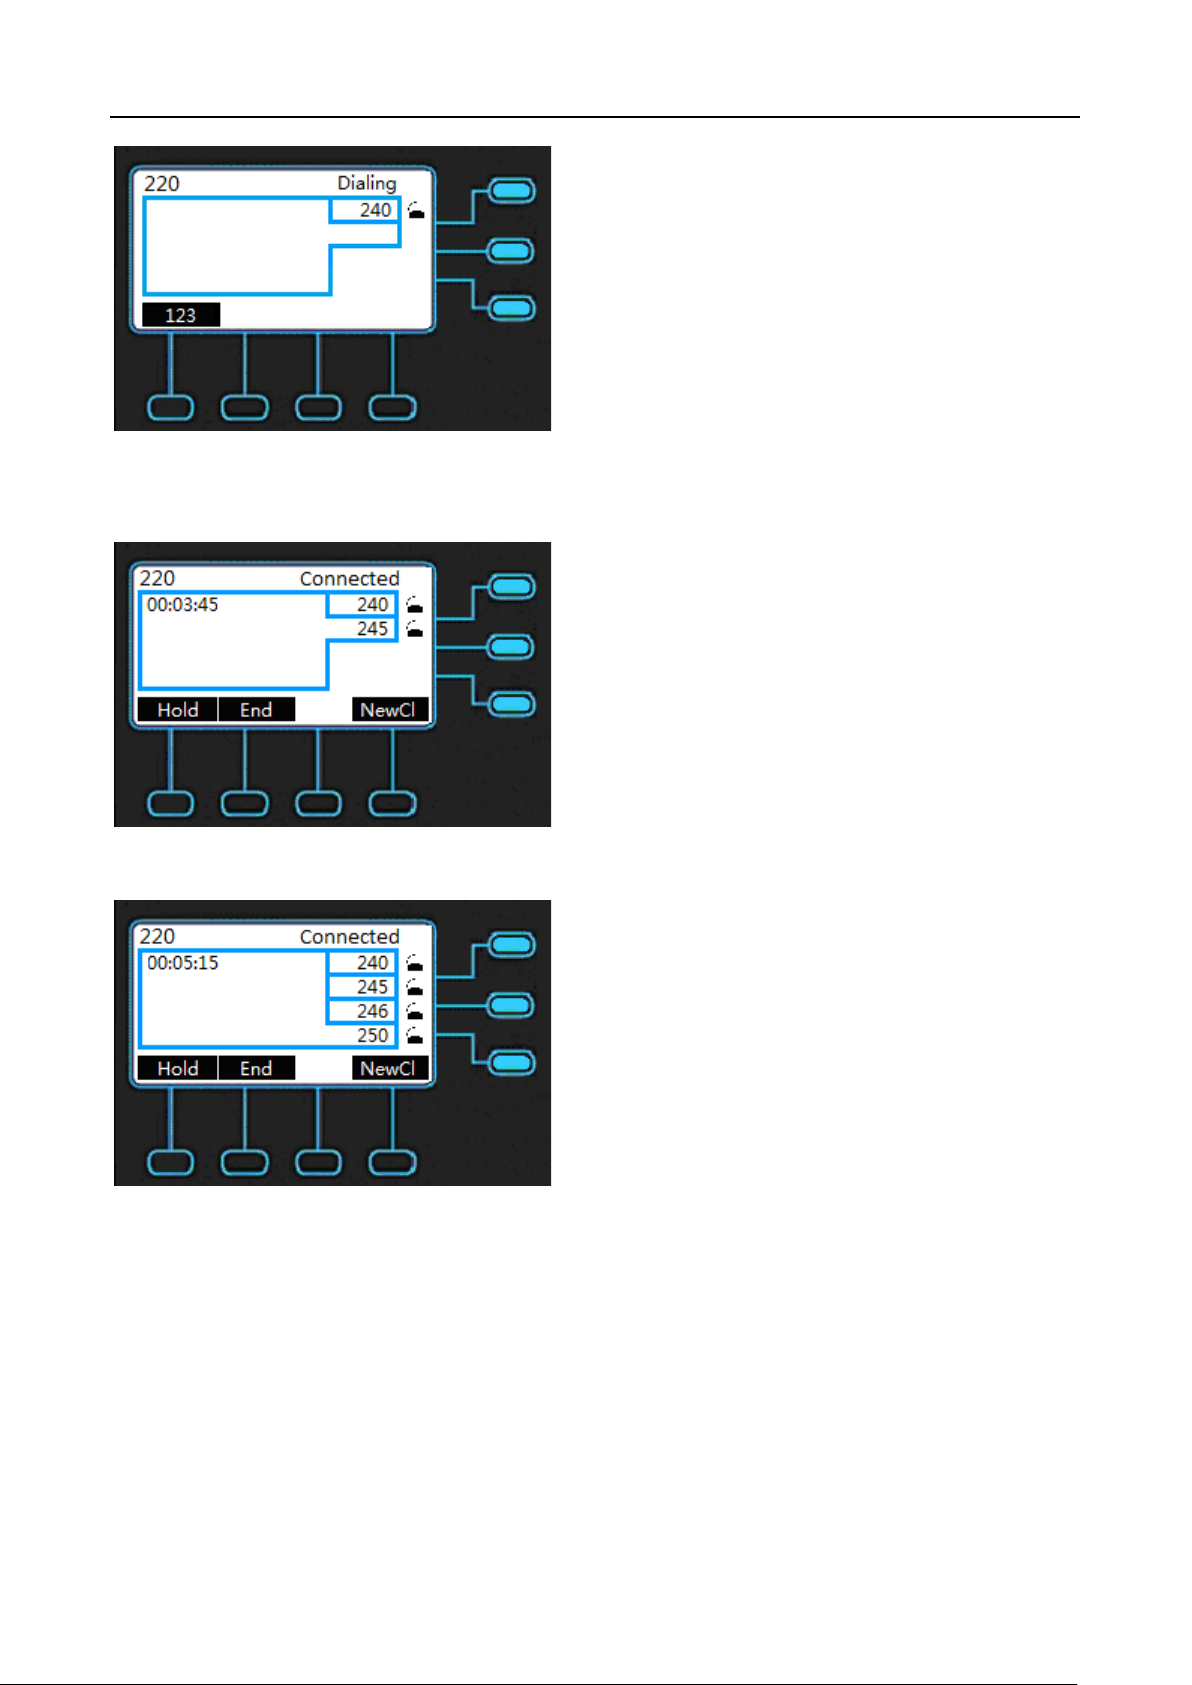
For example, the following screen shows you line 220 has one active call with number 240.
When you dial the number 240, the number you dial will show on the LCD.
When the call party answers the call, the LCD will show as below.
Press the Hold key to keep this call.
You can make a new call on the same line by pressing NewCl.
27
Page 28
M22 USER MANUAL
After the called party answers the call, the following screen shows you line has two calls,
the call to number 240 is on hold, and the call to number 245 is active.
By the steps as above, you can use one line to make 4 calls simultaneously.
28
Page 29
M22 USER MANUAL
Operation
Description
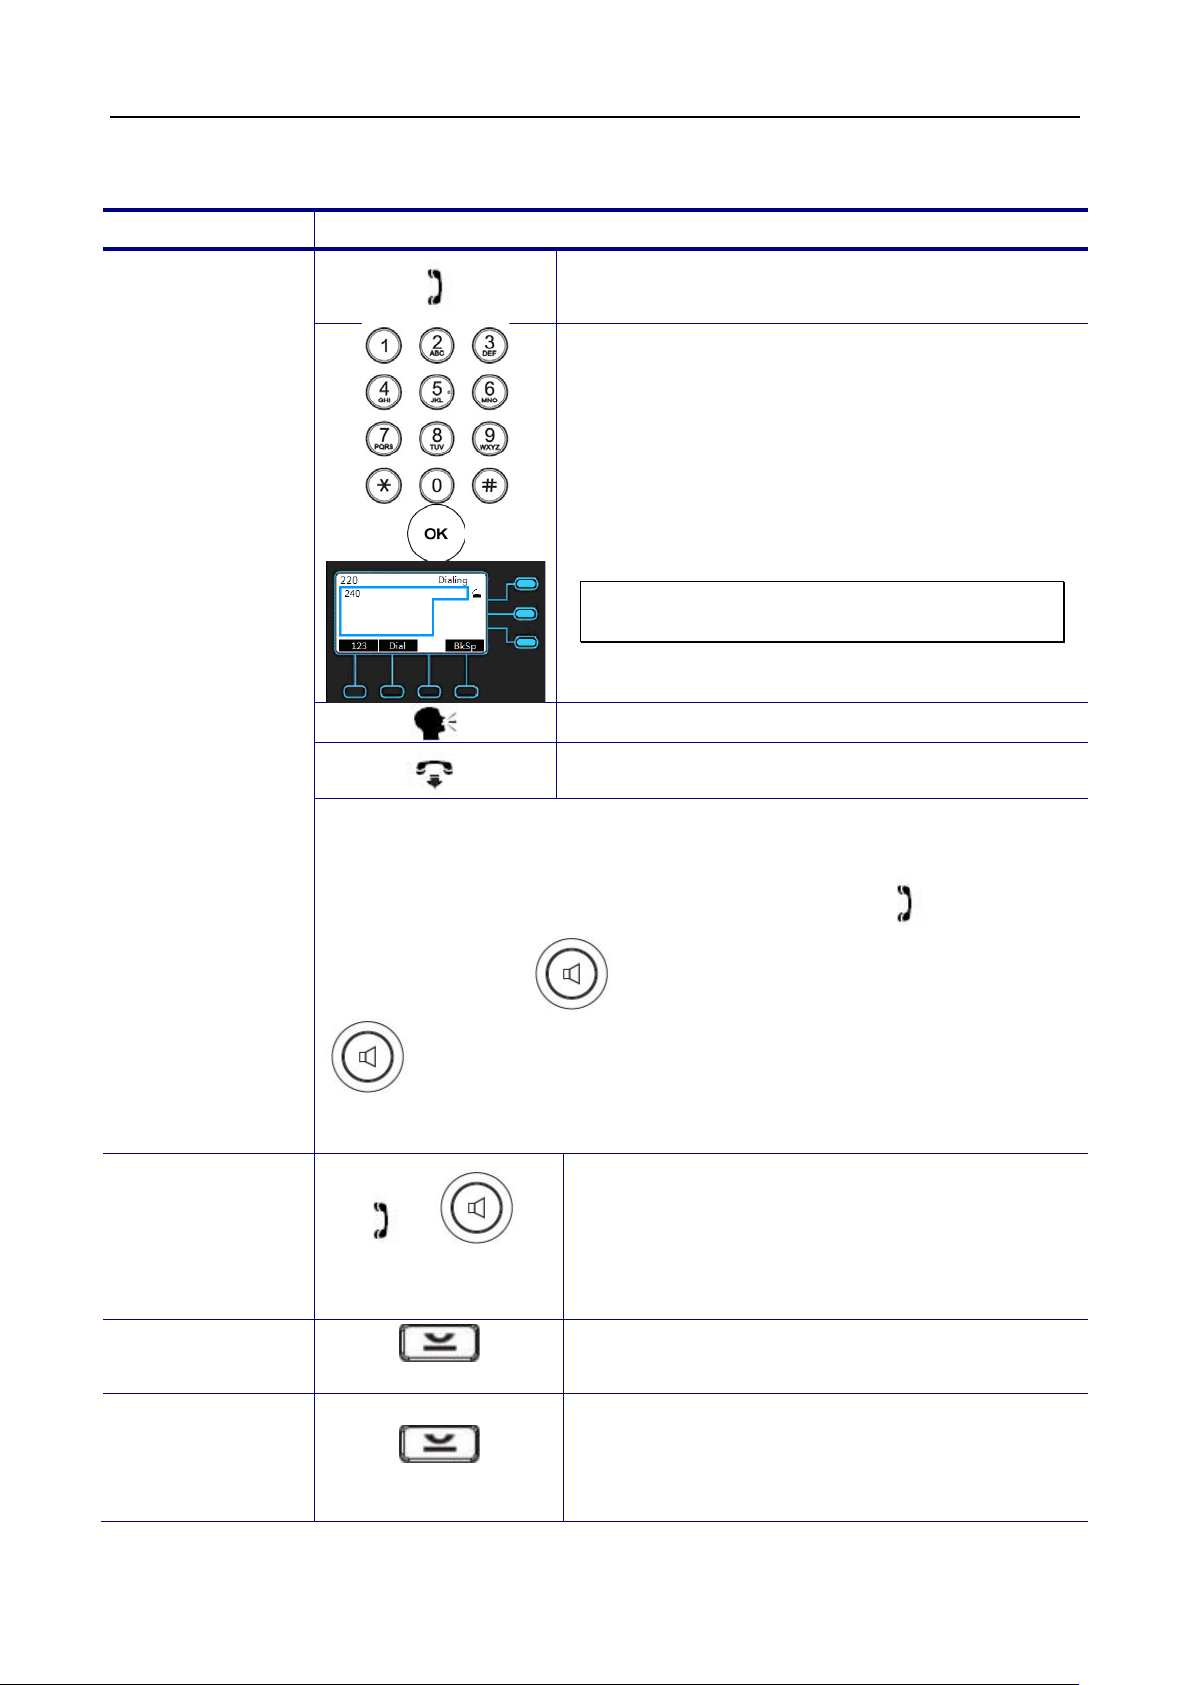
handset. You will hear dial
Use the keypad to dial the phone
On-hook the handset when your
conversation is over.
If there is only one call, just place the
handset back into the cradle, press
If there is another call, press the “End”
soft-key to end the call.
key on the
Basic Call Features
1. Pick-up the
tone played.
2.
number. Press OK key or “Dial” soft-key
to dial out immediately, or wait for a while
(Dial Timeout setting) for auto-ending the
dial.
The LCD window displays the number you
enter.
Note: You could use the “BkSp” soft-key to
delete the last digit.
Making a Call
Ending a call
Start talking to called party.
There are two mode to establish a call for this IP phone, handset mode
and hands-free mode. In this manual, only handset mode is used for
example. In the following features, you can replace to hands-free
mode by pressing key. When the conversation is over, press
key again to release call. For headset mode, please prepare a
headset first.
or
or End
speakerphone or press “End” soft-key to
end the call.
Holding a call
Resuming a call
or Hold
or Rsume
Press the “Hold” soft-key or Hold
phone to place an active call on hold.
Press the “Rsume” soft-key or Hold key on the
phone again to place an active call on hold.
29
Page 30
Receiving a Call
On-hook the handset when your
conversation is over.
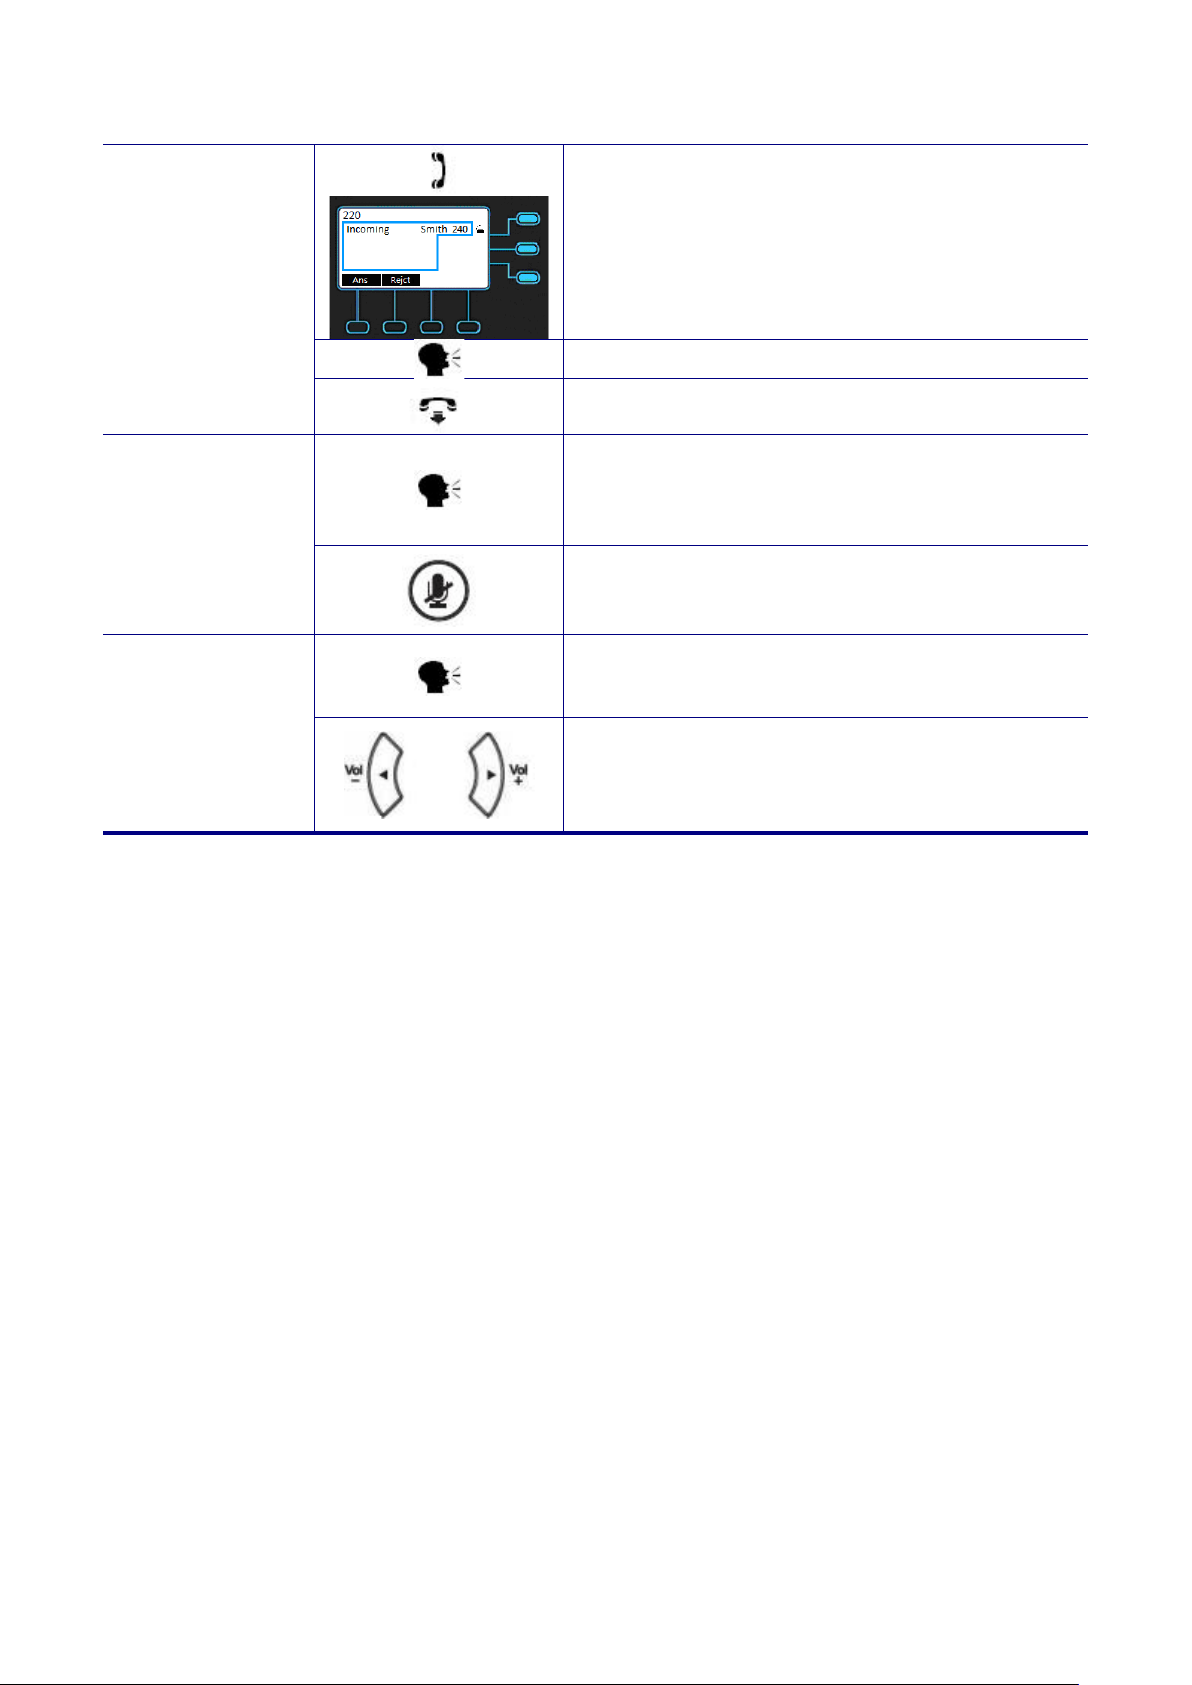
1. While being engaged in a conversation
ophone by
pressing the MUTE key.
1. During a conversation, if the voice
adjust it.
Press the volume control key to adjust
Mute the
Microphone
1. Pick-up the handset while hearing
phone’s ringing.
Start talking to caller party.
(handset, headset, or hands-free mode),
you could mute the micr
2. The mute icon wi ll show on LCD. At this
moment, the user may speak freely, the
outside party will not hear anything.
Adjust the Voice
Volume During a
Conversation
volume is too low or too high, you may
2.
the volume
30
Page 31
M22 USER MANUAL
Operation
Description
4. Press the Conference hot key to set up the
Advanced Call Operations
Redialing a
Number
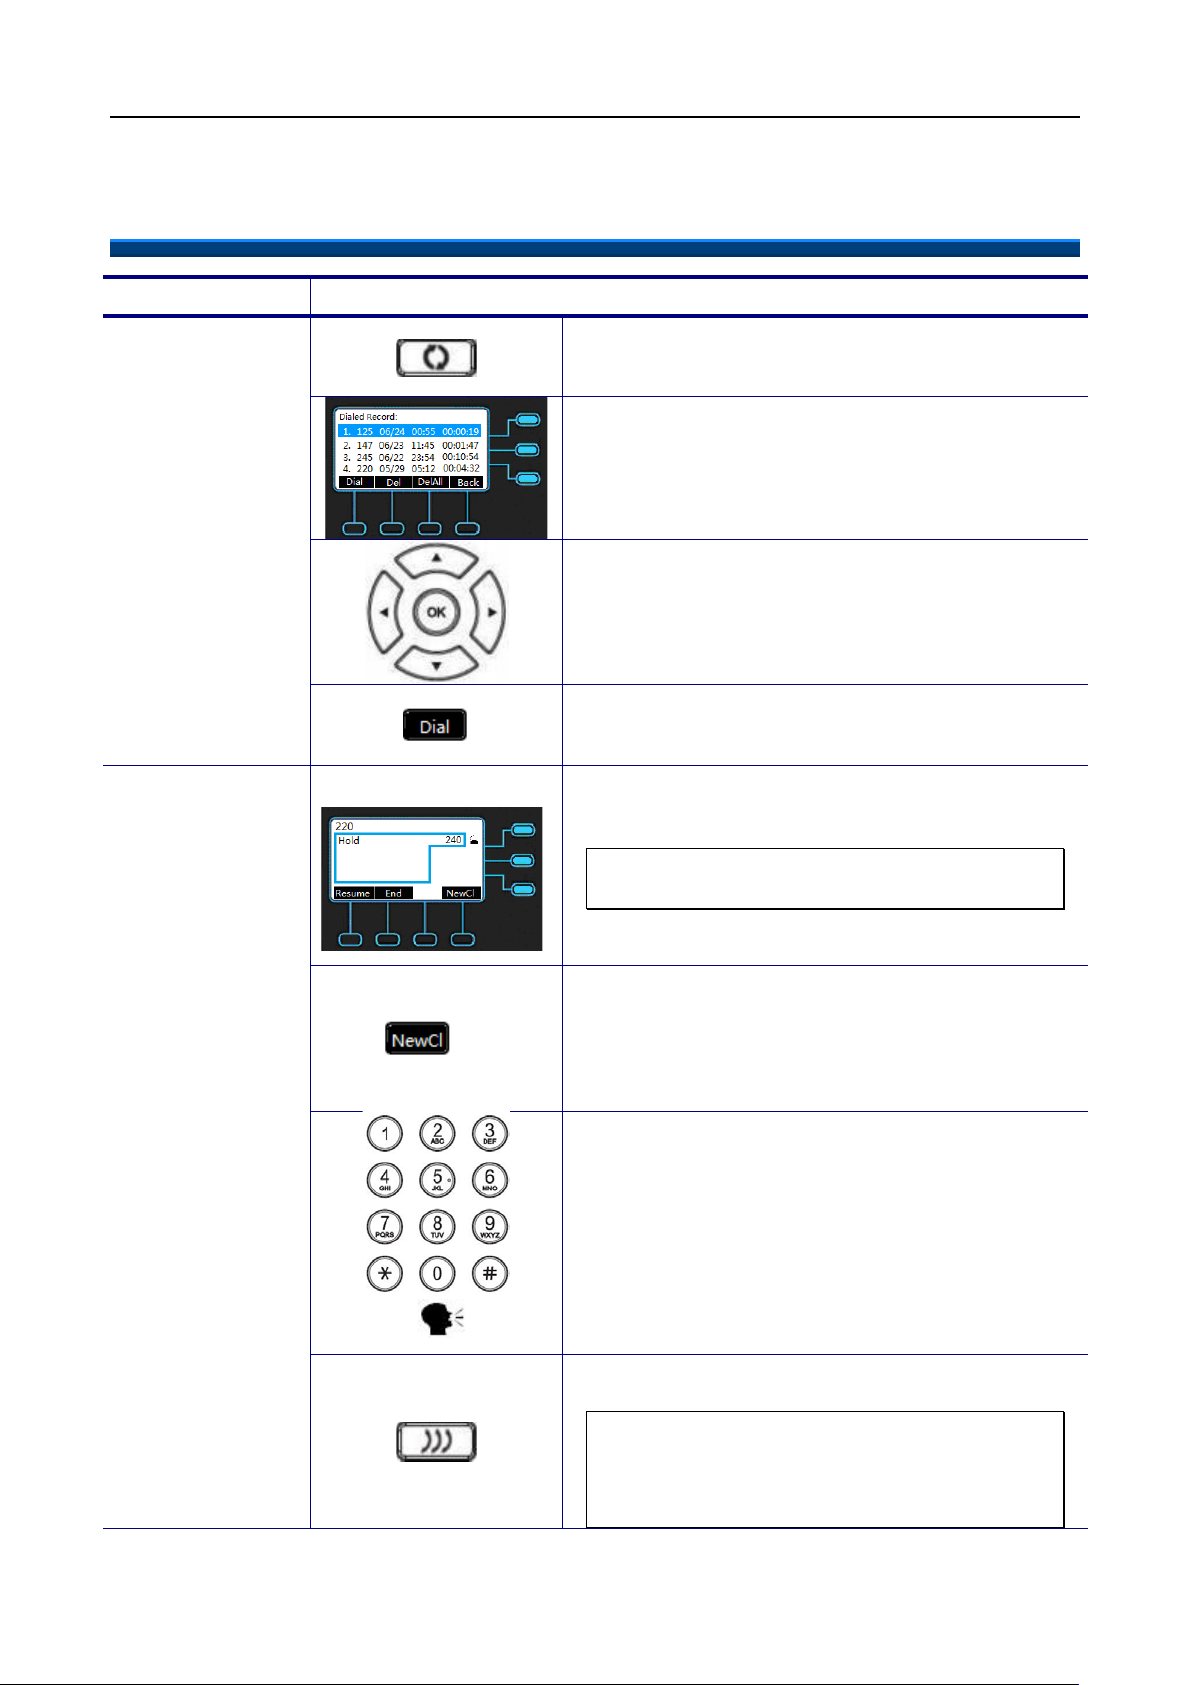
1. Press Redial hot key.
2. Phone will enter “Dialed Record” list.
3. Select the number you want to redial.
4. Press “Dial” soft key on LCD to dial out.
1. Call the first party and Hold the call.
Note: The M22 can support a 5-party
conference call.
3-Way
Conference Call
2. Press “NewCl” soft key
3. Dial the number and call another party.
3-party conference.
Note: If you want to set up a 4-party or a
5-party conference call, repeat Step2 to
dial third or fourth call, and then do Step3
and Step 4.
31
Page 32
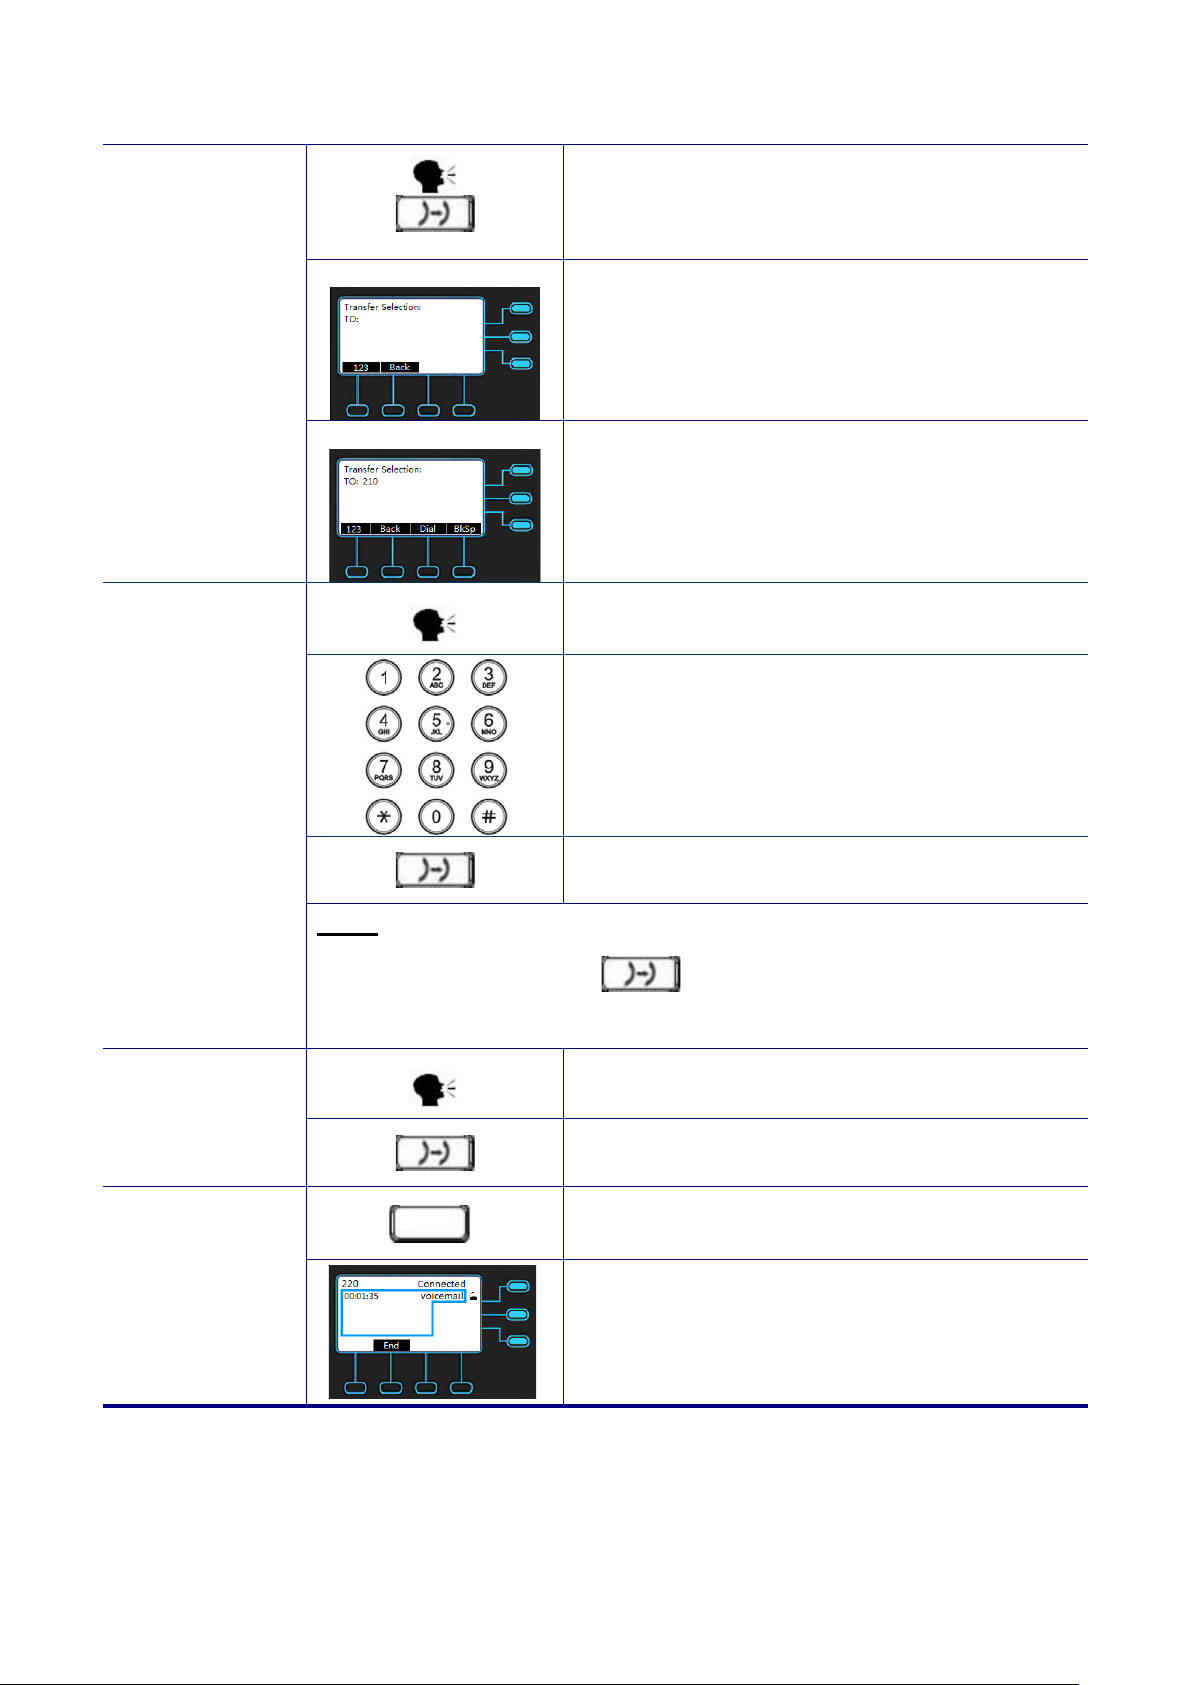
Call Transfer
placed on hold, and an
entry screen is displayed for the number
key to complete the
transfer. If you want to cancel transfer
back tone, press
Input the voicemail password. Follow the
(Blind Transfer)
Call Transfer
(Attended
Transfer)
1. During an active call, press the Transfer hot
key.
2. The active call is
you want to transfer to.
3. Press “Dial” soft-
operation, just press the “Back” soft-key.
1. During an active call, press “NewCl”
soft-key to call another party.
2. Wait for the other party to answer the call.
Call Transfer
(Semi-Attended
Transfer)
Voice Mail
Note: sometimes, you may place more than 2 calls on your phone,
when you press Transfer ( ) hot key, phone will show a call list to
let you select a call to finish the transfer operation.
3. Press the Transfer hot key.
1. During an active call, press “NewCl”
soft-key to call another party
2. When you hear the ring-
the Transfer hot key.
1. Press the Message key.
2.
interactive voice response (IVR) instructions
to retrieve and listen, forward or delete your
messages.
32
Page 33
M22 USER MANUAL
When talk with ODP call, it could not do
these actions below: hold, transfer,
conference, call forward, and make new
the door through ODP. (Note:
ODP Call
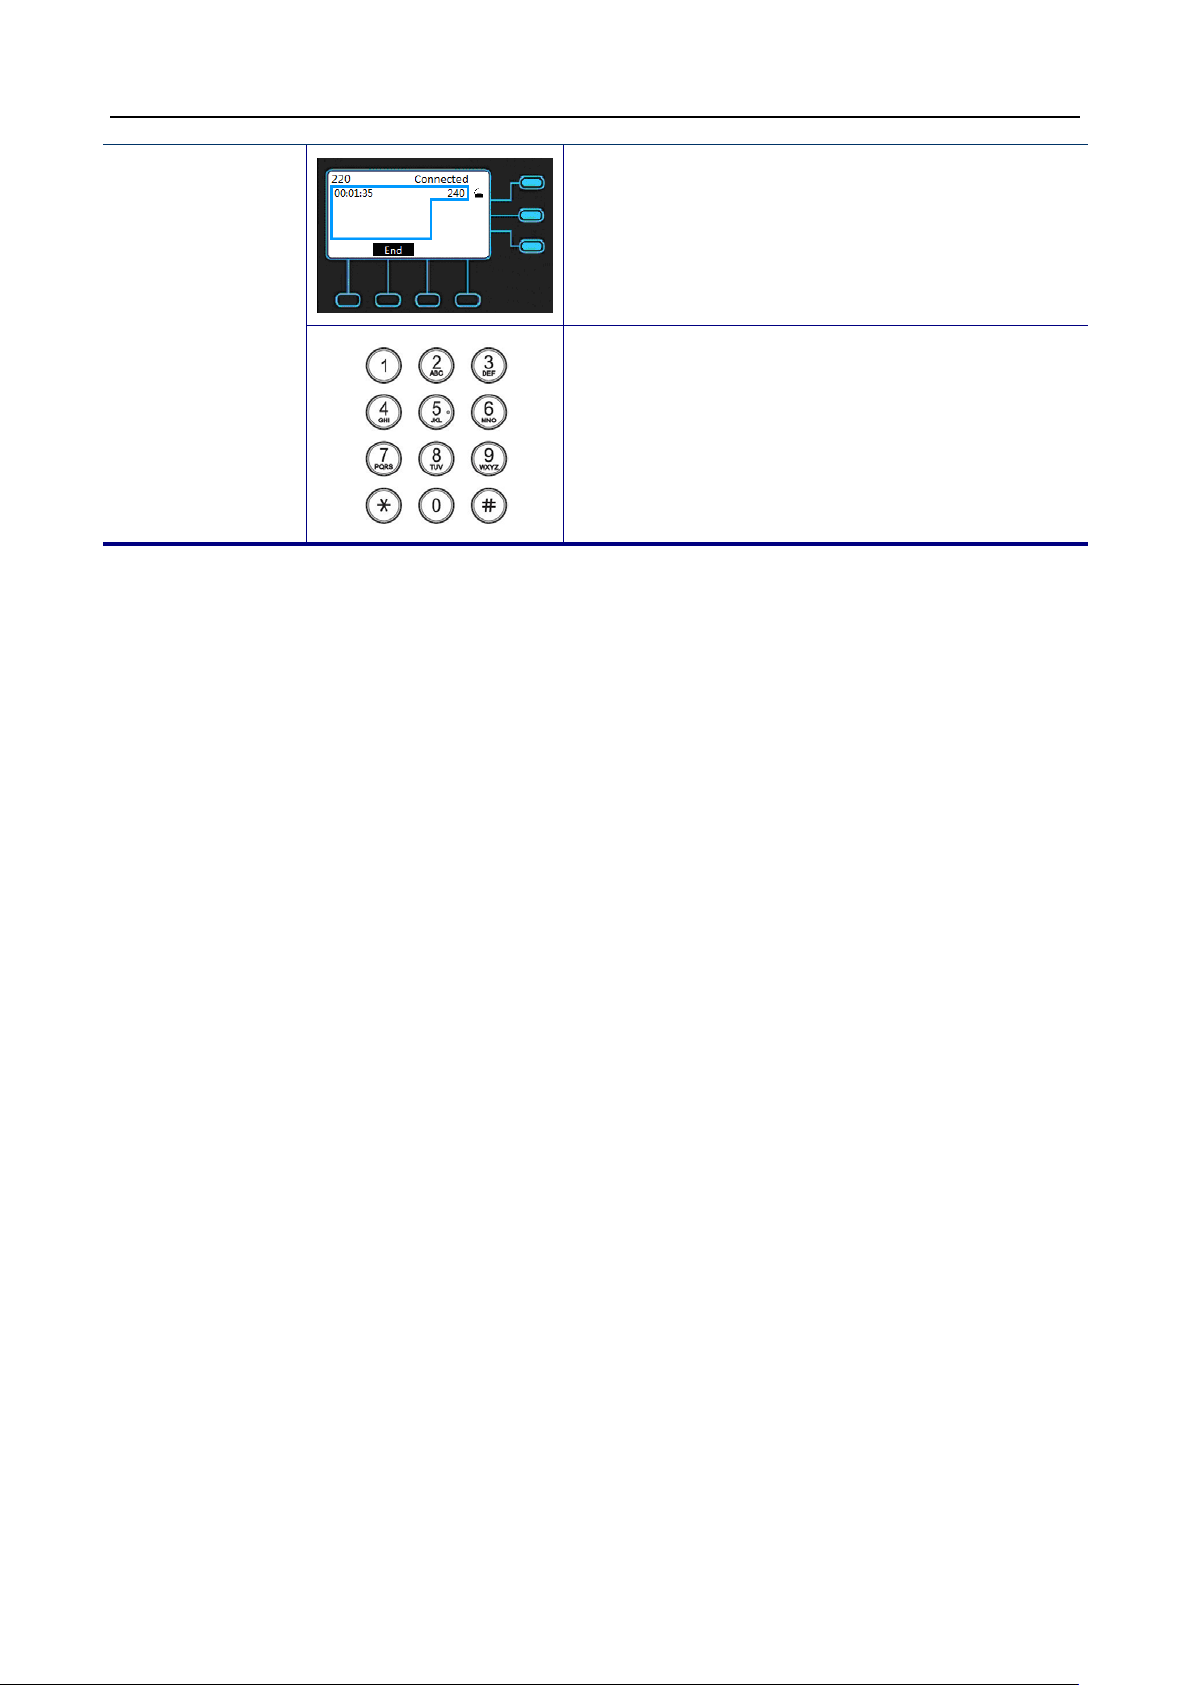
1.
call.
2. Using the keypad to input password as the
format of “##” or “#PASSWORD#”, user can
open
password could not set on feature keys.)
33
Page 34
M22 USER MANUAL
Operation
Description
Phone Setting
Call Log
Dialed Calls
Press the “Del”
Phone Setting
Call Log
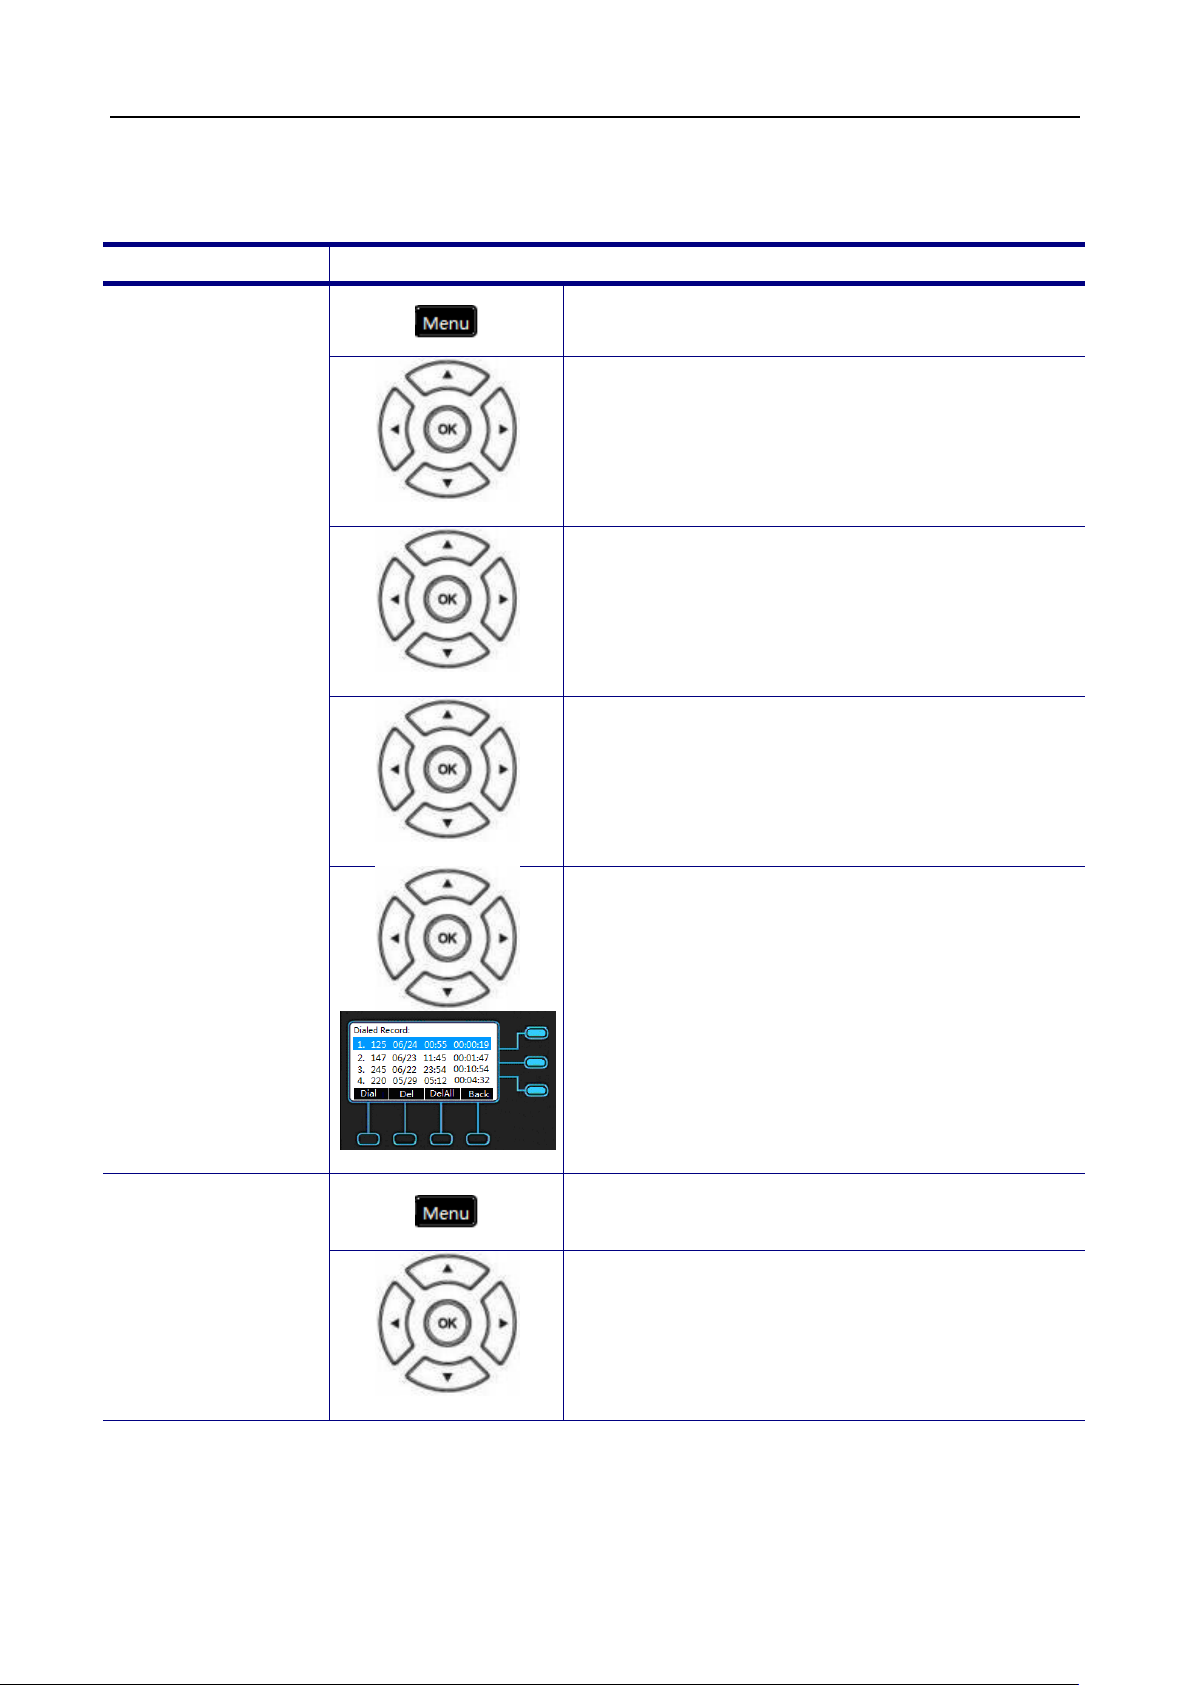
Record the dialed calls, the missed calls and the received calls.
Dialed Calls
1. Press the Menu key on LCD.
2. Use the navigation key to select the Phone
Setting item and press OK key.
3. Use the navigation key to select the Call
Log item and press OK key.
4. Use the navigation key to select the Dialed
Calls item and press OK key.
Missed Calls
5. Use the navigation key to review the dialed
calls. You may choose to redial the number
(using the “Dial” soft-key).
soft-key to delete the selected record. Press
the “Cancel” soft-key to exit the menu.
1. Press the Menu key on LCD.
2. Use the navigation key to select the Phone
Setting item and press OK key.
34
Page 35
M22 USER MANUAL
Call Log
Missed Calls
Press the “Del”
Phone Setting
Call Log
Answered Calls
to select the
3. Use the navigation key to select the Call
Log item and press OK key.
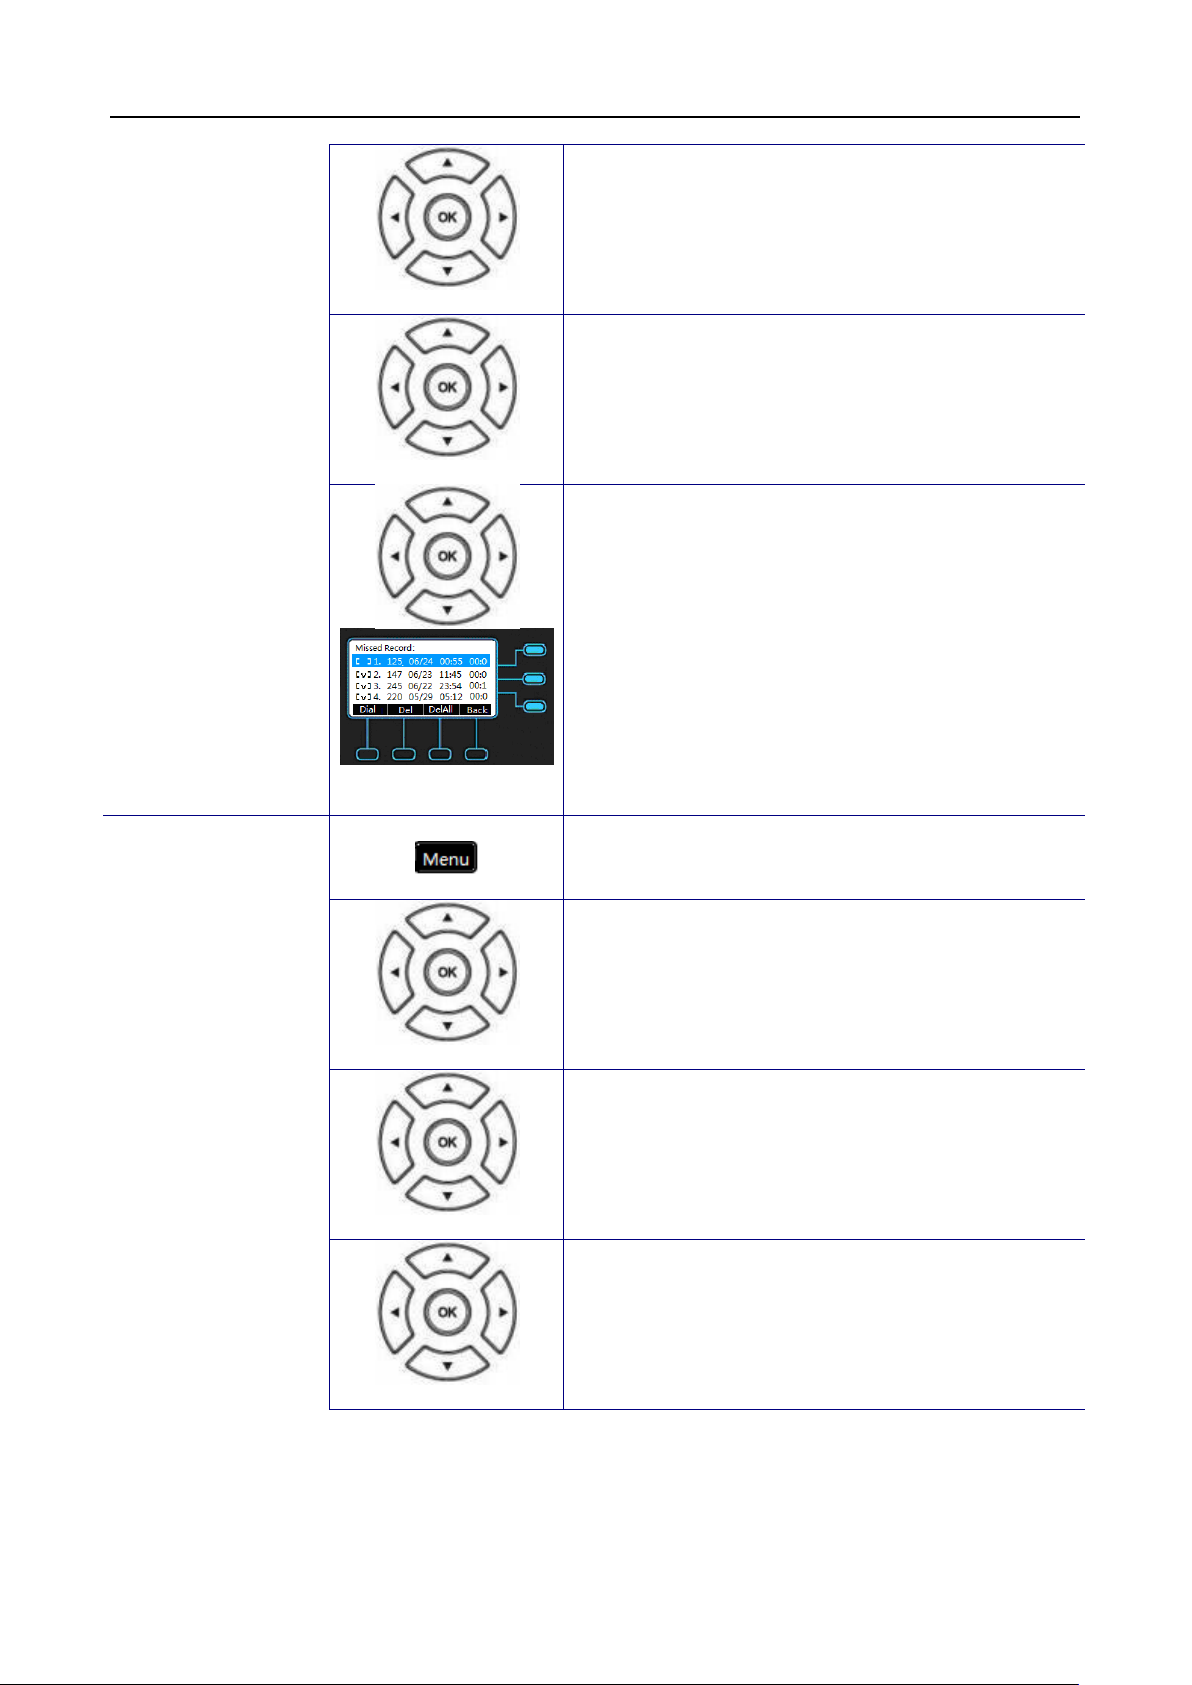
4. Use the navigation key to select the Missed
Calls item and press OK key.
5. Use the navigation key to review the missed
Answered Calls
calls. You may choose to redial the number
(using the “Dial” soft-key).
soft-key to delete the selected record. Press
the “Cancel” soft-key to exit the menu.
1. Press the Menu key on LCD.
2. Use the navigation key to select the Phone
Setting item and press OK key.
3. Use the navigation key to select the Call
Log item and press OK key.
4. Use the navigation key
Answered Calls item and press OK key.
35
Page 36

M22 USER MANUAL
se the navigation key to review the
ed calls. You may choose to redial
to delete the
5. U
answer
the number (using the “Dial” soft-key).
Press the “Del” soft-key
selected record. Press the “Cancel” soft-key
to exit the menu.
36
Page 37
M22 USER MANUAL
Operation
Description
Phone Setting
Call Setting
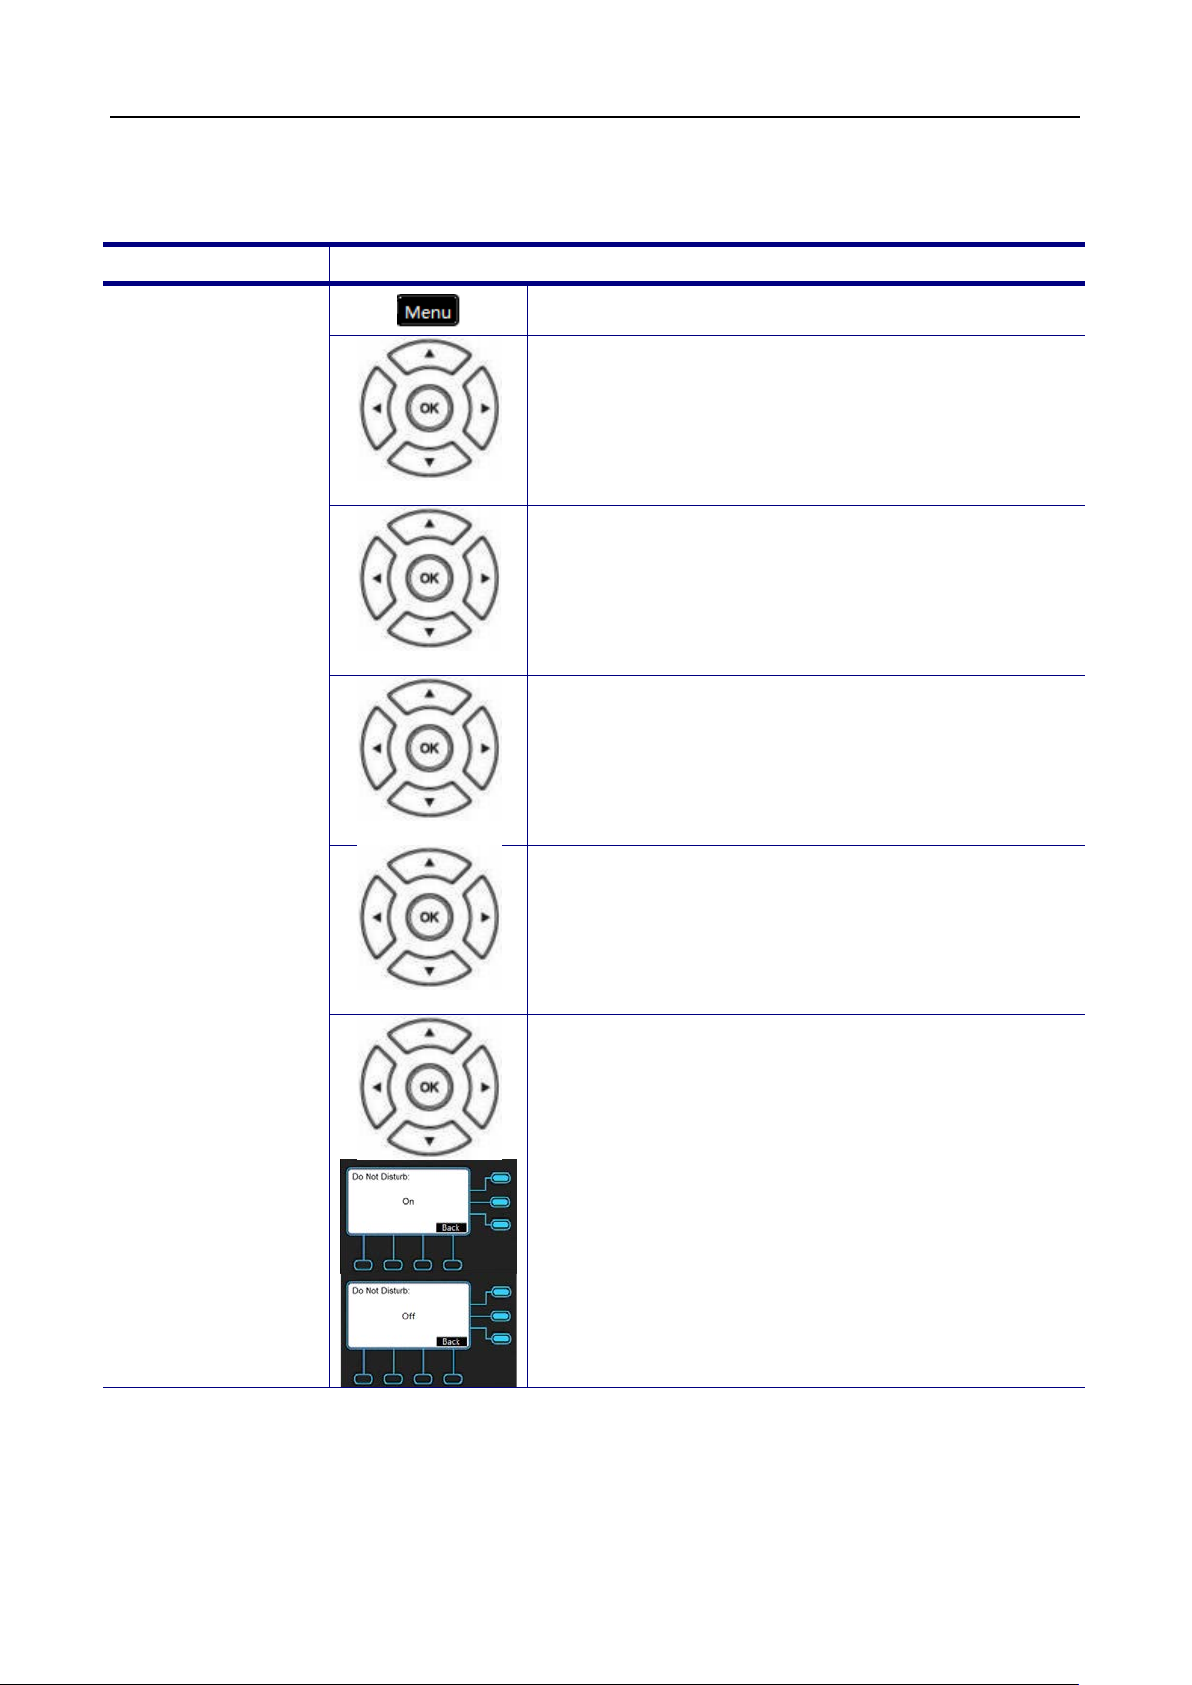
DND Setting
DND
item and
and press OK key to
Call Setting
The specific ring type assigned to the M22 when the M22 rings.
1. Press the Menu key on LCD.
2. Use the navigation key to select the Phone
Setting item and press OK key.
3. Use the navigation key to select the Call
Setting item and press OK key.
DND Setting
4. Use the navigation key to select the DND
Setting item and press OK key.
5. Go to previous menu, choose DND
press OK key.
6. Use the navigation key to choose to turn On or
Off the DND feature
validate. Press the Back key to exit the menu.
37
Page 38
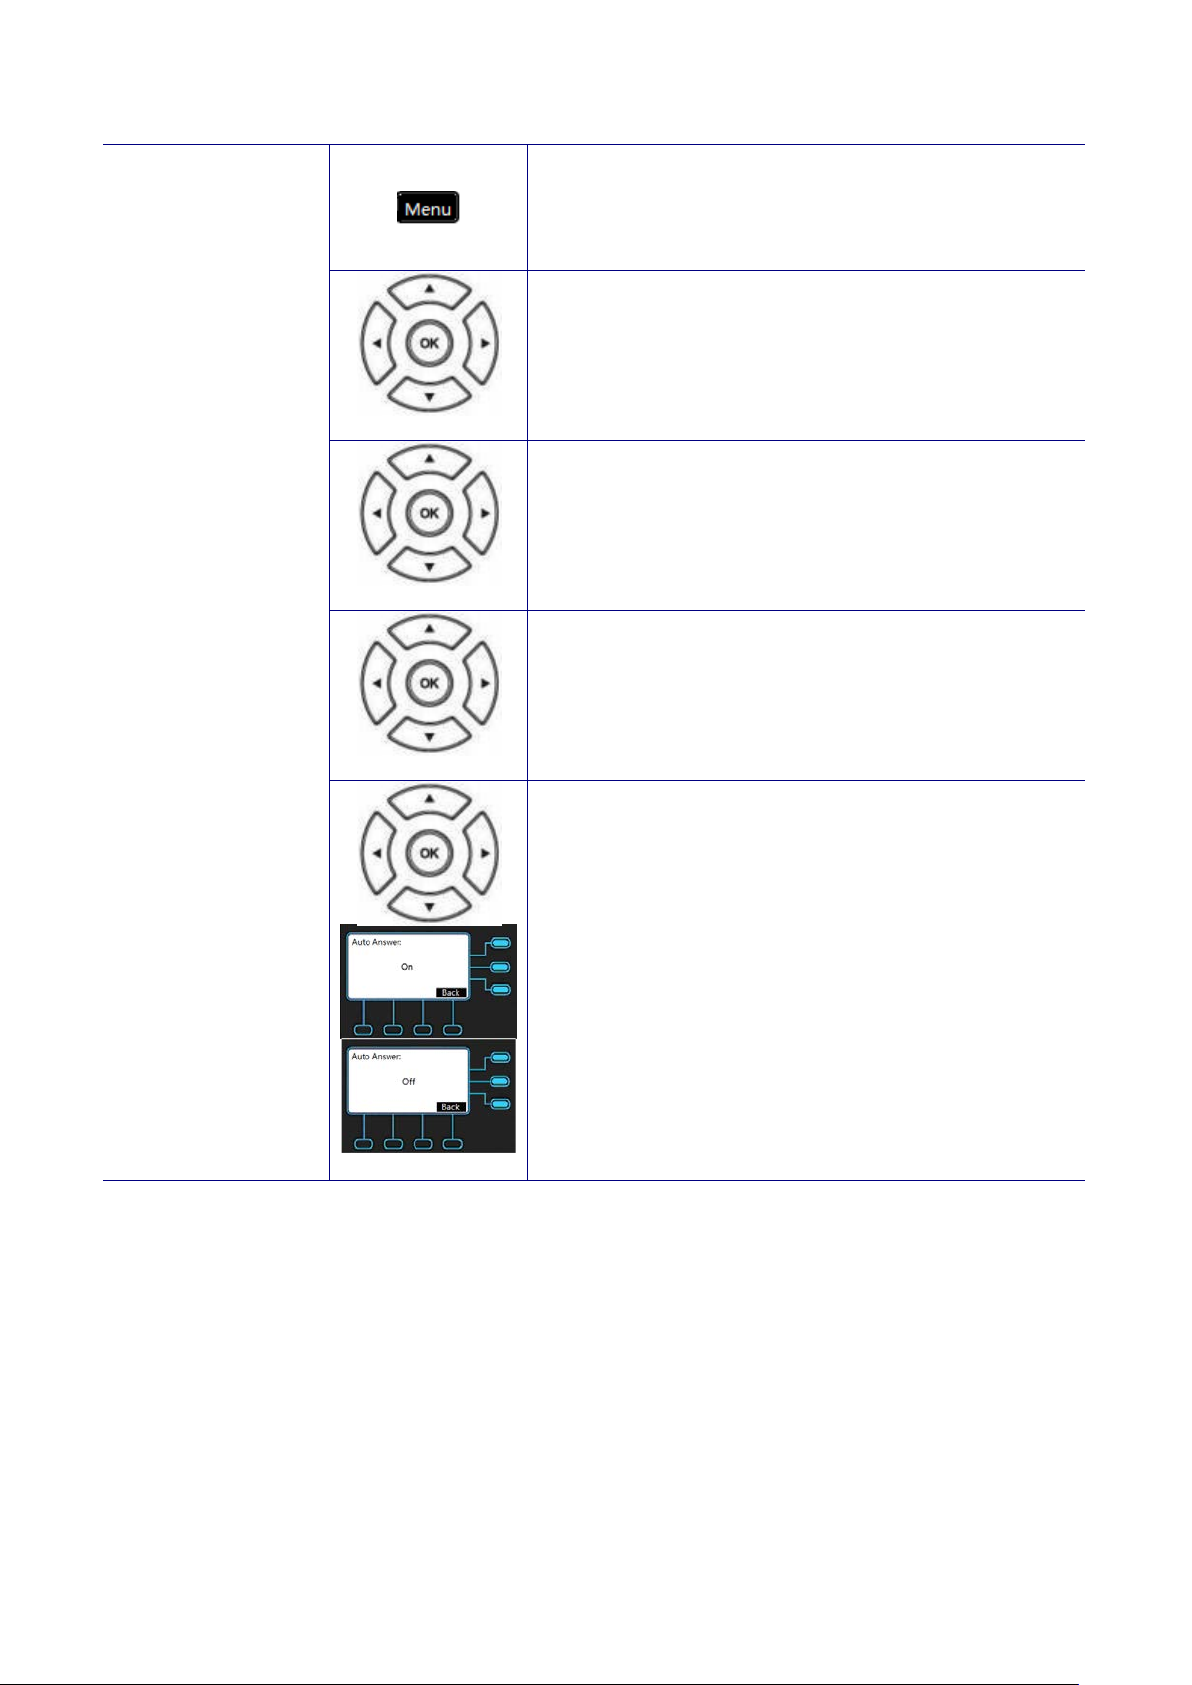
Phone Setting
Call Setting
Auto Answer
Press the
1. Press the Menu key on LCD.
2. Use the navigation key to select the Phone
Setting item and press OK key.
3. Use the navigation key to select the Call
Setting item and press OK key.
Auto Answer
4. Use the navigation key to select the Auto
Setting item and press OK key.
5. Use the navigation key to choose to turn On or
Off and press OK key to validate.
Back key to exit the menu.
38
Page 39
M22 USER MANUAL
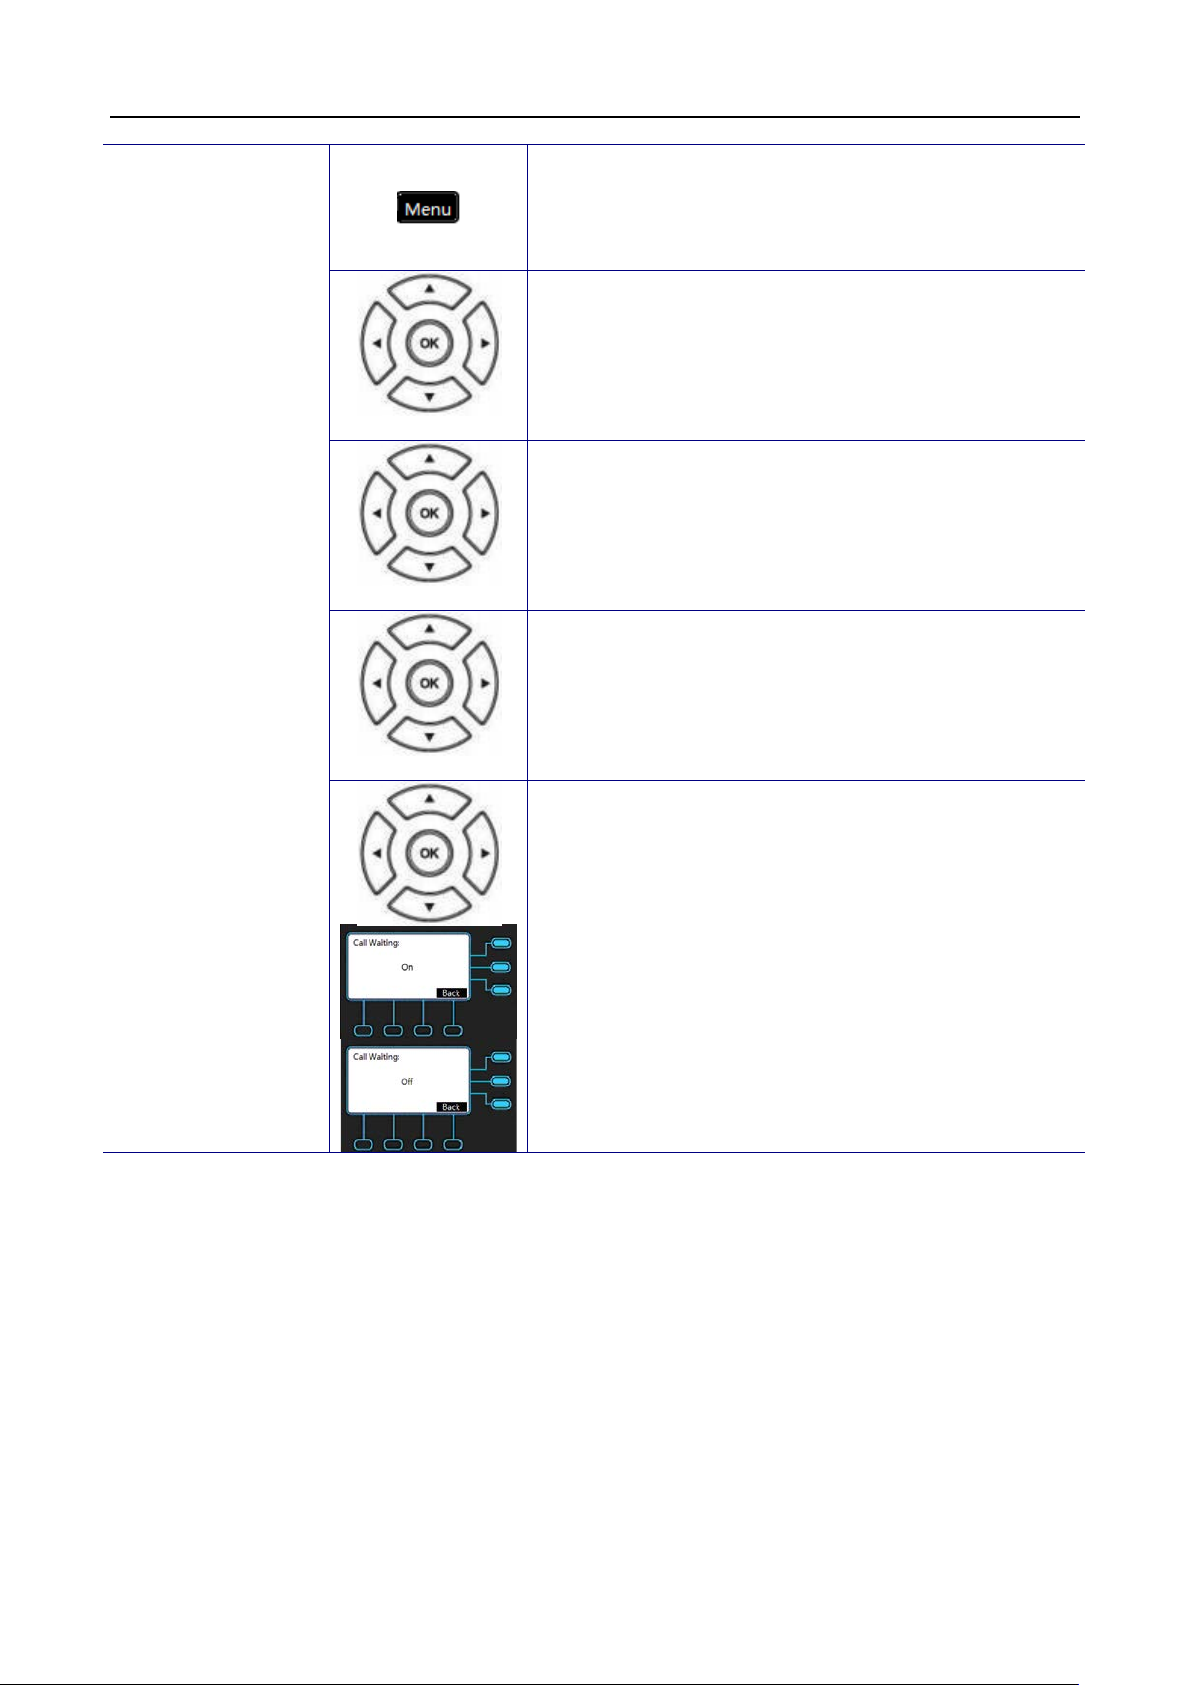
Phone Setting
Call Setting
Call Waiting
Press the
Call Waiting
1. Press the Menu key on LCD.
2. Use the navigation key to select the Phone
Setting item and press OK key.
3. Use the navigation key to select the Call
Setting item and press OK key.
4. Use the navigation key to select the Call
Waiting item and press OK key.
5. Use the navigation key to choose to turn On or
Off and press OK key to validate.
Back key to exit the menu.
39
Page 40
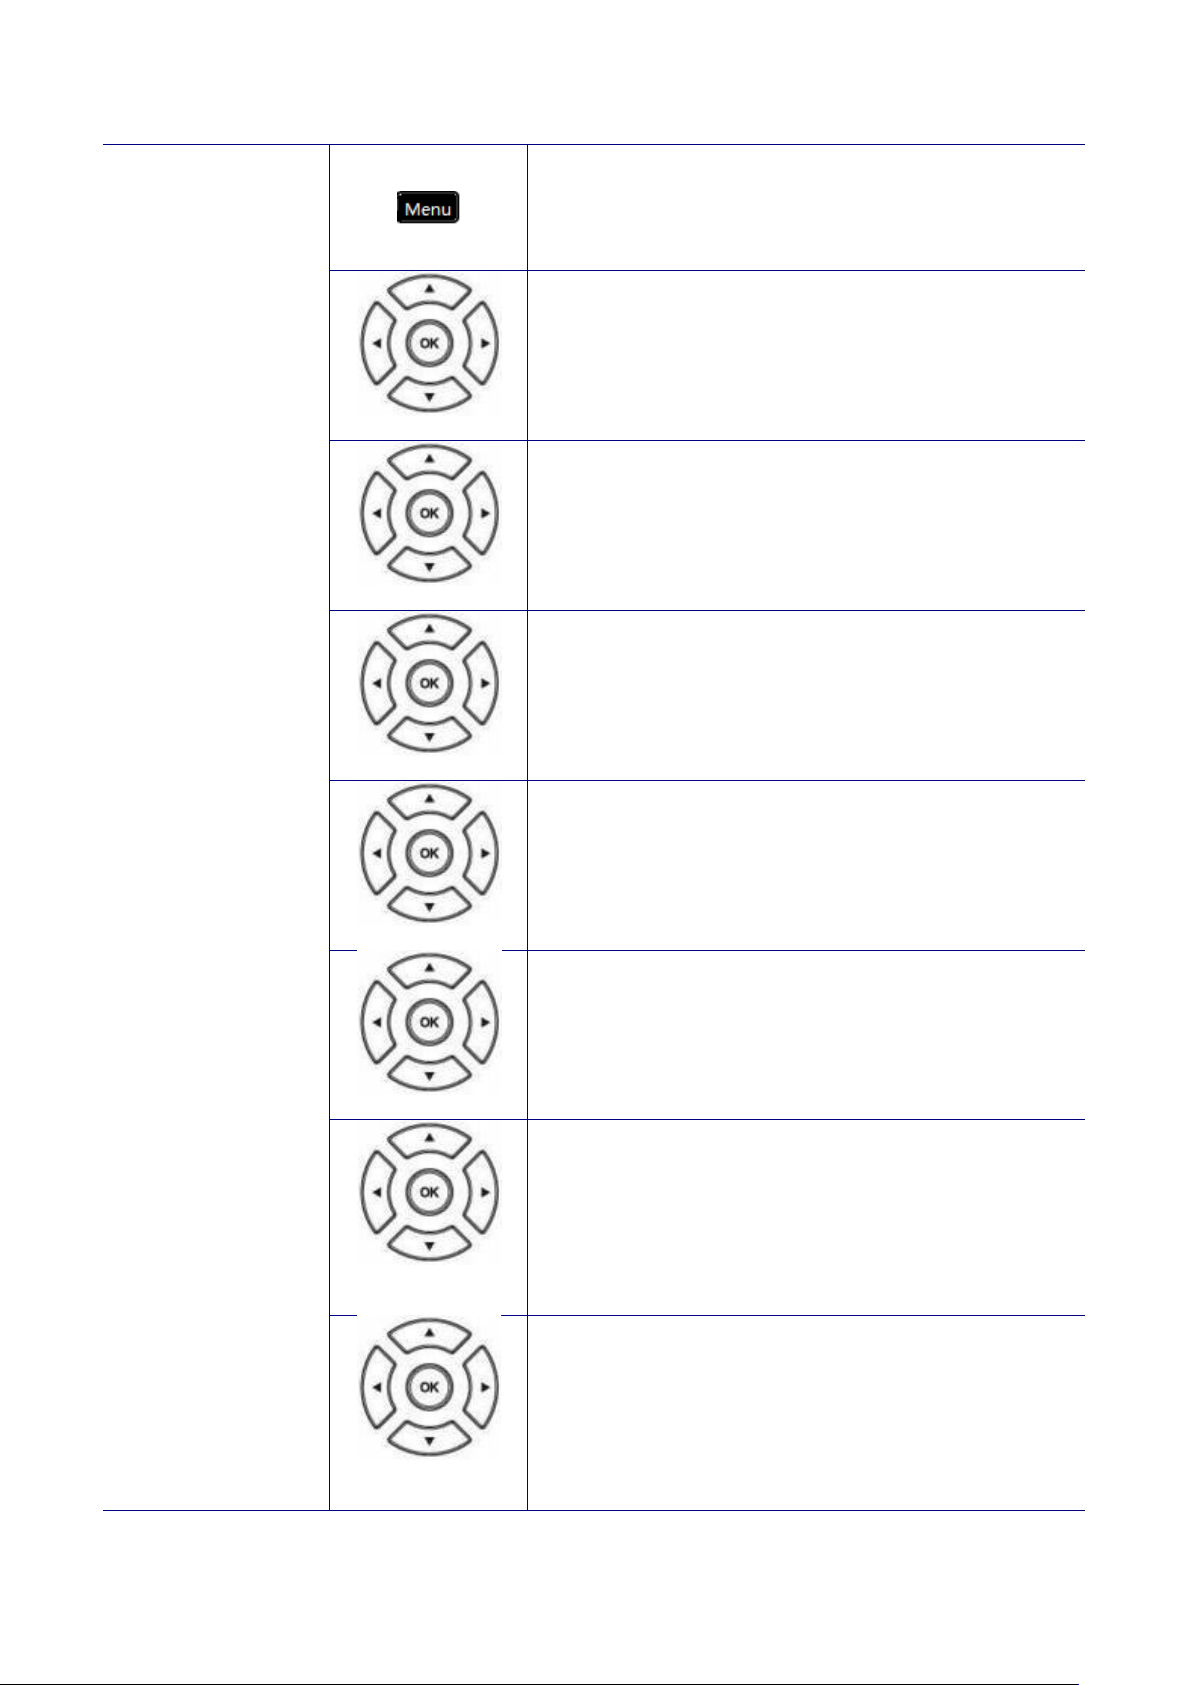
Phone Setting
Call Setting
Call Forward
4. Use the navigation key to select the Call
Forking Forward) you would like to activate.
Status
FWD Number
Forward
, there is one
for user to set. If the
the call will be forwarded to the destination.
Forward
, there is one
for user to
1. Press the Menu key on LCD.
2. Use the navigation key to select the Phone
Setting item and press OK key.
3. Use the navigation key to select the Call
Setting item and press OK key.
Forward item and press the OK key to validate
the selection. Select the next item according to
the type of call forward (Always Forward, Busy
Forward, No Answer Forward, DND Forward or
Call Forward
No Answer
Forking
5. Choose the Status item to turn On/Off the call
forwarding feature. Select On or Off then press
the OK key to validate.
6. Select the FWD Number item to input the
phone number you wish to forward the calls to.
7. For No Answer Forward item
additional item “Timeout”
phone doesn’t answer the call after this time,
(Default value is 15 seconds)
8. For Forking Forward item
additional item “2nd FWD Number”
set. If the 1st destination in busy, the call will be
forwarded to the 2nd destination.
40
Page 41
M22 USER MANUAL
Phone Setting
Call Setting
Call Blocking
se the navigation key to browse all the
you want to add a new number, find an
to enter a new number. Press OK key to
to validate the
Note: It is possible to activate different kinds of call forward at the
same time. Ex: No Answer forward + Busy Forward, etc.
Call Blocking
(Add, Edit, or
Delete a
Number)
1. Press the Menu key on LCD.
2. Use the navigation key to select the Phone
Setting item and press OK key.
3. Use the navigation key to select the Call
Setting item and press OK key.
4. Use the navigation key to select the Call
Blocking item to enter the Call Blocking List
menu. The LCD screen prompts you to enter a
number between 0 and 9.
5. U
blocked Caller ID and press OK key to validate.
If
empty position, then using keypad to enter a
number. Press OK key to validate and press
Back to exit the Call Blocking menu.
If you want to edit an existing number, find the
number you would like to edit. Use the “BkSp”
soft-key to clear the number and use keypad
validate.
1. Press the Menu key on LCD.
SIP Server
2. Use the navigation key to select the Admin
Setting item. Press OK key
selection. Type the administrator’s password to
get into Admin menu.
41
Page 42

M22 USER MANUAL
Admin
Setting
42
Page 43
M22 USER MANUAL
Voice Setting
SIP Server
Packet Time
Outbound Proxy,
Setting
to validate the
Voice Setting
SIP Proxy,
Outbound
Proxy, Registrar
Server,
Registrar
Outbound,
Registrar Time,
Server Port and
Registrar Port,
Codec Setting,
3. Select the Voice Setting item and press OK
key.
4. Select the SIP Server item and press OK key.
5. There are SIP Proxy,
Registrar Server, Registrar Outbound,
Registrar Time, Server Port, Registrar Port,
Codec Setting and Packet Time items for user
to configure.
Phone Number
1. Press the Menu key on LCD.
2. Use the navigation key to select the Admin
Admin
3. Select the Voice Setting item and press OK
Setting item. Press OK key
selection. Type the administrator’s password to
get into Admin menu.
key.
43
Page 44
M22 USER MANUAL
Number
Phone
4. Select the Phone Number item and press OK
key.
5. Use the keypad to edit Phone Number. Press
OK key to validate the input.
Note: You could use the “BkSp” soft-key to
delete the last character.
44
Page 45
Setting
to validate the
Voice Setting
Display Name
Setting
to validate the
Admin
1. Press the Menu key on LCD.
2. Use the navigation key to select the Admin
Setting item. Press OK key
selection. Type the administrator’s password to
get into Admin menu.
3. Select the Voice Setting item and press OK
key.
Display Name
4. Select the Display Name item and press OK
key.
5. Use the keypad to set display name. Press OK
key to validate the input.
Note: You could use the “BkSp” soft-key to
delete the last character.
1. Press the Menu key on LCD.
Authentication
2. Use the navigation key to select the Admin
Admin
Setting item. Press OK key
selection. Type the administrator’s password to
get into Admin menu.
45
Page 46
M22 USER MANUAL
Voice Setting
Authentication
ID, Password
3. Select the Voice Setting item and press OK
key.
4. Select the Authentication item and press OK
key.
5. There are Authorized ID and Password items
for user to configure.
Authorized
46
Page 47
DTMF Type
Setting
to validate the
Voice Setting
DTMF
DTMF Type
the DTMF
key to exit the
Setting
to validate the
Admin
1. Press the Menu key on LCD.
2. Use the navigation key to select the Admin
Setting item. Press OK key
selection. Type the administrator’s password to
get into Admin menu.
3. Select the Voice Setting item and press OK
key.
4. Select the DTMF item and press OK key.
RFC2833
Payload
Admin
5. Select the DTMF Type item and press OK key.
6. Use the navigation key to choose
you would like to set. There are 4 DTMF types
for selection. Press the Back
menu.
1. Press the Menu key on LCD.
2. Use the navigation key to select the Admin
Setting item. Press OK key
selection. Type the administrator’s password to
get into Admin menu.
47
Page 48
M22 USER MANUAL
Voice Setting
DTMF
Payload
and press
set RFC2833 Payload.
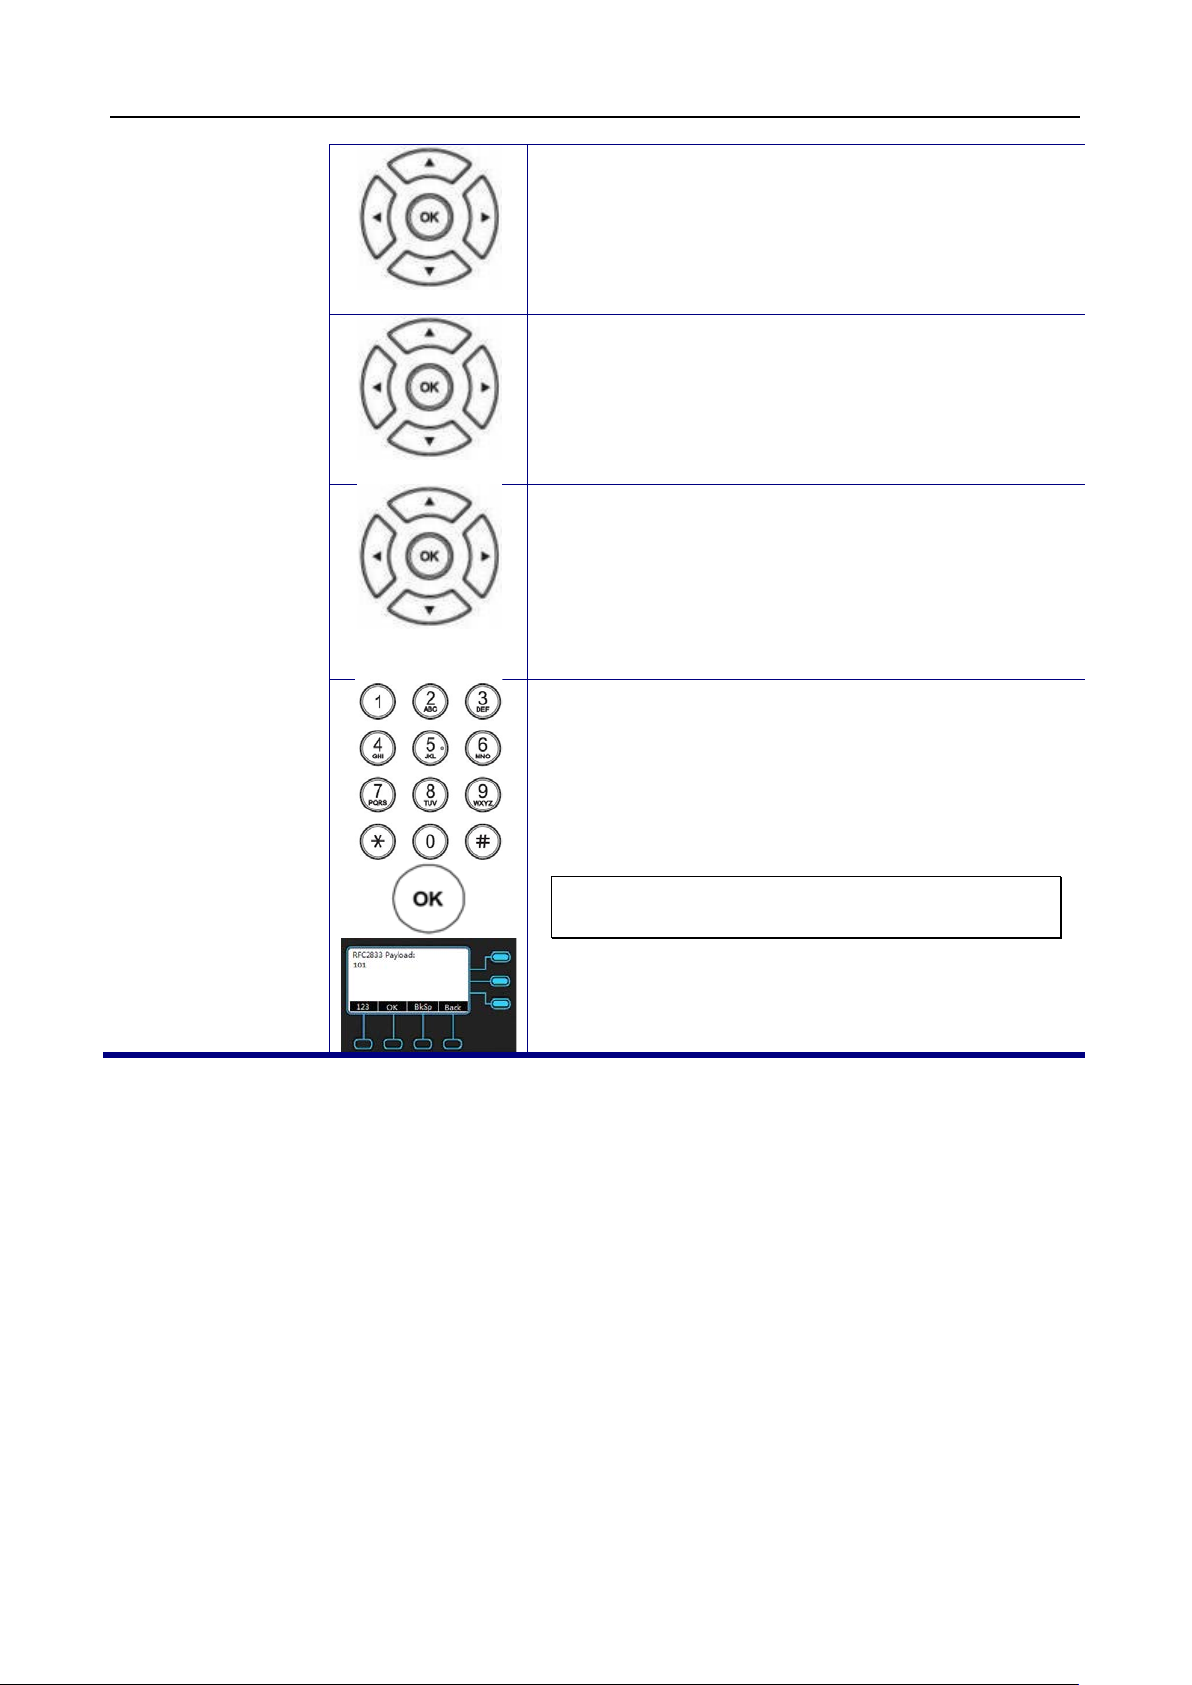
3. Select the Voice Setting item and press OK
key.
4. Select the DTMF item and press OK key.
5. Select the RFC2833 payload item
OK key.
RFC2833
6. Use the keypad to
Press OK key to validate the input. The default
RFC2833 payload is 101.
Note: You could use the “BkSp” soft-key to
delete the last character.
48
Page 49
M22 USER MANUAL
Operation
Description
Phone Setting
key to validate the
Setting
key to validate the
Ring Volume
Volume Setting
Select the volume level of ring, handset speaker, hands-free speaker and headset speaker.
Ring Volume
Volume
1. Press the Menu key on LCD.
2. Use the navigation key to select the Phone
Setting item. Press OK
selection.
3. Use the navigation key to select the Volume
Setting item. Press OK
selection.
4. Select the Ring Volume item and validate with
the OK key.
5. Use the navigation key to tune the voice. Press
the Navigation Left key to make voice lower.
Press the Navigation Right key to make voice
louder. Press the OK key to exit the menu.
49
Page 50
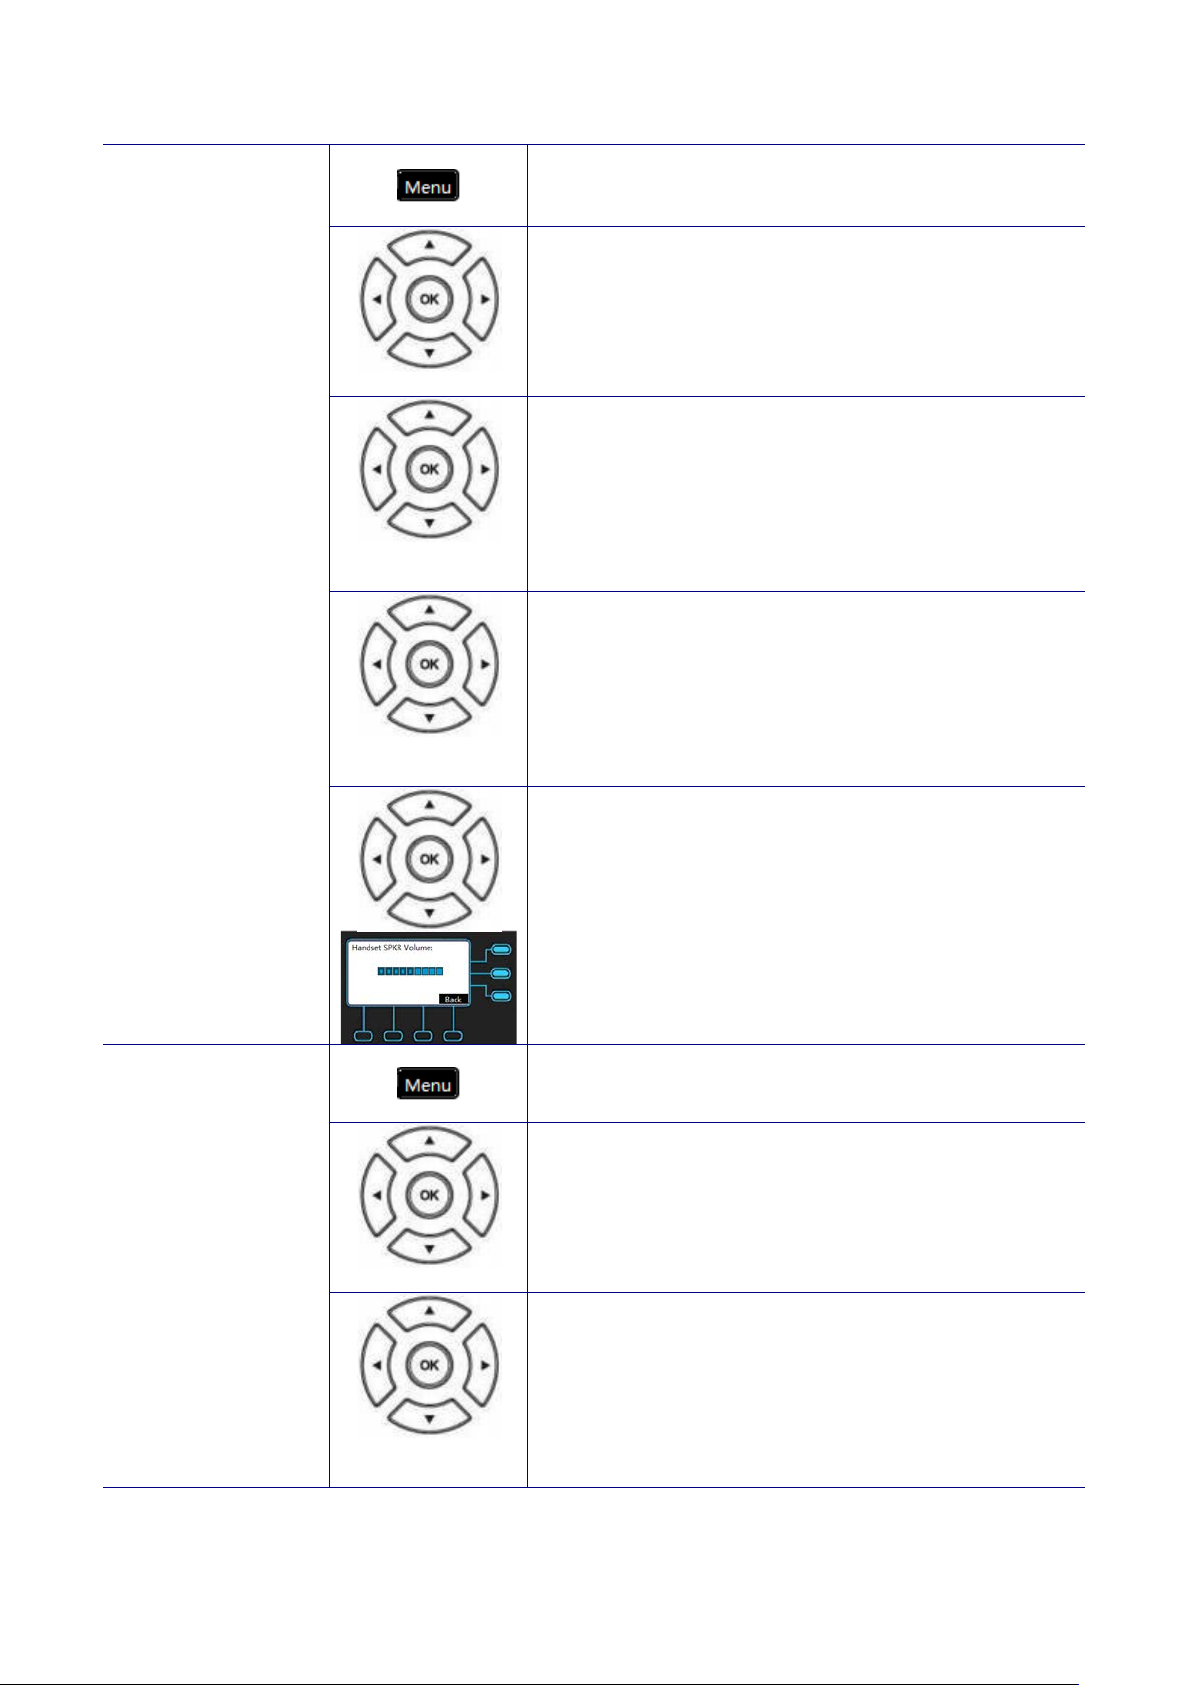
Handset Speaker
Phone Setting
key to validate the
Setting
key to validate the
Speaker
Phone Setting
key to validate the
Setting
key to validate the
Volume
Handset
1. Press the Menu key on LCD.
2. Use the navigation key to select the Phone
Setting item. Press OK
selection.
3. Use the navigation key to select the Volume
Setting item. Press OK
selection.
4. Select the Handset Speaker item and validate
with the OK key.
Hands-free
Speaker
Volume
5. Use the navigation key to tune the voice. Press
the Navigation Left key to make voice lower.
Press the Navigation Right key to make voice
louder. Press the OK key to exit the menu.
1. Press the Menu key on LCD.
2. Use the navigation key to select the Phone
Setting item. Press OK
selection.
3. Use the navigation key to select the Volume
Setting item. Press OK
selection.
50
Page 51
M22 USER MANUAL
Speaker
Phone Setting
key to validate the
Setting
key to validate the
Speaker
Hands-free
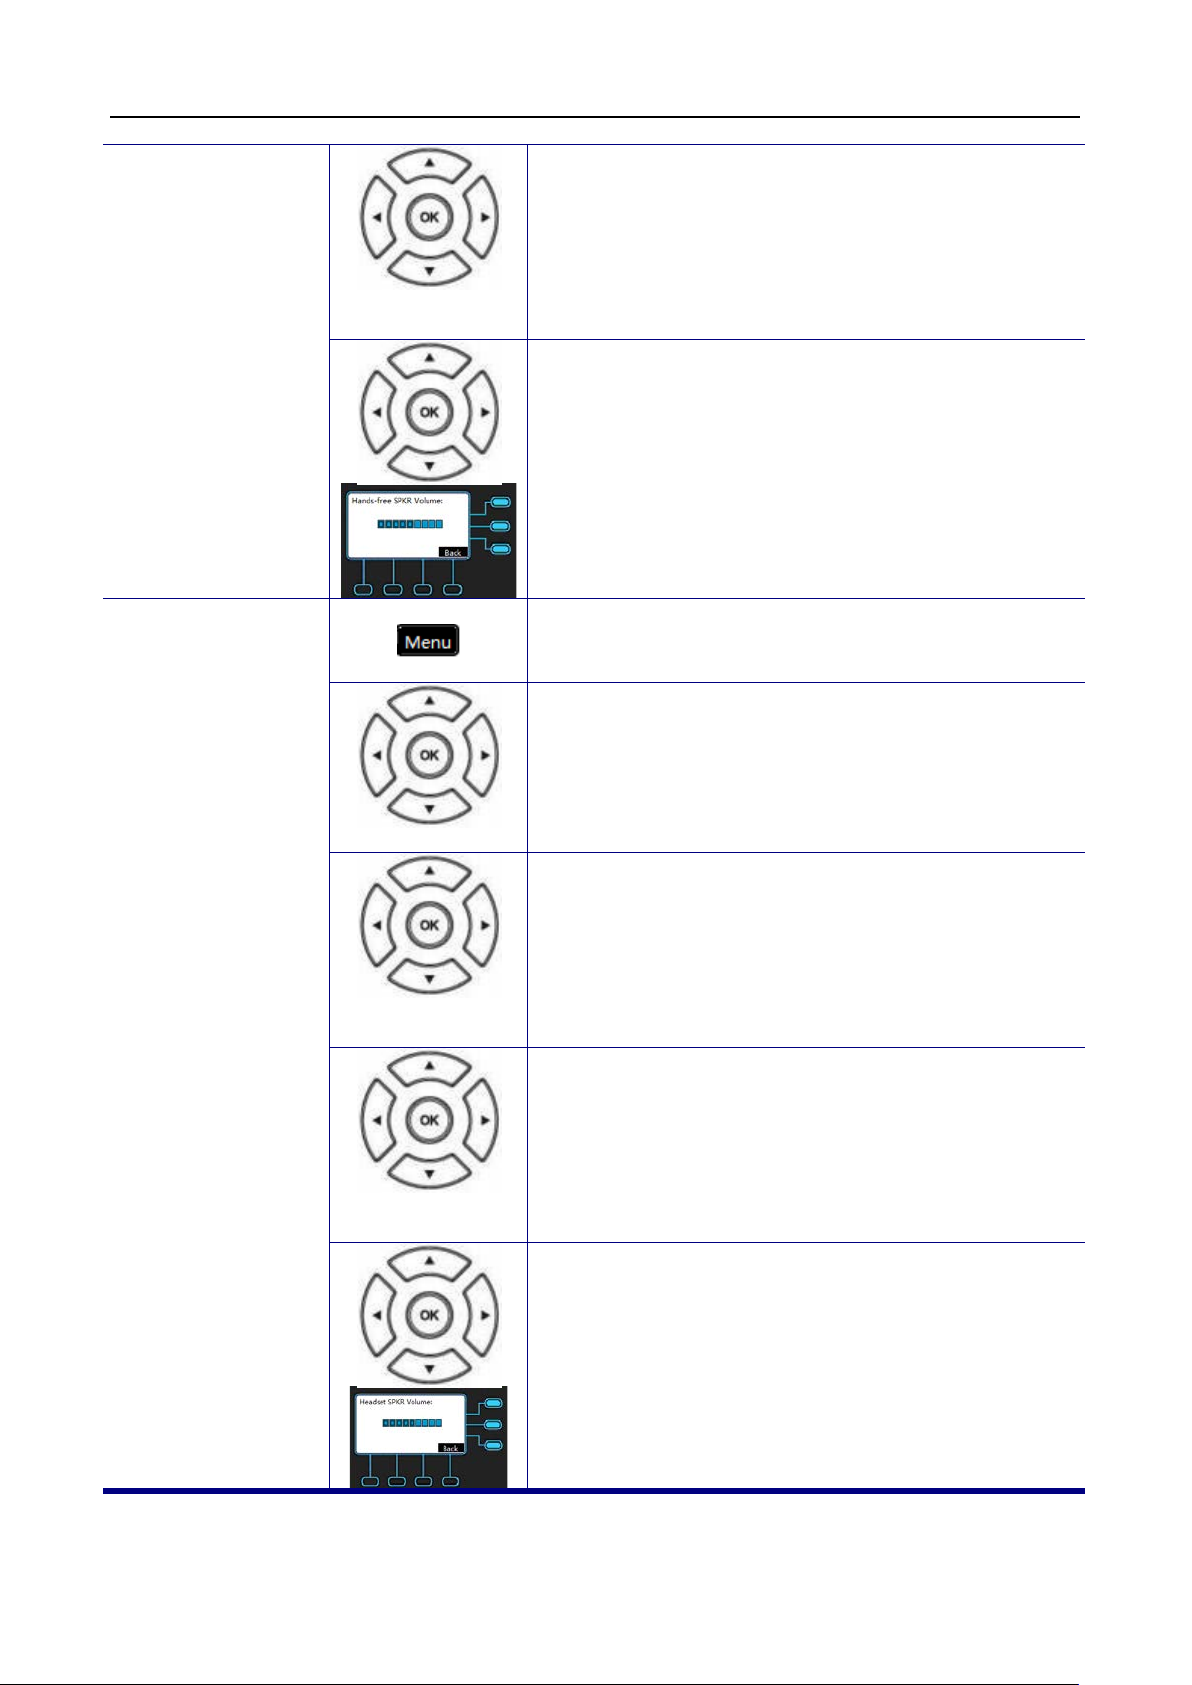
4. Select the Hands-free Speaker item and
validate with the OK key.
5. Use the navigation key to tune the voice. Press
the Navigation Left key to make voice lower.
Press the Navigation Right key to make voice
louder. Press the OK key to exit the menu.
Headset Speaker
Volume
Headset
1. Press the Menu key on LCD.
2. Use the navigation key to select the Phone
Setting item. Press OK
selection.
3. Use the navigation key to select the Volume
Setting item. Press OK
selection.
4. Select the Headset Speaker item and validate
with the OK key.
5. Use the navigation key to tune the voice. Press
the Navigation Left key to make voice lower.
Press the Navigation Right key to make voice
louder. Press the OK key to exit the menu.
51
Page 52
M22 USER MANUAL
Operation
Description
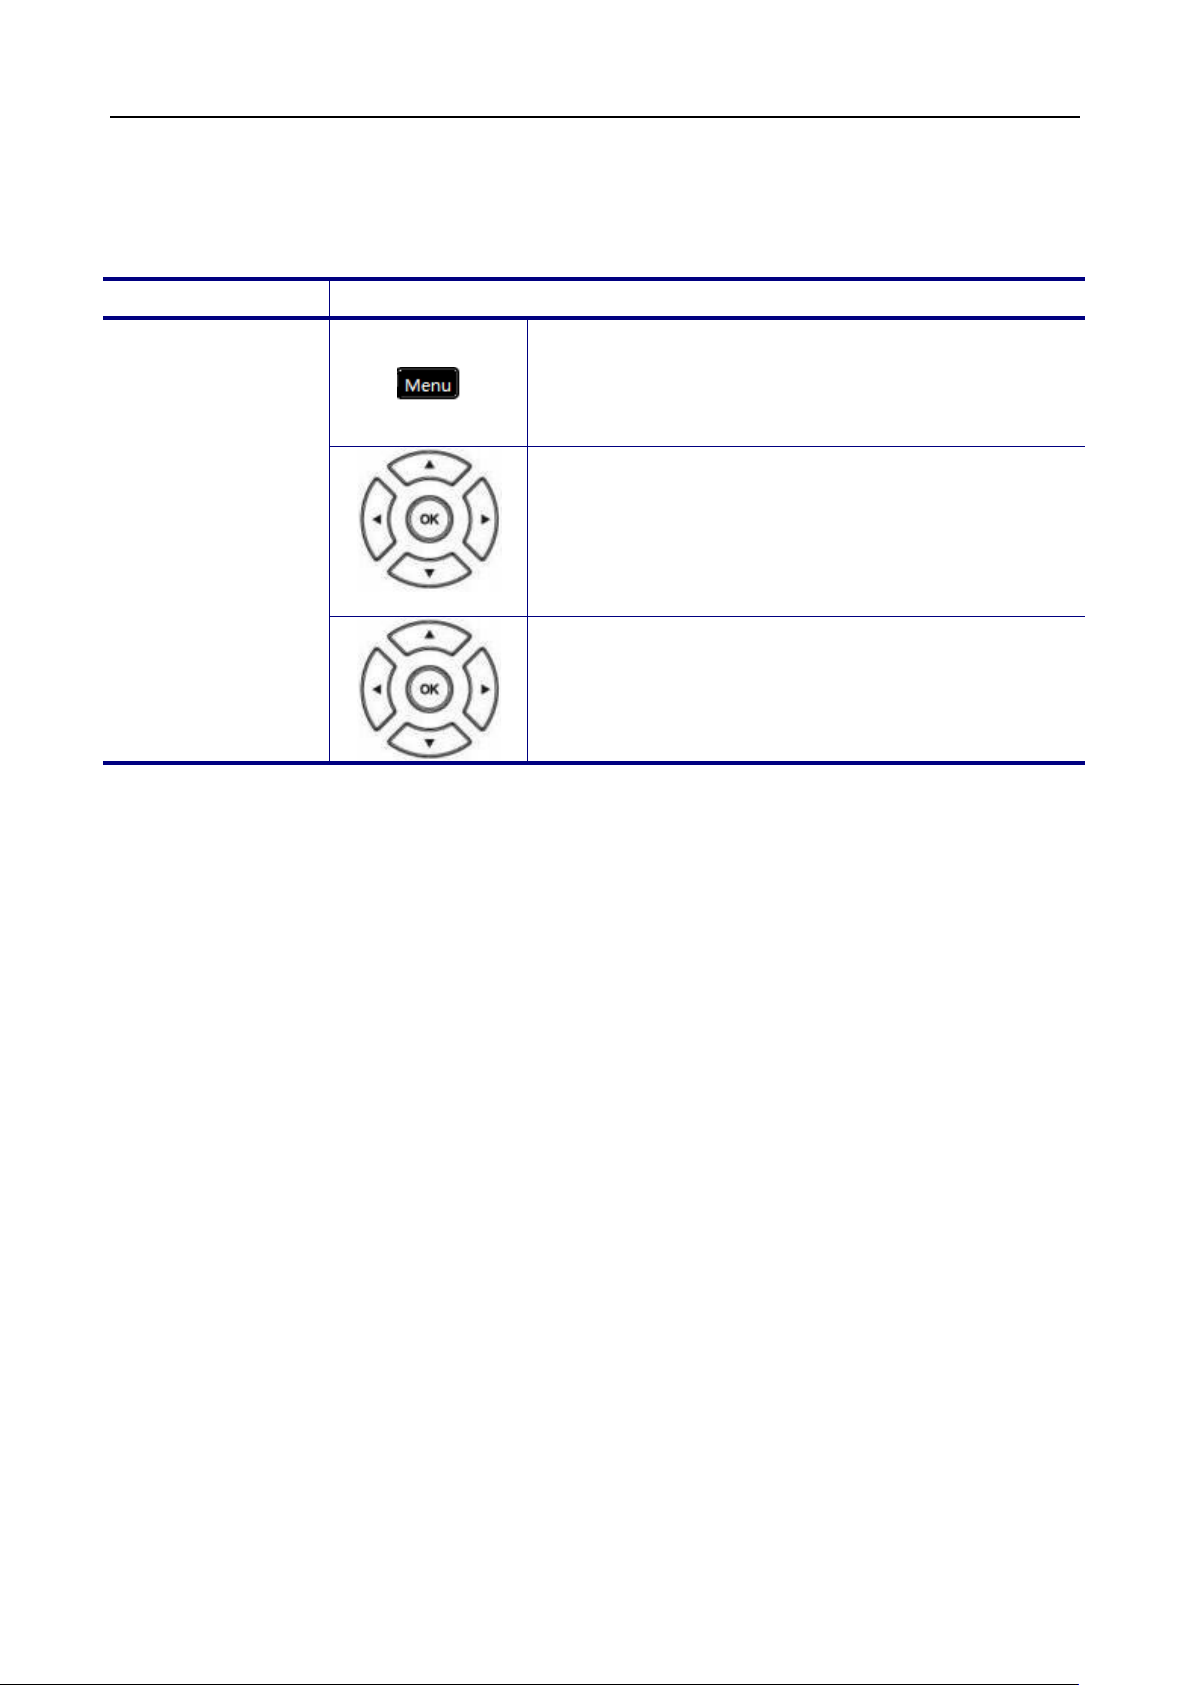
Information
igation key to select the
to choose the
Information
You may view all related information about the M22 t hrough the LCD menu. This may give
you, for example, the current network settings of the M22.
View Information
about the M22
1. Press the Menu key on LCD.
2. Use the nav
Information item and press OK key.
3. Use the navigation key
information you would like to review. Press the
OK key to exit the menu.
The following information can be reviewed from the LCD screen of your M22:
Model Name
Application Version
Firmware Version
Kernel Version
MAC Address
SN
EDM Version
Network Type
IP Address
Subnet Mask
Default Gateway
DNS Server
52
Page 53
M22 USER MANUAL
Operation
Description
Phone Setting
Backlight
key to
Press the
key to validate the
key to exit the
Backlight
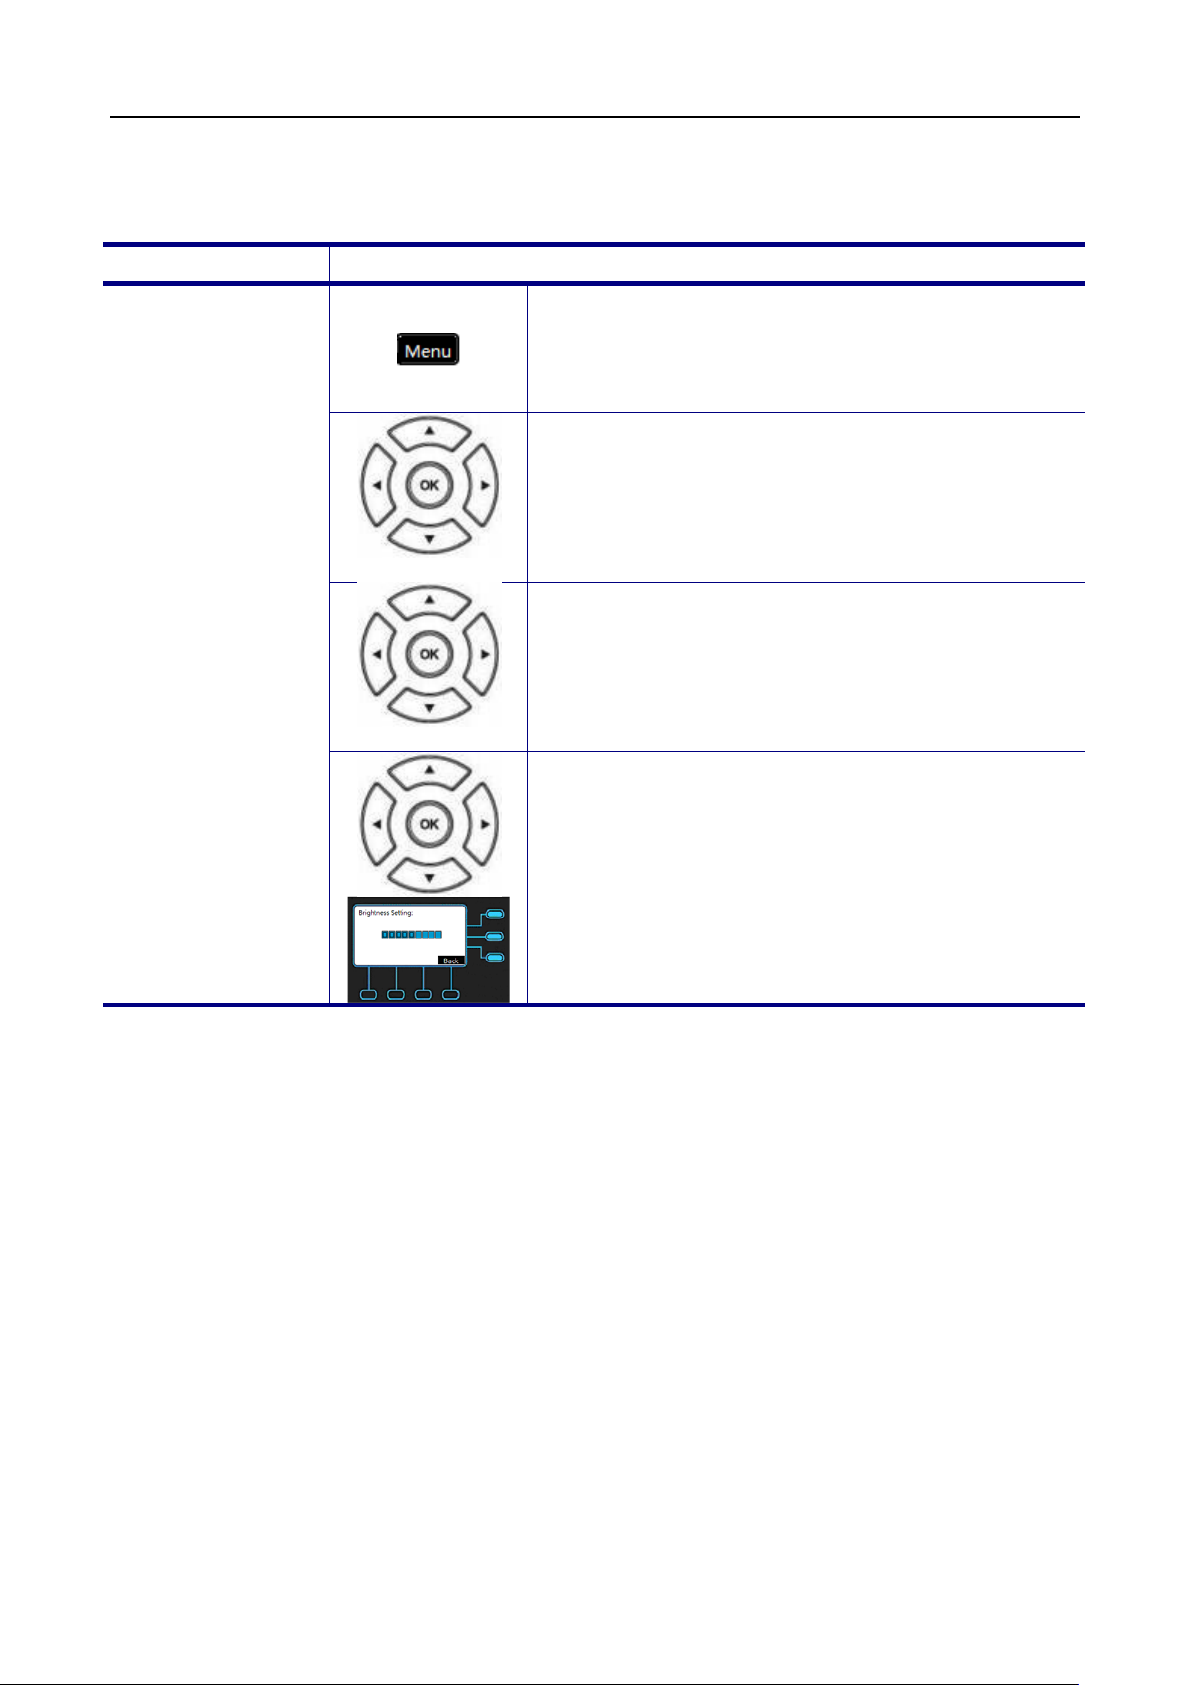
To configure the brightness of the LCD to a comfortable level.
Backlight
1. Press the Menu key on LCD.
2. Use the navigation key to select the Phone
Setting item and press OK key.
3. Select the Backlight item and validate with the
OK key.
4. Use the navigation key to tune the display
brightness. Press the Navigation Up
increase the display brightness.
Navigation Down key to decrease the display
brightness. Press OK
selection or press the Back
menu.
53
Page 54
M22 USER MANUAL
Operation
Description
Phone Setting
Contract
tune the LCD
key to
Press the
Contrast
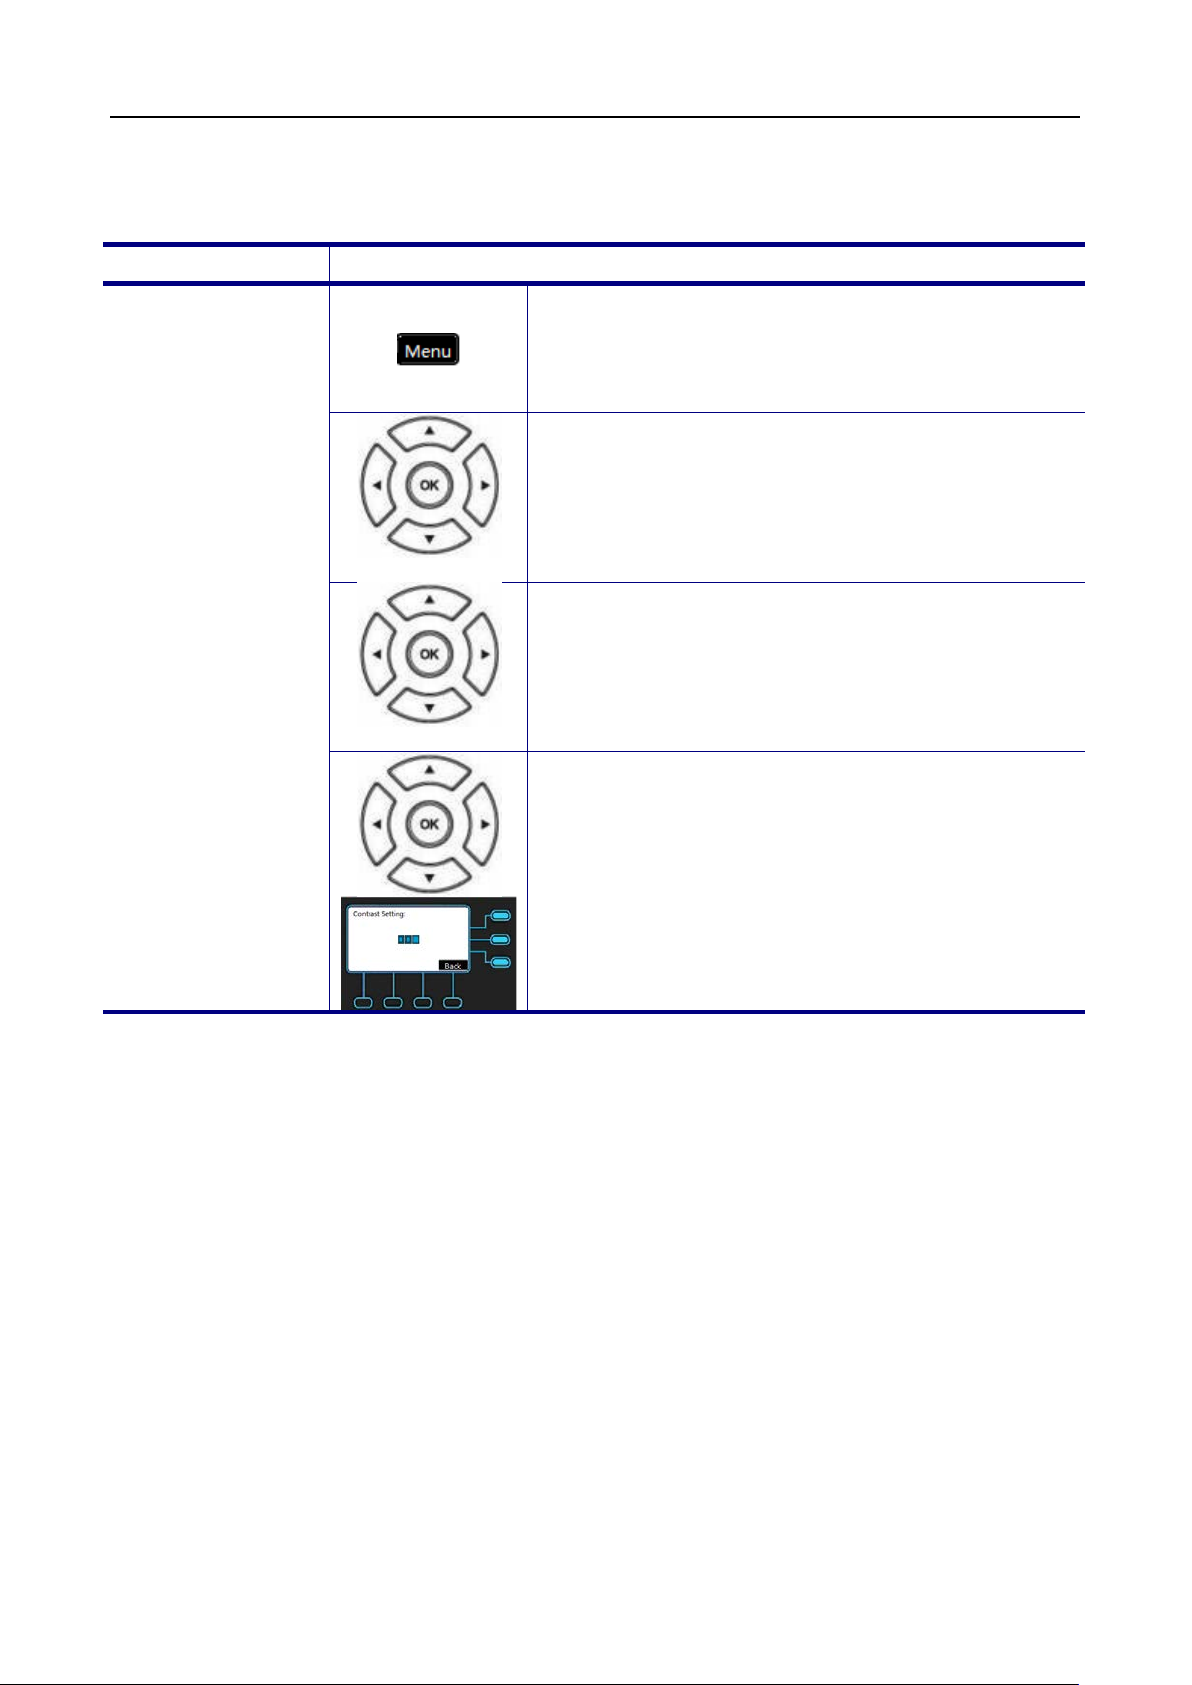
To configure the contrast of the LCD to a comfortable level.
Contrast
1. Press the Menu key on LCD.
2. Use the navigation key to select the Phone
Setting item and press OK key.
3. Select the Contract item and validate with the
OK key.
4. Use the navigation key to
contrast. Press the Navigation Up
increase the display contrast.
Navigation Down key to decrease the display
contrast. Press OK key to validate the selection
or press the Back key to exit the menu.
54
Page 55
M22 USER MANUAL
Operation
Description
Phone Setting
Phonebook
Private
Add
When finished making changes, press the
Phonebook
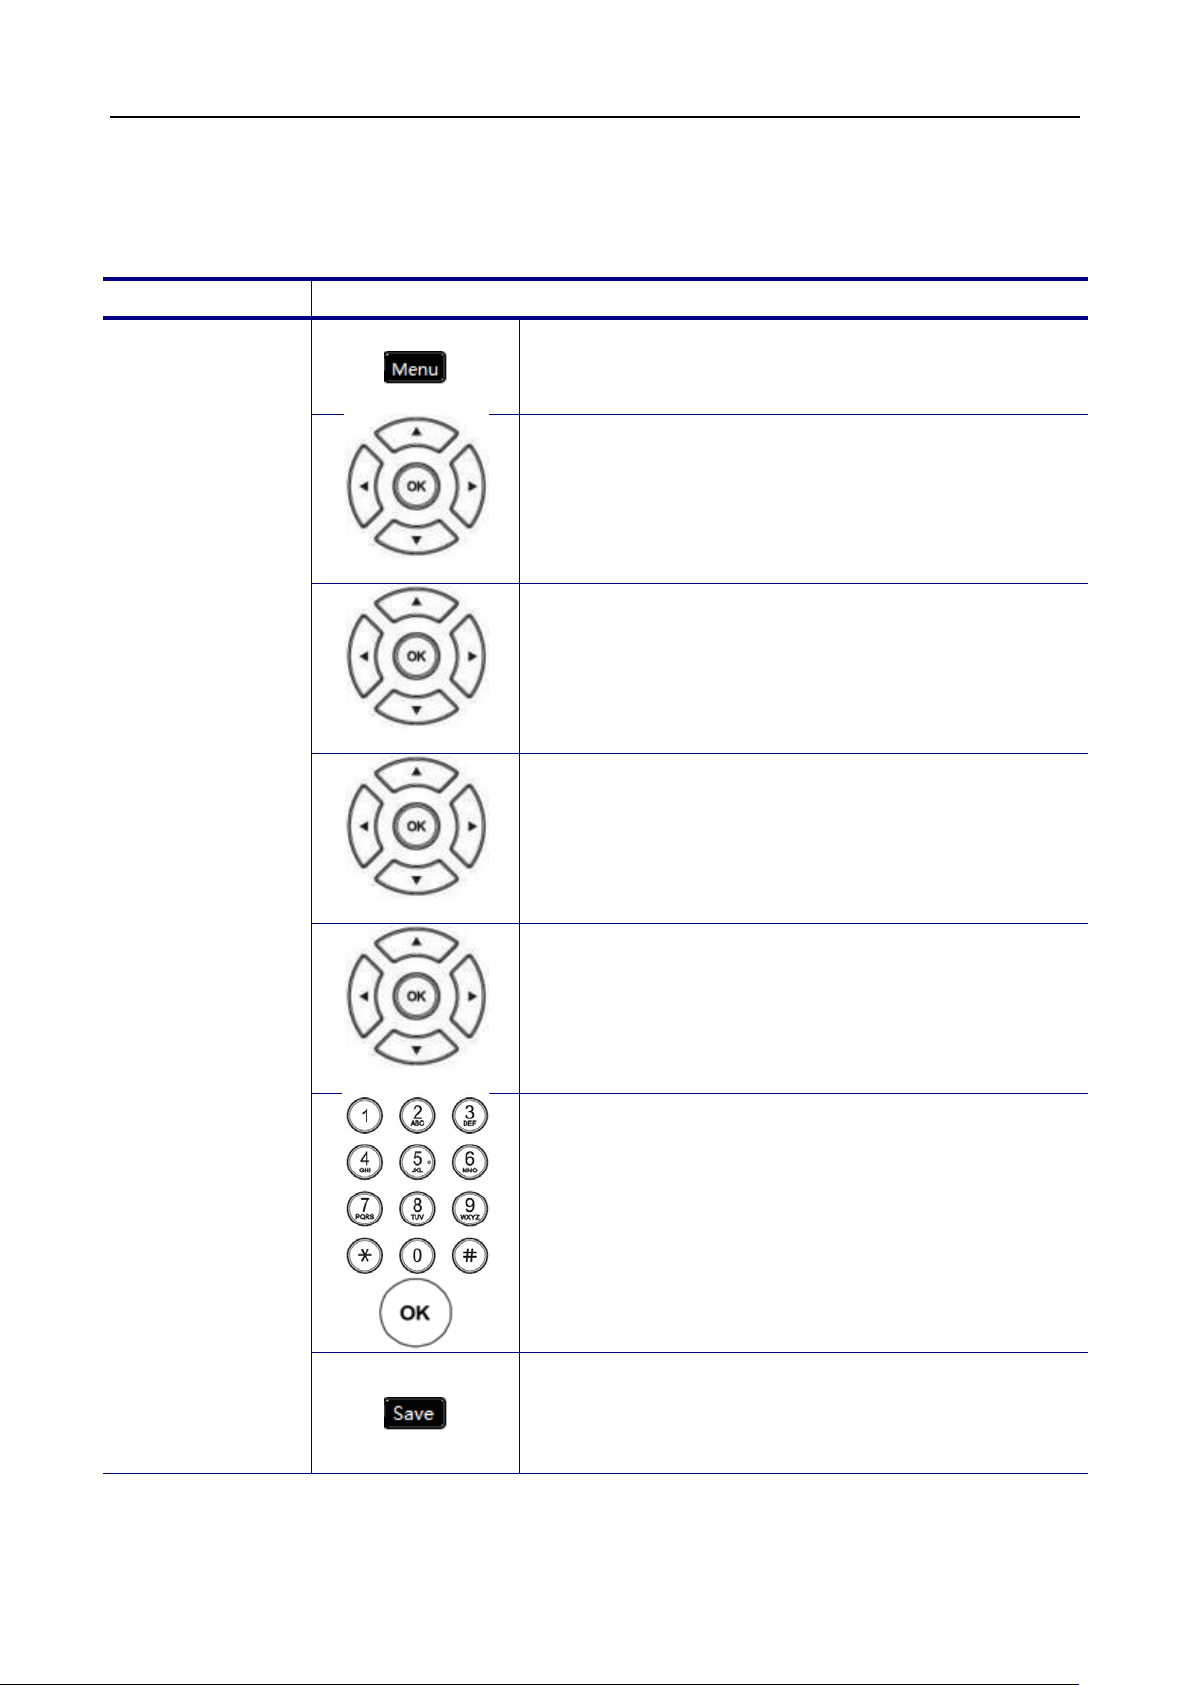
The phonebook feature let’s you store a list of phone numbers. (For M22, it could be stored
up to 100 entries).
Add Contacts
1. Press the Menu key on LCD.
2. Use the navigation key to select the Phone
Setting item and press OK key.
3. Use the navigation key to select the Phonebook
item and press OK key.
4. Select the Private item and validate with the OK
key.
5. Press the Add button.
6. Enter the “Username”, “Phone Number”,
7.
“Group”, and “Ring Type” items and input by
using the keypad. Press OK key to validate the
input. Press the Back key to exit the menu.
“Save” soft-key to save the changes. Press
“Back” soft-key to exit the phonebook menu
55
Page 56
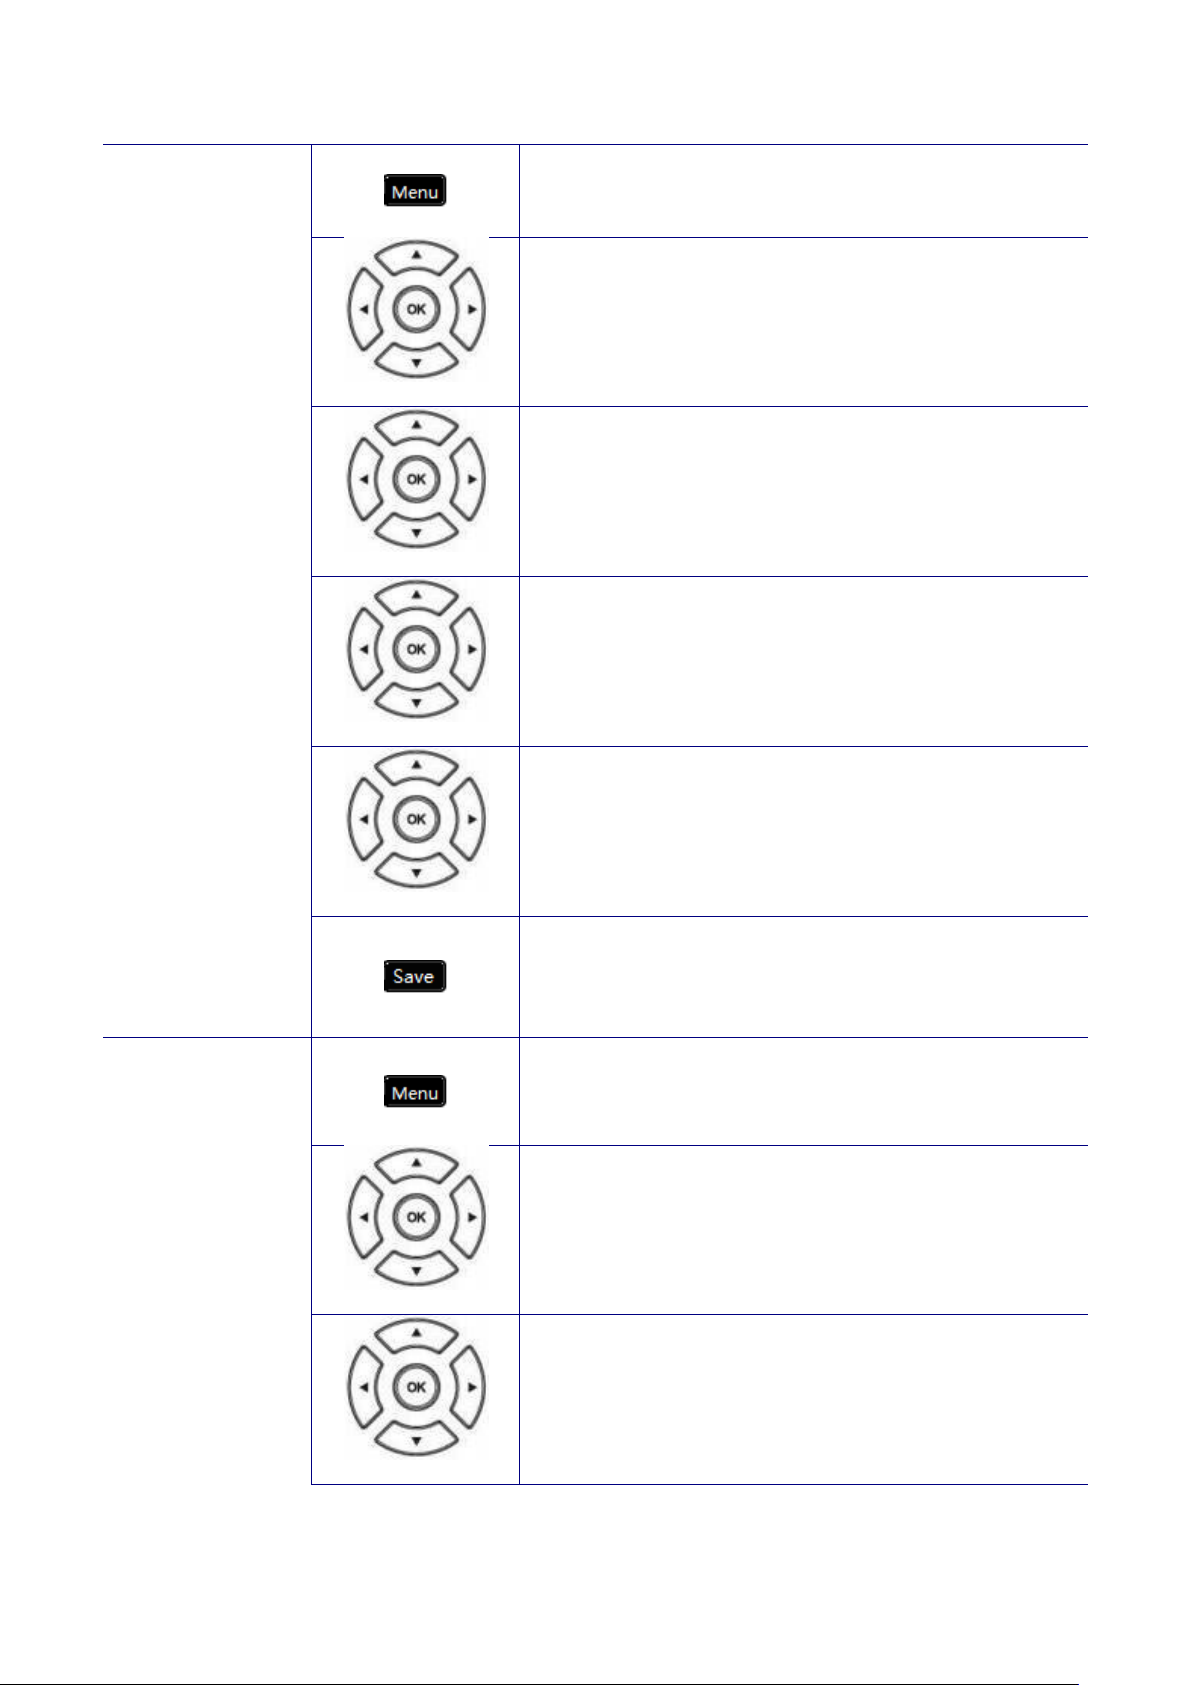
Edit Contacts
Phone Setting
Phonebook
Private
Edit
When finished making changes, press the
Phone Setting
Phonebook
1. Press the Menu key on LCD.
2. Use the navigation key to select the Phone
Setting item and press OK key.
3. Use the navigation key to select the Phonebook
item and press OK key.
4. Select the Private item and validate with the OK
key.
Delete a
Number
5. Using navigation key to browse all phonebook
data. When browsing cer tain phonebook entry’s
items, press “Edit” soft-key to add or edit. There
are 4 items for user to add or edit, “Username”,
“Phone Number”, “Group”, and “Ring Type”.
6.
“Save” soft-key to save the changes. Press
“Back” soft-key to exit the phonebook menu.
1. Press the Menu key on LCD.
2. Use the navigation key to select the Phone
Setting item and press OK key.
3. Use the navigation key to select the Phonebook
item and press OK key.
56
Page 57

M22 USER MANUAL
Private
Del
Press “Back”
4. Select the Private item and validate with the OK
key.
5. Using navigation key to browse all phonebook
data. When browsing certain phonebook entry,
press “Del” soft-key to delete it.
soft-key to exit the phonebook menu.
57
Page 58

M22 USER MANUAL
Operation
Description
Hotline Setting
Set the hotline number which can be dialed immediately.
58
Page 59
M22 USER MANUAL
Phone Setting
Call Setting
Setting
input by using
Phone Setting
Hotline Number
Hotline
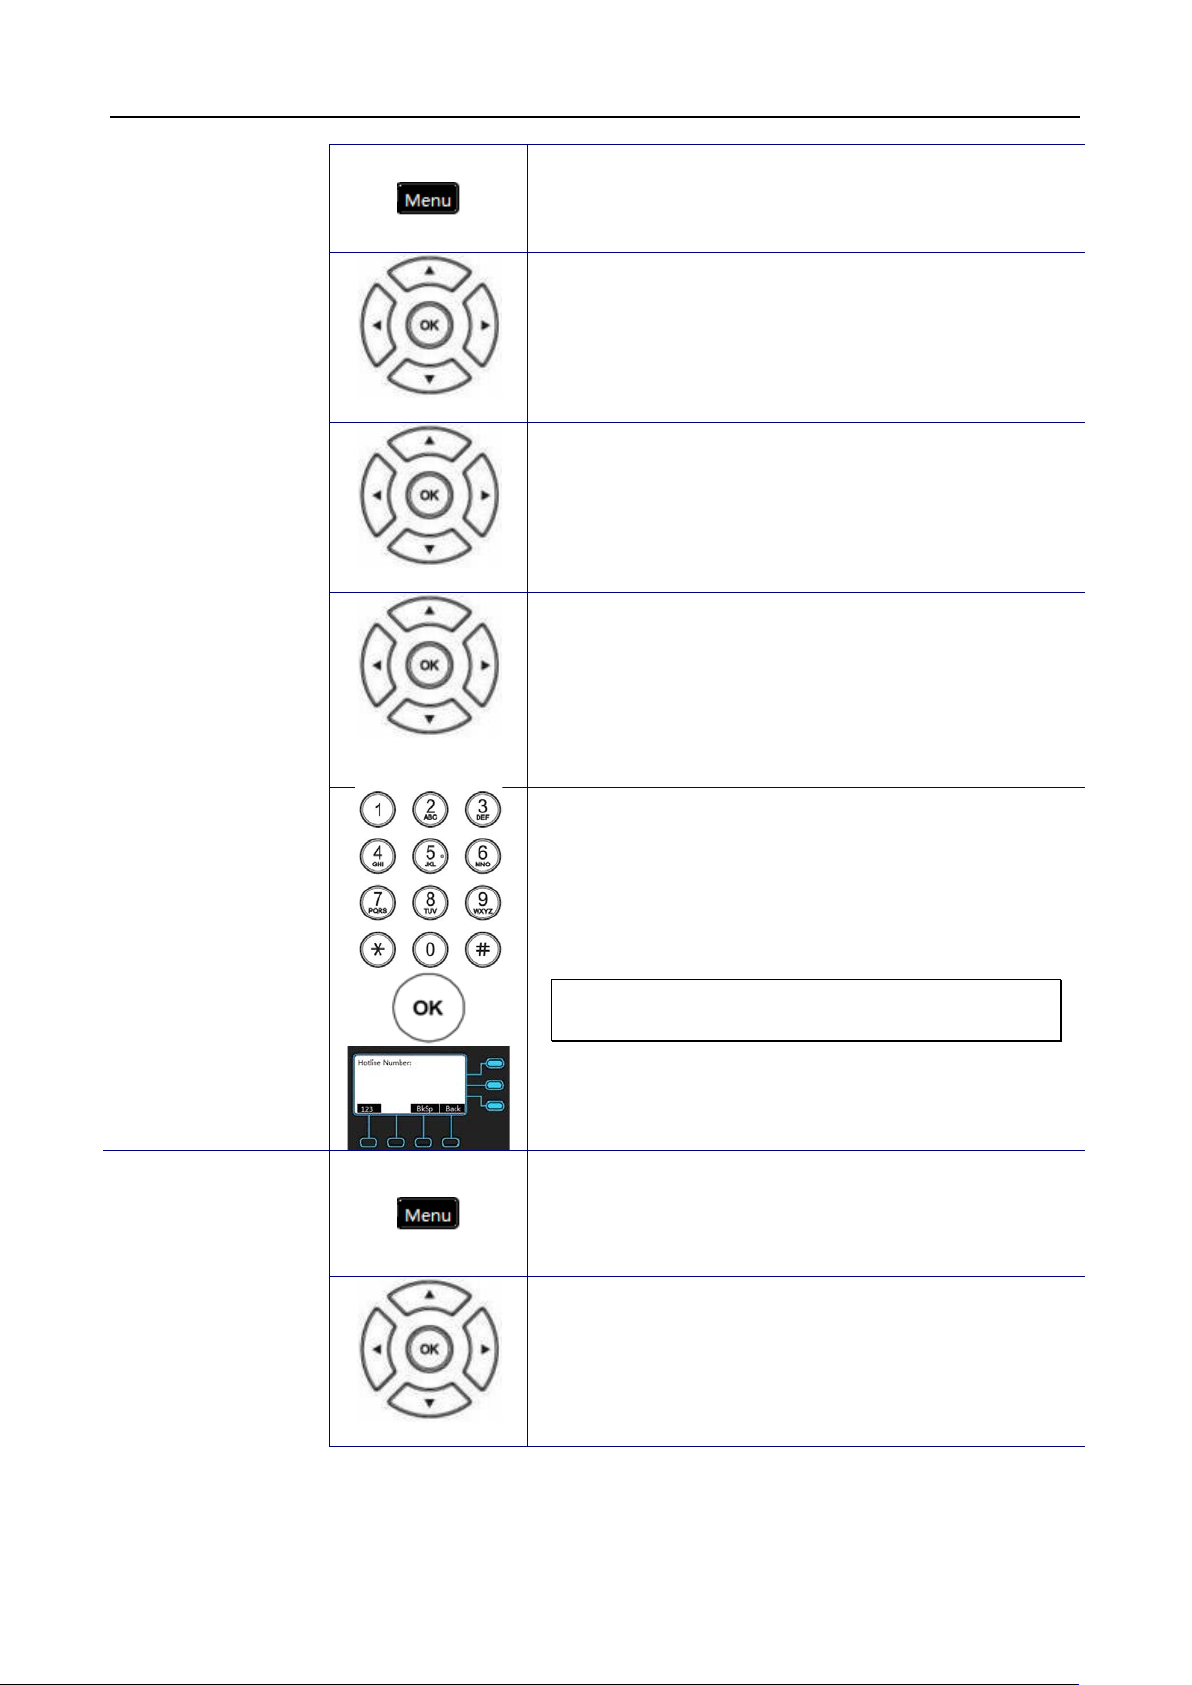
1. Press the Menu key on LCD.
2. Use the navigation key to select the Phone
Setting item and press OK key.
3. Use the navigation key to select the Call
Setting item and press OK key.
4. Use the navigation key to select the Hotline
Setting item and press OK key.
Hotline Timeout
5. Enter the Hotline Number and
1. Press the Menu key on LCD.
6. Use the navigation key to select the Phone
the keypad. Press OK key to validate the input.
Press the Back key to exit the menu.
Note: You could use the “BkSp” soft-key to
delete the last character.
Setting item and press OK key.
59
Page 60
M22 USER MANUAL
Call Setting
Setting
ress OK key to validate the input.
The default
2. Use the navigation key to select the Call
Setting item and press OK key.
7. Use the navigation key to select the Hotline
Setting item and press OK key.
Hotline
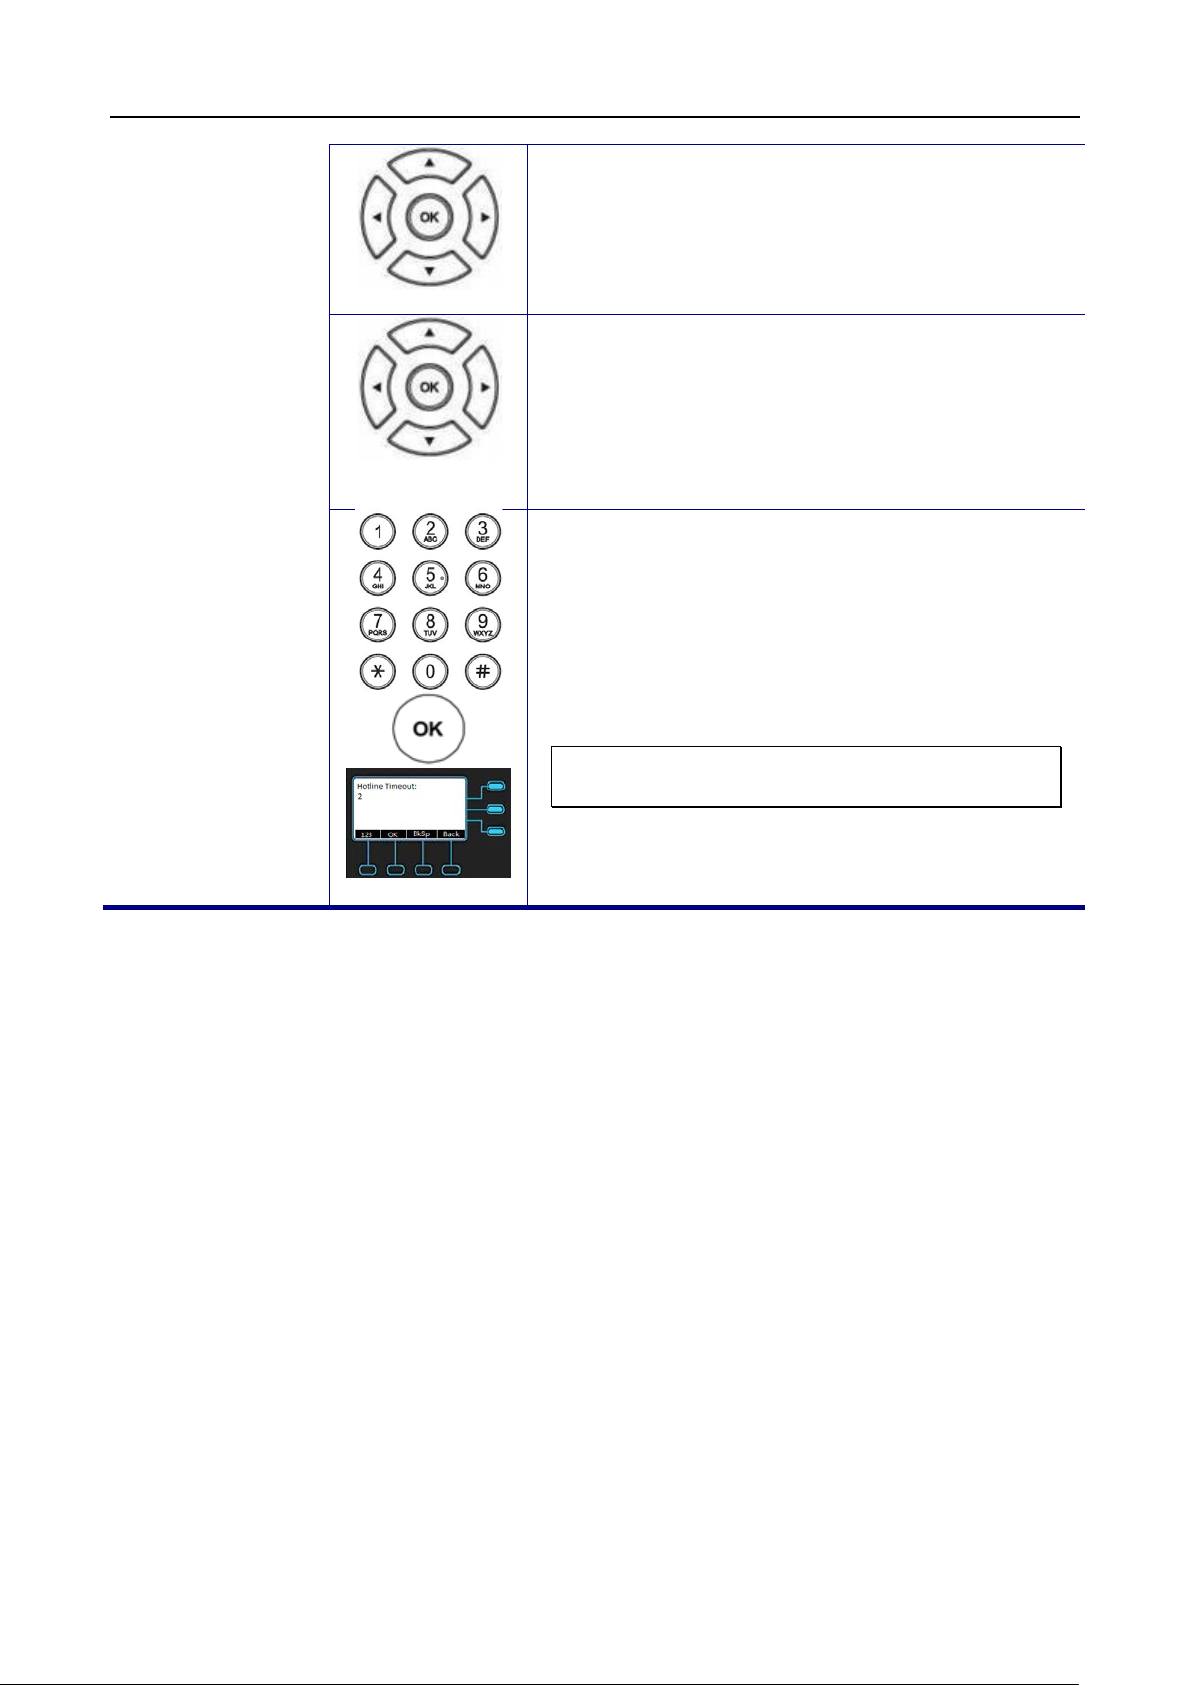
3. Enter the Hotline Time and input by using the
keypad. P
You should enter a number from 0 to 9. Press
the Back key to exit the menu.
timeout is 2.
Note: You could use the “BkSp” soft-key to
delete the last character.
60
Page 61
M22 USER MANUAL
Operation
Description
Phone Setting
Speed Dialing
. The LCD
If you want to add a new number, find an
using keypad to enter a number. Press OK
validate and press Back to exit the
number and use keypad to enter a new
number. Press OK key to validate
Speed Dialing
The Speed Dialing feature let you store a list of 10 phone numbers that you can access
easily using a Speed Dialing number from 0 to 9.
Speed Dialing
(Clr or Edit a
Number)
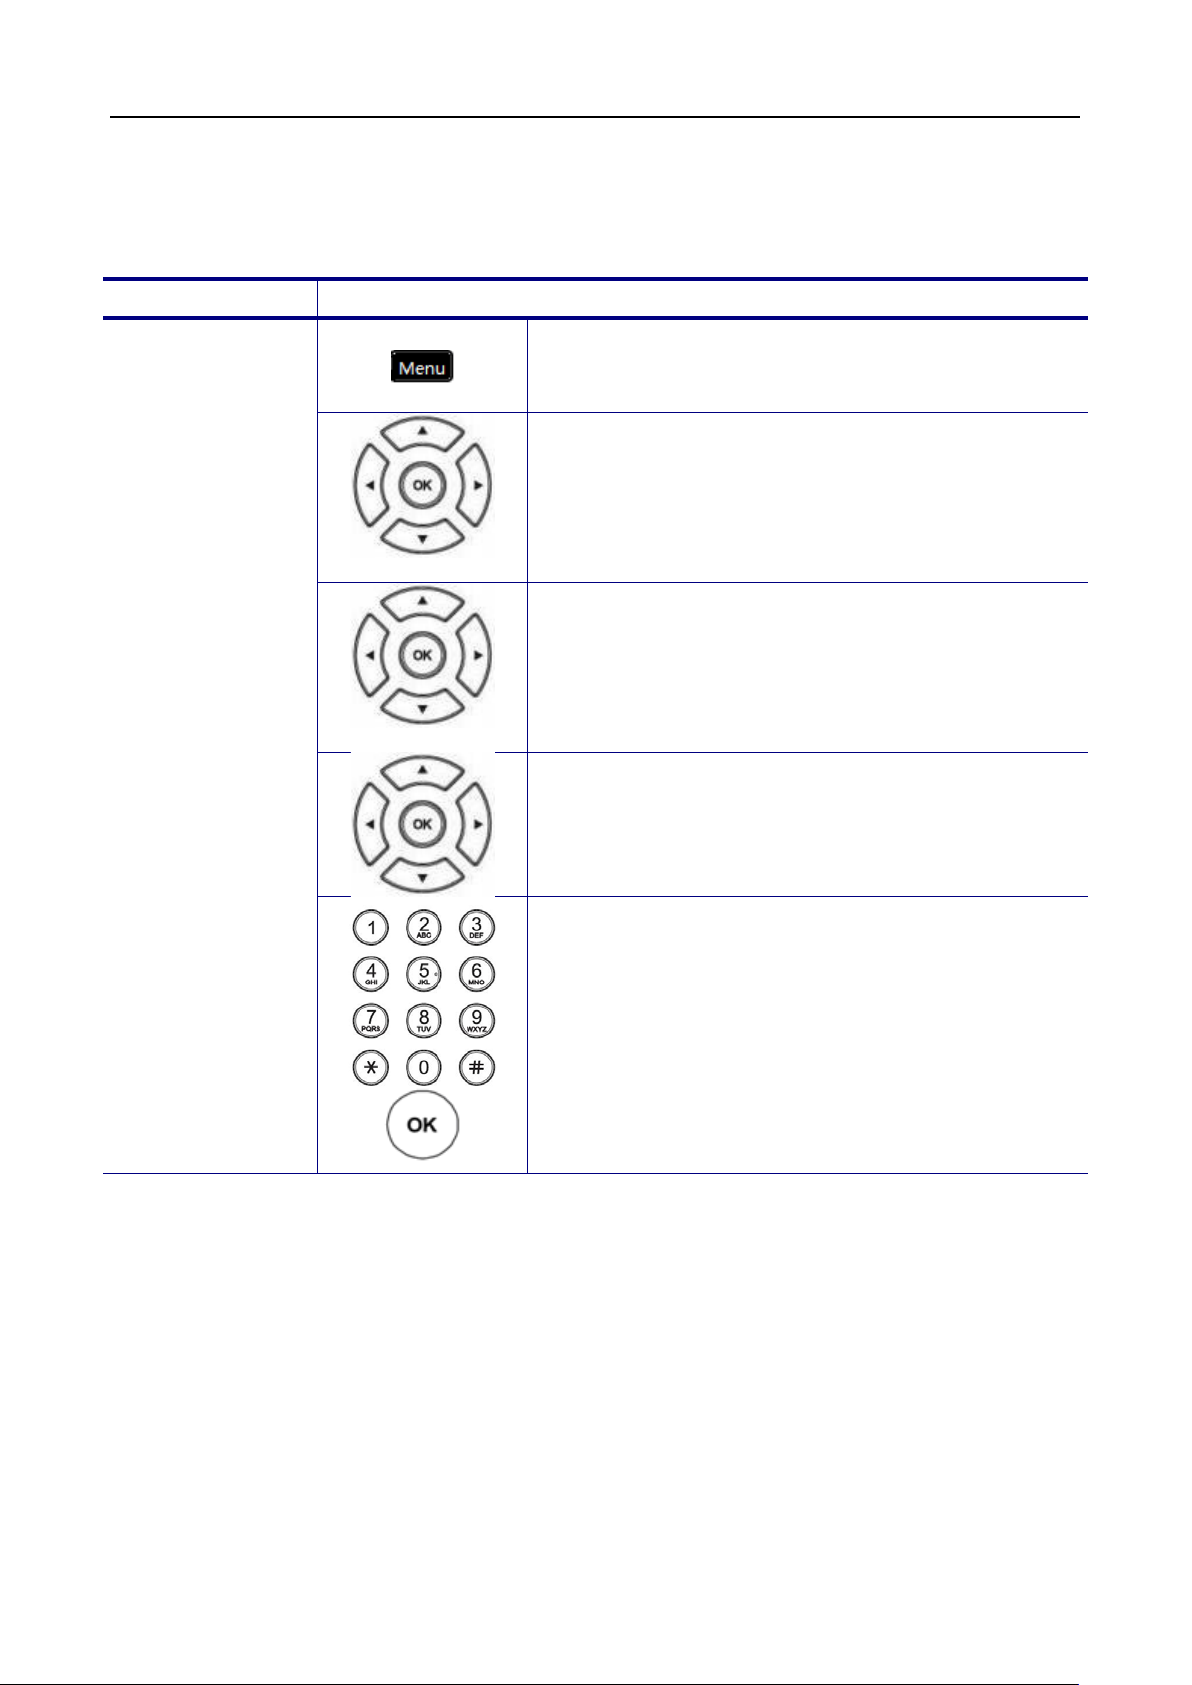
1. Press the Menu key on LCD.
2. Use the navigation key to select the Phone
Setting item and press OK key.
3. Use the navigation key to select the Speed
Dialing item and press OK key
screen prompts you to enter a number between
0 and 9.
4. Use the navigation key to browse all the Speed
Dialing numbers and press OK key to validate.
empty position and press “Edit” soft-key, then
key to
Speed Dialing menu
If you want to edit an existing number, find the
number you would like to edit and press “Edit”
soft-key. Use the “BkSp” soft-key to clear the
61
Page 62
Dial a Speed
, then the
(If dial
key will
Dialing Number
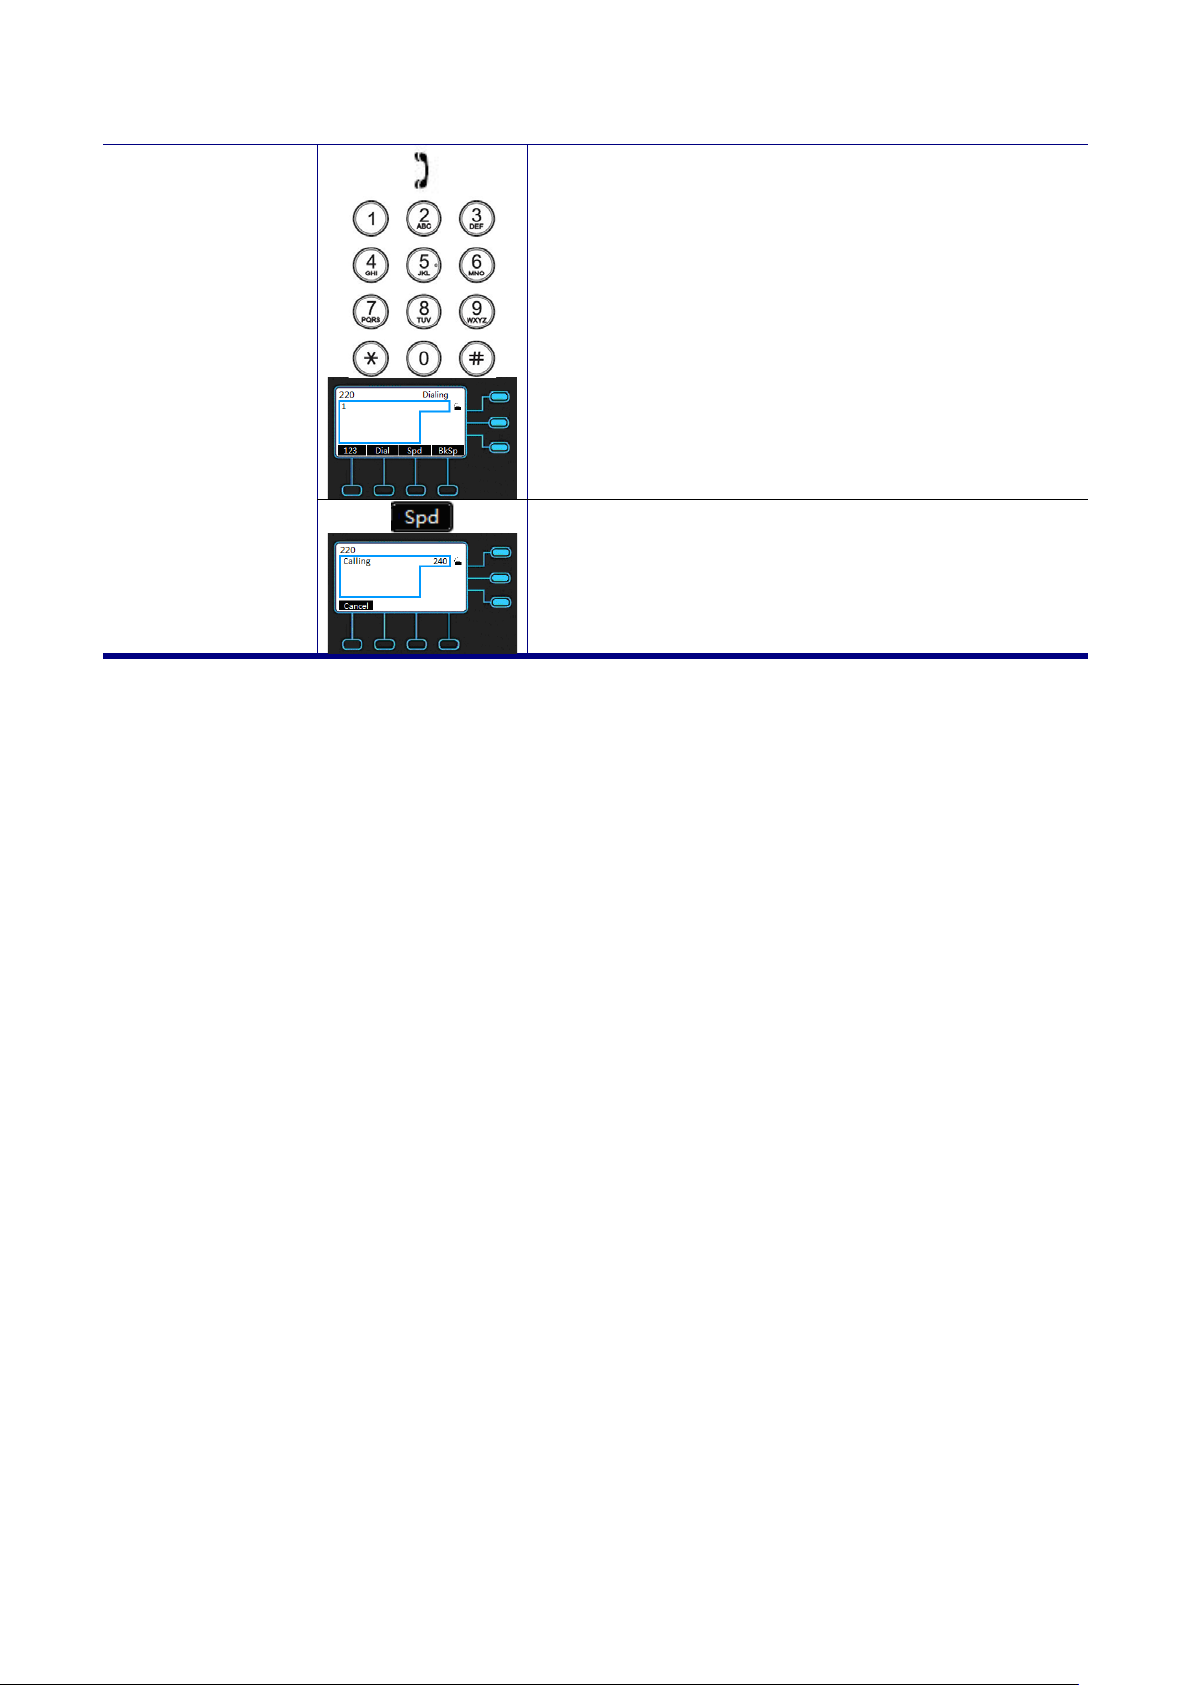
1. Dial the first digit between 0 and 9
LCD will show “Spd” soft-key option.
second digit, the “Spd” softdisappeared)
2. Press “Spd” soft-key, then M22 will dial out the
stored number. (If the stored number is empty,
then it will show “SPD is Empty!” on LCD)
62
Page 63
M22 USER MANUAL
Operation
Description
Admin Setting
Type the administrator’s
Account Setting
validate the selection. The LCD displays
Admin/User
Admin Setting
You will need to enter administrator’s password to set the administrator’s account, network,
QoS, dial timeout, language and reset to default.
The default network settings are the following:
Default IP address: 192.168.1.10
Default Subnet Mask: 255.255.255.0
Default Gateway: 192.168.1.1
Default DNS: 8.8.8.8
Default Administrator’s Username of Web: admin
Default Administrator’s Password of Web: 1234
There are 5 functions for setting:
Account Setting
Networking Setting
Voice Setting
Dial Timeout
Reset to Default
If you need to change these default settings, please refer to the following instructions.
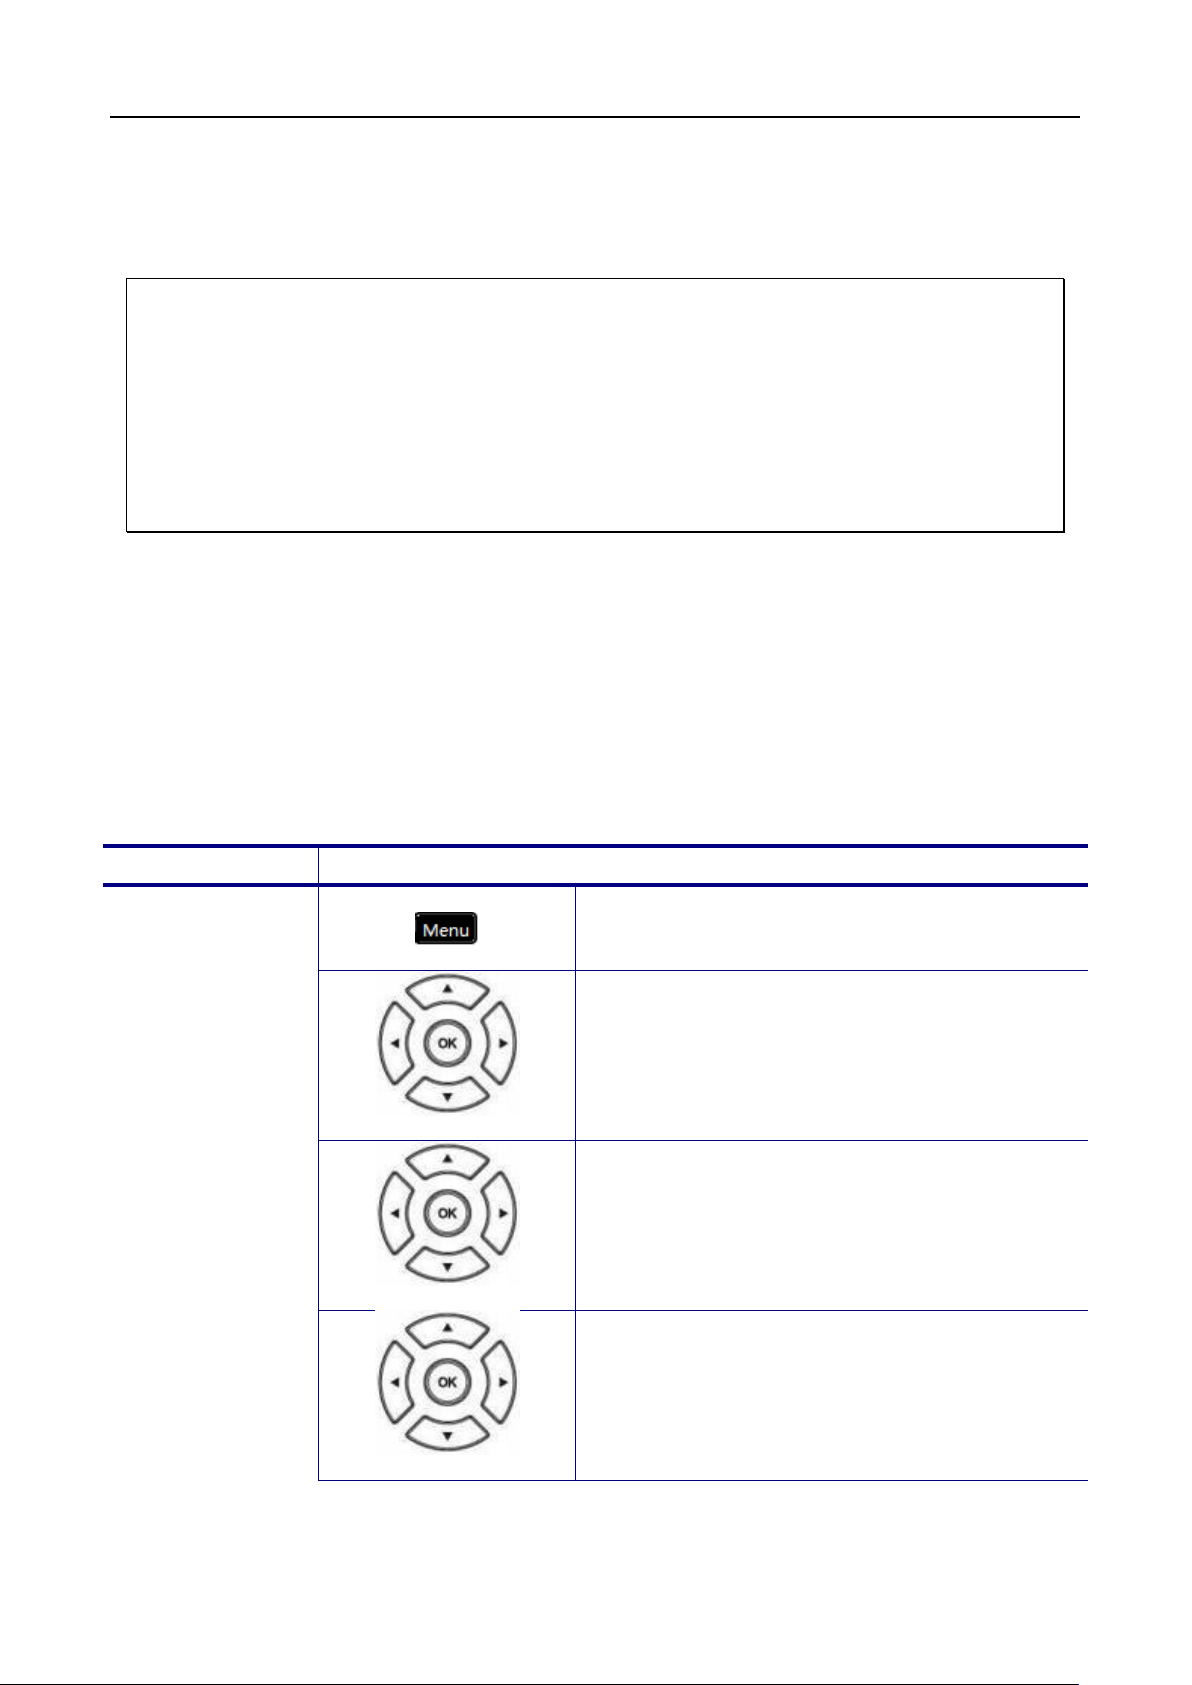
1. Press the Menu key on LCD.
2. Use the navigation key to select the Admin
Setting item. Press OK key to valid ate the
selection.
password to get into Admin menu.
Admin/User
Name, Password
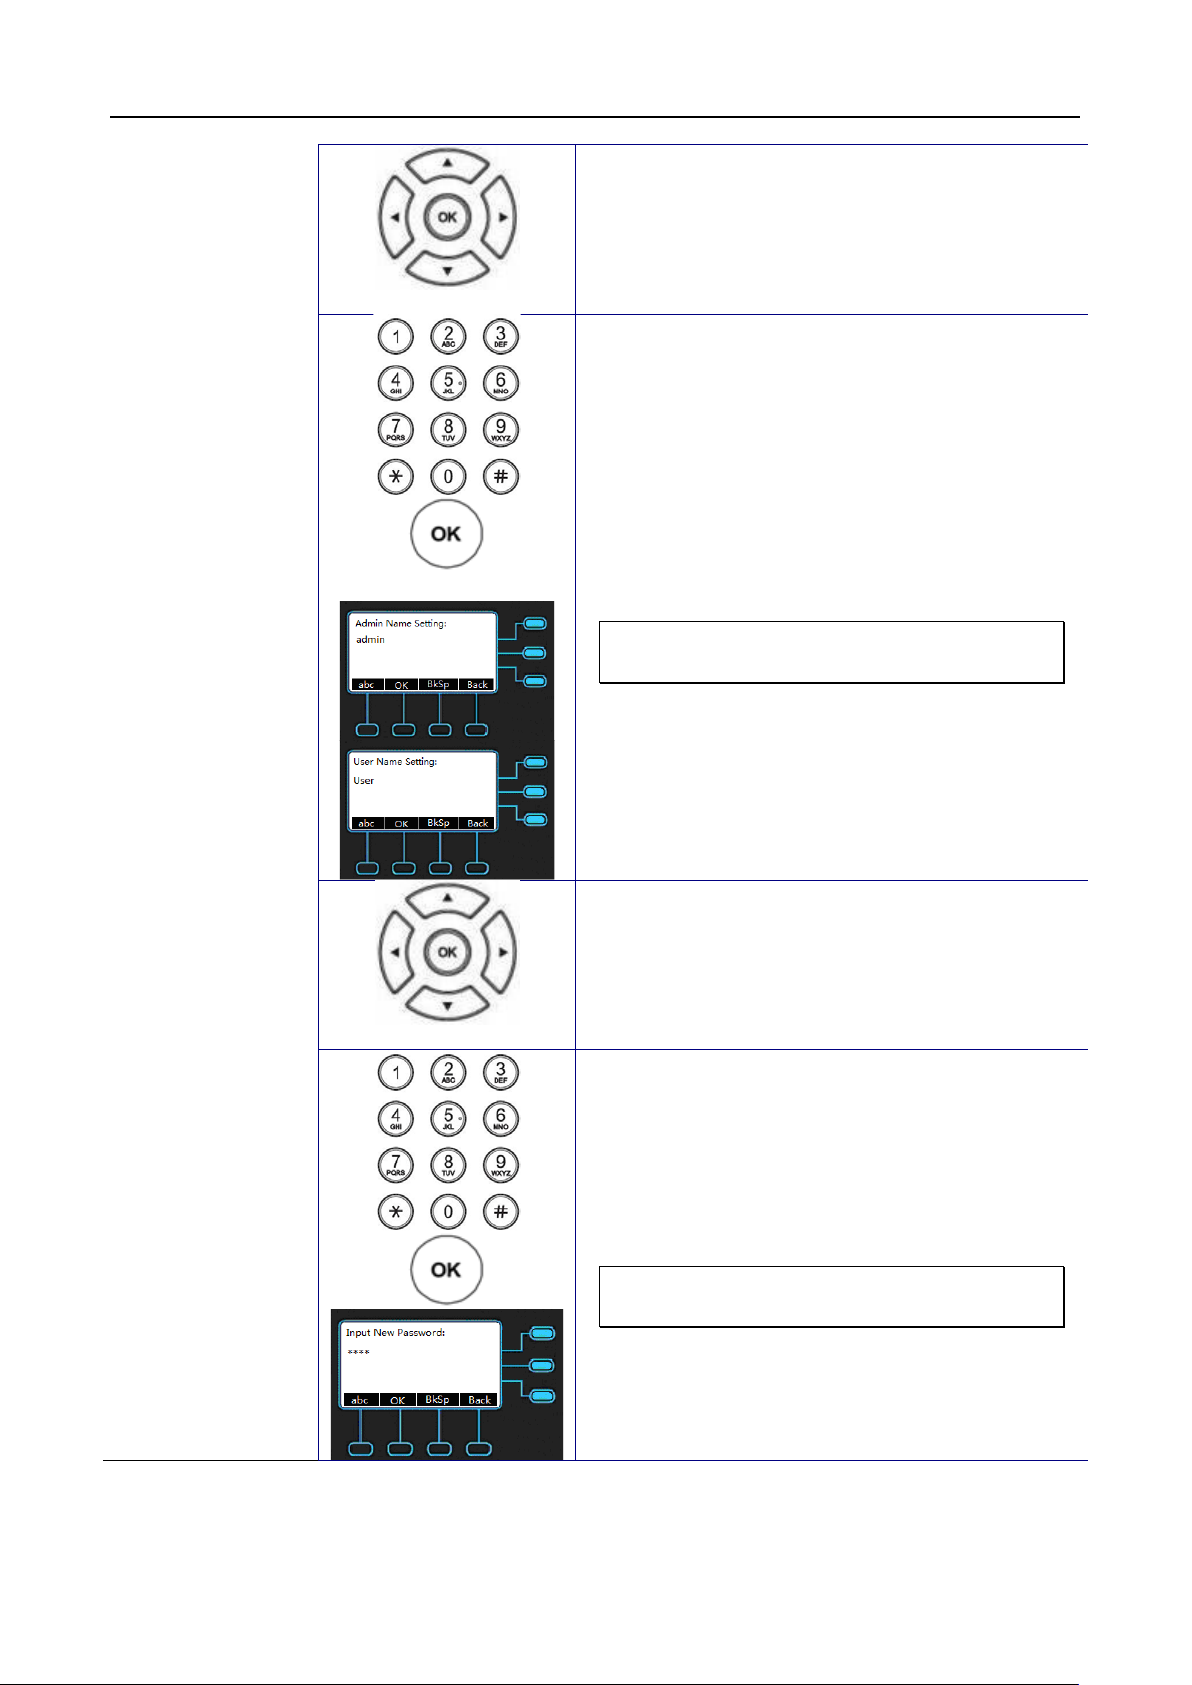
3. Use the navigation key to select the
Account setting item. Press OK key to
the Account Setting menu.
4. Select the Admin/User item and press OK
key.
63
Page 64
M22 USER MANUAL
Name
u. The default
Password
enter new password.
Press OK key to validate the input. The
5. Use the navigation key to choose Name
type and press OK key to validate.
6. Use the keypad to enter name and press
OK key to validate the input. Press the
Back to exit the men
Admin/User name is admin/user.
Note: You could use the “BkSp” soft-key
to delete the last character.
7. Go to previous menu, choose Password
item and press OK key.
8. Use the keypad to
default password is 1234.
Note: You could use the “BkSp” soft-key
to delete the last character.
64
Page 65
M22 USER MANUAL
Admin Setting
Type the administrator’s
Network Setting
CD displays
Network Type
and press
DHCP
validate the network parameter
Admin Setting
Type the administrator’s
Network Setting
CD displays
Dynamic IP
Address (DHCP)
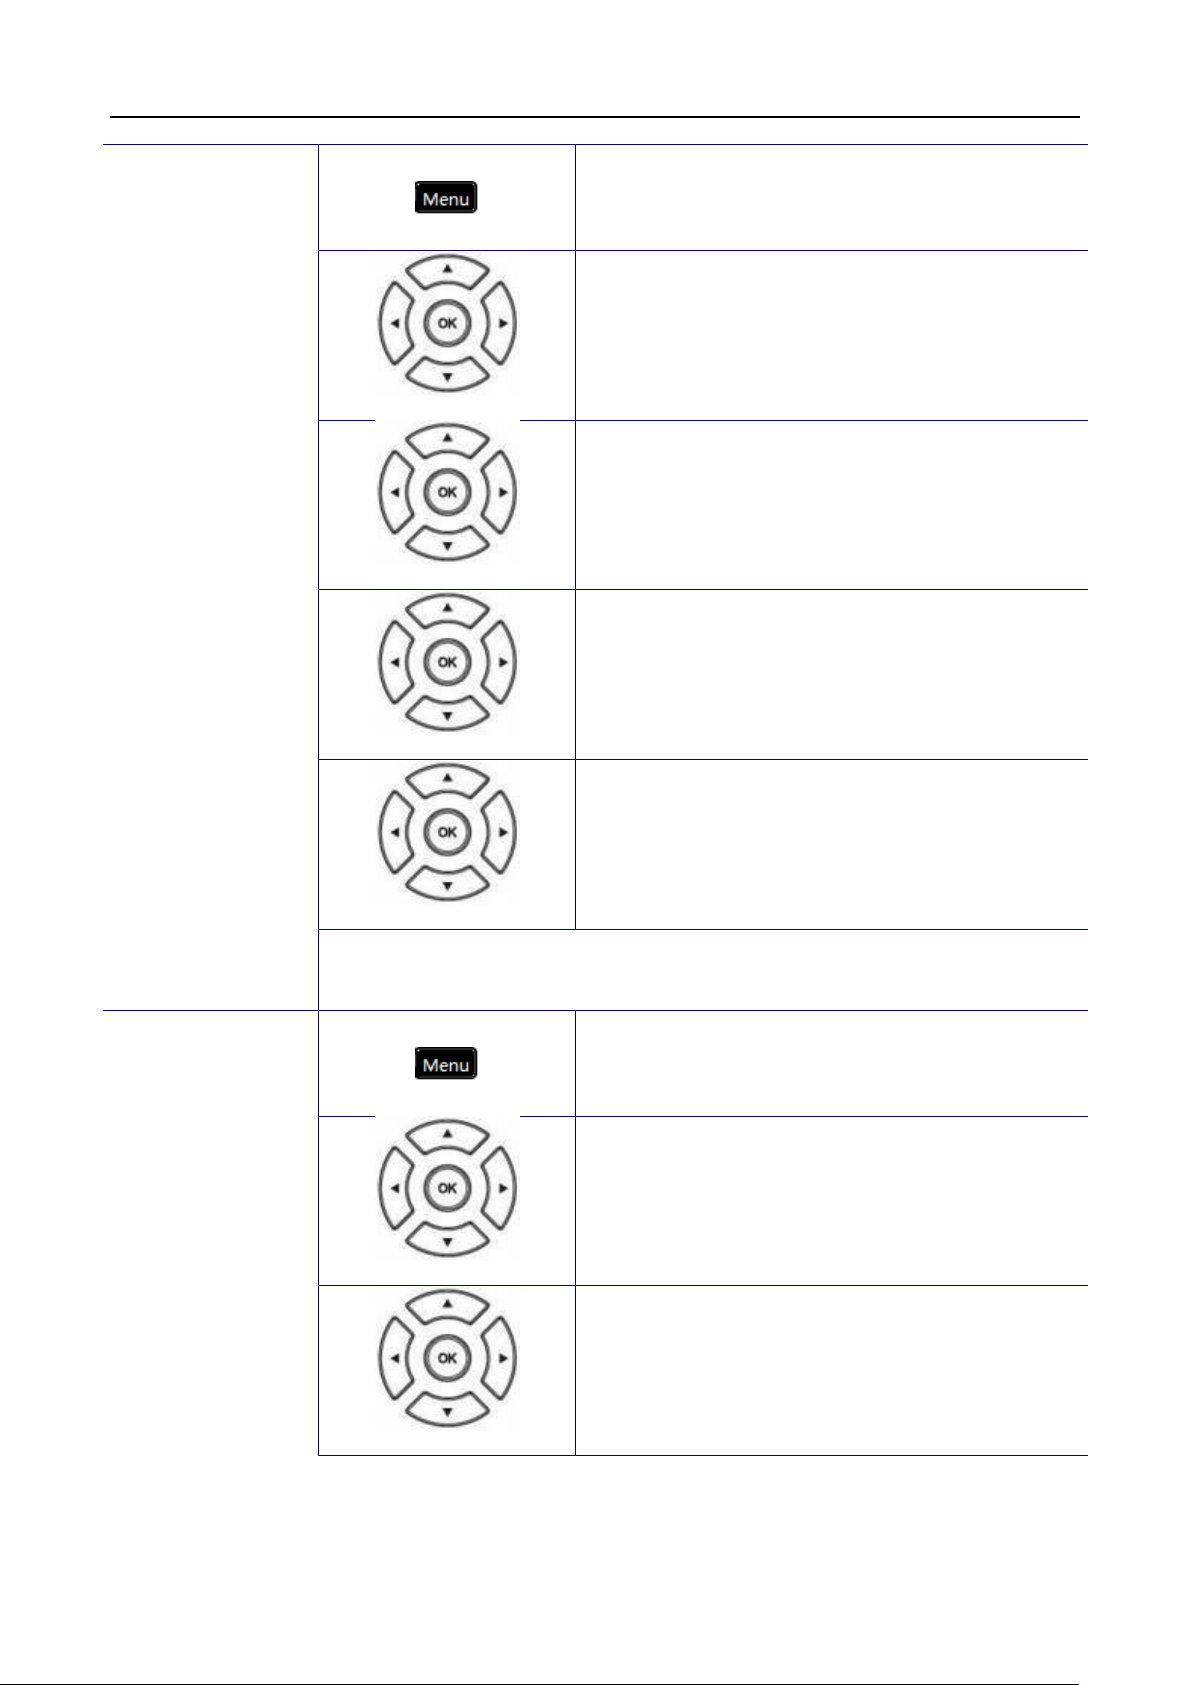
1. Press the Menu key on LCD.
2. Use the navigation key to select the Admin
Setting item. Press OK key to valid ate the
selection.
password to get into Admin menu.
3. Use the navigation key to select the
Network Setting item. Press OK key to
validate the selection. The L
the Network Type menu.
4. Select the Network Type item
OK key.
Static IP
Address
5. Use the navigation key to choose DHCP
type and press OK key to validate.
You must reboot the phone to
changing.
1. Press the Menu key on LCD.
2. Use the navigation key to select the Admin
Setting item. Press OK key to valid ate the
selection.
password to get into Admin menu.
3. Use the navigation key to select the
Network Setting item. Press OK key to
validate the selection. The L
the Network Type menu.
65
Page 66
M22 USER MANUAL
Network Type
and press
Static IP
Gateway, DNS
, press OK key to enter
key for
. Press OK key to
You must reboot the phone to validate the network parameter
Admin Setting
Type the administrator’s
Dial Timeout
IP Address, Subnet
Mask, Default
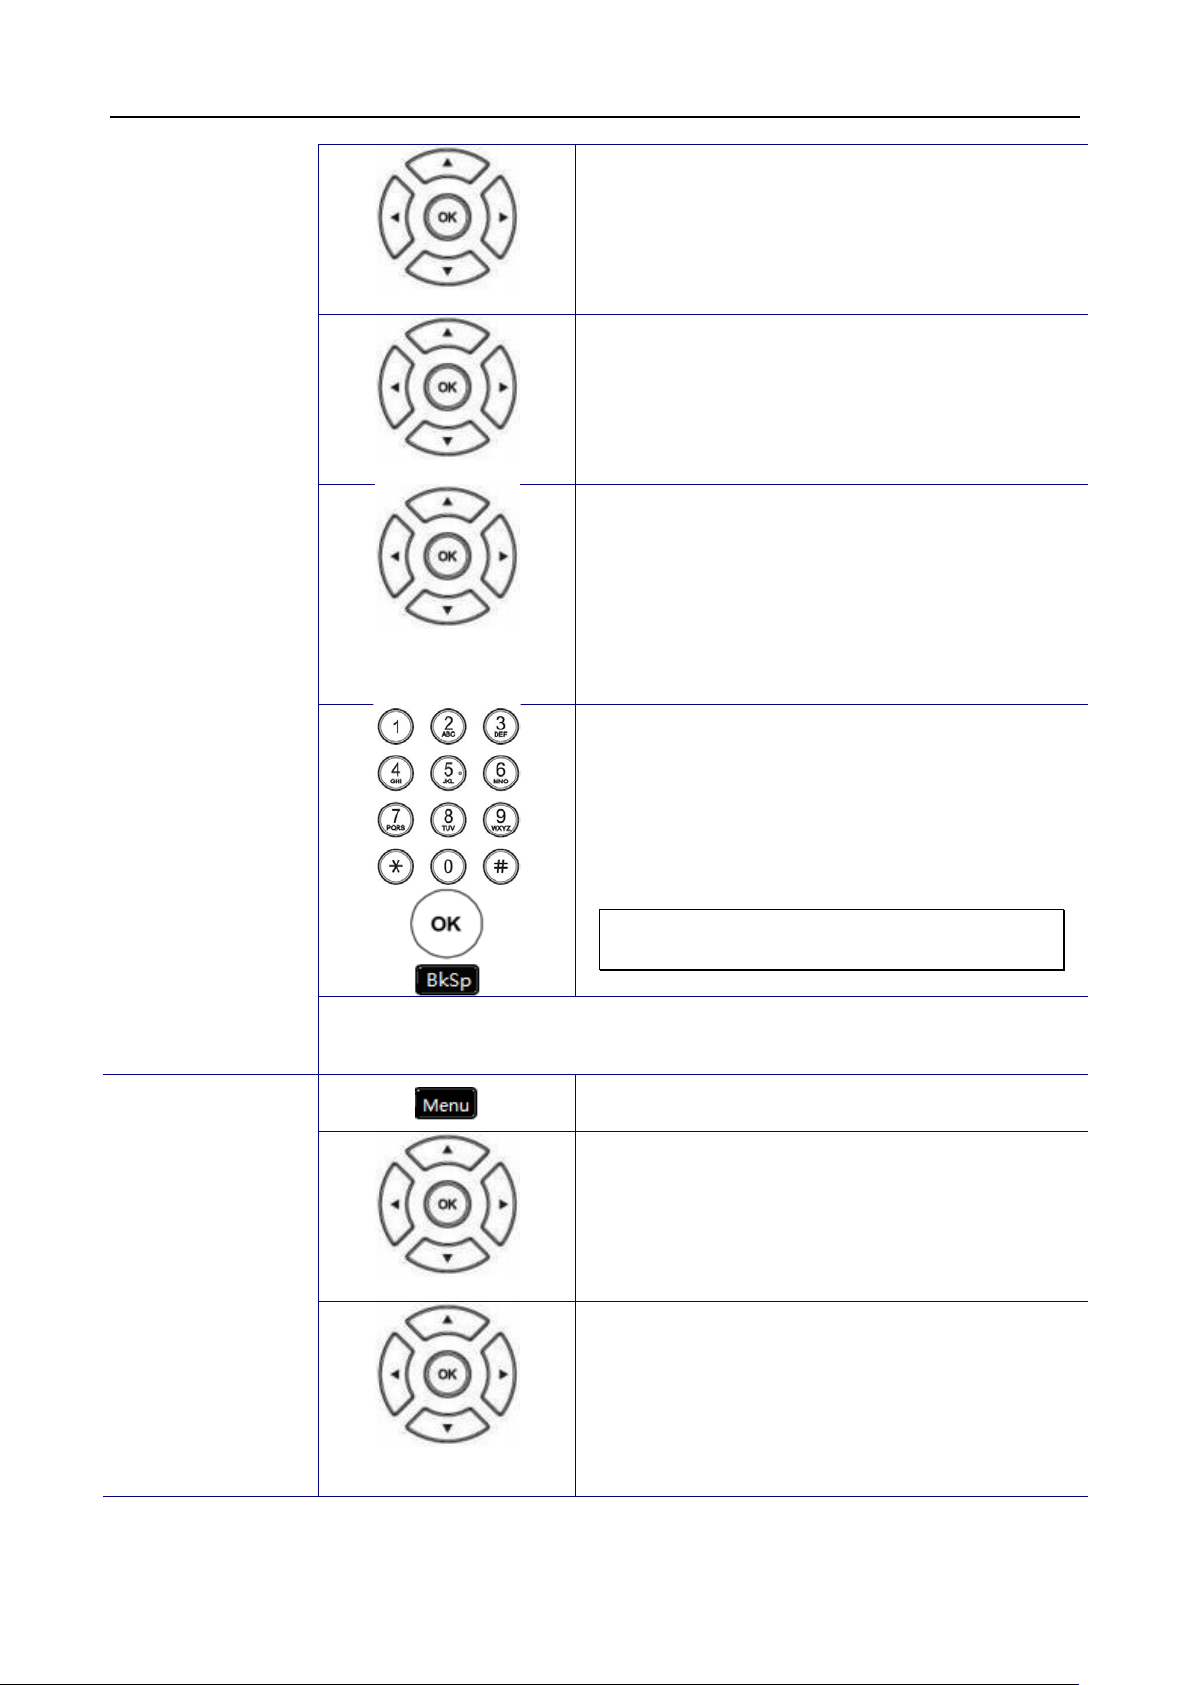
4. Select the Network Type item
OK key.
5. Use the navigation key to choose Static IP
type and press OK key to validate.
6. There are IP Address, Subnet Mask,
Default Gateway, and DNS items for user
to configure
particular entry.
Dial Timeout
changing.
7. Use the keypad to enter the IP address,
subnet mask, default gateway, or DNS of
your IP phone. Use the *
representing a dot ‧
validate the entered value. Press the Back
key to exit the menu.
Note: You could use the “BkSp” soft-key
to delete the last character.
1. Press the Menu key on LCD.
2. Use the navigation key to select the Admin
Setting item. Press OK key to valid ate the
selection.
password to get into Admin menu.
3. Use the navigation key to select the Dial
Timeout item. Press OK key to validate the
selection.
66
Page 67
M22 USER MANUAL
Admin Setting
Type the administrator’s
Network Setting
Ping
Ping
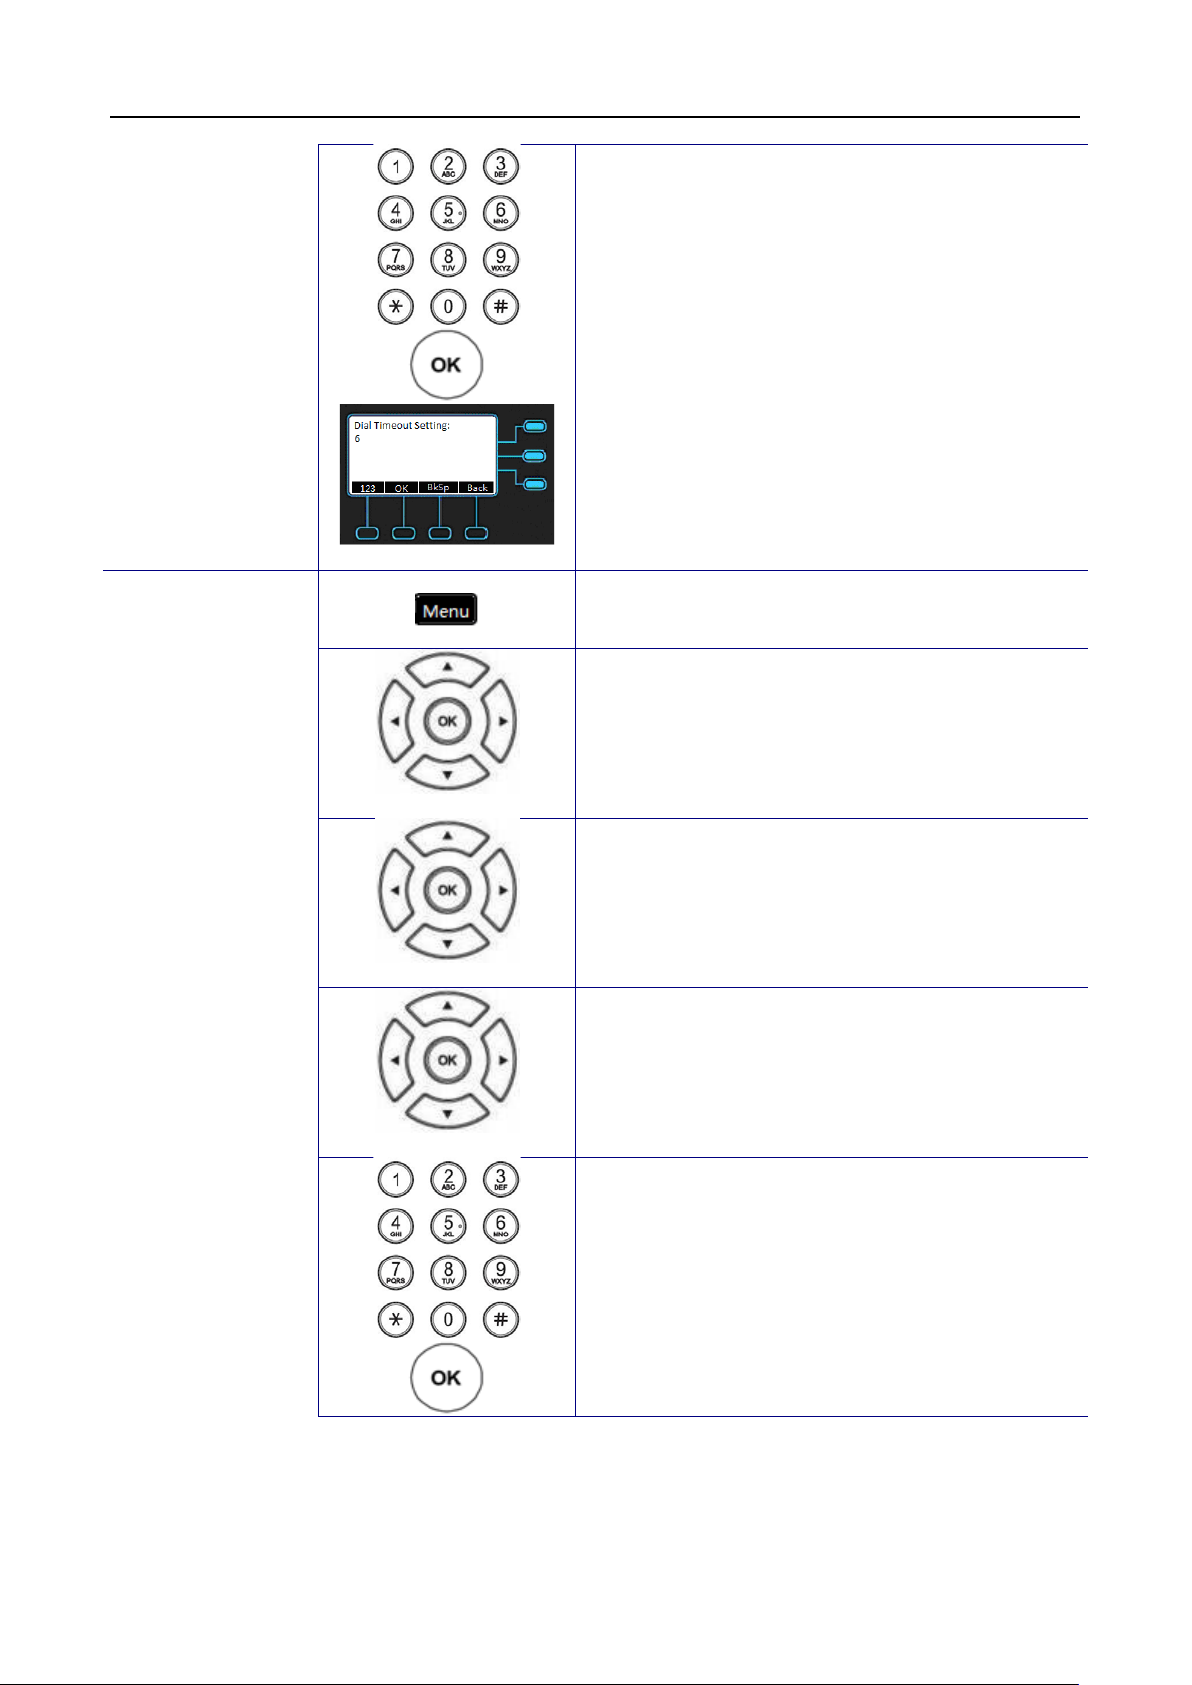
4. Use the keypad to enter the Dial Timeout
and press OK key to validate the input. The
You should enter a number from 0 to 9.
Press the Back key to exit the menu. The
default dial timeout setting is 6.
1. Press the Menu key on LCD.
2. Use the navigation key to select the Admin
Setting item. Press OK key to valid ate the
selection.
password to get into Admin menu.
3. Use the navigation key to select the
Network Setting item. Press OK key to
validate the selection.
4. Select the Ping item and press OK key.
5. Use the keypad to input network address
and press OK key, then LCD will show the
ping result several seconds later.
67
Page 68
M22 USER MANUAL
Admin Setting
Type the administrator’s
Reset to Default
Configuration
item and press
Log
All
Reset to Default
1. Press the Menu key on LCD.
2. Use the navigation key to select the Admin
Setting item. Press OK key to validat e the
selection.
password to get into Admin menu.
3. Use the navigation key to select the Reset
to Default item. Press OK key to validate
the selection.
4. Select the Configuration
OK key.
5. Use the navigation key to choose “Yes” to
reset configuration or choose “No” to exit
the menu, and press OK key to validate.
Phonebook/Call
6. Go to previous menu, choose Phonebook
item and press OK key.
7. Use the navigation key to choose “Yes” to
reset phonebook or choose “No” to exit the
menu, and press OK key to validate.
8. Go to previous menu, choose All item and
press OK key.
68
Page 69

M22 USER MANUAL
9. Use the navigation key to choose “Yes” to
reset all or choose “No” to exit the menu,
and press OK key to validate.
69
Page 70
M22 USER MANUAL
Operation
Description
Reboot
Reboot
Sometimes you will need to reboot your phone to apply new settings.
Reboot
1. Press the Menu key on LCD.
2. Use the navigation key to select the Reboot
item. Press OK key to validate the selection.
And Phone will show a “Reboot” message and
the phone will restart.
Note: the M22 takes about 2 minutes to startup after rebooting; there will be a series of
diagnostic lights on the phone during the process. If your phone does not become
operational within 2 minutes, contact your administrator or Service Provider support line.
70
Page 71

M22 USER MANUAL
Web Configuration
Login page
The default network set tings are the following:
Default IP address: 192.168.1.10
Default Subnet Mask: 255.255.255.0
Default Gateway: 192.168.1.1
Default DNS: 8.8.8.8
Default Administrator’s Username of Web: admin
Default Administrator’s Password of Web: 1234
Default User’s Username of Web: user
Default User’s Password of Web: 1111
There are two modes to access the IP phone’s webpage: Administrator and User mode.
Here lists several differences between two modes:
1. There is no Network page for user mode.
2. There is no SW Upgrade page for user mode.
3. There is no SIP page for user mode.
4. In System page of user mode, user’s password and time settings ar e kept for user to
set.
Accessing the phone through web browser, just simply enter the “http://phone-ip” in the
location field of the browser. If you are not sure about the IP address of the phone, you can
examine the current IP address through phone’s menu. (Press Menu key, select item “3.
Information”, use navigation key to check the IP address)
71
Page 72
M22 USER MANUAL
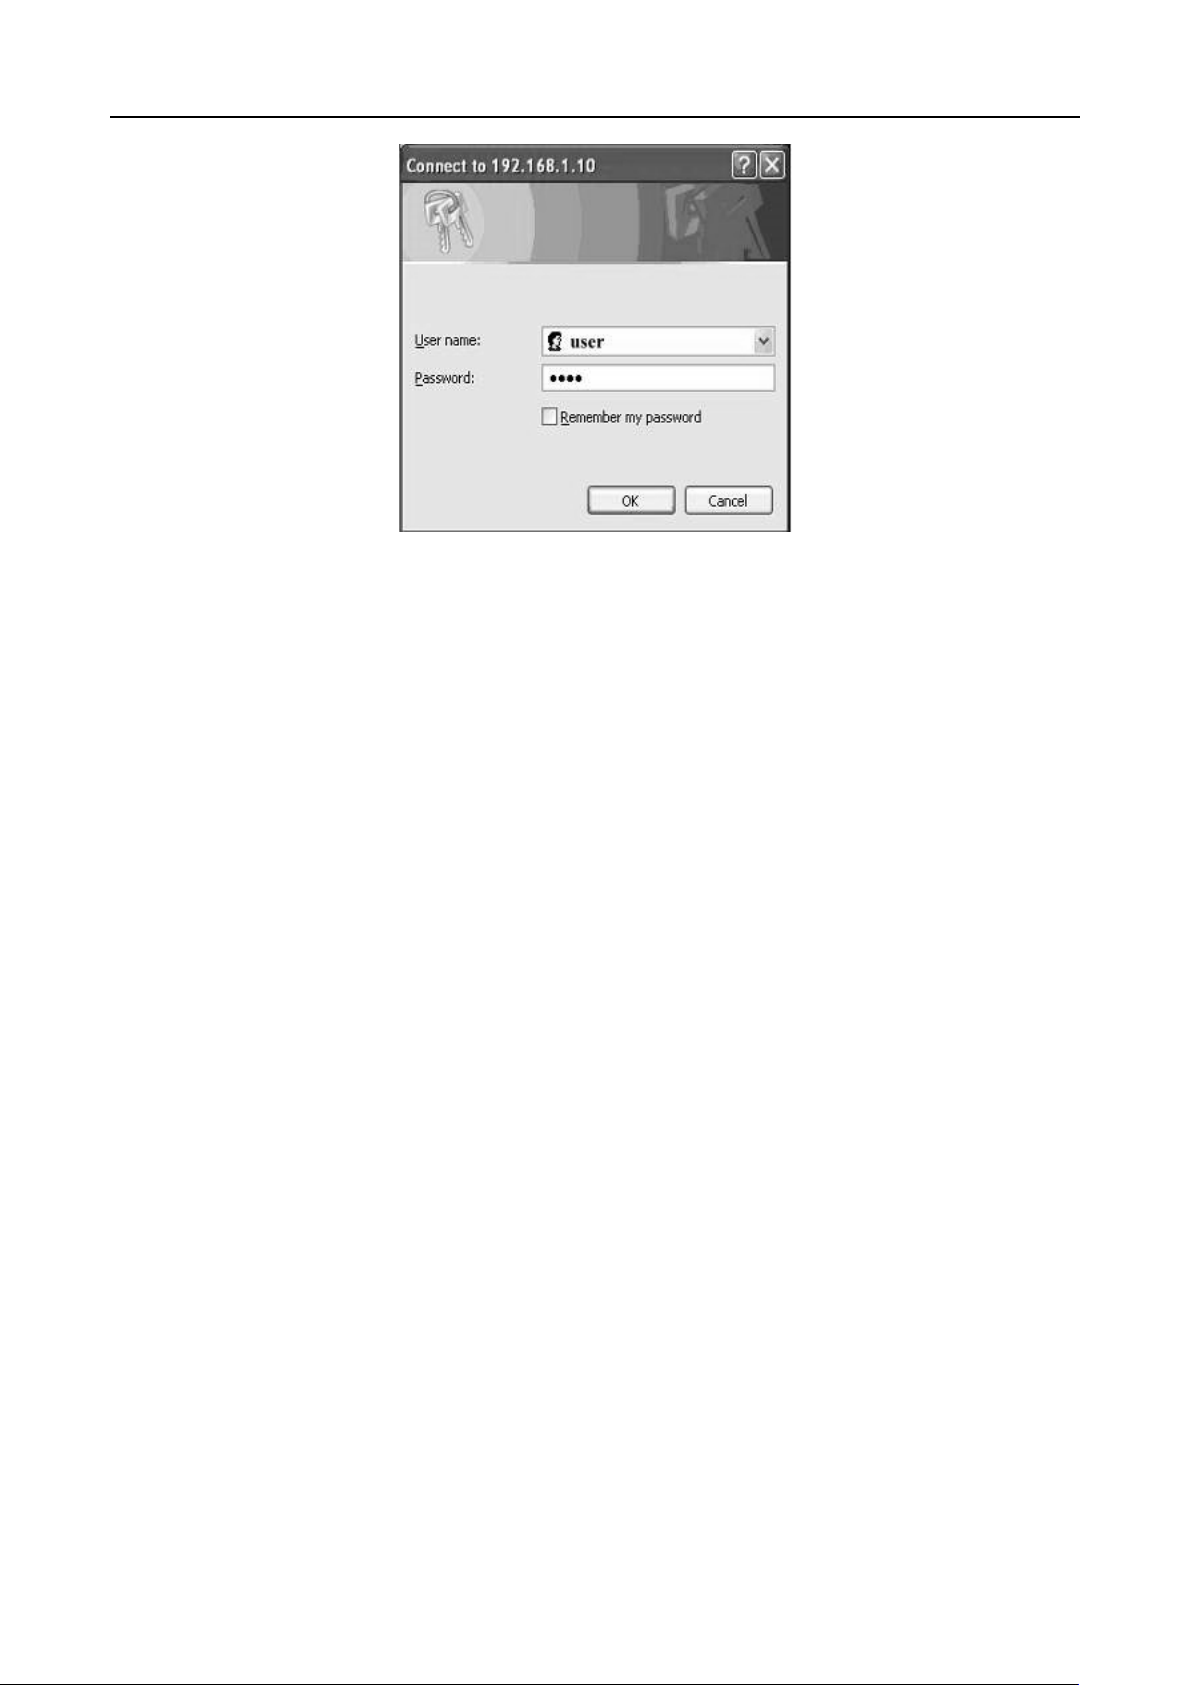
Press ENTER key to validate, the above dialog box will pop up and prompt you t o provide
the username and password in order to prevent unauthorized user accessing the phone.
Please input the username and password then press OK button to enter phone’s webpage.
72
Page 73
M22 USER MANUAL
Configuration Pages
Information Page
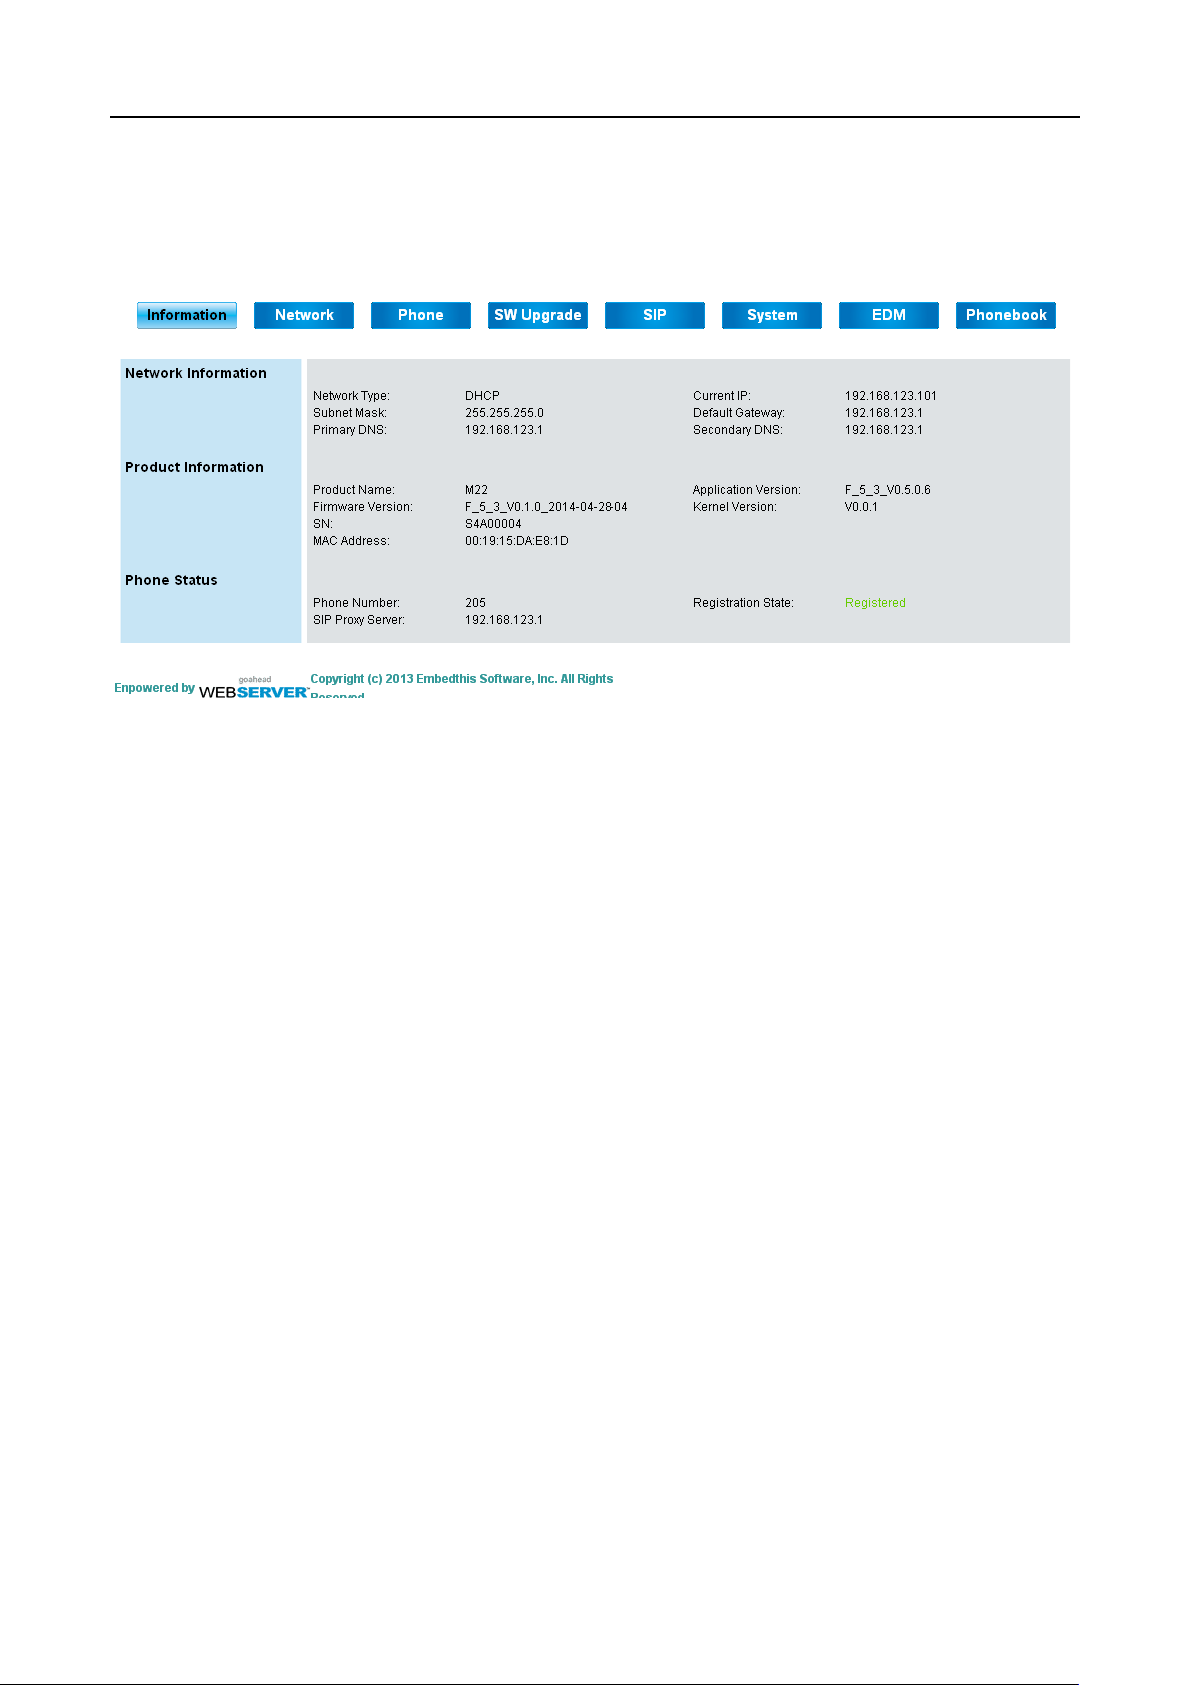
The following is the default page you will see when you login to the phone’s webpage.
In this page, it shows Network/Product information and Phone status.
For Phone status:
“Registr ation State” will be marked “Registered” with green text.
“Unregistered” will be marked with red text.
73
Page 74
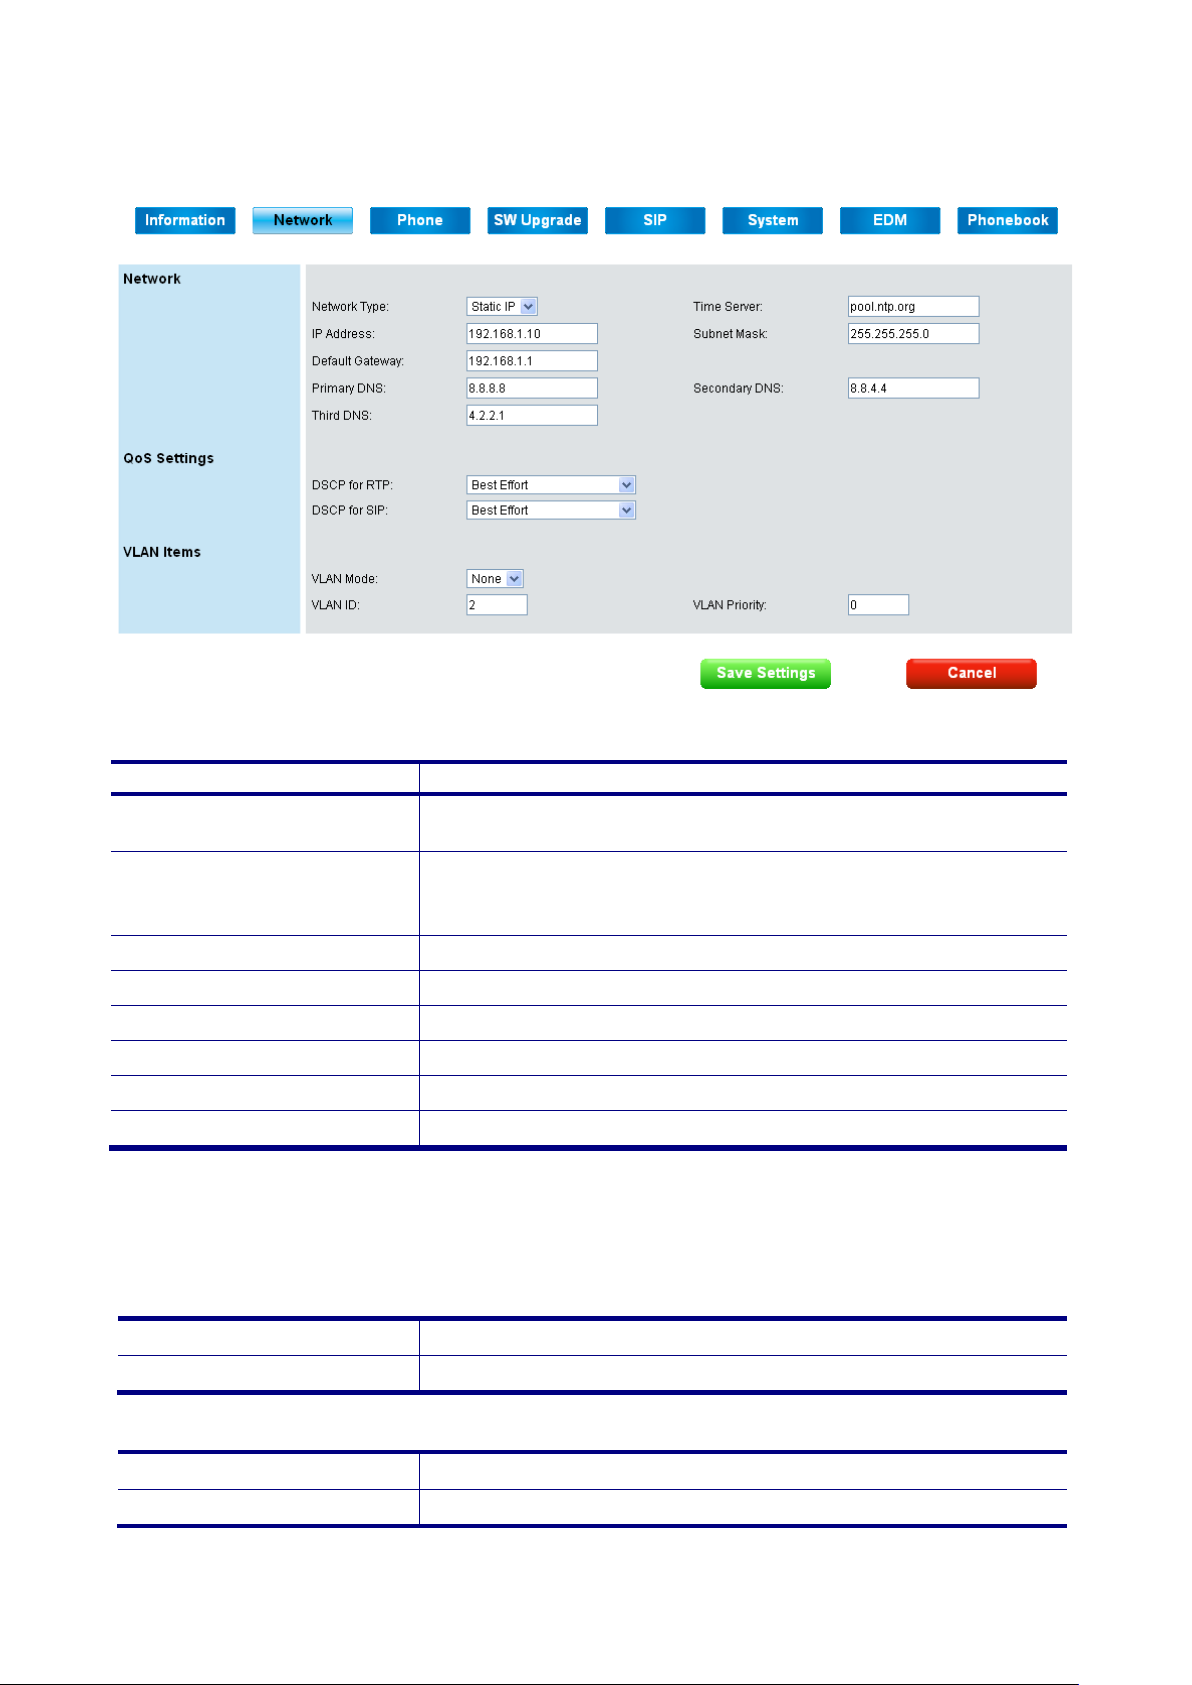
Network Page
Field Name
Function
Select the network type. There are two types: DHCP, Static
IP.
SNTP (Simple Network Time Protocol) server. Phone will
sync correct time from the server according to phone’s time
zone setting (In “System” page).
IP Address
Set IP address when network type is Static IP.
Subnet Mask
Set subnet mask when network type is Static IP.
Default Gateway
Set gateway address when network type is Static IP.
Primary DNS
Set first DNS server when network type is Static IP.
Secondary DNS
Set second DNS server when network type is Static IP.
Third DNS
Set third DNS server when network type is Static IP
DSCP for RTP
Select Differentiated Services Code Point (DSCP) for RTP.
DSCP for SIP
VLAN Mode
Set the VLAN routing mode.
VLAN ID
Network:
Network Type
Time Server
It is necessary to reboot the phone after you change the above network related items.
Press “Save Settings” button first, then it will pop up “Need to Reboot” tips, and choose
“Confirm” button to restart the phone.
QoS Settings:
Select Differentiated Services Code Point (DSCP) for SIP.
VLAN Items:
Set VLAN ID.
74
Page 75

M22 USER MANUAL
VLAN Priority
Set the VLAN priority.
Buttons:
Save Settings
Cancel
Save changes in this page to the phone.
Discard all changes in this page.
75
Page 76
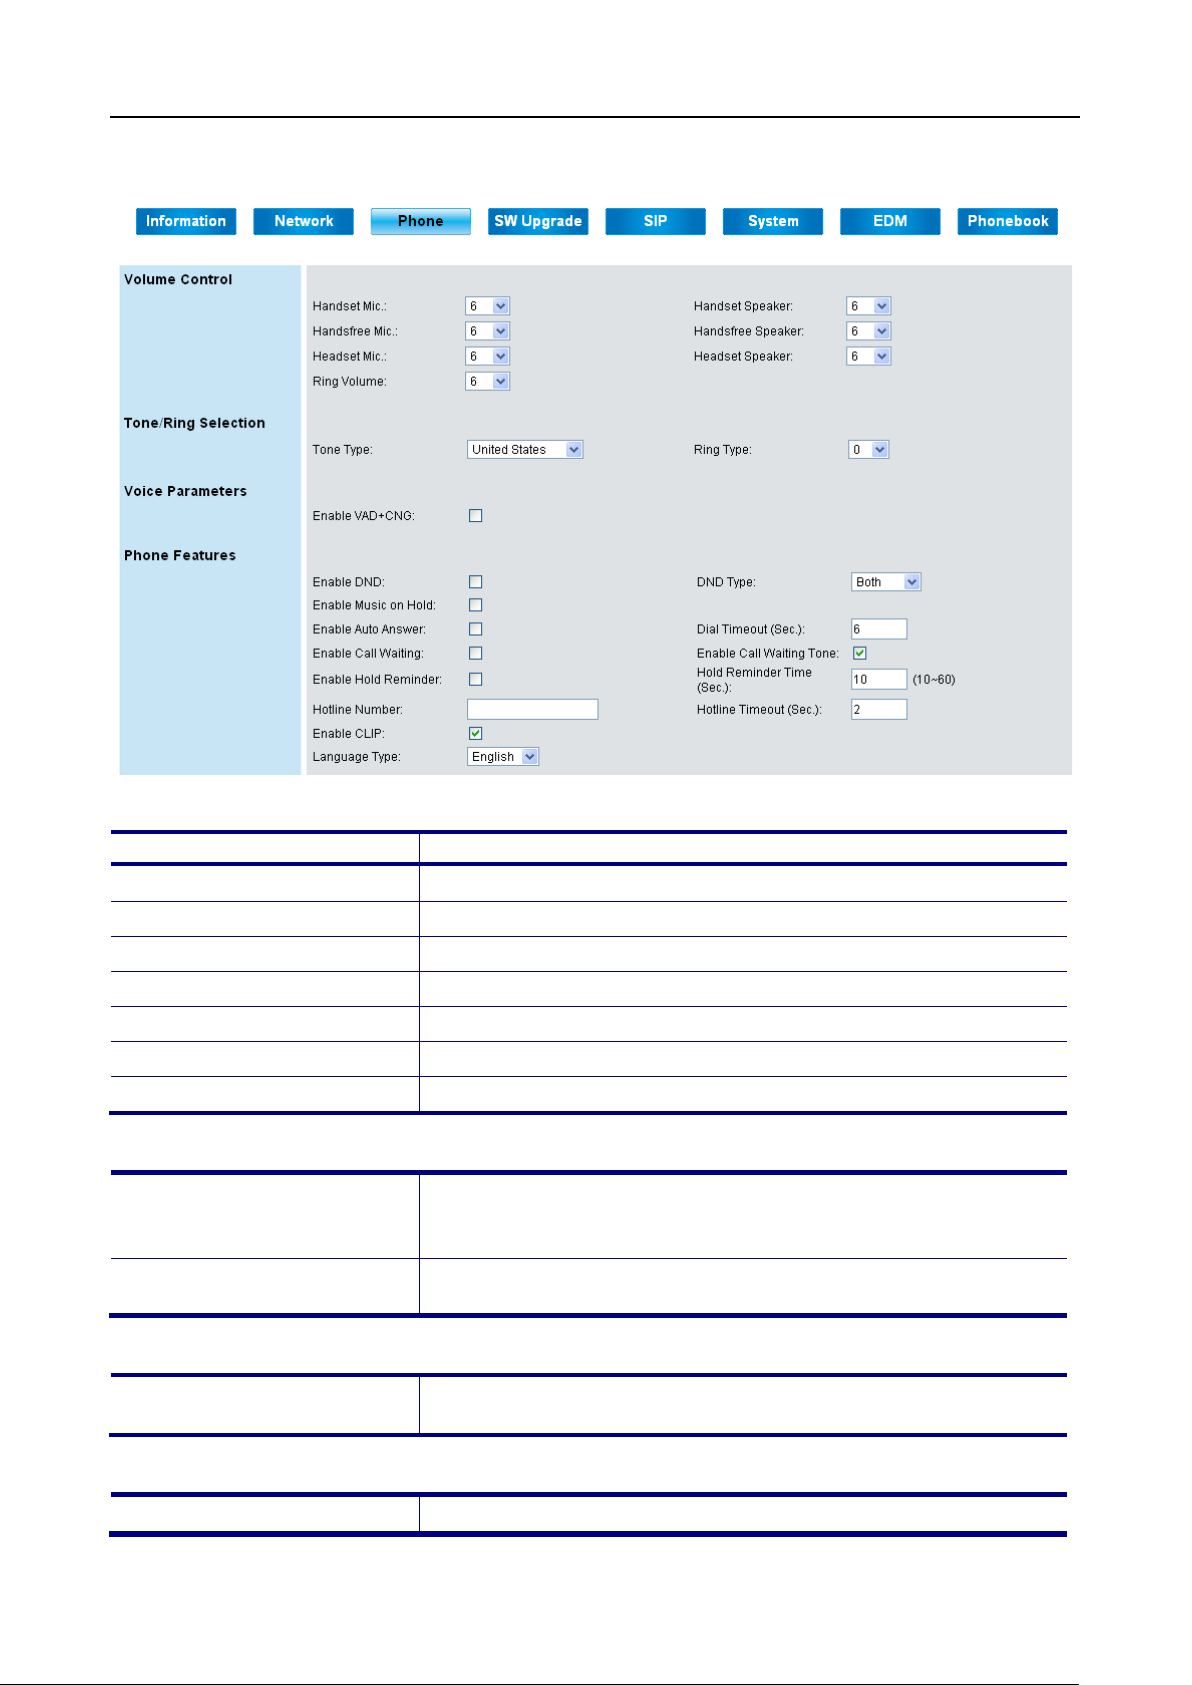
M22 USER MANUAL
Field Name
Function
Handset Mic
Select the volume level of handset microphone.
Handset Speaker
Select the volume level of handset speaker.
Handsfree Mic
Select the volume level of hands-free microphone.
Handsfree Speaker
Select the volume level of hands-free speaker.
Headset Mic
Set the volume level of headset microphone.
Headset Speaker
Set the volume level of headset speaker.
Ring Volume
Select the volume level of ring.
Select the tone type for country. There are 13 tone types for
If user modifies this item, it will not synchronize
with IG server.
Select the ring type. There are 13 ring t ypes for selection. If
user modifies this item, it will not synchronize with IG server.
Enable VAD+CNG
Turn on VAD (Voice Activity Detection) and CNG
(Comfortable Noise Generation) function.
Enable DND
Turn on “Do Not Disturb” function. When it is enabled, all
Phone Page
Volume Control:
Tone/Ring Selection:
Tone Type
Ring Type
Voice Parameters:
selection.
Phone Features:
76
Page 77

M22 USER MANUAL
incoming call will get busy tone when they make call to this
phone number.
DND Type
Select DND action range.
Enable Music on Hold
Plays hold music on phone when held by remote.
Turn on Auto Answer function. When it is enabled, phone will
pick up the call automatically.
Dial Timeout (Sec.)
Set the timeout (0~30 sec) to automatically end dialing.
When Call Waiting function is enabled and user is in talk
Call
one is enabled) to indicate
user. If it’s disabled, when user is in talk state, other
incoming caller will get busy tone.
Turn on the Call Waiting Tone function. At talk state, a beep
is
ringing in.
Enable Hold Reminder
Turn on the Hold Reminder function.
When a call is held, phone will remind user with a beep tone
every this time period.
Hotline Number
This string is only for “Hotline Number” type.
Hotline Timeout (Sec.)
Set hotline time (1~60 sec) for Hotline Number.
Enable Auto Answer
Enable Call Waiting
state, phone can allow other incoming calls. It plays
Waiting Tone (if Call Waiting t
Enable Call Waiting Tone
Hold Reminder Time (Sec.)
Enable CLIP
Language Type
tone will indicate user every 10 seconds when another call
Turn on the CLIP function.
Select language type for local display.
77
Page 78
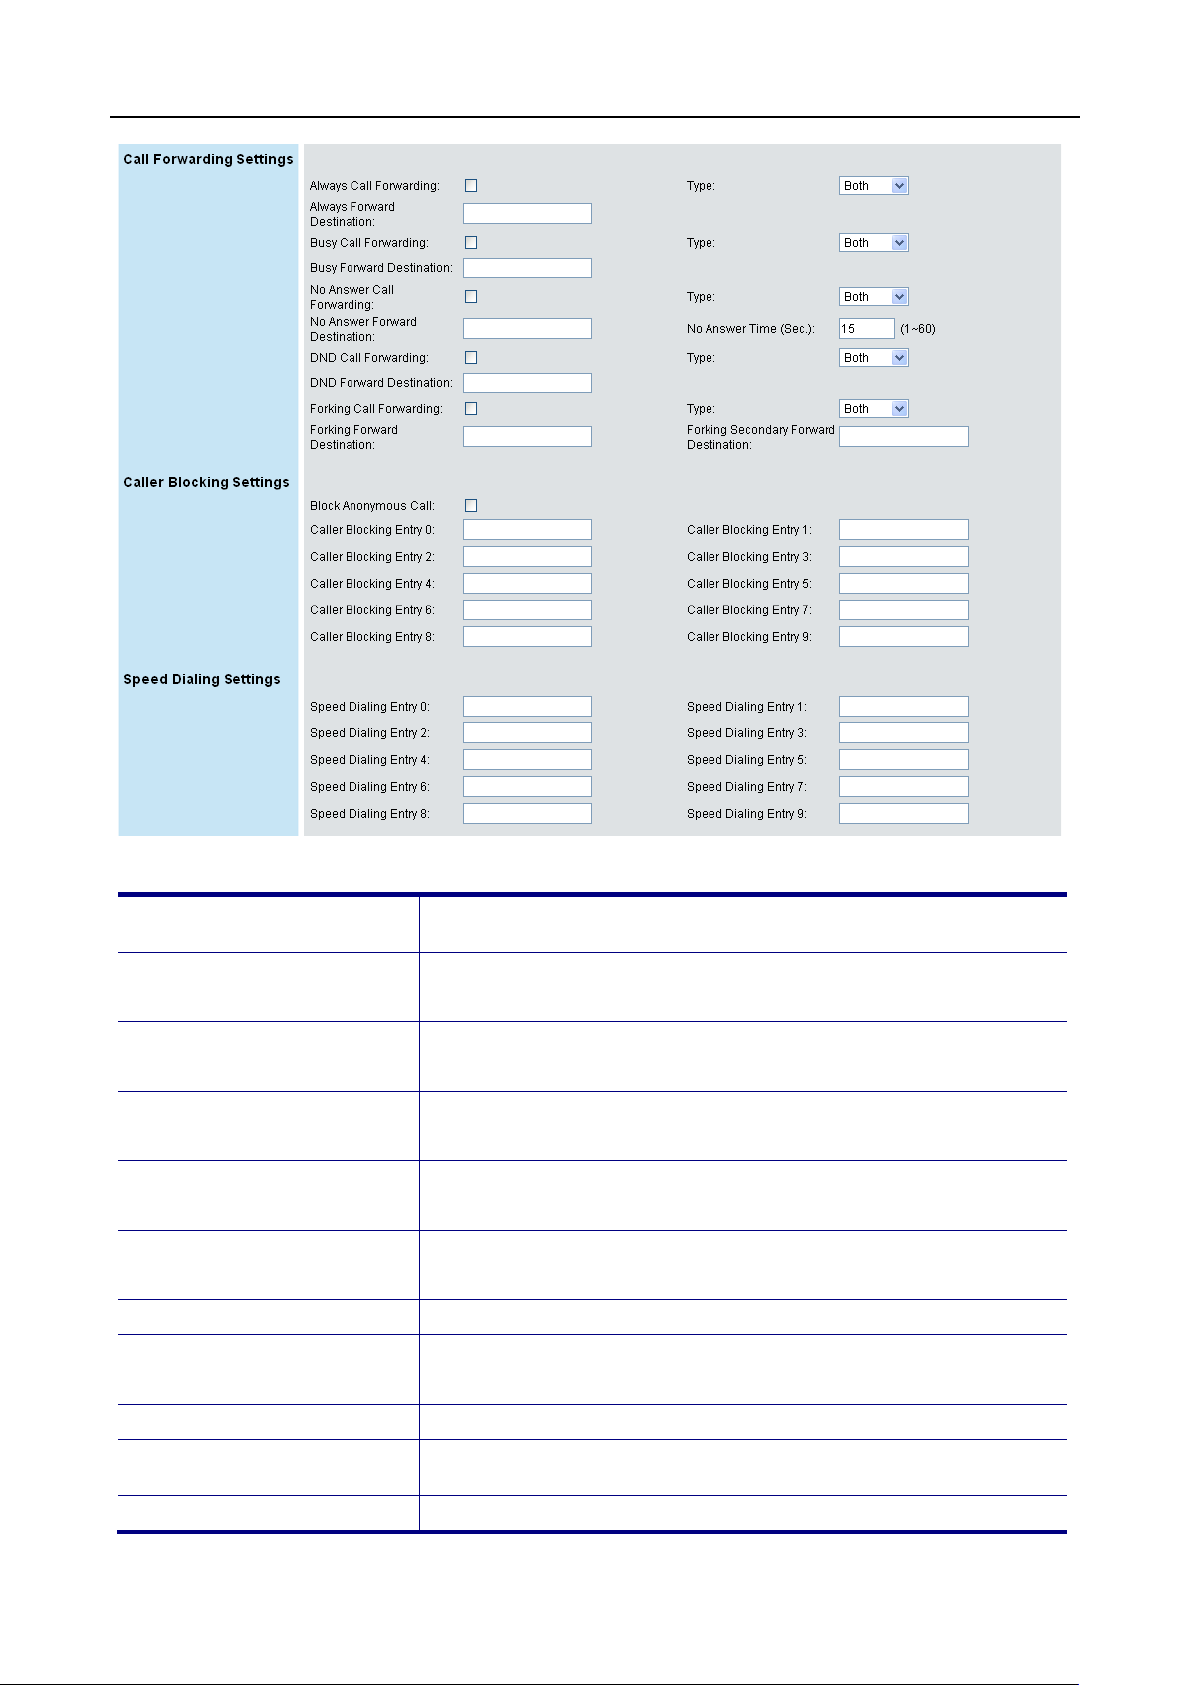
M22 USER MANUAL
Always Call Forwarding
Turn on the always call forwarding function, the right side is
selecting forward action range.
Always Forward
Busy Call Forwarding
the right side is
Busy Forward
No Answer Call
the right side
No Answer Forward
No Answer Timeout (Sec.)
Set the timeout for no answer call forwarding.
DND Call Forwarding
the right side is
DND Forward Destination
Set where the call will be forwarded to.
Forking Call Forwarding
Turn on the forking call forwarding function, the right side is
selecting forward action range.
Forking Forward
Set where the call will be forwarded to.
Call Forwarding Settings:
Destination
Destination
Forwarding
Destination
Set where the call will be forwarded to.
Turn on the busy call forwarding function,
selecting forward action range.
Set where the call will be forwarded to.
Turn on the no answer call forwarding function,
is selecting forward action range.
Set where the call will be forwarded to.
Turn on the DND call forwarding function,
selecting forward action range.
78
Page 79
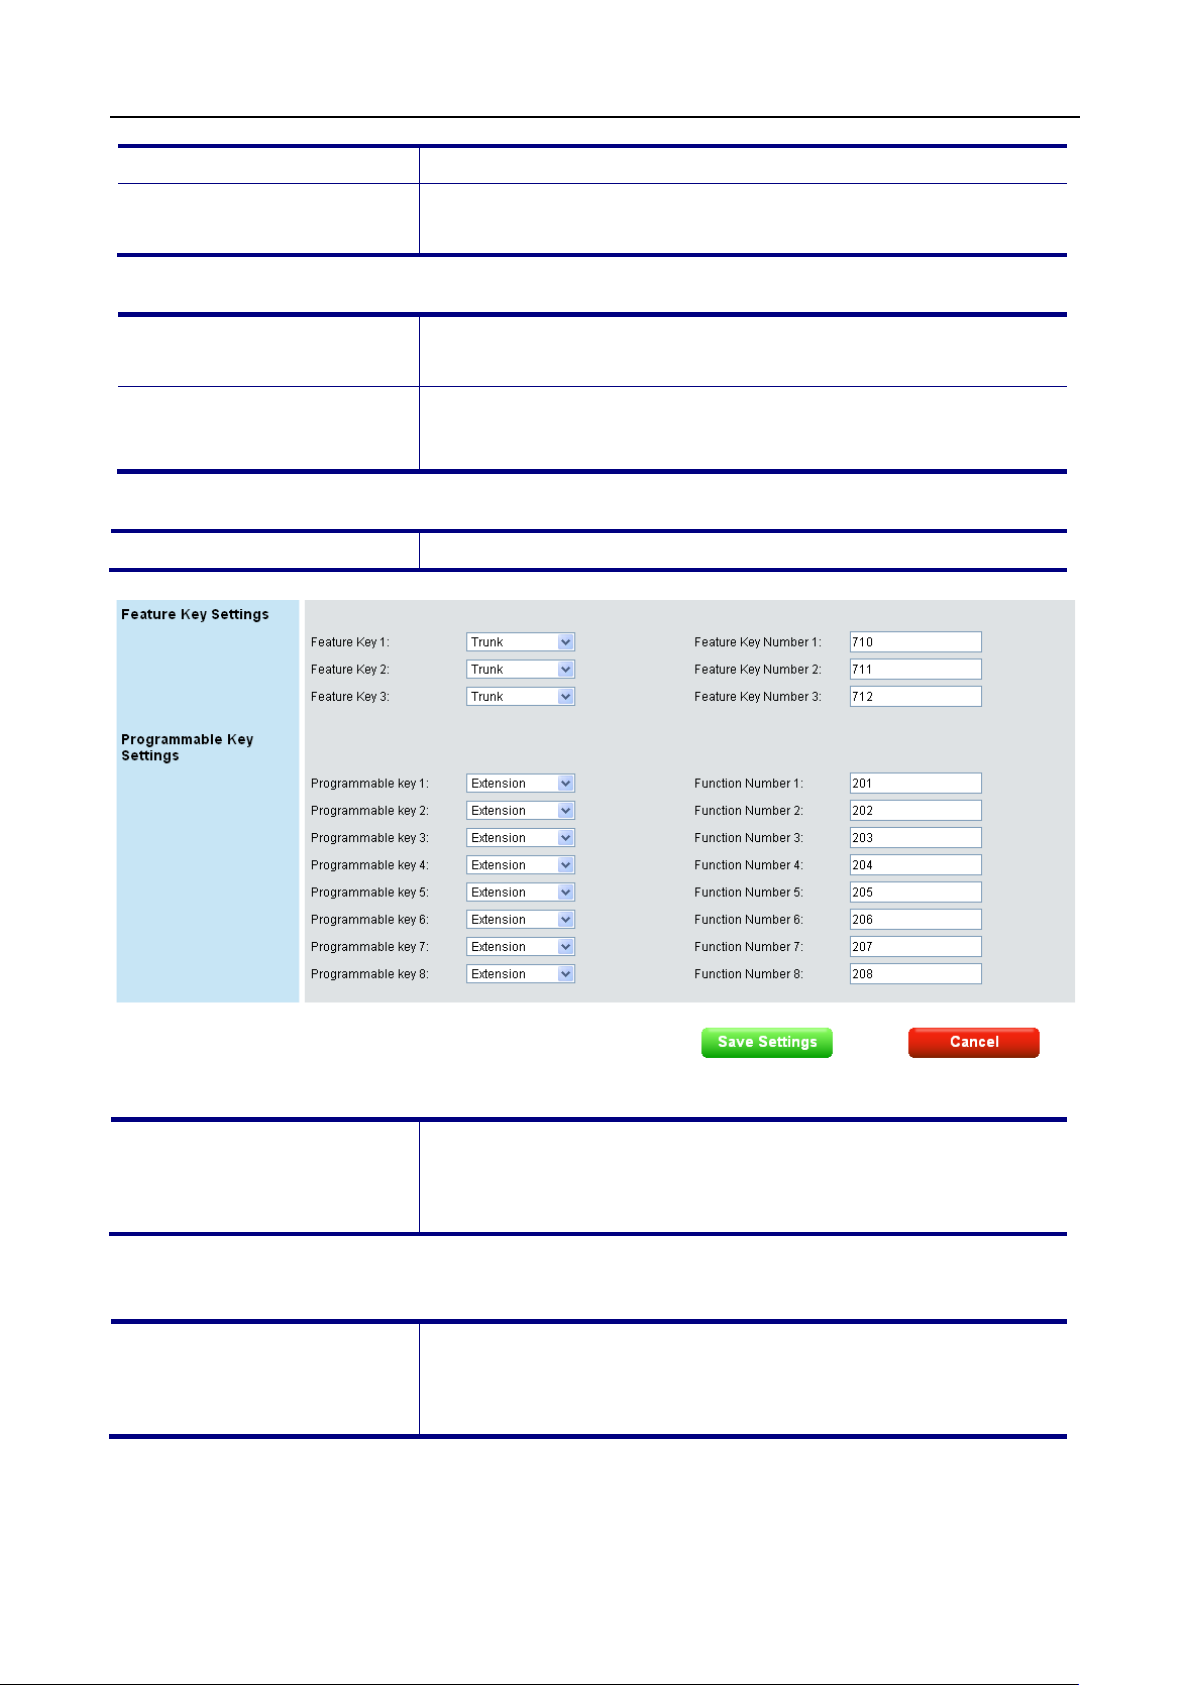
M22 USER MANUAL
Destination
Forking Secondary
when first destination
Enable Block Anonymous
Caller Blocking Entry 0~9
There are 10 blocking entries for user to set. When the caller
call will be blocked. The remote party will hear busy tone.
Speed Dialing Entry 0~9
There are 10 speed dialing entries for user to set.
There are 9 types could be chosen, None, Extension, Trunk,
Do Not Disturb, Live Record, Virtual
s. Phone will do the relative function when
user pressing related feature key button.
There are 9 types could be chosen, None, Extension, Trunk,
Do Not Disturb, Live Record, Virtual
s. Phone will do the relative function when
user pressing related programmable key button.
Forward Destination
Caller Blocking Settings:
Set where the call will be forwarded to
is busy.
Call
Speed Dialing Settings:
Turn on to block the incoming call without Display Name.
ID of the incoming call matches a certain blocking entry, the
Feature Key Settings:
Feature Key 1~3
Call Park, Feature Key,
Mailbox and Other
Programmable Key Settings:
Programmable Key 1~8
Call Park, Feature Key,
Mailbox and Other
Buttons:
79
Page 80

M22 USER MANUAL
Save Settings
Cancel
Save changes in this page to the phone.
Discard all changes in this page.
80
Page 81
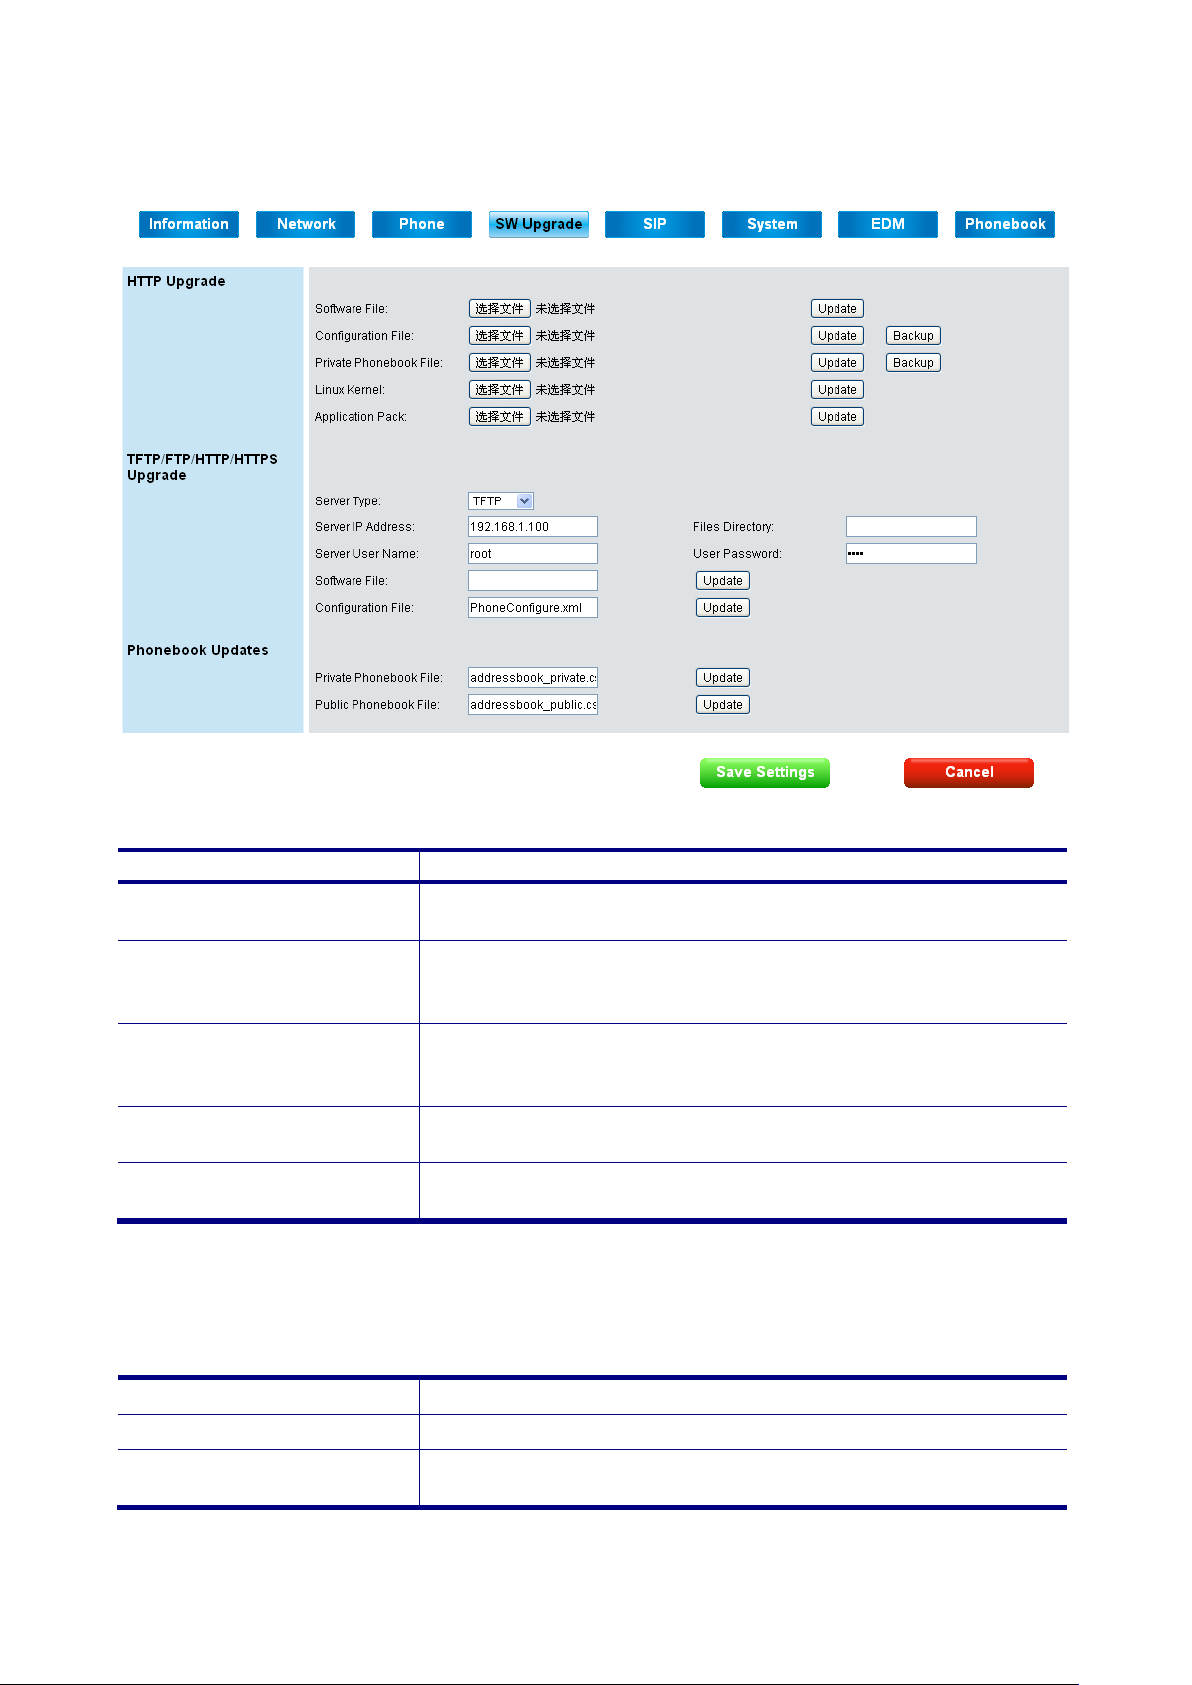
SW Upgrade Page
Field Name
Function
Software File
Select software firmware and press Update button to
upgrade software.
Configuration File
Select the desired configuration file and press Update button
to restore the settings. Press Backup button to save the
configuration file on your PC.
Private Phonebook File
Select desired private phonebook file and press Update
Backup button to save the
phonebook file on your PC.
Linux Kernel
Select Linux kernel and press Update Button to upgrade
kernel.
Application Pack
Select application and press Update button to upgrade
application.
Server Type
Select the Server Type (TFTP, FTP, HTTP or HTTPs).
Server IP Address
IP address of TFTP, FTP, HTTP or HTTPs Server.
Files Directory
Files directory where the software, configuration file, or
phonebook file located.
HTTP Upgrade:
button to update. Press
The software upgrade process needs 2 minutes to finish, please do not turn off the power at
this time. After updating successfully, the phone will reboot automatically.
TFTP/FTP/HTTP/HTTPs Upgrade:
81
Page 82
IP2032 ADMINISTRATOR’S MANUAL
Server User Name
Username of the account on the server.
User Password
Password of the account on the server.
Software File
Software file name on the server.
Configuration File
Configuration file name on the server.
A user or administrator can upload a file using a web
browser.
Phonebook Updates:
The user can add, edit, delete or dial an entry directly
Private Phonebook File
from the web page. The user can also upload his
contacts from a file using a web browser. The Private
Phonebook can have up to 100 contacts.
Public Phonebook File
You can also use TFTP, FTP, HTTP or HTTPs server to update the software, configuration
file, or phonebook file. First, fill the correct f ile name which you desire to update. Second,
press “Save Settings” button to save. Finally, press relative “Update” button, the update
process will start.
Buttons:
Save Settings
Cancel
Save changes in this page to the phone.
Discard all changes in this page.
82
Page 83
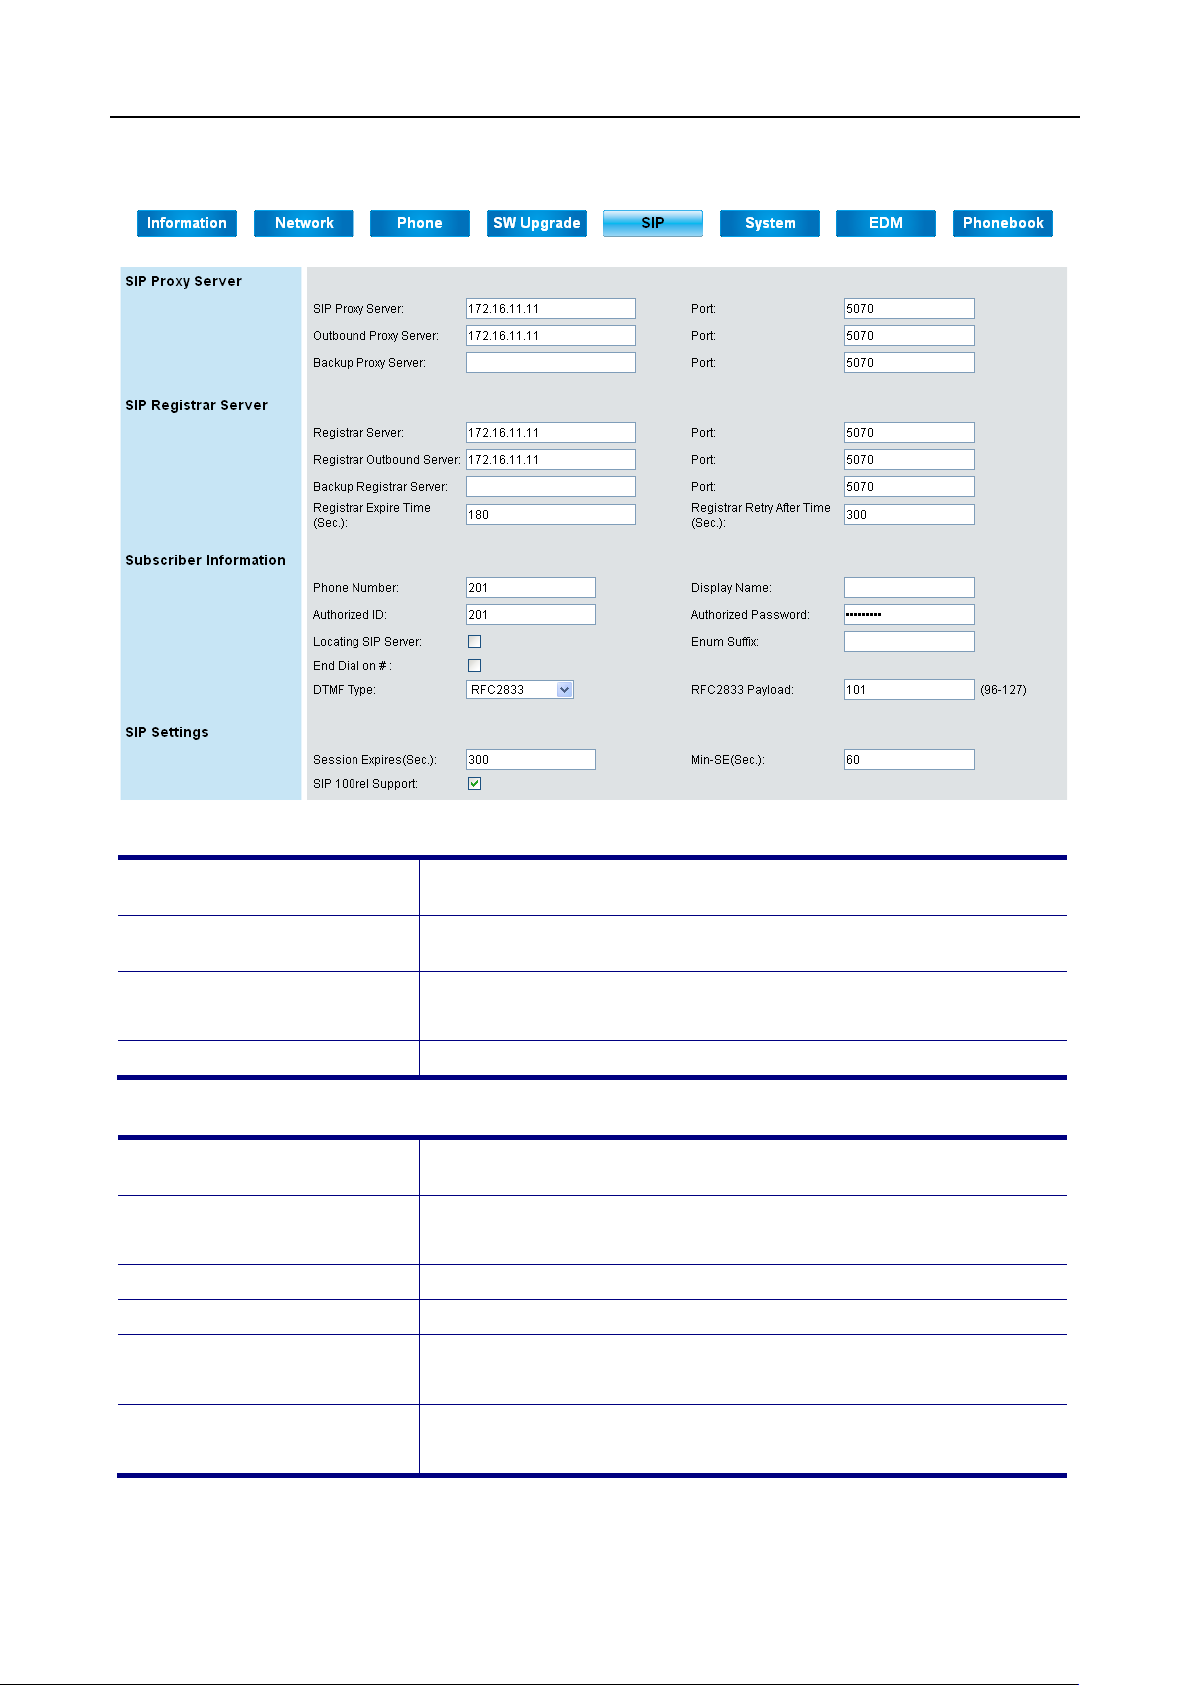
IP2032 ADMINISTRATOR’S MANUAL
SIP Proxy Server
Set SIP proxy server. If user modifies this item, auto PNP
feature will turn to disable.
Outbound Proxy Server
Set SIP outbound proxy server. If user modifies this item,
auto PNP feature will turn to disable.
Backup Proxy Server
Server Port
Set SIP proxy service port.
Registrar Server
Set SIP registrar server. If user modifies this item, auto PNP
feature will turn to disable.
Registrar Outbound
If user modifies this item,
Backup Registrar Server
Set SIP registrar backup server.
Registrar Server Port
Registrar Expire Time
Registrar Retry After
SIP Page
SIP Proxy Server:
SIP Registrar Server:
Server
(Sec.)
Set SIP backup proxy server.
Set SIP registrar outbound server.
auto PNP feature will turn to disable.
Set SIP registrar port.
Set SIP registrar expire time.
Time (Sec.)
Subscriber Information:
Set SIP registrar retry after time.
83
Page 84
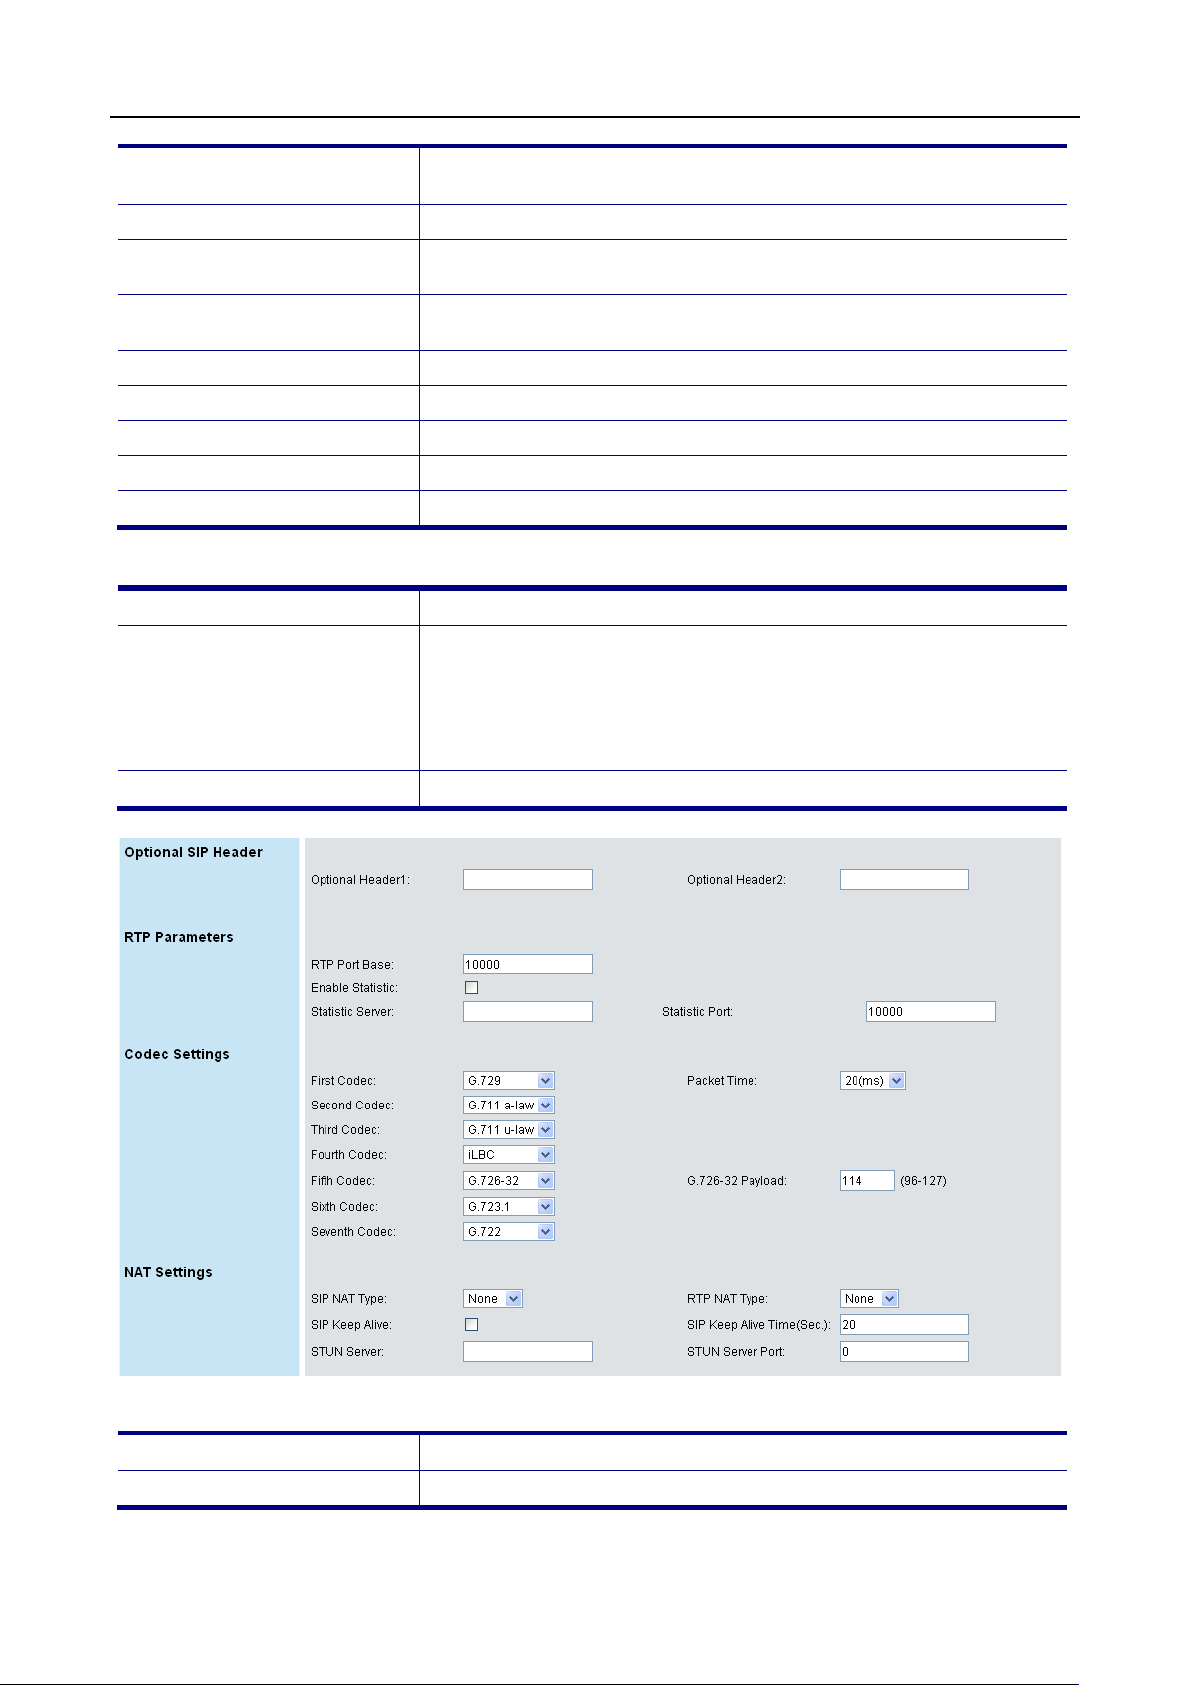
IP2032 ADMINISTRATOR’S MANUAL
Phone Number
Set SIP registrar phone number. If user modifies this item,
auto PNP feature will turn to disable.
Display Name
Set SIP registrar display name.
Authorized ID
Set SIP registrar authorized ID. If user modifies this item,
auto PNP feature will turn to disable.
Authorized Password
Set SIP registrar authorized password. If user modifies this
item, auto PNP feature will turn to disable.
Locating SIP Server
Enable locating SIP server.
Enum Suffix
End Dial on #
Enable end dial on #.
DTMF Type
RFC2833 Payload
Set RFC2833 payload length (96 ~ 127).
Session Expires (Sec.)
Set expire time for session.
MIN SE (Sec.)
Set minimum session expiration time. It will notify server the
that you accepted in negotiation
SE header in the initial
INVITE request.
SIP 100rel Support
Optional SIP Header1
Optional SIP Header2
Set second optional SIP header.
Set Enum Suffix.
Select DTMF type (None, Tone, RFC2833, SIP-INFO).
SIP Settings:
minimum expiration time
state. It is conveyed in the Min-
Turn on SIP 100rel Support.
Optional SIP Header:
Set first optional SIP header.
84
Page 85

IP2032 ADMINISTRATOR’S MANUAL
RTP Port Base
Set port base for RTP (Real-time Transport Protocol).
Enable Statistic
Enable statistic RTP server.
Statistic Server
Set statistic server.
Statistic Port
Set statistic port.
G.711 u-law
Select the codec priority for RTP communications.
Packet Time
Select the relative packet time.
G.726-32 Payload
Fill the number of G.726-32 payload.
SIP NAT Type
Select SIP NAT type.
RTP NAT Type
Select RTP NAT type.
SIP Keep Alive
Turn on SIP keep alive.
SIP Keep Alive Time
STUN Server
Set STUN server IP address.
STUN Server Port
RTP Parameters:
Codec Settings:
G.711 a-law
G.722
G.723.1
G.726-32
G.729
iLBC
None
NAT Settings:
(Sec.)
Set SIP keep alive time.
Set STUN server port.
85
Page 86
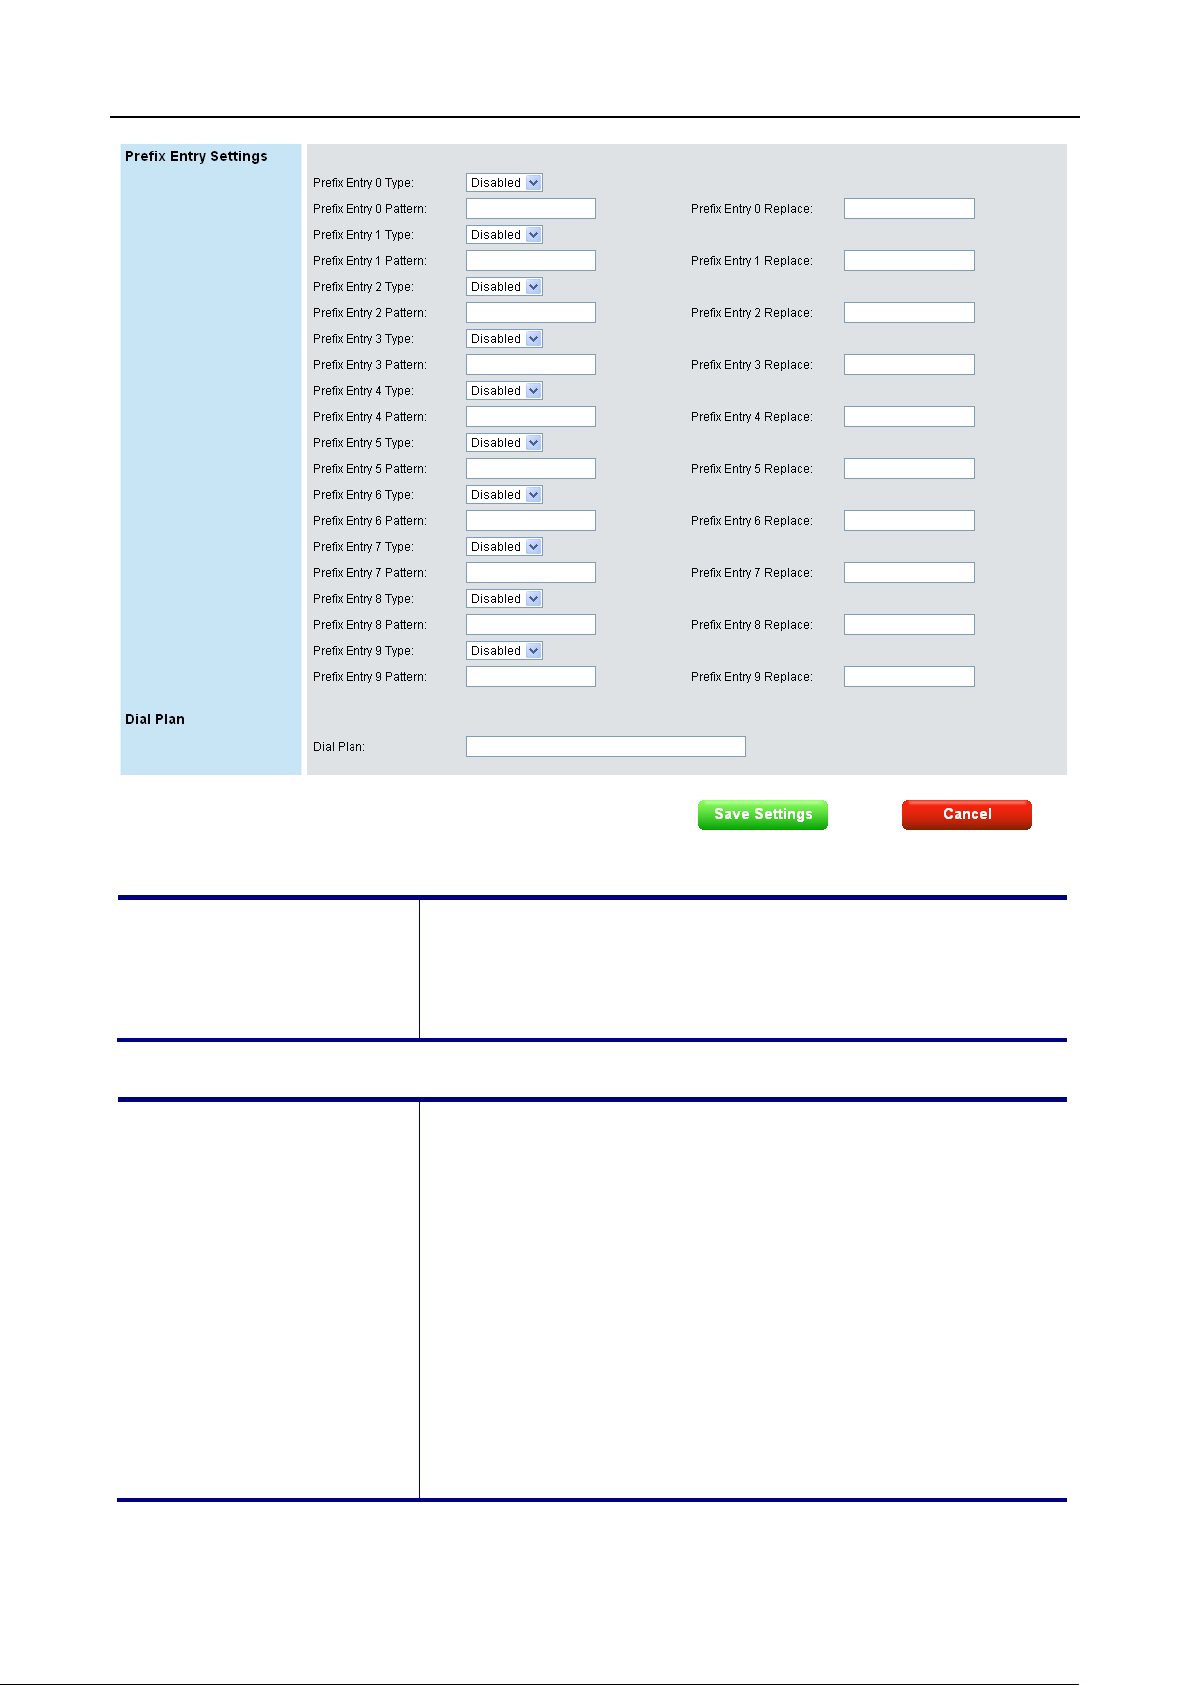
IP2032 ADMINISTRATOR’S MANUAL
Prefix Entry Type,
If the “Prefix Entry Type” is “Re place” mode , the “Pre fix Entry
Pattern” will be replaced by the “Prefix Entry Replace”. For
example, the “Prefix Entry Pattern” is 220 and the “Prefix
When you dial 220 with keyboard, the
phone will dial 210.
Dial Plan
without waiting the dial timeout. It is convenient
several kinds of
settings for dial plan: 1. “x” means any single digit from 0~9.
digit]” means a valid range for a certain number
position. 3. [digits] means acceptable numbers for a certain
dial plan
9]|10[45]”, if
user dial 6000~6099, 306, 307, 308, 309, 104, and 105, IP
phone will dial out it immediately. Otherwise, dial out the
Prefix Entry Settings:
Pattern, or Replace
Entry Replace” is 210.
Dial Plan:
Outgoing call which fit for the dial plan rule will be cal led out
immediately,
for users to make call quickly. There are
2. “[digit-
number position. 4. “|” is used for separate different
items. For example, set dial plan as “60xx|30[6-
number after dial timeout.
86
Page 87

IP2032 ADMINISTRATOR’S MANUAL
Buttons:
Save Settings
Cancel
Save changes in this page to the phone.
Discard all changes in this page.
87
Page 88
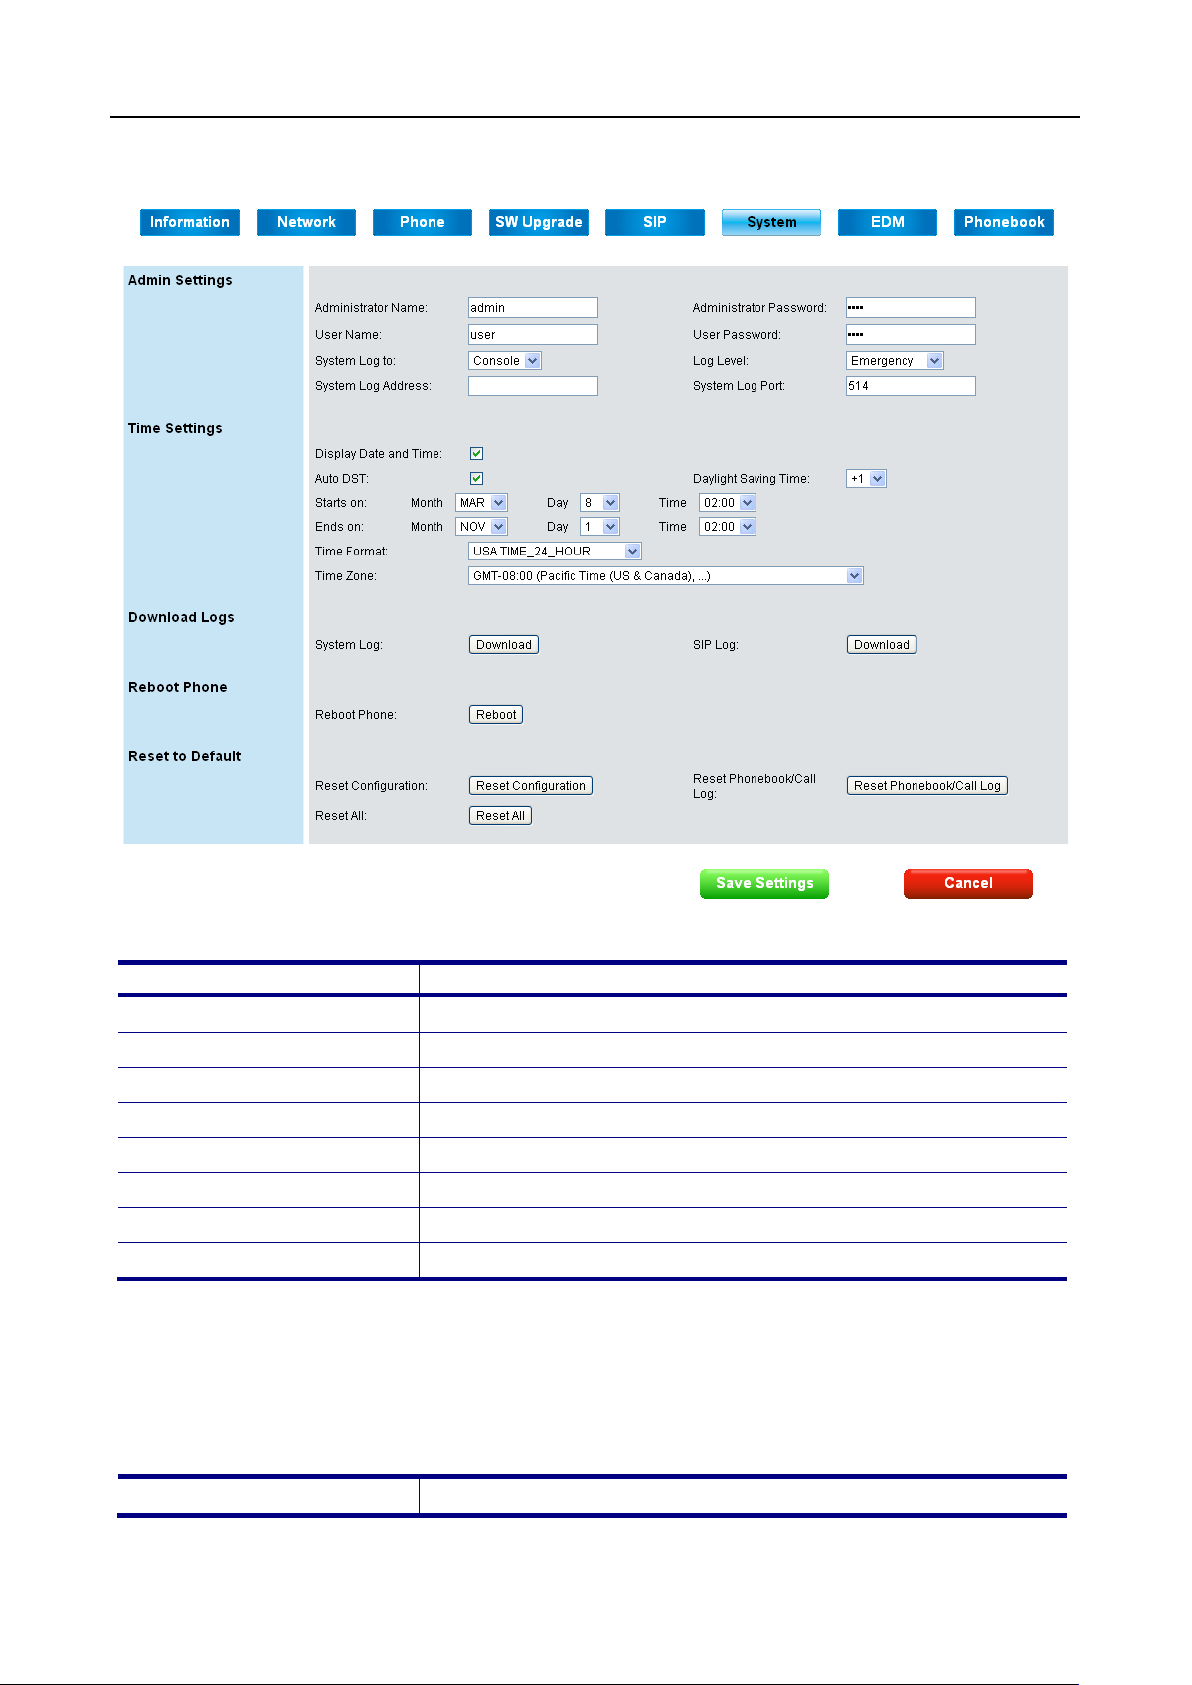
IP2032 ADMINISTRATOR’S MANUAL
Field Name
Function
Administrator Name
The administrator username to login phone’s webpage.
Administrator Password
The administrator password to login phone’s webpage.
User Name
The user username to login phone’s webpage.
User Password
The user password to login phone’s webpage.
System Log to
Select destination of system log redirect to.
Log Level
Select log level.
System Log Address
Set IP address for system log server.
System Log Port
Set port for system log server.
Display Day and Time
Turn on to display day and time on LCD.
System Page
Admin Settings:
The user’s name is not allowed to the same as adm inistrator’s name. The administrator ’s
and user’s name should be set at least 1 character, not allowed to be null. The
administrator’s and user ’s password should be set at least 4 characters. When changing
password in phone’s config menu, less than 4 characters will be discard, not be saved.
Time Settings: (Not used with IG server)
88
Page 89
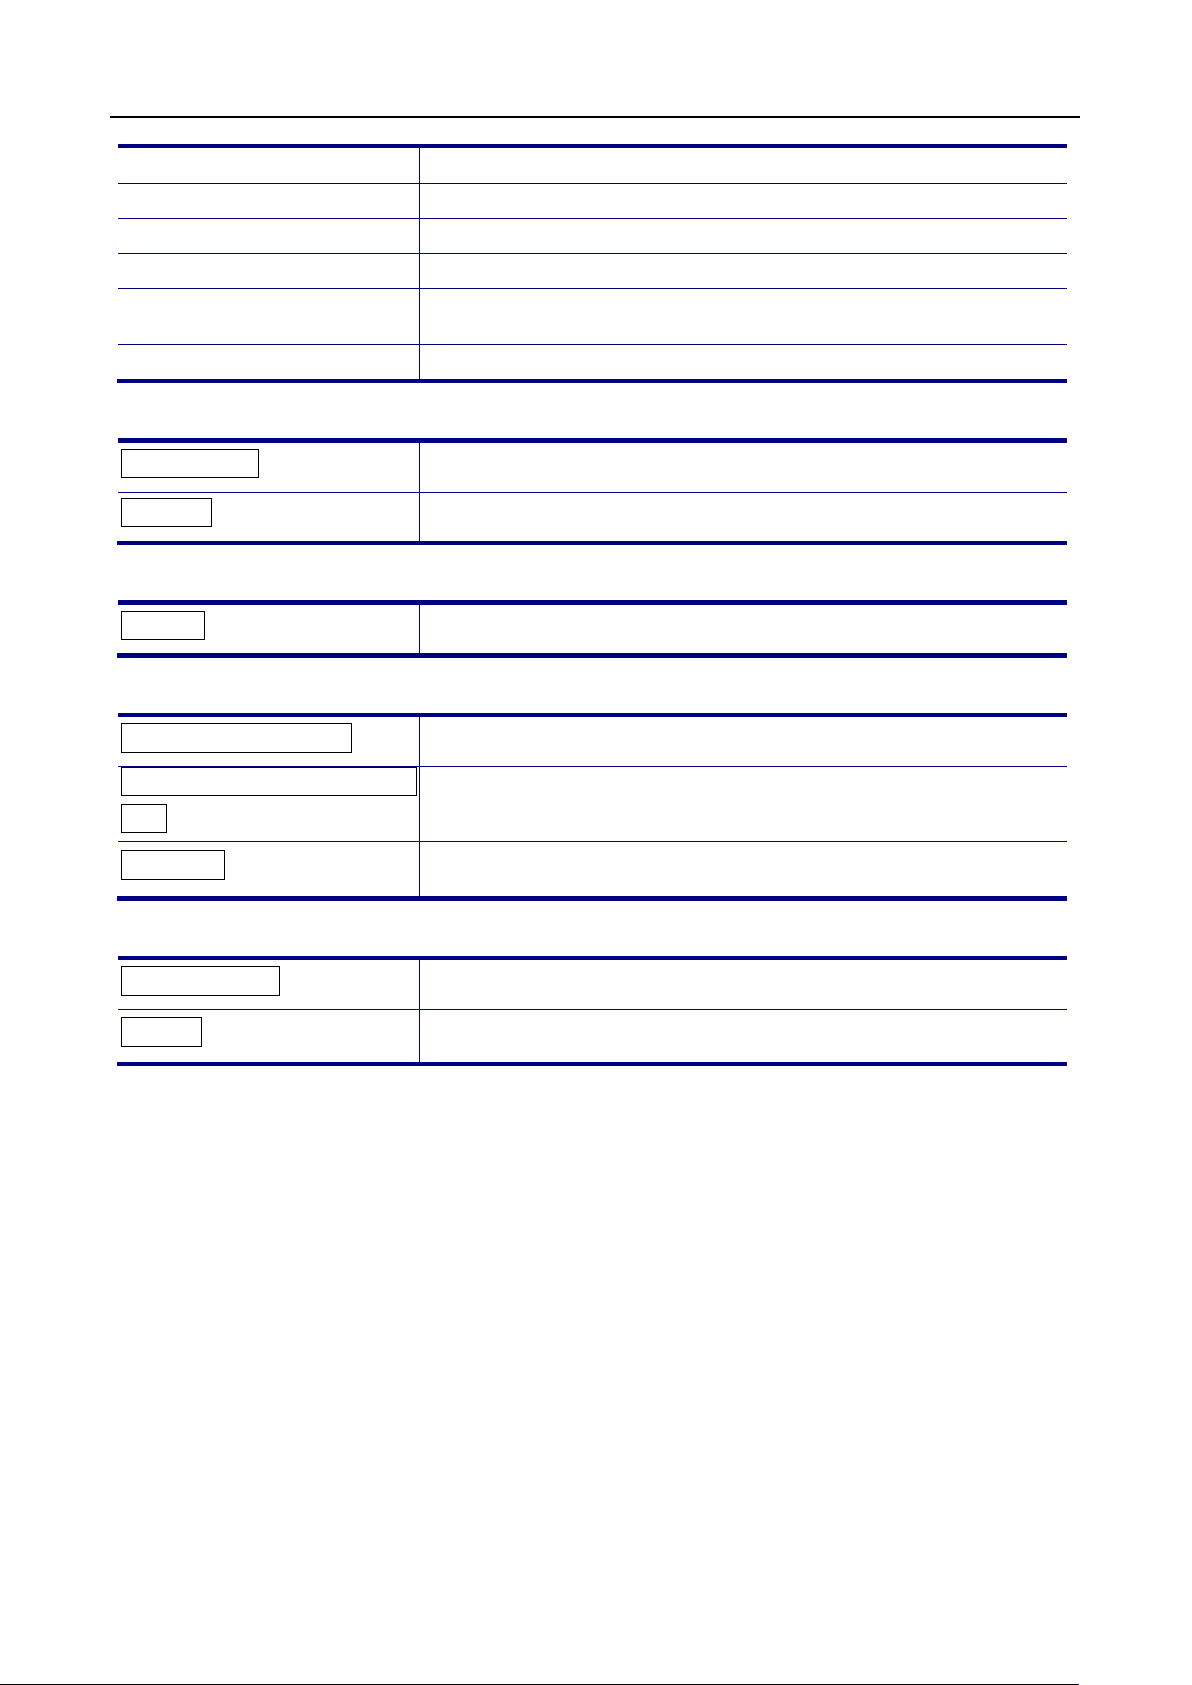
IP2032 ADMINISTRATOR’S MANUAL
Auto DST
Turn on the auto DST (Daylight Saving Time) function.
Daylight Saving Time
Three time shifts could be set, -1, 0, and +1.
Starts on
Start time for DST.
Ends on
End time for DST.
Time Format
USA 24_HOUR, USA 12_HOUR, European 24_HOUR, and
European 12_HOUR.
Time Zone
Set time zone.
Reset Phonebook/Call
Reset all data to default including Configuration, Call
Records, and Phonebook data.
Download Logs:
System Log
SIP Log
Reboot Phone:
Reboot
Reset to Default:
Reset Configuration
Log
Reset All
Buttons:
Save Settings
Cancel
Press to download system log.
Press to download SIP log.
Restart the phone.
Reset Configuration to factory default.
Clear all Phonebook and Call Log data.
Save changes in this page to the phone.
Discard all changes in this page.
89
Page 90
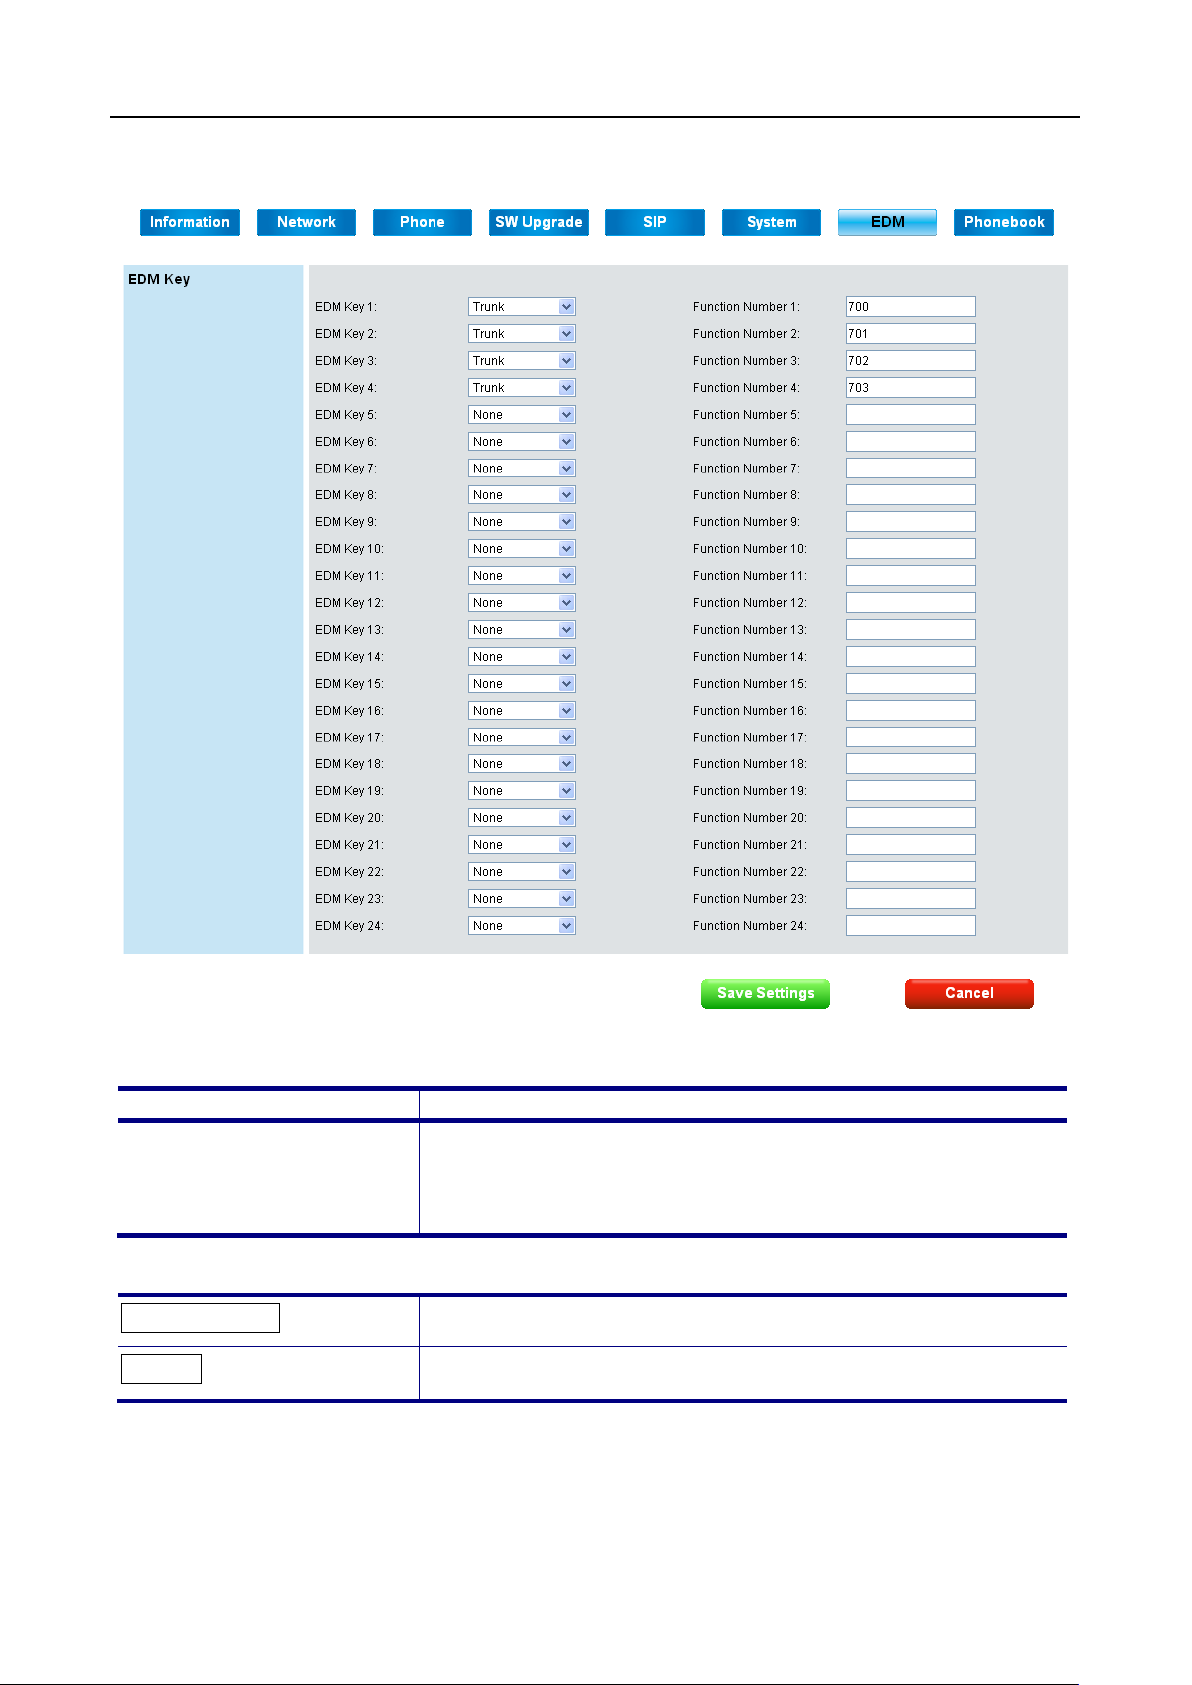
IP2032 ADMINISTRATOR’S MANUAL
Field Name
Function
EDM Key 1~24
There are 9 types could be chosen, None, Extension, Trunk,
Do Not Disturb, Live Record, Virtual
s. Phone will do the relative function when
user pressing related EDM key button.
EDM
EDM Key:
Call Park, Feature Key,
Mailbox and Other
Buttons:
Save Settings
Cancel
Save changes in this page to the phone.
Discard all changes in this page.
90
Page 91
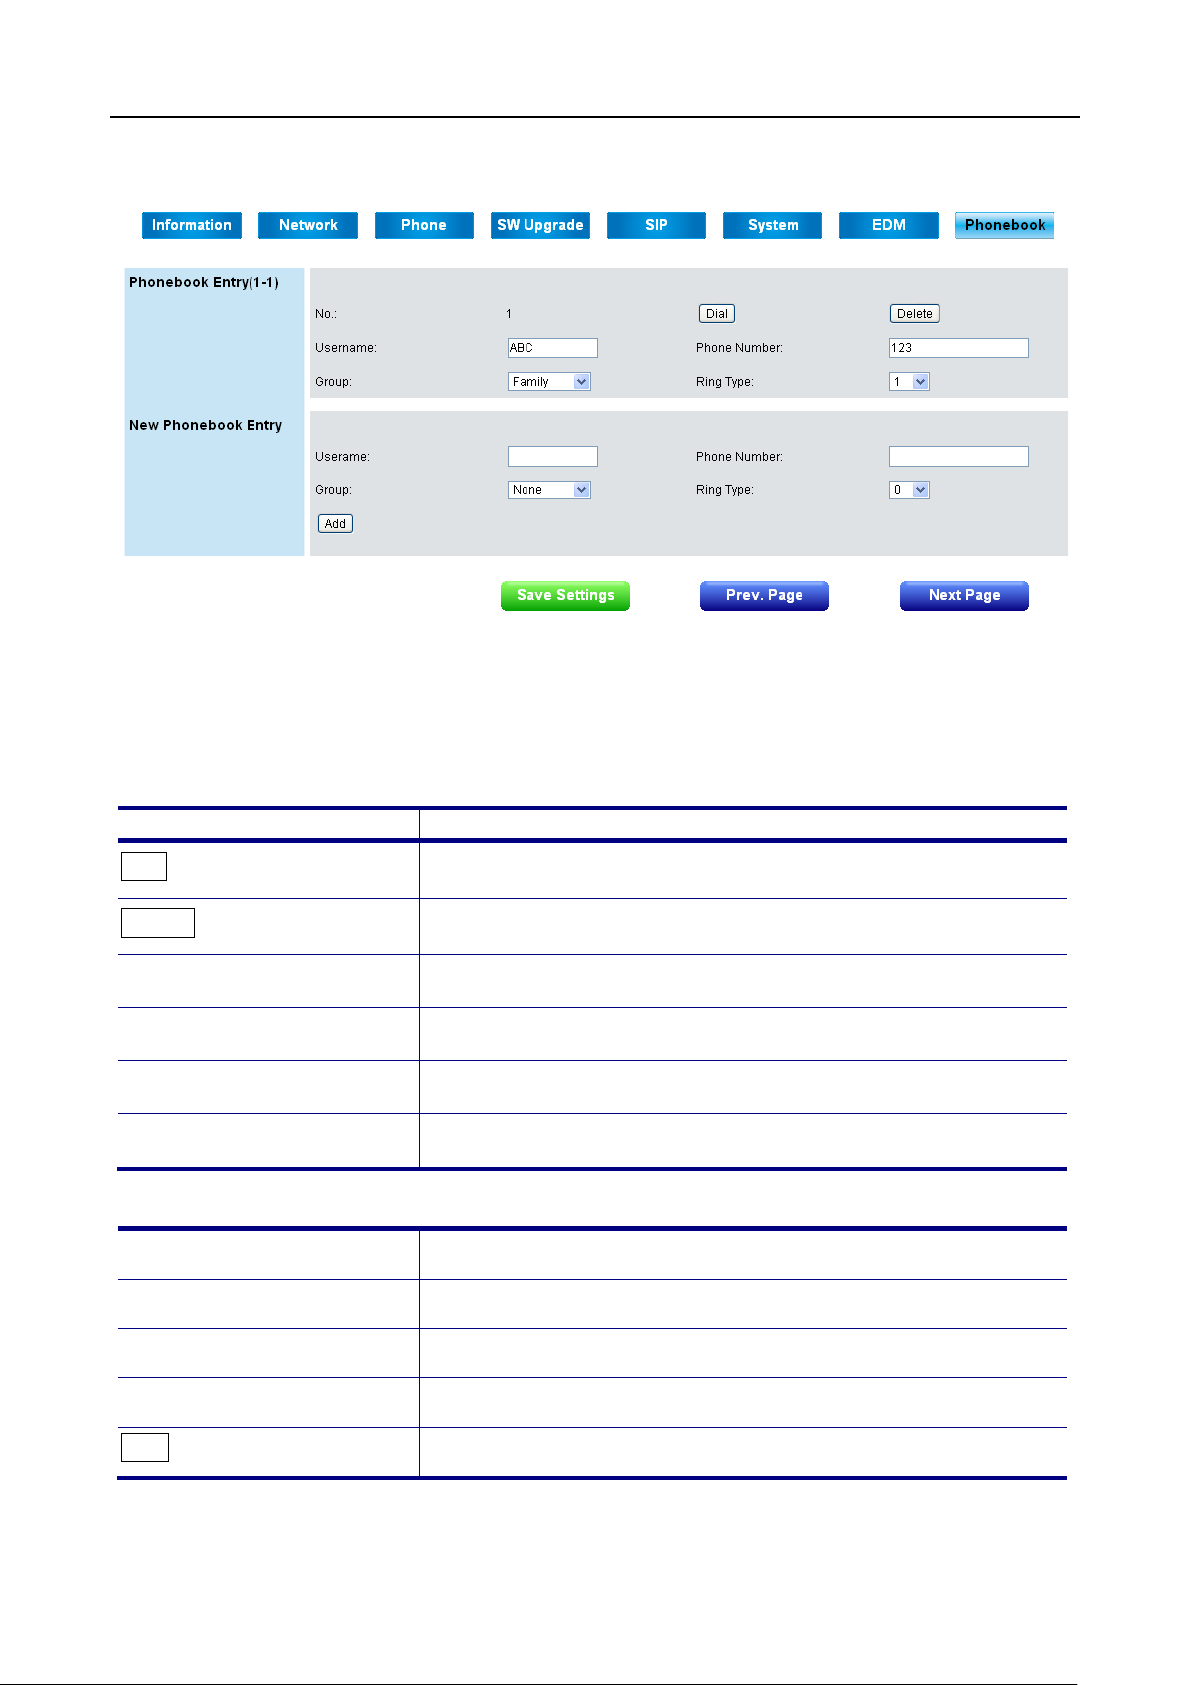
IP2032 ADMINISTRATOR’S MANUAL
Field Name
Function
Username
Phone Number
Group
Ring Type
Phonebook
This page lets you configure phonebook data of your phone. You may:
• Edit up to 200 entries. Each page will just show 20 entries.
• Dial a phone number dir ectly from this webpage.
Phonebook Entry:
Dial
Delete
New Phonebook Entry:
Username
Dial the phone number which your want to dial.
Delete current contact entry.
Name of your contact.
Phone number or SIP URI of your contact.
Select group type for each entry.
Select particular ring type for each entry.
Set name of new contact.
Phone Number
Group
Ring Type
Add
Button:
Set number of SIP URI of new contact.
Select group type for new contact.
Select particular ring type for new contact.
Save the new contact.
91
Page 92
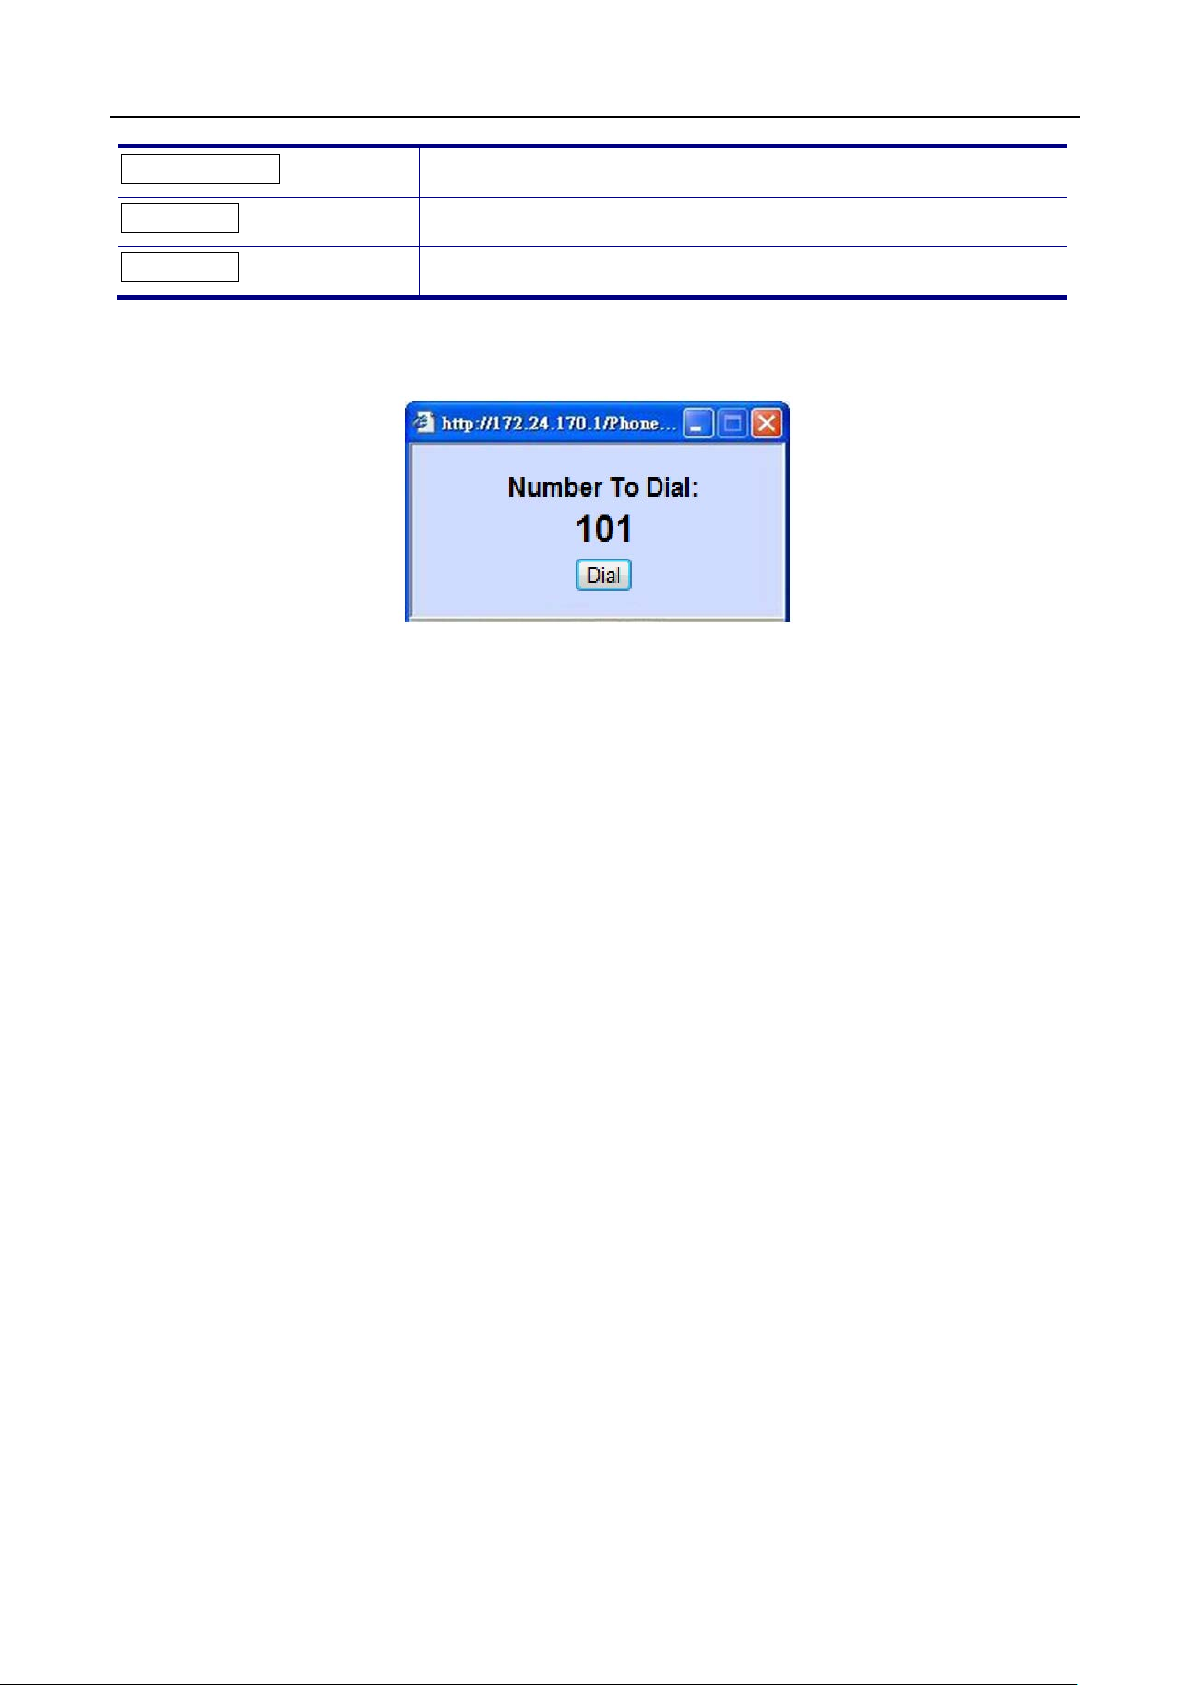
IP2032 ADMINISTRATOR’S MANUAL
Save Settings
Prev Page
Next Page
Save changes in this page to the phone.
Go to the previous page.
Go to the next page.
To call your contact, simply click on the corresponding number and it will show the following
dialog box (for example, if you click entry 001 to call out, the result will be the following):
Then press the “Dial” button in order to start dialing. Phone will dial out corresponding
number automatically.
92
Page 93

IP2032 ADMINISTRATOR’S MANUAL
Features & Specifications
With highly integrated chip and sophisticated design, this IP2032 offers a variety of features.
And it can provide high performance, reliable and quality voice communication for the users.
The hardware specifications are list as follows for your reference.
Main Unit
-Dimension: 180 * 195 * 105 mm.
-Plastic material: ABS type.
-Support 2 angles. (one with stand and one without stand)
-Can be mounted onto the wall with the stand.
-Support detachable handset and curled cord.
LAN and PC Ports
-Integrated 2 ports Ethernet switch.
-IEEE 802.3 10BaseT / 802.3u 100BaseTx compliant.
-Auto-negotiation with link speed and full/half duplex mode.
-Auto MDI/MDIX for both downlink and uplink auto-swapping.
-Support QoS IEEE 802.1p voice priority function.
Power Supply
-Input: 5VDC/2A power adapter.
-Support PoE (Power over Ethernet), IEEE 802.3af Device - Class 2 (7W).
Voice Handling
-Supports multiple Audio Codecs: G.711 a-law/μ-law, G722, G.723.1, G726-32, G.729,
iLBC.
-Supports VAD (Voice Activity Detection) and CNG (Comfort Noise Generation).
-Volume adjustable for Handset, Headset, Hands-free and Hands-free Ring output.
-Support G.165 16ms line Echo Cancellation.
-Adaptive Jitter Buffering function supported.
-Hands-free talking supported.
-Support multiple calls appearance.
Note: * These features are optional. Please contact your supplier to purchase option.
Tone Function:
-DTMF tone generation and detection.
-Side tone and good voice quality supported.
-Out-bound DTMF relay (RFC2833/SIP-INFO) support.
93
Page 94

IP2032 ADMINISTRATOR’S MANUAL
-Local tone support (Dial, Ring, Ring back, Busy and related tones).
94
Page 95

IP2032 ADMINISTRATOR’S MANUAL
Symptom
Check & Remedy
Check network
assistance.
Cannot connect to
Troubleshooting
Check if the power adapter is properly connected.
No operation
No dial tone
connection shown
on LCD
Cannot make call
IP phone cannot
receive any phone
call
the configuration
website of the IP
phone
Check if the Ethernet cable is properly connected.
If applicable, check if the PoE (Power over Ethernet)
switch behind the IP phone is set to the right position.
Check if the handset cord is properly connected.
Check if the power adapter is properly connected.
Check if the Ethernet cable is properly connected.
Check the status of your SIP registration or contact
your supplier or ITSP for more information or
Check if the Ethernet cable is properly connected
Check the status of your SIP registration or contact
your supplier or ITSP for more information or
assistance.
Check if the Ethernet cable is properly connected.
Check the IP address of the IP phone.
Check if your firewall/NAT settings are correct.
95
Page 96

IP2032 ADMINISTRATOR’S MANUAL
Glossary
Acronyms
CODEC Coder and Decoder of Voice
CNG Comfort Noise Generation
DHCP Dynamic Host Configuration Protocol
DNS Domain Name Server
DTMF Dual Tone Multiple Frequency
HTTP Hypertext Transfer Protocol
IP Internet Protocol
ISP Internet Service Provider
ITSP IP Telephony Service Provider
LAN Local Area Network
MWI Message Waiti ng Indication
PoE Power over Ethernet (IEEE802.3af standard)
PPPoE Point-to-point protocol over Ethernet
QoS Quality of Service
NAT Network Address Translation
RTP Real Time Protocol
SIP Session Initiation Protocol
SNTP Simple Network Address Translation
TFTP Trivial File Transfer Protocol
96
Page 97

IP2032 ADMINISTRATOR’S MANUAL
10/100BASE-T
It’s a LAN transmission line specification s tipulated by IEEE. Transmission speed
is 10 or 100 Mbps and the modulation technique is base
modulation. The
cable uses unshielded twisted pair, similar to a telephone wire. 10BaseT is an
IEEE standard (802.3) for operating 10 Mbps Ethernet networks (LANs) with
twisted pair cabling and a wiring hub.
Auto answer
In telephone call control: The capability of a machine to answer a ringing
telephone without human intervention.
CODEC
The CODEC (CODER/DECODER) is a standard through which voice information
can be encoded into data or decoded back to voice informat ion. Both a Coder and
Decoder are necessary on both sides of the telephone call since telephone calls
occur simultaneously in both directions. Bandwidth is an extremely important
factor in QOS (Quality of Service). MOS (Mean Opinion Score) is an attempt to
make a quantifiable benchmark of voice quality. Below are examples of the
CODEC, bit rate and mean opinion score: G.711 (toll quality) 64K MOS=4.1,
G.726 16K (32K) MOS =3.8, G
DHCP
Dynamic Host Configuration Protocol
server to
dynamically assign IP addresses from a predefined list and limit their time of use
so that they can be reassigned. Without DHCP, an IT Manager would have to
manually enter in all the IP addresses of all the computers on the network. When
DHCP is used, whenever a computer logs onto the network, it automatically gets
an IP address assigned to it.
Diff-Serv
Differentiated Services: The Diff-Serv model divides traffic into a small number of
classes to provide quality of service (QoS). One of QoS in i
DNS
Domain Name Service
: A server/program that translates URLs to IP
addresses by accessing a database maintained on a collection of Internet
servers. The program works behind the scenes to facilitate surfing the Web with
alpha versus numeric addresses. A DNS server converts a name like
mywebsite.com to a series of numbers like 107.22.55.26. Every website has its
own specif
Typically one or more DNS servers is
located in an IP network.
DTMF
Dual Tone Mult
: The type of audio signals generated when
you press the buttons on a touch
(after
voice channel connected) and outbound
channel connected)
application.
Ethernet
International standard networking technology for wired implementations. Basic
10BaseT networks off er a band width of about 1 0 Mbp s. Fa st E ther net (10 0 Mb p s)
and Gigabit Ethernet (1
G.711
64 kbps PCM half
minimum processor
load)
IP
Internet Protocol
is located at 3rd layer of ISO network model. A set of rules
used to send and receive messages at the Internet address level. IP protocol is
widely used in Internet and LAN networ ks. Th e purpose i s to del iver data betwee n
computing equipment over the network. The protocol is generally effective but
does not guarantee complete and accurate data communications.
Terminology
-band
.729AB (cell phone quality) 8K MOS=3.7.
(DHCP): A utility that enables a
(DNS)
ic IP address on the Internet.
i-Frequency (DTMF)
000 Mbps) are becoming popular.
-duplex codec (high quality, high bandwidth,
(IP)
nternet.
-tone telephone. Can be used in inbound
(before voice
97
Page 98

IP2032 ADMINISTRATOR’S MANUAL
IP address
A 32-bit number that identifies each sender or receiver of information that is sent
across the Internet. An IP address has two parts: an identifier of a particular
network on the Internet and an identifier of the particular device (which can be a
server or a workstation) within that network. A number used to identify the location
of a host device. It is expressed in numeric dot notation (e.
MAC address
Media Access Control address (MAC address): It is a unique identifier assigned to
most network adapters or network interface cards by the manufacturer for
identification, and used in the Media Access Control protocol sub-layer. It may
also be known as an Ethernet Hardware Address or physical address. In TCP/IP
networks, the MAC address of a subnet interface can be queried with the IP
address using the Address Resolution Protocol (ARP) for Internet Protocol. On
broadcast networks, such as Ethernet, the MAC address uniquely identifies each
node and allows frames to be marked for specific hosts. It thus forms the basis of
most of the Link layer (OSI Layer 2) networking upon which upper layer protocols
rely to produce complex,
NAT
Network Address Translation
: A network capability that enables a houseful
of computers to dynamically share a single incoming IP address from a dial-up,
cable or xDSL connection. NAT takes the single incoming IP address and creates
new IP address for each client computer on the network.
Proxy server
Used in larger companies and organizations to improve network operations and
security, a proxy server is able to prevent direct communication between two or
more networks. The proxy server forwards allowable data requests to remote
servers and/or responds to data requests directly from stored remote server data.
PSTN
Public Switched Telephone Network
: The worldwide voice telephone
network.
RJ-45
Standard connectors used in Ethernet networks. Even though they look very
similar to standard RJ
45 connectors can have up to
eight wires, whereas telephone connectors have only four.
RTP/RTCP
Real
Time Control Protocol (RTP/RTCP): IETF specifications
for audio and video signal management. Allows applications to synchronize and
spool audio and video information. RTP is specifically concerned with the
dependable transmission of latency-sensitive traffic across the network and is
involved in using time stamping to determine network jitter tolerance and makes
s
SIP
Session Initiation Protocol
: A protocol that provides telephony services
similar to H.323, but is less complex and uses fewer resources. SIP is a signaling
protocol for Internet conferencing, telephony, presence, events notification and
instant messaging. SIP is a text-based protocol, similar to HTTP and SMTP, for
initiating interactive commun
Subnetwork or Subnet
Found in larger networks, these smaller networks are used to s implify addressing
between numerous computers. Subnets connect to the central network through a
router, hub or gateway. Each individual wireless LAN will probably use the same
subnet for all t
TCP/IP
Internet Standard Protocol: The underlying technology behind the Internet and
communications between computers in a network. The first part, TCP, is the
transport part, which matches the size of the messages on either end and
guarantees that the correct message has been received. The IP part is the user's
computer address on a network. Every computer in a T CP / IP network has its own
IP address that is either dy namically ass igned at sta rtup or perma nently as signed.
g. 202.203.27.31).
functioning networks.
(NAT)
(PSTN)
-11 telephone connectors, RJ-
-Time Protocol/Real-
ure that voice packets are arriving in order.
(SIP)
ication sessions between users.
he local computers it talks to.
98
Page 99

IP2032 ADMINISTRATOR’S MANUAL
All TCP/IP messages contain the addres s of the destination network as w ell as
the address of the destination station. This enables TCP/IP messages to be
transmitted to multiple networks (subnets) withi n an organization or worldwide.
VAD
Voice Activity Detection (VAD) helps save bandwidth during calls. Examples:
When
listening, that silence is
still taking up bandwidth during the call. When silence is detected by VAD
software over a predetermined length of time, it sends silent packets that inform
other VAD enabled systems to stop holding the bandwidth for these empty
packets.
VoIP
Voice Over Internet Protocol: VoIP is based on the principal of transmitting
digitized voice packets over networks. Basically, VoIP consists of converting voic e
signals into streams of digital packets and sending those packets of data through
an IP-constructed network environment. VoIP can work in both LAN (local area
network) and WAN (wide area network) environments for internetwork or
internetwork communication between VoIP channel users. Routers and switches
and other special compression protocols direct the packetized voice data to their
destination IP address. VoIP can be less expensive than voice transmission using
standard analog packets over POTS (Plain Old Telephone Service). It allows
telephone calls, faxes, or overhead paging to be transported over an existing IP
data network topology.
making a VoIP call and you not speaking and you
99
 Loading...