

Page 1
RIME
RIME
RIME
70121
DualScan
DualScan
DualScan
P
P
P
Ear and Forehead
THERMOMETER
TM
TM
TM
Please Read this
Instruction Manual
Before Use
also
reads
Food
or Bottle
temperature
Page 2
User’s Manual for DualScan™ Prime Digital Thermometer
INTRODUCTION
Thank you for purchasing the DualScan Prime Thermometer from Mobi
Technologies, Inc. The thermometer has been carefully developed for accurate,
safe and fast human body temperature measurements from forehead or ear
readings and object temperature measurements to ensure safe temperatures.
SAFETY PRECAUTIONS
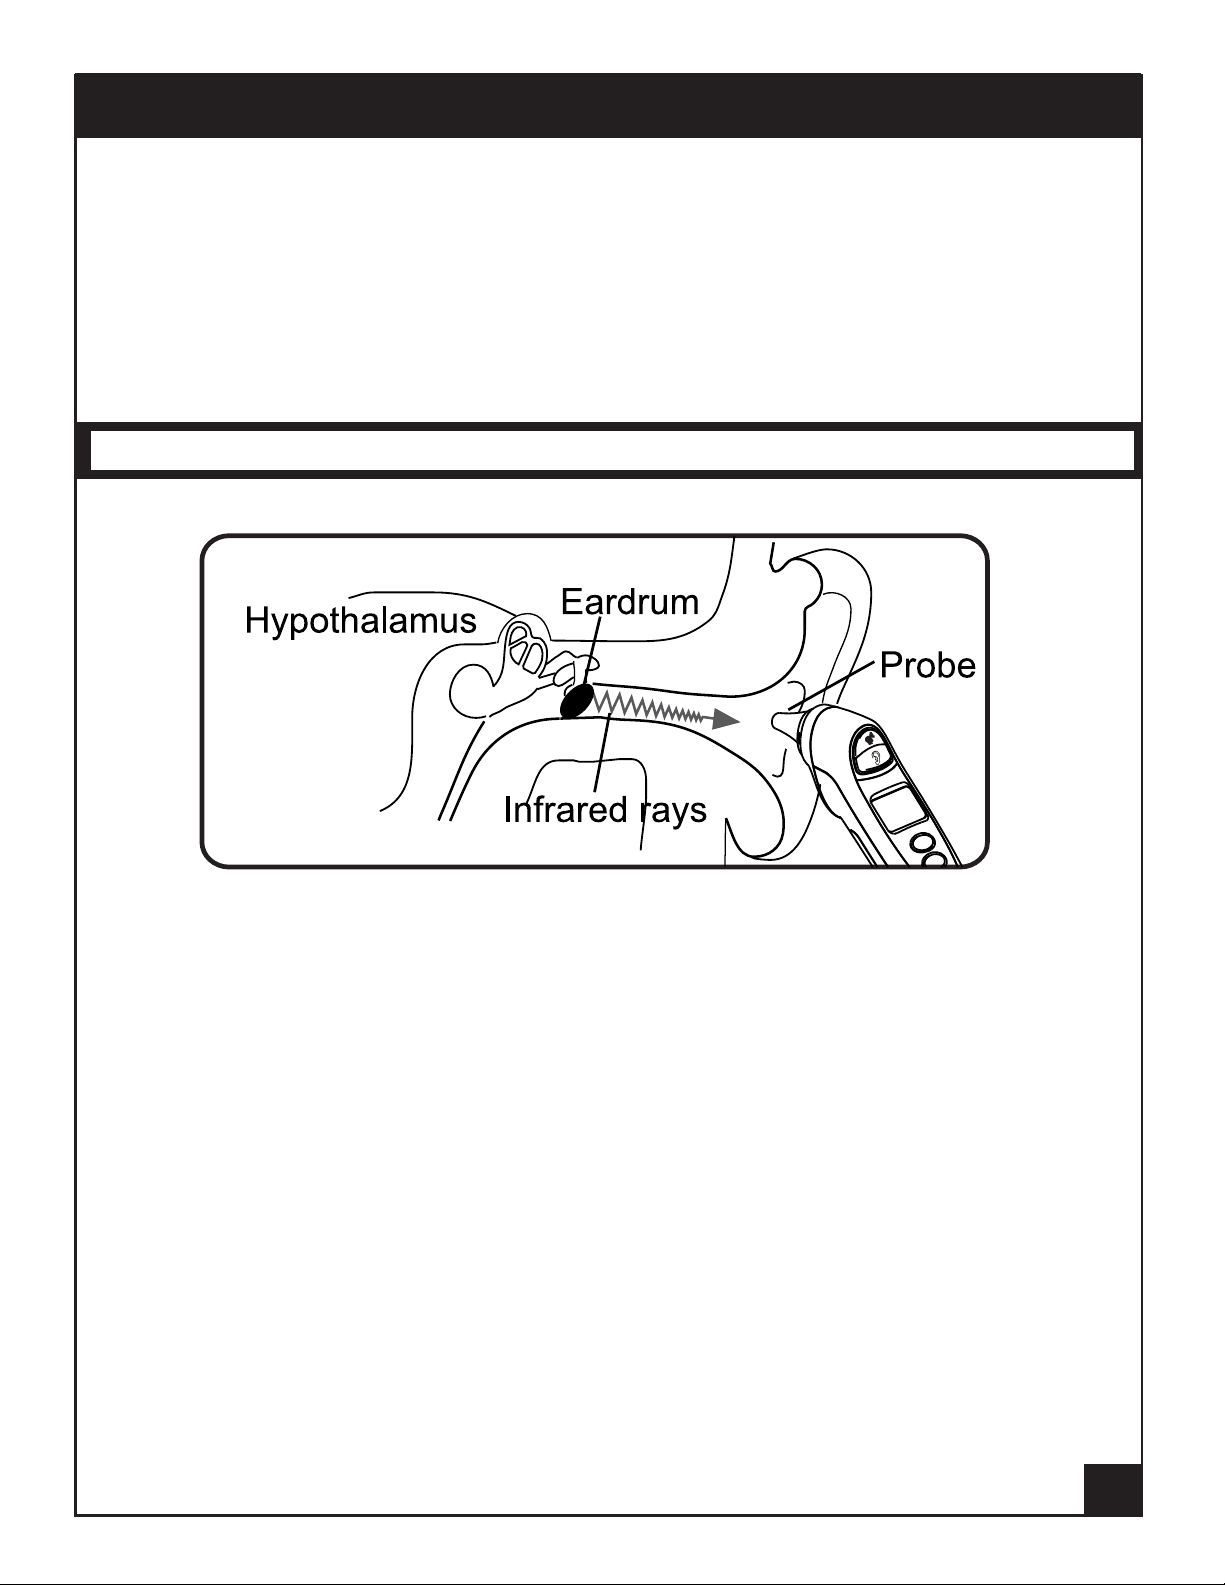
Research indicates that the ear is an ideal site for taking body temperature.
Because body temperature is regulated by the hypothalamus, which shares the
same blood supply as the tympanic membrane, we recommend that you use the
ear temperature mode as often as possible.
However, as with any thermometer, proper technique is critical to obtaining
accurate temperatures. Therefore, in order to obtain an accurate measurement,
please read this manual carefully before using.
• Use of this thermometer is not intended as a substitution for consultation with
your physician. Measurement results are for reference only. Contact your
physician if you have or suspect any health concerns.
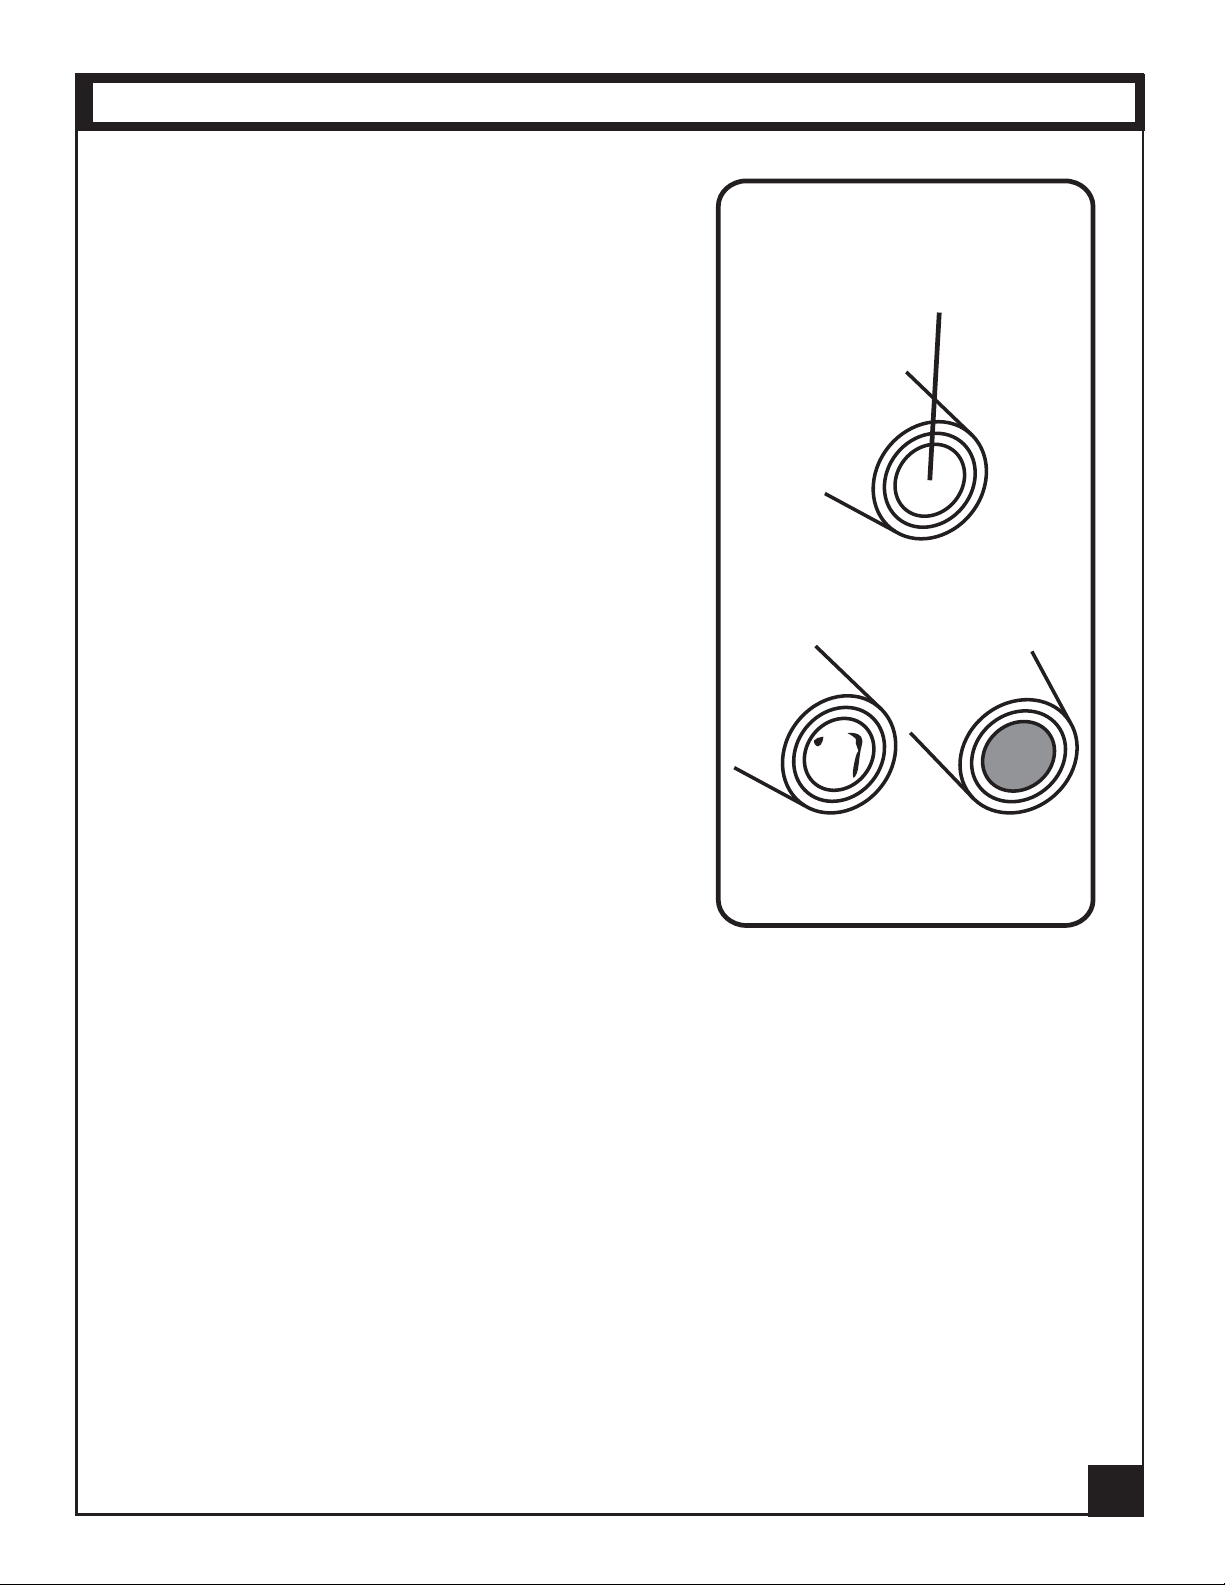
• The Infrared sensor must be kept clean, dry, and undamaged at all times to
ensure accurate measurements.
2
Page 3
SAFETY PRECAUTIONS (cont.)
• Earwax in the ear canal or lipid on the forehead may cause an inaccurate measurement,
so make sure the ear canal or forehead is clean.
• If you clean the ear or forehead, please wait
5~10 minutes before measuring.
• Don't touch or blow on the infrared sensor.
A dirtied infrared sensor may cause inaccuracy.
• Do not use this thermometer for measure-
KEEP INFRARED
SENSOR CLEAN
ments other than human body temperature,
except for the object measurements allowable
when in “object” mode.
• Avoid measuring the ear temperature if the
ear is inamed or infected. The temperature
of the unit’s storage area may dier from that
of the measuring room’s temperature, so
please wait for the thermometer temperature
to adjust to the room temperature about 30
minutes before use. Keep the thermometer
out of the reach of children.
• Don't throw batteries into re. Batteries are likely to explode in re, which could
pose serious danger.
• Don't store the thermometer to temperature extremes (below -20°C/-4°F or
GOOD
NOT GOOD
over 55°C/131°F ) or humidity extremes (below 10%RH or over 90%RH);
otherwise it may cause inaccuracy.
• Don't use the product in a wet ear canal after swimming or bathing. It is possible
to damage the ear canal.
• Don't use the thermometer if the main body is damaged (for example, the
infrared sensor is broken). The continuous use of a damaged unit may cause
injury, improper results, or other serious danger.
3
3
Page 4
SAFETY PRECAUTIONS (cont.)
• Don't take apart, repair or change any parts of the unit at any time.
• Don't use a mobile phone nearby when the thermometer is working. If your
thermometer will not be used on a regular basis, remove batteries to prevent
possible damage due to chemical leakage. If battery does leak, remove carefully.
• Do not allow bare skin to touch leaking uid.
• This product needs special precautions regarding EMC and needs to be installed
and put into service according to the EMC information provided, and this unit can
also be aected by portable and mobile RF communications equipment.
Caution:
This instrument should not be used adjacent to or stacked with other sensing,
measuring, or medical equipment, and if adjacent or stacked use is necessary,
this machine should be observed to verify that is operating normally for the
uses for which it is intended.
NOTES ON BODY TEMPERATURE
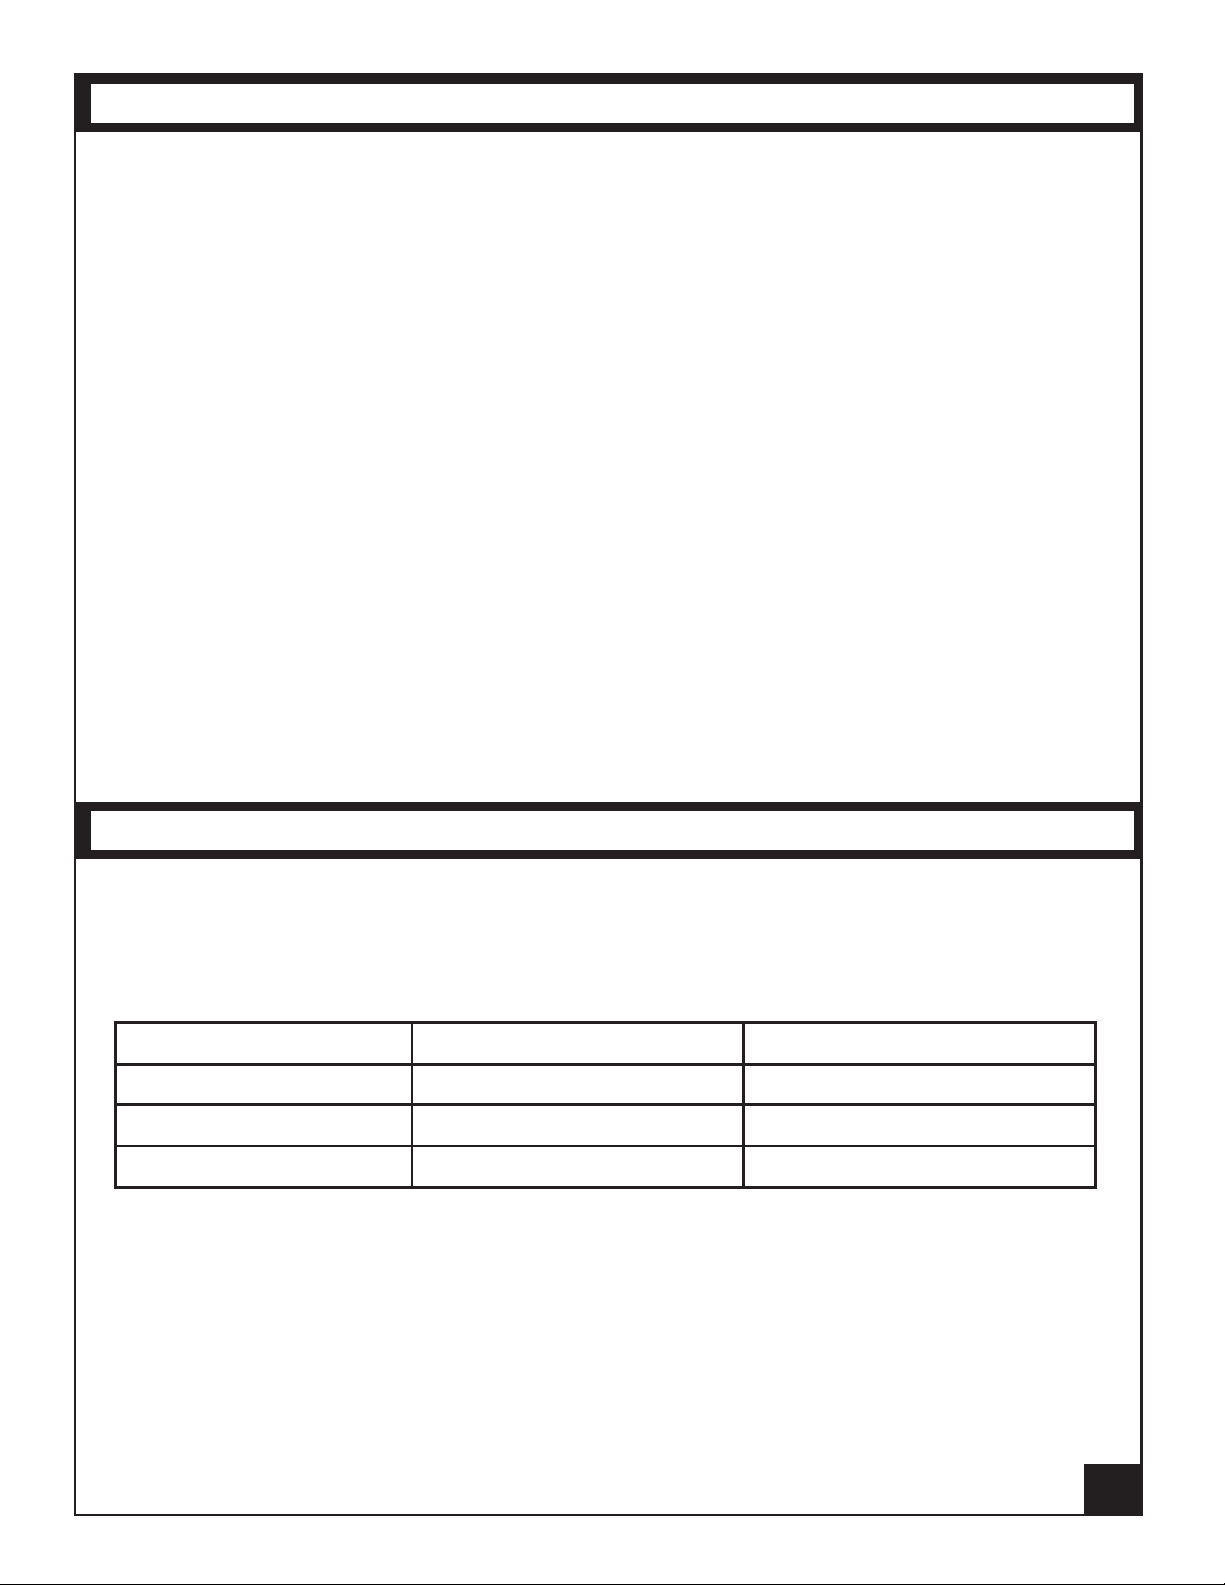
Normal body temperature varies. A person's normal temperature range tends to
decrease with age. The following table shows normal temperature ranges by age:
Normal temperature ranges by age:
0 – 2 years 36.4 – 38.0 °C 97.5 – 100.4 °F
3 – 10 years 36.1 – 37.8 °C 97.0 – 100.0 °F
11 – 65 years 35.9 – 37.6 °C 96.6 – 99.7 °F
> 65 years 35.8 – 37.5 °C 96.4 – 99.5 °F
The normal temperature range varies from person to person and can be
inuenced by many factors such as time of day, measuring from dierent sites,
level of activity, medications, emotional condition and more.
We recommend that you practice with the thermometer on yourself and others
when you are healthy. This way you know how the thermometer works and can
feel more condent of the measurements you take when a family member is ill.
4
Page 5
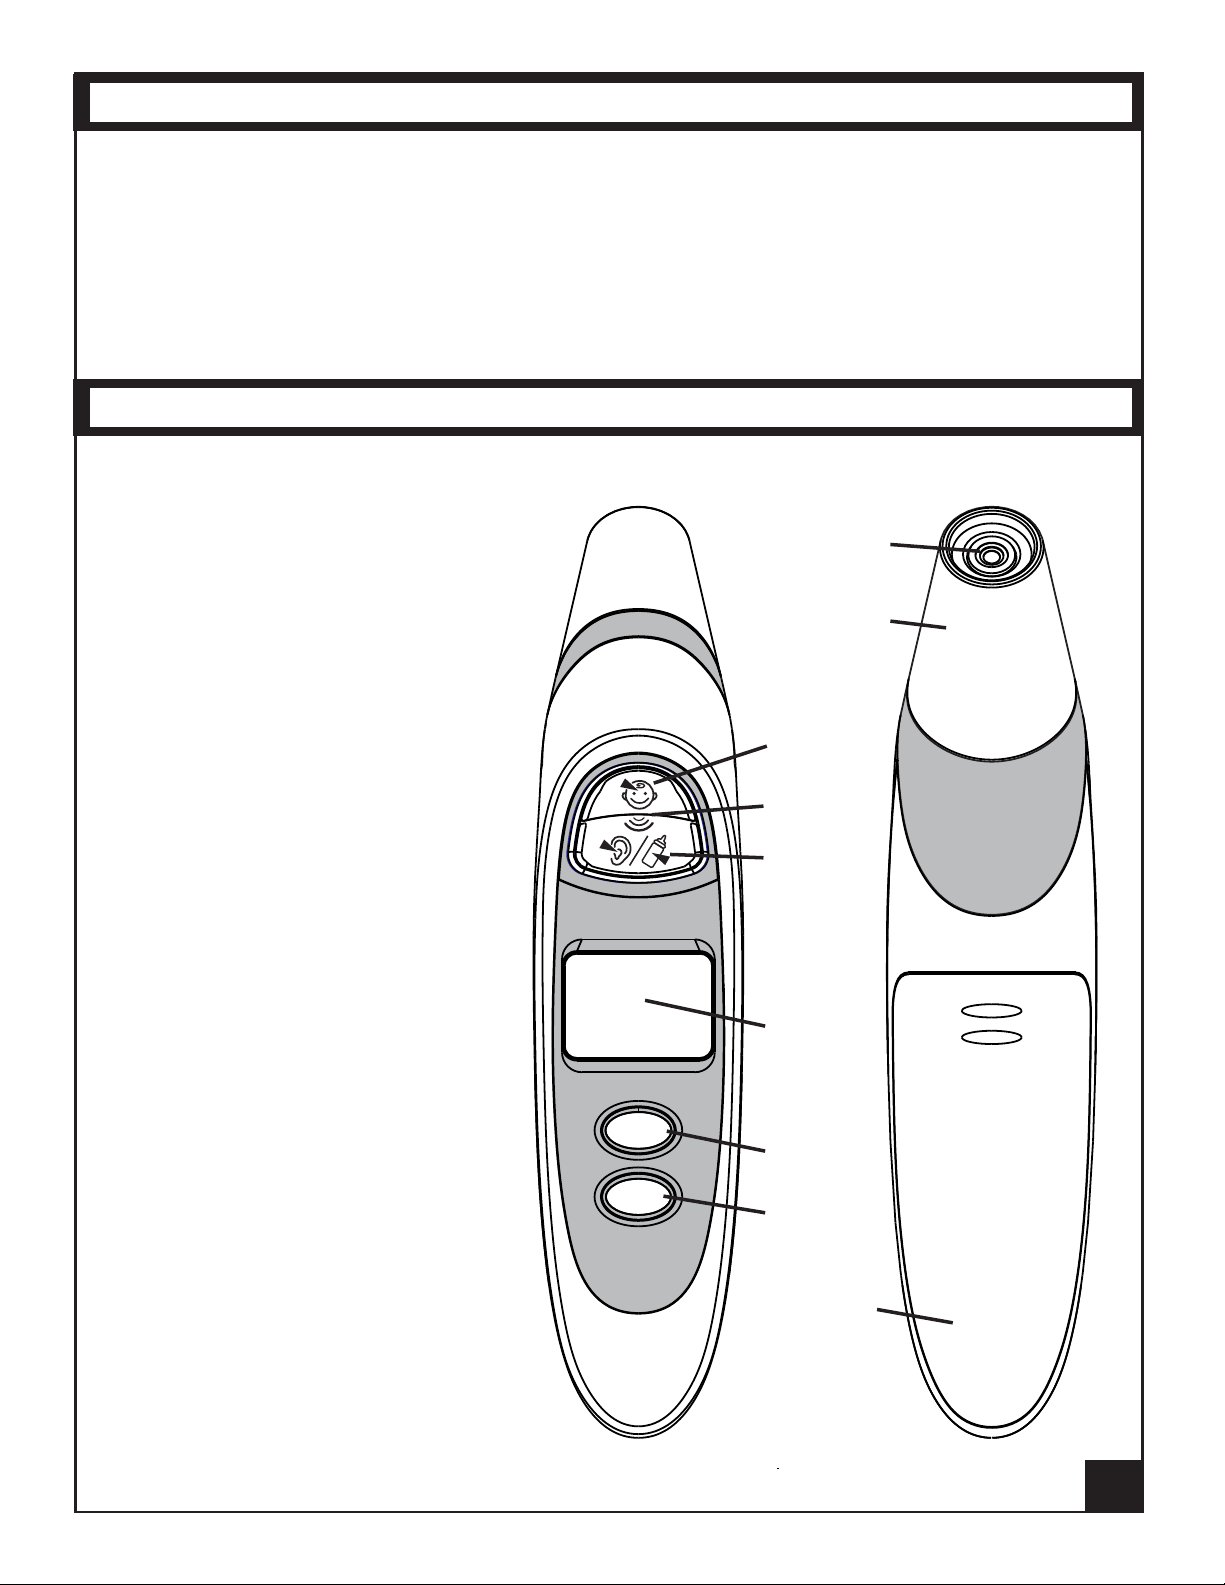
PACKAGE COMPONENTS
DualScan Prime Thermometer
1.5V Battery(AAA)
User manual
INTERFACE LAYOUT
1) Forehead Button
2) Food / Object Button
3) Ear Button
4) LCD Display Screen
1 piece
2 pieces
1 piece
⑦
⑧
①
5) Memory Button
6) Settings Button
7) Infrared Sensor Tip
8) Forehead Probe Cover
9) Battery Cover
②
③
④
MEM
⑤
SET
⑥
⑨
5
Page 6
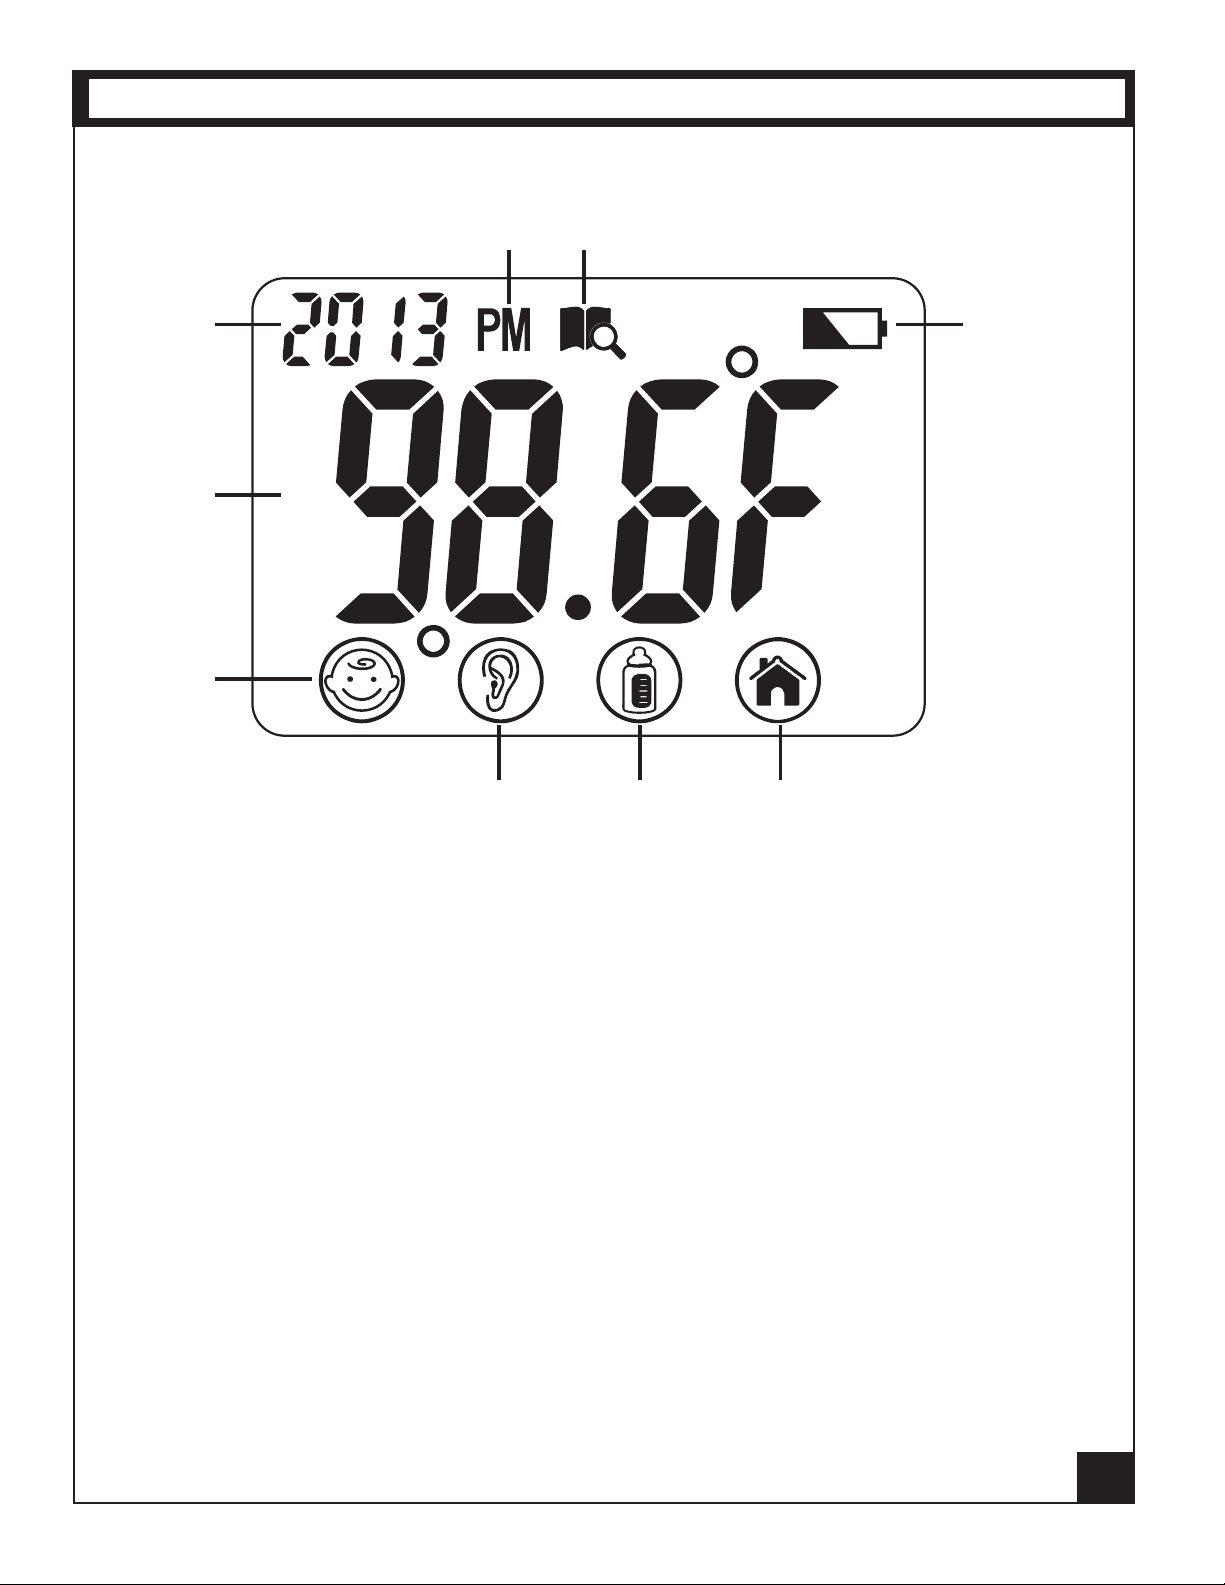
LCD DISPLAY LAYOUT
①
②
③
⑨
⑧
⑦
④ ⑤ ⑥
1) Current Year Display
2) Temperature Display (ºF or ºC)
3) Indicates a Forehead Temperature Measurement
4) Indicates an Ear Temperature Measurement
5) Indicates Object or Food Temperature Measurement
6) Indicates Room Temperature Measurement
7) Low Battery Indicator
8) Memory Indicator
9) AM / PM Indicator
6
Page 7
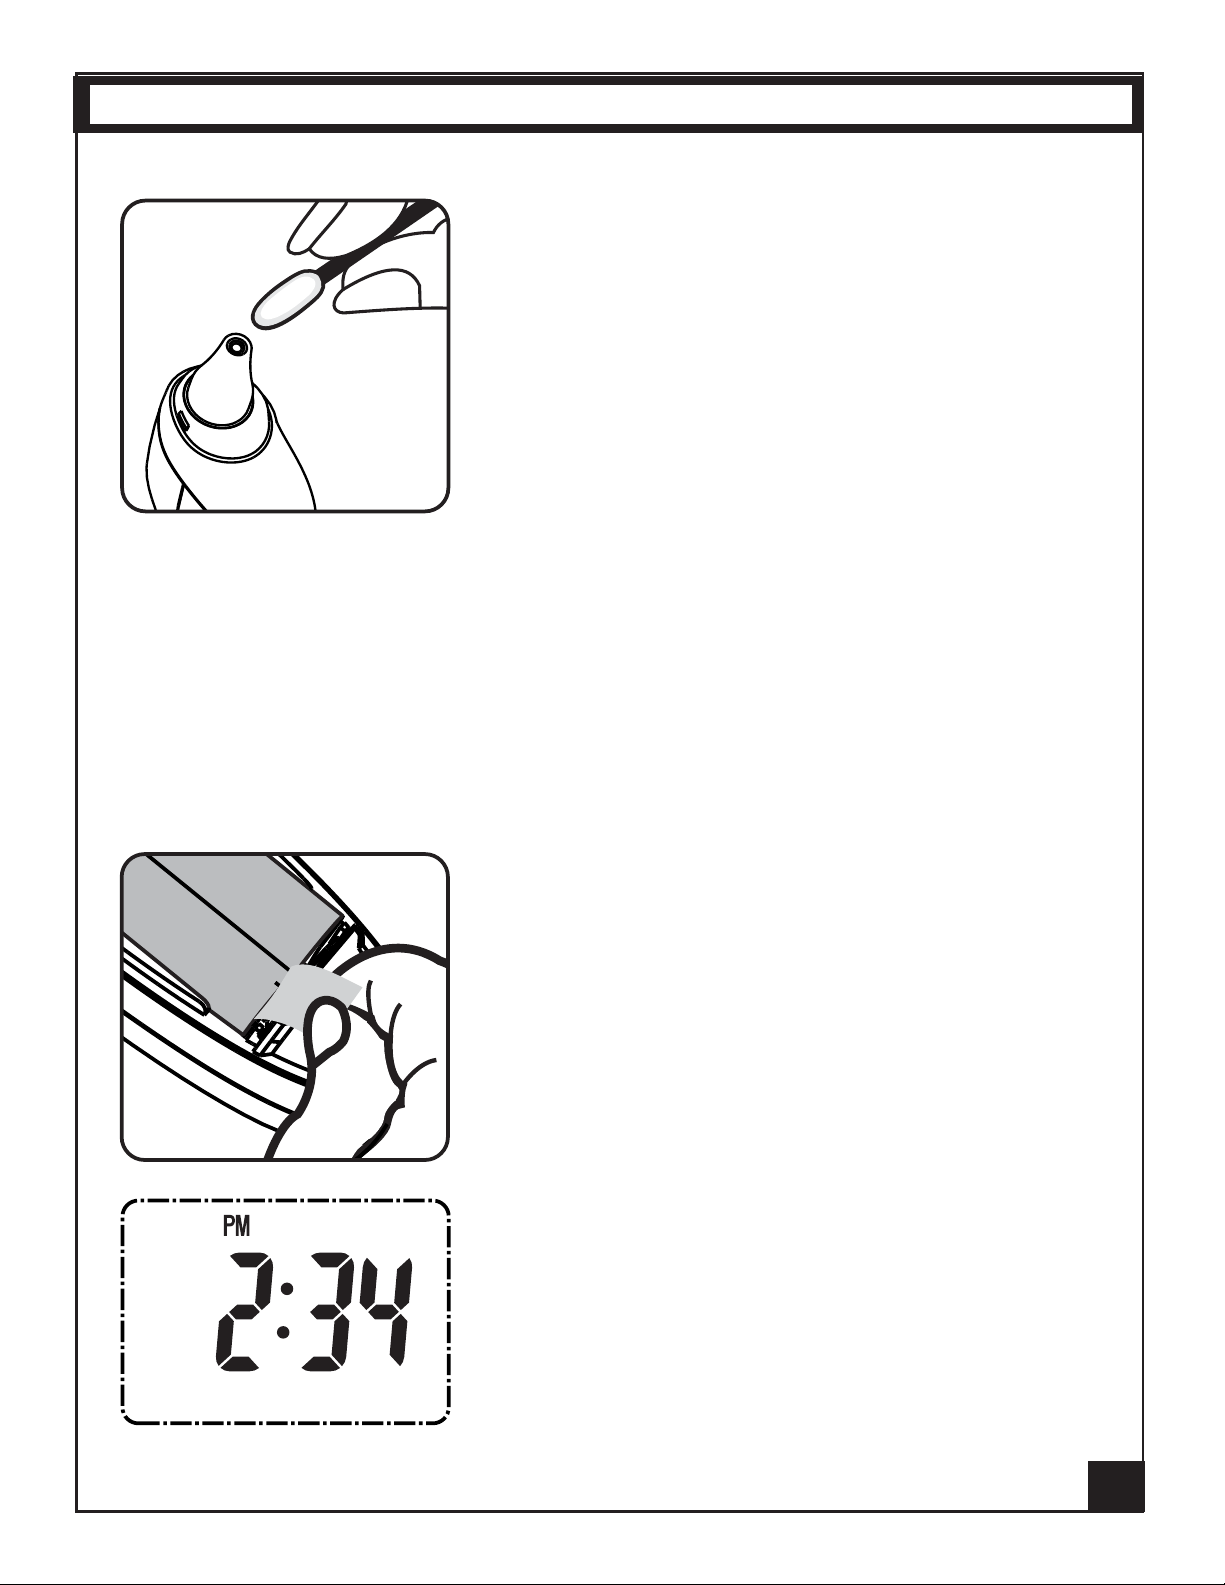
NOTES BEFORE USE
1. To achieve accurate measurements, it is very
important to ensure that the infrared sensor is
clean before using. To clean the sensor, gently
wipe its surface with a cotton swab slightly
moistened with alcohol and immediately wipe
dry with a clean cotton swab. After cleaning,
allow at least 20 minutes drying time before
taking temperatures.
2. Earwax in the ear canal or moisture on the forehead may cause an inaccurate
measurement, so make sure the ear canal or forehead is clean. If you clean
the ear or forehead, please wait for 5 to10 minutes before measuring.
3. If the temperature of the units storage area diers substantially from that of
the measuring room’s, please wait for the thermometer temperature to adjust
to the measuring room temperature for about 30 minutes before measuring.
4. Please open the battery cover and move the
plastic insulating tab away when you use the
thermometer for the rst time, and then the thermometer will turn on automatically, as per the
LCD display in the left gure. Press any button
to turn unit on when unit was previously o.
Start-up screen with time displayed.
7
Page 8
SET
MEM
SET
MEM
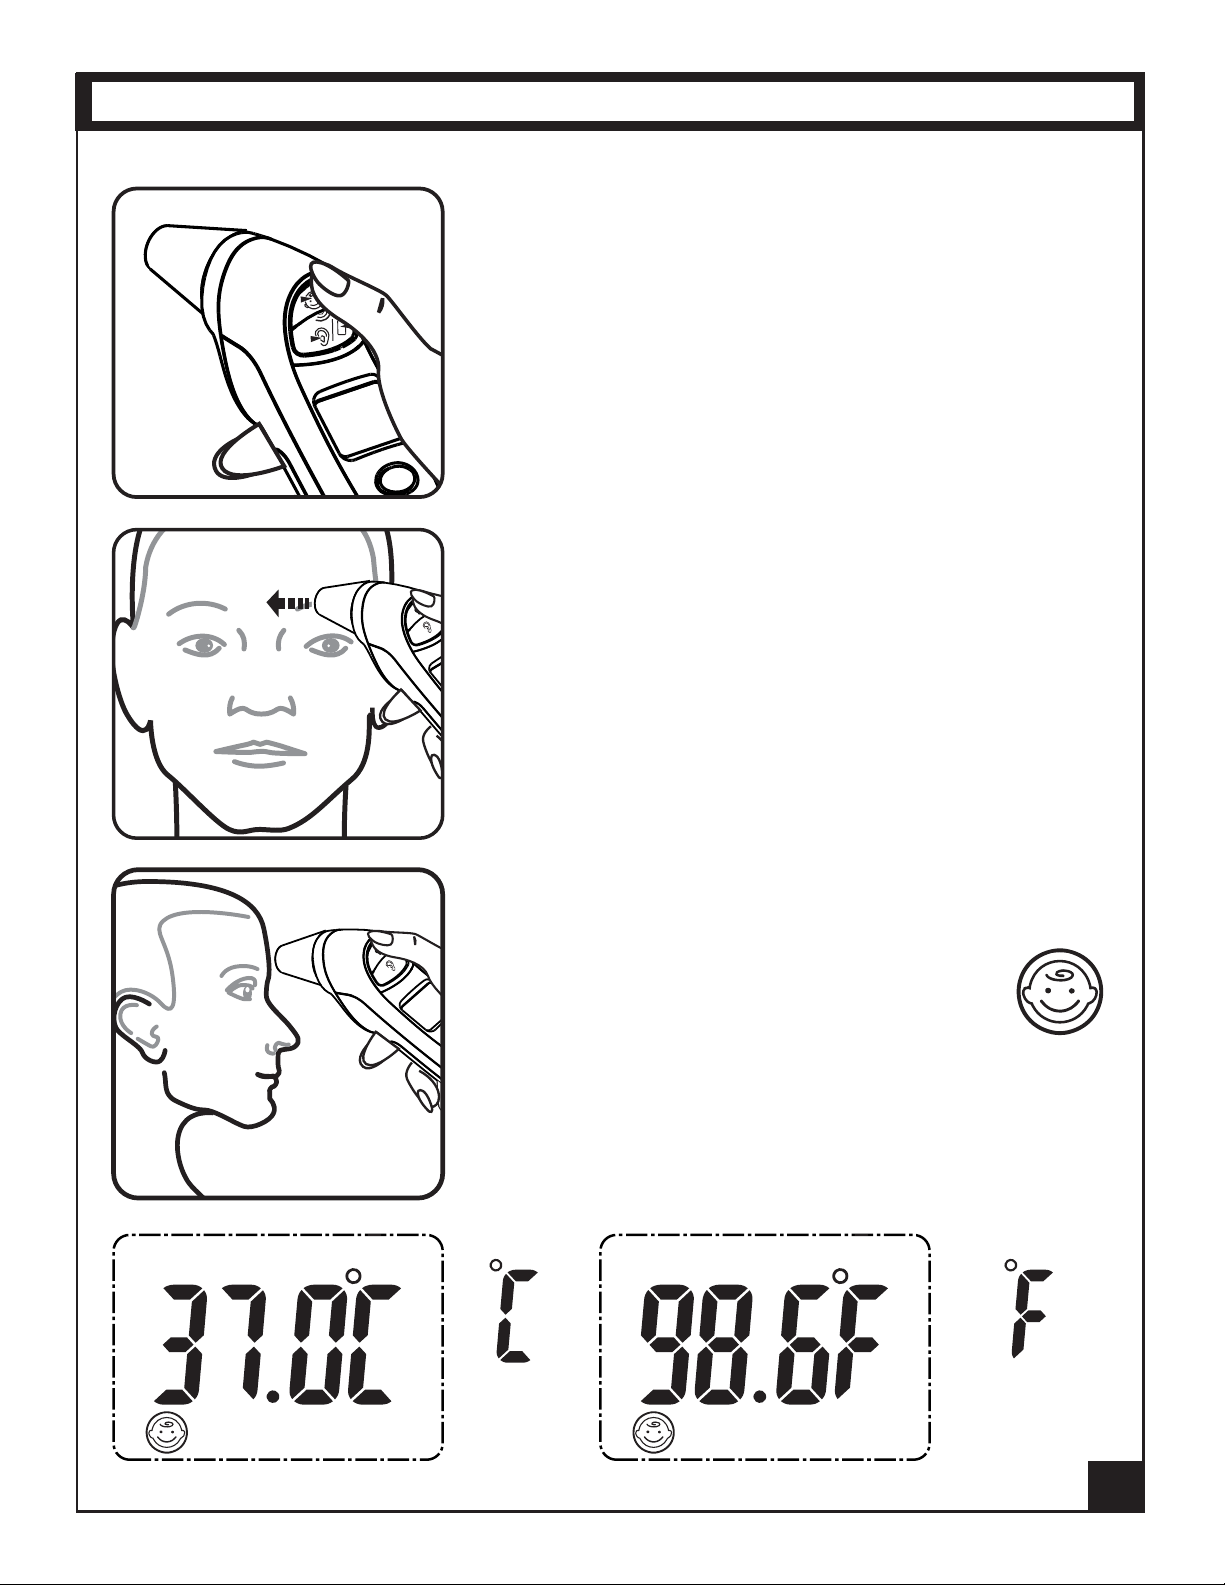
TO MEASURE FOREHEAD TEMPERATURE
MEM
1. Be sure Forehead Probe Cover is snapped onto
the unit before scanning. Place the thermometer
in your hand as shown here with your thumb tip
resting lightly on the Forehead Button.
Before you press the button, make sure the
Infrared Sensor Tip is clean.
2. Hold the thermometer so that the end of the
Forehead Probe Cover is placed ush to skin
surface midway between the eyebrow and hairline.
The tip of the Forehead Probe Cover should
gentally touch the skin.
Now press and hold the Forehead Button to scan
the forehead for a temperature measurement.
3. Keep the thermometer steady and the button
depressed until you hear the indicator sound and
see the LCD Display light up indicating your
Forehead Temperature Measurement.
The measurement is then complete
and the button can be released and the
thermometer moved away from the forehead.
4. Read the temperature on the display in CELSIUS
or FAHRENHEIT depending on the mode you set.
degrees
CELSIUS
degrees
FAHRENHEIT
8
Page 9
SET
MEM
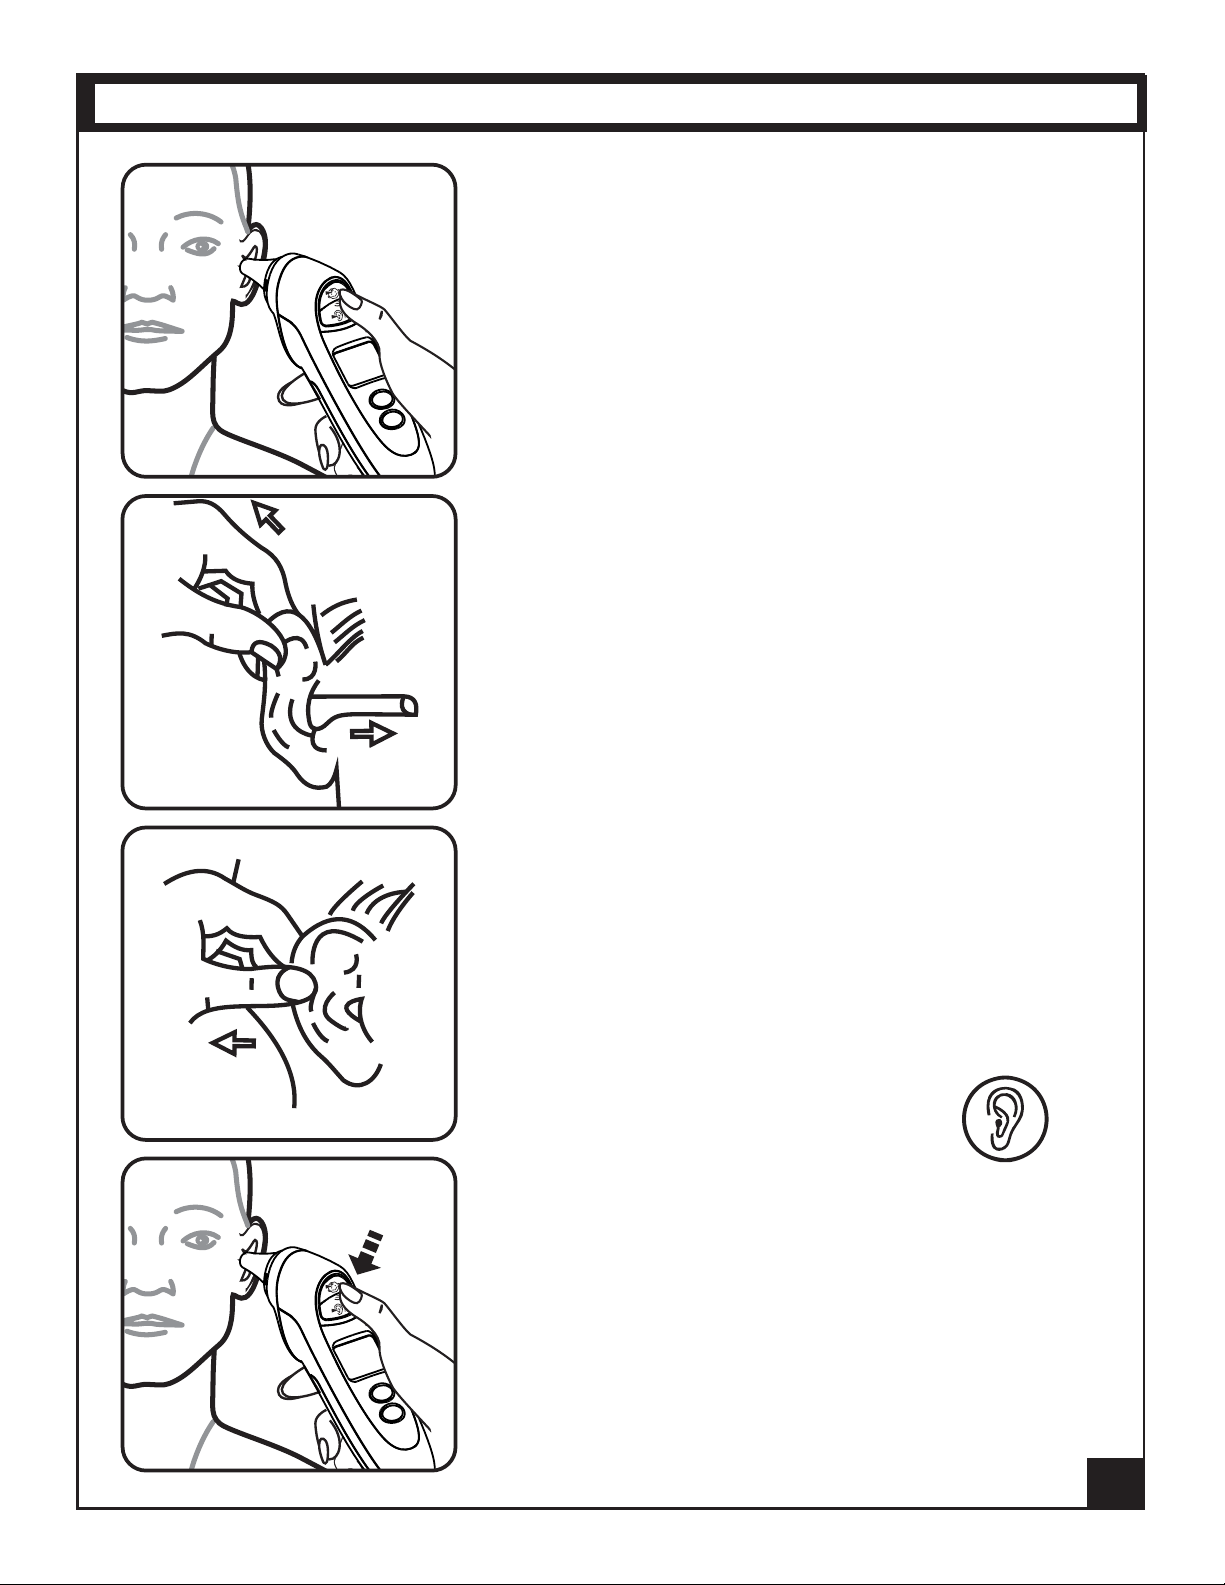
TO MEASURE EAR TEMPERATURE
SET
MEM
1. For Ear Scans, remove Forehead Probe Cover
before use. Place the thermometer in your hand
as shown here with your thumb or forenger tip
resting lightly on the Ear Button.
Before you press the button make sure the
Infrared Sensor Tip is clean.
2. Insert the Ear Probe very gently and slowly into
the ear canal.
Hold the thermometer so that the Infrared Sensor
Tip of the Ear Probe faces straight in the direction
of the Ear Canal. It is important to point the probe
tip of the thermometer toward the Eardrum at the
end of the Ear Canal inside.
To do this, gently pull the outer earlode toward the
rear of the head, straightening the Ear Canal for
accurate alignment with the Ear Probe.
Note: Always insert the thermometer into the same
ear, using the same direction and depth.
3. Now press and hold the Ear Button and keep the
Ear Probe steady until you hear the indicator sound,
and see the LCD Screen light up,
indicating your Ear Temperature
Measurement.
The measurement is then complete and
the button can be released and the thermometer
moved away from the Ear Canal.
4. As with the Forehead Temperature, read the
Ear Temperature on the LCD display in CELSIUS
or FAHRENHEIT depending on the mode you set.
9
Page 10
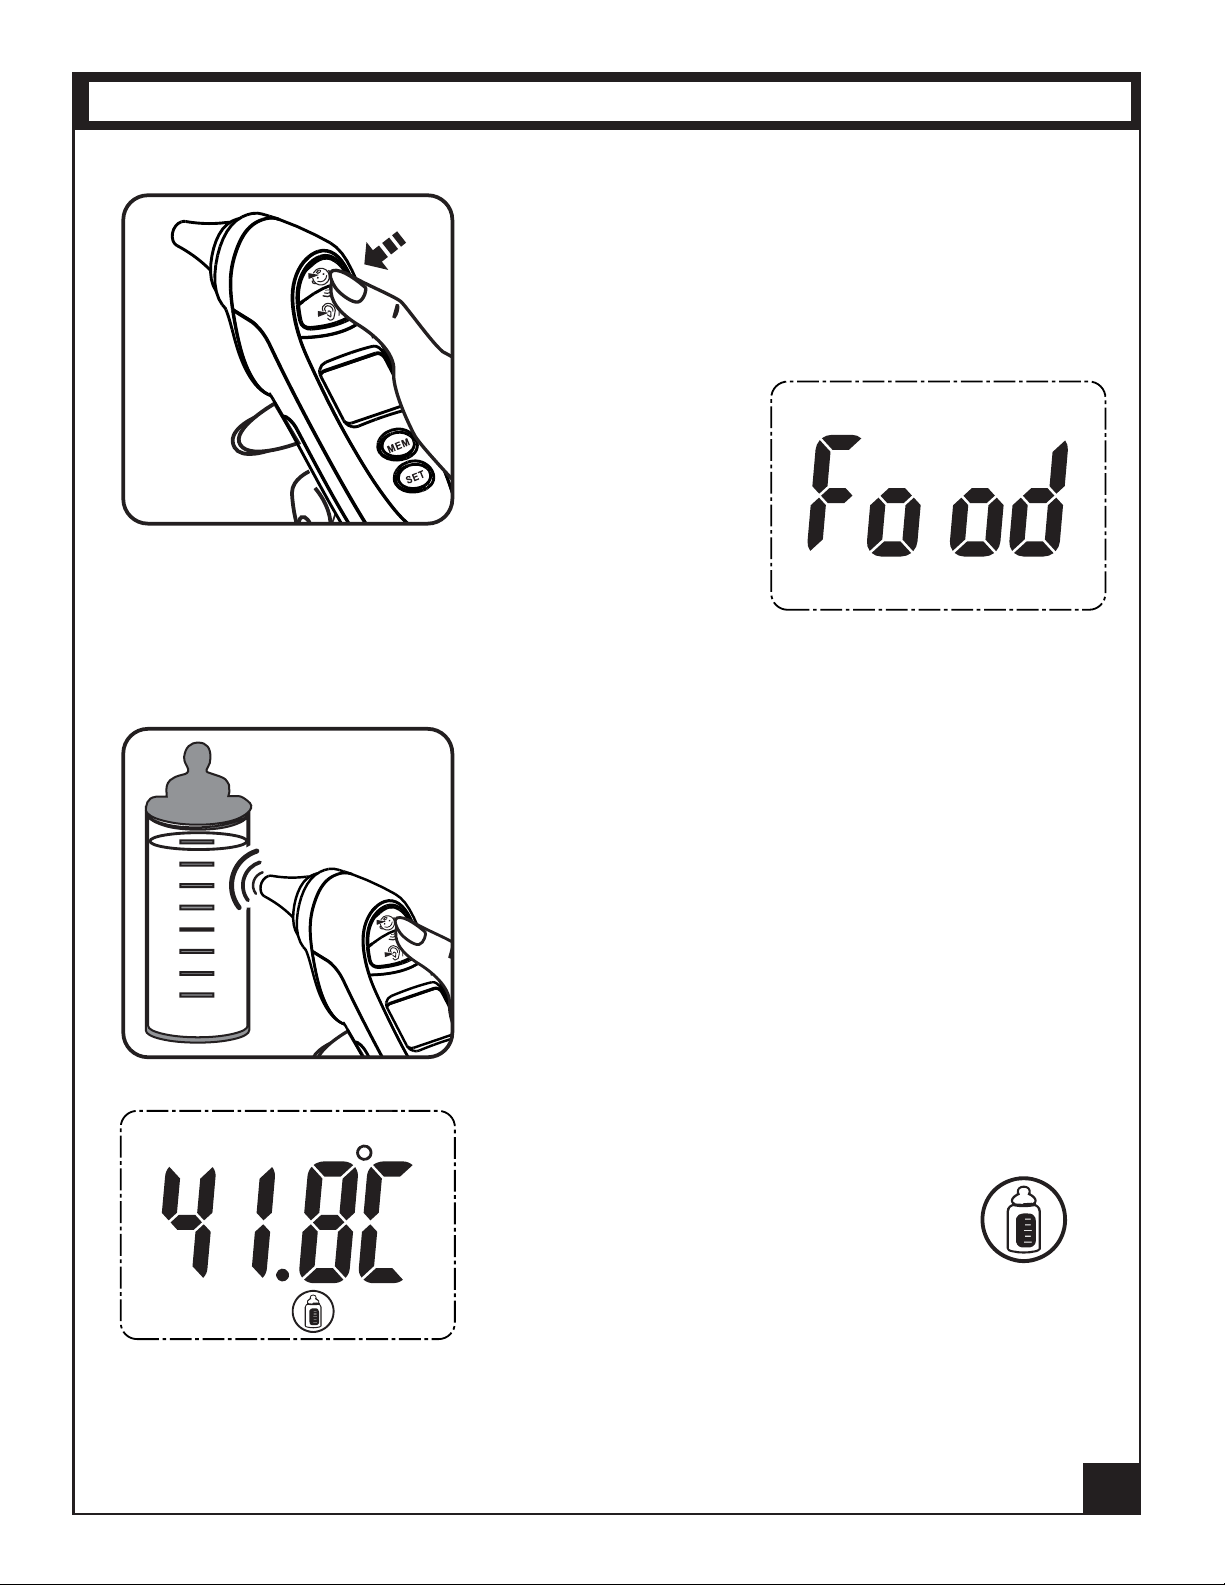
TO MEASURE FOOD / OBJECT TEMPERATURE
Scan within
1/2 inch
(1cm)
Press
Both
Buttons
1. Remove Forehead Probe Cover. Hold the thermometer in your hand (as shown) with your nger
tip on both the Ear Button and Forehead Button.
Press the buttons simultaneously to enter into the
Food / Object Mode and the display will indicate
this when you see...
Note: Make sure to not use the Food / Object Mode to measure body temperature.
2. Hold the thermometer so the Infrared Sensor
Tip is positioned is at a distance within 1/2 inch
(1cm) from the food, liquid, or surface of your
targeted measurement spot.
DO NOT let the Infrared Sensor Tip touch the
target food or object.
Now press and hold the Ear Button ONLY and
hold steady for approximately 2-3 seconds.
3. Move the thermometer away from the object.
The LCD displays the measured temperature and
indicates you’ve made a Food/Object
Temperature Measurement.
To return to normal mode press the Forehead
and Ear Buttons at the same time again, or press
the Memory Button. It will return to normal mode
automatically after 1 minute if you forget to do it
yourself.
10
Page 11

TEMPERATURE TAKING HINTS
1. A temperature measurement taken in the right ear may dier from a
measurement taken in the left ear. Therefore, always take the temperature
in the same ear.
2. External factors may inuence ear and forehead temperatures, particularly
when an individual has:
• been lying on the ear to be measured or has had it covered
• been exposed to very hot or very cold temperatures
• been recently swimming, bathing, or in any way causing the ear canal to
become wet
In these cases, remove the individual from such circumstances and wait 30
minutes prior to taking a temperature.
3. For persons wearing hearing aids or ear plugs, remove any such device and
wait 30 minutes prior to taking a temperature.
4. Use an untreated ear if ear drops or other ear medications have been placed
in an ear canal.
5. With object measurement, the current surface temperature of the object is
displayed. It can be dierent from its internal temperature, especially if the
surface is exposed to direct sunlight or unusual or extreme conditions.
Fever Alert feature: If the body temperature reading exceeds 100.4 ºF, FE will
ash on the screen to alert you that the reading indicates a fever. Depending
on how far the reading is above the normal body temperature of 98.6 ºF, you
may want to seek medical attention, as a high fever can be serious.
BACKLIGHT FUNCTION
Press any button to turn on the backlit LCD Display. The backlight will turn
o automatically after 5 seconds when in temperature measuring mode.
Note: You can use the LCD Display as a soft-glow ashlight so as not to disturb
the person whose temperature is being taken while sleeping in a dark area.
11
Page 12
CLEAN TIP ALERT
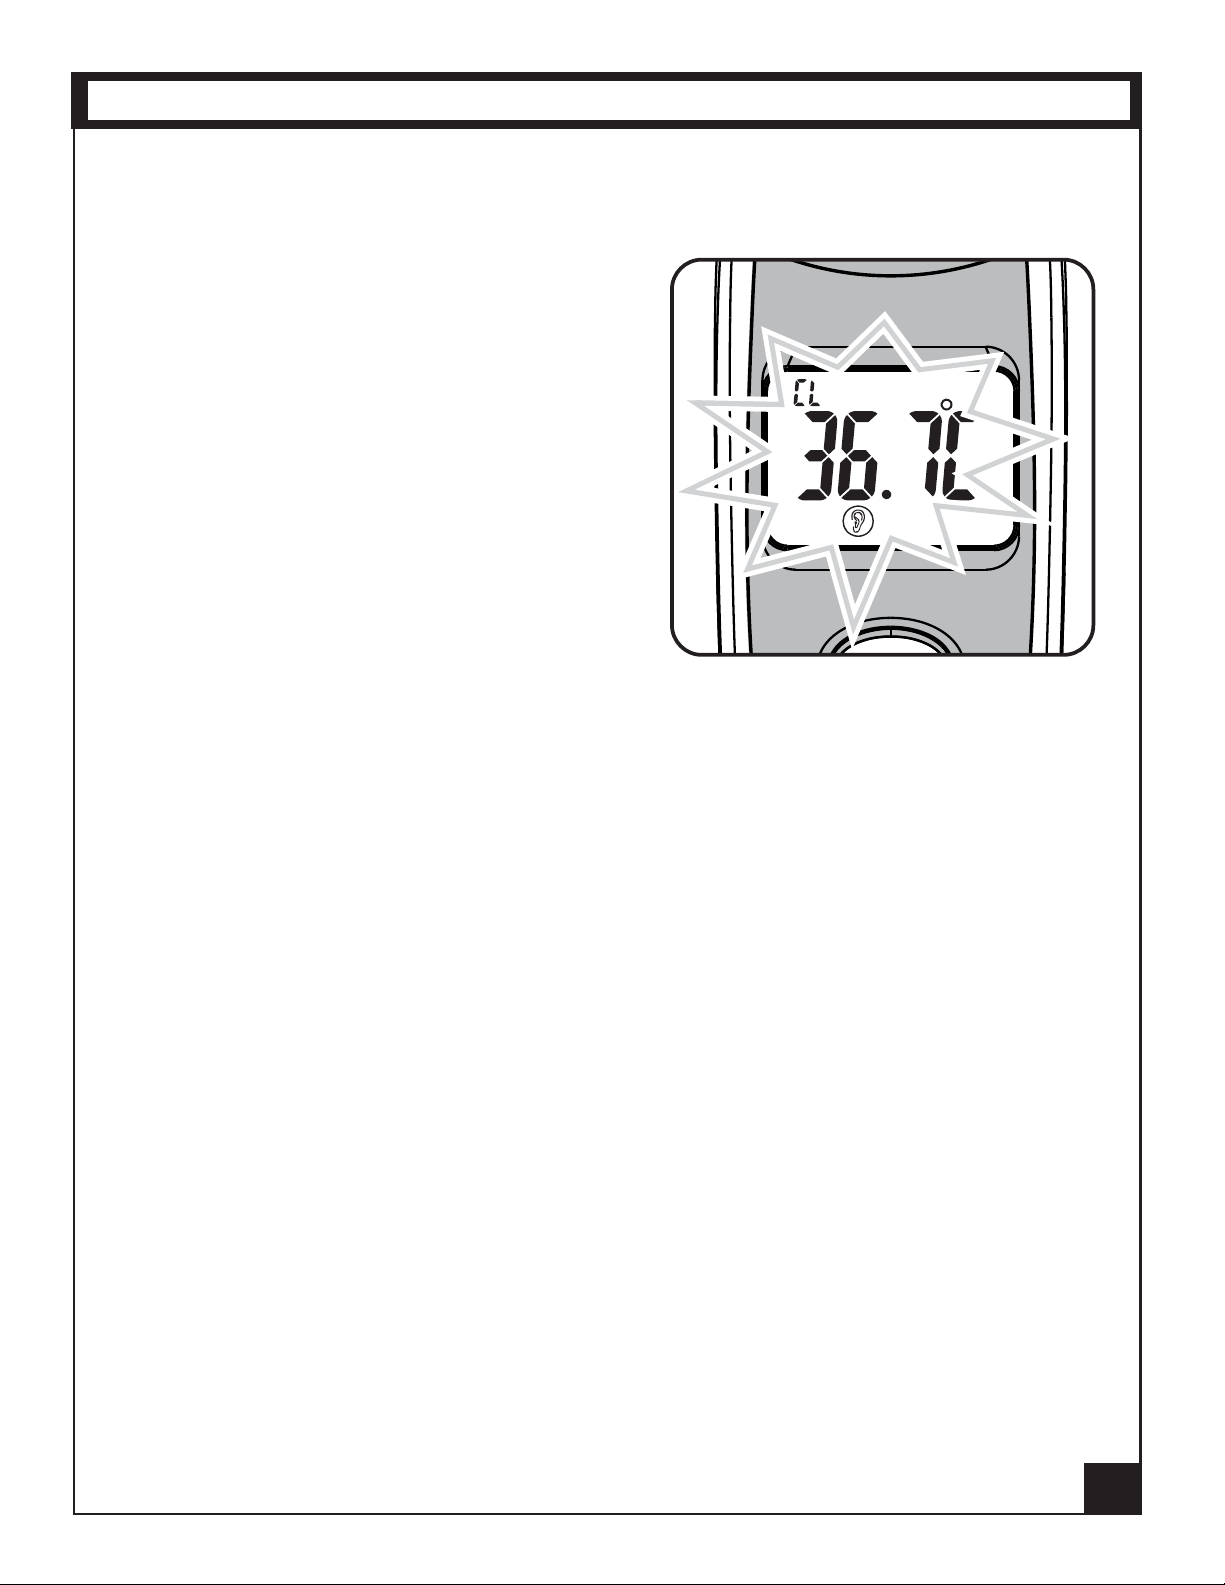
As a reminder to clean the probe tip, there is a special “Clean Tip Alert”.
When you have not used the thermometer
for a long time, or you have taken temperature readings multiple times, the backlight will ash for 1minute to remind you
to clean the probe tip.
Also, the LCD Display will show the letters
“CL” along with a beeping sound.
The thermometer will return to original
mode after you press any button, and the
Clean Tip indicator will stop ashing.
If no button is pressed within 1 minute, the Clean Tip indicator will stop.
However, it will resume again when you press any button subsequently
so as to remind you again.
12
Page 13
PREVIOUS READOUTS IN MEMORY
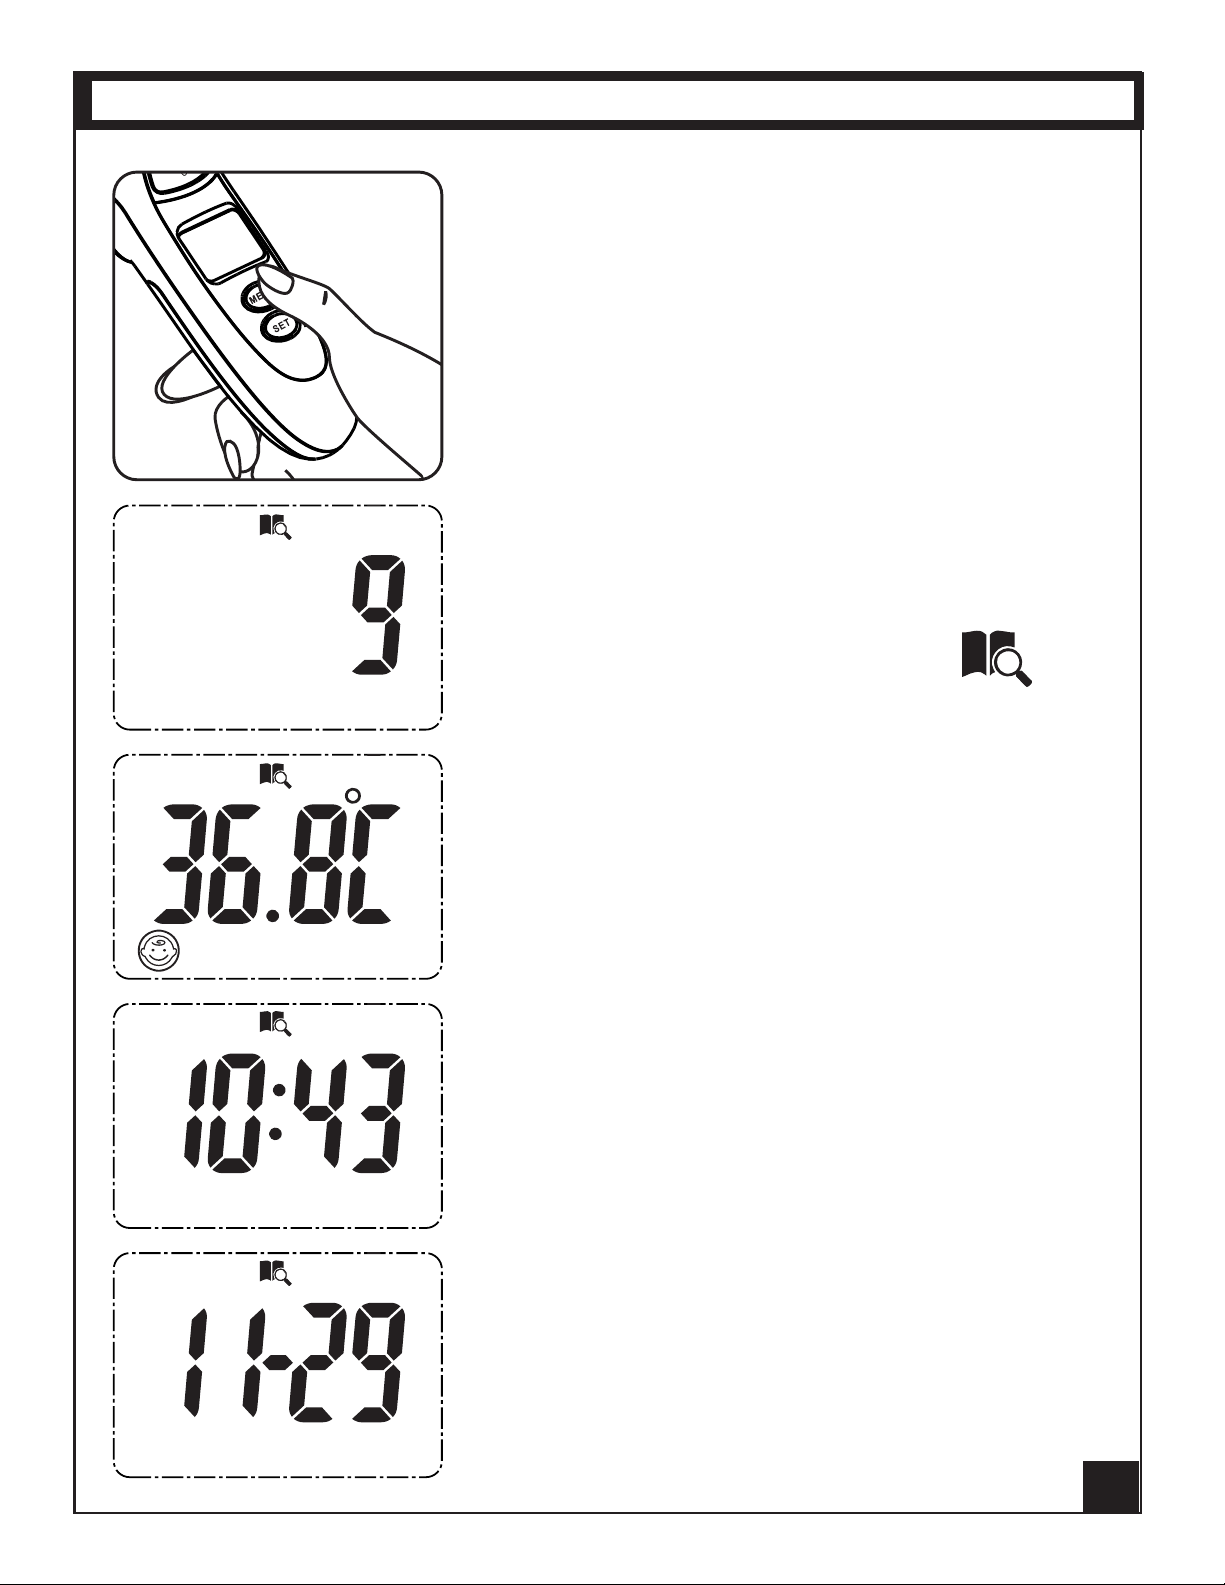
The thermometer records and stores a total of nine
(9) Memory Readouts of previous Ear and/or
Forehead temperature measurements.
The most current measurement is always saved in
the last available space. Once all nine storage spaces
have been occupied, with the next reading the
oldest stored readout is deleted from memory as
the new one is saved.
To view any of the nine stored readouts, pressing
the Memory Button once prompts the display to
show the number of the last memory readout
stored, along with the Memory Mode.
a)
b)
c)
Press the Memory Button repeatedly and you will
sequence back through the stored data of that
record starting with... a) Temperature and Type
(Ear of Forehead) of reading... then b) Time of
reading... and then c) Date of reading.
Pressing the Memory Button again takes you to
the Memory Number previous to the one you’ve
just observed. In this way you can quickly press the
button multiple times to go to whatever Memory
Number you want and to the Stored Data for each
Memory Readout recorded.
To revert back to the normal mode, just press the
Ear and Forehead Buttons at the same time, or it
will go back to normal mode automatically after
1 minute.
13
Page 14
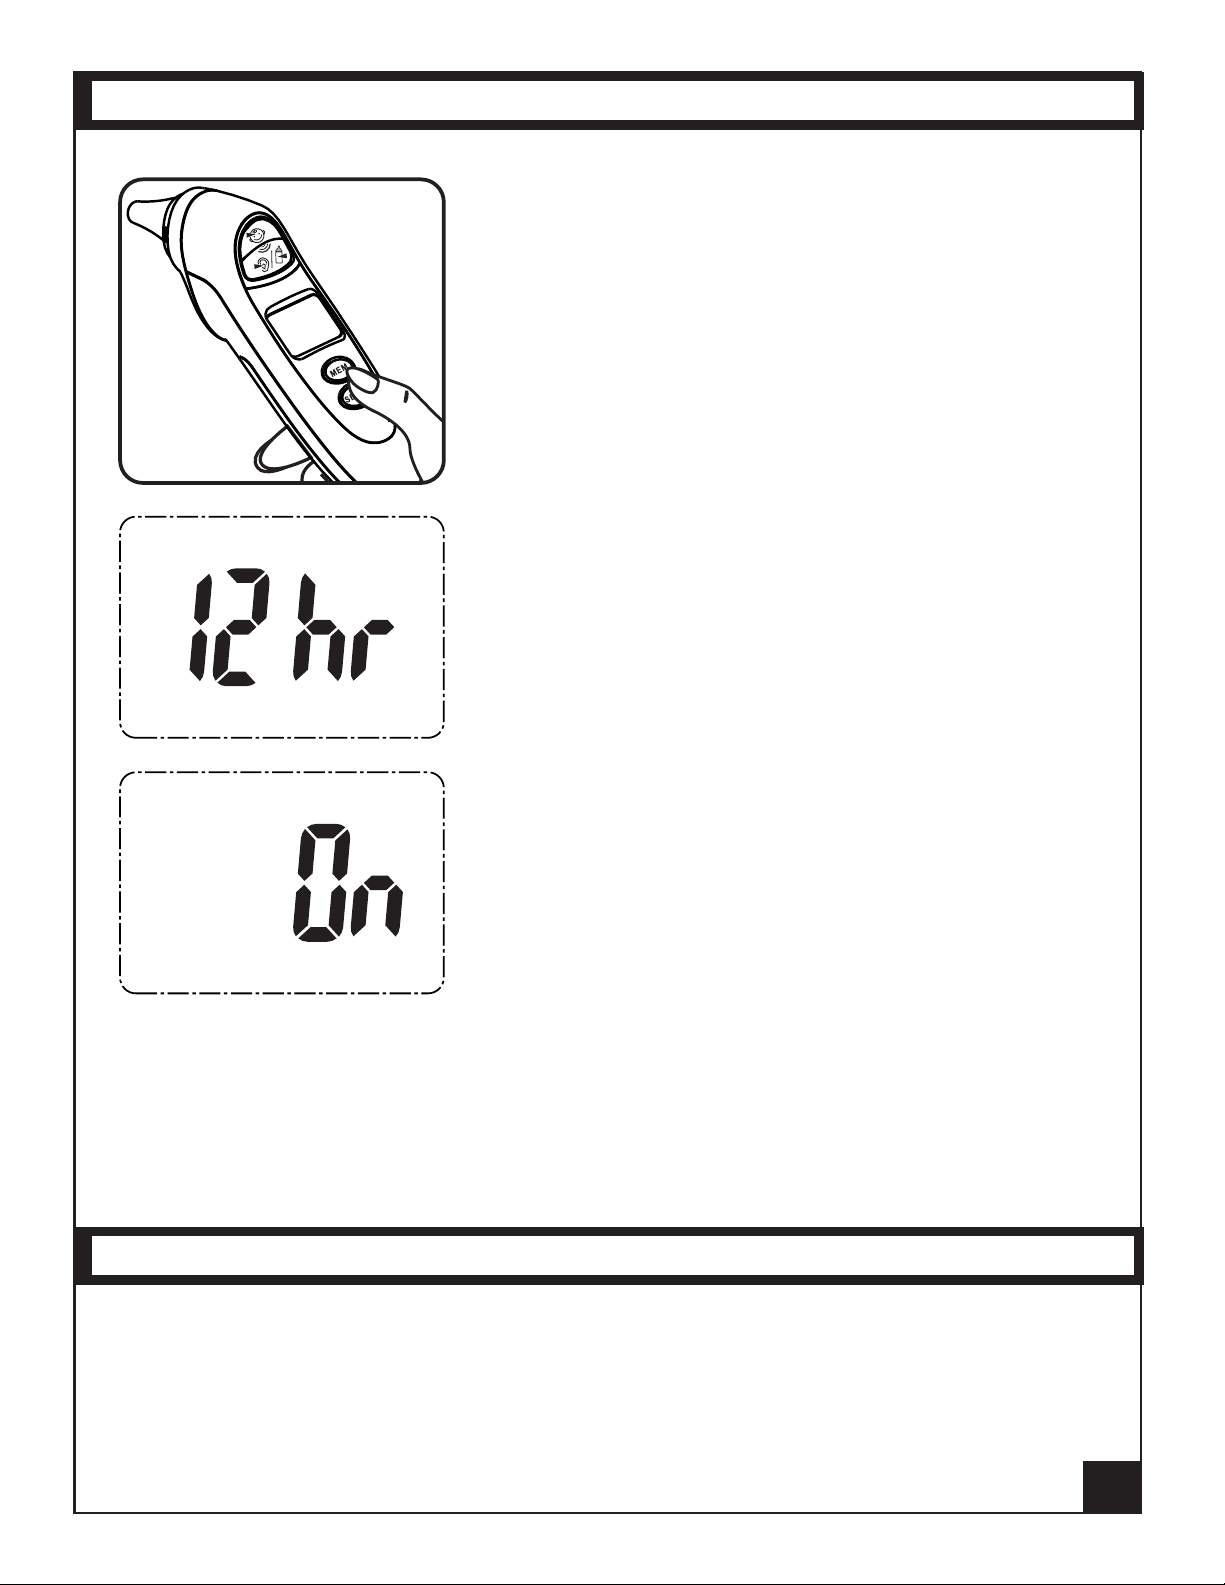
SETTING TIME AND DATE
Press and hold the Settings Button for about 2
seconds to enter into the Settings mode.
Press the Settings Button again to go to the
Time / Date format and select 12hr or 24hr mode.
Note: PM will display on screen when in 12hr
format. Then select Hour, Minute, Year (2001~
2099), Month, Day and whether Sleep Mode is
ON or OFF.
When the Sleep Mode is active, the thermometer
will turn OFF automatically after 1min to 3min
(depending on the factory default). When Sleep
Mode is deactivated, the thermometer remains
with power ON continuously.
Note: For saving battery power, we recommend
that you set Sleep Mode to ON.
While in a Settings mode or Format, advance
through the numbers by pressing the Memory
Button as needed.
To return to normal mode, press the Ear and
Forehead Buttons at the same time.
The thermometer will also go back to normal
mode automatically after 1 minute of non-use.
SETTING TO CELSIUS OR FAHRENHEIT
With the thermometer in Measuring or Memory Mode, press and hold the
Settings Button to switch between Celsius and Fahrenheit.
14
Page 15
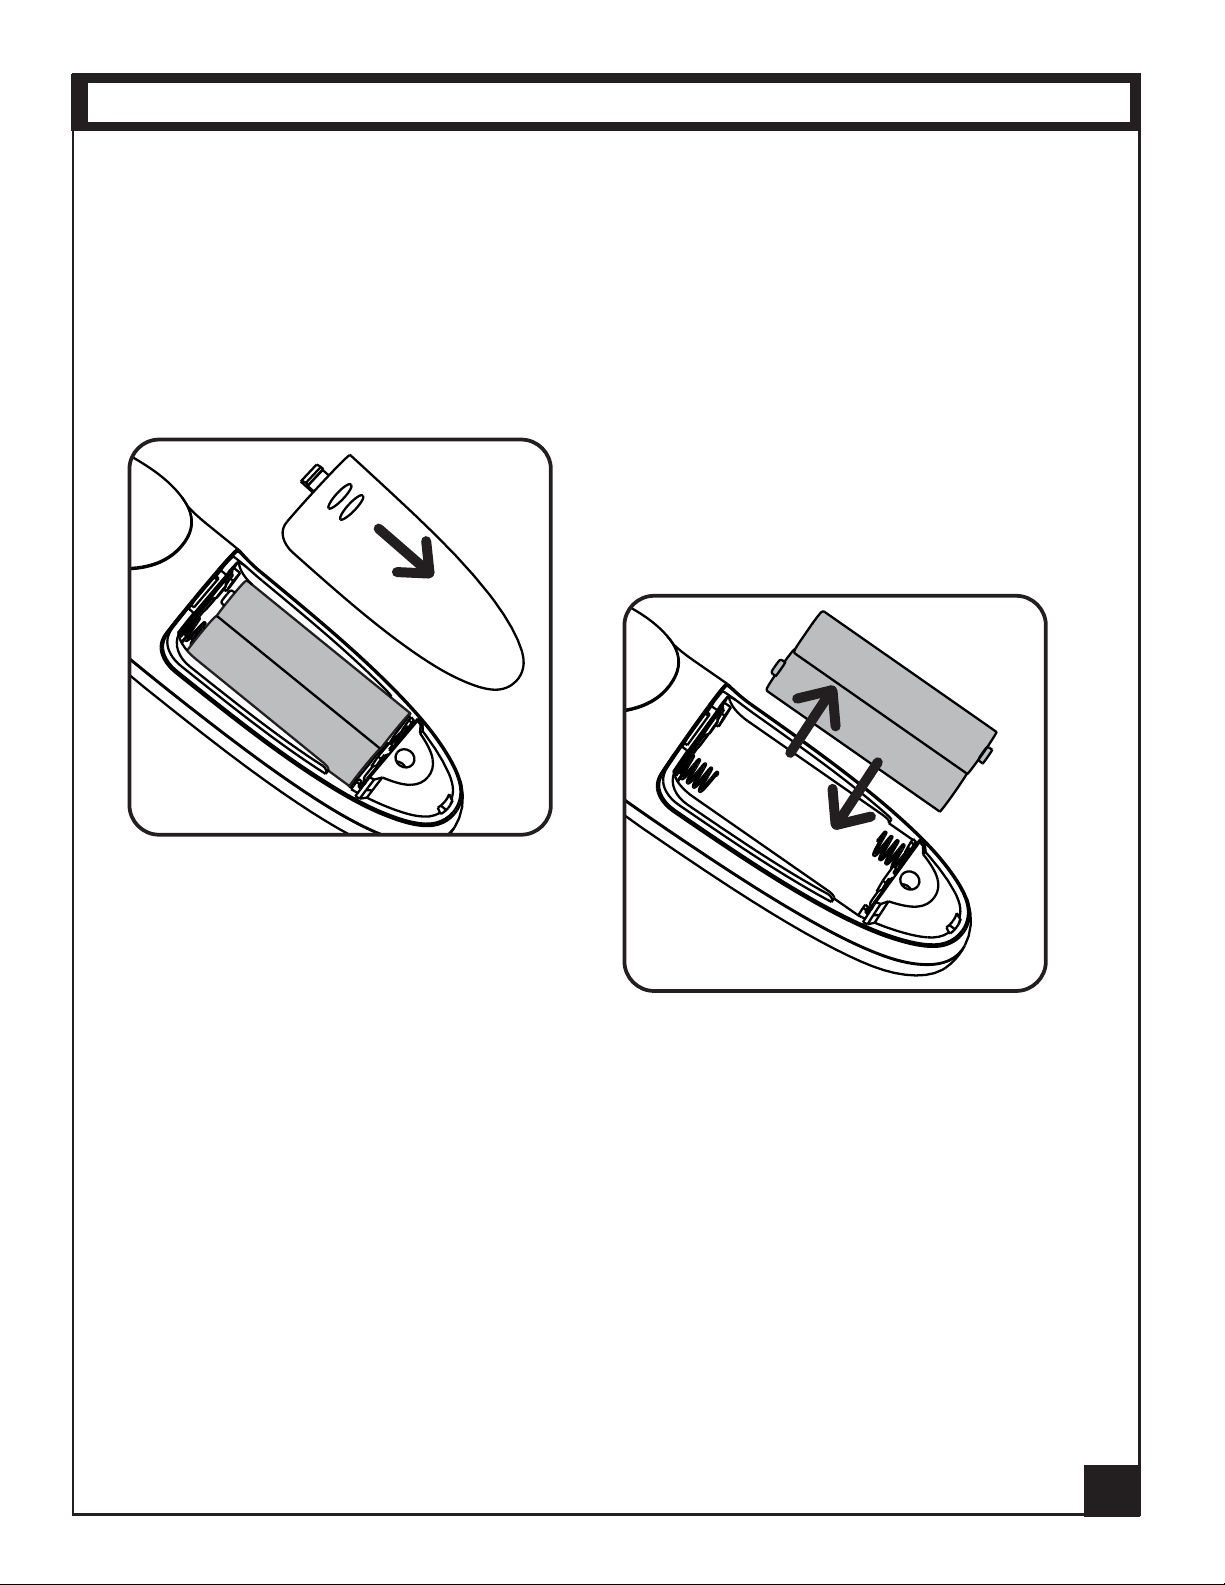
REPLACING THE BATTERIES
When the Low Battery Indicator appears on the screen, or the thermometer
does not function at all, you should replace the batteries immediately.
Note: The thermometer is pre-loaded with two (type AAA) batteries, so remember to remove the plastic tab from the battery connections as shown earlier
before initial use.
To replace low or dead batteries, remove
the Battery Cover by sliding it toward the
bottem end of the thermometer.
Then, pull the old batteries straight
up from the compartment and insert
new AAA batteries (we recommend
Alkaline batteries) into the battery
compartment. Make sure you are installing batteries properly, matching the
positive (+) and negative (-) ends to the corresponding markings inside the
battery compartment. Slide the Battery Cover back in place so it snaps closed.
Caution:
• To protect the environment, please dispose of any old batteries according
to national or local regulations, or applicable local ordinances.
• Keep all batteries out of the reach of children.
3
15
Page 16

THERMOMETER SPECIFICATIONS
Power supply:
Body measuring range:
Ear and forehead measure accuracy:
Object measuring range:
Object measure accuracy:
Displayed room temperature range:
Room temperature accuracy:
DC 3V (2*AAA)
32.0°C ~ 42.9°C (89.6°F ~109.3°F)
±0.2°C (±0.4°F) in range of
35.5°C~42.0°C (95.9°F~107.6°F)
±0.3°C (±0.5°F) for other ranges below
or above
20.0°C (68.0°F)~ 60.0°C (140.0°F)
±1.0°C (2.0°F)
5.0°C ~ 59.9°C (41.0°F~139.8°F)
±1°C (±2°F)
Dimension:
Weight:
Forehead operating condition:
Ear and object operating condition:
Storage environment:
This thermometer has been thoroughly
tested and inspected to assure proper
140(L)x33(W)x57(D)mm
60g (without battery)
15.0°C~40.0°C (59.0°F~104.0°F)
with a relative humidity of 20%~85%
10.0°C~40.0°C (50.0°F~104.0°F)
with a relative humidity of 20%~85%
-20°C~55°C (-4°F~131°F) with a relative
humidity of 20%~90%
performance and operation.
16
Page 17
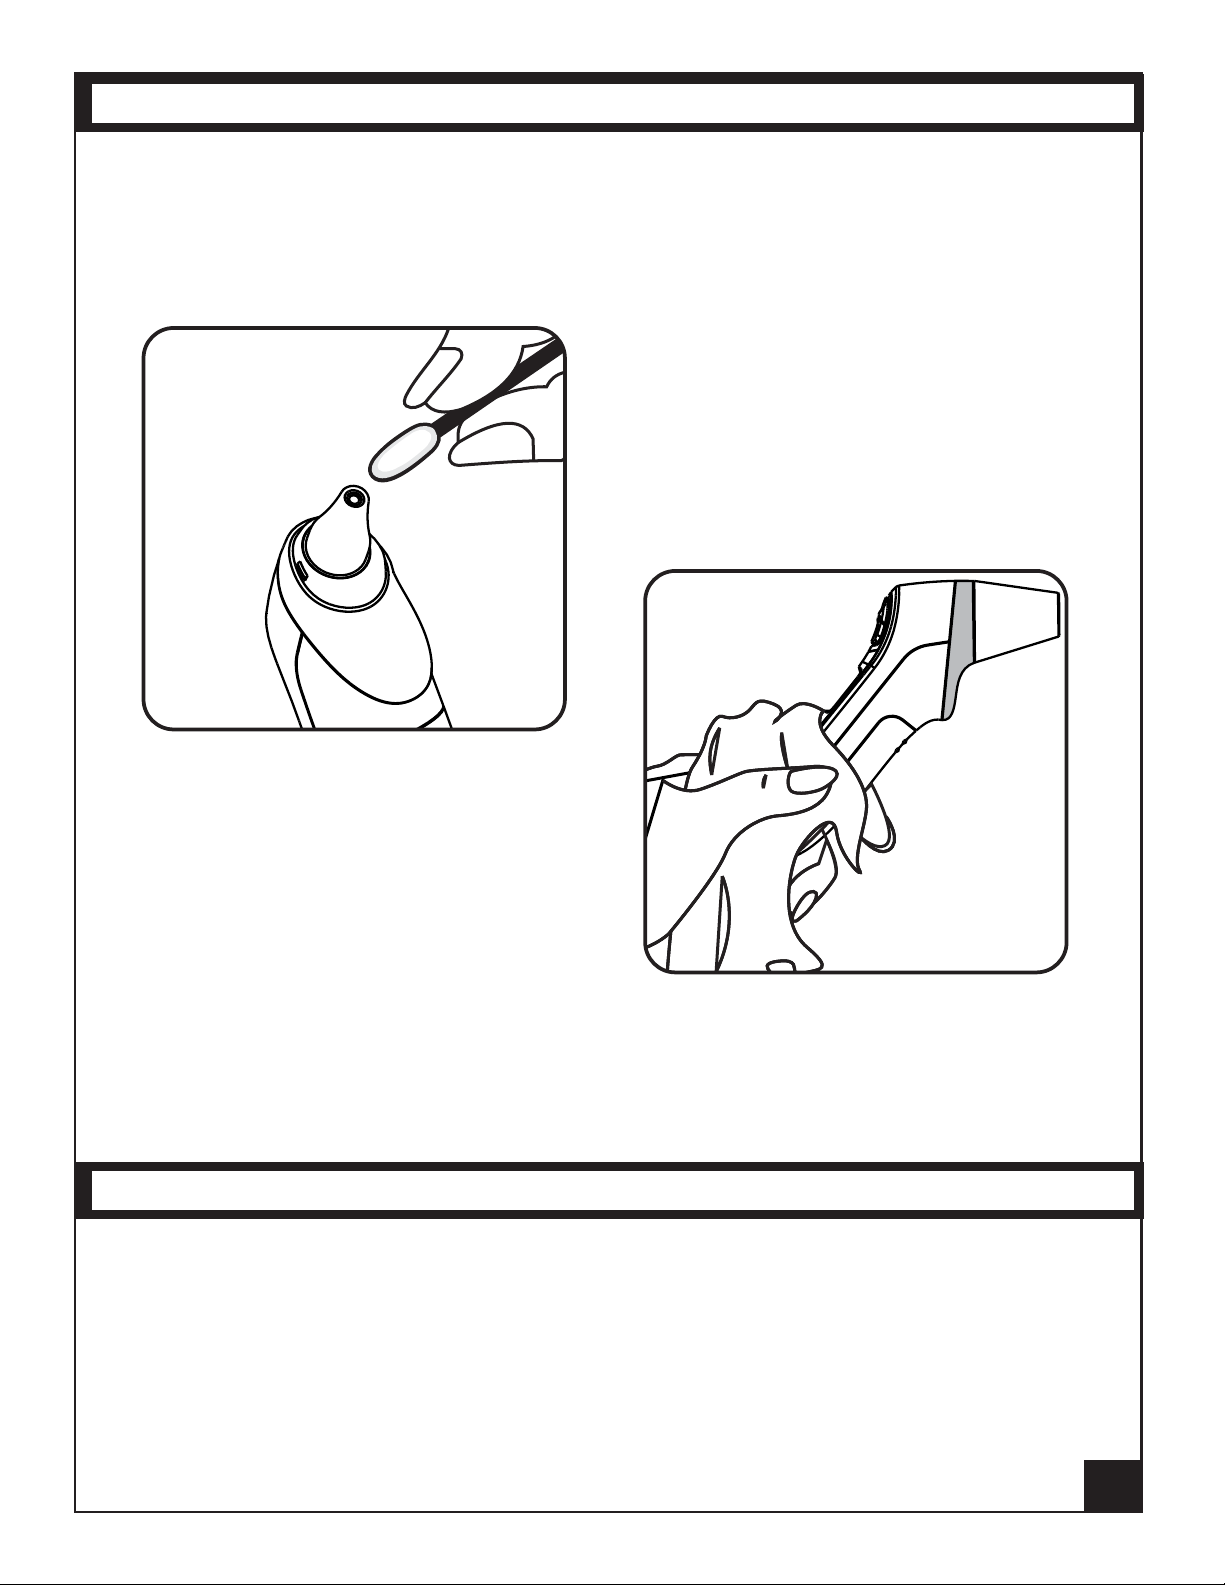
CARE AND CLEANING
VERY IMPORTANT: To ensure accurate measurements, keep the probe tip clean
and free of scratches, nger prints, earwax or dirt, or they will eect the accuracy
of the thermometer.
To clean the probe tip, gently wipe the
clear surface with a cotton swab slightly
moistened with alcohol and immediately
wipe dry with a clean cotton swab.
To clean the body of the thermometer,
use a soft dry cloth. Never clean the thermometer with an abrasive cleanser,
solvent (thinner, benzene, etc.), or submerge the thermometer into water or
other liquids.
After cleaning, store the thermometer in a clean, dry place at room temperature.
Never expose the thermometer to extreme temperatures, humidity, or direct sunlight. Avoid any shocks, drops or high impacts to the thermometer.
CALIBRATION
The thermometer is initially calibrated at the time of manufacturing. If the
thermometer is used according to the instructions, periodic recalibration is not
required. If at any time you question the accuracy of the measurement, please
contact the manufacturer immediately.
Don't attempt to modify or reassemble the thermometer.
17
Page 18
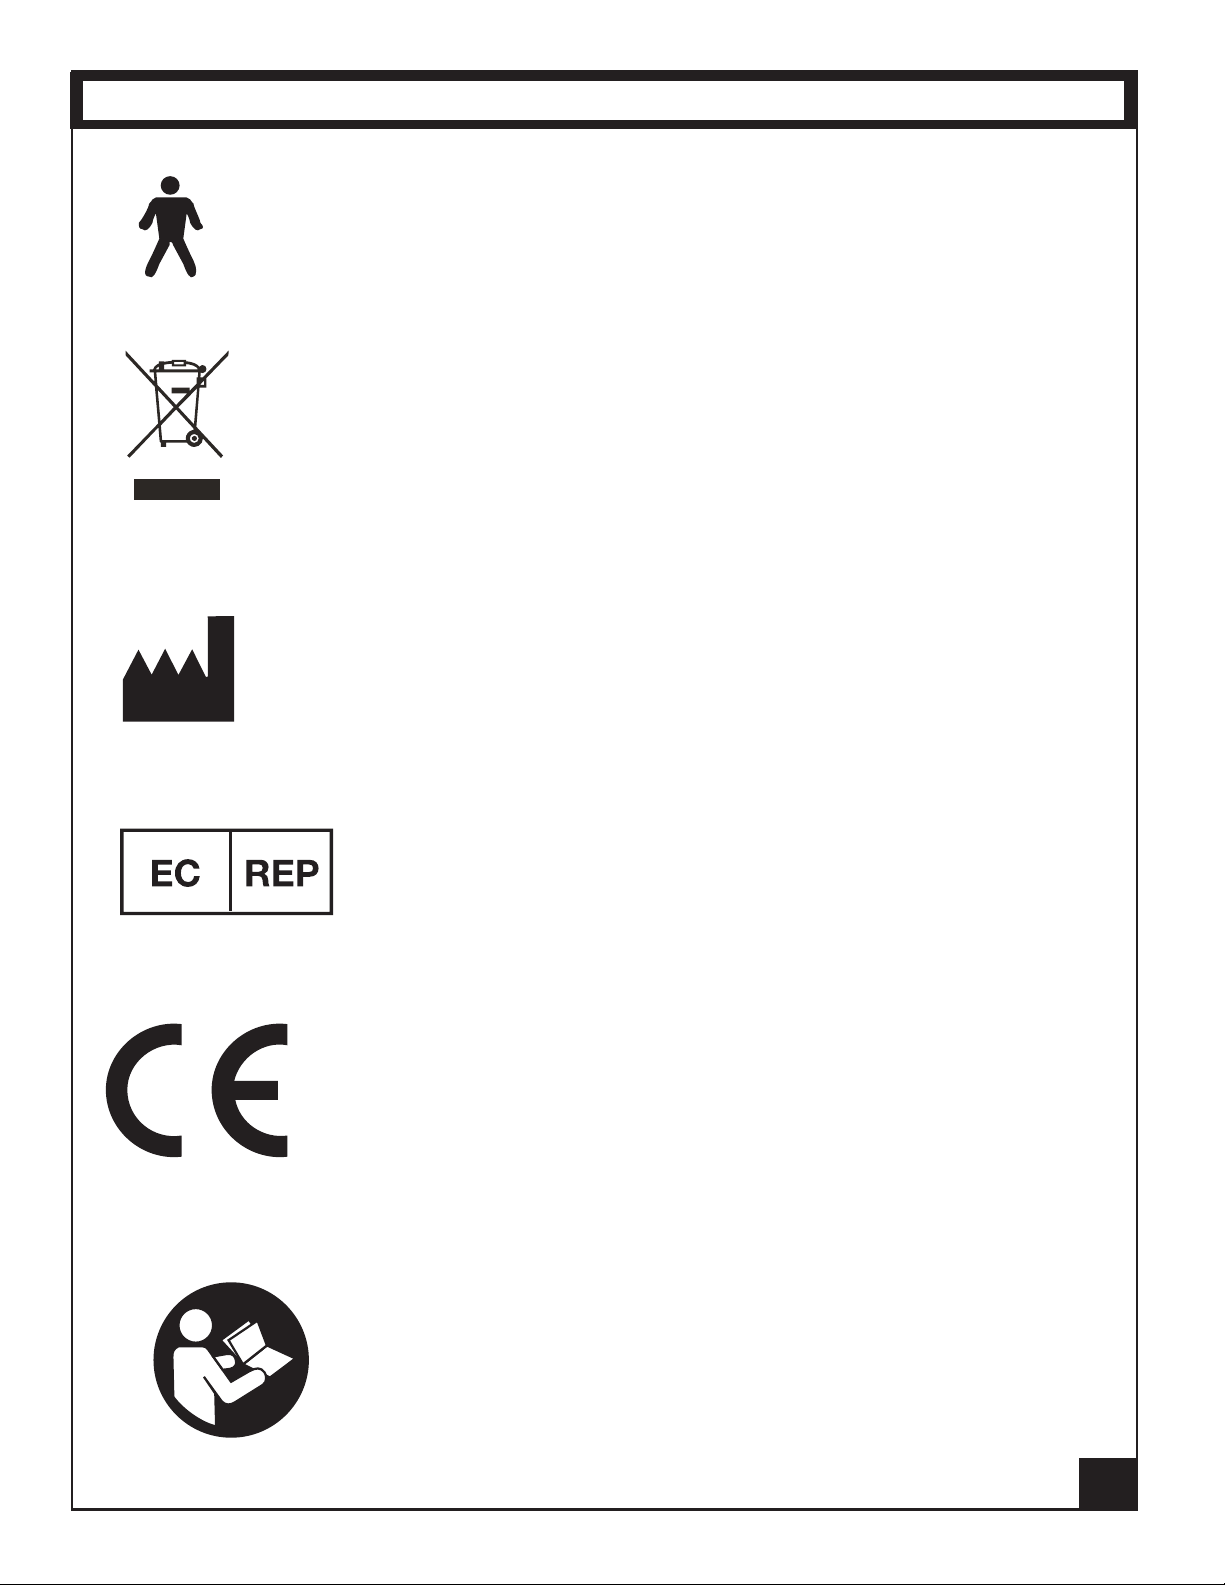
EXPLANATION OF SYMBOLS
Type BF Applied part
Disposal in accordance with Directive 2002/96/EC (WEEE)
The name and the address of the manufacturer
The name and the address of the authorised
representative in the European Community
Complies with the European Medical Device
Directive (93142/EEC) and amended by
0197
directive 2007/47/EC requirements.
Notied body TUV Rheinland (CE0197)
Refer to Instruction Manual.
18
Page 19
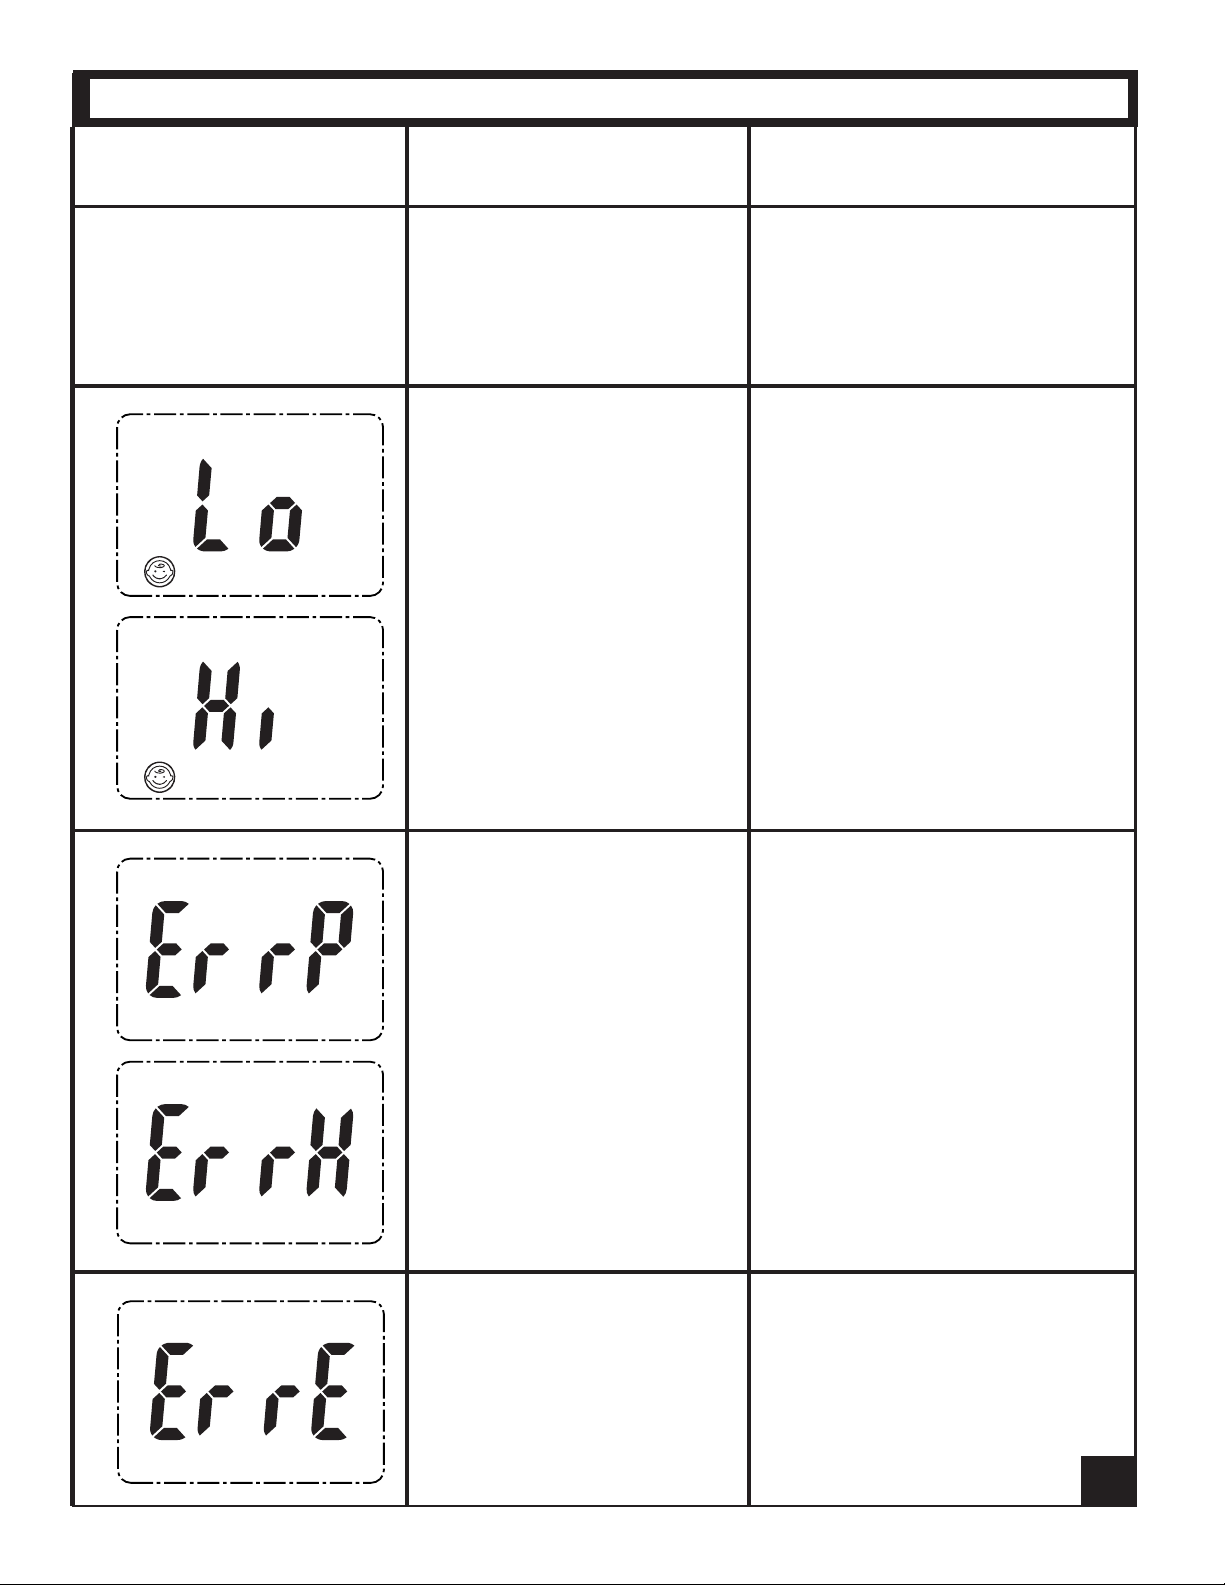
TROUBLESHOOTING
Problem Checklist Countermeasures
No response / automatic
reset when pulling out
plastic insulator tab.
Batteries low or dead?
Batteries installed in wrong
polarity?
Poor battery contact?
Measured temperature is lower
than 32.0°C / 89.6°F or higher
than42.9°C / 109.3°F
Change to new batteries.
Remove batteries and reinsert
batteries correctly.
Follow steps in User's Manual for
proper measurement. Check the
operation method.
These Error Messages indicate
a problem with the hardware.
Room or environment
temperature exceeds proper
operating conditions.
Contact Mobi Technologies, Inc. via
the contact info at the end of this
User’s Manual and report which
Error Message is being displayed.
Retake measurements within
proper operating conditions where
room temperature is well within
the range of 50ºF-104ºF (10ºC40ºC).
19
Page 20
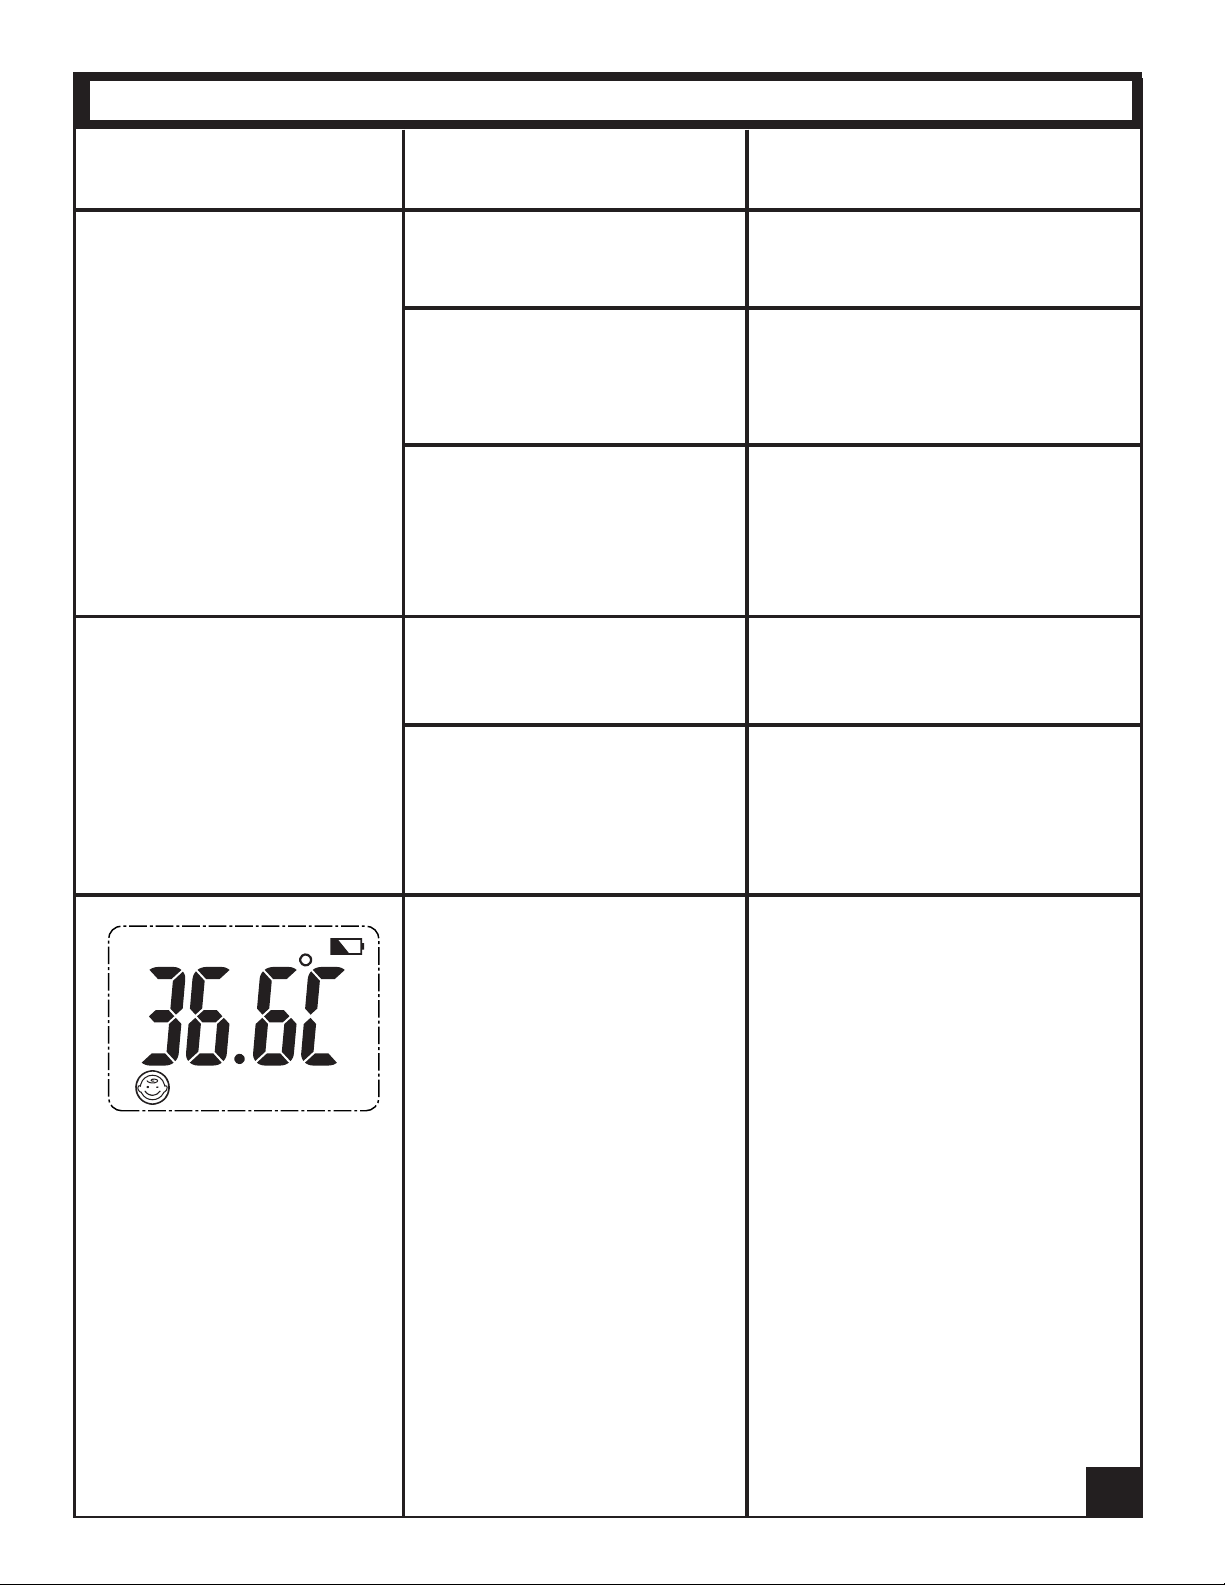
TROUBLESHOOTING (cont.)
Problem Checklist Countermeasures
The measurement is not
accurate or there is doubt
of measurement results.
The measurement is not
accurate or there is doubt of
the measurement results.
Check to see if the infrared
sensor is clean or not.
Determine whether your
measuring method is correct
or not.
Assess whether or not you
have allowed the thermometer
and the patient to become stabilized in the room for 30 min.
Are you using the thermometer
indoors or outdoors?
Determine if you might have
held the thermometer in your
hand too long, which may
aect its accuracy.
Clean the infrared sensor with cotton
swab according to the User’s Manual.
Ensure you have read the User’s Manual and know how to use the thermometer properly.
Please keep the thermometer and
patient in the measuring room for at
least 30 minutes as mentioned in this
manual.
Always take measurements indoors.
Set the thermometer down in the
room where the measurement is
to be taken so as to let it stabilize
before use.
Occasionally check to see if the
Low Battery icon is showing on
the LCD screen.
Immediately replace batteries with
new ones; preferrably Alkaline.
20
Page 21
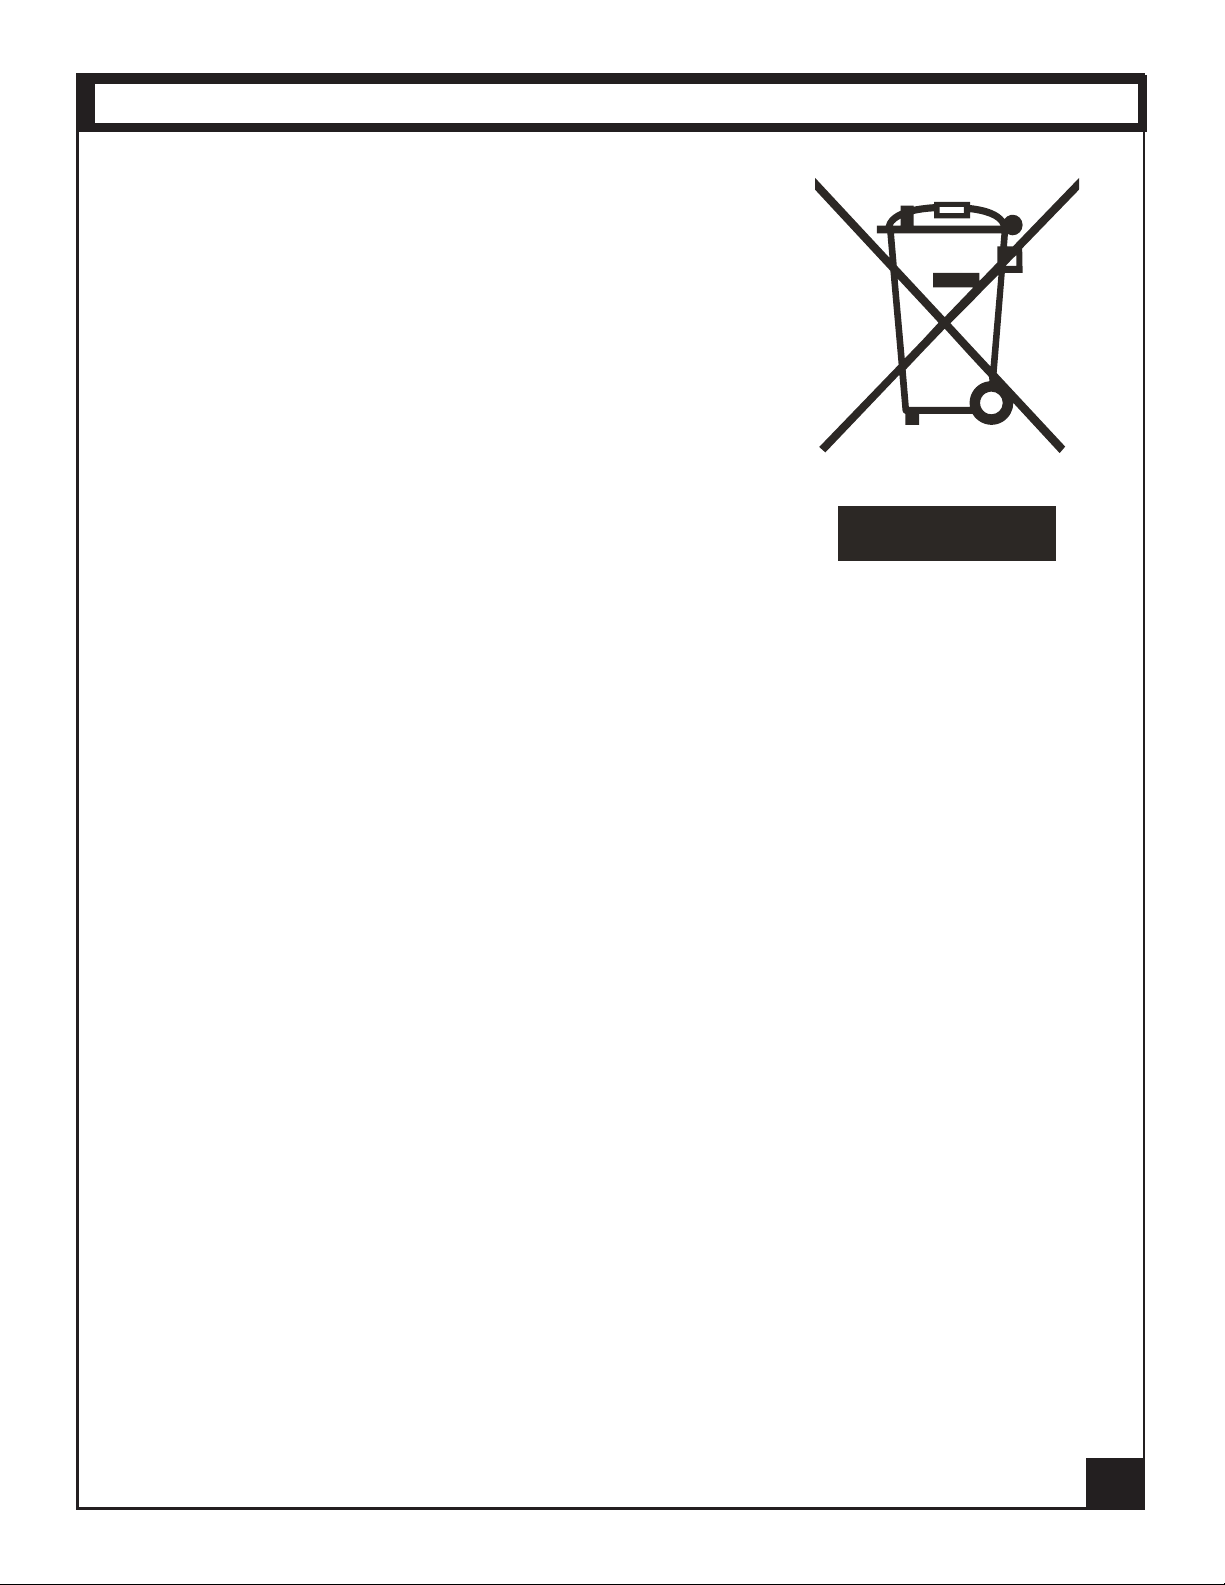
PROPER DISPOSAL
Dispose of the batteries in accordance with current
federal, state and local regulations. As a consumer,
you may be obligated by law to recycle used batteries.
• In an environment in which there is electrostatic
discharge, the unit may malfunction and may
require user to reset the unit.
• Dispose of any electronic device with care;
consult the manufacturer for details.
21
Page 22

LIMITED WARRANTY
Mobi Technologies, Inc. warrants this product to be free from
defects in material and workmanship for a period of ninety (90)
days from the date of purchase. Should this product prove to be
defective at any time during the warranty period, Mobi
Technologies, Inc. will, at its option, either replace or repair it
without charge. After the warranty period, a service charge will
be applied for replacement of parts or labor for repair.
If you suspect that the product is malfunctioning or is defective,
please call Mobi toll free at 1. 877. 662.4462 and ask for the
Service Department. If the problem still persists after consulting
with our Service Department, you may return the product to
obtain warranty service. Please return it to Mobi along with a
dated sales receipt from the place of purchase to varify that it is
within the authorized warrantee period.
This warranty does not cover damage caused by accident, misuse,
abuse, improper maintenance, unauthorized modication, or
connection to an improper power supply. A fee will be charged for
repair resulting from such damage. This warranty excludes all
incidental or consequential damages and any liability other than
what is stated above.
Mobi Technologies, Inc.
5913 Blackwelder Street
Culver City, CA 90232
www.getmobi.com
© 2013 Mobi Technologies, Inc.
All Rights Reserved
V011613
 Loading...