

Page 1
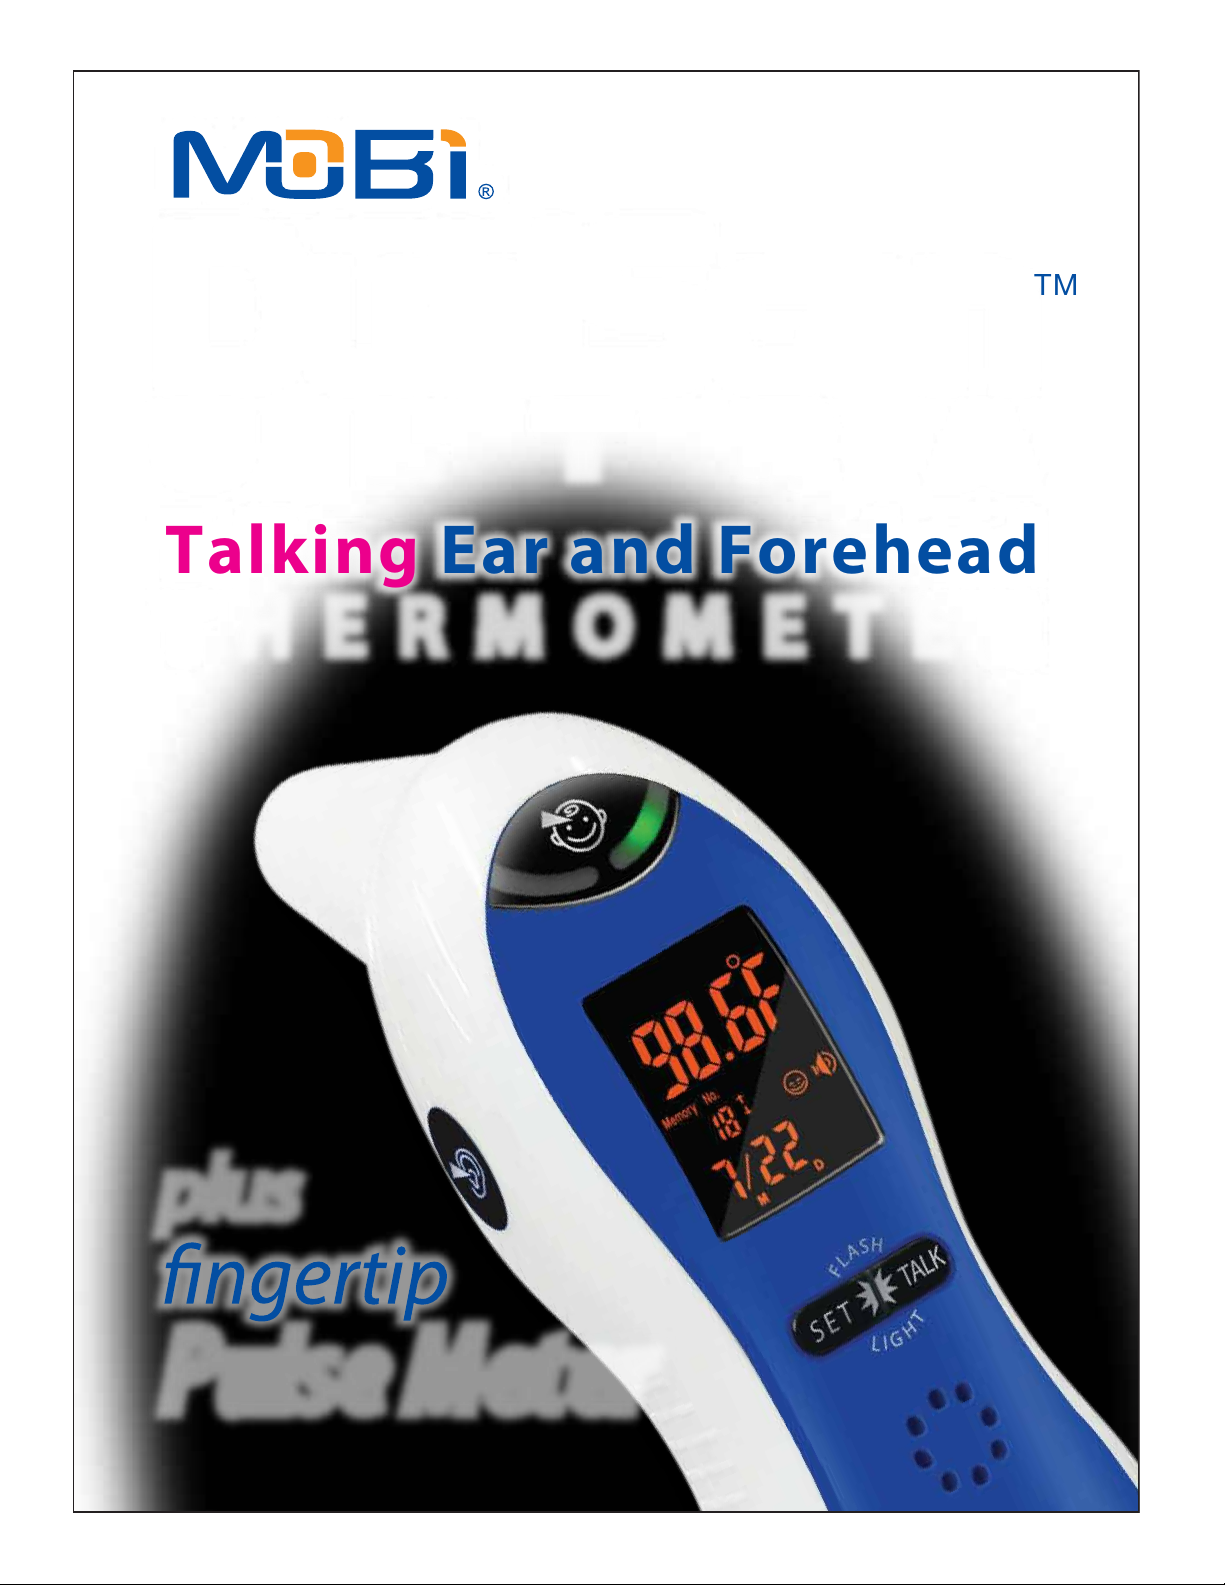
DualScan
U L TRA
Talking Ear and Forehead
THE RMOM E TER
TM
plus
Pulse Meter
Page 2
User’s Manual for DualScan™ Ultra Digital Thermometer
2
- Thank you for purchasing our DualScan™ Ultra thermometer. For optimal use
of this product, be sure to read this user manual before any operation.
- Remove safety tab from battery. Open battery case and gently pull out the
plastic safety tab from underneath the battery. Thermometer will not activate
until this has been performed.
- For safe and proper use of this product, be sure to read and fully understand
Safety Precautions contained in this user Manual.
- Keep this Manual with you for a convenient reference on proper usage and
operation.
SAFETY PRECAUTIONS
- Warning marks and symbols are contained for your safe and proper use of this
product and prevention of any injury to you and others.
- See table below for description of warning marks and symbols:
WARNING
Means a possibility of personal injury in case of improper use.
Means a possibility of personal injury or property damage in case of
improper use.
*Property damage covers any damage to house, family property and domestic animal or pet.
NOTICE
MARKS OR SYMBOLS
PROHIBITED
within or beside the mark. The mark on left means “generally forbidden”.
OBSERVE CAREFULLY
in or beside the mark. The mark on left means “generally/compulsory observation”.
IMPLICATION OF SYMBOL
Means Type-B device.
INTENDED USAGE
The device is intended for the as-needed measurement monitoring of human
body temperature and pulse rate by consumers in the home.
Page 3
WARNING
3
3
Use of this thermometer is not intended as a substitution for consultation with your
physician. Measurement results are for reference only. They cannot be used as a clinical
assessment or medical diagnostic basis. Contact your physician if you have or suspect
any health concerns.
Don't touch or blow infrared sensor.
*A soiled Infrared sensor may cause inaccuracy.
Clean a soiled infrared sensor with a soft wet cloth in a gentle manner.
*Cleansing with toilet tissue or paper towel may scratch the Infrared sensor, causing
inaccuracy.
Keep the unit out of children's reach.
*A self-measurement taken by children may cause ear damage. In case of accidental
swallowing of battery, please contact doctor or emergency room immediately.
Measurement should be delayed until ear is warmed up after any outdoor activities.
activity in winter may cause an inaccurate result.
thermometer for about 3O minutes in room temperature at measurement location.
*Failing to do so may cause inaccuracy.
If the user measurement of the body temperature exceeds 38 degrees C or 100.4 F and
/or feels uncomfortable, the user should contact a medical practitioner immediately .
Stop using the product in case of any occurrence of pain or discomfort, as this might
signify potential ear canal damage.
otitis external and tympanitis, as this may aggravate such a condition.
Don't use the product in a wet ear canal resulting from swimming or bathing, as this
may result in harm to the ear canal.
Taking a temperature reading from the ear is fast and accurate because the ear drum
shares the blood supply with the center of the temperature control center in the brain.
environmentally safe manner.
Page 4
RECOMMENDATIONS
4
- Don't use the product for other purposes then those propose herein.
- This is not a waterproof device. Clean it only with dampened cloth gently.
- It is unsafe and hazardous to leave the product exposed to any chemical solvent,
direct sunshine or high temperature.
- Don't drop, handle roughly, or cause any vibration or impact to the product.
- Don't use a mobile phone nearby when the thermometer is in use.
- Regarding disposal of batteries, please comply with environmentally safe methods
and legal battery disposable means and laws.
- Take out the batteries if you are not going to use the unit for an extended time.
INTERFACE LAYOUT
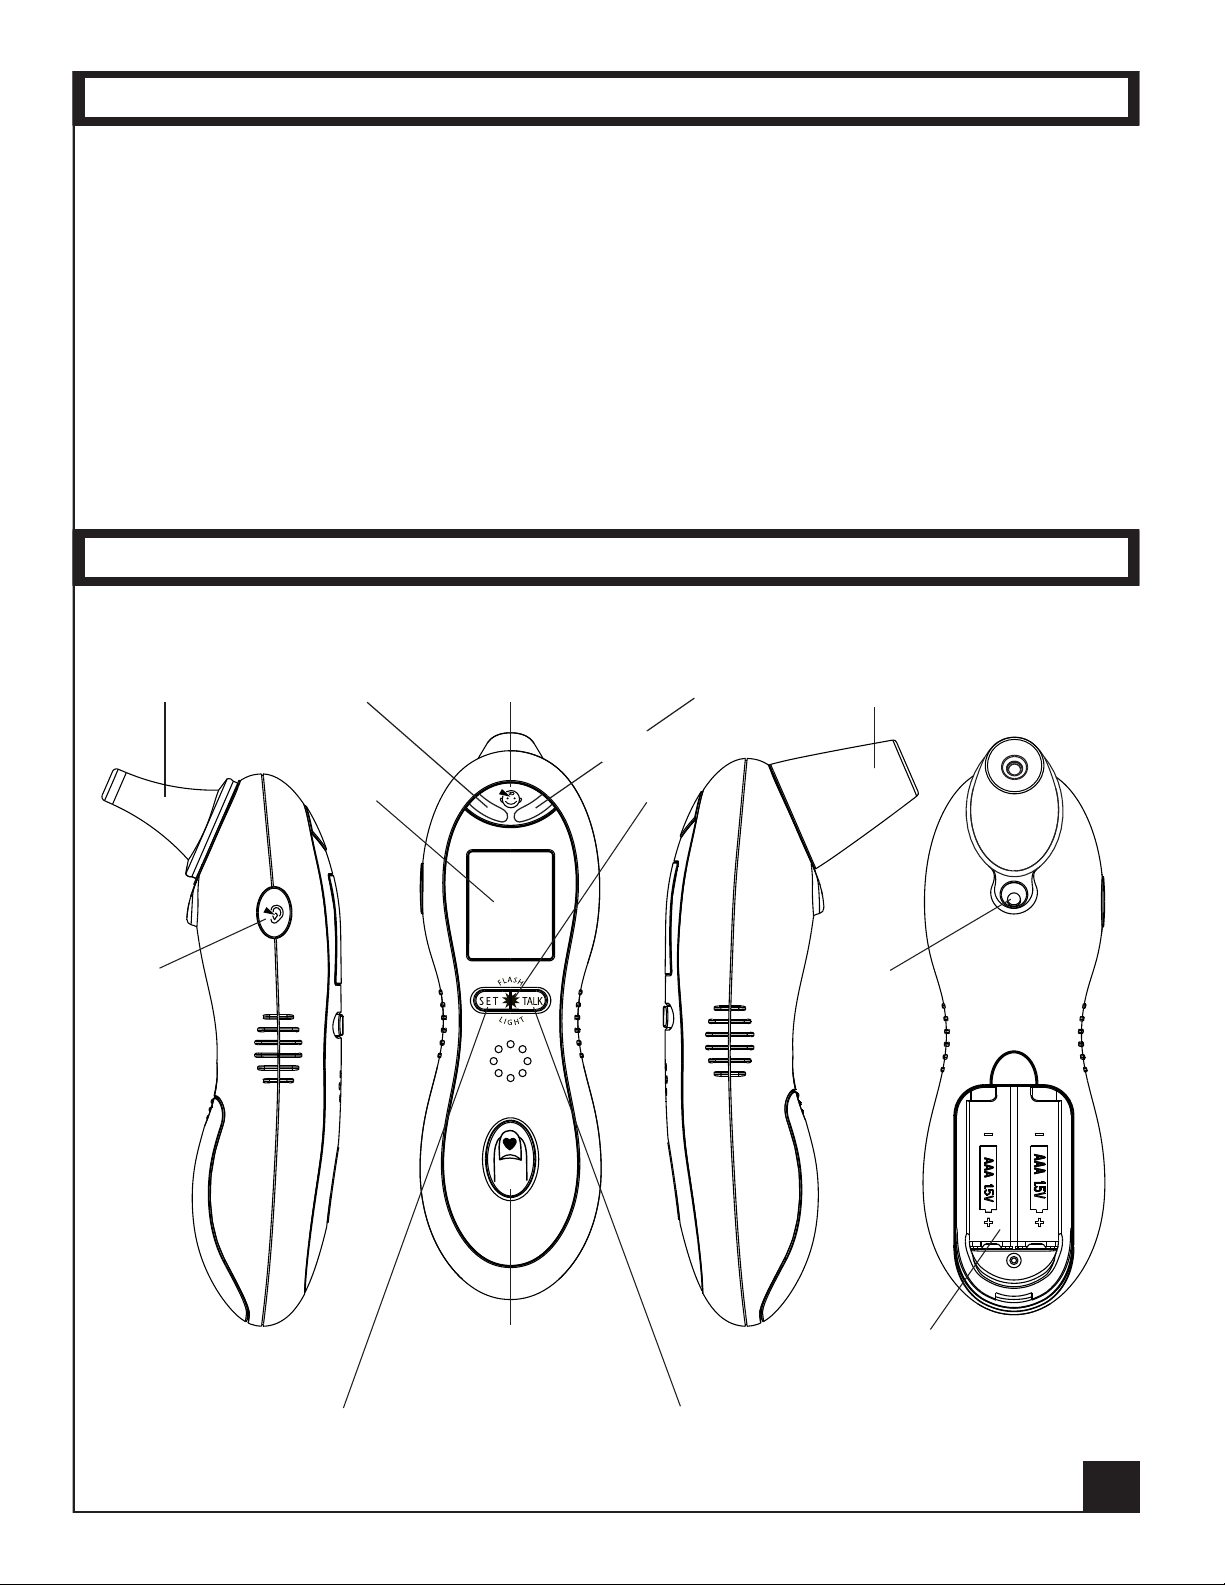
Ear Probe
(cover removed)
Ear
Button
Red LED
(fever)
LCD
Display
Forehead
Button
Green LED
(no fever)
Flashlight
Flashlight
Button
Button
Forehead Probe
(cover remains)
LED
Flashlight
Button/Sensor
Settings /Memory
Button
Heart Rate
Battery
Compartment
Talk
Button
Page 5
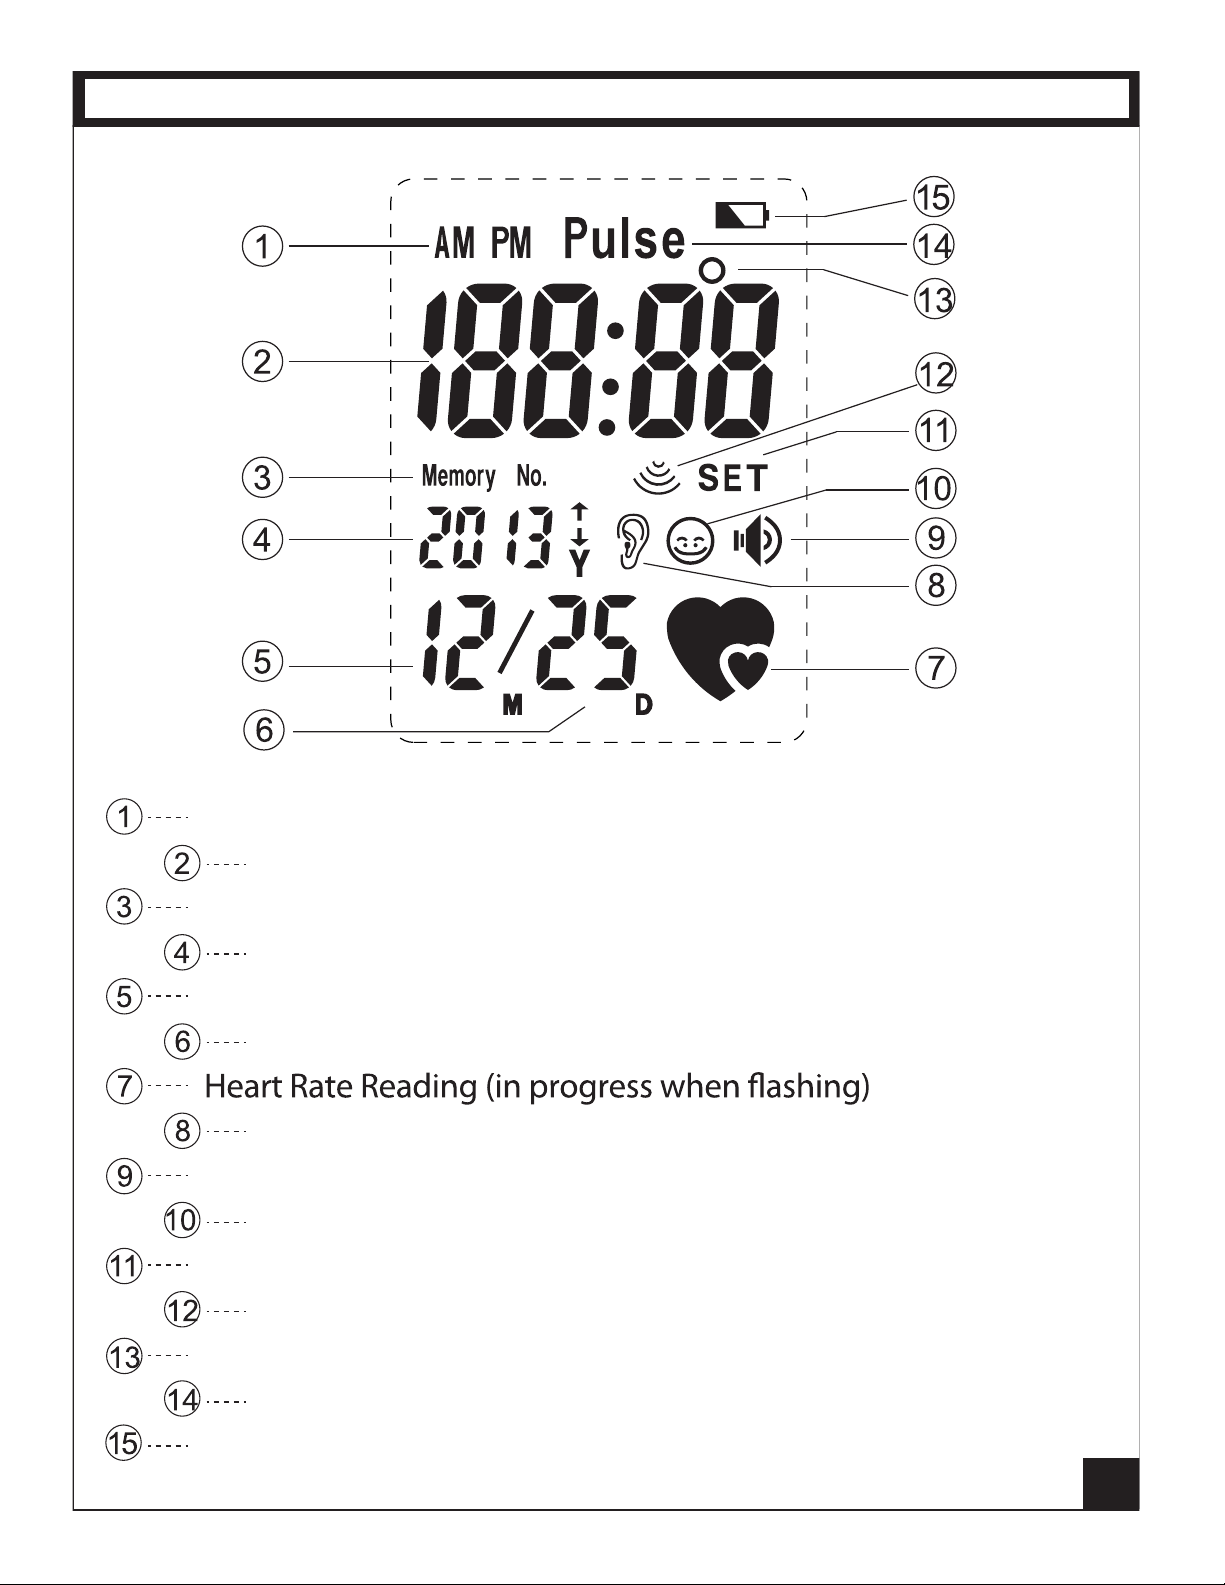
LCD DISPLAY
Indicates AM or PM when time of day is displayed below it
Numerical Readings for Temperature / Time / Pulse
Memory Number heading (Memory Numbers displayed below)
Calendar Year / Number of the previous reading in Memory
Calendar Month
Calendar Day
Indicates Ear Temperature Button was used
Indicates Audio Talking Mode in use
Indicates Forehead Temperature Button was used
Indicates Settings Button in use
Human Temperature measurement indicator
º
Temperature Degree Scale (
F or ºC)
Indicates Heart Rate Button pressed, ready to read Pulse
Battery Level indicator
5
Page 6
PRIMARY FUNCTIONS
6
Calendar Date falls within Gregorian calendar year 2001–2099.
Time of Day is shown in 24 hour shifts. The initial date for a powered unit is
set as January 1st of the manufacturing year.
Room Temperature is displayed with Time of Day (alternating every 5
seconds) when not in use otherwise. Measurement ranges from 41.0°F to
139.8°F (5.0°C to 59.9°C).
Body Temperature displayed when Ear or Forehead Buttons are used with
measurements ranging from 89.6°F to 109.3°F (32.0°C to 42.9°C ).
Memory Function saves a record of every body temperature reading
(maximum of 30 records). Each record is stored with body temperature, date,
measurement mode (ear or forehead), and the record’s memory number.
Voice Readout Mode causes a body or room temperature reading to be
audibly sounded, with the current time, in E
on the setting.
LED Flashlight is built-in and can be used for discreet night time use.
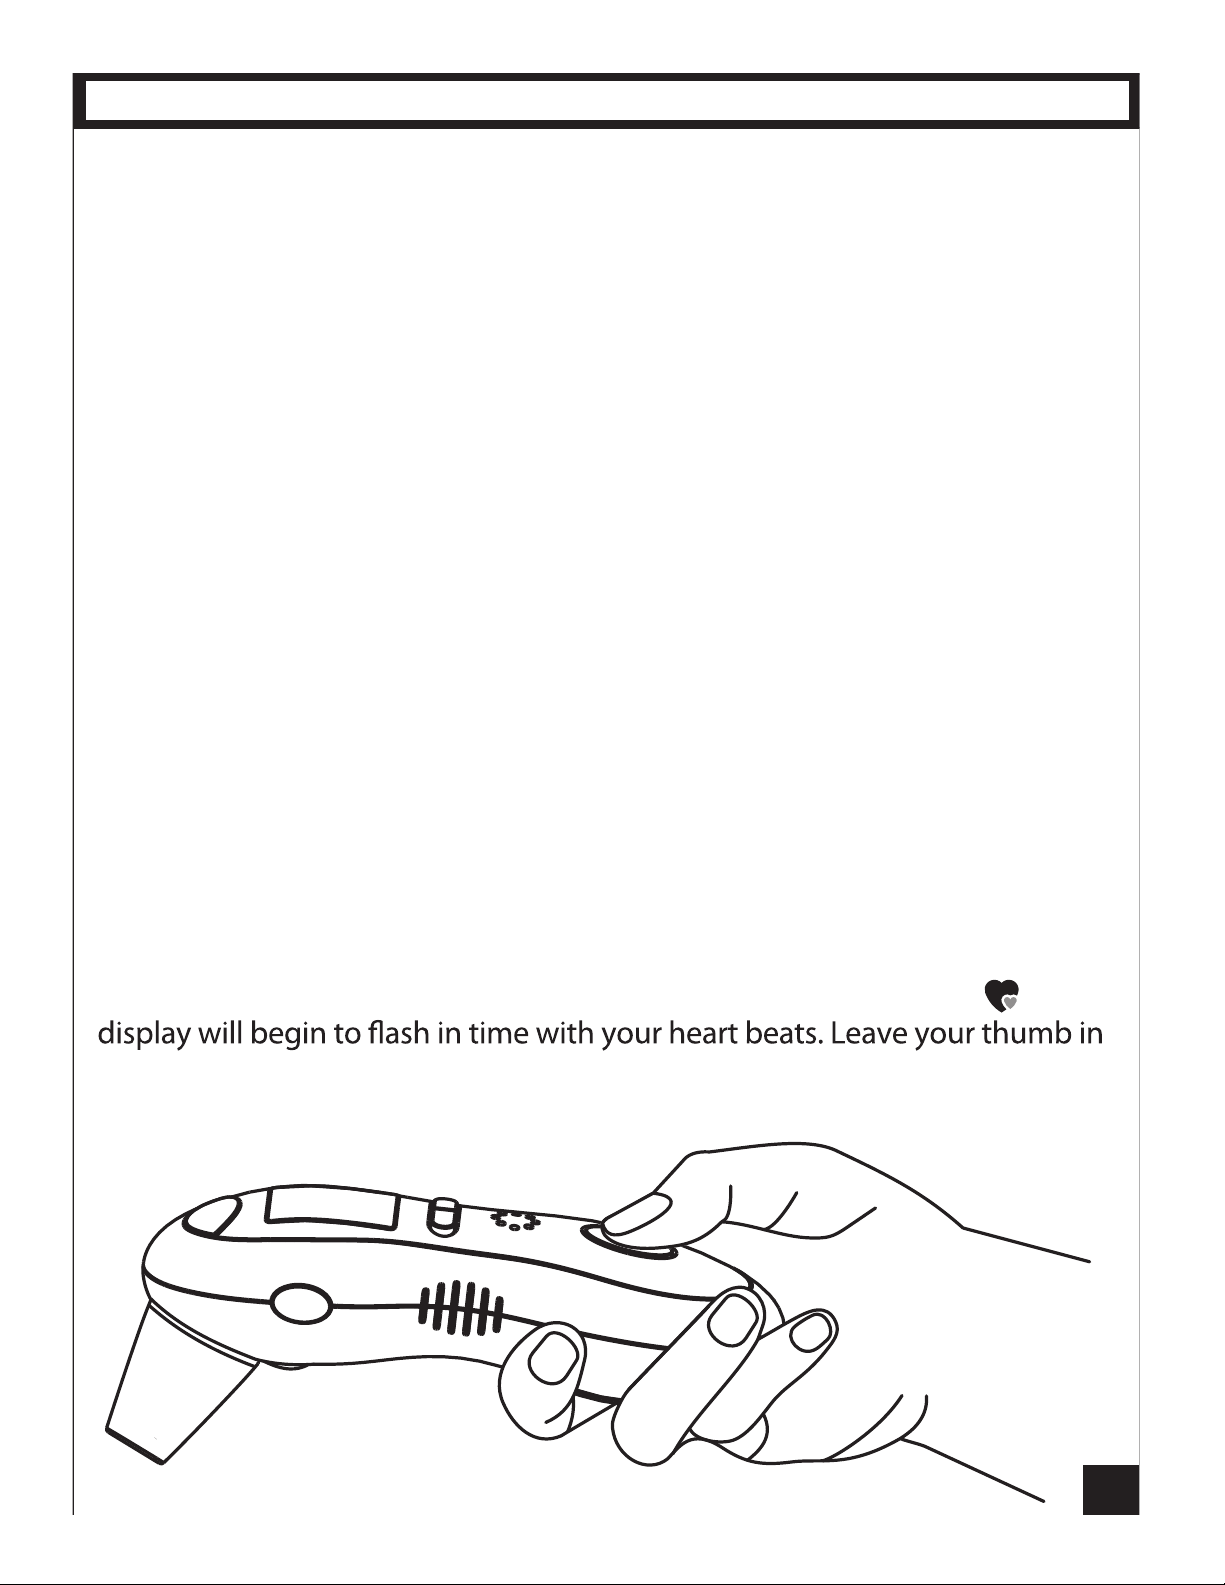
Pulse/Heart Rate is read using the Heart Rate Botton/Sensor and measures
within the range of 40-200 heartbeats per minute. To measure your Pulse:
• With your thumb centered on it, press and release the Heart Rate Button
once but leave the thumb lightly in place on the button without pressing it
again. The unit will beep and the word Pulse will appear on the display.
• As you let your thumb rest on the button the Large Heart symbol on the
place there without moving until the unit beeps again and displays your heart
rate, which is the number of beats per minute for your heart at the time.
nglish, and in °C or °F depending
Page 7
7
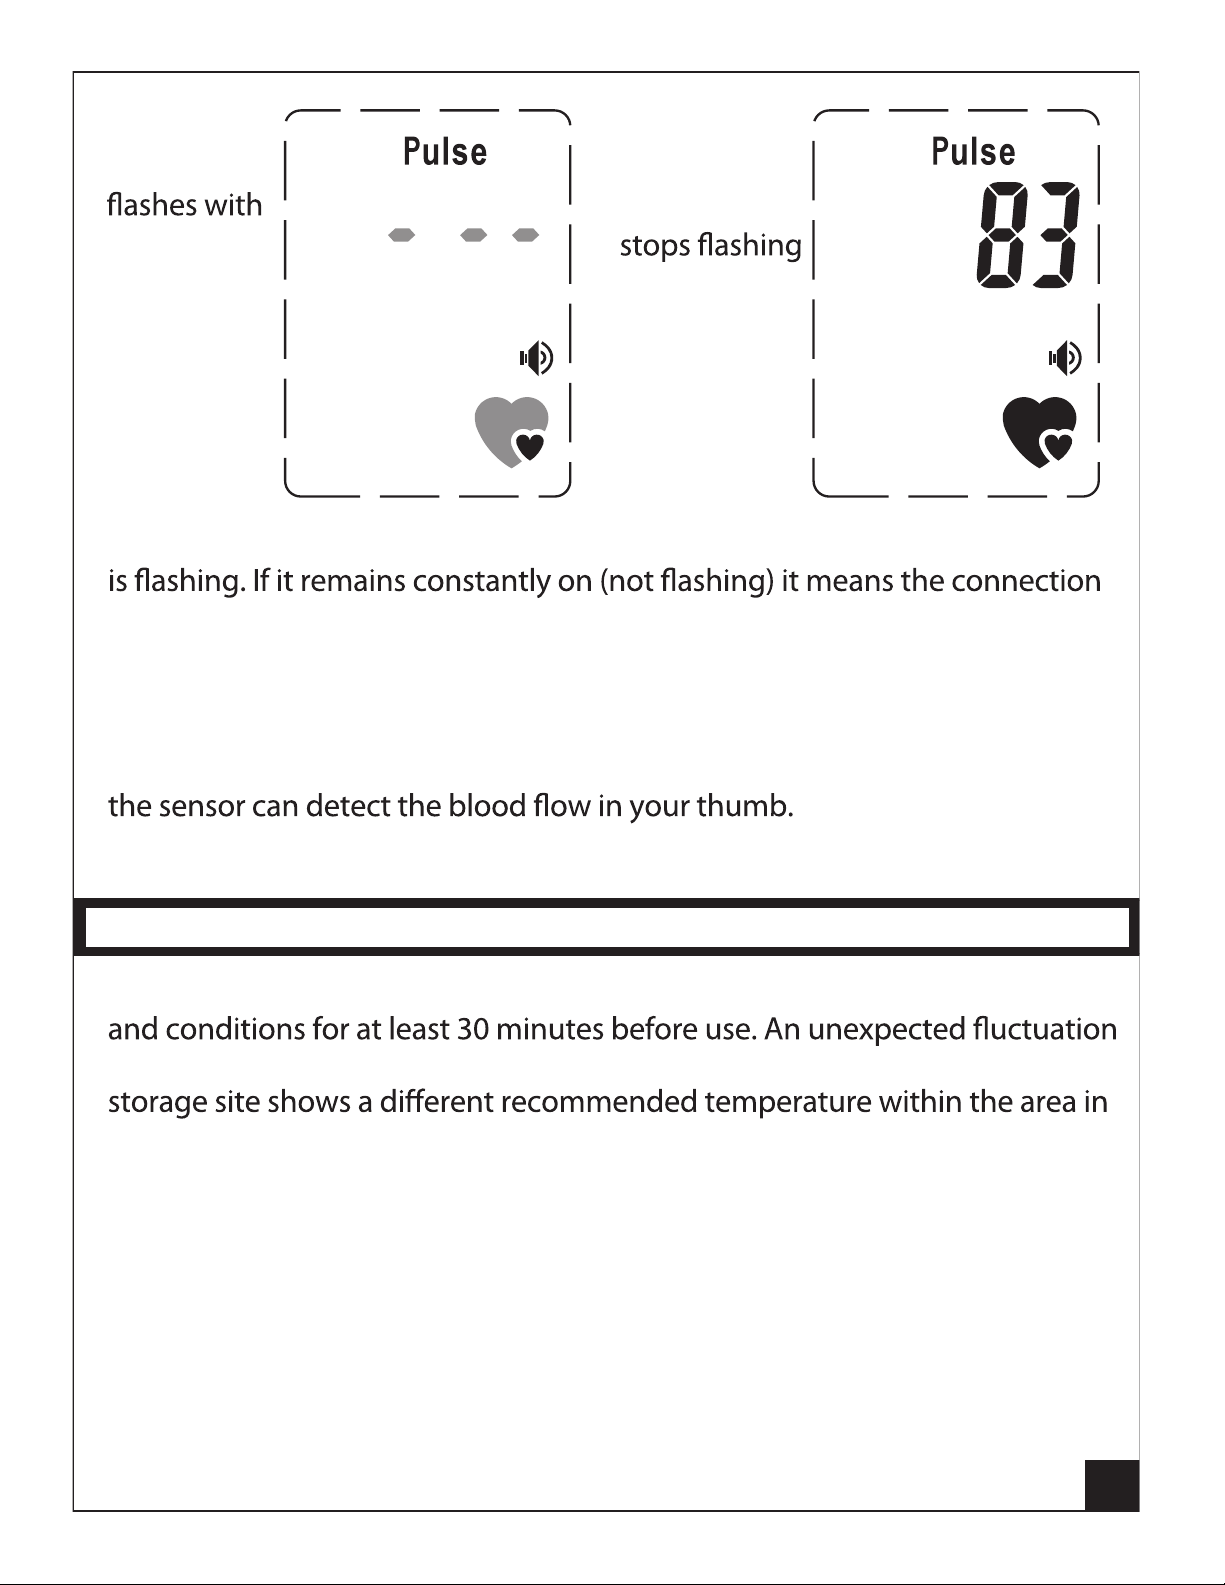
Large Heart
your heart
beat as you
leave your
thumb on
the Heart
Rate Button.
• The Heart Rate is usually read within 15 seconds if the Large Heart symbol
between your thumb and the sensor is not optimal and will result in an ERR
(error) message on the display indicating the Heart Rate was not measured.
In that case press and release the button again to restart the reading and be
sure to leave your thumb resting on the button light enoughto keep it from
When Large
Heart symbol
your Pulse
Rate will be
displayed in
heart beats
per minute.
being depressed again, but with enough pressure to make good contact so
• Press the SET Button to reset the unit for normal use.
MEASUREMENT PREPARATIONS
For proper measurements always store the device in appropriate temperature
of ambient temperature is likely to deteriorate measuring accuracy. When a
which a thermometer is located, or any attempt to perform a temperature
reading in front of an air conditioner or heating device is made, accurate read
outs will be impaired. Be sure to keep ear clean, since an unclean ear canal
may cause read out inaccuracy. Measurement should be done at a calm and
quiet time to ensure an accurate result. Do not talk or move body during
measurement. Temperature is likely to increase immediately after exercise,
bathing, or other physical exertion. If measurement appears to be incorrect
please wait 5-15 minutes before the taking measurement again. Make sure to
use the same thumb when re-measuring Heart Rate.
NOTE: Replace any low-voltage battery to ensure full power supply.
Page 8
HOW TO TAKE TEMPERATURE READINGS
8
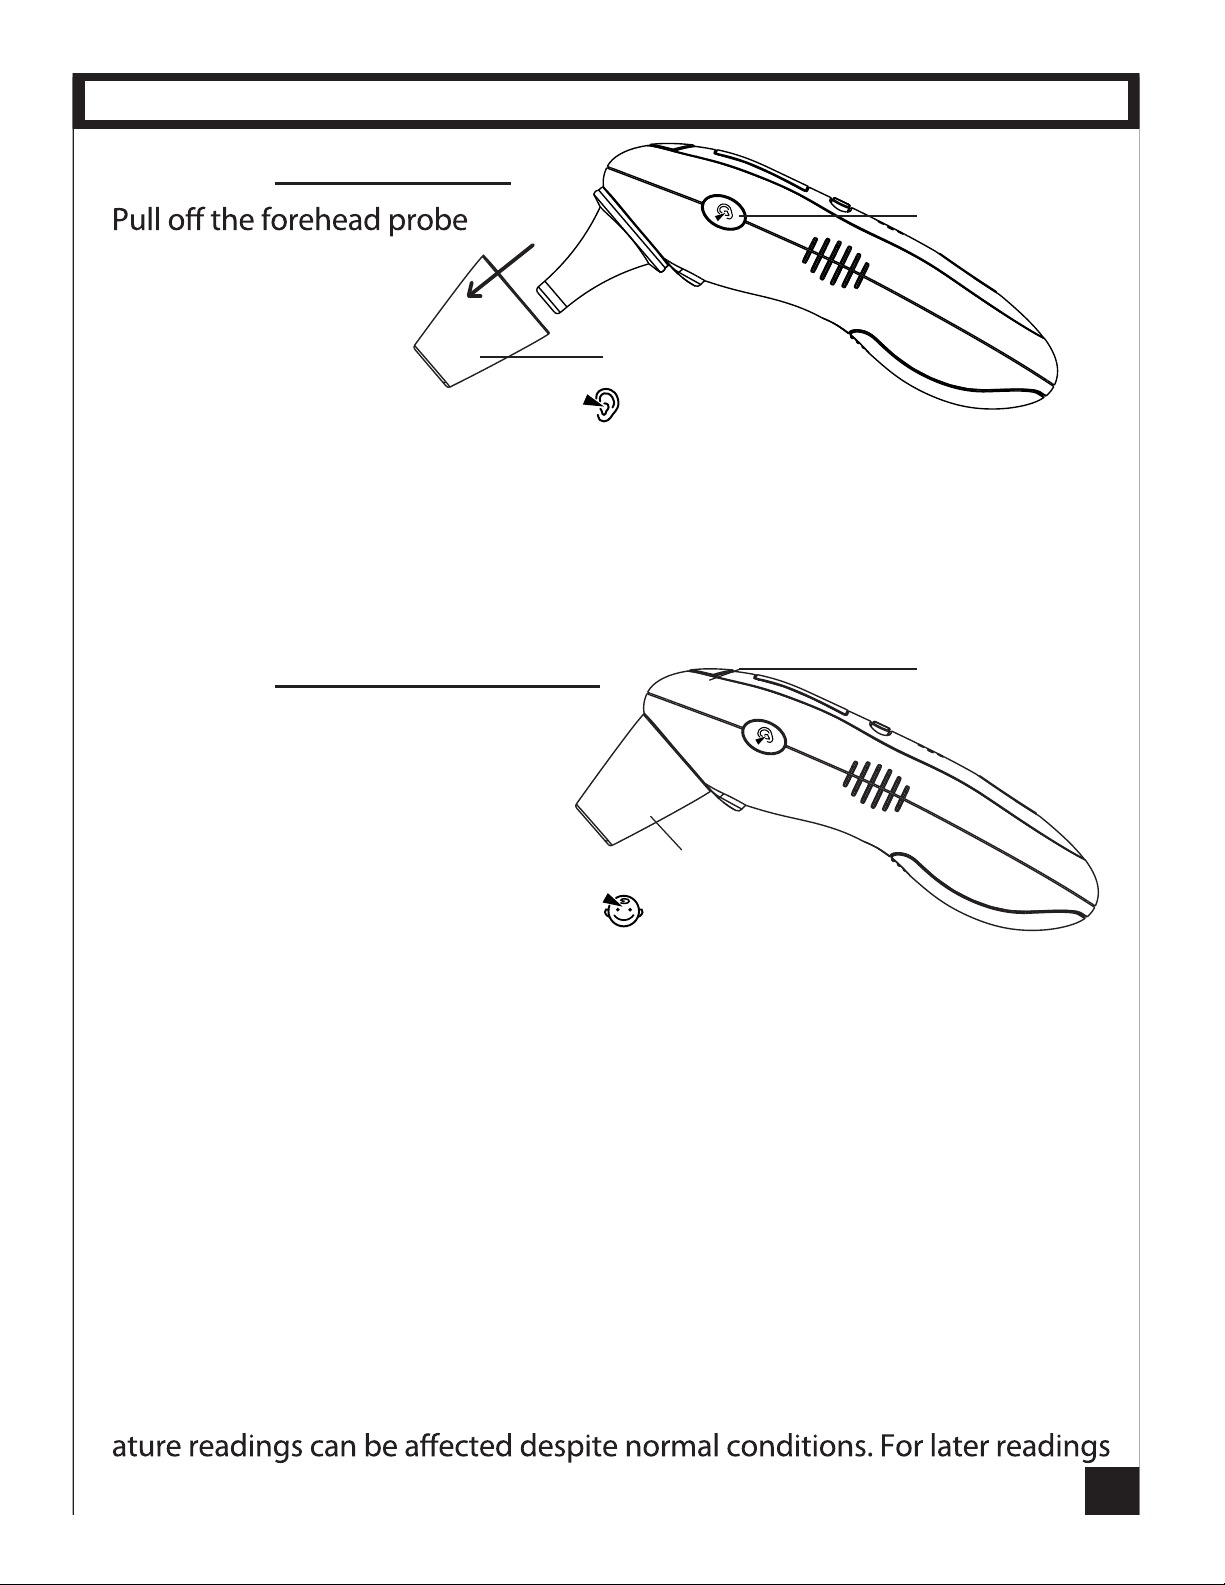
To measure Ear Temperature
cover from the unit, and
insert the slimmer Ear
Ear Button
Probe tip just slightly
into the ear opening,
then press and hold the Ear Button to measure the body
temperature. Grip unit comfortably and depress ONLY the Ear Button.
Once the unit has a measurement, you will hear two short "beeps," the display
will show
be shown in large numerals…either in ºF or ºC…depending on which scale
you have the unit set for. After
To measure Forehead Temperature
Be sure the Forehead Probe Cover is
on the unit, then gently touch the
entire tip of the probe to the
center of the forehead, midway
between the eyebrow and the hairline.
Press and hold the Forehead Button
ooo in the Memory Number area, and the body temperature will
ooo disappears you can measure again.
Forehead
Probe Cover
Forehead
Button
Forehead
Probe Cover
to measure the body temperature. Grip the thermometer
comfortably and
As when reading from the ear, once the unit has a forehead measurement you
will hear two short "beeps," the display will show
area, and the body temperature will be shown in large numerals…either in
ºF or ºC…again, depending on which scale you have the unit set for. After
depress ONLY the Forehead Button.
ooo in the Memory Number
ooo disappears you can measure again.
With either reading method (ear or forehead) the result will be stored into
memory automatically. If 30 sets of memory records are stored already, the
oldest (No.1) set of data will be replaced by the next oldedst and the most
recent record will be stored at the top as the highest No.
Measure 3 times (maximum) consecutively, if desired. Proper body temper-
(after 4 times or more) wait 10 minutes before taking a new measurement.
Page 9
Display of Measurement Results
9
Temperature Range:
Results shown from 89.6°F to 109.3°F (32.0°C to 42.9°C). “HI” is displayed for all
results above 109.3°F (42.9°C), and “LO” displayed for result below 89.6°F (32.0°C)
Fever Diagnosed:
a RED LED lights with results from 100.4°F (38.0°C) to 109.3°F (42.9°C)
No Fever:
a GREEN LED lights with results from 96.0°F (35.6°C) to 100.3°F (37.9°C)
Thirty seconds after a measurement the unit automatically returns to Clock Mode.
button is pressed.
ADVANCED OPERATION
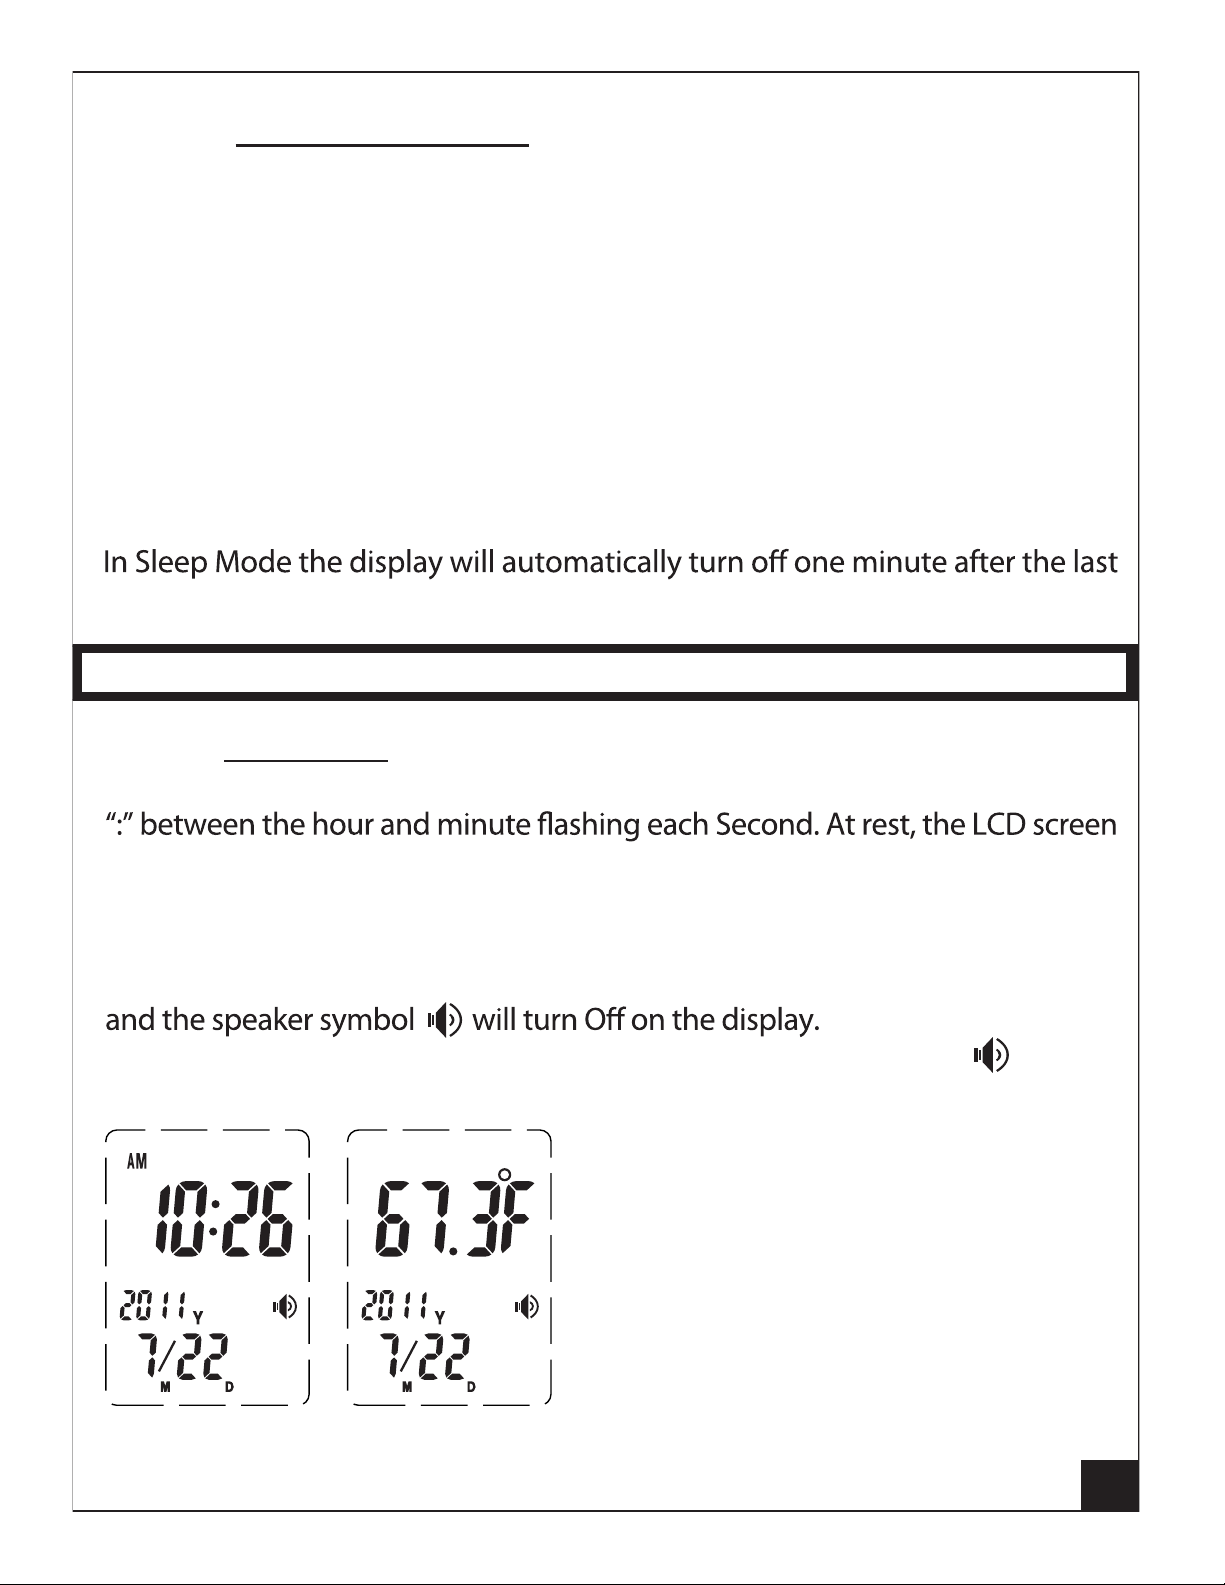
When in Clock Mode
The display will show Time as: Year, Month, Date, Hour, and Minute with the
displays the current Time and Room Temperature, alternating every 5 seconds.
Otherwise, press and release TALK and the unit will visibly display, and audibly
speak, the current Time and Room Temperature.
To turn the Talking Feature OFF, press and hold the TALK Button for 3 seconds
Press and hold TALK
for 3 seconds again and the unit will beep and the speaker symbol will reappear, turning the Talking Feature ON.
Note: The default is for the Talk Feature to
be ON. The unit speaks in English and will
say the temperature in either ºF or ºC depending on what you set the temperature
Clock Mode
(current time)
scale on the unit to.
Clock Mode
(temperature)
Page 10
To retrieve Readings from the Memory
10
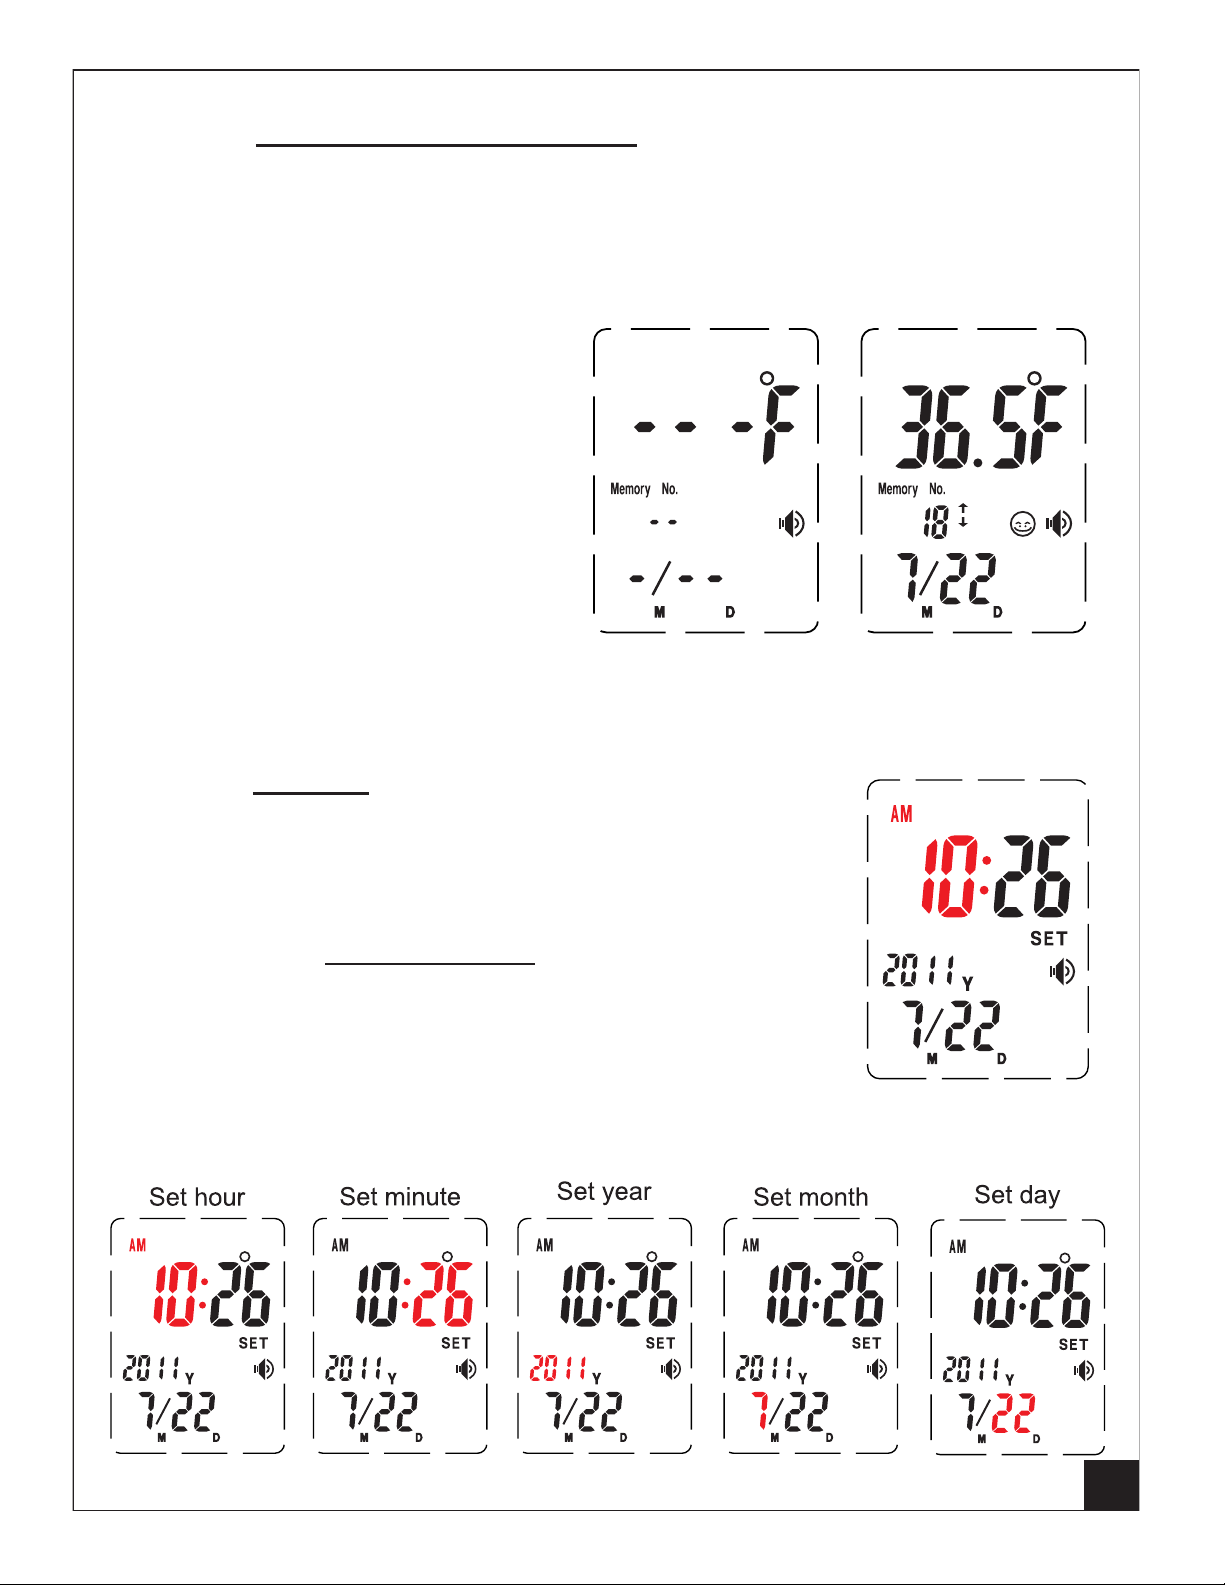
Press and release the SET Button to retrieve the most recent reading recorded
in the Memory. It will show the Body Temperature, the Type of Reading (ear or
forehead), the Fever/No Fever colored light, the Date it was recorded, and the
Memory Number (highest number in memory).
To retieve further readings from
the memory just keep pressing the
SET Button. As you do so the next
previous reading records will
appear in sequence from latest to
oldest as the Memory Number
displayed goes down.
You can stop on any previous reading and press the TALK Button to
hear the reading spoken (if Taking
Feature has not been disabled).
To change Settings
Set-up Mode is entered when you press and hold the
SET Button for 2 seconds. The word SET will appear on
Memory Mode
(no previous recorded
readings in memory)
Memory Mode
(No.18 of previous
recorded readings)
the display. Then you can reset the unit.
To reset current Time and Date
Once the word SET is shown, use theTALK button to go
through to the Year, Month, Hour, Minute, etc. To change
one of those, stop on it, and then use the SET Button again,
which will cycle through the date/time values so you can
stop on the date/time number you need to set it to.
Set-up Mode
Page 11
To set to Sleep Mode
11
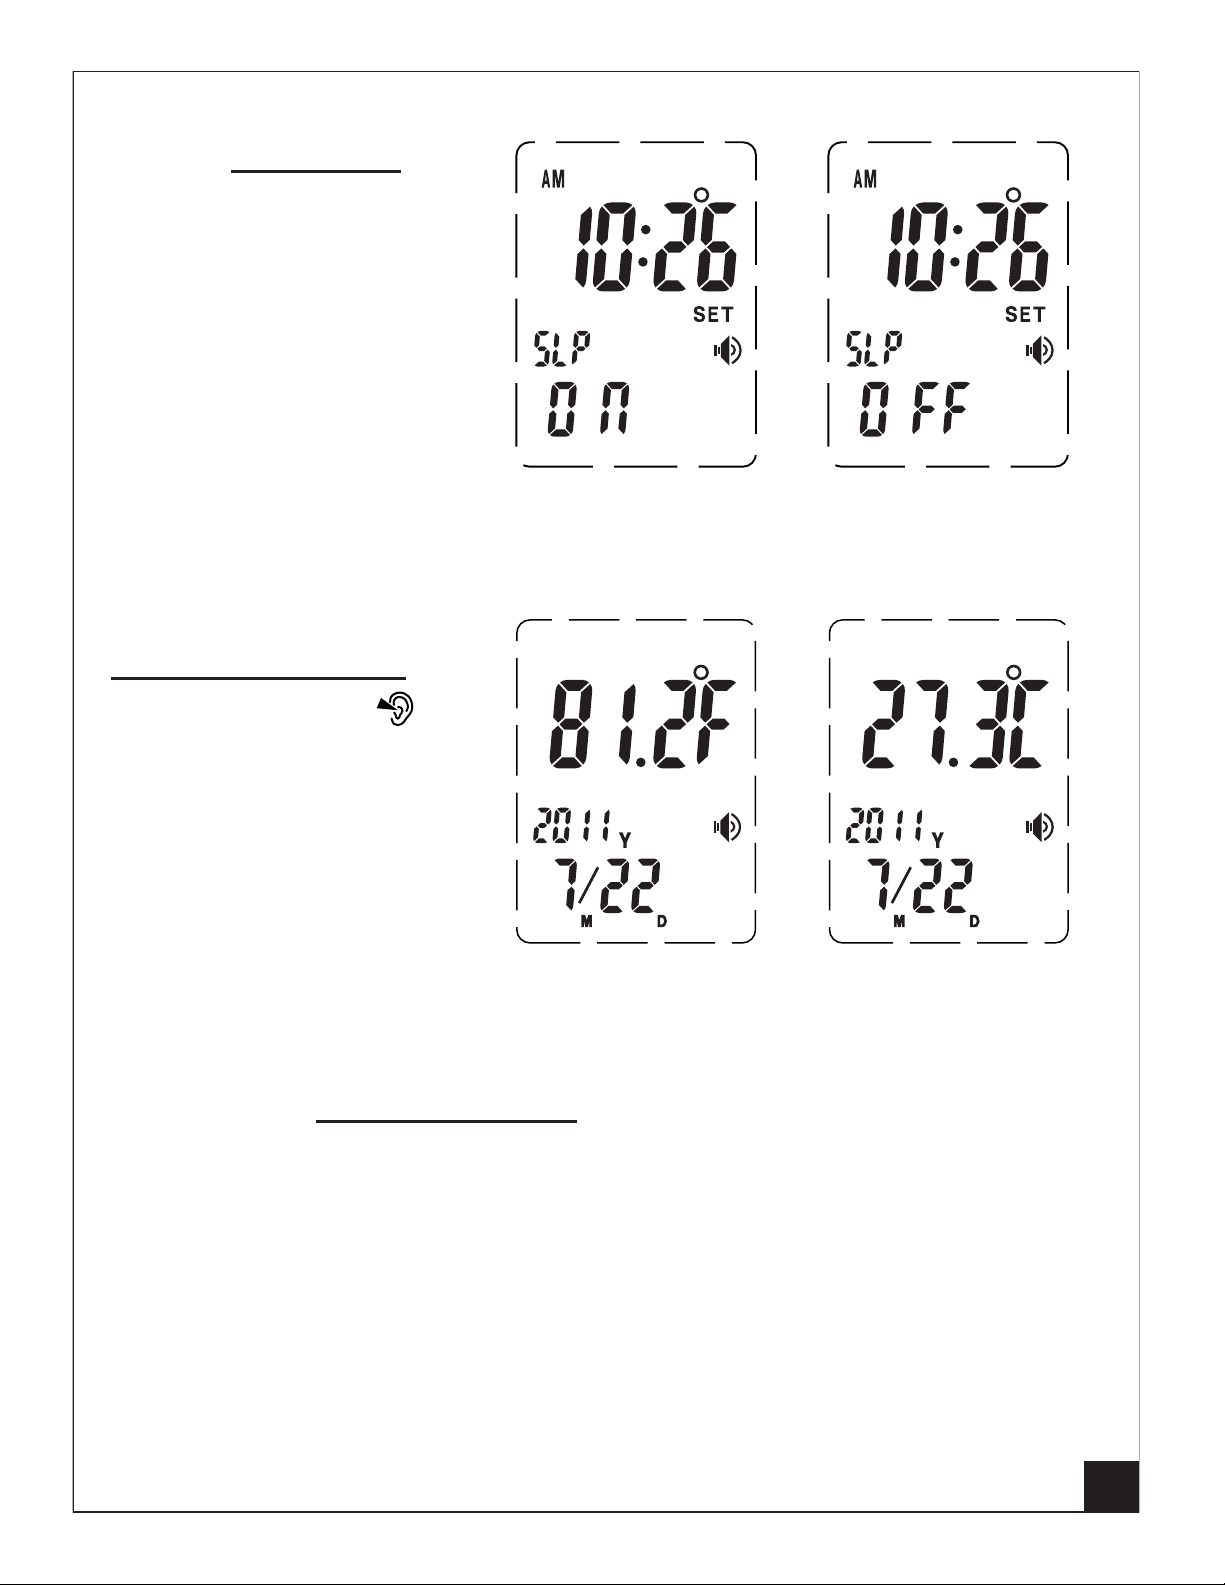
The unit enters Sleep Mode
one minute after the last
button is pressed.
To change between
Fahrenheit or Celsius
Press the Ear Button and
the TALK Button together.
The unit will change from
which ever scale it is in, to
the other…Celsius or
Fahrenheit.
This setting change will be
spoken if the Talking Feature
has not been disabled.
Sleep Mode
(enabled)
Sleep Mode
(disabled)
CelsiusFahrenheit
To activate the LED Mini Flashlight
Press and hold the center of the SET and TALK Buttons for 2 seconds and the
LED Mini Flashlight will turn ON. It will turn OFF automatically after 5 seconds.
After resetting any function the unit returns to Clock Mode automatically
5 seconds after last key is pressed.
Note: Press any button to instantly cut talking on unit when silence is desired.
Page 12
RECOMMENDATIONS
12
For users not familiar with digital thermometers, it is recommended that you
measure the same ear 3 times during initial usage. The maximum reading shall
Wait about 30 seconds before measuring the same patient again to factor in
changes of skin condition.
For users in sound health, both ears will be virtually the same in terms of
body temperature.
Clean ear before taking measurement.
REPLACE BAT TERIES
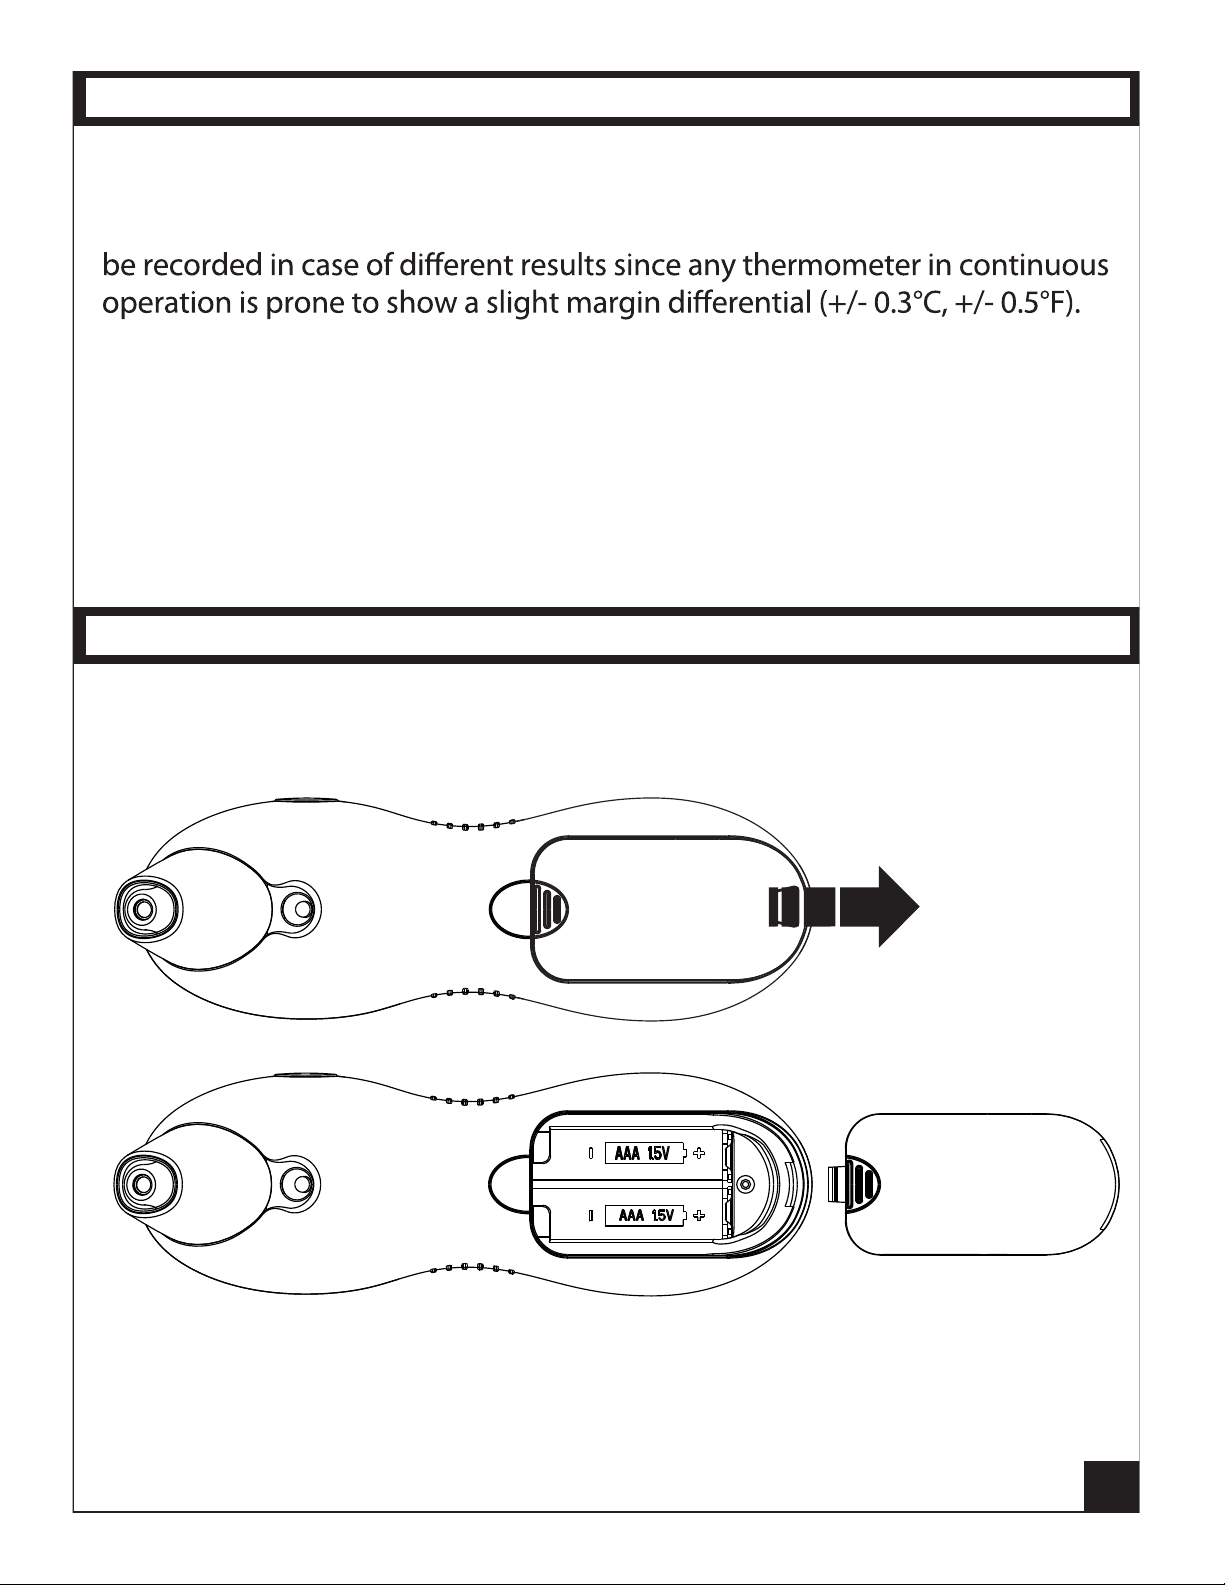
Remove the battery compartment door as shown below.
Put batteries into compartment according to the + and - symbols inside and
use only new batteries (2 x AAA - alkaline recommended).
Replace the battery compartment door tightly.
Page 13
MAINTENANCE, STORAGE AND CALIBRATION
13
Maintenance:
1. Remove all stains from the device with a soft, dry cloth.
2. Clean the tip of the probe as follows: Wipe the surface gently with a swab
of cotton or a soft cloth moistened with alcohol until no dirt or wax remains.
Allow the alchol to dry before using thermometer again.
3. Do not wash the thermometer with water, abrasive detergent or detergent
containing benzene or other harsh solvents.
Storage:
1. After each use, clean the thermometer and put on the protective cover.
2. Do not leave the thermometer exposed to direct sun, high temperatures,
3. If you plan to not use the thermometer an extended time, remove the
batteries.
Calibration:
The thermometer is factory-calibrated. If it is used according to this user
manual, periodic recalibration is not required. If there are doubts concerning
the accuracy of the thermometer, please contact Mobi at the address
given herein. Do not try to repair or modify the thermometer yourself.
CARE AND CLEANING
1. Keep the probe surface clean, otherwise the measurement may not be
accurate.
2. Clean the probe with a non-abrasive cloth or paper moistened with water
or alcohol, and conduct measurement after the water or alcohol on the
surface of the probe has evaporated.
Caution:
Make sure the probe tip of the thermometer is completely clean. A dirty
probe lens will cause inaccurate measurements.
Page 14

14
UNIT SPECIFICATIONS
• Product Name: DualScan Ultra Thermometer
• Model: 70120
• Power supply: DC3V (2 x AAA battery)
• Temperature Sensing Part: IR sensor
• Measuring range: 32.0°C - 42.9°C (89.6°F -109.3°F)
• Room Temperature: 5.0°C - 59.9°C 141.0°F -139.8°F)
• Measuring accuracy: +1- 0.2°C (or +1- 0.4°F) from 35.5°C - 42.0°C
(or 95.9°F -107.6°F), and +/- 0.3°C (+/- 0.5°F), from 32.0°C - 35.4°C
(or 89.6°F - 95.8°F) or from 42.1°C - 42.9°C (or 107.7°F - 109.3°F)
• Room Temperature: +1- 2°C (4°F)
• Outer dimensions: 134 (L)x43(W)X59(D)mm
• Weight :67g (without batteries)
• Working environment: 10°C - 40°C (50.0°F - 104.0°F) for Ear
15°C- 40°C (59.0°F - 104.0°F) for Forehead
• Relative humidity: 20%RH-80%RH
• Storage environment: -20°C - 55°C (-4°F - 131°F)
• Relative humidity: 20%RH-90%RH
• Precision/repeatability: +I- 0.3°C (+/- 0.5°F)
Dispose of used batteries properly and with care and comply
with all environmental ordinances for battery disposal.
Page 15
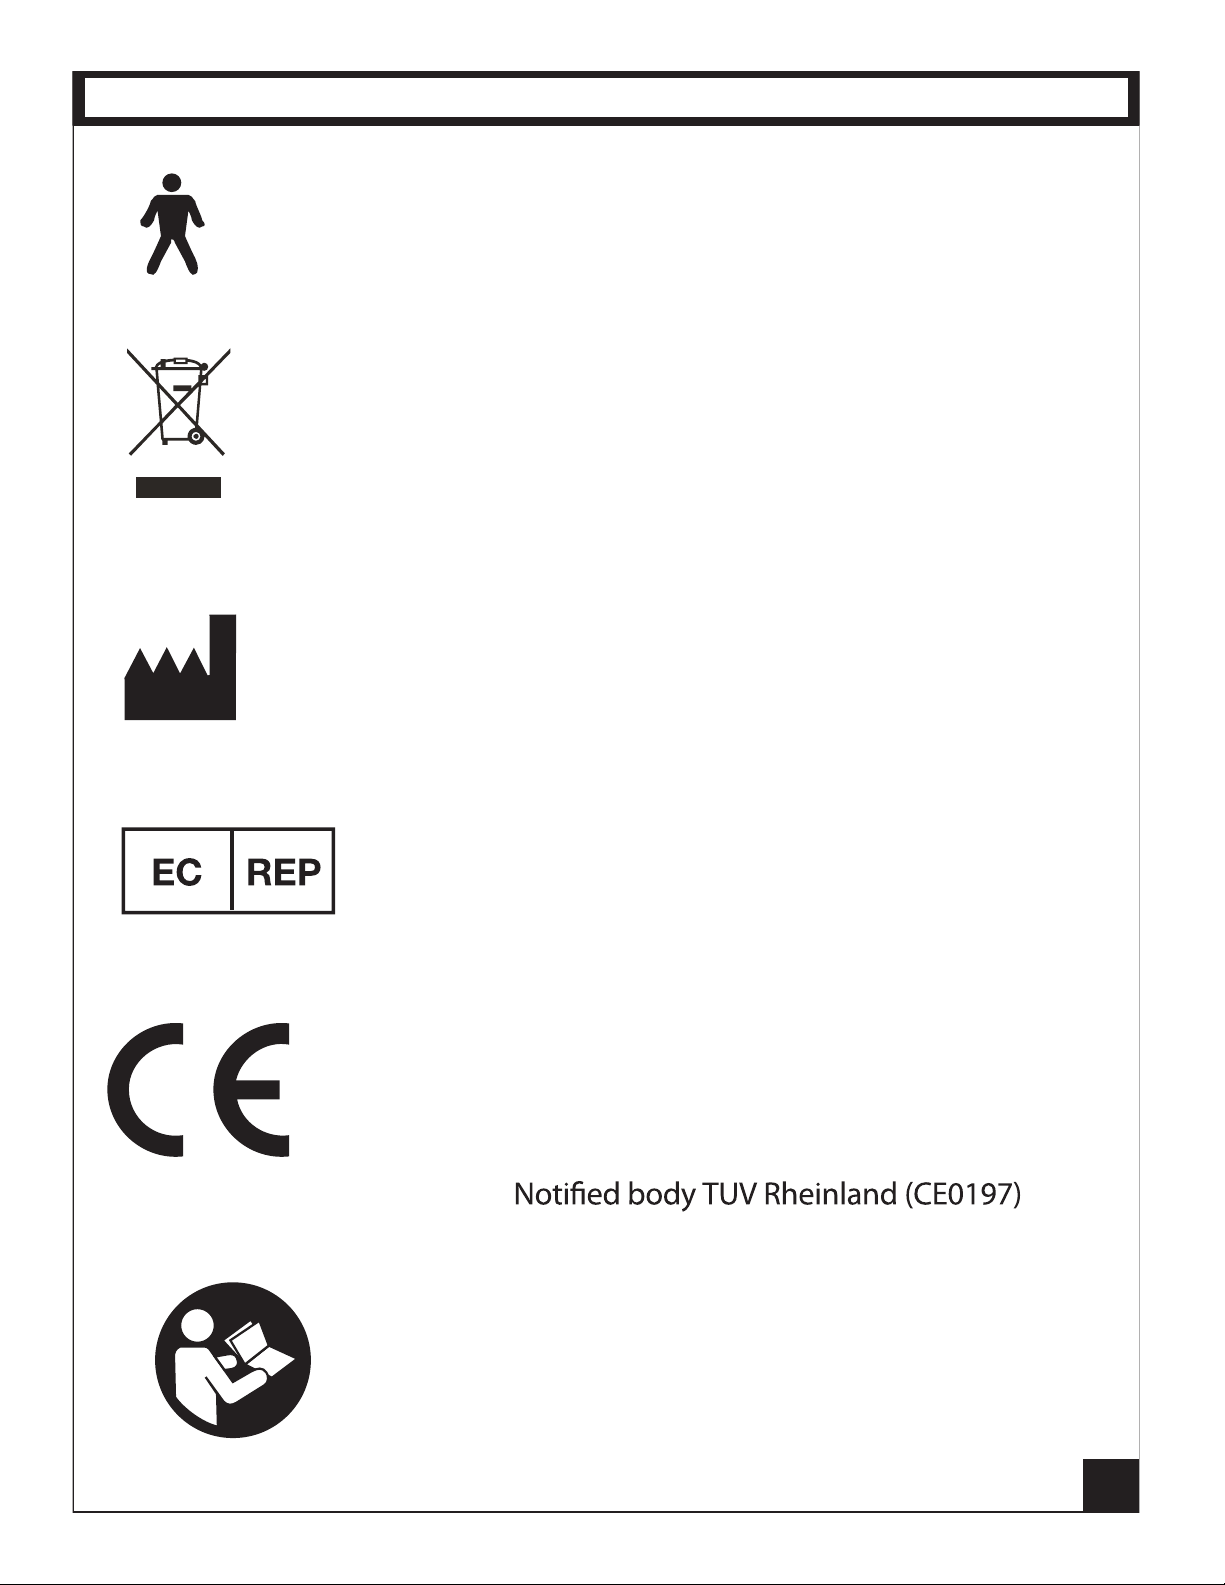
EXPLANATION OF SYMBOLS
15
Type B Applied part
Disposal in accordance with Directive 2002/96/EC (WEEE)
The name and the address of the manufacturer
The name and the address of the authorised
representative in the European Community
Complies with the European Medical Device
Directive (93142/EEC) and amended by
0197
directive 2007/47/EC requirements.
Refer to Instruction Manual.
Page 16
GUIDANCE AND MANUFACTURER'S DECLARATION
16
Guidance and manufacturer's declaration - electromagnetic emissions
below.
The customer or the user must ensure that it is used in such an environment.
Emissions Test Compliance Electromagnetic environment - guidance
RF emissions Group2 The device must emit electromagnetic e
energy in order to perform its intended
CISPR 11
function. Nearby electronic equipment
RF emissions Class B The device is suitable for use in all est-
CISPR 11
ablishments other than domestic and
those directly connected to the Public
Harmonic
low-voltage power supply network that
Not applicable
emissions
supplies buildings used for domestic
IEC 61000-3-2
purposes.
Voltage
emissions
IEC 61000-3-3
RF emissions Complies The device is not suitable for
CISPR 14-1
interconnection with other equipment.
RF emissions Complies The device is not suitable for
CISPR 15
interconnection with other equipment.
Not applicable
Page 17
Guidance and manufacturer's declaration - electromagnetic immunity
17
The device is intended for use in the electromagnetic environment specified
below. The customer or the user should assure that it is used in such an
environment.
Immunity test
Electrostatic
discharge (ESD)
lEC 61000-4-2
Electrical fast
transient/burst
IEC 61000-4-4
Surge
IEC 61000-4-5
IEC 60601
test level
± 6 kV contact
±8 kV air
±2kV for power
supply lines
±1kV for input/
output lines
±1kV
differential
mode
±2kV
common mode
Compliance level
± 6 kV contact
± 8 kV air
Not applicable
Not applicable
Electromagnetic
environment - guidance
Floors should be wood,
concrete or ceramic tile.
If floors are covered with
synthetic material, the
relative humidity should
be at least 30 %.
Mains power quality
should be that of a typical
commercial or hospital
environment.
Mains power quality
should be that of a typical
commercial or hospital
environment.
Voltage dips,
short
interruptions
and voltage
variations on
power supply
input lines
IEC 61000-4-11
Power frequency
(50/60Hz)
magnetic field
IEC 61000-4-8
<5% UT
(>95% dip in UT)
for 0.5 cycle
40% UT
(60% dip in UT)
for 5 Cycles
70% UT
(30% dip in UT)
for 25 Cycles
<5% UT
(>95% dip in UT)
for 5 sec
3 A/m 3 A/m
Not applicable
Mains power quality
should be that of a typical
commercial or hospital
environment. If the user
of the device requires
continued operation
during power mains
interruptions, it is
recommended that the
device is powered from
an uninterruptible power
supply or a battery.
Power frequency magnetic
fields should be at levels
characteristic of a typical
location in a typical
commercial or hospital
environment.
NOTE: UT is the a.c. mains voltage prior to application of the test level.
Page 18
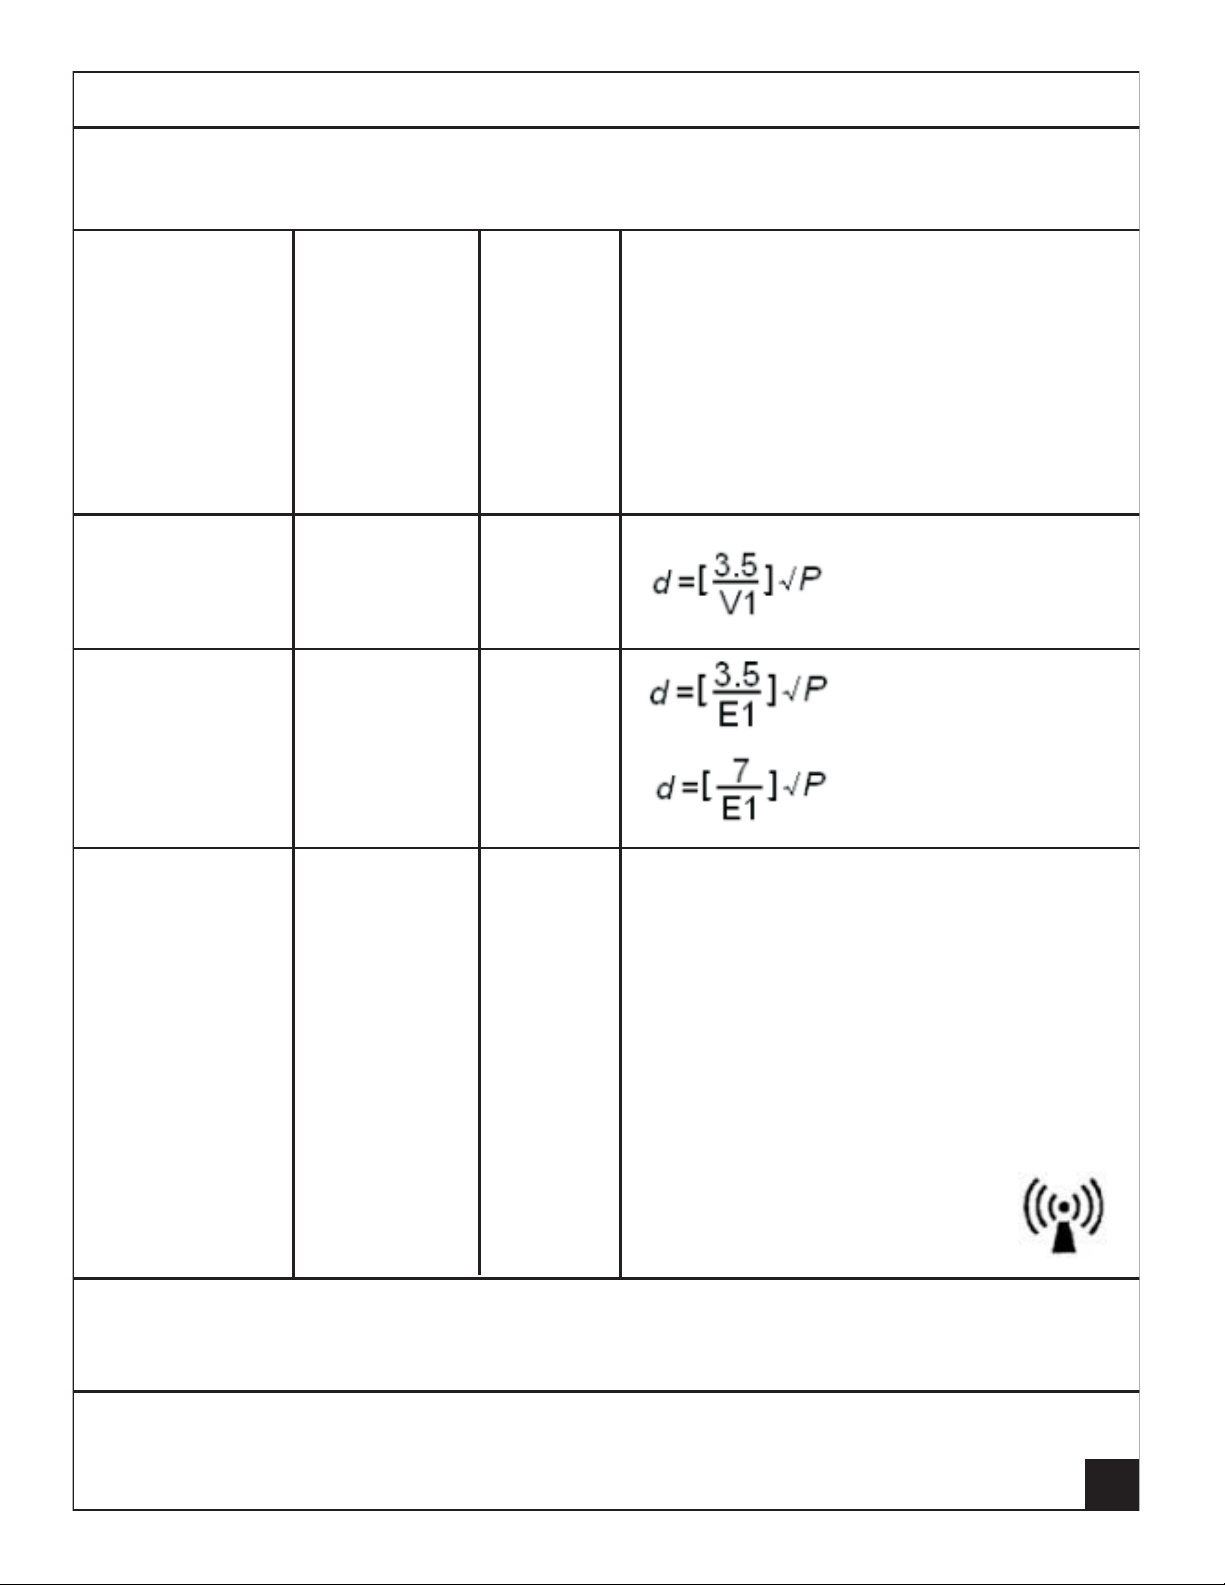
Guidance and manufacturer's declaration - Electromagnetic immunity
The device is intended for use in. the electromagnetic environment specified
below. The customer or the user should assure that it is used in such an
environment.
Conducted R
F lEC 61000-4-6
Radiated RF lEC
61000-4-3
3 Vrms
150 kHz to
80 MHz
3 V/m
80 MHz to
2.5 GHz
3 V
3 V/m
Portable and mobile RF
Communications equipment should be
used no closer to any part of the device,
including cables, than the recommended
separation distance calculated from the
equation applicable to the frequency of
the transmitter. Recommended
separation distance.
80 MHz to 800 MHz
800 MHz to 2.5 GHz
Where P is the maximum output power
rating of the transmitter In watts (W)
according to the. Transmitter
manufacturer and d is the recommended
NOTE I At 80 MHz ends 800 MHz. the higher frequency range applies.
NOTE 2 These guidelines may not apply in all situations. Electromagnetic propagation
is affected by absorption and reflection from structures, objects and people.
a Field strengths from fixed transmitters, such as base stations for radio (cellular/
cordless) telephones and land mobile radios, amateur radio, AM and FM radio
broadcast and TV broadcast cannot be predicted theoretically with accuracy. To
separation distance in meters (m).
Field strengths from fixed RF
transmitters, as determined by an
electromagnetic site survey,a should be
less than the compliance level in each
frequency range.b
Interference may occur In the
vicinity of equipment marked
with the following symbol:
18
Page 19
assess the electromagnetic environment due to fixed RF transmitters,
an electromagnetic site survey should be considered. If the measured
field strength in the location in which the device is used exceeds the
applicable RF compliance level above, should be observed to verify
normal operation. If abnormal performance is observed, additional
measures may be necessary, such as reorienting or relocating the
device.
b Over the frequency range 150 kHz to 80 MHz, field strengths should
be less than [Vi] V/m.
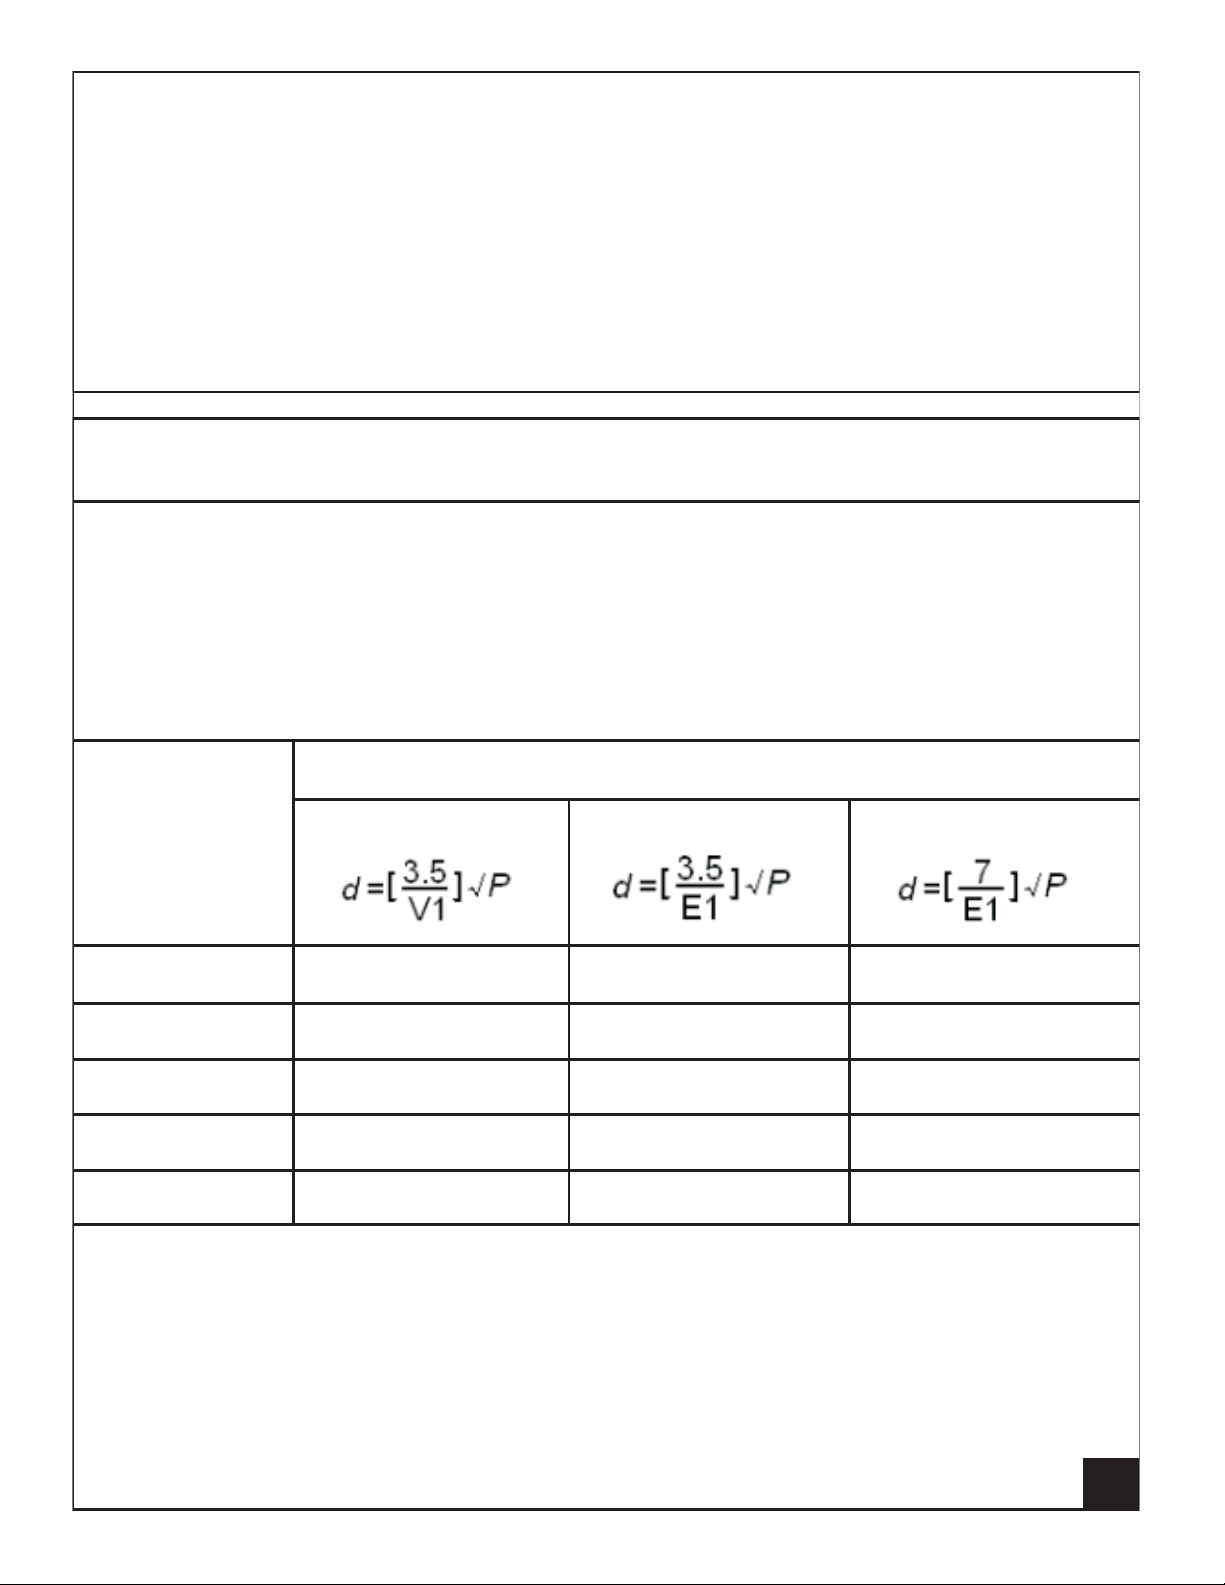
Recommended separation distances between portable and mobile RF
communications equipment and the device
The device is intended for use in an electromagnetic environment in
which radiated RF disturbances are controlled. The customer or the user
of the device can help prevent electromagnetic interference by
maintaining a minimum distance between portable and mobile RF
communications equipment (transmitters) and the as recommended
below, according to the maximum output power of the communications
equipment.
Rated
maximum
transmitter
output power of
For transmitters rated at a maximum output power not listed above, the
recommended separation distance d in meters (m) can be estimated using the
equation applicable to the frequency of the transmitter, where P is the
maximum output power rating of the transmitter in watts (W) accordable to the
transmitter manufacturer.
W
0.01
0.1
1
10
100 12 12 23
Separation distance according to frequency of transmitter
150 kHz to 80 MHz
0.12 0.12 0.23
0.38 0.38 0.73
1.2 1.2 2.3
3.8 3.8 7.3
150 kHz to 80 MHz 150 kHz to 80 MHz
NOTE 1 At 80 MHz and 800 MHz. the separation distance for the higher
frequency range applies.
19
Page 20
20
NOTE 2 These guidelines may not apply in all situations. Electromagnetic
and people.
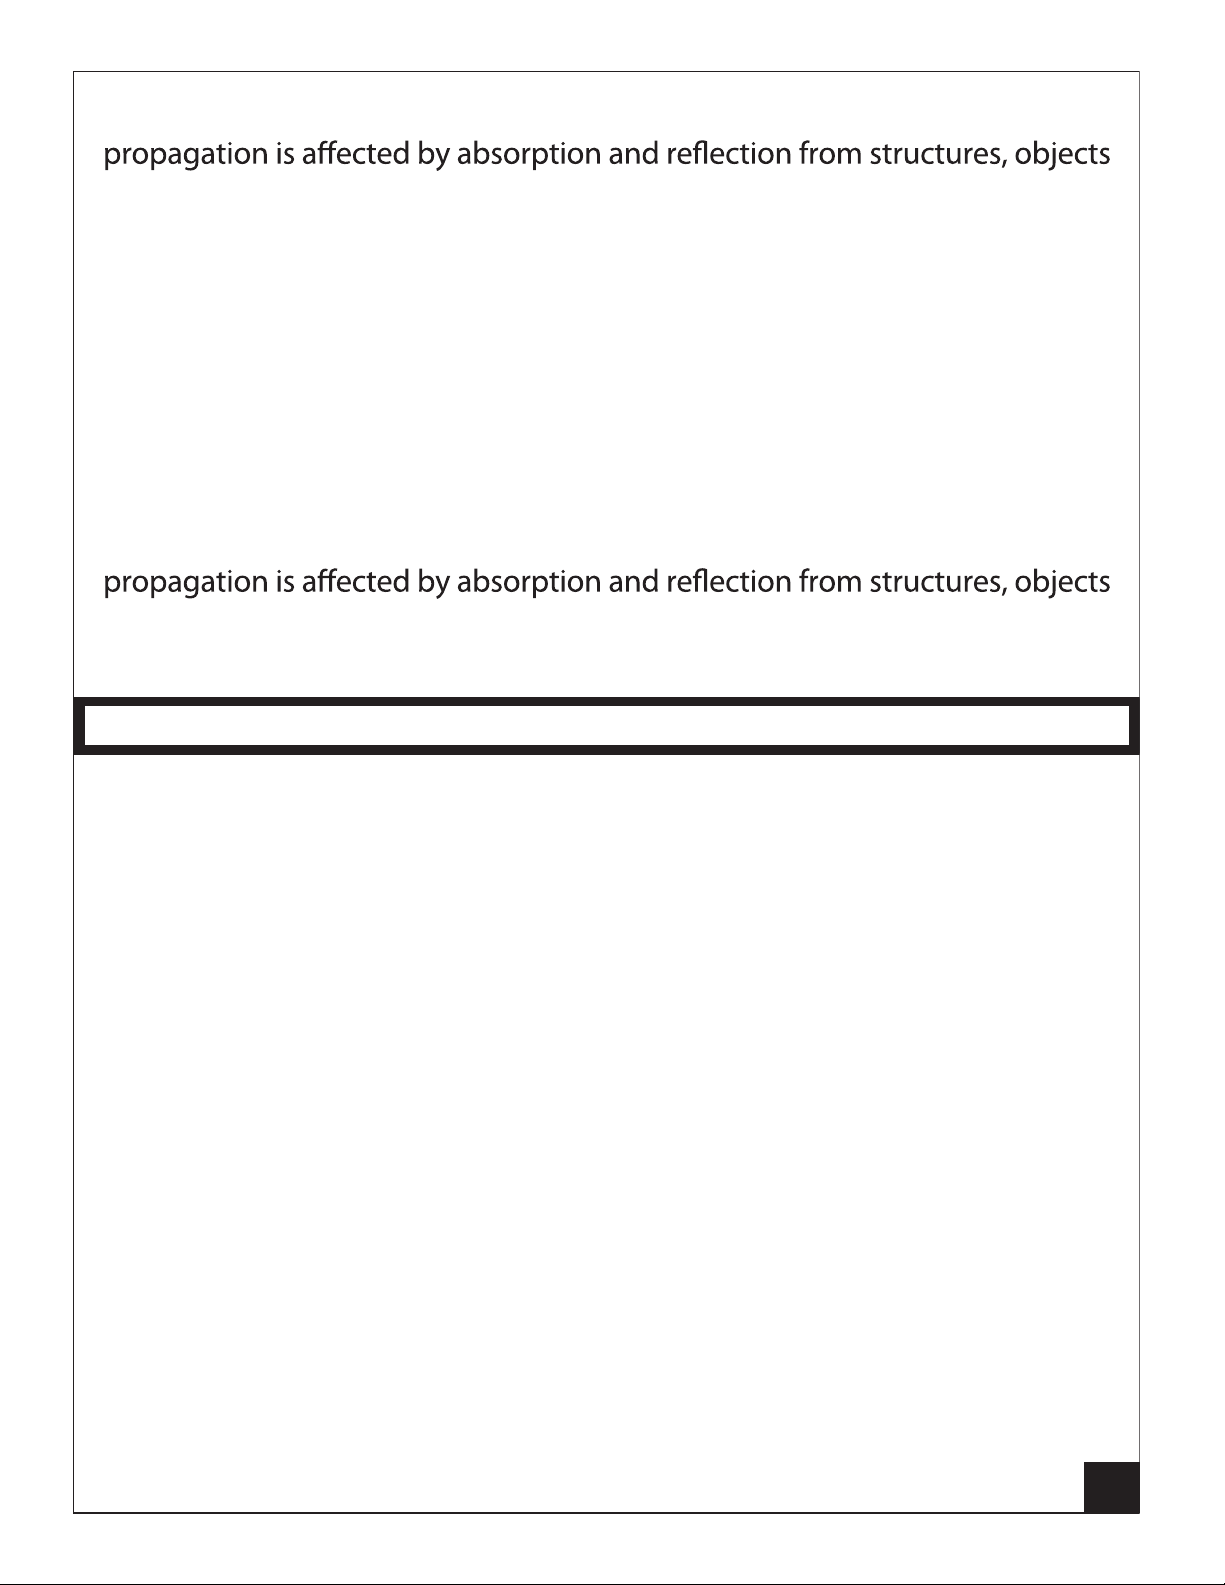
For transmitters rated at a maximum output power not listed above , the
recommended separation distance d in meters (m) can be estimated using
theequation applicable to the frequency of the transmitter, where P is the
maximum output power rating of the transmitter in watts (W) accordable to
the transmitter manufacturer.
NOTE 1 At 80 MHz and 800 MHz. the separation distance for the higher
frequency range applies.
NOTE 2 These guidelines may not apply in all situations. Electromagnetic
and people.
DECLARATION OF CONFORMITY
Mobi Technologies, Inc. declares that the (Mobi DualScan Ultra) complies
with the following normative documents: IEC60601-1, IEC60601-1-2,
IEC60601-1-4, ASTM E1965-98, IS010993-5, I5010IS010993-1010993-1,
ISO 14971, EN 124705.
Page 21
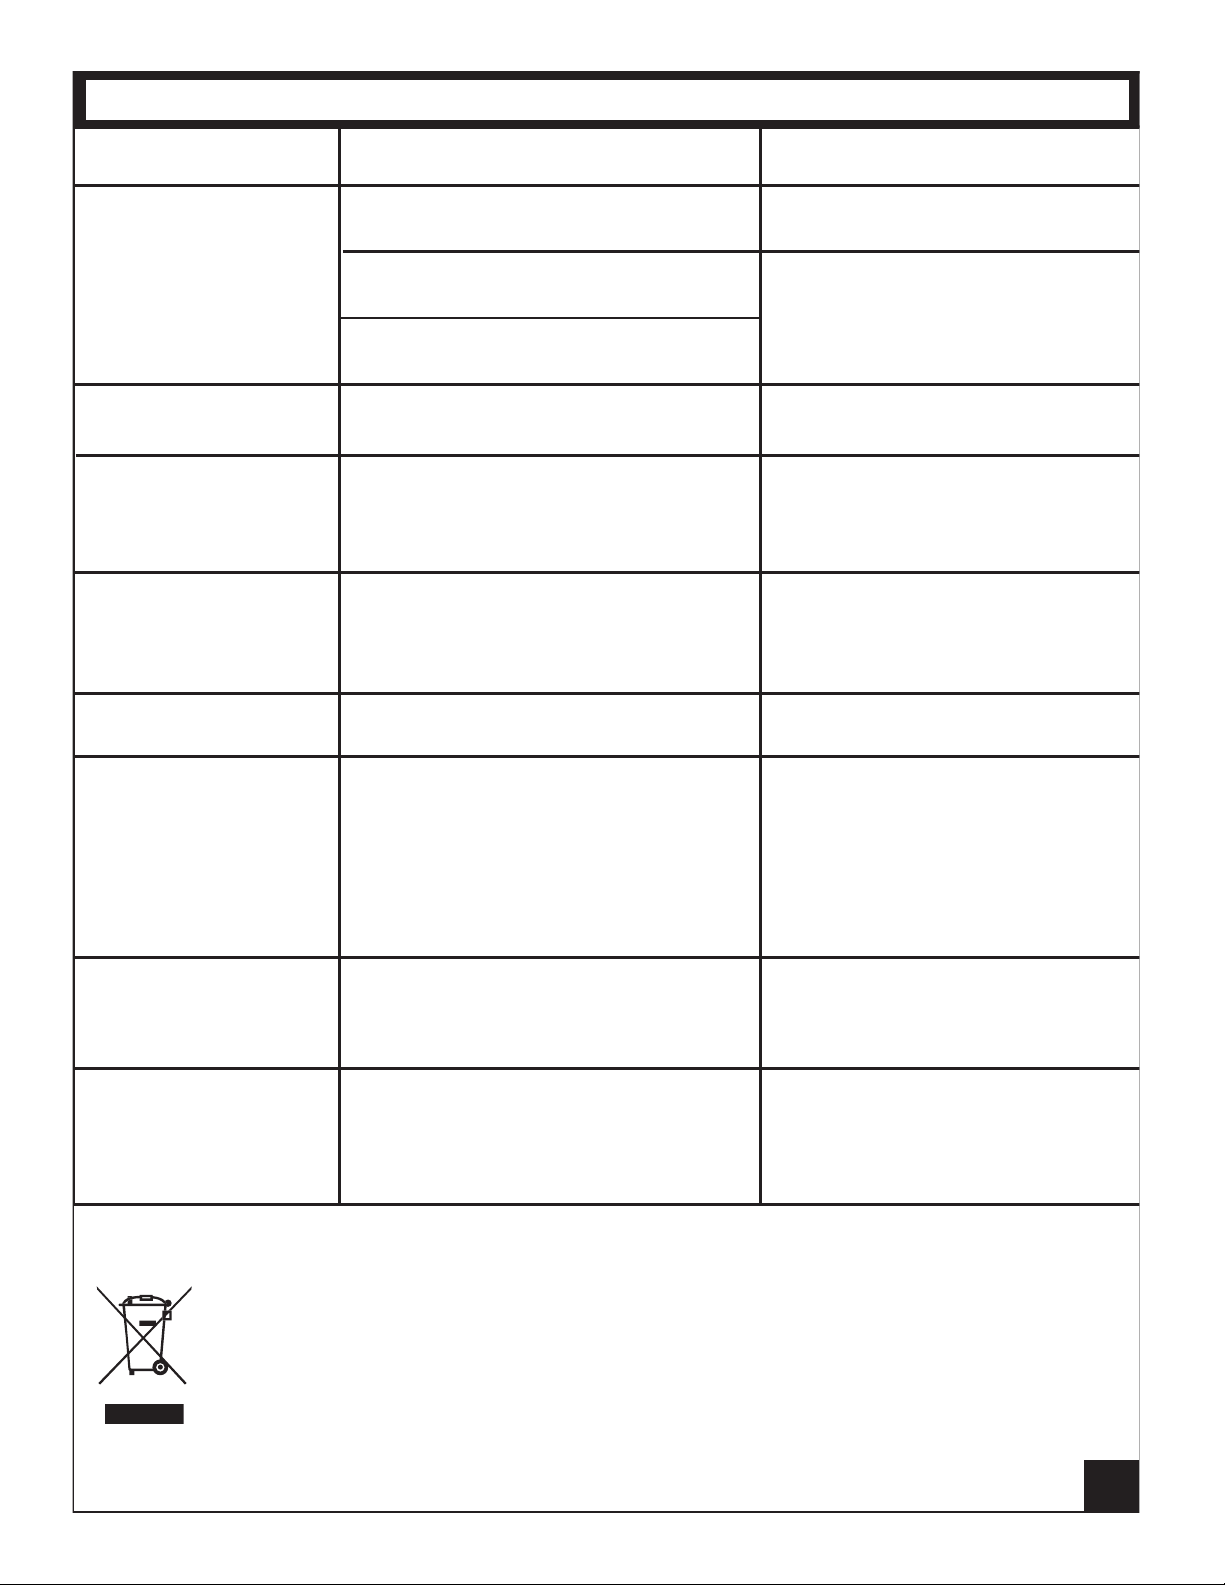
TROUBLESHOOTING GUIDE
21
Troubles
No response/
Automatic
reset when pulling
out insulator
Battery symbol
on LCD
“Lo” on screen
(result below
32.0℃ or 89.6℉)
“Hi” on screen
(result below
42.9℃ or 109.3℉)
“Errp” on screen
Check lists Countermeasures
Battery drained
Battery in wrong polarity?
Poor battery contact
Low battery
Thermometer correctly angled
for the eardrum / forehead?
Please check the operation
method
Hardware problem
Change batteries
Take out battery, reinsert
battery correctly
Change new battery
Follow user’s manual to
correctly angle for the
eardrum / forehead.
Follow user’s manual for
proper measurement.
Consult manufacturer
“Errp” on screen
“Er25” on screen
“Err5” on screen
NOTES:
1. Under an environment with electrostatic discharge, the unit may
malfunction and may require user to reset the unit.
Environment temperature
beyond the scope of
10℃~40℃(50.0℉~104.0℉)
for Ear
15℃~40℃(59.0℉~104.0℉)
for Forehead
Thermometer temperature
measurement circuit failure
Operation error, More than 15
seconds without test result in
measure heart rate mode
Place the thermometer
into environment
temperature 10℃~40℃
(50.0℉~104.0℉) for Ear
15℃~40℃ (59.0℉~
104.0℉) for Forehead
Consult manufacturer
please follow the
instruction in user manual
2. Dispose with care; please consult your retailer or manufacturer
for instructions, if needed.
Page 22
LIMITED WARRANTY
Mobi Technologies, Inc. warrants this product to be free from
defects in material and workmanship for a period of ninety (90)
days from the date of purchase. Should this product prove to be
defective at any time during the warranty period, Mobi
Technologies, Inc. will, at its option, either replace or repair it
without charge. After the warranty period, a service charge will
be applied for replacement of parts or labor for repair.
If you suspect that the product is malfunctioning or is defective
please call Mobi Toll Free at 1. 877. 662.4462 and ask for the
Service Department. If the problem still persists after consulting
with our Service Department, you may return the product to
obtain warranty service. Please return it to Mobi® along with a
dated sales receipt from the place of purchase.
This warranty does not cover damage caused by accident, misuse,
connection to an improper power supply. A charge will be made
for repair of such damage. This warranty excludes all incidental or
consequential damages and any liability other than what is stated
above.
Mobi Technologies, Inc.
5913 Blackwelder Street
Culver City, CA 90232
www.getmobi.com
© 2013 Mobi Technologies, Inc.
All Rights Reserved
V122012
 Loading...