

Page 1

Table of Contents
Using This Guide ..........2
Key Symbols ................... 2
Phone Overview ........... 3
Key Functions ..........4, 5
Display Icons ............ 6, 7
Getting Started ............8
Charging Battery ............ 8
Attaching Battery ........... 9
Basic Phone
Operations ............. 11
Turning on the Phone .. 11
Making a Call ............. .. 11
Answering a Call .......... 12
Unanswered C all s ......... 12
Voice Mail .................... 13
Text Messages (SMS) .... 14
Menu Help ................... 14
Safety Information .... 15
Care and Maintenance . 23
Voice Mode Features .24
Dialing Stored Numbers 24
Speed Dialing ............... 25
Emergency C all s ........... 25
Sounds On/Off ............. 26
Mute/Unmute .............. 26
Adjusting Vo lume ...... .. 26
Sending DTMF Tones .... 27
Pause Feature ............... 27
Memory Link Feature ... 28
Calling Card Calling ...... 28
Conversation Mode ...... 29
Menu System .............31
Access to the Menus .... 31
Menu Map ................... 32
Entering Text ................ 34
®
Quick Type
T9
Text Input ................. 36
Phonebook ...... ....... ...... 38
View ........................ 38
New Entries ............. 38
Status ...................... 39
Messages ..................... 40
Voice Mail ...... .... ... ... 40
Message Inbox ...... ... 40
Status ........ ... ... ... .... ... ... 41
Call Lists ................... 41
Talk Times ................ 41
Own Number ........... 41
IP Address ................ 41
Preferences .................. 42
Sounds On/O ff ............. 52
Key Guard ................. ... 52
Systems ..... ............. ...... 52
Data Mode Features ..54
Connecting to Data
Mode ............ ............. 54
Making a Voice Call ..... 57
Tethered Mode ......... 58
Appendix .................... 71
Accessories ...... ....... ...... 71
Glossary ....................... 72
Troubleshoo t in g . .......... 74
Index .......................... 76
1
Page 2

Using This Guide
The MobileAccess™ T255 phone combines two separate devices –
a wireless voice phone and a wireless data terminal.
The voice phone can be used where cellular service is available. It works
over 800 MHz digital/analog and 1900 MHz digital networks.
To access wireless data service, you must be in an area where wireless IP
(CDPD) service is provided. Your network service provider must set up
and register a unique IP and email address for you.
As you use the phone, keep in mind these two points:
• The phone cannot operate simultaneously as a voice phone and a data
terminal. Pressing the MODE key allows you to switch between Voice
Mode and Data Mode. In some instances, the phone will
automatically switch modes.
• Some of the phone’s keys have different functions depending on
whether you’re in Voice Mode or Data Mode. See Key Functions,
pages 4-5.
Key Symbols
To help you quickly understand this manual, symbols on the keys and
expressions in the display are explained below.
Right arrow on Express Key
Left arrow on Express Key
Up arrow on Express Key
Down arrow on Express Key
SEND key
END key
Softkeys Softkeys control the action or function displayed immediately
Express
above. Press the softkey to perform that action. For example,
Store softkey means press the softkey under the word Store
to store the displayed number or text. Softkey actions/labels
change with each new screen.
The Express Key is the navigation key. Use and on the
Express Key to scroll to the d esi red item in the men u and s ele ct
Key
by pressing
means scroll to the menu item
pressing
Another way to navigate menus is to press the number
associated with a menu item to go directly to the next screen
associated with that item.
OK left softkey. For example, select View Options
View Options and select by
OK left softkey.
2
Page 3
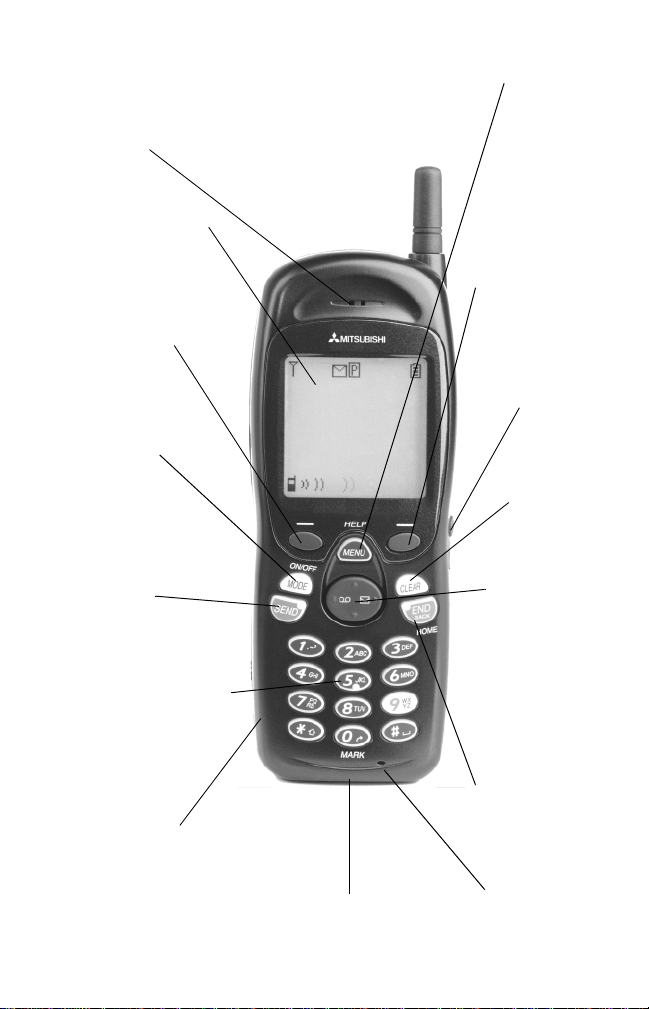
MobileAccess™ T2 55 Phone Overview
Menu key
Press to go to
Earpiece
Graphic display
Telephone numbers,
menus, messages, etc.
are displayed here.
Left softkey
Performs action
displayed on
screen directly
above.
Mode key
Press and hold
to turn the
phone on or off.
Press to toggle
between Voice &
Data Mode.
SEND key
Dials displayed
number or name
and answers calls.
Alphanumeric keys
Enter text and
telephone numbers.
Also used for menu
navigation and speed
dial access.
AC Rapid Charging
Adapter socket
Data cable
connector
for phone and
services. This is
NOT the browser
menu. Press and
Right softkey
Performs action
displayed on
screen directly
headset here.
Turns off alerts.
Express Key
Navigation key.
Press and hold left
arrow to dial voice
mailbox. Press and
hold right arrow to
read text messages.
Press arrows to
between options.
END/Back key
Press and hold to
end a call or go back
to previous display.
Microphone
main menu
data-related
hold to get
menu help.
above.
Headset
socket
Connect
Clear key
Erases
characters.
move cursor
3
Page 4
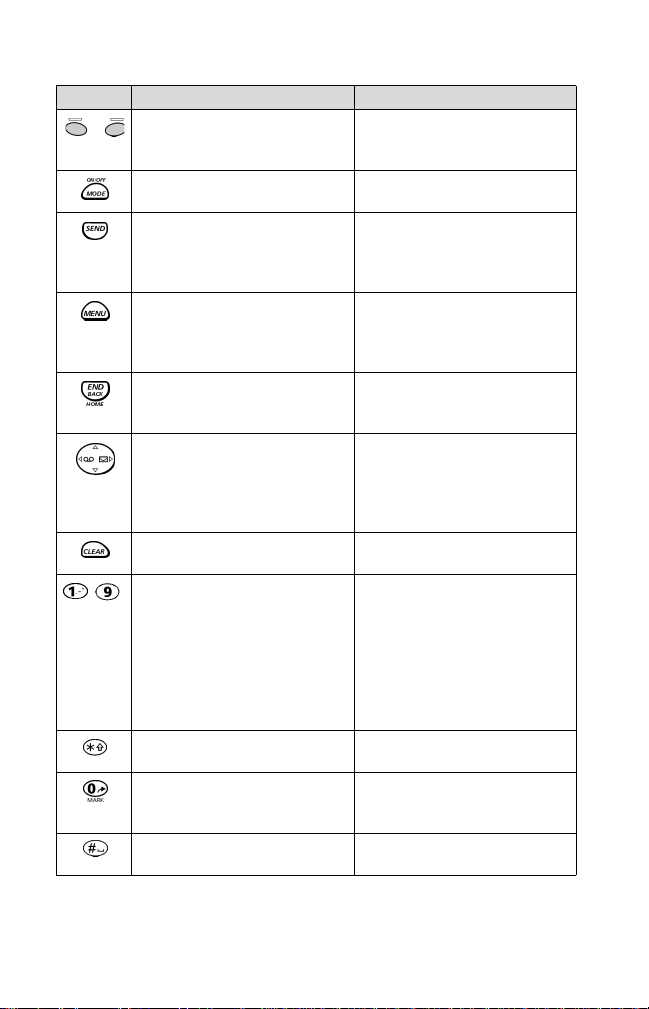
Key Functions - Voice Mode
Key Standby Voice Mode Active Voice Mode
Left: Call Lists
Right: Phonebook
Press/hold: Turn on Key Guard
Press: Switch to Data Mode
Press/hold: Power OFF
Press: Recall last 10 dialed
numbers
Main menu for phone
services
Press/hold: Help/info about
displayed item
Press: Go back 1 screen
Press/hold: Go to standby
screen
Press/hold le ft : voice mailbox
Press/hold right: SMS
messages
Press up/down: Ringer
volume control
Press: Clear previous character
Press/hold: Clear entire entry
Press: In text entry, enter let-
-
ters, numbers or symbols
In text entry, press 1 for
punctuation mark
Press/hold: Speed dial Phonebook entry
Press/hold 9: Emergency Call if
set up
Press: Enter * or change case in
text entry
Press: Enter 0
Press/hold: Speed dial
operator
Press: Enter # or, in text entry,
a space
Left: Mute
Right: Options
Press/hold: Turn on Key Guard
Not active
Press: Dial number displayed/
answer incoming call
Press/hold: Credit card call (if
activated)
Main menu for phone
services
Press/hold: Help/info about
displayed item
Press: Go back 1 screen
Press/hold: Terminate call
Press up/down: Volume
control - earpiece
Press: Clear previous character
Press/hold: Clear entire entry
Press: Enter numbers
(Can be used to enter & store a
number, but tones will sound.
To store a number silently, use
scratchpad option)
Press: Enter *
Press: Enter 0
Press/hold: Speed dial
operator
Press: Enter #
4
Page 5
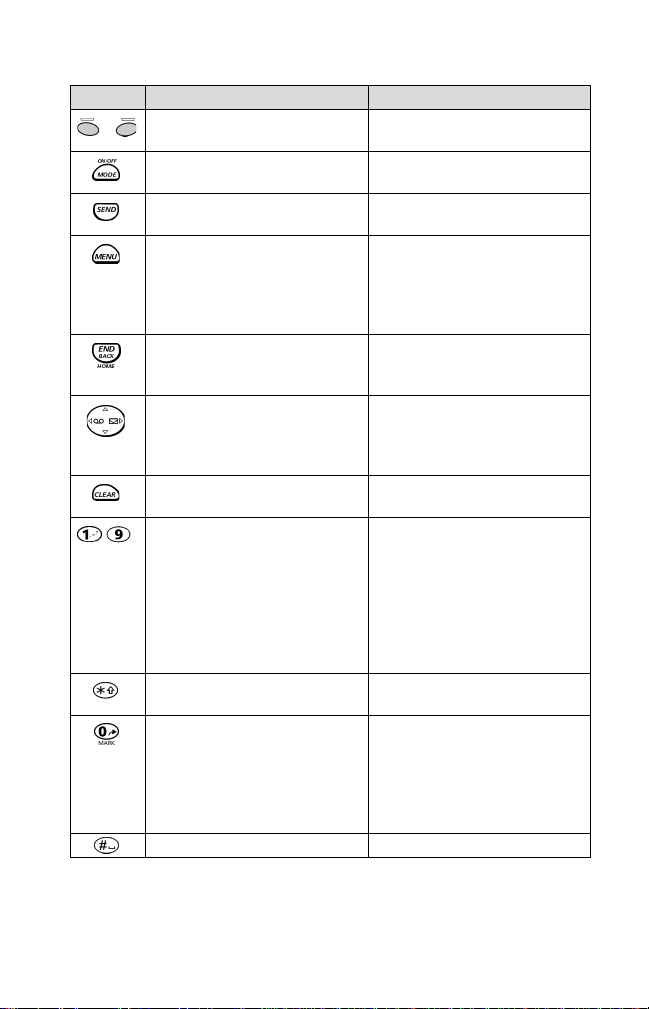
Key Functions - Data Mode
Key Standby Data Mode Active Data Mode
Softkey action Action indicated on softkey
Press: Switch to Voice Mode
Press/hold: Powe r OFF
Not active Not active
displayed above
Press: Switch to Voice Mode
Press/hold: Powe r O F F
Main menu for phone
services (NOT browser Home
Page menu).
Press/hold: Help/info about
displayed item
Press: Go to standby screen Press: Go back 1 scree n
Press up/down: Scroll to
menu selection
Not active Press: Clear previous character
Press: Move directly to menu
-
item next screen
In text entry, enter letters,
numbers or symbols
In text entry, press 1 for
punctuation mark
Press/hold: Go to My Favorites
Press/hold 9: Emergency Call
Press: Enter * Press: To change case in text
Press: Enter 0 Press:
Not active Press: For space
Main menu for phone
services
Press/hold: Help/info about
displayed item
Press/hold: Return to Home
Page
Press up/down: Scroll to
menu selection
Press left/rig ht: Move to next
character or word in text entry
Press/hold: Clear entire entry
Press: Move directly to menu
item next screen
In text entry, enter letters,
numbers or symbols
In text entry, press 1 for
punctuation mark
Press/hold: Go to My Fa vorites
Press/hold 9: Emergency Call
entry
Go to 10th menu
selection.
entry, enter 0. In T9
Type, select next word
Press/hold:
My Favorites entry
In text or numeric
To register a
®
Quick
5
Page 6
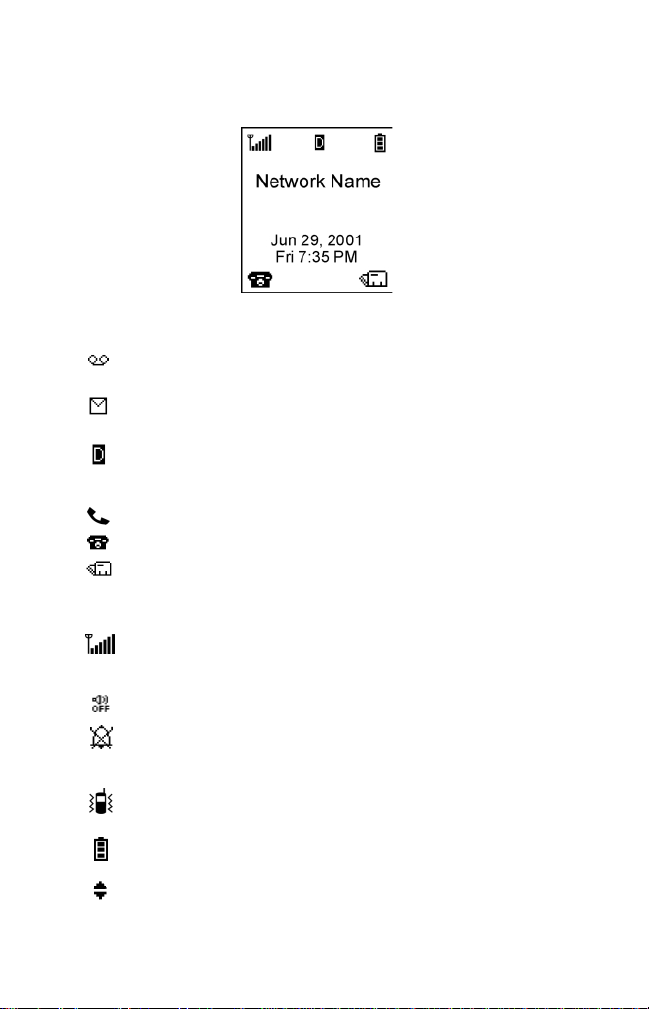
Display Icons – Voice Mode and General
The display screen can display up to eight lines of characters plus one row
of special display indicators or icons. The display screen in standby Voice
Mode appears like this:
Voice Mode Icons
Voice Mail Displays when a PCS voice mail message
Text Message Displays when a PCS text message has
Digital Indicates digital voice network available;
Off Hook Conversation
Call Lists Dialed, received and missed calls listed
Phonebook View local names and numbers
has been received and stored
been received and stored
if not displayed, phone is operating on
analog network
General Icons (Voice and Data)
Signal Strength Six levels indicate the strength of the re-
All Alerts Off All audio alerts are muted
Some Alerts Off Ringer and/or message alert muted.
Vibrate Alert Vibrate alert on (available only if vibrate
Battery Level Three levels indicate the charge level (low,
Scroll Arrows More menu information up/down in menu
ceived signal–signal indicator for network
on which phone is currently registered
Example: if ring volume=0, this icon
appears
battery inst al le d)
medium, high)
screen; in some cases, move left/right
6
Page 7
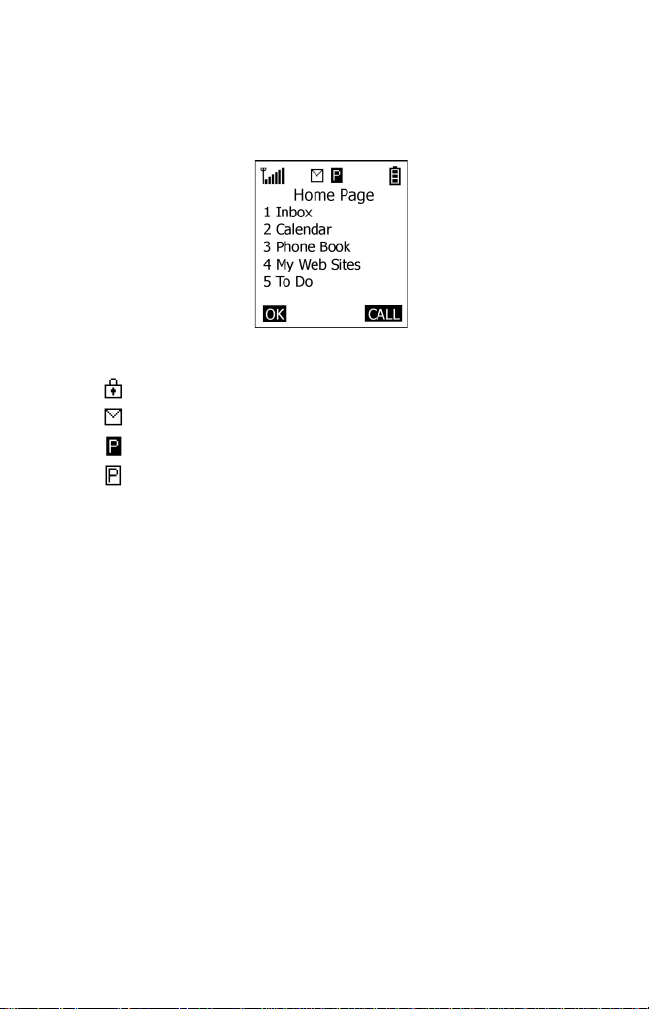
Display Icons – Data Mode
Your service provider supplies the Home Page screen and all Data Mode
content. Therefore, the Home Page screen appearance will vary depending on what your service provider offers. Here is an example of a Home
Page display screen:
Data Mode Icons
Secure Secure mode
Message Alert Data alert received
CDPD Registered Packet data network available – registered
CDPD Not
Registered
Packet data network not available –
not registered
7
Page 8
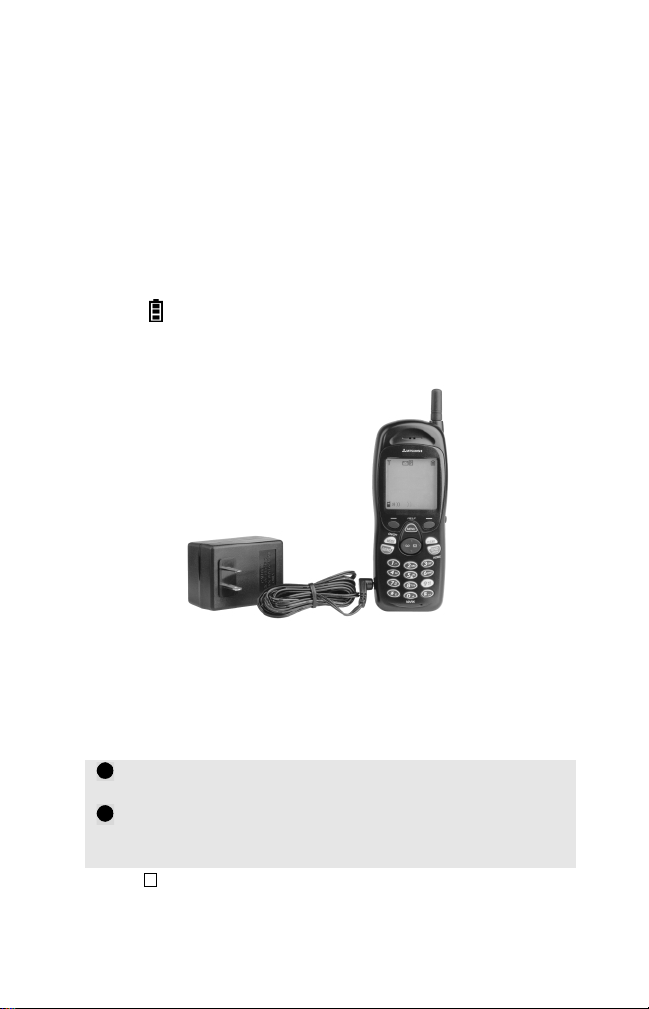
Getting Started
Charging the Battery
The battery must be fully charged before using the phone for the first
time. To reach full capacity of NiMH battery, charge and discharge the
new battery three times before use. To charge the battery, follow
procedure below. To fully discharge the battery, leave the phone on until
it shuts itself off.
1. Make sure the battery is properly installed on your phone.
2. Connect the AC Adapter to the socket on the side of the phone.
Connect the other end to a standard wall outlet. The battery level
indicator flashes during charging.
3. Disconnect the AC Adapter when the Battery Full message displays.
Recharging the Battery
When the battery needs to be recharged, three short tones sound. The
Low Battery icon and message flash on the display.
Connect the AC Adapter to the socket on the side of the
1
phone.
Connect the AC Adapter to a standard wall outlet. The
2
battery begins charging when the AC adapter is connected
to the phone.
✱
If the phone is left on despite a low battery alarm, the phone automatically shuts itself off to
protect the battery from over-discharging.
8
Page 9
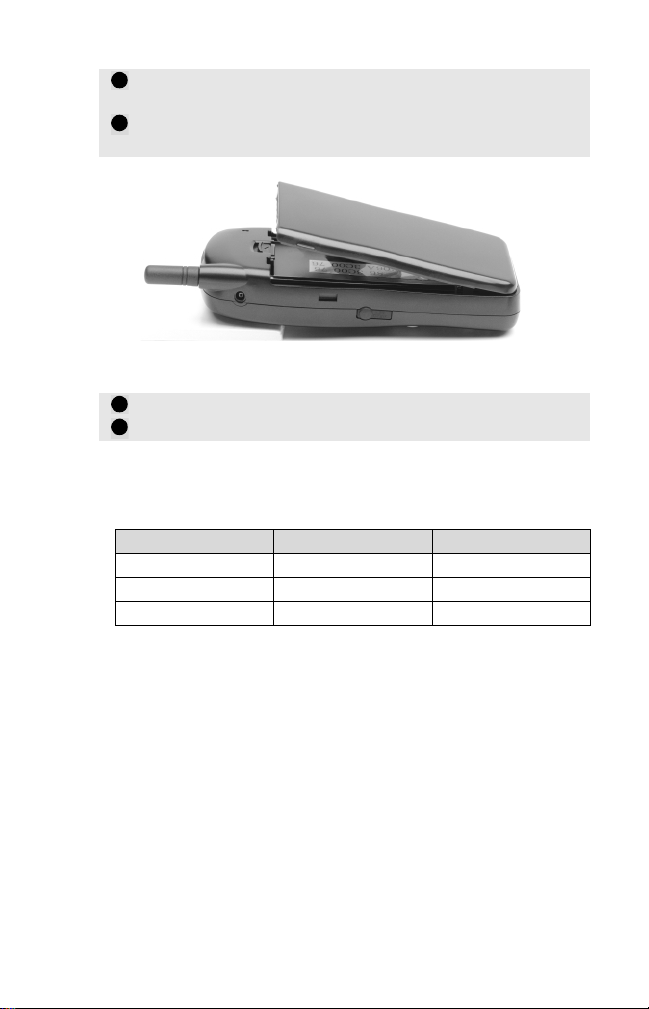
Attaching the Battery
Insert the bottom of the battery into the recess on the back
1
of the phone.
Push inward until the locking catch snaps securely into
2
place.
Removing the Battery
Turn the phone off.
1
Push up the locking catch and remove the batter y.
2
Charging Times
Approximate battery recharging times using the AC Rapid Charging Adapter:
Battery Type Charging time
880 mAh NiMH Standard 120 minutes
880 mAh NiMH Vibrating 120 minutes
1500 mAh NiMH Extended 200 minutes
• It is normal for batteries to become warm during charging.
• The phone can be used while charging but it will increase the
charging time.
• Replace the battery when it will not hold a charge, or when operating time decreases dramatically.
• The NiMH battery performance varies with the condition and history
of the battery.
• Use only the Mitsubishi chargers specified for this battery. Using
other chargers or batteries may cause damage.
• Do not leave NiMH batteries connected to a charger longer than necessary; overcharging will shorten battery life.
9
Page 10

Battery Use Times
Standard Battery
Voice Digital Voice Analog CDPD
Standby 120 hr Standby 10 hr Standby 120 hr
Talk 120 min Talk 70 min Data Mode 7 hr
Extended Life and Vibrating Battery
Voice Digital Voice Analog CDPD
Standby 200 hr Standby 17 hr Standby 200 hr
Talk 200 min Talk 120 min Data Mode 12 hr
Battery Safety Tips
• Do not leave the phone in a closed car during hot summer or cold
winter conditions. The phone may temporarily not work with a hot
or cold battery.
• The recharging temperature range is 32-104° F (0-40° C).
If you attempt to recharge when the battery is above or below this
range, acid leakage or overheating may result.
• Batteries may explode if discarded into a fire or heated.
• Do not use or leave the battery near a heat source such as a stove,
oven, heater or fire (170° F = 76° C or higher).
• The battery is not waterproof. Do not immerse it in liquid or allow it
to get wet.
• Avoid contact of the battery terminals with metal objects (su ch as
keys, paper clips, coins, chains) or excessive static electricity which
may short circuit the battery.
• If the battery terminal s become soiled, clean them with a soft cloth.
• Do not try to disassemble or modify the battery as injury or burns
may result.
• Do not drop or subject the batteries to strong physical shocks.
• Keep batteries out of the reach of children.
10
Page 11
Basic Phone Operations
Turning On the Phone
1
Press and hold key. A beep tone sounds.
If the phone is locked, -Auto L ock- will display. Enter the
2
4-digit code and press OK left softkey.
✱
See page48 for more details on Auto Lock.
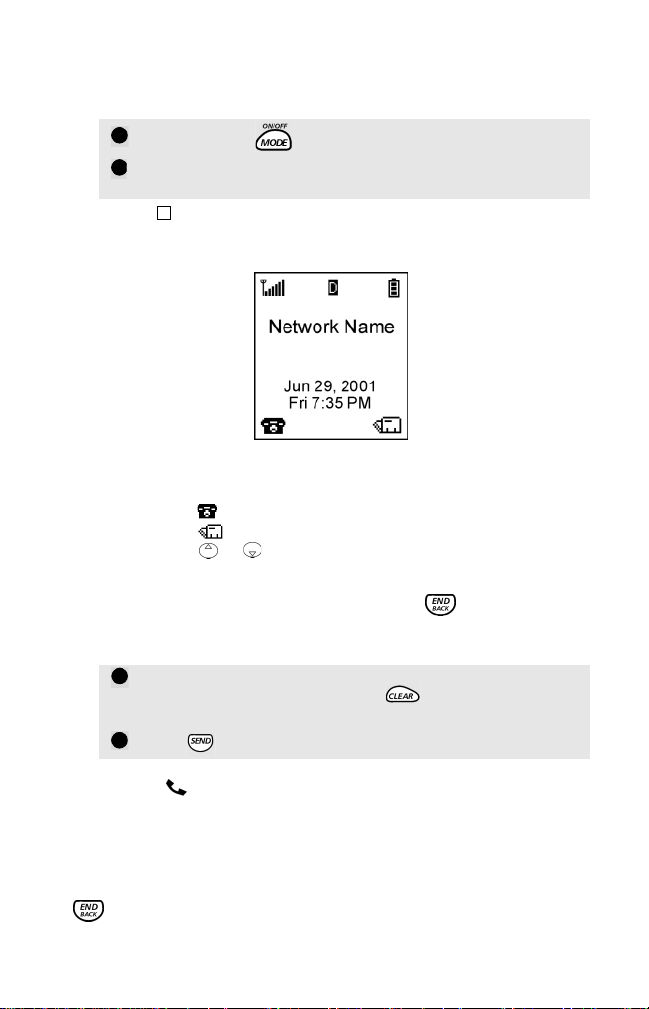
Standby Screen — Voice Mode
The screen displays network and/or service provider, signal strength and
battery level indicators, and Call Lists and Phonebook softkey shortcuts.
To quickly return to the standby screen at any time while in Voice Mode
(except during conversation), press and hold the key.
Press softkey to go to Call Lists.
Press softkey to go to the Phonebook.
Press or on the Express Key to go to volume control.
Making a Call
Key in the telephone number you wish to call.
1
Correct any mistakes by pressing . Press and hold this
key to clear the entire entry.
2
Press .
The off hook indicator displays and you’ll hear a network tone. As the
call connects; the dialed number (if stored), time and date display.
To store the dialed number in the Phonebook, press Store left softkey
before pre ssing the Send key to connect the call.
To cancel the call before it connects, press either Cancel left softkey or
key.
11
Page 12

Muting
While talking, to mute the microphone, press Mute left softkey. To turn
the microphone back on, press Talk left soft key .
Conversation Options
When talking, press Options right softkey to Send DTMF tones, use the
Scratchpad, Store the number, or view your Own Number. See Conversation mode on page 29 for details.
Answering a Call
The ringer alerts you to an incoming call and the caller’s name and
number are displayed if they are stored in your Phonebook. Press any key
to mute ring tone.
To answer the call,
Press Answer left softkey or .
✱
If Any Key Answer is enabled in Preferences - Call Setup menu, you can answer by pressing any
key except the right softkey, End/Back key and Mode key.
Ending a Call
While in Conversation Mode or in the Main Menus, press and hold
to end a call. In all other cases, press to end a call. The
standby screen will display.
Turning Off the Phone
Press and hold .
A turn-off tone will sound and power OFF will briefly display.
Unanswered Calls
If you miss a call, the phone saves the number in an unanswered call log
and alerts you by displaying Missed Call. See page 24.
12
Page 13
Voice Mail
When you have new voice mail, a tone alerts you. The screen displays
and indicates the number of new messages waiting in your voice mailbox.
To access your Voice Mailbox,
Press and hold or press and select 2 Messages,
1
1 Voice Mail. If you are using more than one mailbox, a list
will display.
2
Press or to select a mailbox, or press the corresponding
number displayed in the menu.
3
Press either Call left softkey or to access the selected
mailbox.
Setting up a Voice Mailbox
Up to three separate Voice Mailboxes can be stored.
To add a Voice Mailbox,
Press and select 2 Messages, 1 Voice Mail, 2 Setu p,
1
then press Add right softkey.
Enter your 8-digit Security Code. Default code is 00000000.
2
Enter the Access Number, PIN number and name for the
3
mailbox and press OK left softkey.
4
Press to access the new mailbox.
Edit Voice Mailbox
To edit the name, number, or PIN, or delete an existing Voice Mailbox,
Press and select 2 Messages, 1 Voice Mail, 2 Setu p.
1
Select the mailbox you wish to change and press Edit
2
softkey.
Enter your 8-digit Security Code. Default code is 00000000.
3
Select Edit Name, Edit Number, Edit PIN, or Delete, then
4
press OK softkey.
To enter text, press right softkey to select input mode. The
5
most recently used mode is displayed over the right softkey.
To change mode, cycle through the right softkey until
desired text entry mode is displayed. When finished, press
OK softkey.
✱
See Entering Text, page34.
13
Page 14
Text Messages (SMS)
Text messages are sent via an SMS (Short Message Service) message
center provided by your service provider. When you receive a text
message, a tone alerts you. The screen displays and indicates the
number of unread messages. You can receive up to 30 text messages
with up to 245 characters each. Consult your service provider for details.
To access your Text Messages,
Press and hold or press and select 2 Messages ,
1
2 Msg Inbox.
At the text message list screen, to select a message, either
2
press the number key associated with the message or press
or to scroll to desired message. Unread messages are
marked with *, and urgent unread messages marked with .
If you scroll up or down, press View left softkey and the
3
selected text message will display.
To delete a Text Message ,
Press Delete right softkey.
1
At the next screen, press Yes. The message will be deleted
2
and the remaining messages will display.
To view new Text Messages immediately,
Press View left softkey or press and hold .
To skip Text Messages,
Press Skip right softkey or to view later.
Menu Help
To view a help message describing the meaning of a particular menu
option, press and hold while you are at the desired menu option.
For example,
Press , select 3 Status, and scroll to 4 Accumulated
1
Talk Time.
Press and hold . A help message describing Accumulated
2
Talk Time displays.
To return to the menu, press OK softkey or .
3
14
Page 15

Safety Information
EXPOSURE TO RADIO FREQUENCY SIGNALS
Your wireless handheld portable telephone is a low power radio transmitter and receiver. When it is ON, it receives and also sends out radio
frequency (RF) signals.
In August 1996, the Federal Communications Commissions (FCC) adopted RF exposure guidelines with safety levels for hand-held wireless
phones. These guidelines are consistent with the safety standards previously set by both U.S. and international standards bodies:
*ANSI C95.1 (1992)
*NCRP Report 86 (1986)
*ICNIRP (1996)
*American National Standards Institute; National Council on Radiation Protection and Measurements; International Commission on Non-Ionizing Radiation Protection
Those standards were based on comprehensive and periodic evaluations
of the relevant scientific literature. For example, over 120 scientists, engineers, and physicians from universities, government health agencies,
and industry re viewed the avai lable body of researc h to develop t he ANSI
Standard (C95.1).
The design of your phone complies with the FCC guidelines (and those
standards).
Your phone has been tested and meets the limits for radio frequency (RF)
exposure set by the FCC for normal handheld use next to the ear or worn
on the body using a Mitsubishi brand belt clip accessory specified for this
phone, and used as intended. Operation of the phone in other situations
such as in shirt pockets or non-Mitsubishi brand belt clips or holsters, or
operation with the back of the phone closer than 1 3 mm (0.51”) to the
body, have not been tested. Therefore operation of the phone in nontested situations may not meet the limits for RF exposure set by the FCC
and must be avoided.
ANTENNA CARE
Use only the supplied or an approved replacement antenna. Unauthorized antennas, modifications, or attachments could damage the phone
and may violate FCC regulations.
PHONE OPERATION
NORMAL POSITION: Hold the phone as you would any other telephone
with the antenna pointed up and over your shoulder.
15
Page 16

EFFICIENT OPERATION: For your phone to operate most efficiently, do
not touch the antenna unnecessarily when the phone is in use. Contact
with the antenna affects call quality and may cause the phone to operate
at a higher power level than o therw ise needed.
DRIVING
Check the laws and regulations on the use of wireless telephones in the
areas where you drive. Always obey them. Also, if using your phone while
driving, please:
• Give full attention to driving - driving safely is your first responsibility.
• Use hands-free operation, if available.
• Pull off the road and park before maki ng or answerin g a call if drivi ng
conditions so require.
ELECTRONIC DEVICES
Most modern electronic equipment is shielded from RF signals. However,
certain electronic equipment may not be shielded against the RF signals
from your wireless phone.
Pacemakers
The Health Industry Manufacturers Association recommends that a
minimum separation of six (6”) inches be maintained between a
handheld wireless phone and a pacemaker to avoid potential
interference with the pacemaker. These recommendations are
consistent with the independent research by and recommendations
of Wireless Technology Research.
Persons with pacemakers:
• Should ALWAYS keep the phone more than six inches from their
pacemaker when the phone is turned ON
• Should not carry the phone in a breast pocket
• Should use the ear opposite the pacemaker to minimize the potential for interference
• If you have any reason to suspect that interference is taking place,
turn your phone OFF immediately
Hearing Aids
Some digital wireless phones may interfere with some hearing aids.
In the event of such interference, you may want to consult your service provider (or call the customer service line to discuss alternatives).
Other Medical Devices
If you use any other personal medical device, consult the manufacturer of your device to determine if they are adequately shielded
from external RF energy. Your physician may be able to assist you in
obtaining this information.
16
Page 17

Turn your phone OFF in health care facilities when any regulations
posted in these areas instruct you to do so. Hospitals or health care
facilities may be using equipment that could be sensitive to external
RF energy.
Vehicles
RF signals may aff ect improperly installed or inadequately shielded
electronic systems in motor vehicles. Check with the manufacturer or
its representative regarding your vehicle. You should also consult the
manufacturer of any equipment that has been added to your vehicle.
Posted Facilities
Turn your phone OFF in any facility where posted notices so require.
AIRCRAFT
FCC regulations prohibit using your phone while in the air.
Switch OFF your phone before boarding an aircraft.
BLASTING AREAS
To avoid interfering with blasting operations, turn your phone OFF when
in a “blasting area” or in areas posted “Turn off two-way radio.” Obey all
signs and instructions.
POTENTIALLY EXPLOSIVE ATMOSPHERES
Turn your phone OFF when in any area with a potentially explosive atmosphere and obey all signs and instructions. Sparks in such areas could
cause an explosion or fire resulting in bodily injury or even death.
Areas with a potentially explosive atmosphere are often but not always
clearly marked. They include fueling areas such as gasoline stations; below deck on boats; fuel or chemical transfer or storage facilities; vehicles
using liquefied petroleum gas (such as propane or butane); areas where
the air contains chemicals or particles, such as grain, dust, or metal powders; and any other area where you would normally be advised to turn
off your vehicle engine.
For Vehicles Equipped with Air Bags
An air bag inflates with great force. DO NOT place objects, including both
installed or portable wireless equipm ent, in the area over the air bag or
in the air bag deployment area. If in-vehicle wireless equipment is improperly installed and the air bag inflates, serious injury could result.
17
Page 18

The U.S. Food and Drug Administration’s Center for Devices
and Radiological Health
Consumer Update on Mobile Phones
FDA has been receiving inquiries about the safety of mobile phones,
including cellular phones and PCS phones. The following summarizes
what is known--and what remains unknown--about whether these
products can pose a hazard to health, and what can be done to minimize
any potential risk.
Why the concern?
Mobile phones emit low levels of radio frequency energy (i.e., radio
frequency radiation) in the microwave range while being used. They also
emit very low levels of radio frequency energy (RF), considered nonsignificant, when in the stand-by mode. It is well known that high levels
of RF can produce biological damage through heating effects (this is how
your microwave oven is able to cook food). However, it is not known
whether, to what extent, or through what mechanism, lower levels of RF
might cause adverse health effects as well. Although some research has
been done to address these questions, no clear picture of the biological
effects of this type of radiation has emerged to date. Thus, the available
science does not allow us to conclude that mobile phones are absolutely
safe, or that they are unsafe. However, the available scientific evidence
does not
of mobile phones.
What kinds of phones are in question?
Questions have been raised about hand-held mob ile phones, the kind
that have a built-in antenna that is positioned close to the user’s head
during normal telephone conversation. These types of mobile phones are
of concern because of the short distance between the phone’s antenna-
-the primary source of the RF--and the person’s head. The exposure to RF
from mobile phones in which the antenna is located at greater distances
from the user (on the outside of a car, for example) is drastically lower
than that from hand-held phones, because a person’s RF exposure
decreases rapidly with distance from the source. The safety of so-called
”cordless phones,” which have a base unit connected to the telephone
wiring in a house and which operate at far lower power levels and
frequencies, has not been questioned.
demonstra te any ad vers e health effect s asso ciate d with the use
18
Page 19

How much evidence is there that hand-held mobile
phones might be harmful?
Briefly, there is not enough evidence to know for sure, either way; however, research efforts are on-going.
The existing scientific evidence is confl icting and many of the studies that
have been done to date have suffered from flaws in their research methods. Animal experiments investigating the effects of RF exposures characteristic of mobile phones have yielded conflicting results. A few animal
studies, however, have suggested that low levels of RF could accelerate
the development of cancer in laboratory animals. In one study, mice genetically altered to be predisposed to developing one type of cancer developed more than twice as many such cancers when they were exposed
to RF energy compared to controls. There is much uncertainty among scientists about whether results obtained from animal studies apply to the
use of mobile phones. First, it is uncertain how to apply the results obtained in rats and mice to humans. Second, many of the studies that
showed increased tumor development used animals that had already
been treated with cancer-causing chemicals, and other studies expo sed
the animals to the RF virtually continuously--up to 22 hours per day.
For the past five years in the United States, the mobile phone industry has
supported research into the safety of mobile phones. This research has
resulted in two findings in particular that merit additional study:
1. In a hospital-based, case-control study, researchers looked for an association between mobile phone use and
either glioma (a type of brain cancer) or acoustic neuroma (a benign tumor of the nerve sheath). No statistically
significant association was found between mobile phone use and acoustic neuroma. There was also no association
between mobile phone use and gliomas when all types of types of gliomas were considered together. It should be
noted that the average length of mobile phone exposure in this study was less than three years.
When 20 types of glioma were considered separately, however, an association was found between mobile phone
use and one rare type of glioma, neuroepithelliomatous tumors. It is possible with multiple comparisons of the
same sample that this association occurred by chance. Moreover, the risk did not increase with how often the
mobile phone was used, or the length of the calls. In fact, the risk actually decreased with cumulative hours of
mobile phone use. Most cancer causing agents increase risk with increased exposure. An ongoing study of brain
cancers by the National Cancer Institute is expected to bear on the accuracy and repeatability of these results.
1
2. Researchers conducted a large battery of laboratory tests to assess the effects of exposure to mobile phone RF on
genetic material. These included tests for several kinds of abnormalities, including mutations, chromosomal aberrations, DNA strand breaks, and structural changes in the genetic material of blood cells called lymphocytes. None
of the tests showed any effect of the RF except for the micronucleus assay, which detects structural effects on the
genetic material. The cells in this assay showed changes after exposure to simulated cell phone radiation, but only
after 24 hours of exposure. It is possible that exposing the test cells to radiation for this long resulted in heating.
Since this assay is known to be sensitive to heating, heat alone could have caused the abnormalities to occur. The
data already in the literature on the response of the micronucleus assay to RF are conflicting. Thus, follow-up
research is necessary.
2
19
Page 20

FDA is currently working with government, industry, and academic
groups to ensure the proper follow-up to these industry-funded research
findings. Collaboration with the Cellular Telecommunications Industry
Association (CTIA) in particular is expected to lead to FDA providing
research recommendations and scientific oversight of new CTIA-funded
research based on such recommendations.
Two other studies of interest have been reported recently in the literature:
1. Two groups of 18 people were exposed to simulated mobile phone signals under laboratory conditions while they
performed cognitive function tests. There were no changes in the subjects’ ability to recall words, numbers, or
pictures, or in their spatial memory, but they were able to make choices more quickly in one visual test when they
were exposed to simulated mobile phone signals. This was the only change noted among more than 20 variables
3
compared.
2. In a study of 209 brain tumor cases and 425 matched controls, there was no increased risk of brain tumors
associated with mobile phone use. When tumors did exist in certain locations, however, they were more likely to
be on the side of the head where the mobile phone was used. Because this occurred in only a small number of
cases, the increased likelihood was too small to be statistically significant.
4
In summary, we do not have enough information at this point to assure
the public that there are, or are not, any low incident health problems
associated with use of mobile phones. FDA continues to work with all
parties, including other federal agencies and industry, to assure that
research is undertaken to provide the necessary answers to the
outstanding questions about the safety of mobile phones.
What is known about cases of human cancer that have
been reported in users of hand-held mobile phones?
Some people who have used mobile p hones have been diag nosed wit h bra in
cancer. But it is important to understand that this type of cancer also occurs
among people who have not use d mobile phones. In fact, brain can cer occurs
in the U.S. population at a rate of about 6 new cases per 100,000 people each
year. At that rate, assuming 80 million users of mobile phones (a number
increasing at a rate of about 1 million per month), about 4800 cases of brain
cancer would be e xpected each year among th ose 80 m illion people, w hether
or not they used their phones. Thus it is not possible to tell whether any
individual’s cancer arose because of the phone, or whether it would have
happened anyway.
A key questi on is whethe r the risk of getting a particular form of cancer is
greater among people who use mobile phones than among the rest of the
population. One way to answer that question is to compare the usage of
mobile phones among people with brain cancer with the use of mobile
phones among appropriately matched people without brain cancer. This is
20
Page 21

called a case- control study. The cur rent cas e-contr ol stud y of brain cancer s by
the National Cancer Institute, as well as the follow-up research to be
sponsored by industry, will begin to generate this type of information.
What is FDA’s role concerning the safety of mobile
phones?
Under the law, FDA does not review the safety of radiation-emitting consumer products such as mobile phones before marketing, as it does with
new drugs or medical devices. However, the agency has authority to take
action if mobile phones are shown to emit radiation at a level that is hazardous to the user. In such a case, FDA could require the manufacturers
of mobile phones to notify users of the health hazard and to repair,
replace or recall the phones so that the hazard no longer exists.
Although the existing scientific data do not justify FDA regulatory actions
at this time, FDA has urged the mobile phone industry to take a number
of steps to assure public safety. The agency has recommended that the
industry:
support needed research into possible biological effects of RF of the
type emitted by mobile phones;
design mobile phones in a way that minimizes any RF exposure to the
user that is not necessary for device function ; and
cooperate in providing mobile phone users with the best possible
information on what is known about possible effects of mobile phone
use on human health.
At the same time, FDA belongs to an interagency working group of the
federal agencies that have responsibility for different aspects of mobile
phone safety to ensure a coordinated effort at the federal level.
These agencies are:
National Institute for Occupational Safety and Health
Environmental Protection Agency
Federal Communications Commission
Occupational Health and Safety Administration
National Telecommunications and Information Administration
The National Institutes of Health also participates in this group.
21
Page 22

In the absence of conclusive information about any
possible risk, what can concerned individuals do?
If there is a risk from these products--and at this point we d o not know
that there is--it is probably very small. But if people are concerned about
avoiding even potential risks, there are simple steps they can take to do
so. For example, time is a key factor i n how much exposure a person receives. Those persons who spend long periods of time on their hand-held
mobile phones could consider holding lengthy conversations on conventional phones and reserving the hand-held models for shorter conversations or for situations when other types of phones are not available.
People who must conduct extended conversations in their cars every day
could switch to a type of mobile phone that places more distance
between their bodies and the source of the RF, since the exposure level
drops off dramatically with distance. For example, they could switch to
a mobile phone in which the antenna is located outside the vehicle,
a hand-held phone with a built-in antenna connected to a different
antenna mounted on the outside of the car or built into a separate
package, or
a headset with a re mote ante nna to a mobil e phone ca rried at th e waist.
Again, the scientific data do not
demonstrate that mobile phones are
harmful. But if people are concerned about the radio frequency energy
from these products, taking the simple precautions outlined above can
reduce any possible risk.
Where can I find additional information?
For additional information, see the following websites:
Federal Communicatio ns Commission (FCC)
(select ”Information on Human Exposure to RF Fields from Cel lular and PCS Radio
Transmitters”):
http://www.fcc.gov/oet/rfsafety
World Health Organization (WHO)
International Commission on Non-Ionizing Rad iati on P rotection (select Qs & As):
http://www.who.int/emf
United Kingdom, National Radiological Protection Board
http://www.nrpb.org.uk
Cellular Telecommunications Industry Association (CTIA)
http://www.wow-com.com
U.S. Food and Drug Administration (FDA)
Center for Devices and Radiological Health:
http://www.fda.gov/cdrh/consumer/index.html
RF Safety Program
22
Page 23

1. Muscat et al. Epidemiological Study of Cellular Telephone Use and Malignant Brain Tumors. In: State of the Science Symposium;1999 June 20; Long Beach, California.
2. Tice et al. Tests of mobile phone signals for activity in genotoxicity and other laboratory assays. In: Annual Meeting of the
Environmental Mutagen Society; March 29, 1999, Washington, D.C.; and personal communication, unpublished results.
3. Preece, AW, Iwi, G, Davies-Smith, A, Wesnes, K, Butler, S, Lim, E, and Varey, A. Effect of a 915-MHz simulated mobile
phone signal on cognitive function in man. Int. J. Radiat. Biol., April 8, 1999.
4. Hardell, L, Nasman, A, Pahlson, A, Hallquist, A and Mild, KH. Use of cellular telephones and the risk for brain tumors: a
case-control study. Int. J. Oncol., 15: 113-116, 1999.
Care and Maintenance
This telephone is the product of advanced engineering, design and
craftsmanship and should be treated with care. The suggestions below
will help you to enjoy this product for many years.
• Do not expose the phone to any extreme environment where the
temperature or humidity is high.
• Do not expose or store in cold temperatures. When the phone warms
up after power on, to its normal temperature, moisture can form
inside where it may damage the electrical parts.
• Do not attempt to disassemble the phone. There are no serviceable
parts inside that you can replace.
• Do not expose the phone to water , rain or li quids. It is not waterproof.
• Do not abuse this phone by dropping, knocking or violent shaking.
Rough handling can damage it.
• Do not clean the phone with strong chemicals or solvents. Wipe it
only with a soft, slightly dampened cloth.
• Do not place the telephone near computer discs, credit or travel cards
or other magnetic media. The information contained on discs or cards
may be affected by the phone.
• Do not connect incompatible products. The use of third party
equipment or accessories not made or authorized by Mitsubishi
Wireless Communications Inc. may be a safety risk.
• Do not remove the labels. The numbers on it are important for service
and other related purposes.
• Contact your service provider if you notice a defect.
23
Page 24

Voice Mode Featu res
Dialing Stored Numbers
Any number stored in the phone’s memory can be recalled to the display
and dialed:
...from the Phonebook
Press the softkey to enter the Phonebook list.
1
Press up or down arrow to scroll to the desired number.
2
3
Press to dial the number. Press Cancel softkey to cancel
the call before it connects.
✱
See Phonebook, page 38.
...from the Dialed Calls List
The last 10 numbers you have dialed are stored in the Call Lists.
Press the softkey to enter the Call Lists menu.
1
Select Dialed Calls and press OK softkey.
2
Press up or down arrow to scroll to the desired number.
3
4
Press to dial the number.
...from the Received Calls List
The last 10 numbers you have answered are stored in the Call Lists.
1
Press the softkey to enter the Call Lists menu.
Select Received Calls and press OK softkey.
2
Press up or down arrow to scroll to the desired number.
3
Press to dial the number.
4
...from the Missed Calls List
The last 10 numbers you have missed are stored in the Call Lists.
1
Press the softkey to enter the Call Lists menu.
Select Missed Calls and press OK softkey.
2
Press up or down arrow to scroll to the desired number.
3
Press to dial the number.
4
...Last Number Dialed
1
Press key without inputting a number. The screen
displays the last number you have dialed.
2
Press to dial the number.
24
Page 25

Super Speed Dialing
You can super speed dial numbers stored in Phonebook Locations 01-09
by pressing only one digit key. (Note: 09 can be super speed dialed only
if Emergency Call is not enabled.)
Use either of the following two methods.
Press and hold the digit key; or
1
Press the digit key, then press .
2
✱
See Phonebook, page 38, to view memory Location numbers.
Speed Dialing
Speed dialing is an easy way to dial stored numbers. You can store up to
99 numbers and names for speed dial on your phone.
Enter the 2-digit Location number of the phone number you
1
wish to dial. The 2-digit number will appear on the display.
2
Press to dial. Or press Recall softkey to display full
number, and then press to dial.
See Phonebook, page 38, to view memory Location numbers.
✱
Emergency Calls
When Emergency Call is enabled in the Call Setup menu, you can super
speed dial an emergency number with one key while:
• In Voice Mode (except while in conversation, or receiving or
dialing calls); and
•In Data Mode.
Press and hold (3 seconds) and the call will go through.
When Emergency Call super speed dialing is enabled, you will not be able to super speed dial
✱
entry 09 in the Phonebook.
• Emergency Call super speed dialing can be enabled/disabled
via the Main Menu. See Call Setup, page 44.
• Emergency Call dialing ignores Auto Lock and any call restriction setting.
• If you press and hold the 9 digit key while in Data Mode, the
phone automatically switches to Voice Mode and makes the
emergency call.
• If Key Guard is turned on, press and hold for 3 seconds to
super speed dial the emergency call. Dialing 9-1-1 and pressing Send key will not work when Key Guard is turned on.
25
Page 26

Sounds On/Off
To silence all incoming ring, alert and key tones,
1
Press and select 5 Soun ds On /Off. The sounds are
immediately turned On or Off.
2
When all sounds are turned Off, displays.
3
When all sounds are turned On, the icon disappears.
To quickly turn off ring of an incoming call,
Press up or down arrow key.
To turn on audio or vibrate alerts,
Press and select 4 Preferences.
1
Select 1 Service Alerts.
2
Select 5 Alert Mode.
3
Select Audio Only, Vibrate Only, or Both.
4
Press OK softkey to activate. If Vibrate Only or Both is
5
selected, displays.
The Vibrate Alert is available only if a vibrating battery is installed. See page43.
✱
To turn Ringer or Message Alerts on or off, see pa ge 42.
Mute/Unmute
To mute or unmute your phone’s microphone during conversation,
To mute, press Mute left softkey. The microphone turns off.
1
To unmute, press Talk left softkey. The microphone turns
2
back on.
Adjusting Volume
To adjust the volume of various sounds in voice standby or during
conversation,
1
Press and select 4 Preferences, 3 Volume.
Select Ringer, Msg Alerts, Keypad or Earpiece.
2
Press up or down arrow to adjust sound level from 0 to 7
3
(ringer, message alert, keypad) or 1 to 7 (earpiece).
26
Page 27

Shortcut to adjust volume,
Press up or down arrow. The Ringer v olume adjustment
1
appears.
Either press up or down arrow to adjust Ringer, or press
2
Alert right softkey to scroll to Message Alerts, Keypad, and
Earpiece volume adjustments. Press OK softkey.
Sending DTMF Tones
You can send Dual Tone Multi-frequency (DTMF) tones to communicate with
computerized systems, such as answering machines, voice mail or bankingby-phone. A DTMF is a digit or string of digits that produces tone signals.
You can store DTMF strings the same way you store phone numbers.
Manually
To send individual DTMF tones directly from the keypad during conversation,
Press the desired DTMF keys (0-9, * and # keys). The tones will be
heard in the earpiece and sent immediately.
Automatically
To send a consecutive string of DTMF tones during conversation,
Press Options softkey and select Send DTMF.
1
Enter the DTMF numbers by using the keypad.
2
Press OK softkey. After the tones have been sent the normal
3
conversation screen displays.
Pause Feature
Telephone numbers and a sequence of DTMF tones can be entered in the
display or stor ed i n memor y t ogeth er if th ey ar e se p ar at ed by a “Pa use.”
To insert a Pause,
Enter the number you wish to d ial.
1
To enter a pause, press Options softkey and select Insert
2
Pause. The P character appears.
Enter DTMF tones or phone numbers as needed.
3
Repeat steps 2 and 3 to Insert Pause where needed.
4
Press to dial the number.
5
After the call connects, when prompted, press to trans-
6
mit each DTMF string.
Any number of Pauses, with a maximum of 32 characters, can be stored
together.
27
Page 28

Memory Link Feature
To recall DTMF from memory,
Enter the number you wish to dial.
1
Press Options softkey and select Memory Link. The M
2
character appears.
Enter the 2-digit Phonebook Location number for the DTMF
3
string you want to send.
Enter additional DTMF tones or phone numbers as needed
4
or repeat steps 2 and 3 as needed.
5
Press to dial the number.
6
After the call connects, press to transmit each DTMF
string.
Calling Card Calling
The MobileAccess™ T255 phone supports up to three Calling Cards, with
the access number, phone number and card number sequences used by
major Calling Card services.
Setup
To set up the Calling Card feature,
1
Press and select 4 Preferences, 2 Call Setup.
Select 2 Calling Cards.
2
Enter Security Code and press OK softkey. Press Setup
3
softkey in the next screen. (If you already have three Calling
Cards stored, Setup will not appear on the screen.)
Enter the Calling Card name, up to 32 characters. (See Enter-
4
ing Text, page 34.)
Select one of the following sequences of numbers to be sent:
5
• Access number>phone number>card number
(including PIN)
• Access number>card number (including PIN)>phone
number
• Prefix number>phone number>card number
The screen prompts you to enter each number in your se-
6
quence and press OK sof tkey. A screen will display indicating
that your Calling Card is stored.
To exit the menu, press left softkey or End/Back key.
7
See Calling Card Calling in the Call Setup menu, page44.
✱
28
Page 29

Add/Edit/Delete Calling Card Setup
You can add, delete and edit Calling Cards in the Calling Cards menu
screen.
1
Press and select 4 Preferences, 2 Call Setup.
Select 2 Calling Cards.
2
Enter Security Code and press OK softkey. Select desired
3
Calling Card entry.
Select Add, Delete, or Edit softkey. If you already have
4
three Calling Cards stored, Add will not appear.
Calling Card Dialing
To initiate a Calling Card call,
Enter the phone number you wish to dial.
1
Press and hold key. Phone will dial the access number of
2
the selected Calling Card.
The Calling Card service operator will tell you whe n to press
3
the key.
Conversation Mode
Conversation Mode is activated when you answer a call. Press Options
softkey to display the Options menu, which allows you to Send DTMF
tones, use the Scratchpad, Store a number, and view your Own Number.
Send DTMF
Send out a string of DTMF tones.
Press Options softkey and select 1 Send DTMF.
1
Press desired keys that you want to transmit. Press Clear key
2
to erase a digit, or press a nd hold Clear key to eras e all digits.
Press OK softkey to transmit.
3
Scratchpad
Use the phone as a memo pad to store numbers during a conversation.
Press Options softkey and select 2 Scratchpad.
1
Enter numbers you wish to store. Tones will not be heard.
2
After ending the call, the number remains on screen. Press
3
Store softkey and continue with Step 2 in Store section.
29
Page 30

Store
Store the displayed phone number in your Phonebook.
Press Options softkey and select 3 Store.
1
Caller’s phone number is displayed. Press OK softkey.
2
Enter name and press OK softkey.
3
Select desired ring tone and press OK softkey.
4
Press OK softkey and phone will display the assigned
5
Phonebook Location number (01-99).
Press OK softkey to return to conversation screen.
6
Own Number
To view your phone number,
Press Options softkey and select 4 Own Number.
1
Your phone num be r dis plays so yo u ca n r elay it to yo ur
2
caller.
While in Conversation Mode, you can access the phone’s Main Menu and
perform all functions except the following:
• Enable/disable Privacy Tone
• Set Call Restrictio ns
• Generate key exchange with data gateway (Encryption)
•Reset Timers
•Reset Calls
• A ccess Diagnostics (Data Mode)
• Access Systems (Data Mode)
• A ccess Show URL (Data Mode)
30
Page 31

Menu System
You can access, select and display many functions and features through
the easy-to-use menu system via the Menu key and the softkeys. You can
also access features and services you have requested from your service
provider.
Access to the Menus
• Press left softkey to access Call Lists. Press right softkey to
access your personal Phonebook containing all stored names and
numbers.
• Press key to enter the Main Menu.
• To quickly access a Main Menu item, press the corresponding number
key on the keypad.
• Select functions and features from the menu by pressing the softkeys
when prompted.
• To return to a previous menu, press key.
• To exit from the menus, press and hold key.
The display window at the Main Menu screen appears like this:
Help
While navigating most menu options, you can press and hold the key
to display help text explaining the option marked with the arrow cursor.
Default Settings
Most menu items have a default setting that allows you to return the
item to its original factory setting. T hese default settings are listed with
their menu items, beginning with Phonebook View Options, page 39.
31
Page 32

Menu Map
Menu Item Options
Personal phone 1. Phonebook 1. View
list stored in 2. New Entry
memory 3. View Options
4. Status
Voice ma il and 2. Messages 1. Voice Mail
text messages 2. Msg Inbox
Voice: SMS
Data: Alerts
Information on 3. Status 1. Call Lists
voice calls, 2. Last Talk Time
operating time 3. Total Talk Time
and network 4. Accumulated Talk
Customize 4. Preferences 1. Service Alerts
functions 2. Call Setup
Time
5. Phone Number
6. IP Address
3. Volume
4. Data Network
5. Voice Network
6. LCD Contrast
7. Clock
8. Advanced
9. Security
Set all sounds 5. Sounds On/Off
on or off
32
Page 33

Lock the keypad 6. Key Guard
Network service 7. Systems Voice Mode only
information 1. Automatic Selection
2. Manual Selection
3. New System Selection
4. Setup Private Systems
Data Mode Options
Diagnostics for 7. Diagnostics Da ta Mode only
CDPD of your net- 1. Device Status
work connection 2. Reset Cache
View URL of your 8. Show URL Data Mode only
Home Page
Availability and appearance of menu features are dependent on your
subscription and the services provided by your network operator.
33
Page 34

Entering Text
Text input screens appear in all functions that require the addition or
editing of text. These include storing new entries in the Phonebook and
setting up speed dialing and credit card calling. Below are the steps for
entering, editing and deleting text. An additional, quicker method –
®
Quick Type – is described on page 36.
T9
In the input screen you may select from four input modes:
• QUICK right softkey – for T9 Quick Type text input
• SYM1 right softkey – to enter symbols
• NUM right softkey – to enter numbers
• ALPHA right softkey – to enter alpha characters
Numeric Mode
In this mode, you enter numeric characters only, pressing 0-9 on the
keypad and pressing for spacing between numbers.
Alpha Mode
To type each letter of a word, press the key one, two or three times ,
corresponding to the letter’s sequence in the keypad.
For example, to add a new name and num ber in the Phonebook,
select New Entry.
Enter the new phone number and press OK softkey.
1
In the next screen, press the right softkey until ALPHA
2
appears.
To enter the name, select each letter by pressing one, two or
3
three times, corresponding to the letter’s sequence in the
keypad.
For capital (upper case) letters, press , then press the
4
letter. This key toggles betwe en upper and lower case.
For spaces between words, press , then press the first
5
letter of the next word.
For hyphens, ampersands and other symbols in name
6
entries, press right softkey until SYM1 appears. The
symbols are arranged as the keys are arranged on the
keypad. Press the number corresponding to the symbol’s
location on the screen. For additional symbols, press More
softkey. (For more on symbols, see next page.)
Press OK softkey to store the name and number.
7
34
Page 35

Symbol Mode
In this mode (SYM1 softkey), you can enter a symbol by pressing its
number key. After you make your selection, the screen will automatically
return to the previous mode. Press More softkey to scroll through the
four symbol screens. The four sets of characters available in Symbol
Mode are shown below:
Key Sym1 Sym2 Sym3 Sym4
1 1 = . 1 = @ 1 = ; 1 = ~
2 2 = ! 2 = # 2 = < 2 = `
3 3 = ? 3 = : 3 = > 3 = ^
4 4 = , 4 = / 4 = = 4 = |
5 5 = - 5 = $ 5 = [ 5 = \
6 6 = “ 6 = & 6 = ]
7 7 = ‘ 7 = % 7 = _
8 8 = ( 8 = + 8 = {
9 9 = ) 9 = * 9 = }
The shortcut for entering symbols when in Alpha Mode is to press
key to enter a 1, then continue to press key to cycle through other
choices:
1 . - ‘ , ? / @ ; “ & : ! ( ) _ * # $ % \
Deleting Characters and Words
To erase errors, press to back space and remove characters one at a
time. Press and hold to remove the entire entry .
Moving the Cursor
Press to move backward through your text and to move forward.
Press and hold or to move quickly to beginning or end of text.
35
Page 36

T9® Quick Type Text Input
Using T9 Quick Type, you can enter text with just one keystroke per letter.
The Quick Type system decodes each ke ystroke as you type, checki ng and
rechecking each word to assemble the correct one. Although words will
change on screen as you type, once you have typed an entire word, it
should appear correctly on the screen.
If you type a complete word correctly, but the wrong word displays, it is
because the Quick Type database ranks words and displays the most
common choice first. Press to cycle to other word choices.
Or, press to erase, press right softkey until ALPHA appears to
change to Alpha Mode and type in the correct word.
Typing Words
To type a word in Quick Type, press right softkey until QUICK appear s .
Press keys corresponding to the letters you need, just as if the phone
keypad were a typewriter. Type for space and for period.
For example:
h e l l o w o r l d .
To enter a special word into the custom dictionary, press right softkey
to go to ALPHA Mode, enter the word, then press right softkey to return
to Quick Type. The word will be added to the custom dictionary.
Choosing Another Word
When you finish typing a word but it is not displayed on the screen,
press to go to the nex t word(s).
Moving the Cursor
Use and to move the cursor backward or forward between words.
Capitalization
When you type a period and a space at the end of a word, Quick Type
automatically capitalizes the first letter of the next word. To change to
upper case, press to capitalize the next letter. To change to all caps,
press and hold .
36
Page 37

Punctuation
To enter periods and other punctuation marks in Quick Type, press to
enter a period. If you continue typing, the punctuation symbol will
change. For exampl e, type “you .” Then type “re ”; Quick Type will change
the period (.) to an apostro phe (‘).
Otherwise, to change the punctuation mark, press to cycle through
other choices.
Punctuation marks and symbols that can be entered this way are:
. , - ‘ @ : ?
Entering Other Symbols
For symbols (other than periods) in Quick Type text, press right softkey
to access SYM1 softkey. The first set of symbols will display. For
additional symbols, press More softkey.
The symbols are arranged as the keys are arranged on the keypad. To
select and enter a symbol into your text, press the number corresponding
to the symbol’s location on the screen. You will be returned to the text
entry screen and the symbol will be in place.
See Symbol Mode on page 35 for more information.
37
Page 38

1. Phonebook
The Phonebook stores up to 99 entries, consisting of:
• Name (up to 32 characters)
• Dialing number (up to 32 digits long)
• Custom Ring Tones
• Memory Location number (01-99)
View
To access the Phonebook and view the entries,
Press and select 1 Phonebook, 1 View; or
Press softkey in the standby screen; or
Enter 2-digit Location number (1 digit for entries 01-09), and
press Recall softkey
New Entries
To store Phone Numbers and Names,
Press and select 1 Phonebook, 2 New Entry.
1
Key in Phone Number and press OK softkey.
2
Key in Name. See T9 Quick Type Text Input on page 36, or
3
press right softkey until ALPHA appears. Press OK softkey.
Select desired Custom Ring from Default ring, Tone 1,2,3,4
4
and Melody 1,2,3,4. See Service Alerts on page 42 for instructions on playing tones. Press OK softkey.
A Location (01-99) number will be assigned for new entry.
5
Press OK softkey to store, or if desired, type in a 2-digit
Location number and press OK softkey.
The Location number is the 2-digit number you can use for speed dialing.
See Speed Dialing on page 25.
While entering a new phone number, press Options softkey to insert a
Pause or Memory Link. See Pause Feature and Me mory Link Feature on
pages 27-28 .
New Phonebook entries can also be made:
• While in the Call Lists screen, pressing Store left softkey.
• While entering a phone number, pressing Store left softkey.
• During a call, pressing Options right softkey, then Store softkey.
38
Page 39

View Options
To arrange the order that entries appear in your Phonebook,
Press and select 1 Phonebook, 3 View Options.
1
Select By Location, By Name, Location List, or Name
2
List. The options By Location and By Name display entries
one by one with details. The options Location List and Name
List display entries in a list on one page.
Select 1 View to display the entries.
3
Default setting = By Name
• If one of the two Name options is chosen, Find softkey can be used to
find an entry.
• If one of the two List options is chosen, press Details softkey to view
details of the selected entry.
Editing Phonebook Data
To edit Name, Number, Ring tone or Location, or to delete an entry,
Press and select 1 Phonebook, 1 View.
1
If Phonebook is organized By Name or By Location (see
2
View Options above), Edit softkey displays. Press Edit
softkey to select editing of Name, Number, Custom Ring,
Location, or to Delete.
If Phonebook is organized by Location List or Name List (see
3
View Options above), Details softk ey displays. Press
Details softkey to view the full entry, then Edit softkey to
select editing of Name, Number, Custom Ring, Location, or
to Delete.
Press key to return to the previous screen; or press and
4
hold to return to the standby screen.
•Use up and down arrows to scroll through Phonebook entries.
• To dial a displayed number, press key.
• When a name is too long to fit in the screen, select it and the complete name will briefly display five times.
• To view all the data of a Phonebook entry, press Details softkey.
Status
To see how many empty entries are available,
Press and select 1 Phonebook, 4 Status.
1
Press OK softkey to return to the Phonebook menu screen.
2
39
Page 40

2. Messages
Your Voice Mail and SMS Text Messages can be accessed in this menu.
Voice Mail
An audio alert and voice mail icon signal the arrival of a new Voice
Mail message.
To access your Voice Mailbox,
Press and hold key or
Press and select 2 Messages, 1 Voice Mail.
• Select 1 Call to make a call or hear a message.
• Select 2 Setup to set up voice mailboxes.
• In the Voice Mailbox list screen, press Add softkey or Edit
softkey to add, edit or delete mailboxes. (Note: if you have
already set up three voice mailboxes, Add will not appear on
the screen.)
For instructions on setting up or editing a Voice Mail mailbox, see Voice
Mail in the Basic Phone Operations section, page 13.
Message Inbox
An audio alert and message icon signal the arrival of a Text Message.
In Voice Mode, these are SMS Text Messages. In Data Mode, these are
CDPD alerts. See Text Messages (SMS), page 14, for details on SMS Text
Messages.
To access your Message Inbox,
Press and hold key or
Press and select 2 Messages, 2 Msg Inbox.
To view the message later,
Press Skip softkey or . The Skip softkey or will remove
the alert icon and mute the audio alert. To mute audio alert only,
press key.
To view the new message immediately,
Press View softkey. The screen will display a list of received messages with the most recent at the top and any unread messages
marked with *, and urgent messages marked with .
To delete a message,
Press Delete softkey in the message screen.
40
Page 41

3. Status
Details of incoming and outgoing calls, time of your last call, and total
talk times are stored in the Status menu. Your own phone number and
IP Address can be viewed here.
To view or delete Dialed Cal ls, Received Calls, and Missed Calls,
Press and select 3 Status, 1 Call Lists.
1
Select 1 Dialed Calls to view the last 10 Dialed Calls.
2
Select 2 Received Calls to view the last 10 Received Calls.
Select 3 Missed Calls to view the last 10 Missed Calls.
When you make a selection, the details of each call display.
3
Select Store or Delete softkeys to store the number in the
Phonebook or delete the entry.
To view the length of your Last C a ll,
Press and select 3 Status, 2 Last Talk Time.
1
The length of your Last Call displays in hours, minutes and
2
seconds.
To view Total Talk Time,
Press and select 3 Status, 3 Total Talk Time.
1
Total Talk Time since last reset displays of both public and
2
private services in hours and minutes.
To view Total Call Time since your phone was activated,
Press and select 3 Status, 4 Accumulated Talk Time.
1
Total Call Time since your phone was activated displays in
2
hours and minutes.
To view your own Phone Number,
Press and select 3 Status, 5 Phone Number.
1
Your own Phone Number displays.
2
To view your own IP Address,
Press and select 3 Status, 6 IP Address.
1
Your own IP Address selected for your data network displays.
2
Note: Actual ca ll time billed may be diffe rent for several reasons; for
example, some service providers round up call time.
41
Page 42

4. Preferences
Service Alerts
To choose a Custom Ring tone or melody,
Press and select 4 Preferenc es, 1 Service Alerts.
1
Select 1 Ringer Typ e.
2
Select from four tones and four mel odies. To hear a selec-
3
tion, press Play softkey. To stop a sound, press Stop
softkey. Press OK softkey to return to the menu.
Default setting = Tone 1
To turn on or off the Ringer only,
Press and select 4 Preferenc es, 1 Service Alerts.
1
Select 2 Ringer On/Off.
2
3
Select Disable. The icon displays.
To turn the Ringer on, select Enable.
You can also turn off the Ringer:
•By selecting 4 Preferences, 3 Volume, then 1 Ringer, and
pressing down arrow key until volume reaches zero.
• To turn the Ringer on, press up arrow key to desired level.
• In standby display by pressing the down arrow key until the
volume reaches zero. To turn the Ringer on, press up arrow
key to desired level.
Default = Enable
To choose a Message Alert Tone,
Press and select 4 Preferenc es, 1 Service Alerts.
1
Select 3 Message Alert Type.
2
Select from four tones. To hear a selection, press Play
3
softkey. To stop a sound, press Stop softkey. Press OK
softkey to return to the menu.
42
Default setting = Tone 1
Page 43

To turn off the Message Alerts only,
1
Press and select 4 Preferences, 1 Service Alerts.
Select 4 Msg Alert On/ Off.
2
3
Select Disable. The icon displays.
To turn Msg Alert on, select Enable.
4
Default = Enable
• Message Alerts can also be turned off by selecting 4 Preferences,
3 Volume, then 2 Msg Al er t s, and pressing down arrow key until
volume reaches zero. To turn the Message Alert on, press up arrow
key to desired level.
• Message Alert cannot be turned on or off in standby display.
To select how the phone alerts you to an incoming call or message,
1
Press and select 4 Preferences, 1 Service Alerts.
Select 5 Alert Mode.
2
Select Audio Only, Vibrate Only, or Both. Press OK
3
softkey to return to the menu.
✱
Vibrate alert is available only if a vibrate battery is installed.
Default setting = Audio Only
To disable or enable Immediate Alerts,
1
Press and select 4 Preferences, 1 Service Alerts.
Select 6 Immediate Alerts.
2
Select Disable or Enable and press OK softkey to return to
3
the menu.
Default setting = Enable
To select how many times an Alert sounds,
1
Press and select 4 Preferences, 1 Service Alerts.
Select 7 Msg Alert Dura t ion.
2
Select 1 Time, 5 Times, 10 Times or 15 Times. Press OK
3
softkey to return to the menu.
Default setting = 5 Times
43
Page 44

Call Setup
To enable/disable the super speed dial 911 Emergency Call function,
1
Press and select 4 Preferenc es, 2 Call Setup.
Select 1 Emergency Call.
2
Select Enable or Disable and press OK softkey.
3
✱
See Emergency Calls on page 25.
Default = Enable
To change the Emergency Call phone number,
Press and select 4 Preferenc es, 2 Call Setup.
1
Select 1 Emergency Call.
2
Select Setup right softkey and enter a different phone
3
number (for example, your home phone number). Press OK
softkey. 911 is the default phone number.
Make sure Enable is selected in Emergency Call screen.
4
To set up Calling Card Calling,
Press and select 4 Preferenc es, 2 Call Setup.
1
Select 2 Calling Cards. Enter Security Code.
2
To add a Calling Card, press Setup softkey.
3
The screen will prompt you for a name. Enter name. See
4
Entering Text on page 34. If desired, press Alpha softkey until
Quick appears for T9
In the next screen, select the sequence of numbers (for exam-
5
ple, access+number+ card) used by your Calling Card service
and press OK softkey.
Enter numbers in sequence and press OK softkey.
6
See Calling Card Calling, page28.
✱
You can also edit and delete Calling Card data in the Calling Card Setup screen.
®
Quick Type and enter name.
When enabled, Auto Answer will automatically answer incoming calls
after 5 seconds.
Press and select 4 Preferenc es, 2 Call Setup.
1
Select 3 Auto Answer.
2
Select Enable or Disable and press OK softkey.
3
Default setting = Disable
44
Page 45

When enabled, Auto Redial will automatically redial a call. There will be
a delay and a tone will be heard before Auto Redial.
Press and select 4 Preferences, 2 Call Setup.
1
Select 4 Auto Redial.
2
Select Enable or Disable and press OK softkey.
3
Default setting = Disable
When enabled, Any Key Answer allows you to answer a call by pressing
any key except Mute softkey, End/Back key, and Mode key.
Press and select 4 Preferences, 2 Call Setup.
1
Select 5 Any Key Answer .
2
Select Enable or Disable and press OK softkey.
3
Default setting = Enable
If your network supports the Voice Privacy feature, your call will be
encrypted so that no one can access your call. Your phone always
attempts to use privacy mode. If your service provider’s system does not
support this feature, or if the phone is on an analog channel, Voice
Privacy Off! displays and a warning tone sounds. You can turn this
warning tone on or off.
To enable/disable Privacy Tone,
Press and select 4 Preferences, 2 Call Setup.
1
Select 6 Privacy Tone.
2
Select Enable or Disable and press OK softkey.
3
Default setting = Disable
To enable/d i sa b le S en d Ca lle r ID ,
Press and select 4 Preferences, 2 Call Setup.
1
Select 7 Send Caller ID.
2
Select 2 Sen d (Nor mal) . If Block Caller ID Code needs to be
3
changed, pres s Setup softkey. Enter Block Caller ID Code
and press OK left softkey .
To disable, press 1 Don’t Send and press OK softkey.
4
Default setting = Send (Normal)
45
Page 46

Volume
To adjust volume of various sounds,
Press and select 4 Preferenc es, 3 Volume.
1
Select 1 Ringer, 2 Msg Aler ts, 3 Keypad, or 4 Earp iece
2
and press OK softkey.
Press up or down arrow to adjust volume and press OK
3
softkey. You can also press the right softkey to scroll through
the four types of volume controls.
Default setting = mid-level
Data Network
You can change your data network configuration in this menu. For
changes to take effect, you must exit and re-enter Data Mode by toggling
the key. The default settings were set by your service provider and
should only be changed upon your service provider’s instruction.
To view your IP (Internet Protocol) Address,
Press and select 4 Preferenc es, 4 Data Network.
1
Select 1 Select IP.
2
Your own IP address displays.
3
If your service provider instructs you, the Setup softkey is
4
available for changes.
To view your Gateway (proxy server),
Press and select 4 Preferenc es, 4 Data Network.
1
Select 2 Select Gatew a y.
2
Gateway A displays.
3
Default setting = Gateway A
To select a CDPD Side preference,
Press and select 4 Preferenc es, 4 Data Network.
1
Select 3 CDPD Side.
2
Select A, B, Prefer A, or Prefer B and press OK softkey.
3
Default setting = B
To enable/disable the CDPD Sleep mode,
Press and select 4 Preferenc es, 4 Data Network.
1
Select 4 CDPD Sleep.
2
Select Disable or Enable and press OK softkey.
3
Default setting = Enable
46
Page 47

Voice Network
To choose your voice network telephone number (if available),
Press and select 4 Preferences, 5 Voice Network.
1
Your own Phone Number displays.
2
If you have more than one number provisioned for the
phone, you may select the number you wish to use.
LCD Contrast
To adjust contrast in the display screen,
Press and select 4 Preferences, 6 LCD Contrast.
1
Press up or down arrow to select from 0-7 levels.
2
Press OK softkey to return to the previous screen.
3
Default setting = mid-level
Clock
Note: The phone will maintain the correct time and date even if powered
Off or the battery is removed.
To Set Time,
Press and select 4 Preferences, 7 Clock.
1
Select 1 Set Time, or press Time softkey in the Set Date
2
screen.
The current set time displays at the top of the screen. Press
3
left or right arrow to adjust minutes, up or down arrow to
adjust hours as shown in diagram. Press OK softkey.
To Set Date,
1
2
3
Press and select 4 Preferences, 7 Clock.
Select 2 Set Date, or press Date softkey in the Set Time
screen.
The current set date displays at the top of the screen. Press
left arrow to select month, right arrow to select year and
up or down arrow to select day as shown in diagram. If you
scroll past the month or year, keep pressing arrow until correct entry appears again. Press OK softkey.
The range of years in the date setting is 1999-2010.
✱
47
Page 48

To set Time Format,
Press and select 4 Preferenc es, 7 Clock.
1
Select 3 Time Format .
2
Select 12-hour or 24-hour and press OK softkey.
3
Default setting = 12-Hour
To set Date Fo rmat,
Press and select 4 Preferenc es, 7 Clock.
1
Select 4 Date Format .
2
Select Day/Month or Month/Day and press OK softkey.
3
Default setting = Month/Day
Advanced
To select a Font Size for the phone menu screens,
Press and select 4 Preferenc es, 8 Advanced.
1
Select 1 Font Size.
2
Select Small (6 pt.) or Large (9 pt.) and press OK soft key.
3
Default setting = Large
To select a Language,
Press and select 4 Preferenc es, 8 Advanced.
1
Select 2 Language.
2
Select English or Spanish and press OK softkey. Your
3
carrier may offer other language selections.
✱
The language selection will also change the T9® Quick Type language database.
Default setting = English
When enabled, Auto Lock will automatically lock the phone when it is
turned on. You must enter the 4-digit Unlock Cod e to use the phone.
To enable/disable Auto Lock,
Press and select 4 Preferenc es, 8 Advanced.
1
Select 3 Auto Lock.
2
Select Disable or Enable and press OK softkey. If you
3
enable Auto Lock, you will need to select a 4-digit Unlock
Code. You will then have to e nter the Unlock Code each
time you turn on the phone. See Unlock Code on page 50.
Default setting = Disable
48
Page 49

To set the Defau lt Se rvice Mode , eithe r Voi ce Mod e o r Data M ode, that
will be active when you turn on the phone,
Press and select 4 Preferences, 8 Advanced.
1
Select 4 Default Service.
2
Select Voice Mode or Data Mode and press OK softkey.
3
Default setting = Voice Mode
When enabled, the Talk Timer will display when a call connects. It displays
the duration of a c al l i n ho ur s , min u t es , and seconds.
To enable/disable the Talk Timer,
Press and select 4 Preferences, 8 Advanced.
1
Select 5 Talk Timer.
2
Select Disable or Enable and press OK softkey.
3
Default setting = Disable
Security
The Security menu allows you to control calling restrictions, change
Security and Unlock Codes, set Encryption, and reset various items.
To enter this menu you are required to enter your Security Code. See ‘To
change your Security Code’ on page 50 for more information. Contact
your service provider if you have lost your Security Code.
If an incorrect Security Code is entered, ‘Security Code is not correct!’
flashes and you are returned to the previous menu.
The Restrict Calls option in the Security menu allows you to choose from
the following levels of restriction:
1 No Restrictions All call s al l ow e d
2 Local Only
3 Phonebook 1-99
4 Phonebook 1-9
5 Receive Only
Only local calls up to 7 digits or toll free calls
are allowed
Only calls to Phonebook Locations 1-99 are
allowed
Only calls to Phonebook Locations 1-9 are
allowed
Incoming calls can be answered but no
outgoing calls can be made
49
Page 50

To select a level of Call Restriction,
Press and select 4 Preferenc es, 9 Security.
1
Enter the Security Code and press OK softkey.
2
Select 1 Restrict Calls.
3
Select from the list of restrictions and press OK softkey.
4
Default setting = No Restrictions
For the security system to work properly, change the Security Cod e at
once. Write down the new Code and store it in a separate place.
To change the Security Code (for entry into the Security menu),
Press and select 4 Preferenc es, 9 Security.
1
Enter the Security Code and press OK softkey.
2
Select 2 Security Code.
3
Enter the New Code , usin g 4- 8 di git s, an d pre ss OK softkey.
4
The screen will prompt you to reenter the same code to
confirm.
Enter the code again and press OK softkey. If the first and
5
second codes match, the screen will display “New Security
Code Accepted.” If the codes do not match, the screen will
indicate “not changed.”
Press OK softkey or End/Back key to return to previous
6
screen.
Default = 00000000
For the security system to work properly, change the Unlock Code at
once. Write down the new Code and store it in a separate place.
To change the Unlock Code (for unlocking the phone),
Press and select 4 Preferenc es, 9 Security.
1
Enter the Security Code and press OK softkey.
2
Select 3 Unlock Cod e.
3
Enter the New Code, using 4 digits, and press OK softkey.
4
The screen will prompt you to reenter the same code to
confirm.
Enter the code again and press OK softkey. If the first and
5
second codes match, the screen will display “New Unlock
Code Accepted.” If the codes do not match, the screen will
indicate “not changed.”
Press OK softkey or End/Back key to return to previous
6
screen.
Default = 0000
50
Page 51

In Data Mode only, to exchange the Encryption key between the Gateway
(proxy server) and the phone,
Press and select 4 Preferences, 9 Securi ty.
1
Enter the Security Code and press OK softkey.
2
Select 4 Encrypti on.
3
✱
Perform this function only if instructed to do so by your service provider.
To clear Call Timers
Press and select 4 Preferences, 9 Securi ty.
1
Enter the Security Code and press OK softkey.
2
Select 5 Reset Timers.
3
Press Yes softkey to clear Timers, except for Accumulated
4
Talk Time, and return to previous screen.
To clear all Dialed Calls, Received Calls, Missed Calls and Last dialed
number,
Press and select 4 Preferences, 9 Securi ty.
1
Enter the Security Code and press OK softkey.
2
Select 6 Reset Calls.
3
Press Yes softkey to clear all call history and return to previ-
4
ous screen.
To clear all Phonebook entries,
Press and select 4 Preferences, 9 Securi ty.
1
Enter the Security Code and press OK softkey.
2
Select 7 Reset Phonebook.
3
Press Yes softkey to clear all Phonebook entries and return
4
to previous screen.
To reset Main Menu, Timers, Call Lists and browser cache data to factory
defaults,
Press and select 4 Preferences, 9 Securi ty.
1
Enter the Security Code and press OK softkey.
2
Select 8 Reset Phone.
3
Press Yes softkey to revert to factory settings, (except for
4
Phonebook and short message data), and press OK softkey
to return to previous screen.
51
Page 52

5. Sounds On/Off (All Sounds)
This shortcut method turns on or off all sounds quickly.
Press and select 5 Sounds On/Off or press .
icon will display at the top of the screen.
To turn on all sounds, Press and select 5 Sounds On/Off
again.
To turn off the Ringer or Message Alerts separately, see Service Alerts on
page 42.
6. Key Guard
Key Guard locks the keypad to preve nt an y keys f rom being accide nt ally
pressed.
There are several ways to lock/unlock the phone’s keypad,
• Press .
• Press and select 6 Key Guard.
• Press and hold either the left softkey or the right softkey to
turn on Key Guard.
When Key Guard is on, the screen will prompt you to press
to deactivate. Press Yes softkey to turn off or No softkey to
remain on.
7. Systems
Use this menu to select a Network System when you are out of your
cellular area.
To restart scanning for Network Systems,
Press and select 7 Systems.
1
Select 1 Automatic Selection and press OK softkey.
2
The first available Network System will display.
3
52
Page 53

To select from a list of preset Network Systems,
Press and select 7 Systems.
1
Select 2 Manual Selection.
2
Searching... displays. Press Cancel softkey to cancel search.
3
A list of preset public, private, and residential Systems will
4
display.
Scroll to desired System and press Select so ftkey.
5
The phone attempts to register to the selected System.
6
To locate new private and residential Network Systems,
Press and select 7 Systems.
1
Select 3 New System Selection.
2
Searching... displays. Press Cancel softkey to cancel search.
3
A new Network System name will appear.
4
Press Select softkey to register to the System or press Next
5
softkey to search for additional non-public Systems.
To enable/disable access to a non-public Network System,
Press and select 7 Systems.
1
Select 4 Setup Private Systems. Enter Security Code and
2
press OK softkey.
Select Private or Residential and press OK softkey.
3
Press Enable or Disable and press OK softkey.
4
Default set tings: Privat e = Enable;
Residentia l = Enable
There are two additional menu items when your phone is in Data Mode:
7. Diagnostics
8. Show URL
See Main Menu Map Additions, page 56.
53
Page 54

Data Mode Features
Data Mode turns your phone into a wireless data terminal, giving you
access to computer systems and Web sites for sending and receiving data
communications. The MobileAccess™ T255 phone can access Web sites
tailored specifically for viewing on wireless devices. These Web sites use
HDML (Handheld Device Markup Language -- now called Wireless
Markup Language) to present information in text form.
To access Data Mode, you must be in an area where wireless IP (CDPD)
service is provided.
Your network service provider must set up and register a unique IP and
email address for you.
Connecting to Data Mode
To switch from Voice Mode to Data Mode, press . Or, if you wish to
set the phone to power up in Data Mode, see Default Service Mode set
up on page 49.)
If your phone is registered to the network, the Data Mode Home Page
screen displays. This screen may provide direct access to Email, Web sites
and a range of supporting options, depending on what your service
provider offers. The screen pictured here is an example of how your
Home Page might look:
• To select an option, use the up and down arrow keys to scroll
through the menu, then press OK left softkey.
54
Page 55

Each time you enter Data Mode, the phone will display the name of the
data network provider and try to register to the network while this screen
is displaye d .
When the phone registers to the network, appears at the top of the
screen. If the phone is not registered, appears.
If the phone is not able to connect to the network, the following screen
displays:
To register from this screen, press Retry softkey. Press Done softkey to
return to the previous page stored in the phone’s cache.
When the phone successfully registers to the network, the Data Mode
Home Page screen displays with icon to indicate that the phone is
registered to the network.
Data Mode Icons
Special i cons that appear in the screen are:
Secure Secure mode
Message Alert Data message received
CDPD
Registered
CDPD Not
Registered
Packet data network available – registered
Packet data network available –
not registered
55
Page 56

When the phone or the network is sending data, a phone icon sending
signals to a tower, and vice versa, will appear in the display window. This
indication appears frequently while you are using Data Mode. The length
of time it takes to send and receive data will vary. The display wind ow
looks similar to this:
This screen displays whenever data is being transmitted.
Access to your email, calendar, and other information is supplied by your
service provider.
Main Menu Map Additions
The key provides direct access to the same menu items that are
available in Voice Mode (except for Systems in the Preferences menu).
This key also provides access to the following additional Data Mode
menu items:
7. Diagnostics 1. Device Status
8. Show URL View URL of your Home
2. Reset Cache
Page
To view current Device Status,
Press and select 7 Diagnostics.
1
Select 1 Device Sta t us to view the following:
2
CDPD Diags Screen 1 CDPD Diags Screen 2
Registration Status Cell Number
Channel Status
Channel Number
RSSI Level Service Provider Identifier (SPI)
Transmitted Data (kilobytes)
after power on
Received Data (kilobytes) after
power on
56
Page 57

Forward Block Error Rate
(FwdBLER)
Transmit Power Level
(Tx Power)
Power Product System Preference (SysPref)
Press End/Back key to return to previous screen.
3
To reset (delete) the Web browser’s cache, which contains the most recent Web files you downloaded,
Press and select 7 Diagnostics.
1
Select 2 Reset Cache. As soon as Reset Cache is selected, it
2
has been reset. There is no option to confirm or cancel
before reset takes place.
Service Provider Network Identifier (SPNI)
Wide Area Service Identifier
(WASI)
Making a Voice Call
You can make voice calls two ways in Data Mode.
To make an Emergency Call,
Press for at least 3 seconds.
1
The phone automatically switches to Voice Mode and super
2
speed dials 911.
To make a voice call in Data Mode,
Select an application from the Home Page and press OK
1
softkey.
Select the name you wish to call.
2
The name and phone number will appear. Press Call
3
softkey. Phone will automatically switch to Voice Mode and
make the call.
The phone will return to Data Mode when the call is terminated.
To use your phone as a CDPD modem , see Tethered Mode, page 58.
57
Page 58

Tethered Mode
In tethered mode, your phone can connect your personal computer to
the Internet. Your phone can also synchronize the Phonebook with your
contact database using the FoneSync
data cable.
To operate the phone in tethered mode, you must:
• Install the MobileAccess™ T255 as a modem on your computer.
• Set up dial-up networking.
• Connect a cable between the phone and the mod em.
Using the
software, follow these instructions. You can also install the phone as a
standard 19200 bps modem.
Mitsubishi Modem Installation Procedure
1. Turn on your computer and start the Microsoft® Windows® 95 or 98
operating system.
2. Click on the Start button, then select Settings, then Control Panel.
3. Double-click on Modems icon.
®
modem software and the T255
4. The Modems Properties dialog box appears. Click Add.
58
Page 59

5. Select Other type of modem and click Next.
6. Check Don’t run the Hardware Installation Wizard box, then click
Next.
59
Page 60

7. Check Don’t detect my modem; I will select it from a list box, then
click Next.
8. At the if you have an installation disk screen, click Have Disk....
60
Page 61

9. Insert the installation disk in the CD ROM drive and click OK.
10. The Model list screen should list only the Mitsubishi CDPD T255
Modem. Click Next.
61
Page 62

11. From the Select the port to use with this modem list, select
Communications Port (COM 1), then click Next.
Note: If you have an internal modem in your computer, the computer
may assign Com2. If you experience any difficulties, please check
with your IT department or the computer manufacturer.
12. Your modem has been set up. Click Finish.
62
Page 63

13. The Modems Properties box will list the Mitsubishi CDPD T255
Modem as set up. Click Properties.
14. Click on Maximum speed. Set to 38400, then click OK.
15. To continue, proceed with Set Up Dial-Up Networking section.
63
Page 64

Set Up Dial-Up Networking
Dial-up networking enables you to connect one computer to another
computer and to the network by using a modem.
Double-click on My Computer to make sure dial-up networking is set up
in your computer. If it is not, you can install dial-up networking with the
following steps:
1. Open Control Panel.
2. Double-click on Add/Remove Programs icon.
3. Select Windows Setup tab.
4. Check the Communications box and click Details button.
5. Check the Dial-Up Networking box and click OK button.
6. Click Apply button. Installation of Dial-Up Networking will begin.
7. Click OK button, read notice, and restart your computer if prompted
to do so.
When dial-up networking is installed:
1. Double-click on My Computer.
2. Double-click on Dial-Up Networking icon.
3. Double-click on Make New Connection icon.
4. The Make New C onnection screen appears with My Connection
selected.
64
Page 65

5. Type the name (T255) for the comput er you are dia ling and select the
Mitsubishi CDPD T255 Modem. Click Next.
6. Type any number in the area code box, then select a country code.
Note: with CDPD service, your computer does not dial a telephone
number. After typing, click Next.
65
Page 66

7. The screen will indicate you have successfully created a new dial-up
networking connection called T255. Click Finish to save it in your Dial-
Up Networking folder.
8. Double-click on My Computer.
9. Double-click on Dial-Up Networking icon.
10. Click once on T255 icon, then right-click and select Properties.
66
Page 67

11. The T255 Properties dialog box appears.
12. In the T255 Properties dialog box, select Server Types tab.
67
Page 68

13. Uncheck everything except TCP/IP box. Click TCP/IP Settings button.
14. Select Server assigned IP addr ess. Uncheck Use IP header
compression.
68
Page 69

15. Select Specify name serv er a ddr esse s. Type in the 1 2 digit Primary
DNS (Domain Name Server) address and, if applicable, the Secondary DNS address. These addresses should be obtained from your
service provider. Click OK butt on.
16. Click OK button again. Now your computer is set up to use the
MobileAccess™ T255 phone as a wireless IP modem.
69
Page 70

Connecting to the Inter net with your MobileAccess™ T255
phone
To use the phone as a modem, connect the PC cable to both your phone
and the RS232 port (DB9 port) on your computer.
Click on Dial-Up Networking and the icon for your wireless IP connection.
Then click Connect.
You will now be connected to the Internet over the wireless IP (CDPD)
network.
70
Page 71

Appendix
Accessories List
Handsfree kits Part numbers
Handsfree Headset (earphone + microphone) HDS-P2
Mobile Holder with bracket (mounts in car to hold
phone)
Batteries and Chargers Part numbers
Standard Battery (NiMH-S) SBT-P11
Extended Life Battery (NiMH-L) EBT-P9
Vibrating Batte ry (NiMH-S vibrating) VBT-P2
Desktop Battery Charger (for phone + spare batter y) QCK-P10
AC Rapid Charging Adapter 120V (for battery
charging using wall outlet)
Cigarette Lighter Adapter - plug one end into car
cigarette lighter, other end into phone jack to use
and charge phone in your car
Miscellaneous Part number
Belt Clip w/Button CLP-P7
Data Connector
T255 Data Cable Check with
FoneSync® contact database software
Available from FoneSync
HLD-P6
ACP-P3
CIG-P6
your service
provider
To purchase accessories, contact your service provider.
71
Page 72

Glossary
Term Description
CDPD Cellular Digital Packet Data. An enhanced system
Conversation mode When the phone is making or receiving a call.
DTMF Dual Tone Multi-Frequency. Touch tones.
EID Equipment Identifier for a data device.
Gateway A network point that acts as an entrance to another
GSM Global System for Mobile Communications.
HDML Handheld Device Markup Language – the text-based
HTML Hypertext Markup Language – the text-based language
HTTP Hypertext Transmission Protocol – used by computers
IP address Internet Protocol add ress – the unique number
LCD Liquid Crystal Display.
LED Light Emitting Diode.
NEI Network Entity Identifier – IP address.
Packet data A unit of data that is routed between an origin and a
PIN Personal Identification Number. Supplied by your
RSSI Received Signal Strength Indicator.
SMS Short Message Service.
SPI Service Provider Identifier.
SPNI Service Provider Network Identifier.
Standby mode When the phone is on and re gistered on a n etwork but
overlay for transmitting and receiving data over cellular
networks.
network.
language used to construct Web pages for wireless
phones. Now called Wireless Markup Language.
used to construct Web pages for computers.
to communicate with each other on the Internet.
representing each computer or wireless
communication device in a network.
destination on the Internet or any other packetswitched network.
network/service provider
not making or receiving a call or transmitting data.
72
Page 73

TCP/IP Transmission Control Protocol/ Internet Protocol. The
TDMA Time Division Multiple Access. A digital radio
Phone.com
Browser™
URL Uniform Resource Locator. The address of a file or
basic communication language or protocol of the
Internet and some private networks called intranets
and extranets.
technology that allows many users to employ the same
radio frequency channel simultaneously without
interference. This reduces the number of base stations
needed in a service area and increases the speed and
reliability of voice and data transmission over longer
ranges.
Operating seamlessly between analog and digital
frequencies, TDMA allows easy integration of PCS
devices; maintains superior voice quality over long
distance; ensures voice privacy and data security; and
requires less transmi tter power than other network
access technologies.
Software that allows you to access the Internet from
your phone.
resource accessible on the Internet.
Copyright Notices
Phone.com Browser™ is a trademark of Phone.com, Inc.
®
T9
is a registered trademark of Tegic Communications, Inc.
Microsoft
Corporation.
FoneSync™ is a trademark of Phone.com (Newbury) Ltd.
®
and Windows® are registered trademarks of Microsoft
73
Page 74

Troubleshooting
Problem Possible cause and so lu t io n
Phone does not
turn on
• If the phone is new, see “Charging the Battery” on
page 8. Otherwise, recharge or replace the battery.
If this does not solve the problem, contact
your service provider.
Phone turns on but
there is no display
The phone does not
work with the
handsfree adapter
Dropped calls • The signal strength will depend on your location.
Volume varies/mutes
briefly
• Display contrast is turned down too low. Reset
contrast (see page 47).
• A battery is required to use the handsfree adapter;
verify a charged battery is installed on the back of
the phone. Verify the phone is attached to the
adapter.
Check the received signal strength indicator ,
make sure your antenna is fully extended, and try
again after the signal strength increases (another
bar appears). In addition to geographic location,
the signal wil l weaken behind walls, under br idges,
in tunnels, or due to other obstructions.
• The system’s signal strength will vary depending on
your location. A udio lev el variat ions c an occur due
to a weak signal or high speed travel.
Warning Tones
Tone Description
Error tone
Fast busy tone
Siren tone
Triple high -pitched
tone
• Sounds when an unexpected key is pressed (e.g.,
pressing Send after pressing Menu).
• Indicates that the system has not accepted your
call.
• Indicates an invalid phone number.
• A short triple high-pitched tone generated every
20 seconds indicates the battery needs to be
charged.
74
Page 75

Display Messages
Message Description
-Auto Lock-
Battery Full
Charging
CHECK
error
Low Battery! and
phone beeps
KEY GUARD ON
No Service
No Voice Mail
Center number
• When the phone is turned on, it cannot be used until
you enter the preset 4-digit unlock code. Prevents
unauthorized phone use.
• Battery has finished charging.
• The phone is charging normally while powered off.
Since the phone is off, you cannot make or receive
calls.
• You can press the key to turn on the phone and
operate it normally. The battery will continue to
charge (the battery can be charged with the phone
either off or on.)
• Mitsubishi phones are capable of self diagnostics,
and will alert you when an internal error occurs. For
CHECK errors, write down the number following
CHECK and contact your network service
provider for repairs. Your network service provider
should be able to solve the problem over the phone.
• The phone will turn off for 1 minute. The phone
should be turned off and the battery recharged or
replaced.
• Prevents accidental key entry. Press then Yes
softkey to turn off this feature.
• This message indicates you cannot connect to the
system (calls cannot be placed or received), which
may be due to:
a) The system in this area does not support your
phone.
b) The signal is too weak. Try moving to another lo-
cation to use your phone.
• The Voice Mail Center phone number must be set up
before using quick voice message access. The screen
will prompt to add a voice mail number.
Press Add softkey, then the 8-digit Security Code
(default code is 00000000). Then enter your Voice
Mail Center phone number.
75
Page 76

Index
A
Accessories ......................... 71
Accumulated Talk Time ....... 41
Adjusting Volume ......... 26, 46
Advanced ............................ 48
Alert Mode .................... 26, 43
Alpha Mode ........................ 34
Any Key Answer .................. 45
Attaching Battery .................. 9
Auto Answer ....................... 44
Auto Lock ........................... 48
Auto Redial ......................... 45
B
Basic Phone Operations ...... 11
Battery
Attaching ........................ 9
Charging .......................... 8
Charging Times ................ 9
Safety Tips ..................... 10
C
Call
Answering ..................... 12
Ending ........................... 12
Making .......................... 11
Making in Data Mode .... 57
Call Lists .............................. 41
Call Restrictions .................. 49
Call Setup ........................... 44
Caller ID .............................. 45
Calling Card Calling ............ 28
Care and Maintenance ........ 23
CDPD Side ........................... 46
CDPD Sleep ......................... 46
Charging Battery ................... 8
Clock ................................... 47
Connecting to Data Mode .. 54
Connecting to the Internet . 70
Consumer Update on Mobile
Phones ............................. 18
Conversation Mode ............. 29
Conversation Options ......... 12
Copyright Notices ............... 73
D
Data Mode Features ............ 54
Data Mode Icons ............. 7, 55
Data Network ..................... 46
Date, Set ............................. 47
Default Service .................... 49
Default Settings .................. 31
Device Status ...................... 56
Diagnostics ......................... 56
Dialed Calls ................... 24, 41
Dialing Stored Numbers ...... 24
Dial-Up Networking, Set Up 64
Display Icons ..................... 6, 7
Display Messages ................ 75
DTMF Tones .................. 27, 29
E
Emergency Calls ...... 25, 44, 57
Encryption .......................... 51
Ending a Call ....................... 12
Entering Text ....................... 34
Express Key ....................... 2, 3
F
Font Size ............................. 48
G
Gateway, Select .................. 46
Getting Started ..................... 8
Glossary .............................. 72
H
Help, Menu ................... 14, 31
Home Page ..................... 7, 54
76
Page 77

I
Icons (Indicators) .............. 6, 7
Immediate Alerts ................ 43
Install Modem .................... 58
IP Address ..................... 41, 46
K
Key Functions ................... 4, 5
Key Guard ........................... 52
Key Symbols ......................... 2
Keys .......................... 2, 3, 4, 5
L
Language ........................... 48
Last Number Dialed ............ 24
Last Talk Time ..................... 41
LCD Contrast ...................... 47
Lock keypad (Key Guard) .... 52
Lock, Auto (Lock phone) ..... 48
M
Making a Call ..................... 11
Making a Call in Data Mode 57
Memory Link Feature .......... 28
Menu Help .................... 14, 31
Menu Map .......................... 32
Menu Map Additions .......... 56
Menu System ...................... 31
Message Alert ..................... 42
Message Alert Duration ...... 43
Message Inbox ................... 40
Messages ............................ 40
Missed Calls .................. 24, 41
Mode Key ............................. 3
Modem Installation
Procedure ........................ 58
Muting ......................... 12, 26
N
Network Systems ................ 52
Numeric Mode .................... 34
O
Own Phone Number ..... 30, 41
P
Pause Feature ..................... 27
Phone Overview .................... 3
Phonebook ................... 24, 38
Preferences ......................... 42
Privacy Tone ....................... 45
Problems ............................ 74
Q
Quick Type, T9® Text Input . 36
R
Received Calls ............... 24, 41
Reset Cache ........................ 57
Reset Calls .......................... 51
Reset Phone ........................ 51
Reset Phonebook ................ 51
Reset Timers ....................... 51
Restrict Calls ....................... 49
Ringer Type ......................... 42
S
Safety Information .............. 15
Safety Tips, Battery ............. 10
Scratchpad ......................... 29
Security ............................... 49
Security Code ...................... 50
Send Caller ID ..................... 45
Send DTMF Tones ......... 27, 29
Service Alerts .......... 26, 42, 43
Set Date .............................. 47
Set Time ............................. 47
Set Up Dial-Up Networking .. 64
Setting up a Voice Mailbox .. 13
Show URL ........................... 56
SMS Text Messages ....... 14, 40
Softkeys ............................ 2, 3
Sounds On/Off .............. 26, 52
Speed Dialing ..................... 25
77
Page 78

Standby Screen ................... 11
Status ................................. 41
Store (number in Phonebook)
................................... 11, 30
Super Speed Dialing ............ 25
Symbol Mode ..................... 35
Systems ............................... 52
Systems, Network ............... 52
T
T9® Quick Type Text Input .. 36
Talk Timer, Set .................... 49
Tethered Mode ................... 58
Text Messages (SMS) ..... 14, 40
Text, Entering ..................... 34
Time, Set ............................. 47
Total Talk Time .................... 41
Troubleshooting ................. 74
Turning Off the Phone ........ 12
Turning On the Phone ......... 11
U
Unanswered Calls ............... 12
Unlock Code ....................... 50
URL, Show .......................... 56
Using This Guide ................... 2
V
Vibrate Setting .............. 26, 43
Voice Mail ..................... 13, 40
Voice Mode Features .......... 24
Voice Mode Icons ................. 6
Voice Network .................... 47
Volume Adjustment ...... 26, 46
W
Warning Tones .................... 74
78
 Loading...