

Page 1
Page 2

Page 3

• SAFETY INSTRUCTIONS •
(Always read these instructions before using this equipment.)
When using this product, please thoroughly read this manual as well as GX Developer Operating Manual.
Also, please exercise adequate safety precautions and handle the product correctly.
A - 1 A - 1
Page 4

• CONDITIONS OF USE FOR THE PRODUCT •
(1) Mitsubishi programmable controller ("the PRODUCT") shall be used in conditions;
i) where any problem, fault or failure occurring in the PRODUCT, if any, shall not lead to any major or
serious accident; and
ii) where the backup and fail-safe function are systematically or automatically provided outside of the
PRODUCT for the case of any problem, fault or failure occurring in the PRODUCT.
(2) The PRODUCT has been designed and manufactured for the purpose of being used in general
industries.
MITSUBISHI SHALL HAVE NO RESPONSIBILITY OR LIABILITY (INCLUDING, BUT NOT LIMITED
TO ANY AND ALL RESPONSIBILITY OR LIABILITY BASED ON CONTRACT, WARRANTY, TORT,
PRODUCT LIABILITY) FOR ANY INJURY OR DEATH TO PERSONS OR LOSS OR DAMAGE TO
PROPERTY CAUSED BY the PRODUCT THAT ARE OPERATED OR USED IN APPLICATION NOT
INTENDED OR EXCLUDED BY INSTRUCTIONS, PRECAUTIONS, OR WARNING CONTAINED IN
MITSUBISHI'S USER, INSTRUCTION AND/OR SAFETY MANUALS, TECHNICAL BULLETINS AND
GUIDELINES FOR the PRODUCT.
("Prohibited Application")
Prohibited Applications include, but not limited to, the use of the PRODUCT in;
y Nuclear Power Plants and any other power plants operated by Power companies, and/or any other
cases in which the public could be affected if any problem or fault occurs in the PRODUCT.
y Railway companies or Public service purposes, and/or any other cases in which establishment of a
special quality assurance system is required by the Purchaser or End User.
y Aircraft or Aerospace, Medical applications, Train equipment, transport equipment such as Elevator
and Escalator, Incineration and Fuel devices, Vehicles, Manned transportation, Equipment for
Recreation and Amusement, and Safety devices, handling of Nuclear or Hazardous Materials or
Chemicals, Mining and Drilling, and/or other applications where there is a significant risk of injury to
the public or property.
Notwithstanding the above, restrictions Mitsubishi may in its sole discretion, authorize use of the
PRODUCT in one or more of the Prohibited Applications, provided that the usage of the PRODUCT is
limited only for the specific applications agreed to by Mitsubishi and provided further that no special
quality assurance or fail-safe, redundant or other safety features which exceed the general
specifications of the PRODUCTs are required. For details, please contact the Mitsubishi
representative in your region.
A - 2 A - 2
Page 5
REVISIONS
* The manual number is given on the bottom left of the back cover.
Print Date * Manual Number Revision
Apr., 1999 IB (NA)-0800004-A First edition.
Jun., 2001 IB (NA)-0800004-B CNVW corrected to be GX Converter
GPPW corrected to be GX Developer
Correction
Chapter 2, Chapter 3
Deletions
Appendix 5
Sep., 2001 IB (NA)-0800004-C
Correction
Chapter 3
Feb., 2003 IB (NA)-0800004-D
Correction
SOFTWARE USER REGISTRATION, INTRODUCTION, CONTENTS,
About Manuals, Section 2.1, Chapter 3, Section 3.2
Nov., 2003 IB (NA)-0800004-E
Correction
Section 5.1, Section 6.3.2
Dec., 2005 IB (NA)-0800004-F
Correction
Section 2.1, Section 5.1
Jan., 2007 IB (NA)-0800004-G
Correction
Section 5.1, Section 6.1, Appendix 1
Feb., 2008 IB (NA)-0800004-H
Correction
About the generic terms and abbreviations used in this manual,
Section 2.1, Chapter 3, Section 4.1.1, Section 6.2.2
Nov., 2009 IB (NA)-0800004-I
Addition
CONDITIONS OF USE FOR THE PRODUCT
Correction
About Manuals, Product Components, Section 3.1.2
Deletions
SOFTWARE USER REGISTRATION
Sep., 2010 IB (NA)-0800004-J
Correction
About the generic terms and abbreviations used in this manual,
Section 2.1, Section 3.1.2, Section 3.2
SH-080122-L
This manual confers no industrial property rights or any rights of any other kind, nor does it confer any patent
licenses. Mitsubishi Electric Corporation cannot be held responsible for any problems involving industrial property
rights which may occur as a result of using the contents noted in this manual.
© 1999 MITSUBISHI ELECTRIC CORPORATION
A - 3 A - 3
Page 6

Usage Precautions
The following describes precautions when using GX Converter.
(1) First, please read the "Safety Precautions".
(2) About installation
The GX Converter start by add-in to GX Developer Version 3 (SW3D5C-GPPWE) or later. Therefore, please install the GX Converter on Personal computer that
have GX Developer Version 3 (SW3D5C-GPPW-E) or later preinstalled.
The GX Converter cannot be added in to GX Developer Version 2 (SW2D5CGPPW-E) or earlier.
(3) Multithreading communication
There are some cases where the screen will not be properly displayed while
using GX Converter due to the lack of system resources.
If this occurs, close GX Converter and then close GX Developer (Programs,
Comment, etc.) and other applications, then restart GX Developer and GX
Converter.
(4) About CPU types
Depending on type of CPU used for the GX Developer project, there are some
cases where Instruction or I/O (Device) cannot be correctly converted during data
conversion.
See " GX Developer Operating Manual" for details.
(5) About the file format when TEXT, CSV format files are being read by the GX
Developer
The file format is fixed when export List or Device comments to a TEXT, CSV
format file.
Therefore, create List or Device comments using commercial software using the
file formats specified above as much as possible.
A - 4 A - 4
Page 7
INTRODUCTION
Thank you for choosing the Mitsubishi MELSOFT Series Integrated FA software.
Read this manual and make sure you understand the functions and performance of MELSOFT series
thoroughly in advance to ensure correct use.
CONTENTS
SAFETY INSTRUCTIONS.............................................................................................................................A- 1
CONDITIONS OF USE FOR THE PRODUCT .............................................................................................A- 2
REVISIONS ....................................................................................................................................................A- 3
Usage Precautions .........................................................................................................................................A- 4
INTRODUCTION............................................................................................................................................A- 5
CONTENTS....................................................................................................................................................A- 5
About Manuals ...............................................................................................................................................A- 7
How to read this manual ................................................................................................................................A- 8
About the generic terms and abbreviations used in this manual..................................................................A- 9
Product Components .....................................................................................................................................A-10
1. OVERVIEW 1-1 to 1-2
1.1 Features .................................................................................................................................................. 1- 1
2. SYSTEM CONFIGURATION AND SPECIFICATIONS 2-1 to 2-2
2.1 Operating Environment ........................................................................................................................... 2- 1
2.2 Overall Configuration .............................................................................................................................. 2- 2
3. INSTALLATION AND UNINSTALLATION 3-1 to 3-13
3.1 Installation ............................................................................................................................................... 3- 1
3.1.1 Installing Procedure ......................................................................................................................... 3- 1
3.1.2 Installing Operation .......................................................................................................................... 3- 2
3.2 Uninstallation.......................................................................................................................................... 3- 11
4. CONVERTING TEXT,CSV FORMAT DATA TO GX Developer FORMAT DATA 4-1 to 4-23
4.1 Converting TEXT Format Data to GX Developer Format Data ............................................................. 4- 1
4.1.1 Converting TEXT format data to a list ............................................................................................. 4- 1
4.1.2 Converting TEXT Format Data to Device Comments..................................................................... 4- 7
4.2 Converting CSV Format Data to GX Developer Format Data ............................................................... 4-12
4.2.1 Converting CSV format data to a list ............................................................................................... 4-12
4.2.2 Converting CSV Format Data to Device Comments ...................................................................... 4-17
4.3 Handling of conversion errors................................................................................................................. 4-22
5. CONVERTING GX Developer FORMAT DATA TO TEXT, CSV FORMAT DATA 5-1 to 5-4
5.1 Converting GX Developer Format Data to Text, CSV Format Data ..................................................... 5- 2
A - 5 A - 5
Page 8
6. FILE FORMATS 6-1 to 6-10
6.1 About TEXT CSV format files ................................................................................................................. 6- 1
6.2 File formats when the GX Developer import a TEXT, CSV format file ................................................. 6- 3
6.2.1 When a List is import by the GX Developer .................................................................................... 6- 3
6.2.2 When device comments are import by the GX Developer ............................................................. 6- 7
6.3 File Formats When The GX Developer Format Data is Export to a Text, CSV Format File ................ 6- 8
6.3.1 When a List is export to a text, csv format file................................................................................. 6- 8
6.3.2 When device comments are export to a text, csv format file .......................................................... 6-10
APPENDICES App-1 to App-5
Appendix 1. Limitations and Precautions .................................................................................................App- 1
Appendix 2. Conversion Error Message List............................................................................................App- 3
Appendix 3. Converting CADIF Character-string Data ............................................................................App- 5
Appendix 4. Performance Specifications .................................................................................................App- 5
INDEX Index-1 to Index-2
A - 6 A - 6
Page 9
About Manuals
The following manuals are also related to this product.
In necessary, order them by quoting the details in the tables below.
Related Manuals
Manual Name
GX Developer Version 8 Operating Manual
This manual contains information on creating programs, printing procedures, monitoring procedures,
debugging procedures, and other on-line functions using the GX Developer. (Sold separately)
Manual Number
(Model Code)
SH-080373E
(13JU41)
Note:The Operating Manuals are included on the CD-ROM of the software package in a PDF file format.
Manuals in printed form are sold separately for single purchase. Order a manual by quoting the manual
umber (model code) listed in the table above.
A - 7 A - 7
Page 10

How to read this manual
"How to read this manual" lists the sections in this manual by the objective while
using the GX Converter. Please read this manual using the contents below as a
reference.
(1) When you want to know the features of GX Converter (Section 1.1)
Section 1.1 describes the features of GX Converter.
(2) When you want to know the structure of GX Converter (Chapter 2)
Chapter 2 describes the operating environment and overall configuration of GX
Converter.
(3) When performing Installation and Uninstallation of GX Converter (Chapter 3)
Chapter 3 describes the operating procedures when performing Installation or
Uninstallation of GX Converter.
(4) W hen converting TEXT, CSV format data to GX Developer format data (Chapter 4)
Chapter 4 describes the operating procedures when converting TEXT, CSV
format data to GX Developer format data.
(5) W hen converting GX Developer format data to TEXT, CSV format data (Chapter 5)
Chapter 5 describes the operating procedures when converting GX Developer
format data to TEXT, CSV format data.
(6) When you want to know about file formats (Chapter 6)
Section 6.1 describes the TEXT, CSV format file.
Section 6.2 describes how to write the data when TEXT, CSV format data is
Import by the GX Developer.
Section 6.3 describes the data types used when export GX Developer format data
as TEXT, CSV format data.
(7) When you want to know about limitations and precautions for GX Converter
(Appendix 1)
Appendix 1 describes the limitations and precautions when performing
Installation, Uninstallation or various types of conversion.
(8) When you want to know about GX Converter conversion error messages
(Appendix 2)
Appendix 2 describes the error messages generated during data conversion.
(9) When you want to know about CADIF character-string data conversion (Appendix 3)
Appendix 3 describes the conversion of CADIF character-string data.
(10) When you want to know about the performance specifications for the GX
Converter (Appendix 4)
Appendix 4 describes the performance specifications for the GX Converter.
A - 8 A - 8
Page 11
About the generic terms and abbreviations used in this manual
This manual uses the following generic terms and abbreviations to describe the GX
Converter unless otherwise specified.
Generic term/abbreviation Description of generic term/abbreviation
GX Converter Abbreviation for GX Converter Version 1 (SW0D5C-CNVW-E)
GX Developer Generic term for GX Developer Version 3 (SW3D5C-GPPW-E) or later
GX Developer Version n
(SWnD5-GPPW-E) or earlier
GX Developer Version n
(SWnD5-GPPW-E) or later
CADIF character-string data Abbreviation for the character-string data converted by SW1IVD-CADIF
GX Simulator Generic term for GX Simulator Version 2 (SW2D5C-LLT-E) or later
WindowsR7
Windows VistaR
WindowsRXP
When limited to earlier than the major version (n denotes the version number)
When limited to later than the major version (n denotes the version number)
Generic term for the following:
MicrosoftRWindowsR7 Starter Operating System,
Microsoft
Microsoft
Microsoft
Microsoft
R
WindowsR7 Home Premium Operating System,
R
WindowsR7 Professional Operating System,
R
WindowsR7 Ultimate Operating System,
R
WindowsR7 Enterprise Operating System
Generic term for the following:
MicrosoftRWindows VistaRHome Basic Operating System,
Microsoft
Microsoft
Microsoft
Microsoft
R
Windows VistaRHome Premium Operating System,
R
Windows VistaRBusiness Operating System,
R
Windows VistaRUltimate Operating System,
R
Windows VistaREnterprise Operating System
Generic term for the following:
MicrosoftRWindowsRXP Professional Operating System,
Microsoft
R
WindowsRXP Home Edition Operating System
A - 9 A - 9
Page 12
Product Components
The components of this product are shown below.
Type Product Name Quantity
SW0D5C-CNVW-E
SW0D5C-CNVW-EA
1: The number of included license agreements is equivalent to the number of licenses.
GX Converter Version 1 (1-license product) (CD-ROM) 1
License agreement 1
End-user softwere license agreement 1
Method of installing the MELSOFT series 1
Software registration notice 1
GX Converter Version 1 (Multiple license product) (CD-ROM) 1
License agreement
End-user softwere license agreement 1
Method of installing the MELSOFT series 1
Software registration notice 1
NOTICES
• We do not guarantee the commercially-available WindowsR-based software
products that have been introduced in this manual.
• We hold the copyrights of this software package.
• No part of this manual may be transcribed or duplicated in any form without prior
permission by Mitsubishi Electric Corporation.
• We have attempted to cover all the revisions of software and hardware, but this
manual may not contain the latest revisions.
• The software of this product requires one license to be purchased per computer.
• We permit the user to use this software package (including this manual) based on
the Software License Agreement.
• We are not liable for consequences or influences due to this software package
(including this manual).
• The specifications of this software package and the descriptions in this manual
may be altered in future without prior notice.
n*
1
A - 10 A - 10
Page 13
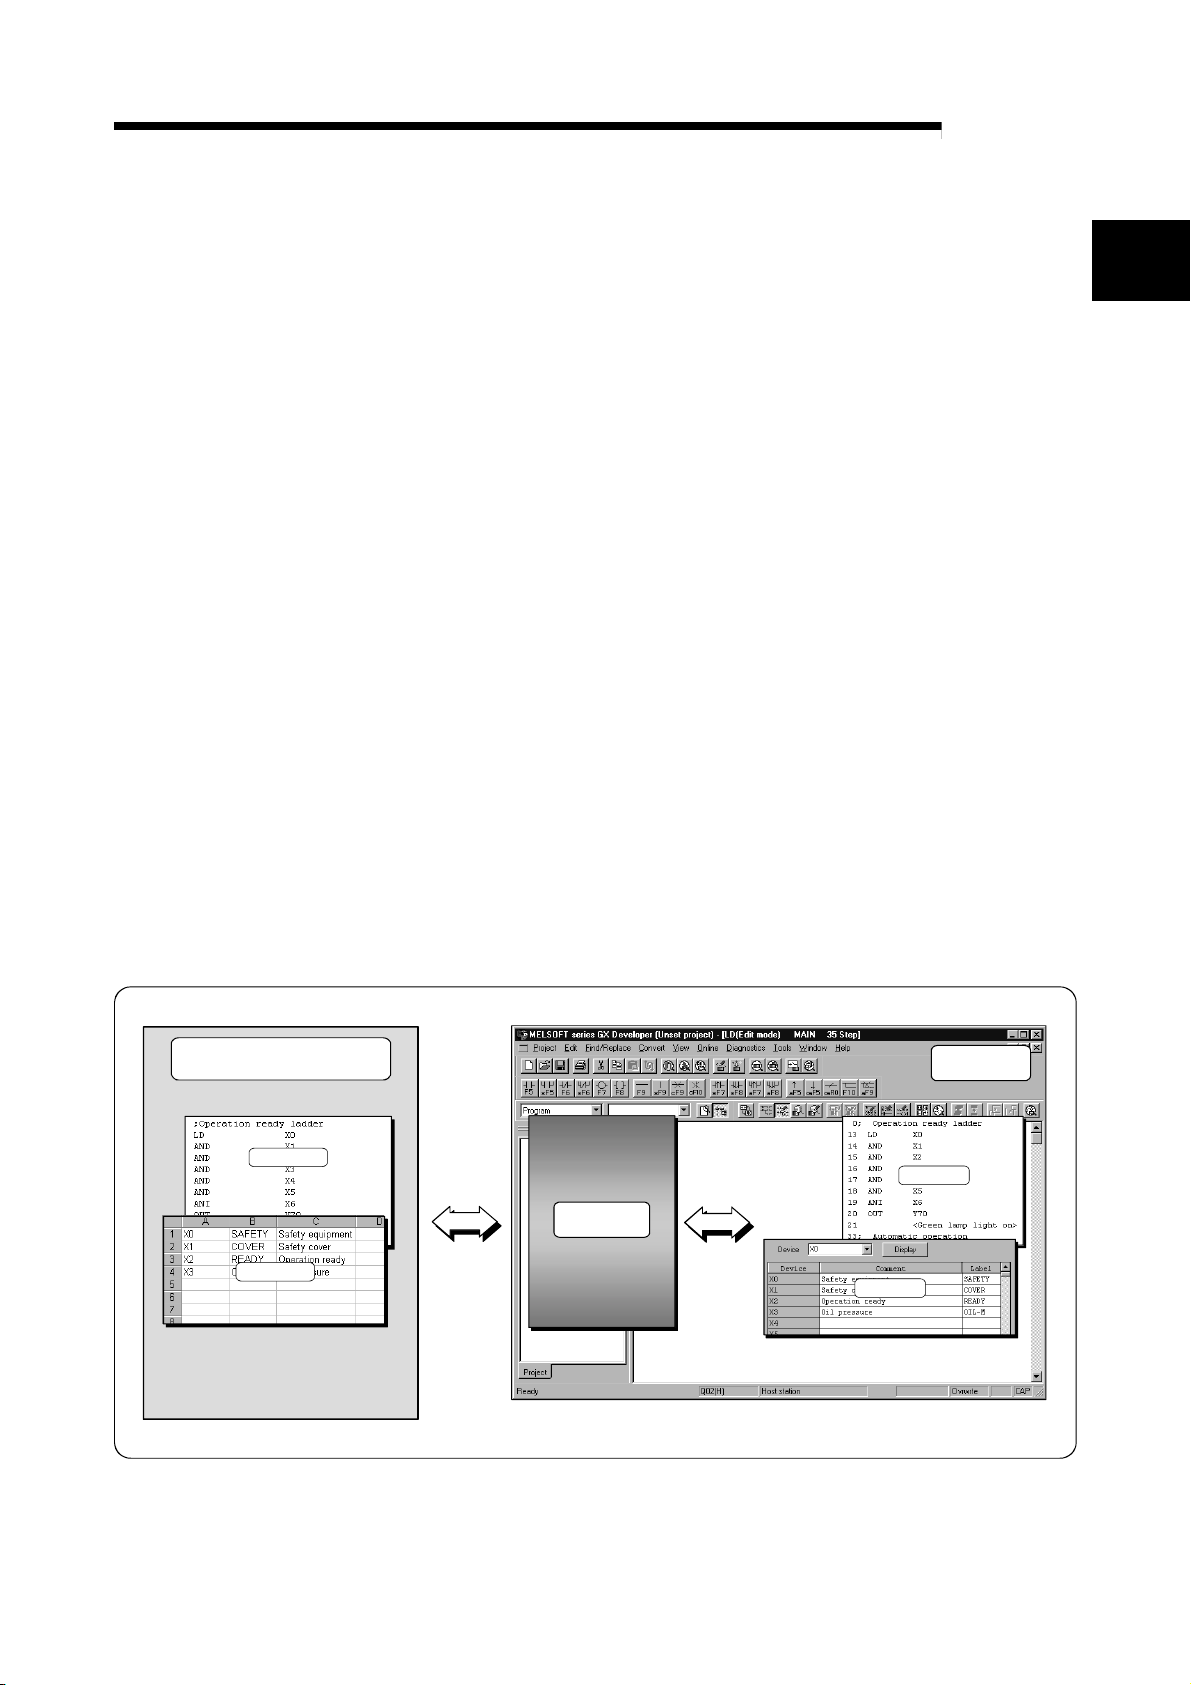
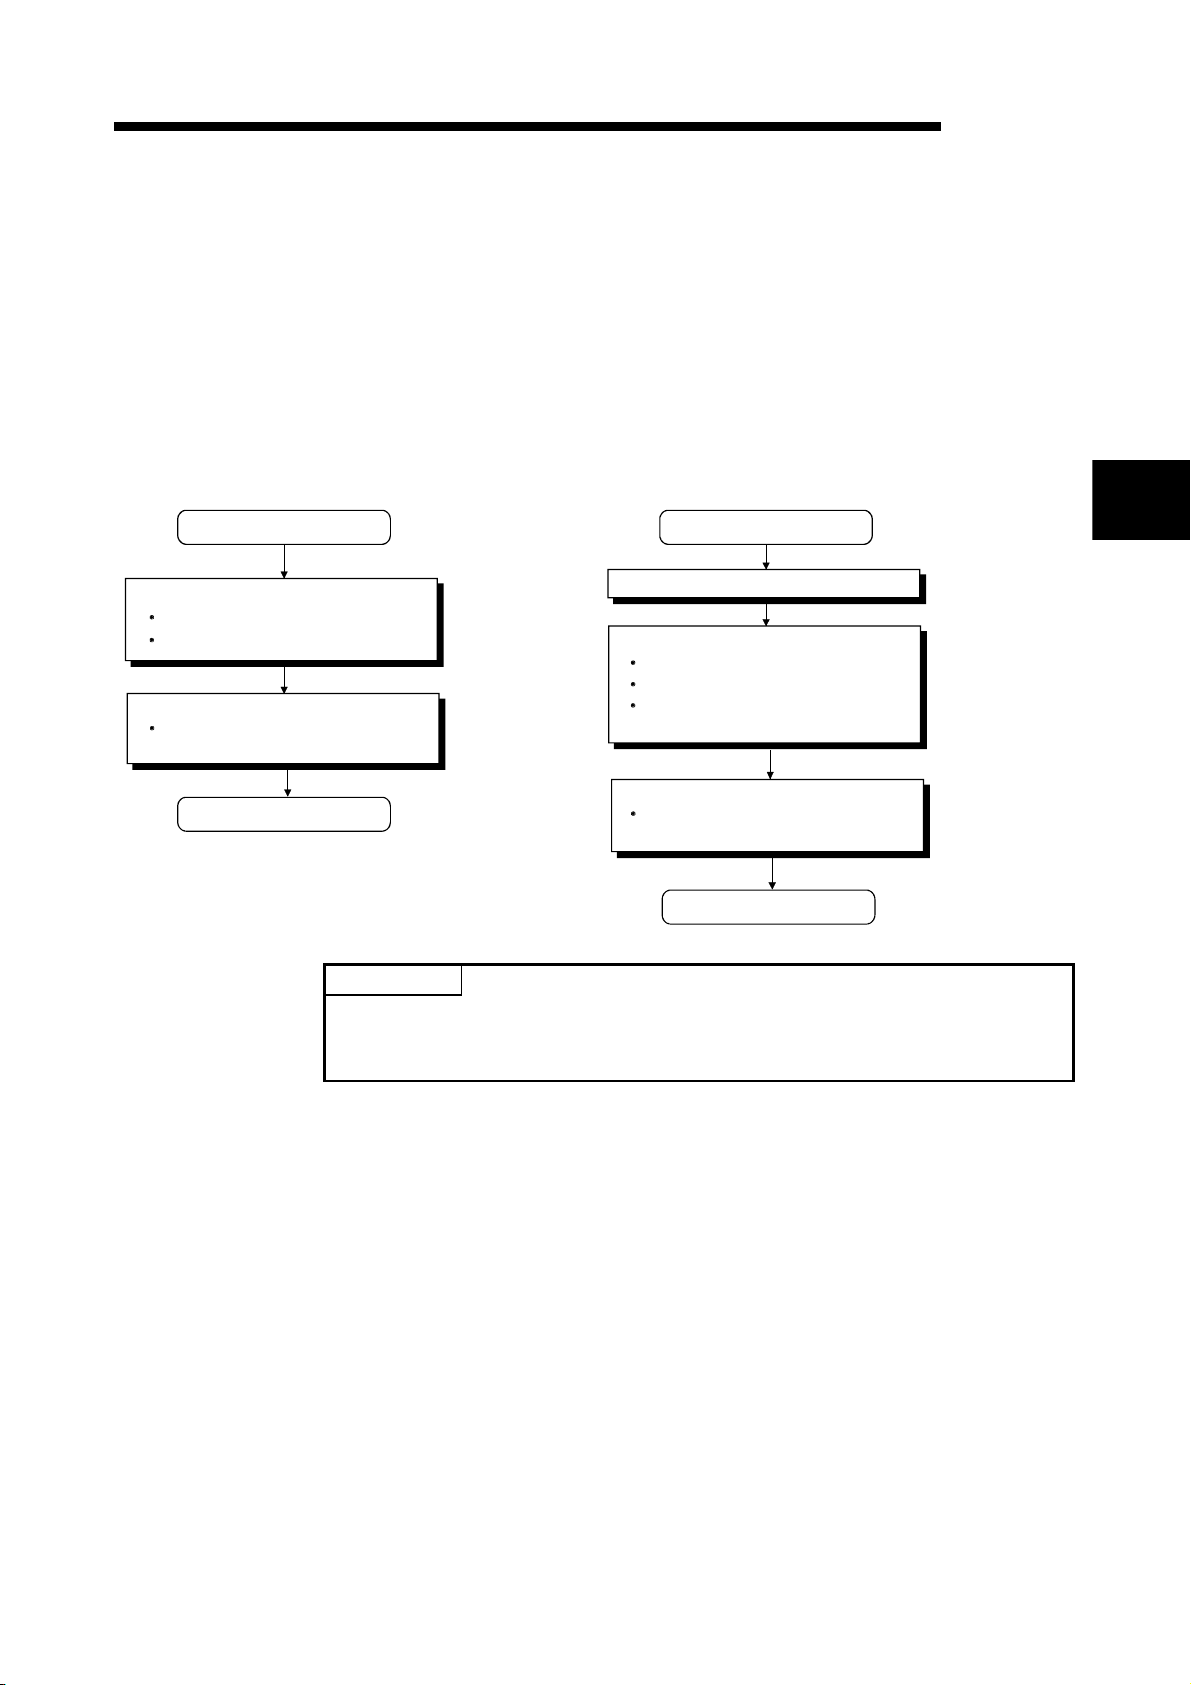
1 OVERVIEW
1. OVERVIEW
MELSOFT
1.1 Features
This chapter explains the overview of GX Converter and this manual.
This manual describes the GX Converter, a product capable of converting TEXT, CSV
format data into List or Device comments so that the GX Developer can handle, and
converting List and Device comments into TEXT, CSV format data.
(1) Conversion can be processed as a GX Devel oper function.
Conversion can be performed without closing the GX Developer because it is an
add-on function for the GX Developer.
(2) Data can be converted by file.
Conversions can be performed between commercial software (TEXT, CSV
format data) and the GX Developer (List or Device comments) at the file level.
(There is no need for copying and pasting.)
(3) Sequence programs can be created using comm er cial softw are.
When a program created using the TEXT,CSV format is converted to a List via
GX Converter, it may be used as an actual sequence program.
(4) Data can be created in any file format.
When creating a List or Device Comments using the TEXT,CSV format, the file
format can be crea te d fr eely.
1
TEXT editor,
Spreadsheet software
TEXT File
GX Converter
CSV File
Comment
1 - 1 1 - 1
GX Developer
List
Page 14

1 OVERVIEW
MEMO
1
MELSOFT
1 - 2 1 - 2
Page 15

2 SYSTEM CONFIGURATION AND SPECIFICATIONS
MELSOFT
2. SYSTEM CONFIGURATION AND SPECIFICATIONS
This chapter explains the operating environment and overall configuration of the GX
Converter.
2.1 Operating Environment
Item Description
Installation (Add-in) destination
1
Computer main unit Personal computer on which WindowsRoperates.
Free
space
Disk drive CD-ROM disk drive
Display 800 600 dot or more resolution 4
Operating system 3
1: GX Converter cannot be installed into GX Developer (SW0D5C-GPPW-E, SW1D5C -GPPW-E, SW2D5C -GPPW-E).
GX Converter becomes unusable if the version (SW0D5C -GPPW-E, SW1D5C -GPPW-E, SW 2D5C -GPPW-E) of GX
Developer (SW2D5C-GPPW-E or earlier) is reinstalled in the environment where GX Converter has already been
installed into GX Developer (SW3D5C-GPPW-E or later).
2: Free space of at least twice the size of the TEXT, CSV format file that will be read is required in the
WindowsRtemporary drive.
3: For details on compatible operating systems, refer to the operating environment of GX Developer.
4: Resolution of 1024 × 768 dots or more is recommended for Windows VistaRor WindowsR7.
CPU
Required memory
For installation 25MB or more
For operation
(Virtual memory)
The operating environment of GX Converter is explained.
Add-in to GX Developer (SW3D5C-GPPW-E, SW 8D5C-GPPW-C or later).
Refer to the following table "Used operating system and performance required for
personal computer".
10MB or more
2
R
Microsoft
MicrosoftRWindowsR98 Operating System
MicrosoftRWindowsRMillennium Edition Operating System
Microsoft
MicrosoftRWindowsR2000 Professional Operating System
MicrosoftRWindowsRXP Professional Operating System
Microsoft
Microsoft
MicrosoftRWindows VistaRHome Premium Operating System
Microsoft
MicrosoftRWindows VistaRUltimate Operating System
Microsoft
MicrosoftRWindowsR7 Starter Operating System
MicrosoftRWindowsR7 Home Premium Operating System
Microsoft
MicrosoftRWindowsR7 Ultimate Operating System
MicrosoftRWindowsR7 Enterprise Operating System
WindowsR95 Operating System
R
Windows NTRWorkstation Operating System Version 4.0
R
WindowsRXP Home Edition Operating System
R
Windows VistaRHome Basic Operating System
R
Windows VistaRBusiness Operating System
R
Windows VistaREnterprise Operating System
R
WindowsR7 Professional Operating System
2
2 - 1 2 - 1
Page 16
2 SYSTEM CONFIGURATION AND SPECIFICATIONS
2
WindowsR95 PentiumR133MHz or more 32MB or more
WindowsR98 PentiumR133MHz or more 32MB or more
WindowsRMe PentiumR150MHz or more 32MB or more
Windows NTRWorkstation 4.0 PentiumR133MHz or more 32MB or more
WindowsR2000 Professional PentiumR133MHz or more 64MB or more
WindowsRXP PentiumR300MHz or more 128MB or more
Windows VistaR PentiumR1GHz or more 1GB or more
WindowsR7 PentiumR1GHz or more 1GB or more
Operating system
Used operating system and performance required for personal computer
POINT
• When WindowsRXP, Windows VistaRor WindowsR7 is used, the following new
functions cannot be used.
If any of the following new functions is used, this product may not operate
normally.
Start of application in Windows
Fast user switching
Remote desktop
Big fonts (Details setting of Screen properties)
Additionally, 64-bit Windows
available.
• In Windows Vista
higher.
• When Windows
Windows XP Mode
R
and WindowsR7, log in as a user having User authority or
R
7 is used, the following new functions cannot be used.
Windows Touch
• To install GX Converter to a Windows
Developer Version 8.91V or later.
2.2 Overall Configuration
MELSOFT
Performance Required for Personal Computer
CPU Required memory
R
compatible mode
R
XP, Windows VistaRand WindowsR7 are not
R
7-based personal computer, use GX
This section explains the overall configuration of the GX Converter.
Peripheral device
A personal computer with
GX Developer preinstalled
GX Converter
2 - 2 2 - 2
Page 17
3 INSTALLATION AND UNINSTALLATION
MELSOFT
3. INSTALLATION AND UNINSTALLATION
This chapter explains how to install and uninstall the product.
3.1 Installation
3.1.1 Installing Procedure
Install GX Converter in the following procedure.
New installation
Install the product.
Register the name and company.
Register the product ID.
Boot the product.
Check whether the product has been
installed properly.
Refer to
Section 3.1.2 (1).
Refer to
Section 3.1.2 (3).
Install the product.
Register the name and company.
Register the product ID.
Register the product ID of the older
product.
Updating
Uninstall the older version.
Refer to the startup
manual of the older
version product.
Refer to
Section 3.1.2 (1).
3
Complete
Boot the product.
Check whether the product has been
installed properly.
Complete
Refer to
Section 3.1.2 (3).
POINT
If the DLL overwrite confirmation message appears during installation, choose
"Yes" to overwrite the DLLs.
If they are not overwritten, the product may not be run properly.
3 - 1 3 - 1
Page 18
3 INSTALLATION AND UNINSTALLATION
3.1.2 Installing Operation
MELSOFT
3
Before starting installation, confirm the following.
POINT
• Terminate all the other applications running under MicrosoftRWindowsROperating
System before installation.
• The installer may not work normally because the update program of operating
system or other companies’ software such as Windows Update and java update
may start automatically. Please install the driver after changing the setting of the
update program not to start automatically.
• When using Windows NT
Microsoft
Windows Vista
Administrator (for computer management).
R
WindowsR2000 Professional Operating System, WindowsRXP,
R
, WindowsR7, logon as a user who has the attributes of an
R
Workstation Operating System Version 4.0,
• Install GX Developer (SW3D5C-GPPW-E, SW8D5C-GPPW-C or later) first
before installing GX Converter.
• If the license key FD is valid, installing this product enables updating.
(The license volume of the older version decreases by 1 license.)
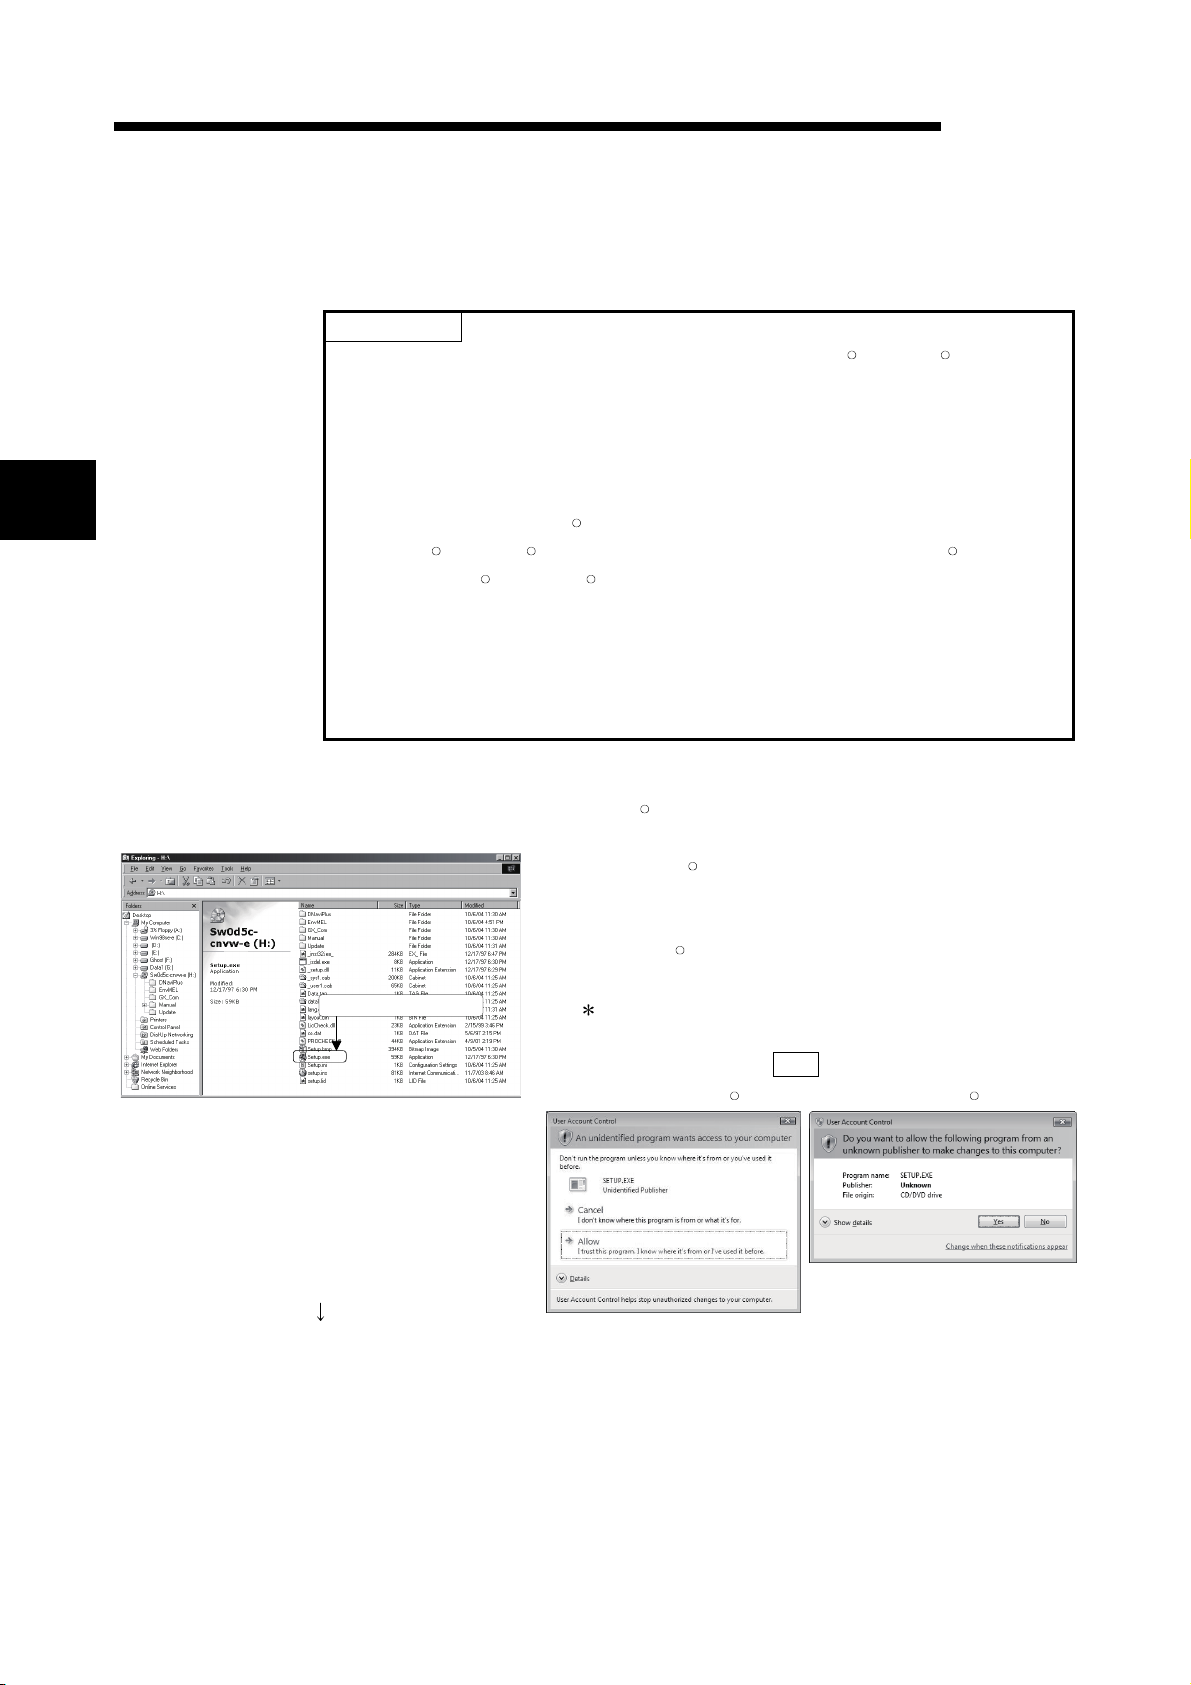
(1) Installing the product
(The screens of WindowsR98 are used in the explanation.)
1) Start Windows
disk has been inserted.
Double-click "Setup.exe".
On Windows
Double-click here
[Windows Explorer].
: When user account control is enabled, the following
screen appears.
Click "Allow" or the Yes button.
<Windows Vista
(To the next page)
R
Explorer and click the drive in which the
R
Explorer, choose [Start]-[Programs]-
R
> <WindowsR7>
3 - 2 3 - 2
Page 19
3 INSTALLATION AND UNINSTALLATION
(From the previous page)
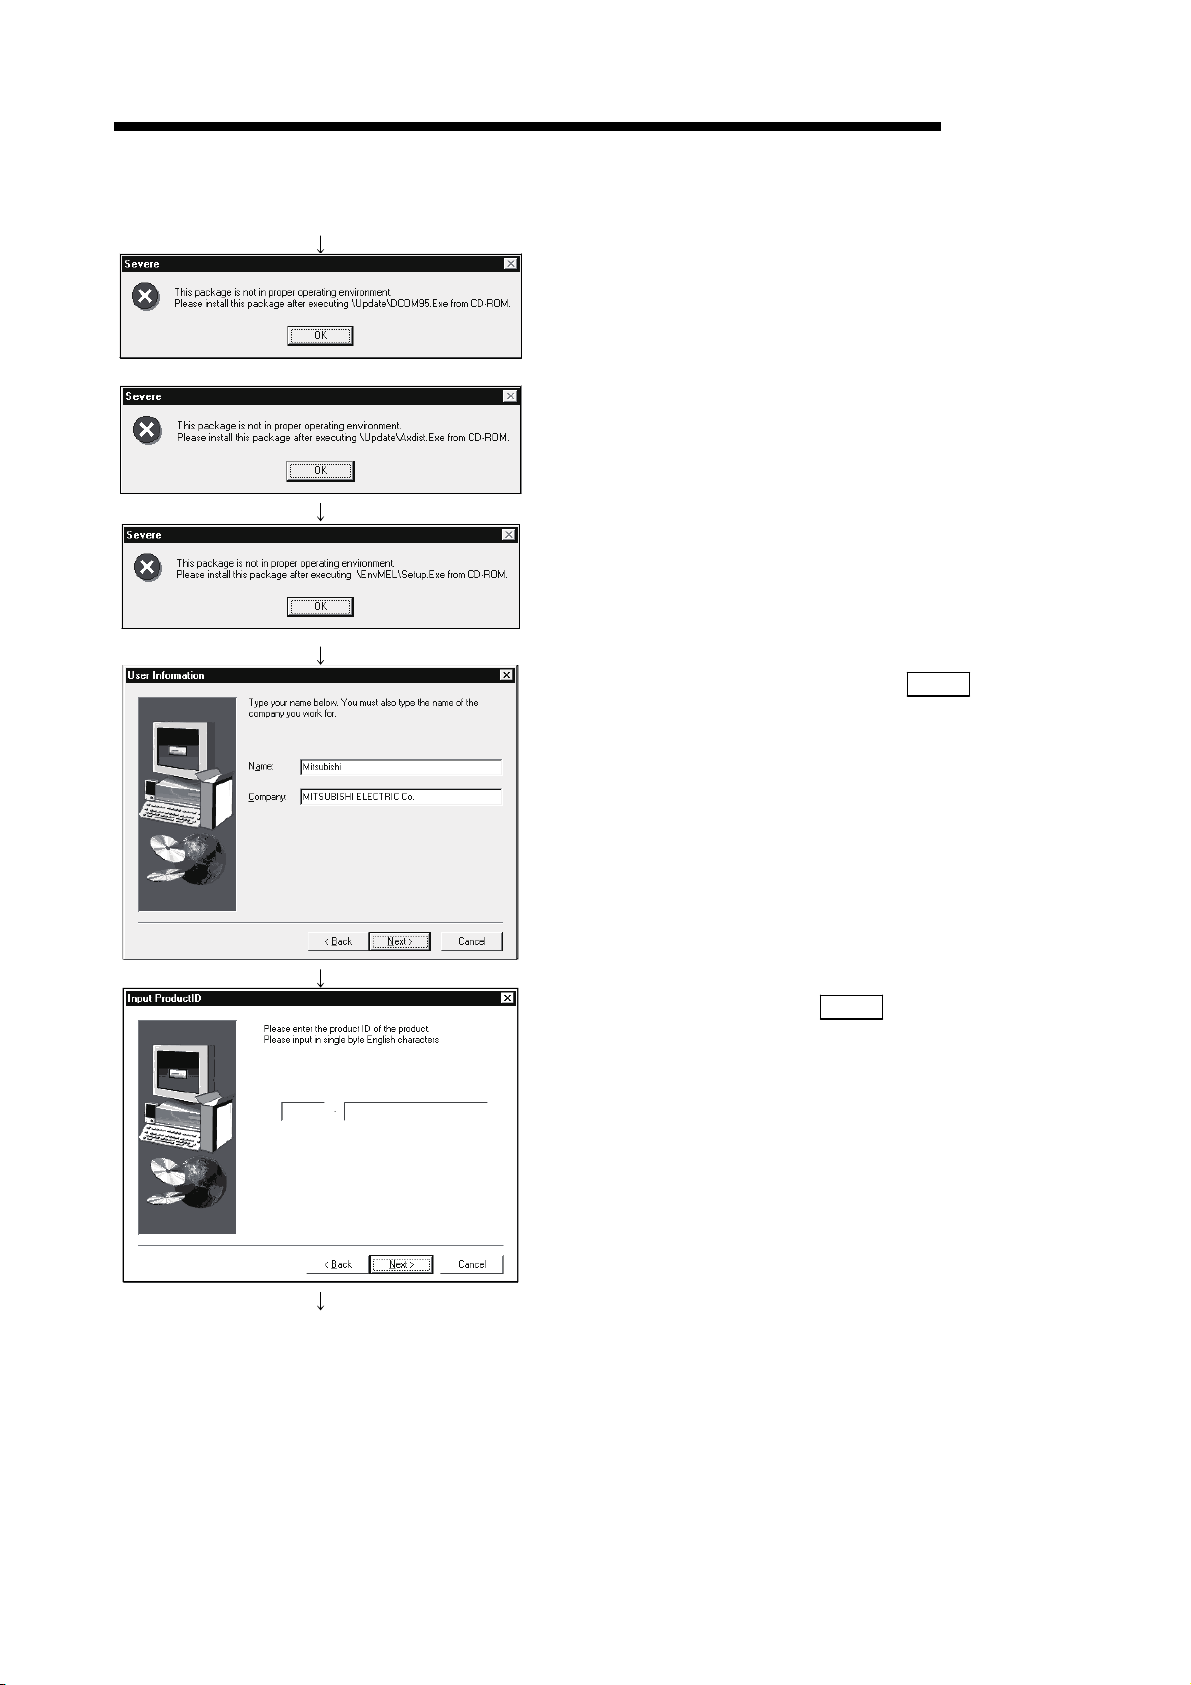
2) If either of the left screens appears, perform operation in
accordance with the instructions given in (a) in "(2) When
message appears at start of installation".
After the operation is over, restart installation operation.
If the left screen appears, perform operation in accordance
with the instructions given in (b) in "(2) When message
appears a start of installation".
After the operation is over, restart installation operation.
3) Type the name and company, and click Next>
MELSOFT
.
As the confirmation dialog box appears, perform operation
in accordance with the message.
(To the next page)
4) Type the product ID and click Next>
The product ID is described on the "License agreement"
included in the product.
.
3 - 3 3 - 3
Page 20
3 INSTALLATION AND UNINSTALLATION
(From the previous page)
5) If either of the left screens appears, perform operation in
accordance with the instructions given in (a) in "(2) When
message appears at start of installation".
After the operation is over, restart installation operation.
6) When the product is to be updated, the screen shown on
the left appears. Type the product ID of the older product
and click Next>
The product ID is described on the "Software Registration
Card" or "License agreement" included in the older
product.
When newly installing the product, the left screen does not
appear.
MELSOFT
.
(To the next page)
7) Specify the installation Destination Folder.
If the installation Destination Folder is correct, click
Next>
.
If you change the destination folder, click Browse and
specify a new drive and folder.
: If the following screen appears, click "Install this driver
software anyway".
This screen may appear in several times.
3 - 4 3 - 4
Page 21
3 INSTALLATION AND UNINSTALLATION
(From the previous page)
The either of the following screens may appear behind the
Windows Security screen. Then, press the Alt
keys to bring it to the front.
Click OK
on the following screens.
MELSOFT
+ Tab
: For WindowsR XP, the following screen appears at
first installation.
Click Continue
We checked operations in Windows
.
R
never occur after installation.)
The following screen may appear behind another
screen. Then, press the Alt
to the front.
+ Tab keys to bring it
XP (Problems
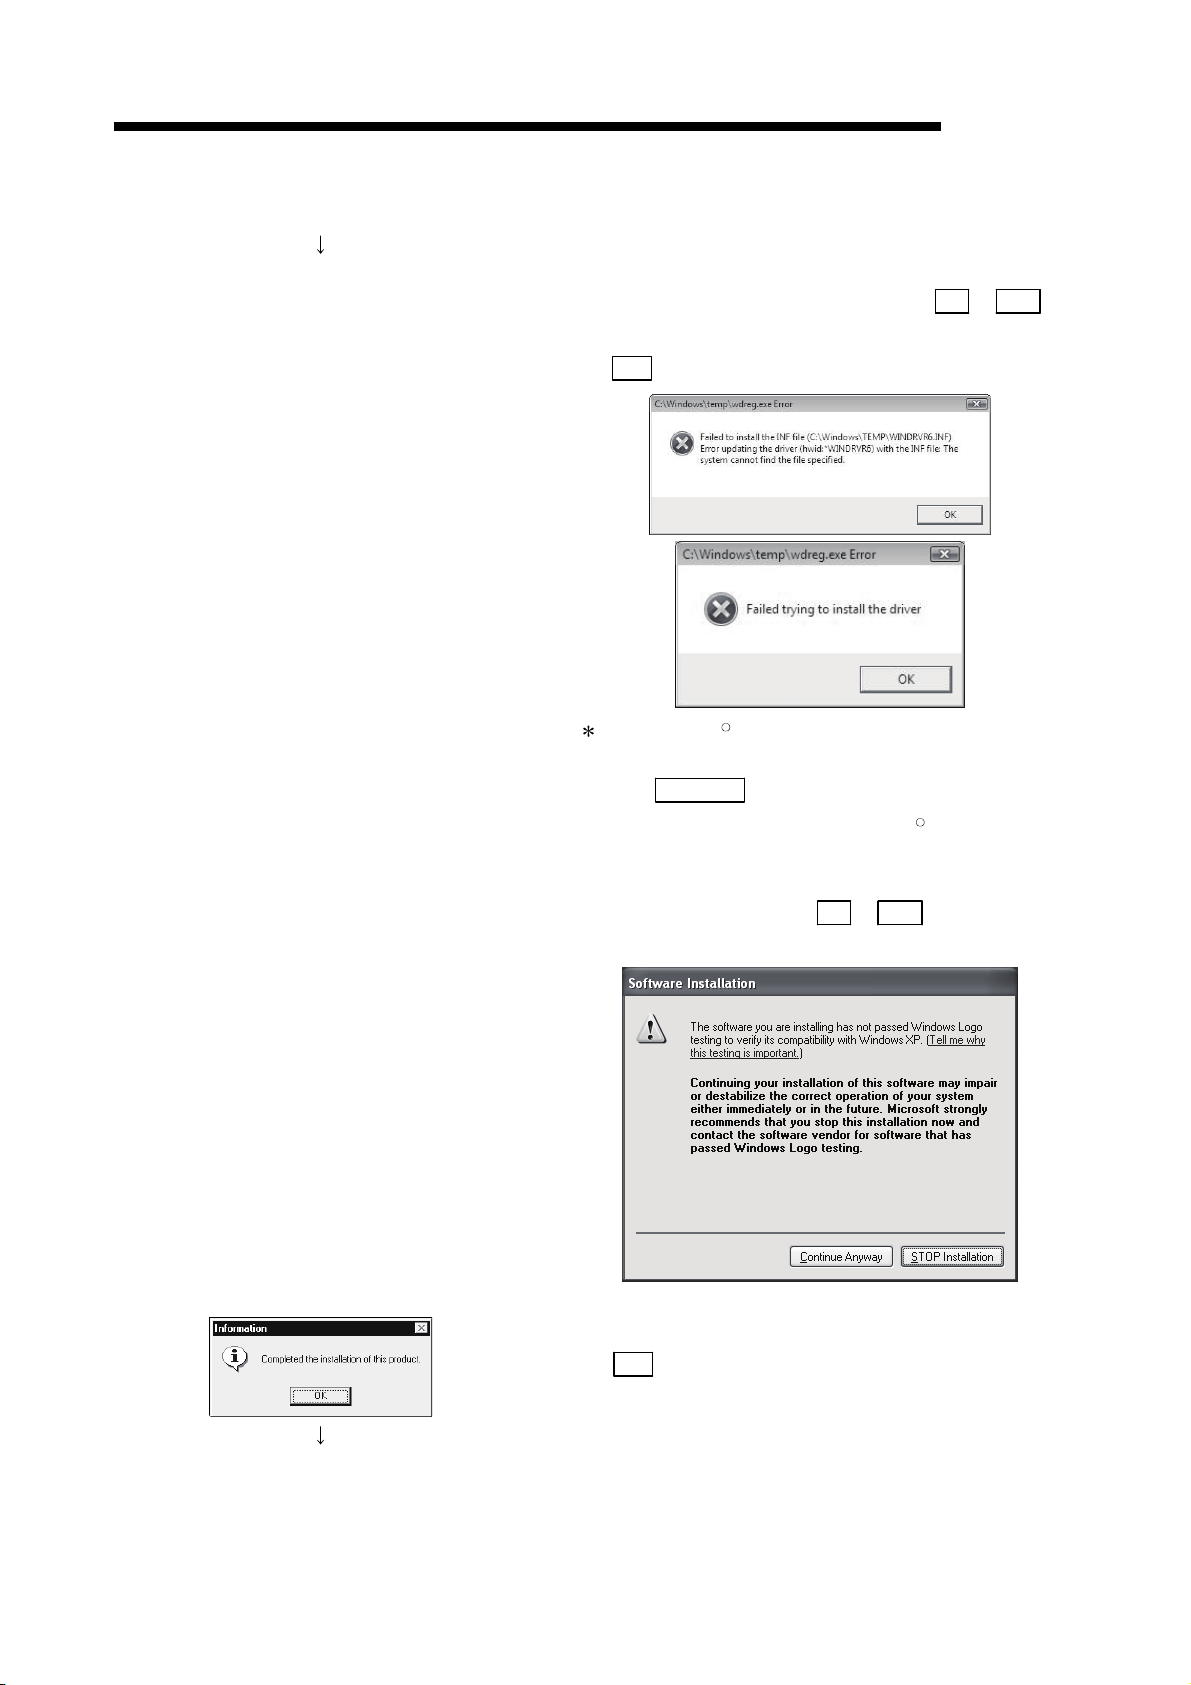
8) This completes installation.
Click OK
.
(To the next page)
3 - 5 3 - 5
Page 22
3 INSTALLATION AND UNINSTALLATION
(From the previous page)
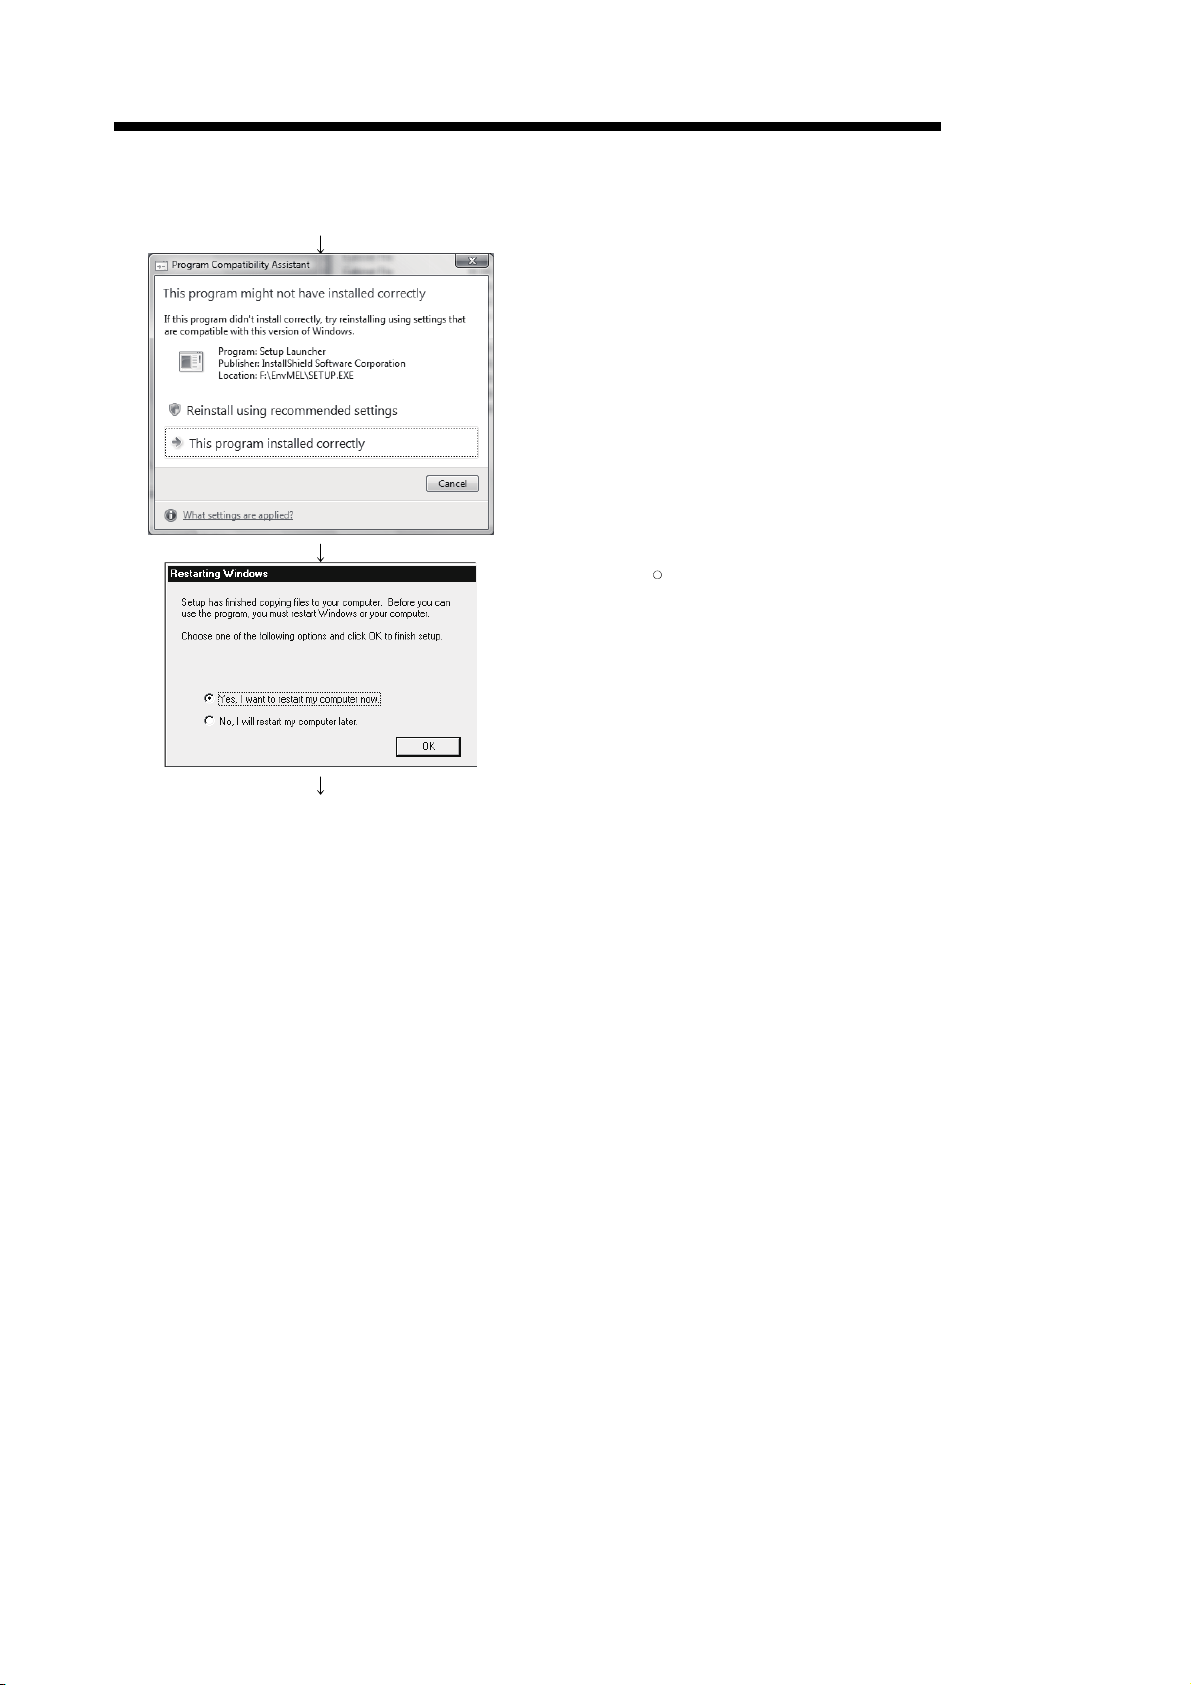
9) When the left screen appears, regardless of the installation
result, choose "This program installed correctly". Do not
choose "Reinstall using recommended settings", because
the installer installs an incorrect module.
If it is selected, reinstall the product following the instruction
described in the point on the next page.
10) Windows
R
must be rebooted if the screen shown on the
left appears.
MELSOFT
(Completion)
3 - 6 3 - 6
Page 23
3 INSTALLATION AND UNINSTALLATION
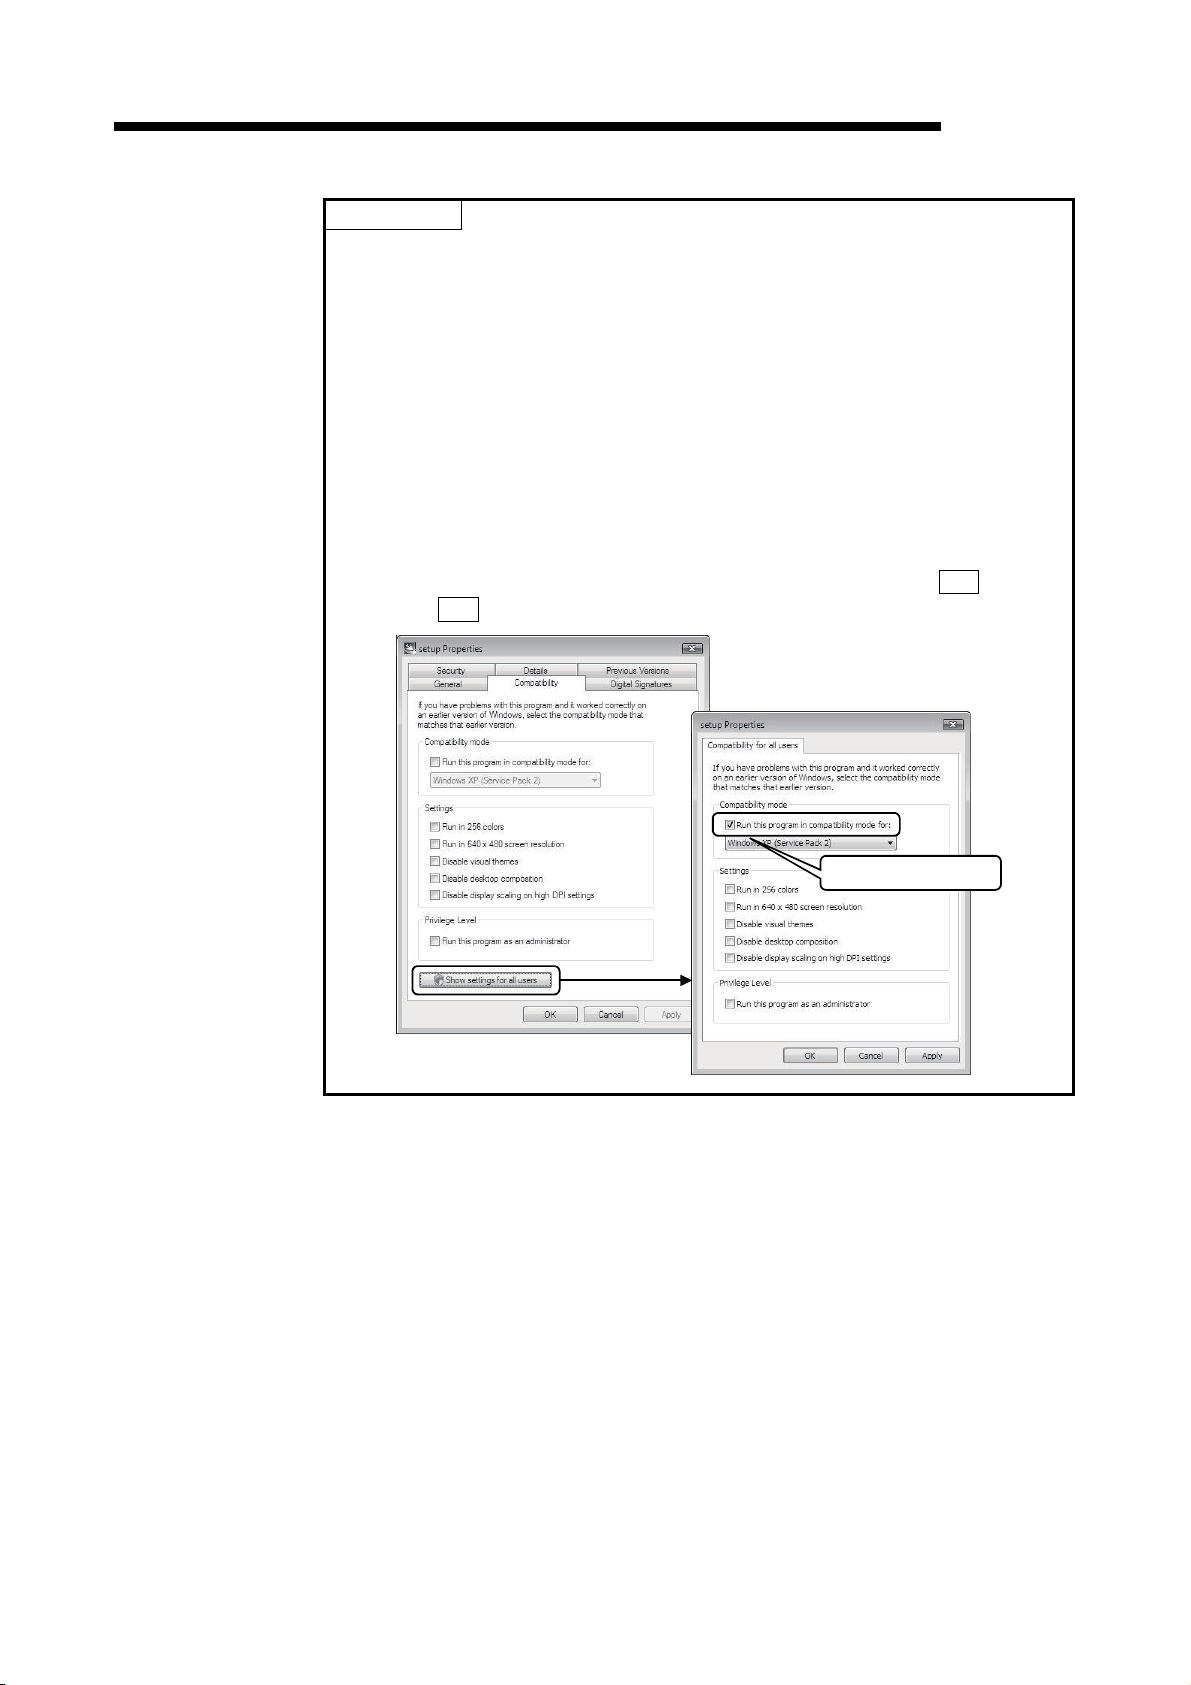
POINT
Note the following instructions when the installer is started from the hard disk drive
of the personal computer.
If the "Program Compatibility Assistant" screen appears after the installation, select
"This program installed correctly".
If "Reinstall using recommended settings" is selected by mistake, 'Windows XP
compatibility mode' is set automatically.
Disable the 'Windows XP compatibility mode' by following the procedure described
below, and perform the reinstallation.
1. Right-click on the setup.exe icon of the installation target in the Windows
explorer, and open the "setup Properties" screen.
2. Select the "Compatibility" tab and click the "Show settings for all users" button.
3. Uncheck the "Run this program in compatibility mode for:" check box of
compatibility mode in the "Compatibility for all users" tab and click the OK button.
4. Click the OK button on the "setup Properties" screen.
MELSOFT
Uncheck the check box.
3 - 7 3 - 7
Page 24

3 INSTALLATION AND UNINSTALLATION
(2) When message appears at start of installation
When the installation of this product starts, the "This package is not in proper
operating environment" message appears, disabling normal completion of
installation.
In such a case, close all applications and perform the (a) to (c) operation.
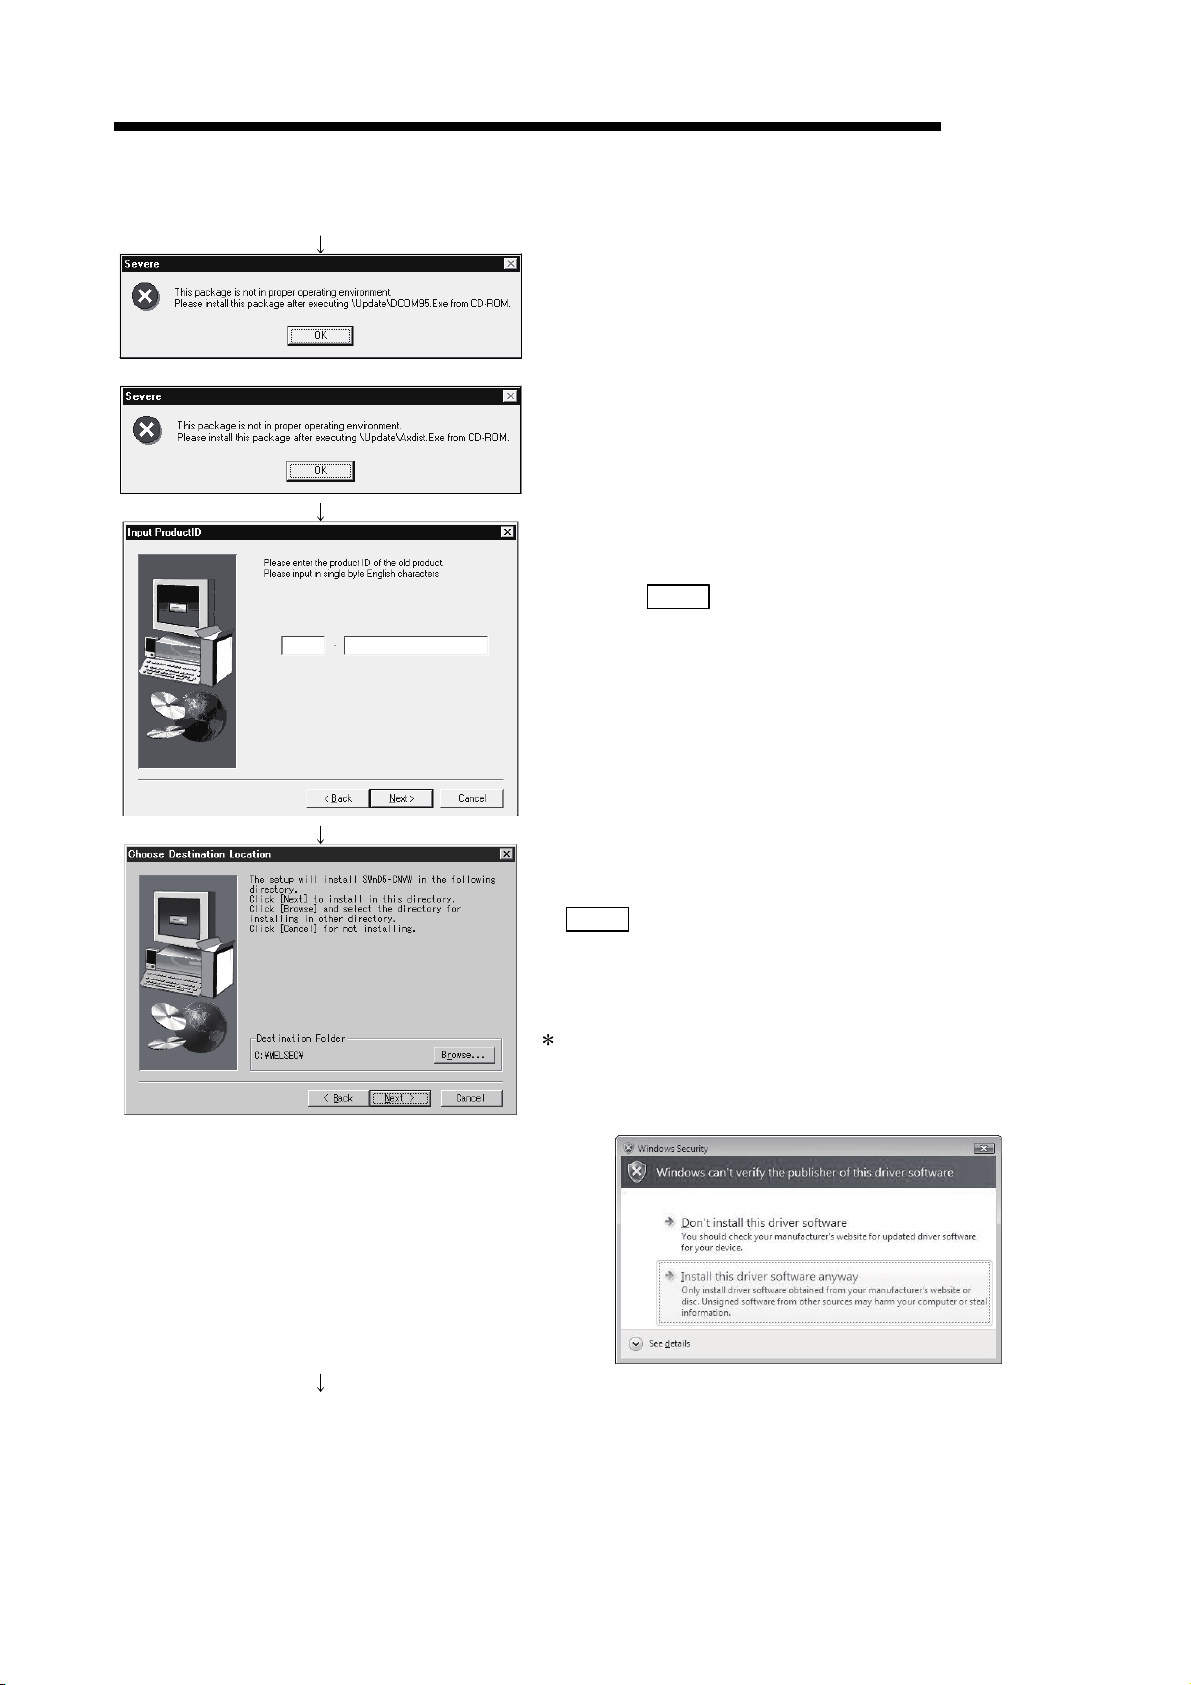
(a) Installation of dcom95.exe or JAAXDIST.EXE
Execute "/Update/dcom95.exe" or "/Update/Jaaxdist.exe" within the product
(CD-ROM).
Then, restart the personal computer and install the product.
The exe file to be executed on the corresponding operating system is
indicated below.
MicrosoftRWindowsR95 Operating System
Microsoft
MicrosoftRWindows NTRWorkstation Operating System Version 4.0 JAAXDIST.EXE
R
WindowsR98 Operating System
(dcom95.exe and JAAXDIST.EXE are in the "Update" folder on CD-ROM.)
MELSOFT
OS File name
dcom95.exe
JAAXDIST.EXE
3 - 8 3 - 8
Page 25

3 INSTALLATION AND UNINSTALLATION
(b) Installation of EnvMEL
Execute "/EnvMEL/Setup.exe" within the product (CD-ROM).
Then, install the product.
: When user account control is enabled, the following screen appears.
Click "Allow" or the Yes button.
<Windows Vista
: After executing the above exe file, reinstall the product. If this product is
not installed properly at this time, reboot the personal computer.
When the following screen appears, regardless of the installation result,
choose "This program installed correctly".
Do not choose "Reinstall using recommended settings", because the
installer installs an incorrect module.
R
> <WindowsR7>
MELSOFT
3 - 9 3 - 9
Page 26

3 INSTALLATION AND UNINSTALLATION
(3) Confirming that the product has booted
1) Select "Do not use label" and open a new project on GX
Developer.
For details, refer to "GX Developer Operating Manual".
2) Confirm the [Import from TEXT, CSV format file] menu is
activated in the [Project] – [Import file] menu.
MELSOFT
3 - 10 3 - 10
Page 27

3 INSTALLATION AND UNINSTALLATION
3.2 Uninstallation
This section describes the operation for removing the product form the hard disk.
Uninstallation of the product
1) From the Control Panel, choose and double-click
"Add/Remove Programs".
To display the Control Panel, choose [Start]-[Settings][Control Panel].
REMARKS
2) Select the software package to be deleted/modified.
Choose "GX Converter".
After selection, click Add/Remove...
REMARKS
(To the next page)
MELSOFT
When using W indowsR XP, choose "Add or Remove
Programs" from the Control Panel.
Chose "Uninstall a program" on the Control Panel in
Windows Vista
R
or WindowsR7.
To display the Control Panel, choose [Start] - [Control
Panel].
.
The screen shown on the left is the one for Windows
R
The screen displayed varies with the OS.
When using W indowsR 2000 Professional, WindowsR
XP, Windows Vista
R
or WindowsR7 perform the following
operation.
<For Windows
R
2000 Professional or WindowsRXP>
(a) Click "Change/Remove Programs".
(b) Click "GX Converter".
(c) Click Change/Remove .
98.
3 - 11 3 - 11
Page 28

3 INSTALLATION AND UNINSTALLATION
(From the previous page)
3) Check whether you will remove the software package or
not.
When uninstalling it , click Yes
Uninstallation starts.
When not uninstalling it, click No
MELSOFT
<For Windows Vista
R
or WindowsR7>
Select GX Converter on the "Uninstall or change a
program" screen, and click the Uninstall/Change
: When user account control is enabled in Windows
R
, the following screen appears.
Vista
Click the Continue button or the Yes button.
<Windows Vista
R
> <WindowsR7>
.
.
button.
(Completion)
This returns to the preceding screen.
: Components indecate the icons and files installed.
4) If the left screen has appeared, click the No To All
button.
Clicking the Yes
files of Windows
or Yes To All button deletes all shared
R
compatible MELSOFT software.
Therefore, when deleting the product only, click
No To All
button.
5) Click OK
when the message indicating the end of
removal has appeared.
When the message indicating completion has appeared,
uninstallation is complete.
3 - 12 3 - 12
Page 29

3 INSTALLATION AND UNINSTALLATION
MEMO
MELSOFT
3 - 13 3 - 13
Page 30
4 CONVERTING TEXT,CSV FORMAT DATA TO GX Developer FORMAT
r
DATA
MELSOFT
4. CONVERTING TEXT,CSV FORMAT DATA TO GX Developer FORMAT DATA
This function converts TEXT,CSV format data to List or Device comments, which are
the formats that can be handled by GX Developer.
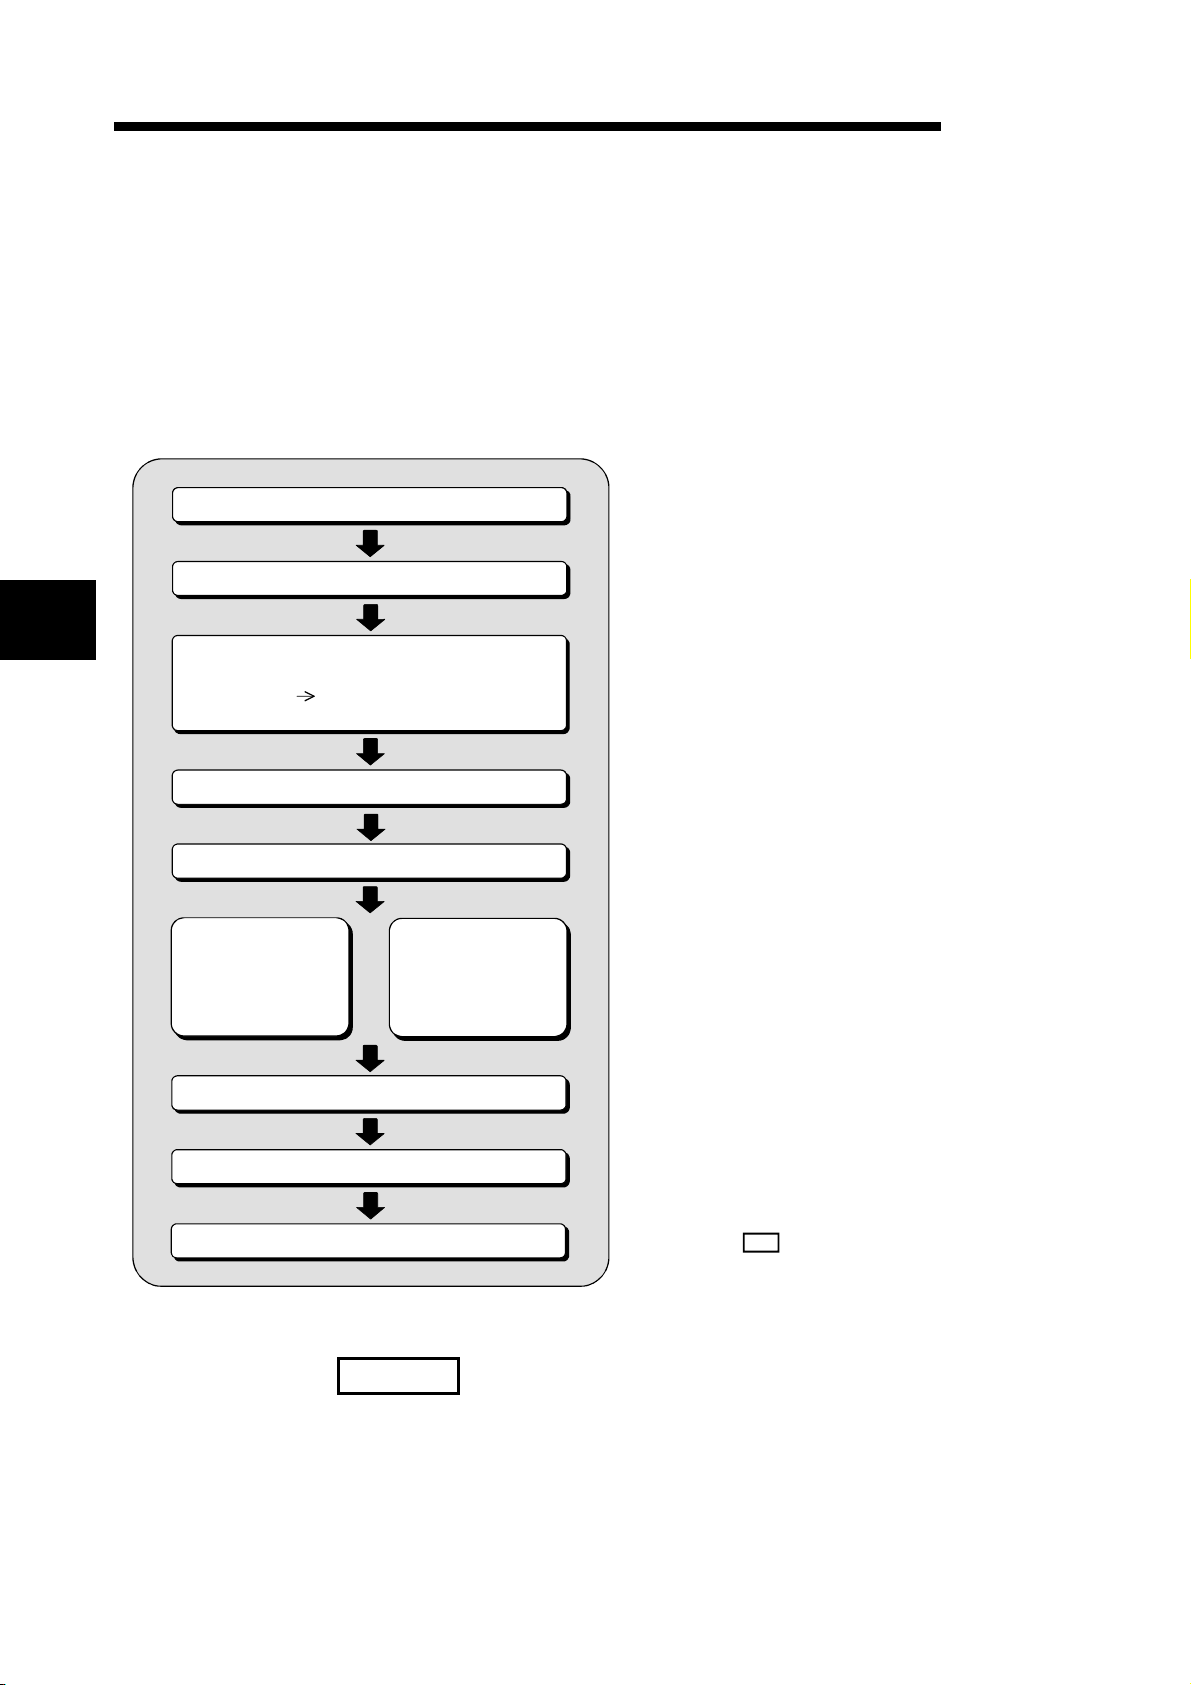
The following illustrates the operation procedure for converting TEXT,CSV format data
to a List or Device comments so that the GX Developer can use.
• Start GX Developer
4
• Open project
• Start GX Converter
Select Menu
[Import file]
[Import from TEXT, CSV format file]
• Open file
• Set conversion source data
• Set delimiter location
When converting
TEXT data
• Set column data
• • • • • Open the project that contains the data to be
converted or a new project in GX Developer and select
[Import from TEXT, CSV format file].
• • • • • See Section 4.1, "Converting TEXT data to GX Develope
format data" for details on the conversion of TEXT files.
See Section 4.2, "Converting CSV data to GX Developer
format data" for details on the conversion of CSV files.
• Set delimiter
When converting
CSV data
• Set export destination data
• Close GX Converter
• • • • • Click on the button in the "Completed"
dialog box to end GX Converter.
OK
REMARK
See Appendix 3, "Converting CADIF character-string data" for information on
reading CADIF character-string data.
4 - 1 4 - 1
Page 31

4 CONVERTING TEXT,CSV FORMAT DATA TO GX Developer FORMAT
DATA
4.1 Converting TEXT Format Data to GX Developer Format Data
This section explains the operation of converting TEXT format data to a List or Device
comments, which are the formats the GX Developer can use.
4.1.1 Converting TEXT format data to a list
The following explains the operation of converting TEXT format data to a List, which
can be used by the GX Developer.
POINT
• See Section 6.2.1, "When a List is import by the GX Developer" for details on file
formats.
• There may be some cases where Instruction, I/O (Device), etc. cannot be
converted, depending on the CPU type of the project opened in the GX Developer.
See "GX Developer Operating Manual" for details.
MELSOFT
4
(1) Start GX Developer
Start GX Developer
Open project
(2) Start GX Converter
(Continued on the next page)
Start GX Developer and open the project
containing the TEXT format data you wish to
import.
Start GX Converter.
1) Start GX Converter by clicking on
[Project] —
1)
[Import file] —
[Import from TEXT, CSV format file].
4 - 2 4 - 2
Page 32

4 CONVERTING TEXT,CSV FORMAT DATA TO GX Developer FORMAT
DATA
(From the previous page)
(3) Open file
Select the TEXT format file you wish to convert to
a GX Developer List.
MELSOFT
(4) Set conversion source data
1)
2)
Caution
• About characters that cannot be displayed in the Data
Preview area
Characters not displayed will be displayed with " · ".
• When setting conversion row
The program cannot proceed if conversion rows are set
as "Start Import at Row > End Import at Row."
• About tabs
Select "CSV" in step 1) for files whose contents are
separated by tabs.
See Section 6.1, " About TEXT,CSV format files" for
details.
Set the format and conversion range of the data to
be converted.
1) Select " TEXT."
2) Select "List."
3)
3) Enter the Start Import at Row.
4)
4) Enter the End Import at Row.
If the number of rows to be converted is not
entered, conversion will take place until the end
of the file is reached.
5) When the setting is complete, proceed to the
next step by clicking the NEXT>
5)
button.
(Continued on the next page)
4 - 3 4 - 3
Page 33

4 CONVERTING TEXT,CSV FORMAT DATA TO GX Developer FORMAT
DATA
(From the previous page)
(5) Set delimiter location
Separate the data to be converted into columns.
1) Separate the data in the Data Preview area.
(Can be separated at a maximum of 16
locations.)
• Separating procedure
Click on the location to be separated.
An arrow is displayed in the delimiter location.
1)
2)
• Changing delimiter locations
Drag the arrow to change the delimiter
location.
• Deleting delimiter
Double-click the arrow to clear the delimiter.
2) When the setting is complete, proceed to the
next step by clicking the NEXT>
MELSOFT
button.
(6) Set column data
Click !
1)
Caution
• When setting data format
When data format are overlapped, the program cannot
proceed to the next step if the overlapping data format is
other than Instruction, Statement, or Note.
When "Do not Import (Skip)" is selected, conversion will
not take place even if data is present in the column.
Set the data types for the columns.
1) Set data types in the Data Preview area.
Select a column (the selected column becomes
highlighted in black) by clicking the Data
Preview area of each data column.
Next, select a column data format from
"Column Data Format" in the upper-right area.
To select multiple settings, repeat this
operation.
2) When the setting is complete, proceed to the
next step by clicking the NEXT>
2)
button.
(Continued on the next page)
4 - 4 4 - 4
Page 34

4 CONVERTING TEXT,CSV FORMAT DATA TO GX Developer FORMAT
2
4
DATA
(From the previous page)
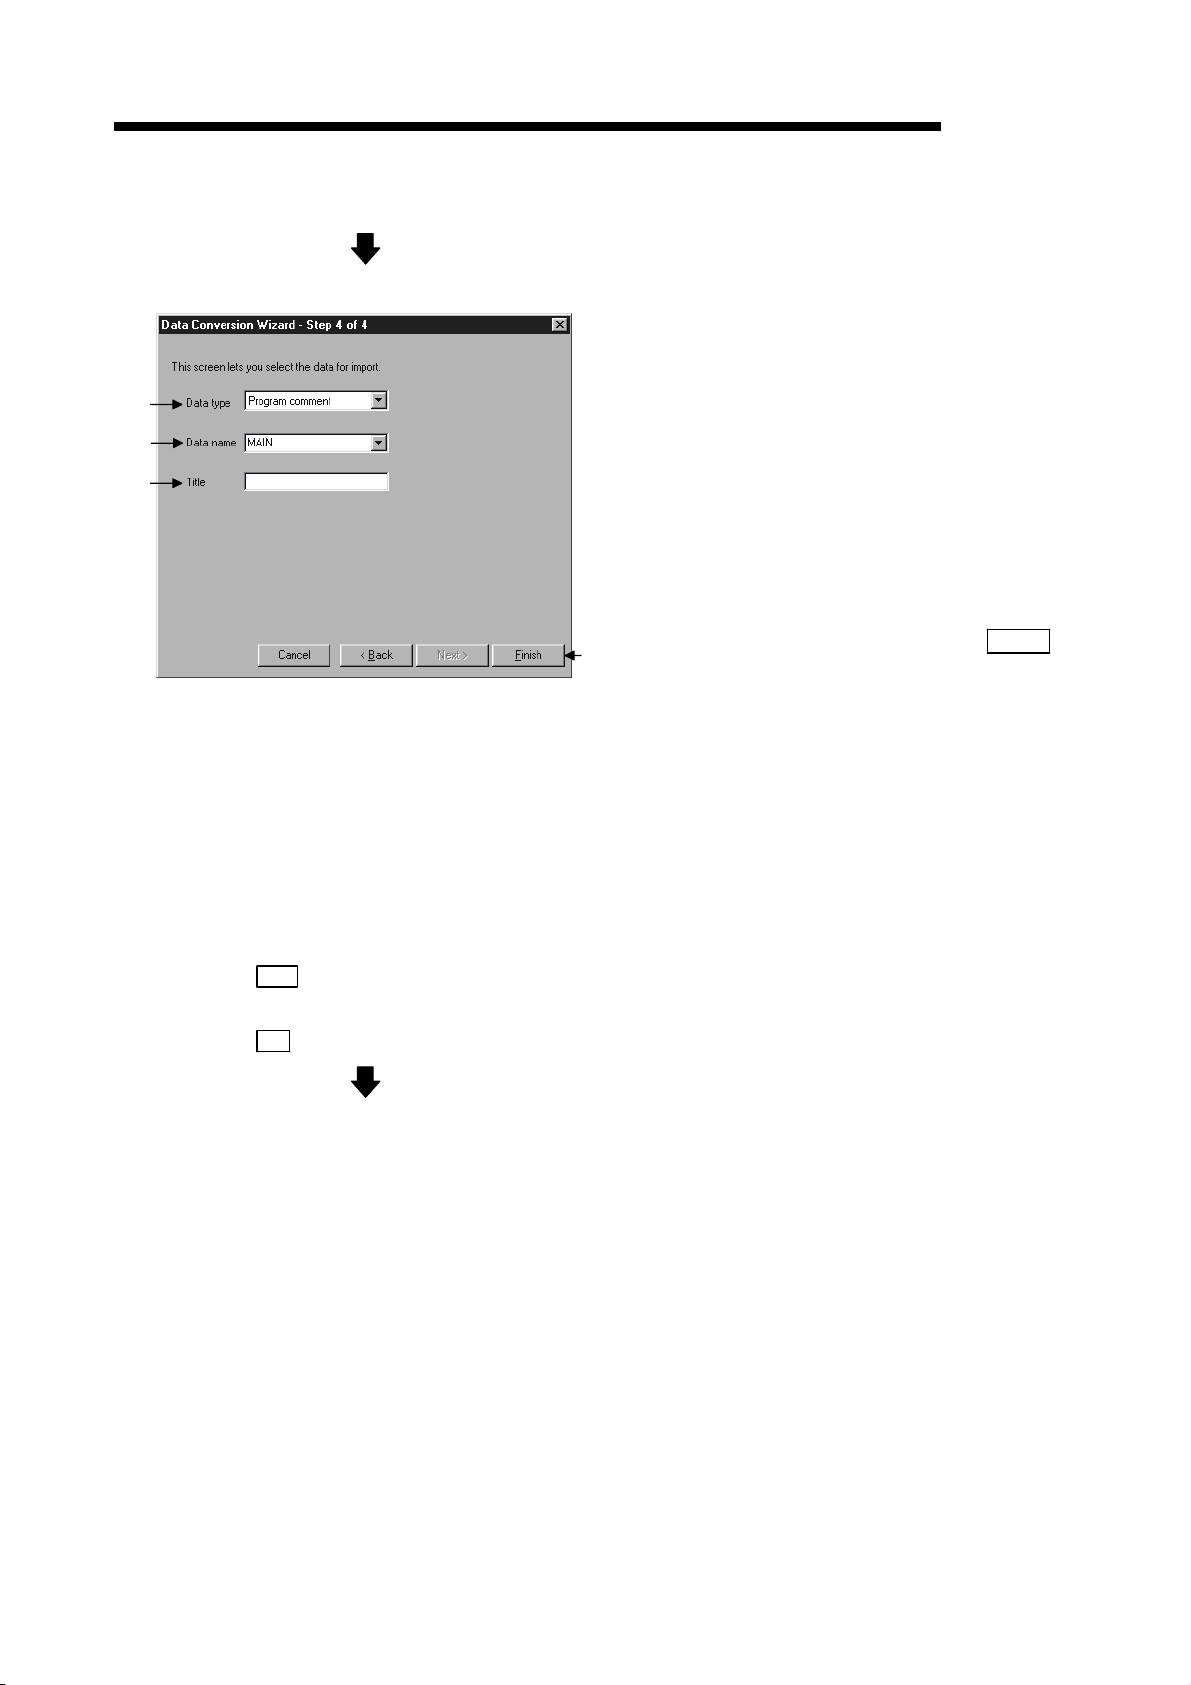
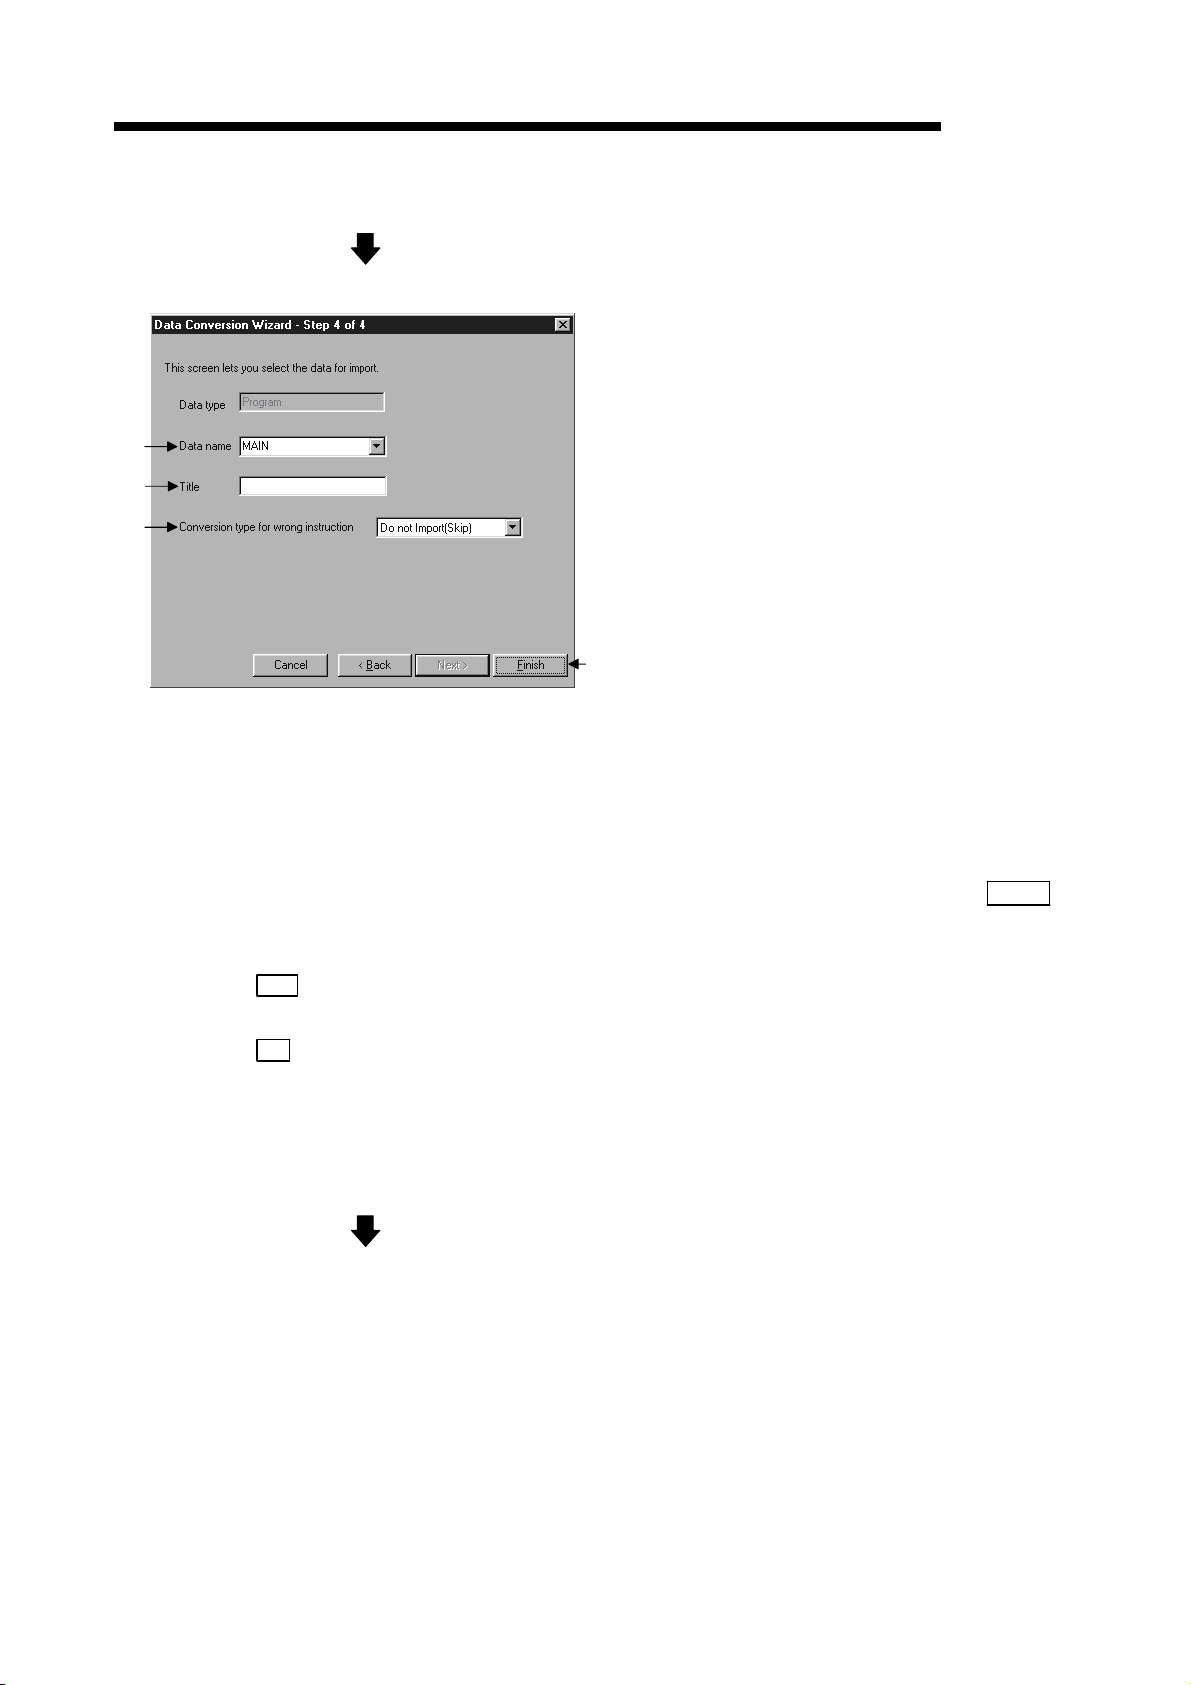
(7) Set export destination data
Set which project data within the GX Developer
the converted data is to be export.
1)
)
3)
)
Caution
• When entering a data name
If the PLC series for the project is a QnA Series, the data
name must be 8 characters or less. If the PLC series for
the project is A Series,FX Series, or Motion (SCPU), only
the predetermined names such as MAIN and SUB1 can
be used.
See "
• When an existing data name is entered or selected
An overwrite verification dialog box is displayed.
Click on the Yes
data.
Click on the No button to end GX Converter.
• When selecting a conversion method
When a conversion error is generated, the content of the
conversion error will be displayed after "(8) Conversion
proces" , regardless of selecting of the Conversion
type for wrong instruction.
GX Developer Operating Manual" for details.
button to discard and overwrite the old
1) Select common comment or comment by
program if the data type is device comment.
(This setting is available for device comment
only.)
2) Specify a data name for the data to be
5)
converted.
Enter or select a data name.
The entered data name is export to the project
that is currently open in the GX Developer.
3) Enter a Title for the data to be converted.
4) Select a Conversion type for wrong instruction.
• Do not Import (Skip)
Invalid instructions are disregarded and no
conversion takes place.
• To line statements
Invalid instructions are converted to line
statements.
• To invalid instructions
Invalid instructions are converted as
instruction code errors.
5) When the setting is complete, execute the
conversion processing by clicking the Finish
button.
MELSOFT
(Continued on the next page)
4 - 5 4 - 5
Page 35

4 CONVERTING TEXT,CSV FORMAT DATA TO GX Developer FORMAT
DATA
(From the previous page)
(8) Conversion proces
This processing converts TEXT format data to a
List and registers it.
MELSOFT
Caution
• When a Cancel
A cancel verification dialog box is displayed.
Clicking the Yes button stops the conversion
processing.
No data will be created in the GX Developer.
When overwriting, the previous data remains.
Clicking the No
processing.
button is clicked
button continues the conversion
(9) Close GX Converter
Conversion
error generated
• See Section 4.3,
"Handling of conversion
errors."
When each Cancel
button is pressed, the
corresponding conversion processing will be
aborted.
Clicking the OK button ends the conversion
processing and closes GX Converter.
If a conversion error is displayed, see to Section
4.3, "Handling of conversion errors" for details.
4 - 6 4 - 6
Page 36

4 CONVERTING TEXT,CSV FORMAT DATA TO GX Developer FORMAT
DATA
4.1.2 Converting TEXT Format Data to Device Comments
The following explains the operation of converting TEXT format data to Device
comments, which are the formats the GX Developer can use.
POINT
• See Section 6.2.2, "When Device comments are import by the GX Developer" for
details on file formats.
• There may be some cases where Instruction, I/O (Device), etc. cannot be
converted, depending on the CPU type of the project opened in the GX Developer.
See "GX Developer Operating Manual" for details.
(1) Start GX Developer
MELSOFT
Start GX Developer
Open project
(2) Start GX Converter
(Continued on the next page)
Start GX Developer and open the project
containing the TEXT format data you wish to
import.
Start GX Converter.
1) Start GX Converter by clicking on
[Project] —
1)
[Import file] —
[Import from TEXT, CSV format file].
4 - 7 4 - 7
Page 37

4 CONVERTING TEXT,CSV FORMAT DATA TO GX Developer FORMAT
DATA
(From the previous page)
(3) Open file
Select the TEXT format file you wish to convert to
a GX Developer Device comments.
MELSOFT
(4) Set conversion source data
1)
2)
Caution
• About characters that cannot be displayed in the Data
Preview area
Characters not displayed will be displayed with " · ".
• When setting conversion row
The program cannot proceed if conversion rows are set
as "Start Import at Row > End Import at Row."
• About tabs
Select "CSV" in step 1) for files whose contents are
separated by tabs.
See Section 6.1, "About TEXT,CSV format files" for
details.
Set the format and conversion range of the data to
be converted.
1) Select "TEXT."
2) Select "Comment."
3)
3) Enter the Start Import at Row.
4)
4) Enter the End Import at Row.
If the number of rows to be converted is not
entered, conversion will take place until the
end of the file is reached.
5) When the setting is complete, proceed to the
next step by clicking the NEXT>
5)
button.
(Continued on the next page)
4 - 8 4 - 8
Page 38

4 CONVERTING TEXT,CSV FORMAT DATA TO GX Developer FORMAT
)
DATA
(From the previous page)
(5) Set delimiter location
Separate the data to be converted into columns.
1) Separate the data in the Data Preview area.
(Can be separated at a maximum of 16
locations.)
• Separating procedure
Click on the location to be separated.
An arrow is displayed in the delimiter location.
1)
• Changing delimiter locations
Drag the arrow to change the delimiter
location.
• Deleting delimiter
2
Double-click the arrow to clear the delimiter.
2) When the setting is complete, proceed to the
next step by clicking the NEXT>
MELSOFT
button.
(6) Set column data
Click !
1)
Caution
• When setting data format
When data format are overlapped, the program cannot
proceed to the next step if the overlapping data format is
other than Device number.
When "Do not Import (Skip)" is selected, conversion will
not take place even if data is present in the column.
Set the data types for the columns.
1) Set data types in the Data Preview area.
Select a column (the selected column becomes
highlighted in black) by clicking the Data
Preview area of each data column.
Next, select a column data format from
"Column Data Format" in the upper-right area.
To select multiple settings, repeat this
operation.
2) When the setting is complete, proceed to the
next step by clicking the NEXT>
2)
button.
(Continued on the next page)
4 - 9 4 - 9
Page 39
4 CONVERTING TEXT,CSV FORMAT DATA TO GX Developer FORMAT
DATA
(From the previous page)
(7) Set export destination data
Set which project data within the GX Developer
the converted data is to be export.
MELSOFT
1)
2)
3)
4)
Caution
• When entering a data name
If the PLC series for the project is a QnA Series, the data
name must be 8 characters or less. If the PLC series for
the project is A Series, FX Series, or Motion (SCPU), only
the predetermined names such as MAIN and SUB1 can
be used.
See "
• When an existing data name is entered or selected
An overwrite verification dialog box is displayed.
Click on the Yes
GX Developer Operating Manual" for details.
button to discard and overwrite the
1) Select the data type for the data to be export.
2) Specify a data name for the data to be
converted.
Enter or select a data name.
The entered data name is export to the project
that is currently open in the GX Developer.
3) Enter a Title for the data to be export.
4) When the setting is complete, execute the
conversion processing by clicking the Finish
button.
old data.
Click on the No
button to end GX Converter.
(Continued on the next page)
4 - 10 4 - 10
Page 40

4 CONVERTING TEXT,CSV FORMAT DATA TO GX Developer FORMAT
DATA
(From the previous page)
(8) Conversion proces
This processing converts TEXT format data to
Device comments and registers them.
MELSOFT
Caution
• When a Cancel button is clicked during Converting
A cancel verification dialog box is displayed.
Clicking the Yes
processing.
No data will be created in the
When overwriting, the previous data remains.
Clicking the No
processing.
• When a Cancel button is clicked during Registering
A cancel verification dialog box is displayed.
Clicking the Yes button stops the conversion
processing.
The data registered until immediately before the
cancellation are created in the GX Developer.
When overwriting, the previous data are discarded.
Clicking the No
button stops the conversion
GX Developer.
button continues the conversion
button continues the conversion
When each Cancel
button is pressed, the
corresponding conversion processing will be
aborted.
processing.
(9) Close GX Converter
Conversion
error generated
• See Section 4.3,
"Handling of conversion
errors."
4 - 11 4 - 11
Clicking the OK button ends the conversion
processing and closes GX Converter.
If a conversion error is displayed, see Section 4.3,
"Handling of conversion errors" for details.
Page 41

4 CONVERTING TEXT,CSV FORMAT DATA TO GX Developer FORMAT
DATA
4.2 Converting CSV Format Data to GX Developer Format Data
This section explains the operation of converting CSV format data to a List or Device
comments, which are the formats the GX Developer can use.
4.2.1 Converting CSV format data to a list
The following explains the operation of converting CSV format data to a List, which can
be used by the GX Developer.
POINT
• See Section 6.2.1, "When a List is import by the GX Developer " for details on file
formats.
• There may be some cases where Instruction, I/O (Device), etc. cannot be
converted, depending on the CPU type of the project opened in the GX Developer.
See " GX Developer Operating Manual" for details.
MELSOFT
(1) Start GX Developer
Start GX Developer
Open project
(2) Start GX Converter
(Continued on the next page)
Start GX Developer and open the project
containing the CSV format data you wish to
import.
Start GX Converter.
1) Start GX Converter by clicking on
[Project] —
1)
[Import file] —
[Import from TEXT, CSV format file].
4 - 12 4 - 12
Page 42

4 CONVERTING TEXT,CSV FORMAT DATA TO GX Developer FORMAT
)
DATA
(From the previous page)
(3) Open file
Select the CSV format file you wish to convert to a
GX Developer List.
MELSOFT
(4) Set conversion source data
1)
2)
Caution
• About characters that cannot be displayed in the Data
Preview area
Characters not displayed will be displayed with " · ".
• When setting conversion row
The program cannot proceed if conversion rows are set
as "Start Import at Row > End Import at Row."
• About tabs
Select "CSV" in step 1) for files whose contents are
separated by tabs.
See Section 6.1, "About TEXT,CSV format files" for
details.
Set the format and conversion range of the data to
be converted.
1) Select "CSV."
2) Select "List."
3)
3) Enter the Start Import at Row.
4)
4) Enter the End Import at Row.
If the number of rows to be converted is not
entered, conversion will take place until the
end of the file is reached.
5) When the setting is complete, proceed to the
5
next step by clicking the NEXT>
button.
(Continued on the next page)
4 - 13 4 - 13
Page 43

4 CONVERTING TEXT,CSV FORMAT DATA TO GX Developer FORMAT
)
DATA
(From the previous page)
(5) Set delimiter location
Separate into columns by setting delimiters.
MELSOFT
1)
2)
Caution
• About data created using spreadsheet software
Commas are used as the delimiters in the data created
and edited using spreadsheet software.
(6) Set column data
1) Select a delimiter for each data. (Multiple
delimiters can be selected.)
• Tab
Select it when using tabs as delimiters.
• Semicolon
Select it when using semicolons as delimiters.
• Comma (default)
Select it when using commas as delimiters.
• Space
Select it when using spaces as delimiters.
3
• Other
When using a character other than above as
the delimiter, check the checkbox and enter
the character.
2) Verify the separated data in the Data Preview
area.
3) After the setting is complete, click on the
NEXT>
button and proceed to the next step.
Set the column data format.
Click !
1) Set data types in the Data Preview area.
Select a column (the selected column becomes
highlighted in black) by clicking the Data
Preview area of each data column.
Next, select a column data format from
1)
"Column Data Format" in the upper-right area.
To select multiple settings, repeat this
operation.
2) When the setting is complete, proceed to the
2)
next step by clicking the NEXT>
Caution
• When setting data format
When data format are overlapped, the program cannot
proceed to the next step if the overlapping data format is
other than Instruction.
When "Do not Import (Skip)" is selected, conversion will
not take place even if data is present in the column.
button.
(Continued on the next page)
4 - 14 4 - 14
Page 44
4 CONVERTING TEXT,CSV FORMAT DATA TO GX Developer FORMAT
DATA
(From the previous page)
(7) Set export destination data
Set which project data within the GX Developer
the converted data is to be export.
1) Specify a data name for the data to be
1)
2)
3)
4)
Caution
• When entering a data name
If the PLC series for the project is a QnA Series, the data
name must be 8 characters or less. If the PLC series for
the project is A Series, FX Series, or Motion (SCPU), only
the predetermined names such as MAIN and SUB1 can
be used.
See "
• When an existing data name is entered or selected
An overwrite verification dialog box is displayed.
Click on the Yes
GX Developer Operating Manual" for details.
button to discard and overwrite the old
converted.
Enter or select a data name.
The entered data name is export to the project
that is currently open in the GX Developer.
2) Enter a Title for the data to be export.
3) Select a Conversion type for wrong instruction.
• Do not Import (Skip)
Invalid instructions are disregarded and no
conversion takes place.
• To line statements
Invalid instructions are converted to line
statements.
• To invalid instructions
Invalid instructions are converted as
instruction code errors.
4) When the setting is complete, execute the
conversion processing by clicking the Finish
button.
MELSOFT
data.
Click on the No
• When selecting a conversion method
When a conversion error is generated, the content of the
conversion error will be displayed after "(8) Conversion
proces", regardless of the selecting of Conversion type
for wrong instruction.
button to end GX Converter.
(Continued on the next page)
4 - 15 4 - 15
Page 45

4 CONVERTING TEXT,CSV FORMAT DATA TO GX Developer FORMAT
DATA
(From the previous page)
(8) Conversion proces
This processing converts CSV format data to a
List and registers it.
MELSOFT
Caution
• When a Cancel
A cancel verification dialog box is displayed.
Clicking the Yes
processing.
No data will be created in the
When overwriting, the previous data remains.
Clicking the No
processing.
button is clicked
button stops the conversion
GX Developer.
button continues the conversion
(9) Close GX Converter
Conversion
error generated
• See Section 4.3,
"Handling of conversion
errors."
When each Cancel
button is pressed, the
corresponding conversion processing will be
aborted.
Clicking the OK button ends the conversion
processing and closes GX Converter.
If a conversion error is displayed, see Section 4.3,
" Handling of conversion errors" for details.
4 - 16 4 - 16
Page 46

4 CONVERTING TEXT,CSV FORMAT DATA TO GX Developer FORMAT
DATA
4.2.2 Converting CSV Format Data to Device Comments
The following explains the operation of converting CSV format data to Device
comments, which are the formats the GX Developer can use.
POINT
• See Section 6.2.2, "When Device comments are import by the GX Developer " for
details on file formats.
• There may be some cases where Instruction, I/O (Device), etc. cannot be
converted, depending on the CPU type of the project opened in the GX Developer.
See " GX Developer Operating Manual" for details.
(1) Start GX Developer
MELSOFT
Start GX Developer
Open project
(2) Start GX Converter
(Continued on the next page)
Start GX Developer and open the project
containing the CSV format data you wish to
import.
Start GX Converter.
1) Start GX Converter by clicking on
[Project] —
1)
[Import file] —
[Import from TEXT, CSV format file].
4 - 17 4 - 17
Page 47

4 CONVERTING TEXT,CSV FORMAT DATA TO GX Developer FORMAT
DATA
(From the previous page)
(3) Open file
Select the CSV format file you wish to convert to a
GX Developer Device comments.
MELSOFT
(4) Set conversion source data
1)
2)
Caution
• About characters that cannot be displayed in the Data
Preview area
Characters not displayed will be displayed with " · ".
• When setting conversion row
The program cannot proceed if conversion rows are
set as "Start Import at Row > End Import at Row."
• About tabs
Select "CSV" in step 1) for files whose contents are
separated by tabs.
See Section 6.1, " About TEXT,CSV format files" for
details.
Set the format and conversion range of the data to
be converted.
1) Select "CSV."
2) Select "Comment."
3)
3) Enter the Start Import at Row.
4)
4) Enter the End Import at Row.
If the number of rows to be converted is not
entered, conversion will take place until the
end of the file is reached.
5) When the setting is complete, proceed to the
5)
next step by clicking the NEXT>
button.
(Continued on the next page)
4 - 18 4 - 18
Page 48

4 CONVERTING TEXT,CSV FORMAT DATA TO GX Developer FORMAT
)
DATA
(From the previous page)
(5) Set delimiter
Separate into columns by setting delimiters.
MELSOFT
1)
2)
Caution
• About data created using spreadsheet software
Commas are used as the delimiters in the data created
and edited using spreadsheet software.
(6) Set column data
1) Select a delimiter for each data. (Multiple
delimiters can be selected.)
• Tab
Select it when using tabs as delimiters.
• Semicolon
Select it when using semicolons as delimiters.
• Comma (default)
Select it when using commas as delimiters.
• Space
Select it when using spaces as delimiters.
3
• Other
When using a character other than above as
the delimiter, check the checkbox and enter
the character.
2) Verify the separated data in the Data Preview
area.
3) When the setting is complete, proceed to the
next step by clicking the NEXT>
button.
Click !
1)
Caution
• When setting data format
When data format are overlapped, the program cannot
proceed to the next step if the overlapping data format
is other than Device number.
When "Do not Import (Skip)" is selected, conversion
will not take place even if data is present in the column.
Set the column data format.
1) Set data types in the Data Preview area.
Select a column (the selected column becomes
highlighted in black) by clicking the Data
Preview area of each data column.
Next, select a column data format from
"Column Data Format" in the upper-right area.
To select multiple settings, repeat this
operation.
2) When the setting is complete, proceed to the
next step by clicking the NEXT>
2)
button.
(Continued on the next page)
4 - 19 4 - 19
Page 49

4 CONVERTING TEXT,CSV FORMAT DATA TO GX Developer FORMAT
DATA
(From the previous page)
(7) Set export destination data
Set which project data within the GX Developer
the converted data is to be export.
MELSOFT
1)
2)
3)
4)
Caution
• When entering a data name
If the PLC series for the project is a QnA Series, the data
name must be 8 characters or less. If the PLC series for
the project is A Series, FX Series, or Motion (SCPU), only
the predetermined names such as MAIN and SUB1 can
be used.
See "
• When an existing data name is entered or selected
An overwrite verification dialog box is displayed.
Click on the Yes
GX Developer Operating Manual" for details.
button to discard and overwrite the old
1) Select the data type for the data to be export.
2) Specify a data name for the data to be
converted.
Enter or select a data name.
The entered data name is export to the project
that is currently open in the GX Developer.
3) Enter a Title for the data to be export.
4) When the setting is complete, execute the
conversion processing by clicking the Finish
button.
data.
Click on the No
button to end GX Converter.
(Continued on the next page)
4 - 20 4 - 20
Page 50

4 CONVERTING TEXT,CSV FORMAT DATA TO GX Developer FORMAT
DATA
(From the previous page)
(8) Conversion proces
This processing converts CSV format data to
Device comments and registers them.
MELSOFT
Caution
• When a Cancel button is clicked during Converting
A cancel verification dialog box is displayed.
Clicking the Yes
processing.
No data will be created in the
When overwriting, the previous data remains.
Clicking the No
processing.
• When a Cancel button is clicked during Registering
A cancel verification dialog box is displayed.
Clicking the Yes button stops the conversion
processing.
The data registered until immediately before the
cancellation are created in the GX Developer.
When overwriting, the previous data are discarded.
Clicking the No
button stops the conversion
GX Developer.
button continues the conversion
button continues the conversion
When each Cancel
button is pressed, the
corresponding conversion processing will be
aborted.
processing.
(9) Close GX Converter
Conversion
error generated
• See Section 4.3,
"Handling of conversion
errors."
4 - 21 4 - 21
Clicking the OK button ends the conversion
processing and closes GX Converter.
If a conversion error is displayed, see Section 4.3,
"Handling of conversion errors" for details.
Page 51

4 CONVERTING TEXT,CSV FORMAT DATA TO GX Developer FORMAT
DATA
4.3 Handling of conversion errors
This section explains the corrective actions when a conversion error is generated when
data in TEXT, CSV format is import by the GX Developer.
(1) Conversion error display
Verify or save the conversion error.
First perform the following operations, then correct
the conversion error.
1) To save the conversion errors
3)
Save the conversion error contents to a
specified file by clicking on the Save
MELSOFT
button.
1) 2)
Caution
• About the error line for an Instruction or I/O (Device)
error
If an I/O (Device) error occurs when multiple I/O (Device)
exist for a single instruction, the line number for the
Instruction will be displayed as the error line number.
Ends the conversion
processing and closes
the GX Converter.
Up to 100 occurrences (lines) of errors can be
saved.
2) To discard conversion errors
Click the OK
button to end the conversion
processing and then close the GX Converter.
3) Up to 100 occurrences (lines) of conversion
errors will be displayed.
When the number of conversion errors
exceeds 100 occurrences (lines), the message
"Convert error counter is over 100. Cancelled
over 100 errors" will be displayed on line
number 101.
See Appendix 2, "Conversion error message
List" for detailed explanations of error
messages.
(Continued on the next page)
4 - 22 4 - 22
Page 52

4 CONVERTING TEXT,CSV FORMAT DATA TO GX Developer FORMAT
DATA
(From the previous page)
(2) Save conversion errors
Save the conversion error contents to a file.
The conversion error contents can be saved to a
file with the desired file format (extension).
MELSOFT
4 - 23 4 - 23
Page 53

5 CONVERTING GX Developer FORMAT DATA TO TEXT, CSV FORMAT
DATA
MELSOFT
5. CONVERTING GX Developer FORMAT DATA TO TEXT, CSV FORMAT DATA
List and Device comments created by GX Developer can be converted to TEXT, CSV
format data, which can be read by other commercial software.
This section describes the operation procedure for converting List and Device
comments created by GX Developer to TEXT, CSV format data, which can be read by
other commercial software.
• Start GX Developer
• Open a project
• Start GX Converter
Select Menu
[Export file]
[Export to TEXT, CSV format file]
• Set conversion source data
• Set export destination file
• Close GX Converter
• • • • • Open the project that contains the data you wish to
convert in GX Developer, then select [Export to
TEXT, CSV format file].
• • • • • Click on the button in the "Completed"
dialog box to end GX Converter.
OK
5
5 - 1 5 - 1
Page 54

5 CONVERTING GX Developer FORMAT DATA TO TEXT, CSV FORMAT
DATA
5.1 Converting GX Developer Format Data to Text, CSV Format Data
This section explains the operation procedures for converting List and Device
comments to TEXT, CSV format data, which can be read by other commercial
software.
POINT
• GX Converter cannot be started up with projects using labels.
• See Section 6.3, "File formats when the GX Developer format data is export to a
TEXT, CSV format file" for details on file formats.
(1) Start GX Developer
MELSOFT
5
Start GX Developer
Open project
(2) Start GX Converter
(Continued on the next page)
Start GX Developer and open the project that
contains the List or Device comments you wish to
convert to TEXT, CSV format data.
Start GX Converter.
1)
1) Start GX Converter by clicking on
[Project] —
[Export file] —
[Export to TEXT, CSV format file].
5 - 2 5 - 2
Page 55

5 CONVERTING GX Developer FORMAT DATA TO TEXT, CSV FORMAT
DATA
(From the previous page)
(3) Set conversion source data
Perform settings for the data to be
converted.
1) Select the data type for the data to be
1)
2)
3)
converted.
2) Select the name of the data to be
converted.
Select from the data within the project
that is currently open.
3) Select the file format after the
conversion.
4) When the setting is complete, proceed
to the next step by clicking the Finish
4)
button.
MELSOFT
Data selection by conversion format
Set 1) to "Instruction list".
List
Device comment
Select the data name 2).
Set 3) to "TEXT file".
Set 1) to "Common comment" or "Program
comment".
Select the data name 2).
Set 3) to "TEXT file".
(4) Select export destination file
Convert to TEXT format Convert to CSV format
Set 1) to "Instruction list".
Select the data name 2).
Set 3) to "CSV file".
Set 1) to "Common comment" or "Program
comment".
Select the data name 2).
Set 3) to "CSV file".
Enter or select the filename in which to
export the converted data.
POINT
1. When using the file extension other than
“csv” and “txt”, type the filename and
extension in the “File name” box.
Ex.) In the case of the extension “001”,
type “ABCDEFGH.001” in the “File
name” box.
2. When using a dot “.” for the filename, type
the file name and extension in the “File
name” box.
Ex.) In the case of filename “No.3”, type
“No.3.csv” in the “File name” box.
3. The file will be saved as the file type that is
selected in the “File type” box on the “File
Conversion Wizard”. (See (3)-3) above.)
(Continued on the next page)
5 - 3 5 - 3
Page 56

5 CONVERTING GX Developer FORMAT DATA TO TEXT, CSV FORMAT
DATA
(From the previous page)
(5) Conversion proces
Read the List or Device comments and convert to
TEXT, CSV format data.
MELSOFT
Caution
• When a Cancel button is clicked
A cancel verification dialog box is displayed.
Clicking the Yes button stops the conversion
processing.
No data will be created in the GX Developer.
When overwriting, the previous data remains.
Clicking the No
processing.
button continues the conversion
(6) Close GX Converter
When each Cancel
corresponding conversion processing will be
aborted.
Clicking the OK button ends the conversion
processing and closes GX Converter.
button is pressed, the
5 - 4 5 - 4
Page 57

6 FILE FORMATS
6. FILE FORMATS
This chapter explains the formats of TEXT, CSV format file, which can be used for GX
Converter conversion.
6.1 About TEXT CSV format files
(1) TEXT format files (delimited by spaces)
This is a file format in which data are separated by spaces.
(a) Necessary commercial software
Use a TEXT editor to create or edit List or Device comments.
(b) About the use of tabs
Do not use tabs in TEXT format files.
The GX Converter recognizes data which are separated by tabs as CSV
format data.
In the CSV format, a single tab is recognized as a delimiter, so caution is
necessary.
When reading data separated by tabs using GX Developer, perform
conversion by selecting " TEXT format" for "Set conversion source data."
MELSOFT
(2) CSV format files (delimited by commas)
This is a file format in which data are separated by commas.
The GX Converter supports conversion of data separated by delimiters other
than commas.
(a) Necessary commercial software
List and Device comments can be created and edited using a spreadsheet.
Alternatively, a TEXT editor may be used.
(b) About commas within data
1) When spreadsheet software is used
Commas may be used within strings such as Statement and Comment.
2) When a TEXT editor is used
Insert double quotations before and after the string in which commas are
used, when import the string to GX Developer.
When the GX Developer export strings that include commas, it will insert
double quotations before and after the strings.
(c) About double quotations
The GX Converter recognizes and converts string data as shown below:
CSV file
(within file)
GX Developer
(Statement, Comment, etc.)
6
AB
"A,B"
""AB""
"""AB""C"""
6 - 1 6 - 1
AB
A,B
"AB"
"AB"C"
Page 58

6 FILE FORMATS
6
MELSOFT
CAUTION
About double quotations in CSV format
There may be some cases in which strings in CSV files created using GX Converter
are not correctly recognized or converted by some spreadsheet products available
on the market.
When this happens, perform necessary actions by referring to the manual of the
spreadsheet software.
Or, this problem can be resolved by opening the CSV file using a TEXT editor and
adding or removing double quotations as necessary.
POINT
(1) GX Converter cannot be started up with projects using labels.
(2) When the TEXT, CSV format file is being import by GX Developer
• Using the same file formats for import a TEXT, CSV format file using GX
Developer and export to TEXT, CSV format file will make the subsequent
operations easier.
• When creating a List using commercial software, the Step number need not
be input, since the GX Developer adds new Step number each time is r
import data.
(3) When export a List or Device comments to a TEXT, CSV format file
• The file format cannot be changed at this time.
Change the file format using a commercial software package after the data
export to the TEXT, CSV format file has been completed.
6 - 2 6 - 2
Page 59

6 FILE FORMATS
6.2 File formats when the GX Developer import a TEXT, CSV format file
This section explains the file formats used when the GX Developer import a TEXT,
CSV format file.
POINT
GX Converter recognizes up to 17 columns of data and will not recognize data in
the 18th column and beyond.
Therefore, when creating data using a TEXT editor or spreadsheet, create it using
17 columns or less.
GX Converter recognizes up to 524288 lines.
6.2.1 When a List is import by the GX Developer
The following explains how to describe each column data format.
Column data format Description
Step number
(1) No description necessary
(Automatically added when performing conversion to GX Developer format.)
(1) Describe Statement strings only.
• Describe only the Statement; e.g. "Master Station Initialization setting".
A conversion error will occur if a semicolon (;) is inserted before a Statement string.
MELSOFT
Line statement
Describe a Line statement only.
(2) Up to 64 characters can be used.
(3) When the CPU type of the GX Developer project is A Series, FX Series or Motion (SCPU)
• All descriptions become Separate statement.
A conversion error will occur if a " * " is inserted before a Statement string.
(4) When the CPU type of the GX Developer project is QnA Series
• Enter an " * " in front of a Statement string to make it a Separate statement; e.g. "Master
Station Initialization setting".
The " * " in front of strings that denotes a Separate statement is not counted as the number of
characters.
(5) If there is a mixture of Line statement, P/I statement and Note in the same line, a conversion
error will occur.
6 - 3 6 - 3
Page 60

6 FILE FORMATS
Column data format Description
(1) Describe Instruction.
• Conversion cannot be performed if data to be the Instruction does not exist. Do not omit
Instruction.
Describe Instruction only in the same column.
Instruction
MELSOFT
(CSV format)
Instruction,
Statement (Line, P/I),
Note
(2) Instruction and I/O (Device) can be described in the same column.
(When performing conversion, set the column data format to "Instruction" in the "Set column
data.")
Describe Instruction and I/O (Device)
separated by a space.
(1) Describe Instruction, Statement (Line, P/I) and Note in the same column.
• Conversion cannot be performed if data to be the instruction does not exist. Do not omit
Instruction.
(Description as shown in (2) in the Instruction section above is not allowed.)
• Insert " ; " for Line statement, " [ ] " for P/I statement, and " < > " for Note in before each data or
before and after each data (to identify each data).
Describe Instruction, Statement (Line, P/I), and Note in the same column.
If the string for the Statement (Line, P/I) or Note is long, describe the part that
includes the Instruction column and I/O (Device) column.
(Text format)
(2) Number of characters allowed for description (" ; ", " [ ] " and " < > " are excluded from the
number of characters used.)
• Up to 64 characters may be used for a Line statement.
• Up to 64 characters may be used for a P/I statement.
• Up to 32 characters may be used for a Note.
(3) When the CPU type of the GX Developer project is A Series, FX Series or Motion (SCPU)
• All descriptions become Separate statement (Line, P/I) or Separate note.
A conversion error will occur if a " * " is inserted before a Statement (Line, P/I) string or Note
string.
(4) When the CPU type of the GX Developer project is QnA Series
• Enter an " * " in front of each string to make it a Separate statement (Line, P/I) or Separate note.
The " * " in front of strings that denotes a Separate statement (Line, P/I) or Separate note is not
counted as the number of characters.
6 - 4 6 - 4
Page 61

6 FILE FORMATS
Column data format Description
(1) Describe I/O (Device) only.
MELSOFT
One Instruction
If multiple I/O (Device) exist for a single
instruction, leave the next Instruction area
blank to denote the I/O (Device).
I/O (Device)
P/I statement
Describe a I/O(Device) only.
(2) Multiple I/O (Device) can be described in the same line.
I/O (Device) are separated by
spaces on the same line, same column.
(3) I/O (Device) can be described in the Instruction column.
• See (2) in the description for Instruction shown above.
(1) Describe P/I statement strings only.
• Describe P/I statement only; e.g. "Switch to bank 2."
Describe only P/I statement using carriage returns.
(2) Up to 64 characters can be used.
(3) When the CPU type of the GX Developer project is A Series, FX Series or Motion (SCPU)
• All descriptions become Separate P/I statements.
A conversion error will occur if a " * " is inserted before a Statement string.
(4) When the CPU type of the GX Developer project is QnA Series
• Insert an " * " in front of each string to make it a Separate P/I statement; e.g. "*Switch to bank
2." The " * " in front of strings that denotes a Separate P/I statement is not counted as the
number of characters.
(5) About P/I statement errors
If there is no corresponding Instruction in the previous line of the P/I statement, a conversion
error will occur.
Also, if the Conversion type for wrong instruction is set to "To invalid instructions" in the "Set
export destination data", they will not be converted to invalid instructions.
(6) If there is a mixture of Line statement, P/I statement and Note in the same line, a conversion
error will occur.
6 - 5 6 - 5
Page 62

6 FILE FORMATS
Column data format Description
(1) Describe Note strings only.
• Describe Note only; e.g. "Send Buffer size setting."
Describe only Note using carriage returns.
(2) Up to 32 characters can be used.
(3) When the CPU type of the GX Developer project is an A Series, FX Series or Motion (SCPU)
• All descriptions become Separate note.
Note
A conversion error will occur if a " * " is inserted before a Note string.
(4) When the CPU type of the GX Developer project is a QnA Series
• Insert an " * " in front of each string to make it a Separate note; e.g. "*Send Buffer size setting."
The " * " in front of strings that denotes a Separate note is not counted as the number of
characters.
(5) About Note errors
If there is no corresponding Instruction in the previous line of the Note, a conversion error will
occur.
Also, if the Conversion type for wrong instruction is set to "To invalid in striation" in the " Set
export destination data ", they will not be converted to invalid instruction.
(6) If there is a mixture of Line statement, P/I statements and Note in the same line, a conversion
error will occur.
MELSOFT
6 - 6 6 - 6
Page 63

6 FILE FORMATS
6.2.2 When device comments are import by the GX Developer
The following explains how to describe each column data format.
Describe a Device number, Label
and Comment in the same line.
MELSOFT
Column with
Device number only
Column data format Description
Device number
Label
Comment
(1) Describe Device number.
Conversion cannot be performed if a Device number is not listed. Always enter this field.
(1) Describe Labels.
• If the Device number area is left blank or invalid device is input, the line will not be registered.
(2) Up to 8 characters can be entered.
(1) Describe Comment.
• If the Device number area is left blank or invalid device is input, the line will not be registered.
(2) Up to 32 characters can be entered.
Column with
Label only
Column with
Comment only
CAUTION
Always enter a Device number.
Use one of the following combinations:
1) Device number, Label, Comment
2) Device number, Comment
3) Device number, Label
6 - 7 6 - 7
Page 64

6 FILE FORMATS
MELSOFT
6.3 File Formats When The GX Developer Format Data is Export to a Text, CSV Format File
This section explains the file formats used when the GX Developer data is export to a
TEXT, CSV format file.
6.3.1 When a List is export to a text, csv format file
POINT
If the CPU type of the GX Developer project is A Series, FX Series or Motion
(SCPU), a
" * " is displayed for Statement (Line, P/I) and Note in the GX Developer. However,
when the data is export to a TEXT, CSV format file, the " * " is eliminated.
(1) TEXT format file (delimited by spaces)
A List is export to a TEXT format file using the format shown below:
1)
Export locations of data types for each line
1) 2) 3)
Step number, Instruction, I/O (Device)
2) 3)
REMARK
Line statement
If the string is long, the part including the Instruction
column and I/O (Device) column will be export.
Note is export after a carriage return
If the string is long, the part including the Instruction
column and I/O (Device) column will be export.
P/I statement is export after a carriage return
If the string is long, the part including the Instruction
column and I/O (Device) column will be export.
For Line statement, P/I statements and Note, " ; ", " [ ] " or " < > " is inserted before
each string or before and after each string.
They are export in the Instruction column 2).
6 - 8 6 - 8
Page 65

6 FILE FORMATS
MELSOFT
(2) CSV format file (delimited by commas)
A List is export to a CSV format file using the format shown below:
Line Statements
Note is export after a carriage return
P/I statement is export after a carriage return
1)
Export locations of data types for each line
1) 2) 3) 4) 5) 6) 7) 8) 9)
Step number, Line statement, Instruction, I/O (Device), Blank, P/I statement, Note, Blank, Blank
2)
3) 5)
6)
7)
8)4)9)
6 - 9 6 - 9
Page 66

6 FILE FORMATS
6.3.2 When device comments are export to a text, csv format file
(1) TEXT format file (delimited by spaces)
Device comments are export to a TEXT format file using the format shown below:
A name for column data format will be added and export.
MELSOFT
The Device number, Label and
Comment are export in this order
in the same line.
1)
Export locations of data types for each line
1) 2) 3) 4)
Device number (16 characters), Label (8 characters), Blank (8 spaces), Comment (32 characters)
2)
3)
4)
(2) CSV format file (delimited by commas)
Device comments are export to a CSV format file using the format shown below:
A name for column data format will be added and export.
The Device number, Label and Comment
are export in this order in the same line.
1)
Export locations of data types for each line
1) 2) 3) 4)
Device number, Label, Comment
2)
3)
POINT
A device will not be written if both of the corresponding label and comment are not
set.
Therefore, the device X2 in (2) above will not be written, as the corresponding
settings are not made.
6 - 10 6 - 10
Page 67

A
PPENDICES
APPENDICES
Appendix 1. Limitations and Precautions
(1) The following explains the limitations and precautions when import
TEXT, CSV format data to the GX Developer.
Item Description
Conversion cannot be performed during monitoring using GX Developer.
While GX Converter is
running
CPU type
Data name
Column data format
Device comments
Conversion row setting
Data Preview area
Conversion cannot be performed while GX Simulator is running in GX Developer.
Conversion cannot be performed when the GX Converter is running without any open project.
GX Converter cannot be used when "Use label" is selected while creating a new project on GX
Developer.
When the GX Developer import TEXT, CSV format data, there may be some cases in which
Instruction and I/O (Device) cannot be converted, depending on the CPU type of the project
opened in GX Developer.
See "GX Developer Operating Manual" for details.
There is a limitation in data names when the PLC type of the GX Developer project is A Series,
FX Series, or Motion (SCPU).
See "GX Developer Operating Manual" for details.
When converting a List, the data type of the Instruction must be present within the conversion
data. Otherwise, conversion cannot be performed.
When converting Device comments, the data type of the Device number must be present within
the conversion data. Otherwise, conversion cannot be performed.
In addition, describe Device number and either Comment or Label.
To save the conversion processing time, describe the Device number in ascending order within
the TEXT, CSV format data.
Conversion is also possible when they are not in the ascending order. When Device numbers
are entered randomly, it takes longer to read Device comments compared to when they are
entered in ascending order.
The input range for Start import at row and End import at row is 1 to 524288.
The default End import at row is blank. When the End import at row is blank, conversion is
performed up to the last row.
When CSV format is specified, the data for the 18th column and beyond will be displayed as " , "
in the Data Preview area.
MELSOFT
APP
APP - 1 APP - 1
Page 68

A
PPENDICES
Item Description
While GX Converter is
running
Delimiter
MELSOFT
(2) The following explains the limitations and precautions when export
GX Developer format data to TEXT, CSV format data.
Conversion is possible even during monitoring using the GX Developer.
Conversion is possible even while GX Simulator is running in GX Developer.
Conversion cannot be performed when GX Converter is running without any open project.
GX Converter cannot be used when "Use label" is selected while creating a new project on GX
Developer.
The delimiter is a comma when export using TEXT format, and a space when export using CSV
format.
APP
APP - 2 APP - 2
Page 69

A
PPENDICES
MELSOFT
Appendix 2. Conversion Error Message List
The following explains conversion error messages when the GX Developer is import
TEXT, CSV format data.
While converting a List
Message Corrective action
The specified data cannot be created. Verify the CPU type and parameter settings.
<Cause>
• The program capacity was not set for the specified program
name.
• An addition was attempted exceeding the maximum number of
programs.
The program capacity has been exceeded. Verify the data being converted.
(The converted data is stored while the capacity allows.)
The instruction or device is incorrect. (nth Line) Correct the data being converted and retry.
(When an Instruction uses multiple lines, the line number within the
parentheses indicates the first line.)
The device is incorrect. (nth Line) Correct the data being converted and retry.
(When an Instruction uses multiple lines, the line number within the
parentheses indicates the first line.)
<Cause>
• A Device that cannot be used is specified.
• There is an error in the index qualification or digit specification.
• There is an error in the setting for a special function module
device or link direct device.
The device number exceeds the usable range.
(nth Line)
A Statements should be 64 characters or less.
(nth Line)
A Note should be 32 characters or less. (nth Line) Verify the position in which the number of characters has been
A Comment should be less than 16 or 32 characters.
(nth Line)
Statement or note cannot be converted. (nth Line) Correct the data being converted and retry.
Separate statement or note cannot be converted.
(nth Line)
Convert error counter is over 100. Cancelled over 100
errors.
Correct the data being converted and retry.
(When an Instruction uses multiple lines, the line number within the
parentheses indicates the first line.)
Verify the position in which the number of characters has been
exceeded.
(Characters up to the 64th character have been recorded.)
exceeded.
(Characters up to the 32nd character have been recorded.)
Verify the position in which the number of characters has been
exceeded.
(Characters up to the 32nd (16th) character have been recorded.
The maximum number of allowable characters will differ depending
on the option information in the GX Developer.)
If the header character is an " * ", change it to " ** " and retry.
Correct the conversion errors and retry.
APP - 3 APP - 3
Page 70
A
PPENDICES
MELSOFT
While converting Device comments
Message Corrective action
The device comment already exists. (nth Line) Correct the duplicate comments and retry.
(The last Device will be valid.)
The device is incorrect. (nth Line) Correct the invalid Device and retry.
Comments should be less than 16 or 32 characters.
(nth Line)
Labels should be 8 characters or less. (nth Line) Verify the position in which the number of characters has been
Convert error counter is over 100.
Cancelled over 100 errors.
Verify the position in which the number of characters has been
exceeded.
(Characters up to the 32nd (16th) character have been recorded.
The maximum number of allowable characters will differ depending
on the option information in the GX Developer.)
exceeded.
(Characters up to the 8th character have been recorded.)
Correct the conversion errors and retry.
APP - 4 APP - 4
Page 71

A
PPENDICES
Appendix 3. Converting CADIF Character-string Data
This section explains the operation to import the character-string data file that has
been converted via SW1IVD-CADIF, to the GX Developer.
(1) When converting a List
Convert a List using TEXT format while taking care of the following settings:
• Separate between the number column and Instruction column in "Set delimiter
location."
• In "Set column data," set the first column to "Do not Import (Skip)" and the
second column to "Instruction."
(2) When converting Device comments
Convert Device comments using CSV format while taking care of the following
settings:
• Decrease the End import at row by 1 using the spin button in the "Set
conversion source data."
• Set " ; " (semicolon) as the column delimiter in "Set delimiter location."
• In "Set column data," set the first column to "Device number" and the second
column to "Comment."
MELSOFT
Appendix 4. Performance Specifications
The following explains the performance specifications for GX Converter.
Conversion element Conversion time
TEXT fomat data to GX Developer fomat data
CSV fomat data to GX Developer fomat data
GX Developer fomat data to TEXT d fomat ata
GX Developer fomat data to CSV fomat data
The computer used for the measurements above
CPU: PentiumR133 MHz, RAM: 32 MB, Free hard disk space: More than 50 MB,OS: WindowsR95
Conversion data List : 1001 steps (LD X0 OUT M0 x 500 times, END)
Device comments : 1000 Device equivalent
(Comment 32 characters, Label 8 characters)
List
Device comments
List
Device comments
List
Device comments
List
Device comments
5 seconds
5 seconds
5 seconds
5 seconds
APP - 5 APP - 5
Page 72

Ind
INDEX
[C]
Commas (within strings) ................................. 6-1
Comment (how to describe the data) ............. 6-7
Conversion
CSV data (Device comments)
to GX Developer data................................ 4-17
CSV data (List) to GX Developer data...... 4-12
GX Developer data (Device comments)
To TEXT data .............................................. 5-2
GX Developer data (List) to TEXT data...... 5-2
GX Developer data (Device comments)
To CSV data ................................................ 5-2
GX Developer data (List) to CSV data........ 5-2
TEXT data (Device comments)
To GX Developer data................................. 4-7
TEXT data (List) to GX Developer data ...... 4-2
Conversion error message List
Device comments................................... APP-4
List........................................................... APP-3
Converting CADIF character-string data ...APP-5
Converting CSV data to GX Developer data
Device comments...................................... 4-17
File format (Device comments) ................... 6-7
File format (List)........................................... 6-3
List.............................................................. 4-12
Converting GX Developer data to CSV data
Device comments........................................ 5-2
File format (Device comments) ................ 6-10
File format (List)........................................... 6-9
List................................................................ 5-2
Converting GX Developer data to TEXT data
Device comments........................................ 5-2
File format (Device comments) ................. 6-10
File format (List)........................................... 6-8
List................................................................ 5-2
Converting TEXT data to GX Developer data
Device comments........................................ 5-2
File format (Device comments) .................. 6-7
File format (List)........................................... 6-3
List................................................................ 4-2
CSV files .......................................................... 6-1
[D]
Double quotations (within strings) ................... 6-1
[F]
Features ...........................................................1-1
File
CSV file.........................................................6-1
TEXT file ....................................................... 6-1
File formats when the GX Developer data is
converted to a TEXT, CSV format file
Device comments(SCV) ............................6-10
Device comments(TEXT) ..........................6-10
List(SCV) ......................................................6-9
List(TEXT) ....................................................6-8
[H]
Handling of conversion errors .......................4-22
How to describe the data (reading to GX Developer)
Comment ...................................................... 6-7
Device........................................................... 6-7
Instruction (CSV)..........................................6-4
Instruction, Statement, Note (TEXT) ...........6-4
I/O (Device) ..................................................6-5
Label ............................................................. 6-7
Line statement (how to describe the data) ..6-3
Note .............................................................. 6-6
P/I statement ................................................6-5
Step number................................................. 6-3
[ I ]
I/O (Device) (how to describe the data) ..........6-5
Installing the GX Converter..........................3-1
Instruction
Instruction
(how to describe the data when CSV)......... 6-4
Instruction, Statement, Note
(how to describe the data when TEXT).......6-4
Index - 1 Index - 1
Page 73

[L]
Label ................................................................ 6-7
Limitations................................................... APP-1
Line statement (how to describe the data) ..... 6-3
[N]
Note (how to describe the data)...................... 6-6
[O]
Operating environment.................................... 2-1
Overall configuration ....................................... 2-1
Overview.......................................................... 1-1
[P]
P/I statement (how to describe the data)........ 6-5
Performance specifications........................ APP-5
Precautions................................................. APP-1
[S]
Statement
Line statement (how to describe the data) 6-3
P/I statement (how to describe the data) .... 6-5
Step number (how to describe the data) ........ 6-3
Ind
[T]
Tab (delimiter) ................................................. 6-1
TEXT files ........................................................ 6-1
[U]
Uninstallation
Uninstalling the GX Converter .................. 3-10
Index - 2 Index - 2
Page 74

IB (NA)-0800004-J
Microsoft, Windows, Windows NT, Windows Vista are registered trademarks of Microsoft Corporation in
the United States and other countries.
Pentium is a registered trademark of Intel Corporation in the United States and other countries.
Other company and product names herein are either trademarks or registered trademarks of their
respective owners.
SPREAD
Copyright (C) 1996 Farpoint Technologies, Inc.
Page 75

Page 76

 Loading...