

Page 1

MITSUBISHI
Mitsubishi Industrial Robot
RV-1A/2AJ Series
ROBOT ARM SETUP & MAINTENANCE
INSTRUCTION MANUAL
BFP-A8052-D
Page 2
CAUTION
CAUTION
WARNING
Safety Precautions
Always read the following precautions and the separate "Safety
Manual" before starting use of the robot to learn the required
measures to be taken.
All teaching work must be carried out by an operator who has received special training.
(This also applies to maintenance work with the power source turned ON.)
→ Enforcement of safety training
For teaching work, prepare a work plan related to the methods and procedures of operating the robot, and to the measures to be taken when an error occurs or when restarting. Carry out work following this plan. (This also applies to maintenance work with the
power source turned ON.)
→ Preparation of work plan
Prepare a device that allows operation to be stopped immediately during teaching work.
(This also applies to maintenance work with the power source turned ON.)
→ Setting of emergency stop switch
CAUTION
WARNING
CAUTION
CAUTION
CAUTION
During teaching work, place a sign indicating that teaching work is in progress on the
start switch, etc. (This also applies to maintenance work with the power source turned
ON.)
→ Indication of teaching work in progress
Provide a fence or enclosure during operation to prevent contact of the operator and
robot.
→ Installation of safety fence
Establish a set signaling method to the related operators for starting work, and follow
this method.
→ Signaling of operation start
As a principle turn the power OFF during maintenance work. Place a sign indicating that
maintenance work is in progress on the start switch, etc.
→ Indication of maintenance work in progress
Before starting work, inspect the robot, emergency stop switch and other related
devices, etc., and confirm that there are no errors.
→ Inspection before starting work
Page 3
The points of the precautions given in the separate "Safety Manual" are given below.
Refer to the actual "Safety Manual" for details.
CAUTION
CAUTION
CAUTION
CAUTION
CAUTION
CAUTION
WARNING
WARNING
Use the robot within the environment given in the specifications. Failure to do so could
lead to a drop or reliability or faults. (Temperature, humidity, atmosphere, noise environment, etc.)
Transport the robot with the designated transportation posture. Transporting the robot
in a non-designated posture could lead to personal injuries or faults from dropping.
Always use the robot installed on a secure table. Use in an instable posture could lead
to positional deviation and vibration.
Wire the cable as far away from noise sources as possible. If placed near a noise source,
positional deviation or malfunction could occur.
Do not apply excessive force on the connector or excessively bend the cable. Failure to
observe this could lead to contact defects or wire breakage.
Make sure that the workpiece weight, including the hand, does not exceed the rated load
or tolerable torque. Exceeding these values could lead to alarms or faults.
Securely install the hand and tool, and securely grasp the workpiece. Failure to observe
this could lead to personal injuries or damage if the object comes off or flies off during
operation.
Securely ground the robot and controller. Failure to observe this could lead to malfunctioning by noise or to electric shock accidents.
CAUTION
WARNING
CAUTION
CAUTION
CAUTION
CAUTION
WARNING
Indicate the operation state during robot operation. Failure to indicate the state could
lead to operators approaching the robot or to incorrect operation.
When carrying out teaching work in the robot's movement range, always secure the priority right for the robot control. Failure to observe this could lead to personal injuries or
damage if the robot is started with external commands.
Keep the jog speed as low as possible, and always watch the robot. Failure to do so
could lead to interference with the workpiece or peripheral devices.
After editing the program, always confirm the operation with step operation before
starting automatic operation. Failure to do so could lead to interference with peripheral
devices because of programming mistakes, etc.
Make sure that if the safety fence entrance door is opened during automatic operation,
the door is locked or that the robot will automatically stop. Failure to do so could lead to
personal injuries.
Never carry out modifications based on personal judgments, or use non-designated
maintenance parts.
Failure to observe this could lead to faults or failures.
When the robot arm has to be moved by hand from an external area, do not place hands
or fingers in the openings. Failure to observe this could lead to hands or fingers catching
depending on the posture.
CAUTION
Do not stop the robot or apply emergency stop by turning the robot controller's main
power OFF.
If the robot controller main power is turned OFF during automatic operation, the robot
accuracy could be adversely affected.
Page 4
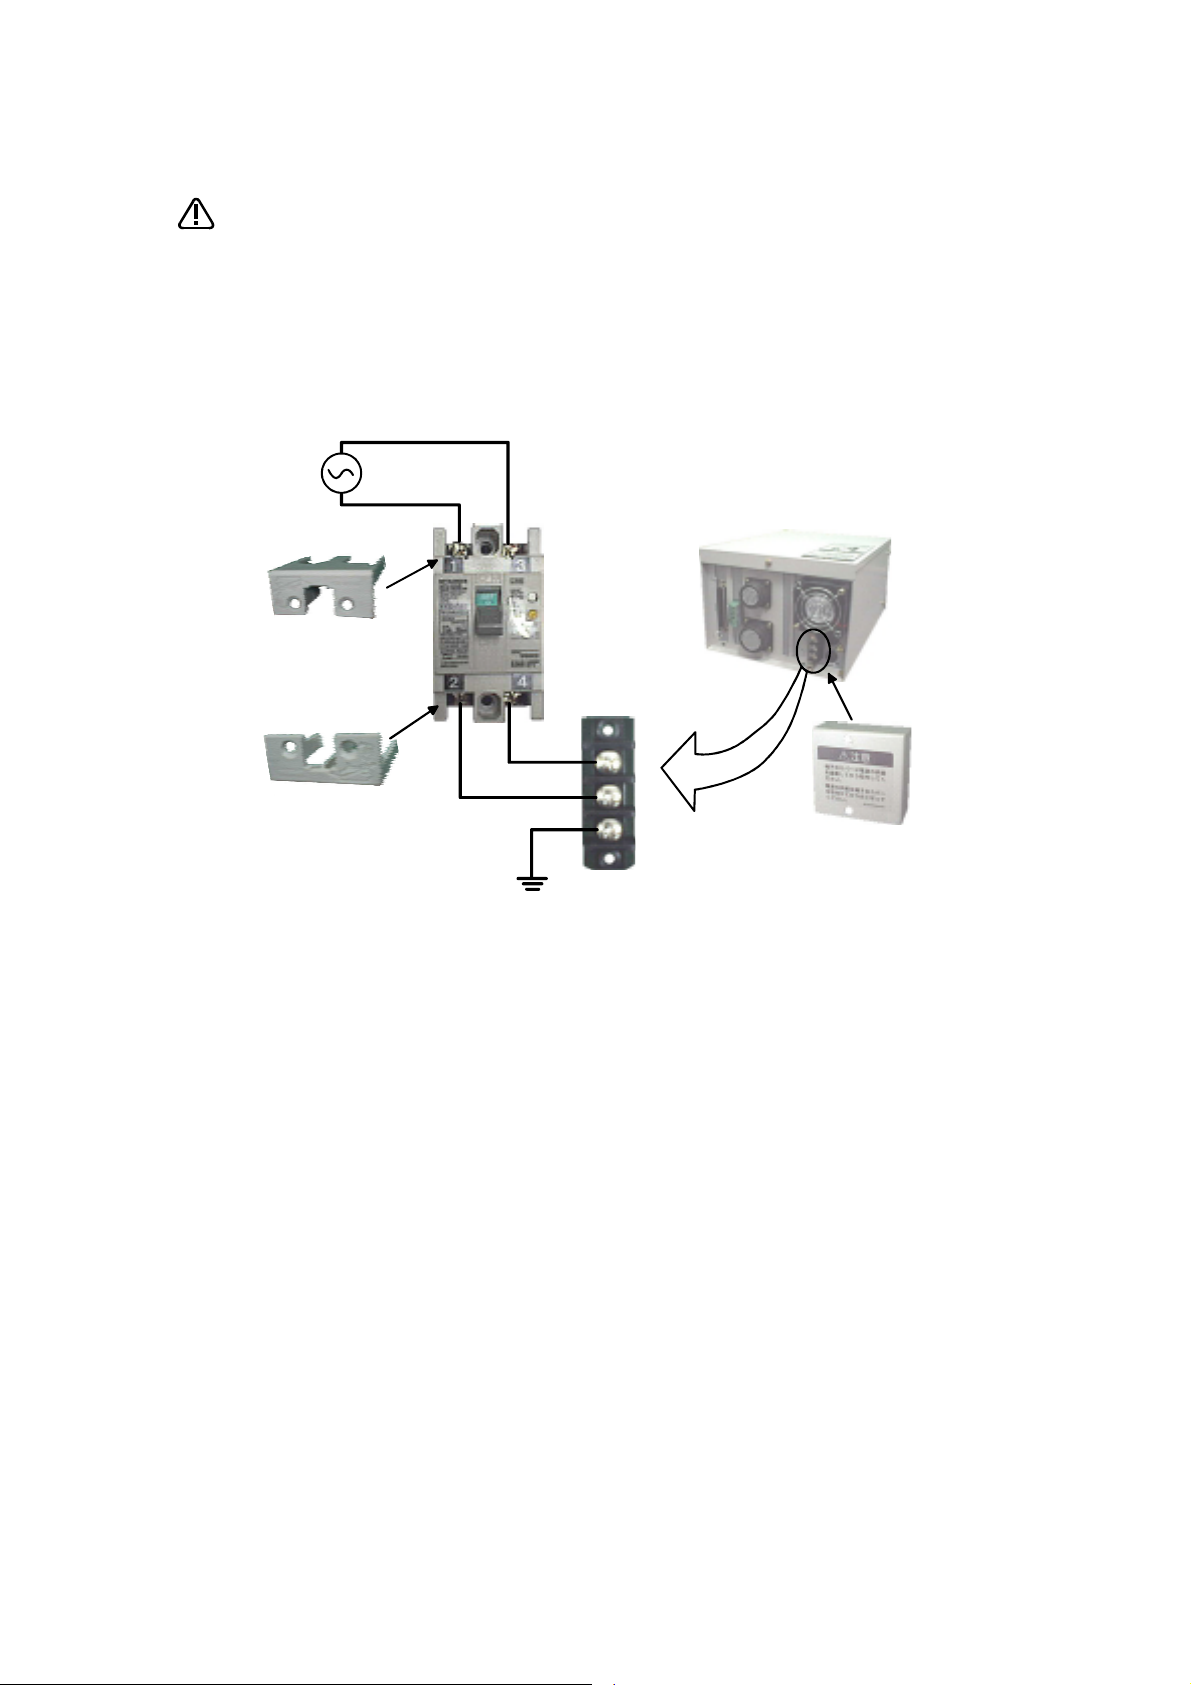
C.Precautions for the basic configuration are shown below.(When CR1-571 is used for the controller.)
CAUTION
Power supply *RV-1A/2AJ series and RP-1AH/3AH/5AH series: Single phase 90-132VAC, 180-253VAC.
Provide an earth leakage breaker that packed together on the primary power
supply of the controller as protection against electric leakage. Confirm the setting connector of the input power supply voltage of the controller, if the type
which more than one power supply voltage can be used. Then connect the
power supply.
Failure to do so could lead to electric shock accidents.
*Except the above: Single phase 180-253VAC.
Cover
Cover
Earth leakage
breaker
(NV)
Terminal
Rear side of controller
Protective earth
terminal
(PE)
Terminal cover
Page 5

Revision history
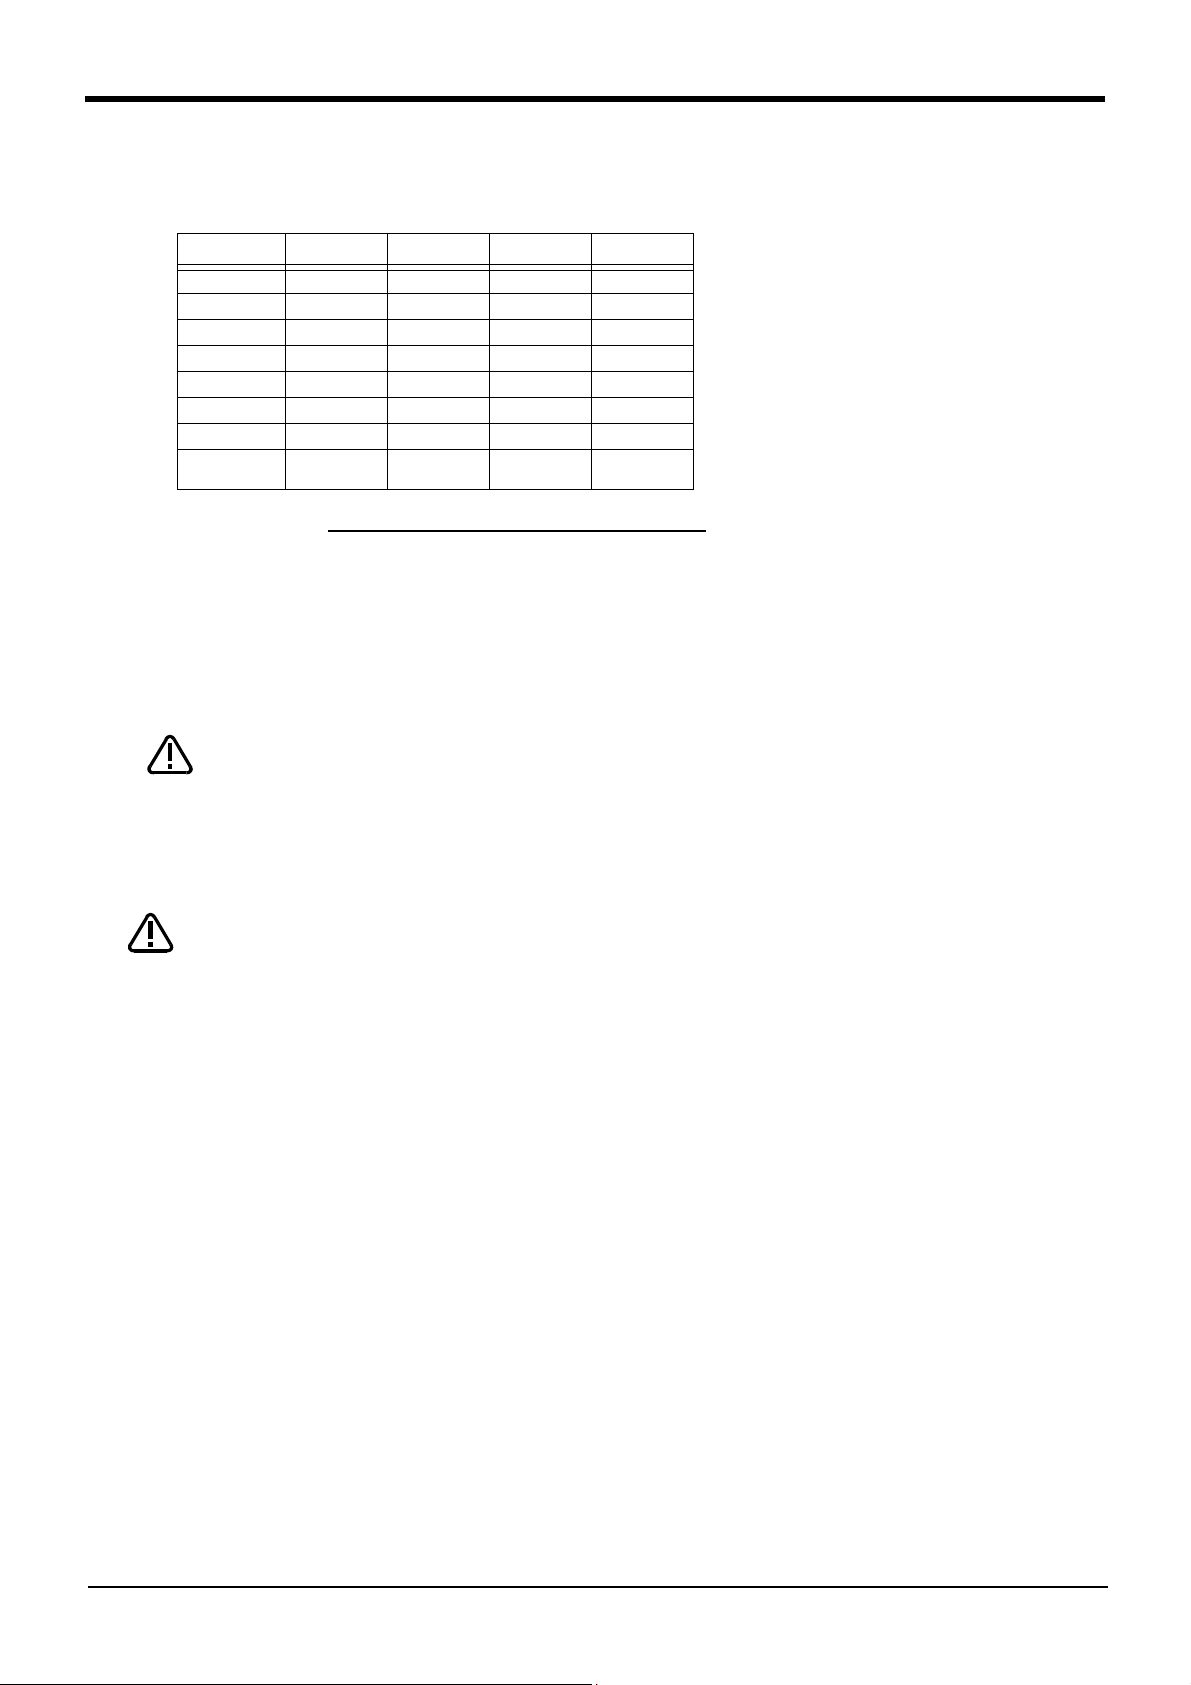
Date of Point Instruction Manual No. Revision Details
2000-02-17 BFP-A8052Z First print
2000-04-05 BFP-A8052 Formal style
2000-05-10 BFP-A8052-A Error in writing correction.
2000-07-12 BFP-A8052-B Spare parts (option) list was added.
2001-03-21 BFP-A8052-C Error in writing correction.
2002-06-05 BFP-A8052-D RV-1AC-SB, RV-2AJC-SB (Clean specification) was added.
Error in writing correction.
Error in writing correction.
Page 6

■ Introduction
Thank you for purchasing the Mitsubishi industrial robot.
This instruction manual explains procedures to be taken for unpacking, installing, servicing and inspecting the
robot arm.
Always read through this manual before starting use to ensure correct usage of the robot.
・ No part of this manual may be reproduced by any means or in any form, without prior consent from
Mitsubishi.
・ The details of this manual are subject to change without notice.
・ An effort has been made to make full descriptions in this manual. However, if any discrepancies or
unclear points are found, please contact your dealer.
・ The information contained in this document has been written to be accurate as much as possible.
Please interpret that items not described in this document "cannot be performed.".
Please contact your nearest dealer if you find any doubtful, wrong or skipped point.
Copyright(C) 2001 MITSUBISHI ELECTRIC CORPORATION
Page 7

CONTENTS
1 Before starting use ......................................................................................................................................................................... 1-1
1.1 Using the instruction manuals ............................................................................................................................................ 1-1
1.1.1 The details of each instruction manuals ................................................................................................................ 1-1
1.1.2 Symbols used in instruction manual ........................................................................................................................ 1-2
1.2 Safety Precautions ................................................................................................................................................................. 1-3
1.2.1 Precautions given in the separate Safety Manual ............................................................................................. 1-4
2 Unpacking to Installation .............................................................................................................................................................. 2-5
2.1 Confirming the product ......................................................................................................................................................... 2-5
2.2 Installation .................................................................................................................................................................................. 2-6
2.2.1 Unpacking ............................................................................................................................................................................ 2-6
2.2.2 Transportation procedures .......................................................................................................................................... 2-7
2.2.3 Installation procedures .................................................................................................................................................. 2-8
2.2.4 Grounding procedures .................................................................................................................................................... 2-9
(1) Grounding methods ..................................................................................................................................................... 2-9
(2) Grounding procedures ............................................................................................................................................... 2-9
2.2.5 Connecting with the controller ................................................................................................................................ 2-10
2.3 Setting the origin ................................................................................................................................................................... 2-11
2.3.1 Installing the teaching pendant (T/B) ................................................................................................................... 2-11
(1) Installing with the control power OFF .............................................................................................................. 2-11
2.3.2 Setting the origin with the origin data input method ...................................................................................... 2-12
(1) Confirming the origin data ..................................................................................................................................... 2-12
(2) Turning ON the control power ............................................................................................................................. 2-12
(3) Preparing the T/B ..................................................................................................................................................... 2-13
(4) Selecting the origin setting method ................................................................................................................... 2-14
(5) Inputting the origin data ......................................................................................................................................... 2-15
(6) Installing the connector box cover .................................................................................................................... 2-16
2.4 Confirming the operation .................................................................................................................................................... 2-17
(1) JOINT jog operation ................................................................................................................................................. 2-20
(2) XYZ jog operation ...................................................................................................................................................... 2-22
(3) TOOL jog operation .................................................................................................................................................. 2-24
(4) 3-axis XYZ jog operation ....................................................................................................................................... 2-26
(5) CYLNDER jog operation ......................................................................................................................................... 2-28
Page
3 Installing the option devices ..................................................................................................................................................... 3-31
3.1 Installing the solenoid valve set (1E-VD01/VD01E/VD02/VD02E) ................................................................ 3-31
3.2 Installation the pneumatic hand set (4A-HP01/HP01E) ................................................................................... 3-33
3.3 Installation the motorized hand set (4A-HM01) .................................................................................................... 3-35
3.4 Hand output cable (1E-GR35S) ...................................................................................................................................... 3-36
3.5 Installing the hand input cable (1A-HC20) and hand curl tube (1A-ST040*C) .......................................... 3-36
3.6 Installing the hand adaptor (1A-HA01) ........................................................................................................................ 3-36
4 Basic operations ............................................................................................................................................................................ 4-37
5 Maintenance and Inspection ..................................................................................................................................................... 5-39
5.1 Maintenance and inspection interval ............................................................................................................................. 5-39
5.2 Inspection items ..................................................................................................................................................................... 5-40
5.2.1 Daily inspection items .................................................................................................................................................. 5-40
5.2.2 Periodic inspection ........................................................................................................................................................ 5-41
5.3 Maintenance and inspection procedures ..................................................................................................................... 5-42
5.3.1 Robot arm structure ..................................................................................................................................................... 5-42
5.3.2 Installing/removing the cover ................................................................................................................................... 5-44
5.3.3 Inspection, maintenance and replacement of timing belt .............................................................................. 5-46
(1) Timing belt replacement period ......................................................................................................................... 5-46
(2) Inspection, maintenance and replacement of J2-axis timing belt ........................................................ 5-47
(3) Inspection, maintenance and replacement of J3-axis timing belt ........................................................ 5-48
i
Page 8

(4) Inspection, maintenance and replacement of J4-axis timing belt ........................................................ 5-49
(5) Inspection, maintenance and replacement of J5-axis timing belt ........................................................ 5-50
(6) Timing belt tension ................................................................................................................................................... 5-51
5.3.4 Lubrication ........................................................................................................................................................................ 5-52
(1) Lubrication position and specifications ............................................................................................................ 5-52
(2) Lubrication method ................................................................................................................................................... 5-53
5.3.5 Replacing the backup battery ................................................................................................................................... 5-54
(1) Replacing the robot arm battery ......................................................................................................................... 5-54
5.4 Maintenance parts ................................................................................................................................................................. 5-55
5.5 Resetting the origin .............................................................................................................................................................. 5-56
5.5.1 Mechanical stopper method ...................................................................................................................................... 5-57
(1) Select the T/B ........................................................................................................................................................... 5-57
(2) J1 axis origin setting ................................................................................................................................................ 5-58
(3) J2 axis origin setting ................................................................................................................................................ 5-59
(4) J3 axis origin setting ................................................................................................................................................ 5-60
(5) J4 axis origin setting (Only 6-axis type) ......................................................................................................... 5-62
(6) J5 axis origin setting ................................................................................................................................................ 5-64
(7) J6 axis origin setting ................................................................................................................................................ 5-65
(8) All axis origin setting ................................................................................................................................................ 5-67
5.5.2 User origin method ........................................................................................................................................................ 5-69
5.5.3 Recording the origin data ........................................................................................................................................... 5-70
(1) Confirming the origin data label ........................................................................................................................... 5-70
(2) Confirming the origin data ..................................................................................................................................... 5-70
(3) Recording the origin data ....................................................................................................................................... 5-70
(4) Installing the cover ................................................................................................................................................... 5-70
6Appendix ...............................................................................................................................................................................Appendix-71
Appendix 1 : Configuration flag ............................................................................................................................ Appendix-71
Page
ii
Page 9
1Before starting use
1 Before starting use
This chapter explains the details and usage methods of the instruction manuals, the basic terminology and the
safety precautions.
1.1 Using the instruction manuals
1.1.1 The details of each instruction manuals
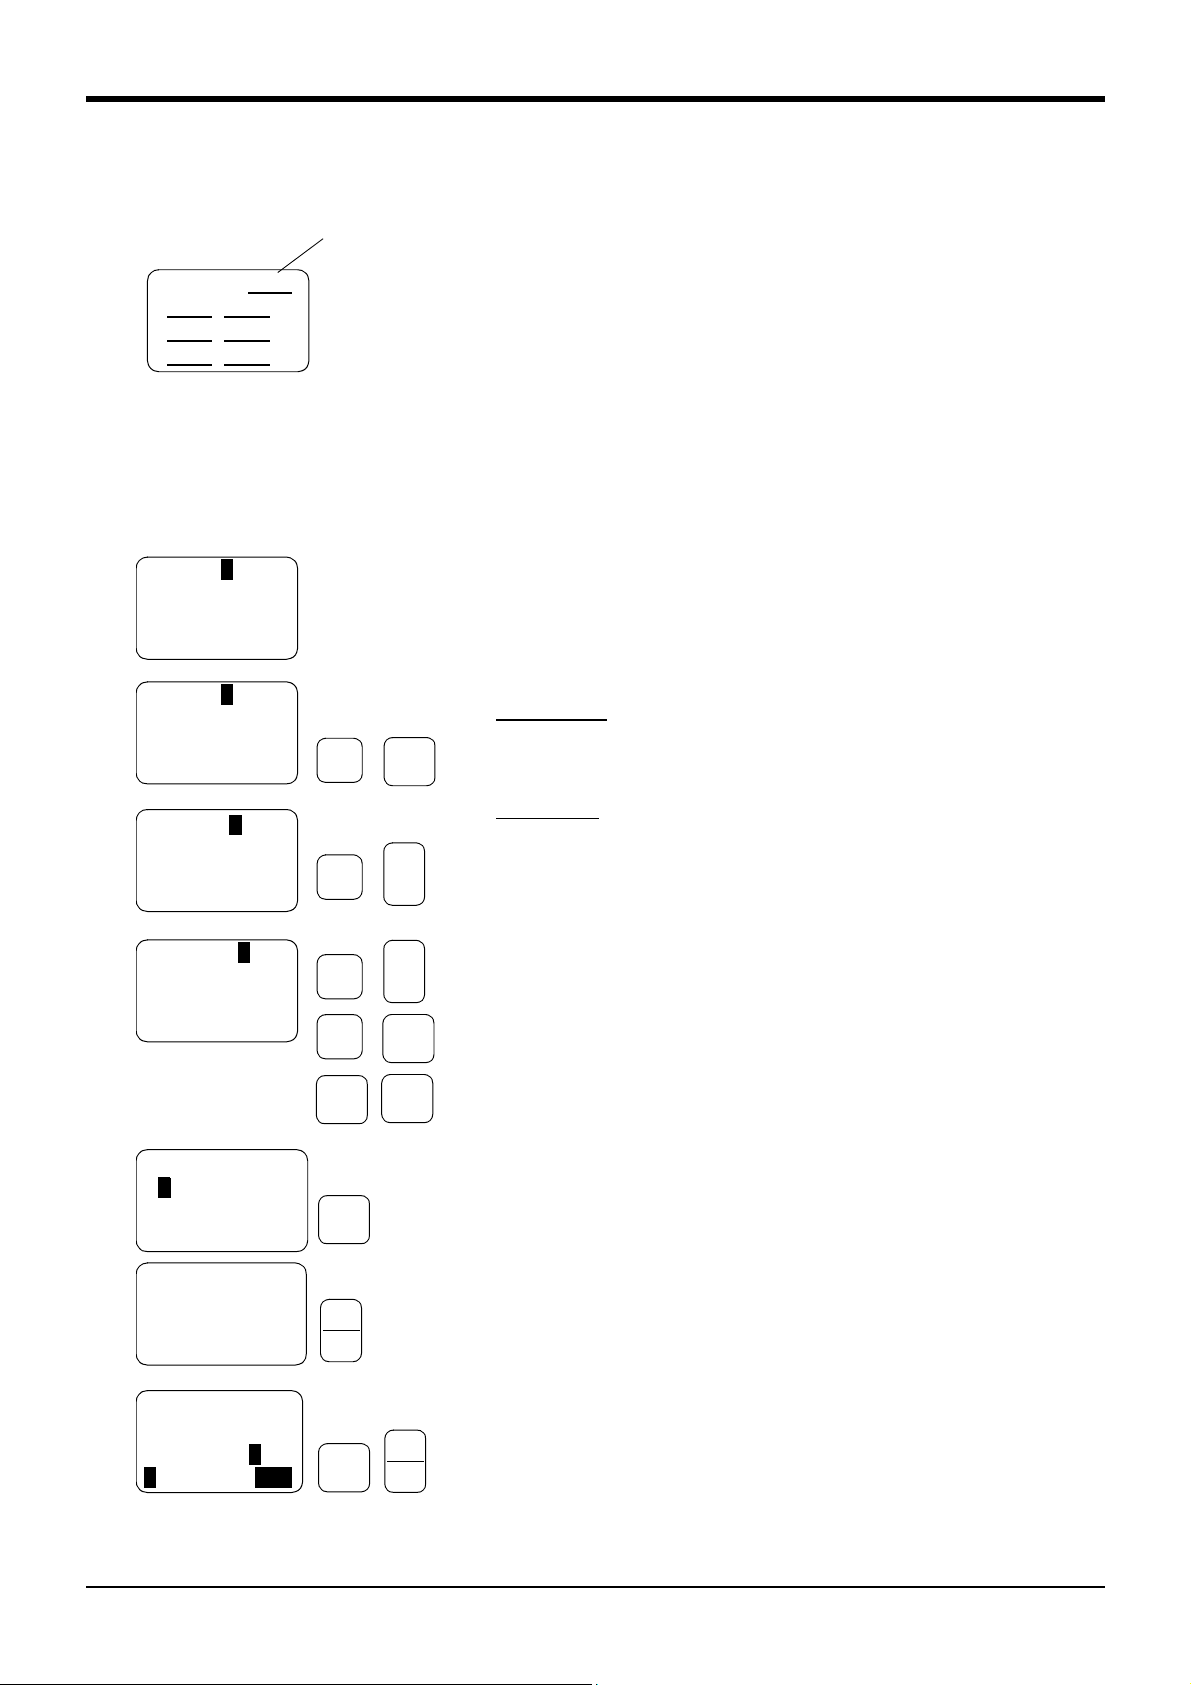
The contents and purposes of the documents enclosed with this product are shown below. Use these documents
according to the application.
For special specifications, a separate instruction manual describing the special section may be enclosed.
Safety Manual
Standard
Specifications
Robot Arm
Setup &
Maintenance
Controller
Setup, Basic
Operation and
Maintenance
Explains the common precautions and safety measures to be taken for robot handling,
system design and manufacture to ensure safety of the operators involved with the
robot.
Explains the product's standard specifications, factory-set special specifications, option
configuration and maintenance parts, etc. Precautions for safety and technology, when
incorporating the robot, are also explained.
Explains the procedures required to operate the robot arm (unpacking, transportation,
installation, confirmation of operation), and the maintenance and inspection procedures.
Explains the procedures required to operate the controller (unpacking, transportation,
installation, confirmation of operation), basic operation from creating the program to
automatic operation, and the maintenance and inspection procedures.
Detailed
Explanation of
Functions and
Operations
Explanations of
MOVEMASTER
COMMANDS
Troubleshooting
Explains details on the functions and operations such as each function and operation,
commands used in the program, connection with the external input/output device, and
parameters, etc.
Explains details on the MOVEMASTER commands used in the program.
(For RV-1A/2AJ and RV-2A/3AJ series)
Explains the causes and remedies to be taken when an error occurs. Explanations are
given for each error No.
Using the instruction manuals
1-1
Page 10
1Before starting use
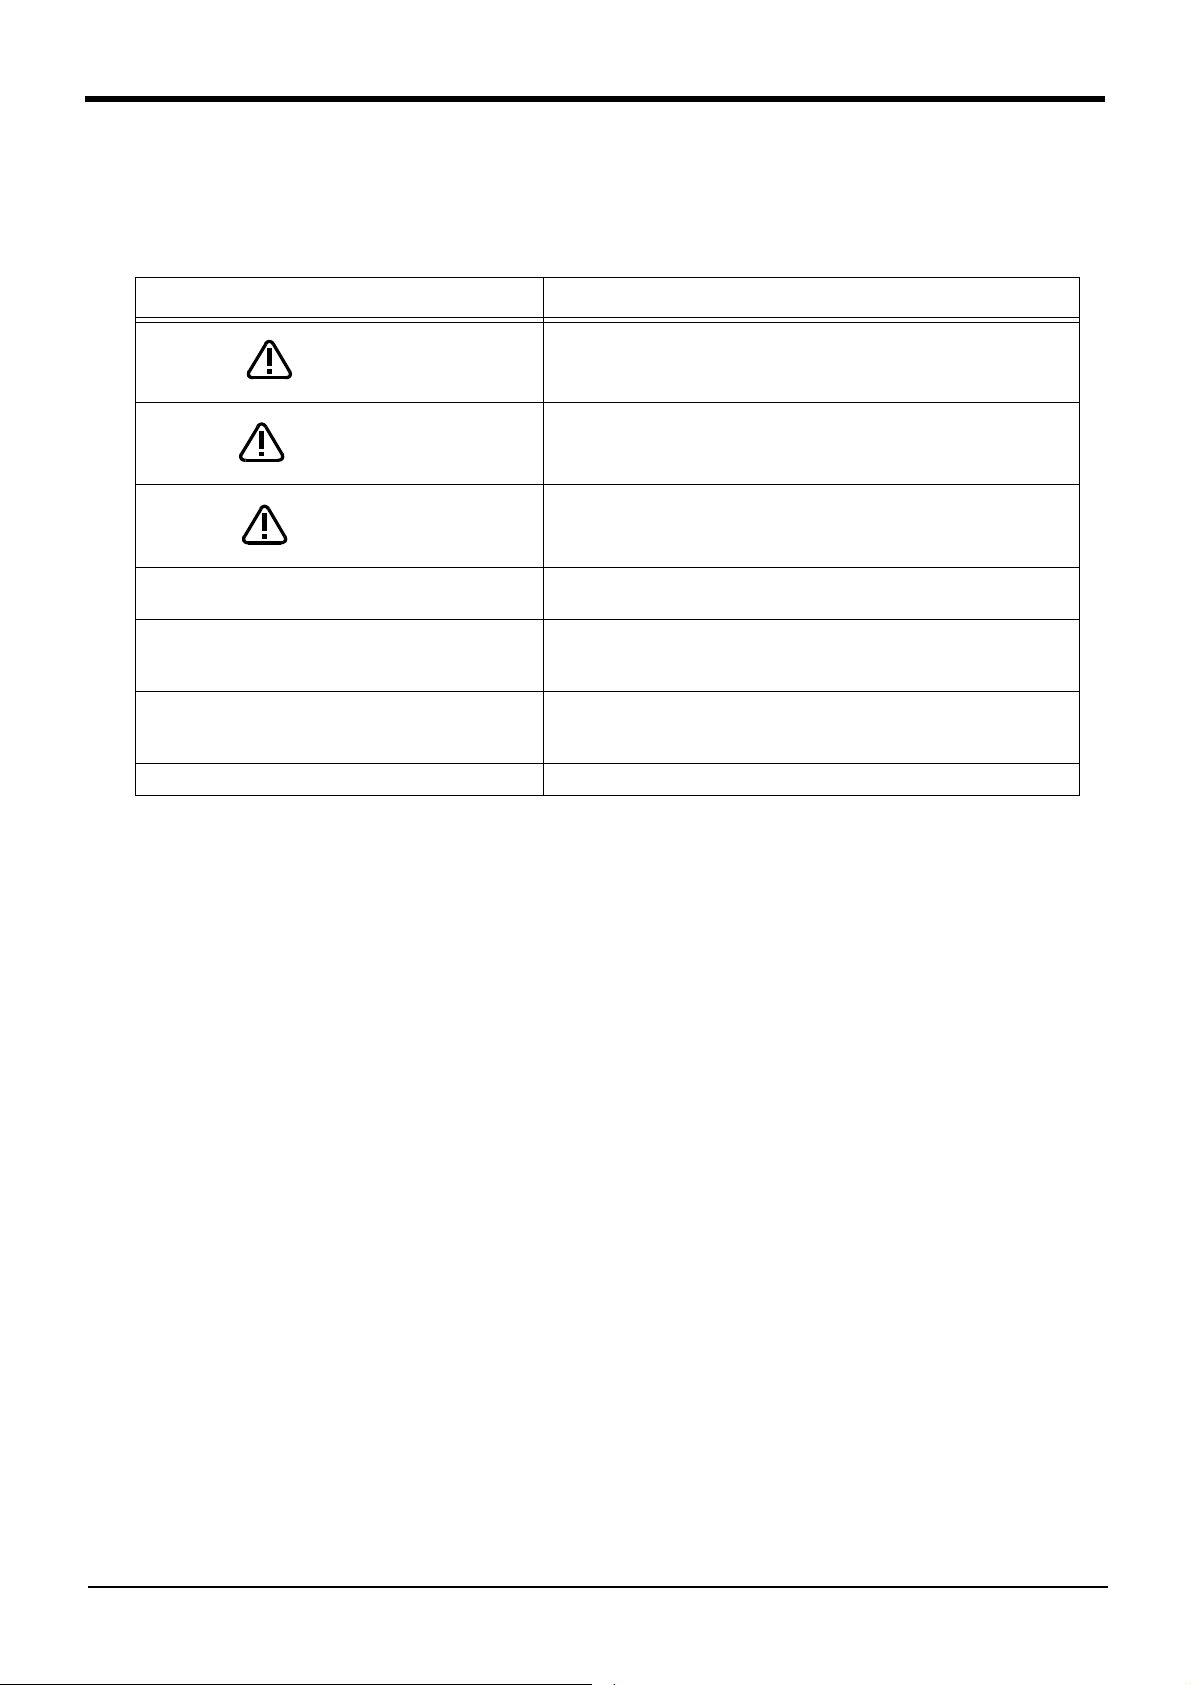
1.1.2 Symbols used in instruction manual
The symbols and expressions shown in Table 1-1 are used throughout this Instruction Manual. Learn the meaning
of these symbols before reading this instruction manual.
Table 1-1:Symbols in instruction manual
Symbol Meaning
DANGER
WARNING
CAUTION
[ JOINT ]
[+/ F O R W D ] + [+ X ]
(A) (B)
[S T E P / MO V E] + ([ COND] → [ RPL ↓ ])
(A) (B) (C)
T/B This indicates the teaching pendant.
Precaution indicating cases where there is a risk of operator fatality or seri
ous injury if handling is mistaken. Always observe these precautions to safely
use the robot.
Precaution indicating cases where the operator could be subject to fatalities
or serious injuries if handling is mistaken. Always observe these precautions to
safely use the robot.
Precaution indicating cases where operator could be subject to injury or
physical damage could occur if handling is mistaken. Always observe these
precautions to safely use the robot.
If a word is enclosed in brackets or a box in the text, this refers to a key on
the teaching pendant.
This indicates to press the (B) key while holding down the (A) key.
In this example, the [+/Forward] key is pressed while holding down the [+X/
+Y] key.
This indicates to hold down the (A) key, press and release the (B) key, and
then press the (C) key. In this example, the [Step/Move] key is held down, the
[Condition] key is pressed and released, and the [Replace ↓ key is pressed.
-
1-2
Using the instruction manuals
Page 11
1Before starting use
1.2 Safety Precautions
Always read the following precautions and the separate "Safety Manual" before starting use of the robot to learn
the required measures to be taken.
CAUTION
CAUTION
WARNING
All teaching work must be carried out by an operator who has received special training.
(This also applies to maintenance work with the power source turned ON.)
→ Enforcement of safety training
For teaching work, prepare a work plan related to the methods and procedures of operating the robot, and to the measures to be taken when an error occurs or when restarting. Carry out work following this plan. (This also applies to maintenance work with the
power source turned ON.)
→ Preparation of work plan
Prepare a device that allows operation to be stopped immediately during teaching work.
(This also applies to maintenance work with the power source turned ON.)
→ Setting of emergency stop switch
CAUTION
DANGER
CAUTION
CAUTION
CAUTION
During teaching work, place a sign indicating that teaching work is in progress on the
start switch, etc. (This also applies to maintenance work with the power source turned
ON.)
→ Indication of teaching work in progress
Provide a fence or enclosure during operation to prevent contact of the operator and
robot.
→ Installation of safety fence
Establish a set signaling method to the related operators for starting work, and follow
this method.
→ Signaling of operation start
As a principle turn the power OFF during maintenance work. Place a sign indicating that
maintenance work is in progress on the start switch, etc.
→ Indication of maintenance work in progress
Before starting work, inspect the robot, emergency stop switch and other related
devices, etc., and confirm that there are no errors.
→ Inspection before starting work
Safety Precautions
1-3
Page 12
1Before starting use
1.2.1 Precautions given in the separate Safety Manual
The points of the precautions given in the separate "Safety Manual" are given below.
Refer to the actual "Safety Manual" for details.
CAUTION
CAUTION
CAUTION
CAUTION
CAUTION
CAUTION
WARNING
WARNING
Use the robot within the environment given in the specifications. Failure to do so could
lead to a drop or reliability or faults. (Temperature, humidity, atmosphere, noise environment, etc.)
Transport the robot with the designated transportation posture. Transporting the
robot in a non-designated posture could lead to personal injuries or faults from dropping.
Always use the robot installed on a secure table. Use in an instable posture could lead
to positional deviation and vibration.
Wire the cable as far away from noise sources as possible. If placed near a noise
source, positional deviation or malfunction could occur.
Do not apply excessive force on the connector or excessively bend the cable. Failure
to observe this could lead to contact defects or wire breakage.
Make sure that the workpiece weight, including the hand, does not exceed the rated
load or tolerable torque. Exceeding these values could lead to alarms or faults.
Securely install the hand and tool, and securely grasp the workpiece. Failure to
observe this could lead to personal injuries or damage if the object comes off or flies
off during operation.
Securely ground the robot and controller. Failure to observe this could lead to malfunctioning by noise or to electric shock accidents.
CAUTION
WARNING
CAUTION
CAUTION
CAUTION
CAUTION
WARNING
Indicate the operation state during robot operation. Failure to indicate the state could
lead to operators approaching the robot or to incorrect operation.
When carrying out teaching work in the robot's movement range, always secure the
priority right for the robot control. Failure to observe this could lead to personal injuries or damage if the robot is started with external commands.
Keep the jog speed as low as possible, and always watch the robot. Failure to do so
could lead to interference with the workpiece or peripheral devices.
After editing the program, always confirm the operation with step operation before
starting automatic operation. Failure to do so could lead to interference with peripheral devices because of programming mistakes, etc.
Make sure that if the safety fence entrance door is opened during automatic operation, the door is locked or that the robot will automatically stop. Failure to do so could
lead to personal injuries.
Never carry out modifications based on personal judgments, or use non-designated
maintenance parts.
Failure to observe this could lead to faults or failures.
When the robot arm has to be moved by hand from an external area, do not place
hands or fingers in the openings. Failure to observe this could lead to hands or fingers
catching depending on the posture.
1-4
Safety Precautions
CAUTION
Do not stop the robot or apply emergency stop by turning the robot controller's main
power OFF.
If the robot controller main power is turned OFF during automatic operation, the robot
accuracy could be adversely affected.
Page 13

2Unpacking to Installation
2 Unpacking to Installation
2.1 Confirming the product
The standard configuration of the robot arm, part of the purchased product, is shown in Table 2-1.
Confirm the parts.
Users who have purchased optional products should refer to the separate "Standard Specifications".
Table 2-1:Standard configuration
No. Part name Type Qty. Remarks
1 Robot arm RV-1A, RV-2AJ,
RV-1AC-SB or
RV-2AJC-SB
2 Guarantee card 1 copy
3 Installation bolts M8x30 4 pcs.
5 Plain washer for installation bolts For M8 4 pcs.
6 Suspension fitting 1 pcs.
7 Suspension fitting installation bolt M5x104 pcs.
8 Nylon clamp (Three kinds one each) 3 pcs.
9 Nylon clamp installation bolts M3x22 1 pcs.
10 Plain washer for Nylon clamp installation bolts For M3 1 pcs.
Either
1 unit
For robot arm installation4 Spring washer for installation bolts For M8 4 pcs.
For robot arm transportation
For wiring and piping for optional
hand
Note) The number 3 - 5, 8-10 are in the plastic bag of the robot arm attachment.
Confirming the product
2-5
Page 14
2Unpacking to Installation
2.2 Installation
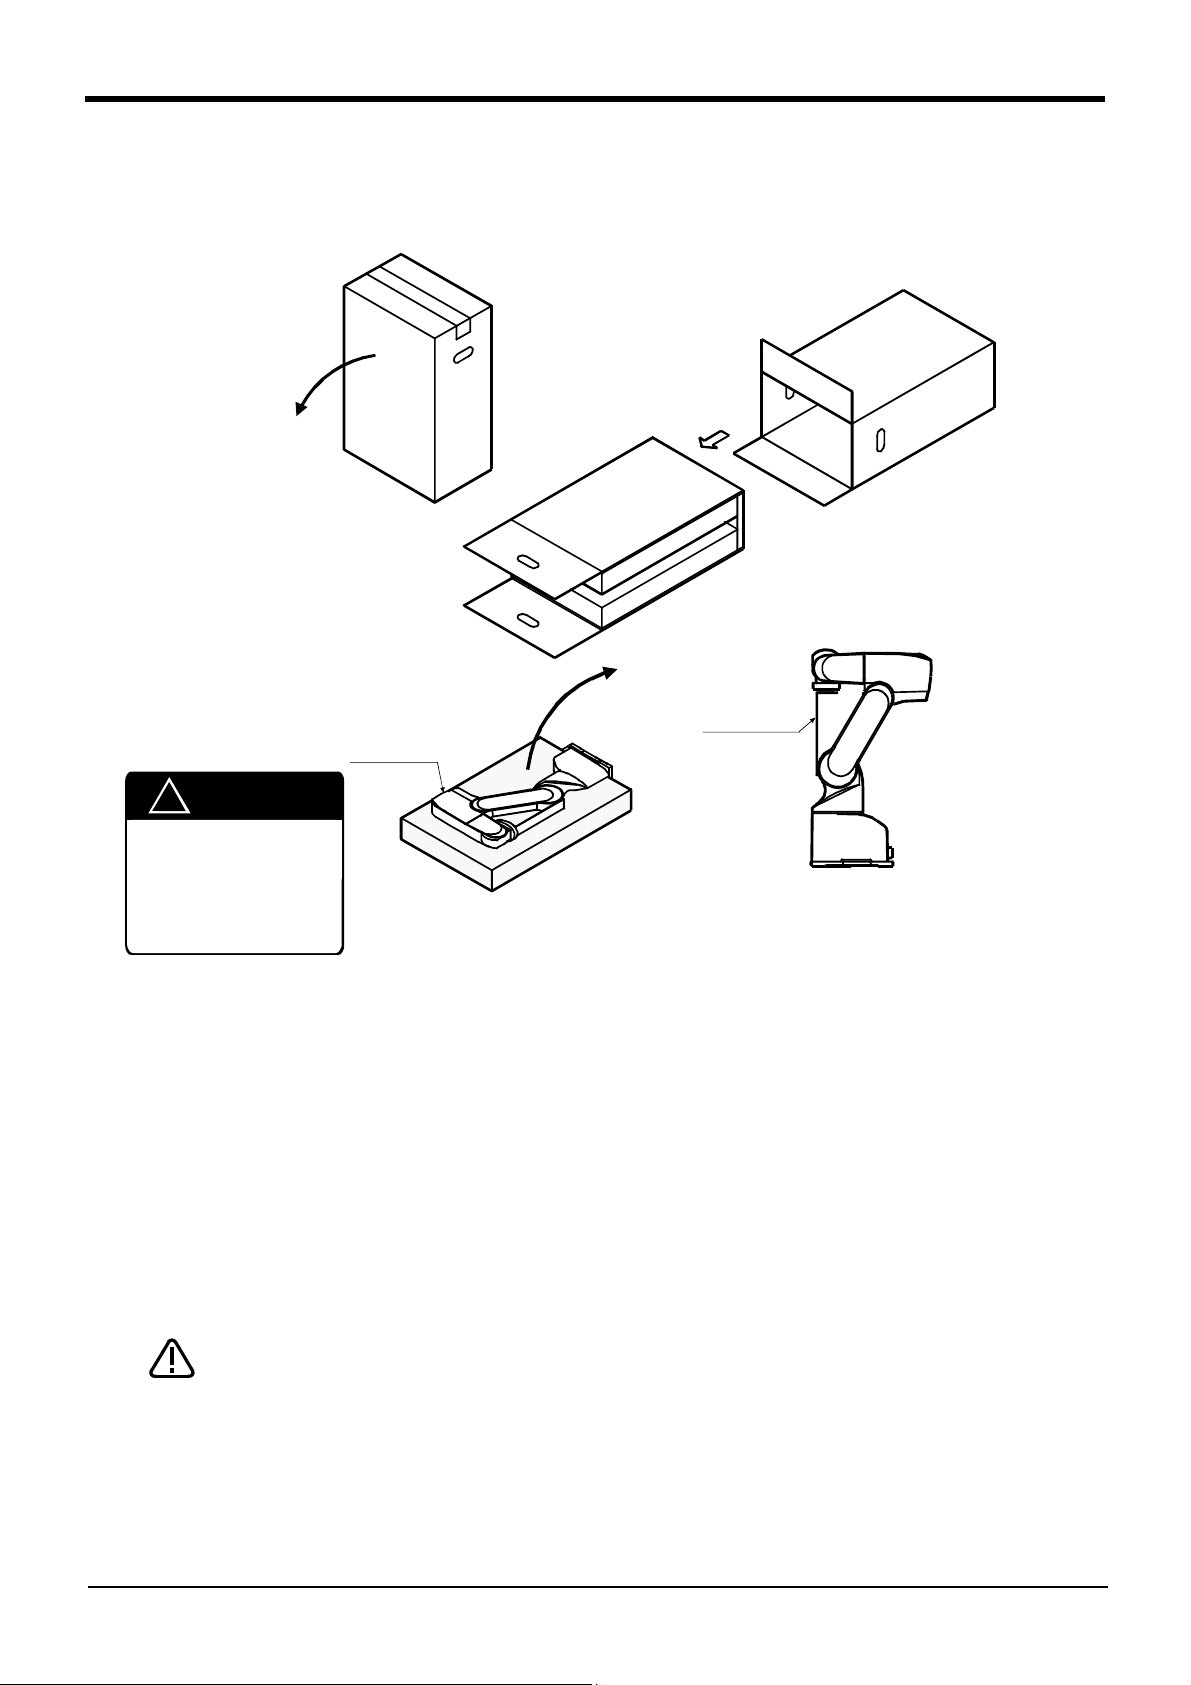
2.2.1 Unpacking
Lays
( a )
Stand up
Robot arm
!
CAUTION
Always unpack the
robot at a flat place.
The robot could tilt
over if unpacked at an
unstable place.
Note) The cushioning material will be required if the robot is transported again , so save it in a safe place.
!
( d )
Pull out
( b )
( c )
Arm fixing
plate
( e )
Fig.2-1:Unpacking the robot arm
The robot is shipped from the factory in cardboard packing. Always refer to Fig. 2-1 and unpack the robot.
Handle the robot arm according to"2.2.2 Transportation procedures"
The unpacking process is shown below.
1) Carefully lay the cardboard box on its side while taking care not to apply impacts. (Fig. 2-1 (a))
2) Using a knife, cut the tape fixing the opening of the cardboard box. (Fig. 2-1 (b))
3) Horizontally pull out the inner box onto the floor. (Fig. 2-1 (c))
4) Remove the inner box and upper cushioning material. (Fig. 2-1 (d))
5) Pull up the robot arm together with the lower cushioning material. (Fig. 2-1 (e))
CAUTION
2-6
Installation
When repackaging the robot in the cardboard box, always use the fixing plates.
Page 15
2.2.2 Transportation procedures
Forearm
2Unpacking to Installation
Arm fixing plate
B
Upper arm
Front
Base
A
Note) The figure shows the 6-axis type, but this also applies for the
5-axis type.
6-axis type
5-axis type
Fig.2-2 : Transportation of robot arm
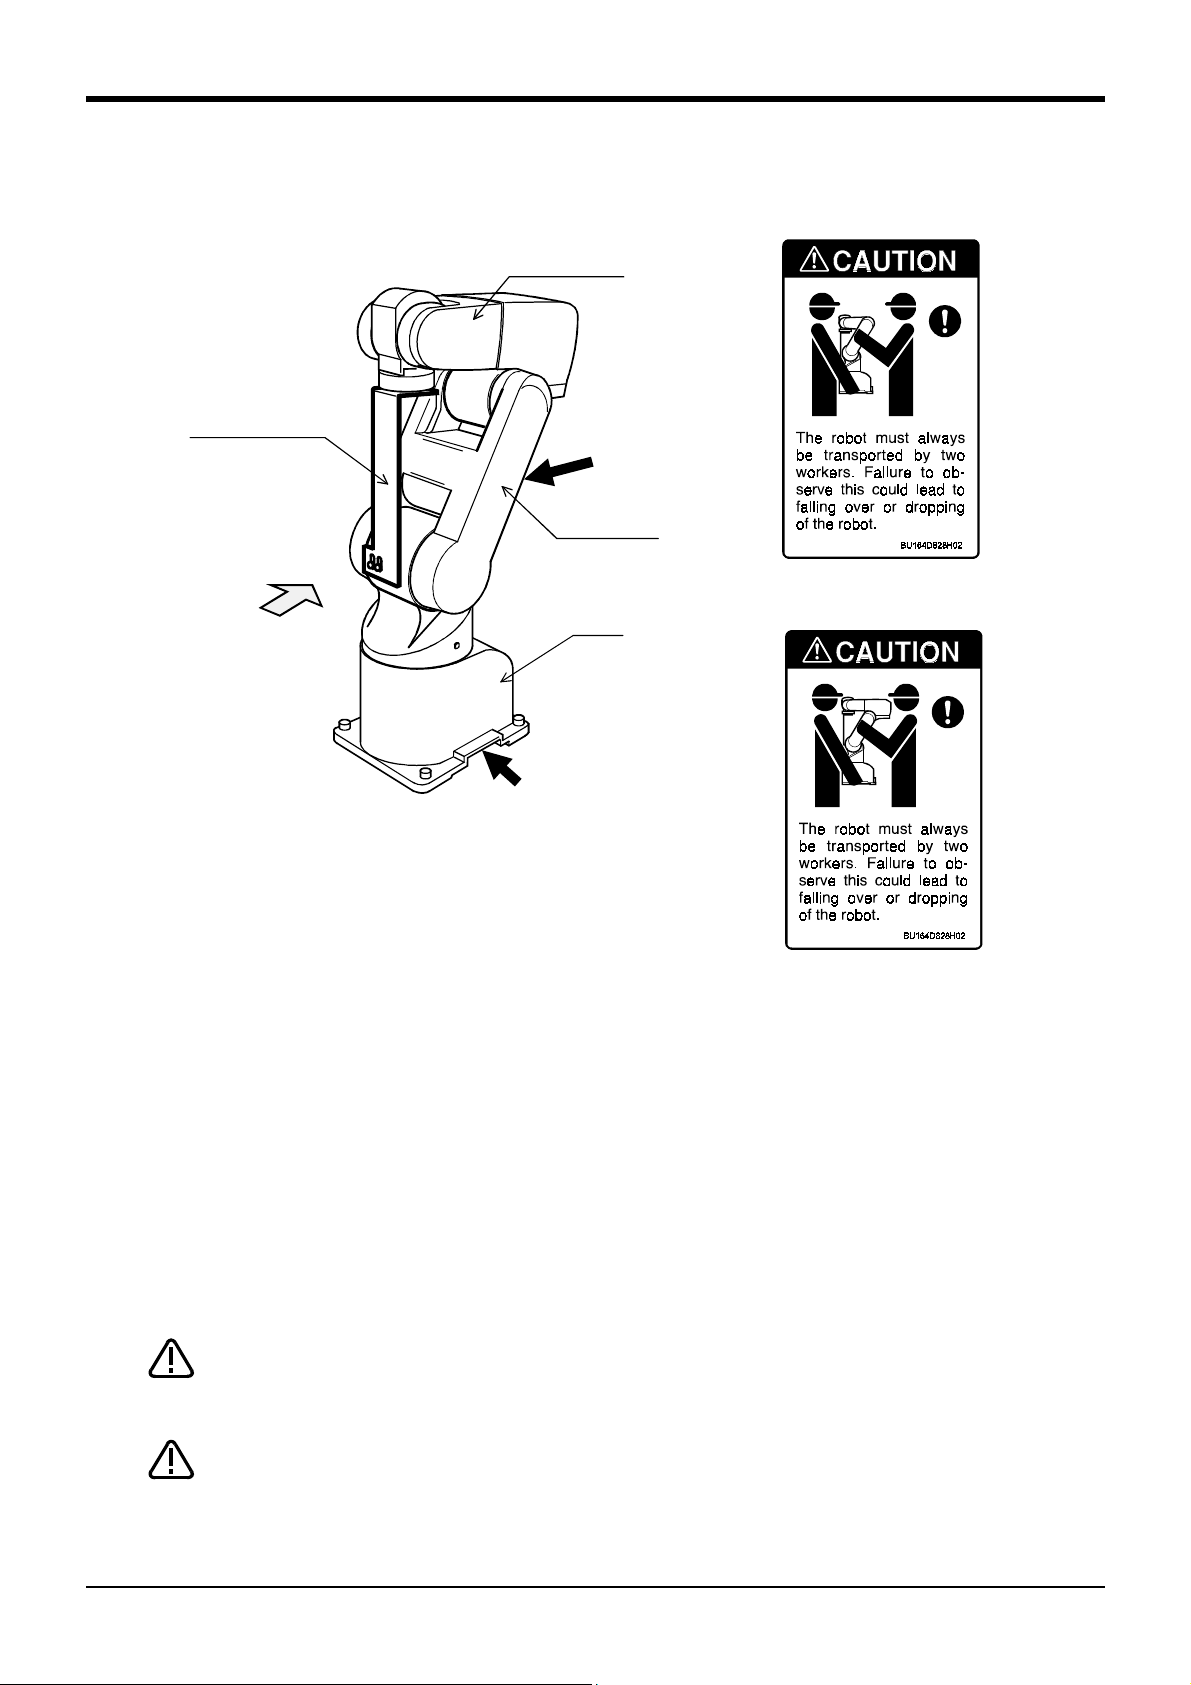
1) The robot must be transported by two workers. Place the robot on a dolly, etc., and move it to near the
installation place. Transporting the robot with the following grips should be limited to placing the robot on
the frame or dolly, and to positioning.
2) When transporting with the grips, one worker should hold the grip (A) at the base, and support the arm from
the front with his body. The other worker should support the back of the upper arm (B). If the robot is held
from the left/right sides or if a cover is held, the robot could tilt over, the cover could be damaged, or
accidents such as dropping could occur.
3) When transporting the robot, do not apply force on the cover, or apply a strong impact on the robot
4) Remove the fixing plates after installing the robot.
CAUTION
CAUTION
To prevent accidents, do not hold the robot from the left/right sides, or hold
covers that have no grips.
When installing the fixing plates again, set each axis of the robot to J1=0 degree,
J2=-30 degree, J3=120 degree, J4=0 degree (6-axis type only), J5=90 degree, and
J6=0 degree.
Installation
2-7
Page 16
2Unpacking to Installation
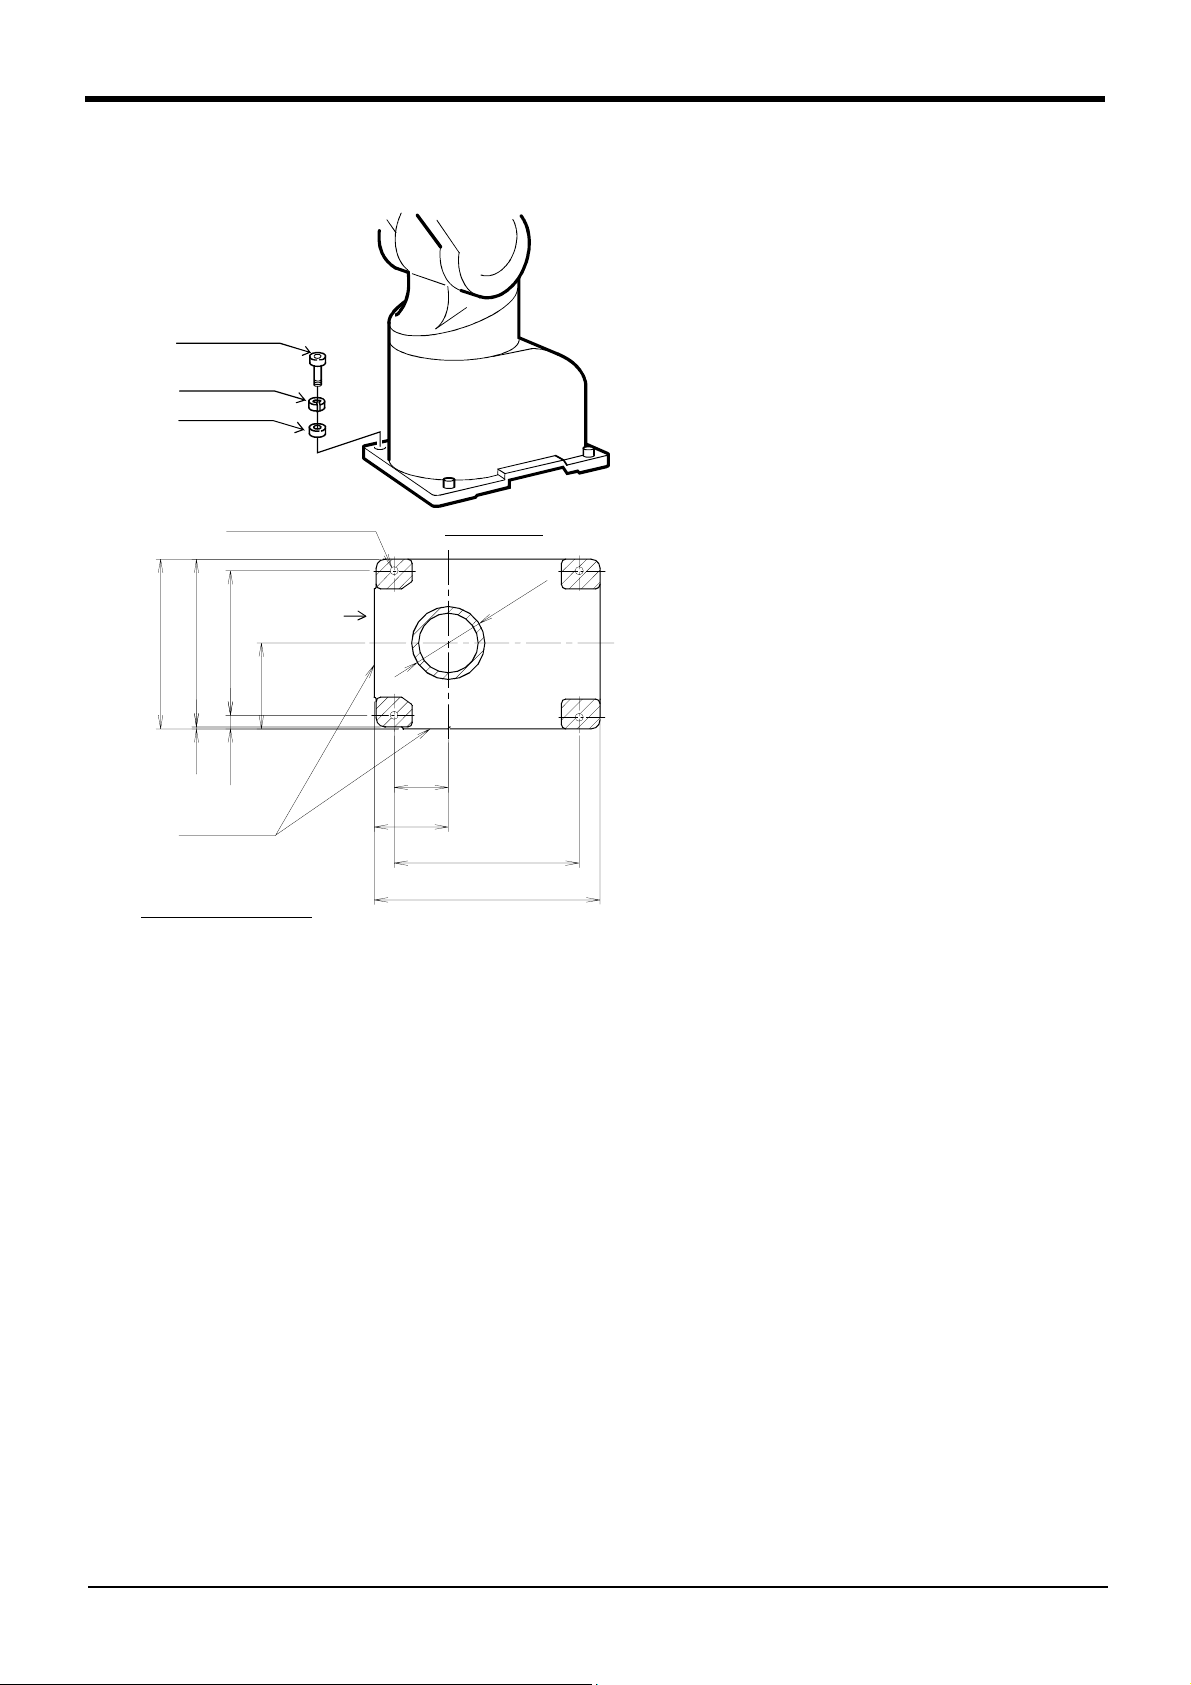
2.2.3 Installation procedures
4-M8×30
(Four positions)
Spring washer
Plain washer
(4-Φ9 installation hole )
(installation bolt M8×35)
Base bottom
1) The robot installation surface has been machine
finished. Use the installation holes (4-φ18 holes)
opened at the four corners of the base, and
securely fix the robot with the enclosed installation bolts (M8 x 30 hexagon socket bolts).
2) Install the robot on a level surface.
3) It is recommended that the surface roughness of
the table onto which the robot is to be installed
by 6.3a or more. If the installation surface is
rough, the contact with the table will be poor, and
positional deviation could occur when the robot
moves.
81
φ
(Front of robot )
188
186
160
95
6.3a
2
15
Installation
reference surface
Installation dimension details
・ The contact section shown with shading on the robot installation surface
must be finished to 6.3a.
・ The section marked with *1 must be contacted against the installation surface
to ensure the robot rigidity.
60
82
6.3a
*1
205
250
Fig.2-3 : Installation dimensions
4) When installing, use a common table to prevent
the position of the devices and jigs subject to
robot work from deviating.
5) The installation surface must have sufficient
strength to withstand the arm reaction during
operation, and resistance against deformation and
vibration caused by the static (dynamic) load of
the robot arm and peripheral devices, etc.
6) When installing on the ceiling, use the ceiling suspension jig available from Mitsubishi. Contact Mitsubishi or your dealer for the ceiling suspension
jig.
7) Remove the fixing plates after installing the robot.
2-8
Installation
Page 17
2.2.4 Grounding procedures (1) Grounding methods
Controller
(Optimum)
and
personal
computer
Robot arm
(a) Dedicated grounding
Robot arm
(b) Common grounding
Fig.2-4 : Grounding methods
(2) Grounding procedures
(Good)
Controller
and
personal
computer
(Normal)
Controller
personal
computer
Robot arm
(c) Common grounding
and
2Unpacking to Installation
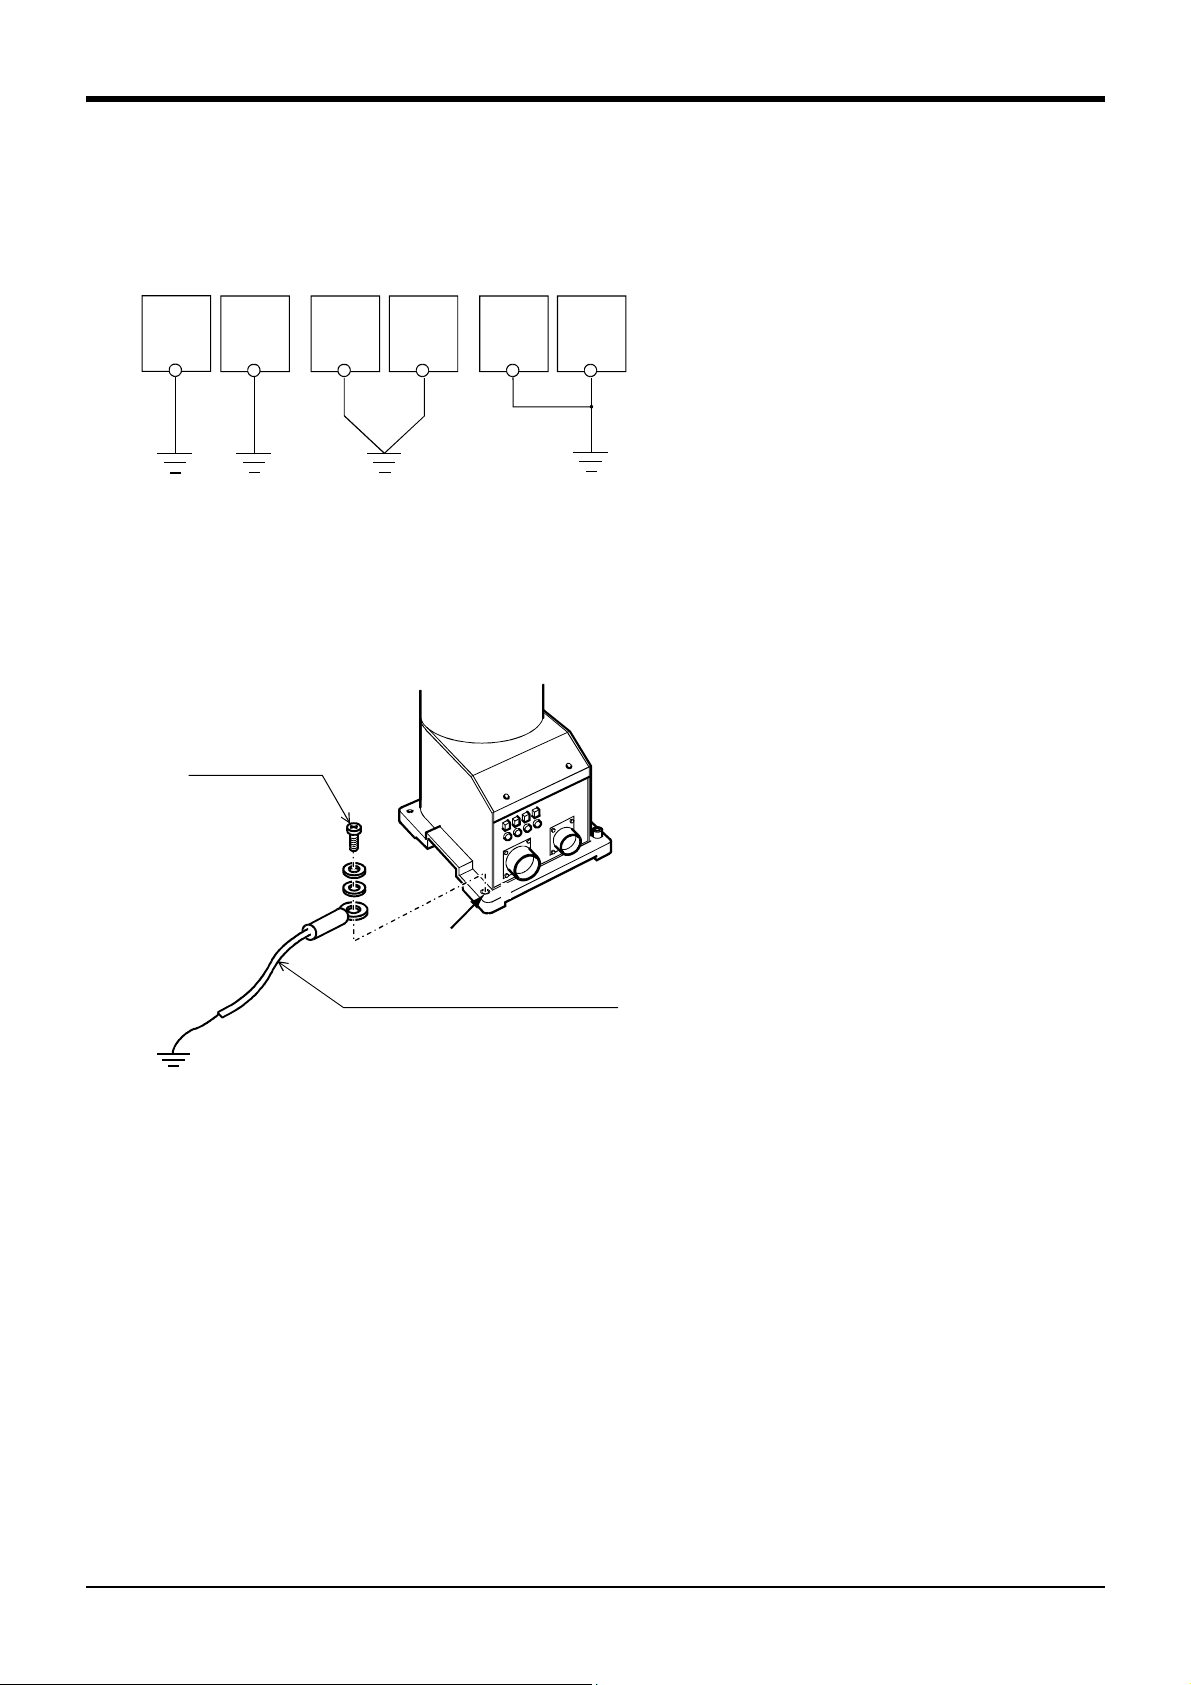
1) There are three grounding methods as shown in
Fig. 2-4, but the dedicated grounding (Fig. 2-4 (a))
should be used for the robot arm and controller
when possible. (Refer to the separate " Controller
Setup, Basic Operation and Maintenance" for
details on the controller grounding.)
2) Use Class D grounding (grounding resistance
100Ω or less).
Dedicated grounding separated from the other
devices should be used.
3) Use a AWG#14(2mm
2
) or more stranded wire for
the grounding wire. The grounding point should be
as close to the robot arm and controller as possible, and the length of the grounding wire should
be short.
Robot arm
M4×10, SW, PW
A
Robot grounding cable
(AWG#14(2mm
(Prepared by customer)
Fig.2-5 : Connecting the grounding cable
2
) or more)
1) Prepare the grounding cable (AWG#14(2mm2) or
more) and robot side installation screw and
washer.
2) If there is rust or paint on the grounding screw
section (A), remove it with a file, etc.
3) Connect the grounding cable to the grounding
screw section.
Installation
2-9
Page 18
2Unpacking to Installation
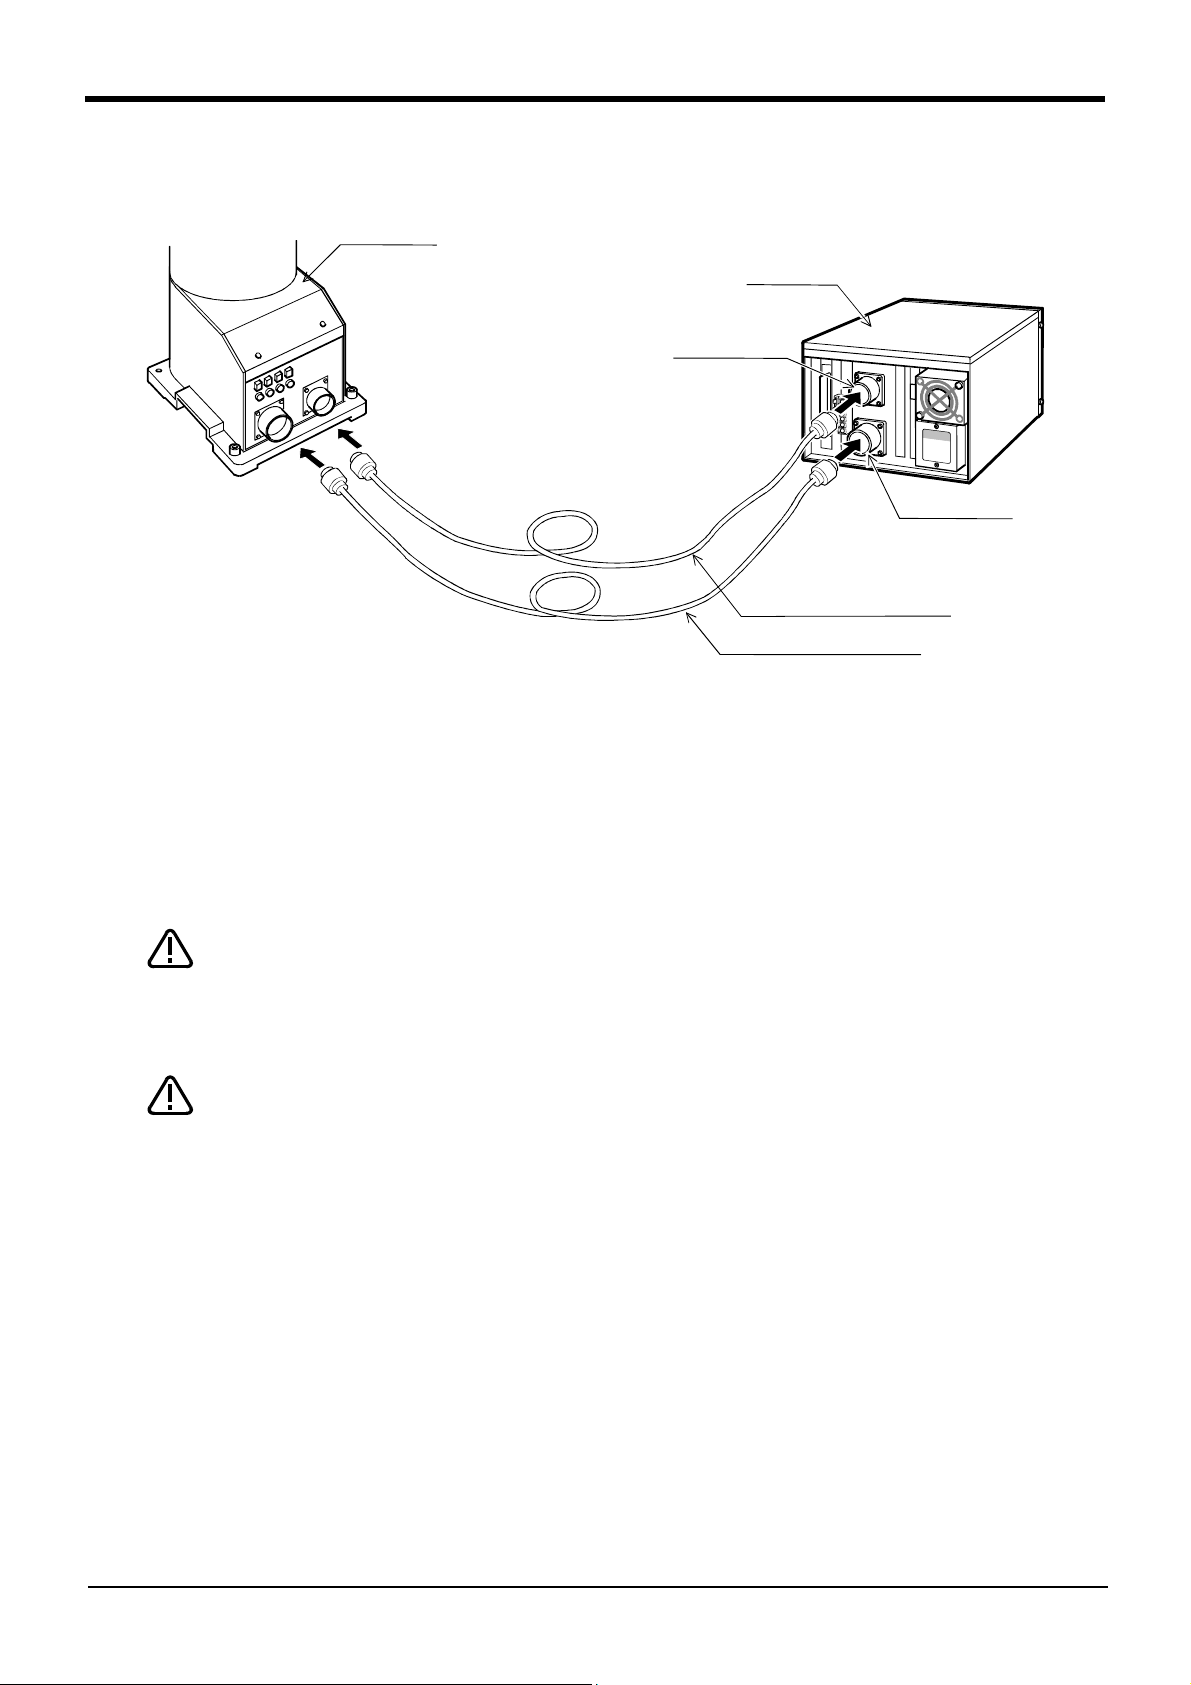
2.2.5 Connecting with the controller
Robot arm
CN2
Controller
Motor power
(CN1)
CN1
Motor signal
(CN2)
Motor power cable(5m)
Motor signal cable(5m)
Fig.2-6 : Connecting the machine cables
Carry out the following procedure after installing the controller referring to the separate "Controller Setup, Basic
Operation and Maintenance" manual.
1) Make sure that the power switch on the front of the controller is turned OFF.
2) Connect the machine cable to the robot arm and the corresponding connector on the controller
CAUTION
CAUTION
The machine cable connectors are dedicated for the controller side and robot arm
side, so take special care when connecting.
If connected incorrectly, the connector pins could bend or break. Thus, even if
connected correctly, the robot will not operate correctly, creating a dangerous
situation.
Take special care to the leading of the connection cable. If the cable is pulled with
force or bent excessively, wires could break or the connector could be damaged.
2-10
Installation
Page 19
2Unpacking to Installation
2.3 Setting the origin
The origin is set so that the robot can be used with a high accuracy. After purchasing the robot, always carry out
this step before starting work. This step must also be carried out if the combination of robot and controller being
used is changed.
There are several methods for setting the origin, but the origin data input method will be explained here. Refer to
"5.5 Resetting the origin" on page 56 for the other methods.
The teaching pendant is required for this operation.
2.3.1 Installing the teaching pendant (T/B)
By using the "REMOVE T/B" switch, the T/B can be installed and removed while the controller's control power is
ON. However, in this procedure, the teaching pendant will be installed with the control power OFF.
Refer to the separate "Controller setup, basic operation, and maintenance" for details on installing the teaching
pendant with the control power ON.
(1) Installing with the control power OFF
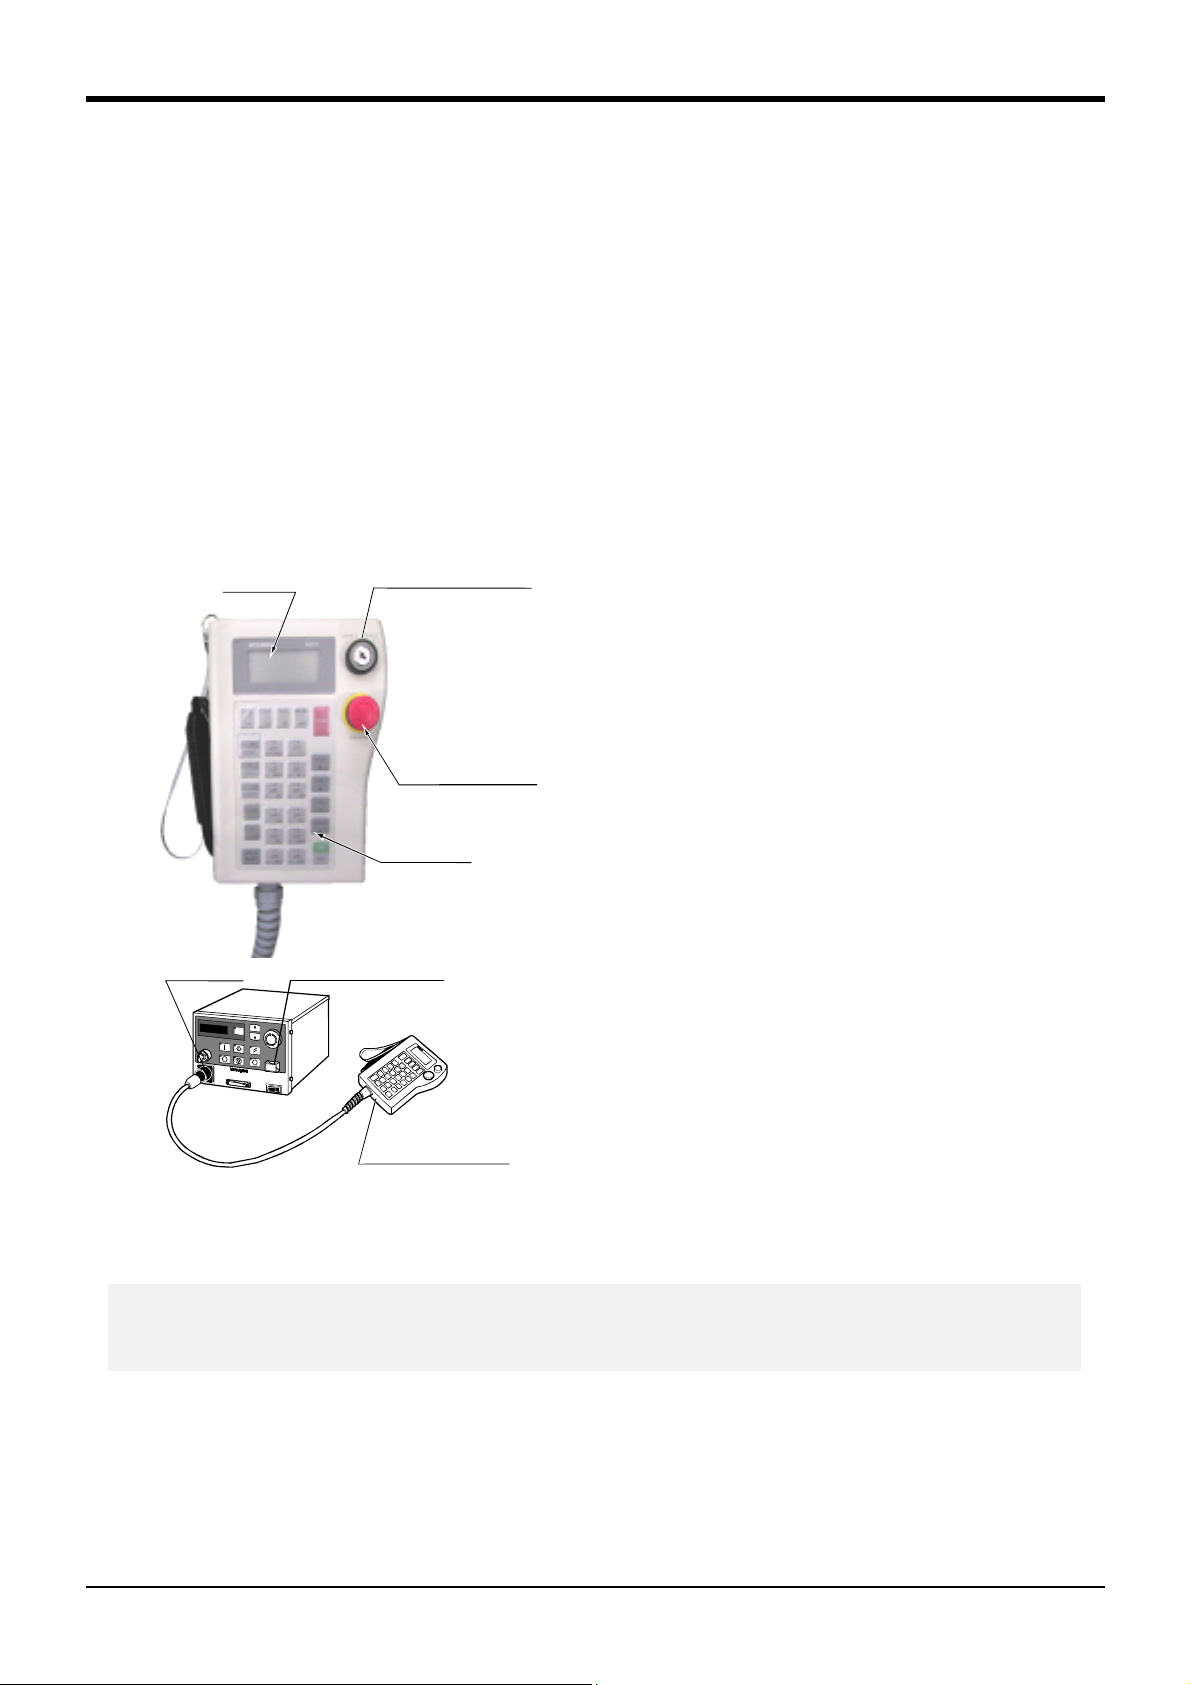
Displ ay LCD
ENABLE/DISABLE switch
1) Confirm that the controller's power supply switch is OFF.
2) Connect the T/B connector to the RS-422 (T/B) connector
on the controller.
3) Do not pull the cable with force or bend it excessively, as
the cable could break or the connector could be damaged.
Emergency stop switch
4) Confirm that the [REMOVE T/B] switch on the side of the
controller is not depressed (is projected).
Connector
Appearance of teaching pendant
REMOVE T/B switch
Operation keys
Teaching pendant
(T/B)
5) Set the T/B [ENABLE/DISABLE] switch to "DISABLE".
Fig.2-7 : Installing the T/B (control power OFF)
◇◆◇ [REMOVE T/B] switch ◇◆◇
When using the robot with the T/B, this switch is used to invalidate the emergency stop from the T/B. This is
also used to install the T/B with turning the controller's power supply ON.
Setting the origin
2-11
Page 20
2Unpacking to Installation
2.3.2 Setting the origin with the origin data input method (1) Confirming the origin data
● Origin data history table (Origin Data History) Serial No.ES804008
Date Default . . . . . . . . .
D V!#S29
J1 06DTYY
J2 2?HL9X
J3 1CP55V
J4 T6!M$Y
J5 Z2IJ%Z0
J6 A12%Z0
Method E E・N・SP E・N・SPE・N・SP
(O: AlphabetO, 0: Zero)
Note) Meanings of symbols in method column
E: Jig method
N: Not used
SP: Not used
Fig.2-8 : Origin data label (an example)
The origin data to be input is noted in the
origin data sheet enclosed with the arm,
or on the origin data history table
attached to the back side of the connector box cover. (Refer to Fig. 2-8).
Referring to "5.3.2 Installing/removing
the cover" on page 44, remove the con-
nector box cover, and confirm the value.
The value given in the default setting
column is the origin settings set with the
calibration jig before shipment.
Note that the 5-axis type does not have
the J4 axis.
WARNING
Always install/remove the cover with the controller control power turned OFF.
Failure to do so could lead to physical damage or personal injury should the robot
start moving due to incorrect operations.
(2) Turning ON the control power
CAUTION
1) Turn the controller [POWER] switch ON.
The control power will be turned ON, and " □ . 100" will appear on the STATUS NUMBER display on the
front of the controller.
Confirm that there are no operators near the robot before turning the power ON.
2-12
Setting the origin
Page 21
(3) Preparing the T/B
STATUS NUMBER
AUTO
(Op.)
AUTO
(Op.)
TEACH
MODE
TEACH
SVO ONMODE
AUTO
(Ext.)
SVO OFF STOP
AUTO
(Ext.)
CHANG DISP
START
RESET
EMG.STOP
Next, prepare to use the T/B
2Unpacking to Installation
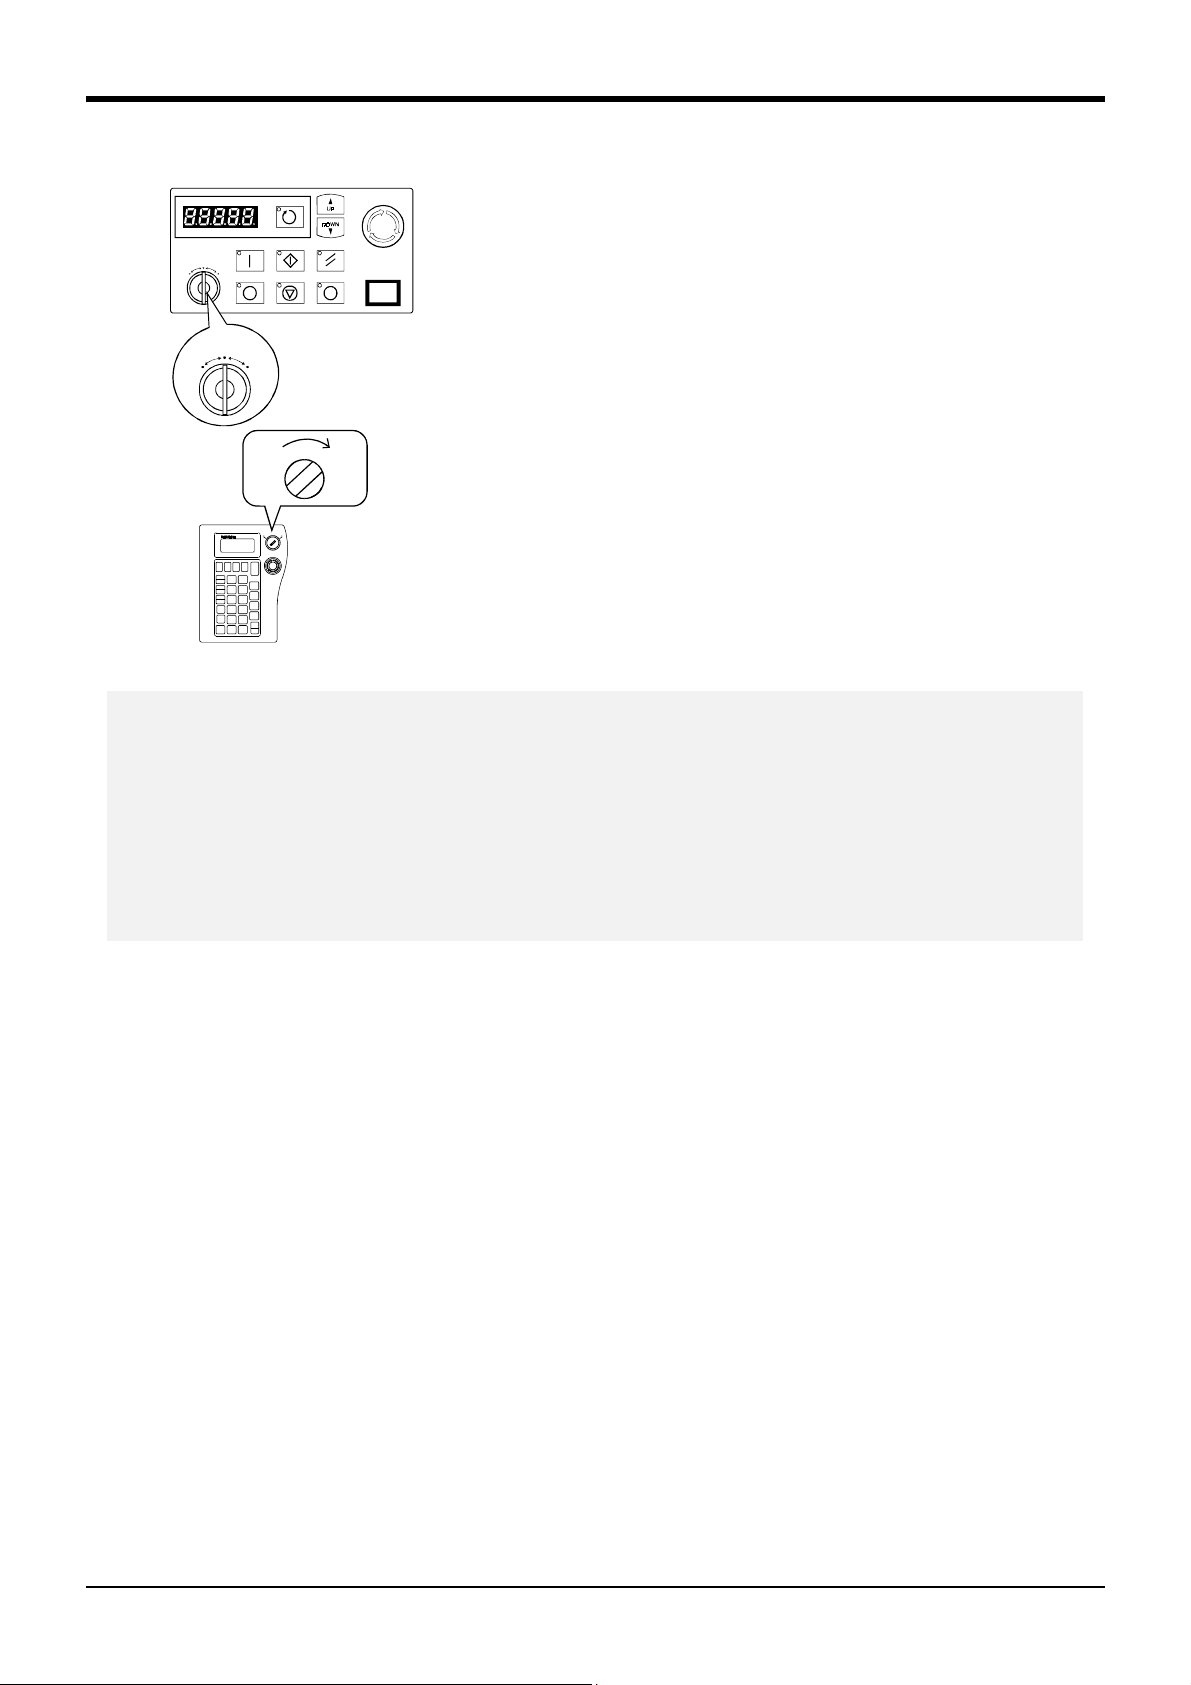
1) Set the [MODE] switch on the front of the controller to "TEACH".
REMOVE T/B
END
DISABLE
ENABLE
2) Set the T/B [ENABLE/DISABLE] switch to "ENABLE". The menu
selection screen will appear.
The following operations are carried out with the T/B.
DISABLE ENABLE
P8TB‑TE
EMG.STOP
◇◆◇ Operating from the T/B ◇◆◇
Always set the [MODE] switch (mode selection key switch) on the front of the controller to "TEACH", and then
set the T/B [ENABLE/DISABLE] switch to "ENABLE".
When the T/B is valid, only operations from the T/B are possible. Operations from the controller or external
signals will not be accepted.
◇◆◇ When T/B operations are mistaken ◇◆◇
The displayed screen will return to the "menu selection screen" when the [MENU] key is pressed. Carry out the
operations again from this screen. Operations can also be carried out again by setting the T/B [ENABLE/
DISABLE] switch to "DISABLE" once and then setting to "ENABLE".
Setting the origin
2-13
Page 22
2Unpacking to Installation
(4) Selecting the origin setting method
<T/B screen> [Keys used]
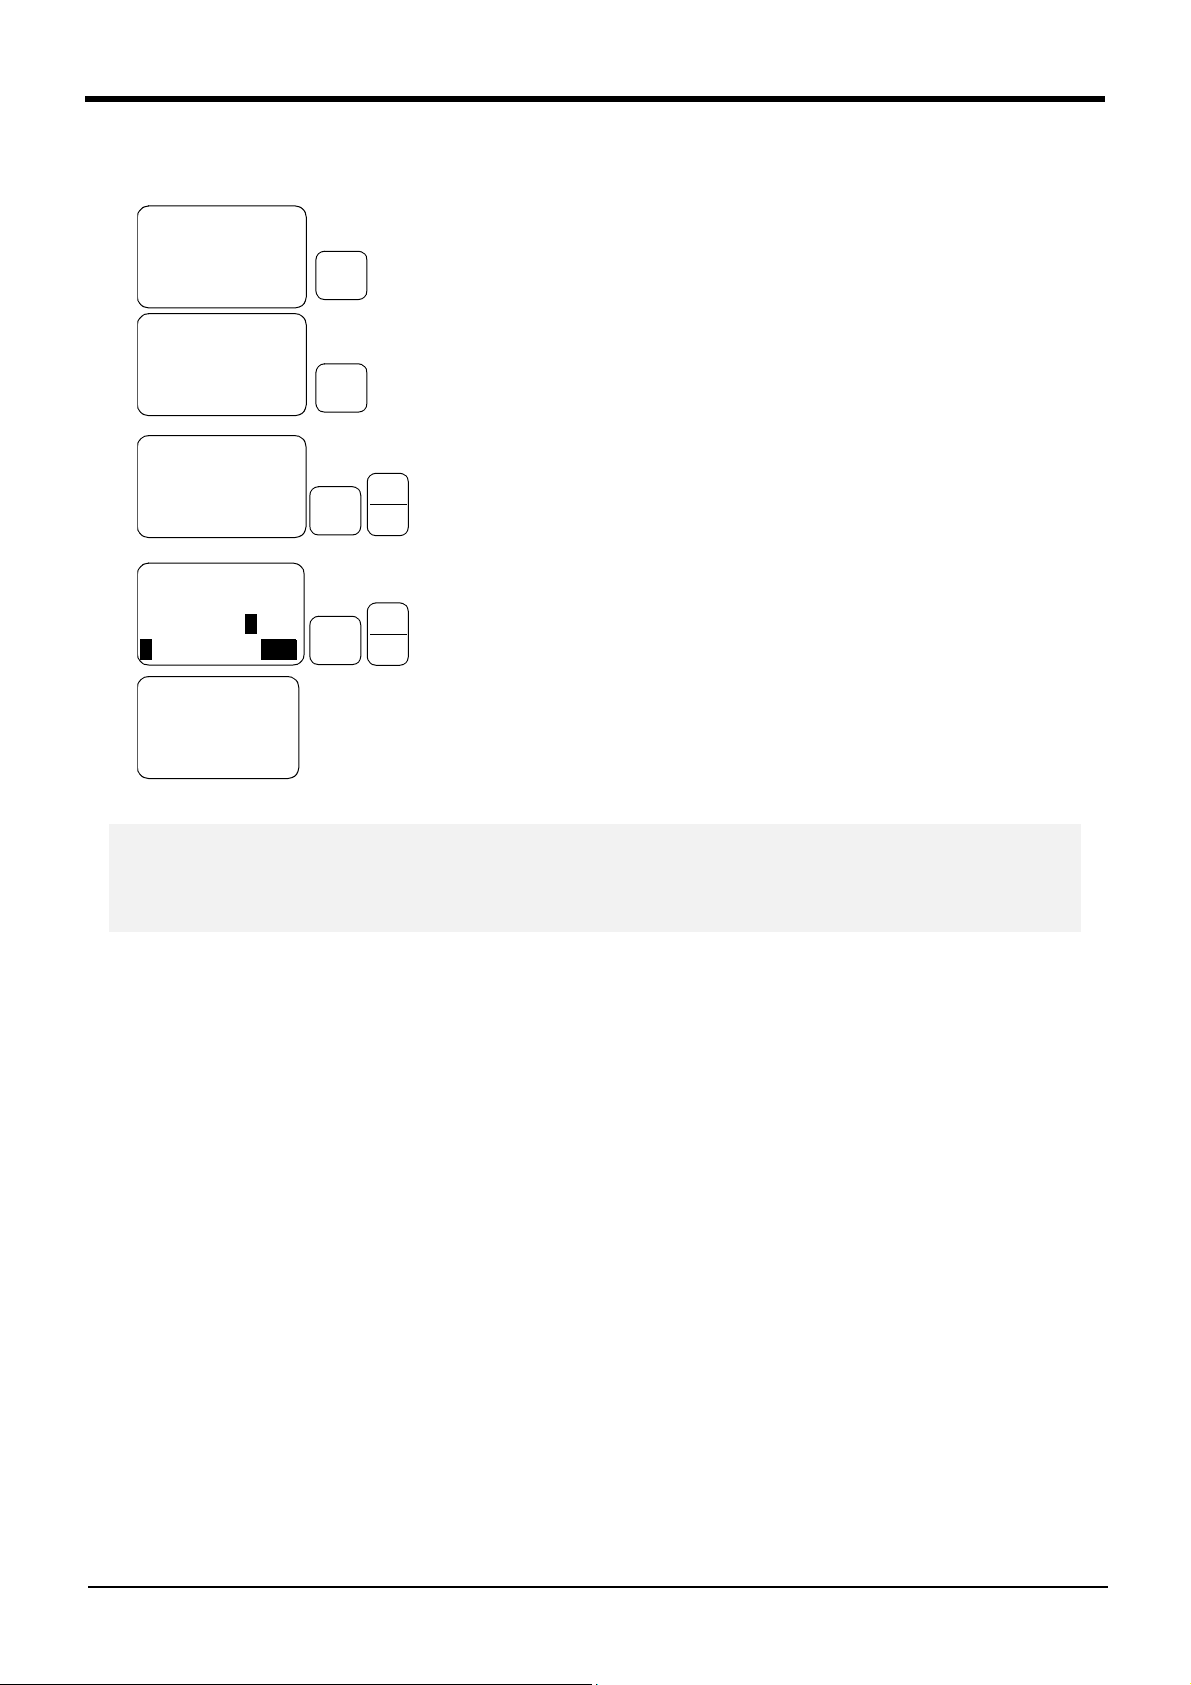
<MENU>
1.TEACH 2.RUN
3.FILE 4.MONI
5.MAINT 6.SET
5
+C
(J6)
STU
1) Press the [5] key on the menu screen, and display the maintenance screen.
<MAINT>
1.
PARAM2.INIT
3.
BRAKE4.ORIGIN
5.
POWER
<ORIGIN>
1.DATA 2.MECH
3.JIG 4.ABS
5.USER
<ORIGIN>
SERVO OFF
OK?(1)
1:EXECUTE
<
DATA>D(000000)
1
1
4
(J2)
-B
(J5)
-B
(J5)
-Y
MNO
DEF
DEF
2) Press the [4] key on the maintenance screen, and display the origin setting
method selection screen.
3) Press the [1] key on the origin setting method selection screen, and select
INP
EXE
the data input method.
The origin data input method will be selected, and the screen for turning
OFF the servo power will appear.
4) Press the [1] and [INP] keys to turn OFF the servo power. The screen for
INP
EXE
inputting the origin data will appear.
1:000000 000000
3:000000 000000
5:000000 000000
◇◆◇ Selecting a menu ◇◆◇
The menu can be selected with one of the following methods.
A: Press the numeral key for the No. of the item to be selected.
B: Using the [ ↓ ] and [ ↑ ] keys, etc., move the cursor to the item to be selected, and then press the [INP] key.
2-14
Setting the origin
Page 23
(5) Inputting the origin data
2Unpacking to Installation
Input the value confirmed in section "(1) Confirming the origin
T/B screen
<DATA> D( D
1: J1
J2
Origin data label
(D,J1,J2,J3,J4,J5,J6)
)
data" on page 12.
The correspondence of the origin data label value and axis to be
input is shown in Fig. 2-9.(For the 5-axis robot, the J4 axis is
meaningless.)
3: J3 J4
5: J5 J6
Fig.2-9 : Correspondence of origin data label and axis
The method for inputting the origin data is explained below. The value shown in Fig. 2-8will be input as an example.
<T/B screen> [Keys used]
<
DATA>D(000000)
1:000000 000000
3:000000 000000
1) Confirm that the cursor is at the "D" position on the T/B display
screen.
5:000000 000000
<
DATA
>D(V00000)
1:000000 000000
3:000000 000000
5:000000 000000
POS
CHAR
+
+B
(J5)
6
VWX
2) Input the D value V!%S29.
Inputting "V"
Press the [VWX] key once while holding down the [CHAR] key. "V" will
appear, so release the [CHAR] key. "V" will be set.
<
DATA
>D(V!0000)
1:000000 000000
3:000000 000000
5:000000 000000
<
DATA
>D(V!0000)
1:000000 000000
3:000000 000000
5:000000 000000
<
DATA
>D(V!%S29)
1:000000 000000
3:000000 000000
5:000000 000000
<
DATA
>D(V!%S29)
1:A@B&8F G#$Y5#
3:H+7%2H B="!1L
5:59A37! K8#&6P
POS
POS
POS
2
CHAR
CHAR
CHAR
-A
(J4)
RPL
↓
INP
EXE
GHI
+
+
+
5
9
SPD
#%!
SPD
#%!
+C
(J6)
+Y
(J2)
Inputting "!"
Press the [#%!] key three times while holding down the [CHAR] key. "!"
will appear, so release the [CHAR] key. "!" will be set.
In the same manner, while holding down the [CHAR] key, press the
["%"] key twice, and the [STU] key once (input "S").
Release the [CHAR] key, and press the [2] key (input "2") and then
the [9] key (input "9").
V!%S29 will appear at the "D" data on the teaching pendant screen.
STU
&<>
3) Press the [ ↓ ] key, and move the cursor to the J1 input position.
4) Input the J1 value in the same manner as above.
5) Input the J2, J3, J4, J5 and J6 values in the same manner. Note
that the J4 axis is not required for the 5-axis type.
6) After inputting all of the values, press the [INP] key. The origin
setting confirmation screen will appear.
<
DATA
>D(V!%S29)
CHANGES TO ORIGIN
OK? (1)
1:EXECUTE
1
-B
(J5)
DEF
INP
EXE
7) Press [1] (-B/-P) and [INP] key to end the origin setting
Setting the origin
2-15
Page 24

2Unpacking to Installation
i
◆◇ Moving the cursor ◇◆◇
Press the [ ↑ ], [ ↓ ], [ ← ] and [ → ] keys.
◆◇ Inputting characters ◇◆◇
Hold down the [CHAR] key and press the key with the character to be input on the lower right. Three characters w
scroll each time the character key is pressed.
◇◆◇ Correcting an input ◇◆◇
After returning one character by pressing the [DEL] key, input the character again.
(6) Installing the connector box cover
Return the connector box cover, removed in section "(1) Confirming the origin data" on page 12 to its original
position.
This completes the setting of the origin with the origin data input method.
Always remove and install the cover with the controller power turned OFF. Failure
WARNING
to do so could lead to the robot moving because of incorrect operations, or to
physical damage or personal injury.
◇◆◇ If the origin input data is incorrect ◇◆◇
If the origin input data is incorrect, the alarm No. 1760 (origin setting data illegal) will occur when origin data input.
In this case, reconfirm the value input for the origin data.
2-16
Setting the origin
Page 25

2Unpacking to Installation
2.4 Confirming the operation
In this section, the robot will be moved manually using the T/B to confirm that the operation is correct.
Moving the robot manually is called "jog operation". This operation includes the JOINT jog that moves each axis,
the XYZ jog that moves along the base coordinate system, the TOOL jog that moves along the tool coordinate
system, and the CYLNDER jog that moves along the circular arc.
This operation is carried out while pressing the deadman switch on the back of the T/B.
CAUTION
CAUTION
CAUTION
The robot will move during this operation. Make sure that there are no operators
near the robot, and that there are no obstacles, such as tools, in the robot operation
range.
To immediately stop the robot, release the deadman switch on the back of the T/B.
The servo power will turn OFF, and the robot will stop.
The robot will also stop if the [EMG.STOP] switch (emergency stop switch) on the
front of the T/B or the [EMG.STOP] switch (emergency stop) on the front of the
controller is pressed.
Confirm that the origin has been set. If the origin has not been set, "****" will
appear at the current position display on the teaching pendant, the JOINT jog operation will take place in any jog mode selected.
Refer to "2.3 Setting the origin" on page 11 for details on setting the origin.
-
J5 axis
+
+
J6 axis
Fig.2-10 : JOINT jog operation
-
-
J1 axis
J3 axis
-
+
J2 axis
-
+
+
-
J5 axis
+
J6 axis
-
* Each axis moves independently.
The 5-axis type does not have the J4 axis.
-
+
J4 axis
-
J1 axis
6-axis type5-axis type
J3 axis
-
+
J2 axis
-
+
Confirming the operation
2-17
Page 26

2Unpacking to Installation
Tool length
-Y
-
+
Control point
-
+
+X
* While maintaining the flange surface posture, the axis moves straight along the base coor-
dinate system.
Also, while maintaining the flange surface position, the flange surface posture changes.
Fig.2-11 : XYZ jog operation
+Z
-Z
5-axis type
+Y
-X
+Z
-
Tool length
+
-
+X
Control point
+
+
-
+Y
+X
-Y
+Z
-Z
6-axis type
-X
+Y
Tool length
+Y
+Z
Control point
+X
* While maintaining the flange surface posture, the axis moves straight along the tool
coordinate system.
Also, while maintaining the flange surface position, the flange surface posture changes.
With the 5-axis type, the axis moves only in the X and Y axis directions of the tool
coordinates.
Fig.2-12 : TOOL jog operation
5-axis type
-X
-Y
+
+Z
Control point
Tool length
-
-Z
+
+
-
+Y
-
+X
6-axis type
2-18
Confirming the operation
Page 27

2Unpacking to Installation
+Z
-
J6
+
-
J5
+
-Y
Control
point
+X
-Z
5-axis type
Tool length
* The axis moves straight along the base coordinate system. At this time, the flange surface
posture is not maintained.
Also, the flange surface posture changes. The flange surface position changes at this time.
Fig.2-13 : 3-axis XYZ jog operation
+Y
-X
Tool length
+
J6
-
J5
-
+
-
+
Control point
-Y
+X
+Z
J4
-Z
6-axis type
-X
+Y
+Z
+Z
Vertical
Tool length
Tool length
Redius
Vertical
Control
point
Arc
+X
-Y
5-axis type
-Z
Redius
Control point
-X
+Y
Arc
-Y
+X
-Z
6-axis type
* The current position is set as the arc centering on the Z axis, and the axis moves along that arc,
expands and contracts in the radius direction, and moves vertically. At this time, for the 6-axis type, the
flange surface posture is maintained. Also, while maintaining the flange surface position, the flange
surface posture changes.
-X
+Y
Fig.2-14 : CYLINDER jog operation
Confirming the operation
2-19
Page 28

2Unpacking to Installation
(1) JOINT jog operation
Select the JOINT jog mode
JOINT LOW
J1 +34.50
J2 +20.00
J3 +80.00
Set the jog speed
JOINT LOW
J1 +34.50
J2 +20.00
J3 +80.00
J1 axis jog operation
STEP
JOINT jog mode
STEP
Set the speed
MOVE
MOVE
+
FORWD-BACKWD
JOINT
+
( )?
+
Press the [MOVE] + [JOINT] keys to select the
JOINT jog mode. "JOINT" will appear at the upper
left of the screen.
Each time the [MOVE] + [+] keys are pressed, the
override will increase in the order of LOW → HIGH →
3 → 5 → 10 → 30 → 50 → 70 → 100%.
When the [MOVE] + [-] keys are pressed, the
override will decrease in the reverse order.
The currently set speed will appear on the upper right
of the screen.
Set the override to 10% here for confirmation work.
STEP
MOVE
+
SPACE
- X
(J1)
-
POR
STEP
MOVE
+
+
+ X
(J1)
' ; ^
STEP
MOVE
+
SPACE
- X
(J1)
-
POR
J1 axis
5-axis type
6-axis type
・ When the [MOVE] + [+X (J1)] keys are pressed, the J1 axis will rotate in the plus direction.
When the [MOVE] + [-X (J1)] keys are pressed, Rotate in the minus direction.
J2 axis jog operation
+
+
- Y
(J2)
MNO
4
&< >
9
+Y
(J2)
-
+
+
- Y
(J2)
MNO
4
-
STEP
MOVE
+
STEP
MOVE
+
+Y
(J2)
&< >
9
STEP
MOVE
STEP
MOVE
STEP
MOVE
J1 axis
+
+
+ X
(J1)
' ; ^
5-axis type
6-axis type
・ When the [MOVE] + [+Y (J2)] keys are pressed, the J2 axis will rotate in the plus direction.
When the [MOVE] + [-Y (J2)] keys are pressed, Rotate in the minus direction.
◆◇ When the robot is in the transportation posture ◇◆◇
The axes may be outside the movement area. Move these axes toward the inner side of the movement area. If
moved outward, an X will appear on the T/B screen, and the robot will not move.
2-20
Confirming the operation
X
Page 29

J3 axis jog operation
STEP
MOVE
+
JKL
3
J3 axis
+
- Z
(J3)
3
+ Z
(J3)
, @\
6-axis type
STEP
MOVE
STEP
MOVE
+
- Z
(J3)
JKL
3
J3 axis
+
+ Z
(J3)
, @\
3
5-axis type
STEP
MOVE
・ When the [MOVE] + [+Z (J3)] keys are pressed, the J3 axis will rotate in the plus direction.
When the [MOVE] + [-Z (J3)] keys are pressed, Rotate in the minus direction.
2Unpacking to Installation
J4, J5 and J6 axis jog
STEP
MOVE
STEP
MOVE
J6 axis
+
+
(J6)
0 ABC
5
- C
+ C
(J6)
-
STU
+
J5
-
axis
+
STEP
MOVE
STEP
MOVE
+
+
- B
(J5)
DEF
1
B
+
(J5)
6VWX
5-axis type
STEP
MOVE
STEP
MOVE
+ C
(J6)
+
5
axis
J6
- C
+
(J6)
0
STU
-
ABC
+
-
J5axis
STEP
MOVE
+
STEP
MOVE
- B
+
(J5)
1
DEF
J
4
axis
+
-
B
+
(J5)
VWX
6
6-axis type
・ When the [MOVE] + [+A (J4)] keys are pressed, the J4 axis will rotate in the plus direction.
When the [MOVE] + [-A (J4)] keys are pressed, Rotate in the minus direction. (6-axis type only)
・ When the [MOVE] + [+B (J5)] keys are pressed, the J5 axis will rotate in the plus direction
When the [MOVE] + [-B (J5)] keys are pressed, Rotate in the minus direction.
・ When the [MOVE] + [+C (J6)] keys are pressed, the J6 axis will rotate in the plus direction
When the [MOVE] + [-C (J6)] keys are pressed, Rotate in the minus direction.
STEP
MOVE
STEP
MOVE
+ A
(J4)
+
7 YZ_
-
(J4)
+
2
A
GHI
◇◆◇ When an X appears on the T/B screen display ◇◆◇
If the robot is moved outside the movement area, an X will appear. In this case, move the axis in the opposite
X
X
direction.
JOINT LOW
XJ1 +160.00
X
In the example on the left, the J1 axis is at the limit of the plus side movement area.
J2 +20.00
J3 +80.00
Confirming the operation
2-21
Page 30

2Unpacking to Installation
X
(2) XYZ jog operation
Select the XYZ jog mode
X,Y,Z
LOW
X +134.50
Y +220.00
Z +280.00
Set the jog speed
X,Y,Z
LOW
X +134.50
Y +220.00
Z +280.00
Moving along the base coordinate system
+
+X
+
(J2)
4
(J1)
- Y
+ X
STEP
MOVE
STEP
MOVE
XYZ jog mode
Set the speed
+
+ Z
(J3)
, @\
8
STEP
MOVE
+Z
MNO
Tool length
+Y
STEP
+
STEP
MOVE
+
MOVE
3
- Z
(J3)
JKL
' ; ^
5-axis type
STEP
MOVE
-Y
+Y
(J2)
9 &< >
MOVE
STEP
MOVE
+X
STEP
+
+Z
SPACE POR
-Z
+
- X
(J1)
XYZ
+
$":
+
FORWD-BACKWD
-X
+Y
Press the [MOVE] + [XYZ] keys to select the XYZ
jog mode. "XYZ" will appear at the upper left of
the screen.
Each time the [MOVE] + [+] keys are pressed, the
override will increase in the order of LOW → HIGH
→ 3 → 5 → 10 → 30 → 50 → 70 → 100%. When
the [MOVE] + [-] keys are pressed, the override
will decrease in the reverse order. The currently
set speed will appear on the upper right of the
screen. Set the override to 10% here for
confirmation work.
+Z
+
+Z
+ Z
(J3)
8 , @\
+
- X
(J1)
SPACE POR
STEP
MOVE
STEP
MOVE
+
- Y
(J2)
4 MNO
STEP
MOVE
Tool length
STEP
MOVE
+X
+
(J1)
+ X
' ; ^
STEP
MOVE
+
STEP
MOVE
- Z
(J3)
3 JKL
+Y
+
+Y
(J2)
9 &< >
+X
-Y
-Z
6-axis type
※ The direction of the frange will not change
-
+Y
・ When the [MOVE] + [+X (J1)] keys are pressed, the robot will move along the X axis plus direction.
When the [MOVE] + [-X (J1)] keys are pressed, Move along the minus direction.
・ When the [MOVE] + [+Y (J2)] keys are pressed, the robot will move along the Y axis plus direction.
When the [MOVE] + [-Y (J2)] keys are pressed, Move along the minus direction.
・ When the [MOVE] + [+Z (J3)] keys are pressed, the robot will move along the Z axis plus direction.
When the [MOVE] + [-Z (J3)] keys are pressed, Move along the minus direction.
◆◇ When the robot is in the transportation posture ◇◆◇
There are directions from which linear movement is not possible from the transportation posture. In this case, an
X will appear on the T/B screen, and the robot will not move. Refer to section "(1) JOINT jog operation" on page
X
20", and move the robot to a position where linear movement is possible, and then carry out XYZ jog.
◆◇ When an X appears on the T/B screen display ◇◆◇
If the robot is moved outside the movement area with any of the axes, an X will appear. In this case, move the axis
in the opposite direction.
XYZ LOW
X
X X +360.00
X
X Y +280.00
X
X Z +170.00
2-22
Confirming the operation
X
X
In the example on the left, further linear movement in the same direction is not possible.
Page 31

Changing the flange surface posture
◇◆◇
◇
+Z
+
- C
(J6)
+Z
ABC
0
-
STEP
MOVE
+
STEP
MOVE
2Unpacking to Installation
+
+ C
(J6)
5 STU
+Z
Control point
(Tool coordinate system)
STEP
+
MOVE
7
+
+Z
STEP
+
MOVE
Tool length
+ A
(J4)
YZ_
-
- A
(J4)
2 GHI
STEP
MOVE
+
STEP
MOVE
+
6 VWX
-
+Y
+ B
(J5)
+
STEP
MOVE
- B
(J5)
DEF
1
STEP
MOVE
+X
+Y
+
+X
+
+ A
(J4)
YZ_
7
+
-
- A
(J4)
2 GHI
Control
point
STEP
MOVE
Tool length
+
+
6-axis type5-axis type
6
* The control point does not change.
・ When the [MOVE] + [+A (J4)] keys are pressed,
6-axis type: The X axis will rotate in the plus direction.
5-axis type: The Z axis will rotate in the plus direction of the tool coordinate system.
When the [MOVE] + [-A (J4)] keys are pressed, Rotate in the minus direction.
・ When the [MOVE] + [+B (J5)] keys are pressed,
6-axis type: The Y axis will rotate in the plus direction.
5-axis type: The Y axis will rotate in the plus direction of the tool coordinate system.
When the [MOVE] + [-B (J5)] keys are pressed, Rotate in the minus direction.
-
(J5)
+Y
+ B
VWX
+X
STEP
MOVE
-Y
+
- B
(J5)
DEF
1
+Y
・ When the [MOVE] + [+C (J6)] keys are pressed,
6-axis type: The Z axis will rotate in the plus direction.
5-axis type: There is no operation.
When the [MOVE] + [-C (J6)] keys are pressed,
6-axis type: Rotate in the minus direction.
5-axis type: There is no operation.
◇◆◇ When alarm No. 5150 occurs ◇◆◇
If alarm No. 5150 (ORIGIN NOT SET) occurs, the origin has not been set correctly. Reconfirm the value input for
the origin data.
Tool length◇◆
The default tool length is 0mm, and the control point is the center of the end axis.
After installing the hand, set the correct tool length in the parameters. Refer to the separate manual "Detailed
Explanation of Functions and Operations" for details.
Confirming the operation
2-23
Page 32

2Unpacking to Installation
(3) TOOL jog operation
Select the TOOL jog mode
TOOL LOW
X +134.50
Y +220.00
Z +280.00
Set the jog speed
TOOL LOW
X +134.50
Y +220.00
Z +280.00
Moving along the tool coordinate system
TOOL jog mode
Set the speed
STEP
MOVE
STEP
+
MOVE
+
+
FORWD-BACKWD
TOOL
=*/
STEP
MOVE
Press the [MOVE] + [TOOL] keys to select the
TOOL jog mode. "TOOL" will appear at the upper
left of the screen.
Each time the [MOVE] + [+] keys are pressed, the
override will increase in the order of LOW → HIGH
→ 3 → 5 → 10 → 30 → 50 → 70 → 100%. When
the [MOVE] + [-] keys are pressed, the override
will decrease in the reverse order. The currently
set speed will appear on the upper right of the
screen. Set the override to 10% here for
confirmation work.
- X
(J1)
+
SPEACE POR
STEP
MOVE
STEP
MOVE
+
+Z
+
- X
(J1)
SPEACE POR
+ Z
(J3)
8
Tool length
, @\
STEP
MOVE
+Y
+X
STEP
MOVE
5-axis type
+
+
3 JKL
+ X
(J1)
' ; ^
- Z
(J3)
STEP
MOVE
+
STEP
MOVE
4
- Y
(J2)
+Z
+
MNO
+ Z
(J3)
8
Tool length
, @\
STEP
MOVE
STEP
MOVE
6-axis type
+Y
- Z
(J3)
+
JKL
3
+
+Y
(J2)
&< >
9
STEP
MOVE
+X
+ X
(J1)
+
' ; ^
* The direction of the frange will not change.
・When the [MOVE] + [+X (J1)] keys are pressed, the robot will move along the X axis plus direction of the tool
coordinate system.
When the [MOVE] + [-X (J1)] keys are pressed, Move along the minus direction.
・When the [MOVE] + [+Y (J2)] keys are pressed, the robot will move along the Y axis plus direction of the tool
coordinate system.
When the [MOVE] + [-Y (J2)] keys are pressed, Move along the minus direction. (6-axis type only)
・When the [MOVE] + [+Z (J3)] keys are pressed, the robot will move along the Z axis plus direction of the tool
coordinate system.
When the [MOVE] + [-Z (J3)] keys are pressed, Move along the minus direction.
◇◆◇ When the robot is in the transportation posture ◇◆◇
There are directions from which linear movement is not possible from the transportation posture. In this case,
an X will appear on the T/B screen, and the robot will not move. Refer to section "(1) JOINT jog operation" on
X
page 20, and move the robot to a position where linear movement is possible, and then carry out TOOL jog.
2-24
Confirming the operation
Page 33

2Unpacking to Installation
◆◇ When an X appears on the T/B screen display ◇◆◇
If the robot is moved outside the movement area with any of the axes, an X will appear. In this case, move the axis
X
X
in the opposite direction.
TOOL LOW
X
X X +360.00
X
X Y +280.00
X
X Z +170.00
In the example on the left, further linear movement in the same direction is not possible.
Changing the flange surface posture
+ C
(J6)
+
STU
+
J6
- B
(J5)
DEF
1
-
STEP
MOVE
+
J5
-
STEP
MOVE
+
+
STEP
MOVE
- C
(J6)
ABC
0
+
6VWX
+ B
(J5)
STEP
MOVE
+Z
+
5-axis type
+
5
0
+ C
(J6)
- C
(J6)
Tool length
STU
-
ABC
STEP
MOVE
+
7
MOVE
-
+Y
+
-
+
+X
+ A
(J4)
YZ_
6-axis type
STEP
STEP
MOVE
+
+
STEP
MOVE
- B
(J5)
DEF
1
+ B
(J5)
6VWX
- A
+
(J4)
2
GHI
STEP
MOVE
+
STEP
MOVE
5
* The control point does not change.
・ When the [MOVE] + [+A (J4)] keys are pressed,
6-axis type: The X axis will rotate in the plus direction of the tool coordinate system.
5-axis type: There is no operation.
When the [MOVE] + [-A (J4)] keys are pressed,
6-axis type: Rotate in the minus direction.
5-axis type: There is no operation.
・ When the [MOVE] + [+B (J5)] keys are pressed,
6-axis type: The Y axis will rotate in the plus direction of the tool coordinate system.
5-axis type: The J5 axis will rotate in the plus direction.
When the [MOVE] + [-B (J5)] keys are pressed, Rotate in the minus direction.
・ When the [MOVE] + [+C (J6)] keys are pressed,
6-axis type: The Z axis will rotate in the plus direction of the tool coordinate system.
5-axis type: The J6 axis will rotate in the plus direction.
When the [MOVE] + [-C (J6)] keys are pressed, Rotate in the minus direction.
◇◆◇ When alarm No. 5150 occurs ◇◆◇
If alarm No. 5150 (ORIGIN NOT SET) occurs, the origin has not been set correctly. Reconfirm the value input for
the origin data.
◇◆◇ Tool length ◇◆◇
The default tool length is 0mm, and the control point is the center of the end axis.
After installing the hand, set the correct tool length in the parameters. Refer to the separate manual "Detailed
Explanation of Functions and Operations" for details.
Confirming the operation
2-25
Page 34

2Unpacking to Installation
X
p
◇◆◇
◇◆◇
(4) 3-axis XYZ jog operation
Select the 3-axis XYZ jog mode
XYZ456 LOW
X +134.50
Y +220.00
Z +280.00
3-axis XYZ jog mode
Set the jog speed
XYZ456 LOW
X +134.50
Y +220.00
Z +280.00
Set the soeed
STEP
MOVE
Moving along the base coordinate system
+Z
+
8
+Z
STEP
MOVE
+
3
5-axis ty
+ Z
(J3)
, @\
Tool length
- Z
(J3)
JKL
+Y
+
STEP
+
MOVE
SPACE POR
-Y
+Y
(J2)
+X
&< >
9
-Z
e
STEP
MOVE
+
STEP
MOVE
- Y
(J2)
4 MNO
+X
+
(J1)
STEP
MOVE
+ X
' ; ^
STEP
MOVE
STEP
MOVE
+
+
FORWD-BACKWD
- X
(J1)
+Y
+
-X
XYZ
$":
XYZ
Press the [MOVE] + [XYZ] keys, and then
press only the [XYZ] key. "XYZ456" will appear
at the upper left of the screen.
$":
Each time the [MOVE] + [+] keys are pressed,
the override will increase in the order of LOW
→ HIGH → 3 → 5 → 10 → 30 → 50 → 70 →
100%. When the [MOVE] + [-] keys are pressed,
the override will decrease in the reverse order.
The currently set speed will appear on the
upper right of the screen. Set the override to
10% here for confirmation work.
+
+Z
+
+ Z
(J3)
8 , @\
Tool length
STEP
MOVE
- Z
(J3)
JKL
3
STEP
MOVE
+Y
+Y
+
(J2)
9 &< >
-Y
+X
6-axis type
+
+Z
- X
(J1)
SPACE POR
-Z
STEP
MOVE
STEP
MOVE
+X
+
+
4
+ X
(J1)
- Y
(J2)
STEP
MOVE
MNO
' ; ^
STEP
MOVE
* The flange position does change.
-
+Y
・ When the [MOVE] + [+X (J1)] keys are pressed, the robot will move along the X axis plus direction.
When the [MOVE] + [-X (J1)] keys are pressed, Move along the minus direction.
・ When the [MOVE] + [+Y (J2)] keys are pressed, the robot will move along the Y axis plus direction.
When the [MOVE] + [-Y (J2)] keys are pressed, Move along the minus direction.
・ When the [MOVE] + [+Z (J3)] keys are pressed, the robot will move along the Z axis plus direction.
When the [MOVE] + [-Z (J3)] keys are pressed, Move along the minus direction.
Jog mode will change when only [XYZ] key is pressed again
When the [MOVE] + [XYZ] keys are pressed and then only the [XYZ] key is pressed, the upper left display will
change in the order of "XYZ" → "XYZ456" → "CYLNDER". Each jog mode can be selected.
◇◆◇ The flange surface end axis posture cannot be maintained with 3-axis XYZ jog. ◇◆◇
With 3-axis XYZ jog, the flange surface end axis posture (orientation) is not maintained when moving linearly in
the X, Y or Z axis direction.
Use XYZ jog to maintain the posture.
2-26
Confirming the operation
Page 35

2Unpacking to Installation
Changing the flange surface
STEP
MOVE
STEP
MOVE
J6 axis
+
+
0 ABC
+ C
(J6)
5 STU
-
- C
(J6)
+
J5
-
axis
+
STEP
MOVE
STEP
MOVE
posture
- B
(J5)
+
1
+
(J5)
+
6VWX
5-axis type
+ C
(J6)
+
5
axis
J6
- C
+
(J6)
0
STU
-
ABC
+
-
J5axis
STEP
MOVE
STEP
MOVE
+
- B
+
(J5)
1
DEF
STEP
J
4
axis
MOVE
+
-
B
+
(J5)
VWX
6
STEP
MOVE
STEP
MOVE
DEF
B
STEP
MOVE
6-axis type
* The flange position changes.
This is the same as the J4, J5 and J6 axis JOINT jog operation.
・ When the [MOVE] + [+A (J4)] keys are pressed, the J4-axis will rotate in the plus direction.
When the [MOVE] + [-A (J4)] keys are pressed, Rotate in the minus direction. (6-axis type only)
・ When the [MOVE] + [+B (J5)] keys are pressed, the J5-axis will rotate in the plus direction.
When the [MOVE] + [-B (J5)] keys are pressed, Rotate in the minus direction.
+ A
(J4)
+
7
-
(J4)
+
2
YZ_
A
GHI
・ When the [MOVE] + [+C (J6)] keys are pressed, the J6-axis will rotate in the plus direction.
When the [MOVE] + [-C (J6)] keys are pressed, Rotate in the minus direction.
Confirming the operation
2-27
Page 36

2Unpacking to Installation
(5)
CYLNDER
jog operation
Select the cylindrical jog mode
CYLNDER LOW
R +134.50
T +220.00
Z +280.00
CYLNDER jog mode
Set the jog speed
CYLNDER LOW
R +134.50
T +220.00
Z +280.00
Set the speed
Moving along an arc centering on the Z axis
Vertical
+
-
Arc
+
+ Z
(J3)
, @\
8
STEP
MOVE
+
- Z
(J3)
3 JKL
5-axis type
+
STEP
MOVE
STEP
MOVE
+X
4
+
-Y
- Y
(J2)
+
MNO
- X
(J1)
SPACE POR
+ Y
(J2)
9 &< >
STEP
MOVE
+
(J1)
STEP
MOVE
Tool length
+ X
' ; ^
Redius
Control
point
STEP
MOVE
STEP
MOVE
+Z
-Z
STEP
+
MOVE
+
+
FORWD-BACKWD
-X
+Y
XYZ
$":
Press the [MOVE] + [XYZ] keys, and then press
only the [XYZ] key. "CYLNDER" will appear at the
upper left of the screen.
Each time the [MOVE] + [+] keys are pressed, the
override will increase in the order of LOW → HIGH
→ 3 → 5 → 10 → 30 → 50 → 70 → 100%. When
the [MOVE] + [-] keys are pressed, the override will
decrease in the reverse order. The currently set
speed will appear on the upper right of the screen.
Set the override to 10% here for confirmation work.
Vertical
+
+
-
8
3
+ Z
(J3)
, @\
STEP
MOVE
+
Arc
STEP
MOVE
- Z
(J3)
JKL
6-axis type
+
STEP
MOVE
9 &< >
+ Y
(J2)
+
+
-Y
- Y
(J2)
4
SPACE POR
- X
(J1)
+Z
MNO
-Z
STEP
MOVE
STEP
MOVE
Tool length
+ X
+
(J1)
' ; ^
Redius
Control
point
STEP
MOVE
* The direction of the frange will not change.
-X
+Y
Assuming that the current position is on an arc centering on the Z axis, the robot moves along that arc.
・ When the [MOVE] + [+Y (J2)] keys are pressed, the robot will move along the arc in the plus direction.
When the [MOVE] + [-Y (J2)] keys are pressed, Move in the minus direction.
・ When the [MOVE] + [+X (J1)] keys are pressed, the robot will expand in the radial direction.
When the [MOVE] + [-X (J1)] keys are pressed, Contract in the radial direction.
・ When the [MOVE] + [+Z (J3)] keys are pressed, the robot will move along the Z axis plus direction.
When the [MOVE] + [-Z (J3)] keys are pressed, Move along the minus direction.
2-28
Confirming the operation
Page 37

2Unpacking to Installation
Changing the flange surface posture
Control
STEP
MOVE
+
STEP
MOVE
Tool length
+ A
(J4)
7
+
+Z
+
point
YZ_
-
- A
(J4)
2
GHI
STEP
MOVE
+
+
STEP
+
MOVE
-
+Y
+ B
(J5)
+X
VWX
6
STEP
STEP
MOVE
STEP
MOVE
MOVE
+Z
- B
(J5)
DEF
1
+Y
+
7
+
+X
+
2 GHI
+
(J4)
(J4)
+ A
-
- A
- C
(J6)
0 ABC
YZ_
Control
point
-
+Z
STEP
MOVE
+
Tool length
5-axis type
* The flange position does not change.
This is the same as the A, B and C axis XYZ jog operation.
・ When the [MOVE] + [+A (J4)] keys are pressed,
6-axis type: The X axis will rotate in the plus direction.
5-axis type: The Z axis will rotate in the plus direction of the tool coordinate system.
When the [MOVE] + [-A (J4)] keys are pressed, Rotate in the minus direction.
+
5
-
+
STEP
+
MOVE
-Y
6-axis type
+ C
(J6)
STU
STEP
MOVE
+Y
+ B
(J5)
6VWX
+X
+
+Z
- B
(J5)
DEF
1
+Y
・ When the [MOVE] + [+B (J5)] keys are pressed,
6-axis type: The Y axis will rotate in the plus direction.
5-axis type: The Y axis will rotate in the plus direction of the tool coordinate system.
When the [MOVE] + [-B (J5)] keys are pressed, Rotate in the minus direction.
・ When the [MOVE] + [+C (J6)] keys are pressed,
6-axis type:The Z axis will rotate in the plus direction.
5-axis type: There is no operation.
When the [MOVE] + [-C (J6)] keys are pressed,
6-axis type:Rotates in the minus direction.
5-axis type: There is no operation.
Confirming the operation
2-29
Page 38

2Unpacking to Installation
2-30
Confirming the operation
Page 39

3 Installing the option devices
3.1 Installing the solenoid valve set (1E-VD01/VD01E/VD02/VD02E)
Robot arm base
3Installing the option devices
<8>. B port
<5>. B port
<3>. No.1 solenoid
valve
GR2
When using one-row
solenoid valve
GR4
GR1
GR2
Connector connection
<4>. A port
<7>. A port
1
GR
GR3
<6>. No.2 solenoid
valve
When using two-row
solenoid valve
Fig.3-1:Solenoid valve installation procedures
GR3
GR4
R port
<2>. P port
Solenoid value set(optional)
<1>. P round head
screw
(M3 x 25)
Secondary piping
pneumatic nose
(φ4)
[Expansion view]
GR1 GR2 GR3 GR4
1 234
AIR IN
Hand output connector
pneumatic coupling number
installation section
<a>
<b>
GR1~GR4 (connect to <b>)
Hand output connector
Primary piping pneumatic nose
(φ6 x 1)
CN2 CN1
(2) GR1~GR4 (connect to <b>)
Hand output connector
(4) AIR IN 1~4 (connect to <a>)
Secondary piping
pneumatic coupling(φ4)
Note) AIR IN4 is used for the
internal suction of the
clean specification.
Fig. 3-1 shows the solenoid valve installation procedures and the solenoid valve connector connection
procedures. The installation procedures are as follow. This work must be carried out with the controller power
turned OFF.
1) Using the screw holes on the base of the robot arm, install the solenoid valve with the enclosed screw <1>
(M3 x 25: 2 screws).
2) Connect the primary air supply air hose (φ6, prepared by customer) to the quick joint (P port) <2> of the
solenoid valve.
3) Connect the AIR IN "1" mark secondary piping coupler on the back of the robot arm to the A port <4> of the
No. 1 solenoid valve <3> with an air hose (φ4 approx. 250mm, prepared by customer.)
In the same manner, connect the AIR IN "2" mark secondary piping coupler to the B port 5 of the No. 1
solenoid valve.
For a double valve (1E-VD02/VD02E), connect the following:
Connect the AIR IN "3" mark secondary coupler to the A port <7> of the No. 2 solenoid valve <6>.
Connect the AIR IN "4" mark secondary coupler to the B port <8> of the No. 2 solenoid valve <6>.
Installing the solenoid valve set (1E-VD01/VD01E/VD02/VD02E)
3-31
Page 40

3Installing the option devices
4) Connect the GR1 plug from the No. 1 solenoid valve <3> to the GR1 connector on the back of the robot arm.
Connect the GR2 plug from the No. 1 solenoid valve <3> to the GR2 connector on the back of the robot arm.
For a double valve (1E-VD02/VD02E), connect the following:
Connect the GR3 plug from the No. 2 solenoid valve <6> to the GR3 connector on the back of the robot arm.
Connect the GR4 plug from the No. 2 solenoid valve <6> to the GR4 connector on the back of the robot arm.
The connections after the installation appear as in Table 3-1 for single type valves, hand 2 is not applicable.
Table 3-1:Solenoid valve ports and hoses: Correspondence of couplings and hand ports
Hand Hand port
Hand 1
Hand 2
OPEN 11A
CLOSE 2 2 B
OPEN 3 3 A
CLOSE 4 4 B
Fore arm
coupling No.
AIR OUT
Robot arm back
side coupling No.
AIR IN
Solenoid valve
port
Solenoid valve
Second set
used
First set
3-32
Installing the solenoid valve set (1E-VD01/VD01E/VD02/VD02E)
Page 41
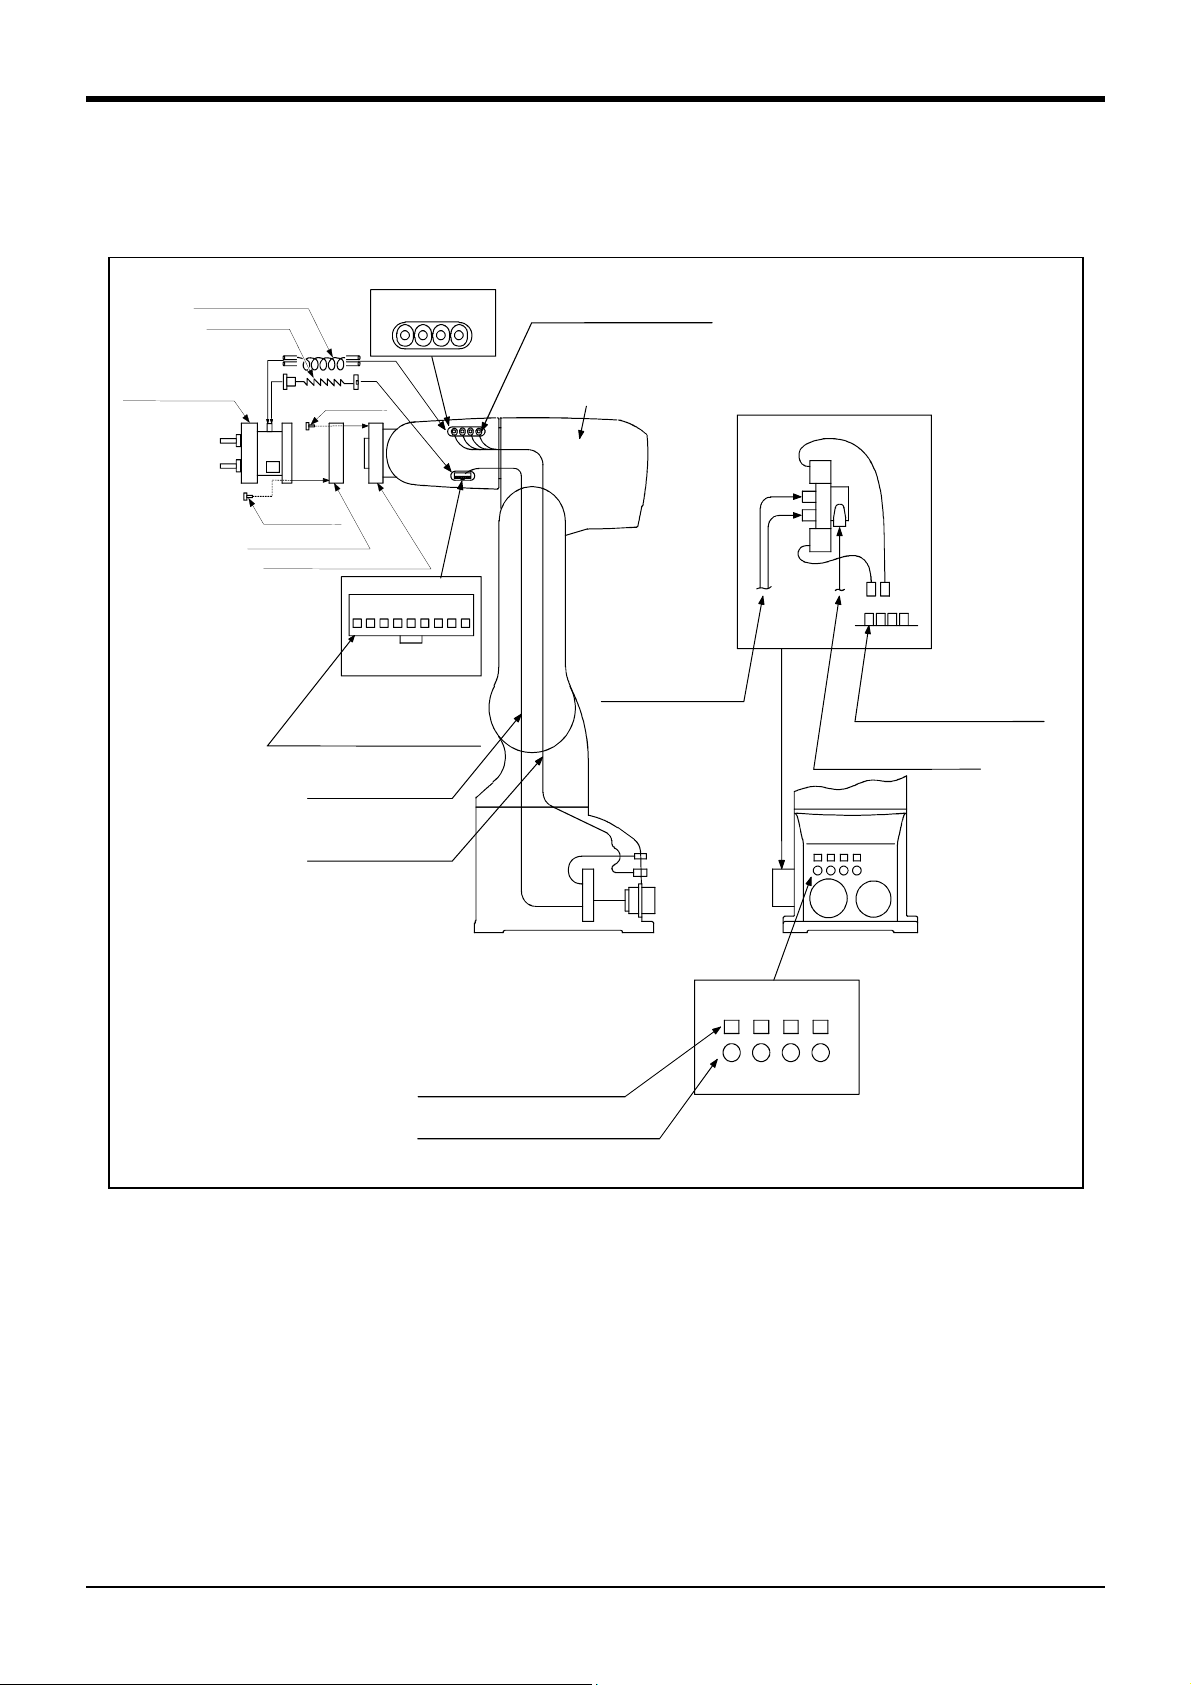
)
3Installing the option devices
3.2 Installation the pneumatic hand set (4A-HP01/HP01E)
Table 3-1 shows the construction of the pneumatic hand set and the installation procedure and Table 3-1 shows
the configuration equipment which correspond with the Table 3-1.
.
Coupling Nos. for hand
<9>. Hand curl tube
<7>. Curl cable
AIR OUT
1 2 3 4
<8>. 1~4 : Secondary piping
couplings(φ4)
Note) AIR OUT4 is not used
for the clean specification.
<5>. Pneumatic hand
2. M3x8
<4>. M3x12
<3>. Hand adapter
<1>. Mechanical interface
9 8 7 6 5 4 3 2 1
CON1H
Hand connector
pin assignment
<6>. Hand input signal or
motorized hand connectors
Hand input signals and
motorized hand cables
Secondary piping hoses
(φ4x4)
Note) This part dosen't exist
for 5-axis type
Secondary piping
pneumatic hose(φ4)
Solenoid valve set(optional)
installation section
<a>
<b>
GR1~GR4 :Connect to the <b>
Hand output connector
Primary piping
pneumatic hose(φ6x1)
CN2 CN1
[Magnification]
GR1 GR2 GR3 GR4
(2)GR1~GR4 :Connect to the <b>)
Hand output connector
(4) AIR IN 1~4 Connect to the <a>)
Secondary piping air coupling(φ4)
Note) AIR IN4 is used for the internal suction
of the clean specification.
Fig.3-2 : Pneumatic hand set installation procedures
1 234
AIR IN
Connector Nos. for hand output.
Coupling Nos. for hand.
Fig. 3-2 shows the procedures for installing the pneumatic hand set. To install the pneumatic hand set, the
pneumatic hand must be installed, the solenoid valve set must be installed and wired, and the pneumatic hand
interface must be installed on the controller.
Carry out this work with the controller power turned OFF.
1) Install the hand adaptor <3> on the robot arm's mechanical interface <1> with the enclosed screw M3 x 8 <2>.
2) Install the pneumatic hand <5> onto the hand adaptor <3> with the enclosed screw M3 x 12 <4>.
3) Connect the pneumatic hand <5> and the robot arm's hand input signal connector <6> with the hand curled
cable <7>.
4) Pipe the "0" mark piping coupler on the pneumatic hand <5> with the "1" mark secondary piping coupler <8>
on the robot arm, and the "C" mark piping coupler on the pneumatic hand <5> with the "2" mark secondary
piping coupler <8> on the robot arm with the hand curl tube <9>.
Installation the pneumatic hand set (4A-HP01/HP01E)
3-33
Page 42

3Installing the option devices
Remove
<12>.
<11>. M3×22
<10>. N
ylon clamp
Fig.3-3 : Fix the air hand cable
CAUTION
7) Follow "3.1Installing the solenoid valve set (1E-VD01/VD01E/VD02/VD02E)", and install the solenoid valve
set (single row). The air hose (φ4, 250mm) for connecting the solenoid valve and the AIR IN secondary
piping coupler on the back of the robot arm is enclosed with the pneumatic hand set.
8) Refer to the separate "Standard Specifications", and install the pneumatic hand interface on the controller.
If the cable is incorrectly fixed and force is repeatedly applied on the connectors
due to the robot movement, wire breakage could occur at the connector section.
5) Bundle the hand curl cable <7> and hand curl
tube <9>. (Fig. 3-3)
6) Remove the installation screw on the top of
the forearm cover, and fix the hand curl cable
<7> and hand curl tube <9> with the nylon
clamp 10, M3 x 22 <11> and flat washer <12>
enclosed with the robot arm. (Tighten with the
cover) Fix so that force is not applied on the
hand input signal connector <6> or secondary
piping coupler when the robot's J5 axis and J6
axis move.
(Adjust the fixing force with the size of the
nylon clamp.) Cut and adjust both ends of the
hand curl tube <7> to match the robot
movement.
This completes the installation of the pneumatic hand set.
3-34
Installation the pneumatic hand set (4A-HP01/HP01E)
Page 43

3.3 Installation the motorized hand set (4A-HM01)
<7>. Carl cable
3Installing the option devices
<5>.Motorized hand
<4>. M3 * 12
<3>. Hand adapter
<1>. Mchanical interface
<6>. Hand input signal or
motorized hand connector
<2>. M3×8
9 8 7 6 5 4 3 2 1
CON1H
Hand connector
pin assign
Note)This part does't exist for the 5-axis type
Hand input signal and
motorized hand cable
Secondary pneumatic hose
(φ4 * 4)
Fig.3-4 : Motorized hand set installation procedures
Fig. 3-4 shows the procedures for installing the motorized hand set. To install the motorized hand set, the
motorized hand must be installed and wired, and the motorized hand interface must be installed on the controller.
Carry out this work with the controller power turned OFF.
1) Install the hand adaptor <3> on the robot arm's mechanical interface <1> with the enclosed screw M3 x 8 <2>.
2) Install the motorized hand <5> onto the hand adaptor <3> with the enclosed screw M3 x 12 <4>.
3) Connect the motorized hand <5> and the robot arm's motorized hand connector <6> with the hand curled
cable <7>.
Remove
<10>. Spur washer
<9>. M3×22
4) Remove the installation screw on the top of
the forearm cover, and fix the hand curl cable
<7> with the nylon clamp <8>, M3 x 22 <9>
and flat washer <10> enclosed with the robot
arm. (Tighten with the cover) Fix so that force
<8>. N
ylon clamp
is not applied on the motorized hand
connector <6> when the robot's J5 axis and
J6 axis move.
(Adjust the fixing force with the size of the
nylon clamp.) (Fig. 3-5)
Fig.3-5 : Fix the motorized hand cable
Installation the motorized hand set (4A-HM01)
3-35
Page 44

3Installing the option devices
CAUTION
5) Refer to the separate "Instruction Manual/Controller setup, basic operation, and maintenance", and install
the motorized hand interface (RZ-364) on the controller.
The motorized hand interface is mounted on the RZ-386 or RZ-387 card in the controller's control unit.
This completes the installation of the motorized hand set.
If the cable is incorrectly fixed and force is repeatedly applied on the connectors due
to the robot movement, wire breakage could occur at the connector section.
3.4 Hand output cable (1E-GR35S)
This hand output cable is used by the customer to connect to the handle output connector on the shoulder section of the robot arm.
Refer to section "3.1Installing the solenoid valve set (1E-VD01/VD01E/VD02/VD02E)", 4) Table 3-1 on page 32
for the connection methods.
3.5 Installing the hand input cable (1A-HC20) and hand curl tube (1A-ST040*C)
The hand input cable and hand curl tube are used to connect to the hand and sensor manufactured by the
customer.
Refer to section "3.2Installation the pneumatic hand set (4A-HP01/HP01E) " 5) and 6) on page 33 for the
installation methods.
3.6 Installing the hand adaptor (1A-HA01)
The hand adaptor is used to change the RV-1A/2AJ mechanical interface to the RV-M1 interface.
Refer to section "3.2Installation the pneumatic hand set (4A-HP01/HP01E) " 1) on page 33 for the installation
methods.
3-36
Hand output cable (1E-GR35S)
Page 45

4 Basic operations
The basic operations from creating the program to automatic operation are explained in section "4. Basic
operations" in the "From Controller Setup to Maintenance" manual. Refer that manual as necessary.
4Basic operations
4-37
Page 46

4Basic operations
4-38
Page 47

5Maintenance and Inspection
5 Maintenance and Inspection
The maintenance and inspection procedures to be carried out to use the robot for a long time without trouble are
described in this chapter. The types and replacement methods of consumable parts are also explained.
5.1 Maintenance and inspection interval
Maintenance and inspection are divided into the inspections carried out daily, and the periodic inspections carry
out at set intervals. Always carry these out to prevent unforeseen trouble, to maintain the product for a long time,
and to secure safety.
(1) Inspection schedule
In addition to the monthly inspection, add the following inspection items every three months (estimated at 500 Hr
operation hours).
0 Hr
Monthly inspection
Monthly inspection
500Hr Monthly inspection 3-month inspection
Monthly inspection
Monthly inspection
1000Hr Monthly inspection 3-month inspection 6-month inspection
Daily inspection
Monthly inspection
Monthly inspection
1500Hr Monthly inspection 3-month inspection
Monthly inspection
Monthly inspection
2000Hr Monthly inspection 3-month inspection 6-month inspection Yearly inspection
Operating time
<Guideline for inspection period>
For one shift
8 Hr/day × 20 days/month × 3 months = approx. 500 Hr
10 Hr/day × 20 days/month × 3 months = approx. 600 Hr
For two shifts
15 Hr/day × 20 days/month × 3 months = approx. 1000 Hr
[Caution] When using two lines, the 3-month inspection, 6-month inspection and yearly
inspection must be carried out when half the time has passed.
Fig.5-1:Inspection schedule
Maintenance and inspection interval
5-39
Page 48

5Maintenance and Inspection
5.2 Inspection items
The inspection items for the robot arm are shown below.
Also refer to section "5. Maintenance and inspection" in the "Controller setup, basic operation, and maintenance"
manual, and inspect the controller.
5.2.1 Daily inspection items
Carry out the daily inspections with the procedures given in Table 5-1.
Table 5-1:Daily inspection items (details)
Procedure Inspection item (details) Remedies
Before turning power ON (Check the following items before turning the power ON.)
1 Are any of the robot installation bolts loose?
(Visual)
2 Are any of the cover tightening screws loose?
(Visual)
3 Are any of the hand installation bolts loose?
(Visual)
4 Is the power supply cable securely connected?
(Visual)
5 Is the machine cable between the robot and controller securely
connected?
(Visual)
6 Are there any cracks, foreign contamination or obstacles on the robot
and controller cover?
7 Is any grease leaking from the robot arm?
(Visual)
8 Is there any abnormality in the pneumatic system? Are there any air
leaks, drain clogging or hose damage? Is the air source normal?
(Visual)
After turning the power ON (Turn the power ON while monitoring the robot.)
1 Is there any abnormal motion or abnormal noise when the power is
turned ON?
During operation (try running with an original program)
1 Check whether the movement points are deviated?
Check the following points if there is any deviation.
1. Are any installation bolts loose?
2. Are any hand installation section bolts loose?
3. Are the positions of the jigs other than the robot deviated?
4. If the positional deviation cannot be corrected, refer to
"Troubleshooting", check and remedy.
2 Is there any abnormal motion or abnormal noise?
(Visual)
Securely tighten the bolts.
Securely tighten the screws.
Securely tighten the bolts
Securely connect.
Securely connect.
Replace with a new part, or take remedial measures.
After cleaning, replenish the grease.
Drain the drainage, and remedy the air leaks (replace
the part).
Follow the troubleshooting section.
Follow the troubleshooting section.
Follow the troubleshooting section.
5-40
Inspection items
Page 49

5.2.2 Periodic inspection
Carry out periodic inspection with the procedures given in Table 5-2.
Table 5-2 : Periodic inspection items (details)
Procedure Inspection item (details) Remedies
Monthly inspection items
1 Are any of the bolts or screws on the robot arm loose? Securely tighten the bolts.
5Maintenance and Inspection
2 Are any of the connector fixing screws or terminal block terminal
screws loose?
3 Remove the cover at each section, and check the cables for wear
damage and adherence of foreign matter.
3-month inspection items
1 Is the timing belt tension abnormal? If the timing belt is loose or too tense, adjust it.
6-month inspection items
1 Is the friction at the timing belt teeth severe? If the teeth are missing or severe friction is found,
Yearly inspection items
1 Replace the backup battery in the robot arm. Exchange it referring to "5.3.5Replacing the backup
2-year inspection items
1 Lubricate the grease at the harmonic reduction gears for each axis. Lublicate it referring to "5.3.4Lubrication" on page 52.
Securely tighten the screws.
Check and eliminate the cause.
If the cables are severely damaged, contact the
Mitsubishi Service Department.
replace the timing belt.
battery" on page 54.
Inspection items
5-41
Page 50

5Maintenance and Inspection
5.3 Maintenance and inspection procedures
The procedures for carrying out the periodic maintenance and inspection are described in this section. Thoroughly
read the contents, and follow the instructions. This work can be commissioned to the Mitsubishi Service Department for a fee. (Never disassemble, etc., the parts not described in this manual.)
The maintenance parts, etc., required for the customer to carry out maintenance and inspection are described in
"5.4Maintenance parts" on page 55 of this manual. Always contact your dealer when parts are needed.
CAUTION
5.3.1 Robot arm structure
An outline structure drawing of the 5-axis type robot arm is shown in Fig. 5-2, and of the 6-axis type robot arm in
Fig. 5-3. Each part is as shown below.
1) The J1 axis rotation is driven by the J1 axis motor <1> and reduction gears <2> arranged in the shoulder.
Non-excitation magnetic brakes are mounted in the J1axis motor <1>.
2) The rotation of the J2 axis motor <3> arranged in the shoulder is conveyed to the reduction gears <5> via
the timing belt <4> to rotate the upper arm and following parts.
Non-excitation magnetic brakes are mounted in the J2 axis motor <3>.
The origin of the machine system could deviate when this work is carried out.
"Review of the position data" and "re-teaching" will be required.
3) The rotation of the J3 axis motor <6> arranged in the shoulder is conveyed to the reduction gears <8> via
the timing belt <7> to rotate the elbow block and following parts.
Non-excitation magnetic brakes are mounted in the J3 axis motor <6>.
4) J4 axis rotation section (only 6-axis type)
The rotation of the J4 axis motor <9> arranged in the 6-axis type elbow block is conveyed to the reduction
gears <11> via the timing belt <10> to rotate the forearm and following parts.
5) The rotation of the J5 axis motor <12> arranged in the forearm is conveyed to the reduction gears <14> via
the timing belt <13> to rotate the wrist housing and following parts.
Non-excitation magnetic brakes are mounted in the J5 axis motor <12.
6) The rotation of the J6 axis is driven by the J6 axis motor <15> arranged in the wrist housing and the reduc-
tion gears <16>.
5-42
Maintenance and inspection procedures
Page 51

5Maintenance and Inspection
<8>. Reducation gears
<7>. Timing belt
<4>. Timing belt
<5>. Reducation gears
Front of robot
<13>. Timing belt
<14>. Reducation gears
Wrist housing
<15>. J6 axis motor
<16>. Reducation gears
<6>. J3 axis motor
<3>. J2 axis motor
Forearm
Upper arm
Shoulder
Base
<12>. J5 axis motor
<1>. J1 axis motor
<2>. Reducation gears
Fig.5-2 : Outline structure drawing of robot arm (5-axis type)
<13>. Timing belt
<14>. Reducation gears
Wrist housing
<15>. J6 axis motor
<16>. Reducation gears
<8>. Reducation gears
<7>. Timing belt
<4>. Timing belt
<5>. Reducation gears
Front of robot
<6>. J3 axis motor
<3>. J2 axis motor
Forearm
Upper arm
Shoulder
Base
<12>. J5 axis motor
Elbow block
<11>. Reducation gears
<10>. Timing belt
<9>. J4 axis motor
<1>. J1 axis motor
<2>. Reducation gears
Fig.5-3 : Outline structure drawing of robot arm (6-axis type)
Maintenance and inspection procedures
5-43
Page 52

5Maintenance and Inspection
5.3.2 Installing/removing the cover
9. 10.
The wrist covers A and B are
integrated with the J6 motor.
(The customer must not remove these.)
*
7. No.2 arm cover (J5) x 2
(Right and left is the same)
*
4. No.1 arm cover x 2
(Right and left is the same)
Note) The packing is attached for
the cover marked with "*"
for the clean specification.
Take special care to not
remove the packing.
3. Shoulder cover-B
2. Shoulder cover-F
Fig.5-4 : Installing/removing the cover (5-axis type)
*
11. Belt cover (J4)
9. 10.
The wrist covers A and B
are integrated with the J6
motor.
(The customer must not remove these.)
*
8. No.2 arm cover (J6) x 2
(Right and left is the same)
Note) Only RV-1AC-SB type
1. Connecta box cover
*
5. Elbow cover-L
The opposite side is the
*
6. Elbow cover-R.
*
4. No.1 arm cover x 2
(Right and left is the same)
3. Shoulder cover-B
2. Shoulder cover-F
Fig.5-5 : Installing/removing the cover (6-axis type)
5-44
Maintenance and inspection procedures
1. Connecta box cover
Page 53

5Maintenance and Inspection
Table 5-3 : Cover names
No Cover names
1 Connector box cover 11
2 Shoulder cover F11
3 Shoulder cover B11
4No. 1 arm cover 2 2 The packing is attached for the clean specification.
5 Elbow cover L-1The packing is attached for the clean specification.
6 Elbow cover R-1The packing is attached for the clean specification.
7 No. 2 arm cover (J5) 2 - The packing is attached for the clean specification.
8 No. 2 arm cover (J6)-2 The packing is attached for the clean specification.
9 Wrist cover A (1)(1)
10 Wrist coverB (2) (2)
11 Belt cover (J4) -1Only RV-1AC-SB type.
For 5-axis type For 6-axis type
Qty.
Remarks
The packing is attached for the clean specification.
Note) In the case of clean specification, there are some places using the packing on the cover of no.4 to 8, and 11
shown in Table 5-3. Take special care to not remove the packing at removing/installing the cover.
Table 5-4 : Cover installation screw list
Installation screw name
Socket bolt M3 ×10 (nickel plated) 23 For 5-axis type
Qty.
31 For 6-axis type
Remarks
(1) Refer to Fig. 5-4 when using the 5-axis type robot arm, and Fig. 5-5 when using the 6-axis type robot arm, and
remove the cover.
(2) The names of the covers are given in Table 5-3, and a list of the cover installation screws is given in Table 5-4.
(3) There are some covers that may be difficult to remove due to the robot posture. In this case, change the robot
posture with jog operation, and then remove the cover.
(4) When attaching the cover after maintenance and inspection, use the detaching procedure in reverse.
The part Nos. and symbols in Table 5-3 and Table 5-4 correspond to Fig. 5-4 and Fig. 5-5.
CAUTION
Wrist cover A is also used as the J6 axis encoder cover. Do not remove it.
Maintenance and inspection procedures
5-45
Page 54

5Maintenance and Inspection
5.3.3 Inspection, maintenance and replacement of timing belt
This robot uses a timing belt for the drive conveyance system of the J5 axis. Compared to gears and chains, the
timing belt does not require lubrication and has a low noise. However, if the belt usage method and tension adjustment are inadequate, the life could drop and noise could be generated. Sufficient aging to remove the initial elongation of the belt, and adjustment of the belt tension have been carried out before shipment from the factory.
However, depending on the robot working conditions, elongation will occur gradually over a long time. The tension
must be confirmed during the periodic inspection. The timing belt must be replaced in the following cases.
(1) Timing belt replacement period
The timing belt life is greatly affected by the robot working conditions, so a set time cannot be given. However, if
the following symptoms occur, replace the belt.
1) When cracks from at the base or back of the belt teeth.
2) When the belt expands due to adherence of oil, etc.
3) When the belt teeth wear (to approx. half of the tooth width).
4) When the belt teeth jump due to belt teeth wear.
5) When the belt snaps.
CAUTION
Due to the manufacturing of the timing belt, initial wear will occur. Wear chips may
accumulate in the cover after approx. 300 Hr of operating the robot, but this is not a
fault. If the wear chips appear soon after wiping them off, replace the belt.
CAUTION
When the belt is replaced, the machine system origin may deviate. In this case, the
position data must be reviewed.
5-46
Maintenance and inspection procedures
Page 55

g
(2) Inspection, maintenance and replacement of J2-axis timing belt
5Maintenance and Inspection
<2>. Timing belt(J2)
<3>. Idler
Mark
a
b
<4>. Timing pulley
<5>. Timing pulley
Fig.5-6 : Inspection, maintenance and replacement of J2-axis timing belt
■ Inspecting the J2 axis timing belt
1) Confirm that the robot controller power is OFF.
2) Refer to "5.3.2Installing/removing the cover" on page 44, and remove the No. 1 arm cover.
3) Visually confirm that the symptoms indicated in "(1)Timing belt replacement period" have not occurred with the
timing belt.
4) Confirm that the belt tension is adjusted to slacken approx. 1.5mm when the center of the belt is lightly pressed
with a finger (approx. 2N) as shown in "Fig.5-10 : Belt tension".
Mark
<1>. Idler inatallation screw
M3x8(hexa
on socket bolt)
■ Adjusting the J2 axis timing belt
1) Carry out steps "1)" and "2)" indicated in " ■ Inspecting the J2 axis timing belt" above.
2) Lightly loosen the two idler installation bolts <1>. (Do not loosen too much.)
3) While confirming the tension of the timing belt <2>, move the idler <3> in the direction of the arrow shown in the
figure. Move until the belt slackens approx. 1.5mm when the center of the belt is lightly pressed with a finger
(approx. 2N).
4) The belt tension will increase when moved in the direction of arrow "a", and will decrease when moved in the
direction of arrow "b".
5) If the belt is loosened too much when adjusting the tension causing it to come off the timing pulleys <4> and
<5>, or if the belt and pulley teeth engagement is deviated, the machine system's origin will deviate.
6) After adjusting, securely tighten the two idler installation bolts <1>. Improper tightening can cause the belt to
loosen with vibration.
■ Replacing the J2 axis timing belt
1) Fig. 5-6 shows the methods for inspecting, adjusting and replacing the timing belt.
2) Move the robot posture with the teaching pendant so that the J2 axis contacts the mechanical stopper. The J2
axis brakes must be released.
3) Make sure that the pulleys do not move while replacing the belt.
4) If the pulley <4> and <5> position relation deviates, the position could deviate.
5) Make marks on the timing belt <2> and timing pulleys <4> and <5> with a felt-tip pen as shown in Fig. 5-6 so
that the engagement of the timing belt <2> and timing pulleys <4> and <5> does not deviate.
6) Loosen the two idler installation bolts <1>, and remove the belt.
7) Copy the marks onto the new timing belt. Make sure that both belts are tense when making the marks.
8) Align the new timing belt with the marks on the timing pulleys <4> and <5>, and install.
9) Refer to steps "3)" to "6)" in " ■ Adjusting the J2 axis timing belt" and "(6)Timing belt tension" to adjust the
tension.
10) The position could deviate after the belt is replaced. Confirm that the position has not deviated. If deviated,
refer to "5.5Resetting the origin" on page 56, and reset the origin position.
Maintenance and inspection procedures
5-47
Page 56
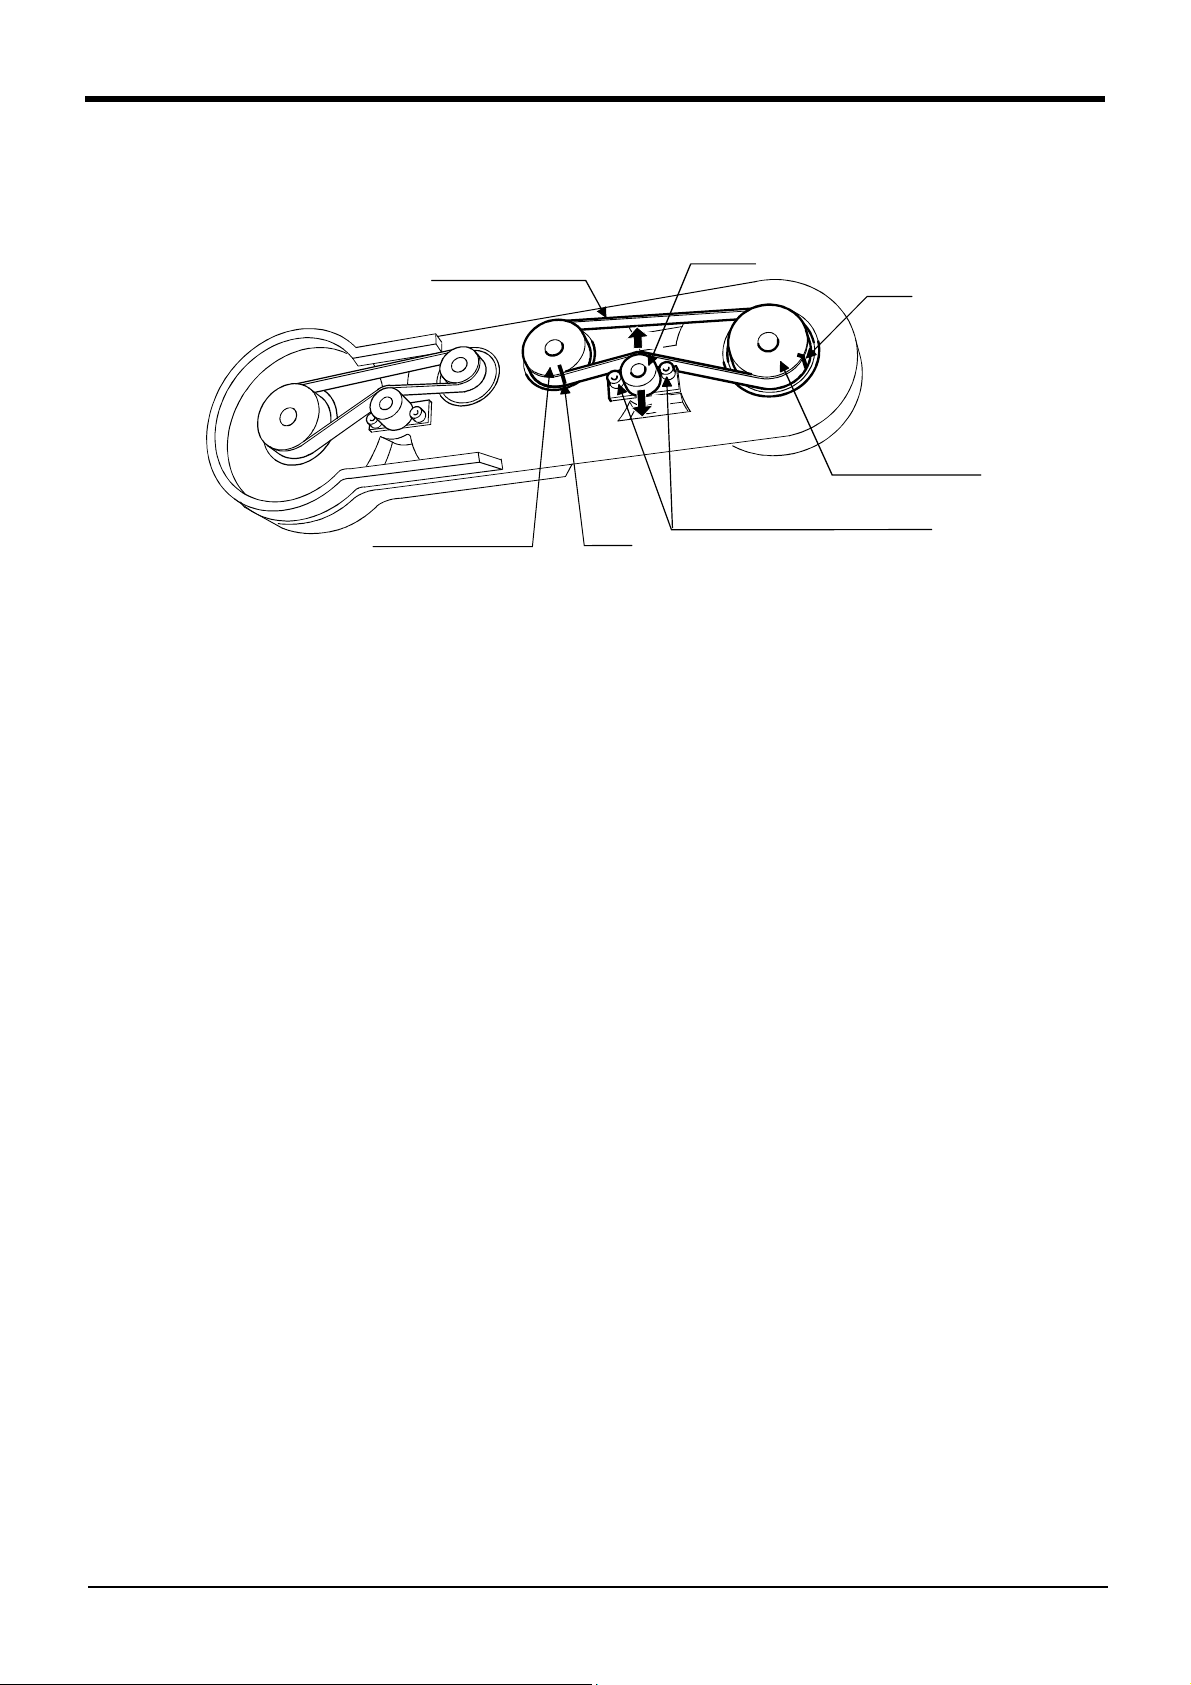
5Maintenance and Inspection
(3) Inspection, maintenance and replacement of J3-axis timing belt
<2>. Timing belt (J3)
<3>. Idler
Mark
a
b
<5>. Timing pulley
<4>. Timing pulley
Fig.5-7 : Inspection, maintenance and replacement of J3-axis timing belt
■ Inspecting the J3 axis timing belt
1) Confirm that the robot controller power is OFF.
2) Refer to Fig. 5-4 or Fig. 5-5, and remove the No. 1 arm cover.
3) Visually confirm that the symptoms indicated in "(1)Timing belt replacement period" have not occurred with the
timing belt.
4) Confirm that the belt tension is adjusted to slacken approx. 1.6mm when the center of the belt is lightly pressed
with a finger (approx. 2N) as shown in "Fig.5-10 : Belt tension".
Mark
<1>. Idler installation screw
M3×8(hexagon socket bolt)
■ Adjusting the J3 axis timing belt
1) Carry out steps 1) and 2) indicated in " ■ Inspecting the J2 axis timing belt" above.
2) Lightly loosen the two idler installation bolts <1>. (Do not loosen too much.)
3) While confirming the tension of the timing belt <2>, move the idler <3> in the direction of the arrow shown in the
figure. Move until the belt slackens approx. 1.6mm when the center of the belt is lightly pressed with a finger
(approx. 2N).
4) The belt tension will increase when moved in the direction of arrow a, and will decrease when moved in the
direction of arrow b.
5) If the belt is loosened too much when adjusting the tension causing it to come off the timing pulleys <4> and
<5>, or if the belt and pulley teeth engagement is deviated, the machine system's origin will deviate.
6) After adjusting, securely tighten the two idler installation bolts <1>. Improper tightening can cause the belt to
loosen with vibration.
■ Replacing the J3 axis timing belt
1) Fig. 5-7 shows the methods for inspecting, adjusting and replacing the timing belt.
2) Move the robot posture with the teaching box so that the J3 axis contacts the mechanical stopper. The J3 axis
brakes must be released.
3) Make sure that the pulleys do not move while replacing the belt.
4) If the pulley <4> and <5> position relation deviates, the position could deviate.
5) Make marks on the timing belt <2> and timing pulleys <4> and <5> with a felt-tip pen as shown in Fig. 5-7 so
that the engagement of the timing belt <2> and timing pulleys <4> and <5> does not deviate.
6) Loosen the two idler installation bolts <1>, and remove the belt.
7) Copy the marks onto the new timing belt. Make sure that both belts are tense when making the marks.
8) Align the new timing belt with the marks on the timing pulleys <4> and <5>, and install.
9) Refer to steps 3) to 6) in " ■ Adjusting the J2 axis timing belt" and "(6)Timing belt tension" to adjust the
tension.
10) The position could deviate after the belt is replaced. Confirm that the position has not deviated. If deviated,
refer to "5.5Resetting the origin" on page 56, and reset the origin position.
5-48
Maintenance and inspection procedures
Page 57
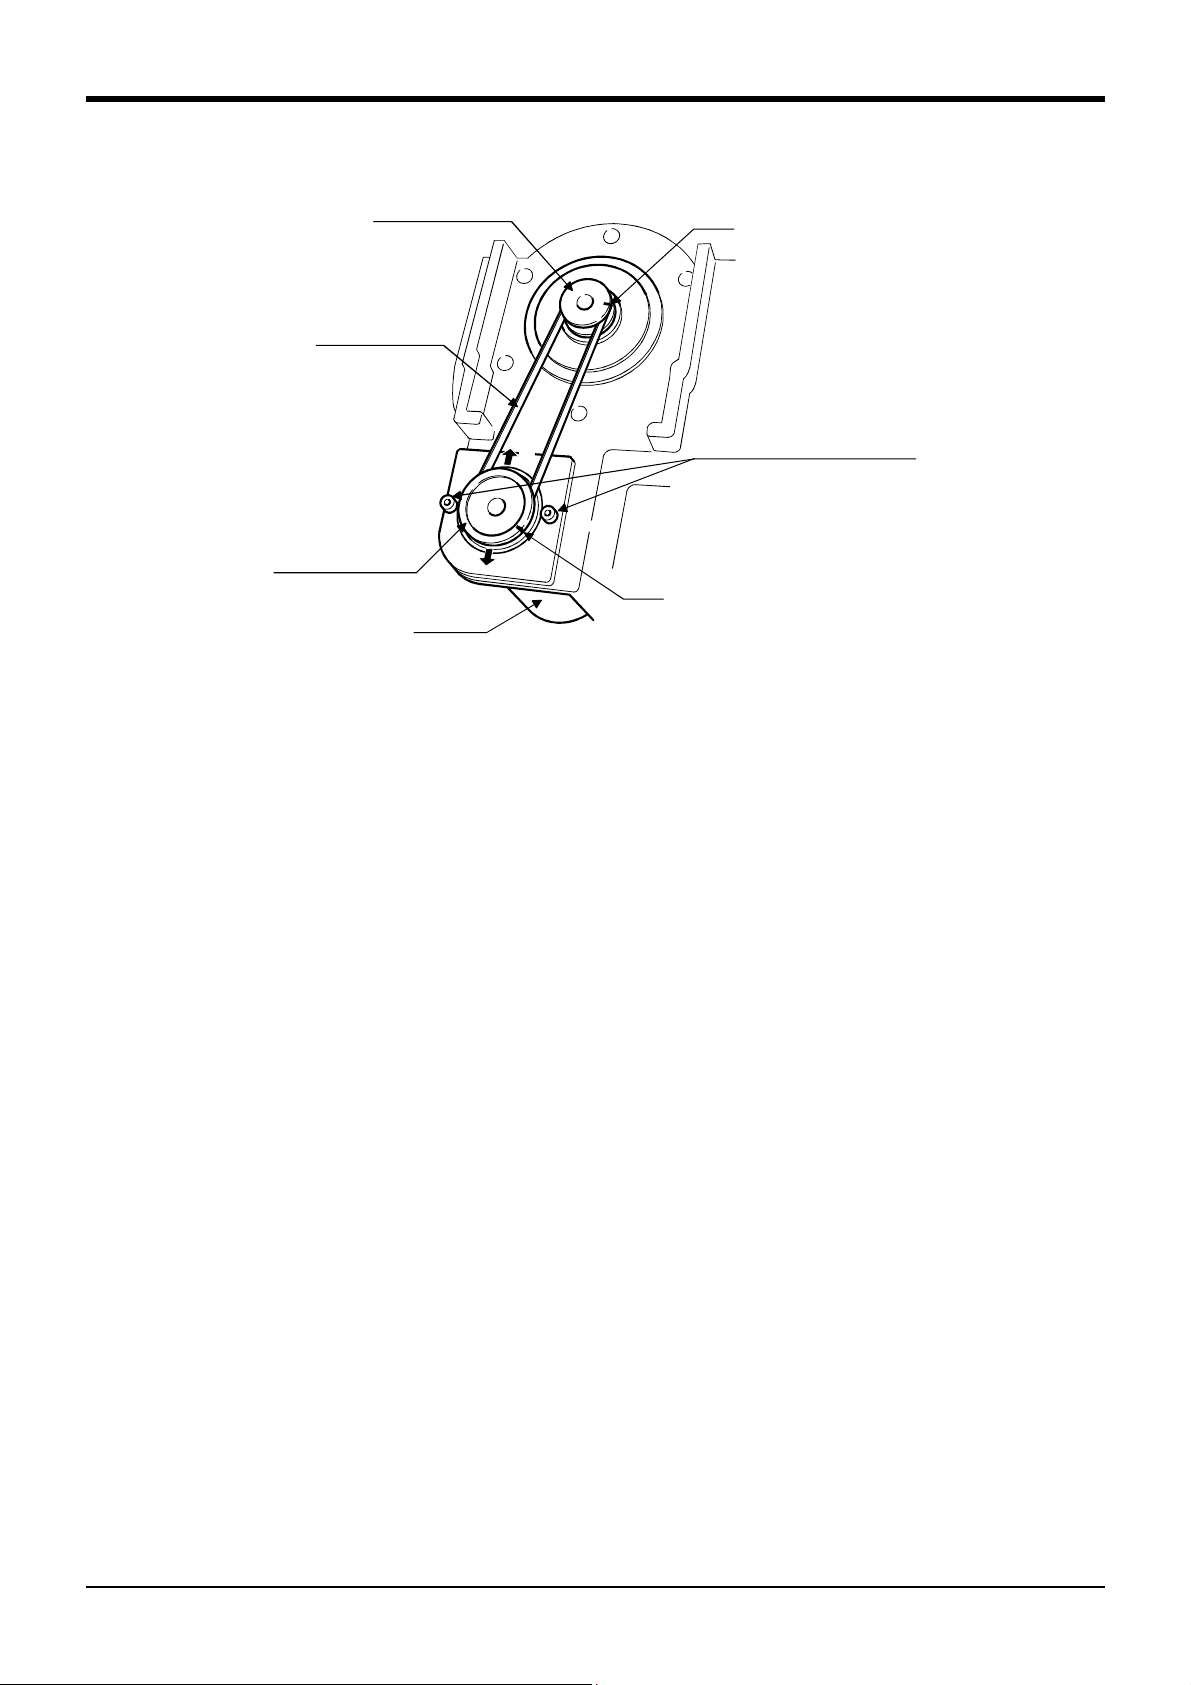
(4) Inspection, maintenance and replacement of J4-axis timing belt
5Maintenance and Inspection
<5>. Timing pulley
<2>. Timing belt
<4>. Timing pulley
b
a
Mark
<3>. Motor
Mark
<1>. Motor installation screw
M3×14(hexagon socket bolt)
Fig.5-8 : Inspection, maintenance and replacement of J4-axis timing belt
■ Inspecting the J4 axis timing belt
1) Confirm that the robot controller power is OFF.
2) Refer to Fig. 5-4 or Fig. 5-5, and remove the elbow covers L and R.
In the case of the clean specification, remove the belt cover.
3) Visually confirm that the symptoms indicated in "(1)Timing belt replacement period" have not occurred with the
timing belt.
4) Confirm that the belt tension is adjusted to slacken approx. 1.4mm when the center of the belt is lightly pressed
with a finger (approx. 0.4N) as shown in "Fig.5-10 : Belt tension".
■ Adjusting the J4 axis timing belt
1) Carry out steps 1) and 2) indicated in " ■ Inspecting the J2 axis timing belt" above.
2) Lightly loosen the two motor installation bolts <1>. (Do not loosen too much.)
3) While confirming the tension of the timing belt <2>, move the motor <3> in the direction of the arrow shown in
the figure. Move until the belt slackens approx. 1.4mm when the center of the belt is lightly pressed with a
finger (approx. 0.4N).
4) The belt tension will increase when moved in the direction of arrow a, and will decrease when moved in the
direction of arrow b.
5) If the belt is loosened too much when adjusting the tension causing it to come off the timing pulleys <4> and
<5>, or if the belt and pulley teeth engagement is deviated, the machine system's origin will deviate.
6) After adjusting, securely tighten the two motor installation bolts <1>. Improper tightening can cause the belt to
loosen with vibration.
■ Replacing the J4 axis timing belt
1) Fig. 5-8 shows the methods for inspecting, adjusting and replacing the timing belt.
2) Move the robot posture with the teaching box so that the J4 axis contacts the mechanical stopper. The J4 axis
must be moved by hand after the servo is turned OFF.
3) Make sure that the pulleys do not move while replacing the belt.
4) If the pulley <4> and <5> position relation deviates, the position could deviate.
5) Make marks on the timing belt <2> and timing pulleys <4> and <5> with a felt-tip pen as shown in Fig. 5-8 so
that the engagement of the timing belt <2> and timing pulleys <4> and <5> does not deviate.
6) Loosen the two motor installation bolts <1>, and remove the belt.
7) Copy the marks onto the new timing belt. Make sure that both belts are tense when making the marks.
8) Align the new timing belt with the marks on the timing pulleys <4> and <5>, and install.
9) Refer to steps 3) to 6) in " ■ Adjusting the J2 axis timing belt" and "(6)Timing belt tension" to adjust the
tension.
10) The position could deviate after the belt is replaced. Confirm that the position has not deviated. If deviated,
refer to "5.5Resetting the origin" on page 56, and reset the origin position.
Maintenance and inspection procedures
5-49
Page 58

5Maintenance and Inspection
(5) Inspection, maintenance and replacement of J5-axis timing belt
<3>. Motor
Mark
<1>. Motor installation
screw
M3x14(socket bolt)
Fig.5-9 : Inspection, maintenance and replacement of J5-axis timing belt
■ Inspecting the J5 axis timing belt
1) Confirm that the robot controller power is OFF.
2) Refer to Fig. 5-4 or Fig. 5-5, and remove the No.2 arm cover.
3) Visually confirm that the symptoms indicated in "(1)Timing belt replacement period" have not occurred with the
timing belt.
4) Confirm that the belt tension is adjusted to slacken approx. 1.4mm when the center of the belt is lightly pressed
with a finger (approx. 0.4N) as shown in "Fig.5-10 : Belt tension".
<5>. Timing pulley
a
b
<2>. Timing belt
Mark
<4>. Timing pulley
■ Adjusting the J5 axis timing belt
1) Carry out steps 1) and 2) indicated in " ■ Inspecting the J2 axis timing belt" above.
2) Lightly loosen the two motor installation bolts <1>. (Do not loosen too much.)
3) While confirming the tension of the timing belt <2>, move the motor <3> in the direction of the arrow shown in
the figure. Move until the belt slackens approx. 1.4mm when the center of the belt is lightly pressed with a
finger (approx. 0.4N).
4) The belt tension will increase when moved in the direction of arrow a, and will decrease when moved in the
direction of arrow b.
5) If the belt is loosened too much when adjusting the tension causing it to come off the timing pulleys <4> and
<5>, or if the belt and pulley teeth engagement is deviated, the machine system's origin will deviate.
6) After adjusting, securely tighten the four motor installation bolts <1>. Improper tightening can cause the belt to
loosen with vibration.
■ Replacing the J5 axis timing belt
1) Fig. 5-9 shows the methods for inspecting, adjusting and replacing the timing belt.
2) Move the robot posture with the teaching box so that the J5 axis contacts the mechanical stopper. The J5 axis
must be moved by hand after the servo is turned OFF.
3) Make sure that the pulleys do not move while replacing the belt.
4) If the pulley <4> and <5> position relation deviates, the position could deviate.
5) Make marks on the timing belt <2> and timing pulleys <4> and <5> with a felt-tip pen as shown in Fig. 5-9 so
that the engagement of the timing belt <2> and timing pulleys <4> and <5> does not deviate.
6) Loosen the two motor installation bolts <1>, and remove the belt.
7) Copy the marks onto the new timing belt. Make sure that both belts are tense when making the marks.
8) Align the new timing belt with the marks on the timing pulleys <4> and <5>, and install.
9) Refer to steps 3) to 6) in " ■ Adjusting the J2 axis timing belt" and "(6)Timing belt tension" to adjust the
tension.
10) The position could deviate after the belt is replaced. Confirm that the position has not deviated. If deviated,
refer to "5.5Resetting the origin" on page 56, and reset the origin position.
5-50
Maintenance and inspection procedures
Page 59

(6) Timing belt tension
s
d
Axis Belt type Span : s (mm) Slack : d (mm) Pressing force : f (N)
J2 291-3GT-6 100 1.5 2
J3 315-3GT-6 102.5 1.6 2
J4 210-2GT-3 75 1.2 0.4
J5 230-2GT-3 85 1.4 0.4
5Maintenance and Inspection
f:Pressing force
s:Span
f
d:Slack
Fig.5-10 : Belt tension
The timing belt can satisfactorily convey the drive and keep a durable force only when it has an adequate tension.
The belt tension should not be too tight or too lose. Instead, it should be adjusted to a degree that elasticity is felt
when the belt is pressed with the thumb. If the belt tension is too weak, the belt loosening side will vibrate. On the
other hand, if the belt tension is too strong, a sharp sound will be heard and the belt tension side will vibrate.
The detailed adjustment (tension) is shown in Fig. 5-10.
Check and adjust with the belt pressing force f and the slack amount d between span s.
Maintenance and inspection procedures
5-51
Page 60

5Maintenance and Inspection
)
5.3.4 Lubrication (1) Lubrication position and specifications
C
B
D
E
6 axis type 5 axis type
A
D
B
A
E
View A (J6 axis)
6. J6 axis lubrication port
J6 axis air bleed bolt(M3)
4. J4 axis lubrication port
J4 axis air bleed bolt(M3)
View B (J5 axis)
J2 axis air bleed bolt(M3)
2. J2 axis lubrication port
View D (J2, J3 axis)
J5 axis air bleed bolt(M3)
5. J5 axis lubrication port
J3 axis air bleed bolt(M3
3. J3 axis
lubrication port
View C (J4 axis)
Fig.5-11 : Lubrication positions
5-52
Maintenance and inspection procedures
J1axis air bleed cap
1. J1 axis
lubrication port
View E (J1 axis)
Page 61

Table 5-5 : Lubrication specifications
No. Parts to be lubricated Oiling method
Lubrication oil
Default charge amount (maker)
5Maintenance and Inspection
Lubrication
intervalLubrication amount
guide*1
Cover to remove
1 J1 axis reduction gears
2 J2 axis reduction gears
3 J3 axis reduction gears
J4 axis reduction gears
4
(6-axis type only)
5 J5 axis reduction gears No.2arm cover
6 J6 axis reduction gears -
Grease nipple
WC-610
Grease nipple
WA-610
Grease
Harmonic grease SK-1A
10g
(Japan Harmonic Systems)
Grease
Harmonic grease SK-1A
4 g
(Japan Harmonic Systems)
2000Hr
3g
2000Hr
1g
Shoulder cover F
No.1arm cover
Elbow cover
Table 5-6 : Lubrication specifications
The grease nipple position is shown in Fig. 5-11. The lubrication specifications for each place are shown in Table
5-5. Before lubricating, refer to "Fig. 5-4Installing/removing the cover (5-axis type)" on page 44 for the 5-axis
type, and "Fig. 5-5Installing/removing the cover (6-axis type)" on page 44 for the 6-axis type, and remove the
required covers.
[Caution]
・ The brands of grease given in Table 5-5 are those filled when the robot is shipped.
・The lubrication time is a cumulative value of the operation at the maximum speed. If the operation has been sus-
pended, or if the designated speed is slow, the lubrication time can be lengthened in proportion.
(The hours marked with a "*1 " are based on the yearly inspection.)
・ Depending on the robot operation state, the lubrication time will fluctuate, so determine the time according to
the state so that the grease does not run out.
・ The numbers in the Table 5-5 correspond to the supply positions in Fig. 5-11.
(2) Lubrication method
1) Refer to the "5.3.2Installing/removing the cover" on page 44 and remove the covers.
2) Remove the drain bolt.
3) Insert the grease shown in Table 5-5 using a grease gun from the lubrication grease nipple.
4) Install the drain bolt.
5) Replace the covers with the removal procedure in reverse.
Maintenance and inspection procedures
5-53
Page 62

5Maintenance and Inspection
p
5.3.5 Replacing the backup battery
An absolute encoder is used for the position detector, so the position must be saved with the backup battery
when the power is turned OFF. The controller also uses a backup battery to save the program, etc. These
batteries are installed when the robot is shipped from the factory, but as these are consumable parts, they must
be replaced periodically by the customer.
The guideline for replacing the battery is one year, but this will differ according to the robot's usage state. When
the battery life nears, the "Battery cumulative time over alarm (Alarm No. 7520)" will occur. Once the alarm
occurs, replace all batteries in the robot arm and controller as soon as possible. Lithium batteries (type: A6BAT
and ER6) are used in both the controller and robot arm. The battery replacement procedures are as follow.
(1) Replacing the robot arm battery
Don't disconnect connector, etc. While replacing the battery, the encoder position
CAUTION
data is saved by the power supplied from the controller. Thus, if the cable
connection is incomplete, the encoder position data will be lost when the controller
power is turned OFF. Several batteries are used in the robot arm, but replace all old
batteries with new batteries at the same time.
<4>. Battery bracket
<2>. Battery cover
<3>. Installation screw
(two screws)
<1>. Installation screw
(two
ositions)
Fig.5-12 : Replacing the battery
1) Confirm that the robot arm and controller are connected with a cable.
2) Turn the controller control power ON.
The position data is retained by the power supplied from the controller while replacing the battery. Thus, if
the cable is not connected correctly, or if the controller power is OFF, the position data will be lost.
3) Move to J2 = -20°, J3 = 90° and J5 =90° with JOG operations so that the cover can be removed.
4) Press the emergency stop button to set the robot in the emergency stop state. This is a measure for safety,
and must always be carried out.
5) Remove the shoulder cover F from the robot. (Refer to "5.3.2Installing/removing the cover" on page 44.)
6) Remove the two installation screws <1>, and remove the battery cover <2>.
7) Remove the two installation screws <3>, and remove the battery bracket <2>.
8) The battery holder is located in the battery bracket <5>. Remove the old battery from the holder, and disconnect the lead connector.
9) Insert the new battery into the holder, and connect the lead connector. Replace all batteries with new ones
at the same time.
10) Carry out steps "5)" to "7)" in reverse to install the parts.
11) Initialize the battery consumption time.
Always carry out this step after replacing the battery, and initialize the battery usage time. Refer to the
separate "Instruction Manual/Detailed Explanation of Functions and Operations" for details on the operation methods.
5-54
Maintenance and inspection procedures
Page 63

5Maintenance and Inspection
5.4 Maintenance parts
The consumable parts that must be replaced periodically are shown in Table 5-7, and spare parts that may be
required during repairs are shown in Table 5-8. Purchase these parts from the dealer when required. Some Mitsubishi-designated parts differ from the maker's standard parts. Thus, confirm the part name, robot arm and controller serial No. and purchase the parts from the dealer.
Table 5-7 : Consumable part list
No.
1 Timing belt 291-3GT-6 J2 axis 1
2315-3GT-6 J3 axis 1
3210-2GT-3 6-axis type:J4 axis 1
4 230-2GT-3 J5 axis 1
5Grease SK-1A Reduction gears of each axis An needed
6 Lithium battery A6BAT In shoulder cover F 5
Table 5-8 : Spare parts list
No.
1 AC servo motor BU220C795G51 J1 axis 1
2 BU220C795G52 J2 axis 1
3 BU220C795G53 J3 axis 1
4 BU220C793G54 6-axis type:J4 axis 1
5 BU220C793G65 J5 axis 1
6 BU220C794G51 J6 axis 1
7 Reduction gears BKO-FA0530H09 J1, J2, J3 axis 3
8 BKO-FA0530H10 6-axis type:J4 axis 1
9 BKO-FA0530H10J5, J6 axis 2
Note) Confirm the robot arm serial No., and contact the dealer for the type.
Part name Type Usage place Q'ty Supplier
Mitsubishi Electric
Part name Type Usage place Q'ty Supplier
Mitsubishi Electric
Table 5-9 : Spare parts (option) list
No.
1 Carl cable 1A-GHCD Pneumatic hand set, Motorized hand set 1 Mitsubishi Electric
Part name Type Usage place Q'ty Supplier
Maintenance parts
5-55
Page 64

5Maintenance and Inspection
5.5 Resetting the origin
The origin is set so that the robot can be used with a high accuracy. After purchasing the robot, always carry out
this step before starting work. The origin must be reset if the combination of robot and controller being used is
changed or if the motor is changed causing an encoder area. The types of origin setting methods are shown in
Table 5-10.
Table 5-10 : Origin setting method
No Method Explanation Remarks
1 Origin data input
method
2 Mechanical stopper
method
3 User origin method A randomly designated position is set as the
The origin data set as the default is input from
the T/B.
This origin posture is set by contacting each axis
against the mechanical stopper.
origin posture.
The setting method is explained in "2.3Setting the
origin" on page 11 .
The setting method is explained in "5.5.1Mechanical
stopper method" on page 57 .
Before using this method, the origin must be set with the
origin data input method or Mechanical stopper method.
The setting method is explained in "5.5.2User origin
method" on page 69.
5-56
Resetting the origin
Page 65
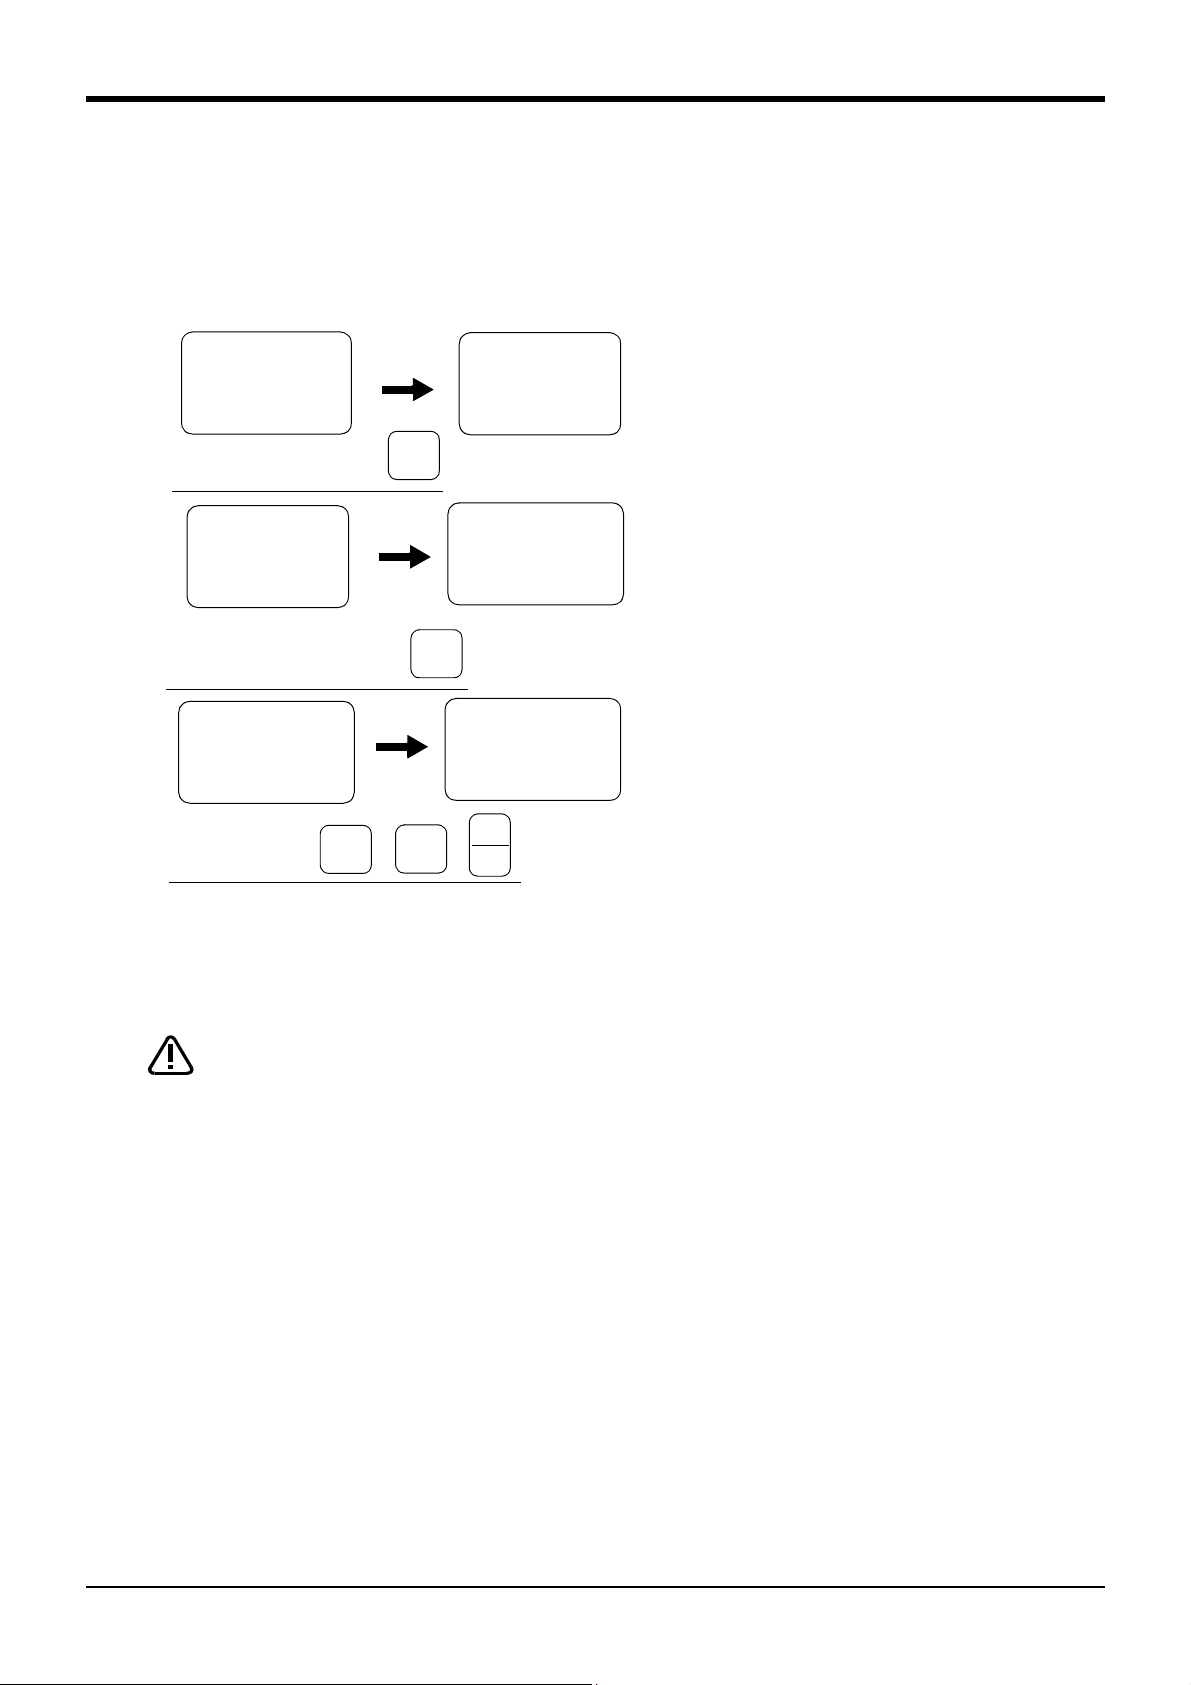
5Maintenance and Inspection
5.5.1 Mechanical stopper method
The method for setting the origin with the transportation jig is explained below.
This operation is carried out with the T/B. Set the [MODE] switch on the front of the controller to "TEACH", and
set the T/B [ENABLE/DISABLE] switch to "ENABLE" to validate the T/B. Move the J4 axis to the upper end
with jog operation beforehand.
(1) Select the T/B
<MENU>
1.TEACH2.RUN
3.FILE4.MONI
5.MAINT6.SET
Display the maintenance screen
5
<MAINT>
1.PARAM2.INIT
3.BRAKE4.
5.POWER
+C
(J6)
STU
ORIGIN
1) Press the [5] key on the menu screen, and dis-
play the maintenance screen.
<MAINT>
1.PARAM2.INIT
3.BRAKE4.
ORIGIN
5.POWER
Display the method selection screen
<ORIGIN>
1.DATA2.MECH
3.JIG4.ABS
5.USER
<ORIGIN>
1.DATA2.MECH
3.JIG4.ABS
5.USER
-Y
(J2)
4
MNO
<MECHA>
SERVOOFF
OK?(1)
1:EXECUTE
2) Press the [4] key on the maintenance screen,
and display the origin setting method selection
screen.
3) Press the [2] key and select the jig method.
Then, press the [1] key and the [INP] key to
turn the servo OFF.
Securely fix the transportation jig A to the base
→
1
-B
(J5)
DEF
→
INP
EXE
with the fixing bolts (M4 ×12, 2 bolts) in this
state
-A
(J4)
2
Select the jig method
GHI
When setting the origin, all axes can be set, or only random axes can be set.
The methods corresponding to the axes to be set are described below, so select the corresponding explanation
and set the origin.
CAUTION
The brakes are released here, and the arm is moved with both hands.
For safety purposes, the brakes must be released by two workers.
Resetting the origin
5-57
Page 66

5Maintenance and Inspection
(2) J1 axis origin setting
<MECHA>12345678
BRAKE(10000000)
SETAXIS(11101000)
ORIGIN:NOTDEF
Designate the origin setting axis
J1(-)
Front of
base
5-axis type
5-axis type
5-axis type5-axis type
Move the cursor
-B
(J5)
1
DEF
Front of
base
RPL
↓
J1(-)
6-
6-axis type
axis type
6-6-
axis typeaxis type
<MECHA>12345678
BRAKE(10000000)
SETAXIS(10000000)
ORIGIN:NOTDEF
Designatetheoriginsettingaxis
1
-B
(J5)
DEF
・
-C
(J6)
0
ABC
→
INP
EXE
1) Press the [1] key. "1" will display at the 1 posi-
tion to set the brake release.
2) Confirm the axis for which the brakes are to be
released.
3) While holding down the deadman switch, hold
down the [MOVE] + [+X] keys. The brakes will
be released while the keys are held down.
4) With both hands, slowly move the J1 axis in (minus) direction , and contact the axis against
the mechanical stopper.
5) Press the [ ↓ ] key. The cursor will move to
"SET AXIS".
6) Designate the axis for which the origin is to be
set.
Set "1" for the 1 axis, and set "0" for the other
axes. Then, press [INP]. Next, a confirmation
screen will appear.
<MECHA>
SETORIGIN
OK?(1)
1
-B
(J5)
DEF
1:EXECUTE
Settheorigin
→
INP
EXE
<MECHA>12345678
BRAKE(10000000)
SETAXIS(10000000)
ORIGIN:COMPLETED
7) Press the [1] and [INP] keys.
The origin posture will be set.
8) Setting of the origin is completed.
9) Refer to "5.5.3Recording the origin data" on
page 70 in this manual, and record the origin data
on the origin data seal.
◇◆◇ Releasing the brakes ◇◆◇
To release the brakes, move the cursor to the "BRAKE" axis No. with the [ ← ] or [ → ] key.
The brakes can be released only for the axis for which a "1" is displayed on the screen. If the brakes are not to
be released, press the [0] key and display a "0".
If the [+X] key on the teaching pendant or the deadman switch is pressed while the brakes are released, the
brakes will be applied immediately.
◇◆◇ Origin setting axis designation ◇◆◇
Move the cursor to the "SET AXIS" axis No. in the origin setting with the [ ← ] or [ → ] key.
The origin is set only for the axis for which a "1" is displayed on the screen. If the origin is not to be set, press
the [0] key and display a "0".
5-58
Resetting the origin
Page 67

(3) J2 axis origin setting
5Maintenance and Inspection
<MECHA>12345678
BRAKE(01000000)
SETAXIS(11101000)
1
-B
(J5)
DEF
ORIGIN:NOTDEF
Designate the origin setting axis
1) Press the [0] key and then press the [1] key.
"1" will display at the 2 position to set the brake
release.
2) Confirm the axis for which the brakes are to be
released.
3) One worker must securely support the upper
arm with both hands.
4) While holding down the deadman switch, hold down the [MOVE] + [+X] keys. The brakes will be released
while the keys are held down.
5) With both hands, slowly move the J2 axis in - (minus) direction , and contact the axis against the mechanical
stopper.
CAUTION
For safety purposes, the step for releasing the brakes must be carried out by two
workers. One worker must operate the T/B, and the other must support the arm.
When the brakes are released, the robot arm could drop by its own weight depending
on the posture.
CAUTION
If the T/B [+X] key or the deadman switch is released, the brakes will be applied
immediately.
J2
(-)
Front of
base
5-
5-axis type
axis type
5-5-
axis typeaxis type
RPL
Move the cursor
↓
<MECHA>12345678
BRAKE(01000000)
SETAXIS(01000000)
ORIGIN:NOTDEF
Designate the origin setting axis
-C
(J6)
0
ABC
・
1
-B
(J5)
DEF
→
INP
EXE
<MECHA>
SETORIGIN
OK?(1)
1:EXECUTE
Set the origin
1
-B
(J5)
DEF
→
INP
EXE
J2
(-)
Front of
base
6-
6-axis type
axis type
6-6-
axis typeaxis type
6) Press the [ ↓ ] key. The cursor will move to
SET AXIS.
7) Designate the axis for which the origin is to be
set.
Set "1" for the 2 axis, and set "0" for the other
axes. Then, press [INP]. Next, a confirmation
screen will appear.
8) Press the [1] and [INP] keys.
The origin posture will be set.
<MECHA>12345678
BRAKE(01000000)
SETAXIS(01000000)
ORIGIN:COMPLETED
9) Setting of the origin is completed.
10) Refer to "5.5.3Recording the origin data" on
page 70 in this manual, and record the origin
data on the origin data seal.
Resetting the origin
5-59
Page 68

5Maintenance and Inspection
yp
◇◆◇ Releasing the brakes ◇◆◇
To release the brakes, move the cursor to the "BRAKE" axis No. with the [ ← ] or [ → ] key.
The brakes can be released only for the axis for which a "1" is displayed on the screen. If the brakes are not to be
released, press the [0] key and display a "0".
If the [+X] key on the teaching pendant or the deadman switch is pressed while the brakes are released, the
brakes will be applied immediately.
◆◇ Origin setting axis designation ◇◆◇
Move the cursor to the "SET AXIS" axis No. in the origin setting with the [ ← ] or [ → ] key.
The origin is set only for the axis for which a "1" is displayed on the screen. If the origin is not to be set, press the
[0] key and display a "0".
(4) J3 axis origin setting
<MECHA>12345678
BRAKE(00100000)
SETAXIS(11101000)
1
-B
(J5)
DEF
ORIGIN:NOTDEF
Designate the origin setting axis
1) Press the [0] key twice and then press the [1]
key. "1" will display at the 3 position to set the
brake release.
2) Confirm the axis for which the brakes are to be
released.
3) One worker must securely support the fore arm
with both hands.
4) While holding down the deadman switch, hold down the [MOVE] + [+X] keys. The brakes will be released
while the keys are held down.
5) With both hands, slowly move the J3 axis in + (plus) direction, and contact the axis against the mechanical
stopper.
CAUTION
For safety purposes, the step for releasing the brakes must be carried out by two
workers. One worker must operate the T/B, and the other must support the arm.
When the brakes are released, the robot arm could drop by its own weight depending
on the posture.
CAUTION
If the T/B [+X] key or the deadman switch is released, the brakes will be applied
immediately.
J3(+) J3(+)
5-60
Resetting the origin
Front of
base
5-
5-axis type
axis type
5-5-
axis typeaxis type
Front of
base
axis type
6-
6-axis type
6-6-
axis t
eaxis type
Page 69

RPL
↓
Move the cursor
5Maintenance and Inspection
6) Press the [ ↓ ] key. The cursor will move to
AXIS.
<MECHA>12345678
BRAKE(00100000)
SETAXIS(00100000)
ORIGIN:NOTDEF
Designate the origin setting axis
1
-B
(J5)
DEF
・
-C
(J6)
→
0
ABC
EXE
<MECHA>
SETORIGIN
OK?(1)
1:EXECUTE
Set the origin
1
-B
(J5)
DEF
→
INP
EXE
<MECHA>12345678
INP
7) Designate the axis for which the origin is to be
set..
Set "1" for the 3 axis, and set "0" for the other
axes. Then, press [INP]. Next, a confirmation
screen will appear.
8) Press the [1] and [INP] keys.
The origin posture will be set.
9) Setting of the origin is completed.
BRAKE(00100000)
SETAXIS(00100000)
ORIGIN:COMPLETED
10) Refer to "5.5.3Recording the origin data" on
page 70in this manual, and record the origin
data on the origin data seal.
◇◆◇ Releasing the brakes ◇◆◇
To release the brakes, move the cursor to the "BRAKE" axis No. with the [ ← ] or [ → ] key.
The brakes can be released only for the axis for which a "1" is displayed on the screen. If the brakes are not to
be released, press the [0] key and display a "0".
If the [+X] key on the teaching pendant or the deadman switch is pressed while the brakes are released, the
brakes will be applied immediately.
◇◆◇ Origin setting axis designation ◇◆◇
Move the cursor to the "SET AXIS" axis No. in the origin setting with the [ ← ] or [ → ] key.
The origin is set only for the axis for which a "1" is displayed on the screen. If the origin is not to be set, press
the [0] key and display a "0".
Resetting the origin
5-61
Page 70

5Maintenance and Inspection
yp
yp
(5) J4 axis origin setting (Only 6-axis type)
<MECHA>12345678
BRAKE(00100000)
SETAXIS(11101000)
ORIGIN:NOTDEF
Designate the origin setting axis
Front of
base
CAUTION
1) Before moving the twist axis, move the J3 axis
to prevent arm interference.
-B
(J5)
1
DEF
Press the [0] key twice and then press the [1]
key. "1" will display at the 3 position to set the
brake release.
2) Confirm the axis for which the brakes are to be
released.
3) One worker must securely support the fore arm
with both hands.
J3(-)
4) While holding down the deadman switch, hold
down the [MOVE] + [+X] keys. The brakes will
be released while the keys are held down.
5) With both hands, slowly move the J3 axis in (minus) direction. Stop at a position where the
arm will not interfere even if the J4 axis is
rotated, and then apply the brakes.
Then, set the J4 axis origin.
6-
6-axis type
axis type
6-6-
axis typeaxis type
For safety purposes, the step for releasing the brakes must be carried out by two
workers. One worker must operate the T/B, and the other must support the arm.
When the brakes are released, the robot arm could drop by its own weight depending
on the posture.
CAUTION
<MECHA>12345678
BRAKE(00100000)
SETAXIS(11101000)
ORIGIN:NOTDEF
Designate the origin setting axis
Front of
base
If the T/B [+X] key or the deadman switch is released, the brakes will be applied
immediately.
6) With both hands, slowly move the J4 axis in +
(plus) direction, and contact the axis against
-B
(J5)
1
DEF
the mechanical stopper.
J4(+)
5-62
Resetting the origin
axis t
6-
6-axis type
6-6-
axis t
e
eaxis type
Page 71

RPL
↓
Move the cursor
5Maintenance and Inspection
7) Press the [ ↓ ] key. The cursor will move to
AXIS .
<MECHA>12345678
BRAKE(00010000)
SETAXIS(00010000)
1
-B
(J5)
DEF
ORIGIN:NOTDEF
Designate the origin setting axis
・
-C
(J6)
0
ABC
→
INP
EXE
<MECHA>
SETORIGIN
OK?(1)
1
-B
(J5)
DEF
1:EXECUTE
Set the origin
→
INP
EXE
<MECHA>12345678
8) Designate the axis for which the origin is to be
set.
Set "1" for the 4 axis, and set "0" for the other
axes. Then, press [INP]. Next, a confirmation
screen will appear.
9) Press the [1] and [INP] keys.
The origin posture will be set.
10) Setting of the origin is completed.
BRAKE(00010000)
SETAXIS(00010000)
ORIGIN:COMPLETED
11) Refer to "5.5.3Recording the origin data" on
page 70 in this manual, and record the origin
data on the origin data seal.
◇◆◇ Releasing the brakes ◇◆◇
To release the brakes, move the cursor to the "BRAKE" axis No. with the [ ← ] or [ → ] key.
The brakes can be released only for the axis for which a "1" is displayed on the screen. If the brakes are not to
be released, press the [0] key and display a "0".
If the [+X] key on the teaching pendant or the deadman switch is pressed while the brakes are released, the
brakes will be applied immediately.
◆◇ Origin setting axis designation ◇◆◇
Move the cursor to the "SET AXIS" axis No. in the origin setting with the [ ← ] or [ → ] key.
The origin is set only for the axis for which a "1" is displayed on the screen. If the origin is not to be set, press
the [0] key and display a "0".
Resetting the origin
5-63
Page 72

5Maintenance and Inspection
yp
(6) J5 axis origin setting
<MECHA>12345678
BRAKE(00001000)
SETAXIS(11101000)
1
-B
(J5)
DEF
ORIGIN:NOTDEF
Designate the origin setting axis
1) Press the [0] key four times and then press the
[1] key. "1" will display at the 5 position to set
the brake release.
2) Confirm the axis for which the brakes are to be
released.
3) One worker must securely support the wrist arm
with both hands.
4) While holding down the deadman switch, hold down the [MOVE] + [+X] keys. The brakes will be released
while the keys are held down.
5) With both hands, slowly move the J5 axis in - (minus) direction, and contact the axis against the mechanical
stopper.
CAUTION
For safety purposes, the step for releasing the brakes must be carried out by two
workers. One worker must operate the T/B, and the other must support the arm.
When the brakes are released, the robot arm could drop by its own weight depending
on the posture.
CAUTION
If the T/B [+X] key or the deadman switch is released, the brakes will be applied
immediately.
J5(-)
J5(-)
Front of
base
5-
5-axis type
axis type
5-5-
axis typeaxis type
RPL
↓
Move the cursor
<MECHA>12345678
BRAKE(00001000)
SETAXIS(00001000)
ORIGIN:NOTDEF
Designate the origin setting axis
1
-B
(J5)
DEF
・
-C
(J6)
0
ABC
→
INP
EXE
<MECHA>
SETORIGIN
OK?(1)
1:EXECUTE
Set the origin
1
-B
(J5)
DEF
→
INP
EXE
<MECHA>12345678
BRAKE(00001000)
SETAXIS(00001000)
ORIGIN:COMPLETED
Front of
base
* The J5 axis direction for the 6-
axis type indicates the direction
when the J4 axis is at 0°.
6-
6-axis type
axis type
6-6-
axis t
eaxis type
6) Press the [ ↓ ] key. The cursor will move to
SET AXIS.
7) Designate the axis for which the origin is to be
set.
Set "1" for the 5 axis, and set "0" for the other
axes. Then, press [INP]. Next, a confirmation
screen will appear.
8) Press the [1] and [INP] keys.
The origin posture will be set.
9) Setting of the origin is completed.
10) Refer to "5.5.3Recording the origin data" on
page 70 in this manual, and record the origin
data on the origin data seal.
5-64
Resetting the origin
Page 73
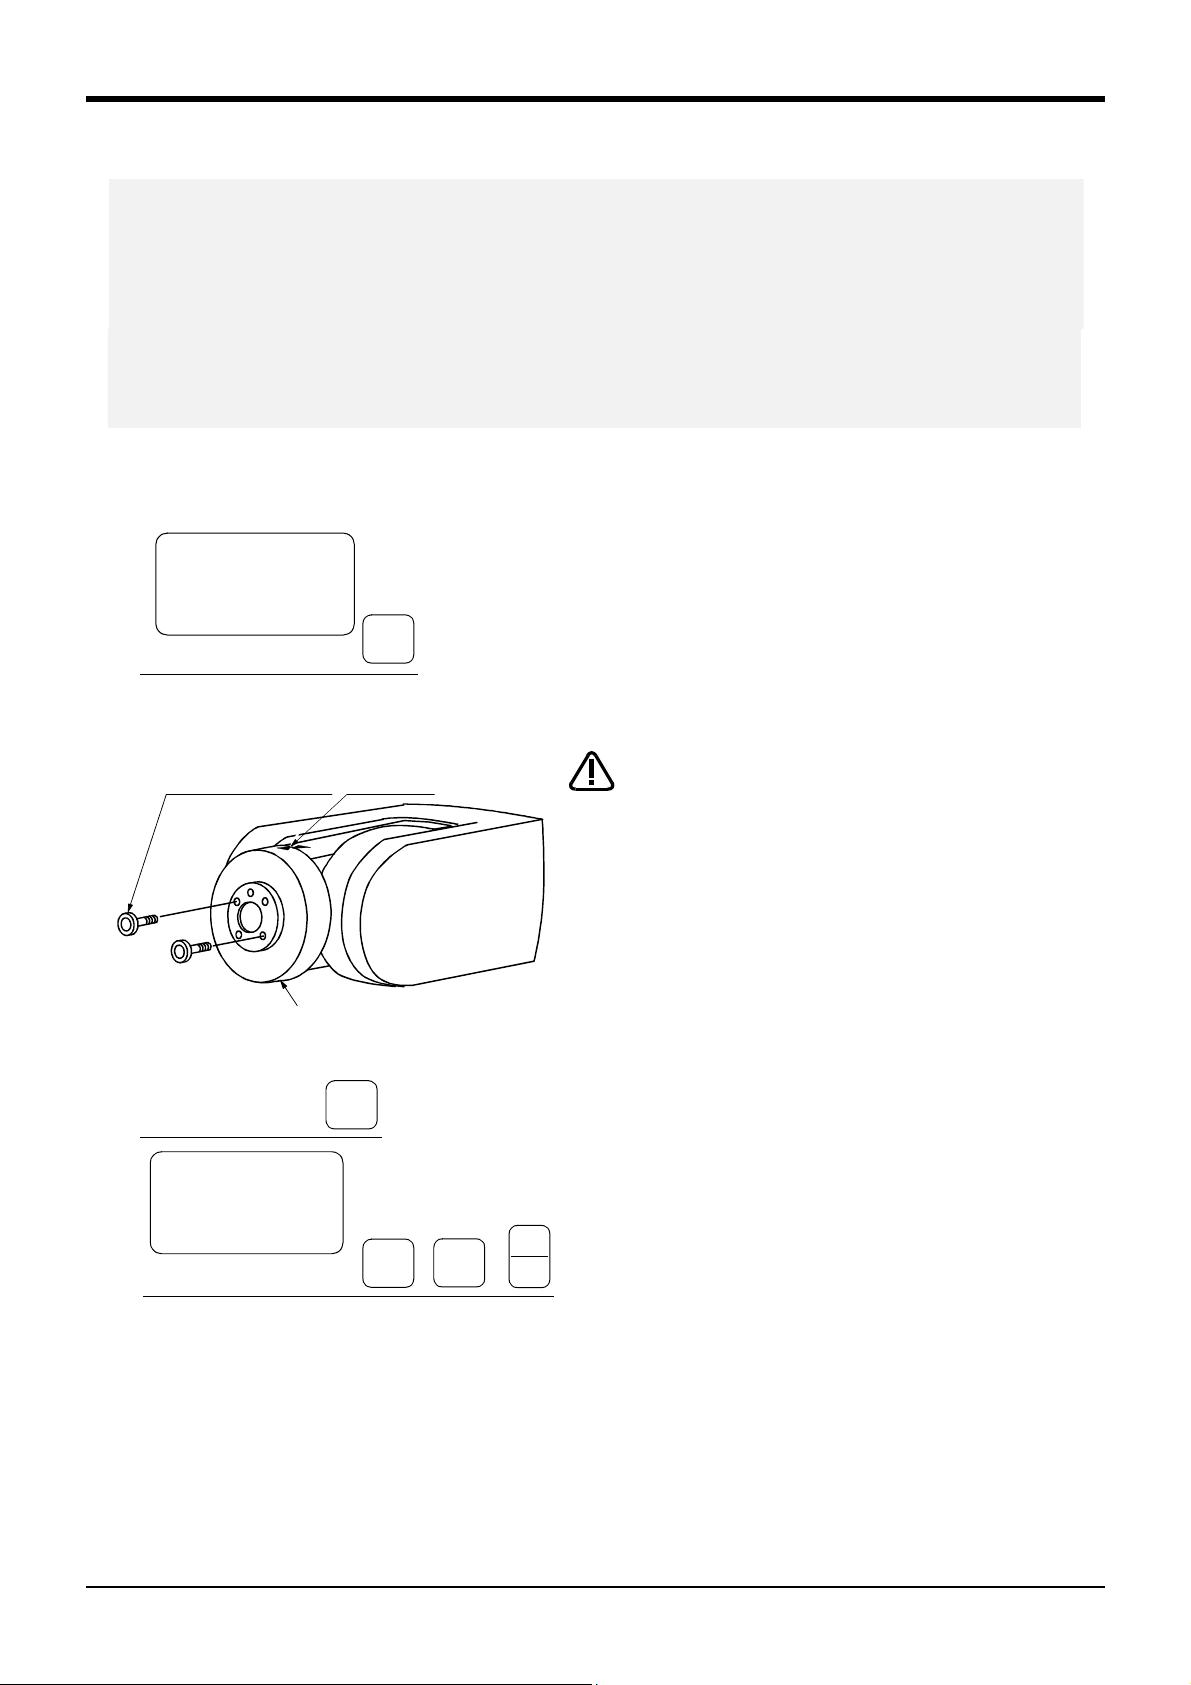
5Maintenance and Inspection
◇◆◇ Releasing the brakes ◇◆◇
To release the brakes, move the cursor to the "BRAKE" axis No. with the [ ← ] or [ → ] key.
The brakes can be released only for the axis for which a "1" is displayed on the screen. If the brakes are not to
be released, press the [0] key and display a "0".
If the [+X] key on the teaching pendant or the deadman switch is pressed while the brakes are released, the
brakes will be applied immediately.
◆◇ Origin setting axis designation ◇◆◇
Move the cursor to the "SET AXIS" axis No. in the origin setting with the [ ← ] or [ → ] key.
The origin is set only for the axis for which a "1" is displayed on the screen. If the origin is not to be set, press
the [0] key and display a "0".
(7) J6 axis origin setting
1) Install the hand (option) or bolt (two M5 bolts
<MECHA>12345678
BRAKE(00000100)
SETAXIS(00000100)
1
-B
(J5)
DEF
ORIGIN:NOTDEF
Designate the origin setting axis
prepared by customer) at opposing positions on
the mechanical interface.
2) Hold onto the hand or bolt installed in step 1, and
slowly rotate the mechanical interface to the
match marks.
Bolt(M5:two bolts)
Prepared by customer
J6 axis
Move the cursor
Match mark
RPL
↓
<MECHA>12345678
BRAKE (00000100)
SETAXIS(00000100)
ORIGIN:NOTDEF
Designate the origin setting axis
1
-B
(J5)
DEF
・
-C
(J6)
0
ABC
→
INP
EXE
CAUTION
3) Press the [ ↓ ] key. The cursor will move to
SET AXIS.
4) Designate the axis for which the origin is to be
set.
Set "1" for the 6 axis, and set "0" for the other
axes. Then, press [INP]. Next, a confirmation
screen will appear.
The J6-axis dose not have a
mechanical stopper.
When setting the origin position ,
do not rotate the axis more than
themotion range( ± 200 deg.).
Resetting the origin
5-65
Page 74

5Maintenance and Inspection
<MECHA>
SETORIGIN
OK?(1)
1:EXECUTE
Set the origin
1
-B
(J5)
DEF
→
INP
EXE
<MECHA>12345678
5) Press the [1] and [INP] keys.
The origin posture will be set.
6) Setting of the origin is completed.
BRAKE(00000100)
SETAXIS(00000100)
ORIGIN:COMPLETED
7) Refer to "5.5.3Recording the origin data" on
page 70 in this manual, and record the origin data
on the origin data seal.
◇◆◇ Releasing the brakes ◇◆◇
To release the brakes, move the cursor to the "BRAKE" axis No. with the [ ← ] or [ → ] key.
The brakes can be released only for the axis for which a "1" is displayed on the screen. If the brakes are not to
be released, press the [0] key and display a "0".
If the [+X] key on the teaching pendant or the deadman switch is pressed while the brakes are released, the
brakes will be applied immediately.
◆◇ Origin setting axis designation ◇◆◇
Move the cursor to the "SET AXIS" axis No. in the origin setting with the [ ← ] or [ → ] key.
The origin is set only for the axis for which a "1" is displayed on the screen. If the origin is not to be set, press
the [0] key and display a "0".
5-66
Resetting the origin
Page 75

yp
5Maintenance and Inspection
(8) All axis origin setting
1) First, refer to step "(6)J5 axis origin setting" on page 64 and set the origin of the J5 axis.
2) To prevent impacts of the J5 axis on the robot arm, move the J5 axis to near 0 degrees with joint jog operation
refer to "(1)JOINT jog operation" on page 20 in this manual.
Flange direction(J5 axis)
Flange direction(J5 axis)
5-axis type
5-axis type
5-axis type5-axis type
6-axis type
6-axis type
6-axis type6-axis type
3) For the 6-axis robot, refer to "(5)J4 axis origin setting (Only 6-axis type)" on page 62 and set the J4 axis origin
position. The following steps are carried out simultaneously with the other axes, so they can be skipped here.
For the 5-axis robot, proceed to step 4.
4) Refer to "(2)J1 axis origin setting" on page 58 and "(3)J2 axis origin setting" on page 59, "(4)J3 axis origin
setting" on page 60, "(7)J6 axis origin setting" on page 65, and set the origin positions of the J1 axis, J2 axis,
J3 axis and J6 axis.
The following steps for setting each axis are carried out simultaneously with the other axes, so they can be
skipped here.
5) When completed with all work, the robot posture should be as bellow.
Front of
base
5-axis type
5-axis type
5-axis type5-axis type
Front of
base
6-axis type
6-axis type
6-axis t
Resetting the origin
e6-axis type
5-67
Page 76

5Maintenance and Inspection
RPL
Move the cursor
↓
<JIG> 12345678
BRAKE(00000000)
SETAXIS(11110000)
ORIGIN:NOTDEF
Designate the origin setting axis
1
-B
(J5)
DEF
・
<JIG>
SETORIGIN
OK?(1)
1:EXECUTE
Set the origin
1
-B
(J5)
DEF
→
0
INP
EXE
-C
(J6)
ABC
→
INP
EXE
6) Press the [ ↓ ] key. The cursor will move to
SET AXIS .
7) Designate the axis for which the origin is to be
set.
The origin setting of the 5 axis has been
completed with the first operation, so set the 5
axis to 0, and set all of the other axes to "1".
Then, press [INP]. The 5-axis robot does not
have the 4 axis, so set 0.
Next, a confirmation screen will appear.
8) Press the [1] and [INP] keys.
The origin posture will be set.
<JIG> 12345678
9) Setting of the origin is completed.
BRAKE(00000000)
SETAXIS(11110000)
ORIGIN:NOTDEF
10) Refer to "5.5.3Recording the origin data" on
page 70 in this manual, and record the origin
data on the origin data seal.
◇◆◇ Releasing the brakes ◇◆◇
To release the brakes, move the cursor to the "BRAKE" axis No. with the [ ← ] or [ → ] key.
The brakes can be released only for the axis for which a "1" is displayed on the screen. If the brakes are not to
be released, press the [0] key and display a "0".
If the [+X] key on the teaching pendant or the deadman switch is pressed while the brakes are released, the
brakes will be applied immediately.
◆◇ Origin setting axis designation ◇◆◇
Move the cursor to the "SET AXIS" axis No. in the origin setting with the [ ← ] or [ → ] key.
The origin is set only for the axis for which a "1" is displayed on the screen. If the origin is not to be set, press
the [0] key and display a "0".
5-68
Resetting the origin
Page 77

5Maintenance and Inspection
5.5.2 User origin method
CAUTION
The procedure for setting the origin with the user origin method is explained below.
This operation is carried out with the teaching pendant. Set the [MODE] switch on the front of the controller to
"TEACH", and set the [ENABLE/DISABLE] switch on the teaching pendant to "ENABLE" to enable the teaching
pendant.
The operation method is shown below.
When setting the origin for the first time using this method, carry out the operations in order from step 1). For the
second and following time, move the robot arm to the user origin position with jog operation, and accurately position all axes. Then start the procedure from step 4).
1) Determine the user origin position
Move the robot to the position to be set as the origin with jog operation. Refer to "2.4Confirming the opera-
tion" on page 17 for details on the jog operation.
Before using this method, the origin must be set with the origin data input method or
Mechanical stopper method.
CAUTION
Choose the user origin position as the position where it doesn't move by the gravity.
This position is left as a guideline to position all axes with jog operation when setting
the origin again with this method.
2) Enter the JOINT jog mode, and display the joint coordinates on the teaching pendant screen. Record the
value of the axis for which the origin is to be set.
3) Input the value recorded in the "user designated origin parameter (USERORG)".
The parameter details and input methods are described in the separate "Instruction Manual/Detailed Explanation of Functions and Operations". Refer to that manual and input the user designated origin position.
<MENU>
1.TEACH 2.RUN
3.FILE 4.MONI
5.MAINT 6.SET
Display the maintenance screen
5
<MAINT>
1.PARAM 2.INIT
3.BRAKE 4.ORIGIN
5.POWER
+C
(J6)
STU
4) Next, set the origin.
Press the [MENU] key to display the Menu
screen.
5) Press the [5] key to display the Maintenance
screen.
6) Press the [4] key to select the Origin Setting
<MAINT>
1.PARAM 2.INIT
3.BRAKE 4.ORIGIN
5.POWER
<ORIGIN>
1.DATA 2.MECH
3.JIG 4.ABS
5.USER
screen.
Display the origin setting method selection screen
<ORIGIN>
1.DATA2.MECH
3.JIG4.ABS
5.USER
<USER>
SERVOOFF
OK?()
1:EXECUTE
4
-Y
(J2)
MNO
7) Press the [5] key to select the user origin
method.
Then, press [1] key and [INP] key to turn OFF
the servo.
Resetting the origin
5-69
Page 78
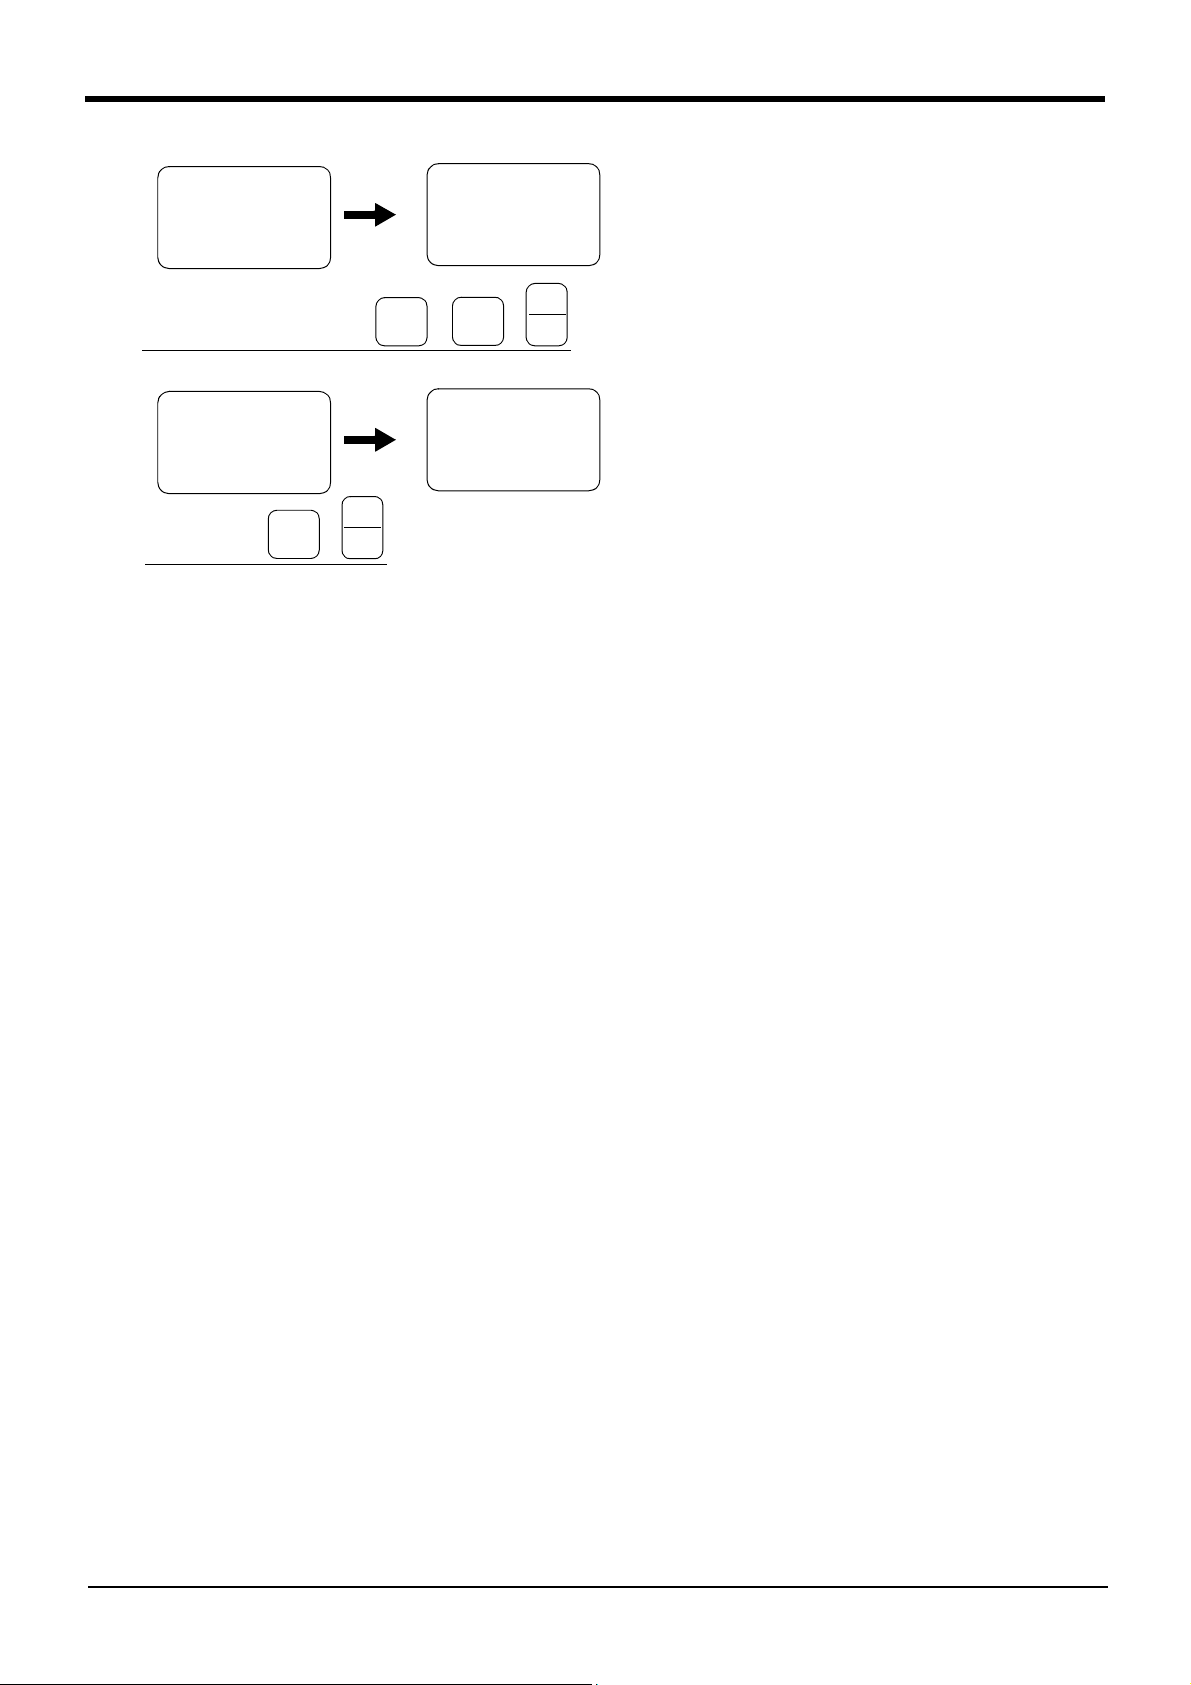
5Maintenance and Inspection
<USER>12345678
BRAKE(00000000)
SETAXIS
(11111100)
ORIGIN:NOTDEF
Designate the origin setting axis
<USER>
CHANGESTOORIGIN
OK?(1)
1:EXECUTE
→
INP
EXE
-B
(J5)
1
Set the origin
DEF
<USER>
CHANGESTOORIGIN
OK?()
1:EXECUTE
→
1
-B
(J5)
DEF
RPL
↓
<USER>12345678
BRAKE(00000000)
SETAXIS
(11111100)
ORIGIN:NOTDEF
→
8) Press the [ ↓ ] key, and input "1" for the axis
for which the origin is to be set. Press the [INP]
key to display the Confirmation screen.
INP
EXE
9) Press the [1] key and then the [INP] key. The
origin will be set
This completes the setting of the origin with the user origin method.
5.5.3 Recording the origin data
When the origin has been set with the jig method, record that origin data on the origin data label. With this, the ori-
gin can be set with the origin data input method the next time.
Confirm the origin data on the teaching pendant screen (origin data input screen). The origin data label is enclosed
with the arm or attached on the back of the connector box cover.
The teaching pendant operation method and connector box cover removal method for confirming the origin data is
the same as the methods for setting the origin with the origin data input method. Refer to "2.3.2Setting the origin
with the origin data input method" on page 12, and write the origin data displayed on the teaching pendant onto
the origin label.
(1)
Confirming the origin data label
Remove the connector box cover.
Refer to "5.3.2Installing/removing the cover" on page 44, and remove the connector box cover.
(2) Confirming the origin data
Confirm the value displayed on the teaching pendant's Origin Data Input screen.
Refer to "2.3.2Setting the origin with the origin data input method""(5)Inputting the origin data" , and display the
Origin Data Input screen on the teaching pendant display screen.
(3) Recording the origin data
Write the origin data displayed on the teaching pendant to the origin data label attached to the back of the con-
nector box cover. Refer to "Fig. 2-8Origin data label (an example)" on page 12, and "Fig. 2-9Correspondence of
origin data label and axis" on page 15 for details on the origin data label.
(4) Installing the cover
Install the connector box cover removed in step "(1)Confirming the origin data label" above.
Refer to "5.3.2Installing/removing the cover" on page 44, and replace the connector box cover.
This completes the recording of the origin data.
5-70
Resetting the origin
Page 79

A
6 Appendix
Appendix 1 : Configuration flag
The configuration flag indicates the robot posture.
For the 6-axis type robot, the robot hand end is saved with the position data configured of X, Y, Z, A, B and C.
However, even with the same position data, there are several postures that the robot can change to. The posture
is expressed by this configuration flag, and the posture is saved with FL1 in the position constant (X, Y, Z, A, B, C)
(FL1, FL2).
The types of configuration flags are shown below.
(1) RIGHT/LEFT
P is center of flange in comparison with the plane through the J1 axis vertical to the ground.
Q is center of J5 axis rotation in comparison with the plane through the J1 axis vertical to the ground.
6Appendix
J1 axis rotation center
LEFT
Q
6-axis type
FL 1(Flag 1 )
&B 0000 00
↑
1/0= R I G H T / L E F T
Note) "&B" is shows the binary
RIGHT
J1 axis rotation center
LEFT
P
5-axis type
RIGHT
Fig.6-1:Configuration flag (RIGHT/LEFT)
(2) ABOVE/BELOW
Q is center of J5 axis rotation in comparison with the plane through both the J3 and the J2 axis.
00
BELOW
BOVE
BELOW
J3 axis
rotation center
J2 axis
rotation center
ABOVE
J3 axis
rotation center
Q
J2 axis
rotation center
Q
FL 1(Flag 1 )
5-axis type
6-axis type
&B 0000 000
1/0= A B O V E / B E L OW
Note) "&B" is shows the binary
0
↑
Fig.6-2 : Configuration flag (ABOVE/BELOW)
Configuration flag
Appendix-71
Page 80

6Appendix
(3) NONFLIP/FLIP (6-axis robot only.)
This means in which side the J6 axis is in comparison with the plane through both the J4 and the J5 axis.
FLIP
J6 axis
flange surface
NON FLIP
FL 1(Flag 1 )
&B 0000 0000
1/0= NON F L I P / F L I P
Note) "&B" is shows the binary
Fig.6-3 : Configuration flag (NONFLIP/FLIP)
↑
Appendix-72
Configuration flag
Page 81

HEAD OFFICE : MITSUBISHI DENKI BLDG MARUNOUCHI TOKYO 100-8310 TELEX : J24532 CAB
NAGOYA W ORKS : 1-14, YADA-MINAMI 5, HIGASHI-KU, NAGOYA, JAPAN
LE MELCO TOKYO
JUN..2002 MEE Printed in Japan on recycled paper. Specifications are subject to change without notice.
 Loading...