

Page 1
© Copyright 2003, Mitsubishi Digital Electronics America
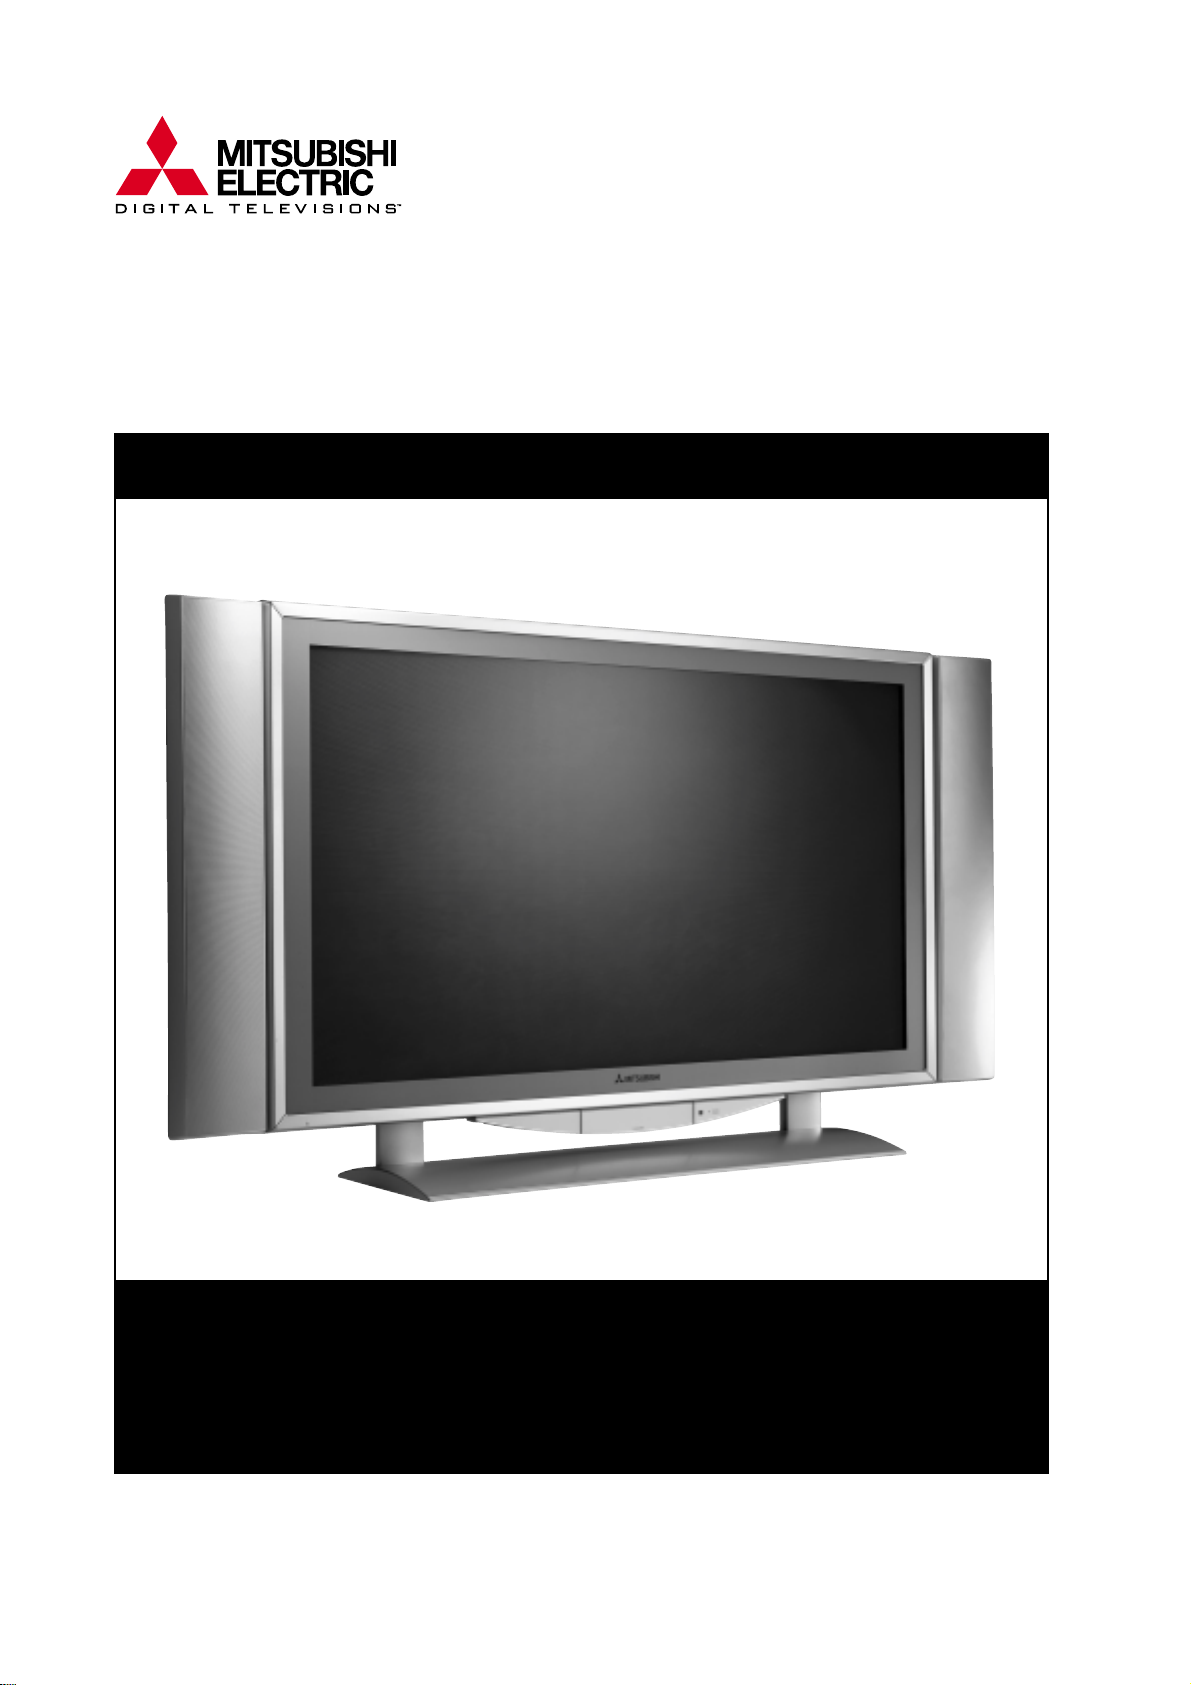
Mitsubishi Plasma TV PD-4225S
Owner’s Guide
Technically Anything is Possible
®
Page 2
2 Plasma TV
Warning
WARNING:
TO REDUCE THE RISK OF ELECTRIC SHOCK DO NOT REMOVE COVER (OR BACK). NO USER
SERVICEABLE PARTS INSIDE. REFER TO QUALIFIED SERVICE PERSONNEL.
The lightning flash with arrowhead symbol, within an equilateral triangle, is intended to alert the user to
the presence of uninsulated “dangerous voltage” within the product’s enclosure that may be of sufficient magnitude to constitute a risk of electric shock to persons.
The exclamation point within an equilateral triangle is intended to alert the user to the presence of
important operating and maintenance (servicing) instructions in the literature accompanying the appliance.
WARNING:
TO PREVENT FIRE OR SHOCK HAZARDS, DO NOT EXPOSE THIS PRODUCT TO RAIN OR MOISTURE.
NOTE TO CABLE/TV INSTALLER:
This reminder is provided to call the CATV system installer’s attention to Article 820-40 of the National Electric
Code (U.S.A.). The code provides guidelines for proper grounding and, in particular, specifies that the cable
ground shall be connected to the grounding system of the building, as close to the point of the cable entry as practical.
REGULATORY INFORMATION
This equipment has been tested and found to comply with the limits for a Class B digital device, pursuant to Part
15 of the FCC Rules. These limits are designed to provide reasonable protection against harmful interference in
a residential installation. This equipment generates, uses and can radiate radio frequency energy and, if not
installed and used in accordance with the instructions, may cause harmful interference to radio communications.
However, there is no guarantee that interference will not occur in a particular installation. If this equipment does
cause harmful interference to radio or television reception, which can be determined by turning the equipment off
and on, the user is encouraged to try to correct the interference by one or more of the following measures:
- Reorient or relocate the receiving antenna.
- Increase the separation between the equipment and receiver.
- Connect the equipment into an outlet on a circuit different from that to which the receiver is connected.
- Consult the dealer or an experienced radio/TV technician for help.
Any changes or modifications not expressly approved by the party responsible for compliance could void the
user’s authority to operate the equipment.
CAUTION:
Do not attempt to modify this product in any way without written authorization from Mitsubishi Digital Electronics
America. Unauthorized modification could void the user’s authority to operate this product.
COMPLIANCE:
The responsible party for this product’s compliance is:
Mitsubishi Digital Electronics America
9351 Jeronimo Road
Irvine, CA 92618
Phone: (949) 465-6000
CAUTION
RISK OF ELECTRIC SHOCK
DO NOT OPEN
W
W
arning
arning
Page 3

Owner’s Manual 3
Safety Instructions
Important safeguards for you and your new product
Y our product has been manufactured and tested with your safety in mind. However, improper use can result in potential electrical shock or fire hazards. To avoid defeating the safeguards that have been built into your new product, please read and
observe the following safety points when installing and using your new product, and save them for future reference.
Observing the simple precautions discussed in this booklet can help you get many years of enjoyment and safe operation
that are built into your new product.
This product complies with all applicable U.S. Federal safety requirements, and those of the Canadian Standards
Association.
1. Read Instructions
All the safety and operating instructions should be read
before the product is operated.
2. Follow Instructions
All operating and use instructions should be followed.
3. Retain Instructions
The safety and operating instructions should be retained for
future reference.
4. Heed Warnings
All warnings on the product and in the operating instructions
should be adhered to.
5. Cleaning
Unplug this product from the wall outlet before cleaning. Do
not use liquid cleaners or aerosol cleaners. Use a damp
cloth for cleaning. (See Page 8, Cleaning Safeguards)
6. Water and Moisture
Do not use this product near water, for example, near a bath
tub, wash bowl, kitchen sink, or laundry tub, in a wet basement, or near a swimming pool.
7. Accessories, Carts, and Stands
Do not place this product on a slippery or tilted surface, or on
an unstable cart, stand, tripod, bracket, or table. The product
may slide or fall, causing serious injury to a child or adult,
and serious damage to the product. Use only with a cart,
stand, tripod, bracket, or table recommended by the manufacturer, or sold with the product. Any mounting of the product should follow the manufacturer’s instructions, and should
use a mounting accessory recommended by the manufacturer.
8. Transporting Product
A product and cart combination should be moved with care.
Quick stops, excessive force, and uneven surfaces may
cause the product and cart combination to overturn.
9. Attachments
Do not use attachments not recommended by the product
manufacturer as they may cause hazards.
10. Ventilation
Slots and openings in the cabinet are provided for ventilation
and to ensure reliable operation of the product and to protect
it from overheating, and these openings must not be blocked
or covered. The openings should never be blocked by placing the product on a bed, sofa, rug, or other similar surface.
This product should not be placed in a built-in installation
such as a bookcase or rack unless proper ventilation is provided or the manufacturer’s instructions have been adhered
to.
11. Power Sources
This product should be operated only from the type of power
source indicated on the marking label. If you are not sure of
the type of power supply to your home, consult your product
dealer or local power company. For products intended to
operate from battery power, or other sources, refer to the
operating instructions.
12. Power-Cord Polarization
This product is equipped with a three-wire grounding type
plug, a plug having a third (grounding) pin. This plug will only
fit into the grounding-type power outlet. This is a safety feature. If you are unable to insert the plug into the outlet, contact your electrician to replace your obsolete outlet. Do not
defeat the safety purpose of the grounding-type plug.
13. Power-Cord Protection
Power-supply cords should be routed so that they are not
likely to be walked on or pinched by items placed upon or
against them, paying particular attention to cords at plugs,
convenience receptacles, and the point where they exit from
the product.
PORTABLE CART WARNING
(Continued on next page)
Safety Instructions
Safety Instructions
Page 4
4 Plasma TV
Safety Instructions
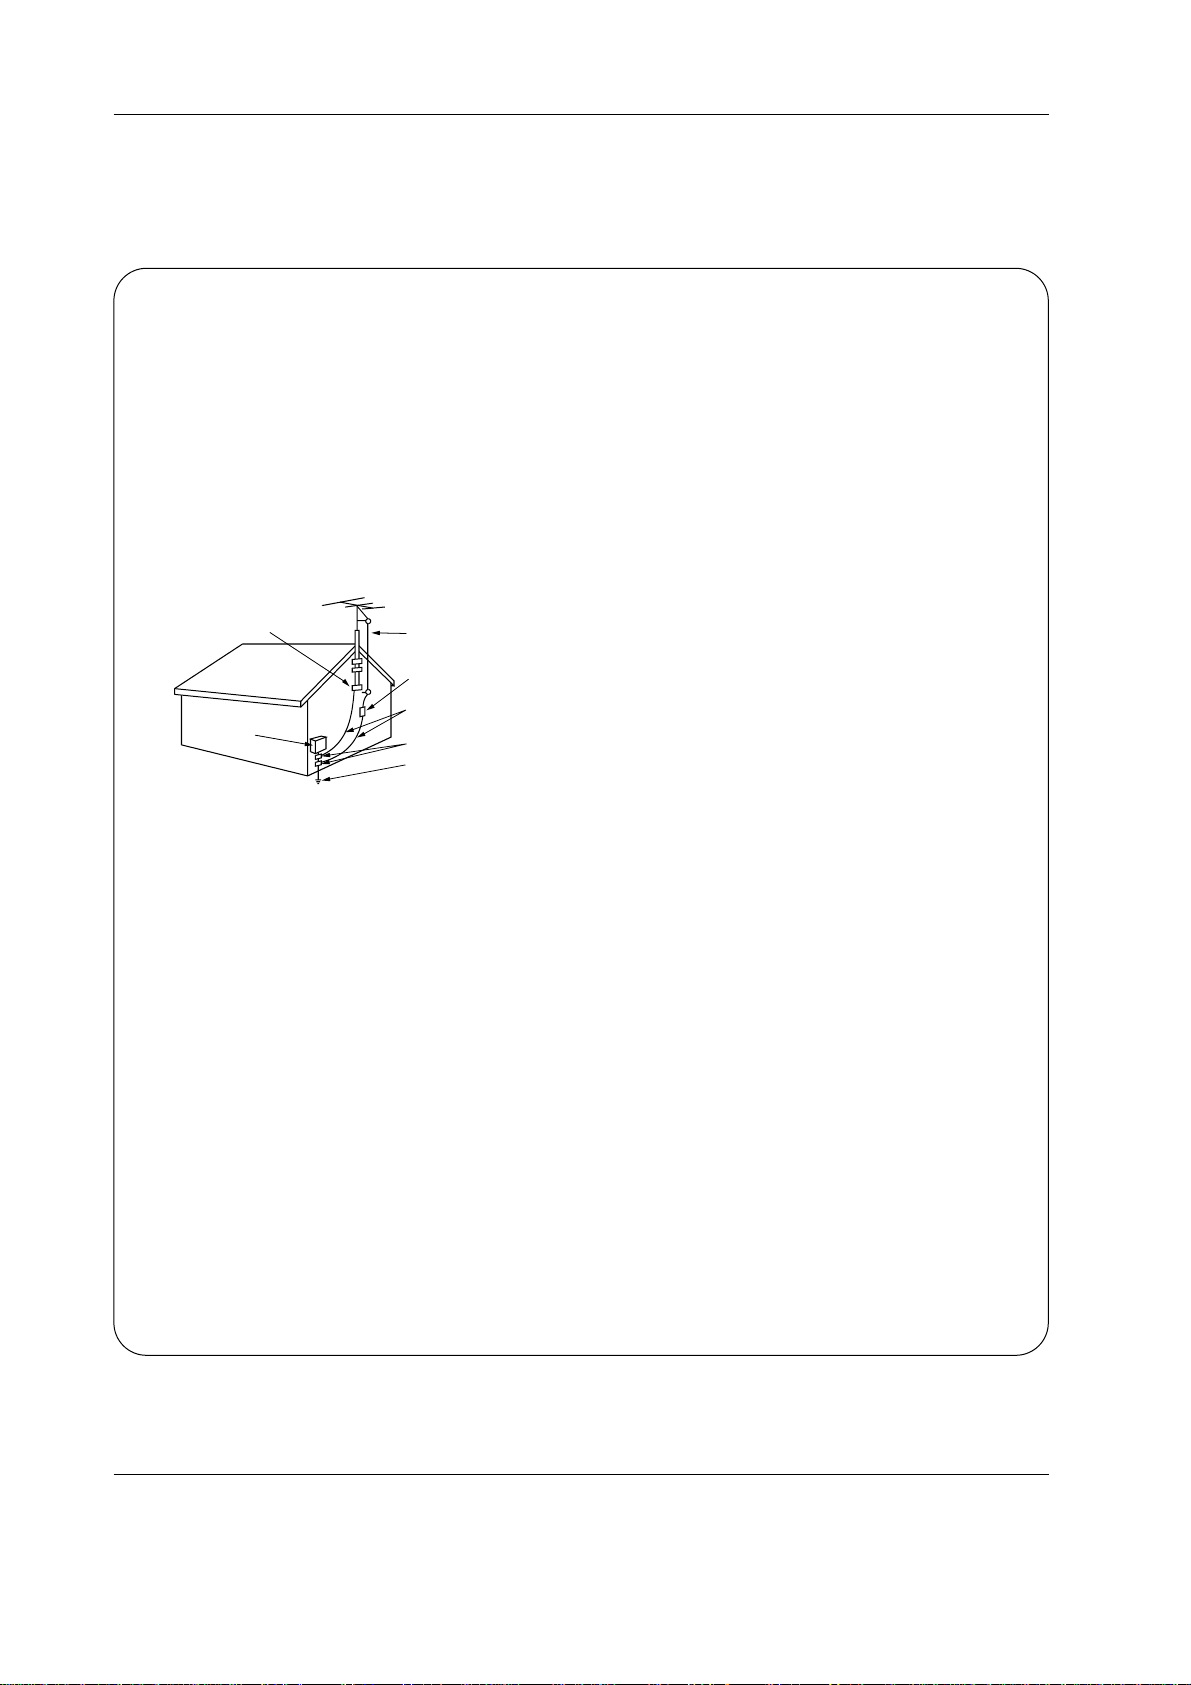
Antenna Lead in Wire
Antenna Discharge Unit
(NEC Section 810-20)
Grounding Conductor
(NEC Section 810-21)
Ground Clamps
Power Service Grounding
Electrode System (NEC
Art 250, Part H)
Ground Clamp
Electric Service
Equipment
Example of Grounding According to National
Electrical Code Instructions
NEC - National Electrical Code
14. Outdoor Antenna Grounding
If an outside antenna or cable system is connected to the
product, be sure the antenna or cable system is grounded so
as to provide some protection against voltage surges and
built-up static charges. Article 810 of the National Electrical
Code (U.S.A.), ANSI/ NFPA 70 provides information with
regard to proper grounding of the mast and supporting structure, grounding of the lead-in wire to an antenna discharge
unit, size of grounding conductors, location of antenna-discharge unit, connection to grounding electrodes, and
requirements for the grounding electrode.
15. Lightning
For added protection for this product (receiver) during a lightning storm, or when it is left unattended and unused for long
periods of time, unplug it from the wall outlet and disconnect
the antenna or cable system. This will prevent damage to the
product due to lightning and power-line surges.
16. Power Lines
An outside antenna system should not be located in the
vicinity of overhead power lines or other electric light or
power circuits, or where it can fall into such power lines or
circuits. When installing an outside antenna system, extreme
care should be taken to keep from touching such power lines
or circuits as contact with them might be fatal.
17. Overloading
Do not overload wall outlets and extension cords as this can
result in a risk of fire or electric shock.
18. Object and Liquid Entry
Never push objects of any kind into this product through
openings as they may touch dangerous voltage points or
short-out parts that could result in a fire or electric shock.
Never spill liquid of any kind on the product.
19. Servicing
Do not attempt to service this product yourself as opening or
removing covers may expose you to dangerous voltage or
other hazards. Refer all servicing to qualified service personnel.
20. Damage Requiring Service
Unplug this product from the wall outlet and refer servicing to
qualified service personnel under the following conditions:
a. If the power-supply cord or plug is damaged.
b. If liquid has been spilled, or objects have fallen into the
product.
c. If the product has been exposed to rain or water.
d. If the product does not operate normally by following the
operating instructions. Adjust only those controls that are
covered by the operating instructions as an improper
adjustment of other controls may result in damage and
will often require extensive work by a qualified technician
to restore the product to its normal operation.
e. If the product has been dropped or the cabinet has been
damaged.
f. If the product exhibits a distinct change in performance.
21. Replacement Parts
When replacement parts are required, be sure the service
technician has used replacement parts specified by the manufacturer or have the same characteristics as the original
part. Unauthorized substitutions may result in fire, electric
shock, or other hazards.
22. Safety Check
Upon completion of any service or repairs to this product,
ask the service technician to perform safety checks to determine that the product is in proper operating condition.
23. Wall or Ceiling Mounting
The product should be mounted to a wall or ceiling only as
recommended by the manufacturer. The product may slide
or fall, causing serious injury to a child or adult, and serious
damage to the product.
24. Heat
The product should be situated away from heat sources
such as radiators, heat registers, stoves, or other products
(including amplifiers) that produce heat.
Safety Instructions continued
Safety Instructions continued
Page 5

Owner’s Manual 5
Important Information
PRECAUTIONS
Please read this manual carefully before using your
Mitsubishi plasma TV and keep the manual handy for
future reference.
CAUTION
RISK OF ELECTRIC SHOCK
DO NOT OPEN
CAUTION:TO REDUCE THE RISK OF ELECTRIC
SHOCK, DO NOT REMOVE COVER. NO
USER-SERVICEABLE PARTS INSIDE.
REFER SERVICING TO QUALIFIED
SERVICE PERSONNEL.
This symbol warns the user that uninsulated
voltage within the unit may have sufficient
magnitude to cause electric shock. Therefore,
it is dangerous to make any kind of contact
with any part inside of this unit.
This symbol alerts the user that important literature concerning the operation and maintenance of this unit has been included.
Therefore, it should be read carefully in order
to avoid any problems.
WARNING
TO PREVENT FIRE OR SHOCK HAZARDS, DO NOT
EXPOSE THIS UNIT TO RAIN OR MOISTURE. ALSO
DO NOT USE THIS UNIT’S POLARIZED PLUG WITH
AN EXTENSION CORD RECEPTACLE OR OTHER
OUTLETS, UNLESS THE PRONGS CAN BE FULLY
INSERTED. REFRAIN FROM OPENING THE CABINET
AS THERE ARE HIGH-VOLTAGE COMPONENTS
INSIDE. REFER SERVICING TO QUALIFIED SERVICE
PERSONNEL.
WARNINGS AND SAFETY PRECAUTIONS
The Mitsubishi plasma TV is designed and manufactured to
provide long, trouble-free service. No maintenance other
than cleaning is required. Use a soft dry cloth to clean the
panel. Never use solvents such as alcohol or thinner to clean
the panel surface.
The plasma display consists of fine picture elements (cells).
Although Mitsubishi utilizes plasma display panels with more
than 99.99 percent active cells, there may be some cells that
do not produce light or remain lit.
For operating safety and to avoid damage to the unit, please
read and observe the following instructions.
To avoid shock and fire hazards:
1. Provide adequate space for ventilation to avoid internal
heat build-up. Do not cover rear vents or install the unit in a
closed cabinet or shelves. The unit is equipped with cooling
fans. If you install the unit in an enclosure, make sure there
is adequate space at the top of the unit to allow hot air to rise
and escape. If this happens, turn off the power to the monitor and unplug the power cord. If the room where the monitor is installed is particularly hot, move the monitor to a
cooler location, and wait for the monitor to cool for 60 minutes. If the problem persists, contact your Mitsubishi dealer
for service.
2. Do not use the power cord polarized plug with extension
cords or outlets unless the prongs can be completely
inserted.
3. Do not expose the unit to water or moisture.
4. Avoid damage to the power cord, and do not attempt to
modify the power cord.
5. Unplug the unit during electrical storms or if the unit will
not be used over a long period.
6. Do not open the cabinet which has potentially dangerous
high voltage components inside. If the unit is damaged in
this way the warranty will be void. Moreover, there is a serious risk of electric shock.
7. Do not attempt to service or repair the unit. Mitsubishi is
not liable for any bodily harm or damage caused if unqualified persons attempt service or open the back cover. Refer
all service to authorized Mitsubishi Service Centers.
CAUTION
PD-4225S can be used with the following optional accessories. Use with other optional accessories is capable of
resulting in instability causing possible injury.
Manufacturer’s name: MITSUBISHI DIGITAL
ELECTRONICS AMERICA, INC
Stand: MB-4225
Speakers: MS-4225
Please contact MITSUBISHI DIGITALELECTRONICS
AMERICA, INC for approved optional accessories.
Important Information
Important Information
Page 6
6 Plasma TV
Important Information
To avoid damage and prolong operating life:
1. Use only with 120V 50/60Hz AC power supply. Continued
operation at line voltages greater than 120 Volts AC will
shorten the life of the unit, and might even cause a fire
hazard.
2. Handle the unit carefully when installing it and do not drop.
3. Set the unit away from heat, excessive dust, and direct
sunlight.
4. Protect the inside of the unit from liquids and small metal
objects. In case of an accident, unplug the unit and have
it serviced by an authorized Mitsubishi Service Center.
5. Do not hit or scratch the panel surface as this causes
flaws on the surface of the screen.
6. For correct installation and mounting it is strongly recommended to use a trained, authorized Mitsubishi dealer.
7. Only use tabletop stands or wall-mount brackets that are
designed specifically for this product.
8. As is the case with any phosphor-based display (like a
CRT monitor, for example) light output will gradually
decrease over the life of a Plasma Display Panel.
Recommendations to avoid or minimize uneven phosphor
aging:
Like all phosphor-based display devices and all other gas
plasma displays, plasma monitors can be susceptible to
uneven phosphor aging under certain circumstances.
Certain operating conditions, such as the continuous display
of a static image over a prolonged period of time, can result
in uneven phosphor aging if proper precautions are not
taken. To protect your investment in this Mitsubishi plasma
TV, please adhere to the following guidelines and recommendations for minimizing this type of damage:
*Do not turn off ORBITER.
†
*Always enable and use your computer’s, video game or
DVD player screen saver during use with these sources.
*Display a moving image whenever possible.
*Change the position of the menu display from time to time.
*Always power down the monitor when you are finished
using it.
If the plasma monitor is in long term use or continuous oper-
ation, take the following measures to reduce the likelihood
of uneven phosphor aging:
*Do not turn off ORBITER.
†
*Lower the Brightness and Contrast levels as much as pos-
sible without impairing image readability.
*Display an image with many colors and color gradations
(i.e. photographic or photo-realistic images).
*Create image content with minimal contrast between light
and dark areas. Use complementary or pastel colors whenever possible.
*Avoid displaying images with few colors and distinct,
sharply defined borders between colors.
NOTE:
Uneven phosphor aging/burn-in is not covered by the
warranty.
Contact Mitsubishi at 1-800-332-2119 for other recommended procedures that will best suit your particular application needs.
†
ORBITER - Uneven phosphor aging/burn-in reduction feature. To minimize the risk of uneven phosphor aging/burn-in when
displaying still images, the Mitsubishi PD-4225S offers a built-in feature known as ORBITER. The ORBITER feature intermittently shifts the screen image horizontally and vertically in small increments. This intermittent screen movement is usually not evident in full motion video. In some instances the ORBITER shift might be evident while displaying static guides or
menus. The default setting for ORBITER is On. Mitsubishi chose this setting to help reduce uneven phosphor aging. Please
do not shut the ORBITER off. For more information regarding ORBITER, see page 34.
Page 7

Owner’s Manual 7
Important Information
WARNING: Do not leave stationary or letterbox images on-screen for
extended periods of time. Mix types of pictures shown. Uneven phosphor
aging is NOT covered by your warranty.
The normal use of a TV should include a mixture of TV picture types. The most frequently used picture types should fill
the screen with constantly moving images rather than stationary images or patterns. Displaying the same stationary
patterns over extended periods of time, or displaying the
same stationary pattern frequently can leave a subtle but
permanent ghost image. To avoid this, mix your viewing pattern. Do not show the same stationary image for more than
15% of your total TV viewing in any one week. Display constantly moving and changing images that fill the screen
whenever possible.
This plasma TV is a phosphor-based display. As is the case
with any phosphor-based display (like a CRT TV/monitor , for
example) light output will gradually decrease over the life of
a plasma display panel. Normal TV pictures fill the screen
with constantly changing images. Under these conditions,
phosphor-based displays age at an even rate across the
entire screen. This maintains a TV picture that is evenly
bright over the whole screen. Stationary images or images
that only partially fill the screen (leaving black or colored
bars to fill the screen), when used over extended periods of
time or when viewed repeatedly, can cause uneven aging of
the phosphors used in plasma displays and can leave subtle
ghosts of the stationary images in the picture.
When using a computer or similar device through a VGA
input, be sure to turn on the Screen Saver feature and set
the activation time to 5 minutes or less. If your computer program allows, you should also set your toolbars to the hidden
mode.
Still or stationary images may be received from broadcasters, cable channels, satellite channels, DVD discs, video
tapes, laser discs, on-line services, web/internet searching
devices, video games, and digital TV tuner/converter boxes.
Examples of these types of images include, but are not limited to the following:
• Letterbox top/bottom black bars: shown at the top and
bottom of the TV screen when you watch a widescreen
(16:9) movie on a standard (4:3) TV.
• Side bar images: solid bars shown on each side of an
image when watching a standard (4:3) program on a
widescreen (16:9) TV.
• Stock-market report bars: ticker running at the bottom of
the TV screen.
• Shopping channel logos & pricing displays: bright
graphics that are shown constantly or repeatedly in the
same location.
• Video game patterns and scoreboards
• Bright station logos: moving or low-contrast graphics are
less likely to cause uneven aging of the picture tubes.
• On-line (Internet) web sites: or any other stationary or
repetitive computer style images.
• Closed Caption Backgrounds: When set to black or
bright color.
Page 8
8 Plasma TV
Cleaning Safeguards
Plasma TV Screen & Cabinet
Please follow the cleaning safeguards listed below to prevent damage to your Plasma TV and retain this document for
future reference.
IMPORTANT: No Abrasives!
DO NOT use any kind of abrasive cloth or cleaner or
ammonia on the Plasma TV’s screen or cabinet.
Cleaning Your Plasma TV
Normally, light dusting with a dry, non-abrasive cloth will
clean your Plasma TV. If cleaning beyond this is needed,
please follow these guidelines:
First, turn off the Plasma TV and unplug the power cord from
the wall outlet before cleaning.
Cleaning the cabinet of your Plasma TV
• Gently wipe down the Plasma TV with a soft, non-abrasive
cloth such as cotton flannel or a clean cloth diaper, lightly
moistened with water.
• Dry with a second dry, soft, non-abrasive cloth.
General Cleaning Warnings:
• DO NOT apply pressure to the Plasma TV’s screen.
• DO NOT allow liquid to enter the Plasma TV through the
ventilation slots or any crevice.
• DO NOT use any strong or abrasive cleaners because they
can scratch the screen and the cabinet.
• DO NOT use any cleaners that contain ammonia, bleach,
alcohol, benzene, or thinners because they can damage
and dull the surfaces.
• DO NOT scrub or rub the screen or cabinet. Wipe it gently.
IMPORTANT
For further information, assistance in operating your
Plasma TV or if you are in need of service, please contact us at www.mitsubishi-tv.com or call Consumer
Relations at
800-332-2119
Cleaning Safeguards
Cleaning Safeguards
Page 9

Owner’s Manual 9
Introduction
Introduction
Introduction
What is a Plasma Display Panel (PDP)?
If voltage is applied to gas within glass panels, ultraviolet rays are produced and fused with a fluorescent substance. At that
instant, light is emitted. APlasma Display is a next generation flat display using this phenomenon.
160° - Wide angle range of vision
Your flat panel plasma TV offers an exceptionally broad viewing angle -- over 160 degrees. This means that the TV is clear and
visible to viewers anywhere in the room.
Wide Screen
The 42" screen gives you a movie-theater experience in the comfort of your own home.
Multimedia
Connect your plasma TV to a PC and you can use it for conferencing, games, and internet browsing. The Picture-in-Picture feature allows you to view your PC and video images simultaneously.
Versatile
The light weight and thin size makes it easy to install your plasma display in a variety of locations where conventional TVs will not
fit.
The PDP Manufacturing Process: Why minute colored dots may be present on the PDP screen
The plasma display panel consists of more than one million fine picture elements (cells). Although Mitsubishi utilizes plasma display
panels with more than 99.99 percent active cells, there may be some cells that do not produce light or remain lit.
WARNING
TO REDUCE THE RISK OF FIRE AND ELECTRIC SHOCK, DO NOT EXPOSE THIS PRODUCT TO
RAIN OR MOISTURE.
Page 10

10 Plasma TV
Contents
After reading this manual, keep it handy for future reference.
Warning . . . . . . . . . . . . . . . . . . . . . . . . . . . . . . . . . . . . .2
Safety Instructions . . . . . . . . . . . . . . . . . . . . . . . . . . . . .3~4
Important Information . . . . . . . . . . . . . . . . . . . . . . . . . .5~7
Cleaning Safeguards . . . . . . . . . . . . . . . . . . . . . . . . . . . . .8
Introduction . . . . . . . . . . . . . . . . . . . . . . . . . . . . . . . . . . . .9
Installation
Installing the Plasma TV on the Stand . . . . . . . . .12
Matching Speaker Installation . . . . . . . . . . . . . . . .14
Controls – Front Panel Controls . . . . . . . . . . . . . .15
Connection Options – Front Panel . . . . . . . . . . . .16
Connection Options – Back Panel . . . . . . . . . . . .17
Remote Control Functions
Care and Operation . . . . . . . . . . . . . . . . . . . . .18
Overview of the TV Layer Buttons . . . . . . . . . . .19
Use of the Remote Control with Other A/V Products
. . .20~21
Special Functions . . . . . . . . . . . . . . . . . . . . . . .22
External Equipment Connections . . . . . . . . . .23~27
Antenna Connection . . . . . . . . . . . . . . . . . . . . .23
VCR Setup . . . . . . . . . . . . . . . . . . . . . . . . . . . .24
Cable TV Setup . . . . . . . . . . . . . . . . . . . . . . . .24
External A/V Source Setup . . . . . . . . . . . . . . . .25
DVD Setup . . . . . . . . . . . . . . . . . . . . . . . . . . . .25
DTV Setup . . . . . . . . . . . . . . . . . . . . . . . . . . . .25
Monitor Out Setup . . . . . . . . . . . . . . . . . . . . . .26
PC Setup . . . . . . . . . . . . . . . . . . . . . . . . . . . . .26
HD-5000/MonitorLink Setup . . . . . . . . . . . . . . .27
Operation
Turning on the TV . . . . . . . . . . . . . . . . . . . . . . . . .28
Menu Language Selection . . . . . . . . . . . . . . . . . .28
Channel Menu Options
Memorizing the Channels with Auto program . . .29
Memorizing the Channels with Manual Program . .29
Fine Tuning Adjustment . . . . . . . . . . . . . . . . . .29
Favorite Channel Memory . . . . . . . . . . . . . . . . .29
Picture Menu Options
Auto Picture Control . . . . . . . . . . . . . . . . . . . . .30
Manual Picture Control . . . . . . . . . . . . . . . . . . .30
Auto Color Temperature Control . . . . . . . . . . . .30
Manual Color Temperature Control . . . . . . . . . .30
Sound Menu Options
Audio Mode . . . . . . . . . . . . . . . . . . . . . . . . . . .31
Level Sound . . . . . . . . . . . . . . . . . . . . . . . . . . .31
Manual Sound Control . . . . . . . . . . . . . . . . . . .31
Stereo/SAP Broadcasts Setup . . . . . . . . . . . . .31
Timer Menu Options
Auto Clock Setup . . . . . . . . . . . . . . . . . . . . . . .32
Manual Clock Setup . . . . . . . . . . . . . . . . . . . . .32
On/Off Timer Setup . . . . . . . . . . . . . . . . . . . . .32
Auto Off . . . . . . . . . . . . . . . . . . . . . . . . . . . . . .33
Sleep Timer . . . . . . . . . . . . . . . . . . . . . . . . . . .33
Special Menu Options
Button Lock . . . . . . . . . . . . . . . . . . . . . . . . . . .34
Long Life . . . . . . . . . . . . . . . . . . . . . . . . . . . . .34
Low power . . . . . . . . . . . . . . . . . . . . . . . . . . . .34
Caption/Text . . . . . . . . . . . . . . . . . . . . . . . . . . .36
Captions . . . . . . . . . . . . . . . . . . . . . . . . . . . . . .36
Screen Menu Options
Auto Adjustment . . . . . . . . . . . . . . . . . . . . . . . .37
Setting Picture Format . . . . . . . . . . . . . . . . . . .37
Picture Size Zoom . . . . . . . . . . . . . . . . . . . . . .37
Adjusting Horizontal/Vertical Position . . . . . . . .38
Manual Adjust . . . . . . . . . . . . . . . . . . . . . . . . . .38
VCR Mode . . . . . . . . . . . . . . . . . . . . . . . . . . . .38
Initializing . . . . . . . . . . . . . . . . . . . . . . . . . . . . .38
Luminance Noise Reduction . . . . . . . . . . . . . . .39
Selecting Wide VGA mode . . . . . . . . . . . . . . . .39
PIP (Picture-in-Picture) Feature
Watching the PIP . . . . . . . . . . . . . . . . . . . . . . .40
Swapping the PIP . . . . . . . . . . . . . . . . . . . . . . .40
Moving the PIP . . . . . . . . . . . . . . . . . . . . . . . . .40
TV Program selection for PIP . . . . . . . . . . . . . .40
Selecting an Input Signal Source for PIP . . . . . .40
PIP Aspect Ratio . . . . . . . . . . . . . . . . . . . . . . . .40
Sub Picture Size Adjustment . . . . . . . . . . . . . . .41
Lock Menu Options
Lock Setup . . . . . . . . . . . . . . . . . . . . . . . . .42~43
External Control Device Setup . . . . . . . . . . . . . . . . . . .44
Troubleshooting Checklist . . . . . . . . . . . . . . . . . . .45~46
Product Specifications . . . . . . . . . . . . . . . . . . . . . . . . .47
APPENDIX . . . . . . . . . . . . . . . . . . . . . . . . . . . . . . . .48~49
Contents
Contents
Setup and Operation Checklist
Setup and Operation Checklist
Setup and Operation Checklist
(See pages 23~27 for available connection and operational setup options.)
1. Unpack the TV and all accessories.
See page 11.
2. Install Matching Stand
See page 12.
3. Connect all external video and audio equipment.
See pages 23 ~ 27.
4. Install batteries in remote control.
See page 18.
5. Turn the TV on.
See page 28.
6. Turn video source equipment on.
7. Select viewing source for the TV.
See page 19.
8. Fine-tune source image and sound to personal preference
or as required by source.
See pages 30 ~ 31.
9. Additional features Setup
See Contents above.
Page 11
Owner’s Manual 11
Installation
Installation
Installation
D-sub 15 pin Cable
Owner’s Manual
1.5V
1.5V
Batteries
(2 AA)
Power Cord
Remote Control
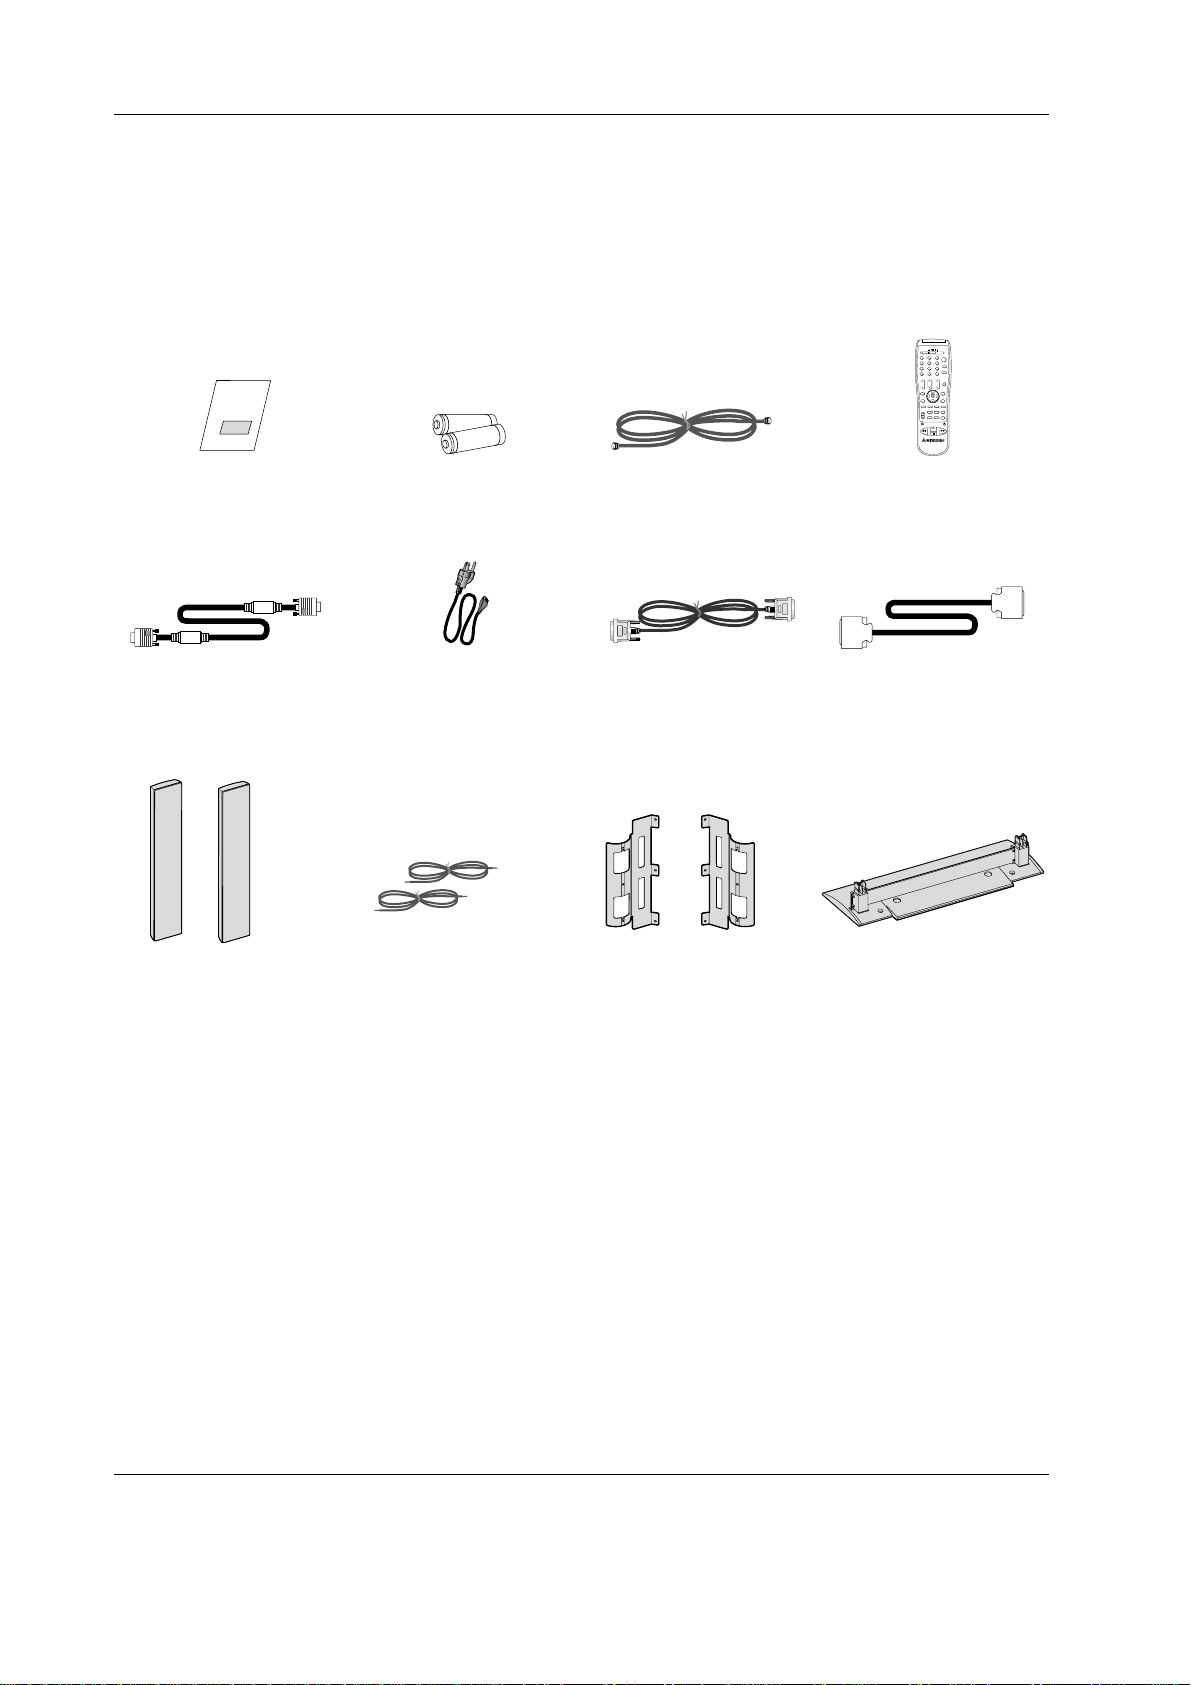
DVI-D Cable
Ensure that the following accessories are included with your TV. If an accessory is missing, please contact the dealer where you
purchased the product.
Tuner Box Cable
(FACTORY INSTALLED)
Speakers (2) Pre-cut
Speaker Wires (2)
Speaker Brackets (2)
(LOCATED UNDERNEATH STYRO-
FOAM PACKAGING ATTHE
BOTTOM OF THE PLASMA BOX.)
The plasma TV panel needs the matching stand (included) or other mounting hardware to stand vertically without tipping.
Be sure to use the matching stand (included) or other mounting hardware that is designed specifically for this product.
For correct installation and mounting it is strongly recommended to use a trained, authorized dealer. Failure to follow correct
installation procedures could result in damage to the equipment or injury to the installer. Product warranty does not cover damage caused by improper installation.
Matching Stand
75 Ohm Coaxial Cable
CABLE/DBS/DTV
VCR
DVD
AUDIO
SQV
DEVICE CH VOL
TV MENU
DEVICE
MENU
TV
2
3
1
POWER
4
5
6
MTS
9
7
8
GUIDE
QV
0
MUTE
HOME
CANCEL
SLEEP
VIDEO
AUDIO
INFO
PIP/POP
PIP CH
EXCH
ZOOM+
PIP DEVICE
ZOOM–
FORMAT
REC
PAUSE
PLAY
FF/FWD
REW/REV
STOP
Page 12
12 Plasma TV
Installation
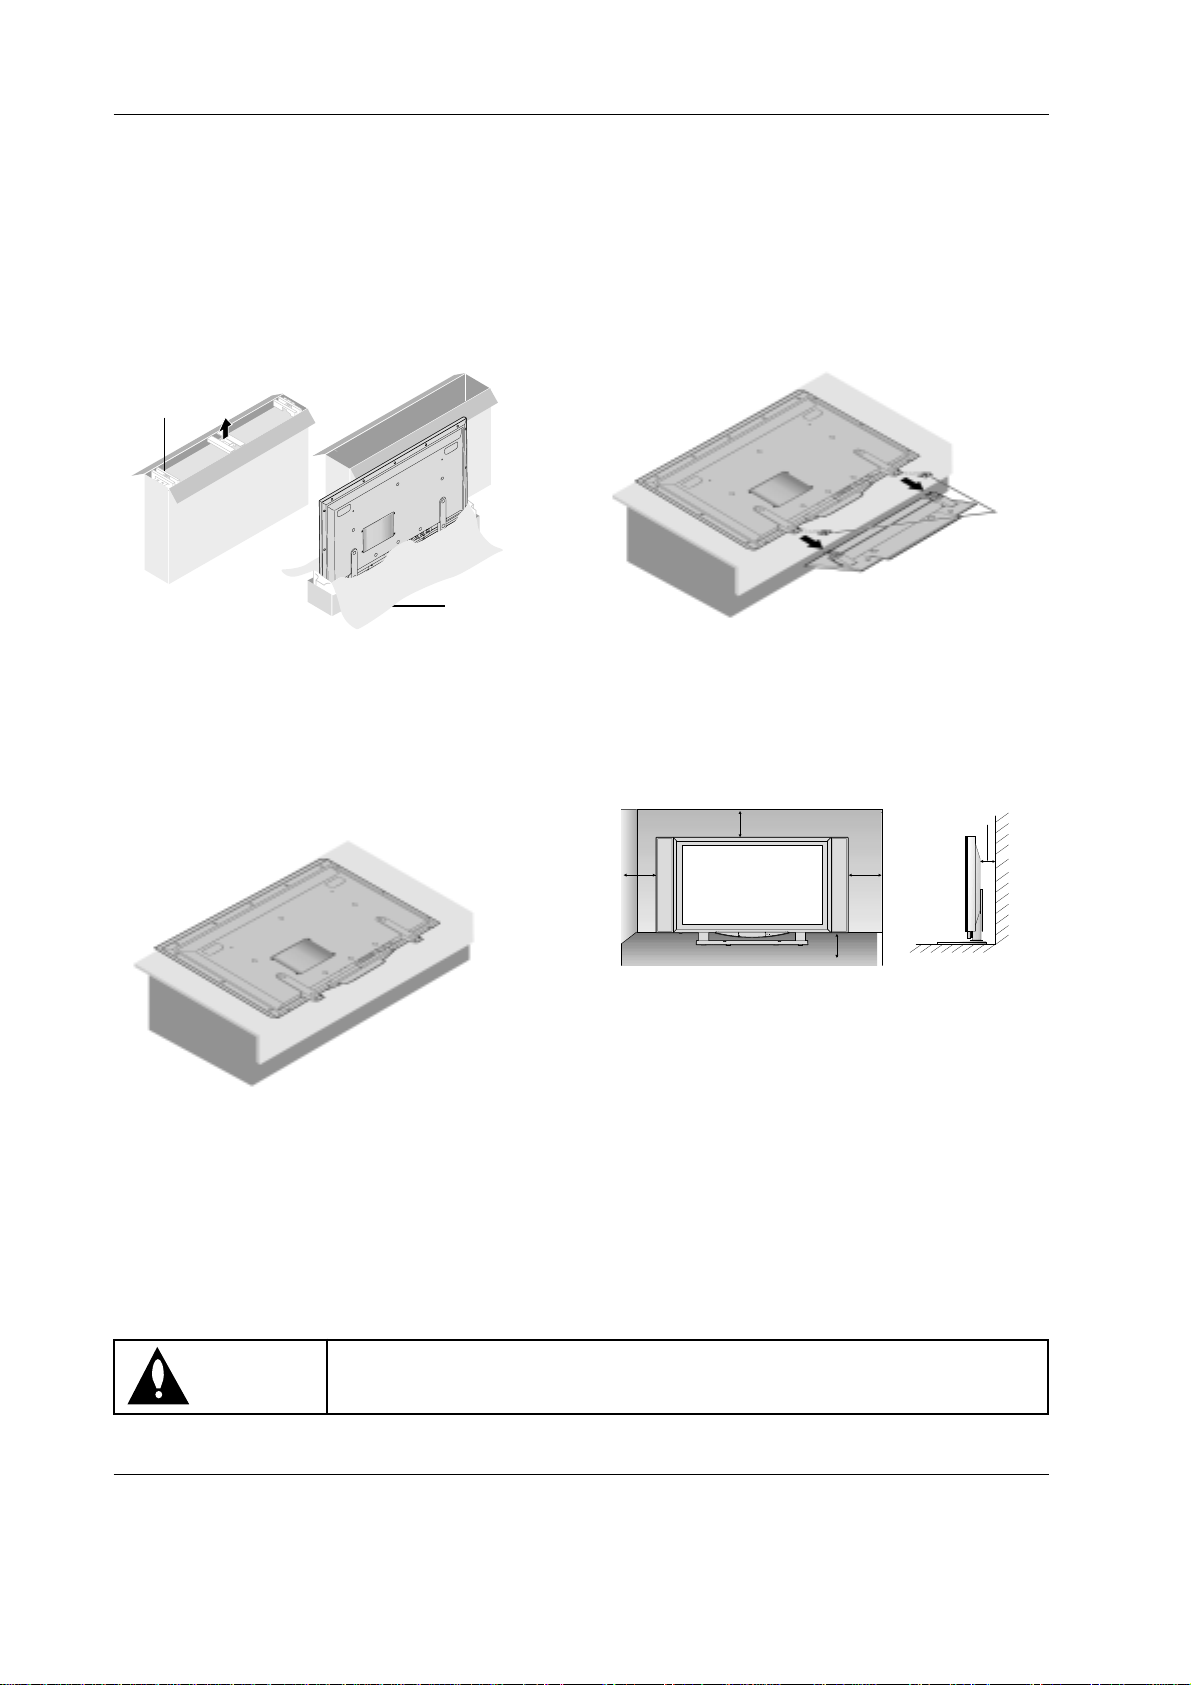
Installing the Plasma TV on the Stand
Installing the Plasma TV on the Stand
Preparations
1. Unpack the plasma TV.
1. Open the top of the cardboard in which the plasma TV is
packed and remove the three pieces of styrofoam.
2. Pull off the cardboard from the top protective sheet.
2. Lay the plasma TV down.
Place the protective sheet in which the plasma TV was
wrapped on a strong and sturdy table or stand larger than
the plasma TV. Lay the plasma TV on the protective sheet
face down. Placing pressure on the glass surface on the
front of the plasma TV could damage it.
3. Remove the stand from the box.
4. Insert the stand into the mounting legs of
the plasma TV and fasten it.
Use four of the included display mounting screws to fasten
the TV to the stand.
Tighten the screws immediately after placing the TV on the stand. If not,
the TV could tip over, resulting in injury.
CAUTION:
For proper ventilation, allow a clearance of 4” on each side
and the top, 2.36” on the bottom, and 2” from the wall.
2 inches
4 inches
2.36 inches
4 inches
4 inches
Styrofoam
Protective sheet
Page 13
Owner’s Manual 13
Installation
• Wall mounts not included.
• Be sure to use mounting hardware that is designed specifically for this product
• For correct installation and mounting, it is strongly recommended to use a trained, authorized dealer.
When mounting this TV to a wall, a UL 1678 listed wall mounting bracket suitable for the weight and mounting surface
must be used.
WWall Mount Installation
all Mount Installation
For proper ventilation, allow a clearance of 4” on each side
and 2” from the wall.
4 inches
4 inches4 inches
4 inches
2 inches
Page 14
14 Plasma TV
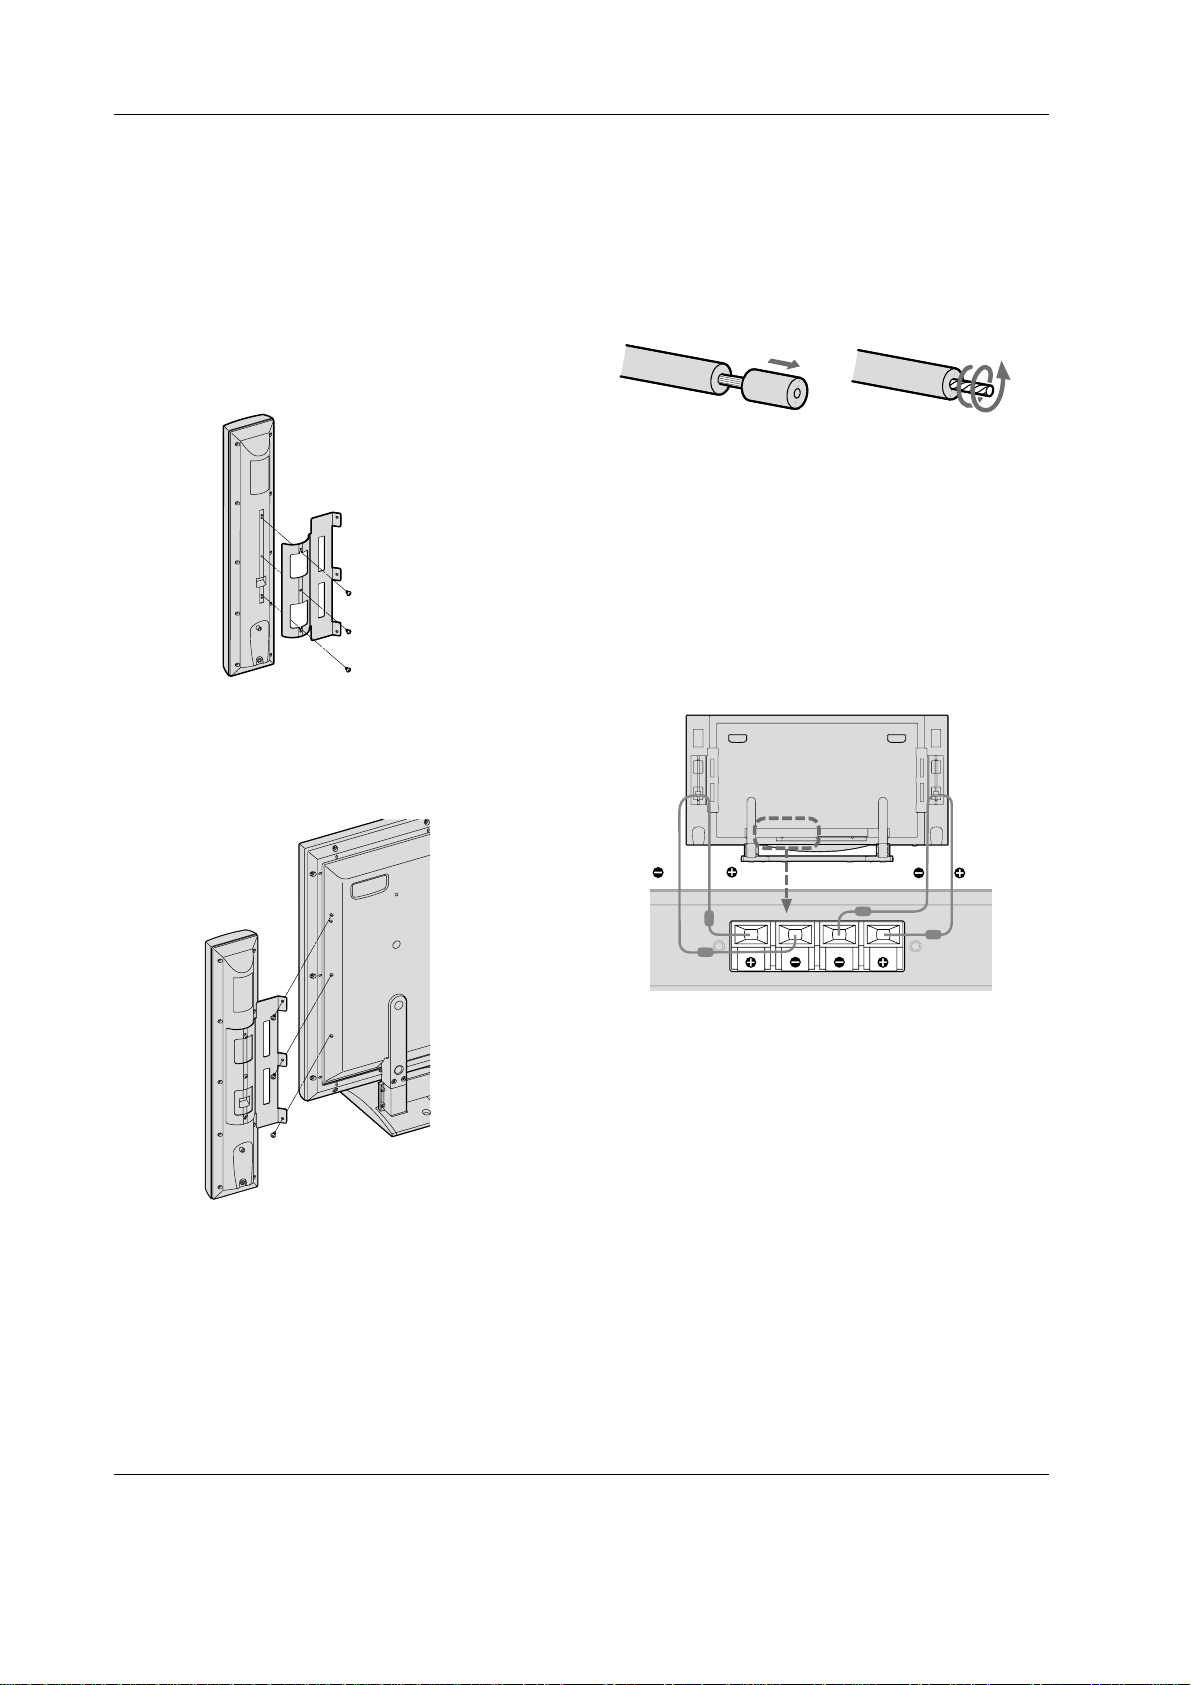
Matching Speaker Installation
Matching Speaker Installation
1. Remove Speaker Brackets from the bottom of Plasma box.
They are located underneath the styrofoam packaging at
the bottom of the Plasma box.
2. Remove the speakers from the box.
3. Fasten the right Speaker Bracket to the Right Speaker
using the 3 included mounting screws. Repeat this procedure for the Left Speaker.
4. Fasten the Right Speaker Assembly (Speaker & Bracket) to
the Plasma TV using the 3 included mounting screws.
Repeat this procedure for the Left Speaker Assembly
(Speaker & Bracket).
5. Remove Speaker wire from Accessories box. Remove precut plastic from both ends of the Speaker Wire. This will
expose the copper wire. Twist the copper wire counter
clockwise as shown below.
Repeat this procedure for the other speaker wire.
6. Press the red (+) terminal tab on the back of the Right
Speaker. Insert the red wire into the red (+) terminal.
Release the tab to secure the wire.
7. Press the black (–) terminal tab on the back of the Right
Speaker. Insert the black wire into the black (–) terminal.
Release the tab to secure the wire.
8. Repeat steps 6 & 7 for the Left Speaker.
9. Press the red (+) terminal tab on the back of the TV. Insert
the red wire (coming from the Right Speaker) into the red
(+) terminal. Release the tab to secure the wire.
10.Press the black (–) terminal tab on the back of the TV. Insert
the black wire into the black (–) terminal. Release the tab to
secure the wire.
11.Repeat steps 9 & 10 for the wires coming from the Left
Speaker.
Page 15
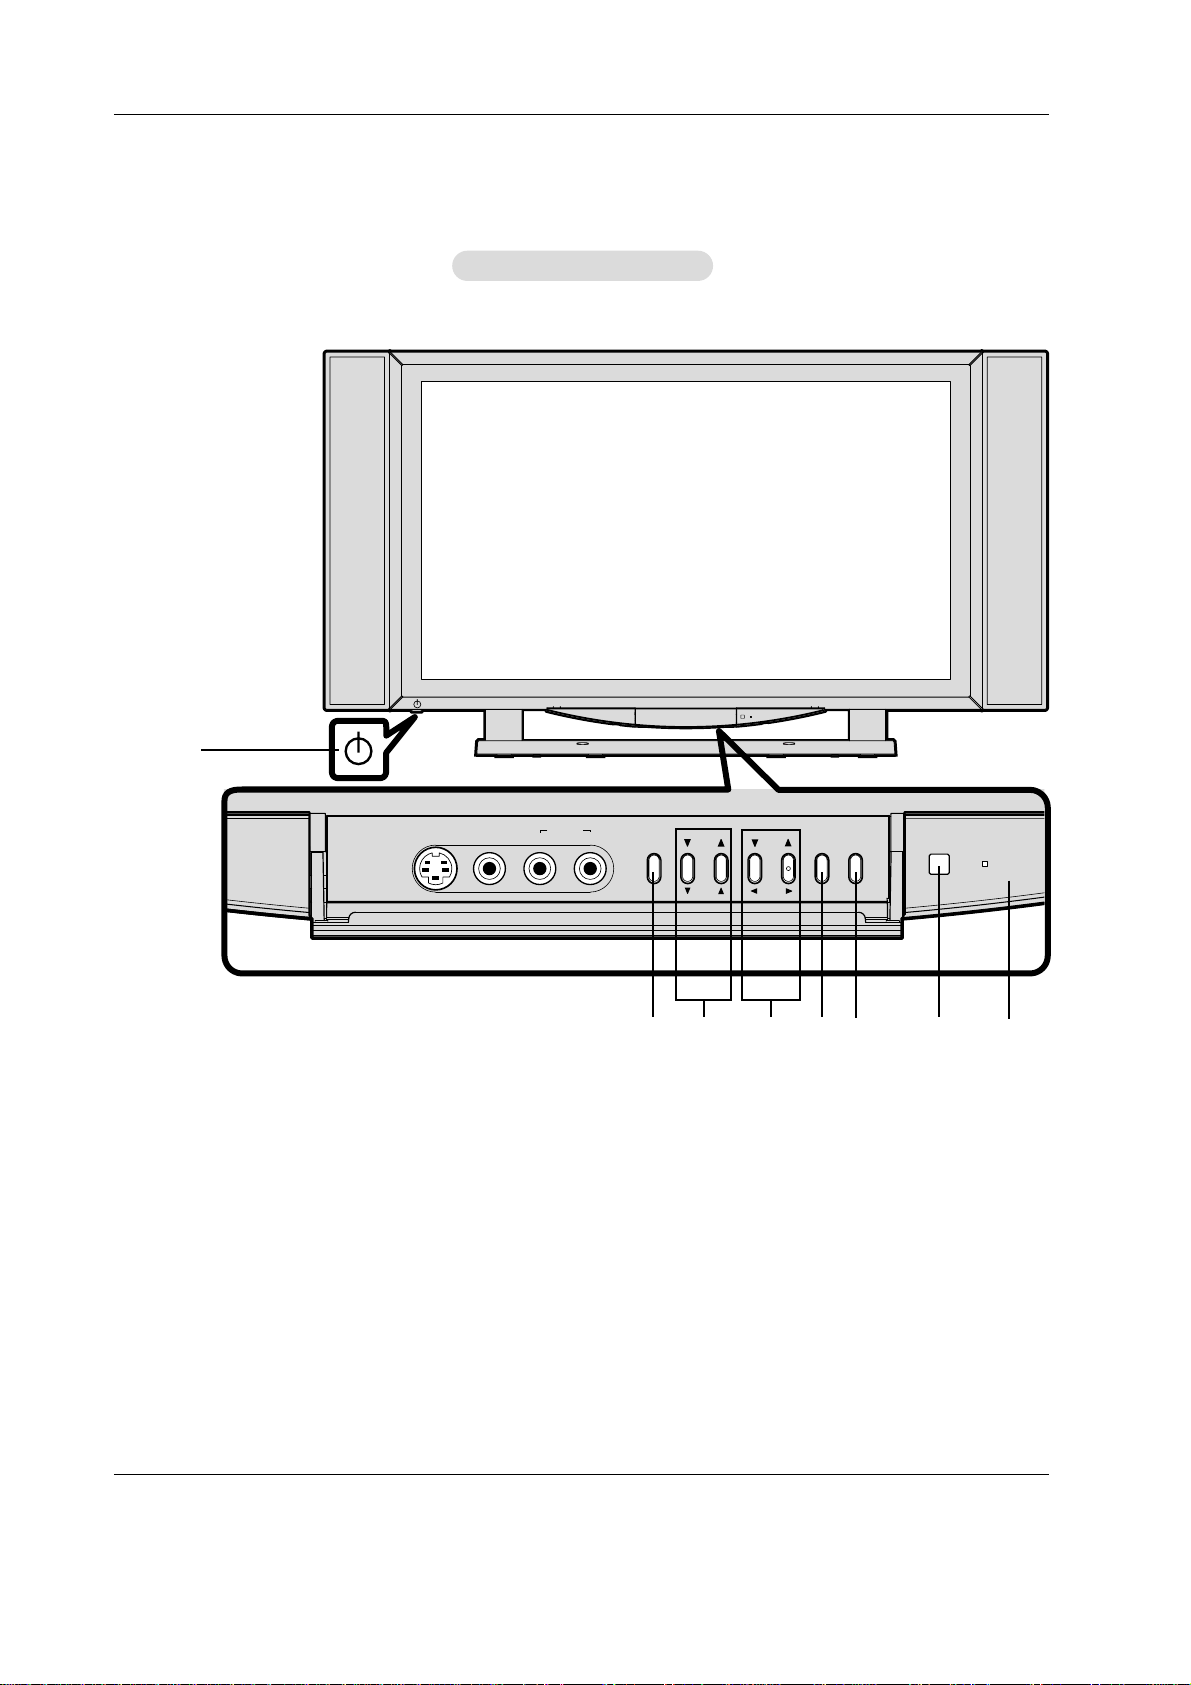
Owner’s Manual 15
Controls
Controls
Front Panel Controls
Front Panel Controls
1. ON/OFF SWITCH
Turns the TV’s power on and off.
2. REMOTE SENSOR WINDOW
Receives the signals from the remote control.
3. POWER/STANDBY INDICATOR
When the TV is on Lights green.
When the TV is in the Standby mode Lights red.
4. DEVICE
Switches the input, in the following order
ANT, VIDEO (REAR), VIDEO (FRONT), S–VIDEO, COMPONENT, RGB, MONITORLINK
5. VOLUME
D
and
E
Adjusts the volume. Functions as the ADJUST (
F / G
) but-
tons in the On-Screen Menu mode.
6. CHANNEL
D
and
E
Changes channels. Functions as the Adjust (
D / E
) buttons
in the On-Screen Menu mode.
7. MENU
Displays the main On-Screen Menu.
8. POWER
Switches the TV from Standby to ON. Switches the TV from
ON to Standby.
1
2
385 467
S-VIDEO VIDEO
AUDIO
(FRONT)
(MONO)
LR
MENU
DEVICE
POWER
POWER/
STANDBY
CH
ADJ
VOL
ADJ
Page 16
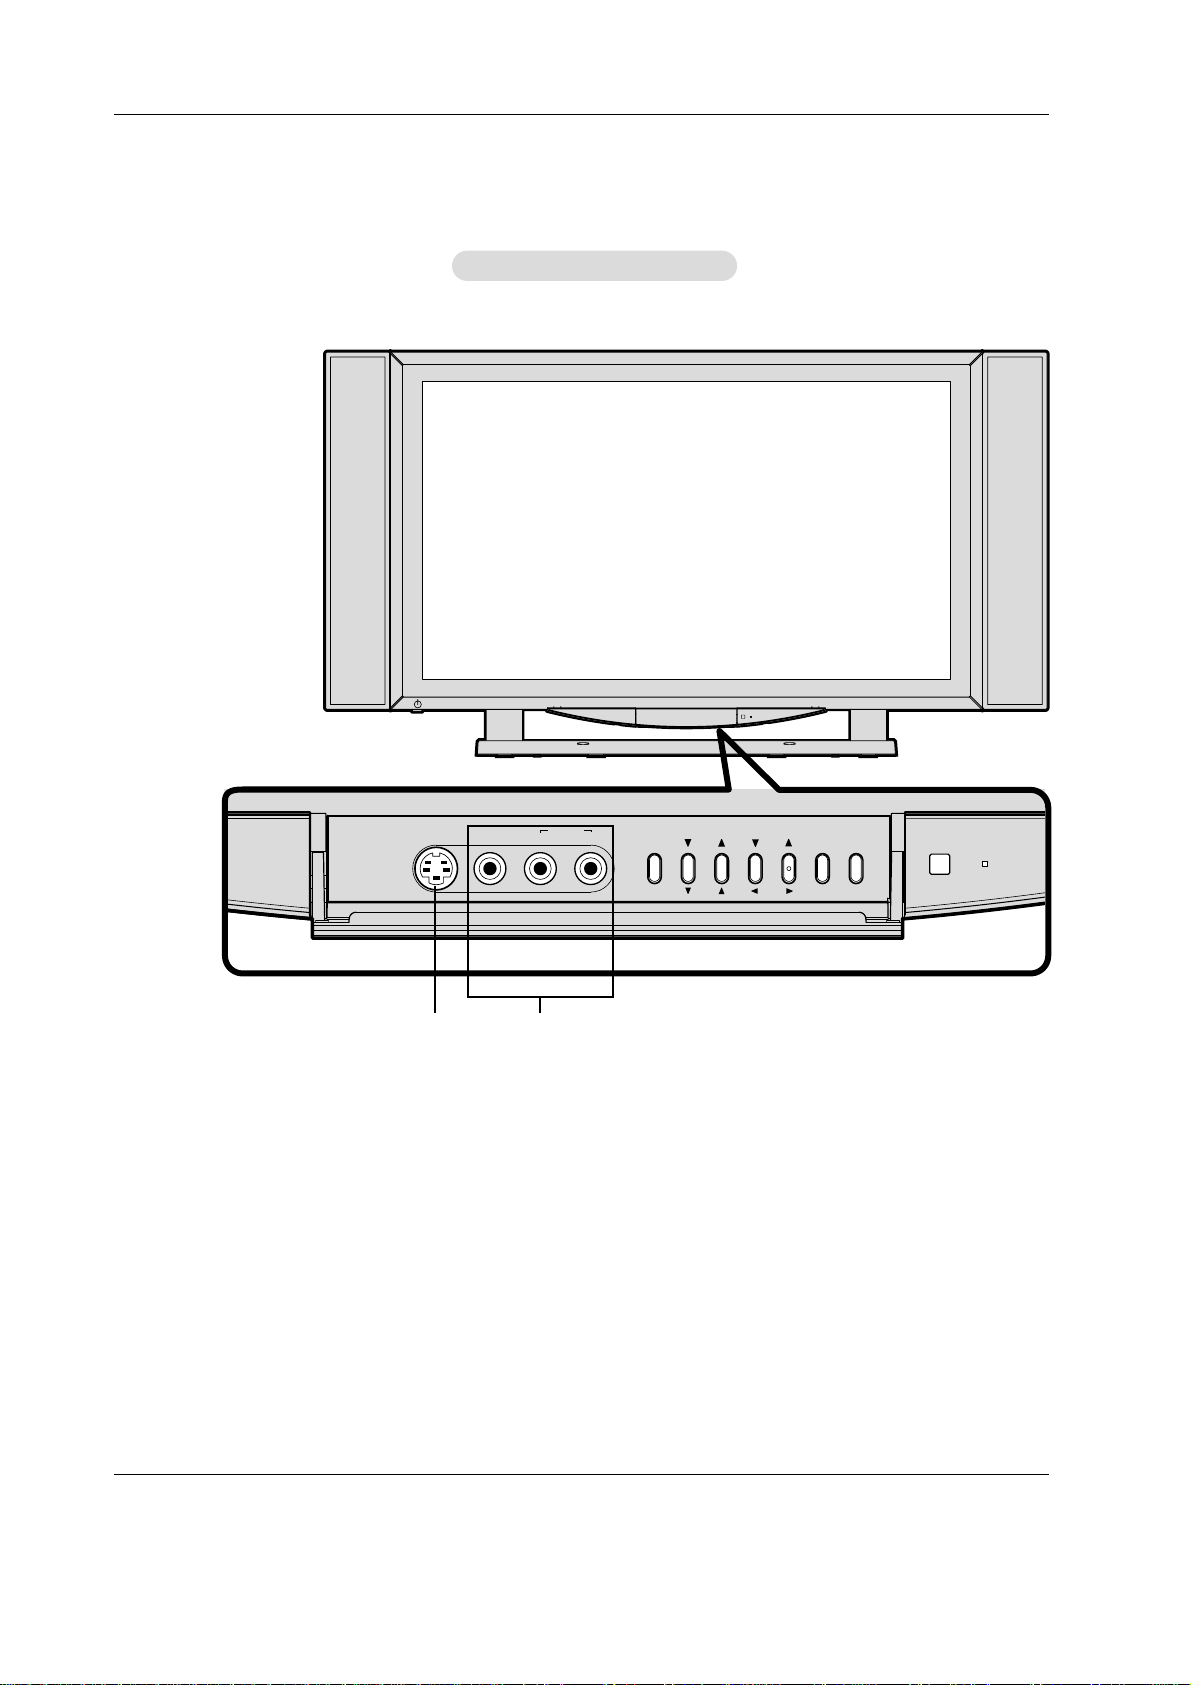
16 Plasma TV
Connection Options
Connection Options
Front Connection Panel
Front Connection Panel
1
2
1. VIDEO (FRONT) INPUT
Connection for audio/video out from external equipment.
2. S-VIDEO
Connection for video out from external equipment.
S-VIDEO VIDEO
AUDIO
(FRONT)
(MONO)
LR
MENU
DEVICE
POWER
POWER/
STANDBY
CH
ADJ
VOL
ADJ
Page 17

Owner’s Manual 17
Connection Options
Connection Options
5
1. ANTENNA INPUT PORT
Connection for an over-the-air or terrestrial antenna, a
cable TV wire, or cable box.
2. VIDEO (REAR) INPUT
Connection for audio/video out from external equipment.
3. AV OUTPUT
Connection for a second TV or monitor (ONLY). DO NOT
CONNECT ANY OTHER INPUT SOURCES.
4. TO DISPLAY (Factory Connected)
Connect the TV to the Tuner with the tuner box cable.
5. EXTERNAL SPEAKER (8 ohm output)
Connect to optional external speaker(s).
6. MONITORLINK CONTROL (CONTROL/SERVICE) PORT
A digital control interface that works in conjunction with
MonitorLink. While MonitorLink provides the digital video signal, MonitorLink Control provides enhanced functioning such
as automatic power on/off and input selection. If you are not
connecting a Mitsubishi HDTV Receiver/Controller with
MonitorLink features, MonitorLink Control can be used as a
RS-232C control signal input port.
7. MONITORLINK/DVI
MonitorLink when used with MonitorLink Control is a
Mitsubishi exclusive digital interface for the display of high
quality digital video signals from a Mitsubishi HD
Receiver/Controller, such as the HD-5000. The MonitorLink
input can also be used as a DVI input from other sources.
NOTE: When MonitorLink is used as a DVI-HD input, the terminal is compliant with EIA-861 standards for extended and
high definition video; however, this input is not intended for
use with personal computers or devices generating video
signals with computer resolutions.
RGB INPUT/AUDIO INPUT JACKS
Connect the PC or DTV to the appropriate input port.
8. TO TUNER (Factory Connected)
Connect the plasma TV to the Tuner with the tuner box
cable supplied.
9. COMPONENT INPUT/AUDIO INPUT JACKS
Connect a component video device to these jacks.
10. POWER CORD SOCKET
This TV operates on an AC power. The voltage is indicated
on the Specifications page. Never attempt to operate the
TV on DC power.
Back Connection Panel
Back Connection Panel
6 8
7
109
1 2 3 4
Page 18

18 Plasma TV
Remote Control Functions: Care and Operation
Remote Control Functions: Care and Operation
- When using the remote control, aim it at the remote control sensor on the TV.
- Under certain conditions such as if the remote IR signal is interrupted, the remote control may not function. Press the key again
as necessary.
Installing Batteries
Installing Batteries
Installing the Batteries:
(Figure 2)
1. Remove the remote control’s back cover by gently pressing the
ridged tab in the direction of the arrow and sliding off the cover.
2. Load the batteries, making sure the polarities (+) and (-) are correct. For ease of installation, install the negative (-) side first.
For Best Results from the Remote Control:
• Be within 20 feet of the equipment.
• Do not press two or more buttons at the same time unless
instructed to.
• Do not allow to get wet or become heated.
• Avoid dropping on hard surfaces.
• Do not use harsh chemicals to clean. Use only a soft, lightly
moistened cloth.
• Do not mix new and old batteries.
• Do not heat, take apart, or throw batteries into fire.
• Use only AA batteries.
You can use the remote to control the TV, CABLE/DBS/DTV, VCR,
DVD, and AUDIO products. Select the product you want to control
by moving the slide switch to the appropriate position. The remote
control has been preset to operate the TV and other Mitsubishi products. To program the remote control to operate other products, see
Use of the Remote Control with Other A/V Products, page 20.
Figure 2. Installing the batteries.
Figure 1. Remote Control Functions.
Operation
Operation
Operating the Remote Control:
Operating the Remote Control:
IMPORTANT
The remote control may return to its initial setting
when the batteries are changed. You may need to
reprogram.
CABLE/DBS/DTV
TV
VCR
DVD
AUDIO
SQV
2
1
4
7
3
POWER
5
6
MTS
9
8
0
GUIDE
QV
size AA
batteries
DEVICE
TV MENU
DEVICE
MENU
SLEEP
PIP CH
REW/REV
CH
INFO
PIP
PIP DEVICE
REC
PLAY
STOP
VOL
CANCEL
AUDIO
EXCH
FORMAT
PAUSE
MUTE
HOME
VIDEO
ZOOM+
ZOOM–
FF/FWD
Page 19

Owner’s Manual 19
Remote Control Functions: Overview of the TV
Remote Control Functions: Overview of the TV
Layer Buttons
Layer Buttons
(Figure 1, preceding page)
Slide Switch: Select A/V product to be controlled by the
remote control.
POWER: Switches the TV from Standby to ON. Switches the
TV from ON to Standby. Turns power on and off for other
connected A/V products.
Numbers: Individually select channels or input information
into TV.
SQV (Super Quick View™): Scan through a memorized list
of favorite channels.
QV (Quick View™): Function not available in TV layer.
GUIDE: When the slide switch is set to CABLE/DBS/DTV,
display the on-screen program guide (some cable boxes and
DBS/DTV receivers).
DEVICE: Select the input to view; ANT, Video (Rear), Video
(Front), S-Video, Component, RGB, MonitorLink.
CH (channel): Scroll up or down through memorized channels. Skips DVD chapters in DVD layer.
VOL (volume): Change sound level.
MUTE: Turn sound on or off.
TV MENU: Display on-screen menu system.
DEVICE MENU: Display menu for a connected A/V device.
ADJUST: Navigate menus, change settings, and move the
PIP on-screen location.
ENT (enter): Select a channel number or menu item.
HOME: Exit on-screen menus and return to TV viewing.
CANCEL: Function not available in TV layer. Used as a sub-
channel button in Cable/DBS/DTV layer.
INFO: Display on-screen summary of the current input used
and any broadcast information available (including current VChip information, Signal Source and Format). Additionally, if
you press the INFO key, it will display time, day and sleep
time.
AUDIO: Select the individual audio settings.
VIDEO: Select the individual video settings.
PIP CH: Scroll up or down through memorized channels in
PIP.
PIP: Cycle through PIP display choices.
EXCH: Exchange PIP with the main TV picture.
SLEEP: Set the TV to turn off within 2 hours. See Sleep
Timer, page 33, for setup instructions.
PIP DEVICE: Select the PIP input source.
FORMAT: Change the shape and size of the main TV picture.
REC: Manually record with your VCR or recordable DVD.
REW/REV: Rewind or reverse search with your VCR, reverse
scan with your DVD, or skip reverse with your CD.
PLAY: Play your VCR, DVD, or CD.
STOP: Stop your VCR, DVD, or CD.
FF/FWD: Fast forward or forward search with your VCR, fast
play with your DVD, or skip forward with your CD.
PAUSE: Pause your VCR, DVD, AV Disc, or freeze the PIP
image. LCD Monitor 5 8 03.indd 5/8/2003, 3:02 PM 24
ZOOM +: Enlarges the main picture.
ZOOM –: Reduces the main picture.
Overview
Overview
Page 20

20 Plasma TV
Use of the Remote Control with Other
Use of the Remote Control with Other
A/V Products
A/V Products
(Figures 1-3 this page, figures 4-5 following page)
1. Move the slide switch at the top of the remote to
the product you want to control.
2. Press and hold the POWER button on the remote
control.
3. Enter the first three digit code listed for your equip-
ment, and then release the POWER button on the
remote control.
4. Point the remote control to the equipment and
press the POWER button.
Note: If the equipment responds, the remote control
is properly programmed to operate the equipment.
If the equipment does not respond, repeat steps 24 with the next three digit code listed in step 3 for
your equipment.
Programming the Remote Control to Use with
Programming the Remote Control to Use with
Other Brands of
Other Brands of
Audio and V
Audio and V
ideo Products:
ideo Products:
POWER
Code to enter:
To reset to default code, enter 000
Cable box brand
General Instruments/
Jerrold
Motorola
Oak
Pioneer
Scientific Atlanta
Zenith
119, 120, 121, 122,123,
124
125, 126, 127
139, 137, 102
101, 116
112, 113
117, 100
If your
cable box
code is not
listed here,
please see
page 48
for a
complete
listing.
Cable Box Codes
1.
2.
3.
TV
AUDIO
CABLE/DBS/DTV
DVD
VCR
IMPORTANT
When set to TV , the PLAY, STOP, REW/REV, and FF/FWD
buttons will operate the VCR after the VCR codes have
been properly programmed into the remote control.
Figure 1. Programming the remote to control your cable box.
Figure 2. Programming the remote to control your satellite
receiver.
Figure 3. Programming the remote to control your VCR.
CABLE/DBS/DTV
1.
3.
Satellite brand
Mitsubishi DTV - DBS
DishNetwork
Hughes - DBS
Panasonic - DBS
RCA - DBS
Sony - DBS
Toshiba-DBS
VCR
TV
Satellite Receiver Codes
To reset to default code, enter 000
DVD
AUDIO
POWER
2.
Code to enter:
006
175
173
174
176
177
170,
173, 189, 190, 191
If your
satellite
receiver
code is not
listed here,
please see
page 49 for
a complete
listing.
CABLE/DBS/DTV
1.
3.
VCR brand
Mitsubishi
Hitachi
JVC
Philips / Magnavox
Panasonic
RCA
Sony
Toshiba
TV
VCR
DVD
AUDIO
VCR Codes
Code to enter:
001, 002
020, 043, 065
030, 054
043, 044, 051
041, 042, 043
020, 053, 065
048, 049, 050
021
POWER
2.
If your
VCR
code is not
listed here,
please see
page 49
for a
complete
listing.
To reset to default code, enter 000
Page 21

Owner’s Manual 21
After entering the correct codes in each position of the
remote control, use the slide switch to select which
product will respond when an operational button is
pressed. If you enter a code from the AUDIO chart while
the slide switch is set to TV, the volume and mute functions change to match the A/V receiver. This is useful
when using an A/V receiver with the TV all the time. In
all other cases, only one of the below devices is allowed
for each slide switch position.
TV position:
TV
A/V receiver (volume and mute only)
Cable/DBS/DTV position:
Cable box
Satellite receiver
DTV receiver
VCR position:
VCR
DVD position:
DVD
LD Player
Audio position:
A/V receiver
Mitsubishi CD player
If you have a Mitsubishi A/V receiver, the audio position
may be used in conjunction with select Mitsubishi CD
players. Your audio position must be programmed to
either 010 or 011. Plug the CD player power cord into a
switched outlet on the back of your A/V receiver.
Pressing the POWER button turns On the A/V receiver,
along with the CD player. In the audio position, for some
CD players, the transport controls (FF, Play, Rew, etc.)
operate the CD player.
IMPORTANT
If the slide switch is set to TV when you enter an A/V
receiver code, VOLUME and MUTE will control the A/V
receiver rather than the TV. To return volume and mute
control to the TV, set the slide switch to TV, press and hold
POWER and enter 000.
IMPORTANT
Some manufacturers may change their products, or
they may use more than one remote control system.
If this is the case, your remote control may not be
able to operate your VCR, DVD, cable box, satellite
receiver, or A/V receiver.
Figure 4. Programming the remote to control your DVD or LDP.
Figure 5. Programming the remote to control your A/V receiver.
Use of the Remote Control with Other
Use of the Remote Control with Other
A/V Products
A/V Products
CABLE/DBS/DTV
1.
TV
VCR
DVD
AUDIO
POWER
2.
3.
DVD/LDP brand
Mitsubishi
JVC
Panasonic
Philips
Pioneer DVD
Samsung
Sony
Toshiba
DVD Player Codes
Code to enter:
003
257
250
258, 253, 272
252
261
254
253
If your
DVD
code is not
listed here,
please see
page 48
for a
complete
listing.
To reset to default code, enter 000
CABLE/DBS/DTV
1.
3.
Audio brand
Mitsubishi A/V receiver
and/or CD player
Denon
Harman Kardon
JVC
Kenwood
Marantz
Onkyo
Pioneer
Sony
Technics
Yamaha
VCR
DVD
TV
AUDIO
A/V Receiver Codes
Code to enter:
010, 015, 011, 012,
013, 014
234, 235, 236, 245,
246, 359
215, 223, 242
233, 232
208, 200
224, 350
209, 214, 240, 247
205, 207
222, 249
218, 219, 221
202, 201, 243, 244
POWER
2.
If your
audio
code is not
listed here,
please see
page 48
for a
complete
listing.
To reset to default code, enter 000
Page 22

22 Plasma TV
Remote Control Functions: Special Functions
Remote Control Functions: Special Functions
When your remote control has been Programmed to operate another manufacturer’s product, the function performed on each layer
may vary. The most common functions are:
Picture-In-Picture (PIP) features allow you to view
Programming in different ways. While watching the main
screen, you can display programs from other channels and
other inputs. To see which inputs can and cannot be used
together, see Selecting an Input Selection for PIP, Page 40.
Activating the PIP
Press PIP to choose a display format.
To turn PIP Off, press PIP. The next time you activate PIP, the
last used PIP format will be displayed first.
Remote Control Functions: Operation of PIP
Remote Control Functions: Operation of PIP
Page 23

Owner’s Manual 23
External Equipment Connections
External Equipment Connections
- Antenna or Cable Service without a Cable Box Connection
- For optimum picture quality, adjust antenna direction if needed.
Antenna Connection
Antenna Connection
• In a poor signal area, purchase and install a signal amplifier
for better picture quality.
• If the antenna needs to be split for two TVs, include a “2Way Signal Splitter” in the connections.
• If the antenna is not installed properly, contact your dealer
for assistance.
Multi-family Dwellings/Apartments
(Connect to wall antenna socket)
Single-family Dwellings /Houses
(Connect to wall jack for outdoor antenna)
Outdoor
Antenna
Wall Antenna
Socket
VHF Antenna
UHF Antenna
RF Coaxial Wire (75 ohm)
Bronze Wire
Turn clockwise to tighten.
Bronze Wire
Be careful not to bend the bronze wire when
connecting the antenna.
• RF coaxial cable is not included with the TV.
Signal
Amplifier
Page 24

24 Plasma TV
- To avoid picture noise (interference), leave an adequate distance between the VCR and TV.
- Use the Long Life feature to avoid having a fixed image remain on the screen for a long period of time, i.e. a frozen still picture
from a VCR. If the 4:3 picture format is used, the fixed image may remain visible on the screen and create permanent phosphor
burn-in. Read Page 7 for more information regarding Uneven Phosphor Aging.
Connection 1
Set VCR switch to 3 or 4 and then tune TV to the same
channel number.
Connection 2
1. Connect the audio and video cables from the VCR's output
jacks to the TV input jacks, as shown in the figure.
When connecting the TV to VCR, match the jack colors
(Video = yellow, Audio Left = white, and Audio Right = red).
2. Insert a video tape into the VCR and press PLAY on the VCR.
(Refer to the VCR owner’s manual.)
3. Use the DEVICE button on the remote control to select
Video (Rear).
VCR Setup
VCR Setup
- After subscribing to a cable TV service from a local provider and installing a converter, you can watch cable TV programming.
- For further information regarding cable TV service, contact your local cable TV service provider(s).
Connection 1
1. Select 3 or 4 with channel switch on cable
box.
2. Tune the TV channel to the same selected
output channel of cable box.
3. Select channels at the cable box or with the
cable box remote control.
Connection 2
1. Connect the audio and video cables from the
cable box output jacks to the TV input jacks,
as shown in the figure.
When connecting the TV to cable box, match
the jack colors (Video = yellow, Audio Left =
white, and Audio Right = red).
2. Use the DEVICE button on the remote control to select Video (Rear).
3. Select channels with the cable box remote
control.
Cable
Cable
TV Setup
TV Setup
VCR
Cable Box
NOTE: Not all cables shown are included with the TV. They are available at most consumer electronics stores.
1
2
1
2
or
Page 25

Owner’s Manual 25
• Component Input ports
To get better picture quality, connect a DVD player to the component input ports as shown below.
- To watch digitally broadcasted programs, purchase and connect a digital set-top box.
- This TV supports HDCP (High-bandwidth Digital
Content Protection) protocol for DTV
(480p,720p,1080i) modes.
How to connect
1. Use the TV’s COMPONENT (Y, P
B, PR) INPUT,
RGB, or MONITORLINK/DVI jack for video connections, depending on your set-top box connector. Then, make the corresponding audio
connections.
How to use
1. Turn on the digital set-top box. (Refer to the
owner’s manual for the digital set-top box.)
2. Use the DEVICE button on the remote control
to select Component, RGB or MonitorLink.
DTV Setup
DTV Setup
How to connect
Connect the audio and video cables from the external equipment's output
jacks to the TV input jacks, as shown in the figure.
When connecting the TV to external equipment, match the jack colors (Video
= yellow, Audio Left = white, and Audio Right = red).
How to use
1. Use the DEVICE button on the remote control to select Video (Rear).
2. Operate the corresponding external equipment. Refer to external equipment
operating guide.
The TV Component Ports
Y
PB
PR
DVD Player Video
Output Ports
Y
Y
Y
Y
Pb
B-Y
Cb
P
B
Pr
R-Y
Cr
P
R
How to connect
1. Connect the DVD video outputs to the COMPONENT INPUT
jacks (Y, PB, PR) and connect the DVD audio outputs to the
AUDIO INPUT jacks.
How to use
1. Turn on the DVD player, insert a DVD.
2. Use the DEVICE button on the remote control to select
Component.
3. Refer to the DVD player's manual for operating instructions.
External
External
A/V Source Setup
A/V Source Setup
DVD Setup
DVD Setup
Digital Set-top box
or or
(FACTORYINSTALLED)
(FACTORYINSTALLED)
NOTE: Not all cables shown are included with the TV. They are available at most consumer electronics stores.
Page 26

26 Plasma TV
How to connect
1. To get the best picture quality, adjust the PC graphics card to a
640x480, 60Hz setting.
2. Use the TV’s RGB INPUT port for video connections.
3. Then, make the corresponding audio connections. If using a
sound card, adjust the PC sound as required.
How to use
1. Turn on the PC and the TV.
2. Turn on the TV by pressing the POWER button on the TV's
remote control.
3. Use the DEVICE button on the remote control to select RGB.
4. Check the image on your TV. There may be noise in the PC mode
associated with the resolution, vertical pattern, contrast or brightness. If noise is present, change the PC mode to another resolution, change the refresh rate to another rate or adjust the brightness and contrast on the menu until the picture is clear. If the
refresh rate of the PC graphics card can not be changed, change
the PC graphics card or consult the manufacturer of the PC
graphics card.
NOTES: • The MonitorLink Input is not intended for use with per-
sonal computers or devices generating video signals with
computers.
• Avoid keeping a fixed image on the TV's screen for a long
period of time. The fixed image may become permanently
imprinted on the screen. Use the Orbiter screen saver
when possible.
• The synchronization input form for Horizontal and Vertical
frequencies is separate.
The TV has a special signal output capability which allows you
to hook up a second TV or monitor.
Connect the second TV or monitor to the TV AV OUTPUT. See
the Operating Manual of the second TV or monitor for further
details regarding that device’s input settings.
NOTE: • Component, RGB-PC/DTV 480p/720p/1080i, S-video
input sources cannot be used for Monitor out.
PC Setup
PC Setup
- This TV provides Plug and Play capability, meaning that the PC adjusts automatically to its settings. The TV sends configuration
information (EDID) to the PC using the Video Electronics Standard Association (VESA) Display Data Channel (DDC) protocol.
Monitor Out Setup
Monitor Out Setup
FACTORYINSTALLED
CABLE
NOTE: Not all cables shown are included with the TV. They are available at most consumer electronics stores.
Page 27
Owner’s Manual 27
Resolution
640x350
720x400
640x480
848x480
852x480
Horizontal
Frequency(KHz)
31.468
37.861
31.469
37.927
31.469
35.000
37.861
37.500
43.269
31.500
35.00
37.500
31.500
35.000
37.500
70.09
85.08
70.08
85.03
59.94
66.66
72.80
75.00
85.00
60.00
70.00
75.00
60.00
70.00
75.00
35.156
37.879
48.077
46.875
53.674
49.725
48.363
56.476
60.023
54.348
63.995
67.500
68.681
60.000
63.981
56.25
60.31
72.18
75.00
85.06
74.55
60.00
70.06
75.02
60.05
70.01
75.00
75.06
60.00
60.02
Vertical
Frequency(Hz)
Resolution
800x600
832x624
1024x768
1152x864
1152x870
1280x1024
Horizontal
Frequency(KHz)
Vertical
Frequency(Hz)
1280x960
Monitor Display Specifications (RGB-PC Mode)
1. Connect a MonitorLink/DVI cable from the TV back
panel to the Mitsubishi HD Receiver/Controller back
panel.
2. Connect the MonitorLink Control/RS-232 cable from the
TV back panel to the Mitsubishi HD Receiver/Controller
back panel.
3. By using a Stereo Mini-plug to L and R RCA adapter,
connect the L (left) and R (right) audio cables from the
HD-5000 receiver/controller to the Audio Input Mini-plug
on the back of the TV.
IMPORTANT: Additional connection cables are not pro-
vided with the TV. They should be available
at most electronic stores.
NOTES: • The 29-pin MonitorLink/DVI and 9-pin RS-232
cables can be found at your local electronics
store. Please refer to www.mitsubishi-tv.com for
more information on RS-232C control.
• When MonitorLink is used as a DVI-HD input,
the terminal is compliant with EIA-861 standards
for extended and high definition video; however,
this input is not intended for use with personal
computers or devices generating video signals
with computer resolutions.
CAUTION: To assure continued FCC compliance, the
user must use a shielded video interface cable with
bonded ferrite cores at each end, when using the
MonitorLink/DVI input.
HD-5000/MONIT
HD-5000/MONIT
ORLINK SETUP
ORLINK SETUP
NOTE: Not all cables shown are included with the TV. They are available at most consumer electronics stores.
Page 28

28 Plasma TV
POWER
- The menus can be shown on the screen in the selected language. First select your language.
1. Press the MENU button and then use
D/ E
button to select the SPECIAL menu.
2. Press the Gbutton and then use
D/ E
button to select Language.
3. Press the Gbutton and then use
D/ E
button to select your desired language.
From this point on, the on-screen menus will be shown in the language of
your choice.
4. Press the MENU button to save new setting and exit SPECIAL menu.
SPECIAL
Prev.
Language
G
Button Lock
Long Life
Low power
Caption / Text
Captions
English
Español
Français
SPECIAL
MENU
Operation
Operation
Menu Language Selection
Menu Language Selection
TTurning on the TV
urning on the TV
• CAUTION
If you connect or disconnect the Tuner Box cable to the TV, the TV will switch to the standby mode.
ON:
1. Plug the power cord into an active AC power outlet.
2. Press the (on/off) button located underneath the left side of the front panel/frame. The TV’s POWER/STANDBY
indicator turns red and the TV is switched to standby mode.
3. Press the POWER button on the remote control to turn the TV on. The POWER/STANDBY indicator will turn green
when the TV is on.
OFF:
Press the (on/off) button (underneath the front panel) to turn off the TV. The TV’s POWER/STANDBYindicator
goes off.
STANDBY ON:
Press the POWER button (on the remote control) to turn on the TV. The TV’s POWER/STANDBY indicator will light up
(green) when the TV is on.
STANDBY OFF:
Press the POWER button on the remote. The TV’s POWER/STANDBY indicator turns red and the standby mode is set.
If you don’t plan to use the TV for an extended period of time, shut it off by using the (on/off) button.
Page 29

Owner’s Manual 29
- You can memorize or erase channels manually.
Memorizing the Channels with Manual Program
Memorizing the Channels with Manual Program
- Favorite channel memory is a convenient feature that lets you quickly scan up to 5 channels of your choice
without having to wait for the TV to scan through all the in-between channels.
1. Press the TV MENU button and then use
D / E
button to select the CHANNEL menu.
2. Press the
G
button and then use
D / E
button to select SQV Memory.
3. Press the
G
button and then use
D / E
button to select the first favorite channel.
4. Press the
F / G
button to tune & select favorite channel.
5. Press the
D / E
button to select second favorite channel position.
6. Press the
F / G
button to tune & select second channel.
7. Repeat steps 5 & 6 for remaining favorite channels.
8. Press the ENTER button to save.
• To tune to a favorite channel, press the SQV (Favorite channel) button repeat-
edly. The five favorite channels appear on the screen in numerical order.
Favorite Channel Memory
Favorite Channel Memory
1. Press the TV MENU button and then use
D / E
button to select CHANNEL menu.
2 Press the
G
button to select Auto program.
3. Press the
G
button to start the Auto program feature.
If you want to stop auto programming, press the ENTER button. Only the channels searched up to that time are memorized.
Memorizing the Channels with
Memorizing the Channels with
Auto Program
Auto Program
Auto Programming is used to memorize all the active channels in your area before you can use the TV.
There are two ways of storing channels in the Tuner's memory.
One is called AUTO PROGRAM and the other is called MANUALPROGRAM.
In AUTO PROGRAM mode, the TV will memorize the channels in ascending numerical order. If there are additional
channels you want to add or delete, you can manually add or delete those channels with Manual Program.
- Redo Auto Program if the TV is ever moved to another location.
- Auto Program will only operate with the ANT. connected.
- If channel numbers for broadcast over-the air TV and cable TV are duplicated
where different channels have the same number, press the same number buttons
again to toggle between:
: (For example, press 17 to go to the channel, press 17 again to go to the dupli-
cated channel.)
Broadcast TV Channels
Cable TV Channels
Channel Menu Options
Channel Menu Options
CHANNEL
Prev.
Auto program
Manual program
SQV Memory
G
- - - - - - - -
- - - - - - - -
- - - - - - - -
- - - - - - - -
- - - - - - - -
CHANNEL
MENU
CHANNEL
Prev.
Auto program
G
Manual program
SQV Memory
To start
CHANNEL
MENU
CHANNEL
Prev.
Auto program
Manual program
G
SQV Memory
TV 2
Memory
Fine 0
CHANNEL
MENU
- This function adjusts the pictures stability and condition when it is poor.
1. Press the TV MENU button and then use
D / E
button to select the CHANNEL menu.
2. Press the
G
button and then use
D / E
button to select Manual program.
3. Press the
G
button and then use
F / G
button to select Fine.
4. Use the
D / E
button to adjust the picture to your preference.
5. Press the ENTER button to save.
Fine
Fine TT
uning
uning
Adjustment
Adjustment
1. Press the TV MENU button and then use
D / E
button to select CHANNEL menu.
2. Press the
G
button and then use the
D / E
button to select Manual program feature.
3. Press the
G
button to select a channel.
4. Use the
D / E
button or NUMBER buttons to select the channel number you want to memorize or erase.
5. Press the
G
button and then use
D / E
button to select Memory or Erase.
6. Press the ENTER button.
Page 30

30 Plasma TV
- You can adjust picture contrast, brightness, color, sharpness and tint to the levels
you prefer.
1. Press the TV MENU button and then use
D / E
button to select the PICTURE menu.
2. Press theGbutton and then use
D / E
button to select the desired picture option
(
Contrast, Brightness, Color, Sharpness, Tint).
3. Press the
G
button and then use
F / G
button to make appropriate adjustments.
4. Press the ENTER button to save.
Manual Picture Control (
Manual Picture Control (Programmable
option)
option)
1. Press the TV MENU button and then use
D / E
button to select the PICTURE menu.
2. Press the
G
button and then use
D / E
button to select Auto Picture.
3. Press the
G
button and then use
D / E
button to select the desired picture option (Sharp, Normal,
Soft, Programmable).
4. Press the ENTER button to save.
Auto Picture Control
Auto Picture Control
• Sharp, Normal, and Soft settings are preset for optimum picture quality at the factory and cannot be changed.
- Auto Picture adjusts the TV for the best picture appearance.
- When adjusting picture options (contrast, brightness, color, sharpness and tint) manually, Auto Picture
automatically changes to
Programmable.
- To initialize values (reset to default settings), select the Medium option.
- When adjusting color temperature options (red, green, or blue) manually, Auto
Color temp. automatically changes to
Programmable.
1. Press the TV MENU button and then use
D / E
button to select the PICTURE menu.
2. Press the
G
button and then use
D / E
button to select Auto Color temp. .
3. Press the Gbutton and then use
D / E
button to select either Medium (Default),
High (Preset), Low (Preset) or Programmable (Manual Adjustment).
4. Press the ENTER button to save.
Auto Color
Auto Color TT
emperature Control
emperature Control
- You can adjust red, green, and blue to any color temperature you prefer.
1. Press the TV MENU button and then use
D / E
button to select the PICTURE menu.
2. Press the Gbutton and then use
D / E
button to select Manual Color temp..
3. Press the
G
button and then use
D / E
button to select Red, Green or Blue.
4. Use the
F / G
button to make appropriate adjustments.
• The adjustment range for Red, Green, and Blue is -20 ~ +20.
5. Press the ENTER button to save.
Manual Color
Manual Color TT
emperature Control (
emperature Control (Programmable
option)
option)
Picture Menu Options
Picture Menu Options
PICTURE
Prev.
Auto Picture
Auto Color temp.
G
Manual Color temp.
Contrast 80
Brightness 60
Color 50
Sharpness 50
Tint 0
PICTURE
MENU
High
Medium
Low
Programmable
PICTURE
Prev.
Auto Picture
Auto Color temp.
Manual Color temp.
G
Contrast 80
Brightness 60
Color 50
Sharpness 50
Tint 0
PICTURE
MENU
Red 0
Green 0
Blue 0
PICTURE
Prev.
Auto Picture
Auto Color temp.
Manual Color temp.
Contrast 80
G
Brightness 60
Color 50
Sharpness 50
Tint 0
PICTURE
MENU
- PICTURE menu adjustments are unique to each input source. Readjust PICTURE menu settings for each input
source as preferred.
• RGB (PC) / DVI (PC),
• RGB (DTV) / DVI (DTV) / Component (480p, 720p, 1080i)
• Video / S-Video / Component (480i) / TV
Page 31

Owner’s Manual 31
Audio Mode
Audio Mode
1. Press the TV MENU button and then use
D / E
button to select the SOUND menu.
2. Press the
G
button and then use
D / E
button to select the desired sound option
(Balance, Treble, Bass).
3. Press the
G
button and then use
F / G
button to make appropriate adjustments.
4. Press the ENTER button to save.
Manual Sound Control (
Manual Sound Control (Programmable
option)
option)
• Flat, Music, Movie and Sports are factory presets and cannot be changed.
- Audio Mode lets you enjoy the best sound without any special adjustment.
- When adjusting sound options (treble, bass, and balance) manually, Audio Mode automatically changes
to
Programmable.
- Level Sound maintains an equal volume level; even if you change channels.
1. Press the TV MENU button and then use
D / E
button to select the SOUND menu.
2. Press the Gbutton and then use
D / E
button to select Level Sound.
3. Press the
G
button and then use
D / E
button to select On or Of f.
4. Press the ENTER button to save.
Level Sound
Level Sound
- You can adjust sound treble, bass, and balance to the levels you prefer.
SOUND
Prev.
Audio Mode
Level Sound
G
Balance 0
Treble 50
Bass 50
SOUND
MENU
On
Off
SOUND
Prev.
Audio Mode
Level Sound
Balance 0
Treble 50
G
Bass 50
SOUND
MENU
Sound Menu Options
Sound Menu Options
1. Press the MTS button repeatedly.
Stereo/SAP
Stereo/SAP
Broadcasts Setup
Broadcasts Setup
• Select mono sound mode if the signal is not clear due to poor signal reception.
• Stereo, SAP modes are available only if included on the broadcast signal.
Mono Stereo SAP
- The TV can receive MTS stereo programs and any SAP (Secondary Audio Program) that accompanies the
stereo program, as the system to be transmitted one additional sound signal as well as the original one.
- Mono : The primary language is heard from left and right speakers. Signal mode is mono.
- Stereo : The primary language is heard from left and right speakers. Signal mode is stereo.
- SAP : The secondary language is heard from left and right speakers.
1. Press the TV MENU button and then use
D / E
button to select the SOUND menu.
2. Press the
G
button and then use
D / E
button to select Audio Mode.
3. Press the
G
button and then use
D / E
button to select any of the five sound modes.
4. Press the ENTER button to save.
Page 32

32 Plasma TV
- Timer function operates only if current time has been set.
- Off-Timer function overrides On-Timer function if they are set to the same time.
- The TV must be in standby mode for the On Timer to work.
- If you don’t press any button within 2 hours after turning on the TV with the On
Timer function, the TV will automatically switch back to standby mode.
On/Of
On/Off f TT
imer Setup
imer Setup
1. Press the TV MENU button and then use
D / E
button to select the TIMER menu.
2. Press the Gbutton and then use
D / E
button to select Off timer or On timer.
3. Press the Gbutton and then use
D / E
button to select On.
• To cancel On/Off timer function, select Off.
4. Press the
G
button and then use
D / E
button to set the hour.
5. Press the
G
button and then use
D / E
button to set the minutes.
6. For only
On timer function; Press the
G
button and then use
D / E
button to set
sound level. Then, press the
G
button and then use
D / E
button to select the channel
at turn-on.
7. Press the ENTER button to save.
Auto Clock Setup
Auto Clock Setup
- The time is set automatically from the PBS broadcast signal.
- The PBS channel signal includes information for the correct time and daylight savings time.
1. Press the TV MENU button and then use
D / E
button to select the TIMER menu.
2. Press the
G
button and then use
D / E
button to select Clock.
3. Press the
G
button and then use
D / E
button to select Auto.
4. Press the
G
button and then use
D / E
button to select your viewing area time
zone. Your choices are: E.S.T. (Eastern Standard Time), C.S.T. (Central Standard
Time), M.S.T. (Mountain Standard Time), P.S.T. (Pacific Standard Time), Alaska, or
Hawaii.
5. Press the Gbutton and then use
D / E
button to set PBS channel.
6. Press the
G
button and then use
D / E
button to set D.S.T. (Daylight Savings Time)
Select
On, or Off depending on whether or not your viewing area observes
Daylight Savings Time.
7. Press the ENTER button to save.
8. Tune into your local PBS channel.
9. The time is set automatically from the PBS broadcast signal.
Manual Clock Setup
Manual Clock Setup
- If current time setting is not correct, set the clock manually.
1. Press the TV MENU button and then use
D / E
button to select the TIMER menu.
2. Press the
G
button and then use
D / E
button to select Clock.
3. Press the
G
button and then use
D / E
button to select Manual.
4. Press the
G
button and then use
D / E
button to set the hour.
5. Press the Gbutton and then use
D / E
button to set the minutes.
6. Press the ENTER button to save.
TTimer Menu Options
imer Menu Options
TIMER
Prev.
Clock
Off timer
On timer
Auto off
TIMER
MENU
Auto
G
Manual
Time zone Auto
PBS Ch. TV 2
D.S.T. ON
TIMER
Prev.
Clock
Off timer
On timer
Auto off
TIMER
MENU
10 : 10
Auto
Manual
G
TIMER
Prev.
Clock
Off timer
On timer
G
Auto off
TIMER
MENU
10 : 30
Vol. 30
TV 2
On
Off
Page 33

Owner’s Manual 33
Sleep
Sleep TT
imer
imer
- Sleep Timer turns the TV off at a preset time. Note that this setting is cleared when the TV is turned off.
1. Press the SLEEP button repeatedly to select the number of preset minutes. First the ---
Min option appears
on the screen, followed by the Sleep Timer turn off times:
10, 20, 30, 60, 90, 120, 180, and 240 minutes.
2. When the number of minutes you want is displayed on the screen, press the ENTER button. The Sleep Timer
begins to count down from the number of minutes selected.
3. To check the remaining minutes before the TV turns off, press the SLEEP or INFO button once.
4. To cancel the Sleep Timer, press the SLEEP button repeatedly until ---
Min appears.
Auto Of
Auto Offf
- If there is no input signal, Auto off can be set to turn the TV off automatically after 10
minutes.
1. Press the TV MENU button and then use
D / E
button to select the TIMER menu.
2. Press the
G
button and then use
D / E
button to select Auto off.
3. Press the
G
button and then use
D / E
button to select On or Off.
4. Press the ENTER button to save.
zzz
z
TTimer Menu Options continued
imer Menu Options continued
TIMER
Prev.
Clock
Off timer
On timer
Auto off
G
TIMER
MENU
On
Off
Page 34

34 Plasma TV
Button Lock
Button Lock
- The TV can be set up so that it can only be used with the remote control.
- This feature can be used to prevent unauthorized viewing by locking out the front
panel controls.
- This TV is programmed to remember which option it was last set to even if you
turn the TV off.
Uneven phosphor aging/burn-in reduction feature. To minimize the risk of uneven phosphor aging/burn-in when displaying still images, the Mitsubishi PD-4225 offers a built-in feature known as ORBITER. The ORBITER feature intermittently shifts the screen image horizontally and vertically in small increments. This intermittent screen movement is
usually not evident in full motion video. In some instances the ORBITER shift might be evident while displaying static
guides or menus. The default setting for ORBITER is ON. Please do not shut the ORBITER off.
- A frozen still picture from a PC/video game displayed on the screen for prolonged periods will result in a ghost
image remaining; even when you change the image. Avoid allowing a fixed image to remain on the TV's
screen for a long period of time.
Special Menu Options
Special Menu Options
SPECIAL
Prev.
Language
Button Lock
G
Long Life
Low power
Caption / Text
Captions
On
Off
SPECIAL
MENU
1. Press the TV MENU button and then use
D / E
button to select the SPECIAL menu.
2. Press the
G
button and then use
D / E
button to select Button Lock.
3. Press the Gbutton and then use
D / E
button to select On or Off.
4. Press the ENTER button to save.
• With the BUTTON LOCK ON, ‘
Button Lock’ appears on the screen if any
button on the front panel is pressed.
Long Life
Long Life
SPECIAL
Prev.
Language
Button Lock
Long Life
G
Low power
Caption / Text
Captions
Off
White Field
Orbiter
Inverse
SPECIAL
MENU
1. Press the TV MENU button and then use
D / E
button to select the SPECIAL
menu.
2. Press the
G
button and then use
D / E
button to select Long Life.
3. Press the Gbutton and then use
D / E
button to select either Off, White Field,
Orbiter or Inverse.
• Off
Uneven phosphor aging/burn-in reduction disabled.
• White Field
White Field helps remove permanent images from the screen. Note: An excessive
permanent image may be impossible to clear entirely with White Field. To return
to normal viewing, press any button.
• Orbiter (DEFAULT)
Orbiter may help prevent ghost images. However, it is best not to allow any fixed
image to remain on the screen. To avoid a permanent image on the screen, the
image will move every 2 minutes: Right → Right → Downside → Downside →
Left → Left → Upside → Upside.
•
Inverse
Negative Mode will automatically invert the TV panel color every 30 minutes.
4. Press the ENTER button to save.
Low Power
Low Power
- Low power reduces the TV power consumption.
SPECIAL
Prev.
Language
Button Lock
Long Life
Low power
G
Caption / Text
Captions
On
Off
SPECIAL
MENU
1. Press the TV MENU button and then use
D / E
button to select the SPECIAL menu.
2. Press the Gbutton and then use
D / E
button to select Low power.
3. Press the Gbutton and then use
D / E
button to select On or Off.
• When you select On, the screen darkens.
4. Press the ENTER button to save.
Page 35

Owner’s Manual 35
Special Menu Options continued
Special Menu Options continued
Closed Captions
Closed Captions
2. An old, bad, or illegally recorded tape is being played.
3. Strong, random signals from a car or airplane interfere with the TV signal.
4. The signal from the antenna is weak.
5. The program wasn’t captioned when it was produced, transmitted, or taped.
Closed captioning is a process which converts the audio portion of a television program into written words which then appear as subtitles on the television screen. Closed captions allow viewers to read the dialogue and narration of television programs.
Captions are the subtitles of the dialogue and narration of television programs. For prerecorded
programs, program dialogue can be arranged into captions in advance. It’s possible to caption a
live program by using a process called real-time captioning, which creates captions instantly.
Real-time captioning is normally done by professional reporters using a machine shorthand system and computer for translation into English.
Captioning is an effective system for the hearing-impaired, and it can also aid in teaching language skills.
• The picture at left shows a typical caption.
• IGNITION:
Picture may flutter, drift, suffer from black spots, or horizontal streaking. Usually caused by interference from automobile ignition systems, neon lamps, electrical drills, and other electrical appliances.
• GHOSTS:
Ghosts are caused when the TV signal splits and follows two paths. One is the direct path and the
other is reflected off tall buildings, hills or other objects. Changing the direction or position of the
antenna may improve reception.
• SNOW:
If your receiver is located at the weak, fringe area of a TV signal, your picture may be marred by
small dots. It may be necessary to install a special antenna to improve the picture.
Caption Tips
FOLLOW ME
Using Closed Captions
• Not all TV broadcasts include closed caption signals.
• Sometimes TV stations broadcast four different caption signals on the same channel. By selecting
From CC 1 to CC 4, you can
choose which signal you view. CC 1 is usually the signal with the captions, while Another mode might show demonstration or programming information.
• Your TV might not receive caption signals because of the following situations.
1. Poor reception conditions are encountered:
Page 36

36 Plasma TV
Caption/T
Caption/T
ext
ext
SPECIAL
Prev.
Language
Button Lock
Long Life
Low power
Caption / Text
G
Captions
CC 1
CC 2
CC 3
CC 4
Text 1
Text 2
Text 3
Text 4
SPECIAL
MENU
1. Press the TV MENU button and then use
D / E
button to select the SPECIAL menu.
2. Press the
G
button and then use
D / E
button to select Caption/Text.
3. Press the Gbutton and then use
D / E
button to select your caption selection.
Your choices are: CC1, CC2, CC3, CC4, Text 1, Text 2, Text3 and Text4.
4. Press the ENTER button to save.
Captions
Captions
1. Press the TV MENU button and then use
D / E
button to select the SPECIAL menu.
2. Press the
G
button and then use
D / E
button to select Captions.
3. Press the Gbutton and then use
D / E
button to select On, On if Mute, or Off.
4. Press the ENTER button to save.
Page 37

Owner’s Manual 37
Auto
Auto
Adjustment
Adjustment
- RGB (PC) mode only; This function doesn’t work for RGB-DTV mode.
- Automatically adjusts picture position and minimizes image shaking.
- Auto Adjust and Manual Adjust are not active in DVI mode.
1. Press the TV MENU button and then use
D /E
button to select the SCREEN menu.
2. Press the Gbutton and then use
D /E
button to select Auto Adjust.
3. Press the Gbutton to run Auto adjustment.
• When Auto Adjust has finished, OK will be shown on screen.
• If the position of the image is still not correct, try Auto adjustment again or you can
make further adjustments with the Manual Adjust option.
Screen Menu Options
Screen Menu Options
SCREEN
Prev.
Auto Adjust
G
Format
Zoom in/out
Position
Manual Adjust
VCR Mode
Initialize
VGA Mode
To set
SCREEN
MENU
Setting Picture Format
Setting Picture Format
- Caution: If a 4:3 fixed image is on the screen for a long time, it may cause permanent phosphor burn-in.
-It’s not available the Stretch and Expand picture format in PC mode.
1. Press the Format button repeatedly to select the desired picture format. You can also adjust FORMAT in the SCREEN menu.
• Narrow
- Choose NARROW when you want to view a picture with an original 4:3 aspect ratio, with gray bars appearing at both the
left and right sides.
• Standard
- Choose STANDARD when you want to adjust the picture horizontally, in a linear proportion to fill the entire screen.
• Stretch
- Choose STRETCH when you want to adjust the picture in a non-linear proportion, that is, more enlarged at both sides, to
create a spectacular view.
• Expand
- Choose Expand when you want to view the picture without any alteration. However, the top and bottom portions of the
picture will be cropped.
1. Use ZOOM+/ZOOM- button to enlarge or reduce the picture size.
• Zoom adjustment range is 100~300.
2. Adjust the main picture position by pressing the
D / E
/ F /
G
buttons while zooming
in or out.
Picture Size Zoom
Picture Size Zoom
- When enlarging or reducing the picture, the image may become distorted.
Zoom out
100%
D
F
G
E
Page 38
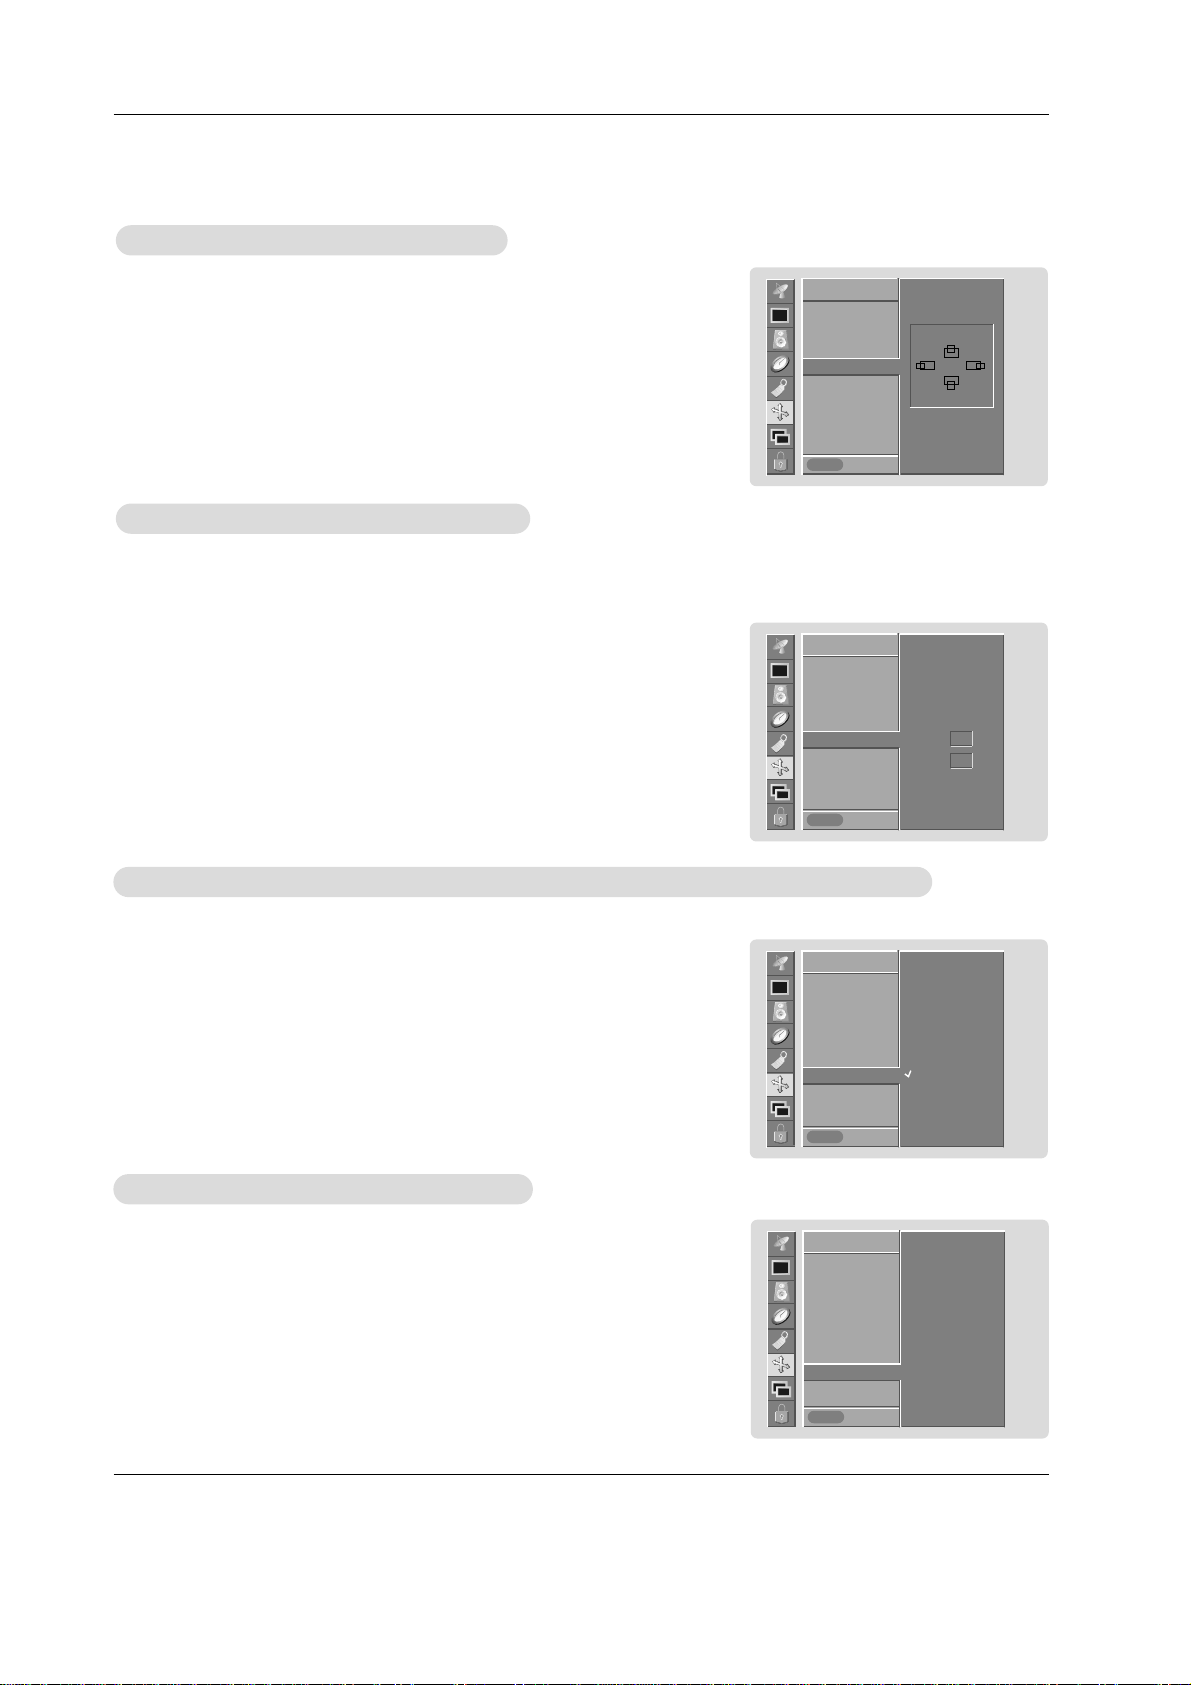
38 Plasma TV
1. Press the TV MENU button and then use
D / E
button to select the SCREEN menu.
2. Press the Gbutton and then use
D / E
button to select Position.
3. Press the Gbutton and then use
D / E
/
F / G
button to adjust the position.
4. Press the ENTER button to save.
SCREEN
Prev.
Auto Adjust
Format
Zoom in/out
Position
G
Manual Adjust
VCR Mode
Initialize
VGA Mode
SCREEN
MENU
SCREEN
Prev.
Auto Adjust
Format
Zoom in/out
Position
Manual Adjust
G
VCR Mode
Initialize
VGA Mode
SCREEN
MENU
Manual
Manual
Adjust (RGB-PC mode only)
Adjust (RGB-PC mode only)
Adjusting Horizontal/ V
Adjusting Horizontal/ V
ertical Position
ertical Position
- If the image still isn’t clear after auto adjustment and especially if characters are still jittery, adjust the picture
Phase manually.
- To correct the screen size, adjust Clock.
- This function works in the following modes:
RGB-PC, RGB-DTV (480p,720p,1080i), DVI-DTV (480p,720p,1080i),
COMPONENT (480p,720p,1080i).
1. Press the TV MENU button and then use
D / E
button to select the SCREEN menu.
2. Press the Gbutton and then use
D / E
button to select Manual Adjust.
3. Press the Gbutton and then use
D / E
button to to select Phase or Clock.
4. Use the
F / G
button to make appropriate adjustments.
• The Phase adjustment range is 0 ~ 31.
• The Clock adjustment range is -50 ~ +50.
5. Press the ENTER button to save.
Phase 0
Clock 0
SCREEN
Prev.
Auto Adjust
Format
Zoom in/out
Position
Manual Adjust
VCR Mode
G
Initialize
YNR
SCREEN
MENU
VCR Mode (TV
VCR Mode (TV
, V
, V
ideo(Exp.), V
ideo(Exp.), V
ideo, S-V
ideo, S-V
ideo and Component 480i mode only)
ideo and Component 480i mode only)
- Use this function to correct jittering or picture instability while viewing a video tape.
1. Press the TV MENU button and then use
D /E
button to select the SCREEN menu.
2. Press the Gbutton and then use
D /E
button to select VCR Mode.
3. Press the Gbutton and then use
D /E
button to select Off or On.
• Select the On option if watching a VCR.
• Select the Off option for other equipment. (Except VCR)
4. Press the ENTER button to save.
Off
On
1. Press the MENU button and then use
D / E
button to select the SCREEN menu.
2. Press the Gbutton and then use
D / E
button to select Initialize.
3. Press the Gbutton.
•You can reset Zoom in/out, Manual Adjust, Position, PIP size, PIP position and
sub picture size.
4. Press the HOME button to exit.
Initializing (Reset to original factory value)
Initializing (Reset to original factory value)
- This function operates in every mode.
- Use the Initialize option to reset the adjusted settings.
SCREEN
Prev.
Auto Adjust
Format
Zoom in/out
Position
Manual Adjust
VCR Mode
Initialize
G
YNR
To set
SCREEN
MENU
D
F
G
E
Page 39

Owner’s Manual 39
SCREEN
Prev.
Auto Adjust
Format
Zoom in/out
Position
Manual Adjust
VCR Mode
Initialize
VGA Mode
G
640x480
848x480
852x480
SCREEN
MENU
SCREEN
Prev.
Auto Adjust
Format
Zoom in/out
Position
Manual Adjust
VCR Mode
Initialize
YNR
G
On
Off
SCREEN
MENU
Selecting W
Selecting W
ide VGA
ide VGA
mode (RGB-PC, DVI-PC mode only)
mode (RGB-PC, DVI-PC mode only)
- To see a normal picture, match the resolution of RGB mode and selection of VGAmode.
1. Press the TV MENU button and then use
D /E
button to select the SCREEN menu.
2. Press the Gbutton and then use
D /E
button to select VGA mode.
3. Press the Gbutton and then use
D /E
button to select the desired VGA resolution.
4. Press the ENTER button to save.
- Use YNR to reduce the picture noise that may appear on the screen.
Luminance Noise Reduction (TV
Luminance Noise Reduction (TV
, V
, V
ideo(Exp.), V
ideo(Exp.), V
ideo, S-V
ideo, S-V
ideo and Component 480i modes only)
ideo and Component 480i modes only)
1. Press the TV MENU button and then use
D /E
button to select the SCREEN menu.
2. Press the Gbutton and then use
D / E
button to select YNR.
3. Press the Gbutton and then use
D / E
button to select On or Off.
4. Press the ENTER button to save.
Screen Menu Options continued
Screen Menu Options continued
Page 40

40 Plasma TV
PIP
PIP
(Picture-In-Picture) Feature
(Picture-In-Picture) Feature
PIP
Prev.
Device
PIP
PIP Device
Win. size
Win. position
PIP Format
G
4 : 3
16 : 9
PIP
MENU
- PIP lets you view 2 different inputs (sources) on your TV at the same time. One source will be large, and the other source will
show a smaller inset image.
- PIP is not available if the
lock on/off option in LOCK menu is set to On.
- You can also adjust the PIP features in the PIP menu (Except Swap function).
TV Program Selection for PIP
TV Program Selection for PIP
Press the PIP CH
D
/
PIP CH Ebutton to select a channel for the sub picture in PIP mode.
WWatching the PIP
atching the PIP
Press the PIP button repeatedly to turn PIP on or off.
PIP
PIP
Aspect Ratio
Aspect Ratio
Moving the PIP
Moving the PIP
Swapping the PIP
Swapping the PIP
Press the EXCH button to exchange the main and sub pictures.
Selecting an Input Signal Source for the PIP
Selecting an Input Signal Source for the PIP
Use the PIP DEVICE button to select the input source for the sub picture.
Main Picture Sub Picture
Component
Video
Component
Video
Video
Component
1. Press the TV MENU button and then use
D /E
button to select the PIP menu.
2. Press the Gbutton and then use
D /E
button to select PIP Format.
3. Press the Gbutton and then use
D /E
button to select 4:3 or 16:9.
4. Press the ENTER button to save.
Main Picture Source
Available Sub Picture Sources
TV
Video (Rear)
Video (Front)
S-Video
Component 480i
Component 480p/720p/1080i
RGB and MonitorLink
Video (Rear), Video (Front), S-Video, Component 480i/480p/720p/1080i, RGB and MonitorLink
TV, Video (Front), S-Video, Component 480i/480p/720p/1080i, RGB and MonitorLink
TV, Video (Rear), S-Video, Component 480i/480p/720p/1080i, RGB and MonitorLink
TV, Video (Rear), Video (Front), Component 480i/480p/720p/1080i, RGB and MonitorLink
TV, Video (Rear), RGB, MonitorLink, Video (Front) and S-Video
TV, Video (Rear), Video (Front) and S-Video
TV, Video (Rear), Video (Front), S-Video, Component 480i
- To watch 4: 3 or 16:9 aspect ratio for sub picture
1. Press the TV MENU Button and then use
D / E
button to select PIP menu.
2. Press the G button and then use
D / E
button to select Win. Position.
3. Press the G button and then press the
D / E
/ F /
G
button to move the PIP in the desired direction.
4. Press the HOME button to exit.
Page 41

Owner’s Manual 41
Sub Picture Size
Sub Picture Size
Adjustment
Adjustment
1. Press the TV MENU button and then use
D / E
button to select PIP menu.
2. Press
G
the button and then use
D / E
button to select Win. Size.
3. Press the
G
button and press the
F / G
button to change the sub picture size.
4. Press the HOME button to exit.
Page 42

42 Plasma TV
Lock Menu Options
Lock Menu Options
Parental Control can be used to block specific channels, ratings and other viewing sources.
The password will be required to gain access to Parental Control.
The Parental Control Function (V-Chip) is used to block program viewing based on the ratings sent by the broadcasting station.
The default setting is to allow all programs to be viewed. Viewing can be blocked by the type of program and by the categories
chosen to be blocked. It is also possible to block all program viewing for a time period. To use this function, the following must be
set :
1. Ratings and categories to be blocked.
2. Specifying a password
3. Enabling the lock
V-Chip rating and categories
Rating guidelines are provided by broadcasting stations. Most television programs and television movies can be blocked by TV
Rating and/or Individual Categories. Movies that have been shown at the theaters or direct-to-video movies use the Movie Rating
System (MPAA) only.
For Movies previously shown in theaters:
Movie Ratings :
• Blocking off
• G (general audience)
• PG (parental guidance suggested)
• PG-13 (13 years and up)
• R (restricted)
• NC-17 (18 years and up)
• X (adult)
If you set PG-13 and Above : G and PG movies will be available , PG-13, R, NC-17 and X will be blocked.
For Television programs including made-for-TV movies :
General TV Ratings :
• Blocking off
• TV-G (general audience) (individual categories do not apply)
• TV-PG (parental guidance suggested)
• TV-14 (14 years and up)
• TV-MA (mature audience)
Children TV Ratings :
• Blocking off
• TV-Y (youth) (individual content categories do not apply)
• TV-Y7 (youth, 7 years and up)
Content Categories :
• Dialog - sexual dialogue (applies to TV-PG, TV-14)
• Language - adult language (applies to TV-PG, TV-14, TV-MA)
• Sex scenes - sexual situations (applies to TV-PG, TV-14, TV-MA)
• Violence (applies to TV-PG, TV-14, TV-MA)
• F Violence - fantasy violence (applies only to TV-Y7)
Aux.Block Ratings :
• Video (Rear) (Blocking On/off)
• Video (Front) (Blocking On/off)
• S-Video (Blocking On/off)
For Canadian English/French language rating system:
Canadian English language rating system:
• C (Children)
• C8+ (8 years and up)
• G (General programming. Suitable for all audiences.)
• PG (Parental guidance suggested)
• 14+ (Viewer 14 years and up)
• 18+ (Adult programming)
Canadian French language rating system:
• G (General)
• 8 ans+ (8 years and up)
• 13 ans+ (13 years and up)
• 16 ans+ (16 years and up)
• 18 ans+ (Adults only)
Page 43

Owner’s Manual 43
Lock Setup
Lock Setup
1. Press the TV MENU button and then use
D /E
button to select the Lock menu.
Then, press the Gbutton.
• If Lock is already set, enter the password then requested.
• The TV is set with the initial password “0-0-0-0”.
2. Setting lock on/off:
Press the
D /E
button to select Lock on/off.
Press the Gbutton and then use
D /E
button to select on or off.
3. Set password:
Press the
D /E
button to select Set password.
Press the Gbutton and then enter a four digit password.
Enter it again when requested.
4. Press the
D /E
button to select type of blocking to be set.
5. Press the Gbutton and then use
D /E
button to select type of ratings to block.
• Age block, Content block, and Canadian opt. options, also have sub menus. So
repeat step 4 to 5 in the sub menu, to set the types of blocking and rating.
LOCK
Prev.
Lock on/off
G
Set password
MPAA
Age block
Content block
Aux. block
Canadian opt.
On
Off
LOCK
MENU
- Select TV, Video (Rear), Video (Front), or S-video input source to use this function.
Lock Menu Options continued
Lock Menu Options continued
Page 44
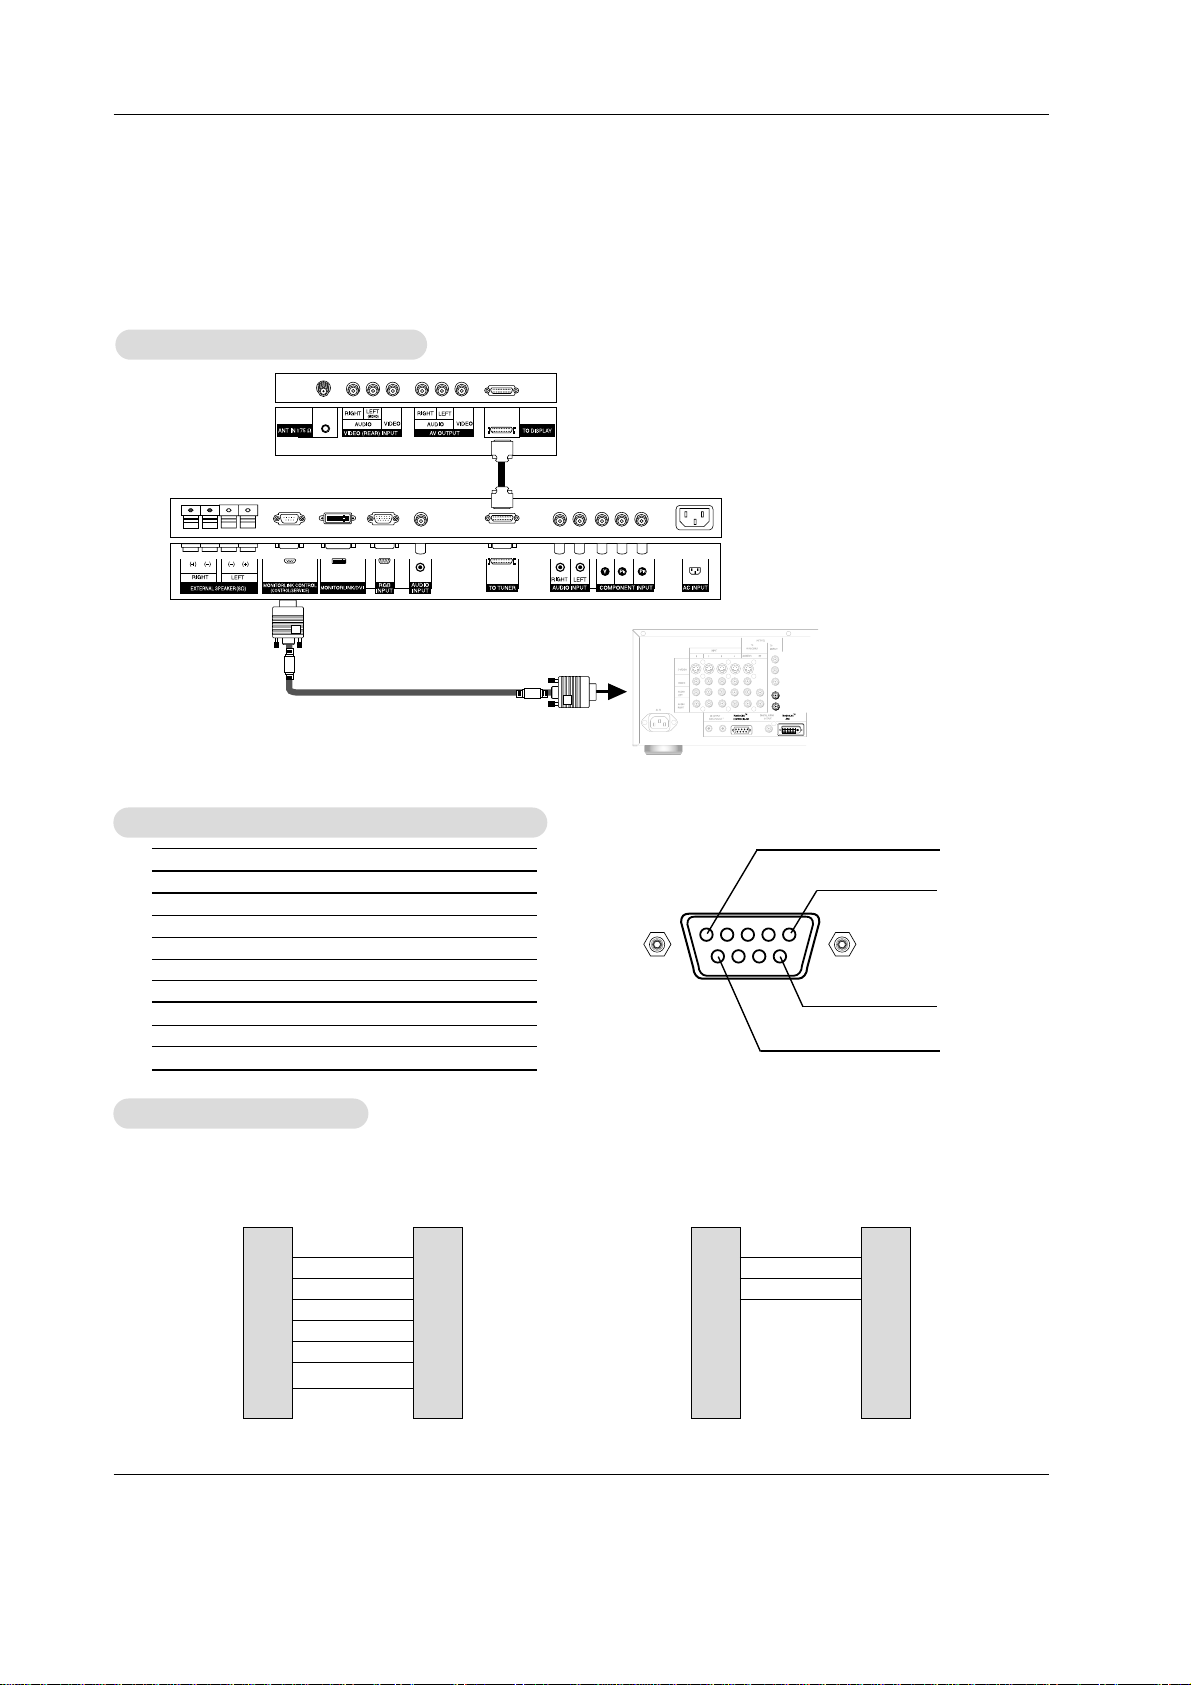
44 Plasma TV
No. Pin name
1 No connection
2 RXD (Receive data)
3 TXD (Transmit data)
4 DTR (DTE side ready)
5 GND
6 DSR (DCE side ready)
7 RTS (Ready to send)
8 CTS (Clear to send)
9 No Connection
1
5
6
9
2
3
5
4
6
7
8
RXD
TXD
GND
DTR
DSR
RTS
CTS
TXD
RXD
GND
DSR
DTR
CTS
RTS
PC
7-Wire Configurations
(Standard RS-232C cable)
D-Sub 9
3
2
5
6
4
8
7
Plasma TV
D-Sub 9
2
3
5
4
6
7
8
RXD
TXD
GND
DTR
DSR
RTS
CTS
TXD
RXD
GND
DTR
DSR
RTS
CTS
PC
3-Wire Configurations
(Not standard)
D-Sub 9
3
2
5
4
6
7
8
Plasma TV
D-Sub 9
- Connect the MONITORLINK CONTROL/RS-232C input jack to an external control device (such as the
Mitsubishi HD-5000 Receiver/Controller or an A/V control system) and control the TV’s functions externally.
- Connect the serial port of the control device to the RS-232C jack on the TV back panel.
- RS-232C connection cables are not supplied with the TV.
- NOTE: Not all cables shown are included with the TV. They are available at most consumer electronics stores.
TType of Connector; D-Sub 9-Pin Male
ype of Connector; D-Sub 9-Pin Male
RS-232C Configurations
RS-232C Configurations
External Control Device Setup
External Control Device Setup
MONIT
MONIT
ORLINK/RS-232C Setup
ORLINK/RS-232C Setup
HD-5000
(FACTORYINSTALLED)
Page 45

Owner’s Manual 45
No picture &
No sound
• Check whether the TV is turned on.
• Power cord inserted into wall outlet?
• Test the wall power outlet, plug other product’s power cord into the wall outlet
where the TV’s power cord was plugged in.
No or Poor color
or Poor picture
• Select COLOR in the PICTURE menu and press the VOLUME (D) button.
(Refer to p.30)
• Keep a sufficient distance between the TV and the VCR.
• Activate any function to restore the brightness of the picture.
(If still picture is on the screen for more than 5 minutes, the screen gets dark.)
The remote control
doesn’t work
• Check to see if there is any object between the TV and the remote control
causing obstruction.
• Are batteries installed with correct polarity (+ to +, - to -)?
(Refer to p.18)
• Install new batteries. (Refer to p.18)
Picture OK &
No sound
• Press the VOLUME (D) button.
• Sound muted? Press MUTE button.
Picture appears slowly
after switching on
• This is normal as the image is muted during the startup process of the TV.
Please contact your service center, if the picture has not appeared after five
minutes.
Horizontal/vertical bars
or picture shaking
• Check for local interference such as an electrical appliance or power tool.
TTroubleshooting Checklist
roubleshooting Checklist
Page 46

46 Plasma TV
No output from one of
the speakers
• Adjust BALANCE in the SOUND menu. (Refer to p.31)
Unusual sound from
inside the TV
• A change in ambient humidity or temperature may result in an unusual noise
when the TV is turned on or off and does not indicate a fault with the TV.
Lines or streaks
in picture
• Check antenna (Change the direction of the antenna).
Poor stereo sound
• Check the kind of input signal and select Mono, Stereo or SAP with the MTS
button.
Auto programming
doesn’t stop
• Press the ENTER button again.
TTroubleshooting Checklist continued
roubleshooting Checklist continued
Picture moves
intermittently around
the screen
• Is ORBITER ON? Default setting for ORBITER is ON. In this mode, picture
moves intermittently around the screen. See page 34 to shut off ORBITER.
Page 47

Owner’s Manual 47
MODEL
Width (inches)
Height (inches)
Depth (inches)
Weight (pounds)
Power requirement
Television System
Program Coverage
Resolution
Color
Operating Temperature Range
Operating Humidity Range
PD-4225S
TV TV w/ Speakers & Base
40 3/4" 49 5/8"
26" 27 5/8"
4 3/8" 10 7/8"
65.2 81.7
AC100-240V ~ 50/60Hz
NTSC
VHF 2 ~ 13, UHF 14 ~ 69, CATV 1 ~ 125
852 x 480 (Dot)
16,770,000 (256 steps of each R, G and B)
32 ~ 104°F (0 ~ 40°C)
Less than 80%
Product Specifications
Product Specifications
• The specifications shown above may be changed without notice for quality improvement.
Page 48

48 Plasma TV
Appendix
Appendix
Appendix
A: Remote Control Programming Codes
A: Remote Control Programming Codes
A/V Receivers
Mitsubishi . .. . 010, 011, 012, 013,
. .. .. .. .. . 014, 360
Admiral . .. .. . 220
Aiwa . .. .. .. . 225, 226, 241
B & K . .. .. . 352
Bose. .. .. .. . 351
Denon . .. .. . 234, 235, 236, 245,
. .. .. .. .. . 246, 359, 361
Fisher . .. .. . 204
Gerrard . .. .. . 213
Harman Kardon 215, 223, 242, 362
Jensen . .. .. . 223, 229
JVC . .. .. .. . 232, 233
Kenwood . .. . 200, 208, 289
KLH . .. .. .. . 363
Koss. .. .. .. . 357
Magnavox . .. . 227, 228
Marantz. .. .. . 224, 350, 360
McIntosh . .. . 216
Nakamichi . .. . 206, 217
Onkyo . .. .. . 209, 214, 240, 247
Optimus. .. .. . 203, 227, 231, 230
Panasonic . .. . 219, 218, 221
Parasound . .. . 356
Philips . .. .. . 223, 248, 290
Pioneer . .. .. . 205, 207
Polk Audio . .. . 353
Quasar . .. .. . 219, 218, 221
RCA . .. .. .. . 203, 205, 227, 231,230
Sansui . .. .. . 203, 211, 239
Sharp . .. .. . 234, 237
Sherwood . .. . 354, 355
Sony. .. .. .. . 222, 249, 364, 365
SoundDesign . . 238
TEAC . .. .. . 212, 213, 210, 211
Technics . .. . 221, 218, 219
Venturer. .. .. . 358
Victor . .. .. . 232, 233
Yamaha. .. .. . 201, 202, 243, 244
Cable Box
ABC . .. .. .. . 124
Archer . .. .. . 125
Cableview . .. . 105
Citizen . .. .. . 122, 105
Color Voice. .. . 128, 129, 130, 106, 107
Comtronics. .. . 128, 129, 130 ,106, 107
Curtis . .. .. . 112, 113
Diamond . .. . 124, 125
Eagle . .. .. . 129
Eastern . .. .. . 134
GC Brand . .. . 105
GE . .. .. .. . 112, 113
Gemini . .. .. . 122, 143
General Instrument
/Jerrold . .. .. . 119, 120, 121, 122, 123
. .. .. .. .. . 124, 125, 126, 127
Hamlin . .. .. . 112
Hitachi . .. .. . 103, 124
Macom . .. .. . 103, 104, 105, 108
Magnavox . .. . 128, 129, 130, 106, 107,
. .. .. .. .. . 133, 138
Memorex . .. . 130
Movietime . .. . 105
Oak . .. .. .. . 102
Panasonic . .. . 114
Paragon. .. .. . 117
Philips . .. .. . 128, 129, 130, 106, 107,
. .. .. .. .. . 133, 138, 131
Pioneer . .. .. . 101, 116
Pulsar . .. .. . 105
RCA . .. .. .. . 115
Regal . .. .. . 112
Regency . .. . 134
Rembrant . .. . 105, 138
Samsung . .. . 105
Scientific Atlanta 112, 113, 194
Signature . .. . 119, 124, 125, 126, 127,
. .. .. .. .. . 120, 121, 122
SL Mark. .. .. . 105, 101
Sprucer . .. .. . 105,
Starcom. .. .. . 119, 124, 125, 126, 127,
. .. .. .. .. . 120, 121, 122
Stargate. .. .. . 105
Teleview. .. .. . 101, 105
Tocom . .. .. . 135, 136
Toshiba . .. .. . 104
Unika . .. .. . 125
United Artists . . 102
United Cable . . 119, 124, 125, 126, 127,
. .. .. .. .. . 120, 121, 122
Universal . .. . 122
Videoway . .. . 106
Viewstar. .. .. . 129, 130
Zenith/
Drake Satellite. . 117, 100
DVD Players
Mitsubishi . .. . 003
Aiwa . .. .. .. . 261, 274
Apex. .. .. .. . 266, 283
Bose. .. .. .. . 286
Denon . .. .. . 250, 273
Ferguson . .. . 251
GE/RCA/Proscan 251, 256
Harman Kardon 282, 288
Hitachi . .. .. . 270
JVC . .. .. .. . 257
Kenwood . .. . 271, 289
Mintek . .. .. . 285
Next Base . .. . 284
Normande . .. . 251
Onkyo . .. .. . 267, 280
Oritron . .. .. . 263, 268
Paite. .. .. .. . 262
Panasonic . .. . 250
Philips/Magnavox 258, 253, 272, 290
Pioneer . .. .. . 252
Saba. .. .. .. . 251
Sampo . .. .. . 263
Samsung . .. . 261
Sanyo . .. .. . 275
Sharp . .. .. . 260
SMC. .. .. .. . 275
Sylvania. .. .. . 264
Sony. .. .. .. . 254, 278, 279
Thompson . .. . 251
Toshiba . .. .. . 253, 287
Venturer. .. .. . 281
Vialta . .. .. . 277
Wave . .. .. . 269
XWave . .. .. . 269
Yamaha. .. .. . 250, 272, 276, 287
Zenith . .. .. . 259
Page 49

Owner’s Manual 49
Appendix
Appendix
Appendix
A: Remote Control Programming
A: Remote Control Programming
Codes, continued
Codes, continued
Satellite Receivers
/DBS/DTV
Mitsubishi
HD/Satellite Receiver 006, 173
Echostar/Dishnetwork 175, 82, 183, 188
Express Vu. .. . 175
GE . .. .. .. . 176
Gradient . .. . 186
Hitachi . .. .. . 173, 181, 184
Hughes . .. .. . 173
Maganavox. .. . 171, 172
Panasonic . .. . 174
Philips . .. .. . 171, 172
RCA/Proscan . . 176, 179, 180,185
Samsung . .. . 192
Sony. .. .. .. . 177
Star Choice . . 173
Toshiba . .. .. . 170, 189, 190,
. .. .. .. .. . 191, 173
Uniden . .. .. . 171, 172
WebTV . .. .. . 187
VCRs
Mitsubishi . .. . 001, 002, 060, 067,
068, 061, 062
Admiral . .. .. . 055
Aiwa . .. .. .. . 047, 052
Akai . .. .. .. . 049, 034, 035, 036
Audio Dynamic 031
Bell & Howell . . 025
Broksonic . .. . 040, 046
Canon . .. .. . 043, 045
Citizen . .. .. . 026
Craig. .. .. .. . 025, 049, 026
Curtis Mathes . . 065, 044, 047
Daewoo. .. .. . 063, 021, 044, 078
DBX . .. .. .. . 030, 031
Dimensia . .. . 065
Emerson . .. . 023, 038, 039, 040, 045,
. .. .. .. .. . 046, 062, 063
Fisher . .. .. . 025, 028, 029, 027
Funai . .. .. . 047, 046, 040,054
GE . .. .. .. . 065, 044, 079, 053
Go Video . .. . 057, 069, 070, 071
Goldstar . .. . 026
Gradiente . .. . 054
Hitachi . .. .. . 043, 065, 020,047
Instant Replay. . 044, 043
Jensen . .. .. . 059
JVC . .. .. .. . 030, 031, 054, 076, 077
Kenwood . .. . 030, 026, 031
LXI . .. .. .. . 047, 026, 020, 027,
. .. .. .. .. . 028, 025, 029
Magnavox . .. . 051, 043, 044
Marantz. .. .. . 030, 031
Marta . .. .. . 026
Memorex . .. . 044, 029
MGA. .. .. .. . 060, 067, 068, 061,
. .. .. .. .. . 062
Minolta . .. .. . 020, 065
Multitech . .. . 067, 047, 024
NEC . .. .. .. . 030, 031, 054
Olympic. .. .. . 044, 043
Optimus. .. .. . 048, 041, 055, 026
Orion . .. .. . 046, 040
Panasonic . .. . 043, 044, 041, 042
VCRs
Penney . .. .. . 044, 020, 065, 025,
. .. .. .. .. . 030, 031
Pentax . .. .. . 020, 031, 065
Philco . .. .. . 051, 044, 047, 043,
. .. .. .. .. . 046, 040, 063
Philips . .. .. . 051, 043, 044
Pioneer . .. .. . 043
Proscan. .. .. . 065, 020, 043, 044, 051,
. .. .. .. .. . 066, 021, 022, 053
Quasar . .. .. . 041, 042, 043, 044
Radio Shack . . 053, 044, 025, 056, 029,
. .. .. .. .. . 060, 047
RCA . .. .. .. . 053, 065, 020, 043, 044,
. .. .. .. .. . 049, 051, 066, 021, 022
Realistic . .. . 044, 025, 056, 029, 060,
. .. .. .. .. . 047
Samsung . .. . 057, 022, 024, 053
Sansui . .. .. . 046, 040, 072
Sanyo . .. .. . 025, 029
Scott. .. .. .. . 021, 022, 024, 029, 060,
. .. .. .. .. . 067, 068, 046, 040
Sears . .. .. . 025, 026, 027, 028, 020
Shaintom . .. . 037
Sharp . .. .. . 055, 056
Signature 2000 047, 055
Singer . .. .. . 037
Sony. .. .. .. . 048, 049, 050, 073, 074,
. .. .. .. .. . 075
SV2000 . .. .. . 047
Sylvania. .. .. . 051, 043, 044, 047
Symphonic . .. . 047
Tashiro . .. .. . 026
Tatung . .. .. . 030, 031
TEAC . .. .. . 030, 047, 031
Technics . .. . 041, 042, 043, 044
Teknika . .. .. . 044, 047, 032
Toshiba . .. .. . 021
Totevision . .. . 026
Vector Research 031
Wards . .. .. . 055, 056, 029, 064, 026
Yamaha. .. .. . 025, 030, 031
Zenith . .. .. . 064,026
Page 50

50 Plasma TV
Notes
Notes
Notes
Page 51

Owner’s Manual 51
MITSUBISHI DIGITALELECTRONICS AMERICA, INC. (“MDEA”) warrants to the original purchaser of this Plasma Display Panel
that if purchased from an authorized MITSUBISHI Audio/Video Dealer, should it prove defective by reason of improper workmanship and/or material:
a. Parts. All parts are warranted for a period of one year from the date of the original purchase at retail. We will repair or replace,
at our option, any defective part without charge for the part. Parts used for replacement may be replaced with those of like kind
and quality and may be new or remanufactured. Parts used for replacement are warranted for the remainder of the original warranty period.
b. Labor. We will provide the labor for a warranty repair by an authorized MITSUBISHI service center without charge for one year
from the original date of purchase at retail.
c. Notice. To obtain warranty service, you must notify an authorized MITSUBISHI service center of any defect within the applicable warranty time period.
1. TO OBTAIN WARRANTY SERVICE:
a. Contact your nearest authorized MITSUBISHI service center, whose name and address can be obtained from your MITSUBISHI
dealer or by writing or calling MDEA at the address and telephone number provided below.
b. Warranty service will be provided in your home or, if required, at an authorized MITSUBISHI service center, provided that your
television is located within the geographic territory customarily covered by an authorized MITSUBISHI service center. If not, you
must either deliver your television to an authorized service location at your own expense, or pay for any travel and/or transportation costs the service center may charge to and from your home. Actual service labor will be provided without charge.
c. Proof of purchase date from an authorized MITSUBISHI dealer is required when requesting warranty service. Present your
sales receipt or other document which establishes proof and date of purchase. THE RETURN OF THE OWNER REGISTRATION
CARD IS NOT A CONDITION OF WARRANTY COVERAGE. However, please return the Owner Registration Card so that we can
contact you should a question of safety arise which could affect you.
3. This Plasma Display Panel uses a revolutionary technology, gas plasma, to create the screen image. This technology creates
the image using small dots, or picture elements (pixels). Your Plasma Display Panel is manufactured to a high level of perfection,
in fact, 99.99% perfect in the number of properly functioning. As in tube television, sometimes a pixel is continuously active or
inactive. Our standard is clear, your pixels must be 99.99% perfect in the number of properly functioning pixels.
4. THIS WARRANTY DOES NOT COVER:
a. ..........Up to .01% pixel outages (small dot picture elements that are dark or incorrectly illuminated).
b. ..........Cosmetic damage or damage to this Plasma Display Panel or to any other products where such damage is caused by
unauthorized modification, alteration, repairs to or service of the product by anyone other than an authorized MITSUBISHI service
center; physical abuse to or misuse of the product (including any failure to carry out any maintenance as described in the Owner’s
Guide or any product damaged by excessive physical or electrical stress); any products that have had a serial number or any part
thereof altered, defaced or removed; product use in any manner contrary to the Owner’s Guide (including, but not limited to,
uneven phosphor aging and imprinted images on the viewing screen); freight damage or damage due to improper shipping methods; damage caused by use of third party mounting brackets or stands or any damage caused by acts of God or other factors
beyond the reasonable control of MDEA, such as power surge damage caused by electrical system or lightning. This warranty
also excludes service calls where no defect in the product covered under this warranty is found, service calls related to unsatisfactory audio or visual reception or signal unless caused by a defect in the product that is covered under this warranty, all costs,
expenses or any other damages arising from product installation, or set-ups, any adjustments of user controls (including, contrast,
brightness, color, tint, fine tuning, sharpness), other adjustment necessary to prepare the unit for display or use, connection with
any external TV tuner, audio receiver, antenna, cable or satellite systems, or service of products purchased or serviced outside the
U.S.A. Please consult the operating instructions contained in the Owner’s Guide furnished with the product for information regarding user controls.
5. ANY EXPRESS WARRANTYNOT PROVIDED HEREIN, AND ANY REMEDY WHICH, BUT FOR THIS PROVISION, MIGHT
ARISE BY IMPLICATION OR OPERATION OF LAW, IS HEREBY EXCLUDED AND DISCLAIMED. THE IMPLIED WARRANTIES
OF MERCHANTABILITYAND FITNESS FOR ANY PARTICULAR PURPOSE ARE EXPRESSLY LIMITED TO ATERM OF ONE
YEAR.
6. UNDER NO CIRCUMSTANCES SHALLMDEABE LIABLE TO PURCHASER OR ANY OTHER PERSON FOR ANY INCIDENTAL, SPECIALOR CONSEQUENTIALDAMAGES, WHETHER ARISING OUT OF BREACH OF WARRANTY, BREACH OF CONTRACT, OR OTHERWISE.
7. Some states do not allow limitations on how long an implied warranty lasts, or the exclusion or limitation of incidental, special or
consequential damages, so the above limitations or exclusions may not apply to you.
8. This warranty gives you specific legal rights, and you may also have other rights which vary from state to state.
9. BEFORE REQUESTING SERVICE, please review the instruction booklet to insure proper installation and correct customer control adjustment. If the problem persists, contact your nearest MITSUBISHI Dealer for the name(s) of authorized MITSUBISHI
Service Center(s). If you are unable to obtain this information, please call 800-332-2119, or write us at the address below.
MITSUBISHI DIGITAL ELECTRONICS AMERICA, INC.
9351 Jeronimo Road
Irvine, CA 92618-1904
Mitsubishi Plasma Display Panel Limited W
Mitsubishi Plasma Display Panel Limited W
arranty
arranty
Page 52

Mitsubishi Digital Electronics America
9351 Jeronimo Road
Irvine, CA 92618
Printed in KOREA
P/N : 3828VA0361Q c
 Loading...