

Mitsubishi Electric PAC-MK50BC, PAC-MK30BC Installation Manual
Air-Conditioners Indispensable Optional Parts
BRANCH BOX
PAC-MK50BC
PAC-MK30BC
ONLY FOR R410A OUTDOOR UNIT
ONLY FOR INDOOR USE
HFC
utilized
R410A
INSTALLATION MANUAL
For safe and correct use, please read this installation manual thoroughly before installing the air-conditioner
unit.
INSTALLATONSHANDBUCH
Zum sicheren und ordnungsgemäßen Gebrauch der Klimaanlage das Installationshandbuch gründlich
durchlesen.
MANUAL D’INSTALLATION
Veuillez lire le manual d’installation en entier avant d’installer ce climatiseur pour éviter tout accident et vous
assurer d’une utilisation correcte.
INSTALLATIEHANDLEIDING
Voor een veilig en juist gebruik moet u deze installatiehandleiding grondig doorlezen voordat u de airconditioner installeert.
MANUAL DE INSTALACIÓN
Para un uso seguro y correcto, lea detalladamente este manual de instalación antes de montar la unidad de
aire acondicionado.
MANUALE DI INSTALLAZIONE
Per un uso sicuro e corretto, leggere attentamente questo manuale di installazione prima di installare il condizionatore d’aria.
MANUAL DE INSTALAÇÃO
Para segurança e utilização correctas, leia atentamente este manual de instalação antes de instalar a unidade de ar condicionado.
INSTALLATIONSMANUAL
Læs venligst denne installationsmanual grundigt, før De installerer airconditionanlægget, af hensyn til sikker
og korrekt anvendelse.
INSTALLATIONSMANUAL
Läs denna installationsmanual noga för säkert och korrekt bruk innan luftkonditioneringen installeras.
MONTAJ ELKİTABI
Emniyetli ve doğru biçimde nasıl kullanılacağını öğrenmek için lütfen klima cihazını monte etmeden önce bu
elkitabını dikkatle okuyunuz.
РУКОВОДСТВО ПО УСТАНОВКЕ
Для осторожного и правильного использования прибора необходимо тщательно ознакомиться с данным руководством по установке до выполнения установки кондиционера.
ΕΓΧΕΙΡΙΔΙΟ ΟΔΗΓΙΩΝ ΕΓKATAΣTAΣHΣ
Για ασφάλεια και σωστή χρήση, παρακαλείστε διαβάσετε προσεχτικά αυτό το εγχειρίδιο εγκατάστασης πριν
αρχίσετε τηv εγκατάσταση της μονάδας κλιματισμού.
Deutsch
Français
English
VOOR DE INSTALLATEUR
Nederlands
PARA EL INSTALADOR
Español
PER L’INSTALLATORE
Italiano
PARA O INSTALADOR
Português
TIL INSTALLATØREN
Dansk
FÖR INSTALLATÖREN
Svenska
MONTÖR İÇİN
Türkçe
ДЛЯ УСТАНОВИТЕЛЯ
Русский
FÜR INSTALLATEURE
POUR L’INSTALLATEUR
FOR INSTALLER
Ελληνικά
ΓΙA AYΤΟΝ ΠΟΥ ΚΑΝΕΙ ΤΗΝ ΕΓΚΑTAΣΤAΣΗ
2
Contents
1. Safety precautions .............................................. 2
2. Selecting a location for installation .................................. 2
3. Confirming supplied accessories ................................... 3
4. Dimensions and required servicing space of Branch Box ................ 3
5. Refrigerant piping ............................................... 6
6. Mounting the Branch Box ......................................... 7
7. Installing refrigerant piping ........................................ 7
8. Electrical work ................................................. 9
9. Test run ..................................................... 13
1. Safety precautions
► Before installing the unit, make sure you read all the “Safety precau-
tions”.
► Please report to or take consent by the supply authority before connec-
tion to the system.
► PAC-MK•BC series are designed as professional equipment.
► When receiving electricity from the outdoor unit, applicable standards for
the outdoor unit may not be satisfied depending on the indoor u it used.
After installation work has been completed, explain the “Safety Precautions,” use,
and maintenance of the unit to the customer according to the information in the
Operation Manual and perform the test run to ensure normal operation. Both the
Installation Manual and Operation Manual must be given to the user for keeping.
These manuals must be passed on to subsequent users.
: Indicates a part which must be grounded.
Warning:
Carefully read the labels affixed to the main unit
Warning:
Describes precautions that must be observed to prevent danger of injury or
death to the user.
Caution:
Describes precautions that must be observed to prevent damage to the unit.
This installation manual is only for the branch box installation. In installing the indoor units and outdoor units, refer to the installation manual attached to
each unit.
Warning:
• The unit must not be installed by the user.
• Ask a dealer or an authorized technician to install the unit.
• For installation work, follow the instructions in the Installation Manual and
use tools and pipe components specifically made for use with refrigerant
specified in the outdoor unit installation manual
• The unit must be installed according to the instructions in order to mini-
mize the risk of damage from earthquakes, typhoons, or strong winds. An
incorrectly installed unit may fall down and cause damage or injuries.
• The unit must be securely installed on a structure that can sustain its
weight.
• If the air conditioner is installed in a small room, measures must be taken
to prevent the refrigerant concentration in the room from exceeding the
safety limit in the event of refrigerant leakage. Should the refrigerant leak
and cause the concentration limit to be exceeded, hazards due to lack of
oxygen in the room may result.
• Ventilate the room if refrigerant leaks during operation. If refrigerant comes
into contact with a flame, poisonous gases will be released
• All electric work must be performed by a qualified technician according to
local regulations and the instructions given in this manual.
• Use only specified cables for wiring
• The terminal block cover panel of the unit must be firmly att ched.
• Use only accessories authorized by Mitsubishi Electric and ask a dealer or
an authorized technician to install them.
• The user should never attempt to repair the unit or transfer it to another lo-
cation.
• After installation has been completed, check for refrigerant leaks. If refriger-
ant leaks into the room and comes into contact with the flame o a heater or
portable cooking range, poisonous gases will be released.
• Be sure to connect the power supply cords and the connecting wires for the
indoor units, outdoor units, and branch boxes directly to the units (no intermediate connections).
Intermediate connections can lead to communication errors if water enters
the cords or wires and causes insufficient insulation to ground or a poor
electrical contact at the intermediate connection point.
(If an intermediate connection is necessary, be sure to take measures to
prevent water from entering the cords and wires.)
Caution:
• Make sure that the refrigerant pipes are well insulated to prevent condensation.
Incomplete insulation may cause condensation on the surface of pipes,
wetting of the ceiling, floor and other important properties
•
Do not use the unit in an unusual environment. If the air conditioner is installed in areas exposed to steam, volatile oil (including machine oil), or sulfuric gas, areas exposed to high salt content such as the seaside, the performance can be significantly reduced and the internal parts can be damaged.
• Do not install the unit where combustible gases may leak, be produced,
flo , or accumulate. If combustible gas accumulates around the unit, fire or
explosion may result.
• When installing the unit in a hospital or communications office, be prepared for noise and electronic interference. Inverters, home appliances,
high-frequency medical equipment, and radio communications equipment
can cause the air conditioner to malfunction or breakdown. The air conditioner may also affect medical equipment, disturbing medical care, and
communications equipment, harming the screen display quality.
•
Thermal insulation of the refrigerant pipe is necessary to prevent condensation.
If the refrigerant pipe is not properly insulated, condensation will be formed.
• Place thermal insulation on the pipes to prevent condensation. If the drainpipe is installed incorrectly, water leakage and damage to the ceiling, floo ,
furniture, or other possessions may result.
• Do not clean the air conditioner unit with water. Electric shock may result.
• Tighten all flar nuts to specificatio using a torque wrench. If tightened
too much, the flare nut can break after an extended period
• Be sure to install circuit breakers, if not installed, electric shock may result.
• For the power lines, use standard cables of sufficient capacity. Otherwise,
a short circuit, overheating, or fire may result
• When installing the power lines, do not apply tension to the cables. If the
connections are loosened, the cables can snap or break and overheating or
fire may result
• Do not connect the ground wire to gas or water pipes, lighting rods, or
telephone grounding lines. If the unit is not properly grounded, electric
shock may result.
2. Selecting a location for installation
* The branch box is only indoor use.
• Ensure that the branch box is installed in a location which facilitates servicing
and maintenance. (ensure that the required maintenance hole or service space
is available).
• Do not install near bedrooms. The sound of refrigerant flowing through
the piping may sometimes be audible.
• Ensure that it is located where noise in operation will not be a problem.
After power is supplied or after an operation stop for a while, a small
clicking noise may be heard from the inside of the branch box. The electronic expansion valve is opening and closing. The unit is not faulty.
• Determine the route of refrigerant piping, and electrical wiring beforehand.
• Ensure that the location of the installation is such that the length of refrigerant
piping is within the specified limits
• Ensure that the branch box is installed above the ceiling of corridor, bath room,
etc., where persons are not regularly there (Avoid installing at around center of
the room.) for maintenance.
* Ensure that the unit is installed in a location able to support its weight.
Warning:
Ensure that the unit is installed firmly in a location able to upport its weight.
If the installation is of insufficient strength the unit may fall, resulting in injury.
• Do not install in location that is hot or humid for long periods of time.
3
3. Confirming supplied accessorie
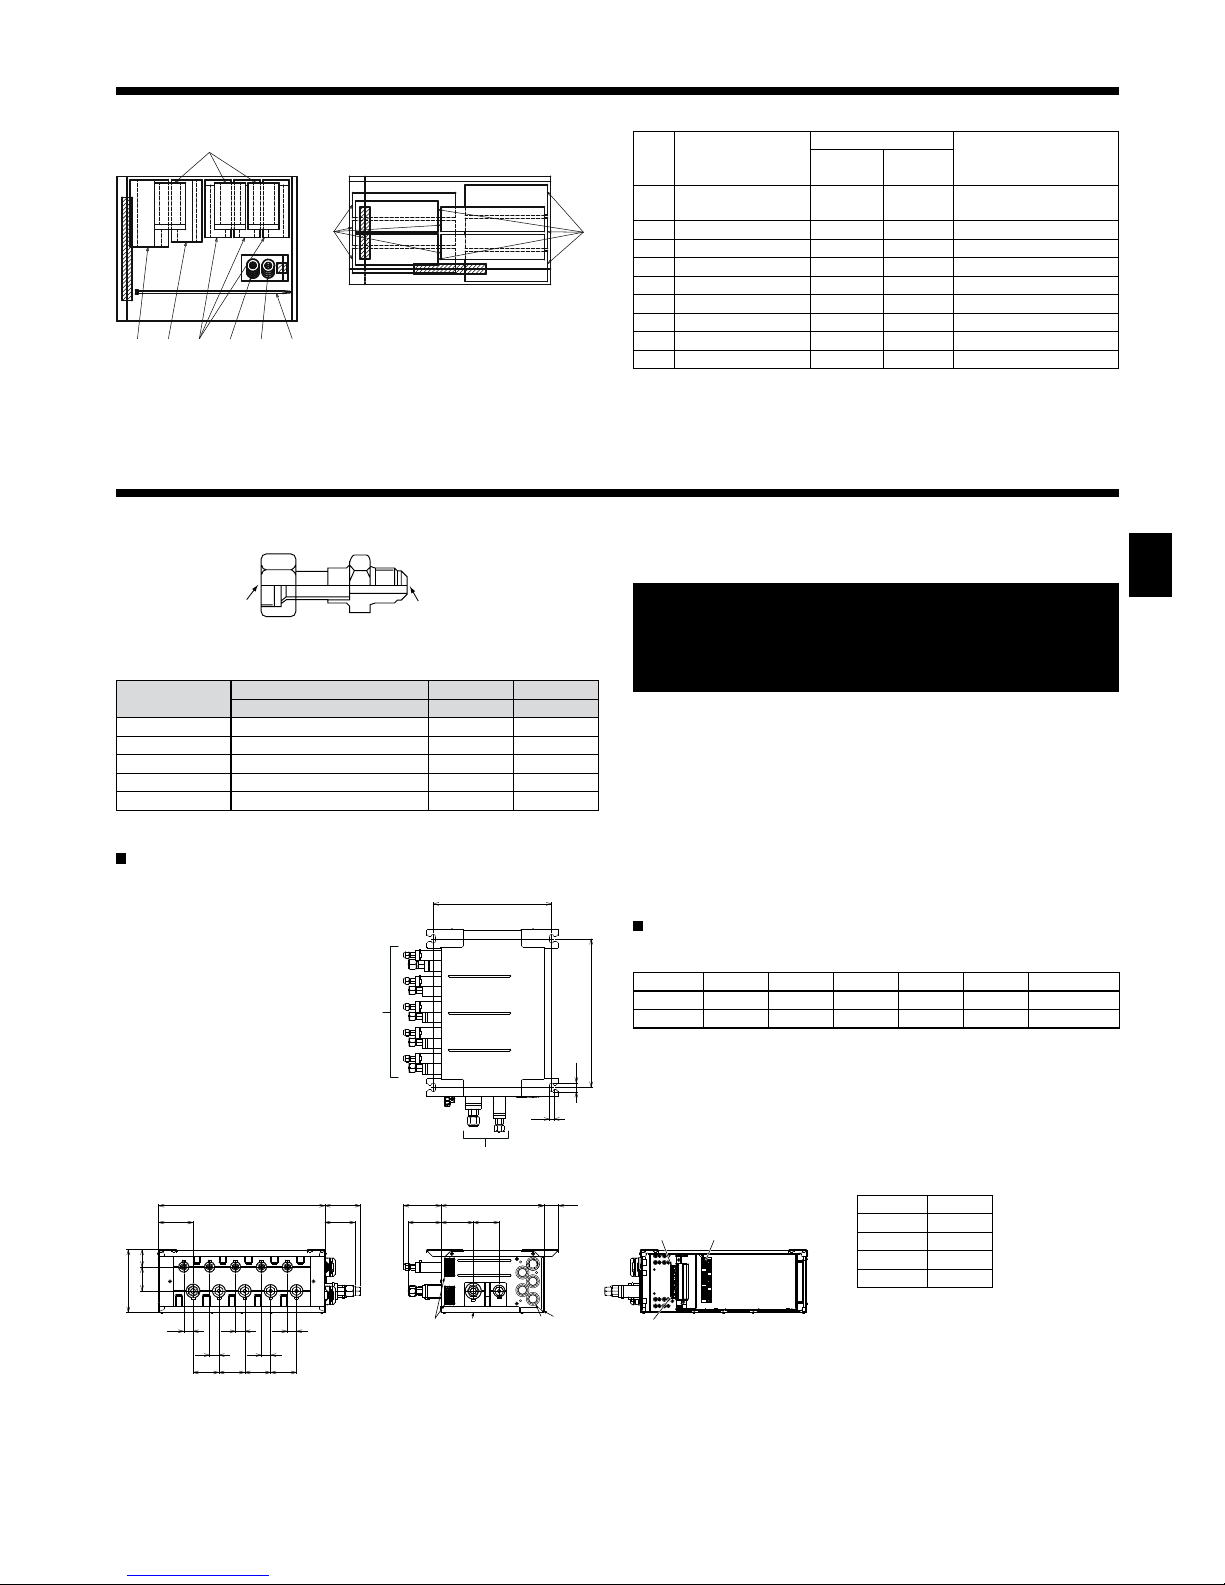
4. Dimensions and required servicing space of Branch Box
PAC-MK50BC (5-branches type)
(mm)
3.1. Check the Branch Box accessories and parts
Accessory name
Q’ty
PAC-
MK30BC
PAC-
MK50BC
1
Washer
(with insulation)
4 4
2
Washer 4 4
3
Pipe cover (Liquid) 1 1 TO OUTDOOR UNIT
4
Pipe cover (Gas) 1 1 TO OUTDOOR UNIT
5
Pipe cover (Liquid) 3 5 TO INDOOR UNITS
6
Pipe cover (Gas) 3 5 TO INDOOR UNITS
7
Joint cover (Liquid) 1 3
8
Joint cover (Gas) 1 3
9
Band 16 24
Fig. 3-1
2 9
8
5 6
4 3 7 1
B
A
Optional different-diameter (deformed) joints
Fig. 4-1
* Please connect 2 indoor units or more with 1 system.
* Up to 2 branch boxes may be connected to 1 outdoor unit.
* Suspension bolt : W3/8 (M10)
* Refrigerant pipe flared connectio
* The piping connection size differs according to the type and capacity of
indoor units. Match the piping connection size for indoor unit and branch
box. If the piping connection size of branch box does not match the piping connection size of indoor unit, use optional different-diameter (deformed) joints to the branch box side. (Connect deformed joint directly to
the branch box side.)
A Suspension bolt pitch
B To indoor unit
C To outdoor unit
D Service panel (for LEV, THERMISTOR)
E Electric cover
F Rubber bush
G Terminal block (to indoor unit on control board)
H Terminal block (to outdoor unit)
J Terminal block (for communication cable)
K Cable clamp
* Ensure that the branch box is installed as shown on the below drawing.
PAC-MK50BC (Fig.4-2)
Suspension bolt: W3/8 (M10)
Refrigerant pipe flared connectio
A B C D E
To outdoor unit
Liquid pipe
ø6.35 ø6.35 ø6.35 ø6.35 ø6.35 ø9.52
Gas pipe
ø9.52 ø9.52 ø9.52 ø9.52 ø12.7 ø15.88
Model name
Connected pipes diameter Diameter A Diameter B
mm mm mm
MAC-A454JP ø9.52 → ø12.7 ø9.52 ø12.7
MAC-A455JP ø12.7 → ø9.52 ø12.7 ø9.52
MAC-A456JP ø12.7 → ø15.88 ø12.7 ø15.88
PAC-493PI ø6.35 → ø9.52 ø6.35 ø9.52
PAC-SG76RJ-E ø9.52 → ø15.88 ø9.52 ø15.88
mm
81
96450
70707070
25
25
25
25
25
170
4765
93
24
12
320
402
40278
7087
102
90
DK
F
E
H
G
J
E D C B A
E D C B A
C
A
B
A
Fig. 4-2
Conversion formula
1/4 F ø6.35
3/8 F ø9.52
1/2 F ø12.7
5/8 F ø15.88
3/4 F ø19.05
4
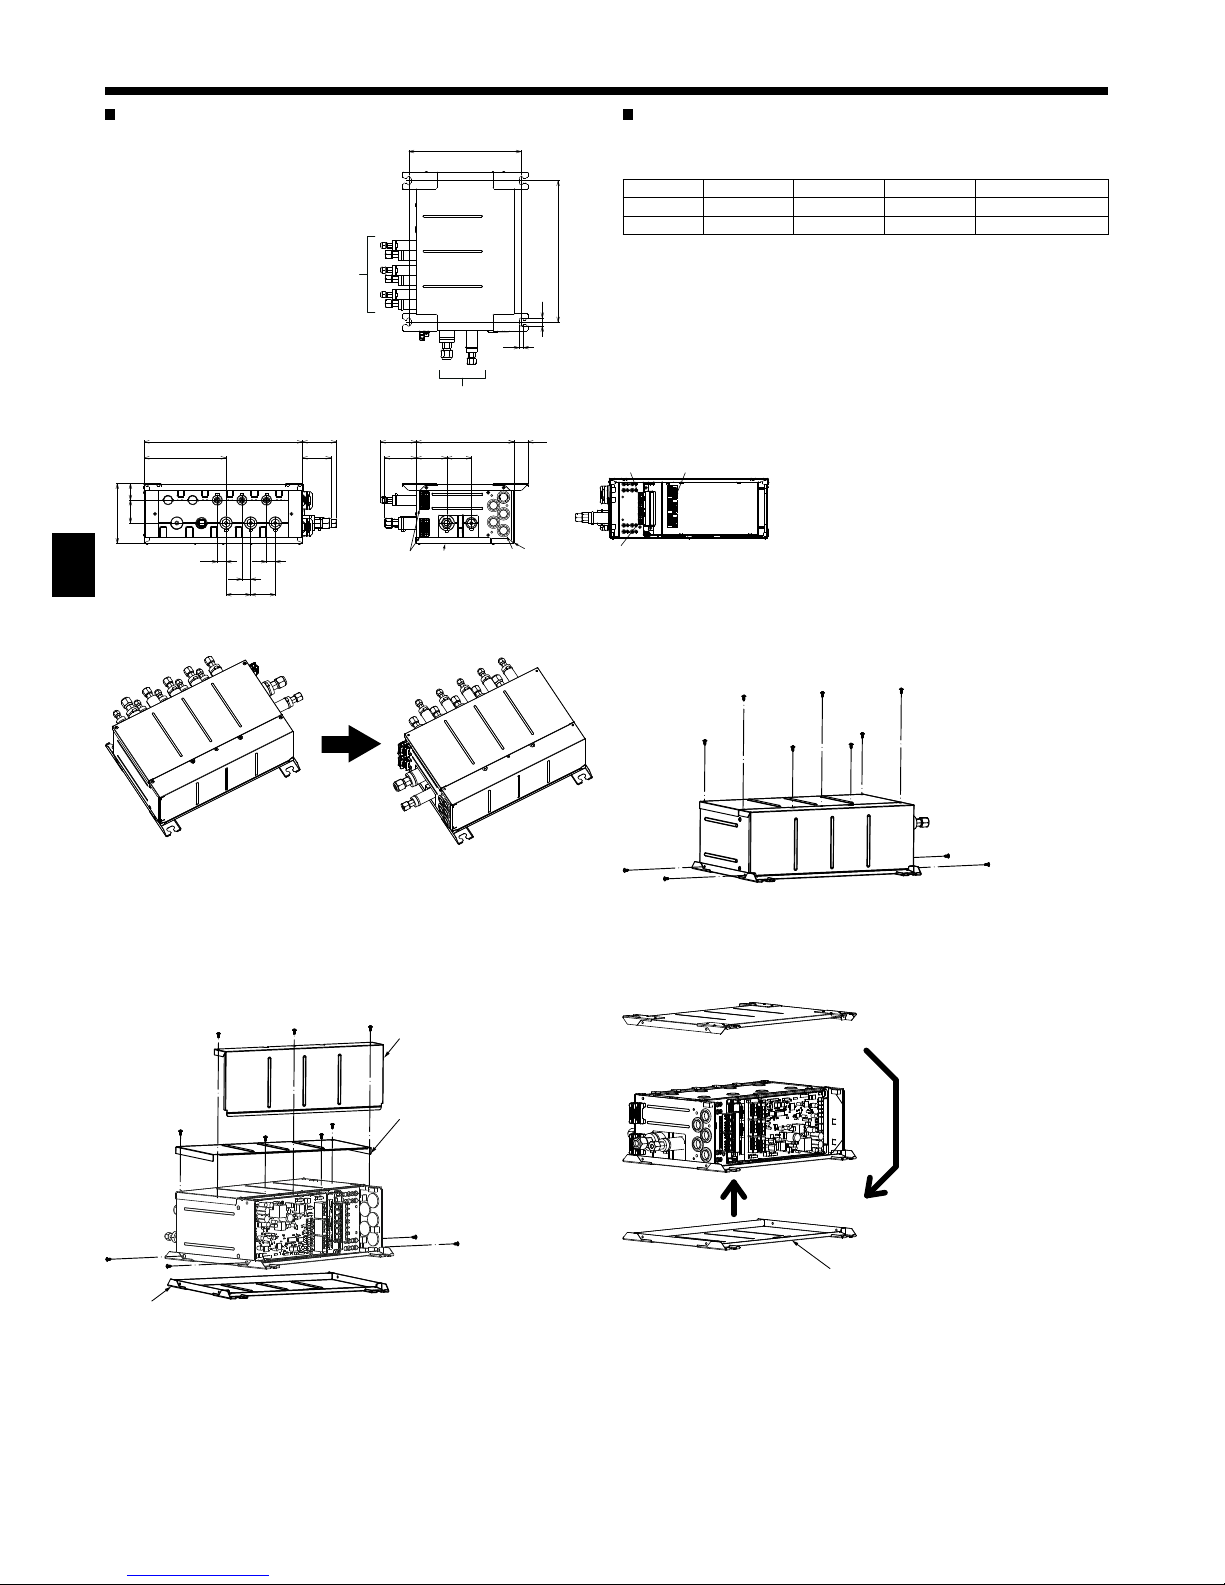
4. Dimensions and required servicing space of Branch Box
PAC-MK30BC (3-branches type) PAC-MK30BC (Fig.4-3)
Suspension bolt: W3/8 (M10)
Refrigerant pipe flared connectio
mm
A B C
To outdoor unit
Liquid pipe
ø6.35 ø6.35 ø6.35 ø9.52
Gas pipe
ø9.52 ø9.52 ø9.52 ø15.88
A
A
B
C
DK
F
E
H
G
J
90
102
87 70
278 40
12
320
402
24
7070
25
25
25
170
4765
96
81
450
233
C B A
C B A
Fig. 4-3
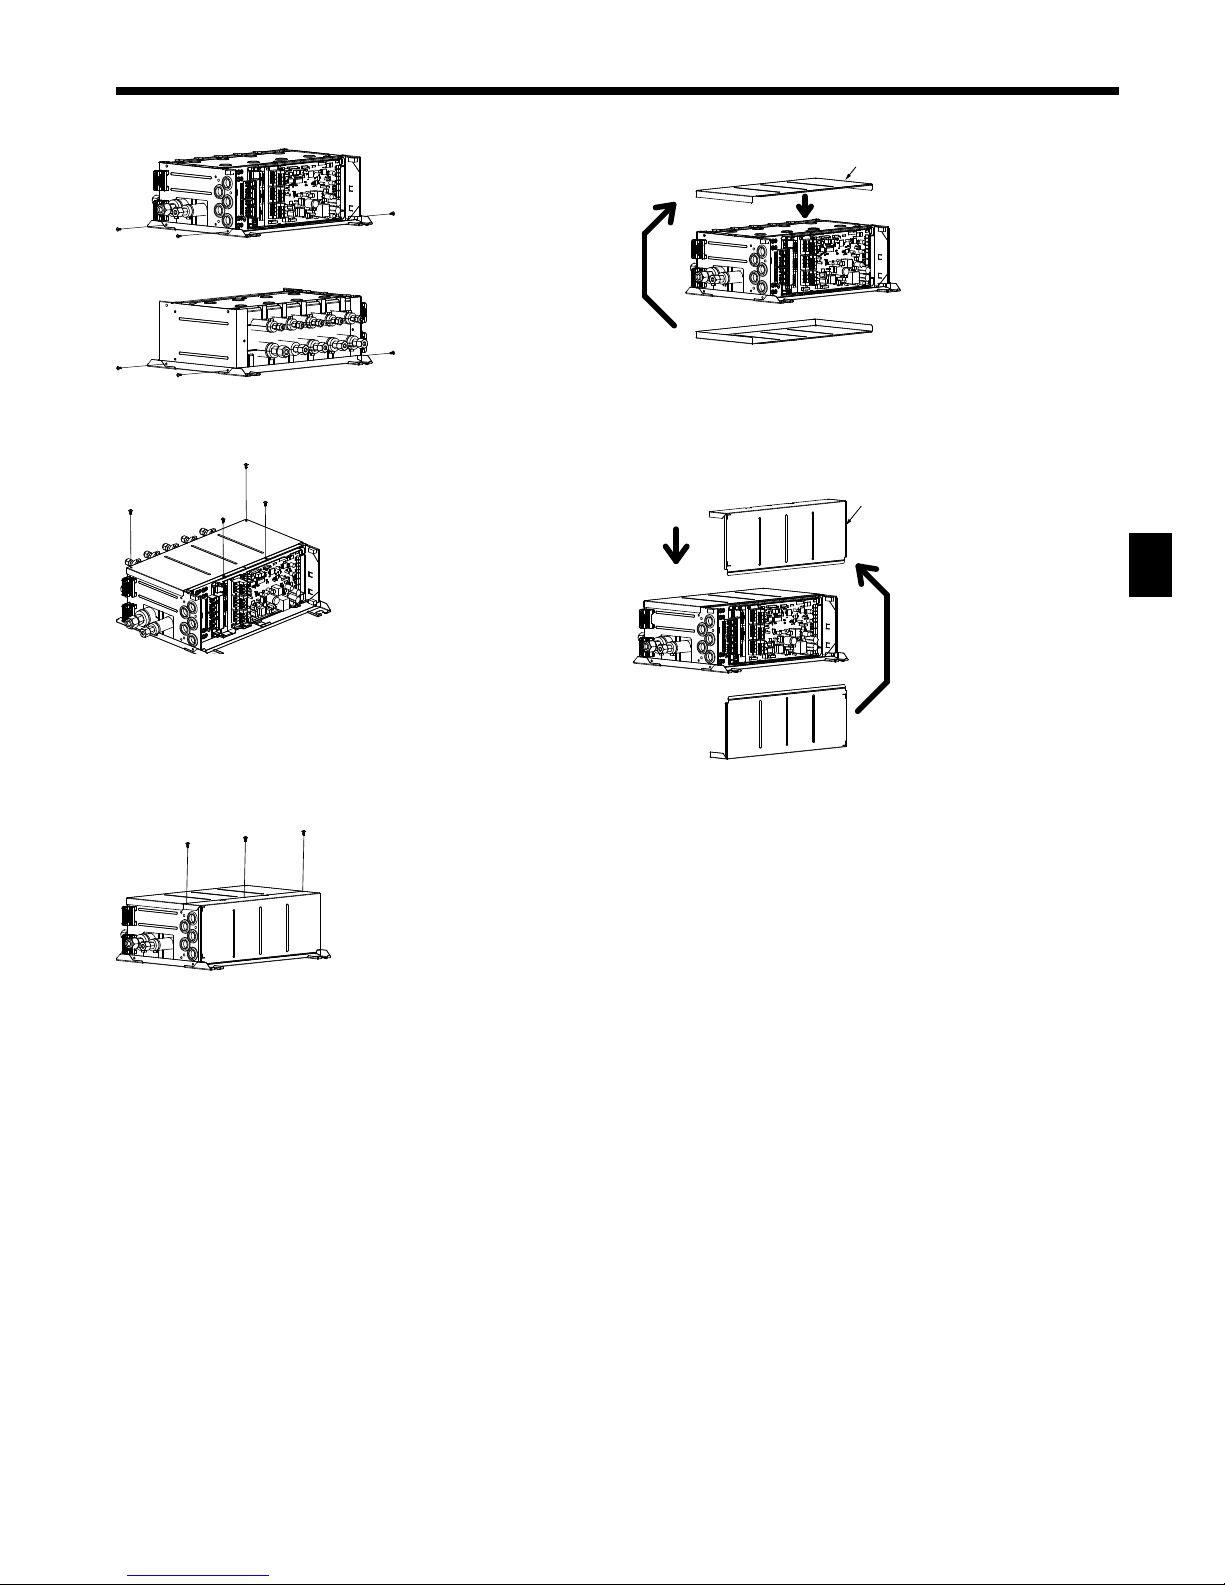
4.1. The direction of the piping can be changed. (Fig.
4-4). [Work Procedures] (Fig. 4-5)
1 Remove the screws in each part.
Fig. 4-4
2 Remove the electric cover, service panel, and top panel.
A
Electric cover
B
Service panel
C
Top panel
B
A
C
3 Install the top panel on the opposite surface.
C
Top panel
C
(mm)
5
4 Fasten the screws in each part.
6 Fasten the screws.
8 Fasten the screws.
5 Install the service panel on the opposite surface.
B
Service panel
B
7 Install the electric cover on the opposite surface.
A
Electric cover
A
Fig. 4-5
4. Dimensions and required servicing space of Branch Box
 Loading...