

Page 1

Display Audio
2018 / OWNER’S MANUAL
Page 2

Introduction
Thank you for buying a Mitsubishi Motors product.
In order to fully utilize the functionality of this product and ensure safe and correct operation,
please read the “User Manual” carefully before operation.
After reading the “User Manual”, ensure this is kept readily available, and refer to it again if you
do not understand any points, or in the event of problems.
Page 3

Table of contents
Introduction
Before Use 3
Disclaimers .................................................... 3
Important Points on Usage ............................ 3
FCC NOTE .................................................... 4
FCC CAUTION .............................................. 4
Restrictions on Operations while the Vehicle Is Driving .........
How to Clean ................................................. 4
Trademarks.................................................... 4
Important Points on Safety for the Customer .........
How to Read This Manual ................. 7
Basic Operation 8
This Product ...................................... 8
Main Unit Panel ............................................. 8
Start ............................................................... 9
How to Perform Touch Operations .....
When Touching ___ ..................................... 10
Searching Items from a List ......................... 10
Home Screen .................................. 11
Display Contents ..........................................11
Switch the Sources ...................................... 12
AV
Audio Functions 13
Basic Operation .............................. 13
Switch Audio ON/OFF ................................. 13
Adjust Volume .............................................. 13
Steering Remote Control Switch Operation ......
10
14
Audio Files (MP3/WMA/AAC) ........... 15
Folder Structure ........................................... 16
What Is MP3? .............................................. 17
What Is WMA? ............................................. 18
What Is AAC? .............................................. 19
Radio 20
Listen to Radio ................................ 20
4
Display Contents ......................................... 21
Register Your Favorite Broadcast Stations ......
Search for Broadcast Stations with Strong Signals .......
6
Search for Broadcast Stations from the Station List .......
iPod/USB 26
Use an iPod ..................................... 26
Play iPod ..................................................... 27
Display Contents ......................................... 27
Switch Playback Mode ................................ 28
Search by List .............................................. 28
Use USB Device .............................. 29
Display Contents ......................................... 30
Display a List ............................................... 32
Switch Playback Mode ................................ 33
Bluetooth Audio 34
Use Bluetooth Audio ....................... 34
Connect a Bluetooth-capable
Audio Device ............................................... 34
Listen to a Bluetooth-capable
Audio Device ............................................... 35
Display Contents ......................................... 35
INFO/SETTINGS
INFO 36
Mobile Phone ................................... 36
Connect Your Mobile Phone ........................ 36
Display the Phonebook ................................ 37
Dial a Telephone .......................................... 37
Incoming Calls ............................................. 39
Other Info ........................................ 40
Camera ........................................................ 40
Product Info ................................................. 40
SETTINGS 41
24
System Settings .............................. 41
24
Bluetooth Setting ......................................... 41
25
Adjust the Sound Quality ............................. 43
Day/Night Display Setting ............................ 44
Display Settings ........................................... 45
Clock ............................................................ 45
Radio Setting ............................................... 46
Language ..................................................... 47
Beep Volume ............................................... 47
Other Settings ................................. 48
Display Off ................................................... 48
Clock Screen ............................................... 48
Other
Troubleshooting .............................. 49
If This Message Appears... .......................... 49
If You Think Something Is Not Working Properly... .......
50
Page 4

Introduction
The following is what you need to know before using this product.
Before Use
Disclaimers
• Mitsubishi Motors will in no way be held
responsible for losses resulting from fi re,
earthquake, tsunami, fl ood, or other natural
disasters; from actions of third parties; from
other accidents; or from inappropriate or
abnormal usage conditions utilized by the
customer, be said conditions deliberate or
unintentional.
• There will be no indemnifi cation for alteration
or loss of any information stored upon this
product by the customer or a third party
resulting from improper use of this product,
the infl uence of static electricity or electric
noise, or at the time of malfunction or repair
or similar circumstances. We recommend
that you create backups of important
information as a precautionary measure.
• Some personal information (telephone
numbers etc.) entered into this product may
remain in memory even if this product is
removed. The customer is responsible for
proper handling and management (including
deleting) of personal information to protect
privacy when handing this product over to
anyone else or disposing of it. Mitsubishi
Motors will in no way be held responsible.
• Mitsubishi Motors will in no way be held
responsible for any collateral losses (loss
of business profi ts, alteration or loss of
recorded data) resulting from the usage or
inability to use this product.
• For the purpose of product improvement,
specifi cations and external appearance may
be subject to change without advance notice.
Accordingly, while the contents of the User
Manual may differ, please be aware that
returns, refunds, exchange, or conversion
are not possible.
• This User Manual explains details for
multiple models together. Depending on the
model, there may be functions that may be
described but not available, or requirements
for separately purchased-products. Thank
you for your understanding.
• Images and illustrations used in the
User Manual are either those used in
development, or used for explanations.
Please be aware that these may differ from
the actual images and illustrations used in
the product.
• Please be aware that Mitsubishi Motors,
including after-sales service departments,
will in no way be held responsible for any
losses or detriment resulting from alteration
or loss of information stored in this product.
Important Points on Usage
Common
• During operation, ensure that the vehicle is
not stationary in a garage or other confi ned
area with bad ventilation while the engine
is running. Doing so may result in carbon
monoxide poisoning.
• For safety, the driver is not to operate this
product while the vehicle is moving. The
driver should also minimize as much as
possible the time spent viewing the screen.
Being distracted by the screen can result in
an accident.
• Do not turn the volume up to the extent that
you cannot hear sounds from outside the
vehicle while driving. Driving without being
able to hear sounds from outside the vehicle
can result in an accident.
• Do not disassemble or modify the product.
This may lead to malfunction, smoking, or
fi re.
• When operating, ensure that the vehicle is
stopped in a safe area in which stopping is
permitted.
• Continued usage of this product without
the engine running may deplete the vehicle
battery, meaning that the engine may not be
able to start.
Ensure this product is used while the engine
is running.
Continued on the next page
Introduction Before Use
3
Page 5
• The following phenomena are characteristic
of LCD screens. They do not indicate a
malfunction.
- Small black dots or bright dots (red, blue,
green) on the screen.
- Screen movement is slow during cold
weather.
- The screen is sometimes dark during hot
weather.
- The color tones and brightness vary with
the viewing angle.
• It is a characteristic of LCD screens that the
picture quality varies with the viewing angle.
When using this product for the fi rst time,
adjust the picture quality.
• If you paste a commercially-available LCD
protective fi lm or the like on the screen, it
may interfere with touch panel operation.
• If you operate the touch panel with a sharp
object (pen tip, fi nger nail, etc.), the screen
may be scratched and this unit may be
damaged, leading to faulty operation.
• Operating the touch panel with gloves on
may cause faulty operation.
• When cleaning the screen, wipe it with a soft
cloth. Do not use benzene, paint thinners,
anti-static agents, or other chemical wipes.
They could scratch the screen.
iPod/iPhone Playback
Function
• This product supports audio playback from
iPod/iPhone devices, however differing
versions mean that playback cannot be
guaranteed.
• Please be aware that depending on the
iPod/iPhone model or version, operation
may differ.
(Option)
FCC NOTE
This device complies with part 15 of the FCC
Rules.
Operation is subject to the following two
conditions: (1) This device may not cause
harmful interference, and (2) this device must
accept any interference received, including
interference that may cause undesired
operation.
This transmitter must not be co-located
or operated in conjunction with any other
antenna or transmitter.
This equipment complies with FCC/IC
radiation exposure limits set forth for an
uncontrolled environment and meets the FCC
radio frequency (RF) Exposure Guidelines
and RSS-102 of the IC radio frequency (RF)
Exposure rules.
This equipment has very low levels of RF
energy that is deemed to comply without
maximum permissive exposure evaluation
(MPE).
FCC CAUTION
Changes or modifi cations not expressly
approved by the party responsible for
compliance could void the user’s authority to
operate the equipment.
Restrictions on Operations
while the Vehicle Is Driving
Some operations are restricted while the
vehicle is driving. The driver should refrain
from operating this product while the vehicle
is moving. First stop the vehicle in a safe
location, then operate this product.
How to Clean
• If the product becomes dirty, wipe with a soft
cloth.
• If very dirty, use a soft cloth dipped in neutral
detergent diluted in water, and then wrung
out. Do not use benzene, thinners, or other
chemical wipes. This may harm the surface.
Trademarks
• Product names and other proper names are the trademarks
or registered trademarks of their respective owners.
• Furthermore, even if there is no specifi c denotation of
trademarks or registered trademarks, these are to be
observed in their entirety.
The Bluetooth® word mark and
logos are registered trademarks
owned by the Bluetooth SIG, Inc.
and any use of such marks by
Mitsubishi Electric Corporation is
under license. Other trademarks
and trade names are those of their
respective owners.
HD Radio Technology
manufactured under license from
iBiquity Digital Corporation. U.S.
and Foreign Patents. For patents
see http://patents.dts.com/. HD
Radio and the HD, HD Radio,
and “ARC” logos are registered
trademarks or trademarks of
iBiquity Digital Corporation in
the United States and/or other
countries.
4
Page 6
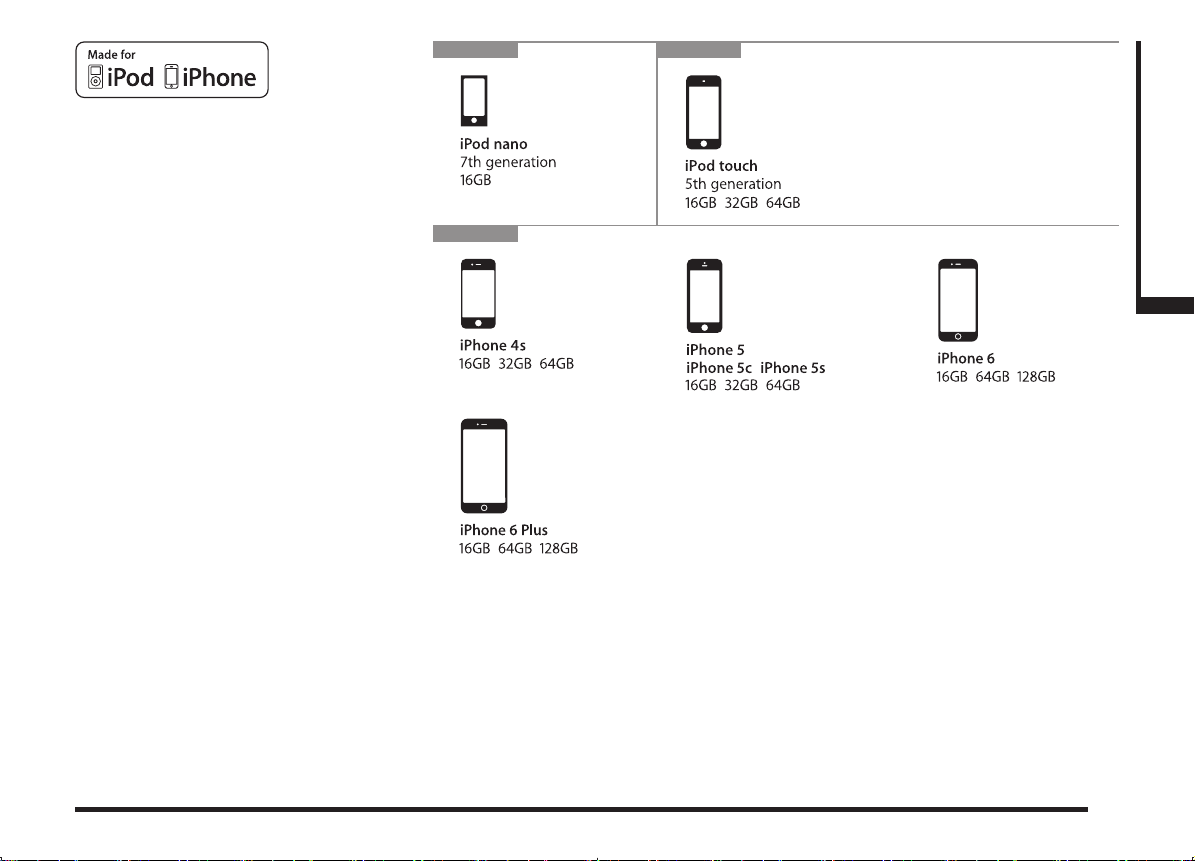
“Made for iPod,” “Made for iPhone” mean that an electronic
accessory has been designed to connect specifi cally to
iPod or iPhone, respectively, and has been certifi ed by the
developer to meet Apple performance standards.
iPhone, iPod nano, and iPod touch are trademarks of Apple
Inc., registered in the U.S. and other countries.
Apple is not responsible for the operation of this device or its
compliance with safety and regulatory standards
* iPod and iTunes licensing allows individual users to privately
reproduce and play back non-copyrighted material as well
as material that may be legally copied and reproduced.
Infringement of copyright is prohibited.
iPodnano iPodtouch
Introduction Before Use
iPhone
5
Page 7
Important Points
on Safety for the
Customer
This product features a number of pictorial
indications as well as points concerning
handling so that you can use the product
correctly and in a safe manner, as well as
prevent injury or damage to yourself, other
users, or property.
WARNING
CAUTION
This indicates details
regarding handling of the
product that if ignored, could
be expected to result in death
or serious injury.
This indicates details
regarding handling of the
product that if ignored, could
be expected to result in
personal injury or property
loss.
WARNING
• The driver should not pay close
attention to the images on the
screen while driving.
This may prevent the driver looking where
they are going, and cause an accident.
• The driver should not perform
complicated operations while
driving.
Performing complicated operations while
driving may prevent the driver looking
where they are going, and cause an
accident.
Therefore stop the vehicle in a safe
location before performing such
operations.
• Do not use during malfunctions,
such as when the screen does
not light up or no sound is
audible.
This may lead to accident, fi re, or electric
shock.
• Ensure water or other foreign
objects do not enter the product.
This may lead to smoking, fi re, electric
shock, or malfunction.
• In the event of abnormalities
occurring when foreign objects
or water enter the product,
resulting in smoke or a strange
smell, immediately stop using
the product, and consult an
authorized Mitsubishi Motors
dealer or a repair facility of your
choice.
Continuing to use the product may result
in accident, fi re, or electric shock.
WARNING
• Do not disassemble or modify the
product.
This may lead to malfunction, fi re, or
electric shock.
• During thunderstorms, do not
touch the antenna or the front
panel.
This may lead to electrical shock from
lightning.
CAUTION
• Do not block ventilation holes or
heat sinks on the product.
Blocking ventilation holes or heat sinks
may prevent heat from escaping from
within the product, leading to fi re or
malfunction.
• Do not turn the volume up to
the extent that you cannot hear
sounds from outside the vehicle
while driving.
Driving without being able to hear sounds
from outside the vehicle may result in an
accident.
Important Points on Safety for the Customer
6
Page 8
How to Read This Manual
The notation used in this manual and what it means are as follows.
1)
2)
3)
4)
5)
6)
7)
8)
9)
10)
11)
○○○
9)
10)
11)
or [○○○]
Shows a touch switch displayed on the
screen.
(P000)
Shows the page to refer to. It contains
relevant explanations etc.
Continued on the next page
Used when the explanation of operations
is continued.
Introduction Before Use
1) Volume Header
Classifi ed by main functions.
2) Chapter Header
Classifi es more fi nely the main functions
in the volume header. A chapter header
appears at the head of each chapter.
You can also check the index on the right
edge.
3) Major Header
Classifi es the main operations and
functions in a chapter.
4) Intermediate Header
Classifi es the operations and functions
under the major header.
Equipment by type
5)
Indicates equipment that differs according
to the vehicle model and grade.
6) Minor Header
Classifi es more fi nely the operations and
functions classifi ed under the intermediate
header.
7) Operation procedure
These are numbers that show the
operation procedure. Perform the
procedure in the order of these numbers.
○○○
8)
Shows an operation key on the panel.
key or [○○○] key
How to Read This Manual
7
Page 9
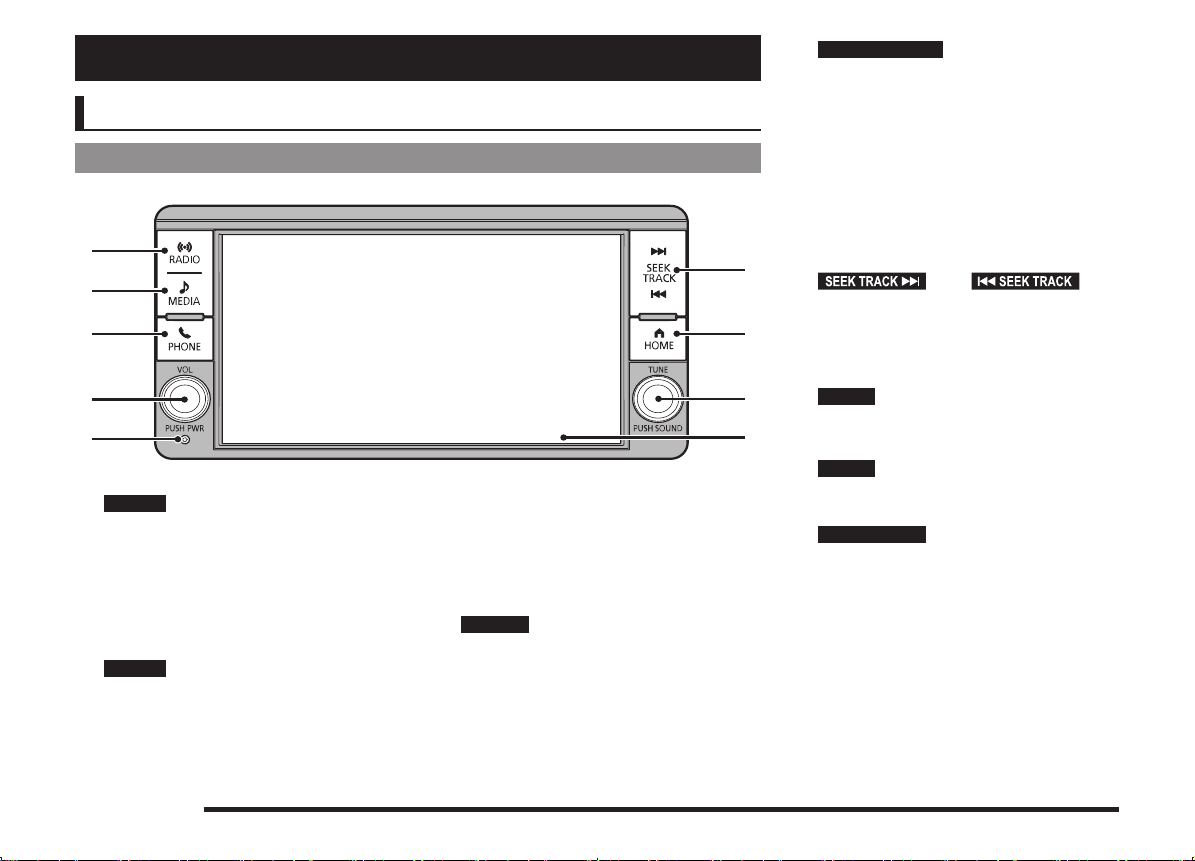
Basic Operation
This Product
Main Unit Panel
This gives the names of each section of the main unit panel and explains their functions.
1)
2)
3)
4)
5)
RADIO
1)
When the radio screen is displayed, the
radio source changes each time the key is
pressed.
When any screen other than the Radio
screen is displayed, pressing the [RADIO]
key will display the Radio screen.
2)
When the media screen is displayed, the
media source changes each time the key
is pressed.
MEDIA
key
key
When any screen other than the Media
screen is displayed, pressing the [MEDIA]
key will display the Media screen.
When no media is connected, this
operation becomes invalid.
PHONE
3)
The telephone menu is displayed.
When the phone has not been registered,
the Bluetooth connection setting screen is
displayed.
key
VOL/PUSH PWR
4)
Allows you to adjust the volume for the
audio function and telephone function.
It also allows you to switch the audio
function ON/OFF.
When the audio function is OFF, the clock
screen is displayed.
5) MIC
A mic is built into this device. It is used
6)
7)
8)
9)
during hands-free calls.
6)
Allows you to seek a radio station and
select tracks.
Holding it down allows you to fast-forward/
fast-rewind tracks.
HOME
7)
key
Displays the HOME screen.
Screen” (P11)
TUNE
8)
Allows to select an audio fi le folder or a
9) Display
key
radio station by turning.
PUSH SOUND
Pressing the key displays the sound
quality setting screen.
Used to adjust the sound quality.
Almost all operations can be performed by
touching the touch switches displayed on
this display.
key
→“Adjust Volume” (P13)
key/ key
key
(P43)
→“How to Perform Touch Operations” (P10)
→“Home
This Product
8
Page 10

Start
Start the system.
Switch the vehicle's engine/
1
power switch to “ACC” or
“ON”.
▼
The display switches to the last screen used
in its previous session.
ADVICE
• Immediately after the engine/power
switch is switched to “ACC” or “ON”,
some functions cannot be used
immediately because data is being
read. Please wait until the reading is
completed.
Introduction Basic Operation
This Product
9
Page 11

How to Perform
Touch Operations
This system uses a touch panel that is
operated by touching the display directly.
When Touching ___
This manual indicates the operation of
touching the screen to “Enter” with “Touch
___”.
Also, the menu of operations executed by
touch is indicated as “Touch Switch”.
CAUTION
• The surface of the display scratches
easily. Do not push on it too hard or rub it
with a stiff cloth.
• If the screen is dirty, wipe it gently with an
eyeglass wipe or other soft cloth.
Searching Items from a List
You can move the display one page by
touching or .
▼
When the item you are searching for is
displayed, touch it directly.
How to Perform Touch Operations
10
Page 12
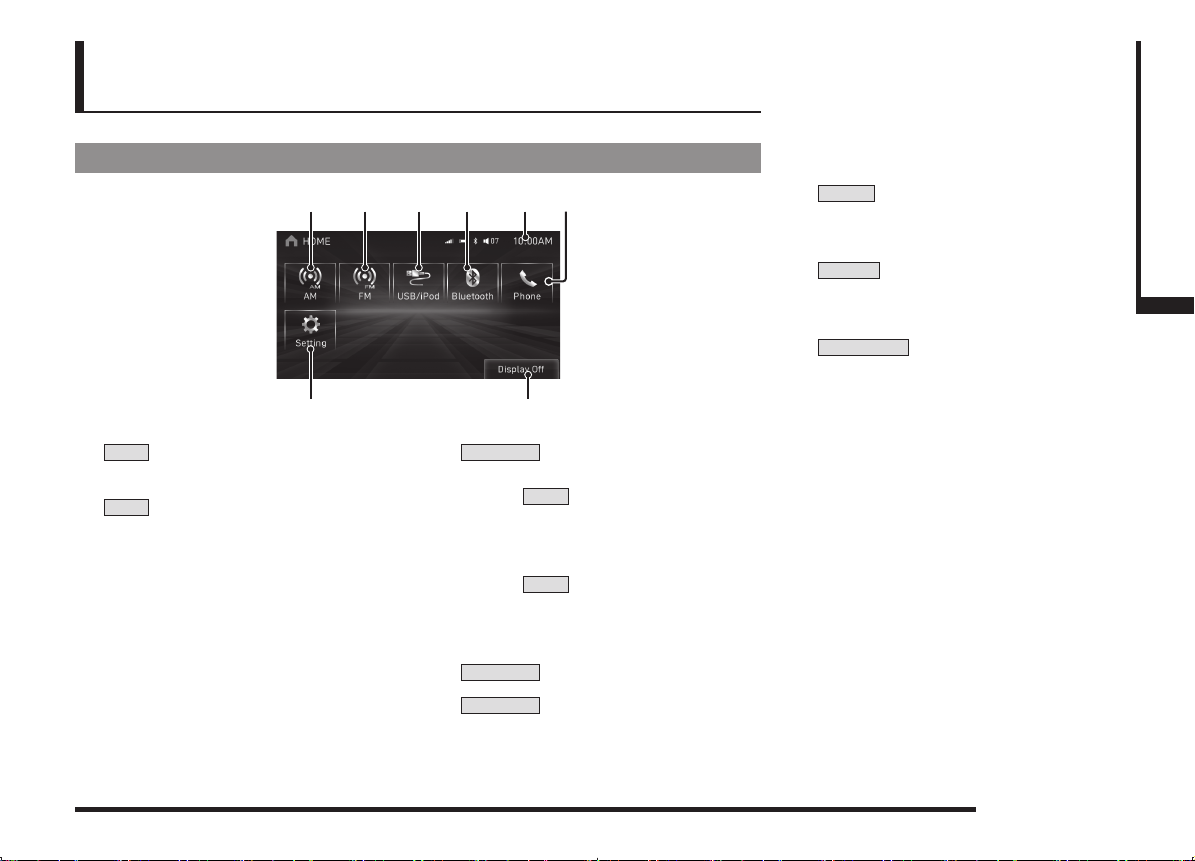
Home Screen
By pressing the [HOME] key to display the home screen, then selecting a source from that
screen, you can use various functions.
Display Contents
6)1) 2) 3) 4) 5)
5) Clock
Displays the current time using 24-hour
time or 12-hour time.
Touch the displayed time to switch to the
clock setting screen.
→“Clock” (P45)
6)
(P36)
*3
Phone
Allows you to make and receive telephone
calls.
Setting
7)
(P41)
Displays the settings screen, on which you
can make various settings for this product.
8)
Display Off
(P48)
This turns off the screen display.
Introduction Basic Operation
7) 8)
AM
1)
(P20)
Allows you to use the AM radio function.
FM
2)
(P20)
Allows you to use the FM radio function.
3)
USB/iPod
*1
When an iPod is connected to this
iPod
product,
is displayed. When you
touch it, the iPod screen is displayed.
(P27)
When a USB device is connected to this
USB
product,
is displayed. When you
touch it, the USB screen is displayed.
(P29)
When nothing is connected to this product,
4)
USB/iPod
Bluetooth
is displayed.
*2
(P34)
When a Bluetooth-capable audio device
is connected to this product, the Bluetooth
audio function can be used.
*1) This requires an external input device and a
cable.
*2) This requires an audio device that is Bluetooth
capable (available separately).
*3) This requires a mobile phone that is Bluetooth
capable (available separately).
Home Screen
11
Page 13
Switch the Sources
A source can be selected on the home screen.
NOTE
• This manual uses the term “source”
as the general name for radio, USB
device, and Bluetooth audio device audio
playback functions.
Press the
1
▼
Displays the HOME screen.
HOME
key.
Touch any “source”.
2
▼
The screen for the selected source is
displayed.
Home Screen
12
Page 14
The following explains audio function operations.
Audio Functions
Basic Operation
NOTE
• The album names, titles, etc. in the title
information in pictures used with the
audio functions and related functions
of this manual were prepared for these
explanations. They have no relationship
whatsoever with actual title information.
AV
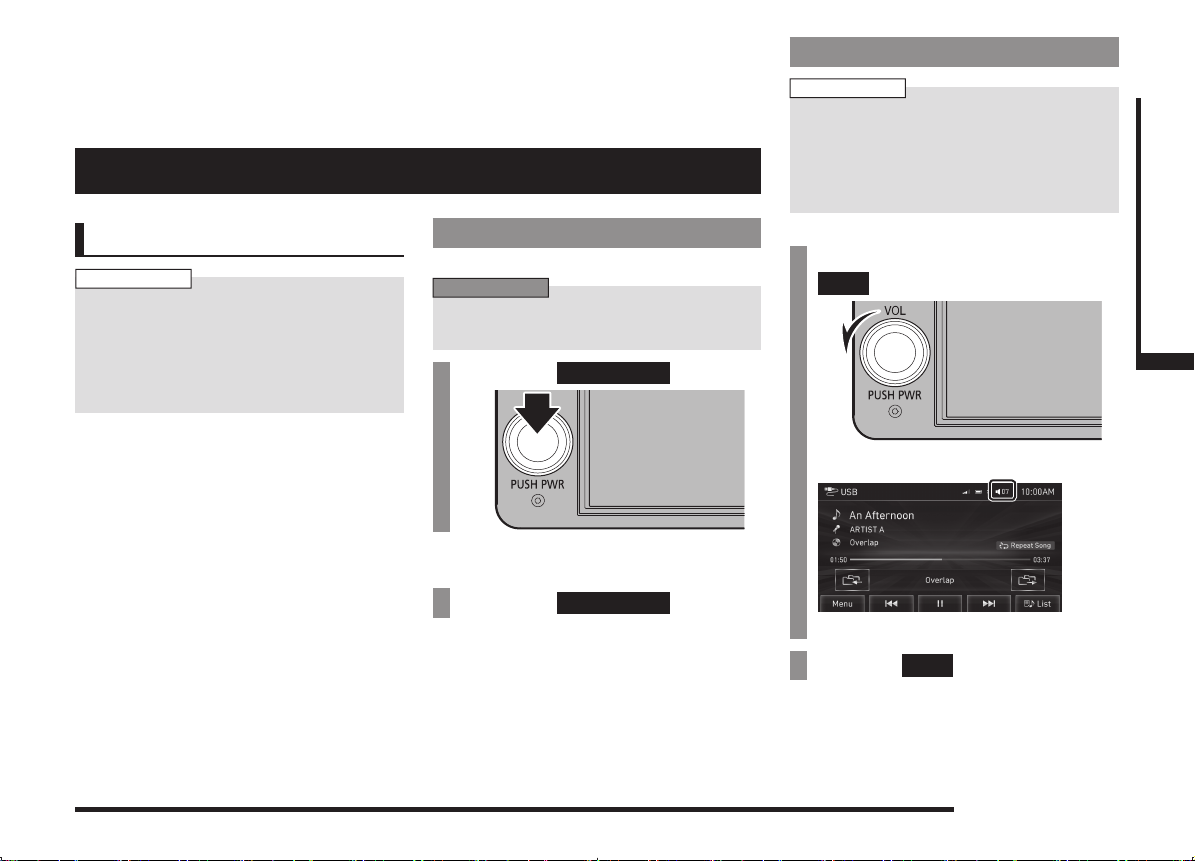
Switch Audio ON/OFF
You can switch the audio function ON/OFF.
ADVICE
• Hold down the steering [MODE] key to
also turn the audio function ON/OFF.
Press the
1
▼
This switches the audio function OFF.
PUSH PWR
key.
Adjust Volume
NOTE
• The volume value is retained for each of
the following sources.
- AM,FM,USB/iPod
- Bluetooth
- Phone
Adjust the audio function volume.
During audio play, turn the
1
VOL
key counter-clockwise.
▼
AV Audio Functions
Press the
2
▼
The audio function is switched ON and the
audio source screen last used is displayed.
PUSH PWR
key.
The volume is lowered.
Turn the
2
▼
The volume is raised.
VOL
key clockwise.
Basic Operation
13
Page 15
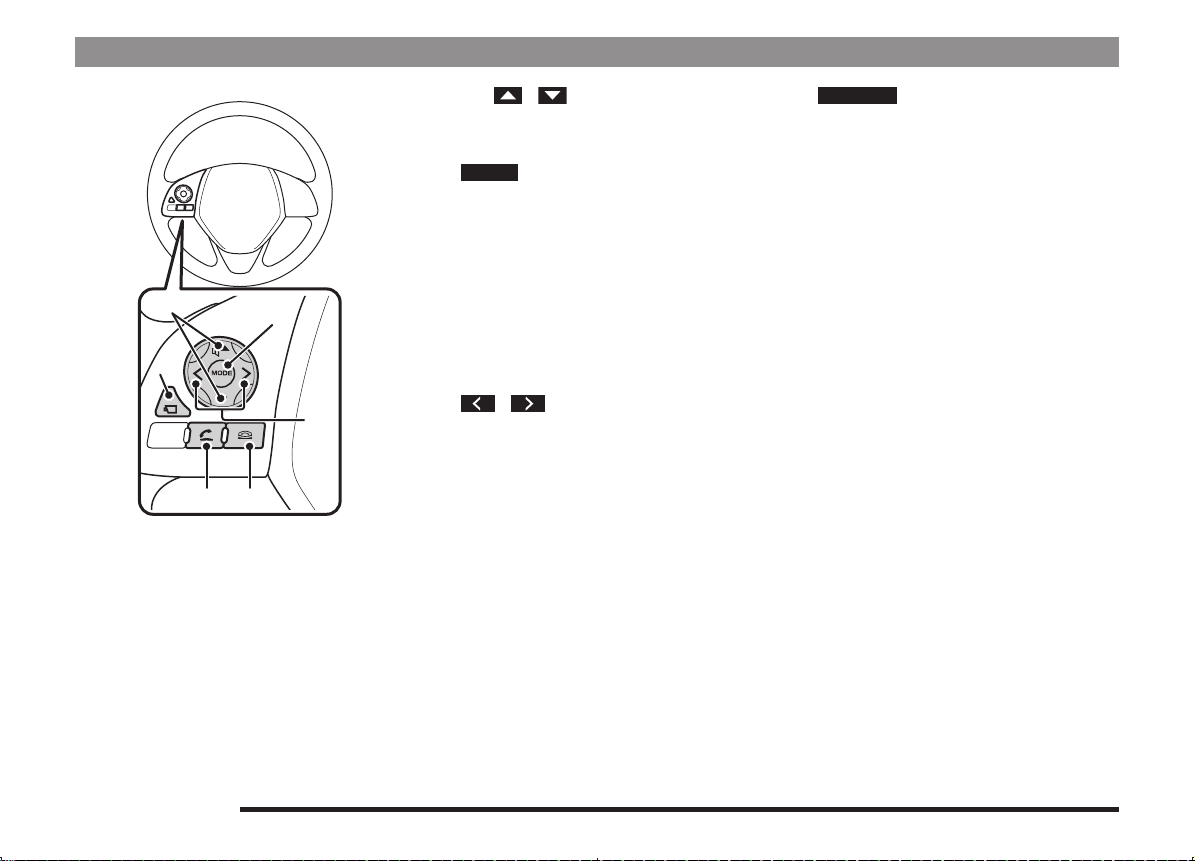
Steering Remote Control Switch Operation
1) Vol , key
Adjust audio functions and the telephone
function volume.
MODE
2)
key
Hold down to turn the audio function
ON/OFF. Additionally, each time this is
pressed, this switches the audio source.
The order of switching is shown below.
If devices are not connected, then
1)
2)
these sources are skipped, and the next
available source is selected.
[AM]→[FM]→[iPod] or [USB
4)
3)
device]→[Bluetooth Audio]→[AM]→___
3)
, key
Allows you to select tracks and radio
CAMERA
4)
The Multi Around View with Bird's-eye
image can be displayed on the screen.
→“Display using the steering remote
control switch” (P40)
5) “OFF HOOK” key
Used to receive a telephone call.
6) “ON HOOK” key
Used to end a telephone call.
*1) Equipment by type.
*2) This requires a mobile phone that is Bluetooth
capable (available separately).
stations.
Hold down to fast forward and rewind
5)
6)
tracks.
key
*1
*2
*2
Basic Operation
14
Page 16

Audio Files (MP3/
WMA/AAC)
This product can play back MP3/WMA/AAC
format audio fi les recorded on USB devices.
There are limitations on the fi les and media
that can be used, therefore read the following
prior to recording MP3/WMA/AAC format
audio fi les on USB devices.
If the MP3/WMA/AAC format audio fi le
includes title information or other data, then
this can be displayed.
CAUTION
• Actions such as copying audio CDs or
fi les and either distributing these to others
for free or for charge, or uploading fi les
via the Internet or other means to servers
is an infringement of the law.
• Do not append the fi le extensions “.mp3”,
“.wma”, or “.m4a”, to other than MP3/
WMA/AAC format fi les. Playing back
USB devices with these types of fi les
recorded upon them may cause the fi les
to be incorrectly identifi ed for playback,
which may lead to loud noise, resulting in
speaker damage or accident.
ADVICE
• Depending on your computer's operating
system, version, or settings, fi les may not
have a fi le extension appended. In these
cases, append the fi le extensions “.mp3”,
“.wma”, or “.m4a” when copying the fi les
to the USB device.
• Files larger than 2GB in size cannot be
played back.
• This product can also play back USB
devices that mix audio fi les in different
formats, MP3, WMA, and AAC.
AV Audio Functions
Audio Files (MP3/WMA/AAC)
15
Page 17
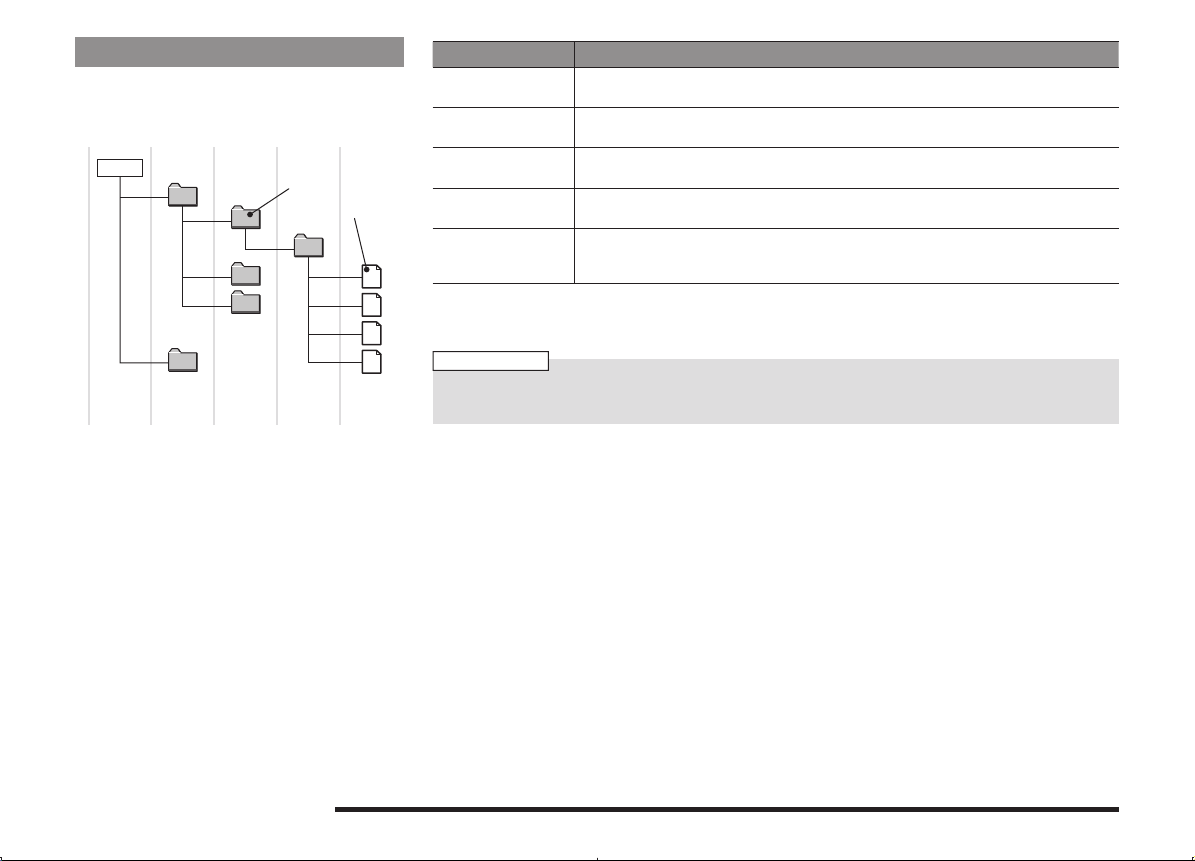
Folder Structure
Up to 8 folder levels can be recognized.
You can create a folder structure as in Genre Artist - Album - Track (MP3/WMA/AAC format
audio fi les) for management of tracks.
ROOT
1 level 2 level 3 level 4 level 5 level
Folder
Audio file
♪
♪
♪
♪
Name Explanation
USB supported
formats
Maximum number
of levels
Maximum folder
number
Maximum fi le
number
File name and
folder name
restrictions
*1) Do not include other than MP3/WMA/AAC fi les. However, if storing many tracks within the same folder,
these may not be recognized even if less than the maximum number of tracks. In these cases, divide the
tracks up into multiple folders.
The recommended fi le system is FAT16 and FAT32. 1 partition only
8 levels (if the root is the 1st level)
255 folders (including root)
65535 fi les (total number on media. Other than MP3, WMA, and AAC fi les not included)
*1
Maximum 30 bytes (30 characters), fi les/folders with fi le/folder names longer than this
will not be displayed or played back.
NOTE
• The order in which folders and audio fi les are displayed on this product may be different
than how they are displayed on a computer.
Audio Files (MP3/WMA/AAC)
16
Page 18
What Is MP3?
MP3 is an abbreviation of “MPEG-1 Audio
Layer 3”. MPEG is an abbreviation of “Motion
Picture Experts Group”, and is a video
compression standard used in video CDs, etc.
MP3 is one of the audio compression methods
contained in the MPEG audio standard, and
reduces the quality of sounds that are beyond
the auditory resolution of the human ear
and that are hidden by louder sounds, thus
creating high-quality audio with a lower data
size.
CAUTION
• MP3 fi les different to the standards at
right may not play back correctly, or
fi le/folder names may not be displayed
correctly.
Standards for MP3 Files That Can Be Played Back
Specifi cations for MP3 fi les that can be played are shown below.
Item Details
Specifi cation MPEG-1 Audio Layer3
Sampling frequency [kHz] MPEG-1:32/44.1/48
Bit rate [kbps] MPEG-1: 32/40/48/56/64/80/96/112/128/160/192/224/256/320/vbr
Channel mode 2Ch, 1Ch
File extension mp3
Supported tag information ID3 tags: Ver. 1.0, Ver. 1.1, Ver. 2.2, Ver. 2.3, Ver.2.4
MPEG-2 Audio Layer3
MPEG-2:8/11.025/12/16/22.05/24
MPEG-2: 8/16/24/32/40/48/56/64/80/96/112/128/144/160/vbr
* Free format bitstream/forbidden unsupported
(Stereo / Joint Stereo / Dual Channel / Single Channel)
Title, Artist name, Album name
AV Audio Functions
Audio Files (MP3/WMA/AAC)
17
Page 19

What Is WMA?
WMA is an abbreviation of Windows Media
Audio, and is an audio compression format
from Microsoft. This is a compression format
that has a higher compression ratio than MP3.
* Microsoft, Windows Media, and Windows are registered
trademarks of Microsoft Corporation (USA) and in other
countries.
CAUTION
• WMA supports digital rights management
(DRM). This product cannot play back
WMA fi les protected using this system.
• WMA fi les different to the standards
at right may not play back correctly, or
fi le/folder names may not be displayed
correctly.
• “WMA9 Professional”, “Voice”, and
“Lossless” are not supported.
Standards for WMA Files That Can Be Played Back
Specifi cations for WMA fi les that can be played are shown below.
Item Details
Specifi cation Microsoft Windows Media Audio Version7.0/8.0/9.0
Sampling frequency [kHz] 8/11.025/16/22.05/32/44.1/48
Bit rate [kbps] CBR:5 to 320
Channel mode 2Ch, 1Ch
File extension wma
Supported tag information WMA tags
VBR:Peak384
(Stereo / Monaural)
Title, Artist name, Album name
Audio Files (MP3/WMA/AAC)
18
Page 20

What Is AAC?
AAC is an abbreviation of Advanced Audio
Coding, and is an audio compression standard
used in “MPEG-2” and “MPEG-4”. This
features 1.4x the compression of MP3, with
comparable audio quality.
CAUTION
• AAC supports digital rights management
(DRM). This product cannot play back
AAC fi les protected using this system.
• AAC fi les different to the standards at
right may not play back correctly, or
fi le/folder names may not be displayed
correctly.
Standards for AAC Files That Can Be Played Back
Specifi cations for AAC fi les that can be played are shown below.
Item Details
Specifi cation MPEG-4/AAC LC (Low Complexity)
Sampling frequency [kHz] 8/11.025/12/16/22.05/24/32/44.1/48
Bit rate [kbps] 8 to 320/VBR
Channel mode 2Ch, 1Ch
File extension m4a (aac and other fi les must be converted to m4a)
Supported tag information AAC tags or ID3 tags
MPEG-2/AAC LC (Low Complexity)
(Stereo / Monaural)
* Files created outside of iTunes are not guaranteed to work
Title, Artist name, Album name
AV Audio Functions
Audio Files (MP3/WMA/AAC)
19
Page 21

Listen to Radio
This explains how to listen to AM and FM
radio broadcasts.
HD Radio TM broadcast or analog broadcast
can be received.
Radio
Press the
1
The radio screen is displayed.
When Audio is ON, each time the key is
pressed, the radio source changes.
RADIO
key.
▼
The AM or FM radio broadcast information
screen is displayed.
Turn the
2
TUNE
key to select a
station.
▼
The station at the selected frequency is
played.
ADVICE
• By pressing the [HOME] key to display
the home screen, then selecting a source
from that screen, you can select the radio
source.
Listen to Radio
20
Program Service Data: Contributes to the superior user experience of
HD Radio Technology. Presents song name, artist, station IDs, HD2/HD3
Channel Guide, and other relevant data streams.
Adjacent to traditional main stations are extra local FM channels. These
HD2/HD3 Channels provide new, original music as well as deep cuts into
traditional genre.
Digital, CD-quality sound. HD Radio Technology enables local radio stations
to broadcast a clean digital signal. AM sounds like today’s FM and FM
sounds like a CD.
Page 22

FM Radio Preset Screen
1)
2)
3)
4)
5)
1) Source plate
Displays the name of the currently
selected source.
2) PTY
Displays the PTY (Program Type) being
received.
3) Received frequency
Displays the frequency currently being
received.
4) Preset switch
Allows you to register your favorite
broadcast stations.
Touch and hold the switch for the desired
preset channel number until you hear
the “beep”. This registers the broadcast
station currently being received.
→“Register Your Favorite Broadcast
Stations” (P24)
Menu
5)
Touching this displays the FM/AM menu
screen, allowing you to confi gure [Scan]
(P24)
, [Sound]
(P43)
, and [Setting]
(P46)
Display Contents
6)
7)
8)
9)
TM
6) HD Radio
indicator
Digital broadcasts are displayed as they
are received.
A white icon is displayed during analog
audio output, and an orange icon is
displayed during digital audio output.
7) Sub Channel Indicator
This is displayed if the station being
received digitally has a sub channel.
Channel numbers with broadcasts are
displayed in white. Channel numbers with
no broadcasts are not displayed.
The channel number being received is
orange.
8) Switch page
Displays Page 2 of the presets.
Info
9)
Switches to the information display.
10) Switch page
Displays Page 1 of the presets.
.
10)
(P23)
11)
12)
13)
14)
15)
11) Indicator
: Live event broadcasts are displayed
as they are received.
: RBDS data is displayed as it is
received.
12) Station name
Displays the station name being received.
13) Preset information
Displays the preset number and frequency
during registration.
For HD Radio
TM
broadcasts, the HD
indicator and sub channel are displayed.
Displays the station name if it can be
received.
14) Message
Displays the HD Radio
Station
15)
TM
reception status.
Displays a list of the stations that can
be received.
→“Search for Broadcast
Stations from the Station List” (P25)
Listen to Radio
21
AV Radio
Page 23

AM Radio Preset Screen
1)
2)
3)
4)
5)
1) Source plate
Displays the name of the currently
selected source.
2) PTY
Displays the PTY (Program Type) being
received.
3) Received frequency
Displays the frequency currently being
received.
4) Preset switch
Allows you to register your favorite
broadcast stations.
Touch and hold the switch for the desired
preset channel number until you hear
the “beep”. This registers the broadcast
station currently being received.
→“Register Your Favorite Broadcast
Stations” (P24)
Menu
5)
Touching this displays the FM/AM menu
22
screen, allowing you to confi gure [Scan]
(P24)
, [Sound]
Listen to Radio
(P43)
, and [Setting]
(P46)
6)
7)
8)
9)
10)
11)
TM
6) HD Radio
indicator
Digital broadcasts are displayed as they
are received.
A white icon is displayed during analog
audio output, and an orange icon is
displayed during digital audio output.
7) Indicator
: Live event broadcasts are displayed
as they are received.
8) Station name
Displays the station name being received.
9) Preset information
Displays the preset number and frequency
during registration.
For HD Radio
TM
broadcasts, the HD
indicator is displayed. Displays the station
name if it can be received.
Info
10)
Switches to the information display.
Station
11)
Displays a list of the stations that can
.
be received.
→“Search for Broadcast
Stations from the Station List” (P25)
(P23)
Page 24

Radio Information Display Screen
FM Radio Screen AM Radio Screen
1)2)
3)
4)
1) Title
Displays the acquired title name.
2) Radio Text
During analog reception, “Title” changes
to “Radio Text”, and the acquired radio
text is displayed.
The “artist” and “album” are not displayed.
1)
3)
4)
5) 5)
3) Artist
Displays the acquired artist name.
4) Album
Displays the acquired album name.
AV Radio
5) Back
Switches to preset display.
Listen to Radio
23
Page 25

Register Your Favorite
Broadcast Stations
You can register your favorite 12 stations for
FM and 6 stations for AM.
On the radio broadcast
1
information screen, turn the
TUNE
key to search for the
“broadcast station” to register.
To register your station, touch
2
and hold the “preset switch”
until you hear the “beep”.
▼
This registers the selected broadcast station
to the chosen preset channel number.
Search for Broadcast
Stations with Strong Signals
This is handy for searching for broadcast
stations you can receive when you drive to a
different area.
Starting the Seek
A receivable station can be searched one at a
time.
On the radio broadcast
1
information screen, press
the
key or
key.
▼
When a receivable station is found, it is
played.
Starting the Scan
This searches for stations that can be
received.
On the radio broadcast
1
information screen, touch
Menu
▼
When a broadcast station is received, this
is played for 10 seconds, then the product
searches for the next station.
Canceling a Scan
During the scan, touch
1
▼
The scan is canceled.
then
Scan
.
Stop
.
Listen to Radio
24
Page 26

Search for Broadcast
Stations from the Station List
You can select a station from the list of
receivable broadcast stations.
On the radio broadcast
1
information screen, touch
Station
The station list is displayed.
Select the broadcast stations
2
.
you want from the station list
and touch it.
▼
Reception of the selected broadcast
station starts.
Updating the Station List
You can manually update the station list.
On the station list, touch
1
Refresh
Updating starts.
▼
The updated station list is displayed.
.
AV Radio
Touch
3
▼
The display returns to the original radio
broadcast information screen.
Back
.
Listen to Radio
25
Page 27

iPod/USB
Use an iPod
By connecting commercially-available iPod/
iPhone devices to this product, you can play
back tracks on these through the product.
If the audio source is an iPod/USB device,
connect the iPod to automatically start
playback.
CAUTION
• Never hold an iPod/iPhone in your hand
and operate it while driving, as this is
dangerous.
• Do not leave the iPod/iPhone unattended
in the vehicle.
• No indemnifi cation for data loss resulting
when the iPod/iPhone is connected to the
product will be possible.
• Depending on how devices are handled,
audio fi les can be damaged or lost,
therefore it is recommended that data be
backed up.
NOTE
• Depending on the generation, model,
or software version of the iPod/iPhone,
playback on this product may not be
possible.
Additionally, playback as explained in this
document may not be possible.
(→P5)
NOTE
• Updating your software sometimes
changes the functions that can be used
while connected with this product.
• Operate the iPod/iPhone while connected
to this product.
• Please refer to your vehicle's user
manual regarding how to connect the
iPod/iPhone.
• When connecting the iPod/iPhone, use
any commercially-available iPod cable.
• If an iPod/iPhone does not operate
correctly, then remove the iPod/iPhone
from the product, reset, then reconnect.
• Viewing videos is not possible even if
the iPod/iPhone supports video playback
functions.
• Set up the device in order that no
unsafe actions, such as plugging in the
connection cable, are taken while driving.
• When inserting and removing the iPod/
iPhone, for safety's sake fi rst stop the
vehicle.
• Depending on the status of the iPod/
iPhone, it may take some time until the
device is recognized, or playback starts.
NOTE
• Buttons on the product will not operate
while iPod/iPhone is connected.
• iPod/iPhone specifi cations and settings
may mean that connection is not
possible, or result in differences in
operation or display.
• Depending on the audio data in the iPod/
iPhone, track information may not be
displayed correctly.
• Depending on the status of the vehicle
and device, the iPod/iPhone may not play
back after starting the engine.
• Data containing copyright information
may not play back.
• It is recommended that the iPod/iPhone
equalizer settings be set to fl at.
Use an iPod
26
Page 28

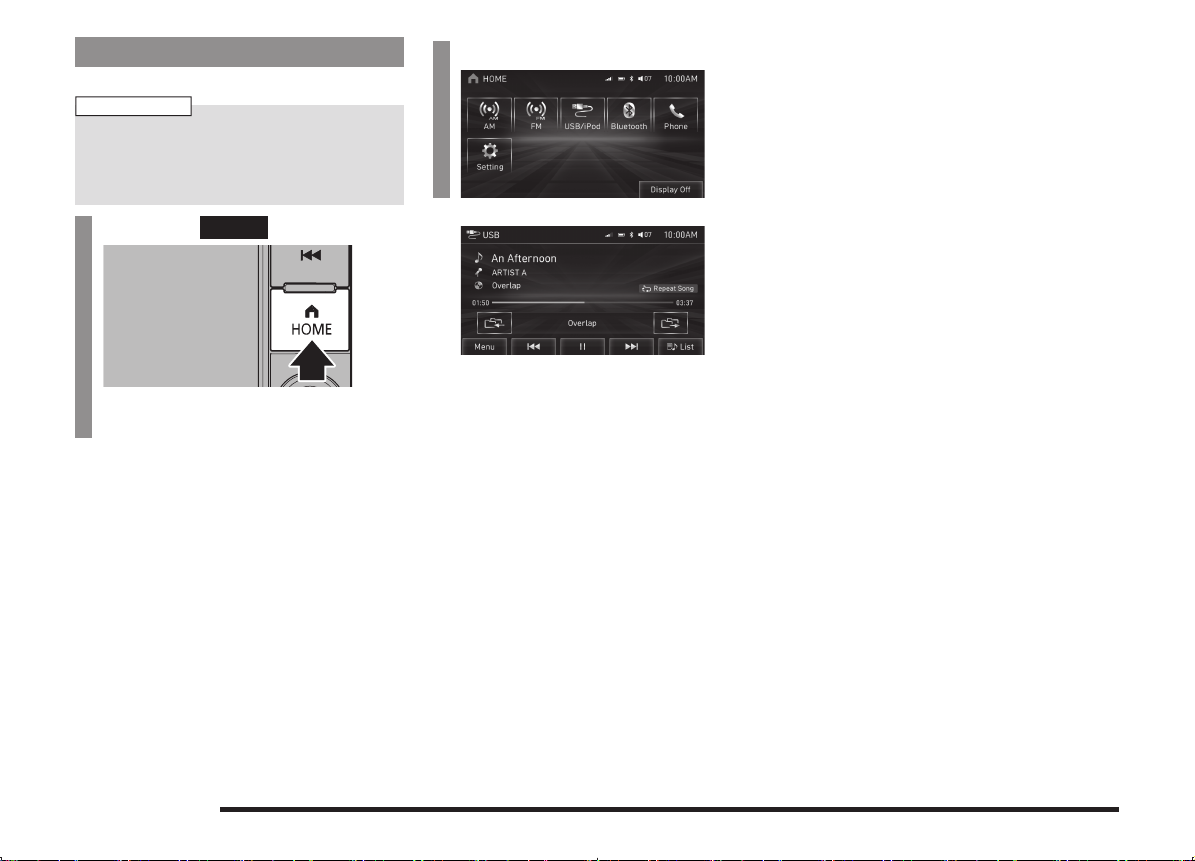
Play iPod
Display Contents
Press the
1
The media last played is resumed.
When Audio is ON, each time the key is
pressed, the media source changes and
the media playback screen is displayed.
MEDIA
key.
▼
The iPod playback information screen is
displayed.
Press the key
2
or key to select
the track.
▼
The selected track is played back.
ADVICE
• You can fast forward or rewind the
track being played by holding down the
key.
• By pressing the [HOME] key to display
the home screen, then selecting a source
from that screen, you can select the
media source.
key or
iPod Playback Information Screen
1)
2)
3)
4)
5)
6)
1) Source plate
Displays the name of the currently
selected source, clock, and volume.
2) Track name
If there is title information, displays the
track name. If there is no title information,
displays “Unknown”.
3) Album name
If there is title information, displays the
album name. If there is no title information,
displays “Unknown”.
4) Playback time
5)
6)
Returns to the previous track. Allows you
to fast rewind by continuing touching.
Menu
Displays the iPod menu screen that allows
you to change the playback mode or
perform [Sound]
*1
(P43)
*1
.
7)
8)
9)
10)
11)
7) Artist name
If there is an artist name in the title
information, displays it. If there is no title
information, displays “Unknown”.
8) Playback mode display
Displays the current playback mode.
*1
→“Switch Playback Mode” (P28)
: Repeat play
: Shuffl e play
: Album shuffl e play
9)
10)
11)
/
Allows you to play or pause.
Plays back the next track. Allows you to
fast forward by continuing touching.
List
This displays the display list.
→“Search by
List” (P28)
*1) “Unknown” may be displayed depending on the
connected iPod/iPhone.
AV iPod/USB
Use an iPod
27
Page 29

Switch Playback Mode
Repeat playback, random playback, etc. are
possible.
On the iPod playback
1
information screen,
touch
Displays the iPod menu.
Touch the “mode” to change to.
2
Menu
.
iPod Menu
Touching [Menu] on the iPod playback
information screen will display the iPod menu.
Repeat Song
Shuffl e All
Songs
Shuffl e
Albums
Sound
Back
Repeat playback of the track
currently being played.
Play tracks on the current level in
a random order.
Play all the albums on the current
level in a random order. However,
the order within albums is not
changed.
Adjusts the sound quality.
→“Adjust the Sound Quality” (P43)
Returns to the playback
information screen.
→“Display Contents” (P30)
Touch “category”.
2
Category menu
▼
A list of the selected category is displayed.
Touch the “item” to play from
3
the list.
3
Touch
Back
.
▼
Playback in the selected mode starts.
Use an iPod
28
Search by List
Touching a category on the playlist displays
a list of its category. By touching the list, you
can check album names and track names
while searching for the tracks you want.
On the iPod playback information
1
screen, touch
The playlist is displayed.
List
.
▼
A list of the selected item is displayed.
Repeat Step 3 to search for tracks.
When you touch the track to play from the list,
playback starts.
ADVICE
• The level of items operated on in Step 3
depends on which category you selected
in Step 2.
• The title information recorded into the
iPod is displayed on the list.
Page 30

Use USB Device
By connecting commercially-available
USB devices such as USB memory to this
product, you can play back audio fi les on
these through the product.
If the audio source is an iPod/USB device,
connect the USB device to automatically start
playback.
CAUTION
• Never hold an USB device in your hand
and operate it while driving, as this is
dangerous.
• Do not leave the USB device unattended
in the vehicle.
• Do not use hard discs, card readers, or
memory readers, as damage may occur
to these or to the data contained therein.
If these are erroneously connected, then
turn the engine / power switch “OFF”,
then remove.
• No guarantee is made as regards
damage to the USB device, nor regarding
loss or damage to data contained therein.
• Depending on how devices are handled,
audio fi les can be damaged or lost,
therefore it is recommended that data be
backed up.
NOTE
• Please refer to your vehicle's user
manual regarding how to connect USB
devices.
• Depending on the type of USB device,
usage may not be possible, or functions
that can be used may be restricted.
• The recommended fi le system for USB
device is FAT16 or FAT32.
NOTE
• The maximum supported capacity for
USB device is 32GB.
• Operate the USB device containing
recorded audio fi les while connected to
this product.
• When connecting a USB device, use any
commercially-available connection cable.
Failure to use a connection cable when
connecting may place undue load on, or
damage the USB connector.
• Set up the device in order that no
unsafe actions, such as plugging in the
connection cable, are taken while driving.
• When inserting and removing the USB
device, for safety's sake fi rst stop the
vehicle.
• Do not insert non-audio devices into
the USB port. Damage to the device or
equipment may result.
• Depending on the status of the USB
device, it may take some time until the
device is recognized, or playback starts.
• Depending on USB devices, buttons on
the product will not operate while the
USB device is connected.
• Data containing copyright information
may not play back.
• USB device specifi cations and settings
may mean that connection is not
possible, or result in differences in
operation or display.
• Depending on audio data in the USB
device, track information may not be
displayed correctly.
• Depending on the status of the vehicle
and device, the iPod/iPhone may not play
back after starting the engine.
Press the
1
The media last played is resumed.
When the media playback screen is
displayed, the media source changes
each time the key is pressed.
MEDIA
key.
▼
The USB device playback information
screen is displayed.
Turn the
2
TUNE
key
to select the folder.
Press the key
3
or key to select
the track.
▼
The selected track is played back.
ADVICE
• You can fast forward or rewind the
track being played by holding down the
key.
• By pressing the [HOME] key to display
the home screen, then selecting a source
from that screen, you can select the
media source.
key or
AV iPod/USB
Use USB Device
29
Page 31

Display Contents
Playback Information Screen
1)
2)
3)
4)
5)
6)
7)
1) Source plate
Displays the name of the currently
selected source, clock, and volume.
2) Track name
If there is title information, displays the
track name. If there is no title information,
displays “Unknown”.
3) Album name
If there is title information, displays the
album name. If there is no title information,
displays “Unknown”.
4) Playback time
5)
6)
30
Used to select a folder. Touching this
switches to the previous folder and plays
back from the fi rst track in that folder.
Menu
Displays the USB menu screen that
allows you to change the playback mode
(P43)
or perform [Sound]
Use USB Device
.
8)
9)
10)
11)
12)
13)
14)
7)
8) Artist name
9) Playback mode display
Plays back the previous track. Allows you
to fast rewind by continuing touching.
If there is an artist name in the title
information, displays it. If there is no title
information, displays “Unknown”.
Displays the current playback mode.
→“Switch Playback Mode” (P33)
: Repeat play
: Folder repeat play
: Shuffl e play
10) Folder name
Displays the name of the folder currently
being played back.
11)
12)
13)
Used to select a folder. Touching this
switches to the next folder and plays back
from the fi rst track in that folder.
Plays back the next track. Allows you to
fast forward by continuing touching.
List
Displays a folder list.
→“Lists”(P31)
14) /
Allows you to play or pause.
Page 32

Lists
Folder List
1) 2)
AV iPod/USB
1) Cursor switch
Scrolls pages.
2) Folder name
Touching this expands the folder.
Current Folder
3)
A folder list is displayed with the folder
currently played fi rst on the list.
3) 5)
4)
Current Track
4)
The currently playing track is displayed at
the head of the displayed track list.
Back
5)
Returns to the playback information
screen.
Continued on the next page
Use USB Device
31
Page 33

Track List
1)
Display a List
2)
A folder list can be displayed.
On the USB device playback
1
information screen, touch
▼
List
.
3) 4) 6)
1) Cursor switch
Scrolls pages.
2) File name
Displays the fi le name.
Touch to play the track and return to the
playback information screen.
Folder List
3)
Switches to the list of the tracks in the
folder one level up.
Use USB Device
32
5)
Current Folder
4)
A folder list is displayed with the folder
currently played fi rst on the list.
Current Track
5)
The currently playing track is displayed at
the head of the displayed track list.
Back
6)
Returns to the playback information
screen.
A folder list is displayed.
2
Touch
Back
.
▼
The display returns to the USB device
playback information screen.
Page 34

Switch Playback Mode
Repeat playback and random playback are
possible.
On the USB device playback
1
information screen, touch
Menu
.
The USB device menu is displayed.
Touch the “mode” to change to.
2
USB Device Menu
Repeat Song
Repeat Folder
Shuffl e
Sound
Back
Repeat playback of the track
currently being played.
Repeat playback of the tracks
within the folder currently being
played.
Play all the tracks on the medium
in a random order.
Adjusts the sound quality.
→“Adjust the Sound Quality” (P43)
Returns to the playback
information screen.
→“Playback Information Screen” (P30)
AV iPod/USB
3
Touch
Back
.
▼
Playback in the selected mode starts.
Use USB Device
33
Page 35

Bluetooth Audio
Use Bluetooth Audio
This product can play back tracks on
commercially-available Bluetooth-capable
audio devices.
CAUTION
• Never hold a Bluetooth-capable audio
device in your hand and operate it while
driving, as this is dangerous.
• Do not leave the Bluetooth audio device
unattended in the vehicle.
• Depending on how devices are handled,
audio fi les can be damaged or lost,
therefore it is recommended that data be
backed up.
NOTE
• Depending on the type of Bluetoothcapable audio devices, usage may not be
possible, or functions that can be used
may be restricted.
• Updating your software sometimes
changes the functions that can be used
while connected with this product.
• A single Bluetooth-capable audio device
can be connected to this product.
NOTE
• Confi rm together with the user manuals
for the commercially-available Bluetoothcapable audio devices.
• Depending on the type of Bluetoothcapable audio devices, volume levels
may differ. There is the danger of
loud volumes, so prior to use, it is
recommended that you turn the volume
down.
→“Adjust Volume” (P13)
• Depending on the status of the Bluetooth
audio device, it may take some time until
the device is recognized, or playback
starts.
• Bluetooth audio device specifi cations
and settings may mean that connection
is not possible, or result in differences in
operation or display.
• Depending on audio data in the Bluetooth
audio device, track information may not
be displayed correctly.
• Depending on the status of the vehicle
and device, the iPod/iPhone may not play
back after starting the engine.
• Data containing copyright information
may not play back.
• It is recommended that the Bluetooth
audio device equalizer settings be set to
fl at.
• The fi rst time you listen to Bluetooth
audio, you must make the connection
settings.
(P34)
Connect a Bluetooth-capable
Audio Device
This product and the Bluetooth-capable audio
device uses the Bluetooth function to connect.
For details on how to connect, refer to
“Bluetooth Setting” (P41)
Operation methods below describe situations
once a connection has been completed.
NOTE
• If the iPod/iPhone is connected via
Bluetooth as a Bluetooth-capable audio
device, do not connect the iPod/iPhone
using an iPod cable. Connection using
both methods will result in erroneous
operation.
.
Use Bluetooth Audio
34
Page 36

Listen to a Bluetooth-capable
Audio Device
Display Contents
Press the
1
The media last played is resumed.
When the media playback screen is
displayed, the media source changes
each time the key is pressed.
MEDIA
key.
▼
The Bluetooth audio playback information
screen is displayed.
Press the key
2
or key to select
the track.
ADVICE
• You can fast forward or rewind the
track being played by holding down the
key.
• By pressing the [HOME] key to display
the home screen, then selecting a source
from that screen, you can select the
media source.
key or
Playback Information Screen
1)
2)
3)
4)
5)
6)
1) Source plate
Displays the name of the currently
selected source, the antenna, the
remaining battery, the Bluetooth logo, the
volume, and the clock.
2) Track name
If there are track names in the title
information, displays them. If there is no
title information, displays “Unknown”.
3) Artist name
If there is an artist name in the title
information, displays it. If there is no title
information, displays “Unknown”.
4) Album name
If there is title information, displays the
album name. If there is no title information,
displays “Unknown”.
7)
8)
9)
5)
6)
7)
8)
9)
Returns to the previous track. Allows you
to fast rewind by continuing touching.
Menu
Displays the Bluetooth audio menu screen
that allows you to confi gure [Sound]
and [Bluetooth]
Allows playback.
Pauses the track.
Plays back the next track. Allows you to
fast forward by continuing touching.
(P41)
.
(P43)
AV Bluetooth Audio
Use Bluetooth Audio
35
Page 37

INFO/SETTINGS
Mobile Phone
Connecting your mobile phone to this
product with Bluetooth lets you use the
hands-free function.
WARNING
• For safety's sake, do not operate the
mobile phone while driving. When
operating the mobile phone, fi rst stop the
vehicle in a safe location.
• Do not leave your mobile phone
unattended in the vehicle. If your mobile
phone rolls underfoot when you stop
the vehicle or when you go around a
curve and it get under the brake pedal,
it can interfere with driving and cause an
accident.
INFO
• While connected, mobile phone (receiving
• Depending on the distance between
• This product allows you to register a
• Even though a mobile phone is
• Even though a mobile phone is Bluetooth
• Some models may not be confi rmed as
NOTE
calls, etc.) operations may not function
correctly.
the product and the mobile phone, the
conditions within the vehicle, and types
of screening, connection may not be
possible. In these cases, situate the
mobile phone as close as possible to the
product.
total of 5 Bluetooth devices, including
Bluetooth-capable mobile phones and
audio devices.
Bluetooth capable, characteristics and
specifi cations may mean that correct
operation may not be possible.
capable, phone specifi cations and
settings may result in differences in
display, or prevent correct operation.
connected, or may not connect.
Connect Your Mobile Phone
This product and your mobile phone use the
Bluetooth function to connect.
For details on how to connect, refer to
“Bluetooth Setting” (P41)
Operation methods below describe situations
once connection has been completed.
NOTE
• This requires a mobile phone that can be
connected to the Bluetooth.
.
Mobile Phone
36
Page 38

Display the Phonebook
The phonebook in your mobile phone can be
displayed.
Press the
1
The mobile phone screen is displayed.
Touch
2
▼
The phonebook screen is displayed.
Touch
3
▼
PHONE
Contacts
Refresh
key.
.
.
Dial a Telephone
There are a number of ways to make a call.
CAUTION
• As much as possible, refrain from phone
calls while driving. First stop your vehicle
in a safe location.
Calling by Entering a
Telephone Number
Press the
1
The mobile phone screen is displayed.
If the keypad screen is displayed, proceed
to Step 3.
Touch
2
The keypad screen is displayed.
Input the “telephone number”.
3
ADVICE
• If you make a mistake for entering, touch
to clear one digit.
• Hold down
characters.
Touch the “OFF HOOK” key.
4
PHONE
Keypad
to delete all of the input
key.
.
INFO/SETTINGS INFO
The phonebook in your mobile phone can be
displayed.
ADVICE
• Only when a Bluetooth connection is
established, touching the [HOME] key
then the [PHONE] key displays the phone
screen.
“OFF HOOK” key
▼
A call is started to the telephone number you
entered.
Mobile Phone
37
Page 39

Making a Call from a Phone
Record
A call can be made using outgoing/incoming
call records.
On the mobile phone screen,
1
touch
Recents
.
Making a Call from a
Phonebook
Display the phonebook.
1
→“Display the Phonebook”(P37)
Select and touch the “person
2
to call”.
ADVICE
• The fi rst letter of the name can be
changed by touching the
• If you touch the fi rst letter of the name,
a list is displayed with the selected letter
fi rst on the list.
or .
Touch
2
or
Touch the “telephone number
3
Outgoing
Missed
.
Incoming
,
,
to call”.
▼
A call is started to the telephone number you
selected.
Mobile Phone
38
Touch the “telephone number
3
to call”.
▼
A call is started to the telephone number you
selected.
Page 40

Calling the Person You Were
Just Talking with
Display the keypad screen.
1
→“Calling by Entering a Telephone
Number”(P37)
Touch the
2
▼
A call is started to the telephone number you
were just talking with.
Redial
.
Incoming Calls
The audio guide sounds and the incoming call
screen is displayed.
ADVICE
• Touching [Mute] switches off the function
for the mic connected to this product.
Touching [Mute] again switches ON the
mic function.
• Touching [Private Call] switches the
speaker and mic functions to the mobile
phone side. Touching [Private Call] again
switches the speaker and mic functions
to this product.
• The call volume is switched to the volume
from the last call. The volume during this
call will be the volume for the next call.
Answering an Incoming Call
Touch .
1
▼
You can now talk with the calling party.
ADVICE
• When the steering remote controller has
the “OFF HOOK” key, pressing the "OFF
HOOK" key allows you to talk with the
calling party.
→“Steering Remote Control Switch
Operation” (P14)
Ending a Telephone Call
Touch .
1
▼
This ends the incoming call.
ADVICE
• When the steering remote controller has
the “ON HOOK” key, pressing the "ON
HOOK" key allows you to end the call.
→“Steering Remote Control Switch
Operation” (P14)
INFO/SETTINGS INFO
Mobile Phone
39
Page 41

Other Info
Equipment by type
Camera
The camera (rear, side, front) can display
pictures of the rear, side, and front of the
vehicle, which prevents blind spots. The type
of camera equipped (rear, side, front) depends
on the type of vehicle.
For information about camera position, display
range of each camera screen and other
operations, please refer to the user manual.
WARNING
• The camera picture does not
exempt the driver from the
obligation to pay attention or
reduce that obligation.
Drive checking the safety of the
surroundings with your own eyes the
same way that you do when there is no
camera.
CAUTION
• If mud, snow, or the like sticks to a
camera, do not strike it off with a stiff rod
or the like. Rather use water or warm
water, then wipe it off with a soft cloth.
• Depending on the number of people in
the car and how much it is loaded, the
camera picture and guide lines may be
out of line.
• On sloped roads and when the car is
otherwise tilted, the camera picture and
guide lines may be out of line.
Display using the gear shift
position
Move the gear shift position to
1
“R”.
▼
Displays the rear view or Multi Around View
with Bird's-eye image.
ADVICE
• The rear view or Multi Around View with
Bird's-eye image is displayed when
the gear is shifted to “R”, regardless of
whether the audio is ON or OFF.
• When the gear is shifted to a position
other than “R”, the rear view or Multi
Around View with Bird's-eye image
returns to the screen that was previously
displayed.
Display using the steering
remote control switch
Press the
1
→“Steering Remote Control Switch
Operation”(P14)
▼
Displays the multi around view with bird's-eye
image.
ADVICE
• Each time the [CAMERA] key is pressed,
the camera image changes.
CAMERA
key.
Product Info
Allows you to confi rm product information.
Press the
1
Displays the HOME screen.
Touch
2
System
Touch the
3
▼
The product information screen is displayed.
HOME
Setting
.
Product Info
key.
, and then
.
40
Other Info
Page 42

SETTINGS
System Settings
System related settings, such as the
operation sound and the time, can be made.
Bluetooth Setting
You can use the Bluetooth function to connect
any commercially-available Bluetooth device
to this product.
What Bluetooth is
Bluetooth is a wireless communications
standard specialized for connecting devices
over short distances (a few meters or less).
Since it uses radio waves, it is not directional.
Thanks to its characteristic, communications
are possible even if there is an obstruction.
This makes it possible to communicate, even
with the mobile phone still in your shirt pocket
or briefcase or shoulder bag.
NOTE
• This product supports Ver. 2.1 + EDR.
Supported profi les
Bluetooth
AUDIO
Hands-free
Phonebook
transfer
Icon display when Bluetooth is
connected
A2DP(v1.1)
AVRCP(v1.3)
HFP(v1.5)
PBAP(v1.0)
The antenna level of the mobile
phone. (1 to 6)
Not displayed if the antenna
information cannot be obtained or
if outside the signal area.
The remaining battery of the
mobile phone. (1 to 6)
Not displayed if the battery
information cannot be obtained.
Bluetooth connected.
INFO/SETTINGS SETTINGS
Continued on the next page
System Settings
41
Page 43

NOTE
• Cancel functions such as the mobile
phone “dial lock”, and connect while on
the standby screen.
• While connected, operations on the
Bluetooth device (receiving calls, etc.)
may not function correctly.
• For details on how to enter the passkey
for your Bluetooth device, refer to its user
manual.
• The connection fails sometimes. Register
again.
• Depending on the distance between this
product and your Bluetooth device, the
conditions within the vehicle, and types
of screening, connection may not be
possible. In this case, put your Bluetooth
as close as possible to this product.
• Even though a device is Bluetoothcapable, its characteristics and
specifi cations may mean that correct
operation is not possible.
• Some Bluetooth devices cannot be
connected.
• Depending on the Bluetooth device,
connecting may take some time.
Registering a Bluetooth
Device
Register a Bluetooth device with this product.
Press the
1
Displays the HOME screen.
Touch
2
Bluetooth
Touch the
3
If no Bluetooth devices are registered to
this product, Step 3 is not required.
▼
Permitting pairing on the Bluetooth device will
allow the connection to be made.
HOME
Setting
.
New Devices
key.
, and then
.
ADVICE
• Up to 5 Bluetooth devices can be
registered.
If 5 devices are already registered, you
must delete one before you can register
a new Bluetooth device.
• Some Bluetooth devices require a pass
key.
• If the pass key is incorrect, redo the
Bluetooth device side operations from the
start.
• Depending on the Bluetooth device's
settings, it may be necessary to enter
the pass key each time the device is
connected.
• Carry out the procedure for entering
the pass key to the Bluetooth device
according to its user manual.
• Some Bluetooth devices do not require a
pass key entry.
• If no Bluetooth device is connected to this
product, Bluetooth device registration/
connection is possible even with the
following procedure.
- Press the [PHONE] key.
- Touch [Bluetooth] on the home screen.
System Settings
42
Page 44

Selecting a Bluetooth Device
If you have registered multiple Bluetooth
devices, you must select the one to connect.
(From then on, the Bluetooth device you set
with this function is connected automatically
when it is detected by this product.)
Press the
1
Displays the HOME screen.
Touch
2
Bluetooth
Touch the
3
Touch the “device name” to
4
HOME
Setting
, and then
.
Paired Devices
key.
.
connect.
Deleting a Registered Device
Deletes the Bluetooth device information
registered with this product.
Press the
1
Displays the HOME screen.
Touch
2
Bluetooth
Touch the
3
Touch
4
HOME
Setting
, and then
.
Paired Devices
Delete
for the Bluetooth
key.
.
device to delete.
Adjust the Sound Quality
Change audio quality settings.
NOTE
• You cannot adjust the sound quality when
the audio is OFF.
Press the
1
Displays the HOME screen.
Touch
2
Sound
▼
HOME
Setting
.
key.
, and then
INFO/SETTINGS SETTINGS
▼
This completes selection of the Bluetooth
device.
ADVICE
• You can disconnect the Bluetooth
connection by once again touching the
name of the device you connected in
Step 4.
Touch the
5
▼
This completes deletion of the Bluetooth
device.
OK
.
Displays the sound quality setting screen.
ADVICE
• You can also display the sound quality
setting screen by pressing the [PUSH
SOUND] key.
Press the [PUSH SOUND] key again to
return to the original screen.
Continued on the next page
System Settings
43
Page 45

Settings name Settings value Settings content
Tone
Balance&Fader
ADVICE
• Touching [Reset] returns all the sound quality adjustments to their factory default settings.
TREBLE Allows you to set the treble to one of 11
BASS Allows you to set the bass to one of 11
Balance:
L11 ~ L1,0,R1 ~ R11
(Left,Right)
Fader:
F11 ~ F1,0,R1 ~ R11
(Front,Rear)
levels, from -5 to +5.
levels, from -5 to +5.
The level of the sound output from each
speaker can be adjusted with the cursor
switches.
Day/Night Display Setting
The screen brightness can be set to “Auto”,
“Day”, or “Night” according to the vehicle
lighting state.
Press the
1
Displays the HOME screen.
Touch
2
Day/Night
▼
You can make the settings concerning the
screen.
Auto
Day
Night
HOME
Setting
key.
, and then
.
The screen brightness can be
linked to change with the vehicle
lighting state (headlights and
position lights).
Lighting on: Screen is dimmed.
Lighting off: Screen is bright.
For some vehicle types, linking
may only be carried out when the
light switch is in Auto.
Screen is constantly bright.
Screen is constantly dimmed.
System Settings
44
Change the settings, then
3
touch
Back
.
▼
The screen setting change is complete.
Page 46

Display Settings
The brightness and contrast of the screen can
be set.
Press the
1
Displays the HOME screen.
Touch
2
Display
▼
HOME
Setting
.
key.
, and then
Change the settings, then
3
touch
Back
.
▼
The screen setting change is complete.
Clock
The time and format of the clock can be
changed.
Press the
1
Displays the HOME screen.
Touch
2
Clock
▼
HOME
Setting
.
key.
, and then
INFO/SETTINGS SETTINGS
You can make the settings concerning the
screen.
Brightness
Contrast
Adjusts the brightness.
Touching [+] makes the display
brighter, touching [-] makes
it dimmer. You may continue
touching the adjustment until the
setting is acceptable.
Adjusts the contrast. Touching [+]
increases the contrast, touching
[-] decreases it. You may continue
touching the adjustment until the
setting is acceptable.
You can make the settings concerning the
time.
Time Format
Time Setting
Touch
3
Change the settings, then
4
touch
Sets 12h or 24h format.
Adjusts time by touching [-] or [+].
Set
.
Back
.
▼
The time setting change is complete.
NOTE
• Touch the displayed time to switch to the
clock setting screen.
System Settings
45
Page 47

Radio Setting
You can change the radio reception mode and
the display language for PTY fi lter.
You can set this for both FM and AM.
Press the
1
Displays the HOME screen.
Touch
2
Radio
Set individual items.
3
ADVICE
• You can also set the radio settings by
touching [Menu] then [Setting] in the
radio screen
HOME
Setting
.
(P21)
key.
, and then
.
Settings name Settings
PTY Language English You can change the display language for PTY fi lter.
HD Radio Technology AM On Set whether or not to receive digital radio.
FM On
value
Espanol
Francais
Off
Off
Settings content
System Settings
46
Page 48

Language
The language displayed for messages and the
like can be changed.
Press the
1
Displays the HOME screen.
Touch
2
Language
Touch the “language” to
3
HOME
Setting
.
key.
, and then
change to.
Beep Volume
Allows you to set the operation volume.
Press the
1
Displays the HOME screen.
Touch
2
System
Touch
3
Touch the “volume” to change to.
4
HOME
Setting
, and then
.
Beep Sound
key.
.
INFO/SETTINGS SETTINGS
Touch
4
▼
The language setting change is complete.
Back
.
Touch
5
▼
The setting change is complete.
Back
.
System Settings
47
Page 49

Other Settings
You can make the settings concerning the
screen.
Display Off
This turns off the screen display.
Press the
1
Displays the HOME screen.
HOME
key.
Clock Screen
Displays the clock over the entire screen.
Press the
1
▼
PUSH PWR
key.
Touch
2
▼
This turns off the screen display.
ADVICE
• Touching the screen returns the display
to the original screen.
Other Settings
48
Display OFF
.
The clock is displayed.
ADVICE
• With [HOME], [Settings], then [Clock],
you can change the format for time
display.
→“Clock” (P45)
• Press the [PUSH PWR] key again to
return to the original screen.
Page 50

Other
Troubleshooting
Please check these items if a message appears on the screen, or if you think something is not working properly.
If This Message Appears...
A message is displayed on the screen of this product according to the situation.
Message Cause Response
This iPod cannot be played Authentication failed. Reconnect your iPod.
The connected iPod has an unsupported format and
cannot be recognized.
This iPod software version is not correct. Please change to a supported software version.
Unsupported Device An unsupported USB device has been connected. Reconnect a supported USB device.
Hub Not Supported
Vbus Error Authentication failed.
No Response from Device
No data that can be played There are no audio fi les that can be played back. Add audio fi les that can be played.
Unplayable File The audio fi le is corrupted.
Use an iPod that supports this product.
→“Use USB Device” (P29)
→“Audio Files (MP3/WMA/AAC)” (P15)
Other
(P5)
Troubleshooting
49
Page 51

If You Think Something Is Not Working Properly...
Here is a list of symptoms, causes and responses if you think something is not working properly.
Symptoms Cause Response
Cannot operate. For safety, some operations are restricted while the
The operation sound is not made. The operation sound is set to [Off]. Set the [Sound] “Operation Volume” to [1], [2], or [3].
Nothing is displayed on the screen. The screen is turned OFF. Stop the vehicle in a safe location, then perform the
The monitor screen is dark. The monitor brightness is not correctly adjusted. Adjust the monitor brightness.
There is no sound or quiet sound. The volume is turned to its minimum. Adjust the volume.
vehicle is moving.
The vehicle's battery voltage has dropped. Charge or replace the battery.
The temperature inside the product is high. Please wait for the temperature to drop.
The balance or fader is turned to one side. Adjust the balance or fader.
“Audio OFF”. Switch to “Audio ON”.
The driver should refrain from operating this product
while the vehicle is moving. First stop the vehicle in a
safe location, then operate this product.
→ “Beep Volume” (P47)
operation to turn the screen back ON
→“Display Settings” (P45)
→“Adjust Volume” (P13)
→“Adjust the Sound Quality” (P43)
→“Switch Audio ON/OFF” (P13)
(P48)
.
Troubleshooting
50
Page 52

Page 53

Page 54

Page 55

Page 56

Page 57

 Loading...