

Page 1

,
MITSUBISHI
~ELECTRIC
HIGH-DEFINITION
BASIC
OWNER'S
TELEVISION
GUIDE
MODELS
C9
737
837
This manual provides basic connection, setup, and operating instructions.
Please visit our website
detailed owner's guide that fully describes the features of this
• For questions:
Series
Series
Series
at
www. mitsubishi-tv.com to view or download a
» Visit our website at www.mitsubishi-tv.com.
» E-mail usatMDEAservice@mdea.com.
» Call Consumer Relations at 800-332-2119.
TV.
• For information on
To
•
order replacementoradditional remote controlsorlamp cartridges, visit our website at
www.mitsuparts.com
837 Series.
part number 242D483020 (two-ended cable)
IR
System
emitter cables are available for purchase from Mitsubishi. Request either
ENERGY
Reset, please see the back cover.
or
call 800-553-7278.
STAR
READY
or
part number 299P254020 (four-ended cable).
@[p
TEXAS
INSTRUMENTS
SCDLDR
-----
PROCESSOR
Huml'·
HIGH-DEFINITION MULTIMEDIA INTERFACE
Command
WITH
IR
LEARNING
Page 2

FCC
Declaration
of
Conformity
CAUTION:TOREDUCE
SHOCK,
NO
SERVICINGTOQUALIFIED
£ within
-,
&
enclosure that may be
tute a risk
DO
NOT
USER
SERVICEABLE
The lightning flash with arrowhead symbol
an
equilateral triangleisintended to
alert the user of the presence of uninsulated
"dangerous voltage" within the product's
of
electric shock to persons.
The exclamation point withinanequilat-
I eral triangle
• the presence of important operating and
&
MAINS
as the disconnect device. The disconnect device shall
remain readily operable.
Stand
CAUTION: Use these Mitsubishi TV models only with
the Mitsubishi stand models shown here. Other stands
can result
WD-60C9, WD-65C9
WD-60737, WD-65737
WD-65837
WD-73C9
WD-73737
WD-73837
82-inch
or
sell matching bases for 82-inch televisions (WD-82737,
WD-82837). When selecting a stand, base, or other furniture to support the
with the appropriate dimensions for stabilityand to
support the TV's total weight
additional equipment you plan to store.
TV
WEIGHT: This TVisheavy! Exercise extreme care
when lifting or moving it. Lift or move the TV with a
minimum of
avoid jarring or moving it while itisturned on. Always
power off your
all
nect
WARNING:
do
not expose this apparatus to rain or moisture.
WARNING: This product contains chemicals known
to
the State of California to cause cancer andlor birth
defects or other reproductive harm.
maintenance (servicing) instructions
literature accompanying the product.
DISCONNECTION: The mains plugisused
Requirement
in
instability and possibly cause injury.
TV
Model
TVs:
Mitsubishi does not design, manufacture,
TV,
two
adults.
TV,
unplug the power cord, and discon-
cables before moving it.
To
reduce the riskoffire or electric shock,
THE
RISKOFELECTRIC
REMOVE
of
is
please make sureitis designed
To
COVER
PARTS
SERVICE
sufficient magnitude to consti-
intended to alert the user to
as
well as the weight of any
prevent damage to the
(OR
INSIDE.
PERSONNEL.
Stand
MB-S60/65A
MB-S73A
BACK).
REFER
in
Model
the
TV,
Product:
Models:
Responsible
Party:
Telephone:
This device complies with Part15of the FCC Rules.
Operation
(1)
This device
and
(2)
This device must accept any interference
received, including interference that may cause
undesired operation.
Note: This equipment has been tested and found
to comply with the limits for a Class B digital device,
pursuant to part
are designed
against harmful interference
lation. This equipment generates, uses and can
radiate radio frequency energy and, if not installed
and used
cause harmful interference to radio communications. However, there
ence will not occur
equipment does cause harmful interference to radio
or television reception, which can be determined
by turning the equipment off and on, the user
encouraged to try to correct the interference by one
or more of the following measures:
» Reorient or relocate the receiving antenna.
» Increase the separation between the equip-
ment and the receiver.
» Connect the equipment into
a circuit different from that to which the
receiver is connected.
» Consult the dealer or
TV
Changesormodifications
approvedbyMitsubishi
interference
to
operate
ENERGY
This TV meets
all
operating modes.
STAR®
Projection Television Receiver
WD-60C9, WD-65C9, WD-73C9
WD-60737, WD-65737, WD-73737,
WD-82737
WD-65837, WD-73837, WD-82837
Mitsubishi Digital Electronics
America, Inc.
9351
Jeronimo Road
Irvine, CA 92618-1904
(800)
332-2119
is
subject to the following two conditions:
may
not cause harmful interference,
15ofthe
to
provide reasonable protection
in
accordance with the instructions, may
in
technician for help.
and
would
this
equipment.
Compliance
ENERGY
FCC
Rules. These limits
in
a residential instal-
is
no guarantee that interfer-
a particular installation. If this
an
outlet
an
experienced radiol
not
expressly
could
void
STAR® efficiency standards
cause
the
user's
harmful
authority
is
on
in
Page 3
Contents
Important
Remote
Safety
Control
Instructions.
........... 4
, , , ,
For Your Records
Record the model number, serial number, and
TV.
purchase date of your
on
..
5
numbers are
page when requesting assistance with the
the back of the
The model and serial
TV.
Refer to this
TV.
TV
Connector
Connector
Connecting
Connecting with HDMIorDVI.
Connecting with Composite Video 7
Connecting with Component Video 7
Connecting Antenna or Cable without a Box 8
Recording to a Device from Antenna or
Cable without a Box 8
Connecting
Connecting
Audio Output 8
Customizing
Auto Device Discovery Feature 9
Device Type and Activity 9
Selecting a Source to Watch 9
TV
Channel
Memorizing Channels
Ch
annelView™ Channel Listings 10
ChannelView™
Using
TV
Menus
Menu Navigation
Picture and Sound Settings
Closed-Caption Settings
Setup of TV Features
Input Management...
Controlling TV Usage
Panel
Performance
Diagrams.
............ 6
...................
Devices
AN
Receiver for TV's Audio Output 8
AN
Receiver for TV Video and
Device
Setup
Setup
MODELNUMBER
SERIAL NUMBER _
..
6
7
PURCHASEDATE _
RETAILER NAME _
LOCATION
_
Lamp Replacement
For lamp-replacement instructions, see the Owner's
Guide.
To
Order a Replacement Lamp Under Warranty
Call (800) 553-7278. Please have model number, serial
TV
purchase date available.
lamps
replaced under warranty
(800)
10
10
number, and
Important: All
must be returned to Mitsubishi where they will be
inspected for defect verification.
To
Purchase a Replacement Lamp After Warranty
Visit our website at www.mitsuparts.com or call
553-7278. Order new lamp part number 915B403001
Internal Fans
11
11
14
14
16
17
Internal cooling fans maintain proper operating tem-
TV.
peratures inside the
when you first turn on the
while viewing the
off
the
TV.
seconds after shutting off the TV and while using the
Bright Lamp Mode.
TV,
You
may notice louder fan noise about
It is normal to hear the fans
TV,
during quiet scenes
and for a short time after shutting
30
USB
Media
Playa
Thumbnail and Playlist Menus
Setup
3D
Video
Initial Setup
Watching3DVideo
To
Watch Regular (non-3D) Video
Troubleshooting,
Lamp-Cartridge
Warranty,
Player
Slide Show or Playlist..
Menu
,.,..,....................
Replacement
Trademarks,
and
Licenses.
and
Cleaning
....
18
18
18
19
19
19
..
20
Choose a Location for your TV.
• Allow at least four inchesofspace on all sides of
the TV to help prevent overheating. Overheating
may cause premature failure
shortened lamp life.
• Avoid locations where light may reflect off the
screen.
• See the stand requirements at the beginning
book.
of
the TVaswell
as
of
this
24
..
26
Page 4
Important Safety Instructions
Please read the following safeguards for your TV and
retain for future reference. Always follow all warnings
and instructions marked on the television.
1)
Read these instructions.
2)
Keep these instructions.
3)
Heed
all
warnings.
4)
Follow all instructions.
5)
Do not use this apparatus near water.
6)
Clean only with
7)
Do not block any ventilation openings. Install
accordance with the manufacturer's instructions.
8)
Do not install near any heat sources such as
radiators, heat registers, stoves, or other apparatus
(including amplifiers) that produce heat.
dry
cloth.
in
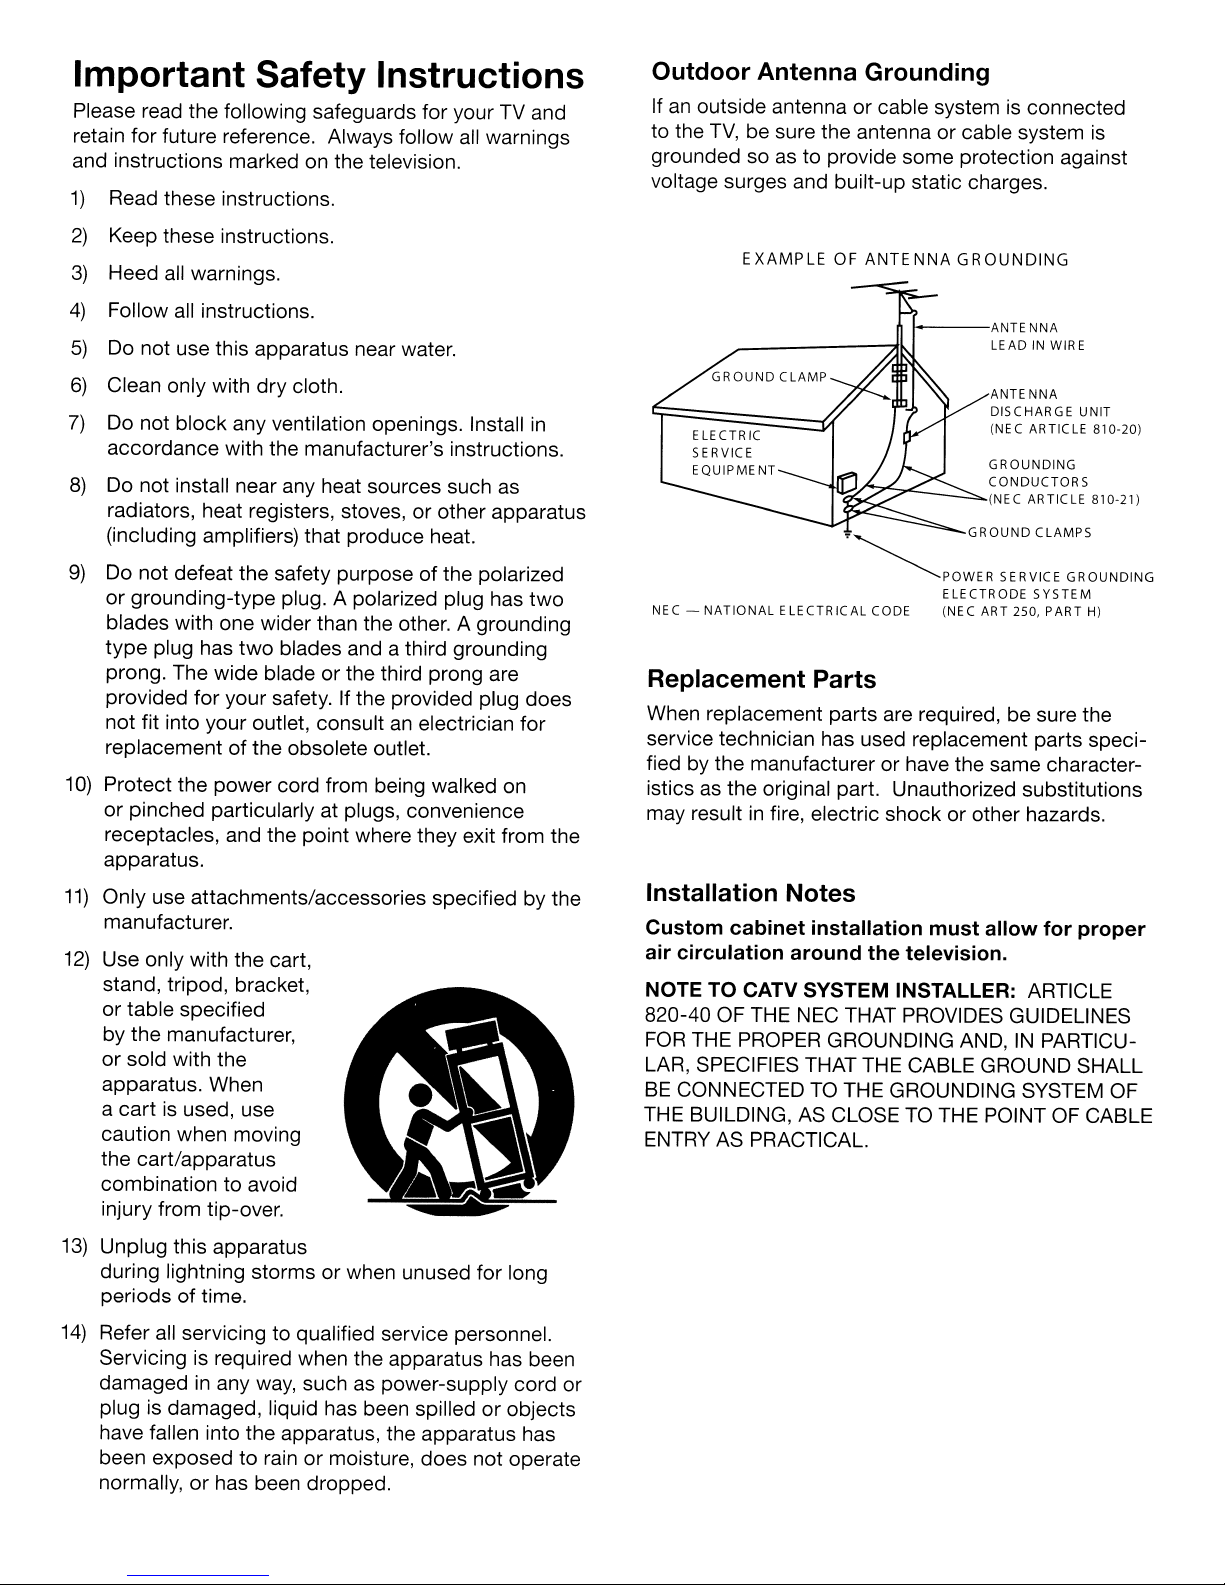
Outdoor Antenna Grounding
Ifanoutside antenna or cable system is connected
to the
TV,
be sure the antenna or cable system is
grounded so as to provide some protection against
voltage surges and built-up static charges.
EXAMPLEOFANTENNA GROUNDING
f---ANTE
'tU:::::~>";;>~--":::::::o......
_
GROUND
NNA
LEADINWIRE
ANTENNA
DISCHARGE
(NEC ARTICLE
GROUNDING
CONDUCTORS
(NEC ARTICLE
CLAMPS
UNIT
810-20)
810-21)
9)
Do not defeat the safety purposeofthe polarized
or grounding-type plug. A polarized plug has
blades with one wider than the other. A grounding
type
plug has
two
blades and a third grounding
prong. The wide blade or the third prong are
provided for your safety. If the provided plug does
not fit into your outlet, consultanelectrician for
replacementofthe obsolete outlet.
10)
Protect the power cord from being walked on
or pinched particularly at plugs, convenience
receptacles, and the point where they exit from the
apparatus.
11)
Only use attachments/accessories specified by the
manufacturer.
12)
Use only with the cart,
stand, tripod, bracket,
or table specified
by the manufacturer,
or sold with the
apparatus. When
a cart is used, use
caution when moving
the cart/apparatus
combination to avoid
injury from tip-over.
two
NEC -
NATIONAL
'~POWER
ELECTRICAL
CODE (NEC ART 2S0,
SERVICE
ELECTRODE
GROUNDING
SYSTEM
PART
H)
Replacement Parts
When replacement parts are required, be sure the
service technician has used replacement parts specified by the manufacturer or have the same characteristicsasthe original part. Unauthorized substitutions
may resultinfire, electric shock or other hazards.
Installation Notes
Custom cabinet installation must allow for
air circulation around the teleVision.
NOTE TO CATV SYSTEM INSTALLER:
820-40OFTHE
FOR
THE PROPER GROUNDING AND,INPARTICU-
NEC
THAT PROVIDES GUIDELINES
LAR, SPECIFIES THAT THE CABLE GROUND SHALL
BE
CONNECTEDTOTHE GROUNDING SYSTEM OF
THE BUILDING, AS CLOSETOTHE POINT OF CABLE
ENTRY
AS
PRACTICAL,
proper
ARTICLE
13)
Unplug this apparatus
during lightning storms or when unused for long
periodsoftime.
14)
Refer all servicing to qualified service personnel.
Servicing is required when the apparatus has been
damagedinany way, such as power-supply cord or
plug is damaged, liquid has been spilled or objects
have fallen into the apparatus, the apparatus has
been exposed to rain or moisture, does not operate
normally, or has been dropped.
Page 5
5
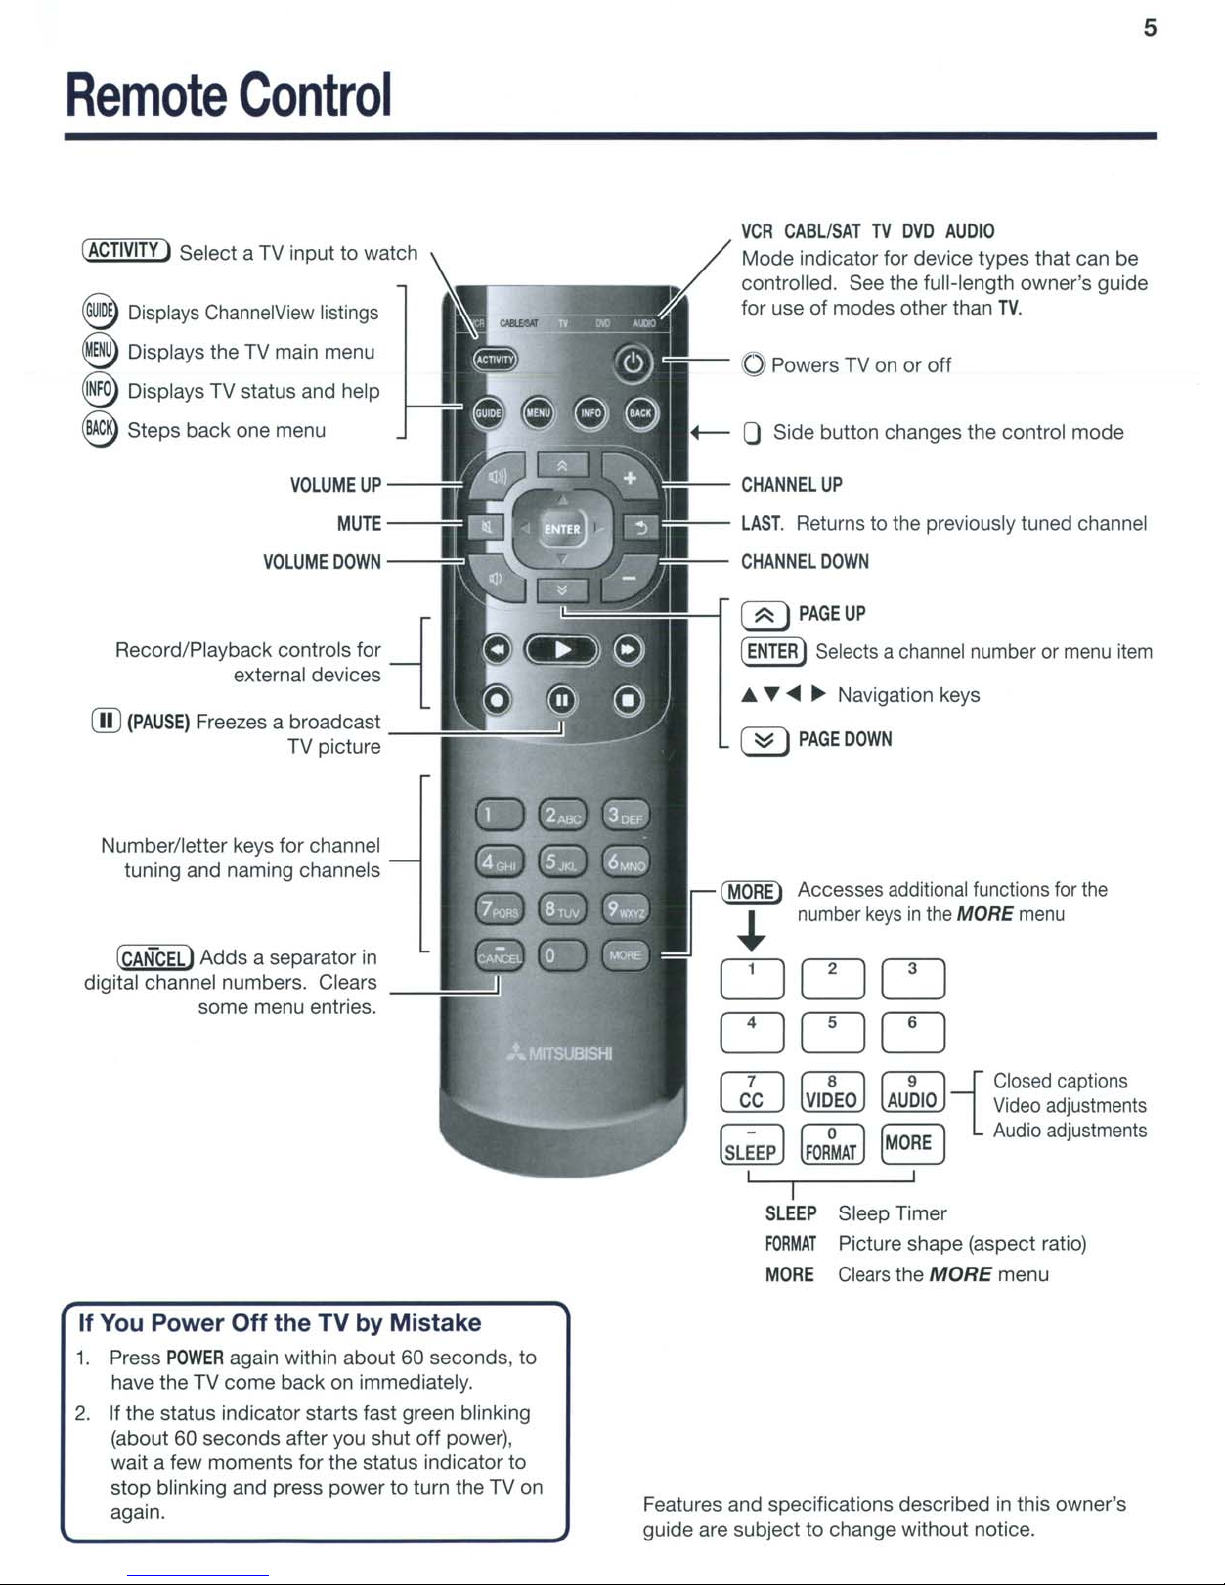
Remote
(ACTIVITY)
~
Displays ChannelView listings
Control
Select a TV
inputtowatch
@ Displays the TV main menu
~
Displays TV status and help
~
Steps
back
one
menu
VOLUME
VOLUME
Record/Playback controls for
external devices
ill)
(PAUSE)
Freezes a broadcast
TV picture
UP
MUTE
OOWN
VCR
CABl/SATTVDVD
Mode
controlled. See the
for useofmodes
indicator for device
oPowers TV on
+--
0 Side button changes the
CHANNEL
lAST.
CHANNEL
( ~ )
-{
(ENTER
• T
(
::::::
UP
Returns to the previously tuned channel
DOWN
PAGE
UP
ISelects a channel number or menu item
~
~
Navigation keys
I
PAGE
DOWN
AUDIO
fulHength
other than
or
off
types
TV.
control
that can be
owner's
mode
guide
Number/letter
tuning and naming channels
(CANCELIAdds
digital channel numbers. Clears
If
You
Power
1.
Press
POWER
have the TV
2.Ifthe
status indicator
(about
wait a few
stop
again.
60
blinking and press
keys for channel
a separator in
some
menu entries.
Off
the
again within
come
back on immediately.
seconds
moments
after you
TV by
about
starts
for the status indicator
powertoturn the TV
Mistake
60 seconds, to
fast green blinking
shut
off
power),
to
on
(MORE)
..
Accesses additional functions for
number
keysinthe MORE menu
CJLJLJ
LJDD
fTI
l..fU
r-=-I
~~
Features and specifications
guide are subject to change
I"B'l
~ ~
['01
I I
I
SLEEP
FORMAT
MORE
Sleep
Picture
Clears the
f9I
[MORE
i Closed captions
Video adjustments
1 Audio adjustments
Timer
shape
described
without
(aspect ratio)
MORE
notice.
menu
in this owner's
the
Page 6
6
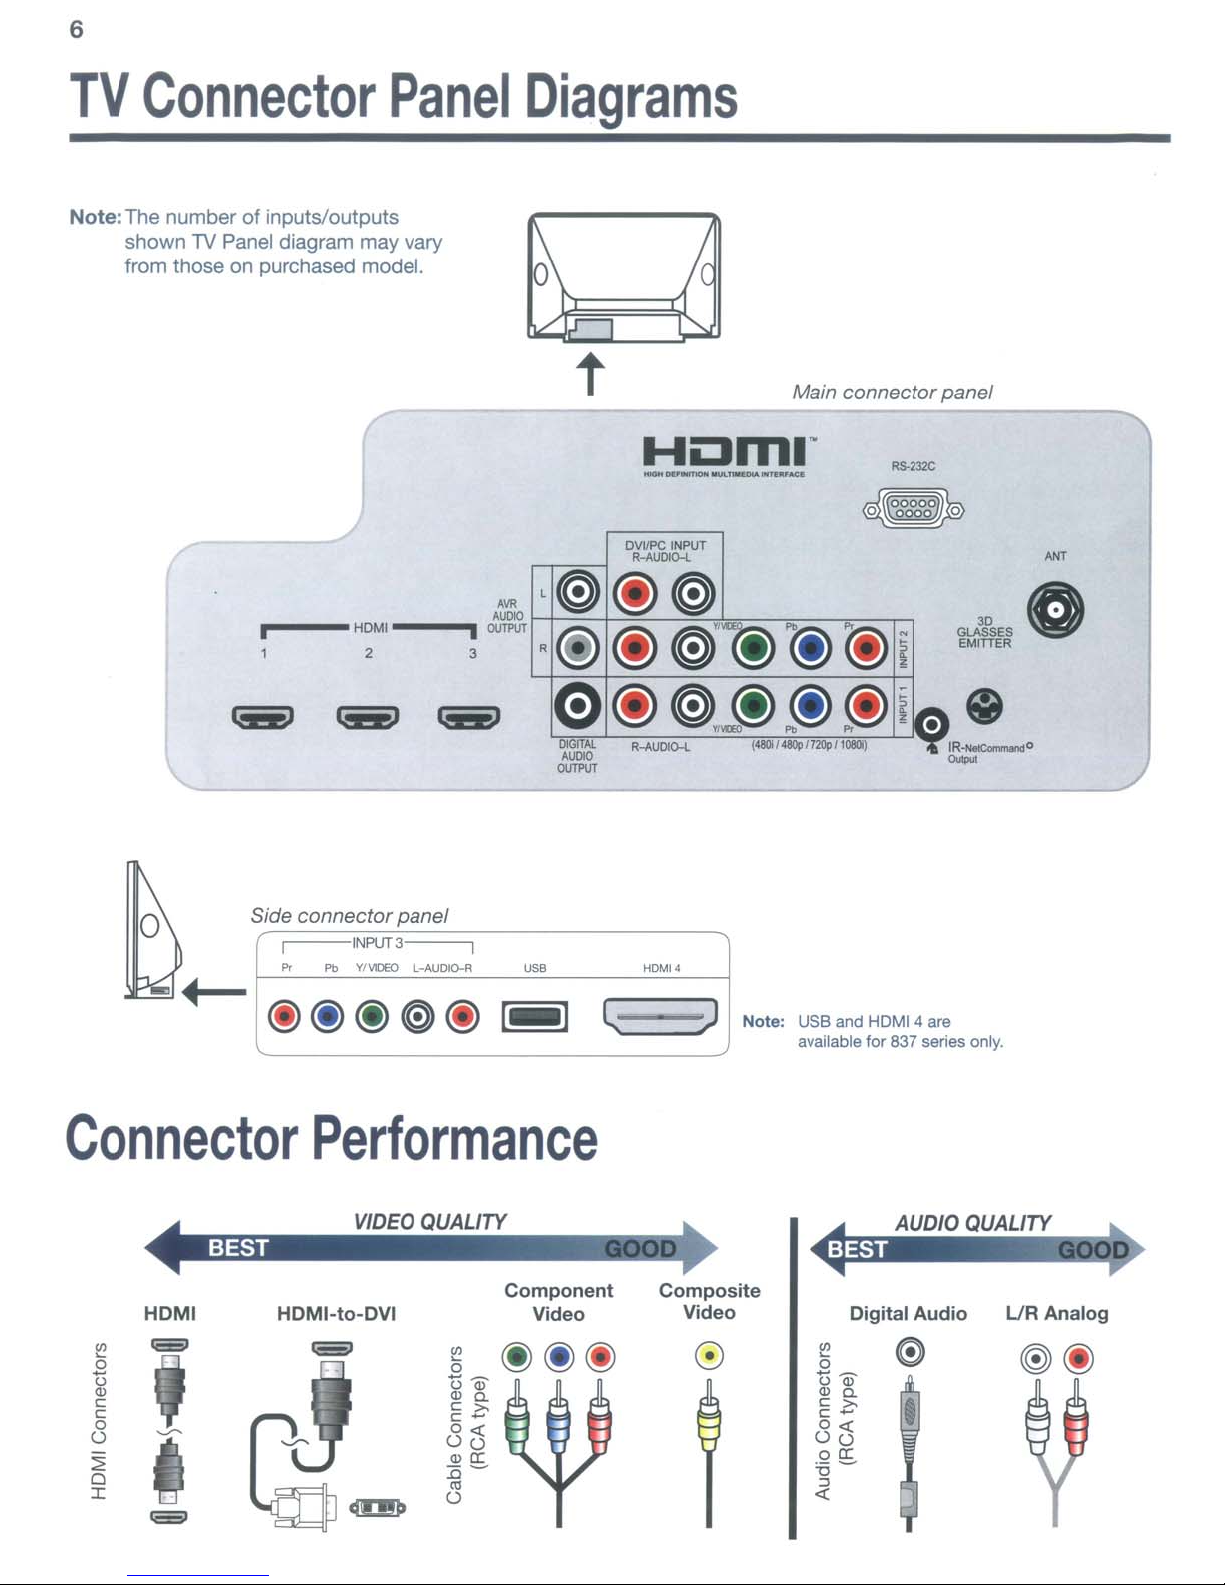
TV
Note:The number of inputs/outputs
Connector
shown
from those on purchased model.
1V
Panel diagram may vary
ri
---
HOMI
2 3
Panel
".
AUllOO
i
0UTP\1T
Diagrams
t
L~
R@
e
~.~
-----._
OVIIPC INPlfT
R-AlJOIO-l
@~
@
@)'(!)
@~@@(i)
R-AUDlO-L
..
"IUD
(48lII1~112IJp'10l1l1i)
Main connectorpanel
~-----
_-
'@
(;)i
-
Pb
i~
'"
.'
JSES
EMrITER
Side connector panel
i INPUf3 i
Pr
Pb
Connector
HDMI
liiiiOl
Performance
HDMI-to-DVI
G3
YI\IC'Ii.O
l-AUDIO-R
15
Om
Ol
c
c -
0":
00
Olcr:
:0-
o
'"
USB
Component
Video
@@@
c.
>.
HOM
••
l ) Note:
Composite
Video
USB
and
available
5 e
om
Ole.
c
>.
c-
o..:
00
ocr:
:0-
~
HDMI 4
for
837
are
series
only.
LlR AnalogDigital Audio
Page 7
7
Connecting
Devices
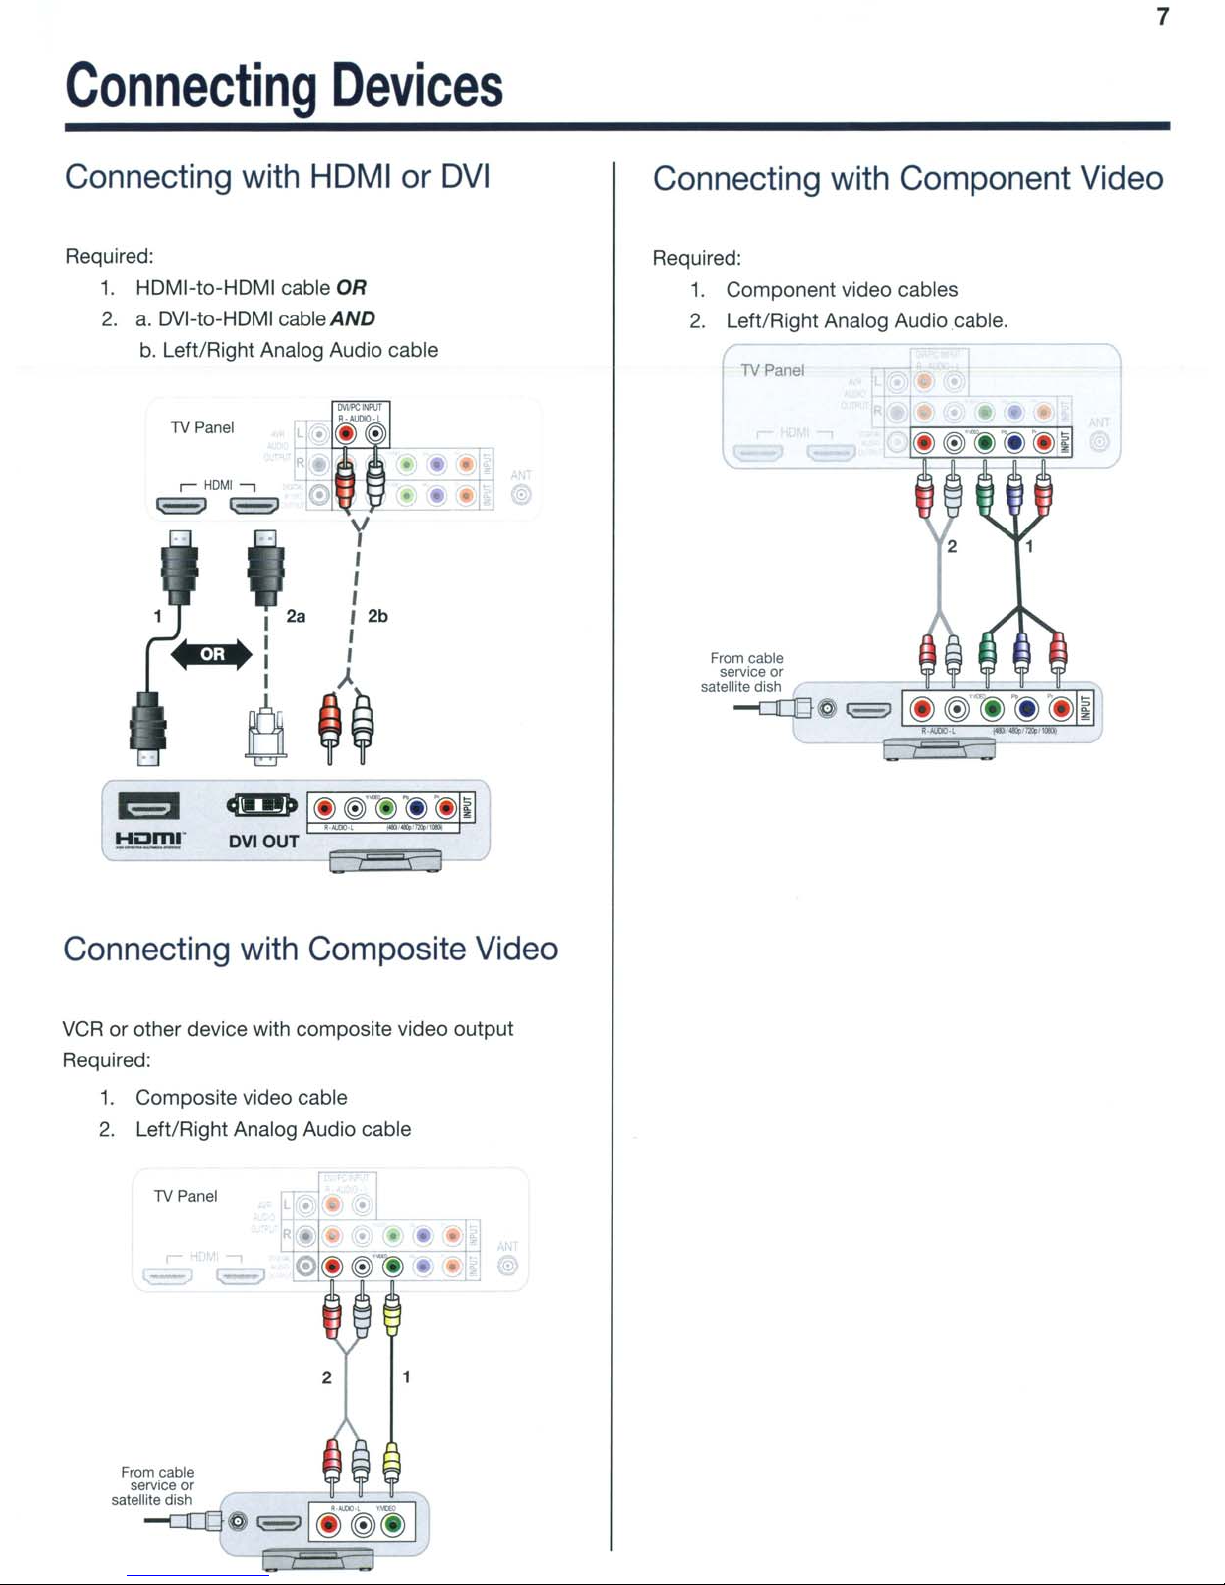
Connecting with HDMI
Required:
1.
HDMI-to-HDMI cable OR
2.
a.
DVI-to-HDMI cable
b.
Left/Right Analog Audio cable
'TV
Panel
AND
or
DVI
Connecting with Component Video
Required:
1.
Component video cables
2.
Left/Right Analog Audio cable.
TYPanel
From
cable
service
satellite
or
dish
--c:JQd .
~oml·
Connecting with Composite Video
VCR
or other device with composite video output
Required:
1.
Composite video cable
2.
Left/Right Analog Audio cable
TV
Panel
+
-
....
2
From
cable
service
satellite
or
dish
--c:JQd.
~I(~r@@
I
Page 8
8
Connecting
Devices
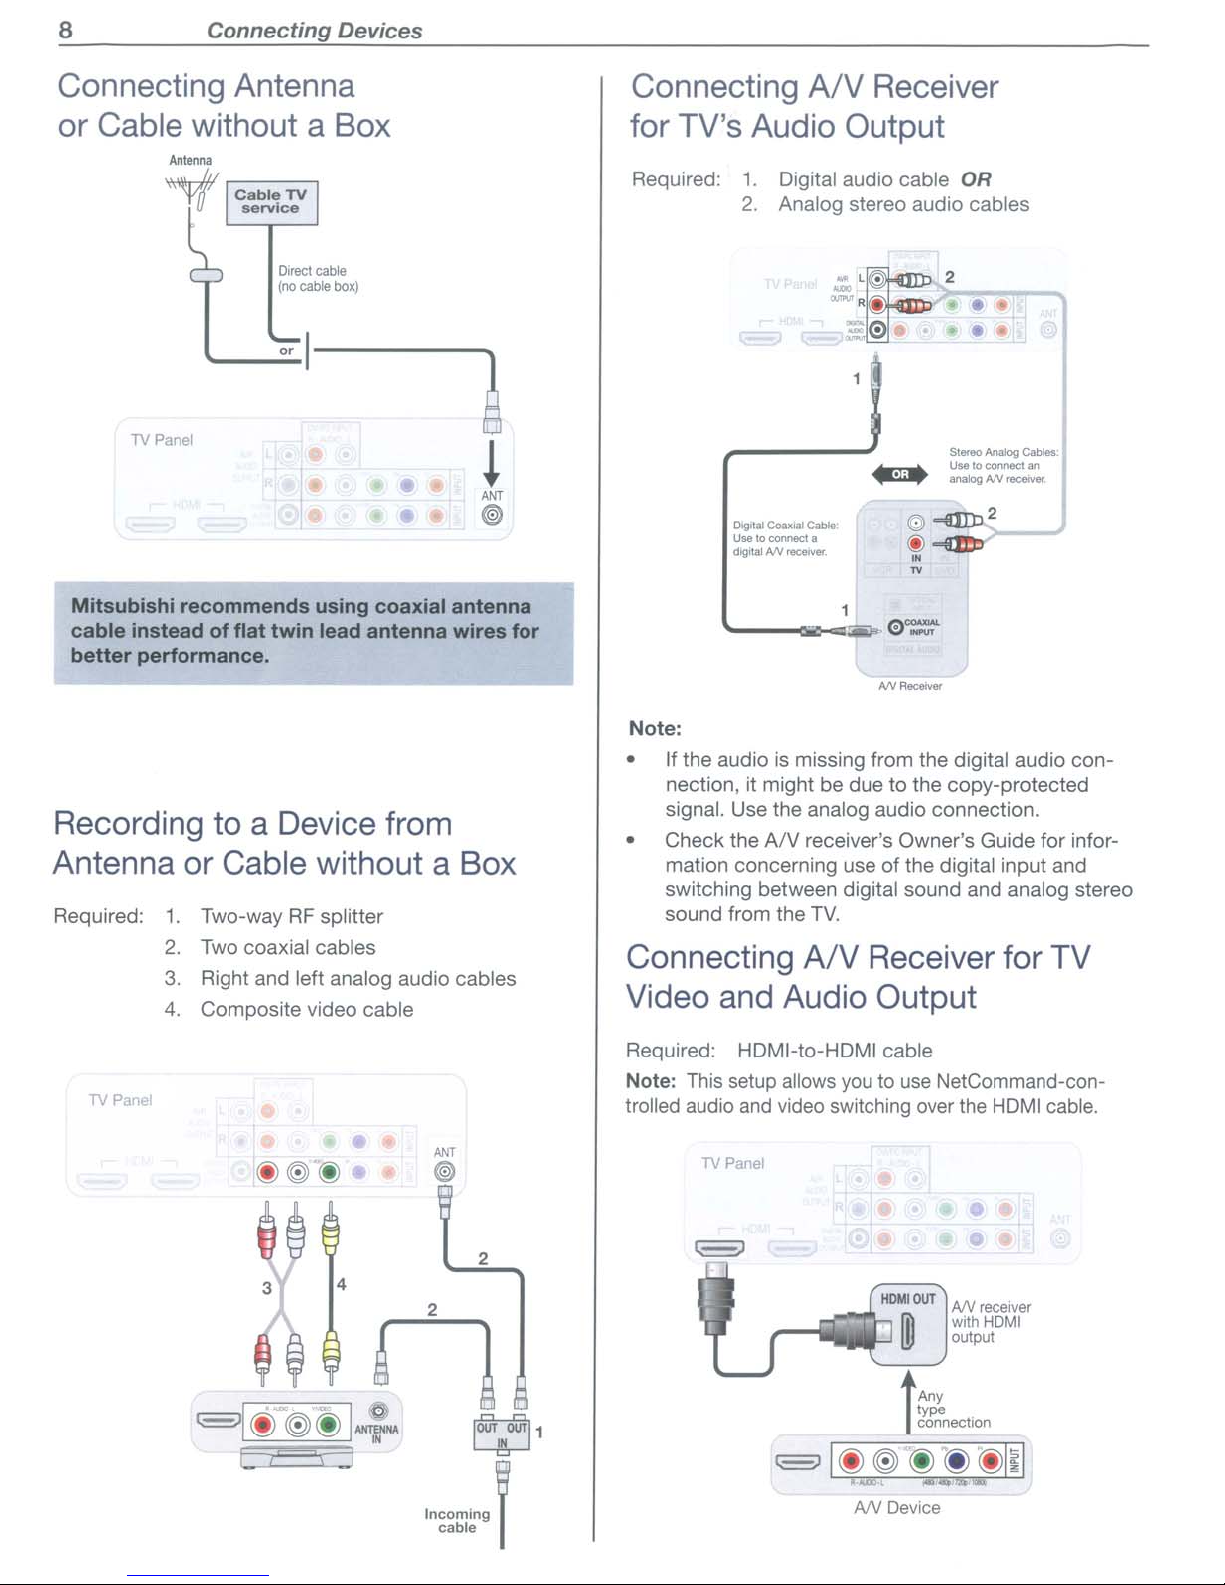
Connecting Antenna
or Cable without a Box
lV
Panel
Mitsubishi
cable
better
recommends
insteadofflat
performance.
using
twin
lead antenna
coaxial antenna
wires
for
Connecting
AN
Receiver
for TV's Audio Output
Required:
1.
Digital audio cable
2.
Analog stereo audio cables
L
'
:l/1O\,"R.
• •
r
'--
__
....
0'='
ANR~
OR
2
•
Recording to a Device from
Antenna or Cable without a Box
Required:
TV Pane!
1.
Two-wayRFsplitter
2.
Two coaxial cables
3.
Right and left analog audio cables
4.
Composite video cable
3 4
2
Note:
is
• If the audio
nection, it might be due to the copy-protected
signal. Use the analog audio connection.
• Check the
mation concerning use of the digital input and
switching between digital sound and analog stereo
sound from the
Connecting
missing from the digital audio con-
AN
receiver's Owner's Guide for infor-
TV.
AN
Receiver for TV
Video and Audio Output
Required: HDMI-to-HDMI cable
Note: This setup allows
trolled audio
and
video switching over
youtouse
NetCommand-con-
the
HDMI
•
NV
receIVer
wrthHDMI
output
cable.
AN
AnY
type
connection
l
Device
Page 9
9
Customizing
Device
Setup
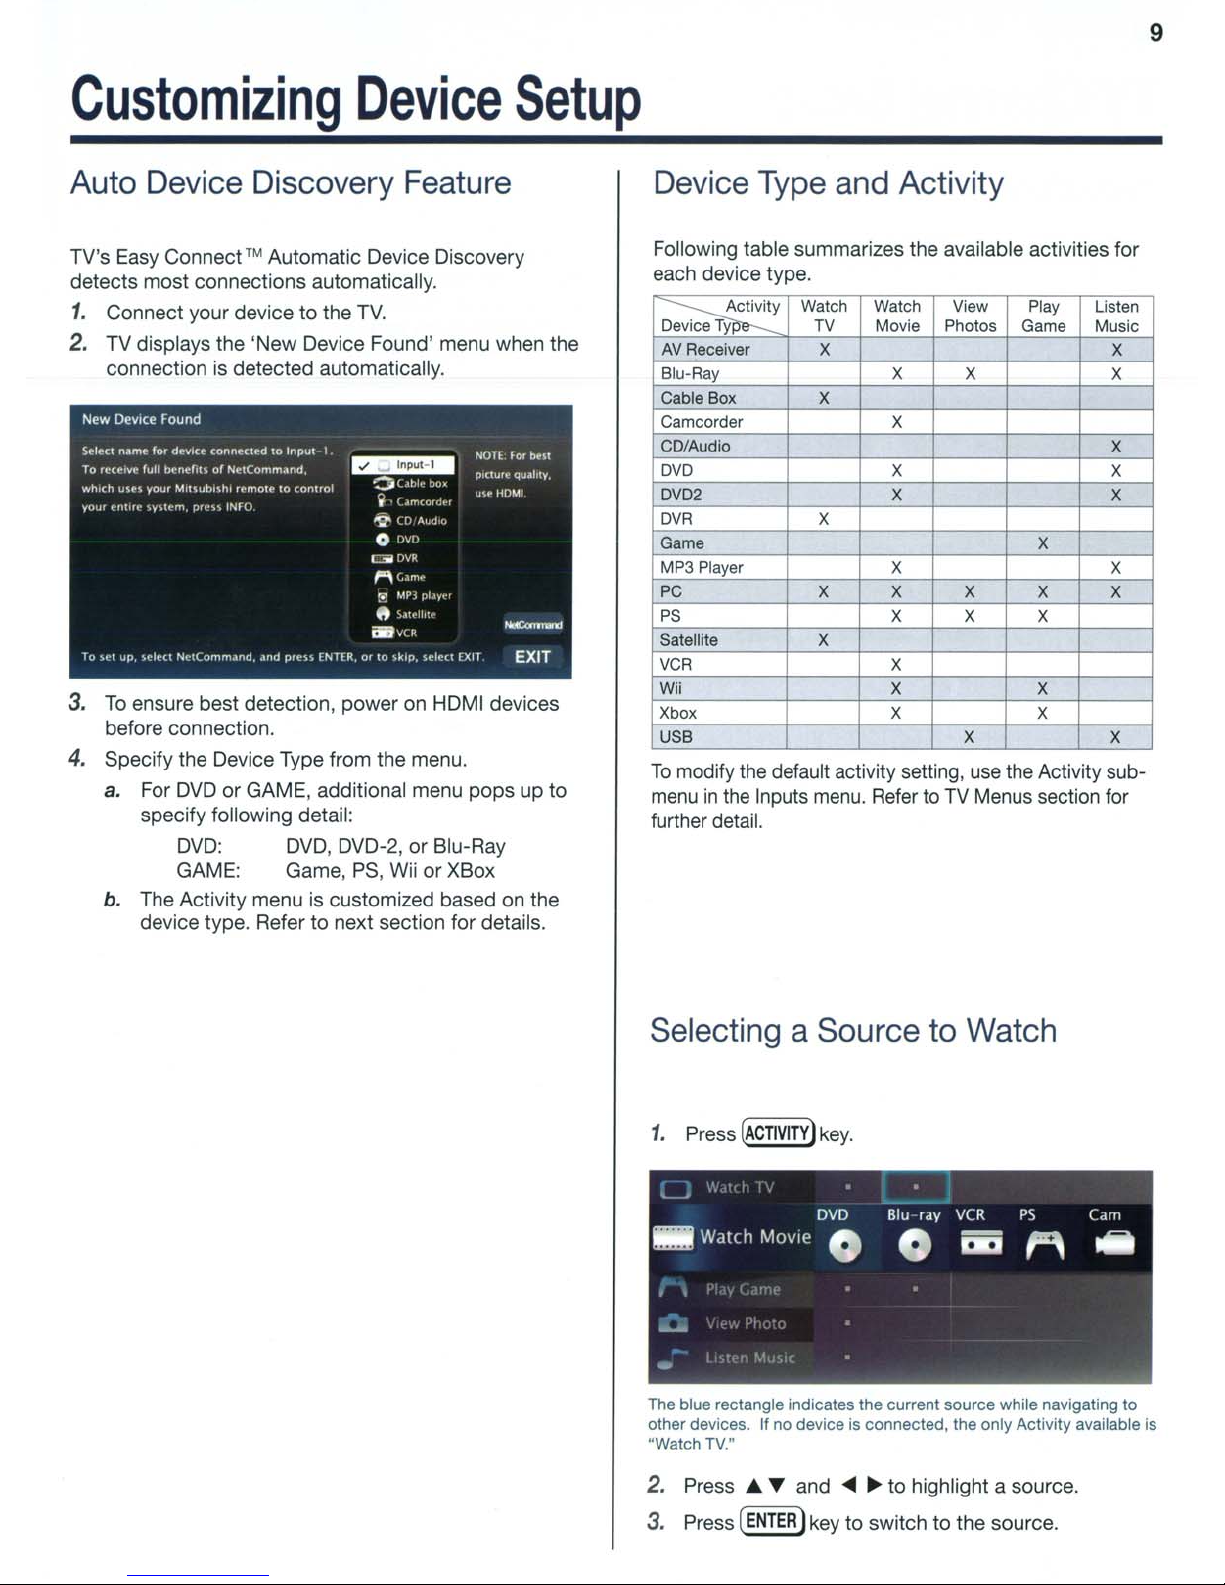
Auto Device Discovery Feature
TV's
Easy
Connect™ Automatic Device Discovery
detects most connections automatically.
1.
Connect your device to the
2. TV displays the 'New Device Found' menu when the
connection is detected automatically.
3.
To
ensure best detection, poweronHDMI devices
before connection.
4.
Specify the Device Type from the menu.
a.
For
DVD
or GAME, additional menu pops up to
specify following detail:
DVD:
DVD,
GAME: Game,
b.
The Activity menuiscustomized basedonthe
device type. Refer to next section for details.
TV.
DVD-2, or Blu-Ray
PS,
Wii or XBox
Device Type and Activity
Following table summarizes the available activities for
each device type.
~y
Device
Ty
AV
Receiver
Blu-Ray
Cable Box
Camcorder X
CD/Audio
DVD
DVD2 X
DVR
Game
MP3 Player
PC X
PS
Satellite X
VCR
WH
Xbox
USB X X
To
modify
the
menuinthe
Watch Watch View Play
TV
Movie
X X
X
X
Photos
X
X
X X
X
x X
X
X X
X X
default activity setting,
Inputs
menu.
RefertoTV
Game
X X
X
use
the Activity sub-
Menus section for
further detail.
Listen
Music
X
X
X
X
X X
X
Selecting a Source to Watch
1.
Press
The
blue
other
devices.Ifno
·Watch
TV."
2.
Press......
3. Press
(ACTIVITY)
rectangle
(ENTER)
key.
Indicates
deviceisconnected,
and
the
current
source
the
...~to highlight a source.
key
to switch to the source.
only
while
Activity
navigating
available
to
Is
Page 10
10
TV
Channel
Setup
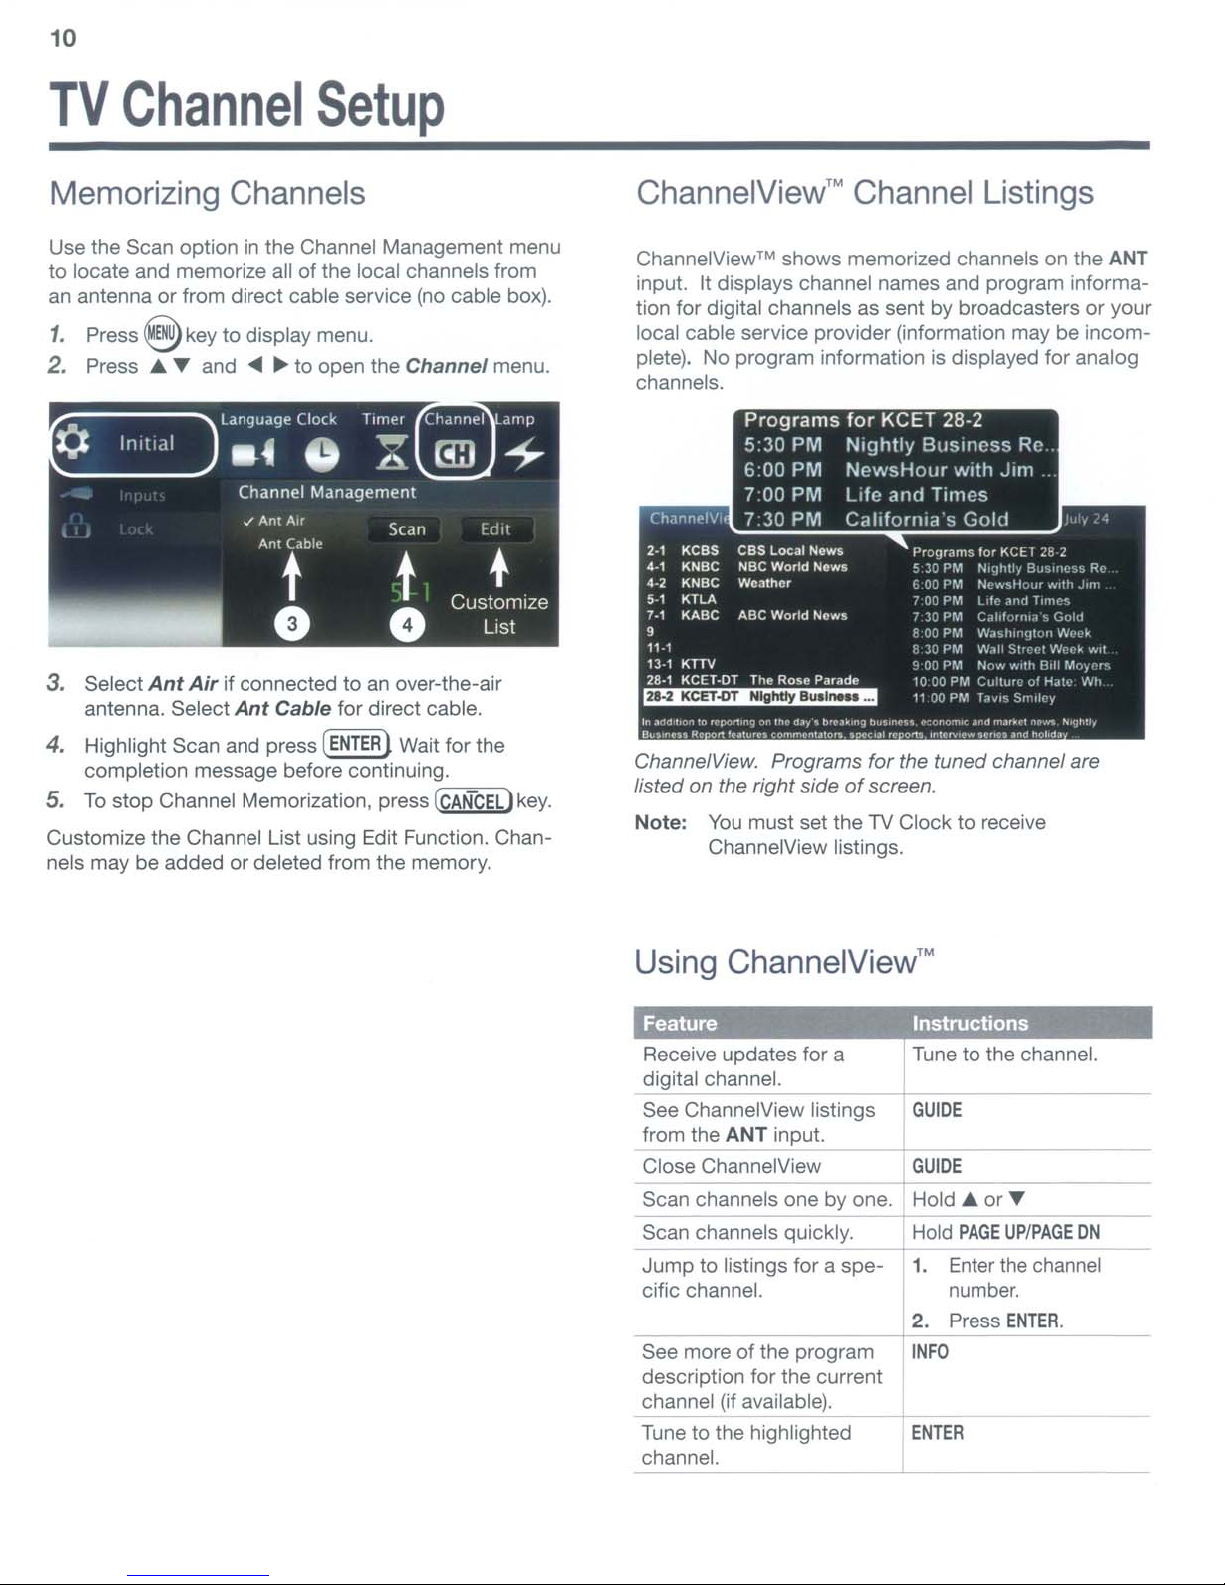
Memorizing Channels
Use the Scan optioninthe Channel Management menu
to locate and memorize all of the local channels from
an antenna
1.
Press
2.
Press
¢
3. Select
antenna. Select
4. Highlight Scan and press
completion message before continuing.
5.
To
Customize the Channel List using Edit Function. Channels may be added
or
from direct cable service (no cable box).
@key
....~and ...~to
In
It
Idol
to
display menu.
open the Channel menu.
Language
.4
Channel Management
JAnt
Ant
Clock
0
Air
Cable
t
e
Ant
Air
if connectedtoan
Ant
Cable for direct cable.
stop
Channel Memorization, press
or
deleted from the memory.
Timer
@®
Chdnni"1
....
C!IJ
.8-
Scan
t
0
over-the-air
Wait for the
f
Customize
[r:C-:-:AN==CC:::E'"'L)
dmp
-+
dll
+
List
key.
ChannelView™
ChannelView™
shows memorized channels on the ANT
Channel Listings
input. It displays channel names and program informa-
or
tion for digital channels as sent by broadcasters
local cable service provider (information may be
your
incomplete). No program information is displayed for analog
channels.
CI'IMn
..IVi.
,.,
Kess
KNBe
4.'
.-,
KNBe
KTLA
5-1
7.1
KABC
,
11·1
13·1
KTIV
28·1
KeEl-OT
~
I~
~''''
"n~'n'~p".,.nQ
R,
,-n,"~
Programs
5:30
6:00
700
730
CBS Local Nows
NBC
World
Weathor
ABC
World
The
Rose
~"'~.
~
lu'",u
«''''''''''~'.''''''
PM
PM
PM
PM
~'Y'
News
Now,
Parade
t>.~
for
KeET
Nightly
Buslncss
NewsHour
Life
and Times
Cahforflla"s
I'r:HJrilms
~
(
7O~PM1,k
7
FOJPM
f:
'. 0,'
10~OPM
l'
•••
n~
h"
••
nu.
.""'".,.~
~.,
"'''',,..
28·2
With Jim
~S
PM
I)~
rM
3:
PM
3~
PM
PM
?OPM
"n
.......
1.",·~,..
Gold
Rc
lor
I'\Cll
1'<';lhll/ g.,"",,,",,,
N.·
C.i1,t
W..
IN.,I.
Nc,·
C"llw,_u·H..:,_,
,.,
~~tI
H''''~
~e
...'H,,'
,1<\11
T"".-·'.
"",'"
,llI"<jl'"
'il'_
"I
......
,It,
flrll
..
,~S'·>I('~
",.""
,.-.
.~~
n"hd.
....
G,,:,I
\fJ."'~
1.
,p,
""',
Mo"
''><In'',
R,
..
~
....
'I
"",
h"
ChannelView. Programs for the tuned channel are
listed on the right side
Note:
You
must set theTVClock to receive
of
screen.
ChannelView listings.
Using
ChannelView™
Feature
Receive updates for a
digital channel.
See ChannelView listings
ANT
from the
input.
Close ChannelView
Scan channels one by one.
Scan channels quickly.
Jump
to listings for a
spe-
cific channel.
See moreofthe program
---4---
description for the current
channel (if available).
to
Tune
the highlighted
channel.
Instructions
Tunetothe channel.
GUIOE
GUIDE
Hold
....
or~
Hold
PAGE
UPIPAGE
ON
1. Enter the channel
number.
2. Press
ENTER.
INFO
ENTER
Page 11
11
TV
Menus
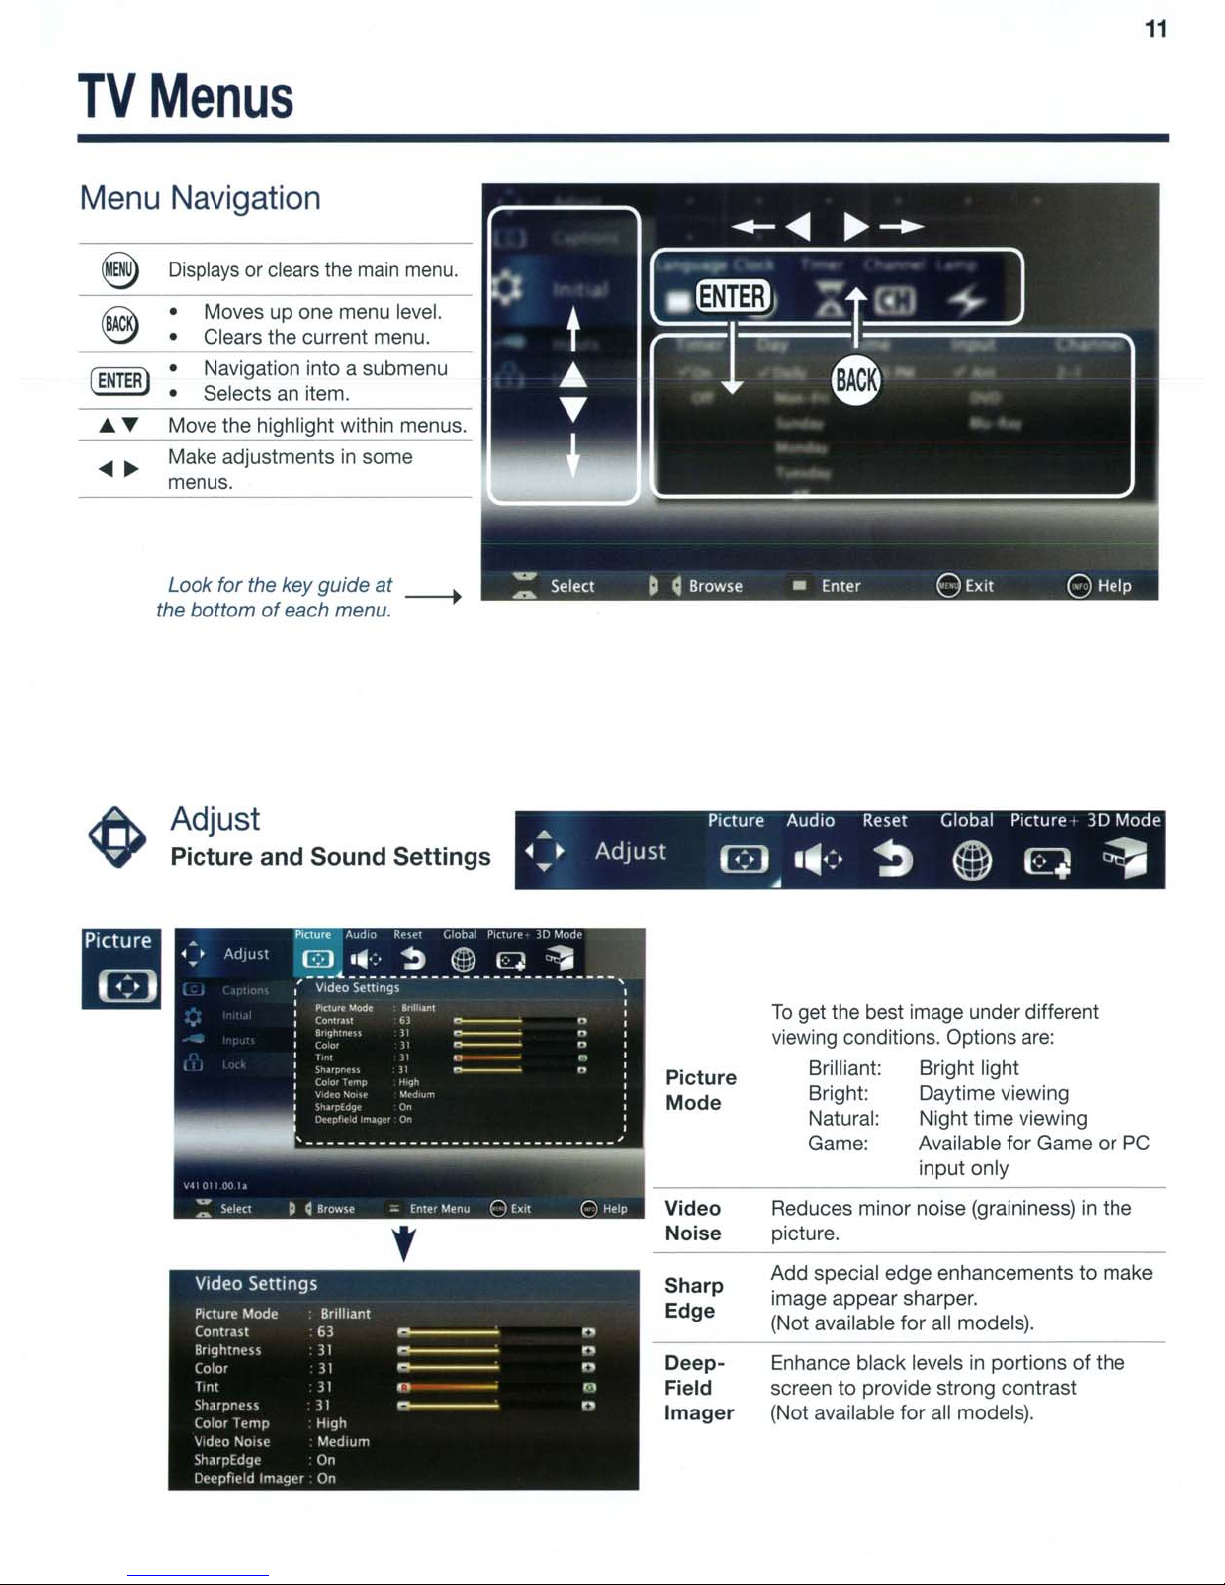
Menu Navigation
Displays
• Moves up one menu level.
• Clears the current menu.
(ENTER)·.
...
~
Move the highlight within menus.
~
~
Make adjustmentsinsome
menus.
Look for the key guide
the bottomofeach menu.
or clears
Navigation into a submenu
Selects
an
the
item.
main
at
menu.
----+
Adjust
Picture and
Video Sellings
PIcture Mode Bnlhanl
CO"Ua~l
Rr,qh:nt'\\
{
0'0'
1''11
"".If:;r(,\\
(0
or
T"mr
\'
dt,O
-"0'\1"
\h,un!
dqt'
[)!".'pflt"d
Irtl.H.j''I
Sound
63
1I
1I
;1
1I
H'qh
",'diU'"
De
On
Settings
f
-
-
-
n
-
...
~
....
Adjust
n
n
n
.,
n
Picture
Picture
Mode
Video
Noise
Sharp
Edge
DeepField
Imager
Audio
B ••
Reset Global Picture
':-
~
@ q
•
To
get the best image under different
viewing conditions. Options
Brilliant: Bright light
Bright: Daytime viewing
Natural: Night time viewing
Game: Available for Game or
input only
Reduces minor noise (graininess)
picture.
Add special edge enhancements to make
image appear sharper.
(Not available for all models).
Enhance black levels
screen to provide strong contrast
(Not available for all models).
are:
in
portionsofthe
3D
Mode
~
PC
in
the
Page 12

12 TVMenus
<e>
Adjust continued
,
Speakers
Sound
Mode
Listen
To
Language
Level
Sound
Displayed only ifanAN
connection
TV:
AN
Receiver:
Head-
phones:
Stereo:
Surround:
Available for analog channels from ANT only.
Mono:
Stereo:
SAP
(Second
Audio
Program):
Selects the current language for a digital
program from ANT.
On, Off: segments, such
has
been
Turnsonthe
Audio available fromanAlV
Receiver.
Audio
No
special audio effects
TV
speakers.
~p~~~:~saudio
Reduces background noise.
The TV plays stereo
and mono broadcsts
Selects
track not audible during nor TV
viewing.
Reduces differencesinsound
volume between programming
regular broadcast programs and
commercials.
receiver or headphone
detected:
internalTVspeakers.
available from headphones.
from
the
from the
an
additional sound
as
TV
in
stereo
in
mono.
between
,
Video
Mul.
Scret>nsoiver Film Mode
"On
Off
"On
Off Off
vi' Auto
Smooth
120Hz
./Off
On
Blue Clow Test
..
On
Off
PICluu'
,,"
Resets audio and picture adjustments for the current
input. Highlight the Reset icon and press
Displays a solid-colored background
when there is no video signal.
Displays a random pattern while
playing
CD/Audio
480i
Auto, theTVapplies film-decoding
correction to movies filmed
frames per second.
Reduces
Select On to see blue accent lighting.
(837
Displays a test picture for use
servicers.
an
audio-only device named
or MP3 Player.
and
1080i
signals
motion blurinaction
Series only.)
..
~
Video
Audio
Screensaver
Film
Smooth
Blue
Test
Mute
Mode
120Hz
Glow
Picture
ENTER.
only.
at
In
24
scenes.
by
TV
Page 13

TV Menus
13
<e>
Adjust continued
PerfectColor
PerfecTint
Advanced
Picture
30
Mode
Glasses
L-R
Sliders adjust the saturation (intensity)
of
six colors for the current input.
Sliders sdjusts six hues for the current
(some
input
To
switch between PerfectColor™ and
PerfecTint™
Adjust
(837
Series
Technical picture adjustments for use
by a professional installer.
Select On setting to enable 3D feature.
Standard:
Reverse:
incorrect
movingininstead of out, or side
side),
models).
adjustments, highlight
Mode
Normal setting.
If
use
and
only.)
the
standard setting looks
(e.g.
objects appear to
the
Reverse
press'"
setting.
~.
be
by
•
To
display 3D images, Mitsubishi Home Theater DLP TVs require that source devices support checkerboard
or
display formats for 3D gaming
• A 3D standard format does not currently exist for Blu-Ray or DVD prepackaged media.
• Future 3D standards may be incompatible with Mitsubishi Home Theater DLPs.
• Please visit mitsubishi-tv.com for updates and information.
3D cinema content.
Page 14

14
TV
Menus
Captions
Closed-Caption
Settings
Services Effects
@)
CaptiOnS
Q B
•
• Provides choices and separate on/off controls for
digital and analog captions.
• Selects background color for analog captions.
Olg'l.11
../
OnIfMUll'
r
.tpl'OII
(Jp~lor
{
,Ip:,nr
(.lr~lor
1..1p:lor
Anillog
../OnIt
Mut~
((I
I
.'
.:
"
CC
.'
I
"
((
.:
((
'J
An.l.log Ba<k9roul'1d
../
Cr;aV
RIM.
•• ••
Selects settings for the appearanceofdigital closed
captions.
Language
.4
Initial
SetupofTV Features
0
unguage
InltlJI
at
Clock
•
language
./Enghsh
hp.lnol
0
Tlmpt
A
--
Ch,mnt'l
(!II
s)
(.,Imp
-+
language
Initial
Choose either EnglishorSpanish for TV menus.
Use this menu to set the TV clock.
Choose the DST (Daylight Savings Time) setting
for your area.
.4
Clock Timer
0
~
Channel
C!II.
lamp
+
Page 15

TV
Menus
15
~
Initial continued
Use this menu to set a day and time for the TV to
power on automatically.
Select the input and channel to be used at Power-On.
Channel Scan searches for channels and adds them
to memory.
Adding/Deleting
Channels
• Check mark indicates memorized channels.
ENTER
• Select and press
to add / delete the channel from
the memory.
Channel
l'J
0/
0/
./
./
}.
l
, ,
.)
"
Edll
1((
I
K\
,
,
ilT
./
,
')
./
0/
..
./
"
II
13-
l .
./
,
"
,
"
I',
,
I,
,
'i
,
0/
"
Standard
Bright
Suitable
for
most viewing conditions
and the most energy efficient mode.
Brightinbrightly lit rooms.
Use
Page 16

16 TV Menus
Inputs
Input
Management
--
__
Name Learn
I Control
nputs
__....
AVR
~.~
• Assignorchange namesofinputs appearing in
the
Activity menu.
• Turn the
Activity menu).
Ant input
On/Off
(to display/hideinthe
• Delete unused HDMI inputs from the
menu.
For complete setup instructions, see the owner's
guide on the web.
HOMI
~
Activity
ActiVIty
~~!.
(837 Series only.)
Select
of
for use
OnorOff to enable or disable the TV's control
a CEC-enabled device. See theTVowner's guide
of
this feature.
• Customize the Activity menu choices for the
current viewing input.
• Highlight the activity name and press
ENTER.
Page 17

Lock
Controlling
TV Usage
TV
Menus
17
This
feature restricts the access according to the
U.S.
based program ratings, the time of day or by the channels.
Restricting the access using the non-U.S. based ratings
(Alternate Rating System) can be setup from the 'Other'
submenu.
o
To
setup the restrictionorto watch TV during the
restricted condition, pass code is required.
o Pass code menu is prompted whenever Lock is
selected on the main menu.
Setting
o Input four-digit pass code using the number keys
a Pass
Code
on the remote control.
o Press
[CANceL!
to delete a number and move back
one space.
o Press
@)or
l§
to close the menu without setting
a pass code.
o Press
o If you forget the pass code: press the number 9 and
l@lli)to
set the pass code.
LAST key on the remote at the same time.
Resetting
a Pass
Code
The old pass code is deleted when entering the Lock
to
menu, and prompts you
enter a new pass code.
Lock by Program Ratings:
o Restricts access
to
the TV using U.S. ratings sent
by the broadcasters.
o Lock applies only
Some signals
to
ANT and composite jacks.
do
not contain rating information
and unable to lock.
o
To
lock for24hours, set the same time for Start
~
Time and Stop Time.
o •
L L S V
.....
./
,,"9
Off
TVY
TV
0"
Y7
IV
(,
IV
PC
" "
VA
"
MOVlt'
R.,l
'>I.lrt
T,mp
hn
9
110QPM
C
P(.
j
"<'
,
,:
,
~Ol
''''.·d
'>tot>
TI"'~
I}00PI\,'
Lock by Time:
o Blocks all use of the TV during the specified time
period.
o Requires pass
code
to view during the locked
time.
Lock Control Panel:
o Disables the buttons on the TV's control panel.
o Press and hold ACTIVITY button from the panel
10
for about
seconds to unlock if the remote
control is not available.
Lock by Other Program Ratings:
o Restricts access using non-U.S. based ratings
sent by broadcasters.
o Grayed out
if
the Other rating is not detected
in
the broadcasted signal.
Note: Other rating locks apply only to digital channels
and signals received on the
ANT.
Page 18

18
USB
o
837
o The TV can display photo
USB device.
o Photos must be in JPEG format and music files in
wma format.
1.
Connect your USB card readerorUSB drive to the
TV's USB
Side Panel
@@@e@
Media
Series only.
port
~N'VT3-,
.
...
"'-..0
Player
or
music files from a
located at the side panel.
l·o\l,D).II
_.
-
I I
...
L;)
Menu
Note:
HOMl4
not available
onaUmodels
.
8
--
2.
The TV ignores all commands while reading files.
to
Wait for icons
menu before activating menu options.
Large files
take a long time to display.
appear in the USB Media Player
or
high-capacity storage devices may
Thumbnail and Playlist Menus
Displays picture thumbnailsora listofmusic files.
.......
GUIDE
CBor
ENTER
~
Moves the hiqhliqht from itemtoitem.
Rotates a thumbnail clockwise in 90·
increments (thumbnail onlvl.
Plays the slide show or playlist starting
with the highlighted item.
~
~
CBor
ENTER_
GUIDE
INFO
®
@
@@
Always
toadifferent
your
Some
Backupthe
connectingitto
responsible
Playa
Starts the slide showorstarts playing music.
Plays the slide showorplaylist.
Rotatesanimage clockwise in
increments
Displays slide nameortrack name.
Press
Pauses a slide showortrack
Stops a slide showortrack.
Displays the previousornext slide
track.
stop
USB
device.
pictures
dataonyour
for
Slideshow or Playlist
BACKtoclear.
IMPORTANT
playback
TV
may
the
any
with@(STOP)
input
before
not
TV.
file
disconnecting
showonthe
USB
drive
Mitsubishiisnot
damageordata
gO·
or
TV.
before
loss.
or
change
@
@
PAGEUP/DN
~
~
-
-
Display
Slideshow
For
automatic
Interval
Frequency Select the
'-
NotesonUsing
• Some images opened and reserved on a computer
may not play back or display
o Some manufacturers' devices may be incompat-
ible with the
photos. you can:
» Transfer files to a different USB device.
» Use your digital camera's YIVIDEO composite
Selects the last item on the current page.
Selects the first item on the current page.
Displays the next or previous page of items.
Setup
Displays the USB Media Setup menu.
You
have the option to play music with
the slide show (Slideshow + Music),
or
Slideshow
Select Auto
advance
Select the time interval for display of each
slide. The actual interval time may vary as
it may take longer for larger files.
to play the complete slide show and/or
playlist:
the
TV.
video output.
Music only.
or
Manual for the slide show
only:
numberoftimes (frequency)
Once,
USB
If the TV is unable to display your
Twice,orContinuous.
Port
in
the thumbnail list.
Page 19

19
3D
This section provides Instructions for viewing 3D video
using the TV's
the
Video
Adjust>
3D
3D
feature. The 3D options are found
Mode
menu.
Initial Setup
1.
Check if your HDMI 3D video source device
outputs a
be needed when you assign
New
10BOp60Hz
Device
Found
2. If your 3D glasses came with
connect the emitter box to the
EMITIER jack on the backofthe
_______
r EMITIER
signal. This information will
an
input nameinthe
screen.
an
emitter box,
3D
GLASSES
TV.
-,JGLASSES
3D
in
Watching 3D Video
1.
Press
ACTIVITY.
2. Highlight the icon for the 3D video input and press
ENTER.
3. Press
4.
MENU
and select the
menu.
Set 3D
rized for the current activity/input combination
when you exit this menu.
ModetoOn. The On setting will be memo-
Adjust>
3D
Mode
3. Power on the TV and the source device.
4. Connect the source device to the TV's HDMI input.
5. When the
name the input according to the table below.
The signal type and choice of name are important
because the TV will process the video signal
differently depending on the name you assign. If
your source device is a Blu-Ray disc
console, the signal must be
Source
of
3D Typeof3D Video Signal NsSlgn
~~
Computer
Any other
3D video
source
New
Device
Recommended:
(1920XlOBO).
the TV screen.
Other 60-Hz computer video
signals compatible with the TV
will display with black bars.
To
see 3D video, signal must be
10BOp
60 Hz
Found
The image will fill
screen displays,
10BOp
10BOp
at 60
60 Hz
or
a game
Hz.
A .
a~
PC
Any
other
name
Use the
viewing.
5. Press
6. If the image does not appear correct, open the
To
The 3D
input combination. When you want to watch non-3D
video on the input selected above:
• Press
• Open the
Adjust>
BACK
Adjust>
l-RtoReverse to reflect the correct polarity.
3D Mode menu to enable 3D video
to close the menu.
3D
Mode
menu again and set Glasses
Watch Regular (non-3D) Video
Mode
which the input is selectable.
ModetoOff.
setting is memorized for each activity/
ACTIVITY
and select a different activity
Adjust>
3D
Mode
menu and set 3D
in
6. Press
BACK
to close the
screen,orto change the nameinthe
sub-menu.
New
Device
Found
Input>Name
Page 20

20
Troubleshooting
General TV Operation
Symptom
1. A fan is running even while the TVispowered
off.
2.
The
fan
gets louder after theTVis
3.
TheTVremote control does not work.
4.
When
I try to
use
the remote control, the
POWER
5. TV does not respond to the remote control or
to control-panel buttons and TV will not power
on or off.
When
6.
menu,
source).
7.
You
code.
8. Rating restrictions
9. On-screen displays appear each time
change a function.
10. A warning message appeared on screen
stating, "TV will shut down
Please check if the air flow is blocked."
11.Ihave
controliserratic
key
blinks five times.
a deviceisselected from the Activity
the screenisblue or black
have forgotten your Lock menu pass
are
not working.
turnedonCEC
for
my
HOMI
andIwishtodisable
shut off.
(no
signal
you
in
a few seconds.
devices
but
it.
Remarks
The roomistoo warm. When the TV is off, internal components
to
continue
Normal operation. The fan speeds
the
after
• Check that the batteries
• Check that the control mode
•
Benomore
• Program the remote control to operate theTVor other device.
Reset
•
Replace the batteries.
Unplug the AC power cord for 10 seconds.
Press and hold the POWER button on the control panel for 10
seconds to perform system reset.
• Make sure the selected device is turned on.
• Begin play
When prompted for the pass code, press the number 9 and
(LAST) keys on the TV remote controlatthe same time. This
process temporarily unlocks the
Open the
• Verify that the ratings locks are active.
• Check the Lock Time/Unlock Time to check if rating restrictions are disabled.
• Rating restrictions apply only to content on the ANT
NormalTVoperation.
• Internal TV temperature has exceeded proper levels. Cool
the room.
• The TV has overheated. Clear blocked air vents and ensure
at least four inches
• Clean the air filter on the lamp cartridge.
• First turn
Open the
select Off.
• Disable CEC on the device itself. See the device's instructions.
• If the problem persists,
1. Disconnect the device from
2.
draw power and must be cooled by the fan.
uptocool the lamp quickly
TV has been shut off.
are
fresh and installed correctly.
on
the remoteisset to
than20feet
the remote control.
of
the device.
Lock>
Reconnect
recognize
Parental Lock menu and:
off
the TV's HDMI control for the specific device.
Inputs>
the
the
from
theTVwhen
TV.
of
clearance on all sidesofthe
HDMI Control menu, select the device,
do
the following:
devicetotheTVand
device with
CEC
the
TV.
Auto
disabled.
using
the
Input
TV.
remote
TV.
Sensing
control.
(i)
in~ut.
will
Page 21

TV
Channels
Symptom
1.
2.
TheTVtakes
channel
You
cannot
several
changes.
accessachannel.
secondstorespond
3. When ChannelView list
tion appears incomplete
to
is
displayed, informa-
Troubleshooting
Remarks
•
Itisnormal for digital channels to take longer to tune
• Press
• Use a 4-digit number for
• Use a 6-digit number for digital cable channels if your cable
• Use number keys instead of CHANNEL Up/Down.
•
• Check that the TV
• Make sure the
• If you cannot tune to a virtual digital channel even though
•
• Program information
• Available information
• Make sure the TV clock
• Press INFO to update the display.
ENTER
delays.
service
Be
sure the channel you wanttoview isinmemory.
antenna for that channel by pressing the ACTIVITY
the TV has already memorized digital channels, tune to the
physical channel number used by the broadcaster. The
virtual channel will then be automatically added to memory.
You
may be trying to tune toananalog channel thatisno
longer broadcasting.
during the most recent power-on.
provider. No other data is available.
after entering a channel number to avoid
an
over-the-air digital channel.
is
able to recognize 6-digit channel numbers.
is
switched to the correct device or
Lock>
Parent menu lockisset to Off.
is
displayed only for channels tuned
is
sent from the broadcaster or cable
is
set correctly.
in.
key.
21
TV
Power
1. TV takes
2.
3.
4.
On/Off
Symptom
an
excessively long time to power
on.
You
cannot program the TV to turn on auto-
matically (Timer function).
TV
turned itself off and the light on the front
panel started
TV
will not power off.
to
blink.
Remarks
When powered on, the TV needs time to boot up, just as a
puter does. Also, the TV's lamp requires a few moments to heat
up to full brightness.
• The TV may be locked.
• The clock may not be set.
• Momentary power fluctuation caused the TV to turn offto
on
prevent damage. Power
illuminate.
• If the TV does not stay on, press the
control panel for ten seconds to perform System Reset. If
this happens frequently, obtain
tioner/surge protector.
•
An
unusual
protection circuit.
Press the
seconds to perform System Reset.
digital
POWER
signal
Poweronthe
button on the control panel for about ten
the TV and wait for the lamp to
may
have
TV.
an
been
POWER
AC
line power condi-
received,
buttononthe
triggering a
com-
Page 22

22
i
Picture
1.
-,,-,,---~--
Symptom
"'··~1-'
e~._~_~
-Picture does not look like a high-definition
Troubleshooting
picture.
! 2.
TV
has sound but no picture.
3. Picture has become dimmer.
i 4. There
is
a large black or gray rectangle on
the screen.
i-
S.
You
cannot view a picture when playing a
!
VHS
tape.
6.
VCRorOVO
player's on-screen menus jitter
I "up and down.
7.
When viewing a stopped
are rolling on the screen.
color program appears as a black and
white image, or the colors are dim, or the
is black.
------><-~
Picture fromanHOMI input is noisy (poor
image from a computer appears dis-
torted when viewed on the
VCR,
TV.
white lines
Remarks
Not
all
signals are high-definition signals.
To
receive high-defini-
tion programming from your cable or satellite provider, you must
"subscribe to the provider's high-definition service. Some over,the-air broadcasts
;a high-quality antenna suited to your location.
*
,0
0.',_,
"..__
: Press and hold the
areinhigh-definition and can be received with
•
POWER
button on the control panel for
10
"seconds to perform System Reset.
• The lamp
is
nearing the end of its life. Order a new lamp.
• Adjust picture brightness and contrast to maximum levels.
• Change Lamp Energy from Standard to Bright.
The TV's analog closed captioning has been set to "text" mode
in
the Captions menu.
Turn
off
because thereisno text informa-
tion being broadcast.
Check your VCR's owner's guide for further troubleshooting.
VCRs
and
OVO
Stop playback. Possible cause: Many
players
provide on-screen menus at only half-resolution that may
appear to jitter up and down.
• Turn off video mute for the
VCR.
Begin playing the tape.
Change the
VCR
to the antenna input.
--"><-
---,,--,
""---~---------
The PerfectColor color balance has been incorrectly set. Reset
the PerfectColor balance.
Upgrade a Category 1 (unmarked) HOMI cable to a Category 2
high-speed HOMI cable.
.
~.
~-
~~
-
Normal TV operation. The TV does not correct distortioninthe
picture from a computer because the correction process may
cause the edges of the image to be cut off.
Page 23

Sound
Symptom
1.
There is no sound even when the
volume is turned up.
2. The sound does not match the screen
picture.
3. The sound from my
not match the screen picture
hear the correct audio from my
receiver).
AN
receiver does
(I
should
AN
4. Cannot select an audio-only device; it
in
does not appear
the Activity menu.
Troubleshooting
Remarks
• Check if the
•
The
TV's "Listen to:" setting maybeset to
from the
• Check that the Speakers option
TV
speakers. Sound
for
an
If
using
•
Receiver to hear sound from the
• Press and hold the POWER button on the control panel for
seconds to perform System Reset.
The TV's "Listen to:" setting may be set to SAP (analog program from
the ANT input).
Check that DIGITAL AUDIO OUTPUT and/or
on TV's back panel
Without this connection, devices connected only to the TV
the
AN
receiver) can be heard only from the TV speakers. Note that
this includes the ANT input, a device (such as a camcorder) con-
nected to the front panel, and any other device sending audio to the
TV only.
an
Plug
Auto Input Sensing and make the audio device selectable
Activity menu.
unused video plug into the INPUT 3
MUTE
ANT
AN
receiver or headphones.
an
AN
buttonison.
input).
maybebeing sent to
receiver, check that the Speakers optionissettoAV
is
connected to the
SAP
(analog program
is
set toTVto hear sound from the
one
of the audio outputs
AN
receiver speakers.
AVR
AUDIO OUTPUT
AN
receiver.
(and
YIVIDEO
jack to activate
in
the
10
not
23
Page 24

24
Lamp-Cartridge
CAUTION:
allow
Lamp
The light source for this televisionisa
lamp, which is part of a lamp cartridge
assembly. The life
vary,
temperature around the TV while it
operating, the selected lamp mode, and
your viewing patterns. Warmer air or
poor ventilation shorten the lamp life,
as
and turning the television on and off
frequently. Mitsubishi warrants the lamp for one
original TV purchase at retail.
To
To
Call (800) 553-7278. Please have model number, serial number, and TV
purchase date available.
Important:
Mitsubishi where they will be inspected for defect verification.
To
Visit our website at www.mitsuparts.com or call (800) 553-7278. Order the
following:
ittocool
based on the lamp itself, the air
does use of the
OrderaNew
Receive a
PurchaseaReplacement
If
the
television is on, press POWERtoturnitoff. Unplug
foratleast one
of
the lamp can
Bright
Lamp
Replacement
All lamps replaced under warranty must be returned to
lamp mode
Lamp
Lamp
Replacement
hour
is
Under
After
before
Touch
tridge
not
(1)
Warranty
Warranty
attempting
BURN DANGER! HOT SURFACES INSIDE!
lamp
cartridge
housing.
tiltasglass
tridge
year from the date of
Keep
may
only
with
to
CAUTION
handle only.
lamp
come
the
and
replace
cartridge
out
and
cause
same
part
THE ACCESS PANEL
PROVIDED WITH
TO
EXCESSIVE ULTRAVIOLET
RADIATION.
ITS PURPOSE
SERVICE WITHOUT REMOVING
PANEL COMPLETELY.
Cleaning
the
television and
the
lamp
cartridge.
&
Do
not
touch
horizontal
injury. Replace
number
REDUCE THE RISK
lamporlamp
during
915B403001.
removal.
WARNING
IS
AN
INTERLOCK
DO
NOT DEFEAT
OR
ATTEMPT
OF
lamp
car-
Do
car-
TO
Lamp
Lamp-Substitution
MDEA recommends that you use only genuine Replacement Lamp Assemblies purchased directly from Mitsubishiora
Mitsubishi Authorized Dealer
separately from the Lamp Cartridge and/or Lamp Assemblies obtained from unauthorized sellers may be incorrect for
your television, may not fit or perform properly and may even damage your television. MDEA can not be responsible
for the performance, reliability or safety of any replacement lamps that are obtained from unauthorized sources.
Alert
or
Mitsubishi Authorized Service Center. MDEA advises that replacement lamps obtained
Part
Number
9158403001
WARNING
• Do not remove the lamp cartridge immediately after turning
lamp is very hot. Allow the television to cool for at least one hour before replacing the lamp cartridge.
• Do not remove the lamp cartridge except when replacing it. Careless treatment can result
• Do not touch the lamp glass element. It may be very hot and break, causing injuries
Be
•
• Install the lamp cartridge securely. Failure to
• Do not touch the lamp glass elements. Oils from your fingers may cause premature lamp failure.
8=
sure not to insert any metal or flammable object into the lamp cartridge opening,asit may cause fire or electrical
is
shock. If a foreign object
THE LAMP INSIDE THIS PRODUCT CONTAINS MERCURY AND MUST
MERCURY
DISPOSED OF ACCORDINGTOLOCAL,
cling information, please contact your local authorities or the Electronic Industries Alliance at
www.eiae.org
inserted into the opening, unplug theACcord of theTVand contact your dealer for service.
do
so may cause a fire.
off
the television.
STATE
You
may get burned because the
in
injuryorfire.
or
burns.
BE
RECYCLED
OR
FEDERAL LAWS. For disposal or recy-
OR
Page 25

Lamp-Cartridge Replacement
Lamp-Cartridge Replacement
Removing the Old Lamp Cartridge
1.
Turn
off
TV power and allow the lamp to cool for at
least one hour before proceeding.
2. After the lamp has cooled, remove the cover
lamp compartment, located on the back
Refer to figures 1 and2.Use a#2(large) Phillips
screwdriver to loosen the screw securing the cover.
Keep the screw and cover for re-installation
3. With a large Phillips screwdriver, loosen the
shiny screws securing the lamp cartridge until they
disengage from the mating threads. These are
captive screws and cannot be separated from the
lamp cartridge.
4. Fully open the bag supplied with the replacement
lamp and set the opened bag aside.
5. Gently grasp the handle
pull the old cartridge straight out. See figure
CAUTION: Do not tilt or rotate the cartridge, as
small glass fragments may fall out.
of
the lamp cartridge and
of
the
two
of
TV.
3.
the
and
Cleaning
----
Figure 1
Figure 3
Use only replacement lamp part number
9158403001.
25
6. Without tilting
insert it into the opened bag. Close the bag while
being careful not to let any glass particles fall out.
Installing the
1.
Do not touch the glass partsofthe new lamp cartridge. Insert the new cartridge into the TV
same orientation as the old cartridge. Push on the
cartridge housing until it is fully seated.
or
putting down the lamp cartridge,
New
Lamp Cartridge
in
the
2. With the screwdriver, gently tighten the two shiny
screws. AVOID OVERTIGHTENING!
3. Replace the plastic cover and retaining screws.
4. WASH
LAMP CONTAINS MERCURY.
Disposal of the Old Lamp Cartridge
Lamp under warranty: All lamps replaced under war-
ranty must
shipping label provided and send to Mitsubishi Digital
Electronics, America, 625 Braselton Parkway, Suite 200
Braselton,
IMPORTANT: Lamps found to be without defect will
be returned and charged back to the sender.
Lamp
local authorities or the Electronic Industries Alliance at
www.eiae.org for lamp-disposal or recycling instructions.
Do
not dispose of the old lamp with common trash.
YOUR
be
returned to Mitsubishi. Use the return
GA
30517.
no longer
HANDS THOROUGHLY, AS THIS
under
warranty: Contact your
Lamp-Cartridge Filter Cleaning
If the TV shuts
will shut down
air flow
air filter may need cleaning. The air filter
lamp cartridge. Use the following procedure to clean
the filter.
1.
is
Remove the lamp cartridge from the TV
described under "Removing the Old Lamp Cartridge."
touch the glass parts
2. Holding the lamp cartridge horizontal (do not tilt or
rotate), use a soft dry brush or vacuum cleaner to
remove any dust that may be present on the mesh
filter.
3. Reinstall the lamp cartridge as described under
"Installing the New Lamp Cartridge."
off
after displaying the message "TV
in
a few seconds. Please check if the
blocked" and/or the
Do
not tilt or rotate the cartridge.
Do
not use liquids. See figure
STATUS
of
the lamp cartridge.
LED
is yellow, the
is
part of the
as
Do
not
4.
Figure 4
Keep lamp
cartridge horizontal
and
remove dust
from the mesh filter
a vacuum
using
cleaner
brush.
or
soft
dry
Page 26

26
Mitsubishi
MITSUBISHI
MITSUBISHI
a.
Parts.
the
dateofthe
a
periodofone
for
the
replacement
b.
Embedded Software.
dance
error-free.
If,
after
functional
Software,
be
fulfilledbymeansofmodificationorreplacement
shallbeMDEA's
to
your
on
the
rizedbyMDEA.
c.
Labor.
tive.
is
solely
service
DIGITAL
AudiolVideo
The
lenticular
original
(1)
year
part.
Parts
used
are
warranted
with
the
functional
The
limited
prompt
notice
descriptioninall
then
MDEA
sole
acceptanceofand
Embedded
For
For
certain
responsible
center
Software
thirty
items
without
(30)
for
DLP
ELECTRONICS
Dealer,
(i.e.
front
purchaseatretail.
from
the
for
replacement
for
MDEA
descriptionofEmbedded
warranty
within
the
material
shall
modifyorreplace
obligationtoyou
compliance
shallbenull
days
after
that
are
any
replacement
charge
AMERICA,
shoulditprove
picture)
dateofthe
the
remainderofthe
warrants
containedinthis
warranty
respects
under
with
and
the
original
designedtobe
for
one
(1)
year
Projection
screeniswarranted
The
maybereplaced
that
period,
labor.
INC.
("MDEA")
defectivebyreasonofagainst
lamp
and
original
purchaseatretail.Wewill
original
all
software
Softwareinall
section
MDEA
andifsuch
the
nonconforming
software
this
limited
the
termsofthe
voidifthe
purchaseatretail,wewill
replacedbythe
from
For
all
the
other
original
Embedded
warrantsasfollowstothe
against
all
other
parts
with
thoseoflike
warranty
incorporated
shall
continue
determines
failureisnot
Embedded
containedona
warranty.
Software
consumer,
parts,wewill
dateofpurchaseatretail.
Television
defects
arising
defectsinmaterials
(except
any
software
repairorreplace,atour
kind
and
quality
period.
into
this
television
material
respects,
foraperiodofone
that
the
Embedded
duetoaccident,
Softwareatno
All
rights
under
License
Softwareismodifiedorchangedinany
repairorreplace,atour
including
provide
but
misuse,
replacement
this
limited
Agreement
(but
the
labor
Software
not
Limited
original
purchaserofthis
from
improper
and
workmanship
incorporated
option,
and
maybeneworremanufactured.
set
(the
"Embedded
MDEA
does
not
(1)
year
from
has
failedtoperforminaccordance
modificationormisapplicationofthe
chargetoyou,
memory
applicabletothis
card
warrantyonthe
option,
limited
to)
some
forawarranty
television
workmanship
foraperiodofthirty
into
this
television)
any
defective
Software")
warrant
the
for
the
that
dateofthe
whichatMDEA's
Customer
Embedded
television,
manner
repairbyan
exceptasspecifically
lenticular
Embedded
Warranty
fromanauthorized
and/or
material:
(30)
days
from
are
part
will
the
Embedded
original
sole
installation.
Software
and
this
screen
if it
Software,
authorized
warranted
without
Parts
performinaccor-
purchaseatretail.
discretion
The
limited
proves
the
MITSUBISHI
for
charge
used
for
Software
with
such
Embedded
may
foregoing
also
subject
warranty
autho-
defec-
consumer
is
d.
Notice.Toobtain
time
period.
e.
This
DLP
Projection
picture
elements
numberofproperly
Our
standardisclear;
BEFORE
adjustment.
1.TOOBTAIN
a.
writingatthe
com.
b.
the
authorized
your
c.
other
COVERAGE
tionofsafety
d.Toobtainareplacement
REQUESTING
Contact
Warranty
Proofofpurchase
your
service
geographic
service
home.
Actual
document
UNDER
warranty
Television
(pixels).
functioning
MDEA
If
the problem persists please arrange for warranty service.
WARRANTY
nearest
address
territory
arise
authorized
provided
willbeprovidedinyour
customarily
locationatyour
service
date
which
establishes
THIS
which
service,
Your
warrants
SERVICE,
SERVICE:
labor
fromanauthorized
LIMITED
could
lamp,
you
usesasingle
DLP
ProjectionTVis
pixels.Asin
only
please review the instruction booklet to insure proper installation and correct customer control
MITSUBISHI
below,
calling
coveredbyan
own
expense,orpay
willbeprovided
proof
and
WARRANTY.
affect
you.
order
the
must
notifyanauthorized
DLP
chiptocreate
manufacturedtoa
other
display
that
the
percentageofproperly
service
center,
MDEAatthe
home
or,ifrequired,atan
authorized
for
without
MITSUBISHI
dateofpurchase.
However,
lamp
directly
MITSUBISHI
the
screen
high
technology,
800-332-2119,orby
MITSUBISHI
any
charge.
dealerisrequired
please
from
the
sometimesapixeliscontinuously
whose
name
authorized
travel
and/or
THE
RETURNOFTHE
return
MDEA
service
image.
This
levelofperformance
functioning
and
service
transportation costs
when
the
Owner
Parts
Departmentat(800)
pixels
address
using
the
service
center.Ifnot,
requesting
OWNER
Registration
centerofany
technology
canbeobtained
support
shop,
creates
and
willbenot
featureofour
provided
you
must
the
warranty
REGISTRATION
Cardsothatwecan
553-7278.
defect
within
the
image
quality,infact,
active,
inactiveorthe
less
than
99.99%ofall
from
your
websiteatwww.Mitsubishi-tv.
that
your
either
deliver
service
center
service.
Present
CARDISNOTACONDITION
the
applicable
using
small
dots,
99.99%
televisionislocated
may
perfectinthe
incorrect
pixels.
MITSUBISHI
your
televisiontoan
chargetoand
your
sales
contact
you
dealer,
receipt
shouldaques-
warranty
or
color.
by
within
from
or
OF
2.
THIS
LIMITED
a.Upto
b.
by
physical
vent
altered,
.01%
Damagetothe
unauthorized
abusetoor
cleaningorany
defacedorremoved;
WARRANTY
pixel
outages
lenticular
modification,
misuseofthe
product
DOES
NOT
COVER:
(small
dot
picture
screenorFresnel
alteration,
damagedbyexcessive
product
product
useinany
repairstoor
(including
elements
lens,
that
screen
serviceofthe
any
failuretocarry
physicalorelectrical
manner
contrarytothe
are
darkorincorrectly
frame,
cosmetic
productbyanyone
damageorto
out
any
stress);
Owner's
illuminated).
any
other
damage
other
thananauthorized
maintenanceasdescribedinthe
any
products that
Guide;
freight
have
damage;orany
where
hadaserial
such
damageiscaused
MITSUBISHI
Owner's
numberorany
damage
causedbyactsofGod
service
Guide
center;
including
part
air
thereof
Page 27

or
other factors
warranty
audioorvisual
any
other
tuning,
sharpness),
or
satellite
Owner's
3.
ANY
EXPRESS
CATIONOROPERATIONOFLAW,ISHEREBY
FITNESS
4.
UNDERNOCIRCUMSTANCES
CONSEQUENTIAL
5.
Some
tial
damages,sothe
6.
This
limited
beyond
also
excludes
receptionorsignal
damages
systems,orservice
Guide
FOR
ANY
statesdonot
warranty
service
arising
other adjustment necessarytoprepare
furnished
WARRANTY
PARTICULAR
DAMAGES,
allow
above
gives
the
reasonable
calls
from
of products
with
the
NOT
WHETHER
limitationsonhow
limitationsorexclusions
you
controlofMDEA,
wherenodefectinthe
unless
causedbyadefectinthe
product installation,orset-ups,
product for information
PROVIDED
PURPOSE
SHALL
MDEABELIABLETOPURCHASERORANY
specific
purchasedorserviced
ARISING
legal
suchaspower
product
the
regarding
HEREIN,
EXCLUDED
ARE
longanimplied
rights,
AND
AND
EXPRESSLY
OUTOFBREACHOFWARRANTY,
may
not
and
you
covered
product thatiscovered
any
adjustments of
unit
for
display or
outside
user
ANY
REMEDY
DISCLAIMED.
LIMITEDTOA
warranty
applytoyou.
may
also
surge
damage
under
use,
the
U.S.A.
controls.
WHICH,
THE
TERMOFONE
lasts,orthe
have
other rights
Warranty
causedbyelectrical
this
warrantyisfound,
under
this
user
controls
connection
Please
BUT
IMPLIED
OTHER
BREACHOFCONTRACT,OROTHERWISE.
exclusionorlimitationofincidental, special,orconsequen-
(including
with
consult
FOR
THIS
WARRANTIESOFMERCHANTABILITY
YEAR.
PERSON
which
vary
systemorlightning.
service
limited
any
the
operating instructions
PROVISION,
FOR
from
calls
warranty,
contrast, brightness,
external
statetostate.
audio
MIGHT
ANY
INCIDENTAL,
This
related
to unsatisfactory
all
costs,
expenses
color,
receiver,
containedinthe
ARISEBYIMPLI-
SPECIAL
limited
tint,
antenna,
AND
27
or
fine
cable
OF
OR
7.Inthe
was
1..
eventofany
purchased
and
dispute
the
under
lawsofsuch
this
state
limited
will
warranty,
govern.
jurisdiction
and
MITSUBISHI
venue
for
resolving
that dispute
willbein
the
state
where
the
television
MITSUBISHI DIGITAL ELECTRONICS AMERICA, INC.
9351
Jeronimo Road
Irvine, CA 92618-1904
Trademark
LICENSOR'S SUPPLIERS DO NOT MAKE
EXPRESS, IMPLIED OR STATUTORY WARRANTY
and
License
OR
PASS
OR
Information
ON TO END USER
REPRESENTATION ON BEHALF OF SUCH SUPPLIERS,
OR
ANY OTHER THIRD PARTY, ANY
INCLUDING, BUT NOT LIMITED TO THE IMPLIED WARRANTIES OF NON-INFRINGEMENT, TITLE, MERCHANTABIL-
OR
ITY
FITNESS
Digital Light Processing® and DLP® are registered trademarks
FOR
A PARTICULAR PURPOSE.
of
Texas Instruments.
Manufactured under license from Dolby Laboratories. Dolby is a trademark
HDMI™
the HDMI logo and High-Definition Multimedia Interface are trademarksorregistered trademarksofHDMI
Licensing LLC.
in
The software
this TV is based in part on the workofthe Independent JPEG Group, copyright © 1991-1998, Thomas
G. Lane, all rights reserved.
x.v.Color and the x.v.Color logo are trademarks
ChannelView™,
DeepField™
Imager, Easy ConnectTM, NetCommand®, PerfectColor™, PerfecTintTM, Plush 1080p®,
SharpEdge™, Smooth120HzTM are trademarks
WARNING: This
product
contains chemicals known to the StateofCalifornia to cause cancer
of
Sony Corporation.
of
Mitsubishi Digital Electronics America, Inc.
other reproductive harm.
of
Dolby Laboratories.
and/or
birth defects
or
Page 28

28
Mitsubishi
TV
Software
END-USER LICENSE AGREEMENT FOR EMBEDDED SOFTWARE
IMPORTANT - READ CAREFULLY: This License Agreement is a legal agreement between you (eitheranindividual oranentity) and
Mitsubishi Digital Electronics America, Inc. (MDEA) for all software pre installed and/or provided along with this television ("Software"). By
utilizing this television and Software, you agree to be bound by the terms of this License Agreement.
The Software is protected by United States copyright laws and international treaty provisions, as well as other intellectual property laws and
treaties. The Software is licensed, not sold.
1.
only with the Mitsubishi television model that included this owner's guide and owned by you.
2.
Software Not for Resale.
Software has been pre installed.
Prohibition on Reverse Engineering. Decompilation and Disassembly. The Software contains trade secrets or other proprietary material
human perceivable form and to protect them, you may not reverse engineer, decompile,
any human perceivable form, except to the extent that the foregoing restriction
Separation of Components. The Softwareislicensed as a single product. Its component parts may not be separated for use on more than
one
No Rental.
Trademarks. This License Agreement does not grant you any rights to any trademarks
3.
may subject you to serious criminal and civil penalties including damages and
violation of this License.
of intellectual property rights that is caused, encouraged, or induced by your failure
is
provision
4.
animations, video, audio, music, text, and "applets" incorporated into the Software), and any accompanying printed materials are owned by
or licensed to MDEA. All title and intellectual property rights
property of the respective content owner and may be protected by applicable copyright or other intellectual property laws and treaties. This
License Agreement grants you no rights to use such content, except that you own the media on which the Software is recorded, but MDEA
and its licensors retain ownership of the Software itself. All rights not expressly granted are reserved by MDEA.
5.
re-export the Software.
or restricted the export of goods or services, which currently include, but are not necessarily limited to Cuba, Iran, Iraq, Libya, North
Korea, Sudan, and Syria, or to any national of any such country, wherever located, who intends
to such country;
production of nuclear, chemical, or biological weapons; or
export transactions by any federal agency of the U.S. government.
agency has suspended, revoked, or denied your export privileges.
6.
APPLICABLE TO THE TV, MDEA MAKES NO OTHER WARRANTIES
HEREBY EXPRESSLY DISCLAIMS ALL WARRANTIES OF ANY KIND WHATSOEVER, EXPRESS OR IMPLIED, WITH RESPECT TO THE
SOFTWARE. ALL IMPLIED WARRANTIES, INCLUDING, WITHOUT LIMITATION, THE IMPLIED WARRANTIES OF MERCHANTABILITY
AND FITNESS FOR A PARTICULAR PURPOSE ARE HEREBY EXPRESSLY DISCLAIMED
BE
INCIDENTAL OR CONSEQUENTIAL DAMAGES OF ANY KIND OR NATURE. BECAUSE SOME JURISDICTIONS DO NOT ALLOW THE
EXCLUSION OR LIMITATION OF IMPLIED WARRANTIES, THE ABOVE LIMITATION MAY NOT APPLY TO YOU.
7.
PARTIES FOR ANY DAMAGES OF ANY NATURE, WHETHER INDIRECT, SPECIAL, INCIDENTAL, CONSEQUENTIAL OR OTHERWISE,
INCLUDING, BUT NOT LIMITED TO, ANY CLAIMS FOR LOST PROFITS, LOSS OF GOOD WILL OR EXPENDITURES MADE
COMMITTED
THIS LICENSE NOR ITS FAILURE TO REPAIR A DEFECT, ERROR OR BUG SHALL CONSTITUTE A FAILURE OF THE ESSENTIAL
PURPOSE OF THIS LICENSE. BECAUSE SOME JURISDICTIONS DO NOT ALLOW THE EXCLUSION OR LIMITATION OF LIABILITY
FOR CONSEQUENTIAL OR INCIDENTAL DAMAGES, THE ABOVE LIMITATIONS MAY NOT APPLY TO YOU. MDEA's liability to
direct damages for any cause whatsoever and regardless of the form of the action, will be limited to the money paid by you for the
TV (based on fair market value of the TV) that caused the damages.
8.
LICENSE GRANT. MDEA grants you a non-exclusive, non-transferable, limited right and licensetouse one copy of the Software
RIGHTS AND liMITATIONS.
You
may not resell or otherwise transfer for value the Software, exceptinconjunction with a sale of the TV that
or
disassemble, or otherwise reduce the Software to
is
expressly prohibited by applicable
TV.
You
may not rent, lease, lend, or sublicense the Software.
of
MDEA.
VIOLATIONS.
effective until terminated, and will terminate immediately without notice from MDEA or judicial resolution if you fail to comply with any
of
this License.
COPYRIGHT. All title and intellectual property rightsinand to the Software (including but not limited to any images, photographs,
EXPORT RESTRICTIONS. MDEA is licensing the Software for use within the United States.
(ii)toany person or entity who you know or have reason to know will utilize the Softwareinthe design, development, or
DISCLAIMER OF WARRANTY. EXCEPTASOTHERWISE PROVIDED IN THIS LICENSE OR IN THE LIMITED WARRANTY
LIABLE TO YOU OR ANY THIRD PARTIES, IN CONTRACT,INTORT OR OTHERWISE, FOR ANY DIRECT, INDIRECT, SPECIAL,
LIMITATION OF LIABILITY. MDEA SHALL NOT, UNDER ANY CIRCUMSTANCESBELIABLE TO YOUORANY THIRD
FOR IN RELIANCE ON THE CONTINUATION OF THIS LICENSE. YOU AGREE THAT NEITHER MDEA'S BREACH OF
GENERAL. This License Agreement will be governed by the laws of the State of California.
You
understand that any use, copying or transfer of the Software, except as permitted pursuant to this License,
an
awardtoMDEA of attorneys' fees in connection with any
You
further understand that you may be held legally responsible for any copyright infringement or other violation
to
abide by the termsofthe License. This license
in
and to the content which may be accessed through use of the Software is the
You
agree that you will not export or
You
specifically agree not to export or re-export the Software:
(iii)
to any person or entity who has been prohibited from participatinginU.S.
You
warrant and represent that neither the BXA nor any other U.S. federal
OF
ANY KIND WHATSOEVER REGARDING THE SOFTWARE AND
(i)toany country to which the
to
transmit or transport the Software back
BY
MDEA. IN NO EVENT SHALL MDEA
law.
U.S.
has embargoed
OR
you
in
for
its
Page 29

•
MITSUBISHI
"ELECTRIC
Website:
www.mitsubishi-tv.com
E-mail:
MDEAservice@mdea.com
For questions, call Consumer Relations
at
800-332-2119
To
order replacement or additional
remote controls, lamp cartridges or IR emitter cables,
Visit our website www.mitsuparts.com
or call
800-553-7278
SYSTEM RESET
Ifthe TV does not respond to the remote control,
or
control-panel buttons,
power bullon for about 10 seconds.
will not power on/off, hold
The TV will take longer
reset or AC on.
setting changes you made most recently before the
system reset, may be losl.
iO
2009 Mitsubishi Digital Electronics America, Inc.
8538710810
to
power on after the system
V411V41+1V41C
Page 30

•
MITSUBISHI
~ELECTRIC
HOlV
Quick-Setup Guide
Connecting
Important.
source.
HD receiver, a Blu-Ray disc player,
High-definition sources can be cable service with
To
HDTV
view
high-definition
Sources
L~
Rei)
AUDIO
OUT
Device
DVloutput
with
digital
!!
c~
()
(HD)
pictures
an
antenna, and direct cable service without a box.
HDMI-to-DVI
cable
you
must
:--.
useahigh-definition
an
HD cable box, satellite service with
DVI/PC
R
-AUDIO
(j)@
programming
INPUT
- L
an
BackofTV
Q
~
HDMloutput
Device
component
output
CableTV
service
><
(1)0
:o.e
ctS(1)
0:0
'0
~
~o
.-c:::
c_
with
video
VHF/UHF
or
antenna
IA\
~y
IA\
~
IA\
~
Pb
Pr
1--1--
~5
~@
:!:c
0-
u>
R-AUDIO-L
______
ANT
(480i
1480p 1720p
11080i)
t
............."
853B653A10
Page 31

•
MITSUBISHI
~ELECTRIC
HOlV
Quick-Setup Guide
Memorizing Channels on the
(Antenna)
Save
channels to memory with a channel scan to enable
reception of
local channels available from
service
only analog channels.
1.
(no
Press
2. Press
menu. Press
Input
HD
digital channels.
cable
box).Ifyou
MENU.
....
T and
ENTER.
The
scan will search for
an
antenna or direct cable
skip this step, theTVwill receive
8 ®
~~~e
~----~:~~+
~
~
~
to
open
IrL.:JI
the
r-J.A:l~
Initial>
._-------.
3. Select
to
Select
cable.
4.
Highlight Scan
completion message before continuting.
Ant
Air
if
connected
an over-the-air antenna.
Ant
Cable
and
for
press
direct
ENTER.
Wait
for the
ANT
~
Channel
.
.
_------
Setting Up
1.
Connect
whichTVinput
3. Power on the
Sample
Device Found
New
menu
Other
your
devicestothe
jack
Inputs
----,,~---~-~--------'
is used
2. Power on all
devicestoensure detection.
TV.
New Device Found
TV, making note
for
each device.
connected
of
.
5. Press
TheTVwill then display
for
the
next
connection
the
it finds.
BACKtoclose
New
Device
the
Found
menu.
menu
Selectinga Source to Watch
1.
Press
ACTIVITY.
2. Press
3. Press
....
T and
to
highlight a source.
ENTERtoswitchtothe
~
~
source.
Identifying
on
the
1.
Press
INFO.
2. The
Receiving High-Definition
DigitalSignal
status
indicate if the
analog
(480i),
digital (SD),
digital (HD).
standard
HD
ANT
display will
standard
or
(HD)
Broadcasts Received
(Antenna)
~INFO
~
broadcast
definition
definition
high-definition
L.----~
Input
8 ®
~e(fj)e
--~-_:~
Ir(~IJJ),~~+
is
-
-
\
--
Page 32

Page 33

IMPORTANT!
REGISTERING
1.1.0
First
Mr.
name
Street
City
E-mail
address
3.
Telephone
number:
(
4.
Your
dateofbirth:
5.
Marital
status:
6.
Dateofpurchase:
/ /
Month
7.
Nameofstore
8.A.Do
9.
10.
11.
12.Priortomaking
you
larger
B.
Did you
have
TV?
1 Yes 2. 0
If
yes,
will
next:
~-,
6
months
1
2. 012months
purchaseanextended
store?
1.
::J
Yes
What
products
purchase?
01
0 Cable box
Sateillte
02
03.
OVO player
w
--,
04.
Blu-ray player
--,
05.
HO-OVO
06.
Antenna
~J
07.
L
Surround
speakers
Do you
plantoenhance
acquiring
sources
01
02.
03.
04
05
06.
07.
2
3.
4
anyofthe
Cable box
~,
Satellite
C
OVO
Blu-ray player
HO-OVO
:::::
:J
Antenna
Surround
:::::
speakers
below
Consumer
=J
cnet.com
MSN
:::::
gadgets
Mltsubishi-tv.com
i:J
IS
EASY•..JUST
2.0
Mrs.
3.0
)
/
Month
Married
1
making
items
purchase,
reports
Year
purchased:
this
3.[J18
4 D24months
warrantyatthe
2. n
DB
0
09
LJ
10.
0 Video
11
0
12
0
your
Mitsubishi
below?
DB
0
09
0
10.
0
11
0
12
0
whichofthe
reference?
5 0 Yahoo/Google
6 0
7.
0
Day
where
planstopurchase
you
be
willbeconnectedtoyour
receiver
player
sound
receiver
player
player
sound
this
did you
tech
and
FILL
OR
REGISTER
Ms.
Initial
Year
2
[]
Single
another
40"
No
purchaseinthe
months
No
Mitsubishi
A/V
receiver
Camcorder
game
Computer
OVR
purchase
A/V
receiver
Camcorder
Video
game
Computer
OVR
search
Customer
reviews
Bestbuy.com
OUT
4.0
or
THE
ONLINE
Miss
Last
1
14.
15.
16.
by
17.
18.
19.When
REGISTER
FORM
BELOW
AT:
WWW.PRDDREGISTER.CDM/MITSUBISHI
name
State/Province
3.
Not
including yourself,
lin
years)
household?
1. 0Noone
2.
Male
1.
Occupation/Employment
{dJe:J<
Professional/Technica!
Upper
Middle
Sales/Marketing
Clerical/Service worker
Tradesman/Machine
Laborer
Teacher/Educator
Healthcare-Physician/Nurse/
Other
Homemaker
Military
Retired
Self
Work
Which
Levelofeducation:
For
What
technologies
someoneinyour
of children
0 Child
else in household
under1year
Female
0 2 0
0 2 0
af
thEt;
EfJpfyJ
management/Executive
management
........
.....................
...
.............
employed/Business
from
home
group
01
Under
0
02.0$15.000-$19.999
03.0$20.000-$29.999
04
:::::
$30.000-$39.999
05
0
$40.000-$49.999
06
0
$50.000-$59.999
07.0$60.000-$74.999
1.
Completed high school
0
2
Completed college
0
3 0 Completed
your
primary
o
Own?
typeofinternet
1. 0 Dial-up
[]
2.
Cable
3 0
OSL
4.
0
Other
Wi-Max)
5.
Satellite
0
new
products
1. 0 Tendtobuy such
available?
2.
0 Tend
a while
YOUR
TOBENOTIFIED
Apt.
Zip/Postal
Age
..............
operator/
.................
.......................
office
..
describes
$15,000
(check
graduate
residence,doyou:
broadband (e.g. fiber optic,
appeal"onthe
household:
to
wait
until
before
code
whatisthe
and
other
adultsinyour
Male
yrs.
0 2 0
yrs.
1.
0 2 0
status:
.....................
owner
your
annual
080$75.000-$99.999
09.0
10.
:::::
11.
:::::
12.
:::::
13.
:::::
14
0
highest
school
2. 0 Rent?
accessdoyou
that
have
the
market,doyou
items
as soonasthey
the
item has been around
buying?
level
PRODUCT
OF
IMPORTANT
GENDER
and
Female
Age
You
0
01.
02.
0
0
03
04.
0
05.
:::::
06
:::::
07.
0
0
DB
0
09
10.
:::::
11.
:::::
12
:::::
13.
0
family
income?
$100.000-$124.999
$125.000-$149.999
$150.000-$174.999
$175.000-$199.999
$200.000-$249.999
$250.000
& over
completed]
useathome?
wireless
latest
or
are
I A L
AGE
Spouse
0
0
0
0
0
0
0
0
0
0
0
0
0
for
NOW
PRODUCT
01
2.A.
Model
number:
B.
Serial
number:
20.Tohelpusunderstand
please
youoryour
basis.
Hame
01 0 Grandchildren
yrs.
yrs
02
03
04.
05.
LeiBllre
06
07
08
09
10
11 0
12.0Stamp/Coin
13
14.0Sewing/Needlework/Knitting
Travel
15
16
17.
18.
19
20
Investing
21
22
23
24.
250Investments/Money
260Contests/Sweepstakes
Greet
27.0Hunting/Shooting
28.
29.
30
31.
Sports,
32.
33.
34.0Health/Natural
350Dieting/Weight
36
37.
38.
39.0Snowboarding/Snow
40
Thanks
for
taking
market
research
mailings and special
relate
services
indicated above.
information
about
are
not. Please check
this
opportunity. 0
Failuretoreturn
Copyright
(Cl
Please
foldinhalf
UPDATES
AND
Mitsubishi
ElectronicS
WD-60
(Please
refertoouter
for
model and serial number.]
indicate
the
interests
spouse
enjoy
Ute
0
Home
improvement/Oo-it-yourself
0 Gardening
0
Ownadog
0
Own
a cat
0
Cultural/Art
0 Avid book reading
0
Bible/Devotional
0
Gourmet
0 Wines
Art/Antique
0 Crafts
0 Airline
0 Travel
0 Foreign
0 Cruise ship vacations
0 RV vacations
0 Casino gambling
0 Shopping
0 Shopping
0 Use
0 Donate
Outdoors
0 Fishing
0 Camping/Hiking
0
Wildlife/Environmental
0 Boating/Sailing
0 Physical
0
Walking
0 Self-improvement
0
Golf
0
Biking
0
NASCAR
the
timetofill
studies
offers
directlytothe
Through
activities in which you
here
this
card
2009
All
and
events
cooking/Fine
collecting
collecting
club/Frequent
in
USA
travel
and
Money
by
catalog/mail
by
internet
credit
cards
to
charitable
Fitness&Health
fitness/Exercise
for
health
out
this
and
this selective
questionnaire.
reports.
They will also allow youtoreceive
fromanumberoffine
specific
interests.
program.
are
if,
for
some
reason. you would
will
not
diminish
Rights
Reserved
seal
with
tape.Donat
SPECIAL
73
OFFERS.
D,&l~~~ica
7
Inc
MODEL
SERIAL
cartonorback panel of
our
customers'
participatingona
reading
foods
flyer
regularly
causes
making
issues
foods
control
skiing
companies
hobbies. and
you will be abletoobtain
involved and less
your
warranty
lifestyles,
and
activitiesinwhich
order
opportunities
Your
answers
whose
products
other
information
about
those
prefer
nato
rights
staple.
regular
will be
important
more
participate
in which you
product
used
and
for
in
Page 34

PLEASE
SEND
OTHER
CORRESPONDENCE
TO:
MITSUBISHI
DIGITAL
ELECTRONICS
AMERICA,
INC.
9351
JERONIMO
RD.
IRVINE,CA92618-1904
I A L 0 1
PN#
8538700A
10
FIRST-CLASS
POSTAGE
REQUIRED
POST
OFFICE
WILL
NOT
DELIVER
WITHOUT
PROPER
POSTAGE.
,
MITSUBISHI
....
ELECTRIC
PO
BOX174268
DENVER
CO
8021
7-4268
11••1.11
•••••
1.1
•••
111
•••
1.1••1••1.1.11••1••1••11••1••1.1••1.1
 Loading...