

Page 1
LEVEL 2 SERVICE
MARS
FA9M0604
NEPTUNE
(DUAL BAND)
R V A: Création B-T. LEGORGEU 09/00 Rédigé par Vérifié par Approuvé par
E E
V R
I S
S I
I O
O N
N S
S
+:
Mitsubishi Electric Telecom Europe S.A.
Z.A. Le Piquet, 35370 Etrelles France
(:
):
+33 (0)2 99 75 71 00
+33 (0)2 99 75 71 47
Written by Checked by Approuved by
B. LEGORGEU G. LEBASTARD G. LEBASTARD
Version A
Date: 10/00
Page 2

Page 3
Level 2 Service Manual
MARS NEPTUNE
TABLE OF CONTENTS
TABLE OF CONTENTS 1
1 General description 1
2 Main Features of Transceiver 2
2.a Description of transceiver 2
2.b Labels 3
2.b.1 IMEI label 3
2.b.2 Label Art Plate 3
2.c SIMLatching 4
2.d Description of options 5
3 Exploded Diagram and Spare parts list 5
3.a MARS 5
3.a.1 Exploded Diagram of MARS 5
3.a.2 Spare Parts list of MARS 6
3.a.3 Assembly 6
3.b NEPTUNE 7
3.b.1 Exploded Diagram of NEPTUNE 7
3.b.2 Spare Parts list of NEPTUNE 7
3.b.3 Assembly 7
4 Test and Measurement 7
4.a Charging measurements 7
4.b E-GSM / DCS measurements 8
4.b.1 Transmitter Power and Ramp profile 8
4.b.2 Phase/ Frequency/ Time relationship 8
4.b.3 Receiver Bit Error Rate (RX sensitivity) 8
4.b.4 Handover between E-GSM 900 and DCS 1800 stantards 8
4.c Operating instructions 9
4.d Buzzer, Receiver and Speaker tests 10
5 Download of software and Setting (Perso) 11
5.a IPLTrium2000 11
5.a.1 Difference between IPLTrium and IPLTrium2000 11
5.a.2 Equipment and installation of IPL Trium 12
5.a.2.1 Equipment description 12
5.a.2.2 Installation 12
5.a.2.3 To launch IPL 13
5.a.3 Description of IPLTRIUM 14
5.a.3.1 Application File 14
5.a.3.2 Loader File / Product 15
5.a.3.3 Setup Line 16
5.a.4 To use ILPTRIUM 17
+:
Mitsubishi Electric Telecom Europe S.A.
Z.A. Le Piquet, 35370 Etrelles France
(:
):
+33 (0)2 99 75 71 00
+33 (0)2 99 75 71 47
Version A
Date: 10/00
Page 4

Level 2 Service Manual
MARS NEPTUNE
5.a.4.1 Start download. 17
5.a.4.2 End of download 18
5.b MSTools 19
5.b.1 Equipment and installation of MSTools 19
5.b.1.1 Equipment description 19
5.b.1.2 Installation 19
5.b.1.3 To launch MSTools 20
5.b.2 Description of MSTools 21
5.b.2.1 TestMode menu 21
5.b.2.1.1 Start from … 21
5.b.2.1.2 Stop and … 22
5.b.2.2 Mobile menu 23
5.b.2.2.1 Download personification 23
5.b.2.2.2 Initialization data users 24
5.b.2.2.3 Mobile identification / How to print labels 25
5.b.2.3 Other menu 26
6 Codes 27
6.a TestMode 27
6.b Software version 27
6.c Software and Perso version 27
7 Operator Debugging 28
8 PERSONNAL NOTES 29
Version A
Date: 10/00
+:
Mitsubishi Electric Telecom Europe S.A.
Z.A. Le Piquet, 35370 Etrelles France
(:
):
+33 (0)2 99 75 71 00
+33 (0)2 99 75 71 47
Page 5
Level 2 Service Manual
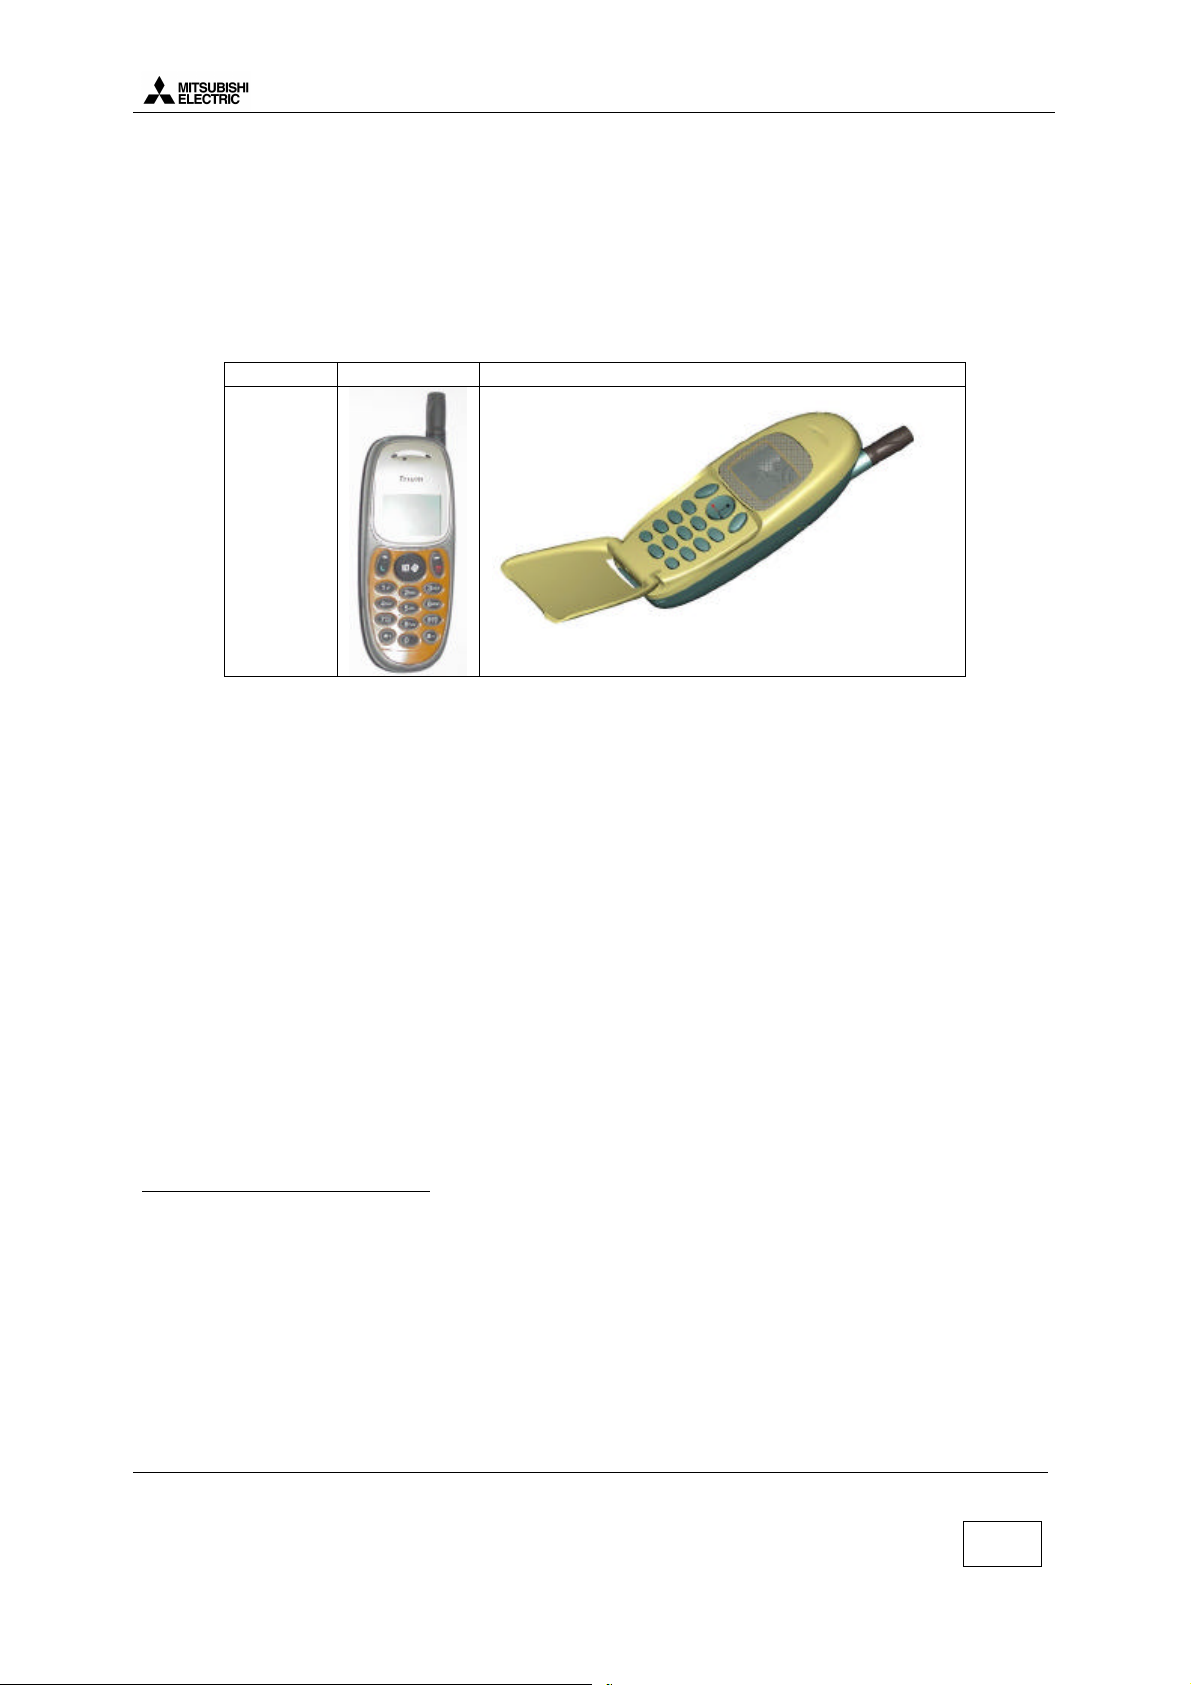
1 General description
The handportable cellular telephone described
here is designed for use in a E-GSM/DCS
network. This phone operates and complies with
the ETSI GSM phase 2 specifications.
MODEL MARS NEPTUNE
PICTURE
MARS NEPTUNE
Standard kit includes following items:
• Transceiver (unretractable antenna type)
• Battery pack 800 mAh (NiMH type).
Reference : FK8B000110
• AC/DC Adapter for battery rapid charging
Speech codec:
• The mobiles M5 uses a speech codec which is able to switch from Half Rate(HR) to Full Rate(FR)
or to Enhanced Full Rate(EFR) according to network, the software and settings version.
• Enhanced Full rate (EFR) allows better voice quality at same rate as Full rate.
• Half rate (HR) is coding on 6.5 kbytes/sec (1/2 Full rate). The network may put two customers on
one timeslot. Each customer will use this timeslot every two frames.
Main features:
• 150 hours idle time and 3 hours conversation time
• Easy user operation with two soft keys
• Full dots graphic LCD display
• Active Flip (Neptune)
• Fixed antenna
• Hand free inside
• WAP 1.1 over CSD
• Data/FAX transmission capability with DATA CONTACT kit option
• SMS/Phone book control capability with DATA CONTACT kit option
• More than 8 languages display and short messaging
1
Circuit Switch Data
1
+:
Mitsubishi Electric Telecom Europe S.A.
Z.A. Le Piquet, 35370 Etrelles France
(:
):
+33 (0)2 99 75 71 00
+33 (0)2 99 75 71 47
Version A
Date: 10/00
1/29
Page 6
Level 2 Service Manual
MARS NEPTUNE
2 Main Features of Transceiver
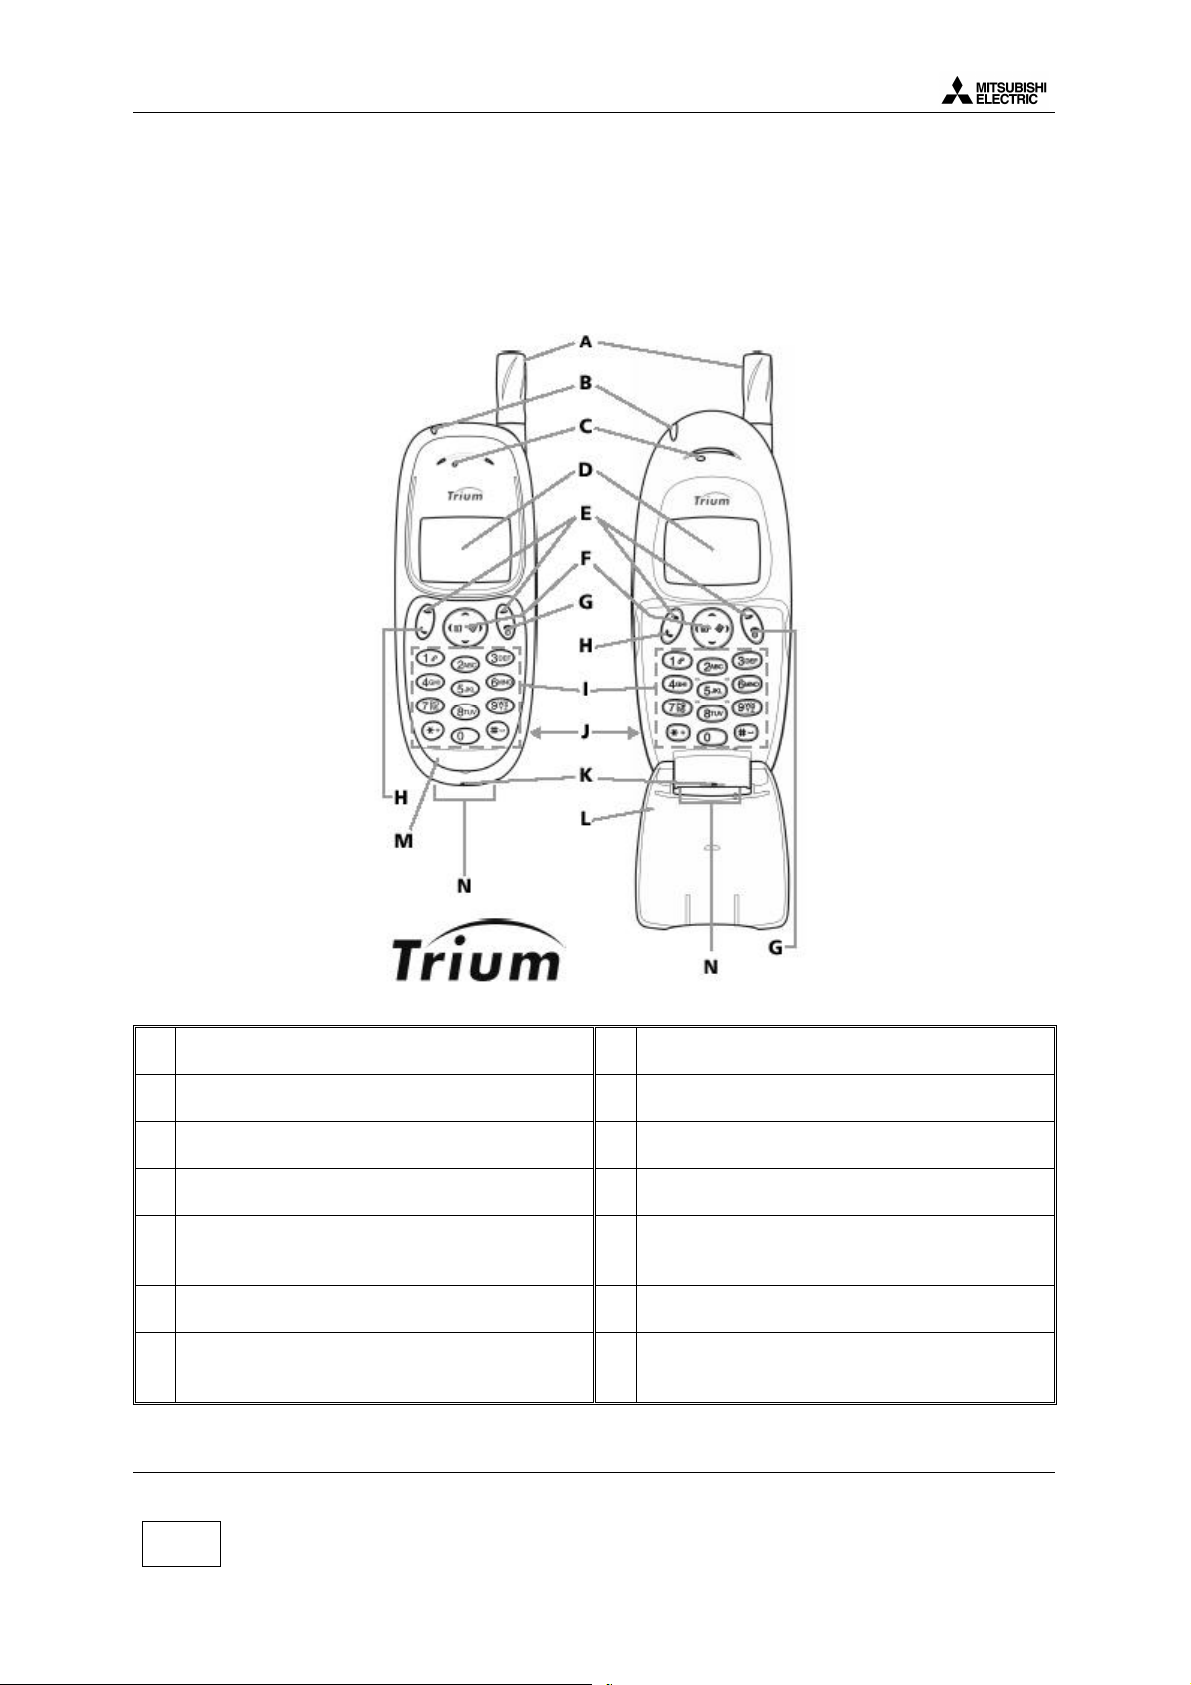
2.a Description of transceiver
MARS NEPTUNE
Antenna
A
LED: call and battery charge indicator
B
Earpiece
C
Graphic display: telephone numbers,
D
menus, messages,… are displayed here
Programmable softkeys or selection keys:
E
perform the functions indicated by the text
above them
Cursor indicator: navigates around the
F
memories and menus
On/Off, End key: hold down to turn on or off
G
the phone. Press to end a call or return to
stand by display
Version A
Date: 10/00
2/29
Call/Send key: press to make or answer a
H
call
Alphanumeric keys: enters numbers,
I
characters and punctuation marks
Changeable battery cover (at the back of
J
the phone)
Microphone
K
Neptune changeable flip
L
Mars changeable front cover
M
Headset, accessories and AC/DC charger
N
socket
+:
Mitsubishi Electric Telecom Europe S.A.
Z.A. Le Piquet, 35370 Etrelles France
(:
):
+33 (0)2 99 75 71 00
+33 (0)2 99 75 71 47
Page 7
Level 2 Service Manual
2.b Labels
MARS NEPTUNE
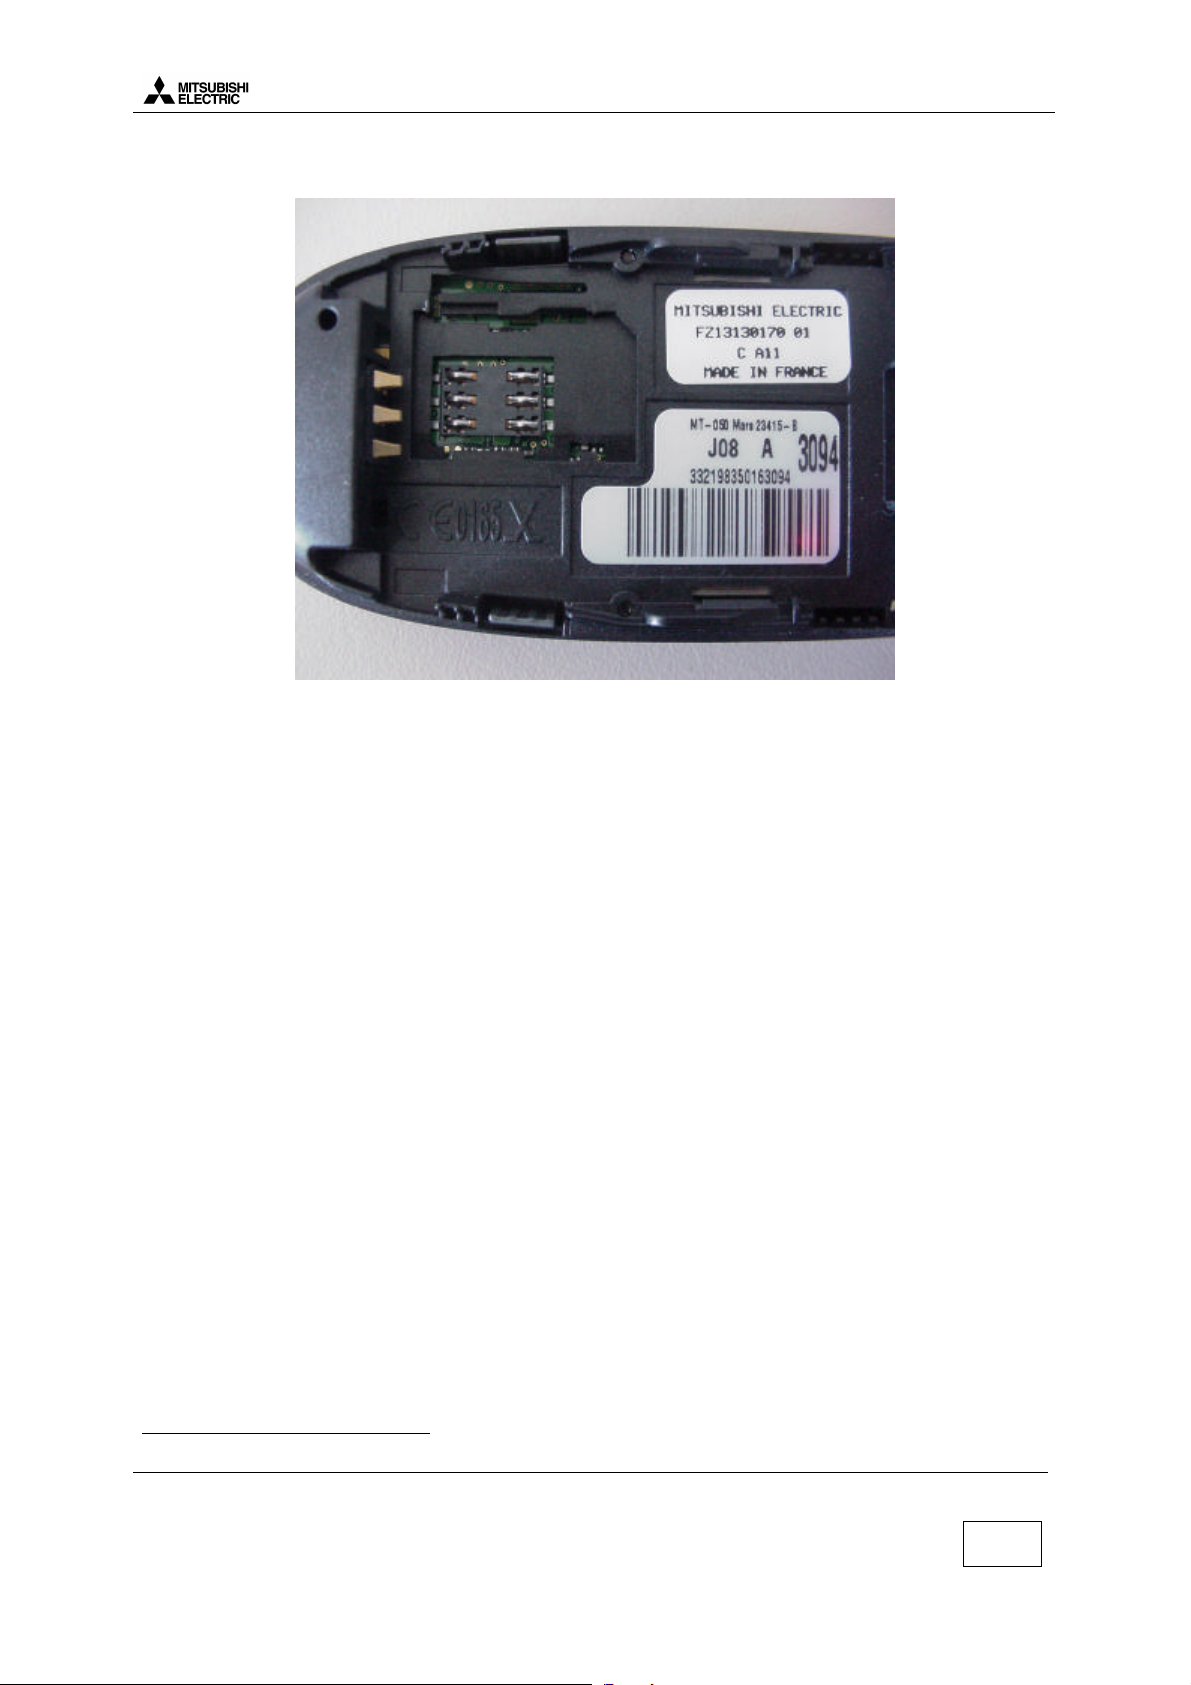
2.b.1 IMEI2 label
The IMEI label is stuck on the rear case of the terminal. The IMEI is held in the logic circuitry of the
main board itself. If the main board is changed then the IMEI will change.
IMEI label shows:
• Kit designation: MT-050 Mars
• Latch: 23415-B see 2.c. SIM latching
• Date code: the 3 digits indicate the date of shipment from factory
Augustfor stands
}
J
{
2000year for the stands
• PCA version: A
• Last four digits of IMEI number: 3094
• IMEI number: the 15 digits is written above the bar code
site Production
}
332198
Code. Approval Typical
mobile theof type with theLinked
35
08
016309
Checksum
}
321321
number. Sequential
mobile with theLinked
4
2.b.2 Label Art Plate
The Label Art Plate identifies the type of assembly and test the mobile has been through.
• Name of the company: Mitsubishi electric
• Article code of the terminal: FZ13130170
• Alternative: 01
• Assembly version: C
• Production module: A11
2
International Mobile Equipment Identity
+:
Mitsubishi Electric Telecom Europe S.A.
Z.A. Le Piquet, 35370 Etrelles France
(:
):
+33 (0)2 99 75 71 00
+33 (0)2 99 75 71 47
Version A
Date: 10/00
3/29
Page 8
Level 2 Service Manual
MARS NEPTUNE
2.c SIMLatching
SIM Lock consists in restricting the use of the terminal to a family of SIM cards. For the SIM Lock,
three main information are used. These information are read from data fields in the SIM card.
1. IMSI (International Mobile Subscriber Identity), 15 Digits:
MCC = Mobile Country Code 3 digits (ex: 208 for France)
MNC = Mobile Network Code 2 digits (ex: 01 for France Telecom service provider)
NS = Network Subset 2 digits
MNC
}
{
MCC
{
NS
123123125501208
2. GID1 (Group IDentifier 1)
This data field can contain digits or letters which identify a family of SIM
Ex: XX for a type for of prepaid SIM card of Service provider 01.
3. GID2 (Group IDentifier 2)
Same as GID1 to identify a sub family of SIM.
Then, from this information, we have 5 types of latch:
number serialt Indifferen
48476
Type IMSI GID1 GID2 Ex:
MCC MNC NS 8 Other
Network Level
NCK
3
208 01 _ _ _ _ Only the cards 208 01 are able to
operate the phone (FranceFrance Telecom)
Network Subset Level
NSCK
4
208 01 55 _ _ _ Only the SIM cards with an IMSI
starting with 208 01 55 are able
to operate the phone (FranceFrance Telecom-55-xxxxxxxx)
Service Provider Level
SPCK
5
208 01 _ _ XX _ Only the SIM cards 208 01 of the
service provider (with XX stored
in GID1 field) will operate the
mobile type d'abonn
Corporate Provider
CPCK
6
IMSI level PCK 208 01 55 1234
208 01 _ _ _ XX Same with GID2
_ _ Only the IMSI card corresponding
5678
to the correct IMSI will operate
the mobile
General information :
To lock /unlock a mobile, you need 8 digits password for each level concerned, and each mobile (one
set of passwords for one IMEI). You have only 10 attempts to correctly unlock a mobile. After 10
unsuccessful attempt, the mobile is permanently blocked.
To enter the unlock procedure, you need to access special menus with specific access codes, given
by the operator.
3
Network Control Key
4
Network Subset Control Key
5
Service Provider Control Key
6
Corporate Provider Control Key
Version A
Date: 10/00
4/29
+:
Mitsubishi Electric Telecom Europe S.A.
Z.A. Le Piquet, 35370 Etrelles France
(:
):
+33 (0)2 99 75 71 00
+33 (0)2 99 75 71 47
Page 9
Level 2 Service Manual
2.d Description of options
MArsKIT M5 MA WAP GENERIC
WAP
rs
lack IronBlack IronBlack IronSIlver Cloud
MArsKIT M5 MA BI BI SIC SIC
B
lack IronBlack IronSilver CloudSIlver Cloud
WAP
MArsKIT M5 MA IG BI BLI SIC
I
vy GreenBlack IronBlack IronSIlver Cloud
WAP
rs
idnight
lueMidnight
lueMidnight
lueMIdnight
lue
ptune
ostFRostEmerald
reenEMerald
reen
NE
ptune
KIT M5 NE FR FR PAB PAB
FR
ostFRostParisian
B
luePArisian
B
lue
WAP
NE
ptune
KIT M5 NE DG DG DAG DAG
D
ark GreyDark GreyDark GreyDark Grey
WAP
ptune
idnight
lueMidnight
lueMidnight
lueMIdnight
lue
Colour
Some of the mobile from Mars and Neptune family are to be defined.
MARS NEPTUNE
Model
MA
MA
MA
rs
MArs KIT M5 MA GPRS GENERIC GPRS
NE
ptune
NE
NE
NE
ptune
NEptune KIT M5 NE GPRS GENERIC GPRS
KIT M5 MA BI BI BLI SIC B
KIT M5 MA MB MB MIB MIB M
KIT M5 MA MB MB MIB PE M
KIT M5 NE GENERIC WAP
KIT M5 NE FR FR EMG EMG FR
KIT M5 NE MB MB MIB MIB M
KIT M5 NE MB MB PAB PAB M
Cover Case cover battery Front panel
B
idnight BlueMidnight BlueMidnight Blue
B
idnight BlueMidnight BlueParisian Blue
B
B
B
PE
arl
G
B
PA
risian Blue
B
G
B
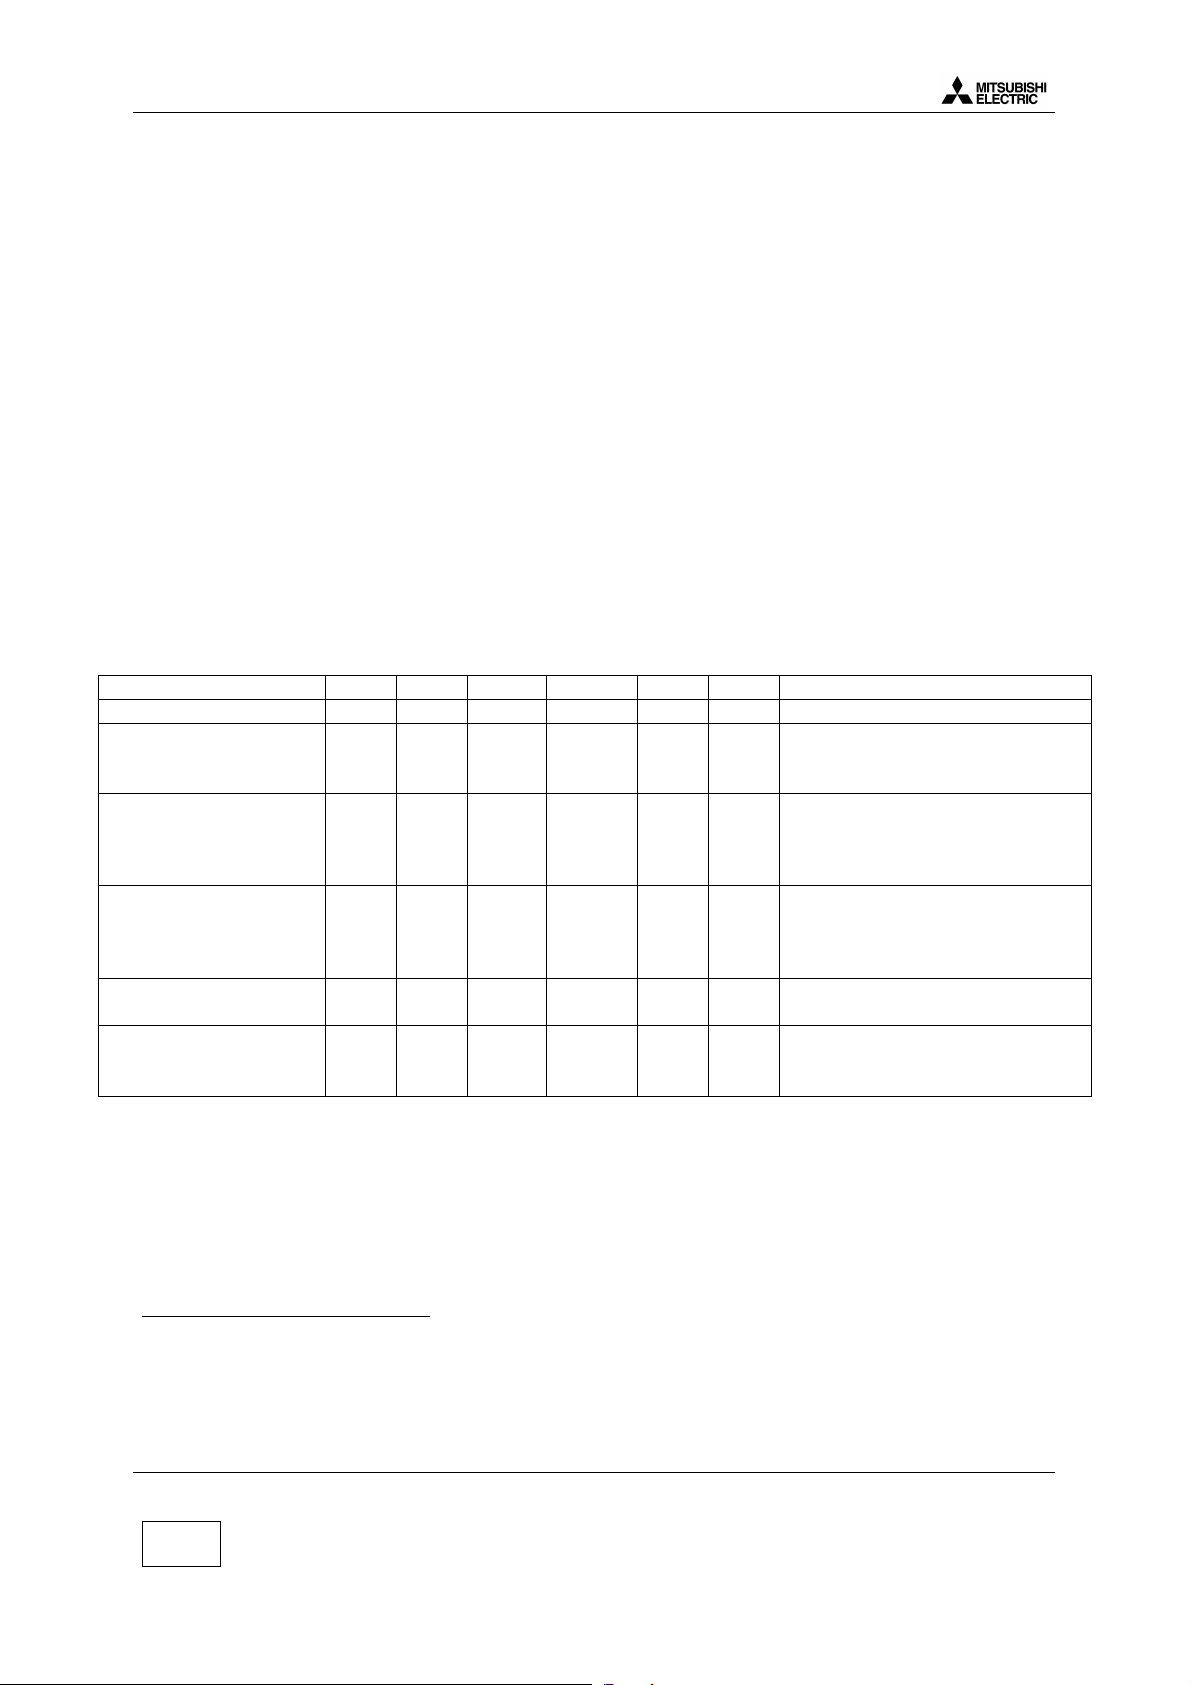
3 Exploded Diagram and Spare parts list
3.a MARS
3.a.1 Exploded Diagram of MARS
Note: Frame LCD has been used only for early products.
OptionSAP KIT designation
WAP
WAP
WAP
WAP
WAP
WAP
+:
Mitsubishi Electric Telecom Europe S.A.
Z.A. Le Piquet, 35370 Etrelles France
(:
):
+33 (0)2 99 75 71 00
+33 (0)2 99 75 71 47
Version A
Date: 10/00
5/29
Page 10

Level 2 Service Manual
123
5
MARS NEPTUNE
3.a.2 Spare Parts list of MARS
The spare parts list of the Mars is:
Reference Description Reference Description
FK1N005710
FK1N005910
FK1N005810
FK1N005610
FK1N005510
FK1N005110
FK1N005410
FK1N005310
FS2E001410 Micro Assy M5 MA/NE FS2E001510 Receiver Assy M5 MA/NE
FS2E001610 Speaker M5 MA/NE FS2E001710 Motor Vibrator M5 MA/NE
FK7P000510 LCD Module Assy M5 MA FK1B001510
FS2E000910 Battery connector M5 MA/NE FS2E00361B Cap RF MA/NE Dark Grey 532C
Notes:
• Case Assy is made of the case and the antenna
• MA stands for MArs
• NE stands for NEptune
Cover Assy M5 MA Ivy Green
C25547
Cover Assy M5 MA Midnight Blue
C95511
Cover Assy M5 MA Black Iron
C25548
Case Assy M5 MA Midnight Blue
C95511
Case Assy M5 MA Black Iron
C25548
Battery cover M5 MA Black Iron
C25548
Battery cover M5 MA Midnight
Blue C95511
Battery cover M5 MA Silver Cloud
C25508
FK1W001810
FK1W002710
FK1W002810
FK1W002510
FK1W000910 FP M5 MA Silver Cloud C25508
FK1W003410
FS2E001910
FS2E001310 I/O connector M5 MA/NE
FP M5 MA Silver Cloud C25508
Logo Vodafone
FP M5 MA Midnight Blue Logo D2
C95511
FP M5 MA Midnight Blue C95511
Logo MOBISTAR
FP M5 MA Midnight Blue C95511
Logo OMNITEL
FP M5 MA Silver Cloud C25508
Logo MOBISTAR
Antenna M5 MA/NE (already
assembled to cover)
Screw PI TITE Bentz Head TPR
N°0 2x6
3.a.3 Assembly
Follow the process:
1. Clip the Antenna into the case
2. Stick the Loud speaker onto the case
3. Insert the vibrator onto the case
4. Clip the Battery connector onto the case
5. Clip the micro assy onto the I/O connector
6. Clip the I/O connector into the PCA
7. Place the PCA on the case
8. Screw the 5 screws, beginning with the one 1
then 2 and 3 (1.7 Nm for each screw)
9. Clip the LCD assy on the PCA
10. Stick the receiver on the holder LCD
11. Place the key rubber on the PCA
12. Clip the cover onto the case
13. Stick the window on the cover
14. Clip the flip (Front panel) of Neptune (Mars)
Version A
Date: 10/00
6/29
4
+:
Mitsubishi Electric Telecom Europe S.A.
Z.A. Le Piquet, 35370 Etrelles France
(:
):
+33 (0)2 99 75 71 00
+33 (0)2 99 75 71 47
Page 11

Level 2 Service Manual
3.b NEPTUNE
3.b.1 Exploded Diagram of NEPTUNE
Note: Frame LCD has been used only for early products.
MARS NEPTUNE
3.b.2 Spare Parts list of NEPTUNE
To be defined.
3.b.3 Assembly
To be defined.
4 Test and Measurement
4.a Charging measurements
To check the charging, we use a modified AC/DC and an ampermeter connected as follow:
When you plug the charger into the wall socket,
the charging current is displayed by ampermeter.
The charging indicator scrolls on the LCD and the
top LED lights up red.
+:
Mitsubishi Electric Telecom Europe S.A.
Z.A. Le Piquet, 35370 Etrelles France
(:
):
+33 (0)2 99 75 71 00
+33 (0)2 99 75 71 47
Version A
Date: 10/00
7/29
Page 12

Level 2 Service Manual
MARS NEPTUNE
Switch off the mobile with battery, but without SIM card.
After plugging the AC/DC, "charging" message is displayed on the LCD.
When backlight is active, the precharge current is about 150 mA, and
then 530 mA. When the backlight switches off, the current decreases to
about 450 mA.
For more details about charging, see the LEVEL 3 SERVICE MANUAL FA9M0605.
4.b E-GSM / DCS measurements
4.b.1 Transmitter Power and Ramp profile
These two are interrelated, since the power ramp shape and its final peak value are stored in
EEPROM as adjustment values.
The peak power output must lie within 3 dB of specification and be flat to within 0.5dB over the active
period. The ramp profile is designed to give minimum harmonics, and hence it is important to ensure it
is adhered to.
Power ramp profile are checked on the channels:
• 975, 37 and 124 for the 900 MHz band
• 512, 698 and 885 for the 1800 MHz band
In conclusion, the ramp must fit the mask at all frequencies and all power levels. The mask is usually
stored in the radiocommunication tester. The test will also be available to cover the frequency and
power range automatically.
4.b.2 Phase/ Frequency/ Time relationship
This is a test of the quality of the modulation including the IQ balance and the Gaussian filters. The
phase of the carrier changes according to the arrival of 1s and 0s. Phase error must not be more than
20° peak or 5° RMS.
4.b.3 Receiver Bit Error Rate (RX sensitivity)
The specification is a Bit Error Rate (BER) of better than 2.44% for an input signal : -102 dBm for the
E-GSM 900 band, and –100 dBm for the DCS 1800 band. There should be no error for -90 dBm to
-20 dBm input signal. The maximum workable error rate is 13%.
It is important that BER and RX sensitivity are good since measures of RXLEV (from -103 to -41 dBm)
and RXQUAL (from 0 to 10%) are reported back to the base station on the SACCH to assist in
handovers and power level control. Errors in reporting will lead to sub optimum use of channel space,
or interference to others.
4.b.4 Handover between E-GSM 900 and DCS 1800 stantards
The M5 dual band may handover from the E-GSM 900 band to the DCS 1800 band automatically. If
the subscribed network has frequencies in both bands, the M5 dual band will work either in 900 MHz
or 1800 MHz band depending on the availability of frequencies.
Version A
Date: 10/00
8/29
+:
Mitsubishi Electric Telecom Europe S.A.
Z.A. Le Piquet, 35370 Etrelles France
(:
):
+33 (0)2 99 75 71 00
+33 (0)2 99 75 71 47
Page 13

Level 2 Service Manual
MARS NEPTUNE
with full
4.c Operating instructions
RADIOCOMMUNICATION TESTER
Mobile
battery
1. Insert Test SIM card in mobile
2. Connect a charged battery
3. Make a call with RADIOCOMMUNICATION TESTER and check following parameters or use the
autotest (CMD55 or CMD55 under MTS or Wavetek 4107)
E-GSM 900
PCL
Power Level
(dBm)
5 33 +/-2dB
6 31 +/-3dB
7 29 +/-3dB
8 27 +/-3dB
9 25 +/-3dB
10 23 +/-3dB
11 21 +/-3dB
12 19 +/-3dB
13 17 +/-3dB
14 15 +/-3dB
15 13 +/-3dB
16 11 +/-5dB
17 9 +/-5dB
18 7 +/-5dB
19 5 +/-5dB
tolerance
DCS 1800
PCL
Power level
(dBm)
0 30 +/-2dB
1 28 +/-3dB
2 26 +/-3dB
3 24 +/-3dB
4 22 +/-3dB
5 20 +/-3dB
6 18 +/-3dB
7 16 +/-3dB
8 14 +/-3dB
9 12 +/-4dB
10 10 +/-4dB
11 8 +/-4dB
12 6 +/-4dB
13 4 +/-4dB
14 2 +/-5dB
15 0 +/-5dB
tolerance
+:
Mitsubishi Electric Telecom Europe S.A.
Z.A. Le Piquet, 35370 Etrelles France
(:
):
+33 (0)2 99 75 71 00
+33 (0)2 99 75 71 47
Version A
Date: 10/00
9/29
Page 14
Level 2 Service Manual
+4
+1-6-1
-30
-70
(dB)
Level
8µS10µS8µS10µS542.8
µ
S
147 «
useful
» bits
MARS NEPTUNE
Power ramping: Check that the burst fits the mask below
RX levels: Check the values for different signal strengths
RX LEVEL RSSI (dBm)
0 Less than -110 dBm
1 -110 to -109
2 -109 to -108
27 -84 to -83
50 -61 to -60
62 -49 to -48
63 Better than -48
Bit error: Check the value for different types
Check the Reception Bit Error Rates (RBER) and Frame Error Rates on channels 1, 62 and 124 at
–102 dBm for GSM band and on channels 512, 698 and 885 for the DCS band according the
following specifications:
Bit error type Value
RBER Class Ib < 0.41 %
RBER Class II < 2.44 %
FER < 0.12 %
4.d Buzzer, Receiver and Speaker tests
Insert a test SIM in a mobile with a battery.
Go to Volume across the path: Home menu>Settings>Phone settings>Tones>Volume and scroll to
the item to be adjusted.
• Test Buzzer/loud Speaker: Ring, Ramping, Alarm volume. Select the item and use
and keys to decrease or increase the volume of buzzer. Make a real communication
and test the loud speaker.
Version A
Date: 10/00
10/29
+:
Mitsubishi Electric Telecom Europe S.A.
Z.A. Le Piquet, 35370 Etrelles France
(:
):
+33 (0)2 99 75 71 00
+33 (0)2 99 75 71 47
Page 15

Level 2 Service Manual
MARS NEPTUNE
• Test Receiver: Select Conversation or Keys and use and keys to decrease or
increase the volume of speaker.
5 Download of software and Setting (Perso)
The software in the mobile consists of two files downloaded independently:
• The first file (.bin) is the core of the software managing the mobile functions themselves.
This is downloaded using IPLTrium
• The second file (.pso) is the setting file managing the default settings (ringing,
customization…). This is downloaded using MS Tools.
MS Tools also allows to enter test mode in order to reset user data (security code), to print labels
(IMEI & factory name plate).
From now, we use soft as software file (.bin) and setting as perso file (.pso)
5.a IPLTrium2000
This part describes how to use the IPLTrium2000 software.
To download a software file (.bin), you need IPLTRIUM software, and the mobile must be with battery.
To download the soft, your phone is connected to your computer:
• Using the interface box “Interface Simplifiée Mitsubishi”, usually used for Level 3 repair.
Therefore, see the Service Manual Level 3 ref. FA9M0605
• Using PC cable, that is described as below
5.a.1 Difference between IPLTrium and IPLTrium2000
Before downloading software in a mobile, the type of the flash needs to be identified. As the flash are
different, the ways to download mobiles are different.
For M4 family, there were 4 different "loaders".
By using the new IPLTrium, you can choose the phone you want to soft, and the loader is
automatically set. Moreover, there are only two different loaders for the M4 & M5 family.
IPLTrium IPLTrium2000
Iplm4mo.bin Iplm4so.bin Iplm4gp.bin Iplm4gpp.bin Iarm.bin
Astral, Galaxy,
Geo
Some information is displayed on the screen of the phone (old IPLTrium), and by checking the
indicator, one is able to know the status of the progress.
Note: From now, we use IPL or ILP2000 or IPLTrium for IPLTrium 2000
Aria, Aria Wap Geo Wap Geo GPRS Cosmo, Cosmo Wap,
Geo GPRS
Ithumb.bin
Astral, Galaxy,
Geo, Geo Wap,
Aria, Aria Wap,
Mars, Neptune,
MCT, Laser
+:
Mitsubishi Electric Telecom Europe S.A.
Z.A. Le Piquet, 35370 Etrelles France
(:
):
+33 (0)2 99 75 71 00
+33 (0)2 99 75 71 47
Version A
Date: 10/00
11/29
Page 16
Level 2 Service Manual
MARS NEPTUNE
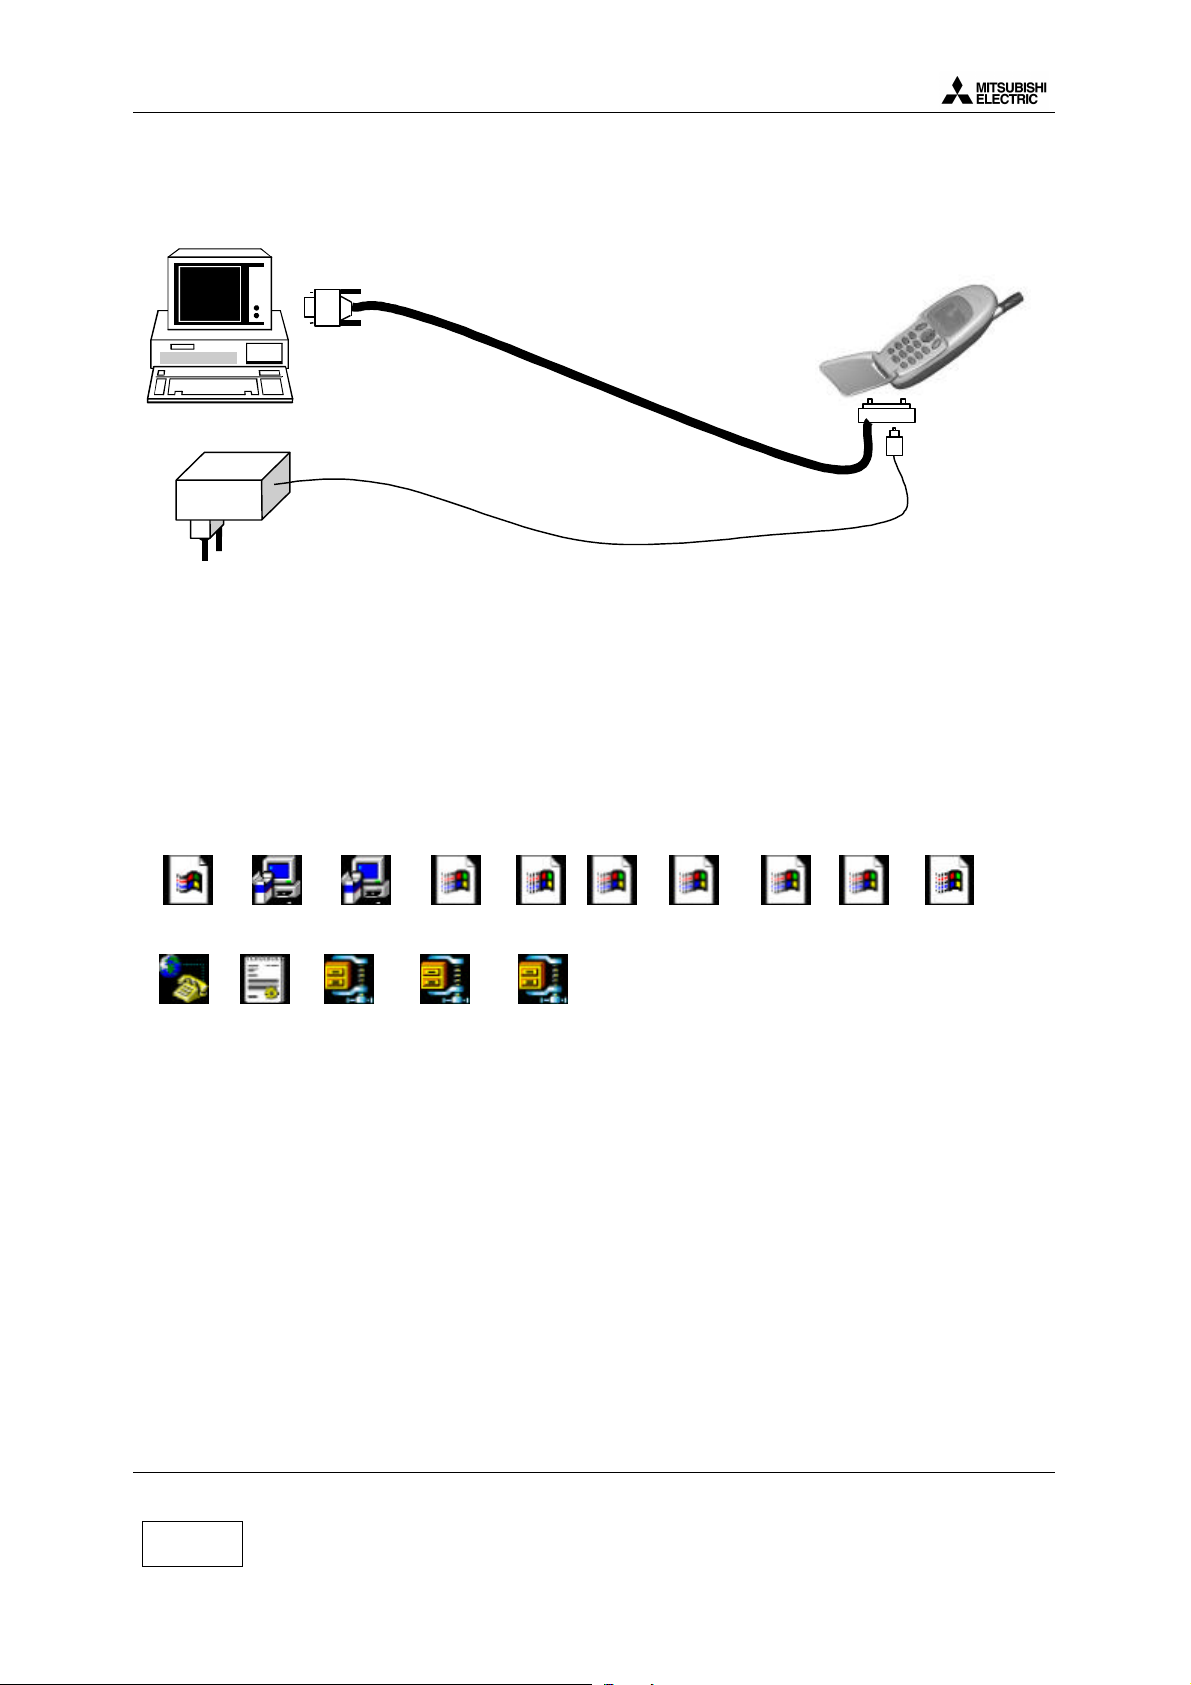
5.a.2 Equipment and installation of IPL Trium
5.a.2.1 Equipment description
To COM1
Mobile with full batteryPC Cable M5Professional
FK8T000110
AC/DC
FK8A000110
Notes:
• A battery fully charged is fitted on the phone
• Switch off the mobile before plugging the PC cable
• The AC/DC can be used
• Nothing appears on the LCD of the phone
• You do not need to switch off the PC before plugging PC cable
5.a.2.2 Installation
IPL Trium is available on Windows 95, 98, NT4 OS and is made of 15 different files:
_isdel.exe
Setup.ins
Setup.exe
Setup.ini _sys1.cab
_setup.dll Layout.bin Lang.dat Os.dat _inst32i.ex_ Setup.lid Data.tag
_user1.cab
Data1.cab
Ipltrium.vrs
(These files can be provided under one ZIP file)
To install IPLTRIUM software, launch the programme Setup.exe, and follow the instructions.
Version A
Date: 10/00
12/29
+:
Mitsubishi Electric Telecom Europe S.A.
Z.A. Le Piquet, 35370 Etrelles France
(:
):
+33 (0)2 99 75 71 00
+33 (0)2 99 75 71 47
Page 17
Level 2 Service Manual
MARS NEPTUNE
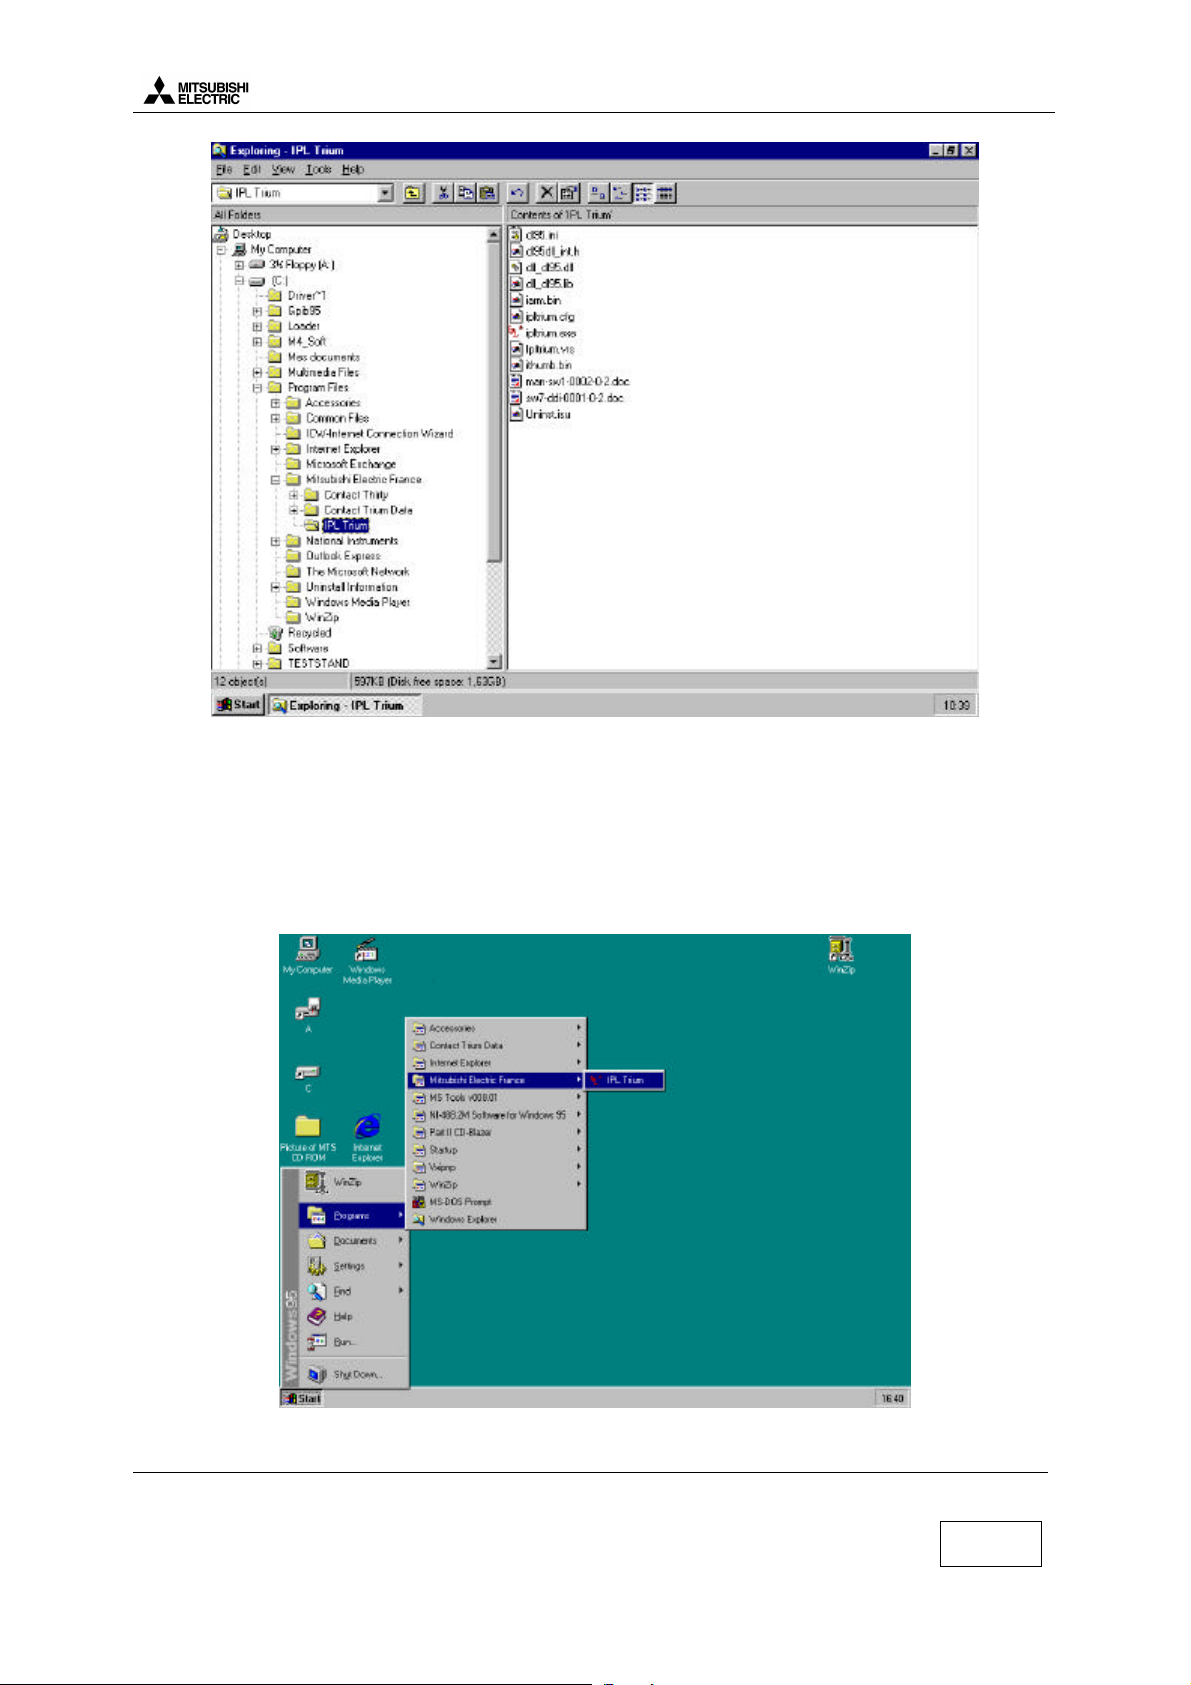
Note: The folder IPLTrium is created, and 12 documents under it.
5.a.2.3 To launch IPL
Click or double click on Ipltrium.exe in Windows Explorer (same path that above).
Or choose IPLTrium in menu.
+:
Mitsubishi Electric Telecom Europe S.A.
Z.A. Le Piquet, 35370 Etrelles France
(:
):
+33 (0)2 99 75 71 00
+33 (0)2 99 75 71 47
Version A
Date: 10/00
13/29
Page 18

Level 2 Service Manual
MARS NEPTUNE
5.a.3 Description of IPLTRIUM
The “IPL” software runs under WINDOWS 32 Bits.
Path of the Application File
(Software)
Path of the Loader File
(Setting / Perso)
Type of the Product
Com used
Progress Indicator
Information Window
5.a.3.1 Application File
We advise you to create special folders with all the softs for each phone. For instance, we have
created these ones under (C:) (C:\Software\M5\MARS_NETUNE), and we have recorded the software
file (Soft_Mars.bin) under the last folder.
The field Application File indicates the path of the software. It depends on where the user had
recorded it. This path can be changed by clicking on the key Browse….
Version A
Date: 10/00
14/29
+:
Mitsubishi Electric Telecom Europe S.A.
Z.A. Le Piquet, 35370 Etrelles France
(:
):
+33 (0)2 99 75 71 00
+33 (0)2 99 75 71 47
Page 19

Level 2 Service Manual
One obtains the window below.
•
•
•
•
•
None
MARS NEPTUNE
Click here to choose the path
Select the software file
Software selected
Click here to validate
Click here to cancel
5.a.3.2 Loader File / Product
It indicates the path of the software. It depends on where the folder IPLTrium is recorded. This loader
is fixed by choosing the type of phone in the field Product. Anyway, the loader file can be changed by
clicking on the key Browse….None is displayed on the product field.
If ever you have to recorded new loader, we advise to create special folders as above.
• The product is recorded:
Click on the arrow to see the list of the phones.
Note that:
Eclipse stands for Cosmo
and Cosmo WAP
Geo++ stands for Geo
GPRS
• Geo+ stands Geo Wap
Aria stands for Aria and
Aria WAP
Galaxy stands for Astral,
Galaxy and Geo
M5Mars stands for Mars
and Neptune
stands for no telephone
recorded and one can change
the loader by clicking on
Browse…
Click here to select the product
(See 5.a.1 Difference between IPLTrium and IPLTrium2000 to get more information about the loader)
+:
Mitsubishi Electric Telecom Europe S.A.
Z.A. Le Piquet, 35370 Etrelles France
(:
):
+33 (0)2 99 75 71 00
+33 (0)2 99 75 71 47
Version A
Date: 10/00
15/29
Page 20

Level 2 Service Manual
MARS NEPTUNE
• The product is not recorded
Click on Browse… in the Loader File field to get the window below. (For instance, we have recorded
the loader loader_Mars.bin under the path C:\Loader\M5\MARS_NEPTUNE)
5.a.3.3 Setup Line
It indicates the com used. One can change the configuration of the port by clicking on the key
Properties…. One obtains the window below.
Choose the maximum
Parity
Cancel
Select the Com
Choose Wait State
Bus Size
Choose
Choose the
Choose Stop bit
Choose Data bit
Click here to validate
Click here to
Note: these parameters depend on the phone you want to soft. The data above are linked with the
Mars and Neptune.
Speed
Version A
Date: 10/00
16/29
+:
Mitsubishi Electric Telecom Europe S.A.
Z.A. Le Piquet, 35370 Etrelles France
(:
):
+33 (0)2 99 75 71 00
+33 (0)2 99 75 71 47
Page 21

Level 2 Service Manual
5.a.4 To use ILPTRIUM
5.a.4.1 Start download.
MARS NEPTUNE
Click here to
There are two ways to connect the mobile
• With the AC/DC: take a mobile with full battery, switch it off. Plug the PC cable and the
AC/DC. The LED indicator is red. Click on Start download. The LED becomes green, and
starts flashing during the process.
• Without AC/DC charger: hold the on/off key of the phone (it does not switch on) and click
on Start download. Keep holding the on/off key until the LED is flashing green.
Information about processing is shown along download line (bytes transferred, and steps of
downloading) in the information window.
You can stop the downloading at any time by clicking on Stop download. By removing the mobile
from the PC cable before the end of the download, the mobile may be damaged. If some one cannot
download soft anymore, leave the phone without battery for one hour and try again to download soft.
Note: Nothing is displayed on the LCD of the phone. Check the indicator. The LED should be flashing
green during the download.
Start download
+:
Mitsubishi Electric Telecom Europe S.A.
Z.A. Le Piquet, 35370 Etrelles France
(:
):
+33 (0)2 99 75 71 00
+33 (0)2 99 75 71 47
Version A
Date: 10/00
17/29
Page 22

Level 2 Service Manual
MARS NEPTUNE
5.a.4.2 End of download
Properties…
Path of the needed files
During information
Final message
Wait for the message "---- DOWNLOAD COMPLETED ---------" on the information windows of IPL.
At the end of the download (the progress indicator is full), the LED indicator is to be green and not
flashing. When an error occurs (except for unknown flash) the LED flashes red. Count the number of
blinks to determine the error, i.e. 6 blinks = Flash programming error.
Note: there will be a pause between the error blinks i.e. 6 links, pause, 6 blinks, pause…
Blink
number
1 Checksum error on received frame 10 Unexpected interrupt
2 Unexpected frame size 11 Receiving Buffer full
3 Uart receiving Error 12 Flash too small to contain application
6 Flash programming error 14 Flash access error
7 Flash erasing error
Description Blink
number
Description
information
Remove the PC cable (with or without the AC/DC charger) and the battery. To check the soft
downloaded see 6.6.b Software version
IPL is to be compatible with the flash:
FUJITSU MBM29LV800TA(1Mbytes) AMD AM29LV800BT (1Mbytes)
FUJITSU MBM29LV160T (2Mbytes) SGS THOMSON M29W800T (1Mbytes)
INTEL 28F800B3T (1Mbytes) INTEL 28F160B3T (2Mbytes)
INTEL 28F160C3B (2Mbytes) INTEL 28F160C3T (2Mbytes)
MITSU M5M29GT160B/M5M29GT161B (2Mbytes)
AMD AM29DL163CT (2Mbytes) AMD AM29DL162CT (2Mbytes)
AMD AM29LV160T (2Mbytes) FUJITSU MBM29LV160B (2Mbytes)
Version A
Date: 10/00
18/29
+:
Mitsubishi Electric Telecom Europe S.A.
Z.A. Le Piquet, 35370 Etrelles France
(:
):
+33 (0)2 99 75 71 00
+33 (0)2 99 75 71 47
Page 23

Level 2 Service Manual
MARS NEPTUNE
This application saves the last setting in the configuration file.ini. When the software restarts, these
settings are loaded automatically.
5.b MSTools
This part describes how to use the MSTools software.
To download a setting file, or to print IMEI label or Label Art, you need MSTools (version 10 or higher)
software.
To download the setting, your phone is to be into “Mitsubishi Testmode” state.
• Using the interface box “Interface Simplifiée Mitsubishi”, usually used for Level 3 repair.
Therefore see the Service Manual Level 3 ref. FA9M0605
• Using PC cable, that is described below
5.b.1 Equipment and installation of MSTools
5.b.1.1 Equipment description
Mobile with full batteryPC Cable M5Professionnal
Notes:
To COM1
AC/DC
FK8A000110
• Same equipments that is used for IPL
• The mobile is with full battery
• You do not need to switch off the PC before plugging PC cable
FK8T000110
5.b.1.2 Installation
MSTools is available on Windows 95, 98, NT4 OS and is made of 3 different files:
Setup.exe Mstools.001 Mstools.002
(These files can be provided under 2 floppy disks)
Before installing a new version of MSTools, be sure to uninstall the old one.
To install MSTools software, we suggest you should record the file in a temporary folder, and then
launch the programme Setup.exe, and follow the instructions.
At the end of the installation, you have to delete the temporary folder.
+:
Mitsubishi Electric Telecom Europe S.A.
Z.A. Le Piquet, 35370 Etrelles France
(:
):
+33 (0)2 99 75 71 00
+33 (0)2 99 75 71 47
Version A
Date: 10/00
19/29
Page 24

Level 2 Service Manual
•
•
•
MARS NEPTUNE
Notes:
The folder MStools is created, and 3 sub-folders
under it.
MSTools.exe is at the end of the path
C:\MSTools\Exec.
Some problem may occur if the file MFC42.DLL onto
your computer is too old. Contact your computer
administrator.
5.b.1.3 To launch MSTools
Click or double click on MSTools.exe in Windows Explorer (same path as above)
Or choose MSTools in menu
This picture was made with MSTools version 10.
Version A
Date: 10/00
20/29
+:
Mitsubishi Electric Telecom Europe S.A.
Z.A. Le Piquet, 35370 Etrelles France
(:
):
+33 (0)2 99 75 71 00
+33 (0)2 99 75 71 47
Page 25

Level 2 Service Manual
5.b.2 Description of MSTools
Start
from
TestMode
MARS NEPTUNE
Unused
To Exit Mstools
Menu :
Black=available
Grey=not available
Information WIndow
Version
To get all the menu available, you have to link the mobile and MSTools (see below).
5.b.2.1 TestMode menu
5.b.2.1.1 Start from …
Your phone is to be linked with MSTools. There are two ways to have this connection (they are both
good):
• Your phone is into TestMode state
If you are using the interface box or you have kept
on pressing * during the dial 5 4 7 2 (before
plugging PC cable)
One can connect the phone by choosing
. The message “Start TestMode…
Operation completed.” is displayed in the
information window.
+:
Mitsubishi Electric Telecom Europe S.A.
Z.A. Le Piquet, 35370 Etrelles France
(:
):
+33 (0)2 99 75 71 00
+33 (0)2 99 75 71 47
Version A
Date: 10/00
21/29
Page 26

Level 2 Service Manual
Start
from
NormalMode
MARS NEPTUNE
• Your phone is not into TestMode state
Plug the PC cable into a switched-on-mobile.
One can connect the phone by choosing
, then the message “Mitsubishi
testMode” is displayed on the phone. The
message “Start TestMode… Operation
completed.” is displayed in the information
window.
Now you can use MSTools functions.
5.b.2.1.2 Stop and …
When you have finished with a phone, you have to disconnect the link before linking with another
phone.
• Stop and keep on TestMode
Your phone is no longer linked with MSTools, but
it is still in TestMode state
• Stop and Go back to NormalMode
Your phone is no longer linked with MSTools, and
you have left the TestMode state
Version A
Date: 10/00
22/29
+:
Mitsubishi Electric Telecom Europe S.A.
Z.A. Le Piquet, 35370 Etrelles France
(:
):
+33 (0)2 99 75 71 00
+33 (0)2 99 75 71 47
Page 27

Level 2 Service Manual
5.b.2.2 Mobile menu
available
After having linked the mobile with MSTools, the menu Mobile is available.
Three sub-menu are provided:
• Download personification
• Initialization data users
• Mobile identification
Mobile is
The phone is correctly linked
MARS NEPTUNE
5.b.2.2.1 Download personification
This function allows you to download the setting.
We advise to create special folders with all the settings for each phone.
Click here to choose the path
Select the setting
Setting selected
Click here to validate
Click here to Cancel
+:
Mitsubishi Electric Telecom Europe S.A.
Z.A. Le Piquet, 35370 Etrelles France
(:
):
+33 (0)2 99 75 71 00
+33 (0)2 99 75 71 47
Version A
Date: 10/00
23/29
Page 28

Level 2 Service Manual
MARS NEPTUNE
The message "Personification data
downloading…Operation completed." is displayed
in the information window to confirm that the
setting has been successfully downloaded.
5.b.2.2.2 Initialization data users
Some parameters can be changed by the user: volume, ringing, lock code…, this function allows you
to re-initialize the mobile. The message "Initialization data users…Operation complete" means that the
operation has been successfully completed.
Notes:
• you have to download the setting again to the mobile after the having chosen
• “Enter lock code:” can be turned off by this way
Version A
Date: 10/00
24/29
Initialization data users
+:
Mitsubishi Electric Telecom Europe S.A.
Z.A. Le Piquet, 35370 Etrelles France
(:
):
+33 (0)2 99 75 71 00
+33 (0)2 99 75 71 47
Page 29

Level 2 Service Manual
MARS NEPTUNE
5.b.2.2.3 Mobile identification / How to print labels
IMEI Number
Labelart Number
Print Labelart
Click to
Click here to Cancel
Click to Print IMEI
Information about process
You can print either IMEI number or Labelart number by clicking on the button
• Equipment description:
To COM1
Mobile with full batteryPC Cable M5Professionnal
FK8T000110
COM2
ZEBRA
90XiII
Printer
MS Tools software version 10.00 (or higher) is required to print labels.
MS tools program does not send information directly to ZEBRA 90Xi II printer, it sends information to
NI VISA driver and NI VISA driver sends information to ZEBRA 90Xi II printer.
+:
Mitsubishi Electric Telecom Europe S.A.
Z.A. Le Piquet, 35370 Etrelles France
(:
):
+33 (0)2 99 75 71 00
+33 (0)2 99 75 71 47
Version A
Date: 10/00
25/29
Page 30

Level 2 Service Manual
Mobile Identification
MARS NEPTUNE
• Driver required: NI VISA
NI VISA driver is required and can be provided by MITSUBISHI ELECTRIC TELECOM EUROPE.
The NI VISA driver is located on NATIONAL INSTRUMENTS NI 488.2 CD-ROM
To install this driver on your PC, launch the setup.EXE which is located in the NI-VISA folder on the
CD-ROM.
• Print IMEI
Click on Print IMEI
The window
have to write the code of the phone and of the
latch:
• MT-050 MARS 23415-B
• MT-250 NEPTUNE
Then Click on OK
The process is (displayed in the information
window):
• Loading file...
• Operation completed.
• Open printer handle...
• Operation completed.
• Printing Label...
• Operation completed.
• Close printer handle...
• Operation completed.
• Print Labelart
Click on Print Labelart
The process is (displayed in the information window):
• Loading file...
• Operation completed.
• Open printer handle...
• Operation completed.
• Printing Label...
• Operation completed.
• Close printer handle...
• Operation completed.
is display, you
You can get some help by clicking on Help menu
To exit MSTools you must click on Exit!
Version A
Date: 10/00
26/29
5.b.2.3 Other menu
+:
Mitsubishi Electric Telecom Europe S.A.
Z.A. Le Piquet, 35370 Etrelles France
(:
):
+33 (0)2 99 75 71 00
+33 (0)2 99 75 71 47
Page 31

Level 2 Service Manual
6 Codes
Mitsubishi
Testmode
Before making a code, you need to switch on the mobile
6.a TestMode
Hold * and dial 5 4 7 2
The message “Mitsubishi Testmode” is displayed on the LCD
6.b Software version
Hold the * key and dial 5 8 0 6.
Then on the mobile, the following message is displayed ,
for example :
MARS NEPTUNE
6.c Software and Perso version
Hold the * key and dial 5 8 0 7.
Then on the mobile, the following message is displayed ,
for example :
SOFT : 41A33500
CODE : 41C33500
DATA : 41D30200
PERSO :41B03000
EEP : 41E02200
Version of the
Linked with Soft
Version of the Perso
Linked with Perso
Soft
+:
Mitsubishi Electric Telecom Europe S.A.
Z.A. Le Piquet, 35370 Etrelles France
(:
):
+33 (0)2 99 75 71 00
+33 (0)2 99 75 71 47
Version A
Date: 10/00
27/29
Page 32

Level 2 Service Manual
B099 07 -085
MARS NEPTUNE
7 Operator Debugging
To display the RX level (in dBm), insert the SIM card (from service provider or test SIM card using
CMD in manual test), connect a charged battery and press the power key. When the mobile displays
the network (real network or test network 001-01), hold the * key and dial 4 3 2 9.
Then on the mobile, the following message is displayed, for example:
RX Level (dBm)
MCC001 MNC01
1.a.1.1.1.1.1.1 And
other
datas
To exit from the Operator debugging mode, use the same command: hold the * key and dial 4 3 2 9.
Version A
Date: 10/00
28/29
+:
Mitsubishi Electric Telecom Europe S.A.
Z.A. Le Piquet, 35370 Etrelles France
(:
):
+33 (0)2 99 75 71 00
+33 (0)2 99 75 71 47
Page 33

Level 2 Service Manual
8 PERSONNAL NOTES
MARS NEPTUNE
Mitsubishi Electric reserves the right to make changes to its products at any time to improve reliability
or manufacturability. Mitsubishi Electric does not assume any liability arising from the use of any
device or circuit described here in, nor does it convey any license under its patent rights or the rights
of others.
+:
Mitsubishi Electric Telecom Europe S.A.
Z.A. Le Piquet, 35370 Etrelles France
(:
):
+33 (0)2 99 75 71 00
+33 (0)2 99 75 71 47
Version A
Date: 10/00
29/29
 Loading...