

Page 1
JY997D29501B
GT10-LDR Memory loader
USER'S MANUAL
Manual Number JY997D29501B
Date Sep 2008
This manual describes the part names, dimensions, mounting, and
specifications of the product. Before use, read this manual and manuals of
relevant products fully to acquire proficiency in handling and operating the
product. Make sure to learn all the product information, safety information, and
precautions.
And, store this manual in a safe place so that you can take it out and read it
whenever necessary. Always forward it to the end user.
Registration
The company name and the product name to be described in this manual are
the registered trademarks or trademarks of each company.
Effective Sep 2008
Specifications are subject to change without notice.
Safety Precaution (Read these precautions before using.)
Before using this product, please read this manual and the relevant manuals
introduced in this manual carefully and pay full attention to safety to handle the
product correctly.
The precautions given in this manual are concerned with this product.
In this manual, the safety precautions are ranked as "DANGER" and "CAUTION".
Indicates that incorrect handling may cause hazardous
conditions, resulting in death or severe injury.
Indicates that incorrect handling may cause hazardous
conditions, resulting in medium or slight personal injury
or physical damage.
Depending on circumstances, procedures indicated by "CAUTION" may also be
linked to serious results.
In any case, it is important to follow the directions for usage.
MOUNTING PRECAUTIONS
• Use the memory loader in the environment that satisfies th e general
specifications described in GT10 User's manual. Never use the product in
areas with excessive dus t, oily smoke, conduct ive dusts, corrosive gas (sa lt
2, H2S, SO2 or NO2), flammable gas, vibra tion or impacts, or exposed
air, Cl
to high temperature, condensation, or rain and wind. Not doing so can cause
an electric shock, fire, malfunction or product damage or deterioration.
STARTUP/MAINTENANCE
PRECAUTIONS
• Do not disassemble or modify the memory loader.
Doing so can cause a failure, malfunction, injury or fire.
• Do not touch the conductive and electronic parts of the memory loader
directly. Doing so can cause a memory loader malfunction or failure.
• When unplugging the cable connected to the GOT, do not hold and pull the
cable portion. Doing so can cause the memory loader or cable to be
damaged or can cause a malfunction due to a cable connection fault.
• Do not bent at a sharp angle or tie the memory loader cables.
Doing so can cause the breaking of the cables.
DISPOSAL PRECAUTIONS
• When disposing of the product, handle it as industrial waste.
TRANSPORTATION
PRECAUTIONS
• Make sure to transport the memory loader and/or relevant unit(s) in the
manner they will not be expo sed to the impact exceeding the impact
resistance described in the general specifications of this manual, as they are
precision devices. Failure to do so may cause the unit to fail.
Associated Manuals
The following manuals are relevant to this product. When these loose manuals are
required, please consult with our local distributor.
Manual
Manual name Contents
Describes the GT10 hardware-relevant
content such as part names, external
GT10 User's Manual
GT Designer2
Version2 Basic
Operation/Data
Transfer Manual
(For GOT1000 Series)
dimensions, mounting, power supply
wiring, specifications, and introduction to
option devices.
Describes methods of the GT Designer2
installation operation, basic operation for
drawing and transmitting data to
GOT1000 series
(sold separately)
(sold separately)
Number
(Model Code)
JY997D24701
(09R819)
SH-080529ENG
(1D7M24)
Bundled Items
Bundled item Quantity
GT10-LDR memory loader 1
USB cable (1m) 1
GT10-LDR Memory loader USER'S MANUAL (This manual) 1
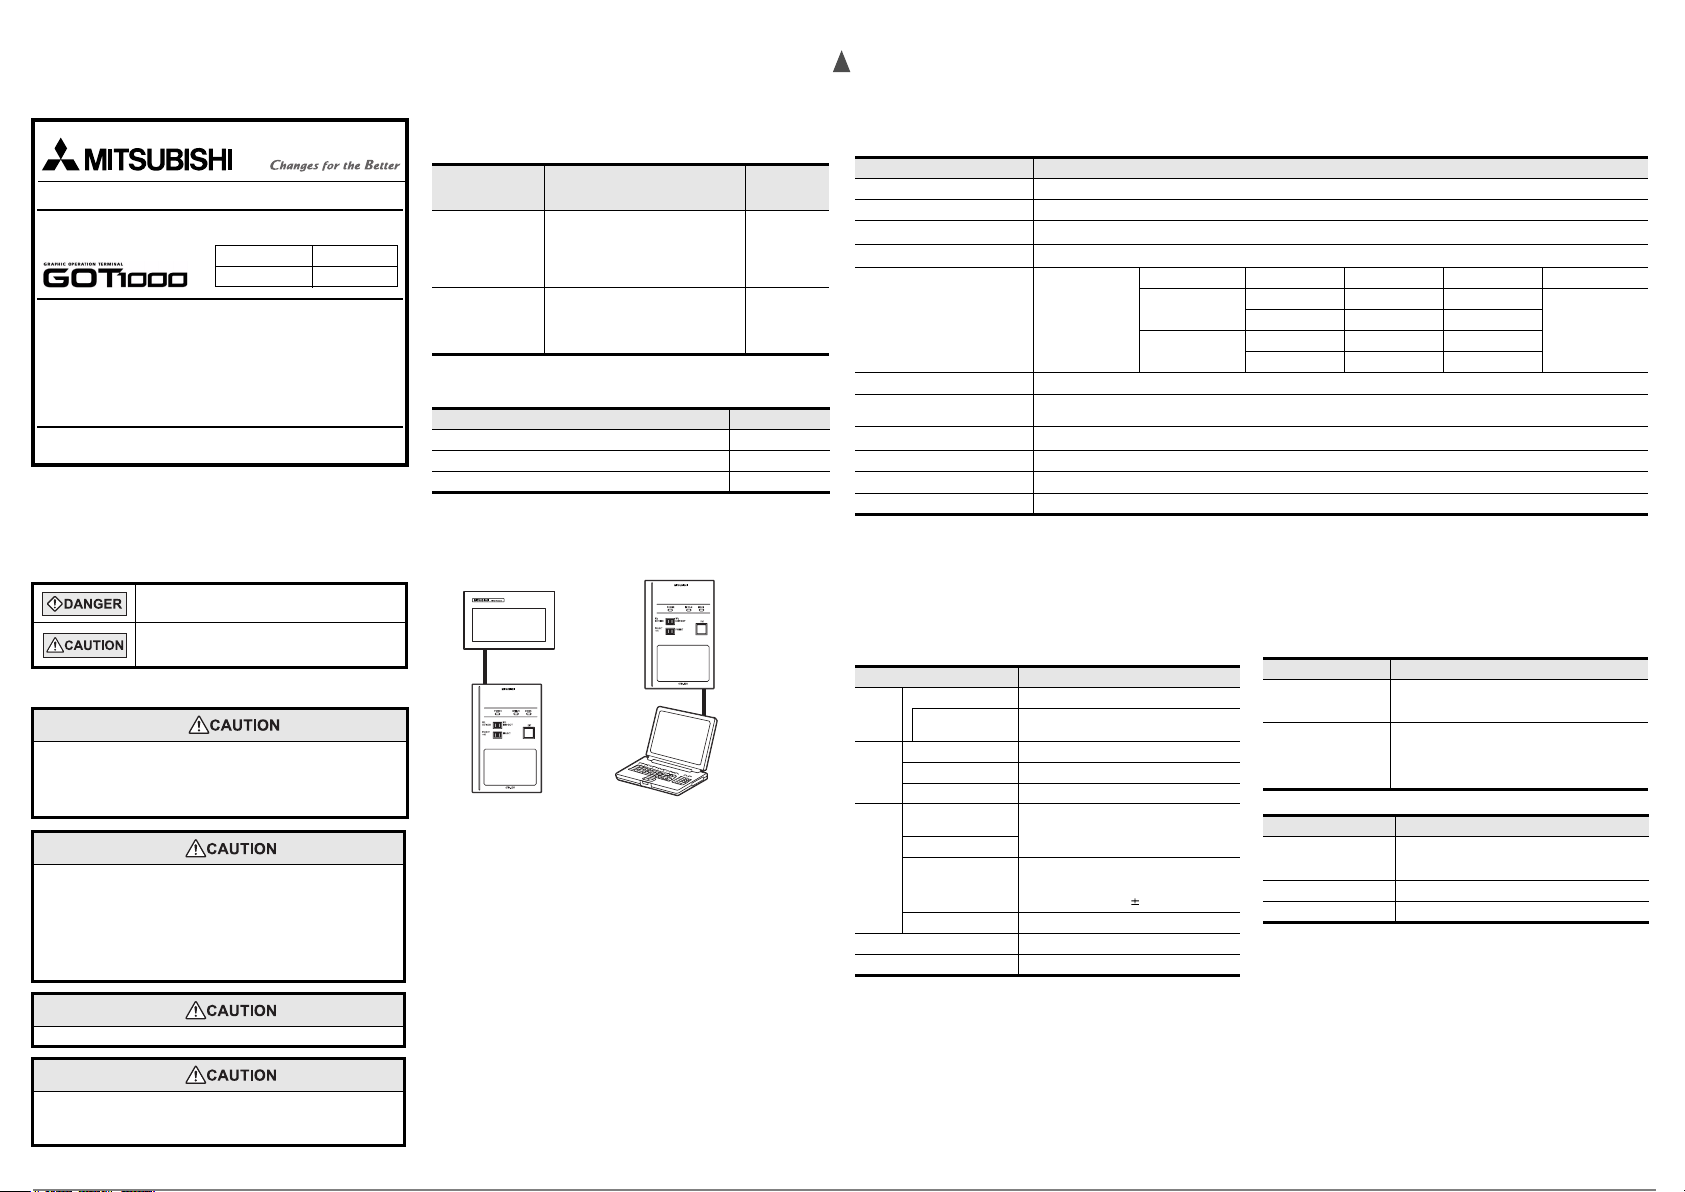
1. Overview
GT10-LDR memory loader is the memory transfer module that reads/writes the data to
GT10 or between a PC (GT Designer2) and GT10-LDR.
GT1020, GT1030
USB connecting
cable (supplied)
*1
PC
(GT Designer2)
*1 When GT10-LDR is connected to a PC via the USB hub, the power supply of the
USB hub must be supplied by the AC adopter of the USB hub.
GT10-LDR connected to the USB hub may no t work properly depending o n the
PC environment. In the case, connect the GT10-LDR directly to the USB port on
the PC.
2. Specifications
2.1 General Specifications
Item Specifications
Operating ambient temperature 0 to 40°C
Storage ambient temperature -20 to 60°C
Operating ambient humidity
Storage ambient humidity
Vibration resistance
Shock resistance
Operating atmosphere
Operating altitude
Overvoltage category
Pollution degree
Cooling method Self-cooling
*1 The wet bulb temperature is 39°C or less.
*2 Do not use or store the GOT under pressure higher than the atmospheric pressure of altitude 0m (0ft.). Failure to obs erve this instruction may cause a malfunction.
*3 This indicates the section of the power supply to which the equipment is assumed to be connected between the public electrica l power distribution network and the
machinery within the premises.
Category II applies to equipment for which electrical power is supplied from fixed facilities.
The surge voltage withstand level for up to the raged voltage of 300 V is 2500 V.
*4 This index indicates the degree to which conductive material is ge nerated in the environment where the equipment is used.
In pollution degree 2, only non-conductive pollution occurs but temporary conductivity may be produced due to condensation.
2.2 Performance Specifications
User memory
Memory
Life (Number of write
times)
POWER green
LED
SET/RUN green/red/orange
ERROR green/red/orange
RD/WR selection
switch
Data selection switch
Switch
ENT key
Write protection switch Slide switch
External dimensions W70(2.75)×H110(4.33)×D21(0.82)[mm](inch)
Weight 0.2kg
*1 ROM in which new data can be written without deleting the written data.
*1
10 to 90% RH, non-condensing
*1
*2
*3
*4
Item Specifications
*1
10 to 90% RH, non-condensing
Conforms to JIS
B3502 and
IEC61131-2
Conforms to JIS B3502, IEC 61131-2 (147 m/s
Must be free of lamp black, corrosive gas, flammable gas, or excessive amou nt of electroconductive dust particles an d must be no
direct sunlight. (Same as for saving)
2000 m (6562 ft) max.
II or less
2 or less
Flash ROM 7.5Mbyte
100,000 times
Paddle switch
Tactile switch
The use of 100 thousand times is due for
replacement.
(operating force 2.55N 0.69N)
Under intermittent
vibration
Under continuous
vibration
Frequency Acceleration Half-amplitude Sweep Count
5 to 9Hz -- 3.5mm
9 to 150Hz 9.8m/s
5 to 9Hz -- 1.75mm
9 to 150Hz 4.9m/s
2
, 3 times each in X, Y and Z directions)
2
2
--
--
10 times each in X, Y
and Z directions
2.3 Communication Specifications
Item Specifications
GOT communication
PC communication
Conforming to RS232
Transmission speed :115,200bps
Connector shape : MINI DIN 6Pins (Male)
Conforms to USB2.0 (Full speed is supported.)
(Performs the conversion between USB and serial in
GT10-LDR. After serial conversion, transmission
speed is 115.200bps.)
Connector shape :USB MINI-B 5Pins (Receptacle)
2.4 Power Supply Specifications
Item Specifications
Input power supply voltage
Fuse -
Power consumption 0.7W (140mA/DC5V) or less
DC5V (DC4.75 to 5.25V)
Supplied from the GOT or PC (Supplied from bus
power)
Page 2
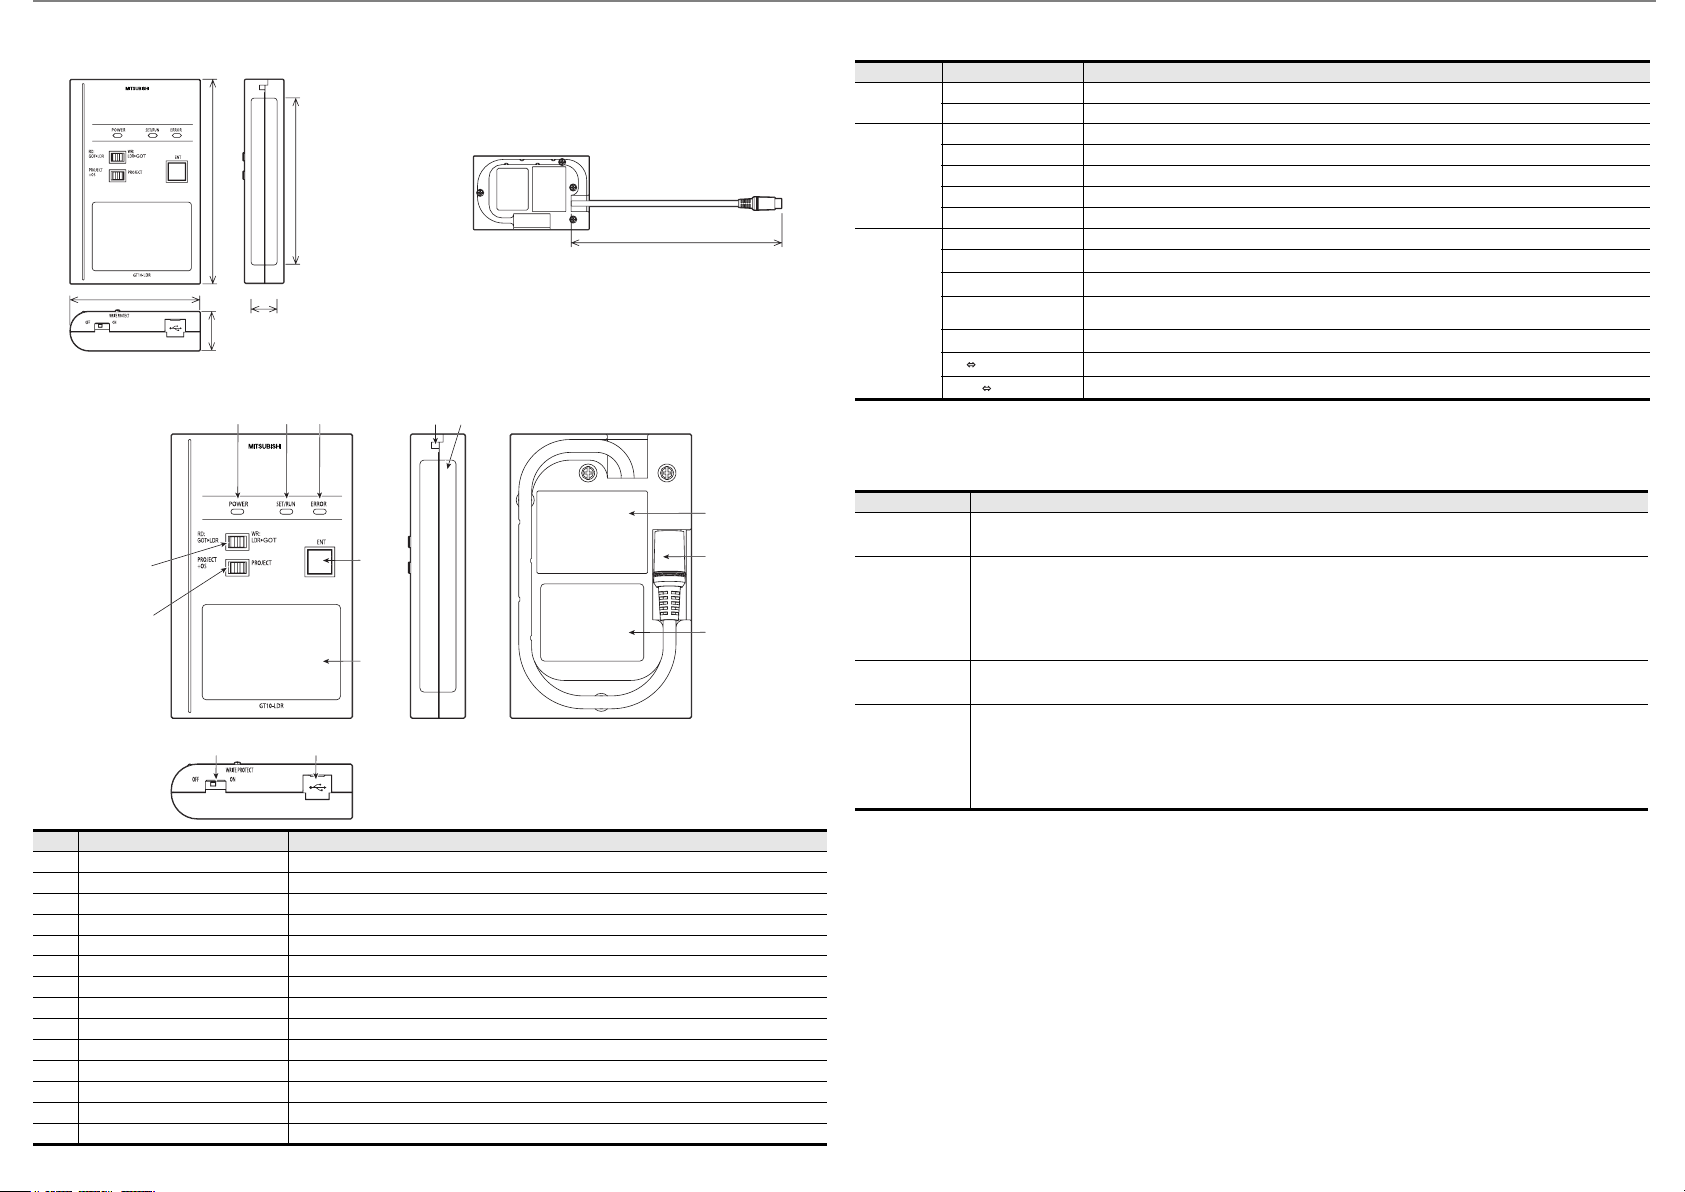
3. External Dimensions
External Dimensions Cable length
70 (2.75")
110 (4.33")
21 (0.82")
14
(0.55")
90 (3.54")
Unit: mm (inch)
Weight: 0.2kg
4. Part Name
1) 2) 3) 12) 13)
240 (9.44")
Unit: mm (inch)
5. LED lighting specification
LED Name Status Contents
POWER
POWER LED is lit. Power is supplied.
POWER LED is not lit. P ower is not supplied.
POWER LED is not lit. B efore starting the transfer.
Orange light The transfer direction and the data to be transferred are determined.
SET/RUN
Green flashing The transfer is running.
Green light The transfer is completed.
Red flashing The transfer is aborted.
POWER LED is not lit. N o errors
1
Green light*
Green flashing*
ERROR
Red light*
Red flashing*
Red Green*
Orange Green*
*1 An error message appears on the GOT screen. Apply remedies according to the display.
Refer to the "Chapter 12 Troubleshooting" for details on handling errors.
1
1
1
1
1
Write protection switch ON
The GOT type that is set in the data to be transferred differs from that of the GOT to which the data is transferred.
The data to be transferred is broken.
The major version of the standard monitor OS is different from that of the project data.
Communication error occurs between the GOT and the memory loader.
Password is set in the project data.
OS installation screen is not active
6. Switch operation specification
10)
4)
6)
11)
5)
14)
9)
7) 8)
No. Name Specifications
1) POWER LED LED to show power status
2) SET/RUN LED LED to show that the settings are being checked/the transfer is running
3) ERROR LED LED to show error status
4) RD/WR selection switch Switch to select read/write direction
5) Data selection switch Switch to select the data to be transferred
6) ENT key Switch to determine the transfer direction and the data to be transferred, and to start the transfer
7) Write protection switch Switch to prevent the memory loader from being written to the data
8) USB port Connection port with a PC (with protection cap)
9) Reference plate (operating instructions) Described operating instructions of the memory loader
10) Reference plate (error contents) Described lighting status of ERROR LED
11) Transfer cable Cable to be connected with the GOT
12) Strap hole A hole to attach a strap
13) Part to be labeled Space to be labeled (created by user)
14) Rating plate (Nameplate) --
Switch Name Specifications
RD/WR selection
switch
Data selection switch
Write protection switch
ENT key
*1 When the standard monitor OS and communication driver are transferred from the memory loader to the GOT, starting up the GOT with OS installation screen is
required.
Switch to select read/write direction
RD : The data is read out from the GOT to the memory loader.
WR : The data is written from the memory loader to the GOT.
Switch to select the data to be transferred
• When reading out the data from the GOT to the memory loader
[PROJECT + OS] : The standard monitor OS, communication driver, project data, and resource data are read out from the GOT to the memory
loader.
[PROJECT] : The project data and resource data are read out from the GOT to the memory loader.
• When writing the data from the memory loader to the GOT
[PROJECT + OS] : The standard monitor OS, communication driver, and project data are written from the memory loader to the GOT.
[PROJECT] : The project data is written from the memory loader to the GOT.
Switch to prevent the memory loader from being written to the data
ON : The data cannot be written neither from the GOT or a PC (GT Designer2) to the memory loader.
OFF : The data can be written from the GOT or a PC (GT Designer2) to the memory loader.
Switch to determine the transfer direction and the data to be transferred, and to start the transfer
The transfer starts by pressing the key twice.
• The first pressing of the key determines the read/write direction and the data to be transferred.
(After the read/write direction and the data to be transferred are determined, if RD/WR selection switch and Data selection sw itch are operated,
the operations that have been made will be canceled.)
(The ENT key must be pressed within 30 seconds after the first pressing of the ENT key. Failure to do so cancels the operations that have been
made.)
• The second pressing of the key starts the transfer.
Page 3

7. Function specification
7.1 Transfer function
Standard monitor OS
1)
Communication driver
Project data
Project data
2)
Resource data
PC
(GT Designer2)
Transfer direction
1) PC (GT Designer2)
Memory loader
2) Memory loader
PC(GT Designer2)
3) Memory loader
GOT
4) GOT
Memory loader
* : Ver.01.08.00 or later of the standard monitor OS of the GT10 is applicable.
7.2 Password reset function on the GOT
When reading out the project data from the memory loader, if the password is set in
the project data, password entry screen will appear on the GOT.
After entering the password, password is reset by pressing the ENT key on the
screen. The data will be transferred from the GOT to the memory loader.
The operation procedure is described below.
When this function is used, Ver.01.08.00 or later of the standard monitor OS of the
GT10 is required.
1) When the upload is started, password entry screen will appear on the GOT
Touch the "INPUT" key.
2) After inputting password, touch the "ENT" key.
3) When the password matches, a message notifying Password correct is display.
Touch the button to close the screen.
ESC
Data selection
switch
PROJECT + OS All data in the memory loader is written to the GOT.
PROJECT
PROJECT + OS*
PROJECT
Project data Resource data
--
--
Transfer data
Standard monitor OS
3)
Communication driver
Project data
Standard monitor OS
4)
Communication driver
Project data
Memory loader
Standard
monitor OS
Resource data
Communication
driver
7.3 Error display function
If an error occurs between the GOT and the memory loader during the transfer, an
error message will appear on the GOT screen.
Apply remedies according to the display.
Chapter 12 Troubleshooting
Turning OFF and ON the power or touching the screen will close the error message
screen.
When this function is used, Ver.01.08.00 or later of the standard monitor OS of the
GT10 is required.
GT1020, GT1030
: Available to transfer : Unavailable to transfer
Operation
After all data in the memory loader is deleted, the
data selected with GT Designer2 is written to the
memory loader all at once.
The project data or resource data is read out from the
memory loader to a PC (GT Designer2).
Only the project data in the memory loader is written
to the GOT.
After all data in the memory loader is deleted, all data
in the GOT is read out to the memory loader.
After all data in the memory loader is deleted, only
the project data and resource data in the GOT are
read out to the memory loader.
8. Installation of Driver, Setting Software
When the communication between a PC (GT Designer2) and the memory loader is
performed, driver installation, communication port setting is required.
8.1 Driver installation
When the communication between a PC (GT Designer2) and the memory loader is
performed, driver installation is required. Refer to the following manual for details
about driver installation.
GT Designer2 Version Basic Operation/Data Transfer Manual
8.2 Confirmation of communication port
Windows® XP example follows.
• In Windows
• If using Windows
• If using Windows
®
XP, click [ Start ] [ Settings ] [ Control Panel ]
[ Peformance and Maintenance ] [ System ] [ Hardware ] [ Device
Manager (D) ] and the window below will be displayed.
Please confirm the COM number to which the USB driver is allocated (COM and
LPT).
Windows
A screen that is equivalent to the one below is displayed by clicking [ My
Computer ] [ Control Panel ] [ System ] [ Device Manager ] i n the
menu of the personal computer.
displayed by clicking [ Start ] [ Control Panel ] [ Device Manager ] in the
menu of the personal computer.
®
98, Windows® 98SE, Windows® Millennium Edition or
®
2000
®
Vista. A screen that is equivalent to the one below is
B)
A)
Check following:
- GT10-LDR is indicated at A).
- GT10-LDR (COM *) is indicated at B).
* indicates the COM number used in Memory loader.
- Install the GT Designer2 again when is displayed.
Select the GT Designer2 COM number as the COM number currently assigned on
the screen above.
8.3 Setting GT Designer2
Click [ Communication ] [ Communic ate with GT10-LDR ] [ Communication
configuration tab ].
Select the same COM number as the COM number of the personal computer when
the setting communication port screen appears.
Click [ Update ].
9. Transfer procedures between a PC and the Memory loader
9.1 To write the data from a PC (GT Designer2) to the memory
loader
The standard monitor OS, communication driver, and project data are written from a
PC (GT Designer2) to the memory loader. The operation procedure is described
below.
Project data
Standard monitor OS
Communication driver
PC
(GT Designer2)
1) Turn OFF the Write protection switch.
2) Connect a PC (GT Designer2) to the memory loader with USB cable supplied.
3) Write the data from a PC (GT Designer2) to the memory loader.
Refer to the following manual for details about operating instructions of GT
Designer2.
GT Designer2 Version Basic Operation/Data Transfer Manual
9.2 To read out the data from the memory loader to a PC (GT
Designer2).
The project data and resource data are read out from the memory loader to a PC
(GT Designer2). The operation procedure is described below.
Project data
Resource data
PC
(GT Designer2)
1) Connect a PC (GT Designer2) to the memory loader with USB cable supplied.
2) Select the data to be uploaded in a PC (GT Designer2) and read it out from the
memory loader.
Refer to the following manual for details about operating instructions of GT
Designer2.
GT Designer2 Version Basic Operation/Data Transfer Manual
Memory loader
Memory loader
When the password does not match, an error message is displayed.
If button is touch it returns to the password input screen again.
OK
Error message on the GOT
Page 4

10. To write the data from the Memory loader to the GOT
The standard monitor OS, communication driver, and project data are written from
the memory loader to the GOT. The operation procedure is described below.
10.1 When the Data selection switch is [PROJECT + OS]
Project data
Communication driver
Standard monitor OS
GT1020, GT1030
Memory loader
1) Connect the memory loader to the GOT.
2) Turn ON the GOT by pressing the lower right corner of the GOT.
(The GOT startups with OS installation screen.)
The OS can be transferred from GT Designer2 Version2 without displaying the
OS installation screen depending on the combination of the GOT and the
standard monitor OS.
Refer to the following manual for details about OS installation screen.
GT10 User's Manual
3) Set the Data selection switch to [PROJECT + OS] and the RD/WR selection
switch to [WR], and select the data to be transferred and transfer direction.
4) Press the ENT key to determine the data to be transferred and transfer direction.
(SET/RUN LED will be orange.)
*: If the next operation is not performed within 30 seconds after the ENT key is
pressed, SET/RUN LED will be unlit, and the operations that hav e been made will
be canceled.
*: When the Data selection switch or the RD/WR selection switch is operated,
after the data to be transferred and the transfer direction are determined, the
operations that have been made will be canceled.
5) Press the ENT key again to start the transfer. (SET/RUN LED will be green
flashing.)
6) Turn OFF the GOT and remove the memory loader after the transfer is
completed. (SET/RUN LED will be green flashing.)
Refer to the "Chapter 12 Troubleshooting" for details on handling errors during
transferring.
10.2 When the Data selection switch is [PROJECT]
Project data
GT1020, GT1030
Memory loader
1) Connect the memory loader to the GOT and turn ON the GOT.
2) Set the Data selection switch to [PROJECT] and the RD/WR selection switch to
[WR], and select the data to be transferred and transfer direction.
3) Press the ENT key to determine the data to be transferred and transfer direction.
(SET/RUN LED will be orange.)
*: If the next operation is not performed within 30 seconds after the ENT key is
pressed, SET/RUN LED will be unlit, and the operations that hav e been made will
be canceled.
*: When the Data selection switch or the RD/WR selection switch is operated,
after the data to be transferred and the transfer direction are determined, the
operations that have been made will be canceled.
4) Press the ENT key again to start the transfer. (SET/RUN LED will be green
flashing.)
5) Turn OFF the GOT and remove the memory loader after the transfer is
completed. (SET/RUN LED will be green flashing.)
Refer to the "Chapter 12 Troubleshooting" for details on handling errors during
transferring.
11. To read out the data from the GOT to the Memory loader
The standard monitor OS, communication driver, project data, and resource data
are read out from the GOT to the memory loader. The operation procedure is
described below.
11.1 When the Data selection switch is [PROJECT + OS]
Project data
Communication driver
Standard monitor OS
Resource data
Memory loader
1) Turn OFF the Write protection switch.
2) Connect the memory loader to the GOT and turn ON the GOT.
3) Set the Data selection switch to [PROJECT + OS] and the RD/WR selection
switch to [RD], and select the data to be transferred and transfer direction.
4) Press the ENT key to determine the data to be transferred and transfer direction.
(SET/RUN LED will be orange.)
*: If the next operation is not performed within 30 seconds after the ENT key is
pressed, SET/RUN LED will be unlit, and the operations that have been made will
be canceled.
*: When the Data selection switch or the RD/WR selection switch is operated,
after the data to be transferred and the transfer direction are determined, the
operations that have been made will be canceled.
5) Press the ENT key again to start the transfer. (SET/RUN LED will be green
flashing.)
6) Turn OFF the GOT and remove the memory loader after the transfer is
completed. (SET/RUN LED will be green flashing.)
Refer to the "Chapter 12 Troubleshooting" for details on handling errors during
transferring.
GT1020, GT1030
11.2 When the Data selection switch is [PROJECT]
Project data
Resource data
Memory loader
1) Turn OFF the Write protection switch.
2) Connect the memory loader to the GOT and turn ON the GOT.
3) Set the Data selection switch to [PROJECT] and the RD/WR selection switch to
[RD], and select the data to be transferred and transfer direction.
4) Press the ENT key to determine the data to be transferred and transfer direction.
(SET/RUN LED will be orange.)
*: If the next operation is not performed within 30 seconds after the ENT key is
pressed, SET/RUN LED will be unlit, and the operations that have been made will
be canceled.
*: When the Data selection switch or the RD/WR selection switch is operated,
after the data to be transferred and the transfer direction are determined, the
operations that have been made will be canceled.
5) Press the ENT key again to start the transfer. (SET/RUN LED will be green
flashing.)
6) Turn OFF the GOT and remove the memory loader after the transfer is
completed. (SET/RUN LED will be green flashing.)
Refer to the "Chapter 12 Troubleshooting" for details on handling errors during
transferring.
GT1020, GT1030
12. Troubleshooting
12.1 GOT error message
When communication between the GOT and the memory loader doe s not work, check
the following contents depending on the GOT error messages.
GOT error message Remedy
Write protection
switch is ON
Wrong GOT model is
connected
Corrupt data or OS
version variance
Communication error
GOT contains a
system password
OS installation
screen isn’t active
12.2 LED display on the memory loader
If communication cannot be established between the GOT and a PC using memory
loader, confirm the following status by checking display LED in memory loader.
State of
POWER LED
POWER LED
is lit.
POWER LED
is not lit.
State of
ERROR LED
Green light
Green
flashing
Red light
Red flashing
Red Green
Orange
Green
Write protection switch ON
Turn OFF the Write protection switch.
The GOT type that is set in the data to be transferred differs
from that of the GOT to which the data is transferred.
Check the GOT type to which the memory loader is
connected.
The data to be transferred is broken, or the major version of
the standard monitor OS is different from that of the project
data.
• Write the standard monitor OS, communication driver, and
project data from GT Designer2 to the memory loader
again, and then transfer them to the GOT again.
• Set the Data selection switch to [PROJECT + OS] and
read out all data from the GOT to the memory loader, and
then transfer them to the GOT again.
Communication error occurs between the GOT and the
memory loader.
• Check the connection with the communication cable.
• Check that power supply is stable. (lighting of POWER
LED)
Password is set in the project data.
Reset the password with the numeric keypad on the GOT.
OS installation screen is not active
Install the data after the OS installation screen is displayed on
the GOT.
Contents
The DC5V power supply from the GOT or the personal computer is
normally supplied. In case of no communication, check the status of
ERROR LED.
The DC 5V power supply from the GOT or the personal computer is
not supplied. Check the items below.
• Turn ON the power.
• Check the connection with the USB cable.
• Check the connection with the GOT.
• Check that PLC is not overloaded when PLC supplies the power
to the GOT connected to the memory loader.
Contents
Write protection switch ON
Turn OFF the Write protection switch.
The GOT type that is set in the data to be transferred differs from that
of the GOT to which the data is transferred.
Check the GOT type to which the memory loader is connected.
The data to be transferred is broken, or the major version of the
standard monitor OS is different from that of the project data.
• Write the standard monitor OS, communication driver, and project
data from GT Designer2 to the memory loader again, and then
transfer them to the GOT again.
• Set the Data selection switch to [PROJECT + OS] and read out all
data from the GOT to the memory loader, and then transfer them
to the GOT again.
Communication error occurs between the GOT and the memory
loader.
• Check the connection with the communication cable.
• Check that power supply is stable. (lighting of POWER LED)
Password is set in the project data.
Reset the password with the numeric keypad on the GOT.
OS installation screen is not active
Install the data after the OS installation screen is displayed on the
GOT.
This manual confers no industrial property rights or any rights of any other kind,
nor does it confer any patent licenses. Mitsubishi Electric Corporation cannot be
held responsible for any problems involving industrial property rights which may
occur as a result of using the contents noted in this manual.
Warranty
Mitsubishi will not be held liable for damage caused by factors found not to be
the cause of Mitsubishi; opportunity loss or lost profits caused by faults in the
Mitsubishi products; damage, secondary damage, accident compensation
caused by special factors unpredictable by Mitsubishi; damages to products
other than Mitsubishi products; and to other duties.
For safe use
•
This product has been manufactured as a general-purpose part for general
industries, and has not been designed or manufactured to be incorporated in
a device or system used in purposes related to human life.
Before using the product for special purposes such as nuclear power, electric
•
power, aerospace, medicine or passenger movement vehicles, consult with
Mitsubishi Electric.
•
This product has been manufactured under strict quality control. However
when installing the product where major accidents or losses could occur if the
product fails, install appropriate backup or failsafe functions in the system.
HEAD OFFICE
: TOKYO BUILDING, 2-7-3 MARUNOUCHI, CHIYODA-KU, TOKYO 100-8310,
JAPAN
HIMEJI WORKS
: 840, CHIYODA CHO, HIMEJI, JAPAN
Page 5

JY997D29501B
GT10-LDR Memory loader
USER'S MANUAL
Manual Number JY997D29501B
Date Sep 2008
This manual describes the part names, dimensions, mounting, and
specifications of the product. Before use, read this manual and manuals of
relevant products fully to acquire proficiency in handling and operating the
product. Make sure to learn all the product information, safety information, and
precautions.
And, store this manual in a safe place so that you can take it out and read it
whenever necessary. Always forward it to the end user.
Registration
The company name and the product name to be described in this manual are
the registered trademarks or trademarks of each company.
Effective Sep 2008
Specifications are subject to change without notice.
Safety Precaution (Read these precautions before using.)
Before using this product, please read this manual and the relevant manuals
introduced in this manual carefully and pay full attention to safety to handle the
product correctly.
The precautions given in this manual are concerned with this product.
In this manual, the safety precautions are ranked as "DANGER" and "CAUTION".
Indicates that incorrect handling may cause hazardous
conditions, resulting in death or severe injury.
Indicates that incorrect handling may cause hazardous
conditions, resulting in medium or slight personal injury
or physical damage.
Depending on circumstances, procedures indicated by "CAUTION" may also be
linked to serious results.
In any case, it is important to follow the directions for usage.
MOUNTING PRECAUTIONS
• Use the memory loader in the environment that satisfies th e general
specifications described in GT10 User's manual. Never use the product in
areas with excessive dus t, oily smoke, conduct ive dusts, corrosive gas (sa lt
2, H2S, SO2 or NO2), flammable gas, vibra tion or impacts, or exposed
air, Cl
to high temperature, condensation, or rain and wind. Not doing so can cause
an electric shock, fire, malfunction or product damage or deterioration.
STARTUP/MAINTENANCE
PRECAUTIONS
• Do not disassemble or modify the memory loader.
Doing so can cause a failure, malfunction, injury or fire.
• Do not touch the conductive and electronic parts of the memory loader
directly. Doing so can cause a memory loader malfunction or failure.
• When unplugging the cable connected to the GOT, do not hold and pull the
cable portion. Doing so can cause the memory loader or cable to be
damaged or can cause a malfunction due to a cable connection fault.
• Do not bent at a sharp angle or tie the memory loader cables.
Doing so can cause the breaking of the cables.
DISPOSAL PRECAUTIONS
• When disposing of the product, handle it as industrial waste.
TRANSPORTATION
PRECAUTIONS
• Make sure to transport the memory loader and/or relevant unit(s) in the
manner they will not be expo sed to the impact exceeding the impact
resistance described in the general specifications of this manual, as they are
precision devices. Failure to do so may cause the unit to fail.
Associated Manuals
The following manuals are relevant to this product. When these loose manuals are
required, please consult with our local distributor.
Manual
Manual name Contents
Describes the GT10 hardware-relevant
content such as part names, external
GT10 User's Manual
GT Designer2
Version2 Basic
Operation/Data
Transfer Manual
(For GOT1000 Series)
dimensions, mounting, power supply
wiring, specifications, and introduction to
option devices.
Describes methods of the GT Designer2
installation operation, basic operation for
drawing and transmitting data to
GOT1000 series
(sold separately)
(sold separately)
Number
(Model Code)
JY997D24701
(09R819)
SH-080529ENG
(1D7M24)
Bundled Items
Bundled item Quantity
GT10-LDR memory loader 1
USB cable (1m) 1
GT10-LDR Memory loader USER'S MANUAL (This manual) 1
1. Overview
GT10-LDR memory loader is the memory transfer module that reads/writes the data to
GT10 or between a PC (GT Designer2) and GT10-LDR.
GT1020, GT1030
USB connecting
cable (supplied)
*1
PC
(GT Designer2)
*1 When GT10-LDR is connected to a PC via the USB hub, the power supply of the
USB hub must be supplied by the AC adopter of the USB hub.
GT10-LDR connected to the USB hub may no t work properly depending o n the
PC environment. In the case, connect the GT10-LDR directly to the USB port on
the PC.
2. Specifications
2.1 General Specifications
Item Specifications
Operating ambient temperature 0 to 40°C
Storage ambient temperature -20 to 60°C
Operating ambient humidity
Storage ambient humidity
Vibration resistance
Shock resistance
Operating atmosphere
Operating altitude
Overvoltage category
Pollution degree
Cooling method Self-cooling
*1 The wet bulb temperature is 39°C or less.
*2 Do not use or store the GOT under pressure higher than the atmospheric pressure of altitude 0m (0ft.). Failure to obs erve this instruction may cause a malfunction.
*3 This indicates the section of the power supply to which the equipment is assumed to be connected between the public electrica l power distribution network and the
machinery within the premises.
Category II applies to equipment for which electrical power is supplied from fixed facilities.
The surge voltage withstand level for up to the raged voltage of 300 V is 2500 V.
*4 This index indicates the degree to which conductive material is ge nerated in the environment where the equipment is used.
In pollution degree 2, only non-conductive pollution occurs but temporary conductivity may be produced due to condensation.
2.2 Performance Specifications
User memory
Memory
Life (Number of write
times)
POWER green
LED
SET/RUN green/red/orange
ERROR green/red/orange
RD/WR selection
switch
Data selection switch
Switch
ENT key
Write protection switch Slide switch
External dimensions W70(2.75)×H110(4.33)×D21(0.82)[mm](inch)
Weight 0.2kg
*1 ROM in which new data can be written without deleting the written data.
*1
10 to 90% RH, non-condensing
*1
*2
*3
*4
Item Specifications
*1
10 to 90% RH, non-condensing
Conforms to JIS
B3502 and
IEC61131-2
Conforms to JIS B3502, IEC 61131-2 (147 m/s
Must be free of lamp black, corrosive gas, flammable gas, or excessive amou nt of electroconductive dust particles an d must be no
direct sunlight. (Same as for saving)
2000 m (6562 ft) max.
II or less
2 or less
Flash ROM 7.5Mbyte
100,000 times
Paddle switch
Tactile switch
The use of 100 thousand times is due for
replacement.
(operating force 2.55N 0.69N)
Under intermittent
vibration
Under continuous
vibration
Frequency Acceleration Half-amplitude Sweep Count
5 to 9Hz -- 3.5mm
9 to 150Hz 9.8m/s
5 to 9Hz -- 1.75mm
9 to 150Hz 4.9m/s
2
, 3 times each in X, Y and Z directions)
2
2
--
--
10 times each in X, Y
and Z directions
2.3 Communication Specifications
Item Specifications
GOT communication
PC communication
Conforming to RS232
Transmission speed :115,200bps
Connector shape : MINI DIN 6Pins (Male)
Conforms to USB2.0 (Full speed is supported.)
(Performs the conversion between USB and serial in
GT10-LDR. After serial conversion, transmission
speed is 115.200bps.)
Connector shape :USB MINI-B 5Pins (Receptacle)
2.4 Power Supply Specifications
Item Specifications
Input power supply voltage
Fuse -
Power consumption 0.7W (140mA/DC5V) or less
DC5V (DC4.75 to 5.25V)
Supplied from the GOT or PC (Supplied from bus
power)
3. External Dimensions
External Dimensions Cable length
70 (2.75")
110 (4.33")
21 (0.82")
14
(0.55")
90 (3.54")
Unit: mm (inch)
Weight: 0.2kg
240 (9.44")
4. Part Name
1) 2) 3) 12) 13)
4)
5)
7) 8)
No. Name Specifications
1) POWER LED LED to show power status
2) SET/RUN LED LED to show that the settings are being checked/the transfer is running
3) ERROR LED LED to show error status
4) RD/WR selection switch Switch to select read/write direction
5) Data selection switch Switch to select the data to be transferred
6) ENT key Switch to determine the transfer direction and the data to be transferred, and to start the transfer
7) Write protection switch Switch to prevent the memory loader from being written to the data
8) USB port Connection port with a PC (with protection cap)
9) Reference plate (operating instructions) Described operating instructions of the memory loader
10) Reference plate (error contents) Described lighting status of ERROR LED
11) Transfer cable Cable to be connected with the GOT
12) Strap hole A hole to attach a strap
13) Part to be labeled Space to be labeled (created by user)
14) Rating plate (Nameplate) --
6)
9)
Unit: mm (inch)
10)
11)
14)
5. LED lighting specification
LED Name Status Contents
POWER
SET/RUN
ERROR
*1 An error message appears on the GOT screen. Apply remedies according to the display.
Refer to the "Chapter 12 Troubleshooting" for details on handling errors.
POWER LED is lit. Power is supplied.
POWER LED is not lit. P ower is not supplied.
POWER LED is not lit. B efore starting the transfer.
Orange light The transfer direction and the data to be transferred are determined.
Green flashing The transfer is running.
Green light The transfer is completed.
Red flashing The transfer is aborted.
POWER LED is not lit. N o errors
1
Green light*
Green flashing*
1
Red light*
Red flashing*
Red Green*
Orange Green*
1
1
1
1
Write protection switch ON
The GOT type that is set in the data to be transferred differs from that of the GOT to which the data is transferred.
The data to be transferred is broken.
The major version of the standard monitor OS is different from that of the project data.
Communication error occurs between the GOT and the memory loader.
Password is set in the project data.
OS installation screen is not active
6. Switch operation specification
Switch Name Specifications
RD/WR selection
switch
Data selection switch
Write protection switch
ENT key
*1 When the standard monitor OS and communication driver are transferred from the memory loader to the GOT, starting up the GOT with OS installation screen is
required.
Switch to select read/write direction
RD : The data is read out from the GOT to the memory loader.
WR : The data is written from the memory loader to the GOT.
Switch to select the data to be transferred
• When reading out the data from the GOT to the memory loader
[PROJECT + OS] : The standard monitor OS, communication driver, project data, and resource data are read out from the GOT to the memory
loader.
[PROJECT] : The project data and resource data are read out from the GOT to the memory loader.
• When writing the data from the memory loader to the GOT
[PROJECT + OS] : The standard monitor OS, communication driver, and project data are written from the memory loader to the GOT.
[PROJECT] : The project data is written from the memory loader to the GOT.
Switch to prevent the memory loader from being written to the data
ON : The data cannot be written neither from the GOT or a PC (GT Designer2) to the memory loader.
OFF : The data can be written from the GOT or a PC (GT Designer2) to the memory loader.
Switch to determine the transfer direction and the data to be transferred, and to start the transfer
The transfer starts by pressing the key twice.
• The first pressing of the key determines the read/write direction and the data to be transferred.
(After the read/write direction and the data to be transferred are determined, if RD/WR selection switch and Data selection sw itch are operated,
the operations that have been made will be canceled.)
(The ENT key must be pressed within 30 seconds after the first pressing of the ENT key. Failure to do so cancels the operations that have been
made.)
• The second pressing of the key starts the transfer.
Page 6

7. Function specification
7.1 Transfer function
Standard monitor OS
1)
Communication driver
Project data
Project data
2)
Resource data
PC
(GT Designer2)
Transfer direction
1) PC (GT Designer2)
Memory loader
2) Memory loader
PC(GT Designer2)
3) Memory loader
GOT
4) GOT
Memory loader
* : Ver.01.08.00 or later of the standard monitor OS of the GT10 is applicable.
7.2 Password reset function on the GOT
When reading out the project data from the memory loader, if the password is set in
the project data, password entry screen will appear on the GOT.
After entering the password, password is reset by pressing the ENT key on the
screen. The data will be transferred from the GOT to the memory loader.
The operation procedure is described below.
When this function is used, Ver.01.08.00 or later of the standard monitor OS of the
GT10 is required.
1) When the upload is started, password entry screen will appear on the GOT
Touch the "INPUT" key.
2) After inputting password, touch the "ENT" key.
3) When the password matches, a message notifying Password correct is display.
Touch the button to close the screen.
ESC
Data selection
switch
PROJECT + OS All data in the memory loader is written to the GOT.
PROJECT
PROJECT + OS*
PROJECT
Project data Resource data
--
--
Transfer data
Standard monitor OS
3)
Communication driver
Project data
Standard monitor OS
4)
Communication driver
Project data
Memory loader
Standard
monitor OS
Resource data
Communication
driver
7.3 Error display function
If an error occurs between the GOT and the memory loader during the transfer, an
error message will appear on the GOT screen.
Apply remedies according to the display.
Chapter 12 Troubleshooting
Turning OFF and ON the power or touching the screen will close the error message
screen.
When this function is used, Ver.01.08.00 or later of the standard monitor OS of the
GT10 is required.
GT1020, GT1030
: Available to transfer : Unavailable to transfer
Operation
After all data in the memory loader is deleted, the
data selected with GT Designer2 is written to the
memory loader all at once.
The project data or resource data is read out from the
memory loader to a PC (GT Designer2).
Only the project data in the memory loader is written
to the GOT.
After all data in the memory loader is deleted, all data
in the GOT is read out to the memory loader.
After all data in the memory loader is deleted, only
the project data and resource data in the GOT are
read out to the memory loader.
8. Installation of Driver, Setting Software
When the communication between a PC (GT Designer2) and the memory loader is
performed, driver installation, communication port setting is required.
8.1 Driver installation
When the communication between a PC (GT Designer2) and the memory loader is
performed, driver installation is required. Refer to the following manual for details
about driver installation.
GT Designer2 Version Basic Operation/Data Transfer Manual
8.2 Confirmation of communication port
Windows® XP example follows.
• In Windows
• If using Windows
• If using Windows
®
XP, click [ Start ] [ Settings ] [ Control Panel ]
[ Peformance and Maintenance ] [ System ] [ Hardware ] [ Device
Manager (D) ] and the window below will be displayed.
Please confirm the COM number to which the USB driver is allocated (COM and
LPT).
Windows
A screen that is equivalent to the one below is displayed by clicking [ My
Computer ] [ Control Panel ] [ System ] [ Device Manager ] i n the
menu of the personal computer.
displayed by clicking [ Start ] [ Control Panel ] [ Device Manager ] in the
menu of the personal computer.
®
98, Windows® 98SE, Windows® Millennium Edition or
®
2000
®
Vista. A screen that is equivalent to the one below is
B)
A)
Check following:
- GT10-LDR is indicated at A).
- GT10-LDR (COM *) is indicated at B).
* indicates the COM number used in Memory loader.
- Install the GT Designer2 again when is displayed.
Select the GT Designer2 COM number as the COM number currently assigned on
the screen above.
8.3 Setting GT Designer2
Click [ Communication ] [ Communic ate with GT10-LDR ] [ Communication
configuration tab ].
Select the same COM number as the COM number of the personal computer when
the setting communication port screen appears.
Click [ Update ].
9. Transfer procedures between a PC and the Memory
loader
9.1 To write the data from a PC (GT Designer2) to the memory
loader
The standard monitor OS, communication driver, and project data are written from a
PC (GT Designer2) to the memory loader. The operation procedure is described
below.
Project data
Standard monitor OS
Communication driver
PC
(GT Designer2)
1) Turn OFF the Write protection switch.
2) Connect a PC (GT Designer2) to the memory loader with USB cable supplied.
3) Write the data from a PC (GT Designer2) to the memory loader.
Refer to the following manual for details about operating instructions of GT
Designer2.
GT Designer2 Version Basic Operation/Data Transfer Manual
9.2 To read out the data from the memory loader to a PC (GT
Designer2).
The project data and resource data are read out from the memory loader to a PC
(GT Designer2). The operation procedure is described below.
Project data
Resource data
PC
(GT Designer2)
1) Connect a PC (GT Designer2) to the memory loader with USB cable supplied.
2) Select the data to be uploaded in a PC (GT Designer2) and read it out from the
memory loader.
Refer to the following manual for details about operating instructions of GT
Designer2.
GT Designer2 Version Basic Operation/Data Transfer Manual
Memory loader
Memory loader
When the password does not match, an error message is displayed.
If button is touch it returns to the password input screen again.
OK
10. To write the data from the Memory loader to the GOT
The standard monitor OS, communication driver, and project data are written from
the memory loader to the GOT. The operation procedure is described below.
10.1 When the Data selection switch is [PROJECT + OS]
Project data
Communication driver
Standard monitor OS
GT1020, GT1030
Memory loader
1) Connect the memory loader to the GOT.
2) Turn ON the GOT by pressing the lower right corner of the GOT.
(The GOT startups with OS installation screen.)
The OS can be transferred from GT Designer2 Version2 without displaying the
OS installation screen depending on the combination of the GOT and the
standard monitor OS.
Refer to the following manual for details about OS installation screen.
GT10 User's Manual
3) Set the Data selection switch to [PROJECT + OS] and the RD/WR selection
switch to [WR], and select the data to be transferred and transfer direction.
4) Press the ENT key to determine the data to be transferred and transfer direction.
(SET/RUN LED will be orange.)
*: If the next operation is not performed within 30 seconds after the ENT key is
pressed, SET/RUN LED will be unlit, and the operations that hav e been made will
be canceled.
*: When the Data selection switch or the RD/WR selection switch is operated,
after the data to be transferred and the transfer direction are determined, the
operations that have been made will be canceled.
5) Press the ENT key again to start the transfer. (SET/RUN LED will be green
flashing.)
6) Turn OFF the GOT and remove the memory loader after the transfer is
completed. (SET/RUN LED will be green flashing.)
Refer to the "Chapter 12 Troubleshooting" for details on handling errors during
transferring.
10.2 When the Data selection switch is [PROJECT]
Project data
GT1020, GT1030
Memory loader
1) Connect the memory loader to the GOT and turn ON the GOT.
2) Set the Data selection switch to [PROJECT] and the RD/WR selection switch to
[WR], and select the data to be transferred and transfer direction.
3) Press the ENT key to determine the data to be transferred and transfer direction.
(SET/RUN LED will be orange.)
*: If the next operation is not performed within 30 seconds after the ENT key is
pressed, SET/RUN LED will be unlit, and the operations that hav e been made will
be canceled.
*: When the Data selection switch or the RD/WR selection switch is operated,
after the data to be transferred and the transfer direction are determined, the
operations that have been made will be canceled.
4) Press the ENT key again to start the transfer. (SET/RUN LED will be green
flashing.)
5) Turn OFF the GOT and remove the memory loader after the transfer is
completed. (SET/RUN LED will be green flashing.)
Refer to the "Chapter 12 Troubleshooting" for details on handling errors during
transferring.
Error message on the GOT
11. To read out the data from the GOT to the Memory
loader
The standard monitor OS, communication driver, project data, and resource data
are read out from the GOT to the memory loader. The operation procedure is
described below.
11.1 When the Data selection switch is [PROJECT + OS]
Project data
Communication driver
Standard monitor OS
Resource data
Memory loader
1) Turn OFF the Write protection switch.
2) Connect the memory loader to the GOT and turn ON the GOT.
3) Set the Data selection switch to [PROJECT + OS] and the RD/WR selection
switch to [RD], and select the data to be transferred and transfer direction.
4) Press the ENT key to determine the data to be transferred and transfer direction.
(SET/RUN LED will be orange.)
*: If the next operation is not performed within 30 seconds after the ENT key is
pressed, SET/RUN LED will be unlit, and the operations that have been made will
be canceled.
*: When the Data selection switch or the RD/WR selection switch is operated,
after the data to be transferred and the transfer direction are determined, the
operations that have been made will be canceled.
5) Press the ENT key again to start the transfer. (SET/RUN LED will be green
flashing.)
6) Turn OFF the GOT and remove the memory loader after the transfer is
completed. (SET/RUN LED will be green flashing.)
Refer to the "Chapter 12 Troubleshooting" for details on handling errors during
transferring.
GT1020, GT1030
11.2 When the Data selection switch is [PROJECT]
Project data
Resource data
Memory loader
1) Turn OFF the Write protection switch.
2) Connect the memory loader to the GOT and turn ON the GOT.
3) Set the Data selection switch to [PROJECT] and the RD/WR selection switch to
[RD], and select the data to be transferred and transfer direction.
4) Press the ENT key to determine the data to be transferred and transfer direction.
(SET/RUN LED will be orange.)
*: If the next operation is not performed within 30 seconds after the ENT key is
pressed, SET/RUN LED will be unlit, and the operations that have been made will
be canceled.
*: When the Data selection switch or the RD/WR selection switch is operated,
after the data to be transferred and the transfer direction are determined, the
operations that have been made will be canceled.
5) Press the ENT key again to start the transfer. (SET/RUN LED will be green
flashing.)
6) Turn OFF the GOT and remove the memory loader after the transfer is
completed. (SET/RUN LED will be green flashing.)
Refer to the "Chapter 12 Troubleshooting" for details on handling errors during
transferring.
GT1020, GT1030
12. Troubleshooting
12.1 GOT error message
When communication between the GOT and the memory loader doe s not work, check
the following contents depending on the GOT error messages.
GOT error message Remedy
Write protection
switch is ON
Wrong GOT model is
connected
Corrupt data or OS
version variance
Communication error
GOT contains a
system password
OS installation
screen isn’t active
12.2 LED display on the memory loader
If communication cannot be established between the GOT and a PC using memory
loader, confirm the following status by checking display LED in memory loader.
State of
POWER LED
POWER LED
is lit.
POWER LED
is not lit.
State of
ERROR LED
Green light
Green
flashing
Red light
Red flashing
Red Green
Orange
Green
Write protection switch ON
Turn OFF the Write protection switch.
The GOT type that is set in the data to be transferred differs
from that of the GOT to which the data is transferred.
Check the GOT type to which the memory loader is
connected.
The data to be transferred is broken, or the major version of
the standard monitor OS is different from that of the project
data.
• Write the standard monitor OS, communication driver, and
project data from GT Designer2 to the memory loader
again, and then transfer them to the GOT again.
• Set the Data selection switch to [PROJECT + OS] and
read out all data from the GOT to the memory loader, and
then transfer them to the GOT again.
Communication error occurs between the GOT and the
memory loader.
• Check the connection with the communication cable.
• Check that power supply is stable. (lighting of POWER
LED)
Password is set in the project data.
Reset the password with the numeric keypad on the GOT.
OS installation screen is not active
Install the data after the OS installation screen is displayed on
the GOT.
Contents
The DC5V power supply from the GOT or the personal computer is
normally supplied. In case of no communication, check the status of
ERROR LED.
The DC 5V power supply from the GOT or the personal computer is
not supplied. Check the items below.
• Turn ON the power.
• Check the connection with the USB cable.
• Check the connection with the GOT.
• Check that PLC is not overloaded when PLC supplies the power
to the GOT connected to the memory loader.
Contents
Write protection switch ON
Turn OFF the Write protection switch.
The GOT type that is set in the data to be transferred differs from that
of the GOT to which the data is transferred.
Check the GOT type to which the memory loader is connected.
The data to be transferred is broken, or the major version of the
standard monitor OS is different from that of the project data.
• Write the standard monitor OS, communication driver, and project
data from GT Designer2 to the memory loader again, and then
transfer them to the GOT again.
• Set the Data selection switch to [PROJECT + OS] and read out all
data from the GOT to the memory loader, and then transfer them
to the GOT again.
Communication error occurs between the GOT and the memory
loader.
• Check the connection with the communication cable.
• Check that power supply is stable. (lighting of POWER LED)
Password is set in the project data.
Reset the password with the numeric keypad on the GOT.
OS installation screen is not active
Install the data after the OS installation screen is displayed on the
GOT.
This manual confers no industrial property rights or any rights of any other kind,
nor does it confer any patent licenses. Mitsubishi Electric Corporation cannot be
held responsible for any problems involving industrial property rights which may
occur as a result of using the contents noted in this manual.
Warranty
Mitsubishi will not be held liable for damage caused by factors found not to be
the cause of Mitsubishi; opportunity loss or lost profits caused by faults in the
Mitsubishi products; damage, secondary damage, accident compensation
caused by special factors unpredictable by Mitsubishi; damages to products
other than Mitsubishi products; and to other duties.
For safe use
•
This product has been manufactured as a general-purpose part for general
industries, and has not been designed or manufactured to be incorporated in
a device or system used in purposes related to human life.
Before using the product for special purposes such as nuclear power, electric
•
power, aerospace, medicine or passenger movement vehicles, consult with
Mitsubishi Electric.
•
This product has been manufactured under strict quality control. However
when installing the product where major accidents or losses could occur if the
product fails, install appropriate backup or failsafe functions in the system.
HEAD OFFICE
: TOKYO BUILDING, 2-7-3 MARUNOUCHI, CHIYODA-KU, TOKYO 100-8310,
JAPAN
HIMEJI WORKS
: 840, CHIYODA CHO, HIMEJI, JAPAN
 Loading...