

Page 1
Page 2

Call-A-Matic
FOR SAFE AND RELIABLE
OPERATION, THIS UNIT MUST BE
GROUNDED PROPERLY
FAILURE TO DO SO, WILL VOID
WARRANTY
Page 3

Call-A-Matic
Document Revision No. 04
Firmware version 2.28, 3.01
CALL-A-MATIC
Fourth Edition August 2001
Version 04
Copyright 2001 EZ Advantage Corp.
All rights reserved.
EZ Advantage Corp.
221, Broad Street,
Milford,
CT-06460
U.S.A.
User Manual
Page 4

Call-A-Matic
TABLE OF CONTENTS
CONNECTION DIAGRAM
CONNECTION DIAGRAM
PRODUCT OVERVIEW ...................................................................................................7
SYSTEM FEATURES.......................................................................................................8
INSTALLATION GUIDE....................................................................................................9
PARAMETER PROGRAMMING ....................................................................................11
CHARGE SETTING PROGRAMS..................................................................................12
101 - PASSWORD OPTIONS .....................................................................................13
102 - CONFIGURE SERIAL PORTS ..........................................................................13
103 - CONFIGURE SMDR .......................................................................................... 14
104 - SET DATE & TIME.............................................................................................16
105 - PRINT ON FLY ..................................................................................................17
106 - RAW DATA PASS THRU...................................................................................17
107 - GRACE PERIOD................................................................................................18
108 - PRINT NON CALL RECORD.............................................................................18
109 - AUTO REPORT SCHEDULING.........................................................................19
110 - DO NOT PRINT ON FLY for following extensions .............................................19
111 - DO NOT COUNT CALLS from these extensions...............................................21
112 - DO NOT COUNT CALLS to these bands ..........................................................22
113 - EVENING RATES .............................................................................................. 22
114 - WEEKEND RATES............................................................................................22
115 - LOCAL / LOCAL LONG DISTANCE DIALING PATTERNS:........................... 23
116 - PBX DIAL OUT STRINGS .................................................................................25
117 - DEFAULT CREDIT LIMIT ..................................................................................26
118 - KEY PAD ENTRY OPTIONS .............................................................................26
119 - ADMINISTRATIVE EXTENSIONS.....................................................................27
120 - DO NOT PRINT ON FLY for following bands ....................................................27
121 - EXTENSION PAIRING.......................................................................................27
122 - BEEPER CONTROL .......................................................................................... 29
123 - REPORT PAGINATION .....................................................................................29
124 - PMS INTEGRATION..........................................................................................29
125 - PMS FORMATS.................................................................................................30
126 - NEW AREA CODE ADDITIONS ........................................................................33
127 - NAME OF PROPERTY ...................................................................................... 34
128 - CALLER-ID DISABLE STRINGS ....................................................................... 34
129 – VALID EXTENSION LIST (for CALL-A-MATIC LIMTED only) ..........................35
130 – PMS TEST PROGRAM.....................................................................................35
201 to 630 CHARGE SETTING PROGRAMS ............................................................35
SUPERVISORY PROGRAMS ....................................................................................39
MANAGEMENT REPORTS (MGMT REPORT key) ......................................................40
ROOM AUDIT REPORTS (ROOM AUDIT key) ............................................................44
TEST LINE PROGRAMMING ........................................................................................48
QUICK SET UP GUIDE..................................................................................................53
CALL-A-MATIC SOFTWARE Version 3.00 ....................................................................56
AREA CODE LIST..........................................................................................................60
PREFIXED STATE GROUPS ........................................................................................62
INTERNATIONAL COUNTRY CODE BANDS ...............................................................63
Call-A-Matic Plus
.................................................................3
Call-A-Matic Express
..........................................................5
- 1 -
Page 5

Call-A-Matic
- 2 -
Page 6

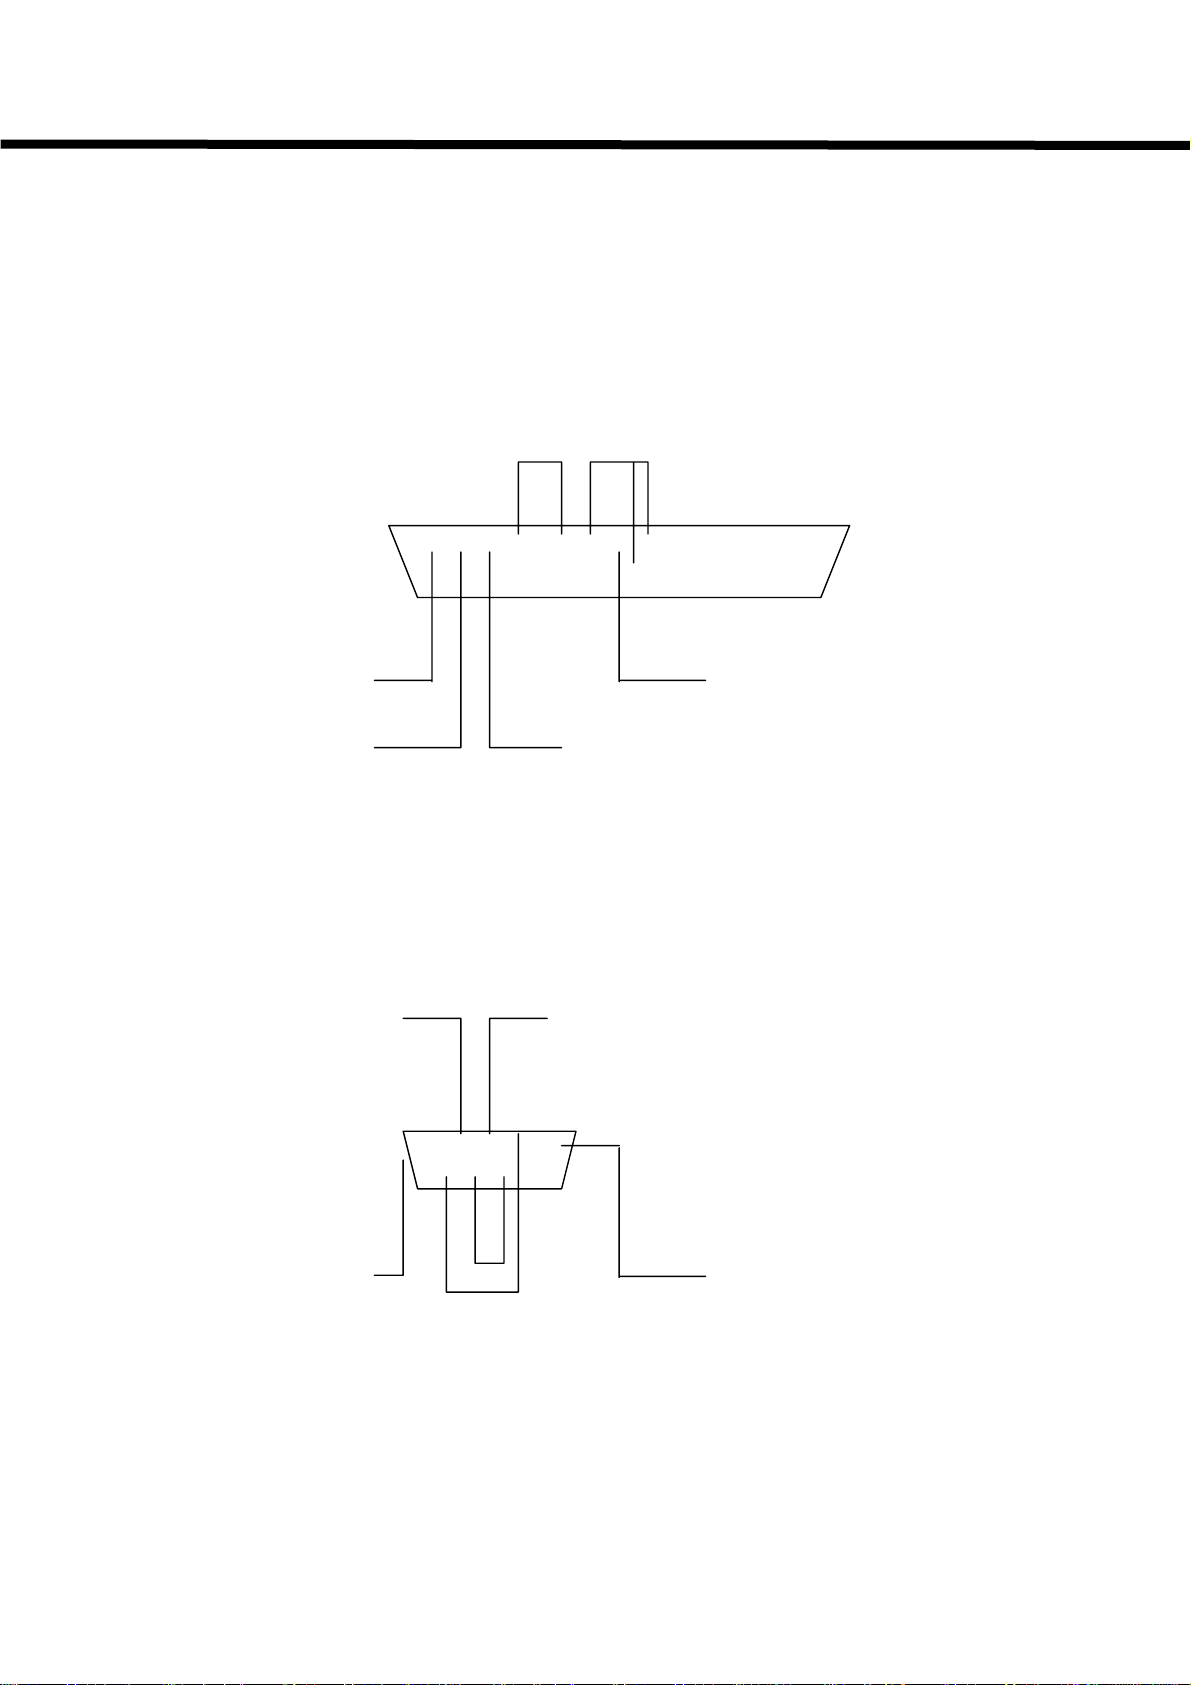
Call-A-Matic
CONNECTION DIAGRAM
Rear panel Connector pin-out
SMDR-PMS-PRINTER Connector type Male DB 37 pin
1 2 3 4 5 6 7 8 9 10 11 12 13 14 15 16 17 18 19
o o o o o o o o o o o o o o o o o o o
o o o o o o o o o o o o o o o o o o
20 21 22 23 24 25 26 27 28 29 30 31 32 33 34 35 36 37
Pin 1 - Parallel Printer Strobe Pin 20 - Parallel Printer D0
Pin 2 – Parallel Printer D1 Pin 21 - Parallel Printer D2
Pin 3 - Parallel Printer D3 Pin 22 - Parallel Printer D4
Pin 4 – Parallel Printer D5 Pin 23 - Parallel Printer D6
Pin 5 – Parallel Printer D7 Pin 24 - Parallel Printer BUSY
Pin 6 – Parallel Printer PE Pin 25 - Parallel Printer SELECT
Pin 7 – Parallel Printer RESET Pin 26 - Parallel Printer FGND
Pin 8 – Parallel Printer DC GND Pin 27 - NC
Pin 9 – NC Pin 28 - DC GND
Pin 10 - FRAME GND Pin 29 - Mitel Lite RX Data In
Pin 11 - Mitel Lite TX Data Out Pin 30 - NC
Pin 12 – NC Pin 31 - NC
Pin 13 – NC Pin 32 - DC GND
Pin 14 – FRAME GND Pin 33 - PMS RX Data In
Pin 15 – PMS TX Data Out Pin 34 - NC
Pin 16 – NC Pin 35 - NC
Pin 17 – NC Pin 36 - DC GND
Pin 18 – FRAME GND Pin 37 - PBX SMDR RX Data In
Pin 19 – PBX SMDR TX Data Out
Note : The custom cable supplied along with the Call-A-Matic Plus unit splits
the signals from the single 37 pin D connector into four individual cables.
These individual cables have the same pin outs as per the cable details given
for the Call-A-Matic Express on the next page. The Mitel Lite cable has the
same pin outs as the PMS cable.
NC = Do not connect
Call-A-Matic Plus
- 3 -
Page 7

Call-A-Matic
- 4 -
Page 8
Call-A-Matic
CONNECTION DIAGRAM
Rear panel Connector pin-outs
1. PBX- SMDR Connector type Female DB 25 pin
1 2 3 4 5 6 7 8 9 10 11 12 13
o o o o o o o o o o o o o
o o o o o o o o o o o o
14 15 16 17 18 19 20 21 22 23 24 25
Frame Ground Signal ground
Tx data out Rx data in
2. PMS-PC Connector type Male DB 9 pin
Rx data in Tx data out
1 2 3 4 5
o o o o o
o o o o
6 7 8 9
Frame Ground
Call-A-Matic Express
Signal ground
- 5 -
Page 9

Call-A-Matic
1. Parallel Printer Connector type Female DB 25 pin
o o o o o o o o o o o o o
o o o o o o o o o o o o
14 15 16 17 18 19 20 21 22 23 24 25
Pin 1 – Strobe out Pin 11 – BUSY input
Pin 2 – Data out 1 Pin 12 – PE input
Pin 3 – Data out 2 Pin 13 – SELECT input
Pin 4 – Data out 3 Pin 16 – Printer RESET
Pin 5 – Data out 4 Pin 18 to 25 – Signal ground
Pin 6 – Data out 5
Pin 7 – Data out 6
Pin 8 – Data out 7
Pin 9 – Data out 8
Pin 10,14,15, 17 – No Connection
1 2 3 4 5 6 7 8 9 10 11 12 13
- 6 -
Page 10

Call-A-Matic
PRODUCT OVERVIEW
The Call-A-Matic is a stand-alone call accounting system designed specifically for the
hospitality industry. The unit is used to collect phone call data from a PBX (phone
system) and then process and store the calls that have been made and generate
informative and useful reports in a variety of formats.
The Call-A-Matic Plus is housed in a sleek ABS enclosure and the Call-A-Matic Express
is housed in a metal enclosure and is designed for desktop use.
This unit can store upto 2880 calls in its minimum configuration mode and the maximum
storage can go up to 15,168 calls. All the essential parameters are stored in a nonvolatile memory.
The important features of the unit are given on the next page.
Specifications :
Power Input
Power Consumption
Battery Back-up
Size
Input/Output Ports
Minimum call storage
Maximum storage
Display
Programming & Reports
Parameter programming storage
Remote Programming & Software upgrade
Modem Speed
Toll restriction / Toll control
9 to 12 volts AC or DC, 500 mA or 5.0
volts DC, 1.5A depending on model
3 watts max
Built in Rechargeable type
12" x 12" footprint
2 – Serial Ports, 1 - Parallel Printer Port
1 – Modem Port
2880 Calls
15,168 Calls
40 X 2 Tiltable LCD Screen
Through 25 key Keyboard
Non-volatile storage in Flash ROM
Through Built-in Modem
2400 Baud
Through built-in Modem
- 7 -
Page 11

Call-A-Matic
The Call-A-Matic plugs directly into the serial printer port of a PBX.
1.
2.
Fully programmable through a 25 key keypad with messages being displayed on a
40 X 2 line LCD display.
3.
User can program the charges separately for each area code, a state, specific
numbers or type of numbers, each country, Operator or Information calls etc. Can
individually mark-up all types of calls.
4.
Charging of calls made from an extension may be excluded or included for mark-up
under user control.
5.
Unit can be programmed to sound an alarm when calls are made to a particular
number or from an extension.
6.
Password protection to insure against unauthorized deletion of calls records.
7.
Two fully user configurable serial ports.
8.
Can output the reports onto a serial printer and /or a parallel printer or an IBM PC
compatible system (PMS).
9.
Call-A-Matic can be configured to interface with a wide variety of PMS.
10.
User programmable SMDR format to allow interfacing with any phone system.
11.
Informative reports – guest check out reports, Audit reports, Room-wise reports,
extension-wise reports, and management reports at the touch of a key.
12.
Memory protection circuitry insures against data loss. All essential parameters
stored in non-volatile memory.
13.
This system can be integrated into a Hotel's billing system to provide phone call
details, automatically at checkout or shift end etc.
14.
Credit limit can be set for each guest, for the total phone call charges, at check in
time and the buzzer will sound when that limit is crossed. Or alternatively the CallA-Matic can cut-off the room phone on violation of credit limit.
15.
The Call-A-Matic can also restrict the use of each guest’s phone for Local, Longdistance or International at check-in. (Toll Control).
16.
Unit can be programmed remotely through the telephone line. Software upgrades
may also be downloaded through the telephone line.
SYSTEM FEATURES
- 8 -
Page 12

Call-A-Matic
INSTALLATION GUIDE
The CALL-A-MATIC System is simple and easy to use. You can start using the system
without much of a problem, as soon as it is unpacked.
The Call-A-Matic shipping carton must contain the following items :
The Call-A-Matic Unit
This User Manual
Wall Adapter
Parallel Printer Cable.
Select a suitable location for the Call-A-Matic to be placed on the Front Desk of your
hotel. A suitable location should have a phone extension socket, a power socket and a
parallel printer. The place selected should also be easily accessible for any service or
maintenance work. Plug in the wall power adapter into the power socket and insert the
other end into the power-input jack on the Call-A-Matic. Switch on the power to the unit.
The CALL-A-MATIC system has a Password protection feature and therefore you must
use the default password, before you proceed to program the unit.
a. Power up the unit. The system should give a few beeps and display the start up
message on the display.
The normal sequence of the display will be
"MODEM CHECK”
“MODEM O.K.”
“DIAL TONE OK” or “NO DIAL TONE”
“PBX CONNECTED” or “PBX NOT CONNECTED”
'Installed memory....'
'CALL-A-MATIC....’ version no., date of the software version.
Instead of the “MODEM OK” message, if the “MODEM NOT RESPONDING”
message appears, it means that there could be a system malfunction. You must
inform your dealer or distributor, from whom the unit was purchased,
After this, a screen appears, giving the PBX & printer status and the time, day &
date. If the unit is working properly, the time on the LCD will be displayed
constantly. (If the date and time are not correct, it can be set correctly later). If the
PBX is not connected to the unit, a beep will be sounded immediately on
completion of the power on check and then again, once every minute, till the serial
cable from the PBX is plugged into the SMDR port.
b. To get the system working, there are two absolutely essential requirements to be
taken care of - the SERIAL PORT CONFIGURATION and the SMDR
CONFIGURATION must be done correctly. Read the 'Configure Serial Port' and
Configure SMDR' section in the 'Parameter Programming' section before trying to
get the system started. All the other programming features can be tried out after
doing this basic programming.
- 9 -
Page 13

Call-A-Matic
This procedure would be a lot easier and faster if you have connected a serial
printer to the serial port of the PBX and obtained the call records for a few hours,
before trying to connect the CALL-A-MATIC System.
If you have been able to get the serial port parameter details from the PBX
manufacturer, then you can proceed to program the serial ports of the CALL-AMATIC system. If you have obtained some call records from the PBX, it would be
helpful in configuring the SMDR format in the system.
c. Using the default password enter the programming mode of the system. If the serial
port parameters of the PBX are known and if the PBX is listed in the predefined
types under program 103, then you can start using the system straight away.
If one or both of the above are unknown then proceed as follows.
d. Read the section ‘Raw Data pass through’ in the programming section and set the
system to pass through the raw data read from the serial port to the parallel printer.
Program 106 (page 12).
Now, set the serial port parameters for the PBX - you will have to try different
combinations one by one - and make a call from the PBX, so that the call record is
put out by the PBX on its serial port.
The most common baud rates are 300, 1200, 2400 and 9600 and usually 8-bit
transmission mode is used. So, start with these combinations and after every call
is made, check whether the printer prints out the call or not. You will have to
continue with this trial and error method till the correct combination is found.
e. Once the serial port for the PBX interface is properly configured, print the Ruler
lines on the printer through Program 103 and then collect a few call records. Now,
find out the starting column numbers and field lengths for each field in the raw call
record as received from the PBX. Some samples records are given below: -
DATE TIME DURN EXT NUMBER TRK AC. #
05\10 1.08P 00:00:06 139 9 3892067 T092 7099
05\10 1.09P 00:00:44 263 9 1609386000 T094 7099
05\10 1.09P 00:01:12 263 9 01191272481370 T098 7099
Read the 'SMDR configuration' section and proceed to program the SMDR details
accordingly. After this is done, the details of the calls will start appearing on the LCD to
indicate the proper functioning of the unit in its very basic mode. By default, the system
is programmed for MITEL PBX with 1200 baud, 8 data, 1 stop, and no parity.
The next section describes each of the available programs in detail.
- 10 -
Page 14

Call-A-Matic
PARAMETER PROGRAMMING
To enter into the programming mode, press
message on the display press (ENTER). To abort, press (EXIT).
When you press (ENTER) the message "Enter Password:" is displayed. Enter your
password here to gain access to the programming mode. If an invalid password is
entered, the system prompts the message ' illegal password ' and returns to normal
mode of operation.
Users of 4 digit passwords are not allowed access to parameter programming.
Once a valid password is entered, the message "Enter Program No.:" is displayed.
Once a valid program number has been entered, the message prompts for that program
are displayed. A '+' sign in the top right hand corner means help is available for this
program. Press the BLUE key to view the Help messages. If an invalid program number
is entered, the error message “No such program number” is displayed on the screen.
Press any key to erase the message.
The programs available are:
Program no. Program description.
------------------------------------------------ -------------------------------------------------------
101 - Passwords (to change/delete/set new passwords)
102 – Configure serial ports (to configure the system's serial ports)
103 - Configures SMDR (to configure the SMDR of the PBX)
104 - Set time, date (to set the real time clock)
105 - Print on fly (to set print-on-fly options)
106 - Raw data pass through (to check the printer/serial port)
107 - Set grace time (to set grace time for call charging)
108 - Non call record options (to set options for non-call records)
109 - Auto report scheduling (to set auto night report timings)
110 - Do not fly print for extensions (to exclude some extensions from p-fly)
111 - Do not count call on extension (to exclude certain extensions)
112 - Do not count calls on bands (to exclude certain bands)
113 - Evening Rates (set discounted evening rate timings)
114 - Weekend Rates (set discounted weekend rate timings)
115 - Local Calling (set Local / local LD dialing options)
116 – Toll Control (dial out required through test line)
117 - Default Credit Limit (set default credit limit)
118 – Keypad options (keypad time out, typing rate)
119 - Administrative extensions (No toll control/surcharge extensions)
120 - Do not print on fly bands (exclude some bands for printing on fly)
121 –Extension pairing (pair two extensions in a room)
122 - Beeper control (Beeper on/off)
123 - Page control options (reports on top-of-page etc.)
125 - PMS formats (select PMS type)
126 - New AREA CODE additions (Add new area codes)
127 – Property name (enter name of property)
128 – Caller Id strings (digits to strip for caller-id disable)
129 – Valid extension list (for Call-a-Matic Limited only)
130 – PMS test program (to send dummy PMS records to PMS)
key first and then as prompted by the
*
- 11 -
Page 15

Call-A-Matic
CHARGE SETTING PROGRAMS
The program numbers from 201 to 630 are all charge-setting programs. These program
numbers are also referred to as band numbers in all reports.
201 - Local calls
202 - Local long distance
203 - 1+ 10 digit calls (Local) (Local, enter area codes)
204 - Common charges for interstate calls (1+10 digit LD calls)
205 - Common charges for all INTL Calls 011 calls
206 - Info calls 1411,411,5551212, 1555 1212
207 - Other 1 + 10 digits not listed elsewhere
208 - Undefined 011 international calls
209 - 1-XXX info calls 1 XXX 555 1212
210 - 1-700 calls
211 - 1-800 calls 1-800, 1-888, 1-877 calls
212 - 1-900 calls
213 - 976 calls
214 - 710 calls
215 - 0+ calls
216 - International credit calls 01 XXX XXX XXXXXXX
301 - 362 State lists with area codes for USA & Canada
401 - 421 prefixed state groups.
500 - 530 prefixed international country code group
601 - 608 user programmable bands for area codes
609 - 616 user programmable bands for exchange
617 - 621 user programmable bands for International codes
622 - 625 user programmable bands for particular #'s
626 - 630 user programmable bands for alarm #'s, area codes and exchanges.
SUPERVISORY PROGRAMS
800 - parameter dump
999 - clear all memory and load default parameters
998 - Load all default charges
996 - Clear property name
995 - Clear Exception report strings
992 - Delete all entries for 110-112,115,119,120,121,126,128,6xx programs
991 - Delete all calls and room numbers
990 - Delete all calls and room numbers, clear user defined entries, load default
charges, load default SMDR, serial port parameters, grace periods
980 - Save program parameters in non-volatile memory
970 - Restore program parameters from non-volatile memory
- 12 -
Page 16

Call-A-Matic
101 - PASSWORD OPTIONS
The passwords can be of 4, 5, or 6 digits. There is a single 6-digit password
programmed into the hardware and cannot be changed. This password would be used
by the maintenance personnel and is known only to the manufacturer's representatives.
There is 1 default password of 5 digits, which is programmed into the unit when shipped
from factory. A maximum of 2 passwords of 5 digits and 3 passwords of 4 digits may be
programmed in the unit. If you try to enter more passwords than the maximum
permitted, an error message will be displayed.
The 5 digit passwords allow access to all programs. Access to programming mode is
denied for 4 digit password users.
Under this program, the user has the following options:
1. Change existing password
2. Define new password
3. Delete existing password
4. View existing password (only with 6 digit master password)
The 5 digit and 4 digit passwords may be changed by the user under this program. The
system prompts the message -
Current Password : (enter the password that needs to be changed)
New Password : (enter the new password).
You may delete only one password at a time. The unit will not allow you to delete the
last remaining 5-digit password.
102 - CONFIGURE SERIAL PORTS
The two serial ports of the system may be configured under this program.
When you go into this program, the unit prompts with the message:
“Configure PBX/SMDR port ? (yes/no) :”
If you press the YES key, the unit will show the current settings for the SMDR serial
port.
The default values shown would be “ 1200, 8 bits, No-parity, 1-stop”
Use the left and right arrow keys to move to the next or previous parameter on the line.
Pressing the NO key will take you through the available options for the current
parameter. To select a different baud rate, position the blinking cursor on the baud rate,
press the NO key repeatedly till the desired baud rate value is displayed on the screen
and then press the YES key. Repeat this procedure till all the parameters are properly
selected as desired. Pressing the ENTER key anywhere will take you to the next screen.
- 13 -
Page 17

Call-A-Matic
EXIT key will take you back to the main menu of “Enter program Number”
Repeat the above procedure for the other serial port when the unit prompts with the
message:
“Configure PMS/PC port ? (yes/no) :”
At this point, the NO key will take you back to the main menu. The YES key will show
the currently programmed values for the second serial port.
Note: The PMS/PC port configuration screen will not pop up if the PBX type
selected under program # 116 is SX200 MITEL LITE or ATLAS. The serial
port parameters, in this case, must be defined under program # 116.
The available options for all the individual parameters are:
Baud rate Data bits Stop bit Parity
------------------- ---------------------- -------------------- ----------------------
19200 7 data bits 1 stop bit No parity
9600 8 data bits 2 stop bits Odd parity
4800 Even parity
2400
1200
600
300
103 - CONFIGURE SMDR
The Serial Module Data Record received from the PBX must be decoded properly by
the system and for this, it is essential to define the SMDR of the PBX correctly.
The SMDR definition for the following PBXs are predefined in the unit:
MITEL
JISTEL
CARDINAL
COMDIAL
TOSHIBA
FUJITSU
AT&T
NORTEL
NEC
ATLAS
TRANSTEL
USER DEFINED
If MITEL PBX is selected, one more option is prompted.
- 14 -
Page 18

Call-A-Matic
MITEL – Answer detection enabled ? YES/NO
In some locations, the TELCO provides a positive identification of a phone call having
actually been put through. If such a facility is available and the MITEL PBX is
appropriately programmed, it provides this information in the SMDR as an ANSWER
DETECTION character. In such cases, the call duration will always be the actual
duration for which the call was made. Hence, grace period method of charging can be
avoided for these calls.
However, even if the Answer Detection is enabled, the grace period method is applied
for all calls, which do not have the “Answer detection” character ion the SMDR. This is
done, because, typically the Answer detection is available only on T1 lines which are
normally used for Long distance and International calls only. Hence, Toll free and Local
calls etc. do not have Answer Detection facility.
When the USER DEFINED option is selected, you have the option of enabling or
disabling the RULER LINE in the next screen. If the ruler line is enabled, the unit prints
a ruler line on the printer and the incoming call record is printed below it. If the RULER
LINE is enabled, the unit will not process the call, but will print it out directly onto the
printer as received from the PBX, even while the user is still in the programming mode.
Hence, if the SMDR pattern is not known or does not fit the pre-defined PBX types,
enable the ruler line and make a few calls. From the print out, determine the starting
columns and field lengths of the different fields in the call record and enter them in the
user defined SMDR pattern.
If USER DEFINED option is selected, the details must be entered (starting column and
field lengths). Once the User Defined type has been defined, the entered values will be
prompted the next time. If any of the above fields are to be ignored, enter 0000 for that
field. The fields that need to be defined are:
DATE
TIME
DURATION
EXTENSION
CALLED NO
TRUNK ID
AC.CODE
DURATION TYPE hh:mm / hh:mm:ss
mmm.m
mmmss
sssss
Hmmts
Start / End time
For each of the above fields, the column numbers and field lengths of all the fields of the
call record are to be entered. The System prompts the field name and expects a 4-digit
number, giving the starting column number of the field in the call record (a 2-digit
number), followed by the field length (a 2 digit number) e.g. 2805 etc.
The call records stored in the memory after processing the incoming records have a
- 15 -
Page 19

Call-A-Matic
predefined format. The length for each of the fields in the processed record has a
maximum limit and hence, even if you define a larger field length in the SMDR format, it
would be truncated. However, if you define a smaller field length, only that many digits
would be taken.
For example, the 'Extn' field has a 4 digit maximum limit and hence, even if you define a
5-digit extension field, only four digits would be taken starting from the column number
specified by you. However, if you define a smaller field length, only that many digits
would be taken.
The DURATION, EXTENSION and CALLED NUMBER fields in the incoming SMDR are
validated for correctness in all incoming call records. If any of these fields contain invalid
characters, the record would be treated as a NON-CALL record.
The DATE and TIME fields are also validated. However, if either one or both of them are
invalid, the current date and time from the real-time clock in the unit is automatically
inserted into the call record.
No validation is done for the TRUNK and AC.CODE fields.
Once the USER DEFINED SMDR is defined fully, you have the option of disabling the
RULER LINE printing. If this is not disabled, the unit will continue to be in a raw data
pass through mode, where it will print the ruler line and then the call record as received
from the PBX.
While processing the calls, the Call-A-Matic automatically takes care of the following :
ALTERNATE CARRIER CALLS – 10xxx or 101xxxx
RIGHT-JUSTIFIED CALLED NUMBERS
DASHES SEPARATING THE AREACODE AND EXCHANGES
If the called number has been dialed with an alternate carrier access code prefixed to
the actual called number, the Call-A-Matic automatically identifies and strips off the
excess digits. However, in the reports and the print on fly records, such calls can be
easily detected since a “+” is prefixed in front of the called number field of the output
record.
If the called number is right justified in the incoming call record, the Call-A-Matic
automatically adjusts the digits properly. Hence, while defining the SMDR fields, the
starting column must be defined in such a way that the leading digits of even the longest
called number – including the Alternate carrier access digits - are not missed out.
104 - SET DATE & TIME
The time and date of the 'real time clock' in the system can be set as per the actual time.
Use the right and left arrow keys to go from one field to the next or previous one. Use
the NO key to scroll through the month and day-of-week. The date and time has to be
entered in by using the digit keys. The YES key would also take you to the next field.
Enter will take you to the next screen.
The time received from the PBX in the call record is used for checking whether the call
was during Evening or Weekend rate period.
- 16 -
Page 20

Call-A-Matic
105 - PRINT ON FLY
As soon as a call record is received, it is validated & formatted as per the standard
format of the system, the type of call is identified, the charges calculated and stored in
memory. If this formatted record is to be immediately printed out every time after the
record is received, then enable the 'print on fly' option. By default, this option is
enabled. The options available are -
The NO key and the left / right arrow keys toggle through the available options. Press
YES or ENTER to go to the next screen.
If you set 0 as the number of additional lines between print on fly records, then each of
these records would be printed on consecutive lines.
The serial printer is connected to the port marked SERIAL/PMS PC at the back of the
unit. If both – serial and parallel printers are being used and you want to separate type
of information to appear on the two printers, choose the third or the fourth option given
above. The fifth option is usually used for troubleshooting.
If the PMS option is enabled, this `printer set up’ screen will not pop-up.
106 - RAW DATA PASS THRU
This option is more of a trouble shooting aid and normally needs to be used at
installation time. When this option is enabled, all the data received from the serial port
connected to the PBX will be rerouted to the serial / parallel printer port without any
changes. However, if the serial port receiving data from the PBX itself is not configured
properly to match the PBX parameters, there will be an error from the serial port and no
data will be output onto the printer port.
When finished with this option you must be sure to disable this option or calls will not be
processed. However, this option is automatically disabled at midnight.
Print-on-fly without header (default)
Print-on-fly with Header
Print-on-fly Disabled
Store no charge calls ENABLED (Default) DISABLED
Additional blank lines between print-on-fly records? (0 to 9):
Printer set up: Options available are –
PARALLEL PRINTER ONLY (default)
SERIAL PRINTER ONLY
SERIAL = PFLY ONLY, P’LLEL = ALL DATA
SERIAL = PFLY+NON CALLS, P’LLEL=REPORTS
ALL DATA ON SERIAL & P’LLEL PRINTERS
Raw data pass through from PBX to PRINTER - Disable or Enable
- 17 -
Page 21

Call-A-Matic
Default = disabled
If the raw data received from the PBX is being sent out on the second serial port,
care must be taken to set the output baud rate higher than the incoming baud
rate. Or, if the output is being directed to the parallel printer, disable the serial
printer in the Printer setup. Failure to do so will result in errors or the unit will
reset.
107 - GRACE PERIOD
Most of the PBXs cannot detect whether a call was actually completed or not or whether
the called number was busy or there was no answer etc., since the call-through signal is
not available from the CO.
Hence, if a call was made to a number from which there was no reply or was engaged but the caller’s handset was off the hook for 1 minute, the call record would indicate that
the call duration was 1 minute, even though the call was never put through or answered.
In such cases, a grace period can be set for different types of calls. If a call record is
received with a duration less than the grace period for that type of call, it would not be
charged. However, if the call duration is greater than the grace period set in the unit,
then the entire duration of the call - which includes the dialing time and waiting to
connect time - is also charged for. Some PBXs may already have a grace period
setting. (Consult the PBX manual for more details).
Note: The grace period type of call validation is only an approximation method.
Hence, there will always be some instances where a call that was never put
through will be charged for and some calls that were put through would not be
charged for. If “Answer Detection” is enabled in Program #103, the grace
period method of charging will be applied to only those calls that DO NOT
have an answer detection character in the call record.
"LOCAL CALLS enter period in seconds:" 45 seconds
"LONG DISTANCE CALLS enter period in seconds:" 45
"INFORMATION CALLS enter period in seconds:" 10
"INTERNATIONAL CALLS enter period in seconds:" 55
"STORE GRACE CALLS? YES / NO :" Default = no
If the calls, which are within the grace period and hence not charged, are to be stored,
appears in the position of the decimal point to indicate
select YES. In these calls, a
that it is a call within the grace period.
108 - PRINT NON CALL RECORD
A non-call record is any invalid record received from the PBX. The record could be
invalid because it contains invalid characters in the Duration or Extension or Called
number fields or because it is some message or title line output by the PBX or because
of some malfunction.
*
- 18 -
Page 22

Call-A-Matic
The two available options Print non-call record (Default)
Do not print non-call record
STORE WAKE UP CALLS
This option is prompted only if MITEL PBX has been selected under program no. 103.
The Wake up calls are stored in a separate area of memory, which can hold between
200 to 300 such records. If this area becomes full, the top 100 records are automatically
purged to make way for fresh records.
109 - AUTO REPORT SCHEDULING
The AUTO NIGHT AUDIT timings and options can be set under this program. If the
auto-night-audit report is enabled, the time at which this program is to be invoked must
be defined. By default the report is disabled.
To print automatically, first ENABLE the report generation, set the time at which the
report is to be printed out and then, set the report options where, you have the option to
purge checked-out calls and admin calls or print only for this AUTO NIGHT AUDIT
report.
If the “purge calls…” option is selected, the room-wise Audit report is printed out and
then the PROFIT & LOSS report is printed out. The deleted Checked out calls &
Checked out summary records for the Checked out rooms are purged from memory and
then the Admin Report is printed out & Admin calls deleted.
If the Auto report has already been invoked once, it will run next, at the same time on
the next day. However, if you re-enter a new time under this program, the Auto report
would be re-invoked once again at the new time, even if the new time falls within the
same day. If the new time were already past the current time, the report would be
invoked as soon you exit from the programming mode.
110 - DO NOT PRINT ON FLY for following extensions
A list of extensions can be entered under this program and for all calls made from these
extensions the calls will not be printed - on – fly. However, the calls would appear on the
screen and be stored normally.
When you run this program the following screen pops up:
The cursor will be flashing on the `V’ of View option. The right arrow key and the NO key
The two available options Do not store Wake up calls (Default)
Store Wake up calls
110 – DO NOT PFLY EXTNS: # entries = 0000
View Add Delete Search
- 19 -
Page 23

Call-A-Matic
take the cursor right, whereas the left arrow key moves the cursor left. Select the
desired option by using one of these keys and press ENTER or YES key.
If there are no entries, the View, Delete and Search options will not work. The unit will
give a short beep to remind you that there are no entries to View or Delete or Search.
Select the “Add” option and after the second line of the display is cleared, the “Add :”
prompt is displayed. Now, enter the Don’t-print-on-fly extensions, one by one. The
extension lengths may be of 2 or 3 or 4 digits. Hence, if you want to add a 2 or 3 digit
extension, press “Enter” key to accept the input. If a 4-digit extension is entered, the unit
will automatically accept this input and scroll the last entered extension and the others
already displayed on the second line, to the right.
Every time an extension is added, the # of entries count at the right hand corner goes
up by one. Hence, it is easy to keep track of the total number of entries already made
under this program. If you try to add an extension that already exists, an error message
will be prompted.
Press EXIT key to terminate the “Add” option. Now, the View-Add-Delete-Search toolbar
will be displayed again.
Once a few entries are entered, the other options may be tried out. Select the “View”
option by pressing the YES or ENTER key when the cursor is blinking on the `View’
option. Now, all the existing entries will be displayed on the second line. If there are
more entries than are possible to show on one line, use the left and right arrow keys to
scroll back and ahead in the list of entries. Press the EXIT key to return to the main
toolbar.
The “Delete” option brings up the “Delete:” display on the second line and also the
prompt “CHECK-OUT key = Delete ALL” message.
At this point, if you press the CHECK OUT key, another screen pops asking you to
confirm by displaying “DELETE ALL ENTRIES ? (Yes/Enter or No)”. If you press the
NO key, the entries will not be deleted. If you press the YES or ENTER key, all the
existing entries will be deleted.
If you pressed any key other than the CHECK OUT key, the “DELETE ALL…” message
will be cleared and if you pressed a digit, it would appear on the second line. Any other
key would result in a warning beep.
If the specific extension does not exist in the current list, the warning beep would sound
and the unit will return to the “Delete:” screen. Press EXIT to return to the main toolbar.
The “Search” option would bring up the “Search for:” message and when you enter an
extension, it would be looked up for a match in the current entries. If a match is found,
the message “Exists” is prompted. Otherwise, the message “Does not exist” is
displayed. Press any key to clear the result message and another search may be
made. Press EXIT key to return to the main toolbar.
All the extensions entered here are subject to the “Pairing extension” check.
Refer to “Program 121” for the further details.
The following programs use the above format to “View-Add-Delete-Search” the
- 20 -
Page 24

Call-A-Matic
entries:
Program # Description Bytes/entry
--------------------- ----------------------------------------------- ---------------- 110 Don’t print on fly extension 4
111 Don’t count extensions 4
112 Don’t count calls to bands 3
115 Local exchanges 3
115 10 digit local area code + exch. 4
115 1+10 local area code + exch. 4
115 Home area codes 3
116 PBX port-extension map 4
119 Administrative extensions 4
120 Don’t print on fly bands 3
121 Extension pairs 6
126 New area code additions 4
128 Caller ID disable strings 4
601-608,629 User defined area codes 3
609-616,627 User defined exchanges 3
617-621 User defined INTL codes 4
622-626 User defined numbers 7
628 User defined bands 3
630 User defined extensions 4
The number of bytes taken up by each type of entry is given in the above table. All
the entries made under all of the above programs are stored together and the total
memory area allocated for all these entries is 8192 bytes. Hence, the total number
of bytes occupied by these entries will be the sum of all the entries in all the
above programs.
For example, 100 local exchanges (100x3=300 bytes), 50 admin. extensions
(50x4=200 bytes), 200 10 digit local exchanges (200x4=800) and 300 extension
pairs (300x6=1800) will give a total of 3100 bytes (300+200+800+1800) for all the
650 entries.
On an average, the total memory space should be enough for at least 2000 entries
of all types put together.
111 - DO NOT COUNT CALLS from these extensions
A list of extensions can be entered under this program and for all calls made from these
extensions, the calls will not be counted. All calls made from extensions listed under this
program will be totally ignored. They will not appear on the screen or print on the fly and
the charges will not be calculated.
The entry is done in the same way as program #110.
- 21 -
Page 25

Call-A-Matic
112 - DO NOT COUNT CALLS to these bands
A list of band numbers may be entered under this program and all calls made to these
bands will not be counted. For e.g. if you want calls made to the '1411' directory
assistance or calls to certain numbers to be ignored - then these phone numbers can be
programmed under the ' USER DEFINED BAND' for particular numbers and that band
number can be entered under this program.
If you want to ignore all local calls, enter `201’ under this program.
The entry is done in the same way as program #110. However, under this program,
since all band numbers are of 3 digits only, the Add-Delete-Search options will proceed
to the next step as soon as 3 digits are entered.
113 - EVENING RATES
It is possible to apply a discount to all calls made during the evening hours. When you
enter this program, the display prompts
the 24-hour format. Once this is completed, press ENTER to go to the next prompt,
where the “End time”
the percentage by which you would like to mark down all calls.
All calls made between these timings on weekdays (Monday-Thursday) will be
discounted. Local calls are not subject to these discounts.
The calls are first charged as per the “first minute” and “additional minute” charges, then
marked up and then discounted by the percentage entered under this program. The
“surcharge” is added after the discount has been calculated. For Admin calls, there is
no markup – hence the charges are directly discounted.
For example, a Long Distance call of 5 minutes to CT, with first minute = 00.35 and
additional minute = 00.33, surcharge = 01.55, markup = 25%, mark down = 30% would
be charged as follows:
For normal extension
= (0.35 + 4 x 0.33) [ (100 + 25) / 100 ] [ (100 – 30) / 100] + 1.55
A mark down of 0% would mean that there is no discount.
= $ 3.01
For Admin extension
= (0.35 + 4 x 0.33) [ (100 – 30) / 100 ]
= $ 1.16
is to be entered. The
114 - WEEKEND RATES
The weekend rates are applicable to all calls made between the “Start time” on Friday
evening and “End time” on Monday. Calls made all day on Saturday and Sunday are
“Start time”
and the time is to be entered in
“Mark Down by %”
appears next. Enter
- 22 -
Page 26

Call-A-Matic
subject to the Weekend rate discounts.
The method of entry and the discount calculation is same as for the Evening rates
program.
115 - LOCAL / LOCAL LONG DISTANCE DIALING PATTERNS:
This program number is used to configure the system for the type of local and local-long
distance calling allowed in your area.
This program presents you with four different options to take care of your different
dialing patterns. The 4 options are:
All the above are “Not selected” by default. Pressing the left or right arrow keys or the
NO key, toggles the Not Selected and Selected options. Press YES or ENTER to take
you to the next screen.
7 digit Long distance:
For areas where all local calls are of 7 digits (e.g. 397 3577) and all Local Long
Distance calls must be prefixed with a 1 (e.g. 1 487 4566), choose “Not selected” for the
7-digit long distance (default value). No further programming is required under this
option.
In some areas, calls of 7 digits, made to other exchanges within the same Area Code,
may be ‘Local' or 'In state Long distance' calls. For such areas, choose “Selected” and
press YES or ENTER.
When 7digit long distance is selected, the View-Add-Delete-Search menu pops up
and the “total numbers of entries” currently in memory are displayed.
The entry is done in the same way as program #110. However, under this program,
since all exchanges are of 3 digits only, the Add-Delete-Search options will proceed to
the next step as soon as 3 digits are entered.
All calls made to exchanges listed under this option will be treated as Local Calls and
charged as per Band 201. All calls made to exchanges NOT listed under this band
would be charged as per Band 202.
10 digit Local calls:
In some areas, calls to nearby areas are treated as Local calls, but the dialing is 10 digit,
using the Area code + exchange (without the 1 in front). In such cases, you will need to
enter all the Area code + exchange combinations, which are to be treated as Local
calling numbers.
7 digit Long distance : Not selected / Selected
10 digit Local calls : Not selected / Selected
1+10 digit local calls : Not selected / Selected
Home area code : Not selected / Selected
- 23 -
Page 27

Call-A-Matic
When 10-digit local calling is selected, the View-Add-Delete-Search menu pops up
and the “total numbers of entries” currently in memory are displayed.
The entry is done in the same way as program #110. However, under this program,
since all area code + exchanges are of 6 digits only, the Delete and Search options will
proceed to the next step as soon as 6 digits are entered.
While Adding the entries, since one area code will have many local calling exchanges,
the area code is automatically prompted, to reduce the total number of digits that are
required to be entered. For example, if the first entry is 203397, as soon as you enter
th
the 6
the right and the area code will be retained after the “Add: “ prompt. To enter the next
combination within the same area code (in this case 203), just enter the 3 digits of the
exchange. If you need to enter a different area code, use the Left arrow key to erase the
current area code and enter all the 6 digits of the new combination.
All calls made to area code + exchanges listed under this option will be treated as Local
Calls and charged as per Band 203. All calls made to area code + exchanges NOT
listed under this band would be treated as Local Long distance calls and are subject to
charges for band 202.
1+10 digit Local calls:
In some areas, where the 10 digit local calling is applicable, all such numbers may be
dialed even with the 1 in front, like a normal 1+10 digit long distance number.
In such cases, select this option and proceed to enter all the area code + exchange
combinations as in the case above.
As in the case above, all calls made to area code + exchanges listed under this option
will be treated as Local Calls and charged as per Band 203. However, all calls made to
area code + exchanges NOT listed under this band would be treated as normal Long
distance calls and are subject to charges for that area code.
Home Area code:
For areas where in state Long Distance Calls are made by dialing Area Codes and
exchanges i.e. 10 digits, the Home Area Code should be entered here. Any calls made
with this area code will now be charged according to band 202.
When you select this option, the View-Add-Delete-Search menu pops up and the “total
numbers of entries” currently in memory are displayed.
The entry is done in the same way as program #110. However, under this program,
since all Area codes are of 3 digits only, the Add-Delete-Search options will proceed to
the next step as soon as 3 digits are entered.
The calls are charged as per the table given below :
digit, the entry will be accepted if it does not already exist, the entry will scroll to
- 24 -
Page 28

Call-A-Matic
No. of
digits in
call
7 to 9 2 to 9 No x x x x Local 201
7 to 9 2 to 9 Yes x x x Exch. match Local 201
7 to 9 2 to 9 Yes x x x No exch. match LLD 202
7 to 9 1+ x x x x x LLD 202
10+ 2 to 9 x No No No x Local 201
10+ 2 to 9 x Yes x x Area code + exch.
10+ 2 to 9 x Yes x x No Area code + exch.
10+ 2 to 9 x Yes x x No match LLD 202
1+10 1 x No No No x LD 3xx
1+10 1 x x Yes x Area code + exch.
1+10 1 x x Yes No No Area code + exch.
1+10 1 x x Yes Yes No Area code + exch.
1+10 1 x x Yes Yes No match LD 3xx
All the above combinations may not be applicable at every site as the actual dialing
pattern varies from site to site. Please check the actual patterns applicable at your site
and program the unit accordingly.
If 7 digit local exchanges or the 10 digit / 1+10 digit area code + exchanges are
applicable to your site, then all the valid combinations must be entered into the Call-AMatic.
116 - PBX DIAL OUT STRINGS
Required for dialing through test line.
The Call-A-Matic supports full toll control of MITEL PBXs.
Since this requires extensive programming keeping your specific PBX in mind as well as
the actual wiring at your site, it is recommended that you see your dealer for set up
instructions. Consult the dealer for further assistance. Additional details are provided at
the end of this manual.
When you invoke this program number, the prompt Enabled or Disabled appears on
the screen. Enable Toll control using the YES/NO keys.
The next screen allows to set the dialing speed of the modem in the unit. The Dialing
speeds may be set in steps of 20 ms from a minimum of 70 ms to a maximum of 250
ms. Press the BLUE key to pop up the Help menu.
call #
starts
with
7
digit
LLD
10
digit
Local
1+10
digit
Local
Note : “x” means not applicable.
Home
area
code
Condition Call
type
Local 203
Match
Local 201
Match, but first 3
digits match exch.
Local 203
Match
Match
LLD 202
Match, but area code
matches entry in
Home area code list
Band
LD 3xx
- 25 -
Page 29

Call-A-Matic
A value of 0 = 70 ms and a value of 9 corresponds to 250 ms. This value sets the
duration of the tone bursts while dialing out to the PBX. Hence, 0 gives the fastest
dialing speed, while 9 gives the slowest.
The following types of PBXs are supported for Toll Control. Consult your dealer for more
information.
MITEL BASIC OPEN/CLOSE type
MITEL SX/20 Allow 1/Allow 2
MITEL SX/20 Allow 1/Allow 2/Allow3
MITEL SX50/MS3504/MS50
MITEL SX50/MS51/MS55
TELTRONICS 319 A
TELTRONICS 319 B
DEAN COMMUNICATIONS
MITEL SX200 LITE
ATLAS
TRANSTEL
If the MITEL SX200 LITE is selected, the TOLL CONTROL is done through the second
serial port marked PMS/PC. Hence, once this option is selected here, the PMS option
cannot be selected under program # 125.
Also, the next screen allows you to set the serial port parameters for sending the Toll
Control strings to the PBX. Another screen allows you to choose between enabling or
disabling ACK/NAK protocol.
117 - DEFAULT CREDIT LIMIT
User may set a default credit limit of $$ for all guests that are checked in automatically.
Credit Limit has to be entered in 2 digits and only whole dollars. e.g. $1 = 01.
Default = $ 05
A default limit of $ 99 will mean that unlimited credit limit is applied to all guestrooms,
from which calls are made without being manually checked in first. Such rooms are not
subject to Credit Violation checks.
118 - KEY PAD ENTRY OPTIONS
This setting will determine how quickly the Call-A-Matic screen will time out to its main
screen when no key is pressed during programming or when it is waiting for an input
during report printing. Intervals can be in blocks of 15 seconds. Since any number
between 0 to 9 can be entered, the shortest time out period is 15 seconds & the
maximum is 135 seconds.
The next screen allows you to set the
keypad, by setting the keystroke de-bounce value.
Default = 9 = 135 seconds
typing speed
- 26 -
for accepting entries from the
Page 30

Call-A-Matic
If you set too low a value, you may not be able to enter the digits properly, as the unit
may take multiple entries for a single key depression. Too large a value may make the
entry process very slow and painful.
The Default value of 2 should be acceptable for almost all units.
119 - ADMINISTRATIVE EXTENSIONS
Administrative extensions are exempt from toll control and the surcharge is not added to
calls made from these extensions. These extensions are not checked in and during a
Checkout report, these extensions are not included.
These extensions can be checked out - i.e. calls from these extensions will be removed
from memory - during a "Night Audit report " or under the "Admin. Extension Report"
under Audit reports.
The extensions can be entered in the same manner as for program number 110.
All the extensions entered here are subject to the “Pairing extension” check.
Refer to “Program 121” for the further details.
If you try to manually check in an extension that has already been programmed as an
Admin extension, a warning message “cannot check in this extension as it is an
Admin extension” will be flashed on the screen. So also, if an extension is already
checked in and now, if you program that extension as an Admin extension, it will be
automatically removed from the list of checked in extensions. The charges for all calls
made from that moment onwards would be charged as per the Admin extension rates.
However, calls made prior to this, which were subject to charges applicable to a normal
extension, will remain as they were.
If an Admin extension is deleted from the list of Admin extensions, it will be
automatically checked-in with the default credit limit and would be subject to credit
violation check from that moment onwards.
120 - DO NOT PRINT ON FLY for following bands
Some bands can be specified as " Don’t print on fly " bands. For example, if the local
calls need not be printed on the fly - since these constitute the bulk of the calls made
from any property - then the band 201 (which is for Local calls) can be entered under
this program.
These bands can be entered in the same way as for program 112.
121 - EXTENSION PAIRING
If one guest room is being provided with 2 phones with separate extension numbers and
you want to treat them as one single extension, it is possible to do so, by programming
- 27 -
Page 31

Call-A-Matic
them as paired extensions under this program.
It is permitted to pair a 3-digit extension with a 4-digit extension and vice versa as well
as pairs of 3 digit and 4 digit extensions. It is also allowed to pair one primary extension
to multiple extensions (no limit).
The entry procedure is same as that for program # 110, with some small variations
relevant to pairing programming. When this program is invoked, the View-Add-Delete-
Search menu pops up and the “total numbers of entries” currently in memory are
displayed.
Under this program, all extensions are treated as 4 digit extensions – hence, a 3-digit
extension like 215 will be stored internally as 0215. However, you need not enter the
leading zero. When you select Add option, the “Press BLUE key for range
programming” message is flashed. If the first key pressed at this stage is the BLUE
key, the unit will take you to the range programming of extension pairs. Otherwise, a
single extension pair may be added.
While adding the single pair, first enter the secondary extension (ex. 215). If you enter 4
digits, the unit will automatically prompt you with the next step. If you entered a 3 digit
extension, press the ENTER key. Now, the “=” sign comes up and the primary extension
(ex. 115) is to be entered. If this extension is of 3 digits, press ENTER to terminate the
entry. The unit will return to the View-add-Delete-Search menu.
If RANGE programming is selected by pressing the BLUE key, the message “first room
# :” is prompted. Enter the first secondary room number to be paired. As above, press
ENTER to terminate if a 3-digit extension is entered. The “=” is prompted. Type in the
first primary extension. After this, the “Last room #:” is prompted. Type in the last
secondary extension to be paired.
However, if an entry already exists for a secondary extension falling within the “first
room – last room” range, that particular pairing will be skipped. In the above example, if
the entry 229 = 101 had already been made earlier, now while range programming, the
entry 229 = 129 will be skipped (a secondary extension may be paired to only one
primary extension). But an entry 358 = 129 will not be skipped, since extension 129
(primary extension) may be paired to more than one extension.
All extension entries – under all other programs and during Check in or Check out
– are subject to the Extension pairing check.
Hence, if you Check in room number 216, the unit will convert it to 116 (since 216 is
paired to 116). If a call is made from 216, it will be treated as having been made from
116. If you enter 216 as a don’t-print-on-fly extension, it will convert it to 116.
Entries under program numbers 110, 111, 119 and 630 are subject to pairing
If the range programming was for –
“first room : 215”, “= 115”, “last room : 250”,
this would show up under “View” option as follows :
“0215 0115, 0216 0116,………… 0250 0150” indicating that the extension 215 is
paired to 115, 216 is paired to 116 and so on, till 250 being paired to 150.
- 28 -
Page 32

Call-A-Matic
check. If a secondary extension is entered under any of these programs, it will be
converted to the primary extension.
Since it is possible to pair multiple secondary extensions to one primary extension, you
may pair all admin extensions together and enter the primary extension in the admin
extension list. Now all these extensions will be treated as Admin extensions. However,
by doing it in this manner, it will not be possible to separate the calls made from each
individual extension – all calls from all these extensions will be shown as having been
made from the primary extension only.
So also, it is not possible to check in a secondary extension. If you try to check in
extension 216 (in the above example), it will accept the entry, but the print out will show
that 116 was checked in.
122 - BEEPER CONTROL
The Beeper in the Call-A-Matic can be enabled or disabled through this program.
Default = enabled
If you disable the beeper, it will suppress the audible clicking of the key depressions, as
well as all alarm beeps etc.
123 - REPORT PAGINATION
Under this program, the option to print all reports on a fresh page can be enabled or
disabled.
Default = disabled
If enabled, a page feed character is sent to the printer before printing any report.
124 - PMS INTEGRATION
This program allows the Call-A-Matic to receive Check-in and Check-out strings from
the PMS. However, this is a separate software module and needs to be factory-enabled.
By default, this module is disabled. When enabled, rooms may be checked in or
checked out on the Call-A-Matic from the host PMS screen itself.
This integration program will not be accessible – even if factory enabled - if in Program
# 116, MITEL LITE or ATLAS PBX is selected for Toll Control through serial port.
To use the PMS Integration feature, go into programming mode, run Program #124 and
ENABLE PMS check in/out using the YES/NO key.
Select the correct PMS type INNSOFT or MITEL LITE using the YES/NO key.
Auto print Check out reports ?
- 29 -
Page 33

Call-A-Matic
YES/NO – If you select YES, every time the PMS sends out a Checkout string to the
Call-A-Matic, that room is checked out and the Check-out report is printed out
automatically. If you select NO, the room will be checked out but the report will not be
printed.
Purge Calls on Check out ?
YES/NO – If you select YES, all the calls of that room will be automatically deleted and
purged form the Call-A-Matic. You MUST NOT run an AUDIT report under this
condition. If you select NO, the calls will be deleted but will not be purged form the CallA-Matic – hence an AUDIT report may be run later if desired.
Default Toll restriction Level
Enter the default Allow character that is to be used when Checking in a room
automatically on receipt of Check-in string from the PMS. The room will be checked in
with the default credit limit.
125 - PMS FORMATS
If the second serial port of the Call-A-Matic is being used to send the processed call
records to the Property Management System installed on the property, then it may be
necessary to send these records in a format specific to that PMS system.
This program may be used to reformat the processed call record to suit the PMS
software. By default the PMS option is disabled. The following PMS Formats are
available -
NGS 39 TEL
MICROS CAS
HOLIDEX
HOBIC
CHECK-INN
INN TEL HX
ENCORE HX
MARLBORO
BELL HOBIC
CHOICE
USER DEFINED
The above formats are predefined and any one of them may be chosen.
If one or more of the fields need to be changed in any of the pre-defined ones, first
select the desired format and complete the programming till the last screen. Then, go
back into pgm# 125 and select User defined option. The screen will scroll up to show
all the fields one by one. The fields that need to be entered are -
- 30 -
Page 34

Call-A-Matic
SEQUENCE NO SSLL (SS = starting column)
DATE SSLL (LL = field length)
TIME SSLL
DURATION SSLL
EXTENSION SSLL
CALLED.NO SSLL
TRUNK SSLL
ACC# SSLL
CHARGES SSLL
$ SS01
HIC SSLL
CHG.TYPE 01 / 02 / 03 / 04
DURN.TYPE 01 / 02 / 03
DATE TYPE 01 / 02
TIME TYPE 01 / 02 / 03
CR/LF 01
BCC 01
HIC NAME CAS_
If SSLL= 00 00 i.e. the starting column and field length equal zero, it means that
particular field is not used in the PMS format.
Charge type 1 = $$$.$$ (leading zeros blanked)
ex = $ _ _2.25
2 = NNN.NN (leading zeros not blanked)
ex = $ 002.25
3 = 1 d.p for cents only ex = $ 002.2
4 = in pennies ex = $ 00225
Duration type 1 = hh:mm:ss
2 = mmm
3 = hh:mm
Date type 1 = mm/dd
2 = mm/dd/yy
Time type 1 = hh:mm:ss
2 = 11:45_PM
3 = 23:45
CR/LF 0 = not required
1 = required
BCC 0 = not required
1 = required
HIC NAME enter max. 4 characters for HOTEL ID. CODE NAME
Note : There are quite a few parameters that are unique to a particular PMS format.
Hence, it is not possible to define a completely new type of PMS format. The purpose of
the User defined option is only to provide a means to juggle around the starting columns
- 31 -
Page 35

Call-A-Matic
and field lengths etc.
After the PMS formats are defined, the following screens appear :
ACK/NAK handshake :
required (default)
not required
If the “ACK/NAK not required” option is selected, the next 2 screens will be skipped and
the program would go to “Printer set up” screen.
If rejected by PMS :
Buffer calls and post when PMS ready (default)
print error message
If ACK/NAK protocol has not been selected, this screen will not appear
Enter ENQ/STX/ETX/ACK/NAK characters (ex. 05 02 03 06 15) :
The above are the normal hex values for the handshake characters. In the unlikely
event that a PMS uses some other values, these can be modified to match the host
PMS.
PMS printer set up :
Serial = PMS, no parallel printer (default)
Serial = PMS, all non-pms data on parallel printer
Serial = PMS, all data on parallel printer
Serial = PMS, all data + pms debug data on parallel printer
While defining the Printer set up under the PMS program, it is assumed that the user
would want only the PMS data to go out on the PMS port. Among the available options,
the first one allows the user to disable the parallel printer port on the Call-A-Matic.
The second option sends all the data – except the PMS record itself to the parallel
printer.
The third option sends even the PMS record to the parallel printer. This is a
troubleshooting aid, to be used when the host PMS is rejecting the records sent out by
the Call-A-Matic. When this option is selected, the actual record sent to the host PMS is
also sent out to the parallel printer. If, even with this option, it is not possible to find the
reason for the records being rejected by the PMS, select the fourth option.
In the fourth option, in addition to the printable data, a description of each of the
handshake characters & control characters is also sent out to the parallel printer. For
example, it could be as given below –
- 32 -
Page 36

Call-A-Matic
ENQ => (Call-A-Matic sends ENQ to PMS)
<= NAK (PMS sends back NAK)
ENQ => (Call-A-Matic sends ENQ to PMS)
<= NAK (PMS sends back NAK)
ENQ => (Call-A-Matic sends ENQ to PMS)
<= ACK (PMS sends back ACK)
STX => (Call-A-Matic sends STX to PMS)
PMS RECORD (Call-A-Matic sends data record to PMS)
ETX => (Call-A-Matic sends ETX to PMS)
BCC => (Call-A-Matic sends BCC to PMS)
CR => (Call-A-Matic sends CR to PMS)
LF => (Call-A-Matic sends LF to PMS)
<= NAK (PMS sends back NAK)
In case the PMS does not respond at all, you will only find three successive ENQs being
sent by the Call-A-Matic to the PMS.
SMDR Records :
to be stored (default)
do not store
This screen pops up even if the PMS output is not selected. If the `do-not-store' option is
selected, the calls are just charged and printed out. No calls are stored in the unit's
memory.
126 - NEW AREA CODE ADDITIONS
New area codes can be added to the existing list of area codes already in the Call-AMatic.
The entry procedure is same as that for program # 110. When this program is invoked,
the View-Add-Delete-Search menu pops up and the “total numbers of entries” currently
in memory are displayed.
Under this program, all entries are of 6 digits (3 digit new area code followed by 3 digit
old area code). Hence, under this program, the Add-Delete-Search options will proceed
to the next step as soon as 6 digits are entered.
To add a new area code, select the Add option. The second line will show “Add: “ – now
first enter the new are code - for example 334 in Alabama - enter 334205 - where 334 is
the new area code and 205 is an existing area code of the same state. Once this is
done, whenever a call is made to 334 area code, the charges and the state code will be
taken from the area code 205.
When you select the View option, all the entries will be shown in a 6-digit format, where
the first 3 digits correspond to the new area code being added and the last 3 digits
correspond to an existing area code of the same state.
- 33 -
Page 37

Call-A-Matic
127 - NAME OF PROPERTY
This program is used to enter the name of the property into the Call-A-Matic. This name
will appear on top of all the reports.
To enter the name of your property, all alphabets and digits have to be entered using
the 2 digit decimal value of the ASCII code for that particular character. Valid character
codes are from 32 to 99.
A maximum of 60 characters may be entered here (including spaces). It is
recommended that the property name first be written down and translated into the ASCII
character set from the list given below.
For example
= 65 66 67 32 77 79 84 69 76
= A B C M O T E L
As you enter the two-digit ASCII code for each letter, you will see the letter displayed on
the screen. Edit the entries by using left arrow key. To finish, press ENTER. The full
name will be automatically centered across the full width of the printer line.
To make any corrections, you will have to re-enter the name fully.
ABC MOTEL
32 Space 44 , 56 8 68 D 80 P 92 \
33 ! 45 - 57 9 69 E 81 Q 93 ]
34 “ 46 . 58 : 70 F 82 R 94 ^
35 # 47 / 59 ; 71 G 83 S 95 _
36 $ 48 0 60 < 72 H 84 T 96 `
37 % 49 1 61 = 73 I 85 U 97 a
38 & 50 2 62 > 74 J 86 V 98 b
39 ‘ 51 3 63 ? 75 K 87 W 99 c
40 ( 52 4 64 @ 76 L 88 X
41 ) 53 5 65 A 77 M 89 Y
42 * 54 6 66 B 78 N 90 Z
43 + 55 7 67 C 79 O 91 [
128 - CALLER-ID DISABLE STRINGS
All over USA, users have the option of withholding the calling number information from
being sent to the recipient of the call. For this, Caller-Id disable strings are to be dialed
before the actual number is dialed out.
These Caller-Id disable strings may contain a
not program these strings in the Call-A-Matic and if a guest pre-fixes these
disable digits and dials out, this call will be treated as a Non-call record.
If these strings are entered and a call is made with these digits preceding the actual
called number, the Call-A-Matic will automatically discard these leading digits and
only the actual called number would appear on the printouts. By looking at the
processed output record, there is no way to find out if the caller had used the Caller-Id
- 34 -
or the # character. If the user does
*
Page 38

Call-A-Matic
disable strings or not.
The entry procedure is same as that for program # 110. When this program is invoked,
the View-Add-Delete-Search menu pops up and the “total numbers of entries” currently
in memory are displayed.
Under this program, entries may be a maximum of 5 digits. Hence, the Add-Delete-
Search options will proceed to the next step as soon as 5 digits are entered. To enter a
smaller string (ex. a 3-digit string), terminate by pressing the ENTER key.
Some typical disable strings are
129 – VALID EXTENSION LIST (for CALL-A-MATIC LIMTED only)
This program is available only when the unit is factory set as CALL-A-MATIC LIMITED.
The LIMITED unit will process calls only for those extensions, which are entered under
this program. A maximum of 32 extensions may be entered. All calls made from any
extension that is not programmed here will be ignored.
The entry procedure is same as that for program # 110. When this program is invoked,
the View-Add-Delete-Search menu pops up and the “total numbers of entries” currently
in memory are displayed.
130 – PMS TEST PROGRAM
This program is used as a testing and debugging tool to check the PMS interface in a
property. Usually while interfacing the Call-a-Matic to the property’s PMS, it is necessary
to make calls with some charges from valid guest rooms. With the help of this program,
dummy calls may be transmitted to the PMS to check if the system is posting the calls
correctly, instead of having to actually climb a few floors, go to a guest room and make
calls that will actually be charged to the property.
Enter room no. : RRRR
Enter duration (in minutes) : MM
Enter phone number : xxxxxxxxxxx
Enter a 3 or 4 digit room number, enter 2-digit duration in whole minutes and then enter
any phone number upto a maximum of 11 digits. If any calls were processed after the
unit was powered on, the details from the last call will be automatically prompted on
screen. If no calls have been processed, all 0’s will be displayed on screen. This call will
be then processed as if it was received from the PBX through the SMDR port.
201 to 630 CHARGE SETTING PROGRAMS
All the charge setting programs (except for Local calls) follow the pattern of “First minute
charges”, “Additional minute charges”, “Surcharge” and “Markup %”
The charges for the total duration are first calculated, and then marked up and the
surcharge added to this amount. If the call was made when discount rates are
*
67
and
#
68
- 35 -
etc.
Page 39

Call-A-Matic
applicable, the discount % is deducted after marking up and the surcharge is added
after that. Greater details may be found under Program # 113.
Default Markup % = 0
201 - Local Call Charges
The Local Calls may be charged on ` A fixed charge' basis or on a `Time block' basis,
as desired by the user.
The system prompts you to enter the `Fixed surcharge' and then you can enter 2
different blocks each with its own time block of minutes and the charges for that block.
If you want to charge a fixed surcharge only for all calls, enter 000000 for the first time
block.
If you want to use only the first time block - e.g. if you want to charge 35 cents for every
3 minutes or part thereof, enter 030035 for the first time block - and enter 000000 for the
second block.
If you want to charge 48 cents for the first 5 minutes and then 32 cents for every
additional minute, enter 050048 for the first time block and 010032 for the second time
block. Default = 0035, 000000, 000000
The total charges are marked up and then the Surcharge would be added over and
above these time charges.
202 - Local Long distance calls
in program # 115. Default = 0033, 0034, 0110
203 - Local 10 digit / 1+10 digit calls
exchange combinations listed under program # 115. Default = 0000 0000
0000
204 - Common charges for all 1+10 digit calls
programmed in this band will be copied onto the charges for all state area code
bands - 301 to 362. The markup % entered under this program # would be
copied onto all bands 310 to 362.
Default charges = 0035, 0034, 0155 (for 301 to 361).
= 0513, 0455, 0155 (for 362)
205 - Common charges for all INT calls
are added to a table of charges, which are based on the standard international
AT&T rates and then copied onto the charges for individual bands 501 to 530.
The markup % entered under this program # would be copied onto all bands 501
to 530.
Default = 0350, 0275, 0155. These charges are added to the table of
international rates.
-- 1 + 7 digit calls or calls to exchanges not listed
– All calls made to the area code +
- to all states, common charges
-- The charges entered under this band
- 36 -
Page 40

Call-A-Matic
206 - Information Calls -
Some central offices have 411, 1411, 5551212, 15551212 for instate information.
207 - Undefined Area Code Band.
208 - Undefined 011 INT calls -
209 - Information calls --
210 - 1-700 calls
211 - 1- 800 Calls
212 - 1- 900 Calls
213 - 976 Calls to Information Services
214 - 710 Calls to government Services
215 - 0+ operator assisted calls
216 - 01+ International Credit card calls
301 - 362
= 0513, 0455, 0155 (for 362)
401 - 420
All the states in the US have been grouped into 21 groups. So, if you want to set your
charges more accurately depending on the actual distance from your property to each of
the other states, these bands could be used to shorten the programming time. The
charges entered under these bands - e.g. 413 (which is for Texas, Oklahoma and New
Mexico) - would be copied onto the respective bands for each of these three states.
Details of the state groups are given at the end of this manual.
This band can be programmed to charge accordingly. Default = 0100, 0000,
0000
These calls are to area codes not found in
bands 301 to 362 and not entered under the `New area codes' under program
126. Default = 0035, 0034, 0155
to countries not listed in bands 501 to 530. Default
= 0350, 0275, 0155
calls to 1-XXX-555-1212 numbers
Some central offices use the above pattern for out of state information calls.
Charges can be set accordingly. Default = 0100 , 0000, 0000
Some area codes, states, central offices have 1-700-XXX-XXX type of calls to
bypass local carrier and go directly to the long distance carriers. Charges can
be programmed to the typical charge setting program. Default = 0000, 0000,
0000
Default = 0000, 0000, 0000
Includes calls to 1-800, 1-888, 1-877 numbers.
Default = 1000, 1000, 1000
Default = 1000, 1000, 1000
Default = 0000, 0000, 0000
Default = 0000, 0000, 0000
Default = 0000, 0000, 0000
Individual area codes grouped according to states. Default charges
= 0035, 0034, 0155 (for 301 to 361).
Prefixed state - nearby state group.
- 37 -
Page 41

Call-A-Matic
501 - 530
Default charges (from band 205) = 0350, 0275, 0155
601 - 630 USER DEFINED BANDS
609 - 616 USER DEFINED EXCHANGES
617 - 621 USER DEFINED COUNTRY CODES
622 - 625 USER DEFINED SPECIFIC NUMBERS
626 USER DEFINED WARNING NUMBERS
627 USER DEFINED WARNING EXCHANGES
628 USER DEFINED WARNING BANDS
629 USER DEFINED WARNING AREA CODES
630 USER DEFINED WARNING EXTENSIONS
For each of these User defined bands, the entry program is same as in program # 110.
The number of digits that need to be entered, during Add or Delete or Search, for each
of the UDF bands, will depend on the type of entry being made. For example, 3 digits
must be entered for Area codes, exchanges and bands. Extensions may be of variable
lengths, but will be stored as 4 digit numbers. The country codes may be of variable
lengths (maximum 5 digits). When entering less than the maximum number of digits,
press ENTER key to end the entry.
For bands 622 to 626 - specific / warning numbers, the numbers of digits can be a
minimum of 1 to a maximum of 14. For example, for band 622, if you entered "1203”
and “01191794543555”, all Long distance calls to area code 203 would be charged as
per band 622 and all calls to the specific number 01191794543555 would be charged as
per band 622.
When a call record is being checked for called-number matches in the Specific number
User defined bands, all digits of an entry in the UDF band must match with as many
digits of the called number. It does not matter if the called number has more digits than
the entry in the UDF band. Hence, if you just enter “1” in the UDF band 622, all calls
which have 1 as their first digit will be taken as matched under band 622.
The Emergency number 911 is programmed into band number 626 for warning numbers
during power-up default programming.
For each of these UDF bands, charges can be entered for them and a corresponding
grace period can also be entered. Default charges for all these bands = 0000, 0000,
0000. The Default grace period for all these bands = 20 seconds.
After the charges are entered, the markup % will need to be entered. The default
markup is 0%.
Prefixed international country code band. Each band is programmed as
a typical group. List of countries, their codes and the charges are given
at the end of this manual.
601 - 608 USER DEFINED AREA CODES
- 38 -
Page 42

Call-A-Matic
800 PARAMETER DUMP
Under this program, a copy of all the parameters, charges etc. set in the system can be
printed out and kept for record purposes.
SUPERVISORY PROGRAMS
999 Set factory defaults :
program parameters, clears all previous calls and checked in rooms from
memory.
998 - Load all default charges :
996 - Clear property name :
992 - Delete all entries for 110-112, 115, 119, 120, 121, 126, 128, 6xx
programs :
View-Add-Delete-Search format) are deleted.
All entries made under above programs (all those that use the
991 - Delete all calls and room numbers :
extensions (like console stations etc.) and checked in rooms are erased from
memory, and call sequence number is reset to 0001.
980 - Save program parameters in non-volatile memory :
parameters used for calculating charges and print and store routines are kept in
the working memory of the unit. This working memory may get corrupted during
power outages or due to a bad mains plug or socket. Hence, it is advisable to
save a copy of these program parameters in the unit’s non-volatile memory. In
case of a memory corruption, the saved parameters can be reloaded. So also, it
is important that you run this program every time you make any changes to the
program parameters.
If the left arrow key is used at any time during programming, the system will
automatically prompt to save the parameters in Non-volatile memory before
exiting from the programming mode.
970 - Restore program parameters from non-volatile memory :
saved parameters from non-volatile memory into working memory. When this
program is run, the unit reloads all parameters from the Non volatile memory into
the working memory area and then will reset and restart.
Loads factory default settings for all charges and
Only the default charges are re-loaded
Erase the name of the property
All the calls are deleted, Admin
All the program
To reload
- 39 -
Page 43

Call-A-Matic
MANAGEMENT REPORTS (MGMT REPORT key)
Enter Password: (4-digit password)
1. Audit Report
2. Current Call Report
3. Credit Violation Report
4. Wake up call Report
With a 4-digit password, only the 4 reports shown above are accessible.
With a 5-digit password, all the 9 reports are accessible to the user.
Enter Report # between 1 to 9 for desired report.
1 Audit Report
2 Checked Out Guest Report
3 Credit Violation Report
4 Clear Monthly Trunk Totals
5 Print Monthly Trunk totals
6 Administration extension reports
7 Calls in memory
8 Wake up calls report
9 Print and purge buffered PMS calls
Description of Reports
1. Audit Report
This report does the following:
- Prints the summary records for all rooms Checked-out since last report
- Prints the ADMIN Call report
- Prints the PROFIT AND LOSS report for these Checked out calls and Admin
Calls
After the report is printed out, a message prompt to ‘erase’ them from memory would
appear. If the option were ‘yes’, only then these summary records and the Admin calls
would be removed from the memory.
2. Checked Out Report
Normally in a hotel, the desk clerk checks out a guest and deletes the calls from the
memory. However, in the Call-A-Matic, a summary of these calls will be retained in
memory. The supervisor can get a print out of all these checked-out-guest-summary
records in the memory under the Audit reports. These records would be printed out in
the order in which the rooms were checked out.
This report forms the first part of the AUDIT report shown below.
- 40 -
Page 44

Call-A-Matic
AUDIT REPORT FROM Mar 04 98 23:07 TO Mar 04 98 23:27
SUMMARY REPORT
CHECKED OUT GUEST CALLS
***EXT 100 HAD 1 CALLS WITH A TOTAL OF $ 7.88 CHECKED OUT 03/04 23:24
***EXT 102 HAD 2 CALLS WITH A TOTAL OF $ 21.16 CHECKED OUT 03/04 23:24
***EXT 132 HAD 1 CALLS WITH A TOTAL OF $ 1.01 CHECKED OUT 03/04 23:24
***EXT 202 HAD 1 CALLS WITH A TOTAL OF $ 1.01 CHECKED OUT 03/04 23:24
***EXT 451 HAD 1 CALLS WITH A TOTAL OF $ 1.94 CHECKED OUT 03/04 23:24
***EXT 452 HAD 1 CALLS WITH A TOTAL OF $ 70.46 CHECKED OUT 03/04 23:24
***EXT 453 HAD 1 CALLS WITH A TOTAL OF $ 69.80 CHECKED OUT 03/04 23:24
***EXT 465 HAD 1 CALLS WITH A TOTAL OF $ 7.88 CHECKED OUT 03/04 23:24
***EXT 466 HAD 1 CALLS WITH A TOTAL OF $ 7.88 CHECKED OUT 03/04 23:24
***EXT 467 HAD 1 CALLS WITH A TOTAL OF $ 7.88 CHECKED OUT 03/04 23:24
***EXT 1004 HAD 1 CALLS WITH A TOTAL OF $ 7.88 CHECKED OUT 03/04 23:24
***EXT 1450 HAD 1 CALLS WITH A TOTAL OF $ 0.86 CHECKED OUT 03/04 23:24
***EXT 1454 HAD 1 CALLS WITH A TOTAL OF $ 2.65 CHECKED OUT 03/04 23:24
***EXT 1455 HAD 1 CALLS WITH A TOTAL OF $ 2.65 CHECKED OUT 03/04 23:24
***EXT 1457 HAD 1 CALLS WITH A TOTAL OF $ 0.86 CHECKED OUT 03/04 23:24
***EXT 1458 HAD 1 CALLS WITH A TOTAL OF $ 0.86 CHECKED OUT 03/04 23:24
***EXT 1459 HAD 1 CALLS WITH A TOTAL OF $ 0.86 CHECKED OUT 03/04 23:24
***EXT 1473 HAD 1 CALLS WITH A TOTAL OF $ 0.86 CHECKED OUT 03/04 23:24
***EXT 2787 HAD 1 CALLS WITH A TOTAL OF $ 18.63 CHECKED OUT 03/04 23:24
***EXT 3788 HAD 1 CALLS WITH A TOTAL OF $ 10.28 CHECKED OUT 03/04 23:24
***EXT 4002 HAD 1 CALLS WITH A TOTAL OF $ 7.88 CHECKED OUT 03/04 23:24
***EXT 4503 HAD 1 CALLS WITH A TOTAL OF $ 1.94 CHECKED OUT 03/04 23:24
***EXT 4544 HAD 1 CALLS WITH A TOTAL OF $ 7.88 CHECKED OUT 03/04 23:24
***EXT 4789 HAD 1 CALLS WITH A TOTAL OF $ 2.65 CHECKED OUT 03/04 23:24
***EXT 5003 HAD 1 CALLS WITH A TOTAL OF $ 7.88 CHECKED OUT 03/04 23:24
***EXT 5751 HAD 1 CALLS WITH A TOTAL OF $ 2.86 CHECKED OUT 03/04 23:24
***EXT 5752 HAD 1 CALLS WITH A TOTAL OF $ 1.29 CHECKED OUT 03/04 23:24
***EXT 7754 HAD 1 CALLS WITH A TOTAL OF $ 10.28 CHECKED OUT 03/04 23:24
****** 28 CHECKED OUT ROOMS TOTAL CHARGES $ 285.95 ******
PROFIT AND LOSS FOR THIS PERIOD
CALLS COST BILLED PROFIT
LOCAL CALLS 8 $ 17.05 $ 47.95 $ 30.90
LONG DISTANCE CALLS 10 $ 25.94 $ 84.20 $ 58.26
OPERATOR CALLS 0 $ 0.00 $ 0.00 $ 0.00
INTERNATIONAL CALLS 2 $ 50.63 $ 140.26 $ 89.63
OTHER CALLS 9 $ 4.90 $ 13.54 $ 8.64
----------------------------------------------------------------
TOTALS 29 $ 98.52 $ 285.95 $ 187.43
PROFIT = 65.54 %
----------------------------------------------------------------
ADMIN. CALL REPORT
***EXT 1463 HAD 1 CALLS WITH A TOTAL OF $ 8.74
***EXT 1456 HAD 1 CALLS WITH A TOTAL OF $ 1.00
***EXT AT01HAD 1 CALLS WITH A TOTAL OF $ 0.60
***EXT AT02HAD 1 CALLS WITH A TOTAL OF $ 2.39
****** 4 ADMIN CALLS TOTAL COST $ 12.73 ******
----------------------------------------------------------------
- 41 -
Page 45

Call-A-Matic
3. Credit Violation Report
This report prints all the rooms with credit violations.
CREDIT VIOLATION REPORT
Mar 04 98 23:22
EXTN CALLS CR.LIMIT CURRENT CHARGES VIOLATION ALLOW
------ ----- -------- --------------- --------- -----
100 1 $ 5 $ 7.88 $ 2.88 4
102 2 $ 5 $ 21.16 $ 16.16
452 1 $ 5 $ 70.46 $ 65.46
453 1 $ 5 $ 69.80 $ 64.80 0
465 1 $ 5 $ 7.88 $ 2.88
466 1 $ 5 $ 7.88 $ 2.88
467 1 $ 5 $ 7.88 $ 2.88
1004 1 $ 5 $ 7.88 $ 2.88 2
2787 1 $ 5 $ 18.63 $ 13.63 1
3788 1 $ 5 $ 10.28 $ 5.28
4002 1 $ 5 $ 7.88 $ 2.88
4544 1 $ 5 $ 7.88 $ 2.88
5003 1 $ 5 $ 7.88 $ 2.88
7754 1 $ 5 $ 10.28 $ 5.28
*** 14 CREDIT VIOLATIONS. CALLS 15 CURRENT CHG $ 263.65 VIOLATION $ 193.65
----------------------------------------------------------------
In the above report, the ALLOW column appears only if TOLL CONTROL is enabled
and the rooms are manually checked in with some credit limit.
4. Clear Monthly Trunk Totals
5. Print Monthly Trunk Totals
The total charges of all calls made - separately for Local calls (201), Local LD
calls (202), Long distance calls (301-361, 207), Information calls, International
calls (501-530, 208) and User defined band calls - are maintained in the
memory. These totals will be of use in ascertaining the traffic on all the lines and
lead to better management of the CO lines.
6. Administrative Report
This report will print a report for all the calls made from the administrative
extensions. The option to PRINT ONLY or PRINT AND CLEAR is prompted
before the report is run.
This report is the same as the last part of the AUDIT report and maybe printed
out in Detail or Summary format.
: Clears monthly totals.
- 42 -
Page 46

7. Total Calls in Memory
The total number of the calls in memory, number of rooms checked in and the
number of deleted call records in memory - would be displayed on the LCD and
also printed out along with the current date and time.
8. Print and purge Wake up calls
This option is valid only for MITEL PBXs and if the “Store Wake up calls” option
has been enabled under program no. 108.
When invoked, this program will print out all the Wake up calls and clear the
memory of all these records.
Wed Mar 04 98 23:14:04 Stored WAKE UP CALLS print out
132 10/17 10:30 WU 10:30 BUSY 1
138 10/17 10:30 WU 10:30 ANSWERED
104 10/17 10:30 WU 10:30 NO ANSWER 1
212 10/17 10:30 WU 10:30 NO ANSWER 1
144 10/17 10:30 WU 10:30 ANSWERED
140 10/17 10:30 WU 10:30 NO ANSWER 1
245 10/17 10:30 WU 10:30 ANSWERED
237 10/17 10:30 WU 10:30 ANSWERED
143 10/17 10:31 WU 10:30 NO ANSWER 1
132 10/17 10:35 WU 10:30 ANSWERED
104 10/17 10:35 WU 10:30 NO ANSWER 2
143 10/17 10:36 WU 10:30 ANSWERED
235 10/17 10:36 WU 10:30 ANSWERED
142 10/17 10:36 WU 10:30 NO ANSWER 2
104 10/17 10:40 WU 10:30 ANSWERED
200 10/17 10:40 WU 10:30 NO ANSWER 3 *****
Printed and cleared
9. Print and purge buffered PMS calls
This report is applicable only when PMS has been enabled and calls are being
buffered when the PMS system stops posting the calls.
In such cases, run this program to print all the buffered calls and clear the
memory of these records.
Call-A-Matic
- 43 -
Page 47

Call-A-Matic
ROOM AUDIT REPORTS (ROOM AUDIT key)
The following reports are available under this key.
1. Audit Report
2. Current Call Report
3. Credit Violation Report
Option (1) AUDIT REPORT needs a password to be invoked. The other reports may be
run without having to enter a password.
Reports (1), (3) and (4) are the same as the corresponding reports available when a 5digit password is used. Report (2) is given below –
EXTN CALLS CHARGES CR.LIMIT VIOLATION ALLOW
------ ----- ----------- -------- --------------- ---- 100 1 $ 7.88 $ 5 OVER $ 2.88*** 4
102 2 $ 21.16 $ 5 OVER $ 16.16***
132 1 $ 1.01 $ 5 UNDER $ 3.99
202 1 $ 1.01 $ 5 UNDER $ 3.99
451 1 $ 1.94 $ 5 UNDER $ 3.06
452 1 $ 70.46 $ 5 OVER $ 65.46***
453 1 $ 69.80 $ 5 OVER $ 64.80*** 0
465 1 $ 7.88 $ 5 OVER $ 2.88***
466 1 $ 7.88 $ 5 OVER $ 2.88***
467 1 $ 7.88 $ 5 OVER $ 2.88***
1004 1 $ 7.88 $ 5 OVER $ 2.88*** 2
1450 1 $ 0.86 $ 5 UNDER $ 4.14
1454 1 $ 2.65 $ 5 UNDER $ 2.35
1455 1 $ 2.65 $ 5 UNDER $ 2.35
1457 1 $ 0.86 $ 5 UNDER $ 4.14
1458 1 $ 0.86 $ 5 UNDER $ 4.14
1459 1 $ 0.86 $ 5 UNDER $ 4.14
1473 1 $ 0.86 $ 5 UNDER $ 4.14
2787 1 $ 18.63 $ 5 OVER $ 13.63*** 1
3788 1 $ 10.28 $ 5 OVER $ 5.28***
4002 1 $ 7.88 $ 5 OVER $ 2.88***
4503 1 $ 1.94 $ 5 UNDER $ 3.06
4544 1 $ 7.88 $ 5 OVER $ 2.88***
4789 1 $ 2.65 $ 5 UNDER $ 2.35
5003 1 $ 7.88 $ 5 OVER $ 2.88***
5751 1 $ 2.86 $ 5 UNDER $ 2.14
5752 1 $ 1.29 $ 5 UNDER $ 3.71
7754 1 $ 10.28 $ 5 OVER $ 5.28***
28 CHECKED IN ROOMS. TOTAL CHARGES $ 285.95 CR.VIOLATIONS $ 193.65 ROOMS 14
--------------------------------------------------------------------
In the above report, the ALLOW column appears only if TOLL CONTROL is enabled
and the rooms are manually checked in with some credit limit.
4. Wake up call Report
CURRENT CHECKED IN ROOM REPORT
Mar 04 98 23:22
- 44 -
Page 48

Call-A-Matic
ERROR MESSAGES
Whenever an error or a wrong operation takes place, the system prompts with an
error message. The list of these error messages and their explanations are given
below:
< Sorry – no further help or help not available press [ENTER] >
This message appears whenever you press the BLUE key but there is no help message
for that program or when you scroll through the available help messages till the end.
Press [ENTER] key to return to your original message prompt.
< No such program number …. >
This message appears under the ‘parameter-programming mode’, whenever you enter a
program number, which does not exist. Press [ENTER] to return to normal operation.
< Illegal Password >
This message appears whenever a non-existent password is used to enter the
programming mode or the ‘Audit reports’. Press [ENTER] return to normal processing
< Access Denied >
This message appears whenever a 4-digit password is used to gain access to the
parameter programming, since only 5 or 6 digit password users have access to these
programs.
<No free memory to store any more room nos. Check out some rooms
first>
The system has a separately allocated memory area to store all the checked in room
numbers . Normally, a maximum of 256 room numbers can be stored along with their
credit limits and total accumulated charges. However, if this number is exceeded, new
rooms cannot be stored without deleting some rooms under the ‘Check-out’ report.
However, the calls will get stored for these new room numbers even if you do not delete
any rooms to free the memory space. But these calls and these room numbers will not
appear in the Audit report and Checked-In room report but will appear in all the other
reports and the extension report with the ‘all’ option.
- 45 -
Page 49

Call-A-Matic
The next few messages given below should not appear during normal mode of
operation. If they do appear, this would be suggestive of a malfunction or some
memory corruption due to voltage fluctuation etc. It is advisable to check all
other parameters also if any of these messages appear due to any reason. Also
make a note of any special conditions that may have triggered this fault
occurrence and notify the supplier if this occurs frequently.
< Warning – memory banks deleted or added - run program # 991 or 999 >
This error message will appear only when some hardware changes have been made like adding or removing memory banks.
< Warning serial port parameters corrupted. Default values set >
< Warning SMDR config string corrupted default values set >
This message appears, normally when the unit is powered on after a long period of
disuse, if the serial port parameters or the SMDR parameters are corrupted.
The parameters stored in the EEPROM are downloaded into normal memory and the
serial port & SMDR are programmed accordingly.
< Warning memory corrupted. Full ram is being cleared >
This message will appear when the system is first powered on after a long period of
disuse - like when the system is first installed at a site etc.
Sometimes, when there are frequent power failures for brief periods, there is a very
small chance that the power on/off surges on the mains line may corrupt the memory.
But for such severe fluctuations, the normal power failures should not affect the system
memory.
If such a memory corruption takes place, all the calls stored earlier will be lost.
However, all the program parameters, charges etc. will be restored from the nonvolatile memory.
- 46 -
Page 50

Call-A-Matic
IMPORTANT NOTES
a. PRINTER MESSAGES
This system puts out a short message on the first line of the display, indicating the
status of the printer attached to the unit. These messages are 'PRN ONLN', 'PRN
OFLN', and `PRN OFF', depending on the printer status.
The message would show PRN OFF when the printer is connected but is powered off.
All print routines will go through when PRN ONLN and PRN OFF. So, if you just need
to see the totals on the LCD, but do not want to print the report, power off the printer
and run the report.
But with printer connected and powered on, if the printer is off line or if there is no
paper, it will show PRN OFLN and the print routines will not go through.
If the printer goes out of paper while printing a report, 'PRINTER NOT READY' message
appears on the last line. If you want to discontinue the printing, press [EXIT] key till the
system returns to normal mode of operation
b. BATTERY BACK-UP
The Call-A-Matic system comes with a built in NiCd rechargeable battery, which is kept
on a constant trickle charge when the system is powered on. When the system is first
unpacked, this battery may be fully run-down and you may get the 'Memory Corruption'
message. However, once installed, this system is expected to be kept permanently
powered on and hence the battery will get fully charged in a day or two and the data
retention during normal power failures would be taken care of. A fully charged battery
should provide a back up for a month at least.
c. WIRING PRECAUTIONS
The unit is supplied with a wall mounting 9 Volts AC transformer with a 2-pin jack, which
will plug in directly into the Call-A-Matic.
FOR SAFE & RELIABLE OPERATION, THIS UNIT MUST BE GROUNDED
PROPERLY.
d.
PBX NOT CONNECTED
The unit constantly checks for the PBX connection. If it is not connected or if the
connection becomes loose, the unit will sound a warning beep and also print a message
on the printer saying, “PBX NOT CONNECTED”. The beep and the message will keep
occurring once every minute, till the problem is rectified.
.
- 47 -
Page 51

Call-A-Matic
TEST LINE PROGRAMMING
Program 116. Dial out required.
IMPORTANT:- Before this feature is enabled the installer must ensure that test
line is connected to the Call-A-Matic unit and that it has been enabled from the
telephone system.
MITEL SX 20
Port 01 is the test line. Switch 6 on the CPU card must be enabled together with switch
8.
MITEL SX 50
Select an unused port and program it for test line operation in command 100. Register
1 bits E,F,G. Switch 1 and 2 on control card must also be enabled.
Before connecting the test line to a Call-A-Matic ensure that line is working by
connecting a regular 2500 telephone to the test line and try a few attendant functions,
e.g.
restriction is to be used, type A or type B.
Type A:
10/20/50 is the same in the Call a Matic. Refer to Toll control type A on the following
pages.
Type B:
programming for that type of phone system in the following pages.
For SX 20
Command 911 has allow 1 restrictions
Command 921 has allow 2 restrictions
Toll allowed becomes allow 3 restrictions
Program COS 9 to have no trunk group access in command 619 reg 1. Whenever a
room exceeds the credit limit or is checked out its COS will be changed to COS 9.
For SX 50
RCS 2 has Allow 2 restrictions
RCS 3 has Allow 3 restrictions
When a room exceeds its credit limit the Call-A-Matic will automatically restrict that
rooms line to Allow 1.
22 rm no 0. This should open that room’s line. Now decide which type of toll
*
open/close line through MSG reg key. The programming for MITEL SX
Allow 1,2,3. For different levels of toll restriction refer to the specific
installer must program phone system so that:-
you must program ARS so that RCS 1 has Allow 1 restrictions
- 48 -
Page 52

Call-A-Matic
Type A - Open close line for MITEL SX 10/20/50
Go into programming mode. At program No. prompt press 116. Select the ENABLED
option by pressing YES or NO key
The next screen allows you to set the dialing speed. No changes are necessary to this
screen. Press ENTER key.
The screen will now show the type of phone system that has been selected. By default,
it will be
If any other type is displayed, press the left or right arrow key repeatedly, till the above is
displayed. Press the ENTER key.
MITEL BASIC OPEN/CLOSE
type.
Press EXIT key to return to main screen.
Now whenever someone is checked in/out or if an extension exceeds its credit limit the
Call a Matic will respectively either open /close the line for the required extension
through the MSG reg function without any operator intervention.
TYPE B - SX20/50 ALLOW 1/2/3
(1 TRUNK GROUP)
Go to program 116. Select the ENABLED option by pressing YES or NO key.
The next screen allows you to set the dialing speed. No changes are necessary to this
screen. Press ENTER key.
The screen will now show the type of phone system that has been selected. By default,
it will be MITEL BASIC OPEN/CLOSE
Press the left or right arrow key repeatedly, till the desired system is displayed. Press
the ENTER key.
MITEL SX20 ALLOW 1 / ALLOW 2 (1trunk group)
MITEL SX20 ALLOW 1 / ALLOW 2 / ALLOW 3 (2 trunks)
MITEL SX50/MS3504/MS50
MITEL SX50/MS51/MS55
Screen shows
MITEL SX… # entries = 0000
View Add Delete Search
Select “Add” option by pressing the left or right arrow keys till the blinking cursor is on
the Add option and then press the YES key. To do RANGE programming, press the
BLUE key at this point. The prompt would now be –
type.
- 49 -
Page 53

Call-A-Matic
First port no. :
Last port No. :
First room no. :
Class of service :
In the above prompts, enter a 2-digit port number for SX20 (Port numbers are in the
range 01 to72) and a 3-digit port number for SX50 (Port numbers are in the range of
001 to 160). Enter a 3-digit room number. The class of service digit is required for SX20
only.
If you want to add a single entry manually, type in the 2 digit equipment no, 1digit COS
no followed by 3 digit room no.
For SX20: 01 1 100 (01= Port no 1=Cos no 100=Room no)
For SX50: 001 100 (001= Port no 100=Room no)
For SX50/100/200
Please note
in length, COS no is one digit in length. For MITEL SX 50 port no is three digits in length
room no is three digits in length
: Equipment numbers are in the range 001 to 160.
Therefore for cct. number 16 in slot 302 you would have
an equipment number of 032.
that for MITEL SX 20 port no is two digits in length, room no is three digits
Type C Allow 1,2,3 for MITEL SX 100/200 Teltronics 319
Installer must first program the generic 319 to have the following attributes for this
feature to work.
1) Enable option 409 (allow ext. to change COS)
2) Assign access code to feature 58 (allow Ext. to change COS)
3) Setup COS values 11, 12, 13 for the following call restrictions
COS 11 should be restrictions to be assigned to Allow 1 (i.e. free calls 0 & 1800)
COS 12 should be restrictions to be assigned to Allow 2 (i.e. Above plus local)
COS 13 should be restrictions to be assigned to Allow 3 (i.e. All calls)
4) Program one extension, which is to be connected to Call-A-Matic to have feature
58 allowed in its COS. Before connecting this line to Call-A-Matic try dialing out
the feature 58 from a regular 2500 set to verify that line can indeed change the
COS of a room.
5) Connect Line to Call-A-Matic
Select Program 116 to ENABLE dial out. (default is DISABLED)
- 50 -
Page 54

Call-A-Matic
Leave the next screen at default value of 1 (Dialing speed)
Select Phone system type to TELTRONICS 319 or DEAN COMMUNICATIONS - the
difference between the two is that for Teltronics system, a guest room’s line will be
restricted to Allow 1, when it is either checked out or if that room exceeds its credit limit.
For MITEL Dean system, a guest room’s line will be restricted to Allow 2 when it is either
checked out or if it exceeds its credit limit.
Type D - Connecting the Call-A-Matic to the SX200 EL/
ML through a Data Set.
1. Enter programming mode on the Call-A-Matic (Press * Followed by the Enter
Key) Use the default password 12345 and then press the ENTER Key. Enter 116
as the program number when prompted to “Enter Program number” in the CallA-Matic.
2. Program the parameters for SX200.
a) ENABLE Toll control (press YES / NO key till the display shows
ENABLE)
b) Set the dialing speed = 1
c) Select the phone type = MITEL SX200 LITE (press the NO key until the
screen displays MITEL SX200 LITE)
d) Choose the Baud rate and Communication specifications (change any
field by pressing NO and to select any field press YES or ENTER. Select
ACK/ NAK required.
3. Programming the SX200 LITE.
a. Select the COS number
b. Form 04 System options : Program the Following
System options/ Timers Status
35. Property Management System ENABLE
27. Room Status Audit DISABLE
33. Room Status DISABLE
c. Enable the following COS options.
• 901 – DTRX Herald.
• 904 – DTRX Complete Message Text.
• 906 – Data SMDR does not apply.
d. Form 29 DTE Profile
• Select a DTE profile number. You will use this profile number in
Form12 – Data Assignment
• Select the SEL option Subform
• Enable the DTRX Echoplex, Editing and edit
Character = 127
e. Form 11 Data Circuit Descriptor
• Select a Circuit Descriptor (CDN). You will use this CDN in form
12 in the Next step.
- 51 -
Page 55

Call-A-Matic
Option Name Value
Session inactivity timer 0
Guard timer 2
Minimum Baud Rate MATCH CALL-A-MATIC
Default Baud Rate MATCH CALL-A-MATIC
Maximum Baud Rate MATCH CALL-A-MATIC
Always use Default Baud rate Yes
DTR off Disconnect timer 5
DTR to CTS Delay timer 100
DTR Forced High YES
RTS Forced High YES
DSR is held high when device idle YES
Originate a DTRX call with Low –high
transition of DTR
Action taken if the Idle DTE has DTR low
( Auto answer)
ASYNC: Keyboard origination allowed DISABLE
ASYNC: ADL auto Baud DISABLE
ASYNC : Flow control XON/ XOFF
ASYNC : Parity MATCH CALL-A-MATIC
ASYNC: Character length MATCH CALL-A-MATIC
ASYNC: Number of Stop Bits MATCH CALL-A-MATIC
DS2100: operating mode ASYNCHRONOUS
f. Form 12 – Data Assignment
g. Form 34, Directed I/O program the PMS
Ext Num Print Out Print out Type Guaranteed
From Form 12 PMS Autoprint NO
NO
Refuse
• Select an available PLID and program the selected Dataset. In
the Data terminal Equipment profile (DTE) field enter the DTE
number you used in Form 29. Use the same CDN you used in
form 11.
- 52 -
Page 56

Call-A-Matic
QUICK SET UP GUIDE
STEP 1 : INTRODUCTION TO PROGRAMMING
To enter the programming mode:-
Press [
Enter [ 1 2 3 4 5 ENTER ]
By entering a program number the system will prompt you through the programming of
the desired option.
Notes:-
ENTER ]
*
The
A sign in the top right hand corner means help is available for this
program #.
Press
STEP 2: INITIALIZING THE UNIT
Press
Enter 9 9 9
STEP 3: DETERMINING THE BAUD RATE OF THE SMDR
If the system is set for:
1200 BAUD (For the MITEL SX20, Command 601 Register 7
8 Data Bits should read 7080810.)
1 Stop Bit
No Parity (For MITEL SX100/200 Check Switch on Scanner
(ORANGE) card to check if 300,1200 Baud.)
then no further action is required and you can continue to Step 5 otherwise: -
key is used to edit any options on screen.
MGMT
REPORT
ENTER
,
*
and help instructions will appear on screen.
Enter Password, then
ENTER
ENTER
- 53 -
Page 57

Call-A-Matic
STEP 4 :
Press
*
ENTER
Enter Password. Press
ENTER
Screen shows:-
1200 8 bits No-parity 1-stop
Use these keys to edit the displayed setting to those of your installation.
If the settings of the phone system match the Call-A-Matic then any valid call in excess
of 1 minute should now print on the printer. If not, the Call-A-Matic BAUD rate does not
match that of the phone system and you should try another setting in program 102.
STEP 5: DETERMINING DIALING PATTERN FOR LOCAL LONG DISTANCE CALLS
a. 7 digits
b. 1 + 7 digits
c. 1 + area code and 7 digits
d. 10 digit locals
e. Home area code calls are local long distance
Default in the system is b.
For areas in the United States where 7 digits can be local and in-state long distance,
you must enter all the local exchanges into the system. This information can usually be
found in the front section of the white pages of your local phone book.
For areas where bordering towns in adjacent states may be local calling, but dialing is
10 digit, you will have to enter all these area code + exchange combinations.
Press 1 0 2
YES NO
Go to program 115.
Enable Local Long distance option.
Select Add option
Add Local exchanges
Press
EXIT
after last entry.
Í Î
Go to Program 115
Enable 10-digit local calls option
Select Add option
Enter area code + exchanges of all local numbers of bordering states.
- 54 -
Page 58

Call-A-Matic
Press
For areas where bordering towns in adjacent states may be local calling, but dialing is
1+10 digit, you will have to enter all these area code + exchange combinations.
Go to Program 115
Enable 1+10 digit local calls option
Select Add option
Enter area code + exchanges of all local numbers of bordering states.
Press
For areas where all calls within the home Area Code are to be dialed with the Area code
+ Exchange and are treated as Local Long Distance calls:
Go to Program 115
Enable Home area code option
Select Add option
Add Home area code
Press
STEP 6 : LOCAL CALL CHARGING
Go to Program no. 201
Enter fixed surcharge. For example 0 0 3 5
Enter First block time and charges. For example 03 0055
Enter Second block time and charges. For example 05 0045
If you want to charge only a fixed rate for all local calls ( however long), then enter 0's
for first and second blocks.
If you want to charge calls only on one block type of charging - for example to charge $
00.55 for every 3 minutes - enter first block as shown above and all 0's for second block.
If you want to charge $ 00.55 for first 3 minutes and then charge $ 00.45 for every
additional 5 minutes of the call, enter second block as shown in above example.
If you do not want to add the surcharge of $ 00.35, enter all 0's for surcharge.
EXIT
after last entry.
EXIT
after last entry.
EXIT
after last entry.
- 55 -
Page 59

Call-A-Matic
CALL-A-MATIC SOFTWARE Version 3.00
1. Call charging style changed
2. PMS operation and reports re-defined
3. Program Nos. 401 to 421 removed
Call charging style
second block minutes-charges, surcharge’ style (as for Local calls in band 201). Hence,
now, 10 digit local calls and 1+10 digit local calls (band 203) may be charged like 201
band calls. All default charges will now have the value “01” in the first block and second
block minutes fields. For example, band 304 had 0034, 0033, and 0155 earlier for first
minute, additional minute and surcharge. Now it would have 010034, 010033, and 0155
The new charging style is applicable to all bands 201-216, 301-362, 501-530, and 601-
630.
Program #204 will copy the common charges for bands 301 to 351 only. The charges
for bands 352 to 362 must be changed individually.
Band 601 is now “User Defined Local Area code” band and 622 is “User Defined Local
numbers” band. Calls to Band 203, 601 and 622 will be tagged as Local calls (with an
`L’) for PMS outputs.
Calls to AREA CODES programmed in Band 601 will be treated as Local calls. The
charges and grace periods programmed for that band would apply to these calls.
Program #125 – PMS Definition
1. When any of the PMS type is selected, the Callamatic prompts with the message
“Load default parameters? YES/ENTER or NO”. When the PMS type is
defined for the first time, press YES or ENTER to load the default parameters for
that PMS type.
2. Next – the Callamatic prompts with the message “Edit PMS parameters?
YES/ENTER or NO”. Press YES or ENTER to change the desired parameters. If
you press NO, the system will skip to the next part of the program. If you change
the default parameters, take care not to LOAD DEFAULT parameters when you
go back into program #125 – press NO at the prompt and complete the rest of
the program options.
3. If a PMS option is enabled, it will automatically set the `Store NO charge calls ?’
option to “NO” under program #105.
4. If the `No parallel printer’ option is selected under the printer set up in program
#125, then program #105 will be bypassed. If you enter 105 at the “Enter
program no.” prompt, you will be asked to set the options under program #125. If
the Parallel printer is selected under program #125, the print-on-fly options may
be set under Program #105.
for all bands made as per the `first block minutes-charges,
- 56 -
Page 60

Call-A-Matic
–
PMS operation
1. Toll control and credit violation check will be done only for manually checked in
rooms. If calls are made from rooms that are not manually checked in, these
rooms will be automatically set up with unlimited credit limit.
2. If the PMS rejects a call, it will be tagged as Unposted. You may select the
“PRINT ERROR MESSAGE” or “DO NOT PRINT ERROR MESSAGE” option as
desired under program #125.
3. The Callamatic attempts to post the first unposted call a maximum of 5 times –
once every time a new call comes in. During each attempt, the Callamatic tries 3
times consecutively to post the same call. If the call is still rejected by the PMS
after 5 attempts, an error message is printed out (if enabled) and will skip this
call during the next attempt at posting previously Unposted calls. These calls
must be posted manually on the PMS.
4. In the PMS Audit report, the Unposted calls will be marked with an asterisk at the
end of the call record.
5. If ACK/NAK is not required, all calls will be treated as posted calls.
6. If TOLL CONTROL is also enabled, the Callamatic will dial out to open and close
the extension during a manual CHECK-IN or CHECK-OUT ONLY. During the
PMS AUDIT report, the room lines are not affected, as there is no DIAL OUT.
Credit Limit Adjustment
The PMS Audit report features Credit Limit Adjustment for the manually Checked-in
rooms. However, the Credit Limit is always maintained in whole Dollars only.
For example if Room #401 was manually checked in with a credit limit of $ 6.00 to start
with and had made calls worth $ 1.10 when the Audit report was run, this will adjust to a
balance credit of $ 5.00, balance charges of $ 0.10. and will appear as
EXTN CR. LIMIT CHARGES BALANCE ADJ. CREDIT ADJ. CHARGES
--------- ------------- ----------------- --------------------- -------------------- ----------------------
401 $ 06 $ 1.10 UNDER $ 4.90 $ 05 $ 0.10
At the time of the next report, if some more calls had been made from that room - for
example, if the total call charges now were $ 2.10, it would appear as
EXTN CR. LIMIT CHARGES BALANCE ADJ. CREDIT ADJ. CHARGES
--------- ------------- ----------------- --------------------- -------------------- ----------------------
401 $ 05 $ 2.10 UNDER $ 2.90 $ 03 $ 0.20
Note that the balance charges of $ 0.10 (from the first report) were added to the $ 2.10
of the second report to get an adjusted balance of $ 0.20 to be carried over from this to
the next report.
The user must keep track of the balance charges from the previous report. The
`Charges’ and `Balance’ columns in this report reflect the figures from the calls made
during the period corresponding to this report only.
If a manually checked in room has exceeded the Credit Limits, at the time of Credit-Limit
(wherever PMS is enabled)
- 57 -
Page 61

Call-A-Matic
adjustment during the PMS Audit report, the Adjusted Credit and the Balance charges
are both set to $ 0.00. For example -
EXTN CR. LIMIT CHARGES BALANCE ADJ. CREDIT ADJ. CHARGES
--------- ------------- ----------------- --------------------- -------------------- ----------------------
401 $ 04 $ 8.21 OVER $ 4.21 $ 00 $ 0.00
MANAGEMENT REPORTS
Whenever PMS is enabled, the following reports are available to the user –
Under ROOM AUDIT KEY (no password)
1. Unposted Guest call report
2. Posted Guest call report
3. Checked in guest report
Under MANAGEMENT REPORT key (under password only)
1. Audit report
2. Unposted Guest call report
3. Posted Guest call report
4. Admin. Call report
5. Checked in guest report
6. Wake-up call report
7. Calls in memory
The AUDIT
the following –
a) If a guestroom was manually checked in, the credit limit will be adjusted and the
b) If the guestroom was not manually checked in, the room would be checked out
c) The Guest report is printed out (in detail or summary) for all rooms that had
d) The Checked in room list after adjustment of credit limits is printed out
e) Admin. extension report is printed out – giving all the Admin. calls extension-wise
f) The PROFIT AND LOSS report (including the Admin. calls) is printed out.
g) The Posted Guest call report (in detail or summary) is printed out.
h) The Unposted Guest call report (in detail or summary) is printed out. If the report
report under PMS may be printed out in Detail or Summary format and does
room would remain checked in.
and deleted from the list of auto-checked in rooms.
charged calls since the last time the report was done.
(in detail or summary) – and all these calls are deleted.
is being printed out in detail, the last column against each record would indicate
the number of times the call was tried to be posted to the PMS.
- 58 -
Page 62

Call-A-Matic
At the end of the report, the Callamatic gives a special beep and asks to confirm
whether calls are to be permanently purged from system memory or not. If the YES or
ENTER key is pressed in response to this question, all the calls are permanently erased
from memory. If the NO key is pressed, these calls will remain in memory and would be
included in the next AUDIT REPORT.
The AUTO NIGHT AUDIT REPORT (Program #109) allows the user to set the
Summary/Detail and Purge/Print only options. The Auto audit report is identical to the
manual Audit report.
ROOM REPORT
print calls made from that room between a particular starting date and time to an ending
date and time.
To invoke this report, press the ROOM REPORT key, select the desired option from
`Detail on printer’ or `Show summary on screen’ or `Summary on printer’ options by
pressing the YES / NO keys.
Enter the room number at the “Room No.: ” prompt. Pressing the BLUE key at this point
will not pop up the “ALL EXTN” option – the “All extn” option is available only under a
non-PMS operation. However, under a non-PMS option, this report is not available.
Once the room number is entered, the next prompt is
“From Date & Time (MMDDhhmm) : ????????”
“To Date & Time (MMDDhhmm) : ????????”
Use the Å key to erase the desired number of question marks and enter the starting
/ending date and time and press ENTER.
This will now give only those calls that were made between these timings (both times
included)
To print all calls for that room – irrespective of when they were made – just hit “Enter” at
both the prompts.
– When a detailed report for a particular room is required, you may
- 59 -
Page 63

Call-A-Matic
AREA CODE LIST
Band State Area codes code
------- ---------------------------- ------------------------------------------------------ ----------
301 - MAINE 207 ME
302 - NEW HAMPSHIRE 603 NH
303 - VERMONT 802 VT
304 - CONNECTICUT 203,860 CT
305 - NEW YORK 516,212,718,914,518 315,607, NY
716,917,631
306 - NEW JERSEY 609,908,201,732,973 NJ
307 - RHODE ISLAND 401 RI
308 - MARYLAND 410,301,240,443,227,667 MD
309 - PENNSYLVANIA 215,717,814,412,610 724 PA
310 - VIRGINIA 703,804,540,757 VA
311 - SOUTH CAROLINA 803,864,843 SC
312 - NORTH CAROLINA 919,704,910,828,336 252 NC
313 - FLORIDA 904,813,407,305,941 954,352, FL
561,850,863
314 - GEORGIA 404,912,706,770 678,470 GA
315 - WEST VIRGINIA 304 WV
316 - OHIO 614,216,419,513,330 440,937,740 OH
317 - ILLINOIS 618,217,309,815,312 708,630, IL
847,773
318 - MICHIGAN 313,517,616,906, 810,248,734 MI
319 - INDIANA 812,317,219,765 IN
320 - KANSAS 316,913,785 KS
321 - DELAWARE 302 DE
322 - ALABAMA 205,334,256 AL
323 - TENNESSEE 615,901,423,931,865 TN
324 - KENTUCKY 502,606 KY
325 - MISSISSIPPI 601,228 MS
326 - WISCONSIN 715,608,414,920,262 WS
327 - LOUISIANA 504,318,337 LA
328 - ARKANSAS 501,870 AR
329 - MISSOURI 417,816,314,573 660,975 MO
330 - IOWA 319,515,712 IA
331 - MINNESOTA 218,612,507,320 MN
332 - TEXAS 214,512,409,915,806,817,903, TX
713,210,281,972,254,830,940,956
333 - OKLAHOMA 405,918,580 OK
334 - NEBRASKA 402,308 NE
335 - SOUTH DAKOTA 605 SD
336 - NORTH DAKOTA 701 ND
337 - MONTANA 406 MT
338 - WYOMING 307 WY
339 - COLORADO 303,719,970,720 CO
340 - NEW MEXICO 505 NM
341 - ARIZONA 602,520,928 AZ
342 - UTAH 801,435 UT
- 60 -
Page 64

Call-A-Matic
343 - IDAHO 208 ID
344 - WASHINGTON 206,509,360,253,425 WA
345 - OREGON 503,541,971 OR
346 - NEVADA 702 NV
347 - CALIFORNIA 619,707,916,415,909,408,209,805, CA
213,714,310,510,562,530,650,760,
925,831,626,323,559,818,949,951,
341, 764, 752, 657, 628,
348 - ALASKA 907 AK
349 - HAWAII 808 HI
350 - MASSACHUSETTS 413,617,508,978,781 MA
351 - WASHINGTON D.C. 202 DC
352 – WEST INDIAN IS. PR
BERMUDA 441
PUERTO RICO 787
CARIBBEAN IS. 809
BAHAMAS 242
BARBADOS 246
ANGUILLA 264
ANTIGUA 268
BR.VIRGIN IS. 284
CAYMAN IS. 345
GRENADA 473
MONTSERRAT 664
DOMINICA 767
ST.LUCIA 758
ST.VINCENT 784
TRINIDAD 868
ST.KITTS 869
JAMAICA 876
US VIRGIN IS. 340
TURKS & CAICOS 649
353 - MANITOBA 204 MB
354 - SASKATCHEWAN 306 SK
355 - ALBERTA, YUKON,
NW TERRITORY 403,867,819,780 AB
356 - ONTARIO 807,416,519,613, 705,905 ON
357 - QUEBEC 418,514,819,450,438 QB
358 - NEW BRUNSWICK 506 NB
359 - BRITISH COLUMBIA 604,250 BC
360 - NEW FOUNDLAND 709 NF
361 - NOVA SCOTIA 902 NS
362 - CNM Islands, GUAM 671,670 GU
- 61 -
Page 65

Call-A-Matic
PREFIXED STATE GROUPS
401 GROUP 1 - NEW HAMPSHIRE, MAINE, VERMONT
402 GROUP 2 - CONNECTICUT, NEW YORK, NJ, RHODE ISLAND
403 GROUP 3 - PENNSYLVANIA, WEST VIRGINIA, VIRGINIA
404 GROUP 4 - SOUTH CAROLINA, NORTH CAROLINA
405 GROUP 6 - MISSISSIPPI
406 GROUP 7 - OHIO, ILLINOIS, WISCONSIN, MICHIGAN
407 GROUP 8 - TENNESSEE, INDIANA, KENTUCKY
408 GROUP 9 - DELAWARE, MARYLAND, WASHINGTON DC
409 GROUP 11- LOUISIANA, ARKANSAS
410 GROUP 12- MISSOURI, IOWA
411 GROUP 13- MINNESOTA, SOUTH DAKOTA
412 GROUP 14- KANSAS, NEBRASKA, COLORADO
413 GROUP 15- TEXAS, OKLAHOMA, NEW MEXICO
414 GROUP 16- MONTANA, WYOMING, IDAHO
415 GROUP 17- WASHINGTON, OREGON
416 GROUP 18- ARIZONA, UTAH, NEVADA
417 GROUP 20- ALASKA, HAWAII, PUERTO RICO
418 GROUP 21- ALBERTA, NW TERR, YUKON, SASKATCHEWAN
419 GROUP 22- MANITOBA, ONTARIO
420 GROUP 24- NEWFOUNDLAND, NEW BRUNSWICK
421 GROUP 25- MEXICO, MEXICO CITY
Note: These bands have been removed in Software version 3.00 and above.
- 62 -
Page 66

Call-A-Matic
INTERNATIONAL COUNTRY CODE BANDS
# Zone Country Code Charges
--------- ---------------- --------------------------------- ------------- ------------------------ 501 Zone 1 VENEZUELA 58 0324,0217,0305
502 Zone 2 U.K. 44 0269,0219,0305
503 Zone 3 ARUBA 297 0273,0134,0305
ST.PIERRE 508
NE ANTILLES 599
504 Zone 4 HONDURAS 504 0369,0231,0305
PANAMA 507
505 Zone 5 BELIZE 501 0371,0231,0305
GUATEMALA 502
EL SALVADOR 503
NICARAGUA 505
COSTA RICA 506
506 Zone 6 HAITI 509 0283,0231,0305
GUADELOUPE 590
FR ANTILLES 596
GUANTANAMO 5399
507 Zone 7 SOUTH AFRICA 27 0337,0234,0305
NIGERIA 234
NAMIBIA 264
508 Zone 8 NETHERLANDS 31 0295,0230,0305
BELGIUM 32
FRANCE 33
SPAIN 34
ITALY 39
LIECHTENSTEIN 41
SWITZERLAND 41
AUSTRIA 43
DENMARK 45
SWEDEN 46
NORWAY 47
FRG GERMANY 49
FAEROE-IS. 298
509 Zone 9 IRELAND 353 0288,0229,0305
510 Zone 10 PERU 51 0364,0236,0305
ARGENTINA 54
BRAZIL 55
CHILE 56
COLOMBIA 57
BOLIVIA 591
ECUADOR 593
FR GUYANA 594
PARAGUAY 595
SURINAME 597
URUGUAY 598
FALKLAND IS. 500
- 63 -
Page 67

Call-A-Matic
511 Zone 11 GREECE 30 0342,0247,0305
GIBRALTAR 350
LUXEMBOURG 352
FINLAND 358
512 Zone 12 HUNGARY 36 0348,0262,0305
GDR 37
YUGOSLAVIA 381
ROMANIA 40
CZECHOSLOVAKIA 42
POLAND 48
TURKEY 90
GREENLAND 299
PORTUGAL 351
ICELAND 354
MALTA 356
CYPRUS 357
BULGARIA 359
BOSNIA 3871
CROATIA 385
ALBANIA 355
SLOVENIA 3866
513 Zone 13 KUWAIT 965 0444,0240,0305
SAUDI-ARABIA 966
UAE 971
514 Zone 14 GUYANA 592 0424,0253,0305
515 Zone 15 MOROCCO 212 0384,0258,0305
LIBYA 218
LIBERIA 231
CAMEROON 237
UGANDA 256
GABON 241
TANZANIA 255
LESOTHO 266
ZIMBABWE 263
ZAMBIA 260
SWAZILAND 268
ANGOLA 244
516 Zone 16 EGYPT 20 0396,0264,0305
ALGERIA 213
TUNISIA 216
GAMBIA 220
SENEGAL 221
IVORY-COAST 225
TOGO 228
BELIZE 229
ZAIRE 243
ASCENSION-IS. 247
KENYA 254
MALAWI 265
BOTSWANA 267
- 64 -
Page 68

Call-A-Matic
517 Zone 17 IRAN 98 0471,0250,0305
JORDAN 962
YEMEN 967
OMAN 968
ISRAEL 972
BAHRAIN 973
QATAR 974
518 Zone 18 AUSTRALIA 61 0435,0250,0305
SINGAPORE 65
JAPAN 81
HONGKONG 852
519 Zone 19 ETHIOPIA 251 0437,0285,0305
SOMALIA 252
520 Zone 20 NEW ZEALAND 64 0513,0270,0305
SAIPAN 670
AMERICAN SAMOA 684
GUAM 671
PAPUA NEW GUINEA 675
FR POLYNESIA 689
521 Zone 21 MALAYSIA 60 0526,0273,0305
INDONESIA 62
PHILIPPINES 63
THAILAND 66
KOREA 82
BRUNEI 673
FIJI 679
N CALEDONIA 687
MICRONESIA 691
MARSHALL-IS 692
MACAO 853
TAIWAN 886
BURMA 95
VIETNAM 84
NORTH KOREA 850
LAO PDR 856
522 Zone 22 MEXICO 52 0273,0224,0305
523 Zone 23 NIGER 227 0396,0345,0305
USSR 7
CAPE VERDE 238
GHANA 233
GUINEA 224
ARMENIA 7885
AZERBAIZAN 7892
BYELORUSSIA 7017
ESTONIA 7014
GEORGIA 7873
TADJIKISTAN 7337
TURKMENISTAN 7363
UKRAINE 7004
UZBEKISTAN 7371
- 65 -
Page 69

Call-A-Matic
524 Zone 24 CHINA 86 0683,0273,0305
525 Zone 25 PAKISTAN 92 0570,0329,0305
SRI LANKA 94
BANGLADESH 880
NEPAL 977
TONGA 676
W SAMOA 685
BHUTAN 975
526 Zone 26 INDIA 91 0545,0329,0305
MALDIVES 960
MAURITIUS 230
REUNION-IS. 262
RWANDA 250
SEYCHELLES 248
527 Zone 27 BURKINA-FASO 226 0448,0374,0305
DIJBOUTI 253
SIERRA-LEONE 232
BURUNDI 252
CEN.AFRICAN.REP 236
CHAD 235
COMOROS 269
CONGO 242
DIEGO GARCIA 246
EQ. GUINEA 240
GUINEA BISSAU 245
MADAGASCAR 261
MOZAMBIQUE 258
SUDAN 249
528 Zone 28 IRAQ 964 0471,0314,0305
YEMEN 969
SYRIA 963
LEBANON 961
529 Zone 29 KIRIBATI 686 0521,0319,0305
530 Zone 30 MALI 223 0400,0360,0305
- 66 -
Page 70

Call-A-Matic
WARRANTY SUMMARY
CALL- A- MATIC
( CALL ACCOUNTING SYSTEM )
EZ Advantage Corp. warrants that the products that it manufactures and sells, will be
free from defects in materials and workmanship, for a period of 1 year from date of
shipment from the factory.
If the product proves defective within the Warranty period, EZ Advantage Corp. will
repair or replace the unit, free of cost.
EXCEPT AS PROVIDED IN THIS SUMMARY OR THE APPLICABLE WARRANTY
STATEMENT, EZ ADVANTAGE CORP. MAKES NO WARRANTY OF ANY KIND,
EXPRESS OR IMPLIED, INCLUDING WITHOUT LIMITATION THE IMPLIED
WARRANTIES OF MERCHANTABILITY AND FITNESS FOR A PARTICULAR
PURPOSE. IN NO EVENT SHALL EZ ADVANTAGE CORP. BE LIABLE FOR
INDIRECT, SPECIAL OR CONSEQUENTIAL DAMAGES
- 67 -
Page 71

Call-A-Matic
FCC Rules
1. The Federal Communications Commission (FCC) has established Rules, which
permit this device to be directly connected to the telephone network. Standardized
jacks are used for these connections. This equipment should not be used on party
lines or coin phones.
2. If this device is malfunctioning, it may also be causing harm to the telephone
network; this device should be disconnected until the source of the problem can be
determined and until repair has been made. If this is not done, the Telephone
Company may temporarily disconnect service.
3. The Telephone Company may make changes in its technical operations and
procedures; if such changes affect the compatibility or use of this device, the
Telephone Company is required to give adequate notice of the changes. You will
be advised of your right to file a complaint with the FCC.
4. If the telephone company requests information on what equipment is connected to
their lines, inform them of:
a. The telephone number to which this unit is connected.
b. The ringer equivalence number. [0.3B]
c. The USOC jack required. [RJ11C]
d. The FCC Registration Number. [SKHIND-32438-DT-E]
Item (b) and (d) are indicated on the label. The Ringer Equivalence Number (REN) is
used to determine how many devices can be connected to your telephone line. In most
areas, the sum of the REN's of all devices on any one line should not exceed five (5.0).
If too many devices are attached, they may not ring properly.
Service Requirements
In the event of equipment malfunction, our Company or an authorized agent should
perform all repairs. It is the responsibility of users requiring service to report the need
for service to our Company or to one of our authorized agents. Service can be obtained
at EZ ADVANTAGE CORP.., 221, Broad Street, Milford, CT 06460 Tel: (203) 876-7978
or Fax (203) 876-2810
- 68 -
 Loading...