

Page 1

©Mission Engineering Inc. 2012. All rights reserved. Trademarks,
registered trademarks, product names, logos and other materials are
the property of their respective owners.
User
Guide
Mission
Engin ring Inc.
www.mission-engineering.com
info@mission-engineering.com
NOTE: Changing SPAN is mainly for use with the raw
taper. For saw and square tapers, the span is not
changed, only the number of times the square/saw
cycles between toe and heel (so instead of eight, it
could be four). When setting extremely tight spans,
it may be necessary to move the treadle a full span
width before pressing the SET button.
INT NAL CV
SWITCH
Expressionator has an internal switch for each
channel to send +5 CV for use with devices that call
for it such as Moogerfoogers, etc.
WARNING: Sending control voltage to a pedal
that does not require it can seriously damage your
pedal! Do NOT flip this switch unless the device
specifically calls for it.
MEMORY
When powering off Expressionator, your current
active channel, ON status, current taper and span for
each channel, is retained.
CL RING
MEMORY
To return Expressionator to factory default, hold
the SET and STOMP down simultaneously for five
seconds. When you see the three channel LEDs cycle,
memory has been cleared.
WARRANTY &
LIABILITY
We offer a one-year warranty on Expressionator.
Contact info@mission-engineering.com for more info.
Due to the nature of this product, we do not take
responsibility for damage to other products.
Thank you for
purchasing the
Expressionator!
Page 2
POW
Expressionator uses the industry standard for power,
a 5.5/2.1mm center negative 9volt jack. To avoid
digital noise, power Expressionator with an isolated
power supply such as Voodoo Labs Pedal Power+ or
CIOKS DC-10. Power consumption ranges from 6080mA.
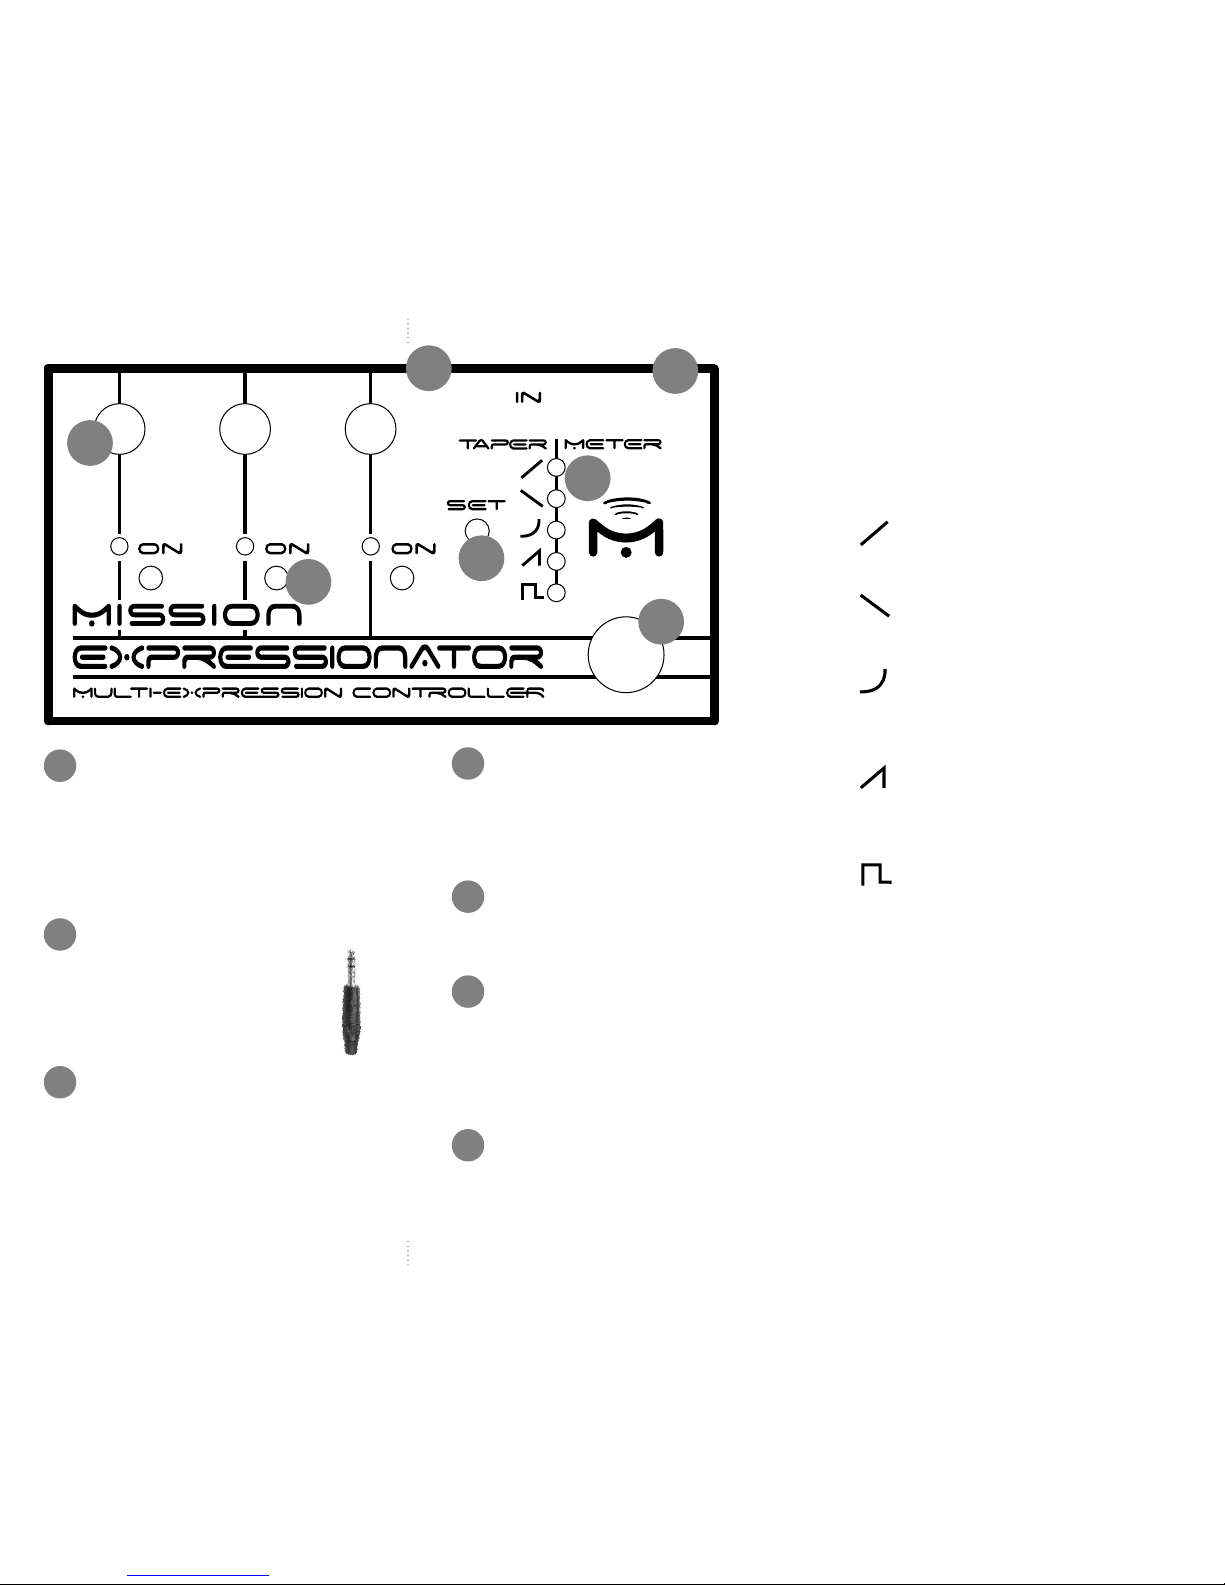
CONNE IONS
All connections are made using TRS plugs. A
TRS cable is identified by two black lines on
the plug. As a general pre-caution, have power
OFF to both effects and Expressionator when
making connections.
CHANNEL LED
This large LED designates the current active channel.
Use the stomp to cycle channels. Your position is
retained when you switch channels (if the ON button
is unlit). Each channel is color-coded (green, yellow,
red) and the meter will change color to siginify the
active channel.
-
9
V
[
B C
3
4
5
6
1
2
7
1
2
3
ON BU ON
Press the ON button to keep that channel transmitting
treadle position, even when you are not on the active
channel. You can have one, two or all three channels
sending treadle position simultaneously.
OMP
Use the stomp to cycle through channels (A, B, C, A,
B, C, etc.)
TAP /M
These five LEDs serve two functions. When using the
expression pedal, they will show treadle position (in
relation to the selected taper). When pressing SET,
the meter will change to a single LED signifying the
taper for that active channel.
S BU ON
Use the set button for choosing a taper for the active
channel and for setting low and high span width per
channel.
4
5
6
7
TAP SELE
Press SET once and the meter will change from
current treadle position to show what taper is
currently selected. To change tapers, click SET two
or more times. After a couple of seconds of non-use
(or if you move the treadle) the display will change to
show treadle position.
RAW - This taper replicates exactly what your
expression treadle is sending. Heel position is zero
lights, Toe position is all meter lights lit.
INVERSE - This taper flips the signal upside
down. Toe is now zero lights and heel position is all
lights lit.
ANTI-LOG - Use this taper for volume pedals
that have been modded with a TRS jack or plugged
in using an “insert”cable. Evens out the steep cliff in
logarithimic pots.
SAW - This taper mimics a saw wave by
ramping from heel to toe eight times in the width
of a single span. Great for filter and whammy-type
effects.
SQUARE - This taper mimics a squarewave
by deleting everything between full toe and full heel,
creating an on/off effect. Like the saw taper, this
happens eight times in the width of one span.
S TING SPAN
1. Select the channel you want to change span width.
2. Hold the SET button until the channel LED starts
blinking slowly.
3. Slow blink siginfies LOW span. Move your treadle
position to the desired lowest position. Press SET.
4. Fast blink siginfies HIGH span. Move your treadle
to the highest desired position. Press SET.
Expressionator will now save and the meter LEDs will
be limited to the span you desiginated.
 Loading...