

Page 1

User Manual
MiVue™ C380D Series
Page 2

Revision: R00
(3/2018)
Disclaimer
The screenshots in this manual may differ between different operating systems and
software versions. You can download the latest User Manual of your product from
Mio™ website (www.mio.com).
Specications and documents are subject to change without notice. MiTAC does not
warrant this document is error-free. MiTAC assumes no liability for damage incurred
directly or indirectly from errors, omissions or discrepancies between the device and
the documents.
Note
Not all models are available in all regions.
Depending on the specic model purchased, the colour and look of your device and
accessories may not exactly match the graphics shown in this document.
MiTAC Europe Ltd.
Spectrum House, Beehive Ring Road,
London Gatwick Airport, RH6 0LG,
UNITED KINGDOM
1
Page 3

Table of Contents
Getting to know your dash cam ............................................................................ 4
Rear camera.................................................................................................... 4
Using your dash cam in a vehicle ......................................................................... 5
Precautions and notices .................................................................................. 5
Inserting a memory card ....................................................................................... 8
Formatting a card ............................................................................................ 8
Connecting to your computer ............................................................................... 8
Turning the dash cam on ...................................................................................... 9
Power button ................................................................................................... 9
Restarting the dash cam ................................................................................. 9
System icons ...................................................................................................... 10
Function keys ..................................................................................................... 10
Switching screens ..........................................................................................11
Setting the date and time ....................................................................................11
Recording in driving mode ...................................................................................11
Continuous recording .....................................................................................11
Event recording ............................................................................................. 12
Camera mode ..................................................................................................... 12
Playback mode ................................................................................................... 13
Safety camera alerts .......................................................................................... 14
Adding a safety camera................................................................................. 14
Updating safety camera data ........................................................................ 15
System settings .................................................................................................. 15
2
Page 4

MiVue Manager .................................................................................................. 18
Installing MiVue Manager .............................................................................. 18
Playing the recording les ............................................................................. 18
For more information .......................................................................................... 21
Caring for your device ................................................................................... 21
Safety precautions......................................................................................... 22
About charging ......................................................................................... 22
About the charger ..................................................................................... 22
About the battery ...................................................................................... 22
About GPS .................................................................................................... 23
Regulatory information .................................................................................. 23
Declaration of conformity ......................................................................... 24
WEEE ............................................................................................................ 24
3
Page 5
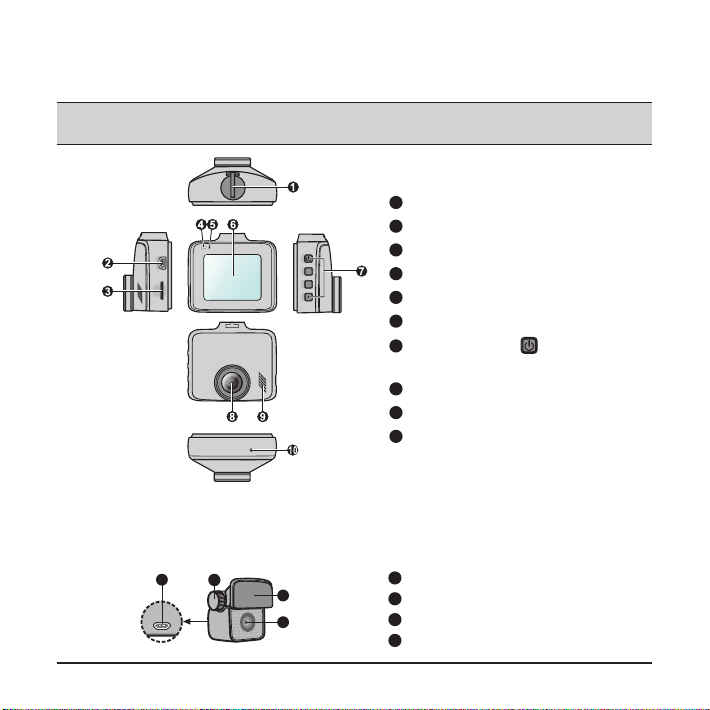
Getting to know your dash cam
Note: The screenshots and other presentations shown in this manual may differ from the ones
generated by the actual product.
1
Device mount socket
2
Mini-USB connector
3
Memory card slot
4
System indicator
5
Microphone
6
LCD screen
7
Power button ( ) /
Function keys
8
Camera lens
9
Speaker
10
Shutdown button
Rear camera
Depending on your model, your device may support a rear camera (may be sold
separately).
1
34
16
1
2
Mounting pad
2
Camera lens
3
Adjustment bolt
4
Micro-USB connector
4
Page 6

Using your dash cam in a vehicle
Precautions and notices
l
Do not operate the device while driving. Using this product does not change the
requirement for a driver to take full responsibility for his or her behavior. This
responsibility includes observing all trafc rules and regulations in order to avoid
accidents, personal injury or property damage.
l
A window mount is needed when using the dash cam in a car. Make sure that
you place the dash cam in an appropriate place, so as not to obstruct the driver’s
view or deployment of airbags.
l
Make sure that no object is blocking the camera lens and no reective material is
placed near the lens. Please keep the lens clean.
l
If the car’s windscreen is tinted with a coating, it may impact the recording
quality.
l
To ensure the highest quality recordings, you are advised to place the dash cam
near the rear view mirror.
l
Select an appropriate location for mounting the device in a vehicle. Never place
the device where the driver’s eld of vision is blocked.
l
If the car’s windscreen is tinted with a reective coating, it may be athermic and
impact the GPS reception. In this instance, please mount your device where
there is a “clear area.”
l
The system will automatically calibrate the G sensor of the device during start-
up. To avoid G sensor malfunction, always turn the device on AFTER you mount
it in the vehicle properly.
5
Page 7
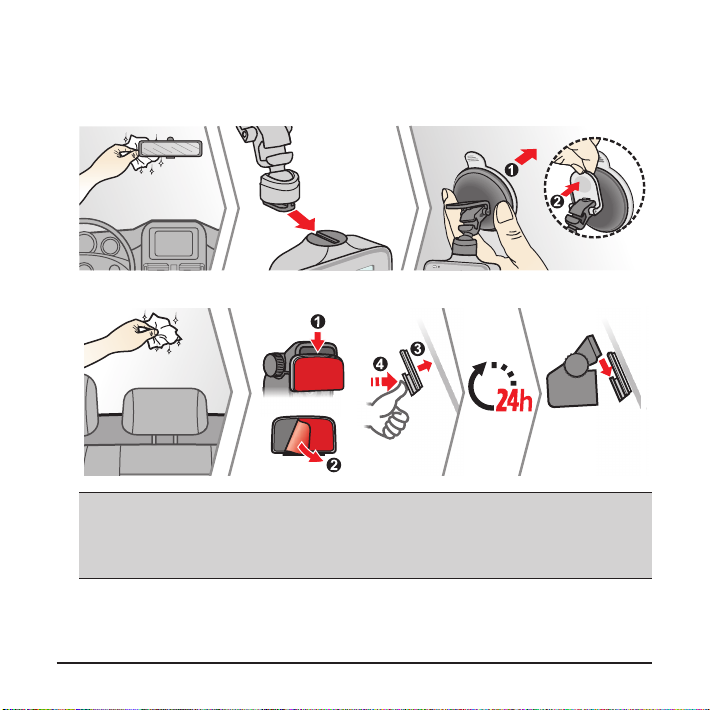
Make sure that your car is parked on level ground. Follow the instructions to mount
your dash cam in a vehicle securely.
1. Mount the dash cam.
2. Mount the rear camera (optional).
Note:
l
Before sticking the mounting pad, it is recommended to clean the windscreen with rubbing
alcohol.
l
If the adhesion of the adhesive tape does not perform well, replace the tape with a new one.
6
Page 8
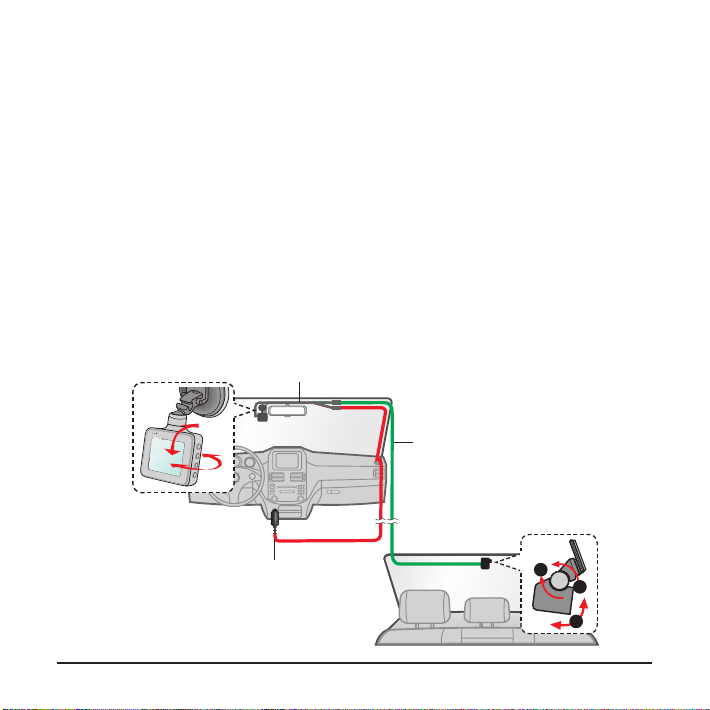
3. Adjust the lens angle.
When adjusting the angle of mounting, make sure that the camera’s view is
parallel with the level ground and the ground/sky ratio is close to 6/4.
4. Connect the cables.
Route the cables through the top ceiling and the A-pillar so that it does not
interfere with driving. Make sure that the cable installation does not interfere with
the vehicle's airbags or other safety features.
If you only use the dash cam (without connecting the rear camera) in your
vehicle, simply connect the car charger to the dash cam and then plug it to the
cigarette lighter.
The installation illustrations are for your reference only. The placement of the
devices and cables may vary depending on the vehicle model. If you encounter
any problems during installation, contact a skilled installer (such as the service
personnel of the vehicle) for assistance.
Y cable
Rear camera cable
Car charger
3
1
2
7
Page 9

Inserting a memory card
Note:
l
DO NOT apply pressure to the centre of the memory card.
l
MiTAC does not guarantee the product’s compatibility with memory cards from all manufacturers.
l
Beforeyoustartrecording,pleaseformatthememorycardtoavoidmalfunctioncausedbyles
not created by the dash cam.
l
Turn the device off before removing the memory card.
You must insert a memory card (not supplied) before you
can start recording. The dash cam supports the Class 10
memory cards with 8 GB – 128 GB capacity.
Hold the card (MicroSD) by the edges and gently insert it
into the slot as shown in the illustration. To remove a card,
gently push the top edge of the card inwards to release it
and pull it out of the slot.
Formatting a card
To format a memory card (all data will be erased), press and select Format.
Connecting to your computer
You can connect the dash cam to your
computer to access data on the memory
card. Connect the dash cam to the
computer via a USB cable (not supplied).
8
Page 10

Turning the dash cam on
Complete the installation according to the instructions in the “Using your dash cam
in a vehicle” section. Once the vehicle engine is started, the dash cam automatically
turns on. The System indicator glows in green when the dash cam is powered.
Power button
Press and hold the Power button for 2 seconds to manually turn the dash cam on
and off.
Restarting the dash cam
If the system does not shut down by keeping the Power button pressed, you can
force it to shut down by inserting a small rod (such as a straightened paperclip) into
the Shutdown button on the device.
9
Page 11

System icons
Various system icons on the status bar at the top of the screen provide the status
information of your device. The icons displayed will vary depending on your device
model and state.
1 2 453
1
Recording indicator
2
Time display
3
Microphone status
4
GPS signal*
5
Current GPS car speed*
* For selected models only.
Function keys
The device provides four function keys to control the corresponding icons displayed
on the LCD screen. The keys' functions may vary on different screens.
Opens the Menu screen
Adds a custom safety (speed) camera
Takes a photo
Manually starts an event recording
Recording screen
Acts as the BACK button
Acts as the ENTER button
Moves to the previous option
Moves to the next option
Menu screen
10
Page 12

Switching screens
Once you connect the rear camera and start recording, you can switch the front and
rear camera images by pressing .
Setting the date and time
To make sure that the date and time of your recordings are correct, check the
settings before you begin recording.
1. Press to access the Settings Menu.
2. Select System > Date/Time.
3. Select Use GPS time or Manual:
l
When you select Use GPS time, select the time zone of your location. The
system will set date and time according to the GPS location.
Note: This feature is not available on all models.
l
When you select Manual, the system will display the date and time setting
screen. Use / to adjust the value of the selected eld; press and
repeat the step until all elds have been changed.
4. When done, press .
Recording in driving mode
Continuous recording
By default, the system will automatically begin with continuous recording in few
seconds after start-up. The System indicator ashes in green and amber alternately
while the recording is in progress.
11
Page 13

When continuous recording is in progress, you can manually stop recording by
pressing . Press to return to the recording screen; the system will start
continuous recording automatically.
The recording may be divided into several video clips; recording will not stop
between video clips. The continuous recordings can be found in the “Video”
category for le playback.
Event recording
By default, if an event happens such as a sudden impact, high speed driving, an
aggressive turn or an accidental crash during continuous recording, the G sensor will
prompt the dash cam to start recording the event.
Note: You can change the sensitivity level of the G sensor by selecting > Video Recording >
G-Sensor Sensitivity.
If you want to manually start an event recording while continuous recording is in
progress, press the Event button ( ).
The event recordings can be found in the “Event” category for le playback.
Camera mode
The dash cam allows you to take a photo.
l
If the recording is in progress, press to take a photo. This function is not
available when the rear camera is connected.
l
Press > Camera > .
The photos can be found in the “Photo” category for le playback.
12
Page 14

Playback mode
To select a video or photo for playback:
1. Press > File Playback.
2. Select the desired type.
3. Press / to select the desired le from the list and then press to start
playback.
4. During playback, you can:
l
While playing videos, press / to play the previous/next video.
l
While viewing photos, press / to display the previous/next photo.
l
Press to return to the list.
l
Press to display the pop-up menu to select:
l
Play / Pause: Starts or pauses the playback.
l
Play rear video / Play front video: The "D" icon displayed on the thumbnail
on the playlist indicates that the video comes with a corresponding rear
video. While playing the video, you can use this option to switch between
the front and rear videos.
Note: Thevideolesrecordedbythefrontandrearcameraswillbesavedseparately
in the corresponding folders of the memory card. If you move or delete a front video, its
corresponding rear video will be processed synchronously.
l
Move to Event: Moves the le to the “Event” category.
l
Delete: Deletes the le.
13
Page 15

Safety camera alerts
Caution: For legal reasons, the safety camera function is not available in all countries.
You can receive alerts to warn you about the
locations of safety (speed) cameras which will
enable you to monitor your speed through these
areas.
When a safety camera appears and is positioned in
the detectable direction, you will receive alerts. The
screen will display the visual alert and you will also
receive audio warnings.
When the alert sound setting is set to Beep:
l
When your car approaches a safety camera, you will receive a normal beep alert.
l
When your car approaches a safety camera at a speed over the set threshold,
you will receive a persistent beep alert until your car speed drops lower than the
appropriate speed limit.
l
When your car passes through a safety camera, you will be notied by a different
beep alert.
You can change the settings about how you want to receive the safety camera alerts.
See the “System settings” section for information.
Adding a safety camera
Note:YoucanaddacustomsafetycameraonlywhenaGPSxisestablished.
Your dash cam allows you to customise the safety camera database. You can add
up to 100 custom safety cameras in your dash cam.
Follow the steps to congure a custom safety camera:
km/h
110
108
500m
14
Page 16

1. To add a custom safety camera in the current location, press on the recording
screen.
2. The next time when you pass by the location, you will receive alerts by the dash
cam.
3. To view the information of the custom safety camera, select > SafetyCam >
Custom SafetyCam and then select the safety camera that you want to check.
4. Press to remove the custom safety camera from the dash cam.
Updating safety camera data
MiTAC does not warrant that all types and locations of safety camera data are
available as cameras may be removed, relocated or new cameras installed.
Occasionally, MiTAC may offer you updates of safety camera data. Visit the Mio
website for available downloads and follow the instructions to complete update.
System settings
Note: Not all setting items and options are available for all models.
To customise the system settings, press .
l
File Playback
Plays the recorded videos and photos.
l
Camera
Press to enter Camera mode.
l
Sound Recording
Sets if you want to include sounds in the recordings. The default setting is On.
15
Page 17

l
SafetyCam
Sets how you want to be notied of safety cameras. The available settings
include:
l
Alert Sound: Turns on (Beep or Voice) or off (Mute) the alert sound.
l
Alert Distance: The system will alert you at a preset distance (Short,
Medium or Long) when a safety camera is detected.
l
Alert Method: Sets the alert distance function according to the current GPS
car speed (Smart Alert) or the speed limit (Standard Alert).
l
Threshold: Sets the speed value for the dash cam to start offering alerts.
l
Cruise Speed Alert: Sets the limit for the cruise speed. When you drive at a
cruise speed over the set value, you will receive alerts by the dash cam.
l
Custom SafetyCam: Lists all custom safety cameras which are sorted by the
created time.
l
Video Recording
Changes the settings of recording, including:
l
Video Clip Length: Sets the length of each video clip for a continuous
recording (1 min, 3 min or 5 min).
l
WDR: Enables the Wide Dynamic Range (WDR) function to improve the dash
cam's image quality under high-contrast lighting conditions.
l
EV: Sets the exposure level (-1 – +1) to adjust the brightness of the image.
The default setting is 0.
l
Frequency: Sets the frequency to match the icker frequency of the local
power supply when recording.
l
G-Sensor Sensitivity: Sets the sensitivity level (6 levels, from Low to High)
of the G sensor that allows automatic triggering of the event recording while
continuous recording is in progress.
16
Page 18

l
Stamps: Sets the information (Coordinates or G-Sensor) that will be
displayed on the recorded video.
l
Speed stamp: Displays the driving speed on the recorded video.
l
Text stamp: Displays customisable text information.
l
System
Allows you to change the system settings of the device.
l
Satellites: Displays the status of the GPS/GLONASS signal reception. You
can press and then select GPS or GLONASS for better signal reception if
the need arises.
l
Date/Time: Sets the system date and time.
l
System Sound: Enables or disables system notication sounds.
l
Welcome Sound: Enables or disables the notication sounds during start-up.
l
Volume: Adjusts the volume level.
l
LCD Standby:
l
Always On: Keeps the LCD on.
l
10 sec / 1 min / 3 min: Sets the timer for the LCD to turn off automatically
after recording starts.
l
Standby: Turns off the LCD (in specied time) but still displays the time
and speed information.
l
Language: Sets the language.
l
Distance Unit: Sets the preferred distance unit.
l
Storage Allocation: The system provides 3 default memory congurations
to store the videos and photos. Select the proper conguration based on
your usage.
l
Restore to Defaults: Restores the system settings to the factory defaults.
17
Page 19

l
Version: Displays the software information.
l
Format
Formats a memory card. (All data will be erased.)
MiVue Manager
MiVue Manager™ is a tool for you to view the videos recorded on a MiVue dash cam.
Note: Not all features are available for every model.
Installing MiVue Manager
Download MiVue Manager from the Support page of Mio website (www.mio.com/
support) and follow the on-screen prompts to install it. Make sure to download the
correct software version (Windows or Mac) according to your computer's operating
system.
Playing the recording les
1. Remove the memory card from the dash cam and access the card on the
computer via a card reader. You are advised to copy the recording les to your
computer for backup and playback.
2. Start MiVue Manager on the computer.
l
By default, MiVue Manager shows the calendar and the le list on the right.
l
When a recording le exists, you will see the date marked with “ .” Click that
date to display the les that were recorded on that date.
l
You can select the le type to display: Event / Normal / Parking.
l
To display all les in the current folder, click All. To return to the calendar
view, click Calendar.
3. Double-click the desired le on the le list to start playback.
18
Page 20

4. The playback controls are described as follows:
1 2 3 4 5 6 7
1
Skips to the previous / next le on the list.
2
Starts or pauses the playback.
3
Changes the playback speed to 1/4x, 1/2x, 1x (default), 1.5x, or 2x.
4
Mutes or unmutes the volume.
5
Adjusts the volume level.
6
Plays the video in full screen.
7
Displays the playback progress. You can click on a point along the track bar
to move directly to a different location for the playback.
5. During playback, you can view more driving information from the dashboard panel
and the G sensor chart that are displayed below the video playback screen.
l
On the dashboard panel, click to display the map screen.
l
The G sensor chart displays data in 3-axis waveform about the car’s shift
forward/backward (X), to the right/left (Y) and upward/downward (Z).
Note: The map screen may not display when the computer is not connected to the Internet or
when your MiVue model does not support the GPS function.
6. The tool bar allows you to do the following:
1 2 3 4 5 6 7
1
Selects the folder that stores the recording les.
19
Page 21

2
Previews and prints the current video image.
3
Saves the selected les to the specied location on your computer.
4
Captures and saves the current video image to the specied location on your
computer.
5
Opens the Settings Menu.
l
Change Language: Sets the display language of MiVue Manager.
l
Change Skin: Sets the colour scheme of MiVue Manager.
l
Check for Update: Checks if there is any new version of MiVue
Manager. (Internet access is required for this feature.)
l
About: Displays the version and copyright information of MiVue
Manager.
6
Exports the GPS information of the selected le in the KML format to the
specied location on your computer.
7
Uploads the selected le to Facebook / YouTube™.
20
Page 22

For more information
Caring for your device
Taking good care of your device will ensure trouble-free operation and reduce the
risk of damage.
l
Keep your device away from excessive moisture and extreme temperatures.
l
Avoid exposing your device to direct sunlight or strong ultraviolet light for
extended periods of time.
l
Do not place anything on top of your device or drop objects on your device.
l
Do not drop your device or subject it to severe shock.
l
Do not subject your device to sudden and severe temperature changes. This
could cause moisture condensation inside the unit, which could damage your
device. In the event of moisture condensation, allow the device to dry out
completely before use.
l
The screen surface can easily be scratched. Avoid touching it with sharp objects.
Non-adhesive generic screen protectors designed specically for use on portable
devices with LCD panels may be used to help protect the screen from minor
scratches.
l
Never clean your device with it powered on. Use a soft, lint-free cloth to wipe the
screen and the exterior of your device.
l
Do not use paper towels to clean the screen.
l
Never attempt to disassemble, repair or make any modications to your device.
Disassembling, modifying or any attempt to repair could cause damage to your
device, may inict bodily harm or damage to property and will void any warranty.
l
Do not store or carry ammable liquids, gases or explosive materials in the same
compartment as your device, its parts or accessories.
l
To discourage theft, do not leave the device and accessories in plain view in an
unattended vehicle.
l
Overheating may damage the device.
21
Page 23

Safety precautions
About charging
l
Use only the charger supplied with your device. Use of another type of charger
may result in malfunction and/or danger.
l
This product is intended to be supplied by a LISTED Power Unit marked with
“LPS”, “Limited Power Source” and output rated + 5 V dc / 1.0 A.
About the charger
l
Do not use the charger in a high moisture environment. Never touch the charger
when your hands or feet are wet.
l
Allow adequate ventilation around the charger when using it to operate the
device or charge the battery. Do not cover the charger with paper or other objects
that will reduce cooling. Do not use the charger while it is inside a carrying case.
l
Connect the charger to a proper power source. The voltage requirements are
found on the product case and/or packaging.
l
Do not use the charger if the cord becomes damaged.
l
Do not attempt to service the unit. There are no serviceable parts inside. Replace
the unit if it is damaged or exposed to excess moisture.
About the battery
CAUTION! This unit contains a non-replaceable internal Lithium Ion battery. The
battery can burst or explode, releasing hazardous chemicals. To reduce the risk of
re or burns do not disassemble, crush, puncture or dispose of in re or water.
l
Use a specied battery in the equipment.
l
Important instructions (for service personnel only)
l
Caution! Risk of explosion if battery is replaced by an incorrect type. Dispose
of used batteries according to the instructions.
l
Replace only with the same or equivalent type recommended by the
manufacturer.
22
Page 24

l
The battery must be recycled or disposed of properly.
l
Use the battery only in the specied equipment.
About GPS
Note: This feature is not available on all models.
l
GPS is operated by the United States government, which is solely responsible
for the performance of GPS. Any change to the GPS system can affect the
accuracy of all GPS equipment.
l
GPS satellite signals cannot pass through solid materials (except glass). When
you are inside a tunnel or building, GPS positioning is not available. Signal
reception can be affected by situations such as bad weather or dense overhead
obstacles (such as trees, tunnels, viaducts and tall buildings).
l
The GPS positioning data is for reference only.
Regulatory information
For regulatory identication purposes, MiVue C380D Series is assigned a model
number of N578D.
Products with the CE marking comply with the Radio Equipment Directive
(RED) (2014/53/EU) - issued by the Commission of the European
Community.
Compliance with these directives implies conformity to the following European
Standards:
EN 50498: 2010
EN 55032: 2015+AC: 2016, Class B
EN 55024: 2010
EN 61000-4-2: 2009 / IEC 61000-4-2: 2008 ED. 2.0
23
Page 25

EN 61000-4-3: 2006 +A1: 2008+A2: 2010 / IEC 61000-4-3: 2010 ED. 3.2
EN 61000-4-4: 2012 / IEC 61000-4-4: 2012 ED. 3.0
EN 61000-4-6: 2014 / IEC 61000-4-6: 2013 ED. 4.0
EN 61000-4-8: 2010 / IEC 61000-4-8: 2009 ED. 2.0
EN 301 489-1 V2.1.1(2017-02)
Draft EN 301 489-19 V2.1.0(2017-03)
ISO 7637-2: 2011
EN 303 413 V1.1.1(2017-06)
The manufacturer cannot be held responsible for modications made by the User
and the consequences thereof, which may alter the conformity of the product with
the CE Marking.
Declaration of conformity
Hereby, MiTAC declares that this N578D is in compliance with the essential
requirements and other relevant provisions of Directive 2014/53/EU.
WEEE
This product must not be disposed of as normal household waste, in
accordance with the EU directive for waste electrical and electronic
equipment (WEEE – 2012/19/EU). Instead, it should be disposed of by
returning it to the point of sale, or to a municipal recycling collection point.
24
 Loading...