

Page 1

Digital Classic Camera Leica M3
Instruction manual
Page 2
Digital Classic Camera Leica M3
• English
Page 3
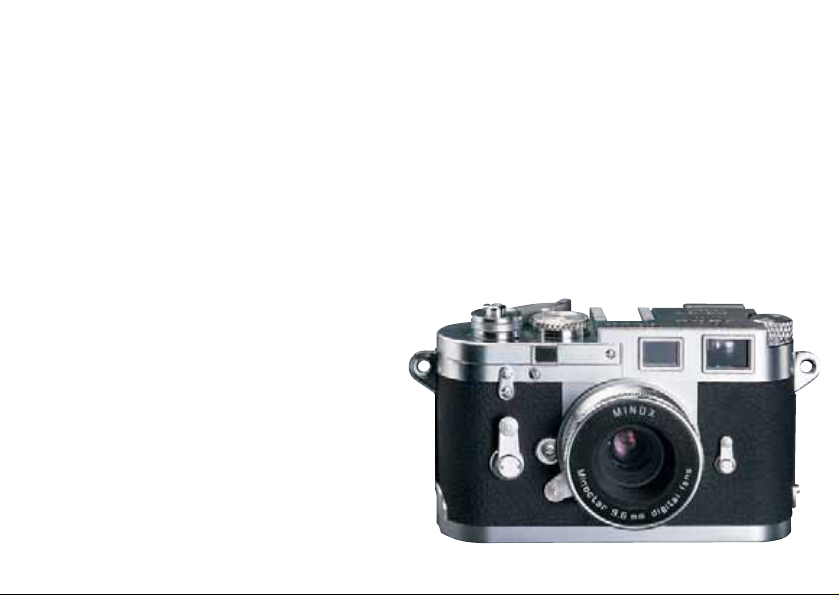
Digital Classic Camera Leica M3
5
4
6
7
MINOX Classic Camera Flash
Optionally available
8
10
11
9
Page 4

Contents
Introduction Page 3
For users in the United States Page 4
For users in Canada Page 4
Getting to know your camera Page 5
The right power supply Page 5
- Important information on batteries
- Inserting the batteries
General Instructions Page 6
Installation of the PC-Software Page 7
- Installing ArcSoft PhotoImpression
- Connecting the DCC to your PC
Using the DCC Page 10
- LCD status display
- Symbols and explanations
- Warning signals
Shooting and deleting images Page 11
- Distance setting
- Shooting images with flash
- Shooting images with the self-timer
- Sources of error when photograhing
- Deleting images
2
Altering the image compression Page 13
Video conference Page 14
Image processing on the PC Page 15
- Loading still images
- Image download using the Camera Wizard
- Image download using ArcSoft PhotoImpression
- Saving images with ArcSoft PhotoImpression
- Video with ArcSoft PhotoImpression
- Image processing on the MacOS
Uninstalling the software Page 16
Uninstalling drivers Page 17
Camera maintenance Page 17
- Places to avoid
- If the camera is not used for a prolonged
period of time
- Travelling overseas
- Cleaning your DCC
Troubleshooting Page 19
Technical data Page 20
Technical support Page 21
Conditions of warranty Page 22
Page 5

Introduction
Congratulations on the purchase of your new MINOX Digital Classic Camera Leica M3.
Like all other MINOX products this digital camera boasts
the traditional values fostered by the house of MINOX.
It combines functionality in the smallest possible space
with maximum quality. We have miniaturized the
classic camera of the fifties - the Leica M3 - and have
given it a modern, digital interior.
Simple and fast operation make the MINOX DCC ideal
for digital photography. It also guarantees unlimited
photographic fun with its distinguished striking looks.
The MINOX Digital Classic Camera – DCC for short – is
now ready to become your permanent companion and
capture wonderful memories in a very modern way.
We wish you great enjoyment with your new camera.
Note
The product designation „MINOX Digital Classic Camera
Leica M3 2.1“ is always abbreviated in these operating
instructions as „DCC“.
3
Page 6

For users in the United States
FCC Declaration of Conformity
This device is in conformity with Part 15 of FCC rules.
Operation of the device is subject to the following two
conditions: (I) this device may not cause harmful interference, and (II) this device must accept any interference received, including interference that may cause
undesired operation.
to try to correct the interference by one or more of the
following measures:
- Reorient or relocate the receiving antenna
- Increase the separation between the equipment
and the receiver
- Contact the equipment into an outlet on a
circuit different from that to which the
receiver is connected
- Consult the dealer or an experienced
radio/TV technician for help
Warning
This device has been tested and found to comply with
the limits for a Class B digital device, pursuant to Part
15 of the FCC rules.These limits are designed to provide
reasonable protection against harmful interference in a
residential installation. This equipment generates, uses
and can radiate radio frequency energy and if not
installed and used in accordance with the instructions
may cause harmful interference to radio or television
reception. However, there is no guarantee that interference will not occur in a particular installation. If this
equipment does cause interference to radio and
television reception, which can be determined by
turning the equipment off and on, the user is encouraged
4
Warning
Any changes or modifications to the unit not expressly
approved in this manual shall make the warrantee null
and void.
For users in Canada
Warning
This Class B device complies with the specifications of
the Canadian ICES-003.
Page 7

Getting to know your camera
The right power supply
1. Shutter release
2. Viewfinder
3. Lens
4. Distance setting
5. USB Port
6. On/Mode button
7. LCD status display
8. Battery compartment
9. Mount for tripod
10. Connection to external flash
11. MINOX Classic Camera Blitz (Optional)
Note
The MINOX Classic Camera Flash (10) is optionally
available and not included in the scope of delivery.
Order number: 69125
The DCC requires a CR2 battery. Do not use rechargeable
batteries. These could damage your camera and make
the warrantee null and void. Please read the following
important instructions and battery information prior to
inserting the battery in your digital camera.
Important information on batteries
• All images taken remain saved on your digital
camera, even when you remove the battery from
the camera.
• Remove the battery prior to storing the camera or
if you do not plan to use it for a prolonged period
of time.
• Never use rechargeable batteries.
• Only replace the battery when the camera is
switched off.
• The camera automatically switches back into
off mode after 30 seconds of non-use, the
LCD display goes blank. All images taken are
then saved in the integrated memory.
5
Page 8

Inserting batteries
1. Open the battery compartment of your DCC.
2. Take a new CR2 battery and place it in the battery
compartment. Pay attention to the correct pole
alignment (+)(-) which is indicated on the side of
the battery.
3. Close and lock the battery compartment.
Trademark information
MS-DOS and Windows are registered trademarks of
Microsoft Corporation in the U.S.A. and other countries.
Windows is an abbreviated term which refers to the
Microsoft Windows Operation System. Other company
or product names are trademarks or registered trademarks of the respective corporate enterprise.
General Instructions
Notes on copyright
Images taken with your digital camera are not to be
used in any way which may infringe upon copyright
laws, apart from the use of a purely private nature.
Please observe that several restrictions concerning the
photographic recording of stage performances, entertainment events and exhibitions even apply to private
use. As user you are also requested to observe that the
transfer of memory cards which contain images or data
subject to copyright laws is only permitted within the
framework of the respective restrictions of said laws.
6
Liquid Crystal Display (LCD)
If the glass of the LCD display is cracked or broken
always handle any discharging liquid crystals with great
caution. If one of the situations listed below should
occur, please proceed as specified:
- If liquid crystals should contact your skin always wipe
the affected area with a cloth and then wash the skin
thoroughly with soap and running water.
- If liquid crystals should contact your eyes rinse the
affected eye with clean water for 15 minutes and
then consult a doctor.
- If you should swallow liquid crystals rinse out your
mouth with water. Drink large quantities of water to
initiate vomiting. Then contact a doctor.
Page 9

Notes on possible electrical interference
Please observe that the switched on digital camera
may cause interference in other electronic equipment in
e.g. hospitals or aircraft. Please observe the applied
rules and warnings given in the respective areas in each
case.
Important note for
At the time of this product’s release,Microsoft strongly encouraged companies to submit their hardware solutions for
certification. If a hardware device driver is not submitted
for Microsoft certification, a warning message appears. You
may see this warning message, when installing the driver or
update. If you do, you may choose to click the continue
anyway-button. Minox has tested this driver or update on
Windows XP and it does not impair or destabilize your
computer.
Windows XP
Installation of the PC-Software
Before you install the software please check the computer requirements listed below in order to ensure that
your computer is compatible with the software provided.
Computer requirements
System requirements Windows 98/SE/ME/2000/XP
MacOS 9.x
CPU Pentium Processor
from 350 Mhz or higher
RAM 64 MB RAM or higher
Available hard disk space 90 MB (for 98/SE/ME)
128 MB (for 2000/XP)
USB interface USB Port
CD installation CD-ROM drive
Monitor 16-Bit color VGA Display
Important
As a result of possible incompatibility of USB hubs or
USB interface modules, PC errors may occur during the
connection or data transmission. We are therefore not
able to guarantee perfect compatibility and we exclude
liability for damage and loss of data.
7
Page 10

Contents of the DCC CD-ROM
• DCC Camera Driver for Windows 98/SE/ME/XP
and MacOS 9.x
• Web-Cam driver for Windows 98/SE/ME/XP
• ArcSoft PhotoImpression 3.0 Software for
image editing
(Not included in Airline-Version)
• User manual as PDF
• Acrobat Reader
2. Select the language you wish to use.
3. Click on “Continue” on the start page to continue
the Setup.
4. Click on “Yes“ on the page with the terms and
conditions, after reading them, to accept these
conditions and to continue with the Setup.
5. Select the storage location on your PC where you
wish to install the software and click on “Next“.
6. The Setup bar appears. Please wait until this
bar disappears to continue.
7. Click on “Finish“ to conclude the setup.
Note
Windows 2000, Me and XP, and MAC OS employ MASS
STORAGE method to upload images from camera to computer. Therefore, no Camera Driver is necessary for image
transfer. MAC OS only support still image transfers.
There is no WEB-CAM feature on MAC OS.
Installing ArcSoft PhotoImpression
Please proceed according to the instructions specified
below to install the ArcSoft PhotoImpression software.
1. Insert the enclosed DCC CD-ROM in the CD-ROM
drive of your computer
8
Note
The ArcSoft PhotoImpression Software is not included in the
Airline-Version CD. You may use other image editing software as well. Please contact our customer service and ask
for the ArcSoft PhotoImpression CD-Rom, if requested.
Connecting the DCC to your PC
For connection to the PC the DCC must always be in
camera mode (LCD display: 00), except in WebCam
mode or during video conferences.To download images
onto the PC connect the DCC to your computer using
the provided USB cable. Please make sure when you are
connecting the camera to the computer the first time
Page 11

that the DCC CD-ROM is positioned in the CD-ROM
drive. Please follow the instructions given below for
connecting your camera to your PC.
Note
Install the software before you provide the USB
connection (for the first time)!
DCC Driver (for Windows 98/SE)
1. Insert the enclosed DCC CD-ROM in the CD-ROM
drive of your computer.
2. Insert the smaller USB connector in the USB port of
your DCC (on the left hand side of the camera).
3. Insert the larger USB connector in the USB port
on your computer.
4. The DCC is BUS-powered. This means the USB port
provides the DCC with power as soon as it is connected to the computer and switches it on automatically.
5. The computer/operating system recognizes the DCC
as a new unknown device. You are then requested to
install the appropriate driver.
6. Follow the instructions on the screen to complete
the installation of the driver for still pictures.
Note
When employing Windows 98/SE, make sure that the DCC
CD-ROM is in the CD-ROM drive before you connect your
DCC to the computer for the first time!
For Windows 2000/ME/XP or MacOS 9.x
This operating system does not require any driver installation for the DCC. You do not have to install any driver.
Web-Cam Driver
Insert the DCC CD-ROM in your CD-ROM drive and connect
the DCC to your computer using the provided USB cable.
1. Turn on your DCC Leica M3 and press the
On/Mode button to scroll to the WebCam
mode (with LCD displaying VC).
2. Insert the smaller USB connector into the USB port of
your DCC (on the left hand side of the camera)
3. Insert the larger USB connector into the USB port
on your computer.
4. The DCC is BUS-powered. This means the USB port
provides the DCC with power as soon as it is connected to the computer and switches it on automatically.
5. The computer/operating system recognizes the
DCC as a new device.You are then requested to
install the appropriate driver.
9
Page 12

6. Follow the instructions on the screen to complete
the installation of the WebCam driver.
Note
Web-Cam Driver applies to all Windows OS versions.
Make sure that the DCC CD-ROM is in the CD-ROM drive
bevore you connect your DCC to the computer for the
first time!
Using the DCC
FL Flash is activated
dL Delete last image
dA Delete all images
OF Switch off
VC Video Conference
Lb Low battery
LCD status display
The LCD display on your DCC indicates the operating
mode, compression rate, flash mode, number of images
taken and etc. Below please find Table 1 for details:
Symbols and explanations
00 2 digit Image counter (camera mode)
SP/Fn Super / Fine mode
Hr/Lr High / Low resolution
St Self-timer is activated (10 seconds)
10
Warning signals
Replace battery
Once the power of the battery drops below a standard
power level, the warning signal “Lb“ is displayed. This
means the battery of your DCC will soon be empty and
must be replaced. You will hear an acoustic signal and
ten seconds later the camera will automatically switch
into off mode.
Memory full
When the image memory of your DCC is full, the image
counter displays “00“.
Page 13
Important information on use
The camera automatically switches back to camera
mode (with LCD displaying 2 digits) if there is no signal
within ten seconds and the camera is not connected to
the PC.
Shooting and deleting images
Note
After an image is captured, the image counter will show a
decrement. The number of decrement depends on the size
of the image captured. It will decrease by at least 1. For
Super / Fine High Resolution mode,the image counter will
decrease from 40. For Fine Low Resolution mode, the image counter will decrease from 60. For Super Low Resolution mode, the image counter will decrease from 99.
Prior to shooting pictures with the DCC always check
that the battery has sufficient power. Always observe
the following instructions when shooting images:
1. Switch on your DCC by pressing the On/Mode
button once. The LCD display of your camera
shows the image counter. The image counter counts
down and indicates the number of shots left.
2. Compose your picture subject in the viewfinder.
3. Hold the camera steady and press the shutter
release to shoot the image.
4. An acoustic signal confirms the image has been
taken correctly.
5. When you let go off the release button you will see
that the image counter now indicates one (or more)
shot less which shows that the picture has been taken.
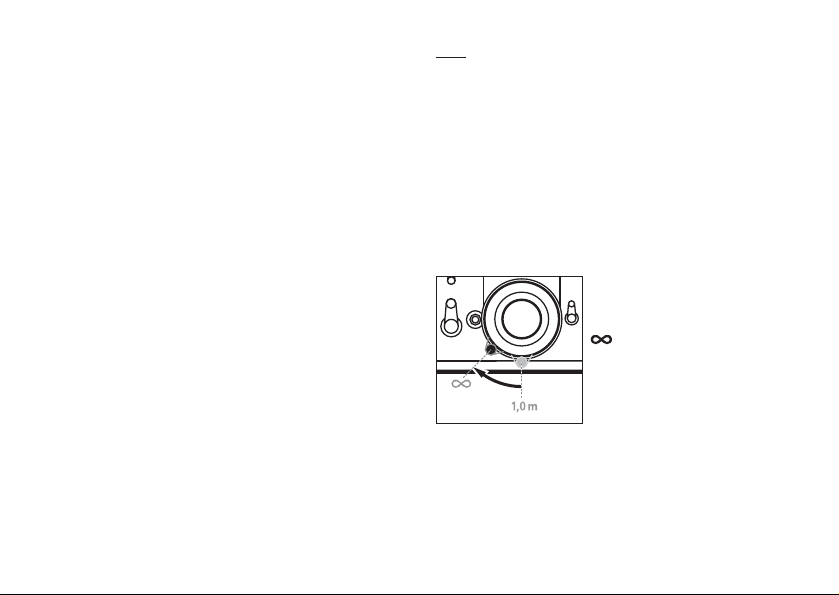
Distance setting
The lens of the MINOX DCC Leica M3 allows you to
select and manually set two depths of field of your choice.
To do this you simply have to
turn the small lever on the lens
to the desired setting:
(infinity) = depth of field
from 1.5 m to infinity (4.92 feet
to infinity)
1.0 m = depth of field from 0.7
m to 1.5 m (2.30 to 4.92 feet)
Shooting images with flash
There is no flash integrated in the DCC. If you wish to
shoot images in unfavorable light conditions (e.g. twilight
or in dark-lit areas), you will require the MINOX Classic
11
Page 14

Camera flash which is optionally available from Minox
dealers. Order number 69125
How to connect the flash to the camera
and shoot photos
1. Connect and securely fasten the Minox Classic
Camera Flash to your DCC. Make sure that your
Minox Classic Camera Flash is turned OFF when
connecting it to your DCC. Only switch the Minox
Classic Camera Flash ON when it is securely fasten
to the DCC. Make sure that correct battery is
inserted into your Flash unit.
2. Switch on your DCC by pressing the On/Mode button.
3. Press down the On/Mode button
until the flash mode “FL“ appears.
Press the shutter release to confirm and set this mode.
4. Compose your subject through the viewfinder.
5. Hold the camera steady and press the shutter
release to shoot the picture. An acoustic signal
confirms the image has been taken correctly.
6. When you let go off the shutter release you will see
that the image counter indicates one (or more) shot
less which confirms that the picture has been taken.
Note
Once the Flash Mode is selected, the camera will remain
in Flash Mode until the camera is switched off.
12
Shooting images with the self-timer
You can also use the DCC with the 10-second self-timer
and put yourself in the picture, for example. To do this
please follow the below instructions.
1. Switch on your DCC by pressing the On/Mode button.
2. Press the On/Mode button until the
self-timer mode “St“ appears.
3. Press the shutter release to confirm and
set this mode.
4. Compose your subject through the viewfinder. Place
your DCC on a flat and steady base.
5. Press the shutter release once and you will hear short
beeping signals. Now you have ten seconds to put
yourself in the picture before the shutter is released to
capture the image.After each shot with the self-timer
the camera automatically switches back to the basic
camera mode (with LCD displaying 2 digits).
Sources of error when photograhing
• Always make sure your finger, the camera strap or
other objects are not covering the lens while you are
shooting images.
• Always make sure that the lens is clean. If it is
soiled, follow the instructions given in chapter
“Camera maintenance“ for cleaning the lens.
Page 15

• Hold the camera steady during the shot to avoid
blurred images.
Deleting images
With the DCC you can either delete the last taken image
or you can also delete all of the stored images. Please
follow the instructions given below to delete images
from the memory.
Delete the last image taken
1. Switch your DCC on by pressing the On/Mode button.
2. Press the On/Mode button untill the mode “dL“ for
“delete last image“appears.
3. The symbol “dL“ flashes until you confirm this mode
you wish to use.
4. Press the shutter release to confirm and set this
mode. The flashing stops and “dL“ is displayed.
5. Press the shutter release again to delete the image.
Delete all images
1. Switch your DCC on by pressing the On/Mode button.
2. Press the On/Mode button until the mode
“dA“ for “delete all images“ appears.
3. The symbol “dA“ flashes until your confirm
this mode you wish to use.
4. Press the shutter release to confirm and set this
mode. The flashing stops and “dA“ is displayed.
5. Press the shutter release again to commence the
deleting of all images.
Altering the image compression
To allow you to store as many images in your digital
camera as possible the images taken are automatically
compressed.
The DCC allows you to alter the degree of image compression before taking the shot (compression rate). Always follow the following instructions for this purpose.
1. Switch on your DCC by pressing the On/Mode button.
2. Press the On/Mode button until the mode “SP“ or
“Fn“ appears.
3. If it is in Super Mode, the display indicates “Fn”.
If it is in Fine Mode, the display indicates “SP”.
4. Press the Shutter Release to set the appropriate
modes. (If you are currently in ‘SP’ mode, the LCD
displays ‘Fn’ and if you press the Shutter Release
while the LCD is displaying ‘Fn’, you will change the
mode from ‘SP’ to ‘Fn’).An acoustic signal confirms
the alteration.
5. Press the On/Mode button until the mode “Lr“ or
“Hr“ appears.
13
Page 16

6. If the current resolution mode is High, the display
indicates “Lr“; if it is in Low Resolution mode, the
display indicates “Hr“.
7. Press the shutter release to set the appropriate
resolution mode. (If you are currently in ‘Hr’ mode,
the LCD displays ‘Lr’ and if you press the Shutter
Release while the LCD is displaying ‘Lr’, you will
change the mode from ‘Hr’ to ‘Lr’).An acoustic
signal confirms the alteration. After changing the
Hr/Lr mode, the camera will automatically reset to
basic mode.
Video conference
Your DCC can be used as Web Cam for video conferences.
Please follow the instructions given below for this purpose.
1. Switch on your DCC by pressing
the On/Mode button.
2. Press the On/Mode button until the mode
for video conferences “VC“ appears.
3. Press the shutter release to confirm and set this
mode. The flashing stops and “VC“ is displayed.
4. Connect the Camera to your PC via the provided
USB cable.
14
5. Start the ArcSoft PhotoImpression software as
follows: Start Programme ArcSoft PhotoImpression PhotoImpression.
6. Click on “Get Photos“ and select “Camera/Scanner“
7. Click on “ “ icon.
8. Select “Live“ to show the video.
Note
Video Conference is available in PC only.
Web Cam Brightness Adjustment
The Camera is preset to auto –brightness mode during
web-cam operation. It means the web-cam will adjust the
brightness automatically according to the ambient light
intensity. But, you can follow the below instruction and
change the brightness to any fixed level you prefer.
1. Click on “ “ icon in the PhotoImpression
2. Click on “Source“
3. You will see the brightness level and “ “
4. Un-check the “ “ to make it empty “ “
(The web cam is now set to manual brightness mode)
5. You can change the brightness value according to your
preference. (for normal office enviroment,the value should be
~5000)
6. Click “yes“ to confirm.
Page 17

Image processing on the PC
Loading still images
Downloading still images from your DCC to your PC.Turn
on the camera and select the camera mode (with LCD
displaying 2 digits). To download images onto the PC,
connect the DCC to your computer using the provided
USB cable. For Windows 98/SE users, please make sure
when you are connecting the camera to the computer
the first time, the DCC CD-ROM is positioned in the CDROM drive. Please follow the instructions given above
for connecting your camera to your PC.
Image download using the Camera Wizard
With the Camera Wizard you can download images to
your PC, store the images, view them in succession as a
running slide show or run your own short video.
1. Connect the DCC to your PC using the
provided USB cable.
2. Double click on “My Computer“.
3. You will now see that a new drive “Removable
Disc“ has been created. Double click on this.
4. All image files stored in the camera now appear on
the screen of your computer.
Image download using ArcSoft PhotoImpression
Please follow the instructions given below to download
images on your PC using ArcSoft PhotoImpression 3.0.
1. Connect your DCC to your PC as described above
using the provided USB cable.
2. Start the ArcSoft PhotoImpression software as follows:
Start > Programme > ArcSoft PhotoImpression >
PhotoImpression.
3. Select “Get Photos“ from the left panel.
4. Click on the symbol “from Folder“ at the
bottom edge of the screen.
5. Click on “Browse“ and select the drive
“Removable Disc“.
6. Select the folder in which the images are stored,
this folder is then displayed on the screen.
Saving images with ArcSoft PhotoImpression
After downloading all selected images onto your PC,
please then follow the instructions given below to save
them on your PC.
1. On the ArcSoft PhotoImpression screen, click on the
screen in the left panel on the symbol “Save“ and
then further down in the screen on “Save as“.
15
Page 18

2. When the save window opens select a directory in
which you wish to save your images, give the image
file a name and click on “Save“.
Note
You can change the name of the drive “Untitled“ to any
other name.
Video with ArcSoft PhotoImpression
You can use your DCC as Web Cam for recording short
video sequences. Follow the instructions given below to
switch the camera to the video mode.
1. Click on “Get Photos“ and select “Camera/Scanner“.
2. Select “Zoran COACH USB digital camera“.
3. Click on the “ “ icon.
4. Select “Live“ to show the video.
Image processing on the MacOS
Loading individual images
Once you have correctly installed the DCC driver you
can load pictures from your digital camera onto your
computer. To load pictures onto your Macintosh Computer (MacOS) please follow the installation instructions given below.
1. Connect the DCC to your Mac using the USB cable.
2. A new drive “Untitled“ appears on your desktop.
Double click this drive to open it.
3. All the saved images will appear in a window on your
computer screen.
16
Uninstalling the software
You can uninstall the software in the “Add/Remove
Program“ in the control panel of your PC.
Note
Only carry out this procedure when the installed software is no longer required or if the software installation
was faulty.
Carry out the following steps to uninstall your software.
1. Click on “My Computer“ on your Desktop.
2. Double click on “Control Panel“.
3. Double click on “Add/Remove Programs“.
4. The Add/Remove window opens.Select the program you
wish to uninstall and click on the Add/Remove button.
5. Your computer will now ask you if you really want to
uninstall the program. Click on “yes“ to confirm this.
Follow the instructions on the screen to conclude the
uninstall process.
Page 19

Uninstalling drivers
Uninstalling the web cam driver
You can uninstall web cam drivers using the Device
Manager.
1. Follow the instructions for switching the
camera into Videoconference mode “VC“.
2. Switch on your PC and connect the camera to the PC.
3. Start up Windows, open the window “My Computer“ and double click on “System“.
5. Open “Device Manager“ and then select
“Imaging device“
6. Select the “COACH Digital Camera“ and then press
“delete“.
7. Select the “COACH Video Camera“
and then press “delete“
Make sure that your DCC is connected to the PC
Note:
and is in the video conference mode, otherwise you
will not find “Imaging Device“ and “Device Manager“.
Uninstalling the DCC camera driver
(for Windows 98/SE)
You can uninstall DCC camera drivers using the Device
Manager.
1. Follow the instructions for switching
the camera into camera mode.
2. Switch on your PC and connect the camera to the PC.
3. Start up Windows, open the window “My Computer“ and double click on “System“.
4. Open “Device Manager“ and then select
“ hard disk controller “
5. Select the “Zoran COACH USB Driver“
and then press “delete“.
Note: You may have to restart your computer after uninstalling the software.Always save files and close all
active programs before restarting your PC.
Camera maintenance
Always read the following information to make sure you
are using your DCC correctly.
Places to avoid
Do not store or use the camera in the following places:
• Very damp, dirty or dusty places
• Places in direct sunshine or extreme temperatures,
such as inside a locked car in summertime.
• Extremely cold places.
• Places exposed to severe vibrations.
17
Page 20

• Places exposed to smoke or steam.
• Places exposed to strong magnetic fields (e.g. in
close vicinity of electrically operated motors,
transformers or magnets)
• Places in which aggressive chemicals such as
pesticides, rubber or vinyl products are stored
on a long-term basis.
Keep the DCC away from sand and dust
Note:
Like any other digital camera the DCC is also particularly susceptible to sand and dust. Always make sure that
the camera is not exposed to sand in sandy places, particularly on beaches or in deserts where fine sand is
blown about by wind.
If the camera is not used for a prolonged
period of time
If you plan not to use the camera for a prolonged period
of time, always remove the battery.
Travelling overseas
Do not pack your camera with your standard luggage.
The baggage handling at airports can cause damage
inside the camera, even when no external damage is
visible.
18
Cleaning your DCC
Use a small brush to carefully remove the dust from the
lens and the LCD surface.Wipe the surface gently with a
dry, soft, fluff-free cloth. Should there be any spots on
the optical system pour a drop of liquid lens cleaning
agent onto a piece of optical cloth and wipe over the
lens surface gently.
Never scratch any parts of the camera using hard objects. Do not use volatile substances such as solvents,
benzole or insecticides as these could react with the
camera housing and lead to deformation or destroy the
coating.
Page 21

Troubleshooting
These guides are to help you cope with typical problems that may arise. Should the problem remain or if you require
further assistance, please contact our technical customer service. The technician will pleased to assist you. In the
attachment you will find all the necessary addresses and further technical specifications.
Problem Symptom Remedy
I can’t load images onto my PC. Faulty connection. Check all connecting cables.
my images are blurred. Could be due to instantaneous Hold your DCC steady until
delay between the pressing you hear the beep sound
of the release and the that indicates the shot has
shooting of the image. been taken.
When I press the release Between the pressing action and Wait until the flash is activated
nothing happens. the release 2 to 5 seconds again (signal lamp flashes) or the
may elapse, depending on whether image data have been stored in
the flash is activated or not. the memory of the camera.
I have found an error message If several of the DCC programs Reinstall the software and select
in the software installation. are already installed on your PC the user-oriented installation.
the installation could cause
an error message.
19
Page 22

Technical data
Digital Classic Camera Leica M3
Image sensor 3.0 MP CMOS (2.1 MP hardware resolution)
Image resolution Still image: Super High Resolution (3MP): 2048 x 1536 Pixels (Interpolation)
Image memory (internal memory) 32MB (FLASH)
Image compression (ratio) super/high (3MP): 1:9 / fine/high (2.1MP): 1:5
Image memory capacity Super High Resolution (3MP): approx.40
Main memory (camera) 16 MB SD-RAM
Viewfinder Integrated optical viewfinder
LCD status display 2 digit
Flash MINOX Classic Camera Flash, optional, order number: 69125
Lens 5 elements, glass lens element with IR filter
Lens aperture F 2.8
Focal length 9,6 mm / related to small picture: approx. 48 mm
Depth of field from 0,7 m to infinity (manuel focusing)
White balance automatic
20
Fine High Resolution (2.1MP): 1600 x 1200 Pixels
Fine Low Resolution (2.1MP): 1600 x 1200 Pixels
Super Low Resolution (2.1MP): 1600 x 1200 Pixels
Web-Cam / Video: 320 x 240 Pixels
fine/low (2.1MP): 1:7,5 / super/low (2.1MP): 1:12
Fine High Resolution (2.1MP): approx. 40
Fine Low Resolution (2.1MP): approx. 60
Super Low Resolution (2.1MP): approx. 99
Page 23

Exposure Auto exposure
Self-timer 10 seconds
Power supply 1 x CR2 battery / via USB connection (PC)
Menue control Shutter Button and On/Mode Button
Beep signal Yes
Automatic off Off mode, after 30 seconds of non-use
PC connection USB cable
Dimensions 65 x 48 x 44 mm (LxWxH)
Weight approx. 95 g
Technical Support
MINOX GmbH
Walter-Zapp-Str. 4
D-35578 Wetzlar, Germany
Tel.: +49 (0) 6441 / 917-0
Fax: +49 (0) 6441 / 917-612
e-mail: info@minox.com
www.minox.com
For your notes
21
Page 24

Conditions of warranty
With the purchase of this MINOX product you have acquired a product which has been manufactured and checked
to special quality standards.
For this product the MINOX GmbH provides warranty of 2
years. The period commences on the date of purchase
from an authorized dealer and the warranty is subject to
the following conditions:
1) During the warranty period we shall deal with com-
plaints based on faulty manufacture (free of charge) by
repair, replacement of defective parts or replacement by
an identical flawless product at our own discretion.
Consequential claims, no matter what kind of what legal
argument in connection with this warranty, cannot be
accepted.
2) Claims under warranty are null and void, if the defect
has been caused by improper handling – which also can
include the use of non-MINOX accessories – if the MINOX
product is serviced by unauthorized persons or workshops,
or if the serial number has been obliterated.
3) Warranty claims can only be made by submission of the
typewritten sales slip of an authorized dealer.
22
4) When submitting claims under warranty please return
the MINOX product together with the typewritten sales
slip and a description of the claim to the MINOX GmbH or
MINOX agency.
5) Tourists may, if required, make use of the Agency of the
country in which they are travelling (within the terms of
the Warranty of the MINOX GmbH) by presenting the
typewritten sales slip.
MINOX GmbH
Walter-Zapp-Str. 4
D-35578 Wetzlar
Tel.: +49 (0) 6441 / 917-0
Fax: +49 (0) 6441 / 917-612
eMail: info@minox.com
Internet: www.minox.com
Page 25

Design subject to alterations without notice.
MINOX is a registered trademark of MINOX GmbH,Wetzlar.
Leica is a registered trademark of Leica Microsystems I. R.GmbH.
MINOX GmbH
Walter-Zapp-Str. 4
D-35578 Wetzlar, Germany
Tel.: +49 (0) 6441 / 917-0
Fax: +49 (0) 6441 / 917-612
e-mail: info@minox.com
www.minox.com
 Loading...