

Page 1

Anleitung
Instructions
Notice d’utilisation
MINOX ECX / MINOX ECX flash
Page 2

Änderungen in Konstruktion und Ausführung vorbehalten
Design subject to alterations without notice
Sous réserve de modifications
MINOX GmbH
Walter-Zapp-Str. 4
D-35578 Wetzlar
Internet: http://www.minox.com · eMail: info@minox.com
Tel. +49(0)6441-9 17-0
960330 FX/ 6/99/L
Page 3
12
1 2
13 10
7 6 4 5
Page 4
2 1 6
3
8 7
11 13 15 14 12
Page 5

Inhaltsverzeichnis
Table of contents
Table des matières
Einleitung . . . . . . . . . . . . . . . . . . . . . . . . . . . . . . . . . 2
Bedienungselemente . . . . . . . . . . . . . . . . . . . . . . . . 4
Inbetriebnahme der MINOX ECX
Anbringen des Handtrageriemens . . . . . . . . . . . . . . 6
Einlegen der Batterie . . . . . . . . . . . . . . . . . . . . . . . 8
Prüfen der Batteriespannung . . . . . . . . . . . . . . . . 10
Einstellungen an der MINOX ECX
Einstellung der Filmempfindlichkeit . . . . . . . . . . . . 12
Öffnen der Filmkammer und
Einstellung des Bildzählwerkes . . . . . . . . . . . . . . . 14
Einlegen der Filmkassette . . . . . . . . . . . . . . . . . . . 16
Filmladekontakt . . . . . . . . . . . . . . . . . . . . . . . . . . 18
Bildzähler in Anfangsstellung bringen . . . . . . . . . . 20
Kamerhaltung . . . . . . . . . . . . . . . . . . . . . . . . . . . . 22
Fotografieren mit der MINOX ECX . . . . . . . . . . . . . 24
Gegenlichtaufnahmen . . . . . . . . . . . . . . . . . . . . . . 28
Langzeitwarnung . . . . . . . . . . . . . . . . . . . . . . . . . . 30
Inbetriebnahme des Blitzgerätes
Einlegen der Batterie . . . . . . . . . . . . . . . . . . . . . . 32
Blitzlichtaufnahmen . . . . . . . . . . . . . . . . . . . . . . . 34
Herausnehmen der Filmkassette . . . . . . . . . . . . . . . 38
Zubehör . . . . . . . . . . . . . . . . . . . . . . . . . . . . . . . . . 40
Filme 8 x 11 . . . . . . . . . . . . . . . . . . . . . . . . . . . . . . . 42
Tips zur Kamera-Pflege . . . . . . . . . . . . . . . . . . . . . . 46
Kundendienst . . . . . . . . . . . . . . . . . . . . . . . . . . . . . 50
Technische Daten MINOX ECX . . . . . . . . . . . . . . . . 52
Technische Daten Blitzgerät MINOX ECX Flash . . . . . 58
Page 6

Introduction . . . . . . . . . . . . . . . . . . . . . . . . . . . . . . 3
Operating Controls . . . . . . . . . . . . . . . . . . . . . . . . 5
Getting the MINOX ECX ready
Attaching the cord . . . . . . . . . . . . . . . . . . . . . . . . 7
Inserting the batteries . . . . . . . . . . . . . . . . . . . . . 9
Checking battery voltage . . . . . . . . . . . . . . . . . . 11
Settings on the MINOX ECX
Setting the film speed . . . . . . . . . . . . . . . . . . . . 13
Operating the film compartment and
setting the frame counter . . . . . . . . . . . . . . . . . 15
Inserting the film cartridge . . . . . . . . . . . . . . . . . 17
Film loading contact . . . . . . . . . . . . . . . . . . . . . 19
Moving the frame counter to the first frame . . . 21
Holding the camera . . . . . . . . . . . . . . . . . . . . . . . 23
Taking photots with the MINOX ECX . . . . . . . . . . 25
Shooting photos with backlight . . . . . . . . . . . . . . 29
Camera shake warning . . . . . . . . . . . . . . . . . . . . 31
Preparing the flash unit
Inserting the battery . . . . . . . . . . . . . . . . . . . . . 33
Flash shots . . . . . . . . . . . . . . . . . . . . . . . . . . . . . 35
Removing the film cartridge . . . . . . . . . . . . . . . . . 39
Accessories . . . . . . . . . . . . . . . . . . . . . . . . . . . . . 41
Films 8 x 11 . . . . . . . . . . . . . . . . . . . . . . . . . . . . . 43
Tips on camera care . . . . . . . . . . . . . . . . . . . . . . . 47
Customer service . . . . . . . . . . . . . . . . . . . . . . . . . 51
Technical Data MINOX ECX . . . . . . . . . . . . . . . . . 54
Technical Data Flash MINOX ECX . . . . . . . . . . . . . 59
Introduction . . . . . . . . . . . . . . . . . . . . . . . . . . . . . . . 3
Compositon de l’appareil . . . . . . . . . . . . . . . . . . . . . 5
Mise en service du MINOX ECX
Montage du cordon de transport . . . . . . . . . . . . . . 7
Installation des piles . . . . . . . . . . . . . . . . . . . . . . . . 9
Contrôle des piles . . . . . . . . . . . . . . . . . . . . . . . . . 11
Réglages du MINOX ECX
Réglage de la sensibilité de film . . . . . . . . . . . . . . 13
Ouverture du logement du film et réglage
du compteur de vues . . . . . . . . . . . . . . . . . . . . . . 15
Mise en place du conteneur de film . . . . . . . . . . . 17
Vérification de fonction du film . . . . . . . . . . . . . . 19
Réglage initial du compteur de vues . . . . . . . . . . . 21
Tenue de l’appareil . . . . . . . . . . . . . . . . . . . . . . . . . 23
Pour photographier avec le MINOX ECX . . . . . . . . . 25
Prises de vue à contre-jour . . . . . . . . . . . . . . . . . . . 29
Signalisation des longs temps de pose . . . . . . . . . . 31
Mise en service du flash
Installation de la pile . . . . . . . . . . . . . . . . . . . . . . . 33
Pour photographier avec le flash . . . . . . . . . . . . . . 35
Extraction du conteneur de film . . . . . . . . . . . . . . . 39
Accessoires . . . . . . . . . . . . . . . . . . . . . . . . . . . . . . . 41
Films de format 8 x 11 . . . . . . . . . . . . . . . . . . . . . . 43
Conseils d’entretien de l’appareil . . . . . . . . . . . . . . 47
Service-Après-Vente . . . . . . . . . . . . . . . . . . . . . . . . 51
Fiche Technique du MINOX ECX . . . . . . . . . . . . . . . 56
Fiche Techique du flash MINOX ECX . . . . . . . . . . . . 60
– 1 –
Page 7

Einleitung
Introduction
Introduction
Zum Kauf Ihrer neuen MINOX ECX möchten wir Sie
ganz herzlich beglückwünschen. Auch diese Kamera
steht in der großen Tradition des Hauses MINOX und
verbindet Kompaktheit mit bester Qualität und herausragendem Design.
Die MINOX ECX kann zu Ihrem ständigen Begleiter
werden, um Ihre schönsten Erinnerungen festzuhalten.
Um die Möglichkeiten der 8 x11 mm Fotografie in
vollem Umfang nutzen zu können, lesen Sie diese
Anleitung bitte sorgfältig durch.
Bei der MINOX ECX sind einige Funktionen, wie z.B.
die Belichtungsautomatik elektronisch gesteuert. Die
Kamera ist deshalb nur mit Batterie voll funktionsfähig.
– 2 –
Page 8

May we first congratulate you on the purchase of
your new MINOX ECX. This camera carries on
with the long tradition of the house of MINOX,
combining top quality compact features with
outstanding design. The MINOX ECX can go with
you everywhere, ready to capture your most precious moments.
To get the most out of 8x11 mm photography,
please read these instructions carefully.
Some operations in the MINOX ECX are electronically controlled, the automatic exposure, for
example, and the camera therefore has to be fitted with a battery.
Nous vous remercions et vous félicitons pour l'acquisition de votre nouveau MINOX ECX. A l'instar
des autres produits MINOX, cet appareil est aussi
détenteur des valeurs traditionnelles MINOX: la
compacité alliée à une qualité de haut niveau, sous
un superbe design. Pratique et discret, il pourra
vous accompagner partout pour mémoriser vos
plus beaux souvenirs. Pour une exploitation optimale des possibilités offertes par la photographie
en format 8 x11 mm, veuillez lire attentivement ce
mode d'emploi.
Certaines fonctions - notamment l'automatisme
d'exposition - étant commandées électroniquement, le MINOX ECX ne peut fonctionner qu'avec
piles.
– 3 –
Page 9

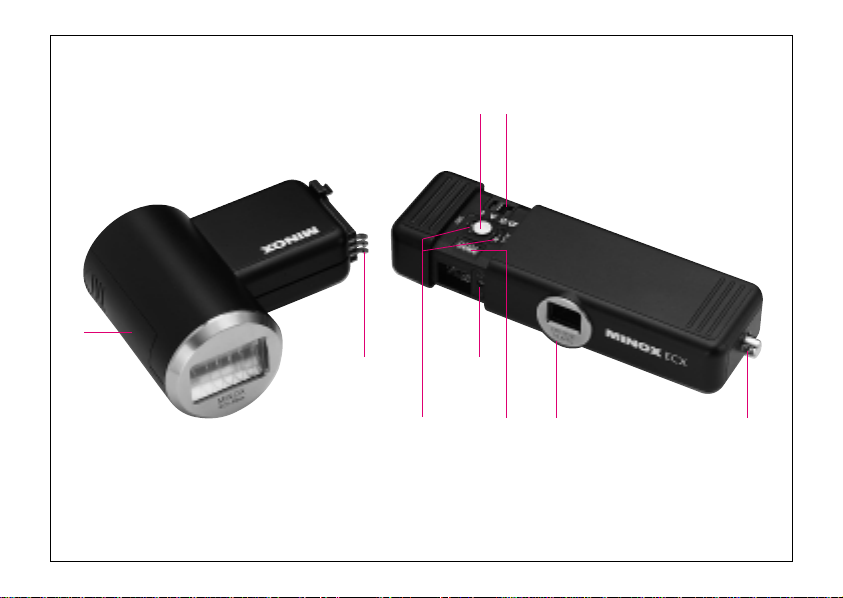
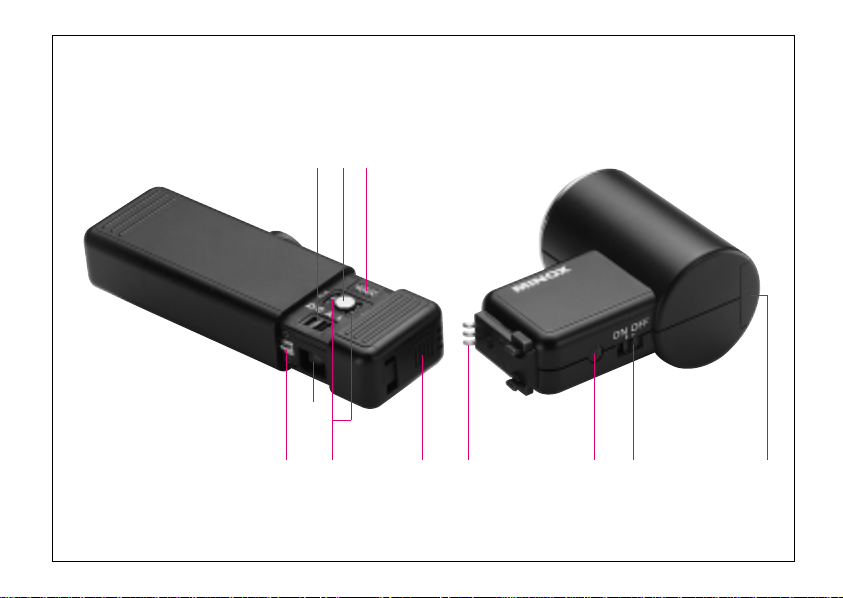
Bedienungselemente
Operating controls
Composition de l'appareil
11) Auslöser
12) Funktionsschalter
13) Sucherfenster
14) MINAR-Objektiv 1:5,6/15 mm
15) Öse für Trageriemen
16) Rändelwalze
17) Filmempfindlichkeitsanzeige (ASA bzw. DIN)
18) Entriegelungstaste (zum Öffnen der Kamera)
19) Bildzählwerk
10) Lichtmeßzelle
11) Batteriefach, Kamera
12) Batteriefach, Blitzgerät
13) Kontaktstifte
14) ON/OFF-Schalter
15) Blitzbereitschaftsanzeige
v
v
– 4 –
Page 10

1) Shutter release button
2) Function mode switch
3) Viewfinder
4) Lens MINAR 15 mm f/5.6
5) Eyelet for cord
6) Milled wheel
7) Film speed display (ASA or DIN)
8) Unlock button (to open the camera)
9) Frame counter
10) CdS meter cell
11) Battery chamber, camera
12) Battery chamber, flash
13) Contact pins
14) Power switch on/off
15) Flash ready symbol
11) Déclencheur
12) Commutateur de fonctions
13) Fenêtre du viseur
14) Objectif MINAR 1:5,6/15 mm
15) Œillets pour le cordon de support de l'appareil
16) Tambour moleté (Pour le réglage de sensibilité
des films)
17) Affichage de la sensibilité des films (en ASA et
en DIN)
18) Verrou de blocage en métal
(Pour ouvrir complètement l'appareil)
19) Compteur d’images
10) Cellule résistance photo CdS
11) Compartiment pour pile, appareil photo
12) Compartiment pour pile, flash
13) Broches de contact
14) Bouton on/off
15) Symbole de chargement du flash
– 5 –
Page 11
1
2
3
Inbetriebnahme der MINOX ECX
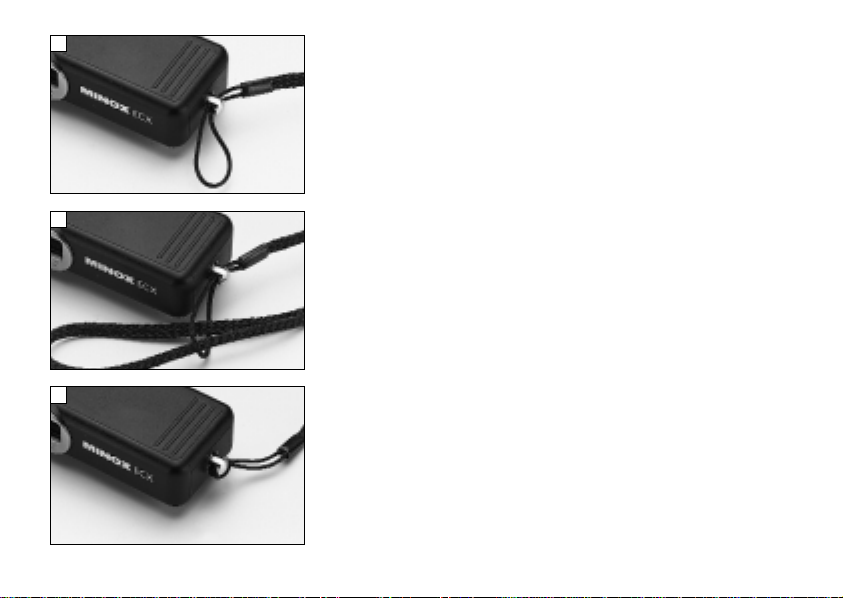
Anbringen des Handtrageriemens
Schieben Sie die kleine Schlaufe des Trageriemens
durch die Öse am Kamerakörper. Das Ende des Trageriemens durch o. g. kleine Schlaufe fädeln und
so festziehen, daß sich die entstandene Schlinge
fest um die Öse am Kamerakörper legt.
– 6 –
Page 12

Getting the MINOX ECX ready
Attaching the cord
Pass the small loop of the cord through the
eyelet on the camera housing. Thread the end of
the cord through the aforementioned small loop
and tighten until the new loop rests firmly
around the eyelet on the camera housing.
Mise en service du MINOX ECX
Montage du cordon de transport
Faire d'abord passer le petit nœud coulant du cordon dans l'œillet de l'appareil. Ensuite, introduire
l'autre extrémité dans le nœud coulant. Tirer fermement pour bien serrer ce dernier à l'armature de
l'œillet.
– 7 –
Page 13
1
2
11
–
+
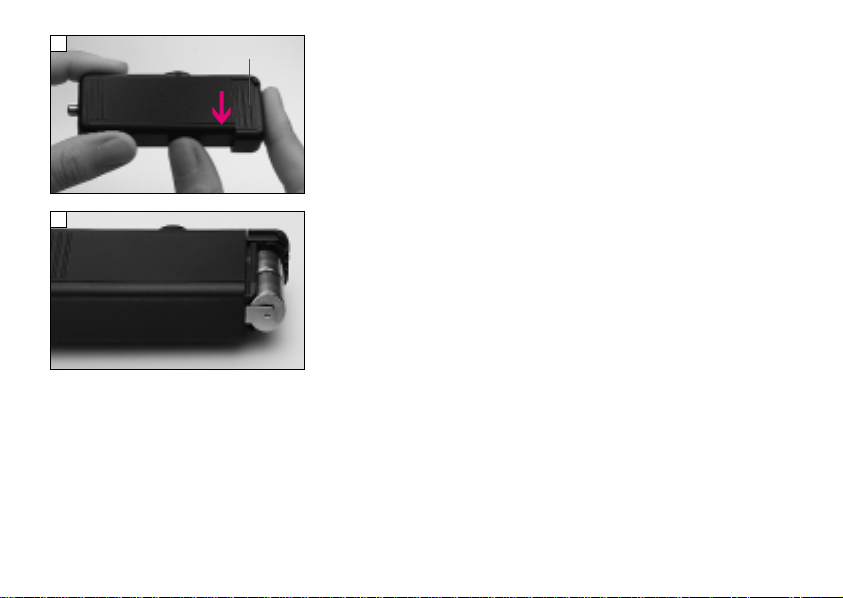
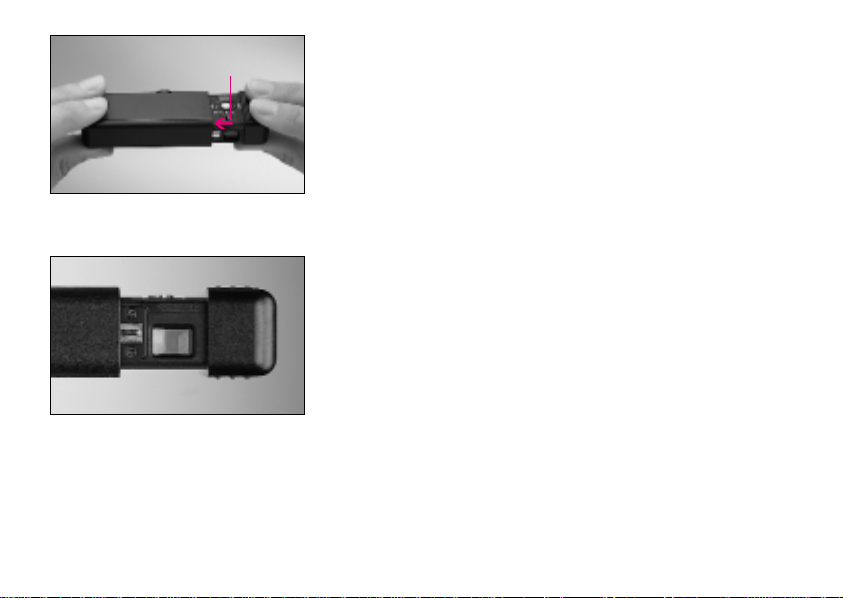
Einlegen der Batterie
Drücken Sie bitte mit Ihrem Zeigefinger so gegen
das Batteriefach (11), daß Sie durch Ziehen in Pfeilrichtung das Batteriefach öffnen. Beim Einlegen der
Batterien bitte auf die korrekte Ausrichtung des
Plus- und Minuspols achten. Nun kann der Deckel
wieder geschlossen werden, so daß dieser deutlich
hörbar einrastet. Verwenden Sie für die MINOX
ECX zwei 3 Volt Batterien vom Typ CR 1/3 N.
Hinweise:
– Minustemperaturen können die Batterieleistung
beeinträchtigen. Bitte schützen Sie Ihre MINOX
ECX deshalb vor extremer Kälte.
– Erschöpfte Batterien dürfen niemals ins Feuer
geworfen werden! Auch kurzgeschlossene,
geöffnete und erhitzte Batterien stellen eine
Gefahr dar und können Personenschäden verursachen.
– Batterien sind kein Spielzeug und sollten deshalb
für Kinder unzugänglich aufbewahrt werden.
Wird eine Batterie verschluckt, suchen Sie bitte
unverzüglich einen Arzt auf!
– 8 –
Page 14

Inserting the batteries
Press the tip of your forefinger against the battery compartment (11) and pull in direction of
arrow to open. Pay attention when inserting the
batteries that the + and - pole are facing the
right way. Replace the cover on the camera body
and make sure that it engages audibly. The
MINOX ECX requires two 3-Volt batteries, type
CR 1/3 N.
Installation des piles
Pour ouvrir le logement des piles (11), presser de
l'index sur son couvercle dans le sens de la flèche.
Important: Disposer les piles en veillant à faire coïncider leurs pôles (+) et (-) respectifs avec les symboles similaires indiqués au fond du logement. Refermer ensuite en faisant glisser le couvercle jusqu'au
déclic. Pour le MINOX ECX utiliser 2 piles de 3
Volts de type CR 1/3 N.
Notes:
– Minus temperatures can impair the battery per-
formance. Please always protect your MINOX
ECX against very low temperatures.
– Never throw used batteries into a fire! Also
short-circuited, opened and heated batteries
are a hazard and a health risk.
– Batteries are not toys! Keep them out of the
reach of children. Should a child swallow a
battery, consult a doctor immediately!
Recommandations:
– Comme les températures basses peuvent affaiblir
la performance des piles, il est conseillé de
protéger votre MINOX ECX du grand froid.
– Ne jamais jeter au feu de piles usées ! Même
celles qui sont court-circuitées, fracturées ou calcinées peuvent toujours être nocives.
– Une pile n'est pas un jouet et devrait toujours
être tenue hors de portée des enfants. En cas
d'ingestion, consulter immédiatement un médecin.
– 9 –
Page 15
•
[ ]
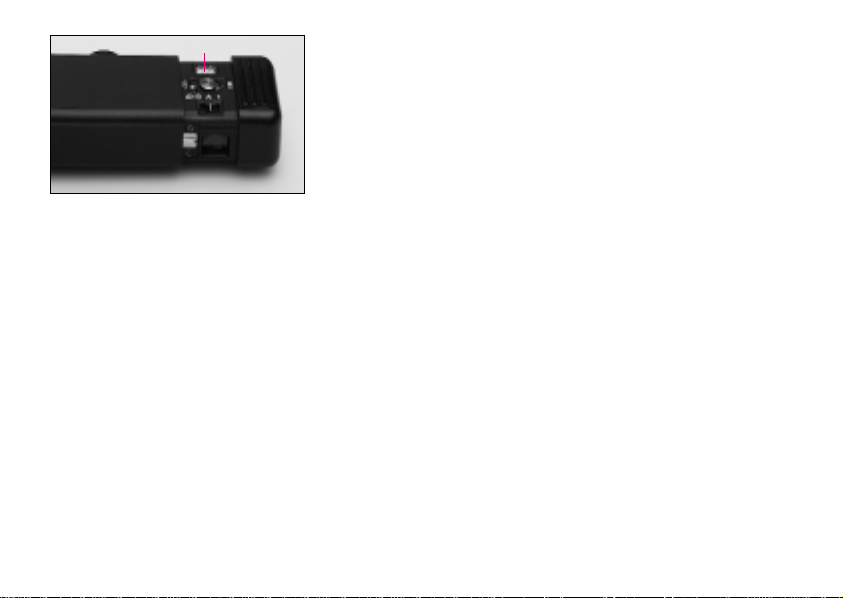
Prüfen der Batteriespannung
2
Um zu überprüfen, ob die Batterie richtig eingesetzt und funktionstüchtig ist, nehmen Sie die
Kamera in beide Hände und ziehen sie bis zum
Anschlag auseinander. Den Funktionsschalter (2)
nun nach links auf das Batteriesymbol schieben. In
dieser Stellung halten Sie bitte den Funktionsschalter fest und schauen dabei durch den Sucher. Die
Batterie ist richtig eingesetzt und funktionstüchtig,
wenn oben im Sucher eine rote LED leuchtet.
Das Aufleuchten der roten LED kann auch durch verschmutzte Batteriekontakte verhindert worden sein.
In diesem Fall sollten die Kontakte mit einem sauberen, trockenen und fusselfreien Tuch gereinigt
werden.
Hinweis:
– Beim Batterietest ist der Stromverbrauch höher als
bei anderen Funktionen der Kamera. T esten Sie die
Batterie deshalb nicht unnötig. In der Regel
genügt es, die Batterie bei jedem Filmwechsel zu
prüfen. Um die Batterieleistung so lang wie möglich zu erhalten, entfernen Sie bitte die Batterie,
wenn die Kamera längere Zeit nicht genutzt wird.
– 10 –
Page 16

Checking battery voltage
To check whether the batteries have been correctly inserted and are in operating order, hold
the camera at both ends and pull fully apart.
Slide the function mode (2) switch to the left, to
the battery symbol. Hold the function mode
switch in this position and look through the viewfinder. The batteries are correctly inserted and in
operating order when a red LED lights up in the
top of the viewfinder.
Contrôle des piles
Pour s'assurer de la position et du fonctionnement
corrects des piles, ouvrir l'appareil en tirant sur ses
extrémités, jusqu'à la butée. Ensuite, diriger le
commutateur de fonctions (2) vers la gauche, sur
le symbole de pile. L'y maintenir et regarder à travers le viseur: si une diode rouge (DEL) y apparaît,
en haut, la position et le fonctionnement des piles
sont bons.
The illumination of the red LED can sometimes
fail due to soiled battery contacts. In this case,
clean the contacts with a clean, dry and non-fluff
cloth.
Note:
– The battery check uses more current than
other camera functions. So avoid checking the
batteries unnecessarily. It is usually sufficient to
check every time you change the film. For longer life, remove the batteries if the camera is
not to be used for a longer period of time.
La manifestation de ce témoin peut être interrompue par des contacts de piles souillés. Dans ce cas,
il faut nettoyer ces derniers avec un chiffon nonpelucheux, propre et sec.
Recommandation :
– Les contrôles de piles entraînant une consomma-
tion de courant supérieure à celle des autres
fonctions, il est conseillé de n'y recourir qu'en
cas de nécessité. Normalement, il est suffisant de
tester les piles que lors d'un changement de
film. Pour préserver leur performance au maximum, en cas de non utilisation prolongée de
l'appareil, il est conseillé de les en retirer.
– 11 –
Page 17
6
Einstellungen an der MINOX ECX
1. Einstellung der Filmempfindlichkeit
Damit die elektronische Belichtungsautomatik die
richtige Belichtungszeit ermittelt, stellen Sie bitte
den entsprechenden DIN- bzw. ASA-Wert ein. Nehmen Sie hierzu die Kamera in beide Hände und
ziehen sie bis zum Anschlag auseinander. Drehen
Sie nun so lange an der Rändelwalze (6), bis der
richtige ASA- bzw. DIN-Wert in der Mitte des Sichtfensters erscheint. Beide Filmempfindlichkeitswerte
sind auf der Filmverpackung angegeben (siehe
ebenfalls: Einstellung bei Gegenlichtaufnahmen).
Hinweis:
– Für die MINOX ECX brauchen Sie MINOX 8x11mm
Filmkassetten (Negativformat 8 x11mm). Bestellnummern der verschiedenen MINOX Filme entnehmen Sie bitte der Zubehörauflistung.
– 12 –
Page 18

Settings on the MINOX ECX
1. Setting the film speed
For the correct exposure setting of the electronic
automatic exposure control you must adjust the
respective DIN or ASA setting. Hold the camera
at both ends and pull fully apart. Turn the milled
wheel (6) to make the correct ASA or DIN speed
appear in the center of the window. Both film
speed values are indicated on the film packing
(refer also to: Adjustment for backlight shots).
Note:
– The MINOX ECX takes MINOX 8 x 11 mm film
cartridges (negative format 8x11mm). For
order numbers of the various MINOX films,
refer to the accessories list.
Réglages du MINOX ECX
1. Réglage de la sensibilité de film
Pour une détermination adéquate des temps de
pose par l'automatisme d'exposition, il faut préalablement programmer l'appareil sur la valeur
DIN/ASA correspondant à celle du film. Pour cela,
ouvrir l'appareil en tirant sur ses extrémités, jusqu'à
la butée. Ensuite, faire tourner le tambour moleté
6)
jusqu'à ce que les valeurs DIN/ASA du film uti-
(
lisé s'affichent. Celles-ci sont généralement indiquées sur l'emballage du film (à ce sujet, voir aussi
le mode de réglage à prévoir en cas de photographie en contre-jour).
Recommandation:
– Pour le MINOX ECX utiliser les conteneurs de
films MINOX 8x11mm (Format de négatif:
8 x11 mm). Les références des films MINOX disponibles figurent sur la liste des accessoires.
– 13 –
Page 19
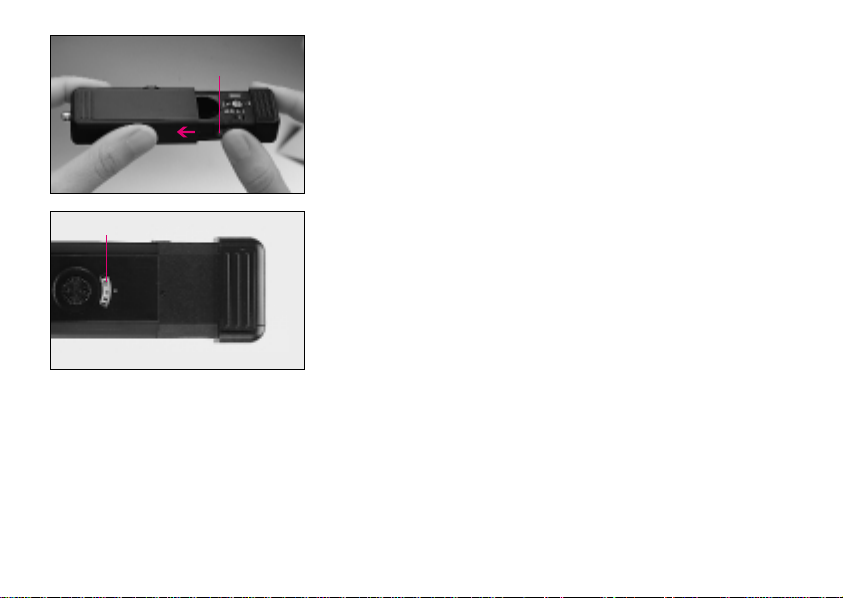
2. Öffnen der Filmkammer und Einstellung des
8
Bildzählwerkes
Durch Drücken der Entriegelungstaste (8) öffnen
Sie die Filmkammer. Ziehen Sie das Kameragehäuse
in Pfeilrichtung vollständig ab. Auf der Rückseite
der Kamera befindet sich die Bildzählscheibe (9).
Um den Transportschritt des Filmes richtig einzustellen, drehen Sie das Zählwerk so lange, bis eine
der drei Ausgangsstellungen in der Mitte des Sicht-
9
fensters erscheint. Bei Filmen mit 36 Aufnahmen
drehen Sie die Riffelscheibe bis zum roten Punkt
zwischen 0 und 36 (siehe Abb.), bei Filmen mit 15
Aufnahmen ist die Markierung zwischen 20 und
15 relevant.
Bei Filmen mit 30 Aufnahmen, stellen Sie bitte das
Zählwerk auf 32. Tip: Die Zahl 30 ist vollständig
am rechten Rand zu erkennen.
Hinweis:
– Das Einstellen des Bildzählwerkes ist sehr wich-
tig, da so der Transportschritt des Filmes in
seiner Länge gesteuert wird. Es ist somit nicht
nur für das Anzeigen der verbleibenden Bilderanzahl verantwortlich.
– 14 –
Page 20

2. Opening the film compartment and setting
the frame counter
Press the unlock button (8) to open the film compartment. Pull off the camera shell in the direction of the arrow. The frame counter (9) is in the
camera base. To correctly set the film transport,
turn the counter until one of the three start positions appears in the center of the window. For
films with 36 exposures you must turn the ribbed
button until the red dot between 0 and 36
appears (see picture), for films with 15 exposures
the relevant marking is between 20 and 15.
For films with 30 exposures set the counter to
32. The number 30 can be seen fully at the right
edge.
Note:
– Setting the frame counter controls the advan-
ce of the film regarding its length and is not
just for displaying the number of pictures left
to shoot.
2. Ouverture du logement du film et réglage du
compteur de vues
Pour accéder au logement de film (8), après avoir
ouvert l'appareil (comme décrit précédemment),
appuyer sur le petit verrou de blocage et tirer dans
le sens de la flèche pour l'ouvrir à fond. Au verso,
on peut alors voir le disque cannelé (9) de réglage
du compteur de vues. Pour assurer un transport
adéquat du film utilisé, faire tourner ce disque
comme indiqué ci-après, jusqu'à obtention de l'affichage correspondant:
Pour les films de 36 vues: le faire tourner jusqu'au
point rouge situé entre 0 et 36 (voir l'illustration).
Pour les films de 15 vues: le faire tourner jusqu'au
point rouge situé entre 20 et 15.
Pour les films de 30 vues: le positionner sur 32. Le
chiffre 30 apparaît alors complètement, sur le bord
droit de l'affichage.
Recommandation:
Le réglage du compteur de vues commande tout
le processus de transport du film en fonction de
sa longueur. Cette opération n'est donc pas
seulement importante pour l'indication du nombre de vues encore à prendre.
– 15 –
Page 21

Einlegen der Filmkassette
Nachdem Sie die Filmkassette in die Filmkammer
gelegt haben (siehe Abb.), schieben Sie bitte das
Kameragehäuse wieder vollständig zu.
Hinweise:
– Achten Sie vor dem Einlegen der Filmkassette
darauf, daß Sie das Bildzählwerk richtig eingestellt haben.
– Wechseln Sie die Filme möglichst immer im
Dunkeln/Schatten und nie unter direkter Lichteinwirkung.
– 16 –
Page 22

Inserting the film cartridge
Make sure to close the camera shell correctly
after inserting the film in the camera compartment (see picture).
Mise en place du conteneur de film
Après l’installation du conteneur de film dans son
logement (voir l'illustration) refermer le boîtier de
l'appareil complètement.
Note:
– Make sure the frame counter is correctly set
prior to inserting the film cartridge.
– Load and unload the film in subdued light and
never in direct light.
Recommandation:
– Avant de déposer le conteneur de film dans son
logement, s'assurer que le compteur d'images
est adéquatement programmé.
– Si possible ne procéder aux changements de
films qu'à l'ombre ou dans la pénombre. Jamais
en pleine lumière.
– 17 –
Page 23

2
Filmladekontakt
Um überprüfen zu können, ob bei der MINOX ECX
ein Film eingelegt, bzw. richtig eingelegt wurde,
bedienen Sie sich bitte erneut dem Funktionsschalter auf der Kameraoberseite. Nehmen Sie die
Kamera in beide Hände und ziehen sie bis zum
Anschlag auseinander. Schieben Sie den Funktionsschalter (2) nun nach links ( ). In dieser Stellung
halten Sie bitte den Funktionsschalter fest und
schauen dabei durch den Sucher. Der Film ist richtig eingelegt, wenn oben im Sucher eine grüne
LED leuchtet. Wenn zusätzlich noch die rote LED
leuchtet, ist die Batterie richtig eingesetzt und
funktionstüchtig.
– 18 –
Page 24

Film loading contact
Use the function mode switch on the top of the
camera to check that there is a film in the
MINOX ECX or that the film it has been inserted
correctly.
Hold the camera at both ends and pull fully
apart. Slide the function mode switch to the left
( ). Hold the function mode (2) switch in this
position and look through the viewfinder. The
film is correctly inserted when a green LED lights
up in the top of the viewfinder. If additionally the
red LED lights up, the battery is correctly fitted
and in good condition.
Vérification de fonction du film
Avec le commutateur de fonctions, on peut vite
s'assurer de la présence d'un film ou de sa bonne
installation dans le MINOX ECX. Pour cela, ouvrir
l'appareil en tirant sur ses extrémités, jusqu'au blocage. Diriger ensuite le commutateur de fonctions
(2) vers la gauche (sur le symbole ). En le
maintenant dans cette position, regarder à travers
le viseur: Si un témoin lumineux vert (DEL) apparaît, le film est alors bien placé. La pile est bien
placée et fonctionne, ci aussi la lumière rouge s’allume.
– 19 –
Page 25

9
Bildzähler in Anfangsstellung bringen
Bevor Sie die Kamera in Gebrauch nehmen, ziehen
Sie die Kamera bitte zweimal nacheinander auseinander und lösen jeweils einmal aus. Durch diese
zwei "Leertransporte" wird das bereits vorbelichtete Filmstück weitertransportiert und der Film in
Aufnahmestellung gebracht. Nach dem nächsten
Auseinanderziehen ist die Kamera aufnahmebereit.
Der Bildzähler (9) steht nun auf der maximalen Bilderzahl.
Hinweis:
– Der Film wird nur nach der Auslösung weiter
transportiert. Sie können folglich ohne Bedenken
die Kamera mehrmals auf und zu machen, ohne
den Film weiter zu bewegen.
– Der Bildzähler der MINOX ECX zählt rückwärts
bis 0. Somit wird Ihnen jeweils die verbleibende
Bilderanzahl angezeigt.
– 20 –
Page 26

Moving the frame counter to the first
frame
Before using the camera, pull open, press the
release button and close. Do this twice. This
blank frame advance action moves on the already
exposed piece of film and brings the film into
shooting position. When pulled open again, the
camera is ready to shoot. The frame counter (9)
is now positioned on the maximum number.
Note:
– The film is only transported after the release of
the shutter. So you can still open and shut the
camera as often as you like, without moving
the film on.
– The frame counter of the MINOX ECX counts
down to 0. You can therefore always see the
number of pictures left to take.
Réglage initial du compteur de vues
Avant de photographier, ouvrir l'appareil deux fois
de suite et appuyer chaque fois sur le déclencheur.
Ces deux transports à vide avancent la portion de
film déjà exposée et le positionnent pour la prochaine prise de vue. Ainsi, dès la prochaine ouverture, l'appareil sera prêt à photographier. Le compteur de vues (9) indique alors le nombre d'image
maximum.
Recommandations:
– Comme le film n'avance qu'après déclenche-
ment, il n'y a aucun risque à ouvrir et refermer
l'appareil, le film restera sa position initiale.
– Le compteur d'images du MINOX ECX étant
soustractif, il décompte jusque 0 et, de ce fait, il
indique toujours le nombre de vues encore disponibles.
– 21 –
Page 27

Kamerahaltung
Das Objektiv der MINOX ECX hat eine Schärfentiefe von 1 Meter bis unendlich. Halten Sie deswegen immer einen Abstand von mindestens 1 Meter
zum Aufnahmeobjekt. Um die Verwacklungsgefahr
zu minimieren, halten Sie Ihre MINOX ECX bitte
so wie in der Abbildung dargestellt mit beiden
Händen. Die Ellbogen sollten am Körper anliegen.
Hinweis:
– Schon geringe Verwacklungen können bei den
Aufnahmen zu einer Beeinträchtigung der Bildqualität führen.
– Da das Objektiv über einen sehr großen Bildwin-
kel verfügt, achten Sie bitte darauf, die Kamera
möglichst weit von hinten zu greifen. Somit
kann ausgeschlossen werden, daß z.B. Fingerkuppen in Ihre Aufnahmen hereinragen und so
Ihre Aufnahmen beeinträchtigen.
– 22 –
Page 28

Holding the camera
The lens of the MINOX ECX has a depth of field
from 1 meter to infinity. Always hold the camera
at least 1 meter away from the subject. To minimize camera shake, hold your MINOX ECX as
shown in the picture, using both hands. Your
elbows should rest against your body.
Tenue de l'appareil
Comme la profondeur de champ de l'objectif du
MINOX ECX s'étend de 1 mètre à l'infini, il faut se
tenir à au moins 1 mètre du sujet pour photographier. Pour éviter tout risque de flou, il est conseillé
de tenir l'appareil à deux mains, comme indiqué
sur l’illustration, les coudes serrés contre le corps.
Note:
– Just a small shake can deteriorate the picture
quality of the shot.
– As the lens has a very wide angle of view,
always make sure to keep your hands as far
back on the camera as possible. This rules out
the possibility of finger tips appearing in your
pictures, for example.
Recommandations:
– Un léger tremblement au moment de la prise de
vue peut déjà occasionner une perte de qualité
notable au niveau de l'image finale.
– En raison du grand angle de champ de l'objectif
du MINOX ECX, pour éviter une apparition indésirable sur l'image (doigts, etc..) veiller à tenir
l'appareil suffisamment à l'arrière.
– 23 –
Page 29

10 4
[ ]
Fotografieren mit der MINOX ECX
Bei Tageslichtaufnahmen lassen Sie den Funktionsschalter in der Mitte auf "A" stehen. Um bei Ihren
Aufnahmen die bestmöglichsten Ergebnisse zu
erzielen, greifen Sie die Kamera möglichst von hinten. Dadurch ist gewährleistet, daß weder das
Objektiv (4) noch die Lichtmeßzelle (10) verdeckt
wird.
Um den Bildausschnitt festzulegen, halten Sie den
Sucher dicht vor Ihr Auge und wählen Sie im
Leuchtrahmen den relevanten Bildausschnitt aus.
Drücken Sie nun den Auslöseknopf und üben mit
dem Daumen einen leichten Gegendruck auf das
Kameragehäuse aus. So vermeiden Sie eventuelle
Verwacklungen.
Nach dem Auslösen schieben Sie die Kamera wieder zusammen und ziehen sie für die nächsten
Aufnahmen bis zum Anschlag wieder auseinander.
Die Kamera ist wieder aufnahmebereit. Die letzte
Aufnahme erfolgt bei Stellung 0 des Bildzählwerks.
– 24 –
Page 30

Taking photos with the MINOX ECX
For daylight shots leave the function mode switch
on center position (A). For best results, hold the
camera with your hands as far back as possible.
This makes sure that neither the lens (4) nor
meter cell (10) are obstructed in any way. For picture composition, hold the viewfinder close in
front of your eye and frame the subject in the
bright light frame. Press the shutter release button and slightly press with your thumb against
the camera base. This helps to avoid any shake.
After exposure push the camera together again
and pull it out as far as it will go, ready for the
next shot. The camera is now ready. You take the
last exposure when the frame counter shows 0.
Pour photographier avec le MINOX ECX
Prises de vue à la lumière du jour: Placer le commutateur de fonction en position médiane, sur
"A". Pour éviter le risque d'obstruer l'objectif (4)
ou la cellule de mesure (10), tenir l'appareil bien à
l'arrière. Avec le viseur tout près de l'oeil, cadrer
dans la limite du repère lumineux puis, au moment
choisi, presser sur le déclencheur. En même temps,
pour éliminer tout risque de flou, exercer une légère contre pression du pouce sur le boîtier.
Après avoir déclenché, pour réarmer l'appareil, il
suffit de le refermer et de le rouvrir jusqu'au point
de butée. Le positionnement sur zéro du compteur
de vues indique qu'il s'agit de la dernière vue
encore disponible.
– 25 –
Page 31

Die elektronische Belichtungsautomatik bildet
Belichtungszeiten von 1/500 bis zu mehreren
Sekunden. Abhängig von der eingestellten Filmempfindlichkeit betragen die längsten Zeiten
bei ASA 25/15 DIN 8 Sekunden,
bei ASA 50/18 DIN 4 Sekunden,
bei ASA 100/21 DIN 2 Sekunden,
bei ASA 200/24 DIN 1 Sekunden und
bei ASA 400/27 DIN 0,5 Sekunden.
Die Blende 5,6 bleibt bei allen Aufnahmen unverändert.
Hinweis:
– Die MINOX ECX besitzt ein Fixfocus-Objektiv
(1:5,6/15 mm), das eine große Schärfentiefe von
1 Meter bis unendlich gewährleistet. Dadurch
entfällt die Entfernungseinstellung.
– Befreien Sie die Objektivoberfläche von Zeit zu
Zeit von Fingerabdrücken oder Staub.
– 26 –
Page 32

The electronic automatic exposure control sets
exposure times from 1/500 second to several
seconds.
The longest times obtained for different film
speeds are:
L'automatisme d'exposition électronique détermine
les temps de pose de 1/500 s. à plusieurs secondes. En fonction de la sensibilité de film sélectionnée sur l'appareil, les plus longs temps de pose
s'établissent comme suit:
8 seconds with ISO 25/15°
4 seconds with ISO 50/18°
2 seconds with ISO 100/21°
1 second with ISO 200/24°
0,5 seconds with ISO 400/27°.
The aperture stays at f/5.6 for all exposures.
Note:
– The MINOX ECX has a fixed focus lens (15mm
f/5.6), which guarantees a great depth of field
from 1 meter to infinity. There is therefore no
need to adjust the focus.
– Clean the surface of the lens every now and
again to remove fingerprints or dust.
sur ASA 25/15 DIN 8 secondes
sur ASA 50/18 DIN 4 secondes
sur ASA 100/21 DIN 2 secondes
sur ASA 200/24 DIN 1 seconde
sur ASA 400/27 DIN 0,5 seconde
La valeur de diaphragme 5,6 reste identique pour
toutes les prises de vue.
Recommandations:
– Comme le MINOX ECX est équipé d'un objectif
fixfocus (1:5,6/15 mm), caractérisé par une grande profondeur de champ (de 1 mètre à l'infini),
la mise au point des distances est superflue.
– Il est recommandé de nettoyer de temps en
temps la partie frontale de l'objectif pour éliminer d'éventuelles traces de doigts ou souillures.
– 27 –
Page 33

Gegenlichtaufnahmen
Bei Gegenlichtaufnahmen oder z. B. bei Aufnahmen im Schnee ist es ratsam, die automatisch
gebildete Belichtungszeit zu verdoppeln. Stellen Sie
hierfür eine um 3 DIN niedrigere Filmempfindlichkeit bzw. einen halbierten ASA-Wert ein (z.B. 18
statt 21 DIN bzw. ASA 50 statt 100).
– 28 –
Page 34

Shooting photos with backlight
When shooting against the light or snow scenes,
for instance, it is advisable to double the exposure time set by the automatic control. To do
this, switch the film speed to 3 DIN steps lower
or to half the ASA value (e.g. 18 instead of 21
DIN or ASA 50 instead of 100).
Prises de vue à contre-jour
Pour les motifs photographiés à contre-jour, ou
ceux situés par exemple dans un environnement
neigeux, il est conseillé de doubler le temps de
pose automatiquement déterminé. Pour cela,
réduire la sensibilité du film exprimée en DIN de 3
valeurs et celle mentionnée en ASA d'une demivaleur. (Exemples: régler sur 18 DIN au lieu de 21
et sur 50 ASA au lieu de 100)
– 29 –
Page 35

•
[ ]
Langzeitwarnung
Bei schlechten Lichtverhältnissen kann die Belichtungszeit länger als 1/30 Sekunden sein. In diesem
Fall warnt Sie die rote LED am oberen Sucherrand
vor erhöhter Verwacklungsgefahr. Benutzen Sie in
diesem Fall bitte Ihren Blitz oder wählen einen ruhigen Untergrund.
Die rote LED als Langzeitwarnung erlischt sofort
nach dem Auslösen. Zur Prüfung, ob für die Aufnahme ein Blitzlicht erforderlich ist, muß die Kamera aufnahmebereit sein, d.h. der Film muß zuvor
transportiert worden sein.
– 30 –
Page 36

Camera shake warning
Under bad light conditions the exposure time
may be longer than 1/30 seconds. If this is the
case, the red LED in the top of the viewfinder
warns you there is a risk of camera shake. You
should then use a flash or place the camera on a
steady surface.
The red LED for camera shake warning extinguishes immediately after exposure. To check
whether you need to use flash, the camera must
be in ready-condition with the film already
advanced.
Signalisation des longs temps de pose
Lors de conditions d'éclairage défavorables, le
temps de pose peut dépasser 1/30 de seconde.
Dans ce cas, un témoin rouge situé sur le bord
supérieur de viseur informe d'un "risque de
bougé". Il est alors conseillé d'utiliser le flash ou,
au moins, de prévoir une assise stable pour maintenir fermement l'appareil.
Après déclenchement, le témoin rouge de signalisation d'un long temps de pose disparaît immédiatement. Pour vérifier si un recours au flash est
nécessaire pour une prise de vue, l'appareil doit
être préalablement réarmé, c'est à dire que le film
doit avoir été avancé.
– 31 –
Page 37

12
Inbetriebnahme des Blitzgerätes
Einlegen der Batterie
Drücken Sie bitte mit Ihrem Zeigefinger so gegen
das Batteriefach (12), daß Sie durch Ziehen in Pfeilrichtung das Batteriefach öffnen. Beim Einlegen der
Batterie achten Sie bitte auf die korrekte Ausrichtung des Plus- und Minuspols. Nun können Sie den
Deckel wieder schließen, indem Sie den Batteriedeckel wieder auf das Batteriefach schieben. Verwenden Sie eine 3 Volt Batterie vom Typ CR 2.
Hinweise:
– Minustemperaturen können die Batterieleistung
beeinträchtigen. Bitte schützen Sie Ihr Blitzgerät
deshalb vor extremer Kälte.
– Erschöpfte Batterien dürfen niemals ins Feuer
geworfen werden! Auch kurzgeschlossene,
geöffnete und erhitzte Batterien stellen eine
Gefahr dar und können Personenschäden verursachen.
– Batterien sind kein Spielzeug und sollten deshalb
für Kinder unzugänglich aufbewahrt werden.
Wird eine Batterie verschluckt, suchen Sie bitte
unverzüglich einen Arzt auf!
– 32 –
Page 38

Preparing the flash unit
Inserting the battery
Press your forefinger against the battery compartment (12) and pull in the direction of the arrow
to open the battery compartment. When inserting the battery make sure that the + and - poles
are the right way round. Now close the compartment again by sliding the cover back onto the
battery compartment. Use a 3-Volt battery of the
type CR 2.
Notes:
– Minus temperatures can impair the battery per-
formance. Therefore always protect your flash
against very low temperatures.
– Never throw used batteries into a fire! Also
short-circuited, opened and heated batteries
are a hazard and a health risk.
– Batteries are not toys! Keep them out of the
reach of children. Should a child swallow a
battery, consult a doctor immediately!
Mise en service du flash
Installation de la pile
Pour ouvrir le logement de la pile du flash (12),
presser de l'index sur son couvercle dans le sens
indiqué par la flèche. Important: Disposer la pile en
faisant coïncider ses pôles (+) et (-) avec les symboles similaires indiqués sur l'unité. Refermer en faisant glisser le couvercle. Modèle de pile à utiliser
pour ce flash: Pile de 3 volts de type CR 2.
Recommandations:
– Comme les températures basses peuvent affaiblir
la performance des piles, il est conseillé de
protéger votre flash du grand froid.
– Ne jamais jeter au feu de piles usées ! Même
celles qui sont court-circuitées, fracturées ou calcinées peuvent toujours être nocives.
– Une pile n'est pas un jouet et devrait toujours
être tenue hors de portée des enfants. En cas
d'ingestion, il faut immédiatement consulter un
médecin.
– 33 –
Page 39

2 13 1514
Blitzlichtaufnahmen
Um den Blitz an der Kamera zu befestigen, stecken
Sie bitte die drei hellen Kontaktstifte (13) des Blitzgerätes in die drei Öffnungen an der rechten Seite
der Kamera. Drücken Sie dann die zwei Tasten am
Blitzgerät zusammen und drücken das Blitzgerät
fest an die Kamera, so daß die schwarzen Haken
hörbar einrasten.
Schieben Sie an Ihrer Kamera den Funktionsschalter
(2) nach rechts (). Betätigen Sie nun den ON/OFFSchalter (14) auf der Rückseite Ihres Blitzgerätes,
um dieses ebenfalls einzuschalten. Der Schalter
steht nun auf der Position des ausgemalten Kreises
(bzw. ON). Die Aufladezeit des Blitzgerätes ist abgeschlossen, wenn die Blitzbereitschaftsanzeige
(15) leuchtet. Die Blitzsynchronzeit beträgt ca. 1/30
Sekunden. Bei dieser Verschlußzeit wird das volle
Licht des Blitzes wirksam.
Um den Blitz wieder abzunehmen, drücken Sie
bitte die Tasten am Blitzgerät gleichzeitig herunter.
– 34 –
Page 40

Flash shots
To fasten the flash on the camera push the three
bright contact pins of the flash unit into the
three openings (13) on the right-hand side of the
camera. Depress the two buttons on the flash
simultaneously and press the flash right up to the
camera to make the black hooks engage with a
click.
Pour photographier avec le flash
Montage du flash sur l'appareil: Introduire les trois
broches de contact du flash dans les trois ouvertures (13) situées à l'extrémité de l'appareil, à droite. Presser ensuite en même temps sur les deux
touches de blocage du flash et appuyer ce dernier
contre l'appareil photo jusqu'à ce que les deux
crochets noirs s'enclenchent distinctement.
Move the function mode switch (2) on your
camera to the right (). Actuate the ON/OFFswitch on the back (14) of your flash unit in
order to switch it on as well. The switch is now
on the position of the filled-in circle (ON). The
charging time of the flash unit is completed
when the ready-display lights up (15). The flash
sync speed is 1/30 seconds. The full power of the
flash is effective during this exposure time.
Press the buttons on the flash unit simultaneously
to remove the flash again.
Ensuite, pousser le commutateur de fonction de
l'appareil (2) vers la droite, sur le symbole .
Activer maintenant le flash en dirigeant son
ON/OFF-commutateur (14) sur le petit cercle situé à
l'arrière. Le recyclage du flash est achevé quand le
témoin de confirmation (15) s'allume (ON). Le
temps de synchronisation flash est d'environ 1/30
de seconde, un temps de pose pendant lequel
toute la lumière du flash est opérationnelle.
Pour retirer le flash presser en même temps vers le
bas sur les touches de l'unité flash.
– 35 –
Page 41

Hinweis:
– Um eine optimale Belichtung zu gewährleisten,
sollte sich das Blitzgerät bei Hochformat-Aufnahmen stets oben befinden.
Bei Blitzlichtaufnahmen mit Adapter muß folgende
Verschlußzeit auf Ihrer 8x11-Kamera eingestellt
werden:
1
/50 sec. bei Kamera-Typen A und B
1
/60 sec. bei Kamera-Typ BL
1
/125 sec. bei Kamera-Typen C und LX
Abweichende Angaben aus älteren Gebrauchsanleitungen sind nicht zu verwenden und können zu
Fehlbelichtungen führen!
– 36 –
Page 42

Note:
- For optimal exposure, the flash should always
be at the top when taking upright shots.
In using the flash with adapter, the following
shutter time must be adjusted to your 8x11
camera:
1
/50 sec. with camera types A and B
1
/60 sec. with camera type BL
1
/125 sec. with camera types C and LX
Please ignore different informatin in earlier
instructions.
Recommandation:
– Pour obtenir un éclairage optimal lors de prises
de vue en hauteur, l'unité flash doit toujours
être située en haut de l'appareil.
Lorsque vous utilisez le flash électronique 8x11
avec adaptateur il es nécessaire de régler la vitesse
sivante sur votre appareil 8 x11 :
1
/50 sec. pour les appareils de type A ou B
1
/60 sec. pour l’appareil de type BL
1
/125 sec. pour les appareils de type C ou LX
Veuillez ignorer indications différentes des modes
d’emploi anciens afin d’éviter une exposition incorrecte.
– 37 –
Page 43

9
Herausnehmen der Filmkassette
Damit nicht das letzte Bild beim Herausnehmen der
Filmkassette versehentlich belichtet wird, transportieren Sie den Film nach der letzten Aufnahme
(Bildzähler steht auf 0) weiter. Drücken Sie den
Auslöser und transportieren den Film ein zweites
Mal. Sie können nun einen roten Punkt im Zählwerk (9) erkennen (siehe Abb.).
Um den belichteten Film zu entnehmen, drücken
8
Sie bitte die Entriegelungstaste (8) neben dem
Sucher ein und ziehen dabei die Kamerahülse in
Pfeilrichtung vollständig ab. Durch ein leichtes Kippen, können Sie nun den Film der Kamera entnehmen.
Hinweis:
– Es ist ratsam, die Filmkassette umgehend zur
Entwicklung zu geben. In der Zwischenzeit
bewahren Sie den belichteten Film bitte in der
lichtdichten Filmschachtel auf.
– 38 –
Page 44

Removing the film cartridge
To make sure light does not get to the last picture
when removing the film, advance the film after
the last exposure (counter at 0), press the release
button and advance once more. You will now
see a red dot in the frame counter window (9)
(see picture).
Extraction du conteneur de film
Afin d'éviter que la dernière image ne se voile lors
de l'extraction du conteneur, après la dernière prise
de vue (compteur sur zéro), faire avancer encore
une fois le film. Déclencher et faire avancer le film
une seconde fois. Un point rouge apparaît alors sur
le compteur de vues (9). (Voir l'illustration).
Remove the exposed film by pressing the unlock
button (8) next to the viewfinder and pulling the
camera shell right off in the direction of the
arrow. By slightly tilting the camera you can now
remove the film cartridge.
Note:
– We advise you to have the film processed as
soon as possible. Keep the exposed film in the
light-proof film box prior to processing.
Pour extraire le film exposé, ouvrir l'appareil
comme expliqué précédemment en pressant sur le
verrou de blocage (8), situé à côté du viseur, et
faire glisser le capot de l'appareil jusqu'au bout,
dans le sens indiqué par la flèche. Retourner ensuite l'appareil pour récupérer le conteneur.
Recommandation:
– Il est conseillé de faire rapidement développer
tout film exposé et, en attendant, de le conserver dans son emballage d'origine, étanche à la
lumière.
– 39 –
Page 45

Zubehör
– Trageriemen 60 cm
(Im Lieferumfang enthalten) 64 710
Ideal um die Kamera immer griffbereit zu haben.
Ermöglicht das Befestigen am Knopfloch oder an der
Gürtelschlaufe.
– Stecketui 64 700
Für den Schutz Ihrer MINOX ECX empfehlen wir
Ihnen die Verwendung dieses Stecketuis aus
schwarzem Leder.
– 40 –
Page 46

Accessories
– Cord 60 cm (part of scope of delivery) 64 710
Ideal for keeping the camera ready for use at all
times. Can be attached to a buttonhole or to a
belt loop.
– Leather case 64 700
Accessoires
– Cordon de transport de 60 cm
(livré de série avec l'appareil) 64 710
C'est l'accessoire idéal pour avoir l'appareil toujours à portée de main, pour vite photographier.
On peut p. ex. le passer à la boutonnière ou à un
passant de ceinture du pantalon, etc. ...
We recommend keeping your MINOX ECX well
protected in this black leather case.
– Etui en cuir souple noir (optionnel) 64 700
Accessoire pratique, recommandé pour une protec-
tion optimale du MINOX ECX
– 41 –
Page 47

Filme 8x11
Schwarzweißfilme 36 Aufnahmen
Minopan 25 ISO 25/15° 69 000
Minopan 100 ISO 100/21° 69 002
Minopan 400 ISO 400/27° 69 004
Schwarzweißfilme 15 Aufnahmen
Minopan 25 ISO 25/15° 69 001
Minopan 100 ISO 100/21° 69 003
Minopan 400 ISO 400/27° 69 005
Farbnegativfilme 36 Aufnahmen
Minocolor 25 ISO 25/15° 69 058
Minocolor 100 ISO 100/21° 69 052
Minocolor 400 ISO 400/27° 69 055
Farbnegativfilme 30 Aufnahmen
Minocolor 100 PRO 100/21° * 69 060
Farbnegativfilme 15 Aufnahmen
Minocolor 100 ISO 100/21° 69 053
Minocolor 100 PRO 100/21° * 69 059
Minocolor 400 ISO 400/27° 69 054
* = Neu! Mit Filmemulsion des Advanced Photo System
– 42 –
Page 48

Films 8x11
Black and white films with 36 exposures
Minopan 25 ISO 25/15° 69 000
Minopan 100 ISO 100/21° 69 002
Minopan 400 ISO 400/27° 69 004
Black and white films with 15 exposures
Minopan 25 ISO 25/15° 69 001
Minopan 100 ISO 100/21° 69 003
Minopan 400 ISO 400/27° 69 005
Color negative films with 36 exposures
Minocolor 25 ISO 25/15° 69 058
Minocolor 100 ISO 100/21° 69 052
Minocolor 400 ISO 400/27° 69 055
Color negative films with 30 exposures
Minocolor 100 PRO 100/21°* 69 060
Color negative films with 15 exposures
Minocolor 25 ISO 25/21° 69 053
Minocolor 100 PRO 100/21°* 69 059
Minocolor 400 ISO 400/27° 69 054
Films de format 8x11
Films noir et blanc (36 prises de vue)
Minopan 25 ISO 25/15° 69 000
Minopan 100 ISO 100/21° 69 002
Minopan 400 ISO 400/27° 69 004
Films noir et blanc (15 prises de vue)
Minopan 25 ISO 25/15° 69 001
Minopan 100 ISO 100/21° 69 003
Minopan 400 ISO 400/27° 69 005
Films négatifs couleurs (36 prises de vue)
Minocolor 25 ISO 25/15° 69 058
Minocolor 100 ISO 100/21° 69 052
Minocolor 400 ISO 400/27° 69 055
Films négatifs couleurs (30 prises de vue)
Minocolor 100 PRO 100/21° * 69 060
Films négatifs couleurs (15 prises de vue)
Minocolor 100 ISO 100/21° 69 053
Minocolor 100 PRO100/21° * 69 059
Minocolor 400 ISO 400/27° 69 054
* = New! With film emulsion of Advanced Photo System
* = Nouveau! Avec émulsion pour les films APS (Advanced Photo
System)
– 43 –
Page 49

Farbdiafilme 36 Aufnahmen
Minochrome 50 E ISO 50/18°
inkl. Entwicklung, ohne Rahmung 69 050
Minochrome 50 ER ISO 50/18°
inkl. Entwicklung, mit Rahmung 69 051
Hinweis:
- Die beste Bildqualität erzielen Sie mit dem neuen
Minocolor 100 PRO Film. Mit seiner Emulsion des
Advanced Photo System garantiert er ein wesentlich höheres Auflösungsvermögen, gesteigerte
Kontraste und außergewöhnliche Brillianz.
– 44 –
Page 50

Color transparency films with
36 exposures
Minochrome 50 E ISO 50/18°
Includes processing, without framing 69 050
Minochrome 50 ER ISO 50/18°
Includes processing, with framing 69 051
Films pour diapositives couleurs
(36 prises de vue)
Minochrome 50 E ISO 50/18°
Développement inclus, sans cadre 69 050
Minochrome 50 ER ISO 50/18°
Développement inclus, avec cadre 69 051
Note:
– The best picture quality is obtained with the
new Minocolor 100 PRO film. With its emulsion
of the Advanced Photo System it warrants a
greatly increased resolving power, improved
contrast and an outstanding brilliance.
Recommandation:
– La meilleure qualité d'image est obtenue avec
l'utilisation du nouveau film Minocolor 100 PRO.
Son excellente émulsion APS (Advanced Photo
System) garantit un notable accroissement du
pouvoir de résolution, du contraste et de la brillance.
– 45 –
Page 51

Pflege und sachgemäßer Umgang mit
Ihrer neuen Kamera bzw. Ihrem neuen
Blitzgerät
Den Kamera- bzw. Blitzgerätkörper und die Objektivoberfläche sollten Sie keinesfalls mit scharfen
Reinigern (Lösungsmittel) säubern. Verwenden Sie
lediglich ein trockenes und sauberes Baumwolltuch.
Bei hartnäckigeren Flecken kann die betroffene
Oberfläche kurz angehaucht und sofort trockengerieben werden.
Spritzwasser sollten Sie ebenso durch ein trockenes
Baumwolltuch entfernen. Wasserschäden können
hohe Reparaturkosten verursachen oder zum Totalschaden der Kamera bzw. des Blitzgerätes führen.
Vermeiden Sie eine abrupte Änderung der Umgebungstemperatur. Durch starke Temperaturschwankungen kann es zu Kondensatbildung im Inneren
der Kamera / des Blitzgerätes kommen.
Darüber hinaus sollten Sie die Kamera/das Blitzgerät vor Staub, Sand und sonstigen Verunreinigungen schützen.
Bei Funktionsstörungen der Kamera/des Blitzgerätes sollten Sie auf jeden Fall von einem Aufschrauben oder gewaltsamen Aufbrechen des Produktkörpers absehen.
– 46 –
Page 52

Care and correct handling of your
new camera and your new flash
Never clean the camera body, the flash and the
lens surface with strong cleaning agents (solvents).
Just use a dry, clean cotton cloth. Stubborn
marks can be breathed on and then quickly
rubbed clean.
Splash water should also be rubbed off with a
dry cotton cloth. Damage through water can
result in expensive repair work or even completely destroy the camera and the flash.
Avoid sudden changes in ambient temperature.
Abrupt temperature fluctuations can cause the
formation of condensation inside the camera and
the flash.
You should also protect the camera and flash
against dust, sand and other forms of contamination.
Should the camera and the flash not be functioning properly, never unscrew the body or try to
force it open.
Conseils pour l'entretien et la manipulation de votre nouvel appareil photo
et notre nouvel flash
Ne jamais nettoyer cet appareil, ce flash et son
objectif avec un produit à action forte (détergents,
etc.). En règle générale, n'utiliser qu'un chiffon de
coton sec et propre. Pour éliminer les tâches opiniâtres, souffler brièvement sur l'endroit et sécher
en frottant doucement.
De même, éclaboussures et embruns devraient
immédiatement être séchés avec un chiffon sec en
coton. Les dégâts causés par l'eau peuvent être à
l'origine de réparations coûteuses ou d'une mise
hors service irrémédiable de l'appareil et du flash.
Dans la mesure du possible, il est préférable d'éviter à l'appareil et au flash tout changement brutal
de température. De genre de variations peuvent en
effet provoquer une condensation à l'intérieur de
l'appareil et du flash.
L'appareil et le flash doivent être tenu à l'écart de
la poussière, du sable et d'autres sources potentielles d'impuretés. En cas de difficultés de fonctionnement, ne jamais dévisser l'appareil ou le flash ou
tenter de l'ouvrir par la force.
– 47 –
Page 53

Um eine Schädigung der Netzhaut auszuschließen,
blicken Sie keinesfalls durch den Sucher in starke
Lichtquellen (z.B. die Sonne). Optische Systeme
können in Verbindung mit hoher Lichtintensität zu
irreversiblen Augenschäden führen.
Achtung:
Für Funktionsstörungen, die sich aus einer unsachgemäßen Handhabung der MINOX ECX/ des Blitzgerätes ergeben, übernimmt die MINOX GmbH
keine Haftung.
– 48 –
Page 54

To prevent damage to the retina of the eye,
never look through the viewfinder into an extremely strong source of light (the sun, for example). Optical systems can cause irreversible damage
to the eye in combination with an extreme intensity of light.
Pour éviter le risque d'un endommagement éventuel de la rétine de l'oeil, ne jamais regarder une
forte source lumineuse au travers du viseur (notamment le soleil). Interposé à une source de lumière
de forte intensité, tout système optique peut provoquer des dommages irréversibles aux yeux.
Important:
MINOX GmbH shall not assume liability for any
malfunctions caused by incorrect handling of the
MINOX ECX.
Important !
La Société MINOX GmbH n'accepte aucune responsabilité pour les défauts de fonctionnement
ayant pour origine une manipulation fautive du
MINOX ECX.
– 49 –
Page 55

Kundendienst
In Schadensfällen oder für Wartungsarbeiten wenden Sie sich bitte an den MINOX Kundendienst:
MINOX GmbH
Walter-Zapp-Str. 4
D-35578 Wetzlar
Tel. +49(0)6441-917-680
Fax +49 (0)6441-917-681
Internet: http://www.minox.com
eMail: info@minox.com
Im Ausland stehen Ihnen unsere Landesvertretungen oder unsere autorisierten Reparaturwerkstätten zur Verfügung. Die entsprechenden Adressen entnehmen Sie bitte der beiliegenden Garantiekarte.
CE-Kennzeichnung
Die CE-Kennzeichnung dieser Kamera und des
Blitzgerätes dokumentieren die Einhaltung der
grundlegenden Anforderungen der jeweils gültigen
EU-Richtlinien.
– 50 –
Page 56

Customer service
If the camera is damaged or for maintenance,
please contact the MINOX Customer Service:
Service-Après-Vente:
Pour toute prestation SAV, merci de prendre
contact avec le Service-Après-Vente MINOX:
MINOX GmbH
Walter-Zapp-Strasse 4
D-35578 Wetzlar
Tel. +49(0)6441-917-680
Fax +49 (0)6441-917-681
Internet: http://www.minox.com
eMail: info@minox.com
In countries other than Germany, please contact
the agencies or authorized repair workshops in
your country. For full addresses please refer to
the enclosed guarantee card.
CE identification
The CE identification of this camera and flash
indicate compliance with the basic requirements
of the respectively valid EU directives.
MINOX GmbH
Walter-Zapp-Strasse 4
D-35578 Wetzlar
Tel. +49 (0)6441-917 680
Fax +49 (0)6441-917-681
Internet: http://www.minox.com
E-Mail: info@minox.com
En dehors de l'Allemagne, prendre contact avec
nos représentations locales ou les ateliers de réparation MINOX agréés. Voir la liste d'adresses sur la
carte de garantie ci-jointe.
Identification CE
L'identification CE de cet appareil photographique
et ce flash confirment le respect des spécifications
édictées par les instances européennes pour ce
type de produits.
– 51 –
Page 57

Technische Daten MINOX ECX
Kamera-Typ Kleinstbildkamera
Filmformat 8x11 mm
Objektiv vierlinsiges MINAR-Objektiv 1:5,6/15 mm
Filmtransport Teleskop-Schnellaufzug (nur nach Auslösen des Verschlusses wirksam)
Schärfebereich 1m bis unendlich
Filmandruck Andruck gelöst während des Filmtransports und beim Filmwechsel
Lichtmeßzelle CdS-Fotowiderstand
Verschluß elektronisch gesteuerter Zentralverschluß, 1/500 s bis 8 s
Filmempfindlichkeitseinstellung stufenlos einstellbar von ASA 25/15 DIN bis ASA 400/27 DIN
Leuchtanzeigen rote Leuchtdiode für Langzeitwarnung und Batteriekontolle,
Sonnenblende fest eingebaut
Sucher Leuchtrahmensucher
Bildzähler manuell einstellbar, rückwärtszählend bis 0
Blitzanschluß Anschluß für MINOX Spezialblitzgeräte
Energieversorgung zwei 3 Volt Batterien vom Typ CR 1/3 N
(bei ASA 25/15 DIN)
grüne Leuchtdiode als Filmladekontrolle
– 52 –
Page 58

Technical Data MINOX ECX
Type of camera Subminiature camera
Film format 8x11 mm
Lens Four-element fixed focus lens MINAR 1:5.6/15 mm
Film transport Push-pull rapid winder (only operates after releasing the shutter)
Focusing range 1 m to infinity
Film pressure plate Pressure lifts during film transport and film change
Meter cell CdS photoconductor
Shutter Electronically controlled leaf shutter, 1/500 s to 8 s (with ISO 25/15°)
Film speed setting Stepless adjustment from ISO 25/15° to ISO 400/27°
LED displays Red LED for camera shake warning and battery check,
Lens hood Built-in
Viewfinder Bright-line finder
Frame counter Manually adjustable, counts down to 0
Flash connection Connection for MINOX special flash units
Power supply Two 3-Volt batteries, type CR 1/3 N
green LED for film load check
– 54 –
Page 59

Design Volkswagen Design
Gewicht 45g (ohne Batterien und ohne Film)
58g (mit Batterien und Film)
Abmessungen
zusammengeschoben 80 (Breite) x 18 (Höhe) x 30 (Tiefe) mm
offen 101,7 (Breite) x 18 (Höhe) x 30 (Tiefe) mm
Zubehör Best.-Nr.
Stecketui für MINOX ECX 64 700
Trageriemen (60 cm) 64 710
Blitzgerät 69 130
– 53 –
Page 60

Design Volkswagen Design
Weight 45 g (1.58 oz) without batteries and film
58 g (2.04 oz) with batteries and film
Dimensions
Closed 80 (width) x 18 (height) x 30 (depth) mm (3.35x0.7x1.2 in)
Extended 101.7 (width) x 18 (height) x 30 (depth) mm (4x0.7x1.2 in)
Accessories Order no.
Leather case for MINOX ECX 64 700
Cord (60 cm) 64 710
Flash unit 69 130
– 55 –
Page 61

Technische Daten Blitzgerät MINOX ECX Flash
Leitzahl (ISO 100/21°) 12
Blitzfolgezeit ca. 4 sec
Blitze / Batterie min. 200
Batterie eine 3 Volt Batterie vom Typ CR 2
Design Volkswagen Design
Gewicht ca. 35 g (ohne Batterie)
Abmessungen 70 x 52 x 33 mm
Blitzbereich
ISO MINOX ECX
100 2 m
200 3 m
400 4,3 m
800 6,1 m
– 58 –
Page 62

Technical Data MINOX ECX flash
Guide number (ISO 100/21°) 12
Flash sequence approx. 4 sec
Number of flash operations/battery min. 200
Battery 3-Volt-battery, type CR 2
Design Volkswagen Design
Weight approx. 35 g (1.23 oz) without battery
Dimensions 70 x 52 x 33 mm (2.75 x 2.05 x 1.3 in)
Flash range
ISO MINOX ECX
100 2 m
200 3 m
400 4.3 m
800 6.1 m
– 59 –
Page 63

Fiche Technique du MINOX ECX
Type d'appareil Appareil photographique subminiature
Format de film 8 x 11 mm
Objectif Fixfocus à 4 lentilles MINAR 1:5,6/15 mm
Transport du film Armement rapide téléscopique (seulement effectif après déclenchement
Plage de mise au point De 1 mètre à l'infini
Presse-Film Pression débrayée pendant l'avancement du film et lors du changement
Cellule de mesure Photorésistance CdS
Obturateur Central, à commande électronique, de 1/500 s. à 8 s.
Sensibilité de film Réglable en continu de ASA 25/15° à ASA 400/27°
Témoins lumineux Diode lumineuse rouge = Signal de vitesse lente et contrôle de pile
Parasoleil Incorporé, monté à demeure
Viseur A cadre lumineux
Compteur de vues Réglable manuellement - Comptage soustractif jusqu'à zéro
de l'obturateur).
de film.
(sur la base de ASA 25/15°)
Diode lumineuse verte = Contrôle de chargement du film
– 56 –
Page 64

Connexion flash Prise d'adaptation pour les flashes spéciaux MINOX
Alimentation électrique Deux piles de 3 Volts de type CR 1/3 N
Design Etudié par Volkswagen Design
Poids 45 g. (sans pile et sans film)
58 g. (avec pile et film)
Dimensions
En position fermée 80 mm (largeur) x 18 mm (hauteur) x 30 mm (épaisseur)
En position ouverte 101,7 mm (largeur) x 18 mm (hauteur) x 30 mm (épaisseur)
Accessoires Numéros de codes
Etui-cuir de rangement pour
le MINOX ECX 64 100
Cordon de transport (60 cm) 64 710
Appareil flash 69 130
– 57 –
Page 65

Fiche Technique du MINOX ECX flash
Nombre-Guide 12
Temps de recyclage 4 secondes environ
Eclairs/Pile 200 minimum
Pile Une pile de 3 volts de type CR2
Design Etudié par Volkswagen Design
Poids 35 g. environ (sans pile)
Dimensions (Lo. x La. x Ep.) 70 mm x 52 mm x 33 mm
Portée du flash
ISO MINOX ECX
100 2 mètres
200 3 mètres
400 4,3 mètres
800 6,1 mètres
– 60 –
 Loading...