

Page 1

Instruction
s
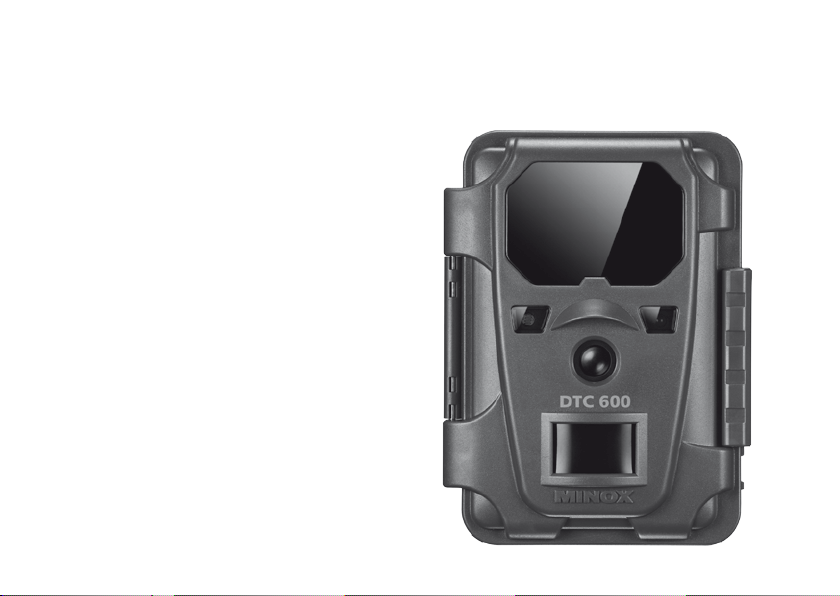
MINOX DTC 600
Page 2
MINOX DTC 600
• English
Page 22
Page 3
MINOX DTC 600
1
8
9
10
11
32
4
5
6
12 13 14 15
7
16
17
3
Page 4

Contents
Introduction 24
Get to know your camera 24
Controls 25
Preparing your camera 25
- Explanation of the controls 25
- Inserting the batteries 26
- Installing the memory card 26
- Language setting 27
- Mounting the camera 27
SET UP and ON mode 28
- SET UP mode 28
- ON mode 28
Menu functions and settings 28
- Manual release 28
- Camera 28
- Video 28
- Day and Night mode 29
- Playback photo/video 29
- Delete photo or video shots 29
- Play video clips 29
22
Settings 30
- Camera mode 30
- Video length 30
- Image resolution 30
- Continuous shooting mode 30
- Time lapse mode 30
- PIR Sensitivity 31
- Temperature unit 31
- Date /time stamp 31
- Date format/time 32
Password 32
- Input password 32
- Deactivate password 33
Battery type 33
Formatting the memory card 33
Camera information 33
- Stored files 34
- Storage space 34
- Firmware version 34
Connecting your camera to a computer 34
- Transferring images and videos to a computer 34
Technical Data 36
Conditions of warranty 37
Page 5

Scope of delivery
- Wildlife Camera MINOX DTC 600
- Mounting strap
- USB cable
- 10 x 1.5 volt AA batteries
- SD card 2 GB
- Instructions
Optional accessories
- AC adapter (EU version), order no. 65016
- Battery cable, order no. 65017
- Security box, order no. 65018
- Mounting holder, order no. 65019
For more information on accessories for the DTC 600,
go to the MINOX website: www.minox.com
23
Page 6

Introduction
Congratulations on the purchase of your game camera
MINOX DTC 600.
Like all other MINOX products this MINOX DTC 600
game camera boasts the traditional values fostered
by MINOX. It combines functionality in the smallest
possible space with the best optical quality. Simple and
fast operation make the MINOX DTC 600 ideal for digital
photo graphy and videos in the intended field of use.
These instructions are to help you make the most of the
full range of performance of your game camera MINOX
DTC 600.
24
Get to know your
MINOX DTC 600.
Please take a few moments to read these guidelines
as well as the safety and maintenance instructions.
Enjoy your new camera!
- 8 megapixel resolution
- Convenient 2“ color display
- High speed trigger delay to shutter release
- Powerful IR flash with a range of
over 15 meters and blackflash
- Low power consumption
- Up to 3 consecutive shots
- Videos of up to 30 seconds in length
- Password protection
Page 7

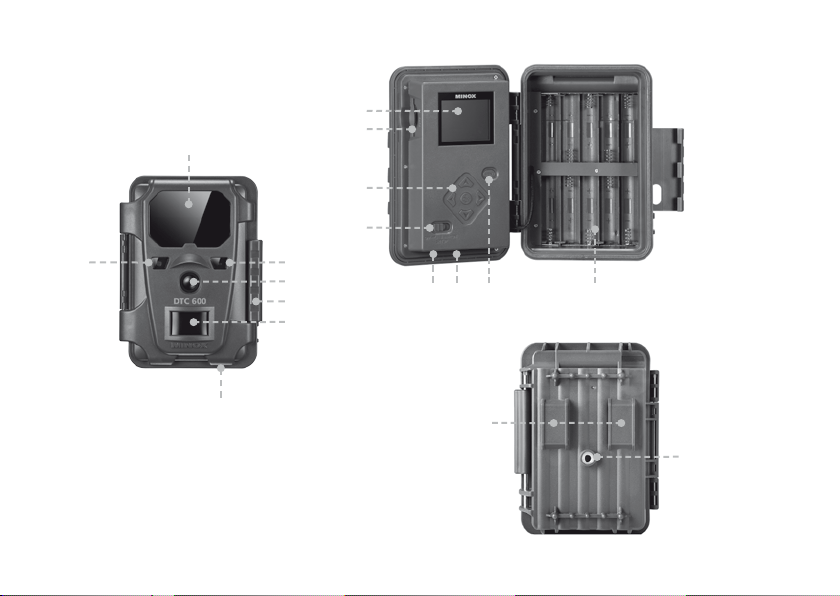
Controls
Preparing your camera
1. IR LEDs with black flash for night shots
2. Twilight sensor
3. Activation LED in blue
4. Camera lens
5. Lock
6. Motion sensor
7. External power supply
8. 2“ LCD color display
9. Slot for memory card
10. Control and input buttons
11. Main switch with three positions
OFF / SET UP / ON
12. External power supply (6V DC)
13. USB cable connection
14. Menu button
15. Battery compartment for 10x1.5 volt AA batteries
16. 2 mounting brackets
17. ¼“ tripod thread
Explanation of the controls
Proceed as follows to prepare the camera for the required use:
1. Place your DTC 600 on a flat surface.
2. Push up the lock (5) on the right of the camera body.
3. Fold the lock (5) over on the right hand side.
4. Open the front of the camera to the left.
On the left hand side of the opened camera body you will
see the controls (10, 11, 14) and on the right hand side
you will see the battery compartment (15).
On the outer edge of the left hand camera body you will
now see the slot for the memory card (9). In the upper
section of the inner surface there is a 2“ LCD display (1).
Beneath this display you will see the four arrow keys for
the menu operation (10). These arrow keys surround the
OK button that is used to confirm the selected menu
settings and there is another oval-shaped button on
the upper right for further switching options (14). On
the bottom left is the main switch with three switching
positions (11):
25
Page 8

1st function “OFF“:
main switch is switched to the left
2nd function “SET UP“:
main switch in middle position
3rd function “ON“:
main switch is switched to the right
The battery compartment (15) is located in the right side
(back) of the folded out camera.
On the bottom of the camera there are additional ports
for:
- external power supply (12)
- USB (13)
To close the camera body proceed as follows:
1. Place your DTC 600 on a flat surface in front of you.
2. Fold over the front camera body to the right hand
side.
3. Fold up the lock (5) on the right side.
4. Slide down the lock on the right hand side of the
camera body.
26
Inserting the batteries
Your DTC 600 camera is designed for alkaline, lithium or
nickel-metal hydride ( NiMH) AA batteries. To insert the
batteries open your camera, insert 10 x 1.5 Volt AA batteries as instructed in the batter y compartment (15). Pay
attention to the correct insertion direction/polarity
(+/-).
Checking the battery status
Switch the DTC 600 into “SET UP” mode (main switch
middle position). In the upper left of the LCD screen
the battery status is displayed via the battery symbol.
Note: You can prolong battery life by producing
smaller video segments.
Installing the memory card
To store photos and videos you need a memory card (SD/
SDHC card). Your DTC 600 camera works with memory
cards of up to 32 GB in size.
Installing the memory card
Insert the memory card into the slot (9) with the marked
side facing you. Make sure that the SD card slide is not
in closed position. Switch your DTC 600 into “SET UP”
Page 9

mode (main switch (11) in middle position). If the DTC
600 emits an acoustic signal this means that there is
either no memory card inserted, the memory card is
not inserted correctly or it is not compatible. The message “NO SD CARD” appears on the LCD screen in red.
If you do not hear an acoustic signal you can proceed
with the camera set up procedure.
Language setting
The default language setting of your DTC 600 is English.
To change the default language setting for the display,
follow these instructions:
1. Switch your DTC 600 camera to SET UP mode (main
switch to the middle position).
2. After approx. 5 seconds, the main menu will appear in
English with „Live Preview“ highlighted in dark blue.
3. Push the Up button once.
4. You are now in the „Language“ menu highlighted
in dark blue.
5. Push the OK button once.
6. Using the Up and Down buttons, choose the language
you would like to use (highlighted in light blue)..
7. Push the OK button once.
8. You are now at the top of the main menu in the selected language.
Mounting the camera
1. Mounting strap
On the back of the camera there are two mounting
brackets (16) for fixing the camera with a strap. Pass
the mounting strap included in the scope of delivery
through the two brackets. Fasten the camera using the
buckle on the mounting strap. Additionally the camera
can be secured with a standard safety harness.
2. Tripod
On the back of the camera on the outside there is a 14“
tripod thread (17) for mounting the camera on a tripod.
27
Page 10

SET UP and ON mode
Menu functions and settings
Your camera has two mode settings:
1. SET UP mode
Switch your DTC 600 camera to “SET UP” mode (main
switch (11) in middle position). In this setting you can
adjust the programming of the camera as well as all
display settings such as date, time, temperature etc. that
are to be later displayed on the photos or video clips.
2. ON mode:
Switch your DTC 600 camera to “ON” mode (main
switch (11) is switched to the right). In this mode your
DTC 600 camera automatically accepts the latest adjustments made in the Set Up mode.
Note: The blue activation LED (3) flashes for approx.
10 seconds before the camera is ready for operation.
28
Manual release
This option allows you to use the DTC 600 as a normal
digital camera. As with any common digital you can view
images and scenes on the display and capture the images and make recordings. Select the menu item “Manual
Release“ in the menu. By pressing the OK button or the
the right arrow key you select automatically the camera
mode. You can switch between Camera and Video mode
using the lef t and right arrow key. Press the Menu button
to return to the Main menu.
Camera
You will see the following displayed on the LCD screen:
in the top left the battery status symbol will appear for
a short moment, in the top right the camera symbol appears, in the bottom right the number of images [0/00]
appears. Press the OK button to shoot an image manually
in camera mode.
Video
If you want to change over to Video mode, press the
left arrow key.
You will see the following displayed on the LCD screen:
in the top right the video camera symbol appears, in the
Page 11

bottom right the recording time is displayed in [00:00] .
To activate Video mode press the OK button. Press the
OK button again to display a still frame. Press the button once more to continue playing the video recording.
Day and Night mode
In your DTC 600 the color mode is activated as the
default setting. Photos or video clips are displayed in
color. Select the item “Manual Release“ in the Menu
and use the Up and Down keys to activate the Day or
Night mode.
Press the bottom arrow key to enter Infrared Night
Mode. The setting changes from “Daytime Color Mode”
to “IR Night Mode” and the image in the LCD screen
changes from color to black and white. In the settings
make a selection between photo or video as well as day
or night mode. Press the OK button to store your setting.
Press the Menu button to return to the main menu.
Playback photo/video
Go to “Playback Photo/Video“ in the main menu and
press the right arrow key or OK button. In the bottom
right of the LCD screen the number of photos or video
recordings is displayed. By pressing the left or right arrow key you can move the displayed images forwards
or backwards chronologically. Press the menu button to
return to the main menu.
Delete photo or video shots
Go to the menu item “Playback Photo/Video“ in the
menu and press the OK button or the right arrow key.
This will take you to the submenu. Select an image and
choose between “Delete one image” and “Delete all
images”, make your selection using the Up and Down
arrow keys. Press the right arrow key and confirm with
Yes or No to delete the data. Press the OK button to
store the setting. Press the menu button to return to
the main menu.
Playing video clips
With vid eo files you will see a “Play s ymbol” in the botto m
left of the LCD screen. Press the OK button to play the
video clip. Press the OK button again to pause the video.
Press the OK button once again to continue playing
the video. With the video running you can run the video
back or forward by pressing the left or right arrow keys.
Press the menu button to return to the main menu.
29
Page 12

Settings
Camera mode
You can set your DTC 600 to record just photos or just
videos. Go to menu item “Camera mode” in the menu.
Press the OK button to enter the submenu. Here you can
select the desired recording format (photo /video) using
the arrow keys Up/Down. Press the OK button again to
store the setting.
Video length
The video length is displayed when the video mode has
been selected in the menu. Go to the menu item “Video
length” in the menu. Press the arrow keys (Up /Down)
or the OK button to set the video length in steps of 10
seconds to a maximum length of 30 seconds. Select the
desired video length and press the OK button to store
the setting. The set adjustment automatically returns
to the main menu.
the submenu. In the submenu you can set the desired
resolution with the arrow keys (Up/Down). Press the
OK button to store the setting. Press the menu button
to return to the main menu.
Continuous shooting mode
Continuous shooting is displayed in the main menu
when the photo mode has been selected in the menu
before. With this function the camera can shoot from
one to 3 sequential shots in rapid sequence every time
the shutter release button has been activated.
Go to the menu item “Continuous shooting” in the menu
and press the OK button or the right arrow key. This
will take you to the submenu. In the submenu press the
arrow keys Up /Down to select the desired number of sequential shots taken every time the shutter is released).
Press the OK button to store the setting. Press the menu
button to return to the main menu.
Image resolution
The image resolution is displayed when the photo
mode has been selected in the menu. Go to menu item
“Image resolution” in the menu. In this setting the
image resolution can be set to 8 MP, 5 MP or 3 MP.
Press the OK button or the right arrow key to enter
30
Time lapse mode
Use this function to set your DTC 600 to record/capture
the next movement at a programed interval. You can set
the time lapse at 5s, 10s, 20s, 30s, 1min, 5min, 10min,
30min, 60min. Go to the menu item “Time lapse” in the
menu, press the OK button or the right arrow key. This
Page 13

will take you to the submenu. In the submenu you can
set the desired time frame by pressing the arrow keys
(Up/Down). Press the OK button to store the setting.
Press the menu button to return to the main menu.
PIR Sensitivity: Setting the IR-sensor
sensitivity
Your MINOX DTC 600 has the option to set the IR-sensor
sensitivity to one of three levels - low, medium and high.
This feature is especially useful to avoid accidental triggering of the camera by movements caused by branches,
grasses or other non-relevant moving objects.
To adjust the sensor's sensitivity, press the DOWN arrow key until you arrive at the PIR sensitivity menu
item. Then press the right arrow button to enter the
submenu. Here you can choose between "Low", "Normal" and "High" by pressing the up or down arrow
keys. Press OK to verify your selection. You will then
automatically return to the main menu and the setting
will be saved.
Please note:
The detection range of the IR sensor is dependent on
external factors such as the temperature in the vicinity
of the camera.
To provide a general guideline for the best set ting, we
recommend the following IR sensor settings:
High (high sensitivity) >
generally in the summer or
when the surrounding temperature is about body temperature of the detected object.
Normal (medium sensitivity) >
generally in spring or
autumn or during times of the year within these typical
temperature ranges.
Low (low sensitivity) >
generally in winter or during
times of the year within these typical temperature
ranges.
Temperature unit
With this setting you can adjust the unit of temperature to degrees Fahrenheit or Celsius. Go to the menu
item “Temperature unit” in the menu and press the OK
button or the right arrow key. This will take you to the
submenu. In the submenu press the arrow keys (Up/
Down) to adjust the setting to degrees Fahrenheit or
Celsius. Press the OK button to store the setting.
Date / time stamp
This setting allows you to mark and display information
31
Page 14

such as date, time and temperature as a “time stamp”
on every recording (photo/video). Go to the menu item
“Date/time stamp” in the menu, press the OK button or
the right arrow key. This will take you to the submenu.
In the submenu you can choose between Yes “Display
time stamp“ or No “Do not display time stamp”. Press
the OK button to store the setting.
Date format / time
This function allows you to adjust the display format for
date/time. Go to the menu item “Setting” in the menu
and press the OK button or the right arrow key. This
will take you to the submenu. In the submenu you can
choose between three settings:
Date format
Select the desired date format and press the OK button
to store the setting.
Time
Select the desired time format “12 or 24 hours“ and
press the OK button to save the setting.
Entry
In this menu item you can select and adjust the Year/
Month/Day in the top row and the Hours/minutes/
32
AM/PM in the bottom row. Adjust the individual
settings using the Up /Down arrow keys. To reach the next
selection field use the left or right arrow key. Once you
have carried out all adjustments press the OK button
to store the settings.
Note: With the exact entry of the data the lunar calendar is automatically activated. The image of the
lunar phase is displayed on each photo or video shot.
Password
This function allows you to enter a 4-digit password to
safeguard your DTC 600 camera against theft. The camera cannot be operated without entering this password.
Go to the menu item “Password” in the menu and press
the OK button or the right arrow key. This will take you
to the submenu. In the submenu you can assign your
number combination under “Enter”.
Input password
Enter the desired number combination from the numbers
0 to 9 in each field using the arrow keys (Up/Down),
use the arrow keys (Left/Right) to access the individual
Page 15

fields of the password combination. Once you have entered the complete number press the OK button to store
it. Press the Menu button to return to the main menu.
Deactivate password
Go to the menu item “Password” in the menu and press
the OK button or the right arrow key. This will take you
to the submenu. In the submenu you can delete your
password under “Deactivate”. Go to “Deactivate” in
the submenu using the arrow keys Up/Down, press the
OK button to delete your number password. Press the
OK button to store the setting. Press the Menu button
to return to the main menu.
Battery type
Your DTC 600 Game Camera is a high precision tool. It
is recommended to use high quality alkaline, lithium or
NiMH batteries. You can use this setting to select the
battery type.
Go to the menu item “Battery type” in the menu and
press the OK button or the right arrow key. This will take
you to the submenu. Select your battery type as Alkaline
or NiMH. Press the arrow keys Up/Down.
Note: When using lithium batteries select ALKALINE.
Press the OK button to store the setting. The set adjustment returns automatically to the main menu.
Formatting the memory card
Formatting the memory card deletes all files on the
memory card and prepares the memory card for use
in the camera.
Go to the menu item “Format card” in the menu and
press the OK button or the right arrow key. This will take
you to the submenu. Select YES, if you want to format
the memory card and press the OK button to store the
setting. Select NO if the memory card should not be
formatted. Press the OK button to store the setting. The
set adjustment returns automatically to the main menu.
Camera information
Go to the menu item “Camera Information” in the menu
and press the OK button or the right arrow key. This
will take you to the submenu. In the submenu you can
33
Page 16

use the arrow keys Up/ Down to choose from the following information items: Stored files, memory space,
Firmware version.
Stored files
Go to the menu item “stored files” in the menu and
press the OK button or the right arrow key. This will
take you to the submenu. In the submenu you will see
a display of the stored files with number via the symbols
camera and video. Press the Menu button to return to
the Start menu.
Connecting the camera
to a computer
Always ensure that the camera is switched off before
connecting it to your computer.
Connect the camera to a computer using the provided
USB cable. Switch the camera to the ON mode (Main
switch in right hand position). Now the camera is detected as a mass storage device. Images or video clips
can be viewed directly.
Storage space
Go to the menu item “Storage space” in the menu and
press the OK button or the right arrow key. This will take
you to the submenu. In the submenu you will see a display
of the “Used storage space” and “Free storage space”.
Press the Menu button to return to the main smenu.
Firmware version
Go to the menu item “Firmware version“ in the menu
and press the OK button or the right arrow key. This will
take you to the submenu. In the submenu you will see a
display of the current Firmware version. Press the Menu
button to return to the main menu.
34
Transferring images and videos
to a computer
Always ensure that the camera is switched off before
removing the SD card from the card slot, as the memory
may otherwise be damaged. Remove the memory card
from the slot and insert it into a memory card reader
that is connected to your computer. The transfer of the
images or video clips to your computer can now begin.
Page 17

Notes
35
Page 18

Technical Data
Image sensor. . . . . . . . . . . . . . . . . 5.0 MP Resolution, CMOS Sensor
Image resolution . . . . . . . . . . . . . . . Adjustable: 8 MP (interpolated), 5.1 MP, 3 MP
Shutter lag time . . . . . . . . . . . . . . . under 1 sec.
Continuous shooting . . . . . . . . . . . . . 1 – 3 images every shutter button actuation (adjustable)
Video resolution . . . . . . . . . . . . . . . 640 x 480, AVI
Video length . . . . . . . . . . . . . . . . . 10 – 30 sec. (adjustable)
High power IR flash . . . . . . . . . . . . . Range of over 15 m / 50 ft
Display . . . . . . . . . . . . . . . . . . . . 2“ TFT color display
Day shots. . . . . . . . . . . . . . . . . . . in color
Night shots . . . . . . . . . . . . . . . . . . black and white
User friendly interface . . . . . . . . . . . . 6-button control
Realtime screen display . . . . . . . . . . . Photo/video playback
Settings . . . . . . . . . . . . . . . . . . . Date, time, temperature, lunar phases on each image /video
External memory. . . . . . . . . . . . . . . SD/SDHC card with up to 32 GB
Ports . . . . . . . . . . . . . . . . . . . . . USB port, 6.0 -Volt for external power supply
Cable . . . . . . . . . . . . . . . . . . . . . USB cable (included in scope of delivery)
Battery . . . . . . . . . . . . . . . . . . . . 10 x 1.5 V AA batteries / alkaline, Lithium or NiMH batteries
Password protection camera. . . . . . . . . 4-digit number combination
Fixing aid. . . . . . . . . . . . . . . . . . . Mounting strap
Dimensions (H x W x D) . . . . . . . . . . . 153 x 114 x 66 m / 4.4 x 6.0 x 2.5 inch
Weight (without batteries). . . . . . . . . . 365 g / 13 oz
Order number . . . . . . . . . . . . . . . 60687 DTC 600 brown / 60689 DTC 600 grey
36
Page 19

Conditions of Warranty
With the purchase of this MINOX DTC 600 you have
acquired a product which has been manufactured and
checked to special quality standards. The implied warranty of 2 years provided for this product commences
on the date of purchase from an authorized dealer and
is subject to the following conditions:
1) During the warranty period we shall deal with
complaints based on faulty manufacture free of
charge by repair, replacement of defective parts
or replacement by an identical flawless product at
our own discretion. Further claims, no matter what
kind or what legal argument in connection with this
warranty, shall not be accepted.
2) Claims under warranty are null and void if the defect has been caused by improper handling – which
also can include the use of accessories made by
other companies – if the product is serviced by unauthorized persons or workshops, or if the serial
number has been obliterated.
3) Warranty claims can only be made by submission of
the typewritten sales slip of an authorized dealer.
4) When submitting claims under warranty please
return the MINOX camera together with the typewritten sales slip and a description of the complaint
to the MINOX GmbH Customer Service or international MINOX Agency.
5) Tourists may, if required, make use of the Agency of
the country in which they are traveling - within the
terms of the Warranty of MINOX GmbH by presenting the typewritten sales slip.
MINOX GmbH
Walter-Zapp-Str. 4
D-35578 Wetzlar
Tel.: +49 (0) 6441 / 917-0
Fax: +49 (0) 6441 / 917-612
eMail: info@minox.com
Internet: www.minox.com
37
Page 20

Design subject to alterations without notice.
MINOX is a registered trademark of MINOX GmbH, Wetzlar.
MINOX GmbH
Walter-Zapp-Str. 4
D-35578 Wetzlar, Germany
Tel.: +49 (0) 6441 / 917-0
Fax: +49 (0) 6441 / 917-612
E-mail: info@minox.com
www.minox.com 99491 02/13
 Loading...