

Page 1

Instruction Manual
DMP3 + DMP4
Further languages are available under www.minox.com
Page 2

Preface
Congratulations on the purchase of your MINOX DMP
With the DMP you have chosen a product that features highest precision and maximum quality.
This User Manual explains how to use the different functions and will help you get the very best
results from your product.
To fully appreciate and optimize the features of the DMP we recommend that you carefully read
the entire manual before use it. After reading, keep this manual handy for future reference.
We hope you will have a lot of fun with your MINOX DMP!
Copyright
The use of copyrighted publications such as books, magazines, and music is limited to personal,
family, or similar purposes only. Duplication or modification of these publications is prohibited
without specific written authorization.
Usage
MINOX GmbH, Wetzlar shall not be liable for any problems / damages which occur in connection
with the use of this product / the recordings or playback.
Privacy
Do not use this product to shoot images that will infringe upon other people privacy or in places
that prohibit the use of photographic equipment and materials.
Page 3

Protection and safety
Handle this product with care at all times. Severe impact or dropping of the product may cause
damage.
In case of damage, only allow qualified personnel to repair this product. Never attempt to open
or disassemble the product, otherwise you will void your warranty.
• Unauthorized reproduction or transfer of this user manual as a whole or in part is strictly
prohibited.
• We reserve the right to make changes to the content of this manual at anytime without
notice.
• We recommend that you store important data separately. Memory data may be lost or
changed under certain circumstances.
MINOX GmbH shall not be liable for data loss from the memory of the product, which is caused
due to improper use, repairs, defects, rechargeable battery change, or any other reason.
MINOX GmbH shall not be liable for possible economic loss or claims for compensation due to
piracy of videos or pictures, loss or change in stored data, or direct or indirect causes resulting
from third-party use of this product.
• All trade names and registered trademarks are the properties of the respective companies.
MINOX GmbH shall not be liable for the content or information downloaded / transferred from
networks or computers.
We have endevoured to make the content of this manual as complete and comprehensive
Page 4

as possible, should, however any information be erroneous or missing, please contact us
immediately.
Table of Contents
Preface . . . . . . . . . . . . . . . . . . . . . . . . . . . . . . . . . . . . . . . . . . . . . . . . . . . . . . . . . . . . . . . . . .
Product Introduction . . . . . . . . . . . . . . . . . . . . . . . . . . . . . . . . . . . . . . . . . . . . . . . . . . . . . . . .
Description . . . . . . . . . . . . . . . . . . . . . . . . . . . . . . . . . . . . . . . . . . . . . . . . . . . . . . . . . . . . . . . 4
Media Browser
Music . . . . . . . . . . . . . . . . . . . . . . . . . . . . . . . . . . . . . . . . . . . . . . . . . . . . . . . . . . . . . . . . . . 12
Photo . . . . . . . . . . . . . . . . . . . . . . . . . . . . . . . . . . . . . . . . . . . . . . . . . . . . . . . . . . . . . . . . . . 15
Movie . . . . . . . . . . . . . . . . . . . . . . . . . . . . . . . . . . . . . . . . . . . . . . . . . . . . . . . . . . . . . . . . . 18
Recorder . . . . . . . . . . . . . . . . . . . . . . . . . . . . . . . . . . . . . . . . . . . . . . . . . . . . . . . . . . . . . . . .
AV-IN
Memory . . . . . . . . . . . . . . . . . . . . . . . . . . . . . . . . . . . . . . . . . . . . . . . . . . . . . . . . . . . . . . . . 24
Setup . . . . . . . . . . . . . . . . . . . . . . . . . . . . . . . . . . . . . . . . . . . . . . . . . . . . . . . . . . . . . . . . . . 24
USB mass storage . . . . . . . . . . . . . . . . . . . . . . . . . . . . . . . . . . . . . . . . . . . . . . . . . . . . . . . . . 26
Charging the rechargeable battery
Technical data . . . . . . . . . . . . . . . . . . . . . . . . . . . . . . . . . . . . . . . . . . . . . . . . . . . . . . . . . . . .
Troubleshooting
Rechargeable battery information . . . . . . . . . . . . . . . . . . . . . . . . . . . . . . . . . . . . . . . . . . . . . 30
Notes on warranty . . . . . . . . . . . . . . . . . . . . . . . . . . . . . . . . . . . . . . . . . . . . . . . . . . . . . . . . 30
. . . . . . . . . . . . . . . . . . . . . . . . . . . . . . . . . . . . . . . . . . . . . . . . . . . . . . . . . . . . 8
. . . . . . . . . . . . . . . . . . . . . . . . . . . . . . . . . . . . . . . . . . . . . . . . . . . . . . . . . . . . . . . . . . 22
. . . . . . . . . . . . . . . . . . . . . . . . . . . . . . . . . . . . . . . . . . . . 27
. . . . . . . . . . . . . . . . . . . . . . . . . . . . . . . . . . . . . . . . . . . . . . . . . . . . . . . . . . 29
21
27
1
4
Page 5
Product Introduction
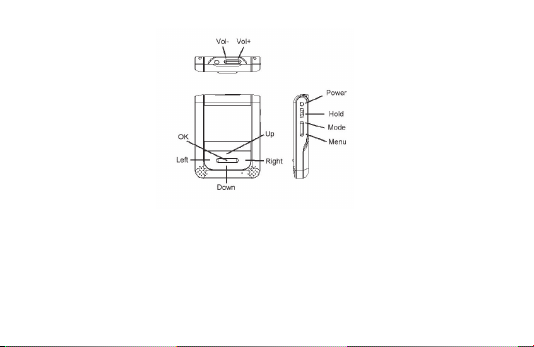
Power button
Hold switch
Mode button
Menu button
Vol +
Vol –
OK button
Up button
Down button
Left button
Right button
Description
Rechargeable battery Installation / Removal
Using both hands hold the DMP with the back facing up. Now remove the battery slot cover by
sliding it down with both thumbs. Insert the rechargeable battery with the metal contact end
facing left. Slide the rechargeable battery into the bay at a 45 degree slant angle, then push the
entire rechargeable battery into the bay. When the rechargeable battery is in the proper position,
replace the cover.
4
Page 6

Recharging the Rechargeable battery
Charge the rechargeable battery for at least 4 hours prior to initial use.
The rechargeable battery is charged automatically when you connect the product to your
computer. Be sure to turn off the power of the DMP before charging.
Plug the USB end of the connection cable into the USB socket of your computer and plug the
mini USB end of the cable into the USB port of the DMP. The red lamp next to the USB port of
your DMP will light up while the rechargeable battery is being charged.
Battery power
The properties of lithium ion batteries vary slightly during the service life. To optimize battery
power this product uses state-of-the-art technology for intelligent battery management and
maximum duration of the power supply.
Note: Insert the battery as described and charge it using the power pack or with the USB cable
until fully charged. Your computer must be switched on to charge the battery via the USB cable.
Installing/Removing the Memory Card
The memory card slot is located on the left side of the product. Push the memory card into the
slot slowly as shown by the marking on the product until it engages.
To remove the memory card, just press the memory card into the slot until it disengages and
ejects automatically.
5
Page 7

Power Button
Power On: Hold the power button in depressed position until the screen starts up and displays
the Main Menu.
Power Off: Hold the power button in depressed position for at least 2 seconds – the DMP then
switches off.
Caution! during the switch-off procedure the product will stop all actions and
complete the data save before switching off completely.
Hold switch
The slide switch locks all controls of the DMP to avoid unintentional button operation
Slide the switch to the left (position “HOLD”) to activate key lock.
Slide the switch to the right to disable key lock.
Mode button
When you press the Mode button, the screen will display 8 options:
- Media Browser
- Music
- Photo
- Movie
- Recorder
6
Page 8

- A/V In
- Memory
- Setup
Press the Mode button to return from the respective mode to this display
Menu button
Press to show the available menu items or options
Vol+
Press and hold to increase the volume.
Vol-
Press and hold to reduce the volume.
OK button
Press to select or activate the highlighted menu item.
In Photo mode press the OK button to display a selected photo in the display.
In Music and Movie modes press the OK button to start playing and press the button again to
stop.
In A/V or Recorder mode press the OK button to start recording and press the button again to
stop.
7
Page 9

Up button
Press the Up button to move the selection upward.
Down button
Press the Down button to move the selection downward.
Left button
Press the Left button to rewind when playing movies.
In the mode for Music, Movie and Photo, press this button to select the previous item again.
Right button
Press the Right button to forward wind when playing movies.
In the mode for Music, Movie and Photo, press this button to select the previous item again.
Media Browser
Finds the media files with extensions, AVI, MP3, WAV, WMV and
JPG.
8
Page 10

Selecting files in Media Browser
Press Up or Down button to change between different files/folders.
Press the OK button to select the highlighted file/folder. If the file is
a photo image, this will be displayed
Switching back to Media Browser
Press the Left or Right button to switch back to the Media Browser.
If you are playing a movie or music file, stop the playback before
switching back to the file browser
Playing a movie or music file
Press the OK button once to start the playback and press it again to pause.
Volume Up/Down
Press the Vol+ button to increase the volume
Press the Vol- button to decrease the volume
Forward wind when playing a movie
Press the Right button once to activate Forward Wind function and press it again to start Fast
Forward.
Press the Right button again to return to normal mode
9
Page 11

Rewind when playing a movie
Press the Left button once to activate the Rewind function and press it again to start the Fast
Rewind.
Press the Left button again to return to normal mode
Preparation before playing the movie in the media player
To ensure the MP4 file can be played properly, use the program MEDIA CONVERTER on the Driver
CD to convert the source file before you play it in the media player
Menu Settings
Press the Menu button to open the Menu. The Browser Menu has 3
available options for files
Copy to Internal (this option is only available when a SD card is used)
Delete One
Exit
Press Up or down button to switch between different options. Press
the OK button to select the highlighted option.
10
Page 12

Copy to Internal
Press Up or down Button to switch between the three folders of the
internal flash memory:
- Backup_1
- Backup_2
- Backup_3
Press the OK button to select the highlighted folder.
1. Do not remove the flash memory card during the copying process as otherwise it will cause the
process to fail.
2. The system will first determine the file size to be copied. If there is not enough memory space
the system will automatically terminate the copying process and show an error message
3. The file copy process can take several seconds, depending on the file size to be copied.
Delete One
Press Up or Down button to switch between Yes and No. Press the
OK button to select the highlighted option
Exit
Select this option to return to the previous screen
11
Page 13

Music
Only files with extension : MP3 & WAV can be browsed.
Music Format Support
Both files in MP3 format or WAV files recorded by the player are
supported
Selecting music files in File Browser
Press Up or Down button to switch between different files. Press
the OK button to select and play the highlighted file
Play/Stop Music
Press the OK button once to play and press the button again to
stop.
If no button is pressed for 10 sec. during play the LCD display
switches off. Press the Menu button to switch the display back
on.
Changing music track during playback
Press Left or Right button to switch to Previous or Next track
12
Page 14

Volume Up/Down
Press the Vol+ button to increase the volume
Press the Vol- button to decrease the volume
Menu Settings
Press the Menu button to open the Menu. There are 4 options in
the Music Menu
Select Directory
Play Mode
Delete One
Exit
Press Up or Down button to switch between different options. Press
the OK button to select the highlighted option
Select Directory
Press Up or down Button to switch between different directories.
Press the OK button to enter the selected directory.
To view the file list in the current directory, select the item [Files]
and press the OK button
13
Page 15

Play Mode
There are 3 options in the Play Mode Menu
- Single
- All
- Cycle
Press Up or Down button to switch between different options. Press
the OK button to select the highlighted option:
Single: The current selection will play once only
All: All music files in the current directory will play once
Cycle: All music files in the current directory will play in loop function until the rechargeable
battery is on low.
Delete One
Press Up or Down button to switch between Yes and No. Press the
OK button to select the highlighted option
Exit
Select this option to return to the previous screen
14
Page 16

Photo
Only files with the extension JPG can be displayed.
Photo Format Support
Only files in JPEG compressed data, baseline YUV 4:2:2 format get
support
Selecting files in File Browser
Press Up or Down button to switch between different files. Press
the OK button to select the highlighted file and show the selected
photo.
To change directory refer to “Menu Settings” in the User Manual
Switching JPEG image while photo is displayed
Press Left or Right button to switch between Previous and Next
Photo
15
Page 17

Menu Settings
Press the Menu button to open the Menu. There are 4 options in
the Photo Menu
Select Directory
Slide Show
Delete One
Exit
Press Up or Down button to switch between different options. Press the OK button to select the
highlighted option
Select Directory
Press Up or down Button to switch between different directories.
Press the OK button to open the selected directory.
To view the file list in the current directory, select item “Files” and
press the OK button
16
Page 18

Slide Show
There are 3 options in the Slide Show Menu
- Single
- All
- Cycle
Press Up or down Button to switch between different options. Press
the OK button to select the highlighted option:
Single: The selected photo is displayed
All: All Photo files in the current directory are shown one after the other
Cycle : All photo files in the current directory are shown one after the other and loop continuously
until the rechargeable battery is on low.
Delete One
Press Up or down Button to switch between Yes and No. Press the
OK button to select the highlighted option
Exit
Return to the previous screen
17
Page 19
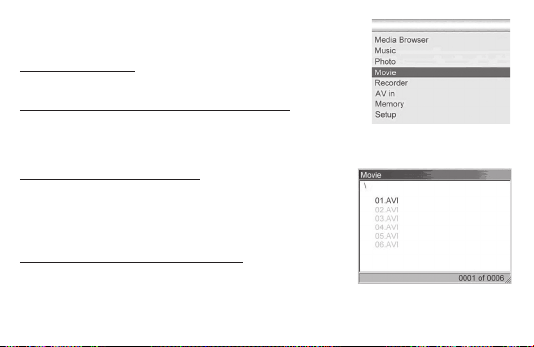
Movie
Files with extension (AVI) can be displayed.
Movie Format Support
Files in AVI with Zoran MPEG 4 format supported
Preparation before playing movie in the media player
To ensure the MP4 file can be played properly use the Media
Converter on the Driver CD to convert the source file before playing
it in the media player
Selecting movie files in File Browser
Press Up or Down button to switch between different files. Press
the OK button to select the highlighted file and the selected
movie will be shown
To change directory, refer to Menu Settings in the User Manual
Changing the movie during movie playback
With the movie stopped, press Left or Right button to switch to
Previous or Next movie
18
Page 20

Playing the movie
Press the OK button once to play and press it again to pause.
Volume Up/Down
Press the Vol+ button to increase the volume
Press the Vol- button to decrease the volume
Forward Wind when playing movie
Press the Right button once to activate Forward Wind function and press it again to start Fast
Forward. Press the Right button again to return to normal Play mode
Rewind when playing movie
Press the Left button once to start the Rewind function. Press it again to start Fast Rewind. Press
Left button again to return to normal Play mode
Menu Settings
Press the Menu button to open the Menu. There are 3 options in
the Movie Menu
Select Directory
Delete One
Exit
19
Page 21

Press Up or Down button to switch between different options. Press the OK
Button to select the highlighted option
Select Directory
Press Up or Down button to switch between different directories.
Press the OK
button to open the selected directory.
To view the file list in the current directory select the item “Files”
and press the OK button
Delete One
Press Up or down Button to switch between Yes and No. Press the
OK button to select the highlighted option
Exit
Select this option to return to the previous screen
20
Page 22
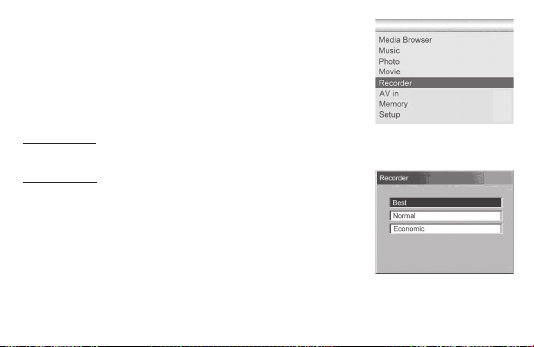
Recorder
You can record audio signals with the built-in or external
microphone or with an other external device. The recording quality
can be adjusted.
If an external signal source is connected this is recognized and
recorded by the recorder. If there is no external signal source
connected the internal microphone will be used.
Record a voice
Press the OK button once to start the recording and press it again to stop.
Menu Settings
With the recorder stopped, press the Menu button to open the
menu.
There are 3 options in the Recorder Menu
Fine
Normal
Economic
Press Up or down Button to switch between different options. Press the OK button
to select the highlighted option.
21
Page 23
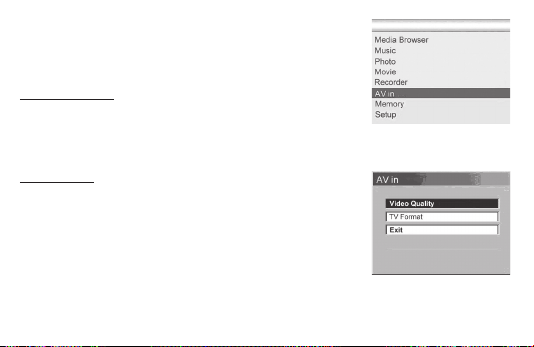
AV-IN
After connection of a suitable AV transmitter in the jack the
received signal will be shown on the LCD panel. You can adjust the
desired recording quality for audio and video.
Recording a movie
Press the OK button once to start the recording and press it again
to stop.
Press the Down button once to pause and press it again to resume
recording.
Menu Settings
When recording is not active press the menu button to open the
menu.
There are 3 options in the Video Menu
Video Quality
TV Format
Exit
Press Up or Down button to switch between different options. Press the OK button to select the
highlighted option.
22
Page 24

Selecting Video Quality
There are 5 options in the Video Menu
Best
Fine
Normal
Basic
Economic
Press Up or Down button to switch between the different options.
Press the OK button to select the highlighted option.
TV Format
There are 2 options in the Video Menu
NTSC
PAL
Press Up or Down button to switch between different options. Press
the OK button to select the highlighted option.
23
Page 25
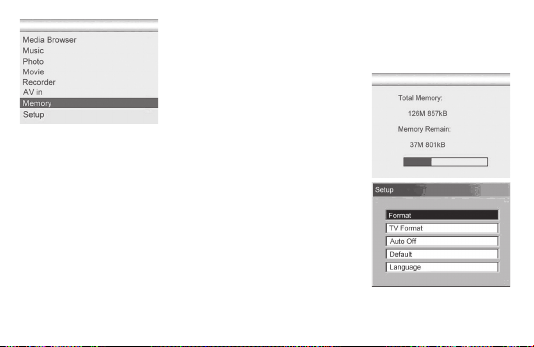
Memory
Shows the total memory and the memory used.
Without SD Card in the player it shows the internal memory.
When SD Card is inserted only the SD
memory will be shown.
Setup
There are 5 options in the Setup Menu
Format
TV Format
Auto Off
Default
Language
Press Up or Down button to switch between different options. Press
the OK button to select the highlighted option.
24
Page 26

Format
With the Format function you can delete (format) the memory.
Press Up or Down button to switch between Yes and No. Press the
OK button to select the highlighted option
TV Format
There are 2 options in the Video Menu
NTSC
PAL
Press Up or Down button to switch between different options. Press
the OK button to select the highlighted option.
Auto Off
Press Up or Down button to switch
between:
- 60sec
- 120sec
- 180sec
- Off
Press the OK button to store the selected auto off time
25
Page 27

Default
With the reset“ function your can reset all settings of the product to the status on delivery. Press
the Up or Down button to switch between Yes and No. Press the OK button to selected the
highlighted option
Language
The media player supports the following languages:
English
French
Turkey
Italian
German
Spanish
Portugese
Chinese (T)
Chinese (S)
Japanese
Press Up or down Button to switch between languages. Press the OK button to set the language
USB mass storage
When the media player is turned on, just plug in to the computer using a USB cable and it will be
recognized as a portable disk.
26
Page 28

Charging the rechargeable battery
When the media player is turned off, connect to the computer using a USB cable.
The internal rechargeable battery will be automatically charged through the USB power.
The rechargeable battery is fully charged when the red LED lights up for one second and then
extinguishes.
If the rechargeable battery is being charged for the first time, make sure that you have installed it
correctly. When charging for the first time the rechargeable battery charging should last for at least
4 hours to ensure that the rechargeable battery is fully charged.
During continuous charging of the rechargeable battery for 30 minutes and longer the media
player will generate some heat. This is a normal phenomenon.
Technical Data
LCD Display 2.5” LTPS (Low Temperature Poly Silicon)
TFT LCD 24 bits color (960 x 240 pixel)
Interface Mini USB, Video Out, Ear Phone Jack,
Speaker, Microphone In, Video out TV Out (NTSC / PAL)
Internal memory 128MB (DMP3)
2 GB (DMP4)
Storage Media SD/MMC Card (32 MB up to 4 GB)
Image Format JPEG (baseline YUV 4:2:2)
Video Recording AVI (MPEG4)
27
Page 29

Voice Recording WAV
AV-In Recording AVI (MPEG4)
MP3 Playing MP3
Power Specification
Battery Li-Ion rechargeable battery (BLB-2 1000 mAh)
Product Dimension
Weight(g) approx. 2.43 oz (without battery)
Length 90 mm
Width 70 mm
Height 162 mm
System Requierments:
PC Microsoft Windows ME/200/XP
Intel Pentium III, 450 MHz or higher
256 MB RAM (recommended)
USB 1.1 port (USB 2.0 recommended)
200 MB free hard disc space
Mac Mac OS 9; Mac OS X 10.x
500 MHz Power PC G3 or higher
256 MB RAM (recommended)
USB 1.1 port (USB 2.0 recommended)
200 MB free hard disc space
28
Page 30

Note: The Media Conversion Programm does not support Mac OS
Troubleshooting
You can troubleshoot the following problems that may occur while using this product:
Cannot switch on the product.
Make sure that the rechargeable battery is fully charged and inserted properly.
Cannot use the inserted SD/MMC card.
If you cannot use the SD/MMC card after inserting it please check the following:
1. If the SD/MMC card is damaged, replace with a new one. Problems are usually due to a faulty
controller chip in the SD card.
2. If the file in the SD/MMC card is damaged, go to Setup mode, Select “Format” to reformat the
SD/MMC.
Cannot connect to the PC, cannot use USB flash disk.
Check that the USB cable is properly connected. We recommend using the USB cable provided
with this product. If your PC uses the Windows 98 operating system, you must install the Windows
98 driver from the CD.
29
Page 31

What can I do if the system freezes during use?
Improper operation may cause the operating system to freeze. If you cannot restart or shut down,
open the battery slot cover, remove the rechargeable battery and then re-insert the rechargeable
battery. Restart to eliminate this problem.
Rechargeable battery information
If the battery icon flashes while the product is switched on, this means that the rechargeable
battery is low. Recharge the rechargeable battery or replace with a new one.
The player comes with a high quality rechargeable battery. When purchasing a new rechargeable
battery we recommend buying one of the same quality to maintain maximum product
performance.
We also recommend NOT to use a low-priced charger to charge this rechargeable battery as some
appliances do not feature an overload protection and this could lead to reduced rechargeable
battery life.
Notes on Warranty
It is not permited to open the housing of the player. If you open the housing the warranty shall be
null and void. Do not apply too much pressure to the LCD display as this will otherwise damage
the product.
30
Page 32

Design subject to alterations without notice.
MINOX is a registered trademark of MINOX GmbH, Wetzlar.
MINOX GmbH
Walter-Zapp-Str. 4
D-35578 Wetzlar, Germany
Tel.: +49 (0)6441/917-0
Fax: +49 (0)6441/917-612
e-mail: info@minox.com
www.minox.com
 Loading...