

Page 1

Bedienungsanleitung
Instruction manual
Mode d’emploi
Digital Classic Camera Blitz
Digital Classic Camera Flash
Page 2
DE U T SCH
Einsetzen / Entfernen der Batterien
Verbinden des Blitzgerätes
mit der MINOX Digital Classic Camera (DCC)
Halten Sie das Blitzgerät mit der linken Hand und ziehen
Sie den Batteriedeckel auf der Rückseite ab. Setzen Sie die
Batterie entsprechend dem Symbol in das Batteriefach ein,
wobei auf die richtige Polarität (+/–) und den korrekten
Sitz der Batterie zu achten ist. Bringen Sie abschließend den
Batteriefachdeckel wieder an.
1
2
3 4 5
Hinweis: Schalten Sie das Blitzgerät aus (Off) (2) und ver-
gewissern Sie sich, dass die rote LED (1) nicht leuchtet, bevor Sie den Blitz mit der MINOX DCC verbinden.
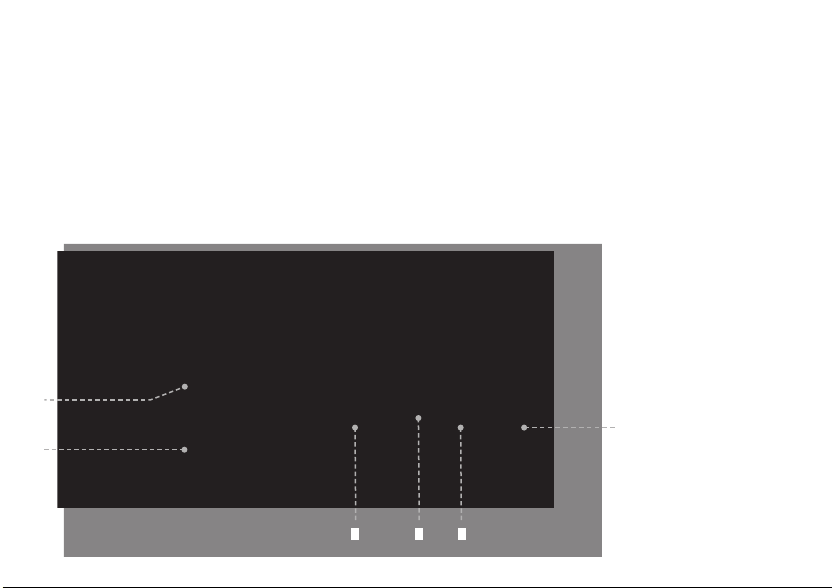
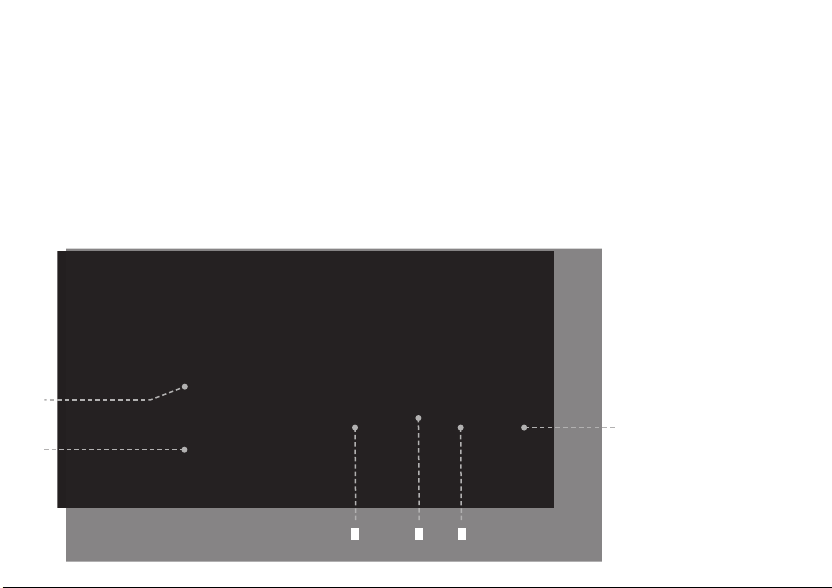
Platzieren Sie die Kamera mit nach hinten gerichtetem
Display auf der Befestigungsschiene (3) des Blitzgeräts.
Bitte darauf achten, dass die beiden Kontakte (6) rechts
korrekt mit den entsprechenden Kontakten auf der Unterseite der Kamera verbunden und der linke Sicherheitskontakt (5) eingedrückt ist. Mit der Schraube (4), die sich an
der Unterseite der Befestigungsschiene befindet, wird die
Kamera befestigt.
Um eine Beschädigung der Kamera zu vermeiden, ziehen Sie
die Schraube (4) bitte vorsichtig an, bis sie spürbar fest sitzt.
6
Page 3

Benutzen des Blitzgerätes
mit der MINOX Digital Classic Camera (DCC)
Vor Inbetriebnahme des Blitzgeräts mit der MINOX DCC
müssen folgende Einstellungen an der Kamera vorgenommen werden:
Schalten Sie die MINOX DCC ein und drücken Sie zweimal
den „Mode“-Knopf um in das Menü „Einstellungen“ zu
gelangen. Wählen Sie „Kamera“ und bestätigen Sie dies
durch Drücken des Auslösers. Im Menü „Kamera“ wählen
Sie „Blitz“ und bestätigen Sie dies durch Drücken des Auslösers. Im Menü „Blitz“ wählen Sie „Auto“ und bestätigen
Sie dies durch Drücken des Auslösers.
Die rote LED leuchtet nicht
Das Blitzgerät ist eingeschaltet und die rote LED leuchtet
nicht nach ca. 20 Sekunden. Dies bedeutet entweder, dass
die Batterie nicht sorgfältig eingesetzt wurde oder leer ist. In
diesem Fall prüfen Sie bitte den korrekten Sitz der Batterie im
Batteriefach des Blitzgerätes oder tauschen Sie diese gegen
eine neue Batterie aus.
Hinweis : Bitte beachten Sie, dass die Automatiksteuerung
den Blitz erst bei schlechten Lichtverhältnissen auslöst.
Der Blitz funktioniert nicht
Aufladen des Blitzgeräts
Schieben Sie den On /Off-Schalter (2) auf „On“. Der Blitz
wird nun automatisch aufgeladen.
Auslösen des Blitzes
Der Blitz ist funktionsbereit, wenn
1. die rote LED (1) blinkt, aber nicht vollständig geladen ist.
2. die rote LED (1) leuchtet und vollständig geladen ist.
Hinweis: Das Blitzgerät löst keinen Blitz aus, wenn es nicht
mit der MINOX DCC verbunden ist.
Obwohl das Blitzgerät mit der MINOX DCC korrekt verbunden ist, wird der Blitz während des Fotografierens nicht
ausgelöst. Dies bedeutet entweder, dass das Blitzgerät
nicht sorgfältig angeschlossen ist oder die ent sprechen den Kameraeinstellungen nicht vorgenommen wurden.
Bit te überprüfen Sie beide Möglichkeiten unter Berücksichtigung der zuvor stehenden Anleitungen „Verbinden
des Blitzgerätes ...“ und „Benutzen des Blitzgerätes ...“.
Page 4
ENG L I SH
Battery Installation / Removal
Connecting the Flash Unit
to the MINOX Digital Classic Camera ( DCC)
Use your left hand to hold the product. Now slide the
battery slot cover down. Then insert the battery according
to the metal contact, negative(– ) side on the top. Put the
batteries into the bay. Make sure that the battery is installed
correctly. When the battery is in the proper position, close
the battery slot cover.
1
2
3 4 5
Note : Switch off the flash unit (2) and make sure the red
LED (1) is off before connecting to the MINOX DCC.
Put the MINOX DCC camera on the arm (3) of the Flash Unit
with the LCD facing back. Make sure that the two metal
pins (6 ) on the right side are properly connected with the
Camera. Also please take care that the safety switch (5)
is depressed. Then turn the screw (4) up to tighten the
MINOX DCC.
To avoid any damaging of the camera please turn up the
screw (4) cautiously till it is tightened.
6
Page 5

Using the Flash Unit in combination
with the MINOX Digital Classic Camera (DCC)
Before using the Flash Unit in combination with the MINOX
DCC the following settings have to be done:
Switch on the MINOX DCC, press the mode button twice
to enter the Setup Mode. Press the shutter button to select
“Camera”. In the camera menu, press the shutter but ton
to select “Flash”, then press the shut ter button to select
“Auto” option.
The red LED does not light on
The flash unit is switched on and the red LED (1) does not
light on af ter approx. 20 seconds. It indicates either the
battery is not installed properly or the battery is low. For the
battery installation problem, reinsert the battery properly.
Replacing a new battery will fix the battery low problem.
Important : Please note that the automatic flash function
only operates in low light conditions.
Charging the Flash Unit
Switch the On /Off button (2) to the ON side. The flash unit
will be charged automatically.
Triggering the Flash
When die flash is ready,
1. the red LED (1) is flashing but is not fully charged.
2. the red LED (1) lights on and is fully charged.
There is no flashing
Note : The Flash Unit has no flashing if it is not connected
to a MINOX DCC.
When the flash unit is connected with a MINOX DCC, there
is no flashing while taking photo. It indicates either the flash
unit is not installed properly or the flash has not been enable
in DCC. For the connection problem, re -connect the flash
unit with the MINOX DCC properly. Enabling the flash in
DCC, in Setup Mode, go to “Camera” menu , select “Auto”
in the Flash option.
Page 6

FR AN Ç A I S
Installation / Remplacement des piles
Connexion de l’unité flash
au MINOX Digital Classic Camera (DCC)
En tenant l’unité flash dans la main gauche, ôter le couvercle
du compartiment de pile situé au dos de l’unité. Installer
adéquatement la pile en respect ant la polarité, comme
indiqué par les symboles (+/–) gravés à l’intérieur du compartiment. Replacer le couvercle du compartiment de pile.
1
2
3 4 5
Remarque : Avant de connecter l’unité flash au MINOX
DCC, assurez-vous tout d’abord qu’il est hors circuit (Off)
(2) et que la diode DEL rouge (1) n’est pas allumée.
Placez l’appareil photo – avec son écran dirigé vers l’arrière
- sur le rail de fixation de l’unité flash (3). Veillez à ce que
les deux contacts (6 ) à droite soient correctement couplés
aux contacts correspondants, situés au dessous de l’appareil
photo. Assurez-vous aussi, que le contact de sécurité (5), à
gauche, s’enclenche bien. Ceci fait, fixez fermement l’appareil photo à l’unité flash en serrant la vis (4), située sous le
rail de fixation. A cette occasion, vissez avec précaution afin
d’éviter d’endommager l’appareil photo.
6
Page 7

Utilisation du flash avec le
MINOX Digital Classic Camera ( DCC)
Avant d’utiliser le flash avec le MINOX DCC, les réglages
suivants sont nécessaires:
Allumez le MINOX DCC puis, pressez deux fois sur le bouton
„Mode“ pour entrer dans le menu des „Réglages“. Là, sélectionnez „Camera“. Confirmez en appuyant sur le déclencheur. Sélectionnez ensuite la fonction „Flash“. Pressez à
nouveau sur le déclencheur pour confirmer. Ensuite, sélectionnez „Auto“ avant de confirmer en appuyant sur le déclencheur.
La diode rouge DEL ne s’allume pas
Le flash est sur circuit et la diode DEL rouge ne s’allume pas
après environ 20 secondes. Ce qui peut signifier que la pile
n’est pas correctement installée, ou qu’elle est épuisée.
Dans ce cas, vérifiez le bon positionnement de la pile dans
le compartiment de pile ou remplacez celle-ci par une nouvelle.
Attention ! La commande automatique du flash ne fonctionne que lorsque les conditions d’éclairage sont défavorables.
Chargement de l’unité flash
Lorsque vous positionnez le commutateur On /Off (2) sur
„On“, le flash se recharge alors automatiquement.
Déclenchement du flash
Le flash est prêt à fonctionner
1. lorsque la diode DEL rouge (1) clignote, mais il n’est pas
chargé complètement.
2. lorsque la diode DEL rouge (1) s’allume et il est chargé
complètement
Le flash ne fonctionne pas
Remarque : Le flash n’émet pas d’éclair s’il n’est pas
connecté au MINOX DCC.
Si le flash ne se déclenche pas lors d’une prise de vue alors
que l’unité flash est connectée au MINOX DCC, ceci peut
indiquer que le flash n’est pas correctement connecté ou
que les réglages de l’appareil photo n’ont pas été bien effectués. Dans ce cas, vérifiez ces deux possibilités à par tir
des instructions mentionnées précédemment :
- Connexion de l’unité flash au MINOX DCC
- Utilisation de l’unité flash avec le MINOC DCC
Page 8

Gewährleistungsbestimmungen
Sie haben ein MINOX Produkt erworben, das nach besonders strengen Qualitätsrichtlinien hergestellt und
geprüf t wurde. Die für dieses Produkt geltende geset zliche Gewährleistung von 2 Jahren wird von uns
ab dem Tag des Verkaufs durch einen autorisierten Händler unter folgenden Bedingungen übernommen:
1) In der Gewährleistungszeit werden Beanstandungen, die auf Fabrikationsfehlern beruhen, kostenlos
und nach eigenem Ermessen durch Instandsetzung, Austausch defekter Teile oder Umtausch in ein
gleichartiges einwandf reies Erzeugnis behoben. Weitergehende Ansprüche, gleich welcher A rt und
gleich aus welchem Rechtsgrund im Zusammenhang mit dieser Gewährleistung, sind ausgeschlossen.
2) Gewährleistungsansprüche entfallen, wenn der betreffende Mangel auf unsachgemäße Behandlung
– wozu auch die Verwendung von Fremdzubehör zählen kann – zurückzuführen ist, ein Eingriff von
nicht autorisierten Personen und Werkstätten durchgeführt oder die Fabrikationsnummer unkenntlich
gemacht wurde.
3) Gewährleistungsansprüche können nur bei Vorlage eines maschinengeschriebenen Kaufbelegs eines
autorisierten Händlers geltend gemacht werden.
4) Bei Inanspruchnahme der Gewährleistung leiten Sie bitte die MINOX Kamera zusammen mit dem Origi-
nal des maschinengeschriebenen Kaufbelegs und einer Schilderung der Beanstandung dem Kundendienst der MINOX GmbH oder einer Landesvertretung zu.
5) Touristen steht im Bedar fsfalle unter Vorlage des maschinengeschriebenen Kauf be legs die Vertretung
des jeweiligen Reiselandes gemäß den Regelungen zur Gewährleistung der MINOX GmbH zur Verfügung.
Page 9

Conditions of warranty
You have purchased a MINOX product which has been manufac tured and checked to special quality
standards. For this product the MINOX GmbH provides warranty of 2 years. The period commences on
the date of purchase from an authorized dealer and the warranty is subject to the following conditions :
1) During the warranty period we shall deal with complaints based on faulty manufacture (free of charge)
by repair, replacement of defective parts or replacement by an identical flawless product at our own
discretion. Consequential claims, no mat ter what kind of what legal argument in connection with this
warranty, cannot be accepted.
2) Claims under warrant y are null and void, if the defect has been caused by improper handling – which
also can include the use of non-MINOX accessories – if the MINOX produc t is serviced by unauthorized
persons or workshops, or if the serial number has been obliterated.
3) Warranty claims can only be made by submission of the typewritten sales slip of an authorized dealer.
4) When submitting claims under warranty please return the MINOX product together with the typewritten
sales slip and a description of the claim to the MINOX GmbH or MINOX agency.
5) Tourists may, if required, make use of the Agency of the country in which they are travelling (within the
terms of the Warranty of the MINOX GmbH) by presenting the t ypewritten sales slip.
Page 10

Clauses de la garantie
Vous avez acquis un produit MINOX fabriqué et vérifié – en cours comme en fin de fabrication – dans
le respect de critères de qualité particulièrement stricts. La garantie légale de 2 ans dont bénéficie ce
produit prend effet à compter du jour de sa vente par un revendeur-agréé et ce, aux conditions suivantes :
1) Il sera remédié, au cours de la période de garantie, aux réclamations qui se fondentsur des défauts de
fabrication, gratuitement et, suivant notre propre appréciation, par le biais d‘une remise en état, d‘un
changement des pièces défectueuses ou d‘un échange contre un produit en par fait état et de même
type. Les demandes qui dé passeraient ce cadre, quelle que soit leur nature et quel que soit leur motif
juridique en rapport avec la présente prestation de garantie, sont exclues.
2) Tout droit de recours à la garantie devient nul et non avenu, si le défaut incriminé est imputable à
une manipulation fautive – y inclue l‘utilisation d‘accessoires étrangers – ou si une inter vention a été
effectuée par des personnes et des ateliers non-autorisés, ou si le numéro de fabrication a été rendu
méconnaissable.
3) Le recours aux prestations relatives à cet te garantie ne sera accepté que sur présentation d‘un justifi-
catif d‘achat, imprimé et émanant d‘un revendeur autorisé.
4) En cas de recours à la garantie, veuillez faire parvenir votre appareil MINOX, accompagné de l‘original
du justificatif d‘achat imprimé et d‘une description de la réclamation, au service après-vente de la
société MINOX GmbH ou à une succursale régionale.
5) En cas de besoin, la succursale locale du pays visité pourra aider les touristes et ce, aussi, dans le cadre
des conditions qui régissent la prestation de garantie de la société MINOX GmbH et sur présentation
du justificatif d‘achat imprimé.
Page 11

Technische Daten (Blitz mit MINOX Classic Camera)
Batterie 1,5 V (AA, Foto Alkaline oder NiMH Akku empfohlen )
Stromverbrauch 700 mA
Leitzahl 4 – 7 ( ISO 100 )
Technical data (Flash Unit with MINOX DCC)
Battery 1.5 V (Size AA, prefer Photo Alkaline or Rechargeable NiMH battery)
Flash Charging Current 700 mA
Guide Number 4 – 7 (ISO 100)
Informations techniques (Flash avec MINOX Classic Camera)
Pile / Accu 1,5 V (AA, Photo Alkaline ou Accu rechargeable NiMH)
Consommation 700 mA
Nombre-Guide 4 – 7 (ISO 100)
Page 12

Änderungen in Konstruktion und Ausführung vorbehalten. Die Marke MINOX ist eine eingetragene Marke der MINOX GmbH, Wetzlar.
Design subject to alterations without notice. MINOX is a registered trademark of MINOX GmbH, Wetzlar.
Sous réserve de modifications. MINOX est une marque déposée par MINOX GmbH,Wetzlar.
MINOX GmbH
Walter-Zapp-Str. 4 · D - 35578 Wetzlar, Germany
Tel.: +49 (0) 6441 / 917-0 · Fax: +49 (0) 6441 / 917-612
www.minox.com · E-mail: info@ minox.com
99464 05/09
 Loading...