

Page 1

DIGITAL CLASSIC CAMERA 5.1
Instruction manual
Page 2

Mode-button
Up-button
Down-button
2
Shutter-button
Page 3

Charging the battery
Connec t the camera to your computer’s USB port
through the USB cable provided w hile the c amera
is turn off. This starts t he char ging automatically.
When the battery is being charged, there is a green
LED indicator light up in the USB connector area.
When this indicator is turn off, the charging is
completed.
Switc hin g the camera on
To switch you r camera on, pre ss and hold the mo de
butto n. To switch your came ra off, press th e mode
button until the Setup Screen shows up. Pres s the
down button to highlighte
the shutter button to switch your c amera off.
Power Off
and then press
Battery lock
3
Page 4

Setup
Camera
Power Off
Format
Auto Off
Buzzer
Your camera will automatically turn itself off in
60 seconds if unused to
conserve battery power.
Taking you r fi rst picture
Frame your subject
When the c amera is turn on, th e camera is in Take
Photo mode,
if it is not visible, press mode button until it is.
Frame th e subject you wan t to capture in th e display
screen on the back of your camera or through the
viewfi nder.
will show on the display screen,
Take the picture
Press the shutter but ton to take the picture. Hold
the camera steady until you hear a
you that a photo has been taken.
beep
. This tells
4
Playback mode
Review your photos or movies
on the display screen
Press the mode button repeatedly until you reach
the play back mode ( ).
Use the up or down buttons to scroll through the
stored images.
To review a movie clip, press the shutter button
to star t viewing, to stop viewing before the end
of the clip press the shut ter button again.
Image quality
Low
(*) – 2608 x 1956 px up to 144 images
Normal
(**) – 2608 x 1956 px up to 110 images
High
(
) – 2608 x 1956 px up to 73 images
***
Press the mode button until you enter the Set-up
menu. Select
You will enter the camera menu.
Camera
and pres s the shutter b utton.
Page 5

Camera
Flash
Quality
Movie
Self Timer
WB
Select
Quality
and press the shutter button.
You will enter t he quality menu where you can
select the dif ferent qualit y settings using the up
and down buttons.
Press the shutter but ton again to confi rm your
selection.
Quality
Low
Normal
High
Increase the camera memory
wit h an S D ca rd
SD (Se cure Digital ) cards will increase the amount
of memory that your camera will have available.
Enabling you to store more images and videos
between downloads.
The DCC suppor ts SD Cards up to 16 GB (SDHC).
Inserting an SD card
Open the battery compartment and inser t the SD
card in the SD card slot with the gold contacts
facing the lens.
Important: W hen t he SD card is lo cked (pr ote cted ),
ca rd lo ck ic on wi ll ap pear on th e dis play scre en an d
photo and videos cannot be taken.
5
Page 6

Deleting unwanted images
Delete your image one at a time
In Playback mode ( ), use t he up or down butt ons
to select the image you want to delete.
Press shutter button to view the Playback menu,
scroll to
Delete One
Select
Yes
selection is deleted from the camera memory.
and press the shutter button.
and press the shu tter butto n again. The
Dele te all your i mages at once
In P lay back mod e ( ) , press shutt er button to vi ew
the playback menu, scroll to
the shut ter button . Select
butto n again. All save d images will be de leted from
the memory.
6
Delete All
Yes
and press
and pres s the shutter
Downloading your images to your
computer
Note: You do not need t o install camer a drivers for
Window s versions 200 0/ME /XP and Mac O S 9.x or
OS X. Your camera does not support version older
than those stated above.
Note: Whe n your c amera is conn ected, y our com puter pr ovides power t hrough the USB c able, saving
your camera‘s battery power.
Connect ing your camer a to the computer
To connect your camera to your computer, the came ra mu st alw ays b e tur ned on fi r st. Then conn ect
the camera to your computer using the provided
USB cable (the smaller head connect to the camera side and the larger head side connect to the
computer side).
Page 7
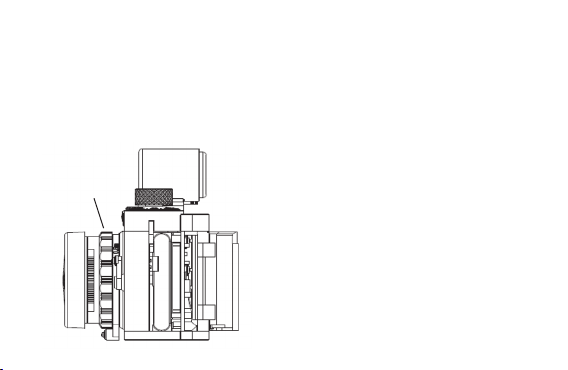
Distance Setting
The depth of fi eld of the camera ex tends f rom
2 m to infi nit y, i.e. focusing is not required within
this range. For close-focus shots you can infi nitely
adjust distanc es between 0. 5 m and 2 m using the
depth of fi eld ring.
depth of fi eld
ring
7
Page 8

DIGITAL CLASSIC CAMERA 5.1
• 5.1 Megapixels
• 2.0” TFT/ LCD-Display
• 128 MB internal memory
• SD cards up to 16 GB
• Compatible with
MINOX Classic Camera fl ash
• Rechargeable Li- Ion batter y
MINOX GmbH
Walter-Zapp-Str. 4
D-35578 Wetzlar, Ger many
Tel.: +49 (0 ) 6441 / 917-0
Fax: + 49 (0) 64 41 / 917-612
e-mail: info@minox.com
www.minox.com
(optional)
99468
 Loading...