

Page 1
The Complete Kit
for Wheel Assembling and T ruing
“WHEEL ASSEMBLY KIT”
Instruction Manual
MADE IN JAPAN
- 1 -
Page 2

CONTENTS
ASSEMBLING BICYCLE WHEELS
CAUTION
REQUIRED TOOLS AND PARTS
• ABOUT COMPONENTS
RIM
SPOKE
NIPPLE
HUB
• BEFORE YOUR WORK
• HOW TO ASSEMBLE WHEELS
CHECK THE RIM
CHECK THE HUB
INSERT TO THE HUB
FIRST SETTING
SECOND SETTING
COMPLETE SECOND SETTING
SWIRL SPOKES
THIRD SETTING
FINAL SETTING
... 3
... 3
... 3
... 4
... 5
... 5
... 6
... 6
... 6
... 6
... 7
... 7
... 7
... 7
... 8
... 8
WHEEL TRUING STAND
(Workman Pro)
• PURPOSE
• COMPONENTS
ARMS
GAUGE FOR VERTICAL SHAKING
GAUGE FOR SIDE SHAKING
• HOW TO OPEN
• HOW TO FOLD
RIM CENTERING GAUGE
(FCG-300)
• PURPOSE
• HOW TO OPEN
... 12
... 12
... 13
... 13
... 13
... 14
... 14
... 14
• TENSIONING SPOKES
ABOUT SPECIAL TENSIONING OF
THE REAR WHEEL
TENSION RIGHT SIDE SPOKES
• HOW TO FIX SIDE SHAKING
• HOW TO FIX VERTICAL SHAKING
... 9
... 9
... 10
... 11
• HOW TO CLOSE
• HOW TO USE
SPOKE WRENCH (NW-100)
• PURPOSE
• HOW TO USE
- 2 -
... 15
... 15
... 16
... 16
Page 3

ASSEMBLING BICYCLE WHEELS
Thank you for purchasing Minoura “WHEEL ASSEMBLY KIT”.
This kit includes three kinds of tools that you will need
when you build or adjust your bicycle’s wheels; a wheel
truing stand, a wheel centering gauge and a spoke
wrench.
With the process to build a new bicycle wheel by yourself, you can save money rather than buying the complete wheel at a shop. Because you don’t need to pay
extra charge for anyone to build it in his factory. You
also can increase your bicycle repair skills and change
your bicycle much better than ever before.
Please read this instructions carefully before use, and
get a knowledge about bicycle wheels. We hope you
will get good skills with our “WHEEL ASSEMBLY
KIT”.
IMPORTANT NOTE
The following instructions are just a sample way
we took. So you need to understand that you
should use another approach when you build a
different wheel.
In this instructions, we picked up a rear wheel
with 36-spoke for MTB.
We don’t explain in this instructions about the front
wheel and composite wheel.
Also you should understand that carbon or alloy
made composite wheels cannot be repaired or
trued.
The following items will help your work;
• Nipple driver or small flat screwdriver
• Spoke tension meter
• Plastic hammer
• Small bowl or box for nipples
• Lubricant
ABOUT COMPONENTS
§ RIM
In this instructions, we use a light alloy rim with 36
holes. Please check the following points.
DIAMETER
Check the diameter of the rim.
Rim should be correct fit for your tire. You cannot use
the wrong one.
There are some common rim sizes for bicycles in the
market, for example 26, 27-inch and 700C. If you already have tires, you should make sure of the diameter
of your tires before going to the shop.
SPOKE HOLES
Check the number of the spoke holes on the
rims.
We usually use a rim for bicycles which has 36 spoke
holes. However some choose another rim which has 32
or less holes, for example for the front wheel of road
bikes.
And check the rim has eyelets which will reinforce the
spoke holes.
§ REQUIRED TOOLS AND PARTS
You have to prepare the following tools and parts before your work;
• Rim
• Spokes
• Hub
• Nipples
• Quick Release Skewer
• Vibyl Tape
• Rags
• Acetone
VALVE STEM HOLE
Check the size of the valve stem hole.
You should look for the valve hole on the rim surface.
Both American and English style valves require a lar ger
valve stem hole, but French style valve needs a narrow
hole.
SECTIONAL SHAPE
Check the sectional shape of the rim to fit for
your tire.
- 3 -
Page 4

Most road bikes usually use tubeless tires which are fixed
by rubber glue, so it requires flat sectional shape.
However most MTB usually require the rim with ordinary tube which has shoulders inside to hold the tire
bead.
Wrong sized rim, too narrow or too wide, can cause the
tire to come off or be punctured easily. So you should
ask to your local shop about the combination of the rim
and the tire, and choose the correct size.
MATERIAL
Check the material of the rims.
There are many kinds of material for the rims in the
market; light alloy, stainless steel, chrome plated steel
or carbon. They have their own benefits, but they also
have their own problems.
If you will use the wheel only for race, you can choose
a light weight one. But if you will use the wheel everyday, you should take strength rather than weight.
In this instructions, we choose a light alloy rim, because
it is light weight enough and durable and has a reasonable price.
DISTORTION
Check the distortion of the rim.
At first, place the rim on a flat table, and next, push
down the edge with your fingers. If the other side has
raised up more than 5mm, the rim is bad. You should
exchange it for a better one. It is the most important
thing when you buy a rim at a shop. Because it is difficult to fix the distortion of the rim will keep its own
shape.
§SPOKE
In this instructions, we use 36 pieces of 14-gauge nonbutted 265mm stainless steel spokes. Please check the
following things.
MATERIAL
Check the material of the spokes.
There are various kinds of materials for spokes in the
market; stainless steel, chrome plated steel or titanium.
They have their own benefits, and also they have their
own problems.
Titanium spokes are very light weight, but they can be
broken easily by sudden force. Chrome plated steel
spokes are cheap, but they will rust easily.
You should choose the material with your own purpose.
W e use stainless steel spokes because it is cheaper than
titanium, and its has enough strength.
SHAPE
Check the shape of the spokes.
There are two kinds of its style; straight and swaged.
W e usually use swaged spokes. However some choose
straight spokes with a special hub for the front wheel
of road bikes.
There are other kind of shapes; butted and non-butted.
Butted spokes have flat shafts on its center part for
aerodynamics. But you should understand that butted
spokes are weaker than non-butted spokes.
SIZE
Check the length and diameter of the spokes.
Mostly there are two different diameters of the spokes;
14-gauge (2.0mm) and 15-gauge (1.8mm).
W e usually use 15-gauge spokes for bicycles. Although
some heavy weight riders should choose 14-gauge
spokes.
All spokes must be the correct size for the nipples, it is
the most important thing.
And there are many length of the spokes available.
Length is decided by two factors; radial or tangential
wheel style, and front or rear. Rear wheel requires a
special style to construct, it is “offset”.
W e can see the different spoke angles on the rear wheel
between right side and left side. Right side (rear cog
side) spokes are more near by hub center than the left
side. Because rear wheel must have 8 to 10 transmission gears on its right side, so the spokes must walk
away to the center.
W e recommend the best spoke length combination for
best fitting, right side spokes should be 1mm shorter
and left side spokes should be 1mm longer. You may
ask to your local shop what the length of the spokes
that you need.
- 4 -
Page 5

THREAD
Check the threads on the spoke’s tip.
The thread of the spokes must be as same as the nipples.
You should screw all nipples through the spokes before your work, and check the condition of the threads.
In some cases, you should wipe off lube or grease on
the thread with rags. Lubricant sometimes will cause
some troubles to the spokes and the nipples during your
ride; loosening each other.
§NIPPLE
§ HUB
In this instructions, we use light alloy 36-hole rear hub.
Please check the following points.
HOLES
Check the number of the spoke holes on the
hub.
The number of the spoke holes should be the same as
on the rim. If you choose wrong one, you must buy the
right one.
W e use 36 brass nipples which fit for 14-gauge spokes.
Please check the folowing points.
SIZE
Check the thread of the nipples.
The nipples must fit for the thread of the spokes.
At first, you should screw all nipples through the
spokes, and check the fittings.
Y ou should make your attention especially on 15-gauge
spokes. They can put through the 14-gauge nipples
easily, but it is bad combination (15-gauge spoke and
14-gauge nipple) that the threads will be broken at a
moment.
Do not use different sized spoke wrench to the nipples.
If you use it, you will not be able to continue your
work as you will round the nipples.
Do not select too short sized nipples. Because the
spoke wrench must reach the nipples.
MATERIAL
Check the material of the nipples.
There are two kind of materials in nipples in the market; brass and light alloy.
You should select brass nipples because light alloy
nipples are light weight and colorful but weak. If you
don’t have special spoke wrench for the alloy nipples,
you will round them easily, and you will not be able to
continue your work.
SHAPE
Check the shape of the hub flange.
W e can see the direction of the holes on the hub flange.
W e usually choose the hub which direction of the spoke
holes are as same as the hub shaft. However in some
cases, for the front wheel of road bike, someone can
select the special hub which have radial direction holes
to install the straight spokes.
Also you should check the shape of the spoke holes,
too.
If it has no hollow to sink the spoke head, the spokes
may be cut by the edge.
And you need to check the thickness of the hub flange.
If the hub has too thick flange, you cannot set plain
spokes to it.
MATERIAL
Check the material of the hub.
There are various kind of materials for the hubs in the
market. Chrome plated steel hubs are cheaper than light
alloy, but they can rust easily.
SHAPE OF THE HUB SHAFT
Check the shape of the hub shaft.
The hub shaft have three types; for normal quick release skewer, 20mm diameter through axle for downhill bikes or for plain hub nut.
If you choose the hub for quick release system, please
make sure that your quick release skewer will fit the
hub shaft.
- 5 -
Page 6

BEFORE YOUR WORK
HOW TO ASSEMBLE THE WHEEL
1.
Check the number of the spoke holes in the rim and the
hub, as well as the number of the spokes and the nipples.
2.
Make groups of the spokes; for front, for right rear and
for left rear.
And make sure that all spokes in its own group are the
same length within 1mm.
3.
Drop oil on the thread of the spokes and wipe off.
Excess oil may cause bad effect, loosening spokes during your ride. And keep them away from any dusts.
4.
Wipe all spoke holes in the rim with rags.
5.
Put all nipples into a small bowl or box, and place them
where they are easy to be reached.
6.
Make sure your work area is well-lighted.
1. CHECK THE RIM
You should make sure that right and left side spoke
holes in the rim are offset on the rim’s centerline to
keep integrity of the wheel.
In the case of Aero-rim, you will see all spoke holes
are on the same line, but they are slanted inside the
rim. You can see the angle of them from the inside of
the rim.
And place the rim on a desk with valve stem hole at
the far side.
2. CHECK THE HUB
If the next left side spoke hole to the valve stem hole
is offset upper from the rim’s centerline, hold the rear
hub with its drive side down. It is important for the
wheel’s integrity.
You should pay attention to the position of the spoke
holes on the hub flange also. Upper side spoke holes
on the hub flange are half pitch offset to the other side’ s
holes.
3. INSERT TO THE HUB
Insert the first spoke from inside to the spoke hole
anywhere you want. And insert the rest of the spokes
into every second holes on the hub flange.
- 6 -
Page 7

4. FIRST SETTING
Hold the hub vertically with its drive side down, and
insert the first spoke into the left side hole of the valve
stem hole, which is on the upper side of the rim’s
centerline, and screw a nipple slightly.
Next, insert the two pitchs left spoke of the hub into
the fourth left spoke hole in the rim, and screw a nipple.
Then insert the rest of the spokes into every fourth
holes.
6. COMPLETE SECOND SETTING
As STEP:4, insert the rest of the spokes into the next
left spoke holes which were already inserted in STEP:4,
and screw the nipples slightly.
After you finished this work, you can see all spokes are
constructed with parallel and radial pattern.
5. SECOND SETTING
Turn over the wheel to assemble another side before
inserting spokes.
As STEP:3, insert the spokes from inside to every second hub spoke holes. In this time, you should make
sure that these spoke holes are half pitch left to the
other side holes.
7. SWIRL SPOKES
Rotate the hub to cross the spokes.
With holding the rim and rotate the hub clockwise.
Now, you can see all spokes are in swirl pattern. This is
the foundation to cross spokes.
You should push or pull the spokes to sink all its heads
into the spoke holes in the rim.
If you don’t do it, the crossing spokes will not reach to
its own holes.
- 7 -
Page 8

8. THIRD SETTING
Insert the first spoke from inside into the spoke hole on
the hub flange, and pull up it avouch and drop it to left.
Pass the spoke under the spoke which is pulled from
fifth left hub flange spoke hole. And insert the spoke
into the second left rim spoke hole, where is two left
next to the passed under spoke was inserted.
Then screw the nipple slightly.
Pass the rest of the spokes and insert them into the spoke
holes in the rim with same process.
Completed wheel
9. FINAL SETTING
Turn over the wheel, and assemble the other side spokes.
Be careful that you drop the spokes to the left in STEP:8,
but in this side, you must drop them to the right.
- 8 -
Page 9

TENSIONING SPOKES
§ ABOUT SPECIAL TENSIONING OF
THE REAR WHEEL
In the front wheel, it is very easy that you can tension
all spokes equally with ignoring the direction of right
and left. However in the rear wheel, you have to select another process; offset tensioning.
You can notice that the rear wheel has different spoke
angle pattern with looking at the wheel from behind.
Rear hub is not symmetrical to the wheel, left side
flange is far from the wheel centerline, and right side
flange is deep in the wheel. Because rear hub must
have extra space where the transmission gear will be
located. But you have to assemble rear wheel symmetrically in this strange situation for its stable balance. It is offset.
We suggest that you have to tension all spokes equally,
so that you should start all tensioning from the spoke
next to the valve stem hole.
And we suggest that you can tighten the nipples, but
you should not loosen them during tensioning and truing. The threads of the nipples and spokes are not as
durable as you think. You can try once only.
1.
Install the assembled wheel on a wheel truing stand.
Spread arms of the truing stand and insert the hub shaft
into the hollow of the top of the arm.
Fix the quick release lever or tighten the hub nut slightly
with pushing down the wheel.
In this instructions, the drive side is in the right.
In this time, make sure that the wheel is installed correctly to the truing stand. You will not be able to finish
this process with slanted wheel installation.
And take all gauges of the truing stand away from the
wheel now.
W e will explain how to use the wheel truing stand in the
following pages.
In offset wheel, the torque works only to the right side
spokes. Because right side spokes should be assembled
more vertically than left side.
So you should understand that right side spoke tension is more important than left side spoke’s one in
this offset assembling. Well adjusted right side spokes
can keep your wheel stable in the future. Left side
spoke tension is just a help.
§ TENSION RIGHT SIDE SPOKES
At first, you have to take care of right side spokes only.
Left side spokes will be adjusted after this process, so
now you don’t have to worry about them.
2.
Rotate the wheel slowly , and tighten the nipples, which
are connected to the drive side of the hub flange, equally
by your finger until these nipples are tight.
3.
Tighten the nipples equally with a spoke wrench little
by little.
You should make sure that you don’t tension all spokes
completely, because you will have to tension the other
side spokes later.
4.
After you finish this work, check the vertical shaking of
the wheel first.
You can ignore the shaking within 3mm now , it is just a
habit of the rim. It will not cause any troubles. But if
the vertical shaking will be appeared more than 6mm,
you may not use this wheel in a race to prevent accidents.
- 9 -
Page 10

5.
Remove the side shaking. Of course, you have to do
this process with right side spokes only. We will explain how to fix the side or vertical shaking in the following pages.
And you don’t have to worry about the wheel centering
adjustment now, you will do later.
It is very important thing that you cannot touch to the
right side spokes at all after you finished above adjustment process.
6.
Tension the left side spokes and adjust wheel centering.
Rotate the wheel slowly , and tighten the left side nipples
equally by your finger. When the nipples stop, you can
use the spoke wrench.
See the vertical gauge and rim, adjust the left side spoke
tensioning until the rim is in the center of the gauge
scale.
Sometimes remove the wheel from the truing stand, and
put the rim centering gauge onto the wheel to check the
wheel is symmetric.
We explain how to use the rim centering gauge in the
following pages.
HOW TO FIX SIDE SHAKING
The side shaking within 2mm may not cause any
troubles. But if you want to be it zero, you can try
again and again with the following process.
1.
You can see two knob bolts on both side of the Ushaped gauge frame. Put the tips of them close to the
surface of the rim. Do not touch the rim.
Rotate the wheel slowly, and check the side shaking.
And stick vinyl tapes to two spokes; one is the beginning amd one is in the ending of the side shaking.
2.
Make three groups of these spokes between the vinyl
tales as below;
Group-A : Three or less spokes in the beginning
and in the ending of side shaking.
Group-B : Three or less spokes between Group-
A except for the center one.
7.
Adjust the side shaking again after you finsh the wheel
center adjuting.
Understand that this side shaking was cause by the left
side spokes only, so you should fix it by the left side
spokes only. Do not touch the right side spokes.
8.
Finally, check spoke tensions with a special spoke tension meter if you need.
Group-C : The center one between the vinyl tapes.
3.
If the rim shakes to the right, tighten the left side
spokes. Do not loosen the right side spokes. Because
the nipples are made by soft material, brass or light
alloy, so its thread can be broken easily by loosening.
- 10 -
Page 11

4.
Tighten Group-A nipples about 1/8 turns, Group-B
about 1/4 turns, and Group-C about 1/2 turns.
And then check the side shaking with rotating the
wheel slowly again.
If the wheel shakes yet, continue the process again.
When you hear strange sound from the nipples or see
some kind of strings while you tighten the spokes, the
thread of the nipples will be broken soon. But do not
apply any oils to the nipples to remove the sound, and
try to exchange the nipple to the new one as soon as
possible.
HOW TO FIX VERTICAL SHAKING
The vertical shaking within 2mm may not cause any
troubles. But if you want to be it zero, you can try again
and again with the following process.
It is similar to the process as side shaking.
In this case, you should tighten both side of the nipples
equally.
1.
Y ou can see a gauge plate on the U-shaped gauge frame.
Put the tips of the plate close to the surface of the rim.
Rotate the wheel slowly, and check the vertical shaking. And stick vinyl tapes to two spokes; one is in the
beginning and one is in the ending of vertical shaking.
2.
Make three groups of these spokes between the vinyl
tapes as below;
Group-A : Three or less spokes in the beginning
and in the ending of vertical shaking.
Group-B : Three or less spokes between Group-A
except for the center one.
Group-C : The center one between the vinyl tapes.
- 11 -
Page 12

3.
If the rim shakes to downward, tighten both side nipples.
And if the rim shakes upward, tighten both far side
nipples. Do not loosen the nipples.
Because the nipples are made by soft material, brass or
light alloy , so its thread can be broken easily by loosening.
4.
Tighten Group-A nipples about 1/8 turns, Group-B about
1/4 turns, and Group-C about 1/2 turns. And then check
the vertical shaking with rotating the wheel slowly again.
If the wheel shakes yet, continue the process again.
When you hear strange sound from the nipples or see
some kind of strings while you tighten the nipples, the
thread of the nipples will be broken soon. But do not
apply any oils to the nipples to remove the sound, and
try to exchange the nipple to the new one as soon as
possible.
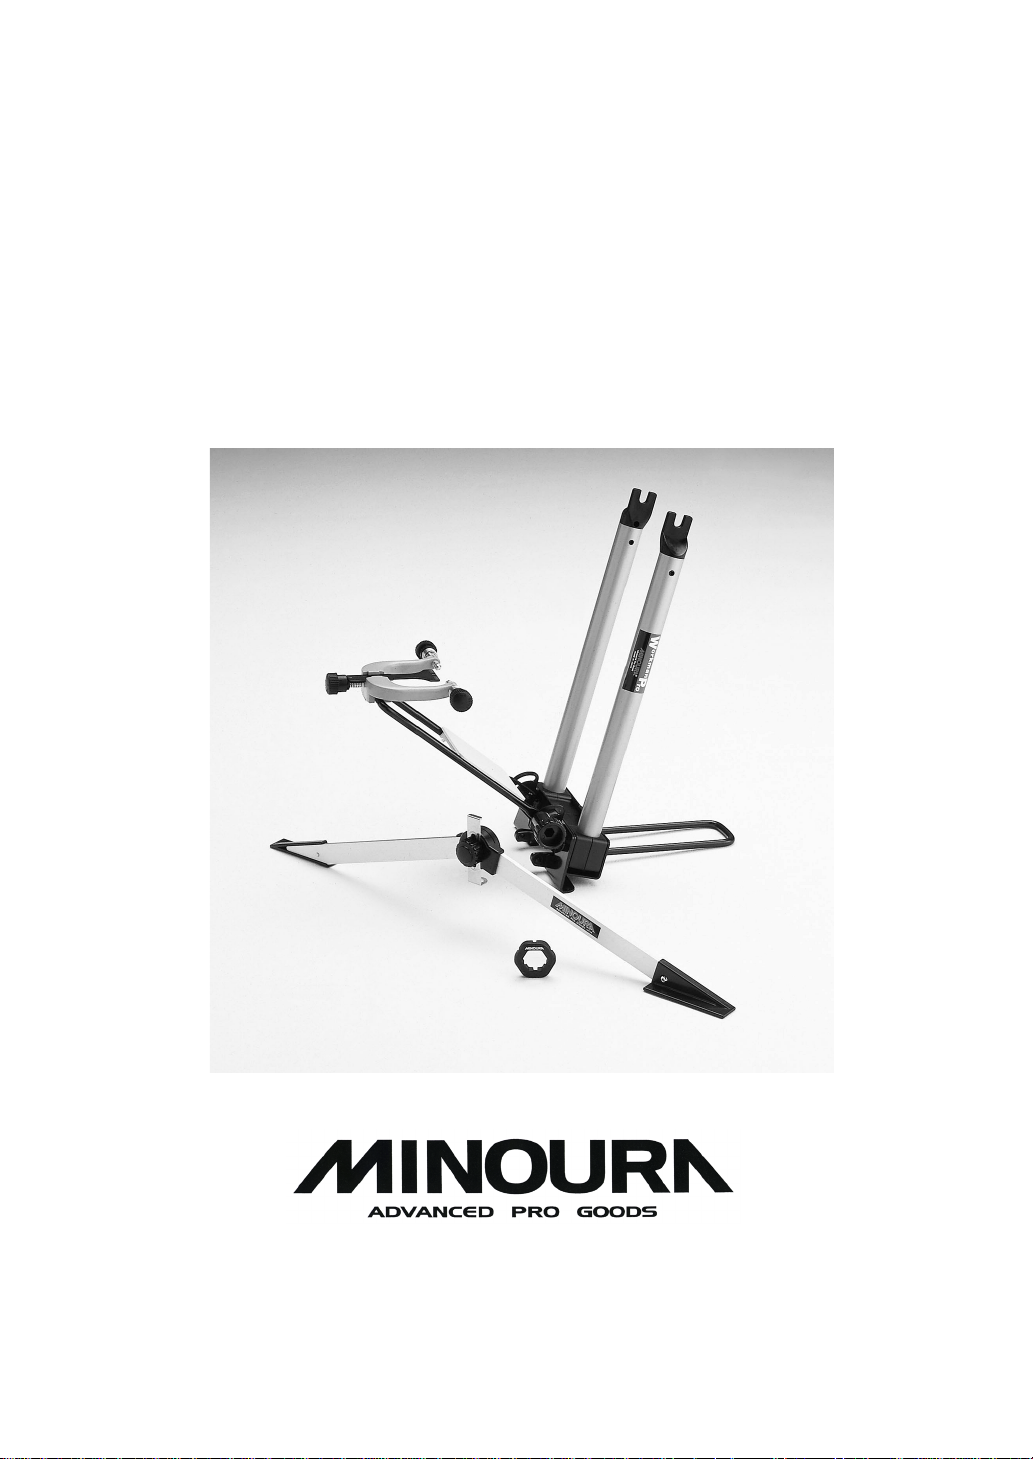
WHEEL TRUING STAND
(Workman Pro)
This “WHEEL ASSEMLY KIT” already includes a
wheel truing stand “Workman Pro”.
You can see how to use the Workman Pro above, so in
this step, we explain the functions of this wheel truing
stand only.
§ PURPOSE
A wheel truing stand is a utensil to measure the balance of the wheel. Do not use Workman Pro as a display stand or an indoor bicycle trainer.
This Workman Pro has a special method, auto-centering system, so you can finish building or checking a
wheel with only this truing stand basically.
But we include a wheel centering gauge in this kit for
your complete wheel adjustment.
§ COMPONENTS
ARMS
Both right and left arms are connected so they will
move together at the same time. When you open or
close the arms, you should hold both arms with your
both hands.
- 12 -
Page 13

The arms have hollow on its top to hold the wheel hub
shaft.
When you install a wheel on the W orkman Pro, follow
these processes.
At first, open the arms enough to install the wheel hub
shaft, and push down the wheel into the hollow of the
arms, then fix the quick release lever or tighten the
hub nut slightly.
GAUGE FOR VERTICAL SHAKING
The gauge plate for vertical shaking is located in the
center of the U-shaped gauge frame, and it has two
purposes.
One is measure the vertical shaking of the wheel, and
another one is to help adjustment for wheel centering
process.
When you want measure the vertical shaking of the
wheel, put the U-shaped gauge frame close to the rim.
And put the gauge plate close to the rim surface with
rotating the knob bolts. The knob bolt has 0.1mm level
scales in its own surface.
Rotate the wheel slowly and see the clearance between
the gauge plate and the rim surface carefully.
Sometimes the gauge plate will touch to the rim, and
sometimes the gauge plate will be away from the rim.
This is the vertical shaking.
Please fix this vertical shaking with “HOW TO FIX
VERTICAL SHAKING” step above.
You do not have to worry about 3mm or less vertical
shaking, it may not cause any troubles.
U-shaped
Side
Shaking
Gauge
Vertical Shaking
Gauge Knob
GAUGE FOR SIDE SHAKING
The gauges for side shaking are located on the both side
of the U-shaped gauge frame, they are the knob bolts.
They have 0.1mm level scale on their own surfaces.
After you set the wheel on the Workman Pro, put the Ushaped frame close to the rim. And tighten the knob
bolts to approach to the rim surface.
Rotate the wheel slowly, and see the clearance between
the tip of the knob bolts and the rim surface.
Sometimes will touch to the rim and sometimes will be
away from the rim. This is the side shaking.
Please fix this side shaking with “HOW TO FIX SIDE
SHAKING” step above.
You do not have to worry about 3mm or less side shaking, it may not cause any troubles.
Gauge
Frame
Vertical
Shaking
Gauge Plate
Gauge Stay
When you want to adjust the rim centering, see the
scale on the gauge plate and the rim position. If the
rim is in the center of the scale, the wheel is right positioned. But when the rim is too right or too left, the
wheel is not correct. Wrong rim position may cause
some troubles, for example one side braking or spoiling running stability, so you should fix the centering
of the wheel.
Please fix this vertical shaking with “TENSIONING
THE SPOKES” step above.
You do not have to worry about 3mm or less difference of the centering position, it may not cause any
troubles.
§ HOW TO OPEN
The Workman Pro is received in its own box folded
down. When you use it, please open the frame with the
following steps.
- 13 -
Page 14

1.
Loosen the knob bolt which is located on the foot of the
arm. And open the gauge stay a little. Then open the
U-shaped gauge frame at right angles.
2.
Then you can open the leg stay fully until it stops to the
end, and place the Workman Pro on the table.
In this time, you should make your attention that you
do not pinch your finger to the frame and the stay.
3.
Finally, open the gauge stay, and tighten the knob bolt
to fix the gauge stay position.
RIM CENTERING GAUGE
(FCG-300)
This “WHEEL ASSEMBLY KIT” already includes a
foldable wheel centering gauge “FCG-300”.
You can know how to use the FCG-300 in the above
steps, so we explain the functions only.
§ HOW TO FOLD
To prevent some accidents, you should fold the Workman Pro when you store it.
1.
Hold both arms with your both hands, and push toward
inside at the end.
2.
Loosen the knob bolt which fixes the gauge stay, and
fold the gauge stay half way . Hold the U-shaped gauge
frame at right angles.
3.
Then you can fold the Workman Pro. Make sure that
you do not pinch your finger in the frame or the stay.
4.
Finally, raise up the U-shaped gauge frame until it is
parallel to the gauge stay. And tighten the knob bolt
again to fix the gauge stay.
§ PURPOSE
A rim centering gauge is the utensil to measure if the
wheel is parallel. You can use FCG-300 as the helper
of the wheel truing stand Workman Pro.
§ HOW TO OPEN
This rim centering gauge is foldable for easy handling
and transporting. You should use the following process so as not to break the joint system.
1.
Loosen the knob nut enoughly which is on the joint.
2.
Pull to separate the right and left frames in the direction of front and behind.
The joint is made by plastic so it may be broken easily
with forceful operation. You should take care of it.
- 14 -
Page 15

3.
Open the frames widely, and push down to the surface
of the table to keep its both plastic brackets will be
parallel.
4.
After opening the frames, push toward inside and let
the joints to bite each other.
5.
Hold the stainless gauge plate with its hole down, and
tighten the knob nut firmly again.
§ HOW TO CLOSE
Close the rim centering gauge with opposite process
of above.
In this time, make sure that the plastic joint will not be
broken with pulling out separately to each other.
The stainless gauge plate will fit with its hole down.
3.
Place both plastic brackets onto both side of the wheel,
and slide the stainless gauge plate down until the edge
of the hub shaft will be inserted into the hole on the
stainless gauge plate.
4.
Tighten the knob nut again with keeping the position.
5.
Turn over the wheel, and place the rim centering gauge
onto the other side of the wheel. Do not forget to insert
the hub shaft into the hole of the stainless gauge plate.
6.
If the stainless gauge plate does not touch to the hub
shaft while both plastic brackets are touching to the rim
surface, the wheel has some difference in the direction
of this side.
Hole Side
§ HOW TO USE
1.
At first, remove the quick release skewer or the hub
nuts of the wheel.
2.
Loosen the joint knob nut slightly, then the stainless
gauge plate will be able to slide down.
7.
If one of the plastic brackets does not touch to the rim
surface while both stainless gauge plate and another plastic bracket touch to the rim and the hub, the wheel has
some difference in the direction of reverse side.
- 15 -
Page 16

8.
When you see the difference, see “HOW TO FIX SIDE
SHAKING” steps.
You adjusted one side spokes to fix the side shaking.
But in this case, to fix the centering position, you should
adjust both right and left spokes. It is important.
SPOKE WRENCH
(NW-100)
This “WHEEL ASSEMBLY KIT” already includes a
spoke wrench “NW-100”. You can see how to use it
above steps, so we explain the functions only.
2.
You should insert the nipples into the wrench jaw
deeply.
If you did not insert enough, the nipples will round
easily.
3.
Do not loosen the nipples as we expalined in above
steps. You can tighten the nipples only.
4.
If you hear some strange sound from the nipples when
you tighten them with a spoke wrench, the nipples will
be broken soon. Do not tighten any more, and exchange it for a new one as soon as possible.
§ PURPOSE
A spoke wrench is a tool to tighten the spokes, shoule
not loosen.
This NW-100 has three dif ferent sizes in its body; 14G,
15G and 3.3mm. So you can use this NW-100 for any
sized nipples.
But if you choose light alloy nipples to your wheel, you
should prepare the special spoke wrench which will fit
for these light alloy nipples completely.
When you use the wrong sized wrench, the nipples will
round easily. This NW-100 is for brass nipples only.
§ HOW TO USE
1.
Insert the wrench jaw into the nipples. When you feel
the gap between the spoke wrench and the nipple, do
not continue your work, and choose another size of the
wrench jaw.
For more information:
MINOURA JAPAN HEAD OFFICE
1197-1 Godo, Anpachi
Gifu 503-2305 Japan
Phone (+81) 584-27-3131
Fax (+81) 584-27-7505
Email : minoura@minoura.jp
URL : www.minoura.jp
MINOURA NORTH AMERICAN CENTER
(for North American residents only)
1996 East Avenue
Hayward, CA 94541-5454 U.S.A.
Fax 1-510-538-5899
Email : MinouraUSA@ATTglobal.net
Sepcial thanks:
“The Bicycle Wheel” by Jobst Brandt
“Mountainbike Manual” by Tadashi Yashiro
- 16 -
 Loading...