

Page 1
instructions
-L
manual
/取扱説明書
(ver.1.2 2009/11)
Important Note
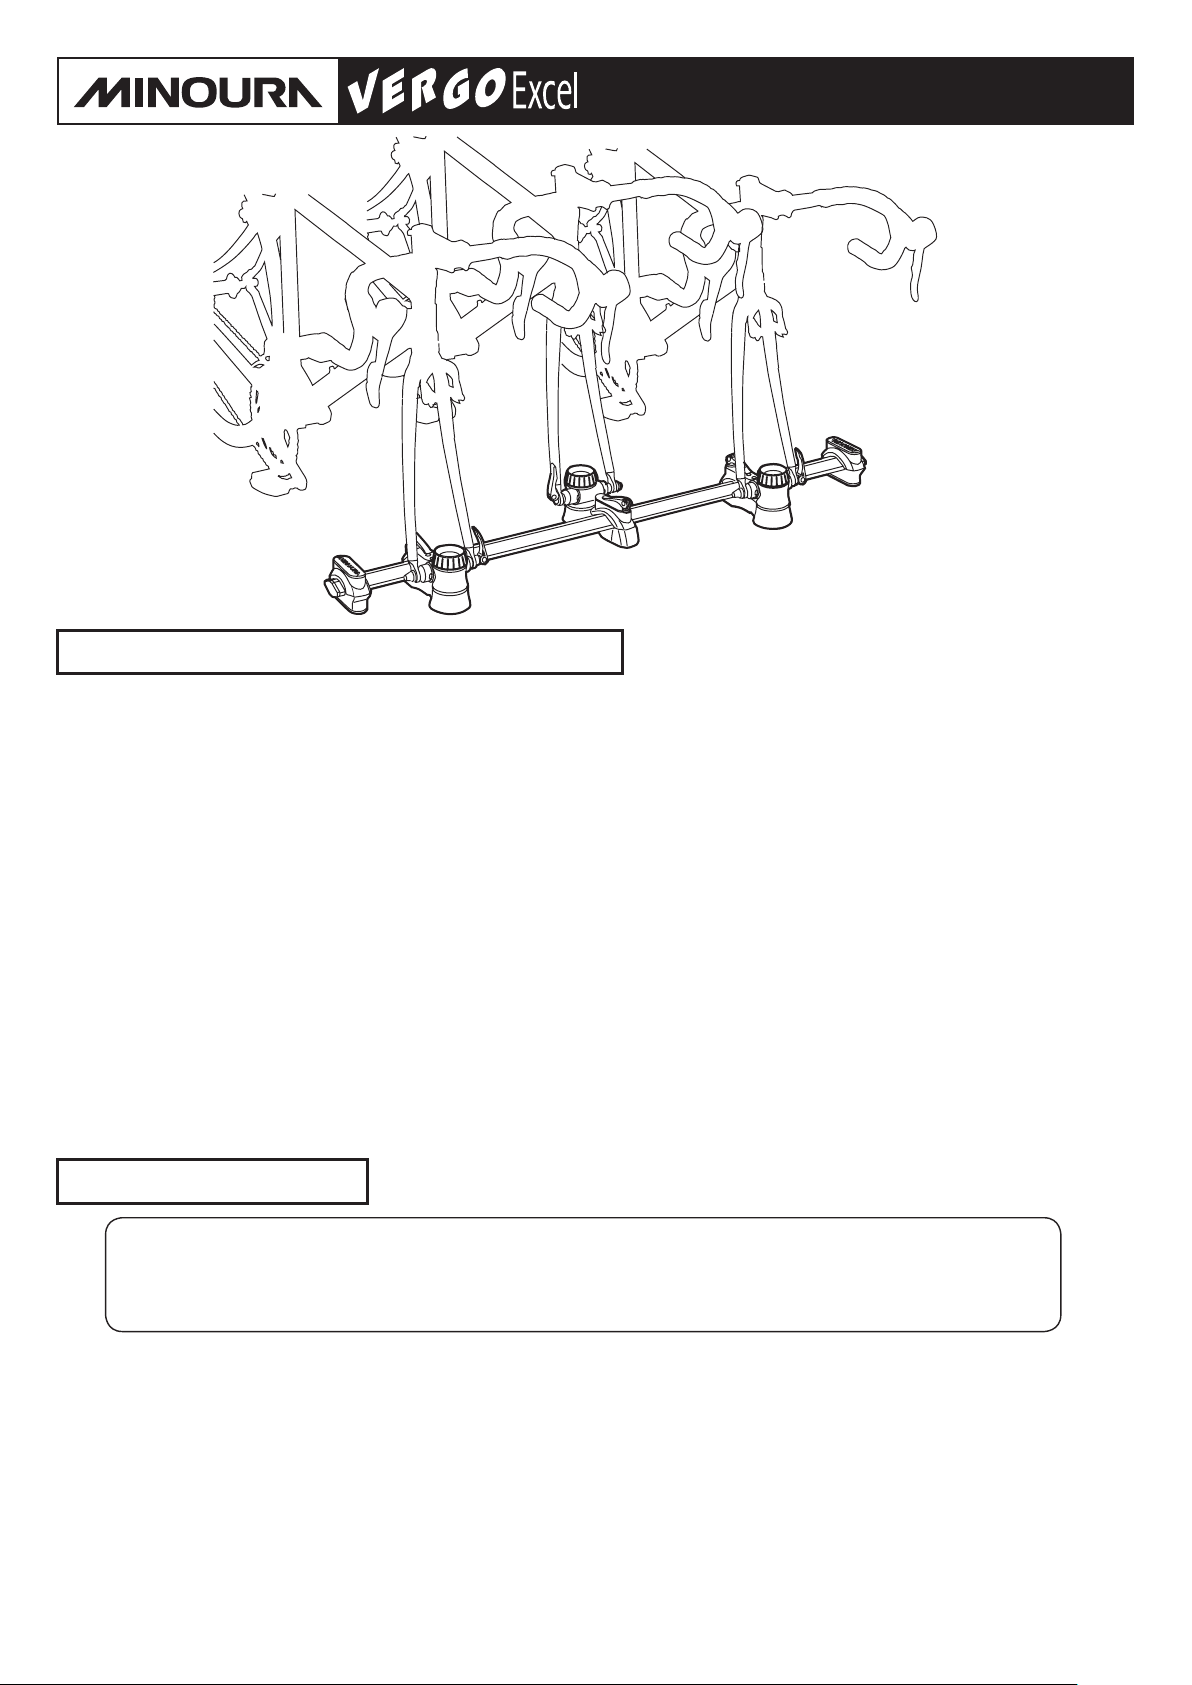
• VERGO-Excel-L is the bike mounting base in vehicle. Do not use for any other purposes than instructed.
バーゴ・エクセルLは自転車を車内に搭載するための台座です。指示されている用途以外の使用はしないでください。
• For normal 2-wheel bike only. Not suitable for heavy electric or tandem bikes. Hub nut type fork can be used.
通常の2輪自転車専用です。重量のある電動車やタンデム車には適していません。ハブナット式フォークでも使えます。
• This kit contains three (3) front fork mounts for 9mm quick release type. The fork mount ts 100mm width of front
wheel hub only. 15mm and 20mm thru type axle hub can be mounted with optional special fork mount.
キットには 9 ミリクイック用のフォークマウントが3台分同梱されています。前輪ハブ幅は 100 ミリに限定されています。
15 ミリや 20 ミリスルーアクスル用フォークマウントには別売オプションで対応しています。
• Drive gently while mounting bikes on VERGO-Excel-L. The bikes are not xed to your car. Do not apply hard
braking, hard cornering and sudden acceleration.
バーゴ・エクセルLに自転車を搭載している間は穏やかに運転してください。自転車は車に固定されているわけではありま
せん。急ブレーキ,急ハンドル,急加速は行なわないでください。
• We strongly recommend you to hold the bikes to the car securely with a tie-down belt for your safety.
安全のため,自転車はタイダウンベルトなどで車内にしっかりと固定しておくことを強く勧めます。
• When closing the rear gate of your car, be careful the bike will not hit the rear window.
リアゲートを閉める際は,ハンドルなどをリアウィンドウに当てないように注意してください。
Contact
/問い合わせ先
/注意していただきたいこと
If you have any questions or need help, you should contact the dealer where you purchased or the
Minoura distributor in your country rst. Only when you cannot get enough service, you can contact us.
もし何かわからないことがあった場合は,まずお買い求めになった販売店にお問い合わせください。
もしそこで十分な情報やサービスを受けられない場合に限り,下記までお問い合わせください。
MINOURA JAPAN (for ALL customers) MINOURA North America (for U.S. residents ONLY)
1197-1 Godo, Anpachi, Gifu 503-2305 Japan 1996 East Ave, Hayward, CA 94541 U.S.A.
Phone: +81-584-27-3131 / Fax: +81-584-27-7505 Phone: 1-510-538-8599 / Fax: 1-510-538-5899
Email: minoura@minoura.jp / Web: www.minoura.jp Email: support@minourausa.com
株式会社 箕浦
503-2305
〒
(0584) 27-3131
電話
メール
岐阜県安八郡神戸町神戸
infodesk@minoura.jp
(製造元)
/ファクス
1197-1
(0584) 27-7505
/ウェブ
www.minoura.jp
株式会社 深谷産業
460-0015
〒
(052) 321-6571
電話
ウェブ
名古屋市中区大井町
www.fukaya-sangyo.co.jp
(販売元)
/ファクス
1-38
(052) 332-3166
Made in Japan
/日本製
Page 2
Schematics
/部品図
VF-3
VF-2
VF-1
VF-4
VB-6
VF-7
VF-5
VB-5
Packed separately
別袋に梱包
VB-3
VB-1
VF-6
VB-6
VB-4
VB-5
Packed separately
別袋に梱包
VB-3
VB-2
VB-1 Base Rail
ベースレール
VB-2 End Cap
エンドキャップ
VB-3 Upper Base
上側ベース(共用)
VB-4 Lower Base
下側ベース
VB-5 Rubber Cover
ゴムカバー
VB-6 Sleeve (43mm)
パイプカラー(43mm)
VF-1 Fork Mount Base
フォークマウント台座
VF-2 Axle Holder Body
アクスルホルダー
VF-3 Knob Bolt
ノブボルト
VF-4 Bottom Plate
底板
VF-5 Fork Mount Skewer
フォークマウントクイック
VF-6 9mm Quick Skewer
9 ミリクイック
VF-7 Fork Mount Cover
フォークマウントカバー
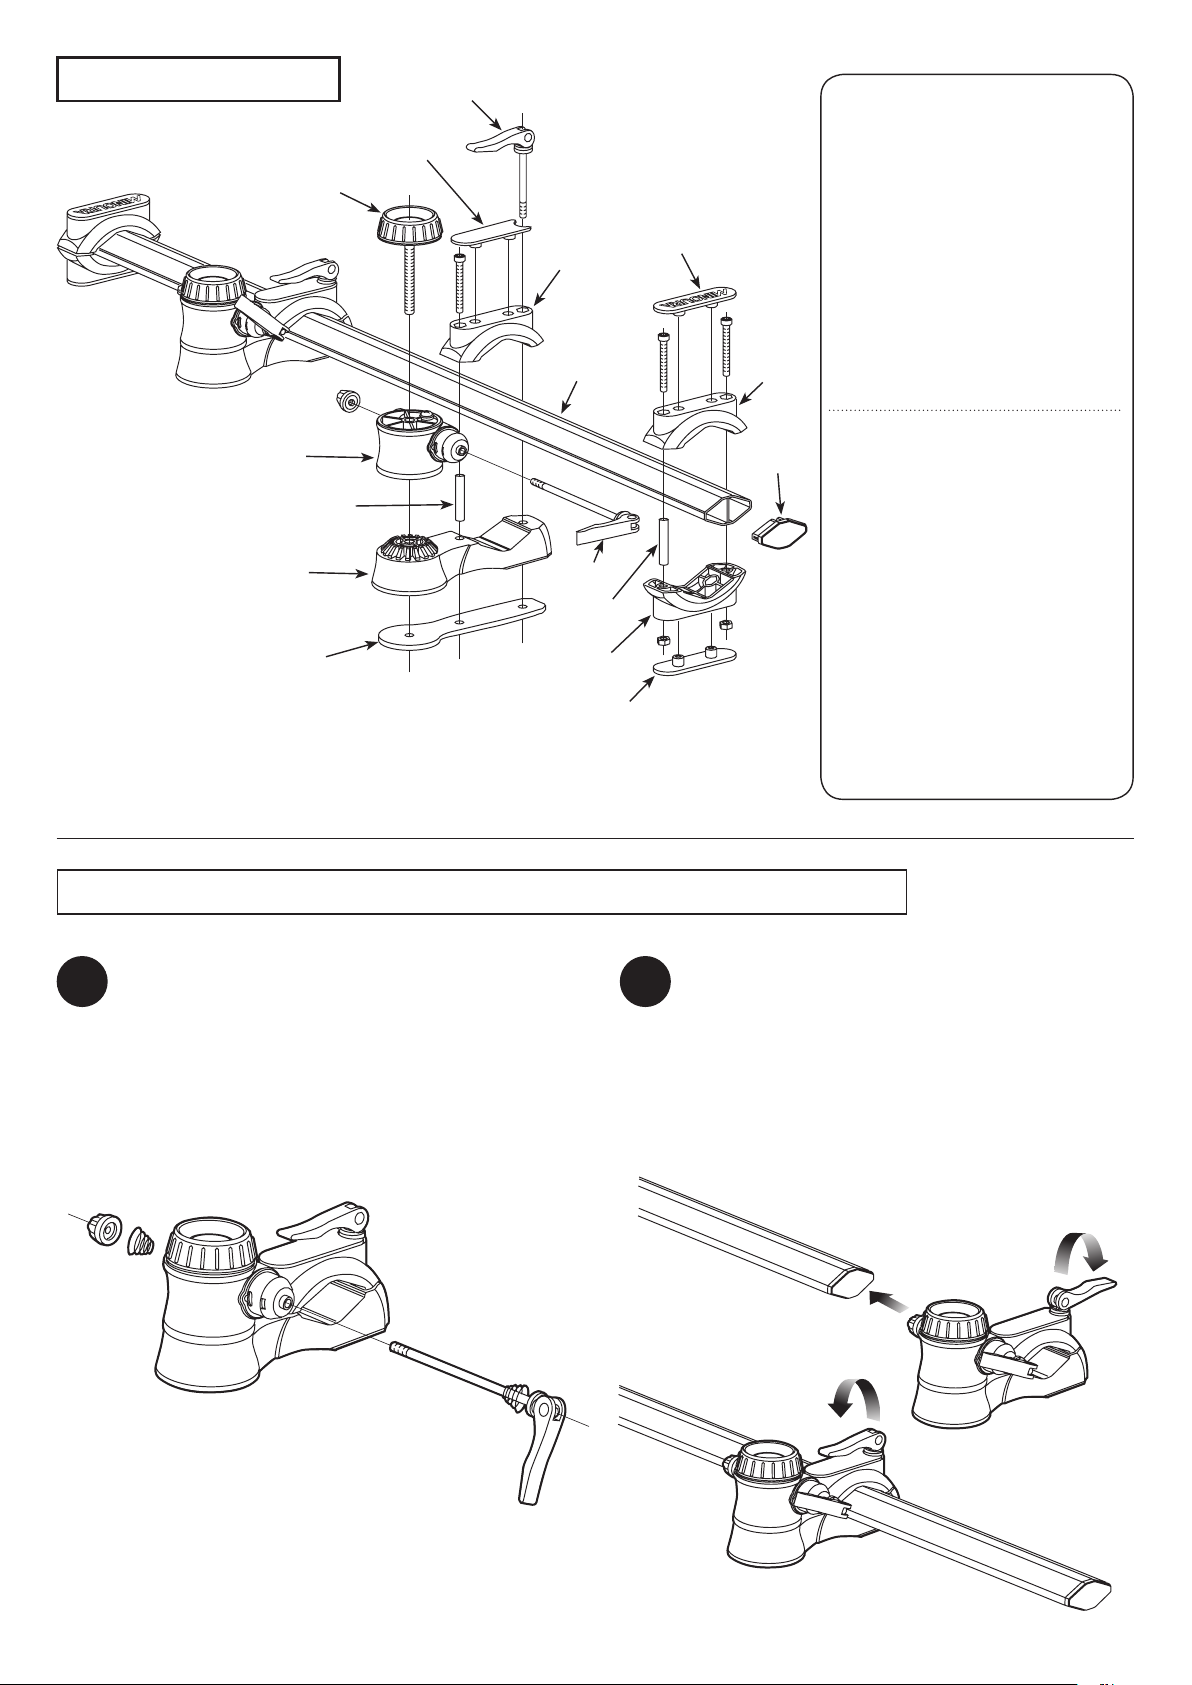
How To Assemble VERGO-Excel-L
/バーゴ・エクセルLの組み立て方
Assemble the Fork Mount. Install the supplied quick
1 2
release skewer into the hole on Axle Holder Body.
Make sure the larger side of the tapered spring is
facing outward.
まずフォークマウントを組み立てます。添付の 9 ミリ
クイックをアクスルホルダーにある孔に通して組み付
けます。
傘状のバネの向きは,広い方が外側になります。
Fully open the cam lever of Fork Mount Skewer to
have enough clearance on the diamond shaped space
between Upper Base and Fork Mount Base, then put
through to Base Rail. Close the cam lever to secure the
position.
フォークマウントクイックのレバーをいっぱいに開
き,上側ベースとフォークマウント台座との間の菱形
のスペースを広げます。ベースレールに通し,レバー
を閉じて位置を固定します。
- 2 -
Page 3

!
!
Install the End Bases to the Base Rail.
3
Loosen both bolts on the End Base a little by 5mm hex wrench to open the space.
Put through to Base Rail, tighten both bolts rmly, then put the Rubber Covers on both top and bottom sides.
The End Bases should be located as close to the bar-end as possible to expect maximum stability.
続いてレール両端にベースを装着します。
ベースのボルトを2本とも 5 ミリ六角レンチで軽く緩め,菱形のスペースを広げます。
ベースをレールに通し,端から 10 ミリくらいのところでボルトを締め込んで固定し,最後にベースの上下ともにゴムカバー
を装着します。安定性を高めるため,ベースはできる限りレールの端に装着してください。
How To Mount Bike On VERGO-Excel-L
Loosen the acorn nut of 9mm Quick Skewer to have
1 2
enough space to put the front fork end in.
9 ミリクイックのナットを緩め,前フォーク下端が差し
込めるスペースを作っておきます。
For your safety, start using this product AFTER you fully
understand the mechanism and proper usage of a quick
release type skewer.
You should not turn the cam lever for tightening, but you
must close the lever to x securely.
Prior to operating the cam lever, tighten the acorn nut until
you feel some resistance when the cam lever comes in
parallel to the axle. Too deep or too shallow angle cannot
expect proper tightening torque.
Use your palm to close the cam lever.
/バーゴ・エクセルLへの自転車の搭載のしかた
Put the front fork end onto the quick skewer axle, tighten
the acorn nut, then pull up the cam lever to x the fork.
前フォークを差し込み,ナットを締め,最後にクイック
レバーを倒してしっかりと固定します。
安全のため,クイックレリーズの構造および使用方法については,
完全に理解してからお使いください。
クイックのレバーはネジ式に回して締め付けるものではなく,
レバーを倒すことによって締め付けます。
いっぱいに開いたレバーを閉じていったとき,レバーがシャフト
と並行になったときに初めて抵抗がかかるようになるまで,あら
かじめ反対側のナットを締め込んでおきます。それより早くても
遅くても適切ではありません。
レバーは手のひらを使って押し込むようにして倒します。
手のひらに軽くレバーの跡が付くくらいの力が必要になっていれ
ば,適切なトルクで締め込んだと言えます。
Front fork has a guard "lip" to avoid sudden wheel
dropping off. When tightening the skewer, make sure
both ends of the front fork are fully inserted to the axle
and the lip doesn't disturb the skewer.
前フォーク先端には車輪の脱落防止用の爪が設けられていま
す。クイックを締め込むときはこの爪に乗り上がった状態で
締め込むことのないよう,事前に前フォークが垂直に奥まで
差し込まれていることを確認してください。
- 3 -
Page 4

How To Adjust Fork Angle
!
You can adjust the front fork angle in every 20 degrees to save the storage space in vehicle. For example, if you twist the fork
mount at 40 degrees, you can have the minimum clearance between bikes even with drop type handlebar.
車内での自転車搭載スペースを最小限にするため,フォークマウントは 20°刻みで角度を変えることができます。
たとえばドロップハンドルの自転車を搭載する場合,フォークマウントを 40°捻っておくとハンドル同士を重ね合わせることがで
き,最小限の間隔で2台の自転車を接近させることができます。フラットバーハンドルの場合は 20°で十分接近させられます。
/前フォークの角度調整のしかた
1
2
3
Loosen the Knob Bolt widely and lift up the Axle Holder Body.
ノブボルトを大きく緩め,アクスルホルダーを持ち上げます。
Twist the Axle Holder Body.
アクスルホルダーを捻ります。
Tighten the Knob Bolt rmly.
ノブボルトをしっかりと締め付けます。
4
Install the front fork, and adjust the
Fork Mount position as needed.
前フォークをセットし,必要に応じて
フォークマウントの位置をずらします。
When the front fork is twisted, the whole
bike will have to be slightly leaned and will
decrease stability due to the caster angle of
the fork. It's crucial to use tie-down belt to hold
the bike securely when you twist the front fork.
前フォークを捻ると,フォークのキャスター角のた
め自転車全体が傾き,全体の安定性が低下します。
前フォークを捻ったときは特にタイダウンベルトな
どを利用した自転車の固定を行なってください。
/ヒント
Tips
You can install the Fork Mount alternately to save the
bike storage space.
フォークマウントの装着方向を前後に入れ替えて,
自転車同士の位置を前後にずらすこともできます。
Options
20mm Thru Axle Fork Mount
20 ミリスルーアクスル用
- 4 -
/オプション
15mm Thru Axle Fork Mount
15 ミリスルーアクスル用
Front Wheel Holder Arm
前輪受けアーム
 Loading...