

Page 1
Page 2

Page 3

Contents
1 Introduction
1.1 We lco me to MINOLTA-QMS .................. .. .... .. .. .... .. .. .... .. .. .............1 -1
1.2 Roa d ma p of this manual ...... .. .. .. .. .. .. .. .. .. .. .. .. .. .. .. .. .. .. .. .. .. .. ............1-2
Where to find w hat in this U se r’s Manual.......... .. .... .. .. .. .. .... .. .. ........ 1 -2
Explanation of special type styl e s and metho d o f presentation ......1-3
1.3 W orking saf ely with your laser printer........ ........ ........ ........ ........1-4
Notes on your safety and operating safety...................... ........ ........1-4
Laser safe ty..... .. .... .. .. .. .... .. .. .. .... .. .. .... .. .. .. .... .. .. .. .... .. .. .... .. ................1-6
Internal laser r adiation.. .. .. .. .. .. .. .. .... .. .. .. .. .. .. .. .. .. .. .... .. .. .. .. .. .. .............1-6
CDRH regulations ...........................................................................1-7
Laser safe ty label. .. .. .. .. .... .. .. .. .... .. .. .... .. .. .. .... .. .. .. .... .. .. .... .. ...............1-7
Laser caution label.................... .. .... .. .. .. .... .. .. .... .. .. .. .... .. .. .. ..............1-8
Ozone emission ..............................................................................1-8
2 Unpacking, installing, and setting up the printer
2.1 Unpacking the laser printer..........................................................2-1
2.2 Ove rv i ew of the printer.... .. .. .. .. .. .. .. .. .. .. .. .. .. .. .. .. .. .. .. .. .. .. .. .. .............2-3
External pri n ter parts. .. .... .... .... .... .... .... .... .... .... .. .... .... .... .... ..............2-3
Internal printer parts........................................................................2-4
Optional access ories... .. .. .. .. .. .... .. .. .. .. .. .. .. .. .. .. .... .. .. .. .. .. .. .. .. ..............2-5
Printer co ntrol panel...................... .... .... .. .... .... .. .... .. .... .... .. ..............2-6
2.3 Installing your laser printer..........................................................2-7
Place of instal l ation ....... .. .... .. .. .. .. .. .. .. .. .. .. .... .. .. .. .. .. .. .. .. .. .. ................2-7
Storage of consumables and accessories ......................................2-7
Ambient c ondi tions .. .. .... .... .... .. .... .... .... .. .... .... .. .... .... .... .. .... ..............2-8
Space required................................................................................2-8
Space required for the standard model printer ...............................2-8
Space required for the printer when equipped with options ...........2-9
2.4 Setting up your lase r p rint er..................... .. .. .. .. .. .. .. .... .. .. ...........2-10
Fitting the paper output tray and paper feed tray 1 ......................2-10
Loading paper into paper feed tray 1 ...........................................2-11
Connecting the power cable .........................................................2-12
Switching the printer on and off.....................................................2-13
Printing a configuration page .......................................................2-14
Connecting the printer to a computer (parallel port) .....................2-15
Connecting the printer to a computer (USB port) .........................2-16
TOC-1
Page 4

3 Installing the printer driver
3.1 System requirements ...................................................................3-1
3.2 Notes on installing the printer driv er........ ........ ........ ...... ............ 3-1
General information on the printer driver........................................3-2
Information us ing Plug-and-Play or Add Printe r Wizard................. 3-2
Information on installing a network printer......................................3-2
3.3 Install ing the U SB devi c e driver. .. .... .... .. .... .... .. .... .... .. .... .. ...........3-3
Installing t he USB device driver for Windows 98.......... .. .. .. .. .. .. ...... 3-3
Installing t he USB device driver for Windows Me............ .. .. .. .. .. ..... 3-7
Installing t h e U SB Device Driv er for Windows 2000.... .. .. ............. 3-11
3.4 Install ing the printer driver us i ng t h e In s t al ler ..... .. .. .. .. .. .. .. ..... 3-23
3.5 Registering the St a tus D isplay............ .. .. .. .. .. .. .. .. .. .. .. .. .. .. .......... 3-25
Registering the Status Display for Windows 95/9 8/NT4.0............3-25
Registering the Status Display for Windows 2000/Me.......... .. .. .... 3-29
3.6 Uninsta ll i ng t h e P rin ter Driver....... .. .. .. .. .. .. .. .. .. .. .. .. .. .. .. .. .. .......... 3-32
4 Working with the Windows printe r drivers
4.1 Displa ying pr int e r driver se ttings .... .. .. .... .. .... .. .... .. .... .. .... .. ......... 4-1
Displaying s et tings in Windows 95/98/Me .... .... .. .. .... .. .. .... .. .... ....... 4-1
Displaying s et tings i n Windows NT 4.0 / Windows 2000 .......... .. ... 4-3
4.2 Paper index card...........................................................................4-4
Selecting a paper format ................................................................4-5
Specifying the num b er o f copies .............. .. .... .. .. .... .. .. .... .. .. ............ 4-5
Specifying th e orientat i on of the print paper ...................... .. .. .. ....... 4-5
Switching on/off the printer’s sorting function .................................4-6
Specifying the p a per source.............. .. .... .. .. .. .. .. .... .. .. .. .. .... .. ...........4-7
Recalling the o rigi nal s ettings [D EF AULT] .................... .... .... ......... 4-7
4.3 Page l ayo ut index card ...... .. .... .. .. .. .. .. .. .. .. .. .. .... .. .. .. .. .. .. .. .. ............4-8
Printing mu ltip le docu m e nt pa ges per p rint p age (N-up) ......... .. .. ... 4-9
Printing watermar ks... ...... ........ ........ ........ ........ ........ ...... ...............4-10
Custom watermarks .. .............................. .....................................4-11
Scaling th e printed do cument .... .... .. .. .. .. .. .. .. .. .. .. .... .. .. .. .. .. .. ...........4-12
Duplex/Booklet function................................................................4-12
4.4 Image ind ex card ...................... .. .. .. .. .. .. .. .. .. .. .... .. .. .. .. .. .. ..............4-13
Optimizing the printout of fax documents (Colors to Patterns). .... 4-14
Enhance Contrast. ........ ...... ........ ........ ........ ........ ...... ....................4-14
Determining the re solu tion.......... .... .... .... ...... .... .... .... .... .... ............4-14
Optimizing the presentation of graphics in the printout (Detail ...) 4-15
4.5 Advan ced index card ........ .... .... .... .... .... .... .... .... .... .... .... .............4-16
Transmit Once..............................................................................4-16
TOC-2
Page 5

4.6 Devic e opt i on index card.... .. .... .... .. .... .... .. .... .... .. .... .. .... ..............4 -17
Activating the optional duplex unit.................................................4-17
Activating optional paper feed tray 2 or 3......................................4-17
5 Working with the Status Display
5.1 Cal ling up the Status Disp lay.......... ........ ........ ...... ........ ...............5-2
Altering the size of the Status Display window ............ ........ ........... 5-3
5.2 Understanding Status Display Messages...................................5-3
5.3 Controlling PopUp Messages ............. .. .. ................ .....................5-4
To activate a popup error message ...... .. .. .. .. .. .. .. .. .. .... .. .. .. .. .. ......... 5 -4
To inactivate a popup err o r message .... .... .. .. .... .. .... .. .... .. .... .. ......... 5-4
5.4 Di spl a yin g Print er Infor mation.......... .. .. .. .... .. .. .. .. .. .... .. .. .. .. ...........5 -5
5.5 Cl osin g the Status D ispl ay... .... .. .... .... .. .... .... .. .... .... .. .... .. ..............5-5
6 Working with the printer
6.1 Pl e ase note the following points................... .. .. .. .. .. .. .. .. .. .. ..........6 -1
What should I watch out for when loading paper? ..........................6-1
What should I watch out for when loading envelopes?...................6-1
Which sizes of paper can I use? .....................................................6-3
What types of paper can I use? . .... .... .. .... .... .... .. .... .... .. .... .... ...........6-4
Printable area........ .... .. .... .. .. .... .. .. .... .. .. .... .. .... .. .. .... .. .. .... .. ................6-4
6.2 Usi ng the control button ...... ........ ........ ........ ...... ........ ..................6-5
Printing the configuration page ........... ........ ........ ........ ........ ...........6-6
Continuing a prin t job aft e r an error message . .. .. .. .. .. .. .. .. .... .. .. .......6-7
6.3 Loa din g p aper .................... .. .. .... .. .. .. .. .. .. .. .. .. .. .... .. .. .. .. .. .. ...............6-8
Loading paper into paper feed tray 1 .............................................6-8
Loading paper into the manual feed unit ........................................6-9
Loading paper in to paper feed tray 2/3 ................ .. .. .. .... .. .. ......... 6 -10
6.4 M oni tor in g print j ob s with the Status Di s play............ .. .... .. ......6-12
7 Installing optional accessories
7.1 Installing paper feed trays 2 and 3 ..............................................7-1
7.2 In sta lling the dup lex unit .... .. .... .. .... .... .. .... .... .. .... .... .. .... .. ..............7-4
7.3 Installing a DIMM me mor y module....... .. .. .. .. .... .. .. .. .. .. .. .. .. ...........7-6
7.4 In sta ll ing a network card.. .. .. .. .. .. .. .. .. .. .. .. .. .. .. .. .. .. .. .. .. .. .. .. ............7-11
8 Caring for and maintaining your printer
8.1 Cleaning the printer ......................................................................8-2
Cleaning the case ........ .... .... .... .... .... .... .... .... .... ...... .... .... ................8-2
TOC-3
Page 6

Cleaning the paper feed roller ....... .. .. .. .. .. .. .. .. .... .. .. .. .. .. .. .. .. .. ..........8-2
8.2 Replacing th e imaging cartridge.... ...... ........ ........ ...... ........ .........8-5
9 Troubleshooting
9.1 Clearing pap e r m isf eeds.................. .. .... .. .. .. .... .. .. .. .... .. .. ..............9-2
Clearing paper misfeeds at the imaging cartridge ......................... 9-2
Clearing a paper misfeed at the fusing unit ...................................9-4
Clearing a paper misfeed at the output tray .......... ...... ...... ...... ...... 9-6
Clearing a paper misfeed at paper feed tray 1 ..............................9-7
Clearing a paper misfeed at the manual feed unit .........................9-8
Clearing a paper misfeed at optional paper feed trays 2 and 3 .... . 9-9
Clearing paper misfeeds at the optional duplex unit (top) ...........9-10
Clearing paper misfeeds at the optional duplex unit (bottom) ..... 9-11
9.2 Problems with print q ua lity .............. .. .. ................ .....................9-12
9.3 Gener al pr inti n g problems.......... .... .. .... .... .. .... .... .... .. .... ............. 9-15
9.4 USB connec t ion problems........ .. .. ................ ................ .............9-16
9.5 Printer messages .... .. .... .. .... .. .... .. .... .. .. .... .. .... .. .... .. .... .. ................9-17
Indicator f unct io ns .................. .... .... .. .... .... .. .... .... .. .... .. .... ..............9-17
Status messages ..........................................................................9-18
User messages.............................................................................9-19
Service messages ...... ........ .......... .......... ........ .......... ....................9-24
10 Appen di x
10.1 Performan ce features ...... ........ ...... ........ ........ ........ ........ .............10-1
Hardware.............. ........ ........ ........ ...... ........ ........ ........ ..................10-1
Operating systems........................................................................10-1
10.2 Technical spec if ications .. .. .... .. .. .. .. .. .. .. .. .. .. .... .. .. .. .. .. .. .. .. ............10-2
PagePro 41 10W printer.............................. ..................................10-2
500-sheet paper feed tray (option) ...................... .. .... .... .. .... .........10-3
Duplex unit ( op tion) ......... .. .... .. .. .. .. .. .. .. .. .. .. .... .. .. .. .. .. .. .. .. .. .............1 0-4
Network c ard ( option) ...... .. .... .. .... .. .. .... .. .... .. .... .. .... .. .... .. .. .............10-4
Expansion memory module (option).... ........ .......... .......... .............10-4
Parallel interface and cable ..........................................................10-5
USB interface and cable................. .... .... .... .... .... .... .... .... ..............10-5
10.3 MINOLTA-QMS's concern for environmental protection........10-6
What does the Ener gy Star mean? ................... .... .... .. .... .... .........10-6
10.4 Index ... .... .... .. .... .. .... .... .. .... .... .. .... .... .. .... .. .... .... .. .... .... .. .................10-7
TOC-4
Page 7

Introduction
1 Introduction
1.1 Welcome to MINOLTA-QMS
Thank you for purc hasing a MINOLTA-QMS Page Pr o 4 110W laser
printer.
To achieve th e best p oss ible results and t o use your laser printer
effectively, this Us e r's Manual provides you with inform at i on on the
following topics:
l Installing the pr in ter driver
l Working wit h th e prin t er drivers and tools
l Working with the printer
l Caring for and maintaining your printer
l Troubleshooting
Read this User's Manual carefully before operating your printer for the first
time, and always keep the manual within reach.
MINOLTA-QMS reserves the right to make changes to the contents of this
manual without notice.
1
Trademarks
Centronics is a r e gi ste red tr ad ema r k of Centroni cs, Inc.
Microsoft, Windo ws and Windows NT are registered tr ademarks of
Microsoft Corpo rat ion.
IBM is a registered trademark of the Internation a l Business Machines
Corporation.
Adobe, PostScri pt, and th e Pos tScr ip t logo are tr adema r ks of Adobe
Systems, Inc.
PagePro is a trademark of Minolta Co., Ltd.
Fine-ART and Fine Micro Toning are trademarks of Minolta Co., Ltd.
MINOLTA-QMS and the MINOLTA-QMS logo are registered trademarks
of MINOLTA-QMS, Inc.
All other names of produ cts and brand-names are trademarks or
registered trad ema rks of t he ir r esp ec tive proprietors.
1-1
Page 8

1
1.2 Roadmap of this m anual
Where to fi n d w h at in t his U ser’s Manual
You don't know exactly where to find the information you need? The
following tab le i s designed to help you.
Alternatively, to find information on a specific problem, refer to the index
at the end of this User's Manual.
No. Title of chapter Content of chapter
Contents A complete list of all the chapters and sub-chapters in
1 Introduction Introductory remarks and information on how to use
2 Unpacking, inst allin g and
setting up the printer
3 Installing the printer driver A step-by-step explanation of the routine for installing
4 Working with the Windows
printer driver s
5 Working with the Windows
printer tools
6 Working with the printer Getting to know how your printer works. For example,
7 Installing optional
accessories
8 Caring for and maintaining
your printe r
9 Troubleshooting Help with analysing and rectifying problems.
10 Appendix A collection of helpful additional information, for
this User’s Manual.
this manual as well as notes on the safe use of the
printer.
|nformation on how to set up the printer as well as an
introduction to the various features.
the printer driver.
Details of how to control the printer via the printer
driver. This helps you learn how to use the printer’s
functions effectively.
Details of how you can use the supplementary
Windows program s most effectively.
information on:
• loading paper
• monitoring print jobs
• cancelling print jobs
Details of how to install optiona l accessories
correctly, for example.:
• 500-sheet paper feed tray
• network card
Details of how to look after your printer and how you
can easily replace cerain parts yourself.
example.:
• technical specifications
• index of keywords
Introduction
1-2
Page 9
Introduction
Explanation of special type styles and method of presentation
Special type styles and methods of presentation are used in this User's
Manual to highlight various circumstances.
CAUTION
This is a warning!
A warning alert s you to dange r to lif e and li mb o r to damage that could
result to the machine by treating it improperly.
Ü The arrow refers you to safety measures that must be taken to prevent
[MENU] Key on the control pa nel / button on the printer driver with
Ü Single action to be performed (there are no other steps)
1
1
the hazard.
the description “Menu”
Step 1 of a series of ac tion s
Step 2 of a series of actions, etc.
2
Help is available here.
?
Ü The s ugg es tion stated here
helps you to get the desired
result.
Here you can see what has to be done.
.
This is a helpful tip
Text passages that are identified in this manner provide you with tips
to make it easier to work with the printer.
1-3
Page 10

1
1.3 Working safely with your laser printer
Notes on your safety and operating safety
Working improp erl y with the printer can result in health hazards and
electric shocks, and may even cause fires. Before you unpack the laser
printer, you s hould make you rself famili a r with this i nfo rma tion regarding
your safety and operating safety.
CAUTION
Observe the foll o wing i nform ation:
Ü M ake s u re that the power cable is correctly p lug ged into the socket
and that the socket is at all times visible and readily acc essible.
Ü Do not pull the cable of the power plug as this may damage the cable.
The result could be an electric shock or a fire.
Ü Remove the power plug from the socket if the machine will not be used
for an extended period of time.
Ü Do not remove the power cable from the socket with wet hands as this
may res ul t in an elect r ic shock.
Ü Do not move the unit unles s the power cable has been removed from
the socket. Otherwise, you may damage the cable. The result could be
a short-circuit or a fire.
Ü Do not place any heavy objects on the power cable. Do not pull or kink
the cable as this can result in damage to the cable. The result could
be an electric shock or a fire.
Ü M ake s u re that the machine is not standing on a c a ble co n nected to
another machine as this can result in damage to that cable. The result
could be a fire or improper functioning of the unit in question.
Ü M ake s u re that the powe r supply to the un it h as the correct voltage.
Otherwise, the result could be a fire or an electric shock.
Ü Swi tch off the unit immediately an d unplug the power cable if the
power supply cable is damaged. Failure to do so could result in a fire
or an electric shock. Contact your customer support technical
specialist.
Ü Use only extension cables that are designed for at least the maximum
power rating of the ma chine . Exten s ion c ab l es wi th lo wer ratings can
result in overheating and can even cause a fire.
Introduction
1-4
Page 11

Introduction
Ü Perfo rm only the proce dures that are described in this manual. Using
Ü Do not place any heavy objects on the machine.
Ü Do n o t open a n y cov e rs on the machine while printing is in progress.
Ü Do not switch off the unit while printing is in progress.
Ü Do not place any magnetic object near the machine.
Ü Do not use any flammable sprays, liquids, or gases in the vicinity of the
Ü Do not remove any sa f e ty dev ice s and do n o t alter the construction of
Ü Do not insert any paper clips, staples or other small metal objects into
Ü Do not place coffee cups, drink bottles, or other containers with liquids
Ü If the machine becomes unusually hot, or if you notice smoke or an
1
the machine improperly can result in a fire or an electric shock.
machine.
the machine. T h e unit is equipped with high-voltage components.
Using the machine improperly can result in a fire or an electric shock.
openings on the machin e. The res ult could be an electric shock or a
fire. If metal pieces are fed into the machine, switch it off immediately,
disconnect the powe r cab le a nd contact y o ur c ustomer support
technical specialist.
in them on the machine. If liq uid ent e rs the machine, the result could
be an electric shock or a fire. If liquid does get into the machine, switch
it off immediately, disconnect the power cable and contact your
customer support tec hni c al s pe cialist.
unusual odor coming from the machine, switch it off immediately and
remove the powe r ca ble from the soc ke t. C ontact your customer
support technical s pe ci alist.
1-5
Page 12

1
Introduction
Laser safety
This printer is equipped with a laser unit. If the printer is used in
accordance with th e in s truc tions in t h i s Use r's Manual, the laser presents
no danger.
The radiation emitted is completely absorbed and attenuated by the case.
The laser radiation cannot escape at any time during the printing process.
This printer is certified as a Class I Laser product under the US
Department of Health a nd Human Se rvice s ( DHHS) Radiation
Performanc e S tanda r d according to t he Ra dia t io n Contro l for Health and
Safety Ac t of 1 968 . Th is means that th e pri nter d o es not produce
hazardous laser radiation.
Internal laser radiation
Average radi atio n output:
1.03 mW at the la ser apert ure of the print head unit.
Wavelength: 770-810 nm
This device works with a laser diode of class 3b with invisible laser
radiation. The laser diode and the pol ygo n mi r ro r for sampling are
integrated into the laser unit.
The laser unit is NOT AN ITEM TO BE MAINTAINED ON SITE. You
should therefore not open it under any circumstance.
1-6
CAUTION
Dangerous laser radiation!
Using the printer in a manner other than indicated in this manual may
result in exposure t o danger ous r adiation.
Ü Use the printer only accordi ng to the ins truc t ions contained in this
manual.
Page 13
Introduction
CDRH regulations
On 2 August 1976 the Center for De vic e s a nd Radi o lo gic al Health
(CDRH), part of the US Food and Drug Administration, introduced
specifications f or all products tha t operate wi th laser beams. Products
which are to be sold or used in the USA must comply with these statutory
requirements without exception. The safety label shown on the following
page confirms compliance with the CDRH regulations. This label must be
attached to all products sold or used in the USA.
Laser safety label
1
DANGER
Use the printer only as describ e d i n this manual!
Using the controls, adjusting the pri nter or pe rf ormi ng p rocedures other
than specified in this manual may result in ex p osure to hazardous
radiation.
Ü Use the printer o nl y a cc o rdin g to th e inst ructions contained in this
manual.
1-7
Page 14
1
Introduction
Laser caution label
1-8
CAUTION
Dangerous laser radiation!
This is a s emic o nducto r las er. T he m aximum po w e r of the laser diode is
5 mW and the wavelength is 770–810 nm.
Ü Use the printer only accordi ng to the ins truc t ions contained in this
manual.
Ozone emission
Small quantities of o zone e scape du ring t he printing process. These
quantities do not represent a hea lth h azard. In spite of this, you should
take car e that the a re a in which the machine is located has adequate
ventilation, especially w h en you a re pri nting large quantitie s of materials
or whether the machine is being used continuously over a long period of
time.
Page 15
Unpacking, installing, and setting up the printer
2 Unpacking, installing, and setting up
the printer
2.1 Unpacking the laser printer
CAUTION
Danger to children from packaging materials made of plastic
Ü After unpacking the printer, keep the packaging materials out of reach
of children.
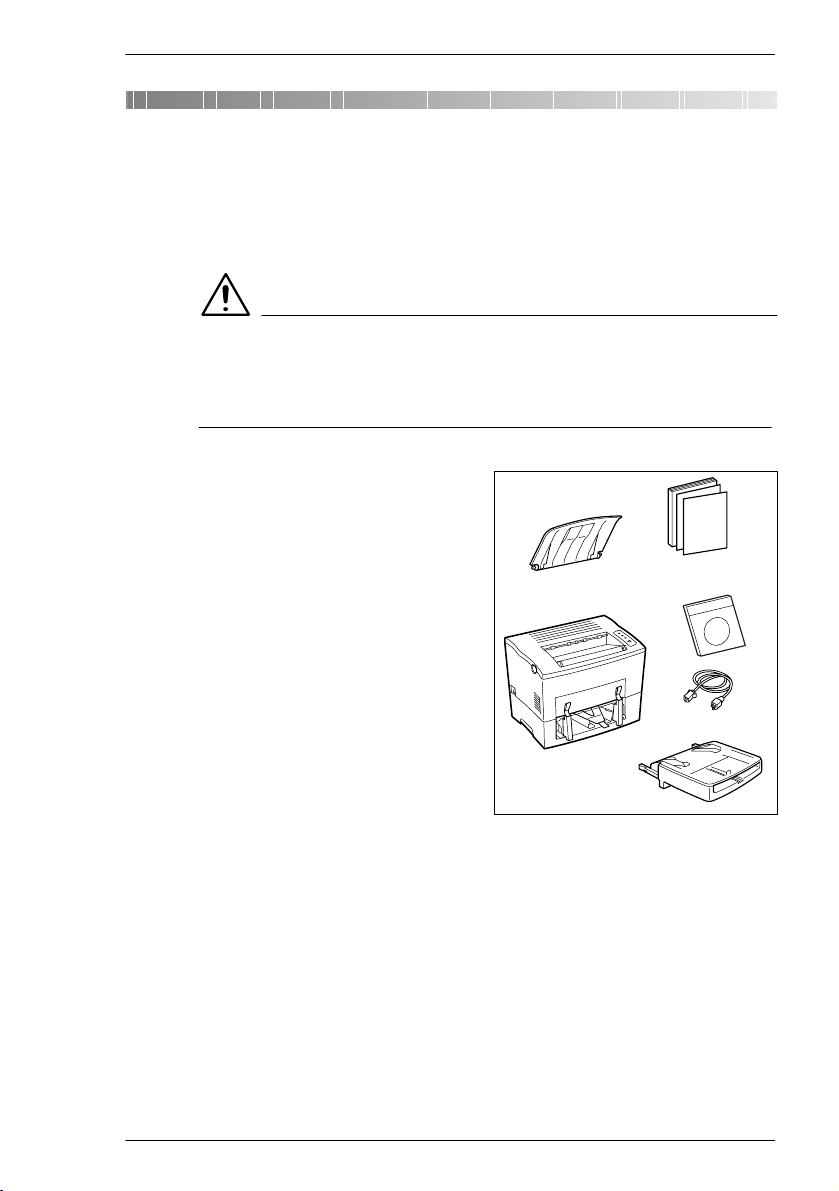
Remove the printer parts and
1
accessories from the box.
m Paper output tray
m Printer
m Installation Guide
m Software and
Docu ment at ion CD -R O
m Power cable
m Paper feed tray
Interface cables are not
included in the shipment. If you
need interface cables, contact
your local vendor or computer
store
2
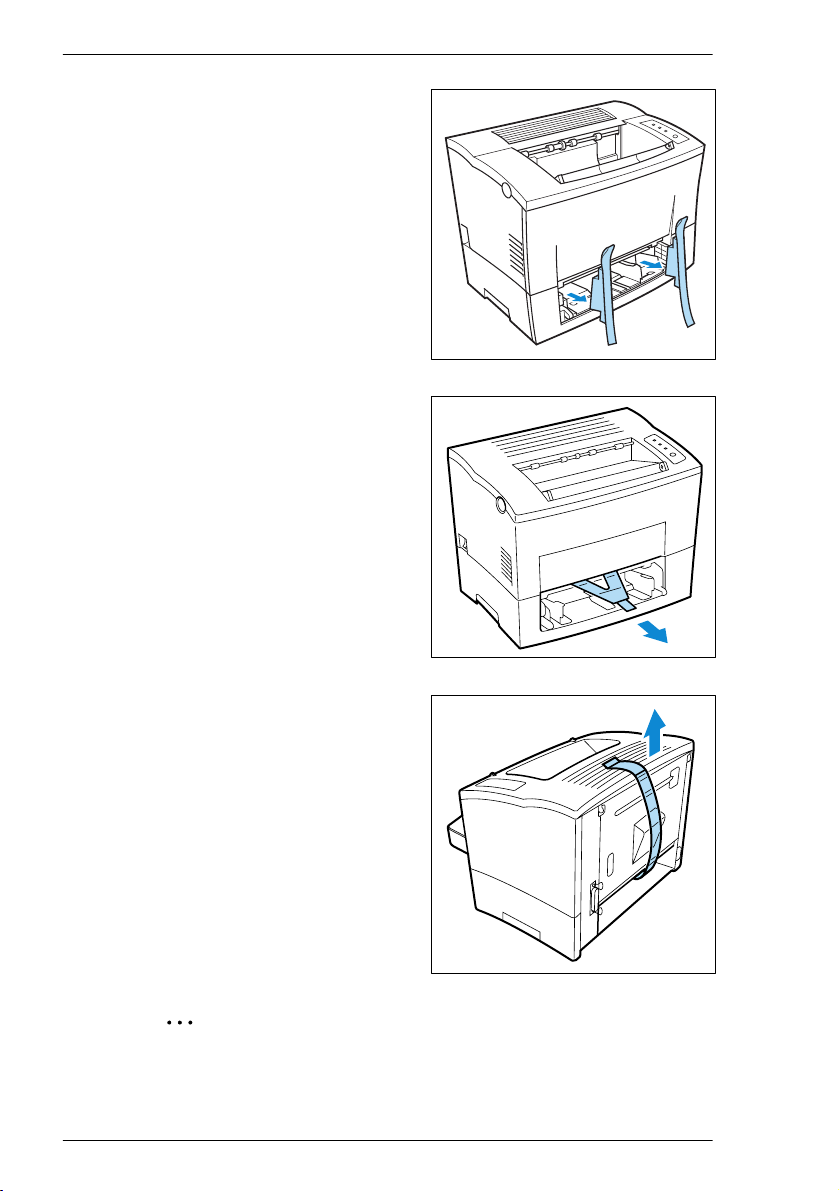
Remove the packaging material
2
from the printer.
2-1
Page 16
2
Unpacking, installing, and setting up the printer
Remove the transport retainers
3
from the print er.
Pull the pl ast ic stri p out of the
4
printer.
2-2
Remove the plastic strip from
5
the rear of the printer.
.
Why save the packaging materials?
If you need to move the printer, you can use the packaging again. In
this way y ou can be certain that your printer is correctly packed.
Page 17
Unpacking, installing, and setting up the printer
2.2 Overview of the printer
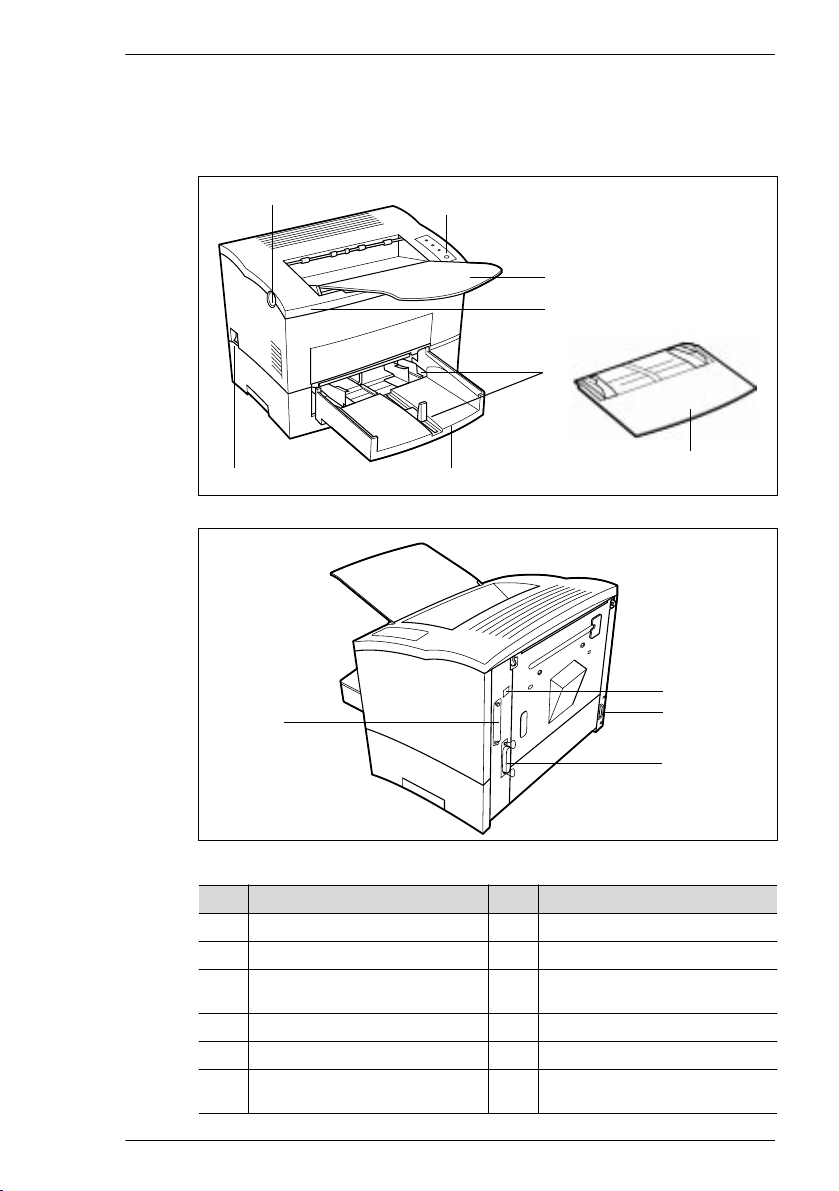
External printer parts
2
12
1
2
3
4
5
8
67
9
10
11
No. Description No. Description
1 Release button for top cover 7 Power Switch (ON/OFF)
2 Control panel 8 Cover for paper feed tray 1
3 Paper output tray
(face down)
4 Top Cover 10 Socket for power cable
5 Paper guides 11 Parallel port
6 Paper feed tray 1
(multipurpose tray)
9 USB port
12 NIC option port
2-3
Page 18
2
Unpacking, installing, and setting up the printer
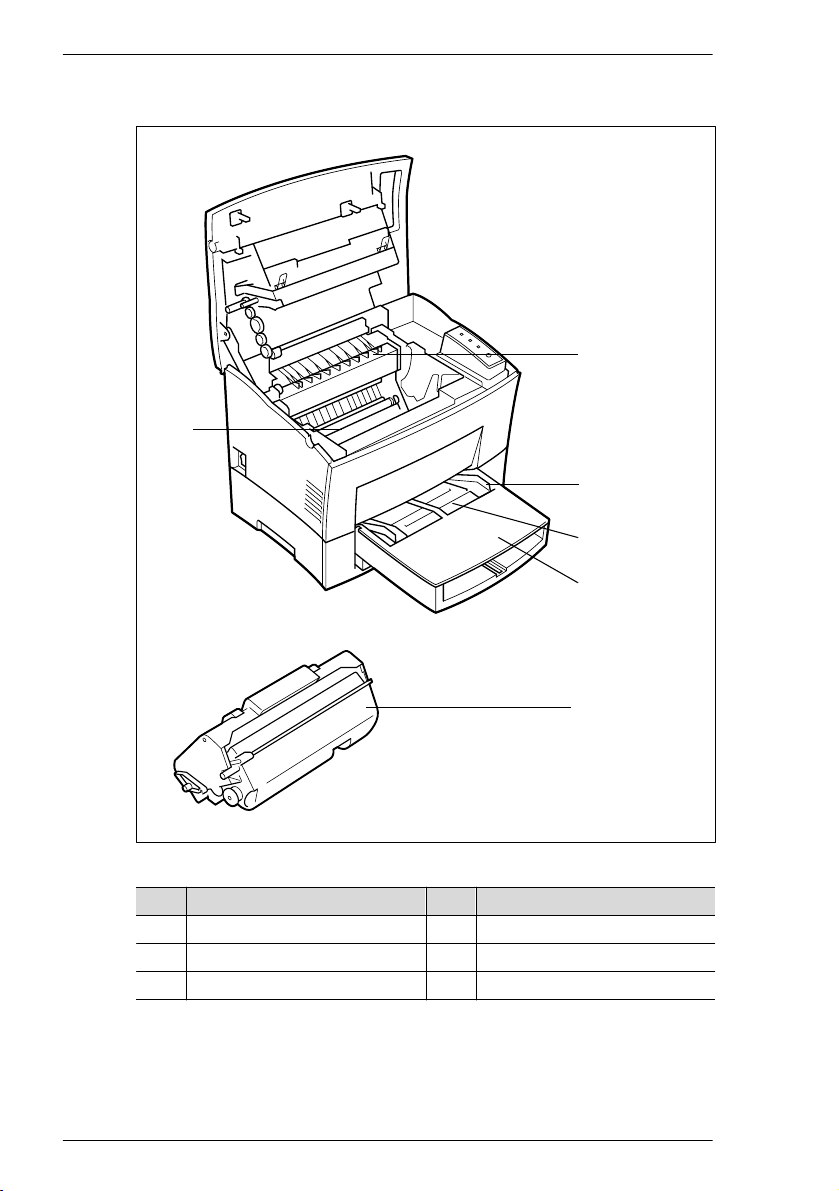
Internal print er part s
1
5
2
3
4
2-4
6
No. Description No. Description
1 Fusing unit 4 Cover for paper feed tray 1
2 Paper guide 5 Image transfer roller
3 Manual paper feed unit 6 Imaging cartridge
Page 19

Unpacking, installing, and setting up the printer
Optional accessories
2
1
2
No. Description No. Description
1 Paper feed tray 2
(500-sh eet cas s ette)
2 Paper feed tray 3
(500-sh eet cas s ette)
3 Duplex Unit
4 Network interface card
3
4
2-5
Page 20

2
Unpacking, installing, and setting up the printer
Printer control panel
1
2
3
4
5
The control panel has four indicators and one button.
No. Description No. Description
1 Fault (orange) 4 Ready (green)
2 Toner empty (orange) 5 Control button
3 Paper empty (orange)
2-6
Page 21

Unpacking, installing, and setting up the printer
2.3 Installing your laser printer
Place of installation
The printer should be set up in a pla ce which is:
l dry and free from dust
l on a stable surface
l well ventilated
l away from highly fl am mable items (fo r example, curtains)
l away from objects which might obstruct the print e r’s ventilation slits
l near to an easily acces s i b l e po wer socket
The printer must be positi o ne d in a way that it ca nno t be adversely
affected by the following:
l splashing liquids
l organic gases (for example, am monia)
l direct s unlight
l severe temperature fluctuations
l exhaust- ai r from heat i ng, ven ti lat i on , or air -condi tioning systems
Storage of co nsum ab les and accessories
Printing consumables and accessories should be kept:
l sealed in their original pack agings
l protected against direct sunlight or heat
l protected against fluorescent light
l in a cool, dry and dust-free place
l out of t he reach of children
2
CAUTION
Toner poses a health hazard!
Toner may be harmful if inhaled.
Ü If you inhale toner, consult a doctor immediately.
Ü If you get toner on your hands, wash them immediately with cold water
and soap.
2-7
Page 22
2
Unpacking, installing, and setting up the printer
Ambient conditions
The optimum ambient conditions for y our printer are a s follows:
l Temperatures from 50°F to 95°F / 10°C to 35°C
(maximum vari ation of 18°F / 10°C per hour);
l Relative humidity of 15% to 85%
(maximum variation of 20% per hour).
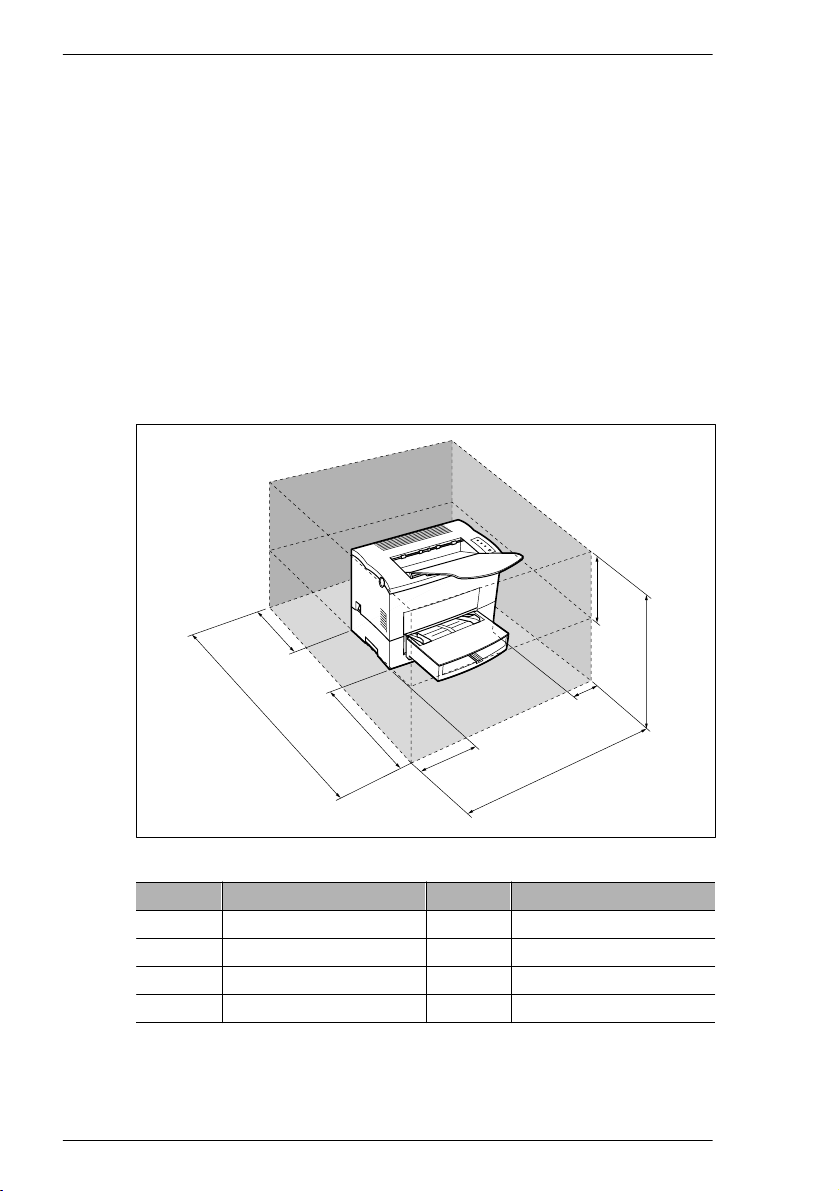
Space required
Make certain that there is enough space available around the printer (see
illustration). This will facilitate operation, reloading paper and toner, and
maintenance of the printer.
Space required for the standa r d model printer
H
2-8
D
A
No. Dimension No. Dimension
A 40-1/2 in. / 1030 mm E 23-1/2 in. / 600 mm
B 33 in. / 840 mm F 11-3/4 in. / 300 mm
C 24-3/4 in. / 630 mm G 4 in. / 100 mm
D 6 in. / 150 mm H 11-3/4 in. / 300 mm
E
F
G
B
C
Page 23
Unpacking, installing, and setting up the printer
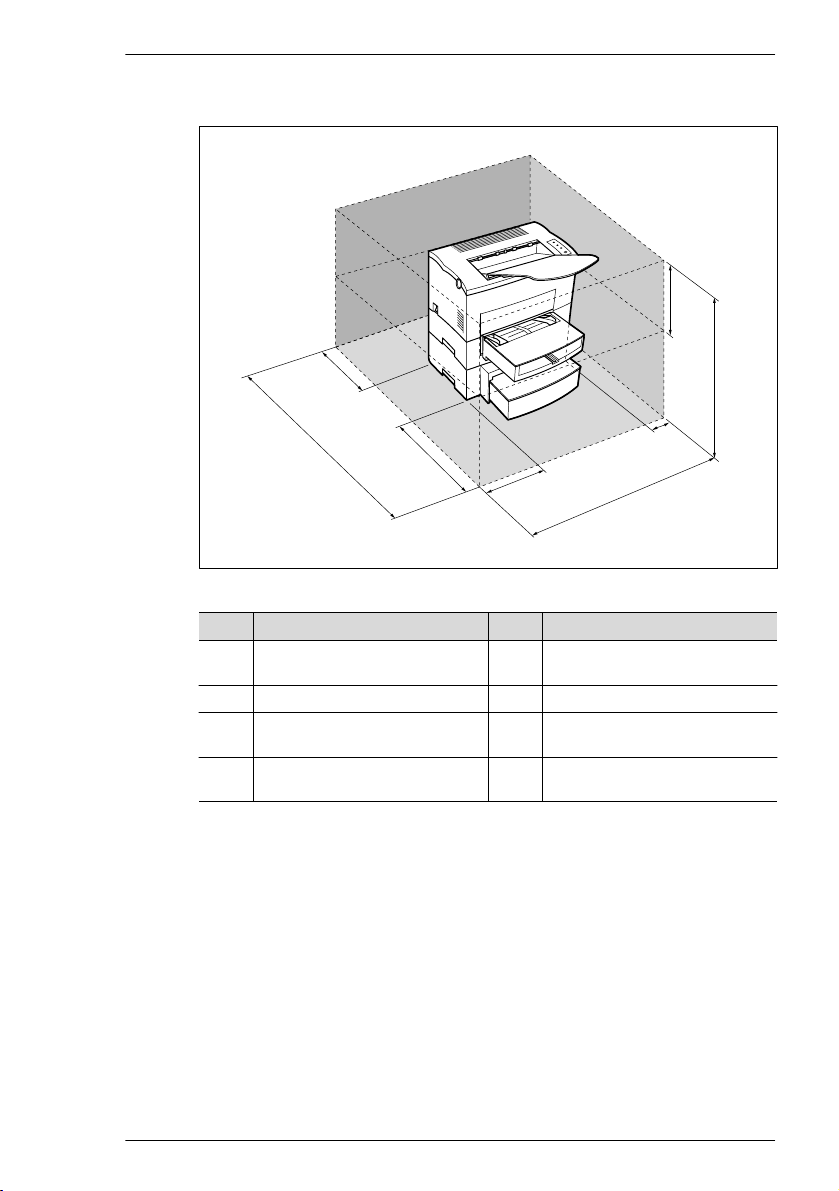
Space require d for the prin t er w h e n equ i p p ed w ith options
2
H
D
A
No. Dimension No. Dimension
A 40-1/ 2in . /1 030mm
46-1/2 in. *
B 33in./840mm F 11-3/4in./300mm
C29-1/2in./750mm
34-1/4 in *
D 6in./150mm
11-3/4 in *
* 1: when equipped with a duplex unit
2: when equipped with a third paper cassette unit
1
/ 1180 mm *
2
/ 870 mm *
1
/ 300 mm *
E
F
1
2
1
E 23-1/2 in./ 60 0mm
G4in./100mm
H 11-3/4 in. / 300mm
B
C
G
2-9
Page 24
2
Unpacking, installing, and setting up the printer
2.4 Setting up your laser printer
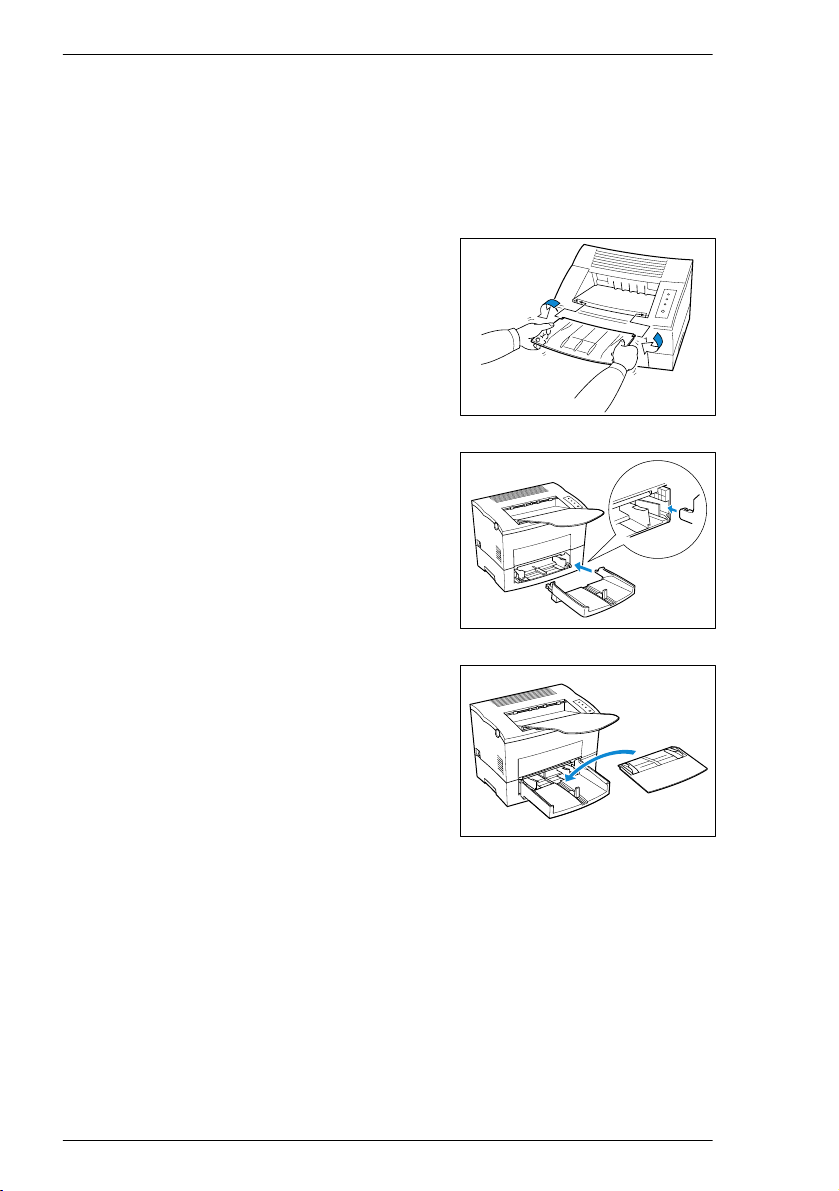
Fitting the paper output tray and paper feed tray 1
Set the guides of the paper feed tray to match the size of paper you want
to use.
Attach the paper output tray to the
1
printer as shown here.
Slide the lowe r part of the paper
2
feed tray i n to the printer.
2-10
Place the cover on top of paper feed
3
tray 1.
Page 25

Unpacking, installing, and setting up the printer
Loading paper into paper feed tray 1
Paper feed tray 1 has a capacity of 250 sheets of plain papier.
Remove the cover of paper feed
1
tray 1.
Using a large paper format?
?
Ü Then extend the paper support.
Place the paper between the paper
2
guides. Slide the guid es up to the
stack of paper.
How many sheets may I place
?
in the cassette?
Ü The sta c k of paper should not
exceed the “ma x.”mark.
2
Place the cover on top of paper feed
3
tray 1.
2-11
Page 26

2
Unpacking, installing, and setting up the printer
Connecting the power cable
Only use the power cable suppl ie d with th e p r inter!
The laser printer requires a power su pply with minimal voltage and
frequency flu ctuati on. I f neces s a r y, a sk an el ectrician for advice.
4 Power supply: 120-1 27V at 50- 60 Hz / 220- 240V at 5 0 -60Hz
4 Voltage fluctuation: 1 20V -10%, 127V +6% / 2 20-240V ± 10
4 Frequency fluctuation: Within 3 Hz
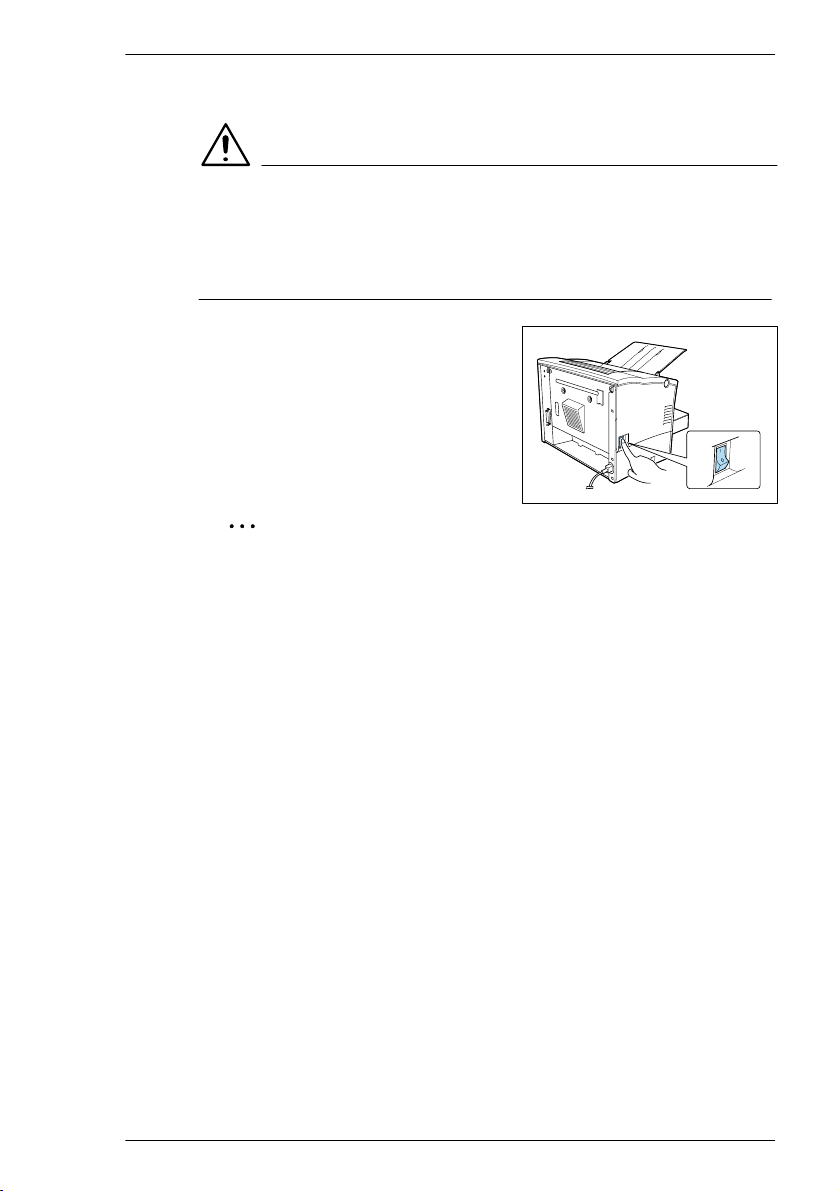
Make sure that t he print er’s p o wer
1
switch is i n t he “0” (OFF) position.
Insert the plug on the end of the
2
power cable (supplied) into the
power socket of the printer.
2-12
Insert the other end of the power
3
cable into a power socket.
CAUTION
Using the wrong power cable may cause a short-circuit!
Using power cables of inad equa t e cros s -s e ction can lead to overheating
of the cable.
Ü Only use an extension cable which has a higher rating than the current
consumption of t he printer.
Ü Only use cables with a ground connection.
Ü Al ways observe the relevant local regulations regarding the
connection of elec tric al equipment to the main power.
Page 27
Unpacking, installing, and setting up the printer
Switching the printer on and off
CAUTION
Improper handling may result in damage to the printer!
Ü Ne ver switch off the print e r while a print job is in progress, the printer
is receiving data from the compute r (flashing “ S tand-by” indicator on
the control panel) or the printer is being reset.
Ü Switch the p ow er switch to “I”(ON)
in order to activate the printer.
The printer is rea dy for use a fter
approximately 23 seconds.
Ü Switch the power switch to
“0” (OFF) in order to deactivate the
printer.
.
Saving energy makes sense!
After the printer has not received a print command for approximately
15 minutes, it automatically switches to POWER SAVE mode. If the
printer receives a new print job while it is in Power Save mode, or if the
top cover is opened, or if the control button is presse d, the printer
automatically starts its warm-up phase.
2
2-13
Page 28
2
Unpacking, installing, and setting up the printer
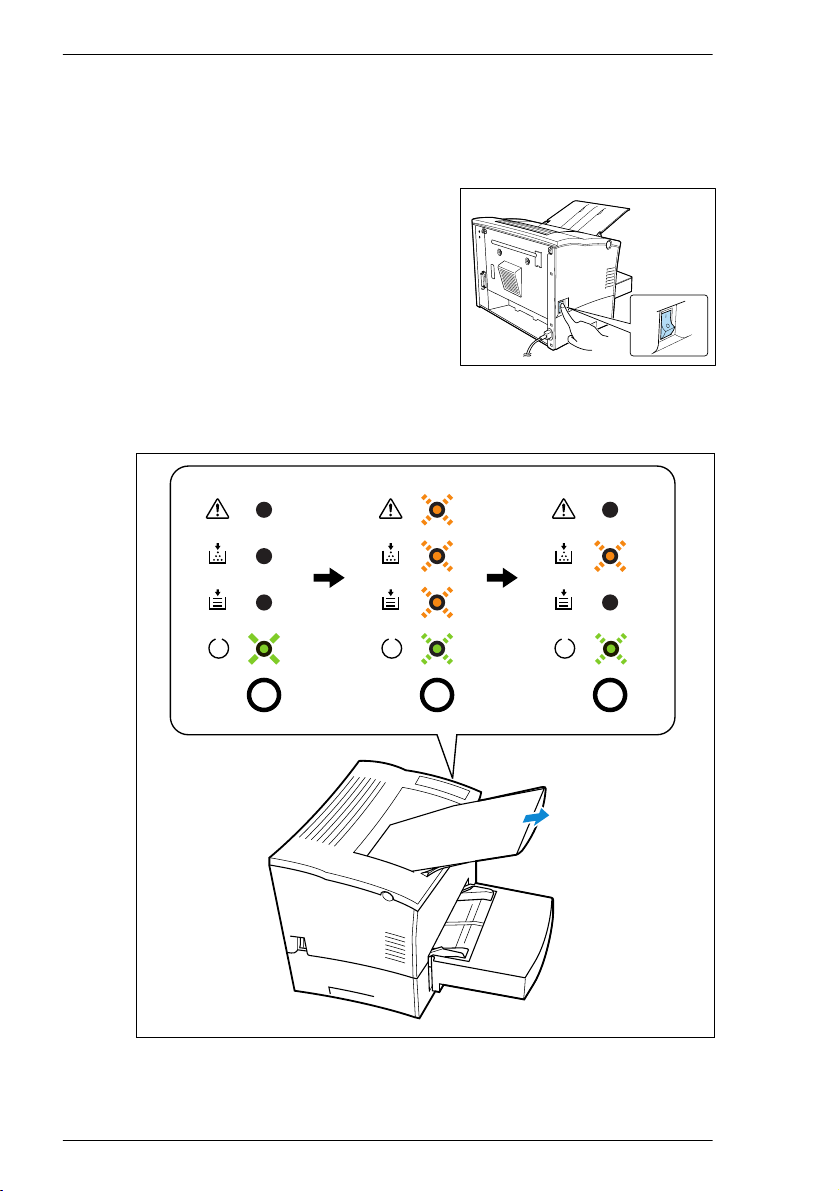
Printing a co n figu ration page
Print a configuration page in order to make sure that the printer is
functioning properly.
Switch on the p rinter.
1
The printer is rea dy for operation
after approximately 2 3 sec onds.
Hold down the [CONTROL BUTTON] for more than 15 seconds until
2
the “Toner empty” and “Ready” indicators flash as shown below.
2-14
After the control button is release d , the Configuratio n Page is printed.
Page 29
Unpacking, installing, and setting up the printer
.
Be well prepa red for technical queries.
Please have a cu rre nt configuration page available when calling for
technical assistance. Ma ke a note of the Se rial N o. of your printer on
the configuration page, see page 1-7 (laser safety label).
Connecting t he pr i n t e r to a com p ute r (parallel port)
Switch off the printer and the
1
computer.
Connect one end of the
2
interface ca bl e t o the p arallel
port of your
computer.
Connect the other end of the
3
interface ca bl e t o the p arallel
port of the pri nter.
Secure the connector by
4
means of the clips on t he s ocket.
2
For the technical speci fic at ions o f the cabl e , see page 10-5.
CAUTION
Using the wrong type of cable may result in damage to the
equipment!
Using the wrong t ype of cable may damage th e socket on the printer.
Ü Only use an IEEE 1284 type B shielded interface cable for connecting
the printer to your computer .
Ü MINOLTA-QMS does not warrant the use of any particular cable. The
user assumes all responsibility as to the quali ty and p erformance of
the cable.
Proceed wit h cha pt e r 3, “Installing the printe r driver.”
5
2-15
Page 30
2
Unpacking, installing, and setting up the printer
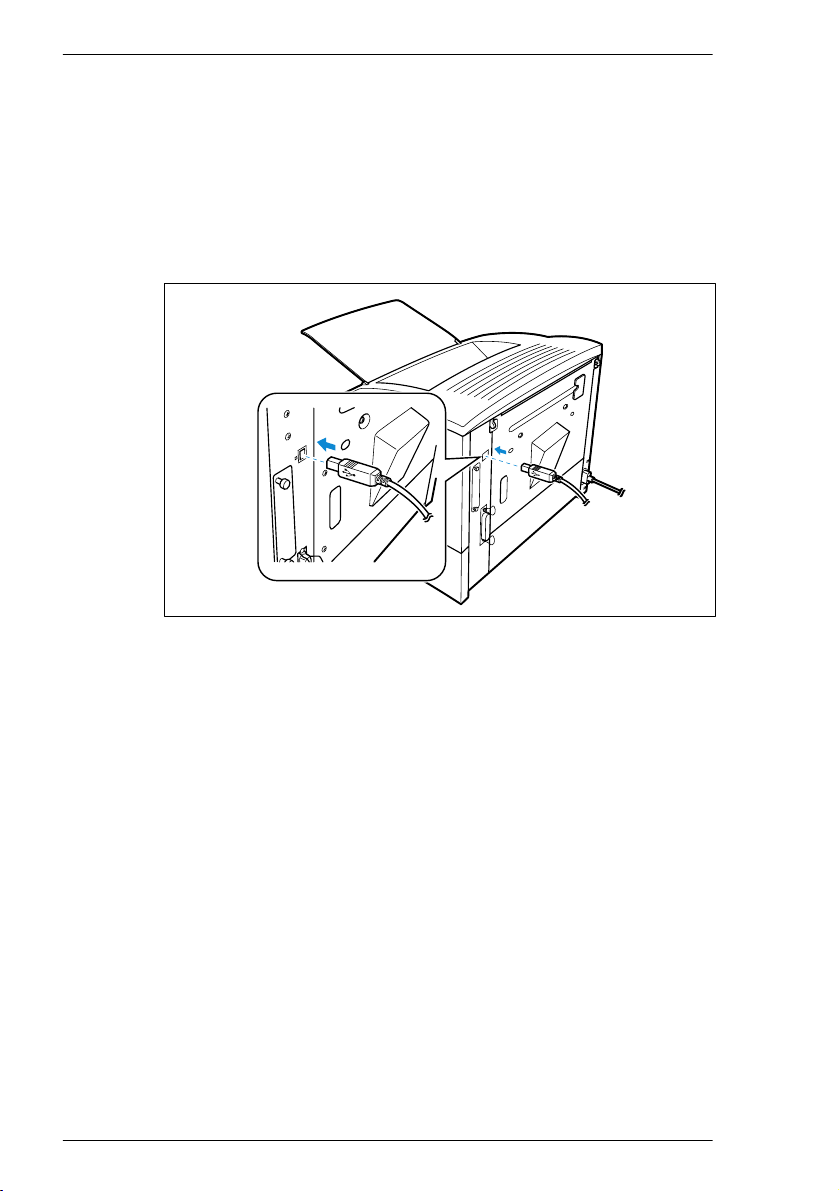
Connecting t he pr i n t e r to a com p u te r (USB port)
Switch on the c omputer and start Window s 98, Windows Me, or
1
Windows 2000.
Switch on the p rinter.
2
Connect one end of the inter face c a b l e to the USB port of the printer.
3
2-16
Connect the other end of the interface cable to the USB port of the
4
computer.
The Add New Hardware Wizard (Windows 98/Me) or Found new
5
Hardware Wizard (Win 2000) dialogue appears.
Insert the Software and Docu m en tat i o n CD - ROM supplied with your
6
printer into your computer’s CD-ROM drive in order to install the USB
device driver (see page 3-3).
Page 31

Installing the printer driver
3 Installing the printer driver
3.1 System requir eme nts
The following system require me n t s will en sure that your printer runs
without problems:
l Personal Computer: IBM-compatible PC with at least a Pentium
150 MHz CPU
l Opera ting Sy stem: Microsoft Window s95, Windows98,
Windows Me, Windows 2000,
or Windows NT4.0
l Memory: Windows 95/98/NT4.0: At least 16 MB of RAM
Windows Me: At least 32 MB of RAM
Windows 2000: At least 64 MB of RA
l Free disk space: Approximately 100 MB of av ailabl e me mory
l CD-ROM drive
l I/O inter fa ce: I E EE 1284/ECP/EPP/Bi -Di/compatible
USB (Available onl y when using Windows 98,
Windows Me or Windows 2000)
3
3.2 Notes on installing the printer driver
The installation program is designed so that even people not accustomed
to working with computers can easily accomplish it. You will be guided
step by step through the installation process. All you need to do is follow
the installation program.
Before you begin the in s talla t i on, you should obser ve the following points:
l What operating system is running on your computer?
l What is the letter of your CD-ROM drive (D, E, etc.)?
l Which optional accessories are fitted to your printer?
l Is your printer a local printer or a network printer?
m Local printer:
When the printer is connect ed directly to your computer via a
parallel or U SB interface ca ble.
m Network printer (option):
When the printer is integrated into a computer n etwork.
.
More questions?
If you are still not certain about making a setting, you can display
additional informa tion on screen by using the HELP button.
3-1
Page 32

3
Installing the printer driver
General inform ation on t he pr int er dr iver
The printer driver is supplied on a CD-ROM a lo n g with the printer. If your
computer has no CD-ROM drive, you can download the printer driver from
the Inte rne t.
You will find the latest version of the printer driver under the address
http://www.minolta-qms.com.
Informa tion usi ng Plug-and-Play or Add Printer Wizard
We recommend that you install the printer driver usin g the Software and
Documentation CD-ROM´s installer. If you install the printer driver using
Plug-and-Play or the Add P r inter Wizard, you should note these points:
l The Driv er directory on t he CD-ROM must be specified.
l The Stat us Display and Driver Help will not b e installed.
l The auxiliary program for deinstallation will not be installed. To use this
auxiliary progr a m, start the file “zuninst.exe” on the CD-ROM that is
supplied wit h your printer.
Informa tion on insta lling a netw or k printer
3-2
.
Local printer or network printer?
The printer can be equipped with an optional network card if required.
Contact your hardware supplier.
You can insta ll the printer a s a local printer or a s a network printer. You
should make note of the following points when i nstalling the printer as a
network printer:
l We recommend consulting your network administrator and referring to
the Network Interf ace Card User´s Manual on the Software and
Documentation CD-ROM.
l Server Ins tall is not available under th e following circumstances:
m When there is a Windows NT4.0 server and a Windows 2000 client
m When there is a Windows 2000 server and a Windows NT4.0 client
Page 33

Installing the printer driver
3.3 Installing the USB device driver
When connecting the PagePro 4110W printer to your computer with a
USB cable, you m us t first i ns ta l l the PagePro 41 10 W US B device driver
before you install t he pr inter d river.
.
Note
In the follow ing proce d ures it i s assumed that you install the PagePro
4110W USB dev ice driver on your computer for the first time.
This printer can only be connected with a USB cable if the computer is
running Win d ows 98, Windows Me, or Windows 2000.
Installin g the U S B dev ice driver for Windows 98
Switch on you r co mputer and start Windows 98.
1
Switch on the p rinter. Do not yet connect the USB cable.
2
Check that Windows 98 has finished loading and that the printer is
3
ready.
Insert the Software and Documentation CD-ROM supplied with your
4
printer into your computer’s CD-ROM drive.
3
When the installation screen appears, close it.
5
Connect the printer to th e computer with the USB cable
6
(see page 2-1 6) to dis play t h e A dd New Hardware W iz ard dialogue.
3-3
Page 34

3
Installing the printer driver
Click [NEXT] to displ ay th e next dialogue.
7
Check the “Search for the best driver for your device” box, and then
8
click [NEXT].
3-4
When the next dialogue appe ar s, che c k t he Specify a location box,
9
and then click [BROWSE...].
Page 35

Installing the printer driver
Browse the CD-ROM and specify the location of the USB Driver on the
10
CD-ROM Drive a s follows:
m “Drivers\Pp4110W\Win98\Gb\Gdi\Drv\usb”
When the following dialogue appears, click [NEXT].
11
3
When the following dialogue appears, click [FINISH] to complete the
12
installation.
3-5
Page 36

3
Installing the printer driver
After the USB devi ce drive r is installed, a “greetings” screen appears.
13
Although you m a y proceed with this screen now to install the printer
driver, we recommend that you exit and install the printer driver later
using th e CD - ROM instal ler .
Check that “Minolta/QMS PagePro 4110W” appears below Universal
14
serial bus controller on the Device Manager tab of the System
Properties dialogue.
3-6
How do I open the System Properties Dialogue?
?
Ü Click with the rig ht -hand mouse button on the [MY C OMPUTER]
icon on the desktop, and then click [PROPERTIES] in the shortcut
menu that appears.
Proceed with “Installing the printer driver using the Installer” on page
15
3-23.
Page 37

Installing the printer driver
Installin g the U S B dev i ce driver for Windows Me
Switch on your computer and start Windows Me.
1
Switch on the p rinter. Do not yet connect the USB cable.
2
Check that Windows Me has finished loading and th at the printer is
3
ready.
Insert the Software and Documentation CD-ROM supplied with your
4
printer into your computer’s CD-ROM drive.
When the installing screen appears, close it.
5
Connect the printer to th e computer with the USB cable
6
(see page 2-1 6) to dis play t h e A dd New Hardware W iz ard dialogue.
3
3-7
Page 38

3
Installing the printer driver
Check the “Search for the best driver for your device” box, and then
7
click [NEXT].
When the next dialogue appe ar s, che c k t he Specify a location box,
8
and then click [BROWSE...].
3-8
Page 39

Installing the printer driver
Browse the CD-ROM and navigate to
9
“Drivers\Pp4110 W\W in M e \ Gb\ G di\Drv\usb.” Th en click [OPEN].
When the following dialogue appears, click [NEXT].
10
3
When the following dialogue appears, click [FINISH] to complete the
11
installation.
3-9
Page 40

3
Installing the printer driver
The following dialogue appears. Although you may proceed with this
12
screen now to install the printer driver, we recommend that you exit
this and install the printer driver later u sin g the CD-ROM installer (see
page 3-23).
Check that “Minolta/QMS PagePro 4110W” appears below Universal
13
serial bus controller on the Device Manager tab of the System
Properties d ialogue.
3-10
Page 41

Installing the printer driver
How do Iopen the System Properties Dialogue
?
Ü Cl ick with the r ight- hand mouse button on the [MY COMPU TER]
icon on the desktop, and then click [PROPERTIES] in the shortcut
menu that appears.
Proceed with “Insta ll ing the printer drive r usin g t he I ns t aller” on page
14
3-23.
Installing the USB Device Driver for Windows 2000
Switch on your computer and st art Windows 2000.
1
Switch on the p rinter. Do not yet connect the USB cable.
2
Check that Windows 2000 has finished loading and that the printer is
3
ready.
Insert the Software and Documentation CD-ROM supplied with your
4
printer into your computer’s CD-ROM drive.
When the installation screen appears, close it.
5
Connect the printer to th e computer with the USB cable
6
(see page 2-16) to display the Found New Hardware Wizard dialogue.
3
Click [NEXT] to display the next dialogue.
7
3-11
Page 42

3
Installing the printer driver
Check the “Search for a suitable driver for my device ” box , and then
8
click [NEXT].
When the foll owin g dialog u e app e ars , check t he Specify a location
9
box, and then click [NE XT ].
3-12
Page 43

Installing the printer driver
When the following dialogue appears, click [BROWSE..].
10
Browse the CD-ROM and navigate to
11
“Drivers\Pp4110W\Win2000\Gb\Gdi\Drv\usb.” Then click [OPEN].
When the following dialogue appears, click [OK]
12
3
3-13
Page 44

3
Installing the printer driver
When the following dialog ue a ppears, check the “Disable the device.
13
The Add/Rem ove Hard war e Wizard in the Control Panel can be used
complete the driv er i nstallation.” box, and then click [FINI SH] .
3-14
Page 45

Installing the printer driver
Open the “System Properties” dialogue . Then click the [DEVICE
14
MANAGER] button on the “Hardware” tab
How do I open the System Properties dialogue
?
Ü Cl ick with the r ight- hand mouse button on the [MY COMPU TER]
icon on the desktop, and then click [PROPERTIES].
3
3-15
Page 46

3
Installing the printer driver
When the following dialogue appears, double-click the “USB Printing
15
Support” below “Universal Serial Bus controllers.”
When the following dialogue appears, click the [UPDATE DRIVER]
16
button on the “Driver” tab.
3-16
Page 47

Installing the printer driver
When the following dialogue appears, click [NEXT] to display the next
17
dialogue.
Check the “Search f o r a su itable driver for my dev ice ” box, and then
18
click [NEXT].
3
3-17
Page 48

3
Installing the printer driver
When the following dialog ue a ppears, check the “Specify a location”
19
box, and then click [NE XT ].
When the following dialogue appears, click [BROWSE..].
20
3-18
Browse to the CD-ROM and navigate to: “Drivers\Pp4110W\Win2000\
21
Gb\Gdi\Drv\ us b .” Th en c lick [OPEN].
Page 49

Installing the printer driver
When the following dialogue appears, click [OK].
22
When the following dialogue appears, click [NEXT].
23
3
3-19
Page 50

3
Installing the printer driver
When the following dialog ue ap pears, click [FINISH ] to fin is h the
24
installation.
A Printer driver installation dialogue appears. Although you may
25
proceed with t his screen now to inst all the pri n te r driver, we
recommend t hat y o u exit this and install the printe r driver later using
the CD-ROM installer (see pag e 3-23).
3-20
When the following dialogue appears, click [CLOSE] on the “Driver”
26
tab.
Page 51

Installing the printer driver
Restart the computer.
27
After the Co mpu ter is restarted, open the “System Properties”
28
dialogue. Then click the [DEVICE MANAGER] button on the
“Hardware” tab.
3
How do I open the System Properties dialogue
?
Ü Cl ick with the r ight- hand mouse button on the [MY COMPU TER]
icon on the desktop, and then click [PROPERTIES].
3-21
Page 52

3
Installing the printer driver
When the follo wing d ialogue appears , check t hat “Minolta/QMS
29
PagePro 41 10W” appears below “Univ ersal Serial Bus controllers.”
Proceed with “Installing the printer driver using the Installer” on page
30
3-23.
3-22
Page 53

Installing the printer driver
3.4 Installing the printer driver using the Installer
Make certain th at th e printer is connected to you r com pu t er locally or
1
through a network.
Switch on the p rinter.
2
Switch on the c om p u t er an d start W indows95 , Windows98,
3
Windows Me, Wind ows2000, or Windows NT4.0.
Who do I do when the Update Device Driver Wizard or Add new
?
Hardware Wizard dialog appears:
Ü Click “Cancel” to close the dialog.
Place the PagePro 4110W Software and Docu mentation CD-ROM
4
into the CD-ROM dr ive o f your co mputer.
The installation pr ogram start s automa tically.
The installation program does not start automatically?
?
Ü Start Windows Explorer and open the directory of the CD-ROM.
Ü Double- cl ick on “MINOLTA-QMS. EXE” to start the inst a llation
program.
3
In the next dialo g window, choose a language for the installation
5
procedure.
3-23
Page 54

3
Installing the printer driver
Follow the instru ction s on the screen to comple t e the installation.
6
During the installat i on a scree n will appea r w h ere you may select the
7
port. When you have installed the PagePro 4110W USB device driver,
select [U SB/PAGEPRO 4110 ]. For th e paral l el po rt, select [LPT 1].
After the printer driver has been installed, the “Minolta/QMS Printer
Utilities” Program Group appears.
3-24
You can now a ccess the “Minolta/QMS Printer Utilities” Progra m Group
via the Window s Start menu.
Page 55

Installing the printer driver
3.5 Registering the Status Display
The Status Display provides you with useful information about the current
status of the pr inte r.
The Status Display is installed automatically when the printer driver is
installed us ing the CD-ROM´s Installer.
Optional registration in the StartUp directory of Windows 95, Windows 98,
Windows NT4.0, or Windows 2000 allow s th e S tatus Display to reside on
your desktop automatically after PC restart. Clicking [EXIT] from the “File”
menu in the “Status Display” will cl o s e this program.
Follow the instructions provided for registering the Stat u s Display
according to your operating environment. For further details, please refer
to the docume ntat i on t h at c ame with your version of Windows.
.
Note
The Status Dis pl a y allows you to mon itor the opera ting status of the
printer only when the printer is locally (directly) connected to the host
computer via a paralle l or USB interface cable.
Registering the Status Display for Windows 95/98/NT4.0
3
.
Note
The screen i m ages s h ow n in this sec ti on a r e e x a m pl es of the Status
Display regi strati o n for Windows 95. The screen images may appear
differently fo r Windows 98 and Windows NT4.0.
3-25
Page 56

3
Installing the printer driver
Click [START] point to [SET T INGS], and then click [TA SKBAR...].
1
The “Taskbar P rop erti es” dialogue appears.
Click on the “Start Me n u P rop erties” tab. Then click [ADD...]
2
The “Create Shortcut” dialogue is opened.
3-26
Click the [BROWSE...] button and navigate to
3
“C:\Windows\ zstpw 18w.exe” (in this examp le w e a ss ume tha t the file
is installed for C:\Windows). Then click [OPEN].
Click [NEXT] in t h e “Crea te Sh ortcut” dialogue.
4
Page 57

Installing the printer driver
The “Select Prog r am Folde r ” dialogue opens.
Select the “StartUp” folder, and then click [NE XT ].
5
The “Select a Title for the Prog ram” dialogue appears.
3
Enter a name for the shortcut to the Status Display. Then click
6
[FINISH].
Click [OK] in the “Taskbar Properties“.
7
Restart the computer.
8
3-27
Page 58

3
Installing the printer driver
Make sure that the “Minolta/QMS P ageP ro 4110W Status Display”
9
window appears on your desktop and that the Status display icon
appears on the taskbar.
3-28
Page 59

Installing the printer driver
Registering the Status Display for Windows 2000/Me
Click [START] point to [SETTINGS], and then click [TASKBAR &
1
START MENU...].
The “Taskbar & St ar t Menu Prop e r ties” dialogue appears.
3
Click on the “Advanc ed” tab. Then click [ADD...]
2
The “Create Sh ort cut” dialogue is opened.
Click the [BROWSE...] button and navigate to
3
“C:\Windows\ zstpw 1 8w. e xe” (i n this e x a m p le w e a ss ume tha t the file
is installed for C:\Windows). Then click [OK].
3-29
Page 60

3
Installing the printer driver
Click [NEXT] in t h e “Crea te Sh ortcut” dialogue.
4
The “Select Prog r am Folde r ” dialogue opens.
Select the “StartUp” folder, and then click [NEXT].
5
The “Select a Title for the Prog ram” dialogue appears.
3-30
Enter a name for the shortcut to the Status Display. Then click
6
[FINISH].
Click [OK] in the “ Taskba r a nd Sta rt Menu Properties“.
7
Restart the computer.
8
Page 61

Installing the printer driver
Make sure that the “Minolta/QMS Page P ro 4110W Status Display”
9
window appears on your des kto p and that t he Status display icon
appears on the taskbar.
3
3-31
Page 62

3
3.6 Uninstalling the Printer Driver
Click on the “Minolta_Q MS Print er Utilities ” Program Group .
1
Click on “Uninstall.”
2
The deinstallation program starts automatically.
Follow the subse q uent i nstr uctions.
3
The deinstallation of the printer driver is successfully completed once
the Windows operating system has been restarted.
.
Note
The USB d ev i ce driver is uninstalle d au t om at ica lly with the printer
driver.
Installing the printer driver
3-32
Page 63

Working with t he Windows printer drivers
4 Working with the Windows printer
drivers
4.1 Displaying printer driver settings
Displaying se tti ngs in Win dow s 95 /98/Me
In the START menu, select “Settings – Printer.”
1
The “Printers” dialogue box app ears.
Click on the “Minolt a/QMS PagePro 4110W” icon.
2
Under “File” select the item “Properties.”
3
The followin g box appears.
4
4-1
Page 64

4
Working with t he Windows printer drivers
Click on the “-> 32-bit SuperDriver Setup” tab.
4
The printer driver dialogue box appears.
.
The operati ng sy st e m also use s index cards!
The “About” index card is automatically determined by the operating
system and is ther e fore n ot de scribed in this manual.
4-2
Page 65

Working with t he Windows printer drivers
Displaying se tti ngs i n Win d ows N T 4.0 / Windows 2000
In the START menu, select “Settings – Printer.”
1
The “Printers” dialogue box app ears.
Click on the “Minolt a/QMS PagePro 4110W” icon.
2
4
Windows NT4.0:
3
Windows 2000:
The followin g box appears.
Under “File” select the item “ D oc ument Defaults.”
Under “File” select the item “Printing Preferences.”
4-3
Page 66

4
4.2 Paper index card
This index card allows you to:
l select the paper format
l specify the n umb e r of copies
l specify the orientation of the paper
l switch on/off the printer’s sorting function
l specify pa p er feed fro m different trays
l recall the original settings (Default)
Working with t he Windows printer drivers
4-4
Page 67

Working with t he Windows printer drivers
Selecting a paper format
Use “Paper s iz e ” to specify the format of the print e d p ag e. The various
paper sizes s upp o rte d by your printe r are shown in the dropdown list:
Paper Size Envelopes Size
Letter
Legal
Invoice
Executive
A4
A5
JIS B5
J-Post
8.5 x 11 in.
8.5 × 14 in.
5.5 x 8.5 in.
7.5 × 10. 5in.
21 0 ×29 7mm
14 8 ×2 10mm
18 2 x25 7mm
100 x 148 mm
.
Not all paper formats are available?
If you have selected the optional paper feed tray 2 or 3 under “Paper
source,” then not all the paper formats given in the tab le are available.
Env. Monarch
Env. COM10
Env. DL
Env. C5
Env. B5
4.125 ×9. 5in.
110×220mm
4
3.875 ×7. 5in.
162x229mm
176×250mm
Specifying the number of copies
In the “Cop ies ” box , spec i fy th e number of copies that you want to print.
You may ente r a ny value between 1 and 999.
Specifying the orientation of the print paper
Under “Orientation” you can specify whether your document should be
printed in portrait (vertical) or landscape (hori z onta l) format.
Portrait
Landscape
A
A
4-5
Page 68

4
Working with t he Windows printer drivers
Switching on/off the printer’s sorting function
Switch on t he “C o ll a t e” function in order to sort your printouts
automatically.
Collate OFF
1
1
1
3
2
1
2
2
3
2
2
Collate ON
1
3
3
3
3
2
1
.
Deactivate the sort feature in othe r appl ications!
Deactivate the sort feature in other software applications if there is a
conflict betw e en the setting in the printer d river an d the setting in the
other appl ication.
4-6
Page 69

Working with t he Windows printer drivers
Specifying the paper source
Under “Paper source” y ou can spec ify from which tra y the printer be fed.
Paper so urce Description
Auto Printing paper is fed from all available trays
Tray 1 Printing paper is fed from tray 1
Tray 2/3* Printing paper is fed from tray 2/3
Manual feed Printing paper is fed into the printer through the manual
feed unit.
To feed paper manually, place a sheet in the input and
press the control button.
* optional paper source units
.
Optional pape r s our c es not available?
If the desired tray is an option, make sure that it has been added in the
“Device Option” ta b.
To specify a first page from a separate tray, check the “Different paper for
1st page” box and select the desired tray from the “1st Page” dropdown
list.
4
Recalling the original settings [DEFAULT]
Click on [DEFAULT] in order to reset all options on this index card to their
original fact ory settings.
4-7
Page 70

4
4.3 Page layout index card
This index card allows you to:
l print several pages of a document on the same print page
l provide printouts with a watermark
l design cus t om wa t e r marks
l scale (enlarge/reduce) documents upon printout
l activate the duplex function (printing on both sides)
l recall the original settings (Default)
Working with t he Windows printer drivers
4-8
Page 71

Working with t he Windows printer drivers
Printing multi ple document pag e s per pr int p a ge (N-up)
Use the “N-Up” function to pr int mu ltip l e red u ced document pages on a
single print page.
The “N-up” functi on c a n n ot be u sed at the same time a s the features
“Scaling” an d “Boo k let.”
Click on the drop- dow n l ist to v iew the follo w i ng N-up set tings:
N-Up settings Description
Off One document page will be printed on each print page
2-up Two document pages will be pr in ted on each print page
4-up Four document pages will be printed on each print page
9-up Nine document pages will be printed on each print page
16-up 16 document pa ges will be printed on each print page
Ü Activate the “ B order line” che c k b o x to s epa rate individual document
pages from each other by mean s of lines.
Ü Click on [DETAIL OF N-UP...] to define the layout of document pages
on the print page.
The “N-Up ” di alogue bo x appears.
4
.
Note
Before printing with a n N-up setting, m a ke s ure that th e document´s
printing orientation has been correctly aligned.
4-9
Page 72

4
Working with t he Windows printer drivers
Printing watermarks
Use the “Watermark” function to print background texts on your pages that
will inform the reader at a glance about the nature of your document.
Ü Selec t a predefin ed wa termark f rom the dropdown list.
Ü Activate the checkbox “First page only” so that the watermark will only
be printed on the first page of a multi -page document.
.
Watermark s a s cop y protection!
Provide your printouts with a watermark in order to prevent the printed
pages from being copied.
4-10
Page 73

Working with t he Windows printer drivers
Custom watermarks
Design your own personal wate rmark.
Click on [EDIT WAT ER MA R K...] in order to open the “Watermark”
1
dialogue box.
Click on [ADD] to create a new watermark,
2
or
click on a predefined watermark to modify it.
The fields under “Watermark edit” are activated.
4
Design your watermark by changing the settings.
3
In the pre vie w box y o u ca n se e how the waterma rk will appear when
it is printed and where it is positioned on the page.
Confirm your en tries with [OK].
4
The dialogue box closes.
.
Deleting water marks?
If you would like to delete a watermark, mark it in the list of watermarks
and click on [DELETE].
4-11
Page 74

4
Working with t he Windows printer drivers
Scaling the printed document
The printout of a document may be en larged or reduced by means of the
“Scaling” function.
The “Scaling” f unct ion cannot be u sed a t th e same time as the “N-up” or
“Booklet” functions.
Ü I n the “Scaling” box, enter t he v alue – in per cent ( % ) – by w h ich the
document is to be enlarged or reduced (max. reduction: 50%; max.
enlargement: 200%).
Duplex/Booklet function
The Duplex/Booklet function allows you to automatically print on both
sides of the paper.
A dropdown list offers you the following options:
l Short edge binding,
l Long edge binding,
l Booklet Left Binding: for printing a document which is folded once in
the middle and bound on the right-hand side,
l Booklet Right Binding: for printing a doc ument which is folded once in
the middle and bound on the left-hand side.
4-12
.
The Bookl et f unction is not available?
The Scalin g and N-up f u nct i o ns cannot be use d at the same time as
the Booklet function.
Page 75

Working with t he Windows printer drivers
4.4 Image index card
This index card allows you to:
l optimize the printout of documents t h at wil l be sent via fax
(Colors to Patterns),
l Enhance t he contrast,
l spec ify the resolution for the pr intout,
l optimize the printing of graphics [DETAIL ...]
l recall the orig inal settin g s (Default).
4
4-13
Page 76

4
Working with t he Windows printer drivers
Optimizing the printout of fax documents (Colors to Patterns)
Use the “Col ors to Patterns” setting to optimize t he printou t of documents
which w ill be sen t via fax.
Enhance Contrast
Use the “Enhanc e C on t rast” setting to e n hance the definition between
dark and light.
Determining the re sol ution
The quality of the printout is defined by means of the “Resolution” function.
Ü Selec t “600 x 600dpi” for normal printouts ( f or example, for text and
graphics wit h thick line elements).
Ü Sele c t “1200 x 600dpi” for printou ts which re quir e a hig h print quality,
(for example, for tex t and graphics with fine lin e elements).
Ü Select “1200x 1200 dpi” for printouts which require a very high print
quality (for example, hi gh- reso l ution graphics).
4-14
Page 77

Working with t he Windows printer drivers
Optimizing the presentation of graphics in the printout (Detail ...)
The Graphics dialogue window is called up via the [DETAIL ...] button.
This window contains further op tio n s fo r opti mizing the appearance of
graphics in the printout.
Click, hold and move the slider controls to alte r the contrast, brightness,
and sharpne ss of graphics.
Value chang e s are reflected in t h e view window a s you make them.
4
4-15
Page 78

4
4.5 Advanced index card
This index card allows you to:
l speed up printing copies when the “Transmit Once” option is enabled
Transmit Once
When this option is enabled, the document is tr ansmitted to the printer
once. Howev er, it stays in the printer´s memo ry and can be reprinted as
many times a s requested.
Working with t he Windows printer drivers
4-16
.
Only one copy is printed?
The document is too large to fit in the memory. Print the do cument
without usi ng the “Transmit O nce” option.
Page 79

Working with t he Windows printer drivers
4.6 Device option index card
This index card allows you to:
l activate the optional duplex unit
l activate optional paper feed tray 2 and/or 3
Activating the o ption al du plex unit
If you have installed the duplex unit, then you can mark this in the list of
available options.
Ü Activate the duplex unit with the [ADD] button.
Ü Deactivate the duplex unit with the [REMOVE] button.
4
Activating optional paper feed tray 2 or 3
If you have installed paper feed tr a y 2 or 3, th en yo u ca n mark this in the
list of available options.
Ü Activate pap er feed tray 2 or 3 with the [ADD] button.
Ü Deactivate paper fee d tra y 2 or 3 with the [REMOVE] button.
4-17
Page 80

4
Working with t he Windows printer drivers
4-18
Page 81

Working with the Status Display
5 Working with the Status Display
The Status Dis pl a y di s plays information about the current status of the
local printer.
.
Automatic start up of Statu s Display!
If, when you install e d the printer driver, you ac tiv ated t he option to
automaticall y start the p rinter dr iv e r, t hen the Status D isplay is
automatically called u p each time the com put er is started.
Optional reg is trat i on in t he StartUp director y of Wind o w s allo ws the
Status Display to res id e o n your deskto p automatically
(see page 3-25).
5
5-1
Page 82

5
5.1 Calling up the Status Display
.
Note
The screen images shown in this section are examples of the Status
Display oper at ing for Windows 95. Th e screen ima ges may appear
differently fo r Windows 98, W indo w s M e, Windows 2000, and
Windows NT 4.0.
Open the “Minolta-QMS PageP ro 4100” Program Group.
1
Click on “Minolta-QMS PagePr o 41 1 0W S tatus.”
2
The Status Dis pl a y appears.
Working with the Status Display
5-2
Page 83

Working with the Status Display
Altering t he si z e of t h e S tat u s Display window
Ü In the Status Display menu bar, select the “Display” menu and then the
option “Status (Reduce)” in order to decrease the size of the window.
Ü In the Status Display menu bar, select the “Display” menu and then the
“Status (Expand)” option in order to increase the size of the window.
5
5.2 Understanding Status Display Messages
The Status Display shows the fo llo win g t ypes of messages:
Printer Status:
l
How to recover:
l
from er r o r co nd itions.
Warni ng S tat us:
l
Printer Status Figure:
l
Printin g Status :
l
mane of the Job, and “Page Number” shows the number of the page
that is curren tly pr inting.
Current operat ional status of the printer.
Explanations of how to correct problems and recover
Warning messages such as “ l o w toner.”
Graphic representation of the printer.
Status of an ongoing print job. “Job Name” shows the
5-3
Page 84

5
5.3 Controlling PopUp Messages
Ü In the S t atu s Dis pla y m enu b ar , sel ect t he “File” menu and then the
“Select Pop up Messag e.. . ” option.
The “Select P opup Message” box appears.
This box shows the error condition s that cause popup error messages to
appear if activated:
l Inactivate Po pup : P opup erro r mes sa ge s which are not activated
l Activate Popup: P opup error m ess a g es w hich are activated
To activate a popup error message
Ü Cl ick on the message in the “Inactivate Popup” li st, then click on
[ADD>>].
The message is m o ved to the “Act iva t e Popup ” list.
Working with the Status Display
5-4
To inactivate a popup e rror message
Ü Cl ick on the message in the “ Ac tivate Popup” list, then click on
[<<DELETE].
The message is m o ved to the “In activ a t e Popup” list.
Page 85

Working with the Status Display
5.4 Displaying Printer Info rmation
Ü In the Status Display menu bar, select the “Display” menu and then the
“Printer information...” option.
The “Printer Inform at ion” box appears.
This box s hows t he c ur ren t printer c onf iguration:
Page Count:
l
printer
Tray 2:
l
Tray 3:
l
Duplex:
l
NIC Option:
l
Printer Memory:
l
Total numbe r o f pag es that have been pr i n t ed by the
Paper feed tray 2 installed or not installed
Paper feed tray 3 installed or not installed
Duplex unit installed or not installed
Network interface card installed or not installed
Available memory capacity
5
5.5 Closing the Status Display
Ü In the Statu s Dis pl a y men u b ar, se l ect the “Fi le” menu and then the
“Exit” comman d in orde r to close the Status Display.
5-5
Page 86

5
Working with the Status Display
5-6
Page 87

Working with the printer
6 Working with the printer
6.1 Please note the following p oints
What should I watch o ut fo r when l oad i n g paper?
To avoid paper misfeeds in the laser printer, please observe the following
points:
l Do not u s e any paper with the follow ing f eat ures:
m Paper that has already been used in a thermal or ink-jet printer.
m Paper that is too thin or too thick.
m Folded or wavy paper.
m Paper having b indin g hole s or perforations.
m Paper with a surfa c e that is too smooth, too r ou gh, or irregular.
m Specially coated paper such as carbon paper or paper with an
adhesive surface.
m Paper that is not cut at right angles.
m Paper that is held toget h er by glue, adhe siv e, or clips.
m Paper with labels that detach easily.
m Wa rped or curled-up pos tcards.
l Please note that the stack of paper in the paper tray should not exceed
the “max.” mark.
6
.
Note
When paper is loaded, the orientation is based on the format marks in
the paper source units.
What should I watch o ut fo r when l oad i n g envelopes?
To avoid env elo pe misfeed s in the lase r printer, please observe the
following p oints:
l Do not use self-adhesive envelopes or those with a tear-off strip,
closures, or a window.
l Place the envelopes in the tray long edge first.
l Place the envelopes in the tray with the flap down so that the upper
surface of the envelopes is lying against the side of the tray with the
feed ro ll er.
6-1
Page 88

6
Working with the printer
l Load envelopes of format B5 with the flap facing down and pointing to
the rear of the tray.
l Make ce rt a in that the flaps are neatly folded back.
.
Test envelopes b e f o re buying large quantities!
Some types o f envelopes cr ease e asi l y when t hey are run through a
printer. Test a type of envelope before purchasing large quantities.
6-2
Page 89

Working with the printer
Which sizes of paper can I use?
This printer is designed for use with the sizes of paper listed below.
Paper size
Standard sizes
A4
210 × 2 97mm
A5
148 × 2 10mm
JIS B5
18 2 × 257mm
Letter
8-1/2 in. × 11 in.
Legal
8-1/2 in. x 14 in.
Executive
7-1/2 in x 10-1/2 in.
Envelopes, postcard and custom sizes
Envelope DL
110 × 220mm
Envelope C5
162 × 250mm
Envelope B5
176 × 250mm
Envelope COM10
4-1/8 in. x 9-1/2 in.
Envelope Monarch
3-7/8 in. x 7-1/2 in.
J-Post (Postcard)
4 in. x 5-3/4 in.
Custom Size
3-3/8 in. to 8-1/2 in. × 3-1/2 in
to 14 in.
86 to 216mm × 9 0 to356mm
Paper source
Tray 1 Tray 2/3*
Yes Yes Yes
Yes No Yes
Yes Yes Yes
Yes Yes*
Yes Yes Yes
Yes Yes Yes
Yes No Yes
Yes No Yes
Yes No Yes
Yes No Yes
Yes No Yes
Yes No Yes
Yes No Yes
(option)
2
1
Manual paper
feed unit
Yes
6
6-3
Page 90

6
Working with the printer
What types of paper ca n I use?
This printer is d e signed for use with the types of paper listed below.
Paper source
Paper media
standard media:
Plain paper
weight: 16 to 24 lbs. / 60 to 90g/m
Recycled paper
weight: 16 to 24 lbs. / 60 to 90g/m
special media:
Transparent film Yes No Yes
Labels Yes No Yes
Letterhead Yes No Yes
Envelopes Yes No Yes
Postcard s Yes No Yes
Card or thick paper
24 to 43-1/4 lbs. / 9 0 to 163g/m
Tray 1 Tray 2/3
Yes Yes Yes
2
Yes Yes Yes
2
Yes No Yes
2
(option)
Manual paper
feed unit
.
6-4
Note
Special media is not supported for duplex pr i nting.
Printable are a
0,16 in. / 4mm0,16 in. / 4mm
0,16 in. / 4mm
Printable area
0,16 in. / 4mm
Page 91

Working with the printer
6.2 Using the con tr o l button
The control panel has four indicators and one button.
No. Des cription No. Description
1 Fault (orange) 3 Paper empty (orange)
2 Toner empty (orange) 4 Ready (green)
5 Control button
6
1
2
3
4
5
The control button allows you to:
l print out the configuration page
l continue a print job after an e rror message
6-5
Page 92

6
Working with the printer
Printing the co nfi gurat i on page
Print out the configuration page in order to check the configuration of your
printer.
Make sure that:
1
m The “Fault” and “Paper” indicators are not on
m T he “Ready” indicator is o n constantly
Hold down the [CONTROL BUTTON] for more than 15 seconds until
2
the “Toner empty” and “Ready” indicators flash as shown below.
6-6
After the control button is release d , the Configuratio n Page is printed.
Page 93

Working with the printer
Continuing a pr i n t job after a n err o r message
Continue the print job after the following error messages:
4 When the print job is too complex and the memory capacity of the
printer is inadequate
4 When there is no more paper in the f e ed trays
4 When paper of a different format to that set in the printer driver was fed
into the printer
Make sure that one of the abov e errors h as occurred.
1
Press the control button in order to operate the page feed.
2
The print job continues.
.
Check the printout!
If you have continued a print job after an error message, then check
the printout. Often not all pages required are printed.
6
6-7
Page 94

6
6.3 Loadi ng paper
Loading paper into paper feed tray 1
Paper feed tray 1 has a capacity of 15 0 sheets of plain papier.
Please not e the fol l owin g points:
4 Refill the tray only when it is completely empty.
4 Refer to the advice on loading paper.
Remove the cover of paper feed
1
tray 1.
Using a large paper format?
?
Ü Then extend the paper support.
Working with the printer
6-8
Place the paper between the paper
2
guides. Slide the guid es up to the
stack of paper.
How many sheets may I place
?
in the c a ssette?
Ü The stac k of paper should not
exceed th e “ma x.”mark.
Place the cover on top of paper feed
3
tray 1.
Page 95

Working with the printer
Loading paper into the manual feed unit
When using the manual feed unit, sheets and envelopes must be fed in
one at a time.
Make sure that the cover of paper
1
feed tray 1 is fitted properly.
Slide the gu i d es outwards as far as
2
they will go.
Place the paper between the guides
3
with the side to be printed facing
upwards.
How are envelopes fed in?
?
Ü Envelopes are loaded long edge
first and with the flap down.
6
Slide the guides toward the paper.
4
6-9
Page 96

6
Working with the printer
Loading paper into paper feed tray 2/3
Paper feed tray 2/3 h as a capacity of 500 sheets of plain papier.
Please not e the fol l owin g points:
4 Pa per feed tra ys 2/3 can only be used for A4, JIS B5, Legal, Letter,
and Executi ve f o r mats. Optio n a l cassettes are availa ble for each
format.
4 Paper can only be loaded lengthwise in paper feed trays 2 and 3.
4 Do not refill the cassette while paper is being fed from paper feed
tray 2 or 3.
4 Refer to the advice on loading paper (see page 6-8).
Pull the cas sette o ut of paper feed
1
tray 2 or 3 until you feel resistance.
Then lift the fro nt of the cassette
slightly before continuing to
withdraw the cassette completely.
Paper feed
tray 2
6-10
Remove the cassette cover.
2
Paper feed
tray 3
Page 97

Working with the printer
Press down the paper lifting plate
3
until it locks.
Place the paper in the cassette.
4
How many sheets may I place
?
in the cassette?
Ü The sta c k of paper should not
exceed the “ma x.”mark.
6
Plac e th e casset te cover.
5
Slide the cassette back into paper
6
feed tray 2 or 3.
Paper feed tray 2
Paper feed tray 3
6-11
Page 98

6
Working with the printer
6.4 Monitoring print jobs with the Status Display
The Status Dis pl ay all o ws you to monitor the printer and the progress of
current print jobs.
l When the background of the printer graphic is green, the printer is in
Stand-by mode or a print job is printing normally.
l When the background of the printer graphic is red, there is an error,
and the print job has been interrupted. The status of the printer and the
error message are shown in the dialogue boxes on the left.
6-12
Page 99

Installing optiona l accessories
7 Installing optional accessorie
The optional accessories i n clude:
l Paper fee d trays 2 and 3 (each 500 sheets)
l Duplex unit
l SDRAM-DIMM memory expansion module
l Network card
7.1 Installing paper feed trays 2 and 3
The installation of paper feed trays 2 and 3 is identical. The figures below
show the installation of tray 2.
Take the par ts out of the box and remove the plastic packaging.
1
Remove all pack ag in g materi a ls and adhesive tape.
2
Remove the plastic pad f ro m the f eed tray.
3
7
Switch the printer OFF and also disconnect the power cable and the
4
interface cable from the printer.
Mount the printer on the paper feed tray so that the locating pins of the
5
feed tray e nage with the holes in the printer.
7-1
Page 100

7
Installing optiona l accessories
Fill the cassette with paper (see page 6-8).
6
How many sheets may I place in the cassette?
?
Ü T h e stack of paper should not exceed the " max."mark.
Place the cassette cover.
7
Slide the cassette back into the feed tray.
8
7-2
Connect the power cable to the printer (page 2-12), and switch on the
9
printer (see page 2-13).
Connect the printer to t h e computer (see page 2-15), switch on the
10
computer, and st a rt up Windows.
Display the “Printer I nfo rmat io n" box in th e Sta tus Display (see page
11
5-2).
 Loading...