

Milwaukee 2386 Operator's Manual
OPERATOR'S MANUAL
MANUEL de L'UTILISATEUR
MANUAL del OPERADOR
Cat. No.
No de Cat.
2386 Series
TO REDUCE THE RISK OF INJURY, USER MUST READ AND UNDERSTAND OPERATOR'S
MANUAL.
AFIN DE RÉDUIRE LE RISQUE DE BLESSURES, L'UTILISATEUR DOIT LIRE ET BIEN
COMPRENDRE LE MANUEL DE L'UTILISATEUR.
PARA REDUCIR EL RIESGO DE LESIONES, EL USUARIO DEBE LEER Y ENTENDER EL
MANUAL DEL OPERADOR.
M12™ HEATED MULTI-ZONE 3-in-1 JACKET AND M12™ USB BATTERY CONTROLLER
2
3
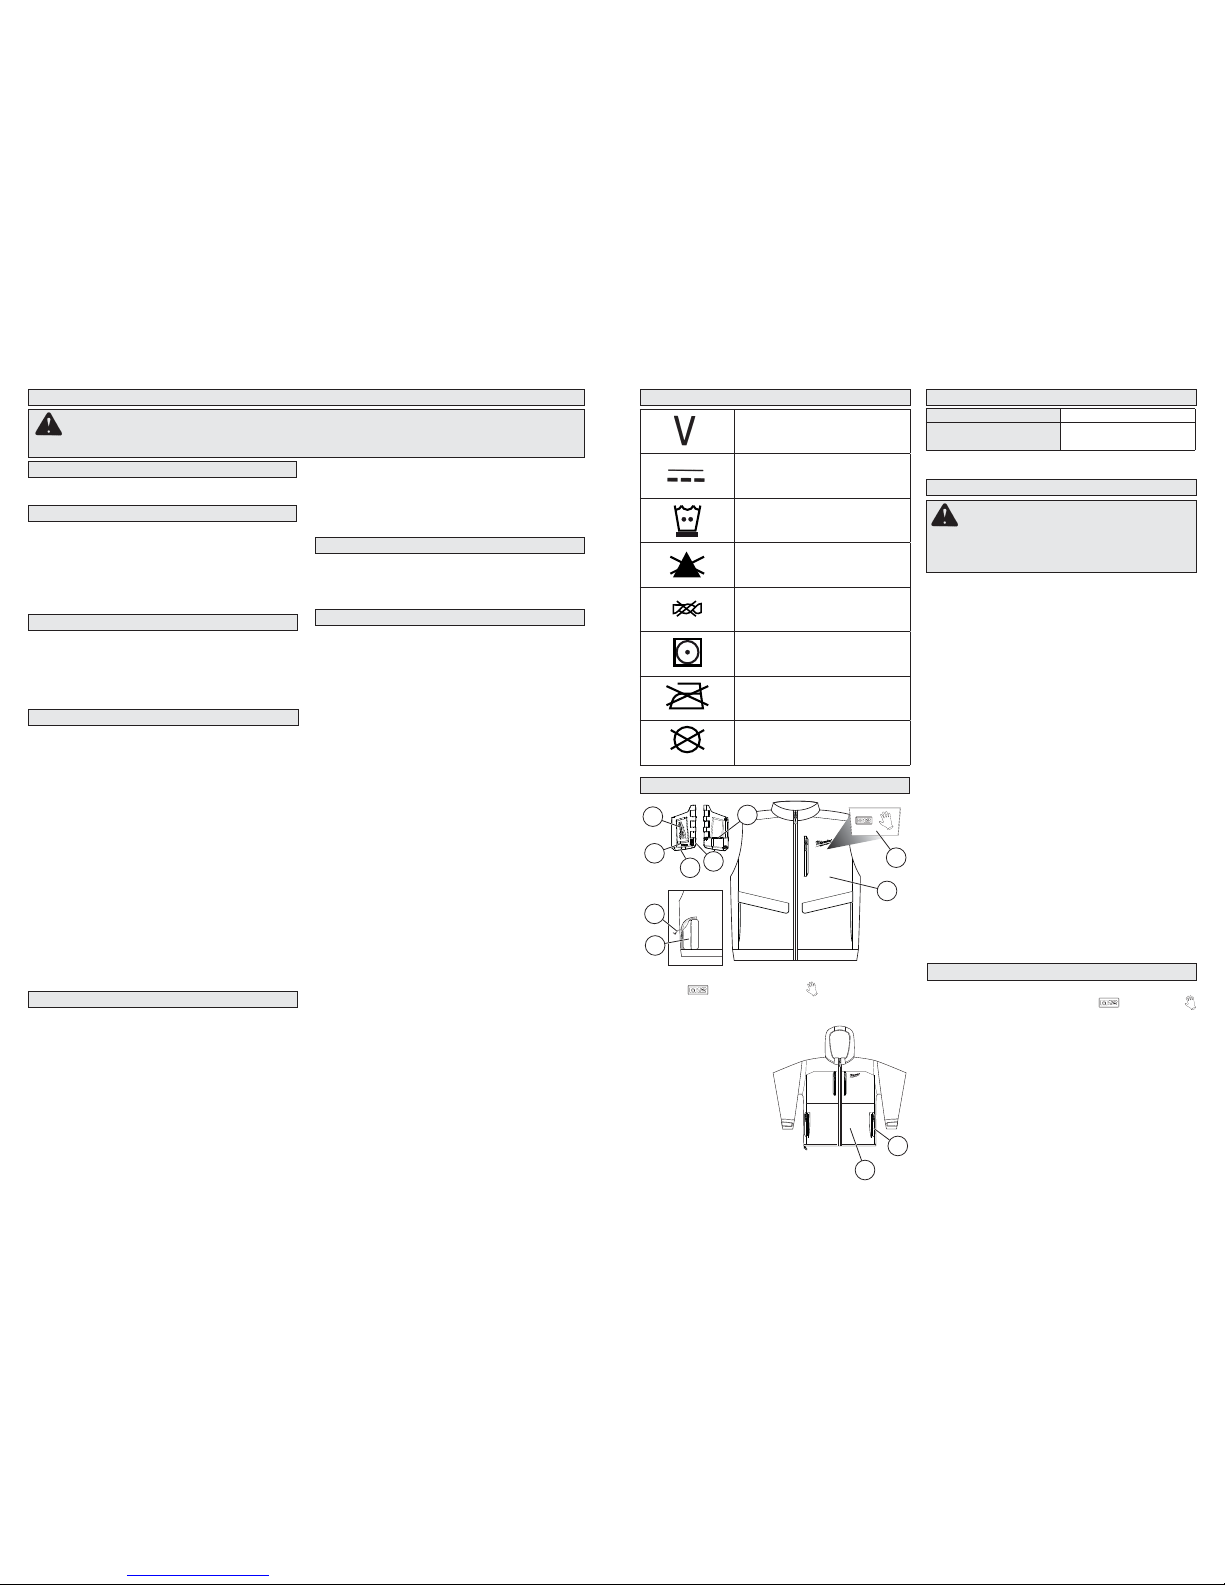
FUNCTIONAL DESCRIPTION
Read instructions carefully.
Use:
• Do not use this heated jacket with an infant,
child, a helpless person, or anyone insensitive to heat, such as a person with poor blood
circulation.
• If you have a medical condition making you
sensitive to overheating, or you use any
personal medical devices, consult the devise
manufacturer and/or your physician to determine
if use of this product is appropriate.
• Never use if inner liner is wet.
• Heating elements are not recommended to
touch bare skin.
• Shut off power immediately if discomfort occurs.
• Do not allow the cords to be pinched.
• If improper operation of this heated jacket is
observed, discontinue its use immediately and
contact a MILWAUKEE service facility for repair.
• Do not use pins. They may damage the electric
wiring.
Care:
• Before washing, disconnect and remove
battery pack and battery holder from battery
holder pocket. Push the power cord completely
into the battery holder pocket and fasten
closed.
• Follow Care Instructions on jacket tags.
Machine wash, Gentle Cycle in warm water.
Tumble Dry Low Heat.
• Do not bleach.
• Do not iron.
• Do not wring or twist.
• Do not dry clean. Do not use dry-cleaning fl uid
on this heated jacket. Do not bleach. Cleaning
solvents may have a deteriorating effect on the
insulation of the heating element.
• Maintain labels and nameplates. These carry
important information. If unreadable or missing,
contact a MILWAUKEE service facility for a free
replacement.
1. Heated Vest
2. Vest and Vest Pocket Power Buttons
(Inner left side of vest)
High: Red LED
Medium: White LED
Low: Blue LED
3. USB Battery Controller
4. Fuel Gauge
5. USB Power Button
6. Power Cable Port
7. USB Port
8. Battery Controller Pocket
9. Power Cable
10. Outer Shell
11. Pass-through pockets
SPECIFIC SAFETY RULES
PERSONAL SAFETY
GENERAL PRODUCT SAFETY WARNINGS
WORK AREA SAFETY
ELECTRICAL SAFETY
• Keep work area clean and well lit. Cluttered or
dark areas invite accidents.
• Do not expose heated jacket to rain or wet
conditions. Water will increase the risk of electric
shock.
• Do not abuse the power cable. Never use the
cord for carrying, pulling or unplugging the
heated jacket. Keep cord away from heat, oil,
sharp edges or moving parts.
WARNING READ ALL SAFETY WARNINGS AND INSTRUCTIONS.
Failure to follow the warnings and instructions may result in electric shock, fi re and/or
serious injury. Save all warnings and instructions for future reference.
PRODUCT USE AND CARE
• Do not use the heated jacket if the power button does not turn it on and off. Any heated jacket
that cannot be controlled with the power button is
dangerous and must be repaired.
• Disconnect the battery pack from the heated
jacket before storing. Such preventive safety
measures reduce the risk of starting the heated
jacket accidentally.
• Store out of the reach of children and do not allow persons unfamiliar with these instructions
to operate the heated jacket. Heated jacket can
be dangerous in the hands of untrained users.
• Maintain heated jacket. Check for breakage of
parts and any other condition that may affect
the heated jacket’s operation. If damaged, have
the heated jacket repaired before use.
• Use the heated jacket in accordance with these
instructions, taking into account the working
conditions and the work to be performed. Use
of the heated jacket for operations different from
those intended could result in a hazardous situation.
• Stay alert, watch what you are doing and use
common sense when using the heated jacket.
Do not use while you are tired or under the
infl uence of drugs, alcohol or medication. A
moment of inattention may result in serious personal injury.
• Recharge only with the charger specifi ed by
the manufacturer. A charger that is suitable for
one type of battery pack may create a risk of fi re
when used with another battery pack.
• Use heated jacket only with specifi cally des-
ignated battery packs. Use of any other battery
packs may create a risk of injury and fi re.
• When battery pack is not in use, keep it away
from other metal objects like paper clips,
coins, keys, nails, screws, or other small metal
objects that can make a connection from one
terminal to another. Shorting the battery termi-
nals together may cause burns or a fi re.
BATTER Y T OOL USE AND CARE
• Under abusive conditions, liquid may be ejected from the battery; avoid contact. If contact
accidentally occurs, fl ush with water. If liquid
contacts eyes, additionally seek medical help.
Liquid ejected from the battery may cause irritation
or burns.
SERVICE
• Have your heated jacket serviced by a qualifi ed
repair person using only identical replacement
parts. This will ensure that the safety of the heated
jacket is maintained.
3
4
5
7
6
SPECIFICATIONS
SYMBOLOGY
Cat. No. Volts DC
2386 Series
43-72-1025
12
12
Volts
Direct Current
Machine wash, Gentle Cycle in
warm water
Do not bleach
Do not wring or twist
Tumble dry, low heat
Do not iron
Do not dry-clean
ASSEMBLY
WARNING Recharge only with the
charger specified for the battery. For specifi c charging instructions, read the operator’s
manual supplied with your charger and battery.
Inserting/Removing the Battery
To insert the battery, slide the pack into the body of
the battery controller. Make sure it latches securely
into place.
Insert the power cable (from inside the battery
controller pocket) into the power cable port on the
battery controller.
Place the battery controller into the pocket and zip
closed. If necessary, unzip the expansion zipper to
accommodate larger battery packs.
To remove the battery, push in the release buttons
and pull the battery pack away from the controller.
Using the USB Port
The USB port can be used to charge a cell phone,
MP3 player, or other personal device that uses less
than 5V, 1A of DC electrical current. The cord can
be run from the battery controller pocket, through
the grommet and channel on the interior of the vest,
and through another grommet into a side pocket. It
is not recommend to use the pocket warmer when
an electronic device is charging in a pocket.
To turn on the USB, press the USB power button.
The USB port will remain on for two hours before
turning off automatically.
Fuel Gauge
Press the USB power button to display the battery
pack’s remaining power.
OPERATION
The zone power buttons are located on the inner
left side of the vest. Use the vest and pocket
power buttons to control the two zones.
To turn on, press and hold (1 to 2 seconds) the
zone’s power button. The zone will be turned to
High and the red LED will light.
Temperature setting can be adjusted at any time
by pressing the zone’s power button. Each press
will cycle through the zone’s temperature settings.
To turn off the heated vest, press and hold (1 to
2 seconds) the zone’s power button. The LED will
turn off.
If the heated vest turns off unexpectedly, check
connections and charge the battery pack.
2
11
8
9
10
1
 Loading...