

Page 1
MilViz Cessna 310R Pilot’s Operating Handbook
Military Visualizations Cessna 310R
Pilot’s Operating Handbook
Version 1.0
Version 1.0 – 23 May 2010
[1]
Page 2

MilViz Cessna 310R Pilot’s Operating Handbook
CONGRATULATIONS
Welcome to the ranks of Cessna owners! Your Cessna has been designed
and constructed to give you the most in performance, economy, and comfort. It
is our desire that you will find flying it, either for business or pleasure, a pleasant
and profitable experience.
This Pilot’s Operating Handbook has been prepared as a guide to help you
get the most pleasure and utility from your airplane. It contains information
about your Cessna’s equipment, operating procedures, and performance; and
suggestions for its servicing and care. We urge you to read it from cover to cover,
and to refer to it frequently.
Our interest in your flying pleasure has not ceased with your purchase of a
Cessna. Worldwide, the Military Visualizations staff stands ready to serve you.
The following services are offered:
MIVIZ Forums: Available 24/7 for technical support, product updates
and other announcements.
Email contacts to MILVIZ staff for detailed questions, suggestions,
and concerns.
Secure transactions to protect your financial interests.
Version 1.0 – 23 May 2010
[2]
Page 3

MilViz Cessna 310R Pilot’s Operating Handbook
PERFORMANCE AND SPECIFICATIONS
MAXIMUM WEIGHT:
Ramp …………………………………….……………………………………..………………………………………………….. 5535 Pounds
Takeoff ……………………………………………………………….……………………………………………………………… 5500 Pounds
Landing ……………………………………………………………….……………………………………………………………… 5400 Pounds
Zero Fuel ………………………………………………………….…………………………….………………………………… 4900 Pounds
*SPEED, BEST POWER MIXTURE:
Maximum – Sea Level …………………………………………….………………………………………………………..……. 207 KTAS
Maximum Recommended Cruise
75% Power at 7500 Feet ….………………………………..………………………………….…………………. 195 KTAS
*RANGE, RECOMMENDED LEAN MIXTURE:
Maximum Recommended Cruise
75% Power at 7500 Feet …………………………………………………………………..………. 494 Nautical Miles,
(600 Pounds Usable Fuel) 2.62 Hours and 193 KTAS
75% Power at 7500 Feet ………………………………………………………..…………………. 884 Nautical Miles,
(978 Pounds Usable Fuel) 4.63 Hours and 193 KTAS
75% Power at 7500 Feet …………………………………………………………………………. 1132 Nautical Miles,
(1218 Pounds Usable Fuel) 5.91 Hours and 194 KTAS
Maximum Range
10,000 Feet (600 Pounds Usable Fuel) ……………………………………..……………… 616 Nautical Miles,
4.12 Hours and 148 KTAS
10,000 Feet (978 Pounds Usable Fuel) ………………………….……………….………. 1152 Nautical Miles,
7.87 Hours and 145 KTAS
10,000 Feet (1218 Pounds Usable Fuel) ……………………….……………….………. 1511 Nautical Miles,
10.46 Hours and 144 KTAS
RATE-OF-CLIMB AT SEAL LEVEL:
All Engines ……………………………………………………………………………………..…………………… 1662 Feet Per Minute
One Engine Inoperative ………………………………………………………………………………………… 370 Feet Per Minute
SERVICE CEILING:
All Engines ……………………………………………………………………………………………………………………….... 19,750 Feet
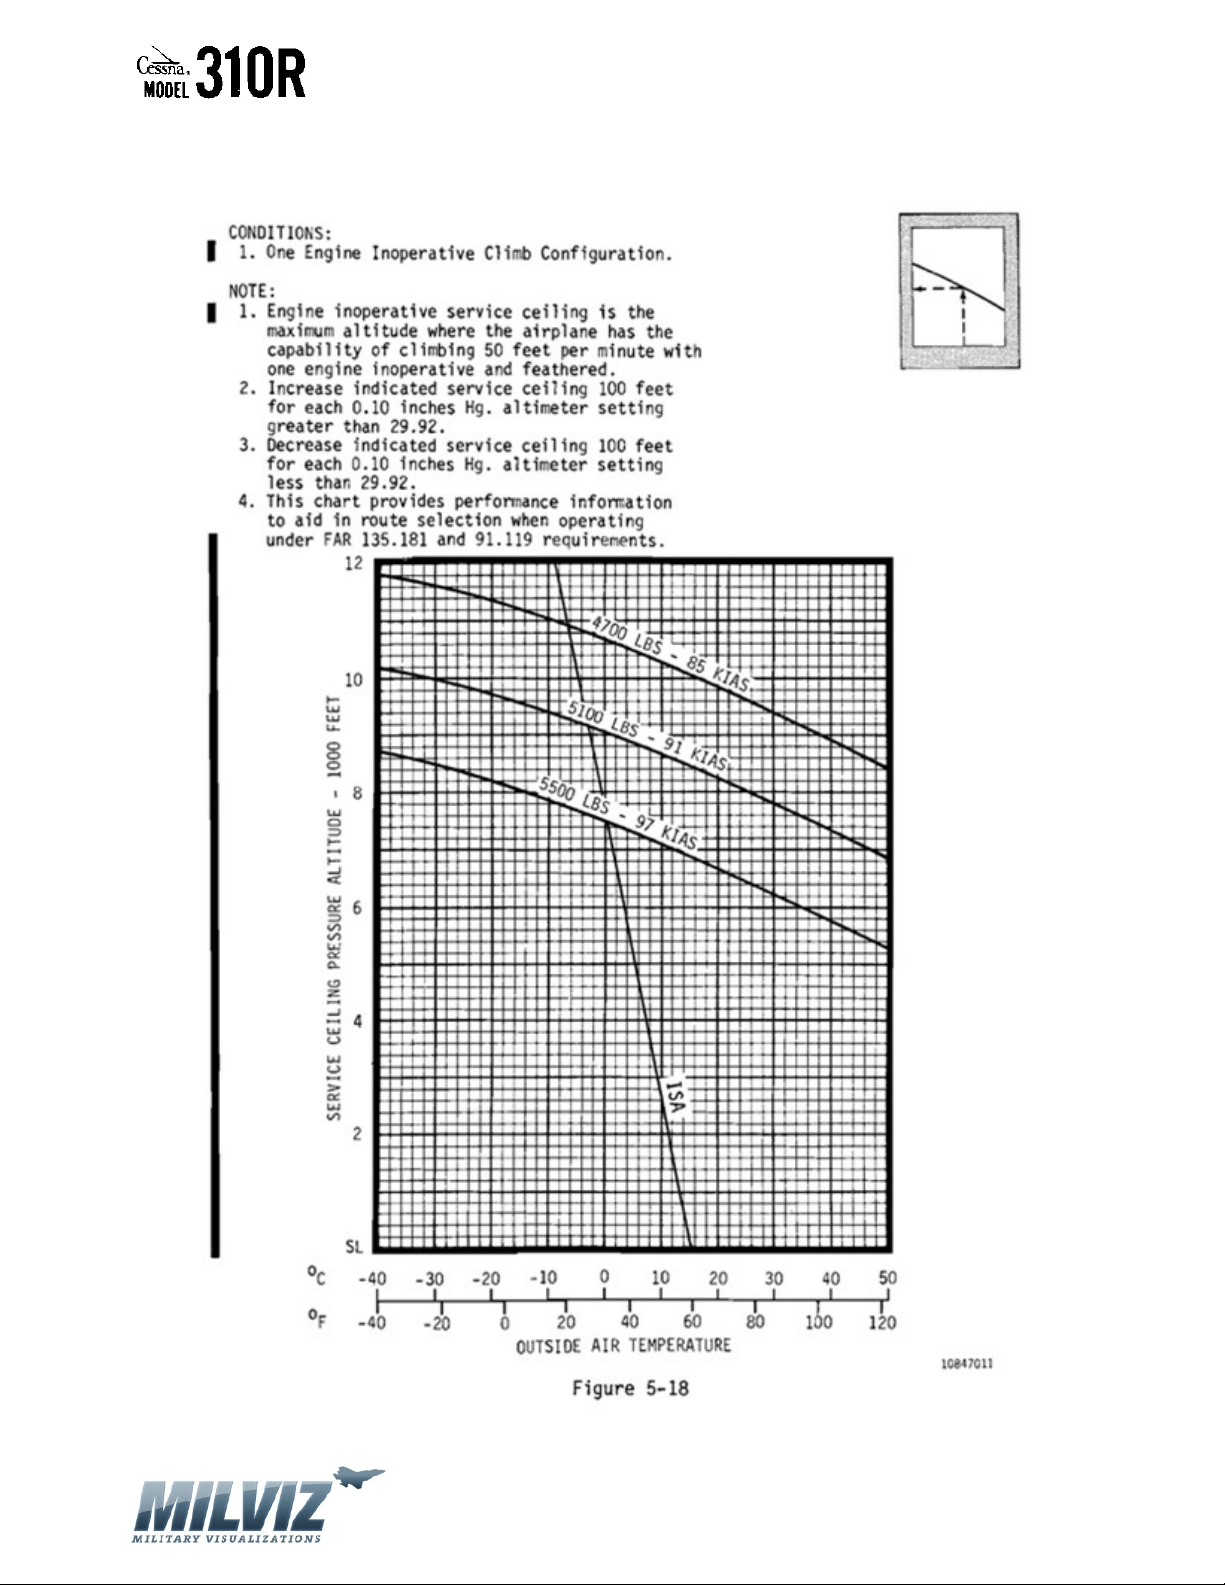
One Engine Inoperative ………………………………………………………………………………………………………… 7400 Feet
TAKEOFF PERFORMANCE: (82 KIAS, 15o Wing Flaps and 5500 Pounds Weight)
Ground Roll …………………………………………………………………………………………………………………………… 1335 Feet
Total Distance (Over 50-Foot Obstacle) ………………………………………………………………………..………. 1700 Feet
LANDING PERFORMANCE: (93 KIAS, 35o Wing Flaps and 5400 Pounds Weight)
Ground Roll ……………………………………………………………………………………………..…………………………….. 640 Feet
Total Distance (Over 50-Foot Obstacle) ………………………………………………………………………………… 1790 Feet
STANDARD EMPTY WEIGHTS: (Approximate)
310R ……………..…………………………………………………………………………………………………….…………… 3347 Pounds
310R II ……………………………………………………………………………………………………………………….…….. 3589 Pounds
BAGGAGE ALLOWANCE: ………………………………………………………………………………………………………….………. 950 Pounds
WING LOADING: …………………………………………………………………………………………………. 30.73 Pounds Per Square Foot
POWER LOADING: ……………………………………………………………………………………..…………. 9.65 Pounds Per Horsepower
Version 1.0 – 23 May 2010
[3]
Page 4

MilViz Cessna 310R Pilot’s Operating Handbook
FUEL CAPACITY: (Total)
Standard (100 Gallons Usable) …………………………………………………………………………….…………….. 102 Gallons
With Auxiliary Tanks (40 Gallons Usable) ……………..…………………………………….………… 143 Gallons
With Auxiliary Tanks (63 Gallons Usable) ……………..…………………………………….………… 166 Gallons
With Auxiliary Tanks (63 Gallons Usable) and Wing Locker Tanks ..…………….………… 207 Gallons
OIL CAPACITY: (Total) …………………………………………………………………………………………………………….………….. 25 Quarts
ENGINES:
Six-Cylinder, Fuel-Injected Engines ………………………………………………………………………………..……… IO-520-M
285 Rated Horsepower At 2700 Propeller RPM
PROPELLERS:
Constant Speed, Full Feathering, Three-Bladed 6’ 4.5” Diameter …………………………………….. 0850334-26
NOTE: Range data includes allowance for start, taxi, takeoff, climb, descent, and 45-minute reserve at
45% power.
*Speeds based on Estimated Mid-Cruise Weight.
Version 1.0 – 23 May 2010
[4]
Page 5
MilViz Cessna 310R Pilot’s Operating Handbook
SECTION 2
LIMITATIONS
TABLE OF CONTENTS
INTRODUCTION …………………….…. 5 FLIGHT LOAD FACTOR LIMITS …… 10
AIRSPEED LIMITATIONS …………... 6 FLIGHT CREW LIMITS …………………. 10
ENGINE LIMITATIONS ………………. 7 OPERATION LIMITS …………………… 10
WEIGHT LIMITS ……………………….. 9 FUEL LIMITATIONS ……………………. 11
MANEUVER LIMITS ………………….. 10
INTRODUCTION
Section 2 of the Pilot’s Operating Handbook presents the operating limitations,
the significance of such limitations, instrument markings, color coding, and basic
placards necessary for the safe operation of the airplane, its powerplants, standard
systems, and standard equipment.
Version 1.0 – 23 May 2010
[5]
Page 6
MilViz Cessna 310R Pilot’s Operating Handbook
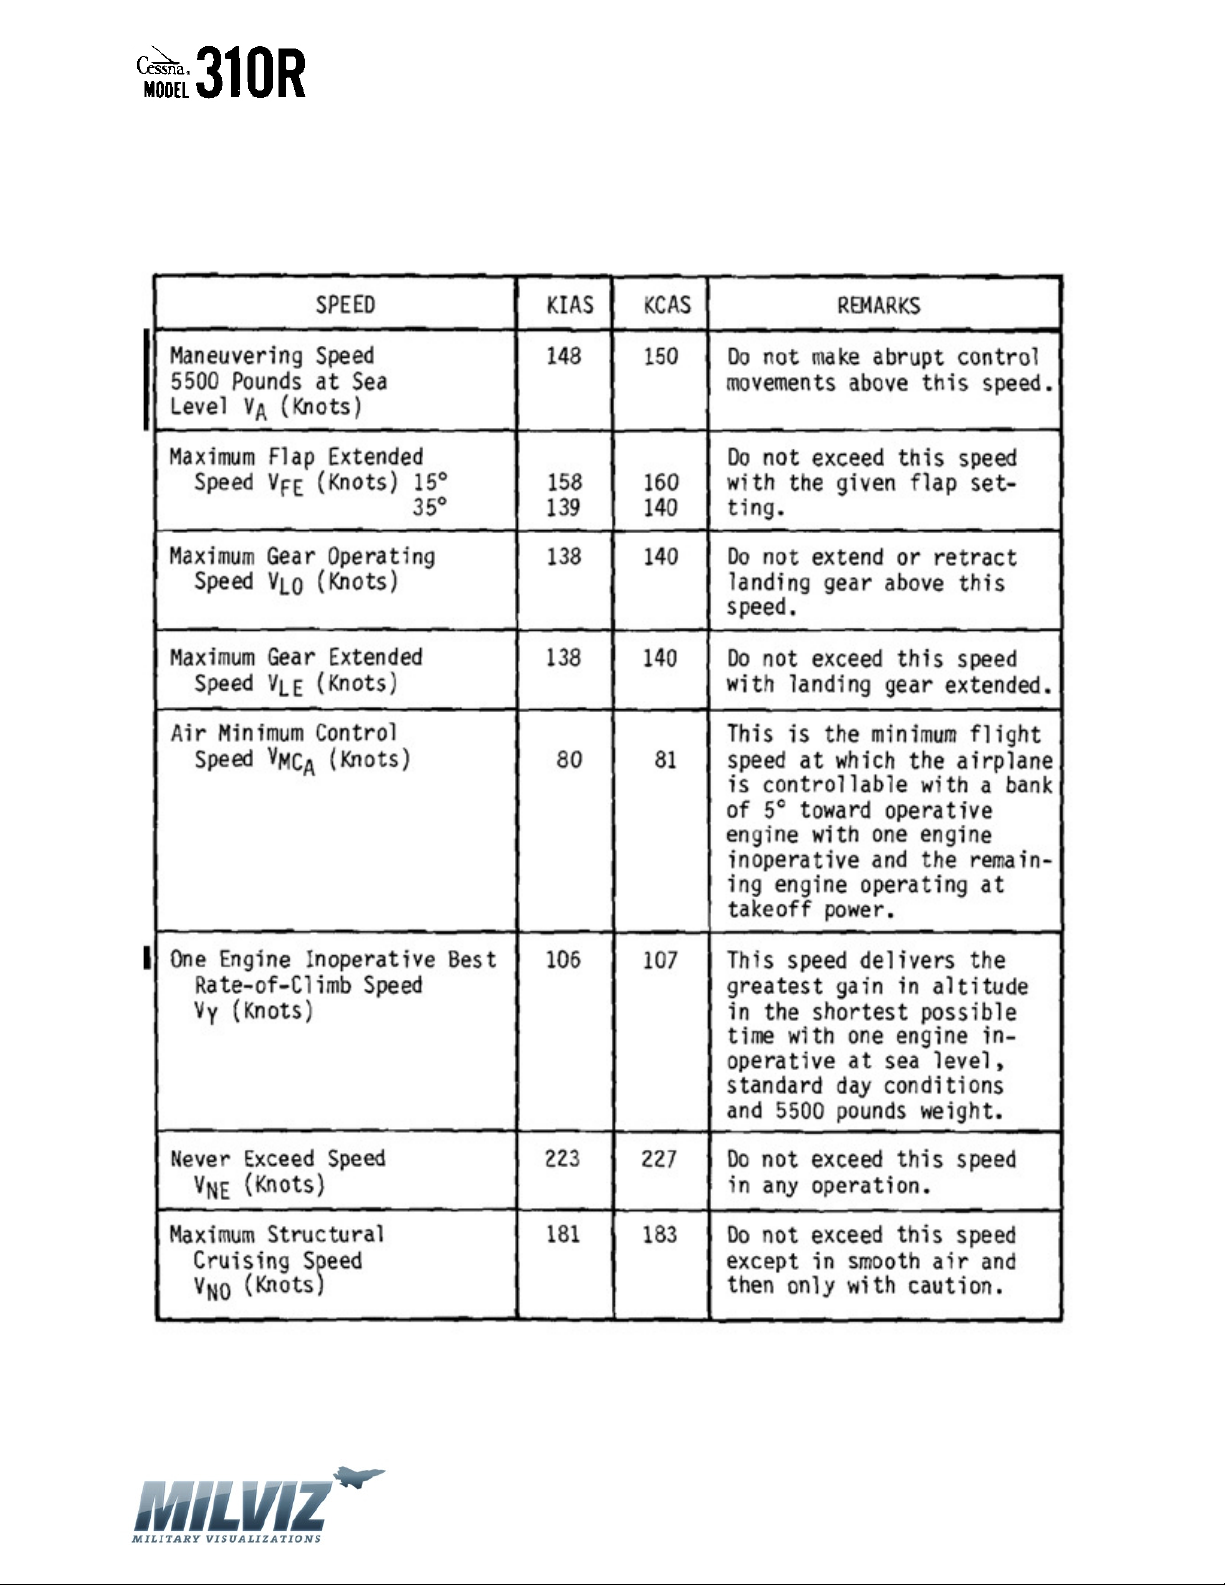
AIRSPEED LIMITATIONS (See Figure 2-1)
AIRSPEED LIMITATIONS TABLE
Figure 2-1
Version 1.0 – 23 May 2010
[6]
Page 7
MilViz Cessna 310R Pilot’s Operating Handbook
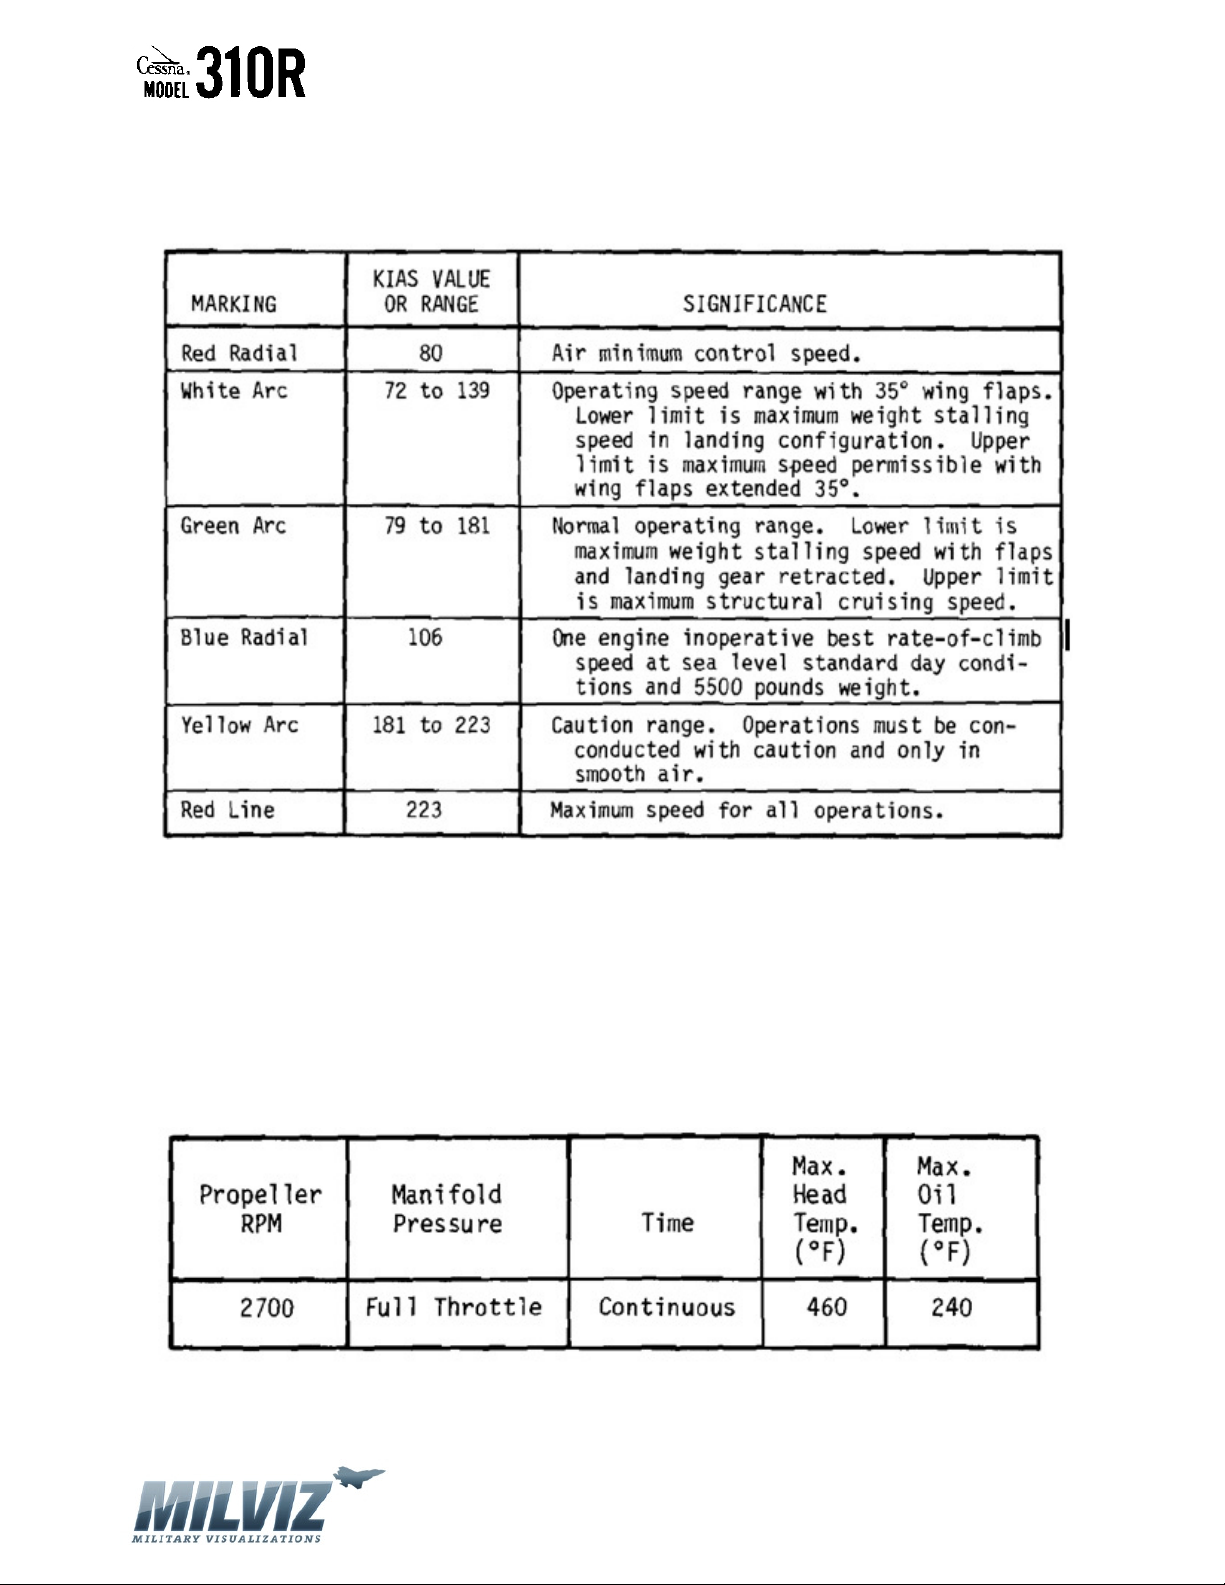
AIRSPEED INDICATOR TABLE
Figure 2-2
ENGINE LIMITATIONS
Number of Engines: 2
Engine Manufacturer: Teledyne Continenal Motors
Engine Model Number: IO-520-M
Engine Operating Limits for Takeoff and Continuous Operation:
a. Maximum power for all operations (All Altitudes)
Version 1.0 – 23 May 2010
[7]
Page 8
MilViz Cessna 310R Pilot’s Operating Handbook
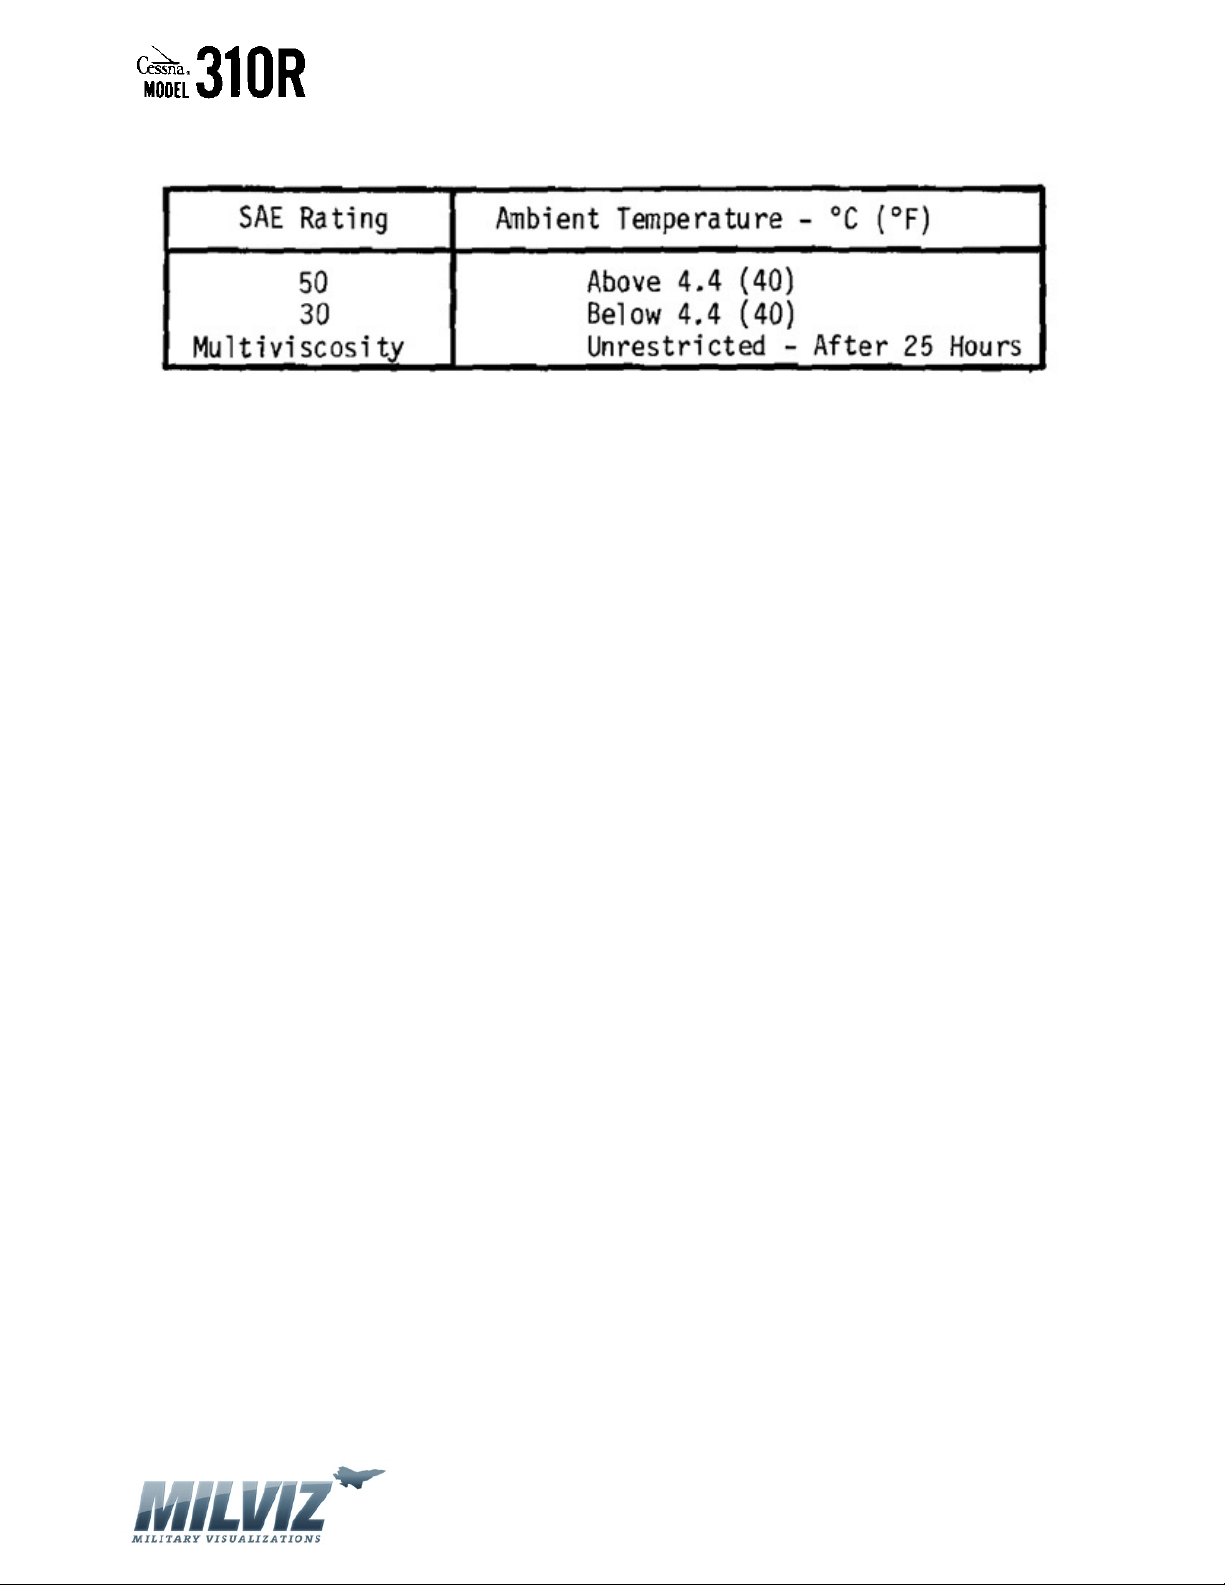
Oil Viscosity:
Propellers:
a. Number of Propellers: 2
b. Manufacturer: McCauley Accessory Division, Cessna Aircraft Company
c. Part Number: 0850334-26
d. Number of Blades: 3
e. Diameter: 6’ 4.5”
f. Blade Range: (At 30-Inch Station)
(1) Low Pitch 13.9o +/-0.2
(2) Feather 81.7o +/-0.3
o
o
g. Operating Limits: 2700 RPM maximum speed
Engine Instrument Markings:
a. Tachometer:
(1) Normal Operating 2100 to 2500 RPM (Green Arc)
(2) Maximum 2700 RPM (Red Radial)
b. Manifold Pressure:
(1) Normal Operating 15.0 to 24.5 inches Hg. Manifold Pressure (Green Arc)
c. Oil Temperature:
(1) Normal Operating 75 to 240oF (Green Arc)
(2) Maximum 240oF (Red Radial)
d. Oil Pressure:
(1) Minimum Operating 10 PSI (Red Radial)
(2) Normal Operating 30 to 60 PSI (Green Arc)
(3) Maximum 100 PSI (Red Radial)
e. Cylinder Head Temperature:
(1) Normal Operating 200 to 460oF (Green Arc)
(2) Maximum 460oF (Red Radial)
Version 1.0 – 23 May 2010
[8]
Page 9

MilViz Cessna 310R Pilot’s Operating Handbook
f, Fuel Flow:
(1) Minimum Operating 2.5 PSI (Red Radial)
(2) Normal Operating 15.0 to 24.5 inches Hg. Manifold Pressure (Green Arc)
(a) Green Radials 45% Power – 59.0 Pounds per hour (6.5 PSI)
55% Power – 71.0 Pounds per hour (7.6 PSI)
65% Power – 82.0 Pounds per hour (8.8 PSI)
75% Power – 94.0 Pounds per hour (10.25 PSI)
(b) Blue Triangle 75% Climb Setting – 107.0 Pounds per hour (12.0 PSI)
(c) White Arc – Sea Level Takeoff and Climb Power Setting 146.5 Pounds per
hour (19.7 PSI) to 150.0 Pounds per hour (20.5 PSI)
(d) Blue Radials – Altitude Takeoff Power and Climb Power Setting
2000 Feet – 134.0 Pounds per hour (17.0 PSI)
4000 Feet – 124.0 Pounds per hour (15.0 PSI)
6000 Feet – 116.0 Pounds per hour (13.5 PSI)
(3) Maximum Operating 155.0 Pounds per hour (21.7 PSI) (Red Radial)
WEIGHT LIMITS
Maximum Ramp Weight: 5535 Pounds
Maximum Takeoff Weight: 5500 Pounds
Maximum Landing Weight: 5400 Pounds
Maximum Zero Fuel Weight: 4900 Pounds
Maximum Weights in Baggage Compartments:
a. Left and Right Wing Lockers – 120 pounds each.
b. Nose Bay – 350 pounds less installed optional equipment.
c. Aft Cabin (Station 96) – 200 pounds. Extends from Station 89 to 109.
d. Aft Cabin (Station 124) – 160 pounds (4-Place Seating). Station 109 to 132.
e. Aft Cabin (Station 126) – 160 pounds (6-Place Seating). Station 111 to 132.
Version 1.0 – 23 May 2010
[9]
Page 10

MilViz Cessna 310R Pilot’s Operating Handbook
MANEUVER LIMITS
This is a normal category airplane. Aerobatic maneuvers, including spins, are
prohibited.
FLIGHT LOAD FACTOR LIMITS
The design load factors are 150% of the following, and in all cases the structure exceeds
design loads.
At Design Takeoff Weight of 5500 Pounds:
a. Landing gear up, wing flaps 0o +3.80 to -1.52G
b. Landing gear down, wing flaps 35o +2.0G
FLIGHT CREW LIMITS
Minimum Flight Crew for FAR 91 operations is one pilot.
OPERATING LIMITS
The standard airplane is approved for day and night operations under VFR conditions.
With the proper optional equipment installed, the airplane is approved for day and night IFR
operations and flight into icing conditions as defined by the FAA.
Version 1.0 – 23 May 2010
[10]
Page 11
MilViz Cessna 310R Pilot’s Operating Handbook
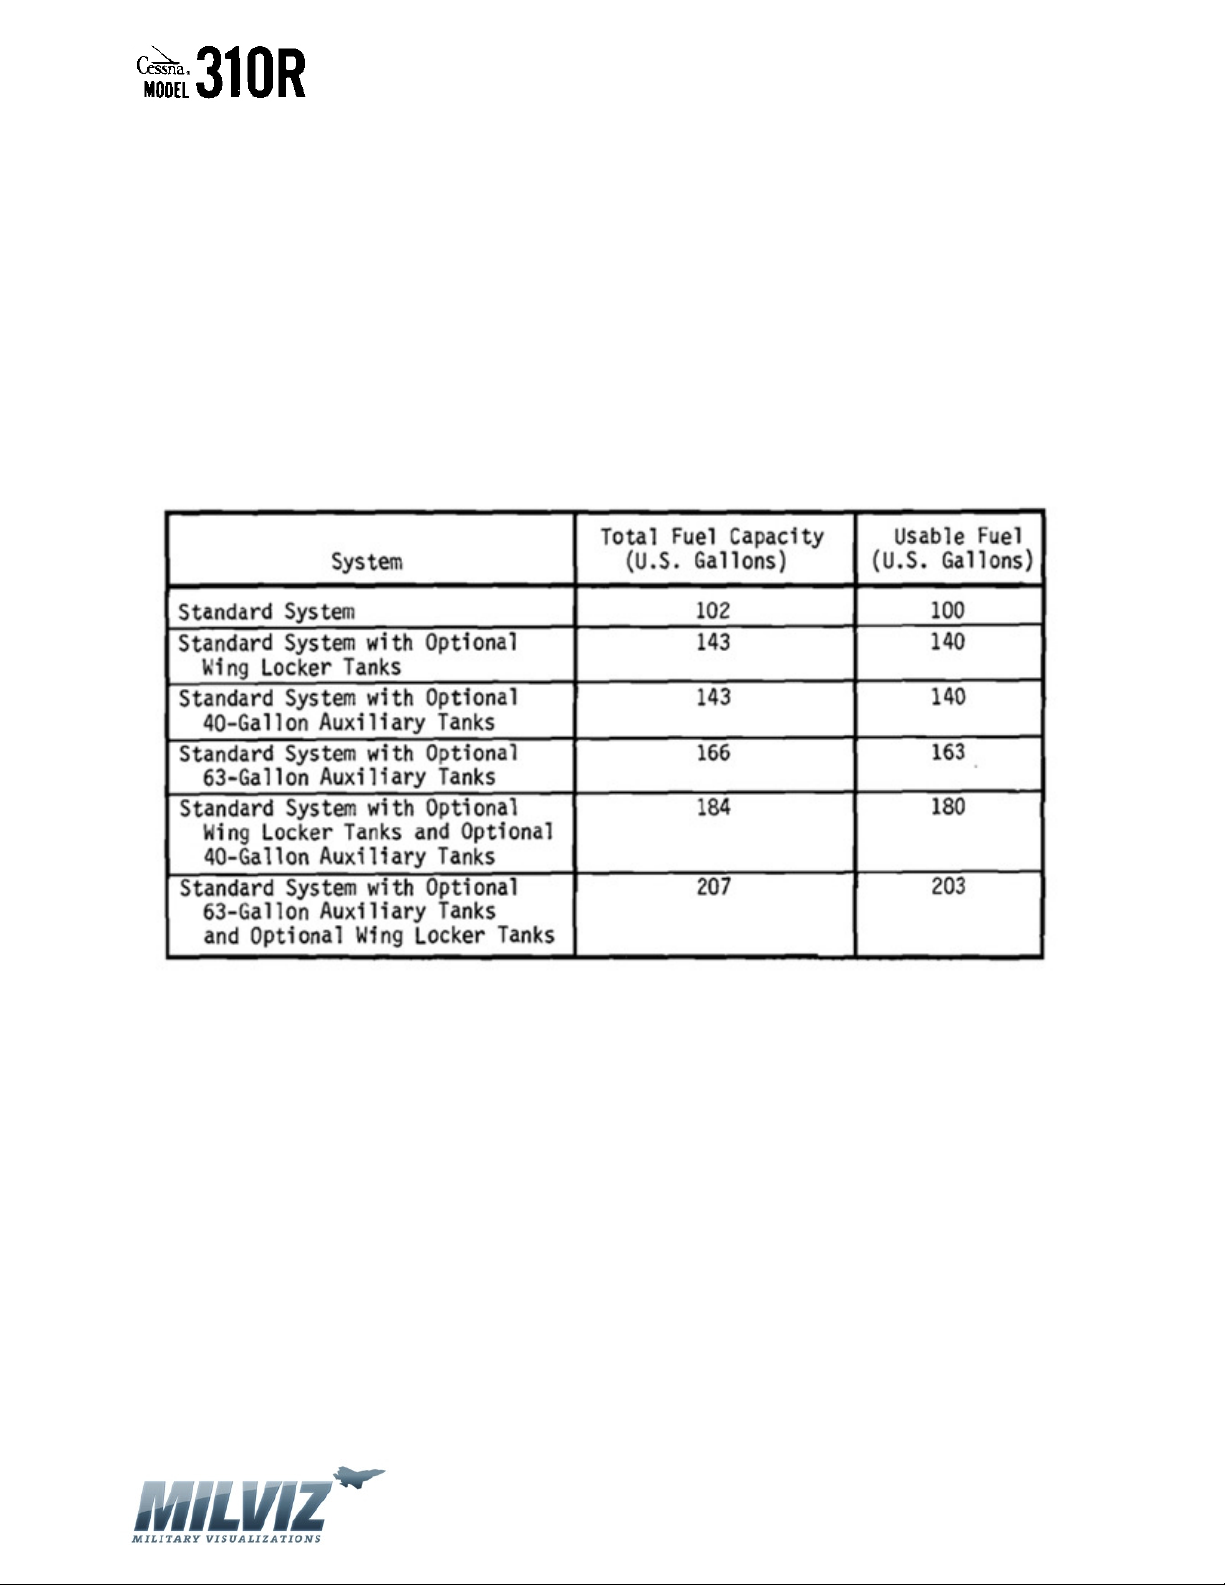
FUEL LIMITATIONS (See Figure 2-3)
Fuel Pressure:
a. Minimum: 2.5 PSI (0 Pounds Per Hour)
b. Maximum: 21.7 PSI (155.0 Pounds Per Hour)
Fuel (Approved Fuel Grades and Colors):
a. 100LL Grade Aviation Fuel (Blue).
b. 100 (Formerly 100/130) Grade Aviation Fuel (Green).
FUEL TABLE
Figure 2-3
Version 1.0 – 23 May 2010
[11]
Page 12
MilViz Cessna 310R Pilot’s Operating Handbook
SECTION 3
EMERGENCY PROCEDURES
TABLE OF CONTENTS
INTRODUCTION ……………………………………………………………………………………………………..…. 12
EMERGENCY PROCEDURES ABBREVIATED CHECKLISTS ……………………………………….……. 13
Engine Inoperative Procedures ………………………………………………………………….…..… 13
Fire Procedures ………………………………………………………………………………………...….. 18
Emergency Descent Procedures …………………………………………………………..…….….... 19
Emergency Landing Procedures ………………………………………………………………….…… 20
Fuel System Emergency Procedures …………………………………………..……………….…. 23
Electrical System Emergency Procedures ……………………………………………………….. 24
Avionics Bus Failure ……………………………………………………………………………………...…. 25
Flight Instruments Emergency Procedures …………………………………………………….. 25
Air Inlet or Filter Icing Emergency Procedures …………………………………………….. 26
Propeller Synchrophaser ………………………………………………………………………………. 26
Emergency Exit Window ………………………………………………………………………………. 26
Spins ……………………………………………………………………………………………………………..…. 27
INTRODUCTION
Section 3 of the Pilot’s Operating Handbook describes the recommended procedures for
emergency situations. The first part of this section provides emergency procedural action
required in an abbreviated checklist form. Amplification of the abbreviated checklist is
presented in the second part of this section.
Version 1.0 – 23 May 2010
[12]
Page 13
MilViz Cessna 310R Pilot’s Operating Handbook
EMERGENCY PROCEDURES
ABBREVIATED CHECKLISTS
Procedures in the Abbreviated Checklists portion of this section outlined in the black boxes are
immediate-action items and should be committed to memory.
AIRSPEEDS FOR SAFE OPERATION
Conditions:
1. Takeoff Weight 5500 Pounds
2. Landing Weight 5400 Pounds
3. Standards Day, Sea Level
a. Air Minimum Control Speed …………………………………………………..….. 80 KIAS
b. Intentional One Engine Inoperative Speed …………………………..……. 92 KIAS
c. One Engine Inoperative Best Angle-of-Climb Speed ………………… 95 KIAS
d. One Engine Inoperative Best Rate-of-Climb Speed (Flaps UP) ……. 106 KIAS
ENGINE INOPERATIVE PROCEDURES
ENGINE SECURING PROCEDURES
1. Throttle – CLOSE
2. Propeller – FEATHER
3. Mixture – IDLE CUT-OFF
4. Fuel Selector – OFF
5. Auxiliary Fuel Pump – OFF
6. Magneto Switches – OFF
7. Propeller Synchrophaser – OFF (Optional System)
8. Alternator – OFF
9. Cowl Flap -- CLOSE
ENGINE FAILURE DURING TAKEOFF (Speed Below 92 KIAS)
1. Throttles – CLOSE IMMEDIATELY
2. Brakes – AS REQUIRED
Version 1.0 – 23 May 2010
[13]
Page 14
MilViz Cessna 310R Pilot’s Operating Handbook
ENGINE FAILURE AFTER TAKEOFF (Speed Above 92 KIAS With Gear Up Or In Transit)
1. Mixtures – AS REQUIRED for flight altitude
2. Propellers – FULL FORWARD
3. Throttles – FULL FORWARD
4. Flaps – UP if extended, in small increments, RETRACTED on blue line speed
5. Landing Gear – CHECK UP
6. Inoperative Engine – DETERMINE:
a. Identify Failed Engine – FOOT OFF RUDDER on failed engine side
b. Verify Failed Engine – RETARD THROTTLE to confirm no loss of power
c. Feather Failed Engine – SET PROP CONDITION LEVER to feather detent
7. Establish Bank – 6o toward operative engine
8. Climb to Clear 50-Foot Obstacle – 92 KIAS
9. Climb at Best Single-Engine-Rate-of-Climb Speed – 106 KIAS at sea level; 94 KIAS at
10,000 Feet
10. Trim Tabs – ADJUST 5o bank toward operative engine with approximately ½ ball slip
indicated on the turn and bank indicator
11. Cowl Flap – Close (Inoperative Engine)
12. Inoperative Engine – SECURE as follows:
a. Fuel Selector – OFF
b. Auxiliary Fuel Pump – OFF
c. Magneto Switches – OFF
d. Alternator – OFF
13. As Soon As Practical – LAND
Version 1.0 – 23 May 2010
[14]
Page 15
MilViz Cessna 310R Pilot’s Operating Handbook
ENGINE FAILURE DURING FLIGHT
1. Inoperative Engine – DETERMINE, if conditions allow
2. Before Securing Inoperative Engine, if conditions allow:
a. Fuel Flow – CHECK If deficient, position auxiliary fuel pump to ON
b. Fuel Selectors – MAIN TANKS
c. Fuel Quantity – CHECK
d. Oil Pressure and Oil Temperature – CHECK
e. Magneto Switches – CHECK ON
f. Mixture – ADJUST until evidence of engine firing. Continue to adjust for smooth
operation
3. Inoperative Engine – SECURE: (Perform immediately if conditions require)
a. Identify Failed Engine – FOOT OFF RUDDER on failed engine side
b. Verify Failed Engine – RETARD THROTTLE to confirm no loss of power
c. Feather Failed Engine – SET PROP CONDITION LEVER to feather detent
d. Mixture – IDLE CUT-OFF
e. Fuel Selector – OFF
f. Auxiliary Fuel Pump – OFF
g. Magneto Switches – OFF
h. Propeller Synchrophaser – OFF
i. Alternator – OFF
j. Cowl Flap -- CLOSE
4. Operative Engine – ADJUST
a. Power – AS REQUIRED
b. Mixture – AS REQUIRED for flight altitude
c. Fuel Selector – AS REQUIRED
NOTE
• Auxiliary Fuel on the side of the failed engine is inaccessible
• Position operative engine fuel selector to MAIN TANK and feel for detent
if below 1000 feet AGL or if nearest airport is within range o fuel
remaining in MAIN TANK. If necessary, range can be extended by using
wing locker fuel, opposite main fuel or auxiliary fuel on the side of the
operative engine. Crossfeed as required to maintain lateral balance.
d. Auxiliary Fuel Pump – ON
e. Cowl Flap – AS REQUIRED
5. Trim Tabs – ADJUST 5o bank toward operative engine with approximately ½ ball slip
indicated on the turn and bank indicator
6. Electrical Load – DECREASE to minimum required
7. As Soon As Practical -- LAND
Version 1.0 – 23 May 2010
[15]
Page 16

MilViz Cessna 310R Pilot’s Operating Handbook
have been extended beyond 15
ENGINE INOPERATIVE LANDING
1. Fuel Selector – MAIN TANK
2. Auxiliary Fuel Pump – ON (Operative Engine)
3. Alternate Air Control – IN
4. Mixture – AS REQUIRED for flight altitude
5. Propeller Synchrophaser – OFF (Optional System)
6. Propeller – FULL FORWARD
7. Approach – 106 KIAS with excessive altitude
8. Landing Gear – DOWN within gliding distance of field
9. Wing Flaps – DOWN when landing is assured
10. Speed – DECREASE below 93 KIAS only if landing is assured
11. Air Minimum Control Speed – 80 KIAS
ENGINE INOPERATIVE GO-AROUND (Speed Above 92 KIAS)
WARNING
Level flight may not be possible for certain
combinations of weight, temperature and
altitude. In any event, do not attempt an
engine inoperative go-around after wing flaps
o
1. Throttle – FULL FORWARD
2. Mixture – AS REQUIRED for flight altitude
3. Positive Rate-of-Climb – ESTABLISH
4. Landing Gear – UP
5. Wing Flaps – UP, if extended
6. Cowl Flaps – OPEN
7. Climb at Best Single-Engine Rate-of-Climb Speed – 106 KIAS at sea level; 94 KIAS at
10,000 feet
8. Trim Tabs – ADJUST 5o bank toward operative engine with approximately ½ ball slip
indicated on the turn and bank indicator
Version 1.0 – 23 May 2010
[16]
Page 17

MilViz Cessna 310R Pilot’s Operating Handbook
AIRSTART
Airplane Without Optional Propeller Unfeathering System:
1. Auxiliary Fuel Pump – CHECK OFF If ON or LOW, purge engine by turning OFF auxiliary
fuel pump, mixture to IDLE CUT-OFF, throttle full open, magneto switches OFF, and
rotating engine 15 revolutions with starter.
2. Magneto Switches – ON
3. Fuel Selector – MAIN TANK
4. Throttle – FORWARD approximately one inch
5. Mixture – AS REQUIRED for flight altitude
6. Propeller – FORWARD of detent
7. Starter Button – PRESS
8. Primer Switch – ACTIVATE in direction of engine to start
9. Starter and Primer Switch – RELEASE when engine fires
10. Auxiliary Fuel Pump – LOW
11. Mixture – AS REQUIRED
12. Power – INCREASE after cylinder head temperature reaches 200oF with gradual mixture
enrichment as power increases
13. Cowl Flap – AS REQUIRED
14. Alternator – ON
BOTH ENGINES FAILURE DURING CRUISE FLIGHT
1. Wing Flaps – UP
2. Landing Gear – UP
3. Propellers – FEATHER
4. Cowl Flaps – CLOSE
5. Airspeed – 111 KIAS
6. Landing – Refer to FORCED LANDING (Complete Power Loss) in this section
Version 1.0 – 23 May 2010
[17]
Page 18

MilViz Cessna 310R Pilot’s Operating Handbook
FIRE PROCEDURES
FIRE ON THE GROUND (Engine Start, Taxi And Takeoff With Sufficient Distance Remaining To
Stop)
1. Throttles – CLOSE
2. Brakes – AS REQUIRED
3. Mixtures – IDLE CUT-OFF
4. Battery – OFF (Use Gang Bar)
5. Magnetos – OFF (Use Gang Bar)
6. Evacuate airplane as soon as practical
INFLIGHT WING OR ENGINE FIRE
1. Both Auxiliary Fuel Pumps – OFF
2. Appropriate Engine – SECURE
a. Throttle – CLOSE
b. Propeller – FEATHER
c. Mixture – IDLE CUT-OFF
d. Fuel Selector – OFF
e. Cowl Flap – CLOSE
f. Magnetos – OFF
g. Propeller Synchrophaser – OFF (Optional System)
h. Alternator – OFF
3. Cabin Heater – OFF
4. Land and evacuate airplane as soon as practical
Version 1.0 – 23 May 2010
[18]
Page 19
MilViz Cessna 310R Pilot’s Operating Handbook
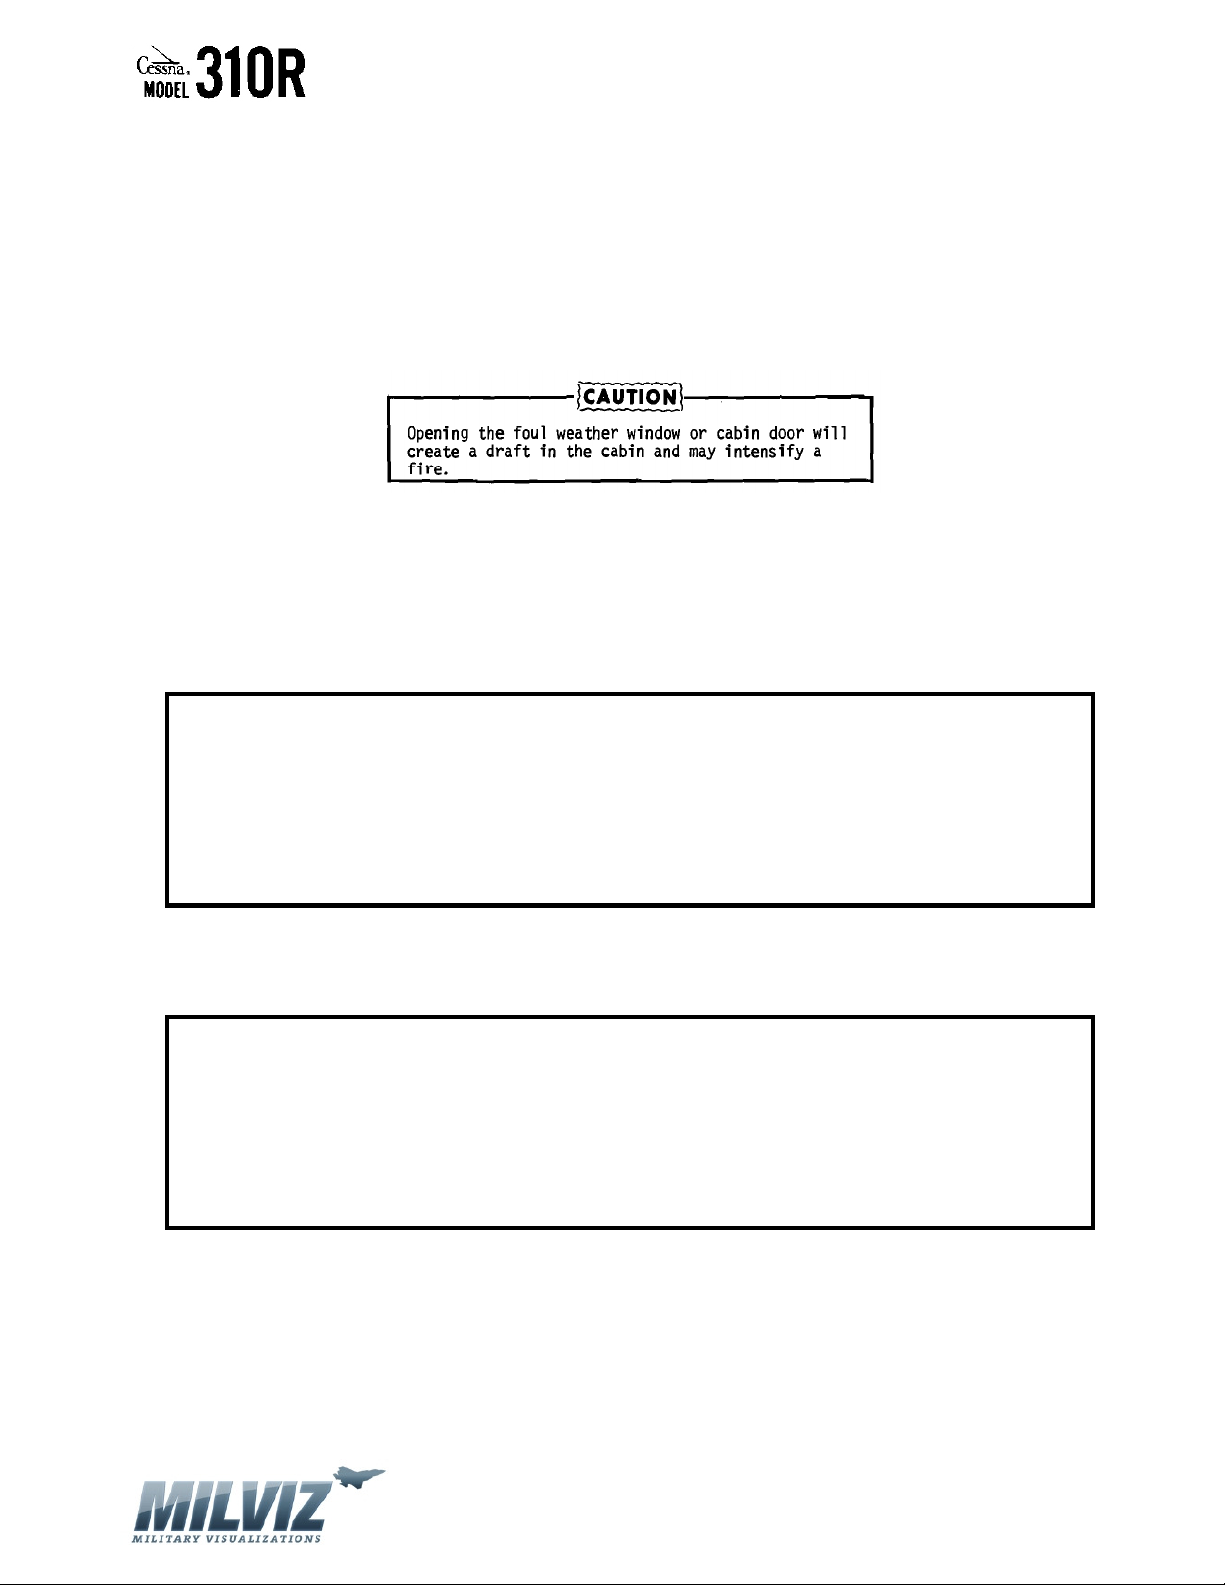
INFLIGHT CABIN FIRE OR SMOKE
1. Electrical Load – REDUCE to minimum required
2. Attempt to isolate the source of fire or smoke
3. Wemacs – OPEN
4. Cabin Air Controls – OPEN all vents including windshield defrost; CLOSE if intensity of
smoke increases
5. Land and evacuate airplane as soon as practical
EMERGENCY DESCENT PROCEDURES
PREFERRED PROCEDURE
1. Throttle – IDLE
2. Propellers – FULL FORWARD
3. Mixtures – ADJUST for smooth operation with gradual enrichment as altitude is lost
4. Wing Flaps – UP
5. Landing Gear – UP
6. Moderate Bank – INITIATE
7. Airspeed – 220 KIAS
IN TURBULENT ATMOSPHERIC CONDITIONS
1. Throttles – IDLE
2. Propellers – FULL FORWARD
3. Mixtures – ADJUST for smooth operation with gradual enrichment as altitude is lost
4. Wing Flaps – DOWN 35o
5. Landing Gear – DOWN
6. Moderate Bank – INITIATE
7. Airspeed – 138 KIAS
Version 1.0 – 23 May 2010
[19]
Page 20

MilViz Cessna 310R Pilot’s Operating Handbook
EMERGENCY LANDING PROCEDURES
FORCED LANDING (With Power)
1. Landing Site – CHECK (Overfly site at 100 KIAS and 15o wing flaps)
2. Landing Gear – DOWN if surface is smooth and hard
a. Normal Landing – INITIATE (Keep nosewheel off ground as long as practical)
3. Landing Gear – UP if surface is rough or soft
a. Approach – 100 KIAS with 15o wing flaps
b. All Switches Except Magnetos – OFF
c. Cabin Door – UNLATCH prior to flare-out
d. Mixtures – IDLE CUT-OFF
e. Magneto Switches – OFF
f. Fuel Selectors – OFF
g. Landing Attitude – NOSE HIGH
FORCED LANDING (Complete Power Loss)
1. Mixtures – IDLE CUT-OFF
2. Propellers – FEATHER
3. Fuel Selectors – OFF
4. All Switches Except Battery – OFF
5. Approach – 111 KIAS
6. If Smooth and Hard Surface:
a. Landing Gear – DOWN within gliding distance of field
b. Wing Flaps – AS REQUIRED
c. Battery Switch – OFF
d. Cabin Door – UNLATCH prior to flare-out
e. Normal Landing – INITIATE (Keep nosewheel off ground as long as practical)
7. If Rough or Soft Surface:
a. Landing Gear – UP
b. Wing Flaps – DOWN 15o
c. Approach – 97 KIAS
d. Battery Switch – OFF
e. Cabin Door – UNLATCH prior to flare-out
f. Landing Attitude – NOSE HIGH
Version 1.0 – 23 May 2010
[20]
Page 21

MilViz Cessna 310R Pilot’s Operating Handbook
LANDING WITH FLAT MAIN GEAR TIRE
1. Landing Gear – Leave DOWN
2. Fuel Selectors – SELECT main tank on same side as defective tire
3. Fuel Selectors – MAIN TANKS
4. Wind should be headwind or crosswind opposite the defective tire
5. Wing Flaps – DOWN 35o
6. In approach, align airplane with edge of runway opposite the defective tire, allowing
room for a mild turn in the landing roll
7. Land slightly wing low on the side of the inflated tire and lower the nosewheel to the
ground immediately for a positive steering
8. Use full aileron in landing roll to lighten the load on the defective tire
9. Apply brakes only on the inflated tire to minimize landing roll and maintain directional
control
10. Stop airplane to avoid further damage unless active runway must be cleared for other
traffic
LANDING WITH DEFECTIVE MAIN GEAR
1. Fuel Selectors – SELECT main tank on the same side as defective gear
2. Fuel Selectors – MAIN TANKS before landing
3. Wind – HEADWIND or crosswind opposite defective gear
4. Landing Gear – DOWN
5. Wing Flaps – DOWN 35o
6. Approach – ALIGN AIRPLANE with the edge of runway opposite the defective landing
gear
7. Battery Switch – OFF
8. Land wing low toward operative landing gear. Lower nosewheel immediately for
positive steering
9. Ground Loop – INITIATE into defective landing gear
10. Mixtures – IDLE CUT-OFF
11. Use full aileron in landing roll to lighten the load on the defective gear
12. Apply brakes only on the operative landing gear to hold desired rate of turn and shorten
landing roll
13. Fuel Selectors – OFF
14. Airplane – EVACUATE
Version 1.0 – 23 May 2010
[21]
Page 22

MilViz Cessna 310R Pilot’s Operating Handbook
LANDING WITH FLAT NOSE GEAR TIRE
1. Landing Gear – Leave DOWN
2. Passengers and Baggage – MOVE AFT
3. Approach – 100 KIAS with 15o Wing Flaps
4. Landing Attitude – NOSE HIGH
5. Nose – HOLD OFF during landing roll
6. Brakes – MINIMUM in landing roll
7. Throttles – RETARD in landing roll
8. Control Wheel – FULL AFT until airplane stops
9. Minimize additional taxiing to prevent further damage
LANDING WITH DEFECTIVE NOSE GEAR
1. If Smooth and Hard Surface:
a. Baggage and Passengers – MOVE AFT
b. Landing Gear – DOWN
c. Approach – 100 KIAS with 15o Wing Flaps
d. Landing Attitude – NOSE HIGH
e. Nose – HOLD OFF during landing roll
f. Brakes – MINIMUM in landing roll
g. Throttles – RETARD in landing roll
h. Control Wheel – FULL AFT until airplane stops
i. Minimize additional taxiing to prevent further damage
2. If Rough or Sod Surface:
a. Landing Gear – UP
b. Approach – 100 KIAS with 15o Wing Flaps
c. All Switches Except Magnetos – OFF
d. Cabin Doors – UNLATCH prior to flare-out
e. Landing Attitude – NOSE HIGH
f. Mixtures – IDLE CUT-OFF
g. Magnetos Switches – OFF
h. Fuel Selectors – OFF
Version 1.0 – 23 May 2010
[22]
Page 23

MilViz Cessna 310R Pilot’s Operating Handbook
LANDING WITHOUT FLAPS (0o Extension)
1. Mixtures – AS REQUIRED for flight altitude
2. Propellers – FULL FORWARD
3. Fuel Selectors – MAIN TANKS
4. Minimum Approach Speed – 105 KIAS
5. Landing Gear – DOWN
DITCHING
1. Landing Gear – UP
2. Approach – HEADWIND if high winds; PARALLEL to SWELLS if light wind and heavy swells
3. Wing Flaps – DOWN 35o
4. Power – AS REQUIRED (300 Feet Per Minute Descent)
5. Airspeed – 93 KIAS minimum
6. Attitude – DESCENT ATTITUDE through touchdown
FUEL SYSTEM EMERGENCY PROCEDURES
ENGINE-DRIVEN FUEL PUMP FAILURE
1. Fuel Selector – MAIN TANK
2. Auxiliary Fuel Pump – ON
3. Cowl Flap – OPEN
4. Mixture – ADJUST for smooth engine operation
5. As Soon As Practical – LAND
6. Fuel in the auxiliary and opposite main tank is unusable
Version 1.0 – 23 May 2010
[23]
Page 24

MilViz Cessna 310R Pilot’s Operating Handbook
ELECTRICAL SYSTEM EMERGENCY PROCEDURES
ALTERNATOR FAILURE (Single)
1. Electrical Load – REDUCE
2. If Circuit Breaker Is Tripped:
a. Turn off affected alternator
b. Reset affected alternator circuit breaker
c. Turn on affected alternator switch
d. If circuit breaker reopens, turn off alternator
3. If Circuit Breaker Does Not Trip:
a. Select affected alternator on voltmeter and monitor output
b. If output is normal and failure light remains on, disregard fail indication and have
indicator checked after landing
c. If output is insufficient, turn off alternator and reduce electrical load to one
alternator capacity
d. If complete loss of alternator output occurs, check field fuse and replace if
necessary
e. If an intermittent light indication accompanied by voltmeter fluctuation is
observed, turn off affected alternator and reduce load to one alternator capacity
Version 1.0 – 23 May 2010
[24]
Page 25

MilViz Cessna 310R Pilot’s Operating Handbook
ALTERNATOR FAILURE (Dual)
1. Electrical Load – REDUCE
2. If Circuit Breakers Are Tripped:
a. Turn off alternators
b. Reset circuit breakers
c. Turn on left alternator and monitor output on voltmeter
d. If alternator is charging, leave it on. Disregard failure light if still illuminated
e. If still inoperative, turn off left alternator
f. Repeat steps c through e for right alternator
g. If circuit breakers reopen, prepare to terminate flight
3. If Circuit Breakers Have Not Tripped:
a. Turn off alternators
b. Check field fuses and replace as required
c. Turn on left alternator and monitor output on voltmeter
d. If alternator is charging, leave it on. Disregard failure light if still illuminated
e. If still inoperative, turn off left alternator
f. Repeat steps c through e for right alternator
g. If both still inoperative, turn off alternators and turn on emergency alternator
field switch
h. Repeat steps c through e for each alternator
i. If still inoperative, turn off alternators, nonessential electrical items and prepare
to terminate flight
AVIONICS BUS FAILURE
1. Avionics Master Switch – OFF
2. Emergency Avionics Power Switch – ON
FLIGHT INSTRUMENTS EMERGENCY PROCEDURES
VACUUM PUMP FAILURE (Attitude and Directional Gyros)
1. Failure indicated by left or right red failure button exposed on vacuum pump gage
2. Automatic valve will select operative source
3. Vacuum Pressure – CHECK proper vacuum from operative source
Version 1.0 – 23 May 2010
[25]
Page 26

MilViz Cessna 310R Pilot’s Operating Handbook
OBSTRUCTION OR ICING OF STATIC SOURCE
1. Alternate Static Source – OPEN
2. Excess Altitude and Airspeed – MAINTAIN to compensate for change in calibration
AIR INLET OR FILTER ICING EMERGENCY PROCEDURES
1. Alternate Air Control(s) – PULL OUT
2. Power – INCREASE as required
3. Mixture(s) – LEAN as required
PROPELLER SYNCHROPHASER
ENGINE INOPERATIVE PROCEDURES
1. Propeller Synchrophaser – OFF (Optional System)
SYNCHROPHASER FAILURE
1. Propeller Synchrophaser – OFF (Optional System)
2. Propeller Synchrophaser Circuit Breaker – PULL (Optional System)
EMERGENCY EXIT WINDOW
1. Red Handle – PULL down and to the rear
2. Window – PUSH OUT at top
Version 1.0 – 23 May 2010
[26]
Page 27
MilViz Cessna 310R Pilot’s Operating Handbook
SPINS
1. Throttles – CLOSE IMMEDIATELY
2. Ailerons – NEUTRALIZE
3. Rudder – HOLD FULL RUDDER opposite the direction of rotation
4. Control Wheel – FORWARD BRISKLY, ½ turn of spin after applying full rudder
5. Inboard Engine – INCREASE POWER to slow rotation (If Necessary)
6. After rotation has stopped:
a. Rudder – NEUTRALIZE
b. Inboard Engine (If Used) – DECREASE POWER to equalize engines
c. Control Wheel – PULL to recover from resultant dive. Apply smooth steady
control pressure
Version 1.0 – 23 May 2010
[27]
Page 28
MilViz Cessna 310R Pilot’s Operating Handbook
SECTION 4
NORMAL PROCEDURES
TABLE OF CONTENTS
INTRODUCTION ……………………………………………………………………………………………………… 28
Preflight Inspection ……………………………………………………………………….………….… 29
NORMAL PROCEDURES AMPLIFIED CHECKLISTS ………………………………..…..……………… 31
Airspeeds for Safe Operation ……………………………………………………………………… 31
Before Starting Engines ………………………………………………………………………………. 32
Starting Engines ………………………………………………………………………………………….. 33
Before Taxiing …………………………………………………………………………………………….. 34
Taxiing ………………………………………………………………………………………………………… 34
Before Takeoff …………………………………………………………………………………………….. 35
Takeoff ………………………………………………………………………………………………………… 36
After Takeoff ……………………………………………………………………………………………….. 38
Climb ………………………………………………………………………………………………………….. 38
Cruise …………………………………………………………………………………………………………. 39
Descent ………………………………………………………………………………………………………. 41
Before Landing …………………………………………………………………………………………… 41
Balked Landing …………………………………………………………………………………………… 42
After Landing ……………………………………………………………………………………………… 42
Shutdown ………………………………………………………………………………………………….. 43
INTRODUCTION
Section 4 of the Pilot’s Operating Handbook describes the recommended procedures for
normal operations. This section provides normal procedural action required in an abbreviated
checklist form.
Version 1.0 – 23 May 2010
[28]
Page 29
MilViz Cessna 310R Pilot’s Operating Handbook
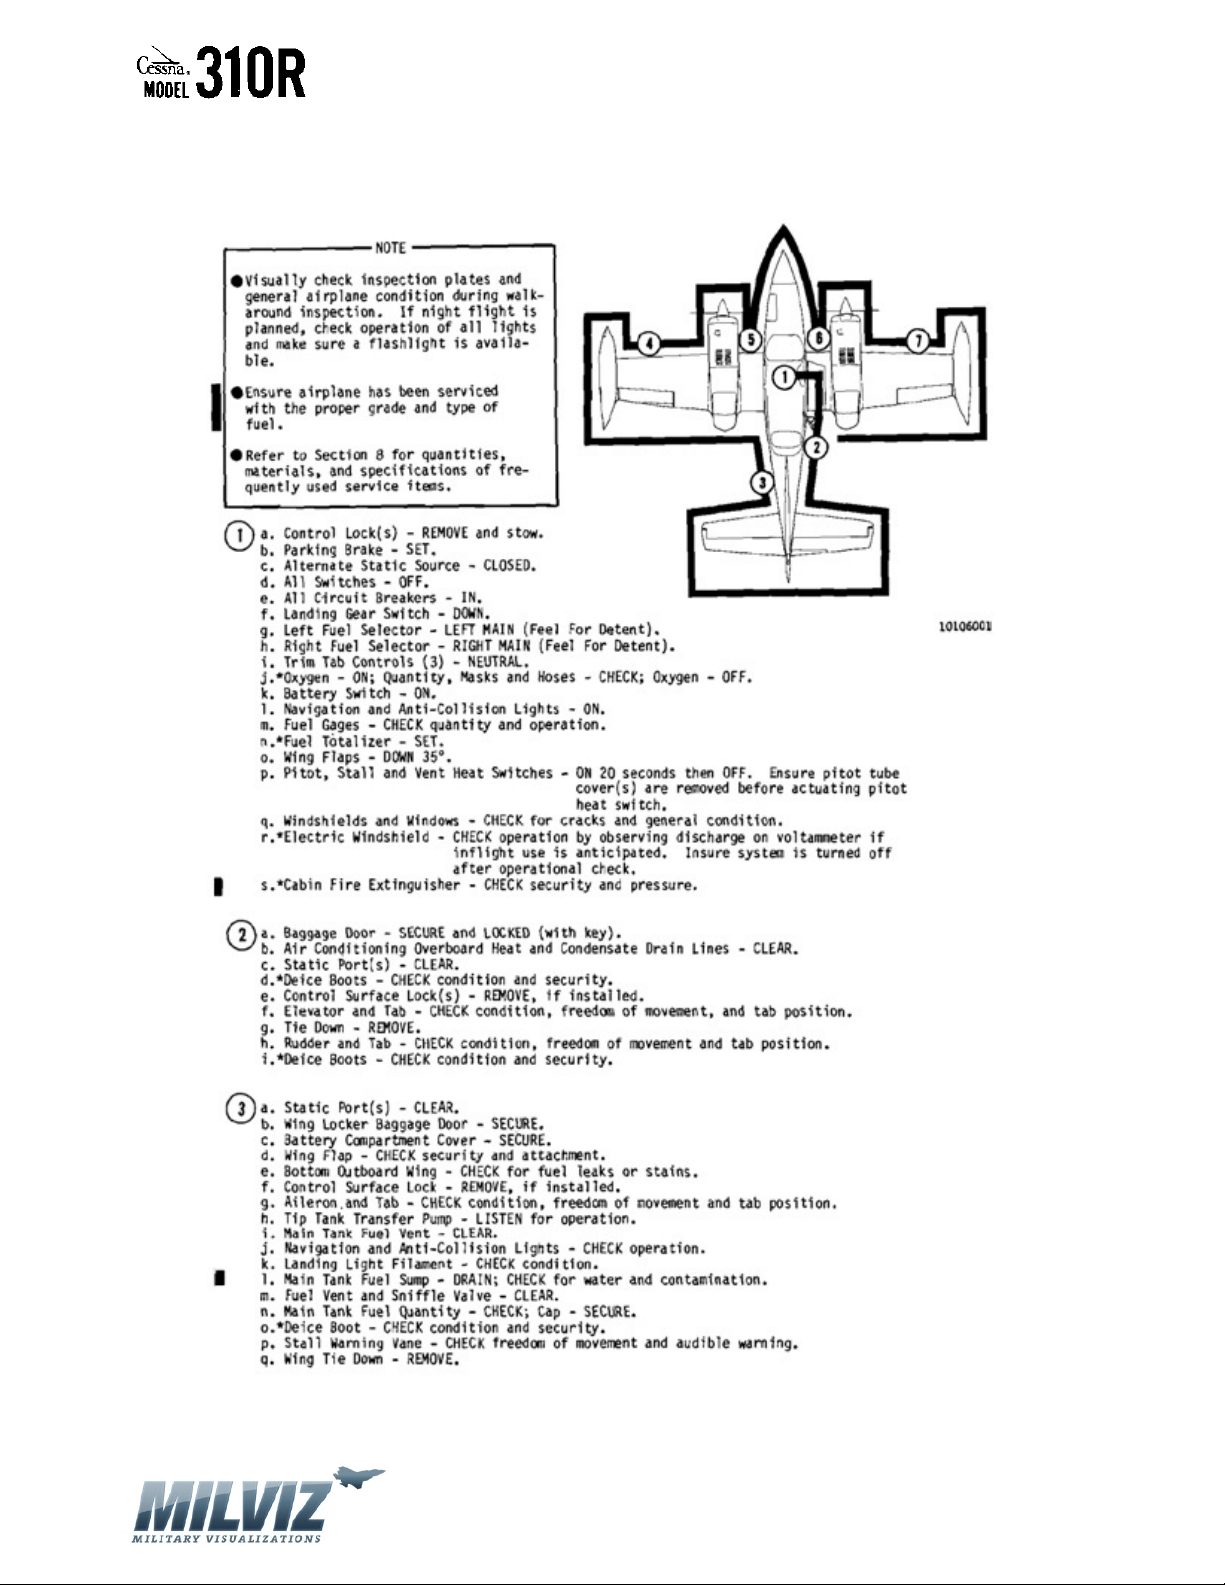
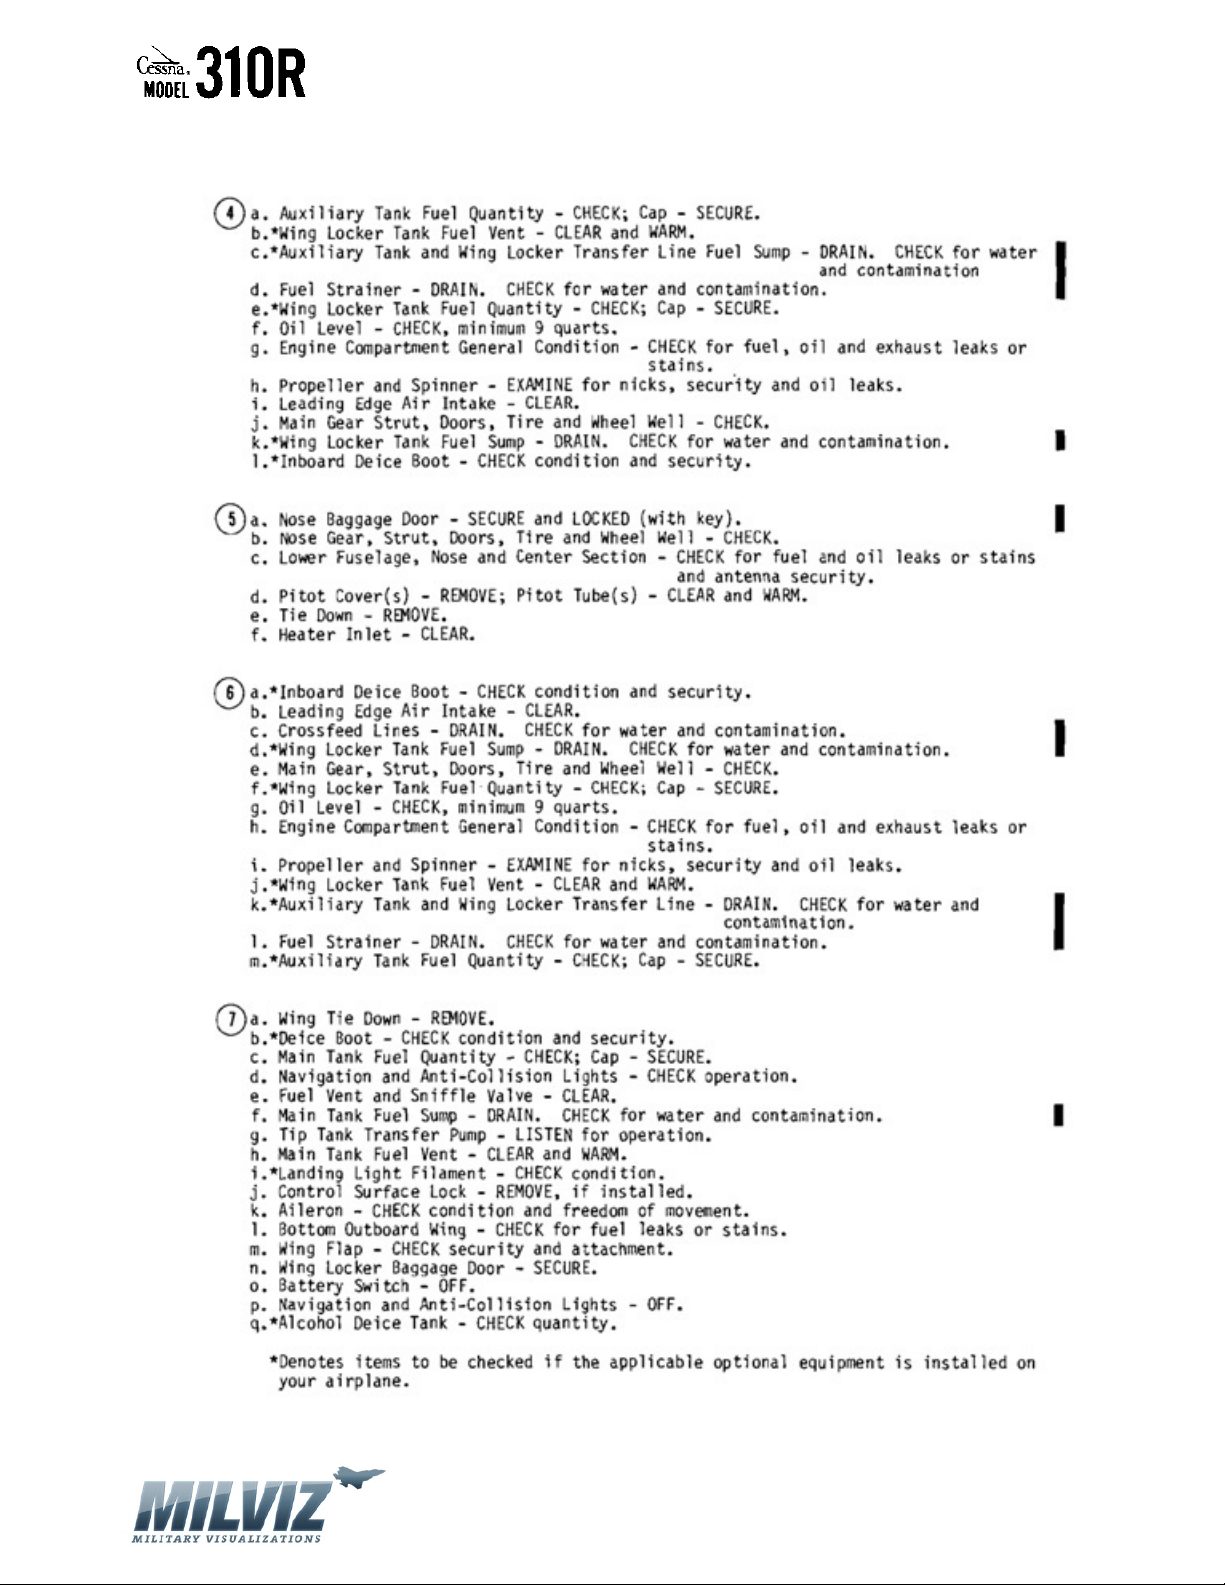
PREFLIGHT INSPECTION
Version 1.0 – 23 May 2010
[29]
Page 30
MilViz Cessna 310R Pilot’s Operating Handbook
Version 1.0 – 23 May 2010
[30]
Page 31
MilViz Cessna 310R Pilot’s Operating Handbook
NORMAL PROCEDURES
AMPLIFIED CHECKLISTS
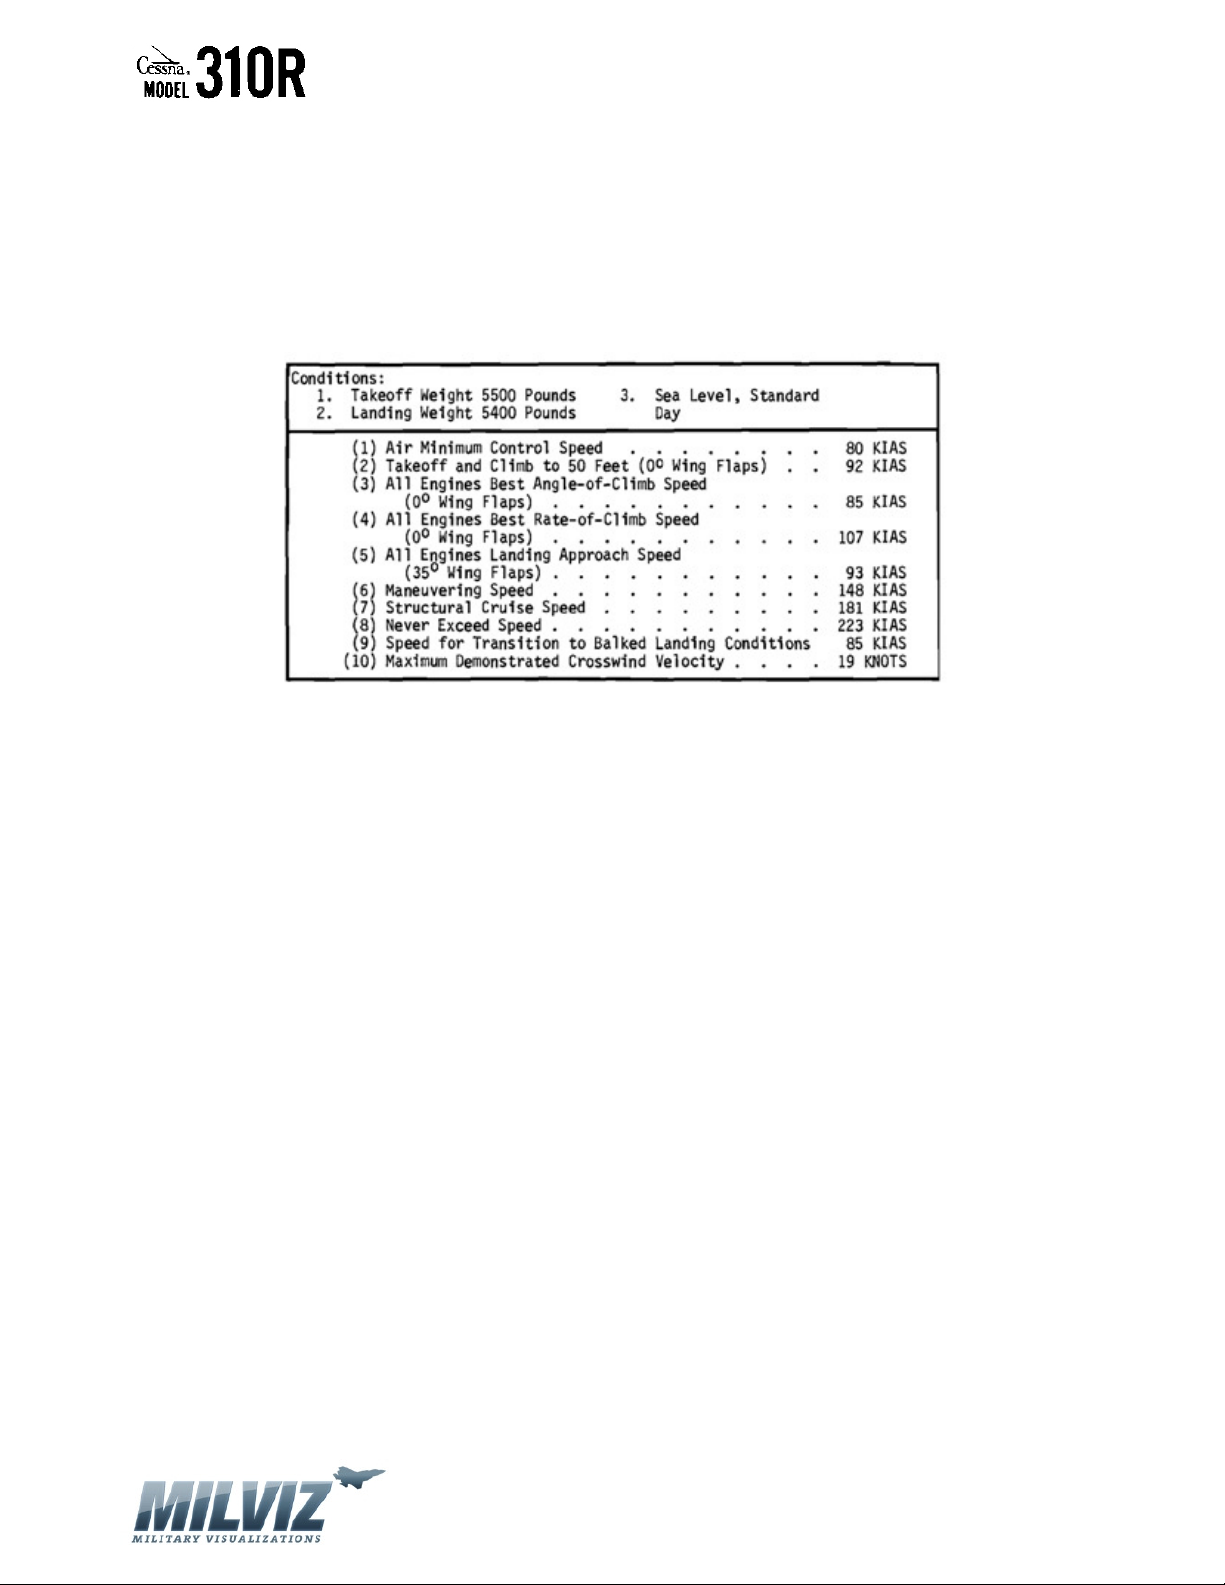
AIRSPEEDS FOR SAFE OPERATION
Version 1.0 – 23 May 2010
[31]
Page 32

MilViz Cessna 310R Pilot’s Operating Handbook
BEFORE STARTING ENGINES
1. Preflight – Complete
2. Cabin Door – LATCHED and SECURE
3. Control Locks – REMOVE
4. Seat, Seat Belts, and Shoulder Harness – ADJUST and SECURE
5. Brakes -- Set
6. Fuel Selectors – BOTH ENGINES SET TO MAIN TANKS
7. Landing Gear Switch – DOWN
8. Mixtures – FULL RICH
9. Propellers – FULL FORWARD
10. Throttles – OPEN ONE INCH
11. Circuit Breakers – IN
12. Emergency Alternator Field Switch – OFF
13. Emergency Avionics Power Switch – OFF
14. Avionics Master Switch – OFF
15. Auxiliary Fuel Pump Switches – OFF
16. Battery and Alternators – ON
17. Lighting Rheostats – AS REQUIRED
18. Landing Gear Position Indicator Lights – Check green lights ON
19. All Warning Lights – PRESS-TO-TEST
20. Altimeter and Clock – SET
21. Cowl Flaps – LOCKED FULL OPEN
22. Fuel Quantity – CHECK
23. Fuel Totalizer – SET (Optional System)
24. Cabin Air Controls – SET AS REQUIRED
25. Alternate Air Controls – IN
26. Anti-Collision Lights -- ON
Version 1.0 – 23 May 2010
[32]
Page 33
MilViz Cessna 310R Pilot’s Operating Handbook
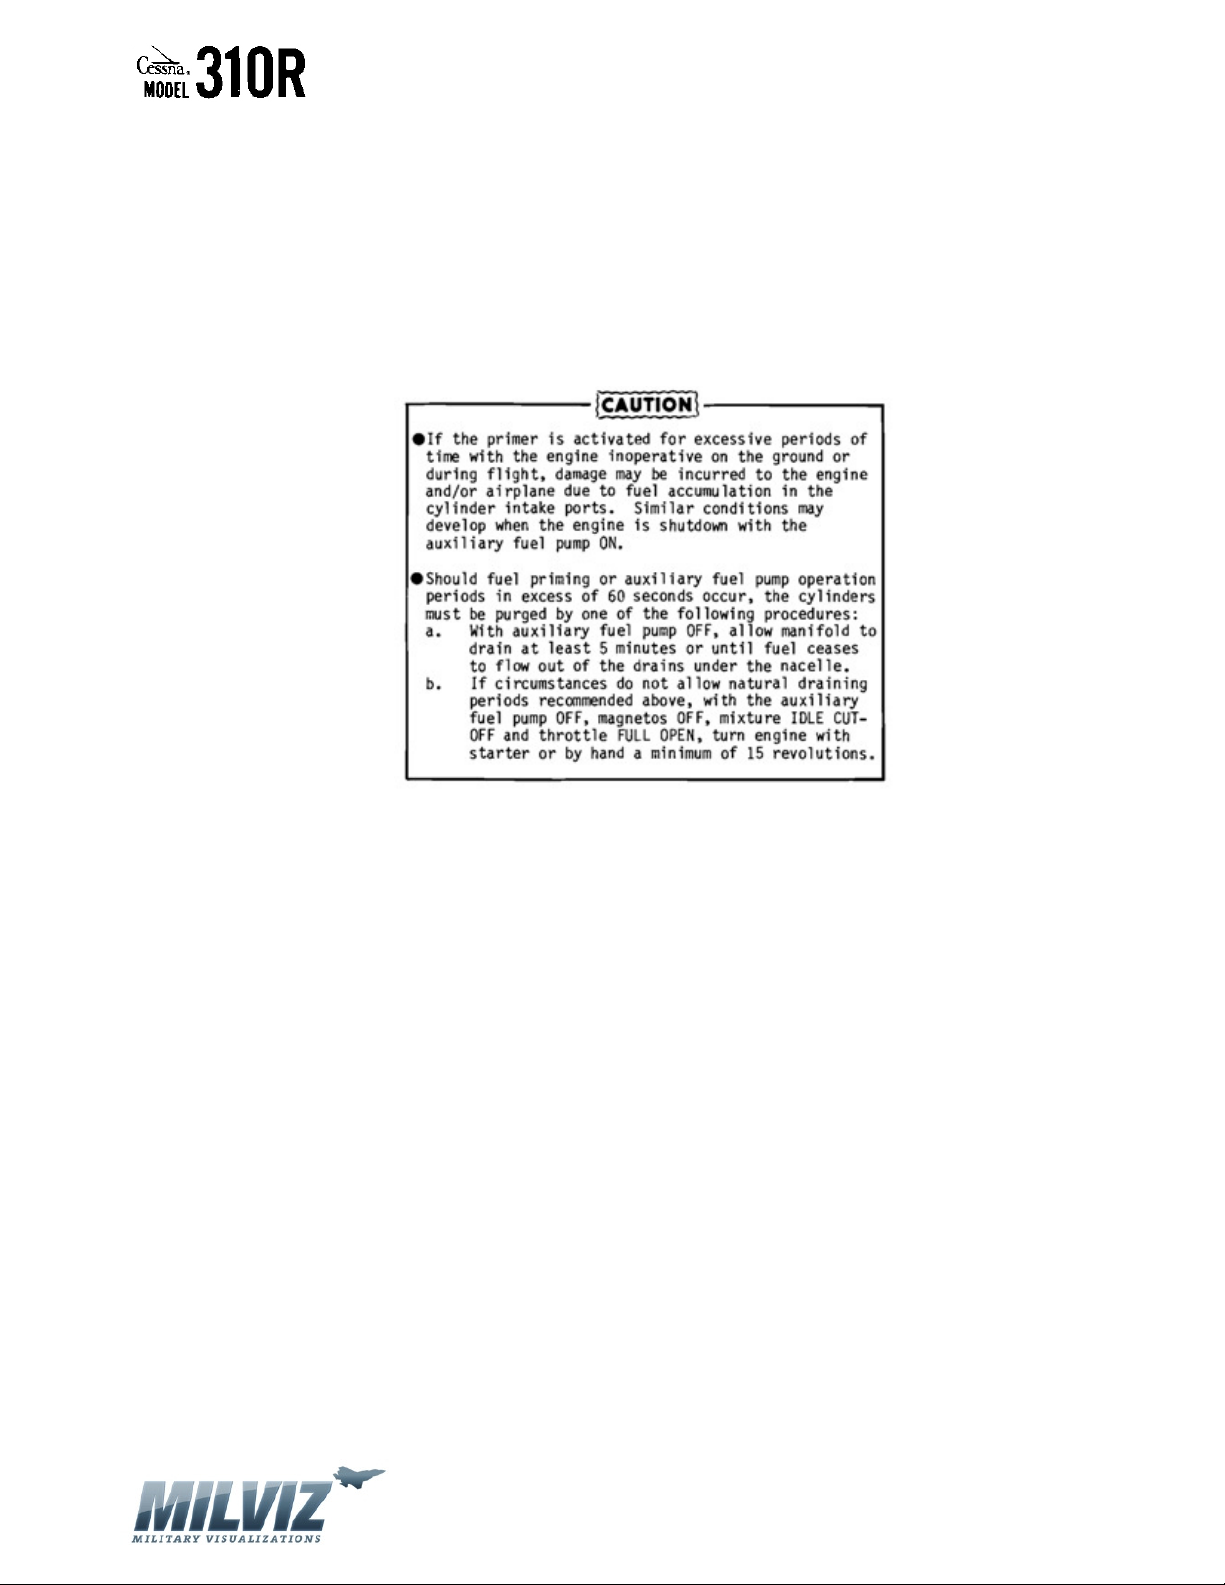
STARTING ENGINES
1. Propellers – CLEAR
2. Magneto Switches – ON
3. Engines – Start
a. Starter Button – PRESS
b. Primer Switch – Left Engine – LEFT, Right Engine – RIGHT
4. Auxiliary Fuel Pumps – LOW to purge vapor from fuel system
5. Throttle – 800 to 1000 RPM
6. Oil Pressure – 10 PSI minimum in 30 seconds in normal weather, or 60 seconds in cold
weather. If no indication appears, shutdown engine and investigate
7. Alternators – ON AND CHECK
Version 1.0 – 23 May 2010
[33]
Page 34
MilViz Cessna 310R Pilot’s Operating Handbook
BEORE TAXIING
1. Passenger Briefing – COMPLETE
2. Avionics Master Switch – ON
3. Avionics -- SET
4. Wing Flaps – UP
5. Lights – AS REQUIRED
6. Cabin Temperature – AS REQUIRED
a. If heating and defrosting is required:
i. Cabin Air Knobs – OPEN
ii. Defrost Knob – AS REQUIRED
iii. Temperature Control Knob – OPEN
iv. Cabin Heat Switch – HEAT
v. Heat Registers – AS REQUIRED
b. If ventilation is required:
i. Cabin Air Knobs – OPEN
ii. Cabin Heat Switch – FAN
iii. Heat Registers and Directional Air Vents – AS REQUIRED
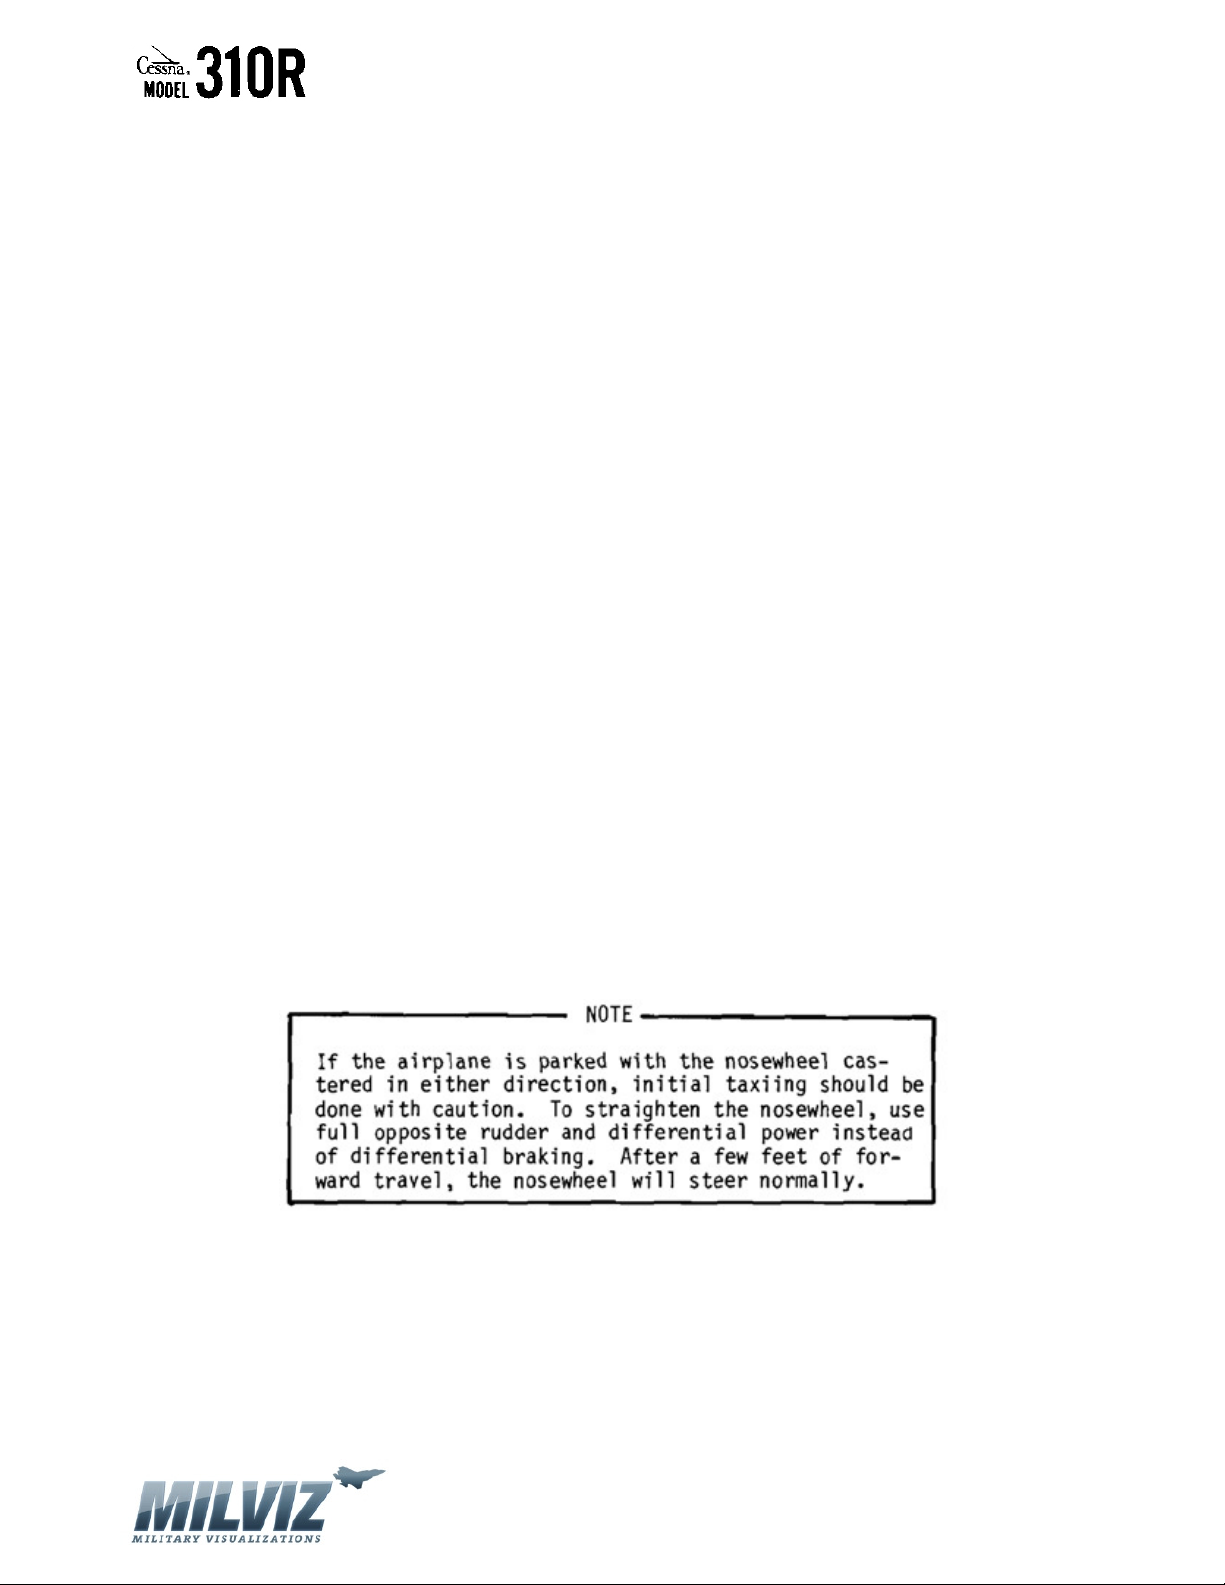
7. Brakes – RELEASE (Pushing the parking brake knob in releases the trapped brake fluid,
allowing the brakes to be released).
TAXIING
1. Throttles – AS REQUIRED
2. Brakes – CHECK
3. Flight Instruments – CHECK
Version 1.0 – 23 May 2010
[34]
Page 35
MilViz Cessna 310R Pilot’s Operating Handbook
BEFORE TAKEOFF
1. Brakes – SET
2. Engine Runup – COMPLETE
a. Throttles – 1700 RPM
b. Alternators – CHECK
c. Vacuum System – CHECK 4.75 to 5.25 inches Hg.
d. Magnetos – CHECK 150 RPM maximum drop with a maximum differential of 50
RPM
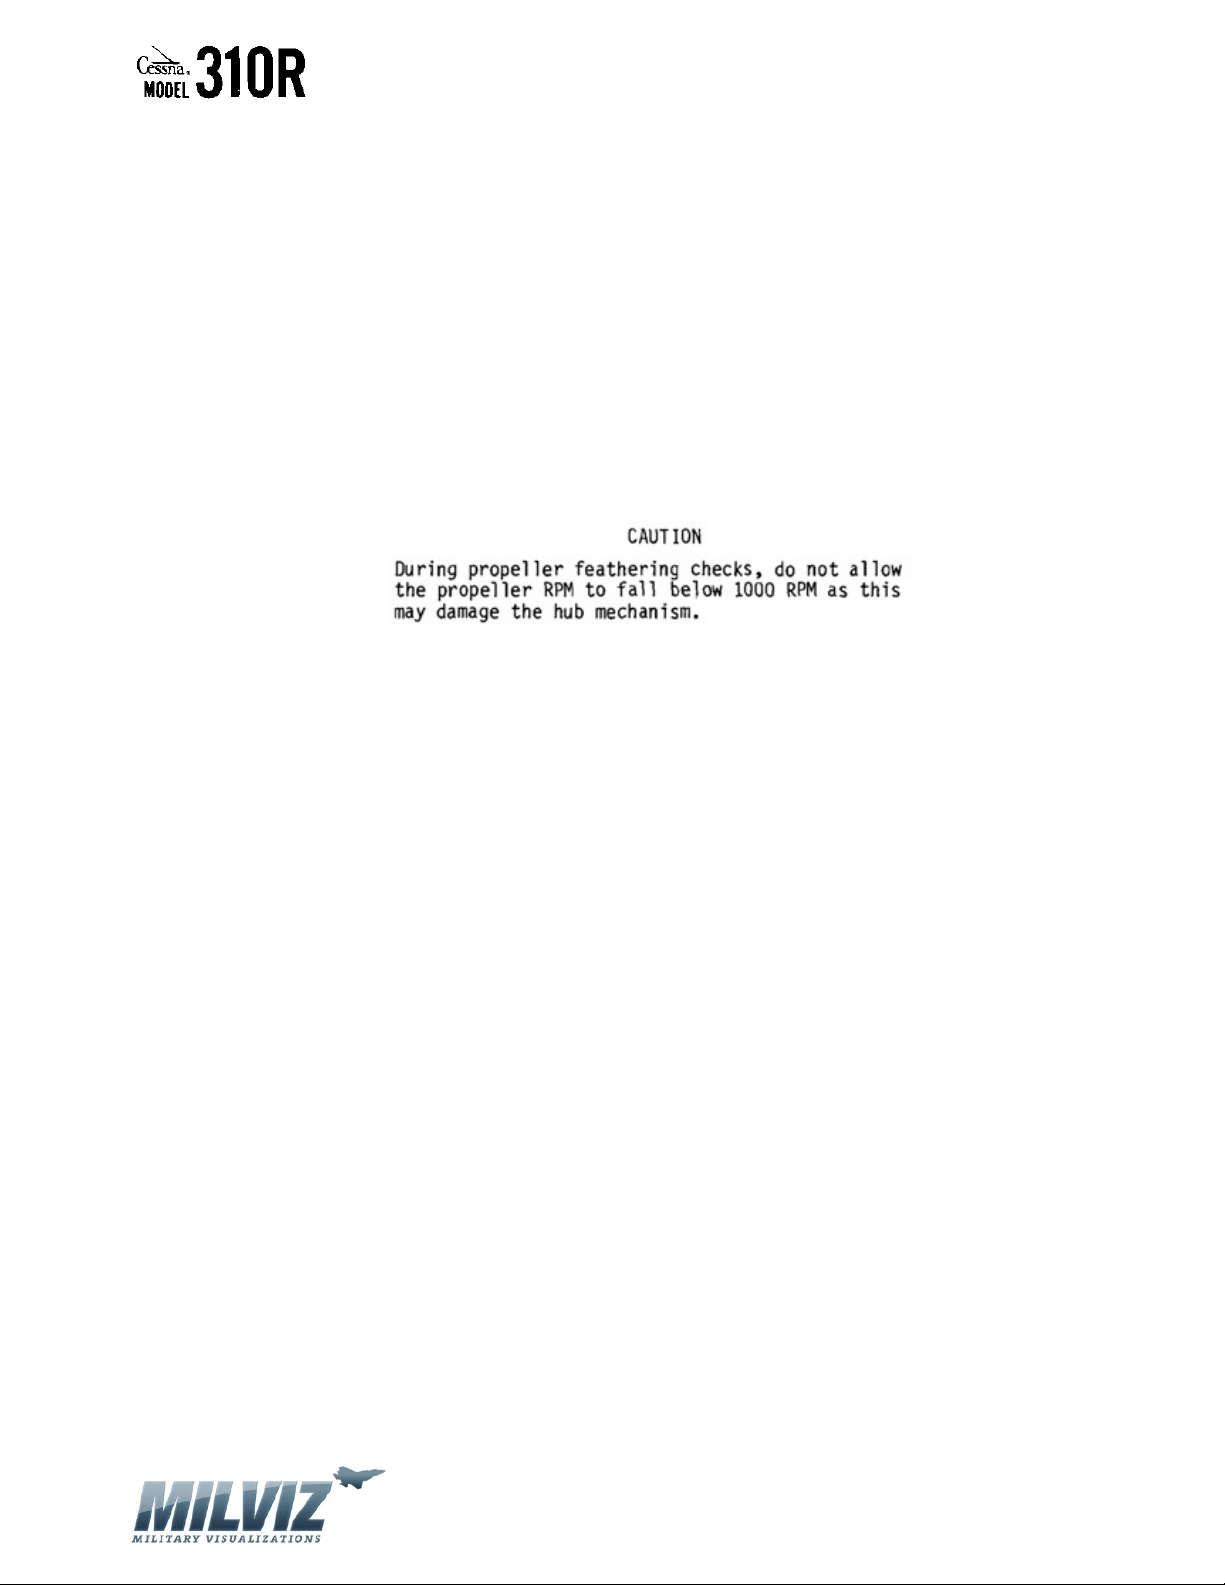
e. Propellers – CHECK feathering to 1200 RPM; return to high RPM (Full Forward
Position)
f. Engine Instruments – CHECK green arc
g. Throttles – 2100 RPM
h. Governor – CHECK (Retard propeller condition levers until noting slight drop in
RPM, then advance throttle and check for no increase in RPM).
i. Propellers – FULL FORWARD
j. Throttles – RETARD TO IDLE
3. Fuel Quantity – CHECK
4. Fuel Selectors – CONFIRM MAIN TANKS SELECTED LEFT AND RIGHT ENGINES
5. Alternate Air Controls – IN
6. Cowl Flaps – LOCKED FULL OPEN
7. Trim Tabs – SET elevator, aileron and rudder tabs in the TAKEOFF range
8. Wing Flaps – UP
9. Flight Instruments and Avionics – SET
10. Lights – AS REQUIRED
11. All Cabin Doors and Windows – CLOSED
12. All Warning Lights – CLEAR
13. Auxiliary Fuel Pumps – ON
14. Flight Controls – CHECK
15. Ice Protection Equipment – AS REQUIRED
16. Seat Belts and Shoulder Harness – SECURE
17. Brakes – RELEASE
Version 1.0 – 23 May 2010
[35]
Page 36
MilViz Cessna 310R Pilot’s Operating Handbook
TAKEOFF
NORMAL TAKEOFF
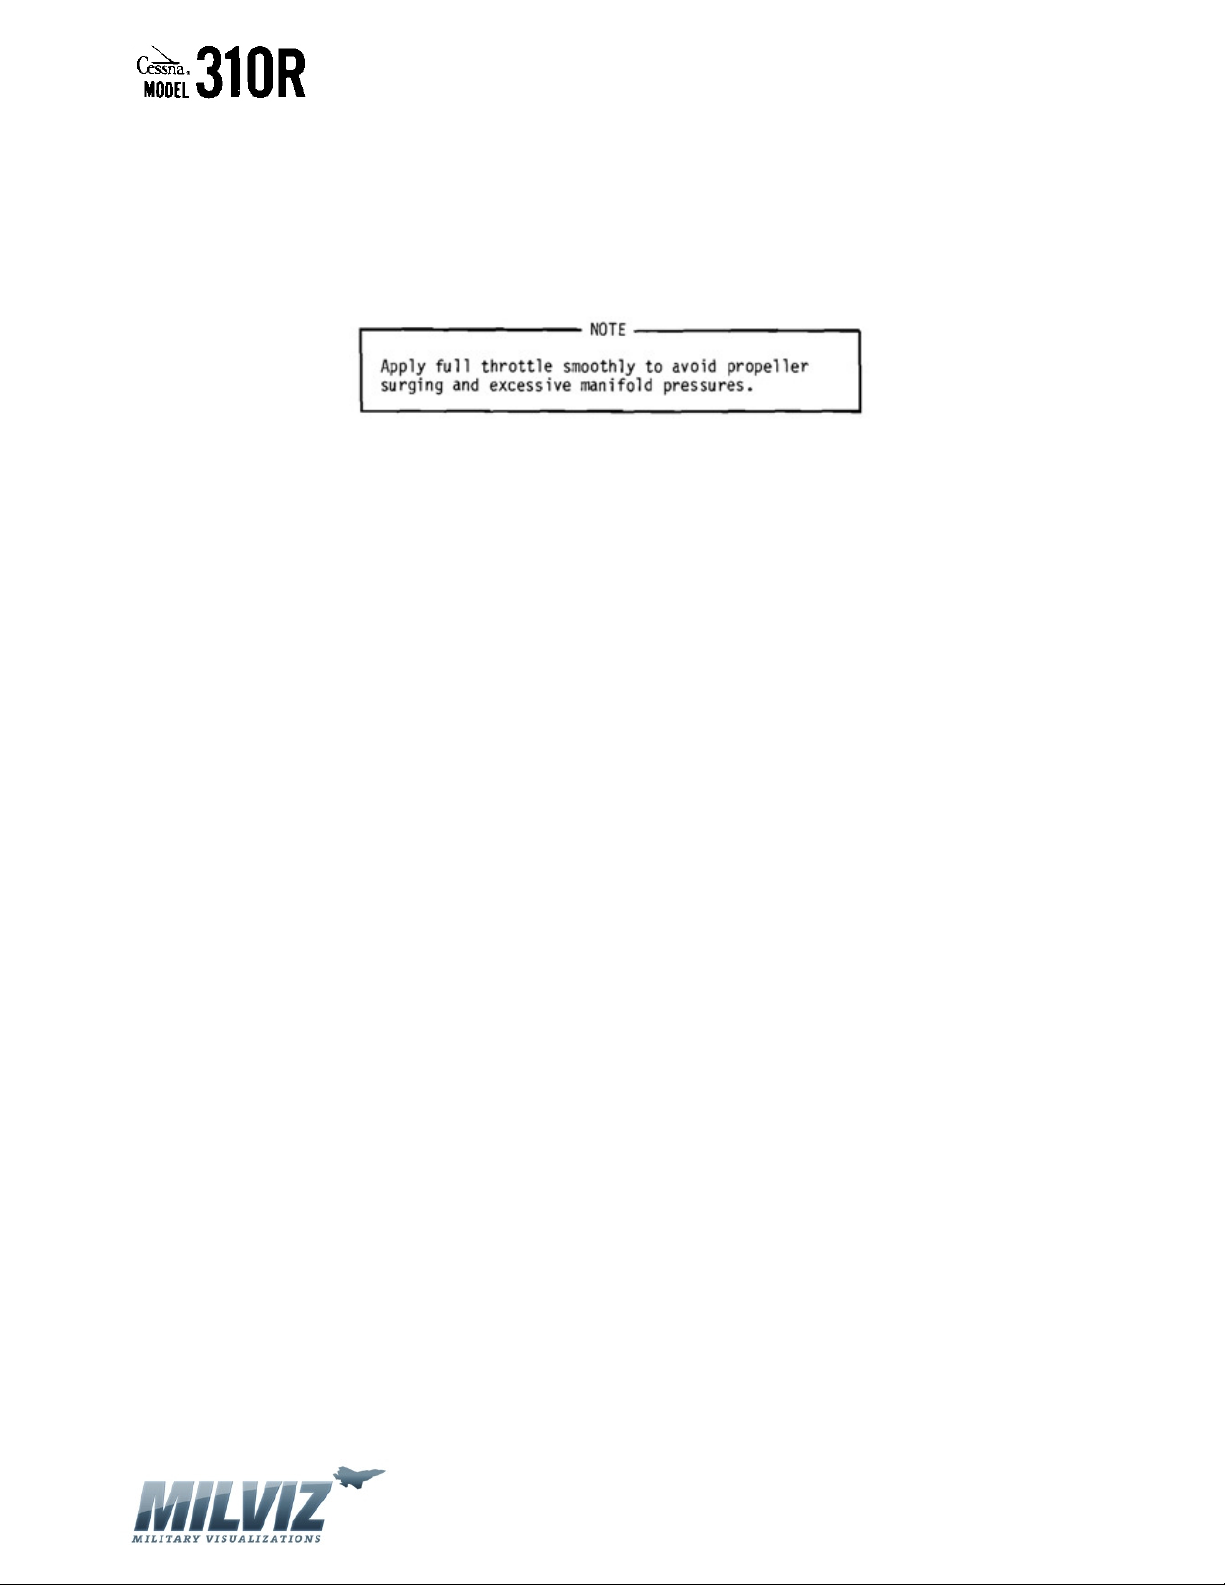
1. Power – FULL THROTTLE and 2700 RPM*
2. Mixtures – LEAN for field elevation
3. Engine Instruments – CHECK
4. Air Minimum Control Speed – 80 KIAS
5. Elevator Control – Raise nosewheel at 83 KIAS
6. Lift-Off – 92 KIAS at 5500 pounds (Refer to Section 5 for speeds at reduced weights)
Version 1.0 – 23 May 2010
[36]
Page 37
MilViz Cessna 310R Pilot’s Operating Handbook
MAXIMUM PERFORMANCE TAKEOFF
1. Wing Flaps – DOWN 15o
2. Brakes – SET
3. Power – FULL THROTTLE*
4. Mixtures – LEAN for field elevation
5. Brakes – RELEASE
6. Power – CHECK 2700 RPM
7. Elevator Control – Raise nosewheel at 70 KIAS
8. Air Minimum Control Speed – 80 KIAS
9. Lift-Off – 82 KIAS at 5500 pounds (Refer to Section 5 for speeds at reduced weights)
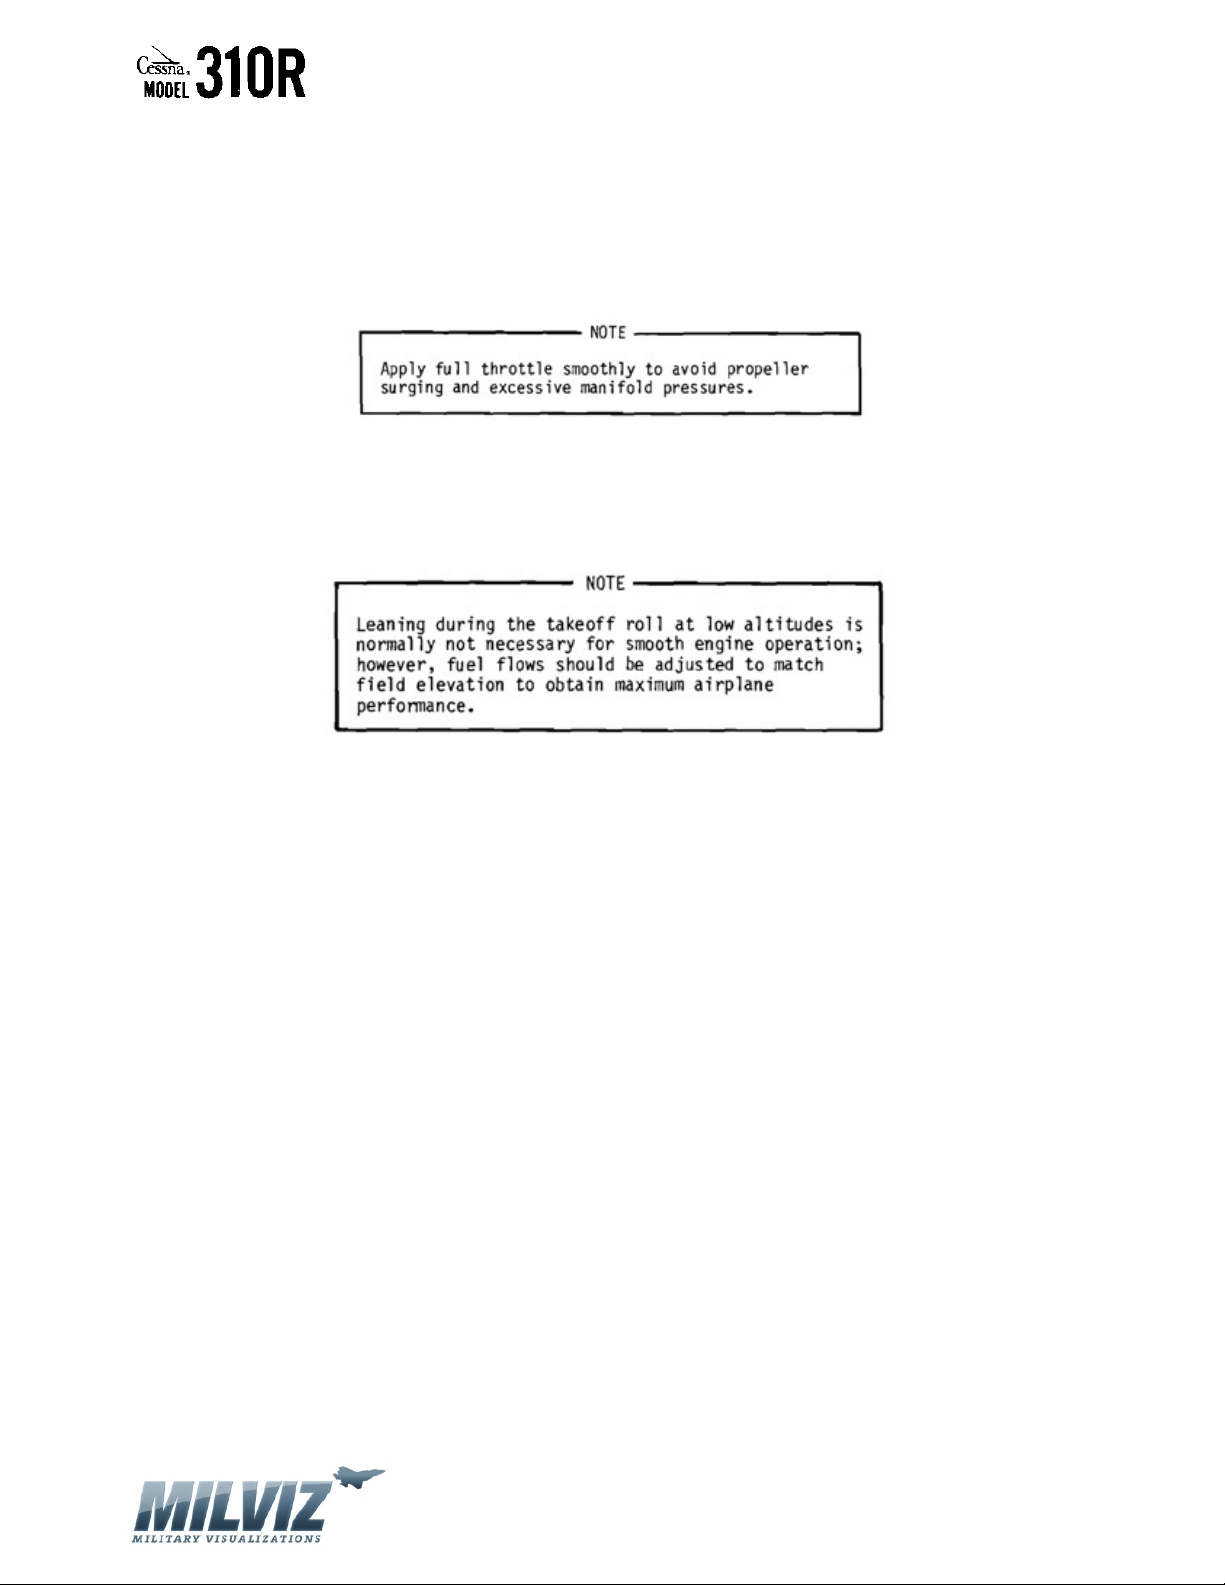
*
Note: Since use of full throttle is not recommended in the static runup, closely observe fullpower engine operation early in the takeoff run. Signs of rough engine operation, unequal
power between engines, or sluggish engine acceleration are good cause for discontinuing the
takeoff. If this occurs, make a thorough full throttle static runup before another takeoff is
attempted. Alternatively, advance throttles to RPM of 2100, check engine instruments, and
concurrently release brakes and smoothly advance throttles to full power during initial takeoff
roll.
Version 1.0 – 23 May 2010
[37]
Page 38
MilViz Cessna 310R Pilot’s Operating Handbook
AFTER TAKEOFF
1. Brakes – APPLY momentarily
2. Landing Gear – RETRACT and check red light off
3. Wing Flaps – UP after obstacles are cleared if maximum performance takeoff
4. Best Angle-of-Climb Speed – 85 KIAS at sea level to 89 KIAS at 15,000 feet with obstacle
5. Best Rate-of-Climb Speed With Wing Flaps Up – 107 KIAS at sea level and 5500 pounds
(Refer to Section 5 for speed at altitude and at reduced weight).
CLIMB
CRUISE CLIMB
1. Power – 2500 RPM and 24.5 inches Hg
2. Airspeed – 115 KIAS to 130 KIAS
3. Mixtures – ADJUST to climb fuel flow
4. Cowl Flaps – OPEN or as required
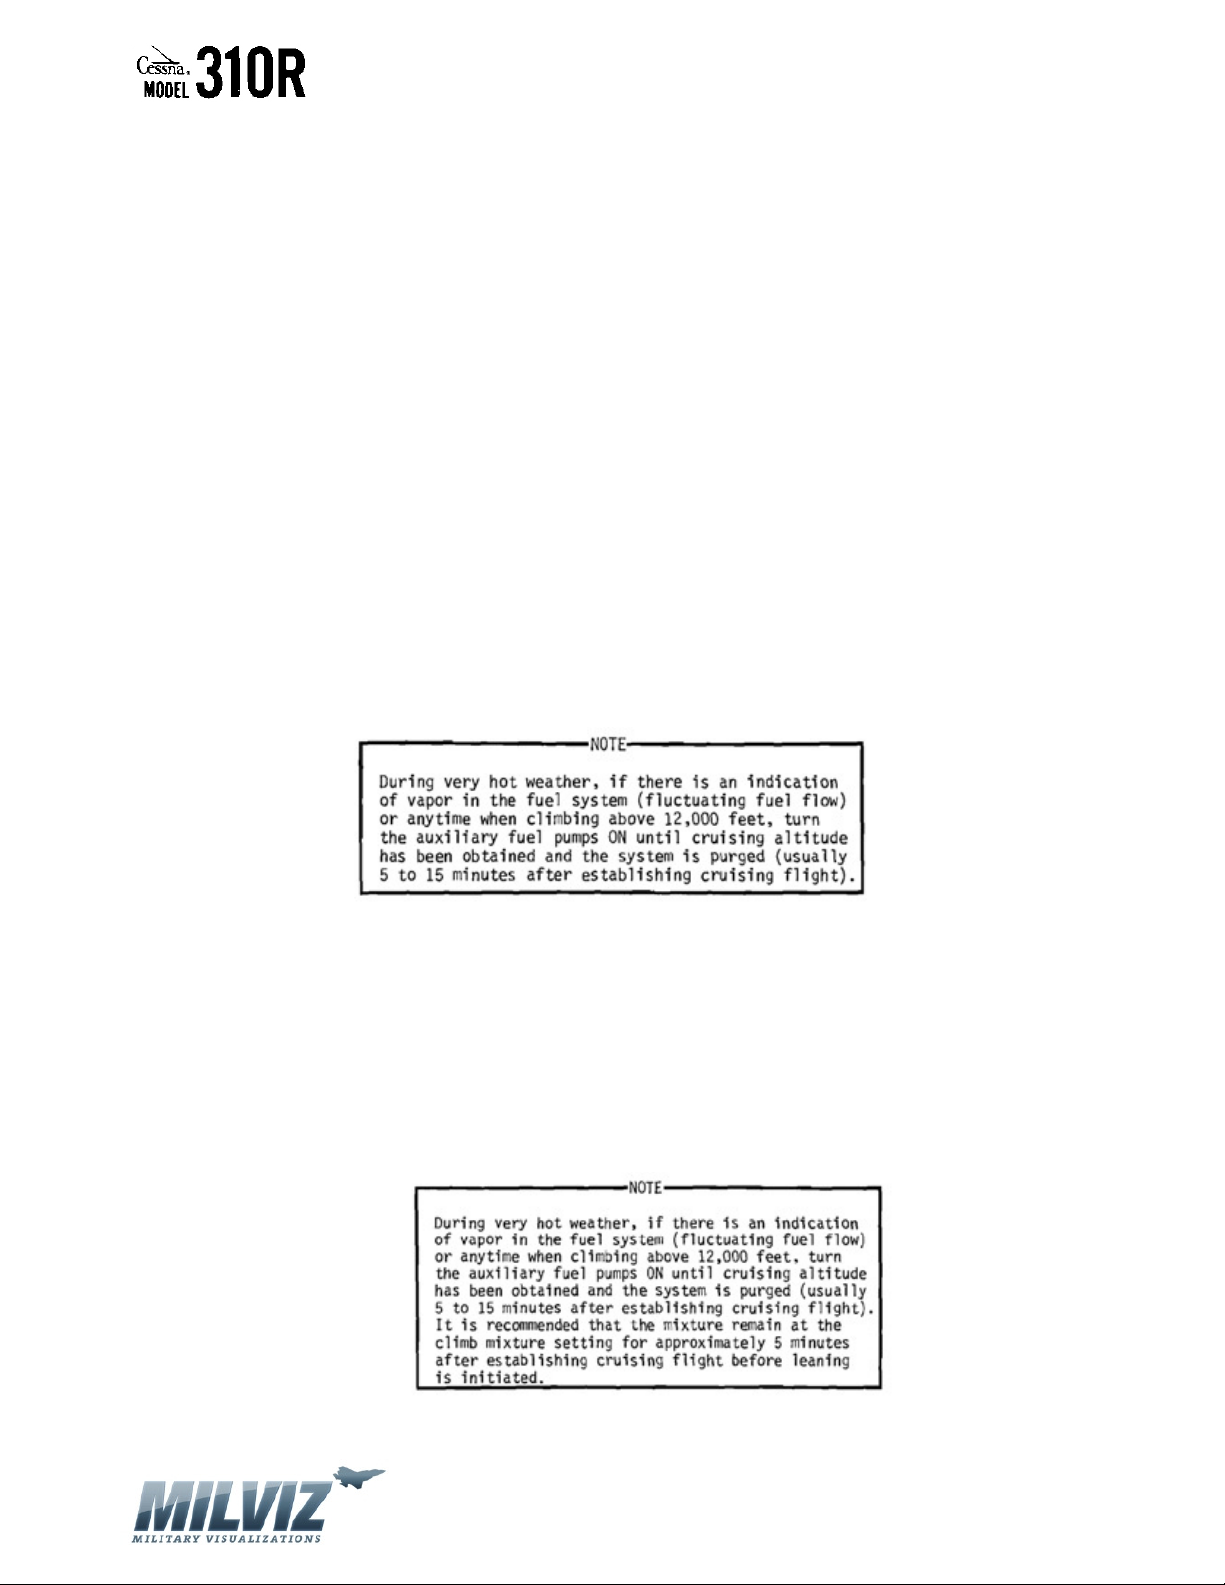
5. Auxiliary Fuel Pumps – ON above 12,000 feet altitude to minimize vapor formation
MAXIMUM CLIMB
1. Power – FULL THROTTLE and 2700 RPM
2. Quadrant Friction Lock – TIGHTEN securely (With Synchrophaser Installed)
3. Propeller Synchrophaser – PHASING (Optional System) Light should illuminate
continuously
a. Phasing Knob – ADJUST for desired phasing position
Version 1.0 – 23 May 2010
[38]
Page 39
MilViz Cessna 310R Pilot’s Operating Handbook
CRUISE
1. Cruise Power – 2100 to 2500 RPM and 15.0 to 24.5 inches Hg.
2. Mixtures – LEAN for desired cruise fuel flow as determined from your power computer.
Recheck mixtures if power, altitude or OAT changes.
3. Cowl Flaps – OPEN or as required
4. Propellers – SYNCHRONIZE manually
5. Quadrant Friction Lock – Tighten securely (With Synchrophaser Installed)
6. Propeller Synchrophaser – PHASING (Optional System) Light should illuminate
continuously
a. Phasing Knob – ADJUST for desired phasing position
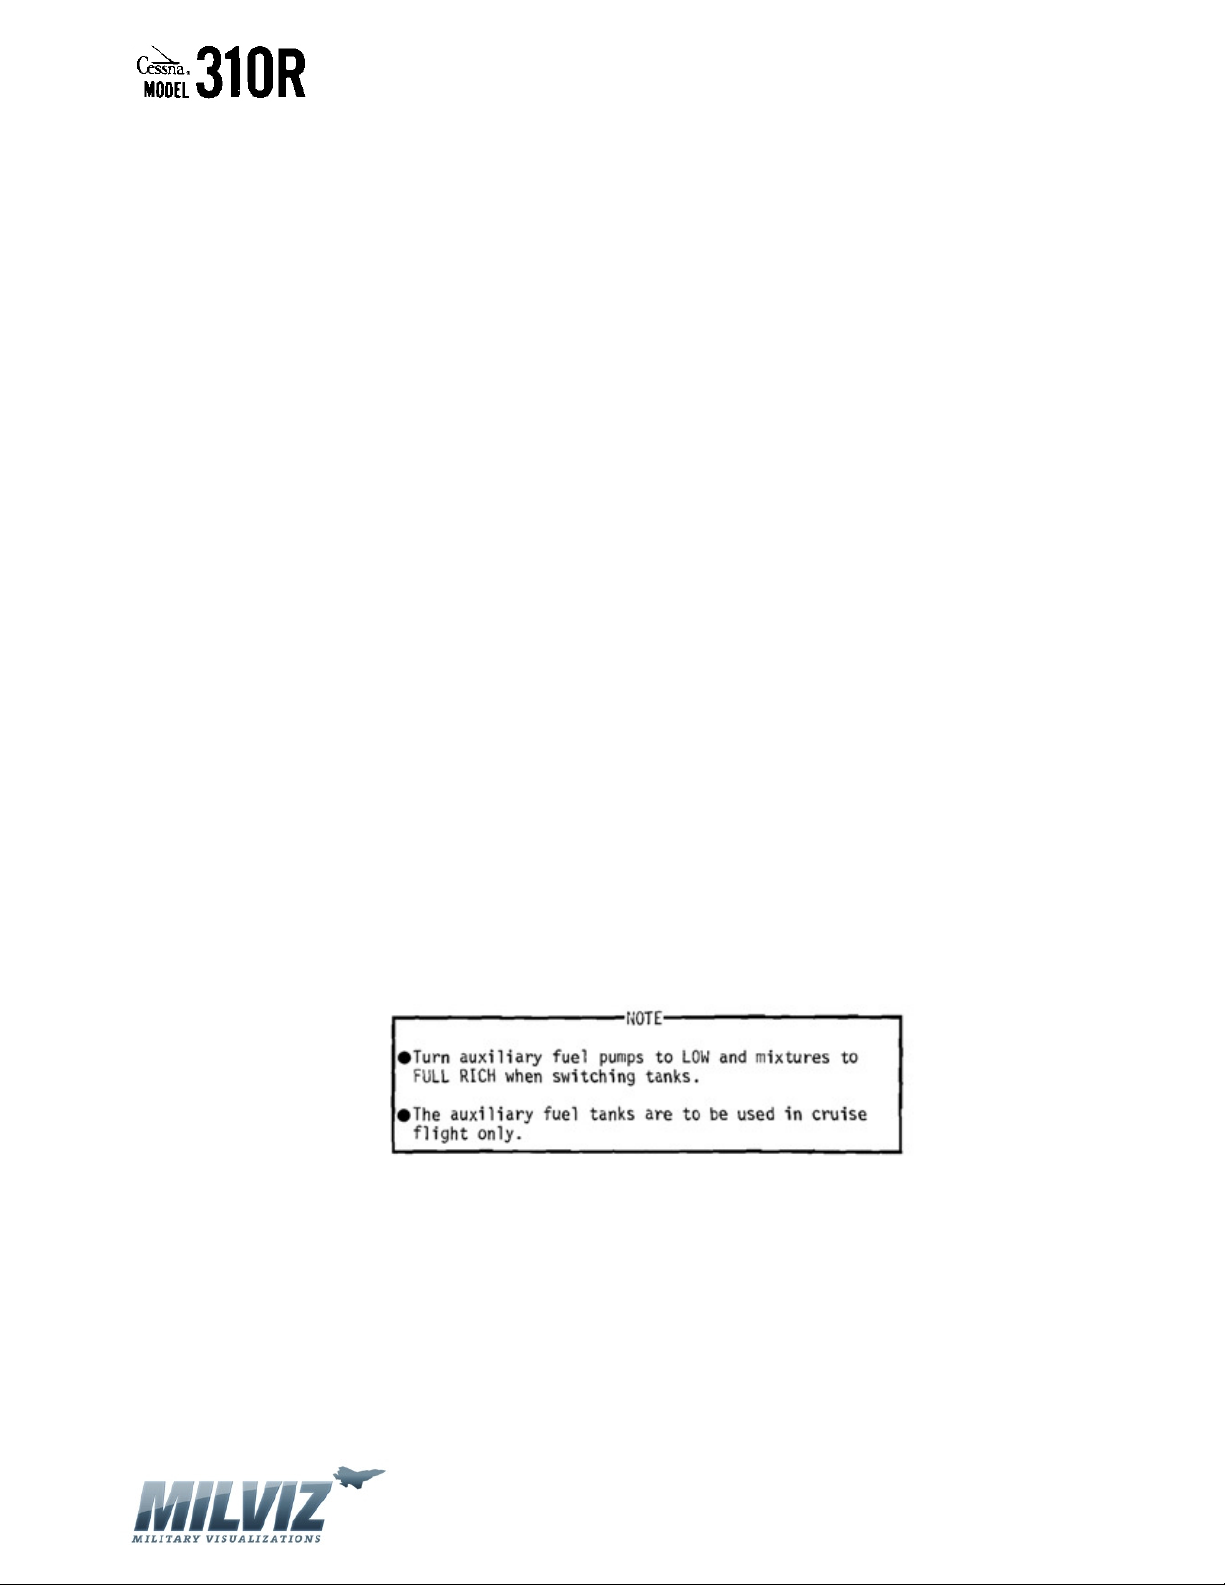
7. Auxiliary Fuel Pumps:
a. Main Tanks – OFF or LOW (if required)
b. Switching Tanks – LOW
c. Auxiliary Tanks – OFF
d. Crossfeeding – LOW
8. Fuel Selectors – Left Engine – LEFT MAIN, Right Engine – RIGHT MAIN
a. If optional 40-gallon auxiliary tanks are installed, fuel selectors – MAIN TANKS for
60 minutes
b. If optional 63-gallon auxiliary tanks are installed, fuel selectors – MAIN TANKS for
90 minutes
c. Usuable auxiliary fuel quantity is based on level flight
d. If wing locker tanks are installed, fuel selectors – MAIN TANKS or, after wing
locker tanks are transferred and main tank quantity is less than 180 pounds each
– AUXILIARY TANKS
e. If wing locker tanks are installed, crossfeed – SELECT as required to maintain fuel
balance after wing locker tank fuel transfer
9. If oxygen use is desired, proceed as follows:
a. Mask – Connect mask and hose assembly and put mask on
Version 1.0 – 23 May 2010
[39]
Page 40
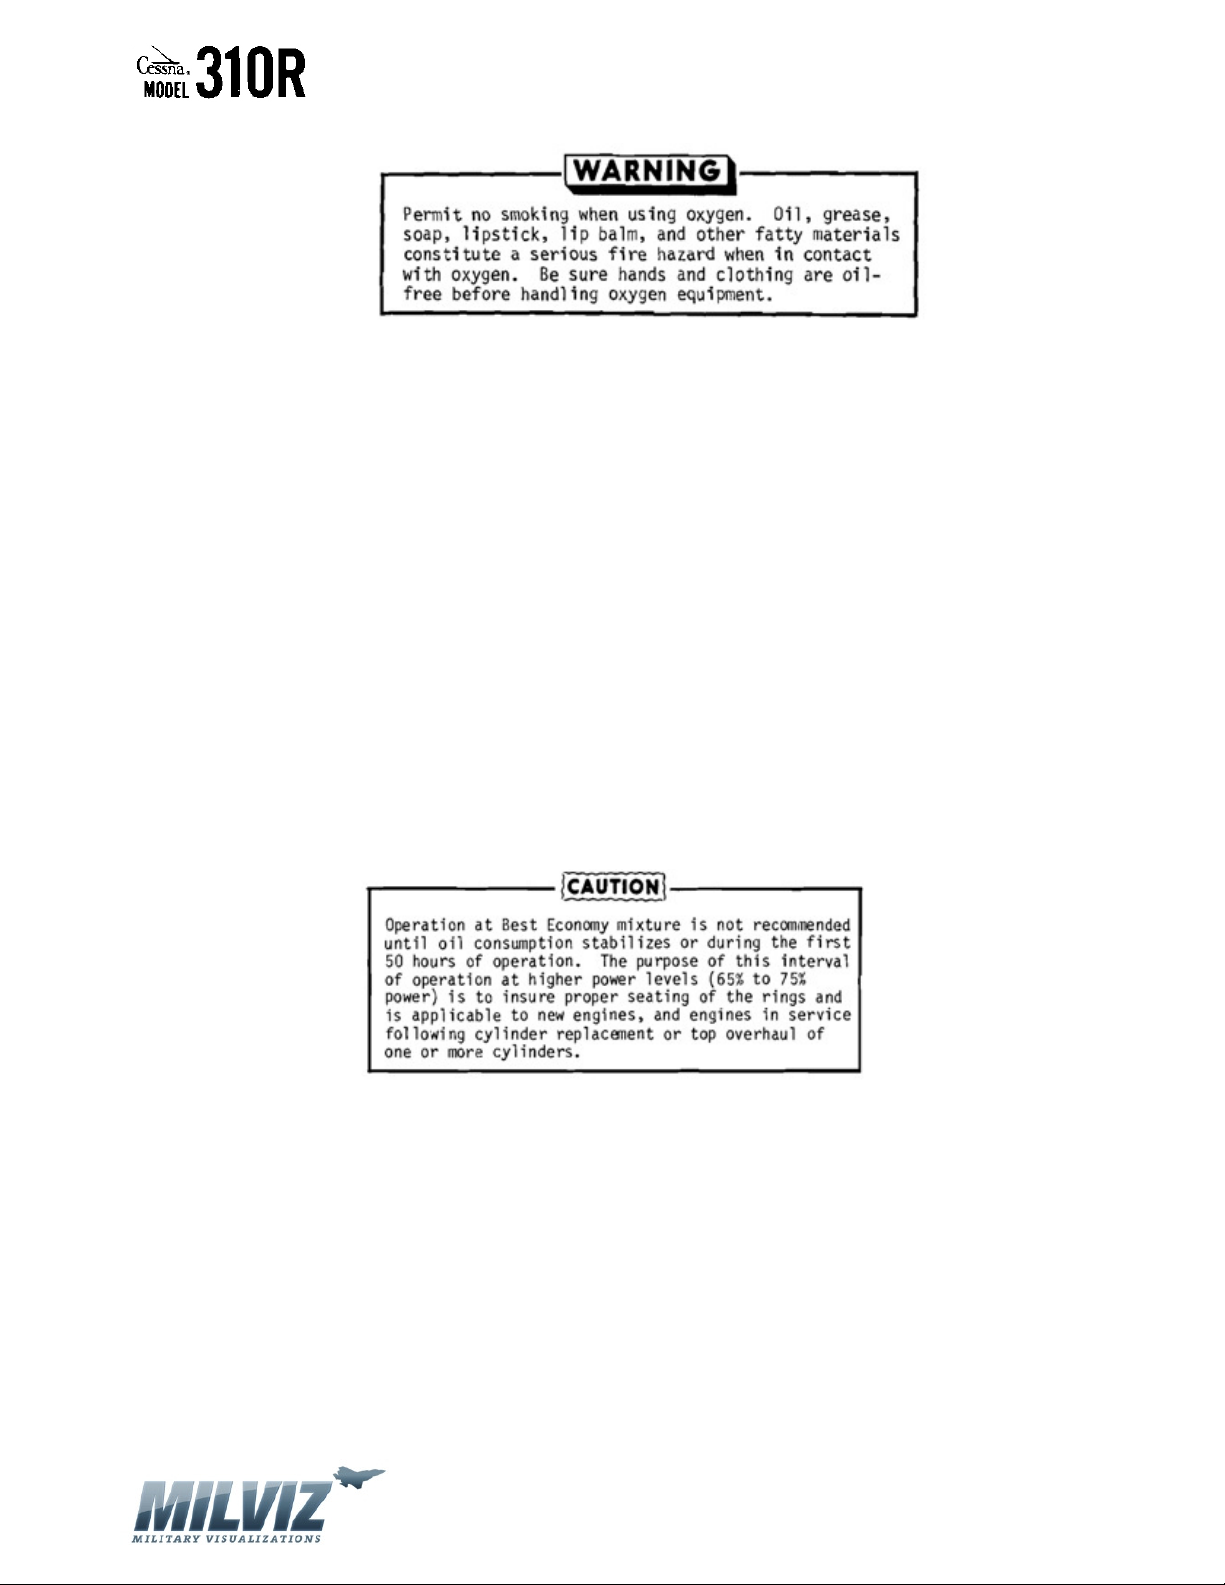
MilViz Cessna 310R Pilot’s Operating Handbook
b. Hose Coupling – Plug into oxygen outlet inside access door in outboard armrest
c. Oxygen Flow Indicator – Check Flow (Indicator Toward Mask Indicates Proper
Flow)
d. Disconnect hose coupling when not in use
10. Trim Tabs -- ADJUST
Note: Normal cruising requires between 50% and 70% power. The manifold pressure and RPM
settings required to obtain these powers at various altitudes and outside air temperatures can
be determined with your power computer. A maximum cruising power of approximately 75%
(24.5 inches Hg. Manifold pressure and 2500 RPM) may be used if desired. Various percent
powers can be obtained with a number of combinations of manifold pressures, engine speeds,
altitudes and outside air temperatures. However, at full throttle and constant engine speed, a
specific power can be obtained at only one altitude for each given air temperature. For a given
throttle setting, select the lowest engine speed in the green arc range that will give smooth
engine operation without evidence of laboring.
Version 1.0 – 23 May 2010
[40]
Page 41
MilViz Cessna 310R Pilot’s Operating Handbook
DESCENT
1. Fuel Selectors – LEFT AND RIGHT ENGINES SET TO MAIN TANKS
2. Power – AS REQUIRED to maintain engine temperatures in the green
3. Cowl Flaps – AS REQUIRED
4. Mixtures – ADJUST for smooth operation with gradual enrichment as altitude is lost
5. Altimeters – SET
Note: Descents should be initiated far enough in advance of estimated landing to allow a
gradual rate of descent at cruise speed. It should be at approximately 500 fpm for passenger
comfort, using enough power to keep the engines warm. This will prevent undesirable low
cylinder head temperatures caused by low power setting at cruise speed. The optimum engine
speed in a descent is usually the lower one in the RPM green arc range that will allow cylinder
head temperatures to remain in the recommended operating range (green arc).
BEFORE LANDING
1. Seat Belts and Shoulder Harness – SECURE
2. Propeller Synchrophaser – OFF (Optional System)
3. Fuel Selectors – BOTH ENGINES SET TO MAIN TANKS
4. Auxiliary Fuel Pumps – ON
5. Alternate Air Contols – CHECK IN
6. Wing Flaps – DOWN 15o below 158 KIAS
7. Landing Gear – DOWN below 138 KIAS
8. Landing Gear Position Indicator Lights – Check down lights – ON; Unlocked Light – OFF
9. Mixtures – FULL RICH or lean as required for smooth operation
10. Propellers – FULL FORWARD
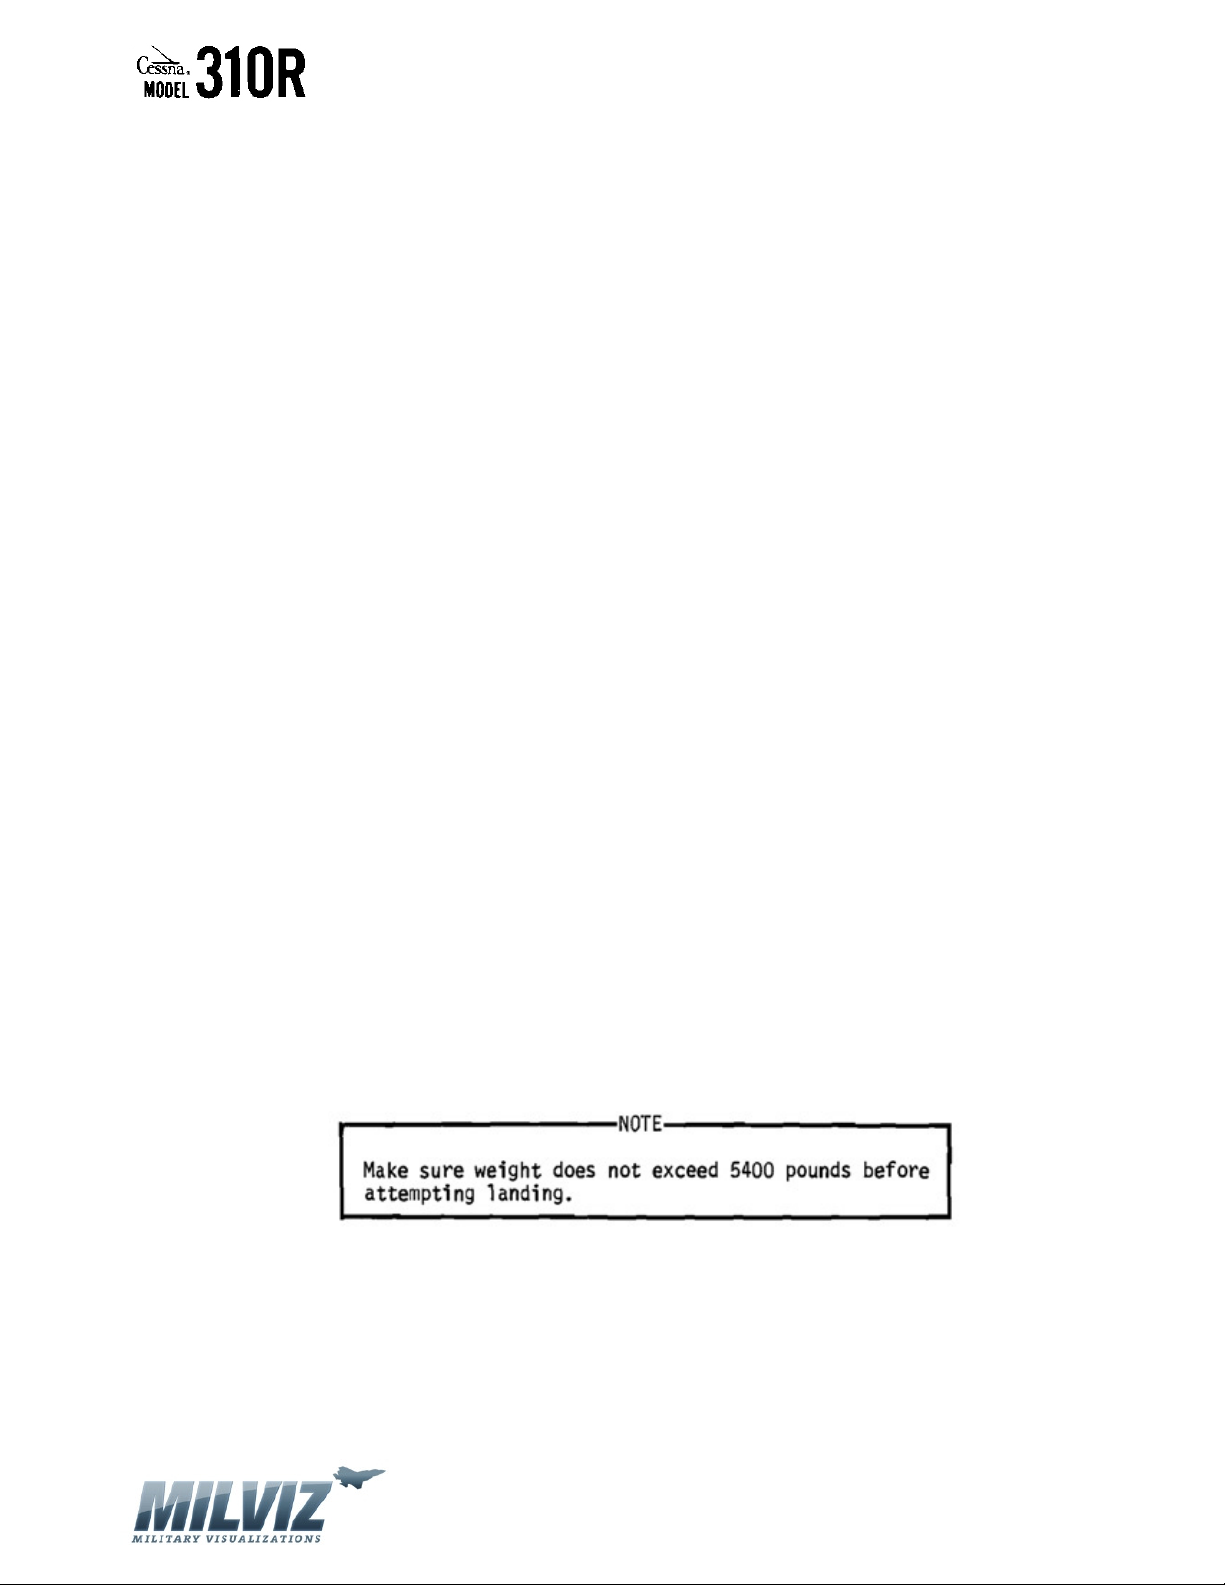
11. Minimum Multi-Engine Approach Speed – 93 KIAS at 5400 pounds (Refer to Section 5
for speeds at reduced weight)
12. Air Minimum Control Speed – 80 KIAS
Version 1.0 – 23 May 2010
[41]
Page 42
MilViz Cessna 310R Pilot’s Operating Handbook
BALKED LANDING
1. Increase engine speed to 2700 RPM and apply full throttle if necessary
2. Mixtures – AS REQUIRED for balked landing power setting
3. Balked Landing Transition Speed – 85 KIAS
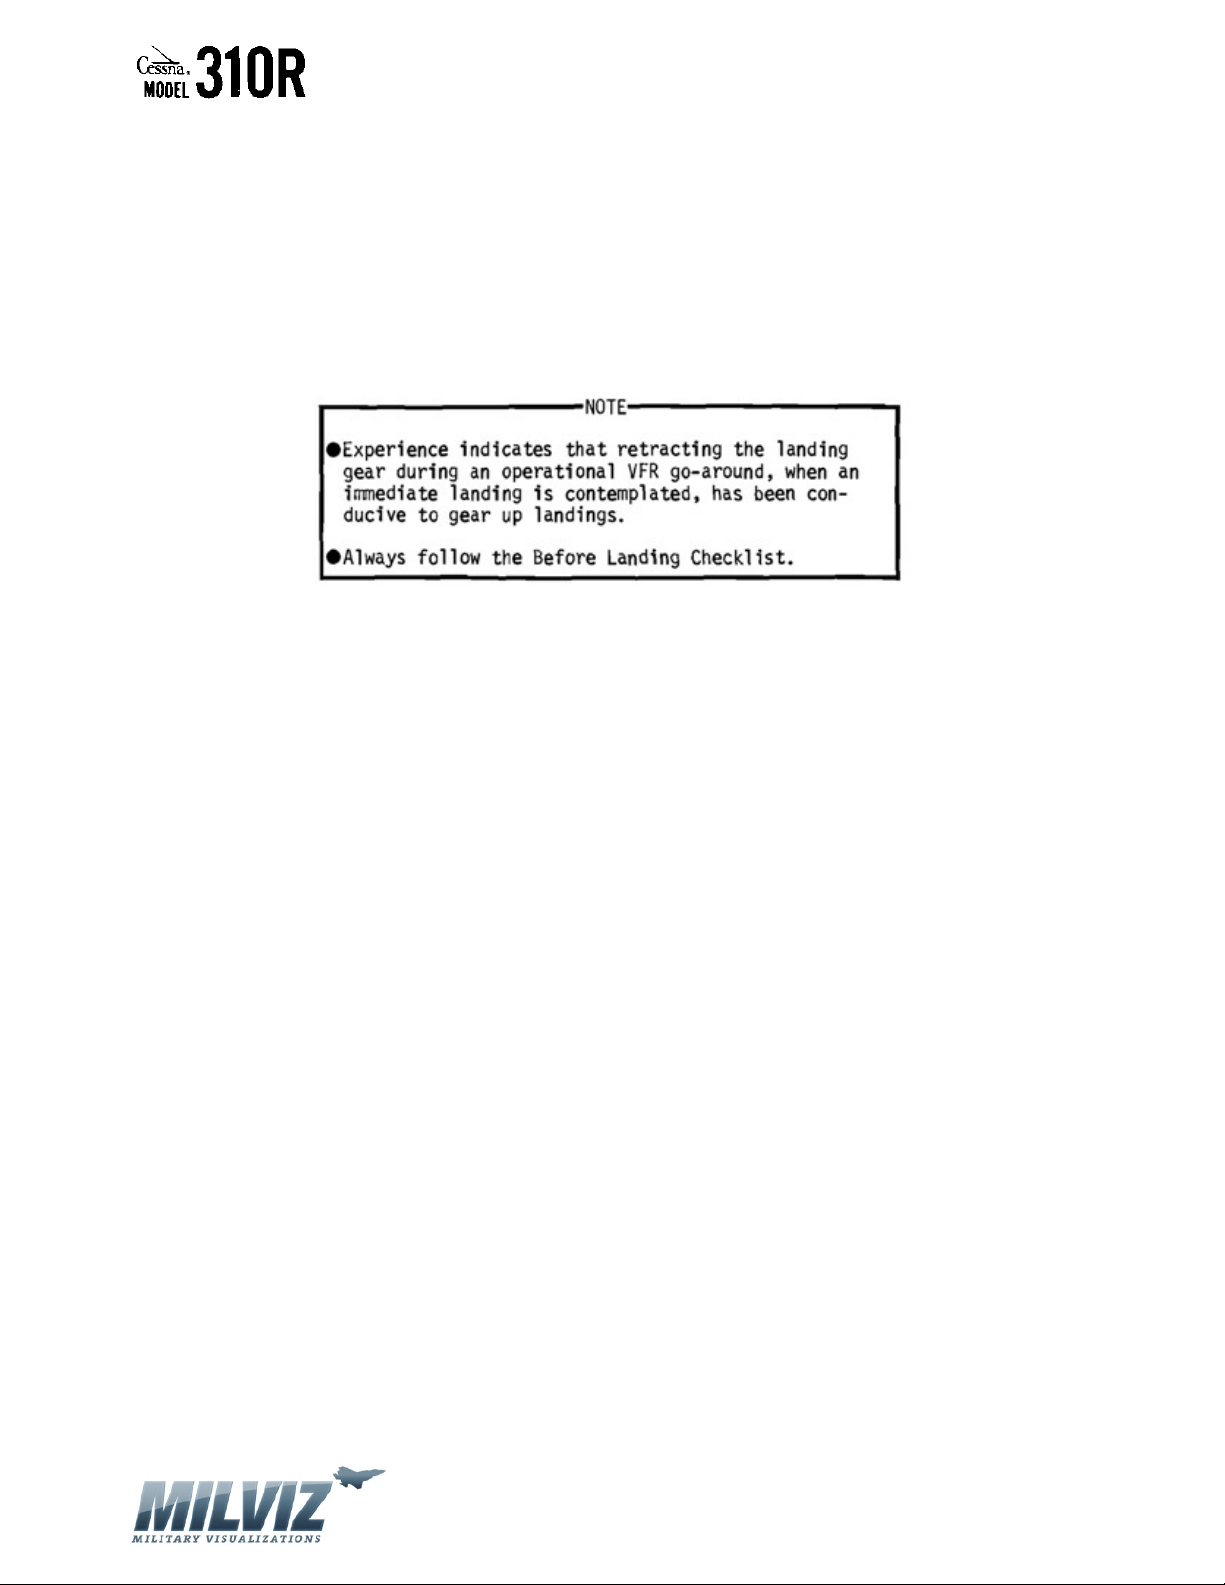
4. Landing Gear – RETRACT during IFR go-around or simulated IFR go-around after
establishing a positive rate of climb
5. Wing Flaps – 15o
6. Time airplane for climb
7. Cowl Flaps – OPEN
8. Wing Flaps – UP as soon as all obstacles are cleared and a safe altitude and airspeed are
obtained
AFTER LANDING
1. Auxiliary Fuel Pumps – LOW
2. Cowl Flaps – OPEN
3. Wing Flaps – UP
Version 1.0 – 23 May 2010
[42]
Page 43
MilViz Cessna 310R Pilot’s Operating Handbook
SHUTDOWN
1. Parking Brake – SET if brakes are cool
2. Avionics Master Switch -- OFF
3. All Switches Except Battery, Alternator and Magneto Switches – OFF
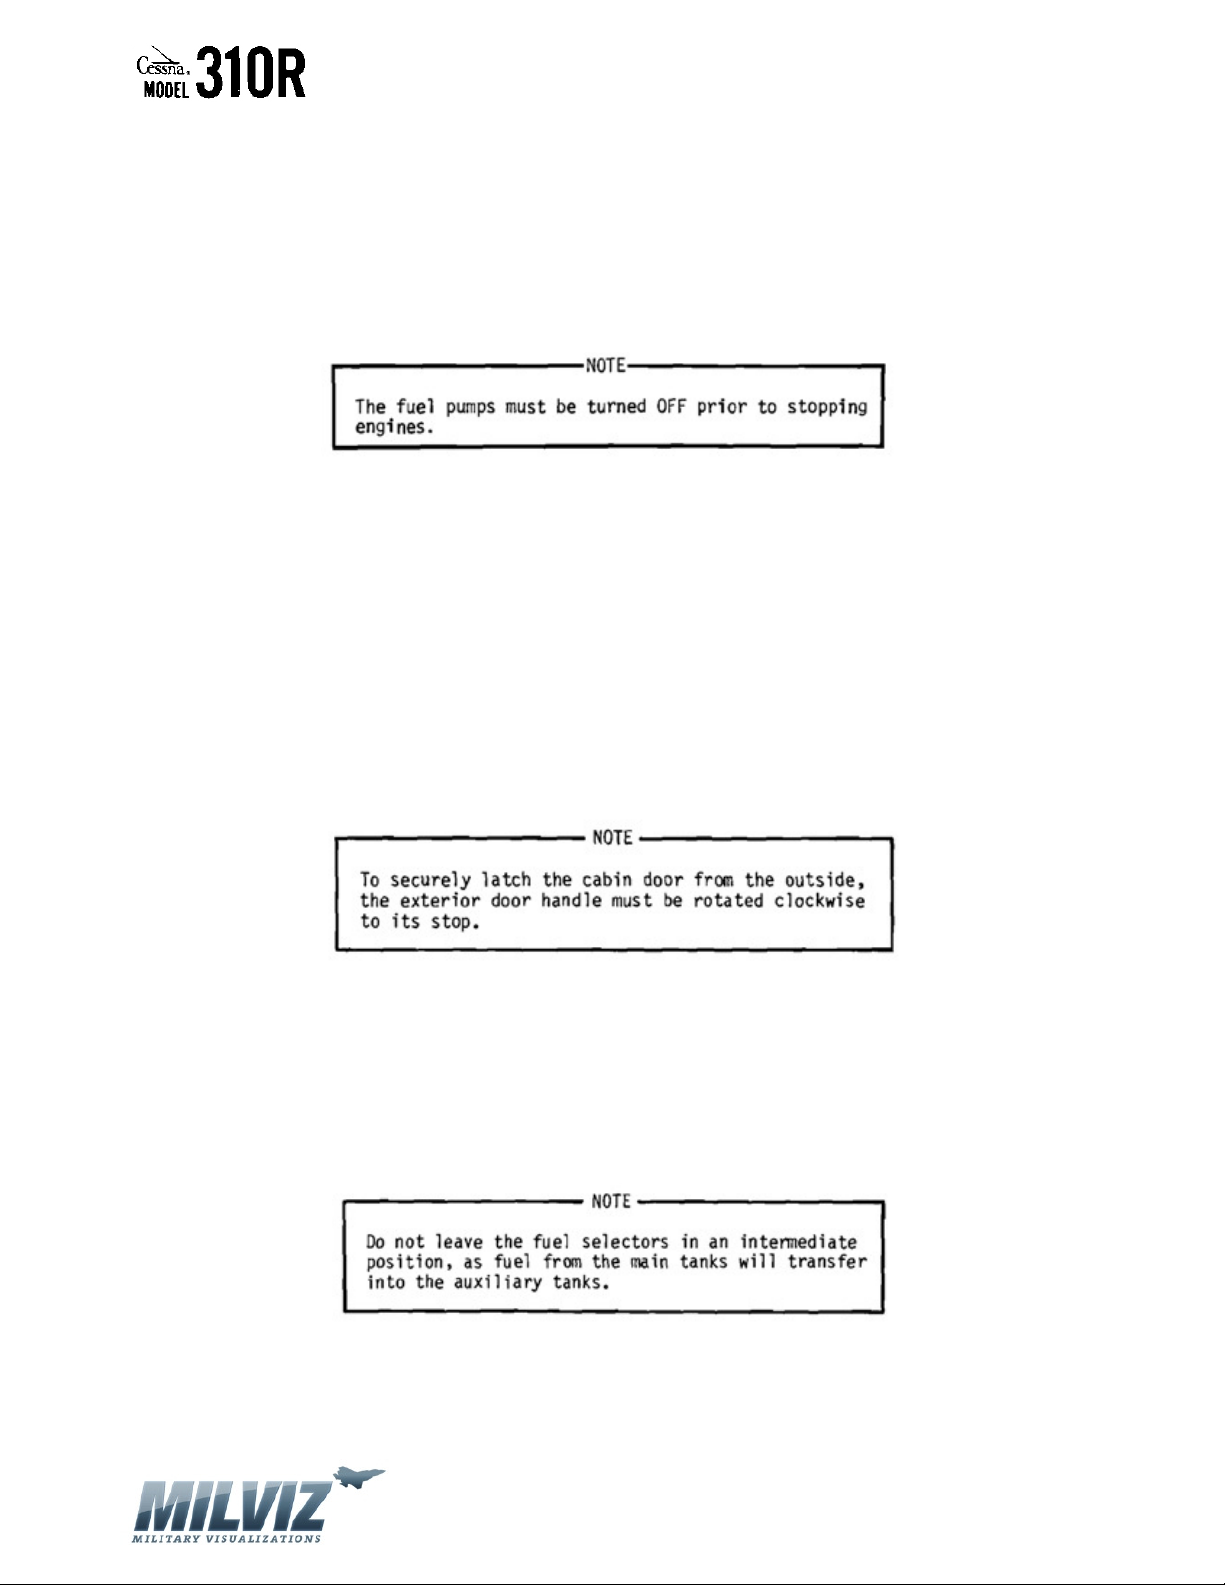
4. Auxiliary Fuel Pumps – OFF
5. Throttles – IDLE
6. Mixtures – IDLE CUT-OFF
7. Battery and Alternators – OFF
8. Magneto Switches – OFF, after engines stop
9. Alternator Switches – OFF
10. Master Battery Switch -- OFF
11. Control Locks – INSTALL
12. Fuel Selectors – OFF if a long period of inactivity is anticipated
13. Cabin Door – CLOSE
Note: With the mixture levers in IDLE CUT-OFF, the fuel flow is effectively blocked at the fuel
metering unit. Thus, it is unnecessary to place the fuel selectors in the OFF position if the
airplane is receiving normal usage. However, if a long period of inactivity is anticipated, the fuel
selectors should be turned OFF to preclude any possible fuel seepage that might develop
through the metering valve.
Version 1.0 – 23 May 2010
[43]
Page 44

MilViz Cessna 310R Pilot’s Operating Handbook
SECTION 5
PERFORMANCE
TABLE OF CONTENTS
INTRODUCTION ………………………………………………………………………………………………………… 45
AIRSPEED CALIBRATION ……………………………………………………………………………………………. 46
ALTIMETER CALIBRATION ………………………………………………………………………………………… 48
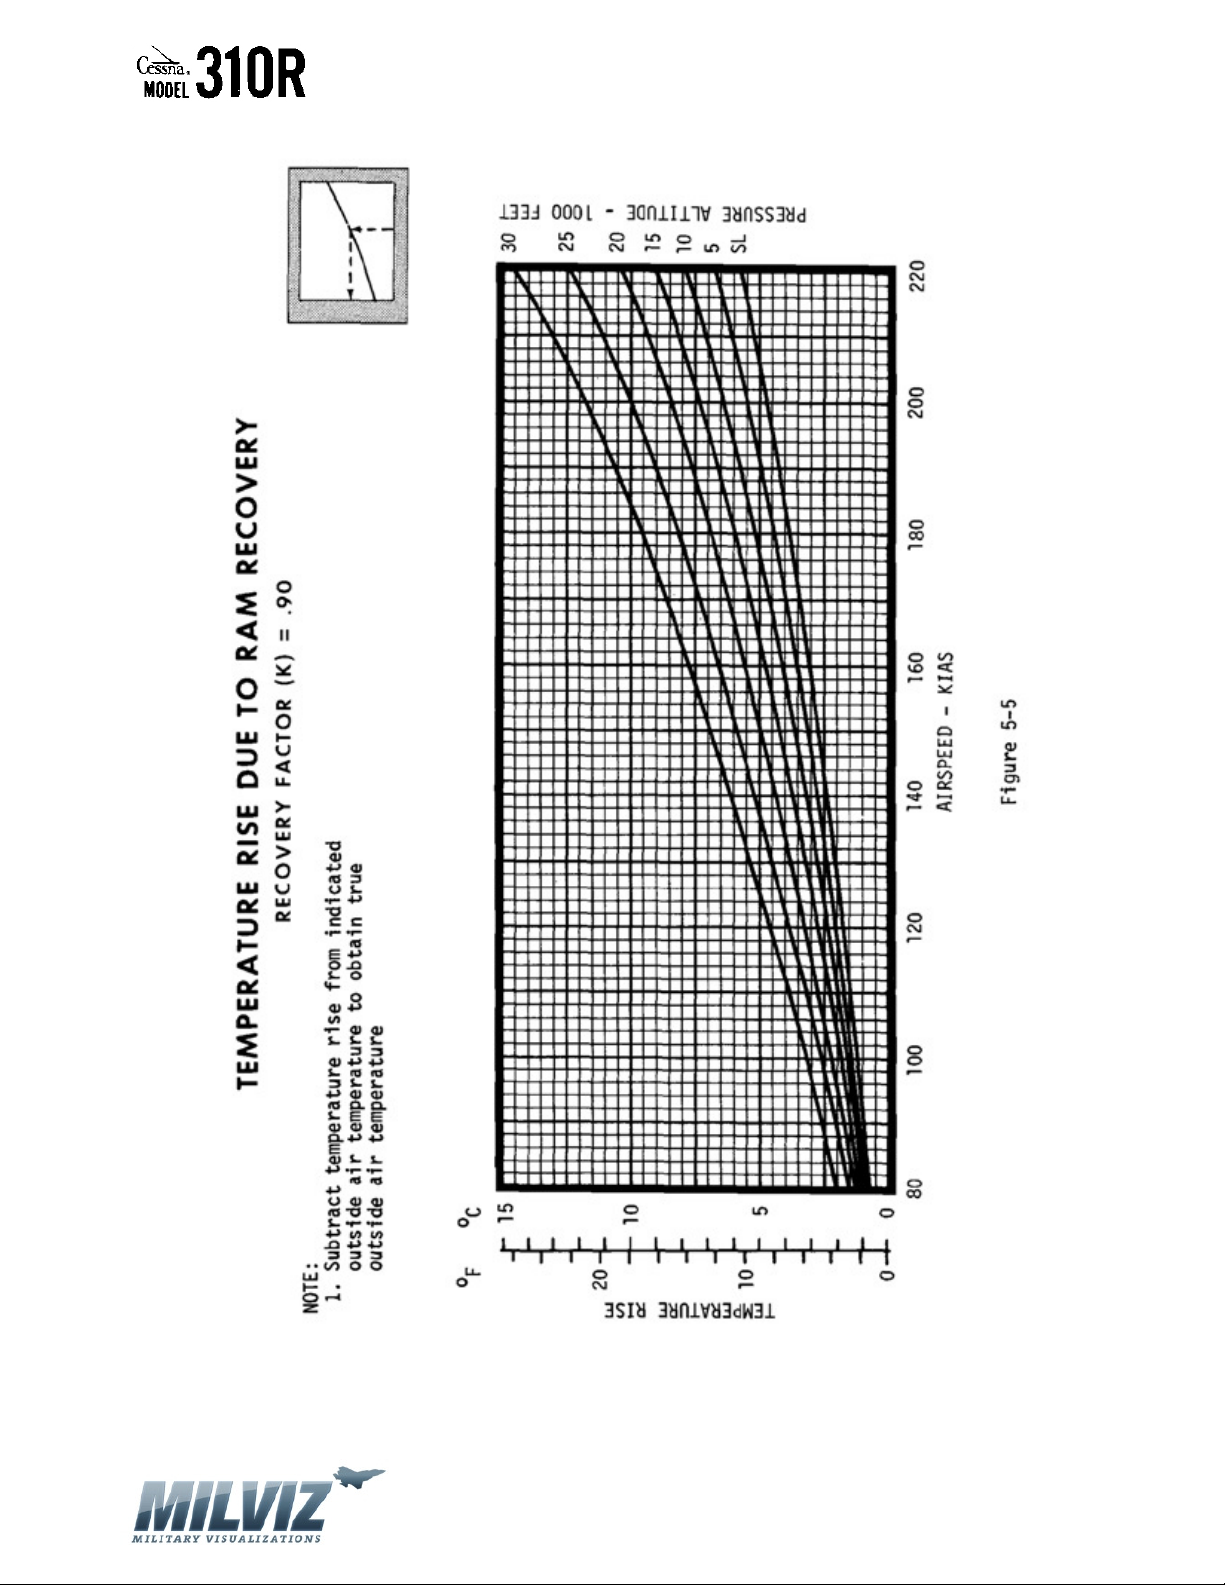
TEMPERATURE RISE DUE TO RAM RECOVERY ………………………………………………………….. 50
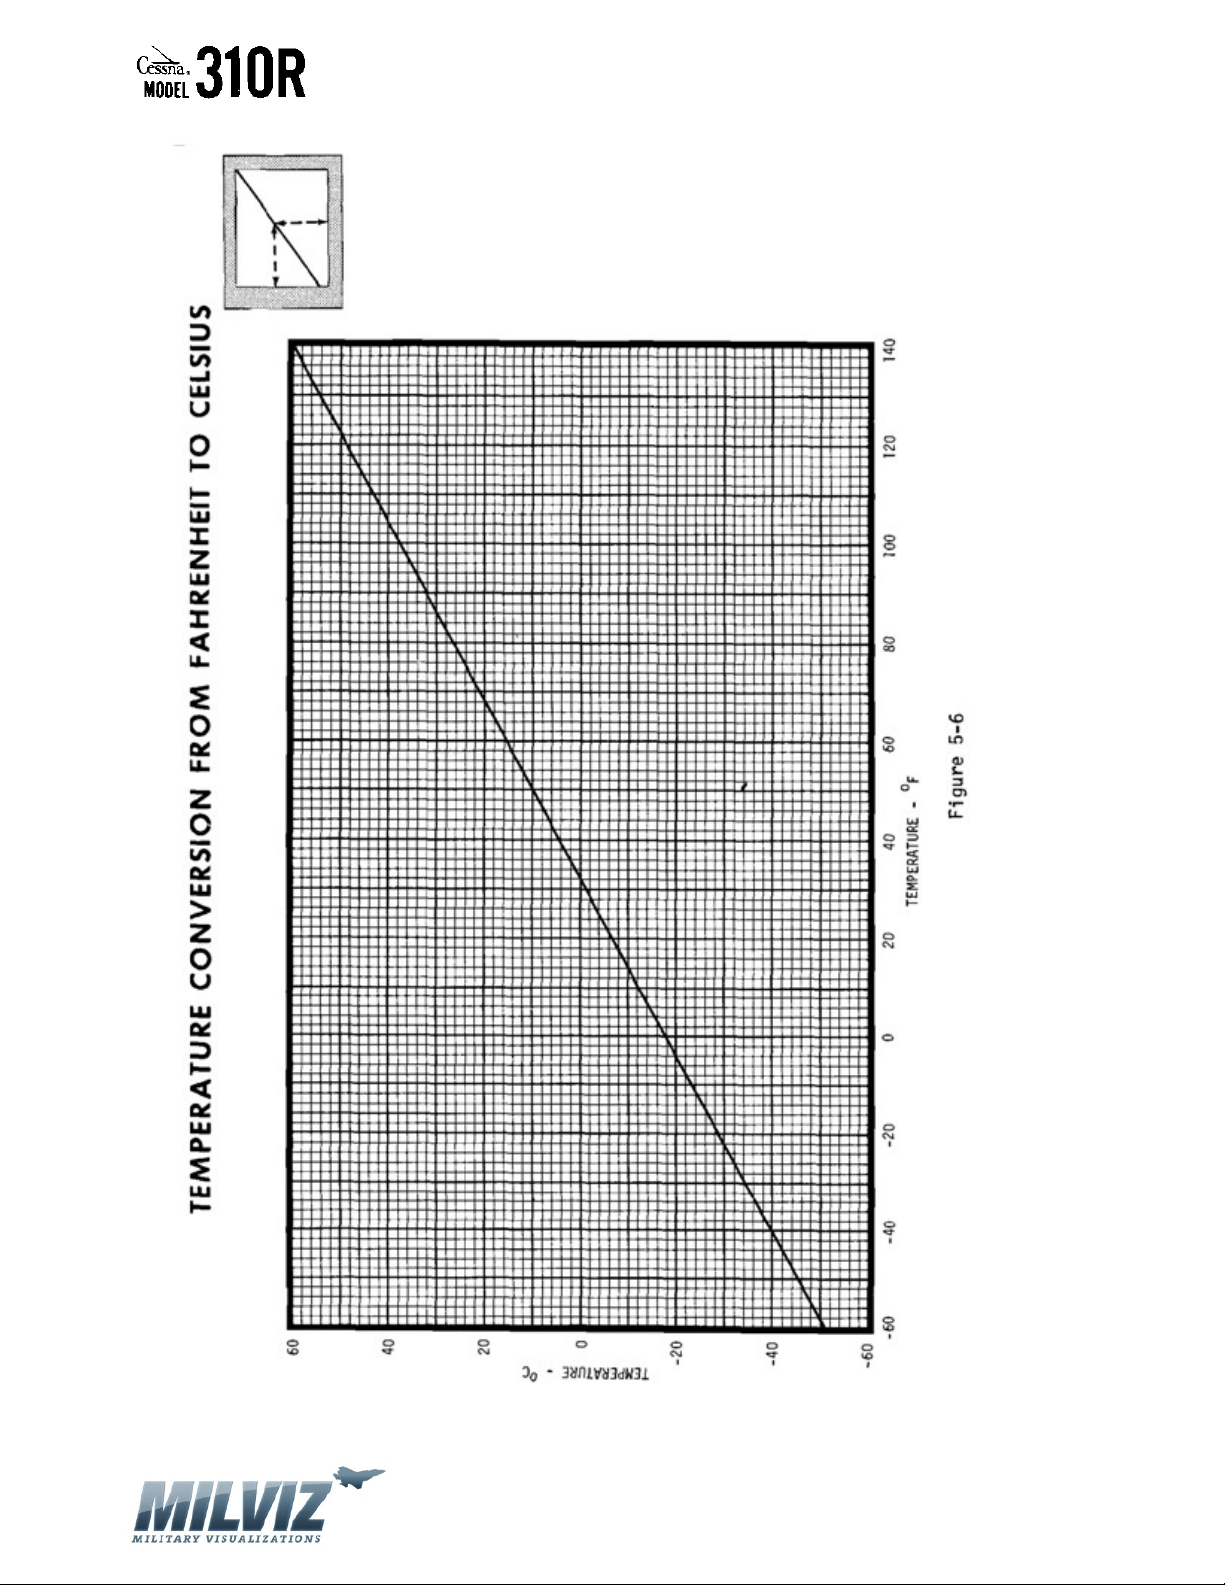
TEMPERATURE CONVERSION OF TO OC …………………………………………………………………….. 51
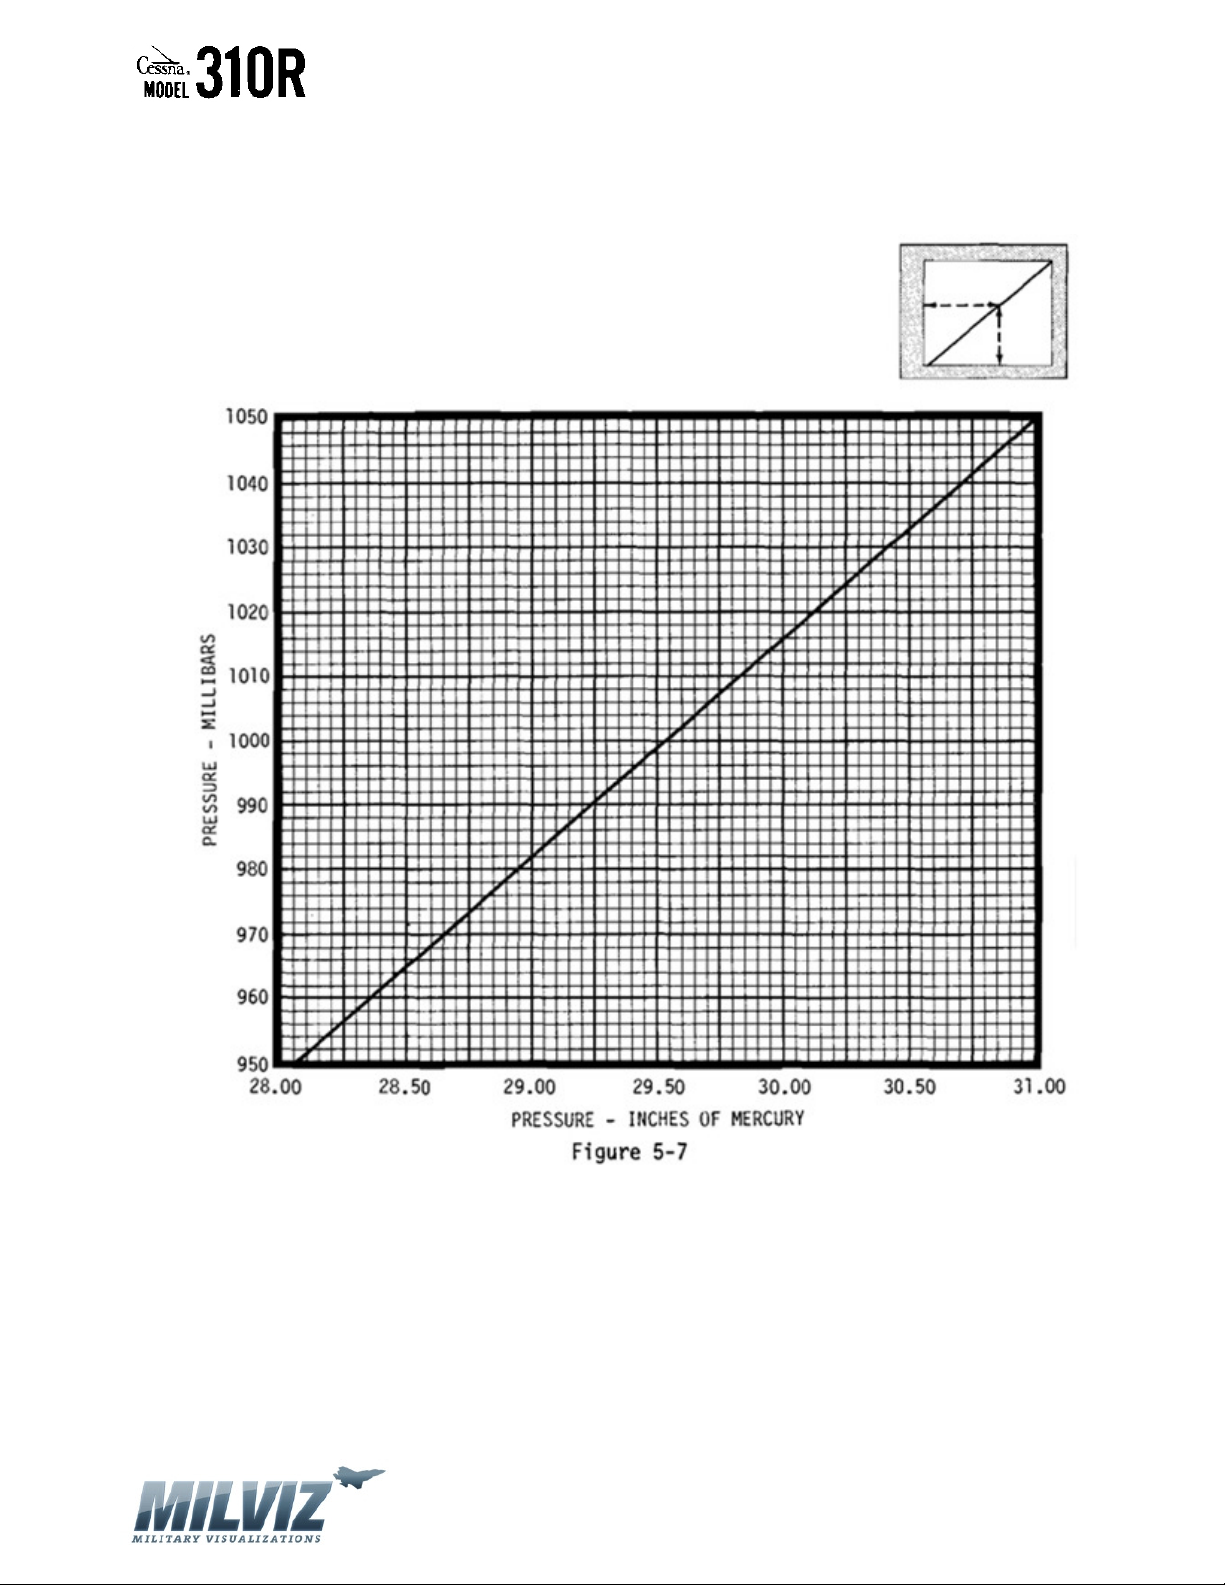
PRESSURE CONVERSION – INCHES OF MERCURY TO MILLIBARS ………………………………. 52
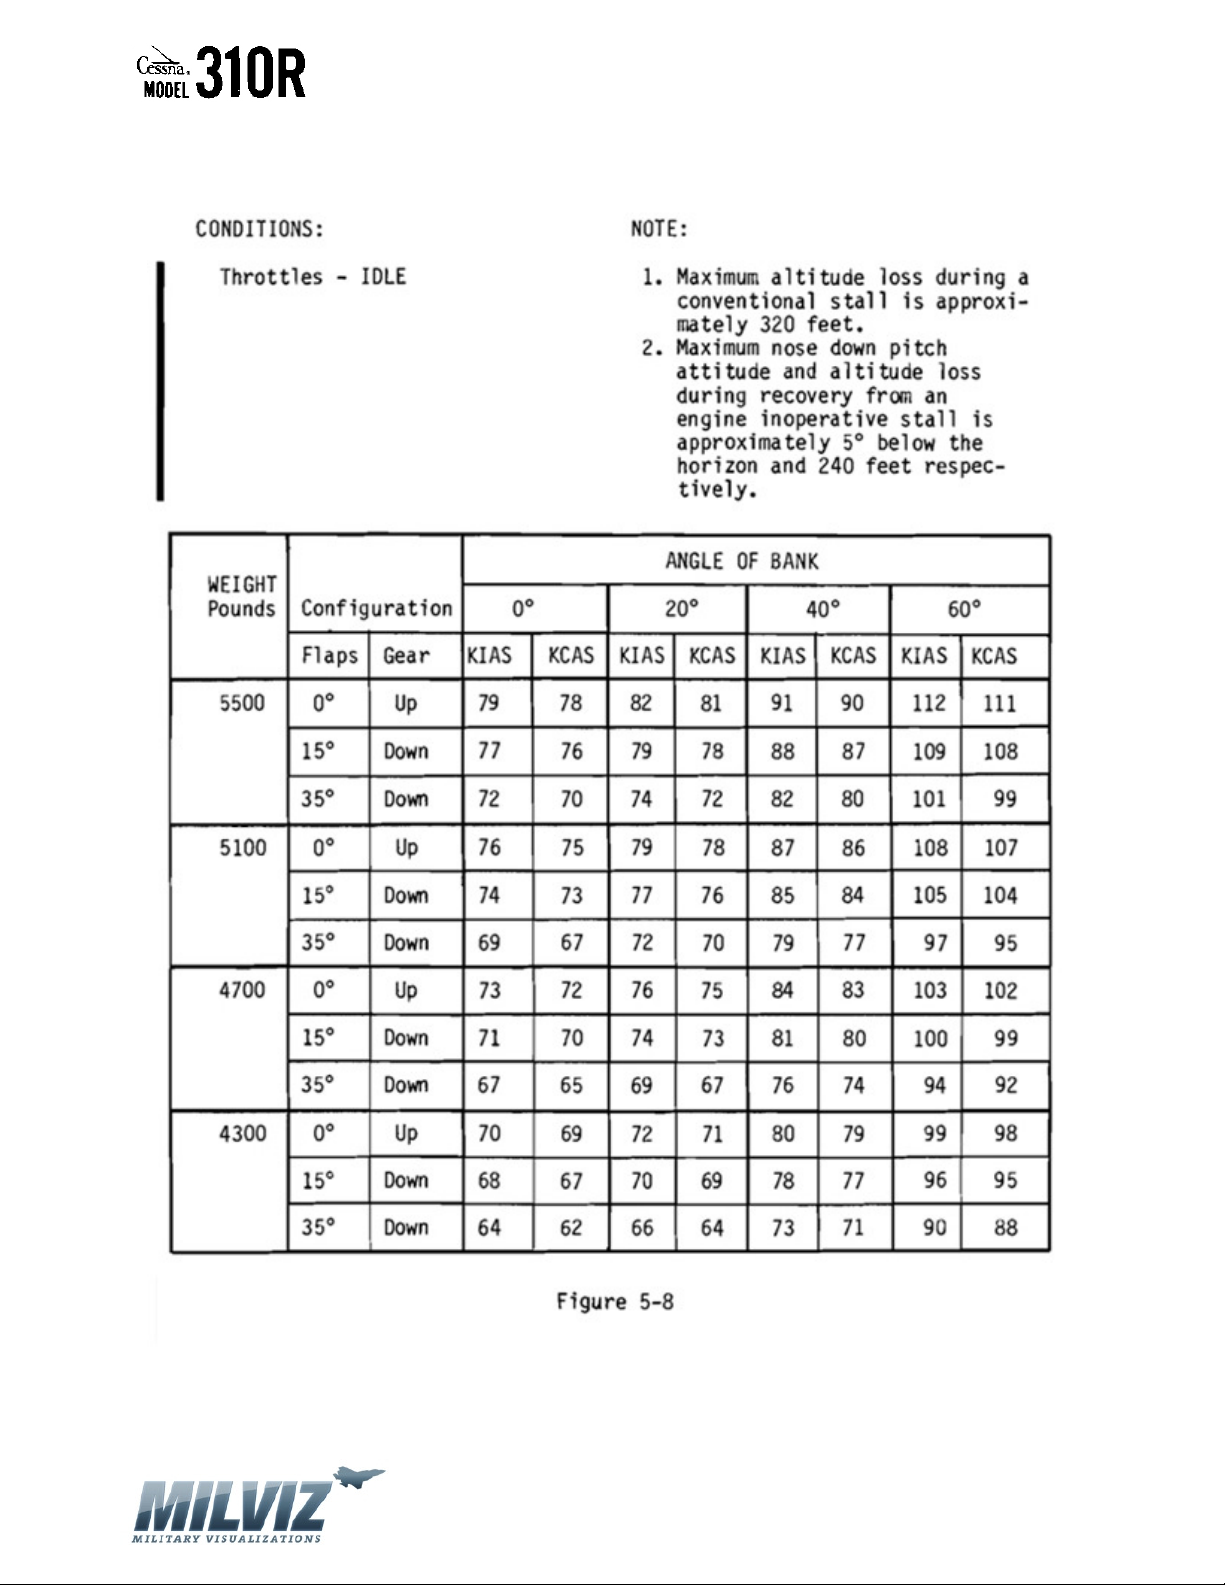
STALL SPEEDS …………………………………………………………………………………………………………… 53
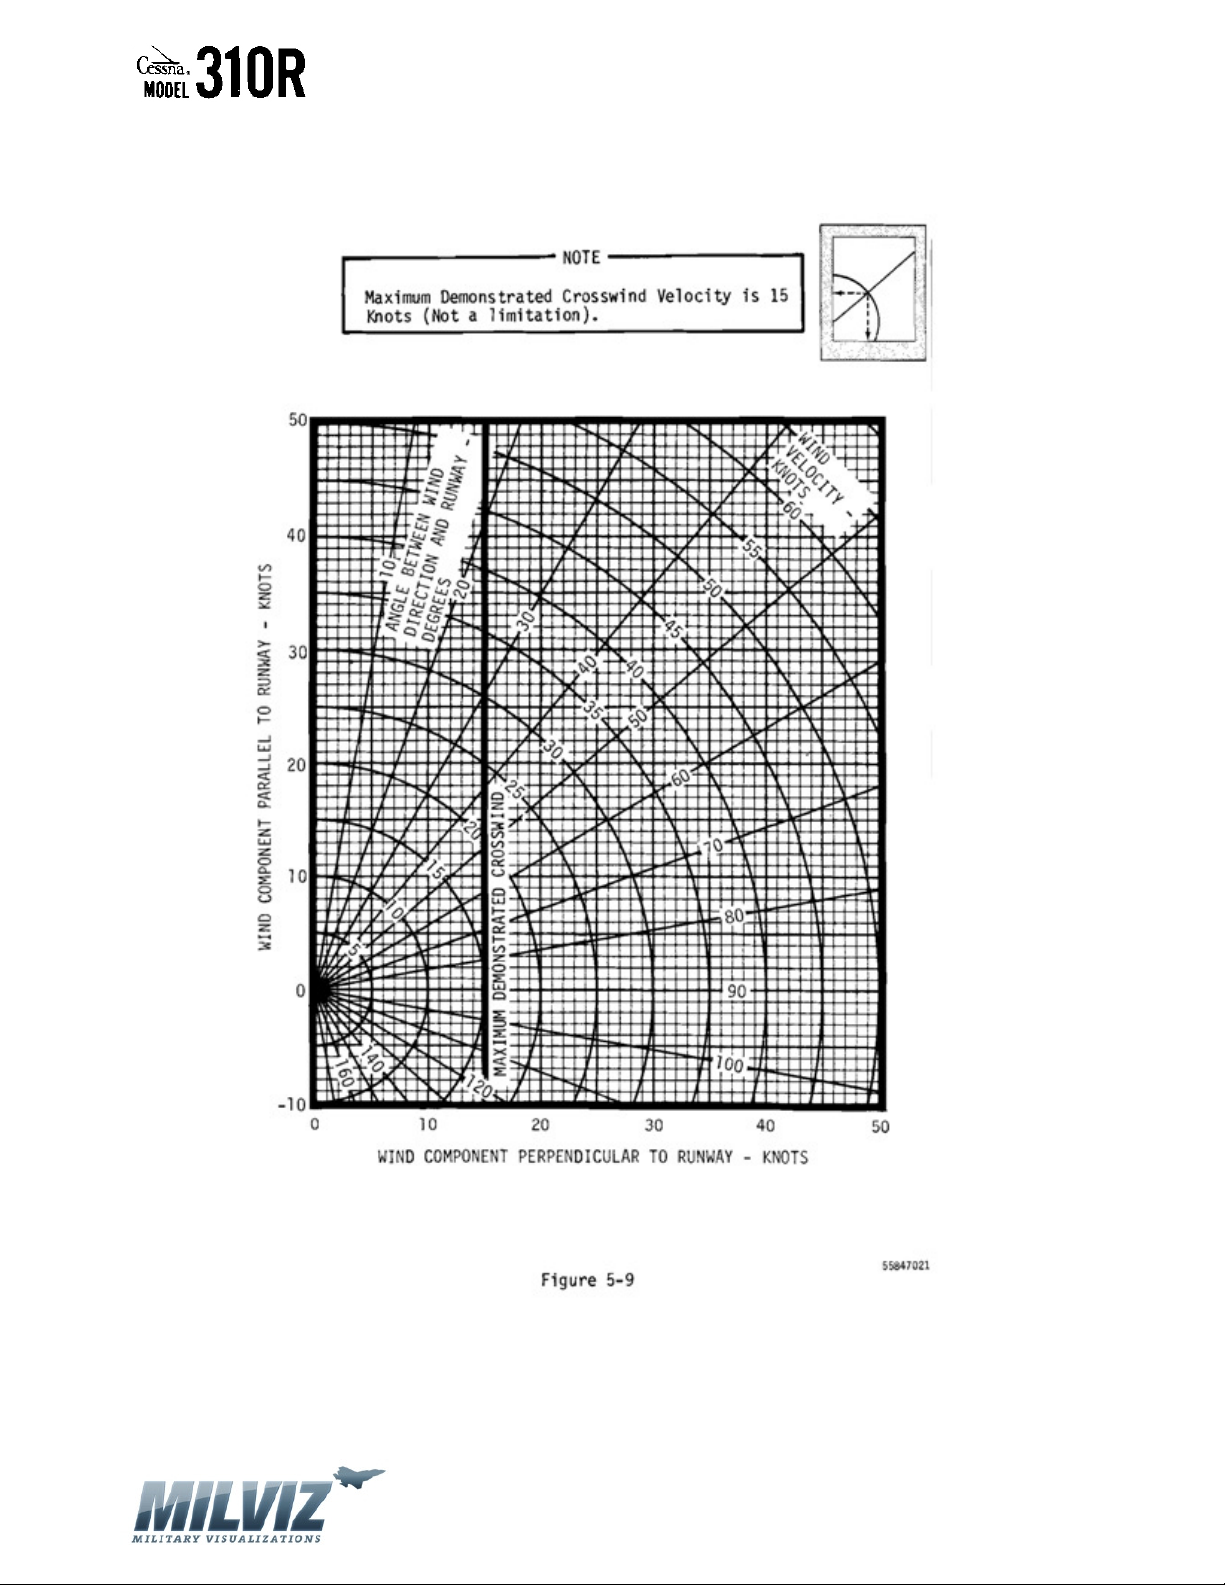
WIND COMPONENT …………………………………………………………………………………………………. 54
NORMAL TAKEOFF DISTANCE ………………………………………………………………………………….. 55
MAXIMUM PERFORMANCE TAKEOFF DISTANCE ……………………………………………………… 56
ACCELERATE STOP DISTANCE ………………………………………………………………………………….. 57
ACCELERATE GO DISTANCE ……………………………………………………………………………………… 58
RATE-OF-CLIMB
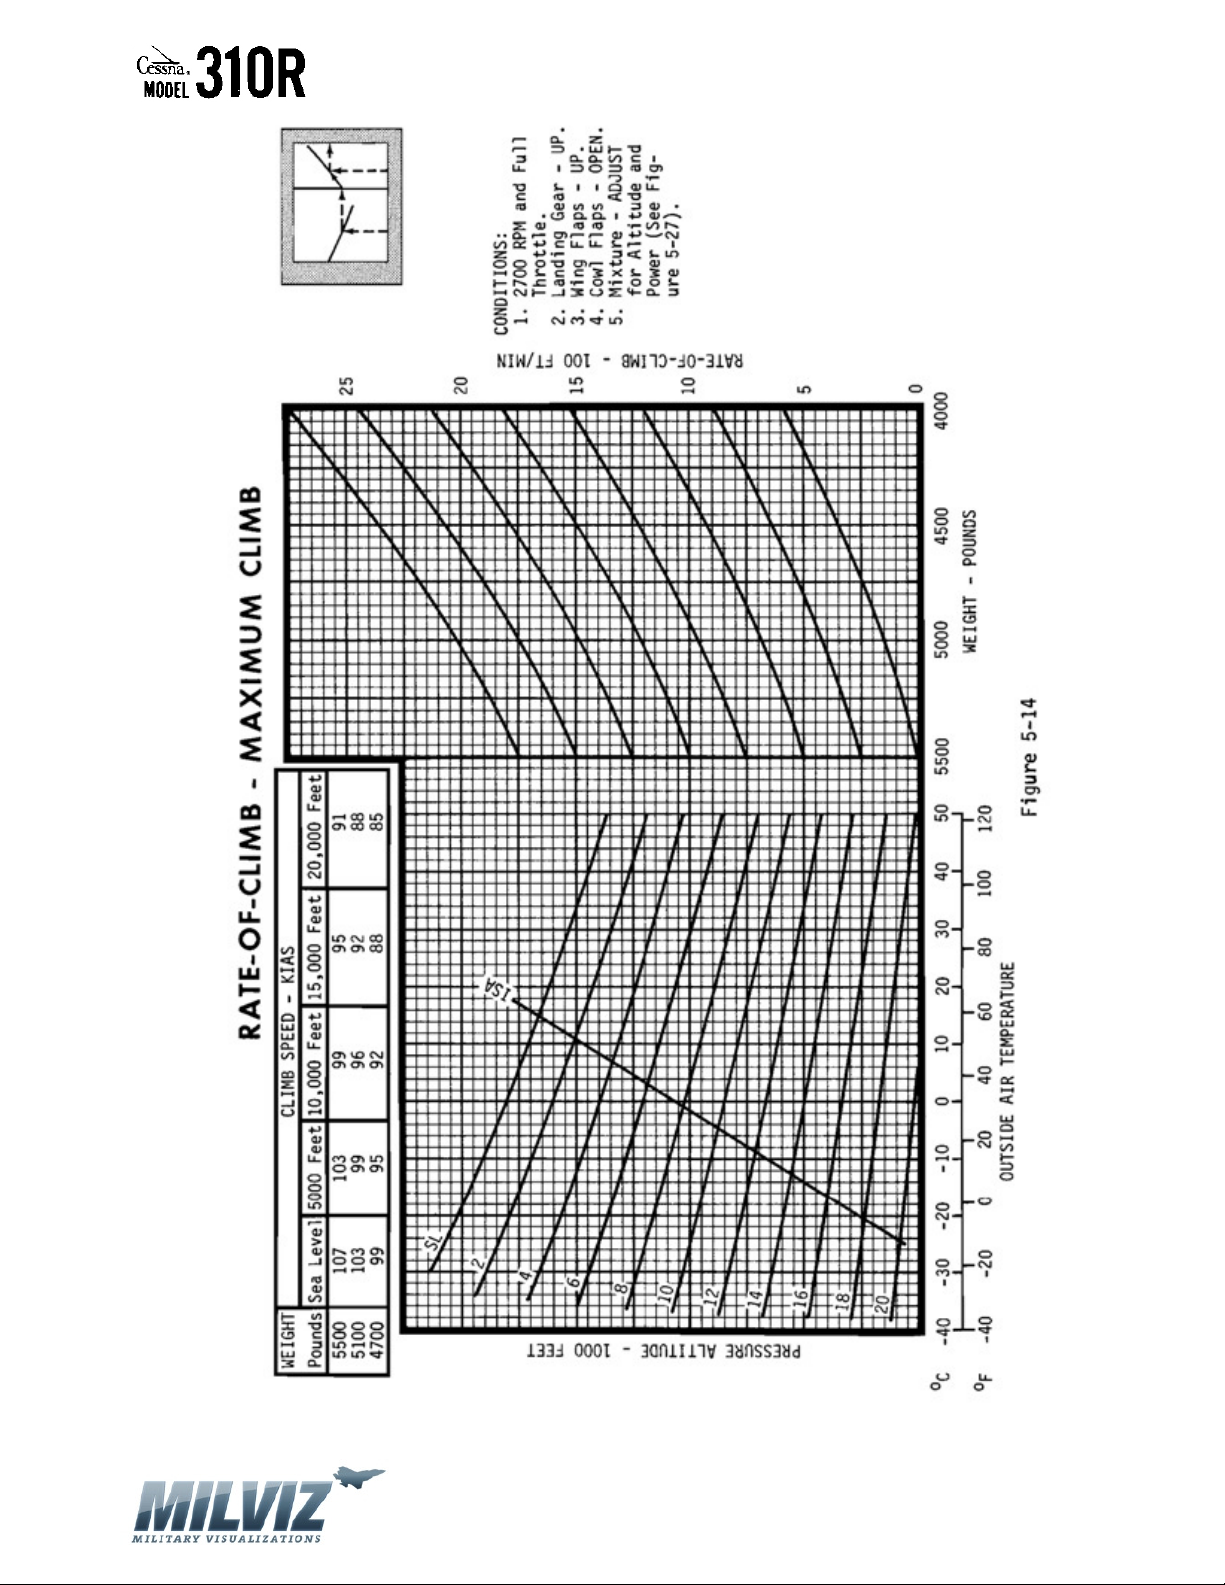
Maximum Climb …………………………………………………………………………………………………. 59
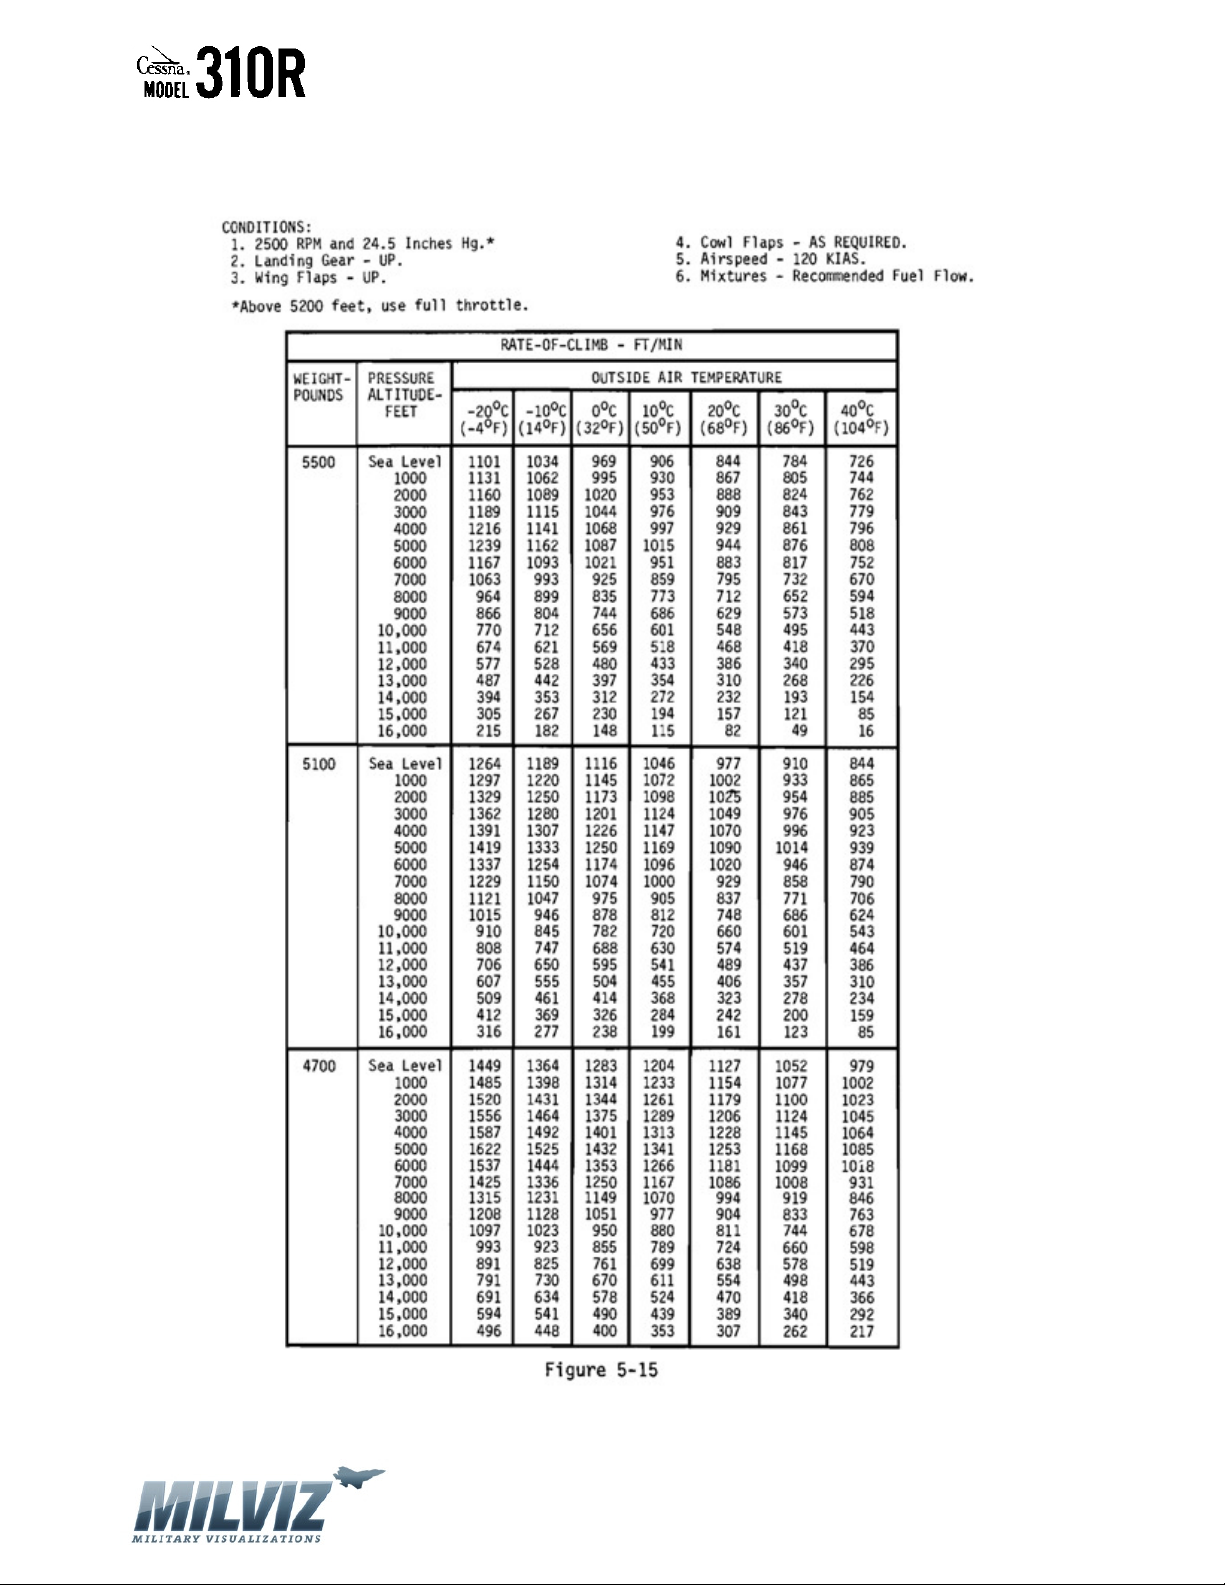
Cruise Climb ………………………………………………………………………………………………………... 60
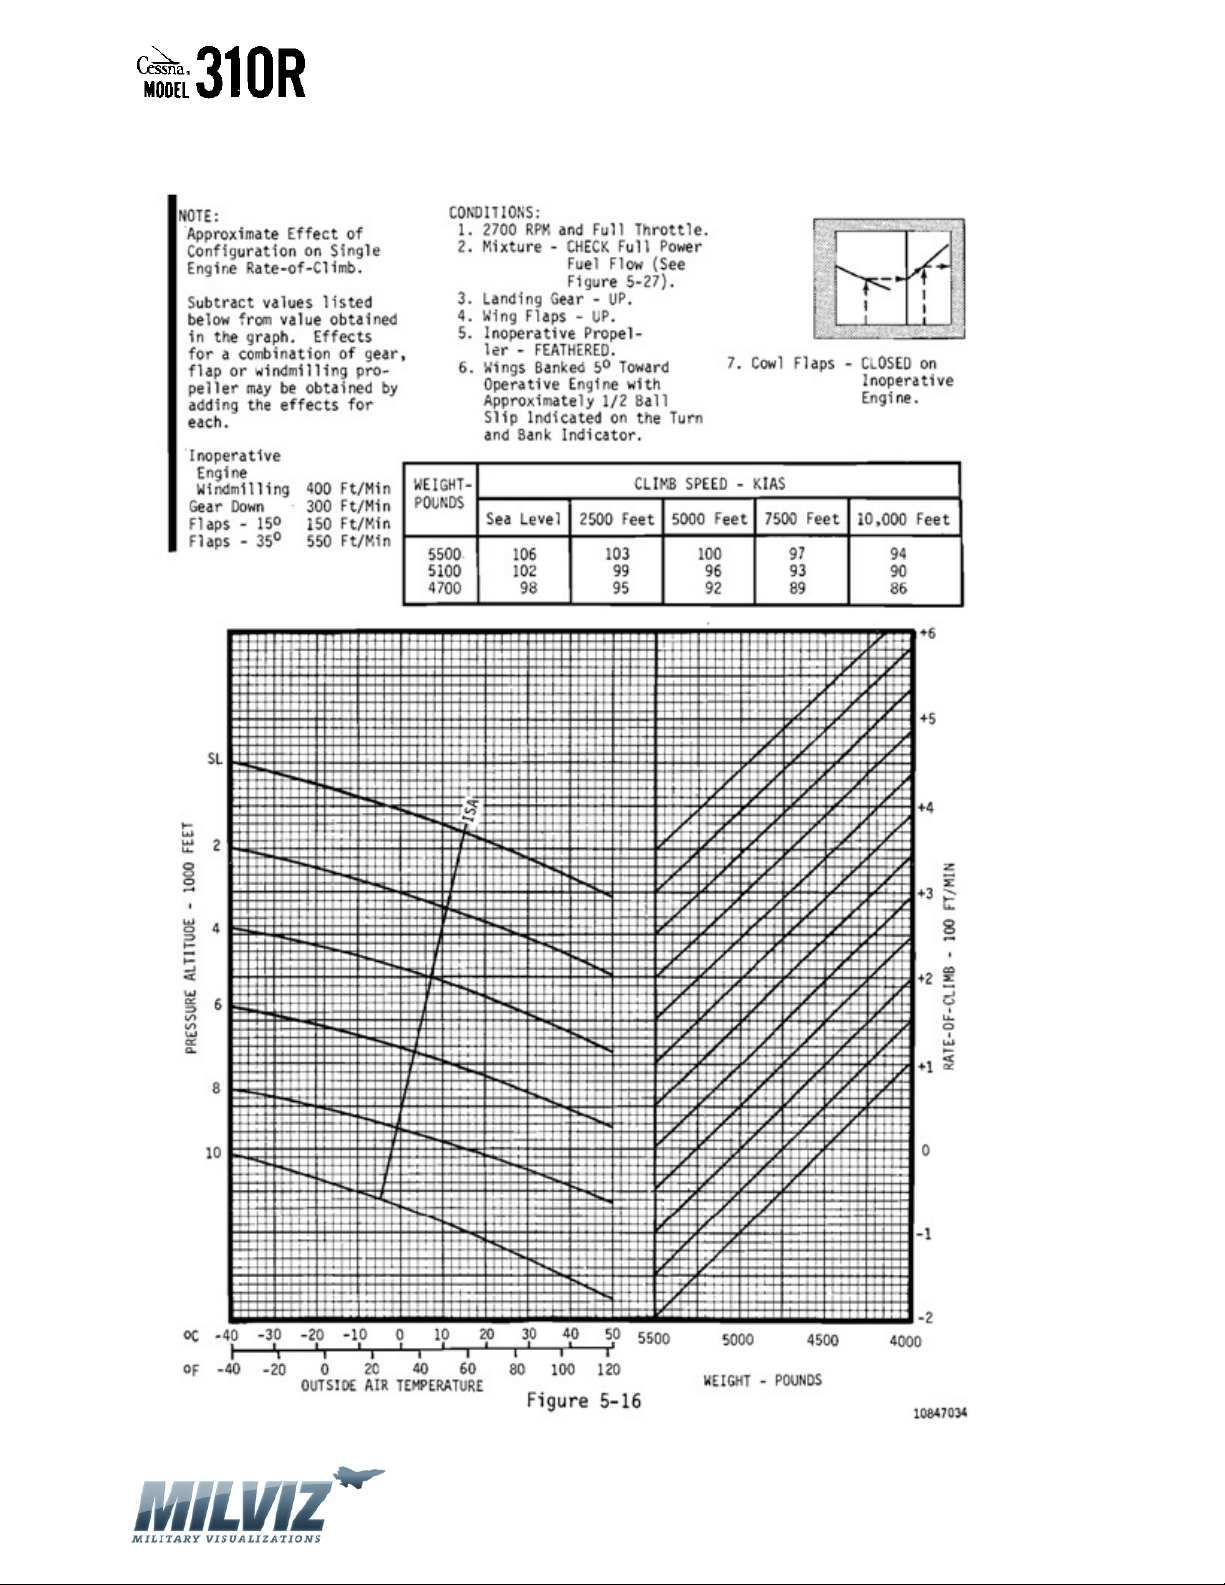
One Engine Inoperative ……………………………………………………………………………………….. 61
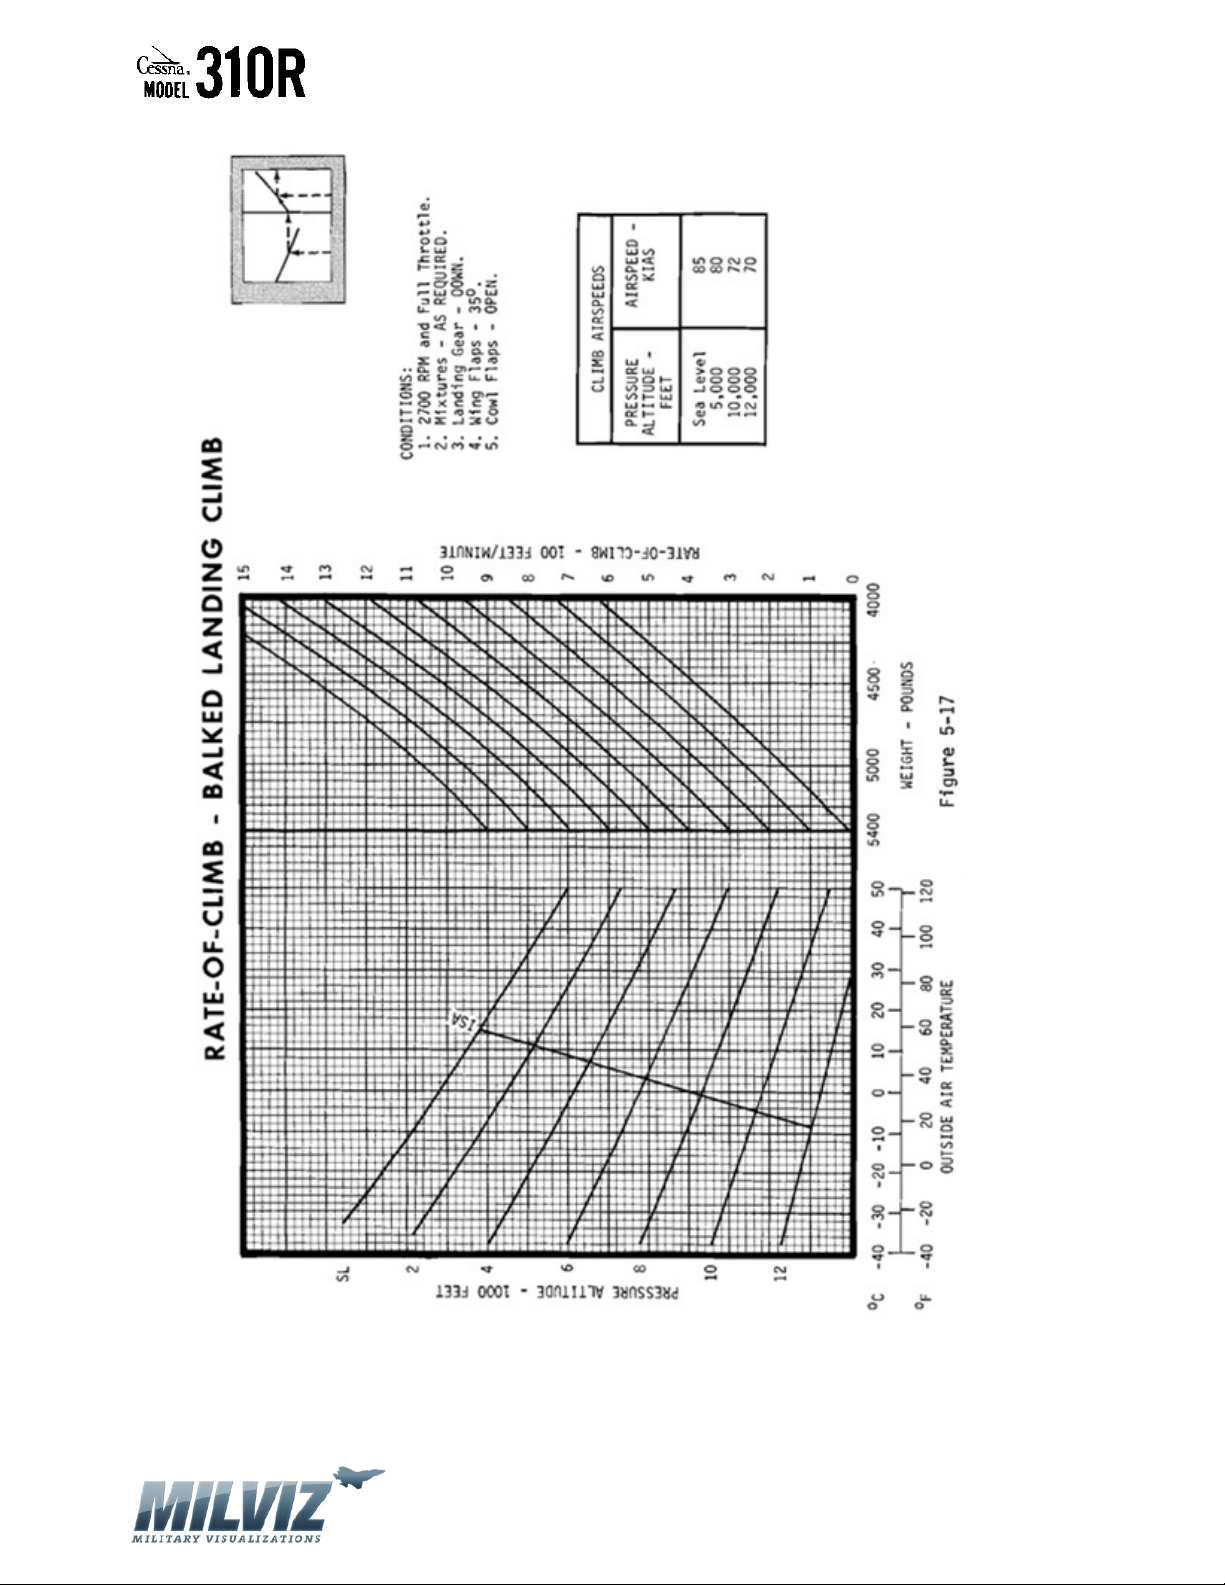
BALKED LANDING CLIMB
Rate-of-Climb ………………………………………………………………………………………………………. 62
ONE ENGINE INOPERATIVE SERVICE CEILING ……………………………………………………………. 63
TIME, FUEL AND DISTANCE TO CLIMB
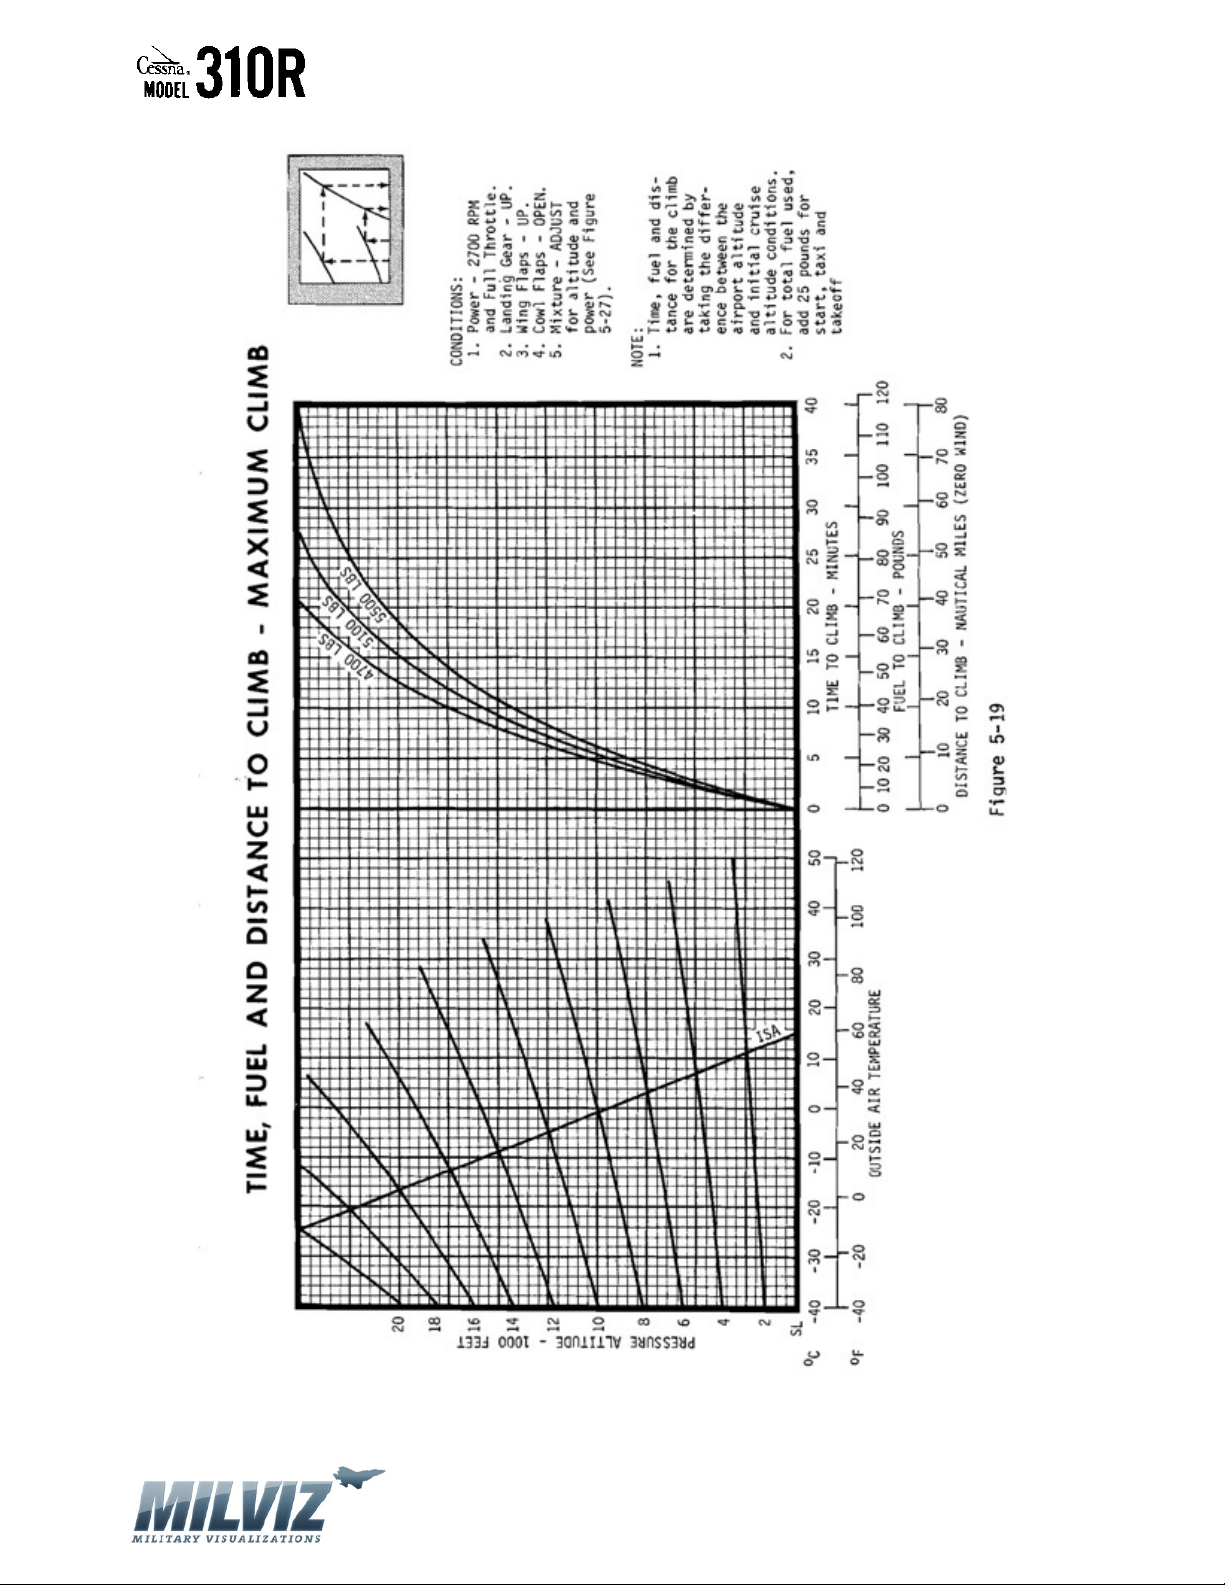
Maximum Climb …………………………………………………………………………………………………… 64
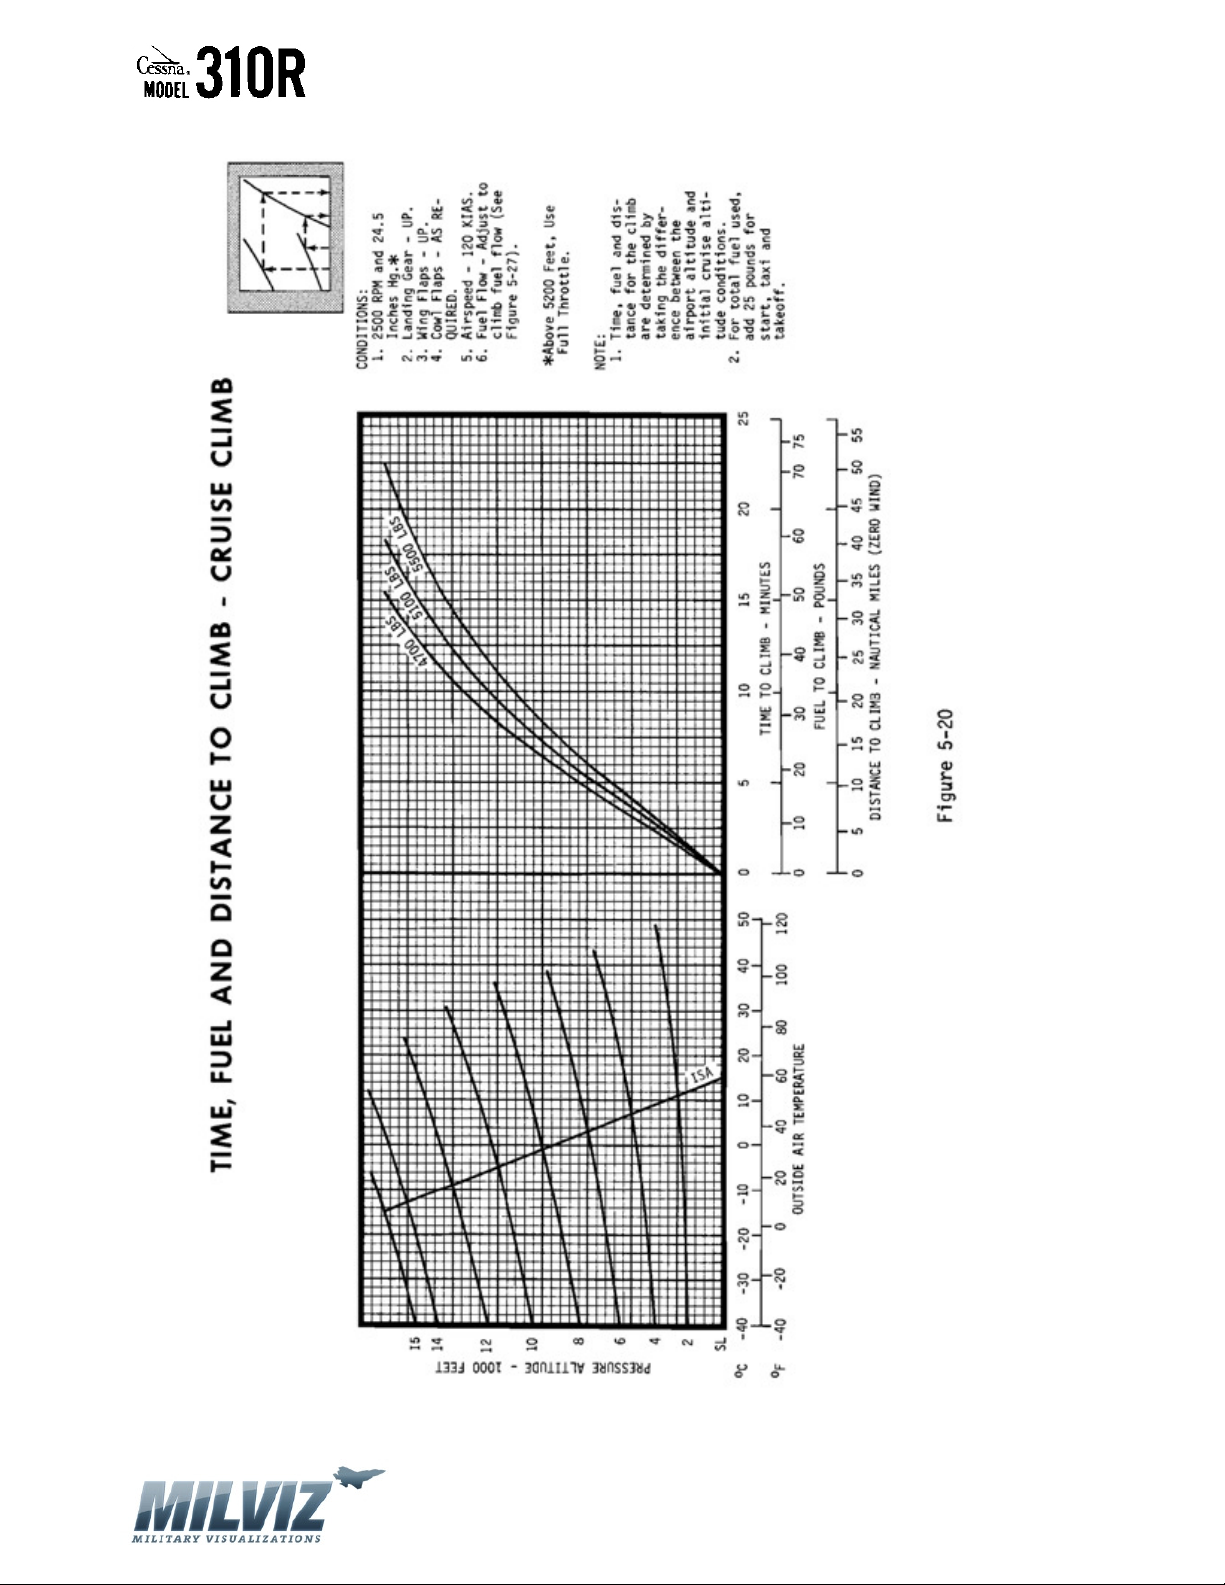
Cruise Climb ……………………………………………………………………………………………………….… 65
CRUISE PERFORMANCE
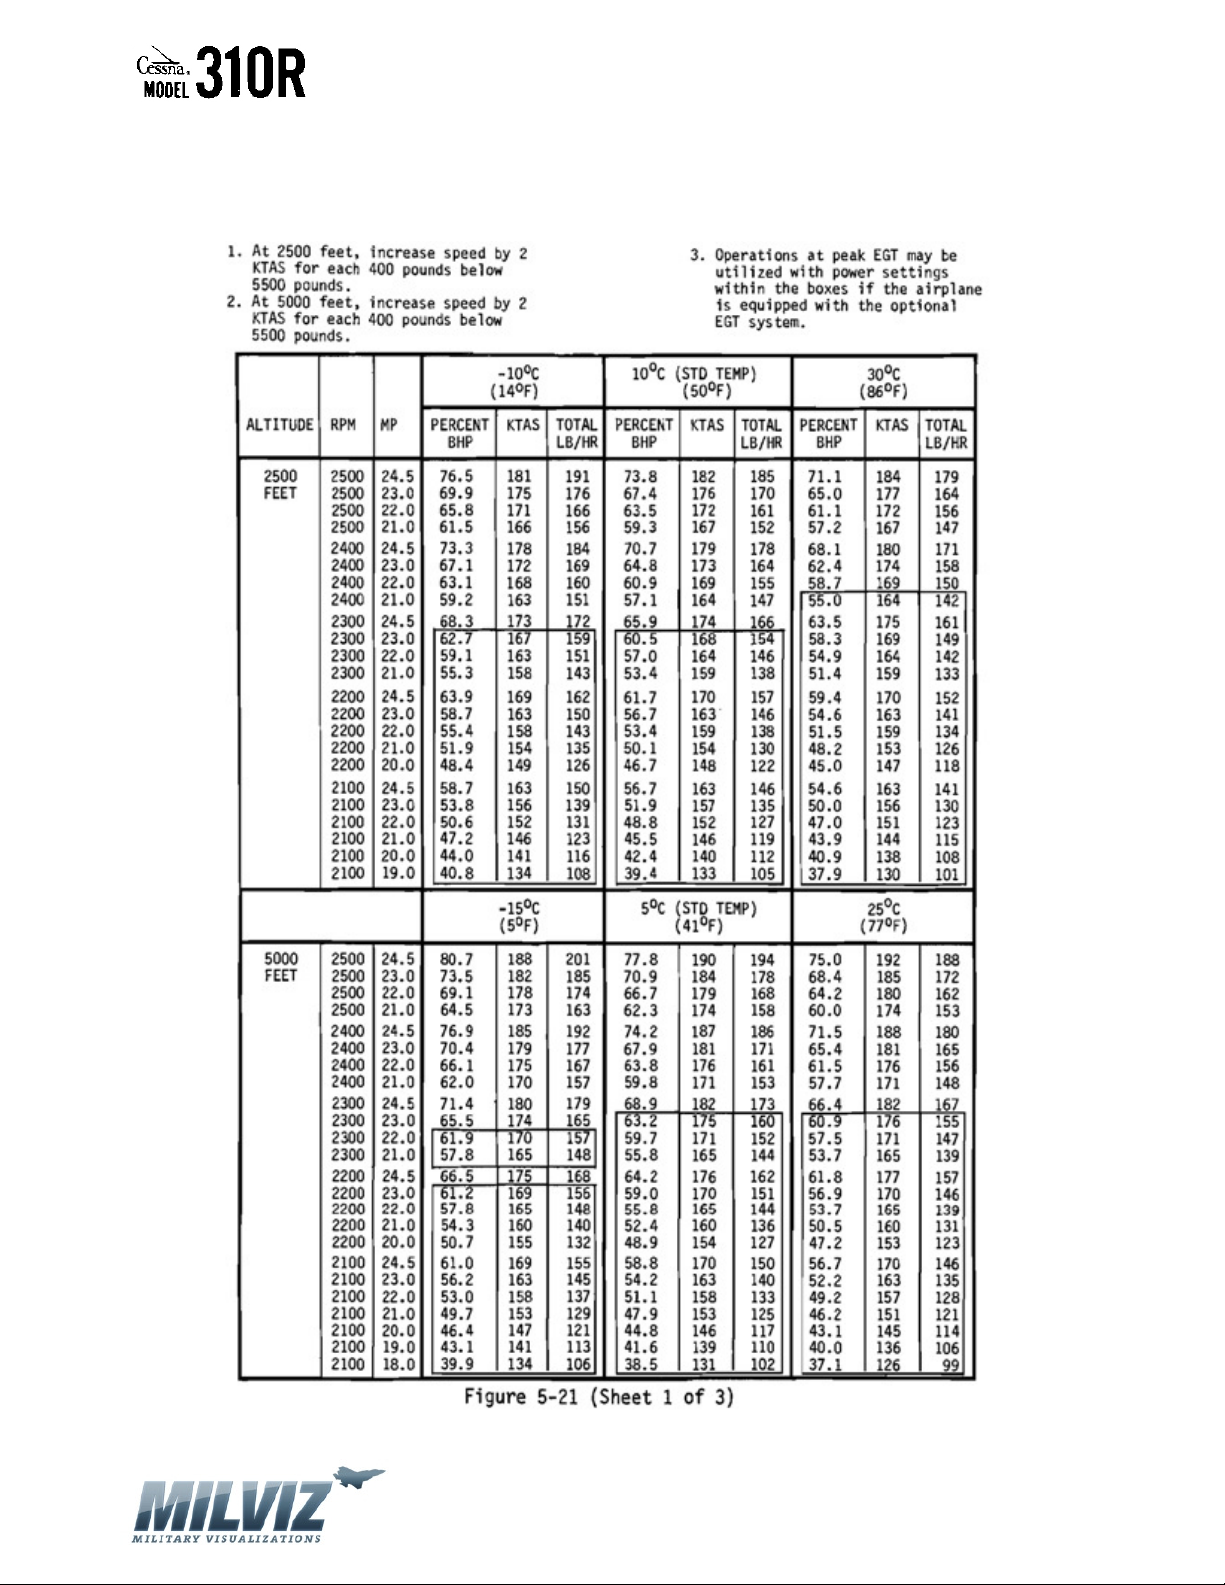
2,500 Feet ……………..…………………………………………………………………………………………….. 66
5,000 Feet ………………..………………………………………………………………………………………….. 66
7,500 Feet ………………..………………………………………………………………………………………….. 67
10,000 Feet ………………………………………………………………………………………………………….. 67
15,000 Feet ………………………………………………………………………………………………………….. 68
RANGE PROFILE ………………………………………………………………………………………………………… 69
ENDURANCE PROFILE ……………………………………………………………………………………………….. 70
HOLDING TIME …………………………………………………………………………………………………………. 71
TIME, FUEL AND DISTANCE TO DESCEND ………………………………………………………………….. 72
NORMAL LANDING DISTANCE …………………………………………………………………………………… 73
FUEL FLOW SCHEDULE ………………………………………………………………………………………………… 74
Version 1.0 – 23 May 2010
[44]
Page 45

MilViz Cessna 310R Pilot’s Operating Handbook
INTRODUCTION
Section 5 of the Pilot’s Operating Handbook contains all the performance information
required to operate the airplane safely and to help you plan your flights in detail with
reasonable accuracy. Safe and precise operation of the airplane requires the pilot to be
thoroughly familiar with and understand the data and calculations of this section.
The data on these graphical and tabular charts have been compiled from actual flight tests,
with the airplane and engines in good condition, using average pilot techniques. Note that the
cruise performance data makes no allowance for wind and/or navigational errors. Allowance
for start, taxi, takeoff, climb, descent and 45 minutes reserve are provided in the range profile
chart.
To determine pressure altitude at origin and destination airports, add 100 feet to field
elevation for each .1 inch Hg. below 29.92, or subtract 100 feet from field elevation for each .1
inch Hg. above 29.92.
The performance tables are presented in increments of temperature, altitude and any other
variable involved. Performance for a given set of conditions can be approximated as follows:
1. Takeoff, Accelerate Stop, Accelerate Go, Landing – Enter tables at the next higher
increment of weight, altitude and temperature.
2. Cruise – Enter tables at next lower increment of temperature and altitude.
To obtain exact performance values from the tables, it is necessary to interpolate between
the increment values.
Version 1.0 – 23 May 2010
[45]
Page 46
MilViz Cessna 310R Pilot’s Operating Handbook
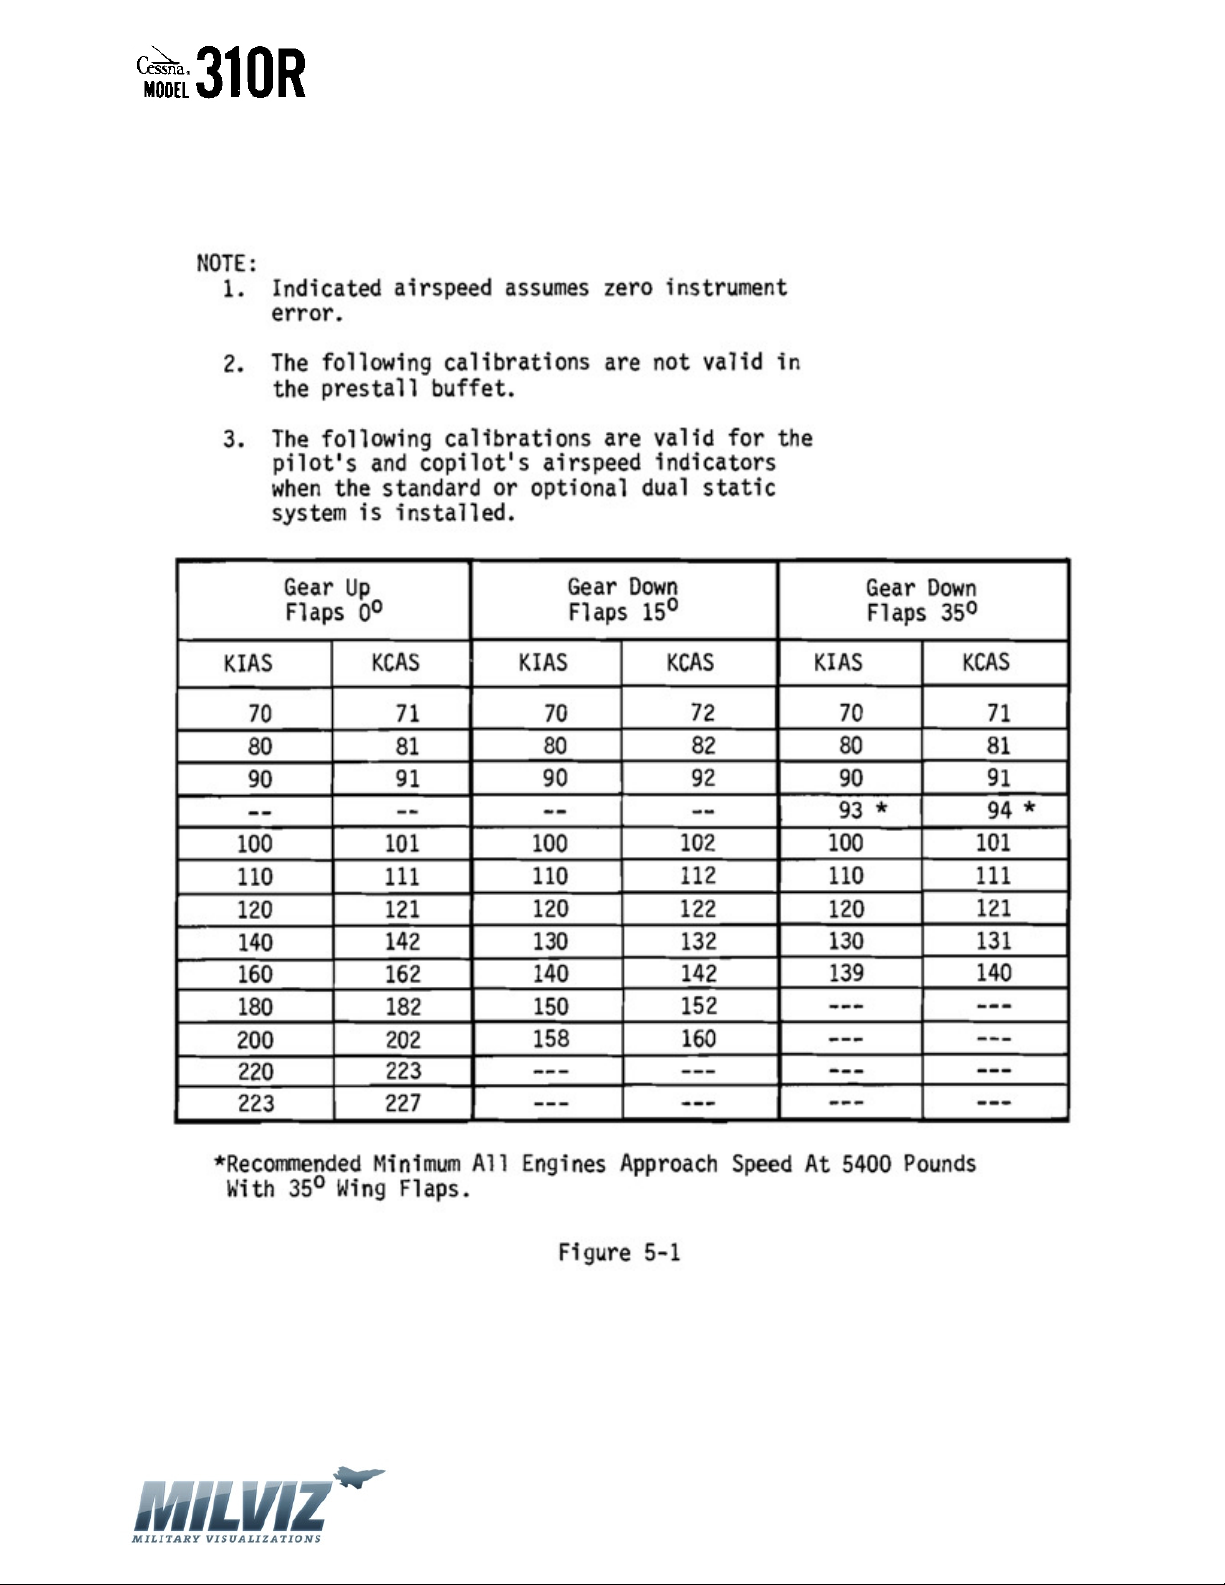
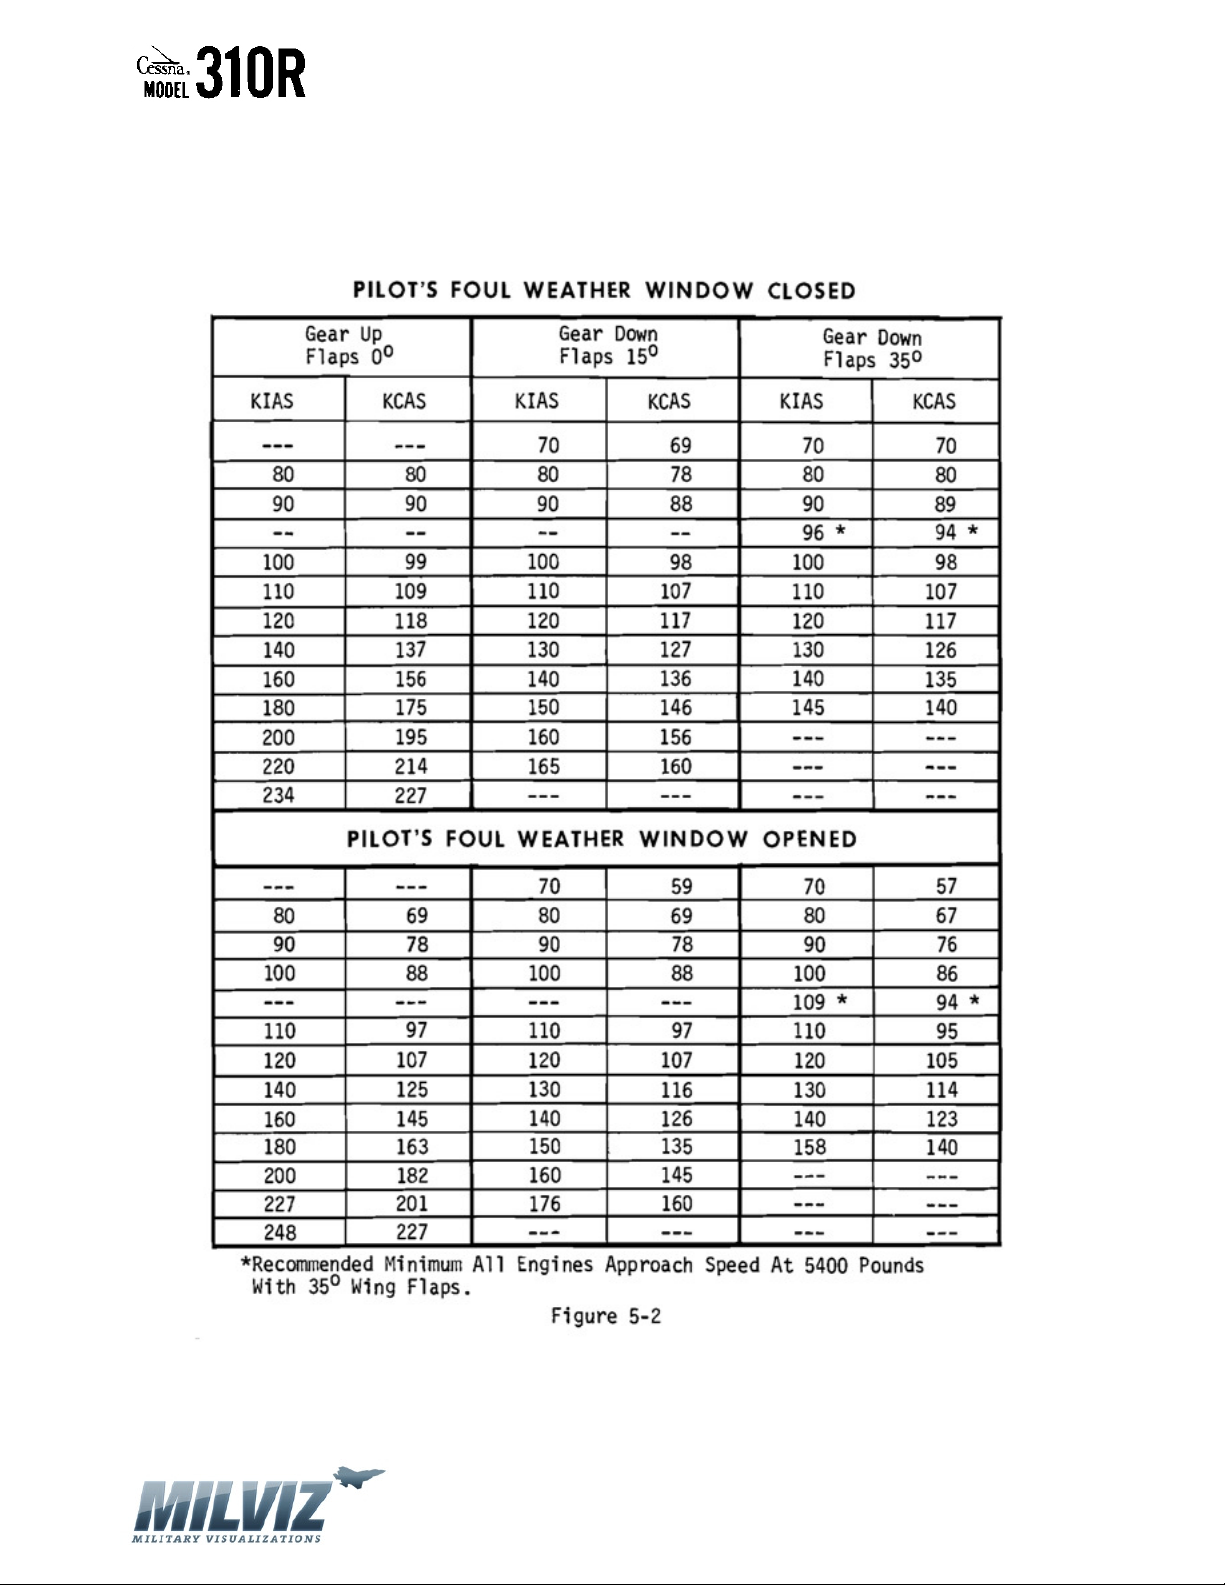
AIRSPEED CALIBRATION
NORMAL STATIC SOURCE
Version 1.0 – 23 May 2010
[46]
Page 47
MilViz Cessna 310R Pilot’s Operating Handbook
AIRSPEED CALIBRATION
ALTERNATE STATIC SOURCE
Version 1.0 – 23 May 2010
[47]
Page 48
MilViz Cessna 310R Pilot’s Operating Handbook
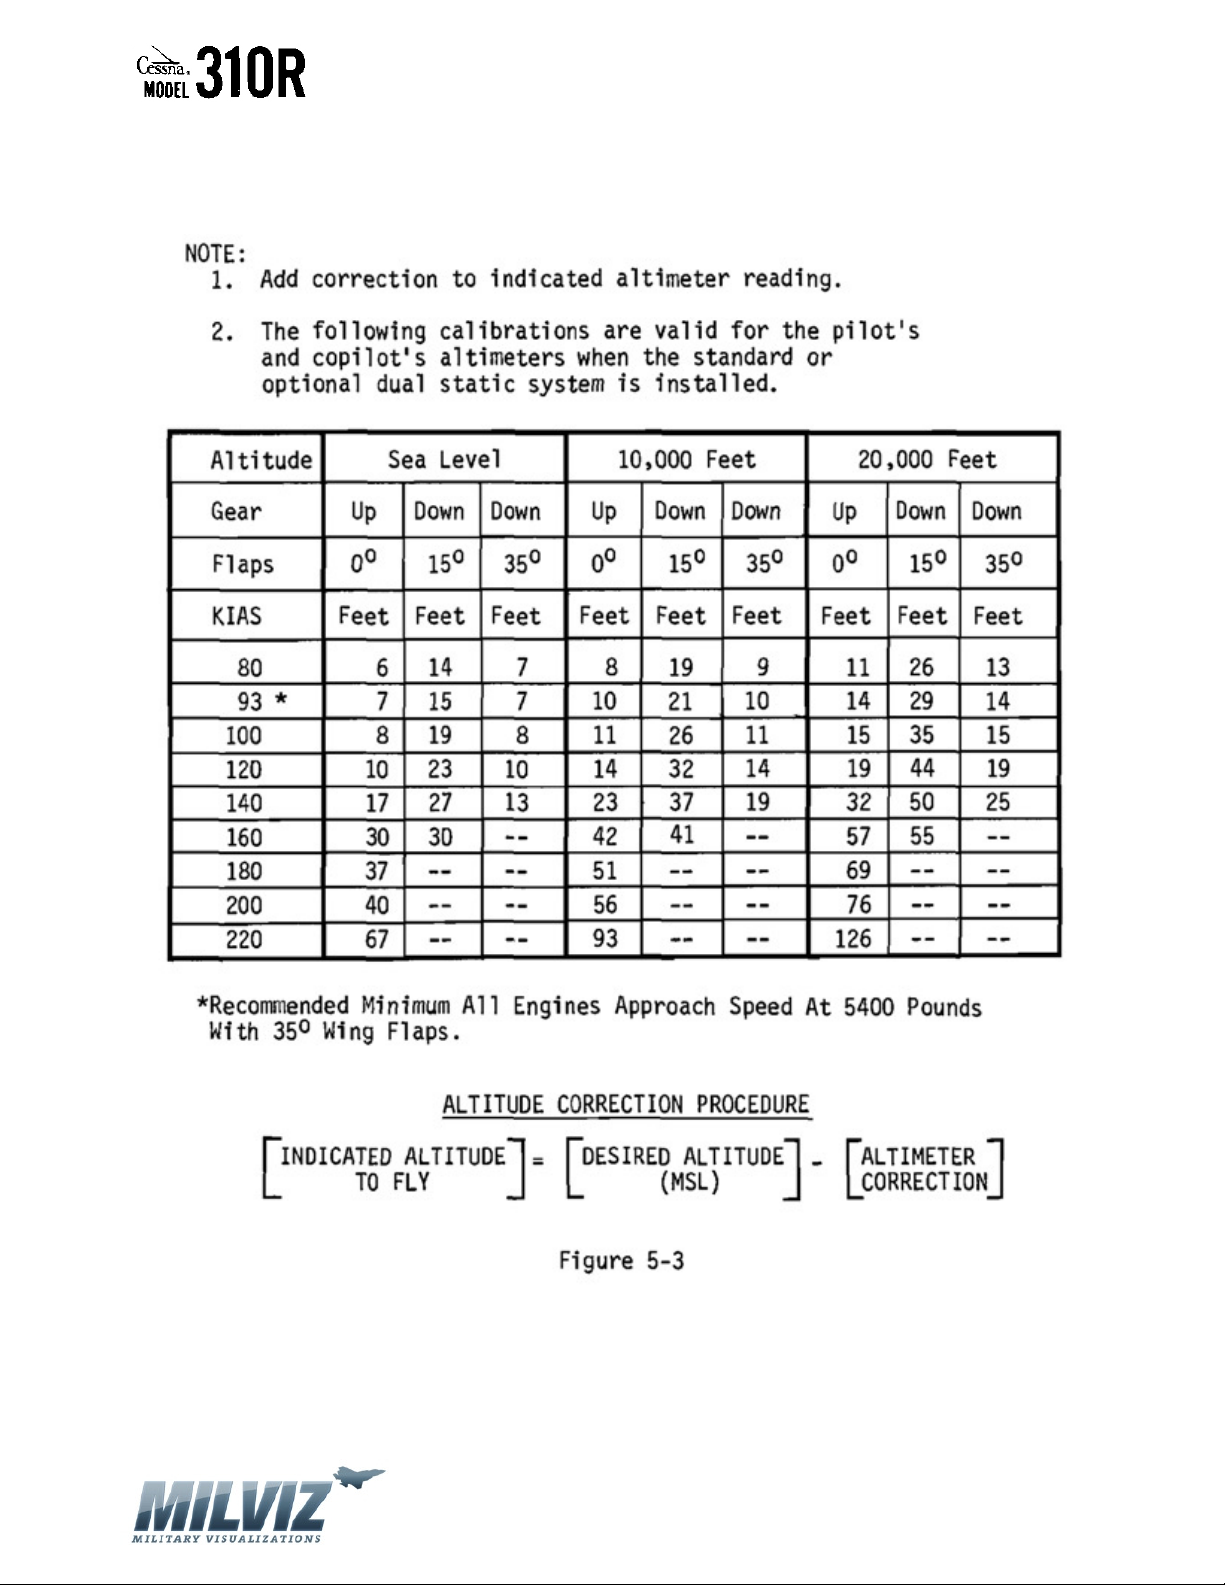
ALTIMETER CORRECTION
NORMAL STATIC SOURCE
Version 1.0 – 23 May 2010
[48]
Page 49
MilViz Cessna 310R Pilot’s Operating Handbook
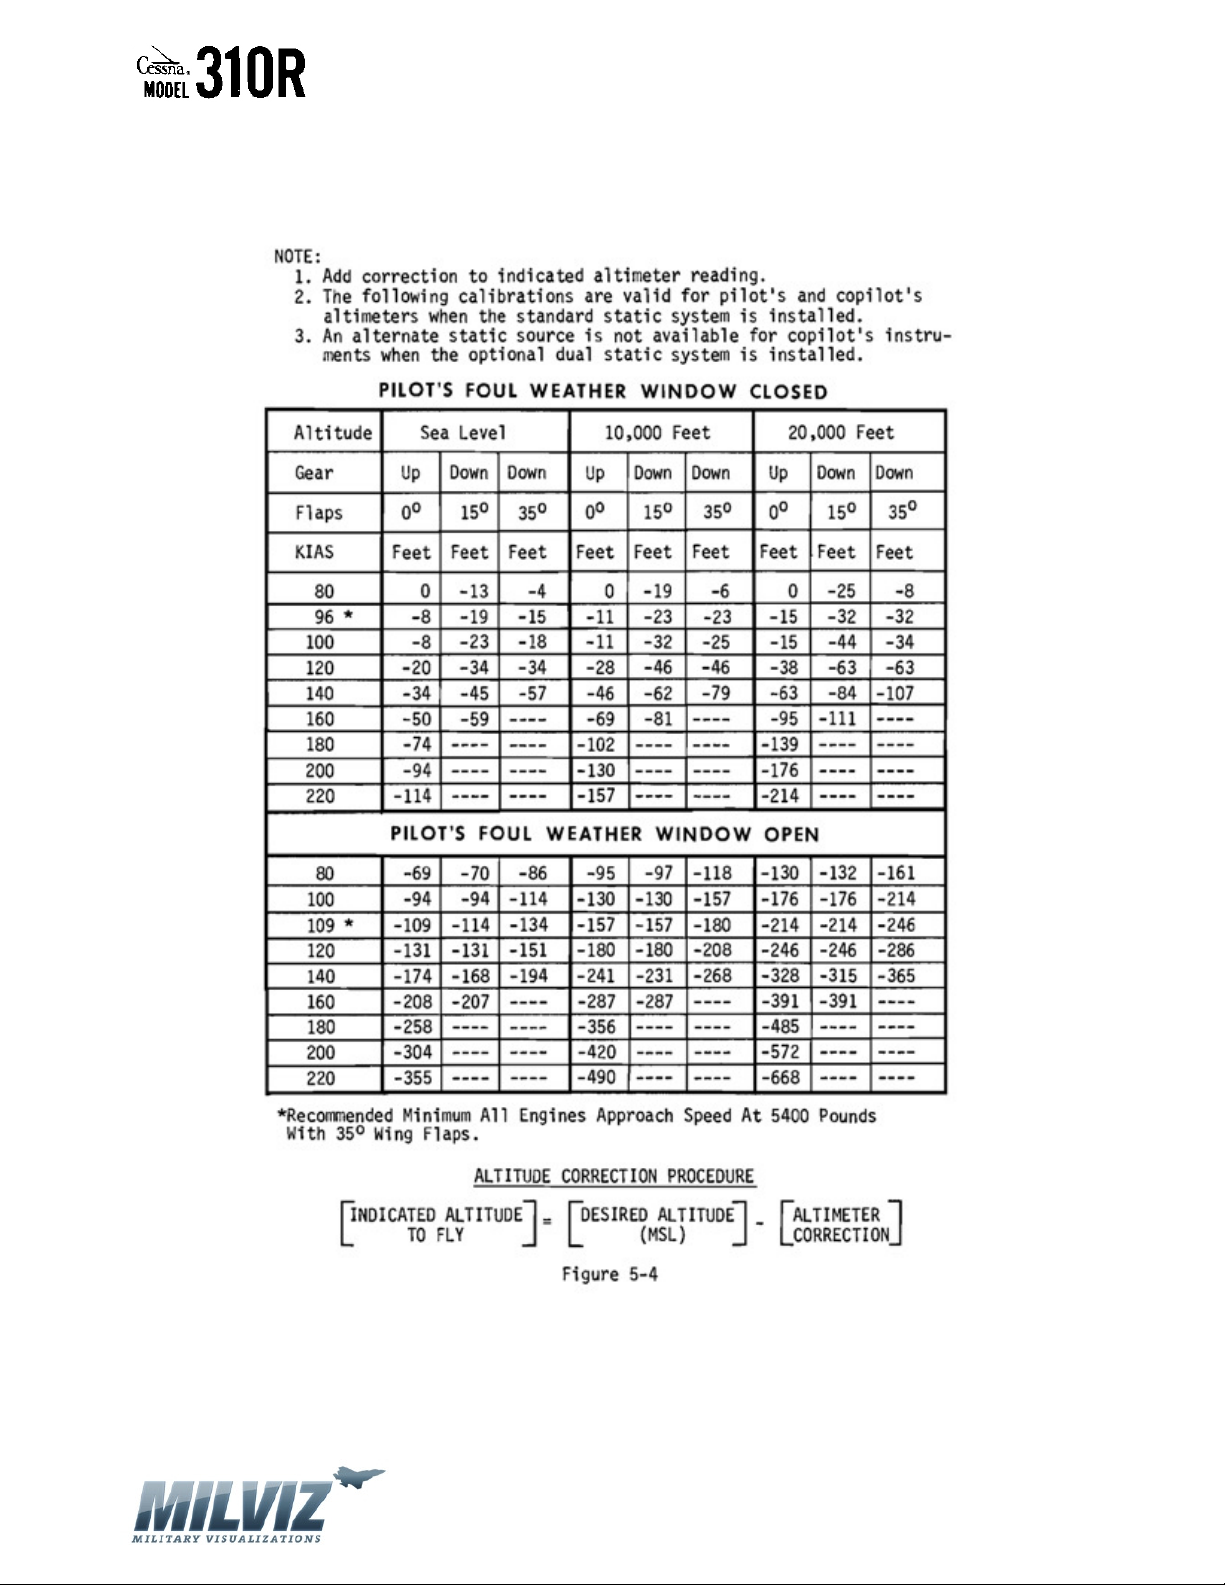
ALTIMETER CORRECTION
ALTERNATE STATIC SOURCE
Version 1.0 – 23 May 2010
[49]
Page 50
MilViz Cessna 310R Pilot’s Operating Handbook
Version 1.0 – 23 May 2010
[50]
Page 51
MilViz Cessna 310R Pilot’s Operating Handbook
Version 1.0 – 23 May 2010
[51]
Page 52
MilViz Cessna 310R Pilot’s Operating Handbook
PRESSURE CONVERSION
INCHES OF MERCURY TO MILLIBARS
Version 1.0 – 23 May 2010
[52]
Page 53
MilViz Cessna 310R Pilot’s Operating Handbook
STALL SPEEDS
Version 1.0 – 23 May 2010
[53]
Page 54
MilViz Cessna 310R Pilot’s Operating Handbook
WIND COMPONENT
Version 1.0 – 23 May 2010
[54]
Page 55
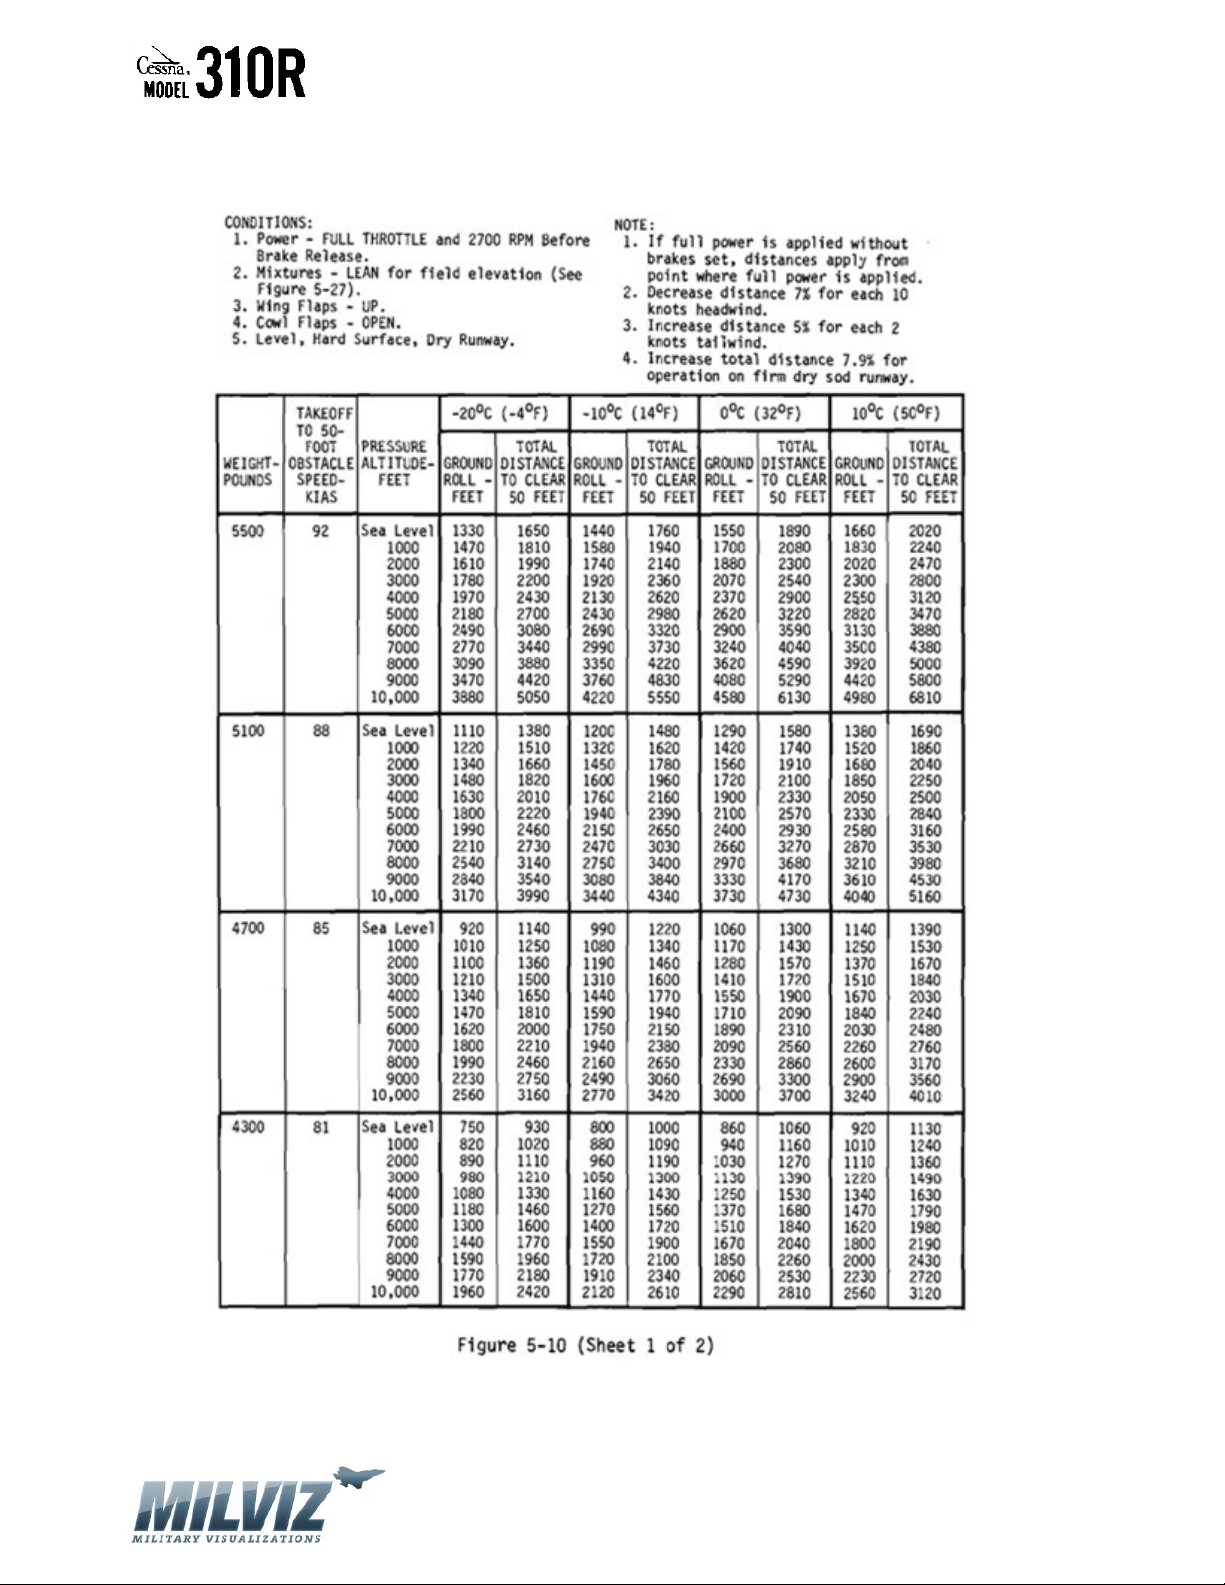
MilViz Cessna 310R Pilot’s Operating Handbook
NORMAL TAKEOFF DISTANCE
Version 1.0 – 23 May 2010
[55]
Page 56
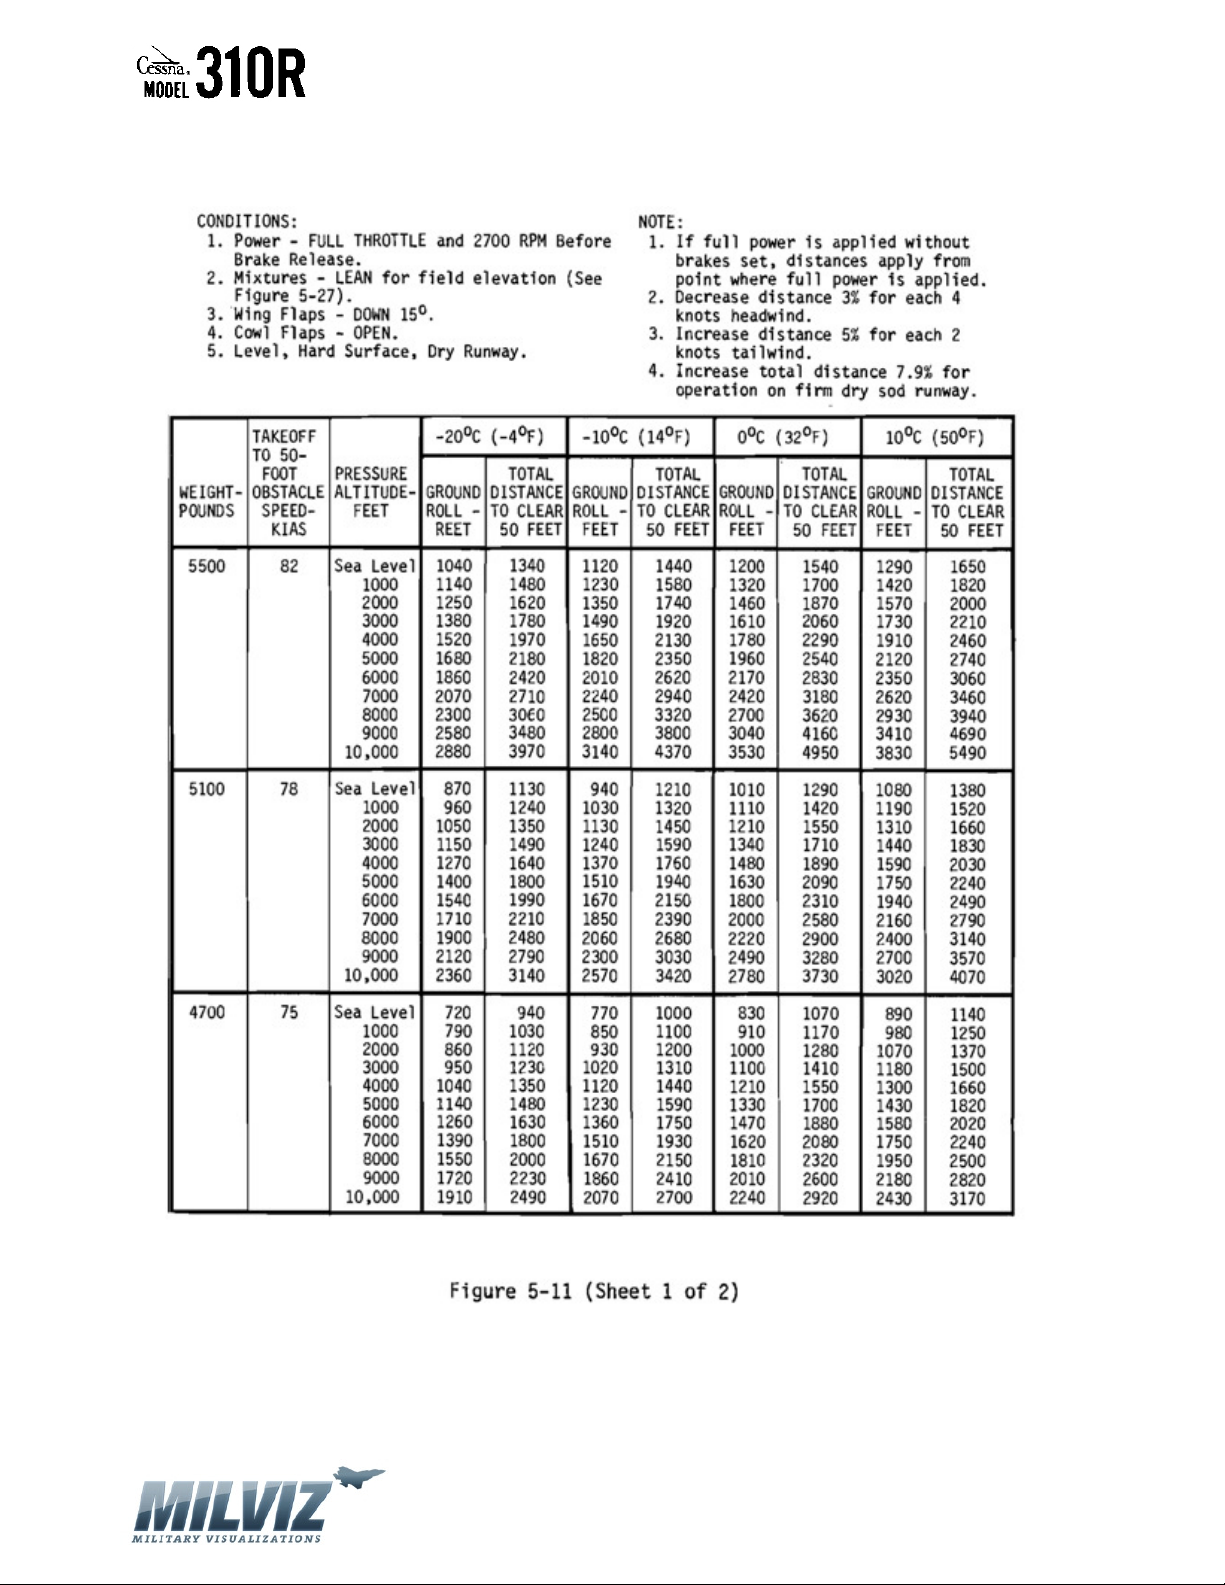
MilViz Cessna 310R Pilot’s Operating Handbook
MAXIMUM PERFORMANCE TAKEOFF DISTANCE
Version 1.0 – 23 May 2010
[56]
Page 57
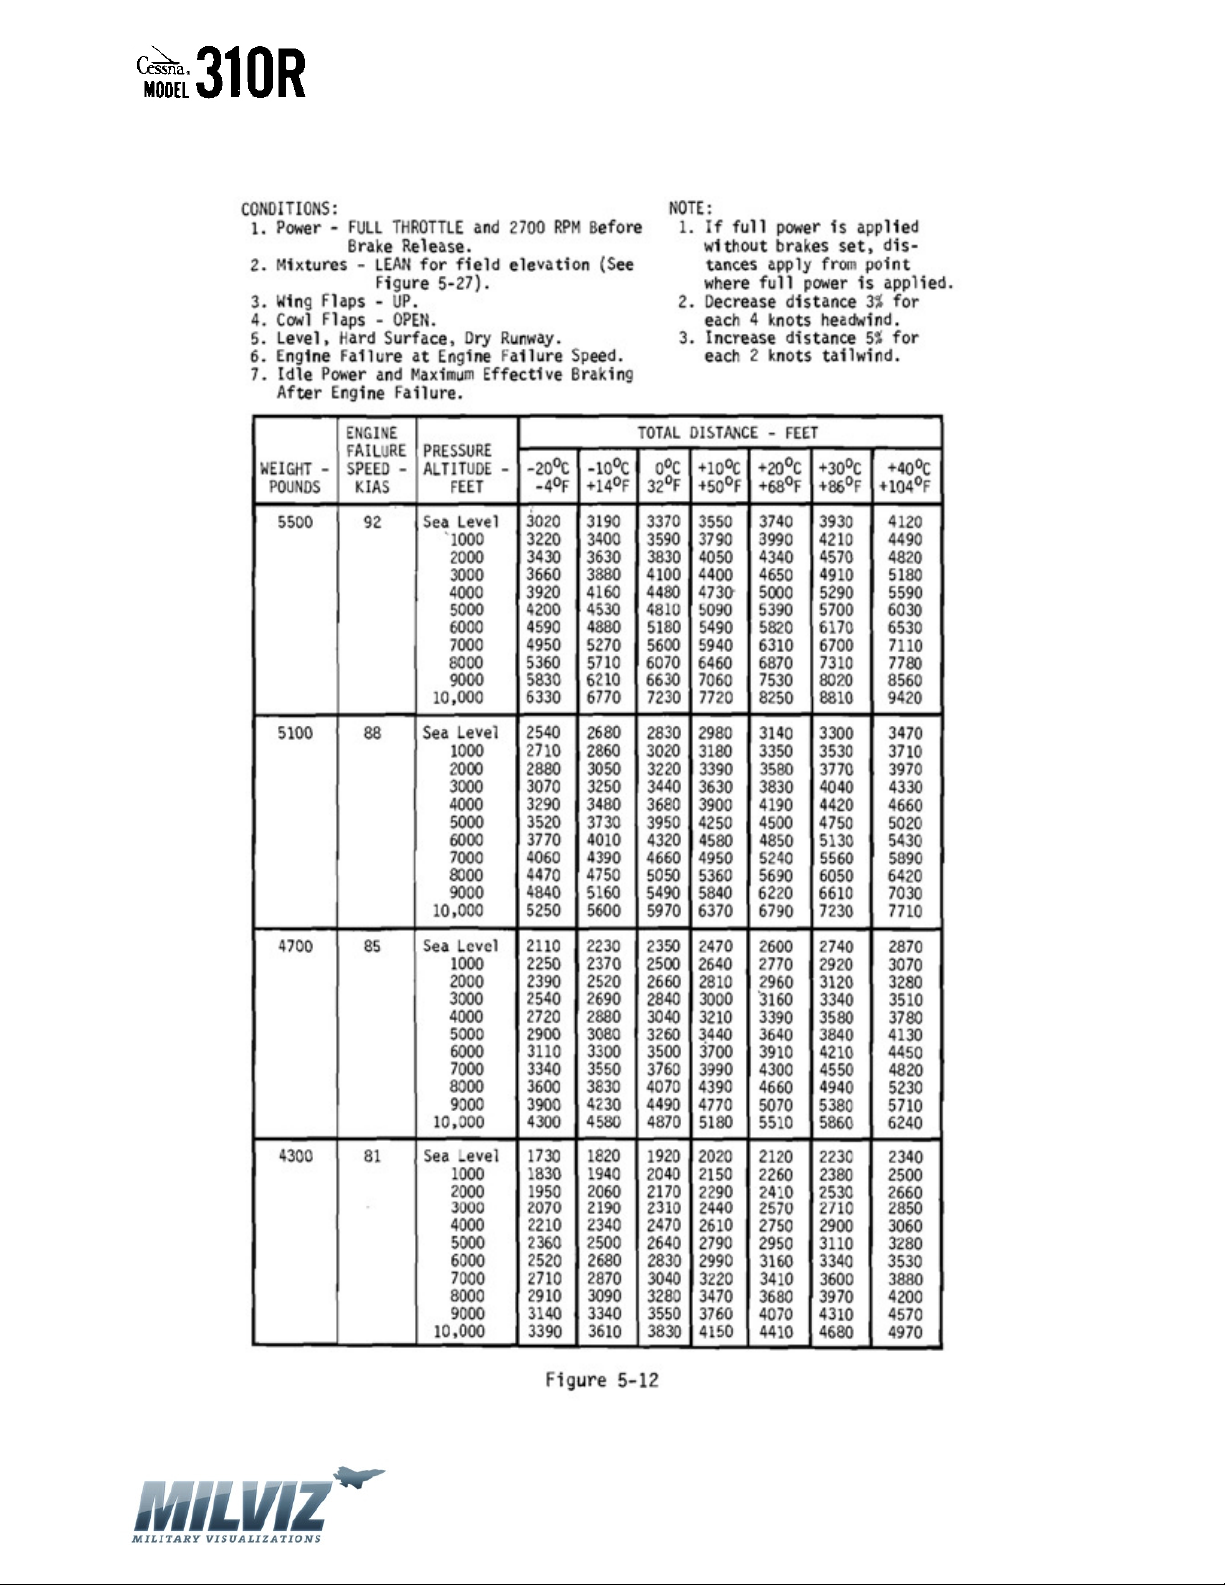
MilViz Cessna 310R Pilot’s Operating Handbook
ACCELERATE STOP DISTANCE
Version 1.0 – 23 May 2010
[57]
Page 58
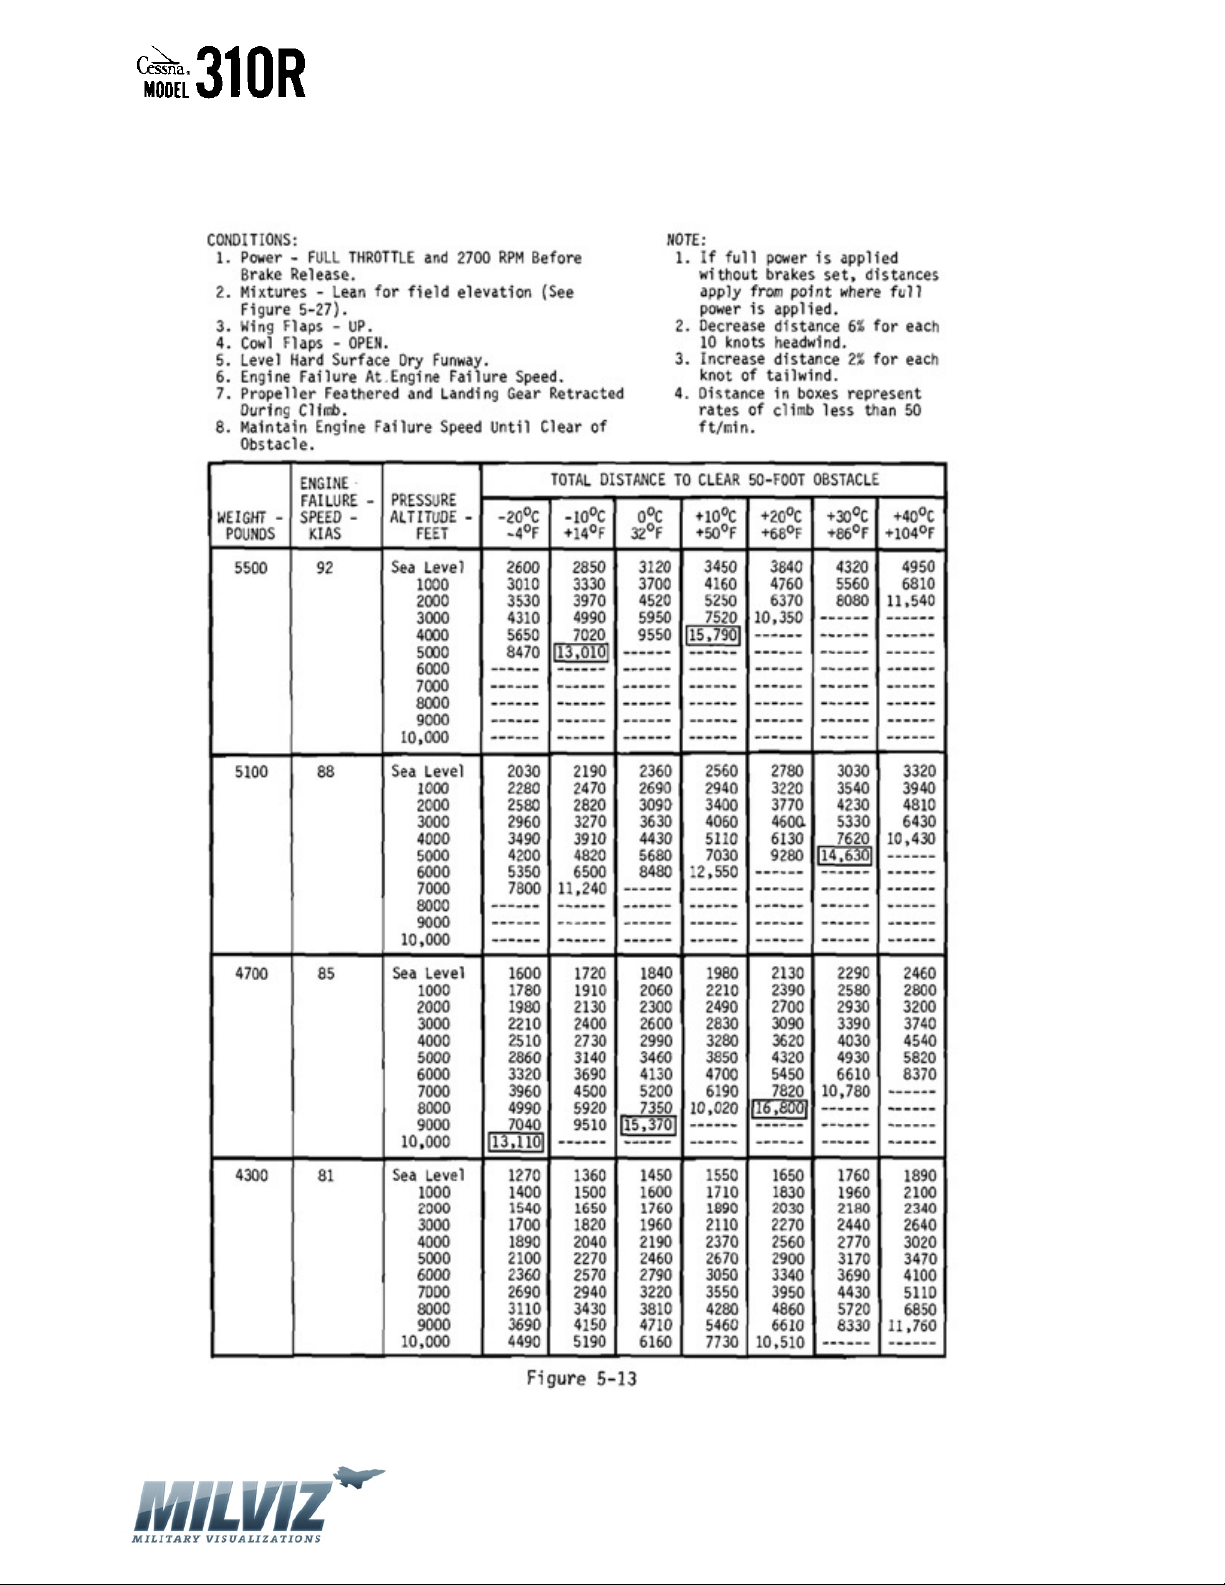
MilViz Cessna 310R Pilot’s Operating Handbook
ACCELERATE GO DISTANCE
Version 1.0 – 23 May 2010
[58]
Page 59
MilViz Cessna 310R Pilot’s Operating Handbook
Version 1.0 – 23 May 2010
[59]
Page 60
MilViz Cessna 310R Pilot’s Operating Handbook
RATE-OF-CLIMB – CRUISE CLIMB
Version 1.0 – 23 May 2010
[60]
Page 61
MilViz Cessna 310R Pilot’s Operating Handbook
RATE-OF-CLIMB – ONE ENGINE INOPERATIVE
Version 1.0 – 23 May 2010
[61]
Page 62
MilViz Cessna 310R Pilot’s Operating Handbook
Version 1.0 – 23 May 2010
[62]
Page 63
MilViz Cessna 310R Pilot’s Operating Handbook
ONE ENGINE INOPERATIVE SERVICE CEILING
Version 1.0 – 23 May 2010
[63]
Page 64
MilViz Cessna 310R Pilot’s Operating Handbook
Version 1.0 – 23 May 2010
[64]
Page 65
MilViz Cessna 310R Pilot’s Operating Handbook
Version 1.0 – 23 May 2010
[65]
Page 66
MilViz Cessna 310R Pilot’s Operating Handbook
CRUISE PERFORMANCE
WITH RECOMMENDED LEAN MIXTURE
Version 1.0 – 23 May 2010
[66]
Page 67
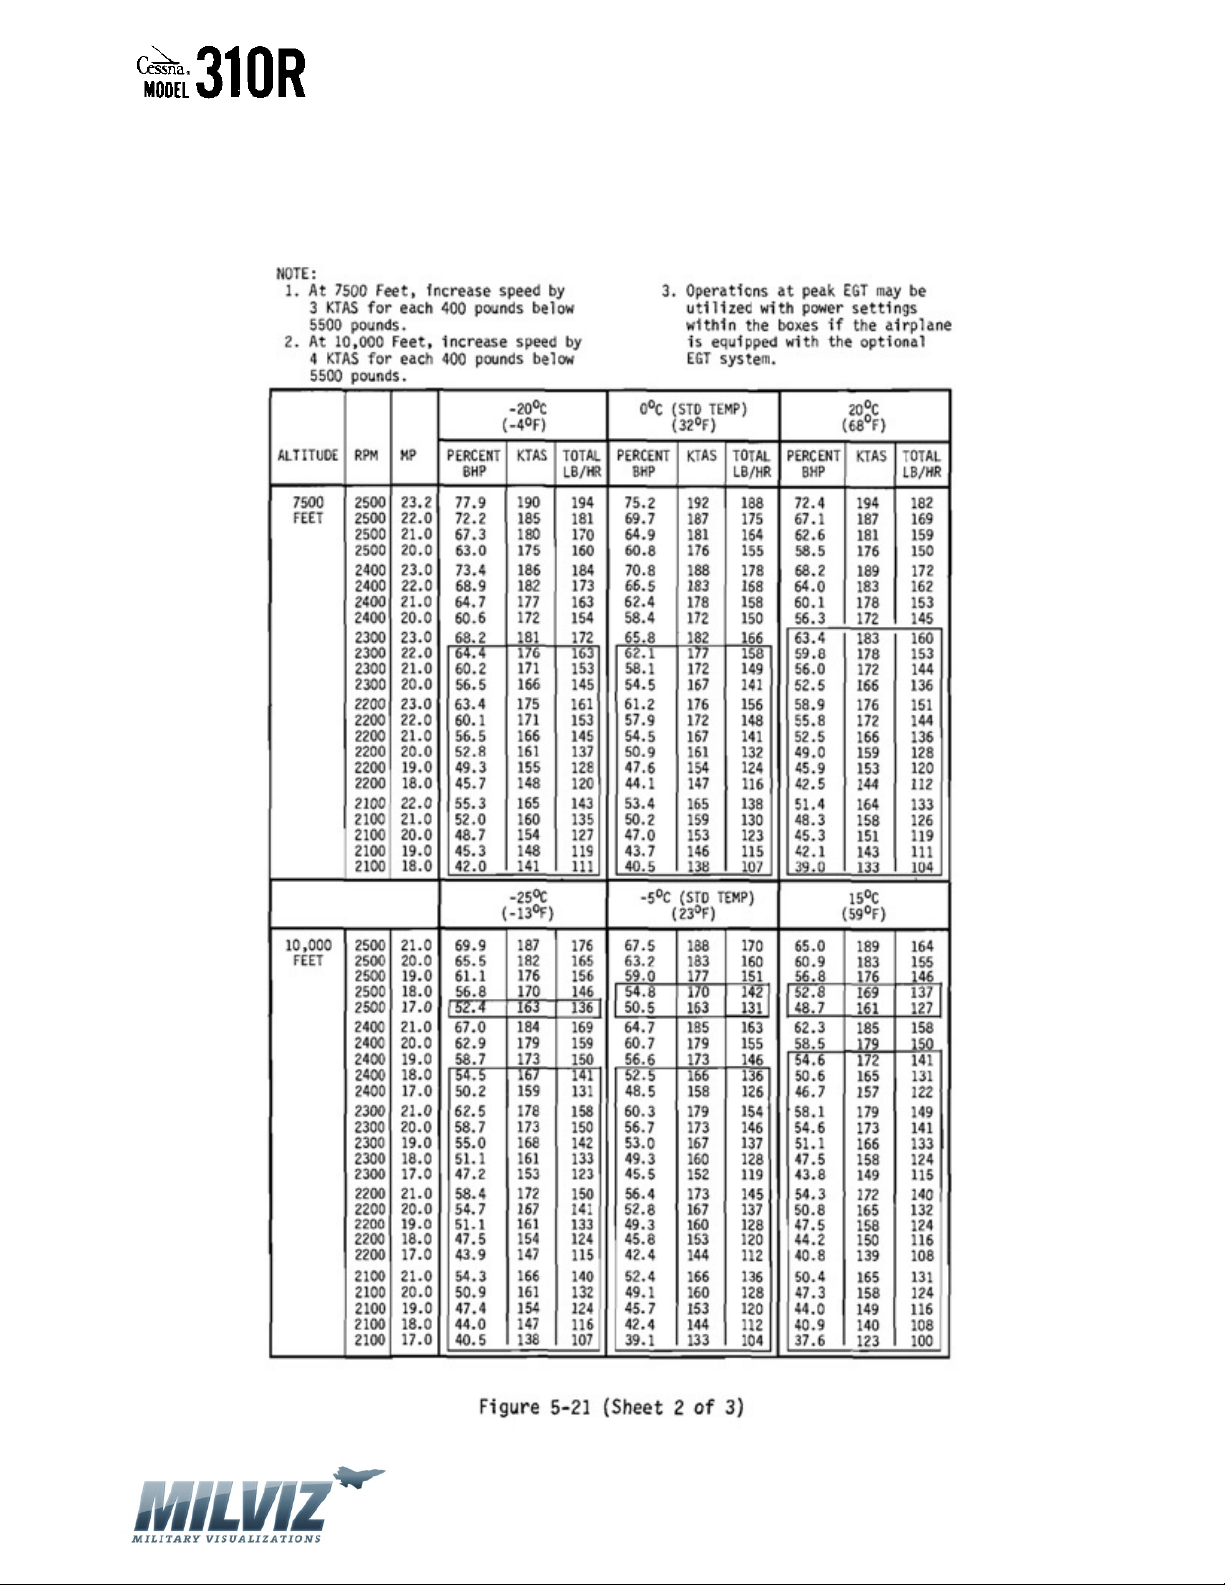
MilViz Cessna 310R Pilot’s Operating Handbook
CRUISE PERFORMANCE
WITH RECOMMENDED LEAN MIXTURE
Version 1.0 – 23 May 2010
[67]
Page 68
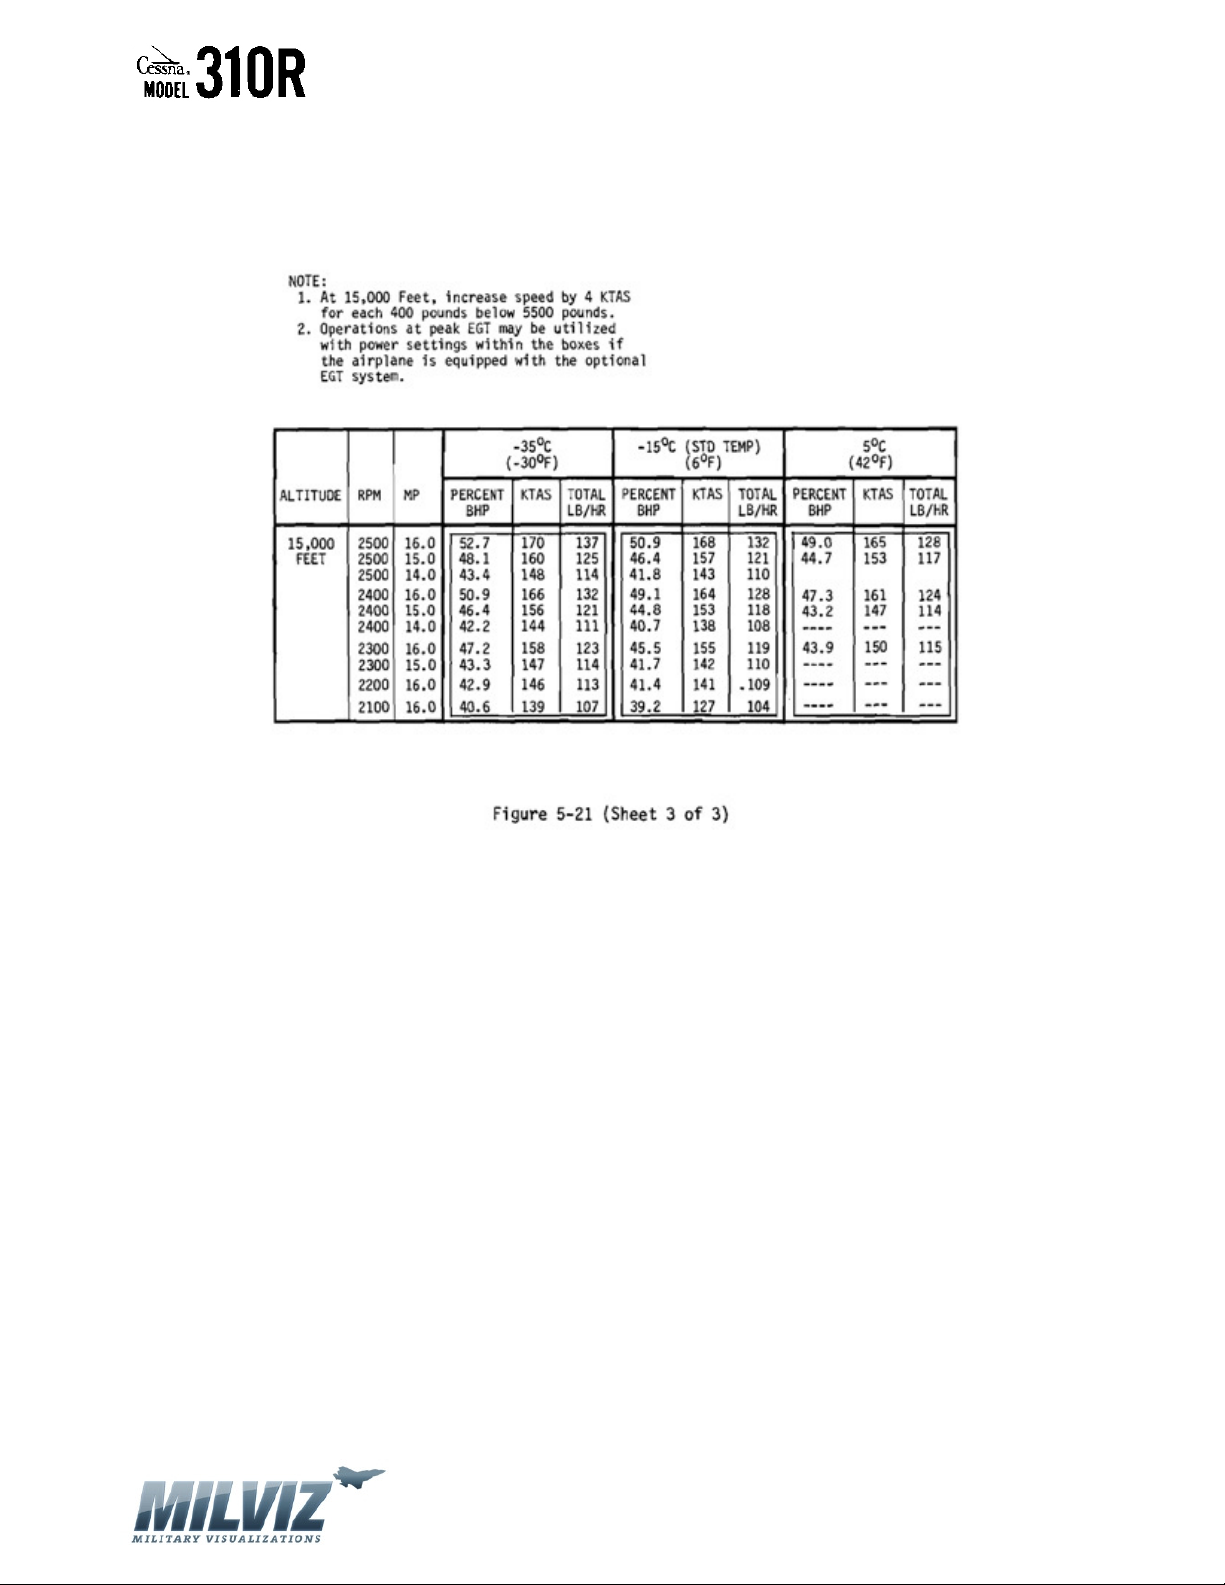
MilViz Cessna 310R Pilot’s Operating Handbook
CRUISE PERFORMANCE
WITH RECOMMENDED LEAN MIXTURE
Version 1.0 – 23 May 2010
[68]
Page 69
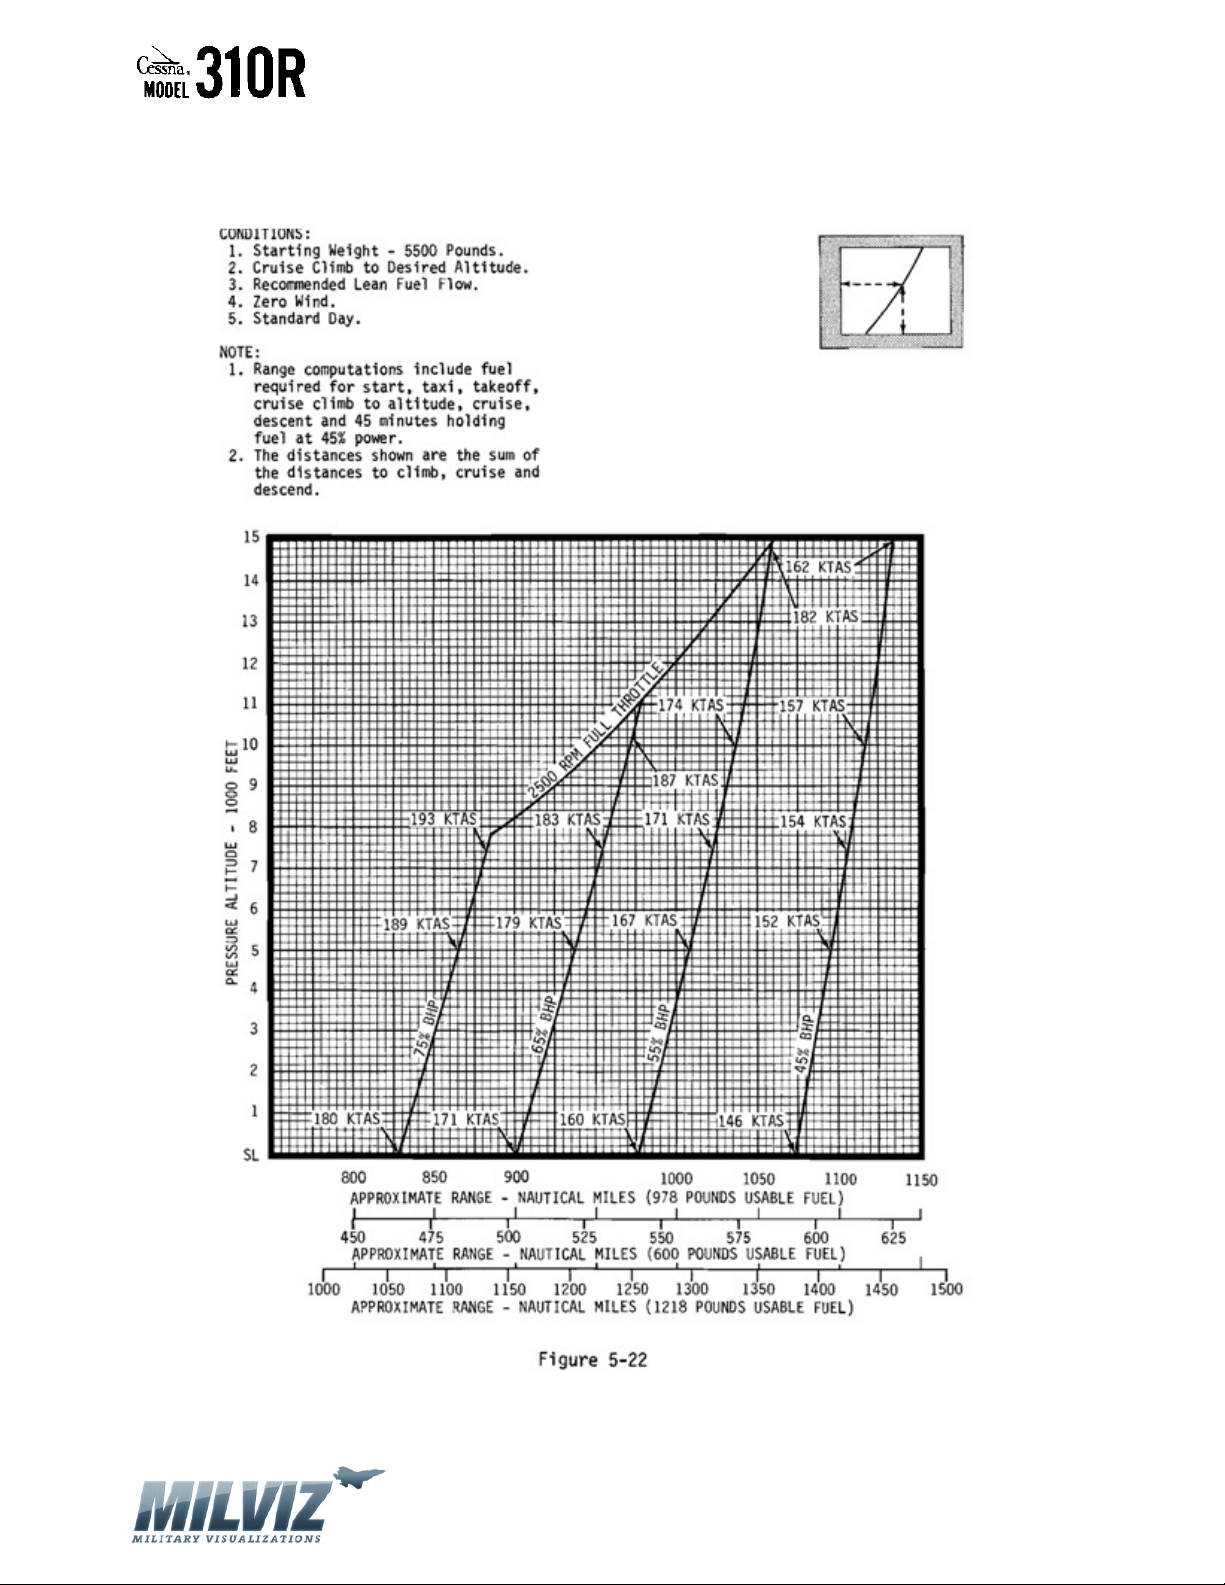
MilViz Cessna 310R Pilot’s Operating Handbook
RANGE PROFILE
Version 1.0 – 23 May 2010
[69]
Page 70
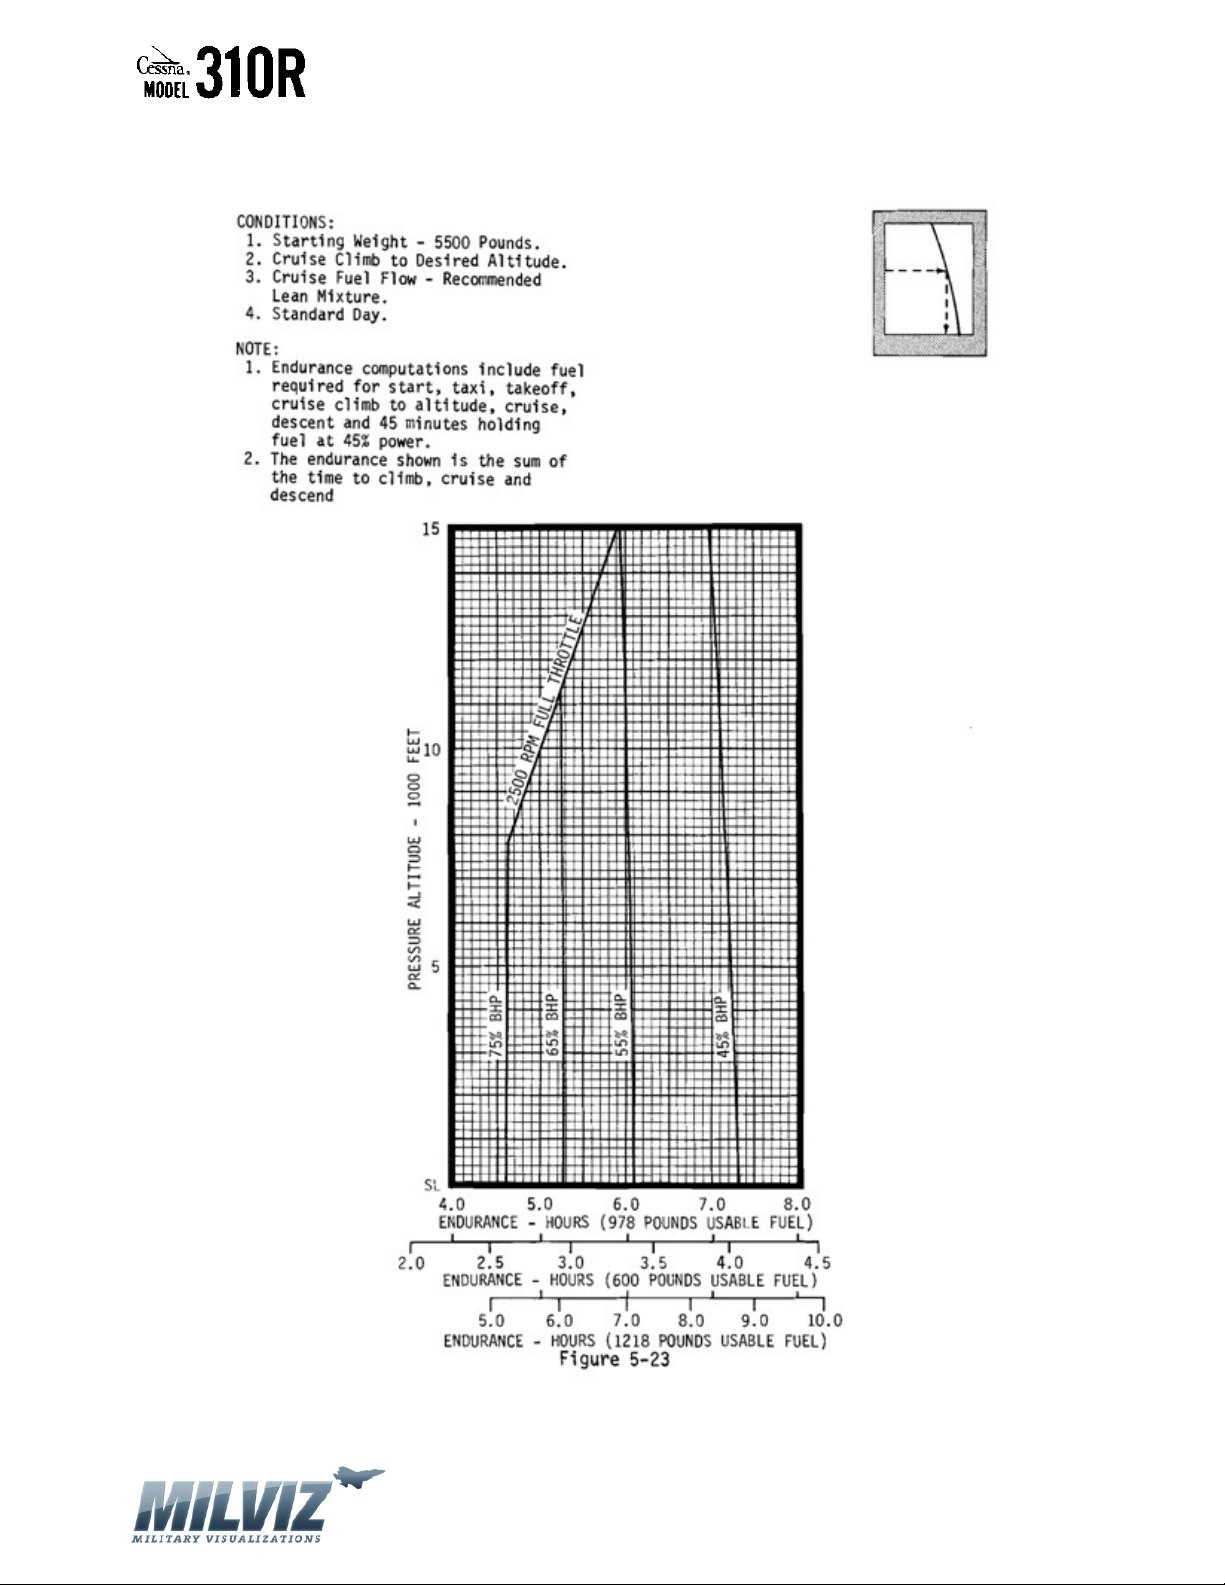
MilViz Cessna 310R Pilot’s Operating Handbook
ENDURANCE PROFILE
Version 1.0 – 23 May 2010
[70]
Page 71
MilViz Cessna 310R Pilot’s Operating Handbook
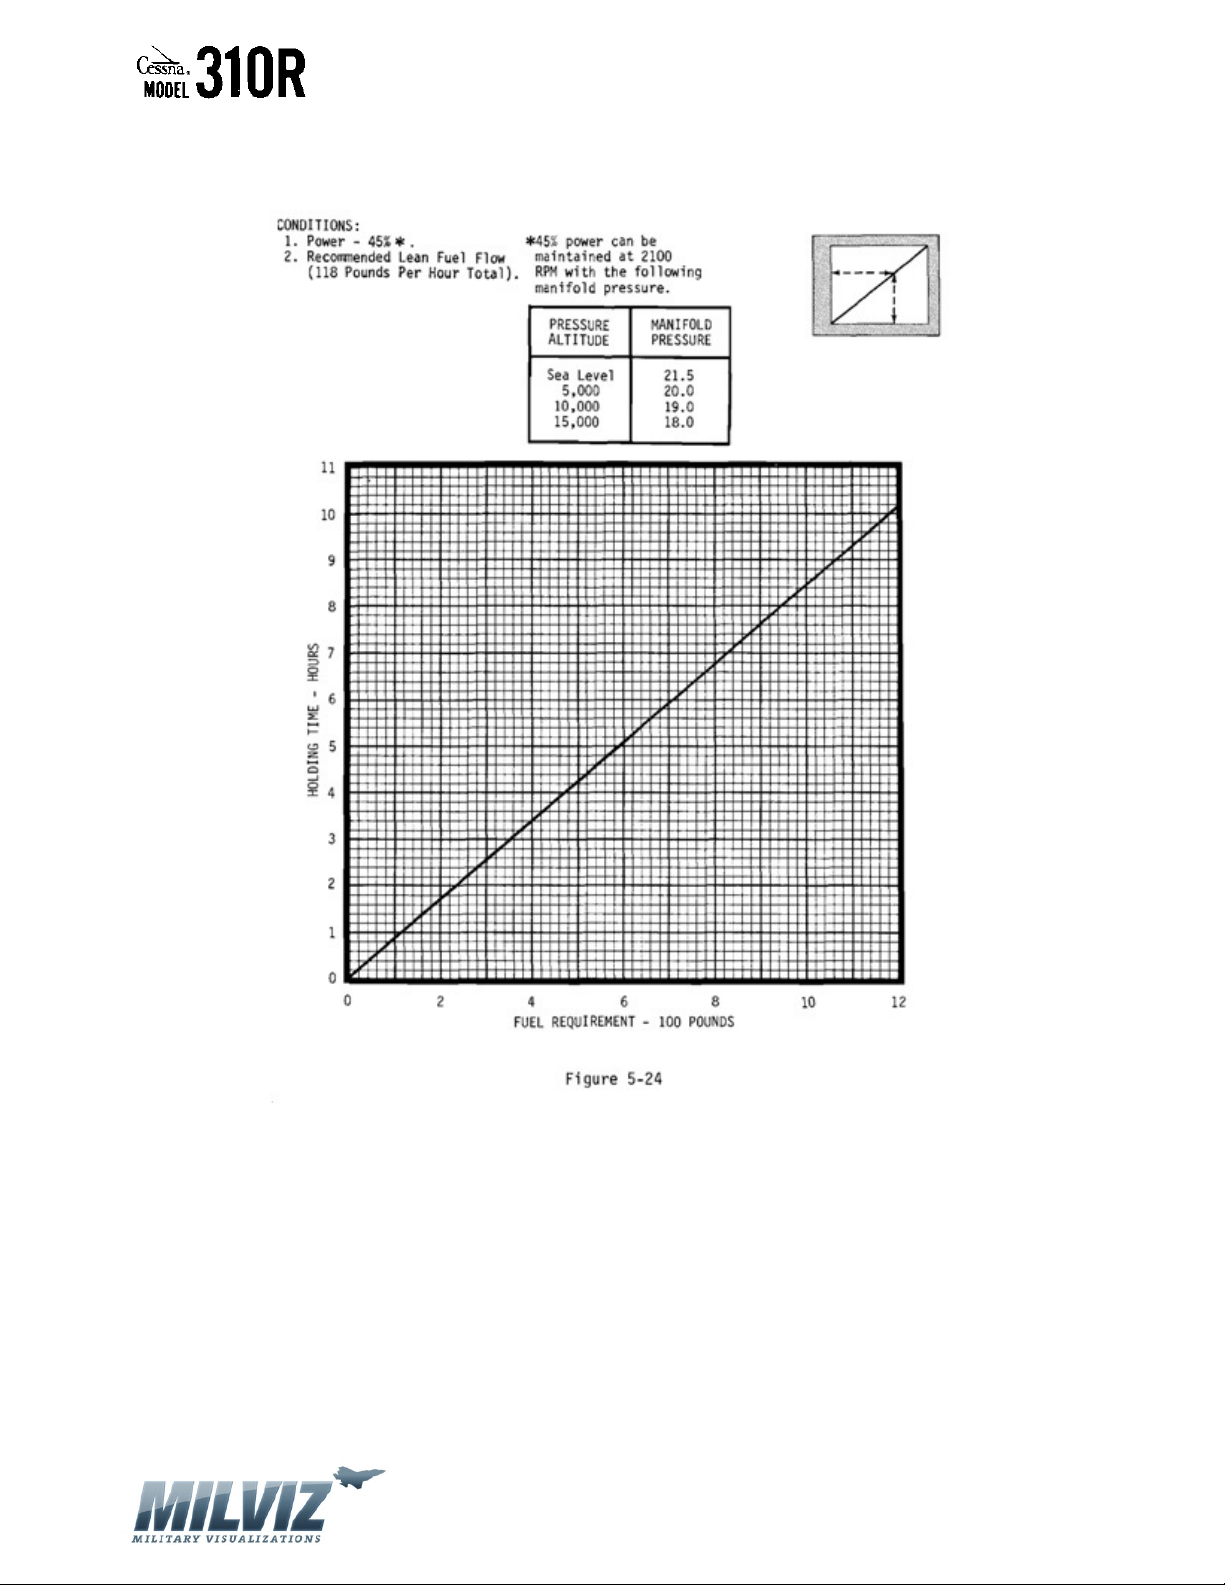
HOLDING TIME
Version 1.0 – 23 May 2010
[71]
Page 72
MilViz Cessna 310R Pilot’s Operating Handbook
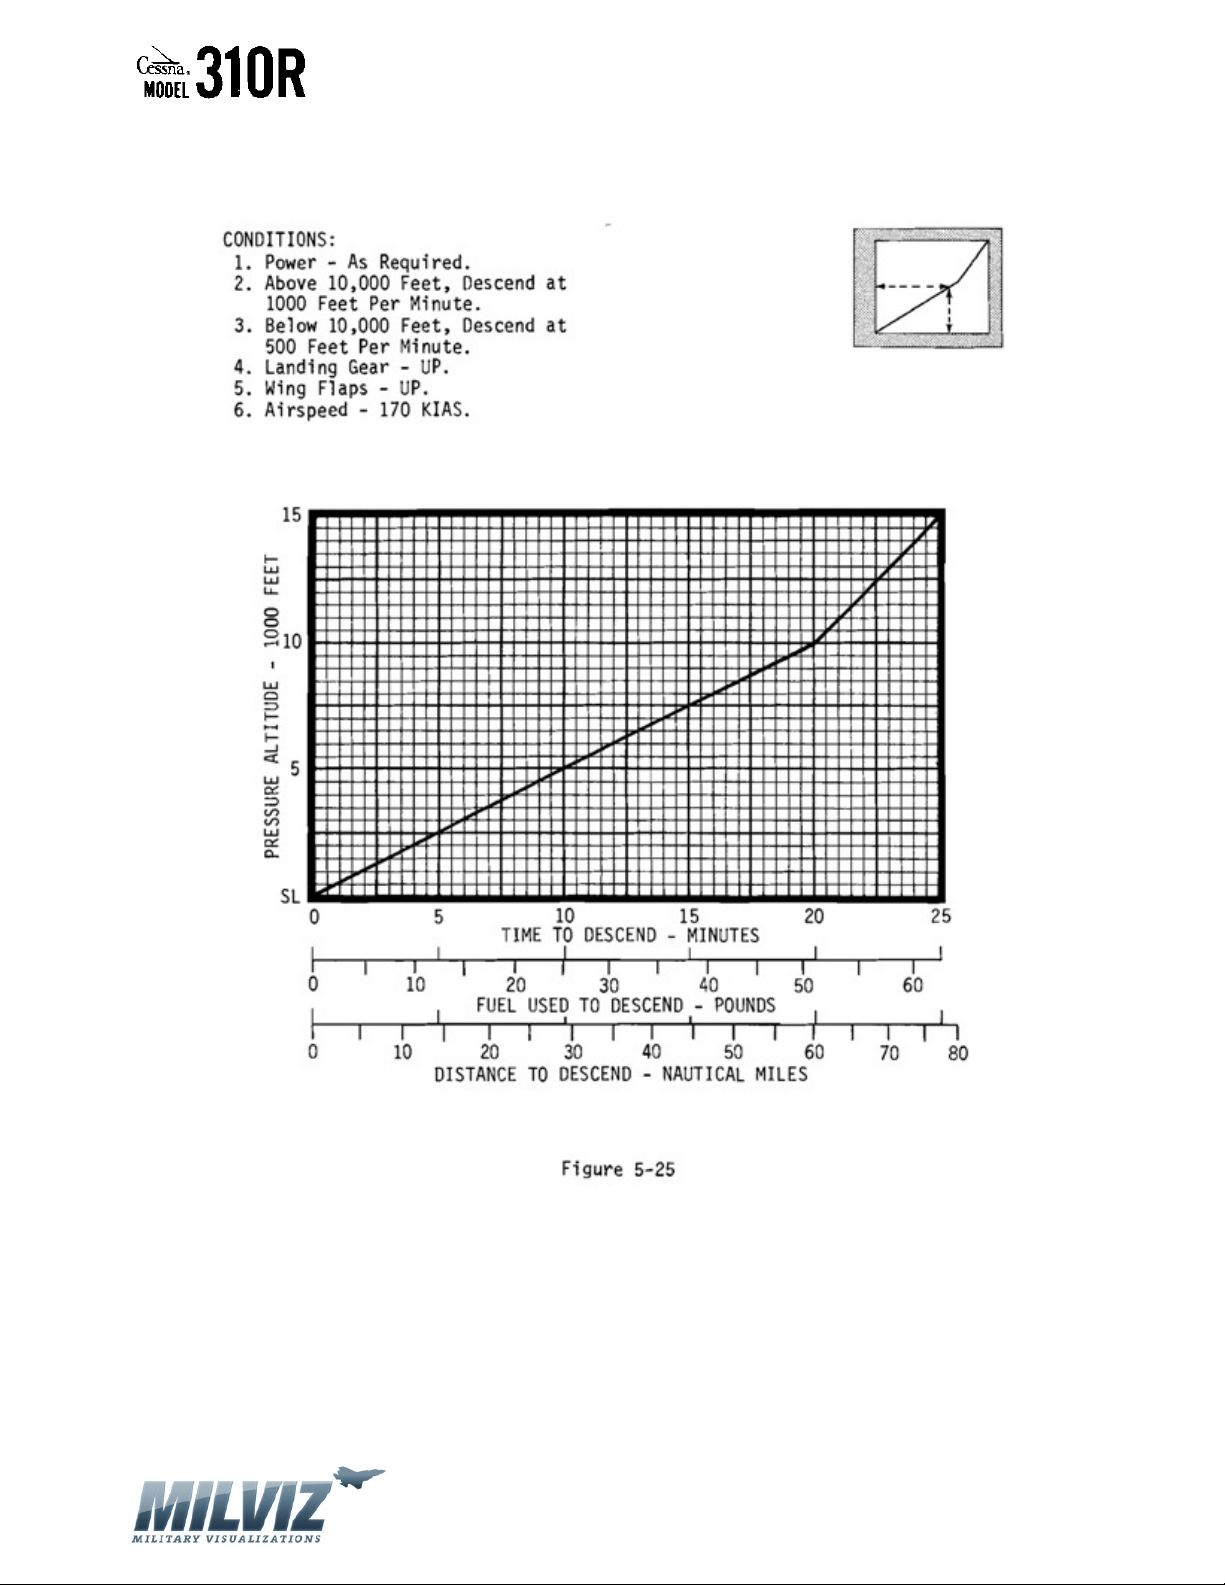
TIME, FUEL AND DISTANCE TO DESCEND
Version 1.0 – 23 May 2010
[72]
Page 73
MilViz Cessna 310R Pilot’s Operating Handbook
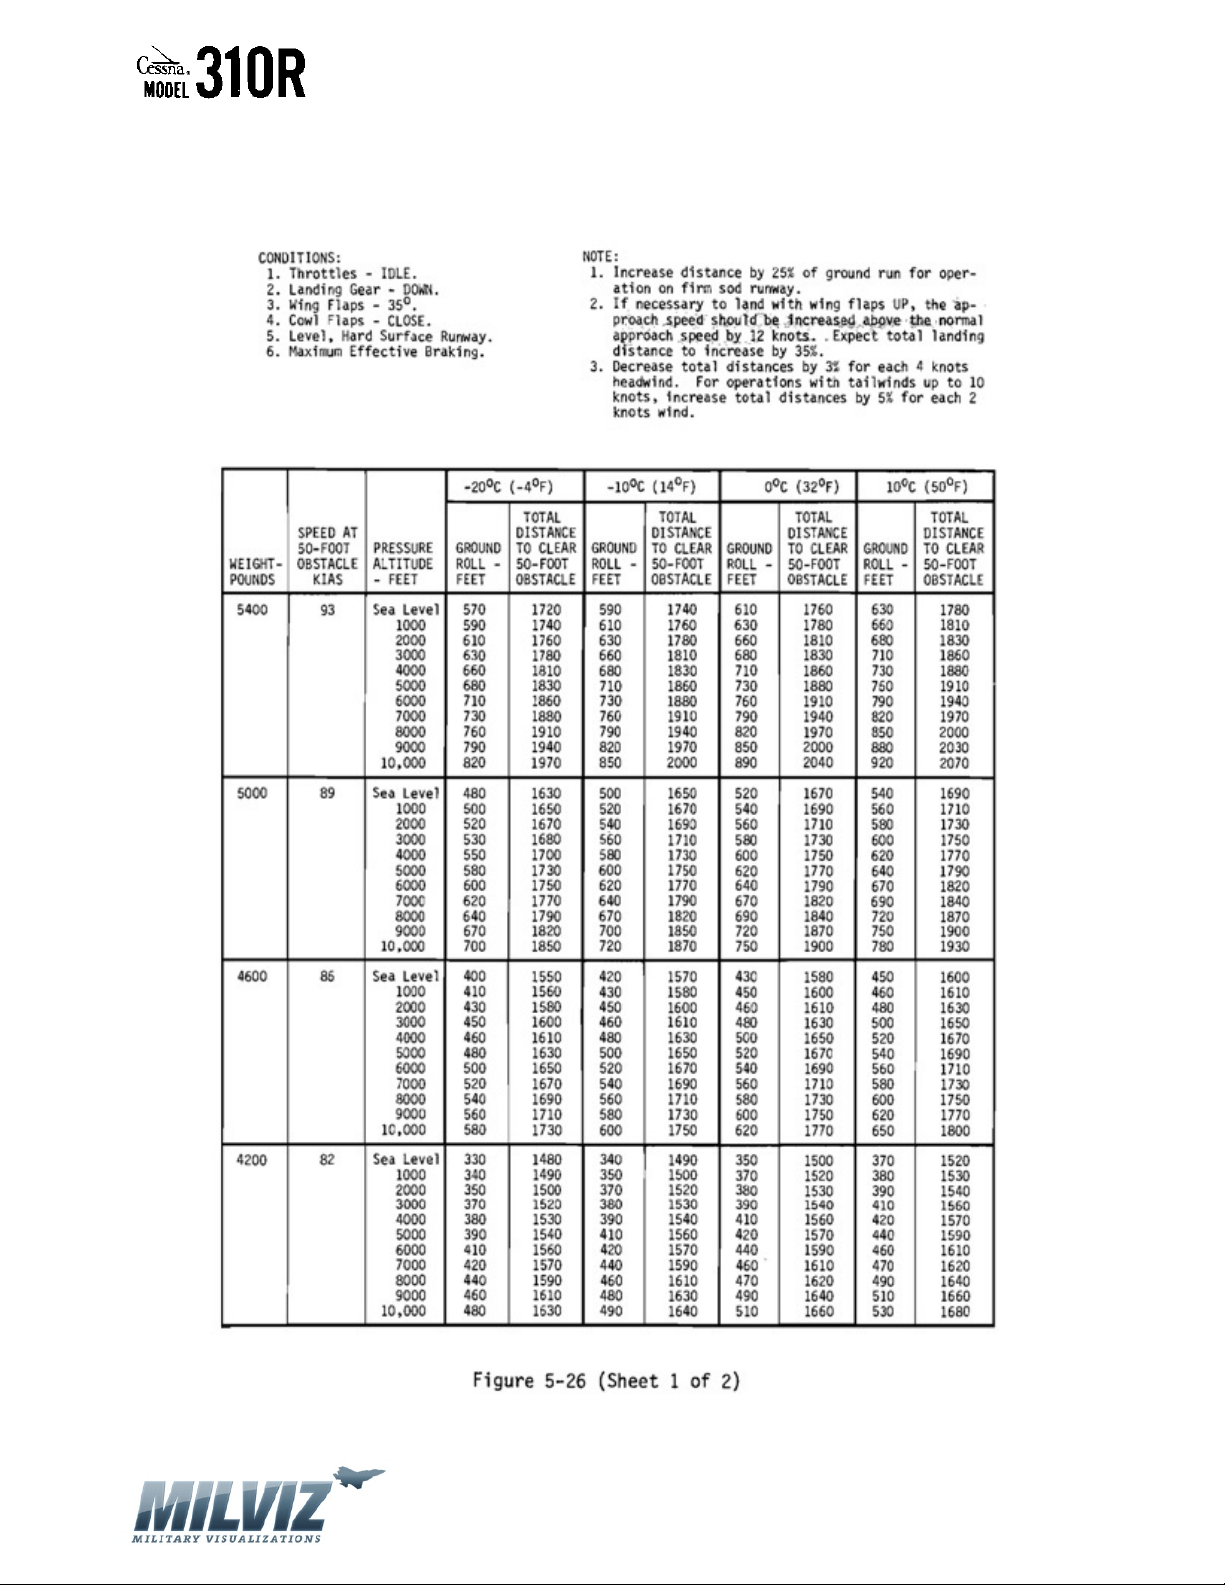
NORMAL LANDING DISTANCE
Version 1.0 – 23 May 2010
[73]
Page 74
MilViz Cessna 310R Pilot’s Operating Handbook
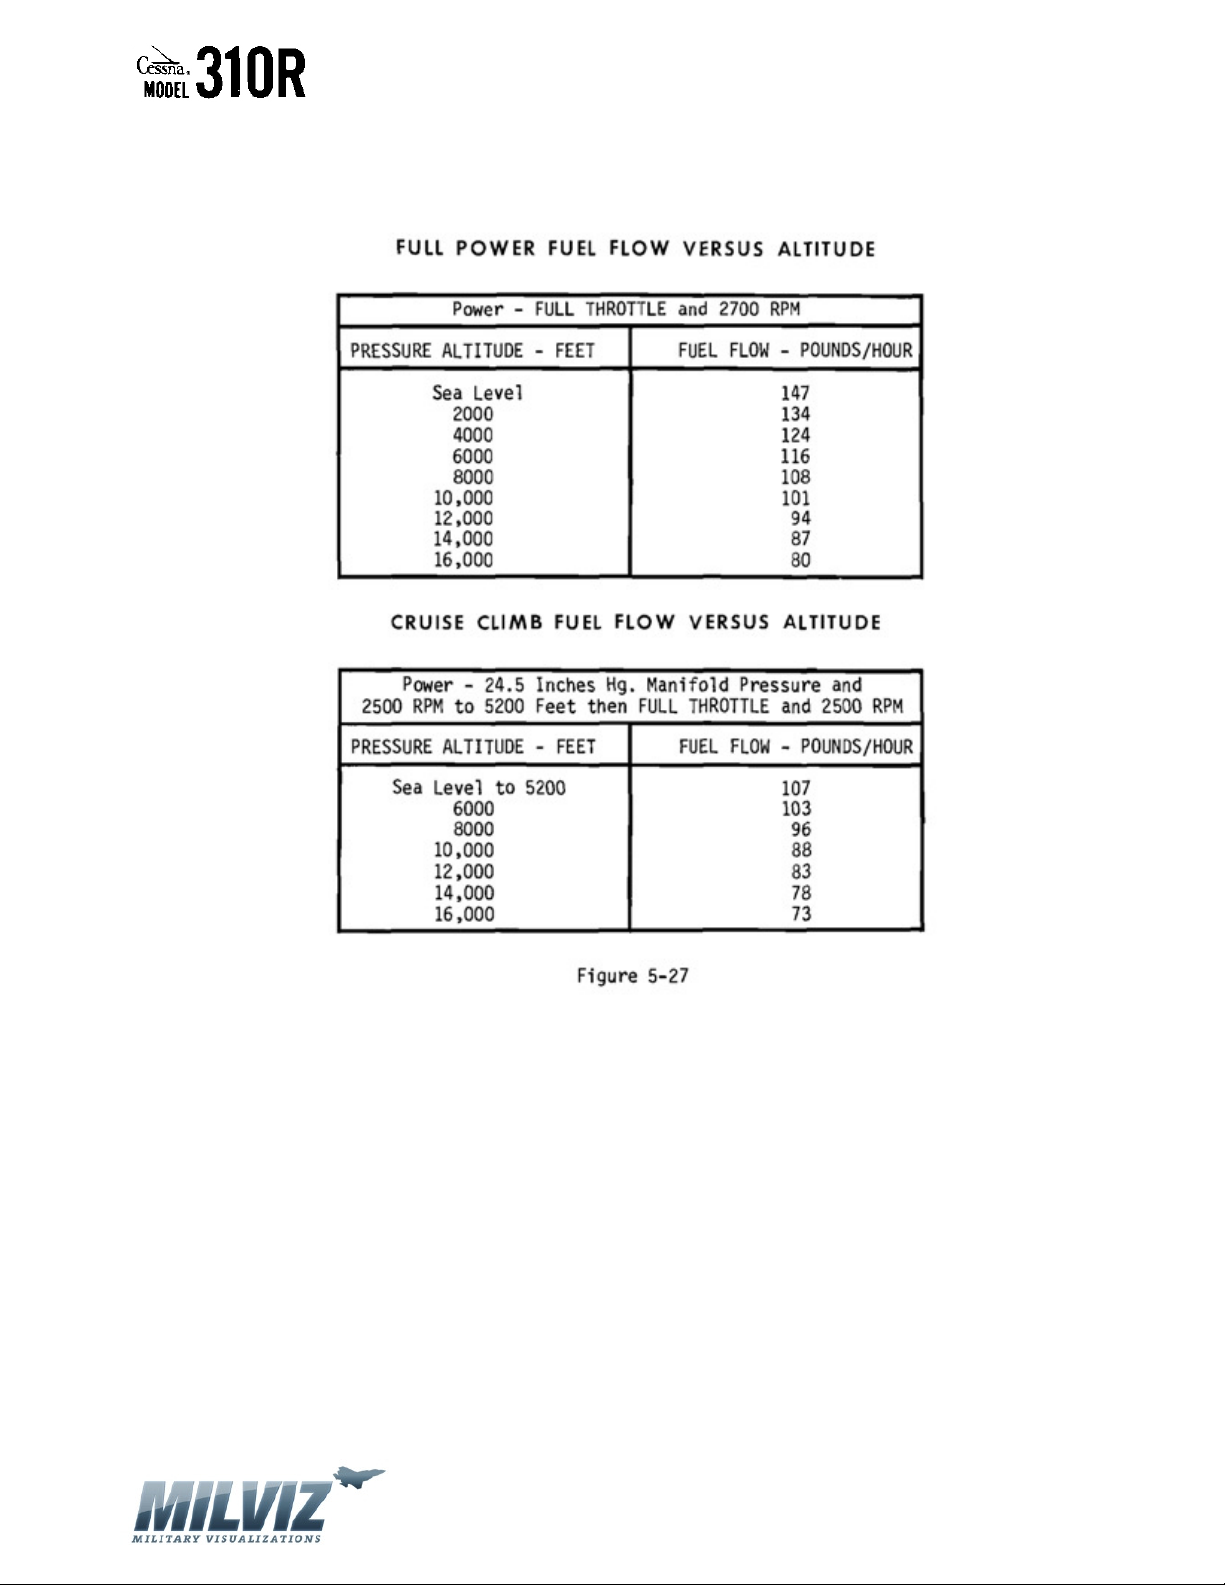
FUEL FLOW SCHEDULE
Version 1.0 – 23 May 2010
[74]
Page 75

MilViz Cessna 310R Pilot’s Operating Handbook
SECTION 6
WEIGHT & BALANCE/EQUIPMENT LIST
TABLE OF CONTENTS
INTRODUCTION ………………………………………………………………………………………………………… 75
AIRPLANE WEIGHING FORM ……………………………………………………………………………………… 76
WEIGHT AND MOMENT TABLES ……………………………………………………………………………….. 77
INTRODUCTION
Section 6 of the Pilot’s Operating Handbook provides procedures for establishing the
airplane’s basic empty weight and moment and procedures for determining the weight and
balance for flight.
Version 1.0 – 23 May 2010
[75]
Page 76
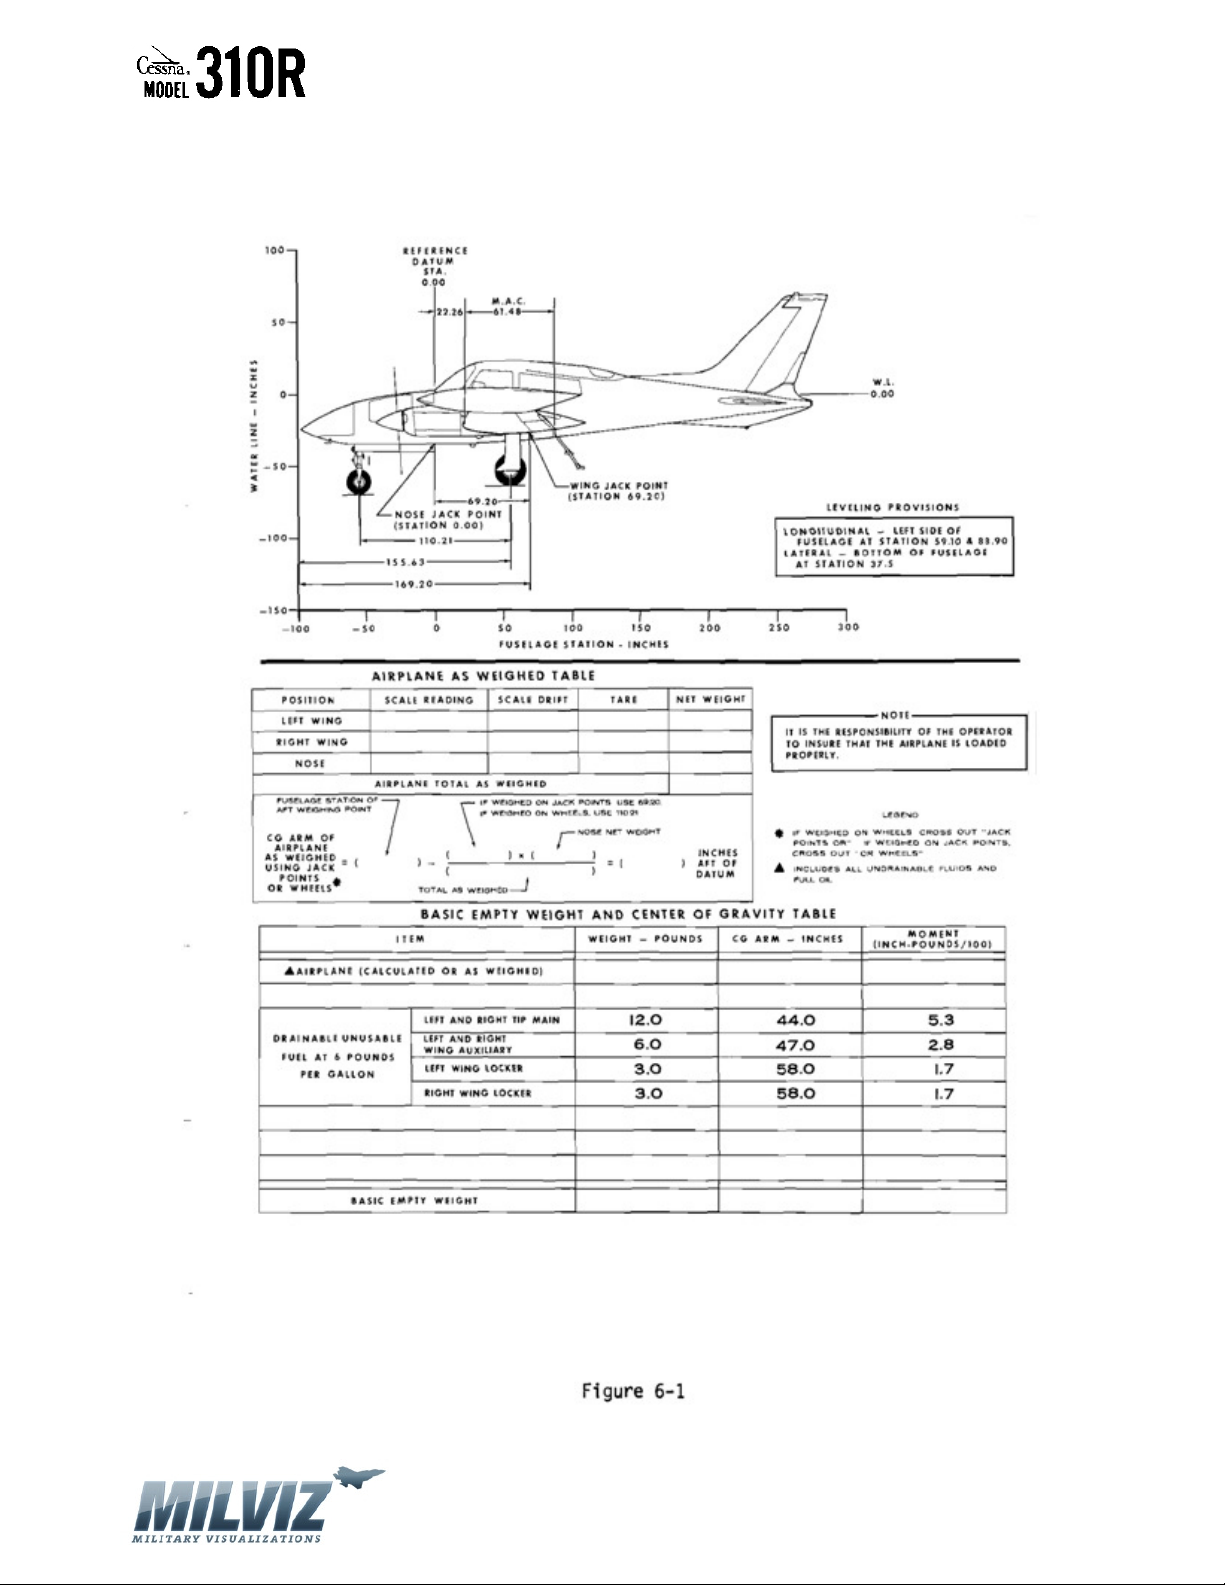
MilViz Cessna 310R Pilot’s Operating Handbook
AIRPLANE WEIGHING FORM
Version 1.0 – 23 May 2010
[76]
Page 77
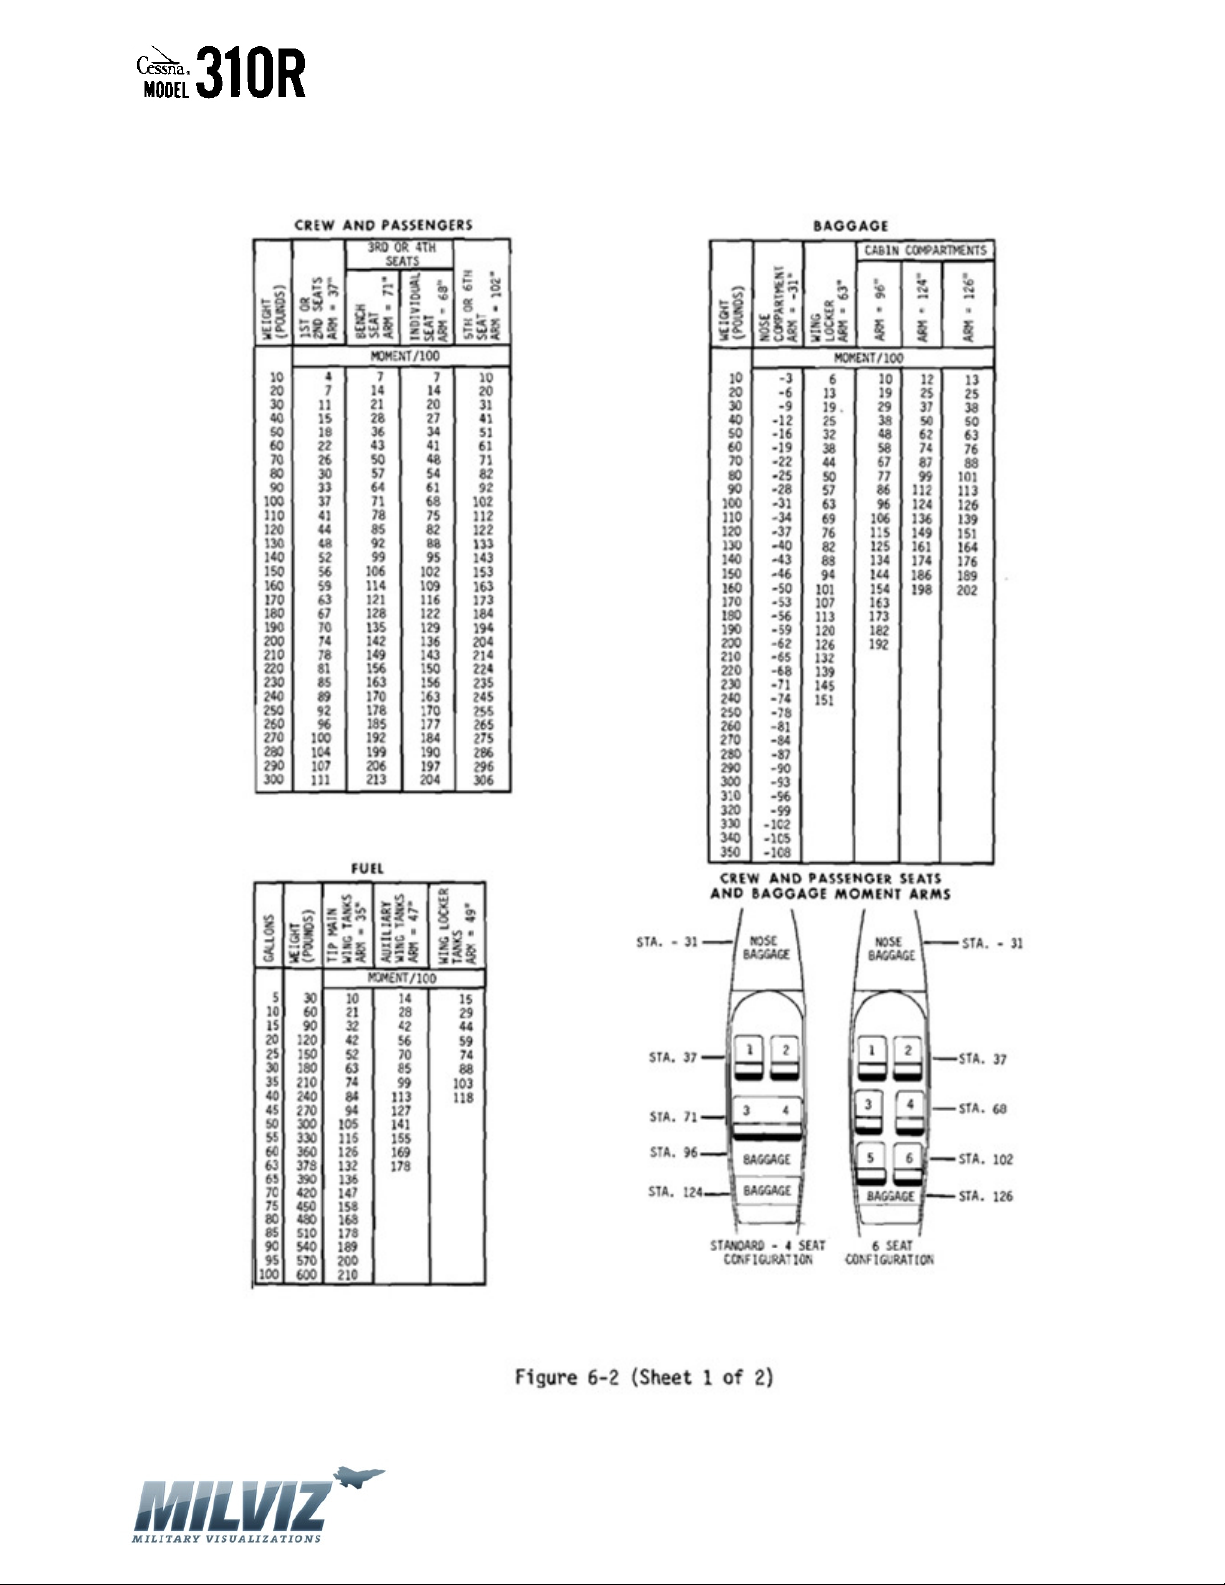
MilViz Cessna 310R Pilot’s Operating Handbook
WEIGHT AND MOMENT TABLES
Version 1.0 – 23 May 2010
[77]
Page 78
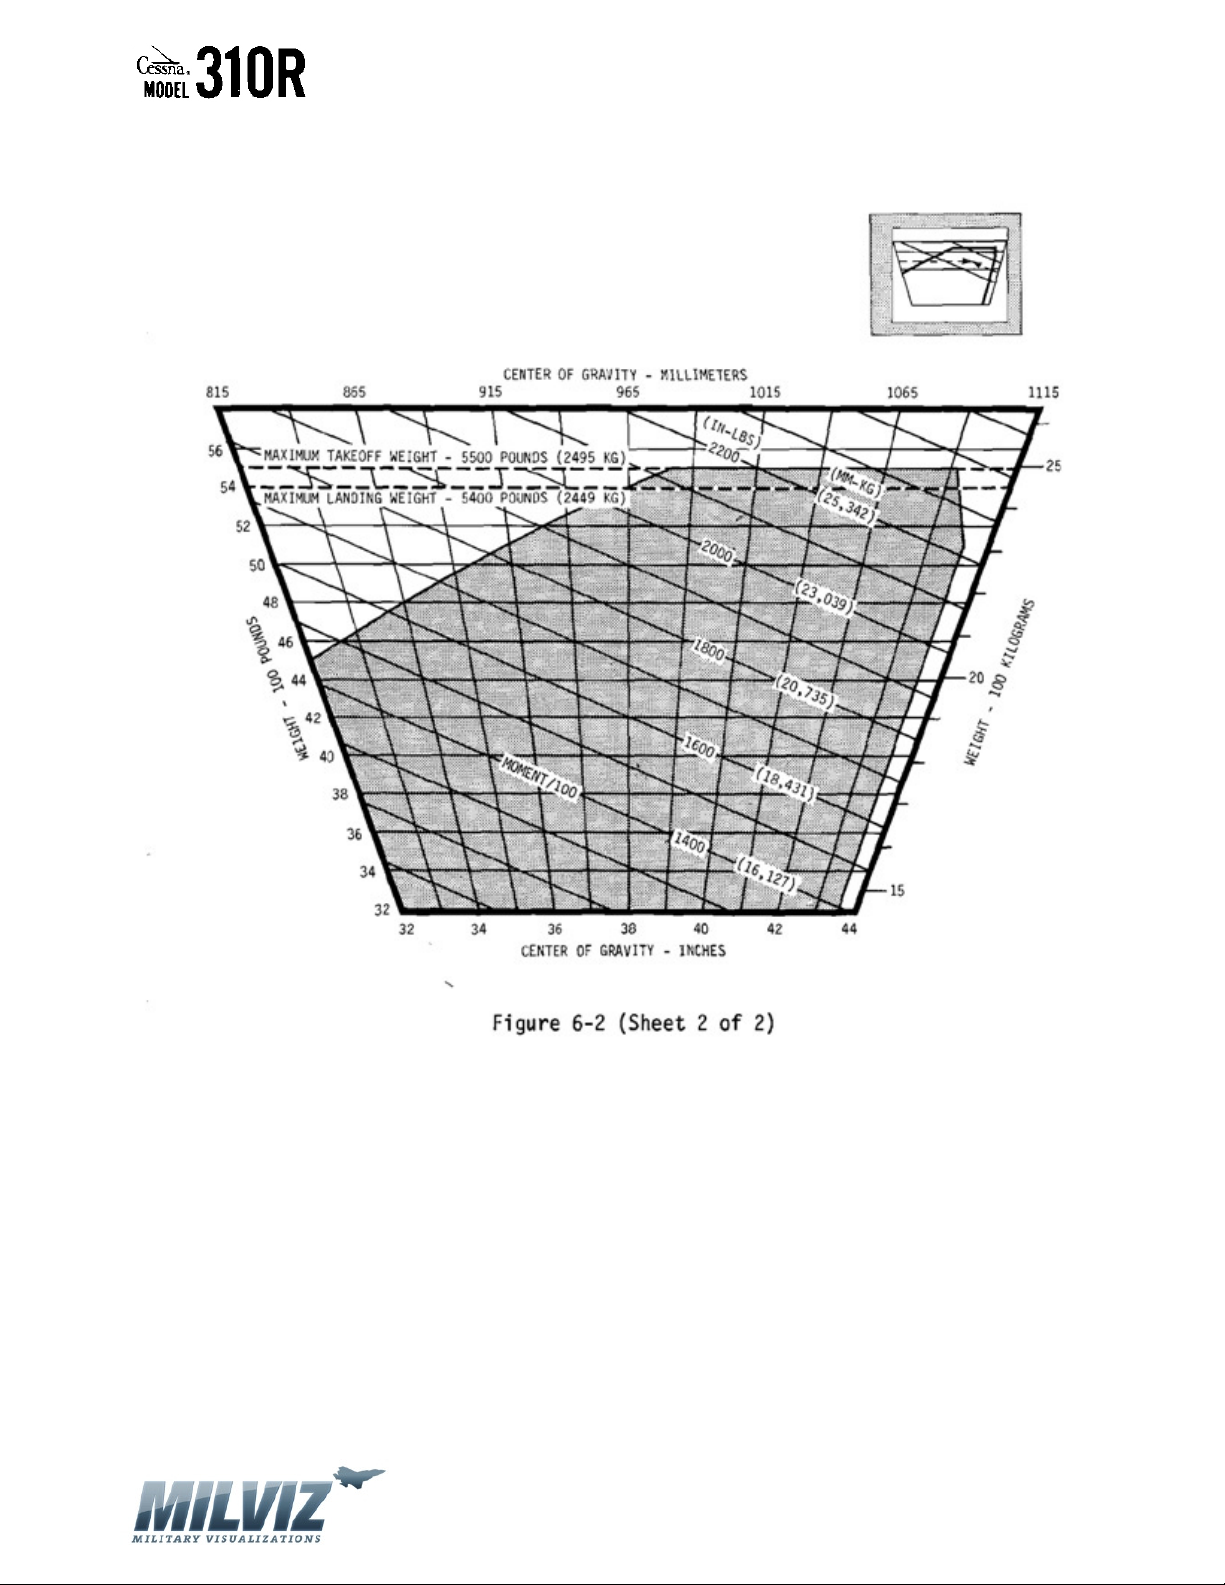
MilViz Cessna 310R Pilot’s Operating Handbook
WEIGHT AND MOMENT TABLES
Version 1.0 – 23 May 2010
[78]
Page 79

MilViz Cessna 310R Pilot’s Operating Handbook
SECTION 7
SYSTEMS
TABLE OF CONTENTS
INTRODUCTION ………………………………………………………………………………………………………… 80
PILOT’S LOWER SWITCHES ………………………………………………………………………………………… 81
AIRCRAFT POWER METER …………………………………………………………………………………………. 82
PILOT’S SIDE SWITCHES …………………………………………………………………………………………….. 83
HORIZONTAL SITUATION INDICATOR (HSI) ………………..……………………………………………… 85
ARTIFICIAL HORIZON (AH) ………………………….…………………………………………………………….. 87
ENGINE INSTRUMENTS …………………………………….………………………………………………………. 88
AUTOMATIC DIRECTION FINDER (ADF) …………….………………………………………………………. 92
AUTOPILOT ………………………………………………………………………………………………………………. 94
THROTTLE QUADRANT ………………………………….…………………………………………………………. 101
FUEL SYSTEMS …………………………………………….……………………………………………………………. 107
MISCELLANEOUS SYSTEMS ………………………………………………………………………………………. 111
PREFLIGHT UTILITY …………………………………………………………………………………………….……. 115
CREDITS AND DISCLAIMER INFORMATION ………………………………………………………………. 116
Version 1.0 – 23 May 2010
[79]
Page 80

MilViz Cessna 310R Pilot’s Operating Handbook
INTRODUCTION
Section 7 contains detailed operating instructions for the avionics and normal systems for
the MilViz Cessna 310R. The information contained herein is designed to support the MilViz
virtual aircraft only and should not be used for actual flight training.
Frequently in this section, use of the mouse buttons will be referenced in discussions about
systems operation. In all cases, for the function to work as written, the pilot must first hover
the mouse pointer over the associated system or switch.
Version 1.0 – 23 May 2010
[80]
Page 81
MilViz Cessna 310R Pilot’s Operating Handbook
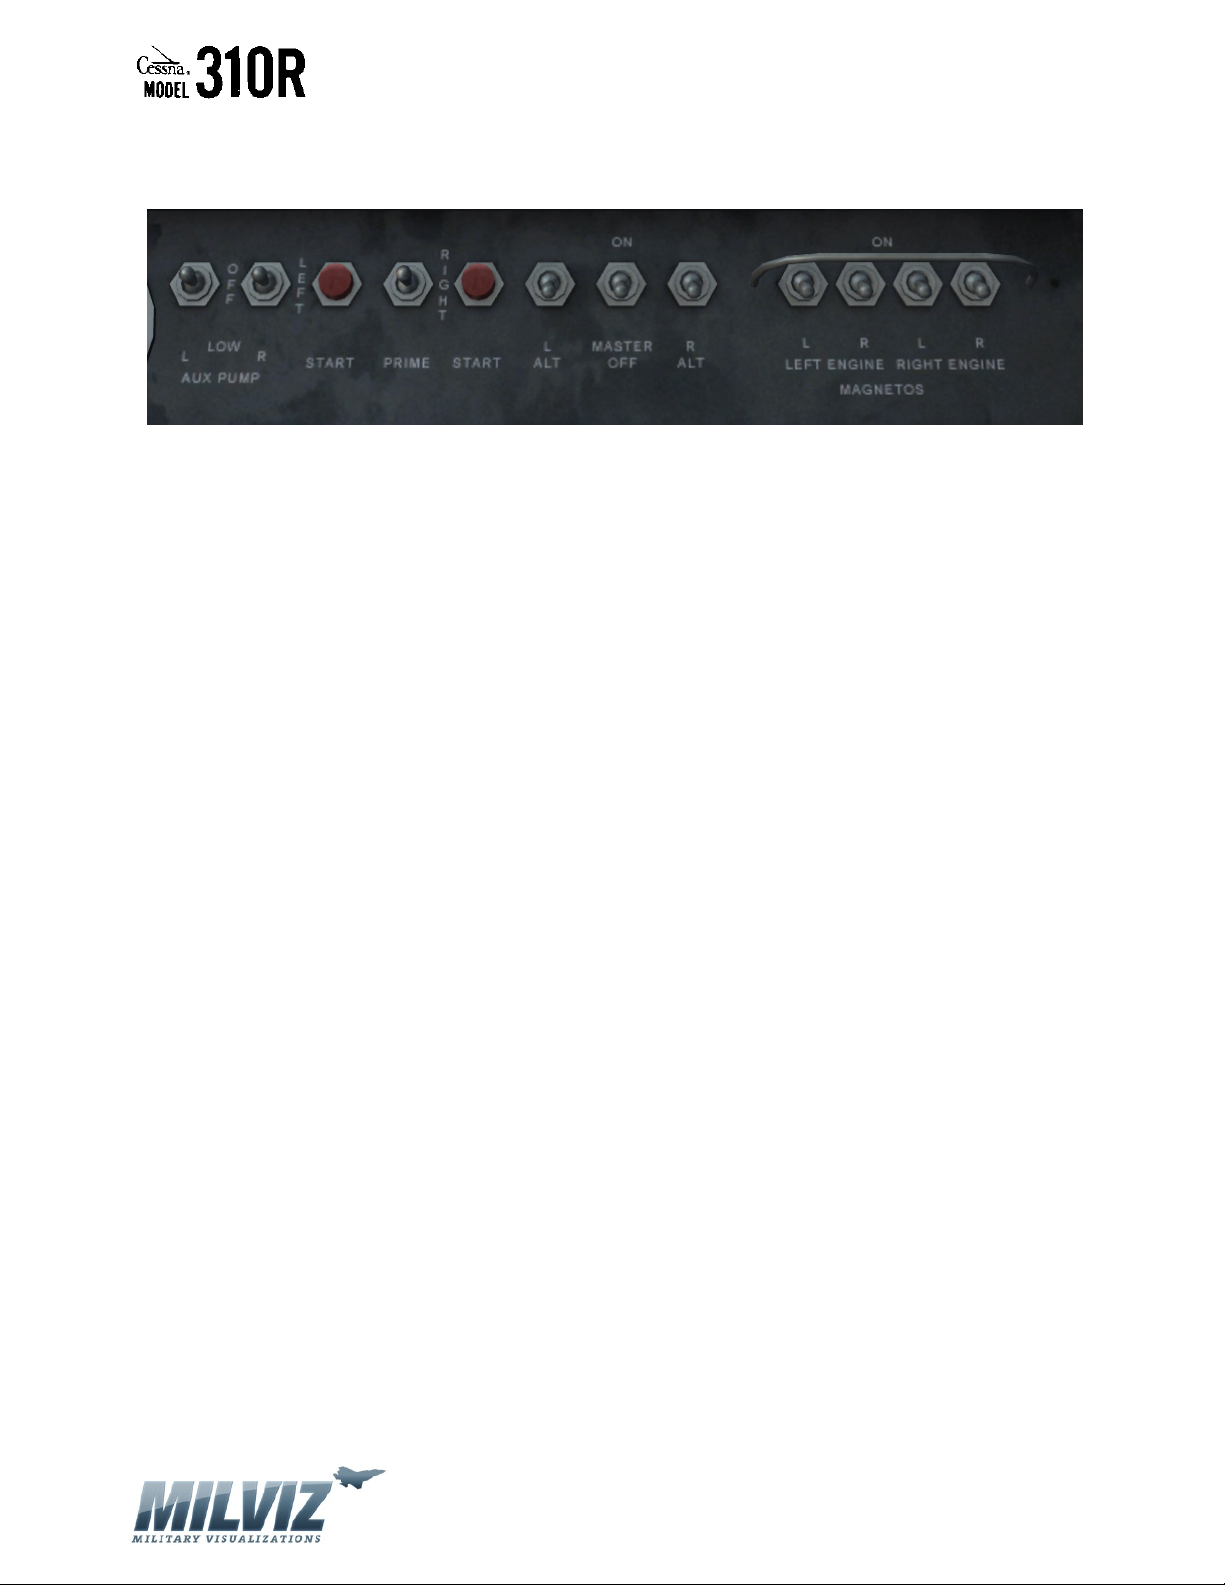
PILOT’S LOWER SWITCHES
The Cessna 310R pilot’s lower panel houses the switches for engine starting, power application,
and fuel pumps. The panel is grouped into three sections, left, center, and right. The left
section switches include the fuel pump, primer, and starters for left and right engines. The
center section switches include the master battery and left/right alternators. The right section
houses the four magneto switches for left and right engines.
The master battery switch supplies essential power to all aircraft systems and must be engaged
before successful operation of any of the other lower panel operations. The battery switch is
two-position, up to engage and down to disengage. If the master battery switch is turned off all
aircraft power systems are immediately disengaged. A left mouse button click will toggle the
switch on or off.
The right side of the lower panel features the four magnetos. Each engine has two separately
running magneto systems to feed power to the spark plugs. The switches toggle up and down
with mouse left button clicks. To activate the magnetos flip the switches to the up position. To
deactivate flip the switches down.
The auxiliary fuel pumps have three position switches. For the fuel pump switches, the
switches move up with successive left mouse button clicks and move down with right mouse
button clicks. The center detent turns the pump off. For high power pump operation, flip the
switch to the upward detent. For low power pump operations flip the switch to the lower
detent. Lower pump power is normally used for engine starts, taxi, takeoffs and landings, and
flight operations above 12,000 feet to prevent vapor lock. The high power pumps are used for
hot starting to purge fuel vapors and during any fuel-related emergency situations to ensure
positive flow to the engines. Note: when the checklist specifies pumps “ON,” this equates to
the low setting.
Engine starting normally requires use of fuel priming, and so the location of the primer switch
between the two starter switches is designed for ease of operation. The primer switch is a
three position rocker, spring loaded to maintain the center (off) position. To prime the left
engine, click and hold the left mouse button. To prime the right engine, click and hold the right
Version 1.0 – 23 May 2010
[81]
Page 82
MilViz Cessna 310R Pilot’s Operating Handbook
mouse button. When the mouse button is released, the fuel primer springs back to the center
(off) position. With the fuel primer engaged, you will hear the sound of the primer pumps
engaging to send fuel to the engines. The engine starters work by pressing and holding the
button with the left mouse button.
Each engine has its own alternator. When the engine is started and running smoothly, the
associated alternator may be turned on. The alternator switches are two positions – up to
engage and down to disengage. The left mouse button will toggle the alternator switches on or
off. Once the alternators are engaged, the pilot should test aircraft power as described in the
next section of this manual, AIRCRAFT POWER METER.
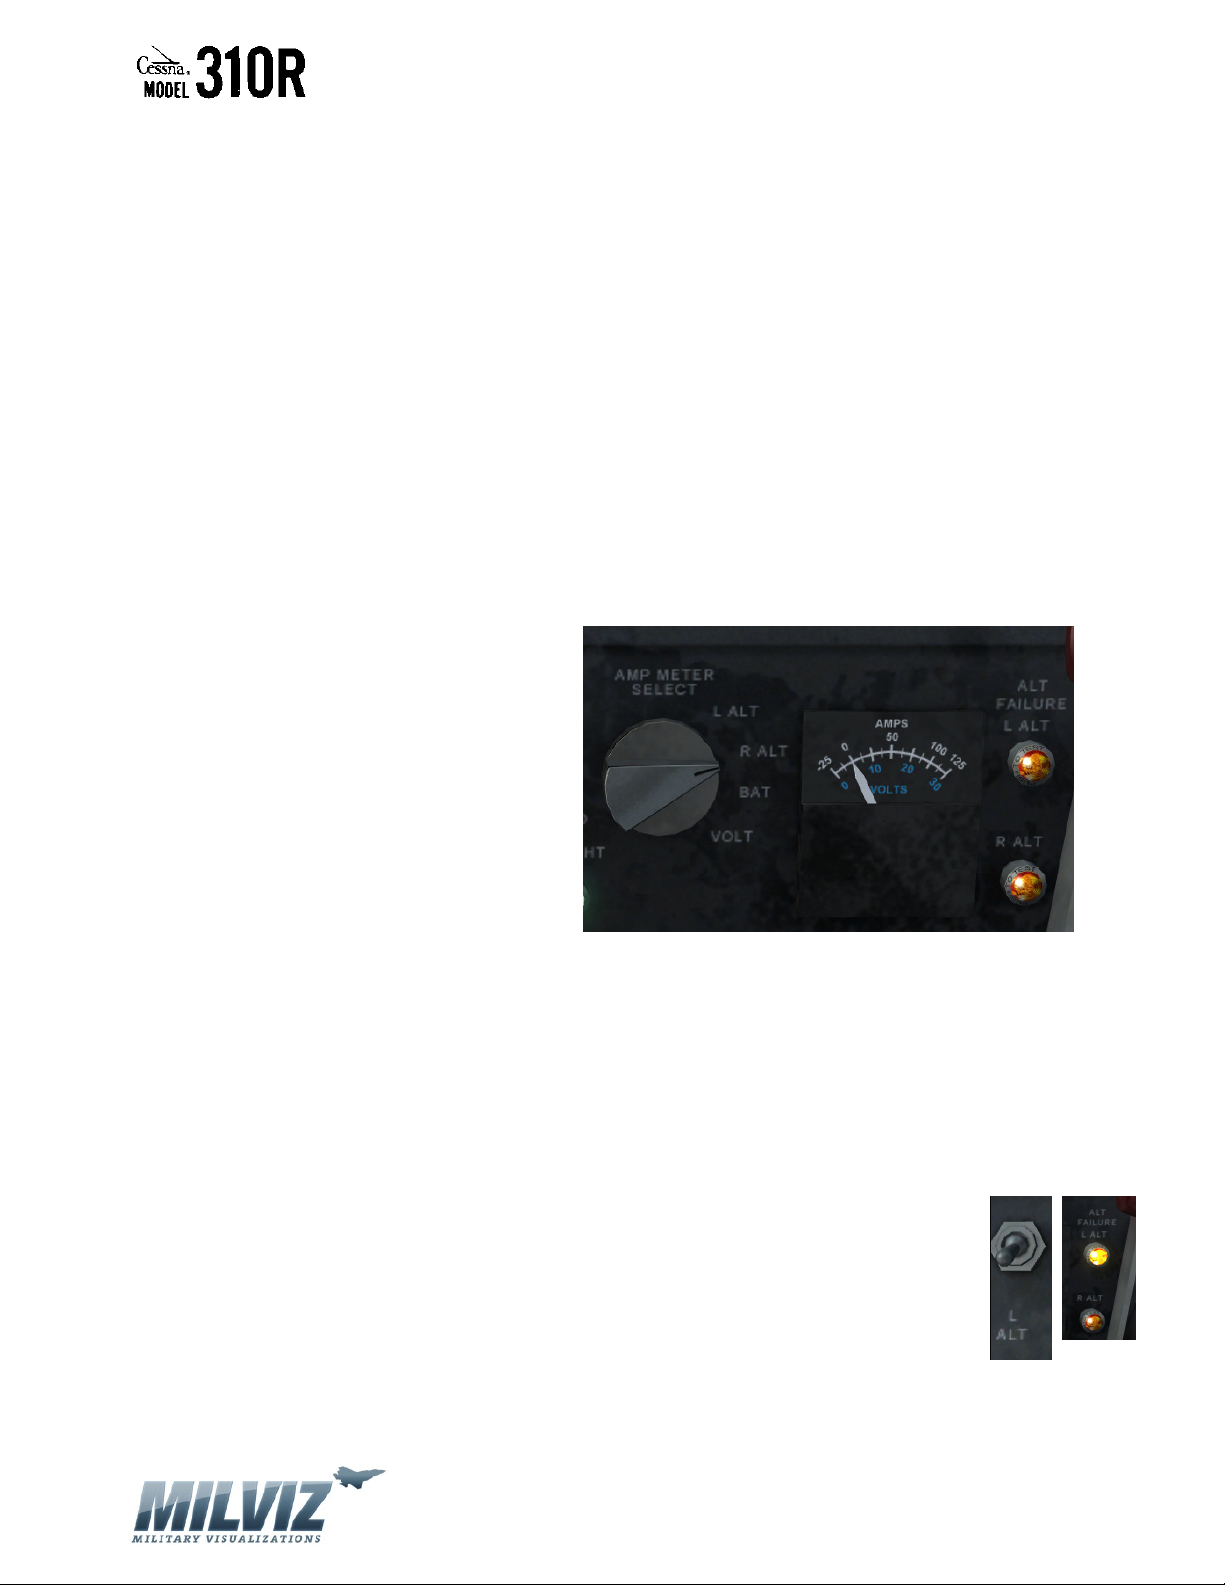
AIRCRAFT POWER METER
The Cessna 310R features a
comprehensive power systems meter and
test system. The wafer switch allows the
pilot to isolate and test the power draw
for either alternator system as well as for
the battery. The pilot can measure the
total voltage draw from all engaged power
sources. To rotate the wafer knob
clockwise, click the right mouse button.
Clicking the left mouse button will rotate it
counter-clockwise. When rating the amperage draws for the alternators and battery, reference
the top white section of the meter. When measuring the voltage draw, reference the bottom
blue section of the meter.
In addition to the wafer knob and meter, the system also has two cat-eye lights which
illuminate when the aircraft detects alternator failure or inadequate alternator power
generation. These lights can sometimes illuminate when the engine is idling at an RPM
insufficient to provide optimal alternator power output.
With the left alternator switch disengaged, you can reference the left alternator
failure light to confirm it is not supplying system power. The same relationship
exists for the right alternator switch and light. If during flight operations with the
alternator switches engaged, and an alternator light illuminates, you should assume
that alternator has failed and troubleshoot with the wafer switch to isolate and
Version 1.0 – 23 May 2010
[82]
Page 83
MilViz Cessna 310R Pilot’s Operating Handbook
measure that alternator’s power output. One alternator provides sufficient power for aircraft
systems.
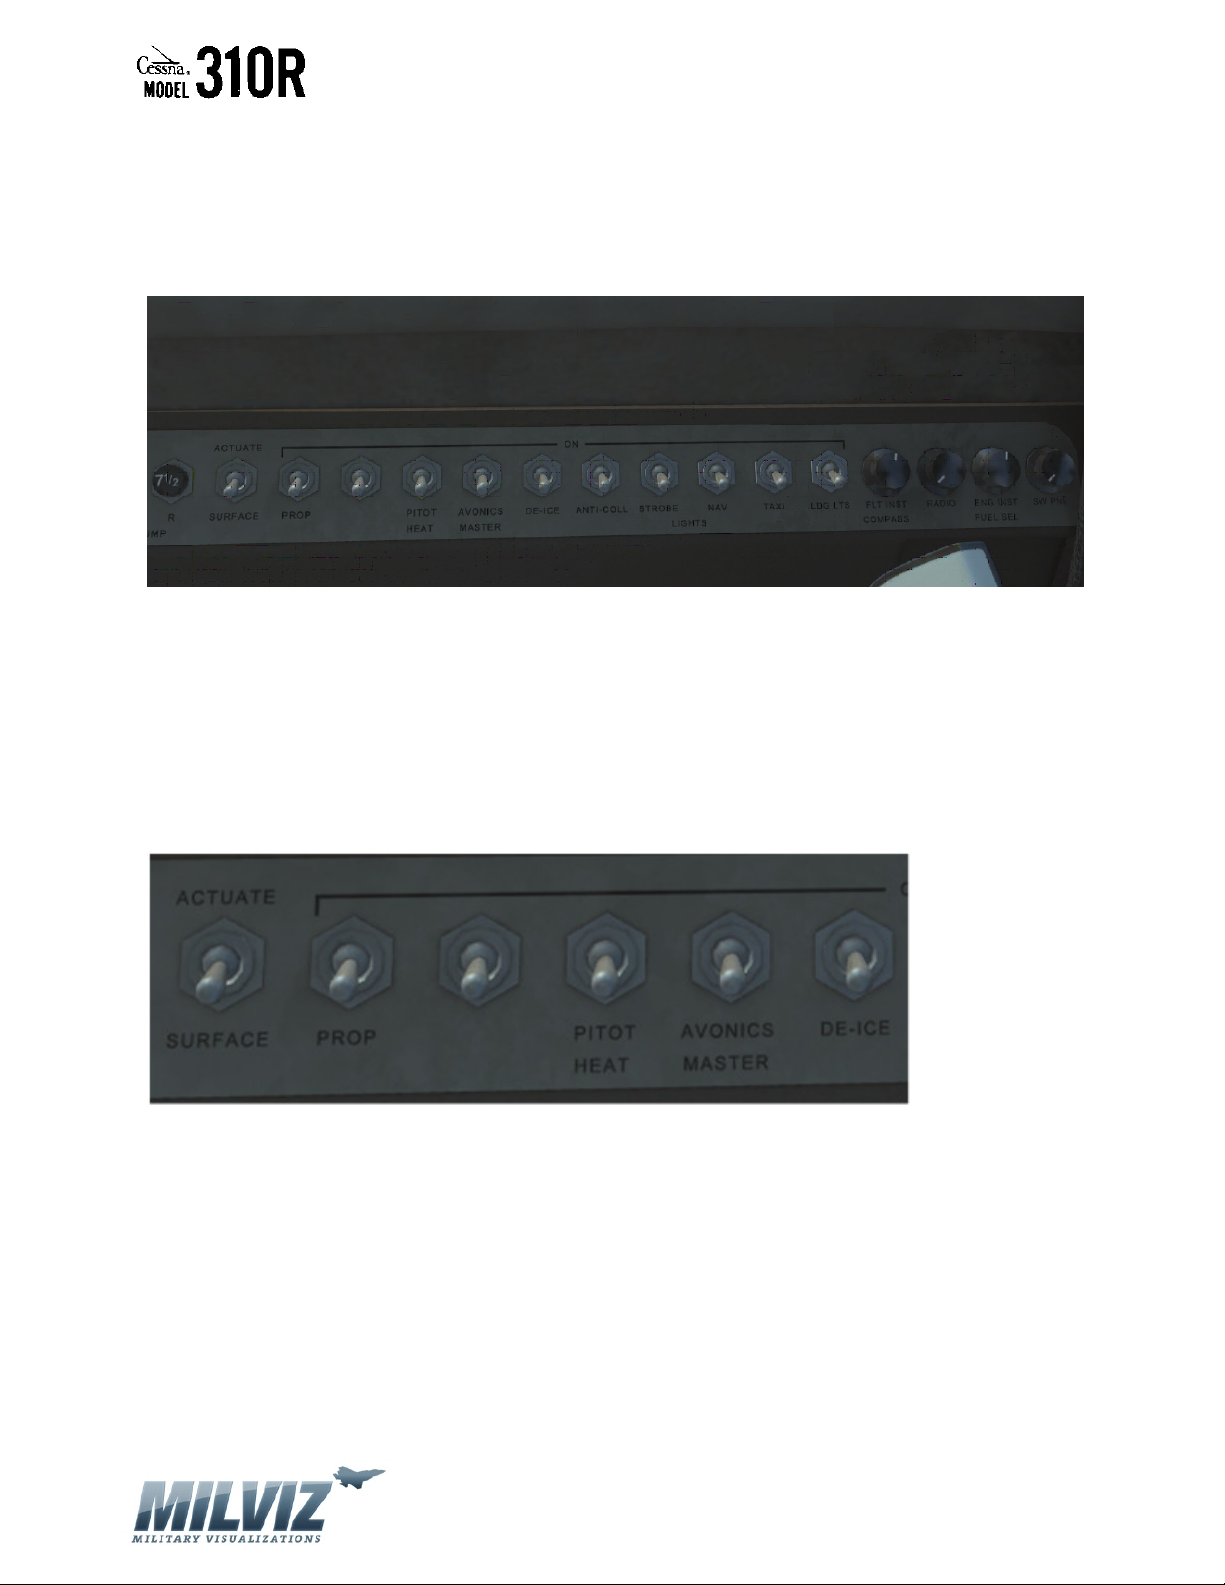
PILOT SIDE SWITCHES
The pilot side switches contain de-icing systems, exterior and interior lighting control, and the
avionics master switch. The left section contains the de-ice systems and avionics master, the
center section the exterior lights, and the right side a set of four black rheostat knobs to control
interior lighting.
DE-ICE EQUIPMENT & AVIONICS MASTER
The actuation switches for these systems are two-position switches for on/off operation. Left
mouse button clicks toggle the switches on or off. In the down position, the systems are turned
off and in the up position they are turned on. The avionics master switch should be toggled on
only after one alternator in on line and providing full power output. While FSX does not model
visible ice accumulations, it does affect the flight characteristics of the aircraft by adding weight
and changing wing life. Use of the surface and prop de-ice switch will reduce or remove these
ice accumulations. The switch for the de-ice exterior lights (located to the right of the avionics
master switch) is likewise not operable.
Version 1.0 – 23 May 2010
[83]
Page 84
MilViz Cessna 310R Pilot’s Operating Handbook
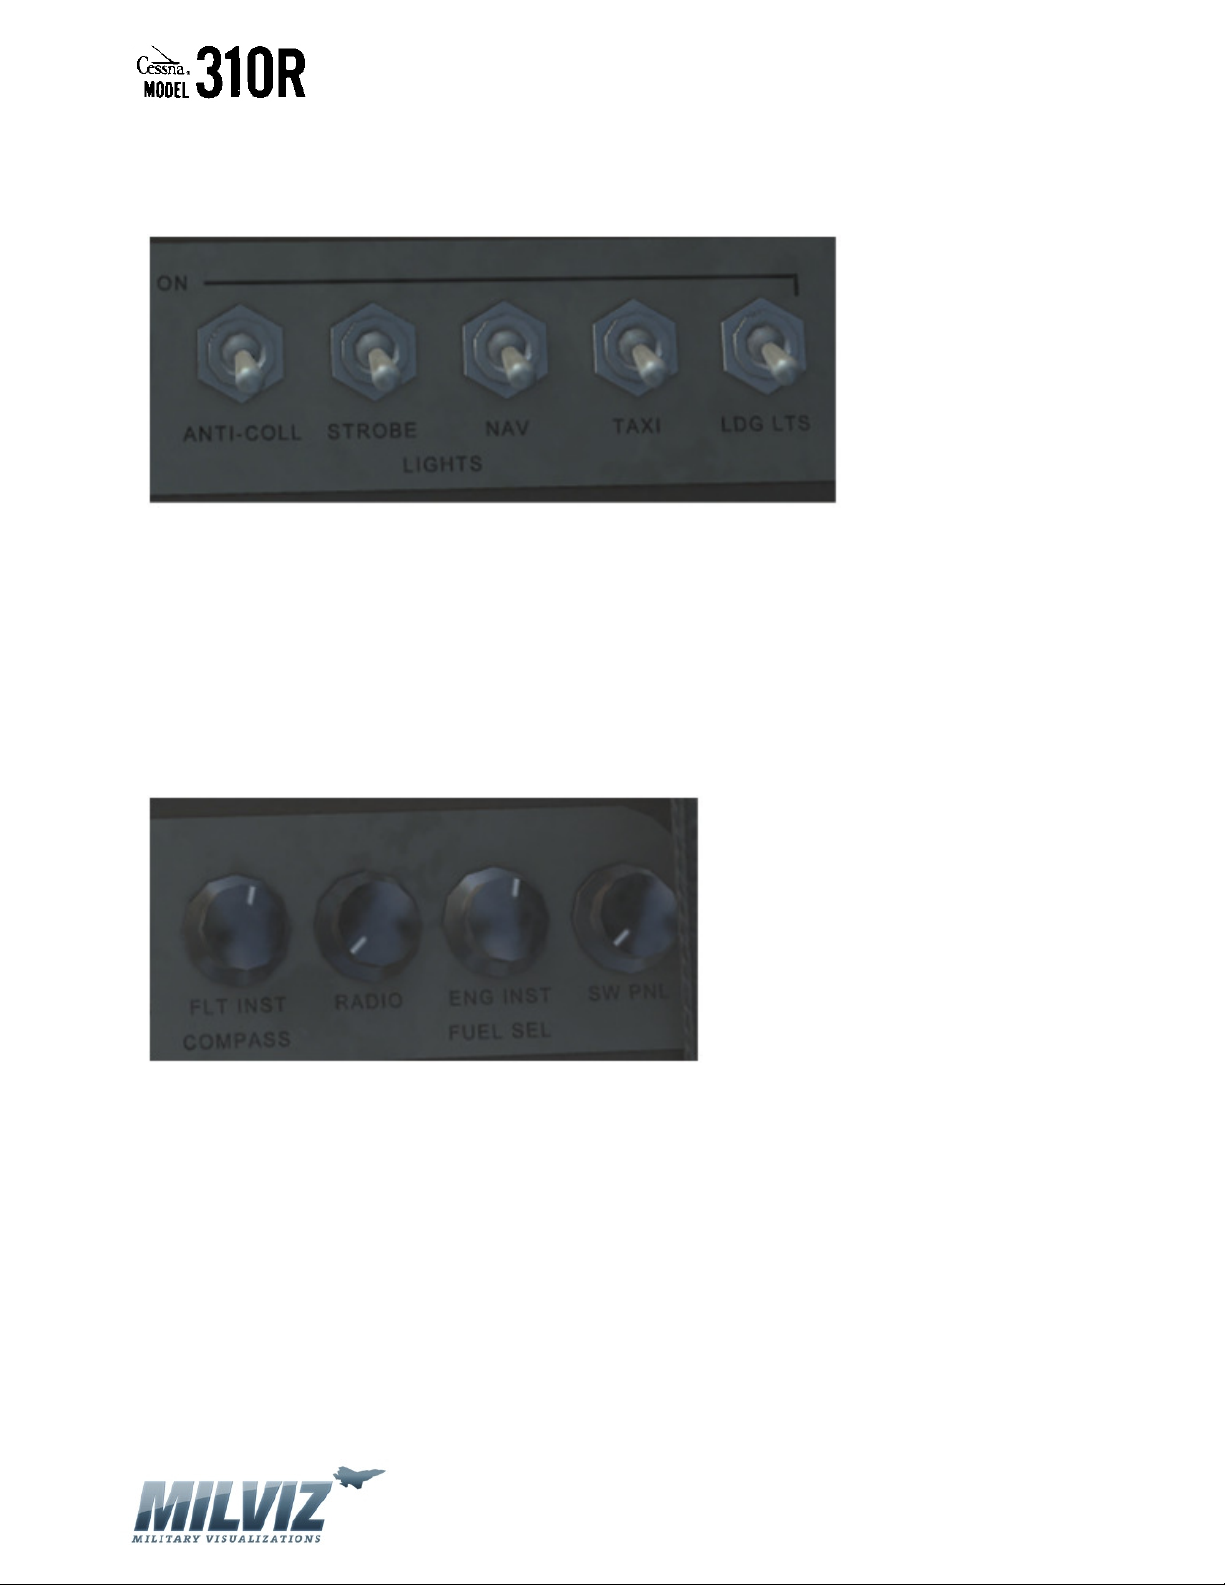
EXTERIOR LIGHTS
All exterior lights shown in this section are operable. With the exception of the landing lights,
each switch is a two-position, on/off, operation. To toggle click the left mouse button. The
landing lights are controlled by a three-position switch. To toggle upward, click the left mouse
button and to toggle down click the right mouse button. In the down position, the landing
lights are off and retracted into the underside of the wing. To extend the lights, click the switch
to the center position. To turn the lights on you must toggle the switch to the up position.
INTERIOR LIGHTS
All interior cockpit lighting is controlled by the rheostat knobs located on the right portion of
the pilot’s side switches. Note: The knob to control the radio backlighting is not operational.
The rightmost knob, labeled “SW PNL,” activates panel backlight illumination and is a simple on
or off operation. It is the master panel light switch and must be toggled on before either of the
backlight rheostats will function. These backlight rheostat knobs are labeled “FLT INST
COMPASS” and “ENG INST FUEL SEL” and provide variable intensity backlighting for the engine
and flight instruments. For these two knobs, a left mouse button click rotates the knob
counter-clockwise to reduce light intensity. A right mouse button click rotates the knobs
clockwise to increase light intensity.
Version 1.0 – 23 May 2010
[84]
Page 85
MilViz Cessna 310R Pilot’s Operating Handbook
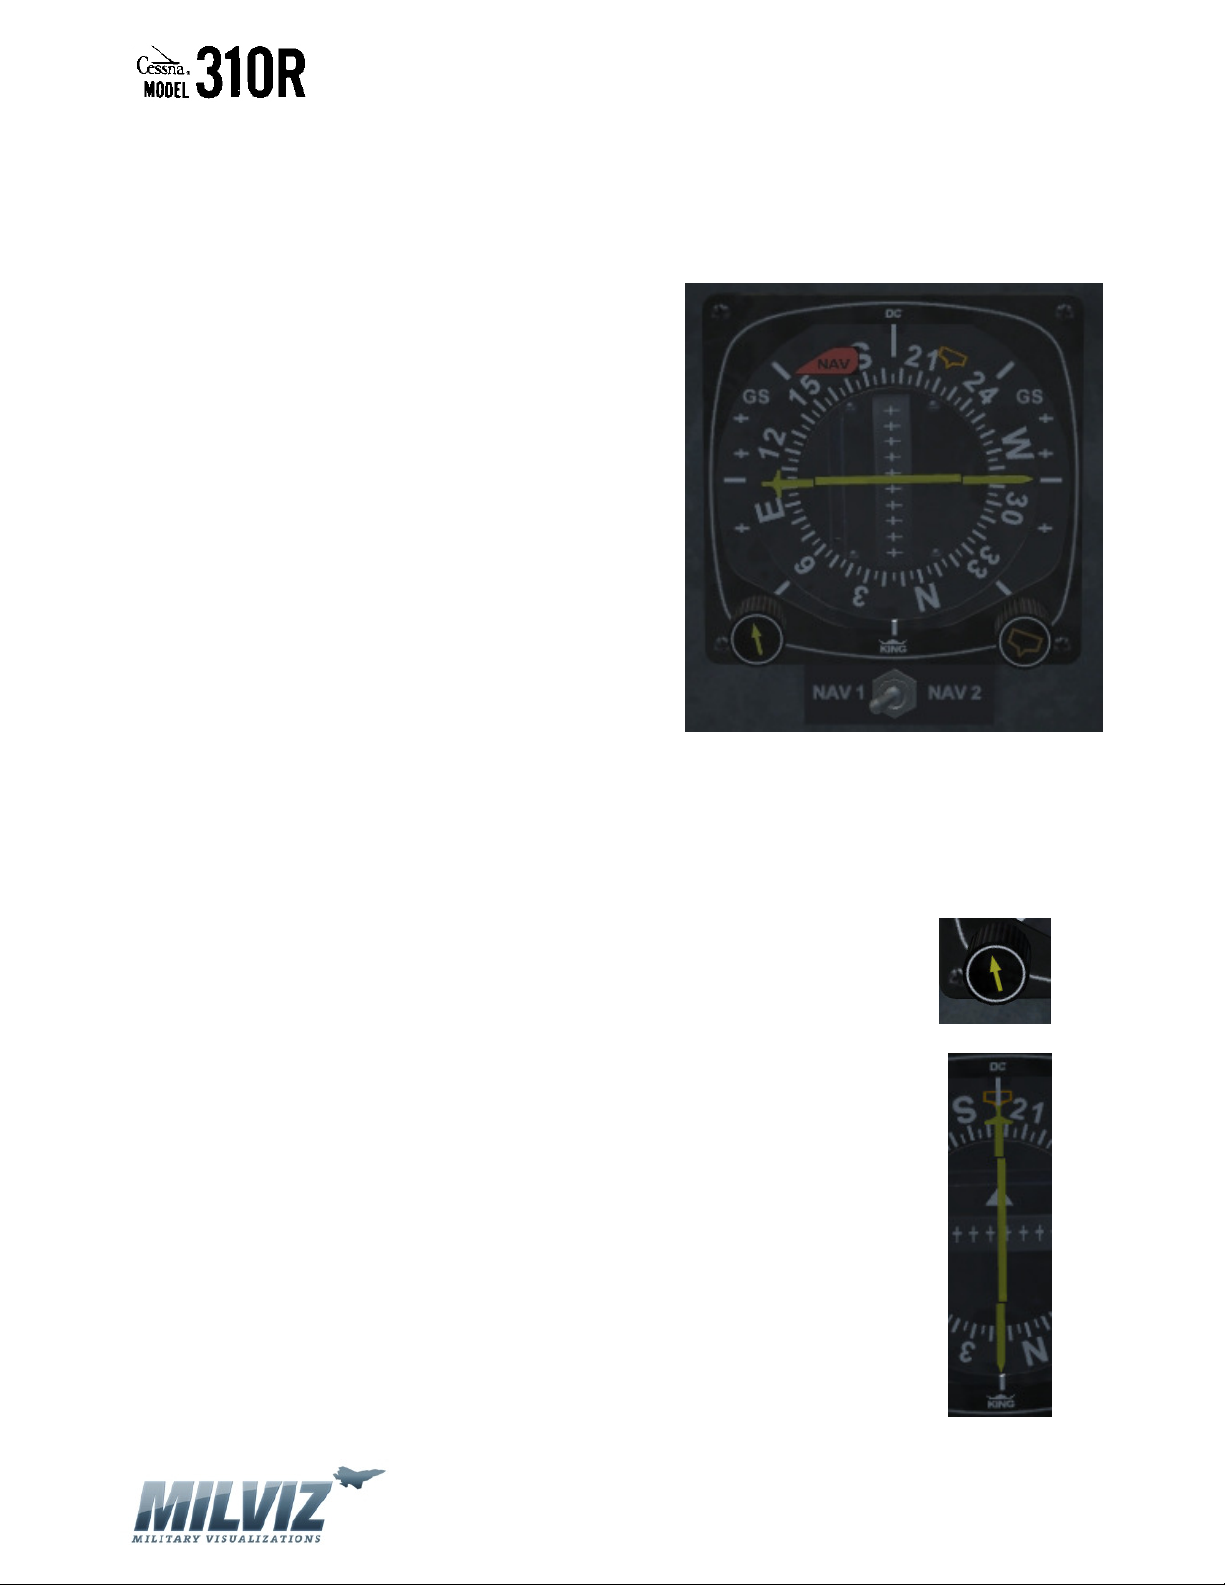
HORIZONTAL SITUATION INDICATOR (HSI)
The HSI is an integrated directional gyro stabilized
compass slaved to the standby magnetic compass.
In addition, it provides course, localizer, and
glideslope information referenced from either the
number one or number two navigational systems.
The number one navigational system is the Garmin
GNS-530. The number two navigational system is
the Garmin GNS-430. For detailed operation of the
GNS-530 and GNS-430 systems consult their
separate operation manuals.
The toggle switch labeled “NAV1” and “NAV2” allows
the pilot to select which navigation systems supplies
inputs to the HSI. Note: due to software limitations
with FSX, only the NAV1 system can be used for GPS
navigational inputs to the HSI. The NAV2 system only supplies inputs from VOR and ILS systems
when they are tuned by the GNS-430 and the system is set to VLOC operation. The NAV1/NAV2
switch toggles left and right using the left mouse button.
For GPS course operation (NAV1 only) the HSI will display a course bar that is set using the
course input knob located on the lower left side of the HSI. The pilot should
adjust the course bar to match the desired track to steer (DTS) indication
shown on the GNS-530 system. The course input knob rotates clockwise and
counter-clockwise via left and right mouse button clicks. If the mouse button is
held down and the mouse pointer indication is kept hovering over the course
knob, the course bar will freely rotate in the chosen direction. During enroute
navigation, the course bar will deviate left and right to indicate distance off
course left and right. It will be centered if the aircraft is precisely on course.
For instrument approach procedures, the course bar will also indicate course
errors left and right, but will switch to a more sensitive mode of operation,
showing twice the amount of deflection for a given course distance error.
Version 1.0 – 23 May 2010
[85]
Page 86
MilViz Cessna 310R Pilot’s Operating Handbook
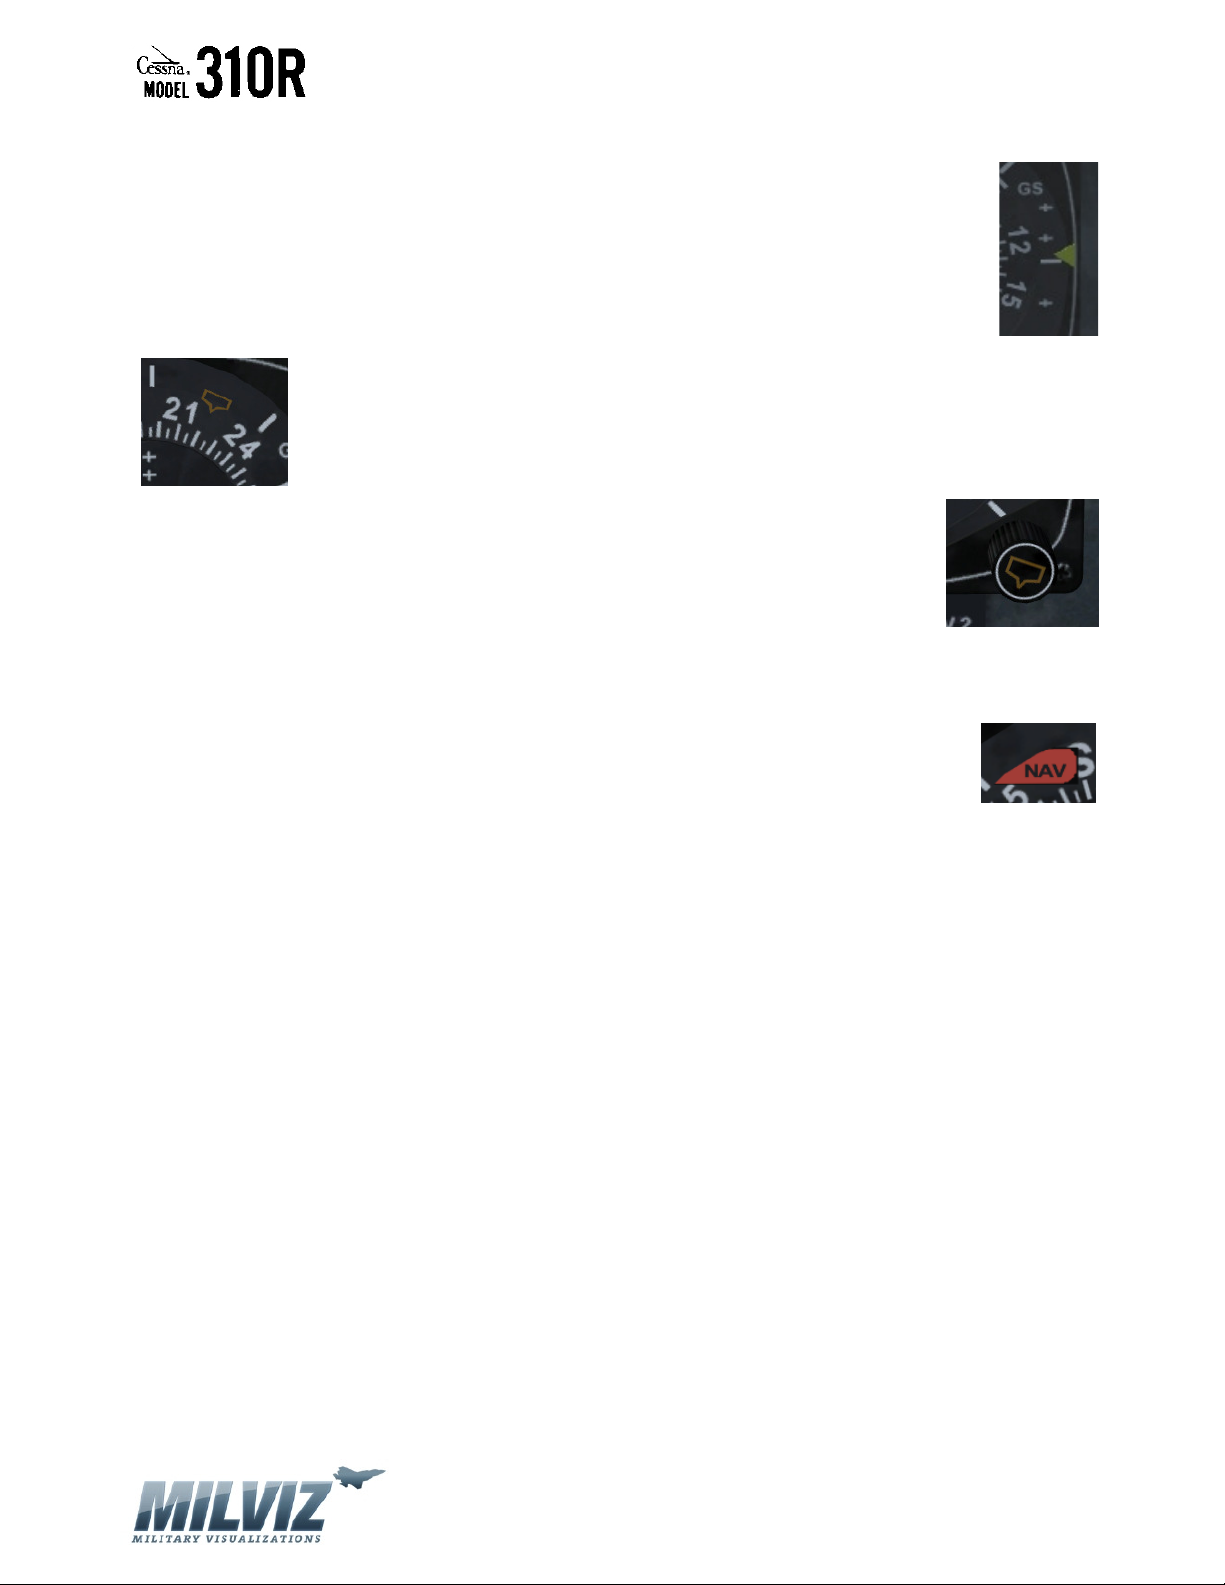
When flying a precision approach, with operating glideslope information, the HSI will
also indicate a glideslope bar indication on the left and right sides of the compass
rose. If the indicator is above the white lubber line, then the aircraft is too low.
When the indicator is below the white lubber line, then the aircraft is too high.
In addition, the HSI features a “heading bug” which the pilot can set using the
heading bug select knob located on the lower right side of the HSI. When the
autopilot is engaged in heading mode, rotation of the heading bug will turn the
aircraft in the shortest direction to match the pilot’s selected heading. The
heading select knob can be rotated clockwise or counter-clockwise in the same
manner that the course input knob adjusts the course bar. The pilot can also
immediately synch the heading bug to the current compass heading on the HSI
by hovering the mouse pointer over the heading knob and clicking the mouse
wheel button.
Finally, the HSI also features two red warning flags to alert the pilot when an unreliable
navigational or heading input signal is encountered, or when aircraft power is not
sufficient to operate the HSI.
Version 1.0 – 23 May 2010
[86]
Page 87
MilViz Cessna 310R Pilot’s Operating Handbook
ARTIFICIAL HORIZON (AH)
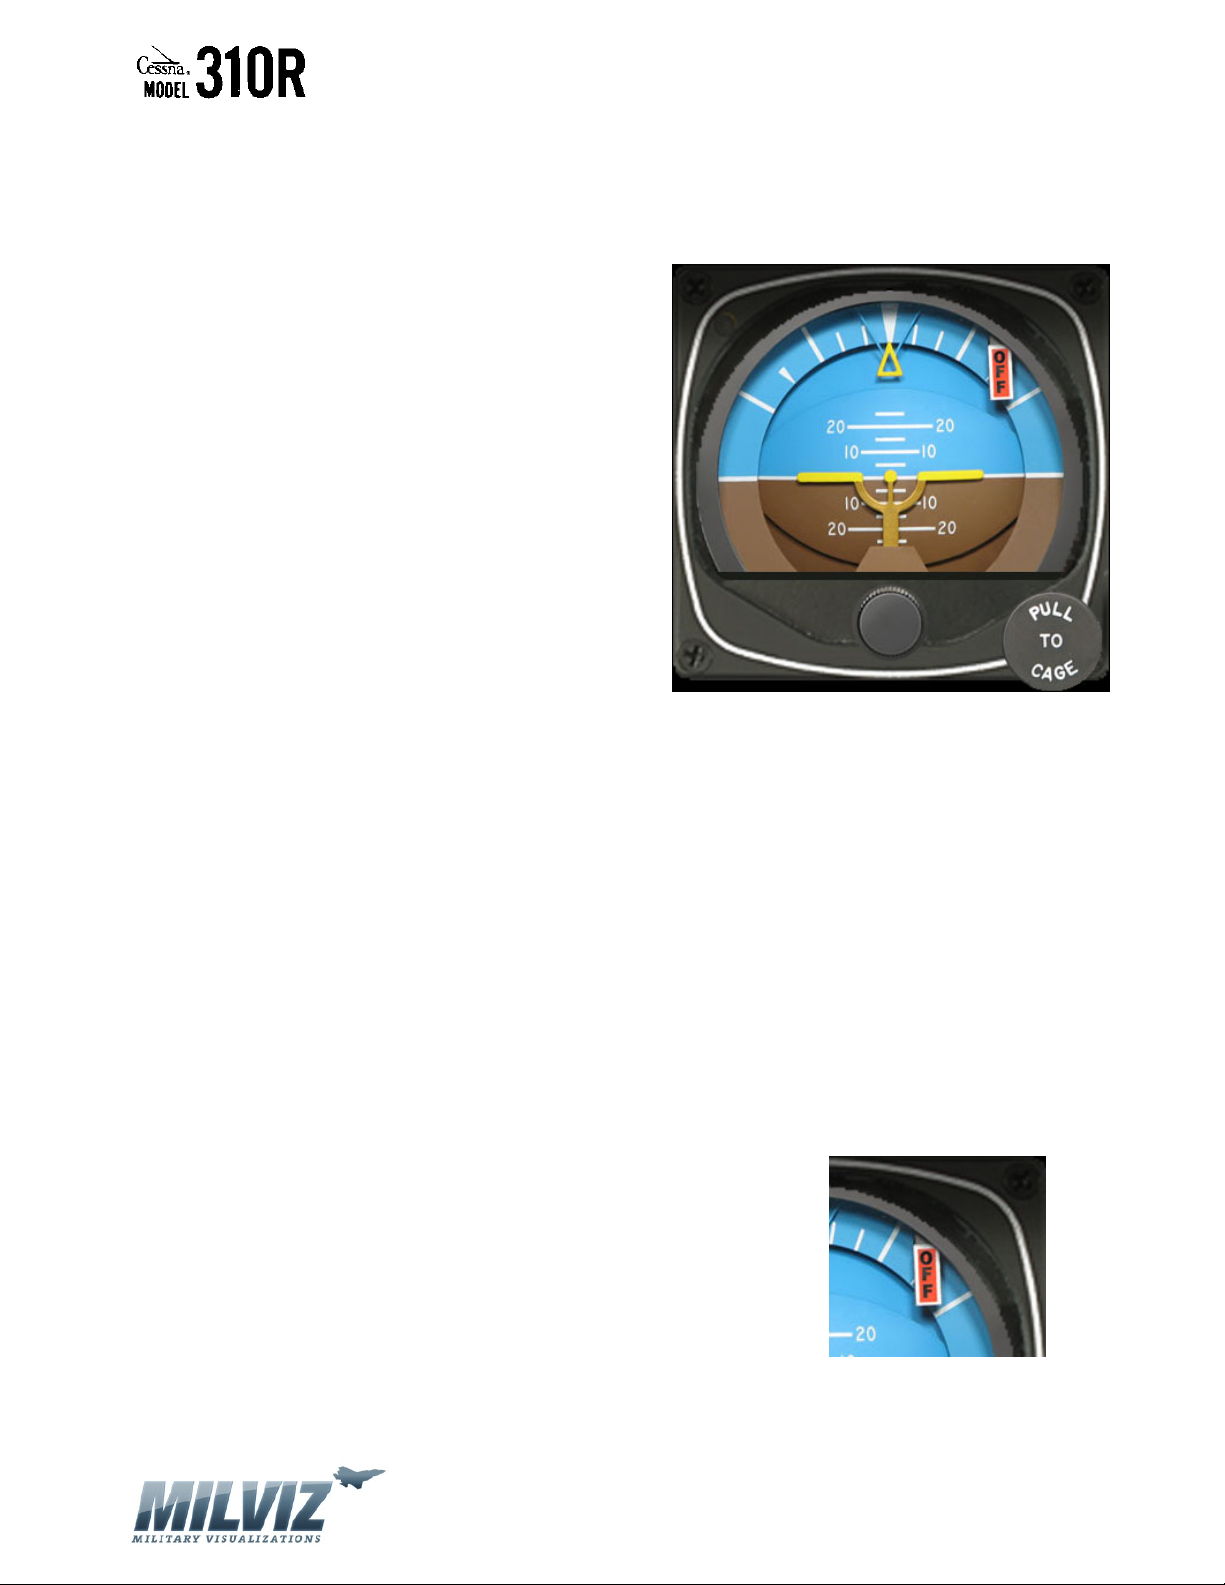
The MilViz Cessna 310R features a single AH. It is
used to maintain aircraft situational awareness,
relative to the horizon. It is used most often when
flying in instrument conditions. It is gyroscopically
stabilized by a vacuum system driven by either
engine to mimic aircraft movements in pitch and
roll. The instrument features a fixed yellow
waterline which can be adjusted up or down
manually by the pilot using the knob located at the
bottom of the instrument. The “card” behind the
waterline pivots and rotates in concert with the
aircraft’s pitch and roll movements.
In stable level flight under visual conditions and
with reference to the actual horizon, the pilot should manually adjust the waterline to lie flush
with the white horizon line between the blue and brown sections of the card.
The card will pivot up or down as the aircraft’s pitch changes. The card features pitch indicators
marked in five degree increments with the ten and twenty degree marks being wider and
labeled. It should be emphasized that these markings indicate pitch relative the horizon and
not angle of attack, which is relative to the flow of air across the wings.
Indications of bank are shown by the yellow arrow at the top of the instrument. The semicircular scale at the top of the instrument is graduated in ten degree marks to the thirty degree
bank indication, and then marked by single marks for 45 and 60 degrees. A left bank is
indicated by the top arrow “appearing” to rotate left along the bank scale. A right bank is
indicated by an apparent rotation to the right.
When the Artificial Horizon detects insufficient vacuum pressure to
operate the gyroscope, it displays a red flag to alert the pilot that
the instrument is unreliable.
To lock the AH to prevent tumbling during unusual attitude
maneuvers in VMC conditions, left mouse click on the “Pull to Cage”
knob. Perform another left mouse click to unlock the AH for normal
operations. You should ensure it is not activated prior to flight in instrument conditions.
Version 1.0 – 23 May 2010
[87]
Page 88
MilViz Cessna 310R Pilot’s Operating Handbook
ENGINE INSTRUMENTS
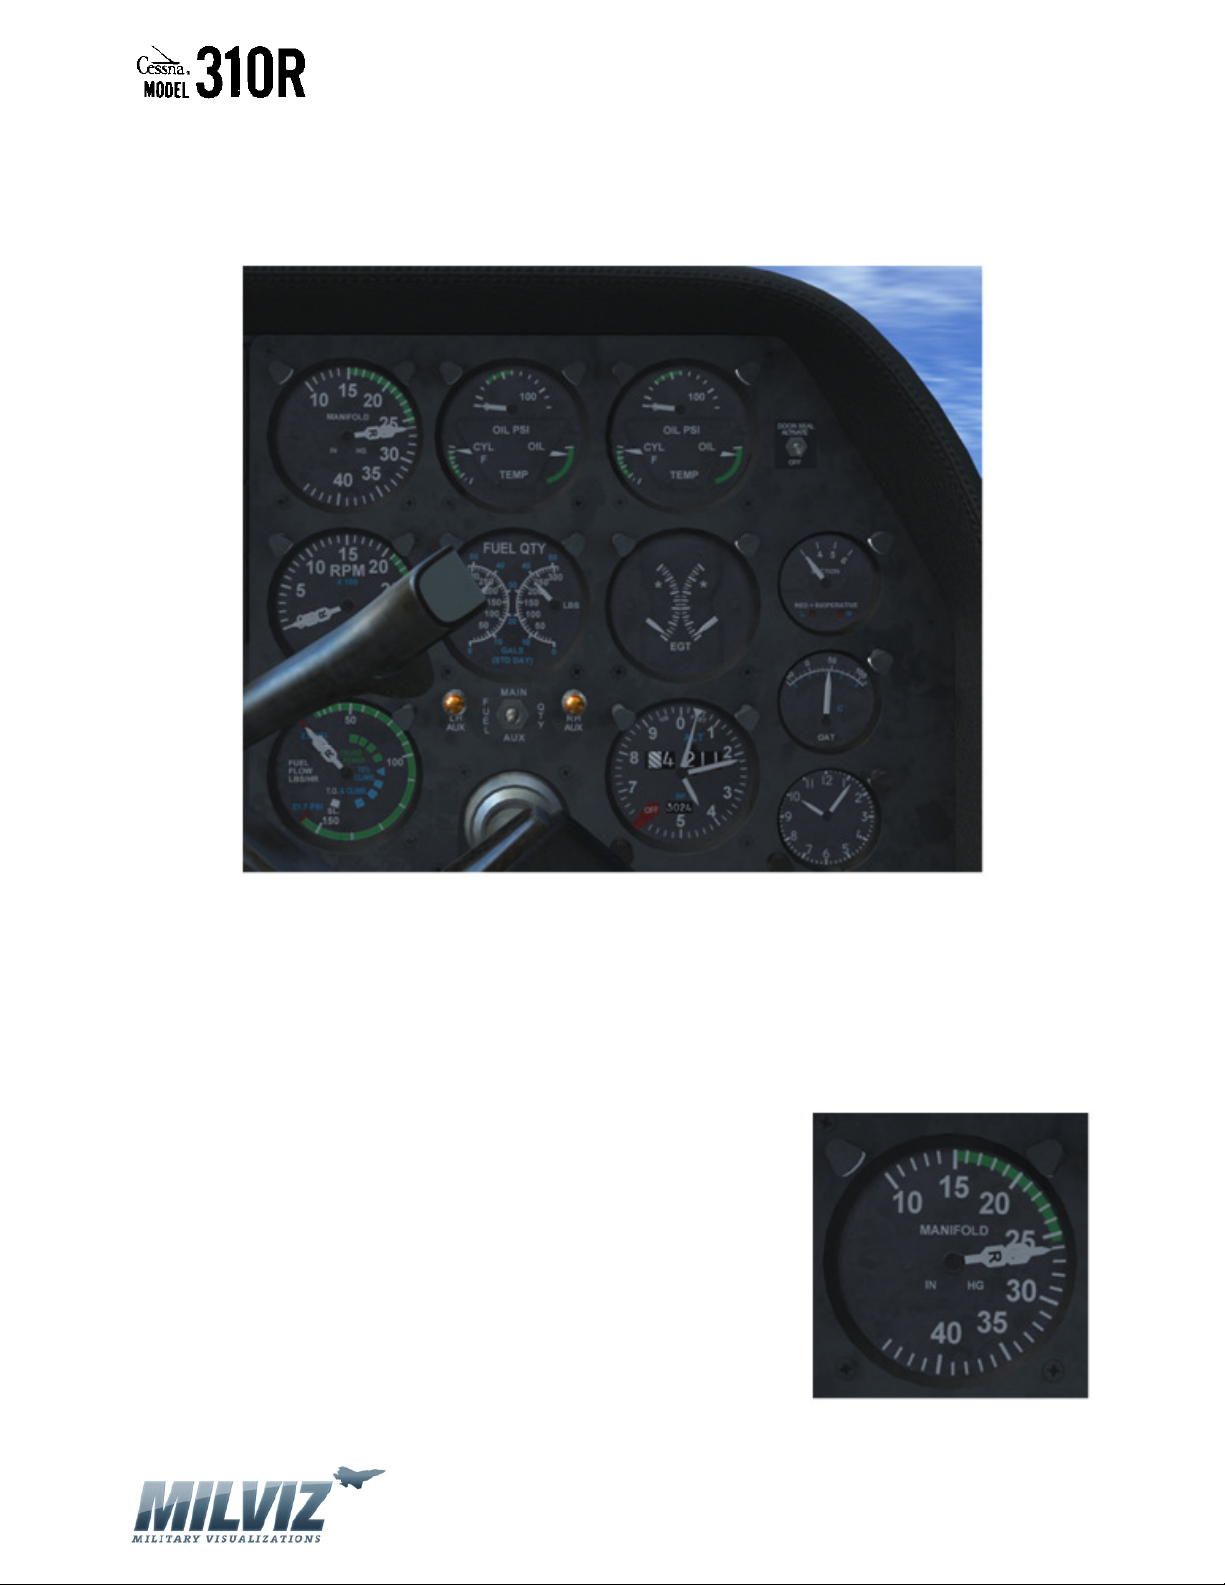
The MilViz Cessna 310R features a series of engine instruments that will be discussed in detail
in this section. They include: manifold pressure, RPM, CHT, oil, EGT, vacuum pressure, and
OAT.
The manifold pressure (MP) gauge features independently operating needles for the left and
right engines and displays the amount of air pressure that each engine is sucking through the
throttle manifold aft of the venturi. When the engines are shut
down, the MP displayed is equal to the outside air pressure.
When the engines are running, then the MP value displayed is
affected by the movement of the throttles which open and close
the throttle wastegates. When the throttles are fully closed, the
wastegate is rotated to its maximum closed position, which
reduces the amount of air that the engine can suck. When the
throttle is fully opened, the wastegate is likewise fully opened,
and the engine can suck air equal to the outside air pressure.
Since this C-310R is not turbocharged, as the plane’s elevation
Version 1.0 – 23 May 2010
[88]
Page 89
MilViz Cessna 310R Pilot’s Operating Handbook
rises, the outside air pressure is reduced. Therefore, the manifold pressure will reduce as the
airplane climbs even if the throttles are fully opened. In other words, the aircraft engines can
never suck air of a pressure greater than the outside air pressure. Manifold pressures above
the top of the normal range (25.5 inches) should only be demanded during takeoff and reduced
to the normal range as soon as practical.
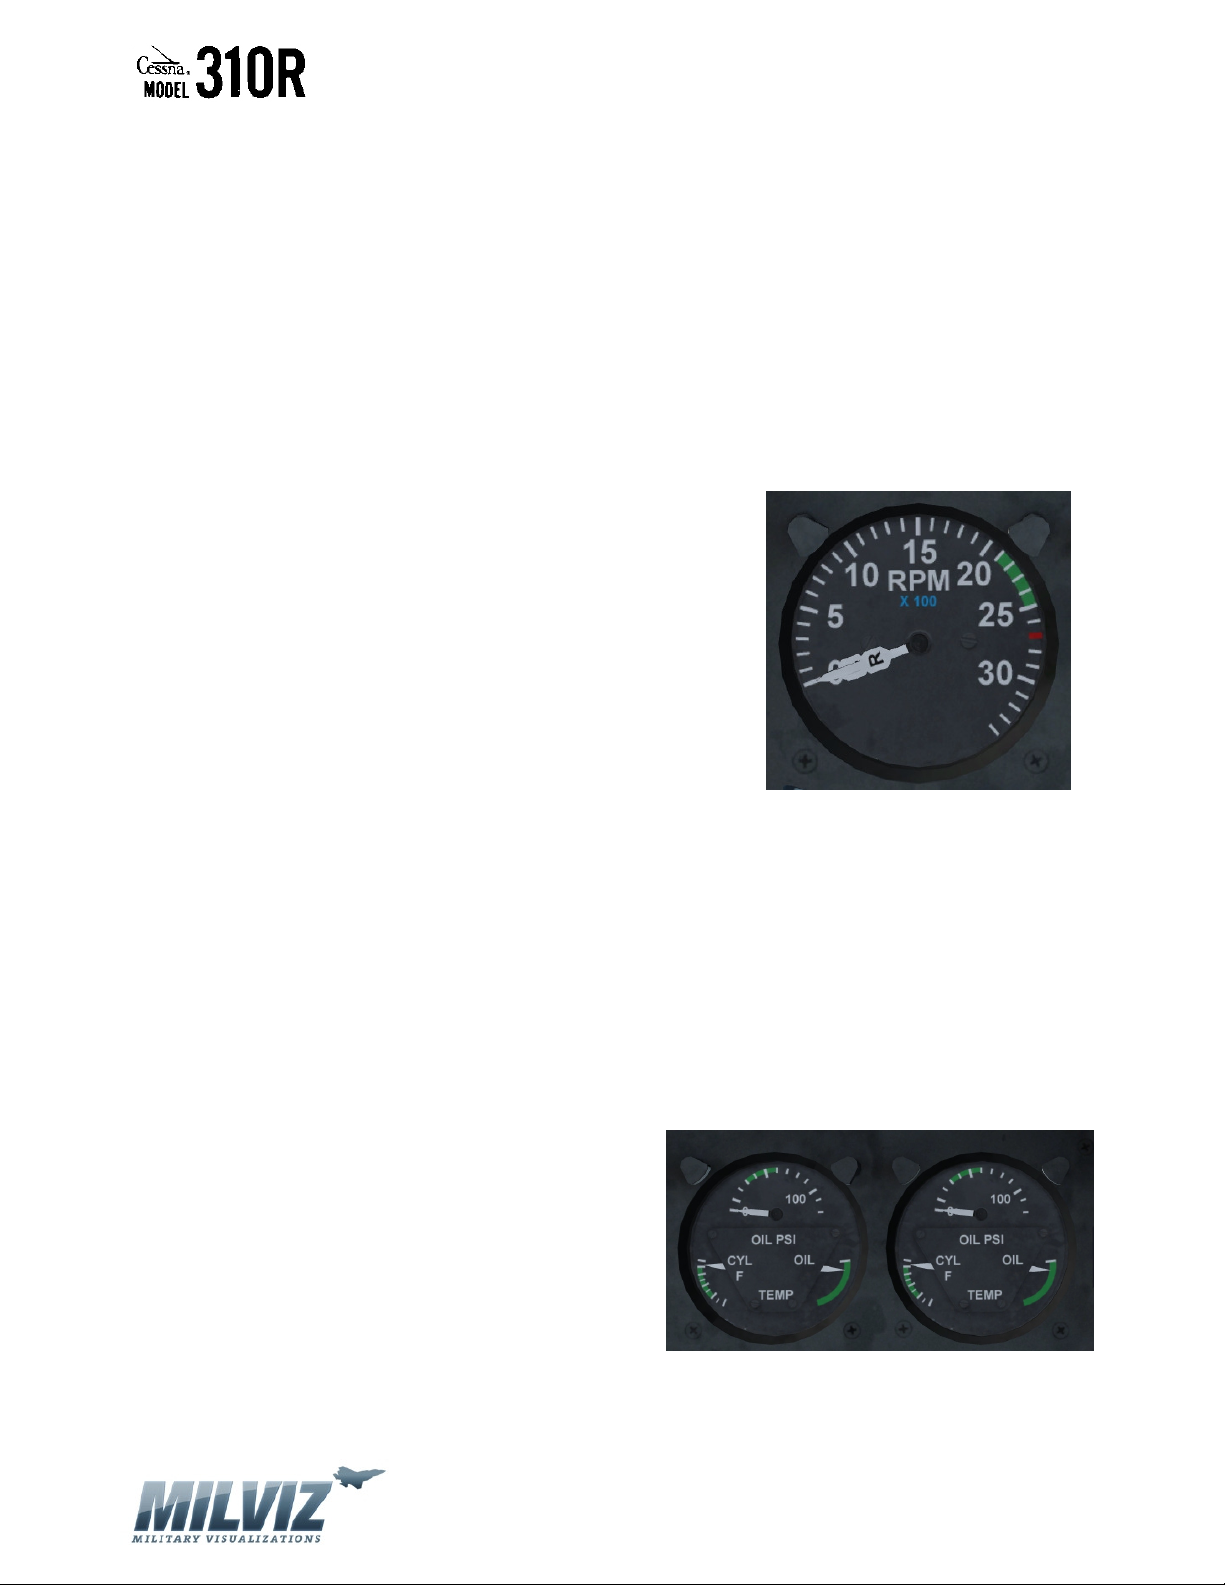
The tachometer (RPM) gauge also features independently operating needles for each engine.
The MilViz C-310R features constant speed propellers. Therefore, the RPM can be adjusted by
the pilot using the associated propeller condition levers located on the throttle quadrant. Full
RPM is reached by the pilot moving the prop condition levers fully forward. The propeller hub
contains a governor which should not allow the RPM to
exceed 2700. A momentary indication above 2700 RPM is
acceptable upon moving the prop condition levers full
forward, provided the governor immediately stabilizes them
to red line. If the RPM value remains above red line,
however, then governor failure should be suspected and the
flight aborted as soon as possible.
RPM’s above the top of the normal range (2500) should only
be allowed during takeoff and landing operations. Also, the
pilot must be careful not to allow a combination of high manifold pressure and low RPM’s as
this combination could cause unacceptable stresses to the engines, potentially leading to
catastrophic failures. During cruise operations, the pilot should ensure that the RPM is kept in
the normal operating range (the green arc) by moving the associated prop condition levers.
Each engine has its associated cylinder head temperature (CHT) and oil temperature/pressure
instruments. During all phases of engine operation, these instruments should be referenced to
ensure no abnormal engine conditions are allowed. During engine start, the pilot should
immediately reference the oil pressure gauge to ensure proper flow of oil through the engine.
If no increase to the normal range is seen immediately after start, the engine should be shut
down as soon as possible to avoid possible seizure.
In addition, during the propeller feather checks on
the ground, the pilot should observe a drop in oil
pressure and temperature when he moves the
associated prop condition lever aft. This ensures
that the oil is flowing through the propeller
governor.
Version 1.0 – 23 May 2010
[89]
Page 90
MilViz Cessna 310R Pilot’s Operating Handbook
Operations outside the normal ranges (green arcs) should not be permitted unless the situation
does not allow for the safe shutdown of the affected engine. CHT readings above or below the
normal range should be avoided and can be controlled by use of the cowl flaps. In the actual
Cessna C-310R, the cowl flaps are located below the throttle quadrant on the aft side of the
pedestal. However, the MilViz C-310R does not model cowl flap levers. The cowl flaps are
modeled fully open. Further on the C-310R, the cowl flaps are fully internalized inside the
engine compartment and therefore do not produce drag. They are normally left fully opened
and should only be closed when the CHT is below the green arc for any sustained time period
(such as in-flight engine shutdown).
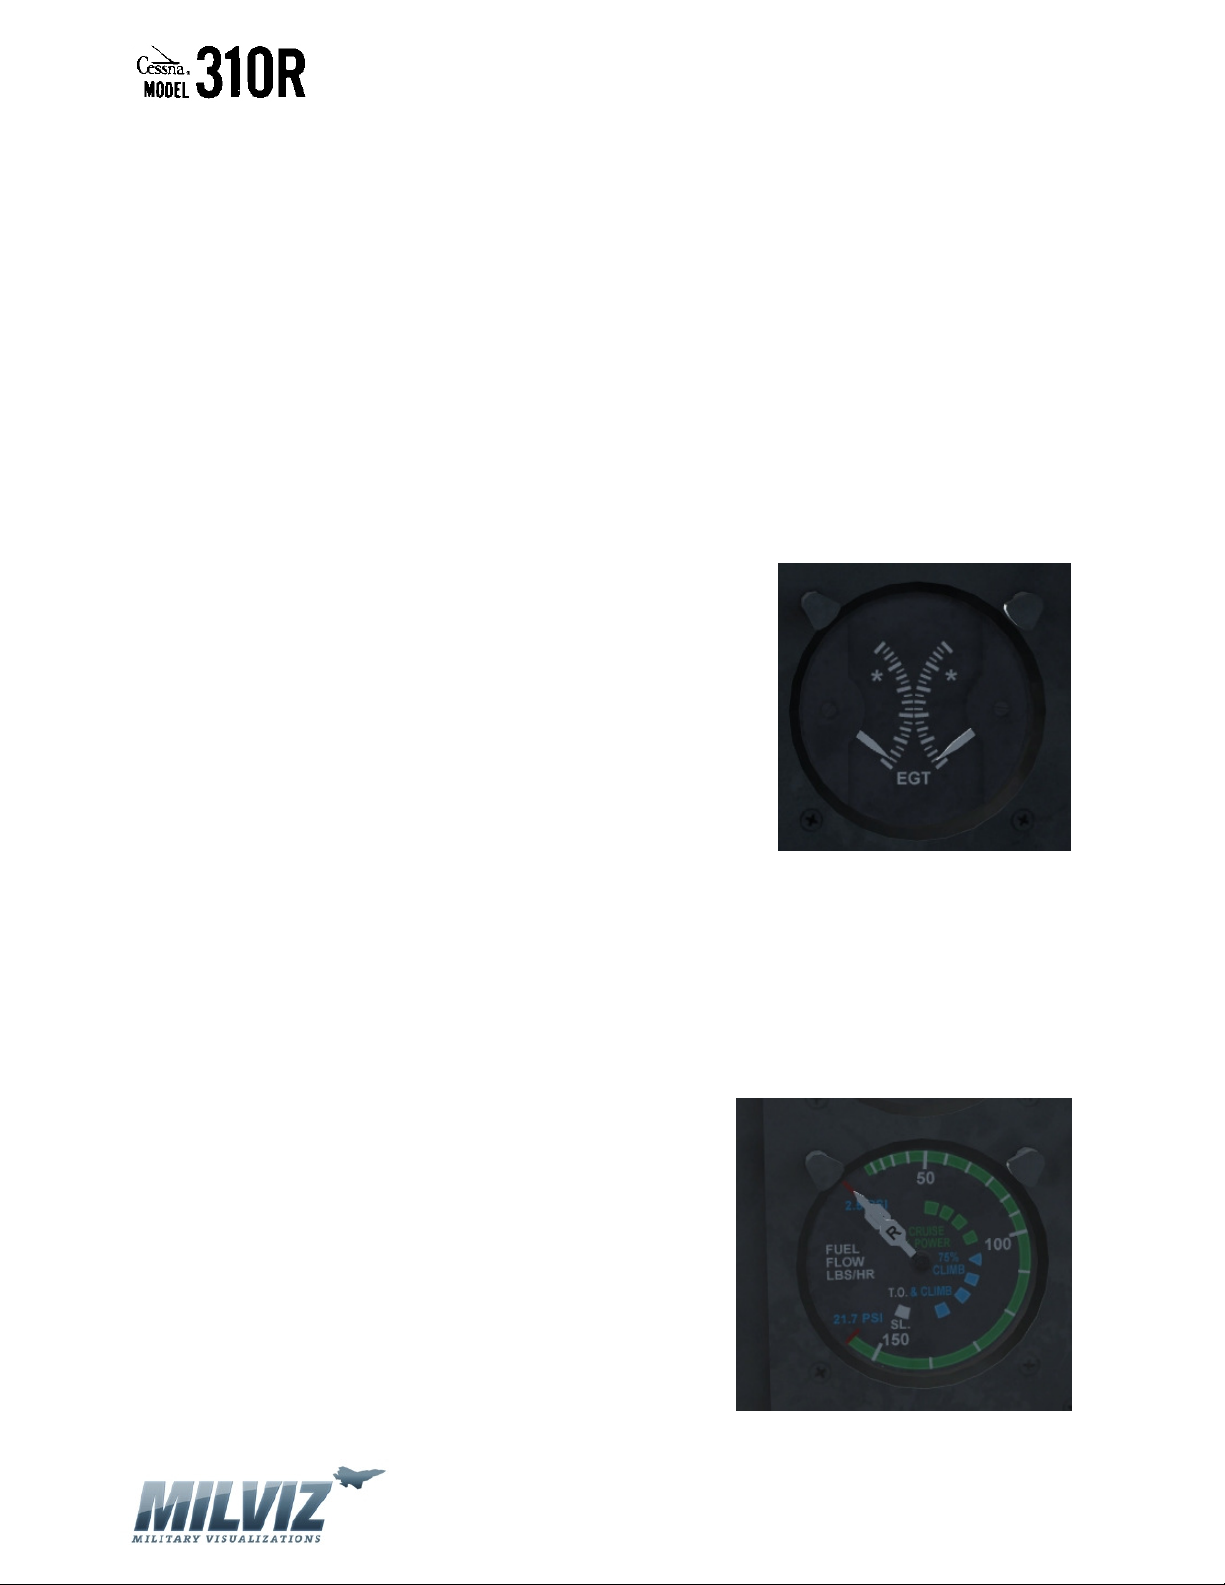
The Exhaust Gas Temperature (EGT) gauge measures the temperature of the exhaust gases
immediately after fuel burn in the ignition phase of engine operations. The gauge features
independent indications for each engine. As EGT increases,
the associated needle will rise to indicate that engine’s
exhaust gas temperature.
During cruise operations, the pilot should lean out the fuel
mixture to maintain an optimal ratio of fuel to air. EGT can be
referenced in concert with the two EDM-700 engine monitors
(see separate manual) to ensure this optimal mixture setting is
maintained. During climbs, the pilot will need to lean the fuel
mixture by moving the associated fuel mixture lever on the
throttle quadrant aft. During descents, as the air pressure increases, fuel will need to be
enriched by moving the mixture lever forward. The asterisks located on the EGT gauge can be
referenced to help determine optimal fuel mixture.
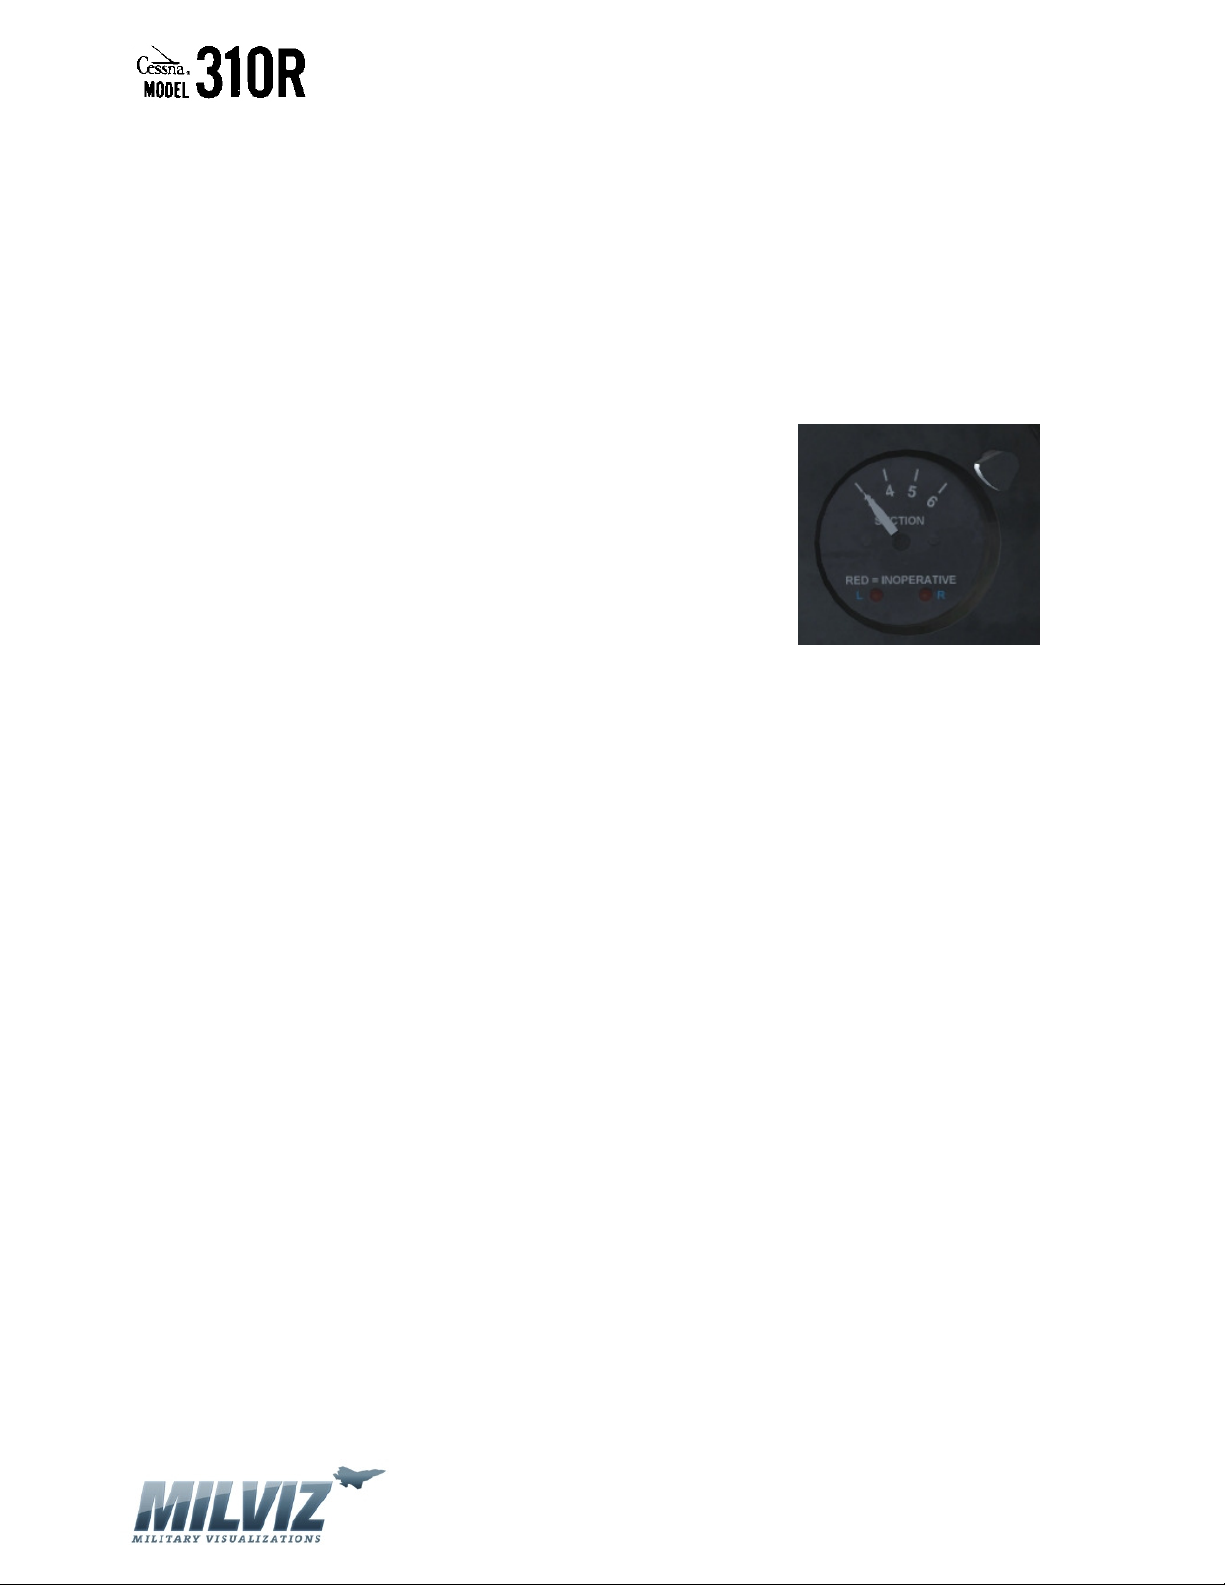
The Fuel Flow gauge uses independently operating needles for each engine to allow the pilot to
easily match the fuel flows to each engine. The pilot adjusts these fuel flows by moving the
associated fuel mixture levers forward and aft. The outer scale is calibrated from a minimum
value of 2.5 PSI to a maximum value of 21.7 PSI. In
between these two PSI limits, the outer scale is calibrated
in fuel flow in pounds per hour.
The inner scale is calibrated to assist the pilot in setting
fuel flows consistent with certain phases of flight. For
example, during normal takeoff at airports below 3,000
feet field elevation, the pilot should set a fully rich mixture
as indicated by the small white section of the inner scale.
The bottom half of the inner scale is in blue and used for
takeoffs and climbs as a reference to keep fuel flows high
Version 1.0 – 23 May 2010
[90]
Page 91
MilViz Cessna 310R Pilot’s Operating Handbook
enough to help keep the cylinder head temperatures in normal range (unburned fuel acts as a
coolant).
During cruise operations, the pilot can set the fuel mixture levers to obtain a flow reading in the
green upper section of the inner scale. These setting are approximately equal to percent of
power operations from 50% power at the top of the green section of the arc to 100% power at
the bottom of the green section of the arc.
The vacuum pressure gauge allows the pilot to measure the amount of air pressure that the
engine vacuum pumps are sucking. This vacuum pressure
rotates the vanes of all the air driven gyroscopes that stabilize
such instruments as the artificial horizon and HSI. During the
engine ground run, and periodically during flight, the pilot
should reference this gauge to determine is he is experiencing
possible vacuum failure on these critical instruments.
Version 1.0 – 23 May 2010
[91]
Page 92
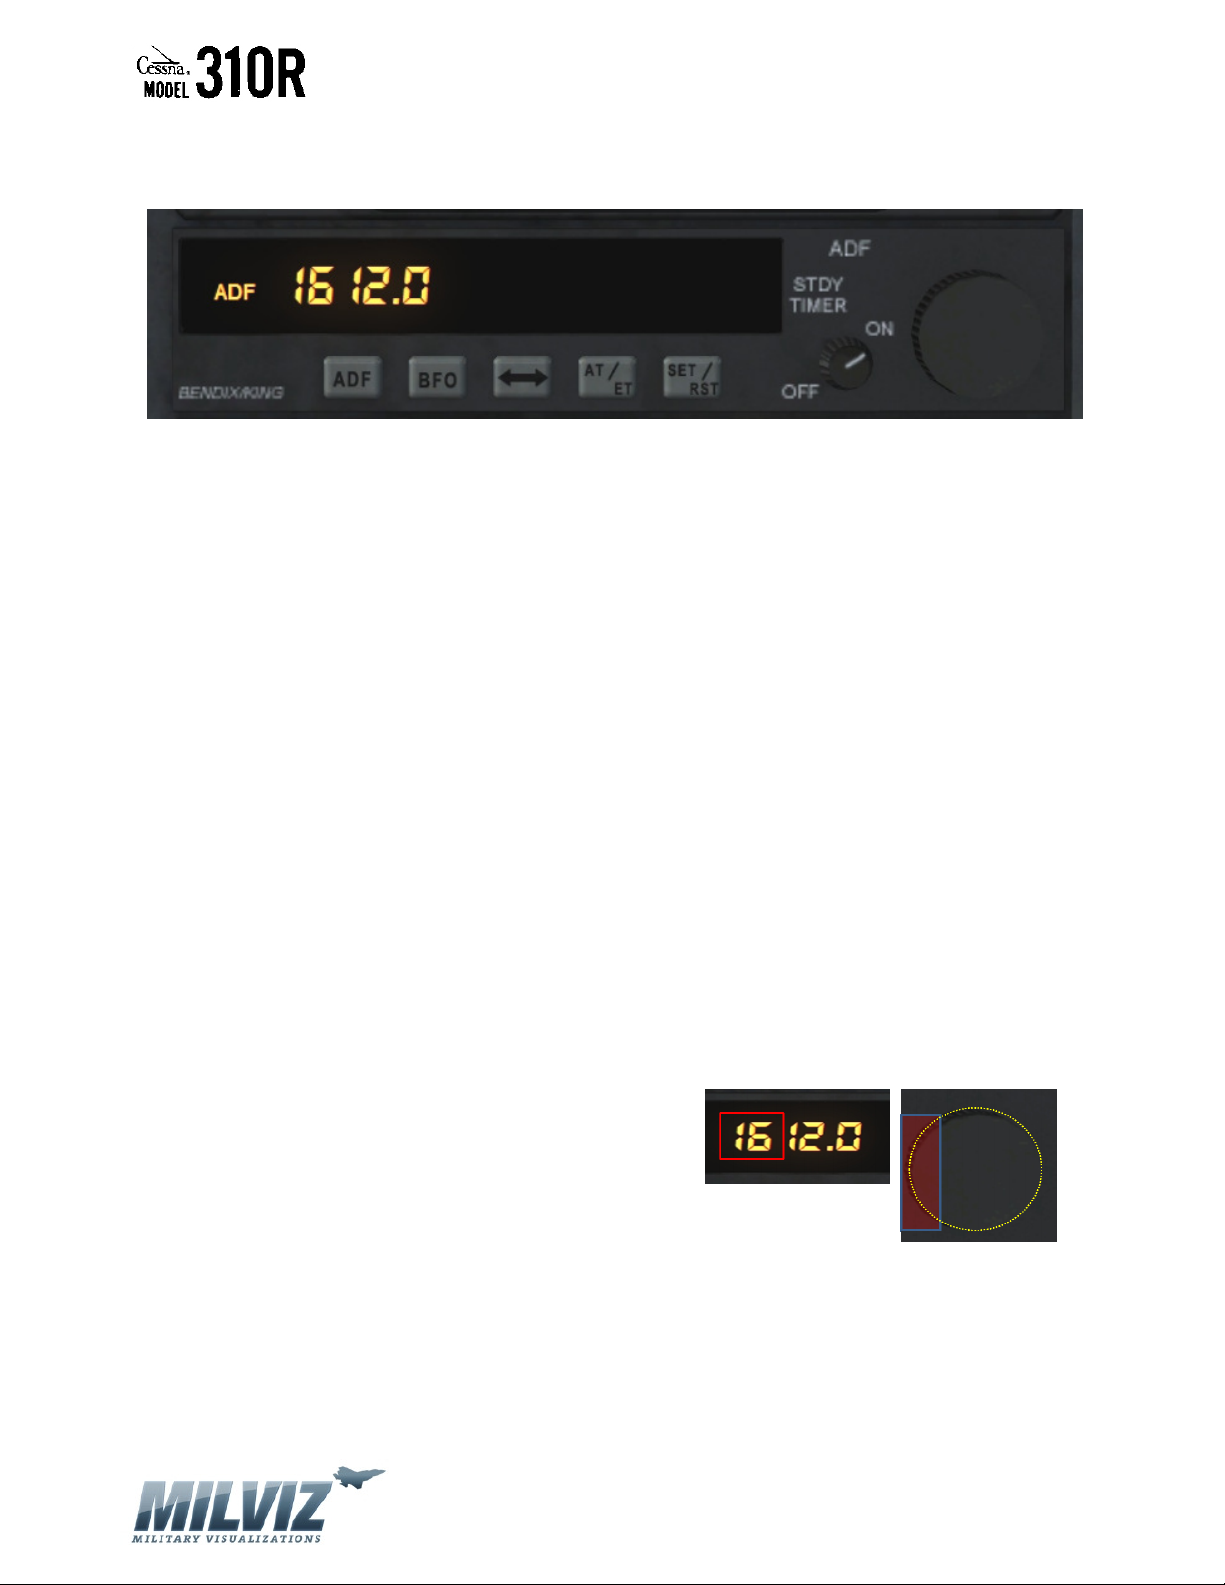
MilViz Cessna 310R Pilot’s Operating Handbook
BENDIX-KING KR-87 AUTOMATIC DIRECTION FINDER (ADF)
The MilViz Cessna 310R features a Bendix-King ADF that integrates itself with the dual purpose
RMI card located on the lower right side of the pilot’s instrument panel. The unit features a
master on/off switch and a digital frequency read-out. To tune frequencies, the pilot uses the
circular dial knob located on the right side of the unit.
FRENQUENCY TUNING
The knob is mapped in three sections to control the three groups of numbers in the frequency.
To adjust the frequency, the pilot will hover the mouse arrow over the desired section of the
knob and then use the mouse wheel to change the number. To increase the desired number,
rotate the mouse wheel forward. To decrease the number, rotate the mouse wheel aft.
Remember, to change the desired number, the mouse pointer must be kept inside the
associated sector of the knob during the time the mouse wheel is rotated.
FREQUENCY TUNING EXAMPLES
These illustrations will show the section of the ADF frequency controlled by the sectors of the
knob (Note: to help identify the outline of the knob, its outer circumference is outlined in
yellow):
To control the hundreds and thousands values of the frequency, use the left edge of the knob
as shown here. The section of the frequency outlined
in the red box is controlled by hovering the mouse
pointer inside the section of the knob highlighted in
red. Note: to work, the mouse pointer must be inside the red highlighted
section but also inside the circumference of the knob (as outlined in
yellow).
Version 1.0 – 23 May 2010
[92]
Page 93
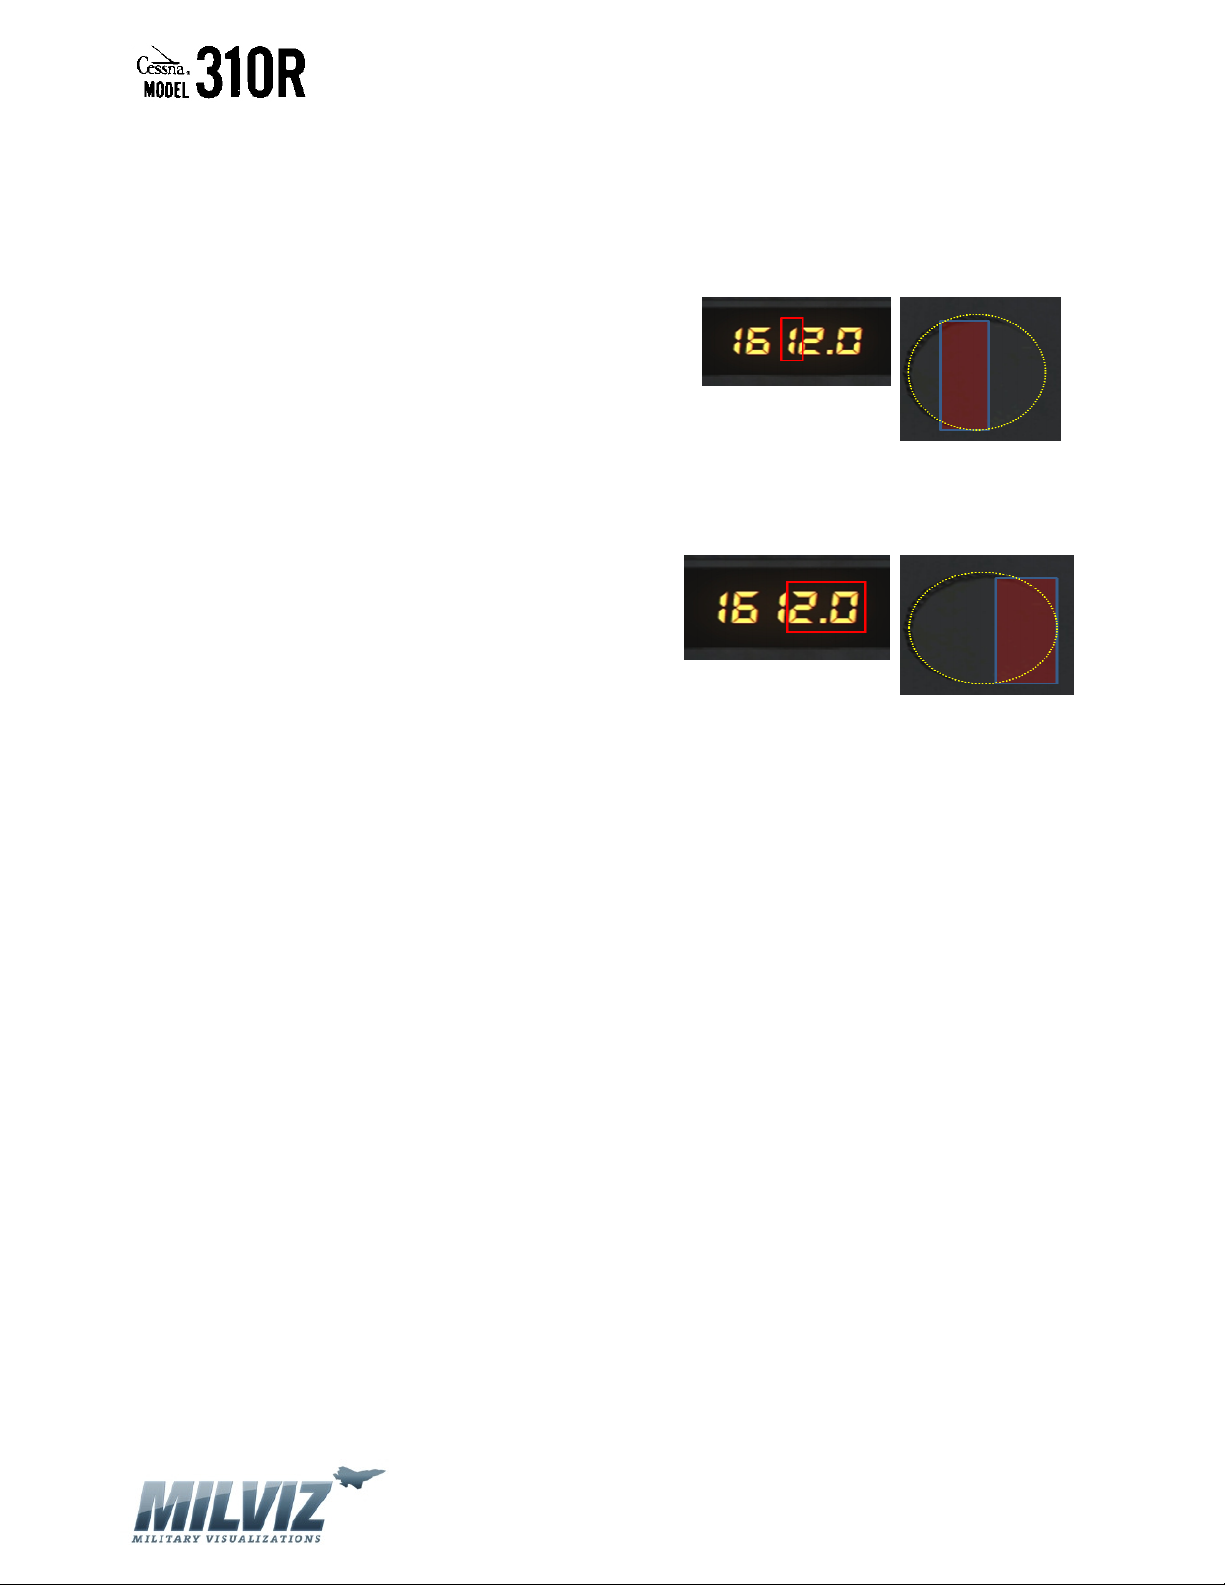
MilViz Cessna 310R Pilot’s Operating Handbook
To control the tens values of the frequency, use the middle-left sector of the knob as shown
here. Again, the section of the frequency outlined in
the red box is controlled by hovering the mouse
pointer inside the section of the knob highlighted in
red.
Note: to work, the mouse pointer must be inside the red highlighted
section but also inside the circumference of the knob (as outlined in
yellow).
To control the ones values of the frequency, use the right sector of the knob as shown here.
Again, the
section of the frequency outlined in the red box is
controlled by hovering the mouse pointer inside the
section of the knob highlighted in red.
Note: to
work, the mouse pointer must be inside the red
highlighted section but also inside the circumference of the knob (as
outlined in yellow). Note: to change the decimal portion of the number group, toggle the
“BFO” button on the unit.
ADF VERSUS ANTENNA MODES
The ADF also features an “antenna mode” which is engaged by toggling the “ADF” button on
the unit. The antenna mode of operation does not allow the course needle on the RMI to point
to the station. This can be used when the pilot desires to tune the frequency but disable the
navigation feature on the RMI.
FLIGHT TIMER AND STOPWATCH MODES
The unit integrates a combination flight timer and stopwatch feature. These features are
displayed by toggling the “AT/ET” button on the unit. Toggling once displays the flight time and
twice displays the stopwatch. Further toggles of the “AT/ET” button will simply cycle between
the flight timer and stopwatch. The stopwatch can be hacked back to zero time by toggling the
“SET/RST” button on the unit. To make the flight timer and stopwatch display disappear, the
pilot toggles the sideways arrow button.
Version 1.0 – 23 May 2010
[93]
Page 94
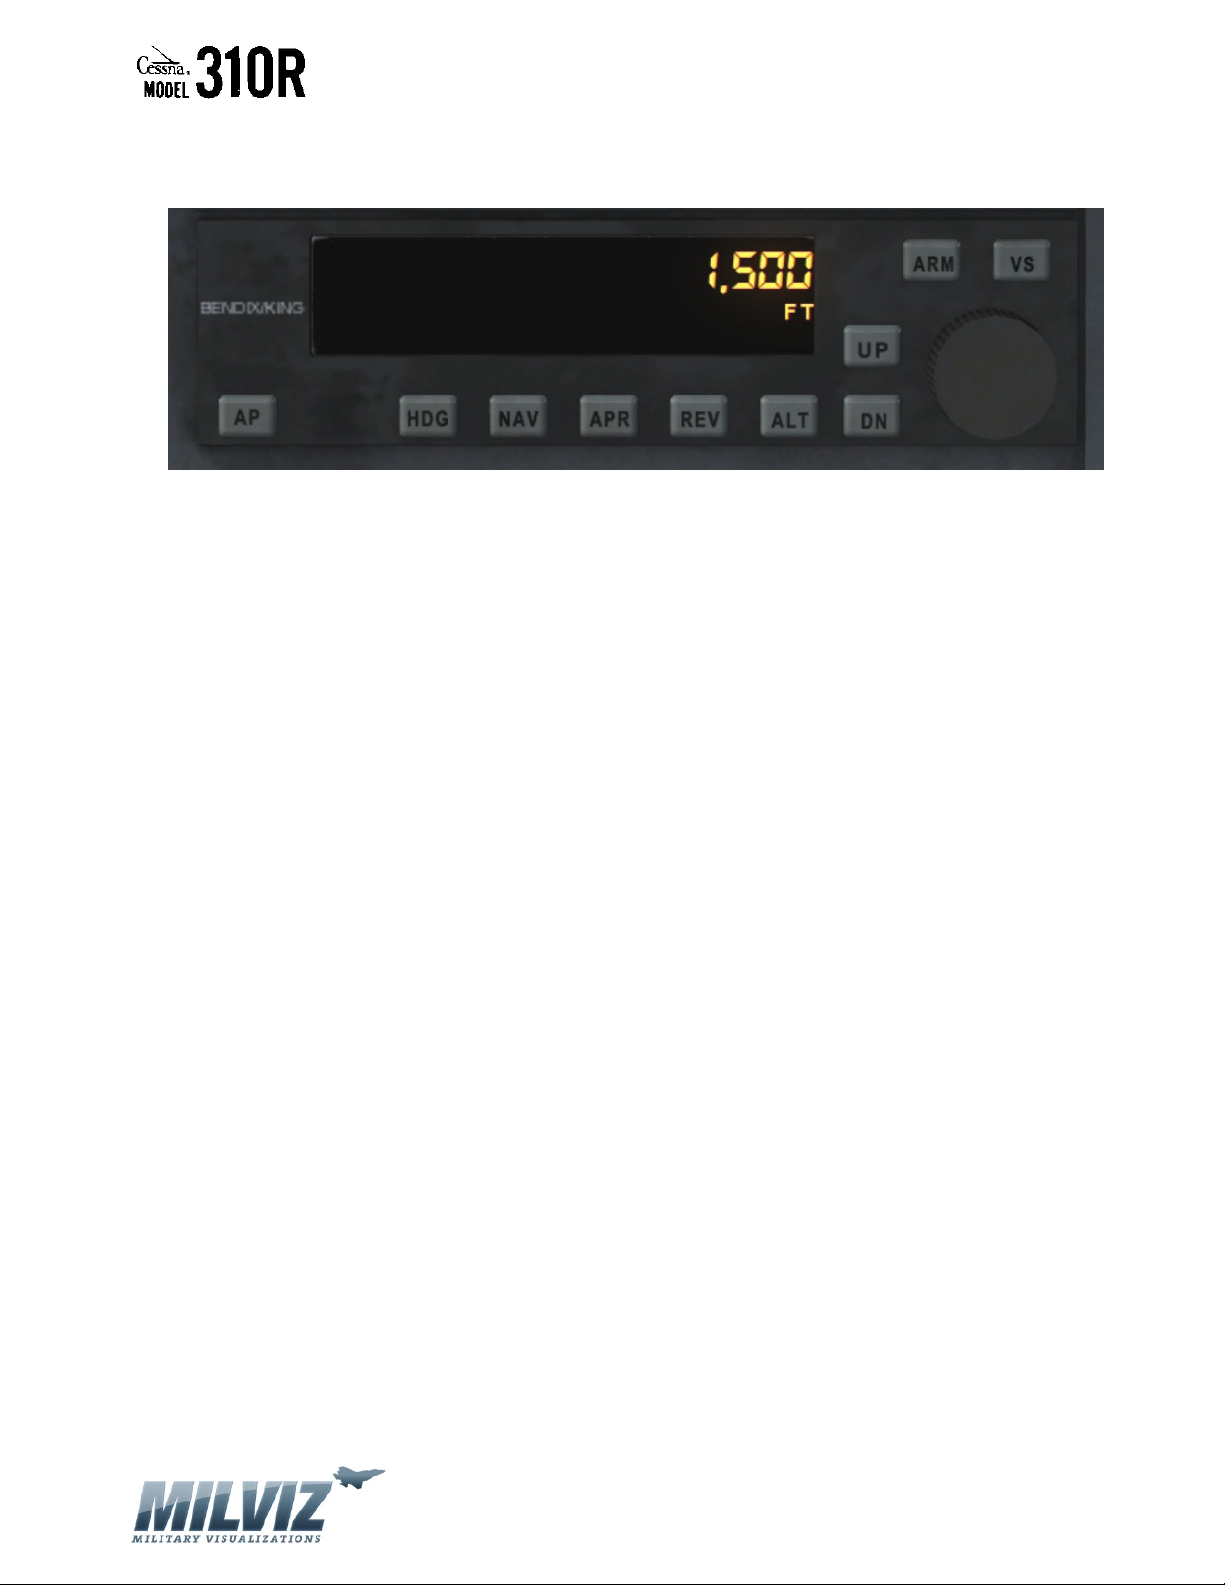
MilViz Cessna 310R Pilot’s Operating Handbook
BENDIX-KING AUTOPILOT (KAP-140)
The MilViz C-310R features a Bendix-King system 140 Autopilot (KAP-140) integrated with the
HSI. The autopilot’s function will be explained herein.
MASTER AUTOPILOT POWER
The autopilot is powered when the avionics master switch is turned on. However, the
functionality of the autopilot is now engaged until the pilot toggles the “AP” button on the
lower-left side of the unit. To disengage the autopilot’s functions, the pilot toggles the AP
button a second time (Note: the pilot will hear a warning tone any time the autopilot is toggled
off deliberately or if autopilot functionality is deemed unreliable.
ALTITUDE CONTROL
The autopilot features a three axis capability with altitude pre-command. This allows the pilot
to not only hold a given altitude, but also to pre-select a desired altitude and then command
the aircraft to climb or descend to that chosen altitude on a pre-set rate. To change altitudes
using a pre-selection, the pilot simply inputs the desired altitude and desired rate of
climb/descent (see ALTITUDE INPUT KNOB and VVI SELECTION sections). To engage the chosen
climb or descent, the pilot simply toggles the “ALT” button on the lower-right row of main
buttons on the unit.
Note: When using altitude pre-selection mode, the pilot will receive a visual warning in the
autopilot display when the aircraft has reached within 1,000 feet of the commanded altitude,
disappears when the aircraft has reached within 200 feet of the commanded altitude, and this
displays temporarily when the altitude is reached.
Version 1.0 – 23 May 2010
[94]
Page 95

MilViz Cessna 310R Pilot’s Operating Handbook
WARNING: The pilot must be very careful that before he toggles the “ALT” button that the
desired altitude and climb/descent VVI rate are safe for surrounding terrain and aircraft
performance capabilities. Failure to adhere to this warning could lead to catastrophic loss of
aircraft and death of all personnel onboard.
ALTITUDE HOLD MODE
In addition to pre-selection, the pilot may manually climb to a chosen altitude, ensure the VVI is
zero’d out, and toggle the ALT button to maintain his current altitude. WARNING: If the pilot
fails to ensure the VVI selection is zero’d out and toggles the ALT button, then the aircraft may
immediately climb or descend.
ALTITUDE INPUT KNOB
The altitude input knob is the large circular knob located on the lower-right corner of the unit.
It is mapped so that if the pilot hovers the mouse pointer overtop of it, he can input a desired
altitude by rotating the mouse wheel. Rotating the mouse wheel forward will increase the
desired altitude and rotating the wheel aft will decrease it. The pilot can also chose to use the
left or right mouse buttons when the pointer is hovered over top the knob. In this case, the left
mouse button will decrease the desired altitude and the right mouse button will increase it.
VVI SELECTION
In addition to setting a desired altitude to climb or descend to, the pilot can also command a
specific climb or descent rate. To input this command the pilot uses the “UP” and “DN” buttons
located immediately left of the altitude input knob. When the pilot toggles either of these
buttons the autopilot is automatically put into VVI SELECTION mode and his commanded rate of
climb or descent is displayed in the right half of the display window. Each button push will
change the selected value by 100 feet up or down depending on what button is clicked on.
After a few seconds of time has elapsed without any changes to the VVI selection, the autopilot
automatically returns to the previous mode of operation on the display, normally the
commanded altitude.
To reduce the chosen VVI, the pilot toggles the “DN” button. To increase the chosen VVI, he
toggles the “UP” button. A chosen rate of descent will be shown by a negative number in the
VVI display. A chosen rate of climb will be shown by a positive number in the VVI display.
WARNING: Confusing the commanded VVI with the commanded altitude display can lead to
unsafe aircraft climbs or descents. The pilot must be careful that he is correctly setting the
value of the VVI and/or altitude in accordance with safe operating requirements. If the VVI is
set too high, then the aircraft can stall during the climb!
Version 1.0 – 23 May 2010
[95]
Page 96

MilViz Cessna 310R Pilot’s Operating Handbook
HEADING MODE
The autopilot features a heading mode of enroute navigation. To select this mode, the pilot
toggles the “HDG” button when the autopilot function is engaged. When the pilot toggles this
mode, the aircraft will immediately turn to compass heading that is set by the heading bug on
the HSI. When heading mode is engaged, any movement of the heading bug on the HSI will
result in an immediately turn by the aircraft to match.
WARNING: The pilot must ensure that the heading bug is set to a safe compass heading on the
HSI before engaging autopilot heading mode, else the aircraft may turn toward unsafe airspace
or terrain.
NAVIGATION MODE
The autopilot will operate in a navigational mode when the “NAV” button is toggled. During
this mode of operation the autopilot will command the aircraft to steer in the shortest direction
to the chosen method of enroute navigation. If the pilot has selected “GPS” mode on the NAV1
system, then the aircraft will fly the flightplan currently loaded into the GPS unit. If the pilot
has selected VLOC on either the NAV1 or NAV2 systems, then the aircraft will steer in the
shortest direction to center the localizer bar on the HSI if a reliable signal is received from the
VOR which the pilot has tuned.
WARNING: In navigation mode, the pilot must ensure that he first has either a safe GPS route
loaded into his NAV1 or has properly tuned and identified a working NAVAID in either NAV1 or
NAV2.
For navigation using a NAVAID, the pilot must first tune and identify the chosen NAVAID and
ensure that he has selected the proper HSI input using the NAV1/NAV2 button on the bottom
of the HSI instrument. Failure to do this could cause the aircraft to turn in an unpredictable
direction.
For navigation using a GPS, the pilot must have either loaded a flightplan into his NAV1 system
or chosen a direct steering waypoint in his NAV1 system. The autopilot is not linked to the
NAV2 system for GPS navigation. Failure to ensure this may cause the aircraft to turn in an
unpredictable direction.
APPROACH MODE
The autopilot will engage a more sensitive level of course guidance when the pilot toggles the
“APR” button. Further, if the pilot has tuned a functional NAVAID with glideslope inputs,
toggling the APR button will bring up the glideslope bar on the HSI and facilitate both localizer
and glideslope autopilot inputs.
Version 1.0 – 23 May 2010
[96]
Page 97

MilViz Cessna 310R Pilot’s Operating Handbook
If the NAV1 system is set to GPS mode, then the autopilot will take its instrument approach
steering inputs from the GPS approach loaded into the flightplan. Sensitive steering and/or
glideslope features will not engage until the aircraft is steering to a point loaded as part of the
instrument approach procedure.
If the NAV1 system is set to VLOC mode, then the autopilot will take its instrument steering
inputs from the NAVAID that the pilot has tuned in to using the communication frequency
setting on the NAV1 radio.
Note: The NAV2 radio can only be used in VLOC mode and only then when the pilot has
selected the NAV2 input on the HSI.
BACKCOURSE LOCALIZER MODE
Some instrument approaches specify use of what is termed a “backcourse localizer” approach.
For this type of approach, the pilot is intending to use a localizer for a runway 180 degrees
opposite of his desire course on final. For example, he tunes a localizer normally used for
runway 27 but is intending instead to fly a final approach course of 090 to land on the opposite
(western) end of the runway.
To facilitate this option, the pilot first tunes the appropriate NAVAID and identifies its
functionality. Then, the pilot dials in the desired course on final in his HSI and toggles the “REV”
button on the bottom row of main menu buttons. This will command the autopilot to reverse
the normal HSI course deviation inputs. This means that the HSI will display course error left or
right relative to the reverse course the pilot is flying.
Version 1.0 – 23 May 2010
[97]
Page 98
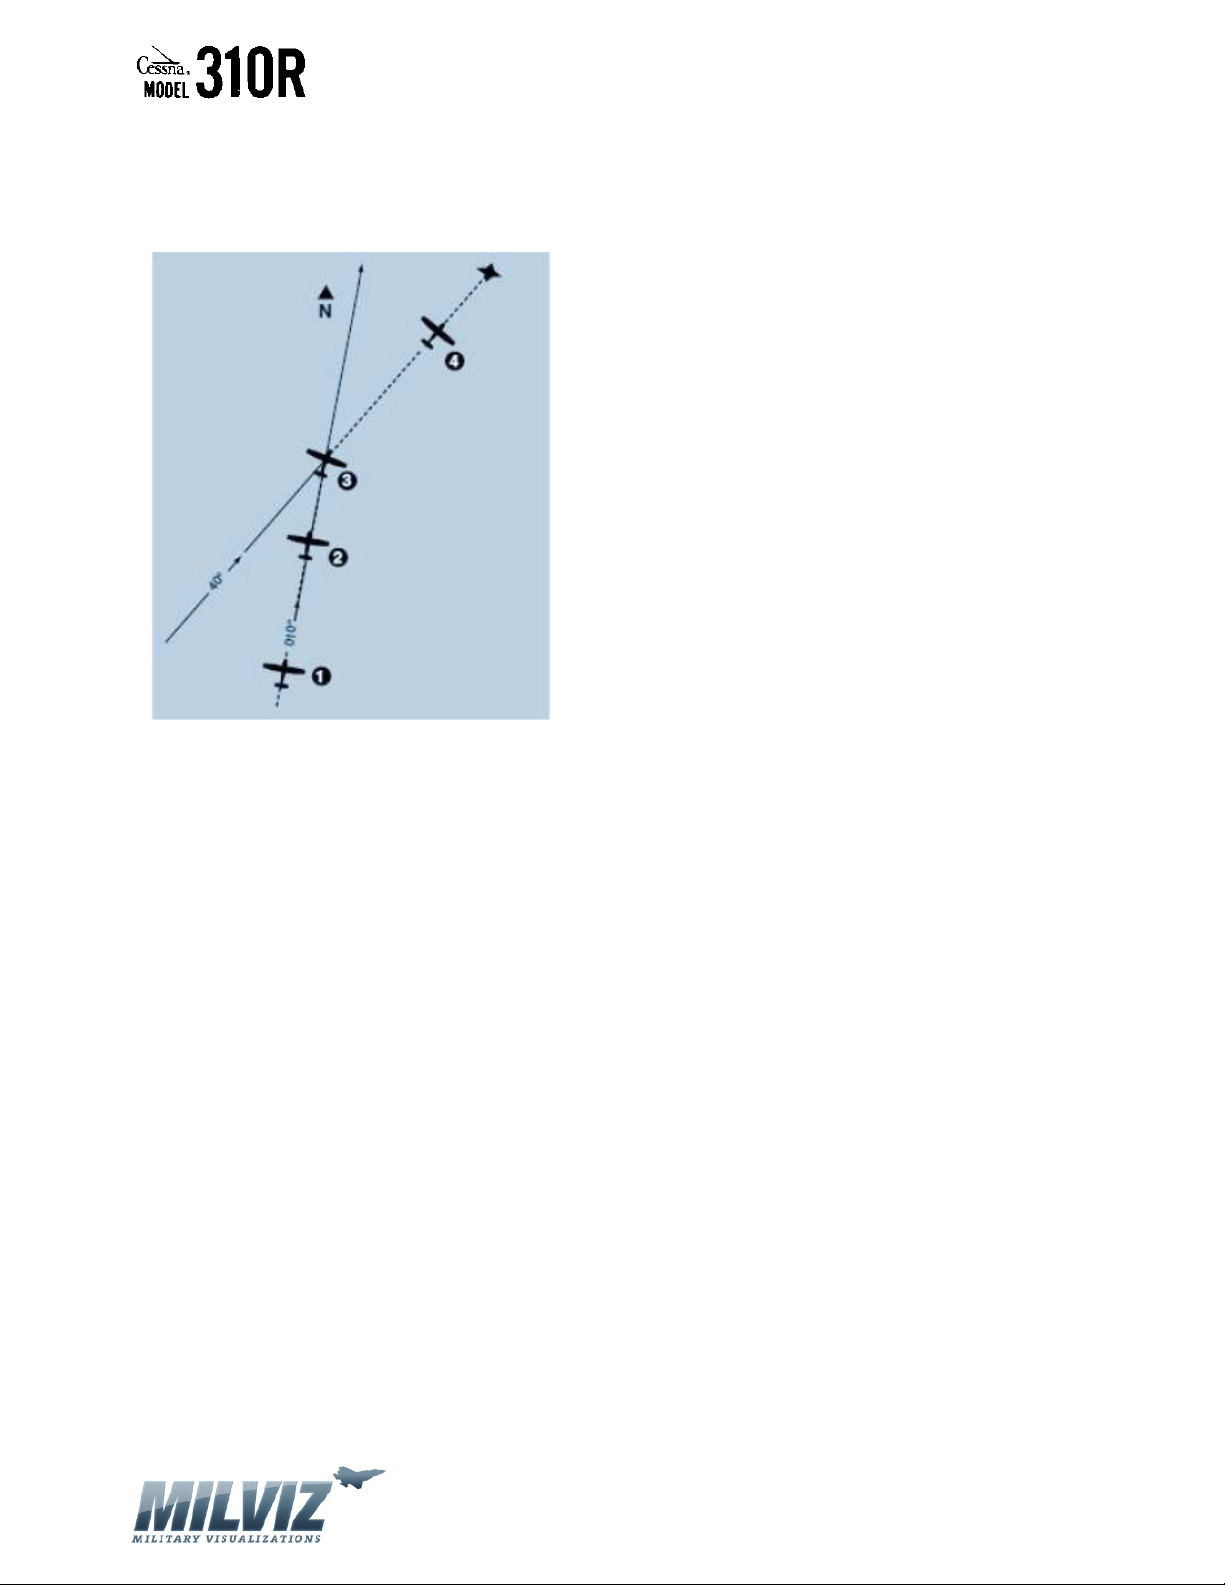
MilViz Cessna 310R Pilot’s Operating Handbook
EXAMPLES OF ENROUTE NAVIGATION PRINCIPLES
Manual GPS Course Capture Using Heading/Course Knobs
1. While flying HDG Mode on a heading of 010°, a GPS waypoint is established. A 30° intercept
is desired.
2. Continuing HDG Mode on 010°, GPS data is selected and the G1000 OBS is set to 040°.
While HDG is annunciated, move the heading bug to the desired course of 040° and a right turn
is initiated by the autopilot.
3. When the Pilot controlled capture point is reached, the Pilot presses the NAV button and
NAV is annunciated.
4. The turn is complete, HDG is extinguished and NAV is Annunciated. The autopilot is tracking
the GPS course in NAV Mode.
Version 1.0 – 23 May 2010
[98]
Page 99
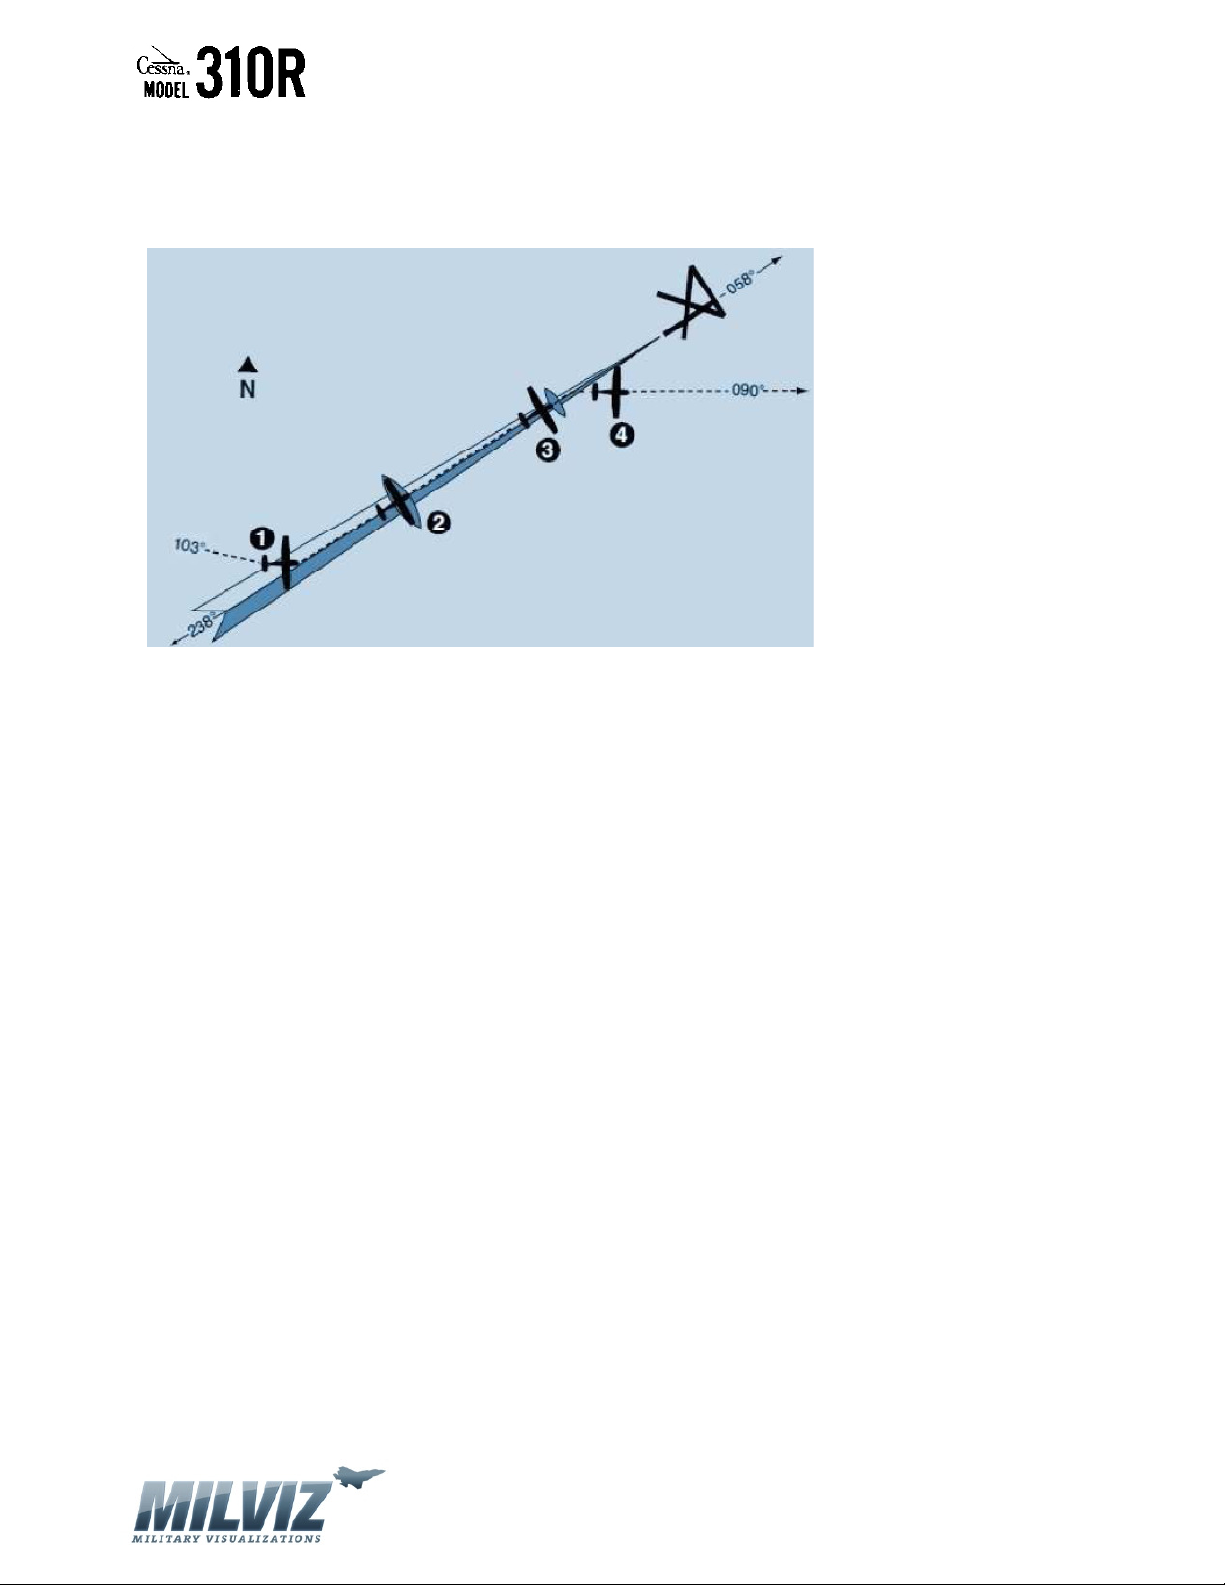
MilViz Cessna 310R Pilot’s Operating Handbook
Front Course ILS Approach Using Heading/Course Knobs
1. Approaching on HDG 103°, APR button is selected and APR coupling occurs (HDG
annunciation changes to APR), and the glideslope mode is automatically armed. The autopilot
will capture the localizer and the CDI course index will center.
2. The autopilot is following the localizer. At the outer marker, the glideslope deviation needle
is at midscale. Altitude hold is automatically disengaged when the glideslope is captured. The
ALT annunciator extinguishes and GS is displayed. The autopilot will make pitch and bank
changes as necessary to maintain localizer and glideslope;
3. At the middle marker, the pilot disengages the autopilot with the button on the control
wheel.
This cancels all operating modes. The flashing AP annunciation is displayed and a disconnect
tone will sound.
4. The pilot initiates the missed approach and stabilizes the aircraft in the climb. The heading
bug is set to the missed approach heading of 090°. By depressing the HDG button on the
Version 1.0 – 23 May 2010
[99]
Page 100

MilViz Cessna 310R Pilot’s Operating Handbook
KAP 140, the autopilot engages into the heading mode, commencing a right turn to a heading
of 090°. To initiate the required climb, the pilot must depress the ALT button and confirm the
proper VVI and altitude value is entered.
LIMITATIONS
Note: The functions of the “ARM” and “VS” buttons are not modeled on this KAP-140
autopilot.
The information written for the function of this autopilot is merely for the virtual KAP-140 as
modeled for the MilViz Cessna 310R. It is not safe to use this information in any real-world
aviation academics or actual flying operations.
Version 1.0 – 23 May 2010
[100]
 Loading...