

Page 1
1
2
3
4
Product Group 19 Conversion and Fitting Instructions
1 von 10 Mat. no. 06694601
14.12.2006 This information should not be duplicated or passed on without Miele approval. All rights reserved.
RD 12428
WTS 430
x
am
Washer/Dryer Stand 430
fr
Montage du socle lave-linge/
sèche-linge 430
es
Zócalo de lavado y secado 430
Page 2
5
6
7
8
Product Group 19 Conversion and Fitting Instructions
2 von 10 Mat. no. 06694601
14.12.2006 This information should not be duplicated or passed on without Miele approval. All rights reserved.
x
Page 3

9
10
am
Parts required
x
Quantity Mat. no. Designation
1 06447280 Washer/Dryer Stand 430
1 00253532 Installation kit for floor mounting, included with dryer for dryer solo installation
Installation instructions
x
Danger!
The washer/dryer stand is suitable for single set-up.
When setting up a washer and dryer combination, the stands have to be connected.
The stand is not suitable for installation of a washer and dryer stack.
To prevent tipping, as a matter of standard practice, the appliances have to be bolted to the stand.
For a dryer single set-up, the stand has to be bolted to the floor with the floor installation kit M. no. 00253532. At least two feet of the
stand have to be bolted to the floor, and at least one of them has to be a rear foot. For optimum stability, fasten feet positioned diagonally.
Danger of injury: Do not stand on the drawer!
Set up only washers/dryers that are not installed, for de-installation instructions, refer to the operating instructions for the appliance.
During the installation, make sure that children or animals cannot get into the work area.
Wear non-slip work gloves and safety shoes while doing installation work. Non-compliance may lead to, e. g., slipping, and result in
serious injury.
During the installation, be sure to keep your body and especially hands and feet out of the space under the appliance, or between the
appliances.
For the installation, tip the washer onto its left side, and the dryer onto its right side. It is important to have sufficient manpower to handle
the weight of the appliances. Non-compliance may result in serious bodily injury, especially to the back. For the weight of the units, refer
to the operating instructions for the units.
Fire Hazard! Do not store flammable items in the drawers.
Before starting any service or installation work, safely disconnect the appliance from its power source.
Product Group 19 Conversion and Fitting Instructions
3 von 10 Mat. no. 06694601
14.12.2006 This information should not be duplicated or passed on without Miele approval. All rights reserved.
x
Page 4

Product Group 19 Conversion and Fitting Instructions
4 von 10 Mat. no. 06694601
14.12.2006 This information should not be duplicated or passed on without Miele approval. All rights reserved.
Warning!
Take any accessories out of the appliance drum.
Note
All repairs should be performed by a trained technician in strict accordance with national, state and local codes.
The stand is suitable only for certain Miele washers/dryers.
Required tools:
• T20 Torx Screwdriver, for the back panel of the stand,
• The 17 mm open end wrench packed with the appliance for appliance foot, stand foot and stud bolt,
• Level for levelling the stand(s).
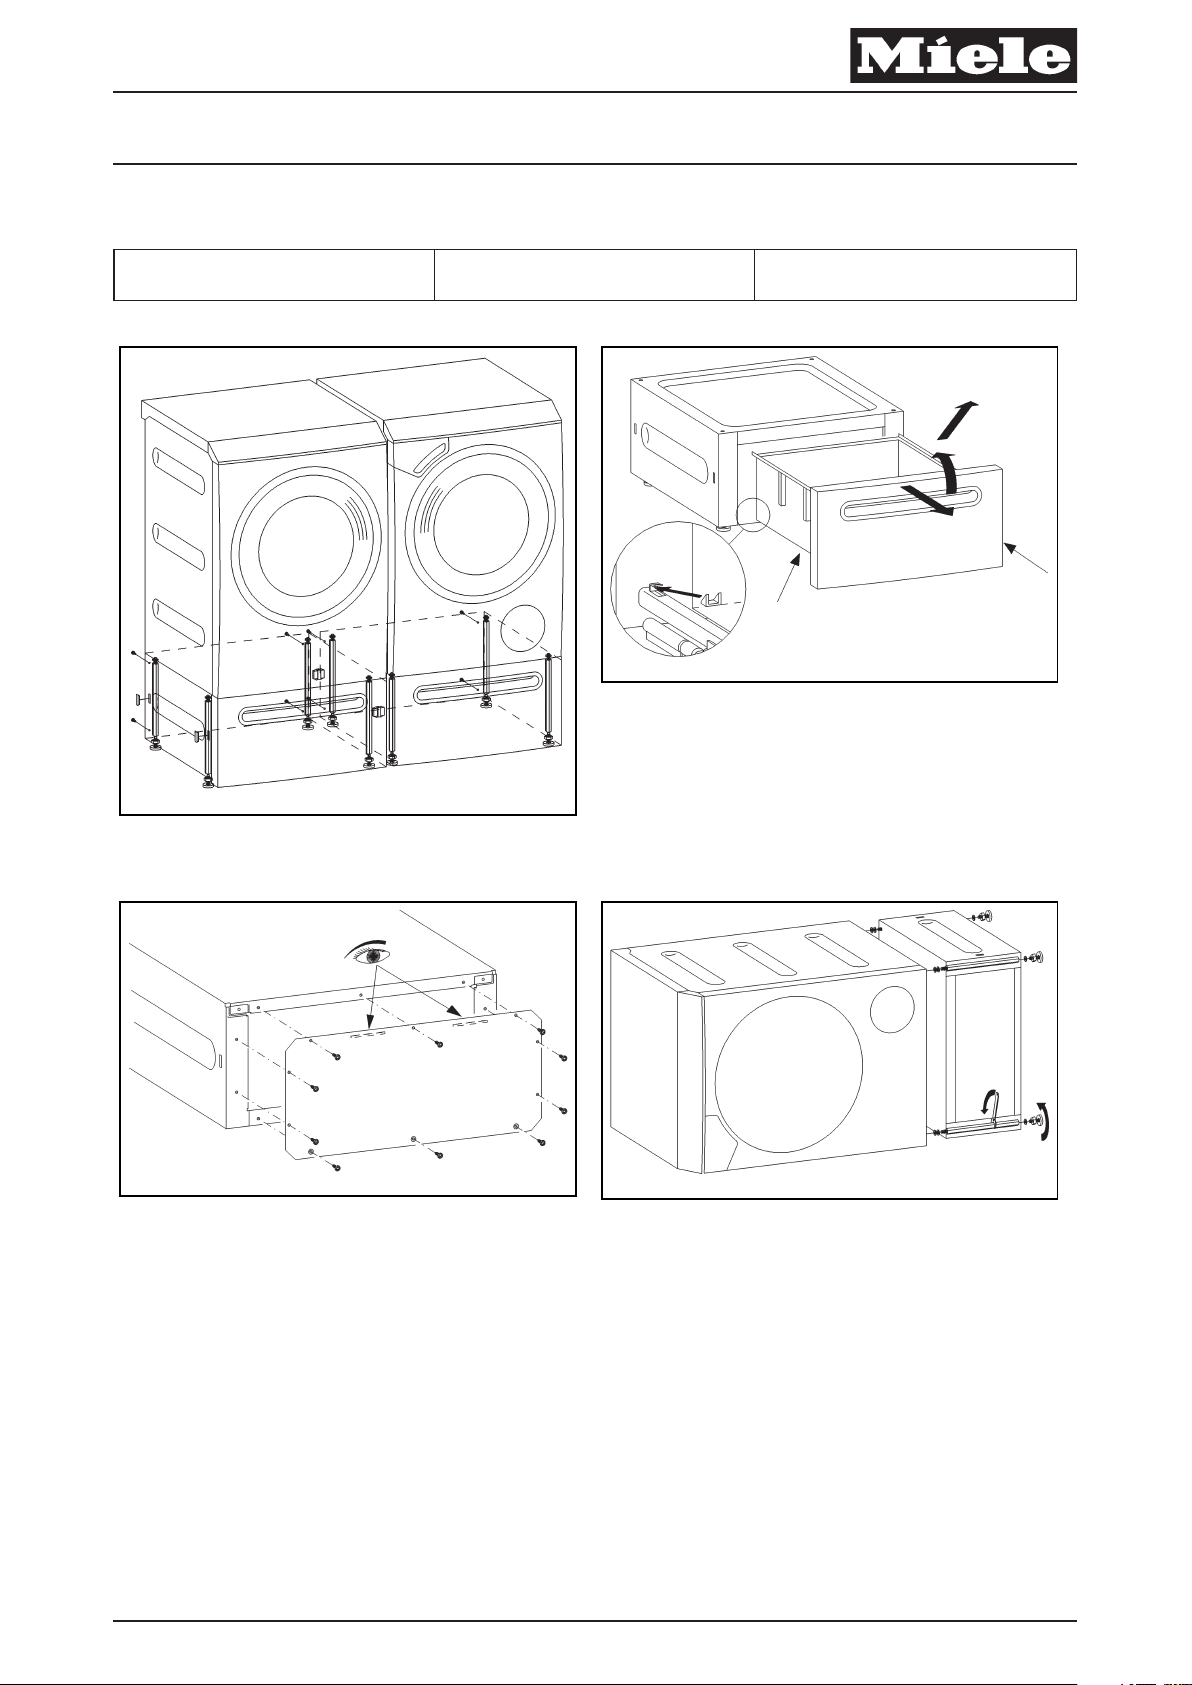
A Set-up overview, refer Abb. 1.
A Take the drawer out of the stand, refer Abb. 2.
A Pull the drawer out to its stop.
A Lift the drawer up at the front and remove it.
A Take the stand back panel off, refer Abb. 3.
A Support the back panel while loosening the screws.
A Remove the screws in the stand back panel (T20 Torx) and take the back panel of f.
A Screw the stand to the washer/dryer, Abb. 4.
x
Note
Fit the transport struts into the washer.
Remove the detergent drawer.
Drain the water from the filter housing of the washer.
Warning!
To put the washer on its left side, the transport struts have to be fitted.
The surface on which the washer is placed has to be level and soft, such as a carpet.
A Tip the washer on its left side and the dryer on its right side and unscrew the appliance feet.
A Put two washers each on the set screws.
A Join the stand to the washer/dryer and fasten together with the bolts.
A Using a 17 mm open end wrench, tighten bolts firmly.
x
Warning!
When joining, do not wedge the stand and the appliance against each other.
A Set the washer/dryer/stand combo upright.
A Screw the back panel to the washer/dryer/stand, refer Abb. 3.
x
Note
The adhesive strip is facing inward, and the indented drill holes are at the bottom.
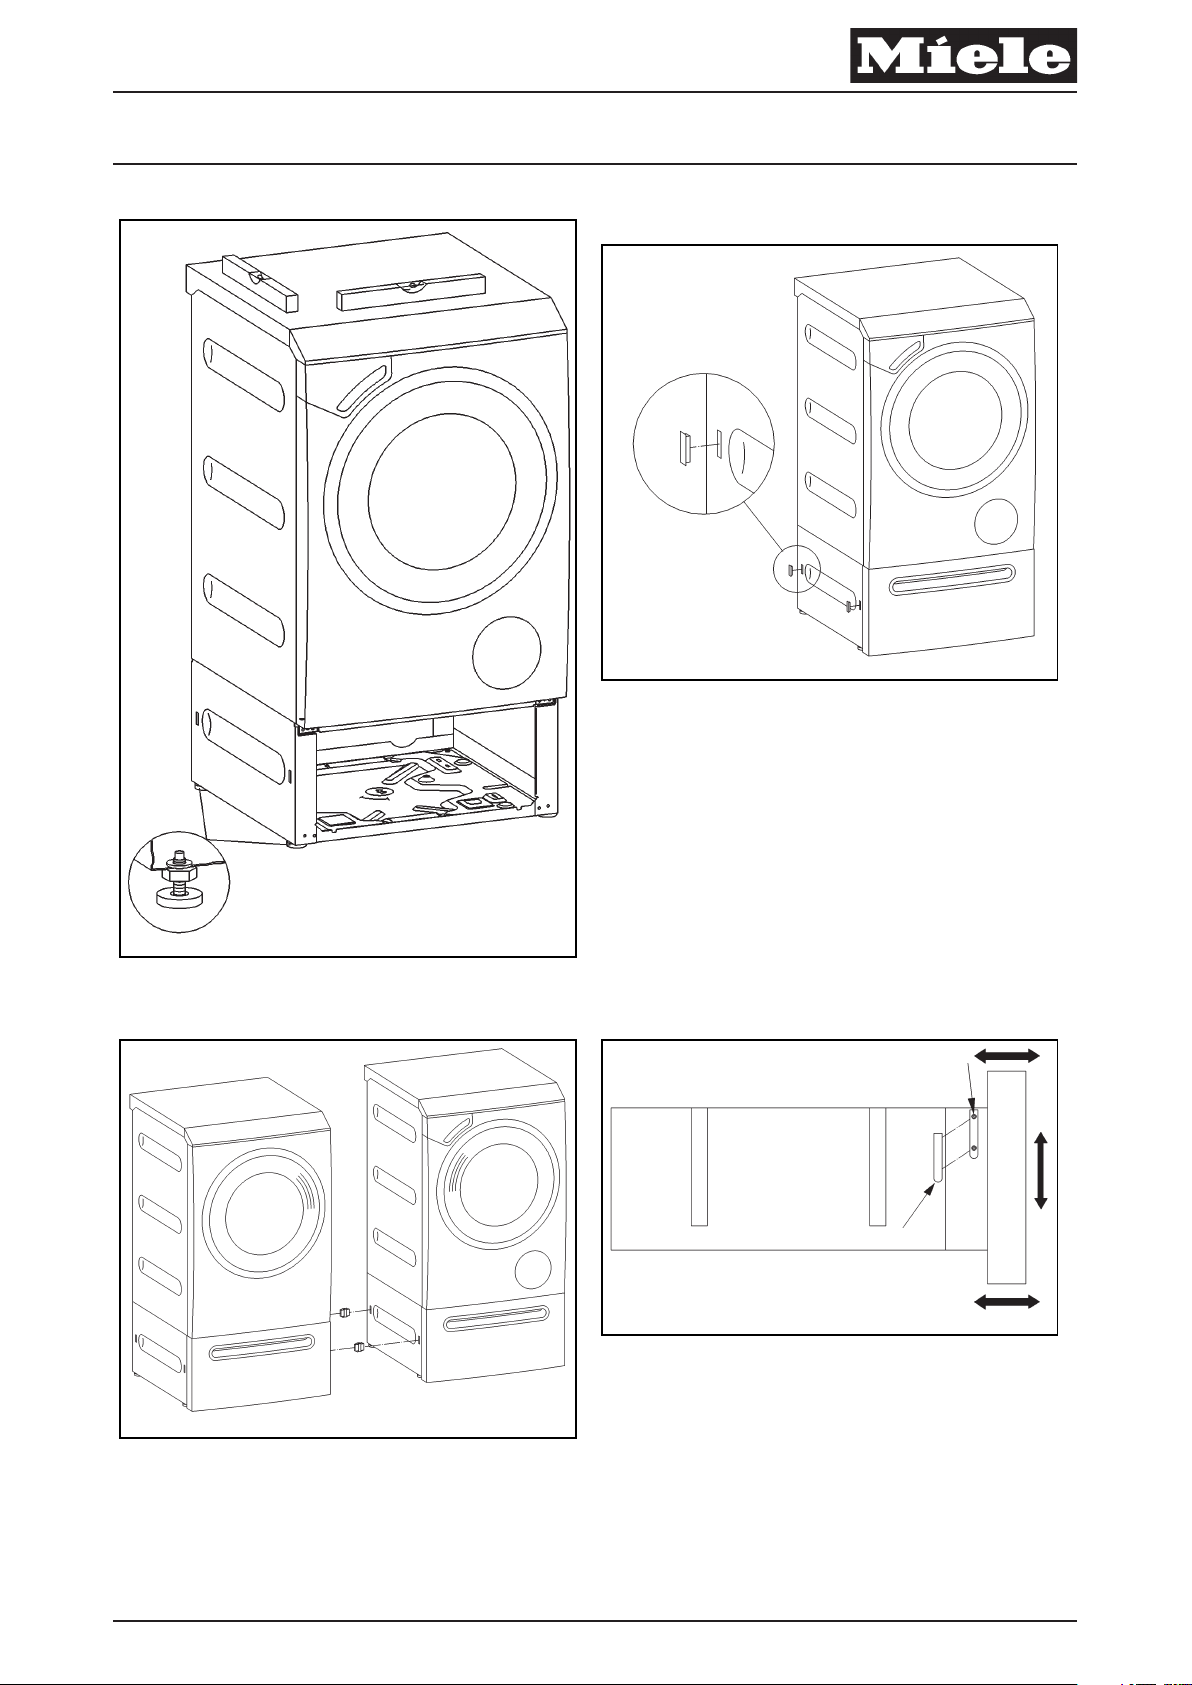
A Set the washer/dryer/stand combo upright on its feet, and level it, refer Abb. 5.
A Set in, and counterlock, the feet of the washer/dryer/stand.
x
Note
Remove the washer transport struts.
Insert the washer detergent drawer.
Page 5

Product Group 19 Conversion and Fitting Instructions
5 von 10 Mat. no. 06694601
14.12.2006 This information should not be duplicated or passed on without Miele approval. All rights reserved.
A In a side-by-side set-up of washer and dryer, the two stands have to be bolted together, refer Abb. 6 and Abb. 7.
x
Warning!
Washer/stand and dryer/stand have to be aligned with each other.
A Snap the connectors into the washer/stand combination.
A Push the washer/dryer/stand combo together until the connectors engage.
x
Note
Connectors have to lock with a visible and audible snap.
A After the washer/stand and dryer/stand are joined, check again that the combo is standing securely, and correct if necessary.
A Put the drawers into the washer and dryer stands, refer Abb. 2.
A Adjust the front panel, refer Abb. 8.
A Remove the caps.
A Loosen the retaining screws on the side of the front panel, do not remove them completely..
A Adjust the panel on the stand.
A Tighten the retaining screws on the side of the front panel.
A Put the caps back.
A Set up the drawer dividers, refer Abb. 9.
A Washer/Dryer/stand Disassembly
A To disassemble, follow the steps of these installation instructions in reverse order.
A Release the snap connectors using the special tool in the kit, refer Abb. 10.
am
fr
Pièces nécessaires
x
Nombre Mat.-Nr. Désignation
1 06447280 Montage du socle lave-linge/sèche-linge 430
1 00253532
Jeu de montage de fixation au sol, nécessaire en cas d'installation d'un
sèche-linge seul
Page 6

Product Group 19 Conversion and Fitting Instructions
6 von 10 Mat. no. 06694601
14.12.2006 This information should not be duplicated or passed on without Miele approval. All rights reserved.
Notice de montage
x
Danger !
Le socle lave-linge/sèche-linge peut être disposé seul.
En cas de combinaison lave-linge/sèche-linge, visser les socles ensemble.
Le socle n'est pas approprié pour le montage en colonne lave-linge/sèche-linge.
Visser les machines au socle afin d'éviter tout risque de basculement.
En cas d'installation d'un sèche-linge seul, fixer le socle au sol avec le jeu de montage M.-Nr. 00253532. La fixation au sol doit être
effectuée avec au moins deux pieds du socle, dont un arrière. Une fixation diagonale au sol est optimale.
Risque de blessure, ne pas monter ou asseoir d'enfant sur le tiroir.
Le montage ne peut être effectué que si le lave-linge ou le sèche-linge ne sont pas installés, désinstallation voir le mode d'emploi de
l'appareil.
Assurez-vous que les enfants ou les animaux ne peuvent pas pénétrer dans la pièce où les travaux sont effectués.
Pour les travaux de montage, portez des gants de travail et des chaussures de sécurité. En cas de non-respect de cette consigne, des
blessures corporelles graves pourraient être occasionnées, par exemple si la machine glisse.
Ne pas mettre les mains ou les pieds sous ou entre les machines lors du montage.
Pour le montage, disposer le lave-linge et le sèche-linge sur le côté gauche. Attention, la force physique disponible doit correspondre au
poids des appareils. Si ce n'est pas le cas, de graves séquelles corporelles pourraient être occasionnées, notamment au niveau de la
colonne vertébrale. Poids des machines : voir mode d'emploi.
Risque d'incendie, ne pas ranger de substance inflammable dans le tiroir de socle.
Déconnecter impérativement tous les câbles sous tension avant d'effectuer les travaux de réparation sur l'appareil.
Attention !
Les accessoires doivent être sortis du tambour.
Remarque
Les travaux doivent être effectués exclusivement par un technicien qualifié en respectant les prescriptions de sécurité en vigueur.
Système métrique.
Ce socle est prévu pour un certain type de lave-linge et sèche-linge uniquement.
Outils nécessaires :
• Tournevis Torx T 20, pour la paroi arrière du socle,
• clé à fourche de 17 mm fournie avec la machine, pour les pieds de l'appareil et du socle et les boulons,
• Niveau pour l'installation d'aplomb du/des socle(s),
A Aperçu général, voir croquis 1.
A Enlever le tiroir du socle, voir croquis 2
A Tirer le tiroir jusqu'en butée.
A Compresser les clips sur les rails du tiroir vers l'intérieur pour déverrouiller et soulever le tiroir à l'avant.
A Enlever le tiroir.
A Démonter la paroi arrière du socle, voir croquis 3.
A Avant de défaire la fixation, bloquer la paroi arrière du socle pour éviter qu'elle tombe.
A Dévisser les vis de fixation du panneau arrière de socle (Torx T20).
A Enlever la paroi arrière du socle.
A Visser le socle aux lave-linge et sèche-linge, croquis 4.
x
Remarque
Monter la sécurité de transport du lave-linge.
Déposer le tiroir de boîte à produits du lave-linge.
Vidanger l'eau contenue dans le filtre du lave-linge.
Page 7

Product Group 19 Conversion and Fitting Instructions
7 von 10 Mat. no. 06694601
14.12.2006 This information should not be duplicated or passed on without Miele approval. All rights reserved.
Attention !
Poser impérativement le lave-linge/sèche-linge avec les sécurités de transport sur le côté gauche.
Poser impérativement le lave-linge/sèche-linge sur un support plat et souple (par ex. un tapis).
A Déposer le lave-linge/sèche-linge sur le côté gauche et dévisser les pieds.
A Mettre deux rondelles sur les tiges filetées.
A Assembler le lave-linge, le sèche-linge et le socle et fixer avec les boulons.
A Serrer à fond les boulons avec la clé à fourche de 17 mm d'ouverture.
x
Attention !
Ne pas coincer le socle et l'appareil l'un contre l'autre en les assemblant.
A Remettre d'aplomb le lave-linge, le sèche-linge et le socle assemblés.
A Visser le panneau arrière de socle de sèche-linge et lave-linge, voir croquis 3.
x
Remarque
Ruban adhésif vers l'intérieur et perçages avec les empreintes vers le bas.
A Régler l'aplomb de l'assemblage lave-linge, sèche-linge et socle assemblés sur le lieu d'installation, voir croquis 5.
A Régler les pieds du socle de lave-linge et sèche-linge et les bloquer.
x
Remarque
Démonter la sécurité de transport du lave-linge.
Remettre le tiroir de boîte à produits du lave-linge.
A En cas de combinaison lave-linge/sèche-linge, visser les socles ensemble, voir croquis 6 und croquis 7..
A Enlever les quatre bouchons correspondant aux côtés qui vont être assemblés.
x
Attention !
Le lave-linge/le sèche-linge assemblés doivent être bien alignés avec leur socle.
A Déclencher les attaches à encliquetage sur l'assemblage lave-linge/socle.
A Lorsque les deux socles (lave-linge/sèche-linge) sont rapprochés, ils doivent s'enclencher l'un dans l'autre.
x
Remarque
Les attaches à encliquetage doivent s'enclencher visiblement et avec un déclic.
A Vérifier et rectifier l'aplomb après l'enclenchement.
A Insérer le tiroir dans le socle de lave-linge et de sèche-linge, voir croquis 2.
A Aligner la façade, voir croquis 8.
A Enlever les bouchons.
A Desserrer les vis de fixation de la façade mais ne pas les dévisser complètement.
A Aligner la façade avec le socle.
A Serrer à fond les vis de fixation de la façade.
A Poser les bouchons.
A Mettre en place les compartiments de rangementvoir croquis 9.
A Démontage du socle lave-linge/sèche-linge
A Effectuer le démontage dans l'ordre inverse du montage.
A Défaire les attaches à encliquetage avec un outil spécial fourni, voir croquis 10.
fr
Page 8

Product Group 19 Conversion and Fitting Instructions
8 von 10 Mat. no. 06694601
14.12.2006 This information should not be duplicated or passed on without Miele approval. All rights reserved.
es
Piezas necesarias
x
Cantidad Nº de mat. Denominación
1 06447280 Zócalo de lavado y secado 430
1 00253532
Instrucciones de montaje
x
¡Peligro!
El zócalo de lavado y secado puede instalarse de forma individual.
En caso de combinación de lavadora y secadora, hay que unir un zócalo al otro.
El zócalo no es adecuado para una columna de lavado y secado.
Debido al riesgo de vuelco, los aparatos deben atornillarse al zócalo de forma generalizada.
En caso de instalación individual de la secadora, el zócalo debe fijarse al suelo con el juego de montaje para fijación al suelo nº de mat.
00253532. La fijación al suelo debe realizarse al menos en dos patas del zócalo, siendo una de ellas, al menos, trasera. Una fijación
diagonal es óptima.
¡Peligro de sufrir lesiones! Queda terminantemente prohibido subirse al cajón.
El montaje deber realizarse exclusivamente con la lavadora y la secadora sin montar. Para desinstalarlas, véanse las instrucciones de
manejo del aparato.
Asegurarse de que durante los trabajos de montaje no accedan niños ni animales a la zona de trabajo.
Al realizar los trabajos de montaje deben utilizarse guantes de trabajo que no resbalen y zapatos de seguridad. Si no se tienen en
cuenta estas indicaciones pueden producirse lesiones corporales graves, p. ej. al resbalar.
Tener en cuenta que durante el montaje no deben colocarse manos o pies debajo o entre los aparatos.
Para realizar el montaje, la lavadora y la secadora deben colocarse sobre el lado izquierdo del aparato. Al hacerlo, deberá considerarse
el peso de los aparatos en relación con la fuerza corporal. Si no se tienen en cuenta estas indicaciones pueden producirse daños
corporales graves, especialmente en la columna. Datos sobre el peso de los aparatos, véanse instrucciones de manejo del aparato.
¡Peligro de incendio! No guardar sustancias inflamables en el cajón del zócalo.
Antes de realizar cualquier trabajo de mantenimiento y reparación en el aparato, éste deberá desconectarse de todas las líneas
sometidas a tensión eléctrica.
Juego de montaje para la fijación al suelo, necesaria en caso de emplazamiento
individual de secadora
¡Atención!
Hay que extraer los accesorios del tambor del aparato.
Advertencia
Los trabajos de reparación y mantenimiento serán realizados exclusivamente por personal autorizado, ateniéndose estrictamente a las
normas de seguridad vigentes.
Sistema métrico.
El zócalo es válido únicamente para determinadas lavadoras y secadoras Miele.
Herramienta necesaria:
• destornillador Torx T 20 para la pared posterior del zócalo,
• llave de boca de 17 mm adjunta al aparato, para las patas del aparato, del zócalo y tuercas de fijación,
• nivel de burbuja para nivelar el/los zócalo(s) verticalmente.
A Vista de la estructura constructiva, véase Figura 1.
A Extraer el cajón del zócalo, véase Figura 2.
A Extraer el cajón hasta el tope.
A Presionar hacia dentro los clips de los carriles guía del cajón para desbloquearlo y levantarlo por la parte delantera.
Page 9

Product Group 19 Conversion and Fitting Instructions
9 von 10 Mat. no. 06694601
14.12.2006 This information should not be duplicated or passed on without Miele approval. All rights reserved.
A Retirar el cajón.
A Desmontar la pared posterior del zócalo, véase Figura 3.
A Al soltar la fijación, asegurar el zócalo de la pared posterior para que no se caiga.
A Desenroscar los tornillos de sujeción de la pared posterior del zócalo (Torx T20).
A Retirar el zócalo de la pared posterior.
A Atornillar el zócalo a la la lavadora y la secadora, Figura 4.
x
Advertencia
Montar el seguro de transporte de la lavadora.
Desmontar el cajón de la cubeta de la lavadora.
Evacuar el agua de la carcasa del filtro de la lavadora.
¡Atención!
Colocar la lavadora, sólo con el seguro de transporte, sobre la parte izquierda del aparato.
Colocar la lavadora exclusivamente sobre una superficie lisa y blanda (p. ej. una alfombra).
A Colocar la lavadora-secadora sobre la parte izquierda del aparato y desenroscar las patas de la lavadora.
A Introducir dos arandelas en cada tornillo prisionero.
A Acoplar la lavadora-secadora y el zócalo y unirlas con los pivotes.
A Apretar los pivotes con la llave de boca de 17 mm.
x
¡Atención!
Al unir el zócalo y el aparato, no ladear un aparato contra el otro.
A Poner de pie la combinación de zócalo de lavadora y secadora.
A Atornillar la pared posterior del zócalo de la lavadora-secadora, véase Figura 3.
x
Advertencia
Tiras adhesivas hacia dentro y orificios con grabado hacia abajo.
A Nivelar verticalmente la combinación del zócalo de la lavadora-secadora, véase Figura 5.
A Ajustar y asegurar las patas del zócalo de la lavadora-secadora.
x
Advertencia
Desmontar el seguro de transporte de la lavadora.
Montar el cajón de la cubeta de la lavadora.
A En caso de combinación de lavadora y secadora, hay que unir un zócalo al otro, véase Figura 6 y Figura 7.
A Retirar los cuatro tapones, en los laterales en los que se unirán los zócalos.
x
¡Atención!
La combinación de zócalo de lavadora y secadora debe estar alineada entre sí.
A Encajar el conector rápido a la combinación de zócalo de la lavadora.
A Encajar la combinación de zócalo de lavadora y de secadora empujándolas.
x
Advertencia
Debe percibirse acústica y visualmente que el conector rápido encaja.
A Tras el enclavamiento, comprobar nuevamente la posición estable y corregirla.
A Colocar el cajón en el zócalo de la lavadora y la secadora, véase Figura 2.
Page 10

Product Group 19 Conversion and Fitting Instructions
10 von 10 Mat. no. 06694601
14.12.2006 This information should not be duplicated or passed on without Miele approval. All rights reserved.
A Nivelar el panel frontal, véase Figura 8.
A Retirar las tapas.
A Soltar los tornillos de sujeción laterales del panel frontal, pero no desenroscarlos del todo.
A Nivelar el panel frontal del zócalo.
A Apretar los tornillos de sujeción laterales del panel frontal.
A Colocar las tapas.
A Nivelar los compartimentos, véase Figura 9.
A Desmontaje del zócalo de la lavadora y la secadora
A El desmontaje se realiza en el orden inverso que al montar.
A Desbloquear el conector rápido con la herramienta especial adjunta, véase Figura 10.
es
 Loading...