

Page 1

Operating instructions
Washer
W 1119
To prevent accidents and
machine damage,
read these instructions
before installation or use.
UV
M.-Nr. 05 874 961
Page 2

Contents
IMPORTANT SAFETY INSTRUCTIONS. . . . . . . . . . . . . . . . . . . . . . . . . . . . . . . . . 4
Guide to the washer. . . . . . . . . . . . . . . . . . . . . . . . . . . . . . . . . . . . . . . . . . . . . . . . 5
Control panel . . . . . . . . . . . . . . . . . . . . . . . . . . . . . . . . . . . . . . . . . . . . . . . . . . . . . . 5
Before using for the first time. . . . . . . . . . . . . . . . . . . . . . . . . . . . . . . . . . . . . . . . 6
Using the washer . . . . . . . . . . . . . . . . . . . . . . . . . . . . . . . . . . . . . . . . . . . . . . . . . . 7
1. Prepare and sort the laundry . . . . . . . . . . . . . . . . . . . . . . . . . . . . . . . . . . . . . . . . 7
2. Load the laundry . . . . . . . . . . . . . . . . . . . . . . . . . . . . . . . . . . . . . . . . . . . . . . . . . 8
3. Select a program . . . . . . . . . . . . . . . . . . . . . . . . . . . . . . . . . . . . . . . . . . . . . . . . . 8
Program guide . . . . . . . . . . . . . . . . . . . . . . . . . . . . . . . . . . . . . . . . . . . . . . . . . . . . . 9
4. Select wash options (if needed) . . . . . . . . . . . . . . . . . . . . . . . . . . . . . . . . . . . . 11
5. Select the temperature and spin speed . . . . . . . . . . . . . . . . . . . . . . . . . . . . . . 12
6. Add detergent . . . . . . . . . . . . . . . . . . . . . . . . . . . . . . . . . . . . . . . . . . . . . . . . . . 14
Detergent . . . . . . . . . . . . . . . . . . . . . . . . . . . . . . . . . . . . . . . . . . . . . . . . . . . . . . . 15
Water softener . . . . . . . . . . . . . . . . . . . . . . . . . . . . . . . . . . . . . . . . . . . . . . . . . . . . 16
Fabric softener. . . . . . . . . . . . . . . . . . . . . . . . . . . . . . . . . . . . . . . . . . . . . . . . . . . . 17
Starch. . . . . . . . . . . . . . . . . . . . . . . . . . . . . . . . . . . . . . . . . . . . . . . . . . . . . . . . . . . 18
Fabric dye . . . . . . . . . . . . . . . . . . . . . . . . . . . . . . . . . . . . . . . . . . . . . . . . . . . . . . . 18
Using the washer . . . . . . . . . . . . . . . . . . . . . . . . . . . . . . . . . . . . . . . . . . . . . . . . . 19
7. Select Delay Start (if needed) . . . . . . . . . . . . . . . . . . . . . . . . . . . . . . . . . . . . . . 19
8. Start the program. . . . . . . . . . . . . . . . . . . . . . . . . . . . . . . . . . . . . . . . . . . . . . . . 19
9. Activate the program lock (if necessary). . . . . . . . . . . . . . . . . . . . . . . . . . . . . . 19
10. Remove the laundry. . . . . . . . . . . . . . . . . . . . . . . . . . . . . . . . . . . . . . . . . . . . . 20
Cancelling a program . . . . . . . . . . . . . . . . . . . . . . . . . . . . . . . . . . . . . . . . . . . . . . 21
Interrupting a program. . . . . . . . . . . . . . . . . . . . . . . . . . . . . . . . . . . . . . . . . . . . . . 21
Making changes to the program . . . . . . . . . . . . . . . . . . . . . . . . . . . . . . . . . . . . . . 21
Adding/removing laundry during a wash program . . . . . . . . . . . . . . . . . . . . . . . . 22
Locking the washer . . . . . . . . . . . . . . . . . . . . . . . . . . . . . . . . . . . . . . . . . . . . . . . 23
Electronic program lock. . . . . . . . . . . . . . . . . . . . . . . . . . . . . . . . . . . . . . . . . . . . . 23
Child Safety Lock. . . . . . . . . . . . . . . . . . . . . . . . . . . . . . . . . . . . . . . . . . . . . . . . . . 23
Washer care . . . . . . . . . . . . . . . . . . . . . . . . . . . . . . . . . . . . . . . . . . . . . . . . . . . . . 24
Cleaning the washer . . . . . . . . . . . . . . . . . . . . . . . . . . . . . . . . . . . . . . . . . . . . . . . 24
Cleaning the detergent drawer . . . . . . . . . . . . . . . . . . . . . . . . . . . . . . . . . . . . . . . 24
Cleaning the water inlet filters . . . . . . . . . . . . . . . . . . . . . . . . . . . . . . . . . . . . . . . . 25
Cleaning the inlet hose filter . . . . . . . . . . . . . . . . . . . . . . . . . . . . . . . . . . . . . . . . . 25
Cleaning the filter in the inlet valve . . . . . . . . . . . . . . . . . . . . . . . . . . . . . . . . . . . . 25
Clean the drain pump . . . . . . . . . . . . . . . . . . . . . . . . . . . . . . . . . . . . . . . . . . . . . . 26
Quick Guide . . . . . . . . . . . . . . . . . . . . . . . . . . . . . . . . . . . . . . . . . . . . . . . . . . . . . 27
2
Page 3

Contents
Washer Care . . . . . . . . . . . . . . . . . . . . . . . . . . . . . . . . . . . . . . . . . . . . . . . . . . . . . 27
Changing the light bulb . . . . . . . . . . . . . . . . . . . . . . . . . . . . . . . . . . . . . . . . . . . . . 27
Frequently asked questions . . . . . . . . . . . . . . . . . . . . . . . . . . . . . . . . . . . . . . . . 28
A wash program cannot be started . . . . . . . . . . . . . . . . . . . . . . . . . . . . . . . . . . . . 28
The program was interrupted and a fault message appears. . . . . . . . . . . . . . . . . 29
General issues with the washer . . . . . . . . . . . . . . . . . . . . . . . . . . . . . . . . . . . . . . . 30
Poor wash results. . . . . . . . . . . . . . . . . . . . . . . . . . . . . . . . . . . . . . . . . . . . . . . . . . 31
The door will not open when the "Door" button is pressed. . . . . . . . . . . . . . . . . . . 32
Open the door during a power failure or when the drain is blocked. . . . . . . . . . . 33
Draining the wash water . . . . . . . . . . . . . . . . . . . . . . . . . . . . . . . . . . . . . . . . . . 33
Open the drum door . . . . . . . . . . . . . . . . . . . . . . . . . . . . . . . . . . . . . . . . . . . . . . . 34
Technical Service. . . . . . . . . . . . . . . . . . . . . . . . . . . . . . . . . . . . . . . . . . . . . . . . . 35
Repairs . . . . . . . . . . . . . . . . . . . . . . . . . . . . . . . . . . . . . . . . . . . . . . . . . . . . . . . 35
PC Update . . . . . . . . . . . . . . . . . . . . . . . . . . . . . . . . . . . . . . . . . . . . . . . . . . . . 35
Optional accessories . . . . . . . . . . . . . . . . . . . . . . . . . . . . . . . . . . . . . . . . . . . . 35
Help protect our environment. . . . . . . . . . . . . . . . . . . . . . . . . . . . . . . . . . . . . . . 38
Installation . . . . . . . . . . . . . . . . . . . . . . . . . . . . . . . . . . . . . . . . . . . . . . . . . . . . . . 39
Front view. . . . . . . . . . . . . . . . . . . . . . . . . . . . . . . . . . . . . . . . . . . . . . . . . . . . . . . . 39
Back view. . . . . . . . . . . . . . . . . . . . . . . . . . . . . . . . . . . . . . . . . . . . . . . . . . . . . . . . 40
Installation site . . . . . . . . . . . . . . . . . . . . . . . . . . . . . . . . . . . . . . . . . . . . . . . . . . . . 41
Installation . . . . . . . . . . . . . . . . . . . . . . . . . . . . . . . . . . . . . . . . . . . . . . . . . . . . . . . 41
Remove the shipping struts . . . . . . . . . . . . . . . . . . . . . . . . . . . . . . . . . . . . . . . . . . 41
Installing the shipping struts . . . . . . . . . . . . . . . . . . . . . . . . . . . . . . . . . . . . . . . . . 43
Level the washer . . . . . . . . . . . . . . . . . . . . . . . . . . . . . . . . . . . . . . . . . . . . . . . . . . 44
Installing the decor panel . . . . . . . . . . . . . . . . . . . . . . . . . . . . . . . . . . . . . . . . . . . 45
Shortening the door panel . . . . . . . . . . . . . . . . . . . . . . . . . . . . . . . . . . . . . . . . . . . 46
Installation beneath a counter . . . . . . . . . . . . . . . . . . . . . . . . . . . . . . . . . . . . . . . . 47
Washer stand with drawer . . . . . . . . . . . . . . . . . . . . . . . . . . . . . . . . . . . . . . . . . . . 47
Washer/ Dryer Stack . . . . . . . . . . . . . . . . . . . . . . . . . . . . . . . . . . . . . . . . . . . . . . . 47
Plumbing. . . . . . . . . . . . . . . . . . . . . . . . . . . . . . . . . . . . . . . . . . . . . . . . . . . . . . . . 48
Water connection. . . . . . . . . . . . . . . . . . . . . . . . . . . . . . . . . . . . . . . . . . . . . . . . . . 49
Drainage . . . . . . . . . . . . . . . . . . . . . . . . . . . . . . . . . . . . . . . . . . . . . . . . . . . . . . . . 50
Electrical connection. . . . . . . . . . . . . . . . . . . . . . . . . . . . . . . . . . . . . . . . . . . . . . 51
3
Page 4

IMPORTANT SAFETY INSTRUCTIONS
Do not wash articles that have
WARNING - To reduce the risk of
,
fire, electric shock or injury to
persons while using your appliance
follow basic safety precautions,
including the following:
Read all instructions before using
the appliance.
GROUNDING INSTRUCTIONS
This appliance must be grounded.
In the event of malfunction or
breakdown, grounding will reduce the
risk of electric shock by providing a
path of least resistance for electric
current. This appliance is equipped
with a cord having an
equipment-grounding conductor and a
grounding plug. The plug must be
plugged into an appropriate outlet that
is properly installed and grounded in
accordance with all local codes and
ordinances.
WARNING - Improper connection
of the equipment-grounding
conductor can result in a risk of electric
shock. Check with a qualified
electrician or serviceman if you are in
doubt as to whether the appliance is
properly grounded.
been previously cleaned, washed,
soaked or spotted with gasoline,
dry-cleaning solvents or other
flammable substances. These articles
give off vapors that could ignite or
explode. Do not add these items to the
washload.
Under certain conditions, hydrogen
gas may be produced in a hot
water system that has not been used
for 2 weeks or more. HYDROGEN GAS
IS EXPLOSIVE. If the hot water system
has not been used for such a period,
turn on all hot water faucets and let the
water flow from each for several
minutes before using the washing
machine. This will release any built-up
hydrogen gas. Do not smoke or use an
open flame during this time, the gas is
flammable.
Before the appliance is removed
for service or discarded, remove
the door.
Do not reach into the appliance if
the drum is moving.
Do not install or store this
appliance where it will be exposed
to the weather.
Do not modify the plug provided
with the appliance - if it will not fit
the outlet, have a proper outlet installed
by a qualified electrician.
Do not allow children to play on or
in the appliance. Close supervision
is necessary when the appliance is
used near children.
4
Do not tamper with
the controls.
Do not repair or replace any part of
the appliance or attempt any
servicing unless specifically
recommended in these operating
instructions.
SAVE THESE INSTRUCTIONS
Page 5

Control panel
Guide to the washer
a Program selection buttons e-
For selecting a program.
b Wash options
Special features to enhance a wash
program.
c Temperature button
For selecting the desired wash
temperature.
d Spin speed button
For selecting the desired spin speed.
e PC Indicator
Allows a service technician to check
and update the wash programs.
f Program sequence display
Shows the currect cycle of the wash
program.
g "Buzzer" button
h FAULT-indicators
i "Delay Start" button
For delaying the start of a program.
j "Start/Stop" button T
Begins the wash program or
interrupts a program.
k "On/Off" button
Turns the machine on and off.
l "Door" button
Opens the drum door.
m Display (h min)
Shows the delayed start time and the
countdown to the end of the
program.
5
Page 6

Before using for the first time
The appliance must be correctly
installed and connected before the
first use. Please see the "Installation
instructions".
For safety reasons, it is not possible to
run a spin cycle before the first use. A
program must be run without laundry
and without detergent to flush out any
residual water from the factory testing
process, as well as to activate the spin
cycle. Using detergent can cause
sudsing and ball valve activation,
resulting in the need to use the
maximum amount of detergent in the
future.
^ Turn on the water valve.
^ Press the "On/Off" button.
^ Select the "Extra White" program with
the program buttons.
^ Press the "Start/Stop T" button.
Once the program ends, the washer
can be used for laundry.
6
Page 7

Using the washer
1. Prepare and sort the laundry
Empty all pockets.
^
Foreign objects left in pockets
,
(e.g. nails, coins, paper clips, etc.)
can cause damage to clothes and
the machine.
^ Sort the laundry.
Only wash items in the machine that are
labeled machine washable by the
manufacturer. Most garments have a
fabric care label in the collar or side
seam. Sort the laundry by care label
and color.
General tips
Dark fabrics often bleed the first few
–
times they are washed. They should
be washed seperately several times
before being included in a mixed
load.
Remove any lead weights or strips
–
from curtains before washing.
Loose undergarment underwires
–
should be removed or sewn in place
before washing.
Woolens and knitted garments
–
should be turned inside out.
– Close zippers and hooks and eyes
before washing.
– Comforter covers and pillowcases
should be fastened in order to
prevent small items from rolling
inside of them.
Do not machine wash items if it is not
recommended on the fabric care label.
^
Pretreat stains.
Tough stains (e.g. blood, egg, coffee,
tea, etc.) or badly soiled areas (e.g.
collars and cuffs) should be penetrated
with a stain remover or a paste made
from powdered detergent and warm
water.
,
Do not use chemical solvents in
the machine.
7
Page 8

Using the washer
2. Load the laundry
Turn on the washer using the "On/Off"
^
button.
Open the drum door using the "Door"
^
button.
Load the laundry into the drum. For
^
best results, wash mixed loads of
small and large items. This will
improve washing effectiveness and
help distribute the load evenly.
Note: Overloading the washer will
cause poor wash results and wrinkling.
^ Close the drum door.
3. Select a program
Press the "PROGRAMS" button e or
^
- until the desired program indicator
lights.
To prevent damage to the door seal
and clothing, make sure that there
are no clothes caught between the
drum door and the seal.
8
Page 9

Program guide
Using the washer
Temperatures Fabric
care
symbol
Normal Options: Extended, Heavy Soil, Soak, Sensitive
Hot 8; Max For a rapid wash of colorfast items and
Very Warm EC High
Warm 7B
Cold 6A
No Heat ee
Wrinkle-free Options: Extended, Heavy Soil, Soak, Sensitive
Hot 8; Med For cotton blends, polyester blends
Very Warm EC
Warm 7B
Cold 6A
No Heat ee
Sanitize Options: Extended, Heavy Soil, Soak, Sensitive
Sanitize 9? Max For white items with special hygienic
Very Hot ö= High
Extra White Options: Extended, Heavy Soil, Soak
Sanitize 9? Max For white items without special
Very Hot ö= High
Hot 8;
Delicates Options: Extended, Heavy Soil, Soak
Warm 7B Low For delicate machine washable
Cold 6A
No Heat ee
Spin
speed
Laundry
mixed loads made from cottons and
linen, e.g. jeans, t-shirts, underwear,
socks.
and synthetics (e.g. acrylic, nylon,
ramie). Fabric softener can be
dispensed in the final rinse of these
programs to reduce static cling.
demands, e.g. baby clothing,
underwear, towels.
hygienic demands.
clothing, e.g. satin, hosiery, lingerie,
lace or crocheted (non-wool) items.
9
Page 10

Using the washer
Temperatures Fabric
care
symbol
Woolens / Options: Sensitive
Warm 7B High For hand washable and machine
Cold 6A Med
No Heat ee
Silk Options: Sensitive
Cold 6A Slow For hand washable and machine
No Heat ee
Handwash / Options: Extended, Heavy soil, Sensitive
Warm 7B Med For handwashable items with no wool
Cold 6A
No Heat ee
Sturdy Options: None
Warm 7B Med For a mixed load of colorfast or perma
Cold 6A Low
No Heat ee
Custom Options: Extended, Heavy Soil, Soak, Sensitive
Sanitize 9? Max All options can be selected individually
Very Hot ö= High
Hot 8; Med
Very Warm EC Low
Warm 7B Slow
Cold 6A Hold
No Heat ee No Spin
Spin
speed
Laundry
washable wool and wool blends.
washable silks and other non-wool
handwashable garments.
or silk content.
press items, or for cotton blends.
for colorfast or white items.
10
Page 11

Using the washer
4. Select wash options
(if needed)
The upper button selects the following
"OPTIONS":
Extended
–
Extended and Heavy Soil
–
Extended and Soak
–
Heavy Soil
–
Soak
–
no selection
–
The lower button selects the "Sensitive"
options.
Extended
For laundry with normal to heavy soiling
or stains.
The main wash cycle time for the wash
program will be extended.
Heavy Soil
For heavily soiled laundry where a
pretreatment is necessary to remove
surface soiling.
Soak
For heavy soiling and stubborn stains
(e.g. blood, grease, chocolate) that
require soaking before the main wash.
The preset soak time is 2 hours.
Sensitive
An additional final rinse that will wash
away detergent residue and scents.
Buzzer
^
Select the desired "OPTIONS". Press
the upper button until the indicator of
the desired wash option lights.
See the Program Guide to determine
which options can be selected in each
program.
If a wash option is chosen and it is not
compatible with the program, the
indicator light will go out when the
button is released.
A buzzer signals the end of the wash
program, or after "No spin".
The buzzer will sound until the washer
is turned off. Once activated, the
buzzer is active in all programs unless
turned off.
The warning sound (indicating a fault
has occured) will activate independent
of whether the buzzer is turned on or
off.
11
Page 12

Using the washer
5. Select the temperature and
spin speed
The default temperature and spin
speed will automatically be selected for
each program. However, you can adjust
the temperature and spin speed within
the parameters of the selected wash
program.
^ Press the "TEMP" and "SPIN" buttons
until the indicator of the desired
setting lights.
Program Spin speed
Normal High
Wrinkle Free Med
Sanitize High
Extra White High
Delicates Low
Woolens / High
Silk / Slow
Handwash / Med
Sturdy Med
Custom Med-no Spin
The laundry is spun after the main
wash and between the rinse cycles.
Reducing the final spin speed will also
reduce the rinse spin speeds. If in the
programs "Sturdy" and "Custom" a spin
speed lower that "Med" is selected, an
extra rinse cycle is added to remove
any detergent left in the laundry.
12
Page 13

Using the washer
Special spin options
Hold
Select "Hold".
^
The laundry is not spun and remains
soaking in water. This will prevent
wrinkles if the laundry is not removed
immediately at the end of the wash
program.
To start the final spin:
–
The washer is set to default to the
maximum spin speed of the wash
program. You can select a lower spin
speed. Start the final spin with the
"Start/Stop" T button.
– To finish the program:
Press the "Door" button. The water
will be drained away.
– Use the "Door" button to open the
door.
No spin
Select "No spin".
^
The laundry is not spun after the final
rinse, but the water is drained away.
After the drain cycle, the washer goes
immediately into the anti-crease cycle.
Spinning between these rinses is also
omitted in this setting. If "No spin" is
selected in the programs "Sturdy" and
"Custom", an extra rinse cycle is
added.
13
Page 14

Using the washer
6. Add detergent
For optimum wash results, it is
important to use the correct amount of
detergent.
Too little detergent may cause:
Ineffective cleaning of laundry;
–
fabrics may become gray and stiff
over time.
Grease stains on the laundry.
–
Hard water deposits on the heating
–
element.
Too much detergent may cause:
– Oversudsing with minimal drum
movement; poor wash, rinse and
spin results.
– Higher water consumption through
an automatic, additional rinse cycle.
– Higher environmental burden.
Pull out the detergent dispenser
^
drawer and add detergent to the
compartments.
j = Detergent for the main wash
i = Only add detergent (
total recommended amount of
detergent) to this compartment
if the "Heavy Soil" wash option
is selected.
1
/4of the
14
§ = Fabric softener or liquid starch.
^
Close the detergent dispenser
drawer.
,
Do not use detergents
containing chemical solvents.
Page 15

Use only high-efficiency, low
sudsing laundry detergent
formulated for front loading washing
machines.
For wool and wool blend fabrics, use a
detergent specially formulated for
woolens.
Follow instructions on the detergent
packaging for the correct use and
amount of detergent. Adjust the amount
of detergent if the load is smaller or
more or less soiled than normal.
Add detergent to the main wash
compartment j at the beginning of
each wash program.
Only add detergent (
recommended amount) to compartment
i if the "Heavy Soil" option was
selected.
Liquid detergent insert
1
/4total
Detergent
If you are washing with liquid
^
detergent, use the liquid detergent
insert in the main wash compartment
j.
The liquid detergent insert helps to
measure the correct detergent amount.
It will prevent the detergent for the main
wash from being used during the
prewash when the "Heavy soil" option is
used.
A liquid detergent dispenser is
supplied with the machine.
Remove the insert from the
compartment j when powder
detergent is used.
,
Do not use chlorine bleach!
15
Page 16

Detergent
The amount of detergent used
depends on the level of soiling:
Light soiling
No soiling or stains are visible.
Normal soiling
Some visible soiling or a few light
stains.
Heavy soiling
Very visible soiling or stains.
The size of the load and the water
hardness level in your area have an
impact on the amount of detergent
necessary to obtain optimum wash
results. If you do not know the water
hardness level in your area, contact
your local water authority.
Water hardness
Hardness
level
I soft 0 - 1.3 0 - 7
II moderate 1.3 - 2.5 7 - 14
III hard to
Water
quality
very hard
Water
hardness
in mmol/l
over 2.5 over 14
German
hardness
°d
Water softener
If the water hardness level is between II
and III, you can soften the water to
reduce detergent consumption.
The detergent packaging should
indicate the correct amount to use in
your machine. Add the detergent, then
add the water softener. You can then
use the recommended amount of
detergent for water hardness level I.
16
Page 17

Fabric softener
Fabric softener added to the wash
program will make fabrics feel softer
and will reduce static cling in the dryer.
Open the lid of the fabric softener
^
compartment §.
^ Pour the amount of liquid fabric
softener into the compartment
according to the manufacturer’s
instructions. Do not exceed the
maximum fill level marked inside the
compartment, as the excess will
prematurely activate the siphon and
be wasted.
Detergent
Never mix fabric softener and starch
together in the fabric softener
compartment §. This will clog the
dispenser.
^
Close the compartment lid and push
in the dispenser drawer.
The fabric softener will automatically be
dispensed during the final rinse cycle.
A small amount of water will remain in
the compartment at the end of the
program.
17
Page 18
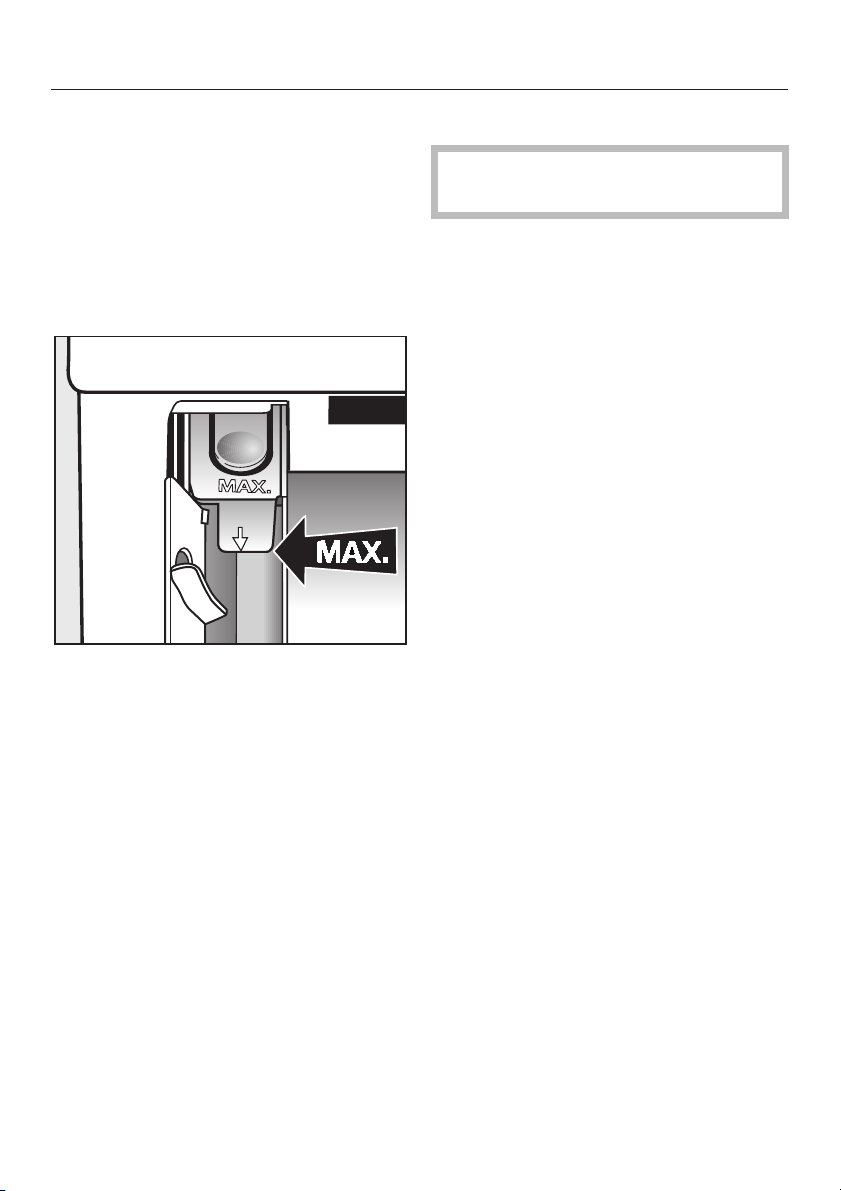
Detergent
Starch
Mild liquid starch is a synthetic starch
wash used to give fabrics some
stiffness. Starching can be included in
any wash program as part of the final
rinse.
Open the fabric softener
^
compartment §.
^ Add the recommended amount of
starch to the compartment.
Do not exceed the maximum level
mark.
Fabric dye
Do not use fabric dyes in this
washer!
^
Close the compartment lid and push
in the dispenser drawer.
^
The starch will be dispensed during
the final rinse.
At the end of the program, a small
amount of water will remain in the fabric
softener compartment.
18
Page 19

Using the washer
7. Select Delay Start (if needed)
If you wish, the start of the wash
program can be delayed to have a load
completed at a later time. Delay start
allows you to delay the start of a
program from 30 minutes to a maximum
of 24 hours.
Press the "Delay Start" button. The
^
Delay Start time will be extended with
each press of the button.
For less than a 10 hour delay, the
–
delay time extends in 30 minute
increments.
– For more than a 10 hour delay, the
delay time extends in 1 hour
increments.
Cancelling Delay Start
^ Press the "Delay Start" button until 24
appears in the display, press once
more and the action has been
cancelled.
8. Start the program
Press the flashing "Start/Stop T"
^
button to begin the program.
The display shows the maximum
program run time. It will count down in
minutes. For the first 10 minutes, the
washer calculates the water
absorbency of the laundry. The overall
program time might be shortened or
lengthened.
9. Activate the program lock
(if necessary)
^ Press the "Start/Stop T" button until
the "Child Lock" indicator lights up.
See "Locking the washer" for further
details.
19
Page 20
Using the washer
10. Remove the laundry
The "Status" indicator "Anti-Crease /
End" will be displayed at the end of a
program.
Use the "Door" button to open the
^
drum door.
Do not attempt to remove laundry
from the washer if the drum is
turning. You may seriously injure
yourself. If the drum turns with the
door open, contact Miele’s Technical
Service Department.
^ Remove the laundry.
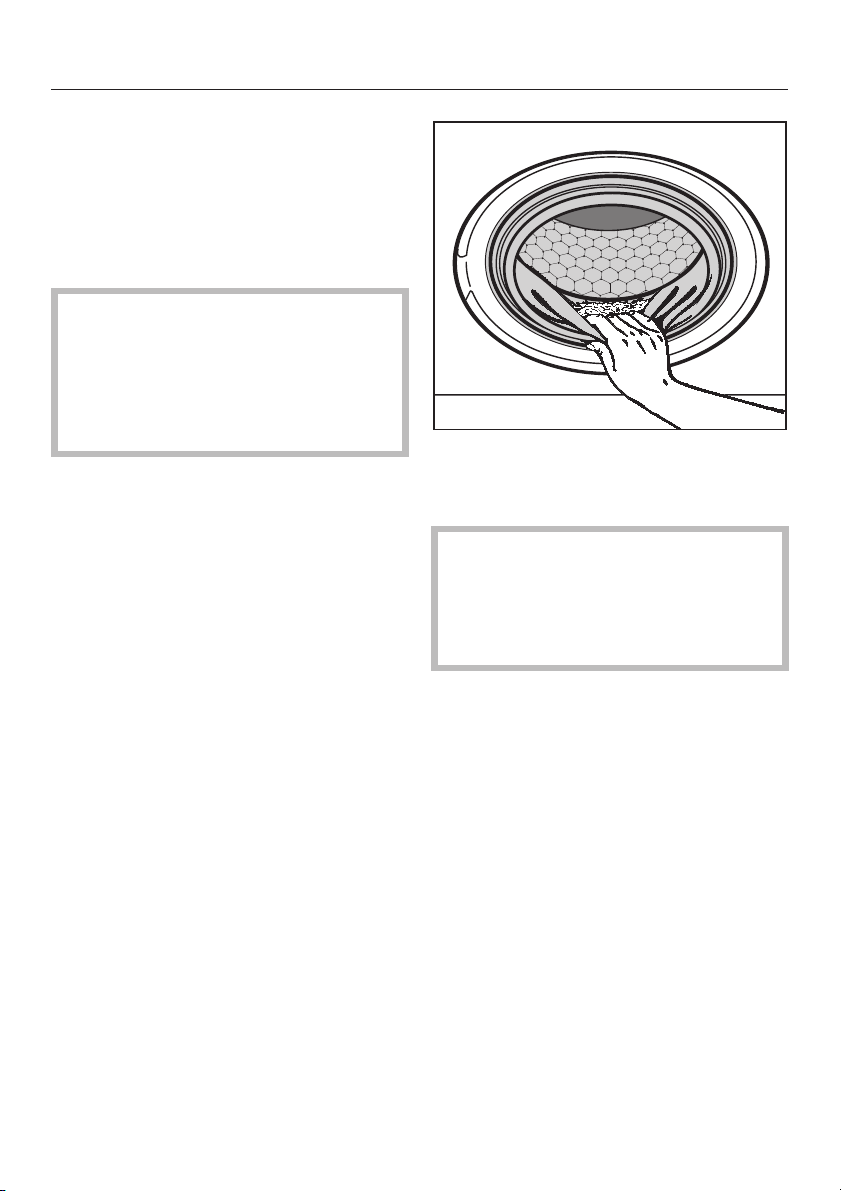
Check the folds of the door seal for
^
any small articles which may have
been trapped.
Check the drum for any missed
pieces of laundry. Items
inadvertently left in the washer may
be damaged (e.g. shrink or discolor)
during the next wash cycle.
20
^ Turn the washer off using the "On/Off"
button.
^
Close the drum door.
Page 21

Using the washer
Cancelling a program
You can cancel a wash program any
time after a program starts.
Press the "Start/Stop T" button.
^
The washer drains the wash water away
and the program is cancelled.
To add or remove laundry
Press the "Door" button.
^
To select another program
Turn off the washer using the "On/Off"
^
button.
^ Turn on the washer using the "On/Off"
button.
Interrupting a program
^ Turn off the washer using the "On/Off"
button.
Making changes to the
program
A program change is not possible
–
after a program has started. To select
a different program, the started
program must be canceled.
The buzzer can be turned on or off.
–
A spin speed can be selected until
–
the final spin starts.
No changes can be made if the
program lock is activated.
To continue the program
^
Turn on the washer using the "On/Off"
button.
21
Page 22

Using the washer
Adding/removing laundry
during a wash program
You can interrupt the following
programs to add or remove a piece of
laundry:
Normal
–
Wrinkle-free
–
Sturdy
–
Use the "Door" button to open the
^
door.
Add or remove the piece of laundry.
^
^ Close the drum door.
The program will continue
automatically.
Note
Once the program has started, the
washer cannot make adjustments for
the load size.
The time remaining will automatically
adjust.
The drum door cannot be opened if:
the water temperature is greater than
–
130°F (55°C).
the water level is too high.
–
the final spin has started.
–
the program lock is activated.
–
If you press the "Door" button during
any of these conditions, the "Child
Lock" indicator will light.
22
Page 23

Locking the washer
Electronic program lock
Washer in use
The program lock prevents the washer
from being opened or the program,
temperature or spin speed from being
changed during a wash program.
To activate the program lock
Once the wash program has started,
^
hold the "Start/Stop T" button until
the "Child Lock" indicator illuminates.
The program lock is now activated.
The washer can no longer accept
program changes.
At the end of the program, the program
lock is automatically unlocked.
To cancel the program lock
^ Hold the "Start/Stop T" button until
the "Child Lock" indicator goes out.
Child Safety Lock
Washer not in use
The Child Safety Lock can be activated
to prevent a child from operating the
washer or climbing inside the washer.
When the Child Safety Lock is
activated, the drum door cannot be
opened and a program cannot be
started.
To activate the Child Safety Lock
The washer must be turned off.
–
– The drum door must be closed.
Step 1. to 4. must be carried out
within 5 secs or the washer will not
recognize the activated Child Safety
Lock.
1. Press and hold the "Sensitive" and
"TEMP" buttons until step 4.
2. Turn on the washer using the "On/Off"
button.
A dot shows in the display.
3. Press the "Extended / Heavy Soil /
Soak" button three times
4. Release the "Sensitive" and "TEMP"
buttons.
The "Child lock" indicator flashes.
To deactivate the Child Safety Lock
Repeat steps 1. through 4.
The "Child Lock" indicator goes out.
.
23
Page 24
Washer care
Before cleaning the appliance,
,
disconnect the power supply by
unplugging the unit or manually
tripping the circuit breaker.
Cleaning the washer
Clean the exterior of the washer with
^
a mild solution of non-abrasive
detergent or soap and water. Wipe
dry with a soft cloth.
Clean the drum with a stainless steel
^
cleaner specially formulated for use
in a washing machine. This type of
cleaner is available from Miele.
Cleaning the detergent drawer
Detergent residue should be cleaned
out regularly.
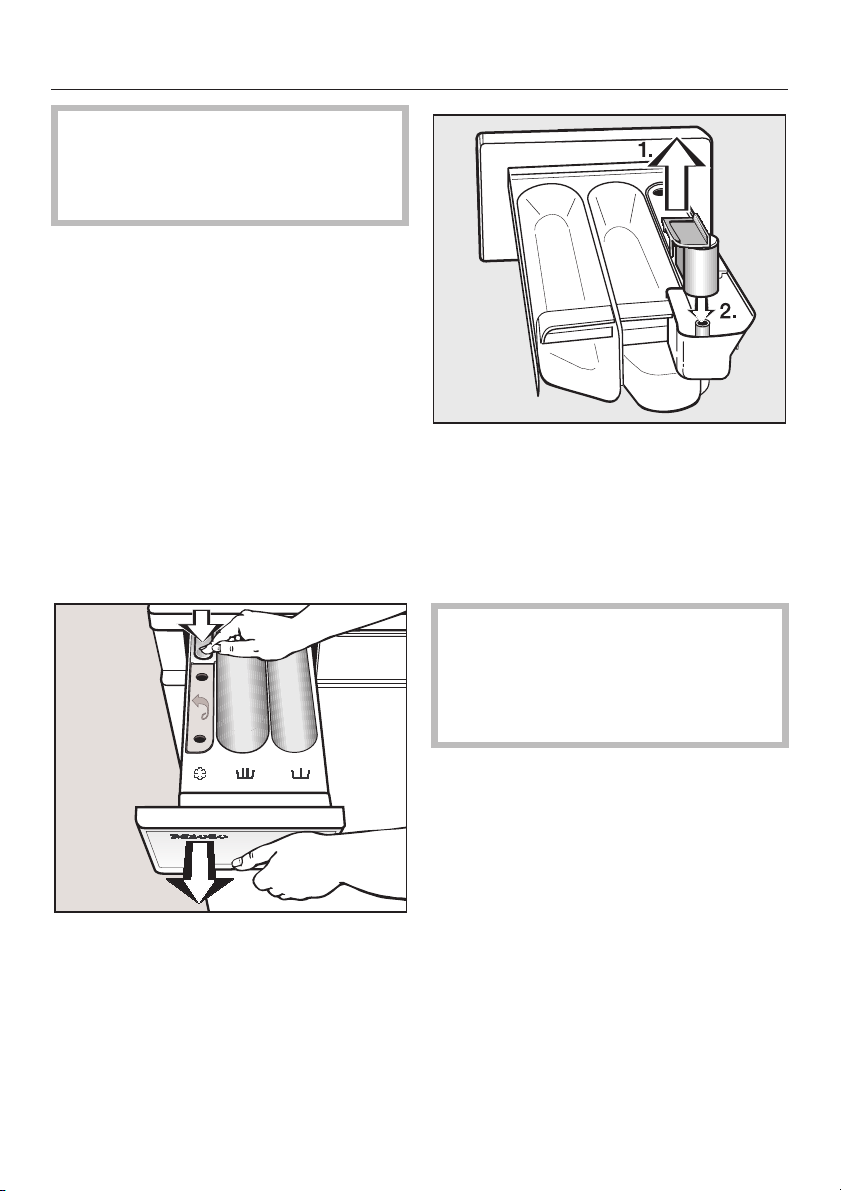
1. Remove the siphon tube from the
fabric softener compartment § and
rinse under warm water. Clean the
pipe on which the siphon tube is
attached.
2. Replace the siphon tube.
,
Do not use chemical solvents,
abrasive cleaners, glass or all
purpose cleaners. These can
damage plastic surfaces and other
parts.
^
Pull out the detergent drawer as far
as it will go. Press down on the red
release lever and pull the drawer out
of the machine.
^
Clean the detergent drawer with
warm water.
^
Clean the siphon tube.
24
Page 25
Cleaning the water inlet filters
The washer has two water inlet filters to
protect each inlet valve. These filters
should be checked and cleaned if
necessry every 6 months. This may
have to be done more frequently with
some water supplies.
Washer care
Inspect the hose regularly. The
,
hose must be in good condition to
withstand high water pressure. The
hose should be replaced if there are
cracks in the surface, or if it has
been otherwise damaged or cut.
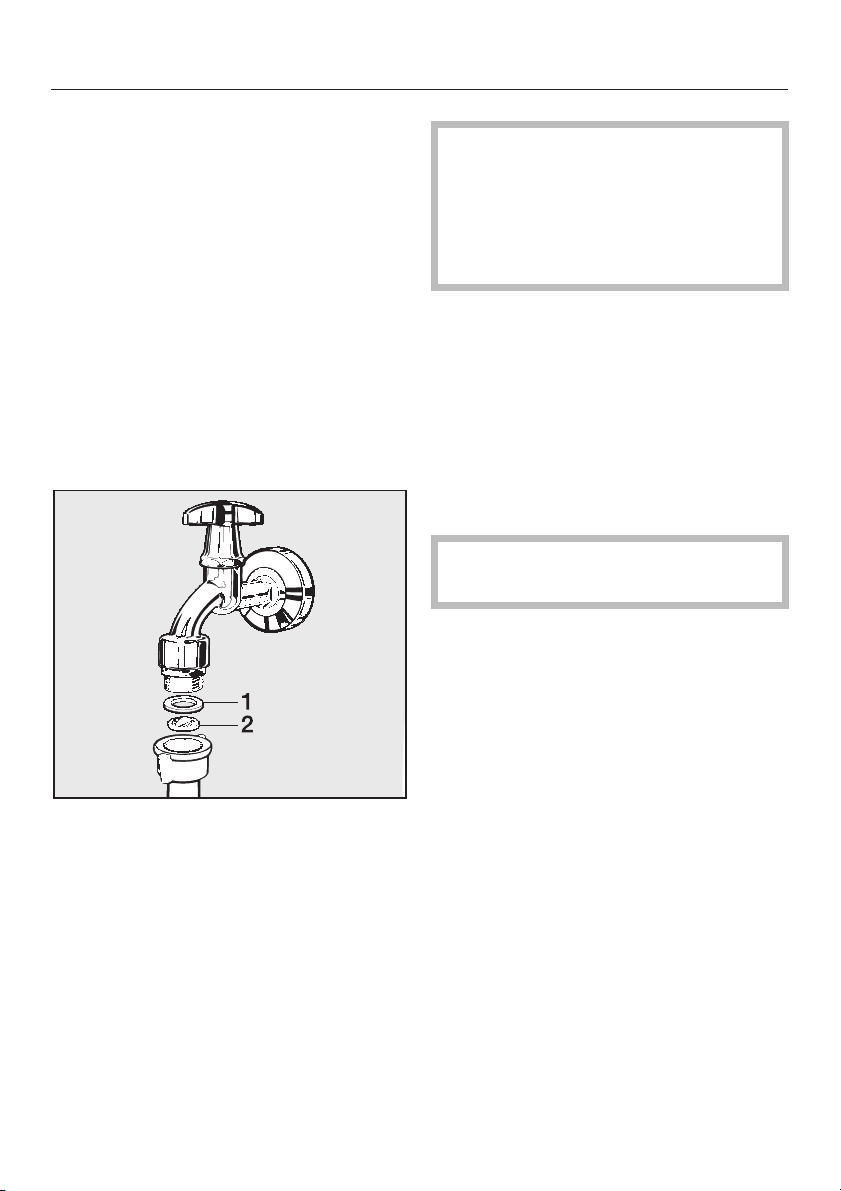
Cleaning the inlet hose filter
Turn off the water valve.
^
Unscrew the inlet hose from the valve
^
by turning he connector
counterclockwise using a wrench if
necessary.
^
Remove the rubber seal, 1, from the
connector.
^
Using needle nose pliers, grasp the
plastic filter, 2, and pull it out of the
hose connector.
Cleaning the filter in the inlet
valve
Using a wrench, carefully loosen and
^
remove the plastic hose connector on
the inlet valve.
^ Using needle nose pliers, remove the
plastic filter (see illustration). Rinse
under water and return parts.
Both filters must be put back in
place after cleaning.
^
Clean the filter under running water
and carefully remove any large
particles. Replace the filter and seal
and reconnect the hose.
^
Slowly turn on the valve and check
for leaks. If water leaks, tighten the
bolt.
25
Page 26
Washer care
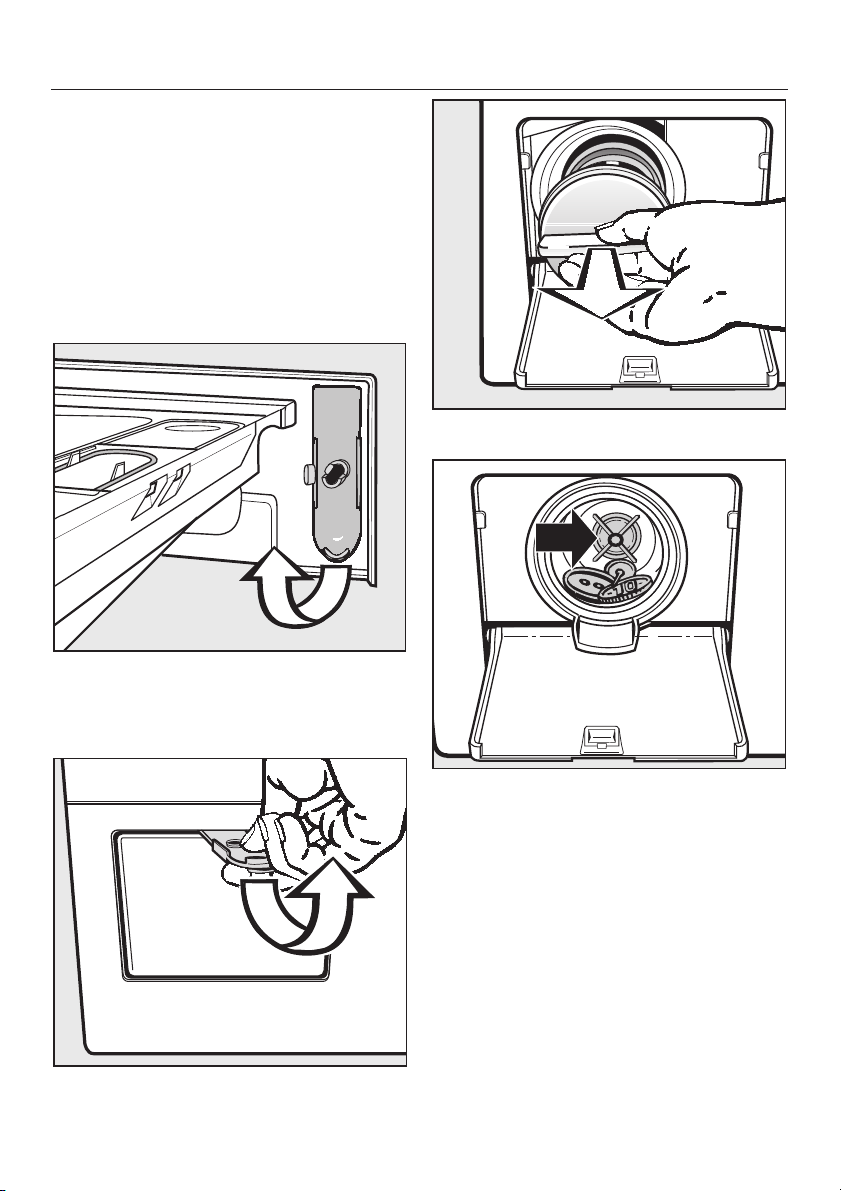
Clean the drain pump
Occasionally, small objects (buttons,
coins, etc.) may become trapped in the
lint trap. If the machine does not drain
completely, the lint trap should be
checked to ensure that it is free of
foreign objects.
Open the detergent dispenser
^
drawer.
Remove and clean the lint trap.
^
^ Remove the tool.
The lint trap lid is visible when the
access panel is opened.
^
Open the access panel.
26
^
Check that the impeller (in the back
of the chamber) rotates freely by
spinning with your hand.
^
Return the lint trap and tighten into
place.
If the lint trap lid is not tightened
securely water will leak out when the
machine is used.
Page 27
Quick Guide
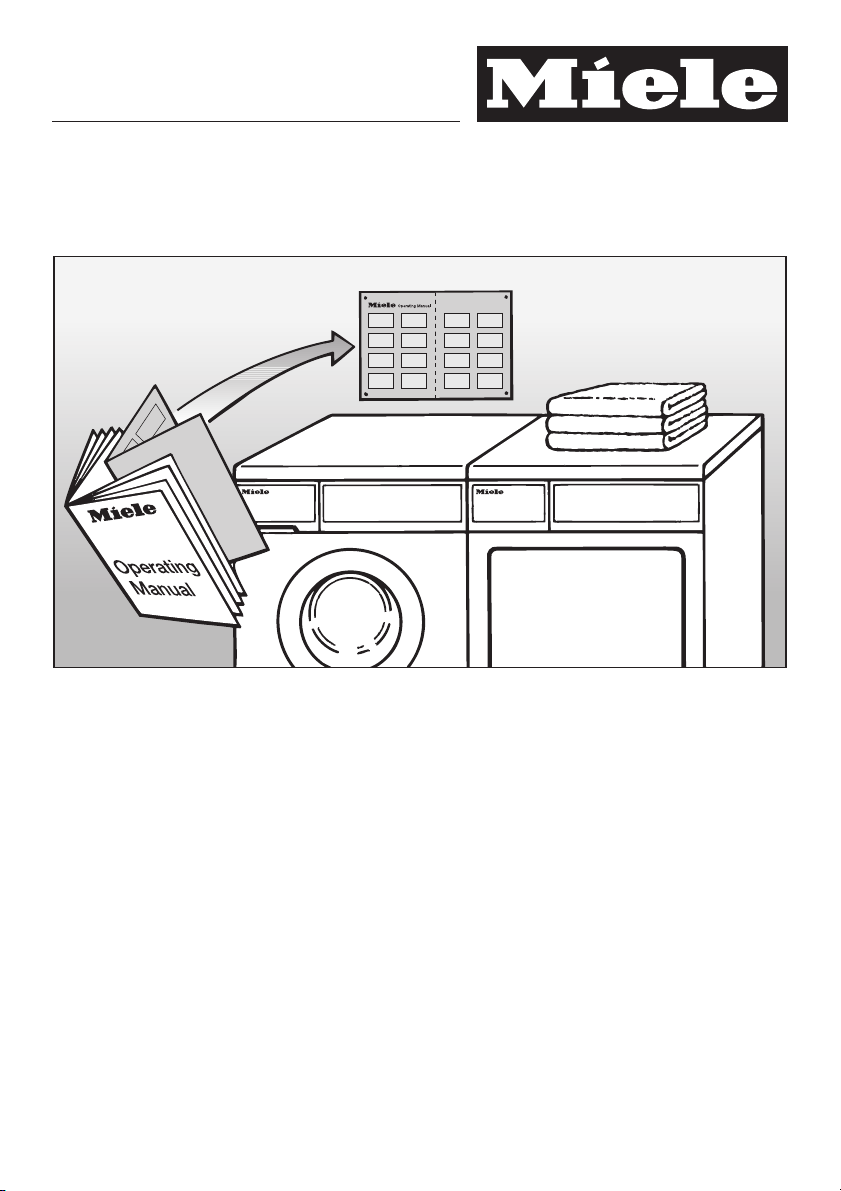
Remove this guide for easy reference
Please read all
instructions, especially
the "Important Safety Instructions",
before using the washer.
Page 28
Quick Guide
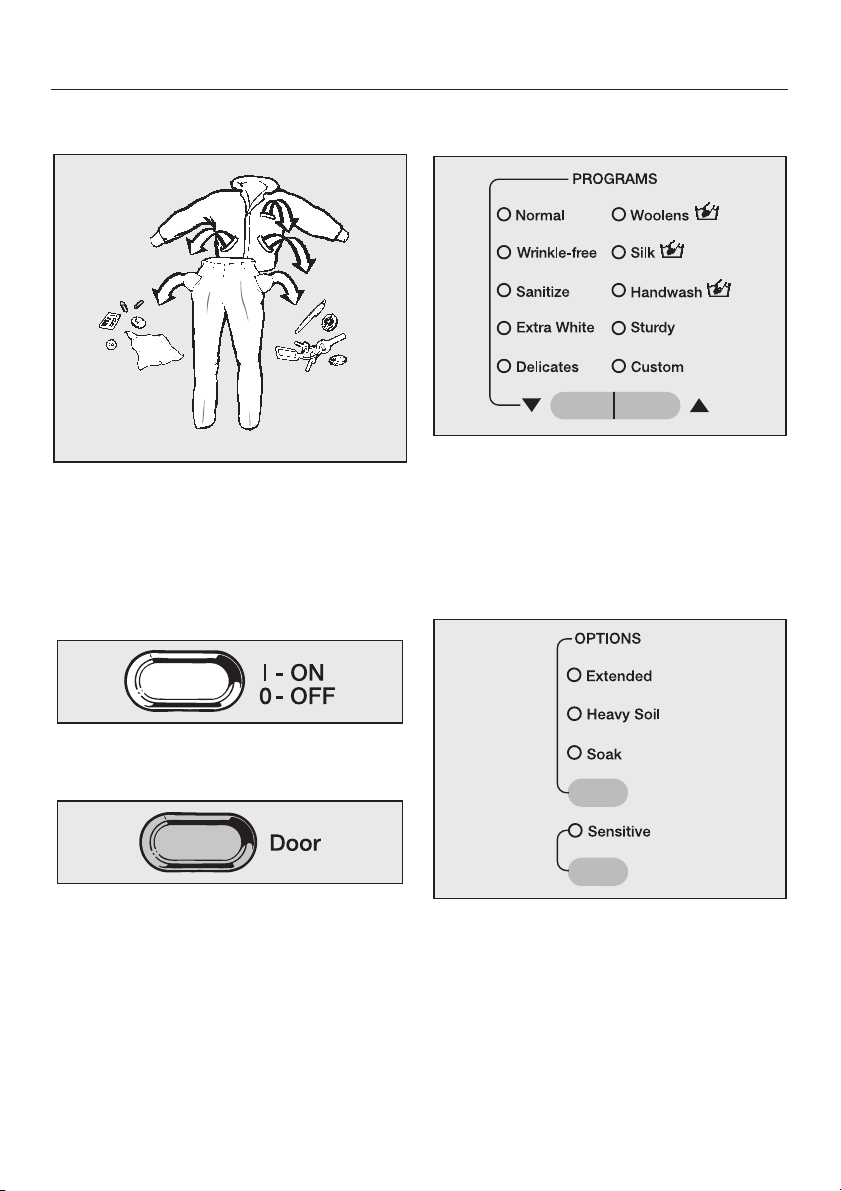
1. Sort the laundry.
^ Empty all pockets.
^ Sort the laundry by fabric and color.
^ Pretreat stains.
2. Load the laundry
3. Select a program
^ Select a desired program.
Refer to the "Program guide" to
determine which program is most
suitable for the load being washed.
4. Select wash options (if needed)
^
Turn on the washer using the "On/Off"
button.
^
Open the drum door by using the
"Door" button.
^
Load the laundry.
^
Close the drum door.
Make sure clothes will not be caught by
the door.
^
Press the upper button until the
indicator of the desired wash option
lights.
^
Press the lower button to select the
"Sensitive" wash option.
Page 29
Quick Guide
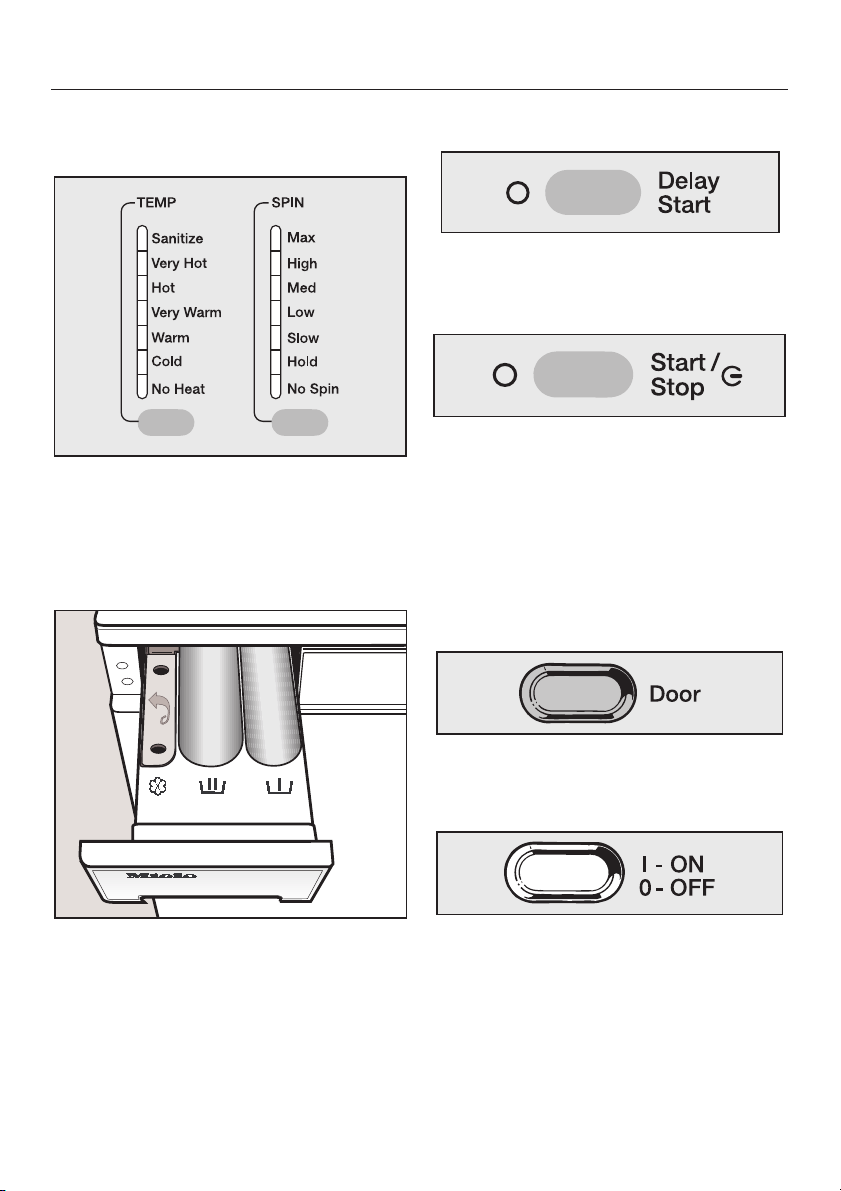
5. Select the temperature and spin
speed
^ Press the "TEMP" and "SPIN" buttons
until the indicator of the desired value
lights.
6. Add detergent
7. Select Delay Start (if needed)
Press the "Delay Start" button.
^
8. Start the program
Press the "Start/Stop" T button.
^
9. Activate the program lock
(if necessary)
^ Hold the "START" button until the
"Child Lock" indicator lights up.
10. Unload the laundry
^
Place the recommended amount of
detergent into the main wash
compartment j. If "Heavy Soil" is
selected, add 1/4 of the total amount
of detergent to the i compartment.
Place fabric softener or liquid starch
in compartment §.
^
Open the drum door using the "Door"
button.
^
Remove the laundry.
^
Turn off the washer using the "On/Off"
button.
^
Close the drum door.
Page 30
Quick Guide
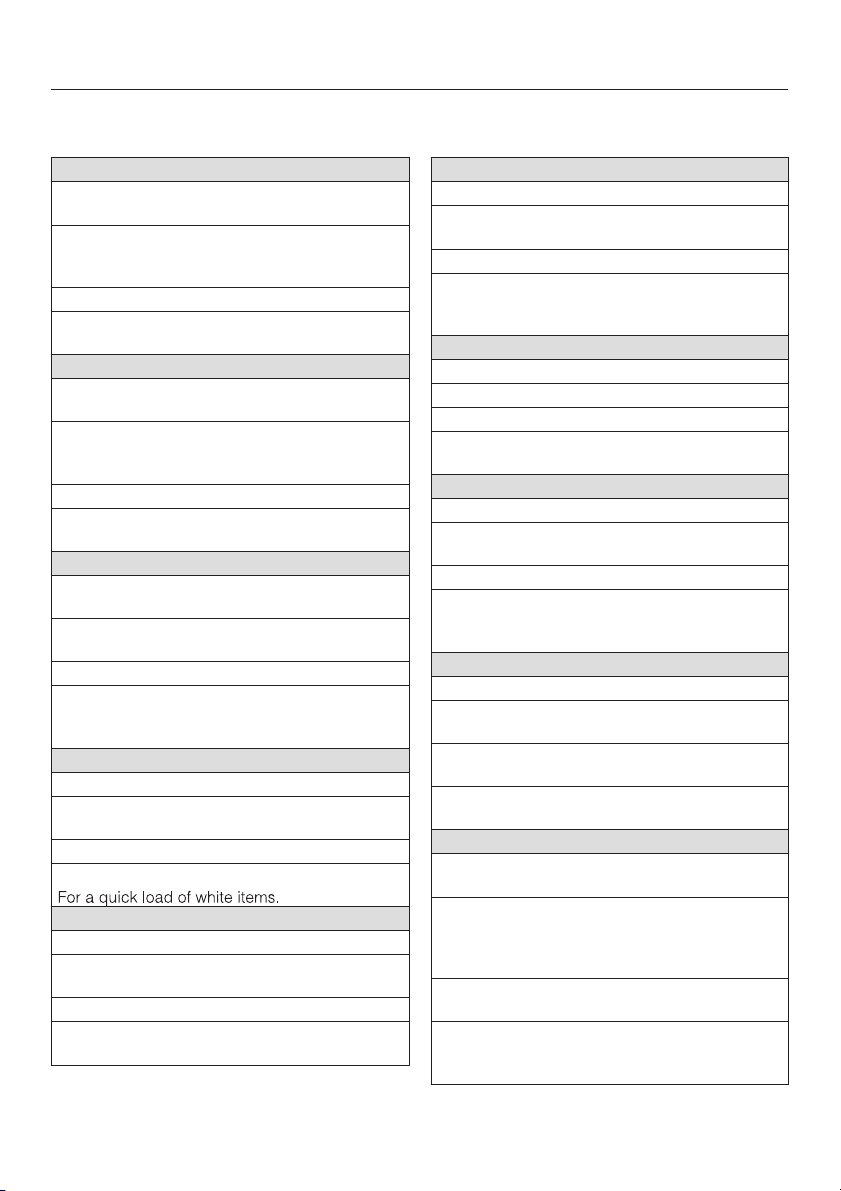
Program guide
Normal
Options:
Extended, Heavy Soil, Soak, Sensitive
Temperatures:
Hot 8;, Very Warm EC, Warm 7B,
Cold 6A, No Heat e
Spin speeds: Max, High
Items:
For a quick load of colorfast items.
Wrinkle Free
Options:
Extended, Heavy Soil, Soak, Sensitive
Temperatures:
Hot 8;, Very Warm EC, Warm 7B,
Cold 6A, No Heat e
Spin speed: Med
Items:
For clothing that tends to wrinkle easily.
Sanitize
Options:
Extended, Heavy Soil, Soak, Sensitive
Temperatures:
Sanitize 9?, Very Hot ö=
Spin speeds: Max, High
Items:
For a load of whites with special hygienic
demands.
Extra White
Options: Soak, PreWash, Sensitive
Temperatures:
Sanitize 9?, Very Hot ö=, Hot 8;
Spin speeds: Max, High
Items:
Delicates
Options: Soak, Prewash, Sensitive
Temperatures:
Warm 7B, Cold 6A, No Heat e
Spin speed: Low
Items:
For delicate clothing that wrinkles easily.
Woolens /
Options: Sensitive
Temperatures:
Warm 7B, Cold 6A, No Heat e
Spin speed: High, Med
Items:
For hand washable and machine washable
wool.
Silk
Options: Sensitive
Temperatures: Cold 6A, No Heat e
Spin speed: Slow
Items:
For silk items.
Handwash /
Options: Extended, Heavy soil, Sensitive
Temperatures:
Warm 7B, Cold 6A, No Heat e
Spin speed: Med
Items:
For handwashable items with no wool or silk
content.
Sturdy
Options: None
Temperatures:
Warm 7B, Cold 6A, No Heat e
Spin speeds:
Med, Low
Items:
For a quick, mixed load of colorfast items.
Custom
Options:
Extended, Heavy Soil, Soak, Sensitive
Temperatures:
Sanitize 9?, Very Hot ö=, Hot 8;,
Very Warm EC, Warm 7B, Cold 6A,
No Heat e
Spin speeds:
Med, Low, Slow, Hold, No Spin
Items:
All options can be selected individually for
colorfast or white items.
Page 31
Washer Care
Changing the light bulb
A burnt out light bulb will not affect the
performance of the washer.
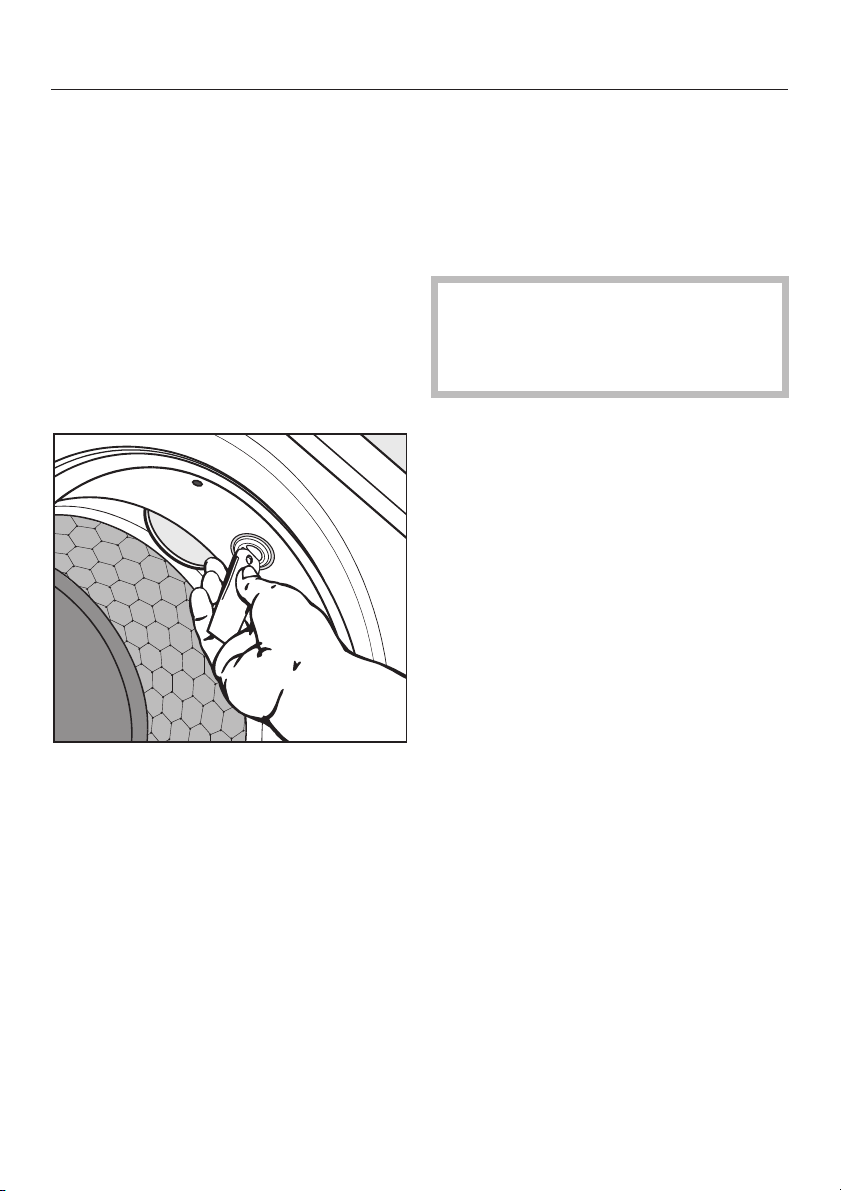
Remove the tool from behind the
^
detergent dispenser drawer.
Turn the washer on and open the
^
door.
Disconnect the power supply to the
^
work area by unplugging the unit,
tripping the circuit breaker or
removing the fuse.
A replacement bulb can be obtained by
contacting Miele.
Insert the light bulb into the socket.
^
Shift it back and forth until the bulb
falls into place, then turn clockwise
with the tool.
A fault will appear and the washer
will not function if the light bulb is not
inserted correctly.
If this occurs reinsert the light bulb.
^
Insert the tool into the slit of the light
bulb, then turn counterclockwise until
resistance is felt.
^
Pull out the drum lighting.
27
Page 32
Frequently asked questions
Repairs to electrical appliances must only be carried out by a qualified
,
and trained person in accordance with local and national safety regulations.
Repairs and other work by unqualified persons could be dangerous. The
manufacturer cannot be held responsible for unauthorized work.
The following section will help you avoid placing a service call by identifying
issues you may encounter while operating the machine:
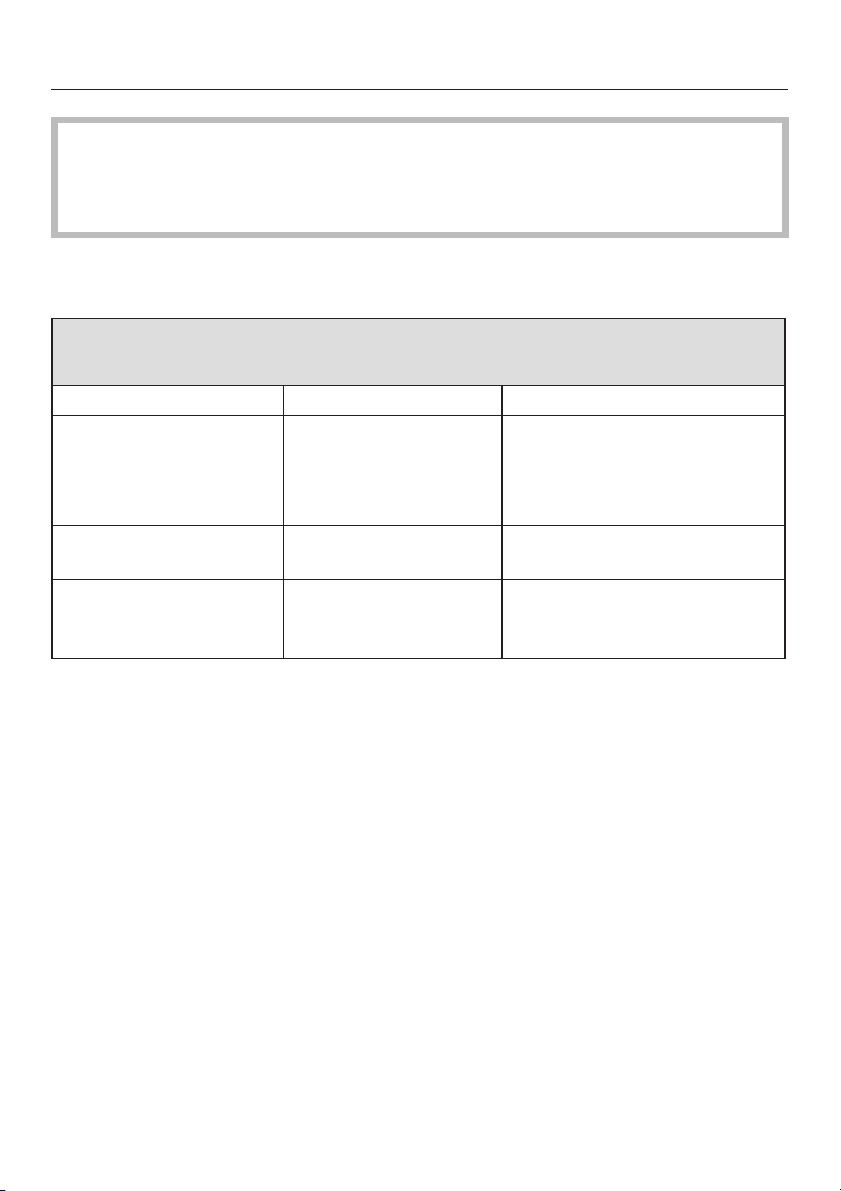
A wash program cannot be started
Issue Possible cause Solution
The display stays
blank and no indicator
illuminates.
The "Child Lock"
indicator flashes.
The program will not
start after pressing the
"Start/Stop T" button.
The washer has no
power.
The electronic lock
function is activated.
The door is not
properly closed.
Check to determine if:
– the washer is plugged in.
– the circuit breaker has
been tripped.
Deactivate the lock function.
Close the drum door.
28
Page 33
Frequently asked questions
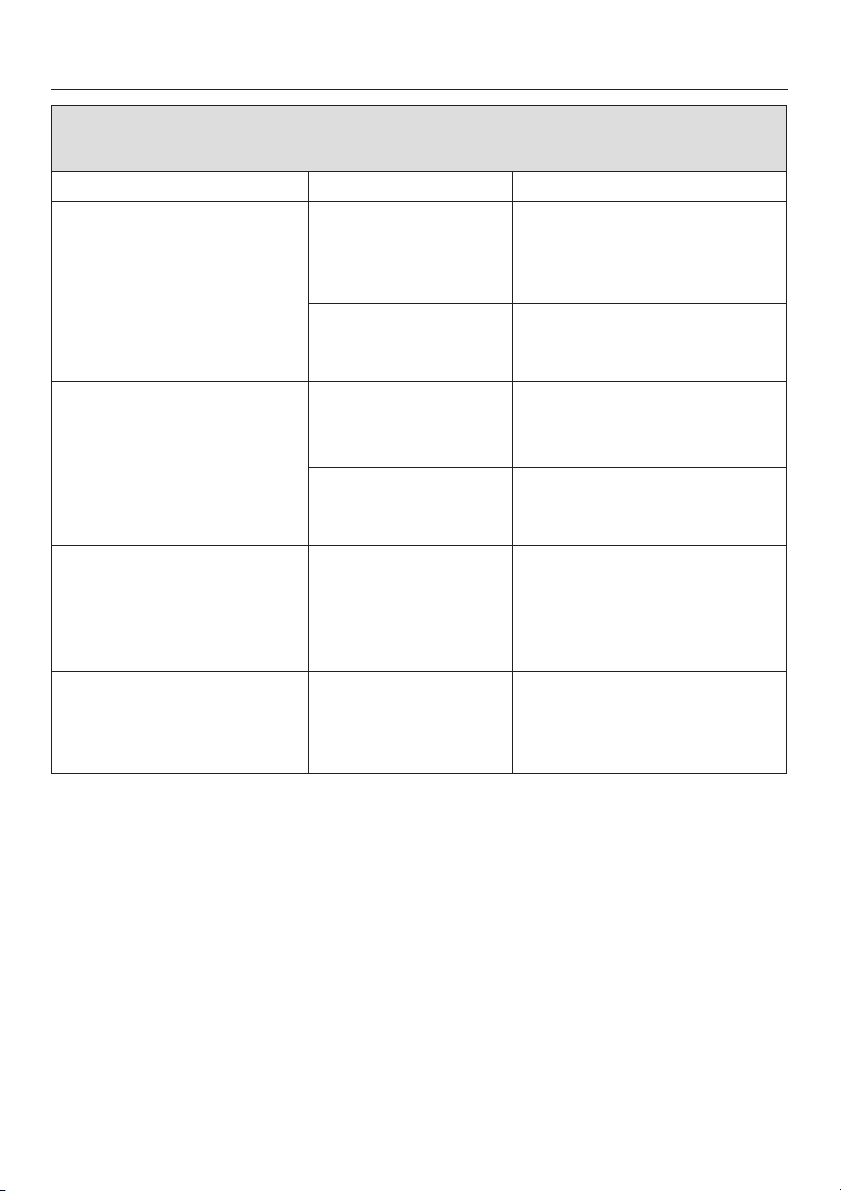
The program was interrupted and a fault message appears.
Issue Possible cause Solution*
The buzzer sounds, and
the "Drain" indicator
flashes.
"- - -". appears in the
display.
The buzzer sounds, and
the "Intake" indicator
flashes.
"- - -". appears in the
display.
The buzzer sounds, and
the "Intake" and "Drain"
indicators flash.
"- - -". appears in the
display.
The buzzer sounds and
the "Soak" and "Rinse"
indicators flash. "- - -".
appears in the display.
The drain is blocked. Clean the drain pump and
lint trap. See "Washer care Cleaning the drain pump
and lint trap".
The drain hose is too
high.
The water intake is
blocked.
The inlet hose filter is
dirty.
There is a fault. Call the Miele Service
There is a fault. Restart the program.
The maximum drain pump
height should not exceed 4ft.
(1.2 m).
Check to determine if:
the water valve is open.
–
the inlet hose is kinked.
–
Clean the filter under running
water and carefully remove
any large particles.
Department.
If the fault message appears
again, call Miele’s Technical
Service Department.
* To turn off the fault message: Turn off the washer using the "On/Off" button.
29
Page 34
Frequently asked questions
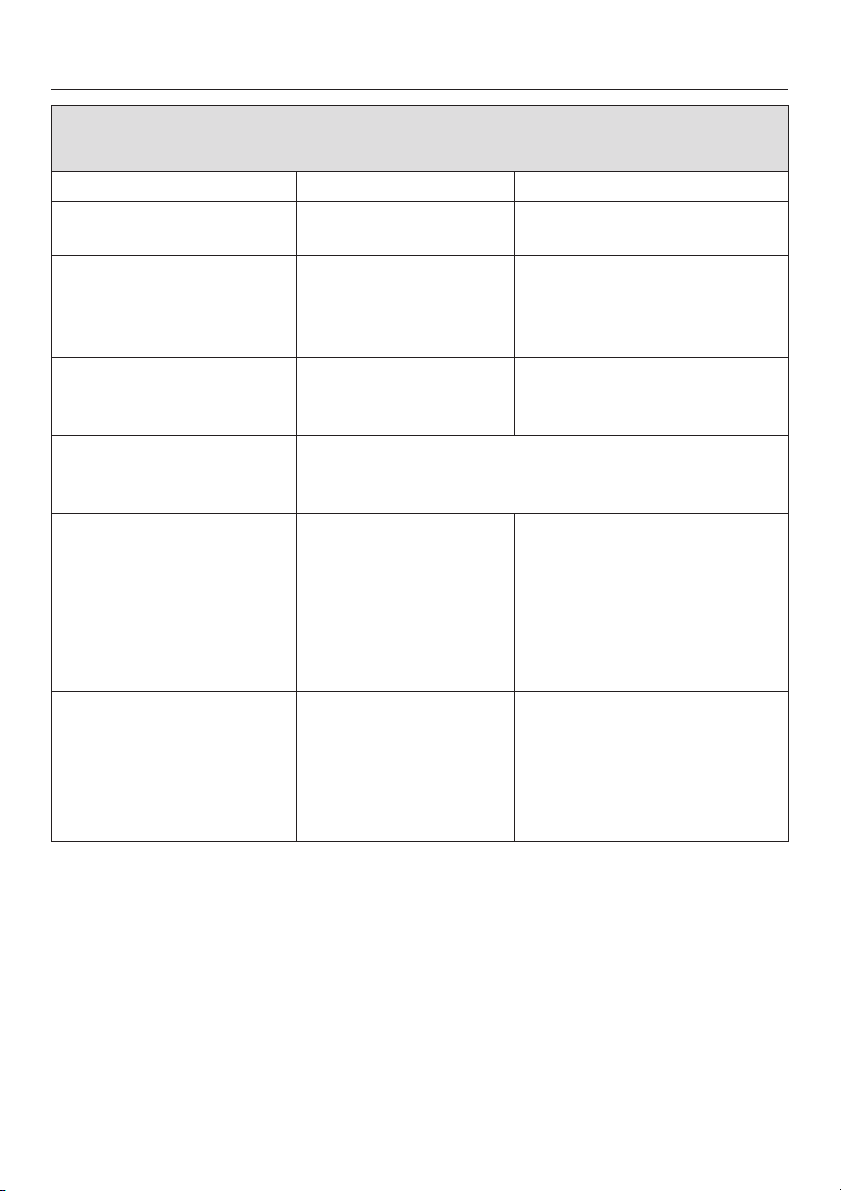
General issues with the washer
Issue Possible cause Solution
The "Oversudsing"
indicator lights.
The "Main wash"
indicator flashes.
The washer shakes
during the spin cycle.
There are unusual
sounds coming from the
drain pump.
A large amount of
detergent residue
remains in the
dispenser drawer.
The fabric softener is
not completely
dispensed, or too much
water remains in the
fabric softener
compartment §.
The machine has
oversudsed.
There is a fault. Restart the program.
The washer’s four feet
are not resting evenly
on the floor.
There is no fault. Lapping sounds at the beginning
and end of the pump process are normal.
The water pressure is
too low.
The siphon tube is
incorrectly positioned
or clogged.
Use less detergent in the
next wash program.
If the fault message appears
again, call Miele’s Technical
Service Department.
Level the machine (see
Installation Instructions.)
– Clean the water intake
hose filter under running
water and carefully
remove any large
particles.
– Select the "Sensitive"
button.
Clean the siphon tube (see
"Cleaning and care"Cleaning the detergent
dispenser drawer").
30
Page 35
Poor wash results
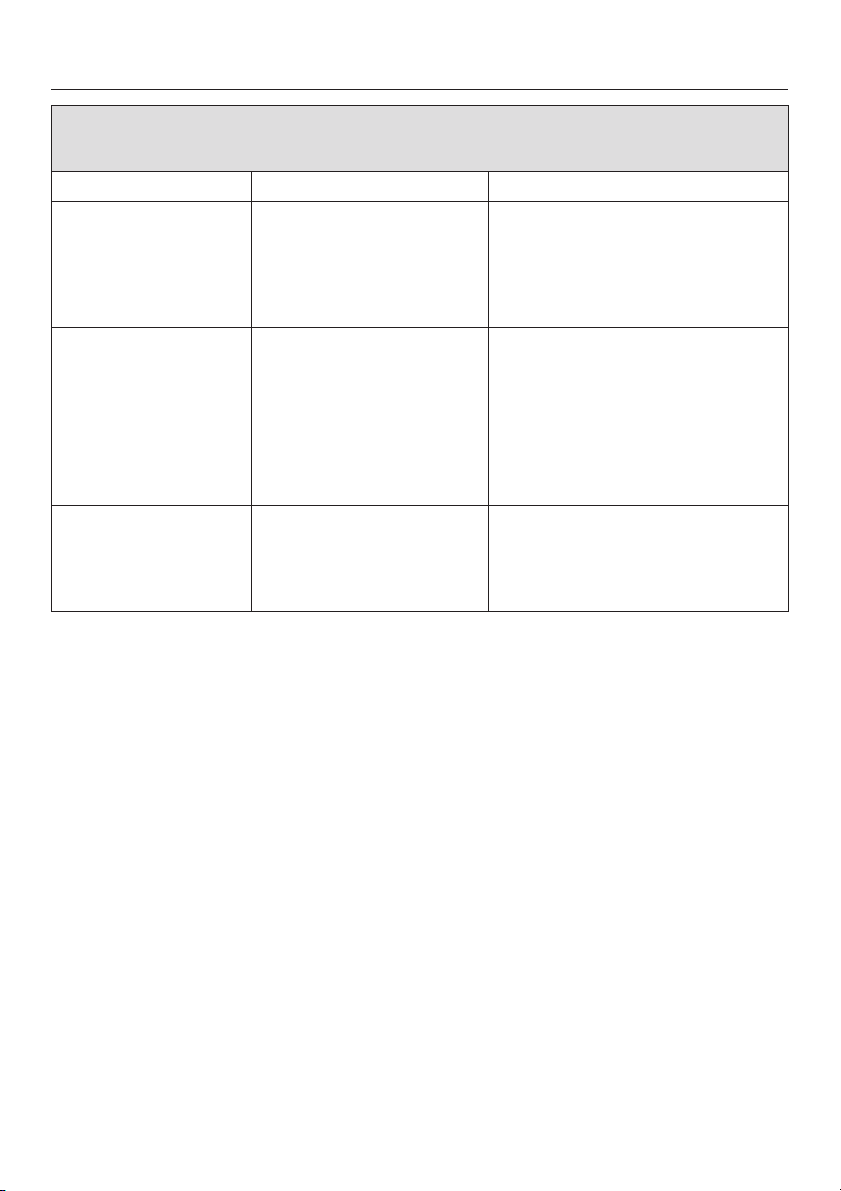
Issue Possible cause Solution
The wash does not
come clean with
liquid detergent.
Laundry has a gray,
sticky residue.
There is white
detergent residue
on dark laundry.
Frequently asked questions
Liquid detergents do not
contain bleaching
agents. Fruit, coffee or
tea stains cannot be
effectively removed.
An inadequate amount
of detergent was used to
dissolve greasy deposits
in heavily soiled laundry
(e.g. grease, oils or
lotion stains).
The detergent was not
completely dissolved
because of hard water.
Use powdered bleach.
–
Do not put liquid detergent
–
and stain remover together in
the same wash compartment.
Add more detergent to the
–
laundry or use a liquid
detergent.
Run a "Normal - Hot" program
–
with liquid detergent to clean
the washer before using it for
laundry again.
– After drying, remove white
residue with a clothing brush.
– Add a water softener to the
detergent for future loads.
31
Page 36
Frequently asked questions
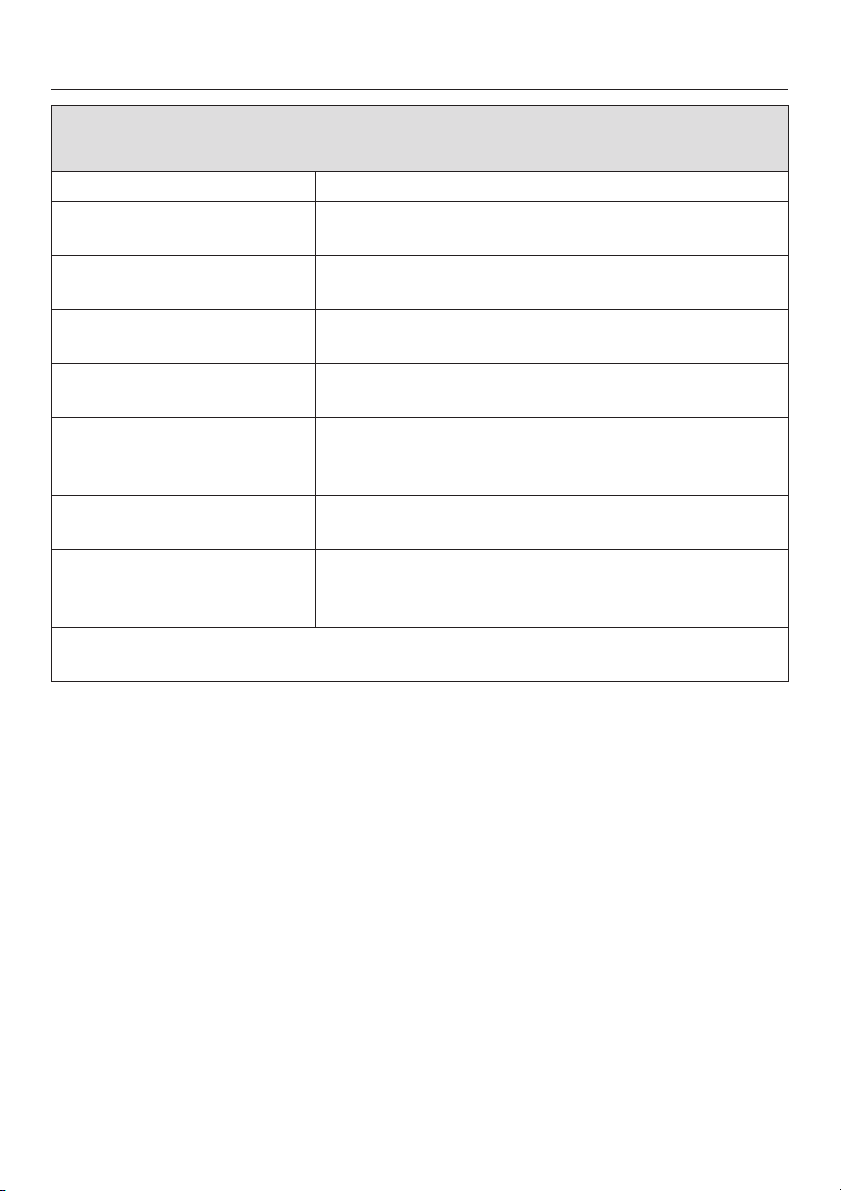
The door will not open when the "Door" button is pressed.
Possible cause Solution
The washer is not hooked
up to electricity.
The washer is not turned
on.
The program lock is
activated.
The Child Lock function is
activated.
Power failure To open the the drum door, see "Frequently asked
The door was not properly
closed.
There is still water in the
drum and the washer
cannot drain it away.
As a safeguard against scalding, the drum door cannot be opened if the wash
water temperature is over 130°F (55°C).
Insert the plug into the outlet.
Turn on the washer using the "On/Off" button.
Deactivate the program lock as described in
"Locking the washer - Electronic program lock".
Deactivate the Child Safety Lock as described in
"Locking the washer - Child Safety Lock".
questions - Opening the drum door during a power
failure."
Push on the drum door and at the same time, press
the "Door" button.
Clean the drain filter and the drain pump as
described in "Cleaning and Care - Cleaning the
drain pump".
32
Page 37
Open the door during a power
failure or when the drain is
blocked
Turn off the appliance with the
^
"On/Off" button.
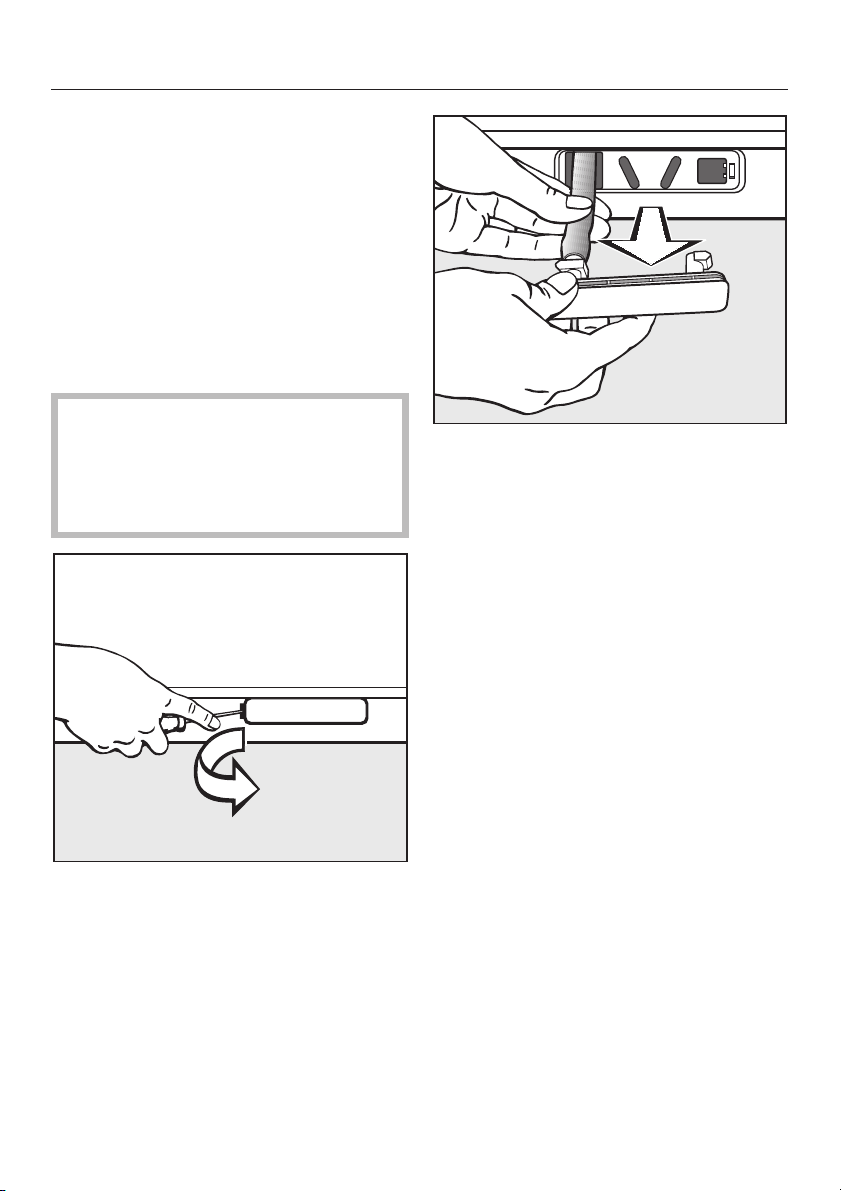
Draining the wash water
If the main drain hose is clogged, water
will be retained in the machine (max.
6.5 gal [25l]).
Caution: If laundry has been
,
washed at a high temperature, the
water draining out of the machine
will still be hot! Stop and allow it to
cool before proceeding.
Frequently asked questions
Remove the plug.
^
^ Once the flow of water stops, seal the
tube with the plug.
^
Open the toe kick lid with a
screwdriver.
^
The drain tube will be pulled from the
machine with the toe kick lid.
^
Put the drain tube in a container.
33
Page 38
Frequently asked questions
Open the drum door
Always make sure the drum is
,
stationary before reaching in to
remove laundry. A moving drum is
extremely dangerous.
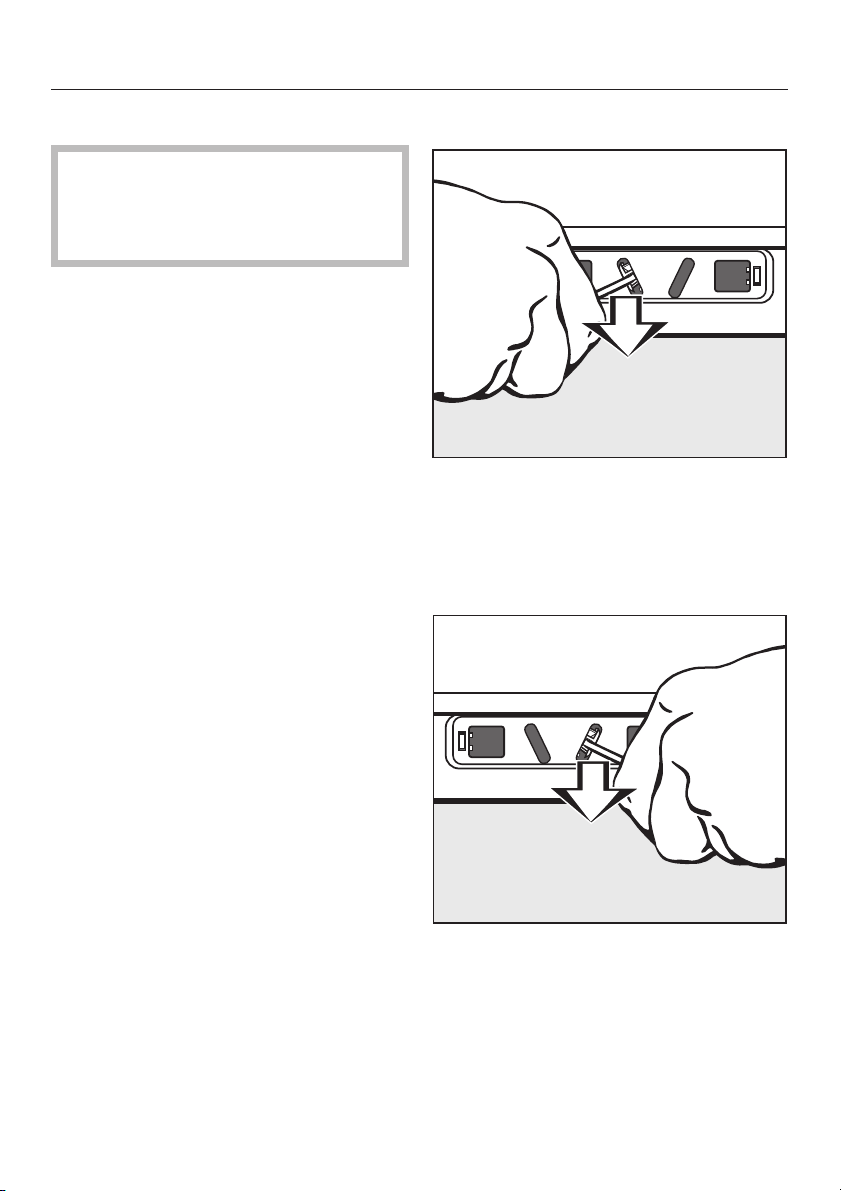
Door hinges on the right side
^ Insert a screwdriver into the notch of
the left opening and pull downwards.
The door will now open.
Door hinges on the left side
34
^
Insert a screwdriver into the notch of
the right opening and pull
downwards. The door will now open.
Page 39
Technical Service
Repairs
In the event of any faults which you
cannot fix yourself, please contact the
Miele Technical Service Department.
U 1-800-999-1360
l 1 800 565-6435
When contacting the Technical Service
Department, please quote the model
and serial number of your appliance.
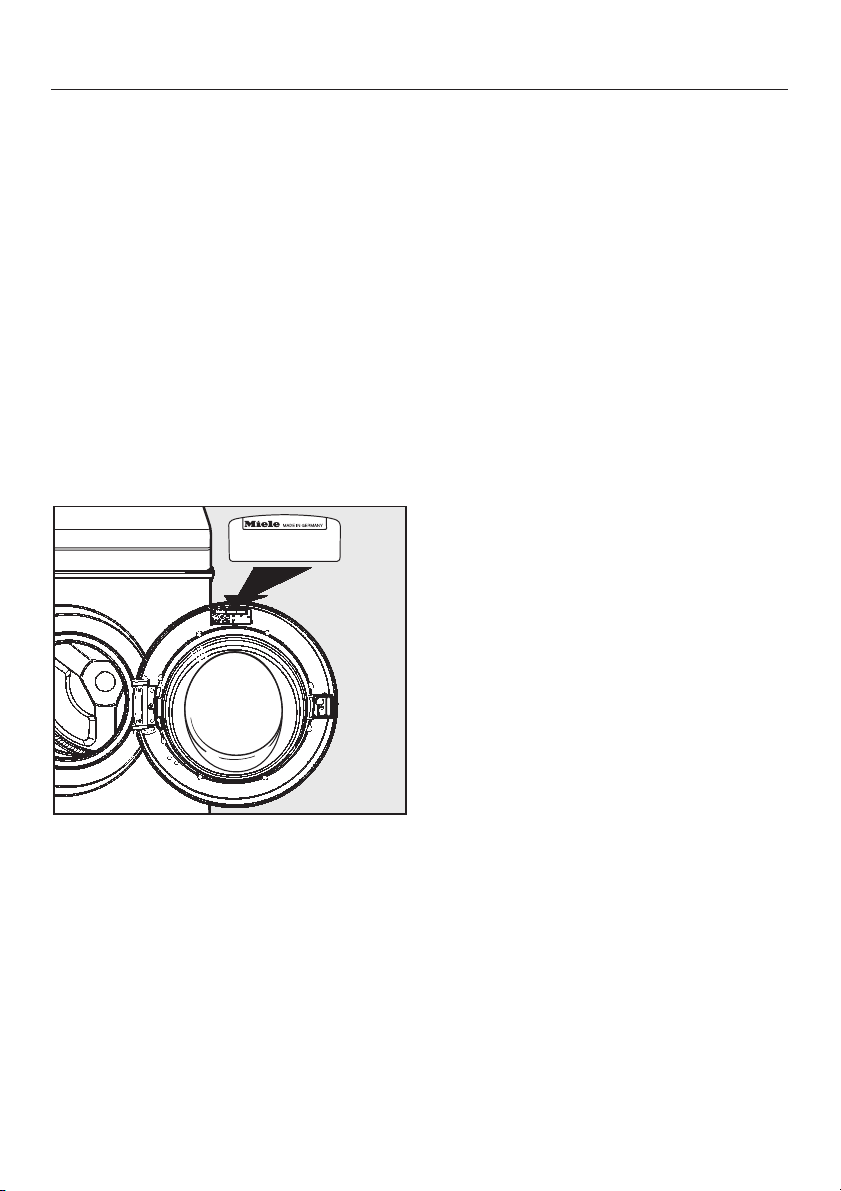
Both can be found on the data plate
visible above the front glass on the
inside of the door.
PC Update
The indicator marked PC allows a
technician to make use of new
technology if new programs are
developed or new fabrics are
introduced.
Optional accessories
Optional accessories are available at
your Miele dealer or through Miele.
35
Page 40

36
Page 41
Installation Instructions
Page 42

Help protect our environment
Disposal of the packing
material
The cardboard box and packing
materials protect the appliance during
shipping. They have been designed to
be biodegradable and recyclable.
Ensure that any plastic wrappings,
bags, etc. are disposed of safely and
kept out of the reach of children, as
they pose a danger of suffocation.
Disposal of an appliance
Old appliances may contain materials
that can be recycled. Please contact
your local recycling authority about the
possibilty of recycling these materials.
Ensure that the appliance presents no
danger to children while being stored
for disposal. Before discarding an
appliance, unplug it from the outlet, cut
off its power cord and remove any
doors to prevent hazards.
38
Page 43
Front view
Installation
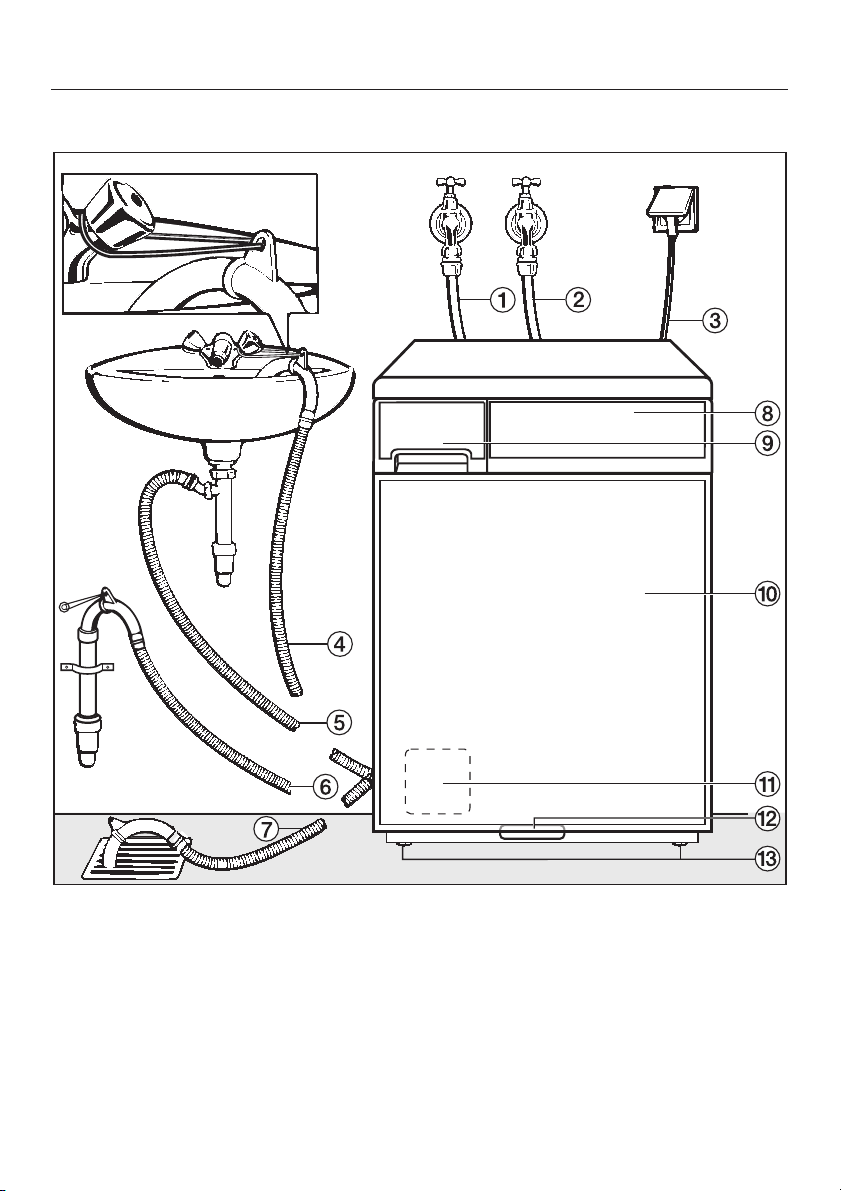
a Hot water intake hose
b Cold water intake hose
c Power cord
d - g Drain hose (with adjustable and
removable elbow) showing drain
options
g Control panel
i Detergent dispenser drawer
j Drum door
k Access panel to lint trap and drain
pump
l Access panel for draining and
opening the machine in case of
emergency
m Four height adjustable feet
39
Page 44
Installation
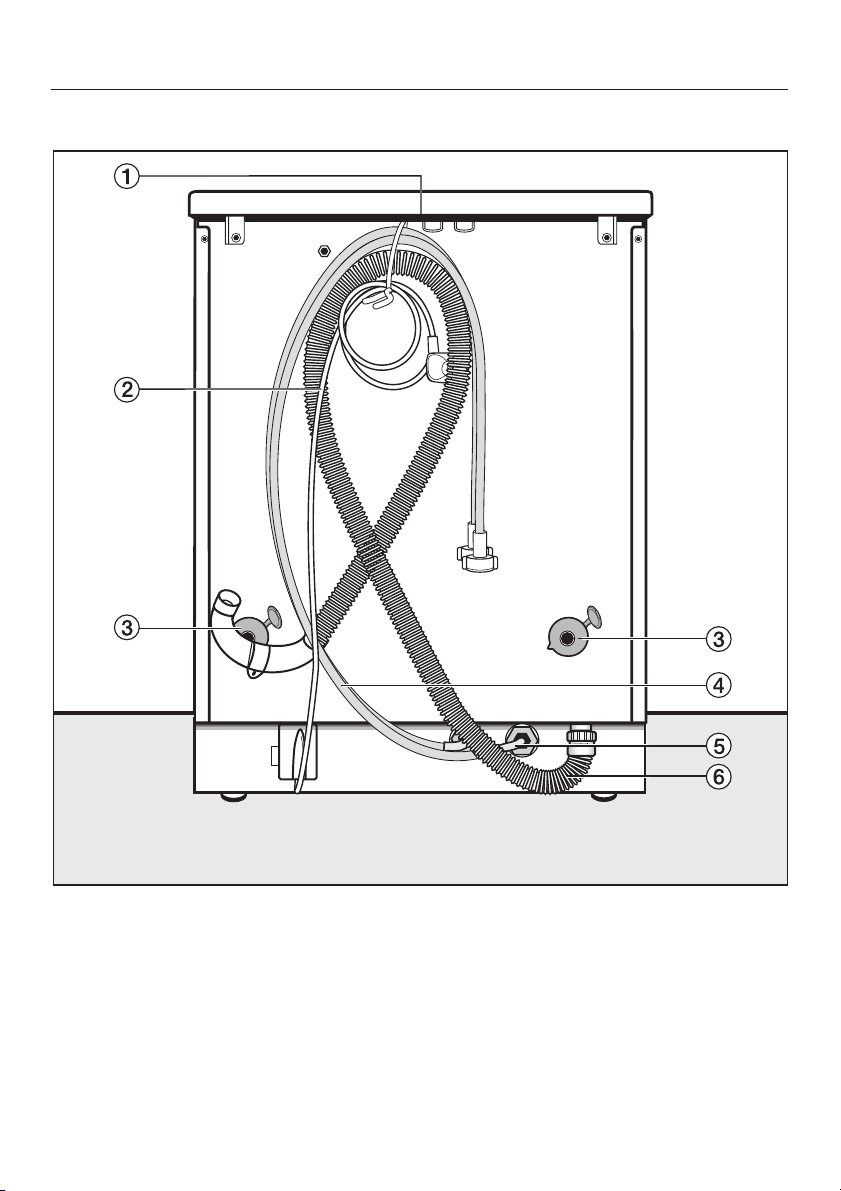
Back view
a Lid excess end with transport grips
b Power cord
c Shipping struts with rotary protection
40
d Hot water intake hose
e Cold water intake hose
f Drain hose
Page 45
Installation
Installation site
A concrete floor is the most suitable
surface for the washer. Concrete floors
are less prone to vibration during the
spin cycle than wooden floors.
Note:
The machine must be levelled and
–
securely positioned.
To avoid vibration while spinning, the
–
machine should not be installed on
soft floor coverings.
If the installation must be on a wooden
joist floor:
^ Install the unit on a
1
23
/4" x 201/2" x 13/16" (59x52x3cm)
plywood base. Ideally the base
should be large enough to span
several joists and should be
anchored to the joists and not just the
floor boards.
It is best to install the washer in the
corner of a room, where the stability of
the floor is at its greatest.
Installation
Use the front washer feet and the rear
excess end to transport the washer
from its shipping pallet to the
installation site.
Do not lift the washer by the drum
door!
Ensure that the machine’s feet
,
and the floor are dry to prevent
slippage during the spin cycle.
Remove the shipping struts
,
If the machine is installed on a
raised platform, it must be secured
with retaining clips. These clips are
available from your dealer or the
Miele. If installed on a masonary or
concrete base, the base should
have a
rim. This is required to prevent the
washer from vibrating off the stand
during the spin cycle.
1
/2" to3/4" (12-20 mm) high
^
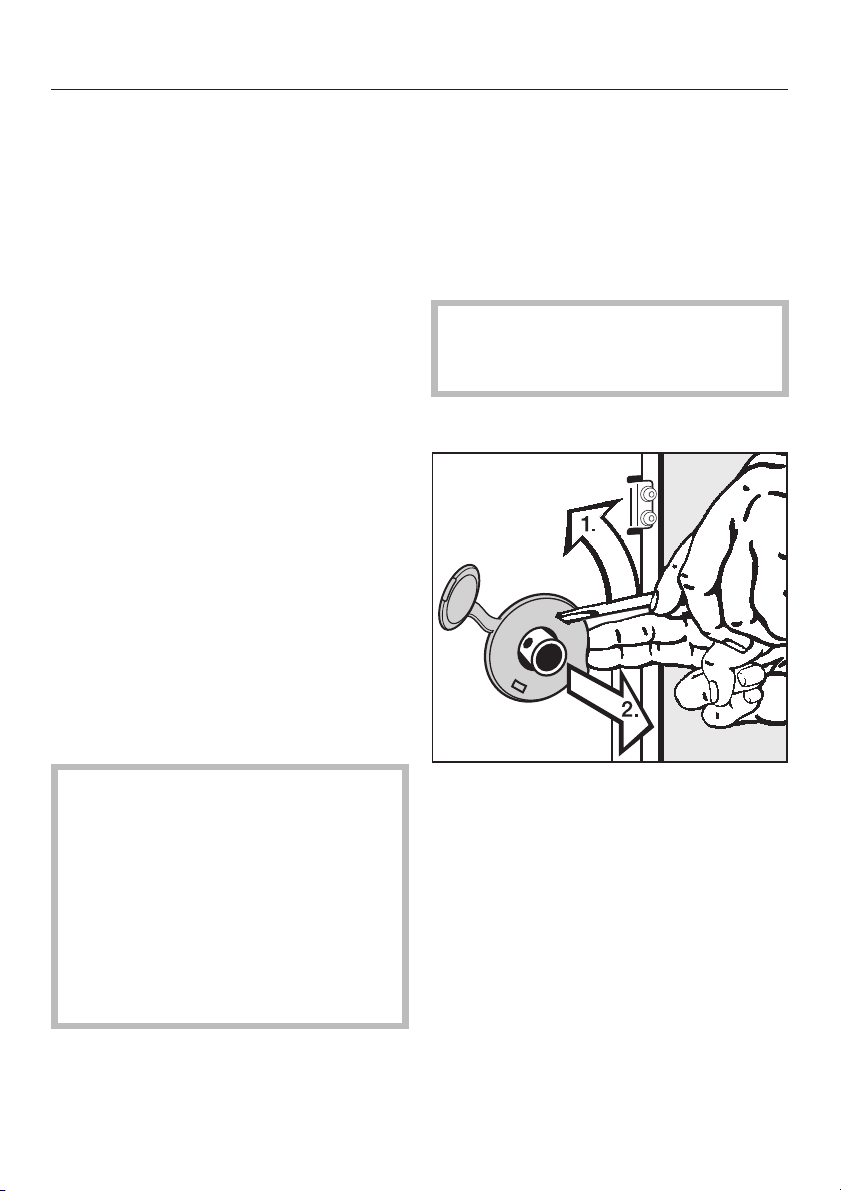
Remove the left and right rotary
protection.
–
Unhook, 1, the rotary protectors with
a screw driver and remove, 2.
41
Page 46
Installation
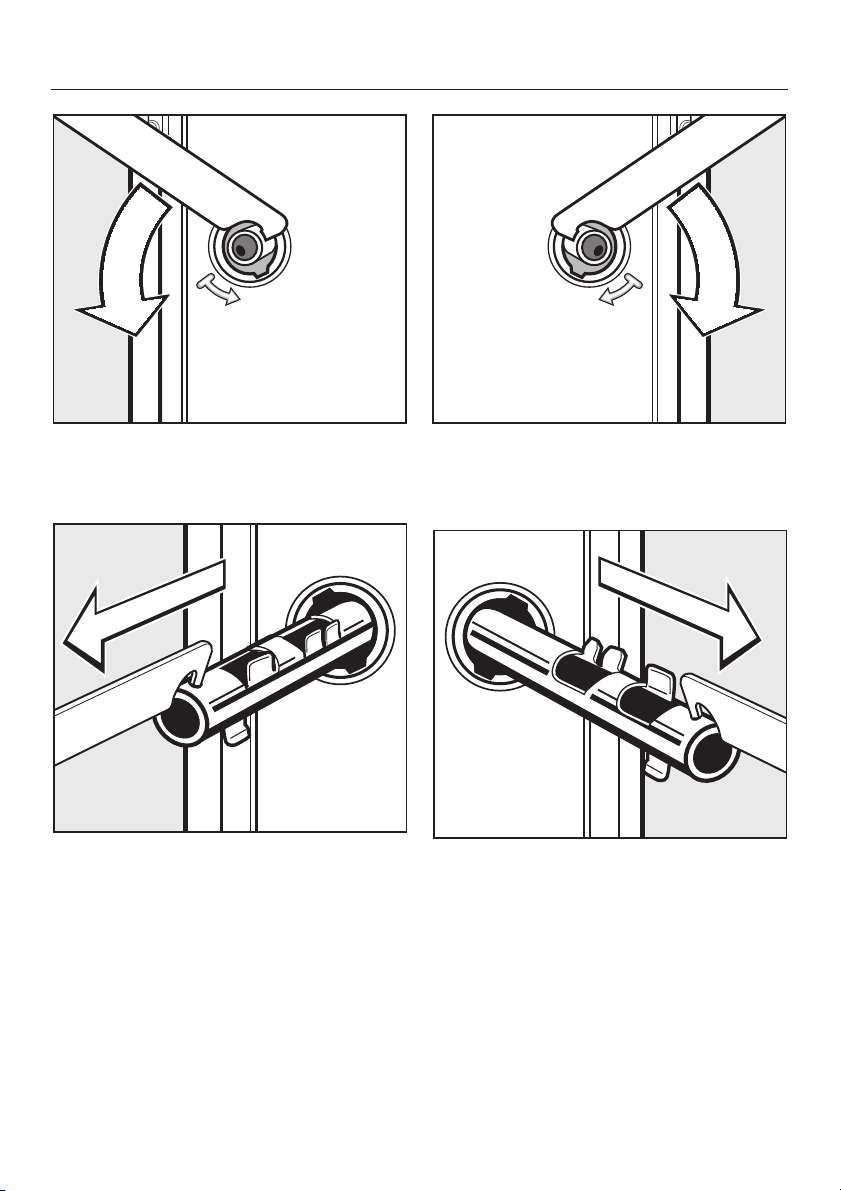
Turn the left shipping strut
^
counterclockwise 90° with the
enclosed combination wrench.
^
Pull out the shipping strut.
Turn the right shipping strut
^
counterclockwise 90° with the
enclosed combination wrench and.
^
Pull out the shipping strut.
42
Page 47
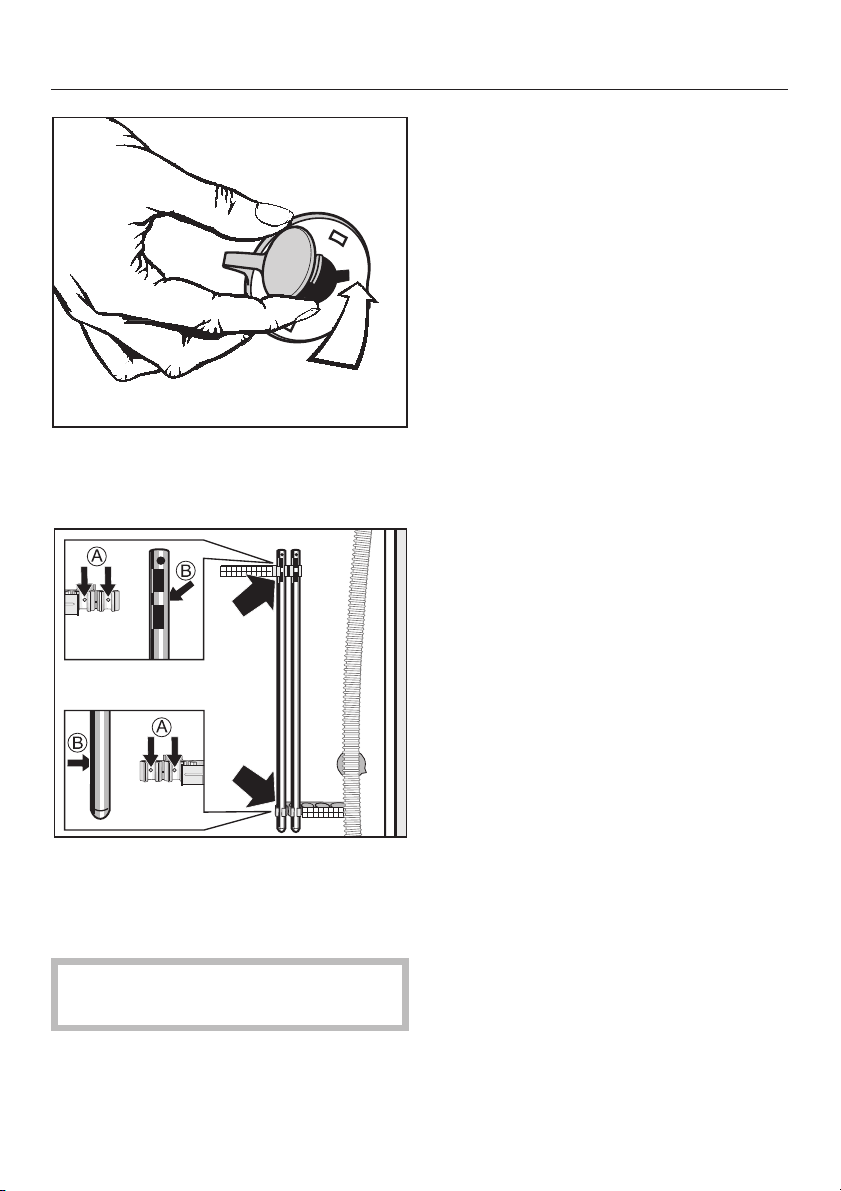
Close the holes with the rotary
^
protectors, making sure to close the
caps.
Installation
Installing the shipping struts
Reinstall the struts by reversing the
above procedure.
^
Fasten the shipping struts to the rear
of the washer. Take care to insert the
drill holes correctly, b, into the
clamps, a.
,
Do not move the washer without
the shipping struts in place.
43
Page 48
Installation
Level the washer
To ensure smooth operation, the washer
must be level.
Failure to level the machine can result
in increased water and energy
consumption, loud noises during the
spin cycle or "walking" across the floor
during use.
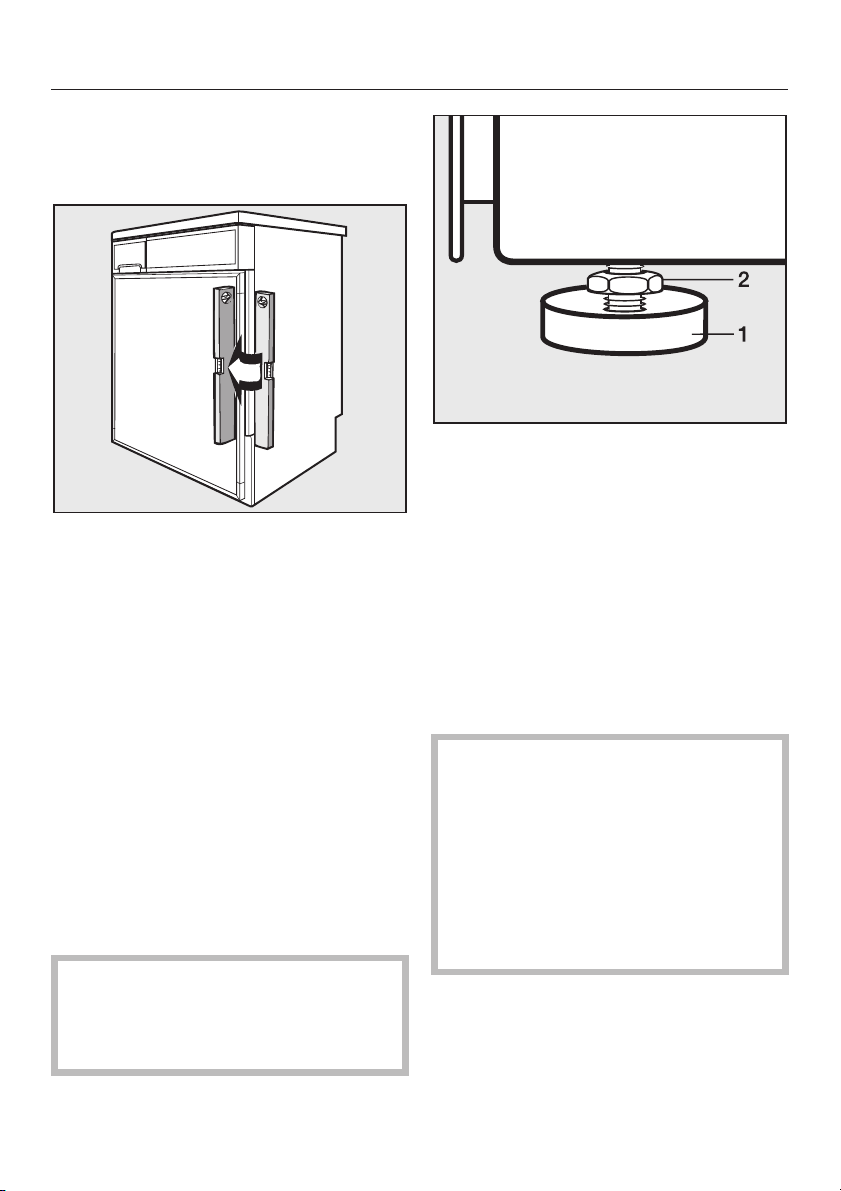
Adjust the four leveling feet
The washer is leveled by adjusting the
four feet:
^
Tip the machine slightly and place a
support, such as a block of wood,
underneath it.
^
Unscrew each of the four feet as
much as necessary by turning both
the foot, 1, as well as the locking ring,
2, to the left using a screwdriver.
,
CAUTION: The washer is
extremely heavy. When tipping the
machine be careful that it does not
slip.
Turn the locking ring, 2,
^
counterclockwise with the enclosed
combination wrench. Unscrew each
of the four feet as much as necessary
by turning both the foot, 1, as well as
the locking ring, 2, to the left.
^ Check that the machine stands level.
^ Once level, hold the foot, 1, steady
with a wrench. Turn the locking ring,
2, with the combination wrench
towards the machine.
,
All four locking rings must be
tight against the bottom of the
machine. In addition, check to see
that the feet were not inadvertently
unscrewed while tightening the
rings. Running a machine that is not
level or whose feet are not tight may
cause damage to both the machine
and its surrounding area.
44
Page 49
Installing the decor panel
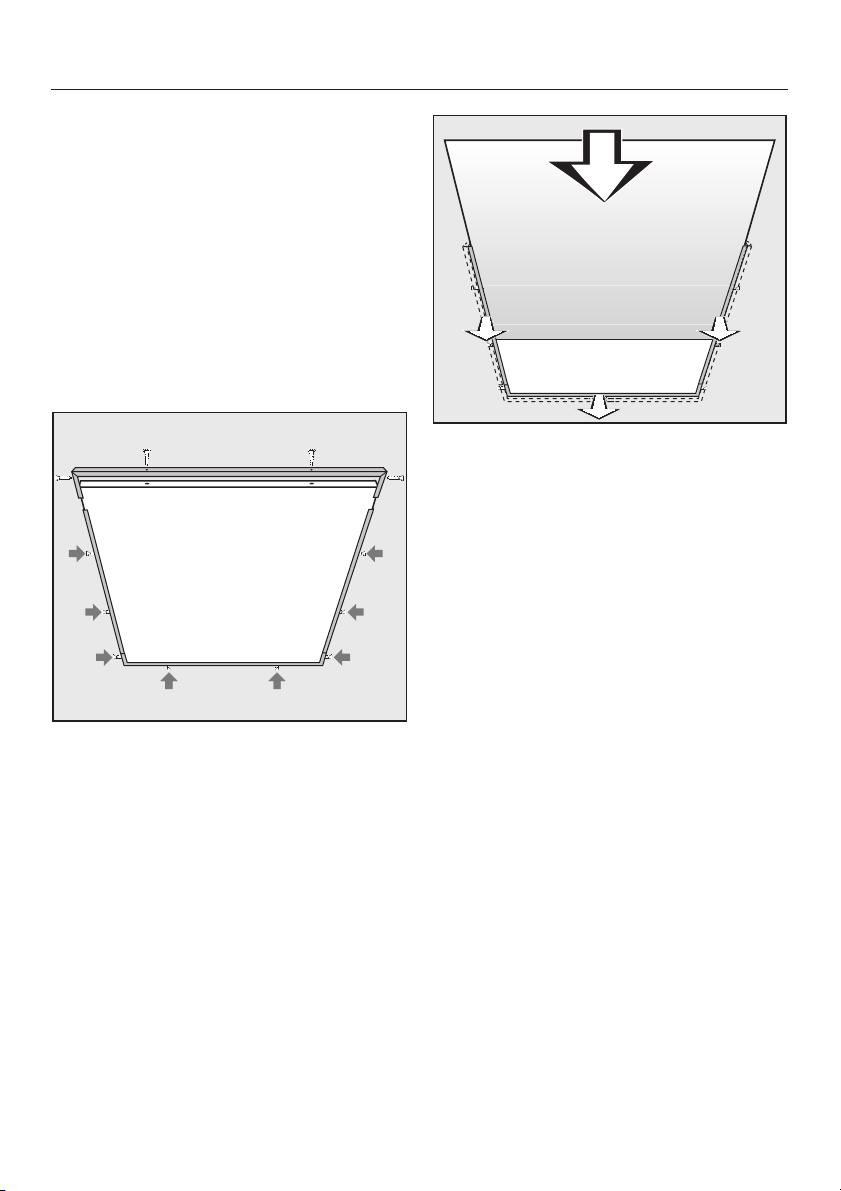
The door can be fitted with a
customized door panel (optional
accessory) to match the adjacent
cabinets.
Decor panel measures
Width 23
Height 24
Thick
1
/4" (591 mm)
15
/16" (633 mm)
1
/16" -3/16" (0.6 - 4 mm)
Installation
A decor panel up to 3/16" thickness
^
can be inserted if the frame sides are
pushed forward.
^ Insert the decor panel from above.
^ Press the frame sides onto the panel
und tighten the screws.
^ Push the top of the decor frame onto
the frame from the front and fix it
with the four screws.
^
Open the door.
^
Unscrew the 4 screws at the top of
the decor frame.
^
and pull it forward.
^
Loose the screws at the other sides
of the decor frame but do not turn
them out.
45
Page 50
Installation
Shortening the door panel
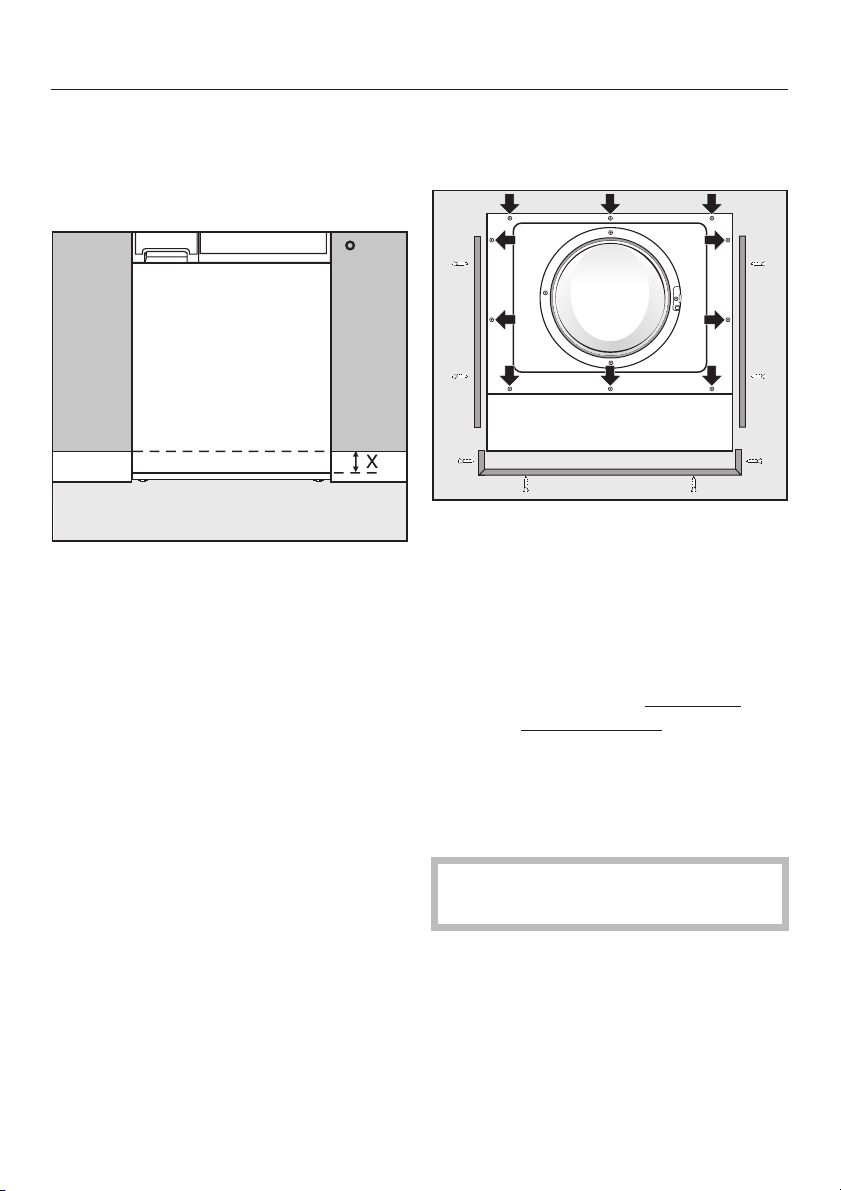
The door panel can be shortended to
match the height with the adjacent
cabinetry.
The measure X equals the space from
the bottom of the washer door to the
bottom of the adjacent cabinet.
Cut the bottom of the door panel with a
jigsaw according to X.
Cut the side decor bars with a
hacksaw.
Installation
Open the door.
^
^ To remove the door panel unscrew
the 10 screws (arrows) from the door
sheet panel.
^ Remove the three decor bars from
the door panel by unscrewing the
screws.
^ Cut the bottom of the door panel
the two side decor bars
^
Drill four holes into the door panel to
fix the lower decor bar.
by X.
and
46
^
Install the decor bars and the door
panel.
To install a decor panel, check if it
need to shortend too.
Page 51
Installation
Installation beneath a counter
If a countertop is placed over the
washer, at least a
left between the top of the machine
and bottom of the countertop;
nothing should be within
other side of the washing machine.
When the machine lid needs to be
–
removed to reduce the height of the
machine, a countertop kit* is
necessary. The cover plate in the
countertop kit replaces the machine
lid and ensures electrical safety.
– A filler frame* is recommenced at a
countertop height of 35
13
35
/16" (90-91 cm)
– Water intake, drain and electrical
connections should be installed near
the machine and be easily
accessible.
An installation manual is supplied with
the countertop kit.
1
/4" gap must be
1
/2" of any
7
/16" to
Washer/ Dryer Stack
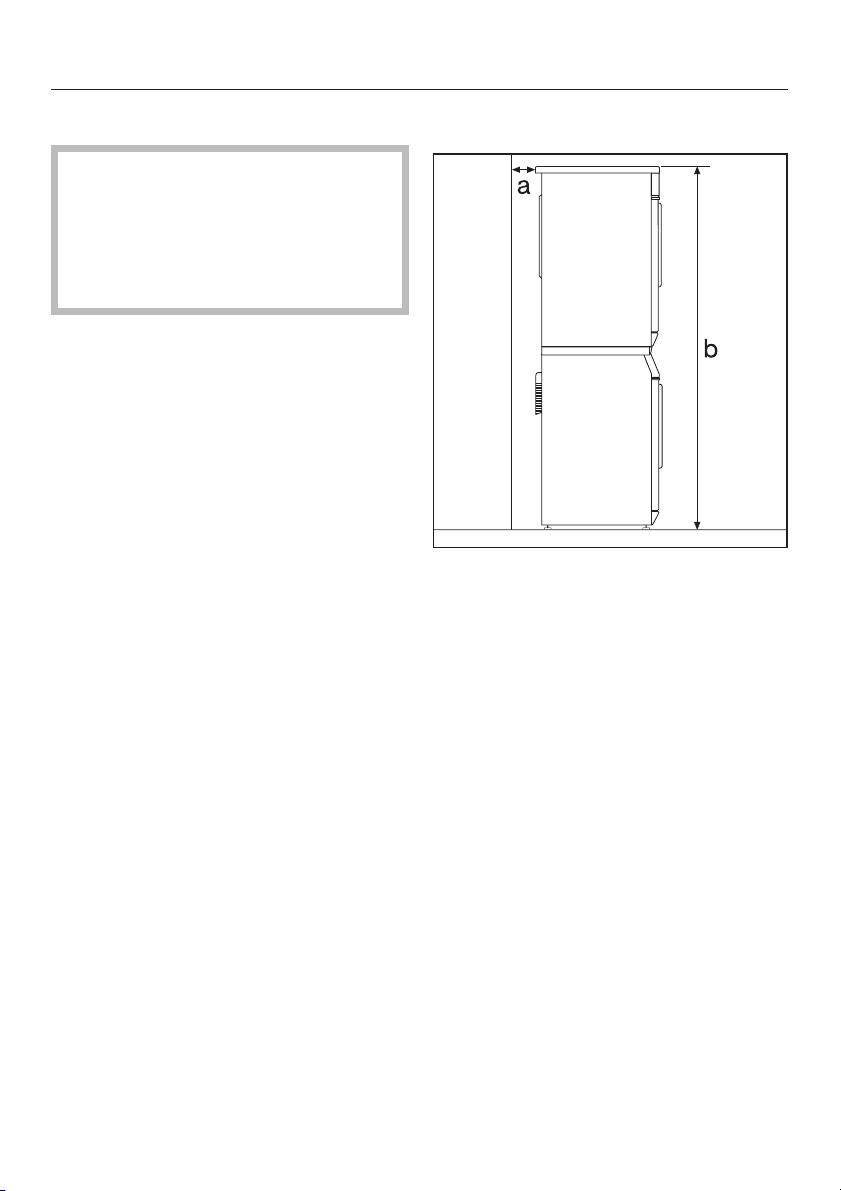
The Miele washing machine can be
installed as part of a washer-dryer
stack in combination with a Miele
tumble dryer. An appropriate "stacking
kit" is required (part # 12 996 026).
(* available from your Miele dealer or
Miele)
(* available from your Miele dealer or
Miele).
Washer stand with drawer
A washer stand is available to raise the
machine for convenience. It has a
drawer to store cleaning essentials.
The stand can be purchased as an
optional accessory.
Note:
a Safety distance to the wall:
minimum
13
/16" (2 cm)
b Height:
Stacking kit with pull out shelf
15
66
/16" (170 cm)
Reinstallation of the machine lid
When reinstalling the machine lid,
check the fit of the cover at the rear
bracket to ensure safe transport.
47
Page 52

Plumbing
The washing machine can be
connected to a portable water supply.
A non-return valve is not needed unless
required by building code.
The washing machine has
hoses with
3
/4" female hose thread
connections. If there is no water
hookup, contact a plumber to install a
connection. Make sure that the sealing
ring is seated properly on the hose
connector.
Replace the hose only with a genuine
Miele hose, or with a hose able to
withstand up to 145 psi (10 bar)
pressure. The water valve connector
must also be able to withstand 145 psi
(10 bar).
1
/2" pressure
The bolted connection is
,
pressurized by water pressure.
Open the water valve slowly to
check for leaks. Adjust the rubber
seal and the bolted connection if
necessary.
To protect the inlet valve, the two
filters - one at the pressure hose /
valve connection and one at the inlet
connection to the solenoid valve must not be removed.
Optional accessory hose extension
Hose extensions with a length of
7
8’ 2
/16" to 13’ 11/2" (2.5 to 4 m) are
available from your Miele dealer or
Miele.
48
Page 53

Plumbing
Water connection
Connect the cold water intake hose
(blue mark) to the cold water valve and
the hot water intake hose (red mark) to
the hot water valve.
If the machine is being connected only
to a cold water supply, both the hot and
cold water intake hoses must be
attached to the cold water valve
through the use of a Y adapter
(available at a hardware store). Both
hoses must be connected to a water
source, or the machine will not function
properly. Do not connect the washer
to hot water only.
Turn on the valve(s) and check for
leaks. The water pressure must be
within 15-145 psi (1-10 bar). If the water
pressure is greater that 145 psi
(10 bar), a pressure reducer must be
installed. If the water pressure is below
15 psi (1 bar), there will not be enough
water available for a complete fill.
Tips for a hot water connection
The hot water temperature from the
–
hot water valve must not exceed
140°F; the ideal temperature is
130°F.
If there is no water pressure at the hot
water inlet, the unit automatically
switches to cold water after several
minutes.
The water intake hoses are equipped
with screen filters. Do not remove these
filters except for cleaning.
49
Page 54

Plumbing
Drainage
The 5 foot drain hose may be
connected as follows:
1. Directly into a sink: hook the hose
over the edge of the sink and secure
it firmly (e.g. by tying the hose to the
water faucet).
2. To a stand pipe: place the drain
hose into a 1
secure it firmly.
3. To a floor drain: The machine is
equipped with an airgap/
anti-siphoning system so that no
minimum drain height is required.
1
/2" stand pipe and
The machine drains using a pump
^
with a maximum delivery height of
4 feet.
Make sure there are no kinks in the
^
drain hose.
If desired, the drain hose may be
extended to run a maximum of 16 feet,
as long as the 4 foot height is not
exceeded. Hose extensions are
available from your dealer or Miele.
50
Page 55
GROUNDING INSTRUCTIONS
This appliance must be grounded. In
the event of a malfunction or
breakdown, grounding will reduce
the risk of electric shock by
providing a path of least resistance
for electric current. This appliance is
equipped with a cord having an
equipment-grounding conductor
and a grounding plug. The plug
must be plugged into an appropriate
outlet that is properly installed and
grounded in accordance with all
local codes and ordinances.
Electrical connection
ELECTRICAL INSTRUCTIONS
This installation should be performed
by an experienced and qualified
technician, in accordance with local
codes and regulations.
The washing machine is supplied with a
5’ 3" (1.6 m) long, 4 wire cord, ending in
a NEMA 14-30 P plug, ready for
connection to a 120/208-240 V, 15 A, 60
Hz, AC power supply.
The proper outlet can be purchased
from an electrical supply dealer or from
Miele (request a NEMA 14-30 R
receptacle).
WARNING – Improper connection of
the equipment-grounding conductor
can result in a risk of electric shock.
Check with a qualified electrician or
service representative if you are in
doubt as to whether the appliance is
properly grounded.
Do not modify the plug provided with
the appliance; if it will not fit the
outlet, have a proper outlet installed
by a qualified electrician.
"EASY INSTALLATION KIT"
If a dedicated 4 wire, 120/208-240 V,
15 Amp line is not available for this
appliance, an optional "Easy Installation
Kit" will allow you to connect to a 240 V,
30 Amp line.
This dual receptacle, wall mounted
connection box can ONLY be used for
connecting a Miele clothes washer and
a Miele clothes dryer to an existing
30 Amp outlet.
057B for on-site outlet NEMA 10-30 R
060B for on-site outlet NEMA 14-30 R
For more information on the "Easy
Installation Kit," or if you have questions
concerning the electrical connection,
please contact:
U 1-800-999-1360
l 1-800-565-6435
51
Page 56
Alterations rights reserved / 3604
This bio-friendly paper was bleached without the use of chlorine.
M.-Nr. 05 874 961 / 00
 Loading...