

Miele TOUCHTRONIC PREMIER PLUS, G 898 Operating Instructions Manual
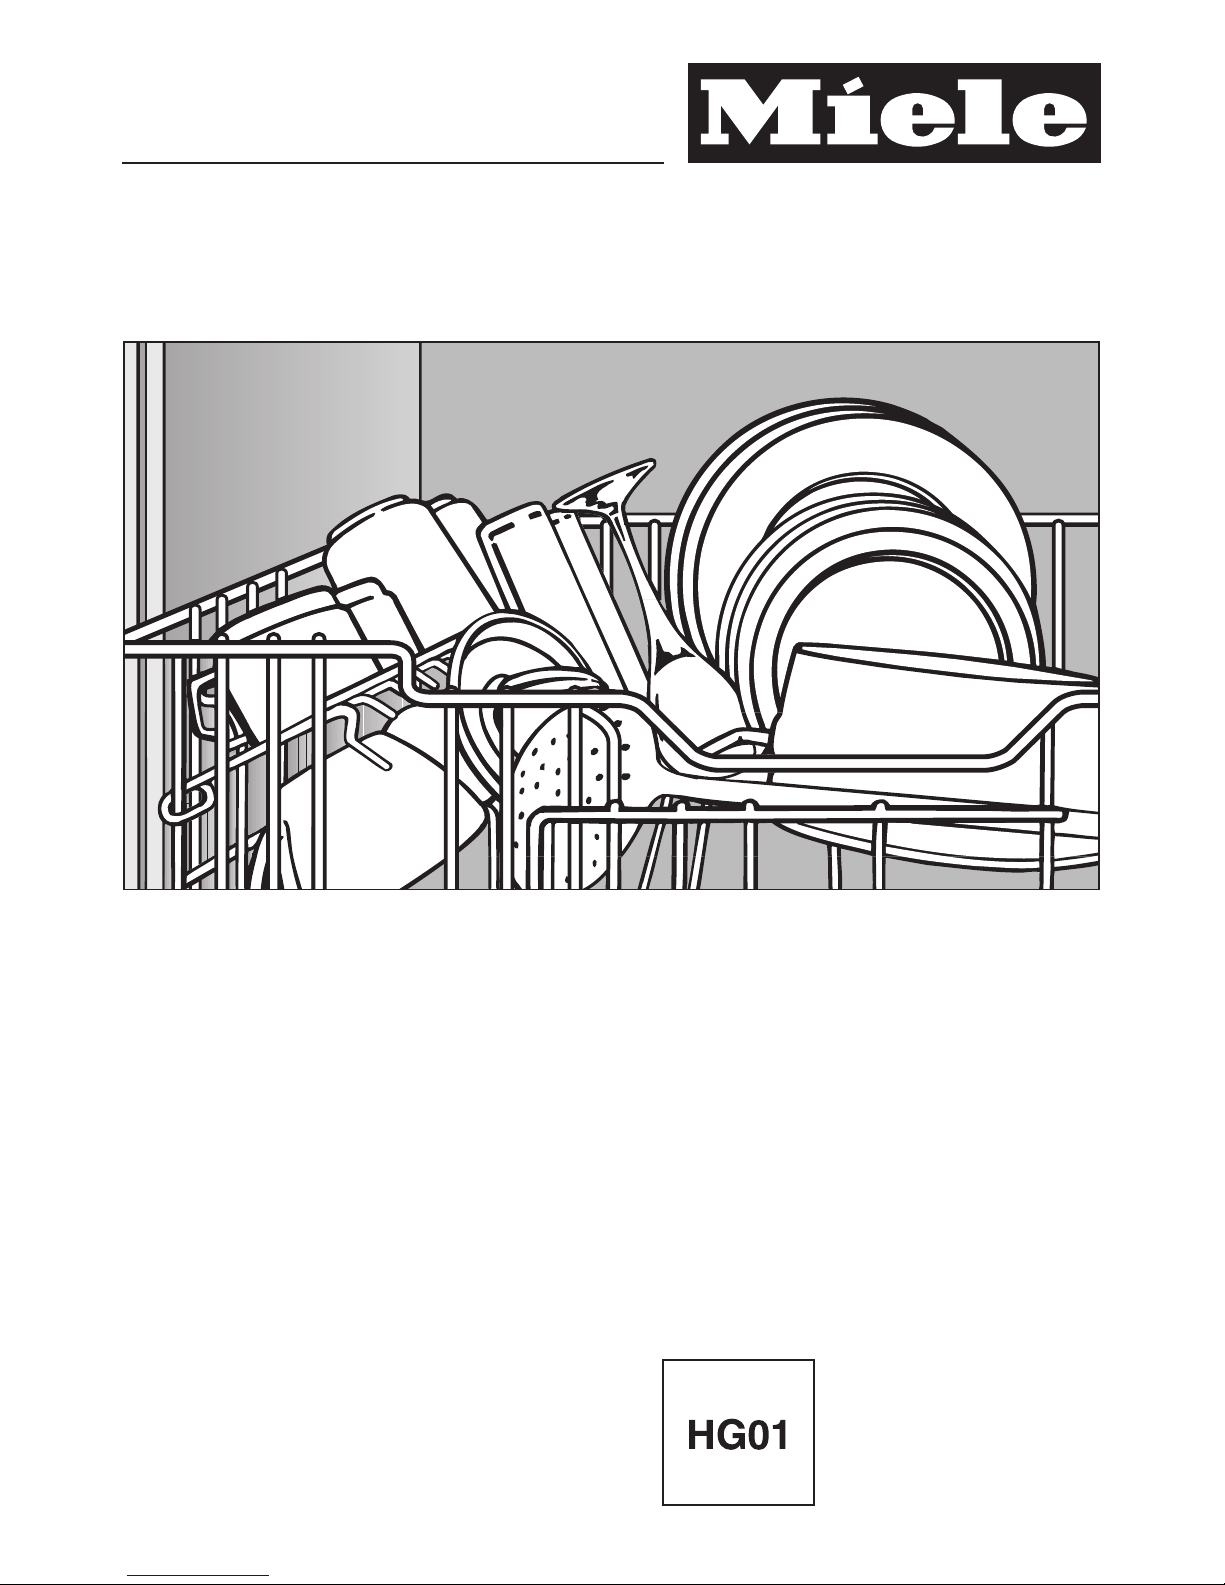
Operating instructions
Touchtronic Premier Plus
To prevent accidents
UV
and machine damage,
read these instructions
before
installation or use. M.-Nr. 05 431 300


IMPORTANT SAFETY INSTRUCTIONS
MESURES DE SÉCURITÉ IMPORTANTES
Caring for the environment
Energy saving washing . . . . . . . . . . . . . . . . . . . . . . . . . . . . . . . . . . . . . . . . . . . . . . 9
Guide to the dishwasher
Wash cabinet . . . . . . . . . . . . . . . . . . . . . . . . . . . . . . . . . . . . . . . . . . . . . . . . . . . . . 10
Control panel . . . . . . . . . . . . . . . . . . . . . . . . . . . . . . . . . . . . . . . . . . . . . . . . . . . . . 11
Before using for the first time
To open the door . . . . . . . . . . . . . . . . . . . . . . . . . . . . . . . . . . . . . . . . . . . . . . . . . . 12
To close the door . . . . . . . . . . . . . . . . . . . . . . . . . . . . . . . . . . . . . . . . . . . . . . . . . . 12
Child Safety Lock. . . . . . . . . . . . . . . . . . . . . . . . . . . . . . . . . . . . . . . . . . . . . . . . . . 12
Water softener . . . . . . . . . . . . . . . . . . . . . . . . . . . . . . . . . . . . . . . . . . . . . . . . . . . . 13
Salt indicator . . . . . . . . . . . . . . . . . . . . . . . . . . . . . . . . . . . . . . . . . . . . . . . . . . . . . 15
Rinse aid . . . . . . . . . . . . . . . . . . . . . . . . . . . . . . . . . . . . . . . . . . . . . . . . . . . . . . . . 16
Adding rinse aid . . . . . . . . . . . . . . . . . . . . . . . . . . . . . . . . . . . . . . . . . . . . . . . . . . 16
Adjusting the dosage. . . . . . . . . . . . . . . . . . . . . . . . . . . . . . . . . . . . . . . . . . . . . . . 17
Rinse aid indicator . . . . . . . . . . . . . . . . . . . . . . . . . . . . . . . . . . . . . . . . . . . . . . . . . 17
Loading the dishwasher
Items not recommended for dishwashing . . . . . . . . . . . . . . . . . . . . . . . . . . . . . . . 19
Cutlery tray (SC units) . . . . . . . . . . . . . . . . . . . . . . . . . . . . . . . . . . . . . . . . . . . . . . 20
Upper basket . . . . . . . . . . . . . . . . . . . . . . . . . . . . . . . . . . . . . . . . . . . . . . . . . . . . . 21
Adjusting the upper basket . . . . . . . . . . . . . . . . . . . . . . . . . . . . . . . . . . . . . . . 21
Adjustable cup racks . . . . . . . . . . . . . . . . . . . . . . . . . . . . . . . . . . . . . . . . . . . . 22
Coffee bar. . . . . . . . . . . . . . . . . . . . . . . . . . . . . . . . . . . . . . . . . . . . . . . . . . . . . 22
Lower basket . . . . . . . . . . . . . . . . . . . . . . . . . . . . . . . . . . . . . . . . . . . . . . . . . . . . . 23
Lower basket inserts
Removing an insert. . . . . . . . . . . . . . . . . . . . . . . . . . . . . . . . . . . . . . . . . . . . . . 24
Inserting an insert . . . . . . . . . . . . . . . . . . . . . . . . . . . . . . . . . . . . . . . . . . . . . . . 24
Foldable spike insert. . . . . . . . . . . . . . . . . . . . . . . . . . . . . . . . . . . . . . . . . . . . . 25
StemGuard . . . . . . . . . . . . . . . . . . . . . . . . . . . . . . . . . . . . . . . . . . . . . . . . . . . . 26
Glassware insert . . . . . . . . . . . . . . . . . . . . . . . . . . . . . . . . . . . . . . . . . . . . . . . . 27
Bottle holder . . . . . . . . . . . . . . . . . . . . . . . . . . . . . . . . . . . . . . . . . . . . . . . . . . . 27
Basket accessories
Contents
3

Operation
Adding detergent. . . . . . . . . . . . . . . . . . . . . . . . . . . . . . . . . . . . . . . . . . . . . . . . . . 29
Running the dishwasher . . . . . . . . . . . . . . . . . . . . . . . . . . . . . . . . . . . . . . . . . . . . 30
Program sequence indicator (14) . . . . . . . . . . . . . . . . . . . . . . . . . . . . . . . . . . . . . 31
Time display (18) . . . . . . . . . . . . . . . . . . . . . . . . . . . . . . . . . . . . . . . . . . . . . . . . . . 31
At the end of a program. . . . . . . . . . . . . . . . . . . . . . . . . . . . . . . . . . . . . . . . . . . . . 31
Interrupting a program. . . . . . . . . . . . . . . . . . . . . . . . . . . . . . . . . . . . . . . . . . . . . . 32
Changing a program . . . . . . . . . . . . . . . . . . . . . . . . . . . . . . . . . . . . . . . . . . . . . . . 32
Program guide . . . . . . . . . . . . . . . . . . . . . . . . . . . . . . . . . . . . . . . . . . . . . . . . . . . . 33
Additional features. . . . . . . . . . . . . . . . . . . . . . . . . . . . . . . . . . . . . . . . . . . . . . . . . 34
"Top Solo" (20). . . . . . . . . . . . . . . . . . . . . . . . . . . . . . . . . . . . . . . . . . . . . . . . . . 34
Delay Start (19). . . . . . . . . . . . . . . . . . . . . . . . . . . . . . . . . . . . . . . . . . . . . . . . . 35
Extended drying . . . . . . . . . . . . . . . . . . . . . . . . . . . . . . . . . . . . . . . . . . . . . . . . 37
Frequently asked questions
After sales service
Transport
User Maintenance Instructions
"Filter" indicator light . . . . . . . . . . . . . . . . . . . . . . . . . . . . . . . . . . . . . . . . . . . . . . . 48
Cleaning the filter in the wash cabinet. . . . . . . . . . . . . . . . . . . . . . . . . . . . . . . . . . 48
Cleaning the spray arms . . . . . . . . . . . . . . . . . . . . . . . . . . . . . . . . . . . . . . . . . . . . 50
Cleaning the wash cabinet . . . . . . . . . . . . . . . . . . . . . . . . . . . . . . . . . . . . . . . . . . 51
Cleaning the door and door seal . . . . . . . . . . . . . . . . . . . . . . . . . . . . . . . . . . . . . . 51
Cleaning the exterior . . . . . . . . . . . . . . . . . . . . . . . . . . . . . . . . . . . . . . . . . . . . . . . 51
Cleaning the water inlet filter . . . . . . . . . . . . . . . . . . . . . . . . . . . . . . . . . . . . . . . . . 52
Cleaning the drain pump and non-return valve. . . . . . . . . . . . . . . . . . . . . . . . . . . 53
Contents
4

WARNING –
When using your dishwasher, follow
basic precautions, including the fol
-
lowing:
Read all instructions before installa
-
tion or use of the dishwasher to pre
-
vent injury and machine damage.
The manufacturer cannot be held re
sponsible for damage or injury
caused by improper use of this appliance.
Use the dishwasher only for its intended purpose. This appliance is
intended for residential use only.
Keep these operating instructions in
a safe place and pass them on to
any future user.
Electrical safety
Before installation make sure that
the voltage and frequency listed on
the data plate correspond with the
household electrical supply. This data
must correspond to prevent injury and
machine damage. Consult a qualified
electrician if in doubt.
Before installation or service, dis
-
connect the power supply to the
work area by unplugging the unit, “trip
ping” the circuit breaker or removing
the fuse.
Do not use an extension cord to
connect this appliance to electric
ity. Extension cords do not guarantee
the required safety of the appliance
(e.g. danger of overheating).
Be certain your appliance is prop
-
erly installed and grounded by a
qualified technician. To guarantee the
electrical safety of this appliance, conti
nuity must exist between the appliance
and an effective grounding system. It is
imperative that this basic safety require
ment be met. If there is any doubt, have
the electrical system of the house
checked by a qualified electrician. The
manufacturer cannot be held responsible for damages caused by the lack, or
inadequacy of, an effective grounding
system.
Installation
Installation and repair work should
be by a Miele authorized service
technician. Work by unqualified persons could be dangerous and could
void the warranty.
This equipment is not designed for
maritime use or for use in mobile
installations such as caravans or air
craft. However, under certain conditions
it may be possible for an installation in
these applications. Please contact the
nearest Miele dealer or the Miele Tech
nical Service Department with specific
requirements.
Inspect the dishwasher for ship
-
ping damage. Do not install or op
erate a damaged unit. Contact the
place of purchase.
IMPORTANT SAFETY INSTRUCTIONS
5

Ensure that any plastic wrappings,
bags etc. are disposed of safely
and kept out of the reach of babies and
young children. Danger of suffocation!
This dishwasher should only be in
-
stalled under a continuous
countertop secured to adjacent
cabinetry.
Do not install this dishwasher be
-
neath a cooking surface or oven.
Do not, under any circumstances
cut the intake hose or submerge in
liquid. This hose contains electrical
components that could cause injury or
property damage if cut or submerged.
Use
Only use the dishwasher if all pan-
els are properly in place.
Do not tamper with the controls.
To reduce the risk of injury, do not
allow children to play in, on, or
near the dishwasher.
Do not abuse, sit, or stand on the
door or baskets of the dishwasher.
Under certain conditions, hydrogen
gas may be produced in a hot
water system that has not been used
for two weeks or more. HYDROGEN
GAS IS EXPLOSIVE. If the hot water
system has not been used for such a
period, turn on all hot water faucets and
let water flow from each for several min
utes before using the dishwasher. This
will release any accumulated hydrogen
gas. Do not smoke or use an open
flame during this time.
Do not wash plastic items unless
they are labeled "dishwasher safe"
or the equivalent. For items not labeled,
check the manufacturer’s recommenda
-
tions.
When loading tableware, place
sharp items away from the door
seal to prevent damage to the seal.
Load knives pointing downwards to
prevent injuries.
Only use detergents and rinse aids
recommended for residential dish
washers. Keep all detergents and rinse
aids out of the reach of children.
Do not drink water from the dishwasher! Harmful residues could be
present.
For dishwashers with visible heating
element
Do not touch the heating element
during or immediately after use.
Disposal of an appliance
If the appliance is removed from its
installation and will not be used,
the door to the wash cabinet should be
removed to prevent children from being
locked in the machine. When discard
ing an old dishwasher, unplug it from
the power outlet, remove the door to the
wash cabinet and cut off the power
cord.
SAVE THESE
INSTRUCTIONS
IMPORTANT SAFETY INSTRUCTIONS
6

AVERTISSEMENT –
Au moment d’utiliser votre
lave-vaisselle, veuillez observer
toutes les mesures de sécurité de
base.
Cet appareil électroménager est conforme à tous les règlements et codes
sur la sécurité. Pour éviter de vous
blesser et d’endommager l’appareil,
veuillez lire soigneusement les in
-
structions sur l’utilisation.
N’utilisez le lave vaiselle que pour
laver la vaiselle.
Le fabricant ne peut être tenu
responsable des dommages ou
blessures causés par une utilisation
inadéquate ou par des utilisations
autres que celles auxquelles
l’appareil est destiné.
Les réparations doivent être effec
-
tuées uniquement par une per
-
sonne compétente. Débrancher l’appa
reil de la prise de courant avant d’en
faire l’entretien (enlever la fiche de la
prise ou fermer le disjoncteur).
Installer uniquement ce lave-vais
-
selle sous un comptoir continu qui
est fixé à des meubles adjacents.
Vous devez mettre le lave-vaisselle
à la terre. Installer le lave-vaisselle
en observant les instructions pour l’ins
-
tallation ci-jointes.
Utiliser des détersifs pour les
lave-vaiselle ménagers seulement
.
Utiliser uniquement des détersifs et des
produits de rinçage recommandés pour
les lave-vaisselle.
Ne pas utiliser votre lave-vaisselle
à moins que tous les panneaux
soient bien en place.
Ne pas permettre aux enfants de
jouer dans ou sur le lave-vaisselle.
Ranger tous les détersifs et pro
-
duits de rinçage hors de la portée
des enfants.
Ne pas modifier
les commandes.
Ne pas boire l’eau du meuble de
lavage.
MESURES DE SÉCURITÉ IMPORTANTES
7

Au moment de remplir le lave-vais
-
selle :
–
Mettre les articles pointus de
manière à ce qu’ils n’endommagent
pas le seau étanche de la porte.
–
Mettre le tranchant des couteaux
vers le bas afin de réduir les risques
de blessure.
Ne pas laver les articles en plas
-
tique à moins qu’ils n’indiquent "Va
au lave-vaisselle" ou l’équivalent. Véri
fier les recommandations du fabricant
poir les articles non étiquetés.
Dans certaines conditions, un sys-
tème d’eau chaude qui n’a pas été
utilisé pendant plus de deux semaines,
peut dégager de l’azote.
L’AZOTE EST EXPLOSIF. Si le système
d’eau chaude n’a pas été utilisé pendant une telle période de temps, ouvrir
tous les robinets d’eau chaude et laisser l’eau couler pendant plusieurs minutes avant d’utiliser le lave-vaisselle.
Ceci dissipera tout l’azote accumulé.
Ne pas fumer ni utiliser une flamme nue
durant ce temps.
Ne pas abuser et ne pas vous as
-
seoir ni vous tenir sur la porte ou
sur les paniers du lave-vaisselle.
Enlever la porte et couper le cor
-
don du lave-vaisselle avant de l’en
lever aux déchets afin d’empêcher les
enfants de se blesser ou de s’enfermer
dans l’appareil par accident.
Lave-vaiselle avec l’élément
chauffant
Ne touchez pas l’élément chauffant
pendant le fonctionnement de l’ap
-
pareil ou immédiatement après.
CONSERVER CES
INSTRUCTIONS
MESURES DE SÉCURITÉ IMPORTANTES
8

Energy saving washing
This dishwasher is exceptionally eco
-
nomical in the use of water and electric
-
ity. For best results follow these tips:
^
For lowest energy consumption and
the gentlest washing of china and
crystal, connect the dishwasher to a
cold water source.
^
For fastest possible wash times, yet
higher energy consumption, connect
the dishwasher to a hot water source.
^
Make full use of the baskets without
overloading for the most economical
washing.
^ Choose a program that best suits the
degree of soiling and the type of
dishes being washed.
^ For small loads:
Select the "Top Solo" feature (see
"Additional features").
^ If baskets are only half full, select the
"Economy" program.
^
Use the correct amounts of detergent
and rinse aid.
Caring for the environment
9
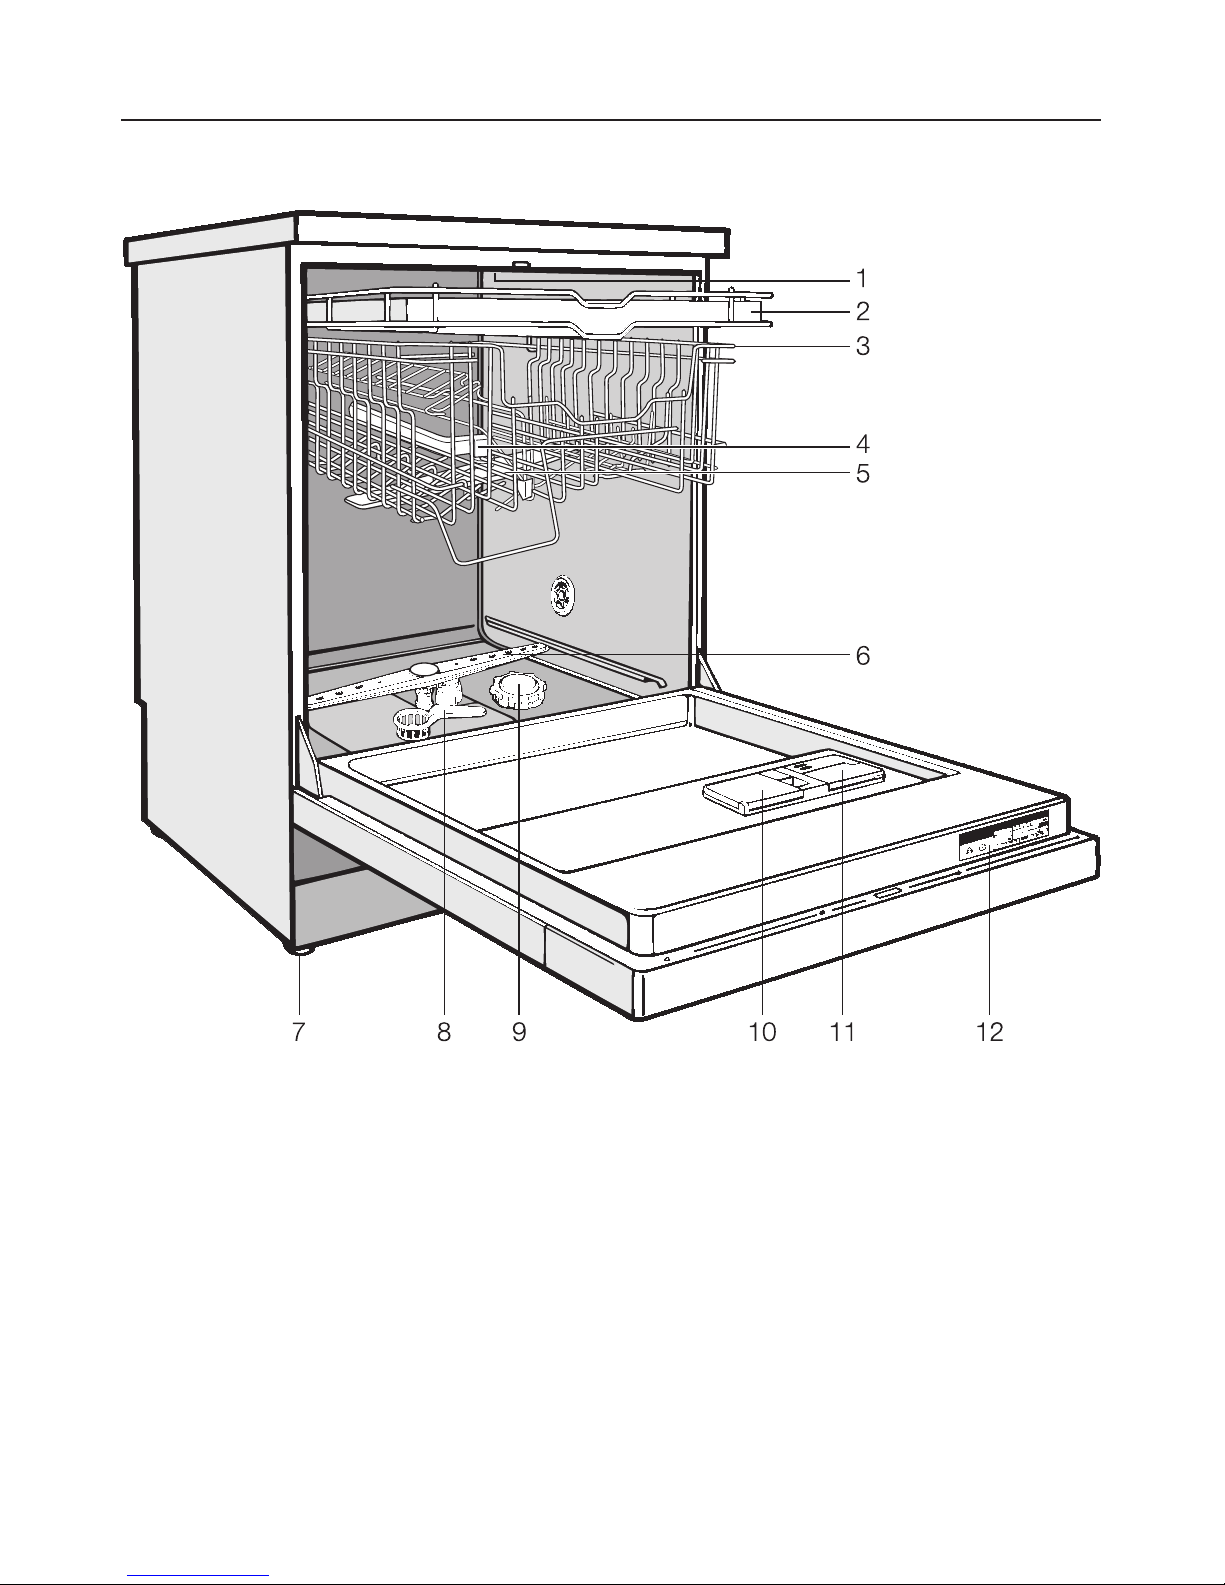
Wash cabinet
1 Upper spray arm (not visible)
2 Cutlery tray
3 Upper basket
4 Water feed for
the middle spray arm
5 Middle spray arm
6 Lower spray arm
7 Four height adjustable feet
8 Triple Filter System
9 Salt reservoir
10 Detergent dispenser
11 Rinse aid reservoir
(with dosage selector)
12 Data plate
Guide to the dishwasher
10
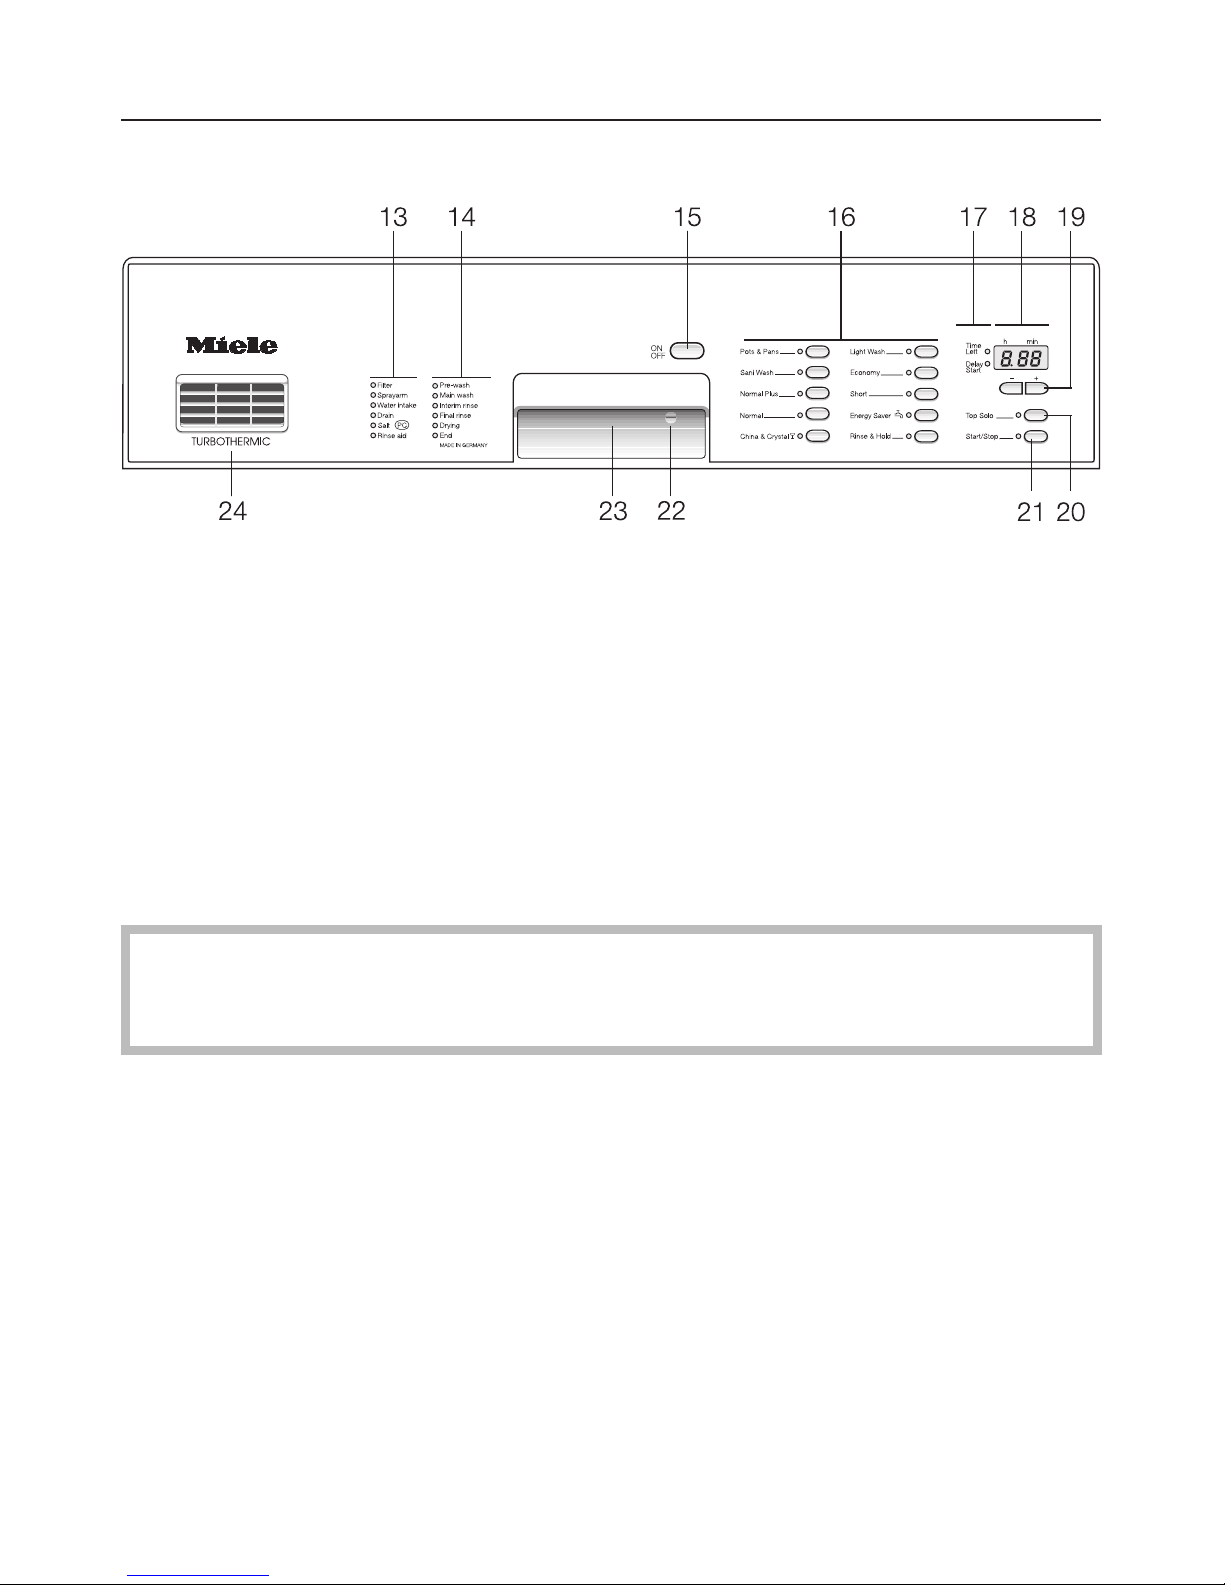
Control panel
13 Check/Refill indicators
14 Program sequence display
15 "On/Off" button
16 Program list / indicators
17 "Time left"/"Delay Start" indicators
18 Time display
19 Plus / Minus time buttons
20 "Top solo" button
21 "Start/Stop" button
22 Child Safety Lock
23 Door release
24 Drying vent
Every dishwasher is tested before leaving the factory. Any water remaining in
the machine is from these tests and does not indicate that the machine has
been used.
Guide to the dishwasher
11

To open the door
^ Press the release catch inside the
door grip.
If the door is opened during operation,
the dishwasher will stop running. Once
the door is closed the program will restart.
To close the door
^ Push the baskets in.
^
Lift the door and push until it clicks
into position.
Child Safety Lock
The yellow key for the Child Safety
Lock is shipped on one of the spikes
at the front of the upper basket. Re
-
move the key before using the dish
-
washer.
The Child Safety Lock is designed to
prevent children from opening the dishwasher.
^
Use the provided key to lock or un
-
lock the dishwasher.
Horizontal:
the door is locked
Vertical:
the door can be opened
Before using for the first time
12

Water softener
To achieve good cleaning results, the
dishwasher needs soft water. Hard
water results in calcium deposits on
dishware and in the dishwasher.
If your tap water hardness is above
8 gr/gal (140 ppm), the water should be
softened. This takes place automati
-
cally in the unit’s integrated water soft
-
ener.
–
Your local water authority will be able
to advise you of the water hardness
level in your area.
– The water softener must be filled with
dishwasher salt for reactivation.
If your water hardness is lower than
8 gr/gal (140 ppm), you do not need to
add dishwasher salt.
If there is a fault, it will help the service
technician to know the hardness of your
local water supply.
^ Enter the water hardness below:
gr/gal (ppm)
Settings
gr/gal* ppm Value shown in
the time display
1
2
3
4**
5
6
7
8
9
10
11
12
13
14
15
16
17
18
19
20
21
22
23
24
25
26
27
28
29
30
31
32
33
34
35
36-70
20
40
50
70
90
110
130
140
160
180
200
220
230
250
270
290
310
320
340
360
380
400
410
430
450
470
490
500
520
540
560
580
590
610
630
650-1260
1
2
3
4
5
6
7
8
9
10
11
12
13
14
15
16
17
18
19
20
21
22
23
24
25
26
27
28
29
30
31
32
33
34
35
36
* US gallons
** 4 gr/gal (70 ppm) is factory preset
Before using for the first time
13
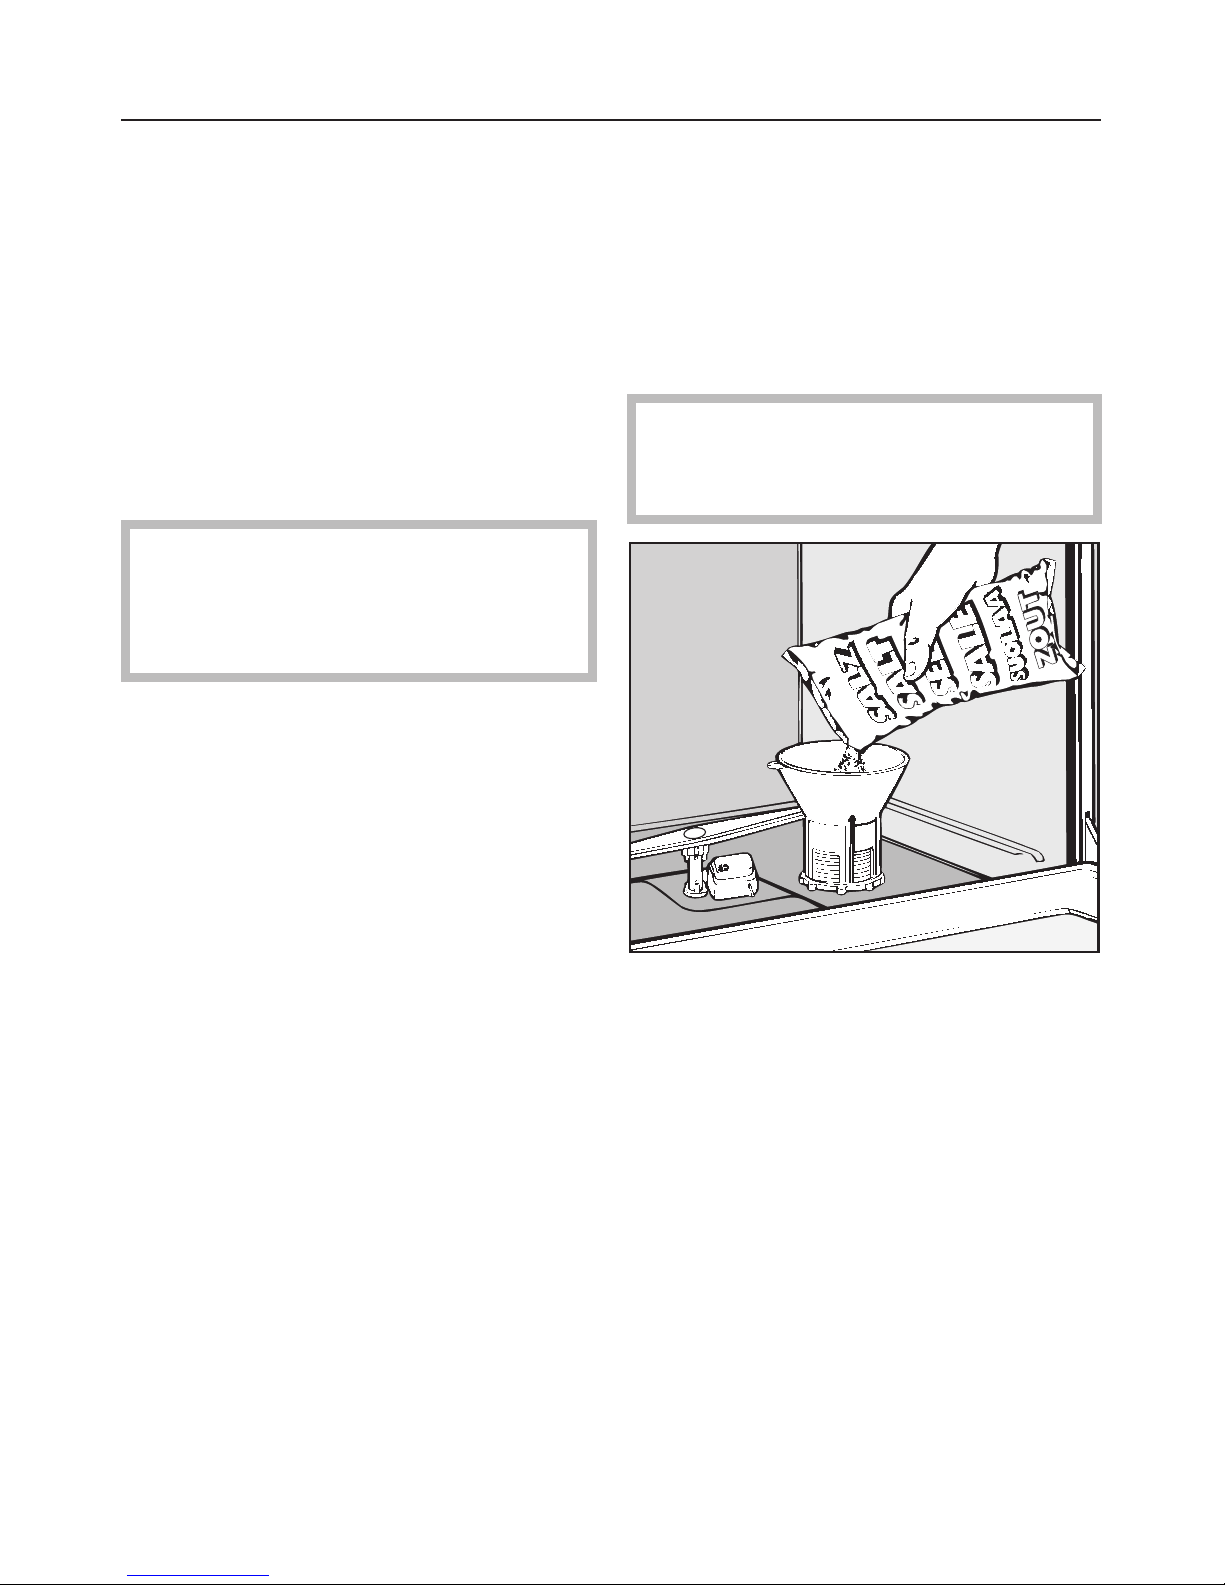
Filling the salt reservoir
If your water hardness level is greater
than 8 gr/gal, the salt reservoir should
be filled before the first use and when
the "Salt" indicator lights.
Only use water softener salt (1 - 4 mm)
grain size; other salts may contain in
soluble additives which can impair the
water softener.
,
Inadvertently filling the salt
reservoir with dishwashing deter
gent will damage the water softener.
To fill the salt reservoir:
^
Remove the lower basket.
^
Unscrew and remove the salt reser
-
voir cap.
^
Place the provided funnel over the
salt reservoir.
Only before adding salt for the first
time, fill the reservoir with approxi
-
mately 2 quarts (2 l) of water.
^
Carefully fill with salt, grain size of
1 - 4 mm. The salt reservoir holds ap
proximately 4.5 lbs (2 kg) of salt. As it
is filled, water will run out.
^
Clean any excess salt from the
threads of the reservoir opening.
^
Screw the cap on firmly.
^
If the dishwasher will not be used im
-
mediately, run the "Rinse & Hold" pro
gram. This will remove any traces of
salt from inside the wash cabinet.
Before using for the first time
14
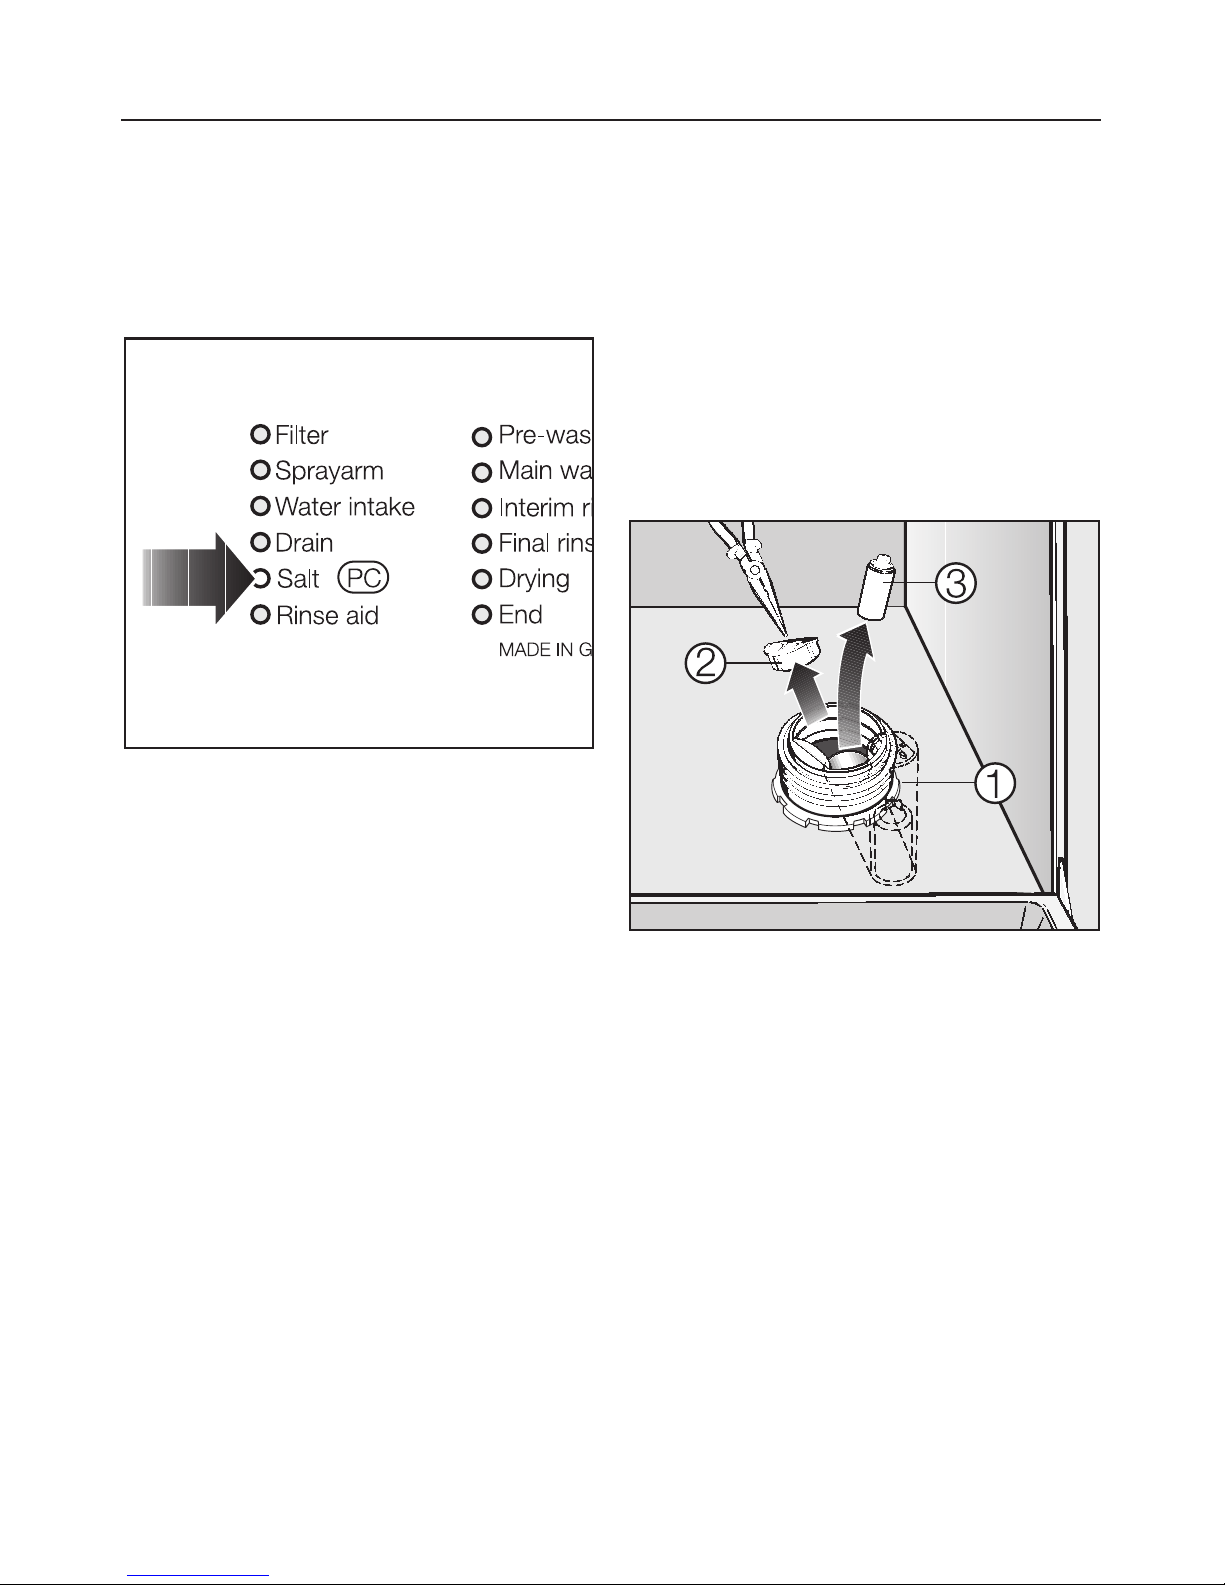
Salt indicator
When the salt reservoir is empty, the
"Salt-PC" indicator will light, indicating
that it should be refilled with reactiva
-
tion salt.
After the reservoir has been filled, the
water softener is automatically reactivated the next time the dishwasher is
started. The "Salt" indicator will light
during this process.
Bypassing the salt indicator
If your water is soft (below 8 gr/gal) the
salt reservoir should not be filled with
salt. The indicator will remain lit and
should be disregarded or bypassed.
^
Remove the salt reservoir cap.
Looking into the salt reservoir, you will
see the top of the float chamber on the
right hand side, a.
^
Using a screwdriver, carefully pivot
the float chamber towards the center
of the reservoir.
^
Using needle nose pliers, first pull the
cap, b, off of the float chamber, then
remove the float, c.
^
Replace the float chamber cap, push
the chamber back into its upright po
sition, and replace the salt reservoir
cap. The indicator should not light.
Before using for the first time
15
Rinse aid
Rinse aid is recommended to prevent
spotting on dishes and glassware.
,
Filling the rinse aid reservoir with
detergent will damage the reservoir.
Only pour rinse aid formulated for
residential dishwashers into the
reservoir.
Adding rinse aid
^
Add rinse aid before the first use and
whenever the "Rise aid" indicator
lights.
^
Press the button in the direction of
the arrow until the flap springs open.
^
Pour liquid rinse aid into the reservoir
until it is visible on the surface of the
screen.
^ Press on the flap until you hear it
click shut. Failure to close it all the
way will allow water to enter the reservoir during the wash program.
^ Wipe up any spilled rinse aid. The
flap will remain closed during normal
operation.
Before using for the first time
16
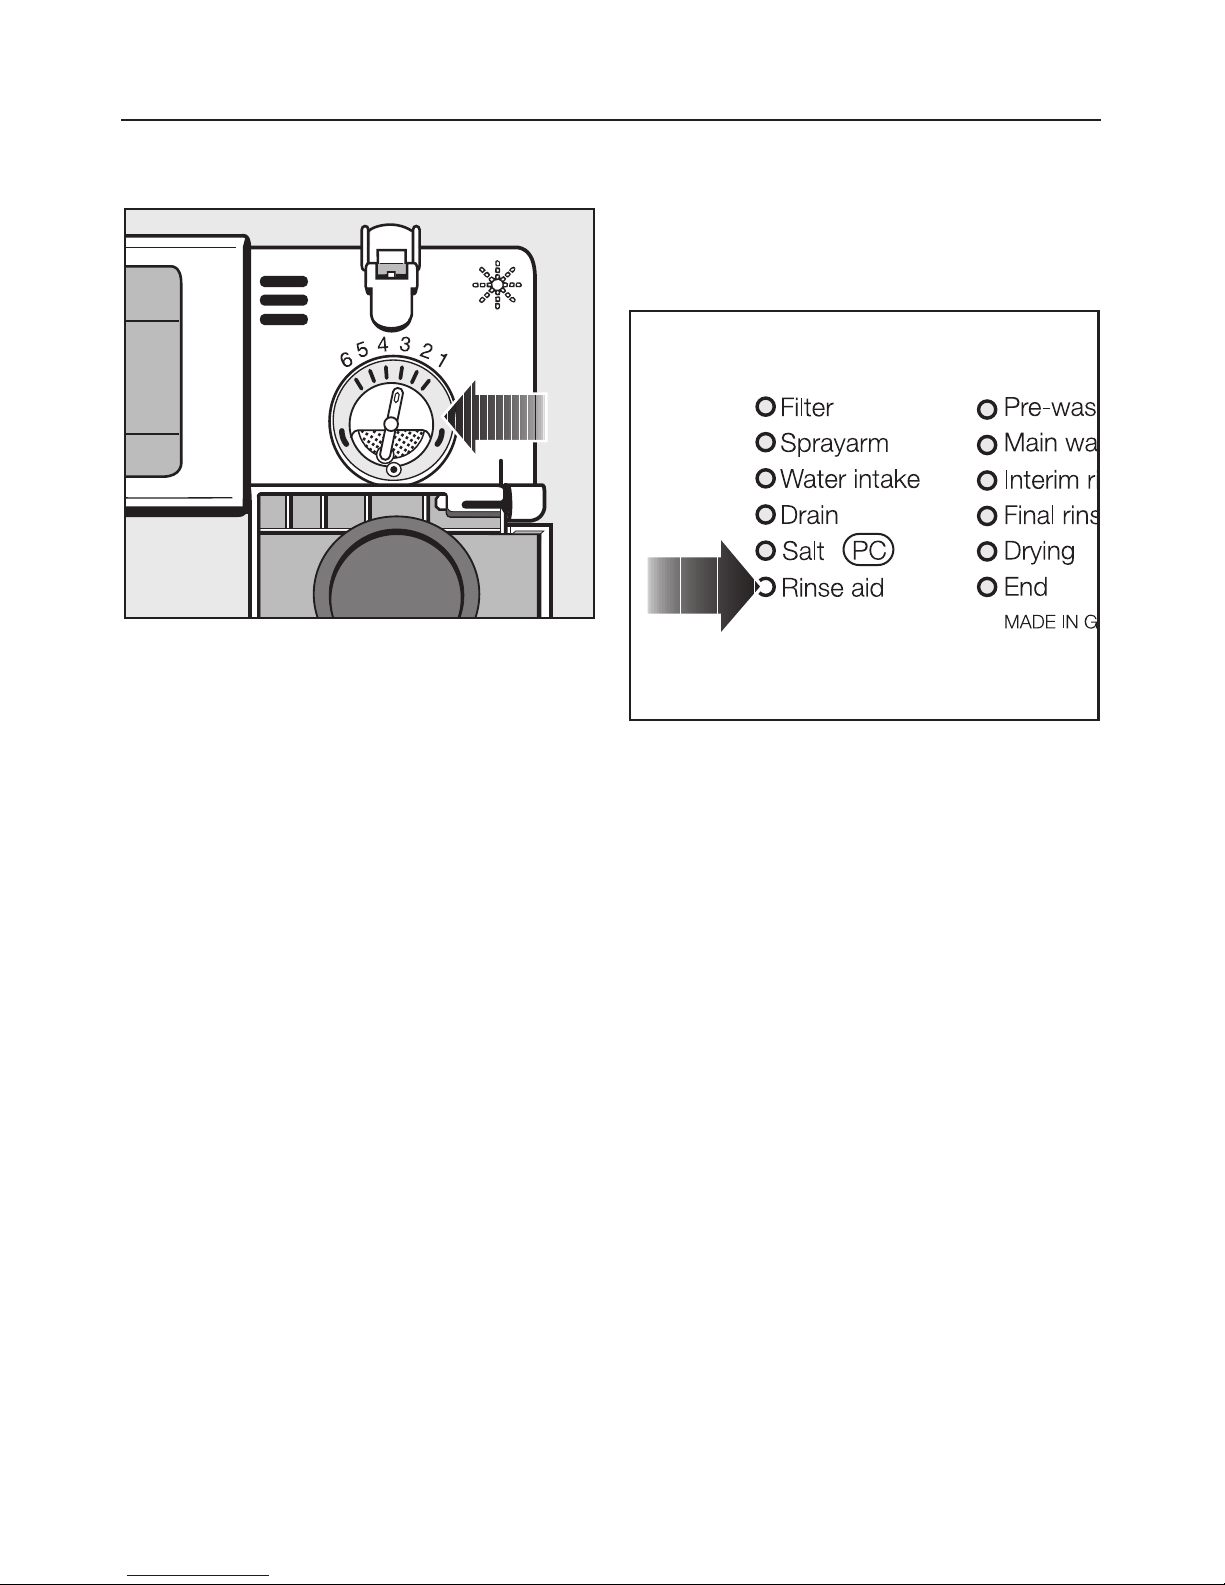
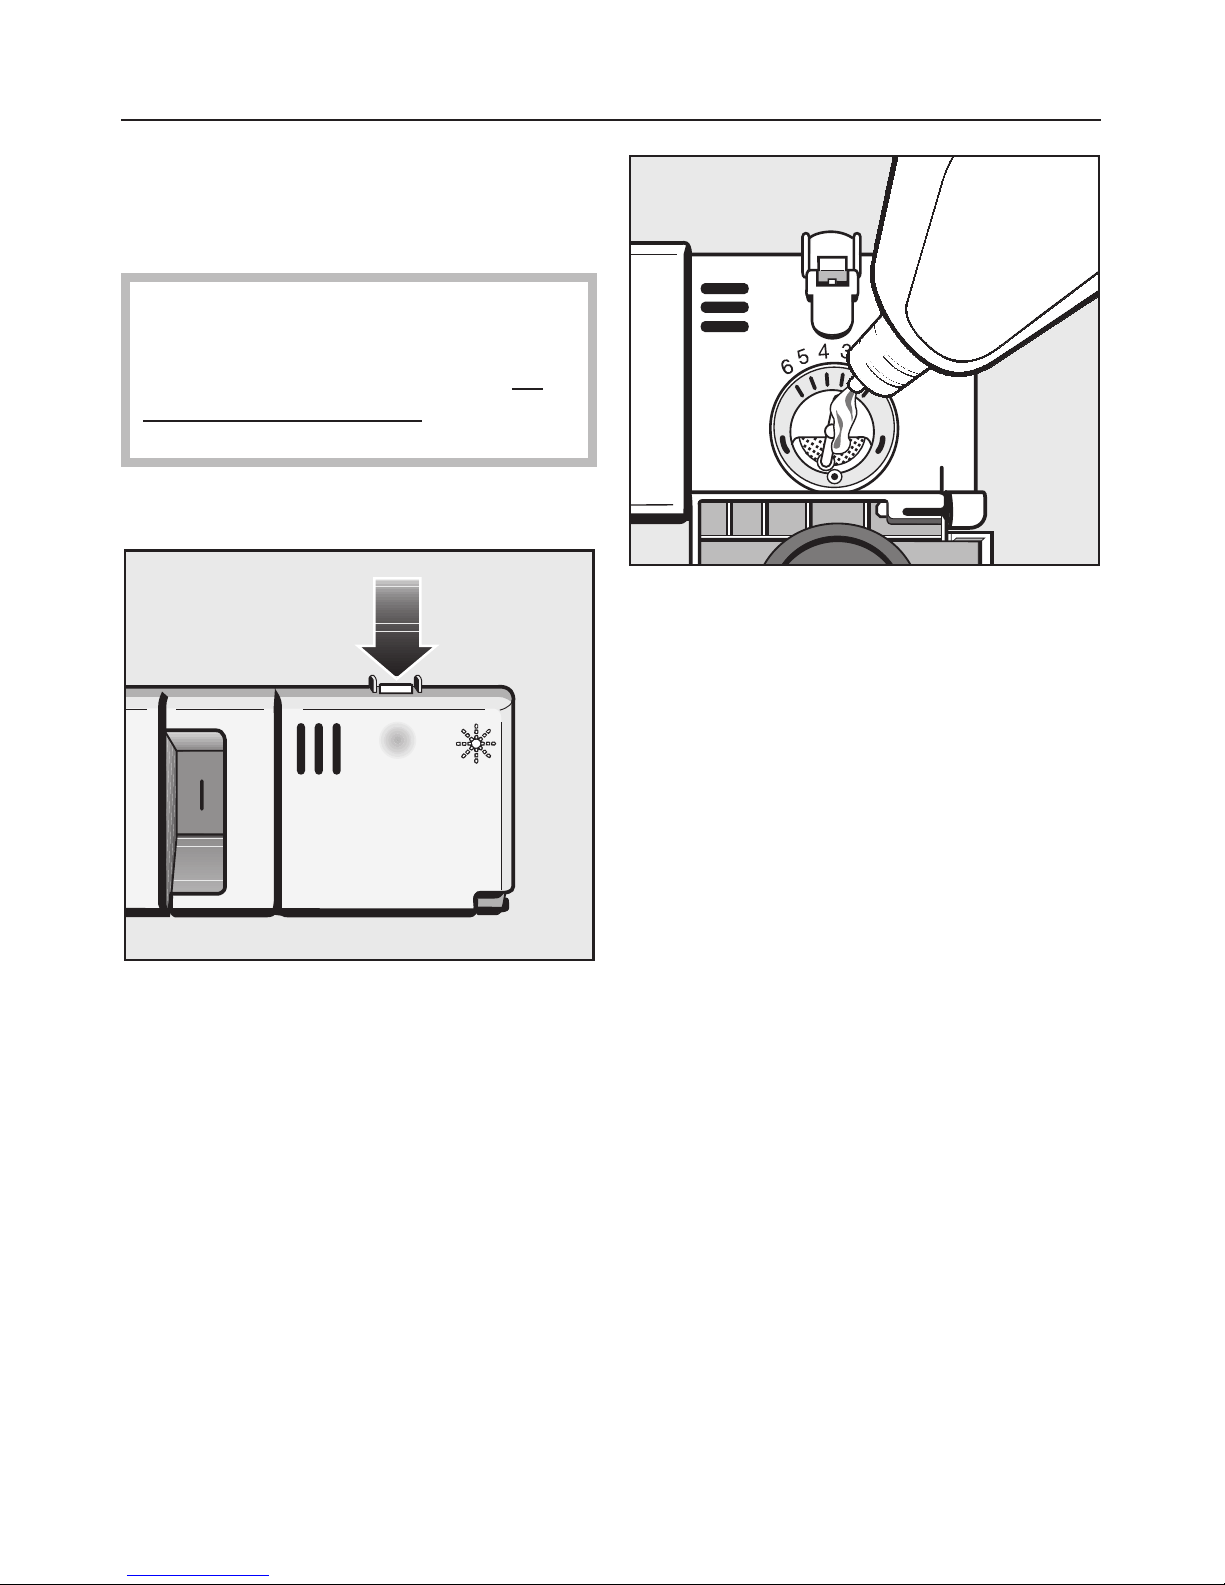
Adjusting the dosage
The dosage selector is preset to 3. This
dispenses approximately 3 ml of rinse
aid per program. It can be adjusted
from 1 to 6.
^ Use a higher setting if spots appear
on dry glassware.
^ Use a lower setting if streaking ap-
pears on dishes or glasses.
Rinse aid indicator
The rinse aid indicator on the control
panel will light when the rinse aid reser
-
voir needs refilling.
When the indicator first comes on, there
will be enough rinse aid left for 2 - 3
washes.
Before using for the first time
17
 Loading...