

Page 1
Operating instructions
for vented tumble dryer
T 8322
To avoid the risk of accidents
or damage to the appliance
it is essential to read these
instructions before it is installed
and used for the first time.
en-GB
M.-Nr. 07 127 330
Page 2
Caring for the environment
Disposal of the packing
material
The transport and protective packing
has been selected from materials which
are environmentally friendly for disposal
and can normally be recycled.
Ensure that any plastic wrappings, bags
etc. are disposed of safely and kept out
of the reach of babies and young
children. Danger of suffocation!
Rather than just throwing these
materials away, please ensure they are
offered for recycling.
Disposal of your old appliance
Electrical and electronic appliances
often contain materials which, if handled
or disposed of incorrectly, could be
potentially hazardous to human health
and to the environment. They are,
however, essential for the correct
functioning of your appliance. Please
do not therefore dispose of your
appliance with your household waste.
Energy saving tips
To avoid unnecessarily long drying
times and high consumption of energy:
Make sure that your laundry is
–
thoroughly spun before drying.
The higher the spin, the greater the
savings that can be made in energy
and time during drying.
Load according to the optimum
–
amount of laundry recommended for
the programme being used (see
"Programme chart").
Underloading is uneconomical.
Overloading gives a poorer quality of
drying and may cause unnecessary
creasing.
– Make sure the room in which the
dryer is located is well ventilated.
– Make sure the fluff filter is clean
before using the dryer.
– Check all parts of the ventilation
system on a regular basis and
remove any build up of fluff etc.
Please dispose of it at your local
community waste collection / recycling
centre or contact your Dealer for
advice. Ensure that it presents no
danger to children while being stored
for disposal.
2
–
The vent ducting should be as short,
straight and smooth as possible to
minimise any resistance to the air
throughflow.
This helps to reduce running times
and energy consumption levels.
Page 3

Contents
Caring for the environment. . . . . . . . . . . . . . . . . . . . . . . . . . . . . . . . . . . . . . . . . . 2
Warning and Safety instructions . . . . . . . . . . . . . . . . . . . . . . . . . . . . . . . . . . . . . 5
Operating the tumble dryer. . . . . . . . . . . . . . . . . . . . . . . . . . . . . . . . . . . . . . . . . 10
Control panel .....................................................10
Notes on laundry care . . . . . . . . . . . . . . . . . . . . . . . . . . . . . . . . . . . . . . . . . . . . . 12
Care symbols .....................................................12
Tips on drying ....................................................12
How to dry correctly . . . . . . . . . . . . . . . . . . . . . . . . . . . . . . . . . . . . . . . . . . . . . . 13
Brief instructions ..................................................13
Extra options / Delay start. . . . . . . . . . . . . . . . . . . . . . . . . . . . . . . . . . . . . . . . . . 16
Low temperature ..................................................16
Buzzer ..........................................................16
Delay start .......................................................16
Programme chart . . . . . . . . . . . . . . . . . . . . . . . . . . . . . . . . . . . . . . . . . . . . . . . . . 17
Changing the programme sequence . . . . . . . . . . . . . . . . . . . . . . . . . . . . . . . . . 20
Once a programme has started.......................................20
- changing the programme ........................................20
- cancelling the programme and then selecting a different programme .....20
- cancelling the programme and then removing the laundry ..............20
Adding or removing laundry after a programme has started.................20
Time remaining ...................................................20
Electronic system lock . . . . . . . . . . . . . . . . . . . . . . . . . . . . . . . . . . . . . . . . . . . . 21
Cleaning and care . . . . . . . . . . . . . . . . . . . . . . . . . . . . . . . . . . . . . . . . . . . . . . . . 22
Cleaning the fluff filter ..............................................22
Cleaning the grilles in the door opening ................................23
Cleaning the tumble dryer ...........................................23
Problem solving guide . . . . . . . . . . . . . . . . . . . . . . . . . . . . . . . . . . . . . . . . . . . . 24
Check and fault messages ..........................................24
Other problems ...................................................26
Changing the lamp ................................................29
After Sales service. . . . . . . . . . . . . . . . . . . . . . . . . . . . . . . . . . . . . . . . . . . . . . . . 30
Future updates (PC)................................................30
Appliance guarantee ...............................................30
Optional accessories ...............................................30
3
Page 4

Contents
Installation and connection . . . . . . . . . . . . . . . . . . . . . . . . . . . . . . . . . . . . . . . . 31
Frontview........................................................31
Rearview........................................................32
Installation site ....................................................32
Transporting the appliance to its installation site .......................32
Building under a continous worktop / in a kitchen run ...................32
Levelling the appliance...........................................33
Washer-dryer stack ..............................................33
Electrical connection . . . . . . . . . . . . . . . . . . . . . . . . . . . . . . . . . . . . . . . . . . . . . 34
Electrical connection U.K. ...........................................34
Installation - venting . . . . . . . . . . . . . . . . . . . . . . . . . . . . . . . . . . . . . . . . . . . . . . 35
General .........................................................35
Calculating the effective duct length : ..................................36
Installation to the rear, left or right side of the appliance ....................37
Venting systems ...................................................38
a Flexible ducting hose ............................................38
b Plastic piping...................................................40
c Connect directly to a wall vent .....................................41
Washer-dryer stack ................................................42
Consumption data . . . . . . . . . . . . . . . . . . . . . . . . . . . . . . . . . . . . . . . . . . . . . . . . 43
Technical data . . . . . . . . . . . . . . . . . . . . . . . . . . . . . . . . . . . . . . . . . . . . . . . . . . . 44
Programmable functions. . . . . . . . . . . . . . . . . . . . . . . . . . . . . . . . . . . . . . . . . . . 46
Extending the range of the drying levels ................................46
Altering the volume of the buzzer .....................................47
Memory function ..................................................48
Extending the cooling down time......................................49
Clean out airways indicator ..........................................50
Keypad tone......................................................51
Adjusting the dryer's electronics for very soft water .......................52
4
Page 5
It is essential to read these
~
instructions.
This tumble dryer conforms to
current safety requirements.
Inappropriate use can, however, lead
to personal injury and damage to
property.
To avoid the risk of accidents and
damage to the tumble dryer, please
read these instructions carefully
before using it for the first time. They
contain important information on its
safety, installation, use and
maintenance.
Keep these instructions in a safe
place and ensure that new users are
familiar with the content. Pass them
on to any future owner.
Warning and Safety instructions
Correct application
This tumble dryer is only intended
~
for drying fabrics which have been
washed in a water solution, and marked
on the manufacturer's care label as
being suitable for tumble drying.
"Dry cleaning kits" for freshening up
garments in a tumble dryer are
increasingly available on the market. If
using, do so at your own risk, and follow
the instructions provided on the
packaging.
Any other applications may be
dangerous. Miele cannot be held liable
for damage resulting from incorrect or
improper use or operation.
This appliance is not intended for
~
use by persons (including children) with
reduced physical, sensory or mental
capabilities, or lack of experience or
knowledge, unless they are supervised
whilst using it or have been shown how
to use it by a person responsible for
their safety.
Safety with children
Keep children away from the tumble
~
dryer at all times. It is not a toy! To avoid
the risk of injury do not allow them to
play on or near it or to play with its
controls. Supervise children whilst you
are using it.
Older children may only use it if its
~
operation has been clearly explained to
them, and they are able to use it safely,
recognising the dangers of incorrect
use.
5
Page 6

Warning and Safety instructions
Technical safety
Before setting up the tumble dryer,
~
check it for any externally visible
damage.
Do not install or use a damaged tumble
dryer.
Before connecting the tumble dryer,
~
ensure that the connection data on the
data plate (voltage and connected
load) match the mains electricity
supply. If in any doubt, consult a
qualified electrician.
The electrical safety of this tumble
~
dryer can only be guaranteed when
continuity is complete between it and
an effective earthing system which
complies with current local and national
safety regulations. It is most important
that this basic safety requirement is
present and regularly tested, and where
there is any doubt the household wiring
system should be inspected by a
qualified electrician. Miele cannot be
held liable for the consequences of an
inadequate earthing system (e.g.
electric shock).
Do not connect the tumble dryer to
~
the mains electricity supply by an
extension lead. Extension leads do not
guarantee the required safety of the
tumble dryer (e.g. danger of
overheating).
Unauthorised repairs could result in
~
unforeseen dangers for the user, for
which Miele cannot accept liability.
Repairs should only be undertaken by a
Miele approved service technician.
Ensure current is not supplied to the
tumble dryer until after maintenance or
repair work has been carried out.
Faulty components must only be
~
replaced by genuine Miele original
spare parts. Only when these parts are
fitted can the safety standards of the
tumble dryer be guaranteed.
If the connection cable is faulty it
~
must only be replaced by a Miele
approved service technician to protect
the user from danger.
In the event of a fault or for cleaning
~
purposes, the tumble dryer is only
completely isolated from the electricity
supply when:
– it is switched off at the wall socket
and the plug is withdrawn, or
– it is switched off at the mains, or
– the mains fuse is disconnected, or
the screw-out fuse is removed (in
countries where this is applicable).
This tumble dryer may only be used
~
in mobile installations such as ships if a
risk assessment of the installation has
been carried out by a suitably qualified
engineer.
In countries where there are areas
~
which may be subject to infestation by
cockroaches or other vermin, pay
particular attention to keeping the
tumble dryer and its surroundings in a
clean condition at all times. Any
damage which may be caused by
cockroaches or other vermin will not be
covered by the guarantee.
Do not make any alterations to the
~
tumble dryer, unless authorised to do
so by Miele.
6
Page 7

Warning and Safety instructions
Correct use
To prevent the risk of fire, the
~
following textiles must not be dried in
this tumble dryer:
items which have not been washed.
–
items, such as workwear, which have
–
not been thoroughly cleaned and
which are still soiled with grease, oil
or other desposits (such as
cosmetics, lotions etc).
If items have not been thoroughly
cleaned there is a danger that these
might ignite when heated, even after
they have been removed from the
dryer at the end of the programme.
– items which have been treated with
inflamable cleaning agents or
contain residues of acetone, alcohol,
benzine, petrol, stain remover,
turpentine, wax, wax remover or other
chemicals (e.g. mops and floor
cloths).
– items which have been splashed with
hair lacquer, hair spray, nail varnish
remover or similar substances.
When washing such heavily soiled
items ensure that you use sufficient
detergent and select a high
temperature. If in doubt, wash the
items several times.
To prevent the risk of fire, the
~
following must not be dried in this
tumble dryer:
fabrics which contain a large
–
proportion of rubber, foam rubber or
rubber-like materials. For example,
products made from latex foam
rubber, shower caps, waterproof
textiles, rubberised articles and items
of clothing and pillows with foam
rubber filling.
items which contain padding or
–
fillings (e.g. pillows, jackets). If these
were damaged the filling could get
out with the risk of igniting in the
dryer.
In many programmes, the heating
~
phase is followed by a cooling down
phase to ensure that the items are not
too hot to handle when you remove
them (this also avoids the danger of the
laundry self-igniting). The programme is
not finished until the cooling down
phase is complete.
Ensure that you always wait until the
end of the programme before removing
the laundry.
Warning: Do not switch the tumble
~
dryer off before the end of the drying
programme. If this was done and the
laundry was then removed immediately,
it could give off a great amount of heat.
Fabric conditioner and similar
~
products must be used according to
the instructions on the manufacturer's
packaging.
7
Page 8

Warning and Safety instructions
The dryer must not be used without
~
the fluff filter in place or if the fluff filter is
damaged in any way.
The fluff filter must be cleaned
~
regularly.
The tumble dryer must not be used
~
without vent ducting in place.
The tumble dryer must not be
~
connected to a chimney or vent flue
which is in use.
Do not install the tumble dryer in a
~
room where there is a risk of frost
occurring. At temperatures around
freezing point the tumble dryer may not
be able to operate properly.
The ambient room temperature should
be between +2°C and +35°C
Check all parts of the extraction
~
system on a regular basis (e.g. wall
vent, external grille, bends in the
ducting etc.) and make sure they are all
free of any hindrance. A build-up of fluff
will prevent a free flow of air through the
system. If the dryer is to be connected
to an existing ducting system, this must
be checked for suitability beforehand.
Adequate ventilation is essential to
~
avoid the danger of asphyxia and
toxic fumes where another appliance
which also uses the room air (e.g. gas,
oil or coal fired heater, continuous flow
or other water heater) is installed in the
same or an adjacent room.
To ensure safe operation, and to
prevent gases given off by these
appliances being drawn back into the
room, an underpressure of 0.04 mbar is
the maximum permissible.
Ventilation can be maintained by:
air inlets in the external wall which
–
cannot be closed or blocked, or
– by fitting a window contact switch
which ensures that the tumble dryer
can only be operated when the
window is opened wide enough.
If in doubt, the advice of a competent
builder must be sought.
The room in which the dryer is
~
installed must be clean and free of dust
and fluff.
Particles of dirt entering the dryer can
lead to blockages occurring.
The exhaust air must not be vented
~
into a chimney or vent flue which is in
use, nor should it be connected to
ducting which ventilates rooms with
fireplaces. It would be dangerous if
smoke or exhaust fumes were drawn
back into the room.
8
Page 9

Warning and Safety instructions
Do not let anyone sit or lean on the
~
door, as this can cause the tumble
dryer to tip up.
Always close the door after use. This
~
way you will avoid the danger of:
children climbing onto or into the
–
dryer or hiding things in it.
pets or other small animals climbing
–
into it.
The tumble dryer must not be hosed
~
down.
Accessories
Only use genuine Miele spare parts
~
and accessories with this appliance.
If non-Miele parts are used, guarantee,
performance and product liability
claims may be invalidated.
Miele cannot be held liable for
damage caused by non-compliance
with these Warning and Safety
instructions.
9
Page 10
Operating the tumble dryer
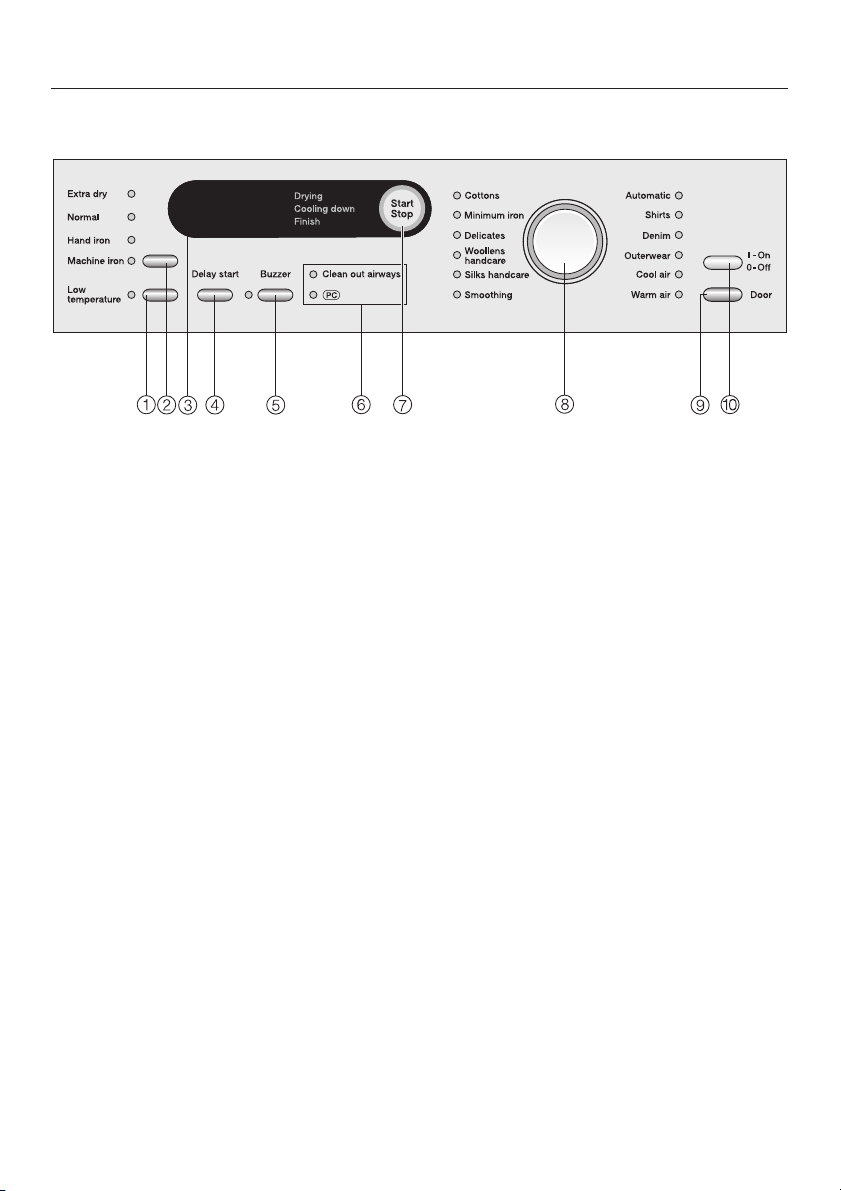
Control panel
a Low temperature button
Delicate fabrics are dried at a lower
temperature.
b Drying level button
with indicator lights
c Display
d Delay start button
This button is used for:
- Selecting the duration of the
Timed drying programmes
- Delaying the start of a programme
e Buzzer button
An audible tone sounds at the end of
the programme.
f Check lights
For a description of these lights see:
"Problem solving guide" / "After sales
service".
g Start/Stop button
For starting the programme selected
and cancelling a programme once it
has started.
The indicator light flashes while a
programme is being selected and
then is on constantly when the
programme has started.
h Programme selector
with indicator lights
i Door button
Pressing this button will open the
door even when the dryer is switched
off at the mains.
j I-On/0-Off button
For switching the dryer on and off.
10
Page 11

Operating the tumble dryer
Display
The following are selected via the
display:
Delay start
–
Duration of the Cool air and Warm air
–
programmes
Programmable functions
–
The display also shows:
Programme duration
–
Programme stage
–
Drying
Cooling down
Finish
– Check and fault messages
Programme duration / Estimated time
remaining
When a programme is selected, the
estimated duration (time remaining) will
appear in the display. Please be aware
that it is only an estimate!
The following factors all affect the
estimated time remaining: residual
moisture content after spinning; type of
fabric; size of load; room temperature;
fluctuations in power supply.
In the same way, the Woollens
handcare, Silks handcare and
Smoothing programmes can finish
earlier than expected if a certain
temperature is reached. This can
happen with particularly fine fabrics,
very small loads or if items were partly
dry beforehand.
Delay start
The delay start time selected will
appear in the display.
After the Start/Stop button has been
pressed, the delay start time will start
counting down.
Once the delay start time has elapsed,
the programme will begin and the
estimated programme duration will
appear in the display.
Programmable functions
The programmable functions can be
used to tailor drying programmes to suit
your individual requirements. In
programming mode, the display will
show the function selected.
The electronics continually assess
conditions in the dryer and adjust the
estimated time remaining for a more
accurate reading. Because of this, the
time displayed can alter during the
course of a programme.
11
Page 12
Notes on laundry care
Care symbols
Before drying check the drying symbol
on the care label. If there are no
symbols, dry at your own risk!
q .........Dryatnormaltemperature
r ............Dryatlowtemperature
s ...............Donottumble dry
Tips on drying
Always observe the maximum
–
recommended loads given in the
"Programme chart". Never overload
the drum.
Overloading can cause unnecessary
wear and tear to the laundry, give a
disappointing drying result and
cause more creasing.
– Do not put soaking wet items into the
tumble dryer. Spin them thoroughly
after washing using the appropriate
spin speed.
–
For delicates and fabrics
following care label r select Low
temperature.
–
Use the Automatic programme for
drying mixed loads of cottons and
minimum iron fabrics.
–
Open jackets
evenly.
–
Woollens and wool blends
become matted and shrink if dried in
a tumble dryer. They can, however,
be partially dried using the Woollens
handcare programme.
so that they can dry
with the
tend to
Down-filled garments
–
which have a tendency to shrink,
depending on the quality of the item.
They can be partially dried using the
Smoothing programme.
Pure linen
–
dried if specified as suitable by the
manufacturer on the care label, as
the surface of the fabric may
otherwise become rough. They can
be partially dried using the
Smoothing programme.
Loopknit garments
–
underwear) tend to shrink depending
on their quality. Do not over-dry these
textiles. When purchasing these
garments it is advisable to take their
shrinkage properties into account.
– For garments made from very fine
weave fibres, such as shirts or
blouses, only use the Shirts or
Delicates programme to avoid
creasing. If in doubt, reduce the load
or use the Smoothing programme.
–
Starched laundry
tumble dryer. To achieve the usual
finish, double the amount of starch
should be used.
–
New dark coloured garments
be washed and dried separately from
light coloured garments to avoid the
danger of colours running and
discolouring other garments or even
plastic components in the appliance.
Dark coloured fibres can also settle
on light coloured garments and vice
versa.
should only be machine
have linings
(e.g. T-shirts and
can be dried in the
should
12
Page 13
How to dry correctly
Brief instructions
The headings numbered (A, B, C ...)
show the operating sequence and can
be used as a brief guide to using your
dryer.
A Sort the laundry
To ensure an even drying result
separate out the washed laundry and
sort it according to:
. . . the drying level required
. . . the type of fibre or weave
. . . size
. . . the moisture content after spinning.
Make sure that objects e.g.
,
detergent dispensing balls have
been removed from the laundry.
They could melt, and cause damage
to the dryer or the laundry.
– Check seams and stitching to ensure
that padding and linings are intact.
– Fasten duvet covers and pillow cases
to prevent small items from being
trapped inside them.
C Load the tumble dryer
Press the Door button to open the
^
door.
Load the laundry loosely into the
^
drum.
Do not overload the drum. See the
"Programme chart" for recommended
loads for each programme.
Overloading can cause unnecessary
wear and tear to the laundry and
give a disappointing drying result.
Before closing the door make sure
^
the fluff filter is correctly positioned.
–
Fasten hooks and eyes etc.
–
Tie fabric belts and apron strings.
–
Sew in or remove underwiring from
bras.
B Turn on the tumble dryer
^
Switch the dryer on by pressing the
I-On/0-Off button in.
The tumble dryer may be switched on
after loading, saving energy as the light
will not come on.
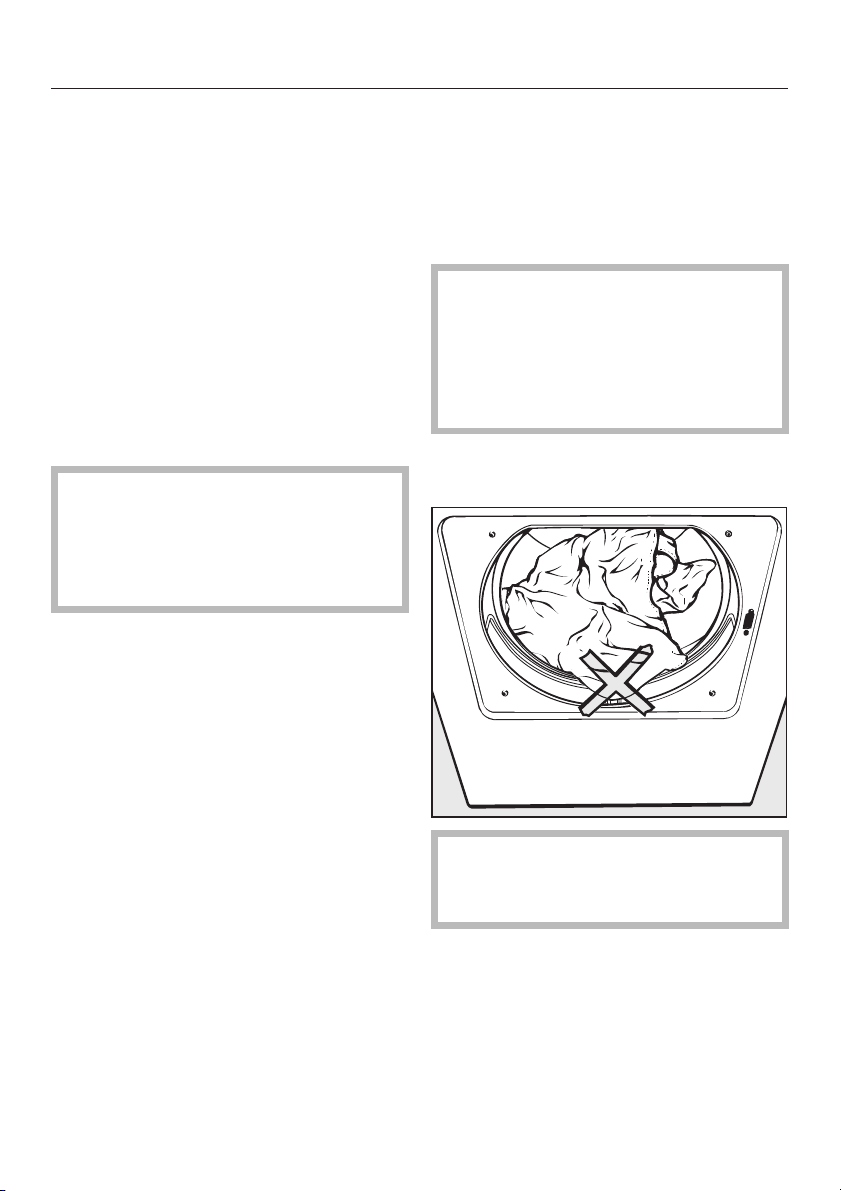
Check the laundry is right inside the
drum so that it cannot get trapped or
damaged when the door is shut.
^
Shut the door either with a gentle
swing, or lean against it and push it
shut.
13
Page 14
How to dry correctly
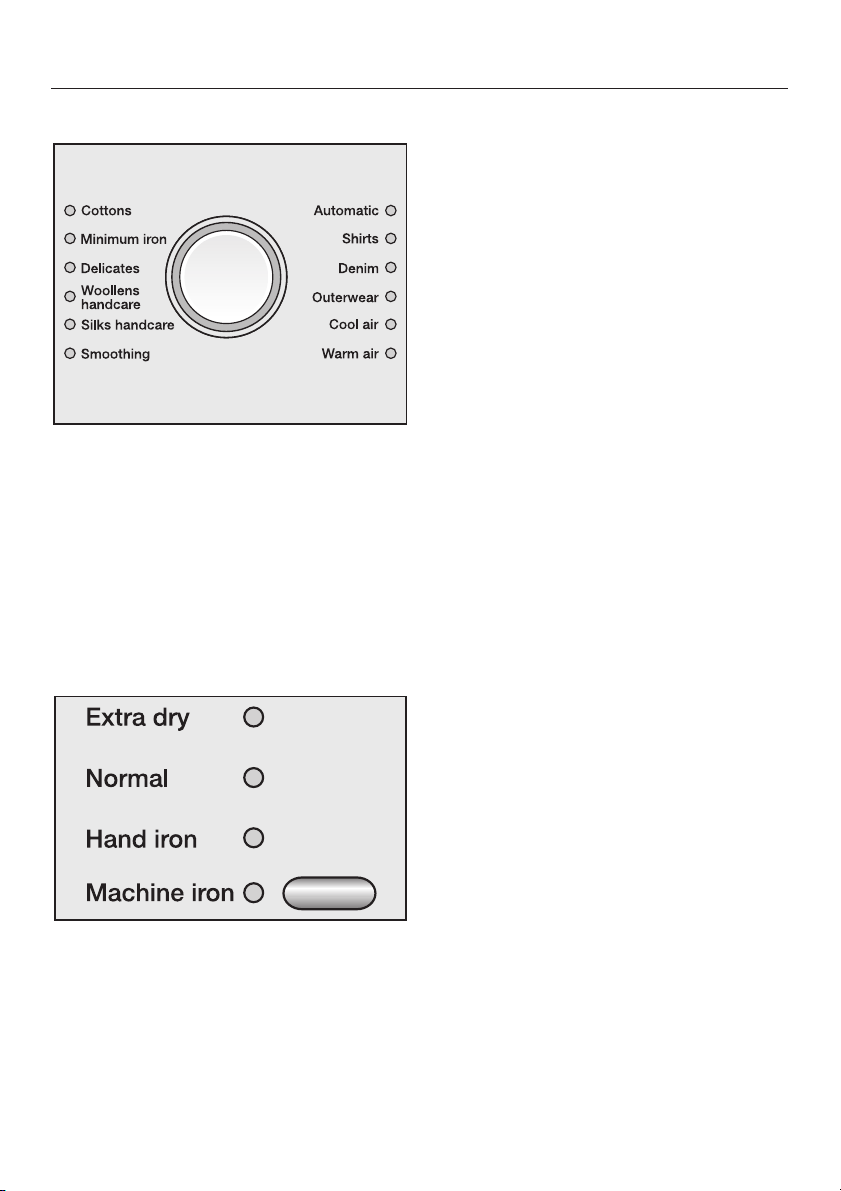
D Select a programme
Select the programme you want.
^
The indicator lamp for the programme
selected will light up.
A drying level or extra option indicator
light may also light up, and the duration
may also be displayed.
Cottons, Minimum iron, Delicates,
Automatic, Shirts, Denim and
Outerwear programmes
Important: Please note that the
programme duration shown in the
display will vary according to the
programme selected (see "Programme
duration/Estimated time remaining").
The Woollens handcare, Silks handcare
and the Smoothing programmes cannot
be changed.
Timed drying programmes
The indicator light for the Delay start
button will flash when the Cool air or
Warm air programme is selected.
Press the Delay start button
^
repeatedly until the required duration
shows in the display.
You can select a duration of 20 minutes
up to 2:00 hours in 10 minute steps.
E Select any Extra options / Delay
start
^ Low temperature, buzzer and delay
start are selected by pressing the
appropriate button (see "Extra options
/ Delay start").
Anti-crease (see next page) is
permanently switched on.
^
Press the Drying level button
repeatedly until the indicator light for
the drying level you want lights up.
Any of the drying levels can be
selected for the Cottons programme. A
more limited range is available when
using other programmes.
14
N.B.: It is not possible to select Delay
start when using the Warm air or Cool
air programme.
Page 15

How to dry correctly
F Start the programme
The Start/Stop button will flash when a
programme is being selected. The
flashing indicates that a programme
can be started.
Press the Start/Stop button.
^
The Start/Stop button will now light up
constantly.
Drying will appear in the display and
the time remaining will start counting
down.
Before the end of a programme
There is a cooling down phase at the
end of the drying sequence (Cooling
down will appear in the display). The
programme will not finish until the
cooling down phase has been
completed.
There is no cooling down phase at the
end of the Woollens handcare, Silks
handcare and Smoothing programmes.
G Remove the laundry when the
programme has finished
0 and Finish will appear in the display
to indicate that the programme has
finished. The buzzer (if selected) will
sound at intervals.
The drum will continue to rotate at
intervals for up to an hour to prevent
laundry creasing, if you do not wish to
remove it immediately (anti-crease).
There is no anti-crease phase at the
end of the Woollens handcare or Silks
handcare programmes.
^ Press the Door button.
^ Open the door.
^ Remove the laundry.
Check that all items have been
removed from the drum. If items are
left in the dryer, they could be
damaged by overdrying when the
dryer is next used.
If the dryer is switched on at the mains
and the door is opened, the drum
lighting will come on. It will go out a few
minutes later to save energy.
^
Switch the dryer off by pressing the
l-On/0-Off button.
^
After every cycle, remove the fluff
from the fluff filter in the door.
^
Close the door.
15
Page 16
Extra options / Delay start
Low temperature
For all delicate or minimum iron
fabrics with the r symbol on the care
label (e.g. acrylic garments).
The programme duration is longer.
–
On some programmes Low
–
temperature is a standard part of the
programme and so cannot be
deselected.
Buzzer
A buzzer sounds (at intervals for a
maximum of 1 hr) to let you know the
programme has finished.
The buzzer will still sound if there is a
fault, even if it has been switched off.
Delay start
The start of a programme can be
delayed by 30 minutes up to 24
hours.
After selecting a programme:
^
Press the Delay start button
repeatedly until the required delay
period shows in the display.
–
The Delay start indicator light will
flash.
–
Times of:
up to 10^ are selected in 30 minute
steps
more than 10^ in 1 hour steps
To begin delay start
Press the Start/Stop button.
^
The Delay start indicator light will
–
light up constantly.
The delay start time counts down
towards the start of the programme as
follows:
more than 10^ by the hour
–
less than 10^ in minutes
–
The drum will turn briefly every hour to
help prevent creasing.
While the delay start time is counting
down, you can still add laundry to the
drum:
^ Switch the dryer off.
^ Open the door and add the laundry.
^ Close the door and switch the dryer
back on again.
To cancel/alter delay start
^
Press the Start/Stop button.
This cancels delay start.
^
To alter the delay start time, press the
Delay start button repeatedly until the
required delay period shows in the
display.
^
Press the Start/Stop button.
The altered delay start time will start
counting down from the beginning
again.
–
If you keep the Delay start button
pressed in, the time will continue to
increase up to 24^.
16
Page 17
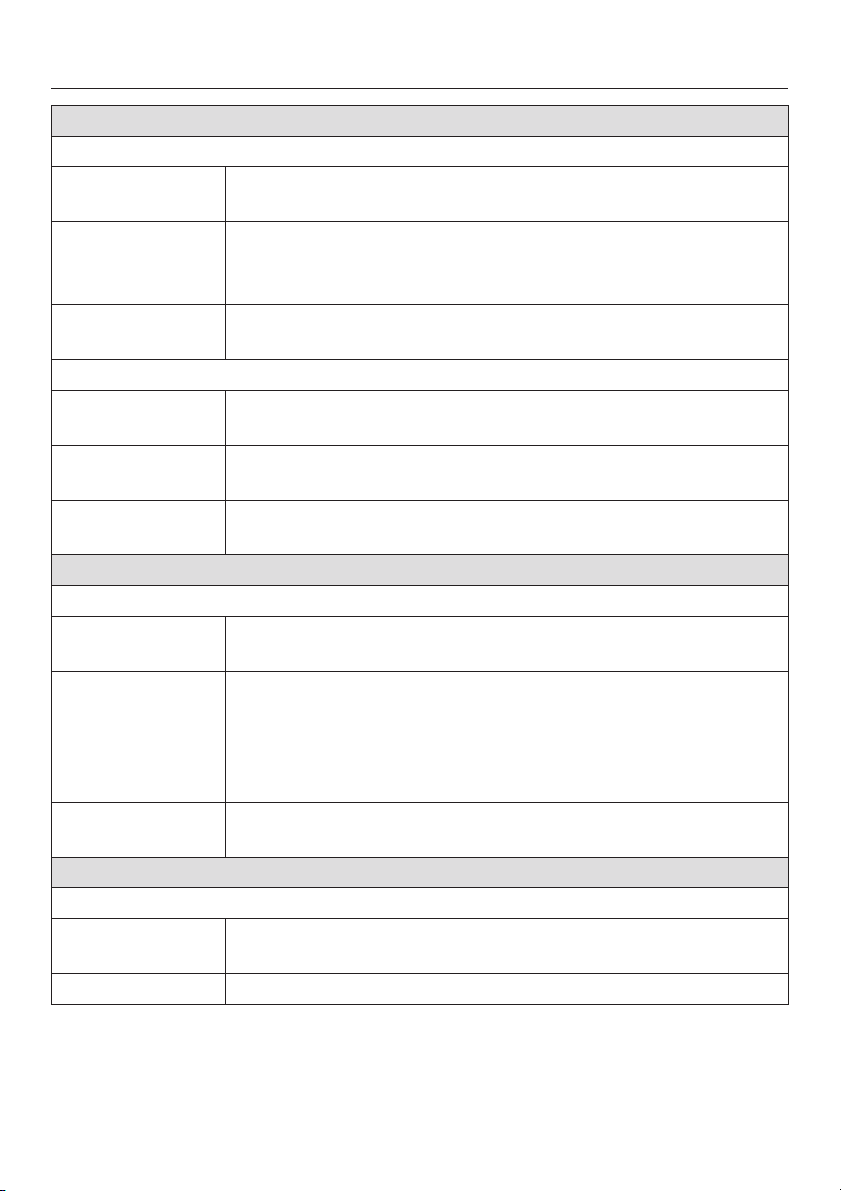
Programme chart
Cottons Max. load: 6 kg*
Extra dry, Normal**
Fabric type Single and multi-layered cotton fabrics such as towelling,
jerseywear, T-shirts, underwear.
Notes
Low temperature Also select the Low temperature option for delicate fabrics
Hand iron**, Machine iron
Fabric type Cottons or linen fabrics, e.g.: table linen, bed linen, starched
Note
Low temperature Also select the Low temperature option for delicate fabrics
Minimum iron Max. load: 3 kg*
Extra dry, Normal**, Hand iron
Fabric type Minimum iron items made of cotton, synthetic or blended
Notes – Select Hand iron for delicate fabrics and to reduce
Low temperature Also select the Low temperature option for delicate fabrics
Delicates Max. load: 2 kg*
Normal, Hand iron
Fabric type Delicate items made of synthetic fibres, easy care cotton or
Low temperature Low temperature cannot be deselected.
* Weight of dry laundry
** Note for test institutes: Use this programme without selecting Low temperature
for testing according to EN 61121 Standard.
Select Extra dry for multi-layered and very thick fabrics.
–
Do not use Extra dry for jersey fabrics (e.g. T-shirts,
–
underwear), as they have a tendency to shrink.
with the r symbol on the care label.
laundry.
To prevent laundry from drying out it should be rolled up
–
until you are ready for ironing.
with the r symbol on the care label.
fabrics, e.g.: shirts, blouses, skirts and table cloths.
creasing even more, reduce the load to 1.5 kg*.
–
In the Minimum iron programme with the Hand iron drying
level, items are dried with very little creasing, depending on
fabric type and amount of laundry.
with the r symbol on the care label.
blended fabrics, e.g. shirts, blouses and appliqued garments.
17
Page 18
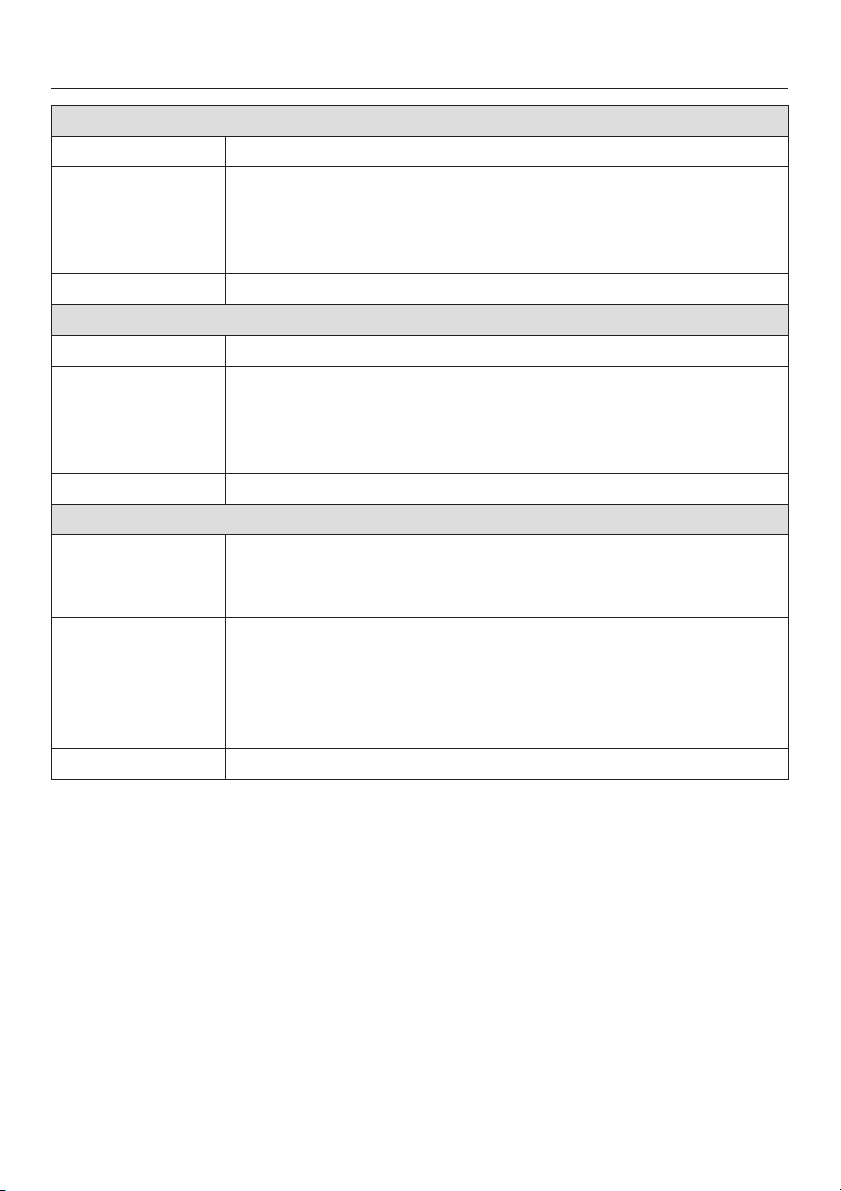
Programme chart
Woollens handcare Max. load: 2 kg*
Fabric type Woollen fabrics
Note
Low temperature Low temperature cannot be deselected.
Silks handcare Max. load: 1 kg*
Fabric type Silks, e.g. blouses and shirts.
Notes
Low temperature Low temperature cannot be deselected.
Smoothing Max. load: 3 kg*
Fabric type – Cotton and linen fabrics.
Notes – Smooths out creasing caused during the spin cycle in the
Low temperature Low temperature cannot be deselected.
* Weight of dry laundry
This programme only fluffs up woollen garments.
–
Fabrics are not completely dried in this programme.
–
Remove garments as soon as the programme has finished
and leave to finish drying at room temperature.
Smooths out creasing.
–
Fabrics are not completely dried in this programme.
–
Remove garments as soon as the programme has finished
and leave to finish drying at room temperature.
– Minimum iron mixed fibre, cotton or synthetic items, e.g.:
trousers, jackets, shirts.
washing machine.
– Fabrics are not completely dried in this programme.
Remove garments as soon as the programme has finished
and leave to finish drying at room temperature.
18
Page 19
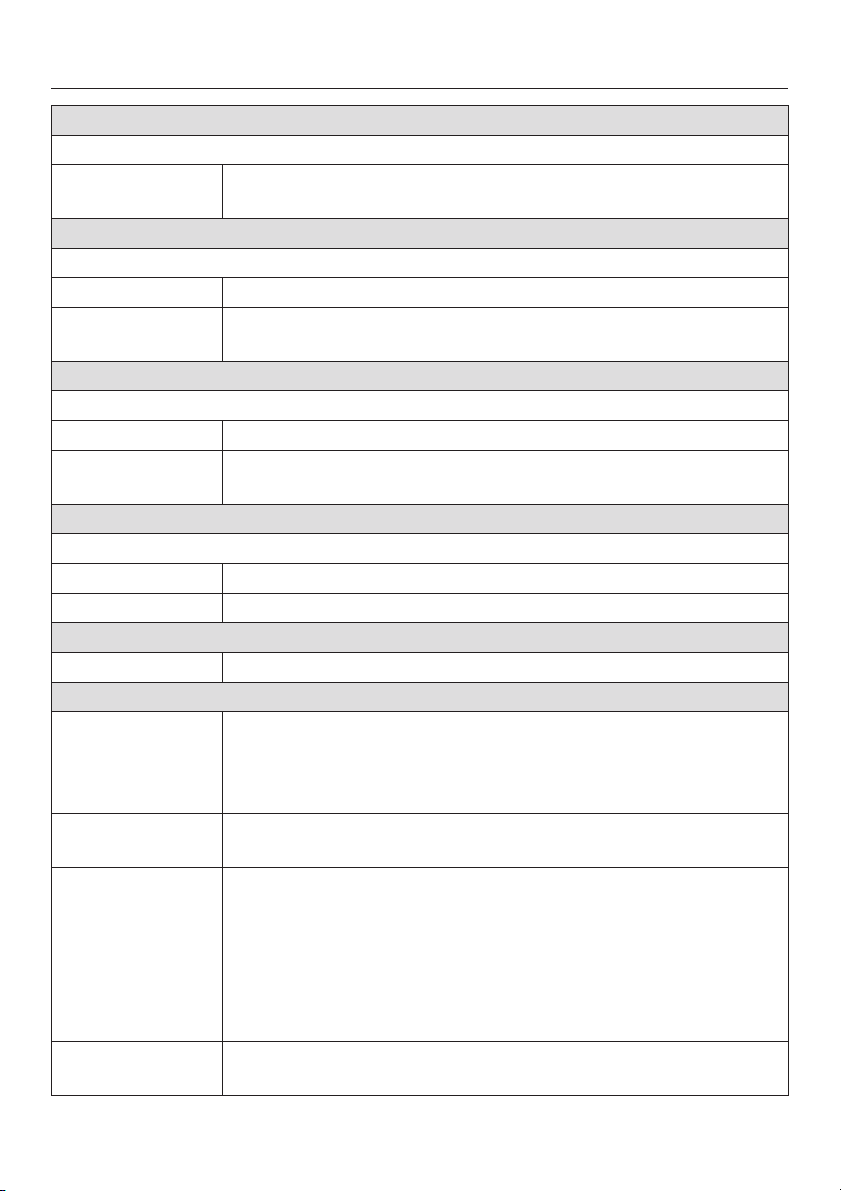
Programme chart
Automatic Max. load: 3.5 kg*
Normal, Hand iron
Fabric type Mixed loads of garments suitable for the Cottons and
Minimum iron programmes. Sort according to colour.
Shirts Max. load: 2 kg*
Normal, Hand iron
Fabric type Shirts and blouses.
Low temperature Select the Low temperature option for delicate fabrics with the
r symbol on the care label.
Denim Max. load: 3 kg*
Normal, Hand iron
Fabric type Denim garments, e.g. jeans, jackets, skirts, shirts.
Low temperature Select the Low temperature option for delicate fabrics with the
r symbol on the care label.
Outerwear Max. load: 2 kg*
Normal, Hand iron
Fabric type Outerwear which is suitable for drying in a tumble dryer.
Low temperature Low temperature cannot be deselected.
Cool air Max. load: 6 kg*
Fabric type Any item which only needs airing.
Warm air Max. load: 6 kg*
Fabric type
Note
Tip You can use the Warm air programme to help remove odours
Low temperature Select the Low temperature option for delicate fabrics with the
* Weight of dry laundry
–
Multi-layered fabrics whose layers have different drying
characteristics, e.g. jackets, pillows.
–
For drying individual items, e.g. bath towels, bathing
costumes, tea-towels and small loads.
–
Do not select the longest drying time to start with. Check
the items as you are drying them to find the optimum time.
from cotton clothing which has been worn but it still clean (select
a duration of between 1/2 and 1 hour). Items must be suitable
for drying in a tumble dryer. Dampen the garments a little
beforehand or add a fabric conditioner sheet. The Warm air
programme will not be as effective at removing odours from any
parts of the garments which are made of synthetic fibres.
r symbol on the care label.
19
Page 20

Changing the programme sequence
Once a programme has started
- changing the programme
You cannot change to another
programme once a programme has
started (this prevents unintentional
alterations).
You will need to cancel the current
programme before you can select a
new one.
- cancelling the programme and then
selecting a different programme
^ Press the Start/Stop button.
The items will be cooled down,
depending on the temperature
reached and how long they have
been dried for.
If you press the Start/Stop button
again during the cooling down
phase, Finish will light up in the
display.
Adding or removing laundry
after a programme has started
Press the Door button.
^
Open the door.
^
Danger of burning:
,
Do not touch the back of the drum
when adding or removing items. The
drum and the items can get very hot.
Add or remove items as required.
^
Close the door.
^
^ Press the Start/Stop button.
Time remaining
The time left shown in the display may
now vary from the actual drying time.
^
Switch the dryer off.
^
Switch the dryer on.
^
Select another programme and start
it.
- cancelling the programme and then
removing the laundry
^
Proceed as described in "Adding or
removing laundry after a programme
has started" below.
^
Switch the dryer off after closing the
door.
20
Page 21

The system lock prevents the dryer
being used without your knowledge.
It can be activated if wished.
The dryer's electronics are then locked.
The dryer can still be switched on but a
programme cannot be started.
If an attempt is made to start a
–
programme, the indicator light for the
Low temperature button will come on
and a key symbol 0-§ will appear in
the display.
The door is not locked and can be
opened at any time.
To activate the lock
Before you begin, first ensure that
– The tumble dryer is switched off.
– The door is closed.
A Press the Low temperature button
and keep it pressed in whilst carrying
out steps B to E.
B Press the I-On/0-Off button in.
The Automatic indicator light will come
on.
:
Electronic system lock
D Now slowly turn the programme
selector six positions stage by stage
in an anti-clockwise
Each of the six programme indicator
lights must come on one after the
other.
The indicator light for the Low
temperature button will flash and a key
symbol 0-§ will appear in the display.
E Release the Low temperature button.
The electronics have now been locked.
Switch the dryer off.
^
To deactivate the lock
Before you begin, first ensure that
– The tumble dryer is switched off.
– The door is closed.
^ The procedure is the same as for
activating the lock. Carry out steps A
to E as described previously.
At step E the indicator light for the Low
temperature button will stop flashing
and the key symbol 0-§ will go out.
The electronics are no longer locked.
direction.
:
C Slowly turn the programme selector
three positions stage by stage in a
clockwise
Each of the three programme
indicator lights must come on one
after the other.
direction.
21
Page 22
Cleaning and care
Cleaning the fluff filter
The fluff which is created by the drying
process is collected in the fluff filter in
the door. Clean the filter after each
drying cycle*.
* Always check the fluff filter if the
Clean out airways indicator light
comes on.
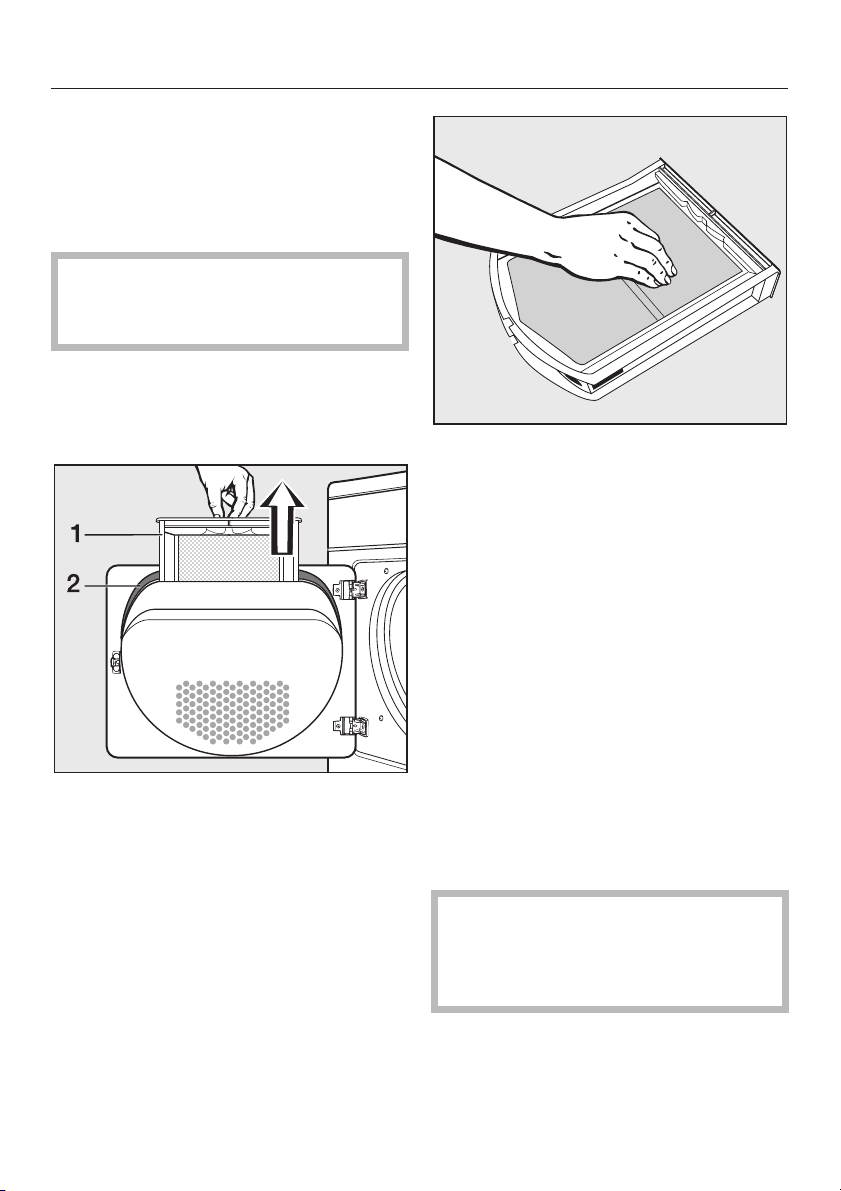
Cleaning whilst dry
Tip: You can also use a vacuum cleaner
to remove the fluff.
Use your fingers to remove the fluff
^
from the surface of the filter.
^ Remove any fluff from the hollow part
of the door opening. You could also
use a cleaning brush which is
available as an optional extra from
your Miele dealer or the Miele Spare
Parts Department, or use a vacuum
cleaner.
^
Open the door and pull the fluff filter
(1) out of the door as illustrated.
22
^ Also clean the door seal (2) with a
damp cloth.
^
Once clean, push the filter back into
the door holder until it clicks into
position. Ensure it is facing the
correct way. Close the door.
Cleaning with water
If there is still a great deal of
compacted fluff on the filter after
cleaning it as described above, you
can clean it with water.
^
Rinse the filter under hot, running
water.
^
Dry the filter carefully and thoroughly.
Page 23
Cleaning and care
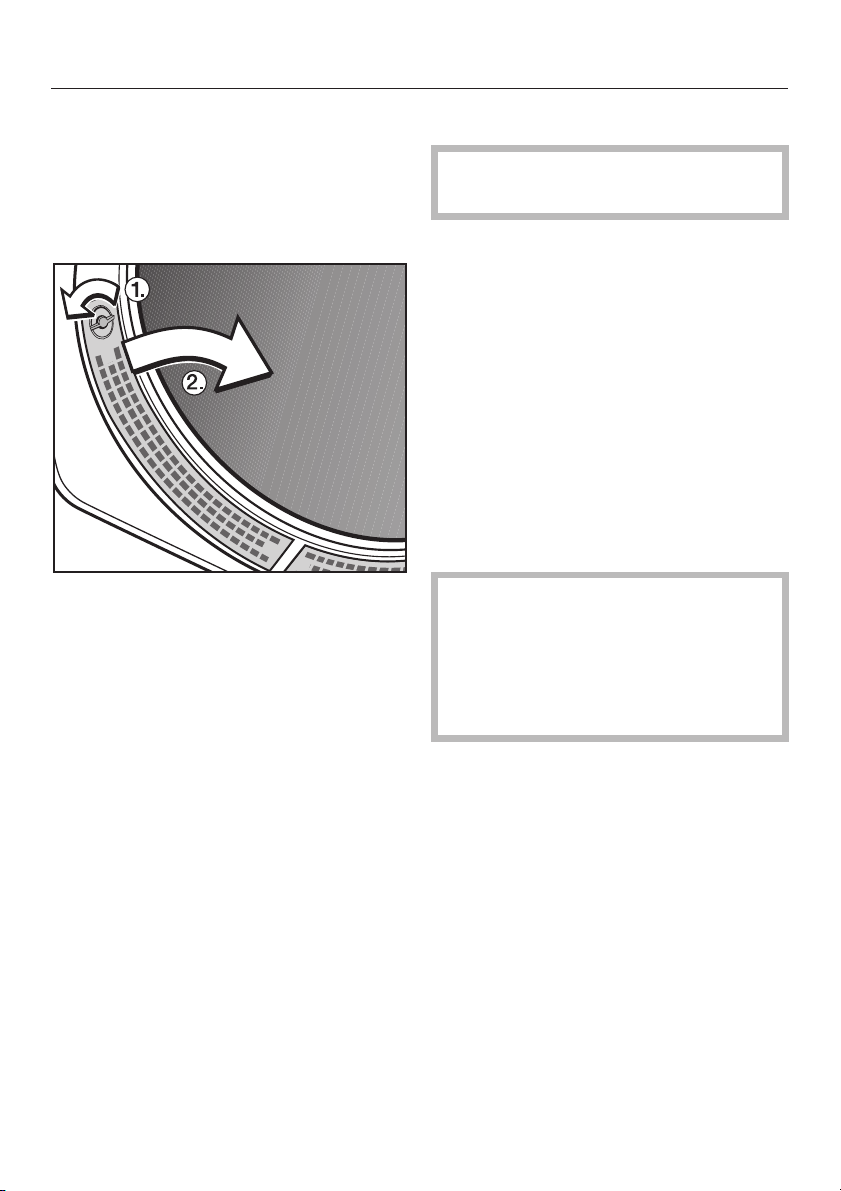
Cleaning the grilles in the door
opening
Clean the grilles in the door opening
and also the area underneath them
from time to time.
^ Turn dial a on each grille until you
hear it click.
^ Take hold of the dial, and pull the
grille out of the door opening as
shown b. Do the same on the other
side.
^
Clean the grilles under hot running
water, and dry thoroughly.
Cleaning the tumble dryer
Disconnect the tumble dryer from
the mains electricity supply.
Miele branded cleaning and
conditioning products are available to
order from your Dealer, the Miele Spare
Parts Department or via the internet on
www.miele-shop.com.
Clean the housing, control panel and
^
door seal with a slightly damp cloth
and a mild detergent or soapy water.
The drum and other stainless steel
^
parts can be cleaned with a suitable
propietary stainless steel cleaner
following the manufacturer's
instructions.
Do not use solvents, abrasive
cleaners, glass cleaners or
all-purpose cleaners. These could
damage plastic sufaces and other
parts. The tumble dryer must never
be hosed down.
^
Dry all parts with a soft cloth.
^
Also clean the area underneath them,
e.g. with a vacuum cleaner.
^
Replace by inserting them at the
bottom and pressing them into place
at the top.
^
Lock both dials (you will hear them
click).
23
Page 24
Problem solving guide
With the help of the following notes, minor faults in the performance of the tumble
dryer, some of which may result from incorrect operation, can be put right without
contacting the Service Department.
Repair work to electrical appliances should only be carried out by a suitably
,
qualified person in strict accordance with current local and national safety
regulations. Repairs and other work by unqualified persons could be
dangerous. The manufacturer cannot be held liable for unauthorised work.
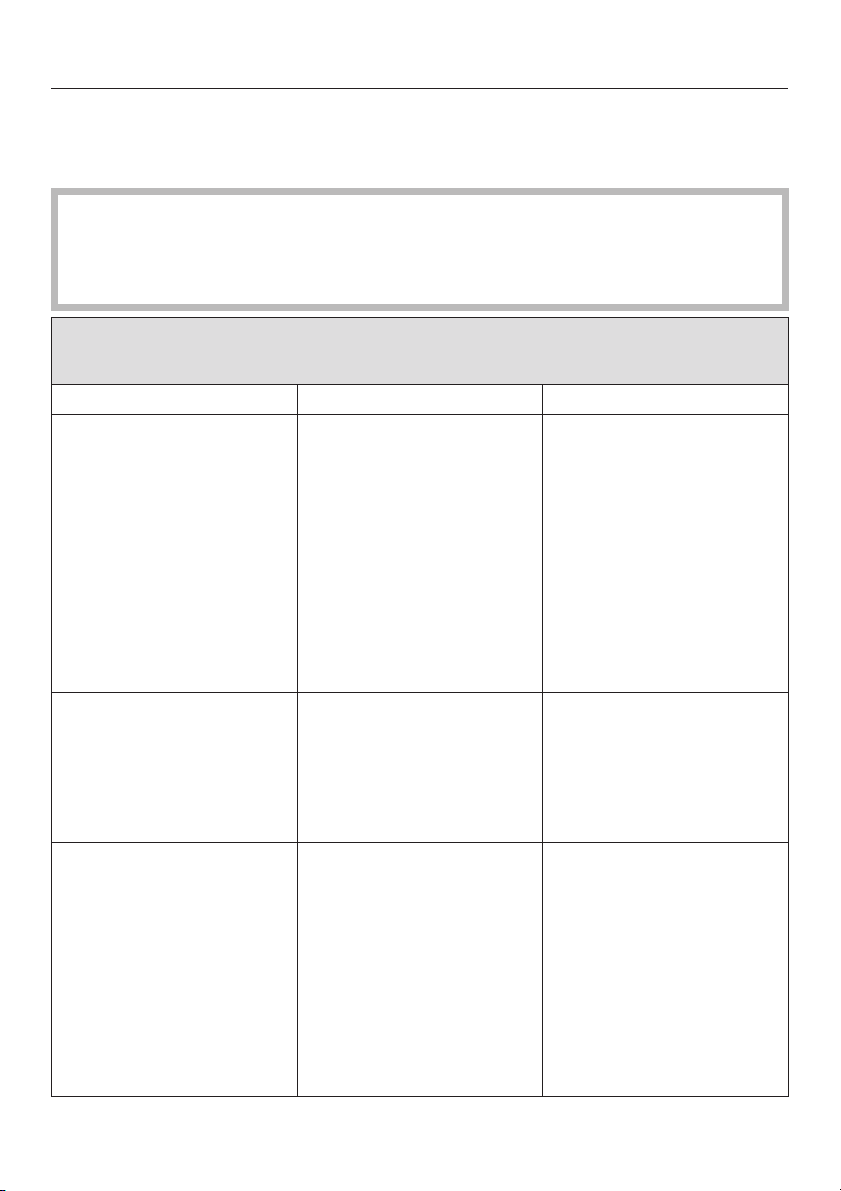
Check and fault messages
Problem Possible cause Remedy
The programme stops
and 0 and Finish appear
in the display.
The buzzer sounds.
The Low temperature
indicator light starts
flashing after the dryer
has been switched on
and 0-§ appears in the
display.
The programme stops
and Cooling down or
Finish flashes in the
display.
The buzzer sounds.
This is not a fault.
The electronic unit has
recognised that there is
no laundry in the drum
and cancelled the
programme.
Drying individual
garments or items which
are already dry can also
cause the programme to
be cancelled.
The electronic system
lock is activated.
No obvious cause.
Use the Warm air
programme (timed
drying) to dry individual
items.
To delete the fault
message:
– Open and close the
door.
You will need to
deactivate the system
lock before the dryer can
be used (see "Electronic
system lock").
–
Switch the dryer off and
then on again.
–
Then start the
programme again.
If the programme stops
again and Cooling down
or Finish flashes again
there is a fault. Contact
the Miele Service
Department.
24
Page 25
Problem solving guide
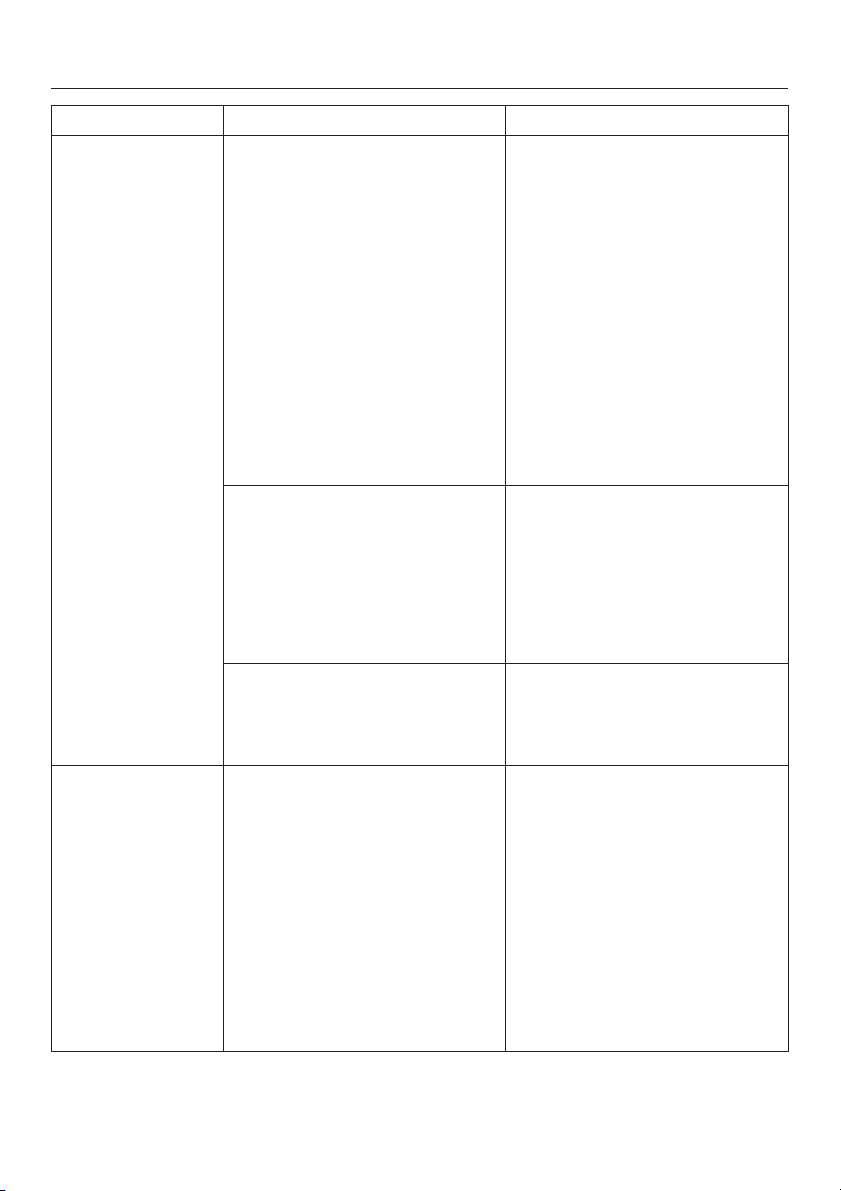
Problem Possible cause Remedy
The Clean out
airways
indicator light
comes on.
The programme
stops.
The Clean out
airways
indicator light
comes on.
The buzzer
sounds.
This indicator light comes on
to warn you that the dryer is
not working efficiently.
Possible cause: The fluff filter
is clogged with fluff or with
detergent residues.
The vent ducting may be very
long, which does not
constitute a fault.
See above for possible
causes and their remedies.
Cleaning the fluff filter is
–
usually all that is required.
However, if the Clean out
airways indicator light does
not go out after you have
cleaned the filter, then also
check all the possible
causes described under
"The drying process goes
on too long or even
switches off".
To switch off the indicator
light:
– Open and close the door.
– See "Installation - venting"
regarding calculating
length and diameter.
– If very long ducting is used,
then programme times will
be longer and energy
consumption higher.
The Clean out airways
indicator light can be
deactivated (see
"Programmable functions").
To switch off the indicator
light:
–
Open and close the door.
–
Switch the dryer off and
then back on again.
–
Then start the programme
again.
–
If the Clean out airways
indicator light comes on,
contact the Miele Service
Dept.
25
Page 26
Problem solving guide
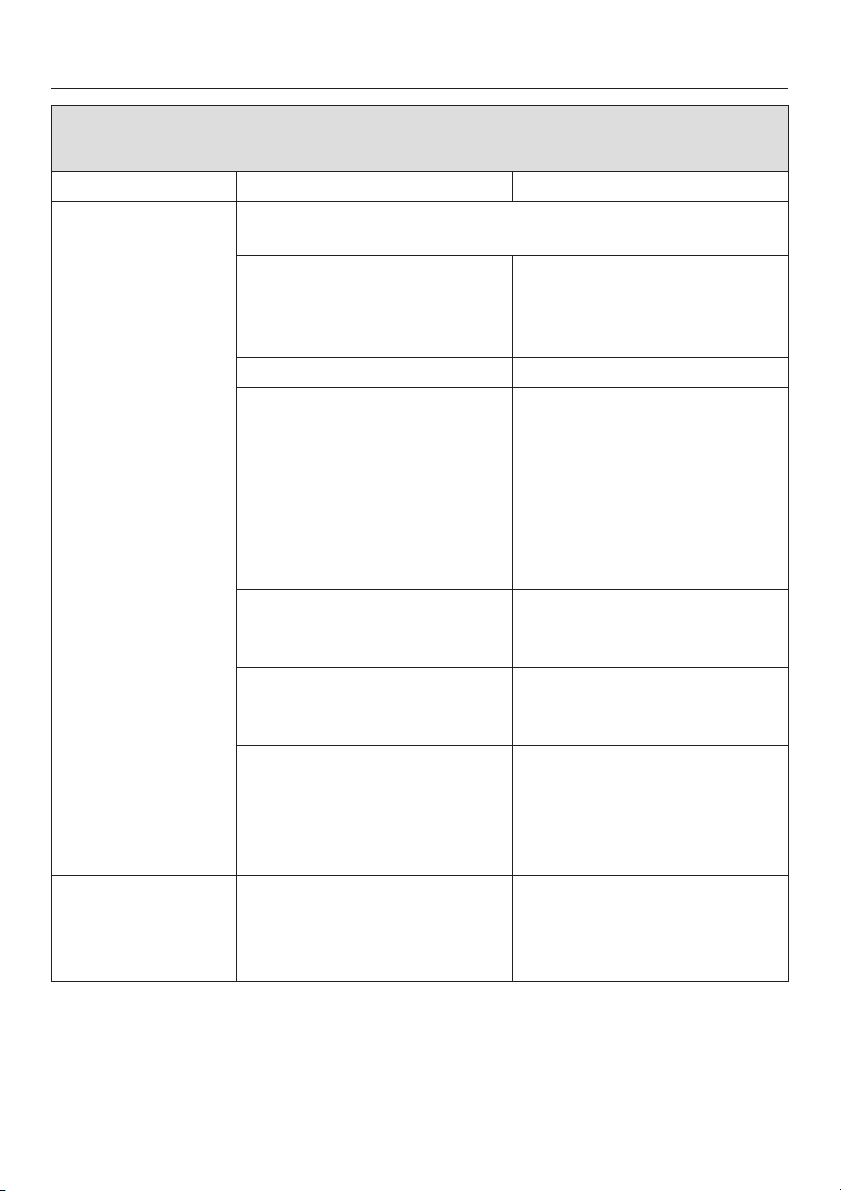
Other problems
Problem Possible cause Remedy
The drying
process goes on
too long or even
switches off.
In some
circumstances,
the Clean out
airways indicator
light still comes
on, even though
the filter is clean.
The laundry is not
sufficiently dry.
Please check all the possible causes and switch the
dryer off and then back on again.
Ventilation to the dryer is
insufficient (e.g. because it is
installed in a room which is
too small).
The fluff filter is blocked. Remove any fluff.
The vent ducting or the
ventilation outlet is blocked.
The laundry has not been
spun sufficiently.
The tumble dryer has been
overloaded.
Metallic components, e.g.
zips, have prevented the
dryer from registering the
correct moisture level in the
laundry.
The load consisted of
different fabrics.
Open a door or window while
the dryer is in operation for
increased air flow.
Check all parts of the vent
–
ducting system on a
regular basis (e.g. wall
pipe, external grille, bends
in the ducting etc.) and
make sure they are all free
of any hindrance.
– Remove any fluff.
Make sure that your laundry
is thoroughly spun at the
appropriate spin speed.
Do not exceed the maximum
load for the programme
selected.
–
Open zips next time.
If the problem occurs again,
dry garments with long zips
using the Warm air
programme (timed drying).
–
Finish drying using the
Warm air programme.
–
Select a different
programme next time.
26
Page 27
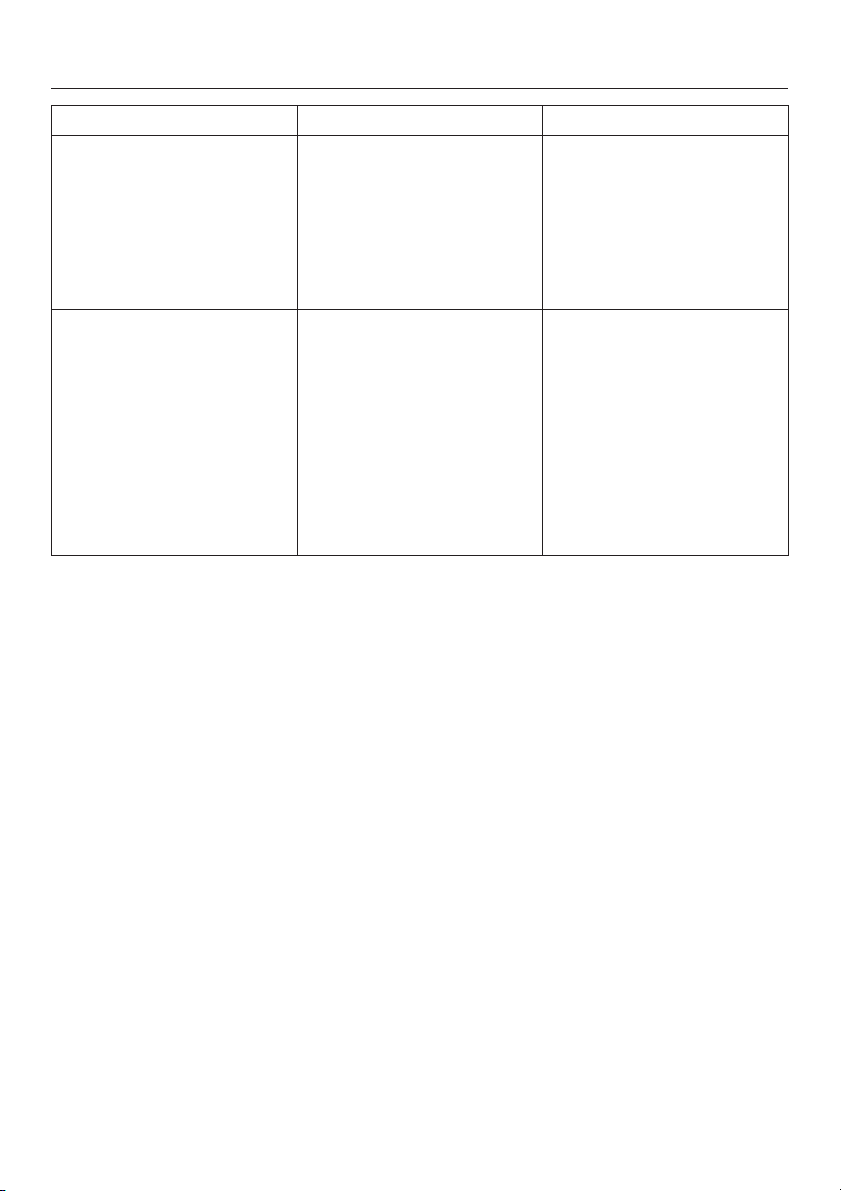
Problem solving guide
Problem Possible cause Remedy
Items made of synthetic
fibres are charged with
static electricity after
drying.
There is a build-up of
fluff.
Synthetic fibres tend to
attract static charge.
Fluff is principally the
result of friction when
garments are being worn
and washed. Machine
drying hardly causes any
fluff to form and has been
established by research
institutes to have no
appreciable effect on the
lifetime of fabric.
Static charge can be
reduced by adding a
fabric conditioner to the
final rinse in the washing
programme or a fabric
conditioner sheet to the
load when drying.
Fluff is collected by the
fluff filter and can be
easily removed (see
"Cleaning and care").
27
Page 28
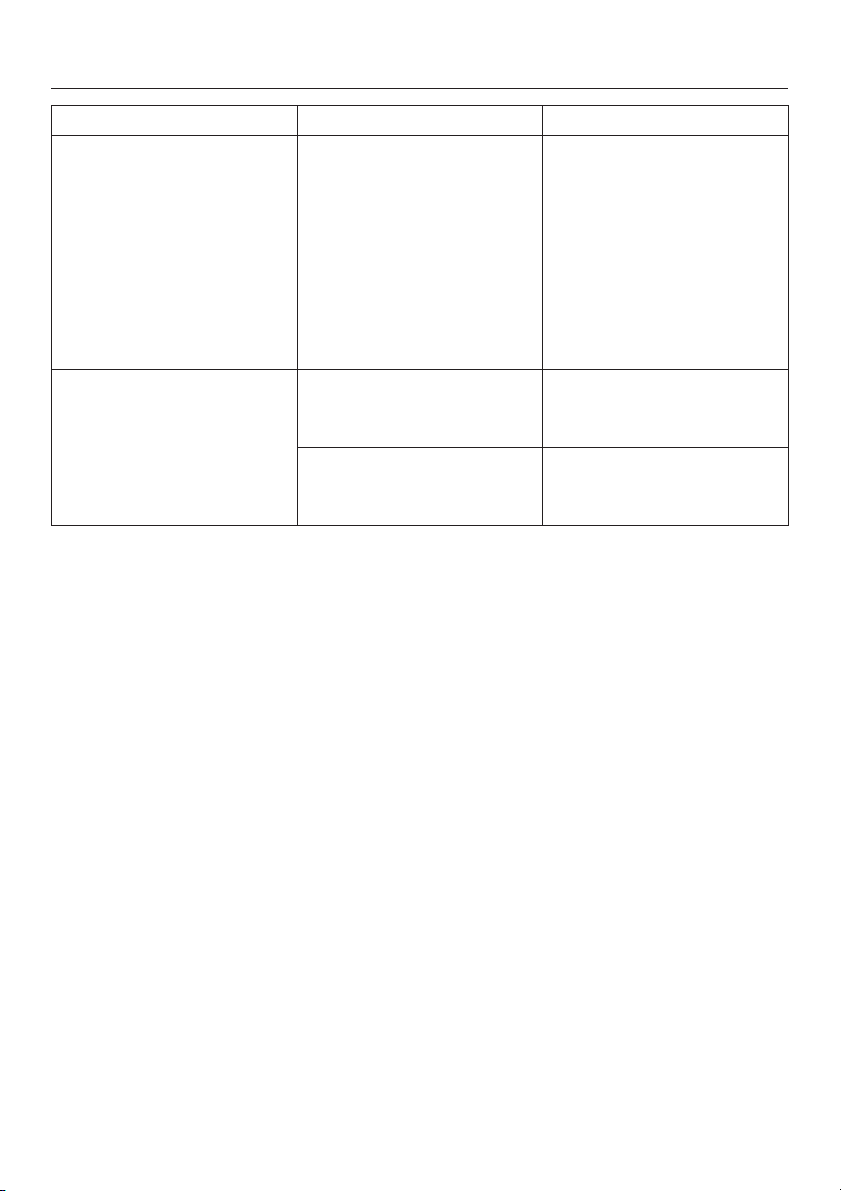
Problem solving guide
Problem Possible cause Remedy
The tumble dryer fails to
start when switched on.
The interior drum
lighting does not come
on.
No obvious cause.
The lighting switches off
automatically (to save
energy).
The lamp needs
changing.
Is the dryer switched
–
on?
Is the plug correctly
–
inserted into the socket
and switched on?
Is the door closed
–
properly?
Has the fuse or circuit
–
breaker tripped?
Switch the dryer off and
then on again.
Change the lamp as
described at the end of
this section.
28
Page 29
Changing the lamp
Disconnect the tumble dryer from
the mains electricity supply.
Problem solving guide
The lamp specification and
maximum wattage is stated on the
data plate and on the lamp cover.
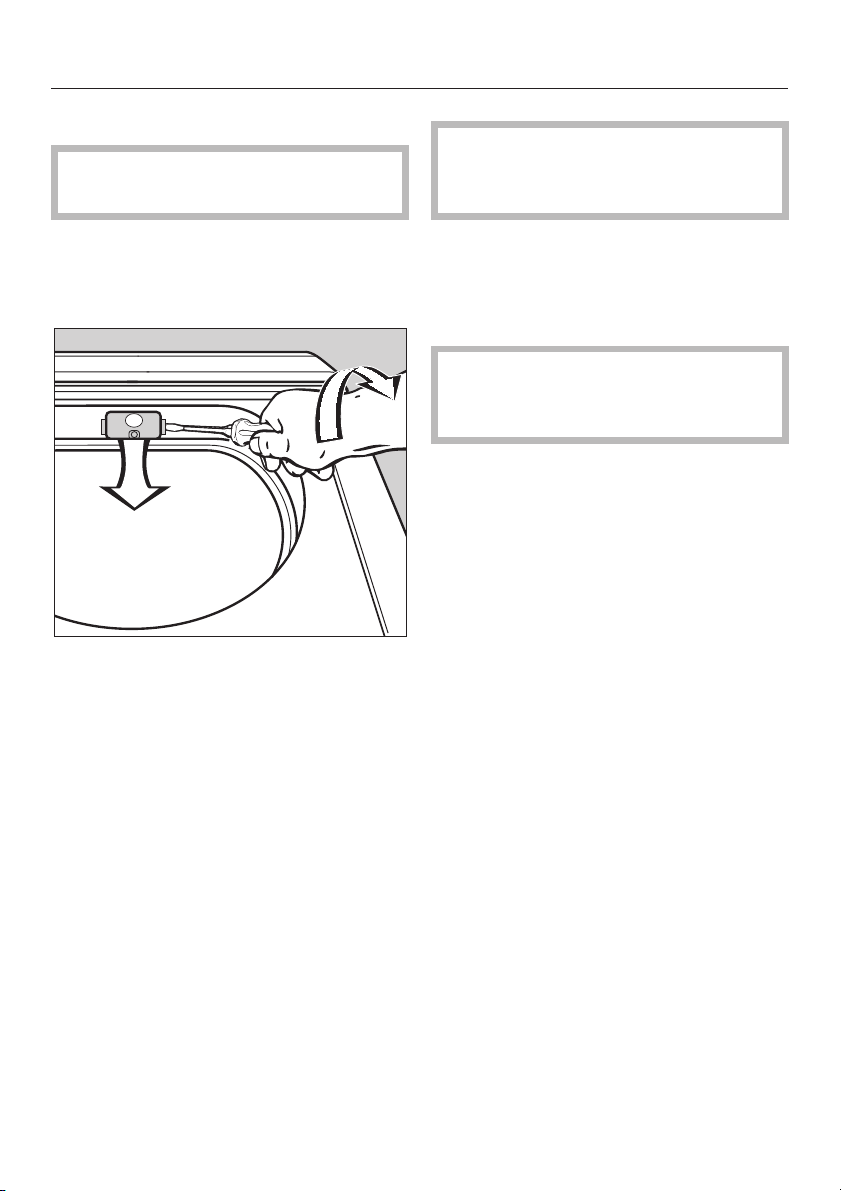
Open the door.
^
You will find the interior lamp cover at
the top of the drum aperture.
^ Insert a suitable tool, such as a wide
bladed screwdriver, under the side
edge of the lamp cover as illustrated.
^
Apply a little pressure and whilst
doing so turn your wrist in the
direction of the arrow to open the
cover.
Replace the lamp.
^
To close the cover push it upwards
^
and press it on the left and right until
you hear it click into position.
Ensure that it is fitted into
,
position securely, as any moisture
could cause a short circuit.
The cover will open downwards.
The temperature resistant lamp should
only be ordered from your Miele Dealer
or the Miele Spare Parts Department.
29
Page 30
After Sales service
In the event of any faults which you
cannot remedy yourself, please contact
your Miele dealer or
–
the Miele Service Department (see
–
back cover for contact details).
N.B. A call-out charge will be applied
for unnecessary service visits where the
problem could have been rectified by
the customer as described in this
instruction manual.
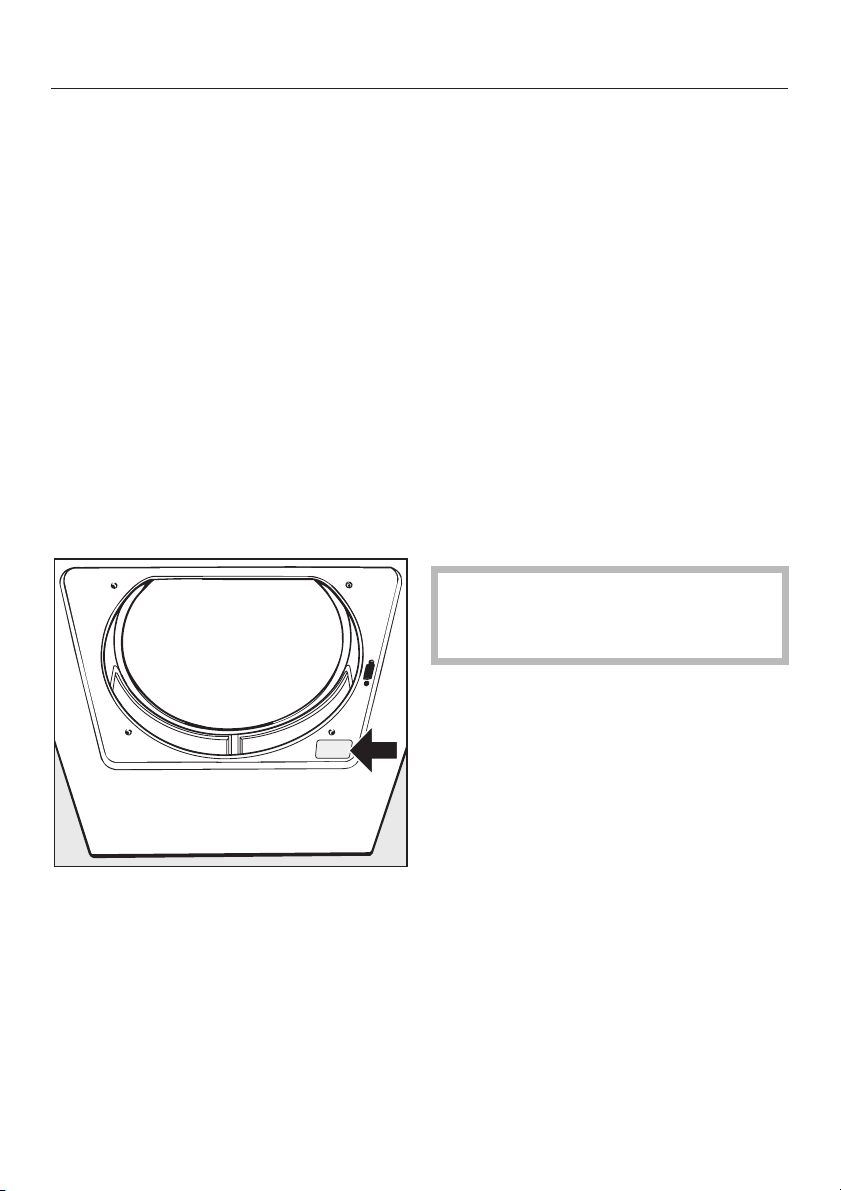
When contacting your dealer or the
Service Department, please quote the
model and serial number of your
appliance, both of which are shown on
the data plate situated on the right hand
side below the drum aperture.
Future updates (PC)
The indicator or check light marked PC
on the fascia panel is the interface used
by the Miele service technicians during
service work for testing purposes and
for updating the appliance's
programme data.
Appliance guarantee
Please see the guarantee card supplied
with your appliance.
Optional accessories
Optional accessories for this dryer are
available from your Miele Dealer, the
Miele Spare Parts Department or via the
internet at www.miele-shop.com.
Please note that telephone calls may
be monitored and recorded for
training purposes.
30
Page 31
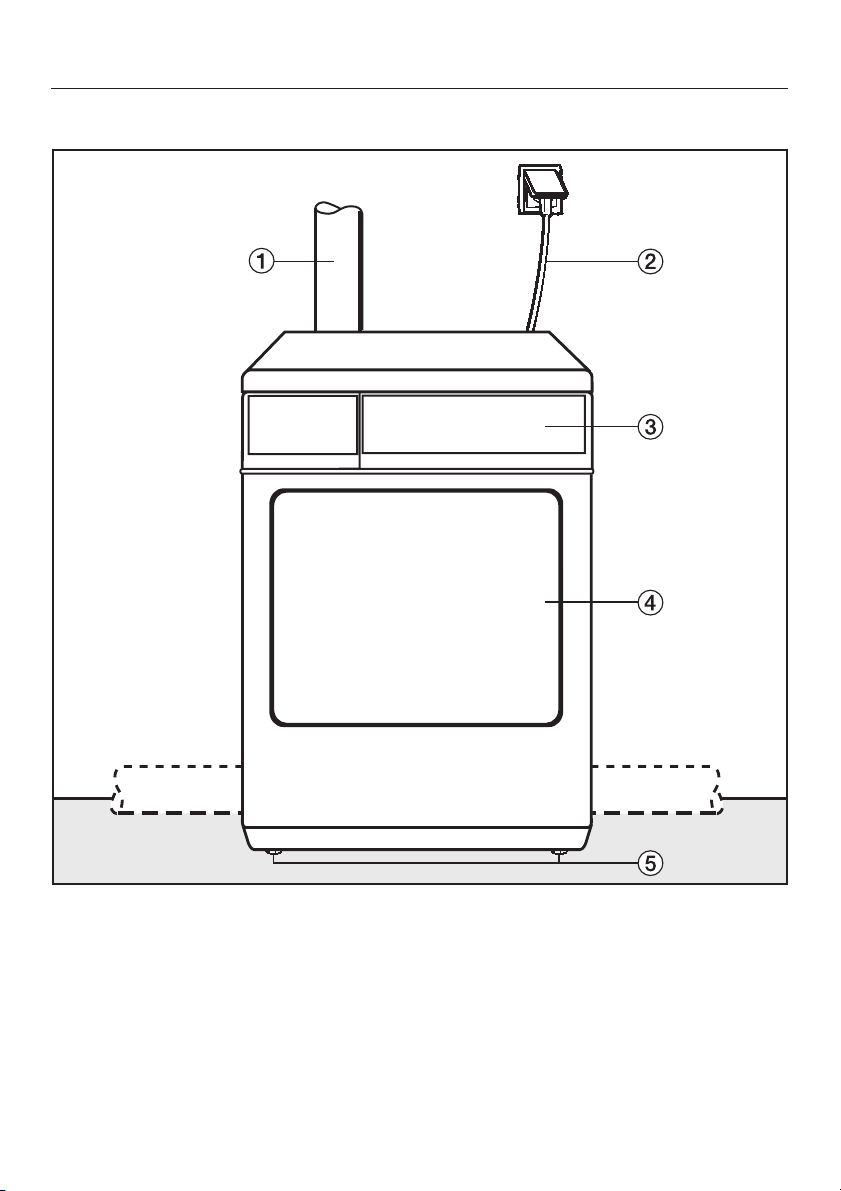
Front view
Installation and connection
a Venting connection: rear, right or left
(supplied with the rear socket open)
b Mains connection cable
c Control panel
d Door
e Four height adjustable screw feet
31
Page 32
Installation and connection
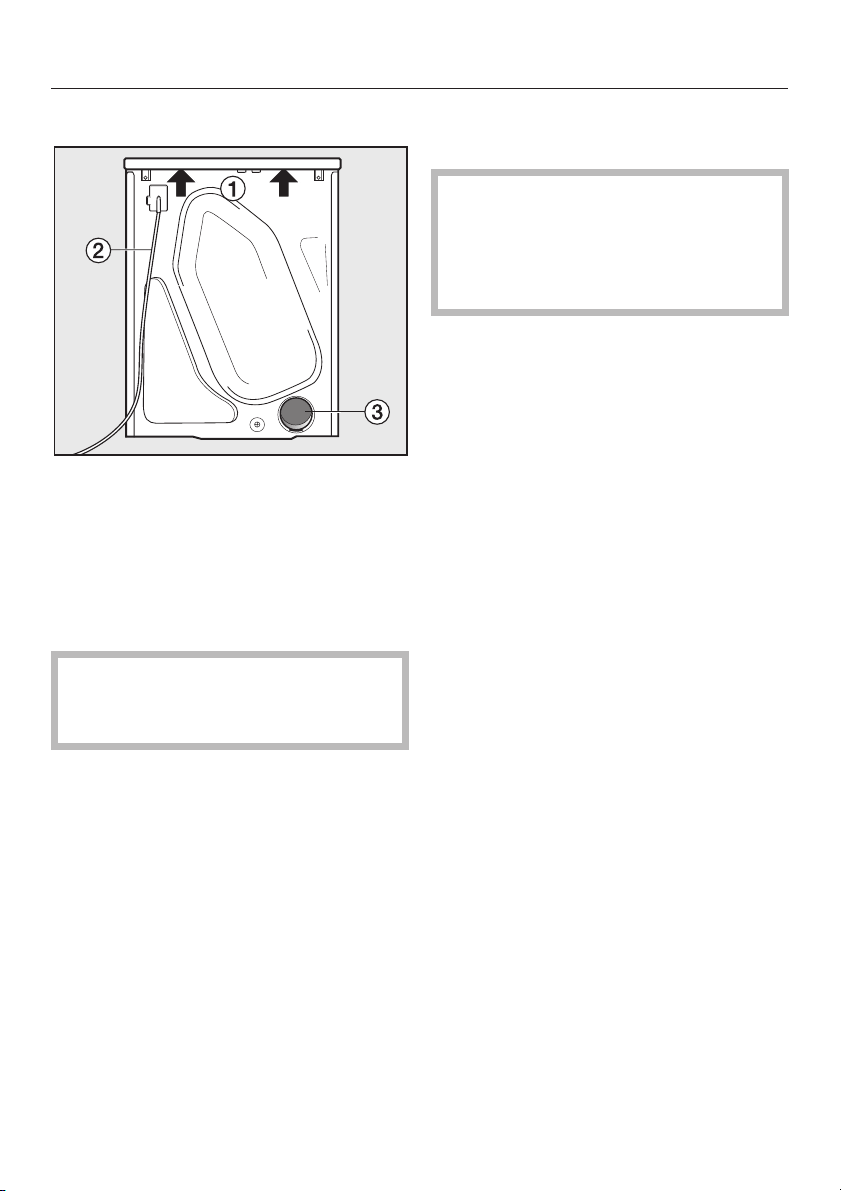
Rear view
a Protruding lid for holding when
moving the appliance (see arrows)
b Mains connection cable
c Venting connection at the rear
Installation site
,
Make sure the dryer door can be
opened without hindrance after
installation.
Transporting the appliance to its
installation site
When moving the appliance, hold it by
the lid where it protrudes to the rear of
the dryer. To manoeuvre the dryer out of
its packing case to its installation site
you will also need to hold it by the front
feet.
Do not lift the appliance by the door.
Building under a continous worktop /
in a kitchen run
A building-under kit* with a
,
coverplate to replace the appliance
lid is required. It must be fitted by
suitably qualified person to ensure
electrical safety.
N.B. If you wish to push your appliance
under a worktop and there is space to
do this without removing the lid the
building-under kit is not necessary.
Otherwise it is essential.
– The building-under kit is supplied
with its own installation instructions.
– N.B. When built under drying times
may be longer.
– The electrical socket must be
located in an accessible position
near the appliance.
– The space required by the vent duct
must be taken into consideration
when calculating the distance
between the tumble dryer and a wall
or other appliances or furniture on
either side.
With niche heights of:
–
830-840 mm, longer screw feet* are
required.
–
870-885 / 915-930 mm, one or two
raising kits* are required.
* Miele accessory available to order
Replacing the lid
If the lid has been removed in order to
fit a coverplate, ensure that, if the lid is
ever replaced, it fits securely into the
rear holders. Otherwise, it is not
properly secure for transport.
32
Page 33
Levelling the appliance
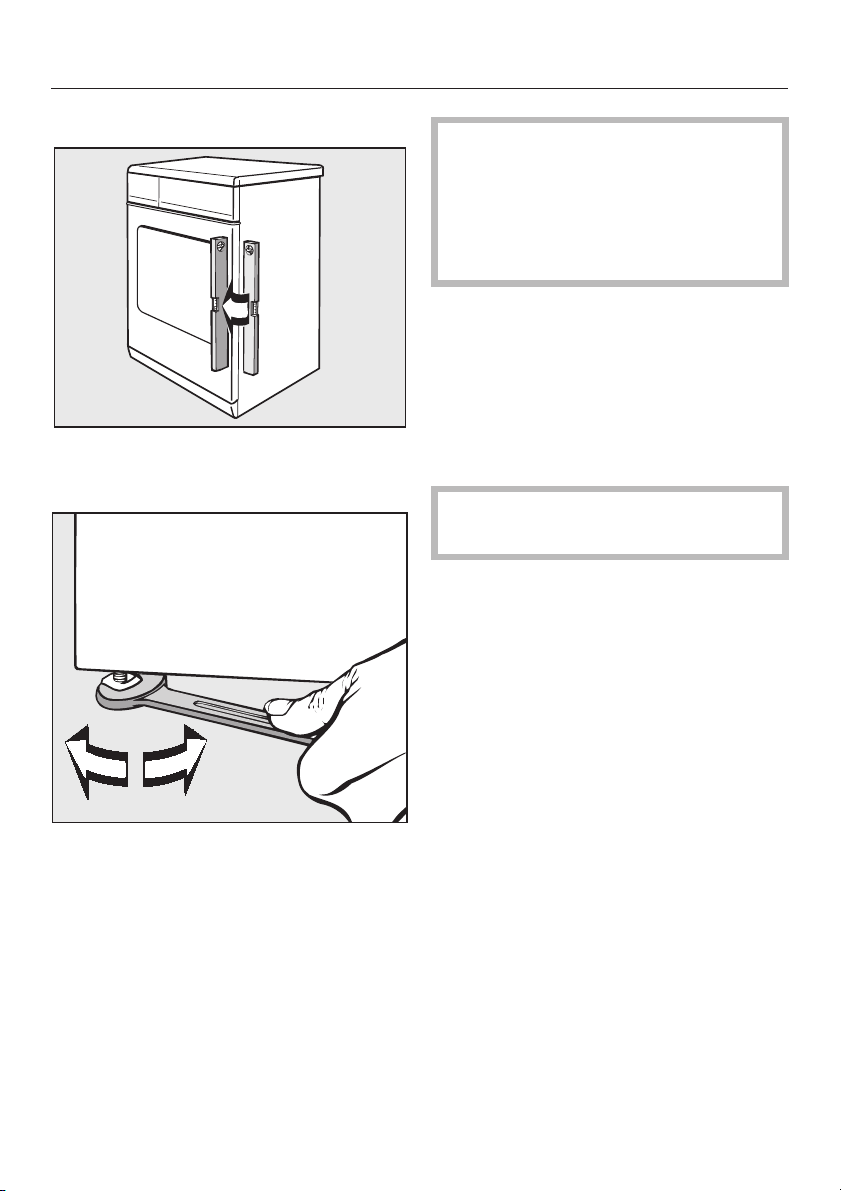
The appliance must be perfectly level to
ensure safe and proper operation.
Installation and connection
A ventilation gap of 10 mm must
,
be maintained between the base of
the appliance and the floor. It must
not be blocked by deep pile carpets,
plinths, etc as this would prevent a
sufficient intake of air.
Washer-dryer stack
The tumble dryer can also be
combined with a Miele washing
machine in a washer-dryer stack. The
appropriate "WTV" stacking kit
(available to order) to match your dryer
is required.
Stacking kits must only be
,
installed by a suitably qualified fitter.
^
The screw feet can be adjusted to
compensate for any unevenness in
the floor.
33
Page 34

Electrical connection
Electrical connection U.K.
All electrical work should be carried out
by a suitably qualified and competent
person, in strict accordance with
current national and local safety
regulations (BS 7671 in the UK).
Ensure power is not supplied to the
appliance until after installation work
has been carried out.
The appliance is supplied with a mains
cable with moulded plug ready for
connection to a 230-240V mains supply.
Please ensure the connection data
quoted on the data plate match the
household mains supply.
Connection should be made via a
suitable switched socket which is easily
accessible after installation.
For extra safety it is advisable to install
a suitable residual current device
(RCD). Contact a qualified electrician
for advice.
Non-rewireable plugs BS 1363
The fuse cover must be refitted when
changing the fuse, and if the fuse cover
is lost, the plug must not be used until a
suitable replacement is obtained. The
colour of the correct replacement cover
is that of the coloured insert in the base
of the plug, or the colour that is
embossed in words on the base of the
plug (as applicable to the design of
plug fitted).
Replacement fuses should be ASTA
approved to BS 1362 and have the
correct rating. Replacement fuses and
fuse covers may be purchased from
your local electrical supplier.
WARNING: THIS APPLIANCE
MUST BE EARTHED
Do not connect via an extension lead.
Extension leads do not guarantee the
required safety of the appliance (e.g.
danger of overheating).
34
Page 35

Installation - venting
General
Important
Before operating the tumble dryer, a
suitable ducting system must be
installed to carry the moist air from
the dryer to the outside. This can be:
...flexible ducting hose, or plastic
piping connected to the dryer, or
. . . the dryer may be connected
directly to the wall vent.
Before installing the ducting system,
–
ensure that the appliance is not
connected to the power supply.
– The ducting outlet (e.g. wall pipe)
should be installed in such a way that
the moist expelled air . . .
. . . cannot be drawn back into the
room in which the dryer is installed;
. . . cannot cause any damage to the
building or other nuisance.
– The dryer uses the room air. It is
therefore essential to ensure
adequate ventilation to avoid the
danger of asphyxia caused by gases
given off by other appliances being
drawn back into the room. Insufficient
ventilation will also cause drying
times to be considerably longer.
Ventilation can be maintained by:
- an open window;
- an air inlet which cannot be
blocked in windows, doors and
outside wall vents;
- a window switch which prevents
the dryer being used when the
window is closed.
Avoid:
very long ducting systems
–
too many bends or corners, tight
–
corners
Otherwise the drying result will be less
effective and it will take longer and use
more energy.
Suitable materials
for the ventilation ducting:
–
flexible ducting* or plastic piping with
a diameter of at least 100 mm.
– for venting to the outside:
a wall pipe kit* or a window vent kit*.
* Available as an optional accessory
from your Miele dealer or the Miele
Spare Parts Department.
Procedure
^ First measure the duct length
required. Calculate the effective duct
length and establish the internal duct
diameter required (use the tables on
the next page).
^
Then decide which type of ducting
you want to use (see "Venting
systems" in this section).
35
Page 36
Installation - venting
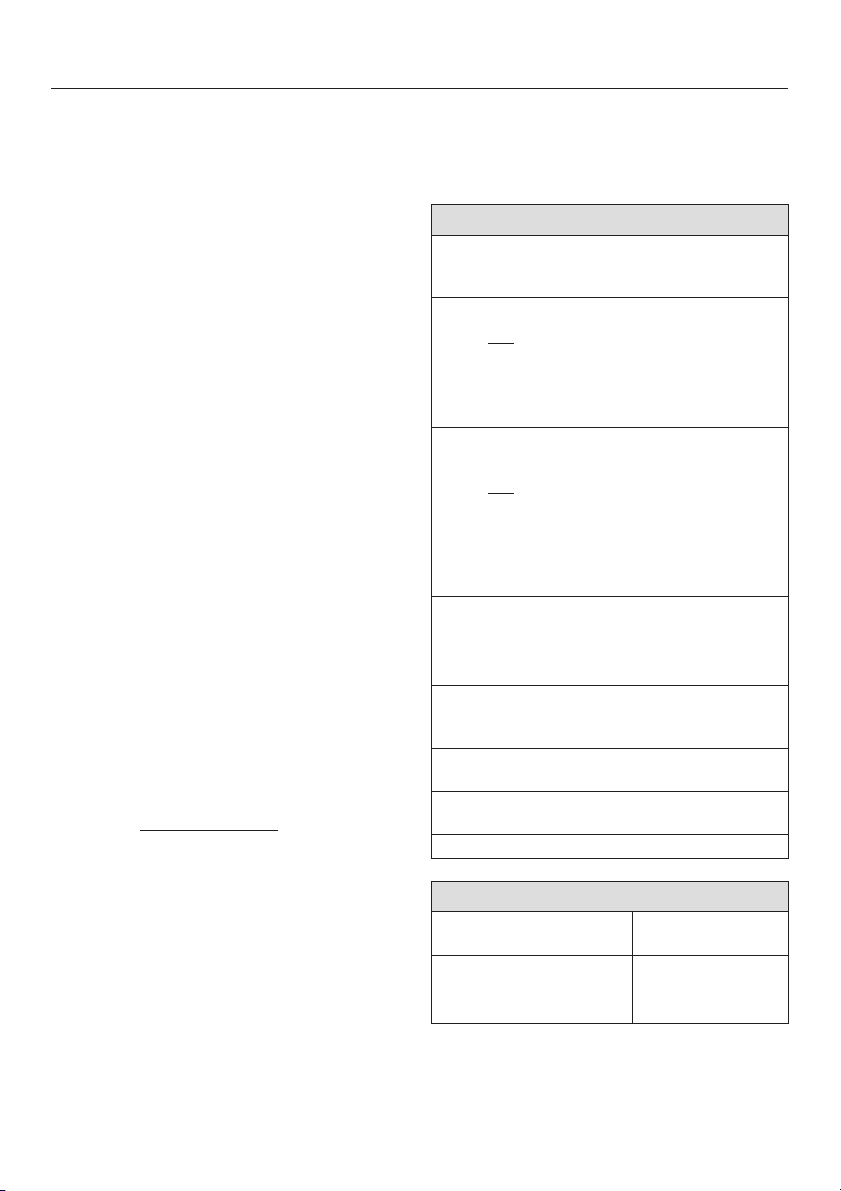
Calculating the effective duct
length :
Friction against the inner walls of the
ducting will slow down the expelled air
as it passes through. An elbow, bend,
non-return flap or wall vent creates
more friction than a straight duct. The
friction created by each of these is
expressed as an additional duct
length factor. The additional length
factors are calculated by comparing the
friction created by, for example, an
elbow to that created by 1 metre of
straight plastic piping (Table I).
The additional duct length factor for
each item needs to be added together
to ascertain the effective duct length
required.
A larger internal duct diameter also
helps reduce friction. If the effective
duct length is more than 20 m the
duct diameter should be increased
(Table II).
1. To calculate the effective duct
length required:
^
First measure the distance which will
require straight ducting
amount by the corresponding
additional duct length factor in Table I.
^
Establish the number of angles,
bends etc. necessary and add their
additional duct length factors
together with the help of Table I.
^
Add all the additional duct length
factors together to get the effective
duct length.
. Multiply this
2. Internal duct diameter
Refer to Table II for the appropriate
^
duct diameter required.
Table I
Additional
duct length
factor
Flexible ducting*
1 m laid straight
–
45° angle
–
(Bend radius = 0.25 m)
90° angle
–
(Bend radius = 0.25 m)
Flexible aluminium vent hose* / plastic
piping
1 m laid straight / or 1 m
–
straight pipe
45° angle / elbow
–
(Bend radius = 0.25 m)
90° angle / elbow
–
(Bend radius = 0.25 m)
Wall vent kit* or window vent kit*
–
with louvred grille
–
with non-return flap (hinged
flap)
Non-return flap* to be
integrated into the vent
ducting
Flat ducting (for washer dryer
stack)*
Venting connection to the
left/right
*optional accessory from Miele
14.3 m
11.0 m
Table II
Maximum effective
duct length allowable
20 m
40 m
100 m
Internal duct
diameter required
100 mm
125 mm
150 mm
1. 8 m
1. 5 m
2.5 m
1. 0 m
0.6 m
0.8 m
3.8 m
1. 5 m
1. 0 m
36
Page 37
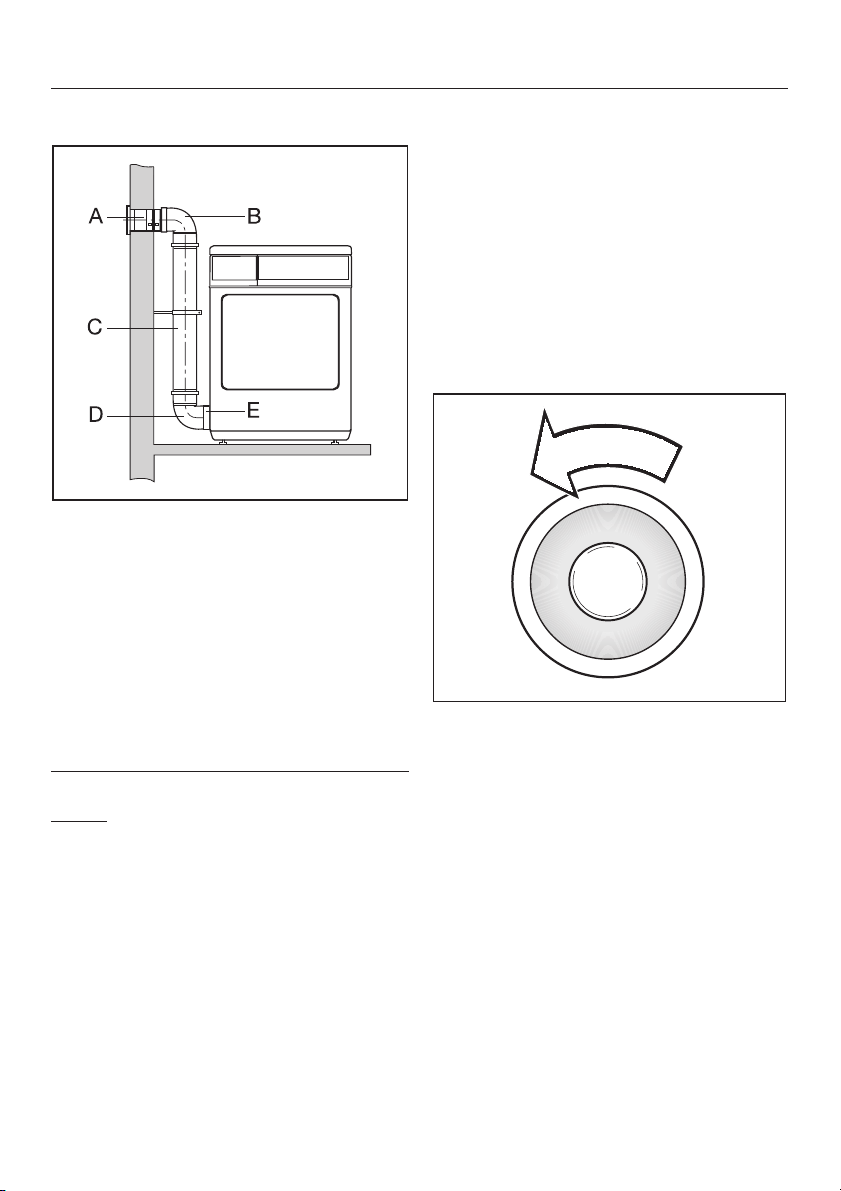
Installation - venting
Calculation example
A Wall pipe, with louvred vent
= 1 x 3.8 m Additional duct
length
B/D 2 Elbows, 90°
= 2 x 0.8 m Additional duct
length
C 0.5 m plastic piping
=0.5x1mAdditional duct
length
E Side connection, left
=1mAdditional duct length = 1.0 m
Effective duct length = 6.9 m
= 3.8 m
= 1.6 m
= 0.5 m
Result: A duct diameter of 100 mm is
adequate as the effective duct length is
less than the 20 m specified in Table II.
Installation to the rear, left or
right side of the appliance
At the rear
The dryer is delivered with this
connection open.
Fit one of the venting systems
^
described on the following pages.
Left or right side of the appliance
^
Turn the cover flap anti-clockwise.
^
Refit it securely in the rear outlet.
^
Fit one of the venting systems
described on the following pages.
37
Page 38
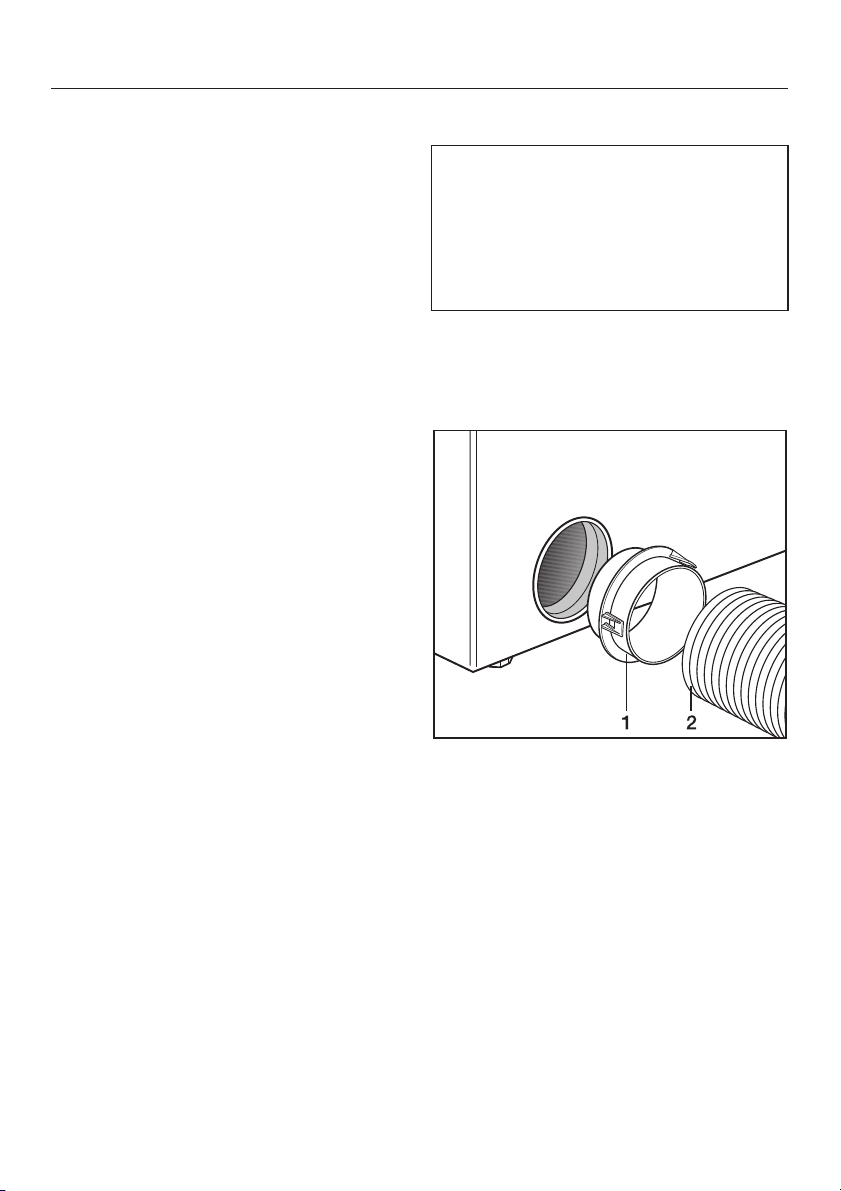
Installation - venting
Venting systems
The various venting systems which are
possible are described on the following
pages.
a Flexible ducting hose
b Plastic piping
c Connecting directly to a wall vent
a Flexible ducting hose
This is a simple, cost effective way of
directing the moist air outside. The
adapter supplied is fitted into the vent
opening on the dryer and the 100
mm C ducting hose is then
connected to the adapter.
The following items are required: . .
^
...flexible ducting hose
...awallventkit* or window vent kit*.
* (Miele optional accessory).
38
A Insert adapter (1) into the vent
opening on the dryer.
B Attach the hose (2).
^
Installation examples are shown on
the next page.
Page 39
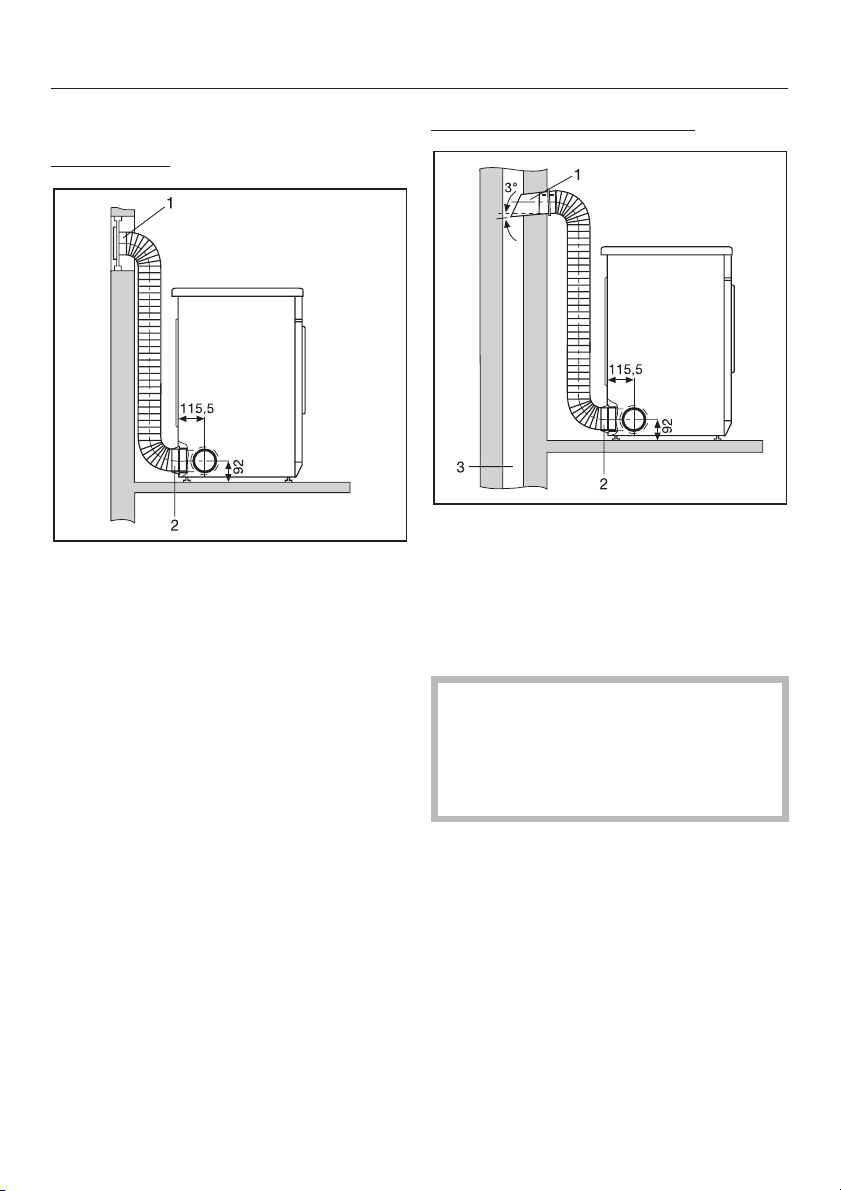
Installation - venting
Installation examples
Window vent
1. Window vent kit (fitted in a
"plexiglass" pane)
(separate fitting instructions are
supplied with the Miele window vent
kit)
Connection to an exhaust flue
1. Pipe with connection piece
(= supplied with the Miele wall vent
kit)
2. Adapter for flexible hose
3. Exhaust flue insulated against damp
2. Adapter for flexible hose
,
The ducting must not be vented
into a chimney or vent flue which is
in use, nor should it be connected to
ducting which ventilates rooms with
fireplaces.
39
Page 40
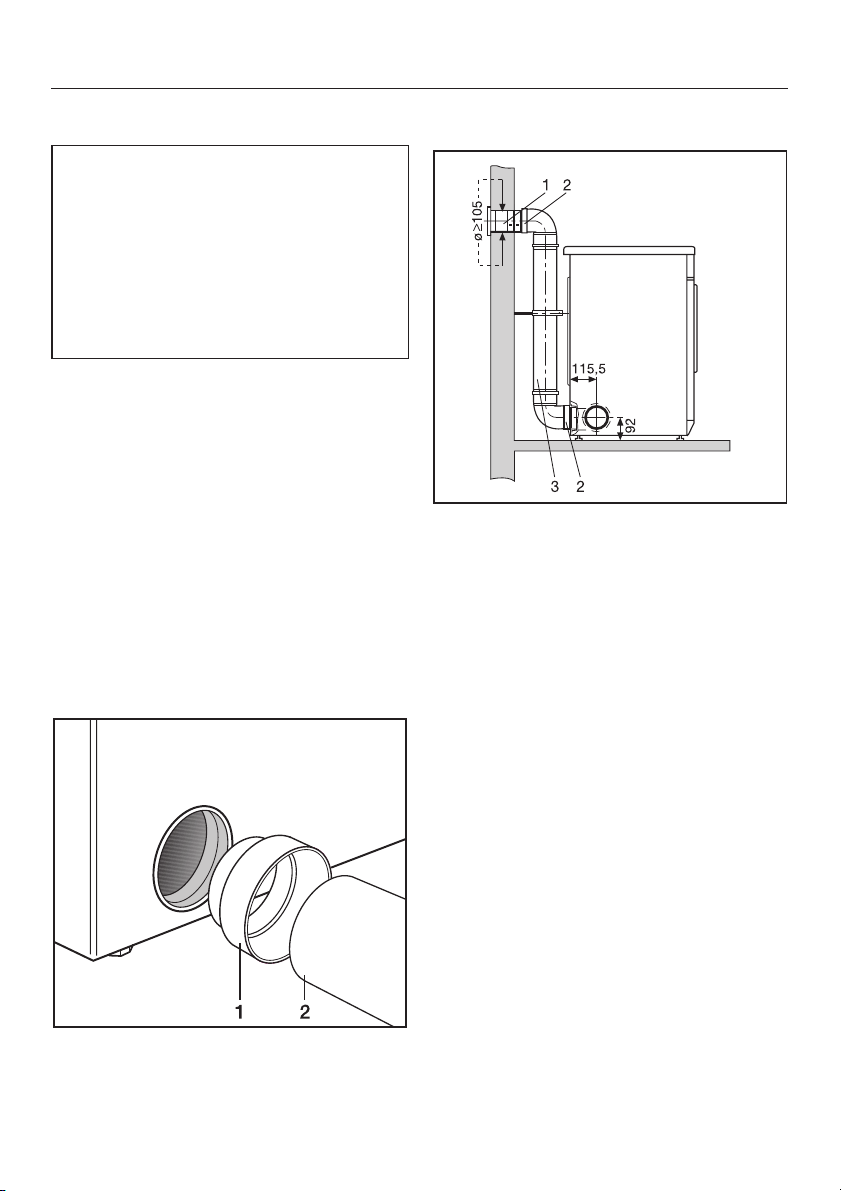
Installation - venting
b Plastic piping
Plastic piping is a good option where
the vented air has to ducted for some
distance. The smooth walls of the
pipe create less friction for the vented
air than the walls of a flexible vent
hose, for example. Time and energy
consumption are better with plastic
piping.
The following items are required:
An adapter* (C 100 mm).
–
A wall vent kit* or window vent kit*.
–
– Suitable piping (C 100 mm) is
available from your dealer or builders
merchants. Where the pipe diameter
is more than 100 mm, an adapter is
necessary (e.g. from C 100to125
mm) to connect the pipe to the dryer.
* Available as an optional accessory
from your Miele dealer or the Miele
Spare Parts Department.
Example
1. Wall vent kit
(Separate fitting instructions are
supplied with the Miele wall vent kit).
2. Adapter
3. Plastic piping, diameter DN 100
^
The plastic pipe (2) is connected to
adapter (1) which is fitted into the
vent opening on the dryer.
40
Page 41
Installation - venting
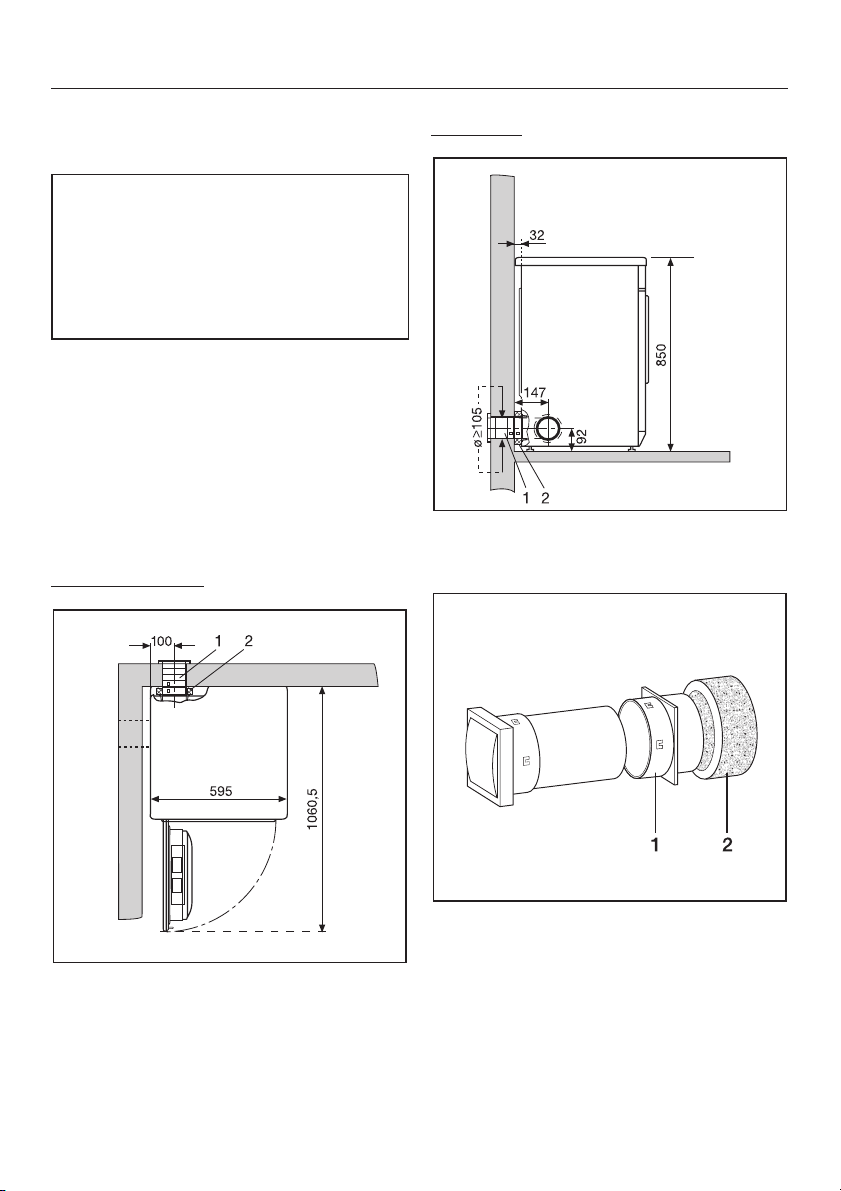
c Connect directly to a wall
vent
The best method of venting the dryer
is to connect it directly to the outside
wall of a room. Time and energy
consumption are better with plastic
piping. This involves boring through
an outside wall.
A wall pipe* and a flexible foam gasket*
must be used
(* Miele optional accessories).
A Before drilling into the wall, . .
. . . please read the installation
instructions supplied with the Miele
wall vent kit.
. . . and study the following diagrams.
View from above:
Side view:
1. Wall pipe
2. Flexible foam gasket
1. Wall pipe
2. Flexible foam gasket
B Fit the foam gasket (2) onto the
adapter (1) on the wall pipe.
C Push the dryer up against the wall.
41
Page 42
Installation - venting
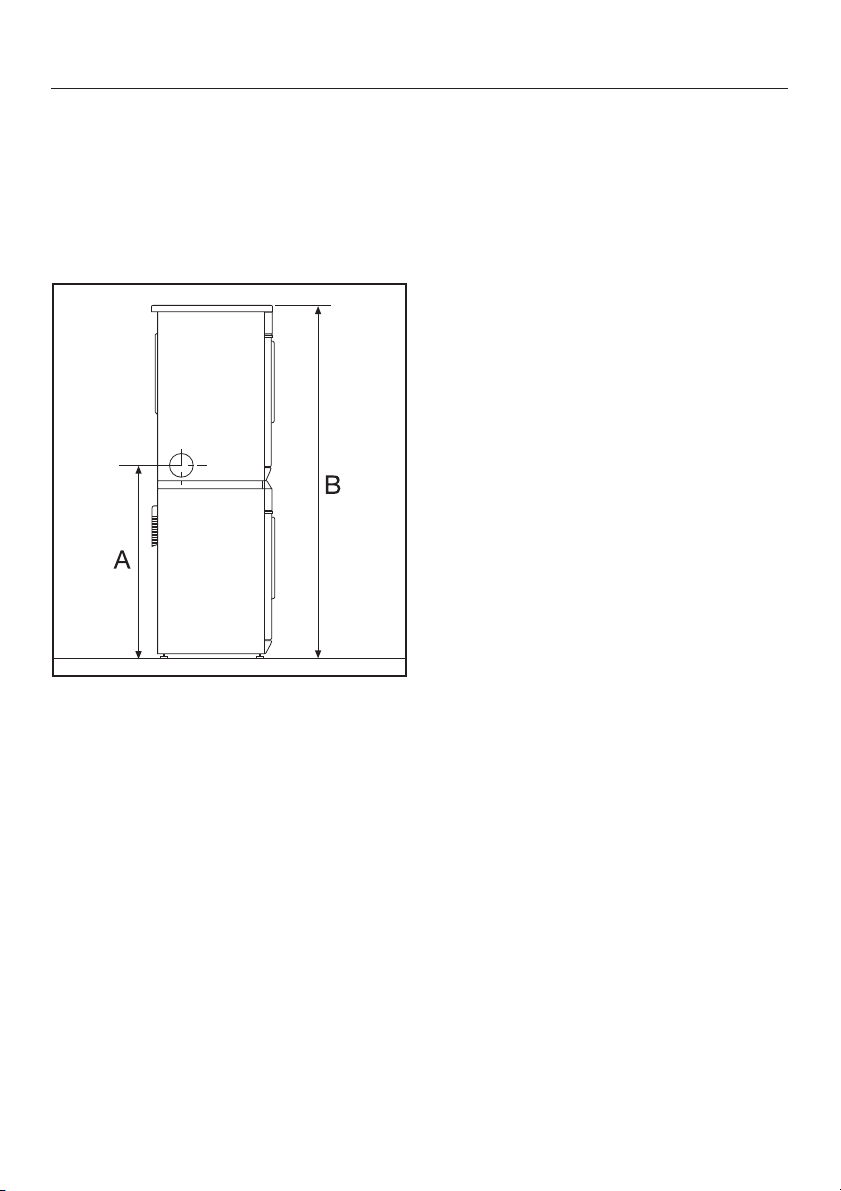
Washer-dryer stack
Height of venting outlet for
washer/dryer stack
Example: Miele washing machine with
straight or sloping fascia
Stacking kit* without pull-out shelf:
A = 94.2 cm
B = 170.0 cm
Stacking kit* with pull-out shelf:
A = 92.8 cm
B = 168.6 cm
* Miele accessory available to order
42
Page 43
Consumption data
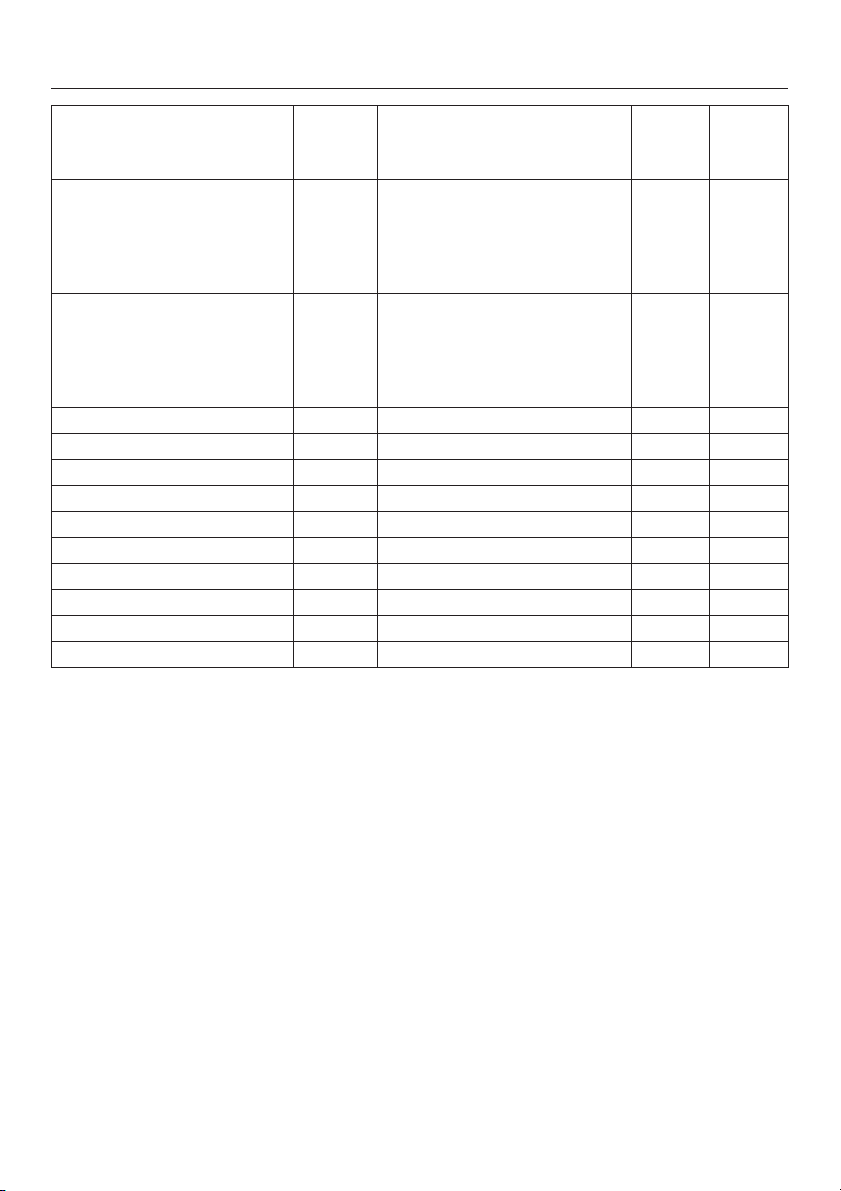
Programme Load Final spin speed
in a domestic washing machine
kg* rpm kWh Minutes
Cottons
Normal
Cottons
Hand iron
Minimum iron Normal 3.0 1200 (40 % residual moisture)** 1.05 30
Minimum iron Hand iron 3.0 1200 0.90 26
Delicates Normal 2.0 800 1.05 39
Automatic Normal 3.5 800 1.80 52
Shirts Normal 2.0 600 1.05 29
Denim Normal 3.0 900 1.85 51
Woollens handcare 2.0 1000 0.15 4
Silks handcare 1.0 400 0.15 5
Smoothing 3.0 1000 0.30 8
Outerwear Normal 2.0 800 1.35 42
6.0 1000 (60 % residual moisture)**
1200
1400
1600
1800
6.0 1000 (60 % residual moisture)**
1200
1400
1600
1800
Energy Duration
3.20
2.90
2.75
2.45
2.40
2.45
2.15
2.00
1.70
1.65
79
72
68
62
60
59
52
49
42
41
* Weight of dry laundry
** EN 61121:2005 test programme
All data without a "star" against it was calculated using EN 61121:2005.
Before testing in accordance with EN 61121, drya3kgload of cotton laundry with 70% residual
moisture as per the above standard using the Cottons Normal programme without any extra options.
Consumption data can vary from the nominal values given above depending on the size of the
load, types of textiles, residual moisture levels after spinning, fluctuations in the electricity
supply and any extra options selected.
43
Page 44

Technical data
Height 850 mm
Height for building under 820 mm
Width 595 mm
Depth 580 mm
Depth with door open 1,060 mm
Suitable for pushing under a worktop yes
Suitable for stacking yes
Weight 45 kg
Drum volume 111 litres
Maximum capacity 6 kg dry weight
Length of connection cable 2 m
Voltage see data plate
Connected load see data plate
Fuse rating see data plate / plug
Lamp wattage see data plate
Energy consumption see "Consumption data"
Test certificates awarded see data plate
44
Page 45

Programmable functions
for changing default settings
The programmable functions are
used to alter the tumble dryer´s
electronics to suit changing
requirements.
Programmable functions can be
altered at any time.
45
Page 46

Programmable functions
Extending the range of the
drying levels
You can extend the range of the
drying levels for many of the
programmes:
Machine iron+
(drier than Machine iron).
Hand iron+
(drier than Hand iron).
Normal+
(drier than Normal).
In addition the Extra dry drying level
can be made available for the
Delicates and Denim programmes.
You can use this programmable
function to extend the range of the
drying levels for the following
programmes:
Cottons, Minimum iron*, Delicates, Automatic, Denim.
* Machine iron+ cannot be
programmed for this programme.
Follow steps A to E to programme
and store in memory.
Before you begin, first ensure that
–
The tumble dryer is switched off.
:
The Low temperature indicator light
–
will briefly flash on and off twice.
P and 0 (default setting) will flash
–
alternately in the display.
The number which appears alternately
in the display with P means:
0 Default setting
1 Drying level range extended
(The Automatic indicator light will
also flash).
D Pressing the Start/Stop button
switches from one to the other.
E Switch the dryer off with the
I-On/0-Off button.
The setting you have selected is now
stored in memory. You can change it
again at any time.
To select the extended drying level
^ Select a programme.
^ Press the drying level button
repeatedly until one or two indicator
lights come on.
–
Indicator lights Extra dry and Normal
= Normal+
–
The door is closed.
A Press the Start/Stop button and keep
it pressed in whilst carrying out steps
B-C.
B Press the I-On/0-Off button in.
Wait until the indicator light for the
Start/Stop button lights up
constantly ...
C . . . and then release the Start/Stop
button.
46
–
Indicator lights Hand iron and
Normal = Hand iron+
–
Indicator lights Machine iron and
Hand iron = Machine iron+
Page 47

Programmable functions
Altering the volume of the
buzzer
The buzzer has two volumes.
Normal
The buzzer sounds at the end of a
programme (default setting).
Loud
The buzzer sounds at maximum volume
at the end of a programme.
Follow steps A to F to programme
and store in memory.
Before you begin, first ensure that
– The tumble dryer is switched off.
– The door is closed.
:
A Press the Start/Stop button and keep
it pressed in whilst carrying out steps
B-C.
B Press the I-On/0-Off button in.
Wait until the indicator light for the
Start/Stop button lights up
constantly ...
C . . . and then release the Start/Stop
button.
D Press the Low temperature button
once.
The Low temperature indicator light
–
will briefly flash on and off four times.
– P and 0 (default setting) will flash
alternately in the display.
The number which appears alternately
in the display with P means:
0 Normal buzzer
(Default setting)
i Loud buzzer
(The Automatic indicator light will
also flash).
E Pressing the Start/Stop button
switches from one to the other. You
will hear the two buzzer volumes as
youdoso.
F Switch the dryer off with the
I-On/0-Off button.
The setting you have selected is now
stored in memory. You can change it
again at any time.
47
Page 48

Programmable functions
Memory function
The electronics will memorise any
extra options selected for a
programme.
The duration selected for the timed
drying programmes will also be
stored in memory.
These settings will be selected
automatically the next time the
programme is chosen. You can either
accept these or change them by
pressing the appropriate button.
Follow steps A to F to programme
and store in memory.
Before you begin, first ensure that
– The tumble dryer is switched off.
– The door is closed.
:
A Press the Start/Stop button and keep
it pressed in whilst carrying out steps
B-C.
B Press the I-On/0-Off button in.
Wait until the indicator light for the
Start/Stop button lights up
constantly ...
C . . . and then release the Start/Stop
button.
D Press the Low temperature button
twice.
The Low temperature indicator light
–
will briefly flash on and off six times.
– P and 0 (default setting) will flash
alternately in the display.
The number which appears alternately
in the display with P means:
0 Memory deactivated
(Default setting).
i Memory activated
(The Automatic indicator light will
also flash).
48
E Pressing the Start/Stop button
switches from one to the other.
F Switch the dryer off with the
I-On/0-Off button.
The setting you have selected is now
stored in memory. You can change it
again at any time.
Page 49

Programmable functions
Extending the cooling down
time
The cooling down phase which takes
place before the end of a programme
can be lengthened if required. This
makes the garments easier to handle.
The cooling down time
can be extended by 5 minutes or 10
–
minutes.
is not available for timed drying,
–
smoothing or handcare programmes.
Follow steps A to F to programme
and store in memory.
Before you begin, first ensure that
– The tumble dryer is switched off.
– The door is closed.
:
A Press the Start/Stop button and keep
it pressed in whilst carrying out steps
B-C.
B Press the I-On/0-Off button in.
Wait until the indicator light for the
Start/Stop button lights up
constantly ...
C . . . and then release the Start/Stop
button.
D Press the Low temperature button
three times.
The Low temperature indicator light
–
will briefly flash on and off seven
times.
– P and 0 (default setting) will flash
alternately in the display.
The number which appears alternately
in the display with P means:
0 Default setting
i The cooling down time will be five
minutes longer.
(The Automatic indicator light will
also flash once).
2 The cooling down time will be ten
minutes longer.
(The Automatic indicator light will
also flash twice).
E Pressing the Start/Stop button
switches from one to the other.
F Switch the dryer off with the
I-On/0-Off button.
The setting you have selected is now
stored in memory. You can change it
again at any time.
49
Page 50

Programmable functions
Clean out airways indicator
Fluff should be removed after drying.
The Clean out airways indicator will
remind you to clean the filters when a
certain amount of fluff has collected
in the filters. You can decide at what
level of fluff this reminder should be
given.
You will have an idea of which of the
four options to select after a few drying
programmes.
Follow steps A to F to programme
and store in memory.
Before you begin, first ensure that
– The tumble dryer is switched off.
– The door is closed.
:
A Press the Start/Stop button and keep
it pressed in whilst carrying out steps
B-C.
B Press the I-On/0-Off button in.
Wait until the indicator light for the
Start/Stop button lights up
constantly ...
C . . . and then release the Start/Stop
button.
D Press the Low temperature button
four times.
The Low temperature indicator light
–
will flash on and off slowly once.
P and 2 (default setting) will flash
–
alternately in the display.
The number which appears alternately
in the display with P means:
0 The Clean out airways indicator
light is deactivated
I The Clean out airways indicator
light will come on when there is a
heavy build-up of fluff
(The Automatic indicator light will
also flash once).
2 Default setting
(the Automatic indicator light will also
flash twice).
3 The Clean out airways indicator
light will come on when there is
only a light build-up of fluff
(The Automatic indicator light will
also flash three times).
E Pressing the Start/Stop button
switches from one to the other.
F Switch the dryer off with the
I-On/0-Off button.
The setting you have selected is now
stored in memory. You can change it
again at any time.
50
Page 51

Programmable functions
Keypad tone
An audible tone sounds each time a
button is pressed.
Follow steps A to F to programme
and store in memory.
Before you begin, first ensure that
The tumble dryer is switched off.
–
The door is closed.
–
:
A Press the Start/Stop button and keep
it pressed in whilst carrying out steps
B-C.
B Press the I-On/0-Off button in.
Wait until the indicator light for the
Start/Stop button lights up
constantly ...
C . . . and then release the Start/Stop
button.
D Press the Low temperature button five
times.
The Low temperature indicator light
–
will flash on and off slowly once and
will then flash on and off quickly
once.
– P and 0 (default setting) will flash
alternately in the display.
The number which appears alternately
in the display with P means:
0 Keypad tone deactivated
(Default setting)
i Keypad tone activated
(The Automatic indicator light will
also flash)
E Pressing the Start/Stop button
switches from one to the other.
F Switch the dryer off with the
I-On/0-Off button.
The setting you have selected is now
stored in memory. You can change it
again at any time.
51
Page 52
Programmable functions
Adjusting the dryer's
electronics for very soft water
Extremely soft water can affect
,
the sensitivity of the control
electronics. If the dryer is installed in
an area with very soft water, you
should contact your local water
supplier for information and advice
regarding water hardness and water
conductivity. If the water conductivity
is less than 150 µS, the following
programmable function will need to
be activated.
Important. This programmable
function should not be activated if,
despite the water being extremely
soft (as would be the case if a water
softener were used), its conductivity
is greater than 150 µS.
Follow steps A to F to programme
and store in memory.
Before you begin, first ensure that
–
The tumble dryer is switched off.
–
The door is closed.
:
A Press the Start/Stop button and keep
it pressed in whilst carrying out steps
B-C.
B Press the I-On/0-Off button in.
Wait until the indicator light for the
Start/Stop button lights up
constantly ...
C . . . and then release the Start/Stop
button.
D Press the Low temperature button six
times.
The Low temperature indicator light
–
will flash on and off slowly once and
will then flash on and off quickly
twice.
– P and 0 (default setting) will flash
alternately in the display.
The number which appears alternately
in the display with P means:
0 Default setting
i Adjusted for very soft water
(with low conductivity)
(The Automatic indicator light will
also flash)
E Pressing the Start/Stop button
switches from one to the other.
525354
F Switch the dryer off with the
I-On/0-Off button.
The setting you have selected is now
stored in memory. You can change it
again at any time.
Page 53

Page 54

Page 55

55
Page 56
Alteration rights reserved/2008
M.-Nr. 07 127 330 / 01
 Loading...